


User Manual
Electronic Cash Register
QMP 5000 series

Dear valued customer!
On behalf of our proud company we wish to welcome you to the QUORION family of fine business machines. We sincerely hope you will appreciate the many benefits of being associated with a distinguished product name that represents both quality and commitment to customer satisfaction.
The QUORION QMP 5000 series is fully customizable and yet simple to operate. Users can easily adapt it to any type of retail/scanning or hospitality system. Moreover, our dynamic software generates a compatible environment for a wide array of peripheral devices. It is exactly this versatility and quality that has made us successful among our multinational customers.
It is therefore with great pride that we look forward to continuing our close collaboration with our customers.
Your QUORION Team
2

Index |
|
|
1. Safety Precautions .................................................................................. |
5 |
|
2. General information................................................................................. |
6 |
|
2.1 |
Technical data ....................................................................................................................... |
6 |
2.2 Components .......................................................................................................................... |
7 |
|
2.3 Operating modes................................................................................................................... |
8 |
|
2.4 |
Interfaces ............................................................................................................................... |
9 |
2.4.1 Pin Assignment ................................................................................................................ |
9 |
|
2.4.2 Connection to PC ........................................................................................................... |
10 |
|
2.4.3 Connection to printer ..................................................................................................... |
11 |
|
2.4.4 Adapter Cable for RS232................................................................................................ |
13 |
|
2.5 |
Keyboard ............................................................................................................................. |
14 |
2.5.1 Keyboard Layout ............................................................................................................ |
14 |
|
2.5.2 Keyboard 8 x 8................................................................................................................ |
14 |
|
2.5.3 Keyboard 8 x 16 Flat....................................................................................................... |
15 |
|
2.6 |
Names of Keys and Their Function.................................................................................... |
16 |
3. Getting Started....................................................................................... |
18 |
|
4. Sign in and Register .............................................................................. |
18 |
|
4.1 |
Sign in a Clerk/Sales Person .............................................................................................. |
18 |
4.2 |
Register a Department ........................................................................................................ |
19 |
4.3 |
Register Pre-Programmed PLU’s ....................................................................................... |
19 |
4.4 |
Enter a New Price ................................................................................................................ |
19 |
4.5 |
Create a PLU during the Sale ............................................................................................. |
20 |
4.6 |
Multiplication/Division ........................................................................................................ |
21 |
4.7 |
Holding a Sale ..................................................................................................................... |
22 |
4.8 |
Tendering in Local Currency.............................................................................................. |
22 |
4.9 |
Tendering in Foreign Currency .......................................................................................... |
23 |
4.10 Receipt On/Off and Receipt Copy .................................................................................... |
23 |
|
4.11 Time and Date.................................................................................................................... |
23 |
|
4.12 No Sale / Open Drawer ...................................................................................................... |
23 |
|
5. Corrections ............................................................................................ |
24 |
|
5.1 |
Clearing of Inputs and Error Messages ............................................................................. |
24 |
5.2 |
Error correction................................................................................................................... |
24 |
5.3 |
Void function ....................................................................................................................... |
24 |
5.4 |
Refund.................................................................................................................................. |
25 |
5.5 |
Transaction Refund............................................................................................................. |
25 |
5.6 |
Transaction Cancel ............................................................................................................. |
26 |
5.7 |
Tender Correction ............................................................................................................... |
26 |
6. Discounts, RA and PO........................................................................... |
26 |
|
6.1 |
Percentage Discount/Surcharge ........................................................................................ |
26 |
6.2 Amount Discount/Surcharge .............................................................................................. |
27 |
|
6.3 |
Received on Account / Paid Out ........................................................................................ |
27 |
7. Using Shift Levels.................................................................................. |
28 |
|
7.1 |
PLU/Department Shift ......................................................................................................... |
28 |
7.2 |
Price Shift ............................................................................................................................ |
28 |
7.3 |
Tax Shift............................................................................................................................... |
28 |
|
|
3 |

7.4 Keyboard Levels ................................................................................................................. |
29 |
8. Balance Functions (Tables) .................................................................. |
29 |
|
8.1 Open and Close a Balance ................................................................................................. |
29 |
|
8.2 |
Print the Invoice .................................................................................................................. |
30 |
8.3 |
Transfer Balance ................................................................................................................. |
30 |
8.4 |
Splitting a Balance .............................................................................................................. |
31 |
8.5 |
Balance Clerk Transfer ....................................................................................................... |
31 |
8.6 Modifiers and Condiments ................................................................................................. |
32 |
|
9. Reports ................................................................................................... |
32 |
|
9.1 |
System Reports................................................................................................................... |
33 |
9.2 |
User Reports........................................................................................................................ |
34 |
9.3 |
Electronic Journal ............................................................................................................... |
35 |
9.3.1 Text Format..................................................................................................................... |
35 |
|
9.3.2 Binary Format ................................................................................................................. |
36 |
|
10. Programming ....................................................................................... |
36 |
|
10.1 |
Programming of Date and Time ....................................................................................... |
36 |
10.2 Easy PLU Programming.................................................................................................... |
37 |
|
10.3 |
File Programming.............................................................................................................. |
38 |
10.4 |
Program Version and Test Routines................................................................................ |
39 |
11. Training Mode ...................................................................................... |
40 |
|
12. Instructions for Use ............................................................................. |
40 |
|
12.1 |
Thermal printer paper insertion ....................................................................................... |
40 |
12.1 |
Power Supply and Interfaces ........................................................................................... |
41 |
12.2 |
Cleaning............................................................................................................................. |
41 |
12.3 |
Service and Maintenance.................................................................................................. |
41 |
13. Information on the Electromagnetic Compatibility and Safety......... |
42 |
|
4

1. Safety Precautions
This section presents important information intended to ensure safe and effective use of the QMP 5000 series. Please read this section carefully and store it in an accessible location.
∙Be sure the voltage of your main power net corresponds to the input voltage printed on the rating plate of the system. Do not connect power adapters from other manufacturers. Use this product only for its intended application. Improper usage may lead to equipment damage, fire, or shock.
∙Be sure your power cable meets the relevant safety standards and includes a power-system ground terminal (PE terminal). Otherwise shock may result.
∙Never attempt to stretch the cables to enable a connection. The power cable and DC cable must have adequate slack at all times during use.
∙Do not connect to electrical outlets close to devices that generate voltage fluctuations or electrical noise. In particular, stay clear of devices that use large electric motors.
∙Never insert or disconnect the power plug with wet hands. Doing so may result in severe shock.
∙Always connect the DC cable before plugging the power cable into the wall outlet.
∙When disconnecting the DC cable, hold it firmly at the connector area. Do not tug on the cable itself.
∙Never attempt to repair this product yourself. Improper repair work can be dangerous.
∙Never disassemble or modify this product. Tampering with this product may result in injury, fire, or electric shock.
∙Be sure to set this unit on a firm, stable, horizontal surface. Product may break or cause injury if it falls.
∙Keep the system away from all conditions, which may cause damage, fire or accidents: Direct sunlight, high temperature and humidity, extreme changes in temperature, heating and cooling equipment, or humidity, volatile materials, high levels of dust, vibration, and impact.
∙Keep away any liquids from the system. If water or other liquid spills into the equipment, unplug the power cable immediately, and then contact your dealer for advice. Continued usage may lead to fire or shock.
∙To prevent possible harm to the environment or human health please separate this product from other waste streams to ensure that it can be recycled in an environmentally sound manner. For more details on available collection facilities please contact your local dealer where you purchased this product.
5

2. General information
2.1 Technical data
|
Processor |
|
CPU |
32 bit ARM 966E |
||
|
|
|
|
Program Memory |
2 MB FLASH ROM |
|
|
Memory |
|
|
Data Memory |
4 MB FLASH ROM |
|
|
|
|
Working Memory |
600 kB SRAM (battery buffered) |
||
|
|
|
|
|||
|
|
|
|
Memory Expansion |
SD card slot |
|
|
|
|
|
|
|
Alphanumeric LCD with 2 lines |
|
Display |
|
|
Operator Display (3 versions) |
|
Alphanumeric LCD with 8 lines |
|
|
|
|
|
Alphanumeric LCD with 16 lines |
|
|
|
|
|
|
|
|
|
|
|
|
Customer Display |
Numeric VFD with 1 line, 11 digit |
|
|
|
|
|
|
|
64 keys raised |
|
Keyboard |
|
|
Internal (3 versions) |
|
104 keys raised |
|
|
|
|
|
|
128 keys flat, spill-proof |
|
|
|
|
|
|
2 x 38 mm thermal without cutter |
|
Printer |
|
|
Internal (3 versions) |
|
1 x 58 mm thermal, cutter optional |
|
|
|
|
|
|
1 x 80 mm thermal with cutter |
|
|
|
|
Serial (standard) |
2 x RS232-5V (RJ45) |
|
|
|
|
|
Serial (second level) |
4 x RS232-5V (RJ45) (optional) |
|
|
Interfaces |
|
|
USB |
1 x Device |
|
|
|
|
Ethernet |
1 x LAN (RJ45) |
||
|
|
|
|
|||
|
|
|
|
Card Reader |
1 x Magnetic Card (optional) |
|
|
|
|
|
Clerk Key Lock |
Magnetic Dallas i-Button (optional) |
|
|
|
|
|
Application |
QMP – Quorion Multi Purpose |
|
|
|
|
|
Max. Number of PLU’s |
55,000 |
|
|
|
|
|
Max. Number of Departments |
999 |
|
|
Software |
|
|
Max. Number of Clerks |
999 |
|
|
|
|
|
Max. Number of Sales Persons |
999 |
|
|
|
|
|
Max. Number of Tables |
10,000 |
|
|
|
|
|
Max. Number of Customer Reports |
99 |
|
|
|
|
|
Dimensions (LxWxH), incl. drawer |
|
410 x 425 x 276 mm (small display) |
|
|
|
|
|
410 x 425 x 356 mm (large display) |
|
|
|
|
|
|
|
|
|
Specifications |
|
|
Weight, incl. drawer |
12.0 kg |
|
|
|
|
Power Supply |
110 … 240 V |
||
|
|
|
|
|||
|
|
|
|
Operating Temperature |
0 … +40°C |
|
|
|
|
|
Storage Temperature |
-10 … +50°C |
|
|
|
|
|
|
|
|
6

2.2 Components
 Operator display (2 lines)
 Function key lock
 Keyboard (64 keys)
 Main switch
Printer (2 x 38 mm)
 Operator display (8 lines)
 Function key lock
 Keyboard (108 keys)
 Main switch
Printer (1 x 58 mm)
 Clerk key lock
 Operator display (16 lines)
 Function key lock
 Keyboard (128 keys)
 Main switch
Printer (1 x 80 mm)
Clerk key lock
7
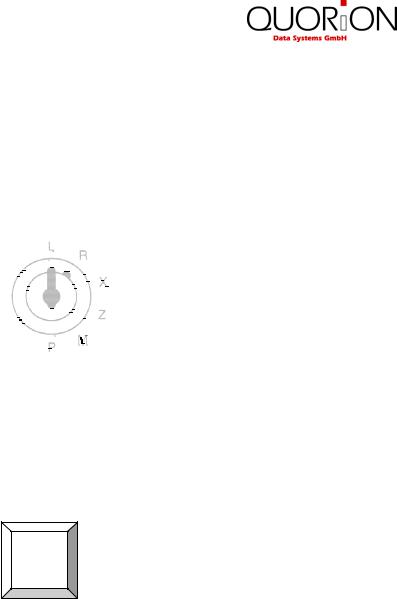
2.3 Operating modes
The operating modes control the operation of your Cash Register. There are six different modes for various functions. The selection of an operating mode can be done either by mechanical key lock or by soft key on keyboard.
Function key lock
The following keys are provided:
OP |
- Operator key for modes: |
L - R - X |
OW |
- Manager key for modes: |
L - R - X - Z - M |
OWP |
- Owner Program key for modes: |
L - R - X - Z - M - P |
Soft key
X |
LRXZMP |
The soft key alternating switches the modes L - R - X - Z - M - P. The access authority is realized by programming of special operator flags. See system option 221.
Mode |
Display |
Function |
|
|
|
|
|
L |
|
Off |
– machine switched off |
|
|
|
|
R |
– REG – |
Registration |
– all sales operations and registrations |
|
|
|
|
X |
– – X – – |
X-Report |
– viewing and printing of all reports without clearing |
|
|
|
|
Z |
– – Z – – |
Z- Report |
– viewing and printing of all reports with clearing |
|
|
|
|
M |
– MGR – |
Manager |
– all sales operations and registrations |
|
|
|
– all functions with manager authority |
|
|
|
– easy programming |
|
|
|
|
P |
– – P – – |
Programming |
– programming of all functions |
|
|
|
|
8
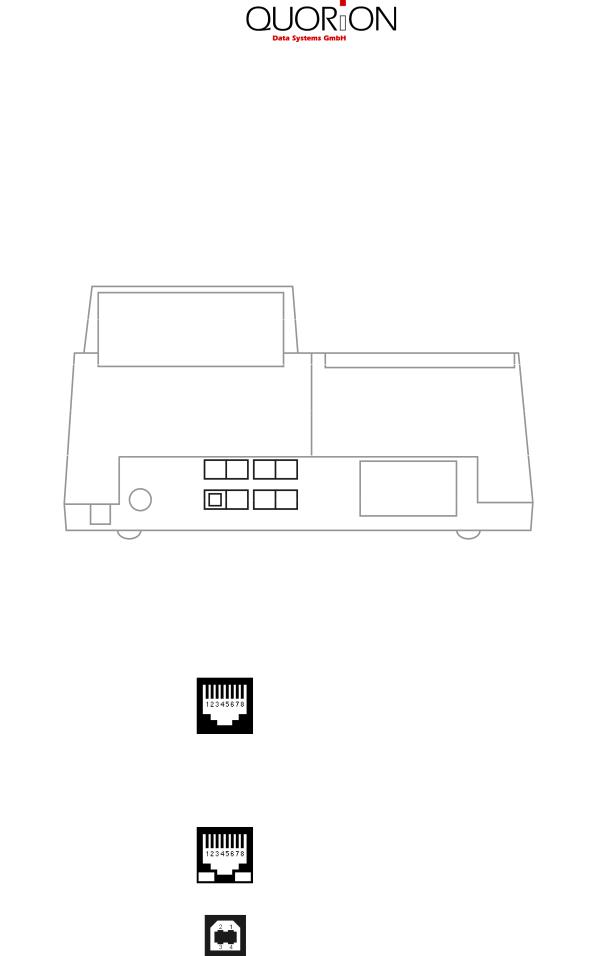
2.4 Interfaces
The QMP 5000 series by default is equipped with 2xRS232, USB device and LAN interface. Optionally you may add further 4xRS232 interfaces. All RS232 interfaces support +5VDC on pin 9 as power supply for external devices like scanner, display, QuoriLog etc. The USB port is only prepared for PC communication. It is not to be used with USB devices, like memory sticks, scanners, printers etc. The LAN port may be used for PC communication and cash register network.
Location of the interfaces (rear view):
|
6 |
|
|
5 |
|
4 |
|
|
3 |
|
|
|
|
||||
|
|
|
|||||||||||||||
|
|
|
|
|
|
|
|
|
|
|
|
|
|
|
|
|
|
|
|
|
|
|
|
|
|
|
2 |
1 |
|
|
|
||||
USB device |
|
|
|
|
|
|
|
|
|
|
|
|
|
|
|
|
RS232 ports 3 to 6 (optional) |
|
|
|
|
|
|
|
|
|
|
|
|
|
|
|
|
||
|
|
|
|
|
|
|
|
|
|
|
|
|
|
|
|
||
Ethernet network (LAN) |
|
|
|
|
|
|
|
|
|
RS232 port 1 and 2 |
|||||||
|
|
|
|
|
|
|
|
||||||||||
2.4.1 Pin Assignment |
|
|
|
|
|
|
|
|
|
|
|
|
|
||||
RS232 Ports 1 to 6 |
|
|
|
|
|
|
|
|
|
|
|
|
1: +5V DC (max. 0,5A) |
||||
|
|
|
|
|
|
|
|
|
|
|
|
|
|
|
|
|
2: RxD |
|
|
|
|
|
|
|
|
|
|
|
|
|
|
|
|
|
3: TxD |
|
|
|
|
|
|
|
|
|
|
|
|
|
|
|
|
|
4: DTR |
|
|
|
|
|
|
|
|
|
|
|
|
|
|
|
|
|
5: GND |
|
|
|
|
|
|
|
|
|
|
|
|
|
|
|
|
|
6: DSR |
|
|
|
|
|
|
|
|
|
|
|
|
|
|
|
|
|
7: RTS |
|
|
|
|
|
|
|
|
|
|
|
|
|
|
|
|
|
8: CTS |
Ethernet Network |
|
|
|
|
|
|
|
|
|
|
|
|
1: TX+ |
||||
|
|
|
|
|
|
|
|
|
|
|
|
|
|
|
|
|
2: TX- |
|
|
|
|
|
|
|
|
|
|
|
|
|
|
|
|
|
3: RX+ |
|
|
|
|
|
|
|
|
|
|
|
|
|
|
|
|
|
6: RX- |
USB Host 1 and 2 |
|
|
|
|
|
|
|
|
|
|
|
|
1: VCC |
||||
|
|
|
|
|
|
|
|
|
|
|
|
|
|
|
|
|
2: USB N0 |
|
|
|
|
|
|
|
|
|
|
|
|
|
|
|
|
|
3: USB P0 |
|
|
|
|
|
|
|
|
|
|
|
|
|
|
|
|
|
4: GND |
|
|
|
|
|
|
|
|
|
|
|
9 |
||||||
2.4.2 Connection to PC
The QMP 5000 can be connected to a PC for programming, reporting and back-office. QUORiON offers a small software tool, called QProg, for this purpose. The connection can be established via RS232, USB or LAN.
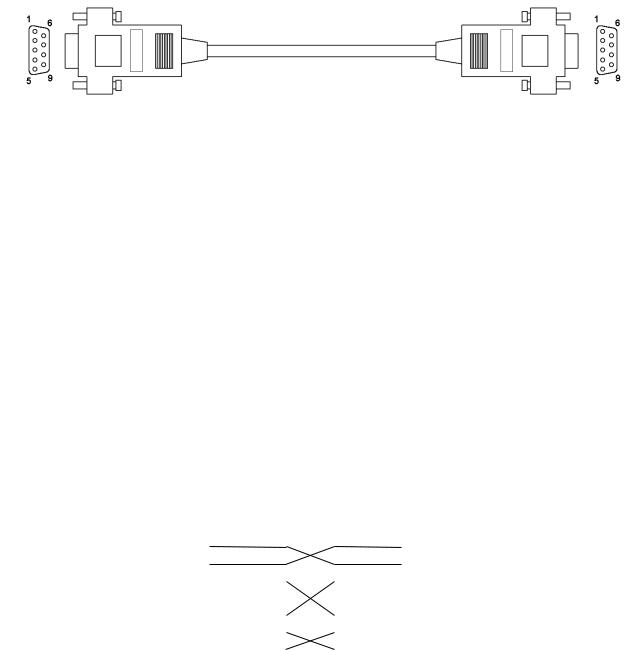
Connection via RS232
By default RS232 port 1 is prepared for PC communication with 57600 baud. Please note that you will probably need an adapter cable from the RJ45 connector of the QMP 5000 to DSUB-9 on PC (see chapter 2.4.4). If your PC does not have an RS232 port, you may use a Serial-to-USB converter.
For the RS232 connection you need a standard 9-pin cross wired cable with female DSUB connectors which have all signals connected.
PC (DSUB9 female) |
|
|
|
|
|
QMP (DSUB9 female) |
||
VCC |
Pin 1 |
|
|
|
|
|
Pin 1 |
VCC |
RxD |
Pin 2 |
|
|
|
|
|
Pin 2 |
RxD |
TxD |
Pin 3 |
|
|
|
|
|
Pin 3 |
TxD |
DTR |
Pin 4 |
|
|
|
|
|
Pin 4 |
DTR |
|
|
|
|
|||||
GND |
Pin 5 |
|
|
|
|
|
Pin 5 |
GND |
|
|
|
|
|||||
DSR |
Pin 6 |
|
|
|
|
|
Pin 6 |
DSR |
|
|
|
|
|||||
RTS |
Pin 7 |
|
|
|
|
|
Pin 7 |
RTS |
|
|
|
|
|||||
CTS |
Pin 8 |
|
|
|
|
|
Pin 8 |
CTS |
|
|
|
|
|||||
-- |
Pin 9 |
|
|
|
|
|
Pin 9 |
-- |
SHLD |
SHLD |
|
|
|
|
|
SHLD |
SHLD |
|
|
|
|
|
||||
Connection via USB
If you want to use USB, you need to install a driver on your PC first. This driver will create a virtual COM port in your Windows system. Please follow these steps to install:
•Switch on the QMP 5000
•Connect the cash register to the PC using a standard USB device cable
•Wait for the Windows message “New hardware found”
•Select the driver files “stmcdc.inf” and “usbser. sys” from your local drive
•The installation will now run automatically
Please note, that system parameter 1 in the cash register (PC port) has to be re-programmed to 16 for USB communication. This will activate the USB communication, but de-activate RS232 for PC. The communication between PC and QMP 5000 will run with 12 MBit/s (USB full speed).
10
Connection via LAN
In order to activate the Ethernet port for communication, you must program a valid IP ADDRESS in the cash register. This can be done in P-Mode by entering 97 on the TYPE key. The address consists of the three values IP BASE ADDRESS, SUBNET MASK and DEFAULT GATEWAY.
The IP base address is the number of the register in the Ethernet network. Please note, that any address of the network must be unique to avoid conflicts with other devices. The subnet mask is used to specify the address range of the local network. It depends on the local network. In most cases it is set to 255.255.255.0 which means that the first 3 parameters specify the LOCAL network and the last the device in the network. The Default Gateway is the address of the ROUTER when used. When the IP address is not on the LOCAL network (checked by SUBNETMASK) this address will be used instead.
Please note that the programmed address must fit to the network settings in your PC. For further information please check the additional programming guides or ask your local dealer and network specialist.
2.4.3 Connection to printer
For the connection between a QMP Cash Register and an external printer you need a standard 9 to 25-pin cross wired printer cable with one 9-pin female D-Sub connector and one 25-pin male D-Sub connector.
QMP (DSUB9 female) |
Printer (DSUB25 male) |
||||||||||||||
VCC |
Pin 1 |
|
|
|
|
|
|
|
|
|
|
|
|
Pin 1 |
-- |
|
|
|
|
|
|
||||||||||
RxD |
Pin 2 |
|
|
|
|
|
|
|
|
|
|
|
|
Pin 2 |
TxD |
|
|
|
|
|
|
|
|
|
|
|
|
||||
TxD |
Pin 3 |
|
|
|
|
|
|
|
|
|
|
Pin 3 |
RxD |
||
|
|
|
|
|
|
|
|
|
|
||||||
DTR |
Pin 4 |
|
|
|
|
|
Pin 4 |
RTS |
|||||||
|
|
|
|||||||||||||
GND |
Pin 5 |
|
|
|
|
|
|
|
|
|
|
Pin 5 |
CTS |
||
|
|
|
|
|
|
|
|
|
|
|
|
||||
DSR |
Pin 6 |
|
|
|
|
|
|
|
|
Pin 6 |
DSR |
||||
|
|
|
|
|
|||||||||||
RTS |
Pin 7 |
|
|
|
|
|
|
|
|
|
|
|
Pin 7 |
GND |
|
|
|
|
|
|
|||||||||||
CTS |
Pin 8 |
|
|
|
|
|
|
|
|
|
|
|
Pin 8 |
-- |
|
|
|
||||||||||||||
|
|
|
|
|
|
|
|
|
|
|
|
||||
-- |
Pin 9 |
|
|
|
Pin 20 |
DTR |
|||||||||
|
|
||||||||||||||
SHLD |
SHLD |
|
|
|
|
|
SHLD |
SHLD |
|||||||
|
|
|
|
|
|||||||||||
11
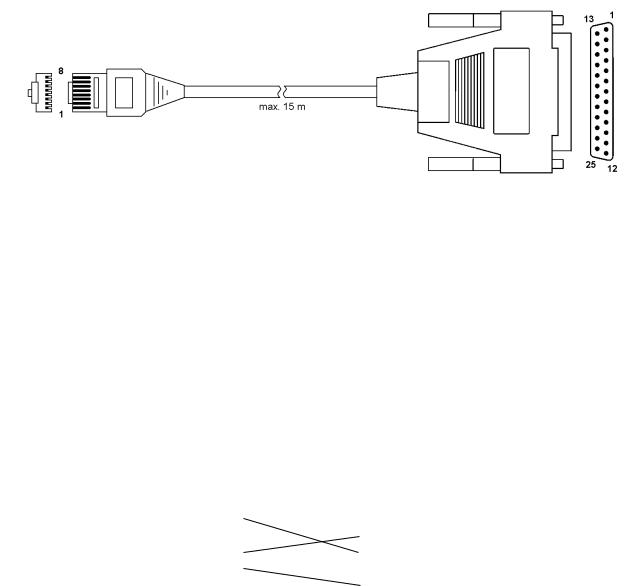
Please note that you will probably need an adapter cable from the RJ45 connector of the QMP 5000 to DSUB-9 on printer cable (see chapter 2.4.4).
If you want to make your own special cable for direct connnection to printer, please note the following description:
QMP (RJ45) |
|
|
|
|
|
Printer (DSUB25 male) |
||
VCC |
Pin 1 |
|
|
|
|
|
Pin 1 |
-- |
|
|
|
|
|
||||
RxD |
Pin 2 |
|
|
|
|
|
Pin 2 |
TxD |
|
|
|
|
|
||||
TxD |
Pin 3 |
|
|
|
|
|
Pin 3 |
RxD |
|
|
|
|
|
||||
DTR |
Pin 4 |
|
|
|
|
|
Pin 4 |
RTS |
|
|
|
|
|
||||
GND |
Pin 5 |
|
|
|
|
|
Pin 5 |
CTS |
|
|
|
|
|
||||
DSR |
Pin 6 |
|
|
|
|
|
Pin 6 |
DSR |
|
|
|
|
|
||||
RTS |
Pin 7 |
|
|
|
|
|
Pin 7 |
GND |
|
|
|
|
|
||||
CTS |
Pin 8 |
|
|
|
|
|
Pin 8 |
-- |
|
|
|
|
|
||||
|
|
|
|
|
||||
|
|
|
|
|
|
|
Pin 20 |
DTR |
|
|
|
|
|
|
|
||
SHLD |
SHLD |
|
|
|
|
|
SHLD |
SHLD |
|
|
|
|
|
||||
12

2.4.4 Adapter Cable for RS232
To connect standard peripheral devices you will need an adapter cable from the RJ-interface of the QMP 5000 series to the D-SUB connector of the external device. Connect the original cable of the device to the D-SUB connector of the adapter and put the other end of the adapter in the interface socket of the QMP 5000.
You can order the special adapter cable from your local QUORION dealer. If you want to make the connection yourself, please note the following specifications:
QMP (RJ45) |
|
|
|
|
|
|
|
QMP (DSUB9 male) |
||
VCC |
Pin 1 |
|
|
|
|
|
|
|
Pin 1 |
-- |
|
|
|
|
|||||||
RxD |
Pin 2 |
|
|
|
|
|
|
|
Pin 2 |
RxD |
|
|
|
|
|
|
|
||||
TxD |
Pin 3 |
|
|
|
|
|
|
|
Pin 3 |
TxD |
|
|
|
|
|
|
|
||||
DTR |
Pin 4 |
|
|
|
|
|
|
|
Pin 4 |
DTR |
|
|
|
|
|
|
|
||||
GND |
Pin 5 |
|
|
|
|
|
|
|
Pin 5 |
GND |
|
|
|
|
|
|
|
||||
DSR |
Pin 6 |
|
|
|
|
|
|
|
Pin 6 |
DSR |
|
|
|
|
|
|
|
||||
RTS |
Pin 7 |
|
|
|
|
|
|
|
Pin 7 |
RTS |
|
|
|
|
|
|
|
||||
CTS |
Pin 8 |
|
|
|
|
|
|
|
Pin 8 |
CTS |
|
|
|
|
|
|
|
||||
|
|
|
|
|
|
|
||||
|
|
|
|
|
|
|
|
|
Pin 9 |
VCC |
|
|
|
|
|
|
|
|
|
||
SHLD |
SHLD |
|
|
|
|
|
|
|
SHLD |
SHLD |
|
|
|
|
|
|
|
||||
13
 Loading...