

Page 1

Q-See Q25DVR4ES User's Manual
Q25DVR4ES
Economy Series
User Manual
Contact Us:
Q-See Products
8015 E. Crystal Dr
Anaheim, CA 92807
Website:
http://www.q-see.com
Customer Service:
Phone: 877-998-3440 x 538
Email: cs@dpsi-usa.com
Tech Support:
Phone: 877-998-3440 x 539
Email: ts@dpsi-usa.com
Fax:
714-998-3509
Rev 101207
Page 1
Page 2

Page 3

Q-See Q25DVR4ES User's Manual
Q-SEE Product Warranty
Q-See Q25DVR4ES User's Manual
Table of Contents
Thank you for choosing our products.
All of our products users have a conditional free warranty repair service for hardware
within 12 months starting from purchase date, and a free exchange service within one
month (valid for manufacturing defects).
Permanent upgrading service is provided for the software.
Liability Exclusions:
Any product malfunction, abnormalities in operation or damage caused by following
reasons are not within the free service scope of our company.
Please select payable service.
(1) Equipment damage caused by improper operation
(2) Improper environment and conditions in/on which the equipment operates, e.g.,
improper power, environment temperature, humidity and lightening strike etc. that cause
equipment damage.
(3) Damage caused by acts of nature: earthquake and fire etc.
(4) Equipment damage caused by the maintenance of personnel not authorized by our
company.
(5) Product sold over 12 months ago.
In order to provide various services to you, please complete registration procedure after
you purchase the product. Cut off or copy User's Information Card and fax or mail it to us
after the card is filled in. You can also register the product by going to the
website and clicking on the Register link.
www.q-see.com
Customer Information Card
User's Name Mr./Mrs.
Company Name
Postal Address
Postal code
Phone Number
E-mail
Model Number of
Product
Serial Number of
Product
Purchase Date
Distributor
1.DVR Features 3
2.Layout 3
2.1Front Panel 3
2.2Rear Panel 4
2.3Remote Control 4
3.Installation 5
3.1Installing Hard Drive 5
3.2Connecting Camera and TV Monitor 6
3.3Connecting Power Supply .6
4.System Boot 6
4.1Detecting Installed Hard Drive 6
4.2Recovering Lost Data 7
4.3Restore Recording Feature 7
4.4Main Screen 7
5.DVR Setup 8
5.1Setup Menu 8
5.2Camera Select 9
5.3Record Select 9
5.4Record Mode 9
5.5Recording Frame Rate 10
5.6Recording Quality 10
5.7Schedule Set 11
5.8Sub Menu - Auto Record 11
5.9Sub Menu - Password Enable 11
5.10Sub Menu - Password Change 12
5.11Sub Menu - Color Set 12
5.12Sub Menu - Time Set 13
5.13Hard Disk Setup 13
5.14Motion Setup 14
5.15NTSC/PAL Output Selection 15
5.16Factory Reset 15
6.Recording 16
6.1Start Recording 16
6.2Stop Recording 16
6.3Recording Time on Hard Drive 17
7.Playback 17
8.USB DVR Access 18
8.1 Program Installation 18
8.2 Program Buttons 19
9.Specifications 22
10.Appendix 24
10.1System Connection Diagram 24
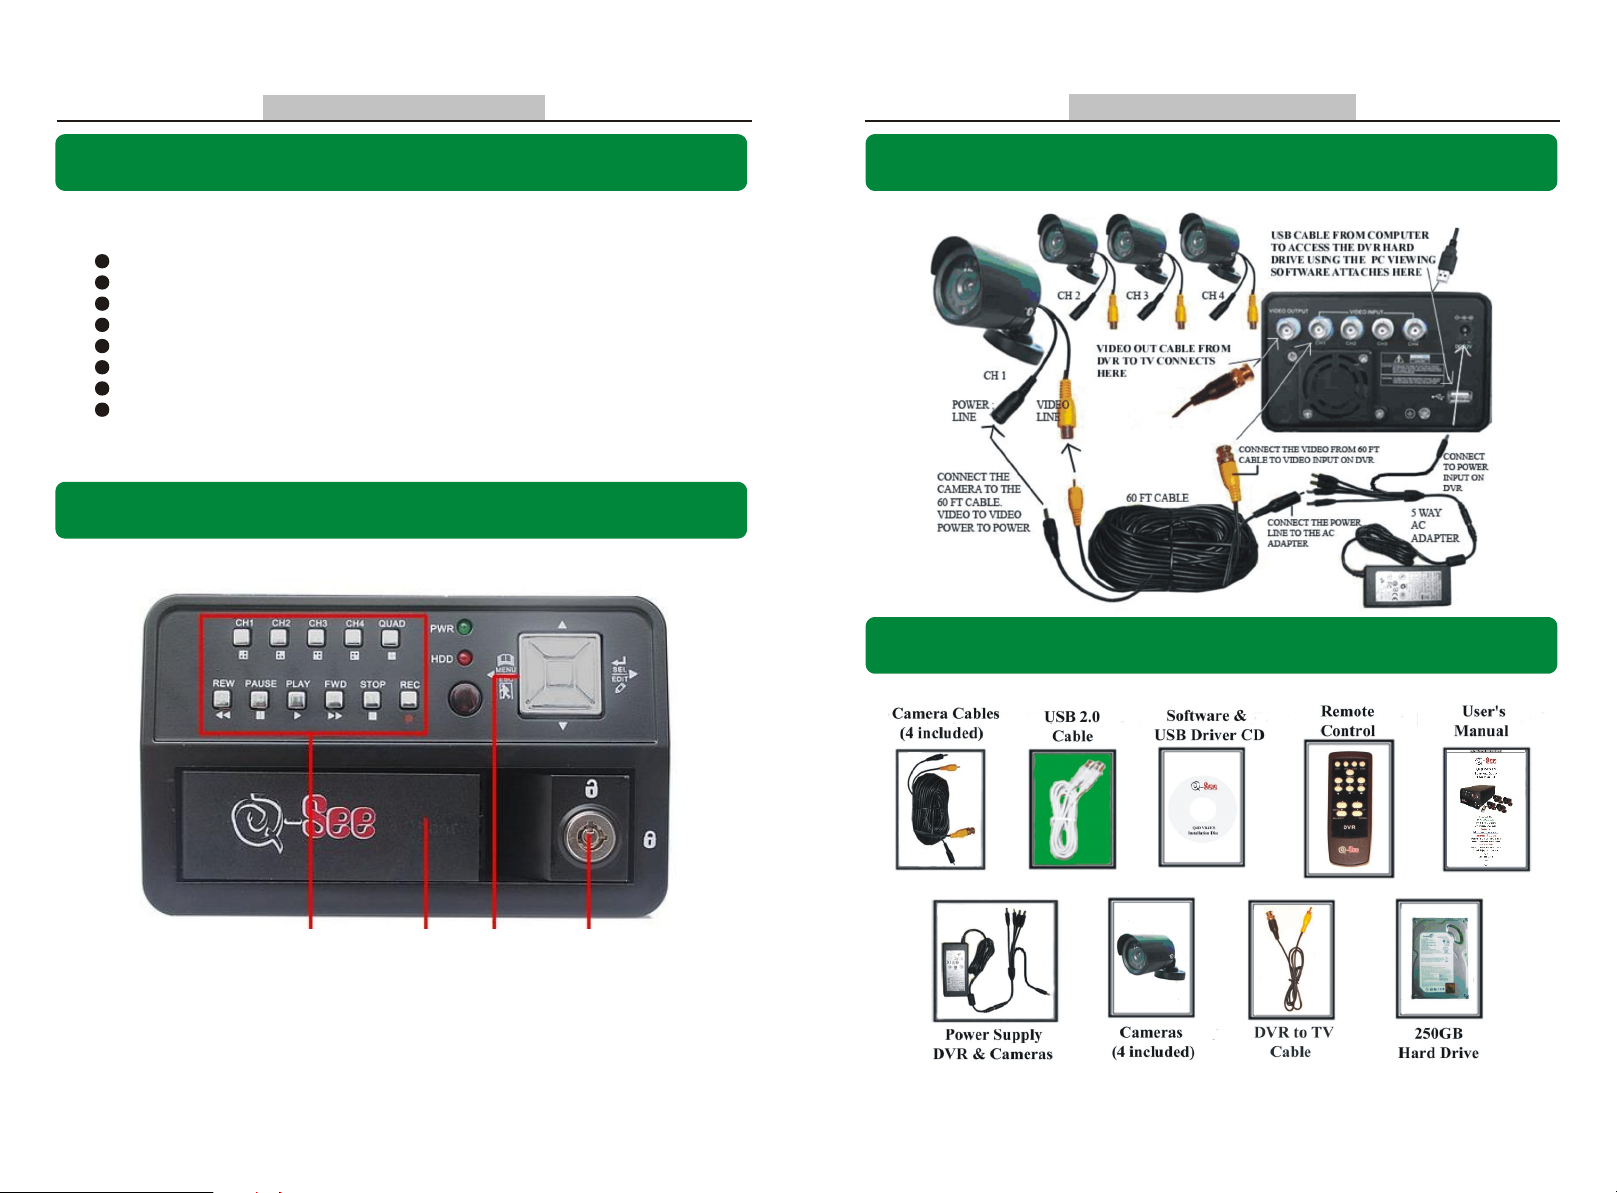
10.2DVR Accessories (included) 24
Q-SEE Product Warranty ..25
Page 25
Page 2
Page 4
Q-See Q25DVR4ES User's Manual
Chapter 1: DVR Features
4 Channel BNC Camera Input.
1 Channel BNC Video Output.
Video Source Option: NTSC / PAL.
Motion Detection with Sensitivity and Area Settings.
Time Schedule Recording / Motion Triggered Recording.
One ATA-100 Hard Disk Interface.
USB 2.0 Back up to computer.
With Remote Control & Removable Hard Drive Tray.
Chapter 2: Layout - 2.1 Front Panel
Q-See Q25DVR4ES User's Manual
Chapter 10: Appendix - 10.1 System Connection Diagram
Chapter 10: Appendix - 10.2 DVR Accessories (included)
11 22 33
1.FUNCTION KEYS
2.REMOVABLE HARD DRIVE TRAY
3.SELECTION / DIRECTION KEYS
4.HDD LOCK
Page 3
44
Page 24
Page 5

Q-See Q25DVR4ES User's Manual
Camera Specifications
Q-See Q25DVR4ES User's Manual
Chapter 2: Layout - 2.2 Rear Panel
11 22 33
1. 1 x BNC VIDEO OUTPUT
55
44
2. FAN
3. 4 X BNC VIDEO INPUT
4. 12V DC POWER SUPPLY
5. USB 2.0 PORT
Page 23
Chapter 2: Layout-2.3 Remote Control
01. CH1 Select or enlarge CH1
02. CH2 Select or enlarge CH2
03. CH3 Select or enlarge CH3
04. CH4 Select or enlarge CH4
05. QUAD Quad View
06. Rewind
07. Play recording list
08. Forward
09. Record
10. Pause
11. Stop recording
13. MENU Enter or exit setup menu
14. UP Move up prompt
15. SEL/Edit Modify item
16. DOWN Move down prompt
Page 4
Page 6

Q-See Q25DVR4ES User's Manual
Q-See Q25DVR4ES User's Manual
Chapter 3 : Installation - 3.1 Installing Hard Drive
NOTE: This package comes with a 250GB hard drive. You would follow these instructions if
you want or need to install a new hard drive.
1. Slide the HDD tray out of DVR body carefully.
2. Connect the power cord and data cable to hard disk
drive carefully.
3. Insert the HDD tray into DVR body.
4. Lock the HDD tray.
Make sure the HDD is set as MASTER.
CAUTION: Do not remove the cartridge while the
DVR is on!
CAUTION: The wedge at the end of the cartridge handle must be fully inserted into
the compartment; otherwise the cartridge will not be able to insert into the DVR
firmly, it could also cause damage by scraping the body of the DVR.
Chapter 9: Specifications
DVR Specifications
ITEM DESCRIPTION NOTE
Video Format NTSC / PAL
Operation System None STAND-ALONE
Camera Input Channel 4 channel Composite BNC
Video Output Channel 1 channel Composite BNC
NTSC 120 frames/second 4 x 30 frames/second
Display Frame Rate
(Quad)
(Each Mode)
Record Mode
Display
Resolution
Record
Video Compression Format
(Each Channel)
HDD Support Up to 500GB ATA -100 Interface
Estimated Record Length
USB
Remote Control
Search
Dimension( L x W x H ) 12.25in * 5.25in * 3.25in
Method
Full Screen YES
PAL 100 frames/second 4 x 25 frames/second
NTSC Max.30 fps (Quad) Quad ModeRecording Frame Rate
PA L Max.25 fps (Quad) Quad Mode
NTSC
PAL
Each Channel =
30fps Number of Cameras
Each Channel =
25 fps Number of Cameras
Continuous, Time Schedule, Motion Triggered.
NTSC 720 x 480
PAL 720 x 576
NTSC 320 x 112, 640 x 224
PAL 320 x 136, 640 x 272
Modified Motion -JPEG
(12-20K bytes/frame)
120GB Hard drive @ 7 frames per second @ Normal Quality
(120*1024*1024 K byte) ( 7*15*60*60 ) = 332 Hours
For PC playback & backup
Included
Time Date Event
Max. 30 frames/s
(Total)Recording Frame Rate
Max. 25 frames/s
(Total)
Quad 640 x 224 (total)
Each 640 x 224
Low : 12K Byte
Normal : 15K Byte
High : 20K Byte
USB 2.0
Page 5
Page 22
Page 7

Q-See Q25DVR4ES User's Manual
Press to configure the DVR play/record system.
Q-See Q25DVR4ES User's Manual
Chapter 3: Installation - 3.2 Connecting Cameras and TV Monitor
There are 4 camera inputs and 1 video output with BNC connectors (Refer to Chapter 2: Layout
-2.2 Rear Panel).
1. Connect the camera cables from the camera to the 4 Video Inputs on the DVR.
2. Connect the 4 power feeds for the cameras to the power connectors on the cable near the
video ports of the DVR, connect the other end to the power supply and plug the power
supply into a surge protector.
3. Using the included RCA to BNC cable, connect the yellow RCA connector from the cable
to the RCA video in port on the TV, connect the silver BNC connector on the other end of
the cable to the BNC video out port on the back of the DVR.
NOTE: Refer to Chapter 10: Appendix-10.1 System Connection Diagram
Press to print the picture of DVR's playback
Press to play the video .
Chapter 3: Installation - 3.3 Connecting Power Supply
Please only use the power adapter supplied with the DVR.
Connect the power cord to a surge protector or Uninterruptible Power
Supply.
Chapter 4: System Boot -4.1 Detecting Installed Hard Drive
After connecting the power, the system
will boot-up and detect the installed
hard drive.
On the Monitor it will show the hard
drive information.
Please refer to the hard drive manual to
configure hard drive as Master.
Page 21
Page 6
Page 8

Q-See Q25DVR4ES User's Manual
Q-See Q25DVR4ES User's Manual
Chapter 4: System Boot - 4.2 Recovering Lost Data
The system will automatically recover lost
data.
A Power Error can cause data to be lost.
Chapter 4: System Boot - 4.3 Restore Recording Feature
If a Power Error occurs during
recording process, the system will
automatically resume recording after
power is restored.
1 DVR Event List
3. Save DVR's Recorded Video to PC 4. Configuration
5. Load Video File Saved in PC 6. Play DVR Video File
7. Play PC Video File 8. Channel Selection Keys
9. Playing Scroll Bar 10. Fast backward
11. Previous Frame 12. Play Backward
13. Pause
15. Next Frame
17. Volume Scroll Bar (not used by this unit) 18. Exit
Press to open the event video list.
2. Capture one frame picture
14. Play
16. Fast Forward
Chapter 4:System Boot - 4.4 Main Screen
10%
While the DVR is running, the monitor
will display the view from the cameras
as well as the following:
Upper left: Percentage of hard drive
space used.
Middle: Channel name (CH 1 through
CH 4).
Bottom right: Date and Time.
Bottom left: Mode, Status, Hard Drive
Info,and Schedule Setting of the DVR.
Refer to 6.1 Start Recording
Page 7
Page 20
Page 9

Q-See Q25DVR4ES User's Manual
Q-See Q25DVR4ES User's Manual
Chapter 5: DVR Setup - 5.1 Setup Menu
Press [ Menu] to enter the setup
menu;
Use [ Up] and [ Down] to
select item;
Press [ Select] to modify settings
and [ Menu] to exit.
Menu Directory
Chapter 8: USB DVR Access - 8.2 Program buttons
CAMERA SELECT
RECORD SELECT
RESOLUTION
RECORD FRAME
MAIN
MENU
VIDEO QUALITY
SCHEDULE SET
MISCELLANEOUS MENU
AUTO RECORD
PASSWORD ENABLE
PASSWORD CHANGE
COLOR SET
HARD DISK SET
TIME SET
MOTION SET
FACTORY RESET
Page 19
Page 8
Page 10

Q-See Q25DVR4ES User's Manual
Q-See Q25DVR4ES User's Manual
Chapter 5: DVR Setup - 5.2 Camera Select
The DVR system can display 4 camera feeds in one
picture (Quad Mode).
Users can configure which camera is displayed.
Press [ Select] to modify setting and press [ CH1],
[ CH2], [ CH3],[ CH4] to set each channel
separately.
If the channel is disabled, the system will display
OFF on the monitor.
Chapter 5: DVR Setup - 5.3 Record Select
Configure which channels are allowed to record.
Note: If no channels are selected, an error message will appear briefly on
the screen when record is selected.
There are two modes of resolution for video recording
1. Each Mode: The DVR compresses and records each video channel
separately so the user can enlarge a single channel to full screen display
and still be recording on all channels. You can also record on specific
channels, for example, user can turn off the record function of CH1 and
CH2 and then the system will only record video on CH3 and CH4.
Press [ CH1], [ CH2], [ CH3], [ CH4] to switch between channels
when playing back recorded video.
In Each Mode user can use the Loop Function.
Loop Function: When the system is in Live mode or Recording mode, press the
Chapter 5: DVR Setup - 5.4 Record Mode
2008/01/08 08:30:56
01 TIME
3
02 TIME
*
03 TIME
04 TIME
*
05 MOTION
*
5
0 6 MOTION
07 MOTION
4
08 MOTION
(UP,DOWN) MOVE (PLAY) PLAY (MENU) EXIT
(FF) SELECT MODE (SELECT) CHANGE
1. Start Time.
3. TIME: Continuous record.
SEARCH TIME
2008/01/08 15:50:20
2008/01/08 14:30:56
2008/01/08 14:15:30
2008/01/08 14:00:15
2008/01/08 13:55:37
2008/01/08 11:30:12
2008/01/08 10:15:30
2008/01/08 08:30:55
2. End Time.
4. MOTION: Motion Triggered event.
5. Un-played video recording.
Chapter 8: USB DVR Access - 8.1 Program Installation
1.Put the USB Driver Program CD in your CD-ROM Drive.
2.Open CD directory.
3.Double click on Set up .
4.Run the install DVR Viewer program.
To Run the program Double click the program icon [ ] on the desktop.
DVR Viewer will detect the hard drive automatically when user connects
the USB cable to PC.
NOTICE: If the hard drive isn't detected, please restart and try the following:
1-Close the USB program window and remove the USB cable
2-Press [ ] then reconnect the USB cable to the PC and try again.
2 1
2008/01/08 16:00:35
Page 9
Page 18
Page 11

Q-See Q25DVR4ES User's Manual
Q-See Q25DVR4ES User's Manual
Chapter 6: Recording -6.3 Recording Time on Hard Drive
Estimated record time based on a 120GB Hard Drive (Quad Mode) Unit: Hour
System
PAL
System
NTSC
Quality
HIGH
NORMAL
LOW
Quality
HIGH
NORMAL
LOW
Frame Rate
Frame Rate
Estimated record time based on a 120GB Hard Drive (Quad Mode) in hours:
120 (G Byte) x 1024 (M Byte) x 1024 (K Byte)
15 (K Byte/frame) x 7 (frame/sec.) x 60 (sec.) x 60 (min.)
Estimated time would be 332 Hours
25
20
15
12
20
15
12
70
93
117
30 15
58
78
97
Divided by:
Chapter 7: Playback
12
146
194
243
117
155
194
291
388
485
6
7
251
332
416
1748
2330
2913
1
1748
2330
2913
[QUAD] button and hold for three (3) seconds to make each video
channel enlarge to full screen.
The full screen will be displayed for three (3) seconds, including Quad view.
1
The Loop Function will continue until any button is pushed.
For example, [Stop] will stop the Loop function and may stop the recording
depending on Record Schedule Settings.
2. Quad Mode: The DVR will compress and record all 4 video channels
into one file, therefore user cannot enlarge a single channel to full screen in
play back mode.
User can not use the video Loop Function in this mode.
Chapter 5: DVR Setup - 5.5 Recording Frame Rate
Recording frame rate will affect the movement of objects in recorded video. More frames
per second gives smoother movement and uses more hard disk space.
System default value is 30fps (frames per second) for NTSC (PAL is 25fps), which means
the system will record 30 frames per second shared by all cameras. User can set frame rate
for NTSC to 30,15,10,7,5,4,3,2,1 frames per second (PAL is 25,12,8,6,4,3,2,1)
Press [ Play] to play the last recording.
Note: The DVR will play the last recording which has not been previously played
until all recordings have been played.
* Marks un-played video recording.
During playback, press the [Menu] button to initiate the Time Search feature then
the system will list all recorded video clips from the hard drive.
Newest video will at the top of the list, press [FF] to change the select mode and
then press [ Up] and [ Down] to select start time or date to change.
Press [ Select] to edit time value.
Press [ Play] again to continue playing the video.
Page 17
Chapter 5: DVR Setup - 5.6 Recording Quality
There are three levels of recording quality, High, Normal, and Low.
Higher quality uses more hard drive space.
Record frame rate, record quality and available hard drive space will affect
the total recording time of the DVR system.
Page 10
Page 12

Q-See Q25DVR4ES User's Manual
Q-See Q25DVR4ES User's Manual
User can setup video recording method by Time, Motion Triggered and Continuous
Recording.
Chapter 5: DVR Setup - 5.7 Schedule Set
"-" No Recording.
"T" Continuous (System Default).
"A" Motion Triggered.
[ ] Up / [ ]Down: To move the prompt.
[ ] Select: To select Method.
Numbers along bottom are hours of the day.
Chapter 5: DVR Setup - 5.8 Sub Menu-Auto Record
When the function is set to be "ON", DVR will be awaked to record automatically
by schedule if DVR is without any manual operations in five minutes.
When you choose "OFF", DVR will not record until you press the [RECORD]
button.
Press [ Record ] to start recording (As set in 5.7 Schedule Set).
System will display information on Screen.
NOTE: Only EACH Mode can enlarge single channel to full screen display.
Chapter 6: Recording - 6.1 Start Recording
10%
2
1
3
R R
RR
4
5
7
6
QUAD REC [M] (T) 2008/07/01 16:22:30
1. Hard Drive Usage (Displayed as a percentage)
2. Recording Symbol (channel is currently recording)
3. Channel Name
4. Mode (QUAD or EACH)
5. Status (REC, Play, FF1, FF2, FF3, REW, PAUSE)
6. HD Info. ([M] Master Hard disk)
7. Schedule settings: (T) Continuous (A) Motion (-) No Recording
8. The time and date on the DVR
8
Chapter 5: DVR Setup - 5.9 Sub Menu- Password Enable
When this option is set to be "ON", you will be required to enter the password if
you want to stop recording or enter menus.
Page 11
Chapter 6: Recording - 6.2 Stop Recording
Press [ Stop] and system will prompt you to input password if you have already activated
the password. If password option is disabled [ Stop] will not stop recording.
Page 16
Page 13

Q-See Q25DVR4ES User's Manual
Chapter 5: DVR Setup - 5.15 NTSC/PAL Output Selection
Chapter 5: DVR Setup - 5.10 Sub Menu-Password Change
Q-See Q25DVR4ES User's Manual
Change the J10 jumper on the system board to select NTSC or PAL video
output as marked on the silkscreen of the system board.
NTSC/PAL Select
Chapter 5: DVR Setup - 5.16 Factory Reset
Press the [ SEL] Button to reload factory defaults, then the DVR will reboot, all custom
settings (including password) will be restored to default.
There is no confirming dialog box for this selection after you press [ SEL] button, the system
will just reboot!
System default password: Press [ CH1] button six times.
User needs to enter six characters for the
password.
All keys can be used as password key except the
[ Menu] key, which is used to exit.
Note: To Reset the DVR.
Press the [Pause] button 10 times.
Resetting the DVR restores all values to system
defaults and the DVR will reboot.
Afterward the default password is [ CH1]
button 6 times.
Chapter 5: DVR Setup - 5.11 Sub Menu- Color Set
Page 15
HUE : 0-99.
SATURATION : 0-99.
CONTRAST : 0-99.
BRIGHTNESS : 0-99.
Button function :
[ Up] [ Down]: moves the prompt.
[REW]: Increase Value.
[FWD]: Reduce Value.
[CH1-CH4, QUAD]: Select Channel.
[ Menu]: exit.
Page 12
Page 14

Chapter 5: DVR Setup - 5.12 Sub Menu-Time Set
Q-See Q25DVR4ES User's Manual
Chapter 5: DVR Setup - 5.14 Motion Setup
Q-See Q25DVR4ES User's Manual
To configure the DVR's time:
Press [ Up] and [ Down] to move
prompt.
Press [ Select] to modify.
Press [ Menu] to save and exit.
HDD FORMAT:
If you format the hard drive, it will erase all the data on the hard drive.
Note: When you install a new hard drive in the DVR, please use this
function to format the hard drive.
Chapter 5: DVR Setup - 5.13 Hard Disk Setup
OVERWRITE ENABLED:
If you choose YES, recording continues
and overwrites previous recordings when
the hard drive is full. If you choose NO,
the recording process stops when the
hard drive is full.
HDD SIZE: This shows the size of the
hard drive installed in the DVR.
HDD USED: This shows the space used
up on the hard drive and the
master
percentage of hard drive space being used.
MOTION RECORD TIME:
CHANNEL AREA SET:
Press Select to enter the sensitive area of each camera. The picture
of the selected channel is divided into 144(12*12) blocks, press [REW] to
move left, press [FWD] to move right, press [UP] to move up, press
[DOWN] to move down, press [ Select] to set the block to being active or not.
When the block is transparent, it's active to record. When the block is
covered by shadow, it is not active, and motion in this area will NOT be recorded.
Make sure Record Schedule is set to Motion for the times required.
After completing the MOTION SETUP , User can exit by clicking
[ Menu], and press [ Record] to start Motion Recording.
This number indicates how long the triggered
recording lasts after the DVR has been triggered by
motion.
MOTION ALARM TIME:
This number indicates how long the buzzer inside
the DVR will sound when a motion event has been
detected.
MOTION SET:
User needs to have video record method set to
Motion Trigger. (Refer to 5.7 Schedule Set)
CHANNEL SENSITIVITY:
Press [ Select] to adjust sensitivity of motion
detection on each channel.
High (1----------9,OFF) Low
When it's OFF, the channel cannot be triggered
by movement.
Page 13
Page 14
 Loading...