

Page 1

Owner’s manual
Page 2

Safety instructions
Keep the unit away from heat sources and do not place
sources of naked flames (such as candles) on the unit.
Unit ventilation should not be impeded by covering the
ventilation openings with newspapers, curtains etc.
Do not place any objects containing liquids on the unit,
such as vases.
When plugged in, Legato II remains connected to mains
power, even in standby with the display backlight off.
Ensure that the mains plug is readily accessible in case
isolation from the mains is required.
Do not remove screws from or open the radio casing.
Sicherheitshinweise
Das Gerät nicht in der Nähe von Heizquellen positionieren
und keine Vorrichtungen mit offenen Flammen (z. B.
brennende Kerzen) auf dem Gerät abstellen.
Die Ventilatorlüftung des Geräts nicht durch das Abdecken der
Lüftungsschlitze mit Zeitungen, Vorhängen usw. beeinträchtigen.
Keine Gefäße mit Flüssigkeit (z.B. Blumenvasen) auf das
Gerät stellen.
Das an eine Stromsteckdose angeschlossene System
Legato II steht auch im Standby-Modus und bei deaktivierter
Hintergrundbeleuchtung des Displays unter Netzstrom.
Sicherstellen, dass der Netzstecker leicht zugänglich ist, um
das Gerät problemlos vom Netz trennen zu können.
Entfernen Sie keine Schrauben vom Gehäuse und öffnen
Sie dieses nicht.
Consignes de sécurité
Tenir l’appareil éloigné de toute source de chaleur et ne pas
poser d’objets susceptibles de provoquer des flammes nues
(par exemple des bougies) sur l’appareil.
La ventilation de l’appareil ne doit pas être bloquée en
couvrant les aérations de journaux, rideaux, etc.
Ne pas poser d’objets contenant des substances liquides sur
l’appareil (par exemple, des vases).
Lorsqu’elle est branchée, la chaîne Legato II reste
connectée à l’alimentation du secteur, même si elle est en
mode veille et que le rétroéclairage de l’écran est éteint.
Veiller à ce que la prise secteur soit facilement accessible
pour pouvoir la débrancher, si nécessaire.
Ne pas ouvrir le boîtier de la radio ou en enlever les vis.
Istr uzioni di sicurezza
Tenere la radio lontana da fonti di calore e non collocare
sull’unità fiamme vive (come candele).
Non ostruire le aperture di ventilazione dell’unità con
giornali, tende, ecc.
Non posizionare sull’unità oggetti contenenti liquidi come vasi.
Quando collegato, Legato II rimane connesso alla rete
d’alimentazione persino in modalità di standby con la
retroilluminazione del display spenta. Assicurarsi che la
presa d’alimentazione sia facilmente accessibile in caso
sia necessario isolare l’unità.
Non rimuovere le viti né aprire l’involucro della radio.
Sikkerhedsforskrifter
Hold enheden væk fra varmekilder, og anbring ikke åben
ild (som f.eks. stearinlys) oven på enheden.
Ventilation til enheden må ikke forhindres ved at dække
ventilationsåbningerne med aviser, gardiner osv.
Anbring ikke beholdere med vand som f.eks. vaser på
oven på enheden.
Når Legato II er tilsluttet, forbliver apparatet tilsluttet
strømforsyningen også i standby-tilstand, hvor displayets
baggrundslys er slukket. Sørg for, at der er nem adgang
til stikkontakten, hvis det bliver nødvendigt at afbryde
tilslutningen.
Fjern ikke skruer fra og åbn ikke radiokabinettet.
Veiligheidsinstructies
Houd het toestel uit de buurt van hittebronnen en plaats
geen open vuur (zoals kaarsen) op het toestel.
De ventilatie van het toestel mag niet worden geblokkeerd
door de de ventilatie-openingen te bedekken met kranten,
gordijnen etc.
Plaats geen voorwerpen die vloeistoffen bevatten op het
toestel zoals vazen.
Als de stekker van de Legato II is aangesloten op
de stroomvoorziening, dan is het toestel met het
elektriciteitsnet verbonden, zelfs als het in stand-by staat
en het lichtje van het display uit is. Zorg ervoor dat de
hoofdstekker makkelijk bereikbaar is in geval het apparaat
moet worden afgesloten van de elektriciteit.
Verwijder geen schroeven uit de omkasting van de radio
en open het niet.
Copyright
Copyright 2006 by Imagination Technologies
Limited. All rights reserved. No part of this
publication may be copied or distributed,
transmitted, transcribed, stored in a retrieval
system, or translated into any human or computer
language, in any form or by any means, electronic,
mechanical, magnetic, manual or otherwise, or
disclosed to third parties without the express written
permission of Imagination Technologies Limited.
Copyright
Copyr ight 200 6 by Imagin ation Tec hnologi es
Limited. Alle Rechte vorbehalten. Kein Teil dieser
Publikation darf ohne ausdrückliche und schriftliche
Zustimmung von Imagination Technologies Limited
in irgendeiner Form (elektronisch, mechanisch,
magne tisch , manuell od er auf ande re Weise )
kopiert, verteilt, übermit telt, überschrieben, in
einem Suchsystem gespeichert, in eine andere
natürliche oder Computersprache übersetzt
oder Dr itten zu gänglich ge macht werd en.
Copyright
Copyright 2006 Imagination Technologies Limited.
Tous droits réservés. Aucune partie de la présente
publication ne doit être copiée ou diffusée,
tran s m i s e , r e transcrite, sto c k é e d a n s un s ystème
de récupération de données ou traduite, que ce
soit dans une langue humaine ou dans un langage
infor m at i qu e, s ou s qu el qu e fo r me e t p ar qu el qu e
moyen qu e ce soit , élect roniqu e, mécani que,
magnétique, manuel ou autre, ou encore
diffusée auprè s de tiers sans autorisat ion écrite
expresse de Imagination Technologies Limited.
Copyright
Copyright 2006 by Imagination Technologies
Limit ed. Tut ti i diri tti ri ser vati. Ne ssuna p arte
della presente pubblicazione può essere copiata
o dist ribu ita, t ras mes sa, tr asc rit ta, m emor izz at a
in un sis tema di ar chivia zione, o tr adot ta in
un formato normalmente comprensibile, in
qualsiasi forma o con qualsiasi mezzo, elettronico,
mecc anico, magn etico, man uale o altr o, o
divul gata a ter ze parti s enza il per messo
scri tto di Im aginati on Technol ogies Li mited.
Copyright
Copyright 2006 tilhører I m a gination Te chnologi es
Limited. Alle rettigheder forbeholdes. Ingen dele af
denne publikation må kopieres eller distribueres,
transmitteres, omskrives, gemmes i et system, hvor
den kan hentes, eller oversættes til menneskeligt
fors tåeli gt spr og eller c ompute rspr og, i noge n
som hel st form el ler med noge n som hels t
midler, d et være si g elekt ronis ke, mekan iske,
magnetiske, manuelle eller på anden måde, eller
fremvises til tredje parter uden udtrykkelig, skriftlig
tilla delse f ra Imag inati on Techno logie s Limit ed.
Copyright
Copyright 2006 door Imagination Technologies
Limited. Alle rechten gereserveerd. Geen enkel
gedee lte va n deze pu blica tie ma g gekop ieerd o f
gedistribueerd, uitgezonden, overgeschreven,
opgeslagen in een retrieval system of vertaald in
om het even welke menselijke of computertaal,
in geen enkele vorm of door geen enkel middel,
elektronisch, mechanisch, magnetisch, manueel
of ande rs o f beke nd ge maa kt a an der de p ar ti jen
zonder de uitdrukkelijke geschreven toestemming
van Imagination Technologies Limited.
Tra dem ark s
Legato II, the Legato II logo, ReVu, Intellitext, PURE,
the PURE logo, PURE Digital, the PURE Digital logo,
Imagi nation Tech nologie s, and the Ima ginatio n
Technologies logo are trademarks or registered
trademarks of Imagination Technologies Limited.
All oth er produ ct names ar e trade marks of t heir
respective companies. Version 2 December 2006.
Warenzeichen
Lega to II, das L egat o II Log o, ReVu, Int ellit ext , PURE,
das PURE Logo, PURE Digital, das PURE Digital
Logo, Im agina tion Tec hnolog ies und d as Imagi natio n
Technologies Logo sind Warenzeichen oder eingetragene
Waren zeiche n von Imag inati on Techno logie s Limi ted.
Alle anderen Produktnamen sind Warenzeichen ihrer
jeweil igen Bes itze r. Version 0 2. Dezemb er 2006
Marques commerciales
Legato II, le logo Legato II, ReVu, Intellitext, PURE, le logo
PURE, PURE Digital, le logo PURE Digital, Imagination
Technologies et le logo Imagination Technologies sont
des marques commerciales ou des marques déposées de
Imagination Technologies Limited. Tous les autres noms
de produits sont des marques commerciales de leurs
déten te ur s re sp ec ti fs . Ver si on 2 er D éc emb re 20 06.
Marchi
Lega to II, il log o Legat o II, ReVu, In tellit ext, P URE,
il logo PURE, PURE Digital, il logo PURE Digital,
Imagi nation Tech nologie s e il logo Imag ination
Technologies sono marchi o marchi registrat i di
Imagination Technologies Limited. Tutti gli altr i
nomi di prodotti sono marchi di proprietà delle
rispettive società. Versione 2 Dicembre 2006.
Varemærker
Legato II, Legato II-logoet, ReVu, Intellitext, PURE,
PURE-logoet, PURE Digital, PURE Digital-logoet,
Imagination Technologies og Imagination Technologieslogoet er varemærker eller registrerede varemærker,
der tilhører Imagination Technologies Limited. Alle
andre p roduk tnav ne er var emær ker, der t ilhør er dere s
respektive virksomheder. Version 2. december 2006.
Handelsmerken
Legato II, het Legato II logo, ReVu, Intellitext, PURE,
het PURE logo, PURE Digital, het PURE Digital
logo, Im aginat ion Techno logie s en het Imag inati on
Technologies logo zijn handelsmerken of geregistreerde
handel sm er ken v an Im agi nat io n Tec hno log ie s Li mi te d.
Alle andere productnamen zijn handelsmerken van
hun res pect ieve f irma’s. Ve rsie 2 D ecemb er 2006.
Page 3

Contents
Overview of the controls and connectors ........................................2
Overview of the display ...................................................................4
Getting started ................................................................................5
Navigating menus .........................................................................................................5
Using DAB ........................................................................................6
Changing stations .........................................................................................................6
Changing the information displayed .............................................................................6
ReVu™ - Pausing and rewinding radio ..........................................................................6
Intellitext™ - news, sports and more ...........................................................................7
Setting and selecting presets .......................................................................................7
Using the EPG (Electronic Programme Guide) .............................................................8
Changing DAB options ...................................................................................................9
Using FM ........................................................................................ 10
Changing stations .......................................................................................................10
Changing the information displayed ...........................................................................10
Setting and selecting presets .....................................................................................10
Changing FM options ...................................................................................................10
Playing a CD ................................................................................... 11
Selecting a track .........................................................................................................11
Changing the information displayed ........................................................................... 11
Changing CD options ...................................................................................................11
Using an SD memory card ............................................................. 12
Inserting and removing a card ....................................................................................12
Recording DAB radio ...................................................................................................12
Playing a track or playlist ...........................................................................................12
Changing the information displayed ........................................................................... 12
Changing SD card options ...........................................................................................12
Setting alarms/timers ................................................................... 13
Setting an alarm .........................................................................................................13
Cancelling alarms .......................................................................................................14
Setting a timed event ..................................................................................................14
Cancelling a timed event .............................................................................................14
Setting a sleep timer ...................................................................................................14
Setting the clock .........................................................................................................15
General options ............................................................................. 15
Audio ...........................................................................................................................15
Display ........................................................................................................................15
Upgrade ......................................................................................................................15
Hints and Tips ................................................................................ 16
Technical Specifications ................................................................ 16
1
Page 4
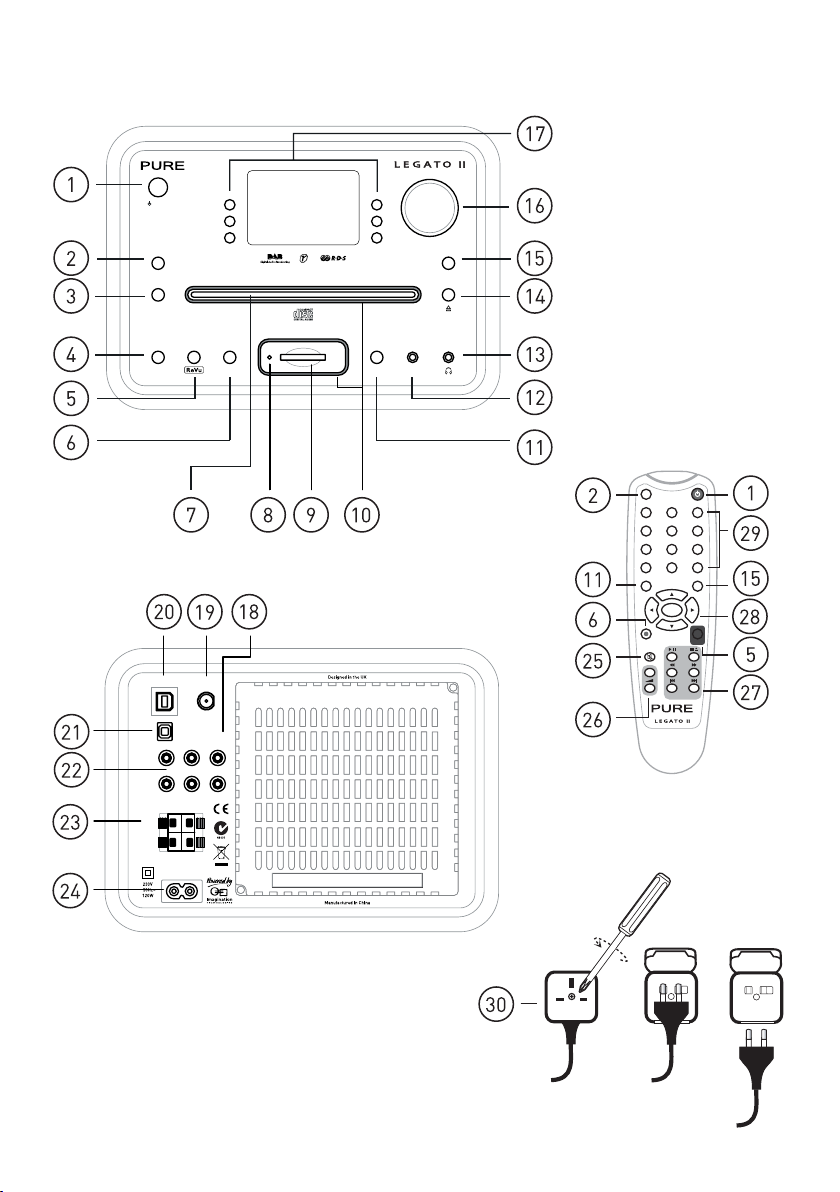
Overview of the controls and connectors
8W_MZ
;W]ZKM 5MV]
/]QLM :MKWZL )]`QV1VNW
<X^[LN 9X`N[
"
!
<J_N
2WOX
6NW^
=RVN
<NUNL]
<]W
0^RMN
=RVN
6^]N
-Jb
-Jb
=;*=;*
7X\QKIT7]\
)]`QV )]`QV
4
:
<]W
;NLX[M ;N?^
)MZQIT)MZQIT
>IZQIJTM
W]\X]\
4
;XMISMZ[
:
2
Page 5

1. Switches between on and standby
2. Switch between modes ( DAB/FM/CD/SD/AUX 1/AUX 2/AUX 3)
3. Receives signal from remote control
4. Push to access EPG in DAB.
5. Enters ReVu for DAB pause and rewind
6. Record DAB to SD card
7. Slot for audio and MP3 CDs
8. Light shows when recording or accessing SD card via USB.
9. Slot for SD card.
10. SD and CD lights.
11. Changes the information shown on the display.
12. 3.5mm stereo input from iPod/Minidisc etc.
13. 3.5mm headphone socket (mutes speakers)
14. Eject/load CD.
15. Access alarms/timers, Intellitext and setup options.
16. Turn for volume.
Push and turn to browse and push again to select stations, tracks and menu options
17. Six shortcut buttons provide quick access to radio presets, CD/MP3 controls and menu
options
18. Configurable dual phono output giving fixed volume output for connection to an external
amplifier or recorder, or variable for connection to a powered subwoofer.
19. F-type connector for DAB/FM aerial. Unscrew plastic cap and remove to access.
20. Connect to a PC for software updates or to access an SD card.
21. S/PDIF optical digital out (DAB/FM/CD/SD). Remove plug to use.
22. 2 x Dual phono stereo inputs from iPod/Minidisc etc.
23. Spring loaded speaker connectors
Connect red socket to red on speaker and black socket to black on speaker
24. Power cord socket.
25. Mutes speakers/headphones.
26. Volume control.
27. CD/SD controls, also used for FM tuning and ReVu.
and change day in DAB EPG.
28. Select and select stations/tracks and menu options.
Press Select to access DAB EPG and use arrows to navigate
29. Press Save + number or hold down number to store a preset. Press number to recall.
Press -/-- first for double digit presets.
Press to quickly access CD tracks
30. UK power plug adapter removal.
3
Page 6
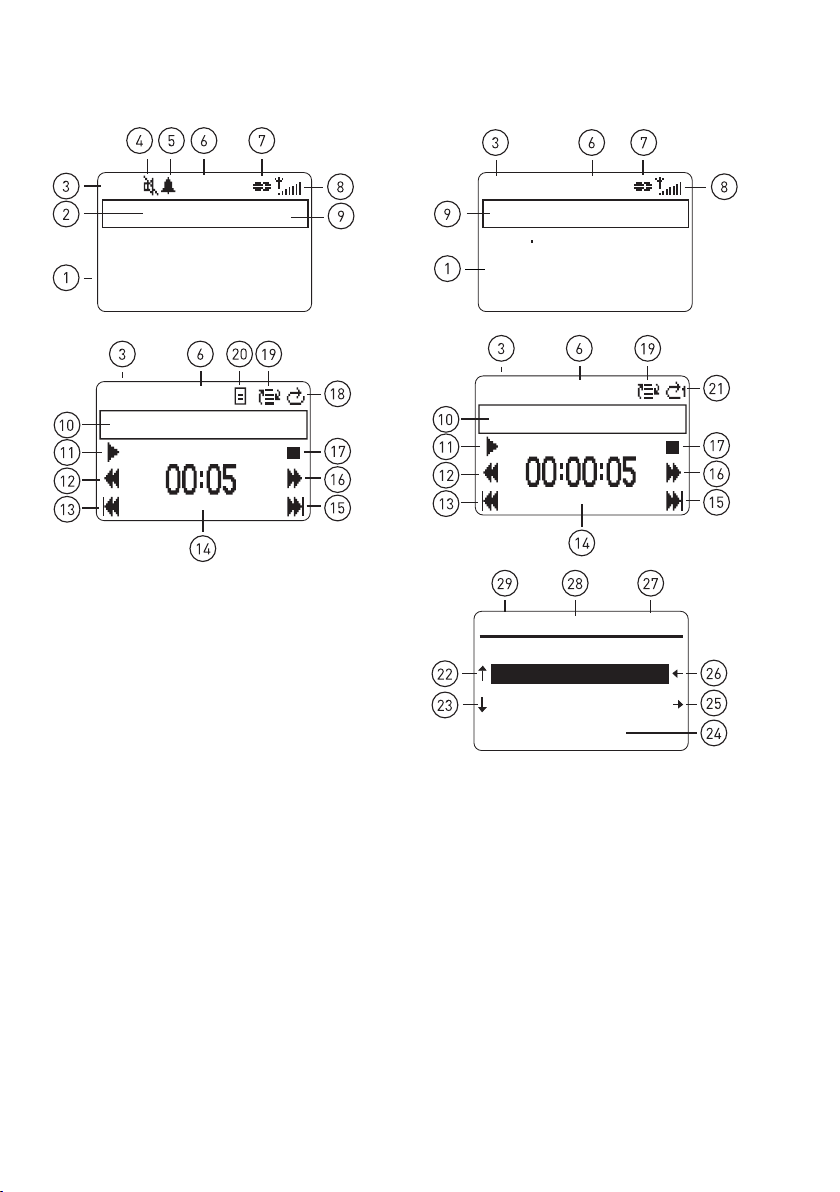
Overview of the display
E
P
G
DAB FM
DAB
Jo Whiley Changing
Tracks - go online to
nominate the tunes
09:40
BBC Radio 1
CD
CD
1. Scrolling DAB or FM (RDS) text.
2. EPG available.
3. Audio source.
4. Audio muted.
5. Alarm (bell) /timer (clock) set.
6. Clock, updated by DAB or FM (RDS)
7. Stereo signal.
8. Signal strength.
9. Station name or frequency (FM)
10. Track number/name
11. Play/pause shortcut button
12. Rewind shortcut button
13. Skip back shortcut button
14. Time into track
15. Skip forward shortcut button
16. Fast forward shortcut button
17. Stop shortcut button
18. Repeat all
09:40
Track 1
4
FM
Today's Best Mix for Herts
Beds and Bucks - 97.6
Chiltern FM
09:41
Chiltern
SD
S
Permanent Vacation
09:40
D
EPG
09/08
13:00 Colin and Edith
16:00
17:45 Newsbeat
18:00
19:00 Zane Lowe
Wed
S
cot t Mills
S
cot t Mills
19. Shuffle selected
20. Playlist in use
21. Repeat track
22. Previous day shortcut button
23. Next day shortcut button
24. Programme start times and names
25. Next station shortcut button
26. Previous station shortcut button
27. DAB station name
28. Listing day
29. Listing date
Radio 1
Page 7
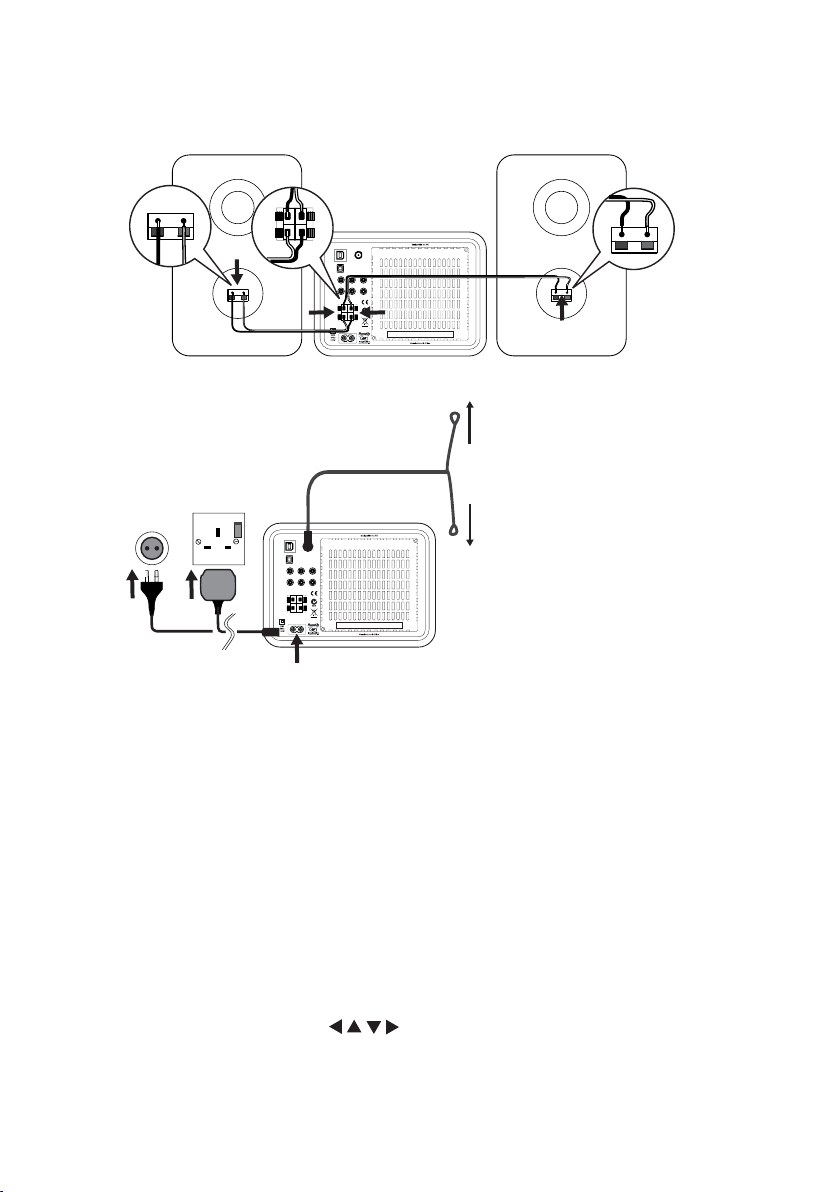
Getting started
1. Connect the speakers using the supplied cables. Ensure that the bared ends of the wires
are securely gripped by the spring clips.
)MZQIT)MZQIT
=;*=;*
7X\QKIT7]\
>IZQIJTM
)]`QV )]`QV
W]\X]\
4
:
4
;XMISMZ[
:
2. Fully extend the aerial, and plug in to your power supply.
)MZQIT)MZQIT
=;*=;*
7X\QKIT7]\
>IZQIJTM
)]`QV )]`QV
W]\X]\
4
:
4
;XMISMZ[
:
3. Press the Power button, if necessary, to switch the unit on.
4. Select an autotune to find all the DAB radio stations in your area, choose from:
UK Scans frequencies in Band III only
Rest of World Scans of all frequencies in Band III and L-Band.
An autotune starts and tunes to a station when finished.
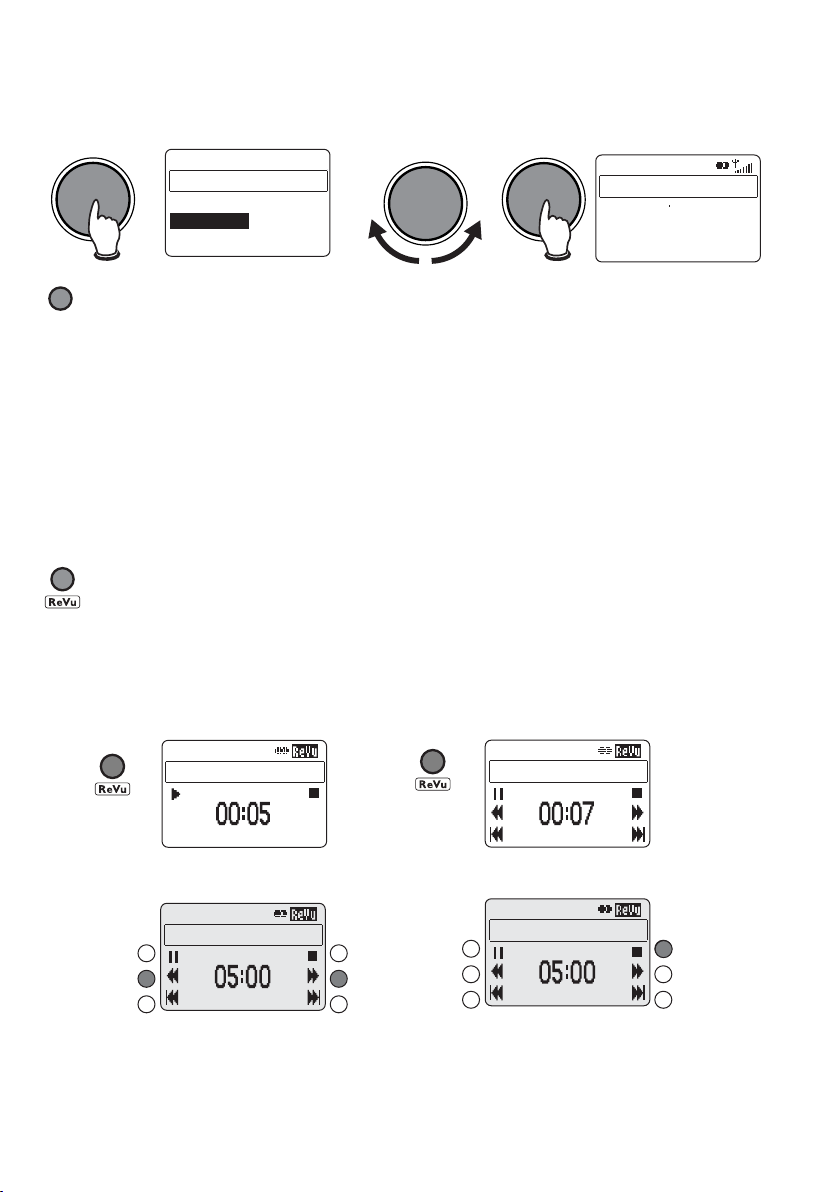
5. To change stations, push the dial and turn to scroll through the station list, then push
the dial again to tune to the highlighted station.
6. Push the source button to listen to FM, CD, SD or one of the auxilliary inputs.
Navigating menus
You turn the dial to scroll through menu options, stations or track lists and push the dial to
select options. In most menus if you do not select anything you return to the previous screen.
Alternatively use the equivalent ( + Select) remote control buttons. In many cases
you can also press a shortcut button to select the option shown on screen next to that button.
5
Page 8
Using DAB
Changing stations
DAB Station List
1Xtra - BBC
BBC London
BBC Radio 1
BBC Radio 2
Changing the information displayed
1VNW
1. Scrolling text broadcast by most DAB stations
2. Channel and frequency for the current station
Signal strength; maximum 16 bars, anything below the empty block and you may
experience audio distortion
Signal quality; 85 to 100 Good, 70 to 84 OK, 0 to 69 poor
3. Multiplex in which the current station is broadcast
Content being broadcast e.g. Pop music.
Signal data rate and a stereo or mono indicator.
4. Presets for quick access to your favourite stations using the six shortcut buttons.
5. Date and time updated regularly by the current DAB station.
ReVu™ - Pausing and rewinding radio
ReVu lets you pause and rewind live DAB digital radio.
Legato II constantly stores audio from the current station. You can access this audio and pause
or rewind radio for up to around 30 minutes depending on the broadcast. When full, ReVu
starts to overwrite the oldest stored audio.
09:40
DAB
BBC Radio 1
Jo Whiley's Changing
Tracks - go online to
nominate the tunes
Pause Play
09:40
DAB
Paused
Rewind/Fast Forward Exit
09:42
DAB
BBC Radio 1
The timer shows how far behind the live broadcast you are.
6
09:40
DAB
BBC Radio 1
09:42
DAB
BBC Radio 1
Page 9

Intellitext™ - news, sports and more
E
P
G
E
P
G
E
P
G
E
P
G
Intellitext* provides on-demand text information such as sports headlines and news from
DAB stations. The text is stored in your radio while you listen to stations and is updated by
the broadcasters. Intellitext is listed by station and split into categories. For example, the
broadcaster may send information on Football, Cricket, Headlines etc.
When your unit is on, Intellitext will only appear for stations that you have been tuned to for a
while. While your radio is in standby it will collect updates (from the last station for which you
viewed Intellitext) ready for when you next switch on.
To access Intellitext
Menu>Intellitext
View Intellitext
Select a station and use the dial to browse and select Intellitext categories for that station.
e.g. talkSPORT > Football > Premiership. The selected information will scroll up the screen.
Press the Menu button to move back up the menu or any other button to exit.
Clear all
Deletes Intellitext immediately.
Set timeout
Delete Intellitext after 1 week (default) or 1 day.
Setting and selecting presets
Store up to 99 DAB radio stations in a list for easy access.
To set a preset
09:40
DAB
BBC Radio 1
Jo Whiley's Changing
Tracks - go online to
nominate the tunes
To select a preset
09:40
DAB
BBC Radio 1
Jo Whiley's Changing
Tracks - go online to
nominate the tunes
* from participating broadcasters
09:40
DAB
BBC Radio 1
- V ir g in
Plnt R oc k Clas s ic
Preset s 01-04
09:40
DAB
BBC Radio 1
- V ir g in
Plnt R oc k Clas s ic
Preset s 01-04
09:40
DAB
BBC Radio 1
Radio 1 V irg in
Plnt R oc k Clas s ic
Preset s 01-04
09:40
DAB
BBC Radio 1
Radio 1 V irg in
Plnt R oc k Clas s ic
Preset s 01-04
7
Page 10

Using the EPG (Electronic Programme Guide)
/]QLM
EPG provides programme schedules and information for DAB stations that broadcast it.
If a station belongs to a multiplex which has EPG available, an EPG icon is displayed next to
the station name. Programme schedules are displayed when sufficient information has been
received.
If the schedules are updated or you tune to a station in another multiplex with EPG, then the
schedules are refreshed so there may be a delay in displaying them.
If you use an SD card, it can be used to store the EPG information, enabling you to switch
between stations on different multiplexes without losing the information.
Without an SD card fitted, the information is lost if you change multiplex and you will need to
wait until the information is refreshed.
Note Updates are occasionally saved to the card and while saving you see a message and
temporarily cannot use buttons. To cancel the updates hold down the Menu button.
Displaying the EPG
Press the Guide button or Menu > DAB > Guide.
Today’s listing for the current station is displayed showing programme start times and names.
Note There may be a delay in listings arriving for particular days.
Navigating the EPG
You can move around the EPG using the buttons on the remote or the shortcut buttons
indicated on screen. Press Info to see more information on a highlighted programme.
Using the EPG to set up a timed event
You can use the EPG to quickly set up a timed recording* or automatically tune in to a
programme. For more information on timed events, see page 14.
Turn the dial to scroll through the programme list and push the dial or press the Record button to
select a programme and choose one of the following options:
Save to SD card Tunes in and saves the selected programme to SD card.
Send to digital out Tunes in and sends the programme to the Optical Out socket.
Tune in Tunes in to the programme. This will tune in immediately if the
programme is currently on-air.
Cancel Returns to the guide without taking any action.
8
Record function provided for personal use only
*
Page 11

Changing DAB options
Menu > DAB
Guide settings
Change the way the programme guide information is handled:
Current multiplex only Displays latest broadcast information from current multiplex only
Store guide to SD card Displays latest programme guide information on the SD card if
available. Programme guide information from all multiplexes is stored
to a folder called ‘GUIDE’ on the SD card and automatically updated
when new information is broadcast. This is also updated if the unit is
in standby.
Autotune
Scans for DAB stations and adds any new ones to the station list.
UK Scans only Band III frequency range.
Rest of World Scans complete Band III and L-Band frequency ranges.
Station order
Alphanumeric Lists all stations in alphanumeric order.
Favourite Displays your eight most listened to stations first on the station list. Your
favourite stations display a heart next to the names in the station list.
Active station Lists active stations first on the station list.
Multiplex Lists stations in groups according to their multiplex.
Trim stn. list Removes inactive stations from the station list.
Favs
presets Available only when Favourite station order (above) has been selected.
Transfers your eight favourite stations to presets.
Manual tune
Shows DAB signal level which can help you find the best position for your radio.
1. Select the channel you want from the list. You see a signal strength display.
The marker indicates the minimum required level for reception and the filled blocks
indicate the current level.
2. Move your aerial and try to raise the current level to the marker or beyond. You see the
multiplex name at the top of the screen if a good signal is received and the stations in
that multiplex are listed below and added to the station list.
3. Select a station or press Info or Menu to exit manual tuning.
DRC
DRC (Dynamic Range Control) value makes the quieter sounds in a DAB broadcast easier to
hear at low volume or in a noisy environment. Check with the broadcasters to find out if they
use DRC.
DRC OFF DRC is switched off. Any DRC level broadcast is ignored.
DRC HALF DRC level is set to half that sent with the broadcast.
DRC FULL Applies the DRC level as sent with the broadcast.
9
Page 12

Using FM
The first time you switch to FM or after resetting your unit, select the FM tuning mode:
Autotune Finds all the stations available in your area and lists them in alphanumerical
order using RDS (Radio Data System) station names where available.
Manual tuning Tune manually either in steps of 0.05 MHz or seek to find the next station.
Changing stations
You select a station in different ways depending on tuning mode:
Autotune Push the tuning dial and turn to scroll through the station list, then push the
dial to tune to a station or use the shortcut buttons on screen.
Manual tuning Push the dial and turn to step up or down the frequency range or use the
shortcut buttons on screen to step or scan to the next station.
Changing the information displayed
1VNW
1. Scrolling text broadcast by most FM(RDS) stations.
2. Content being broadcast e.g. Pop music. (RDS)
Signal strength; maximum 16 bars.
Frequency and a stereo or mono indicator.
3. Presets for quick access to your favourite stations using the six shortcut buttons.
4. Date and time updated regularly by the current FM (RDS) station.
Setting and selecting presets
Store up to 24 FM radio stations in a list for easy access. Use the same method as for DAB
stations to set and select preset FM stations, see page 7.
Changing FM options
Menu > FM
Tune
Choose between [BYNAME] which shows stations in a station list (similar to the DAB station
list) using RDS station names or [MANUAL] to step or scan through the FM frequencies.
Station order
Alphanumeric Displays named stations at the top of the station list.
Named stations Displays stations with an RDS name only.
Stereo mode
Auto Uses stereo signal by default where available.
Mono Uses mono signal only. This may provide clearer audio for stereo stations
with poor reception.
Autotune
Performs a scan to find all the stations available in your area and lists them in alphanumeric
order using RDS station names where available.
10
Page 13

Playing a CD
Insert your CD label side up in the CD slot. Legato II checks the CD type and loads a track list. If
you insert a CD with MP3 files on it Legato II detects this and displays the MP3 icon on the screen.
MP3 files can be in folders on the CD and playlist files which usually have a .M3U file extension
are also supported. The following icons help you differentiate between files and folders:
MP3 files
Selecting a track
1VNW
Playlist file Closed folder Open folder
To change tracks on a CD, either:
• push and turn the dial to scroll through tracks, push again to play the highlighted track
• use the skip forward or skip back buttons or shortcut buttons on screen
• select a track number using the numbered buttons on the remote. MP3 tracks are
numbered in the order they appear on the track list.
Changing the information displayed
Choose from the following options, depending on whether a normal or MP3 CD:
Track elapsed Time the current CD/MP3 track has been playing plus on normal CD,
press Stop to view total time and total tracks on the CD.
Track remaining Time remaining of the current track.
Disc remaining Time remaining of current CD.
MP3 ID3 text ID3 text – album name, track information artist etc., if included with file.
CD text Album name, track info, artist, etc., if included on the CD.
Date and time Updated by the DAB or FM (RDS) signal.
Changing CD options
Menu > CD (or MP3)
Play (Not MP3 CD)
ALL plays all tracks on the CD, LIST plays tracks on a playlist you have created.
Shuffle
OFF plays tracks in the order they appear on the disc, ON plays tracks in a random order.
Repeat
OFF no repeat, TRACK repeats the current track, ALL repeats the whole CD or folder (MP3 CD).
Set playlist
To create a playlist, containing the order in which to play up to 20 tracks from the current CD:
1. Turn the dial and push to set the first track on your playlist.
2. Repeat until you have completed your playlist and select one of the following options:
OK Set your playlist and exit. This automatically sets the Play mode to [LIST]. If you
play your CD it plays the tracks you specified in the order you specified.
Clear Delete the current playlist.
Cancel Exit the screen without saving any changes made.
A playlist remains available only for as long as the current CD is inserted.
11
Page 14

Using an SD memory card
You can use an SD card for recording* and playing back DAB digital radio or playing MP2/MP3
files recorded elsewhere. As a rough guide – a 2GB card will give you around 30 hours of DAB
recording time from a 128 kbps broadcast data rate.
Note Legato II records files to SD cards in MP2 format. You may need to use a computer to
convert these files to a different format if you wish to use them in another SD card device.
Inserting and removing a card
To insert an SD memory card, push the card label side up into the slot on the
front panel with the gold pins towards the rear of the unit until it clicks.
To remove a card push the card in and it will pop out so you can remove it.
Note It is not recommended that you remove a card when the SD light is lit.
Recording DAB radio
You can record DAB radio* to SD card.
1. Press the Record button to start recording. You see the record icon ( ) flashing.
2. Press the Record button again to stop recording. You see the time, date and filename
that the recording has been saved under. The filename is made up of the month, date
and time. e.g. 10141020.mp2 means October the 14th, starting at 10:20 am. The
recording also stores the station and multiplex. DAB recordings are saved in a ‘TRACKS’
folder on your SD card so they can be found easily.
Note You can also record radio at a later time using a timed event, see 14.
Playing a track or playlist
To select tracks on an SD card, either:
• push and turn the dial to scroll through the track list, then push again to play the
highlighted track or playlist, or open or close a folder.
• while playing, use the skip forward or skip back shortcut buttons.
• select a track number in the current folder using the numbered buttons on the remote.
Tracks are numbered in the order they appear on the track list.
Changing the information displayed
1VNW
1. Time the current track has been playing.
2. ID3 text - Album name, track info, artist etc., if included with the file.
3. Date and time updated by the DAB or FM (RDS) signal.
Changing SD card options
Menu > SD Card
Status
Displays the total, used and available space on the SD card.
Shuffle
OFF play tracks in the order they appear in the current folder.
ON play tracks in a random order.
12
Record function provided for personal use only
*
Page 15

Repeat
TRACK Repeats the current track.
ALL Repeats all tracks in the current folder.
OFF No repeat.
Delete
Turn the dial to browse a list of tracks and folders on the SD card and push to delete the
highlighted track or open/close a folder. Alternatively use the bottom shortcut buttons or left/
right arrows on the remote.
Format
Deletes all files (including any non-audio files) and clears the card. This may be a good idea if
you have previously used the card in another device.
USB
Enables access to an SD card inserted in your Legato II using a USB connection to your PC.
This enables you to manage files on your SD card using Windows Explorer on your PC e.g.
move files to and from the SD card, delete files etc.
While USB access is enabled you can only access the files on the SD card through your PC.
Setting alarms/timers
You can set up to 20 alarms or timed events. Alarms switch Legato II on and tune to a station, play
a CD or SD card, or sound a tone. Timed events can record DAB to SD card, send to the Digital out
socket or tune to a station. You can also set a sleep timer after which Legato II will switch to standby.
Setting an alarm
Menu > Alarm/timer >Alarms> Add an alarm
Turn the dial and push to accept a setting and move to the next. Set the time, day and one
of the following modes: Tone, DAB station (choose a station), FM station (last tuned to), SD
card track (from first track found) or CD (from first track).
You will see a bell symbol on the screen indicating that the alarm is set. The bell icon is filled
if an alarm is due within the next 24 hours.
Note When Legato II is switched on the unit displays either an alarm or timer icon on the top
line of the display depending on which is due first, in standby, an icon and time for both the
next alarm and timer set are displayed.
Changing an alarm
Menu > Alarm/timer >Alarms
1. Select the alarm you want to change.
2. Select Set to change the alarm settings, Turn off to switch the alarm off (Alarm will be
marked ‘Disabled’) or Remove from list to delete the alarm from the list.
Setting the alarm volume
Menu > Alarm/timer >Alarm volume
The alarm volume set will apply to all DAB, FM, CD or SD card alarms.
13
Page 16

Changing the alarm snooze time
Menu > Alarm/timer >Snooze period
Choose a snooze period between 5 and 59 minutes. The snooze period applies to all alarms.
Cancelling alarms
When an alarm goes off, the alarm icon flashes and you have several options:
Snooze Press the bottom left shortcut button or down arrow on the remote to
snooze the alarm for a set period (the default is 8 minutes). The alarm will
re-sound when the snooze period has elapsed.
Cancel Press the top left shortcut button or left arrow on the remote to cancel the
alarm and return unit to its previous power state (on/standby).
Cancel and off Press the Power button to switch the unit off and cancel the alarm.
Cancel and on Press the top right shortcut button, press the dial, or right arrow or Select
on the remote. Pressing any other button not listed above will also cancel
the alarm and perform its normal function.
Setting a timed event
You can use timed events to set up a DAB radio recording* or automatically tune in to a DAB
station. See page 8 for details of how to use EPG to set a timed event.
Menu > Alarm/timer > Timers > Add an event
Turn the dial and push to accept a setting and move to the next. Set the time, duration, day,
station and one of the following actions: Save to SD card, Send to digital out, Tune in, or
Cancel to return to the list without setting an event.
You see a clock symbol on the screen if a record event is set or a musical note symbol if a ‘Tune
in’ event is set. A crossed out clock is shown if an event is not due in the next 24 hours.
Note When Legato II is switched on, the unit displays either an alarm or timer icon on the top
line of the display depending on which is due first, in standby, an icon and time for both the
next alarm and timer set are displayed.
Changing a timed event
Menu > Alarm/timer > Timers
1. Select the event you want to change.
2. Select Set to change the event settings, Turn off to switch the timed event off (event will
be marked ‘Disabled’) or Remove from list to delete the timed event from the list.
Cancelling a timed event
If a ‘Tune in’ event is underway you can cancel the end time of the event by pressing any
button. A record event can be cancelled by pressing the Record button.
Setting a sleep timer
Sleep Timer switches your unit into standby after a number of minutes.
Menu > Alarm/timer > Sleep
Select a sleep time. Set to zero or press the Clear shortcut button to cancel the sleep timer.
Return to the Sleep menu again to view the time remaining or to change the sleep time again.
14
Record function provided for personal use only
*
Page 17

Setting the clock
Menu > Alarm/timer > Set clock
In most cases the time and date on your Legato II comes from and is updated by the DAB or
FM (RDS) signal. If a good DAB or FM signal is not available or you want to manually set the
time/date you can use this option.
General options
Press the Menu button to access the following options:
Audio
Tone
Set the Bass output level. Push the dial to set the Treble level.
Balance
Adjust the audio balance between left and right channels.
Subwoofer
Specify if you have an active subwoofer connected to your Variable Out socket:
YES variable level output and will mute if headphones are inserted.
NO fixed line level output and will not mute if headphones are inserted.
Digital out
On Switches the output on all the time. Select this option if connecting the
Digital out to the digital inputs of an external amplifier or a recorder without
synchro-record function.
Off/Timer Switches the output off until a timed event specifying the output is selected. Some
external recorders can be set to detect when a digital S/PDIF signal is present
(synchro-record) and start recording. If using a synchro-record method you should
select this option so that your recorder can detect when the recording is to start.
Display
Active settings
Set the screen backlight brightness. Press the dial to set the contrast.
Standby settings
Set the standby screen brightness level.
CD/SD lights
Set the CD/SD card lights OFF, ON or ACTIVE (on when CD/SD source selected)
Upgrade
Displays the current version of your unit and 16-digit serial number. Register your product
online to receive automatic e-mail notification of product updates or visit our website at www.
pure.com/support. To upgrade your product, press the Upgrade shortcut button and follow the
instructions on screen.
Note USB upgrade requires a PC (not Mac) running Windows XP and a suitable USB cable
(not included).
15
Page 18

Hints and Tips
I don’t see any Intellitext
This could be because you haven’t tuned to a participating station or the station hasn’t broadcast
any Intellitext since you tuned in. Try tuning to a participating station, wait and then check again.
(>>/<<) DAB Secondary services
Secondary services accompany some stations, providing extra information or alternative content
and may only be broadcast at certain times. If a station has secondary services available, the
station shows ‘>>’ next to its name in the station list and the secondary service appears next to
the station in the list. A secondary service has a ‘<<’ before its name in the station list.
(?) Inactive or unavailable DAB stations
Inactive or unavailable stations are those which appear on the station list but are not currently
available. Inactive stations have a ‘?’ before their name on the station list. If you select a station
which has this symbol, your radio tries to tune in or returns to the previous station.
Display says ‘ No stations available’
Try adjusting your aerial or radio position. Use Autotune to search for stations.
Alarm bell icon has a cross through it
This happens if you set an alarm but no DAB or FM RDS time has been acquired yet. Check that
your aerial is extended, return to DAB/FM or standby and wait for a short period.
Resetting your radio
Resetting your Legato II removes all presets, stored stations and favourite stations, Intellitext and
alarm/timer settings and resets all options to defaults. To reset:
1. Press and hold the Menu button for three seconds. The screen shows ‘Do you want to reset?’.
2. Confirm the reset or press no buttons to cancel the reset.
Technical Specifications
General Fully compliant with ETS 300 401 and capable of decoding all DAB
transmission modes 1-4 up to and including 192 kbps.
Frequency range DAB Band III 174-240, DAB L-Band 1452-1490, FM 87.5-108
Amplifier power 30W RMS per channel output (into 8 Ohms @10% THD+N, A-weighted).
CD Player CD-R and CD-RW playback compatible. Support for CD Text. MP3 playback,
including support for ID3 tags and M3U playlists.
SD card Record DAB radio and playback MP2/MP3. Red SD record warning LED.
Speakers 8 Ohms (nominal) impedance. 30W RMS power handling. Polypropylene
mid-bass drivers. Two-way rear ported enclosure. Custom-tuned 2nd order
crossovers.
Connectors 3.5 mm headphone output. RF F-connector 75 Ohms DAB/FM aerial
connection. 3.5 mm stereo line-level input (front) and two dual-phono linelevel inputs (rear). Dual phono for stereo analogue line-level or variablelevel output. Optical Toslink connector for digital S/PDIF output (IEC958 @
48 kHz). USB (B type) connector for future software upgrades and SD card
access. Spring-clip terminals for speakers.
Mains power supply 240V 60W with removeable Euro/UK power socket adapter.
Approvals CE marked. Compliant with the EMC and Low Voltage Directives (89/336/
EEC and 73/23/EEC).
Dimensions (mm) Main unit 210 (w) x 150 (h) x 240 (d); speaker 160 (w) x 250 (h) x 240 (d).
16
Page 19

Warranty information
Imagination Technologies Ltd. warrants to the end user that this product will
be free from defects in materials and workmanship in the course of normal
use for a period of two years from the date of purchase. This guarantee covers
breakdowns due to manufacturing or design faults; it does not apply in cases
such as a ccident a l da m a g e , ho w e v e r caused, we ar a n d tear, neglig e n ce,
adjustment, modification or repair not authorised by us. Please return your
warranty card or visit www.pure.com/register to register your product with
us. Should you have a problem with your unit please contact your supplier
or contact PURE Support at the address shown on the rear of this manual.
Garantie-Informationen
Imagination Technologies Ltd. garantiert dem Endbenutzer, dass dieses
Produkt für die Dauer von zwei Jahren ab Kaufdatum bei normalem Gebrauch
frei von Schäden an Material oder Verarbeitung ist. Diese Garantie umfasst
Ausfälle aufgrund von Herstellungs- und Konstruktionsfehlern; sie gilt nicht
für Unfallschäden, wie auch i m mer verur sacht, Verschleiß, Fahrlässigkeit
und Veränderung oder Reparatur durch von uns nicht autorisierte Personen.
Senden Sie Ihre Garantiekarte ein oder registrieren Sie Ihr Produkt bei uns
unter w ww.p ure.co m/reg iste r. Sollt en Sie mi t Ihrem G erät ei n Prob lem
haben, w enden Sie s ich an Ihr en Verk äufer od er den PUR E Suppor t.
Die Adr esse f inde n Sie auf de r Rücks eite d ieser B edien ungsa nleit ung.
Disclaimer
Imagination Technologies Limited makes no representation or warranties
with r es pec t to t he co nte nt of t his docu men t and s pec if ica lly di scl aim s
any implied warranties of merchantabilit y or fitness for any particular
purpose. Further, Imagination Technologies Limited re serves the
righ t to revi se this p ublic ation an d to make ch anges in i t from t ime
to time without obligation of Imagination Technologies Limited to
notify any person or organization of such revisions or changes.
Ausschlusshinweis
Imagi n a tion Techno l o gies Limi ted gewährt keine Gar a ntien für den Inhalt
dies es Do kum ent s un d lehn t ins be son der e imp liz ier t e Gar ant ien f ür di e
allgemeine Gebrauchstauglichkeit bzw. die Eignung für spezielle Zwecke ab.
Weiterhin behält sich Imagination Technologies Limited das Recht vor, diese
Publikation vo n Zeit zu Zeit zu überarbeiten und zu ände rn, ohn e dass d araus
eine Verpflichtung für Imagination Technologies Limited entsteht, irgendeine
Person oder Organisation von solchen Änderungen in Kenntnis zu setzen.
Garantie
Imagination Technologies Ltd. garantit à l’utilisateur que le présent produit est
exempt de défauts en termes de matériaux et de main-d’œuvre, dans le cadre
d’une utilisat ion normale , pour une pér iode de deux a ns à compter d e la date
d’achat. La présente garantie couvre les pannes dues à un défaut de conception
ou de fabrication ; elle ne prend pas en compte les dommages accidentels, quelle
que soit leur cause, l’usure normale du produit, ainsi que tous dommages dus à la
négligence, à la modification, au réglage ou à la réparation effectué(e) sur l’appareil
sans notre autorisation. Veuillez renvoyer votre carte de garantie ou visiter le site
www.pure.com/register pour enregistrer votre produit auprès de nos services.
En cas de problème avec votre appareil, veuillez contacter votre fournisseur ou
le centre d’assi stance PU R E, à l ’a dr esse indi q ué e a u d o s du p résent ma nu e l.
Infor mazioni sulla garanzia
Imagination Technologies Ltd. garantisce all’utente finale che il presente
prodo tto è e sent e da dife tti d i mater iale e fa bbric azio ne in cond izion i
normali di utilizzo per un periodo di due anni a partire dalla data di acquisto.
La pre sent e garan zia co pre i dann i dovut i a difet ti di f abbri cazi one o
progettaz ione; non si applica in casi quali danni accidentali, in qualsiasi
modo si ano st ati pr ovoca ti, usu ra, neg ligen za, reg olaz ione, mo difi ca o
ripar a zio ne no n au tor iz z at e. Re s ti tu ire l a sc he da de lla g ar anz ia o ppu re
visitare il sito www .p ure . com/ re gister per registra re il prodotto. I n caso d i
problemi relativi all’unità, contattare il proprio fornitore oppure contattare il
Supporto tecnico PURE all’indirizzo indicato sul retro del presente manuale.
Garantioplysninger
Imagination Technologies Ltd. garanterer over for slutbrugeren, at dette
produkt ikke er fejlbehæftet, hvad angår materialer og håndværksmæssig
udfør e l se v e d no r ma l b r ug i t o år f r a k ø b sd a t oe n. D e nn e ga r an t i d æk k er
sammenbrud, der skyldes fremstillings- eller desig nfejl. Den dækker ikke
i tilfælde, hvor enheden beskadiges som følge af hændeligt uheld, uanset
hvord an det te ske r, samt sl itag e, uag tsom hed, ju ster ing, æn drin g eller
reparation, som ikke er godkendt af os. Du bedes returnere garantikortet eller
besøge www.pu re.com/ registe r for at registrere produ ktet hos os. Hvi s de r
skulle opstå problemer med enheden, bedes du kontakte leverandøren eller
PURE Support på adressen, der er angivet på bagsiden af denne vejledning.
Informatie over de waarborg
Imagination Technologies Ltd. waarborgt de eindgebruiker dat dit product
vrij i s van de fec ten in m ater ial en en we rkur en bi j norm aal ge brui k voor
een duur van twee jaa r v a n a f de datum van aa n k o op. Deze gar a ntie dekt
defecten door productie- of ontwerpfouten; het is niet van toepassing
in geval len als ac cident ele scha de, hoe ook v eroor zaakt , slijt age,
onachtzaamheid, instelling, wijziging of reparat ie die door ons niet werd
goedgekeurd. Gelieve uw garantiekaart terug te sturen of bezoek www.
pure.com om uw product bij ons te registreren. Indien u een probleem
hebt met uw apparaat, gelieve uw leverancier te contacteren of contacteer
PURE Sup port o p het adr es op de ac hter zijde va n deze han dleidi ng.
Avis de non-responsabilité
Imagination Technologies Limited refuse toute représentation ou garantie
vis- à-vis du c onten u du prés ent doc ument et r efus e spéci fique ment
tout e garant ie impli cite de v aleur mar chande o u d’adéqua tion à un
usage s pécif ique. En ou tre, Imag inatio n Technolo gies Li mited se
rése rve l e droit d e révi ser la pr ésen te publ icat ion et d’y a ppor ter de s
modifications, quand elle le souhaite, sans obligation de sa part de notifier
toute personne ou organisation desdites révisions ou modifications.
Dichi arazion e di non respo nsabili tà
Imagi nati on Techn olog ies Li mite d non si a ssu me alcu na res pons abili tà
rispetto al contenuto del presente documento, in particolare non riconosce
ness un a ga ra nz ia i mp li ci t a di c om me rc ia bi li t à o id one i t à pe r uno s c op o
specifico. Ino l tre, Imagi n a t i o n Te c hn o l o g i es Limite d s i riserv a i l d iritto di
revisionare la presente pubblicazione e di apportarvi modifiche periodiche
senz a alcun ob bligo di n otif ica a qua lsiasi p ers ona o org anizz azio ne.
Ansvarsfraskrivelse
Imagination Technologies Limited afgiver ingen garantier eller erklæringer
med hensyn til indholdet af dette dokument og fralægger sig i særdeleshed
eventuelle stiltiende garantier for salgbarhed eller egnethed til et bestemt
form ål. Endv ider e forb ehold er Imag inat ion Tech nolog ies Li mite d sig re t
til at r ev ide r e den ne p ubl ik at io n og fo r et ag e æn dr ing er f r a ti d ti l an den ,
uden at I magin atio n Techno logi es Lim ited e r for plig tet t il at und erre tt e
nogen person eller organisation om sådanne revideringer eller ændringer.
Vrijwaring
Imagi nation Te chnolo gies Li mited g eeft g een ver klarin g of gara nties
met bet rek king to t de inho ud van di t docum ent en wi jst sp ecif iek el ke
verantwoordelijkheid af met betrekking tot om het even welke onuitgesproken
garanties naar verhandelbaarheid of geschiktheid voor enig bijzonder doel.
Daarenboven behoudt Imagination Technologies Limited zich het recht voor
om deze publicatie te reviseren en af en toe veranderingen aan te brengen
zonder de verplichting voor Imagination Technologies Limited om personen
of organisaties van deze revisies of veranderingen op de hoogte te brengen.
Page 20

www.pure.com
PURE Digital
Imagination Technologies Ltd.
Home Park Estate
Kings Langley
Herts, WD4 8DH
UK
PURE Digital
Karl-Marx Strasse 6
64589 Stockstadt/Rhein
GERMANY
PURE Digital - Vertrieb über:
TELANOR AG
Unterhaltungselektronik
Bachstrasse 42
4654 Lostorf
SCHWEIZ/SWITZERLAND
+44 (0)1923 277477 support
+44 (0)1923 277488 sales
+44 (0)1923 270188
support@pure.com
sales@pure.com
+49 (0) 6158 878872 sales
+49 (0) 6158 878874
sales_ gmbh@pure.com
+41 (0)62 285 95 95 sales
+41 (0)62 285 95 85
info@telanor.ch
www.telanor.ch
12V99
 Loading...