

Page 1
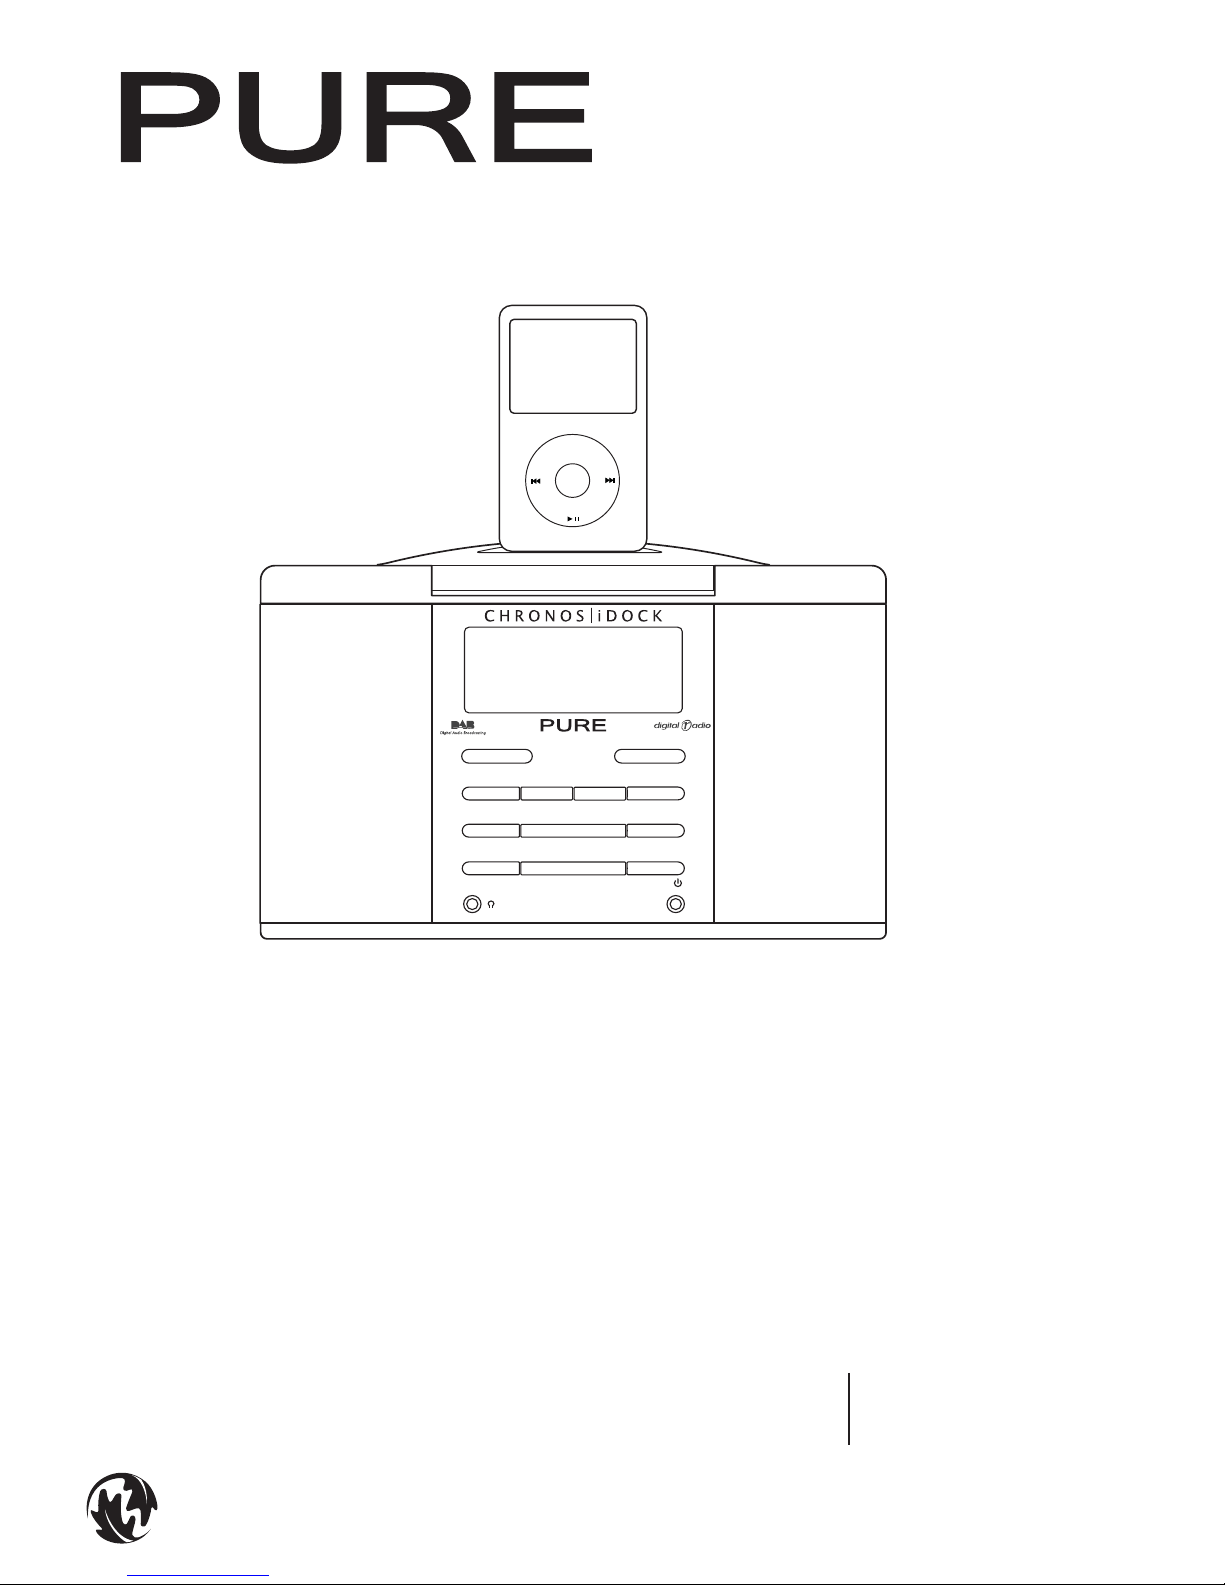
CHRONOS iDOCK
Info
Preset
Alarm
Menu
Volume −
Volume +
Select
+
Source Slee p Standby
Aux in
−
Menu
(iPod not included)
Owner’s manual
Printed on 100% recycled
paper using soya-based ink
Page 2

Safety instructions
Keep t he radio away from hea t source s.
Do not use the radio near water.
Avoid o bje ct s or l iqui ds ge t tin g int o th e rad io.
Do not remove screws from or open the
radi o casing . Fit the ma ins adapt or to an
easily accessible socket located near
the r adio and ONLY u se the main s power
adapt er suppli ed. Keep t he supplie d iPod
Dock Adapters away from small children.
Copyright
Copy right 2007 by Imaginat ion Technologie s
Limited. All rights reserved. No part of this
publication may be copied or distributed,
transmitted, transcribed, stored in a retrieval
sys tem, or t ran slate d into a ny human o r compu ter
langu age, i n any fo rm or b y any me ans, e lec tr oni c,
mechanical, magnetic, manual or otherwise, or
disclosed to third parties without the express written
permission of Imagination Technologies Limited.
Trademarks
Chro nos iDoc k, tex tSCA N, PURE, t he PURE log o,
PURE D igita l, the PUR E Digit al logo, E coPlu s, the
EcoP lus logo, I magina tion Tech nologi es, and t he
Imagination Technologies logo are trademarks or
registered trademarks of Imagination Technologies
Limi ted. The ‘ DAB Digit al Radio’ lo go and the
stylised ‘r’ mark
®
and © Dig ital On e Limit ed.
iPod i s a tradema rk of Apple C ompute r, Inc .,
reg ister ed in the U.S. a nd other c ountri es. All
other pro duct name s are trad emarks o f their
respective companies. Version 1. September 2007.
Page 3

Disposal of Waste Electrical & Electronic Equipment
This symbol on the product or on its packaging indicates that this product should
not be treated as household waste. Instead it should be handed over to a suitable
collection point for the recycling of electrical and electronic equipment. By ensuring
this product is disposed of correctly, you will help prevent potential negative
consequences for the environment and human health, which could otherwise be
caused by inappropriate waste handling of this product. The recycling of materials
will help to conserve natural resources. For more detailed information about recycling
of this product, please contact your local council office, your household waste
disposal service or the shop where you purchased the product.
Contents
Overview of the controls and connectors ................................2
Icons on the display .................................................................2
Quick set up .............................................................................4
Listening to DAB and FM ..........................................................5
Changing stations ................................................................................................... 5
Changing the information shown on screen ...........................................................5
textSCAN™ − pause and control scrolling text (DAB & FM) ...................................5
Setting and selecting presets ..................................................6
Docking and playing your iPod .................................................6
Docking your iPod .................................................................................................. 6
Selecting and playing tracks ..................................................................................7
Setting alarms .........................................................................8
Using the sleep timer ........................................................................................... 10
Changing your radio setup ..................................................... 10
DAB only options .................................................................................................. 10
FM only options .................................................................................................... 12
Help and specifications .......................................................... 12
Secondary and inactive stations .......................................................................... 12
Hints and tips ....................................................................................................... 12
Technical Specification s ....................................................................................... 13
Page 4

2
Overview of the controls and connectors
Standby
Menu
Remote
9V DC
Underneath
x 7
Top
Info
Preset
Alarm
Menu
Volume −
Volume +
Select
+
Source Sleep Standby
Aux in
−
Front
Icons on the display
APSX^
=^f_[PhX]V)6[
iPod
Page 5

3
Key to controls and connectors
1. Set and select preset stations. » Page 6
2. Cycle through on-screen information. » Page 5
3. Set and adjust alarms, when the unit is on or in standby. » Page 8
4. Access setup options » Page 10
5. In DAB Press +/- to scroll through radio stations. Press Select to listen. » Page 5
In FM Press and release +/- to manually tune up or down frequency range. Press and hold to scan up or
down to the next available station. » Page 5
In menus Press +/- to scroll or change options and press Select to confirm.
textSCAN Press Select to pause scrolling text. Press +/- to move left and right and Select to exit. » Page 5
6. Switch between DAB, FM, iPod or Auxiliary.
7. Set and adjust Sleep timer.
» Page 10
8. Switches between On and Standby.
9. Snooze an alarm.
» Page 9
10. iPod control (Menu) In iPod mode, press to go back up to the previous album or playlist, or press and hold
to access setup options. In all other modes, press to access setup options » Page 10
11. Volume up.
12.
iPod control (Skip/search ) Press to skip to the previous/next track on your iPod or press and
hold to search forwards or backwards through the current track. » Page 7
13. iPod control (Play/Pause ) Press to play or pause the currently playing track. » Page 7
14. Volume down.
15. 3.5mm headphone socket (mutes speakers).
16. Infrared sensor receives signal from remote control.
17. Light sensor for display auto-dimming (do not cover).
18. Analogue stereo input for auxiliary device.
19. Recess for insertion of an iPod Dock Adapter (supplied).
20. Interchangeable iPod Dock Adapter (7 different types supplied).
21. Connects to the 9V DC mains adapter (supplied).
Icons on the display
22. Alarm active indicators (1,2,3,4). » Page 9
23. Snooze active. » Page 9
24. Sleep timer active. » Page 10
25. DAB, FM, AUX and iPod source indicators.
26. Signal strength indicator (max=6 bars; DAB only)
27. Stereo indicator (DAB and FM only).
28. 16 x 2 character text area for station names, DAB scrolling text and other messages.
Page 6
4
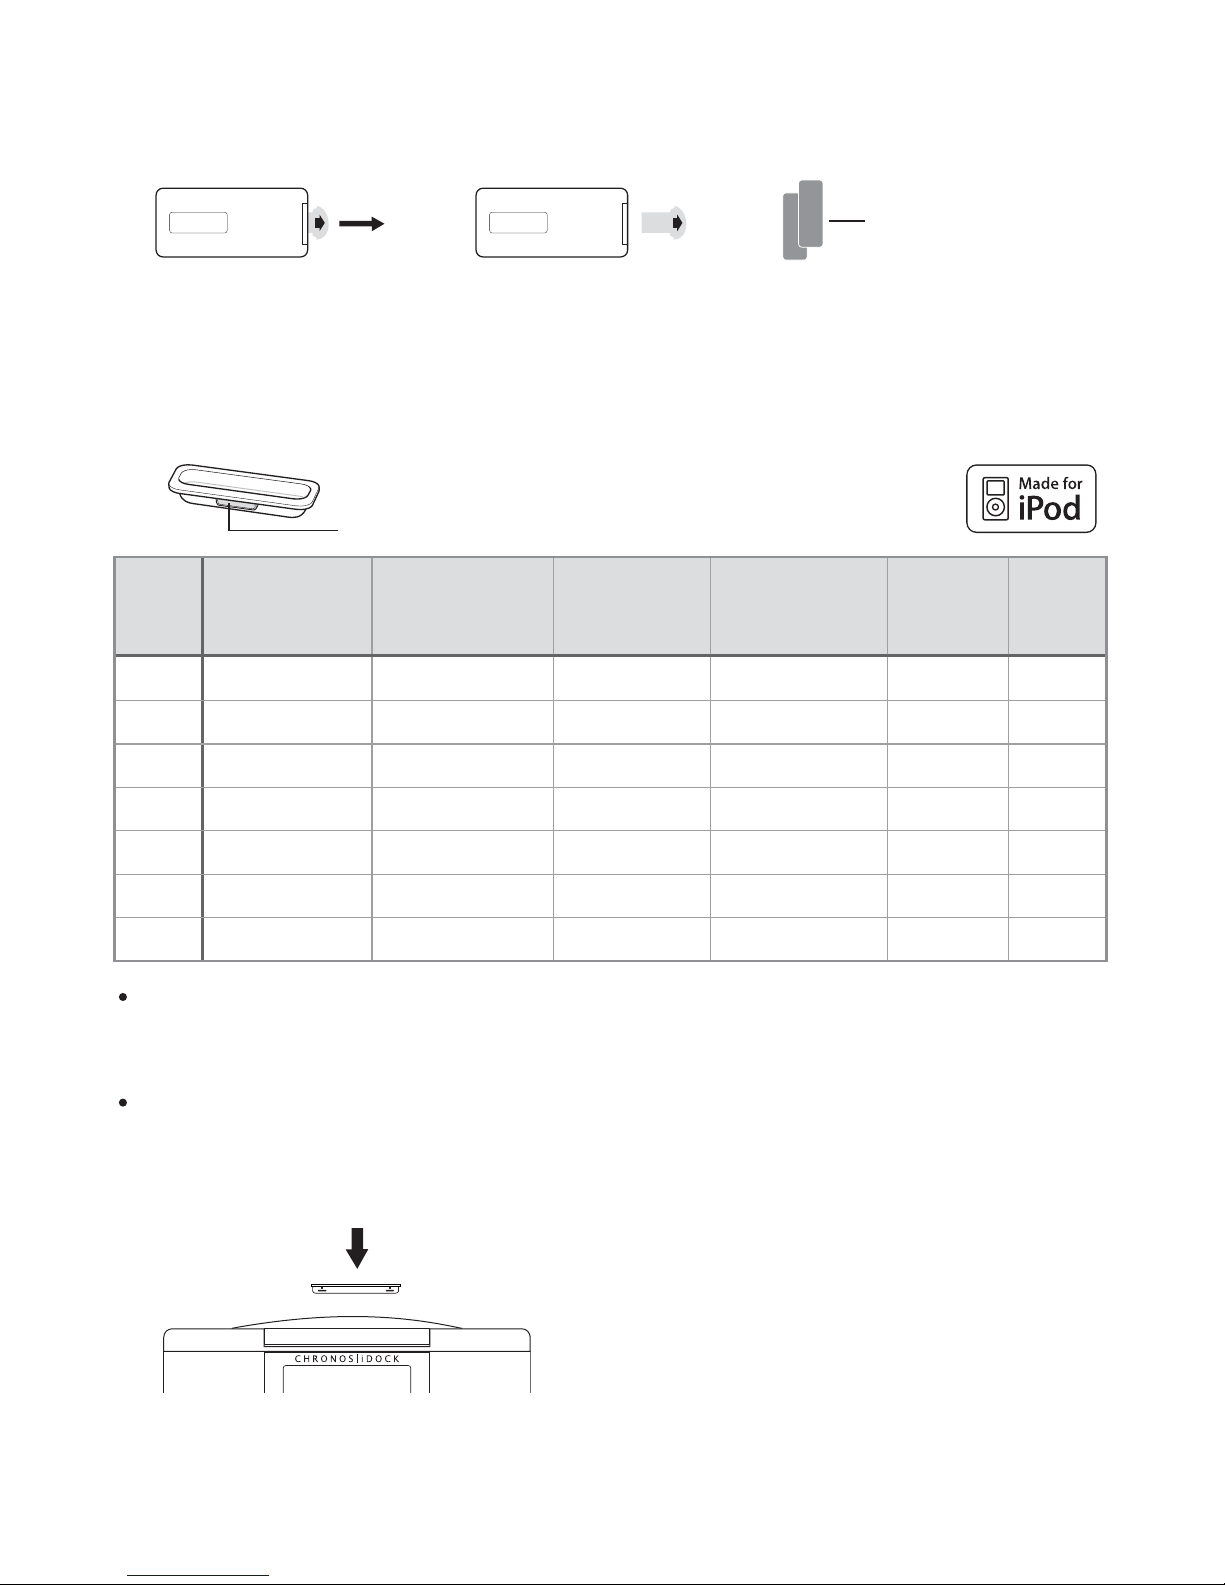
Dock Adapter number (3, 6-11)
Dock
Adapter
number
iPod
4th generation
(colour display)
iPod nano
1st generation
iPod
5th generation
(video)
iPod nano
2nd generation
(aluminium)
iPod mini iPod
classic
3 4GB, 6GB
620GB, 30GB
740GB, 60GB
8 1GB, 2GB, 4GB
9 30GB 80GB
10 60GB, 80GB 160GB
11 2GB, 4GB, 8GB
Quick set up
1. Pull out the plastic slip from the remote control battery compartment.
2. Open the box containing the iPod Dock Adapters and select the adapter that is compatible with
your model of iPod as detailed in the table below.
3. Fit the Dock Adapter to the top of the unit with the adapter number facing towards the rear.
5. Wait for Chronos iDock to complete an Autotune for all available DAB stations (takes about a minute).
The table above lists the seven included Dock Adapters and the iPod models they are compatible •
with. Chronos iDock is compatible with all iPod models that connect to the iPod Universal Dock,
except 3rd generation models.
A compatible Dock Adapter is provided with most iPod models. If your model of iPod is not listed •
in the table, and if you do not already have a compatible Dock Adapter, we recommend that you
purchase the correct type from Apple.
4. Hang the aerial wire vertically, connect the mains adapter to the underside of the unit and plug
the unit into the power supply.
The remote can be magnetically attached to the side of the unit for handy storage. If you’d like
to do so, affix one of the supplied adhesive magnetic strips to the recess on the reverse of the
remote and one to the side of the unit.
Magnetic strips (x2)
Page 7

5
Listening to DAB and FM
Changing stations
DAB
FM
Press to step down or up 0.05 MHz
Press and hold to scan to next or previous station
Changing the information shown on screen
Press the In fo button and repeat to switch between:
1. Scrolling text broadcast by most DAB stations and FM (RDS) stations (default mode).
2. The content of the current DAB or FM (RDS) station, e.g., Pop Music.
3. The DAB multiplex in which the current station is broadcast, e.g., Digital1.
4. Time and date updated regularly by the D AB signal.
5. The channel of the current DAB Multiplex, e.g., 12B.
6. DAB signal data rate and a stereo or mono indicator.
7. DAB signal quality: 85 to 100 Good, 70 to 84 OK, 0 to 69 poor.
Note: the Info button only works in FM if the station has RDS data.
Press and hold the Select button in DAB to display a meter indicating signal strength.
textSCAN™ − pause and control scrolling text (DAB & FM)
Press the Select button when listening to a station to pause and control the scrolling text.
112APSX^!
0\hbcTahc^dac
112APSX^!
112A%<
;MTMK\
1VNW
Exit
;MTMK\
GcaP112
_PVTR^\X]Vd_
;MTMK\
Want to jot down a song title or competition phone number from the
scrolling text? Use textSCAN™ to pause the text and check the details.
Tip
112APSX^%<dbXR
=^f_[PhX]V)2[d
Page 8

6
Setting and selecting presets
Store up to 30 DAB and FM radio stations in a combined list for quick access to your favourite stations.
To set a preset
Tune to the station you want to store. Press the Pr eset button and use the +/- buttons to select
the Preset number you wish to save the station to. Hold down the Select button or the Preset
button for 3 seconds until the display changes to a confirmation message, e.g., ‘Preset 1 saved’.
To select a preset
To listen to a station you have stored to a preset, press the Preset button once to access the list
of stored presets. Use the +/- and Select keys to scroll to and select the relevant preset.
Docking and playing your iPod
Chronos iDock can amplify music files stored on your iPod through the stereo speakers.
Docking your iPod
1. Insert your iPod into the correct Dock Adapter on the top of the unit. If you have not
fitted the Dock Adapter, see the table on page 4. Chronos iDock will begin to charge your
iPod if necessary. Charging will stop when the iPod is fully charged (check the iPod screen).
112APSX^!
0\hbcTahc^dac
8ZM[M\
?[P]TcA^RZ
?aTbTc
?[P]TcA^RZ
^WT\XP]AWP_b^Sh
;MTMK\
or
8ZM[M\
4\_ch_aTbTc
?aTbTc
;MTMK\
8ZM[M\
?[P]TcA^RZ
^WT\XP]AWP_b^Sh
?[P]TcA^RZ
?aTbTc bPeTS
Info
Preset
Alarm
Menu
Volume −
Volume +
Select
+
Source S leep Standby
Aux in
−
Menu
Info
Preset
Alarm
Menu
Volume −
Volume +
Select
+
Source Sleep Standby
Aux in
−
Menu
Page 9

7
2. Press the Source button and repeat to change the audio source to ‘iPod’. Alternatively,
press the Play/Pause button on the mini-remote, which will wake your iPod and start
playing a track, even if you’re listening in DAB, FM or Auxiliary mode.
3. Select and play a track using your iPod or the mini-remote.
4. Adjust the playback volume using the buttons on the front of the unit or the mini-remote.
Do not adjust the volume on the iPod.
Selecting and playing tracks
As an alternative to using the controls on the iPod, you can operate your iPod using the miniremote as detailed below.
Pause/play the currently playing track.
Play a new track.
Skip to the next or previous track. Hold to search forwards or backwards.
Access the list of songs, albums and playlists and go up one level
when navigating menus/track lists.
Navigate music files, albums and playlists. Play tracks.
Turn off the iPod.
;W]ZKM
iPod
iPod
Info
Preset
Alarm
Menu
Volume −
Volume +
Select
+
Source
Sleep Standby
Aux in
−
Menu
or
or
Menu
2
Volume −
Volume +
Page 10

8
Setting alarms
Chronos iDock has 4 alarms. When activated, an alarm either switches the radio on (if in standby)
and tunes to a DAB or FM radio station; activates and plays your iPod (if docked); or sounds a
beeping alarm tone.
How to set an alarm
1. Press the Alarm button then select Alarm 1, 2, 3 or 4 with +/− and Select. The time,
repeat days and on/off status are displayed on the top line.
2. Select ‘Set alarm’ and choose ‘On’ to turn the alarm on.
3. Select ‘Set time’ to set the time you want the alarm to sound. Adjust the hours using +/−
and press Select to confirm, then adjust the minutes and press Select to confirm.
4. Select ‘Set days’. Choose when you want the alarm to repeat (press +/− to browse
through the options and press Select to confirm):
Daily Every day
Weekday Monday to Friday, every week
Weekend Every weekend
Saturday Every Saturday
Sunday Every Sunday
Once The alarm will sound at the time you have selected and not repeat
5. Select ‘Set Mode’ to choose the type of alarm you want: Radio, Tone or iPod.
6. If you select ‘Radio’, now choose a radio station from the preset list using +/− to choose and
Select to confirm. If you select ‘Last used’ the alarm will tune to the DAB or FM station you
most recently listened to. (To learn how to set presets, see page 6.)
)TIZU
&)3PX[h>UU
0[Pa\
;MTMK\
>UU
>]
&)"
&)"BTc\X]b
;MTMK\
;MTMK\
An alarm you’ve already set can be turned off by selecting ‘Set Alarm >
Off’. You can reactivate an alarm by selecting ‘On’.
Tip
Page 11

9
7. Select ‘Set volume’ and adjust the volume level for the alarm from 1 (very quiet) to 16 (very
loud) using the +/− buttons and Select to confirm.
That’s it! You can see which alarms are currently switched on by looking at the
numbered alarm clock icons on the screen, in either active or standby mode.
For example:
You can change alarm settings by pressing Alarm when Chronos iDock is switched on or in standby
mode, selecting the alarm number and changing settings as described above.
To stop an alarm
When an alarm is sounding press either the Alarm or Standby button to stop the alarm
sounding. Pressing Standby when a radio alarm is sounding will also switch the unit off.
To snooze an alarm
When an alarm is sounding press the Snooze button or the Play/Pause button on the remote
to silence the alarm for nine minutes (the default snooze time).
Changing the alarm snooze time
You can change how long the alarm snoozes for. Press Alarm, scroll to ‘Snooze time’ and press
Select and then adjust the snooze time between 5 and 60 minutes using +/−
To wake to a track of your choice: set an iPod alarm, play a track on your
iPod (using the iPod controls or the remote) and then switch the unit into
standby or change the sour ce. The iPod wi ll pause the tr ack and power down.
Tip
EXaVX]APSX^
2^]cPRcdbfaX
Alarm 1 is
currently set
or or
or
)TIZU
)TIZU
B]^^iTcX\T
;MTMK\
Page 12

10
Using the sleep timer
The sleep timer switches your radio into standby after a number of minutes.
To set/change the sleep timer
Press the Sleep button and repeat to increase the duration of the Sleep timer (90
minutes maximum). Wait a few seconds and the Sleep timer will activate.
To cancel the sleep timer
Press and hold the Sle e p button for 3 seconds.
;TMMX
BTcb[TT_
"\X]b
BTcb[TT_
$\X]b
;TMMX
BTcb[TT_
>UU
;TMMX
?[P]TcA^RZ
^WT\XP]AWP_b^Sh
Changing your radio setup
DAB only options
Station Order
Alphanumeric Lists all stations in alphanumeric order.
Active station Lists active stations first on the station list.
Multiplex Lists stations in groups according to their Multiplex.
Trim stations Removes inactive stations from the station list.
Autotune
Scans all DAB Band III frequencies for stations and adds any new stations found to the station
list.
DRC value
DRC (Dynamic Range Control) value makes the quieter sounds in a DAB broadcast easier to
hear at low volume or in a noisy environment. Check with the broadcasters to find out if they
use DRC.
DRC full Applies the DRC level as sent with the broadcast.
DRC half DRC level is set to half that sent with the broadcast.
DRC off Any DRC level broadcast will be ignored.
5MV]
Page 13

11
Other options
Display
Press the Menu button and select ‘Display’. You can customise the display settings for both
Active and Standby modes. The diagram below shows the available options.
Active mode: Backlight settings that apply when the unit is switched on.
Standby mode: Backlight settings that apply when the unit is in Standby.
Timed: The display backlight brightens when a button is pressed then
switches off after no button has been pressed for a few seconds.
Always on: The display is constantly on as defined by your Brightness and
Contrast settings.
Auto dimming: The display backlight alters automatically depending on the ambient
light conditions.
Brightness: Adjust between 1 (very dim) and 9 (very bright).
Contrast: Adjust between 1 (low) and 16 (high).
Setting the clock
Clock set
You can manually set the time and date if required. If you have a DAB signal the time and date
will be updated automatically.
12/24 Hour set
Choose 12 hour or 24 hour clock display
Display
Brightness
Contrast
Timed
Always on
Active mode
Standby mode
< 1 - 9 >< 1 - 16 >
Timed
Always on Auto dimming
Page 14

12
Audio
Set the Treble and Bass levels.
Manual tune
Shows DAB signal level, which can help you find the best position for your radio.
1. Use the +/- buttons to scroll through different channels and push Select to choose one
(UK stations are in the range 11B to 12D). You see a signal level display. The empty
block indicates the minimum required level for reception and the filled blocks indicate
the current level.
2. Move your aerial/unit and to try to raise the current level to the empty block or beyond.
Once you have a good signal the display will show the Multiplex name and add the
stations to the station list.
3. Push the Menu button to exit or +/- and Select buttons to change channel.
FM only options
FM stereo mode
Choose from Stereo or Mono − mono may improve audio clarity where stereo signals are weak.
Help and specifications
Secondary and inactive stations
(<</>>) Secondary DAB services
Secondary services accompany some stations, providing extra information or alternative content
and may only be broadcast at certain times. If a station has secondary services available, the
station shows ‘>>’ next to its name in the station list and the secondary service appears next to
the station in the list. A secondary service has a ‘<<’ before its name in the station list.
(?) Inactive or unavailable DAB stations
Inactive or unavailable stations appear on the station list preceded by ‘?’ and cannot be tuned
to. A station may be inactive or unavailable because the station is not broadcasting at the current
time (check with the station) or has stopped broadcasting altogether. Also, you may not have a
strong enough signal to receive the Multiplex on which the station is broadcast.
Hints and tips
The message on screen says ‘ No stations available’
DAB reception is not strong enough to receive any stations. Check that your aerial is fully uncoiled
and use Autotune (page 10) to search for stations. Try adjusting your aerial and radio position.
The screen is very dark
Check the Display settings. Check that the light sensor is not obstructed if Auto dimming is
selected.
The on-screen clock does not appear
If you disconnect the unit from the mains whilst listening to your iPod and then plug it in again,
you may need to change the audio source to DAB so that the time can be acquired from the DAB
signal.
Page 15

13
The bass/treble on iPod tracks is too high
Check the bass and treble controls on the iPod, which will affect the sound from the Chronos iDock
when playing iPod tracks.
The volume control on the iPod does not affect the volume level
When your iPod is docked, the volume level must be adjusted on the unit, not the iPod. Do not turn
up the iPod volume: it should be left at the volume level you normally use for portable listening.
The iPod alarm does not play a specific track
If you do not select a track as described on page 8 the alarm will play the first track on your iPod
when the alarm sounds.
Tone alarm safety net
If you set an alarm to ‘iPod’ mode but then forget to insert your iPod into the dock before the alarm
time is reached, the tone alarm will sound instead.
Resetting your Chronos iDock
Resetting your radio removes all presets, stored stations and favourite station settings and resets
all options to defaults. To reset:
1. Press and hold the Menu button for 3 seconds.
2. Press Select within 3 seconds to confirm the reset or the reset will cancel.
Technical Specifications
Specifications: Stereo digital radio with full Band III and FM reception. ETS 300 410
compliant and capable of decoding all DAB transmission modes 1-4 up to
and including 192 kbps. Supports FM RDS and RadioText.
Frequency ranges: Band III 174–240 MHz, FM 87.5–108 MHz.
Speakers: Two 3" x 1.5" custom-wound oval drive units.
Input connectors: 9V DC power adaptor socket (230V supplied). 3.5mm Line-in for auxiliary
devices. iPod connector with 7 supplied adapters.
Output connectors: 3.5mm stereo output for headphones.
Remote: Infrared remote control
Presets: 30 DAB and FM presets in a combined list.
LCD display: LCD display with 16 x 2 characters, large clock and feature icons. Includes
adjustable backlight (active and standby mode) with autodimmer.
Mains power supply: 230V AC to 9V DC external power adapter.
Power consumption: In standby: 0.71W (industry average 5.72W). In operation: 2.5W (industry
average 7.21W).
Approvals: CE marked. Compliant with the EMC and Low Voltage Directives (89/336/
EEC and 73/23/EEC).
Dimensions (mm): 125 high x 195 wide x 185 deep.
Aerial: Wire aerial attached.
Components are selected for
minimised environmental impact
This product has been designed specifically to work with iPod and has
been certified by the developer to meet Apple performance standards.
Page 16

Warranty information
Imagination Technologies Ltd. warrants to the end user that this
product will be free from defects in materials and workmanship
in the c ourse o f normal us e for a per iod of two y ears fr om
the da te of pur chas e. This gu arant ee cove rs br eakdow ns due
to manu fact uring o r desig n fault s; i t does no t apply in c ases
such a s accide ntal dama ge, howeve r cause d, wear and te ar,
negl igenc e, adjus tmen t, modi fic atio n or repa ir not au thor ised
by us. Please return your warranty card or visit www.pure.
com/register to register your product with us. Should you
have a problem with your unit please contact your supplier or
cont act PUR E Suppor t at the ad dres s shown on th e back of
this m anu al. I f you n ee d t o re t ur n yo ur pr o duc t p le as e us e t he
orig inal pac kagin g and inclu de all par ts an d acce ssor ies. We
reserve the right to refuse incomplete or badly packaged returns.
Disclaimer
Imag inat ion Techn olog ies L imite d make s no rep res ent ati on or
warr antie s with r espec t to the c ontent o f this doc ument and
specifically disclaims any implied warranties of merchantability
or fi tness f or any par ticular pur pose. Fur ther, Ima ginatio n
Technologies Limited reser ves the right to revise this
publication and to make changes in it from time to time
without obligation of Imagination Technologies Limited to
notify any person or organiz at ion of such revisions or changes.
Page 17

www.pure.com
PURE Digital - Vertrieb über:
TELANOR AG
Unterhaltungselektronik
Bachstrasse 42
4654 Lostorf
SCHWEIZ/SWITZERLAND
+41 (0)62 285 95 85
+41 (0)62 285 95 95 sales
info@telanor.ch
www.telanor.ch
100LY
PURE Digital
Imagination Technologies Ltd.
Home Park Estate
Kings Langley
Herts, WD4 8DH
UK
+44 (0)1923 270188
+44 (0)1923 277477 support
+44 (0)1923 277488 sales
support@pure.com
sales@pure.com
PURE Digital
Karl-Marx Strasse 6
64589 Stockstadt/Rhein
GERMANY
+49 (0)6158 878874
+49 (0)6158 878872 sales
sales_gmbh@ pure.com
EcoPlus
100%
Chronos iDock is a member of the PURE EcoPlus™ product family.
All EcoPlus products are designed and manufactured to minimise
their environmental impact.
This documentation and the accompanying warranty card are
printed on 100% recycled paper using soya-based ink.
The retail carton protecting your product is printed on at least
70% recycled card fi nished using a water-based varnish and is
sized for maximum transport effi ciency.
For more information please visit www.pure.com/
ecoplus
 Loading...