

Page 1
ControlScape
RadioLinx
RadioLinx® ControlScape FH
March 16, 2011
USER MANUAL
Page 2

Your Feedback Please
We always want you to feel that you made the right decision to use our products. If you have suggestions, comments,
compliments or complaints about our products, documentation, or support, please write or call us.
How to Contact Us
ProSoft Technology
5201 Truxtun Ave., 3rd Floor
Bakersfield, CA 93309
+1 (661) 716-5100
+1 (661) 716-5101 (Fax)
www.prosoft-technology.com
support@prosoft-technology.com
Copyright © 2011 ProSoft Technology, Inc., all rights reserved.
ControlScape User Manual
March 16, 2011
ProSoft Technology ®, ProLinx ®, inRAx ®, ProTalk ®, and RadioLinx ® are Registered Trademarks of ProSoft
Technology, Inc. All other brand or product names are or may be trademarks of, and are used to identify products
and services of, their respective owners.
ProSoft Technology® Product Documentation
In an effort to conserve paper, ProSoft Technology no longer includes printed manuals with our product shipments.
User Manuals, Datasheets, Sample Ladder Files, and Configuration Files are provided on the enclosed CD-ROM in
Adobe® Acrobat Reader file format (.PDFs). These product documentation files may also be freely downloaded from
our web site: www.prosoft-technology.com
Page 3

Page 4

Page 5

ControlScape ♦ RadioLinx Contents
RadioLinx® ControlScape FH User Manual
Contents
Your Feedback Please ........................................................................................................................ 2
How to Contact Us .............................................................................................................................. 2
ProSoft Technology® Product Documentation .................................................................................... 2
1 ControlScape FH 9
2 Serial Port Settings 11
2.1
2.2
2.3
Viewing the Serial Port Settings .............................................................................. 12
Configuring the Serial Port ...................................................................................... 13
Serial Port Defaults ................................................................................................. 14
3 Network Configuration 15
3.1
3.2
3.3
3.4
3.5
3.6
3.7
3.8
3.9
3.10
3.11
3.12
3.13
3.14
Setting Up the Network ........................................................................................... 16
Set Radio Color ....................................................................................................... 17
Graphical Layout Screen ......................................................................................... 20
Adding Remote Radios ........................................................................................... 21
Add Repeaters ........................................................................................................ 22
Graphically Defining the RF Link ............................................................................. 24
Auto Layout of Network Icons ................................................................................. 26
Rename Radios ....................................................................................................... 28
Change a Radio's Type ........................................................................................... 30
Remove Radio ......................................................................................................... 32
Saving the Network Configuration ........................................................................... 33
Change Password ................................................................................................... 35
Printer Settings ........................................................................................................ 37
Print ......................................................................................................................... 38
4 Radio Configuration 39
4.1
4.2
4.3
General Radio Configuration ................................................................................... 40
Save ........................................................................................................................ 42
When to Re-Configure Radios ................................................................................ 43
5 Existing Network Maintenance 45
5.1
5.2
5.3
5.4
Modify ...................................................................................................................... 46
Delete Network ........................................................................................................ 48
Modify Radio Settings ............................................................................................. 49
Change a Network's Channel .................................................................................. 50
6 Diagnostics and Troubleshooting 51
6.1
6.2
6.3
6.4
Diagnostics Overview .............................................................................................. 52
View Operating Network.......................................................................................... 53
Viewing Signal Strength .......................................................................................... 55
Viewing Radio Channel Noise Level ....................................................................... 56
ProSoft Technology, Inc. Page 5 of 132
March 16, 2011
Page 6

Contents ControlScape ♦ RadioLinx
User Manual RadioLinx® ControlScape FH
6.5
6.6
6.7
6.5.1
Troubleshooting Missing Radios............................................................................. 57
Sources of Interference .......................................................................................... 58
Query a Radio Directly ............................................................................................ 59
Query a Radio Remotely ........................................................................................ 62
7 Miscellaneous Options 65
7.1
7.2
7.3
7.4
7.5
Zoom View of Graphical Layout.............................................................................. 66
Zoom In ................................................................................................................... 67
Zoom Out ................................................................................................................ 68
Zoom To Fit ............................................................................................................. 69
Update Firmware .................................................................................................... 70
8 Dialog Boxes 73
8.1
8.2
8.3
8.4
8.5
8.6
8.7
8.8
8.9
8.10
8.11
8.12
8.13
8.14
8.15
8.16
8.17
8.18
8.19
8.20
8.21
8.22
8.23
8.24
8.25
8.26
8.27
8.28
8.29
8.30
8.31
8.32
8.33
8.34
8.35
8.36
8.2.1
8.2.2
Network Properties Dialog Box ............................................................................... 75
Graphical Layout Screen ........................................................................................ 76
Close ....................................................................................................................... 76
Exit .......................................................................................................................... 77
Radio Configuration Dialog Box - IFHS .................................................................. 78
Radio Configuration Dialog Box - IFHE .................................................................. 81
Radio Configuration Dialog Box - Protocol Transparent ........................................ 83
Radio Configuration Dialog Box - Modbus & DNP Protocol ................................... 85
Radio Configuration Dialog Box - DF1 Half Duplex ................................................ 87
Radio Configuration Dialog Box - FHE Radio ......................................................... 89
Associate Device IDs Dialog Box - Modbus & DNP ............................................... 92
Associate Device IDs Dialog Box - DF1 Half Duplex.............................................. 93
Automatic Baud Detection Dialog Box .................................................................... 94
Configuration Access Password Dialog Box .......................................................... 95
Configuration Access Password Dialog Box .......................................................... 96
Confirm Network Configuration Password Dialog Box ........................................... 97
Device Network Properties Dialog Box ................................................................... 98
Data Serial Port Settings Dialog Box ...................................................................... 99
Edit BootP Table Dialog Box ................................................................................ 101
Ethernet Radio Parameters Dialog Box ................................................................ 102
IFHE Spectrum Analyzer Dialog Box .................................................................... 104
Invalid Password Dialog Box ................................................................................ 105
IP Address Required Dialog Box .......................................................................... 106
Local or Remote Dialog Box ................................................................................. 107
Network Device IDs Dialog Box ............................................................................ 108
Radio Color Dialog Box ........................................................................................ 109
Radio Configuration Status Dialog Box ................................................................ 110
Radio Discovery Tool Dialog Box ......................................................................... 111
Radio IP Settings Dialog Box ................................................................................ 112
Radio Status Dialog Box - Local Radio ................................................................ 113
Radio Status Dialog Box - Remote Radio ............................................................ 114
Radio Status Dialog Box - IFH Radio ................................................................... 115
Reset to Defaults Dialog Box ................................................................................ 116
Select Download Dialog Box ................................................................................ 117
Select Radio Dialog Box - IFHE............................................................................ 118
Select Radio Dialog Box - FHE............................................................................. 119
Serial Radio Parameters Dialog Box .................................................................... 120
Set a Radio IP Address Dialog Box ...................................................................... 121
Page 6 of 132 ProSoft Technology, Inc.
March 16, 2011
Page 7

ControlScape ♦ RadioLinx Contents
RadioLinx® ControlScape FH User Manual
8.37
Set the Radio IP Address Dialog Box ................................................................... 122
9 Support, Service & Warranty 123
Contacting Technical Support ......................................................................................................... 123
9.1
9.2
9.1.1
9.1.2
9.1.3
9.2.1
9.2.2
9.2.3
9.2.4
9.2.5
9.2.6
9.2.7
9.2.8
9.2.9
9.2.10
Return Material Authorization (RMA) Policies and Conditions.............................. 125
Returning Any Product .......................................................................................... 125
Returning Units Under Warranty ........................................................................... 126
Returning Units Out of Warranty ........................................................................... 126
LIMITED WARRANTY ........................................................................................... 127
What Is Covered By This Warranty ....................................................................... 127
What Is Not Covered By This Warranty ................................................................ 128
Disclaimer Regarding High Risk Activities ............................................................ 128
Intellectual Property Indemnity .............................................................................. 129
Disclaimer of all Other Warranties ........................................................................ 129
Limitation of Remedies ** ...................................................................................... 130
Time Limit for Bringing Suit ................................................................................... 130
No Other Warranties ............................................................................................. 130
Allocation of Risks ................................................................................................. 130
Controlling Law and Severability ........................................................................... 130
Index 131
ProSoft Technology, Inc. Page 7 of 132
March 16, 2011
Page 8

Contents ControlScape ♦ RadioLinx
User Manual RadioLinx® ControlScape FH
Page 8 of 132 ProSoft Technology, Inc.
March 16, 2011
Page 9

ControlScape ♦ RadioLinx ControlScape FH
RadioLinx® ControlScape FH User Manual
1 ControlScape FH
The RadioLinx ControlScape FH Setup Application provides a user interface for
the configuration and maintenance of a radio network. It graphically (page 20)
reflects the physical layout of the component radios.
The Setup Application provides a means to:
Configure new networks (page 75) and radios (page 40):
o
assign roles (Master, Remote or Repeater) to the radios.
o
define data paths
o
set the radio’s operation parameters (baud rate, parity, IP Address and so
on)
Edit existing networks (page 46) or radios (page 40, page 49):
o
add or delete Remote or Repeater radios
o
re-assign roles to the radios.
o
define operation parameters
Diagnose functionality of existing networks (page 51, page 52).
o
display the status of each REMOTE or REPEATER radio (when a
MASTER radio is cabled to the PC)
Note: ProSoft Technology, recommends that the RadioLinx ControlScape FH Setup Application be
installed on only one computer and that the network configuration be done only from that one
computer. When a network is designed, configuration settings are stored in a database in the
RadioLinx ControlScape FH Setup Application. When networks are modified, the RadioLinx
ControlScape FH Setup Application depends upon the retrieval of the network’s configuration
history. Network modification and maintenance is easier if the RadioLinx ControlScape FH
Application Software is installed on only one computer. All subsequent network-related
configurations are done using that one computer.
The computer where the RadioLinx ControlScape FH Setup Application has been
installed will be referred to as the Configuration PC throughout this
documentation.
ProSoft Technology, Inc. Page 9 of 132
March 16, 2011
Page 10

ControlScape FH ControlScape ♦ RadioLinx
User Manual RadioLinx® ControlScape FH
Page 10 of 132 ProSoft Technology, Inc.
March 16, 2011
Page 11

ControlScape ♦ RadioLinx Serial Port Settings
RadioLinx® ControlScape FH User Manual
2 Serial Port Settings
In This Chapter
Viewing the Serial Port Settings ............................................................ 12
Configuring the Serial Port .................................................................... 13
Serial Port Defaults ............................................................................... 14
ProSoft Technology, Inc. Page 11 of 132
March 16, 2011
Page 12
Serial Port Settings ControlScape ♦ RadioLinx
User Manual RadioLinx® ControlScape FH
2.1 Viewing the Serial Port Settings
Before radio communication can begin, the Configuration PC’s serial port must
be identified and its parameters must be set.
To view the current settings, from the main menu of the RadioLinx ControlScape
FH Setup Application’s Main Menu, select:
Port Setup
o
Serial Port Configure
The displayed dialog box has three tabs. The serial port settings are displayed
with the first of the tabbed dialog boxes, Port. See Setting the Serial Port (page
13) to understand how to customize these settings.
Page 12 of 132 ProSoft Technology, Inc.
March 16, 2011
Page 13

ControlScape ♦ RadioLinx Serial Port Settings
RadioLinx® ControlScape FH User Manual
2.2 Configuring the Serial Port
These are the default serial port parameters for the Configuration PC:
Generally, these default settings should not be changed:
Baud rate: 115200 (default)
Parity: None (default)
Data Bits: 8 (default)
Stop Bits: 1 (default)
Do NOT change the "Handshaking" settings:
Select the COM port from the drop-down list. The COM port refers to the
hardware connectors that allow the computer to communicate with other devices
(for example, a printer or a RadioLinx radio) through cables. COM ports are
usually located in the back of the computer.
The RadioLinx ControlScape FH Setup Application automatically determines and
displays the serial ports.
To detect the identity of each COM port:
Look for a COM port label near the serial port connector on the back of the
PC
Refer to the computer's documentation
Check (and/or adjust) the PC's BIOS settings
Experiment, trial-and-error
In general, the defaults will not have to be changed.
Click OK to accept the current settings.
See Serial Port Defaults (page 14) for an illustration of the default serial port
settings.
ProSoft Technology, Inc. Page 13 of 132
March 16, 2011
Page 14

Serial Port Settings ControlScape ♦ RadioLinx
User Manual RadioLinx® ControlScape FH
2.3 Serial Port Defaults
From any of the three associated dialog boxes, select:
The OK button to confirm/enter any changes made and return to the
application’s main screen.
The Cancel button to discard any changes and return to the application’s
main screen.
Page 14 of 132 ProSoft Technology, Inc.
March 16, 2011
Page 15

ControlScape ♦ RadioLinx Network Configuration
RadioLinx® ControlScape FH User Manual
3 Network Configuration
In This Chapter
Setting Up the Network.......................................................................... 16
Set Radio Color ..................................................................................... 17
Graphical Layout Screen ....................................................................... 20
Adding Remote Radios.......................................................................... 21
Add Repeaters ...................................................................................... 22
Graphically Defining the RF Link ........................................................... 24
Auto Layout of Network Icons ................................................................ 26
Rename Radios ..................................................................................... 28
Change a Radio's Type ......................................................................... 30
Remove Radio ....................................................................................... 32
Saving the Network Configuration ......................................................... 33
Change Password ................................................................................. 35
Printer Settings ...................................................................................... 37
Print ....................................................................................................... 38
ProSoft Technology, Inc. Page 15 of 132
March 16, 2011
Page 16
Network Configuration ControlScape ♦ RadioLinx
User Manual RadioLinx® ControlScape FH
3.1 Setting Up the Network
From the ControlScape Main Menu, select:
Configure
o
New Network
A Network Properties dialog box is displayed where the basic parameters of the
new network are defined. The items on this dialog box depend on what type of
radio you select. The following example shows a RadioLinx IFHS (Industrial
Frequency Hopping Serial) radio.
Refer to Network Properties dialog box (page 75) for more information on the
settings.
Page 16 of 132 ProSoft Technology, Inc.
March 16, 2011
Page 17
ControlScape ♦ RadioLinx Network Configuration
RadioLinx® ControlScape FH User Manual
3.2 Set Radio Color
While the color of radio icons does not affect a network's function, some
applications may be more clearly represented with color-coded radios. Radio
color can be set for the entire network or for individual radios.
Note: If radio colors other than the default color are to be assigned, they must be assigned first,
before the overall network or individual radios are configured. This is the only time a global
network color may be picked, before the network is first configured. Unique colors for individual
radios may be selected when individual radios are later added to existing Point-Multipoint networks
of either variety.
To set color for the entire network, select the following from the RadioLinx
ControlScape FH Setup/Diagnostic Application Main Menu:
Utilities
o
Set Radio Color
The Radio Color dialog box appears (as shown here):
Select the radio color to be initially used by the entire network (individual radios
with unique colors may be added later to existing Point-Multipoint networks of
either variety) and click OK or press [Enter]. With this action, the dialog box goes
away and the focus is returned to the Main Menu. Then, from the Main Menu:
Configure
o
New Network
ProSoft Technology, Inc. Page 17 of 132
March 16, 2011
Page 18
Network Configuration ControlScape ♦ RadioLinx
User Manual RadioLinx® ControlScape FH
The New Network dialog box appears as shown below:
To set a different color for the entire network, select the following from the
RadioLinx ControlScape FH Setup/Diagnostic Application Configure Menu:
Radio
o
Add Radio
Radio
o
Set Radio Color
Page 18 of 132 ProSoft Technology, Inc.
March 16, 2011
Page 19

ControlScape ♦ RadioLinx Network Configuration
RadioLinx® ControlScape FH User Manual
Click Set Radio Color to bring up the Radio Color selection box:
Note: When radios are first added to a network they appear grayed out. After they are configured,
the radios will be the color you chose in this dialog box.
ProSoft Technology, Inc. Page 19 of 132
March 16, 2011
Page 20
Network Configuration ControlScape ♦ RadioLinx
User Manual RadioLinx® ControlScape FH
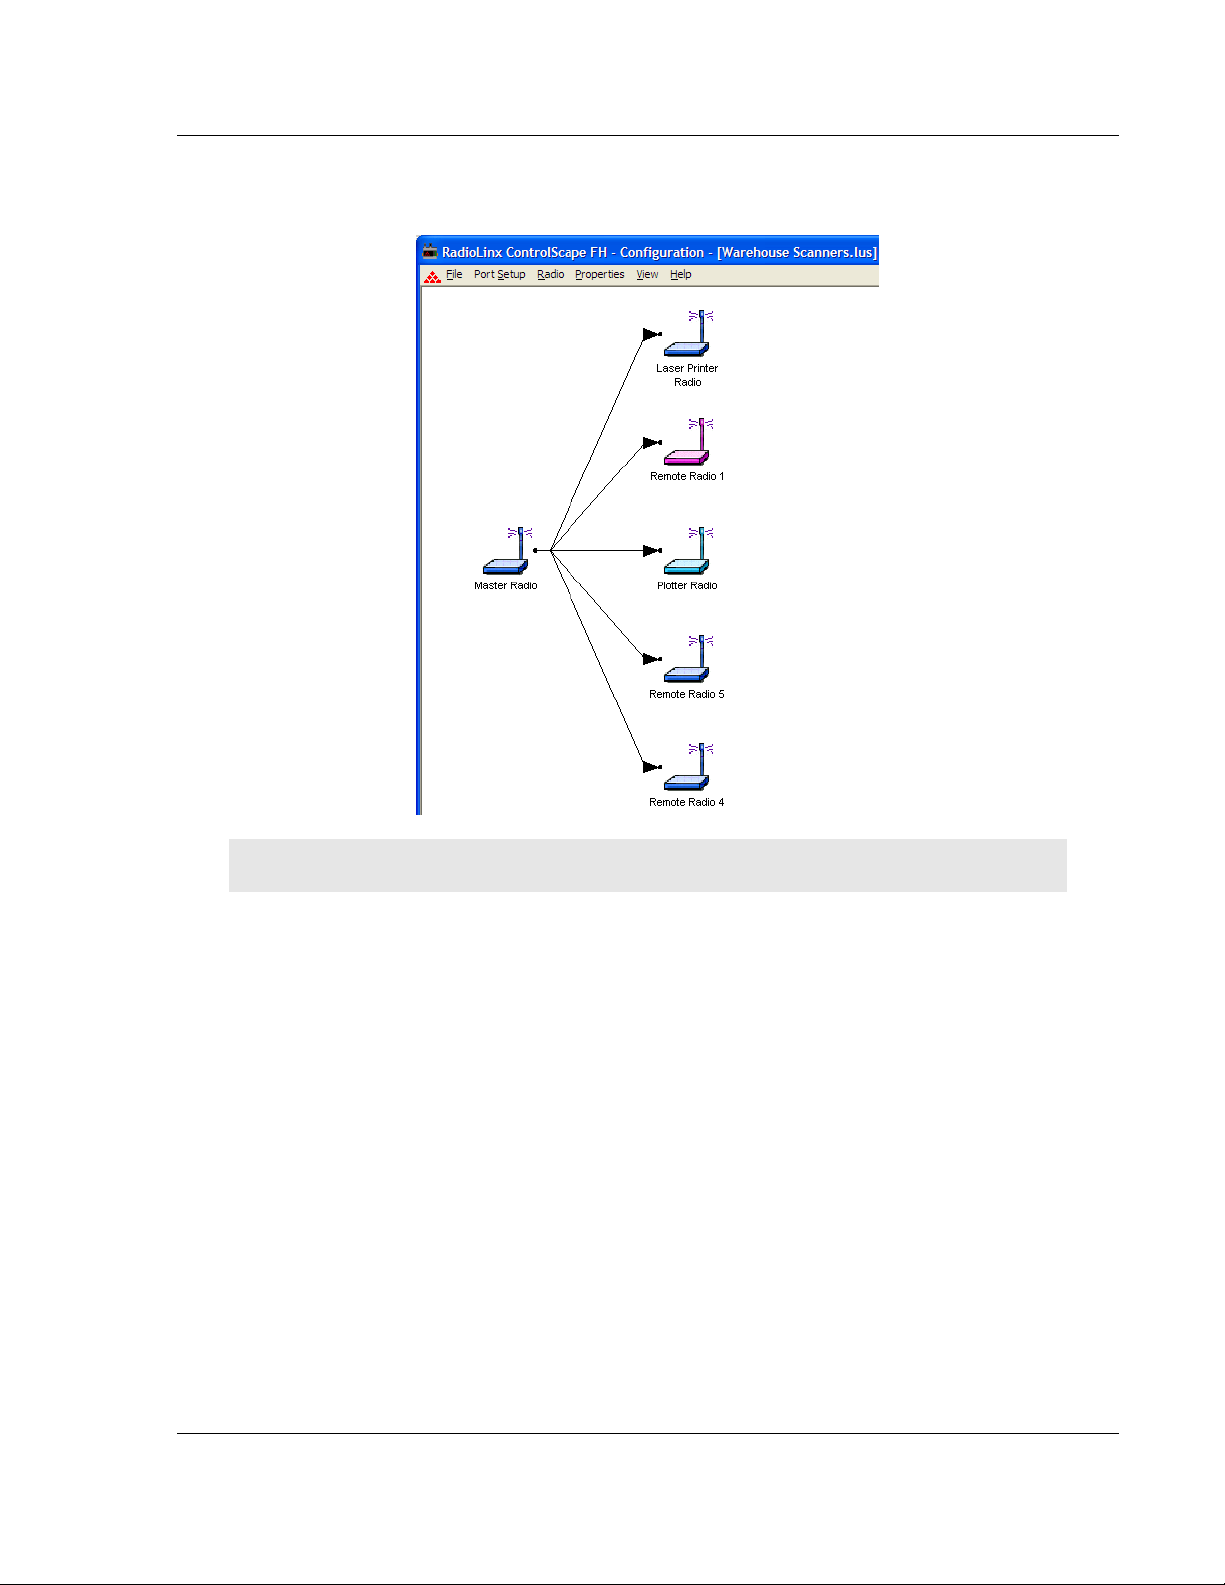
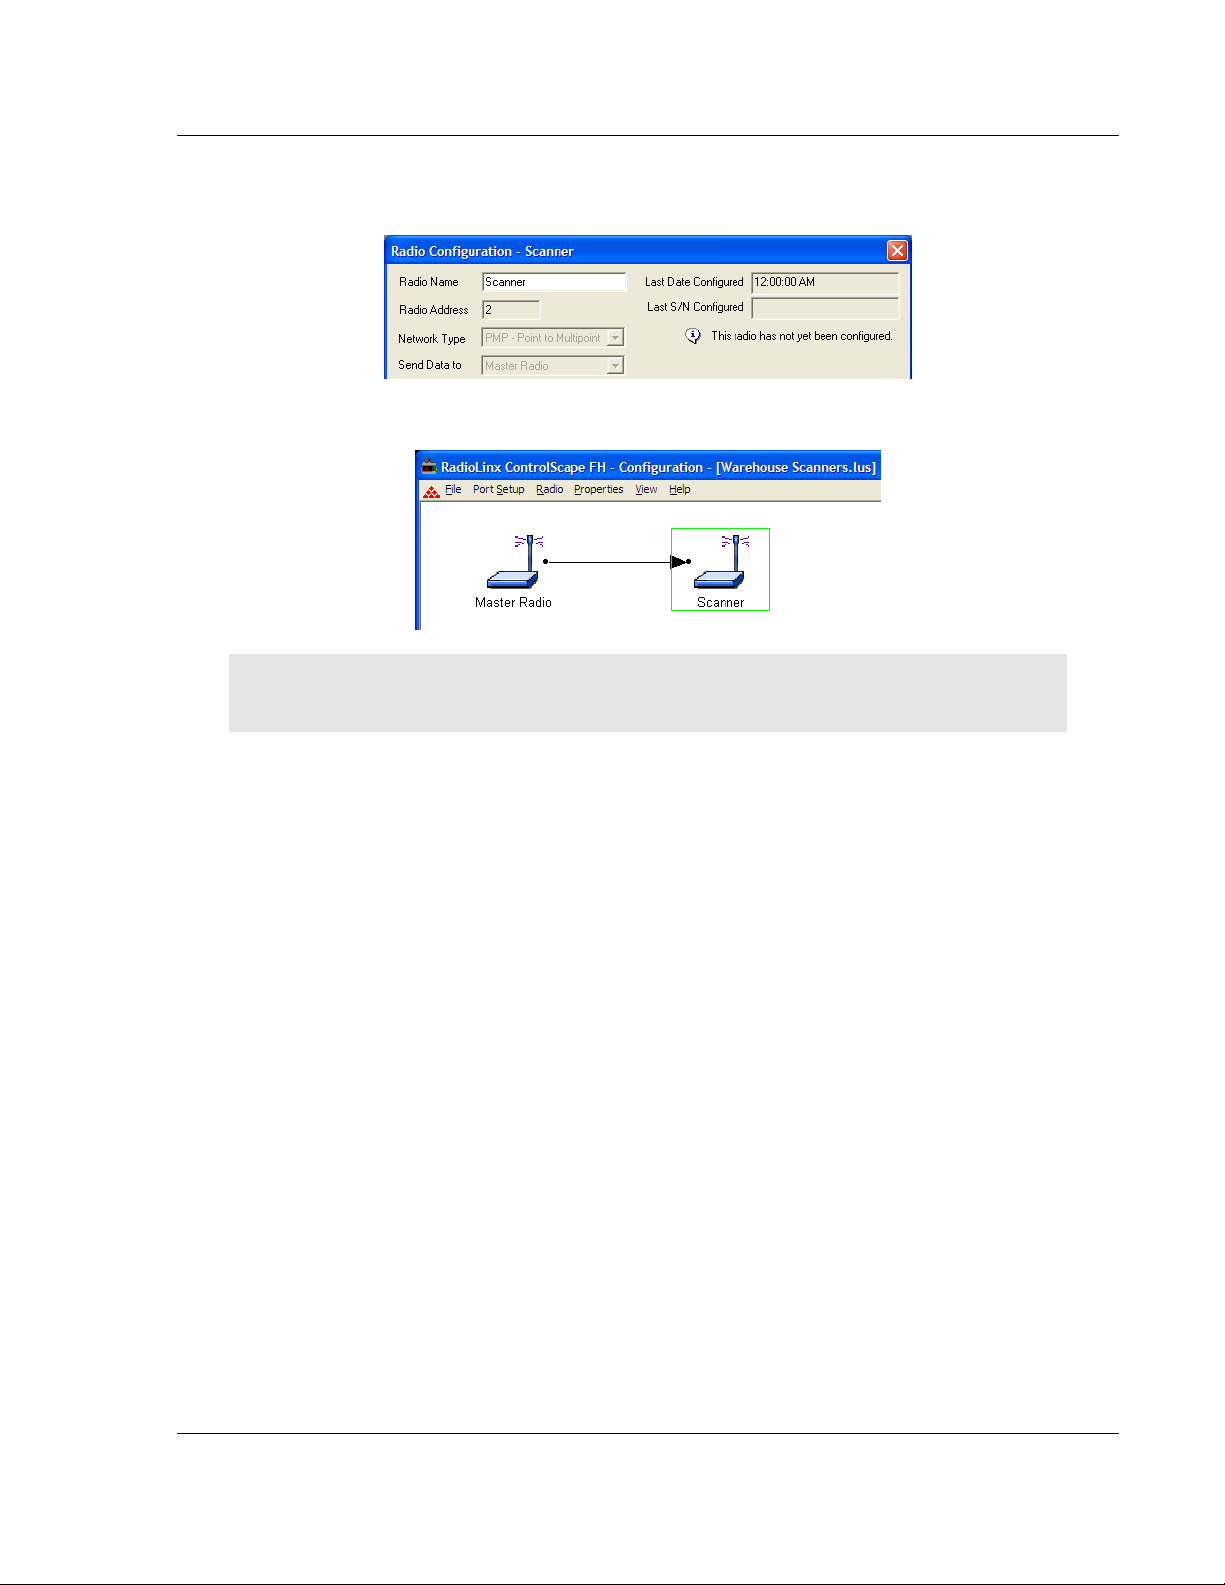
3.3 Graphical Layout Screen
A graphical illustration of a basic two-radio network and its communication path
(RF link) is displayed when the settings of the Network Properties (page 75)
dialog box are accepted. Each radio icon has a radio name displayed underneath
it to identify the radio. The radios will appear grayed out and labeled update radio
until they are configured (This is the default).
Add additional Repeaters with Add Repeater Radio (page 22) function or Remote
radios with the Add Radio (page 21) function.
Note: Any remote radio can be changed to a repeater radio and any repeater radio can be
changed to a remote radio.
Page 20 of 132 ProSoft Technology, Inc.
March 16, 2011
Page 21
ControlScape ♦ RadioLinx Network Configuration
RadioLinx® ControlScape FH User Manual
3.4 Adding Remote Radios
The radios can be displayed in different colors, or you can use the default color.
The color of a radio does not affect the function of the network, however, there
may be an application that can be more clearly represented with color-coded
radios.
Important: When defining a color, the color (page 17) must be defined before the radio is added.
From the ControlScape Main Menu, select:
Radio
o
Add Radio
The new radio icon image appears and is superimposed over part of the Master
Radio icon.
Move (click and drag) the additional Remote radio icon off the Master Radio icon.
Continue on to Graphically Define the RF Link (page 24) to define the
communication links between radios.
Note: See When to Re-Configure Radios (page 43) to ensure all radios will be updated.
ProSoft Technology, Inc. Page 21 of 132
March 16, 2011
Page 22
Network Configuration ControlScape ♦ RadioLinx
User Manual RadioLinx® ControlScape FH
3.5 Add Repeaters
The following illustration shows how to Add a Repeater to the Network. After
selecting the add repeater function from the menu, a repeater icon will appear on
the Graphical User Interface (GUI).
The repeater radio will have a link point (black dot) on both the right and left side
of each repeater radio. The remote radio has only one link point located on the
left side of the radio. As with all new radios, it will show the radio needs to be
updated.
Page 22 of 132 ProSoft Technology, Inc.
March 16, 2011
Page 23
ControlScape ♦ RadioLinx Network Configuration
RadioLinx® ControlScape FH User Manual
Initially, a new network will start out with a Master radio and a Remote radio
connected by the RF link. To add a Repeater, the RF link (page 24) between the
Master and Remote will need to be deleted. After the Repeater is in place and
RF links are connected, the Repeater's setting can be adjusted.
Important: The items on this dialog box depend on what type of radio you select. The example in
this topic shows a RadioLinx IFHS (Industrial Frequency Hopping Serial) radio. Refer to the user
manual for your radio for an explanation of each configuration item.
ProSoft Technology, Inc. Page 23 of 132
March 16, 2011
Page 24
Network Configuration ControlScape ♦ RadioLinx
User Manual RadioLinx® ControlScape FH
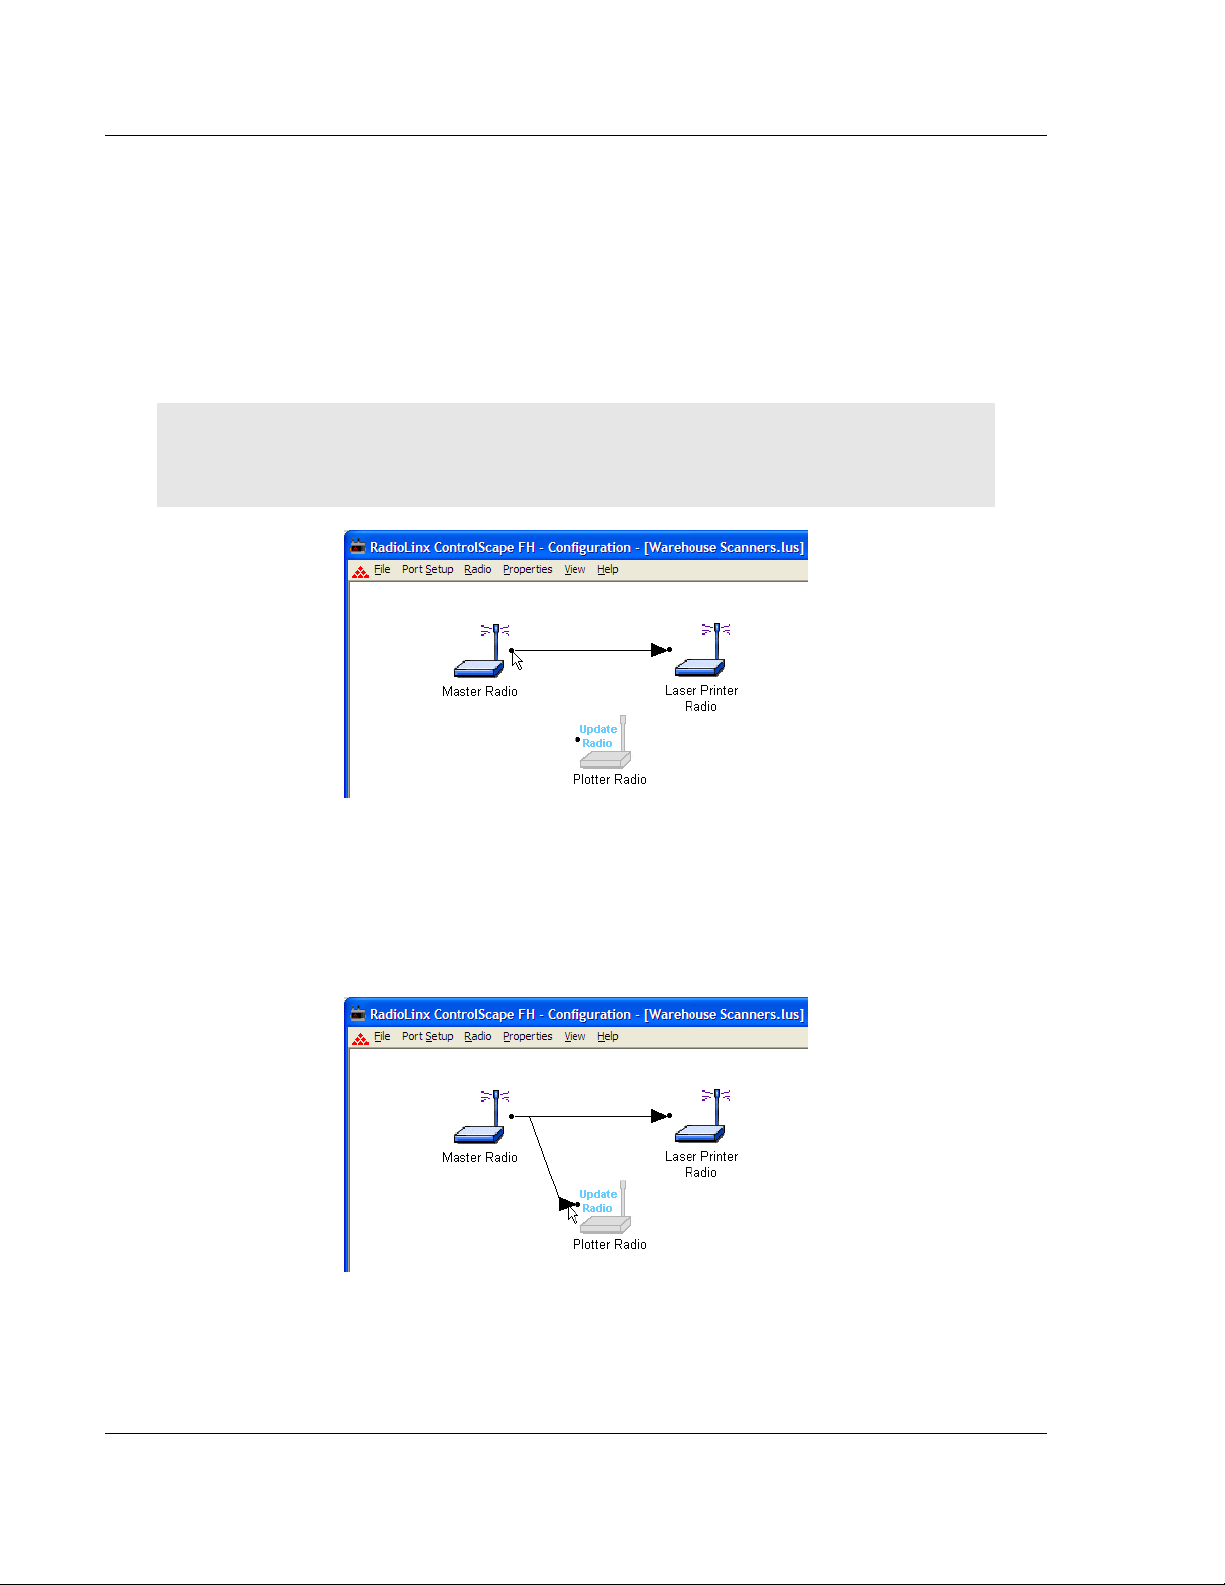
3.6 Graphically Defining the RF Link
Radio communication links between radios must be defined. ControlScape uses
lines between radios to graphically define the RF communication links in a
network.
From the network's Graphical Layout Screen:
Use the left mouse button to select the Master radio's link point (the black dot to
the right of the Master radio icon).
Note: Select the Master radio's link point (only) and not the Master radio icon itself. If the Master
radio is selected (surrounded by a colored box), left-click anywhere else on the screen to de-select
the Master radio icon.
Hold the left mouse button down and drag the RF link to the Remote radio's link
point (located to the left of the Remote radio). As the mouse is being dragged, a
line will appear between the Master and Remote radios. This is the graphical
representation of the RF communication link. After the mouse button is
released an arrowhead will appear at the end of the graphical link line at the
Remote radio's link point.
Page 24 of 132 ProSoft Technology, Inc.
March 16, 2011
Page 25
ControlScape ♦ RadioLinx Network Configuration
RadioLinx® ControlScape FH User Manual
To remove a RF link between two radios, select the line between the radios.
Press the Delete key to remove the graphical link line between the radios. Now a
repeater could be added between the two radios or the radios could be
connected to other radios.
ProSoft Technology, Inc. Page 25 of 132
March 16, 2011
Page 26
Network Configuration ControlScape ♦ RadioLinx
User Manual RadioLinx® ControlScape FH
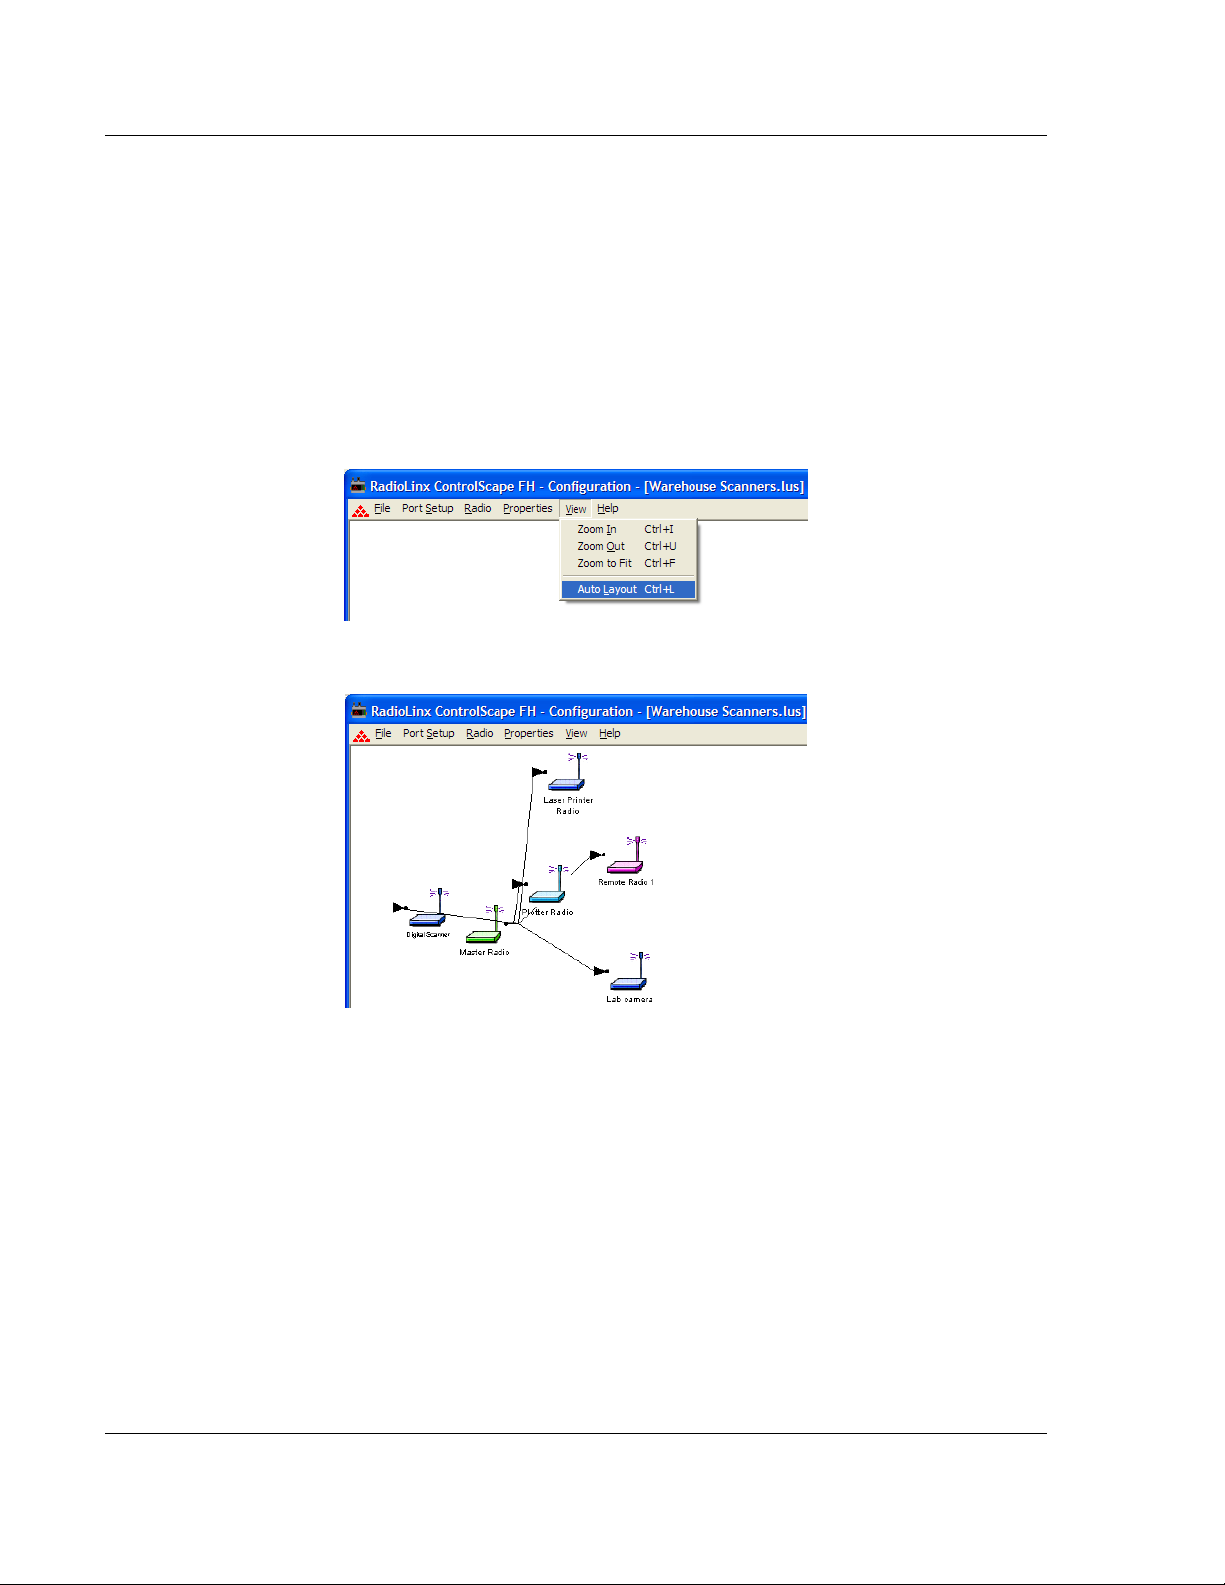
3.7 Auto Layout of Network Icons
Radios may be moved manually or aligned automatically. If the graphical
representation of the network is disorganized, use the AUTO LAYOUT function
to automatically redraw the network in a hierarchical structure based on the
connections between the Master radio and the Remote radios. This structure is
based on the order on that the radios were added to the network in the diagnostic
window.
From the ControlScape menu, select:
View
o
Auto Layout
Graphical representation of the network before Auto Layout.
Page 26 of 132 ProSoft Technology, Inc.
March 16, 2011
Page 27
ControlScape ♦ RadioLinx Network Configuration
RadioLinx® ControlScape FH User Manual
Graphical representation of the network after Auto Layout. The application
automatically realigns the radio icons.
Note: The default radio names (page 28) can also be changed.
ProSoft Technology, Inc. Page 27 of 132
March 16, 2011
Page 28
Network Configuration ControlScape ♦ RadioLinx
User Manual RadioLinx® ControlScape FH
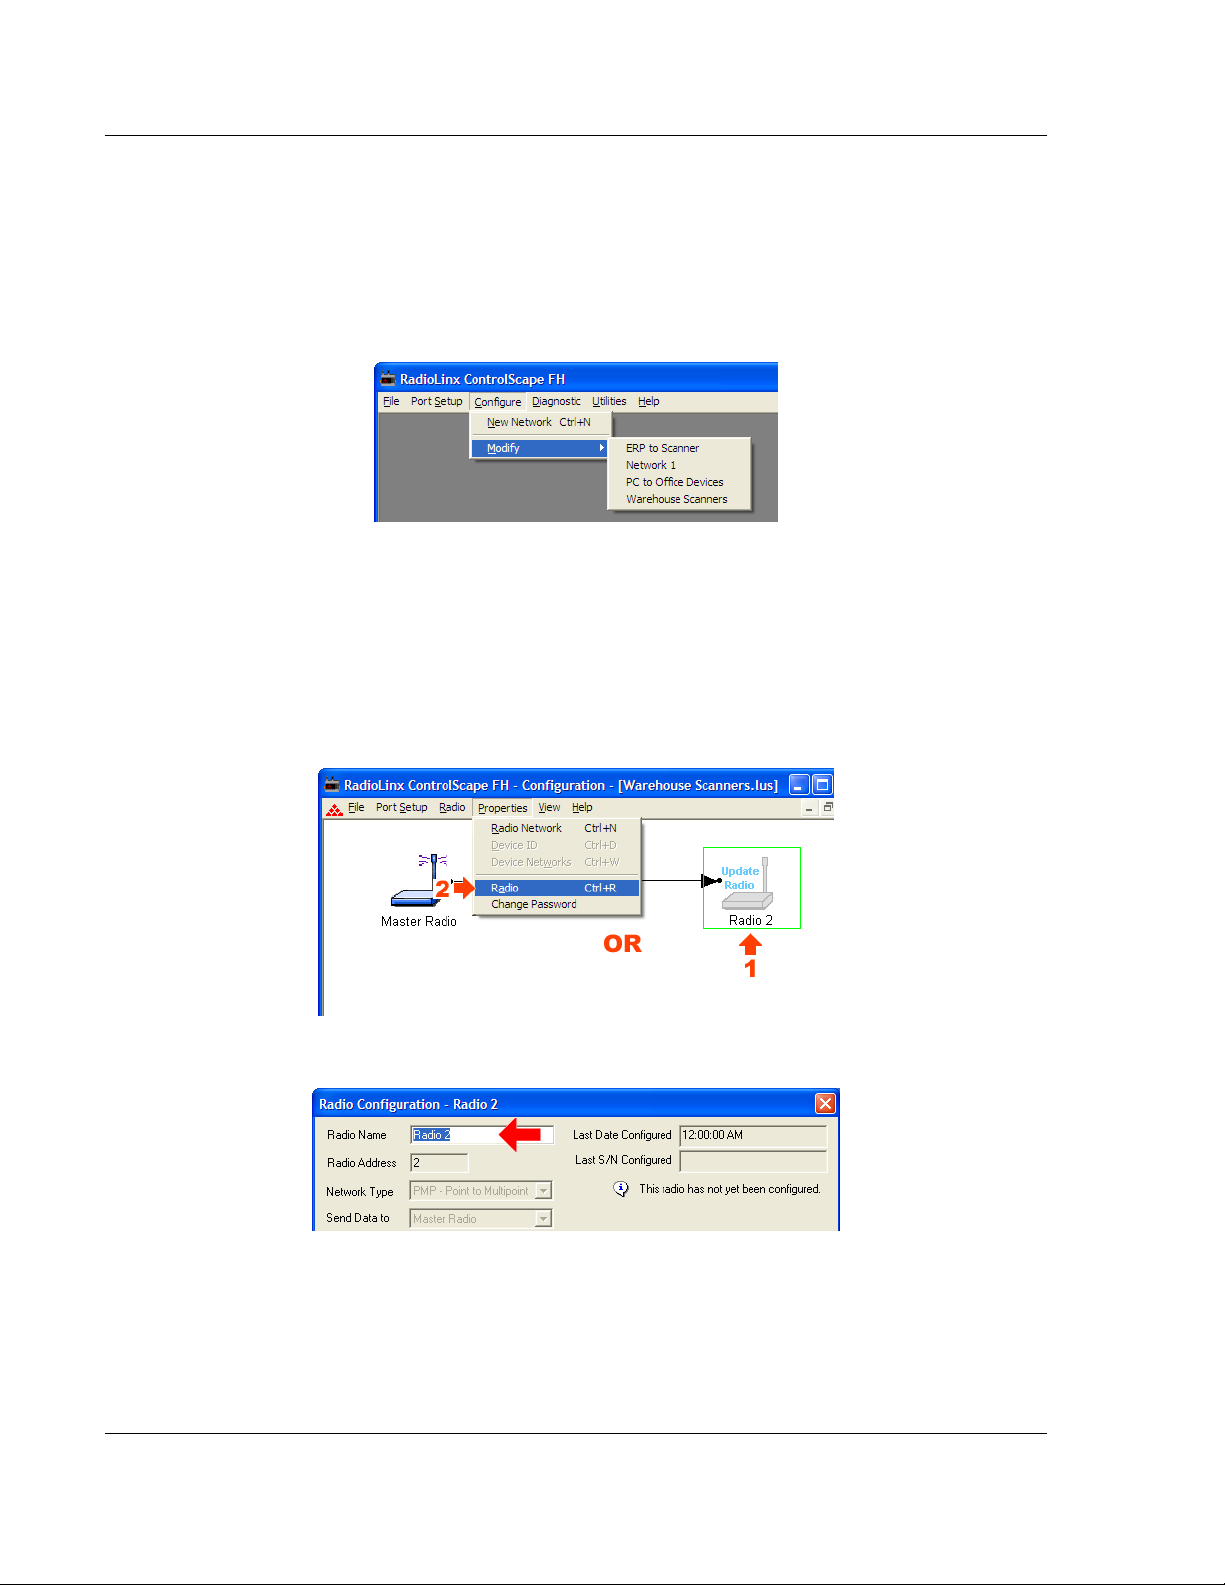
3.8 Rename Radios
To rename an existing radio, access the Radio Configuration dialog box. From
the RadioLinx ControlScape FH Setup/Diagnostic Application’s Main Menu,
select:
Configure
o
Modify (the network by name)
The Graphical Layout Screen is displayed. There are two different methods to
access the Radio Configuration dialog box;
double-click the radio’s icon,
OR
select the radio’s icon by selecting it with a single left-click of the mouse and
then choose the following menu items:
o
Properties / Radio
Select the Radio’s current name in the Radio Name field.
Page 28 of 132 ProSoft Technology, Inc.
March 16, 2011
Page 29
ControlScape ♦ RadioLinx Network Configuration
RadioLinx® ControlScape FH User Manual
Type the Radio’s new name into the Radio Name field. Click OK or press
[Enter].
The radio now has a new name.
Note: To learn more about the Radio Configuration dialog box and its specific settings, go to the
modify radio settings (page 40, page 49) section.
ProSoft Technology, Inc. Page 29 of 132
March 16, 2011
Page 30
Network Configuration ControlScape ♦ RadioLinx
User Manual RadioLinx® ControlScape FH
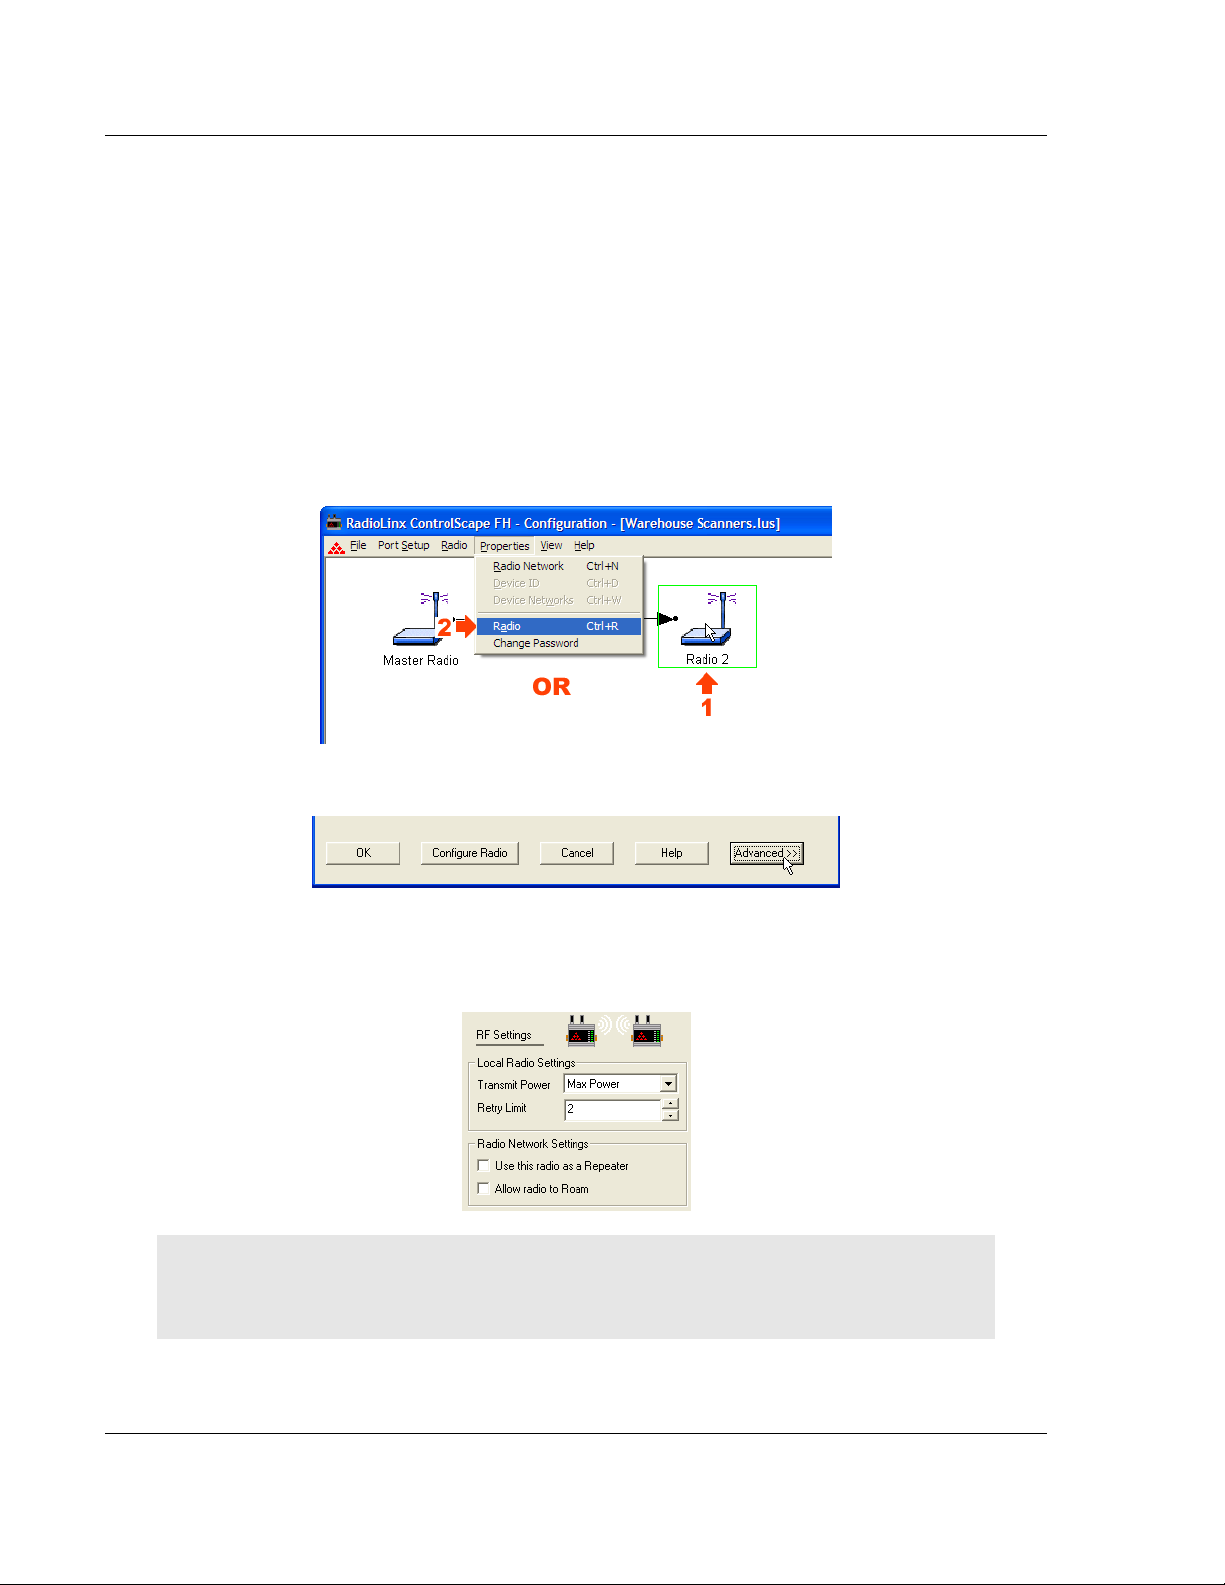
3.9 Change a Radio's Type
When radios are first added to a network, they are added as a Remote Radio or
a Repeater Radio. However, it is easy to change the radio type after a radio has
been added to the network. To change the radio's type, open its configuration
dialog.
There are two different methods to access the Radio Configuration dialog box;
double-click the radio's icon,
OR
select the radio's icon by selecting it with a single left-click of the mouse and
then choose the following menu items:
o
Properties / Radio
Click on the Advanced>> button to show the Radio Network Settings.
In the Radio Network Settings is a check box "Use this radio as a Repeater". If
this box is checked, the radio will be act as a Repeater. If it is unchecked it will
not.
Important: The items on this dialog box depend on what type of radio you select. The following
example shows a RadioLinx IFHS (Industrial Frequency Hopping Serial) radio. Refer to the user
manual for your radio for an explanation of each configuration item.
Page 30 of 132 ProSoft Technology, Inc.
March 16, 2011
Page 31

ControlScape ♦ RadioLinx Network Configuration
RadioLinx® ControlScape FH User Manual
The following illustration shows a two-radio network.
If you wish to expand the network, the second radio can be reconfigured as a
repeater. Then additional radios can be added to expand the network. This is
shown below after Radio 2 was changed to a Repeater and Radio 3 was added.
Note: The Repeater and Remote radio type does NOT affect how the radio communicates with
devices connected to it. A radio's type only affects whether other radios can be linked to it.
ProSoft Technology, Inc. Page 31 of 132
March 16, 2011
Page 32

Network Configuration ControlScape ♦ RadioLinx
User Manual RadioLinx® ControlScape FH
3.10 Remove Radio
From the network’s Graphical Layout Screen:
Select the icon for the radio to be deleted
Click the following:
Radio
o
Remove
OR
Press the keyboard delete key:
<Del>
Note: The Master radio cannot be deleted.
Page 32 of 132 ProSoft Technology, Inc.
March 16, 2011
Page 33

ControlScape ♦ RadioLinx Network Configuration
RadioLinx® ControlScape FH User Manual
3.11 Saving the Network Configuration
Save the Network’s definition if:
A new network has been defined
Changes have been made to the network’s definition
From the Main Menu, select:
File
o
Save
The standard windows Save As dialog box will be displayed; the network name
can be accepted as it is or it can be edited here.
Note: This is the last time that the network’s name can be changed within ControlScape. If you
need to rename a network you have already saved, you can rename the .LUS file in Windows
Explorer.
Select:
Save
Notes: DO NOT change the default directory. The ControlScape Setup/Diagnostic Application
uses the default directory to maintain network-related data.
The Network’s Definition can be printed (page 38).
ProSoft Technology, Inc. Page 33 of 132
March 16, 2011
Page 34

Network Configuration ControlScape ♦ RadioLinx
User Manual RadioLinx® ControlScape FH
If this is the first time this network has been saved, the Password dialog box
appears.
Enter the new password and click OK. If no password protection is desired, leave
the password blank and click OK.
Page 34 of 132 ProSoft Technology, Inc.
March 16, 2011
Page 35

ControlScape ♦ RadioLinx Network Configuration
RadioLinx® ControlScape FH User Manual
3.12 Change Password
To change the current password, from the ControlScape P
select:
P
ROPERTIES
o CHANGE PASSWORD
The C
HANGE PASSWORD
ROPERTIES
dialog box appears (as shown here):
menu,
Enter the new password and click OK or press [E
NTER].
If no password
protection is desired, select the old password and Delete. Click OK or press
[E
NTER]
to return to the ControlScape Application.
Password Invalid
If the password is not valid, the following dialog box will appear.
The password must be between 5 and 7 characters. The allowable values are
the alphanumeric characters "a" through "z" and "0" through "9". The values are
case insensitive.
ProSoft Technology, Inc. Page 35 of 132
March 16, 2011
Page 36

Network Configuration ControlScape ♦ RadioLinx
User Manual RadioLinx® ControlScape FH
Password Confirm
If the password is valid and not blank, you will be prompted to confirm the
password.
This dialog box is used to confirm the password that is used to access Network
Configuration through the ControlScape Setup and Diagnostics Software. Make
sure to remember the password used. After it is entered, the configuration cannot
be accessed without it. If it is forgotten, a new Network (page 75) will have to be
defined and the old network Deleted (page 48).
Password Mismatch
The Password Mismatch dialog box appears when the value entered in the
Confirm Password field is not the same as the value entered in the Configuration
File Password field of the Network Properties.
Click OK to return to the Confirm Network Configuration Password dialog box.
Then re-enter the password and click OK again.
Page 36 of 132 ProSoft Technology, Inc.
March 16, 2011
Page 37

ControlScape ♦ RadioLinx Network Configuration
RadioLinx® ControlScape FH User Manual
3.13 Printer Settings
The printer settings can be checked or modified in the Print Setup dialog box.
Refer to the printer’s User’s Guide for more information on these settings.
The Print Setup dialog box can be accessed from three different screens; Main,
Configure, and the Network Diagnostic screen.
Main
Configure (Only when Modify Network; not when creating a New Network)
Diagnostic (Network only; not from the Radio screen)
ProSoft Technology, Inc. Page 37 of 132
March 16, 2011
Page 38

Network Configuration ControlScape ♦ RadioLinx
User Manual RadioLinx® ControlScape FH
3.14 Print
Two different network configuration reports can be printed:
Print from the Configure screen
Print from the Diagnostics screen
From the Configure screen:
File
o
Print
Prints a text list of network parameters that have been stored in the RadioLinx
Setup/Diagnostic Application’s internal database stored on the Configuration PC
(This list is especially useful for troubleshooting).
Serial Network Configuration:
Ethernet Network Configuration:
From the Diagnostic screen:
File
o
Print
Prints a graphic representation of the network’s current operating status (a visual
"snapshot in time").
Page 38 of 132 ProSoft Technology, Inc.
March 16, 2011
Page 39

ControlScape ♦ RadioLinx Radio Configuration
RadioLinx® ControlScape FH User Manual
4 Radio Configuration
In This Chapter
General Radio Configuration ................................................................. 40
Save ...................................................................................................... 42
When to Re-Configure Radios ............................................................... 43
ProSoft Technology, Inc. Page 39 of 132
March 16, 2011
Page 40

Radio Configuration ControlScape ♦ RadioLinx
User Manual RadioLinx® ControlScape FH
4.1 General Radio Configuration
Note: If possible, you should configure all the radios side by side in an office setting and make sure
they link before you install them in the field. If feasible, it would be even better if you could set up
the entire system in the office and make sure your equipment communicates properly through the
radio network.
Important: If the radios are close enough to each other that their received signal strength is
greater than -40dBm, performance may be degraded. Disconnect antennas from radios during
bench testing, or move the radios further apart from each other.
Configure the radios themselves after the network is designed. Radios are
configured ONE AT A TIME USING THE CONFIGURATION PC.
Use the specified cable and connect the radio to the Configuration PC's COM
port as specified in the PC's serial port dialog box (page 12).
Access the Radio Configuration dialog box to set network-specific parameters
for each individual radio. Starting from the ControlScape Main Menu, select:
Configure
o
Modify (the network by name)
The Graphical Layout Screen is displayed. There are two different methods of
bringing the dialog box up from the screen:
double-click the icon of the radio to be configured,
OR
select the icon of the radio to be configured by selecting it with a single
left-click of the mouse and then choose the following menu items:
o
Properties / Radio
Page 40 of 132 ProSoft Technology, Inc.
March 16, 2011
Page 41

ControlScape ♦ RadioLinx Radio Configuration
RadioLinx® ControlScape FH User Manual
The Radio Configuration dialog box (page 78) is displayed - the image of the
dialog box is different depending on which network type the radio is incorporated
into.
Continue to configure the radios depending on their network type:
Note: The network types available depend on the type of radio you select. Not all network types
are supported on all radios. Refer to the user manual for your radio to determine what network
types are available.
ProSoft Technology, Inc. Page 41 of 132
March 16, 2011
Page 42

Radio Configuration ControlScape ♦ RadioLinx
User Manual RadioLinx® ControlScape FH
4.2 Save
Once the radio has been configured, these changes need to be saved into the
network’s definition file. Select the following from the Graphical Layout Screen:
File
o
If the standard windows Save As dialog box is displayed; follow the instructions
under Save the Network’s Definition (page 33), otherwise:
The radio is now configured.
Physically label each radio with its role in the network (labeling can minimize
future confusion regarding radio identities and roles):
Master or Remote radio
Baud Rate
Channel
Save
Page 42 of 132 ProSoft Technology, Inc.
March 16, 2011
Page 43

ControlScape ♦ RadioLinx Radio Configuration
RadioLinx® ControlScape FH User Manual
4.3 When to Re-Configure Radios
All radios need to be configured before initial installation in a network. In general,
after radios are functioning in a network, they do not need to be re-configured if
the network changes. The program will instruct when the radios need to be
configured, as illustrated below:
After all the radios are configured, the graphical layout will be displayed as
follows:
ProSoft Technology, Inc. Page 43 of 132
March 16, 2011
Page 44

Radio Configuration ControlScape ♦ RadioLinx
User Manual RadioLinx® ControlScape FH
Page 44 of 132 ProSoft Technology, Inc.
March 16, 2011
Page 45

ControlScape ♦ RadioLinx Existing Network Maintenance
RadioLinx® ControlScape FH User Manual
5 Existing Network Maintenance
In This Chapter
Modify .................................................................................................... 46
Delete Network ...................................................................................... 48
Modify Radio Settings ........................................................................... 49
Change a Network's Channel ................................................................ 50
ProSoft Technology, Inc. Page 45 of 132
March 16, 2011
Page 46

Existing Network Maintenance ControlScape ♦ RadioLinx
User Manual RadioLinx® ControlScape FH
5.1 Modify
Existing networks contain several elements that may be edited. To modify
network settings, select the following menu items from the Main Menu:
Configure
o
A drop-down list will appear to the right of the Modify function with a list of the
existing network names (as shown here):
After selecting the name of an existing network, visit one of the following topics
for detailed information on the various available activities:
Change a radio's settings (page 40, page 49) (baud rate, output power,
channel, and so on)
Rename radios (page 28)
Delete radios (page 32) from a network (master radios cannot be deleted)
Add new radios (page 21)
Delete Network (page 48)
Password Protection
If no password protection was set up for the network, the "Configure" view will be
opened. If password protection was set up, the "Configuration Access Password"
dialog box will appear, requiring the user to enter the password before
proceeding.
Modify
Page 46 of 132 ProSoft Technology, Inc.
March 16, 2011
Page 47

ControlScape ♦ RadioLinx Existing Network Maintenance
RadioLinx® ControlScape FH User Manual
After the password has been entered, it will be checked against the password in
the file. If they do not match, the following dialog box will appear. Click OK to
return to the "Configuration Access Password" dialog box to try again.
Passwords must be between 5 and 7 characters. The allowable values are the
alphanumeric characters "a' through "z' and "0' through "9'. The values are case
insensitive.
If the password has been forgotten, a new Network (page 75) will have to be
defined and the old network Deleted (page 48).
ProSoft Technology, Inc. Page 47 of 132
March 16, 2011
Page 48

Existing Network Maintenance ControlScape ♦ RadioLinx
User Manual RadioLinx® ControlScape FH
5.2 Delete Network
A Network would need to be deleted if its password were forgotten. A new
Network would need to be defined in its place.
Note:
After a Network has been deleted, there is no way to restore it.
To delete a network, from the RadioLinx ControlScape FH Setup Application’s
Main Menu, select:
File
o
Exit
Open the Windows Explorer and locate the "Program Files" folder on the main
drive. In the "Program Files" folder will be the "ProSoft" folder and inside that will
be the "RadioLinx" folder. Open these folders. Locate and select the network
name that is to be deleted. The name will have a .lus extension. Click the Delete
Icon in the Menu Bar.
The network is now deleted from the RadioLinx ControlScape FH Application.
Page 48 of 132 ProSoft Technology, Inc.
March 16, 2011
Page 49

ControlScape ♦ RadioLinx Existing Network Maintenance
RadioLinx® ControlScape FH User Manual
5.3 Modify Radio Settings
Existing radios contain elements that may be edited. To modify settings for an
existing radio:
double-click the icon of the radio to be modified,
OR
select the icon of the radio to be modified by selecting it with a single left-
click of the mouse and then choose the following menu items:
o
Properties / Radio
The Radio Configuration dialog box is displayed - the image of the dialog box is
different depending on which network type the radio is incorporated into.
ProSoft Technology, Inc. Page 49 of 132
March 16, 2011
Page 50

Existing Network Maintenance ControlScape ♦ RadioLinx
User Manual RadioLinx® ControlScape FH
5.4 Change a Network's Channel
For Transparent, Dialup Modem Emulation and Ethernet Protocols, from the
Graphical Layout Screen (page 20) of an existing network, select:
Properties
o
Radio Network
The Networks Properties dialog box will then display.
Important: The items on this dialog box depend on what type of radio you select. The following
example shows a network of RadioLinx IFHS (Industrial Frequency Hopping Serial) radios. Refer to
the user manual for your radio for an explanation of each configuration item.
Select an unused Network Channel from the drop-down list.
Refer to the user manual for your radio for an explanation of other configuration
items on this dialog box.
Note: Some fields are "grayed-out" in this dialog box because these parameters cannot be
changed from here.
Note: See When to Re-Configure Radios (page 43) to ensure all radios will be updated.
Page 50 of 132 ProSoft Technology, Inc.
March 16, 2011
Page 51

ControlScape ♦ RadioLinx Diagnostics and Troubleshooting
RadioLinx® ControlScape FH User Manual
6 Diagnostics and Troubleshooting
In This Chapter
Diagnostics Overview ............................................................................ 52
View Operating Network ........................................................................ 53
Viewing Signal Strength ........................................................................ 55
Viewing Radio Channel Noise Level ..................................................... 56
Troubleshooting Missing Radios ........................................................... 57
Query a Radio Directly .......................................................................... 59
Query a Radio Remotely ....................................................................... 62
ProSoft Technology, Inc. Page 51 of 132
March 16, 2011
Page 52

Diagnostics and Troubleshooting ControlScape ♦ RadioLinx
User Manual RadioLinx® ControlScape FH
6.1 Diagnostics Overview
Use the Diagnostic function in ControlScape to:
view a graphical representation of the overall function of a network (page 53)
query an individual radio (page 59) and display its operating parameters
The information obtained from the diagnostics function can be used to:
optimize network function
determine the source of failed communication
Page 52 of 132 ProSoft Technology, Inc.
March 16, 2011
Page 53

ControlScape ♦ RadioLinx Diagnostics and Troubleshooting
RadioLinx® ControlScape FH User Manual
6.2 View Operating Network
To view a graphical representation of a network's communication links, connect a
radio to the Configuration PC.
From the ControlScape Main Menu, select:
Diagnostic / Network
o
the network by name (from the displayed list of configured networks)
If an Ethernet Network, the following will display:
Select which radio is connected to the Configuration PC from the Radio Name
drop down list. The IP Address of the radio connected to the configuration PC is
automatically displayed.
Note: For IFHS radios, full network diagnostics are available only when you are connected to the
Master radio. If you are connected to a Remote or a Repeater radio, you will only be able to
retrieve status information for the radio to which you are currently connected.
ProSoft Technology, Inc. Page 53 of 132
March 16, 2011
Page 54

Diagnostics and Troubleshooting ControlScape ♦ RadioLinx
User Manual RadioLinx® ControlScape FH
Following is the ControlScape's graphical representation of a network with
intact communication links. The functioning RF communication links are
represented by solid colored lines.
The colored lines indicate the signal strength of each radio, see Viewing Signal
Strength (page 55). If any of the communication links show red dashed lines see
Broken Links in a Radio Network (page 57).
Page 54 of 132 ProSoft Technology, Inc.
March 16, 2011
Page 55

ControlScape ♦ RadioLinx Diagnostics and Troubleshooting
RadioLinx® ControlScape FH User Manual
6.3 Viewing Signal Strength
After a network is configured, the Signal Strength of the Remote radios can be
monitored. This is helpful when the radios are being physically installed.
To monitor the Remote radio's Signal strength:
From the ControlScape Main Menu, select:
Diagnostic / Network
o
the network by name (from the displayed list of configured networks)
After the network is displayed, double click the Remote radio to open the Radio
Status dialog box. This dialog box shows information about the radio, including
serial number, hardware and firmware information, and signal strength. The
appearance of this dialog box depends on the radio model and type.
Note: An ethernet radio must be monitored with an ethernet connection. Refer to view operating
network (page 53) for information.
ProSoft Technology, Inc. Page 55 of 132
March 16, 2011
Page 56

Diagnostics and Troubleshooting ControlScape ♦ RadioLinx
User Manual RadioLinx® ControlScape FH
6.4 Viewing Radio Channel Noise Level
All radio networks experience background "noise", known as Electromagnetic
Interference (EMI), which consists of such things as stray signals from other
radios on the same frequency, or random interference generated by non-radio
devices that "leak" or emanate EMI as a by-product or side effect of their actual
function. There are also natural sources of EMI, including atmospheric
disturbances and sunspots. The "snow" on an unused or distant television
channel, or "static" on a car radio when passing under high voltage power lines,
are two common examples of background noise.
Unwanted noise, or EMI, on a data network can cause data transmission errors,
or stop a radio network from functioning at all. Most modern devices, including
RadioLinx radios, are designed to prevent unwanted emanation of EMI from the
device. Radios are also typically designed to tolerate a certain amount of
interference from other devices, however when the amount of noise reaches a
certain threshold, typically within 10dB of a link's RSSI, the radio may be unable
to distinguish between wanted and unwanted signals.
ControlScape can help you diagnose transmission problems with a graphical
representation of radio channel noise. You can use this diagnostic information
during a site survey to check for RF signals already present in an area, or to
detect network issues caused by RF interference.
To detect the radio channel noise level for a particular radio, open the U
menu, and then choose IFHE S
ADDRESS
, and then click O
measure the noise in the its frequency band. This data can help determine if
there is a signal that is interfering with radio communications. The radio will
continue to periodically scan its frequency band until you click the C
or you select a different radio to scan.
PECTRUM ANALYZER
PEN.
ControlScape will then scan within the radio, and
TILITIES
. Select the radio by IP
LOSE
button,
Note: The information in this dialog box is valid only for radios accessible through a wired Ethernet
network. Scans for radios reachable only over the RF network may not be accurate.
Note: Radio network communications are interrupted while the Spectrum Analyzer is active.
Normal communication will resume when you close the dialog box.
Page 56 of 132 ProSoft Technology, Inc.
March 16, 2011
Page 57

ControlScape ♦ RadioLinx Diagnostics and Troubleshooting
RadioLinx® ControlScape FH User Manual
6.5 Troubleshooting Missing Radios
To view the communication link any radio can be cabled to the Configuration PC
for network diagnostics.
One of the most common reasons radios do not communicate is an incorrect
setting in the "Send Data To" field in the Radio Configuration dialog box. Verify
that the radio is sending to and receiving from the correct radio ID.
If radios do not communicate, investigate some of the sources of interference
(page 58).
ProSoft Technology, Inc. Page 57 of 132
March 16, 2011
Page 58

Diagnostics and Troubleshooting ControlScape ♦ RadioLinx
User Manual RadioLinx® ControlScape FH
6.5.1 Sources of Interference
The RadioLinx radio modem operates more reliably than a radio using
conventional technology due to the frequency hopping spread spectrum
technique. While RadioLinx radios are less susceptible to interference due to this
technique, interference (radio "noise") may still occur. Radios are designed to
detect specific radio frequencies. An "interferer" is an unwanted signal that has
been transmitted at the same frequency that the radio was designed to detect.
There are many man-made and natural sources of electromagnetic interference
(lightning, power lines, switching power supplies, fluorescent lighting, microwave
ovens, cordless phones, and so on). To decrease the effects of interference on
network function:
Use a directional (high gain) antenna at the Remote radio locations, if
possible
Verify that each network operating in close proximity to each other has BEEN
ASSIGNED TO A DIFFERENT CHANNEL (page 50)
Install networks in rural areas (if at all possible) where they will likely
encounter less man-made noise than in urban or suburban areas
Enable encryption
Change a radio's network output power (refer to the Radio Settings -
Transmit Power sections in the Radio Configuration (page 40) screens for
each type of network):
o
Increase power to "drown out" competing noise
o
Decrease power of the radios on the network if they are interfering with
another network in the vicinity
Page 58 of 132 ProSoft Technology, Inc.
March 16, 2011
Page 59

ControlScape ♦ RadioLinx Diagnostics and Troubleshooting
RadioLinx® ControlScape FH User Manual
6.6 Query a Radio Directly
A radio can be queried so that it reports its settings to the Configuration PC.
Radios may be queried directly (through a cable connected to the Configuration
PC) or remotely (page 62) (through communication with the Master radio cabled
to the Configuration PC). If necessary, check (page 12) the serial port settings to
determine which COM port is configured for the ControlScape network.
To directly query a radio (either Master or Remote), cable the radio to the
Configuration PC. From the ControlScape Setup/Application Main Menu, select:
Diagnostic
o
Radio
The Radio Parameters dialog box appears. Click the Get Data button to receive
data.
For Serial Radios:
Serial Radio Parameters dialog BEFORE getting data
Serial Radio Parameters dialog AFTER getting data
ProSoft Technology, Inc. Page 59 of 132
March 16, 2011
Page 60

Diagnostics and Troubleshooting ControlScape ♦ RadioLinx
User Manual RadioLinx® ControlScape FH
For Ethernet Radios:
Page 60 of 132 ProSoft Technology, Inc.
March 16, 2011
Page 61

ControlScape ♦ RadioLinx Diagnostics and Troubleshooting
RadioLinx® ControlScape FH User Manual
Ethernet Radio Parameters dialog BEFORE getting data
Ethernet Radio Parameters dialog AFTER getting data
Selecting the Get Data button to retrieves data from the radio cabled to the COM
port or Ethernet port. Generally, a radio is queried if there is a network failure (An
error dialog box will appear if there is no communication between the cabled
radio and the Configuration PC).
Click the Close button to close the Radio Parameters dialog box.
ProSoft Technology, Inc. Page 61 of 132
March 16, 2011
Page 62

Diagnostics and Troubleshooting ControlScape ♦ RadioLinx
User Manual RadioLinx® ControlScape FH
6.7 Query a Radio Remotely
A radio can be queried so that it reports its settings to the Configuration PC.
Radios may be queried remotely (through communication with the Master radio
cabled to the Configuration PC) or directly (page 59) (through a cable connected
to the Configuration PC) so that it reports its settings to the Configuration PC (If
necessary, check (page 12) the serial port settings to determine which COM port
is configured for the ControlScape network).
Revision information is available by querying radios through the Diagnostic
menu.
To remotely query a radio, cable the Master radio to the Configuration PC. From
the ControlScape Setup/Application Main Menu, select:
Diagnostic
o
Network / the network, by name (as shown)
From the Diagnostic Network Menu, select the Remote radio's icon, then:
Radio
o
Properties
OR
Double-click the radio's icon
The Radio Status dialog box displays the following fields and parameters:
Radio Name: as defined during network configuration (page 75).
Address: the radio's address as automatically set during network
configuration.
Serial #: the radio's serial number as programmed by the manufacturer.
Firmware: the version number of the software code embedded in the radio.
Hardware: the version number of the radio's hardware.
FPGA: the version number of the Field Programmable Gate Array logic in the
radio. This logic determines the hardware characteristics of the radio.
Baud rate: the baud rate of the radio's serial port as set during radio
configuration (page 40).
Channel: the channel (page 75) of the network of which the radio is a
component.
Page 62 of 132 ProSoft Technology, Inc.
March 16, 2011
Page 63

ControlScape ♦ RadioLinx Diagnostics and Troubleshooting
RadioLinx® ControlScape FH User Manual
Network Type: as set during network configuration (page 75).
Signal Quality: parameters that indicate how well the network is operating.
The Remote radio calculates the strength (Signal Strength) of the signal
from the Master. It also calculates the strength of the background noise
(interference (page 58)). The Signal-to-Noise value is the ratio of SignalStrength to Noise-Strength. Monitoring how this value changes when
antennas are moved during installation verification can ensure that the
installation configuration has been optimized. For optimum network
performance, the larger the Signal-to-Noise ratio, the better. The Signal
Quality Graph is a color coded grid to more precisely display the Signal-toNoise ratio and aide in installation verification.
Messages: indicates if the radio is responding or not.
ProSoft Technology, Inc. Page 63 of 132
March 16, 2011
Page 64

Diagnostics and Troubleshooting ControlScape ♦ RadioLinx
User Manual RadioLinx® ControlScape FH
Page 64 of 132 ProSoft Technology, Inc.
March 16, 2011
Page 65

ControlScape ♦ RadioLinx Miscellaneous Options
RadioLinx® ControlScape FH User Manual
7 Miscellaneous Options
In This Chapter
Zoom View of Graphical Layout ............................................................ 66
Zoom In ................................................................................................. 67
Zoom Out .............................................................................................. 68
Zoom To Fit ........................................................................................... 69
Update Firmware ................................................................................... 70
ProSoft Technology, Inc. Page 65 of 132
March 16, 2011
Page 66

Miscellaneous Options ControlScape ♦ RadioLinx
User Manual RadioLinx® ControlScape FH
7.1 Zoom View of Graphical Layout
Use the Z
software displays graphical networks. Zoom is helpful when changing the screen
view for greater clarity (smaller, larger, or custom area) or for overall global
network comprehension (making it easier to move radio icons around).
Zoom In (page 67): moves view to focus the graphical display closer to the
Zoom Out (page 68): moves view further away; radios look smaller - more
Zoom To Fit: changes view to match screen size; could be used to:
o
o
OOM
feature to customize the way the RadioLinx ControlScape FH
user; radios look larger - less overall space is displayed
overall space is displayed
expand a small network to fill up the entire screen
contract an entire larger network to fit on one screen
Page 66 of 132 ProSoft Technology, Inc.
March 16, 2011
Page 67

ControlScape ♦ RadioLinx Miscellaneous Options
RadioLinx® ControlScape FH User Manual
7.2 Zoom In
Access the Z
V
IEW
o ZOOM IN
Before Zoom In
OOM
feature from the Graphical Layout Screen (page 20):
After Zoom In
Return to Zoom View of Graphical Layout (page 66) for other Z
OOM
commands.
ProSoft Technology, Inc. Page 67 of 132
March 16, 2011
Page 68

Miscellaneous Options ControlScape ♦ RadioLinx
User Manual RadioLinx® ControlScape FH
7.3 Zoom Out
Access the Z
V
IEW
o ZOOM OUT
Before Zoom Out
OOM
feature from the Graphical Layout Screen (page 20):
After Zoom Out
Return to Zoom View of Graphical Layout (page 66) for other Z
OOM
commands.
Page 68 of 132 ProSoft Technology, Inc.
March 16, 2011
Page 69

ControlScape ♦ RadioLinx Miscellaneous Options
RadioLinx® ControlScape FH User Manual
7.4 Zoom To Fit
Access the Z
V
IEW
o ZOOM TO FIT
Before Zoom to Fit
OOM
feature from the Graphical Layout Screen (page 20):
After Zoom to Fit
Return to Zoom View of Graphical Layout (page 66) for other Z
OOM
commands.
ProSoft Technology, Inc. Page 69 of 132
March 16, 2011
Page 70

Miscellaneous Options ControlScape ♦ RadioLinx
User Manual RadioLinx® ControlScape FH
7.5 Update Firmware
The Download Code utility allows the user to upgrade the Serial and Ethernet
radios' firmware when radio feature updates are implemented. Code updates can
be obtained from the ProSoft Technology web site at
www.prosoft-technology.com.
To start a code download, connect the radio to be upgraded to the Configuration
PC’s COM port as specified in the serial port configuration (page 12). From the
ControlScape Setup Application’s Main Menu, select:
Utilities
o
The download selection dialog box will then be displayed. Select the type of radio
being updated.
Download Code
After the correct selections are made, click the 'Download Code' button to begin
the download. Status dialogs like the one below will be shown as the download
progresses.
Page 70 of 132 ProSoft Technology, Inc.
March 16, 2011
Page 71

ControlScape ♦ RadioLinx Miscellaneous Options
RadioLinx® ControlScape FH User Manual
The following dialog will be shown after the code has been successfully
downloaded.
If a dialog like the one below is displayed, the files to be downloaded into the
radio are not present.
The files are not included with the ControlScape Setup and Diagnostics
Software. The installation updates can be obtained from the ProSoft Technology
web site at www.prosoft-technology.com.
ProSoft Technology, Inc. Page 71 of 132
March 16, 2011
Page 72

Miscellaneous Options ControlScape ♦ RadioLinx
User Manual RadioLinx® ControlScape FH
Page 72 of 132 ProSoft Technology, Inc.
March 16, 2011
Page 73

ControlScape ♦ RadioLinx Dialog Boxes
RadioLinx® ControlScape FH User Manual
8 Dialog Boxes
In This Chapter
Network Properties Dialog Box .............................................................. 75
Graphical Layout Screen ....................................................................... 76
Radio Configuration Dialog Box - IFHS ................................................. 78
Radio Configuration Dialog Box - IFHE ................................................. 81
Radio Configuration Dialog Box - Protocol Transparent ........................ 83
Radio Configuration Dialog Box - Modbus & DNP Protocol................... 85
Radio Configuration Dialog Box - DF1 Half Duplex ............................... 87
Radio Configuration Dialog Box - FHE Radio ........................................ 89
Associate Device IDs Dialog Box - Modbus & DNP .............................. 92
Associate Device IDs Dialog Box - DF1 Half Duplex ............................. 93
Automatic Baud Detection Dialog Box ................................................... 94
Configuration Access Password Dialog Box .......................................... 95
Configuration Access Password Dialog Box .......................................... 96
Confirm Network Configuration Password Dialog Box .......................... 97
Device Network Properties Dialog Box .................................................. 98
Data Serial Port Settings Dialog Box ..................................................... 99
Edit BootP Table Dialog Box ............................................................... 101
Ethernet Radio Parameters Dialog Box ............................................... 102
IFHE Spectrum Analyzer Dialog Box ................................................... 104
Invalid Password Dialog Box ............................................................... 105
IP Address Required Dialog Box ......................................................... 106
Local or Remote Dialog Box ................................................................ 107
Network Device IDs Dialog Box ........................................................... 108
Radio Color Dialog Box ....................................................................... 109
Radio Configuration Status Dialog Box ............................................... 110
Radio Discovery Tool Dialog Box ........................................................ 111
Radio IP Settings Dialog Box .............................................................. 112
Radio Status Dialog Box - Local Radio ............................................... 113
Radio Status Dialog Box - Remote Radio ........................................... 114
Radio Status Dialog Box - IFH Radio .................................................. 115
Reset to Defaults Dialog Box ............................................................... 116
ProSoft Technology, Inc. Page 73 of 132
March 16, 2011
Page 74

Dialog Boxes ControlScape ♦ RadioLinx
User Manual RadioLinx® ControlScape FH
Select Download Dialog Box ............................................................... 117
Select Radio Dialog Box - IFHE ........................................................... 118
Select Radio Dialog Box - FHE ............................................................ 119
Serial Radio Parameters Dialog Box ................................................... 120
Set a Radio IP Address Dialog Box ..................................................... 121
Set the Radio IP Address Dialog Box .................................................. 122
Page 74 of 132 ProSoft Technology, Inc.
March 16, 2011
Page 75

ControlScape ♦ RadioLinx Dialog Boxes
RadioLinx® ControlScape FH User Manual
8.1 Network Properties Dialog Box
The Network Properties dialog box opens when you create a new network (page
75) or view the properties for an existing network (page 46). The items available
on this dialog box vary depending on the type of radio you select.
Network Name: Use up to 20 alphanumeric characters. The RadioLinx
ControlScape FH Setup Application will use this assigned name in all
subsequent references to this network. The network name cannot easily be
changed. The recommended procedure is to choose a name at the time of
network definition which will be recognized by those responsible for future
network maintenance.
Radio Type: Select the radio type from the dropdown list. Note that all radios
on a network must be the same type.
(RLX-FHS radios only): Serial Protocol: Some RLX models support a variety
of serial protocol types. Choose the protocol type from the dropdown list.
(RLX-IFH radios) Network Type: Some RLX models support a variety of
network types. Choose the network type from the dropdown list.
Network Channel: From the drop-down list, select a channel for the network.
Network channel selection is used to allow the operation of up to 32 different
networks in the same location. There may be a total of up to 2047 radios per
network (including the master radio and its remote radios). The following
network channel requirements must be met for full network functionality:
o
The Master Radio and Remote Radios of each network must be assigned
to the same network channel.
o
Networks in close proximity must be assigned to different channels.
Wireless Link Rate (RLX-IFH radios): For most applications, you do not
need to change this setting. Wireless Link Rate sets the rate at which data is
transmitted over the wireless link. Changing this value will tradeoff throughput
for receive sensitivity.
Hop interval (RLX-IFH radios): For most applications, you do not need to
change this setting. Hop Interval sets the length of time that the radios stay
on a channel before hopping to the next channel. Changing this value to an
incorrect setting can render the network inoperable. For certain traffic
patterns, this value can be tailored so as to provide a small improvement to
throughput or latency.
Encryption Key (RLX-FH radios)
o
5 to 7 characters = 40 bit encryption
o
15 to 24 characters = 128 bit encryption
Encryption Level: Choose the encryption type (128-bit AES or Disabled)
from the dropdown list.
Passphrase (RLX-IFH radios): The passphrase is used to encrypt all radio
traffic. All radios in a network must be programmed with the same
passphrase, or they will not be able to communicate. ControlScape populates
this field with a randomly generated sequence of characters. If you prefer,
you can enter your own passphrase here.
ProSoft Technology, Inc. Page 75 of 132
March 16, 2011
Page 76

Dialog Boxes ControlScape ♦ RadioLinx
User Manual RadioLinx® ControlScape FH
8.2 Graphical Layout Screen
This Graphical Layout screen appears after you create a new network (page 16)
configuration, or open an existing network (page 46) configuration. Use the
following menu commands to view or change the settings for networks and
radios.
File Menu
Close (page 76)
Save (page 33)
Print Setup (page 37)
Print (page 38)
Exit (page 77)
Port Setup Menu
Serial Port Configure (page 12)
Radio Menu
Add Radio (page 21)
Add Repeater (page 22)
Remove Radio (page 32)
Set Radio Color (page 17)
Properties Menu
Radio Network (page 46)
Device ID (page 92)
Device Networks (page 98)
Radio (page 78)
Change Password (page 35)
View Menu
Zoom In (page 67)
Zoom Out (page 68)
Zoom to Fit
Auto Layout (page 26)
Help Menu
Help Topics
8.2.1 Close
Choose Close to close the current project, without exiting ControlScape. If you
have made changes to the project, you will be prompted to save or discard your
edits.
Page 76 of 132 ProSoft Technology, Inc.
March 16, 2011
Page 77

ControlScape ♦ RadioLinx Dialog Boxes
RadioLinx® ControlScape FH User Manual
8.2.2 Exit
Choose Exit to close ControlScape. If you have made changes to the project, you
will be prompted to save or discard your edits.
ProSoft Technology, Inc. Page 77 of 132
March 16, 2011
Page 78

Dialog Boxes ControlScape ♦ RadioLinx
User Manual RadioLinx® ControlScape FH
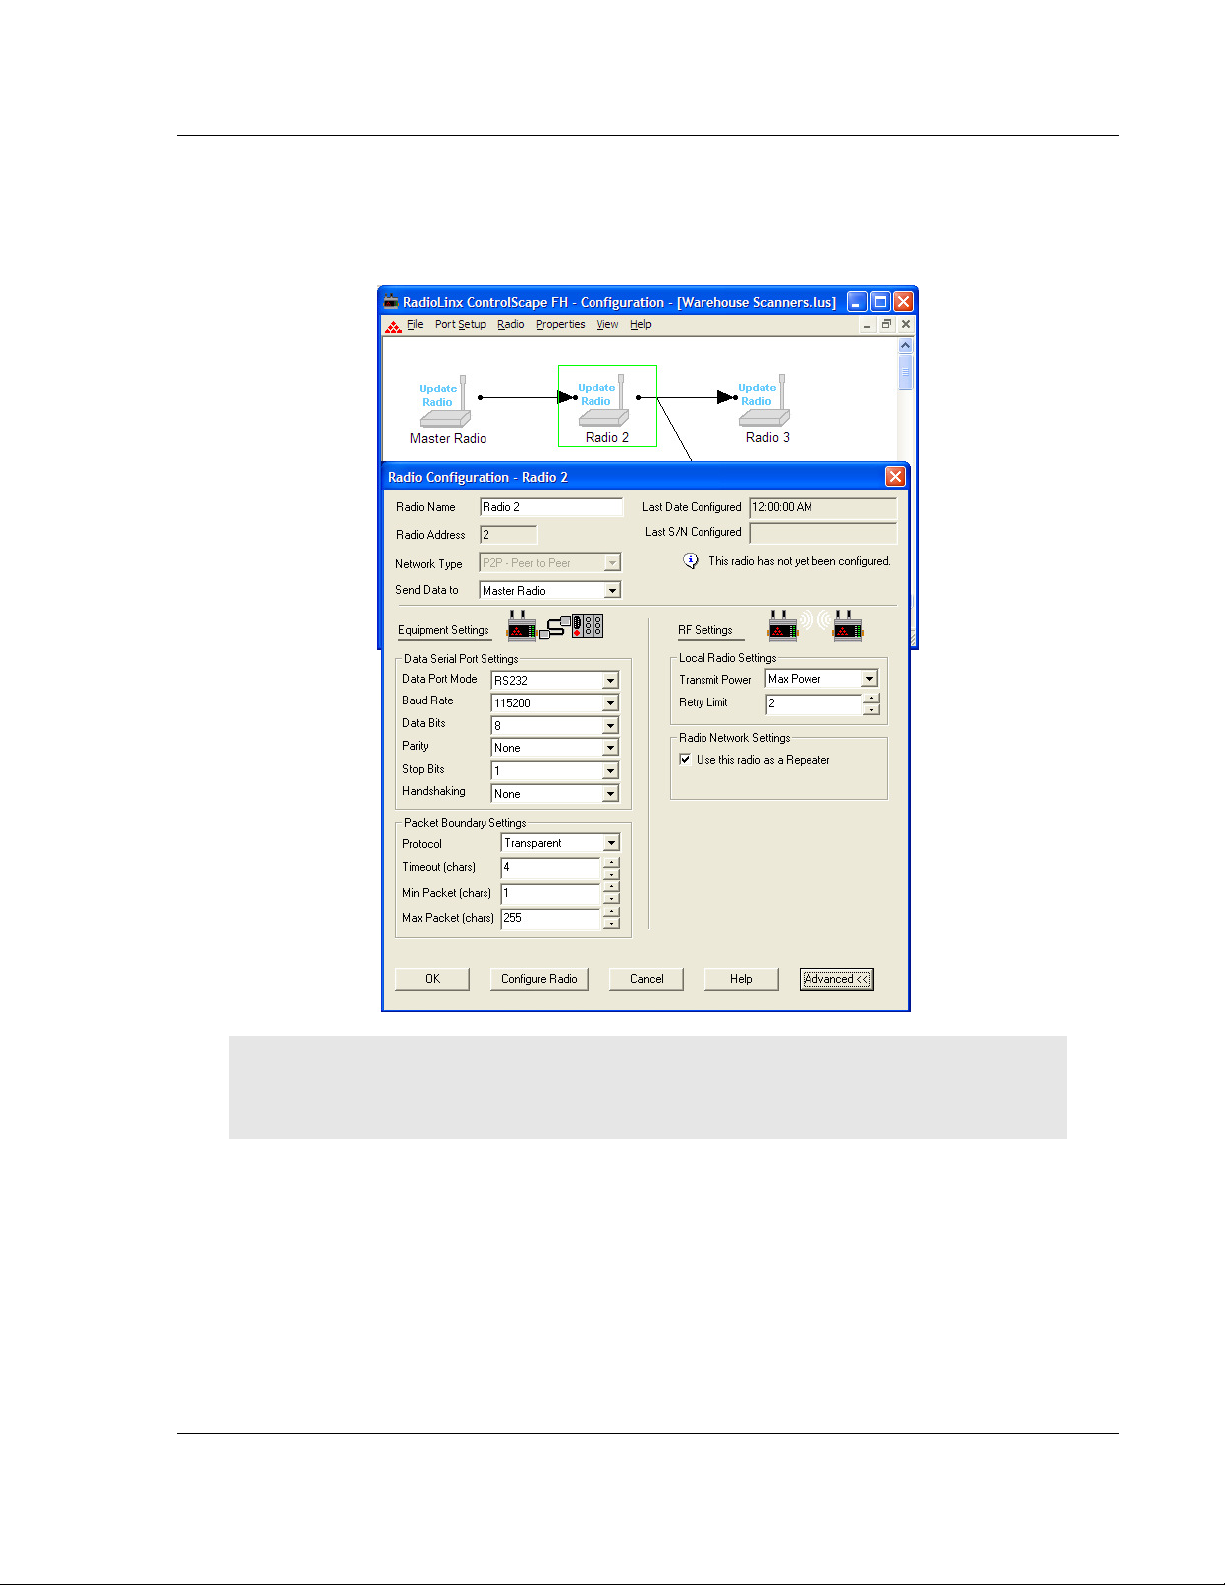
8.3 Radio Configuration Dialog Box - IFHS
The Radio Configuration Dialog Box opens when you select a radio in the
Graphical Layout Screen (page 76), and then choose Properties. Use this dialog
box to view or modify the settings for a radio.
Radio Name: Identifies the radio in the Graphical Layout Screen. Type the
name (for example, Scanner, Radio 1, or Repeater) of the radio in this field.
Last Date Configured: The date and time reported here indicates:
o
The last time that the configuration parameters were modified and saved
o
The last time the radio was configured (page 40) (configuration data was
downloaded to the radio).
Last S/N Configured: This is the serial number of the radio being configured.
The information in this field is maintained by ControlScape and cannot be
modified. If this radio has never been configured as a part of this network, this
field will be blank.
Send Data to: Select the send data mode from the dropdown list. For some
network types, this setting is fixed and cannot be modified.
Data Serial Port Settings
Data Port Mode: Select the data port mode (RS232, RS485 half-duplex or
RS485 full-duplex) from the dropdown list. The port mode on the radio must
match the port mode on the connected serial device.
Baud Rate: Select the baud rate from the dropdown list. The baud rate on
the radio must match the baud rate on the connected serial device.
Parity: Select the parity (None, Even or Odd) from the dropdown list. The
parity on the radio must match the parity on the connected serial device.
Data Bits: Select the number of data bits (7 or 8) from the dropdown list. The
data bits on the radio must match the data bits on the connected serial
device.
Stop Bits: Select the number of stop bits (1 or 2) from the dropdown list. The
stop bits on the radio must match the stop bits on the connected serial
device.
Handshaking: Select the handshaking mode (None or Hardware) from the
dropdown list. The handshaking mode on the radio must match the
handshaking mode on the connected serial device. The radio uses RTS/CTS
for hardware handshaking.
OK: Click the OK button to save your settings to a configuration file on your
local computer. These settings do not affect the radio until you click the
Configure Radio button to transfer the configuration to the radio.
Configure Radio: Click the Configure Radio button to send the configuration
settings to the radio. When you click this button, ControlScape opens a
connection between the serial port on the computer and the serial port on the
radio, and then copies the configuration from the computer to the radio's
memory.
Cancel: Click the Cancel button to close the dialog box and discard your
changes.
Help: Click the Help button to read the online help for ControlScape.
Page 78 of 132 ProSoft Technology, Inc.
March 16, 2011
Page 79

ControlScape ♦ RadioLinx Dialog Boxes
RadioLinx® ControlScape FH User Manual
Advanced: Click the Advanced button to view and change additional settings
for the radio. These settings control advanced features that are normally not
required for a typical radio network.
Advanced Settings
Radio Address: The software assigns a unique address to each radio in the
network after the radio is configured (The user cannot change this addressing
scheme - the address field is grayed-out).
Network Type: This is the network type configured on the Network
Properties dialog box.
Protocol: Choose the Protocol type from the dropdown list.
Timeout (chars): This value configures the length of time to look for gaps in
the data being received from the local attached device. The timer is activated
after the Minimum Packet Size has been accumulated in the radio, after
which, if the radio detects a gap in the data exceeding the Character Timeout
value, the radio will transmit the data. The radio will accumulate data in its
buffers until either
a) the number of bytes configured in the Maximum Packet size field has
been accumulated, or
b) the number of bytes configured in the Minimum Packet Size has been
accumulated
AND
the Character timeout has expired—whichever occurs first. If the Char
Time Out value is set to 0ms, the radio will buffer exactly the Minimum
Packet size and then transmit that data.
Min Packet (chars): This is the minimum packet size, in bytes. Use this
setting, and the one below, to adjust throughput and latency of data
transmission.
Max Packet (chars): This is the maximum packet size, in bytes. Use this
setting, and the one above, to adjust throughput and latency of data
transmission.
Note: In most cases, there should be no need to change these settings.
Transmit Power: This setting controls the output power in dBm (mW) to use.
You should ordinarily choose the minimum value that will maintain an
adequate system fade margin.
Important: Maximum output power for radios is controlled by regulatory agencies in the country in
which this radio will be operated. Do not choose a power level that exceeds the maximum allowed
for your country or region.
Retry Limit: When the Send Data To field is set to Broadcast, this field
specifies the number of times each RF transmission is sent for every packet.
When the Send Data To field is set to a specific radio ID, this value specifies
how many times radio packet should be retransmitted if it doesn't get through.
Use this radio as a Repeater: If this box is checked, the radio will be act as
a Repeater. If it is unchecked it will not.
ProSoft Technology, Inc. Page 79 of 132
March 16, 2011
Page 80

Dialog Boxes ControlScape ♦ RadioLinx
User Manual RadioLinx® ControlScape FH
Allow radio to Roam: Allows the radio to search the network for the next
available radio to send the information packet to.
Page 80 of 132 ProSoft Technology, Inc.
March 16, 2011
Page 81

ControlScape ♦ RadioLinx Dialog Boxes
RadioLinx® ControlScape FH User Manual
8.4 Radio Configuration Dialog Box - IFHE
The Radio Configuration Dialog Box opens when you select a radio in the
Graphical Layout Screen (page 76), and then choose Properties. Use this dialog
box to view or modify the settings for a radio.
Radio Name: Identifies the radio in the Graphical Layout Screen. Type the
name (for example, Scanner, Radio 1, or Repeater) of the radio in this field.
Send Data to: Select the send data mode from the dropdown list. For some
network types, this setting is fixed and cannot be modified.
Last Date Configured: The date and time reported here indicates:
o
The last time that the configuration parameters were modified and saved
o
The last time the radio was configured (page 40) (configuration data was
downloaded to the radio).
Last S/N Configured: This is the serial number of the radio being configured.
The information in this field is maintained by ControlScape and cannot be
modified. If this radio has never been configured as a part of this network, this
field will be blank.
Select radio: Click this button to select a radio to configure over the Ethernet
connection, or change the radio’s IP address.
IP Address: Displays the IP Address of the currently selected radio. To
change the IP address for this radio, click the Select Radio button.
Subnet Mask: This defines the network ID and is typically set to
255.255.255.0. All Ethernet devices on a particular network should have the
Subnet Mask set to the same value.
Default Gateway: This defines the default network that the Configuration PC
will operate on. The gateway is the computer that routes the traffic from a
workstation to the outside network.
Serial Settings: This button opens the Serial Settings dialog box, allowing
you to configure the way serial data packets are encapsulated and
transmitted over an Ethernet network.
OK: Click the OK button to save your settings to a configuration file on your
local computer. These settings do not affect the radio until you click the
Configure Radio button to transfer the configuration to the radio.
Configure Radio: Click the Configure Radio button to send the configuration
settings to the radio. When you click this button, ControlScape opens a
connection between the serial port on the computer and the serial port on the
radio, and then copies the configuration from the computer to the radio's
memory.
Cancel: Click the Cancel button to close the dialog box and discard your
changes.
Help: Click the Help button to read the online help for ControlScape.
Advanced: Click the Advanced button to view and change additional settings
for the radio. These settings control advanced features that are normally not
required for a typical radio network.
ProSoft Technology, Inc. Page 81 of 132
March 16, 2011
Page 82

Dialog Boxes ControlScape ♦ RadioLinx
User Manual RadioLinx® ControlScape FH
Advanced Settings
Radio Address: The software assigns a unique address to each radio in the
network after the radio is configured (The user cannot change this addressing
scheme - the address field is grayed-out).
Network Type: This is the network type configured on the Network
Properties dialog box.
Transmit Power: This setting controls the output power in dBm (mW) to use.
You should ordinarily choose the minimum value that will maintain an
adequate system fade margin.
Important: Maximum output power for radios is controlled by regulatory agencies in the country in
which this radio will be operated. Do not choose a power level that exceeds the maximum allowed
for your country or region.
Retry Limit: When the Send Data To field is set to Broadcast, this field
specifies the number of times each RF transmission is sent for every packet.
When the Send Data To field is set to a specific radio ID, this value specifies
how many times radio packet should be retransmitted if it doesn't get through.
Page 82 of 132 ProSoft Technology, Inc.
March 16, 2011
Page 83

ControlScape ♦ RadioLinx Dialog Boxes
RadioLinx® ControlScape FH User Manual
8.5 Radio Configuration Dialog Box - Protocol Transparent
The Radio Configuration Dialog Box opens when you select a radio in the
Graphical Layout Screen (page 76), and then choose Properties. Use this dialog
box to view or modify the settings for a radio.
Radio Name: Identifies the radio in the Graphical Layout Screen. Type the
name (for example, Scanner, Radio 1, or Repeater) of the radio in this field.
Last Date Configured: The date and time reported here indicates:
o
The last time that the configuration parameters were modified and saved
The last time the radio was configured (page 40) (configuration data was
downloaded to the radio).
Last S/N Configured: This is the serial number of the radio being configured.
The information in this field is maintained by ControlScape and cannot be
modified. If this radio has never been configured as a part of this network, this
field will be blank.
Baud Rate: Select the baud rate from the dropdown list. The baud rate on
the radio must match the baud rate on the connected serial device.
Parity: Select the parity (None, Even or Odd) from the dropdown list. The
parity on the radio must match the parity on the connected serial device.
Data Bits: Select the number of data bits (7 or 8) from the dropdown list. The
data bits on the radio must match the data bits on the connected serial
device.
Stop Bits: Select the number of stop bits (1 or 2) from the dropdown list. The
stop bits on the radio must match the stop bits on the connected serial
device.
Handshaking: Select the handshaking mode (None or Hardware) from the
dropdown list. The handshaking mode on the radio must match the
handshaking mode on the connected serial device. The radio uses RTS/CTS
for hardware handshaking.
OK: Click the OK button to save your settings to a configuration file on your
local computer. These settings do not affect the radio until you click the
Configure Radio button to transfer the configuration to the radio.
Configure Radio: Click the Configure Radio button to send the configuration
settings to the radio. When you click this button, ControlScape opens a
connection between the serial port on the computer and the serial port on the
radio, and then copies the configuration from the computer to the radio's
memory.
Cancel: Click the Cancel button to close the dialog box and discard your
changes.
Help: Click the Help button to read the online help for ControlScape.
Advanced: Click the Advanced button to view and change additional settings
for the radio. These settings control advanced features that are normally not
required for a typical radio network.
ProSoft Technology, Inc. Page 83 of 132
March 16, 2011
Page 84

Dialog Boxes ControlScape ♦ RadioLinx
User Manual RadioLinx® ControlScape FH
Advanced Settings
Radio Address: The software assigns a unique address to each radio in the
network after the radio is configured (The user cannot change this addressing
scheme - the address field is grayed-out).
Device Network: Select the Device Network for this radio from the dropdown
list. Device Networks are defined on the Device Network Properties Dialog
Box (page 98).
Destination: Choose the destination radio (for example, Master Radio, or
Radio 2) to which this radio should transfer data.
Keep data packet together: Select (check) this check box to keep the data
packet together so that the information is complete. This is the default setting,
and is correct for most configurations.
Low latency mode: Select (check) this checkbox only if latency is an issue.
Both the transmitting and receiving radios need to have it selected. The Low
Latency Mode will work the best with slower baud rates and large messages.
Transmit Power: This setting controls the output power in dBm (mW) to use.
You should ordinarily choose the minimum value that will maintain an
adequate system fade margin.
Important: Maximum output power for radios is controlled by regulatory agencies in the country in
which this radio will be operated. Do not choose a power level that exceeds the maximum allowed
for your country or region.
Retry Limit (ms): The transmitting radio will re-send the data as many times
as set if there is an error in transmission. In normal transmission, the
receiving radio "acknowledges" that the data has been received with no
detected errors. If the transmitting radio does not get an acknowledgement, it
will re-transmit until the retry limit has been met.
Broadcast Repeats: Sets the number of times the radio will attempt to send
the data.
Use this radio as a Repeater: If this box is checked, the radio will be act as
a Repeater. If it is unchecked it will not.
Allow radio to Roam: Allows the radio to search the network for the next
available radio to send the information packet to.
Collision Handling: Select (check) this checkbox to turn on collision
handling. All radios in the network should be set the same, either on or off.
Collision Handling is not necessary for:
o
A single point to point device network
o
A single master slave device network
o
Any other situation where normally only one device is transmitting at a
time
Collision Handling may be necessary if:
o
Multiple independent device networks are connected to a single radio
network
o
The devices use a peer-to-peer asynchronous protocol
o
Any other situation where multiple devices are regularly transmitting
simultaneously
Page 84 of 132 ProSoft Technology, Inc.
March 16, 2011
Page 85

ControlScape ♦ RadioLinx Dialog Boxes
RadioLinx® ControlScape FH User Manual
8.6 Radio Configuration Dialog Box - Modbus & DNP Protocol
The Radio Configuration Dialog Box opens when you select a radio in the
Graphical Layout Screen (page 76), and then choose Properties. Use this dialog
box to view or modify the settings for a radio.
Radio Name: Identifies the radio in the Graphical Layout Screen. Type the
name (for example, Scanner, Radio 1, or Repeater) of the radio in this field.
Last Date Configured: The date and time reported here indicates:
o
The last time that the configuration parameters were modified and saved
o
The last time the radio was configured (page 40) (configuration data was
downloaded to the radio).
Last S/N Configured: This is the serial number of the radio being configured.
The information in this field is maintained by ControlScape and cannot be
modified. If this radio has never been configured as a part of this network, this
field will be blank.
Associate (protocol) ID: In a Modbus or DNP network, remote devices
connected to the network must be "associated" with the particular radio they
are connected to. Use this button to set the unique device ID (page 92)
number(s) connected to this radio.
Modbus Master: Select (check) this checkbox if this radio is a Modbus
Master.
Baud Rate: Select the baud rate from the dropdown list. The baud rate on
the radio must match the baud rate on the connected serial device.
Parity: Select the parity (None, Even or Odd) from the dropdown list. The
parity on the radio must match the parity on the connected serial device.
Data Bits: Select the number of data bits (7 or 8) from the dropdown list. The
data bits on the radio must match the data bits on the connected serial
device.
Stop Bits: Select the number of stop bits (1 or 2) from the dropdown list. The
stop bits on the radio must match the stop bits on the connected serial
device.
Handshaking: Select the handshaking mode (None or Hardware) from the
dropdown list. The handshaking mode on the radio must match the
handshaking mode on the connected serial device. The radio uses RTS/CTS
for hardware handshaking.
OK: Click the OK button to save your settings to a configuration file on your
local computer. These settings do not affect the radio until you click the
Configure Radio button to transfer the configuration to the radio.
Configure Radio: Click the Configure Radio button to send the configuration
settings to the radio. When you click this button, ControlScape opens a
connection between the serial port on the computer and the serial port on the
radio, and then copies the configuration from the computer to the radio's
memory.
Cancel: Click the Cancel button to close the dialog box and discard your
changes.
Help: Click the Help button to read the online help for ControlScape.
Advanced: Click the Advanced button to view and change additional settings
for the radio. These settings control advanced features that are normally not
required for a typical radio network.
ProSoft Technology, Inc. Page 85 of 132
March 16, 2011
Page 86

Dialog Boxes ControlScape ♦ RadioLinx
User Manual RadioLinx® ControlScape FH
Advanced Settings
Radio Address: The software assigns a unique address to each radio in the
network after the radio is configured (The user cannot change this addressing
scheme - the address field is grayed-out).
Device Network: Select the Device Network for this radio from the dropdown
list. Device Networks are defined on the Device Network Properties Dialog
Box (page 98).
Keep data packet together: Select (check) this check box to keep the data
packet together so that the information is complete. This is the default setting,
and is correct for most configurations.
Low latency mode: Select (check) this checkbox only if latency is an issue.
Both the transmitting and receiving radios need to have it selected. The Low
Latency Mode will work the best with slower baud rates and large messages.
Transmit Power: This setting controls the output power in dBm (mW) to use.
You should ordinarily choose the minimum value that will maintain an
adequate system fade margin.
Important: Maximum output power for radios is controlled by regulatory agencies in the country in
which this radio will be operated. Do not choose a power level that exceeds the maximum allowed
for your country or region.
Retry Limit (ms): The transmitting radio will re-send the data as many times
as set if there is an error in transmission. In normal transmission, the
receiving radio "acknowledges" that the data has been received with no
detected errors. If the transmitting radio does not get an acknowledgement, it
will re-transmit until the retry limit has been met.
Broadcast Repeats: Sets the number of times the radio will attempt to send
the data.
Use this radio as a Repeater: If this box is checked, the radio will be act as
a Repeater. If it is unchecked it will not.
Allow radio to Roam: Allows the radio to search the network for the next
available radio to send the information packet to.
Collision Handling: Select (check) this checkbox to turn on collision
handling. All radios in the network should be set the same, either on or off.
Collision Handling is not necessary for:
o
A single point to point device network
o
A single master slave device network
o
Any other situation where normally only one device is transmitting at a
time
Collision Handling may be necessary if:
o
Multiple independent device networks are connected to a single radio
network
o
The devices use a peer-to-peer asynchronous protocol
o
Any other situation where multiple devices are regularly transmitting
simultaneously
Page 86 of 132 ProSoft Technology, Inc.
March 16, 2011
Page 87

ControlScape ♦ RadioLinx Dialog Boxes
RadioLinx® ControlScape FH User Manual
8.7 Radio Configuration Dialog Box - DF1 Half Duplex
The Radio Configuration Dialog Box opens when you select a radio in the
Graphical Layout Screen (page 76), and then choose Properties. Use this dialog
box to view or modify the settings for a radio.
Radio Name: Identifies the radio in the Graphical Layout Screen. Type the
name (for example, Scanner, Radio 1, or Repeater) of the radio in this field.
Last Date Configured: The date and time reported here indicates:
o
The last time that the configuration parameters were modified and saved
The last time the radio was configured (page 40) (configuration data was
downloaded to the radio).
Last S/N Configured: This is the serial number of the radio being configured.
The information in this field is maintained by ControlScape and cannot be
modified. If this radio has never been configured as a part of this network, this
field will be blank.
Associate Device ID: In this type of protocol network, remote devices
connected to the network must be "associated" with the particular radio they
are connected to. Use this button to set the unique device ID (page 93)
number(s) connected to this radio.
Master: Select (check) this checkbox if this radio is a DF1 Master.
Baud Rate: Select the baud rate from the dropdown list. The baud rate on
the radio must match the baud rate on the connected serial device.
Parity: Select the parity (None, Even or Odd) from the dropdown list. The
parity on the radio must match the parity on the connected serial device.
Data Bits: Select the number of data bits (7 or 8) from the dropdown list. The
data bits on the radio must match the data bits on the connected serial
device.
Stop Bits: Select the number of stop bits (1 or 2) from the dropdown list. The
stop bits on the radio must match the stop bits on the connected serial
device.
Handshaking: Select the handshaking mode (None or Hardware) from the
dropdown list. The handshaking mode on the radio must match the
handshaking mode on the connected serial device. The radio uses RTS/CTS
for hardware handshaking.
OK: Click the OK button to save your settings to a configuration file on your
local computer. These settings do not affect the radio until you click the
Configure Radio button to transfer the configuration to the radio.
Configure Radio: Click the Configure Radio button to send the configuration
settings to the radio. When you click this button, ControlScape opens a
connection between the serial port on the computer and the serial port on the
radio, and then copies the configuration from the computer to the radio's
memory.
Cancel: Click the Cancel button to close the dialog box and discard your
changes.
Help: Click the Help button to read the online help for ControlScape.
Advanced: Click the Advanced button to view and change additional settings
for the radio. These settings control advanced features that are normally not
required for a typical radio network.
ProSoft Technology, Inc. Page 87 of 132
March 16, 2011
Page 88

Dialog Boxes ControlScape ♦ RadioLinx
User Manual RadioLinx® ControlScape FH
Advanced Settings
Radio Address: The software assigns a unique address to each radio in the
network after the radio is configured (The user cannot change this addressing
scheme - the address field is grayed-out).
Device Network: Select the Device Network for this radio from the dropdown
list. Device Networks are defined on the Device Network Properties Dialog
Box (page 98).
Keep data packet together: Select (check) this check box to keep the data
packet together so that the information is complete. This is the default setting,
and is correct for most configurations.
Low latency mode: Select (check) this checkbox only if latency is an issue.
Both the transmitting and receiving radios need to have it selected. The Low
Latency Mode will work the best with slower baud rates and large messages.
Transmit Power: This setting controls the output power in dBm (mW) to use.
You should ordinarily choose the minimum value that will maintain an
adequate system fade margin.
Important: Maximum output power for radios is controlled by regulatory agencies in the country in
which this radio will be operated. Do not choose a power level that exceeds the maximum allowed
for your country or region.
Retry Limit (ms): The transmitting radio will re-send the data as many times
as set if there is an error in transmission. In normal transmission, the
receiving radio "acknowledges" that the data has been received with no
detected errors. If the transmitting radio does not get an acknowledgement, it
will re-transmit until the retry limit has been met.
Broadcast Repeats: Sets the number of times the radio will attempt to send
the data.
Allow radio to Roam: Allows the radio to search the network for the next
available radio to send the information packet to.
Use this radio as a Repeater: If this box is checked, the radio will be act as
a Repeater. If it is unchecked it will not.
Collision Handling: Select (check) this checkbox to turn on collision
handling. All radios in the network should be set the same, either on or off.
Collision Handling is not necessary for:
o
A single point to point device network
o
A single master slave device network
o
Any other situation where normally only one device is transmitting at a
time
Collision Handling may be necessary if:
o
Multiple independent device networks are connected to a single radio
network
o
The devices use a peer-to-peer asynchronous protocol
o
Any other situation where multiple devices are regularly transmitting
simultaneously
Page 88 of 132 ProSoft Technology, Inc.
March 16, 2011
Page 89

ControlScape ♦ RadioLinx Dialog Boxes
RadioLinx® ControlScape FH User Manual
8.8 Radio Configuration Dialog Box - FHE Radio
The Radio Configuration Dialog Box opens when you select a radio in the
Graphical Layout Screen (page 76), and then choose Properties. Use this dialog
box to view or modify the settings for a radio.
Radio Name: Identifies the radio in the Graphical Layout Screen. Type the
name (for example, Scanner, Radio 1, or Repeater) of the radio in this field.
Last Date Configured: The date and time reported here indicates:
o
The last time that the configuration parameters were modified and saved
o
The last time the radio was configured (page 40) (configuration data was
downloaded to the radio).
Last S/N Configured: This is the serial number of the radio being configured.
The information in this field is maintained by ControlScape and cannot be
modified. If this radio has never been configured as a part of this network, this
field will be blank.
Select radio: Click this button to select a radio to configure over the Ethernet
connection, or change the radio’s IP address.
IP Address: Enter the IP address for the radio in this field. This is the radio’s
identifier on the network. Each radio must have its own unique address to be
able to communicate to the master on the network. This address must be
different from any other device on the network including the Configuration
PC.
Subnet Mask: This defines the network ID and is typically set to
255.255.255.0. All Ethernet devices on a particular network should have the
Subnet Mask set to the same value.
Default Gateway: This defines the default network that the Configuration PC
will operate on. The gateway is the computer that routes the traffic from a
workstation to the outside network.
Port Number: Select the UDP port number to use for encapsulated serial
data transmission.
Serial Protocol: Some RLX models support a variety of serial protocol types.
Choose the protocol type from the dropdown list.
Baud Rate: Select the baud rate from the dropdown list. The baud rate on
the radio must match the baud rate on the connected serial device.
Parity: Select the parity (None, Even or Odd) from the dropdown list. The
parity on the radio must match the parity on the connected serial device.
Data Bits: Select the number of data bits (7 or 8) from the dropdown list. The
data bits on the radio must match the data bits on the connected serial
device.
Stop Bits: Select the number of stop bits (1 or 2) from the dropdown list. The
stop bits on the radio must match the stop bits on the connected serial
device.
Turn around time between packets (ms): The amount of time the Serial
Server waits to hear from an attached Modbus RTU slave before accepting
another Modbus TCP request. If the serial protocol is set to Modbus TCP/IP,
the radio acts as both a Modbus TCP Slave and a Modbus RTU Master. It
accepts requests from the Modbus TCP Master and then sends them out the
serial port as if it were a Modbus RTU Master.
ProSoft Technology, Inc. Page 89 of 132
March 16, 2011
Page 90

Dialog Boxes ControlScape ♦ RadioLinx
User Manual RadioLinx® ControlScape FH
OK: Click the OK button to save your settings to a configuration file on your
local computer. These settings do not affect the radio until you click the
Configure Radio button to transfer the configuration to the radio.
Configure Radio: Click the Configure Radio button to send the configuration
settings to the radio. When you click this button, ControlScape opens a
connection between the serial port on the computer and the serial port on the
radio, and then copies the configuration from the computer to the radio's
memory.
Cancel: Click the Cancel button to close the dialog box and discard your
changes.
Help: Click the Help button to read the online help for ControlScape.
Advanced: Click the Advanced button to view and change additional settings
for the radio. These settings control advanced features that are normally not
required for a typical radio network.
Advanced Settings
Radio Address: The software assigns a unique address to each radio in the
network after the radio is configured (The user cannot change this addressing
scheme - the address field is grayed-out).
Device Network: Select the Device Network for this radio from the dropdown
list. Device Networks are defined on the Device Network Properties Dialog
Box (page 98).
Transmit Power: This setting controls the output power in dBm (mW) to use.
You should ordinarily choose the minimum value that will maintain an
adequate system fade margin.
Important: Maximum output power for radios is controlled by regulatory agencies in the country in
which this radio will be operated. Do not choose a power level that exceeds the maximum allowed
for your country or region.
Retry Limit (ms): The transmitting radio will re-send the data as many times
as set if there is an error in transmission. In normal transmission, the
receiving radio "acknowledges" that the data has been received with no
detected errors. If the transmitting radio does not get an acknowledgement, it
will re-transmit until the retry limit has been met.
Use this radio as a Repeater: If this box is checked, the radio will be act as
a Repeater. If it is unchecked it will not.
Allow radio to Roam: Allows the radio to search the network for the next
available radio to send the information packet to.
Page 90 of 132 ProSoft Technology, Inc.
March 16, 2011
Page 91

ControlScape ♦ RadioLinx Dialog Boxes
RadioLinx® ControlScape FH User Manual
Collision Handling: Select (check) this checkbox to turn on collision
handling. All radios in the network should be set the same, either on or off.
Collision Handling is not necessary for:
o
A single point to point device network
o
A single master slave device network
o
Any other situation where normally only one device is transmitting at a
time
Collision Handling may be necessary if:
o
Multiple independent device networks are connected to a single radio
network
o
The devices use a peer-to-peer asynchronous protocol
o
Any other situation where multiple devices are regularly transmitting
simultaneously
Configure Via COM Port: Select (check) this checkbox to use a connection
between the serial port on the configuration PC and the serial port on the
radio, rather than an Ethernet connection, to configure the radio.
ProSoft Technology, Inc. Page 91 of 132
March 16, 2011
Page 92

Dialog Boxes ControlScape ♦ RadioLinx
User Manual RadioLinx® ControlScape FH
8.9 Associate Device IDs Dialog Box - Modbus & DNP
The Associate Device IDs Dialog Box opens when you click the Associate IDs
button on the Radio Configuration Dialog Box. Use this dialog box to choose
which device IDs to associate to this radio.
Device ID List: This is a list of all the devices that you can associate with this
radio.
Select All: Click this button to select all the items in the list.
Clear All: Click this button to clear (un-select) all the items in the list.
OK: Click the OK button to save your selection and close the dialog box.
Cancel: Click the Cancel button to close the dialog box and discard your
changes.
View All Devices: Click this button to open the Network Device IDs dialog
box (page 108). This dialog box shows a list of all device networks, radios
and device IDs associated with this radio.
Page 92 of 132 ProSoft Technology, Inc.
March 16, 2011
Page 93

ControlScape ♦ RadioLinx Dialog Boxes
RadioLinx® ControlScape FH User Manual
8.10 Associate Device IDs Dialog Box - DF1 Half Duplex
The Associate Device IDs Dialog Box opens when you click the Associate IDs
button on the Radio Configuration Dialog Box. Use this dialog box to choose
which device IDs to associate to this radio.
Edit Field: Type the Device ID in this field, and then click the Add ID button
to add it to the Device ID List.
Add ID: Type the Device ID in the Edit Field, and then click this button to add
it to the Device ID List.
Device ID List: This is a list of all the devices that you can associate with this
radio.
Remove ID: Select one or more Device IDs from the list, and then click this
button to remove (permanently delete) these IDs from the list.
View All Devices: Click this button to open the Network Device IDs dialog
box (page 108). This dialog box shows a list of all device networks, radios
and device IDs associated with this radio.
OK: Click the OK button to save your selection and close the dialog box.
Cancel: Click the Cancel button to close the dialog box and discard your
changes.
ProSoft Technology, Inc. Page 93 of 132
March 16, 2011
Page 94

Dialog Boxes ControlScape ♦ RadioLinx
User Manual RadioLinx® ControlScape FH
8.11 Automatic Baud Detection Dialog Box
If ControlScape is unable to open the COM port on the configuration PC, you will
be prompted to check the port configuration (page 11). The Automatic Baud
Detection dialog box opens when you click Yes on the message box prompt "The
connected radio is not responding. Do you want to attempt an automatic baud
rate detection sequence?"
ControlScape will attempt to open the port using all available combinations of
baud rate, data bits, parity and stop bits. This procedure may take several
minutes; if you know the correct settings for your COM port, click Cancel, and
then use the Serial Settings dialog box to configure the port.
Page 94 of 132 ProSoft Technology, Inc.
March 16, 2011
Page 95

ControlScape ♦ RadioLinx Dialog Boxes
RadioLinx® ControlScape FH User Manual
8.12 Configuration Access Password Dialog Box
The Configuration Access Password dialog box opens when you save a network
configuration. Leave the password blank to allow anyone to access the
configuration from your computer, or enter a password to restrict access.
Password Field: Type your password in this field. For security reasons, the
characters you type are replaced with * characters.
OK: Click the OK button to save your selection and close the dialog box.
ProSoft Technology, Inc. Page 95 of 132
March 16, 2011
Page 96

Dialog Boxes ControlScape ♦ RadioLinx
User Manual RadioLinx® ControlScape FH
8.13 Configuration Access Password Dialog Box
The Configuration Access Password dialog box opens when you attempt to open
a network configuration that has a password assigned to it. Enter the assigned
password in the Password field, and then click OK to continue.
Password Field: Type your password in this field. For security reasons, the
characters you type are replaced with * characters.
OK: Click the OK button to save your selection and close the dialog box.
Cancel: Click the Cancel button to close the dialog box and discard your
changes.
Help: Click the Help button to read the online help for ControlScape.
Page 96 of 132 ProSoft Technology, Inc.
March 16, 2011
Page 97

ControlScape ♦ RadioLinx Dialog Boxes
RadioLinx® ControlScape FH User Manual
8.14 Confirm Network Configuration Password Dialog Box
The Confirm Network Configuration Password dialog box opens when you assign
a password to a new network, or change the password to an existing network.
For the password to take effect, you must enter the password twice, and the two
passwords must match each other. Enter the password in the Password field,
and then click OK to continue.
Password Field: Type your password in this field. For security reasons, the
characters you type are replaced with * characters.
OK: Click the OK button to save your selection and close the dialog box.
Cancel: Click the Cancel button to close the dialog box and discard your
changes.
ProSoft Technology, Inc. Page 97 of 132
March 16, 2011
Page 98

Dialog Boxes ControlScape ♦ RadioLinx
User Manual RadioLinx® ControlScape FH
8.15 Device Network Properties Dialog Box
The Device Network Properties dialog box opens when you open the Properties
menu, and then choose Device Networks. Use this dialog box to view or modify
the list of device networks associated with this radio network.
Note: This option is available only for certain radio types. For more information, please refer to the
user manual for your radio.
Device Network Name: Type the Device Network Name in this field, and
then click the Add to List button to add it to the Device Network List.
Add to List: Type the Device Network Name in the Edit Field, and then click
this button to add it to the Device Network List.
Protocol: Select the protocol for this device network from the dropdown list.
Device Network list: This window shows a list of available device networks,
sorted by network name and protocol.
Edit Existing List: Click to edit existing items in the Device Network List.
Delete Network: Select a network from the Device Network list, and then
click this button to delete (permanently remove) the network from the list.
Edit Existing List
OK: Click the OK button to save your selection and close the dialog box.
Cancel: Click the Cancel button to close the dialog box and discard your
changes.
Help: Click the Help button to read the online help for ControlScape.
Page 98 of 132 ProSoft Technology, Inc.
March 16, 2011
Page 99

ControlScape ♦ RadioLinx Dialog Boxes
RadioLinx® ControlScape FH User Manual
8.16 Data Serial Port Settings Dialog Box
The Data Serial Port Settings dialog box opens when you click the Serial Settings
button on the Radio Configuration dialog box.
Use this dialog box to configure settings for serial data to be encapsulated and
sent over the wireless Ethernet network.
Encapsulation Protocol
o
TCP Client - Serial data is encapsulated into a TCP packet. This radio will
initiate a communication with a TCP server, either another radio or
another device. TCP can be more reliable than UDP, but uses more
bandwidth.
o
TCP Server - Radio receives data from a TCP Client. TCP can be more
reliable than UDP, but uses more bandwidth.
o
TCP Client/Server - Radio can both send and receive TCP traffic. This
radio will initiate a communication with a TCP server, whether it be
another radio or another device. It will also receive. data from a TCP
Client. TCP can be more reliable than UDP, but uses more bandwidth.
o
UDP Point-to-Point - UDP is the standard method for encapsulation.
Point-to-Point allows this device to send to another IP address and to
receive UDP data.
o
UDP Point-Multipoint (Point) - UDP is the standard method for
encapsulation. UDP point to multipoint allows many device to send to and
receive data from a single device. As a point, the device will sent to and
receive from many devices.
o
UDP Point-Multipoint (Multipoint) - UDP is the standard method for
encapsulation. UDP point to multipoint allows many device to send to and
receive data from a single device. As a multipoint, the device will sent to
and receive from one device.
o
UDP Multipoint-to-Multipoint - UDP is the standard method for
encapsulation. UDP multipoint allows this device to send data to and
receive data from many devices.
Remote IP: Enter the IP Address of the radio that should receive
encapsulated serial protocol packets.
Remote Port: Select the UDP port number to use for encapsulated serial
data transmission.
Listen IP: Enter the IP Address of the radio that should originate
encapsulated serial protocol packets.
Listen Port: Select the UDP port number to use for encapsulated serial data
transmission.
Modbus RTU Encapsulation: This setting determines how the RLX-IFHxE
radio converts between serial data and an Ethernet packet.
When unselected, the serial data is encapsulated/decapsultaed directly
to/from a standard UDP or TCP packet.
When selected, the serial data is translated into/from a properly formatted
Modbus TCP packet.
ProSoft Technology, Inc. Page 99 of 132
March 16, 2011
Page 100

Dialog Boxes ControlScape ♦ RadioLinx
User Manual RadioLinx® ControlScape FH
Timeout (chars): This value configures the length of time to look for gaps in
the data being received from the local attached device. The timer is activated
after the Minimum Packet Size has been accumulated in the radio, after
which, if the radio detects a gap in the data exceeding the Character Timeout
value, the radio will transmit the data. The radio will accumulate data in its
buffers until either
a) the number of bytes configured in the Maximum Packet size field has
been accumulated, or
b) the number of bytes configured in the Minimum Packet Size has been
accumulated
AND
the Character timeout has expired—whichever occurs first. If the Char
Time Out value is set to 0ms, the radio will buffer exactly the Minimum
Packet size and then transmit that data.
Max Packet (chars): This is the maximum packet size, in bytes. Use this
setting, and the one above, to adjust throughput and latency of data
transmission.
Note: In most cases, there should be no need to change these settings.
Data Port Mode: Select the data port mode (RS232, RS485 half-duplex or
RS485 full-duplex) from the dropdown list. The port mode on the radio must
match the port mode on the connected serial device.
Baud Rate: Select the baud rate from the dropdown list. The baud rate on
the radio must match the baud rate on the connected serial device.
Data Bits: Select the number of data bits (7 or 8) from the dropdown list. The
data bits on the radio must match the data bits on the connected serial
device.
Parity: Select the parity (None, Even or Odd) from the dropdown list. The
parity on the radio must match the parity on the connected serial device.
Stop Bits: Select the number of stop bits (1 or 2) from the dropdown list. The
stop bits on the radio must match the stop bits on the connected serial
device.
Handshaking: Select the handshaking mode (None or Hardware) from the
dropdown list. The handshaking mode on the radio must match the
handshaking mode on the connected serial device. The radio uses RTS/CTS
for hardware handshaking.
Page 100 of 132 ProSoft Technology, Inc.
March 16, 2011
 Loading...