

Page 1
Bedienungsanleitung / Garantie
Instruction Manual
Gasgrill
PC-GG 1206
Gas Barbecue
PC-GG1206_IM 09 .12.19
Page 2

Inhaltsverzeichnis .............................................................................................................................. Seite 3
PC-GG1206_IM 09 .12.19
Table of Contents ............................................................................................................................... Page 17
2
Page 3
PC-GG1206_IM 09 .12.19
Inhaltsverzeichnis
Sicherheitshinweise ..................................................................................3
Symbole in dieser Bedienungsanleitung .................................................3
Verwendungszweck ................................................................................3
Allgemeine Gefahren...............................................................................3
Gerät auspacken .....................................................................................3
Gasanlage anschließen ..........................................................................3
Gasgrill betreiben ....................................................................................4
Gasgrill warten .........................................................................................4
Maßnahmen zur Brandbekämpfung .......................................................4
Erste-Hilfe-Maßnahmen ..........................................................................4
Transporthinweise ...................................................................................4
Aufbewahrungshinweise .........................................................................5
Bestimmungsgemäßer Gebrauch ............................................................5
Technische Daten ......................................................................................5
Hinweis zur Richtlinienkonformität .........................................................5
Übersicht .....................................................................................................6
Stückliste ....................................................................................................7
Grill montieren ...........................................................................................7
Gasanschluss ...........................................................................................12
Allgemeines ...........................................................................................12
Regler und Schlauch .............................................................................12
An der Gas asche .................................................................................12
Am Gerät ...............................................................................................12
Undichte Stellen nden .........................................................................12
Gasgrill betreiben ....................................................................................12
Aufstellort ...............................................................................................13
Wenn Sie Gasgeruch bemerken ...........................................................13
Gasgrill einschalten ...............................................................................13
Seitenkocher einschalten ......................................................................13
Hitzeverteilung auf dem Rost ................................................................13
Tipps zum Grillen ...................................................................................13
Störungsbehebung ..................................................................................14
Gasgrill reinigen .......................................................................................14
Außen ächen ........................................................................................14
Innen ächen ..........................................................................................14
Innen äche der Grillwanne ...................................................................14
Grillrost ..................................................................................................14
Reinigung der Brenner ..........................................................................14
Wartung .................................................................................................14
P ege und Schutz von Edelstahl- und Emaille ächen .......................14
Verwendung von Schutzhüllen ..............................................................15
Emaillierten Flächen ..............................................................................15
Gasgrill aufbewahren ..............................................................................15
Gas asche .............................................................................................15
Garantie .....................................................................................................15
Garantiebedingungen ............................................................................15
Garantieabwicklung ...............................................................................15
Entsorgung ...............................................................................................16
Verpackung ............................................................................................16
Gasgrill ...................................................................................................16
Sicherheitshinweise
Sie haben ein sicheres Produkt erworben, doch auch der Kunde trägt
Verantwortung für den ordnungsgemäßen Aufbau, den Betrieb und die
P ege des Grills.
Verschiedene Sicherheitseinrichtungen schützen Sie vor Schäden oder
Verletzungen. Was Sie zu Ihrer eigenen Sicherheit wissen müssen, haben
wir Ihnen in dieser Anleitung zusammengefasst. Erwerben Sie kompetentes Wissen. Lesen und beachten Sie die Bedienungsanleitung vor der
Montage und der Inbetriebnahme des Gerätes.
Lesen Sie vor allem die Sicherheitshinweise. Benutzen
Sie den Artikel nur wie in dieser Anleitung beschrieben.
Ein Nichtbeachten der Anleitung kann zu Verpuffungen oder Bränden
führen!
Bewahren Sie diese Anleitung zum späteren Nachlesen auf. Bei Weitergabe des Artikels ist auch diese Anleitung mitzugeben.
Symbole in dieser Bedienungsanleitung
Wichtige Hinweise für Ihre Sicherheit sind besonders gekennzeichnet.
Beachten Sie diese Hinweise unbedingt, um Unfälle und Schäden am
Gerät zu vermeiden:
WARNUNG:
Warnt vor Gefahren für Ihre Gesundheit und zeigt mögliche Verletzungsrisiken auf.
ACHTUNG:
Weist auf mögliche Gefährdungen für das Gerät oder andere Gegenstände hin.
HINWEIS:
Hebt Tipps und Informationen für Sie hervor.
Verwendungszweck
Der Gasgrill darf nur zum Grillen im Freien verwendet werden.
WARNUNG: Anweisung für Kinder und Personen mit einge-
schränkten Fähigkeiten
Dieses Gerät ist nicht für die Benutzung durch Kinder oder durch
Personen mit eingeschränkten Fähigkeiten vorgesehen. Es darf nur
von Personen benutzt werden, die in der Lage sind, das Gerät sicher
zu bedienen.
Allgemeine Gefahren
WARNUNG:
Der Gasgrill hat scharfe Kanten, an denen Sie sich schneiden können.
Verwenden Sie bei der Montage, Wartung und Reinigung Schutzhandschuhe.
Gerät auspacken
WARNUNG:
• Zur Sicherheit Ihrer Kinder lassen Sie keine Verpackungsteile (Plastikbeutel, Karton, Styropor, etc.) erreichbar liegen.
• Lassen Sie kleine Kinder nicht mit Folie spielen. Es besteht Ersti-
ckungsgefahr!
Gasanlage anschließen
WARNUNG: BRAND- UND EXPLOSIONSGEFAHR
• Der Gasgrill darf nur mit einem Niederdruckregler betrieben werden.
Der beiliegende Druckregler ist für den Betrieb mit Flüssiggas (LPG)
werksseitig korrekt eingestellt. Lesen und beachten Sie auch die
separat dem Druckregler beiliegenden Montage- und Anwendungshinweise.
• Der Gasschlauch muss ggf. ausgetauscht werden, wenn entsprechend nationale Anforderungen bestehen.
• Achten Sie darauf, dass sich keine Zündquellen, offenes Feuer o. Ä.
in der Nähe be nden, wenn Sie die Gas asche austauschen.
• Lassen Sie sich beim Kauf oder Mieten der Gas asche im Fachhan-
del beraten.
• Das Gerät muss so angeschlossen werden, wie es in dieser Anleitung beschrieben ist.
3
Page 4
WARNUNG: BRAND- UND EXPLOSIONSGEFAHR
• Achten sie darauf, dass der Gasschlauch nicht geknickt wird oder
scheuert.
• Prüfen Sie nach der Montage der Gasanlage alle Verbindungsstellen
mit einem handelsüblichen Lecksuchspray oder Seifenwasser auf
Dichtheit. Eine Dichtigkeitsprüfung mit offener Flamme ist strengstens untersagt!
Gasgrill betreiben
WARNUNG: BRAND- UND EXPLOSIONSGEFAHR
• Rauchen Sie nicht beim Umgang mit der Gasanlage. Stellen Sie die
Gasasche nicht in der Nähe von offenem Feuer ab.
• Benutzen Sie den Gasgrill nur im Freien. Achten Sie darauf, dass
der Gasgrill windgeschützt steht.
• Schützen Sie den Grill vor Regen, Feuchtigkeit, Spritzwasser, etc.
• Stellen Sie den Gasgrill auf eine ebene, stabile und feuerfeste Fläche.
• Schützen Sie die Gasasche vor starker Sonneneinstrahlung.
• Prüfen Sie den Schlauch und den Druckregler vor jedem Betrieb auf
Risse und Beschädigungen.
• Nehmen Sie den Gasgrill nicht in Betrieb, wenn Druckregler,
Schlauch oder Gasasche defekt oder undicht sind.
• In den Röhren der Brenner nisten sich gerne Insekten ein. Prüfen
Sie die Brenner vor jedem Betrieb auf Fremdkörper. Entfernen Sie
Fremdkörper mit einer Bürste (Flaschenbürste, Pfeifenreiniger).
• Entzünden Sie die Gasamme nicht mit einer offenen Flamme. Benutzen Sie zum Zünden den elektrischen Anzünder des Gerätes.
• Zum Schutz gegen versehentlich ausströmendes Gas sollte das
Flaschenventil auf der Gasasche nur dann geöffnet sein, wenn der
Gasgrill in Betrieb ist. Drehen Sie das Flaschenventil nach jedem
Ausschalten des Gasgrills sofort wieder zu.
• Achten Sie auf einen Freiraum von mindestens 1 m um die Rückund Seitenwände des Gerätes.
• Halten Sie während des Betriebes einen sicheren Abstand zu brenn-
baren und hitzeempndlichen Materialien ein. Der Abstand darf nicht
geringer als 3 m sein.
• Achten Sie darauf, dass sich oberhalb des Gasgrills keine Gegen-
stände oder Gebäudeteile benden.
• Die Flächen des Gasgrills werden während des Betriebes sehr heiß.
Warnen Sie umstehende Personen und halten Sie Kinder fern.
• Lassen Sie den Gasgrill während des Betriebes nicht unbeaufsichtigt.
• Drehen Sie bei einer Störung sofort das Ventil der Gasasche zu.
• Vor jedem Stellplatzwechsel muss der Gasgrill ausgeschaltet, das
Ventil der Gasasche zugedreht und die Gasasche zum Schutz des
Druckreglers und der Schlauchleitung aus dem Unterteil des Grills
herausgenommen werden.
Gasgrill warten
WARNUNG: BRAND- UND EXPLOSIONSGEFAHR
• Reparaturen und Wartungen an der Gasanlage dürfen nur von hierfür autorisiertem Fachpersonal durchgeführt werden. Nehmen Sie
keine Veränderungen am Gasgrill und am Druckregler vor.
• Tauschen Sie den Druckregler nach 2 und den Schlauch nach spätestens 5 Jahren, auch wenn keine äußerlichen Schäden zu erkennen
sind. Achten Sie darauf, dass der Druckregler für das verwendete Gas
zugelassen und auf den korrekten Ausgangsdruck (siehe Technische
Daten) eingestellt ist. Ein neuer Schlauch darf nicht länger als 1,5 m
sein.
WARNUNG: BRAND- UND EXPLOSIONSGEFAHR
• Das Gas bildet zusammen mit Öl ein explosives Gemisch. Versuchen Sie niemals, schwergängige Ventile und Regulierknöpfe mit Öl
oder Kriechöl leichtgängig zu machen.
Maßnahmen zur Brandbekämpfung
• Bringen Sie umstehende Personen in Sicherheit! Drehen Sie, wenn
möglich, das Ventil der Gasasche zu. Kühlen Sie die Gasasche mit
Wasser. Achten Sie dabei auf Ihre Sicherheit! Eine spontane, explosionsartige Wiederentzündung ist möglich.
• Löschen Sie ausströmendes, brennendes Gas nur, wenn Sie den Gasaustritt nicht stoppen können. Alle Löschmittel können benutzt werden.
Erste-Hilfe-Maßnahmen
– Maßnahmen nach Einatmen von Gas
• Hohe Konzentrationen können Ersticken verursachen. Symptome
können Verlust der Bewegungsfähigkeit und des Bewusstseins sein.
Das Opfer bemerkt das Ersticken nicht. In niedrigen Konzentrationen
können Schwindelgefühl, Kopfschmerzen, Übelkeit und Koordinationsstörungen auftreten.
• Bringen Sie das Opfer an die frische Luft. Verständigen Sie einen
Arzt oder den Rettungsdienst. Leiten Sie bei Atemstillstand die
künstliche Beatmung ein.
– Maßnahmen nach größeren Verbrennungen oder Verbrühungen
• Es besteht die akute Gefahr einer Unterkühlung und eines Schocks.
Rufen Sie sofort den Rettungsdienst!
• Eventuellen Kleiderbrand sofort mit Wasser löschen oder die Flam-
men mit einer dicken Decke ersticken.
• Bei Verbrühungen: Kleidung sofort entfernen.
• Bei Verbrennungen: Kleidung am Körper lassen.
• Mit kaltem Wasser mindestens 15 Minuten kühlen, bis der Schmerz
nachlässt.
• Den betroffenen Bereich mit einem sterilen Metalline-Brandtuch ab-
decken. Die mit Metalline beschichtete Seite auf die verletzte Haut
auegen und locker mit einer Mullbinde oder einem Dreieckstuch
xieren.
• Keine Hausmittel wie Salben, Puder, Öle, Desinfektionsmittel etc.
anwenden!
– Maßnahmen nach kleineren Verbrennungen oder Verbrühungen
• Bei Verbrühungen: Kleidung sofort entfernen.
• Bei Verbrennungen: Kleidung nur entfernen, wenn sie nicht haftet.
• Mit kaltem Wasser mindestens 15 Minuten kühlen, bis der Schmerz
nachlässt.
• Kleine Verbrennungen oder Verbrühungen ohne Blasenbildung an
der Luft heilen lassen, nicht mit einem Paster oder Verband abdecken.
Transporthinweise
WARNUNG: BRAND- UND EXPLOSIONSGEFAHR
• Transportieren Sie die Gasasche möglichst nicht in Fahrzeugen,
deren Laderaum nicht von der Fahrerkabine getrennt ist. Der Fahrer
muss die möglichen Gefahren der Ladung kennen und er muss wissen, was bei einem Unfall oder Notfall zu tun ist.
• Transportieren Sie die Gasasche stehend sowie gegen Umfallen
und Verrutschen gesichert.
• Achten Sie darauf, dass das Ventil der Gasasche geschlossen und
dicht ist.
4
Page 5
Aufbewahrungshinweise
WARNUNG: BRAND- UND EXPLOSIONSGEFAHR
• Wird das Gerät nicht verwendet, muss die Gasasche vom Gerät
getrennt werden.
• Bewahren Sie die Gasasche außerhalb der Reichweite von Kindern
auf.
• Halten Sie die Gasasche von oxidierenden Gasen und anderen
brandförderlichen Stoffen fern.
• Ausströmendes Flüssiggas ist schwerer als Luft und sinkt zu Boden.
Bewahren Sie die Gasasche nicht im Haus, unter Erdgleiche (z. B.
Keller, Schacht, Tiefgarage etc.) oder an unbelüfteten Plätzen auf,
an denen sich ausströmendes Gas sammeln könnte.
• Schützen Sie die Gasasche vor direkter Sonneneinstrahlung und
anderen Wärmequellen.
• Lagern Sie die Gasasche bei weniger als 50 °C an einem gut gelüf-
teten, schattigen Ort und gegen Witterungseinüsse geschützt.
• Lagern Sie die Gasasche stehend und gegen Umfallen gesichert.
• Leere Gasaschen enthalten immer eine Restmenge Flüssiggas.
Beachten Sie die Aufbewahrungshinweise auch für leere Gasaschen.
Technische Daten
Bestimmungsgemäßer Gebrauch
Dieses Gerät dient
• zum Grillen und Überbacken von festen Nahrungsmitteln.
• zum Erwärmen und Garen von festen oder üssigen Nahrungsmitteln.
Es ist ausschließlich für diesen Zweck bestimmt und darf nur dafür ver-
wendet werden.
Es darf nur in der Art und Weise benutzt werden, wie es in dieser Ge-
brauchsanleitung beschrieben ist.
Sie dürfen das Gerät nicht für gewerbliche Zwecke einsetzen.
Jede andere Verwendung gilt als nicht bestimmungsgemäß und kann zu
Sachschaden oder sogar zu Personenschaden führen.
Der Hersteller übernimmt keine Haftung für Schäden, die durch nicht
bestimmungsgemäßen Gebrauch entstehen.
Modell: PC-GG 1206
Gesamte aufgenommene Heizleistung aller Gaskategorien: 15,5 kW (1125 g/h) Der Grillbrenner ist bemessen mit 3,1 kW und der Seitenbrenner
mit 3,1 kW.
Gas Kategorie: I
Gasart: Butan, Propan oder deren Gemische
Gasdruck: 50 mbar
Gasdüse: Grillbrenner: 0,75 mm
Maximale Schlauchlänge: 150 cm
Identikationsnummer: 0063CS7068
Zielländer: AT und DE
3B/P(50)
Seitenbrenner: 0,75 mm
0063-19
Hinweis zur Richtlinienkonformität
Hiermit erklärt der Hersteller, dass sich das Gerät PC-GG 1206 in Übereinstimmung mit den grundlegenden Anforderungen der europäischen Verord-
nung EU / 2016 / 426 für Gasverbrauchsgeräte bendet.
5
Page 6
PC-GG1206_IM 09 .12.19
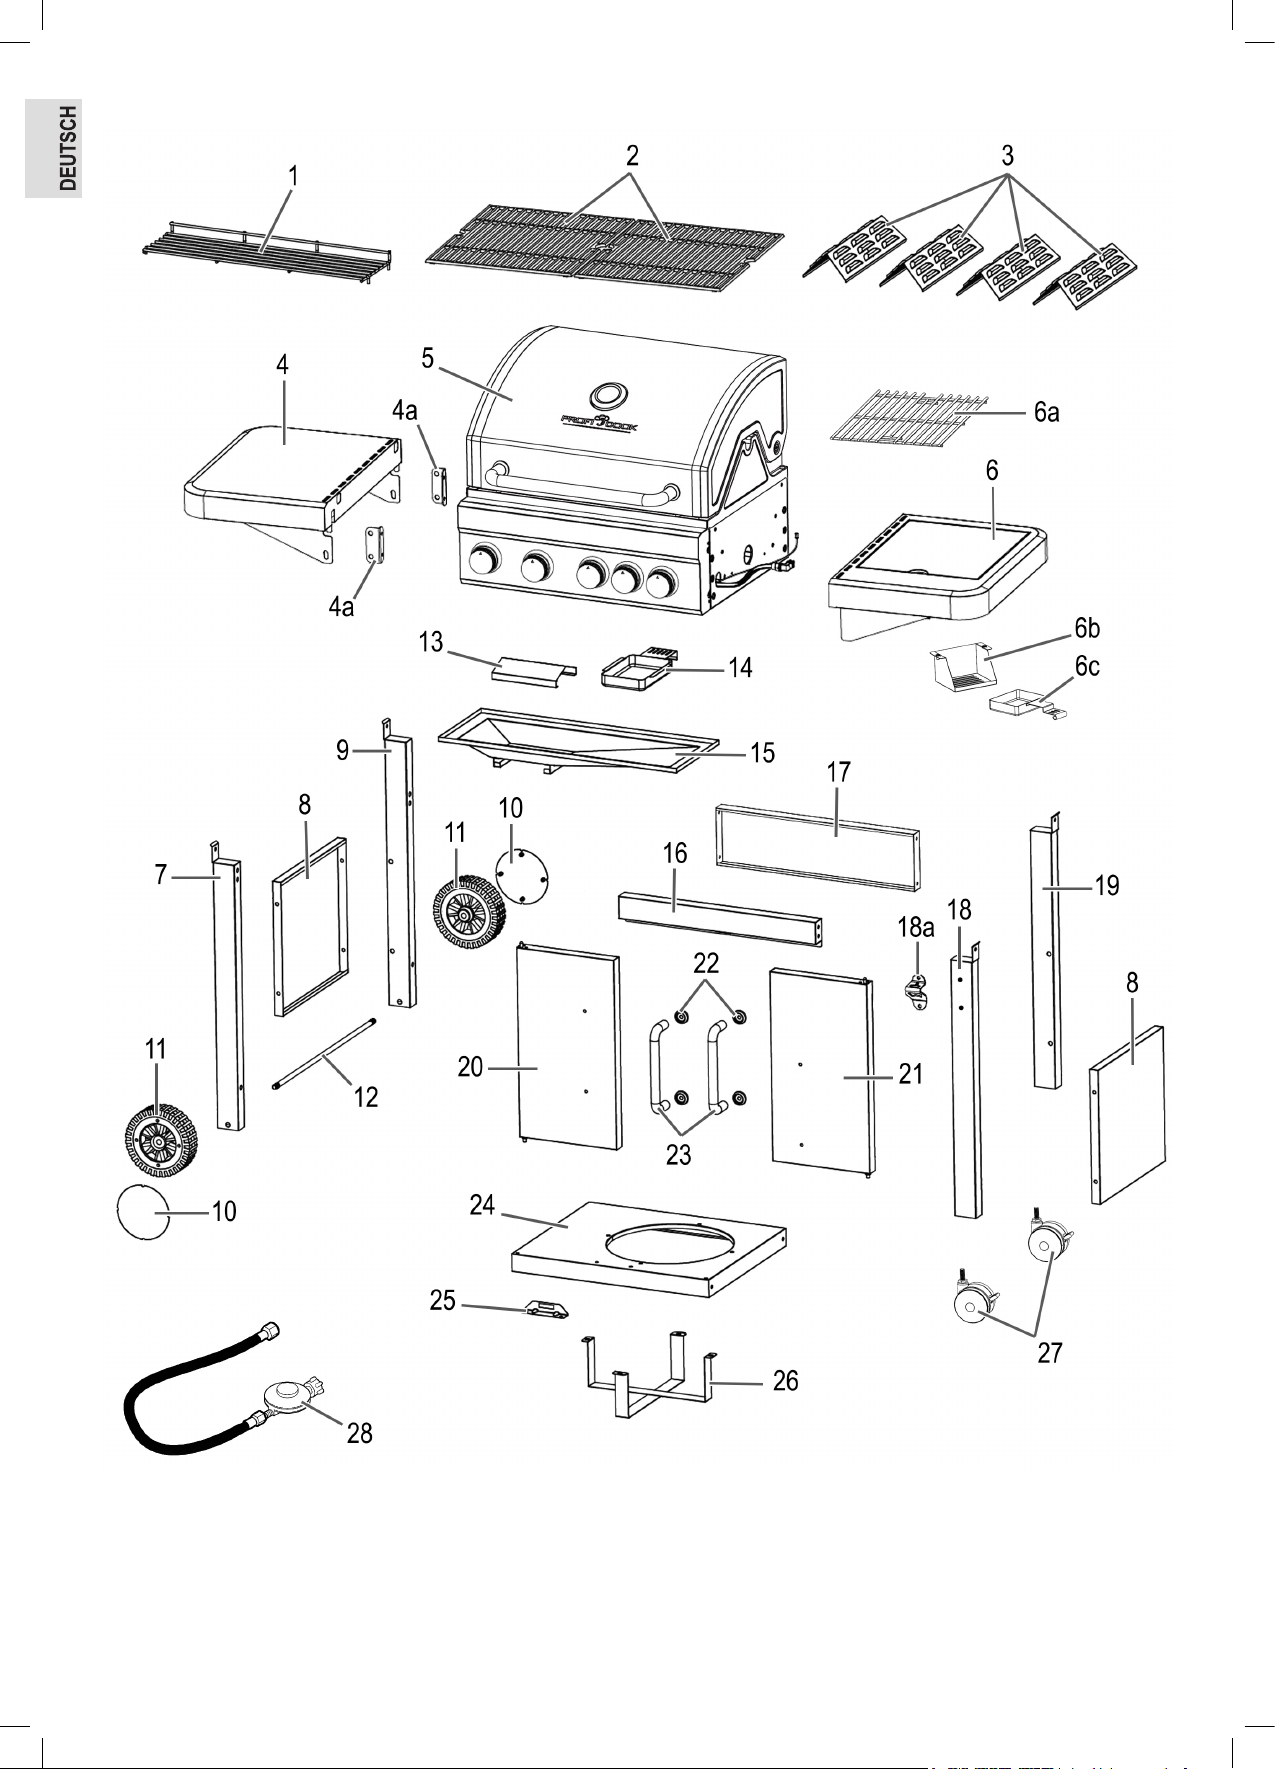
Übersicht
6
Page 7
PC-GG1206_IM 09 .12.19
Stückliste
Pos. Beschreibung Stk.
1 Grillgutablage 1
2 Grillrost 2
3 Flammabdeckung 3
4 Seitentisch, links 1
4a Winkel 1
5 Oberteil / Grill-Gehäuse 1
6 Seitentisch, rechts (für Seitenbrenner) 1
6a Seitenbrennergrillrost 1
6b Seitenbrenner Fettschubladenhalterung 1
6c Seitenbrenner Fettschublade 1
7 Standbein vorne, links 1
8 Seitenblech 2
Pos. Beschreibung Stk.
16 Traverse, vorne 1
17 Traverse, hinten 1
18 Standbein vorne, rechts 1
18a Flaschenöffner 1
19 Standbein hinten, rechts 1
20 Tür, links 1
21 Tür, rechts 1
22 Türgriff-Ring 4
23 Türgriff 2
24 Bodenplatte 1
25 Türanschlag 1
26 Träger 2
9 Standbein hinten, links 1
10 Radkappe 2
27 Rolle 2
28 Druckregler 1
11 Rad 2
12 Achse 1
13 Hitzeschild 1
14 Fettschublade 1
15 Fett Trichter 1
A Schraube M6×12
B Schraube M4×12
C Mutter M10
D Schraube M6
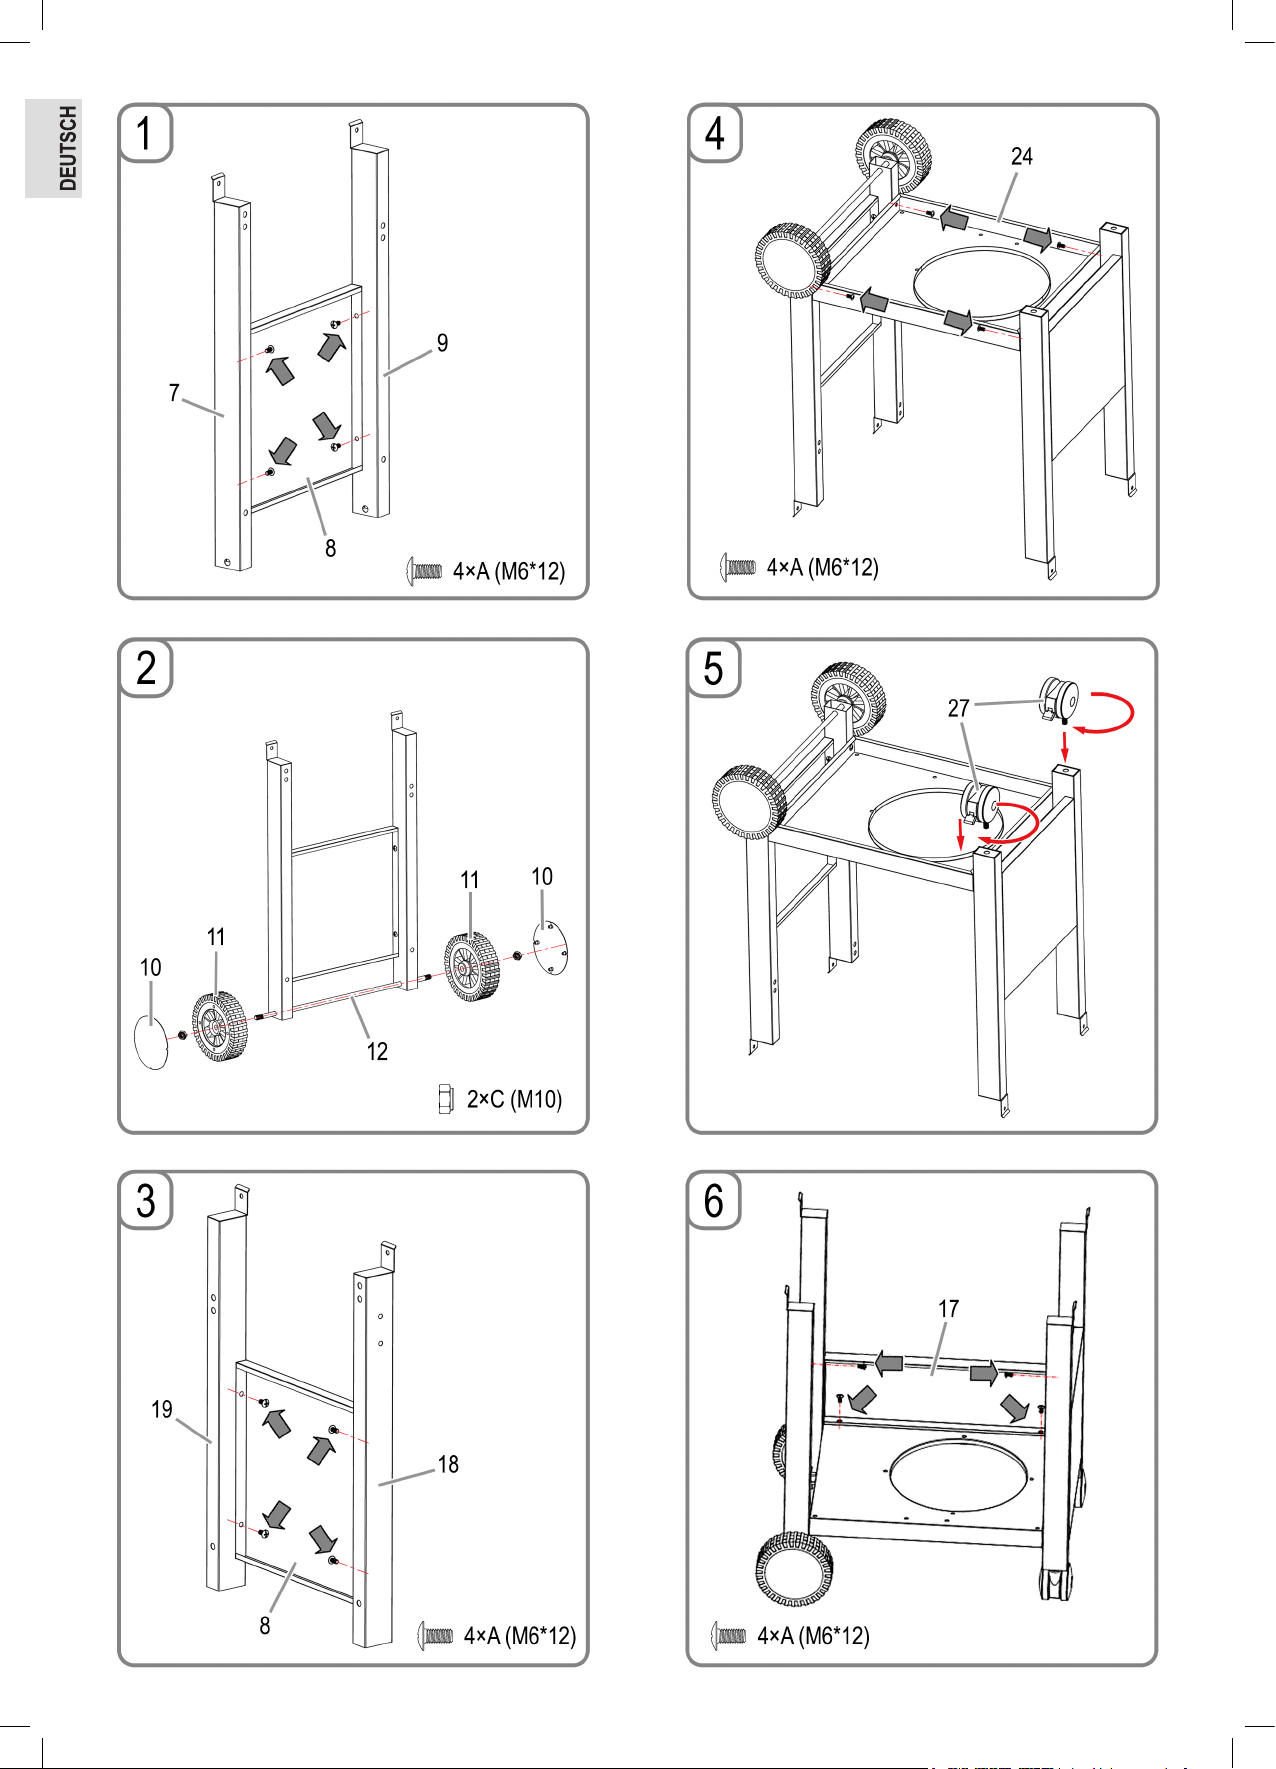
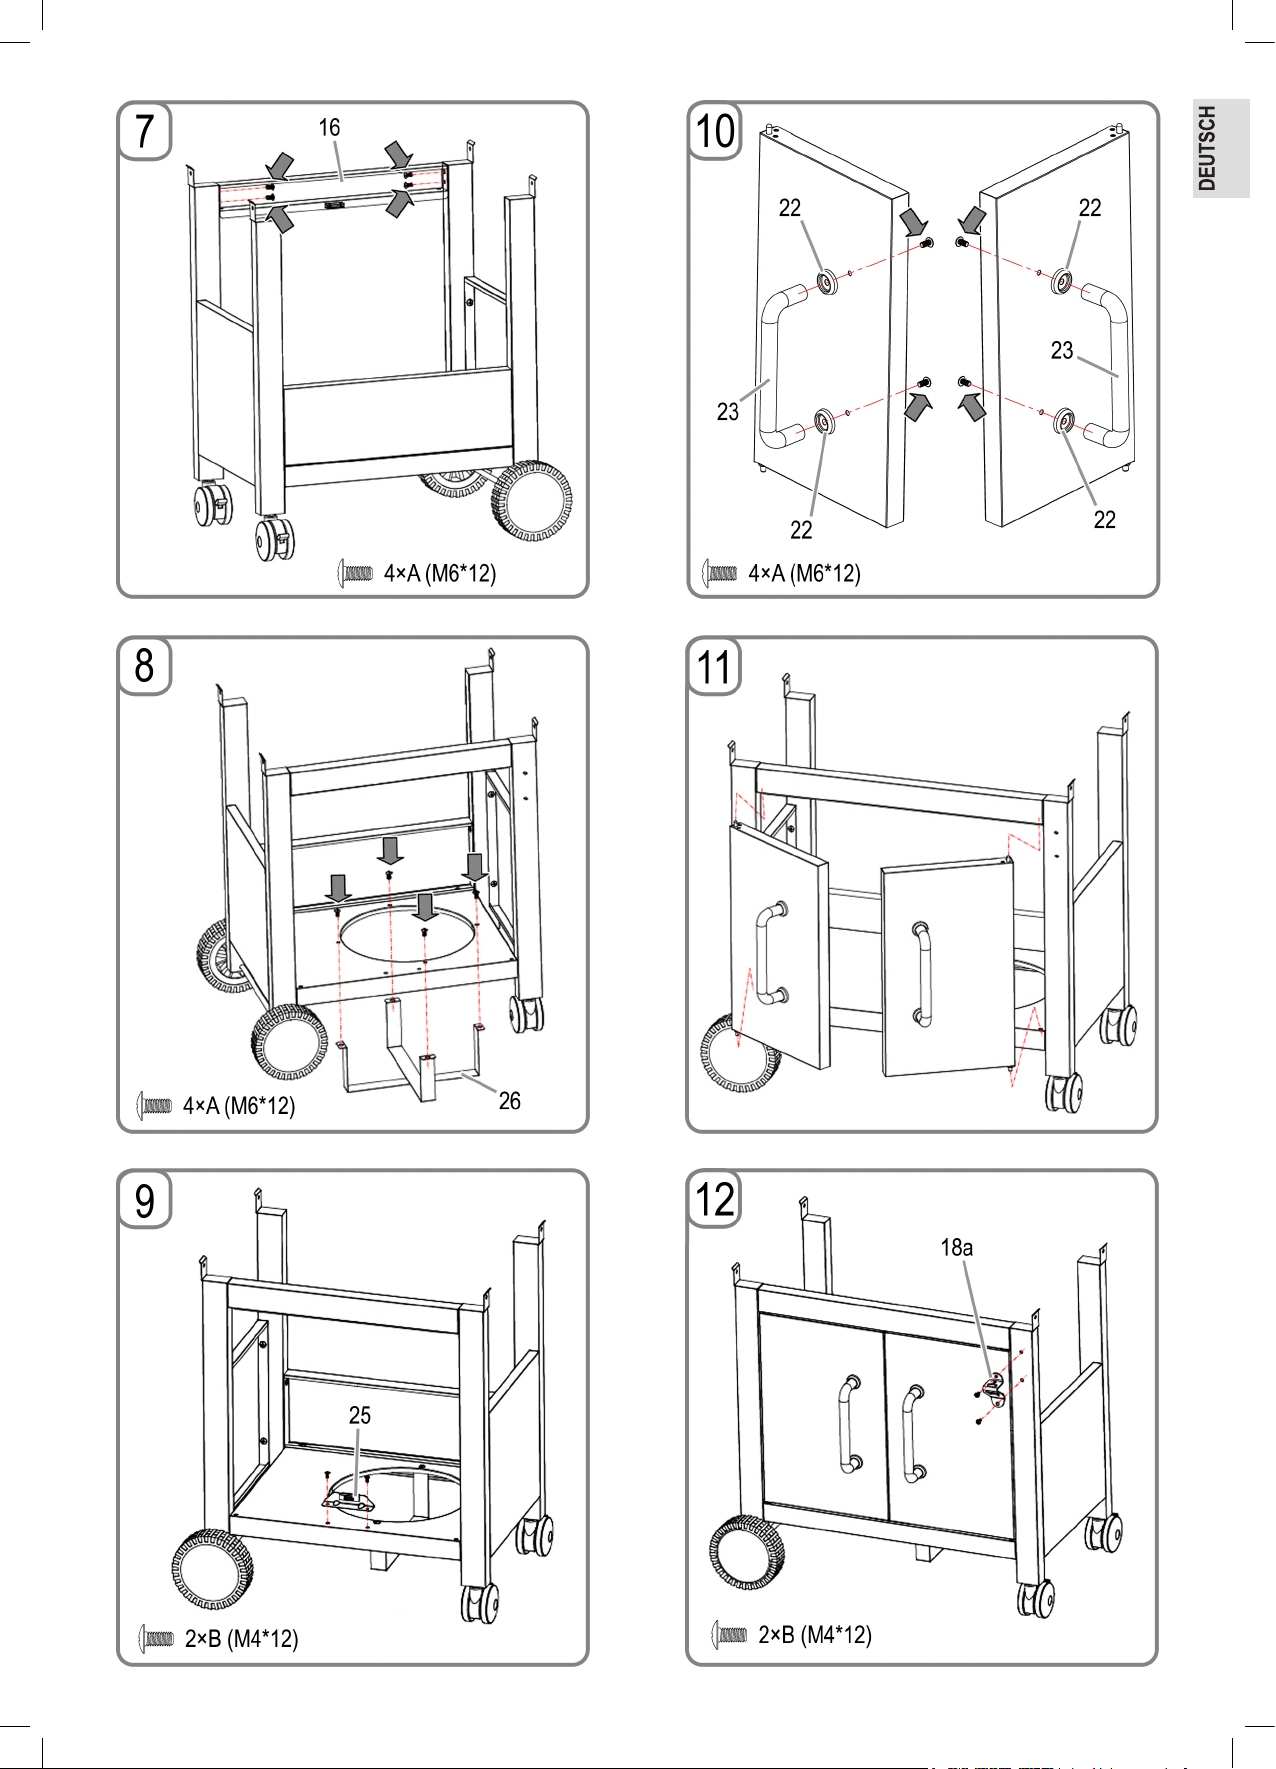
Grill montieren
Für den Aufbau benötigen Sie: • 2 Personen
• Schutzhandschuhe
• Ggf. eine Decke als Unterlage
• Schraubenschlüssel SW 17
• Schraubendreher der Größe PH2
Entfernen Sie vorher die Schutzfolien, die an den Flächen haften.
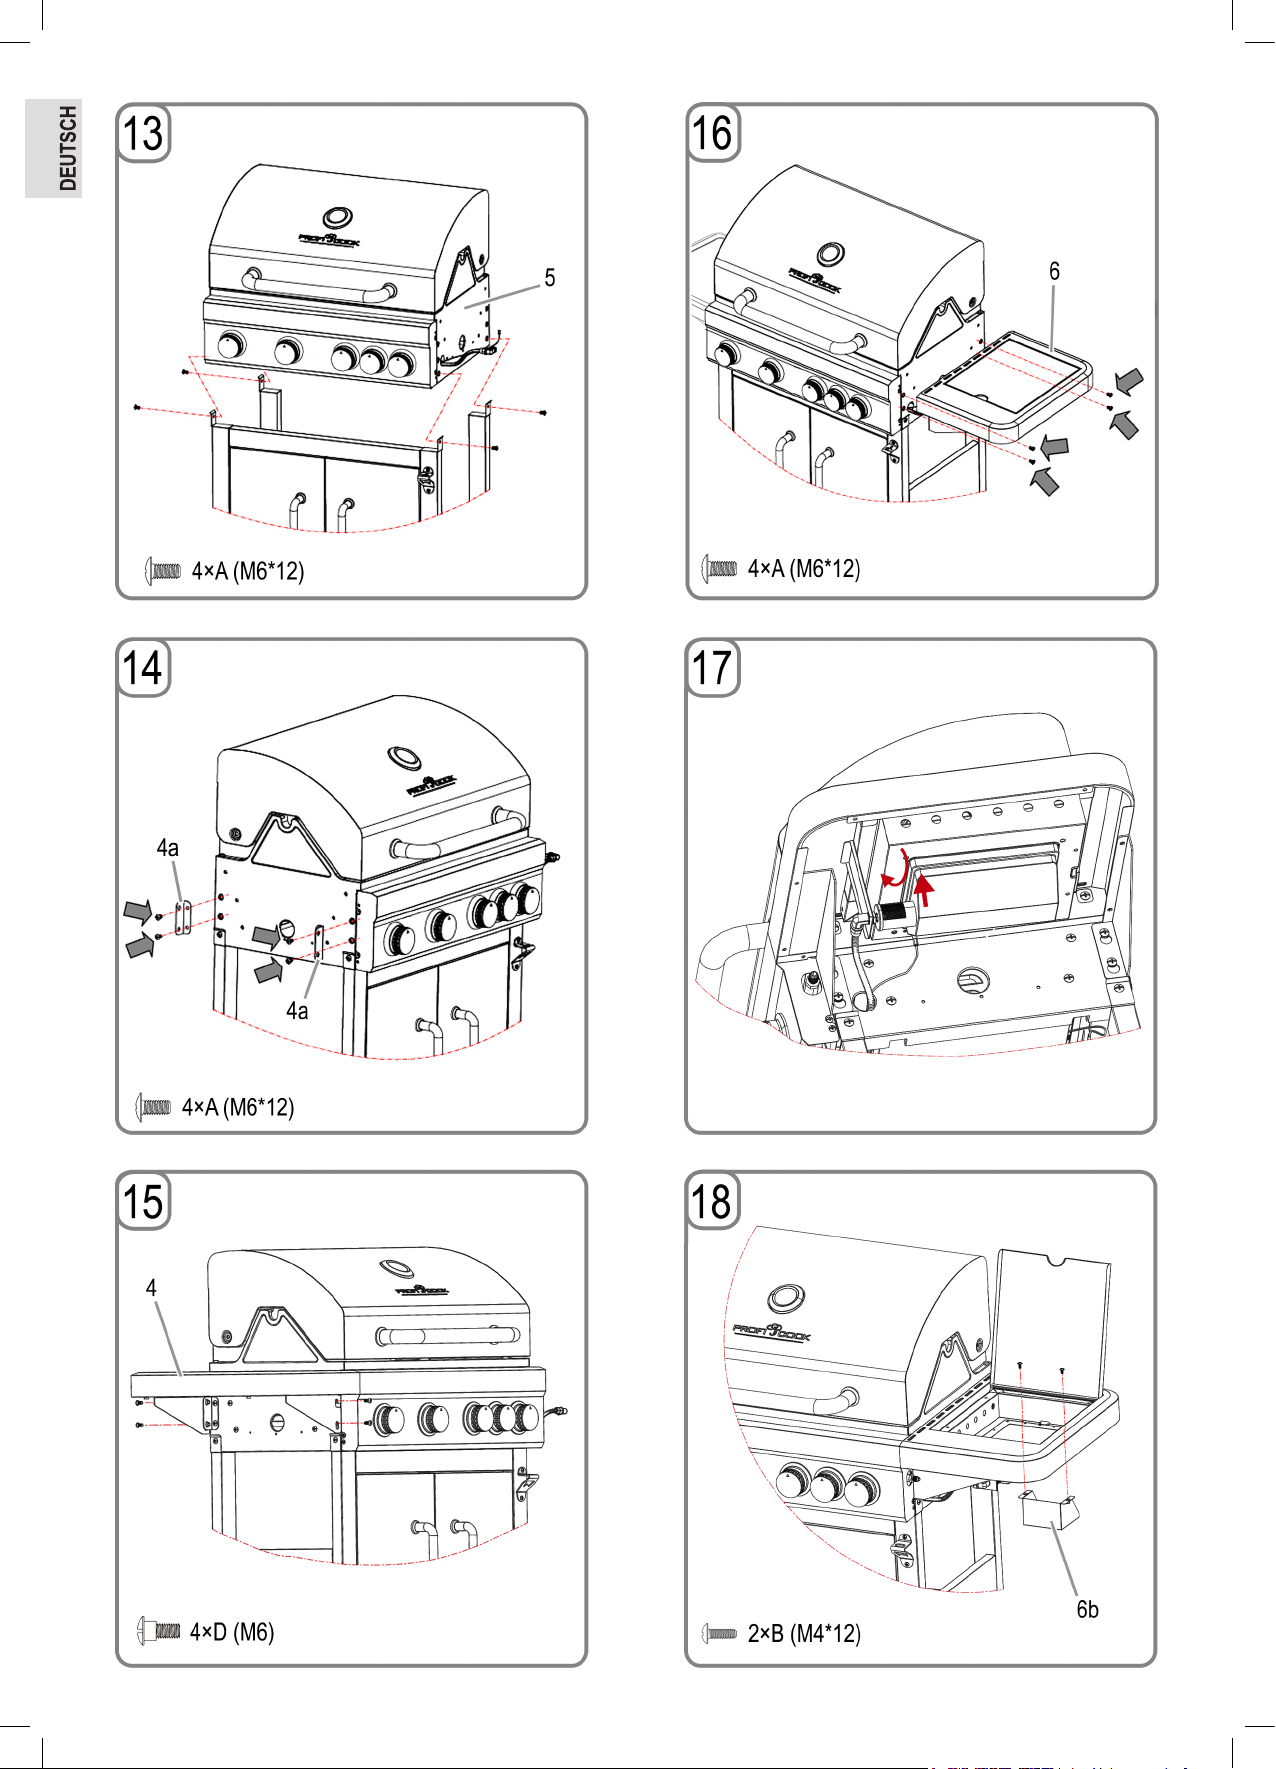
Bei der Montage orientieren Sie sich an der Stückliste und der bebilderten Aufbauanleitung:
40
6
2
4
7
Page 8
PC-GG1206_IM 09 .12.19
8
Page 9
PC-GG1206_IM 09 .12.19
9
Page 10
PC-GG1206_IM 09 .12.19
10
Page 11

PC-GG1206_IM 09 .12.19
11
Page 12

PC-GG1206_IM 09 .12.19
Gasanschluss
Allgemeines
Der Grill kann mit Gasaschen zwischen 5 kg bis 11 kg betrieben werden.
Zugelassen sind Niederdruck -Butan-, -Propan- oder -LPG-Gasgemische.
Ihr Grill funktioniert am besten mit Propangas oder LPG-Gasgemischen.
Butan kann verwendet werden, aufgrund der Nennleistung des Geräts
kann die Gasasche jedoch einfrieren. Dadurch sinkt der Gasdruck und
Ihr Grill liefert nicht die volle Leistung.
Verwenden Sie einen Regler, der nach DIN EN 16129 zertiziert ist.
HINWEIS:
Wenden Sie sich für Informationen zum richtigen Regler für Gasaschen an Ihren LPG-Händler.
Regler und Schlauch
Diese Teile sind im Lieferumfang des Grills enthalten. Ersatzteile erhalten
Sie bei Ihrem Händler oder einem zugelassenen LPG-Lieferanten.
Verwenden Sie nur Schläuche und Regler mit dem oben angegebenen
Druck, die für LPG zugelassen sind.
Die Haltbarkeit des Reglers beträgt normalerweise 2 Jahre. Ein Austausch des Reglers wird innerhalb von 2 Jahren nach Herstellungsdatum
empfohlen.
WARNUNG:
• Der verwendete Schlauch muss den nationalen Vorgaben entsprechen.
• Die Verwendung von ungeeigneten Schläuchen oder falschen Reglern ist gefährlich.
• Vergewissern Sie sich vor dem Betrieb, dass Sie die richtigen Teile
verwenden.
An der Gasasche
Der Anschluss erfolgt über einen exiblen Schlauch und den passenden
Niederdruckregler. Der Niederdruckregler ist an der Gasasche zu mon-
tieren.
1. Entfernen Sie die Schutzkappe und den Gewindeschutz an der Gas-
asche.
2. Wählen Sie einen passenden Schraubenschlüssel und ziehen Sie die
Überwurfmutter (Achtung Linksgewinde) des Niederdruckreglers an
der Gasasche handfest.
3. Wählen Sie einen passenden Schraubenschlüssel und ziehen Sie die
Überwurfmutter (Achtung Linksgewinde) des Schlauches am Niederdruckregler handfest.
Am Gerät
Spinnweben oder Insekten können Brenner oder Rohr verstopfen. Stellen
Sie vor dem Anschluss sicher, dass der Brenner und die Brenneröffnungen sauber sind.
Den Gasanschluss nden Sie an der rechten Seite des Gerätes in Höhe
der Stellknöpfe.
• Wählen Sie einen passenden Schraubenschlüssel und ziehen Sie
die Überwurfmutter (Achtung Linksgewinde) des Schlauches am Grill
handfest.
Die Schraubanschlüsse des Schlauches müssen mit dem Gerät und dem
Niederdruckregler sicher verbunden sein.
Undichte Stellen nden
ACHTUNG:
Prüfen Sie vor dem Gebrauch auf undichte Stellen.
• Suchen Sie undichte Stellen niemals mit offener Flamme.
• Verwenden Sie ein Lecksuch-Spray oder Seifenlauge.
Undichte Stellen lassen sich mit Seifenlauge sichtbar machen. Sie benötigen ca. 50 ml im Mischverhältnis 1:3.
1. Vergewissern Sie sich, dass alle Stellknöpfe auf 12 Uhr Position (OFF)
stehen.
2. Haben Sie alle Bauteile wie zuvor beschrieben angeschlossen, drehen
Sie das Gas auf.
3. Verteilen Sie das Seifenwasser auf den Schlauch und sämtliche
Anschlüsse. Werden an einer Stelle Blasen geworfen, ist diese Stelle
undicht und muss vor Gebrauch repariert werden.
4. Wiederholen Sie die Prüfung nach der Reparatur.
5. Drehen Sie die Gasasche nach dem Test zu.
Sollten Sie eine undichte Stelle nden, die Sie nicht reparieren können,
wenden Sie sich an einen Gasfachmann.
Gasgrill betreiben
ACHTUNG: Bei geschlossener Haube nur mit Kleinstellung grillen!
HINWEIS: Zur ersten Inbetriebnahme
Bevor Sie das erste Mal Speisen mit dem Gerät zubereiten:
Schließen Sie den Deckel und lassen Sie das Gas 15 Minuten lang auf LOW brennen.
Durch die hohe Temperatur werden die Gerüche der Oberächenbehandlung beseitigt.
12
Page 13

PC-GG1206_IM 09 .12.19
Aufstellort
Der Grill ist nur für die Verwendung in Außenbereichen. Stellen Sie den
Grill und die Gasasche beim Gebrauch immer auf einen ebenen, stabilen
Untergrund.
ACHTUNG:
Die Gasasche darf während des Betriebes nicht im Grill abgestellt
werden.
• Das Gerät ist vor Zugluft und vor Tropfwasser (z. B. Regenwasser) zu
schützen.
• Entfernen Sie brennbare Materialien im Umkreis von 3 m.
• Achten Sie auf einen Freiraum von mindestens 1 m um die Rück- und
Seitenwände des Gerätes.
• Über dem Grill darf es wegen der aufsteigenden Hitze keine Hindernisse geben.
• Decken Sie den Grill in keiner Weise ab, um die Lüftung nicht zu behindern.
Wenn Sie Gasgeruch bemerken
1. Drehen Sie die Gaszufuhr an der Flasche zu.
2. Löschen Sie offene Flammen und benutzen Sie keine elektrischen
Geräte in der Nähe.
3. Lüften Sie den Bereich.
4. Suchen Sie nach den undichten Stellen wie zuvor beschrieben wurde.
5. Sollten Sie immer noch Gasgeruch feststellen, wenden Sie sich an
Ihren Händler oder Gasfachmann.
Gasgrill einschalten
1. Öffnen Sie vor dem Zünden der Brenner die Haube des Grills.
2. Drehen Sie alle Schalter im Uhrzeigersinn auf 12 Uhr Position (OFF).
3. Schließen Sie den Gasschlauch an die Gasasche und den Grill an.
4. Drehen Sie die Gaszufuhr an der Gasasche auf.
5. Ist die Anlage dicht? Prüfen Sie die Verbindungen mit Seifenwasser
oder Lecksuchspray auf undichte Stellen.
6.
ACHTUNG: Starten Sie immer mit dem linken Stellknopf /
Brenner 1!
Alle anderen Brenner werden über den Zündkanal gezündet.
Drücken Sie den linken Stellknopf und drehen ihn dann gegen den
Uhrzeigersinn.
7. Ein CLICK-Geräusch ist hörbar. Es wird der linke Brenner 1 gezündet.
8. Während Sie den Stellknopf weiter in Richtung HI drehen, überprüfen
Sie, ob die Flamme brennt. Ansonsten wiederholen Sie den Vorgang.
9. Sollte der Brenner auch jetzt nicht zünden, warten Sie 5 Minuten und
wiederholen Sie dann ab Schritt 6.
10. Zündet der Brenner nicht elektrisch, kontaktieren Sie Ihren Gashänd-
ler zur Reparatur der Zündung.
11. Drehen Sie den Stellknopf, um die Hitze zwischen HI und LOW zu
regeln.
12. Zünden Sie die restlichen Brenner von links nach rechts, indem Sie
die Schritt 6 bis 10 wiederholen. Durch den Zündkanal zwischen den
Brennern wird der nächste Brenner gezündet.
13. Um den Grill auszustellen, drehen Sie das Ventil an der Gasasche
zu.
14. Drehen Sie dann die Stellköpfe auf 12 Uhr Position (OFF).
Seitenkocher einschalten
Den Seitenkocher können Sie separat betreiben.
1. Öffnen Sie den Deckel des Seitenkochers, bevor Sie diesen zünden.
2. Drücken Sie den Stellknopf des Kochers und drehen Sie ihn entgegen
dem Uhrzeigersinn auf die Position HI. Dabei ist ein CLICK-Geräusch
zu hören. Der Brenner zündet. Sollte der Brenner nicht zünden, wiederholen Sie diesen Schritt.
3. Zündet der Brenner auch dann nicht, warten Sie 5 Minuten und wiederholen Sie Schritt 2.
4. Zündet der Kocher nicht, zünden Sie den Kocher mit einem langen
Streichholz. Kontaktieren Sie Ihren Händler oder Gasfachmann, um
den Fehler an der Zündung zu beheben.
5. Regulieren Sie die Wärme, indem Sie den Stellknopf auf eine beliebige Einstellung zwischen der HI und LOW Stellung drehen.
6. Um den Kocher außer Betrieb zu nehmen drehen Sie den Stellknopf
in die 12 Uhr Position (OFF).
7. Um den kompletten Grill außer Betrieb zu nehmen, schließen Sie das
Ventil der Gasasche und drehen Sie alle Stellknöpfe in die 12 Uhr
Position (OFF).
Hitzeverteilung auf dem Rost
Durch die Bauart der Brenner wird die Hitzeverteilung vorgegeben:
Grillen
Garen
Warmhalten
Tipps zum Grillen
Der Gasgrill ist ein multifunktionales Gerät. Bei geschlossener Haube
können Sie Ihren Gasgrill wie einen Backofen nutzen.
• Sie können Fleisch, Fisch, Gemüse und Früchte nun nicht nur grillen,
sondern auch garen.
• Bei geschlossener Haube darf die Temperatur nicht zu hoch sein. Eine
geringe Temperatur bedeutet ein schonendes Garen des Grillguts.
• Überwachen Sie die Temperatur am Thermometer und regeln Sie bei
Bedarf nach.
• Als Faustregel gilt: Tritt bei geschlossener Haube Rauch aus, so ist die
Temperatur zu hoch!
13
Page 14

PC-GG1206_IM 09 .12.19
Störungsbehebung
Tritt eine Störung auf, liegt es oft nur an einer Kleinigkeit. Bevor Sie sich an unseren Service wenden, beachten Sie bitte folgende Hinweise:
Störung Mögliche Ursache Hinweis / Abhilfe
Brenner lassen sich über das Zündsystem nicht
zünden
Brenner zündet nicht über Streichholz Gasasche leer Gasasche wechseln
Kleine gelbe Flamme oder Rückkopplung
(Feuer in Brennerleitung – zischendes oder
gurgelndes Geräusch)
Gasasche leer Gasasche wechseln
Regler beschädigt Regler prüfen oder austauschen
Brenner verstopft Brenner reinigen
Gasdüsen oder Schlauch verstopft Düsen und Schlauch reinigen
Elektrodenkabel locker oder von Elektrode oder
Zündung getrennt
Elektrode oder Kabel beschädigt, fehlerhafte
Schalterzündung
Regler beschädigt Regler prüfen oder austauschen
Brenner verstopft Brenner reinigen
Gasdüsen oder Schlauch verstopft Düsen und Schlauch reinigen
Gasasche zu klein Größere Flasche verwenden
Brenner verstopft (Insektennest?) Brenner reinigen
Gasdüsen oder Schlauch verstopft Düsen und Schlauch reinigen
Zugluft Grill an geschützterem Ort aufstellen
Kabel wieder anschließen
Elektrode und Kabel austauschen Zündung
austauschen
Gasgrill reinigen
WARNUNG: HEISSE OBERFLÄCHEN
Warten Sie vor der Reinigung, bis der Gasgrill genügend abgekühlt ist.
WARNUNG: BRAND- UND EXPLOSIONSGEFAHR
• Entfernen Sie vor der Reinigung des Gasgrills die Gasasche.
• Verwenden Sie keine brennbaren Reinigungsmittel.
ACHTUNG:
• Benutzen Sie keine Drahtbürste oder andere scheuernde Gegenstände.
• Verwenden Sie keinen Backofenreiniger. Der greift lackierte Flächen
an.
• Reinigen Sie den Grill nach jedem Gebrauch!
HINWEIS:
Wenn Sie beide Brenner nach jedem Betrieb für ca. 15 Minuten ohne
Grillgut mit maximaler Hitze brennen lassen, werden Ablagerungen fast
vollständig weggebrannt.
Außenächen
• Verwenden Sie milde Reinigungsmittel oder Natronlauge sowie heißes
Wasser.
• Milde Reinigungsmittel können für hartnäckige Verschmutzungen verwendet werden.
• Anschließend spülen Sie gründlich mit Wasser nach.
Innenächen
Sieht die Innenäche des Grilldeckels so aus, als würde Farbe abblättern? Es sind verbrannte Fettrückstände die jetzt abplatzen.
1. Reinigen Sie die Fläche gründlich mit starker, heißer Seifenlauge.
2. Spülen Sie gründlich mit Wasser nach und lassen Sie den Deckel
trocknen.
14
Innenäche der Grillwanne
1. Entfernen Sie Rückstände mit einer Bürste oder einem Schaber.
2. Mit Seifenlauge und Schwamm waschen Sie die Fläche im Anschluss
ab.
3. Spülen Sie gründlich mit Wasser nach und lassen Sie die Fläche
trocknen.
Grillrost
• Verwenden Sie milde Seifenlauge.
• Milde Scheuermittel können für hartnäckige Verschmutzungen verwen-
det werden.
• Anschließend gründlich mit Wasser nachspülen.
Reinigung der Brenner
1. Drehen Sie das Gas am Stellknopf auf die 12 Uhr Position (OFF).
2. Trennen Sie die Verbindung zur Gasasche.
3. Entfernen Sie die Gitter.
4. Reinigen Sie den Brenner mit einer weichen Bürste oder mit Druckluft
und wischen Sie ihn mit einem Tuch ab.
5. Reinigen Sie verstopfte Öffnungen mit einer Rohrbürste oder einem
stabilem Draht.
6. Prüfen Sie den Brenner auf Schäden (Risse oder Löcher). Wenden
Sie sich bei Schäden an den Service oder Ihren Gasfachmann.
Wartung
Ihr Gasgrill sollte jährlich durch einen Fachmann gewartet werden.
Pege und Schutz von Edelstahl- und Emailleächen
Ihr Gasgrill fordert regelmäßige Pege, um die gute Optik zu erhalten.
Edelstahl ist entgegen landläuger Meinung weder rost- noch wartungs-
frei. Selbst hochwertiger Edelstahl muss regelmäßig gereinigt werden.
Rost und anderen Formen der Korrosion wird damit vorgebeugt.
Gerade der heute bevorzugte gebürstete Edelstahl ist ohne die richtige
Pege für Korrosion empfänglich. Der Edelstahl mittlerer Härte, der in
Ihrem Grill verbaut wurde, braucht Reinigung und Schutz, damit Sie lange
daran Freude haben.
Wir empfehlen nach dem Aufbau den Schutz durch Olivenöl. Verteilen
Sie es mit einem sauberen Tuch in dünner Schicht auf die zugänglichen
Page 15

PC-GG1206_IM 09 .12.19
Edelstahlächen. Anschließend polieren Sie und entfernen mit einem
sauberen Tuch die Ölrückstände.
Dieser bewährte Schutz ist nicht nur lebensmittelecht, er erleichtert auch
die Reinigung bis hin zum entfernen von Fingerabdrücken.
Regelmäßig wiederholt, erleichtert Ihnen diese Prozedur die unangenehme Entfernung von fest sitzendem Schmutz.
Verwendung von Schutzhüllen
Wird der Grill längere Zeit nicht genutzt, werden gerne Schutzhüllen verwendet. Diese sind auch empfehlenswert, soweit der Grill zuvor gereinigt
und gut getrocknet wurde.
Achten Sie bei der Wahl der Schutzhülle darauf, dass diese luftdurchlässig ist.
Restfeuchtigkeit oder Kondensat können ein schädliches, feuchtes Klima
unter der Hülle erzeugen. Bei einer längeren Standzeit führt dieses feuchte Klima auch bei guten Stählen zur Korrosion.
Emaillierten Flächen
Emaille ist eine hervorragende Oberächenbeschichtung, bricht aber
leicht. Gehen Sie mit den emaillierten Teilen daher vorsichtig um.
• Entfernen Sie Staub oder Verschmutzungen von Hand in einem Spülbad.
• Achten Sie darauf, die Emailleäche nicht zu zerkratzen.
• Verwenden Sie niemals Ofenreiniger für Ihren Gasgrill. Ofenreiniger
wirken aggressiv auf die lackierten Flächen Ihres Grills. Der Lack wird
dadurch beschädigt.
Gasgrill aufbewahren
• Ist der Grill sauber und trocken können Sie ihn mit einer Decke schützen.
• Bewahren Sie den Grill in einem frostfreien und trockenen Raum auf.
• Schließen Sie immer das Ventil der Gasasche und bewahren Sie die-
se außerhalb der Reichweite von Kindern auf.
• Beachten Sie zur Aufbewahrung auch die Hinweise im Abschnitt
„ Sicherheitshinweise“.
• Die linke Seitenablage ist zur platzsparenden Aufbewahrung anklappbar. Heben Sie die Seitenablage dafür waagerecht nach oben.
• Lagern Sie die Gasasche nicht in der Nähe von offenem Feuer
oder anderen Zündquellen.
Garantie
Garantiebedingungen
1. Gegenüber Verbrauchern gewähren wir bei privater Nutzung des
Geräts eine Garantie von 24 Monaten ab Kaufdatum.
Ist das Gerät zur gewerblichen Nutzung geeignet, gewähren wir beim
Kauf durch Unternehmer für das Gerät eine Garantie von 12 Monaten.
Die Garantiezeit für Verbraucher reduziert sich auf 12 Monate, sofern
sie ein zur gewerblichen Nutzung geeignetes Gerät – auch teilweise –
gewerblich nutzen.
2. Voraussetzung für unsere Garantieleistungen sind der Kauf des
Geräts in Deutschland bei einem unserer Vertragshändler sowie die
Übersendung einer Kopie des Kaufbelegs und dieses Garantiescheins
an uns.
Bendet sich das Gerät zum Zeitpunkt des Garantiefalls im Ausland,
muss es auf Kosten des Käufers uns zur Erbringung der Garantieleistungen zur Verfügung gestellt werden.
3. Mängel müssen innerhalb von 14 Tagen nach Erkennbarkeit uns
gegenüber schriftlich angezeigt werden. Besteht der Garantieanspruch zu Recht, entscheiden wir, auf welche Art der Schaden/Mangel
behoben werden soll, ob durch Reparatur oder durch Austausch eines
gleichwertigen Geräts.
4. Garantieleistungen werden nicht für Mängel erbracht, die auf der
Nichtbeachtung der Gebrauchsanweisung, unsachgemäßer Behandlung oder normaler Abnutzung des Geräts beruhen. Garantieansprüche sind ferner ausgeschlossen für leicht zerbrechliche Teile, wie zum
Beispiel Glas oder Kunststoff. Schließlich sind Garantieansprüche
ausgeschlossen, wenn nicht von uns autorisierte Stellen Arbeiten an
dem Gerät vornehmen.
5. Durch Garantieleistungen wird die Garantiezeit nicht verlängert. Es
besteht auch kein Anspruch auf neue Garantieleistungen. Diese
Garantieerklärung ist eine freiwillige Leistung von uns als Hersteller
des Geräts. Die gesetzlichen Gewährleistungsrechte (Nacherfüllung,
Rücktritt, Schadensersatz und Minderung) werden durch diese Garantie nicht berührt.
Stand 12 2013
Gasasche
– Behandeln Sie die Gasasche immer mit Vorsicht!
• Wird das Gerät nicht verwendet, drehen Sie die Gasasche zu und
schrauben Sie den Niederdruckregler ab.
• Verschließen Sie die Flasche und setzen Sie die Schutzkappe wieder auf.
• Die Gasasche darf während des Betriebs nicht im Grill stehen!
• Gasaschen müssen draußen aufrecht stehend und für Kinder un-
zugänglich gelagert werden.
• Lagern Sie die Flasche nicht im Keller, da sich ausströmendes Gas
am Boden sammeln kann.
• Die Gasasche darf niemals an Orten gelagert werden, an denen
Temperaturen von über 50 °C entstehen können.
Garantieabwicklung
Nutzen Sie bitte bei einer Reklamation oder zur Bestellung eines Zubehör- oder Ersatzteils für Ihren Gasgrill direkt eine der folgenden Kontaktmöglichkeiten:
info@sli24.de Hotline: 0 21 61 - 6 78 86 06 www.sli24.de
Bitte teilen Sie uns Ihren Namen, Vornamen, Straße, Hausnummer,
PLZ und Wohnort, Telefon-Nummer, soweit vorhanden, Fax-Nummer
und E-Mail-Adresse mit. Im Weiteren benötigen wir die Typenbe-
zeichnung des reklamierten Gerätes, eine kurze Fehlerbeschreibung,
das Kaufdatum und den Händler, bei dem Sie das Neugerät erworben
haben. Wenn Sie ein Zubehör- oder Ersatzteil benötigen, geben Sie
bitte zur Vermeidung einer Verwechslung die Teilenummer aus der Bedienungsanleitung an.
Bitte nehmen Sie in keinem Fall eine unfreie Einsendung Ihres Gerätes
vor. Bei unfreien Lieferungen entfällt Ihr Anspruch auf Garantieleistungen.
Stand 03 2014
Pro Cook
Industriering Ost 40
D-47906 Kempen
15
Page 16

PC-GG1206_IM 09 .12.19
Entsorgung
Verpackung
Die Produktverpackung besteht zu großem Teil aus wiederverwertbaren
Rohstoffen.
Helfen Sie die Umwelt zu schonen! Entsorgen Sie die Werkstoffe entsprechend ihres Materials in bereitgestellten Sammelbehältern.
Gasgrill
Entsorgen Sie den Gasgrill am Ende seiner Nutzungszeit nicht im Hausmüll!
Erkundigen Sie sich bei Ihrer Kommune oder einem ansässigen Recycling-Unternehmen über die fachgerechte und schonende Entsorgung des
Produkts.
16
Page 17

PC-GG1206_IM 09 .12.19
Table of Contents
Safety Notes .............................................................................................17
Symbols Used in these Operating Instructions .....................................17
Intended Purpose ..................................................................................17
General Hazards ...................................................................................17
Unpacking the Device ...........................................................................17
Connecting the Gas System .................................................................17
Operating the Gas Barbecue ................................................................18
Servicing the Gas Barbecue .................................................................18
Action when Fighting Fires ....................................................................18
First Aid Measures .................................................................................18
Instructions Concerning Transportation ................................................18
Storage Notes ........................................................................................18
Intended Use ............................................................................................19
Technical Data ..........................................................................................19
Note on Policy Compliance ....................................................................19
Summary ...................................................................................................20
List of Pieces ............................................................................................21
Assembling the Grill ................................................................................21
Gas Connection .......................................................................................26
General Information ...............................................................................26
Regulator and Hose ..............................................................................26
Connecting the Gas Cylinder ................................................................26
Connecting the Appliance .....................................................................26
Finding Areas with a Bad Seal ..............................................................26
Operating the Gas Barbecue ..................................................................26
Installation Site ......................................................................................27
If You Notice the Smell of Gas ..............................................................27
Switching the Gas Barbecue On ...........................................................27
Switching on the Side Burner ................................................................27
Head Distribution on the Grille ..............................................................27
Tips for Barbecue Cooking ....................................................................27
Troubleshooting .......................................................................................27
Cleaning the Gas Barbecue ....................................................................28
Exterior Surfaces ...................................................................................28
Interior Surfaces ....................................................................................28
Interior Surface of the Barbecue Tray ...................................................28
Barbecue Grille ......................................................................................28
Cleaning the Burner ..............................................................................28
Servicing ................................................................................................28
Maintenance and Protection of
Stainless Steel and Enamel Surfaces....................................................28
Use of Protective Covers ......................................................................28
Enamelled Surfaces ..............................................................................28
Storing the Gas Barbecue ......................................................................28
Gas Cylinder ..........................................................................................29
Disposal ....................................................................................................29
Packaging ..............................................................................................29
Gas Barbecue .......................................................................................29
Safety Notes
You have bought a safe product. However, the customer shares responsibility for the proper set up of the barbecue as well as for its operation and
maintenance.
Various pieces of safety equipment protect you from damage and injuries.
In these instructions, we have put together everything that you need to
know for your safety. You will acquire knowledge and know-how. Read
and follow the operating instructions before assembling and putting the
appliance into use.
In particular, read the safety instructions. Only use the
appliance as described in these instructions.
Non-compliance with the instructions may result in explosions and
res!
Keep these instructions safe for reading later on. When passing this
appliance on, please enclose these instructions.
Symbols Used in these Operating Instructions
Important instructions for your safety are specially marked. In order to
avoid accidents and damage to the appliance, make sure you follow these
instructions:
WARNING:
Warns of dangers for your health and indicates potential risks of injury.
CAUTION:
Indicates potential dangers for the device or other objects.
NOTE:
Highlights tips and information for you.
Intended Purpose
The gas barbecue should only be used for outdoor barbecues.
WARNING: Note for children and persons with limited capac-
ities
This appliance is not intended for use by children or persons with limited capacities. It should only be used by persons who are in a position
to use the appliance safely.
General Hazards
WARNING:
The gas barbecue has sharp edges which you could cut yourself on.
When assembling, servicing and cleaning, wear protective gloves.
Unpacking the Device
WARNING:
• For the safety of your children, keep any packing parts (plastic bags,
cartilage, Styrofoam etc.) out of their reach.
• Don’t let small children play with foils for danger of suffocation!
Connecting the Gas System
WARNING: RISK OF FIRE AND EXPLOSION
• The gas barbecue should only be operated with a low pressure regulator. The enclosed pressure regulator has been correctly set in the
factory for operation with liquid petroleum gas (LPG). In addition, read
and follow the separate assembly and usage instructions which accompany the pressure regulator.
• If necessary, the gas hose has to be exchanged if there are corresponding national requirements.
• Make sure that there are no sources of naked ames (or similar) in
the vicinity when you change the gas cylinder.
• When buying or renting the gas cylinder, let the store advise you.
• The appliance must be connected in the way that is described in
these instructions.
• Make sure that the gas hose is not buckled or worn.
• After assembling the gas system, check all of the connections for
tightness with a standard leak detection spray or soapy water. It is
strictly prohibited to test the seal with a naked ame!
17
Page 18

PC-GG1206_IM 09 .12.19
Operating the Gas Barbecue
WARNING: RISK OF FIRE AND EXPLOSION
• Do not smoke when handling the gas system. Do not place the gas
cylinder in the vicinity of a naked ame.
• Only use the gas barbecue outdoors. Make sure that the gas barbecue is protected from the wind.
• Protect the barbecue from rain, moisture, water splashes, etc.
• Place the gas barbecue on a level, stable and reproof surface.
• Protect the gas cylinder from direct sunlight.
• Before operating the appliance, always check the hose and the pressure regulator for cracks and damage.
• Do not operate the gas barbecue if the pressure regulator, hose or
gas cylinder are defective or if they are not sealed.
• Insects often build nests in the pipes of the burner. Before operating
the burner, always check it for foreign objects. Remove foreign objects with a brush (bottle brush, pipe cleaner).
• Do not ignite the gas ame with a naked ame. To ignite, use the
electrical ignition that is installed in the appliance.
• In order to protect against gas that ows out by accident, the cylin-
der valve on the gas cylinder should only be opened when the gas
barbecue is operational. After you shut off the barbecue grill, always
make sure that you shut the cylinder valve.
• Make sure there is clearance of at least 1 m around the rear and side
walls of the appliances.
• Whilst operating the appliance, make sure that you maintain a safe
distance from combustible and heat sensitive materials. The distance
should not be less than 3 m.
• Make sure that there are no objects or parts of the building above the
gas barbecue.
• During operation, the surfaces of the gas barbecue are very hot.
Warn people who are standing around and keep well away from
children.
• During operation, do not leave the gas barbecue unattended.
• In the case of a fault, shut the valve of the gas cylinder.
• Before changing the position of the barbecue it must be switched off,
the valve of the gas cylinder must be shut and the gas cylinder must
be removed from the bottom part of the barbecue in order to protect
the pressure regulator and the hose.
Servicing the Gas Barbecue
First Aid Measures
– Measures after inhaling gas
• High concentrations can cause suffocation. Symptoms can include
loss of mobility and consciousness. The victim does not realise the
suffocation are suffocating. Low concentrations can result in dizziness, headaches, nausea and coordination problems.
• Bring the patient into the open air. Inform a doctor or the emergency
services. In the event that the patient stops breathed, perform articial
respiration.
– Measures following major burns or scalding
• There is a risk of hypothermia and shock. Call the emergency services straight away!
• Extinguish any burning clothing with water straight away or smother
the ames with a thick blanket.
• In the case of scalding: Remove clothing straight away.
• In the case of burns: Keep clothing on the body.
• Cool with cold water for at least 15 minutes until the pain eases.
• Cover the affected area with a sterile Metalline bandage (for burns).
Apply the side coated with Metalline to the wounded skin and loose-
ly x with a gauze bandage or a triangular cloth.
• Do not use household remedies such as ointments, powder, oils,
disinfectants etc.!
– Measures following minor burns or scalding
• In the case of scalding: Remove clothing straight away.
• In the case of burns: Only remove clothing if it is not sticking.
• Cool with cold water for at least 15 minutes until the pain eases.
• In the case of small burns or scalding without any formation of a
blister, allow to heal through exposure to the air. Do not cover with a
plaster or bandage.
Instructions Concerning Transportation
WARNING: RISK OF FIRE AND EXPLOSION
• Where possible, do not transport the gas cylinder in vehicles where
the storage area is not separated from the driver’s cab. The driver
must be aware of the possible dangers associated with the load and
he must know what to do in the event of an accident or emergency.
• Transport the gas cylinder standing upright and secure the gas cylinder from falling over or sliding.
• Make sure that the valve of the gas cylinder is closed and has a
good seal.
WARNING: RISK OF FIRE AND EXPLOSION
• Repairs and servicing of the gas system should only be carried out
by authorised experts. Do not carry out any changes to the gas barbecue or the pressure regulator.
• Replace the pressure regulator after at least 2 years and the hose
after 5 years, even if there are no visible external signs of damage.
Make sure that the pressure regulator is approved for the gas that is
used and is set to the correct output pressure (see Technical data). A
new hose should not be longer than 1.5 m.
• Together with oil, gas forms an explosive mixture. Never attempt to
free stiff valves and control knobs with oil or penetrating oil.
Action when Fighting Fires
• Move persons who are standing around to a safe place! If possible,
close the valve of the gas cylinder. Cool the gas cylinder with water. At
the same time, ensure your own safety! Spontaneous and explosive
re-ignition is possible.
• Only extinguish leaking, burning gas if you cannot stop gas from escaping. All extinguishers can be used.
18
Storage Notes
WARNING: RISK OF FIRE AND EXPLOSION
• If the appliance is not being used, the gas cylinder must be disconnected from the appliance.
• Keep the gas cylinder out of the reach of children.
• Keep the gas cylinder away from oxidising gases and other materials
that help res.
• The liquid gas that escapes is heavier than air and it sinks to the
ground. Do not store the gas cylinder indoors under ground level
(e.g. basement, shaft, underground garage etc.) or in non-ventilated
areas where escaping gas could collect.
• Protect the gas cylinder from direct solar radiation and other sources
of heat.
• If the temperature is less than 50 °C, store the gas cylinder in a place
that is well-ventilated, shady and protected against weathering.
• Store the gas cylinder so that it is standing and secured from falling
over.
Page 19

PC-GG1206_IM 09 .12.19
WARNING: RISK OF FIRE AND EXPLOSION
• Empty gas cylinders always contain a residual quantity of liquid gas.
Follow the storage instructions, even for empty gas cylinders.
It is designed exclusively for this purpose and may only be used therefore.
It may only be used in the manner described in this instruction manual.
The appliance may not be used for commercial purposes.
Any other use is considered not as intended and may lead to damage to
Intended Use
This device is intended for
• for grilling (barbecues) and baking toppings of solid foods.
property or even personal injury.
The manufacturer assumes no liability for damage resulting from use
other than the intended purpose.
• heating and cooking rm or liquid food.
Technical Data
Model: PC-GG 1206
Total absorbed heat all categories of gas: 15.5 kW (1125 g/h) The barbecue burner gure is 3.1 kW and the side burner gure
is 3.1 kW.
Gas category: I
Gas type: Butane, propane or their mixtures
Gas pressure: 50 mbar
Gas jet: Barbecue burner: 0.75 mm
Maximum hose length: 150 cm
Identication number: 0063CS7068
Target countries: AT and DE
3B/P(50)
Side burner: 0.75 mm
0063-19
Note on Policy Compliance
Hereby the manufacturer declares that the appliance PC-GG 1206 is in compliance with the essential requirements of European Regulation
EU / 2016 / 426 for gas appliances.
19
Page 20

PC-GG1206_IM 09 .12.19
Summary
20
Page 21

PC-GG1206_IM 09 .12.19
List of Pieces
Item Description pc.
1 Storage rack for barbecue food 1
2 Barbecue grille 2
3 Flame cover 3
4 Side tray, left 1
4a Recess 1
5 Top section / Grill housing 1
6 Side tray, right (for the side burner) 1
6a Side burner cooking grid 1
6b Side burner grease pan 1
6c Side burner grease tray support 1
7 Front leg, left 1
8 Side plate 2
Item Description pc.
16 Front traverse 1
17 Rear traverse 1
18 Front leg, right 1
18a Bottle opener 1
19 Rear leg, right 1
20 Door, left 1
21 Door, right 1
22 Door handle 4
23 Door handle 2
24 Baseplate 1
25 Door stop 1
26 Support 2
9 Rear leg, left 1
10 Hub cap 2
11 Wheel 2
12 Axle 1
13 Heat shield 1
14 Grease collection tray 1
27 Castor 2
28 Pressure regulator 1
A Screw M6×12
B Screw M4×12
C Nut M10
D Screw M6
15 Grease chuter 1
Assembling the Grill
To assemble the barbecue, you will need: • 2 persons
• Protective gloves
• If necessary, put a blanket downbase
• SW 17 screw wrench
• PH2 screw driver
Beforehand, remove the protective lm that is attached to the surfaces.
When assembling, familiarise yourself with the list of parts and the illustrated assembly instructions:
40
6
2
4
21
Page 22

22
PC-GG1206_IM 09 .12.19
Page 23

PC-GG1206_IM 09 .12.19
23
Page 24

24
PC-GG1206_IM 09 .12.19
Page 25

PC-GG1206_IM 09 .12.19
25
Page 26

PC-GG1206_IM 09 .12.19
Gas Connection
General Information
The barbecue can be operated with gas cylinders weighing between 5 kg
and 11 kg. Low pressure butane, propane and LPG gas mixtures are
approved.
Your barbecue works best with propane gas and LPG mixtures. Butane
can be used, on account of the power rating of the appliance, the gas
cylinder may however freeze. As a result of this, the gas pressure drops
and your barbecue does not provide full power.
Use a regulator which is certied in accordance with DIN EN 16129.
NOTE:
For information concerning the correct regulator for gas cylinders,
please consult your LPG dealer.
2. Select a suitable wrench and tighten the coupling nut (attention: left
thread) of the low pressure regulator on the gas cylinder hand-tight.
3. Select a suitable wrench and tighten the coupling nut (attention: left
thread) of the hose on the low pressure regulator hand-tight.
Connecting the Appliance
Spider’s webs and insects can block the burner or pipe. Before connecting, make sure that the burner and the burner ports are clean.
You will nd the gas connection on the right hand side of the appliance
level with the adjustment knobs.
• Select a suitable wrench and tighten the coupling nut (attention: left
thread) of the hose on the barbecue.
The screw connections of the hose must be securely connected to the
appliance and the low pressure regulator.
Regulator and Hose
These parts are supplied with the barbecue. You can obtain spare parts
from your dealer or an approved LPG supplier. Only use hoses and regulators at the pressure stated above which are approved for LPG.
Normally, the service life of a regulator is 2 years. It is recommended that
the regulator is replaced within 2 years of the production date.
WARNING:
• The hose that is used must correspond to statutory regulations.
• The use of unsuitable hoses and incorrect regulators is dangerous.
• Before operation, make sure that you use the correct parts.
Connecting the Gas Cylinder
A connection is established via a exible hose and the correct low pressure regulator. The low pressure regulator should be tted onto the gas
cylinder.
1. Remove the protective cap and the thread protector on the gas
cylinder.
Operating the Gas Barbecue
CAUTION: If the hood is closed, only barbecue at a low setting!
Finding Areas with a Bad Seal
CAUTION: Before use, check to make sure there are no areas
with a bad seal.
• Never look for sections with a bad seal using a naked ame.
• Use a leak detection spray or soapy water.
Sections with a bad seal soon become apparent in soapy water. You will
need approx. 50 ml (mix ratio 1:3).
1. Make sure that all adjustment knobs are in the 12 o’clock position
(OFF).
2. Once you have connected all components as described above, turn
the gas on.
3. Spread the soapy water on the hose and all connections. If bubbles
appear at a particular point, the section has a bad seal and it must be
repaired before use.
4. Repeat the test after the repair.
5. After the test, shut the valve on the gas cylinder.
If you nd a section with a bad seal that you cannot repair, refer the problem to a gas technician.
NOTE: When using for the rst time
Before preparing food for the rst time:
Close the lid and let the gas burn at a LOW setting for 15 minutes.
The smells from the treated surface are eliminated by the high temperature.
26
Page 27

PC-GG1206_IM 09 .12.19
Installation Site
The barbecue is for outdoor use only. During use, always place the barbecue and the gas cylinder on even, stable ground.
CAUTION:
During operation, the gas cylinder should not be placed in the barbecue.
• The appliance should be protected from drafts and dripping water (e. g.
rain water).
• Remove combustible materials within a radius of 3 m.
• Make sure there is clearance of at least 1 m around the rear and side
walls of the appliances.
• There should not be any obstructions above the barbecue, because of
the rising heat.
• In order to not obstruct the ventilation, do not cover the barbecue in any
way.
If You Notice the Smell of Gas
1. Close the gas valve on the cylinder.
2. Extinguish naked ames and do not use electrical devices in the
vicinity.
3. Ventilate the area.
4. Look for areas with a bad seal (as previously described).
5. If you can still smell gas, refer to your dealer or gas specialist.
12. Ignite the remaining burners from left to right, by repeating steps 6
to 10. The next burner is ignited by the ignition channel between the
burners.
13. In order to switch off the barbecue, close the valve on the gas cylinder.
14. Following this, turn the adjustable knobs to the 12 o’clock position
(OFF).
Switching on the Side Burner
You can operate the side burner separately.
1. Open the cover of the side burner before you ignite it.
2. Press the adjustable knob of the burner and turn it anticlockwise to the
HI position. At the same time, you will hear a CLICK. The burner will
ignite. If the burner does not ignite, repeat this step.
3. If the burner still does not ignite, wait 5 minutes and repeat step 2.
4. If the burner does not ignite, ignite the burner with a long match.
Contact your dealer or gas technician in order to resolve the fault with
the ignition.
5. Regulate the heat by turning the adjustable knob to any setting of your
choice between the HI and LOW setting.
6. In order to shut down the burner, turn the adjustment knob to the
12 o’clock position (OFF).
7. In order to shut down the entire barbecue, close the valve on the gas
cylinder and turn all the adjustment knobs to the 12 o’clock position
(OFF).
Switching the Gas Barbecue On
1. Before igniting the burner, open the hood of the barbecue.
2. Turn all switches in a clockwise direction to a 12 o’clock position
Head Distribution on the Grille
As a result of the design of burner, the heat distribution is specied as
follows:
(OFF).
3. Connect the gas hose to the gas cylinder and the barbecue.
4. Shut off the gas supply on the gas cylinder.
Barbecue cooking
5. Is the system properly sealed? Check the connections for leaks using
soapy water or leak detection spray.
6.
CAUTION: Always start with the left adjusting knob /
burner 1!
Cooking
Keeping warm
All other burners are ignited via the ignition channel.
Press the left adjusting knob and then turn it anticlockwise.
7. You should be able to hear a CLICK noise. The left burner 1 is ignited.
8. Whilst turning the adjustment knob further in the direction HI, check
whether the ame is burning. Otherwise, repeat the process.
9. If the burner still does not ignite, wait 5 minutes and repeat from step
6 onwards.
10. If the burner does not ignite electrically, contact your gas dealer for the
ignition to be repaired.
11. Turn the adjustable knob in order to regulate the heat between HI and
LOW.
Tips for Barbecue Cooking
The gas barbecue is a multifunctional appliance. With the hood closed,
you can use your gas barbecue like an oven.
• You don’t have to only barbecue meat, sh, vegetables and fruit, you
can also cook them.
• With a closed hood, the temperature should not be allowed to get too
high. A low temperature results in gentle cooking of the barbecue food.
• Monitor the temperature on the thermometer and if necessary, adjust it.
• The following applies as a rule of thumb: If smoke emerges from a
closed hood, the temperature is too high!
Troubleshooting
Malfunctions are often just caused due to minor problems. Before contacting our customer service, please check the table below:
Problem Possible Cause Notes / Solution
The burners cannot be ignited by the ignition
system
Gas cylinder is empty Replace the gas cylinder
The regulator is damaged Check or replace the regulator
The burner is blocked Clean the burner
The gas jets or hose is blocked Clean the jets and the hose
The electrode wiring is loose or separated from
Reconnect the cable
the electrode or ignition
The electrode or cable is damaged,
faulty switch ignition
Replace the electrode and the cable,
replace the ignition device
27
Page 28

PC-GG1206_IM 09 .12.19
Problem Possible Cause Notes / Solution
Burner does not ignite with a lit match Gas cylinder is empty Replace the gas cylinder
The regulator is damaged Check or replace the regulator
The burner is blocked Clean the burner
The gas jets or hose is blocked Clean the jets and the hose
No yellow ame or back coupling (re in the
burner line – hissing or bubbling noise)
Gas cylinder is too small Use a larger cylinder
Burner blocked (insect nest?) Clean the burner
The gas jets or hose is blocked Clean the jets and the hose
Draft Set the barbecue up in a protected location
Cleaning the Gas Barbecue
WARNING: HOT SURFACES
Before cleaning, wait until the gas barbecue has cooled down sufciently.
WARNING: RISK OF FIRE AND EXPLOSION
• Before cleaning the gas barbecue, remove the gas cylinder.
• Do not use any ammable detergents.
CAUTION:
• Do not use a wire brush or other abrasive utensils for cleaning.
• Do not use any oven cleaners. Oven cleaner attacks painted surfaces.
• Clean the barbecue after each use!
NOTE:
If you allow both burners to burn at full power for approx. 15 minutes
without food, the residual deposits will be burn away completely.
Exterior Surfaces
• Use mild detergents, caustic soda and hot water.
• Mild abrasive agents can be used for stubborn stains.
• Following this, rinse thoroughly with water.
Interior Surfaces
Does the inner surface of the grill lid look as if paint may ake off? There
is burnt-on grease which is aking.
1. Clean the surface thoroughly with highly concentrated, hot soap suds.
2. Rinse thoroughly with water and allow the lid to dry.
Interior Surface of the Barbecue Tray
1. Remove residue with a brush or a scraper.
2. Using soap suds and a sponge, nish by washing the surface.
3. Rinse thoroughly with water and allow the surface to dry.
Barbecue Grille
• Use mild soap suds.
• Mild abrasive agents can be used for stubborn stains.
• Following this, rinse thoroughly with water.
Cleaning the Burner
1. Turn the adjustable knob to the 12 o’clock position (OFF).
2. Disconnect the gas cylinder.
3. Remove the grille.
4. Clean the burner with a soft brush or compressed air, and wipe down
with a cloth.
5. Clean clogged ports with a pipe brush or a rigid wire.
6. Check the burner for damage (cracks or holes). In the case of damage, refer to your service team or your gas technician.
Servicing
Your gas barbecue should be serviced annually by a technician.
Maintenance and Protection of
Stainless Steel and Enamel Surfaces
Your gas barbecue requires regular care in order to ensure that it keeps
looking good.
Contrary to popular perception, stainless steel is neither rust resistant nor
maintenance-free. Even high-quality stainless steel has to be regularly
cleaned. This prevents rust and other forms of corrosion.
Even brushed stainless steel, which is very popular nowadays, is susceptible to corrosion without the right care. The medium-hard stainless steel
that has been built into your barbecue requires cleaning and protection.
This will ensure that you enjoy your barbecue for many years to come.
After assembling the barbecue, we recommend protecting it using olive
oil. Spread it in a thin layer on the accessible stainless steel surfaces with
a clean cloth. Following this, polish it and remove oil residue with a clean
cloth.
The tried and tested method of protection is not just suitable for use with
food, it also helps the cleaning process and the removal of ngerprints.
If repeated regularly, this procedure will save you the unpleasant job of
removing stubborn dirt.
Use of Protective Covers
If the barbecue is not used for a long time, it is a good idea to use protective covers. These are also recommended as soon as the barbecue has
been cleaned and dried out well.
When selecting the protective cover, make sure it allows air to pass
through.
Residual moisture and condensation can generate damaging, moist air
under the cover. If left for a long period, this moist air leads to corrosion,
even in the case of good quality steels.
Enamelled Surfaces
Enamel is an excellent surface coating but it breaks easily. As such,
handle enamelled parts carefully.
• Remove dust or dirt by hand in a rinsing bath.
• Be careful not to scratch enamelled surfaces.
• Never use oven cleaner for your gas barbecue. Oven cleaners attack
the painted surfaces of your barbecue. This damages the paintwork.
Storing the Gas Barbecue
• If the barbecue is clean and dry, you can protect it with a blanket.
• Store the barbecue in a frost-free, dry room.
• Shut the valve of the gas cylinder and store it out of the reach of children.
• Concerning storage, also refer to the information in the section entitled
“Safety Notes”.
28
Page 29

PC-GG1206_IM 09 .12.19
• The left side shelf can be folded down for space-saving storage. To do
this, lift the side shelf horizontally.
Gas Cylinder
– Always handle the gas cylinder with care!
• If the appliance is not in use, shut the gas cylinder and remove the
low pressure regulator.
• Close the cylinder and replace the protective cap.
• During operation, the gas cylinder should not be in the barbecue!
• Gas cylinders should stand upright outdoors and should be stored
out of the reach of children.
• Do not store the cylinder in a basement, as leaking gas can collect
on the oor.
• Never store the gas cylinder in places where temperatures can ex-
ceed 50 °C.
• Do not place the gas cylinder in the vicinity of a naked ame or other
sources of ignition.
Disposal
Packaging
The product packaging mostly consists of reusable materials.
Help protect the environment! Dispose of materials in the relevant recy-
cling containers provided.
Gas Barbecue
At the end of its service life, do not dispose of the gas barbecue with the
household waste!
Ask your local authority or a local recycling company about the proper
way to dispose of your product.
29
Page 30

PC-GG1206_IM 09 .12.19
Page 31

PC-GG1206_IM 09 .12.19
Page 32

PC-GG1206_IM 09 .12.19
Stand 11 / 2019
Internet: www.procook-germany.de
Made in P.R.C.
PC-GG 1206
 Loading...