


 Loading...
Quick Setup Guide
SL4M™ and T4M™
RFID Smart Label and Thermal Printers
NOTICE
This Quick Setup Guide contains a CD-ROM, located in a plastic pocket in the back cover, with the following material:
•Printer Setup Wizard
•Windows Drivers
•Label Design Software
•Network and RFID Solutions
•Manuals
•Contact Us
Save this guide. If you move your printer to a different location in the future, you may need these instructions again.

Introduction
Thank you for your purchase of the SL4M RFID Smart Label printer or T4M thermal printer.
This Quick Setup Guide describes how to set up the printer, load ribbon and media, and print a test page.
NOTE: This Quick Setup Guide covers both the SL4M and T4M printers.
The SL4M is a smart label printer. It is equipped with an RFID encoder and has the “RFID SMART” logo near the control panel.
The T4M printer does not come equipped with an RFID encoder, but can be upgraded in the field.
3

Printer Setup
Printer Setup
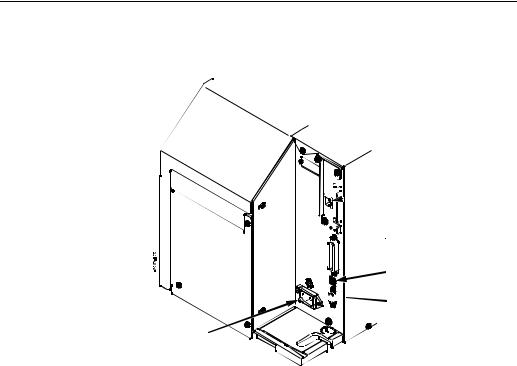
Front View
Power Switch
1.Place the printer on a flat level surface that allows easy access to all sides of the printer.
CAUTION Never operate the printer on its side or upside down.
2. At the front of the printer, set the power switch to O (Off).
4
Rear View

 Ethernet Interface

 (optional)
IEEE1284 Parallel


 Interface
 USB Connection


 RS-232 Serial
Interface
AC Power
Receptacle
3.At the rear of the printer, connect the desired interface cable to the appropriate connector and the host computer.
WARNING Failure to properly ground the printer may result in electric shock to the operator.
In compliance with international safety standards, this printer has been equipped with a three-pronged power cord. Do not use adapter plugs or remove the grounding prong from the cable plug. If an extension cord is required, ensure that a three-wire cable with a properly grounded plug is used.
4.Plug the AC power cord into the AC power receptacle.
5.Plug the AC power cord to a grounded (three prong) electrical outlet of the proper voltage. (Do not turn on the printer yet.)
5

Loading Ribbon And Roll Media
Loading Ribbon And Roll Media
IMPORTANT For best results, use only genuine Printronix supplies. See “Printronix Supplies Department” on page 18.
CAUTION DO NOT TOUCH the printhead or the electronic components under the printhead assembly.
CAUTION Do not close the pivoting deck without label stock installed between the printhead and the platen, because debris on the platen may damage the printhead.
CAUTION Avoid touching the electrical connectors while setting up the printer to prevent electrostatic discharge damage. The discharge of accumulated electrostatic energy can damage or destroy the printhead or electronic components used in this printer.
6

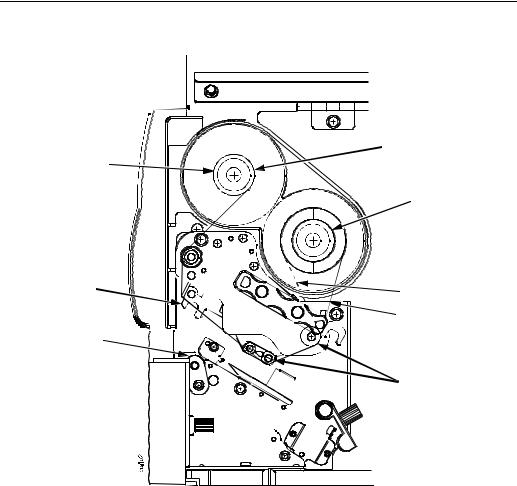
Load Ribbon
Load Ribbon
For direct thermal media (no ribbon required), go to page 10.
Media Cover |
Flange |
|
Ribbon
 Take-Up Core
Ribbon
 Take-Up Spindle
Ribbon


 Roll
Roll
 Ribbon
Supply Spindle
Pivoting |
Deck Lock |
Deck |
Lever |
IMPORTANT Clean the printhead, platen roller, and media sensors every time you change the ribbon. Refer to the User’s Manual.
1.Raise the media cover.
2.Install the ribbon take-up core on the ribbon take-up spindle.
NOTE: The first ribbon take-up core comes with the printer. Thereafter, move the empty core from the ribbon supply spindle to the take-up spindle after the ribbon is used up.
3.Slide the ribbon roll onto the ribbon supply spindle until it is flush with the flange.
4.Open the pivoting deck by rotating the deck lock lever fully counterclockwise until the deck swings upward.
7
Loading Ribbon And Roll Media
|
Ribbon |
Ribbon Take-Up |
Take-Up Spindle |
|
|
Core |
|
|
Ribbon |
|
Supply Spindle |
Printhead |
Alternate |
|
Ribbon Path |
|
Ribbon |
Platen |
|
(not shown) |
|
|
Ribbon Guide |
|
Roller (2) |
5.Thread the end of the ribbon under the ribbon guide rollers, between the platen (rubber drive roller) and the printhead, and between the ribbon take-up and supply spindles.
NOTE: Make sure to thread the ribbon behind the ribbon take-up spindle.
NOTE: The alternate ribbon path is for ribbons that are inked on the inside.
8
Loading...