


MultiPad PMP7100D3G
Tablet PC
User Manual |
1 |
USER MANUAL | MultiPad PMP7100D3G |

Common information
Dear Customer. Thank you for choosing Prestigio MultiPad PMP7100D3G Tablet PC. Before starting to use the tablet, please read this manual carefully to discover all its features. Please save this manual and refer to it in the future if you have questions concerning your device.
This manual contains safety information, technical specifications of Prestigio MultiPad PMP7100D3G Tablet PC, preinstalled software basic features and other useful information, which will help you to improve your use of the device, Android operating system and applications.
For information about meaning of the terms used in this manual, please refer to the "Glossary" section at the end of this manual, as well as to other open information sources or Prestigio customer support line.
Disclaimer.
As the Prestigio products are constantly updated and improved, your device’s software may have a slightly different appearance or modified functionality than presented in this User Manual. We make every effort to ensure that the information and procedures in this user manual are accurate and complete. No liability can and will be accepted for any errors or omissions. Prestigio reserves the right to make any changes without further notice to any products herein.
Important Safety Instructions
Your Prestigio MultiPad PMP7100D3G Tablet PC is manufactured and designed for mobile using.
Please, read the following instructions carefully. It helps you to proper use your device without risk for someone's safety and keep your Tablet PC in good working condition as long as it possible.
General instructions
1.Do not place objects on top of the MultiPad as objects may scratch the screen.
2.MultiPad should be kept away from extreme changes of temperature.
3.Protect it from direct sunlight or heat sources.
4.Protect the device from moisture and from dusty or smoky environment as it can harm the tablet.
5.Keep your MultiPad away from contact with active chemicals.
6.Do not place the MultiPad on an uneven or unstable surface. Fall of the device can cause damage to the LCD screen which is not covered with warranty.
7.Do not expose the MultiPad to strong magnetic or electrical field.
8.Protect your MultiPad from hits and extreme pressure.
9.Operation Temperature: This MultiPad should only be used in environments with ambient temperatures between 5°C (41°F) and 35°C(95°F).
10.Do not insert into MultiPad devices or items not matching to standard sockets on it.
11.Do not use MultiPad in the rain - it is NOT a waterproof device. Protect the Multipad from dust, dirt and high humidity.
12.Do not use Your MultiPad during driving.
13.Use only manufacturer approved chargers. Using non-original chargers may cause damage of the device and be harmful to your health.
14.The MultiPad and the adapter may produce some heat during normal operation or charging. Avoid placing it to the soft surfaces, other places and conditions which may prevent normal dispersion of the heat, causing device overheating. Do not leave the MultiPad on your lap or other part of the body to prevent discomfort or injury from heat exposure.
15.Disconnect the MultiPad from an electrical outlet after it is charged.
16.Do not use a pen or any sharp object to tap the screen. Clean the touch screen with a soft cloth. If needed, dampen the cloth slightly before cleaning. Never use abrasives or cleaning solutions.
17.DO NOT disassemble the MultiPad, only a Prestigio certified service technician should perform repair.
18.Always power off the MultiPad to install or remove external devices that does not support hot-plug.
29. Your MultiPad must be switched off during airplane take-off and landing.
Warranty Information
Warranty information could be found at www.prestigio.com/service. Prestigio MultiPad PMP7100D3G Tablet PC life cycle is 2 years.
USER MANUAL | MultiPad PMP7100D3G |
2 |

Contents
1.Product Overview
1.1 Package Contents
1.2 Device Overview
2.Getting Started
2.1Charging the battery
2.2Using the storage card
2.3Hot plug of storage card
2.4Memory space
2.5Power on/off and Device Reset
2.6Connect to wireless networks (Wi-Fi)
2.7Inserting a SIM card
3. Home Screen
3.1Status and notifications
3.2Shortcuts to Add widgets
3.3Finger gestures
3.4Coping files to and from the storage card
3.5Searching the device and the web
4. Personalizing
4.1Change the Notification ringtone
4.2Change your wallpaper
4.3Personalize your Home screen with folders
4.4Rearrange widgets and shortcuts on your Home screen
5. Web browsing
6. Manage Applications
7. Typical applications introduction
7.1Music Player
7.2Video Player
7.3Gallery
7.4File Manager
7.5Instant Messaging tools
7.6E-mails
7.7Camera
8.Prestigio preinstalled applications 9. Settings
9.1Wireless & networks
9.2Sound
9.3Display
9.4HDMI Settings
9.5Storage
9.6Apps
9.7Accounts& Sync
9.8Location service
9.9Security settings
9.10Language & input setting
9.11Backup &reset
9.12Date & Time setting
9.13Accessibility
9.14Developer options
9.15About tablet
10. Troubleshooting
10.1Force shutdown
10.2Restore default settings
10.3System updating
11. Glossary
USER MANUAL | MultiPad PMP7100D3G |
3 |
1. Product Overview |
1 |
|
1.1Package Content:
Prestigio MultiPad PMP7100D3G Tablet PC – 1x
Carrying Case – 1x
Quick Start Guide – 1x
Legal and Safety Notices – 1x
AC Adapter – 1x
USB Cable – 1x
Warranty Card – 1x
OTG cable – 1x
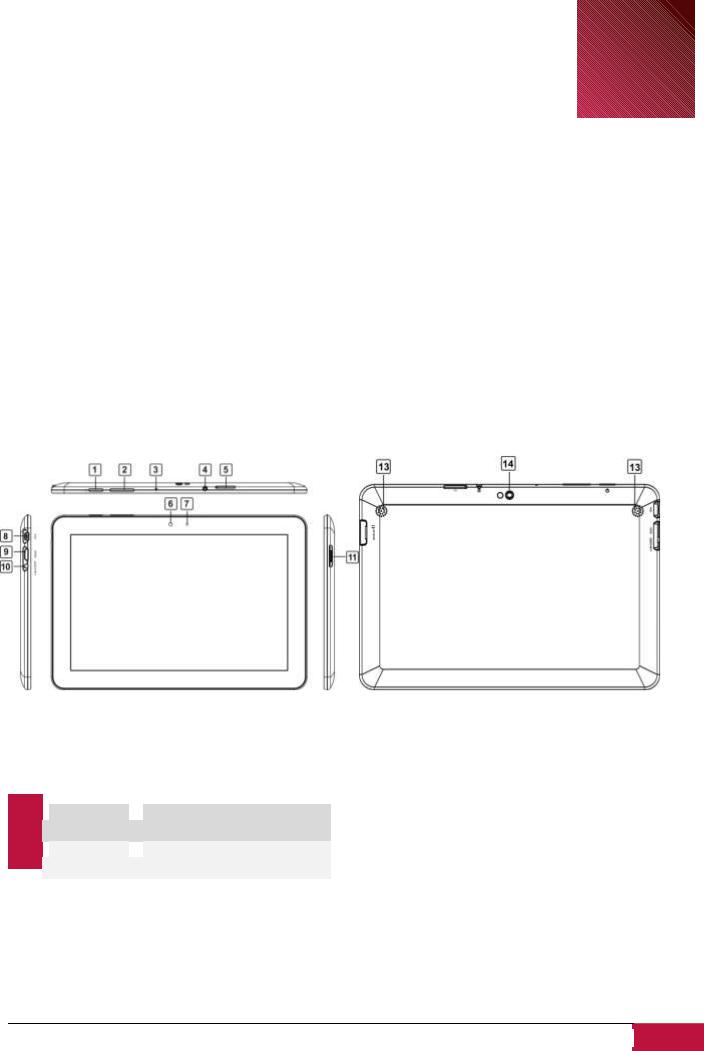
1.2Device Overview
Control Buttons and Connectivity:
|
1 |
|
Power Button |
Turn on/off the device; |
|
|
|
|
Suspend/Activate the device |
|
|
|
|
|
|
|
|
|
|
|
|
|
|
|
2 |
|
Vol+\Vol- |
Adjust the volume level |
|
|
|
|
|
|
|
|
|
|
|
|
|
3 Microphone
  To record voice
4 Earphone Jack
 Earphones connection
|
|
|
|
|
|
|
5 |
|
SIM Card slot |
Insert a SIM card for 3G |
|
|
|
|
connection |
|
|
|
|
|
|
|
|
|
|
|
|
|
|
|
6 |
|
Front Camera |
Take photos or video chat |
|
|
|
|
|
|
|
|
|
|
|
|
|
|
7 |
|
Light Sensor |
Adjusts the display brightness |
|
|
|
|
|
|
|
|
|
|
|
|
|
|
8 |
|
|
Mini USB port |
|
USB connection |
|
|
|
|
|
|
|
|
|
|
|
|
|
|
|
|
|
|
|
|
|
9 |
|
|
HDMI port |
|
Back to Home screen |
|
|
|
|
|
|
|
|
|
|
|
|
|
|
|
|
|
|
||
|
10 |
|
|
DC port |
|
Power adapter connection |
|
|
|
|
|
|
|
|
|
|
|
|
|
|
|
|
|
|
||
|
11 |
|
|
Micro SD card |
|
Insert the Micro SD card |
|
|
|
|
|
slot |
|
|
|
|
|
|
|
|
|
|
|
|
|
|
|
12 |
|
|
Front Camera |
|
Take photos or video chat |
|
|
|
|
|
|
|
|
|
|
|
|
|
|
|
|
|
|
||
|
13 |
|
|
Speakers |
|
Stereo Speakers |
|
|
|
|
|
|
|
|
|
|
|
|
|
|
|
|
|
|
||
|
14 |
|
|
Rear Camera |
|
Take photos |
|
|
|
|
|
|
|
|
|
|
|
|
|
|
|
|
|
|
|
|
USER MANUAL | MultiPad PMP7100D3G |
4 |

Technical Specifications:
 Processor
CPU |
ARM Cortex A9 (Rockchip 3066) |
|
|
CPU Internal Clock Rate |
1.6 GHz |
|
|
 Display
Display Size |
10.1’ |
|
|
Display Resolution |
1280x800 |
|
|
Display Technology |
TFT LCD |
|
|
Display Features |
Capacitive multi touch screen |
|
|
Screen rotation |
4 way G-Sensor |
|
|
 Memory
Internal Memory Size |
16 GB |
|
|
Installed RAM Storage Capacity |
1 GB DDR3 |
Flash Card |
External Micro SDHC up to 32GB |
|
|
 Interfaces
Interface ports available |
Micro SD, USB 2.0, Wi-Fi, Mini HDMI |
Interface Wi-Fi |
IEEE 802.11b/g/n |
Interface Bluetooth |
Yes |
Interface USB |
1 x mini USB |
Interface HDMI |
1 x mini HDMI |
Interface Audio |
1 x 3.5 mm mini jack |
Supported 3G protocols |
HSDPA |
|
|
 Multimedia
|
Digital Camera |
|
|
Back : 2 Mpixel, Front : 0.3 Mpixel |
|
|
Supported eBook Formats |
|
|
PDF, FB2 |
|
|
|
|
|
||
|
Supported Audio Formats |
|
|
MP1, MP2, MP3, WMA7, WMA8, WMA9, WAV, APE, OGG, OGA, FLAC, AAC, M4A |
|
|
|
|
|
||
|
Supported Picture Formats |
|
|
PNG, BMP, GIF, JPG |
|
|
|
|
|
||
|
Supported Video Formats |
|
|
1080P@60 fps & H.264/MVC/VP8 encoder by 1080P@30fps |
|
|
|
|
|
||
|
Video Features |
|
|
Video Playback |
|
|
|
|
|
||
|
Sound Features |
|
|
Stereo Audio Playback |
|
|
|
|
|
|
|
 Software
 Operating System
  Android 4.0.4
 Battery
Battery Technology |
Lithium Polymer |
|
|
Battery Current Capacity |
6400 mAh |
Battery Video playback Time |
Up to 6.5hr |
Battery Audio playback Time |
Up to 36hr |
Battery Standby Time |
Up to 120hr |
|
|
 Miscellaneous
Built-in Devices |
3G Modem, Card Reader, Microphone, Speakers, |
Included Accessories |
USB Cable, OTG-cable, Pouch, Power Adapter |
System Requirements |
Microsoft Windows 7, Microsoft Windows Vista, Microsoft Windows XP, Apple Mac OS |
|
10.6 or Later, Linux 2.6 |
Applications Installed |
Adobe Flash, Office Suite, eReader Prestigio, Skype, Google Play |
|
|
 Warranty
 Warranty Term (month)
  24 month
 Temperature and Humidity
Storage Temperature |
0°C (32°F) ~ +50°C (122°F) |
Operation Temperature |
5°C (41°F) ~ +35°C (95°F) |
|
|
Storage Relative Humidity |
0% ~ 90%, Non-Condensed |
|
|
Operating Relative Humidity |
0% ~ 90%, Non-Condensed |
|
|
USER MANUAL | MultiPad PMP7100D3G |
5 |
2. Getting Started
2
2.1 Charging the battery
Prestigio MultiPad comes with a built-in polymer rechargeable battery and is designed to use only manufacture-specified original batteries and accessories. You can see battery status on status bar of MultiPad in the lower right corner of the home screen. Android OS has battery charge detection system and notify user if battery charge is low and device need to be connected to AC adapter. If you will see such message, or your device couldn’t power on, connect original AC power adapter to charge your device. Plug one end of the adapter into the power jack of the device, and the other to the power socket. To extend the battery operation life, wait for finish of charge process.
Please, fully charge your new device after unpacking.
[Note]: it is normal if the device is warm or hot during charging, you can use it as usual, just follow the respective security precautions.
2.2 Using the storage card
Your new Prestigio MultiPad PMP7100D3G Tablet PC is equipped with Micro SD card slot to extend available device memory. It is compatible with Micro SD/ Micro SDHC/ TF-Flash card formats of size up to 32Gb. Proper functioning of larger capacity cards is not guaranteed.
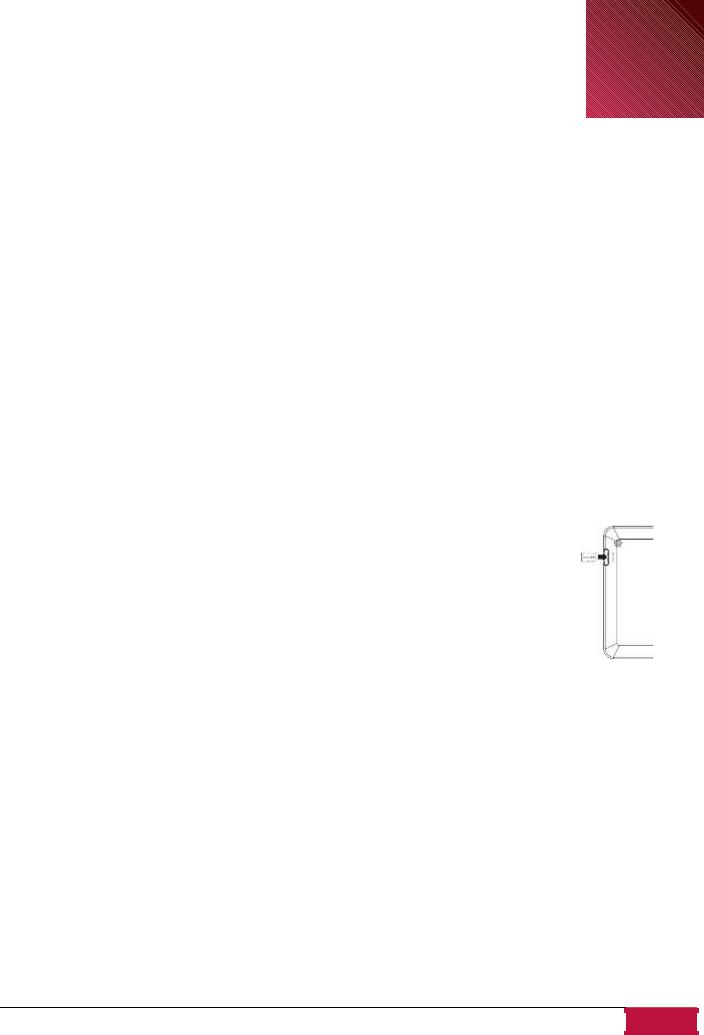
Insert the storage card
The storage card slot is on the left side of the back panel of device. To insert a card, place the card as shown on the picture (left) and press it in card slot until click. Card must be inserted effortlessly. DO NOT push the card too strong, it could damage the card slot or storage card.
Browse files in the storage card
To browse the files you should do one of the following:
●Select “Explorer” icon to view files in the storage card;
●You can also install and run any other third party file browser applications.
Remove the storage card
To avoid data loss or damage, please stop using files/programs in the storage card, and then tap
Settings> Storage> Unmount SD card to remove it safely.
To remove the storage card, gently press the edge of the card to release the safety lock and pull the card out of the slot.
[Note]:
1.Make sure the location and direction of the storage card is correct when inserting.
2.To avoid possible issues or incompatibility of the storage card with your MultiPad, major brands of storage card are recommended.
USER MANUAL | MultiPad PMP7100D3G |
6 |
2.3 Hot plug of storage card
Please do not hot plug the storage card when using or browsing its files.
For example, when you are running the Music/Video Player/ Gallery, the storage card could be damaged and files on it might become corrupt if you take out the storage card without proper preparation. As for details of inserting/removing storage card, see 2.2 Use the storage card.
2.4 Memory space
The capacity of built-in flash chip is 16GB. The device contains 2 memory partitions: Internal storage & NAND Flash storage. The space is partitioned to store apps, setting and user data. A part of storage will be reserved for system resources and wouldn’t be available for user. The exact size of available memory may vary depending on Firmware version.
MultiPad supports extended storage – micro SD cards of 32GB maximum capacity.
2.5 Power on/off and Device Reset
1.Power on: press down the Power Button and hold it for a while to turn on the device when the battery is full enough.
2.Power off: press down the Power Button and hold it for about 3 seconds and then select Power Off in popup menu to turn off the device.
3.Screen Lock short-press down the Power Button once to shutdown the screen to save battery life. Short-press down the Power Button again to activate the lock screen. After unlocking, the device will resume the screen before locking.
4.Reset: Press the power button for about 8 seconds to perform forced reset of device.
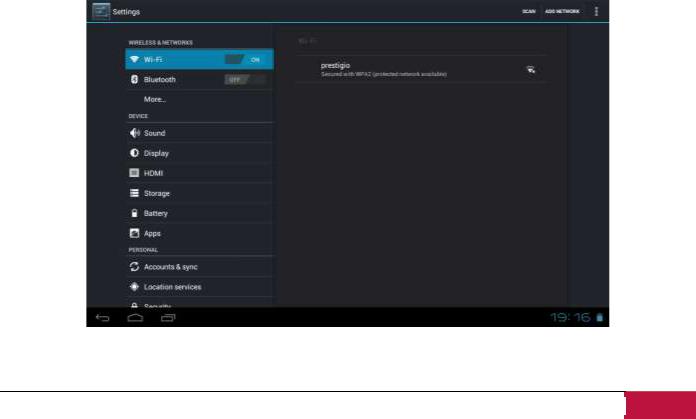
2.6 Connect to wireless networks (Wi-Fi)
To connect to a Wi-Fi wireless network, you should follow:
1. Tap Settings on the Home screen or go to the Settings in other way (via Notification bar or Application list);
USER MANUAL | MultiPad PMP7100D3G |
7 |

2.Turn Wi-Fi switch on in Wireless & Networks section;
3.The network names and security settings of detected Wi-Fi networks are displayed in the Wi-Fi networks section;
4.Tap a Wi-Fi network to connect. If you select an open network, you will be automatically connected to the network. If you select a secure protected network, enter the Password and then tap
Connect.
Depending on the network type and its security settings, you may also need to enter more information or choose a security certificate.
5.After successful connection, the Wi-Fi connected icon  will appear on the status bar.
2.7Inserting a SIM Card
The MultiPad is equipped with the SIM card slot which allows you to insert the SIM card into the unit as shown below:
Use steel wire to poke the hole on the SIM card port to popup the SIM card base. Place the SIM card on the card base and insert them into the SIM card port.
[Note]: 3G module does not support hot plug-in of SIM card. You have to switch the MultiPad off completely, install SIM card as described above and switch the MultiPad on.
USER MANUAL | MultiPad PMP7100D3G |
8 |
3. Home Screen |
3 |
|
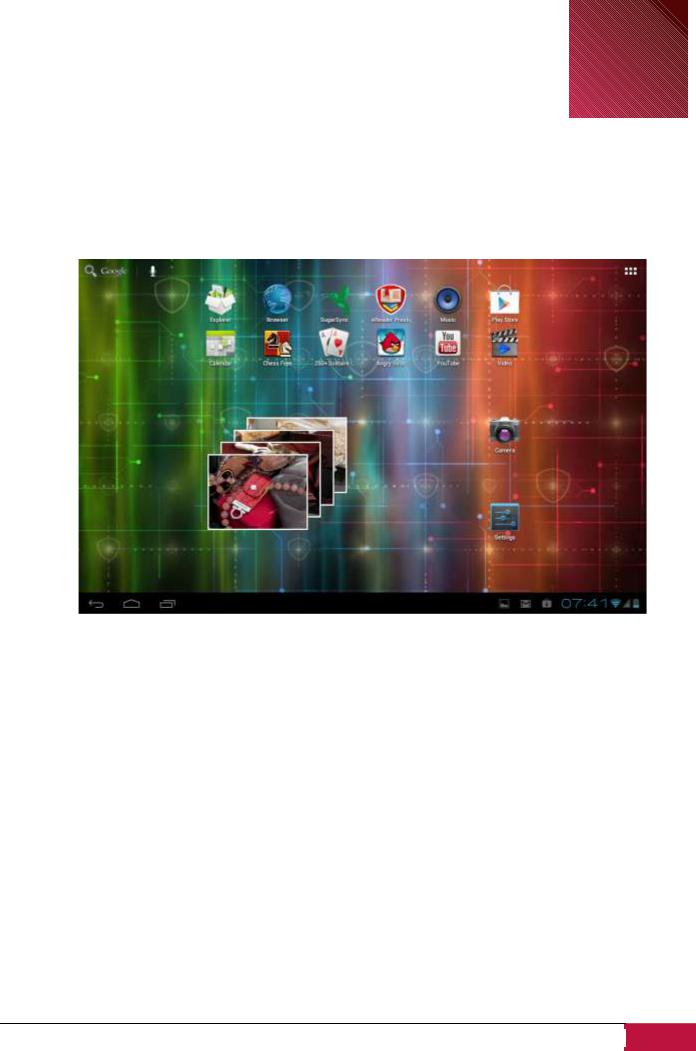
The Home screen is your starting point to access all the features on you device. It displays application icons, widgets, shortcuts, and other features. You can customize the Home screen with different wallpaper & widgets and display items you want. See the Personalizing section in this manual.
When you start, the Home screen appears.
Sleep mode
Sleep mode suspends your device to a low power state while the display is off in order to save battery power. You will still be able to receive messages while the device is in Sleep mode.
[Note]: By default the device enters sleep mode automatically in case it’s not operated for 2 minutes.
You may change this time or even disable automatic sleep mode activation in menu Settings-Device- Display-Sleep.
Wake up from sleep mode
To wake up your device manually, press the Power Button. You will a Lock Screen than.
Unlocking the screen
Touch the lock icon  , hold it and slide towards unlock icon on the screen.
Other unlock ways, like PIN code, Face Unlock, Pattern etc. could be set up by user in menu Settings-
Personal-Security-Screen Security – Screen Unlock.
USER MANUAL | MultiPad PMP7100D3G |
9 |
Browse Home Screen
You can go to the extended Home screen by sliding your finger horizontally across the screen to go to the left or right side
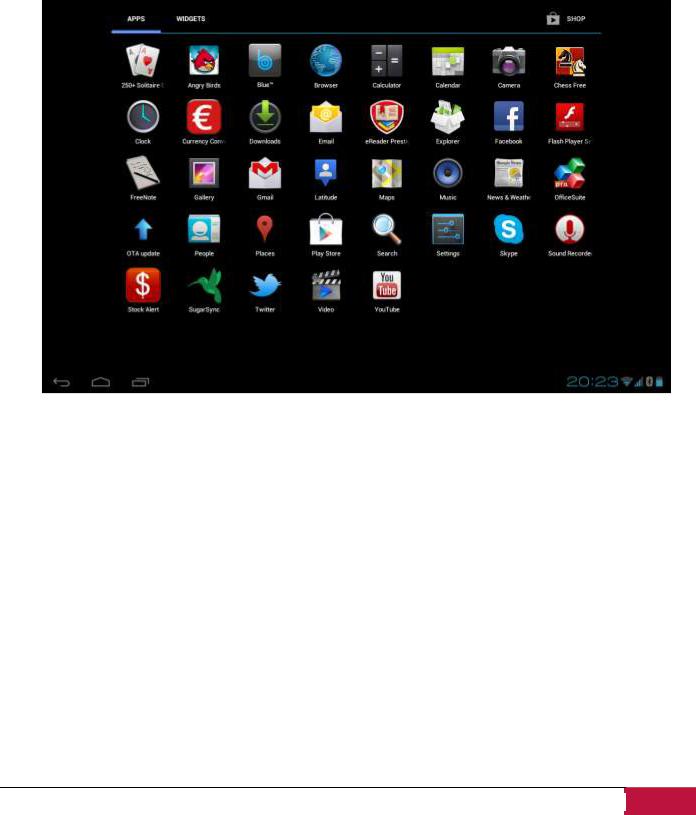
of the Home screen. Tap the icon  to view all applications on your device.
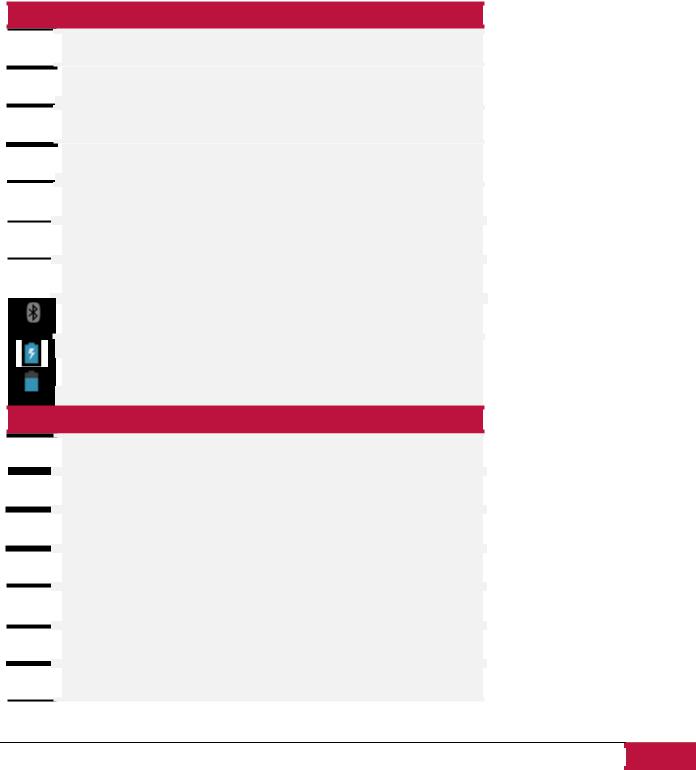
3.1 Status and notifications
Status and Notification Icons may appear.
The status bar contains different information like time and date, battery status, wireless networks status, active notifications from Android OS or installed applications and so on. When an application is running, corresponding notification icon will appear in the notification area. Icons you may often see are listed as follows:
Status icons and its meanings


 Tap to go to the Home screen


 Back
Back


 Recently applications view


 Menu icon


 Android debug bridge enabled


 Connected to a Wi-Fi network and display the signal strength


 Connected to 2G/3G mobile network
 Bluetooth status icon

 Battery status
Notification icons its meanings


 New Gmail (Google Mail) message


 New Email message


 Music player is ongoing


 SD card is mounted


 USB Connected


 Airplane mode


 Settings
USER MANUAL | MultiPad PMP7100D3G |
10 |
Open notification panel
When a new notification icon displays in the status bar, touch and hold the status bar, then slide your finger upwards to open the Notifications panel as follows:
If you have several notifications, you can scroll down the screen to view more notifications.
In the notification panel, there are toggles for turning on/off Auto-rotate screen option and Notifications, and shortcuts for quick access to Settings and Wi-Fi tabs.
Close the Notifications panel
Simply touch the Back button on the device panel.
USER MANUAL | MultiPad PMP7100D3G |
11 |
3.2 Shortcuts to Add widgets
Widgets put at-a-glance important information and media content up front on your Home screen. Some widgets are already added to your Home screen for your convenience. You can add more from the available selection of widgets, or download more widgets.
1. Adding a widget to your Home screen
To add widgets to Home screen, you can:
1.1 Tap  on the home screen to enter into all apps interface as follows
1.2 Tap 
1.3. Select one item. Touch and hold your finger on widget. Choose desired place for widget on the home screen.
[Note]: When choosing place for widget you can switch home screen tabs by sliding finger with holding widget to the left or right side of the home screen.
USER MANUAL | MultiPad PMP7100D3G |
12 |
 Loading...