


Important Safety
Instructions
EN
The exclamation point within an equilateral triangle is intended to alert the user to the presence of important operating and maintenance (servicing) instructions in the literature accompanying the appliance.
CAUTION
1.To reduce the risk of electric shock, do not remove the cover (or back). No user-serviceable parts inside. Refer servicing to qualified service personnel.
2.The manufacturer should not hold responsibility for the damage caused by any substitutions and modifications of the product without authorization from the manufacturer or authorized unit.
WARNING
The device should not be exposed to dripping or splashing and no objects filled with liquids should be placed on the device.
To prevent the GPS from being damaged, be sure to keep the GPS out of direct
sunlight or heat. Maintain well-ventilated conditions around the unit to avoid overheating.
EN-1
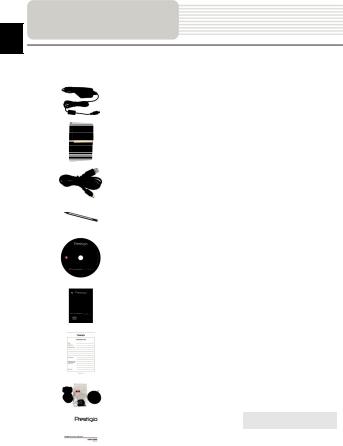
Accessories
EN
Accessories List
ITEM |
|
NAME |
|
QTY |
||||
|
|
|
|
|
|
|
|
|
|
|
|
|
Car Charger |
|
|
1 |
|
|
|
|
|
|
|
|
|
|
|
|
|
|
Pouch |
|
|
1 |
|
|
|
|
|
for GV5700/5700BT |
|
|
|
|
|
|
|
|
|
|
|
|
|
|
|
|
|
|
|
|
|
|
|
|
|
|
USB Cable |
|
|
1 |
|
|
|
|
|
|
|
|
|
|
|
|
|
|
Stylus Pen |
|
|
1 |
|
|
|
|
|
|
|
|
|
|
|
|
|
|
Driver/Documentation CD |
|
|
1 |
|
|
|
|
|
|
|
|
|
|
|
|
|
|
User Manual |
|
|
1 |
|
|
|
|
|
|
|
|
|
|
|
|
|
|
Warranty Card |
|
1 |
|
|
|
|
|
|
|
|
|
|
|
|
|
|
|
Smart Mount |
|
|
1 |
|
|
|
|
|
|
|
|
|
|
|
|
|
|
User guide |
|
|
1 |
|
|
|
|
|
(for smart mount) |
|
|
|
|
|
|
|
|
|
|
|
|
|
|
|
|
|
|
|
|
|
|
EN-2
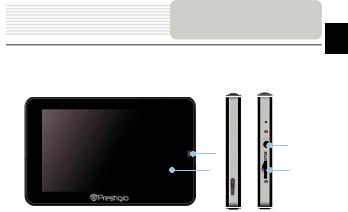
View of Main Unit
EN
Front and Side View
 5
5
3
2
1 |
4 |
6 
1.LCD Touch Screen
Tap the screen with touch pen or finger to select menu commands or to enter information.
2.Light sensor
3.Headphone Port
Connects to stereo headphones or headsets.
4.microSD Slot
Receives microSD memory card for data access or memory expansion.
5.Reset Button
Press to reset the device
6.Speaker
Emits sound, voice or music.
EN-3

View of Main Unit
EN
Top and Bottom View
2
1
1.Power Button
Press to power ON/OFF device.
2.Mini-USB Port
Connect to USB Cable for data access or battery charging
EN-4

Device Connections
EN
Inserting microSD Card
zTo insert a microSD card, place connector towards device and card label towards the front side of the device.
zTo remove a microSD card, gently press the edge of the card to release the safety lock and pull the card out of the slot.
NOTE:
Please always make sure that no application is accessing the microSD card before extraction.
Connecting to External USB Device (Charging)
zInsert the mini USB connector into the appropriate mini USB port.
zInsert the other USB connector into the USB port on PC to start charging.
EN-5
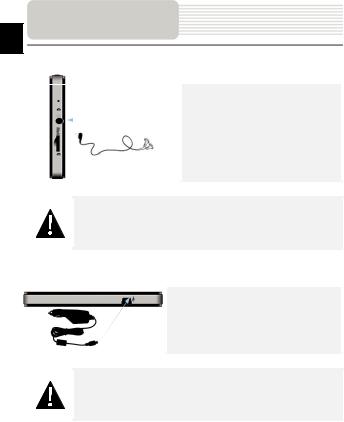
Device Connections
EN
Connecting to Earphones
z Insert earphone jack (earphones not included) into the appropriate earphone port to switch audio output from device speaker to earphone.
NOTE:
High volume level is a potential risk to your hearing. Please turn down the volume before connecting the earphone and gradually turn up the volume to a comfortable level.
Connecting to Car Charger
z Insert USB connector into the appropriate USB port.
z Insert car charger connector into vehicle 12V accessory/cigarette socket to start charging.
NOTE:
Please connect the car charger to vehicle 12V accessory/cigarette socket after vehicle engine is started to protect the device from sudden surges in current.
EN-6
Cautions on Battery
Charging
About Rechargeable Battery
The device is equipped with a built-in rechargeable battery. Please fully charge the battery (for at least 8 hours) before initial use. The battery status indicator glows in red color when charging, and turns green color when the battery is full. Charging time is approximately 2 hours.
Working conditions and precautions for the rechargeable battery
zDevice with new batteries should be fully charged before initial use.
zBattery should only be used and charged when temperatures are between 0° ~ 37°C.
zIt is not necessary to start charging the device before the battery is fully discharged.
NOTE:
Please connect the car charger to vehicle 12V accessory/cigarette socket after vehicle engine is started to protect the device from sudden surges in current.
EN
EN-7
EN
Getting Started
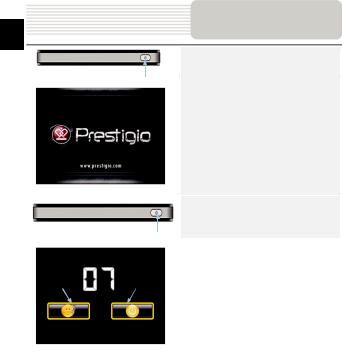
1. Press and hold Power Button to turn on the device.
2. Shortly after the loading screen is shown, the main menu will be displayed.
3. Tap the corresponding buttons with touch pen included to navigate various functions.
4. Press and hold Power Button to turn off the device or to allow the device to enter sleep mode.
Sleep |
OFF |
|
|
5. Tap Sleep icon to enter sleeping |
|
|
|
|
|
|
|
|
|
|
|
mode or OFF icon to complete turn |
|
|
|
|
|
off the device. |
|
|
|
|
|
|
|
EN-8
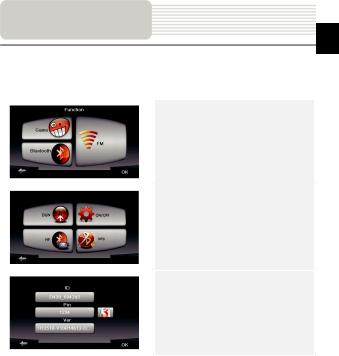
Bluetooth Function
Main Menu
Bluetooth function (optional)
The following is shown how to select, switch on/off the Bluetooth function
EN
1.Tap on Function icon on the main menu.
2.Tap on Bluetooth icon to start using Bluetooth function.
3.Tap on ON/OFF icon to enable/ disable Bluetooth function.
4.Tap Info icon to review Bluetooth information.
5.Tap on  to reset a new PIN code. The default setting is 1234.
EN-9
Bluetooth Connection
EN
How to operate the Bluetooth function.
1. Tap on DUN icon or HF icon on the main menu.
2. Tap on Paired List icon to start pairing with mobile phone device with GPRS function.
3. Please make sure Bluetooth function on mobile phone is detectable by other devices.
4. Tap on  to start searching process.
5. Mobile phone name desired for connection will be displayed on the list when search is completed.
6. Tap on the mobile phone name and tap on  to establish connection.
7. Enter PIN code 1234 when PIN number is required on mobile phone device.
8. Tap on  to disconnect current Bluetooth connection.
9. Select mobile phone name from
Paired List and tap on  to re-connect from previously connected mobile phone.
10. Select mobile phone name from Paired List and tap on  to remove it from the list.
EN-10
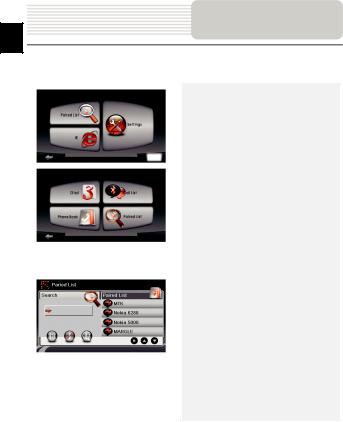
Hands Free Function
EN
1.Tap on HF icon on the main menu.
NOTE:
Please refer to Bluetooth Connection section before connecting by Hands Free function.
2.Tap on Dial icon to make phone calls.
3.Tap on digit buttons and tap on  to start dialing.
4. Tap on  to answer a call if it is on standby.
5. Tap on  to end call.
6. Tap on  to switch the call to mobile phone or switch it back to device.
7. Tap on  to show dialing keypad to dial more numbers.
8. Tap on Phone Book icon to view phonebook entries.
9. Tap on  to browse phonebook entries stored in SIM card.
10. Tap  /
/ to scroll pages up/down.
11.Select a phonebook entry and tap  to make the call.
12.Select a phonebook entry and tap  to delete it.
EN-11
Hands Free Function
EN
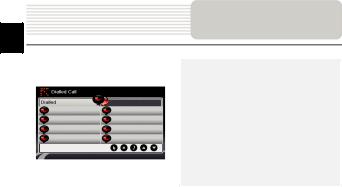
13. Tap on Calls List icon to review call history.
14. Tap  to view Dialed Call list,
Received Call list, and Missed Call list.
15. Tap  /
/ to scroll pages up/down.
16. Select a phonebook entry and tap  to make the call.
17. Select a phonebook entry and tap  to delete it.
EN-12
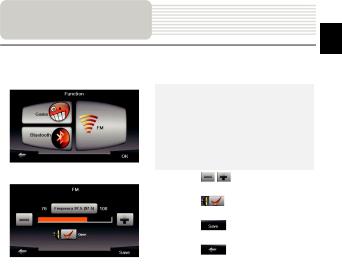
FM Function
EN
FM function (optional)
1.Tap on Function icon on the main menu.
2.Tap on FM icon to start using Bluetooth function.
|
|
|
|
3. |
Tap on |
/ |
to tune FM |
|
frequency down/up. |
||
4. |
Tap on |
|
to open the selected |
|
frequency for broadcast. |
||
5. |
Tap on |
|
to save current FM |
|
station. |
|
|
6. |
Tap on |
|
to cancel settings and |
|
exit. |
|
|
|
|
|
|
EN-13

EN
Initialization and
Software Activation
|
1. |
Tap |
/ |
and language option to |
|
|
|
|
|||||
|
|
select system language. |
|
|||
|
2. |
Tap |
|
to confirm selection |
|
|
|
3. |
Carefully read through Software and |
|
|||
|
|
Database End User License |
|
|||
|
|
Agreement. Tap |
to agree with |
|
||
|
|
the terms of use. |
|
|
||
|
|
|
|
|
|
|
|
|
|||||
|
4. |
The configuration wizard will be |
|
|||
|
|
displayed in the selected language. |
|
|||
|
|
Tap |
|
to continue. |
|
|
|
5. |
Tap |
/ |
to display all available |
|
|
|
|
voice guidance language profile. Tap |
|
|||
|
|
on a language for a short voice sample |
|
|||
|
|
and tap |
|
|
to confirm selection. |
|
|
|
|
|
|
|
|
|
|
|||||
|
6. |
Select desired time format and units |
|
|||
|
|
and tap |
|
|
to confirm selection. |
|
|
7. |
Select desired route navigation option |
|
|||
|
|
and tap |
|
|
to confirm selection. |
|
|
8. |
The initialization is now complete. Tap |
|
|||
|
|
|
|
to continue. |
|
|
|
|
|
|
|
|
|
|
|
|
|
|
|
|
9. |
Tap |
|
to start tutorial that |
|||
|
|
review the basic steps of navigation. |
||||
|
|
Tap |
|
to skip introduction. |
||
10. |
Tap |
|
to activate navigation |
|||
software right away.
NOTE:
Device must be connected to an active Internet connection to start activation process.
EN-14
Navigation
EN
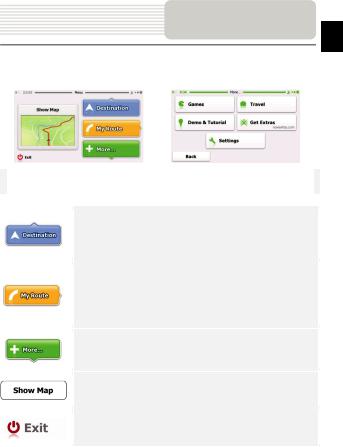
Introduction
Tap on Navigation icon to start navigation software. The options are displayed as below:
Tap Destination icon to start navigation function by entering an address or selecting a Place Of Interest (POI), a location on the map, or one of Favorite destinations. Recent destinations can also be displayed from the Smart History.
Tap My Route icon to display routing parameters including cancelling current route, selecting route alternatives, simulating navigation, and adding destination to Favorites.
NOTE:
The button remains inactive when no destination is selected.
Tap More… icon to adjust software settings, go through Demo & Tutorial, execute additional applications, or received extra content from www.naviextras.com
Tap Show Map icon to start navigating on the map.
Tap Exit icon to stop navigation and exit the software.
EN-15
Navigation
EN
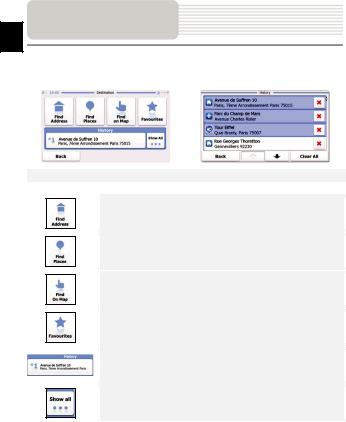
Destination Menu
In the navigation menu, tap on Destination icon to start navigation function.
Enter an address as routing destination.
Select a POI as routing destination.
Select a location on the map to navigate to.
Select a routing destination from favorite list.
Navigate to the latest destination as displayed.
Select one of latest destinations from history list.
EN-16
Navigation
EN
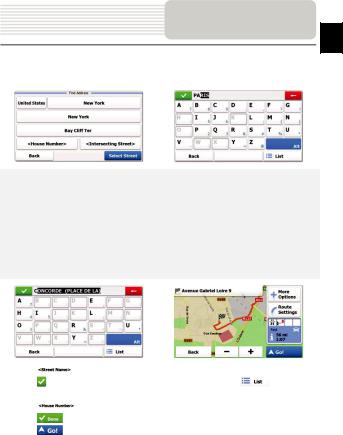
Navigating to An Address
1.In the navigation menu, tap Destination icon and then Find Address icon.
2.Current country/state/town (location attributes) is set as default location.
3.Tap Select Street to continue or Back to return.
4.Tap location attributes desired to change its values.
5.After tapping a few characters, the device automatically matches character strings
with names of location in database.
6. Tap  to confirm selection or
  to correct entry.
7. Tap  to browse a list of location names matching input. Tap an item to select.
8. |
Tap |
and enter a few characters of desired street name. |
|
9. |
Tap |
to select street name automatically generated or tap |
to browse a |
|
list of all street names matching input. Tap an item to select. |
|
|
10. |
Tap |
to enter house number. |
|
11. |
Tap |
to complete address entry. |
|
12. |
Tap |
to start navigation after system calculation of best desired route. |
|
EN-17
Navigation
EN
Navigating to a Place Of Interest (POI)
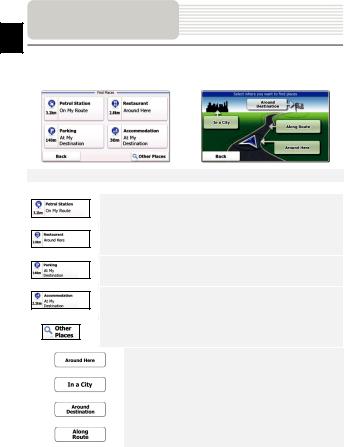
In the navigation menu, tap Destination icon and then Find Places icon.
Displays a list of petrol stations along the route, around current position, or last known location
Displays a list of restaurants along the route, around current position, or last known location.
Displays a list of parking lots near destination.
Displays a list of accommodations near destination.
Displays all available POI near the following locations:
Near current position.
In a desired city/town.
Near destination of active route
Along the active route.
EN-18
 Loading...