

Page 1

HTML version converted to PDF (Mike Krueger 6/15/2017)
Thank you for purchasing PreSonus™ Studio One™ software, and welcome to the Studio One Reference Manual.
Studio One 3.5 is a groundbreaking music-creation and production application for Mac® OS X and Windows® that makes audio
recording, MIDI sequencing, and audio mastering (in Studio One Professional) easy and fun—the way it should be. From tracking
to mixing to mastering and distribution, this is a creative environment built for intuitive use, speed, and efficiency, yet robust
enough for the most complex productions. Version 3.5 adds a wide range of new features, improvements, and advanced
technologies.
This manual is a great place to start learning about Studio One, and it also provides an in-depth reference for experienced and
new audio-software users alike.
We encourage you to contact us with questions or comments regarding this product. Our forums are a great source of
information from our staff and from other Studio One users. Users in the USA also can reach us by email at
techsupport@presonus.com
PreSonus is committed to constant product improvement, and we value your suggestions highly. We believe the best way to
achieve our goal of constant improvement is by listening to the real experts: our valued customers. We appreciate the support
you have shown us through the purchase of this software.
. Users in other countries should contact their local PreSonus distributors for technical support.
Page 2

Studio One Versions
There are two versions of Studio One 3.5: Artist and Professional. Studio One uses a single installer for all versions, and the
product key with which you activate Studio One determines the version that you run. The following describes the key differences
between the versions.
Studio One Artist
Unlimited audio and MIDI Tracks, unlimited simultaneous record inputs
Content browser with musical search and direct access to the PreSonus Shop
Advanced editing features, including comping, transient detection and editing, pitch correction (Melodyne trial version),
and much more
Full SoundCloud™ integration
30 Native effects and 5 virtual instruments
Studio One Professional
Includes all Artist features and content
Adds the Project page, an integrated mastering solution
Adds Arranger Track and Scratch Pads
Adds fully licensed Melodyne Essential 4 pitch correction
Adds Extended FX Chains and Multi Instruments
Adds support for 3rd party sampler formats (EXS, Giga, Kontakt, Bitwig)
Adds video playback and sync
Adds Note FX, Groove Delay, Multiband Dynamics, OpenAIR, Pipeline, and IR Maker Native Effects plug-ins
Adds support for 3rd party VST/AU plug-ins, Rewire and MP3 encoding/decoding
Page 3

System Requirements
Set Up
Your Audio Device
Audio Device Input/Output Setup
Set Up
Your MIDI Devices
Managing Your Content
Creating a
New
Song
General Options
Advanced Options
Chapter 3:
Fundamentals
Nondestructive Editing and
Undo/Redo
High-Precision Mix
Engine
Automatic Delay Compensation
Audio Dropout Protection
Look
Mom, No
MIDI!
Drag-and-Drop
Transport Controls
Key Commands
Studio One Help and Information
Info View
Flexible Parame
ter Control
Control Link
Presonus Hardware Integration
Chapter 4:
Pages
Start
Song
Project (Studio One Professional)
Quick Switch
Table of Contents
Introduction
Chapter 1:
Installation and Activation
Chapter 2:
Setup
52
51
50
47
46
45
44
43
42
41
38
39
37
36
35
34
33
32
31
27
25
22
20
15
13
9
8
7
1
v
Chapter 5:
Recording
Audio Tracks
Instrument Tracks
Activating Recording
Metronome Control
Loop Recording on Audio Tracks
Instrument Track Recording
Step Recording
Track Layers
Audio Recording Format
Creating a Good Monitor Mix
Cue Mixes and Low-Latency Monitoring
Print Effects While Recording
80
77
76
75
73
74
71
69
66
64
59
54
53
PreSonus Studio One v3.5
Page 4

Chapter 6: Editing
82
84
89
91
97
99
101
103
106
111
113
117
125
127
128
129
130
Events
Arrange View Mouse Tools
The Grid
Common Editing Actions
Audio Loops and Music Loops
Edit Groups
Timestretching
Comping
Transient Detection and Editing
Track Transform
Track and Event Inspectors
Edit View Event Editing
Pitch Correction with Melodyne Integration
Action Menu
Undo History
Navigating with Zoom
Macro Toolbar
Editing Suggestions
Exporting Audio and MIDI Files
136
Chapter 7: The Browser
138
139
140
145
147
152
154
157
158
Browser Tabs and Search
Instruments and Effects Tabs
Loops Tab
Files Tab
Cloud Tab
Pool Tab
Browsing Song and Project Content
Importing Project Files from Other Applications
File and Folder Commands
159
Chapter 8: Arranging
161
162
163
164
165
168
170
172
173
174
Quickly Duplicating Events
Duplicating Tracks
Tempo Track
Time Signature
Arranger Track
Scratch Pad
Bouncing
Adding Time to the Arrangement
Deleting Time from the Arrangement
Folder Tracks
Track List
176
Chapter 9: Mixing
187
195
200
The Console
Effects Signal Routing
Channel Editor
Groups
VCA Faders
201
81
177
178
160
137
PreSonus Studio One v3.5
Page 5

204
206
207
208
210
211
214
Metering
Automatic Plug-In Delay Compensation
Manual Audio Track Delay
Using the Marker Track
Looping During Mixing
Mixing Down
Export Stems from your Song
Mixing Suggestions
216
Chapter 10: Automation
220
221
224
228
What is Automation?
Automation Types
Editing Automation Envelopes
Automation Modes
Instrument Part Automation
229
Chapter 11: Control Link
232
233
234
236
237
239
What is Control Link?
Set Up Your External Devices
Map Your Keyboard
Control Linking
Global and Focus Mapping
Automation with Hardware Controllers
Mackie Control Support
241
Chapter 12: Mastering
247
248
251
252
254
255
256
258
Creating a New Project
Adding Tracks
Track Sequencing
Editing Tracks
Using Insert Effects
Master Device Rack
Metering
Publishing Your Project
Song and Project Integration
264
Chapter 13: Built-In Effects
265
272
Built-in Effect Micro Views
Metering, Analysis, and Signal Generation
Delay
Distortion
Dynamics
Mix Engine FX
Mastering
Mixing
Modulation
Reverb
Pipeline
276
282
286
288
291
302
307
311
263
246
231
219
261
PreSonus Studio One v3.5
Page 6

Chapter 14: Built-in Virtual Instruments
342
SampleOne
Presence XT
Presence XT Editor
Impact
Mai Tai
Mojito
Multi Instruments
Note FX
346
360
362
Chapter 15: Video Playback and Sync
372
373
374
Video Player Interface
Import Video
Sync to Video
Supported Video Formats
375
371
366
333
319
315
314
PreSonus Studio One v3.5
Page 7

T
hi
s
se
ct
io
n takes you through the Studio One installation and activation process.
Installation
The process for registering, installing, and authorizing your copy of Studio One will differ, depending on the method you used to
acquire it.
Retail Purchase If you bought Studio One in a retail box and only received a Product Key in the box, you'll register the key and
t
he
n
d
ow
nload Studio One, and then activate it online upon first launching the product.
Direct Purchase from Shop.PreSonus.com If you bought the software directly from http://shop.presonus.com, installation
and activation happen entirely online and the purchased software is automatically added to your user account.
Retail or Direct Purchase of USB Flash Drive If you're installing Studio One from the USB flash drive which comes with select
retail versions and is also available as an additional accessory purchase from http://shop.presonus.com, your activation will
h
ap
p
e
n
o
nline using the Product Key after launching the product for the first time.
If you purchased Studio One by any of these three first methods, see Register and Download Studio One
for further details on
registration and downloading your new software.
PreSonus Audio Interface or Audio Mixer Purchase If you bought an AudioBox, FireStudio or StudioLive Ai Mixer product,
these all come with a bundle version of Studio One Artist. Registering the hardware in your My.Presonus account automatically
gives you access to Studio One and a corresponding Product Key. When you launch Studio One for the first time, you can
authorize the software using the provided Product Key.
I
f
yo
u
cam
e about acquiring Studio One by purchasing a PreSonus hardware product and wish to claim your Studio One Artist
license, see Register and Download Studio One Bundled with PreSonus Hardware for more information.
Creating a My.Presonus Account
You must have a PreSonus account to install and activate Studio One for use on your system. If you bought Studio One from our
website, you already have a My.PreSonus user account. If you do not yet have a My.PreSonus user account, you'll want to
create one.
Beyond being a requirement to download and activate the latest version of Studio One 3, there are many benefits to creating a
My.PreSonus account including easy access to additional documentation and other content files, access to the user forums,
l
at
e
st
ti
ps and product videos, and the ability to easily create a technical support ticket.
To create a user account, go to: http://my.presonus.com . On that web page, click [Create My PreSonus Account], then fill out
the provided form and then click [Create My PreSonus Account] again to create your new account.
Chapter 1: Installation and Activation
PreSonus Studio One v3.5
Page 1
Page 8

I
f
yo
ur
com
puter is not connected to the internet, you can still download and activate Studio One by using a different computer
that does have internet access, as described in the Offline Activation section below.
Once you create your account, a verification email from PreSonus is automatically sent to the email address you provided. Click
on the link in the email to activate your account. You are now ready to download and install Studio One.
R
egister and Download Studio One
To download the Studio One installer, log into your My.PreSonus user account at http://my.presonus.com. Click the [Register a
Product] button, choose Software or Extensions from the Choose Product Type menu, and enter your Product Key.
If you bought a license or upgrade for Studio One from our website, the Product Key is sent to you by email. If you bought a
boxed version of Studio One, the Product Key is included in the box. If you bought your copy of Studio One in a retail store, your
dealer may have provided your Product Key on the sales receipt for your purchase.
Once you've entered the Product Key, click the [Register] button to register your copy of Studio One. A confirmation window
appears, and you can press the [View Your Product] button to see your new software in the software section of your
My.PreSonus account. This page is where you download your Studio One installer.
The installer download button for your operating system should be the first in the list. If you are downloading from a different type
of computer than the computer on which you plan to install Studio One, you can click the [View Other Systems] button to access
installer downloads for other operating systems.
Once you have downloaded the appropriate installer for your type of system, run the installer and follow the on-screen prompts to
install Studio One.
Register and Download Studio One Bundled with PreSonus Hardware
If your copy of Studio One came bundled with a PreSonus audio interface or mixer, follow this procedure to claim your Studio
O
ne Artist license and download the installer.
F
irst, visit my.presonus.com and log into your user account. Here you can register your hardware and any software it came
b
undled with. If your hardware came with a Studio One Product Key, register Studio One with that key, as described in Register
and Download Studio One, then register your new hardware as described below.
If no Studio One Product Key is provided with your bundled hardware, registering the hardware will automatically register its
bundled software and enable the software to be downloaded and installed. In this case, click the [Register a Product] button in
your My.PreSonus account page, choose Hardware from the Choose Product Type selector, and enter the purchase date and
serial number of your new hardware into the form. Your hardware's serial number can be found on the bottom of the unit, as well
as on the provided registration card.
Once you have entered the serial number and purchase date, click [Register] to conclude the hardware registration process.
Then, click [View Your Product] to see all the newly registered hardware and software in your account. In the Studio One Artist
section, click the [View More Details] button to access software downloads and further installation information.
The Studio One installer download button for your operating system should be the first in the list. If you are downloading from a
different type of computer than the computer on which you plan to install Studio One, you can click the [View Other Systems]
button to access installer downloads for other operating systems.
Once you have downloaded the appropriate installer for your type of system, run the installer and follow the on-screen prompts to
install Studio One.
PreSonus Studio One v3.5
Page 2
Page 9

S
tud
io
O
ne
must be activated for use on your computer. Once installation is complete, launch Studio One. The License
Agreement appears.
Click [I Accept] to accept the agreement. The PreSonus Login window is then displayed.
If you already have a user account, enter your email address (or My.PreSonus username) and password, and press [Login] to log
into your account.
I
f yo
u
n
e
ed
to create an account and your computer is connected to the internet, click on [Create My.PreSonus Account].
Activation
Fill in your desired user-account details, and click [Create PreSonus Account].
PreSonus Studio One v3.5
Page 3
Page 10

A
c
tiva
ting Stud
io One
In most cases, Studio One will self-activate the first time you log in with your My.PreSonus account. In the rare instance where
you have multiple licenses of the same Studio One version registered to the same My.PreSonus account, you will need to select
which license to activate. If you have not already done so, launch Studio One and select Studio One Activation from the Studio
One menu.
Online Activation
If the computer on which Studio One has been installed is connected to the Internet, select the [Activate my purchased version of
Studio One] option. Click the drop-down button next to the Product Key field, and choose Show my Existing Product Keys from
the menu. Your registered Studio One license (or licenses) are shown. Choose the license you wish to use, and click the
[Activate] button to finish the activation process.
Offline Activation
If the computer on which Studio One has been installed is not connected to the Internet, click [Activate Offline] in the Studio One
Activation window, and make note of the Activation Code shown in the instructions. Offline Activation lets you activate your copy
of Studio One using a separate, internet-connected computer. To activate Studio One in this way, you will need a USB flash drive
(or
o
t
h
er
portable data storage device), a written copy of your Product Key, and your Activation Code.
PreSonus Studio One v3.5
Page 4
Page 11

H
e
a
d
to
a computer with an Internet connection, visit http://my.presonus.com, and log in to your account. Click the [Register a
Product] button, choose Software or Extensions from the Choose Product Type menu, and enter your Product Key, as printed on
the Studio One package or provided via email. Click on [Register], and you are taken to your Software list.
Click the [View More Details] button for the version of Studio One in your Software list, and then click [Offline Activation] on the
next page. Click [Activate Software], and enter the Activation Code provided by Studio One. You may also enter a computer
name to help you keep track of your five allowed activations.
Click [Offline Activation] again, and then click [Download License] to download your User License file. Save this file to some sort
of external media (such as a flash drive or CD-R), and then copy the file to the computer on which Studio One is installed.
In Studio One, navigate to the Studio One/Studio One Activation dialog again, click [Activate Online], then click [Select License
File] to load your user license file, activating Studio One.
Content Installation
Studio One comes with many audio loops and instruments that are organized into Sound Sets, as well as demo songs and
tutorial videos. The number of Sound Sets available for installation depends on the version of Studio One you have installed
(Artist or Professional). To install the Sound Sets and demo/tutorial material, launch Studio One and open the Studio One/Studio
One Installation menu item.
In the Install From selector, you can choose to download all selected content from your PreSonus Account, or navigate to
downloaded content in your file system (or a provided USB stick). If you wish to install any further content at a later time, you can
always return to Studio One/Studio One Installation window to do so.
By default, all packages included with your version of Studio One are selected for installation. You can set the Install To location
to any desired location on your computer, then click on [Install].
As your files download, a Transfers window is shown, giving information on the status of each file queued for download. If you
h
i
d
e
th
e Transfers window and later wish to see it again, navigate to View/Additional Views/Transfers, or just click the animated
arrow button in the toolbar, which looks like this:
After installation, you can find all of the installed content in the Browser, which is on the Song page. Demos and tutorials can be
accessed from the Start page. Instrument presets are listed under the related instrument in the Instruments tab of the Browser,
as well as the preset browser in the plug-in window.
D
o
w
n
l
oadi
ng Included Content from My.PreSonus.com
If you have any difficulty downloading the content from within Studio One, you can always visit my.presonus.com to download
the content directly from your user account page. To do this, first log into your user account, then click the [My Products] button to
view your registered software.
Click the [View More Details] button under your current Studio One license to view available downloads. All included Sound Sets
and content are available to download on this page. Once downloaded, to install the content, simply double-click each file, or
drag it onto the Studio One window.
I
ns
ta
l
l
i
n
g Add-On Content
If you need to install additional content you've purchased from the http://shop.presonus.com alongside Studio One, or as an
A
d
d
-
o
n
at a later time, simply locate and select it from the Studio One Installation window, listed as “My Purchased Items.”
Alternatively, download the content from your http://my.presonus.com account. To install the content to the default user
location, simply double-click or drag the content onto the Studio One window.
PreSonus Studio One v3.5
Page 5
Page 12

I
f
yo
u
w
ish to store the content in another location, place it there, and add that location to Studio One/Options/Locations (Mac OS
X: Preferences/Locations). There, you can add new locations for Sound Sets, Instruments, and 3rd-party plug-ins. Once you tell
Studio One where your new content is located, it becomes available for use in Studio One.
Activating Add-On Content
Once you've installed add-on content, you are prompted to activate it. If your computer is connected to the internet, simply press
t
h
e
[
Ac
tivate] button to activate the content in the current copy of Studio One.
If your computer is not connected to the internet, go to a computer with internet service, and log into your my.presonus.com
user account. Click [My Products] to see your registered products, then click [Add-ons] to see your purchased add-on content.
Locate the add-on you are trying to install, and click [View More Details].
On the following screen, click [Offline Activation], and download the license file for your add-on content. Transfer this license file
to your Studio One computer using a flash drive or other form of removable storage device.
Once you install the add-on content, you are prompted to activate the content. Press [Select License...] and navigate to your new
license file. Once the activation is confirmed, restart Studio One to use your new content.
Melodyne
We have partnered with Celemony to bring you access to their Grammy-winning Melodyne, a useful timing and pitch correction
and manipulation tool that integrates closely with Studio One. Studio One Professional comes with a full Celemony Melodyne
Essential 4 license.
Installing Melodyne
In Studio One, navigate to Studio One/Studio One Installation. Check the box next to the version of Melodyne that is listed to
select it. Once selected, you can click [Install] to install Melodyne.
Studio One Professional comes with a full license for Melodyne Essential 4. Click the [Claim Product Key] button next to the
Melodyne listing to claim your Melodyne product key. The key is displayed, and you can click the [Copy] button to copy it to the
clipboard.
Authorizing Melodyne Essential
Before you can use Melodyne Essential, you must first launch the standalone Melodyne application that is installed along with the
plug-in versions. Once opened, press the [Enter Serial Number] button, then type or paste in the provided Melodyne Essential
serial number, and press [Continue]. You are then prompted to register your copy of Melodyne, by clicking [Create myCelemony
account]. Follow the prompts to register your copy of Melodyne Essential.
Once registration is finished, you can quit the standalone Melodyne application, and then launch Studio One to begin using
Melodyne Essential.
PreSonus Studio One v3.5
Page 6
Page 13

S
et
u
p
T
h
is
chapter contains information about Studio One system requirements, hardware device setup, and software setup. A
thorough knowledge of this information is helpful before attempting to work in Studio One.
Chapter
2:
Setup
PreSonus Studio One v3.5
Page 7
Page 14

S
ys
t
e
m
R
equirements
T
he
f
o
ll
owing are the system requirements to run Studio One.
Mac
®
OS (1
0.8.5 o
r
H
igher)
Systems
Windows® 7 (x64 or x86, SP1 + Platform Update) or Windows 8.1 (x64, x86) Systems
A
dd
i
t
i
on
al Requirements (all Systems)
I
nt
e
r
n
et
connection on an available computer (for authorization and updates only)
A
m
o
n
i
to
r resolution no lower than 1366 x 768 resolution (high-dpi monitor recommended)
M
ul
t
i
-
to
uch enabled monitor required for touch operation (in Mac OS X systems, monitor must support TUIO)
30 GB available hard-drive space for installation, content, and recording projects
System
Requirements
PreSonus Studio One v3.5
Page 8
Page 15

S
tu
d
i
o
O
ne automatically selects an audio device to use for audio input and output, pulling from a list of devices currently installed on
your computer. If you have a PreSonus audio interface, it is selected automatically.
Then follow these steps to configure your audio device for use in Studio One:
1.
N
avi
g
a
t
e
to Studio One/Options/Audio Setup/Audio Device (Mac OS X: Preferences/Audio Setup/Audio Device) to open the
Audio Device settings window.
2
. S
e
l
e
ct
your audio device:
Mac OS X: Select your chosen playback (output) device from the Playback Device menu. Select your chosen record
(input) device from the Record Device menu.
Windows: Select your device for audio input and output from the Audio Device menu.
3. Some devices offer a selection of configuration options. If your connected device has those controls, you can click on the
[Control Panel] button next to the device selection drop-down menu and make your changes within the device’s control panel.
If your device does not offer these options, the Control Panel button is greyed out.
4. Set Device Block Size to fit your needs. Lower settings minimize latency, which is useful when tracking. Higher settings bring
more latency, but give you additional processing power for effects and instrument plug-ins. Generally, you want to pick the
lowest block size that still lets your system perform correctly. If you require higher performance but want to keep latency low,
you can increase the level of Dropout Protection and employ Low-Latency Monitoring.
5. When the aforementioned settings are selected, your system’s current total input and output latency, sample rate, and bit
Set Up Y
our Audio Device
d
ep
t
h
is
reported below the Audio Setup menus.
Audio Dropout Protection and Low-Latency Monitoring
When you are working with a large amount of audio tracks and virtual instruments, computer performance can limit your capabilities.
You can increase the amount of buffer to help free up computer resources, but this traditionally comes at the cost of greater latency
(or delay) when monitoring audio inputs or playing virtual instruments. Set the buffer too low, and audio dropouts and glitches can
occur.
To remedy this, Studio One features Audio Dropout Protection and an advanced Native Low-Latency Monitoring system. Under this
system, the tasks of audio playback and monitoring of audio inputs and virtual instruments are handled as separate processes. This,
in effect, lets you use a large processing buffer to handle heavy audio playback and effects processing tasks, while keeping latency
low
f
o
r
audio input and virtual instrument monitoring.
PreSonus Studio One v3.5
Page 9
Page 16

D
e
v
i
c
e
Block Size Vs. Process Block Size
The latency that you hear when monitoring audio inputs or playing virtual instruments is based primarily on the Device Block Size
that you specify in the Studio One/Options/Audio Setup/Audio Device (Mac OS X: Preferences/Audio Setup/Audio Device) window.
For the lowest latency, Device Block Size should be set to the lowest setting that provides the performance you need.
The Audio Dropout Protection system uses its own buffer for playback and processing of audio tracks, distinct from the Device Block
Size setting. The size of this buffer (also known as the Process Block Size) depends on the Dropout Protection level that you specify
in the Studio One/Options/Audio Setup/Processing (Mac OS X: Preferences/Audio Setup/Processing) window. If you use Native or
Hardware Low-Latency Monitoring, the Dropout Protection level has no effect on audible latency, though higher levels can affect the
responsiveness of onscreen meters and displays.
As long as the Process Block Size is larger than the Device Block Size you've specified, you have the option to use Native Low-
Latency Monitoring.
Monitoring Latencies
The Monitoring Latencies display shows you the latency values for audio inputs (round-trip, from input to output) and virtual
instruments, based on the current Device Block Size and Dropout Protection settings. The "Standard" column shows the latency for
the current settings if you choose not to use Low-Latency Monitoring, while the "Low Latency" column shows values for the Native
Low-Latency Monitoring system.
Plug-in Use with Native Low-Latency Monitoring
When monitoring an audio input or virtual instrument through the Native Low-Latency Monitoring system, any inserted FX on the
corresponding Channel continue to function and can be heard in real time, provided that they add 3 ms or less of latency.. Plug-ins
t
h
a
t
me
et this latency requirement show a green power button in the Console (rather than blue or grey). Any inserted plug-ins that
i
n
t
r
o
du
ce more than 3 ms of latency are not audible in the monitoring path while a Channel is armed for monitoring or recording
u
n
d
e
r
N
ative Low-Latency Monitoring. They begin functioning again when recording/monitoring mode is disengaged.
The following plug-in types and configurations are not supported on Channels that utilize Native Low-Latency monitoring:
External effects, routed into the system using the Pipeline plug-in
Analyzer plug-ins
FX Chains that incorporate Splitter devices
C
o
n
f
i
gu
ring Audio Dropout Protection and (Native or Hardware) Low-Latency Monitoring
PreSonus Studio One v3.5
Page 10
Page 17
T
o
co
n
fi
gure Audio Dropout Protection and Low-Latency Monitoring, do the following:
1. Navigate to the Studio One/Options/Audio Setup/Processing (Mac OS X: Preferences/Audio Setup/Processing) settings
window.
2. Choose your desired level of protection from the Dropout Protection drop-down menu. The Process Block Size display shows
you the corresponding processing buffer size. If you want to use Native Low-Latency Monitoring, choose a Dropout Protection
level that sets the Process Block Size to a value that is higher than the Device Block Size you have selected.
3. For low-latency performance when playing virtual instruments, enable the "Enable low latency monitoring for instruments"
option. If you run into performance issues when using a virtual instrument with particularly high CPU usage, you may want to
disable this option.
4.
I
f
u
si
ng
a supported DSP-enabled audio interface, you have the choice to use its onboard Hardware Low Latency Monitoring
(and hardware DSP-based effects when available, as with the PreSonus Studio 192) for incoming audio inputs, or to use the
Native Low Latency Monitoring that Studio One provides. Enable "Use native low latency monitoring instead of onboard DSP"
to use Native Low-Latency Monitoring, or disable it to use Hardware Low-Latency Monitoring.
Note that when using Hardware Low-Latency Monitoring to monitor an audio input, Insert FX do not function on the
related Channel, since the audio input is being monitored before it reaches Studio One. If Insert FX are needed while
tracking, use Native Low-Latency Monitoring instead. To do this, navigate to Studio One/Options/Audio
Setup/Processing (Mac OS X: Preferences/Audio Setup/Processing) and enable the "Use native low-latency
monitoring instead of hardware monitoring" option.
Enabling Low-Latency Monitoring in the Console
Once you've configured your system to use Native or Hardware Low-Latency Monitoring, you can toggle low-latency monitoring on
and off for the Main output as well as any Cue Mix outputs you've specified, by clicking the Enable Low-Latency Monitoring button
("Z", short for Z-Mix) below the volume fader for the related output. When low-latency monitoring is disabled, the "Z" button goes
d
a
r
k.
Wh
en Native Low-Latency Monitoring is enabled, the "Z" button turns green. When Hardware Low-Latency Monitoring is
enabled, the "Z" button turns blue.
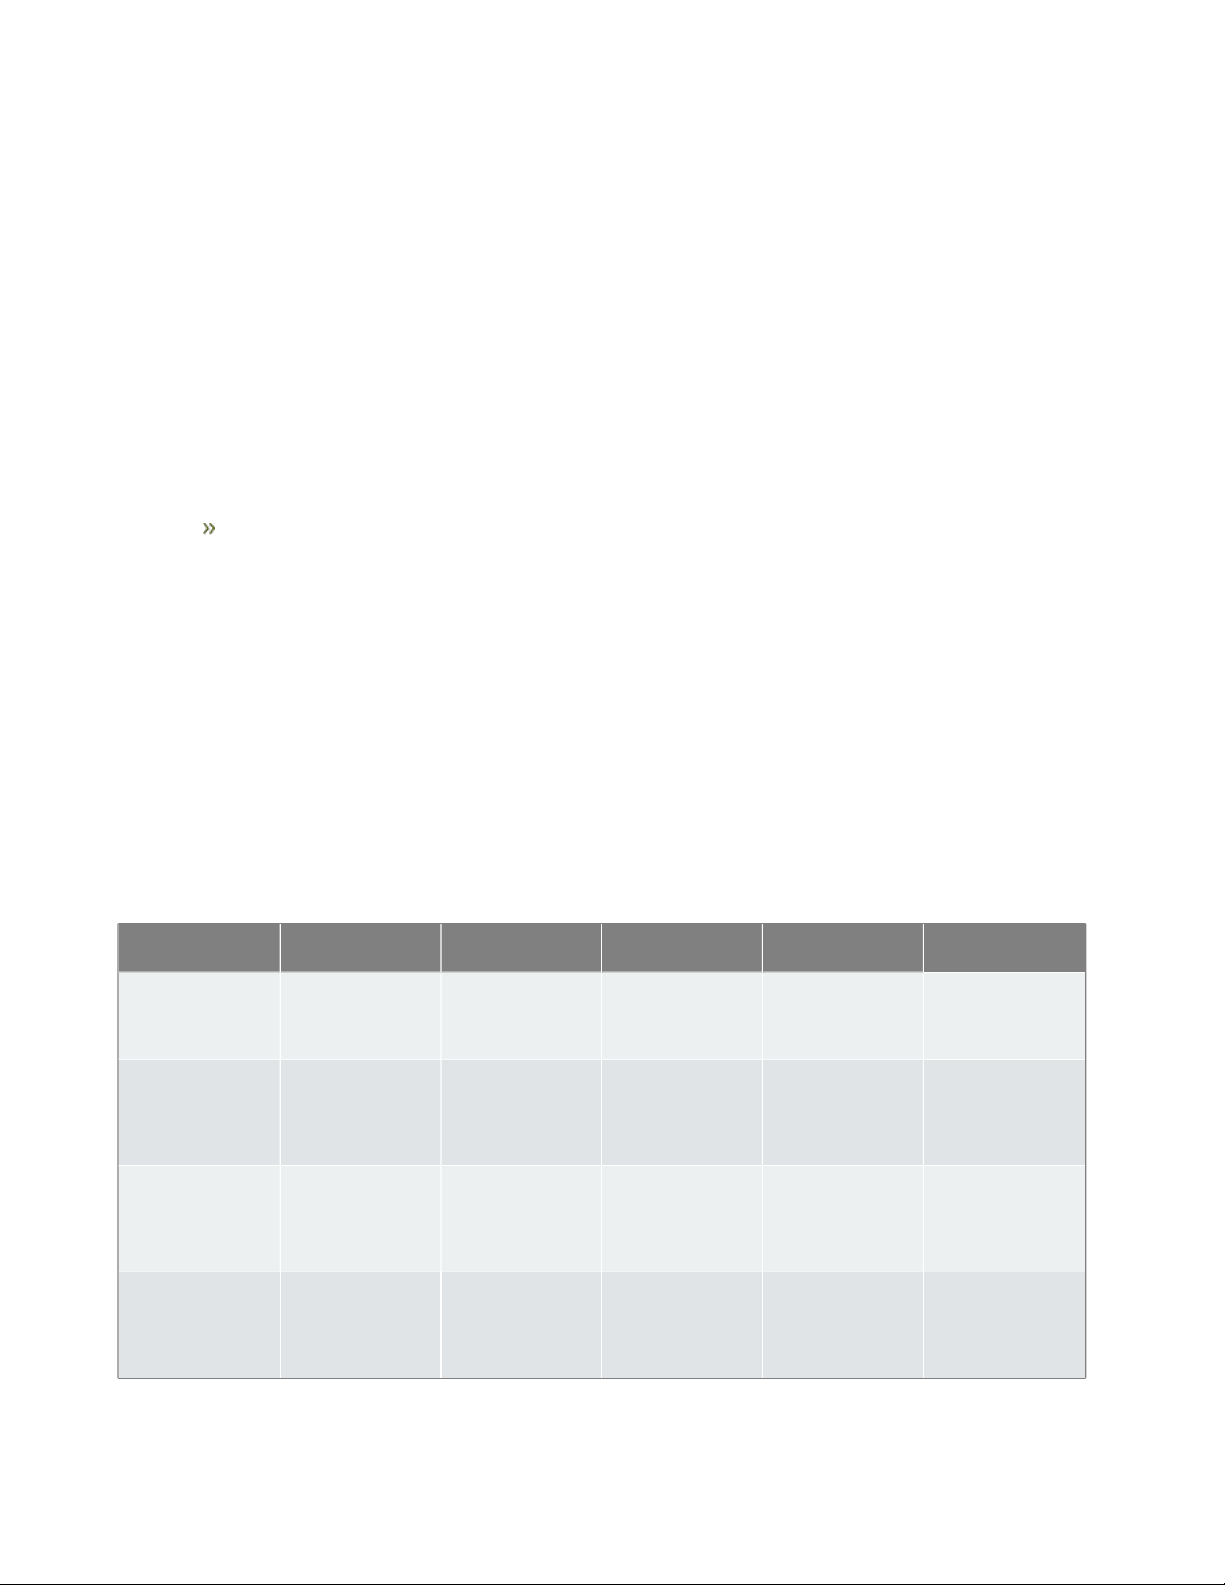
Monitoring Mode Attributes
This table describes the primary monitoring methods available in Studio One, and the conditions that must be met to use them.
Type Z-Mix
Necessary
Conditions
Monitoring Insert FX Send FX
Standard Software
Monitoring
Disabled Large Device Block
Size, low Process
Block Size (Dropout
Protection)
Standard latency All function All function
Native LowLatency
Monitoring
Enabled Process Block Size
(Dropout
Protection) must
exceed Device
Block Size
Native low-latency Plug-ins with 3ms
or less of latency
function normally,
all others are
disabled
All function
Virtual Instrument
Low-Latency
Monitoring
Enabled Process Block Size
(Dropout
Protection) must
exceed Device
Block Size
Native low-latency Plug-ins with 3ms
or less of latency
function normally,
all others are
disabled
All function
Hardware LowLatency
Monitoring
Enabled "Use software low-
latency monitoring
instead of hardware
monitoring" option
must be disabled
Hardware lowlatency
No Insert FX
function
All function
PreSonus Studio One v3.5
Page 11
Page 18

P
r
o
c
e
ss
Precision
By default, Studio One’s process precision is set at Single (32-bit). If using Studio One Professional, you may choose double
precision (64-bit) from the Process Precision drop-down menu.
Supported Devices
Studio One supports most audio devices, including those that run on ASIO or WASAPI (Windows) or Core Audio (Mac OS X) drivers.
When using a WASAPI audio device in Windows, note that WASAPI offers Exclusive and Shared modes of operation. In Exclusive
mode, lower latency can be achieved, but other applications (such as Windows Media Player) cannot use the audio device at the
same time. Refer to the Windows Control Panel/Hardware and Sound/Sound to configure the options for your WASAPI device.
Performance Monitor
When setting up your audio device (specifically when determining appropriate Internal or Device Block Size, or selecting Single or
Double Process Precision), you should take into account the related performance demands on your computer.
Open the Performance Monitor by selecting it from the View menu, or by clicking on the [Performance] button in the Transport. This
monitor displays the current relative overall CPU and disk performance, as well as the performance of instruments and automation.
When these meters approach or reach the top of their range, you may need to consider altering your audio device settings (or
changing the Song or Project) to avoid audible clicks and pops or possible instability. For instance, it is common to lower the Device
and/or Internal Block Size while recording to keep monitoring latency low but then to increase Block Size while mixing to provide as
much CPU headroom as possible for effects processing.
If any playback issues are encountered with third-party virtual instrument or effect plug-ins that have their own multiprocessor
support implementation (e.g., NI Kontakt, FL Studio), it is recommended that this support be disabled in the plug-ins. In this case,
Studio One manages all processor scheduling.
PreSonus Studio One v3.5
Page 12
Page 19

stu
d
i
o
,
where you use a different audio interface. Simply connect your friend’s hardware audio device channels to the correct
software I/O channels. When you get back to your studio, the original I/O configuration for the Song is automatically loaded for
you, as if you never left. You can do the same thing if you need to open the Song on your laptop using its built-in audio hardware.
This is possible because Studio One stores I/O configurations with your Song, per computer and per audio device driver,
ensuring that your Song remains highly portable and is never “broken” by changing audio devices.
Audio I/O Setup Menu
Each Track in a Song receives a signal from an input source and routes to an output destination. The input sources and output
destinations made available to each Track are determined by the software I/O channel configuration created in the Audio I/O
Setup menu. To view this menu and set up a default I/O configuration for each Song, create a new Song by clicking on Create
New Song in the Start Page and navigate to Song/Song Setup/Audio I/O Setup.
The configuration of the Audio I/O Setup is done within each Song, so that it is possible for each Song to have a separate I/O
se
tu
p
.
As
discussed in Default Device I/O Setup, a default I/O setup can be created so that each new Song defaults to a
Audio
Device
Input/Output Setup
So
ftw
are
I/O Channels
In most recording applications, audio Tracks directly use your hardware audio device’s channels. In Studio One, there is a layer
of software I/O (input and output) channels between your hardware audio device channels and your Tracks. This setup affords
many advantages over the traditional method.
For instance, let’s say you produce a Song in your studio, using a multi-channel interface, then take your Song file to your friend’s
p
ar
t
i
cu
la
r I/O setup if you desire.
In the Audio I/O Setup menu, there are two tabs: one for input configuration and one for output configuration. In each tab, a
Matrix Routing view shows the current configuration, with the vertical columns indicating hardware audio device channels
(hardware I/O) and the horizontal rows indicating created software I/O channels. Software I/O channels function as the input
sources and output destinations available to individual Tracks in Studio One
PreSonus Studio One v3.5
Page 13
Page 20

A
d
d
o
r
Re
move Software I/O Channels
Click on the [Add (Mono)] or [Add (Stereo)] button to add an Input or Output Channel, depending on which tab you are currently
viewing. When a new channel is added, the next unassigned hardware inputs or outputs are assigned to the new channel by
default.
To remove any channel, click on the channel to select it and then click on the ]Remove] button. To rename any channel, double-
click on the name of the channel, type a new name, and press Enter. In order for software I/O changes to occur, be sure to click
Apply before exiting this menu.
Assigning Hardware I/O to Software I/O Channels
Hardware inputs and outputs are assigned to software I/O channels in a matrix router, which is a visual representation of the
routing. Software channels (mono and stereo) are each given a horizontal row, and hardware inputs and outputs are given
vertical columns. The points at which these rows and columns intersect represent potential connections, or routes, between the
hardware I/O and software I/O channels.
By default, Studio One creates three Input Channels: one stereo and two mono. These channels are labeled Input L+R (stereo),
Input L (mono), and Input R (mono). By default, the stereo Input Channel receives input from the first stereo hardware input pair
of your selected audio device. The two mono Channels receive input from the same stereo hardware input pair.
The Output Channel is labeled Main Out (stereo) and is routed by default to the first stereo hardware output pair of your selected
audio device.
To create a route between software I/O channels and hardware I/O, click on the empty square at the intersection of the desired
hardware input or output and the software channel input or output. A colored square appears with an M, L, or R label, indicating
whether the route is a mono route (M) or the left or right side of a stereo route (L or R).
While it is uncommon for Audio I/O Setup changes to be required in the middle of Song production, the audio I/O routing can be
changed at any time. However, you should be aware that routing changes affect all associated Tracks, possibly switching inputs
for audio Tracks, changing the hardware output for the Main Output, and so on.
When making new routes in the Audio I/O Setup menu, notice the meters to the left of the software I/O channels. By displaying
signal levels on each channel, these meters help you ensure that the appropriate routings have been made.
Default Device I/O Setup
We recommend that you create a default Audio I/O Setup that can be a starting point for all new Songs. This lets you immediately
begin working in your new Song, with little or no preliminary setup.
To do so, create software I/O channels for all of your audio device’s commonly used inputs and outputs and name them
appropriately. Then, click on the [Make Default] button in the Audio I/O Setup menu, and a pop-up window appears to confirm
that you wish to make the current I/O setup the default for new Songs. Click on Yes, and from that point forward, all new Songs
are created with this audio I/O setup.
Audition Channel
The Preview Player in the Browser and in the Import File menu uses the Audition channel for audio playback. Any stereo Output
Channel can be used as the Audition channel, allowing you to audition sounds from an output other than your main output.
PreSonus Studio One v3.5
Page 14
Page 21

T
o
se
t
up
your Keyboard, navigate to Studio One/Options/External Devices (Mac OS X: Preferences/External Devices) and follow
these steps:
1. In the Options/External Devices menu (Mac OS X: Preferences/External Devices), click on the [Add...] button.
2
. C
h
o
o
se
your device from the predefined device list or set this to New Keyboard if you do not see your device in the list.
If set to New Keyboard, you may wish to type in a Manufacturer Name and a Device Name in the appropriate fields.
This makes identifying your Keyboard easier.
3. Specify which MIDI channels to used to communicate with this Keyboard. All MIDI channels are selected by default.
Setting Up Your MIDI Devices
All MIDI
-capable hardware devices are collectively referred to as External Devices in Studio One. There are three types of
External Devices: Keyboards, Instruments, and Control Surfaces. While each device type functions in a slightly different way,
there is one menu to add and configure any External Device. The menu can be found by navigating to Studio
One/Options/External Devices/Add Device (Mac OS X: Preferences/External Devices/Add Device).
Set Up MIDI Keyboards
A MIDI keyboard controller is a hardware MIDI device that is generally used for playing and controlling other MIDI devices, virtual
software instruments, and software parameters. In Studio One, these devices are referred to as Keyboards. Before recording a
performance with a Keyboard, the MIDI keyboard controller must first be set up in Studio One. Once a Keyboard is set up, it is
available at all times for use in Studio One.
I
f
yo
u
ar
e unsure of the appropriate MIDI channels to use, just leave this at the default setting.
4. Engaged Split Channels if you would like to create a separate Instrument Track input for each MIDI channel from the
Keyboard.
5. Specify the device to which the Keyboard is sending and the device from which it is receiving via Studio One. Select your
device driver name from the drop-down menu for both Receive From and Send To.
6. You can choose to use this Keyboard as your Default Virtual Instrument Input by checking the appropriate box. If you are
using only one Keyboard with Studio One, you should check this box.
7
. Y
o
u
r
K
eyboard is now ready for use in Studio One.
Click on the "+" button in the External window of the Console to quickly set up a new Keyboard or other External
Device.
PreSonus Studio One v3.5
Page 15
Page 22

Se
t U
p
E
xte
rnal Hardware Instruments
In Studio One, an External Instrument is an external MIDI hardware synthesizer, workstation, or other device that can generate or
manipulate sound. External instruments are set up globally and then are available for use in any Song.
To set up your Instrument, navigate to Studio One/Options/External Devices (Mac OS X: Preferences/External Devices) and
follow these steps:
1. In the Options/External Devices menu, click on the [Add...] button.
2. In the left-hand browser, choose your device from the predefined device list. Set this to New Instrument if you do not see
your device in the list. If set to New Instrument, you may wish to type in a Manufacturer Name and a Device Name in the
appropriate fields. This makes identifying your New Instrument easier.
3. Specify which MIDI channels to use to communicate with this Instrument. MIDI Channel 1 is selected by default. If you are
unsure of the appropriate MIDI channels to use, just leave this at the default setting.
4. Specify the device to which Studio One is sending MIDI and the device from which the software is receiving MIDI. Select
the appropriate MIDI device from the drop-down menu for Send To and (optionally) Receive From. It is likely your external
instrument is not connected directly to your computer. In this case, your external instrument must be physically connected
to another MIDI device (such as a MIDI interface) that does connect to your computer; you need to select the driver for
that device.
5. You can choose to send MIDI Clock to this Instrument and/or use MIDI Clock Start by checking the appropriate boxes.
Y
ou
sh
o
ul
d send MIDI Clock to your Instrument if it has a built-in sequencer or components (such as LFOs) that need to
sync to Studio One. Enabling MIDI Clock Start sends MIDI Clock Start signals to your Instrument.
6. You can choose to send MIDI Time Code to this Instrument. You can set a Display Offset under Song/Song
Setup/General to correct for time-code variances with external devices.
7. You can vary the speed at which Automated MIDI CC messages are transmitted, using the CC Automation Interval slider.
You can vary the value between 10-100ms, with the default value being 10ms.
Your external instrument is now available for use in any Song. To use an external instrument in a Song, be sure that an
I
ns
t
r
u
me
nt Track is routed to it and that the appropriate Audio Tracks have been added and configured. Refer to Monitoring an
E
xt
e
r
n
al
Instrument for more on this topic.
PreSonus Studio One v3.5
Page 16
Page 23

N
ot
e
t
ha
t if your instrument is also a controller (such as a keyboard workstation), you need to set it up twice. First, set it up as an
External Instrument without a Receive From selection, and then set it up as a Keyboard, without a Send To selection. This allows
the keyboard-controller section of the workstation to be used as a source for Instrument Tracks, while allowing the synthesizer
section to be used as an external instrument.
Set Up Control Surfaces
In Studio One, a Control Surface is a hardware device that includes transport controls, faders, and other specialized controls. The
control surface might use MIDI directly or via a special control layer such as Mackie Control.
To set up a Control Surface, do the following:
1. In the Options/External Devices menu (Mac OS X: Preferences/External Devices, click on the [Add...] button.
2. Choose your device from the predefined device list. Set this to New Control Surface if you do not see your device in the
list. If set to New Control Surface, you may wish to type in a Manufacturer Name and a Device Name in the appropriate
fields. This makes identifying the Control Surface easier.
3. Specify the device to which the Control Surface is sending and the device from which it is receiving via Studio One. Select
your MIDI device driver name from the drop-down menu for both Receive From and Send To.
4. You do not need to specify the MIDI channels your Control Surface should use, as control surfaces use alternative
protocols, such as Mackie Control, to communicate with Studio One.
5. Your Control Surface is now ready for use in Studio One.
F
or
m
o
re
information on using Mackie Control devices with Studio One, see Mackie Control.
PreSonus Studio One v3.5
Page 17
Page 24

T
o
cu
st
om
ize this placement, click on Placement in the Options/External Devices menu after adding your surfaces. All ungrouped
surfaces appear under the Ungrouped tab. To place a surface in a group, select a Group tab, then click-and-drag the surface
from the Ungrouped area to the selected group area. To adjust the order of the grouped surfaces, click-and-drag them left or
right. Channels in the Console appear in order across the surfaces from left to right.
Up to four Groups can be created, to allow for mirroring of Channels across multiple surfaces. This is helpful if you have more
than one location in the studio where you wish to use control surfaces (e.g., an A room and B room or a control room and live
room).
Only supported and predefined Control Surfaces appear in the Placement window. User-defined devices do not appear in this
window.
Use Your Computer Keyboard as a MIDI Keyboard
You can use your regular QWERTY computer keyboard as a MIDI Keyboard to play virtual instruments and record musical data
in Studio One. To do this, add a new device in the Studio One/Options/External Devices/Add Device menu (Mac OS X:
Preferences/External Devices/Add Device), choosing the QWERTY Keyboard device from the PreSonus device folder.
C
us
tom
Pl
ac
ement of Control Surfaces
If you are using multiple surfaces with motorized faders, you can customize the placement of the fader banks so that Channels in
the Studio One Console are spread across your surfaces in the desired order.
PreSonus Studio One v3.5
Page 18
Page 25

W
i
t
h
th
e device added, to use your keyboard as a MIDI Keyboard, open the interface for the QWERTY Keyboard device by
double-clicking on it in the External panel of the Console. Any record-enabled Instrument Track then receives input from the
QWERTY Keyboard, as shown in the QWERTY Keyboard device interface. Your keyboard only transmits data to Instrument
Tracks while the QWERTY Keyboard device interface is open.
Using the PreSonus FaderPort
If you have a PreSonus FaderPort connected to a computer running Mac OS X or Microsoft Windows, Studio One automatically
recognizes it and configure it for use. Just open a Song or Project to use the FaderPort immediately.
Reconnect Devices
In most applications, when MIDI devices become disconnected while the application is running, you usually have to restart the
application, and the software may crash. In contrast, if an external MIDI device becomes disconnected while Studio One is
running with a Song or Project open, the device can be reconnected without restarting Studio One.
If this occurs, navigate to Studio One/Options/External Devices (Mac OS X: Preferences/External Devices) and click on
Reconnect at the bottom of the menu. Then reconnect your devices and click OK. The devices should now work normally in
Studio One.
If an external device is not present when Studio One is started—for instance, if you’re traveling and don’t have some of your gear
with you— the application still runs normally. You should see a warning message that makes you aware of the situation. If your
setup frequently changes, you may wish to turn off this warning message by disengaging the Notify Me If Devices Are
Unavailable When Studio One Starts option.
Later, when you start Studio One with the device connected to your computer, Studio One recognizes the device automatically,
and it can be used exactly as before, with no further setup required.
PreSonus Studio One v3.5
Page 19
Page 26

Managing Y
our Content
Content m
anagement and file management can become unwieldy when working with digital audio workstation software due to
the sheer volume of loops, effects, song ideas, individual tracks, and so on. In Studio One, you only need to locate your
preexisting content once, after which all of the locations are remembered. Any content you create using Studio One is similarly
m
anaged. In Studio One, your content is kept in distinct categories.
The following describes the process of managing your content using the Studio One/Options/Locations (Mac OS X:
Preferences/Locations) menu.
User Data
Any content you create using Studio One is automatically stored in the location you specify. This includes Songs, Projects,
Effects Presets, and all of the files these categories contain. All of your creative output can be logically organized and kept in a
single place, which makes future location and backup a breeze.
When creating a new Song or Project, the User Data folder is the default save location. While we recommend using this location,
you can specify any save location when creating any new Song or Project.
Engage the Auto Save Documents option to automatically save any open document at a specified interval of time.
Engage the Ask to Copy External Files when Saving Song feature to be given the option to consolidate any outside files to the
central data folder when saving a Song.
File Types
All supported file extensions are listed in the Studio One/Options/Locations/File Types (Mac OS X: Preferences/Locations/File
Types) menu. Only these supported file types are displayed in the Browser.
It is possible to add file extensions to this list by clicking on the [Add...] button. In the pop-up menu, you can choose an icon, enter
the file extension, and provide a description for the file type. Select a user-added extension from the list and click on Remove to
remove it.
Sound Sets
Preconfigured packages of loops and samples are bundled with Studio One. The Browser’s Sound Sets folder makes finding this
content quick and easy. These packages also contain information about each content vendor, which is displayed in the Browser
when a package is selected. Click on the Visit Website link in the Browser for more information about the vendor and the content
they supply.
Instrument Library
Studio One includes a native virtual instrument called Presence XT that utilizes a cross-platform sample library format, as well as
standard libraries in Giga, EXS, Kontakt (version 4 and below), and Sound Font (SF2 and SFZ) formats. Using the Instrument
Library function, you can tell Studio One where your sound sets are located, giving you access to them as presets in Presence
XT.
To add sound library file locations to your Instrument Library, in the Studio One/Options/Locations/Instrument Library (Mac OS X:
Preferences/Locations/Instrument Library) menu, click on the [Add...] button and specify a file location, then click OK. You can
specify as many locations as you need.
For more information on the Presence XT built-in virtual instrument, refer to the Presence XT section.
PreSonus Studio One v3.5
Page 20
Page 27

VS
T
P
l
ug
-ins
W
hen Studio One starts for the first time, most of your plug-ins are located automatically and are ready to use immediately. If
Studio One fails to find certain plug-ins, adding them is easy.
To add any missing VST plug-ins, navigate to the Studio One/Options/Locations/VST Plug-ins (Mac OS X:
Preferences/Locations/VST Plug-ins) menu and click on the [Add...] button, then specify a location and click OK. You can also
drag-and-drop any folder from the Explorer/Finder into the Locations list. Studio One then scans these locations at startup,
including searching for new plug-ins you’ve added. You can always add more locations if needed.
AU, VST 3, and ReWire-enabled plug-ins and applications have their own pre-set file path in the OS and do not have to be
located manually.
Failed Plug-ins
If any plug-in fails to start correctly when scanned at startup, a notice appears next to its name in the startup message list, and a
warning message is shown. If the plug-in continues to fail at startup—for instance, if it is not authorized correctly or a required
iLok key is not present—Studio One puts the plug-in in a blacklist and ignores it at startup from that point on.
To reset this blacklist and force Studio One to scan missing plug-ins again at startup, navigate to Studio
One/Options/Locations/VST Plug-ins (Mac OS X: Preferences/Locations/VST Plug-ins) and click on [Reset Blacklist]. The next
time you start Studio One, the previously blacklisted plug-ins are scanned again. If the issues that caused the plug-ins to fail the
scan have been resolved, the plug-ins are made available.
VST Format Support
Studio One Producer and Professional support VST 2.4 (including VSTXML for hierarchical parameter structure) and VST 3.
PreSonus Studio One v3.5
Page 21
Page 28

C
rea
t
i
ng
a
New Song
A
S
o
n
g
i
s where all recording, editing, arranging, and mixing takes place. To create a New Song, do one of the following:
F
ro
m
t
he
Start page, click on the Create a New Song link.
N
avi
g
a
t
e
to File/New Song.
P
re
ss
[
Ct
rl]/[Cmd]+N on the keyboard.
If no Song is currently open, click on the Song quick-access button.
The default name of each new Song is derived from today's date and the Artist name you've set in the Artist Profile on the Start
page. You can set your own title by editing the text in the Song Title field.
Song Templates
On the left side of the New Song creation menu, there is a list of preconfigured Song templates, which are designed to help get
you started quickly with various recording tasks.
Creating a New Song
T
he
t
e
mp
lates can include particular I/O and Track setups, effects plug-in and virtual instrument processing, and all other aspects
of a Song. By default, the Empty Song template is selected, which creates a completely empty Song with no Tracks or
preconfigured I/O setup.
Create a Song Template
If there is a particular Song setup you use again and again, it can be helpful to create a template. To do so, first create a new
Empty Song. Next, configure the I/O and create and configure all Tracks, and virtual instruments, effects plug-ins, and any other
aspects of the Song that you need in your template. Then, in the File menu, select Save as Template.
PreSonus Studio One v3.5
Page 22
Page 29

So
ng
Loc
a
ti
on
Ne
w Songs and all related data are saved to your User Data location, set in Studio One/Options/Locations/User Data (Mac OS X:
Preferences/Locations/User Data). If you like, you can choose a different file location by clicking on the [...] button in the New
Song dialog, and browsing to your chosen location.
Sample Rate
“Sample rate” refers to the rate at which incoming analog audio is sampled per second during conversion to a digital signal. The
most common setting is the standard sample rate for audio CDs: 44.1 kHz, meaning 44,100 samples per second.
The Studio One sample rate should match the sample rate of your audio interface, so by default, the sample rate is set to your
current audio interface’s sample rate, and changing this setting initiates a sample rate change in that device. If the sample rates
don’t match, Studio One resamples all audio files to match the sample rate of the hardware, but this can cause performance
Type in a title and description, choose an image for the Template icon, if you like, and select OK. You can also drag an image
from Windows Explorer or Mac Finder onto the image icon to use that image. The exact current state of the Song is now
available as a template in the New Song creation menu.
problems and should be avoided. Studio One is capable of recording at any sample rate your hardware audio device offers.
Not all devices allow a third-party software application to change the hardware sample rate. The desired sample rate should be
set before creating a New Song.
File size is directly proportional to the sample rate and resolution. The higher the sample rate and resolution, the larger the
resulting audio file is.
Resolution
“Resolution” refers to the bit depth of digital audio, which is related to the audio’s dynamic range. Standard CD audio has a 16-bit
resolution, which results in roughly 96 dB of dynamic range. Thus, with “CD-quality” audio, the difference between the quietest
and loudest sounds possible is 96 dB. The most common resolution setting in professional recording is 24-bit, which produces a
dynamic range of approximately 144 dB.
Studio One can record audio with 16, 24, or 32-bit (floating point) resolution. Which resolution to use is a matter of preference. If
you are unfamiliar with these concepts, try experimenting with recording at each resolution and comparing your results.
Timebase
The timebase of your New Song determines the way the timeline is represented. The timebase selection can be changed at any
t
i
m
e
.
Y
ou have the option of the following:
S
e
c
o
n
ds
The timeline division is an expression of hours : minutes : seconds : milliseconds.
S
a
m
p
l
es
The timeline division is an expression of samples.
B
a
r
s
T
he
timeline division is an expression of musical bars and beats.
Frames The timeline division is an expression of frames.
Song Length
Here, you can specify a length for your new Song, or go with the default setting of five minutes. If you wish to change the length
o
f
a
So
ng once in progress, you can move the Song End marker to the desired end point, as detailed in the Song Start and End
M
a
r
k
e
rs
section.
You can also change the length of the currently open Song by opening the Song/Song Setup dialog and setting the Song End
parameter to your desired end point.
PreSonus Studio One v3.5
Page 23
Page 30

T
e
m
p
o
H
er
e, you can specify a starting tempo for your Song, or go with the default setting of 120 BPM.
Time Signature
Here, you can specify a starting time signature for your Song, or use the default setting of 4/4.
Stretch Audio Files to Song Tempo
Enable this option to automatically timestretch imported audio files (that have tempo information) to match your Song’s current
tempo. This is highly recommended to avoid having to manually stretch audio or place Tracks in Timestretch mode.
However, if you do not intend to work with Timestretching in your Song and want to ensure that nothing gets timestretched
automatically by mistake, make sure this option is deselected.
Only audio files with encoded tempo information are stretched automatically with this option engaged. Studio One remembers
tempo information you specify within the Inspector view for any audio file.
PreSonus Studio One v3.5
Page 24
Page 31

T
he
f
o
ll
owing options give you a variety of controls over how Studio One looks and operates. Click on each tab in the Studio
One/Options/General (Mac OS: Preferences/General) menu to access these options.
G
ene
r
a
l
W
he
n
S
tu
dio One starts Choose the default action to be done upon startup.
D
o
N
o
t
hi
ng No Song or Project opens by default.
O
pe
n
L
as
t Song/Project The most recent Song or Project opens.
Open Default Song/Project The default Song or Project opens. To set the Song or Project to open by default, set
up a Song or Project and save it, with the name “default,” to the Songs or Projects folder located at the current User
D
at
a
l
oca
tion set in Options/Locations.
C
re
a
t
e
a
New Song A new Song is created and opened.
C
he
c
k
fo
r Updates Check for software updates on startup.
L
an
g
u
a
ge
Choose your language from the list.
Enable High-DPI Mode (Windows only, on by default) Enables Studio One to optimize its UI to match the scaling of a
high-resolution display. If you have a display with a more standard resolution (such as 1920 x 1080 pixels), you can
d
isa
b
l
e
t
his option. For more information, see High DPI Mode.
High DPI Mode (Windows Only)
If you're running Windows with a high-resolution display (4k, 2560 x 1440, or similar), you can change the DPI scaling value in
Windows, which governs how your computer's UI is scaled on your display. Depending on the size and distance of your display,
values between 100-200% may be optimal. You can change this and other display settings by going to Control
Panel/Appearance and Personalization/Display.
Enabling High DPI Mode in Studio One lets its engine automatically scale the Studio One UI to match the DPI scaling setting in
the Windows Control Panel. This gives you the best display quality, preventing the fuzzy effect sometimes seen when this scaling
is done by the operating system.
If you're using a display with a standard resolution (such as 1920 x 1080 pixels), you can disable High DPI Mode.
Mac OS manages display resolutions differently, and thus, no High DPI Mode is needed when using Studio One with a Mac.
Appearance
Set the color balance for the user interface in Studio One, with separate controls for Background and Arrangement elements.
General
Options
C
ol
o
r
se
ttings can be stored as files on disk and loaded from disk, allowing trading with other users or archiving for personal use.
Press [Reset] to set the color balance back to factory specs.
Keyboard Shortcuts
This panel lets you assign and change keyboard shortcuts for features and functions in Studio One. For more information, see
K
ey
C
o
mm
ands
.
PreSonus Studio One v3.5
Page 25
Page 32

N
e
tw
o
rk
T
og
gle the "Allow remote control apps to discover this DAW" option on to let compatible networked controllers connect to Studio
One.
Touch Input
Here, you can enable multi-touch operation (if you have a compatible display attached to your system), as well as specify which
monitor is to be used for touch input. To specify the current monitor, click the [This] button.
PreSonus Studio One v3.5
Page 26
Page 33

E
na
b
l
e
C
rosshair Cursor for Tools is engaged by default. It enables a large, white, vertical-and-horizontal crosshair in
t
he
A
r
ra
nge view that aids in displaying the exact position of the various mouse tools.
Locate When Clicked in Empty Space is disengaged by default. When engaged, it allows the timeline cursor to be
l
oca
t
e
d
b
ased on clicking in empty space or clicking where there are no Events.
Apply Folder Track Color to Content is disengaged by default. When engaged, it causes all content contained in a
F
ol
d
e
r
T
rack to be color-coded with the same color you choose for the Folder Track.
Colorize Track Controls is disengaged by default, and in that state, the color you choose for each Track is shown in a
small area in its controls in Arrange view. When Colorize Track Controls is engaged, it causes the whole control area of
e
ach
T
r
ack
to be color-coded with assigned color, for better visibility.
Show Channel Numbers in Tracks is disengaged by default. Some Tracks do not have corresponding Channels in the
Console (and vice versa). Because of this, Tracks and Channels are assigned numbers separately to avoid gaps in Track
or Channel numbering. This means that in some cases, a Track and its corresponding Channel may be numbered
differently. If this bothers you, enable the Show Channel Numbers in Tracks option to mark each Track with its
co
rr
e
sp
o
nd
ing Channel number, avoiding this mismatch.
Don’t Show Event Names removes the name labels from Events in the Arrangement view. This is purely an aesthetic
d
if
f
e
r
en
ce and does not change any functions.
Draw Events Translucent is not engaged by default. It enables the Timeline grid in the Arrange and Edit view to be seen
in the background, through Events. Seeing the grid may help with various editing tasks.
Automation
C
li
ck
o
n
t
he Automation tab to access the following options:
Automation Follows Events is engaged by default. This means that automation envelopes lock to Events so that moving
an Event with automation “under” it also moves the automation.
Advanced Options
S
tudio One o
ffers the following ways to customize your workflow. Click on each tab in the Studio One/Options/Advanced (Mac
OS: Preferences/Advanced) menu to access these options.
Many of the following options that pertain to editing in Arrange view can be accessed and toggled on or off by clicking the Options
button in the Arrange view toolbar.
Editing
Click on the Editing tab to access the following options:
D
is
a
b
l
e
Events Under Automation Envelopes is also engaged by default. This makes Events unavailable to the mouse
tools while viewing an automation envelope, which helps prevent you from unintentionally editing underlying Events while
e
di
t
i
n
g
automation.
Automatically Create Automation Tracks for Channels is disabled by default. Engaging this option automatically adds
an automation Track for every new FX Channel, Bus, or VCA Channel that you create in the Console. This helps to retain
p
ar
i
t
y
be
tween the structure of Tracks in Arrange view, versus Channels in the Console.
Automatically Add Envelopes for all Touched Parameters is enabled by default. Engaging this option adds an
a
ut
o
m
a
ti
on envelope for any automation-friendly parameter when you touch its control.
The Default Envelopes for new Audio Tracks selectors let you specify which types of automation envelopes are created
for each new track by default. You can enable or disable Volume, Pan, and Mute.
PreSonus Studio One v3.5
Page 27
Page 34

A
u
di
o
C
l
i
ck
o
n
the Audio tab to access the following options:
U
s
e
C
ac
he for Timestretched Audio Files is engaged by default. It is described in depth in the Using Timestretch
C
a
c
h
e
sect
ion of the Editing chapter.
Record Tempo Information to Audio Files is engaged by default. When engaged, this option enables tempo tagging for
any audio file recorded in Studio One. The Song tempo at the time position of the recording is saved with the file, so that
automatic timestretching can be accomplished. If another application has issues reading audio files from Studio One, try
d
i
sa
b
l
in
g this option.
Use Dithering for Playback and Audio File Export is engaged by default, and means that triangular dithering (with no
noise-shaping) is applied when the audio signal’s bit depth is reduced from a higher bit depth by a device or during file
export. Turn this off if you would like to use a third-party dithering solution, such as a limiter Insert effect on the main
o
u
t
p
u
t
that has built-in dithering with characteristics you prefer.
Use Realtime Processing to Update Mastering Files ensures that real-time processing is used when the mastering file
for a given Song is automatically updated. This is necessary when Songs utilize certain devices, such as External
I
n
st
r
u
me
nts, that require a real-time mixdown in order to be included in the mix.
Pre-record Audio Input creates a buffer of a length you can specify, which records continuously, even when the transport
is stopped. This saves the audio you create before recording begins. Once recording concludes, the number of seconds of
a
u
d
i
o
yo
u've specified are available before the point at which recording started.
The recorded data is collected in the Input Channels as long as physical inputs are connected. After recording with
P
r
e
-
R
eco
rd enabled, you can reveal the pre-recorded data by pulling the Event-start handle to the left.
If recording restarts on the same Track, the Pre-Record data is limited to the last recording’s end, so that data is
n
o
t
r
ep
eated and a seamless join between the two recordings is possible.
Record Offset allows you to input a value, in samples, by which any recorded audio should be offset in the arrangement,
t
h
e
r
e
by
compensating for device/driver latency.
Release Audio Device in Background is disabled by default. When engaged, the currently used audio device is made
a
va
i
l
a
bl
e to other applications when Studio One is minimized.
Process Audio in Safe Mode is disabled by default. When engaged, more processing bandwidth is given to audio-
processing tasks, resulting in higher latency. This option may be useful on low-powered computers or on computers that
exhibit performance issues.
MIDI
C
l
i
c
k
on
the Midi tab to access the following options:
Timecode Follows Loop is engaged by default and allows MIDI Timecode to remain in sync when Loop is active in a
Song or Project. With this disengaged, MIDI Timecode continues to run linearly (counting up) while Studio One's transport
i
s
l
o
o
pi
ng.
Reveal Precount Notes is disengaged by default. Engage this option to retain any MIDI notes played during the count-in
w
h
e
n
Pr
ecount is enabled. This can be helpful when playing in parts that start just before the downbeat.
Chase Long Notes is engaged by default. When engaged, if playback starts after a note start, the note is played as
though its start time were at the position at which playback started. For instance, if a synth pad note starts at bar 1 and
lasts through bar 8, and playback is started at bar 4, the note plays from bar 4 as it would normally from bar 1. With this
option disengaged, in the above example, the note would not play at all.
PreSonus Studio One v3.5
Page 28
Page 35

W
i
n
d
o
ws
MIDI options:
Hide Emulated DirectMusic Ports is engaged by default and eliminates possible redundancies in how MIDI device ports
a
r
e
p
re
sented in Studio One.
Use Legacy MIDI instead of DirectMusic is not engaged by default. Engaging this option means that Studio One ignores
D
i
r
e
ct
Mu
sic MIDI devices and accesses MIDI devices through Legacy MIDI instead.
Ignore MIDI Timestamps is not engaged by default. This option is useful when a MIDI device exhibits timing issues, such
as drift or a general offset.
Console
C
l
i
ck
o
n
the Console tab to access the following options:
Colorize Channel Strips Enable this option to apply channel color coding to full channel strips in the Console. Normally
the color only shows on the channel labels. This sort of enhanced visual reference can be helpful when trying to navigate
l
a
r
g
e
S
ongs.
Solo Follows Selection With this option enabled, once a track is soloed, selecting a different track causes the newly
se
l
e
ct
e
d
track to be soloed. When this option is disabled, tracks stay soloed until solo is disengaged.
Channel Editor follows Selection is engaged by default and causes currently viewable channel devices, such as virtual
effects or instruments, to automatically switch when a Channel is selected. This ensures you are only viewing the devices
r
e
l
a
t
ed
to the selected Channel.
Audio Input follows SelectionEnable this option to automatically engage Record and Monitor mode for any Audio Track
yo
u
se
l
ect
.
If you would like Audio or Instrument Track monitoring to be enabled automatically when recording is enabled on a Track,
e
n
g
a
g
e
the Audio Track Monitoring Follows Record and Instrument Track Monitoring Follows Record options.
Audio Track Monitoring Mutes Playback (Tape Style) mutes playback of any pre-existing audio on Audio Tracks that
h
a
ve
m
on
itoring enabled.
Instrument Input follows Selection Enable this option to automatically engage Record and Monitor mode for any
Instrument Track you select.
C
u
t
L
on
g Notes at Part End is not engaged by default. When engaged, this means that notes are cut at the end of a Part
w
h
e
r
e
i
t would otherwise extend beyond the Part end. This effectively places the note-off at the Part End.
Record Offset allows you to input a value, in milliseconds, by which any recorded musical performance should be offset
in the arrangement, thereby compensating for device/driver latency.
F
a
d
e
r
M
ode This sets the mouse behavior for channel faders in the Console. Choose Touch to require clicking on the
fader handle itself before dragging it to the desired position. Choose Jump to allow clicking anywhere on the travel of the
fader to set its position.
Services
Studio One gives you the ability to selectively enable and disable particular services, or modules, that enable specific features.
This may be helpful when troubleshooting. For instance, if a ReWire device seems to be causing a problem, you can disable the
ReWire service to see if that resolves the issue. This kind of troubleshooting enables the Studio One technical-support team to
quickly locate and resolve specific issues with your computer system and to identify any previously unknown problems in the
program.
PreSonus Studio One v3.5
Page 29
Page 36

A
l
l
se
rvi
ces are enabled by default. To disable any service, click on the Services tab in the Studio One/Options/Advanced menu
(Mac OS X: Preferences/Advanced) and click on the confirmation button, paying special attention to the disclaimer message.
Then click on any service in the list and click on the Disable button to disable that service. You must restart Studio One for these
changes to take effect.
If a service has been disabled, follow the instructions above, and click on the Enable button for the service in order to re-enable it.
Again, Studio One needs to be restarted for any of these changes to take effect.
PreSonus Studio One v3.5
Page 30
Page 37

T
he
f
o
ll
owing chapter presents important, fundamental design aspects of Studio One. Familiarity with these aspects of Studio
One helps to ensure that your experience is as enjoyable and creatively stimulating as possible.
C
ON
T
A
C
T
US
Chapter
3:
Fundamentals
PreSonus Studio One v3.5
Page 31
Page 38

A
lm
o
st
eve
ry editing and mixing action in Studio One can be undone and redone. There is no limit to how far back actions can be
undone and to how far forward actions can be redone once they have been undone. Most actions that cannot be undone or
redone are accompanied by verification dialog boxes.
So, feel free to explore without fear that you might permanently alter anything. In fact, playing freely with the controls is a fast way
to learn, and it often leads to unexpected results.
Undo/redo history is cleared when you save a Song or Project, or exit Studio One.
Nondestructive
Editing
and Undo/Redo
PreSonus Studio One v3.5
Page 32
Page 39

S
tu
d
i
o
O
ne features a cutting-edge high-precision mix engine. A mix engine is the “number cruncher” that does the mathematical
summing required to mix multiple sources of digital audio. Studio One employs a floating point, mixed-mode engine.
64-Bit Mix Engine
Studio One Professional offers both 32-bit and 64-bit mix engine modes. This means that the audio engine can automatically
switch between using 32-bit, single-precision floating-point and 64-bit, double-precision floating-point math on the fly, depending
on the capability of the plug-ins (VST/AU effects, etc.) inserted into the signal chain.
In Studio One/Options/Audio Setup (Mac OS X: Preferences/Audio Setup), set Process Precision to Double (64-bit) to activate
64-bit processing. Otherwise, all processing is done in single precision (32-bit).
C
ON
T
A
C
T
US
High-Precision Mix Engine
PreSonus Studio One v3.5
Page 33
Page 40

C
ON
T
A
C
T
US
Automatic Delay Compensation
S
t
u
dio O
ne au
tomatically compensates for the time delay that results from some VST and AU processing. This lets you avoid
having to manually realign Tracks to compensate for that delay, and keeps a
ll Tracks perfectly in sync regardless of the number
of virtual plug-ins and effects you run. For more information on this topic, refer to the Automatic Plug-In Delay Compensation
section.
PreSonus Studio One v3.5
Page 34
Page 41

C
ON
T
A
C
T
US
Audio
Dropout
Protection
W
hen u
sing a D
AW, working with high track and plug-in counts can be challenging. Squeezing the highest performance from
your computer generally requires the use of high buffer settings, which can dramatically increase the amount of latency (or
delay) you experience when monitoring audio inputs or playing software instruments. Set the buffer too low, and audio playback
can be c
o
m
p
ro
mised.
Audio interfaces that employ hardware DSP (such as the PreSonus Studio 192) can provide low-latency audio input monitoring at
high buffer settings. However, they are not able to help keep virtual instruments free of disruptive latency, as those instruments
must run within the DAW's native audio engine.
Next-Level Performance with Low Latency
Studio One now features an improved audio monitoring engine that can provide dropout-free audio playback and Native Low
Latency Monitoring monitoring for audio inputs and virtual instruments, even as track and plug-in counts push the limits of your
system.
For more information on working with and configuring the new audio engine, see Audio Dropout Protection and Low-Latency
Monitoring.
PreSonus Studio One v3.5
Page 35
Page 42

Look Mom, No MIDI
T
h
e Musi
cal Instrument Digital Interface (MIDI) specification was created in 1983. While it has served musicians well for more
than 25 years, it has some limitations in terms of resolution and speed. We circumvent many of those limitations within Studio
One by substituting our own high performance control system in place of MIDI when controlling certain vital internal parameters.
As an example, fine-grained parameter automation is provided within virtual instrument parts, rather than much lower-resolution
(128 steps) MIDI control-data automation. The Control Link system is also made possible by abstracting MIDI from Studio One's
internal processes. As MIDI evolves and new potential standards are developed, Studio One remains prepared for the
innovations of the future.
PreSonus Studio One v3.5
Page 36
Page 43

Drag and Drop
M
a
ny funct
ions in Studio One have integrated drag-and-drop support. This means that objects can be clicked on and then
dragged to various locations, and over other objects, in order to accomplish certain tasks. For example, you can find an audio
effect in the Browser, and then click-and-drag it directly onto a Track to insert the effect onto that Track. You can then click-and-
drag that effect onto another Track to copy that effect and its settings to a new Track.
You can drag a virtual instrument from the Browser and drop it into blank space in the Arrange view to create a new Instrument
Track with that virtual instrument. You can also drop the virtual instrument on top of an Instrument Track to replace the existing
virtual instrument.
If, while in mid-drag, you decide you no longer want to drag the object in question, press [Esc] on the keyboard to cancel the drag
action.
These, and many other drag-and-drop features, allow you to work very quickly, without having to stop for menu navigation or
other distracting processes.
PreSonus Studio One v3.5
Page 37
Page 44

T
he
T
r
an
sport Controls are a central set of buttons that give you control over playback, navigation, and recording in Studio One.
T
ra
n
sp
o
rt
Controls are present in both the Song and Project pages. The following controls are available:
Play Start playback at the current cursor location. You can also Play by hitting the spacebar on your keyboard, which also
w
or
ks
t
o
s
top the transport, when it is in playback.
S
to
p
S
t
op
playback. You can also Stop by hitting the spacebar on your keyboard, or [0] on the numerical keypad.
Record Begin recording at the current cursor location. You can also activate recording by pressing [*] on the numeric
ke
yp
a
d
.
L
oo
p
P
r
ess
to enable/disable Loop mode. You can also toggle looping by pressing [/] on your keyboard.
R
ew
i
n
d
a
nd Fast Forward Press these buttons to move the cursor back or forward in time.
G
o
T
o
Pr
evious/Next Marker Press these buttons to shuttle to the previous or next marker on the Marker Track.
Return to Zero (RTZ) Return the playback cursor to the beginning of the timeline. You can also zero the transport by
pressing [,] on the keyboard.
Transport
Controls
PreSonus Studio One v3.5
Page 38
Page 45

Exa
m
p
l
e:
[F3].
In several instances, options are located in the Studio One menu in the Windows version but in Preferences in the Mac OS X
version. In these cases, the Windows location is given first, and the Mac location follows in [brackets].
A complete list of key commands is always available via Help/Keyboard Shortcuts, which renders an HTML document and opens
it in your browser with the currently configured key commands.
Key Commands for Migrating Users
If you are migrating from another DAW to Studio One, you might find it helpful to switch the key command set to one specifically
created to make the transition from another DAW easier.
In the Studio One/Options/General/Keyboard Shortcuts (Mac OS X: Preferences/General/Keyboard Shortcuts) menu, you can
see a heading called Keyboard Mapping Scheme. Here, you can select from keyboard maps for several DAWs; select a map,
and Studio One recognizes and applies common key commands from that DAW. You can then customize the key commands to
fit your workflow.
The key commands used for each DAW can be viewed in the Key Command menu and can be exported in several file types for
external viewing.
Mapping Custom Key Commands
In the Studio One/Options/General/Keyboard Shortcuts menu (Mac OS X: Preferences/General/Keyboard Shortcuts), you can
modify the existing key commands to be anything you like, as well as adding commands for functions that don’t have default key
commands.
Note that all mentions of keyboard shortcuts in this manual refer to the standard settings.
Key Commands
M
a
ny oper
ations in Studio One have associated key commands, or keyboard shortcuts, that can be used in lieu of navigating
menus with the mouse. Some key commands use modifier keys, and some modifier keys differ depending on the operating
system.
In this manual, key commands with modifier keys are shown with the Windows modifier key first, as follows: [Win modifier
key]/[Mac modifier key]+[key]. For example: [Ctrl]/[Cmd]+[C] means “press [Ctrl]+C in Windows, or press [Cmd]+C in Mac OS X.”
W
here there is no difference between the Windows and Mac version of a key command, only one key command is displayed.
PreSonus Studio One v3.5
Page 39
Page 46

T
o
m
o
d
if
y any key command:
1. Find the function for which you wish to edit the key command by typing in the name of the function in the Search field.
2. When the function is found, select it by clicking on it in the list on the left.
3. Click in the Enter Key field and input any key combination using your computer keyboard. Your key combination is
displayed.
4. Click Assign to assign this key command to the selected function.
5. If the key command you are trying to assign is already in use, the current use is displayed below the Enter Key field, along
with a Show link that selects that function for you so that you can change it.
6
. C
l
i
ck
on
the Keyboard Mapping Scheme selection box to choose from the following options:
I
mp
o
r
t
Se
lect to import a Studio One Keyboard Mapping Scheme.
E
xp
o
r
t
Se
lect to export your Studio One Keyboard Mapping Scheme.
Export as Text Select this to export your Studio One Keyboard Mapping Scheme as a text file so that you can
create a reference guide to your custom mappings.
A complete list of key commands can be viewed via Help/Keyboard Shortcuts, which renders an HTML document that shows the
currently configured key commands and opens the document in your browser.
PreSonus Studio One v3.5
Page 40
Page 47

T
oolti
ps
M
a
n
y c
ontrols, tools, and windows in Studio One have associated tooltips that display when you hover your mouse pointer over
the control. These short descriptions can help you quickly orient yourself to the functions available in Studio One.
PreSonus.com
O
ur
w
e
b
si
te, http://presonus.com, contains a wealth of information about Studio One and how best to use it. You can also get
i
nfo
r
m
a
ti
on and answers from fellow users at our forums at http://forums.presonus.com/
Studio One Help and Information
We h
ave w
o
r
ked to make S
tudio One as easy to learn and use as possible, but any tool with as many capabilities as a modern
DAW is bound to come with a learning curve. To help you on your way, this manual contains i
nformation on of every feature in
Studio One. You can access this manual at any time by navigating to Help/Studio One Reference Manual, or by pressing the F1
key on your keyboard.
If you have one of the built-in Studio One plug-ins open and need help with its functions, pressing F1 takes you to the relevant
section of this manual.
Info View
The Info View panel, accessed via the Question Mark icon in the top toolbar on the Song and Project pages, displays all possible
actions for the selected mouse tool, as well as showing the possible modifiers and their related actions. Various controls in the
Studio One interface and included plug-ins also display information in the Info View when you hover the mouse pointer over
them. From Info View, you can press F1 on your keyboard to jump directly to related sections of the Studio One reference
manual.
PreSonus Studio One v3.5
Page 41
Page 48

T
he
I
n
fo
View panel, accessed via the Question Mark icon in the top toolbar on the Song and Project pages, displays all possible
actions for the selected mouse tool, as well as showing the possible modifiers and their related actions. The Info View panel also
shows a variety of other useful information, including plug-in control functions. This helps you to discover features and provides a
convenient, context-sensitive reference.
Also note that if you float the mouse over any tool, button, or window in Studio One for a few seconds, a Tooltip appears,
showing the function the tool, button, or window serves.
Info View
PreSonus Studio One v3.5
Page 42
Page 49

Sc
r
o
l
lw
heel Hover your mouse pointer over the desired control or parameter and move the scrollwheel (or other scrolling
mechanism) on your pointing device. In this way, you can smoothly adjust variable controls (such as mixer faders or plug-
i
n
p
a
r
am
eters) and scroll quickly though lists of options (such as setting Quantize Value or channel I/O assignments).
Click and Drag While moving knobs and linear faders by clicking and dragging may seem obvious, also note that many
numerical settings (such as Transpose or Start and End times) can be adjusted by clicking the center of the setting's
d
isp
l
a
y
,
and dragging up or down to the desired value.
Double-Click and Type Many numerical parameters can be precisely set by double-clicking the currently set value and
typing in the desired value. Press [Enter] to lock in the new value.
Flexible Parameter Control
M
a
ny contr
ols and parameters throughout Studio One let you adjust their settings with the mouse and keyboard in several useful
w
ays:
PreSonus Studio One v3.5
Page 43
Page 50

Control Link
C
o
n
tr
o
ll
ing DAW software with hardware MIDI controllers can sometimes be a complex task. To make things simpler, Studio One
provides the Control Link system, a clear and easy MIDI mapping protocol. With minimal configuration, you can achieve effective
control over your software and external equipment.
F
or more on the Control Link System, refer to the Control Link chapter.
PreSonus Studio One v3.5
Page 44
Page 51

S
tu
d
i
o
O
ne offers integrated control for the following PreSonusaudio hardware products:
S
tu
d
i
o
1
92 audio interface
S
tu
d
i
o
1
92 Mobile audio interface
S
tu
d
i
o
Li
ve AI-series mixers
S
tu
d
i
o
Li
ve RM-series mixers
When you connect one of these supported units to Studio One, many of the hardware control features you know from the
included UC Surface software are then available directly within Studio One.
Basic Setup Procedure
To connect your PreSonus Studio 192 interface or StudioLive AI or RM-series mixer to Studio One, do the following:
1. Connect your interface or mixer to the computer running Studio One, using the included data cable (USB or Firewire).
2. Install and launch the included UC Surface software on the computer running Studio One.
3. Launch Studio One. The control features for your hardware are now enabled in Studio One.
For more detailed information on setup and Studio One hardware integration, see the owner's manual for your Studio 192 series
interface or StudioLive AI or RM-series mixer.
PreSonus
Hardware
Integration
PreSonus Studio One v3.5
Page 45
Page 52

P
ag
e
s
T
h
e
functions in Studio One are organized into three main pages: Start, Song, and Project. Each page is designed to help you
accomplish a specific set of tasks, and each page is accessible at all times.
In this chapter, we discuss the general layout of the user interface for each page.
Chapter 4: Pages
PreSonus Studio One v3.5
Page 46
Page 53

W
hen
S
t
ud
io One is launched, the Start page is displayed.
On this page, you can find document management and device configuration controls, as well as your artist profile, a news feed,
and links to demos and tutorials. The following section provides a brief description of the Start page.
Tasks
In the top portion of the Start page, you can find three options: Create a New Song, Create a New Project and Open an
Existing Document. A Song is where you can record, edit, arrange, and mix audio and musical data. A Project is where multiple
Songs or audio files can be arranged and mixed on a single timeline for mastering purposes. Songs are accessed in the Song
page, and Projects are accessed in the Project page.
Recent Files, Songs, and Projects
The Recent Files list includes links to the most recently accessed documents. Click on any of these links to quickly open the
associated Song or Project. Floating the mouse to the left of any listed document reveals a Pin icon that, when clicked, pins that
document to the Recent Files list until it is unpinned.
To open an auto-saved version of a document, [Right]/[Ctrl]-click the name of the document and choose the desired revision from
the pop-up list. This right-click menu also offers the ability to display the selected document in the Windows Explorer, or Mac OS
Start
F
ind
e
r
.
T
he
Songs and Projects list displays all Songs and Projects contained in the User storage location.
Setup
This area displays your currently selected audio device and contains links to configure your audio device, configure external
devices, check for updates, and view information about Studio One.
PreSonus Studio One v3.5
Page 47
Page 54

C
o
n
f
i
gu
re Audio Device
Studio One automatically selects, from a list of devices installed on your computer, an audio device (such as an audio interface)
to use for audio input and output. To select a different device, click on the Configure Audio Device link to access the Audio Setup
t
a
b
i
n
the Options menu. For in-depth information on how to set up your audio device, refer to the Set Up Your Audio Device
section.
Configure External Devices
Studio One can send and receive musical data to and from any MIDI device connected to your computer. Studio One’s advanced
use of MIDI devices requires you to tell it a few things about your devices. For details on how to set up these devices, refer to the
S
e
t
U
p
Your MIDI Devices section.
Check for Updates
From time to time, PreSonus issues software updates for Studio One to incorporate bug fixes and add features. To manually
check for updates, click on the Check for Updates link. Your version number, as well as the most current version number, is
displayed. If a newer version of Studio One is available, a link to download the new version is also displayed.
About Studio One
Click on the About link to view your current license and version information, as well as information about the Studio One
development team.
Artist Profile
Here you can specify certain meta-information that is used to tag your Songs, including an image, artist name, genre, and artist
Web URL. To add an image to the artist information, click the [...] button to choose a file, or drag-and-drop an image onto the
image icon from any location on your computer. To remove the current image, click the button marked X.
In addition to enabling you to personalize Studio One, this feature saves you the effort of filling in meta-information for every
Song.
SoundCloud Dashboard
On
ce
yo
u’
ve set up an account, the SoundCloud dashboard lets you have direct interaction with your fans and customers, as well
as view various statistics, such as play and download numbers, and the number of followers you have.
PreSonus Studio One v3.5
Page 48
Page 55

S
ho
w
s
yo
u
the number of sounds you have posted.
S
ho
w
s
yo
u how many fans you have.
S
ho
w
s
yo
u the number of plays you have.
S
ho
w
s
yo
u
the number of downloads you have.
S
ho
w
s
yo
u the number of hearts you've been given.
Shows you the number of comments left by listeners.
News Feed
The Studio One news feed comes directly from PreSonus. This news feed contains helpful information related to Studio One and
updates automatically if your computer is connected to the Internet.
Demos and Tutorials
Any installed demo or tutorial songs appears in the Demos list, which can be launched by clicking on the demo-song name. Use
these demo songs to check out various aspects of Studio One.
PreSonus Studio One v3.5
Page 49
Page 56

W
he
n
a
n
ew Song is created, or an existing Song is opened, you are taken to the Song page. This page contains all of the
necessary tools to record, edit, arrange, and mix multitrack audio and instrument data.
Song Page Workflow
The Song page is a complete multitrack production environment with a single-window interface. On this page, any number of
audio and instrument Tracks can be recorded, edited, and arranged. Any number of audio effects, virtual instruments, and
external effects and instruments can be used, and most parameters can be automated using Track or Part automation.
An integrated Browser makes it fast and easy to find and import audio and musical data files, VST/AU audio effects, and VST/AU
virtual instruments and applications. Audio files can be imported and automatically timestretched to fit the current tempo. Virtual
instruments can be dragged from the Browser directly into the Song for instant setup of all parameters, allowing a fast workflow
when inspiration hits.
C
ON
T
A
C
T
US
Song
PreSonus Studio One v3.5
Page 50
Page 57

Proj
e
c
t
Pa
ge Workflow
The Project page is a dedicated mastering solution integrated into Studio One Professional. Here, you can burn industry-standard
Red Book audio CDs, create high-quality MP3 albums, and standard disc and DDP images. Songs and audio files are arranged
as a sequence of Tracks on a continuous timeline.
You can apply effects to individual Tracks, as well as to the master output Track, in order to achieve sonic continuity throughout
the Project. An integrated Browser makes importing Songs, audio files, and audio effects quick and simple.
High-quality master output metering is displayed at all times, including Spectrum, Peak/RMS, and Phase meters. These tools
help you know at a glance exactly what is going on sonically in your Project. Loudness metering and offline loudness analysis is
available, offering information in the current EBU R128 and LU/LUFS standards, for dynamic perfection in broadcast and
streaming-oriented material.
As mentioned, Songs can be imported directly into your Projects without having to export a Song mix. After importing a Song into
a Project, you can go back and change the Song mix, and the Project is automatically updated.
For detailed information on the Project page, refer to the Mastering
chapter.
Project
(Studio
One Professional)
W
h
en
you create or open a Project in Studio One Professional, you are taken to the Project page. This area contains the tools
you need to master and publish audio.
PreSonus Studio One v3.5
Page 51
Page 58

Quick Switch
I
n
Stu
di
o One Professional, you can have multiple Songs and Projects open simultaneously and can switch between them
quickly. The fastest way to switch between any open Song or Project, as well as the Start page, is to press [Ctrl]+[Tab] and
continue to hold [Ctrl] on the keyboard. This displays a pop-up list of all open documents.
While holding [Ctrl], press [Tab] to cycle through the open documents. Release [Ctrl] when the desired document is selected.
Now, you can view that document.
PreSonus Studio One v3.5
Page 52
Page 59

Y
ou
a
r
e
h
ere:
The following chapter discusses aspects of recording in Studio One, including Audio and Instrument Tracks, recording modes
and formats, and recording tips.
Chapter
5:
Recording
PreSonus Studio One v3.5
Page 53
Page 60

T
he
f
o
ll
owing options are available in this menu:
N
am
e
C
l
ick
here and type in a name for the new Track.
C
ou
n
t
C
ho
ose the number of Tracks you would like to create.
T
yp
e
C
h
oo
se Audio.
C
ol
o
r
C
ho
ose a color.
A
ut
o
-
C
ol
or Check this box if you would like your Tracks auto-colored.
F
or
m
a
t
Ch
oose mono or stereo.
P
re
s
e
t
Ch
oose an FX Chain to be pre-loaded on the Tracks.
Input Assign an audio Input to the new Track(s). When creating multiple Tracks, you can engage the Ascending option to
assign Inputs to each Track in ascending order (Track 1, Input 1, Track 2, Input 2, etc.).
Audio Tracks
B
e
fore r
eco
rding can take place, you need at least one Track on which to record. Studio One has two types of Tracks for basic
recording: the Audio Track and the Instrument Track. Audio is recorded to Audio Tracks, while musical performance data is
recorded to Instrument Tracks.
Creating an Audio Track
To create an Audio Track, navigate to Track/Add Tracks or press [T] to open the Add Tracks menu.
O
ut
p
u
t
Ass
ign an audio Output to the new Track(s). When creating multiple Tracks, you can engage the Ascending option
to assign Outputs to each Track in ascending order (Track 1, Output 1, Track 2, Output 2, etc.).
Once these options are configured, click on OK, and the Tracks appear in the Arrange view, below the currently selected Track.
Navigate to Track/Add Audio Track (mono or stereo) to quickly add an audio Track.
[Right]/[Ctrl]-click in blank space in the Track Column and select Add Tracks For All Inputs to quickly add a Track for every
configured input in Audio I/O Setup.
Alternatively, you can [Right]/[Ctrl]-click in any blank space in the Track Column of the Arrange view and select Add Audio Track
(Mono) or Add Audio Track (Stereo) to quickly add an audio Track.
PreSonus Studio One v3.5
Page 54
Page 61

U
s
e
a
nd C
reate Presets
In Studio One, you can store presets of an entire chain of effects plug-ins as an FX Chain, allowing quick recall of complex
effects setups on any Track. Any factory preset or user-created FX Chain can be selected as a Preset when creating a Track. For
m
o
r
e
in
formation, refer to the FX Chains
se
ct
i
o
n
o
f the Mixing chapter.
Configuring an Audio Track
This section describes the editable Audio Track parameters.
Input/Output Selection
An Audio Track’s I/O channel(s) can be selected from three places: the Track Column, the Console, and the Track Inspector.
T
o
se
l
ect
an Input Channel from the Track Column:
I
f
n
e
ed
ed, expand the Track's control area to expose the input selector.
Click the Input Selector immediately below the horizontal Track fader to choose from any configured Input Channel.
T
o
se
l
ec
t an Input or Output Channel from the Console:
O
p
e
n
th
e Console by clicking the [Mix] button, or press [F3] on the keyboard.
Click the selectors above each Track’s Fader and Pan controls to choose an Input and/or Output Channel. The Input
Channel selector is on top, with the Output Channel selector beneath.
T
o
S
e
le
ct an Input or Output Channel from the Inspector:
O
p
e
n
th
e Inspector window by clicking on the [I] button above the Track Column or pressing [F4] on the keyboard.
In the Channel area of the Inspector window, you can find the currently selected Track’s Channel Mode toggle (mono or
st
e
r
e
o
)
and Input and Output Channel selectors.
Click on the Input or Output Channel selector to choose a Channel.
Stereo Tracks can select from both mono and stereo Input Channels, while Mono Tracks can only select from mono Input
Channels.
Tempo Mode
The Tempo mode, found in the Inspector, affects the way in which Audio Events are handled on any audio Track.
PreSonus Studio One v3.5
Page 55
Page 62

T
h
e
r
e
a
re three Tempo modes:
D
o
n
’
t
F
ollow Audio Events on the selected Track are not affected by Song tempo.
Follow The start position of Audio Events on the selected Track is adjusted with tempo changes, so the Events stay in
syn
c
w
i
t
h
their Bars (bars and beats) position. The length of the Event is not affected.
Timestretch Assuming that the Song file contains tempo information, tempo changes cause Audio Events on the selected
Track to be dynamically stretched so that the Events’ start and end times stay in sync with their Bars (bars and beats)
positions. The length and internal timing of the Event is affected in the stretching process but the pitch of the audio
remains unaffected.
PreSonus Studio One v3.5
Page 56
Page 63

I
f
t
h
e
Stretch Audio Files to Tempo option is selected when creating a new Song, Timestretch is set as the default tempo mode
for all new Audio Tracks.
Re-Recording
Instrument Output, Bus, and ReWire channels can be selected as the input to any stereo Audio Track. These Channels are
grouped in branches in the input selection menu for the Audio Track.
This is very useful in a number of situations in which you would like to “print” the live output of one of those Channel types (live
virtual instrument recording to audio, hybrid analog mixing, etc.).
Record-Enabling an Audio Track
To record to an Audio Track, the Track must be record-enabled. To record-enable an Audio Track, click on the Track’s Record
Enable button once or select the Track and press [R] on the keyboard. Select multiple Tracks and record-enable any of them to
record-enable all selected Tracks. The Record Enable button turns red when active, and the Track’s meter begins to move up
and down if there is live audio input on the Track’s selected Input Channel.
Alternatively, if you press and hold [Alt]/[Option] on the keyboard, and then click on Record Enable, you both record-enable the
related Track and disarm record-enable for all other Tracks.
You can find the Audio Input Follows Selection in the Studio One/Options/Advanced/Console options list (Mac OS X:
Preferences/Advanced/Console). Engaging this automatically record-enables the last Track selected in the Arrange view.
Monitor-enable is, by default, automatically engaged when Record Enable is engaged.
When an Audio Track is record-enabled, a clip indicator appears at the top of the input-level meter for that Track in the Arrange
view. If clipping occurs at the input, the clip indicator turns on. When clipping occurs, you should adjust the input gain/level on
your audio interface, as once the distorted signal is recorded, it cannot be fixed.
O
n
ce
a
n
Audio Track is record-enabled, you are ready to record. Refer to Activating Recording for more on this topic.
Software Monitoring
To monitor (listen to) live audio input on an Audio Track, click on the Monitor enable button once. This button should turn blue,
PreSonus Studio One v3.5
Page 57
Page 64

a
n
d
yo
u
should begin to hear your live audio input and see its input level on the Track meter. You can also hold [Alt]/[Option] on
the keyboard and then click on the Monitor enable button to simultaneously engage monitoring on a Track and disengage
monitoring on all other Tracks.
It may be helpful to picture the signal path to understand exactly what is happening. For example, if you are listening to a guitar
plugged into channel 1 on your audio interface, then Studio One receives the guitar input on Hardware Input 1.
In Audio I/O Setup, you will have created a mono Input Channel with Hardware Input 1 as its source. Your Audio Track has that
Input Channel selected as its input. The Output of your Audio Track is likely to be the Main Output, which is a stereo Output
Channel. The Output Channel sends to a designated stereo pair of outputs on your hardware audio interface, which presumably
are connected to your monitor speakers or headphones.
When monitoring live audio input from a microphone, avoid listening with speakers that are in close proximity to the microphone.
Otherwise, you might create a feedback loop that could quickly generate dangerously loud audio levels, possibly harming your
ears and your speakers.
Hardware Monitoring
Some audio interfaces feature the ability to monitor the hardware inputs and outputs directly, as opposed to monitoring through
software. This is referred to as “hardware monitoring” or “zero-latency monitoring.” When using this type of interface, we
recommend that you monitor live audio input via the hardware, rather than through the software. This can help you to avoid
common problems that result from software latency, such as hearing a delay when you record vocals, or recording off-beat.
Setting Input Levels
Setting good input levels is critical to making a good recording. This begins with the hardware audio interface. If the hardware’s
input level is set too low, and you increase the level later in Studio One to compensate, you also raise the level of any noise in
the signal. If the level is too high, you can overload the hardware input, causing unpleasant clipping distortion that cannot be
fixed. Therefore, you should set the input gain on your audio interface as high as possible without overloading the input. There is
usually a clip indicator for each input on the audio interface to assist you in detecting overloads.
As long as the input levels are not clipping in your audio interface or on the Track to which you are recording in Studio One, you
can always adjust the levels of recorded material after the recording is made. To visually monitor the input levels for any input in
Studio One, it is best to view the Input Channels in the Console by clicking on the Inputs tab in the Console.
Disabling an Audio Track
When working in large Songs with high Audio and Instrument Track counts, it can be useful to disable certain Tracks that are not
currently in use, to free up CPU and RAM resources for use elsewhere. Disabling an Audio Track disables and unloads any
Insert effects used. To disable an Audio Track, [Right]/[Ctrl]-click the Track in Arrange view, and choose "Disable Track" from the
pop-up menu. To re-enable a disabled Audio Track, [Right]/[Ctrl]-click the Track and choose "Enable Track" from the pop-up
menu.
PreSonus Studio One v3.5
Page 58
Page 65

T
he
f
o
ll
owing options are available in this menu:
N
am
e
C
l
ic
k here and type in a name for the new Track.
C
ou
n
t
C
ho
ose the number of Tracks you would like to create.
T
yp
e
C
h
oo
se Instrument.
C
ol
o
r
Ch
oose a color.
A
ut
o
-
C
ol
or Check this box if you would like your Tracks auto-colored.
Input Assign a MIDI input Device to the new Track(s). Choose All Inputs | Any to accept input from any connected MIDI
Device.
Instrument T
racks
I
n
str
um
ent Tracks are where performance data is recorded, drawn, and edited. This data usually comes from a Keyboard, which
is used to play a virtual instrument or hardware sound module. Performance data is not audio; the virtual instrument or sound
module is the audio source.
In Studio One, MIDI controllers are referred to as Keyboards. If you have not set up a Keyboard, refer to the Set Up Your MIDI
Devices section of the Setup chapter.
Creating an Instrument Track
To create an Instrument Track, navigate to Track/Add Tracks or Press [T] to open the Add Tracks menu.
W
he
n
cr
ea
ting multiple Tracks, you can engage the Ascending option to assign inputs to each Track in ascending
o
rd
e
r
of
device and MIDI channel.
Output Assign an Instrument to the new Track(s). To create a new instance of a software instrument for each new Track,
choose New Instrument and select an instrument from the provided list. To assign the new Tracks to a hardware
instrument or to a software instrument already in use in the Song, choose Existing Instrument, and select from the
p
ro
v
i
d
ed
list.
When creating multiple Tracks, you can engage the Ascending option to assign Outputs to each Track in ascending
order of Instrument and MIDI channel.
PreSonus Studio One v3.5
Page 59
Page 66

O
n
c
e
th
ese options are configured, click OK, and the Tracks appear in the Arrange view, below the currently selected Track. It is
important to note that Instrument Tracks do not appear directly in the Console, as they do not output audio. The virtual
instruments generate sound and are represented in the Console by Instrument Channels.
Alternatively, [Right]/[Ctrl]-click in a blank space in the Track Column of the Arrange view and select Add Instrument Track from
the pop-up menu to quickly add an Instrument Track.
Configuring an Instrument Track
In Studio One, an Instrument Track can only receive input from a Keyboard that has been set up in the External Devices menu.
T
o
se
t
u
p a Keyboard, refer to the Set Up Your MIDI Devices
se
c
t
i
o
n
of the Setup chapter. If you have a Keyboard set up as the
default Instrument Track input, all Instrument Tracks default to using that Keyboard.
An Instrument Track can trigger a virtual instrument that has been set up in a Song or an external instrument. The Instrument
Track Input and Output can each be selected in one of two places:
S
e
l
e
ct
in
g an Instrument Track Input or Output from the Track Column:
S
e
t
t
he
Arrange view Track size to medium or larger to be able to access the current Instrument Track Input.
There are two I/O selectors on each Instrument Track. Click the top selector to choose an output to any previously set up
virtual or external instrument. Click the bottom selector to choose from any configured Keyboard input.
S
e
l
e
ct
in
g an Instrument Track Input or Output from the Inspector:
O
p
e
n
th
e Inspector window by clicking on the [I] button above the Track Column or by pressing [F4] on the keyboard.
Click the Input or Output selector to select from any configured Keyboard input or to trigger any previously set up virtual or
external instrument.
Press [F11] to open the instrument editor for the selected Instrument Track.
Note that it is possible to select All Inputs as the input for Instrument Tracks, which combines the input of all defined keyboard
devices. If Default Instrument Input is not checked for any Keyboard device, new Instrument Tracks automatically use All Inputs.
This item is always in the inputs list, even if no keyboard device is defined. However, for any MIDI input to be received on an
I
n
st
r
u
me
nt Track, your MIDI input device (Keyboard Controller, etc.) must first be set up in the External Devices menu as a
Keyboard.
Set Up a Virtual Instrument
Studio One supports VST and AU virtual instruments, ReWire applications, and Studio One's Native virtual instruments. The
difference between these types of virtual instruments is transparent to the user in Studio One, as they are all handled in the same
manner. To use any VST or AU virtual instrument, you need to be sure Studio One knows where they are installed on your
co
m
p
u
t
er
. Refer to the VST Plug-ins
se
ct
i
o
n
o
f the Setup chapter for more information on locating your plug-ins.
PreSonus Studio One v3.5
Page 60
Page 67

A
d
d
a
Vi
rtual Instrument from the Browser
To add any VST, AU, ReWire, or built-in virtual instrument to your Song, open the Browse view and click on the Instruments tab
t
o
v
i
ew
your virtual instrument. Then do one of the following:
Click on and drag any virtual instrument to an empty space in the Arrange view to simultaneously add the virtual
instrument to your Song and create an Instrument Track with its output routed to the virtual instrument. The Instrument
T
r
a
ck
co
nve
niently inherits the name of the virtual instrument.
Click on and drag any virtual instrument on top of an existing Instrument Track to replace the Track’s current virtual
i
n
st
r
u
me
nt.
Click and drag any virtual instrument from the Instruments tab to the Console to simply add the virtual instrument to your
S
o
n
g
.
I
n order to control or play this virtual instrument, you need to select it as the output for an Instrument Track.
The virtual instrument is now set up and ready to play and has one or more dedicated Audio Channels in the Console.
Once a virtual instrument is added to your Song, be sure that an Instrument Track is routed to it so that the instrument can be
played.
Set Up Multiple Virtual Instrument Outputs
Many virtual instruments have the capability to send audio on more than one channel. In Studio One, only the first output or
output pair of any virtual instrument is active by default.
T
o
a
ct
iv
ate the other possible virtual instrument Output Channels in the Console:
Open the Console by pressing [F3] on the keyboard, then open the Instruments panel (open by default) by clicking on the
I
n
st
r
.
b
utton to the far left of the Console.
C
l
i
ck
o
nce
on the virtual instrument in the Instruments panel, and the Output Channel activation menu expands.
C
l
i
ck
o
n
the checkbox next to any output to activate that output for the virtual instrument.
Each active virtual instrument output has a dedicated Audio Channel in the Console.
You can also activate virtual instrument outputs in the plug-in window. Any virtual instrument plug-in that offers multiple Output
Channels has an Outputs button near the top of the plug-in window. Click on this button to view and activate the available
outputs.
PreSonus Studio One v3.5
Page 61
Page 68

Se
t
U
p
a
ReWire™ Application
ReWire applications are set up in a similar way to virtual instruments. Any ReWire applications known to Studio One Professional
are listed in the Browser Instruments tab, along with all known virtual instruments. You can drag in the ReWire application just
like an instrument, and Studio One has a special ReWire object to represent the application.
The ReWire interface window is similar to the virtual instrument interface windows. There are also two special controls, Open
Application and Close Application, which can open and close most ReWire applications, so you do not need to leave Studio One
to open or close the ReWire application.
If clicking on Open Application does not immediately launch your ReWire application, this means that the ReWire application
does not support this function, so you need to manually launch the application. The application should launch in ReWire slave
mode.
Engaging the Allow tempo/signature changes option in the ReWire interface window allows the ReWire application to make
tempo and time signature changes within Studio One. To suppress these changes from the ReWire application, disable this
option.
Record Enabling an Instrument Track
To record musical performance data to an Instrument Track, the Track must be record-enabled. To record-enable an Instrument
Track, click on the Record Enable button once; it should turn red.
Also, note that monitor-enable is, by default, automatically engaged when Record Enable is engaged. This behavior can be
configured in the Studio One/Options/Advanced/Devices menu (Mac OS X: Preferences/Advanced/Devices). If musical data
arrives from the Track’s selected Keyboard, the Instrument Track’s meter moves up and down, corresponding to that input.
Once an Instrument Track is record-enabled, you are ready to record musical performance data to that Track. Refer to
A
c
t
i
v
at
ing Recording for more on this topic.
PreSonus Studio One v3.5
Page 62
Page 69

M
o
ni
t
ori
ng
an Instrument Track
Instrument Tracks record and output musical performance data, not audio. The virtual or external instrument to which the
Instrument Track is routed generates the audio. The following describes how virtual and external instrument audio output is
monitored.
Disabling an Instrument Track
When working in large Songs with high Audio and Instrument Track counts, it can be useful to disable certain Tracks that are not
currently in use, to free up CPU and RAM resources for use elsewhere. Disabling an Instrument Track also disables and unloads
any Insert effects used. To disable an Instrument Track, [Right]/[Ctrl]-click the Track in Arrange view, and choose "Disable
Track" from the pop-up menu. To re-enable a disabled Instrument Track, [Right]/[Ctrl]-click the Track and choose "Enable Track"
from the pop-up menu.
Monitoring a Virtual Instrument
Virtual instruments usually load with a default sound; however, you should be sure that the virtual instrument you wish to monitor
is set up correctly to generate audio. With the Output of an Instrument Track routed to the virtual instrument you wish to monitor,
click on the Monitor button, and it turns blue.
You should now be able to play the Keyboard that you selected as the input to the Instrument Track and should see the Track
meter moving, as well as hear the audio output of the virtual instrument. If you cannot hear the audio output of the virtual
instrument, make sure that your virtual instrument is set up correctly and that the corresponding Audio Channels in the Console
are not muted.
If you select the Instrument Input Follows Selection option in the Options menu, any Instrument Track you select automatically
has Monitor and Record enabled, and all other Instrument Tracks have these disabled.
Monitoring an External Instrument
To monitor and record the hardware audio output of an external instrument, one or more Audio Tracks need to be created to
receive that output. This means that your external instrument needs to be physically connected to one or more inputs on your
a
u
d
i
o
i
nterface. Thus, monitoring an external instrument involves the following:
The Output of an Instrument Track is routed to the external instrument, which has been set up to receive MIDI input from
S
t
u
d
i
o
One.
T
h
e
I
nst
rument Track is monitor-enabled.
One or more Audio Tracks have been created and configured to use the Input Channels to which the external instrument’s
a
u
d
i
o
o
utput is connected.
The Audio Tracks are monitor-enabled.
With the above conditions met, you can play your Keyboard and see the Instrument Track meter moving. You will also see the
related Audio Track meters moving, as well as hear the live audio input from the external instrument.
PreSonus Studio One v3.5
Page 63
Page 70

Th
e
R
eco
rd button in the Transport turns red, the playback cursor starts to scroll from left to right, and new Events are recorded
to any record-enabled Tracks. Recording continues until you manually stop it.
Precount and Preroll
When recording audio or Instrument Parts, it is often useful to give the performer a count-in before recording begins, to alert them
that recording is starting, and present the tempo of the Song so that they can play on-beat from the start. Studio One offers two
ways to do this: Precount and Preroll.
Engaging Precount lets you specify a number of bars of metronome clicks to be played before recording begins. Preroll lets you
specify a number of bars in the Song to play before recording begins. Choose the mode that best meets your needs as you
record.
Follow these steps to use Precount or Preroll:
1. Click on the Metronome Setup button to open the Metronome Setup menu.
2
. S
e
l
e
ct
Precount or Preroll in the Metronome Setup menu, and enter a number in the Bars field for the number of bars you
wish to play before recording begins.
You can also enable the selected mode by clicking on the Precount or Preroll button in the Transport, or by
pressing [Shift] + [C] on the keyboard to engage Precount, or [O] to engage Pre-Roll.
3. Set the playback cursor to the timeline position at which you wish to begin recording.
Activating
Recording
O
nce you h
ave the de
sir
ed Tracks created, setup, and record-enabled, the next step is to record. The following illustrates several
ways to activate recording, each associated with a different purpose.
Manually
Manually activating recording is the most basic way to record. Recording starts at the current playback-cursor position and
continues until you manually stop recording. To manually activate recording, click on the Record button in the Transport or press
[
NumPad *] on the keyboard.
4
. C
l
i
ck
on
the Record button in the Transport or press [NumPad *] to begin recording.
I
n
P
r
e
cou
nt mode, the Metronome clicks for the specified number of bars. The number of beats remaining before
recording starts is displayed in the Record button in the Transport.
In Preroll mode, playback begins a specified number of bars before the position you chose, with the playback
cursor moving from left to right.
5. Recording automatically activates at the position you chose. The Record button in the Transport turns red, the playback
cursor scrolls from left to right, and new Events begin recording to any record-enabled Tracks.
6. Recording continues until you manually stop it by pressing [Space Bar] on the keyboard or clicking Stop in the Transport.
PreSonus Studio One v3.5
Page 64
Page 71

A
uto
P
un
c
h
It
is sometimes useful to automate the point at which recording begins and ends. For example, if you wish to record over a
specific phrase of a vocal part, but not before or after that phrase, you can automatically begin and end recording at specified
points. This process is commonly referred to as “punching in and out,” and the resulting new Audio Event is referred to as the
“punch-in.”
In Studio One, punching in/out is achieved with the Auto Punch feature. Follow these steps to engage Auto Punch:
1. Set the Left Locator in the Timeline Ruler of the Arrange view at the position you wish to punch in—that is, where
recording should begin.
2. Set the Right Locator in the Timeline Ruler of the Arrange view at the position you wish to punch out, that is, where
recording should stop.
3. Click on the Auto Punch button in the Transport, or press [I] (the letter ‘i’) on the keyboard.
4. With Tracks record-enabled, begin recording at any point before the Left Locator position.
5. Playback begins and recording automatically activates at the Left Locator position. The Record button in the Transport
turns red, the playback cursor continues to scroll from left to right, and new Events begin recording to any record-enabled
Tracks.
6. Recording automatically stops at the Right Locator position. However, playback continues beyond the Right Locator
position until you manually stop it by pressing [Space Bar] on the keyboard or by clicking Stop in the Transport.
If you use the Auto-Punch feature in Studio One to record your punch-ins, or if you punch in manually, the newly recorded audio
is automatically crossfaded at its edges with the existing Audio Event, so the transition between the old and new audio is not
a
ud
i
b
l
e.
The crossfade time is very small and not audible; however, you can edit the crossfade manually.
CONTACT US
PreSonus Studio One v3.5
Page 65
Page 72

The Output Channels in the Console also feature Metronome buttons and level controls above the volume fader. These controls
allow you to choose, for each output, whether or not the metronome is heard, and its level.
Metronome Setup
Click the Metronome Setup button (next to the Metronome button in the Transport) to access the Metronome Setup menu. In this
menu, you can configure sounds and behavior for the metronome, as well as Precount and Preroll.
Metronome
Control
A
metro
nome makes audible clicks or other sounds that correspond to beats at a selectable tempo, providing the musicians with
a tempo reference while recording. This is especially useful when recording drums or other rhythm-intensive tracks, as the editing
and arranging processes are made much easier when the recorded audio lines up with musical bars and beats.
In Studio One, the metronome can be engaged and disengaged both globally and for each hardware output in the Console,
including the Main Out and any Sub Outs.
Turn the Metronome On/Off Manually
In the Transport, the Metronome button is to the left of the Master Volume fader and meter. Click on the Metronome button, or
press [C] on the keyboard, to globally engage and disengage the metronome. The metronome is globally disengaged by default.
H
ere
,
yo
u
can choose an individual sample and volume level for Beats, Accents, and Offbeats. Accents play on the downbeat, or
first beat, of each new bar. Offbeats play in the space between each Beat. You can choose from seventeen default samples for
each, including Click, Clave, Rim Shot, and Tambourine. By default, the Accent Level setting is higher than the Beat Level
setting, as most musicians like to have the downbeat of each bar emphasized to help keep time.
PreSonus Studio One v3.5
Page 66
Page 73

W
he
n
P
re
count is enabled, pressing record shows a countdown in the record button, of the number of beats remaining before
recording starts.
Precount can also be enabled by clicking the Precount button, to the left of the Metronome buttons in the Transport, or by typing
[Shift] + [C]. Preroll can also be enabled by typing [O].
Repeat Accent
This setting repeats the Accent sound when using a time signature with more than one accent per bar, such as 12/8. You can try
this out by doing the following:
1. Open the Metronome settings, and chose a sound for the Accent that is different from both the Beat and the Offbeat.
Metronome Presets
Once you have configured the Metronome, you can save the current setup as a preset by clicking the [Store] button. These
presets can be recalled at any time by clicking the [Load] button.
Precount and Preroll
Precount and Preroll are two methods you can use to signal the start of recording and give a sense of the song's tempo to a
musician before recording begins. When you click Record with Precount enabled, the metronome clicks for the number of bars
specified in the Bars parameter, before recording starts. When you click Record with Preroll enabled, Studio One starts playback
behind where the cursor is placed, by a number of bars specified by the Bars parameter. When playback passes the cursor
position, recording starts.
2. Leave the Repeat Accent checkbox empty.
3. Make sure the Click in Play option is active, so that you can hear the Metronome during playback.
4. Set the time signature to 12/8, and either click the Play button or press the Space Bar.
You’ll notice the Accent is only heard every 12 beats. However, if you go through steps 3 and 4 with the Repeat Accent function
switched on, the Accent is heard every 3 beats.
Click in Precount Only
W
he
n
r
ec
ording is triggered with Pre-Roll engaged, as discussed in the Precount and Preroll section of this chapter, a specified
number of Precount bars play before reaching the current playback cursor position. The number of Precount bars is specified in
the Metronome Setup menu. In this same menu, there is a checkbox to engage the Click Only in Precount option, which is
disengaged by default.
With Click Only in Precount engaged, the metronome provides a traditional count-in during the Precount bars and is not heard
beyond those bars.
Click in Play
The Click in Play option in the Metronome setup menu allows you to enable/disable the Metronome during playback, as opposed
to while recording. Disabling Click in Play allows you to leave the Metronome engaged in the Transport at all times, so that if you
are recording, you hear a click, but if you are playing back, you do not hear the click. Click in Play is engaged by default; click on
the Click in Play checkbox to disengage the Metronome during playback.
PreSonus Studio One v3.5
Page 67
Page 74

R
e
n
d
e
r
Metronome
You can create an Audio Track of the Metronome by clicking the [Render] button located in the upper-right corner of the
Metronome Setup window, and choosing one of the Render range options. These options allow you to create a click track that is
either the full length of your Song, or just the length of a looped range within it, such as 4, 8, or 16 bars.
PreSonus Studio One v3.5
Page 68
Page 75

1.
S
e
t
t
he Left and Right Locators in the Timeline Ruler at the beginning and end, respectively, of the area in which you wish
to record.
2. Click on the Loop button in the transport or press [NumPad /] on the keyboard to engage Looping.
3. Activate recording manually or via Pre-Roll or Auto Punch.
4. When the playback cursor reaches the Right Locator position, it loops back to the Left Locator Position.
5. Recording continues until you manually stop it by pressing [Space Bar] on the keyboard or clicking Stop in the Transport.
When Loop Recording with Audio Tracks, multiple Takes are created. These Takes represent each recorded pass over the
looped region. If Record Takes to Layers is engaged in the Record panel, opened from the View menu or with [Shift]+[Alt]+[R] on
the keyboard, the takes are automatically placed in separate layers which are expanded when recording is stopped. Refer to the
C
om
p
i
n
g
se
ct
i
o
n
o
f the Editing chapter of this manual for more information.
Selecting Takes of an Audio Event
When there are multiple Takes available for an Audio Event, the Take icon appears in the lower left corner of the Event in the
Arrange view.
By default, the last recorded Take is selected. To select any other take, [Right]/[Ctrl]-click on the Audio Event to expose a list of
Takes. Click on any numbered Take to select it. Takes are edited as a single Audio Event, so sizing or splicing any Take splices
all of the Takes contained in the Audio Event.
It is possible to splice an Audio Event that contains multiple Takes, then select a different Take for each splice of the original
Event. For example, if you recorded three Takes for a vocal verse, you could split that Audio Event in between each vocal
phrase, and then, for each phrase, select the best of the three Takes.
Loop Recording on Audio T
racks
I
t
can
be
very useful to loop a specific section while recording in order to capture multiple performances or takes of the same
musical passage. In Studio One, this is called “Loop Recording.”
Follow these steps to accomplish Loop Recording:
U
npa
c
k
Ta
kes
When two or more Takes exist for an Audio Event, it is possible to unpack the individual takes to separate Events on new Tracks,
new Layers, or existing Layers. To do this, [Right]/[Ctrl]-click on the Event and click on Unpack Takes in the contextual menu.
Choose Unpack to Tracks to place each Take at the appropriate time on its own new Track. Note that the settings of the
originating Track are not duplicated for the new Tracks.
Choose Unpack Takes to New Layers to place each Take on its own Layer. This is usually done for comping, discussed in detail
i
n
t
h
e
Co
mping
se
cti
o
n
of
the Editing chapter. Choose Unpack Takes to Existing Layers if you would like to unpack the Takes to
existing Layers.
PreSonus Studio One v3.5
Page 69
Page 76

Se
t
a
nd
S
hif
t Loop
Several key commands that you may find helpful when loop recording are available in the Keyboard Shortcuts menu and by
default have no key command assigned.
Set Loop Start and Set Loop End allow you to place the left and right locators at the current playback-cursor position. The same
commands might be used when setting left and right locators for a punch-in using Auto Punch.
Shift Loop and Shift Loop Backwards allow you to move the loop range to the next or previous range of equal time. For instance,
if you have eight bars looped, Shift Loop would move the loop range to the next eight bars.
PreSonus Studio One v3.5
Page 70
Page 77

T
he
r
e
ar
e several modes for recording to an Instrument Track. To switch between these modes, navigate to the View menu and
select Record panel, or press [Shift]+[Alt]+[R] on the keyboard. In the Record panel, you can choose between a range of
recording modes, and access creative recording tools. The following describes each of the Record Panel modes and functions.
Record Mode Options
Replace and Overdub
When in the Replace recording mode, recording over any existing Instrument Part results in the new material being recorded to a
new Event, which replaces that portion of the original Event. While recording, you do not hear the previously recorded Event
playing back, as the purpose of this mode is to replace the existing material.
When Replace is disabled, you are in Overdub recording mode. In this mode, recording over any existing Instrument Part results
in the newly recorded material being overdubbed, or added to, the existing material. While recording, you hear the previously
recorded Event playing, along with the material currently being recorded, assuming that you are monitoring the Instrument Track.
Takes to Layers
Engage the Record Takes to Layers option to move the contents of each Take created while recording in loop mode to its own
L
aye
r
b
el
ow the current Track. If you engage this option while Record Takes is enabled, the notes from each run-through of the
l
oo
p
a
re
moved to their own new Layer. Engaged while Record Mix is enabled, a new Layer is created each time recording is
started and stopped, containing all notes from the entirety of the most recent recording pass.
Input Quantize
E
ng
a
g
e
I
nput Quantize to snap recorded notes to the rhythmic value set by the Quantize parameter. When recording parts that
are destined to be heavily quantized (such as synth arpeggios or drum-machine-style beats), this saves you the step of later
Quantizing the contents of your loop.
Instrument Loop Record Options
Record Takes and Record Mix
If Loop is engaged in the Transport while recording, the recording mode changes either to Loop Record Takes or Loop Record
Mix, depending on the selection in the Record panel. These modes are functionally similar to the regular Record Mode Overdub
Instrument T
rack Recording Modes
a
nd
R
e
cor
d Mode Replace.
When Loop Record Takes is selected, each pass through the looped region is recorded to a new Take within a single new
Instrument Part. When recording is stopped, each Take is individually selectable by [Right]/[Ctrl]-clicking on the Instrument Part
and choosing one of the numbered takes from the top of the pop-up menu. Only one Take can be selected at a time for any
Instrument Part.
PreSonus Studio One v3.5
Page 71
Page 78

T
a
k
e
s
on
Instrument Parts can be unpacked to new Instrument Tracks, as with Audio Event Takes, described in the Unpack
T
a
k
e
s
se
ction of this chapter.
When Loop Record Mix is selected, each pass through the looped region is added to the existing material within a single new
Instrument Part. For instance, if you loop a four-bar region to record a new drum part, this would allow you to play one piece of
the drum kit during each pass until you have recorded the whole part.
Instrument Recording Tools
Undo Last Loop and Undo All Loops
The standard Studio one Undo/Redo functions do not apply to individual record passes in Loop mode. Instead, use these two
special Undo buttons. Once you have some note information in your loop, you can click Undo Last Loop to erase only the notes
added in the most recent run-through of the loop. Click Undo All Loops to erase all notes in the current loop, and start fresh.
Note Repeat
With Note Repeat enabled, any notes played during the current recording pass retrigger according to the current Quantize
setting. For example, with a Quantize setting of 1/16, held notes create a series of 16th notes at those note values. This can
come in handy when recording drum fills or rhythmic synth parts. Note that this mode cannot be combined with the Note Erase
mode.
If your MIDI keyboard or controller supports aftertouch, you can vary the velocity of repeated notes by applying pressure to the
keys or pads. The higher the pressure, the greater the velocity of the recorded notes.
You can also specify a Repeat Key in the Record panel, which functions as a switch for Note Repeat. While this note is held,
Note Repeat is active. This can be more convenient than using the mouse to click on Note Repeat to switch the mode.
Note Erase
If Note Erase is selected in the Record panel, any notes played during the current recording pass erase existing notes of the
same note value. For instance, if you start recording a drum pattern, and the kick pattern is on C1 and has an extra eighth-note
hit on beat four, you could switch to Note Erase while recording and play C1 on beat 4 for one eighth-note, and that would erase
the previously recorded note.
It is only possible to engage this mode if Record Mix is engaged and Note Repeat is disengaged; engaging Record Takes or
Note Repeat disables this mode.
PreSonus Studio One v3.5
Page 72
Page 79

T
o
a
cce
s
s S
tep Record mode, click to select the Instrument Track you wish to record to, open the Editor by clicking the [Edit]
button, then click the [Step] button in the Editor toolbar to display the Step Record toolbar. When you're finished, you can hide the
Step Record controls by clicking the [Step] button again.
T
he
S
t
ep
Record toolbar contains the following controls:
Enable Toggle this on to enter Step Record mode. When enabled, playing notes on the keyboard adds notes and chords
to the selected Instrument Part. If you place the cursor in an empty area on the track, playing notes creates a new
I
nst
r
u
m
en
t Part in that location, for notes to be recorded to. Toggle Enable off to exit Step Record mode.
Follow Q Enable this to link the Step Length setting to the current Quantize setting. If you change the Quantize value, the
S
te
p
L
en
gth value changes to match it.
Step Length With these selectors, you can choose a Step note length between whole notes and 64th notes, in the
following musical note groupings: Straight, Triplet (3 notes in the space of 2), Quintole (a quintuplet with 5 notes in the
space of 4), Septole (a septuplet with 7 notes in the space of 8), or Dotted (notes are increased in length by 50% from the
ch
ose
n
r
hy
thmic value).
Back Click this button to erase the most recently added note or chord and move the cursor back to where that note or
ch
or
d
st
ar
ted. Press Back multiple times to erase multiple notes.
Rest Click this button to move the cursor forward in time, according to the currently selected Step Length, in effect,
creating a musical rest for that step.
Recording in Step Mode
To record a Part in Step Mode, follow these steps:
1. Place the cursor at the point within the chosen Instrument Track that you wish to record to.
2. Open the Step Record toolbar by pressing the [Step] button in the Editor toolbar.
3. Press [Enable] to enable Step Recording.
Step
Recording
S
t
ep Re
cor
ding is a special, note-by-note method of recording musical note data. Rather than playing in real time, or drawing in
notes with the Paint tool, you can simply specify a rhythmic value and press keys on your MIDI controller to enter notes and
chords with ease and precision.
Step Record Toolbar
4
. C
h
o
o
se
a rhythmic value from the Step Length selectors. You can change this value at any time as you create the Part.
5. Play a note on a connected MIDI controller to create a note with the specified length at the cursor location. When you
release the note, the cursor moves ahead according to the Step Length setting, and you're ready to enter the next note. If
you wish to enter a chord, simply play and hold the notes that make up the chord, then release.
6. When you're finished, press [Enable] again, to exit Step Record mode.
PreSonus Studio One v3.5
Page 73
Page 80

T
rack Layers
I
n Stud
io One, both audio and instrument Tracks have optional layers that can be used to record multiple different ideas to a
single Track. For instance, you might want to compare one set of lyrics for a vocal Track to another set of lyrics. In this case, you
could record two different performances to two separate layers on a single Track and quickly switch between the two without
needing a second Track.
To create a new layer on any Track, [Right]/[Ctrl]+[Click] the Track's control area in the Arrange view, and choose Add Layer from
the Layers menu. You can also create a layer by opening the Inspector by pressing [F4] on the keyboard, then selecting Add
Layer from the Layer selection box. The new layer is effectively like having a whole new Track without duplicating Inserts, Sends,
and I/O setup. You can also duplicate layers by selecting Duplicate Layer from the Layer selection box, which enables you to try
out and compare two different edits of the same Events on two layers.
L
ayers are also used in the comping system of Studio One, as described in the Comping
se
ction of the Editing chapter of this
manual.
PreSonus Studio One v3.5
Page 74
Page 81

Audio
Recording
Format
St
ud
io One records in the Broadcast Wave file format. This is the only format supported, as it is the most widely used format, and
it contains timestamps that mark when recordings start within a Song. When recorded Broadcast Wave audio files get bigger than
4 GB, the RF64 file format is automatically used as the standard file format.
The recommended file system for the recording partition on your computer is NTFS for Windows and HFS+ for Mac OS X.
PreSonus Studio One v3.5
Page 75
Page 82

w
ay
,
t
he
vocal will sound more like a finished production. This approach often helps when recording guitars, keyboards, and
other instruments, as well.
If your audio device supports zero-latency hardware monitoring, use that as the primary monitor source, so that no delay is
heard. In addition, you can use Sends and FX Channels in the Console, as you normally would in a mix, to build a better monitor
sound. For instance, on the audio Track to which you are recording, you could add a Send to an FX Channel with a reverb. You
could then route the FX Channel Output to a Sub Out Channel and back to your audio interface, where it can be mixed with the
zero-latency dry signal.
When adding time-based effects, such as reverb or delay, you generally don’t have to be concerned about plug-in delay and
latency that could result from using software plug-ins on a live input source. A few milliseconds of processing delay on a reverb
will probably not be audible.
Creating
a
Good Monitor
Mix
W
hen r
ecording any performance in the studio, take the time to build a great monitor mix for the performers. It’s critical that they
clearly hear their performance and that of the other musicians, and a good monitor mix helps inspire a better performance.
Ideally, each performer should feel like they are playing on a finished record.
For instance, it is common in many styles of music for the lead vocals to have some reverb so that they sit well in the space of
the overall mix. Therefore, when recording vocals, it is sometimes a good idea to include reverb in the vocalist’s monitor mix. This
PreSonus Studio One v3.5
Page 76
Page 83

Cue
Mixes
and Low
Latency Monitoring
S
tudio One features a powerful Native Low-Latency Monitoring system that provides low-latency monitoring for audio recording
and virtual instruments, without compromises in system performance. Hardware Low-Latency Monitoring is also available when
using a compatible DSP-enabled audio interface. In this section, we will discuss how to take advantage of these features to create
low-latency cue mixes for monitoring while recording or composing.
Creating a Cue Mix Output
In Studio One, it is possible to quickly and easily create multiple cue mixes. A cue mix is separate from the main mix and is usually
p
rovided to musicians for monitoring purposes during recording.
For instance, when recording vocals, the engineer and vocalist often need to hear different mixes. Many vocalists want to hear their
vocal boosted in the mix, possibly with some reverb to make it sound natural, while the engineer might want to focus on how the
performance balances with the rest of the mix. The cue mix functionality in Studio One makes this task easy.
The first step in building a cue mix is to create an additional Output Channel. To do this, open the Song/Song Setup/Audio I/O Setup
window in a Song, switch to the Outputs tab, and add a new Stereo Output Channel. Next, specify that this output is a Cue Mix
output by clicking on the Channel’s Cue Mix checkbox. You can create as many cue mixes as your audio interface has available
stereo outputs.
N
ow
t
h
at
you have created a Cue Mix output, you can see special Send objects (called Cue Mix objects) in the Channels of the
Console. In the Small Console view, Cue Mix objects appear in the right column when a Channel is expanded. In the Large Console
vi
ew
,
C
ue
Mix objects appear below the Send Device Rack on each applicable Channel.
PreSonus Studio One v3.5
Page 77
Page 84

E
a
ch
C
ue
Mix object features an Activate button, horizontal level and pan faders, and a Lock to Channel button.
Mixing the Cue Mix
Cue mixes are built using Cue Mix objects. By default, the level and pan values are locked to the channel level and pan faders. This
means that each Cue Mix is identical to the main mix in the Console. Changing the level or pan in the Cue Mix object unlocks both
settings, allowing independent control of level and pan for each Channel in each Cue Mix. Thus, the level and pan for Channels in a
Cue Mix can be completely different from the related level and pan in the main mix.
At any time, you can lock the cue-mix level and pan back to the channel settings by clicking on the Lock to Channel button. To
completely remove any Channel from a cue mix, simply deactivate the Cue Mix object for that Channel.
M
oni
tor
i
ng
Liv
e Input in a Cue Mix
C
u
e
m
ixe
s are normally used in a recording situation in which one or more live inputs need to be monitored. This is where the Cue
M
i
x
f
e
at
ure in Studio One is very useful. Monitoring with very low latency can be achieved using the Native Low-Latency
Monitoring system in Studio One.
You can also achieve low-latency cue mixes by using Hardware Low-Latency Monitoring with a compatible audio interface that
provides that feature, such as a PreSonus Studio 192, AudioBox VSL or FireStudio interface. These interfaces feature internal
hardware mixers that provide low-latency monitoring. While these mixers are easy to use, Studio One makes it even easier by
allowing you to control the mixers from within the software.
Let’s return to our example of recording live vocals. For a vocalist to be comfortable and perform well, it is important that the
performance sound as natural and as polished as possible. Vocalists need to hear themselves well, with no audible delay of their
vo
i
ce
s
i
n
the mix. Adding some reverb provides a little ambiance so the voice is not dry and lifeless.
PreSonus Studio One v3.5
Page 78
Page 85

H
e
r
e
’
s h
ow this scenario would look in Studio One:
1. Set up a Cue Mix output for the vocalist.
2. Record-enable and monitor-enable the vocal Track.
3.
E
n
g
a
g
e
the Enable Low-Latency Monitoring (or "Z") button below the level fader on the Cue Mix output being used by the
vocal channel. This enables Native or Hardware Low-Latency Monitoring for that Cue Mix output (depending on what is in
use).
Note: Channels that are able to be monitored using Native or Hardware Low-Latency Monitoring display a "Z" mark at
the bottom of their channel strip.
4. Create a Send on the vocal channel to an FX Channel with your favorite reverb effect.
5. The vocalist hears the live low-latency input, as well as the rest of the cue mix, including the output of the reverb. Adjust the
level of the vocal and other Channels in the Cue Mix to the vocalist’s liking, and you’re ready to record.
In a few seconds, you can ensure that vocalists hear their voices with low latency, in a custom mix that includes effects.
Simultaneously, you can listen to a completely independent main mix, allowing you to focus on engineering while the artist focuses
on the performance.
Note that when monitoring with Hardware Low-Latency Monitoring engaged, you do not hear Insert FX on that channel, as you are
monitoring the signal before it is processed in software. If you need to hear Insert FX, use Native Low-Latency Monitoring instead. To
do this, navigate to Studio One/Options/Audio Setup/Processing (Mac OS X: Preferences/Audio Setup/Processing) and enable the
"Use native low latency monitoring instead of hardware monitoring" option.
Low-Latency Monitoring on the Main Output
The Main output always acts as a Cue Mix, and any Audio or Instrument Channels routed to it can be monitored using Native or
Hardware Low-Latency Monitoring (if enabled). To engage Native or Hardware Low-Latency Monitoring for the Main output, enable
the "Enable Low-Latency Monitoring" (or "Z") button, found below its volume fader. When enabled, the "Z" button is green (when
using Native Low-Latency Monitoring) or blue (when using Hardware Low-Latency Monitoring).
PreSonus Studio One v3.5
Page 79
Page 86

Print
Effects While
Recording
So
me pe
ople prefer to place Insert effects on Input Channels so that those effects may be printed to the Track while recording.
For instance, you might place a compressor, EQ, or other effect on a vocal Input Channel in order to save time and computer
resources later, when mixing. This is easy to accomplish in Studio One. It may be helpful to review the Mixing
chapter in order to
better understand these instructions.
To insert an effect on an Input Channel, open the Console and click on the Inputs tab on the far left to view the Input Channels. If
you’re working in the Small Console view, double-click on the Input Channel to open its Insert Device Rack.
I
nse
r
t
an
effect in the Insert Device Rack on any of the Input Channels, and those effects are recorded at the input of any Track
that uses that source. Studio One automatically compensates for any latency caused by the Insert effects.
Note that when Insert effects are used on Input Channels, and effects are recorded to a Track, there is no way to go back and
change the sound of the recording. To avoid this scenario, you might consider placing effects on the Audio Channels to which
you are recording for monitoring purposes only and printing with effects at mixdown.
PreSonus Studio One v3.5
Page 80
Page 87

A
fte
r
r
ec
ording, the next step in production is usually editing the recorded Events to achieve a desired sound. The following
chapter discusses aspects of editing in Studio One, including Arrange view and Edit view editing, mouse tools, Event envelopes,
edit groups, timestretching, comping, integrated Melodyne pitch correction, and transient detection and editing.
Chapter 6: Editing
PreSonus Studio One v3.5
Page 81
Page 88

Eve
n
t
s
th
at contain musical data are called Instrument Parts and can only be located on Instrument Tracks. Instrument Parts are
distinct in that they display musical performance information.
Audio Events and Instrument Parts are referred to collectively as Events in this manual. Event editing can take place both in the
Arrange view and the Edit view. Audio Events and Instrument Parts can be edited in similar ways, but each has special
considerations.
[Right]/[Ctrl]-clicking on any Event displays the Event contextual menu, which contains all related Editing actions, logically
grouped. At the top of the contextual menu, you can find the Event Name, which can be edited by double-clicking on it and
entering a new name. You can rename all Events on a Track by renaming the Track and holding [Shift] while pressing [Enter]
after typing in the new name. You can also change the Event color by clicking on the color bar next to its name and selecting a
color or scrolling through the colors with the mouse wheel.
Common editing actions are listed under the Event name, as well as a Recent Items list that contains the five most-recently used
Events
A
l
l audio
and musical data that exists within the timeline of your Song are visually represented by Events. Events that contain
audio are called Audio Events and can only be located on Audio Tracks. Audio Events are distinct in that they display audio
waveforms. Audio Parts are Events that contain multiple Audio Events.
a
cti
o
n
s.
I
n this way, you have instant access to the editing actions you most likely want to use.
Note that the available actions listed in the Event contextual menu depend on whether you are working with an Audio Event or an
Instrument Part, and the actions may vary slightly depending on your version of Studio One.
PreSonus Studio One v3.5
Page 82
Page 89

T
o
ol
a
nd
Event Snapping
Snapping allows editing actions to occur only at specified divisions in time (such as bars and beats), making editing easier when
working with tempo-specific material. For instance, Snapping makes it possible to rearrange specific beats from a bar of a drum
loop while keeping the rest of the loop in time. Snap is engaged by default and can be disengaged by clicking on the Snap to Grid
button. You can also temporarily defeat Snapping by pressing the [Shift] key while moving the mouse.
If Snap is engaged, the current Snap setting affects the behavior of tools and Event editing, by snapping the tool or Event to
n
e
a
r
b
y
time values, as follows:
Adaptive The default setting, where snapping occurs at the nearest logical subdivision of the current Timebase, based on
t
h
e
cu
rr
ent timeline zoom level.
B
a
r
S
n
ap
ping occurs at the nearest musical bar line.
Q
u
a
n
t
ize
Snapping occurs at the nearest musical subdivision of the current Quantize Setting.
Frames Snapping occurs at the nearest frame subdivision.
T
h
e
r
e
a
re four optional behaviors that can be selected and applied to any of the four modes above:
S
n
a
p
to
Cursor and Loop This option enables snapping to the playback cursor and Loop locators.
S
n
a
p
to
Events This option enables snapping relative to Events in the Arrangement.
S
n
a
p
to
Grid This option is engaged by default, allowing tool and Event snapping to the grid.
Relative Grid This option maintains the time relationship relative to the grid for any Event, so that when the Event is
moved, the snap position maintains the original position relative to the grid, instead of snapping directly to the grid.
PreSonus Studio One v3.5
Page 83
Page 90

I
n
t
h
e
A
rrange view, the following mouse tools and related functions are available from left to right in the toolbar.
Arrow Tool
This tool is selected by default. Click on the Arrow tool button or press [1] on the keyboard to select the Arrow tool. The Arrow
tool can be used for the following purposes:
Move an Event
To move an Event using the Arrow tool, click anywhere on the Event and drag left, right, up, or down. Dragging the Event left or
right moves the Event backward and forward in time, relative to the current Timebase and Timeline zoom. When dragging an
Event left or right beyond the viewable arrangement, hold [Space Bar] on the keyboard to speed up the scrolling.
Dragging the Event up or down moves the Event to another existing Track of the same type. If the Event is dragged to a position
where no Track currently exists, Studio One creates a new Track of the same type.
When dragging an Event from one Track to another (up or down), the position of the Event is constrained within an automatic
snapping range to make it easy to keep the Event at the same time position. To defeat this snapping, hold Shift while dragging
the Event up or down.
Size an Event
Events can be thought of as windows into audio files and musical performances, where what you see is what you hear. Sizing is
a fundamental technique wherein Events are made shorter or longer, so that only a portion of the audio or musical data they
contain is seen and heard. To size any Event using the Arrow tool, float the mouse to the left or right edge of the Event to reveal
the Sizing tool. When this tool appears, click-and-drag left or right to size the Event. Events can be sized and resized
nondestructively any number of times.
Two adjacent Events can be sized simultaneously so that no gap is created between them. To do this, float the Arrow tool to the
Arrange V
iew Mouse T
ools
The m
ouse to
ols allow direct interaction with Events, using the mouse. It is helpful to remember that actions done using the
mouse tools can be undone at any time, so feel free to explore them. You can click the right mouse button in any open space in
the Arrange or Edit views to open a list of mouse tools and editing commands. Choose the desired tool or command by clicking it
with the left mouse button. You can also click the middle mouse button (or scroll wheel) to display an expanded list of tools to
choose from, including all Paint tool shapes.
b
ot
t
o
m
o
f where the two Events meet in the Timeline, where you can see the sizing icon with both left and right arrows
illuminated, and then click-and-drag left or right.
Holding [Alt]/[Option] on the keyboard and then sizing an Event from the right edge results in the Event being freely
t
im
e
st
r
et
ched. Refer to the Timestretching section of this chapter for more information.
PreSonus Studio One v3.5
Page 84
Page 91

A
d
j
u
s
t
Audio Event Volume Envelopes
All Audio Events feature a basic volume envelope that allows the volume of the audio to be shaped in several ways. Using the
volume envelope, you can create a fade-in and fade-out, as well as set a constant volume level between the fades. The volume
envelope applies gain changes to the audio clip in the Event and is therefore at the front end of the audio signal path.
To create a fade-in or fade-out, click-and-drag left or right on the Fade Flag in the upper left or right corner of an Audio Event. By
default, a linear fade is created over the length you have moved the Fade Flag. Fade times, as well as Event gain, can also be
edited in the Inspector for any selected Event.
To change the curve of the fade, click on the Fade Curve box in the middle of the fade curve and drag up or down. The fade
curve determines how quickly or slowly the fade occurs and changes over time. If you press and hold [Shift] while editing the fade
length or the curve, you can edit both at once. Dragging up or down edits the curve, and dragging left or right changes the length.
It is also possible to drag a complete crossfade left or right, or up or down, in order to change the location and characteristics of
the fade. Float the mouse to the center of the crossfade until the Hand icon appears, then click and drag to adjust. Dragging left
or right adjusts the location of the fade, extending or shortening the crossfaded Events. Dragging up or down alters the shape of
the crossfade.
To adjust the overall volume level of an Audio Event, click on the volume box in the center of the volume envelope and drag up or
down. As you adjust the volume envelope, the audio waveform is redrawn to approximate the effect of the adjustment.
Select Multiple Events
Multiple Events can be selected in order to edit them all at once, with a single action. To select multiple Events with the Arrow
t
o
o
l
,
d
o one of the following:
Click outside of the range of an Event, and then drag over any other Events; a gray box is drawn while you drag over the
target-selection area. Release the mouse button once the box is drawn over all of the Events you wish to edit, and these
E
ve
n
t
s
ar
e selected for editing.
Click on any Event, then while holding [Shift] on the keyboard, click on any other Events to select them. This allows you to
se
l
e
ct
mu
ltiple Events that are not in close proximity to each other. All selected Events can then be edited at once.
Click on any Event, then press [Alt]/[Option]+[Shift]+[Home] or navigate to Edit/Select/Select from Start to Event, to select
a
l
l
E
ven
ts on all Tracks that lie between the start of the Song and the current Event.
To select all Events on the currently selected Track that lie between the start of the Song and the current Event,
p
r
e
s
s
[S
hift]+[Home].
C
l
i
ck
on
any Event, then press [Alt]/[Option]+[Shift]+[End] or navigate to Edit/Select/Select from Event to End, to select all
E
ve
n
t
s
on
all Tracks that lie between the current Event and the end of the Song.
To select all Events on the currently selected Track that lie between the current Event and the end of the Song,
p
r
e
ss
[
Sh
ift]+[End].
Double-click on the timeline of a Track in the Arrange or Edit view while holding [Shift], to select all Events present on that
Track.
PreSonus Studio One v3.5
Page 85
Page 92

N
o
r
m
a
ll
y, when you select multiple Events and adjust volume or fade in/out shape on one of them, all selected Events change to
match the new setting. If you want to adjust an individual Event without losing your selection, hold [Alt] while making your
changes.
Select a Range
L
i
ke
t
he
Range tool
, you can use the Arrow tool to select a range, or area, within Tracks and their contents, without switching
tools. Do this by hovering the Arrow tool in the upper half of a track. The cursor changes to a crosshair shape. Click-and-drag to
select your chosen range.
You can enable or disable this feature by clicking the bracket-shaped button next to the Arrow tool in the toolbar.
Alternate Arrow Tool Uses
For speed and efficiency when editing, a selection of modifier keys can be applied while the Arrow tool is selected, giving
t
e
m
p
o
ra
ry access to the following alternate tools and editing modes:
R
a
n
g
e
T
ool Hold [Ctrl]/[Cmd].
S
l
i
p
Ed
iting Hold [Ctrl]/[Cmd]+[Alt] while floating the Arrow tool over an Event.
D
e
f
i
n
e
Tempo Hold [Ctrl]+[Alt]/[Command]+[Option] while floating the Arrow tool over the edge of an Event.
Range Tool
The Range tool is used to select a range, or area, within Events. Click on the Range tool button or press [number 2] on the
keyboard to select the Range tool.
To select a range within an Event, using the Range tool, click-and-drag over the area to be selected; a gray box is drawn over the
target selection area. Release the mouse button when the box is drawn over the range of the Events you wish to select. The
range you have selected is now treated as a single, consolidated Event. Clicking once with the Range tool on a Track moves the
play cursor to that location.
For instance, you can use the Range tool to select the content of several Audio Events across multiple Tracks in bar 12, and then
use the Arrow tool to move that section of audio to bar 14. Another common use of the Range tool is to quickly select and delete
a range of audio within an Event, rather than using the Split tool to make two splits, then select and delete the section with the
Arrow tool.
When you float the mouse cursor over a selected range, the Arrow tool temporarily appears. This makes it easy to quickly select
and edit a range of Events.
To select multiple, non-contiguous ranges across any Event, on any Track, hold the [Shift] key while using the Range tool.
Continue to hold [Shift] and use the Arrow tool to select whole Events. For instance, when using the Arrow tool, if you press and
h
o
l
d
[C
trl], you get the Range tool. Press and hold [Ctrl] and [Shift] to select multiple ranges, then continue to hold [Shift] but
release [Ctrl]; now you have the Arrow tool and can select whole Events. All of your selections remain selected.
To split an event in half without reaching for the Split tool, double-click at your chosen split point. Double-click a selected range to
split the Events in that range at the left and right borders of the range.
PreSonus Studio One v3.5
Page 86
Page 93

I
f
S
n
a
p
to Grid is enabled, your selections using the Range tool snap to the value set by the Snap Timebase parameter. To
temporarily reverse the Snap to Grid option while editing, hold the [Shift] key.
Selected ranges can be sized by floating the Range tool at the left/right edge of the selection. You also can split a selected range
at the left and right edges of the selection by choosing Split Range from the Edit menu or by pressing [Ctrl]/[Cmd]+[Alt]+X after
selecting a Range.
To temporarily switch to the Arrow tool while the Range tool is selected, hold [Alt].
Split Tool
Using the Split tool, single Events can be split into multiple Events. Click on the Split Tool button, or press [number 3] on the
keyboard to select the Split tool.
With the Split tool selected, a vertical and horizontal line is drawn near the current mouse-cursor position. The vertical line
indicates the exact time position of the Split tool, while the horizontal line underscores the Track on which the Event to be split
r
e
si
d
e
s.
The Split tool is directly affected by the current Snap settings.
Click on any Event with the Split tool to split the Event at that position. By splitting a single Event, you create two Events that can
be edited independently. If multiple Events are selected across multiple Tracks, the Split tool affects all of the selected Events in
the same way.
It is also possible to split selected Events at the timeline cursor, without using the Split tool, by pressing [Alt]+[X] on the keyboard.
If you have a range of time selected, pressing [Alt]+[X] will split the selected content into a new Event.
To temporarily switch to the Arrow tool while the Split tool is selected, hold [Alt].
Splitting Instrument Parts
Normally, if you split an Instrument Part at a point that falls within one or more notes, those notes are truncated at the split point,
and no longer play in the newly created Part to the right of the split point. This can be an issue, especially when splitting up Parts
in which some notes are held for long periods, such as pad and string passages.
For example, if you have a four-bar Part in which a chord is played and held throughout, splitting the Part in the middle leaves the
Part to the left of the split point mostly untouched. However, the held notes are now missing from the newly created Part to the
right of the split point.
To split an Instrument Part and split (rather than truncate) any notes that cross the split point, hold [Alt]/[Opt] while you make the
split.
Eraser Tool
The Eraser tool is used to delete Events. Click on the Eraser Tool button or press [number 4] on the keyboard to select the
Eraser tool. To delete any Event using the Eraser tool, simply click on the Event. If multiple Events are currently selected, clicking
one of the Events with the Erase tool erases all selected Events.
You can click and drag across multiple Events with the Eraser tool, erasing each Event you touch.
To temporarily switch to the Arrow tool while the Eraser tool is selected, hold [Alt].
PreSonus Studio One v3.5
Page 87
Page 94

Pa
i
nt
T
ool
I
n the Arrange view, the Paint tool can only be used to create an empty Instrument Part on an Instrument Track. Click on the
Paint Tool button or press [number 5] on the keyboard to select the Paint tool.
To create a new, empty Instrument Part on an Instrument Track with the Paint tool, click-and-drag over any empty area in the
Track lane of the Instrument Track. Clicking once with the Paint tool creates an empty Instrument Part that varies in length
according to the current timebase setting.
To temporarily switch to the Arrow tool while the Paint tool is selected, hold [Alt].
Mute Tool
In the Arrange view, the Mute tool is used to mute Audio Events, Audio Parts, and Instrument Parts. Click on the Mute Tool
button or press [number 6] on the keyboard to select the Mute tool. To mute or unmute any Audio Event or Instrument Part,
simply click on it with the Mute tool. When an Event or Part is muted, it appears grayed out, and an “m” icon appears in the lower
left corner of the Event or Part.
Click and drag the Mute tool to select multiple Events to mute. If multiple Events are already selected, clicking one of them with
the Mute tool mutes all selected Events.
To temporarily switch to the Arrow tool while the Mute tool is selected, hold [Alt].
Select Muted Events
Sometimes, you may use Event muting to silence superfluous Audio or Instrument content that you don't intend to use. If you
decide you want to get rid of these unused Events, you can quickly select all muted Events by navigating to Edit/Select/Select
Muted Events, then simply press [Backspace] or [Delete] to delete (and clear away) the unwanted Events.
Bend Tool
In the Arrange view, the Bend tool is used to manipulate, add, and remove Bend Markers. For more information on Bend
M
a
r
ke
r
s,
refer to the Transient Detection and Editing section of this chapter.
Listen Tool
In the Arrange view, click and hold on any Track to instantly solo the Track and start playback from the position you clicked.
Playback continues as long as the mouse click is held. When the mouse click is released, playback is stopped, and the related
Track is un-soloed.
PreSonus Studio One v3.5
Page 88
Page 95

Th
e
Q
ua
ntize panel can be opened from the toolbar by clicking on the Quantize Panel button, or by selecting Quantize from the
View/Additional Views menu. The Quantize panel can be detached and freely placed on the screen. In this panel, you can edit all
settings related to the Quantize grid that are displayed in the Arrangement. From left to right in the panel, you can see areas for
Grid or Groove mode; note-value selection; note grouping and Swing amount; Start, End, Velocity, and Range percentages; and
preset management.
Rhythmic Values
With Grid mode selected, you can choose a note value between whole notes and 64th notes, and the following musical note
groupings: Straight (with a Swing percentage setting), Triplet (3 notes in the space of 2), Quintole (a quintuplet with 5 notes in the
space of 4), or Septole (a septuplet with 7 notes in the space of 8). These settings also determine the look and behavior of the
g
rid
i
n
t
he Arrange view. For information on the Groove mode of the Quantize panel, refer to the Groove Extraction and
Q
uan
t
i
ze
sec
tion.
Swing
Swing is a rhythmic style you can apply, in which off-beats are moved forward in time relative to on-beat notes, creating a
relaxed, bouncy feel. This offset is calculated based on the currently selected Quantize value. For example, at 100% Swing, with
16th-note quantize selected, a pattern of 16th notes play at a 2:1 ratio; On-beat notes play on beat, and offbeats play as though
they were the final 16th-note triplet in a group of three. You can set the amount of swing between 0% (straight timing) and 100%
(fully swung).
Quantize Note Starts
The Start percentage defaults to 100%, which means that the start of a selected note, Event, or transient snaps to the grid if
The Grid
T
h
e Arra
ngement grid is comprised of the ticks in the timeline and the vertical lines extending from those ticks through the
background of the Arrangement. This grid uses the Timebase setting as the basis for its display. The Timebase settings are
Seconds, Samples, Bars, and Frames, and they determine the behavior of Event and tool snapping. The Timebase can be
changed at any time, without directly affecting the arrangement.
Perhaps the most common Timebase setting is Bars, which display time in a musical format of bars and beats. With this
Timebase setting, the grid is determined by the settings in the Quantize panel.
Quantize Panel
q
uan
t
i
ze
d.
This is effectively a quantize-strength parameter, where anything less than 100% moves the note, Event, or transient
a relative amount closer to the grid, instead of all the way to the grid.
Quantize Note Ends
The End percentage only affects notes in Instrument Parts. The function is similar to the Start percentage, except that it affects
the note end, effectively making quantized notes shorter or longer. The Velocity percentage also only affects notes, and adjusts
note velocity according to an extracted groove if the Quantize mode is set to Groove.
PreSonus Studio One v3.5
Page 89
Page 96

C
O
N
T
A
CT
US
Velocity Sensitivity
The Velocity percentage lets you tie Quantize strength to note velocity, to the degree that you specify.
Quantize Range
The Range percentage sets the relative range from grid lines within which notes, Events, or transients are quantized. Notes,
Events, or transients beyond this relative range are not quantized. As there is no display indicating the Range, quantizing several
times while adjusting this setting may lead to the best results.
The presets area of the Quantize panel allows you to quickly switch between up to five Quantize panel settings, so that working
with multiple complex quantization setups is very easy. You can also store and recall Quantize panel settings, just as you would
store an effect or instrument preset.
PreSonus Studio One v3.5
Page 90
Page 97

C
ut
P
r
e
ss [
Ctrl]/[Cmd]+[X] on the keyboard to cut the current selection.
C
op
y
P
r
ess
[Ctrl]/[Cmd]+[C] on the keyboard to copy the current selection.
Paste Once a selection is cut or copied, press [Ctrl]/[Cmd]+[P] on the keyboard to paste the selection. The Events are
pasted on the selected Track, at the current playback cursor position. If you select and copy Events on multiple Tracks,
then select another timeline location on the first Track, and then paste, the copied Events are pasted in the appropriate
T
ra
cks
a
n
d
locations, starting with the first (selected) Track.
Paste at Original Position If you want to copy and paste an Event from one Song into another Song (or another version
of the Song), and want the Event to be placed at its original location in the timeline, copy the Event and paste by pressing
[Ctrl]+[Shift]+[V].
Audio Event Slip
Often, after an Audio Event has been sized to fit a particular region of time, the audio clip the Event contains needs to be moved
ahead or behind in time without changing the Event’s length and volume envelope. This action is commonly called “slipping” or
“slip,” and it is often used alongside splitting, or splicing, to correct the timing of rhythm tracks. For instance, if one snare-drum hit
is off the beat by a little bit, you could split the Event on either side of that section and then slip the audio into perfect time.
To use Slip, select the Arrow tool, and then press and hold [Ctrl]/[Cmd]+[Alt] on the keyboard, while floating the mouse over an
Audio Event. The Slip tool icon appears. Click-and-drag on the Event to slip the audio left or right across the timeline. Multiple
Audio Events can be selected and slipped at once, even across multiple Tracks.
When slipping the audio in an Audio Event, note that all of the Event characteristics remain unchanged, including the Event size,
position, Inspector parameters, and volume envelope.
An Audio Event can be slipped only as far as the length of the audio clip it contains.
Audio Event Transpose and Tune
The ability to transpose and fine-tune audio adds a lot of flexibility when working with audio files. For instance, if you have a
keyboard loop collection in which every loop is in the key of C, being able to transpose these loops to any other key opens up
many possibilities.
In Studio One, transposing and tuning are a part of the same set of advanced algorithms as timestretching, so the quality is
Common Editing Actions
C
u
t, Copy
, and Pas
te
As with most software applications, Studio One supports cut, copy, and paste actions. Once you have selected an Event or a
r
ange of Events, you can perform these actions:
e
xtr
e
m
e
ly
high.
PreSonus Studio One v3.5
Page 91
Page 98

T
o
t
r
an
spose any audio Event, select it and open the Inspector by pressing [F4] on the keyboard or clicking on the Inspector
button above the Track Column. Then enter a value in the Transpose field, from -24 to +24 semitones.
Tuning is similar to transposing but the pitch is changed in cents, rather than semitones. Enter a value from -100 to 100 cents in
the Tune field to fine-tune the audio Event.
Any number of Events can be selected and transposed or tuned simultaneously, but note that this change is not relative to the
current setting of each Event. All selected Events are transposed or tuned to the same chosen value.
Nudge
Nudging is an alternative to moving Events and notes across the timeline with the mouse. To Nudge any Event or note, select it
a
n
d
d
o
one of the following:
NudgePress [Alt]+[Right Arrow] on the keyboard to move the Event or note forward in time by the current snap value in
t
h
e
A
rr
angement or Editor. With Snap disabled, nudging adjusts in milliseconds.
N
u
d
g
e
B
ackPress [Alt]+[Left Arrow] on the keyboard to move the Event or note backward in time.
N
u
d
g
e
B
arPress [Ctrl]/[Cmd]+[Right Arrow] to move the Event or note forward by one bar.
Nudge Bar Back Press [Ctrl]/[Cmd]+[Left Arrow] to move the Event or note backward by one bar.
Any number of Events or notes can be selected and Nudged simultaneously. The Nudge commands are also available in the Edit
me
n
u
.
PreSonus Studio One v3.5
Page 92
Page 99

D
u
pl
i
c
ate
T
he Duplicate action essentially combines the Copy and Paste actions and intelligently places the pasted selection based on the
musical timing of the selection in the Song. Choose Duplicate in the Edit menu or press [D] on the keyboard to duplicate the
current selection. The duplicated Event is always placed after the original Event, and it is automatically selected once duplicated.
As with the other editing actions, Duplicate can apply to any number of currently selected Events.
A good use of the Duplicate command is to quickly create copies of a loop across a region in a Song by selecting an Event and
repeatedly pressing [D] on the keyboard. Another interesting use involves selecting very short regions within a loop, using the
Range tool, and duplicating them several times, consecutively, in order to create a stutter effect that is popular in electronic
music.
If you would like to duplicate an Event and push existing material to the right across the timeline to make room for the duplicated
Event, press [Alt]+[D] on the keyboard to use the Duplicate and Insert command.
Duplicate Shared
When you duplicate an Event normally, each duplicate is treated as a separate Event, and edits made to one duplicate are not
reflected in the other copies. If you want to duplicate an Instrument Part and link the content of the duplicates to that of the
original Part, select the Part and choose Duplicate Shared from the Edit menu, or press [Shift] + [D] on the keyboard. A ghost
icon appears on the original Part and any Shared duplicates, to alert you that those copies are now Shared. Any edits made to
the original Part or a Shared copy are applied to all instances of that Part.
If you later decide you wish to edit one of the Shared copies of a Part individually, select it and choose Separate Shared Copies
from the Event menu. The ghost icon disappears from that Part to alert you that the copy is no longer Shared, and can be edited
without affecting the other copies.
Explode Pitches to Tracks
It is sometimes helpful to explode existing pitches within an Instrument Part to new Tracks, placing each pitch within individual
Instrument Parts on separate Tracks. For instance, if you have a MIDI loop to use with a virtual drum instrument, you may want to
have each piece of the drum kit on its own Instrument Track.
To do this, [Right]/[Ctrl]-click on an Instrument Part in the arrangement and select Explode Pitches to Tracks from the Instrument
Parts sub-menu.You can also accomplish this by selecting the Part, and choosing Explode Pitches to Tracks from the Events
menu.
Strip Silence
It is quite common that, as the result of continuous recording, some Audio Events may have gaps of silence or relatively low
levels between performances. It may be helpful in these cases to remove the gaps and only keep the desired sections of the
recorded Event. Studio One's Strip Silence function, controlled from the Strip Silence panel, is designed to handle this task.
Open the Strip Silence panel by clicking on the Strip Silence button in the toolbar, or select Strip Silence from the View/Additional
Views menu. Select the Audio Events from which you wish to strip silence, make the desired settings, and then click on [Apply].
Click on the [Default] button to return all settings in the panel to their defaults.
The result of the Strip Silence process is similar to using a gate processor to only allow the desired signal to be heard, except
that the Event is edited.
When the small light indicator next to the [Apply] button is lit, this means that changing the Detection or Event options and then
PreSonus Studio One v3.5
Page 93
Page 100

cl
i
cki
n
g
A
pply automatically undos the previous operation, making it easier to find the right settings by viewing the result of the
Strip Silence process, then tweaking the settings if needed without having to undo manually. Any change in selection (or other
editing operation) ends this automatic state, and the indicator is no longer lit.
The following describes each setting:
D
e
t
e
c
ti
on This determines how Studio One identifies silence in the areas you wish to process.
M
a
t
e
r
ia
l The first three options set the Open and Close Threshold for the gate algorithm automatically.
Lots of Silence Choose this for material that contains lots of silence and single hits—for instance, a clean, typical
si
n
g
l
e
-d
rum recording (hat, kick).
Little Silence Choose this for material that has some action going on but still has some silence—for instance,
m
i
n
i
m
al
techno/single drum loops, ride, or snare tracks.
Noise Floor Choose this for material where there is almost no real silence—for instance, noisy drum recordings,
o
ve
r
h
e
ad
s, drum mixes, and drum loops.
M
a
n
u
a
l A
llows the Open and Close Threshold to be manually edited.
O
p
e
n
Th
reshold Set between -80 and 0.00 dB.
T
h
r
e
s
ho
ld Link Engage to link the Close Threshold to the Open Threshold.
Close Threshold Set between -80 and 0.00 dB.
E
v
e
n
t
s T
his section determines the nature of the Events created after removing silence.
M
i
n
i
m
um
Length Determines the minimum length in seconds for any resulting Event.
Pre-Roll Determines the amount of time in seconds that should remain at the beginning of resulting Events from the time
a
t
w
h
ic
h the previously detected silence ends.
Post-Roll Determines the amount of time in seconds that should remain at the end of resulting Events from the time at
w
h
i
c
h
n
ewly detected silence begins.
F
a
d
e
-
In
Determines the length in seconds of the linear fade-in applied to resulting Events.
F
a
d
e
-
Ou
t Determines the length in seconds of the linear fade-out applied to resulting Events.
Link Enable this option to automatically set the Fade-In parameter to match the Pre-Roll setting, and the Fade-Out
parameter to match the Post-Roll setting.
Audio Parts
It is often convenient to merge multiple separate Events into a single object in order to move them all together or simply to clean
up the Arrangement. This is accomplished with Audio Parts.
To create an Audio Part, select the Audio Events and then press [G] on the keyboard. This makes the separate Events appear
and function as a single Event in the arrangement while also appearing and functioning as separate Events in the Editor. It is
then much simpler to, for instance, duplicate a chorus in the arrangement and retain access to the individual Events for editing
crossfades and other details.
Note that Audio Parts support shared, or ghost, copies, with the exception of any Event FX which are strictly per Event instance.
PreSonus Studio One v3.5
Page 94
 Loading...