

PRESONUS Studio 2, Studio 4 Owner's Manual
English
Studio 2|4
24-Bit, 192 kHz USB 2.0 Audio Interface
Owner’s Manual
www.presonus.com
®

Table of Contents
1 Overview — 1
1.1 Introduction — 1
1.2 What is in the Box — 1
1.3 Companion PreSonus Products — 2
2 Hookup — 3
2.1 Front-Panel Connections — 3
2.2 Back Panel Connections — 4
2.3 Connection Diagram — 5
3 Connecting to a Computer — 6
3.1 Installation for Windows — 6
3.1.1 Universal Control (Windows) — 6
3.1.2 Loopback Recording (Windows only) — 8
3.2 Installation for macOS — 9
3.3 Using the Studio 2|4 with Popular
Audio Applications — 9
4 Studio One Artist Quick Start — 11
4.1 Installation and Authorization — 11
4.2 Setting Up Studio One — 12
4.2.1 Configuring Audio Devices — 13
4.2.2 Configuring MIDI Devices — 13
4.3 Creating a New Song — 17
4.3.1 Configuring Your I/O — 18
4.3.2 Creating Audio and Instrument
Tracks — 19
4.3.3 Recording an Audio Track — 20
4.3.4 Adding Virtual Instruments
and Effects — 21
5 Technical Information — 23
5.1 Specifications — 23
6 Warranty Information — 24
6.1 How Consumer Law Relates
To This Warranty — 24
1
1 Overview
1.1 Introduction
Studio 2|4
Owner’s Manual
1 Overview
1.1 Introduction
Thank you for purchasing a PreSonus® Studio 2|4 audio interface. PreSonus
Audio Electronics, Inc., has designed the Studio 2|4 utilizing high-grade
components to ensure optimum performance that will last a lifetime. Loaded
with high-headroom, Class A microphone preamplifiers; robust metering,
high-definition 24-bit, 192 kHz conversion; and more, the Studio 2|4 breaks
new boundaries for music performance and production. All you need is a
computer with a USB C, 2.0, or 3.0 connection, a few microphones and cables,
powered speakers, and your instruments, and you are ready to record!
We suggest that you use this manual to familiarize yourself with the
features, applications, and correct connection procedures for your
Studio 2|4 audio interface before trying to connect it to your computer.
This will help you avoid problems during installation and setup.
Throughout this manual you will find Power User Tips that
can quickly make you a Studio 2|4 interface expert.
1.2 What is in the Box
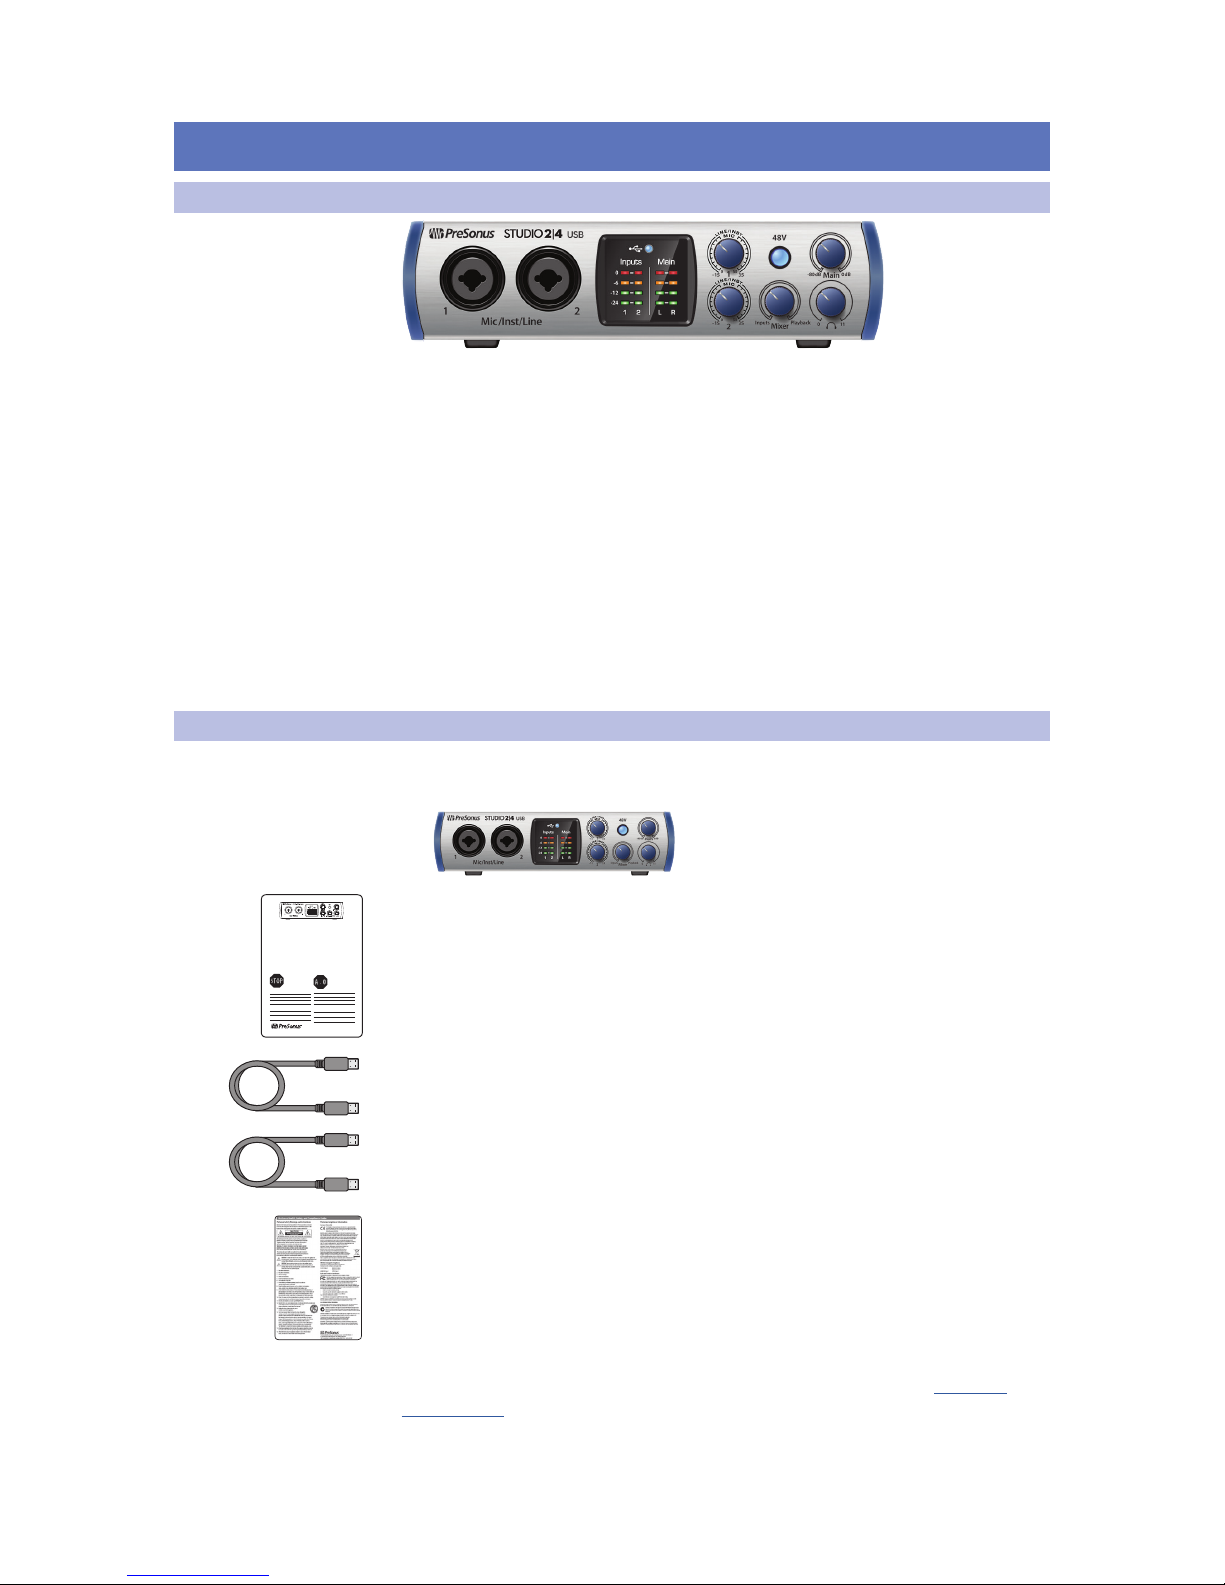
Your Studio 2|4 package contains:
• Studio 2|4 24-bit, 192 kHz audio interface
• Quick Start Guide
• 1M USB C to C Cable
• 1M USB A to C Cable
• PreSonus Health Safety and Compliance Guide
Power User Tip: All companion software and drivers for your PreSonus Studio 2|4 are
available for download from your My PreSonus user account. Please visit http://my.
presonus.com and register your Studio 2|4 to receive downloads and licenses.
Studio 2|4 24-Bit 192 kHz
USB-C Audio Interface
Congratulations on choosing PreSonus. You now own a
state-of-the-art, USB-C interface featuring our renowned
microphone preamplifiers — and Studio One Artist creative
music environment.
Getting Started
Package Contents
• Studio 2|4 Audio Interface
• USB A-C cable
• USB-C cable
• This Hook-Up Guide
• Safety Instructions
Downloads
• Studio 2|4 software drivers for Windows
• Studio One Artist DAW and resources (approximately 2 GB)
• Studio 2|4 Owner’s Manual PDF
Before operating your Studio
2|4, you must register online
for software downloads,
Owner’s Manual, and
instructional video.
1 Go online to my.presonus.com and create
— or log into — your MyPreSonus user account.
2 Click to register.
3 Enter your Studio 2|4 serial number.
4 Download your Windows driver (no driver necessary for
Mac), software and Owner’s Manual.
5 Connect your equipment to the Studio 2|4. Please refer
to the hook-up diagram in this Getting Started guide
and additional instructions in your Owner’s Manual.
6 Install your Windows driver (if necessary) and
Studio One Artist DAW software.
7 Watch the Studio 2|4 Instruction video and consult
your Owner’s Manual for further instructions.
Studio 2|4 USB - Interfaz de
Audio USB-C a 24 Bits / 192 kHz
Felicitaciones por y gracias por elegir PreSonus. Ahora usted
posee su propia interfaz USB-C de última generación portando
nuestros renombrados y afamados preamplificadores de
micrófono — y el entorno creativo musical que proporciona
Studio One Artist.
Comenzando
Contenido del paquete
• Studio 2|4 Interfaz de audio
• Cable USB A-C
• Cable USB-C
• Esta guía de conexiones
• Instrucciones de seguridad
Descargas
• Drivers de Studio 2|4 para Windows
• Daw Studio One Artist y recursos (aproximadamente 2 GB)
• Manual de usuario en formato PDF para su Studio 2|4
Antes de operar su Studio 2|4,
primero debe registrarse
online para descargar el
software, Manual de usuario y
video instructivo.
1 Vaya online a my.presonus.com y cree — o ingrese —
a su cuenta de usuario MyPreSonus.
2 Haga clic en Register (Registrar).
3 Ingrese el número de serie de su Studio 2|4.
4 Descargue el driver para Windows (No se requieren drivers
para macOS), software y Manual de usuario.
5 Conecte su hardware a la interfaz Studio 2|4.
Por favor utilice como referencia el diagrama de
conexiones en esta Guía de inicio y las instrucciones
adicionales en su Manual de usuario.
6 Instale su driver Windows (si se requiere) y el software
DAW Studio One Artist.
7 Observe el video instructivo de Studio 2|4 y consulte el
Manual de usuario para obtener más instrucciones.
2
1 Overview
1.3 Companion PreSonus Products
Studio 2|4
Owner’s Manual
1.3 Companion PreSonus Products
Thanks for choosing PreSonus! As a solutions company, we believe the best way to
take care of our customers (that’s you) is to ensure that you have the best possible
experience from the beginning of your signal chain to the end. To achieve this goal,
we’ve prioritized seamless integration throughout every design phase of these
products from day one. The result is systems that communicate with each other
as intended—straight out of the box—without excessive configuration hassles.
We’re here for you. Find out more at www.presonus.com.
3
2 Hookup
2.1 Front-Panel Connections
Studio 2|4
Owner’s Manual
2 Hookup
2.1 Front-Panel Connections
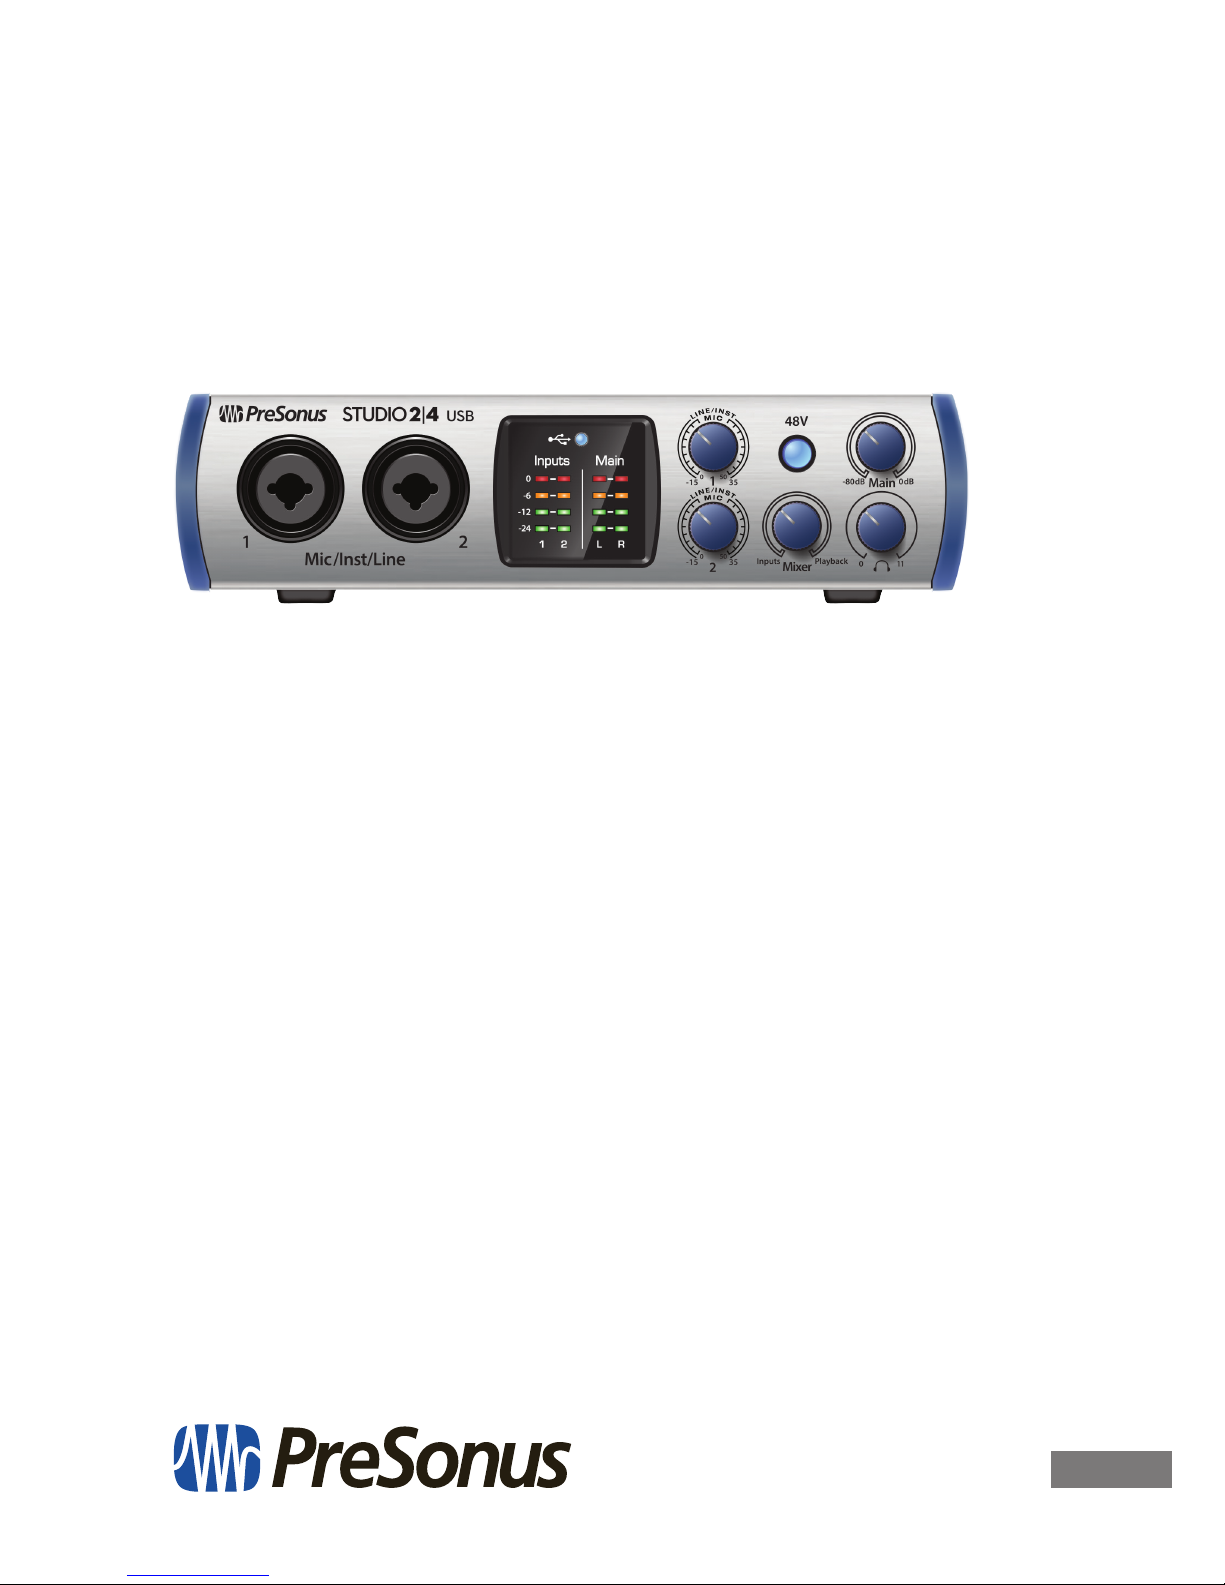
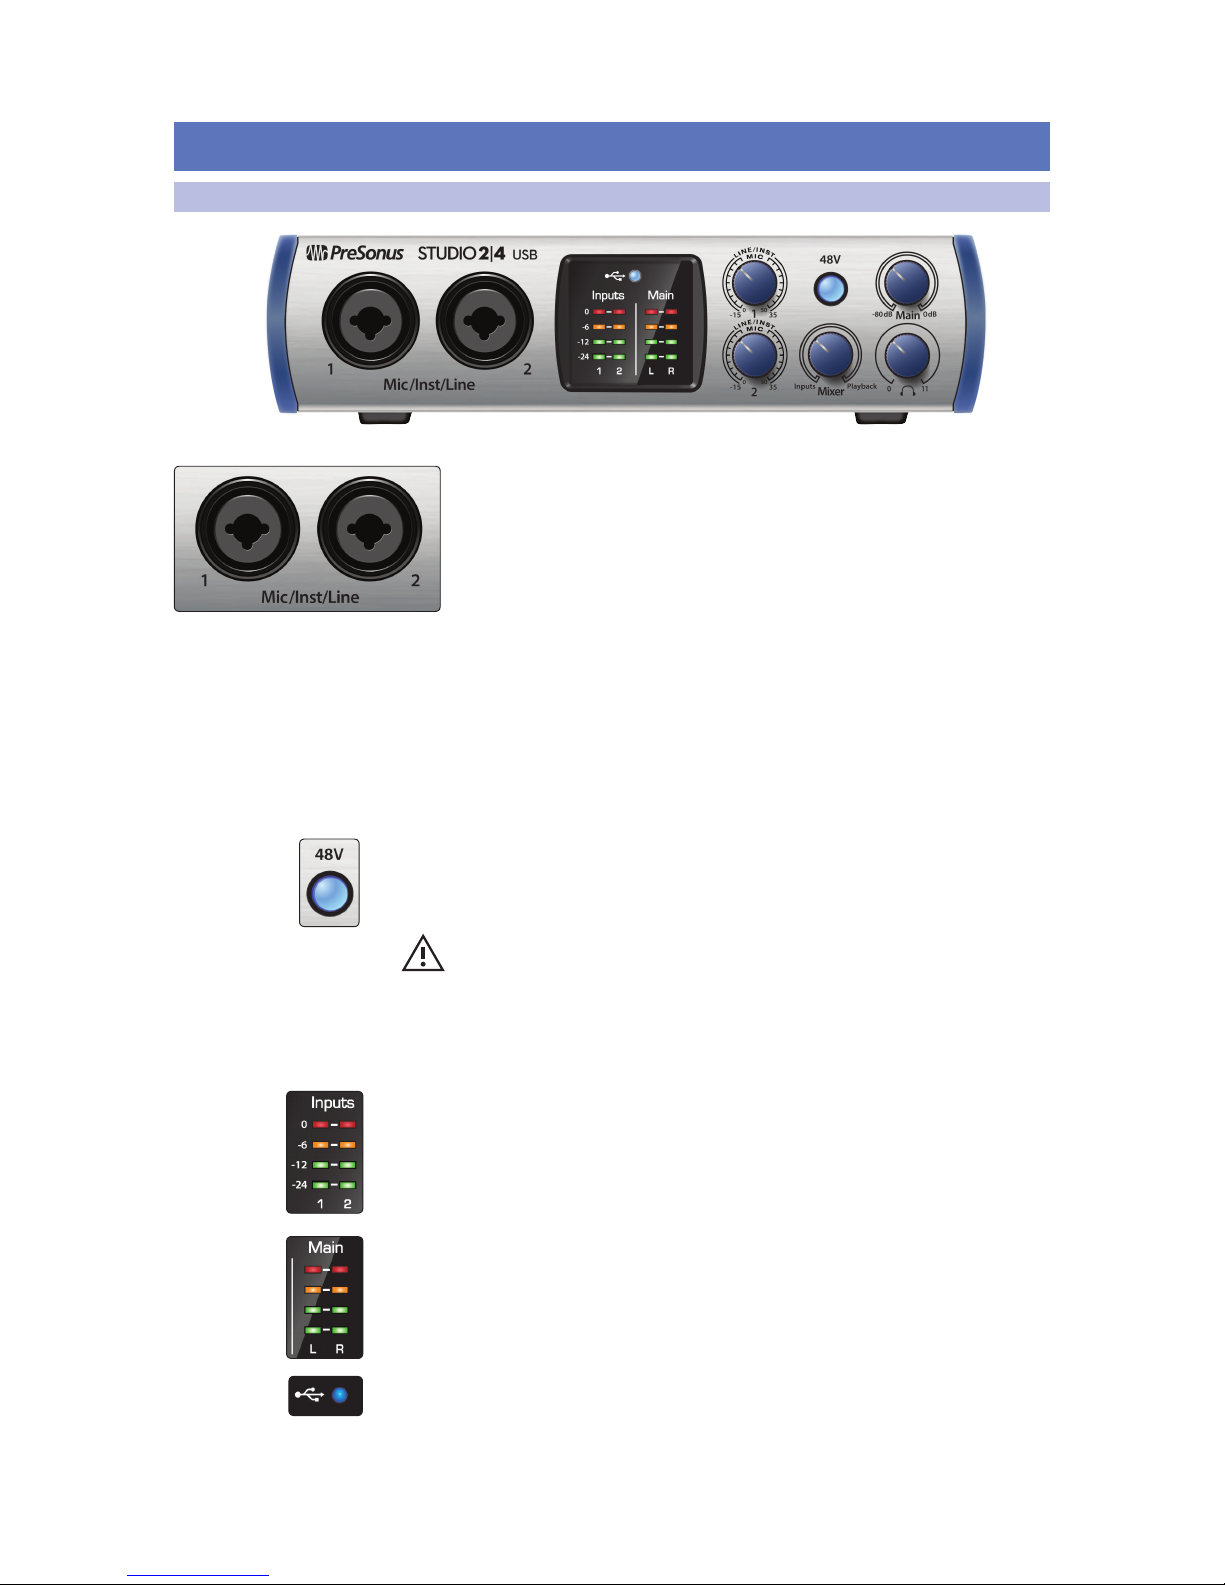
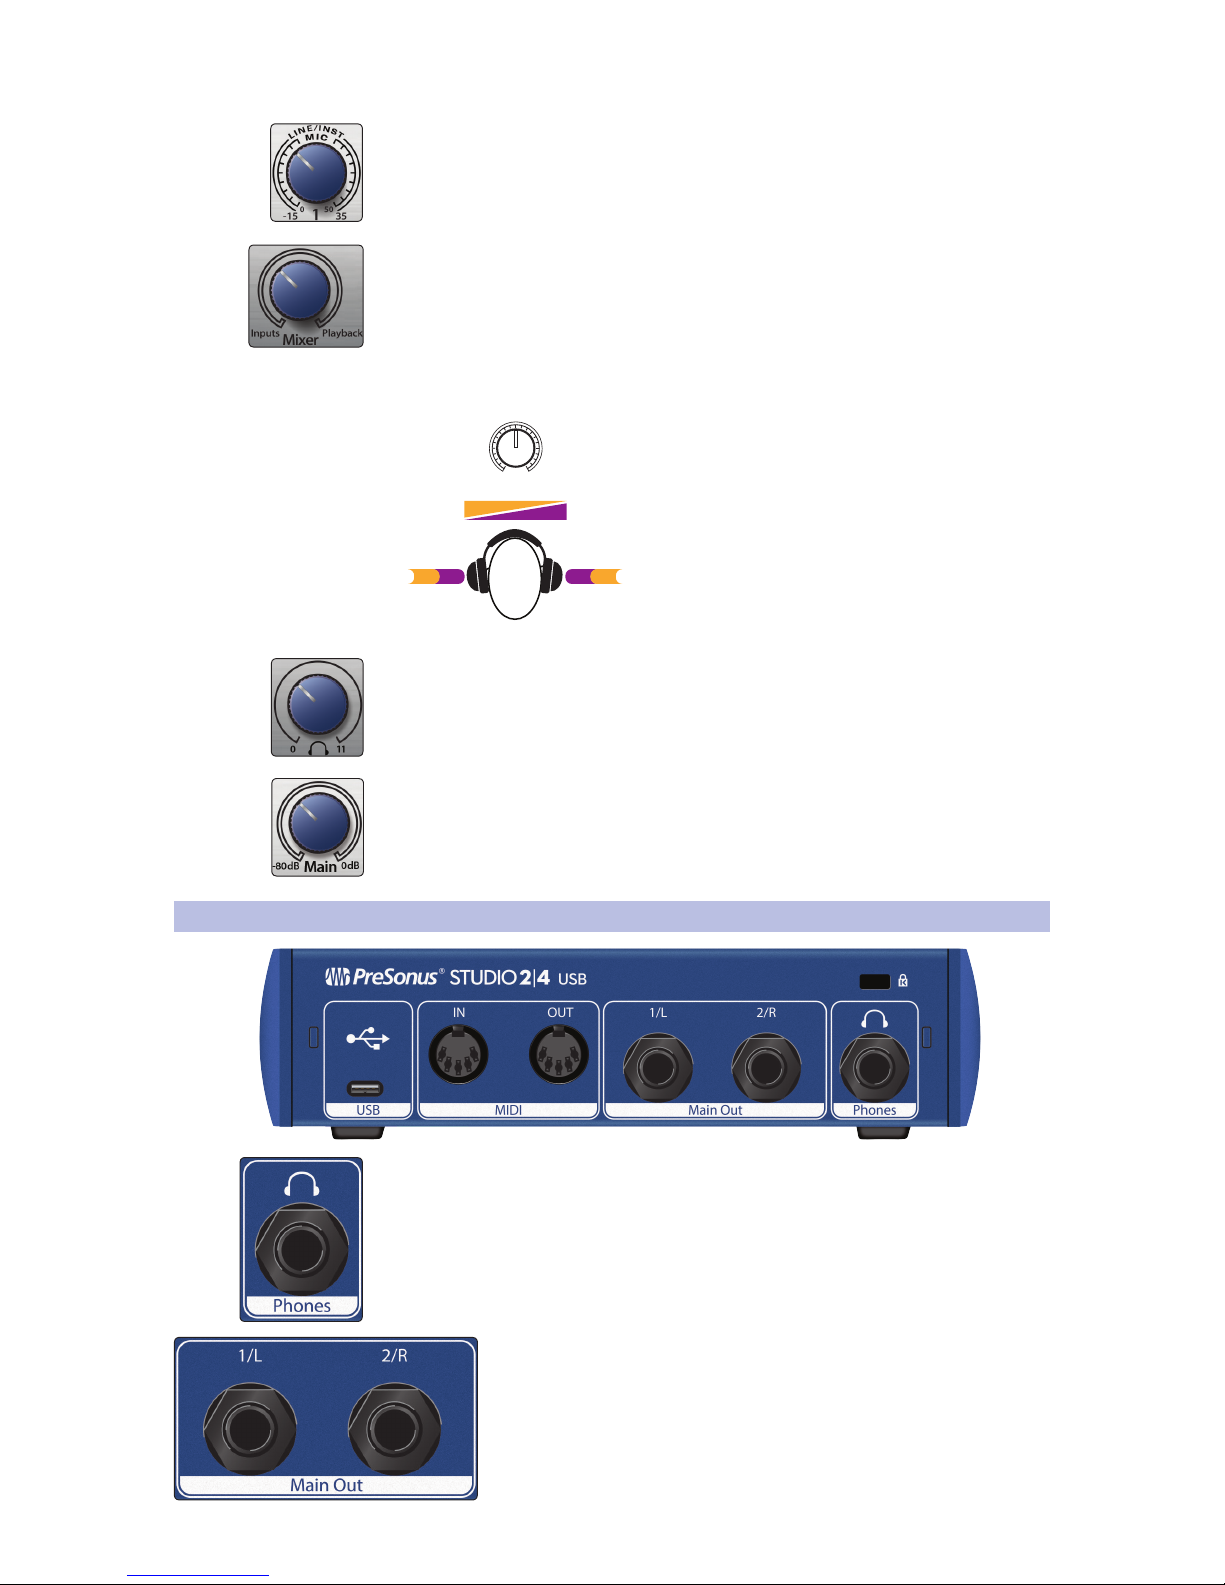
Microphone Inputs. Your Studio 2|4 interface is equipped with high-quality
microphone preamplifiers for use with all types of microphones. The Studio
2|4 features XMAX-L solid-state microphone preamps that are optimized for
bus powering.
Both input channels on your Studio 2|4 interface are
equipped with combo jacks. This convenient connector
accepts either a ¼-inch phone plug or an XLR plug.
Instrument / Line-Level Inputs. The ¼-inch connectors on Channels
1 and 2 can be used with passive instruments (guitar, bass, etc.)
or line-level devices (synthesizers, signal processors, etc.).
Please note: As with any audio input device, plugging in a microphone or an instrument,
or turning phantom power on or off, will create a momentary spike in the audio output.
Because of this, we highly recommend that you turn down the channel trim before
changing connections or turning phantom power on or off. This simple step will add
years to life of your audio equipment.
48 Volt Phantom Power. The Studio 2|4 provides 48V phantom power for the
microphone inputs. Pressing the 48V button switches phantom power on and off for
all microphone inputs; the button will illuminate in blue when phantom power is
available on the microphone preamplifiers.
WARNING: Phantom power is only required for condenser microphones and
can severely damage some dynamic mics, especially ribbon mics. Therefore,
switch phantom power off when it is not required. Consult the user documentation
that came with your microphone before engaging phantom power.
XLR connector wiring for phantom power:
Pin 1 = GND Pin 2 = +48V Pin 3 = +48V
Input Meters. These LED meters show the input level of the analog inputs on your
Studio 2|4. The red Clip LED will illuminate when your input signal reaches -0.5 dBFS.
At this level, the signal will begin to overload the analog-to-digital converters and
exhibit signs of clipping. Use the gain controls to keep the signal below this level.
Output Meters. These meters display the signal level received from the first two
driver returns (Main Left/Right). These meters have the same range as the input
meters and display the signal level before the main output level control.
Sync LED. This light indicates if your Studio 2|4 is in sync with your computer. When
no sync is available, this light will flash red.
4
2 Hookup
2.2 Back Panel Connections
Studio 2|4
Owner’s Manual
Input Gain Control. These knobs provide 50 dB of variable gain (0 to +50 dB for
microphones, -15 to 35 dB for line/instrument).
Mixer. The Mixer knob allows you to blend your input signals with the playback
streams from your computer so that you can monitor your input signals without any
latency (delay). If the knob is positioned at 12 o’clock, the input signal and the
playback stream will be equally balanced. Turning the knob to the left will increase
the level of the input signal relative to the playback stream; turning to the right will
increase the level of the playback stream relative to the input signal as illustrated
below:
Mixer
PlaybackInputs
Inputs
Playback
Playback InputsPlaybackInputs
Headphone Level. This knob controls the level of the rear panel headphone output.
Main. The main knob controls the output level for the main left/right outputs on the
back of your Studio 2|4 and has a range of -80 dB to 0 dB. This control provides
attenuation only.
2.2 Back Panel Connections
Headphone Output. The rear-panel headphone output mirrors the same streams as
the Main left/right outputs.
Main Outs. These are the Main outputs for the Studio 2|4. The output
level of the Main outputs is controlled by the Main level control on the
front of the unit. Playback streams 1 and 2 are routed to these outputs.

5
2 Hookup
2.3 Connection Diagram
Studio 2|4
Owner’s Manual
MIDI I/O. This is the MIDI input and output connections.
MIDI stands for “Musical Instrument Digital Interface.” However, MIDI
can be used for many things other than instruments and sequencing.
The MIDI inputs and outputs allow connection to a variety of MIDIequipped hardware, such as keyboard controllers, and can be used
to send and receive MIDI Machine Control and MIDI Time Code.
Note: MIDI does not carry audio signals but is frequently used to trigger or control an
audio source, such as a virtual instrument or hardware synthesizer. You should
ensure that MIDI data is correctly sent and received by the appropriate hardware or
software. You may also need to route hardware sound sources’ audio to the inputs of
your Studio-series interface. Please consult the User’s Manual of your MIDI devices for
help with MIDI setup and usage.
USB C Port. Use this port to connect your Studio 2|4 to your computer. While the
Studio 2|4 connects using USB C, it is fully compatible with USB 2.0 and 3.0
connections. Use the USB C to A cable that came with your Studio 2|4 if your
computer has a USB 2.0 or 3.0 connection rather than a USB C connection. Do not
connect your Studio 2|4 to a USB 1.1 or lower connection on your computer.
2.3 Connection Diagram

6
3 Connecting to a Computer
3.1 Installation for Windows
Studio 2|4
Owner’s Manual
3 Connecting to a Computer
Before connecting your Studio 2|4 to a computer, please visit www.
presonus.com to verify the latest system requirements.
Note: The speed of your processor, amount of RAM, and capacity, size, and speed of your
hard drives will greatly affect the overall performance of your recording system. A faster
processor and more RAM can reduce signal latency (delay) and improve overall
performance.
The Windows ASIO driver, and Universal Control installer for macOS and
Windows are available for download from your My PreSonus user account.
To begin, you must first visit http://my.presonus.com, create or log into your
user account, and register your Studio 2|4. Once registered, all software
downloads will be available from within your My PreSonus user account.
3.1 Installation for Windows
Download the Universal Control installer from your My PreSonus account.
Connect your Studio 2|4 to an available USB C, 2.0, or 3.0 port and
launch the installer. The installer will take you through each step of the
installation process. This application will install the ASIO and WDM drivers,
as well as Universal Control. Please read each message carefully.
It is recommended that you quit all applications before you start the installation.
The Universal Control installer will take you through each step
of the installation process. Please read each message carefully
so that you do not connect your Studio 2|4 too soon.
Power User Tip: It is recommended that you temporarily disable or turn off any anti-virus
programs you have running to prevent installation issues.
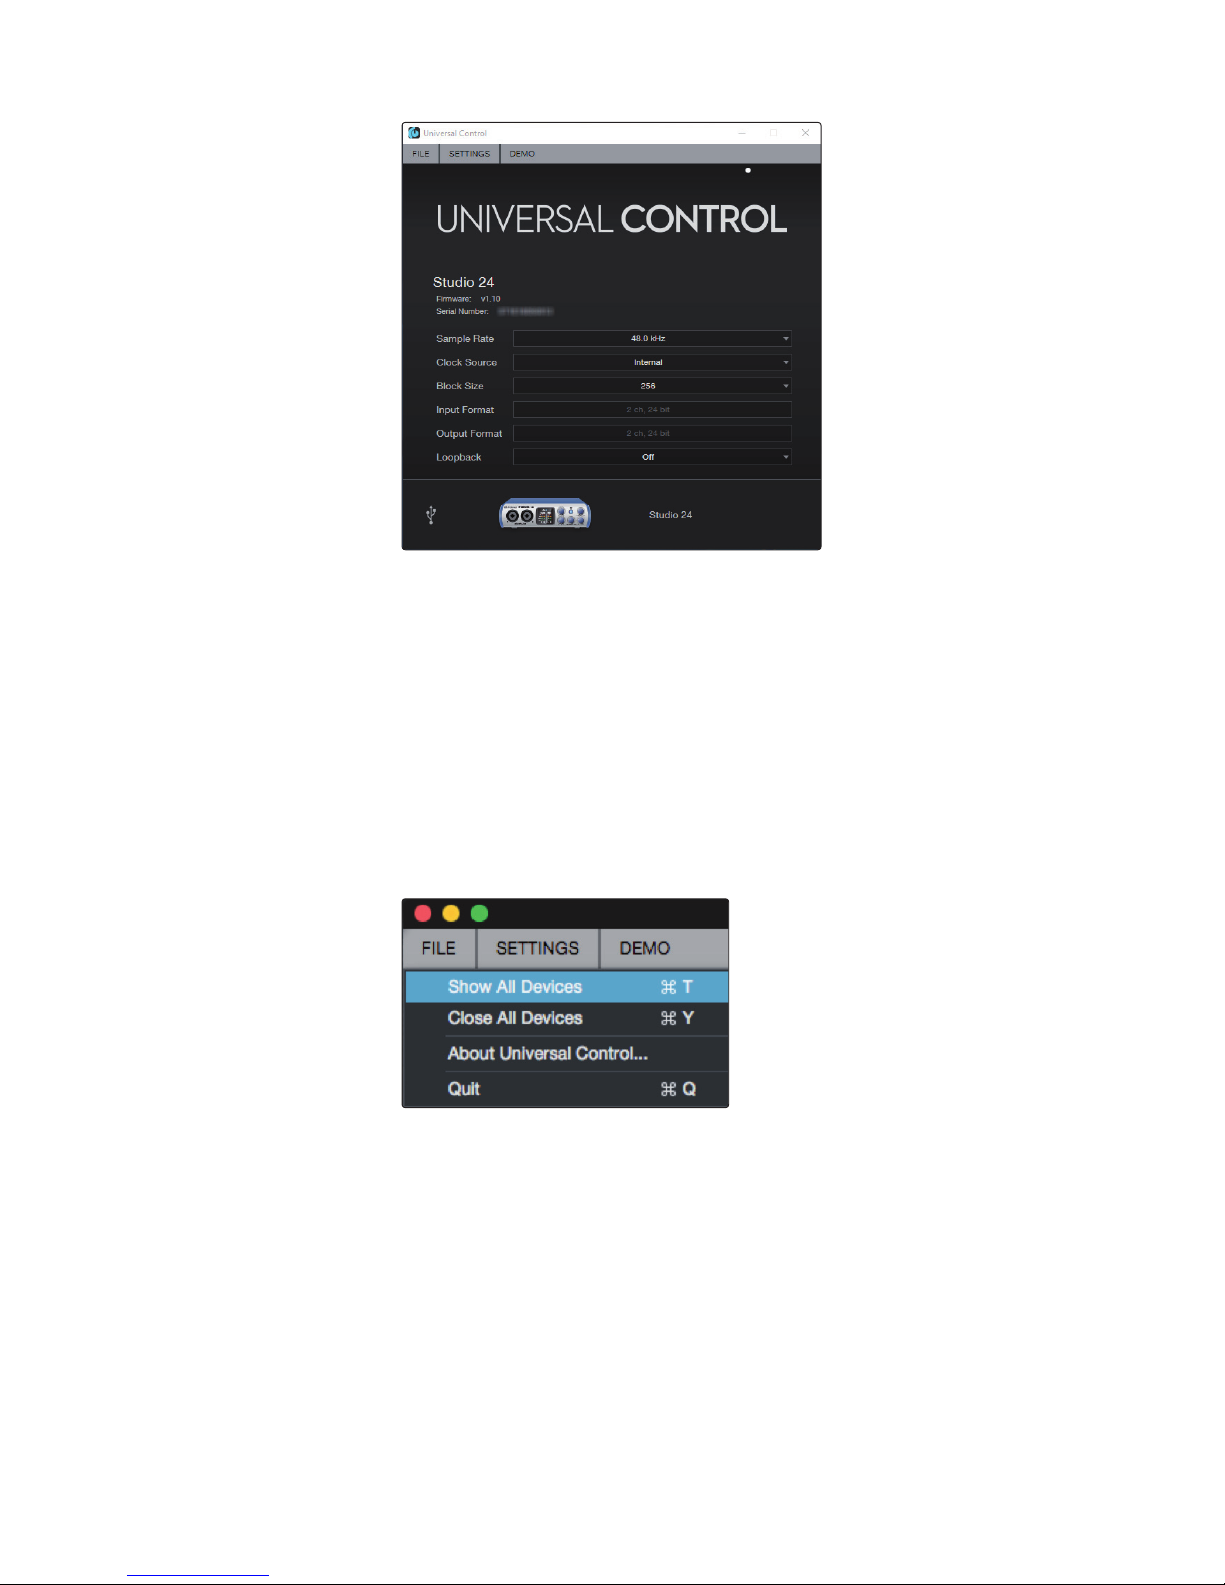
3.1.1 Universal Control (Windows)
Universal Control is a powerful hardware-management application for all PreSonus
interface products. It allows you to view any PreSonus interface product connected
to your computer or your computer’s network.
When Universal Control is launched, you will see the Launch window.
From this window, you can manage all the ASIO driver settings.
7
3 Connecting to a Computer
3.1 Installation for Windows
Studio 2|4
Owner’s Manual
Sample Rate. Changes the sample rate.
You can set the sample rate to 44.1, 48, 88.2, 96, 176.4, or 192 kHz. A higher
sample rate will increase the fidelity of the recording but will increase the file
size and the amount of system resources necessary to process the audio.
Block Size. Sets the buffer size.
From this menu, you can set the buffer size. Lowering the buffer size will
lower latency; however, this will also increase performance demands
on your computer. In general, you will want to set the buffer size as
low as your system can safely support. If you begin to hear pops, clicks,
or distortion in your audio path, try raising the buffer size.
Loopback (Windows only). The Studio 2|4 ASIO driver provides
two loopback streams to record audio from one application
to another. See Section 3.1.2 for more information.
File Menu. Manages devices connected to Universal Control.
• Show All Devices. Launches all control windows for all
supported devices connected to your computer.
• Close All Devices. Closes all open control windows.
• About Universal Control. Displays version and build date information.
• Quit. Quits the Universal Control application and all hardware control windows.
 Loading...