

Page 1
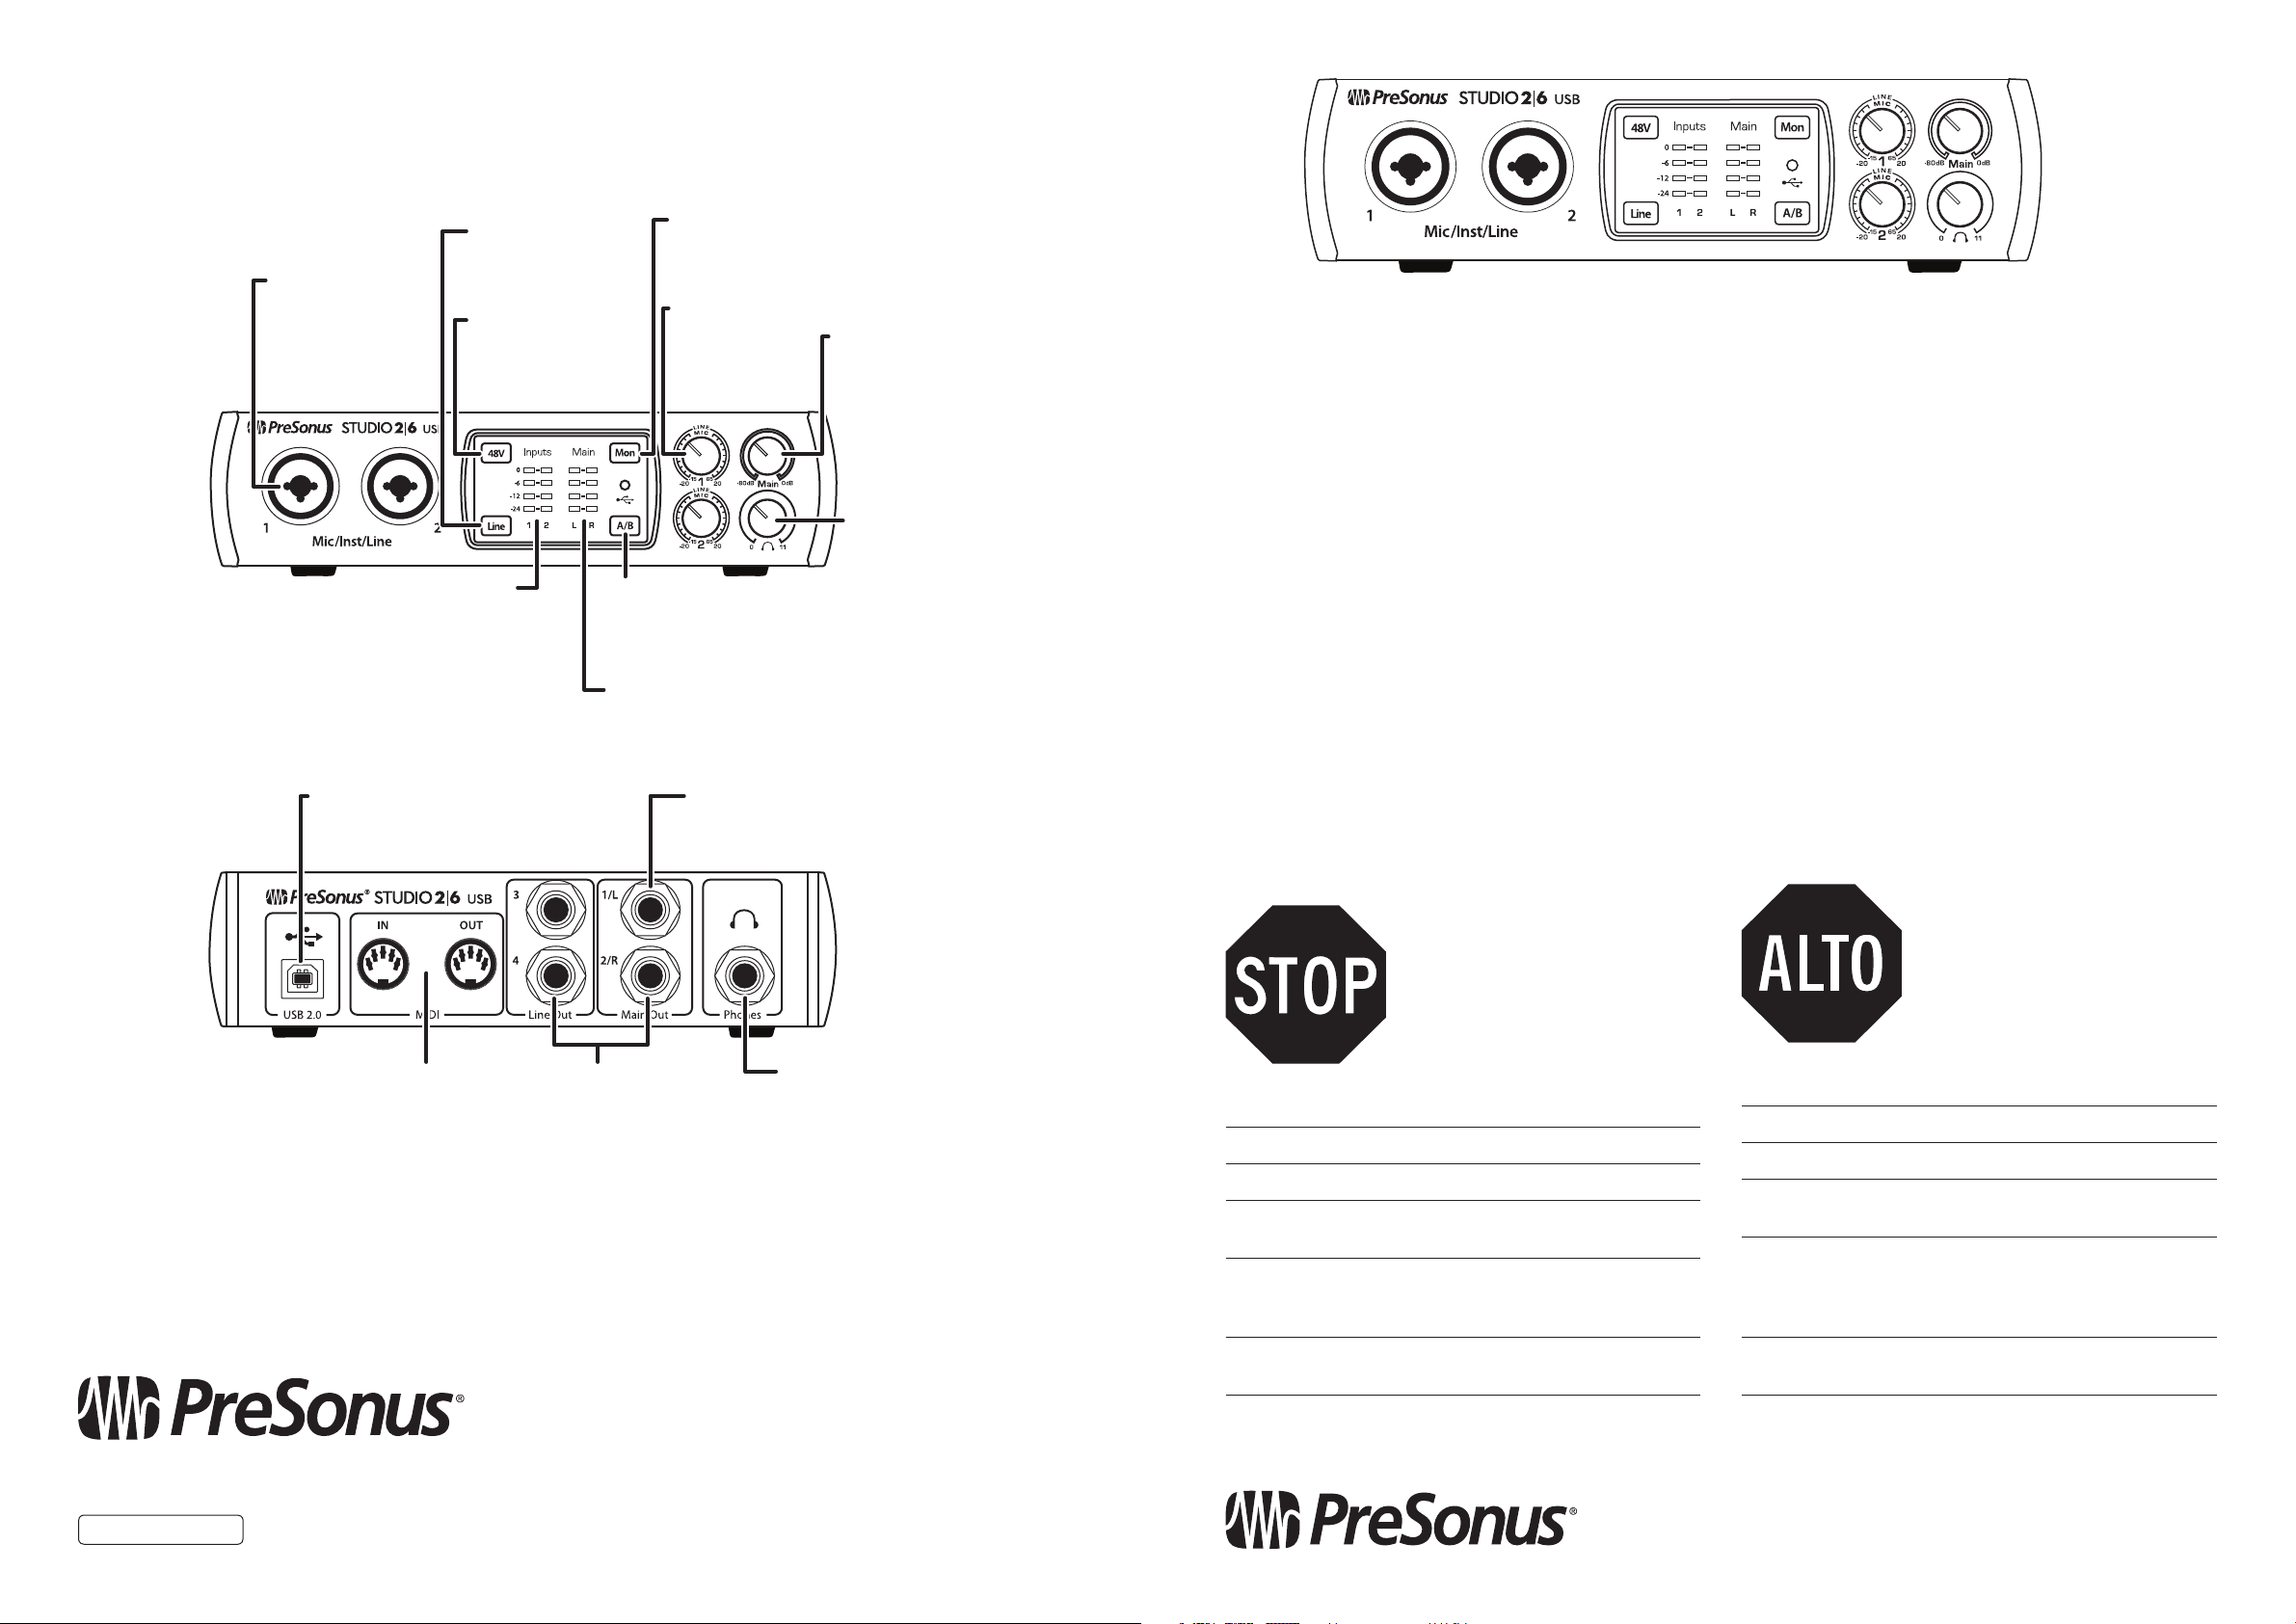
Front panel mic/instrument inputs
Entradas de micrófono/instrumento en el
panel frontal
Frontseitige Mikrofon-/Instrumenteneingänge
Entrées micro/instrument en face avant
Line/Instrument switch
Interruptor línea/instrumento
Line/Instrument-Umschaltung
Sélecteur ligne/instrument
—
+48V phantom power switch
Interruptor para poder
phantom +48V
+48V Phantomspannung, schaltbar
Interrupteur d’alimentation fantôme +48V
Input monitoring switch
Interruptor para entrada de monitor
Eingangswahlschalter
Commutateur d’écoute d’entrée
—
Preamplifier controls and level display
Display de controles y controls
preamplificadores
Bedienelemente und Anzeige für den
Vorverstärker
Commandes et affichage de préampli
Main Level control
Nivel de salida principal
Lautstärkeregler Main-Ausgang
Niveau de sortie générale
Studio 2|6 24-Bit 192 kHz
USB 2.0 Audio Interface
Congratulations on choosing PreSonus. You now own a
state-of-the-art, USB 2.0 interface featuring our renowned
microphone preamplifiers — and Studio One Artist creative music environment.
Studio 2|6 - Interfaz de Audio
USB 2.0 a 24 Bits / 192 kHz
Felicitaciones por y gracias por elegir PreSonus. Ahora usted posee su propia interfaz USB 2.0 de última generación
portando nuestros renombrados y afamados preamplificadores de micrófono — y el entorno creativo musical que
proporciona Studio One Artist.
USB 2.0 I/O
USB 2.0
USB 2.0
USB 2.0
4-LED input Level display
4 medidores LED del nivel de entrada
Anzeige mit 4 LEDs für Eingangspegel
Indicateurs de niveau d’entrée à 4 LED
MIDI I/O
E/S MIDI
MIDI I/O
Entrée/sortie MIDI
Cue mix control for headphone monitoring
Control para mezcla cue para monitoreo de audífonos
Cue-Mix-Regler für das Monitoring über Kopfhörer
Commande de mixage Cue pour l’écoute de contrôle au
casque
—
Main Left/Right Level display
Medidores de salida principal Izquierda/Derecha
Ausgangspegelanzeige Main Left/Right
Indicateurs de niveau de sortie générale gauche/droite
4 balanced TRS Line Outputs
4 salidas balanceadas de línea TRS
4 symmetrische TRS-Line-Ausgänge
4 sorties ligne symétriques sur jack 3
points (TRS)
Main Outputs
Salidas principales
Main-Ausgänge
Sorties générales
Headphone output
Salidas de auriculares
Kopfhörerausgänge
Sorties casque
Headphone level control
Control para nivel de audífonos
Regler für Kopfhörerpegel
Commande de niveau casque
Getting Started
Package Contents
• Studio 2|6 Audio Interface
• USB cable
• Studio One® 3 Key Command Card
• This Hook-Up Guide
• Safety Instructions
Downloads
• Studio 2|6 software drivers for Windows
• Studio One Artist DAW and resources (approximately 2 GB)
• Studio 2|6 Owner’s Manual PDF
Before operating your Studio
2|6, you must register online
for software downloads,
Owner’s Manual, and instructional video.
1 Go online to my.presonus.com and create
— or log into — your MyPreSonus user account.
2 Click to register.
3 Enter your Studio 2|6 serial number.
4 Download your Windows driver (no driver necessary
for Mac), software and Owner’s Manual.
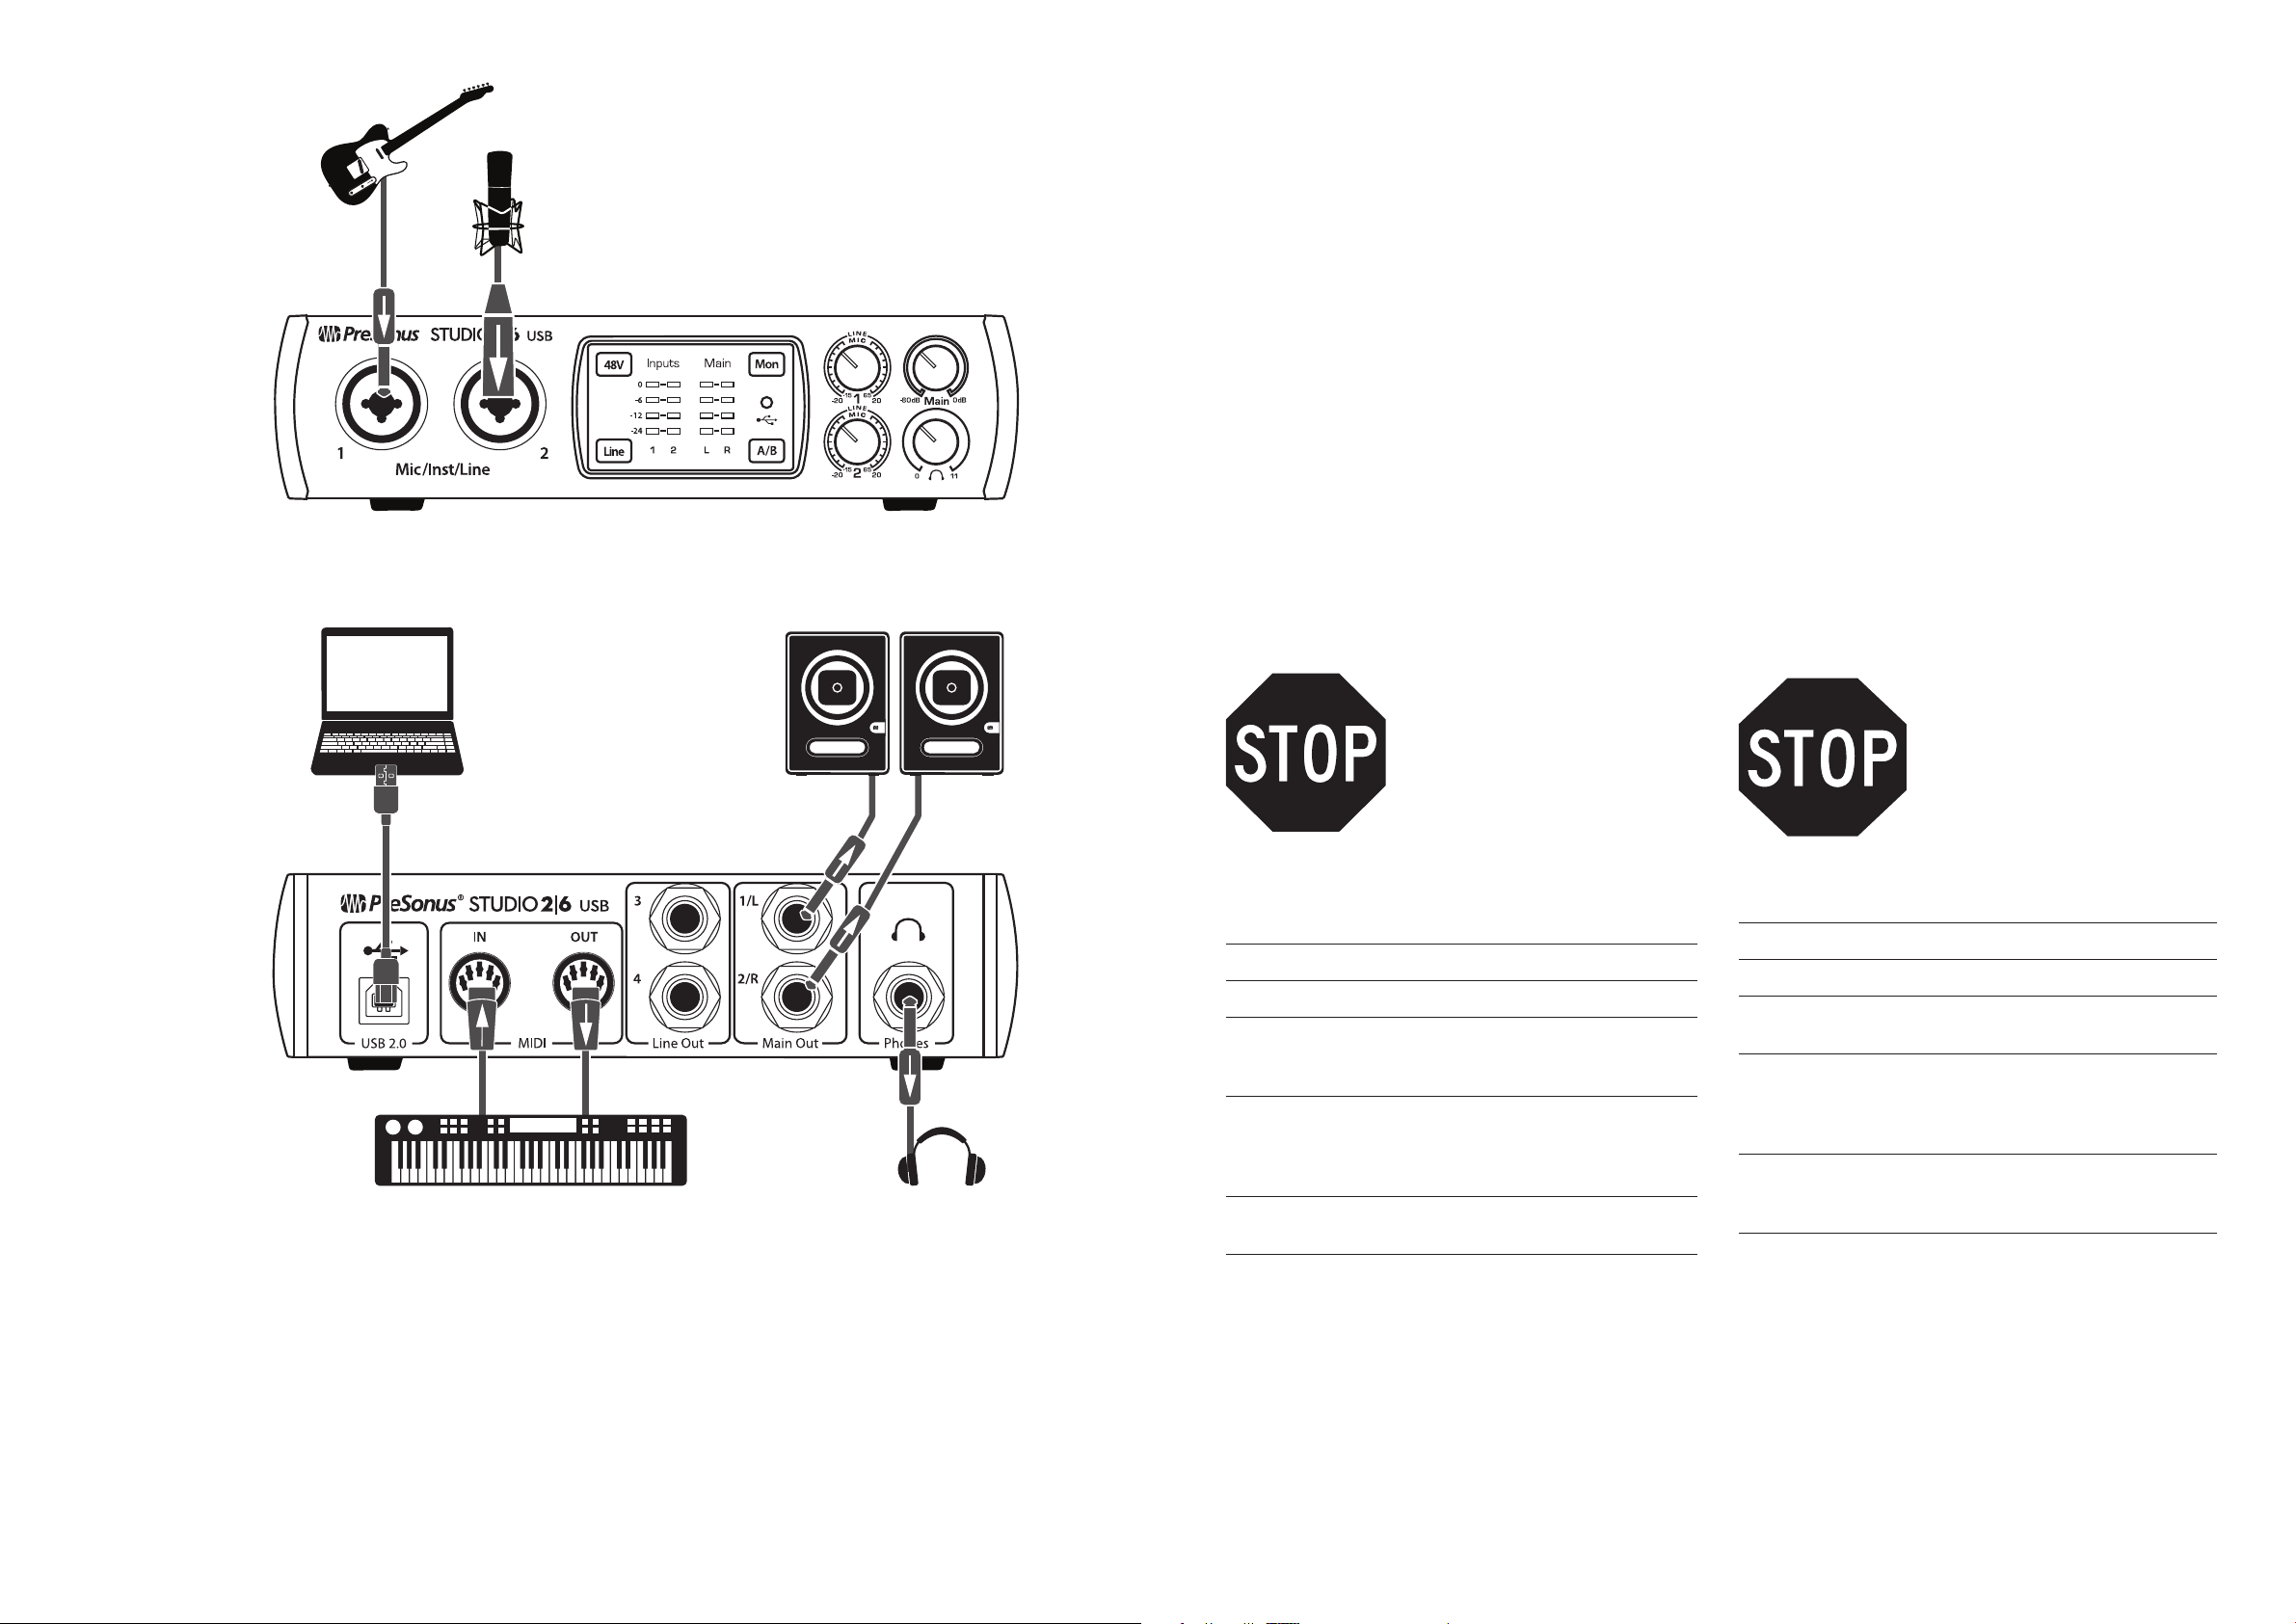
5 Connect your equipment to the Studio 2|6. Please refer
to the hook-up diagram in this Getting Started guide
and additional instructions in your Owner’s Manual.
Comenzando
Contenido del paquete
• Studio 2|6- Interfaz de audio
• Cable USB
• Tarjeta de comandos de teclado para Studio One® 3
• Esta guía de conexiones
• Instrucciones de seguridad
Descargas
• Drivers de Studio 2|6 para Windows
• Daw Studio One Artist y recursos (aproximadamente 2 GB)
• Manual de usuario en formato PDF para su Studio 2|6
Antes de operar su Studio 2|6,
primero debe registrarse online
para descargar el software,
Manual de usuario y video
instructivo.
1 Vaya online a my.presonus.com y cree — o ingrese —
a su cuenta de usuario MyPreSonus.
2 Haga clic en Register (Registrar).
3 Ingrese el número de serie de su Studio 2|6.
4 Descargue el driver para Windows (No se requieren
drivers para OS X), software y Manual de usuario.
5 Conecte su hardware a la interfaz Studio 2|6.
Por favor utilice como referencia el diagrama de
conexiones en esta Guía de inicio y las instrucciones
adicionales en su Manual de usuario.
18011 Grand Bay Ct. • Baton Rouge,
Louisiana 70809 USA• 1-225-216-7887
www.presonus.com
Part# 70-12000036-C
© 2017 PreSonus Audio Electronics, Inc. All Rights Reserved. PreSonus, UC Surface, and XMAX are trademarks or registered trademarks of
PreSonus Audio Electronics, Inc.. Studio One is a registered trademark of PreSonus Software, Ltd. Mac and Mac OS are registered trademarks of
Apple, Inc., in the U.S. and other countries. Windows is a registered trademark of Microsoft, Inc., in the U.S. and other countries. Other product
names mentioned herein may be trademarks of their respective companies. All specifications subject to change without notice.
6 Install your Windows driver (if necessary) and
Studio One Artist 3 DAW software.
7 Watch the Studio 2|6 Instruction video and consult
your Owner’s Manual for further instructions.
www.presonus.com
6 Instala el driver de Windows (si se requiere) y el
software DAW Studio One Artist 3.
7 Observe el video instructivo de Studio 2|6 y consulte el
Manual de usuario para obtener más instrucciones.
Page 2
Studio 2|6 24 Bit/192 kHz
Studio 2|6 Interface audio
See Studio 26 box for
computer requirements
Vea los requerimientos de
hardware en la caja de
Studio 26
Systemvoraussetzungen
siehe Studio 26
Packungsaufdruck
Voir la boîte de la Studio 26
pour les configurations
informatiques requises
USB 2.0 Audio-Interface
Herzlichen Glückwunsch, dass Sie sich für PreSonus
entschieden haben. Sie sind jetzt stolzer Besitzer eines
modernen USB 2.0 Audio-Interface mit unseren berühmten Mikrofonvorverstärkern – und der kreativen Musiksoftware Studio One Artist.
Einführung
Lieferumfang
• Studio 2|6 Audio-Interface
• USB Kabel
• Studio One® 3 Referenzkarte Tastaturbefehle
• Diese Installationsanleitung
• Sicherheitshinweise
Downloads
• Studio 2|6 Treibersoftware für Windows
• Studio One Artist DAW und Ressourcen (ca. 2 GB)
• Studio 2|6 Bedienungsanleitung (PDF)
Bevor Sie Ihr Studio 2|6 verwenden können, müssen Sie
sich online registrieren, um auf
die Software-Downloads, die
Bedienungsanleitung und das
Einführungs-Video zugreifen
zu können.
USB 2.0 24 bits 192 kHz
Félicitations pour avoir choisi PreSonus. Vous disposez
désormais d’une interface USB 2.0 dernier cri avec nos
célèbres préamplificateurs de microphone - et de l’environnement de création musicale Studio One Artist.
Pour commencer
Contenu de l’emballage
• Studio 2|6 – Interface audio
• Câble USB
• Carte de clé de produit Studio One® 3
• Ce Guide de branchement
• Instructions de sécurité
Téléchargements
• Pilotes logiciels de la Studio 2|6 pour Windows
• Station de travail audio numérique Studio One Artist avec
environ 2 Go de ressources
• Mode d’emploi PDF de la Studio 2|6
Avant de faire fonctionner
votre Studio 2|6, vous devez
vous enregistrer en ligne pour
télécharger les logiciels, le
mode d’emploi, et des vidéos
de formation.
1 Öffnen Sie die Webseite my.presonus.com und
erstellen Sie einen neuen Account – oder loggen Sie
sich in Ihren My PreSonus-Account ein
2 Klicken Sie hier, um sich zu registrieren.
3 Geben Sie die Seriennummer Ihres Studio 2|6 ein.
4 Laden Sie den Treiber für Windows (für OS X
wird kein Treiber benötigt), die Software und die
Bedienungsanleitung herunter.
5 Verkabeln Sie Ihr Equipment mit dem Studio 2|6.
Beachten Sie dazu bitte das Anschlussdiagramm
in dieser Kurzanleitung sowie die zusätzlichen
Anweisungen in Ihrer Bedienungsanleitung.
6 Installieren Sie den Windows- bzw (falls nötig). Mac-
Treiber und die DAW Studio One Artist 3.
7 Sehen Sie sich das Studio 2|6 Einführungs-Video
an und lesen Sie für weitere Informationen die
Bedienungsanleitung.
1 Allez sur my.presonus.com et créez – ou connectez-
vous à – votre compte utilisateur MyPreSonus.
2 Cliquez sur Register (enregistrer un produit).
3 Saisissez le numéro de série de votre Studio 2|6.
4 Téléchargez votre pilote Windows (aucun pilote n’est
nécessaire pour OS X), le logiciel et le mode d’emploi.
5 Branchez vos équipements à la Studio 2|6.
Veuillez vous reporter au schéma de branchement
de ce Guide de prise en main et aux instructions
supplémentaires de votre mode d’emploi.
6 Installez votre pilote Windows (si nécessaire) et le
logiciel station de travail audio numérique Studio One
Artist 3.
7 Regardez en vidéo les instructions concernant la
Studio 2|6 et consultez votre mode d’emploi pour des
instructions supplémentaires.
 Loading...