

PRESONUS RM32AI, RM16AI, StudioLive RM series Owner's Manual
English
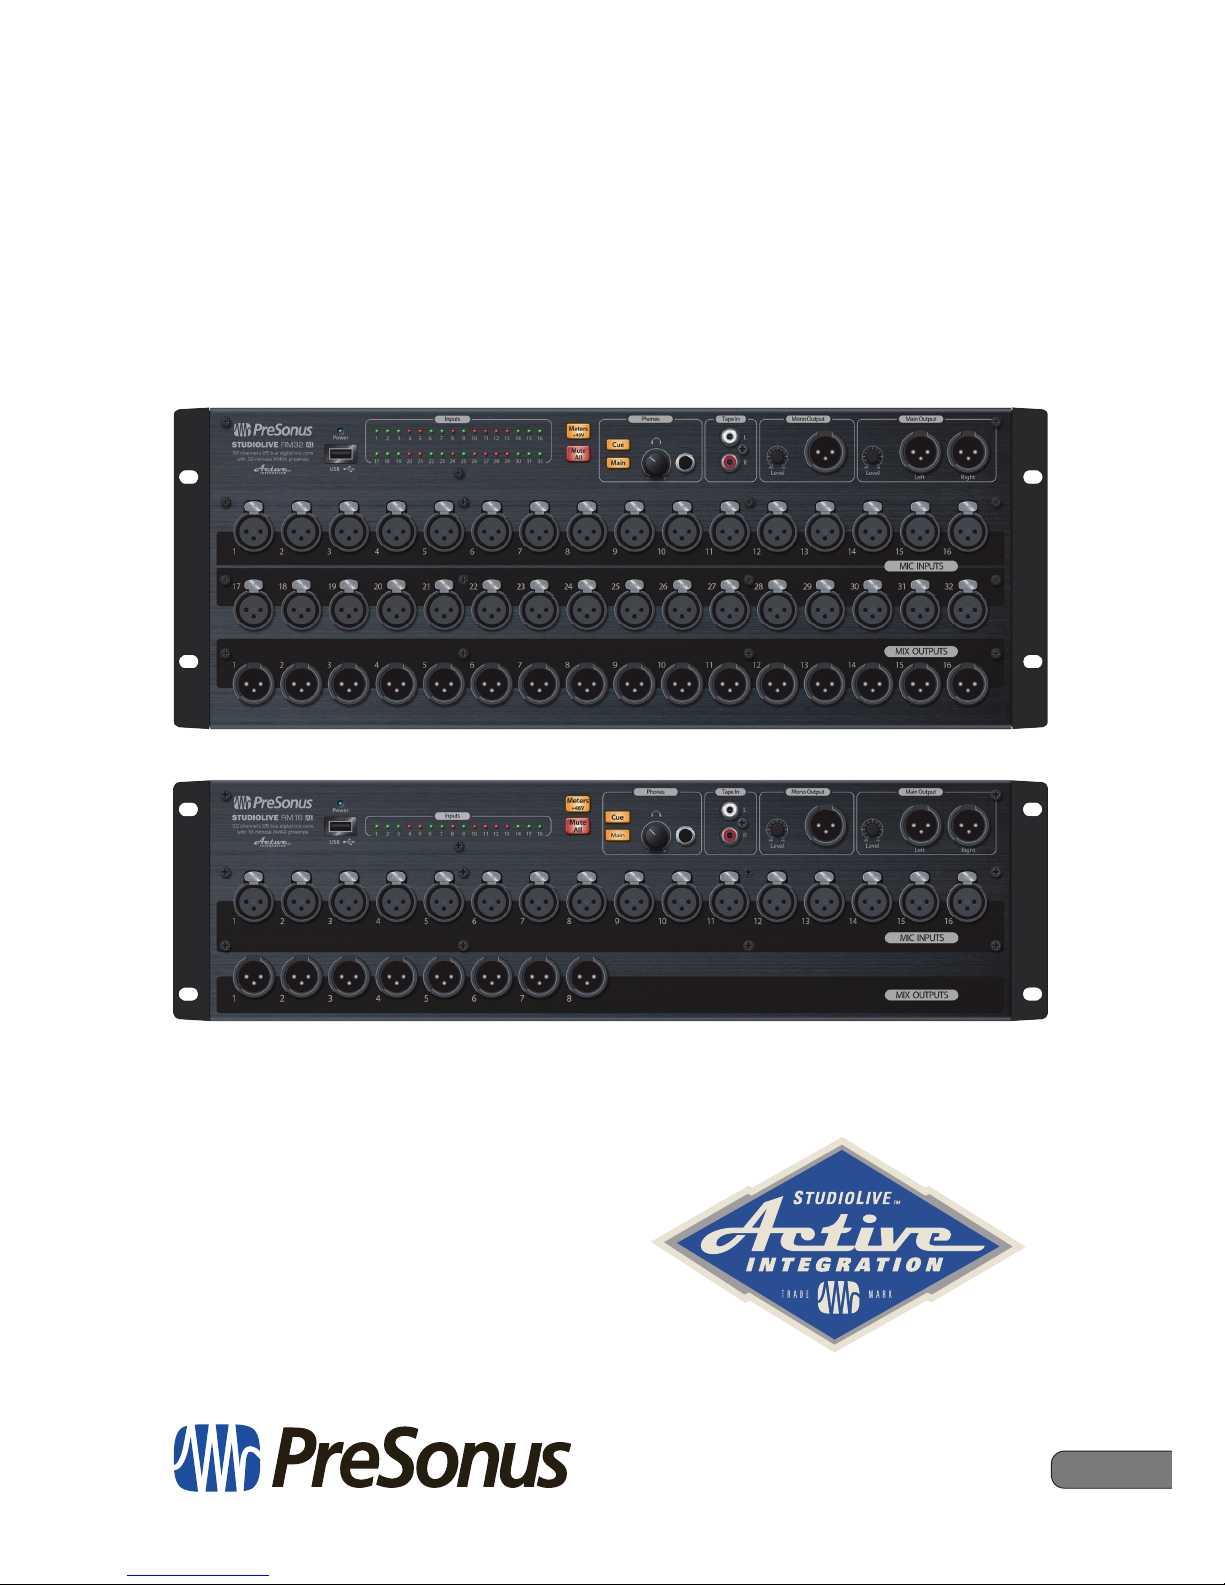
StudioLive™ RM-Series Mixers
Touch-Software-Controlled, Rack-mount Digital
Mixing System with Active Integration
™
Owner’s Manual
www.presonus.com
®

Table of Contents
1 Overview — 1
1.1 Introduction — 1
1.2 StudioLive RM-series Digital Mixer Features — 1
1.3 What is in the Box — 3
1.4 What You Will Need — 4
1.5 About This Manual — 5
1.6 Technical Support — 5
2 Getting Started — 6
2.1 System Setup Overview — 7
2.2 Registering Your StudioLive
RM-series Mixer — 7
2.3 Powering the StudioLive RM-series Mixer — 9
3 Networking the
RM-series Mixer — 10
3.1 Minimum Computer System
Requirements — 10
3.2 Networking Overview — 11
3.3 Wired Ethernet Control Setup — 13
3.4 Wireless Control Setup — 14
3.5 Connecting Your Computer to Your Network
in Software — 18
3.6 Connecting an iPad to Your Network — 20
3.7 Connecting an iPhone/iPod touch
to Your Network — 23
3.8 How to Update StudioLive
RM Mixer Firmware — 24
3.9 Setting Permissions — 28
3.10 FireWire Audio Setup — 33
3.11 Configuration Examples — 34
4 Connecting Your RM-series Mixer
to Your Audio System — 37
4.1 Before You Begin — 37
4.2 Connecting Microphones — 38
4.3 Connecting a Stereo Playback Device — 38
4.4 Connecting Mix Outputs — 39
4.5 Connecting Headphones — 40
4.6 Muting All Inputs — 41
4.7 Metering — 41
4.8 Let’s Get a Sound and Set a Level! — 42
4.9 Diagrams of Typical Setups — 46
4.9.1 RM32AI Typical Band Setup — 47
4.9.2 RM16AI Typical Band Setup — 48
4.9.3 RM32AI Typical Church Setup — 49
4.9.4 RM16AI Typical Church Setup — 50
5 RM Mixer Reference — 51
5.1 Front Panel — 51
5.2 Rear Panel — 54
5.3 StudioLive RM-series Mixer
Block Diagrams — 55
5.4 RM16AI and RM32AI
Technical Specifications — 56
6 Resources — 59
6.1 Stereo Microphone Placement — 59
6.2 Troubleshooting — 62
7 Warranty Information — 64
7.1 How Consumer Law Relates
To This Warranty — 64
7.2 PreSonus Products And EU
Statutory Warranty — 64

7.3 What This Warranty Covers — 64
7.4 Exclusions and Limitations — 64
7.5 Who This Warranty Protects — 65
7.6 How Long This Warranty Lasts — 65
7.7 What PreSonus Will Do — 65
7.8 How to Get Warranty Service (USA) — 65
7.9 How to Get Warranty Service
(outside of USA) — 65
7.10 Limitation of Implied Warranties — 66
7.11 Exclusion of Damages — 66


1
1 Overview
1.1 Introduction
StudioLive™ RM-Series Mixers
Owner’s Manual
1 Overview
1.1 Introduction
Thank you for purchasing a PreSonus® StudioLive™ RM-series Active
Integration™ digital mixer. PreSonus Audio Electronics, Inc., has
designed the RM32AI and RM16AI utilizing high-grade components
to ensure optimum performance that will last a lifetime.
The powerful, scalable, and compact StudioLive RM32AI and RM16AI
32x16x3 rack-mount mixers combine the all new, battle-ready UC Surface
touch-control software for Windows®, Mac® OS X, and iOS® with a powerful
and comprehensive set of facilities for up to 32-channel mixing.
Based on the StudioLive AI-series engine, the StudioLive RM-series’ Active
Integration™ technology provides direct Wi-Fi and Ethernet networking, along
with a tightly integrated software suite that includes Capture™ recording software
with true virtual soundcheck and Studio One® Artist DAW software for Mac and
Windows. You also get a Nimbit® Free account for online promotion and distribution.
Put all of this together and your StudioLive RM-series mixer provides you with a
complete “riff to release” solution for live-sound mixing and studio recording.
(See 3.1 Minimum Computer System Requirements for complete
hardware and software compatibility information.)
We encourage you to contact us with questions or comments regarding
this product. PreSonus Audio Electronics, Inc., is committed to constant
product improvement, and we value your suggestions highly. We believe
the best way to achieve our goal of constant product improvement is by
listening to the real experts: our valued customers. We appreciate the
support you’ve shown us through the purchase of this product.
For technical support, please visit www.presonus.
com/support/Contact-Technical-Support.
1.2 StudioLive RM-series Digital Mixer Features
• Fully recallable 32-channel digital mixer
• Up to 96 kHz sample rate at 24-bit resolution
• 32/16 recallable Class A XMAX™ microphone preamplifiers
with individual +48V phantom power
• Locking XLR mic inputs
• 16/8 balanced line outputs on front-panel XLR jacks,
mirrored on rear-panel DB25 multipin connectors
• 3 balanced main outputs (left, right, mono/center) on
front-panel XLR jacks with analog trim pots

2
1 Overview
1.2 StudioLive RM-series Digital Mixer Features
StudioLive™ RM-Series Mixers
Owner’s Manual
• Stereo unbalanced tape inputs
• 32/16 LED meter grid
• 32 internal channels
• 25 mix buses
- 16 aux mix buses
- 3 main mix buses (left, right, mono/center)
- 4 internal FX buses (2 reverb, 2 delay)
- Stereo solo bus
• High-definition AD/DA converters (118 dB dynamic range)
• 32-bit floating-point digital mixing and effects processing
• True LCR panning
• Fat Channel signal processing on all input channels and buses, with:
highpass filter, gate, compressor, limiter, 4-band parametric EQ
• 52x34 direct digital FireWire s800 recording interface
• Audio networking over Ethernet AVB
• Coaxial S/PDIF output
• Free UC Surface battle-ready, live mixing and control software
- Designed specifically for live sound mixing
- Multiplatform support for Mac, Windows, and iPad
- Windows 8 multi-touch-compatible for large touchscreen mixing
- Context-based navigation for quick, intuitive access to all mixing functions
• Compatible with free QMix-AI personal monitorcontrol app for iPhone/iPod touch
• Complete solution: Capture live-recording software and
Studio One Artist DAW for Mac and Windows and Nimbit Free
account for online music promotion and distribution
• USB 2.0 jack and included Wi-Fi LAN adapter provide wireless control
• 2 FireWire s800 ports, 1 Ethernet AVB/control port
• Option card slot for future expansion (Dante™ and Thunderbolt option cards)
• Front-panel Mute All button
• Headphone output with volume knob and selectable source
• Displays phantom power assignments on the meter grid
• MIDI interface (for future implementation)
• 4U/3U rack-mount
• Scene automation with load/save/recall of all settings
• Four onboard effects processors: two reverbs and two delays
• Eight mute groups with All On/All Off
• 31-band graphic EQ on the main mix and 12 aux mixes
• Talkback communication system
3
1 Overview
1.3 What is in the Box
StudioLive™ RM-Series Mixers
Owner’s Manual
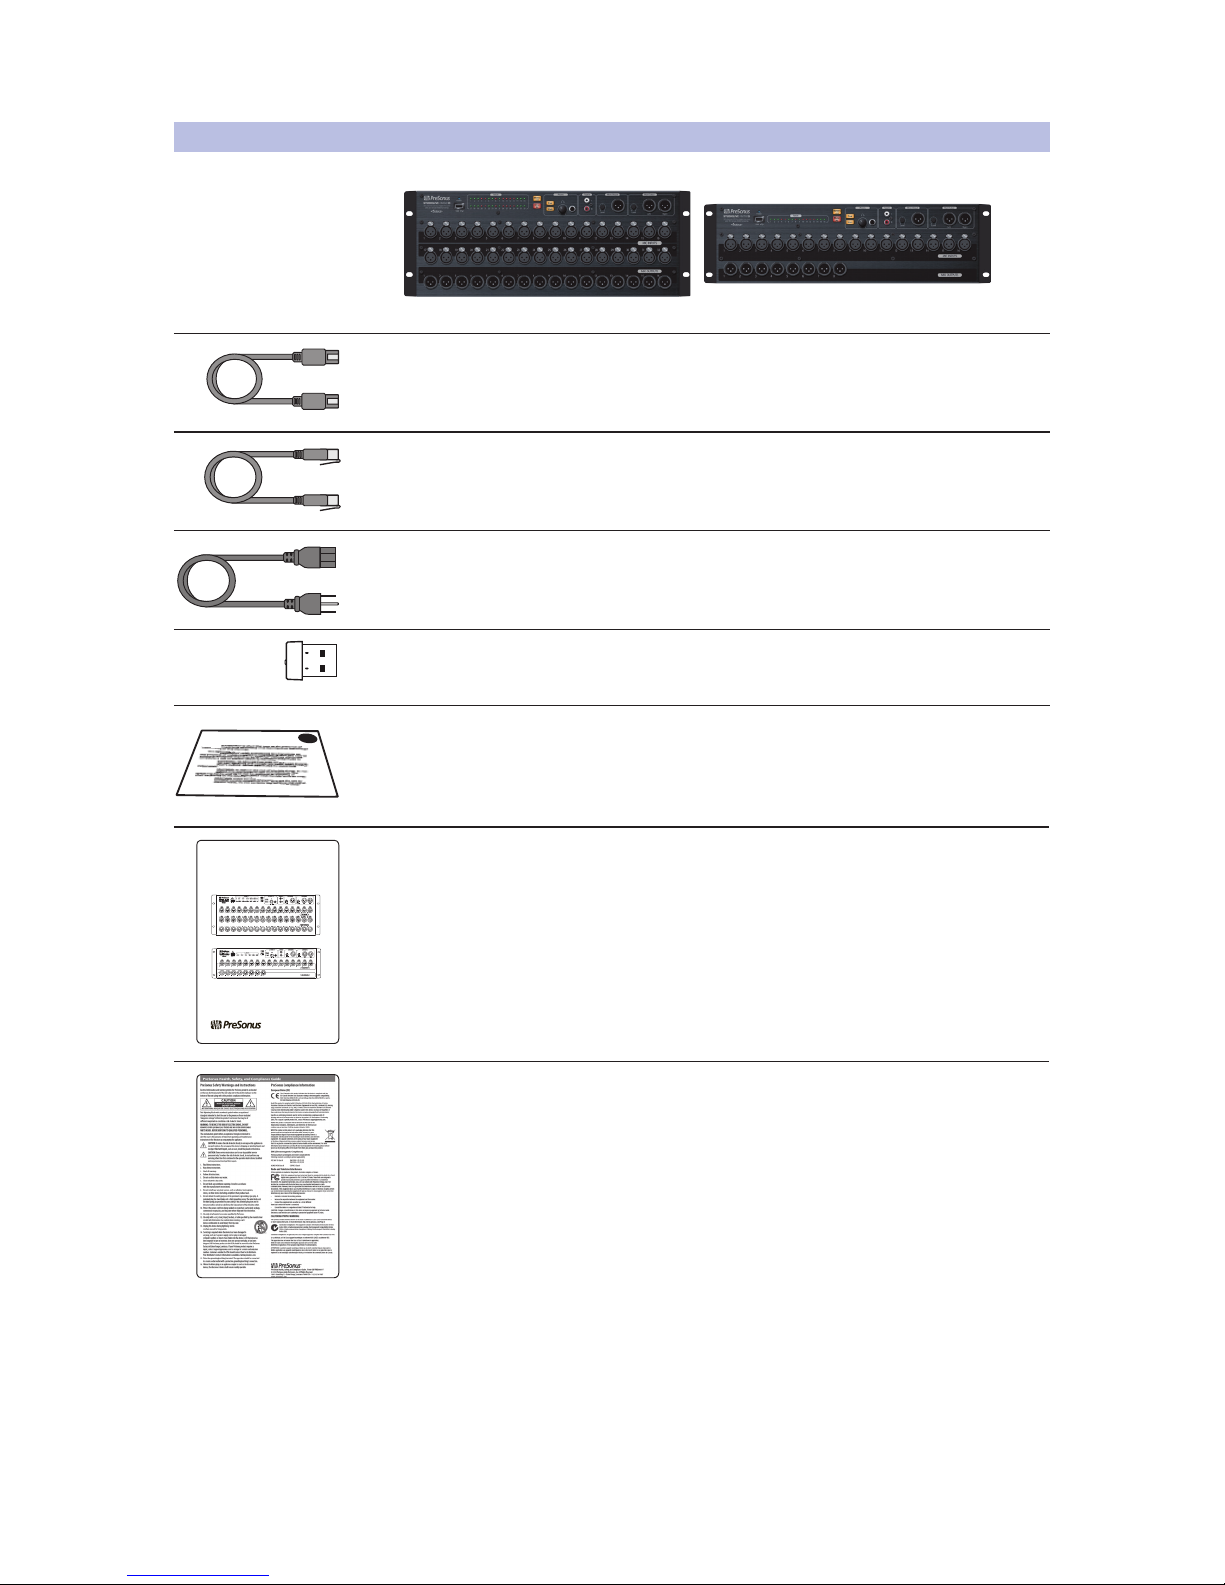
1.3 What is in the Box
Your StudioLive RM-series package contains the following:
• PreSonus StudioLive RM32AI or RM16AI digital recording and performance mixer
• 5-foot (1.5 meter), 9-pin-to-9-pin FireWire s800 cable
• Ethernet cable
• IEC power cord
• USB Wi-Fi LAN adapter
• Product registration and software authorization card
• StudioLive RM-series Quick Start Guide
• PreSonus Health Safety and Compliance Guide
PreSonus® StudioLive™
RM32AI/RM16AI
Visual Quick Start Guide
www.presonus.com
®
4
1 Overview
1.4 What You Will Need
StudioLive™ RM-Series Mixers
Owner’s Manual
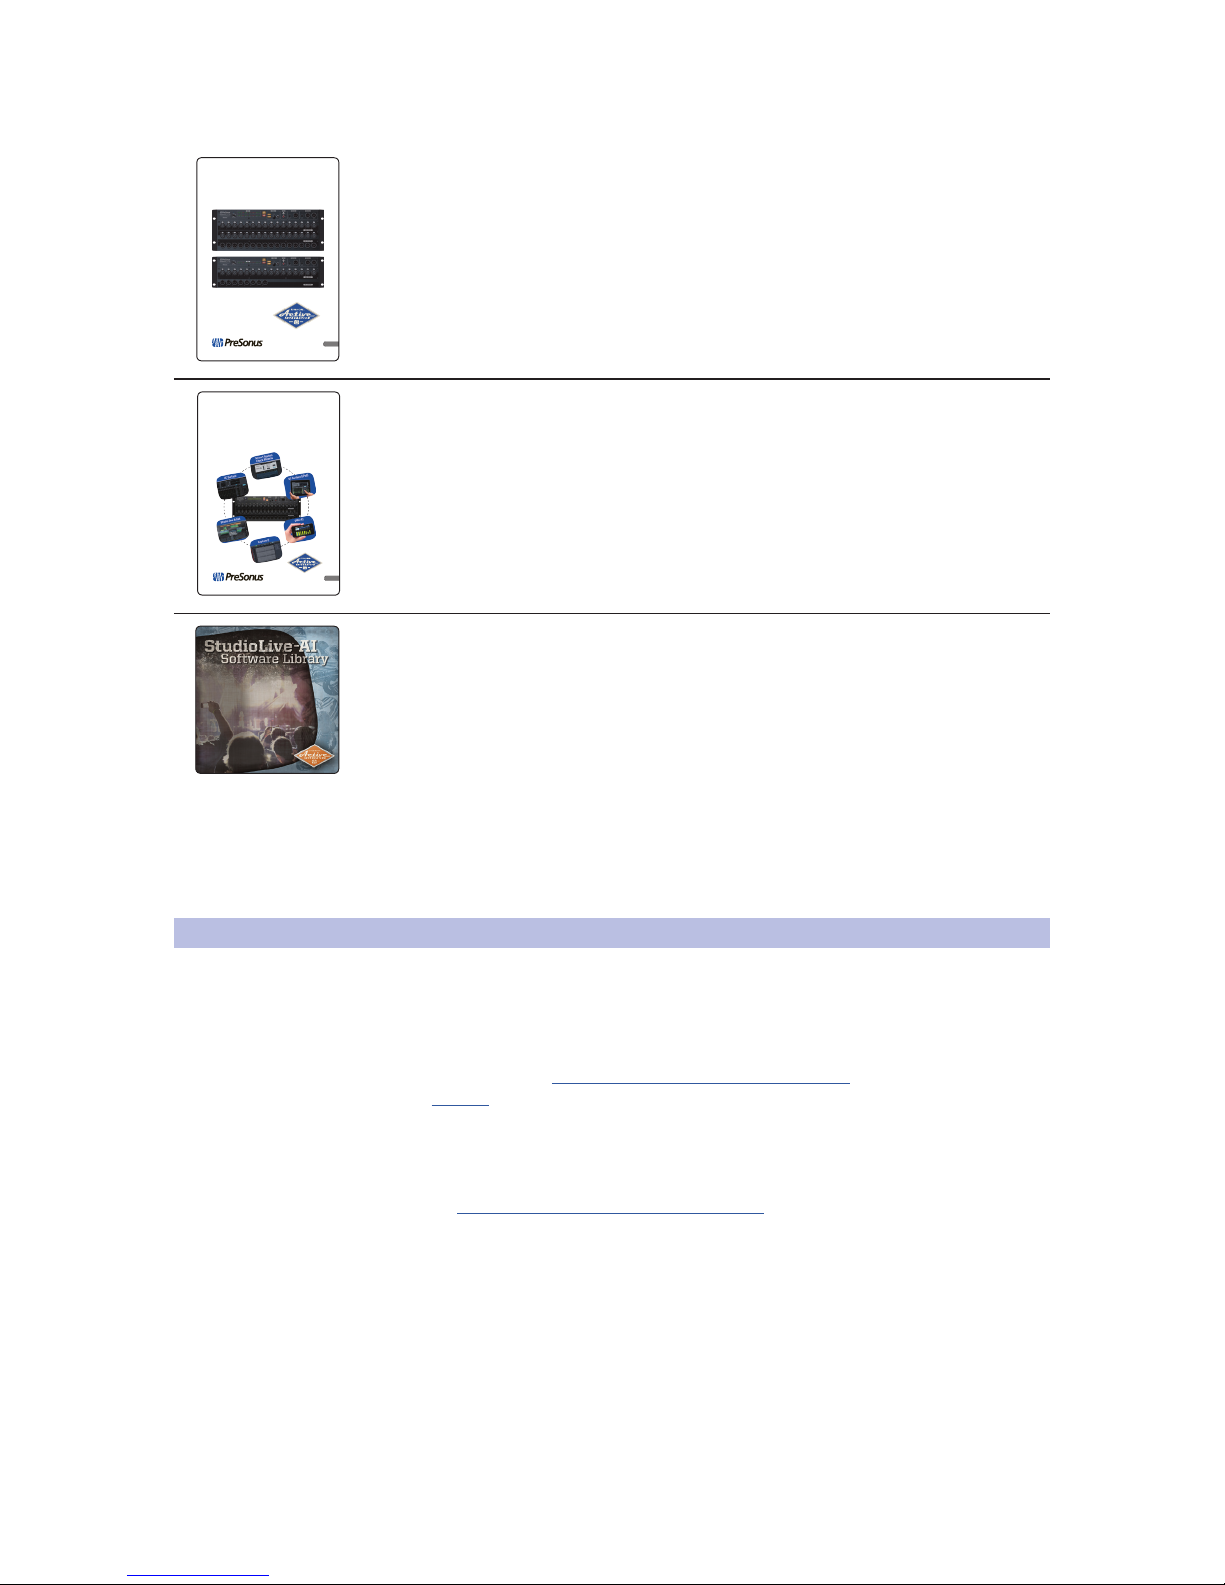
What is not in the box:
• This manual.
• StudioLive AI Software Library Manual
• StudioLive AI Software Library
Once you’ve registered your mixer, you can download UC Surface,
Capture, and Studio One Artist from your My PreSonus account.
Download UC Surface for iPad and QMix-AI for iPhone/
iPod touch from the Apple App Store.
For more details, see the StudioLive AI Software Library Reference Manual.
1.4 What You Will Need
The following items are not included with your RM-series mixer and
are needed to complete its setup, updating, and operation.
• Mixer connected to a network with Internet access or a USB flash drive with
at least 8 GB capacity (SanDisk brand recommended) for firmware updates.
• Wireless router. Click here for information on wireless
routers we know work well with RM-series mixers.
• Control device running UC Surface. This could be a Mac or Windows
computer or an iPad and must be connected, either wired or
wirelessly, to a network router that is connected to the mixer.
• An Apple Thunderbolt to FireWire adapter is needed for Apple computers
shipped since late 2012 that have Thunderbolt ports but not 1394 FireWire ports.
English
StudioLive™ RM-Series Mixers
with UC Surface Control
Touch-Software-Controlled, Rack-Mount Digital Mixers
Owner’s Manual
www.presonus.com
®
English
StudioLive™ RM-Series
Active Integration
™
Software
Library Reference Manual
UC Surface with Smaart® System Check Wizards
UC Surface for iPad
®
| QMix™-AI for iPhone®/iPod
touch® Capture™ 2 | Studio One® Artist
www.presonus.com
®

5
1 Overview
1.5 About This Manual
StudioLive™ RM-Series Mixers
Owner’s Manual
1.5 About This Manual
We suggest that you use this manual to familiarize yourself with the
features, applications, and connection procedures for your StudioLive
RM-series mixer before trying to connect it to your computer. This
will help you avoid problems during installation and setup.
This manual covers hardware functions for the StudioLive RM32AI and RM16AI
32x16x3 rack-mount Active Integration™ digital mixers. When functional differences
are called out, the RM32AI will be mentioned first, followed by the RM16AI.
Note: Unless otherwise indicated, illustrated examples
use images of the StudioLive RM32AI.
The StudioLive AI Software Library Reference Manual, available at
www.presonus.com/products/StudioLive-RM-Series/downloads,
discusses downloading, installing, and using UC Surface touch-control
software, QMix-AI remote control software, Capture recording software,
and Studio One Artist DAW software with your RM-series mixer.
Throughout this manual you will find Power User Tips. These tips
provide mixing tricks, some of which are unique to StudioLive mixers,
and offer explanations of various audio terms. In addition, you will find
a tutorial about microphone placement to help you get the most from
your StudioLive RM-series mixer. Thank you, once again, for buying our
product. We are confident that you will enjoy your StudioLive RM!
1.6 Technical Support
Many technical issues can arise when using a standard computer as a digital audio
workstation (DAW) and when networking wireless devices. PreSonus can only
provide support for issues that directly relate to the StudioLive RM-series mixer
and interface, UC Surface control software, QMix-AI, Capture, and Studio One.
PreSonus does not provide support for computer hardware, iOS hardware, wireless
networks, operating systems, and non-PreSonus hardware and software, and it may
be necessary to contact the manufacturer of these products for technical support.
Please check our Web site (www.presonus.com) regularly for
software information and updates, firmware updates, and
support documentation for frequently asked questions.
Online technical support is available to registered users through their My
PreSonus account. Visit my.presonus.com to register. PreSonus telephone
technical support is available to customers in the USA on Monday through
Friday from 9 a.m. to 5 p.m. Central Time by calling 1-225-216-7887.
Customers outside of the USA should contact their national or regional
distributor for telephone technical support. A list of international distributors
is provided at www.presonus.com/buy/international_distributors.
Advanced troubleshooting guides can be found at
http://support.presonus.com/forums.
6
2 Getting Started
1.6 Technical Support
StudioLive™ RM-Series Mixers
Owner’s Manual
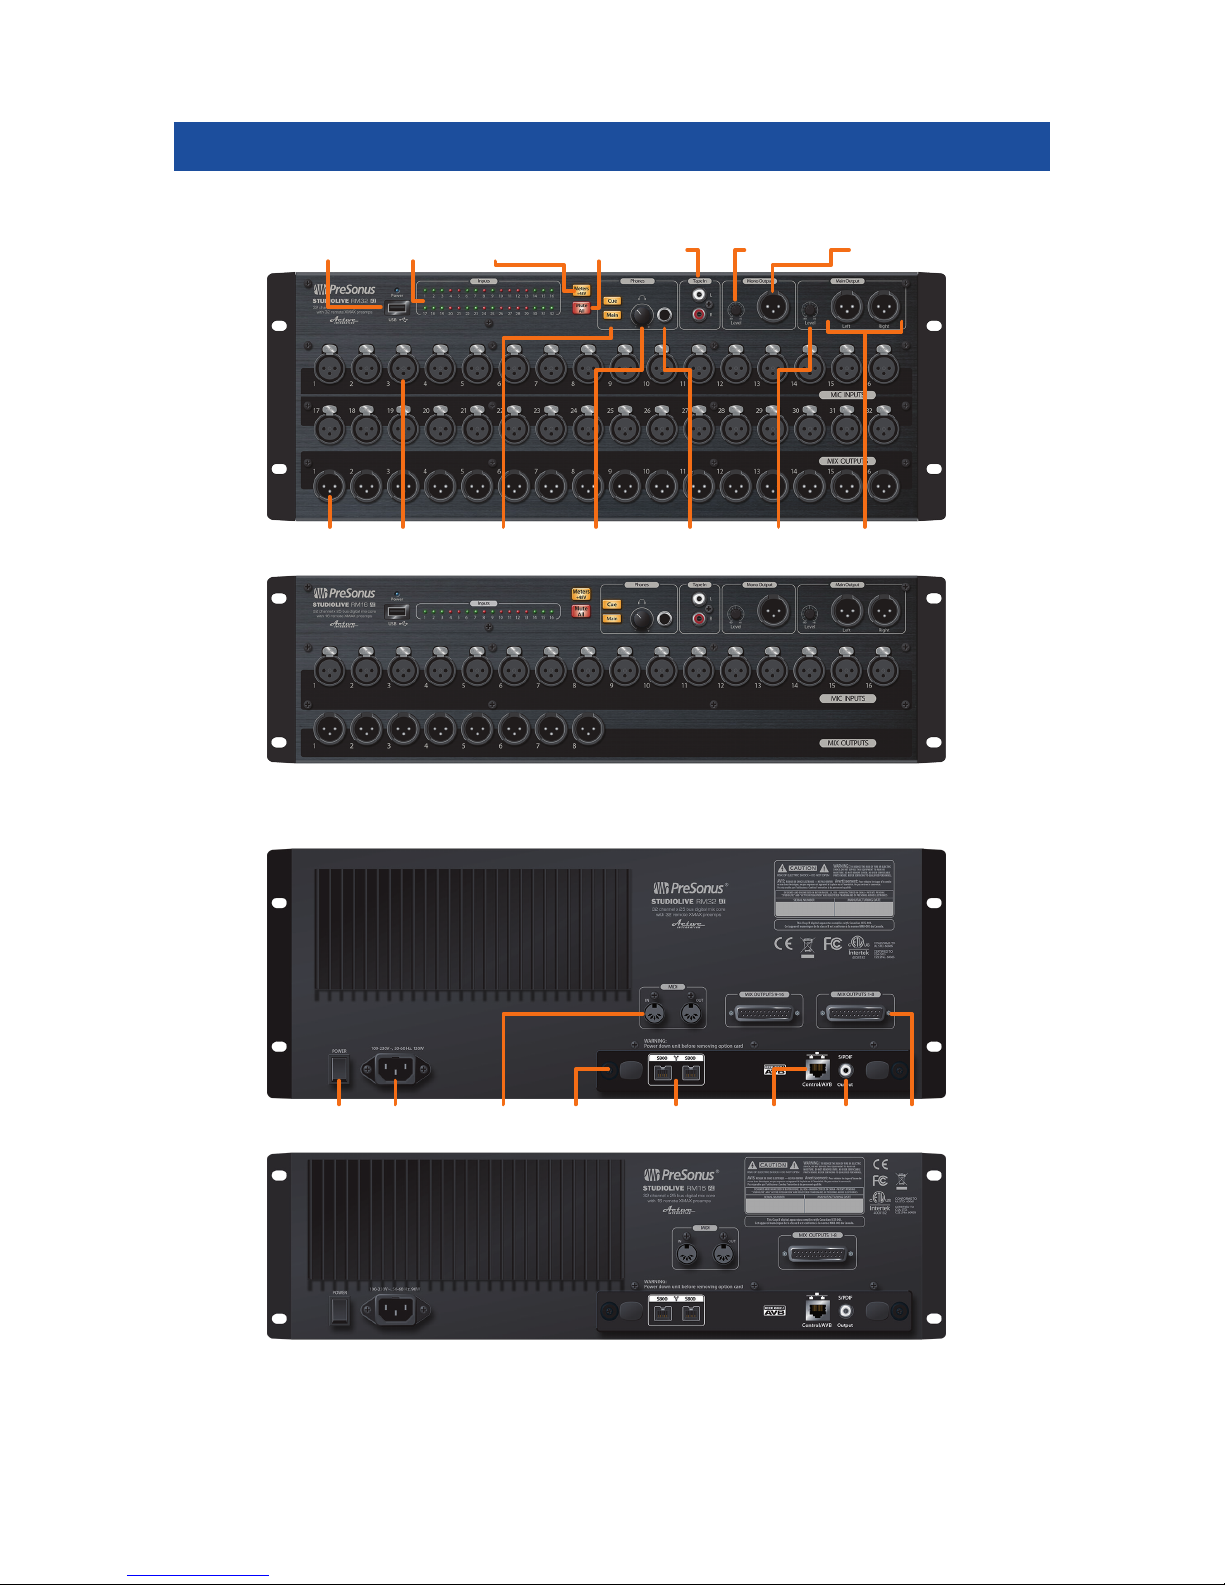
2 Getting Started
Mix
Outputs
Microphone
Inputs
Headphones
Source Select
Headphones
Level
Headphones
Output
Main Output
Level
Main
Outputs
USB
Port
Input
Meters
Meter
Mode Select
Mute All
Button
Tape In
Jacks
Mono/Center
Level
Mono/Center
Output
Power
Switch
IEC Power
Connector
MIDI In/Out
[Future]
Option
Card
Firewire S800
Ports
Mix
Outputs
Ethernet
Port
S/PDIF
Output

7
2 Getting Started
2.1 System Setup Overview
StudioLive™ RM-Series Mixers
Owner’s Manual
2.1 System Setup Overview
It only takes a few steps to get your StudioLive RM-series mixer up and running:
• Register your StudioLive RM-series mixer in your My PreSonus account.
• Download the StudioLive AI Software Library.**
• Install the software.**
• Connect the RM-series mixer to AC power using the included IEC power cord.
• Connect the RM-series mixer to your computer and configure
the system (see 3.2 Networking Overview).
• Check that your RM-series mixer has the latest firmware.
• Connect your audio equipment to the RM-series mixer.
• Run the software and follow your bliss.**
**For detailed information on this step, see the
StudioLive AI Software Library Manual.
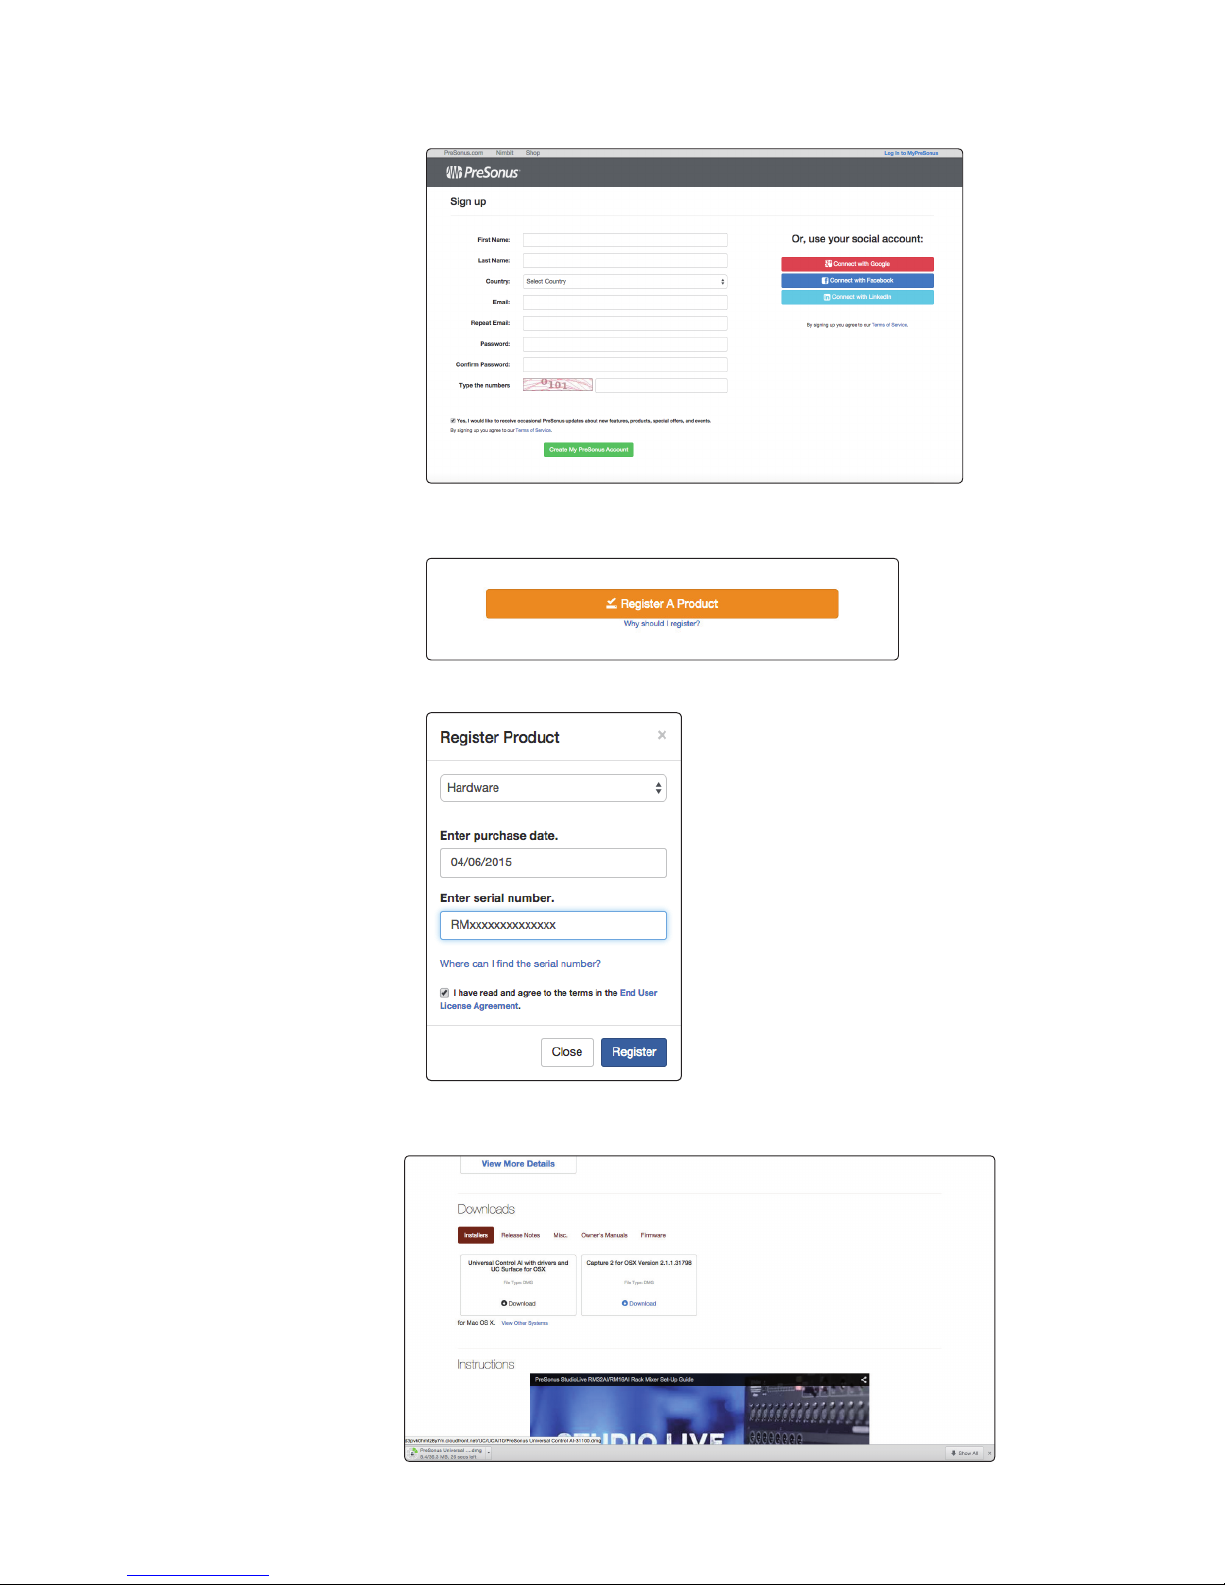
2.2 Registering Your StudioLive RM-series Mixer
1. Go to https://my.presonus.com
8
2 Getting Started
2.2 Registering Your StudioLive RM-series Mixer
StudioLive™ RM-Series Mixers
Owner’s Manual
2. Log in or create a new account if you don’t already have one.
3. After logging into your account, click/tap the “Register A
Product” button in the My Hardware section.
4. Enter the information for your RM-series mixer and click/tap the Register button.
5. You now can download and authorize the included software
and can download the manuals and video guides.
9
2 Getting Started
2.3 Powering the StudioLive RM-series Mixer
StudioLive™ RM-Series Mixers
Owner’s Manual
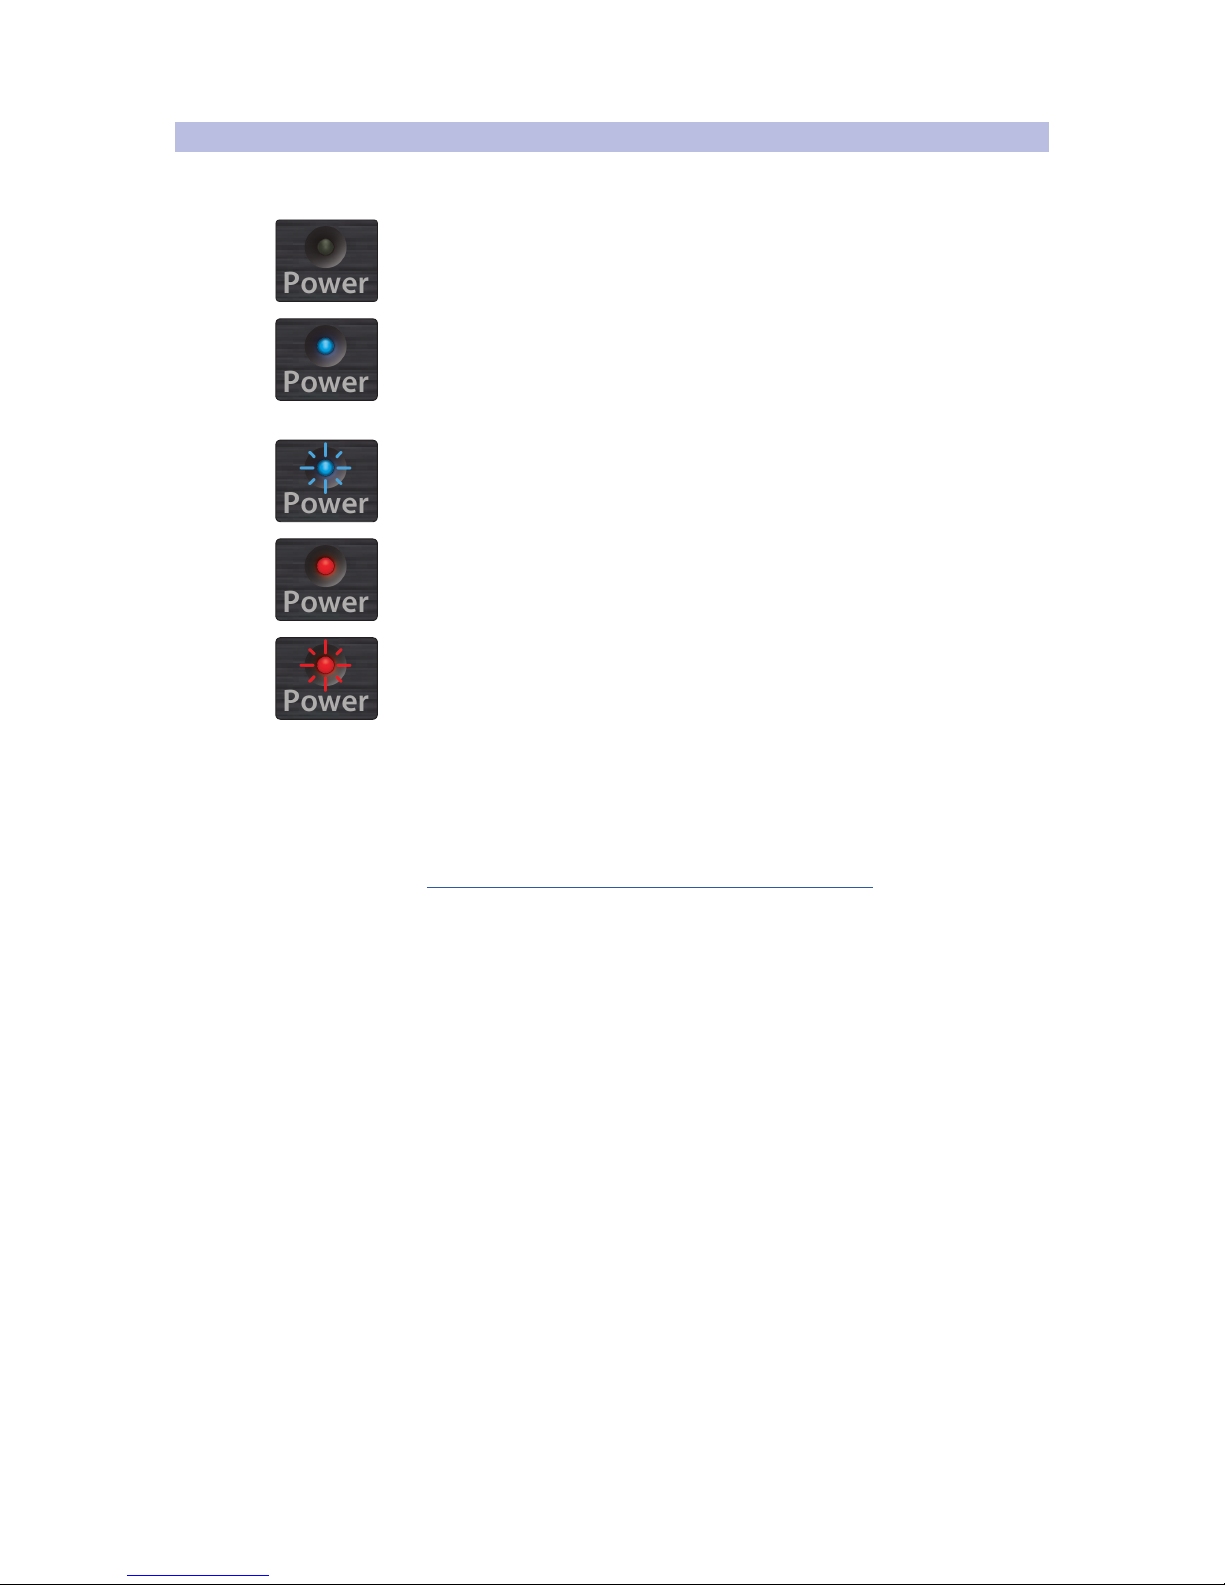
2.3 Powering the StudioLive RM-series Mixer
When you power a StudioLive RM-series mixer, the Power/Status indicator
displays the current state of the mixer in one of the following ways.
Off: The mixer is switched off.
Solid blue: Powered up, connected to a control
device, and functioning properly.
Flashing blue: In the process of booting up or loading a firmware update.
Solid red: On and functioning correctly but with no control device connected.
Flashing red: Boot or update failure.
If the power LED is flashing red:
1. Turn the RM-series mixer off for a few seconds and then turn it on
again. You can also try connecting to a computer for control.
2. If that doesn’t work, open a new technical support ticket by going to
www.presonus.com/support/Contact-Technical-Support and
clicking on the “Click here to submit a support request” link in the
“Submit an Online Technical Support Request” section. U.S. customers
can also call technical support at 1-225-216-7887 Monday through
Friday between 9 a.m. to 5 p.m. Central Standard Time (CST).
A firmware recovery may be necessary to restore proper operation.
This erases everything on the mixer and restores factory defaults.

10
3 Networking the RM-series Mixer
3.1 Minimum Computer System Requirements
StudioLive™ RM-Series Mixers
Owner’s Manual
3 Networking the RM-series Mixer
3.1 Minimum Computer System Requirements
Mac
• Mac OS X 10.8 64-bit or later
• Intel® Core® i3 (Core i5 or faster recommended)
• 4 GB of RAM or more
Windows
• Windows 7 32-bit/64-bit or Windows 8 32-bit/64-bit
• Intel Core i3 (Core i5 or faster recommended)
• 4 GB of RAM (8 GB or more recommended)
Mac and Windows
• Wireless (Wi-Fi) or wired Ethernet network connection
• Internet connection
• For Capture and Studio One:
- FireWire s800 (IEEE 1394b) port
- Internal or external 7200 RPM storage drive highly recommended
- Monitor with 1280x800 resolution
iOS Devices
• iOS 7.03 or higher
• iPad Air
• iPad mini with Retina display
• iPad (4th generation)
• iPad mini
• iPad (3rd generation)
• iPad 2
NOTE: The speed of your processor, amount of RAM, and size and speed of your
hard drive will greatly affect the overall performance of your recording system.
Also, a more powerful system (faster processor with more RAM) will allow for
lower latency (signal delay) while monitoring audio or MIDI signals.
11
3 Networking the RM-series Mixer
3.2 Networking Overview
StudioLive™ RM-Series Mixers
Owner’s Manual
3.2 Networking Overview
Networking your RM-series mixer involves both hardware and software
components. The entire installation and configuration procedure is given in this
manual, but before beginning, you must download and install UC Surface touchcontrol software onto a Mac or Windows computer or an iPad, as described in
Chapter 2, “Getting Started,” in the StudioLive AI Software Library Manual.
Computer Control and Audio Data Connections
Two types of data flow between your RM-series mixer and your
computer. We will describe them first, then show you different
scenarios for connecting the RM-series mixer to a computer.
Control: This is the primary connection between the RM-series
mixer and your computer, which UC Surface uses to modify
settings and save and load mix scenes and presets.
Audio: A FireWire s800 connection enables recording audio to, and
playing back from, Capture, Studio One Artist, or another digital audio host
application. This connection is not necessary for mixing live sound.
A single computer can be used both to control and to record from the RMseries mixer, or separate computers can be used for control and audio.
Note: Most of the networking discussion in this manual concerns the control
data connection, as that is the essential connection for RM-series mixers.
Power User Tip: Network connections occasionally require troubleshooting, especially
when a lot of wireless networks are in use. Because of this, it is always a good idea
to get your networked devices and RM-series mixer happily communicating before
the pressure is on, and you have a singer trying to dial in a monitor mix while you’re
trying to mic the drum kit. So while the guitarist is flirting with the bartender, take a
quick moment to get your iPad, iPhone, computer, and StudioLive RM mixer talking.
Network RouterLaptop Ethernet cable
FireWire-equipped laptop
12
3 Networking the RM-series Mixer
3.2 Networking Overview
StudioLive™ RM-Series Mixers
Owner’s Manual
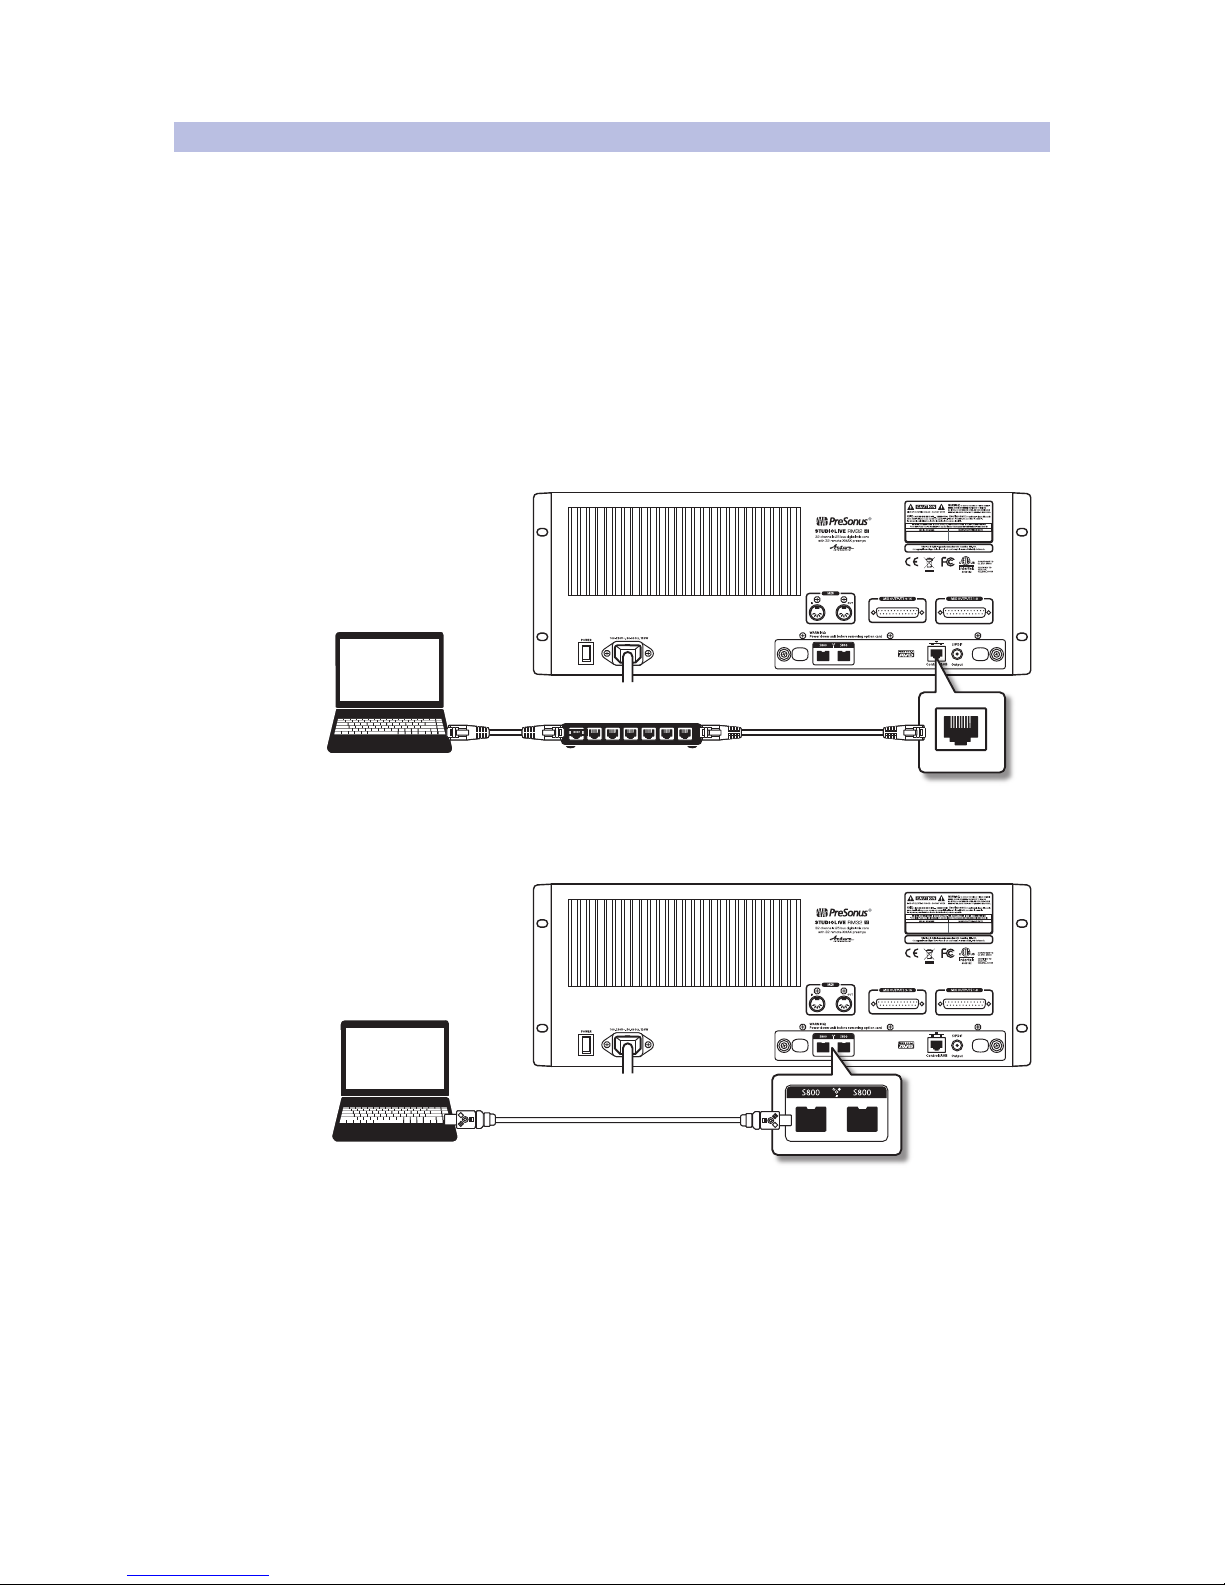
Making Control Data Connections
Your can connect your StudioLive RM-series mixer
to a computer or network router in either of two ways:
• Using a CAT5e or CAT6 Ethernet cable, connect the mixer directly to a router. If a
wired connection is available, the RM mixer will not scan for wireless networks.
• Connect the mixer to the router wirelessly using the included
USB Wi-Fi LAN adapter and a network router. The included adapter is the
only LAN adapter supported for use with your StudioLive RM mixer.
Note: StudioLive RM-series mixers do not support hot-swapping the Wi-Fi LAN
adapter. The LAN adapter must be connected when you power your mixer.
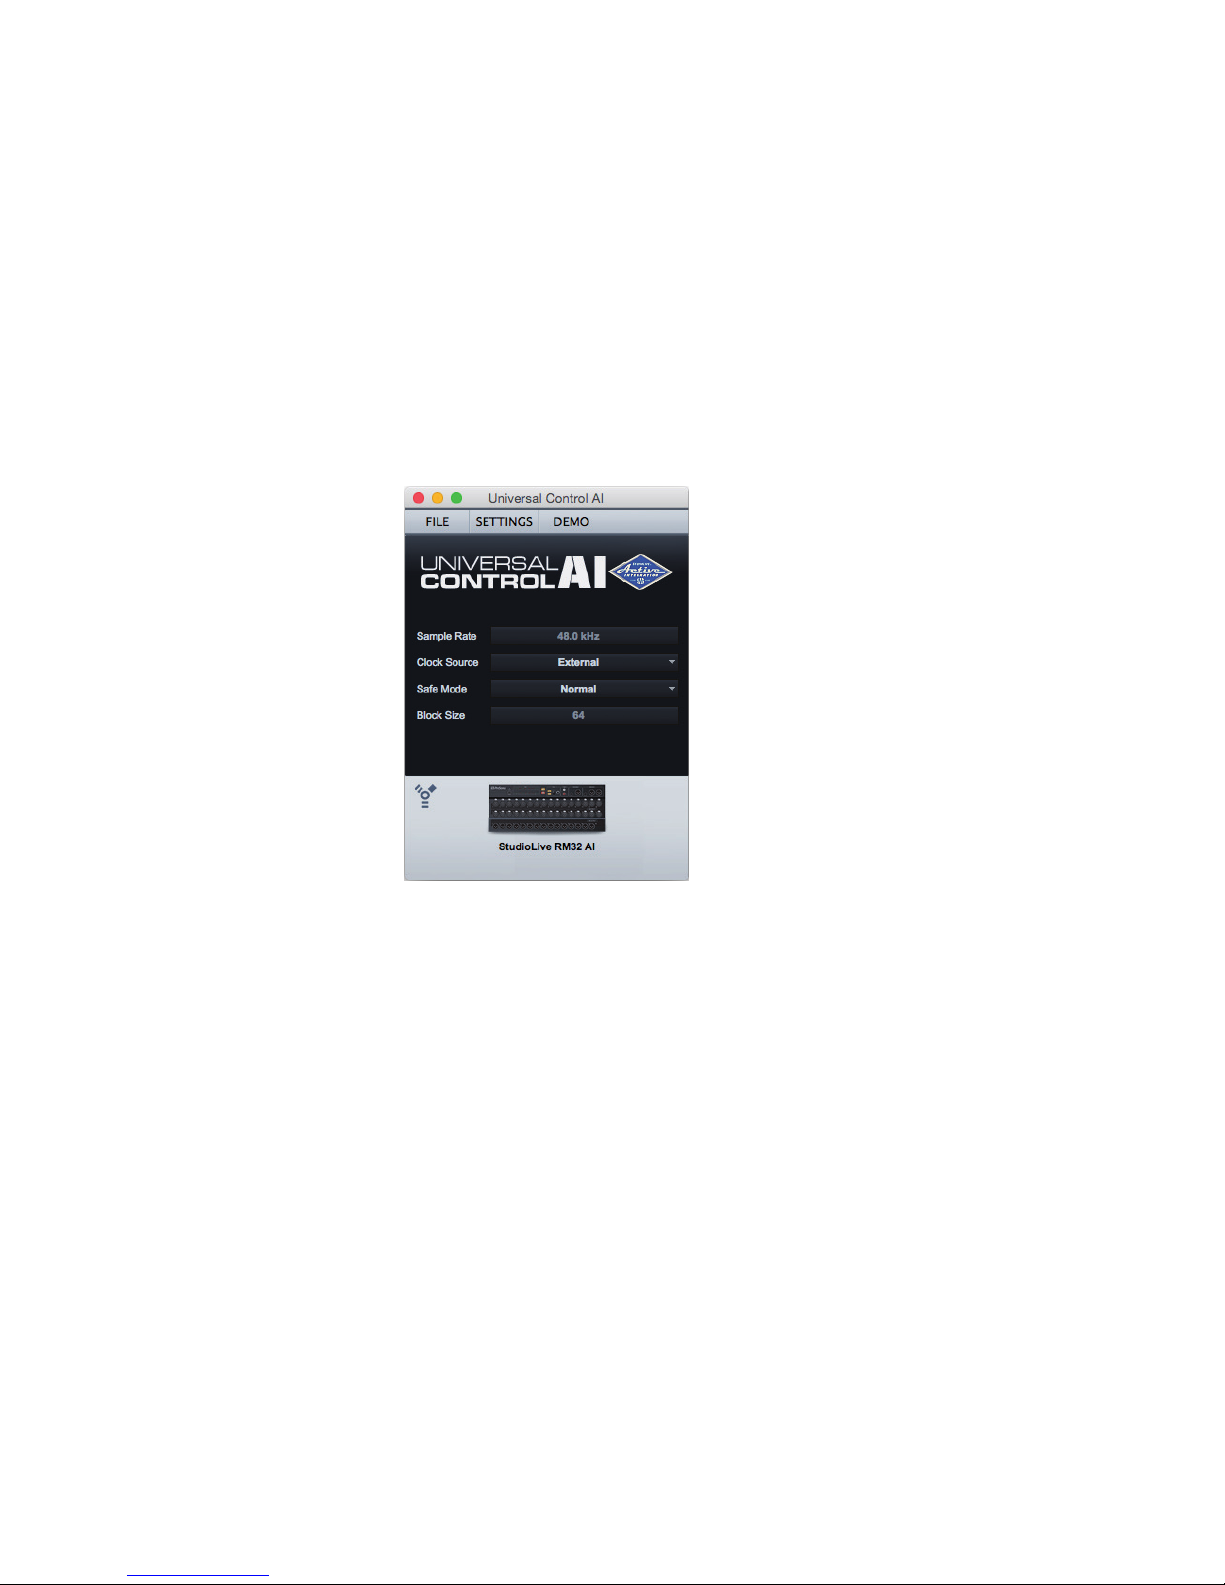
Once you make the connection, the RM-series mixer will be shown
in the Universal Control AI launch window. For more information
on the launch window, see Chapter 2, “Getting Started,” in the
StudioLive AI Software Library Reference Manual.
Power User Tip: When you launch UC Surface with the computer and StudioLive RM32AI
or RM16AI connected to the same network, the software will automatically see the mixer.
Note: If your RM-series mixer appears in the launch window with an
exclamation point next to it, UC Surface is having a problem establishing a
connection. If the connection to the RM mixer is wireless, check to be sure you
have a strong wireless signal or try a wired connection. If the connection to
the RM mixer is wired, check for bad cables going in or out of the router.
Note: If you do not see your RM mixer displayed at the bottom of the launch window,
UC Surface software is not “seeing” the mixer. Check that cables are properly connected
and choose Rescan Network from the Settings menu. If your RM mixer still does
not appear in the window, you will need to troubleshoot your network setup.

13
3 Networking the RM-series Mixer
3.3 Wired Ethernet Control Setup
StudioLive™ RM-Series Mixers
Owner’s Manual
3.3 Wired Ethernet Control Setup
A wired Ethernet setup is the simplest:
1. Connect standard CAT5e or CAT6 Ethernet cables from your
computer’s Ethernet port to an Ethernet router, and from the router
to the Control port on the RM-series mixer’s rear panel.
2. Launch UC Surface software on a computer (Mac or
Windows) that is connected to the router.
3. The Universal Control launch window will appear and
should recognize the presence of your RM mixer.
MANUFACTURING DATE
SERIAL NUMBER
WARNING
:
TO REDUCE THE RISK OF FIRE OR E LECTRIC
SHOCK, DO NOT EXPOSE THIS EQUIPMENT T O RAIN OR
MOISTURE. DO NOT REMOVE COVER. NO USER SERVI CEABLE
PARTS INSIDE. REFER SERVICING TO QUALIF IED PE RSONNEL .
AVIS
:
RISQUE DE CHOC ELECTRIQUE — NE PAS OUVR IR
DESIGNED AND ENGINEERED BY PRESON US • MANU FACTURED IN CHINA • PATENT S PE NDING
“PreSonus”,“STUDIOLIVE” AND “ACTIVE INT EGRATION” ARE REGI STERED TRADEMARKS OF PRES ONUS AUD IO ELECTRO NICS
This device complies with Part 15 of the FCC Rules and ICES- 003 for Canada. Operation is subjected to th e
following two conditions: (1) this device may not cause harmful inter ference, an d (2) th is device mu st
accept any interference received, including interference that m ay cause un desired operation.
WARNING:
Power down unit before removing option card
32 channel x 25 bus digital mix core
with 32 remote XMAX preamps
R
STUDIOLIVE RM32
S800S800
S800S800
S800S800
S/PDIF
Output
S800S800
S800S800
S800S800
IN OUT
MANUFACTURING DATE
SERIAL NUMBER
WARNING
:
TO REDUCE THE RISK OF FIRE OR E LECTRIC
SHOCK, DO NOT EXPOSE THIS EQUIPMENT T O RAIN OR
MOISTURE. DO NOT REMOVE COVER. NO USER SERVI CEABLE
PARTS INSIDE. REFER SERVICING TO QUALIF IED PE RSONNEL .
AVIS
:
RISQUE DE CHOC ELECTRIQUE — NE PAS OUVR IR
DESIGNED AND ENGINEERED BY PRESON US • MANU FACTURED IN CHINA • PATENTS PEN DING
“PreSonus”,“STUDIOLIVE” AND “ACTIVE INT EGRATION” ARE R EGISTERED TRADEMA RKS OF PRES ONUS AUD IO ELECTRO NICS
This device complies with Part 15 of the FCC Rules and ICES- 003 for Canada. Operation is subjected to th e
following two conditions: (1) this device may not cause harmful inter ference, an d (2) th is device mus t
accept any interference received, including interference that m ay cause un desired operation.
WARNING:
Power down unit before removing option card
32 channel x 25 bus digital mix core
with 32 remote XMAX preamps
R
STUDIOLIVE RM32
S800S800
S800S800
S800S800
S/PDIF
Output
S800S800
S800S800
S800S800
IN OUT
1
2
345
Ethernet
cable
Network router
1
2
345
Ethernet
cable
Network router
Touch screen
computer
Lap top
14
3 Networking the RM-series Mixer
3.4 Wireless Control Setup
StudioLive™ RM-Series Mixers
Owner’s Manual
3.4 Wireless Control Setup
A standard wireless Ethernet router can be used to make a wireless
connection from the router to the RM-series mixer.
Wireless Connection from Router to StudioLive RM Mixer
By default, StudioLive RM-series mixers are configured to automatically connect
to a wireless network using the following network name and password:
• Wireless network name: StudioLive
• Wireless network password: StudioLive
Note: While you may wish to use the default values for testing a new RM-series mixer,
to maintain basic security, we strongly urge configuring different network settings.
To control a StudioLive RM mixer wirelessly over an existing or new network,
first make a wired connection between the RM mixer and the wireless router
and perform the necessary setup. Once setup is complete, the wired connection
is no longer necessary, and the RM mixer can be controlled wirelessly.
If you have no network called “StudioLive” and would like to
connect instead to another existing or new network:
1. Make a wired network connection to the RM mixer, as
described in 3.3 Wired Ethernet Control Setup.
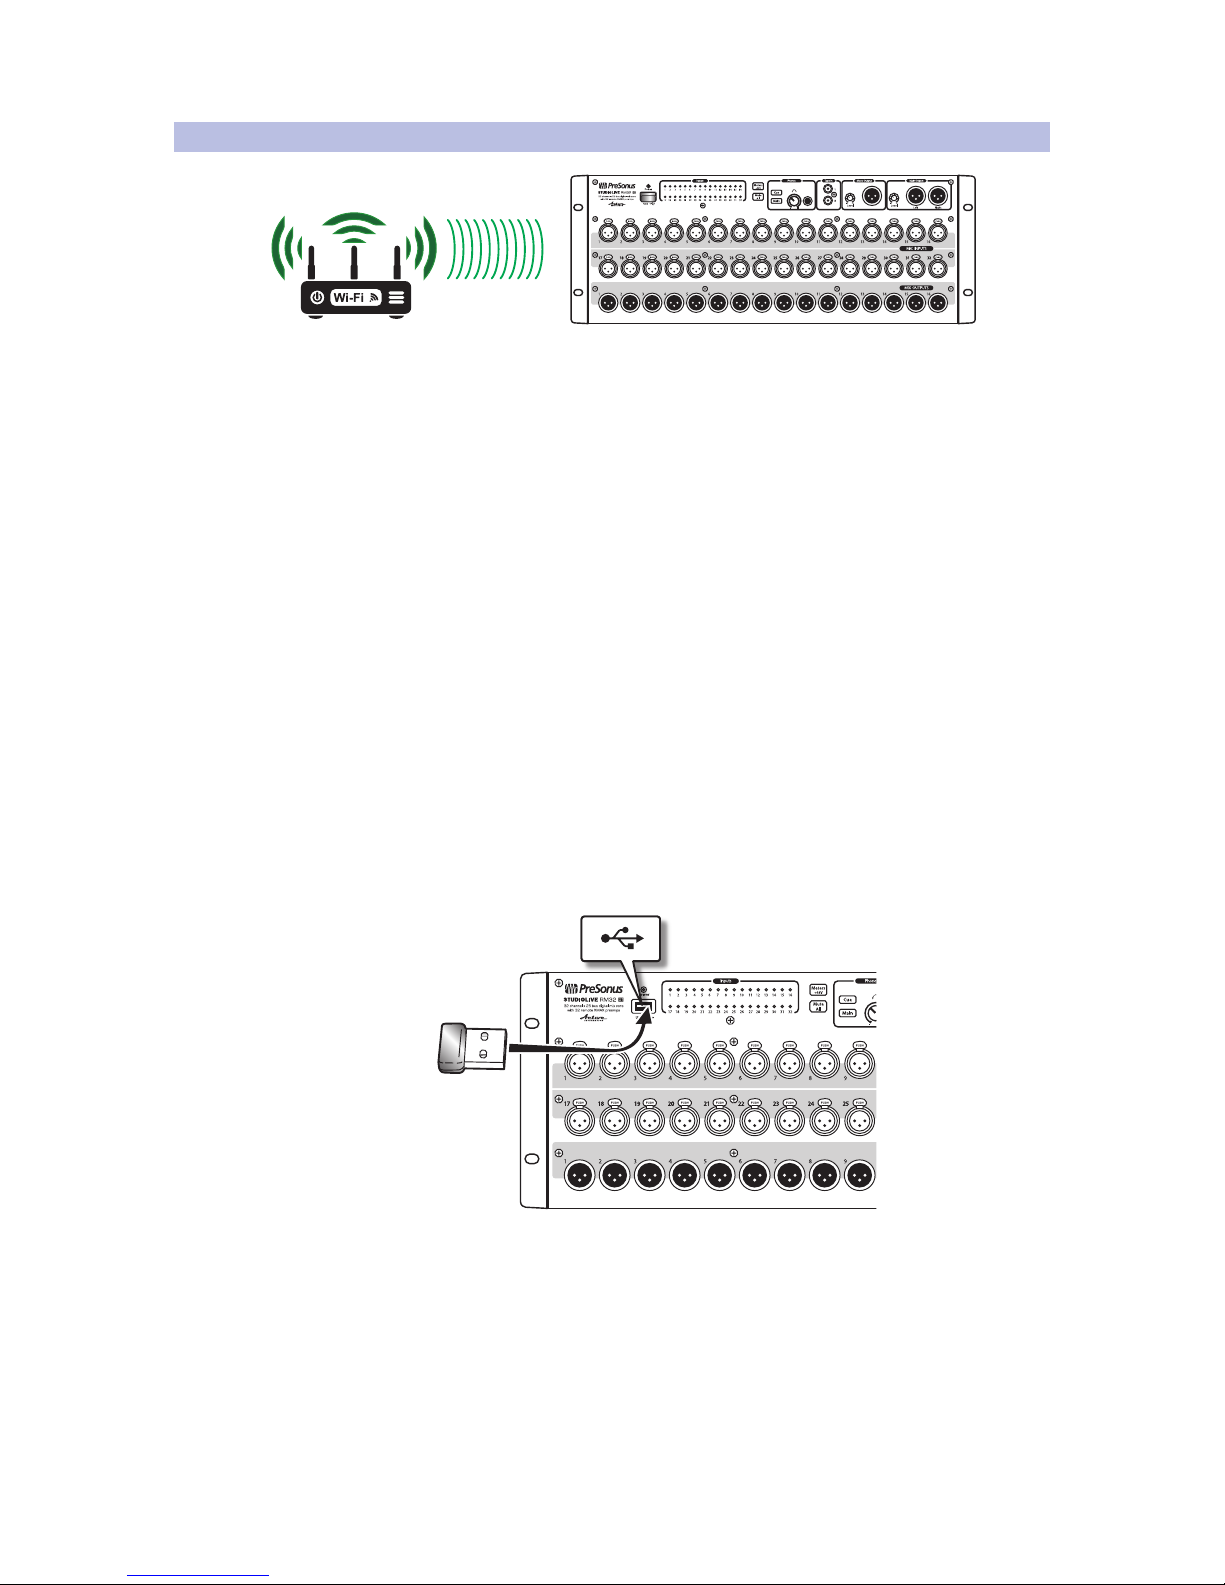
2. With the RM-series mixer powered off, insert the included USB Wi-Fi
adapter in the USB slot on the front panel of the RM-series mixer. StudioLive
RM-series mixers do not support hot-swapping the Wi-Fi LAN adapter.

15
3 Networking the RM-series Mixer
3.4 Wireless Control Setup
StudioLive™ RM-Series Mixers
Owner’s Manual
3. Power on the RM-series mixer and wait until
the Power LED has turned solid red.
4. Launch UC Surface software on a computer (Mac or Windows)
or iPad that is connected to the network you want to use.
5. The Universal Control launch window will appear and
should recognize the presence of your RM mixer.
6. When your RM-series mixer does appear in the window, click/
tap on the icon to connect and open the UC Surface mix window.
A blue swirl in the lower right shows the attempt to connect.
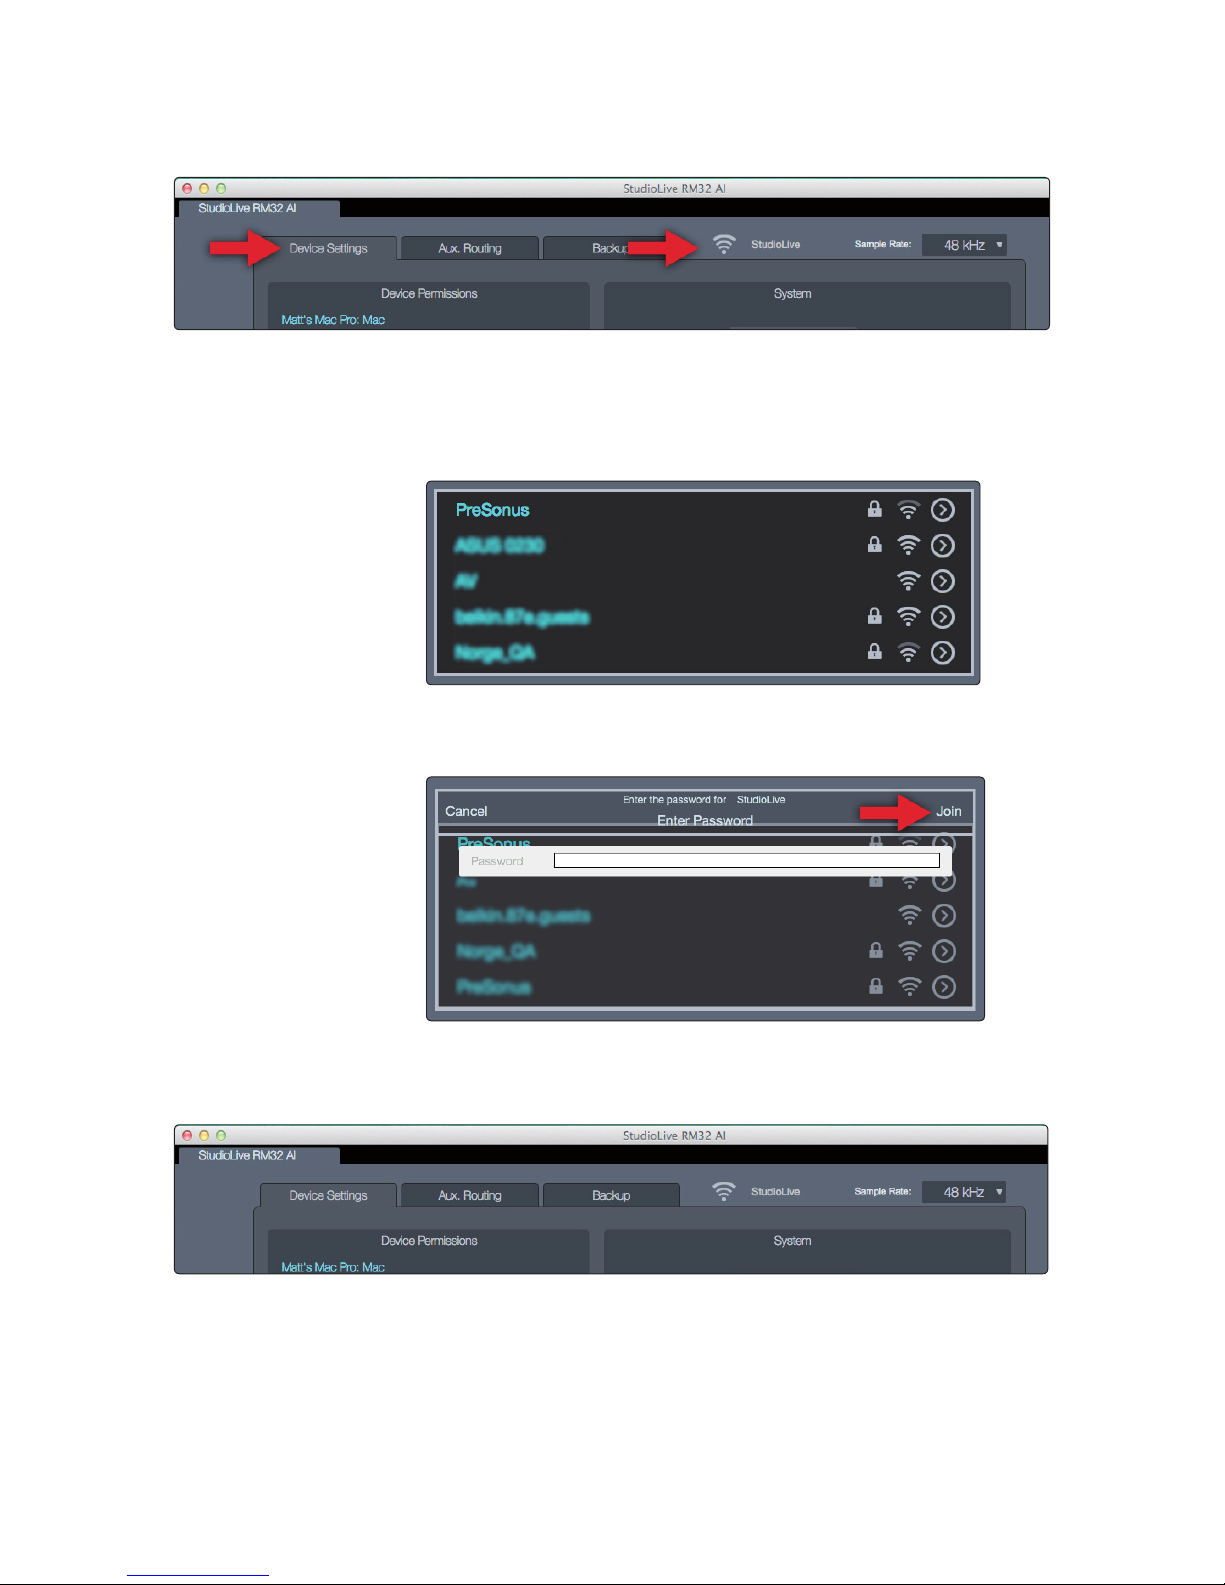
7. Click/tap the Open Global Settings button to open the Global Settings view.
16
3 Networking the RM-series Mixer
3.4 Wireless Control Setup
StudioLive™ RM-Series Mixers
Owner’s Manual
8. Click/tap the wireless connection icon near the top of the tab. The Network List
view appears, showing all of the wireless networks being seen by the RM mixer.
Note: Scanning for networks can take a little time. If you see a dialog that reads
“The mixer has limited or no Wi-Fi capability detected or is still scanning for
additional networks,” try closing and reopening the Global Settings view.
9. Click/tap the name of the wireless network you want to
use in the list of available wireless networks.
10. Enter a password at the prompt, if one is required.
11. Click/tap the Join button.
12. Close the Network List view; the name of the network you just joined should be
displayed next to the wireless connection icon. If it is not, you did not successfully
join the network and must try again or troubleshoot the network connections.
13. Quit UC Surface and shut down the RM mixer.
14. Remove the wired connection between the router and the RM mixer.
Your system is now configured to connect to the new wireless network.
17
3 Networking the RM-series Mixer
3.4 Wireless Control Setup
StudioLive™ RM-Series Mixers
Owner’s Manual
Every time you turn on your StudioLive RM-series mixer, it will:
1. Look for a wired Ethernet connection and use it if one is found.
2. If no wired connection is found, it will check whether
the USB Wi-Fi LAN adapter is plugged in.
3. If the Wi-Fi LAN adapter is found, the mixer will look for, and attempt
to connect to, the wireless network it has been configured to use.
Note: StudioLive RM-series mixers support only WPA and WPA2 security. Please
be sure that your router is configured using one of these security protocols.
Power User Tip: WPA and WPA2 are protocols created to make wireless
networks secure. WPA stands for “Wi-Fi Protected Access,” and WPA2 is a
later version that conforms to the IEEE 802.11i networking standard. Most
routers have settings that manage their security protocols; consult the
documentation for your router to learn how to change these settings.
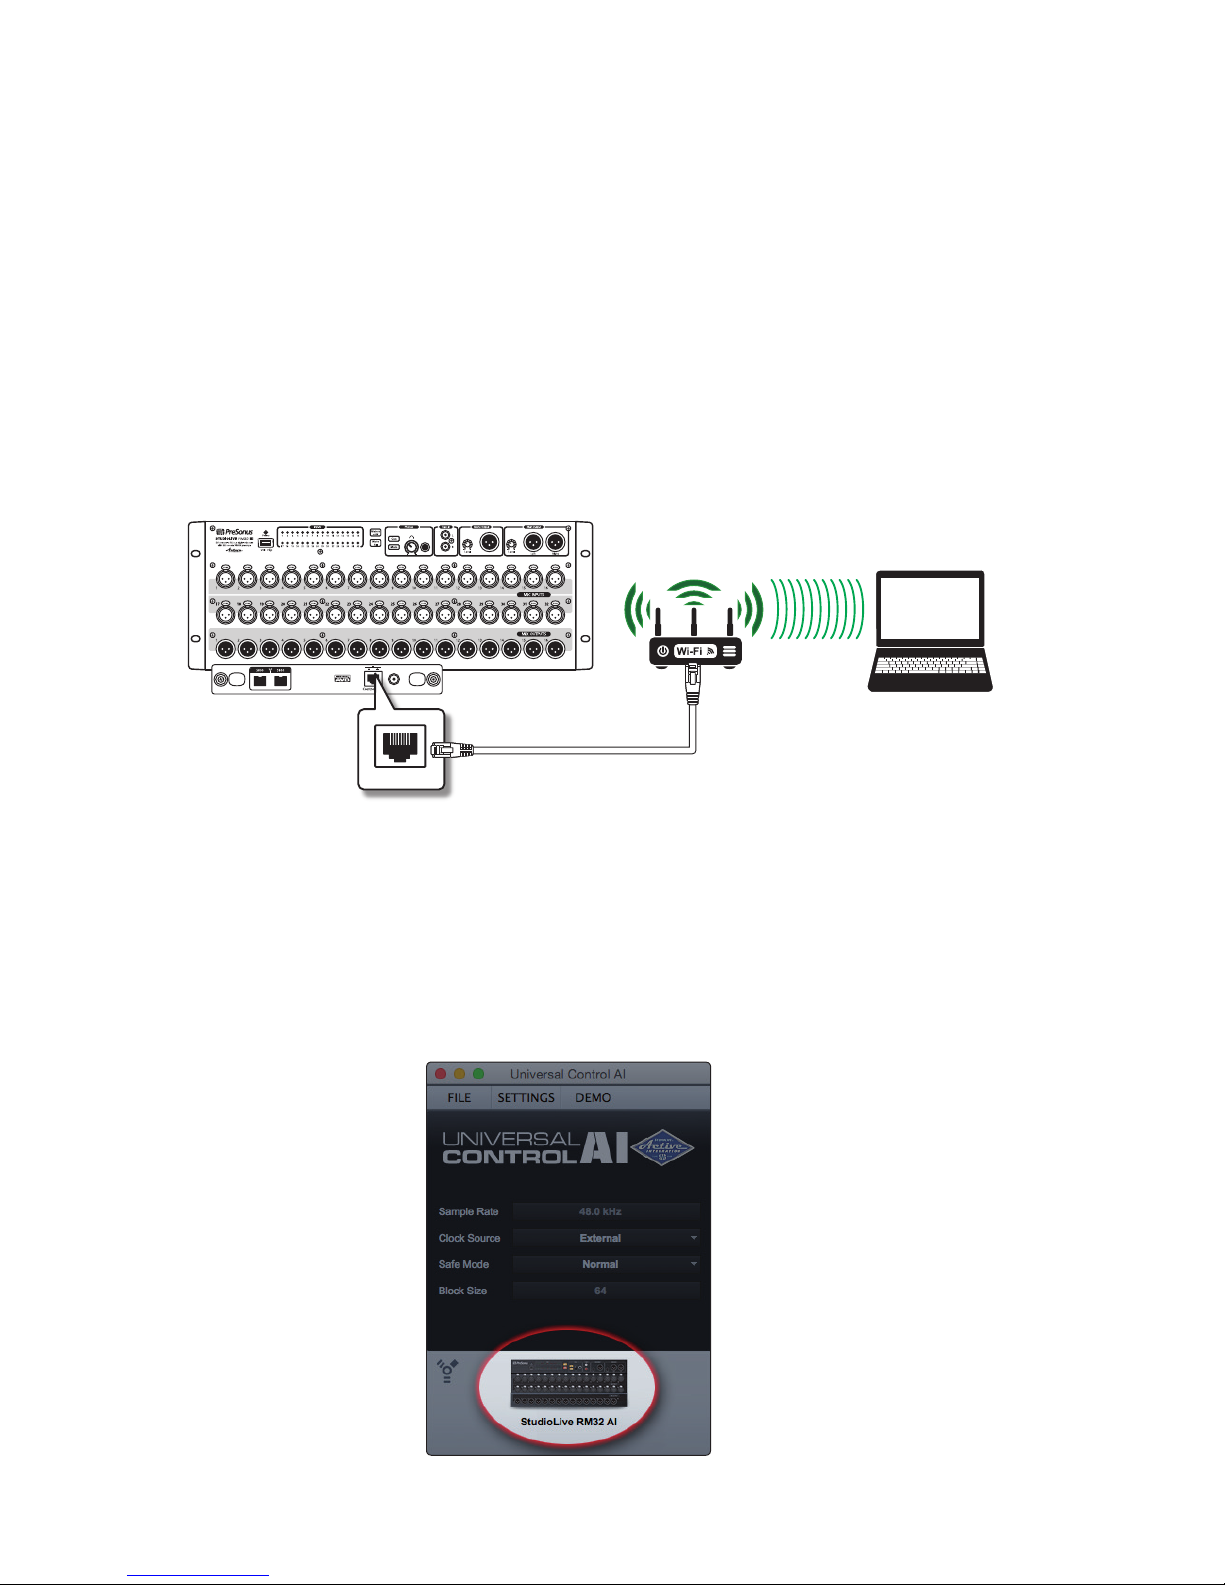
Wireless Connection from Computer to Router
To create this setup:
1. Configure a wireless connection between your computer
or iPad and a wireless Ethernet router.
2. Connect a standard CAT5e or CAT6 Ethernet cable from the
Control port of the RM-series mixer to the router.
3. Launch UC Surface software on a computer (Mac or Windows)
or iPad that is connected to the network you want to use.
4. The Universal Control launch window will appear and
should recognize the presence of your RM mixer.
Laptop
Ethernet cable
18
3 Networking the RM-series Mixer
3.5 Connecting Your Computer to Your Network in Software
StudioLive™ RM-Series Mixers
Owner’s Manual
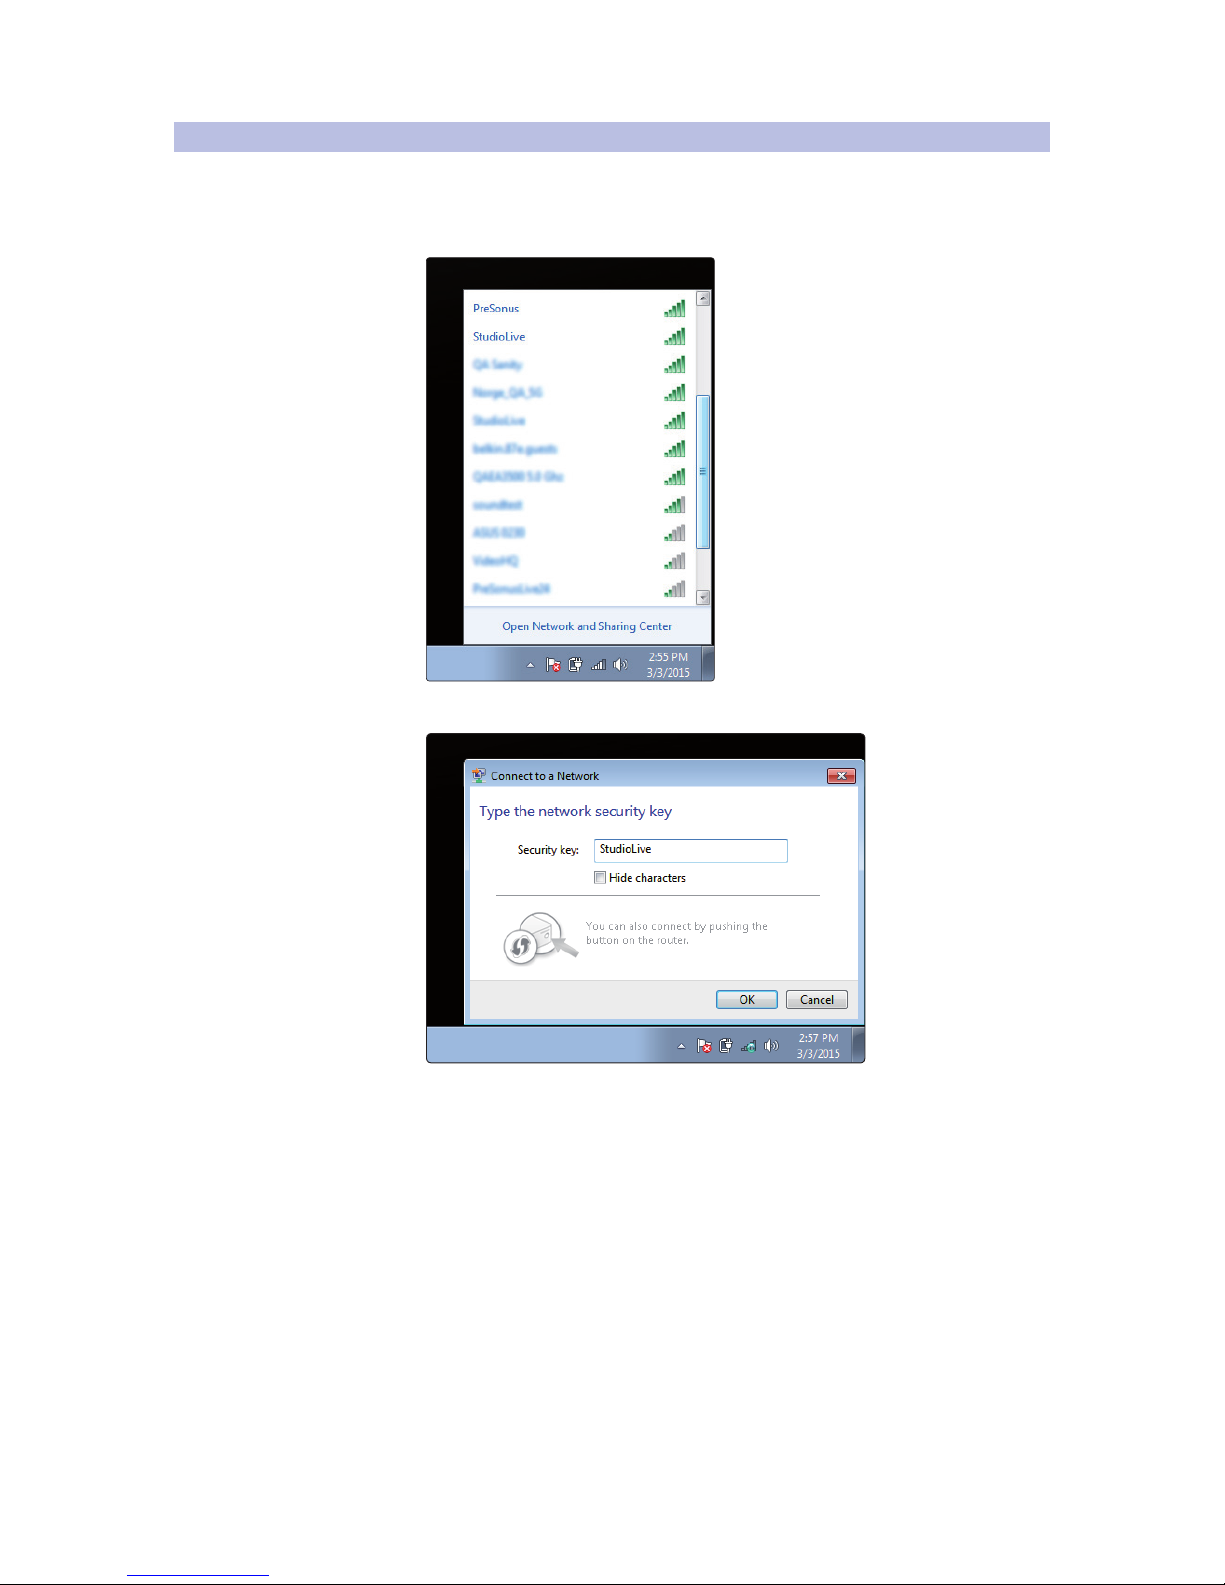
3.5 Connecting Your Computer to Your Network in Software
Windows 7+
1. Click/tap on the network icon in the notification area to
open the Connect to Network Control Panel.
2. Select the same wireless network to which you configured your RM-series mixer.
3. Enter the network password or key.
 Loading...