

Page 1

“mLAN Patchbay” is application software that allows mLAN plugs (virtual
input/output jacks) to be connected to or disconnected from the mLAN bus
(system), and synchronization settings of each mLAN device to be managed
— all under centralized control from your computer. The Macintosh version
manages the mLAN devices via IEEE 1394, and the Windows version manages them via the serial interface.
Table of Contents
Starting mLAN Patchbay
Windows98/95 environment ....... 2
Macintosh environment............... 2
Menu bar
File .............................................. 3
Edit.............................................. 4
View ............................................ 5
Option ........................................ 6
Help (Windows only) ................. 10
• The software and this owner’s manual are exclusive copyrights of Yamaha Corporation.
• Copying of the software or reproduction of this manual in whole or in part by any means is
expressly forbidden without the written consent of the manufacturer.
• Yamaha makes no representations or warranties with regard to the use of the software and documentation and cannot be held responsible for the results of the use of this manual and the software.
• Copying of the commercially available music sequence data and/or digital audio files is strictly
prohibited except for your personal use.
• The company names and product names in this owner’s manual are the trademarks or registered trademarks of their respective companies.
• The screen displays as illustrated in this owner’s manual are for instructional purposes, and may
appear somewhat different from the screens which appear on your computer.
..................................... 3
.......... 2
Main window
Tabs ...........................................11
Tool buttons...............................11
Data list
......................................13
Operation
Making a connection..................15
Breaking a connection................16
Master and slave settings............16
Master and Slave mode settings ...17
............................11
...................................15
This owner’s manual assumes that you are already familiar with basic Windows/Macintosh operation. If you are not, please refer to the owner’s manual which came with
your Windows/Mac OS software before using mLAN Patchbay.
For information about hardware requirements, the interconnection of devices and
the installation of the mLAN Patchbay software, refer to the separate “Installation
Guide” as well as the owner’s manual for the respective mLAN device.
This owner’s manual is applicable to the mLAN Patchbay for both Windows and
Macintosh. The screen illustrations are mainly taken from the mLAN Patchbay for
Macintosh.
©2000 Y amaha Corporation
1
Page 2

7
Starting mLAN Patchbay
After installing mLAN Patchbay and making the necessary connections, start up mLAN Patchbay as follows.
Windows98/95 environment
In Windows 98/95, select “Start” button
“mLAN Patchbay.”
If the state of the bus is not read within a certain length of time after the program is
started, check to make sure that the Serial Port value matches the COM port on
your computer to which the serial cable is connected, and that no other application
programs are using the COM port. (Page 8.)
Macintosh environment
Double-click the mLAN Patchbay icon.
→
“Programs (P)” menu
→
“mLAN Tools,” and choose
2
Page 3

Menu bar
File
New
Create a new file. The Audio and MIDI pages will show all mLAN plugs of the current bus (system) as
unconnected. The WCLK page will display the current word clock (synchronization) status of the bus. If
you wish to view the latest connection status of the bus, select the [Option] menu command [Update].
Open ...
Open an existing file. The previously-saved connection status (Audio/MIDI pages) and synchronization
status (WCLK page) will be displayed. Simply opening a file will not cause its settings to be reflected on the
bus.
If you wish to apply the settings of all pages, select the [Option] menu command [Apply].
Close
Close the file you are currently editing.
Save
Save the currently-edited file by overwriting it.
Save As...
Save the currently-edited file under another name.
Print... (Windows only)
Print the currently selected page.
Information (Property)
Open the Information (Property) dialog box to view detailed information on the selected mLAN plug
or mLAN device.
In the Information (Property) dialog box you can modify the Nickname.
A Nickname you modify in the Property dialog box will not be applied to the bus
until you execute the [Option] menu command [Apply].
Quit
Exit mLAN Patchbay.
3
Page 4
Edit
Undo/Redo
Undo returns the previously-edited item to its previous state. After Undo is executed, this command
will change to Redo. Redo cancels the effect of Undo, restoring the item to its edited state.
Disconnect
Disconnect the selected mLAN plug and save it in the clipboard. This cannot be used in the WCLK page.
Copy
Copy the selected mLAN plug and save it in the clipboard. This cannot be used in the WCLK page.
Paste
Connect the mLAN plug copied in the clipboard to the selected mLAN plug. This cannot be used in the
WCLK page.
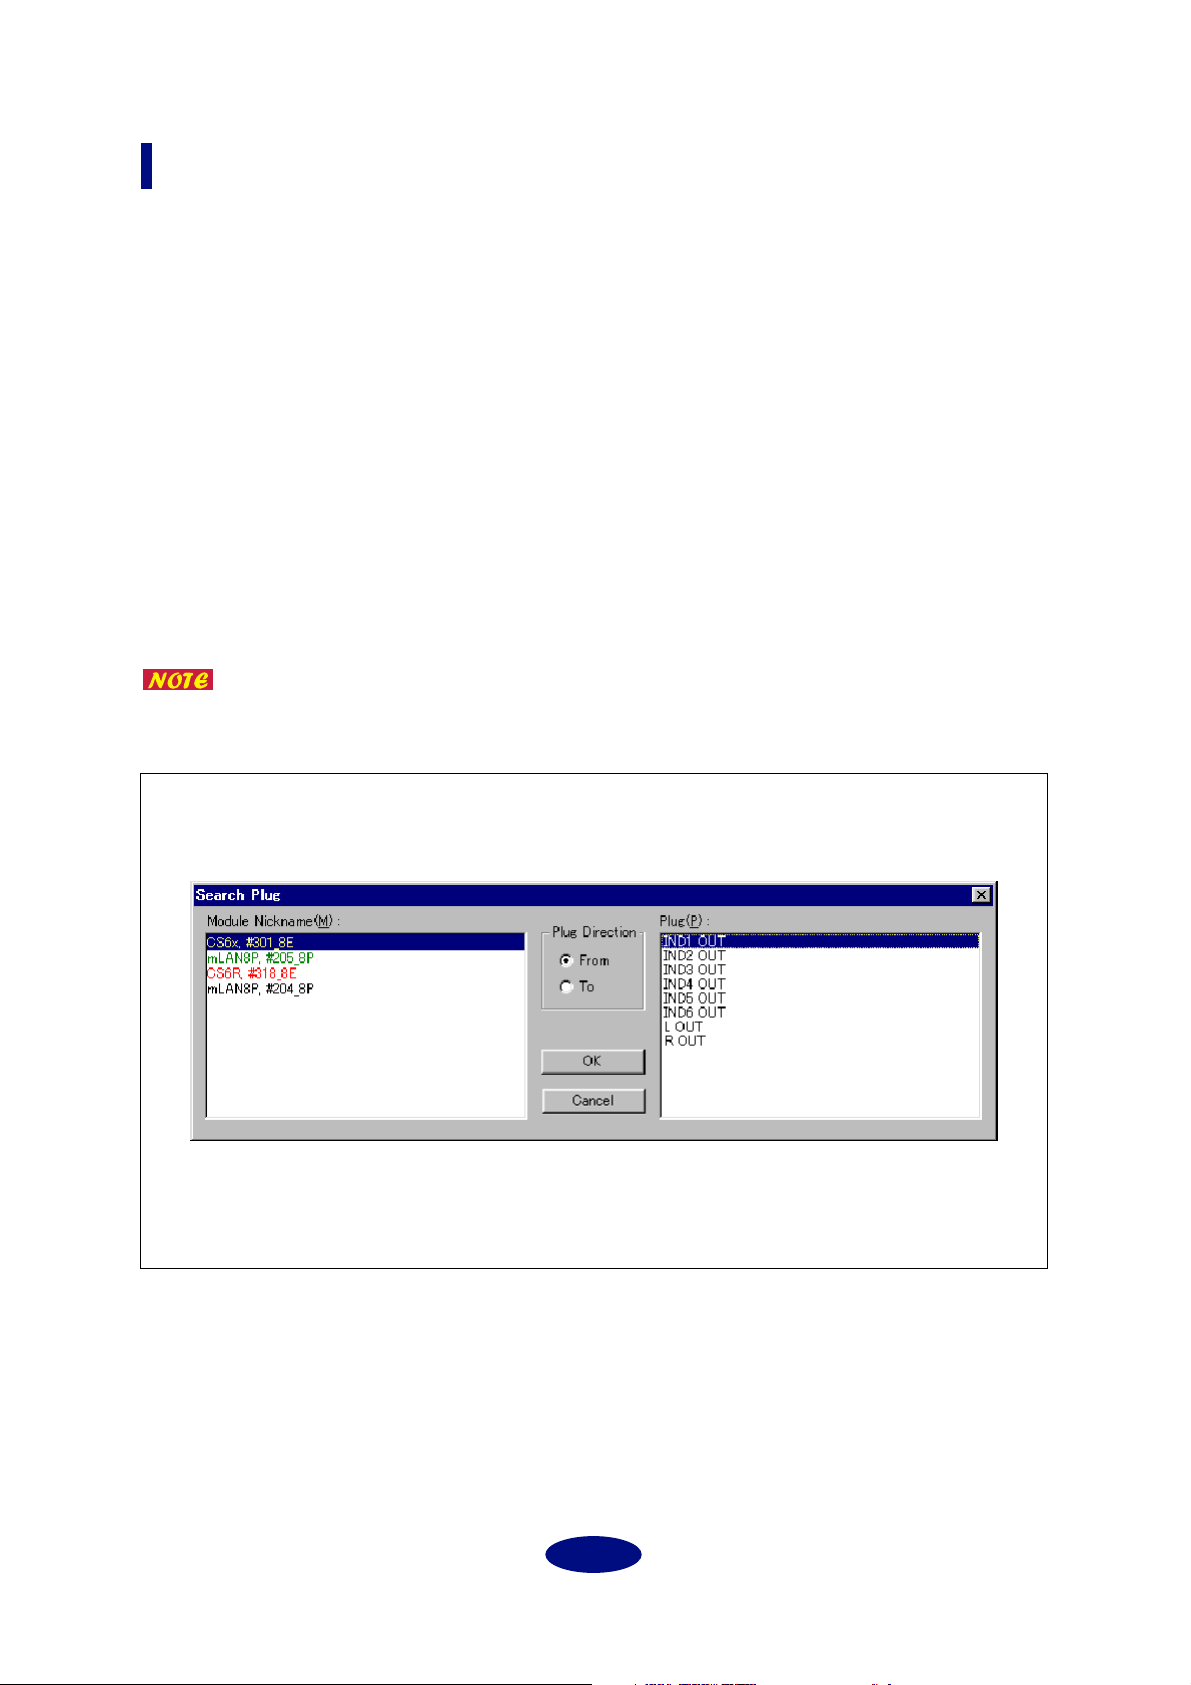
Search... (Windows only)
Open the Search Plug dialog box. This cannot be used in the WCLK page.
Before using this, you must first open either the Audio or the MIDI page depending
on the mLAN plug for which you wish to search.
Search Plug dialog box
The Search Plug dialog box lets you find the location of the desired mLAN plugs.
Search
1. In the Module Nickname column, select the mLAN device that contains the mLAN plugs you
wish to find.
2. In the Plug Direction column, select either From (output plugs) or To (input plugs).
3. In the Plug column, select the mLAN plug that you wish to find, and then click [OK].
4
Page 5

Disconnect All
Disconnect all mLAN plugs connected to the selected mLAN plug. This cannot be used in the WCLK
page.
Disconnect Field All
Disconnect all mLAN plugs (output plugs / input plugs) of the specified mLAN device.
If an item in the From field is selected, all mLAN plugs in the To field will be disconnected. If an item in
the To field is selected, all mLAN plugs in the From field will be disconnected. This cannot be used in
the WCLK page.
Connect All (Windows only)
Connect all mLAN plugs that are copied to the clipboard to all mLAN plugs of the specified mLAN
device. Available only on the Audio page.
View
View Toolbar
Switch the tool buttons between visible and hidden.
Status bar (Macintosh only)
Lets you to select visible or hidden for the status indication.
Column Filter
Switch each item in the data list between visible and hidden.
Ve n d e r : Hide/show the Vender item.
Module: Hide/show the Module item.
Nickname: Hide/show the Nickname item. This cannot be used in the WCLK page.
Plug Name: Hide/show the Plug Name item. This cannot be used in the WCLK page.
Format: Hide/show the Format item. This cannot be used in the WCLK page.
5
Page 6
Option
Update
Show the mLAN devices currently on the bus and their settings on the appropriate pages.
Apply
Apply the state specified in all pages to the mLAN devices on the bus.
After you click the [Apply] button, the status of the application may not match the
status of the mLAN device. After clicking the button, click the [Update] button or
use the Auto Update function (page xx).
Identify
Issue an Identify to the selected mLAN device. The mLAN connector’s LED on the mLAN device that
has received an “Identify” will flash for five seconds.
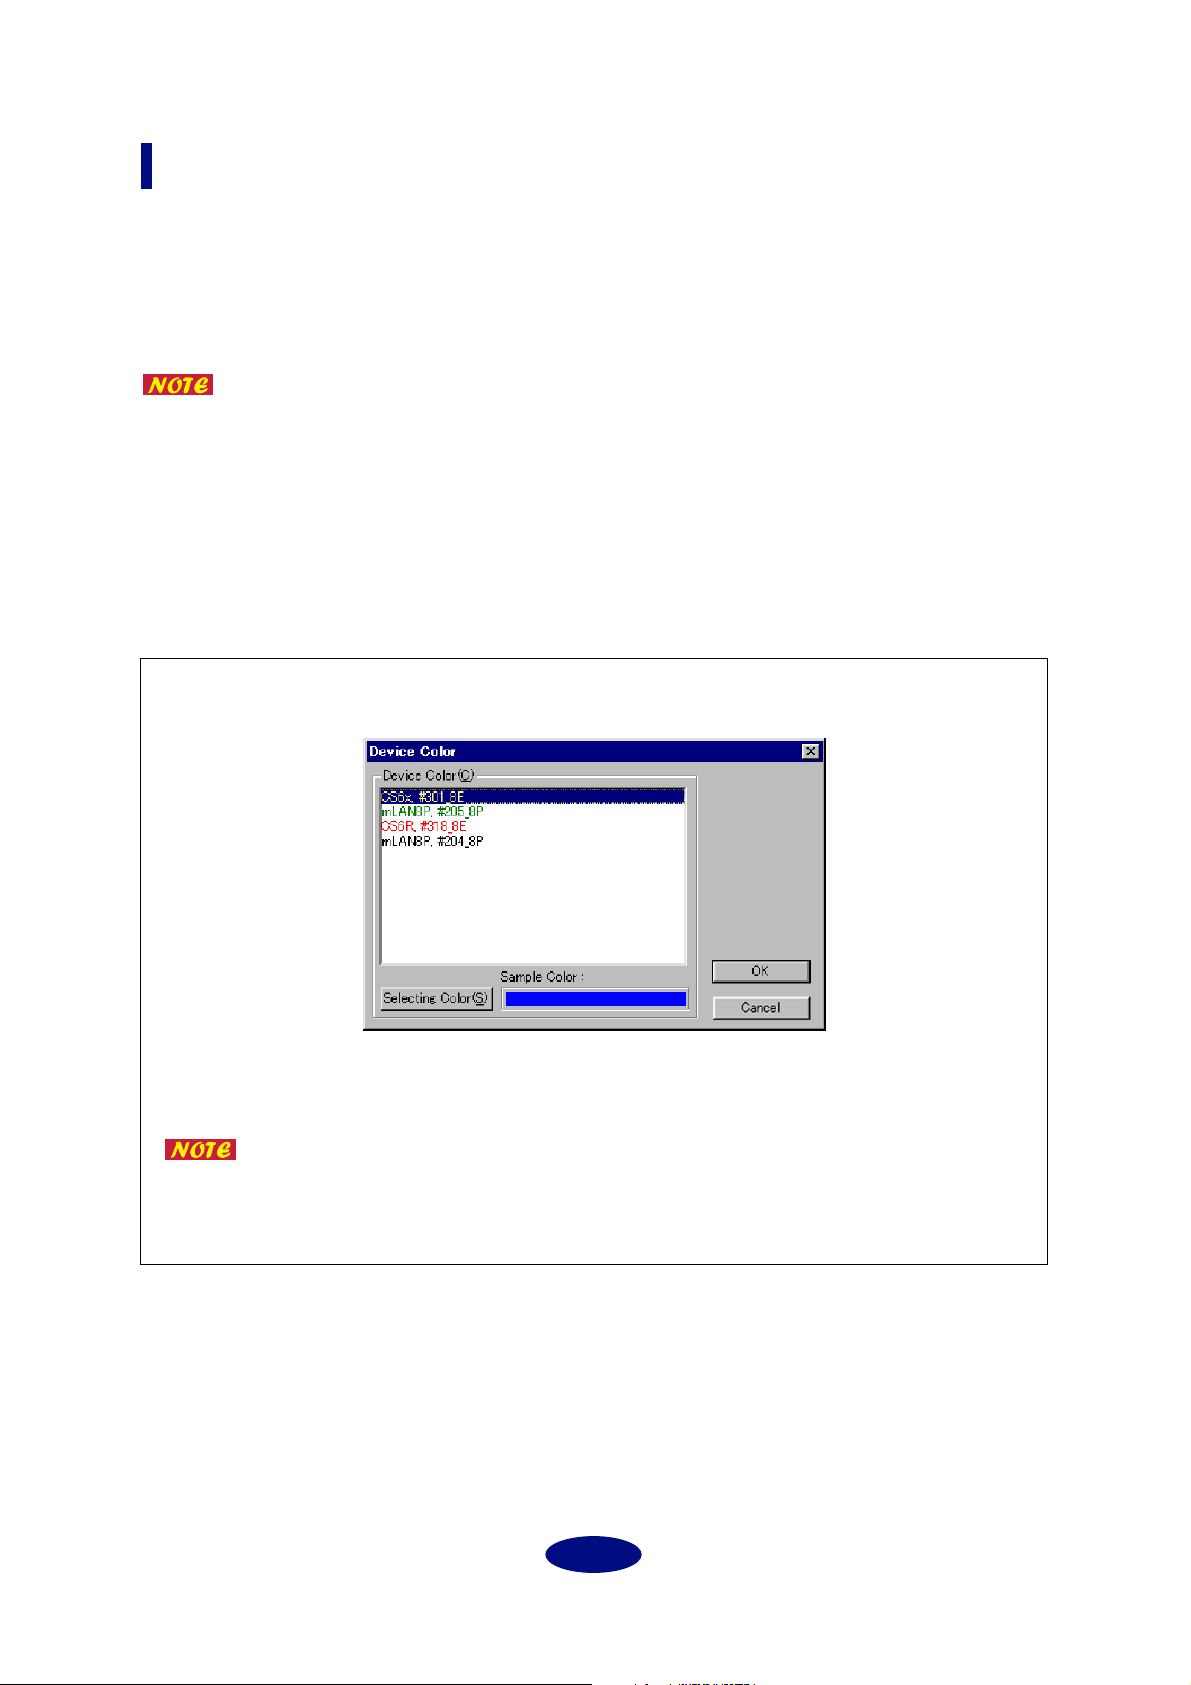
Device Color... (Windows only)
Open the Device Color dialog box.
Device Color dialog box
In the Device Color dialog box you can specify the display color for each mLAN device.
1. Select the mLAN device whose device color you wish to specify.
2. Click [Selecting Color]. The color dialog box will appear.
3. Select the color that you wish to use for the mLAN device.
If you wish to customize the color, click [Customize Color] and add the desired color.
4. Click [OK]. The selected color will be displayed in Sample Color.
5. Click [OK], and the display color of the mLAN device will be changed. If you decide not to
change the color, click [Cancel].
6
Page 7
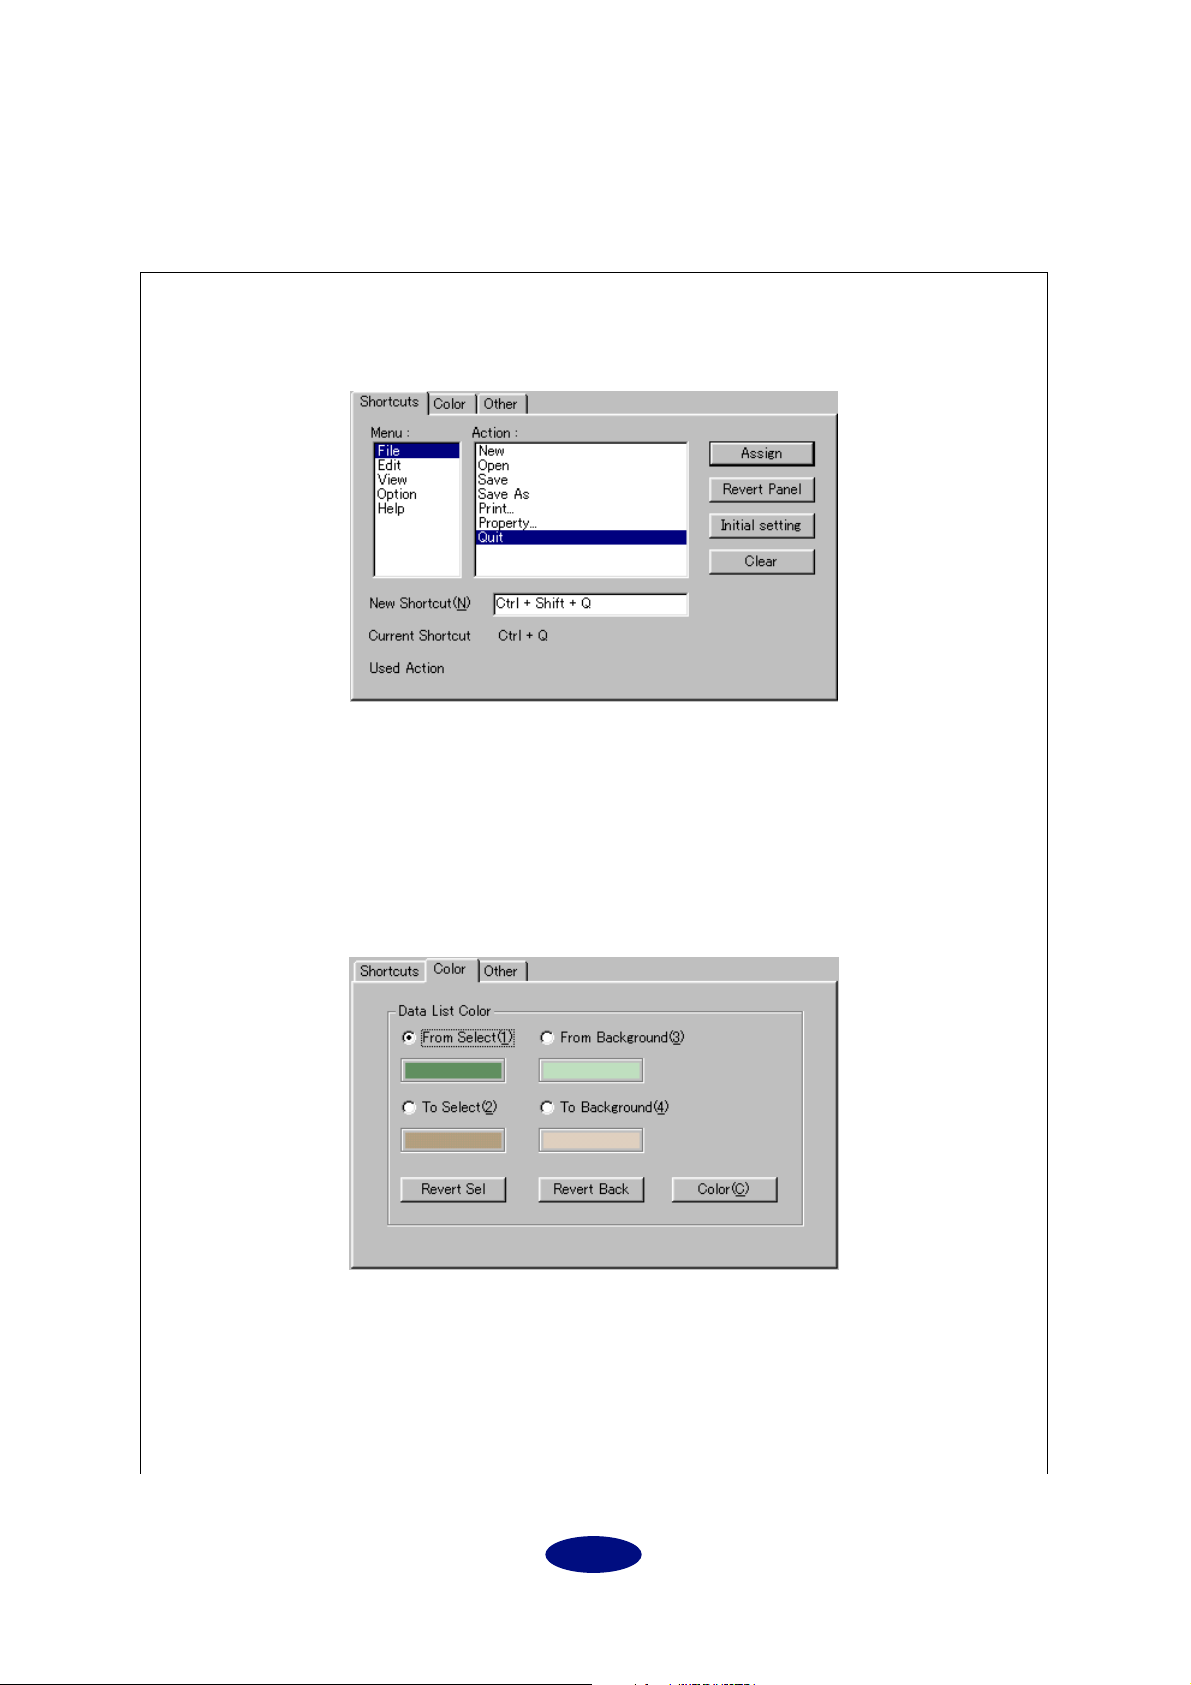
Preference (Windows only)
Open the Preference dialog box. In the Preference dialog box you can make settings for Shortcuts, Color
and Other.
Preference dialog box
[Shortcuts]
Specify (customize) the menu shortcut keys.
1. Select the menu item for which you wish to specify a shortcut key.
2. Click the New Shortcut field, and then press the key that you wish to specify as the shortcut.
3. Click [Assign] to finalize the setting. If you click [Revert Panel], you will return to the settings
of the previous step. If you click [Initial setting], the default settings (Ctrl + first letter of the
action) will be applied. To clear the settings, click [Clear].
[Color]
You can specify the color and background color in the data list.
1. Select an item to be edited and click [Color]. The Color dialog opens.
2. Select the desired color.
3. Click [OK]. The selected color appears below the item.
To reset the color and background color to their initial settings, click [Revert Sel] and [Revert
Back] respectively.
7
Page 8
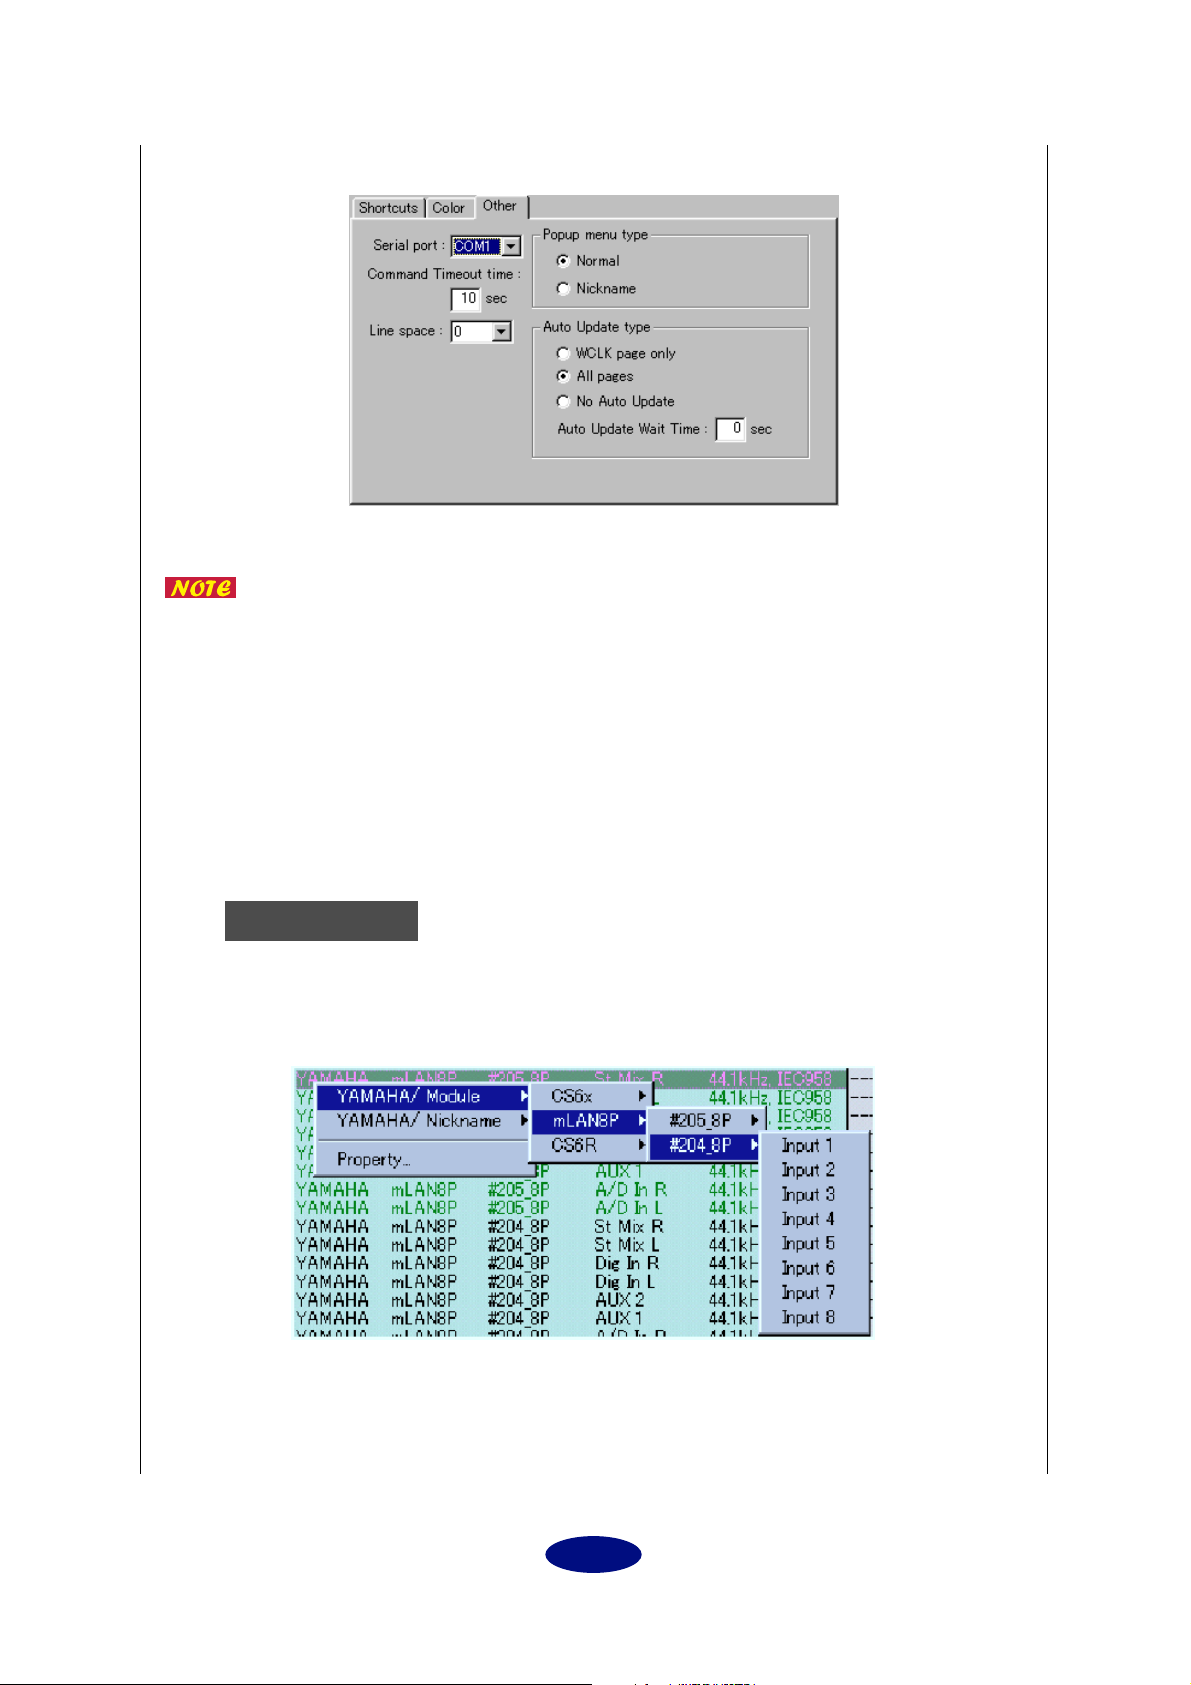
[Other]
Serial port:
Command Time out Time:
the mLAN device until the receipt of a response from the device. If the system displays “Serial Timeout Error,” increase this value.
Line space:
page.
Popup menu type:
a mLAN plug in the Audio or MIDI pages, or when you manually select the Master mLAN device
for a Slave mLAN device in the WCLK page.
Select the COM port that is used to connect the computer and mLAN device.
If there is a problem such as failure to read data, check whether this value
matches the COM port you are actually using.
Set the response time that is taken from the issuance of a command to
Specify the display spacing at which mLAN plugs or mLAN devices are shown on a
Select the display method that will be used for popup menus when you connect
Popup menu type
For the Audio or MIDI page
If you specify “Normal,” popup menus will be displayed as shown below.
The upper line will extend from the module name to the plug name.
Audio page
8
Page 9
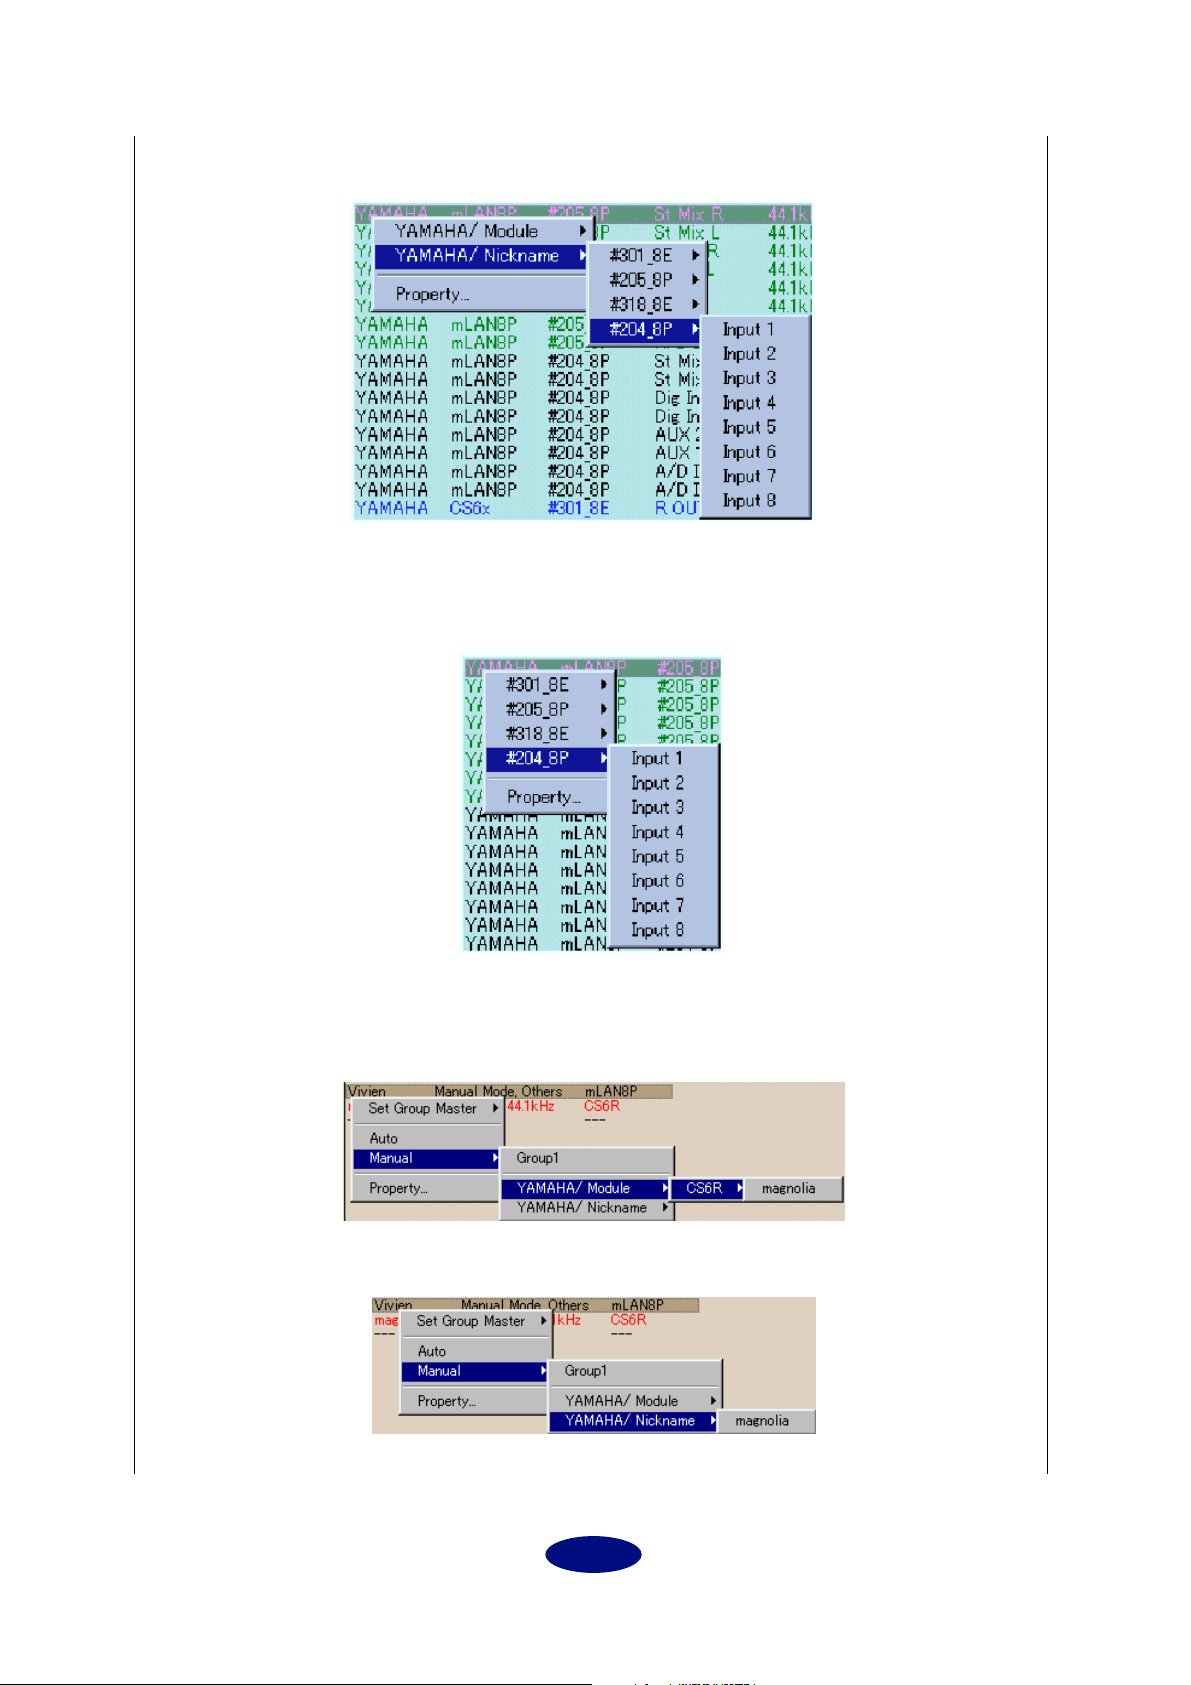
The lower line will skip the module name and extend from the nickname to the plug name.
Audio page
If you specify “Nickname,” Vender/Module will be omitted as shown below, and display will
begin with the Nickname.
Audio page
For the WCLK page
If you specify “Normal,” popup menus will be displayed as shown below.
The upper line will extend from the module name to the nickname.
The lower line will skip the module name and extend to the nickname.
9
Page 10
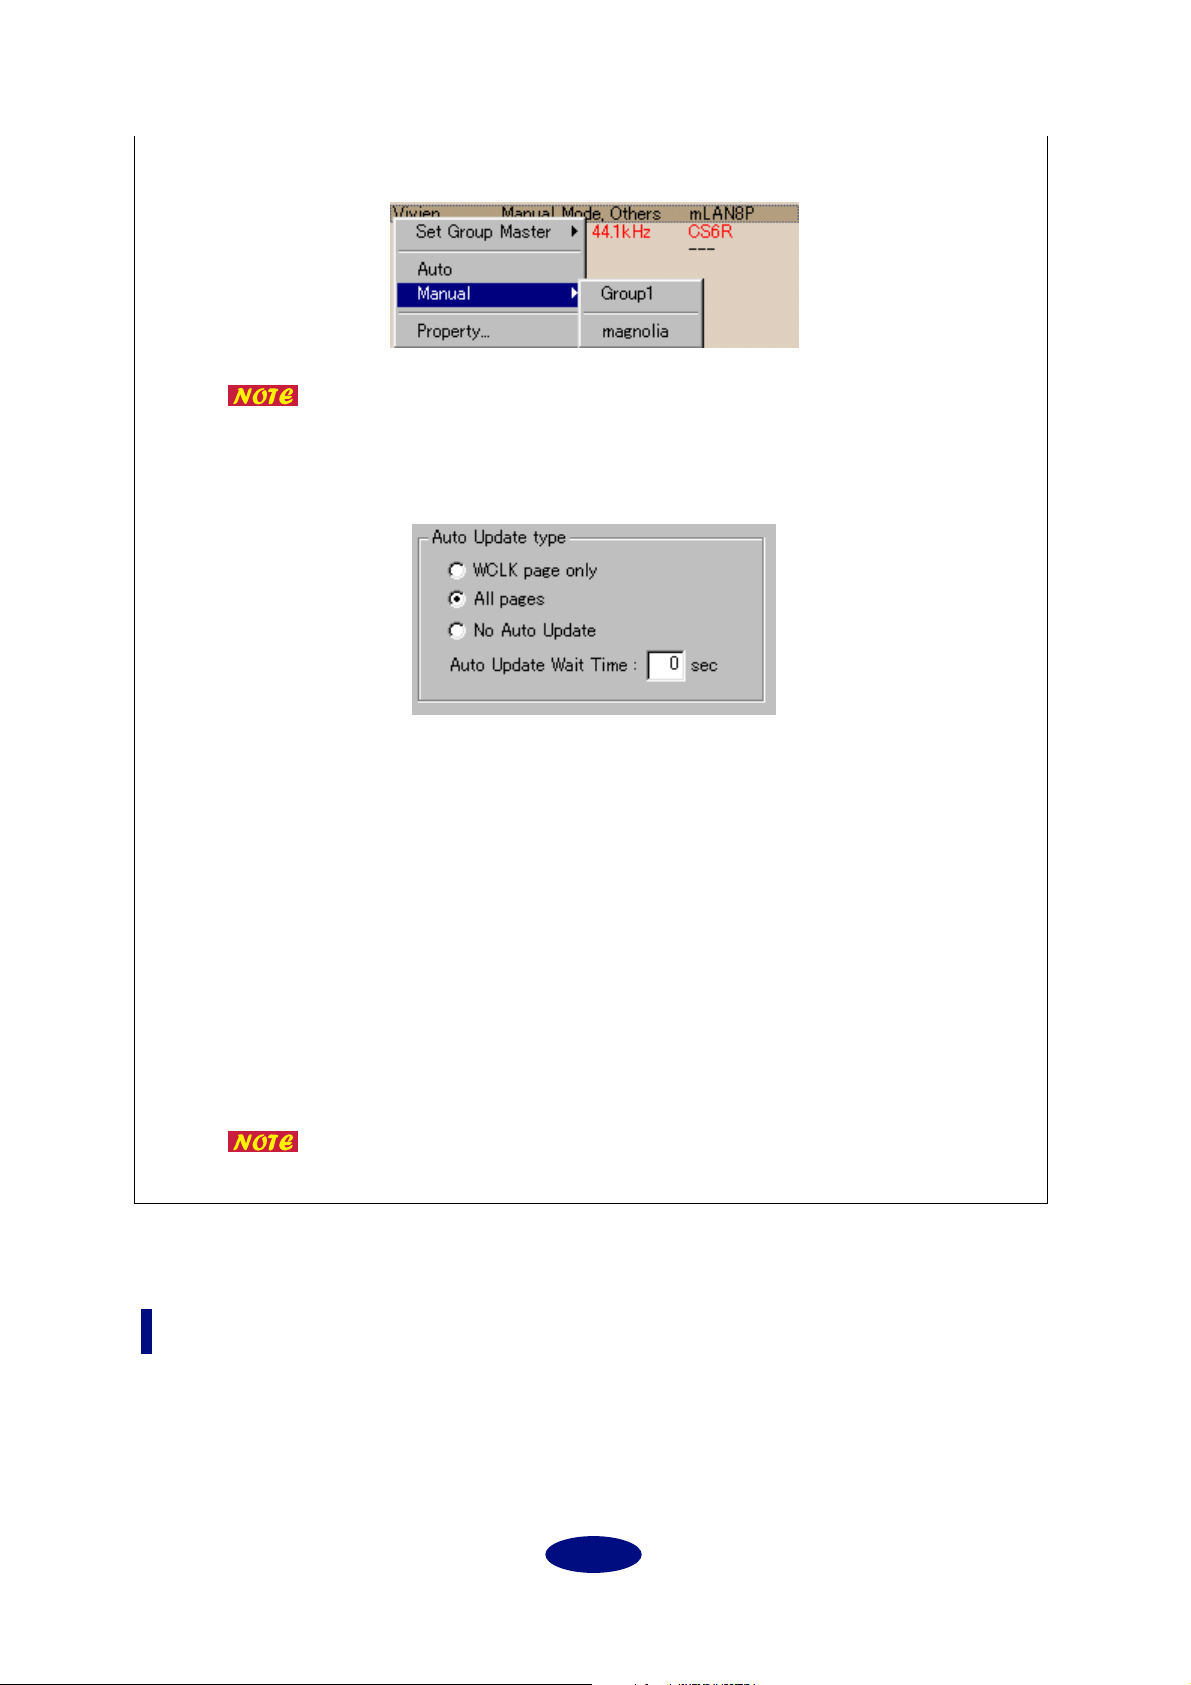
If you specify “Nickname,” Vender/Module will be omitted as shown below, and display will
begin with the Nickname.
By right-clicking while holding down the Ctrl key, you can access the
type of popup menu opposite to that which was selected.
Auto Update type: These are options for when executing the Apply command.
WCLK page only
After Apply has been completed, the WCLK page display will automatically be updated to
the current state of the bus. This is convenient when you wish to verify the synchronization
data after executing Apply.
All pages
After Apply has been completed, the display of all pages will automatically be updated to
the current state of the bus. This is convenient when you wish to verify that all data was correctly applied to the bus after Apply was executed.
No Auto Update
No action will be performed after Apply is completed.
Auto Update Wait Time
Specify the interval time following Apply after which the display will be updated to the current state of the bus. The units are seconds.
The initial setting is three seconds. If you have connected six or more
mLAN devices, set this value higher than three seconds.
Help (Windows only)
About mLAN Patchbay (A)...
Display version information for mLAN Patchbay.
10
Page 11
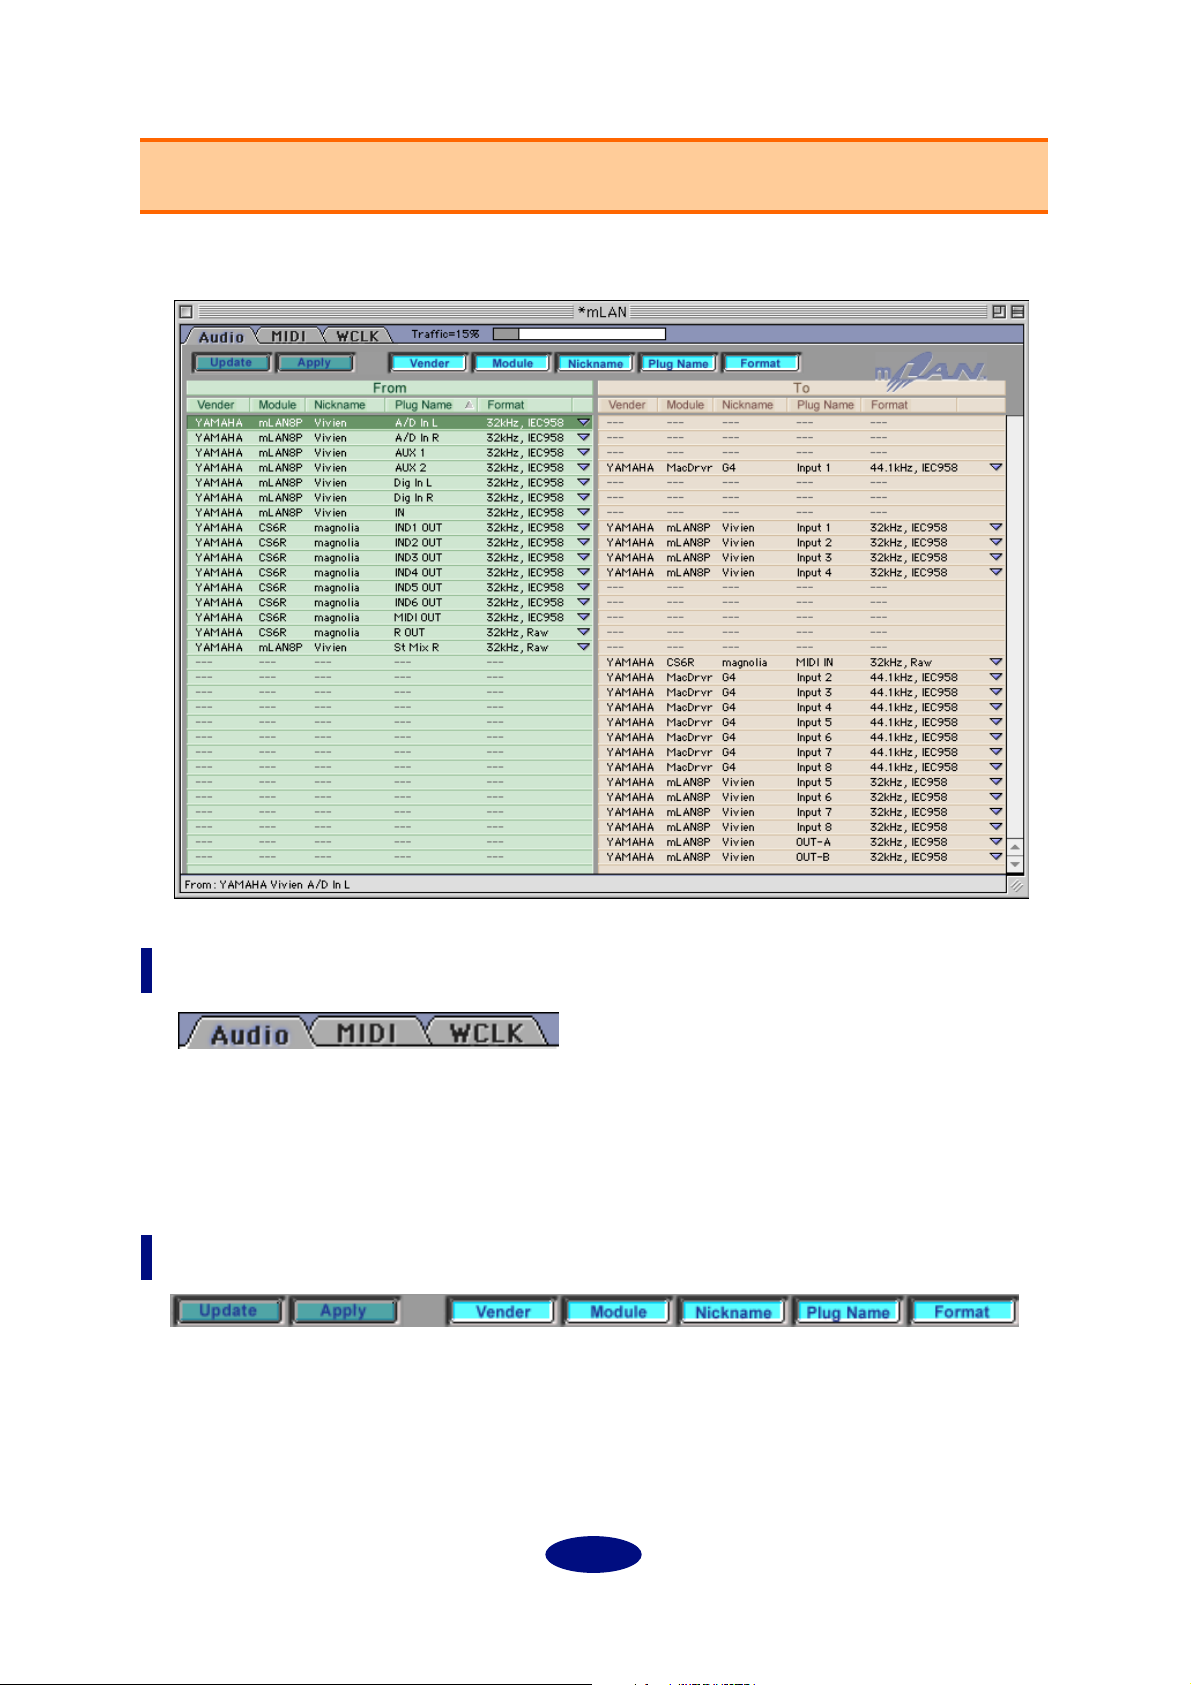
Main window
When you start up mLAN Patchbay, the following window will appear.
Main window
Tabs
By clicking the tabs, you can access the following pages.
Audio: Connections for Audio plugs.
MIDI: Connections for MIDI plugs
WCLK (Word Clock): Synchronization settings such as word clock master and slave
Tool buttons
Update: Make the data section show the state of the devices currently connected to the bus. This is
the same function as the [Option] menu command [Update].
Apply: Apply the state shown in the data section to the devices on the bus. This is the same function
as the [Option] menu command [Apply].
Ve n d e r : Switch the Vender between displayed/hidden. This is the same function as the [View] menu
command [Column filter] item [Vender].
11
Page 12

Module: Switch the Module column between displayed/hidden. This is the same function as the
[View] menu command [Column filter] item [Module].
Nickname: Switch the Nickname between displayed/hidden. This is the same function as the [View]
menu command [Column filter] item [Nickname]. If the WCLK page is selected, this has no function.
Plug Name:
menu command [Column filter] item [Plug Name]. If the WCLK page is selected, this has no function.
Format:
command [Column filter] item [Format]. If the WCLK page is selected, this has no function.
Switch the Plug Name between displayed/hidden. This is the same function as the [View]
Switch the Format between displayed/hidden. This is the same function as the [View] menu
For MIDI connections, it is not necessary to take account of differences in Format. In
such cases, it is convenient to use the Format tool button to hide Format from
being displayed.
12
Page 13
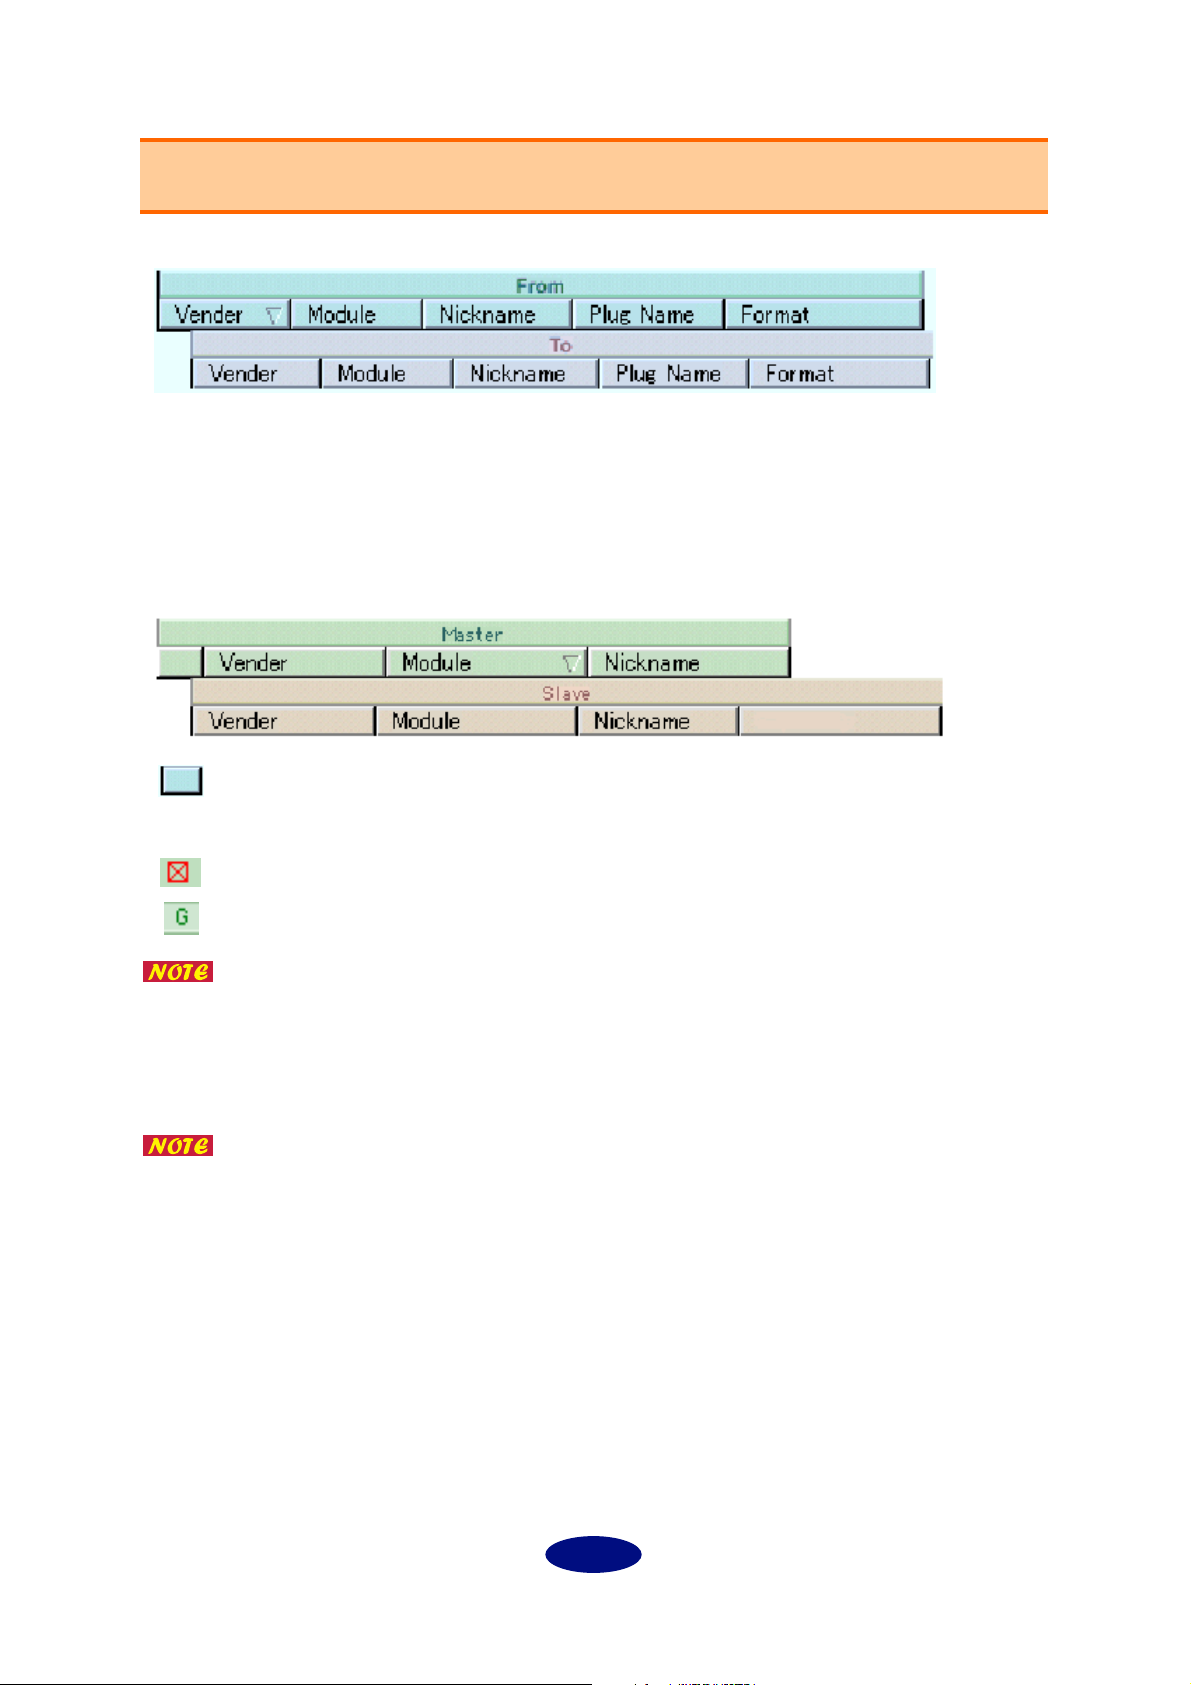
Data list
Audio and MIDI pages
Ve n d e r : Displays the manufacturer of the mLAN device.
Module: Displays the model name of the mLAN device
Nickname: Displays the nickname of the mLAN device.
Plug Name: Displays the plug name of the mLAN device.
Format: Displays the format of the mLAN device.
WCLK page
WC marker: Displays the common word clock mark.
44 (44.1k), 48 (48k)
A word clock is not supplied.
Group Master
There is no Sort function for WC marker.
Ve n d e r :
Module:
Nickname: Displays the nickname of the mLAN device.
Status: Displays the sync mode and word clock frequency of the mLAN device.
Displays the manufacturer of the mLAN device.
Displays the model name of the mLAN device
Displayed/hidden settings for each item in the Audio and MIDI pages are shared.
The Sort function is independent for each page.
Internal
13
Page 14
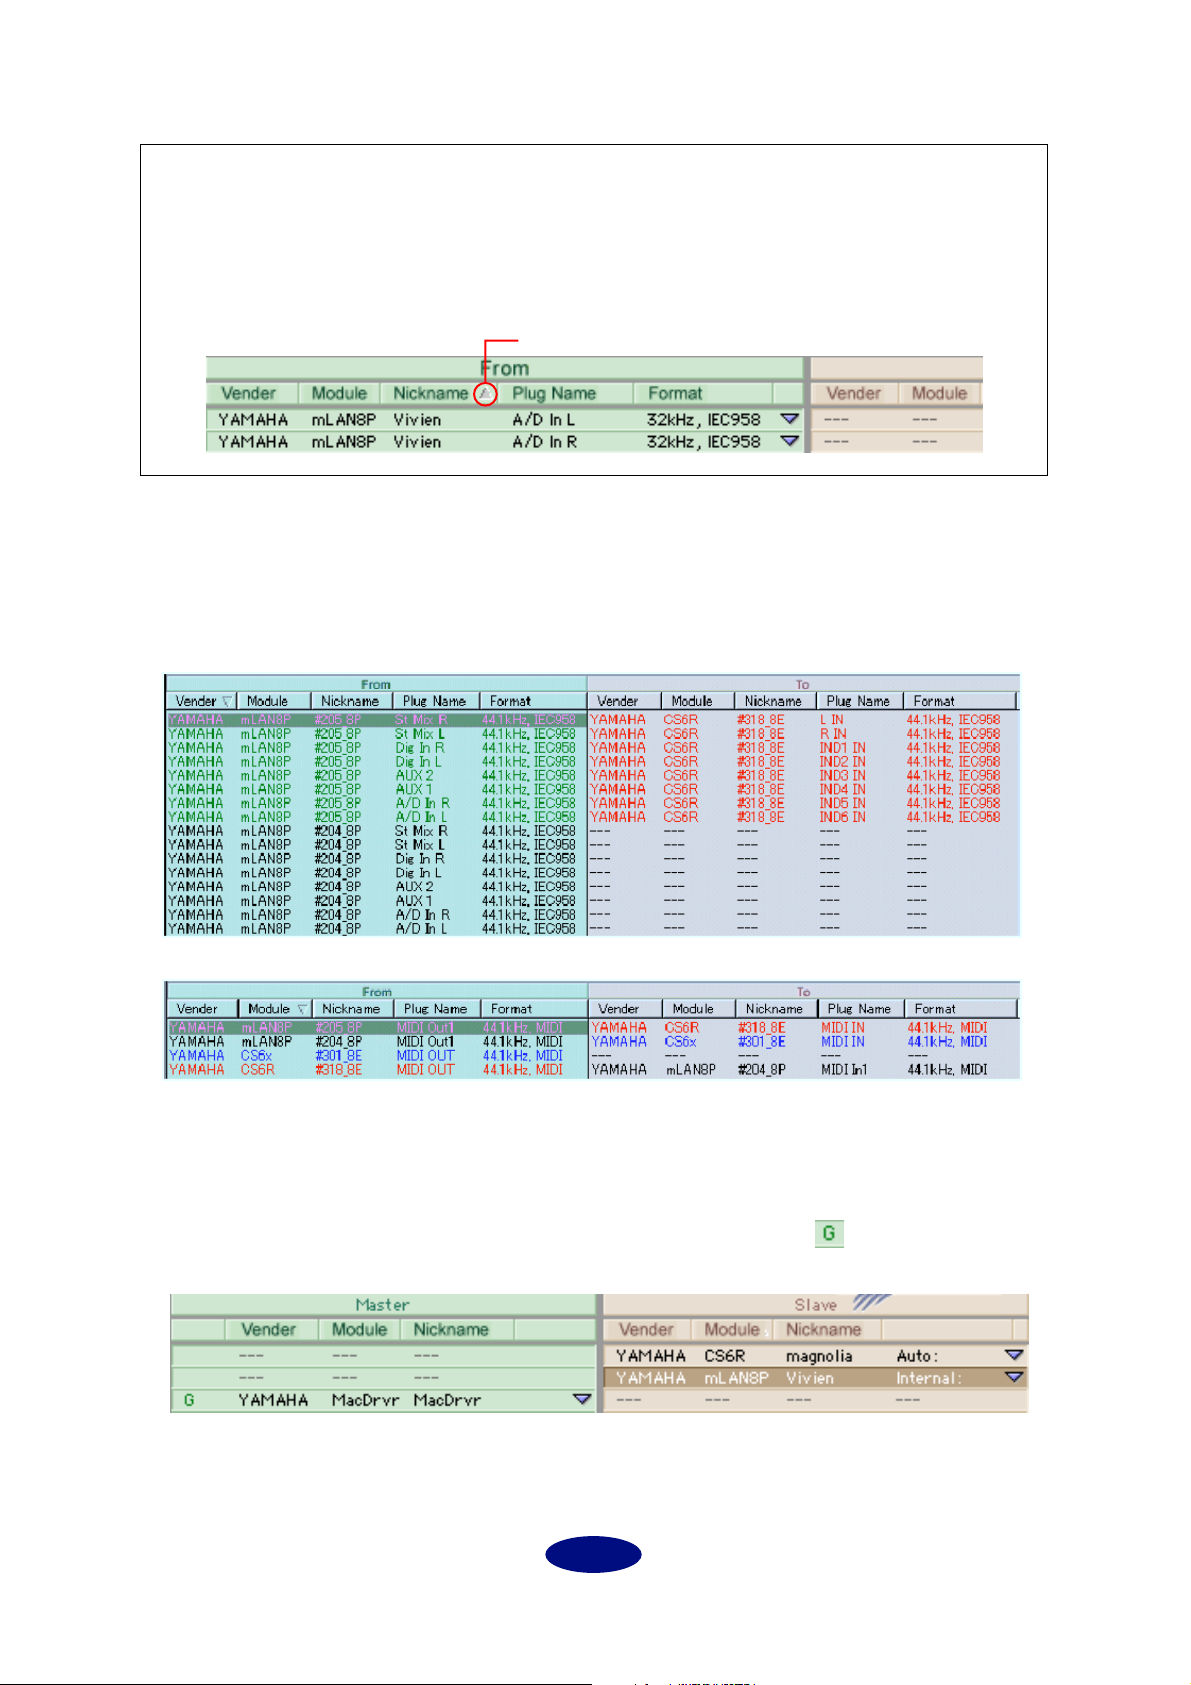
Sorting data
If you click the title of an item, the list will be sorted with that item as the key. A sort symbol will be
displayed at the right of that title. The sort symbol will point upward to indicate ascending order, or
downward to indicate descending order. Each time you click the title of an item, sorting for that item
will alternate between ascending and descending order.
By dragging the title of an item to left or right, you can change the order of the items.
Sort symbol
Connection data
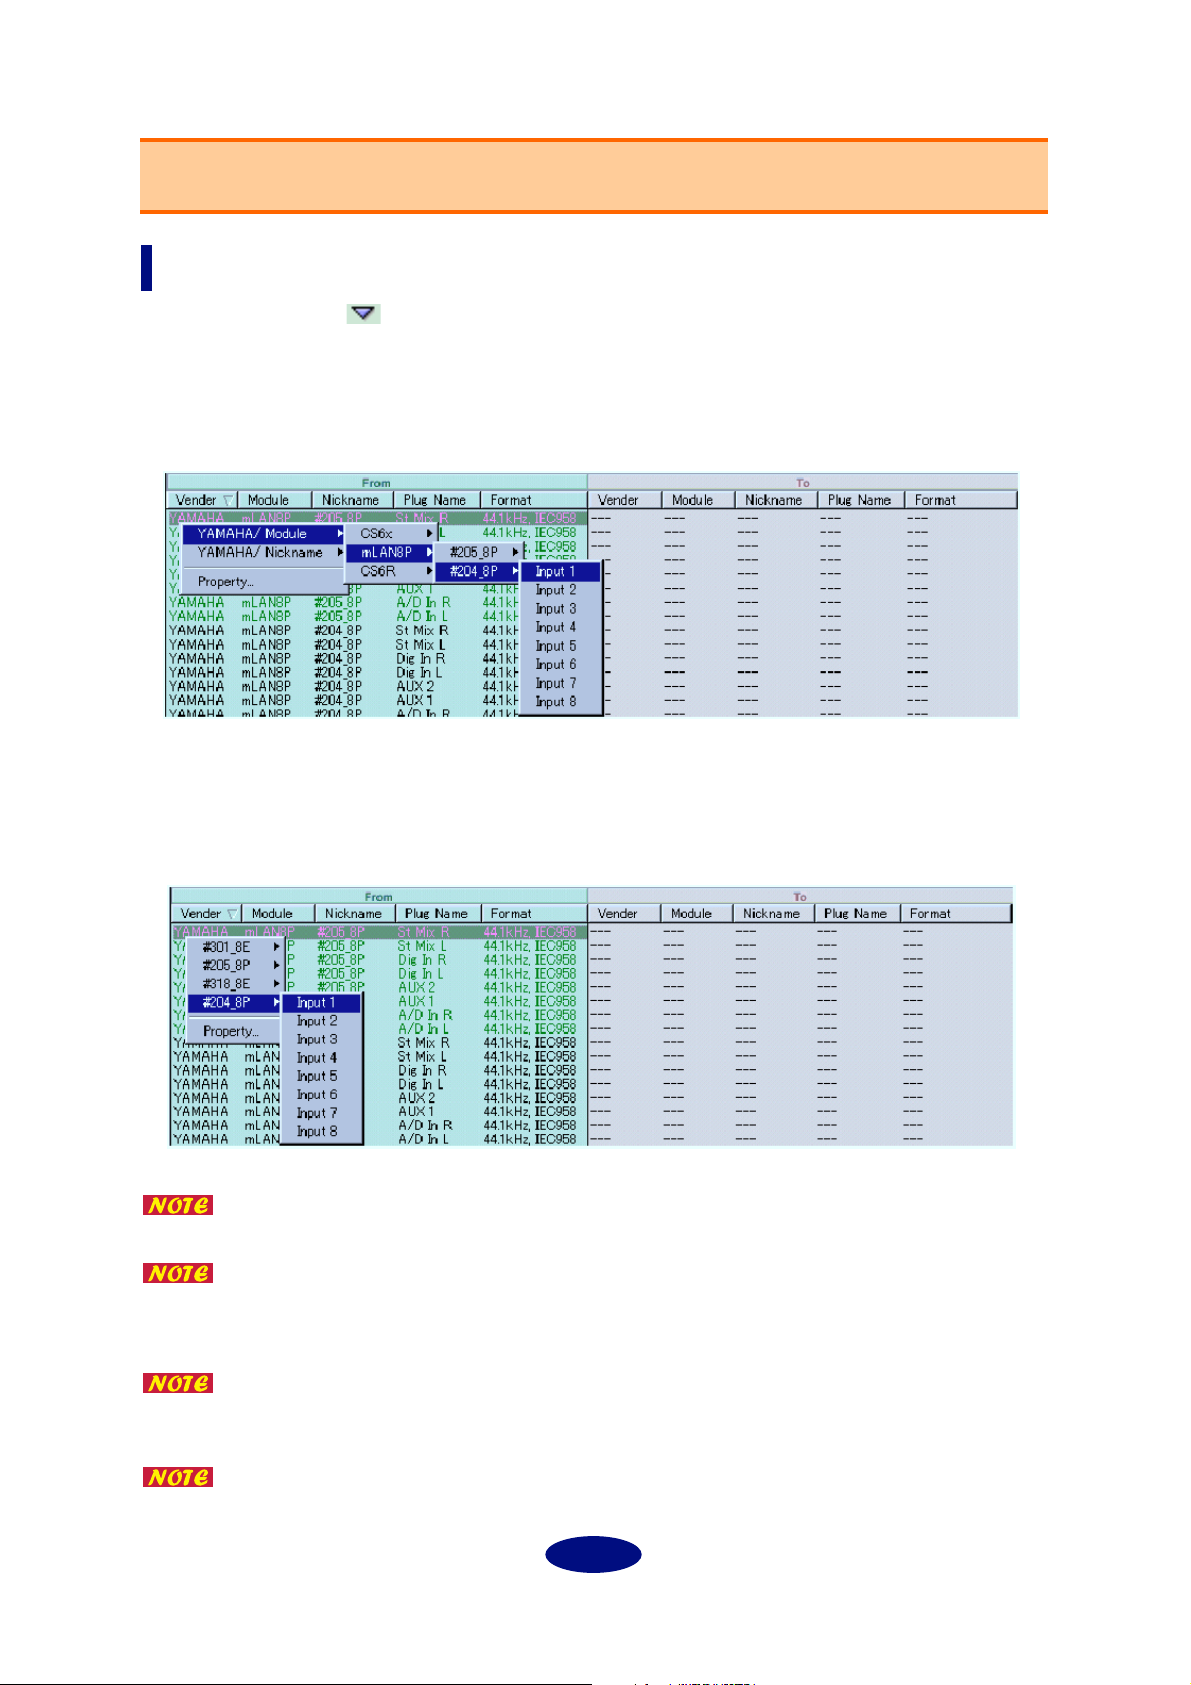
Audio and MIDI pages
These pages display the connection status of the mLAN plugs. “From” displays the output plugs, and
“To” displays the input plugs. If unconnected, a “---” (hyphen) will be displayed. If connected, the
connection destination mLAN plug will be displayed.
Audio page
MIDI page
WCLK page
This page displays the synchronization status of the mLAN devices, such as the Master and Slave relationships. If there is no master/slave relationship, a “---” (hyphen) will be displayed. If there is a master/slave relationship, the corresponding mLAN device will be displayed.
For an mLAN device that is set to the Group Master, the frequency symbol will be displayed at the
WC marker.
14
Page 15
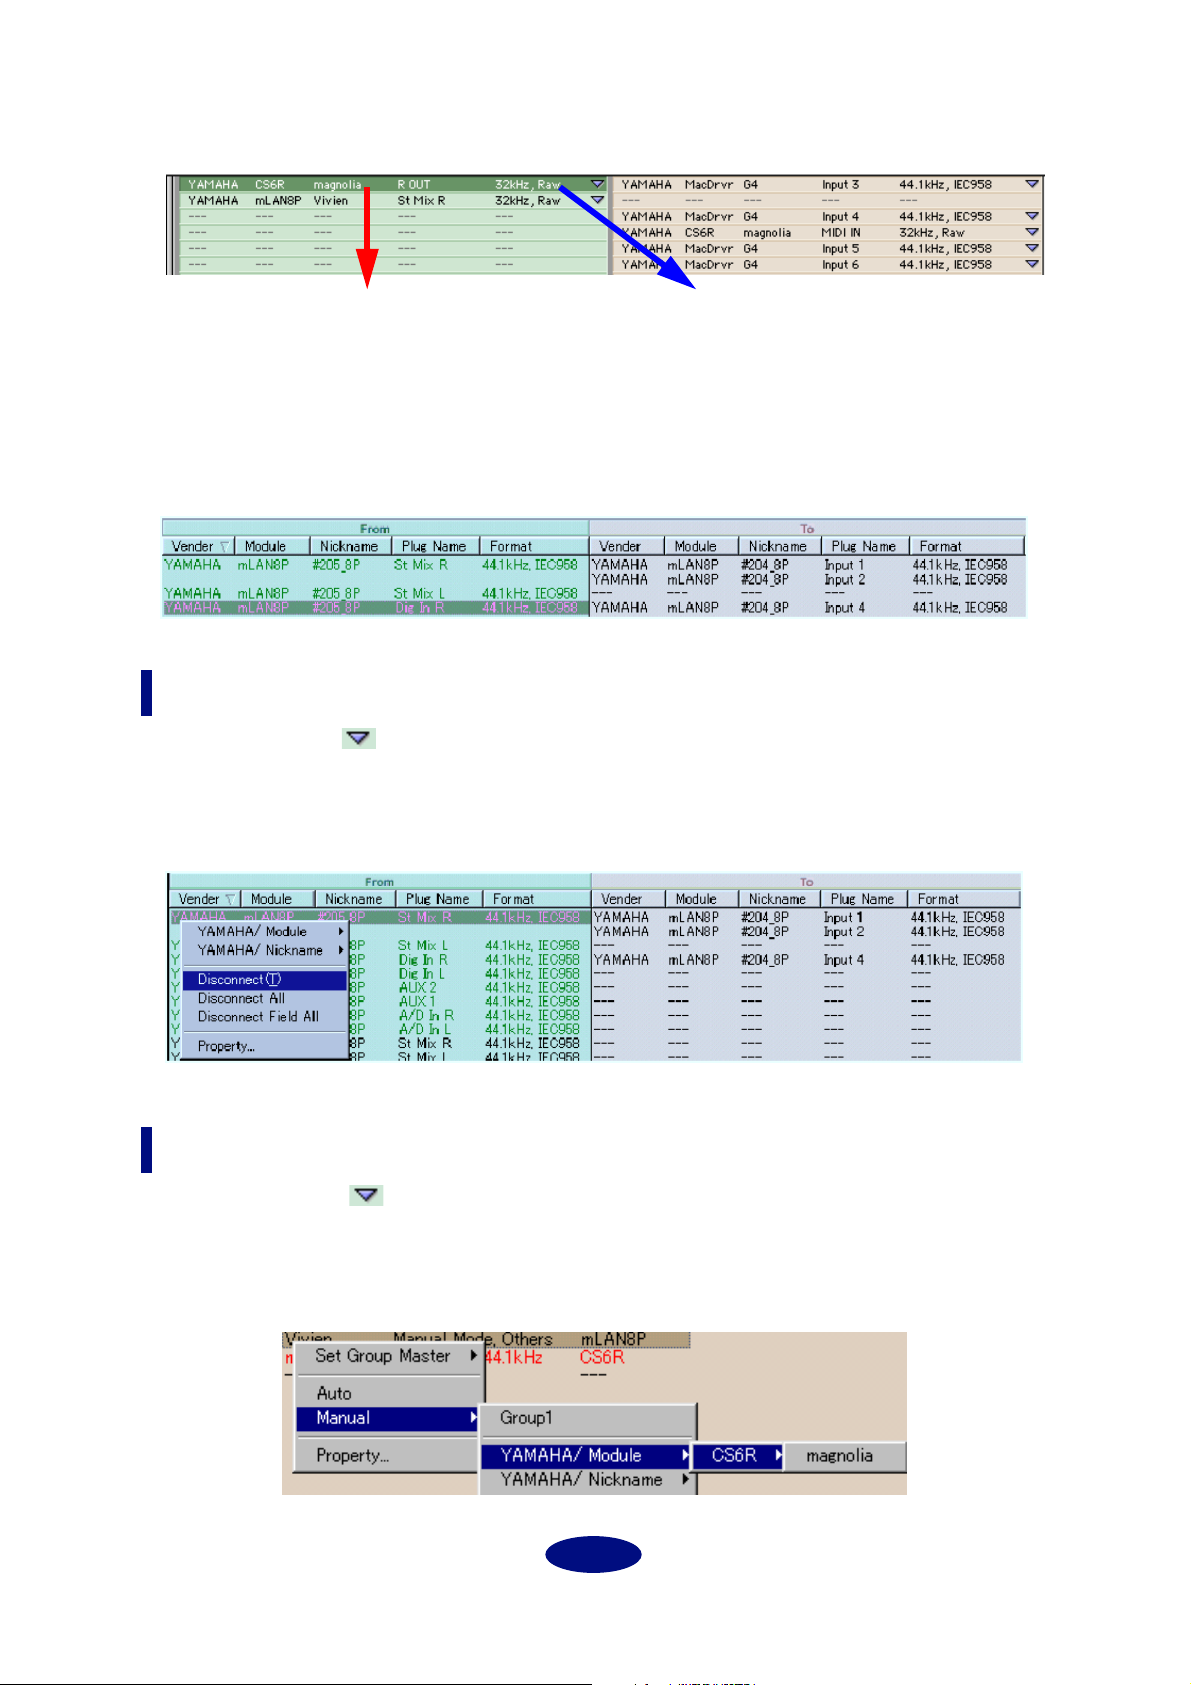
Operation
Making a connection
When you click on the mark (Macintosh) or right-click in the “From” (or “TO”) field (Windows),
the mLAN plugs available for connection will be shown in a popup menu. By traversing the sub-menus
that appear, select the desired mLAN plug, and then click it to establish the connection. However,
mLAN plugs that are grayed-out cannot be selected. Clicking (Macintosh) or right-clicking (Windows)
an area that is displayed as “---” has no effect.
In the “From” field, specify the “To” mLAN plug
If you click (Macintosh) or right-click (Windows) while holding down the Ctrl key, you can select from
the Nicknames as shown below. When the mLAN plugs are displayed in the popup menu, mLAN plugs
that are temporarily unavailable for connection (e.g., if you attempt to connect an already-connected
“To” mLAN plug to another “From” mLAN plug) will be displayed, but cannot be selected.
Click (Macintosh) or right-click (Windows) while holding down the Ctrl key
Selecting a plug while holding down the Shift key works in the same way as [Connect All] in the Edit menu. (Windows)
The popup menu will also appear when you press the Space key. This can also be
used in conjunction with the Ctrl key.
You can delete the popup menu by pressing the Alt key.
A connection can also be made by dragging a mLAN plug and releasing it on the
mLAN plug to which you wish to connect it. However, only one mLAN plug can be
selected and dragged.
Releasing the plug while holding down the Shift key works in the same way as
[Connect All] in the Edit menu. (Windows)
15
Page 16
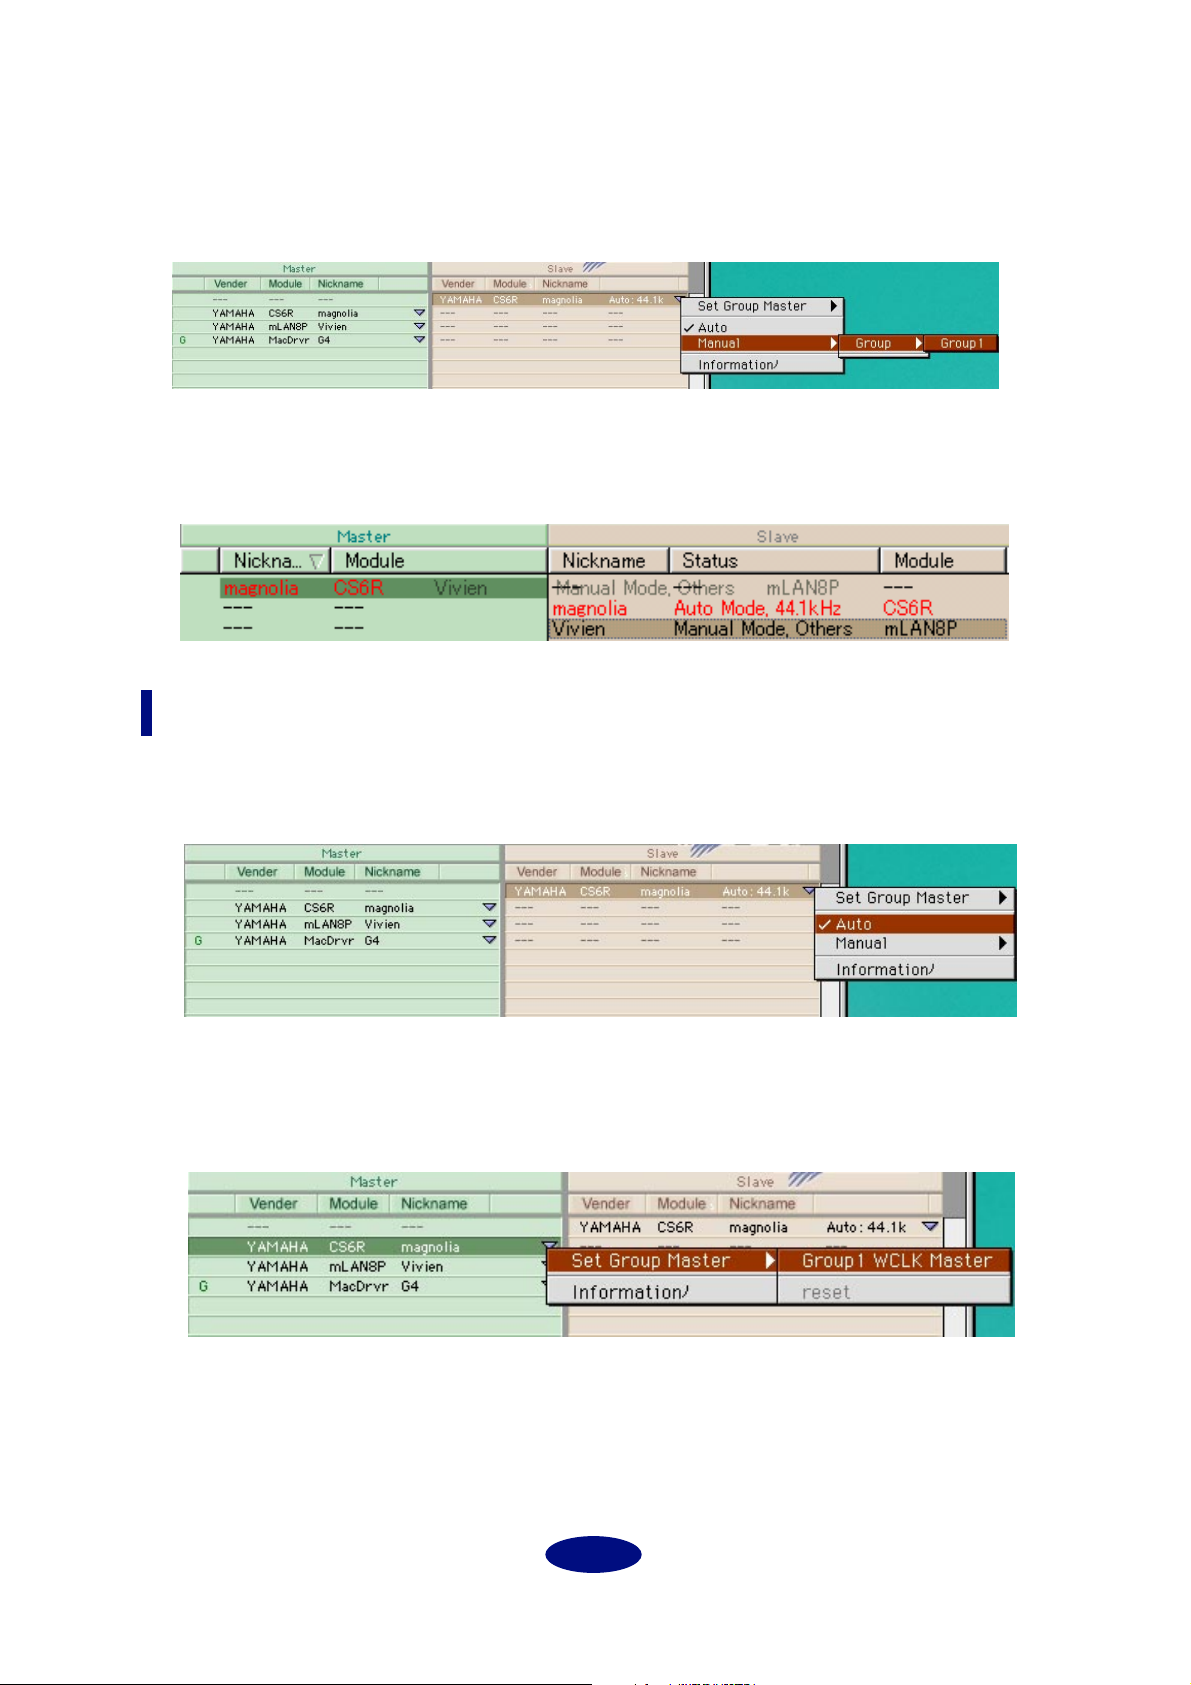
Connect by dragging and releasing an mLAN plug
(Macintosh) (Windows)
Depending on the sorting, there may be cases as shown below in which a single “From” mLAN plug is
connected to multiple “To” mLAN plugs. Spaces (blanks) will be displayed for the “From” mLAN plugs
to indicate that the mLAN plug is identical.
If such cases are excepted, normal connections will show a single “From” mLAN plug for each “To”
mLAN plug.
Data section after editing
Breaking a connection
When you click on the mark (Macintosh) or right-click (Windows) a connected mLAN plug, a Disconnect command will be added to the menu as shown below, and you can break the connection by
selecting this command. If you select Disconnect All, all connections of the “module” you clicked will be
disconnected.
Using the popup menu to disconnect
Master and slave settings
When you click on the mark (Macintosh) or right-click (Windows) an mLAN device in the Slave
area, the mLAN devices that can be selected as the master will be displayed. Traverse the submenus of
the popup menu to select the mLAN device that you wish to select as the master, and click (Macintosh)
or left-click (Windows) it to connect that slave mLAN device to the specified master mLAN device.
Selecting the master from the popup menu
16
Page 17
If there is a Group Master on the bus, by selecting the submenu of Group 1 of the Manual mode, as
shown below, the mLAN devices lock to the Group Master. If the Group Master does not exist, set the
Status to “Manual: Group 1” so that the devices will be ready for syncing to the Group Master.
Specifying the common word clock master from the popup menu
If a Slave mLAN device is in Manual mode, you can drag that item and release it on the mLAN device
that you want to specify as the master to specify the master/slave relationship.
Drag and release the Slave mLAN device to specify the Master
Master and Slave mode settings
By clicking (Macintosh) or right-clicking (Windows) a Slave mLAN device, you can use the capabilities
of the mLAN device to specify the Slave mode.
Mode settings for a Slave mLAN device
By clicking (Macintosh) or right-clicking (Windows) a Master mLAN device, you can use the capabilities of the mLAN device to set/cancel the Group Master. However, this setting is not possible for an
mLAN device that does not have Group Master functionality.
Common word clock setting for a Master mLAN device
17
 Loading...