

Presonus Revelator IO24 Owner’s Manual
Revelator io24
2-channel audio interface for streamers,
podcasters, and music creators
Owner’s Manual
®
www.presonus.com
English

Table of Contents
1 Overview — 1
1.1 Introduction — 1
1.2 What is in the box — 1
3.2.6 Using Revelator io24
on Chromebook — 28
3.2.7 Using Revelator io24 with Zoom
on Chromebook — 29
3.2.8 Using Revelator io24 with Google Meet
on Chromebook — 30
1.3 What is in your MyPreSonus account — 2
1.3.1 Step 1: Register Revelator io24 — 2
1.3.2 Step 2: Download and Install
Universal Control — 4
1.3.3 Step 3: Download and Install
Studio One Artist (Optional) — 5
1.3.4 Step 4: Download and Install
Studio Magic (Optional) — 6
2 Connections and Controls — 7
2.1 Front Panel — 7
2.1.1 The Screen — 8
2.2 Back Panel — 10
2.3 Connection Diagram — 11
2.4 Standalone controls — 11
2.4.1 Setting the Microphone Level — 12
2.4.2 Setting Main Output level — 12
3.2.9 Using Revelator io24 with
iOS/iPadOS devices — 31
3.2.10 Using Revelator io24 with
Android devices — 31
4 Presets and Scenes — 32
4.1 Preset Management — 32
4.1.1 Changing Preset Button Slots — 33
4.1.2 Storing New Presets — 34
4.1.3 Exporting/Importing Presets — 36
4.1.4 Scenes - Save and Recall — 38
4.1.5 Sharing Scenes and Presets — 38
5 Fat Channel and Voice Effects — 39
5.1 Fat Channel and Voice FX — 39
5.1.1 High Pass Filter (HPF) — 39
5.1.2 Gate — 40
2.4.3 Setting Headphone level — 12
2.4.4 Setting Monitor blend — 13
2.4.5 Selecting Presets — 13
2.4.6 Stream Mix Mode — 14
3 Universal Control — 15
3.1 The Launch Window — 15
3.1.1 Launch Window Menu Items — 16
3.2 Using Your Revelator io24 with Popular
Applications — 17
3.2.1 Using Revelator io24 for
System Audio — 17
3.2.2 Using Revelator io24 for Skype — 21
3.2.3 Using Revelator io24 for Zoom — 22
3.2.4 Using Revelator io24 for
Google Meet — 26
3.2.5 Using Revelator io24 for OBS — 27
5.1.3 Compressor (Comp) — 40
5.1.4 Equalizer (EQ) — 41
5.1.5 Limiter — 42
5.1.6 Voice FX — 42
5.1.7 Reverb — 43
6 Mixing and Loopback Audio — 45
6.1 What is Loopback Audio? — 45
6.2 Mixer Controls — 46
6.2.1 Microphone Channel Controls — 46
6.2.2 Mixer Channel Controls — 47
6.2.3 Main Output Controls
and Mix Selection — 48
6.3 Feedback Loops are Bad — 49

7 Advanced Features and
Customization Tools — 50
7.1 Settings Menu — 50
7.2 Advanced Fat Channel and
Voice Effects Controls — 51
7.2.1 High Pass Filter — 51
7.2.2 Noise Gate — 51
7.2.3 Compressor — 52
7.2.4 Changing the Signal Chain — 55
7.2.5 Equalizer — 55
7.2.6 Limiter — 58
7.2.7 Voice FX — 58
8 Studio One Artist
Quick Start Guide — 62
8.1 Installation and Authorization — 62
8.2 Setting Up Studio One — 63
8.2.1 Configuring Audio Devices — 64
8.2.2 Configuring MIDI Devices — 64
8.3 Creating a New Song — 68
8.3.1 Configuring Your I/O — 69
8.3.2 Creating Audio and
Instrument Tracks — 70
8.3.3 Recording an Audio Track — 72
8.3.4 Adding Virtual Instruments
and Effects — 72
9 Resources — 74
9.1 Gain Staging 101: Begin at the Beginning — 74
9.2 Microphone Tips and Tricks — 75
9.2.1 Pickup Patterns — 76
9.2.2 Handling Noise — 76
9.2.3 How Close is Too Close? — 76
9.2.4 Problematic Pronunciation — 76
9.2.5 Putting it All Together — 77
9.3 Technical Specifications — 77
1 Overview
Hookup • Conexiones • Verkabelung • Branchements • 连接连接
© 2021 PreSonus Audio Electronics, Inc. All Rights Reserved. PreSonus is a registered registered
trademarks of PreSonus Audio Electronics, Inc. Other product names mentioned herein may be trademarks
of their respective companies. All specifications subject to change without notice.
18011 Grand Bay Ct. • Baton Rouge,
Louisiana 70809 USA• 1-225-216-7887
www.presonus.com
Revelator io24
2-channel audio interface for streamers and podcasters
Quick Start Guide
Revelator io24
Interfaz de audio de 2 canales para streamers y podcasters
Guía de arranque rápido
Revelator io24
2-Kanal-Audio-Interface für Streamer und Podcaster
Kurzanleitung
Revelator io24
Interface audio à deux canaux pour les streameurs et les podcasteurs
Guide de prise en main
Revelator io24
为流媒体工作者和播客设计的双通道音频接口为流媒体工作者和播客设计的双通道音频接口
快速启动指南
Part# 70-12000164-B
Microphone or Instrument to Input 2
Micrófono o Instrumento a Entrada 2
Mikrofon oder Instrument an Input 2
Microphone ou instrument vers entrée 2
麦克风或乐器至 Input 2
Microphone or Instrument to Input 1
Micrófono o Instrumento a Entrada 1
Mikrofon oder Instrument an Input 1
Microphone ou instrument vers entrée 1
麦克风或乐器至 Input 1
MIDI In and Out to MIDI Controller
Entrada y salida MIDI a controlador MIDI
MIDI-Ein- und Ausgang an MIDI-Controller
Entrée et sortie MIDI vers contrôleur MIDI
MIDI 输入输出至MIDI 控制器
USB-C to USB-A to computer or USB power
USB-C a USB-A a ordenador ó alimentación USB
USB-C auf USB-A an Computer oder
USB-Stromversorgung
USB-C vers USB-A pour ordinateur ou alimentation USB
USB-C至USB-A到电脑或USB 电源
Out to Headphones
Salida para auriculares
Ausgabe über Kopfhörer
Sortie vers casque
输出至耳机
Left/Right Main Out to Speakers
Salida principal Izquierda/Derecha a altavoces
Lautsprecher an den Main-Ausgängen Links/
Rechts
Sorties gauche/droite vers enceintes
左/右主输出至扬声器
Basic functions • Funciones básicas • Grundlegende Funktionen • Fonctions de base • 基础功能基础功能
Press channel 1 or 2 button to select channel. Press encoder to cycle through
settings. Turn encoder to change chosen setting.
Pulse el botón canal 1 ó 2 para seleccionar el canal. Pulse el encoder para desplazarse
por los ajustes. Gire el encoder para cambiar el ajuste elegido.
Channel 1 oder 2 drücken, um den Kanal auszuwählen. Endlosregler drücken, um
durch die Einstellungen zu blättern. Endlosregler drehen, um die ausgewählte
Einstellung zu ändern.
Pressez la touche de canal 1 ou 2 pour sélectionner le canal. Pressez l’encodeur pour
parcourir les réglages. Tournez l’encodeur pour modier le réglage choisi.
按下 channel 1 或 2 按钮进行轨道选择。按下编码器在设置中进行循环选择。旋转编码器对
选中的设置进行更改。
Tap Preset to cycle through sound presets. Press and hold Preset to turn presets
o or on.
Toque Preset para desplazarse entre los presets de sonidos. Mantenga pulsado Preset
para desactivar o activar los presets.
Preset drücken, um durch die Sound-Presets zu blättern. Preset gedrückt halten,
um Presets zu de-/aktivieren.
Appuyez sur Preset pour parcourir les préréglages de son. Pressez et maintenez Preset
pour désactiver ou activer les préréglages.
按下 Preset 在声音预设中进行循环选择。按住 Preset 可开启或关闭预设。
From Home screen, press Encoder to cycle through control of Headphone
volume, Main volume, or monitor blend. Turn encoder to adjust the
selected parameter.
Desde la pantalla Inicio, pulse Encoder para ir desplazándose entre el volumen
de los auriculares, el volumen Principal o la mezcla de monitoraje. Gire el
encoder para ajustar el parámetro seleccionado.
Drücken Sie den Endlosregler im Home-Screen, um zwischen
Kopfhörerpegel, Gesamtlautstärke und Monitormischung umzuschalten.
Drehen Sie den Endlosregler, um den ausgewählten Parameter anzupassen.
En écran d’accueil, pressez l’encodeur pour faire déler les commandes de
volume du casque, de volume principal ou de mélange pour l’écoute de
contrôle. Tournez-le pour régler le paramètre ainsi sélectionné.
在主屏幕上,按编码器可循环控制耳机音量、主音量或监听混合。转动编码器来调
整所选参数。
PRESS
0
3
12
24
48v
2
+24dB
80Hz
PRESS
48v
+24dB
80Hz
HOLD
Inputs
Playback
0
3
12
24
48v
2
80Hz
+30dB
Added bonus: PreSonus’ previously Top Secret recipe for…
Fantastic Vegan Gumbo
Ingredients:
•80ml all-purpose flour
•70 ml vegetable oil (e.g. high heat
sunflower oil)
•1-2 onions (diced)
•2 celery stalks (diced)
•1 green bell pepper (diced)
•3 cloves garlic (minced)
•1 liter of vegetable broth
•1 handful of okra, cut into pieces
•1 red bell bell pepper, cut into pieces
•250g mushrooms, cut into pieces
•1 cauliflower, cut into florets
•PreSonus “Sweet Darlin‘“ Cajun Dry
Rub
•salt
•thyme
•smoked paprika
•paprika (hot)
•black pepper
•2-3 bay leaves
•parsley, finely chopped
•spring onion, finely chopped
Cooking Instructions:
1. Make a roux: heat the oil in a pan set to medium heat. and stir in the our. Slowly
add our 1-2 Tbsp at a time, stirring continuously. Continue cooking and stirring
the roux until it is a dark brown (it should look like melted chocolate—milk or dark
chocolate is a question of taste and patience.) Be careful to not let the oil get too
hot, or the our will burn and you’ll have to start over! It’s best to work with the
heat set to medium and your patience set to high.
2. Once roux has reached the desired color, add the onions, peppers and celery; stir
well. After a few moments, add the garlic and fry briey. Then add the broth and
bring to a boil.
3. Add bay leaves and okra, and season to taste with the spices. Simmer on lowest
heat for about one hour.
4. In the meantime, place cauliower, red bell peppers and mushrooms on a baking
sheet. Drizzle with oil and sprinkle with Sweet Darlin‘. Brown in the oven at approx.
220°C.
5. Add the vegetables to the stew and simmer a little more, or turn o the heat and
let it sit for a few hours (Like any stew, it gets better overnight.)
6. Serve with rice and sprinkle with green onion and parsley. Season to taste with
Tabasco (or other hot sauce).
Serves 3-4
1
4
6
7
9
10 11 12
8
2 2
3
5
ENGLISH
1. Combo input jacks. Suitable for XLR, Line, or Instrument connections.
2. Channel Select Buttons. Press to display information about Input 1 or
input 2 on screen (3).
3. Screen. Displays metering, preset selection, and other important
information.
4. Back Button. Returns display on screen (3) to default Home view.
5. Preset Selectors. Cycles through presets for inputs 1 and 2,
respectively. Press to cycle through Presets; press and hold
to bypass Presets.
6. Multipurpose Encoder. Controls many parameters. From Home screen,
press it to cycle through controlling Headphone volume, Main volume,
or monitor blend. From Channel screen, press it to cycle through
+48v, gain, and high-pass lter options. Rotate Encoder to adjust the
selected parameter.
7. Mute. Enables/Disables the Main Outs.
8. Kensington Lock. Connect this port to a Kensington lock
to prevent theft.
9. USB-C. Connect USB-C to USB-A cable (included) to your computer or
USB power source.
10. MIDI In/Out. Connect to external MIDI controllers like keyboards for
control of virtual instruments in Studio One.
11. Main Out. Balanced 1/4” TRS outputs for speakers or power amp.
12. Headphone Output. The rear-panel headphone output mirrors the
same streams as the Main left/right outputs.
ESPAÑOL
1. Jacks combo de entrada. Adecuados para conexiones XLR, Línea o
Instrumento.
2. Botones de selección de canal. Pulse para mostrar información en pantalla
(3) sobre la Entrada 1 ó la entrada 2.
3. Pantalla. Muestra la medición, selección de presets y otra información
importante.
4. Botón Back. Devuelve lo mostrado en pantalla (3) a la vista Inicio por defecto.
5. Selectores de presets. Se desplaza de forma cíclica por los presets para
las entradas 1 y 2 respectivamente. Pulse para desplazarse por los presets;
mantenga la pulsación para poner los presets en bypass.
6. Encoder multifunción. Controla muchos parámetros. Desde la pantalla Inicio,
pulse en éste para ir desplazándose entre el volumen de los auriculares, el
volumen Principal o la mezcla de monitoraje. Desde la pantalla Canal, pulse
en éste para ir desplazándose entre las opciones +48v, ganancia y ltro paso
altos. Gire el encoder para ajustar el parámetro seleccionado.
7. Mute. Activa/desactiva la salida Principal (Main Outs).
8. Ranura se seguridad. Conecte este puerto a una ranura de seguridad
(Kensington lock) para prevenir su hurto.
9. USB-C. Conecte el cable USB-C a USB-A (incluido) a su ordenador fuente de
alimentación USB.
10. MIDI In/Out. Conecte a controladores MIDI externos como teclados para el
control de instrumentos virtuales en Studio One.
11. Main Out. Salidas TRS balanceadas de 1/4” para altavoces o una etapa de
potencia.
12. Salida de auriculares. La salida de auriculares del panel posterior reproduce
las mismas transmisiones que las salidas principales left/right.
DEUTSCH
1. Combo-Eingangsbuchsen. Zum Anschluss von Mikrofonen, Line-Quellen
oder Instrumenten.
2. Kanalauswahltasten. Drücken, um im Display (3) Informationen zu Input 1
bzw. 2 einzublenden.
3. Display. Blendet wichtige Information wie Pegelanzeigen und ausgewählte
Presets ein.
4. Zurück-Taste. Drücken, um im Display (3) den Home-Screen einzublenden.
5. Preset-Wahltasten. Drücken, um durch die Presets für die Inputs 1 und 2
zu blättern. Drücken, um durch Presets zu blättern; drücken und halten, um
Presets zu deaktivieren.
6. Multifunktions-Endlosregler. Steuert eine Vielzahl von Parametern.
Drücken Sie den Regler im Home-Screen, um zwischen Kopfhörerpegel,
Gesamtlautstärke und Monitormischung umzuschalten. Drücken Sie
ihn im Channel-Screen, um zwischen den Einstellungen für +48 V, Gain
und Hochpasslter umzuschalten. Drehen Sie den Endlosregler, um den
ausgewählten Parameter einzustellen.
7. Mute. Aktiviert/Deaktiviert die Main-Ausgänge.
8. Kensington Lock. Önung für ein Kensington-Schloss zur
Diebstahlsicherung.
9. USB-C. Zum Anschluss an einen Computer oder eine USB-Stromversorgung
mit einem USB-Kabel USB-C auf USB-A (im Lieferumfang enthalten).
10. MIDI In/Out. Zum Anschluss externer MIDI-Controller wie beispielsweise
Keyboards oder zur Steuerung virtueller Instrumente in Studio One.
11. Main Out. Symmetrische 6,35 mm TRS-Ausgänge zum Anschluss an
Lautsprecher oder Endstufen.
12. Kopfhörerausgang. Der rückseitige Kopfhörerausgang gibt denselben
Stream aus wie die Ausgänge Main Links/Rechts.
FRANÇAIS
1. Prises d’entrée mixtes. Conviennent aux connexions XLR, ligne ou
instrument.
2. Touches de sélection de canal. Pressez pour acher à l’écran (3) des
informations sur l’entrée 1 ou l’entrée 2.
3. Écran. Ache la mesure de niveau, la sélection de préréglage et
d’autres informations importantes.
4. Touche de retour. Ramène la page d’accueil par défaut à l’écran (3).
5. Sélecteurs de préréglage. Font respectivement déler les préréglages
des entrées 1 et 2. Pressez-les pour parcourir les préréglages.
Maintenez-les pressés pour désactiver les préréglages.
6. Encodeur multifonction. Contrôle de nombreux paramètres. En écran
d’accueil, pressez-le pour faire déler les commandes de volume du
casque, de volume principal ou de mélange pour l’écoute de contrôle.
En écran de canal, pressez-le pour faire déler les options +48 V, gain et
ltre passe-haut. Tournez-le pour régler le paramètre ainsi sélectionné.
7. Mute. Active/désactive les sorties principales.
8. Fixation antivol Kensington. Attachez-lui un antivol Kensington pour
empêcher le vol.
9. USB-C. Connectez le câble USB-C vers USB-A (inclus) à votre ordinateur
ou à votre source d’alimentation USB.
10. Entrée/sortie MIDI. Connectez-les à des contrôleurs MIDI externes
comme des claviers pour contrôler les instruments virtuels de Studio
One.
11. Sortie principale. Sortie sur jacks 6,35 mm 3 points (TRS) symétriques
pour enceintes ou ampli de puissance.
12. Sortie casque. La sortie casque de la face arrière produit les mêmes
ux que les sorties principales (Main Out) gauche/droite.
中文
1. 组合输入口。组合输入口。适用于 XLR、线路或乐器连接。
2.
轨道选择按钮。轨道选择按钮。按下按钮可在屏幕(3)上显示 Input 1 或 Input 2的信息。
3.
屏幕。屏幕。显示咪表、预设选择和其他重要信息。
4.
返回按钮。返回按钮。将屏幕(3)上的显示返回至默认的主页显示。
5.
预设选择器。预设选择器。分别循环浏览 Input 1和2的预置。按下可循环浏览预置;按住可
绕过预置。
6.
多用途编码器。多用途编码器。控制许多参数。在主屏幕上,按下它可以循环控制耳机音量、
主音量或监听混合。在通道屏幕上,按它可循环控制+ 48v,增益和高通滤波
器选项。旋转编码器来调整所选参数。
7.
静音。静音。启用/禁用主输出。
8. Kensington
锁。锁。将此端口连接到Kensington锁上以防止盗窃。
9. USB-C
。。将USB-C转USB-A电缆(附带)连接到您的电脑或USB电源。
10. MIDI
输入输出。 输入输出。连接到外部MIDI控制器,如键盘,以控制Studio One中的虚
拟乐器。
11.
主输出。主输出。用于扬声器或功率放大器的平衡1/4 “ TRS输出。
12.
耳机输出 。耳机输出 。
PreSonus Safety Warnings and Instructions
Electrical information and warning symbols for PreSonus products are located on the rear electrical panel of the unit
adjacent to the electrical plug or on the bottom of the unit along with other product compliance information.
This lightning flash with arrowhead symbol within an equilateral triangle is intended to alert the user to the presence of noninsulated “dangerous voltage” within the product’s enclosure that may be of sufficient magnitude to constitute a risk of electric shock.
WARNING: TO REDUCE THE RISK OF ELECTRIC SHOCK, DO NOT REMOVE COVER (OR BACK) AS THERE
ARE NO USER-SERVICEABLE PARTS INSIDE. REFER SERVICING TO QUALIFIED PERSONNEL.
The exclamation point within an equilateral triangle is intended to alert the user to the presence of
important operating and maintenance instructions in the literature accompanying the appliance.
CAUTION: To reduce the risk of electric shock, do not expose this appliance to rain and moisture. Do not expose this device
to dripping or splashing liquids and no object filled with liquids, such as vases, should be placed on the device.
CAUTION: These service instructions are for use by qualified service personnel only. To reduce the risk of electric shock,
do not perform any servicing other than that contained in the operation instructions. Qualified service personnel must
perform repairs.
1. Read these instructions.
2. Keep these instructions.
3. Heed all warnings.
4. Follow all instructions.
5. Do not use this device near water.
6. Clean only with a dry cloth.
7. Do not block any ventilation openings. Install in accordance with the manufacturer’s instructions.
8. Do not install near any heat sources, such as radiators, heat registers, stoves,
or other device (including amplifiers) that produce heat.
9. Do not defeat the safety purpose of the polarized or grounding-type plug. A polarized plug has two blades
and a third grounding prong. The wide blade and the third prong are provided for your safety. If the provided
plug does not fit into your outlet, consult an electrician for replacement of the obsolete outlet.
10. Protect the power cord from being walked on or pinched, particularly at plugs,
convenience receptacles, and the point where they exit from the device.
11. Use only attachments/accessories specified by PreSonus.
12. Use only with a cart, stand, tripod, bracket, or table specified by the manufacturer or sold with
this device. Use caution when moving a cart/device combination to avoid injury from tip-over.
13. Unplug this device during lightning storms or when unused for long periods.
14. Servicing is required when the device has been damaged in any way, such as if a power-supply
cord or plug is damaged; or liquid is spilled, or objects have fallen into the device; or if
the device has been exposed to rain or moisture, does not operate normally, or has been
dropped. All PreSonus products in the USA should be serviced at the PreSonus factory
in Baton Rouge, Louisiana. If your PreSonus product requires a repair, contact support@
presonus.com to arrange for a return authorization number. Customers outside the USA
should contact their local distributor. Your distributor’s contact information is available at www.presonus.com.
15. Protective grounding(earthing) terminal. The apparatus should be connected to a
mains socket outlet with a protective grounding(earthing) connection.
16. Where the Mains plug or an appliance coupler is used as the disconnect device,
the disconnect device shall remain readily operable.
17. The use of apparatus is in moderate climates.
18. Please allow 5cm around the apparatus for sufficient ventilation; the ventilation should not be impeded
by covering the ventilation openings with items, such as newspapers, table-cloths, curtains, etc.
Rackmounting
• Use an equipment rack that is 19-inches wide (482.6 mm) and rated for the total weight of your equipment.
• Use a minimum of (4) 10/32 threaded screws per rack mounted device.
WARNING:
Cancer and reproductive harm - www.p65warnings.ca.gov
PreSonus Compliance Information
European Union (EU)
The CE mark on this product indicates that the device is compliant with the
EU Council Directives
2014/35/EU Low Voltage Directive
2014/30/EU EMC Directive
2011/65/EU RoHS Recast
EC 1907/2006 REACh
For a copy of a specific product DoC, contact PreSonus at support@presonus.com.
RoHS Recast Directive 2011/65/EU
REACh Directive EC1907/206
WEEE This symbol on this product or its packaging indicates that this product must not be disposed of with other
waste. Instead, it is your responsibility to dispose of your waste equipment by handing it over to a designated
collection point for the recycling of waste electrical and electronic equipment. The separate collection and recycling
of your waste equipment at the time of disposal will help conserve natural resources and ensure that it is recycled
in a manner that protects human health and the environment. For more information about where you can drop
off your waste equipment for recycling, please contact your local city recycling office or the dealer from whom you
purchased the product.
Radio and Television Interference
If these symbols are marked on the product, the device complies as follows:
Any Changes or modifications not expressly approved by the party responsible for compliance could void the user’s authority to operate
the equipment.
USA: This equipment has been tested and found to comply with the limits for a Class B digital device, pursuant to
Part 15 of the FCC Rules. Operation is subject to the following two conditions: (1) This device may not cause harmful
interference, and (2) this device must accept any interference received, including interference that may cause
undesired operation. These limits are designed to provide reasonable protection against harmful interference in a
residential installation. This equipment generates, uses, and can radiate radio frequency energy, and, if not installed
in accordance with the instructions, may cause harmful interference to radio communications. However, there is no guarantee that
interference will not occur in a particular installation. If this equipment does cause harmful interference to radio or television reception,
which can be determined by turning the equipment off and on, the user is encouraged to try to correct the interference by one or more of
the following measures:
• Reorient or relocate the receiving antenna.
• Increase the separation between the equipment and the receiver.
• Connect the equipment into an outlet on a circuit different from that to which the receiver is connected.
• Consult the dealer or an experienced radio/TV technician for help.
FCC Radiation Exposure Statement:
This equipment complies with FCC radiation exposure limits set forth for an uncontrolled environment. This equipment should be installed
and operated with minimum distance 20cm between the radiator& your body.
This transmitter must not be co-located or operating in conjunction with any other antenna or transmitter.
CAUTION: Changes or modifications to this device not expressly approved by PreSonus Audio Electronics could void the user’s authority to
operate the equipment under FCC rules.
Australian Compliance: This equipment complies with Radio communication Devices Notice 2003; or Radio communication
Labeling (Electromagnetic Compatibility) Notice 2008; or Radio communication (Compliance Labeling Electromagnetic
Radiation) Labeling Notice 2003.
IC WARNING
IC RSS warning: This device complies with Industry Canada licence-exempt RSS standard (s). Operation is subject to the following two
conditions: (1) this device may not cause interference, and (2) this device must accept any interference,including interference that may
cause undesired operation of the device. Under Industry Canada regulations, this radio transmitter may only operate using an antenna of a
type and maximum (or lesser) gain approved for the transmitter by Industry Canada. To reduce potential radio interference to other users,
the antenna type and its gain should be so chosen that, the equivalent isotropically radiated power (e.i.r.p.) is not more than that necessary
for successful communication.
This radio transmitter (identify the device by certifcation number, or model number if Category II) has been approved by Industry Canada
to operate with the antenna types listed below with the maximum permissible gain and required antenna impedance for each antenna
type indicated. Antenna types not included in this list, having a gain greater than the maximum gain indicated for that type, are strictly
prohibited for use with this device.
IC Radiation Exposure Statement:
This equipment complies with IC RF radiation exposure limits set forth for an uncontrolled environment. This transmitter must not be
co-located or operating in conjunction with any other antenna or transmitter.
ICES003: This CAN ICES3 (B)/NMB3(B) digital apparatus complies with Canadian ICES003.
PreSonus Health, Safety, and Compliance Guide
Class B
PreSonus Health, Safety, and Compliance Guide
Class B
®
PreSonus Health, Safety, and Compliance Guide. Part# 70-00000013-C
© 2018 PreSonus Audio Electronics, Inc. All Rights Reserved.
18011 Grand Bay Ct. • Baton Rouge, Louisiana 70809 USA • 1-225-216-7887
www.presonus.com
1.1 Introduction
1 Overview
1.1 Introduction
Revelator io24
Owner’s Manual
Thank you for purchasing the Revelator io24 audio interface! Revelator io24 is
the perfect audio interface for live streaming or podcasting, and is a powerful
recording solution for voice-overs and music production in your home studio. It’s
designed to deliver polished, professional-sounding results with ease. Once you’ve
registered your Revelator io24 at my.presonus.com, you’ll be able to download
your drivers, a complimentary copy of Studio One Artist, additional plug-ins,
content, and more. It’s our gift to you for becoming a PreSonus customer.
We suggest you read this manual to familiarize yourself with the features
and applications for your Revelator io24 before trying to connect it to your
computer. This will help you to avoid problems during installation and use.
Throughout this manual you will find Power User Tips. These tips and
tricks will help you to become a Revelator io24 expert—as well as help
you to better understand audio terminology, so you can get the most
from your purchase and get the best sound quality possible.
Thanks for joining the PreSonus family. We’re glad you’re here.
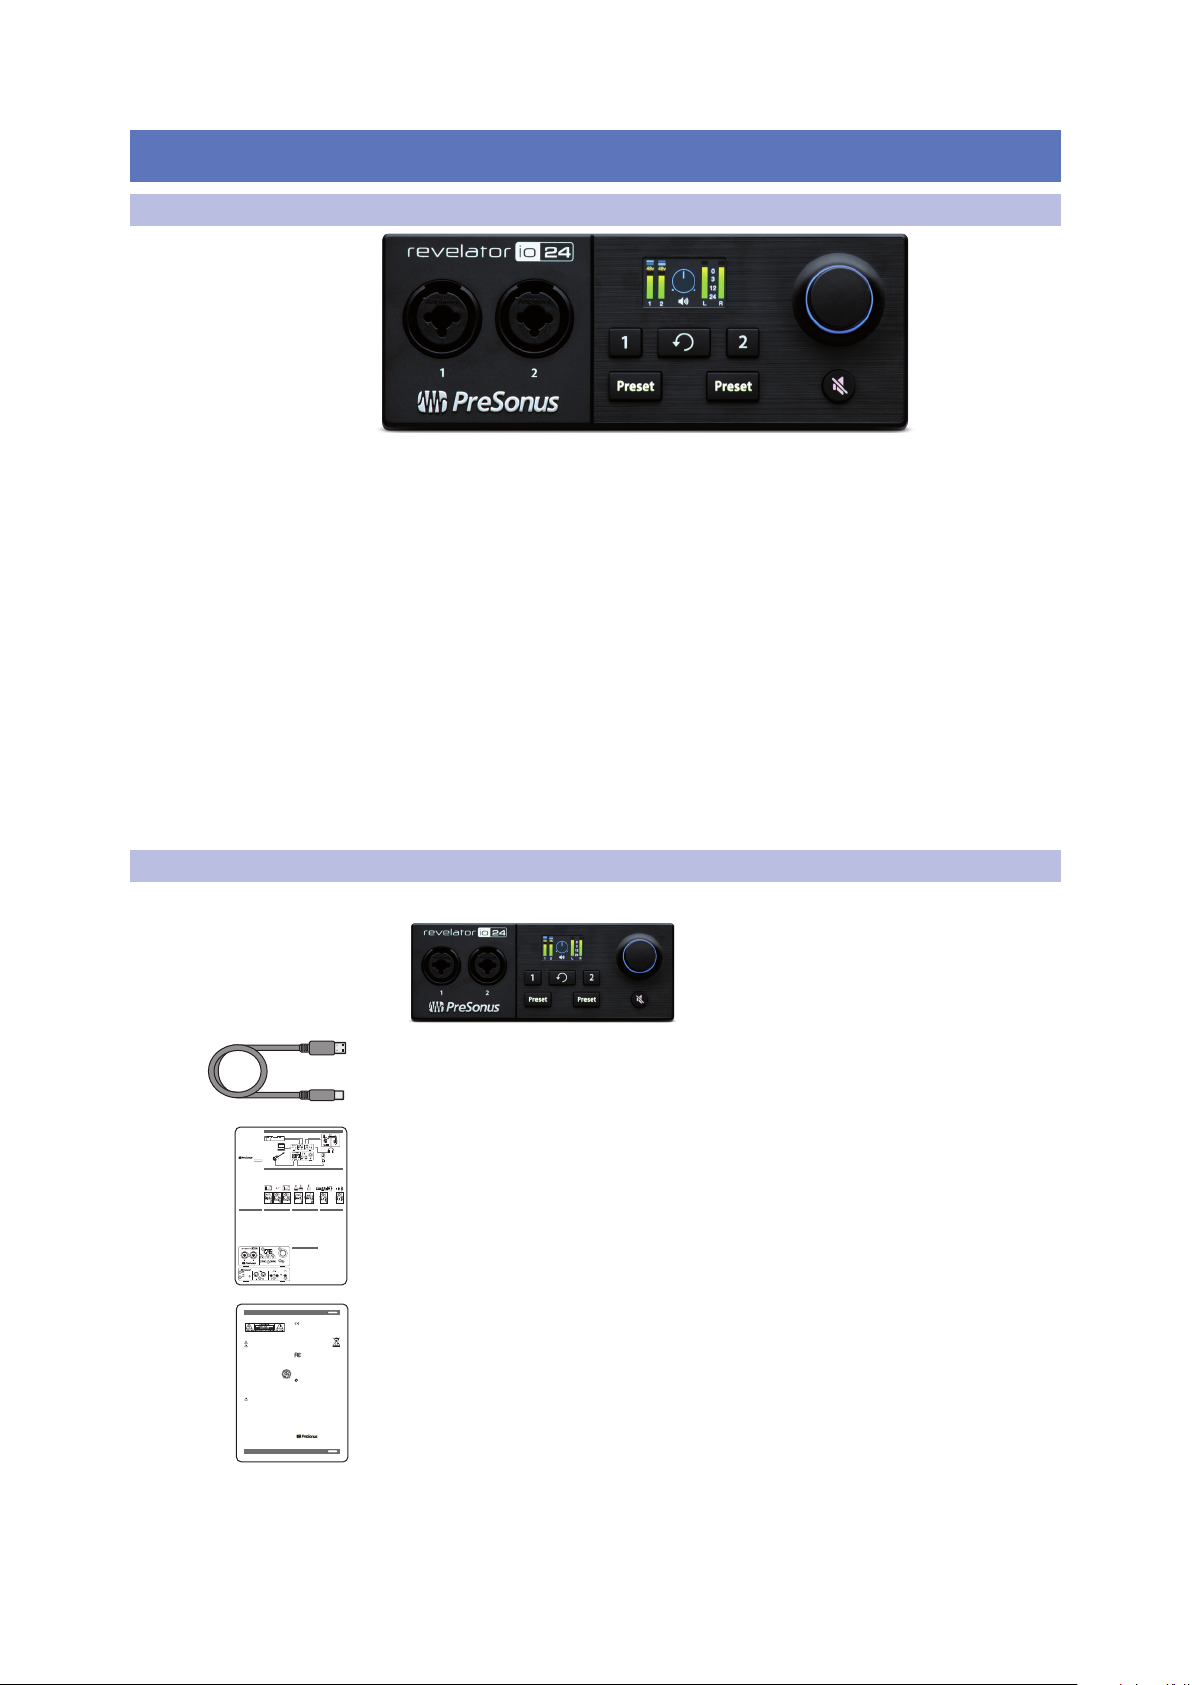
1.2 What is in the box
• Revelator io24 USB audio interface
• 1M USB-C-to-USB-A Cable. Use this to connect your Revelator io24 to a USB
• Quick Start Guide. Use this as a handy reference guide to your hardware
• PreSonus Health, Safety, and Compliance Guide. Legal language to cure your
port on your computer or a powered USB hub.
features while you familiarize yourself with your new interface
insomnia.
• Warranty/Registration Card
1
1 Overview
1.3 What is in your MyPreSonus account
1.3 What is in your MyPreSonus account
There’s more to your Revelator io24 than what comes in the box!
Let’s take a moment to register your Revelator io24 and download
the digital products that come with it. These include:
• Universal Control. Unlock the StudioLive inside your Revelator io24 with
Universal Control. This installation package also includes your audio driver
controls that you will need to use advanced Revelator io24 features.
• Studio One Artist. Studio One Artist is our award-winning recording
and production software. It’s also designed to be intuitive and easy
to use, so whether you’re a seasoned professional or just starting out,
Studio One Artist has the tools you need to make a great recording.
• Studio Magic Bundle. Over $1000 USD worth of plug-ins, sounds, and
more; Studio Magic supercharges your Studio One Artist experience!
1.3.1 Step 1: Register Revelator io24
To download your digital products, you must first create a MyPreSonus
account. This account lets you manage all your PreSonus product
registrations, provides curated educational content, and is the portal
to all tech support and service inquiries. Let’s get started!
Revelator io24
Owner’s Manual
1. In your Internet browser of choice, visit my.presonus.com and
click “Create Account”
Power User Tip: If you already have a MyPreSonus account, please log in and skip
to step 5.
2
1 Overview
1.3 What is in your MyPreSonus account
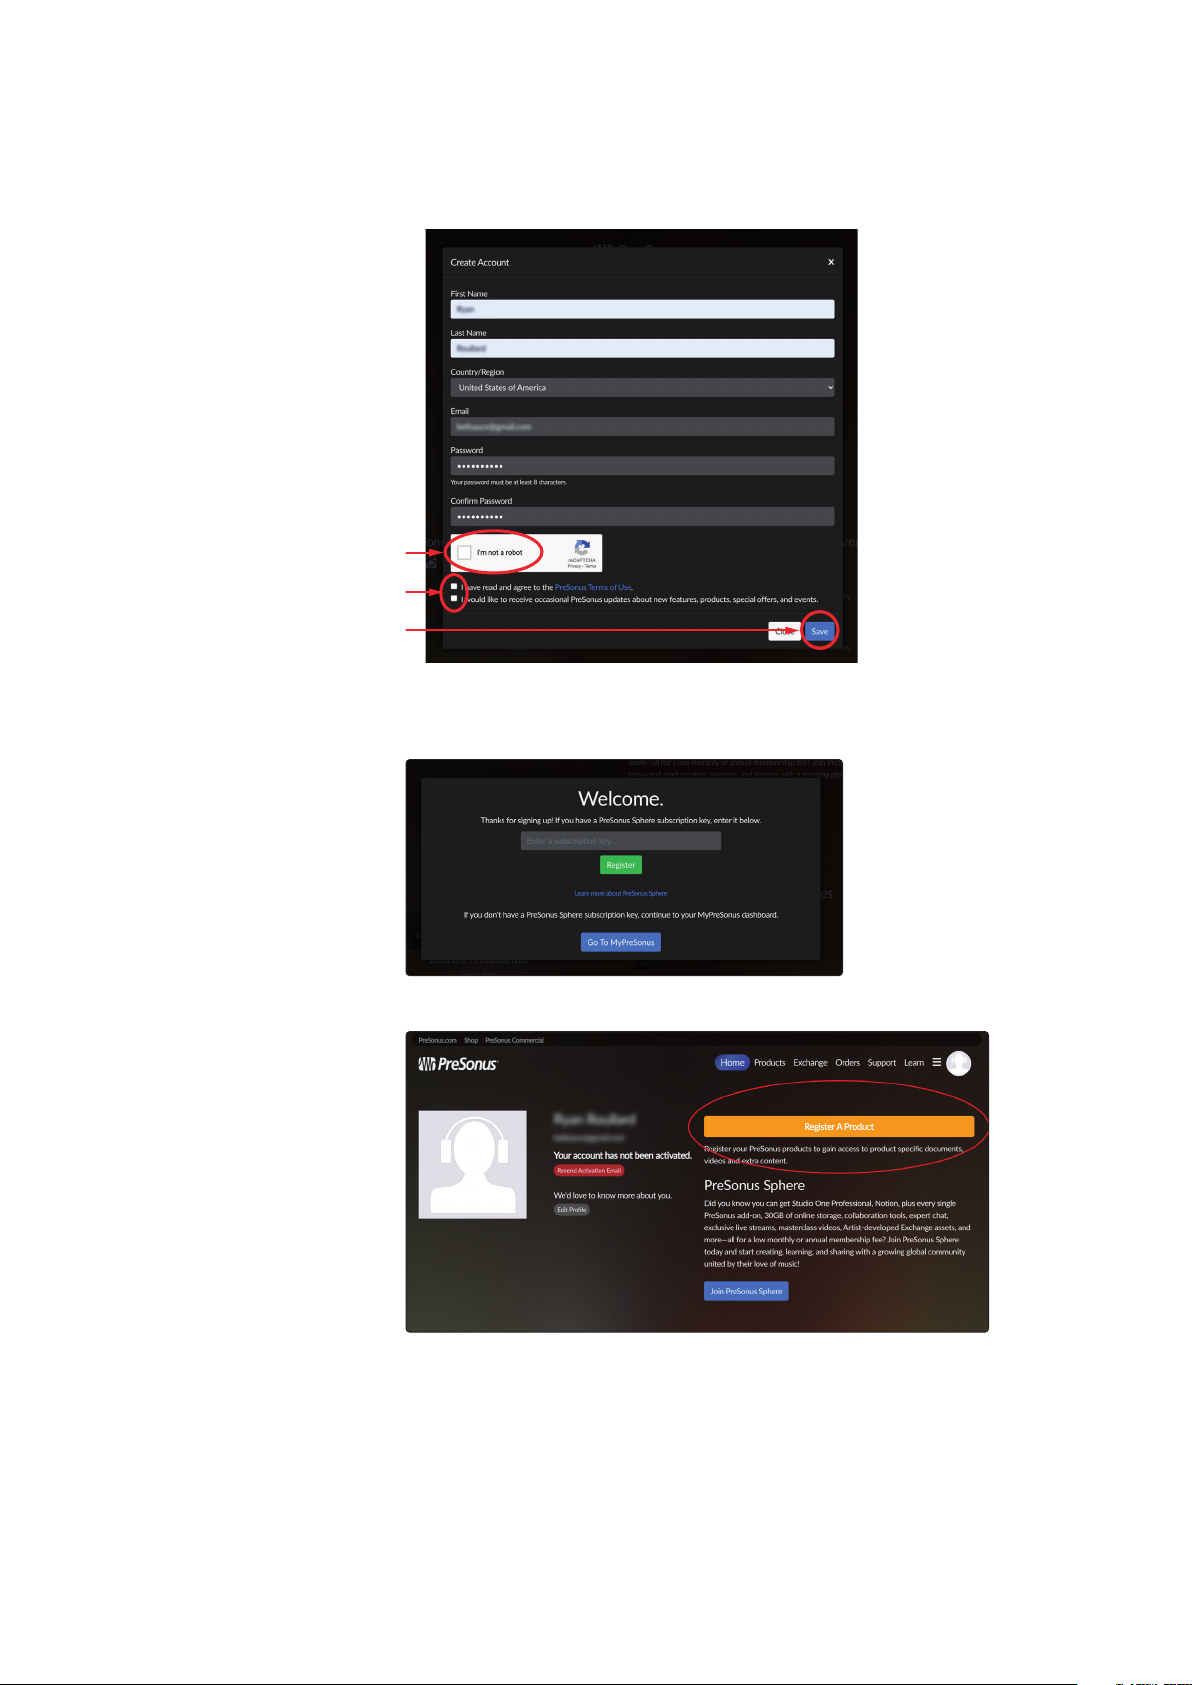
2. Fill in the form with the required information. Make sure to verify
that you are, in fact, human and agree to our PreSonus Terms of
Use. If you’d like to receive occasional emails about promotions
and new video content, check that box now as well.
Revelator io24
Owner’s Manual
3. Click “Save.”
4. Click “Go to MyPreSonus” to log into your shiny new MyPreSonus account.
5. Click “Register a Product.”
3
1 Overview
1.3 What is in your MyPreSonus account
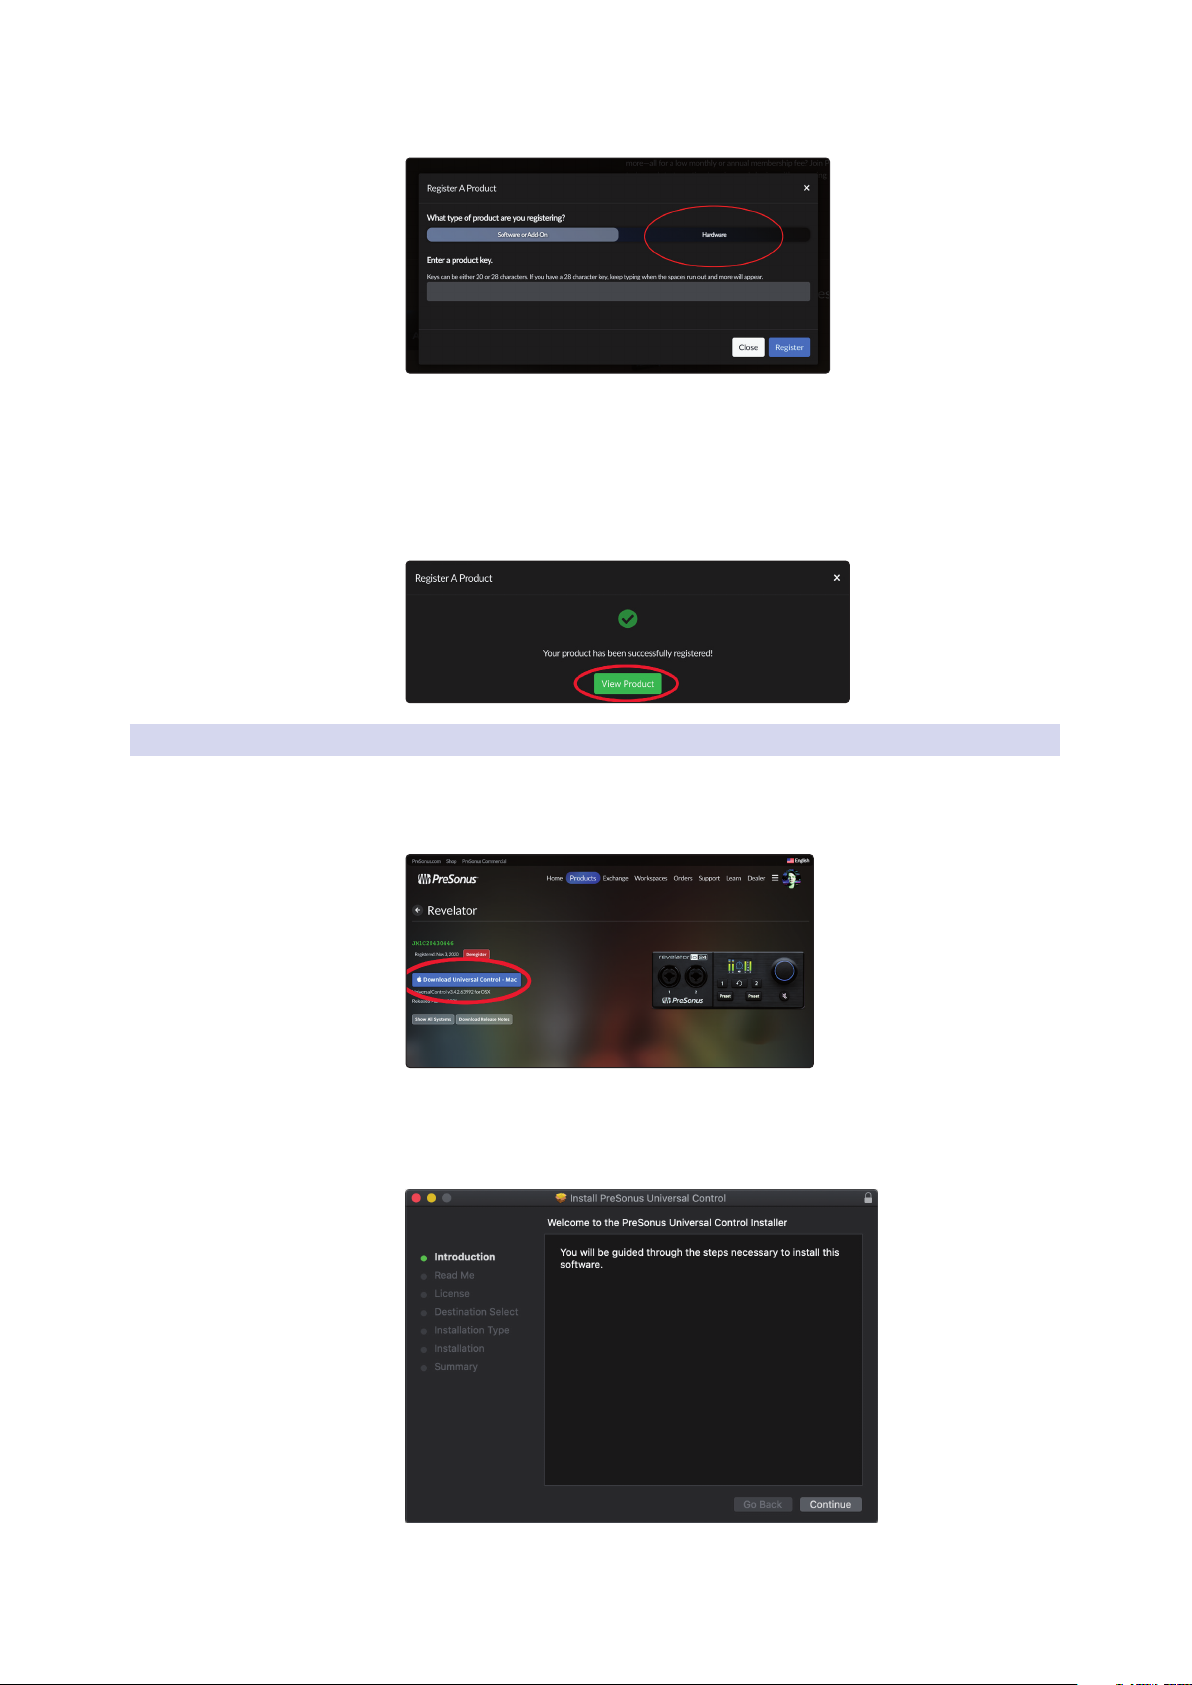
6. In the pop-up menu, click on the Hardware tab.
7. Select your purchase date and enter your Revelator io24 Serial
Number. You can find your serial number on the bottom of
your interface as well as on your Quick Start Guide.
8. Click Register.
9. Click View Product to download your companion software.
Revelator io24
Owner’s Manual
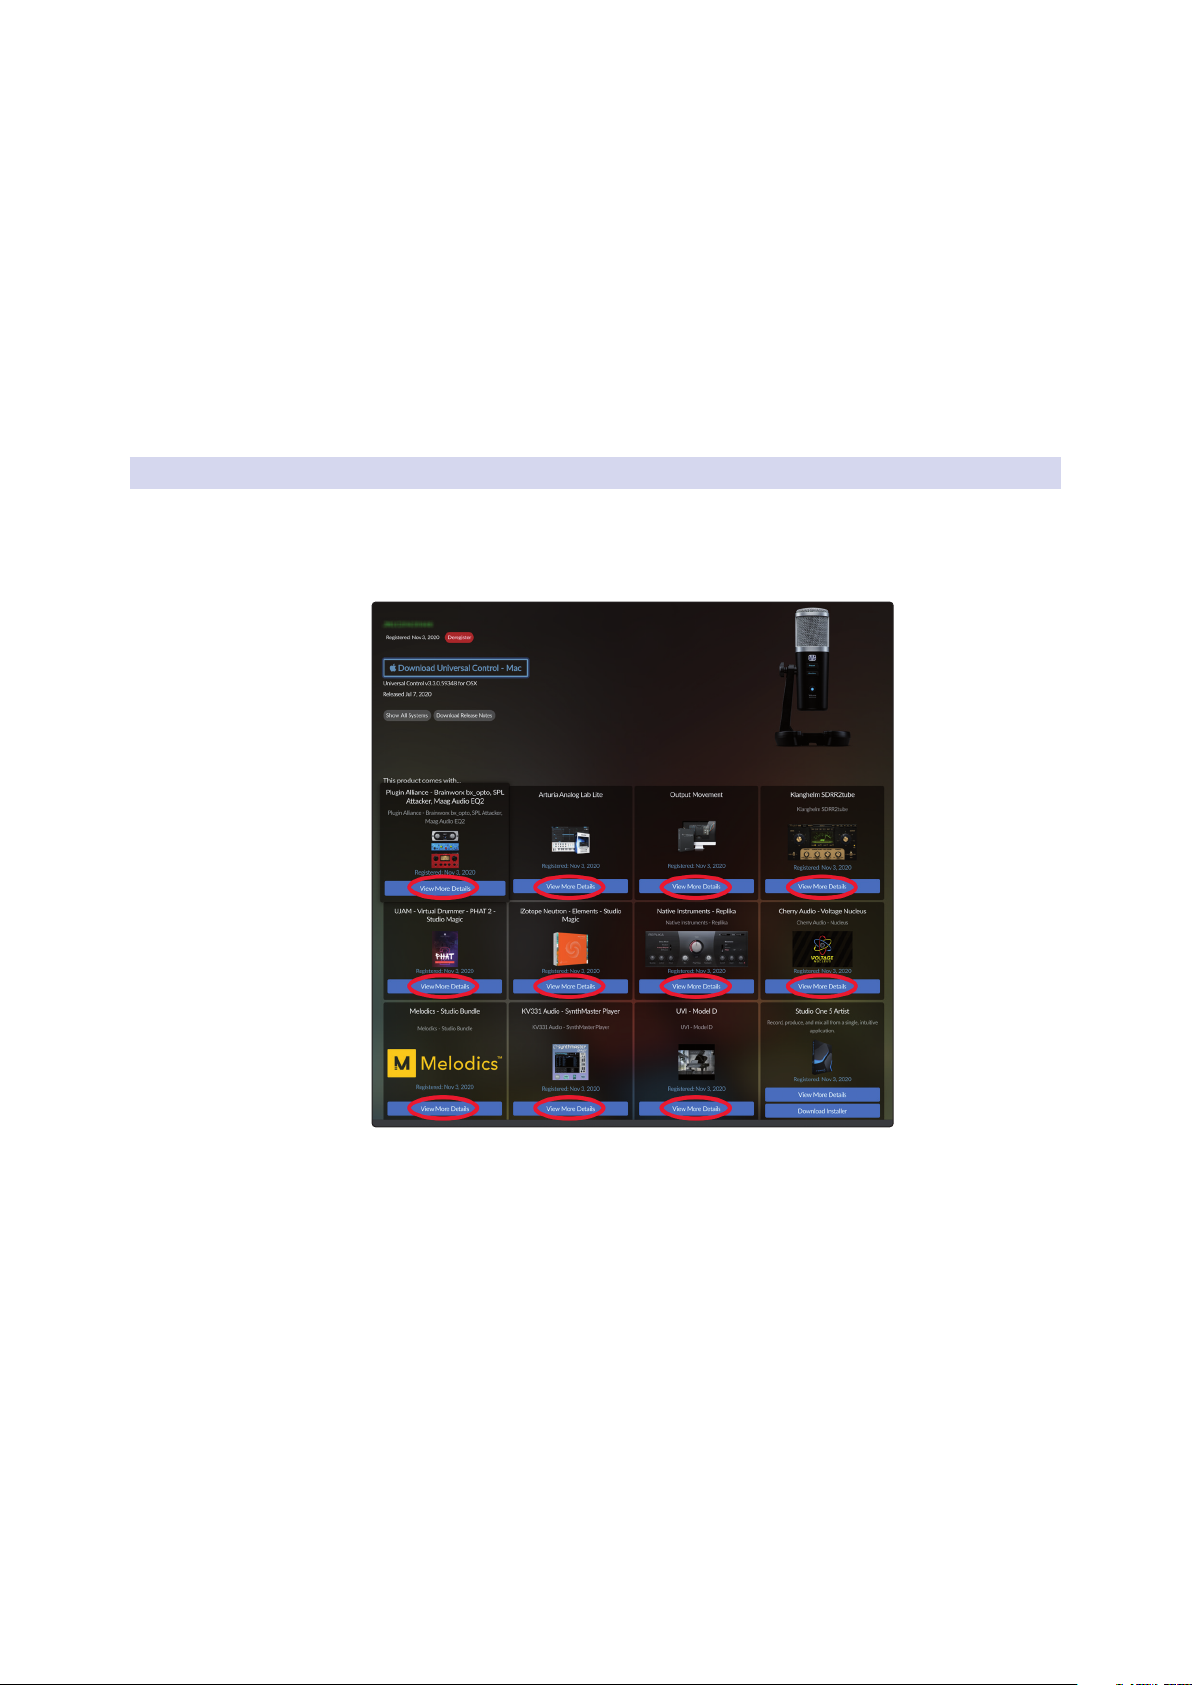
1.3.2 Step 2: Download and Install Universal Control
1. From the Revelator io24 product listing in MyPreSonus, click the
“Download Universal Control” button at the top. MyPreSonus will scan your
computer and present the correct installer for your operating system.
2. Locate the Universal Control installer in your
Downloads folder. Double click to open it.
3. Follow the onscreen instructions to install Universal Control.
See Section 3 for information and use instructions for all the advanced
features available in Universal Control.
4

1 Overview
1.3 What is in your MyPreSonus account
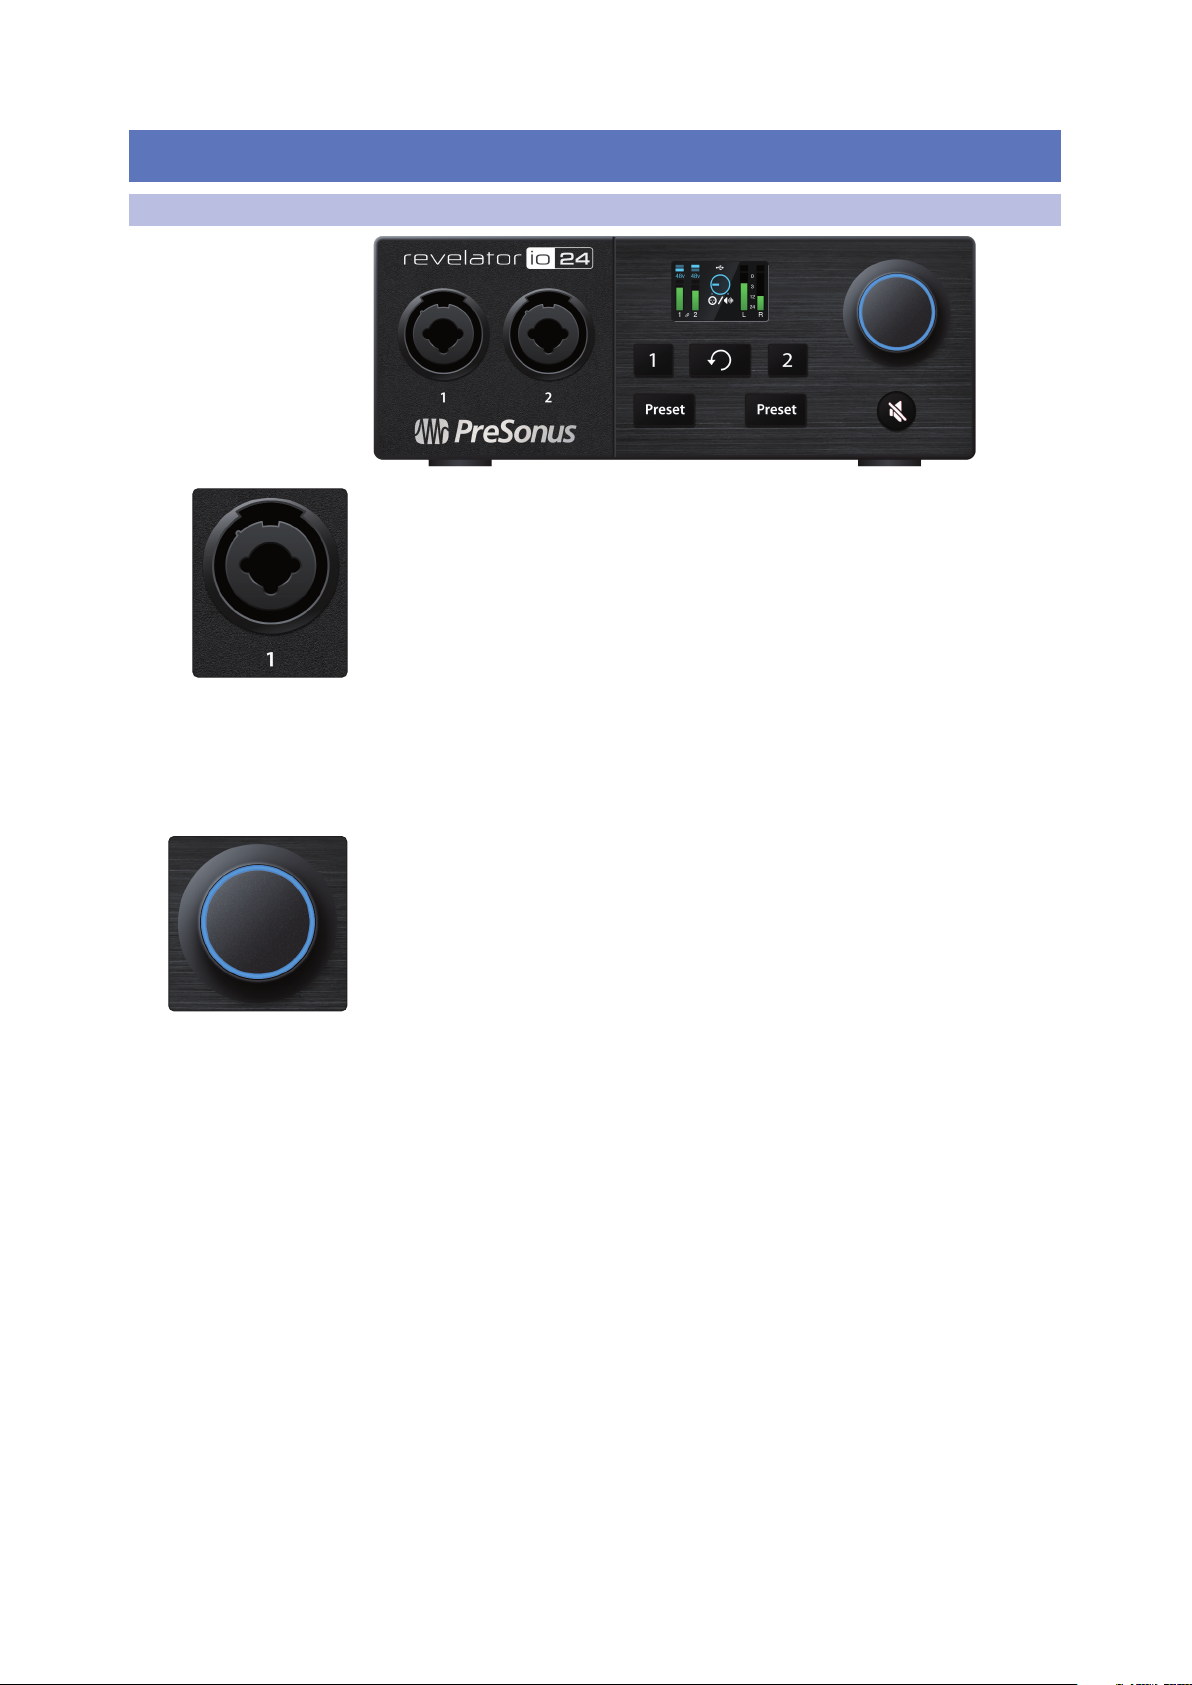
1.3.3 Step 3: Download and Install Studio One Artist (Optional)
1. From the Revelator io24 product listing in MyPreSonus, locate Studio One
Artist from the product listing. Quick links to every digital product that comes
with your Revelator io24 will be listed here. Click the “Download Installer”
button at the bottom of the Studio One Artist listing. MyPreSonus will scan
your computer and present the correct installer for your operating system.
Revelator io24
Owner’s Manual
2. Locate the Studio One installer in your Downloads folder. Double click to open it.
Windows: Launch the Studio One Artist installer
and follow the onscreen instructions.
Mac: Drag the Studio One Artist application into the
Applications folder on your Mac hard drive.
3. Locate Studio One in your Applications and launch it. When Studio One is
launched for the first time on your computer, it will communicate with your
My.PreSonus account and verify your registration. To ensure a seamless
authorization process, make sure to download your installer to the computer
on which you will be using it, and be sure that your computer is connected
to the Internet when you launch the application for the first time.
5
1 Overview
1.3 What is in your MyPreSonus account
Power User Tip: You may be prompted to enter your My.PreSonus user account
information. Clicking “Remember Credentials” will allow you to have immediate access to
any content you purchase from shop.presonus.com.
Studio One Artist comes bundled with an array of demo and tutorial
materials, instruments, loops, and samples. The first time you launch Studio
One Artist, you will be prompted to install its companion content. Select the
content you wish to add and click “Install.” The content will automatically
begin to download and install from your My.PreSonus user account.
Power User Tip: To select only a portion of the available content, click on “Show
Packages.” From here you can customize your content installation.
See Section 8 for a Getting Started guide to help your start recording and mixing in
Studio One Artist.
1.3.4 Step 4: Download and Install Studio Magic (Optional)
From the Revelator io24 product listing in MyPreSonus, you will
also find a complete list with links to all the Studio Magic products
that came with your Revelator io24 registration. Click on the “View
More Details” button below any product you’d like to install.
Revelator io24
Owner’s Manual
Studio Magic software is developed by many different manufacturers, so
MyPreSonus will send you to their respective websites for download and installation.
6
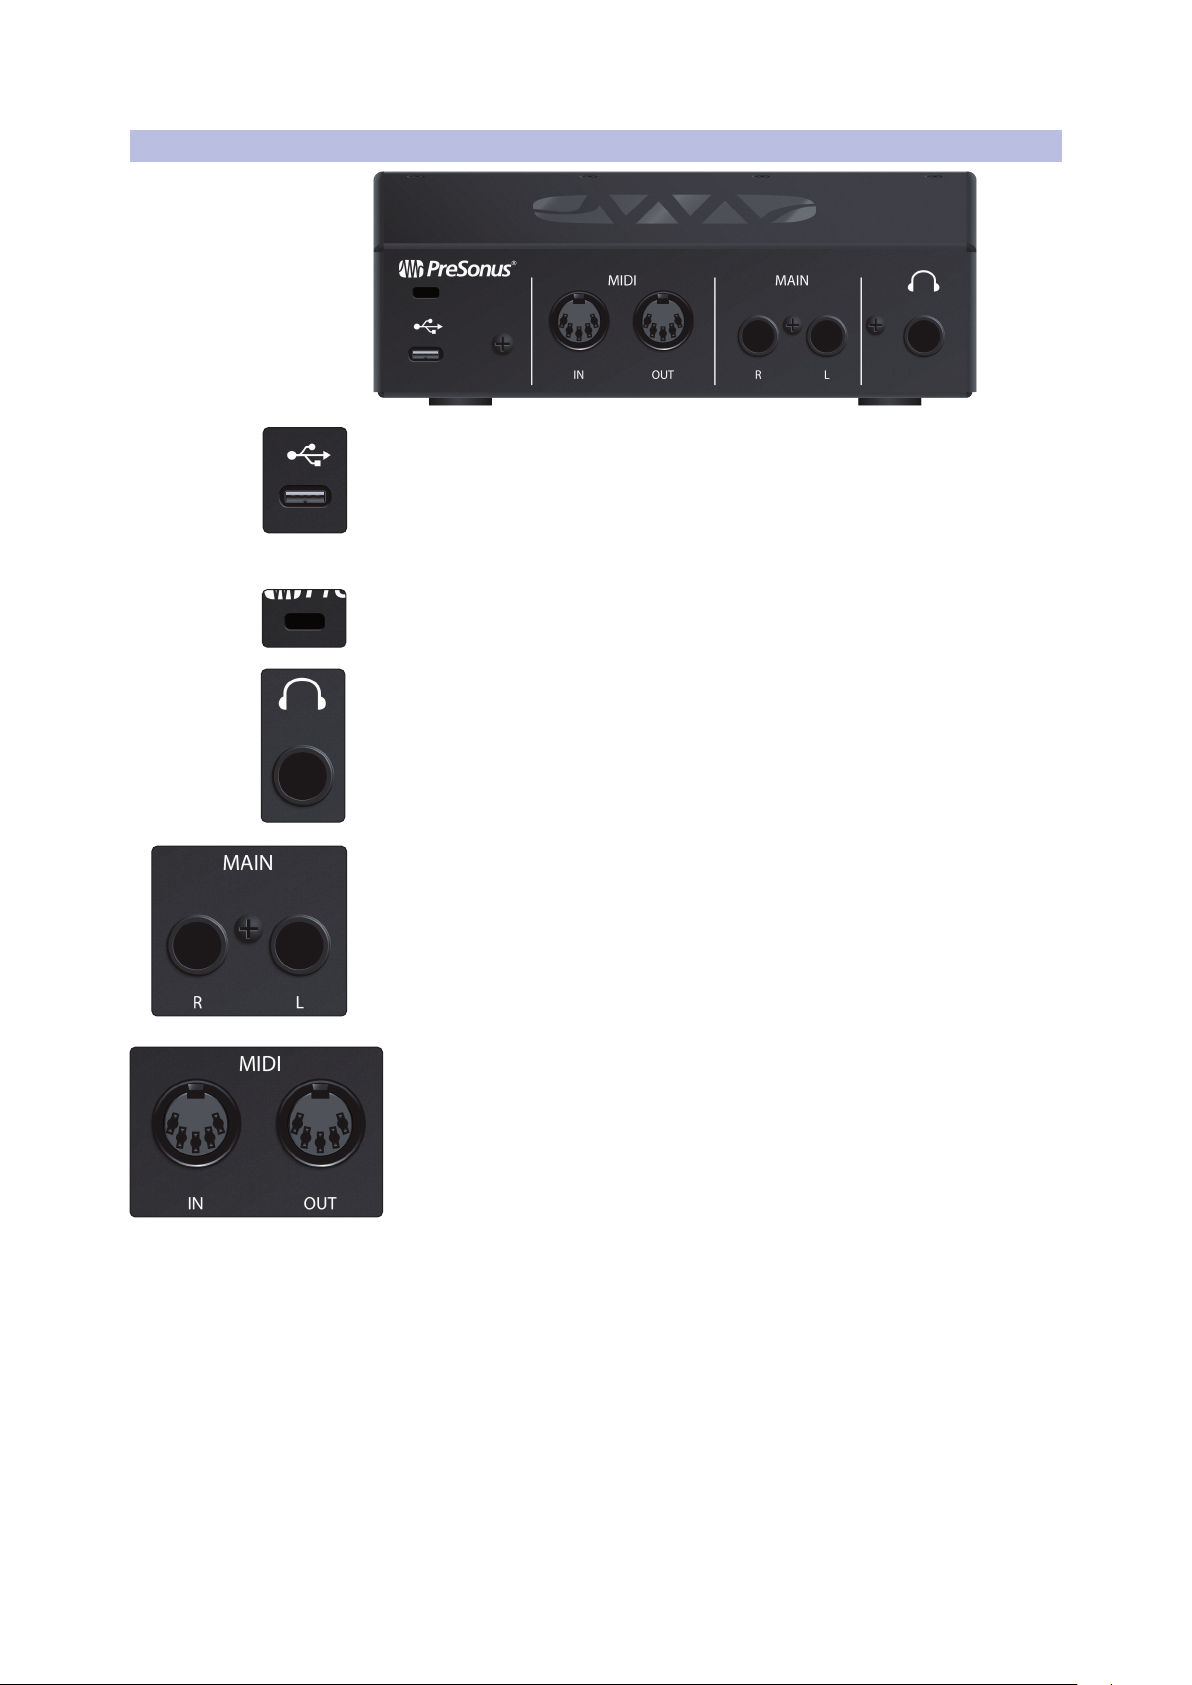
2 Connections and Controls
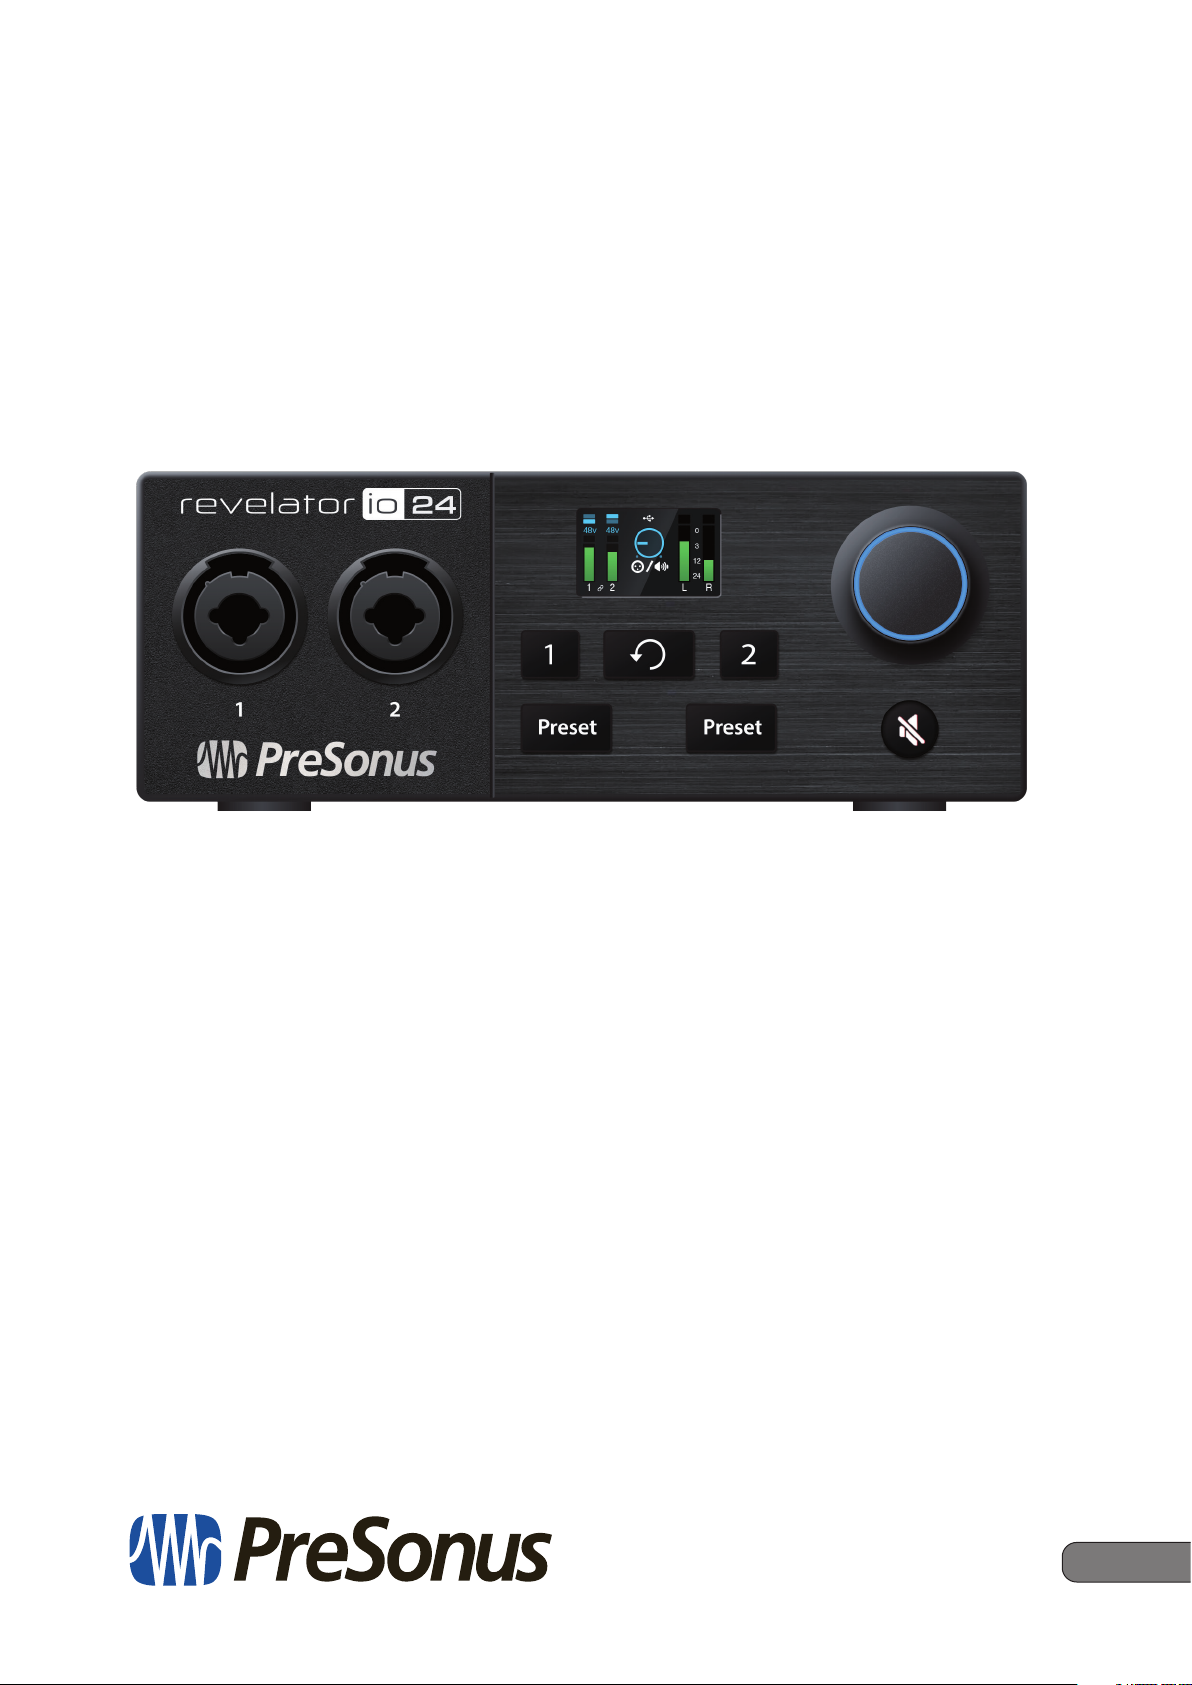
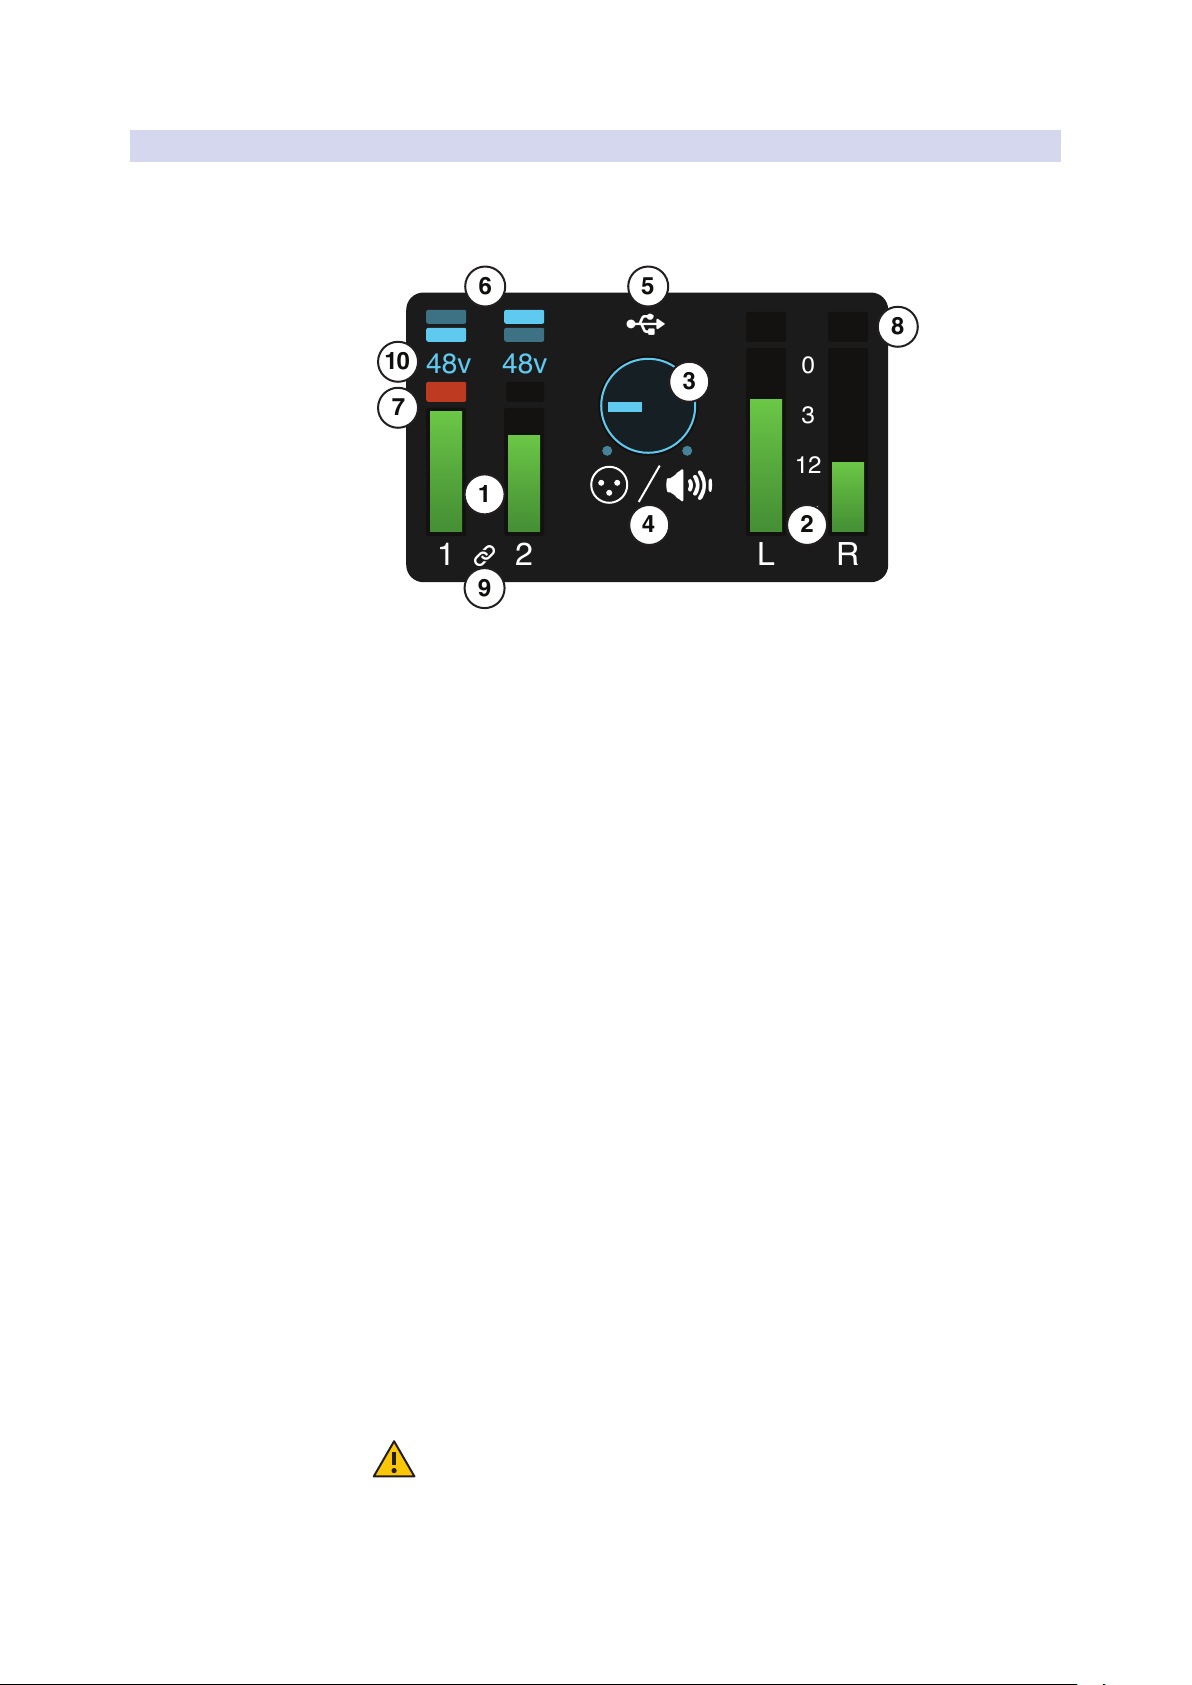
2.1 Front Panel
2 Connections and Controls
2.1 Front Panel
Microphone Inputs. Your Revelator io24 interface is equipped with high-quality
microphone preamplifiers for use with all types of microphones. The Revelator io24
features XMAX-L solid-state microphone preamps that are optimized for bus power.
Both input channels on your Revelator io24 interface are equipped with combo
jacks. This convenient connector accepts either a ¼-inch or an XLR connector.
Instrument / Line-Level Inputs. The ¼-inch connectors on Channels
1 and 2 can be used with passive instruments (guitar, bass, etc.)
or line-level devices (synthesizers, signal processors, etc.).
Please note: As with any audio input device, plugging in a microphone or an instrument,
or turning phantom power on or off, will create a momentary spike in the audio output.
Because of this, we highly recommend that you turn down the channel trim before
changing connections or turning phantom power on or off. This simple step will add
years to life of your audio equipment.
Multipurpose Encoder Knob. This is a lot more than a simple volume knob! It’s
also a button, and can be used to control many features of your Revelator io24:
• From the Home screen, press it to cycle through Headphone volume,
Main volume, and Monitor Blend. Rotate to edit the selected option.
• From the Channel screen, press to cycle through +48v, Gain, and High-pass filter
options. Rotate to edit the selected option.
Revelator io24
Owner’s Manual
7
2 Connections and Controls
0
31224
1
48v
LR2
48v
1
234
5
6
7
8910
2.1 Front Panel
2.1.1 The Screen
Revelator io24
Owner’s Manual
The screen displays metering, preset selection, and other important information.
The following information is displayed on Revelator io24’s Home screen.
This is the default screen you’ll see when you first use Revelator io24.
1. Input Meters. These meters indicate the input level of the analog
inputs on your Revelator io24. The red Clip indicator will light when
your input signal reaches -0.5 dBFS. At this level, the signal will begin
to overload the analog-to-digital converters and exhibit signs of
clipping. Use the gain controls to keep the signal below this level.
2. Output Meters. These meters indicate the signal level received
from the first two driver returns (Main Left/Right). These meters
display the signal level before the main output level control.
3. Output Volume/Blend. This indicates output volume of
the currently-selected output (Headphones or Mains) just
like a volume knob—as well as Monitor Blend.
4. Encoder status. Lets you know if the Encoder Knob is controlling Headphone
output level, Main output level, or monitor Blend (direct vs. hardware.)
5. USB Status indicator. Confirms that Revelator io24 is
connected via USB and functioning normally.
6. Preset indicators. These lights indicate the preset selection of
both channels. If presets are bypassed, both will be dark.
7. Input Clip indicator. Lights red when the incoming signal
is too loud for the converter, causing distortion.
8. Output Clip indicator. Lights red when the outgoing signal is too loud.
9. Stereo link indicator. This icon informs you that Channels 1 and 2 are
configured for use as a single stereo channel for use with stereo instruments
like keyboards. This feature can be activated in Universal Control, or by
pressing both channel buttons on Revelator io24 simultaneously.
10. +48v indicator. Informs you if +48v power has been
activated—required for most condenser microphones.
WARNING: Phantom power is only required for condenser microphones and
can severely damage some dynamic mics, especially ribbon mics. Therefore,
switch phantom power off when it is not required. Consult the user documentation
that came with your microphone before engaging phantom power.
XLR connector wiring for phantom power:
Pin 1 = GND Pin 2 = +48V Pin 3 = +48V
8

2 Connections and Controls
0
3
12
24
48v
80Hz
2
+24dB
1
234
5
6
2.1 Front Panel
Revelator io24
Owner’s Manual
The following information is displayed on Revelator io24’s
Channel screens. Press Channel Select Buttons 1 or 2 to bring it
up. Press the Back button to return to the Home screen.
From the Channel screen, the Encoder Knob can be
pressed to cycle through the following options:
1. Gain. Rotate the Encoder to turn input Gain up or down. Use this to
bring your connected instrumet or microphone signals up or down
to suitable recording levels. Avoid aforementioned clipping.
2. High-pass filter 80Hz. Rotate the Encoder to turn the High-pass
filter on and off. This can be used to cut low-end rumble and
other unwanted low frequencies from your recordings.
3. +48v Phantom Power. Rotate the Encoder to enable/disable
+48v power for attached condenser microphones.
Other information on the Channel screen includes:
4. Input Meter. This meter indicates the input level of the selected
channel on your Revelator io24, just like on the Home screen.
5. Gain reduction meter. If you’re running any compression or limiting
via Revelator io24’s DSP (Digital Signal Processing), the amount of
gain reduction being applied will be indicated by this blue meter.
6. Preset indicators. These lights indicate the preset selection
of the currently-selected channel, including none.
Channel Select Buttons. Press to display information about Input 1 or input 2 on
the screen.
Back Button. Returns display on screen to default Home view.
Preset Selectors. Cycles through presets for inputs 1 and 2, respectively.
Press to cycle through Presets; press and hold to bypass Presets.
Mute. Enables/Disables the Main Outs. Has no effect on Headphone Out.
9
2 Connections and Controls
2.2 Back Panel
2.2 Back Panel
Revelator io24
Owner’s Manual
USB-C Port. Use this port to connect your Revelator io24 to your computer. While
the Revelator io24 connects using USB-C, it is fully compatible with USB 2.0 and
3.0 connections. Use the USB-C to A cable that came with your Revelator io24
if your computer has a USB-A connection rather than a USB-C connection.
Please note: The Revelator io24 is backward compatible with USB 2.0 and USB 3.0 speed
connections. USB 1.1 is not supported.
Kensington Lock. Connect this port to a Kensington lock to prevent theft.
Headphone Output. Connect your headphones here. Level can be controlled from
the Home screen using the Encoder.
Main Outs. These are the Main outputs for the Revelator io24. The output level of the
Main outputs is controlled by the Main level control on the front of the unit. Playback
streams 1 and 2 are routed to these outputs.
MIDI I/O. This is the MIDI input and output connections. MIDI stands for “Musical
Instrument Digital Interface.” However, MIDI can be used for many things other
than instruments and sequencing. The MIDI inputs and outputs allow connection
to a variety of MIDI-equipped hardware, such as keyboard controllers, and
can be used to send and receive MIDI Machine Control and MIDI Time Code.
Note: MIDI does not carry audio signals but is frequently used to trigger or control an
audio source, such as a virtual instrument or hardware synthesizer. You should
ensure that MIDI data is correctly sent and received by the appropriate hardware or
software. You may also need to route hardware sound sources’ audio to the inputs of
your Studio-series interface. Please consult the User’s Manual of your MIDI devices for
help with MIDI setup and usage.
10
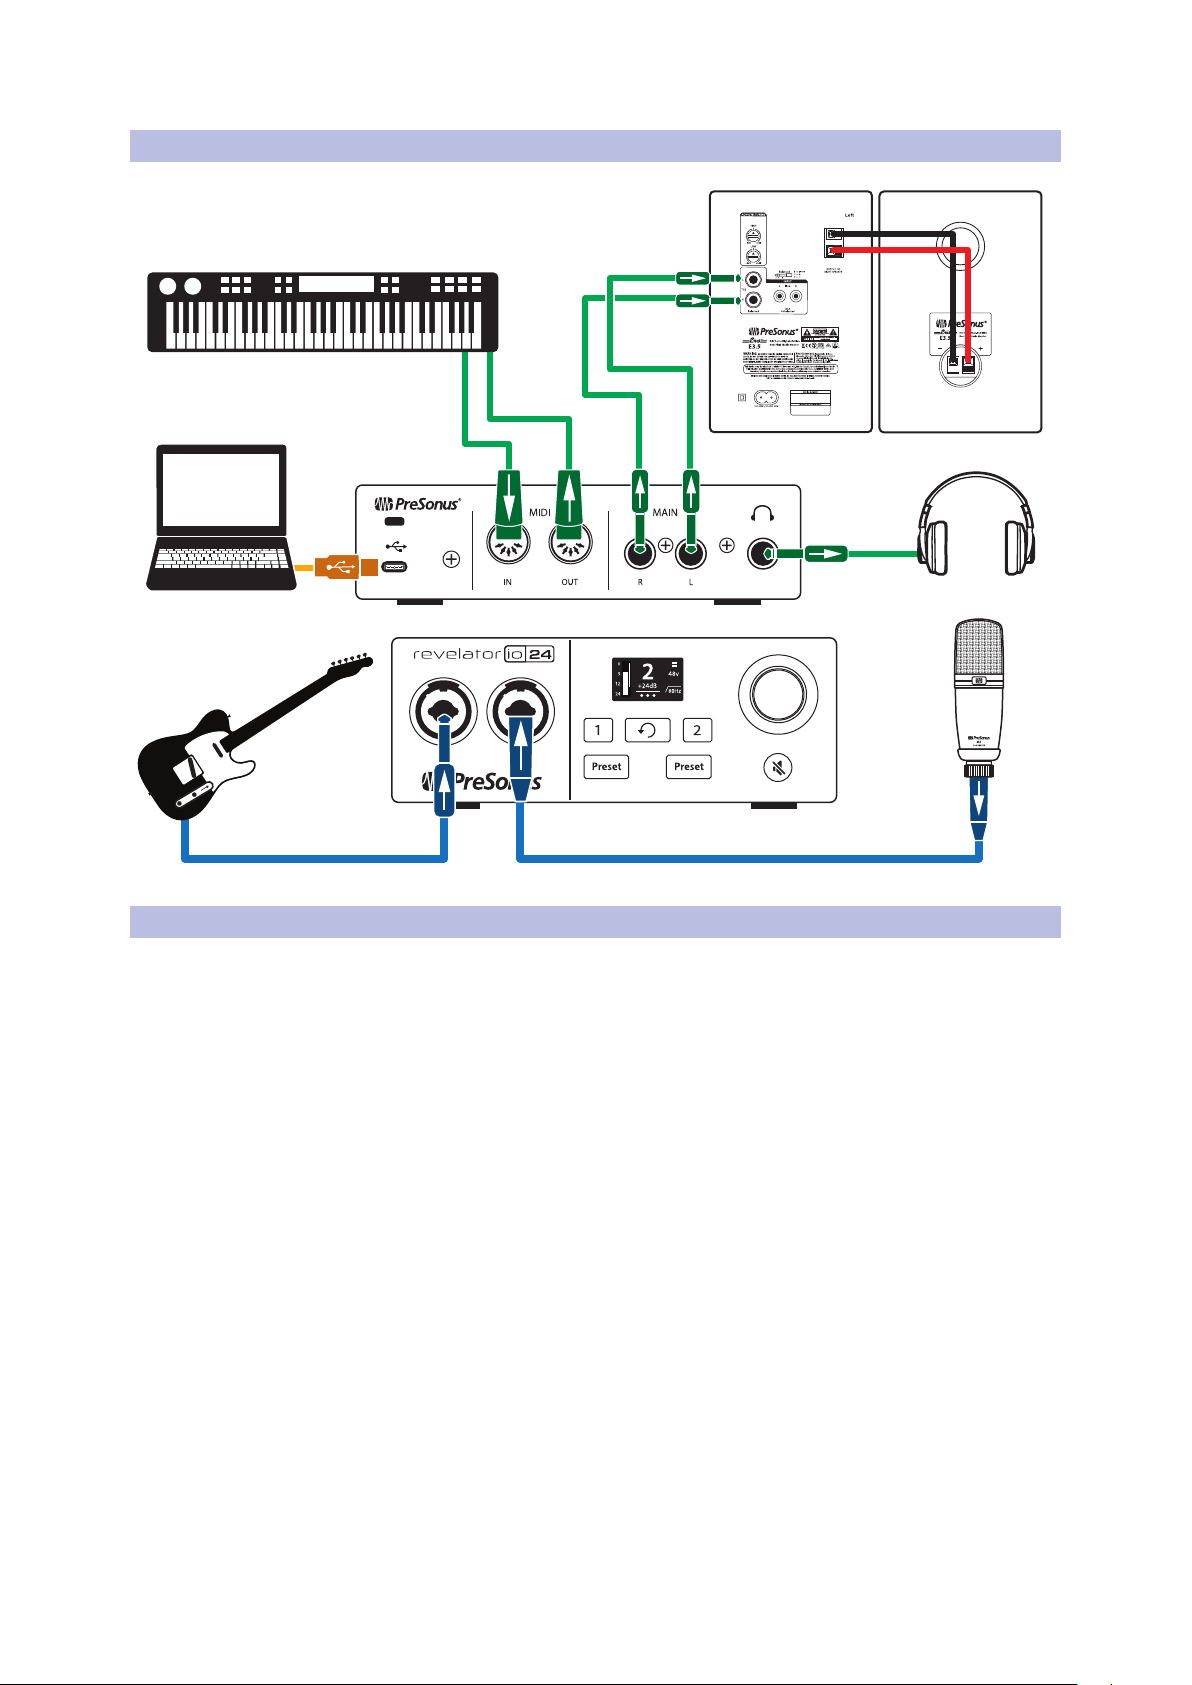
2 Connections and Controls
2.3 Connection Diagram
2.3 Connection Diagram
Revelator io24
Owner’s Manual
2.4 Standalone controls
While many of the features available for your Revelator io24 can be
found in Universal Control, critical controls are available right at your
fingertips. Most of these settings can be changed from Universal Control
to customize your Revelator io24 to your application and needs.
The most important thing to remember is that the Multipurpose Encoder
on your Revelator io24 can be used for nearly everything! From either
the Home or Channel screen, pressing the Encoder will cycle through
the available options, and rotating it will adjust the parameters.
From the Home screen you can:
• Adjust your Headphone volume
• Adjust your Main Out volume
• Blend your mix between your input signal and
And from the Channel screen you can:
• Set your mic level
• Toggle +48v phantom power
• Toggle the 80Hz High-pass filter
the playback from your computer
11
2 Connections and Controls
2.4 Standalone controls
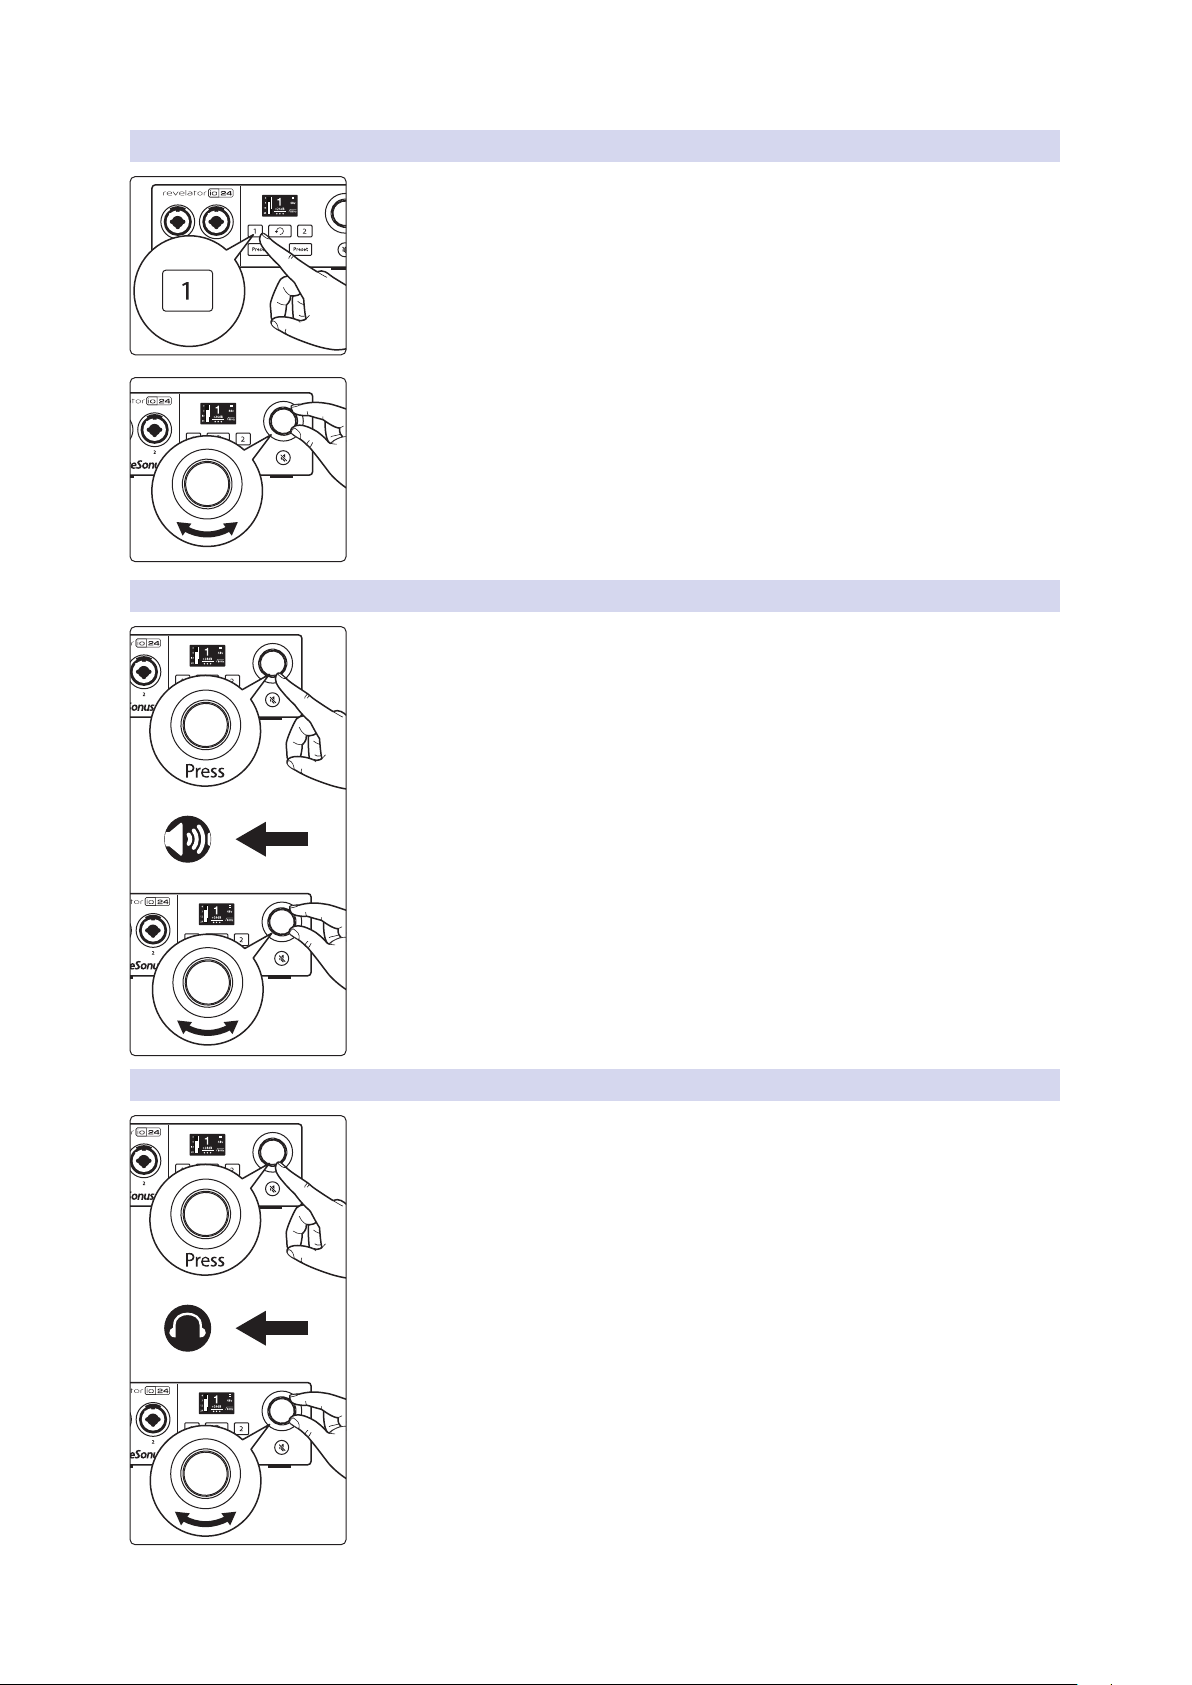
2.4.1 Setting the Microphone Level
To set your Revelator io24’s input level, press the Channel button for the Channel
you would like to use. Next, press the encoder to cycle through the available options.
A yellow underline will indicate the currently-selected option. Once you’ve selected
the Gain setting—it’s shown below the Channel indicator number and measured in
dB (decibels)—turn the Encoder to set the desired gain level.
Power User Tip: If your input level is too loud, the clip indicator will display in red above
the input level meter. This means that your input signal is clipping, and will begin to
sound distorted. If your input signal clips, it will overload the analog-to-digital converters
and cause digital distortion. Digital distortion sounds terrible, and cannot be undone if
recorded. Because of this, it’s important to keep your eye on this indicator while you’re
setting your levels. Check out Section 9 for other recording tips.
2.4.2 Setting Main Output level
By default, the Encoder knob on your Revelator io24 controls the output level of
your Main Outputs—the outputs you have your speakers connected to. From the
home screen, press the Encoder repeatedly until the speaker icon appears below the
Volume indicator. Then rotate the Encoder to set the desired Main output level.
Revelator io24
Owner’s Manual
2.4.3 Setting Headphone level
From the home screen, press the Encoder repeatedly until the headphone icon
appears below the Volume indicator. Then rotate the Encoder to set the desired
Headphone output level.
12
2 Connections and Controls
Press + Hold
2.4 Standalone controls
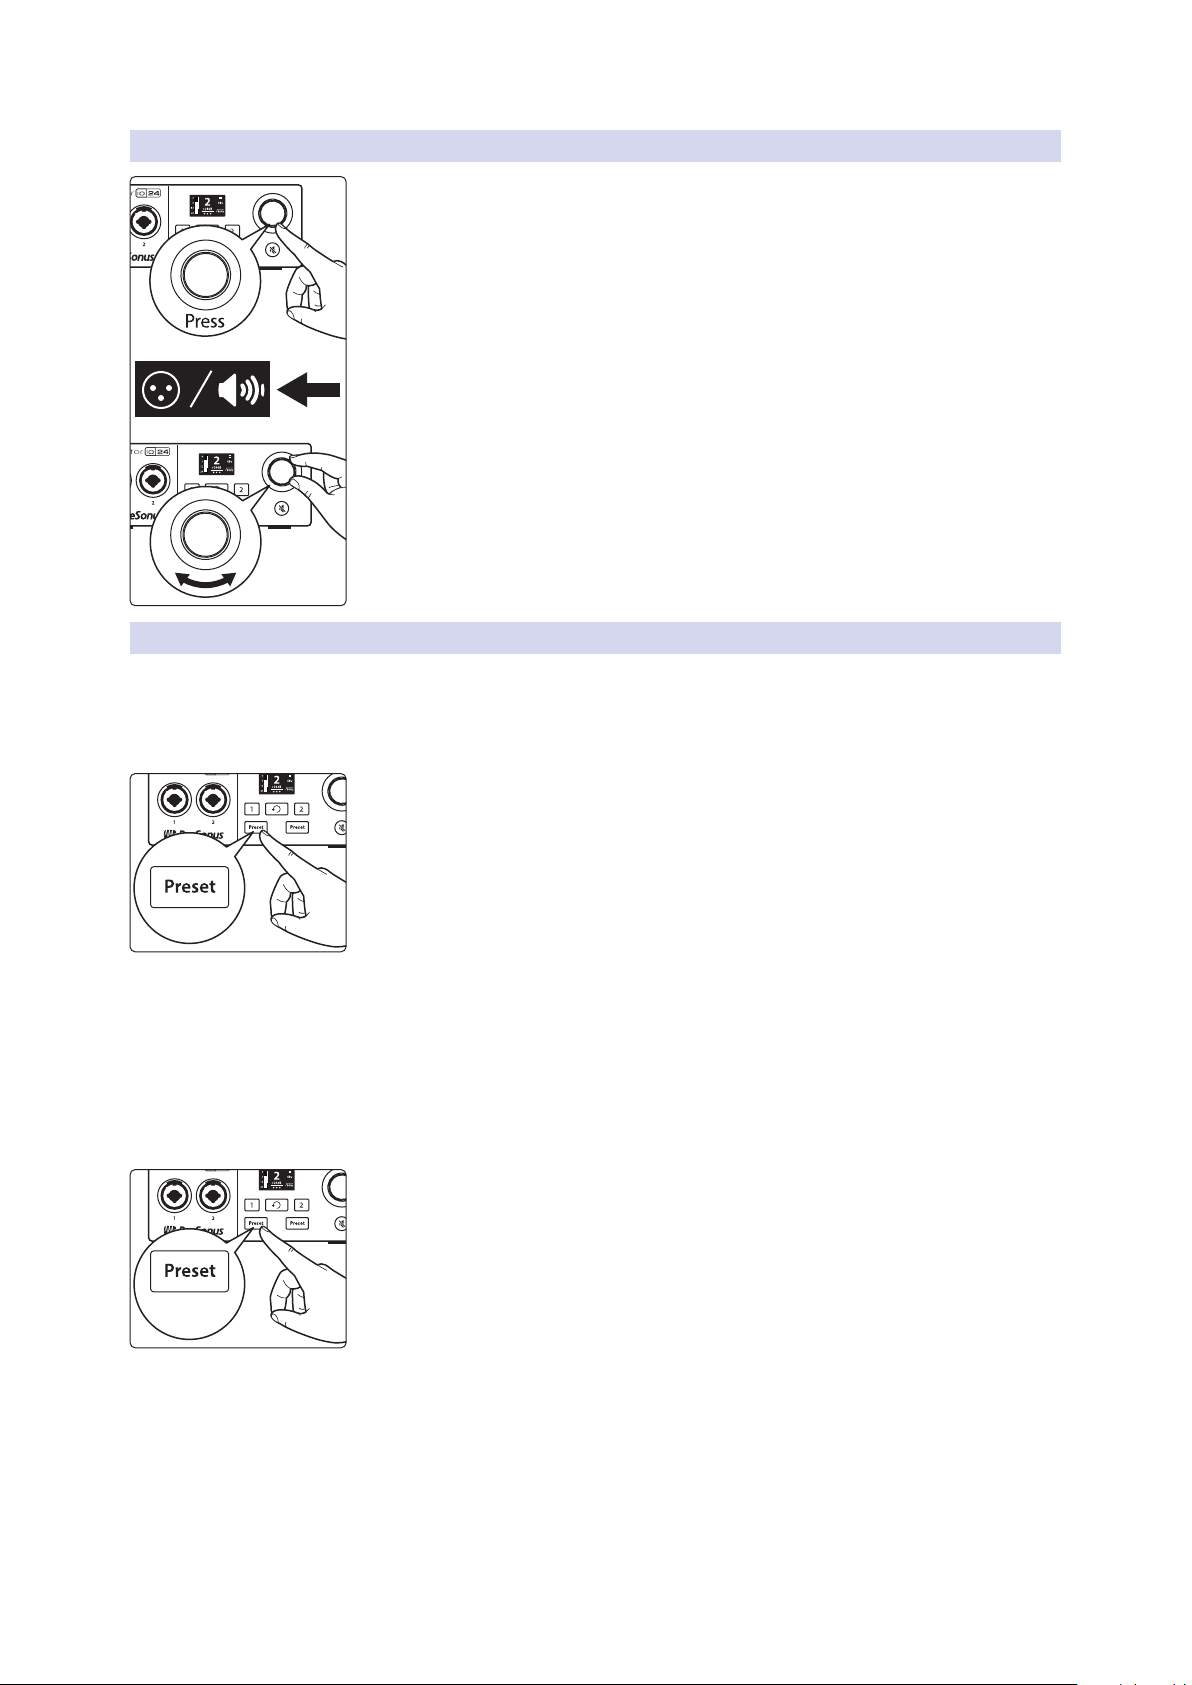
2.4.4 Setting Monitor blend
Revelator io24 provides an easy way to create a blend between your
input signal and the playback from your computer. This lets you listen
to your performance in real-time without any latency (delay).
From the home screen, press the Encoder repeatedly until the XLR/
speaker icon appears below the Volume indicator. Then rotate
the Encoder to set the desired monitor Blend balance.
Turning the knob to the left will increase the level of the input signal relative
to the playback from your computer. Turning it to the right will increase the
level of the playback from your computer relative to the input signal.
Power User Tip: Universal Control lets you create a custom mix between your input
signals, main computer playback, and both stereo loopback audio channels.
So when you’re ready to dial in your headphone mix, go to Section 6 to learn more!
2.4.5 Selecting Presets
Revelator io24
Owner’s Manual
EQ and compression are the secret behind the professional broadcast studio
sound we all know so well. Your Revelator io24 has you covered with 8 easy-to-use,
professionally crafted processing and effects presets. These presets are designed to
give you great-sounding results with no audio engineering experience required!
The first two presets can be accessed right from the Preset buttons on your
Revelator io24. To cycle through them, press the Channel 1 or Channel 2
Preset buttons repeatedly. The default Presets for Channel 1 are Broadcast
and Vocal. Channel 2’s default presets are Broadcast and Acoustic Guitar.
When Channels 1 and 2 are linked for stereo operation, available
factory presets include several options optimized for stereo recordings,
including: Stereo Acoustic, Stereo Piano, Stereo DJ, and more!
Power User Tip: But wait! There’s more! No really, there are a lot more. Open up Universal
Control to access the other presets. You’ll also find an additional 12 preset slots (6 per
channel) to create your own. You can choose any two of these 12 total presets to be
accessible directly from the Preset buttons on your Revelator io24. See Section 4.1 for
information on creating and storing presets.
By default, the sound you hear in your headphones will be the sound that is
recorded. If you’d like to use presets for monitoring purposes only, you can open
up Universal Control and change that setting. See Section 6 to learn how.
To bypass the presets, just press and hold the Preset button for the desired
Channel. The Preset indicators on Revelator io24’s screen will go dark.
Power User Tip: Bypass the presets when you want a clean sound with no effects—great
for processing your recording later, or when you want to monitor through plug-ins inside
your favorite recording application.
For more on presets, check out Section 4.
13
2 Connections and Controls
ComputerComputer
Revelator 24io
Computer
Revelator 24io
Stream Mix Deactivated (Default Mode)
Channel 1
Channel 2
Channel 1
Channel 2
Stream Mix Activated
L
R
Out to
DAW
USB
Out 1/2
Mixer
DSP
MixerDSP
Out to OBS,
etc.
USB
Out 1/2
2.4 Standalone controls
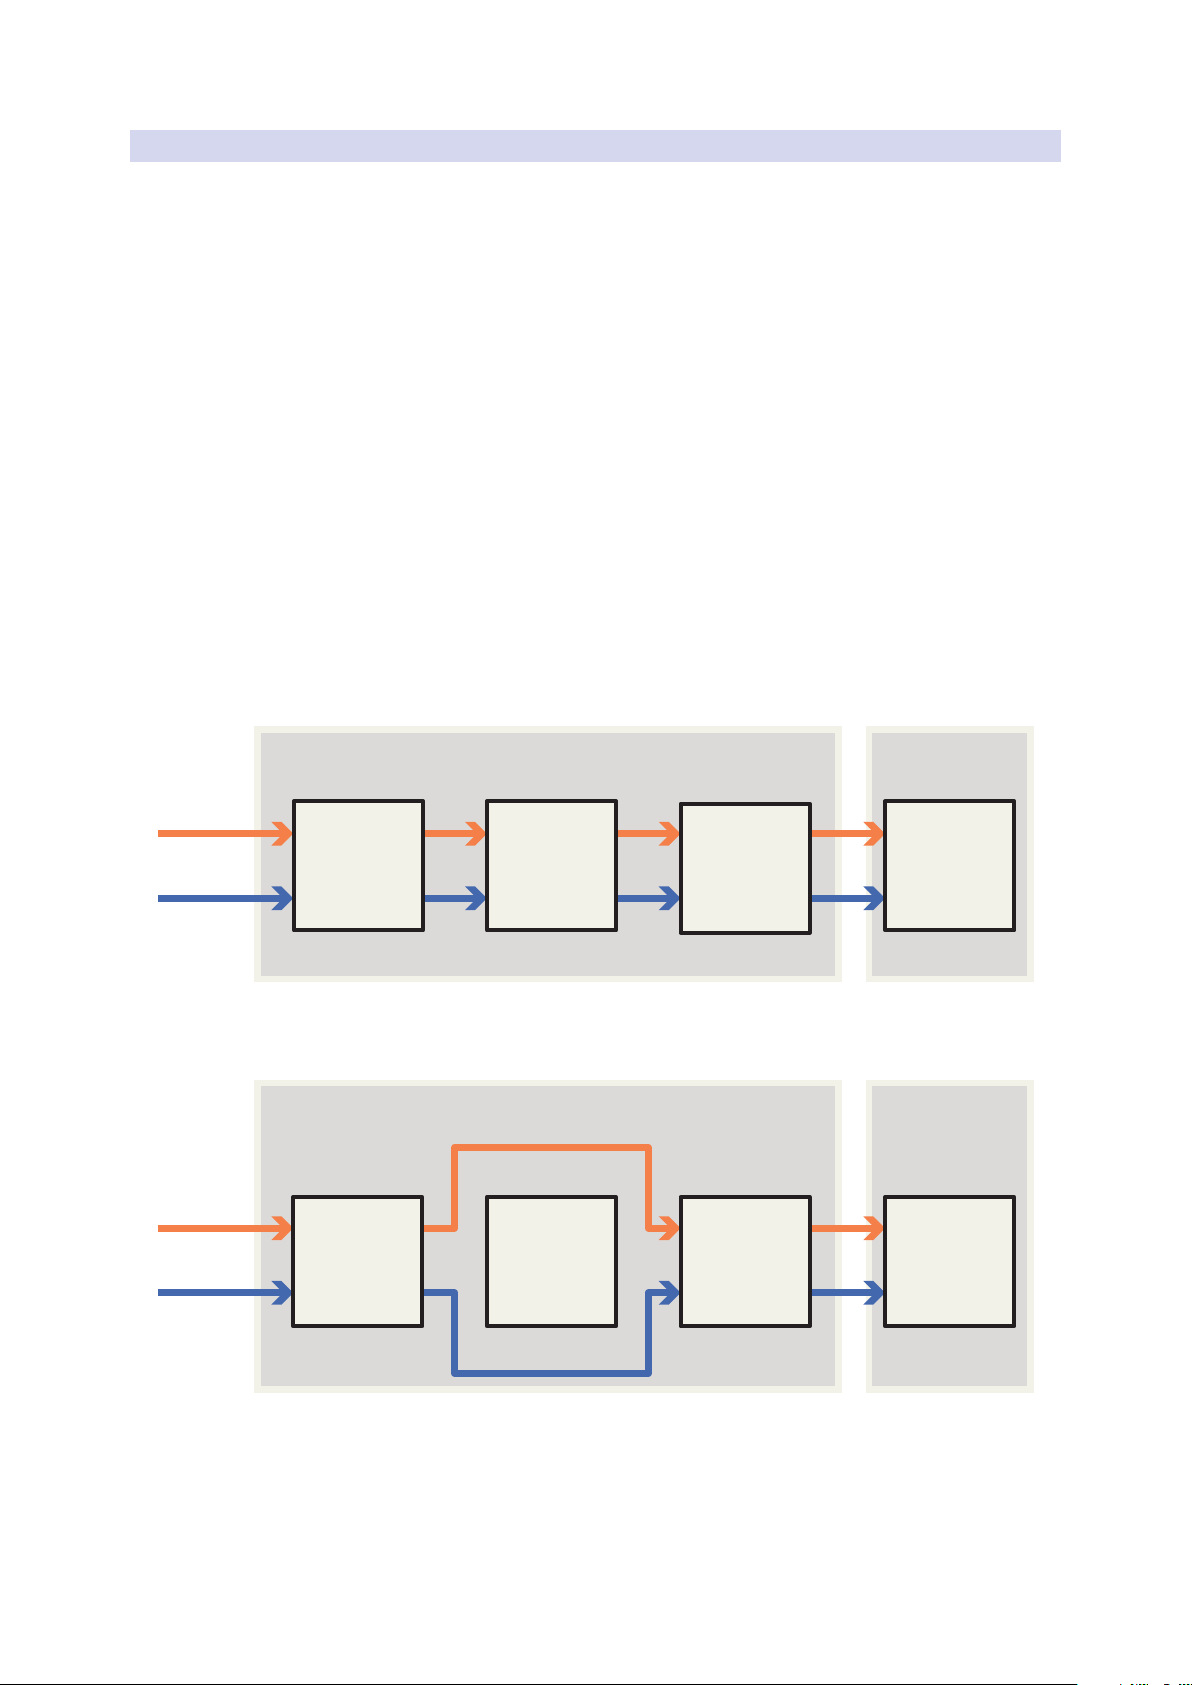
2.4.6 Stream Mix Mode
When to use Stream Mix mode:
When to use Default mode:
Revelator io24
Owner’s Manual
Stream Mix mode gives you single-click access to an efficient routing configuration
optimized for live streaming. In Stream Mix Mode, Revelator io24 sends a complete
mix of your analog inputs, loopback channels, reverb, and effects directly to USB
Outputs 1 and 2 for use with streaming applications like OBS or Facebook Live.
• When you would like to live stream using multiple audio sources
including: your microphone, guest audio from Skype or Zoom,
backing music from a media player app, etc., and you want all of these
elements sent to your streaming software in a stereo signal.
• You will be able to monitor the full mix of the above
mentioned sources in your headphones.
• When you would like to record directly from the Revelator io24’s inputs into a
DAW, and you don’t want to mix in any sources from Skype, Zoom, Spotify, etc.
Here’s a simple block diagram to illustrate the changes in signal flow when
using Revelator io24 in Stream Mix Mode vs. the Default mode.
14
3 Universal Control
3.1 The Launch Window
3 Universal Control
The Revelator io24 is so much more than a great-sounding
USB interface—and the secret to its advanced features and
mixing capability is unlocked with Universal Control.
Before proceeding, please make sure you have followed the instructions in Section
1.3.2 and have downloaded and installed Universal Control.
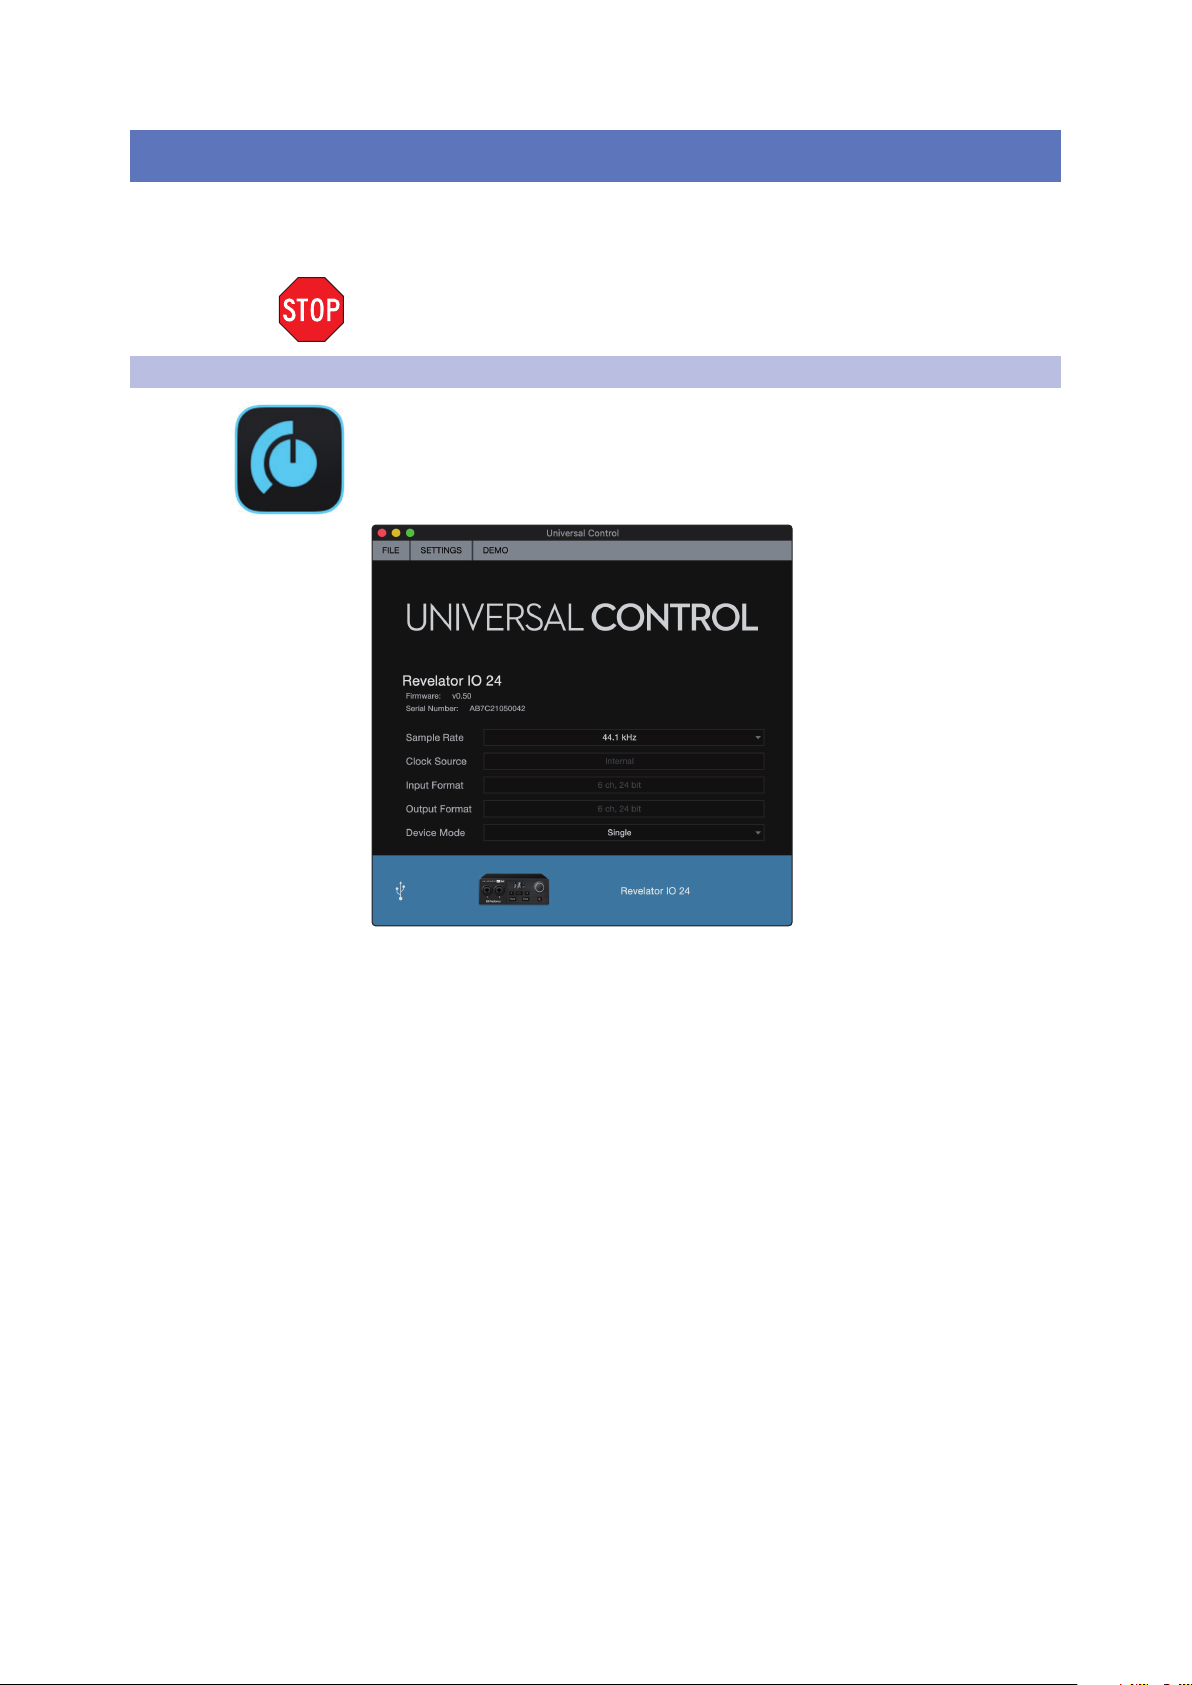
3.1 The Launch Window
Get ready for lift off! When Universal Control is launched, you will see the Launch
window. From this window, you can manage all the driver settings for your
Revelator io24.
Revelator io24
Owner’s Manual
Sample Rate. Changes the sample rate. You can set the sample rate to 44.1, 48, 88.2,
or 96 kHz. (With Multi Mode on macOS, the sample rate is limited to 44.1 and 48 kHz.)
A higher sample rate will increase the fidelity of the recording, but will also increase
the file size and the amount of system resources necessary to process the audio.
Power User Tip: For most applications, leaving this setting on 48 kHz will yield the best
results with the least amount of hassle.
Block Size (Windows only). Sets the buffer size. From this menu, you can set the
buffer size from 64 to 8,192 samples. Lowering the buffer size will lower latency,
which is the amount of time it takes for your audio to go from Revelator io24 to
the computer and back to your ears; however, this will also increase performance
demands on your computer. In general, you will want to set the buffer size as low
as your system can safely support. If you begin to hear pops, clicks, or distortion
in your audio path, try raising the buffer size. When adjusting the block size,
the Safe mode will automatically change to provide the best performance.
Power User Tip: Your Revelator io24 features built-in zero-latency monitoring so you can
leave your Block Size high and the performance demands on your computer low. In
general, you can use the default block size, but if you’re using an older computer that is
having trouble keeping up, go ahead and raise this setting. Experiment to find what
works best for you!
15
3 Universal Control
3.1 The Launch Window
Device Mode (macOS only). By default, your Revelator io24 presents itself as a
single audio interface with 6 inputs and 6 outputs. But when you’re ready to use
the loopback audio streams to record or route audio to multiple applications at the
same time (like the output of a Skype call to the audio input of your Facebook Live
stream), that’s where Multi Mode comes in. In this mode, your Revelator io24 will
show up as 3 different devices on your computer: Revelator IO 24, Revelator IO24
Loopback 1, and Revelator IO 24 Loopback 2. Each of these devices has 2 inputs
and 2 outputs. This is great for applications like Skype that only allow you to use
the first two inputs and outputs of any audio interface. PreSonus recommends that
you use Multi mode for the best experience. Note that in Multi mode, sample rate
options are limited to 44.1 kHz or 48 kHz. For more information on how loopback
audio works and how to use it for your podcasts, streams, and more, see Section 6.
Power User Tip (for Windows Users): On Windows, Revelator io24 is always in Single
Mode. If you are using WDM for applications like Skype, your Web Browser, etc., look for
the Revelator IO 24 name in respective applications’ audio setup menus. If you are using
ASIO for applications like Studio One and other DAWs, look for “PreSonus DSP USB” in
respective applications’ audio setup menus.
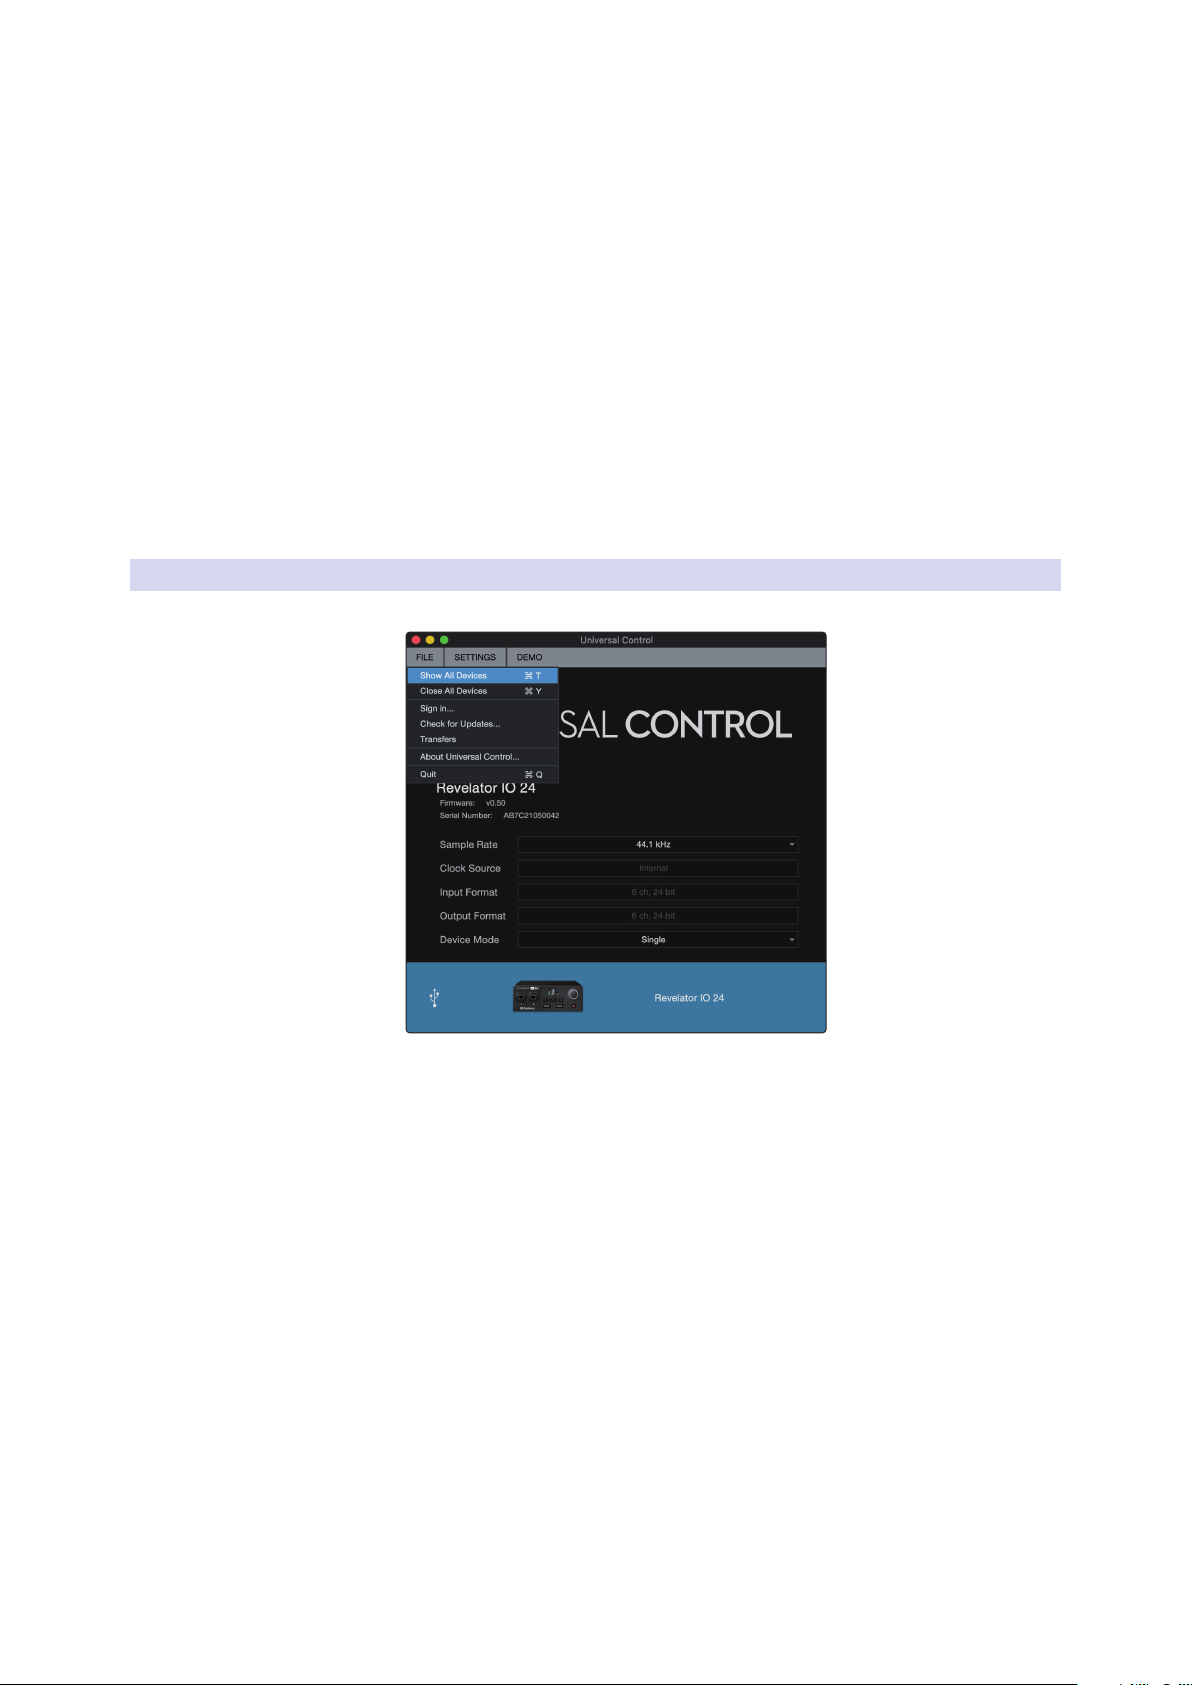
3.1.1 Launch Window Menu Items
• File Menu. Manages devices connected to Universal Control.
Revelator io24
Owner’s Manual
• Show All Devices. Launches all control windows for all
supported devices connected to your computer.
• Close All Devices. Closes all open control windows.
• Sign Out. Signs out of your My.PreSonus user account.
• Check for Updates. Connects to your My.PreSonus user
account to check for updates for Universal Control.
• Transfers. Displays recent downloads from your My.PreSonus user account.
• About Universal Control. Displays version and build date information.
• Quit. Quits the Universal Control application and all hardware control windows.
16

3 Universal Control
3.2 Using Your Revelator io24 with Popular Applications
• Settings Menu. Provide customization options to
personalize your Universal Control experience.
• Always on Top. Keeps the Universal Control Launch window on
top whether it is the currently active application or not.
• Run at Startup. Launches Universal Control
automatically when your computer boots.
• Preferences. Sets language and appearance options (see below).
• Rescan Network. Scans your computer’s connections
for all supported PreSonus products.
• Language. Sets the language (English, French, German,
Korean, Simplified Chinese, or Spanish).
Power User Tip: The Launch Window will inform you when a new firmware update is
available for your Revelator io24 —or other PreSonus hardware!
Revelator io24
Owner’s Manual
3.2 Using Your Revelator io24 with Popular Applications
If you’ve never used an audio interface, your computer and every application
on it are currently sourcing audio from the built-in microphone and
routing audio out to the onboard sound card. To use Revelator io24 with
any application that can access audio inputs or outputs or both, you must
first set up your computer to use Revelator io24 as an audio interface.
This section will take you through some of the most common use
cases. If you are using an application not listed in this section, you’ll
need to check with the documentation that came with it.
3.2.1 Using Revelator io24 for System Audio
The easiest way to make your Revelator io24 seen by just about any
application on your computer is to set it up as the default sound source
for your computer. Not only will this prompt most video conferencing
and streaming applications to look for Revelator io24, it will also set
your default Internet browser to use Revelator io24 as well.
Power User Tip: Setting your Revelator io24 as the default sound card for your system will
also route music streaming applications like Spotify and Apple Music to the headphone
output on your new interface. If you do not want to use your interface this way, it is best to
configure Revelator io24 as the audio I/O only for the applications for which you want to
use it.
17
3 Universal Control
3.2 Using Your Revelator io24 with Popular Applications
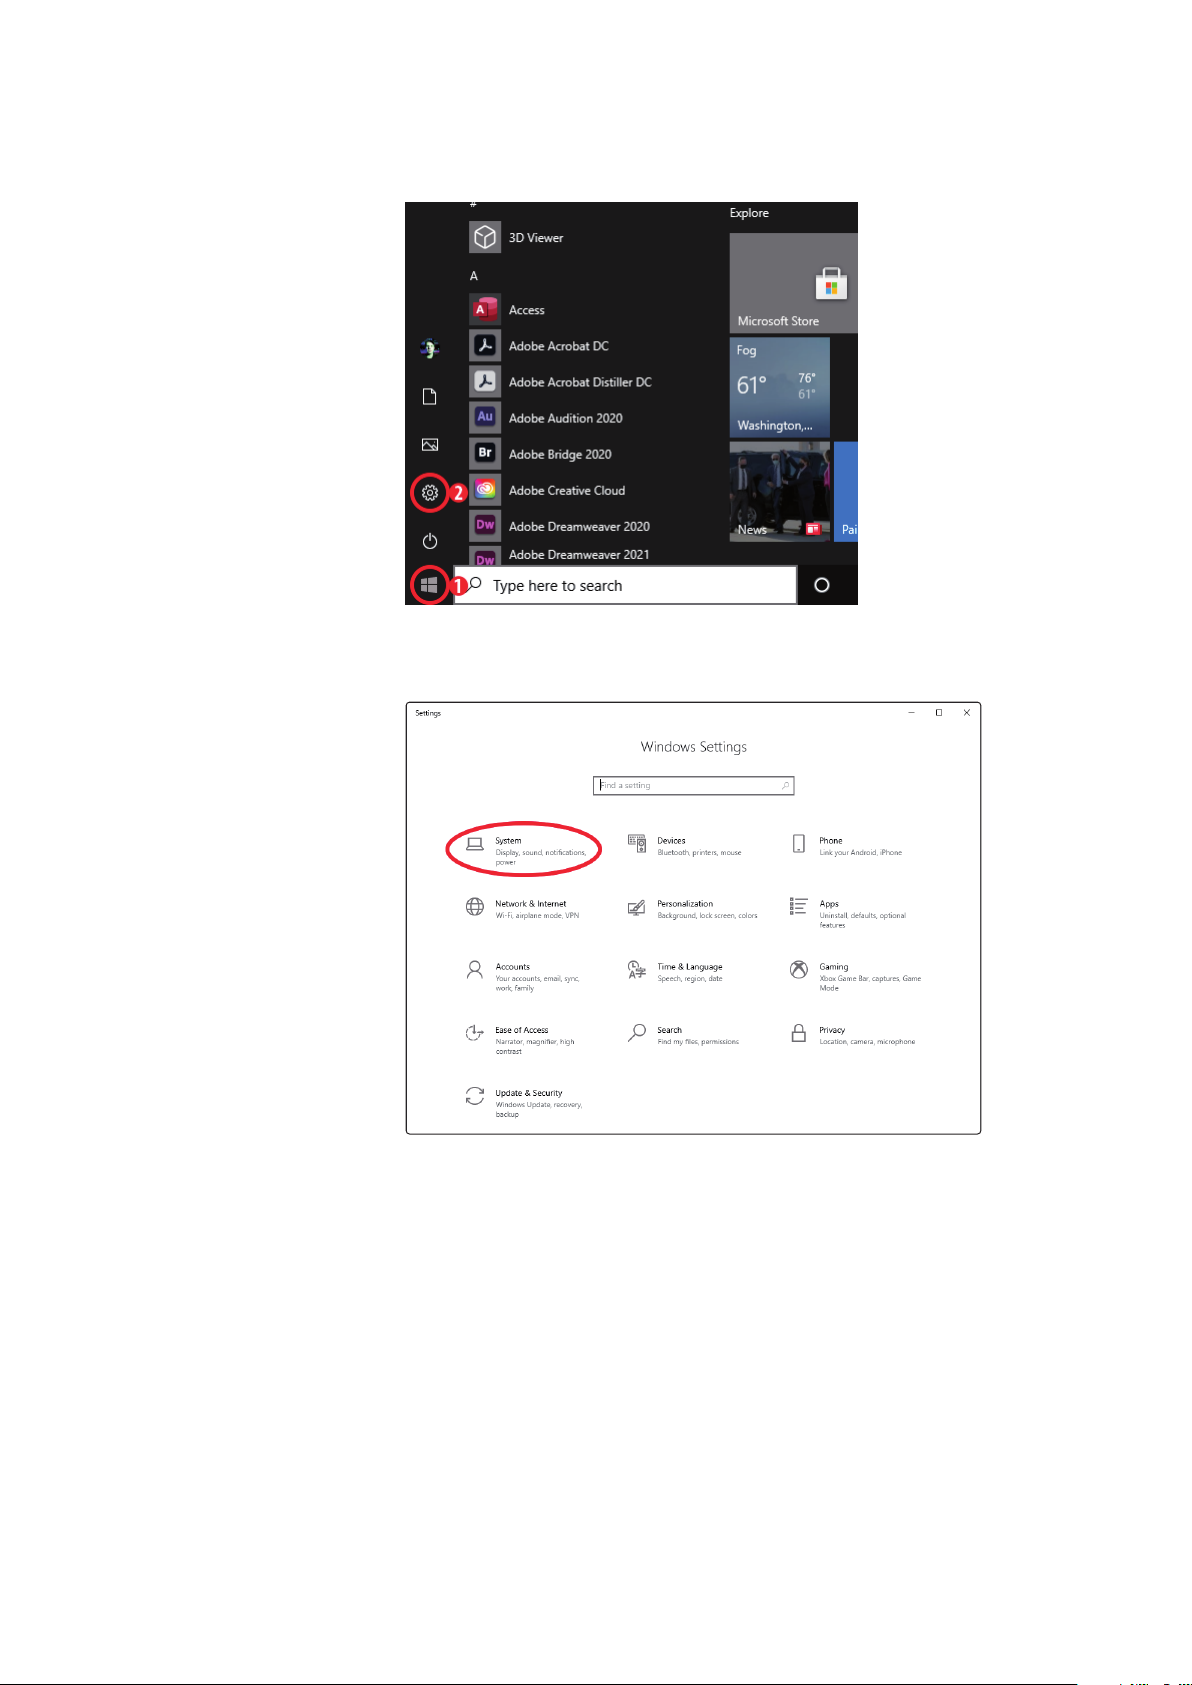
Windows
1. Click on start icon in lower left corner
2. Click on Settings gear icon
Revelator io24
Owner’s Manual
3. Click on System
4. Click on Sound
18
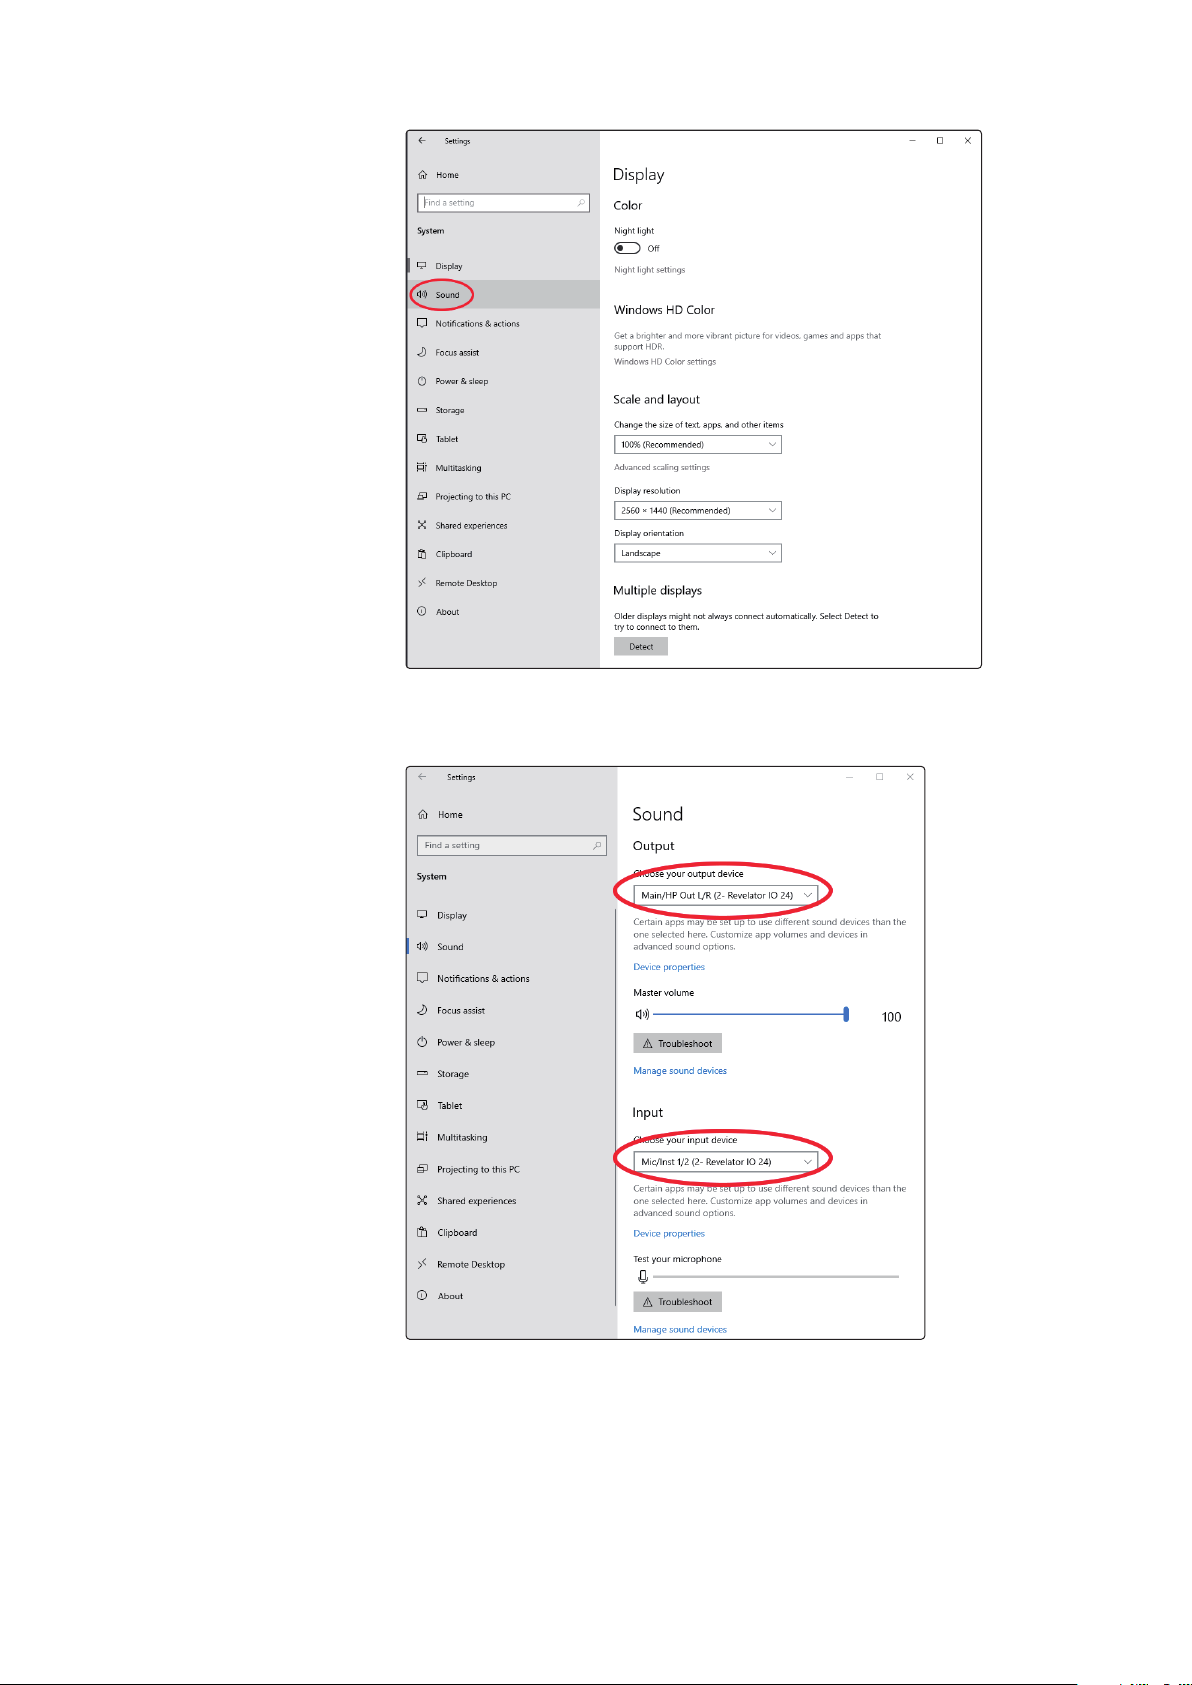
3 Universal Control
3.2 Using Your Revelator io24 with Popular Applications
Revelator io24
Owner’s Manual
5. Click on “Choose your Output Device” and choose HP Out L/R (Revelator IO 24)
6. Click on “Choose your input device” and choose Mic/Inst 1/2 (Revelator IO 24)
Your Revelator io24 is ready to use!
19
3 Universal Control
3.2 Using Your Revelator io24 with Popular Applications
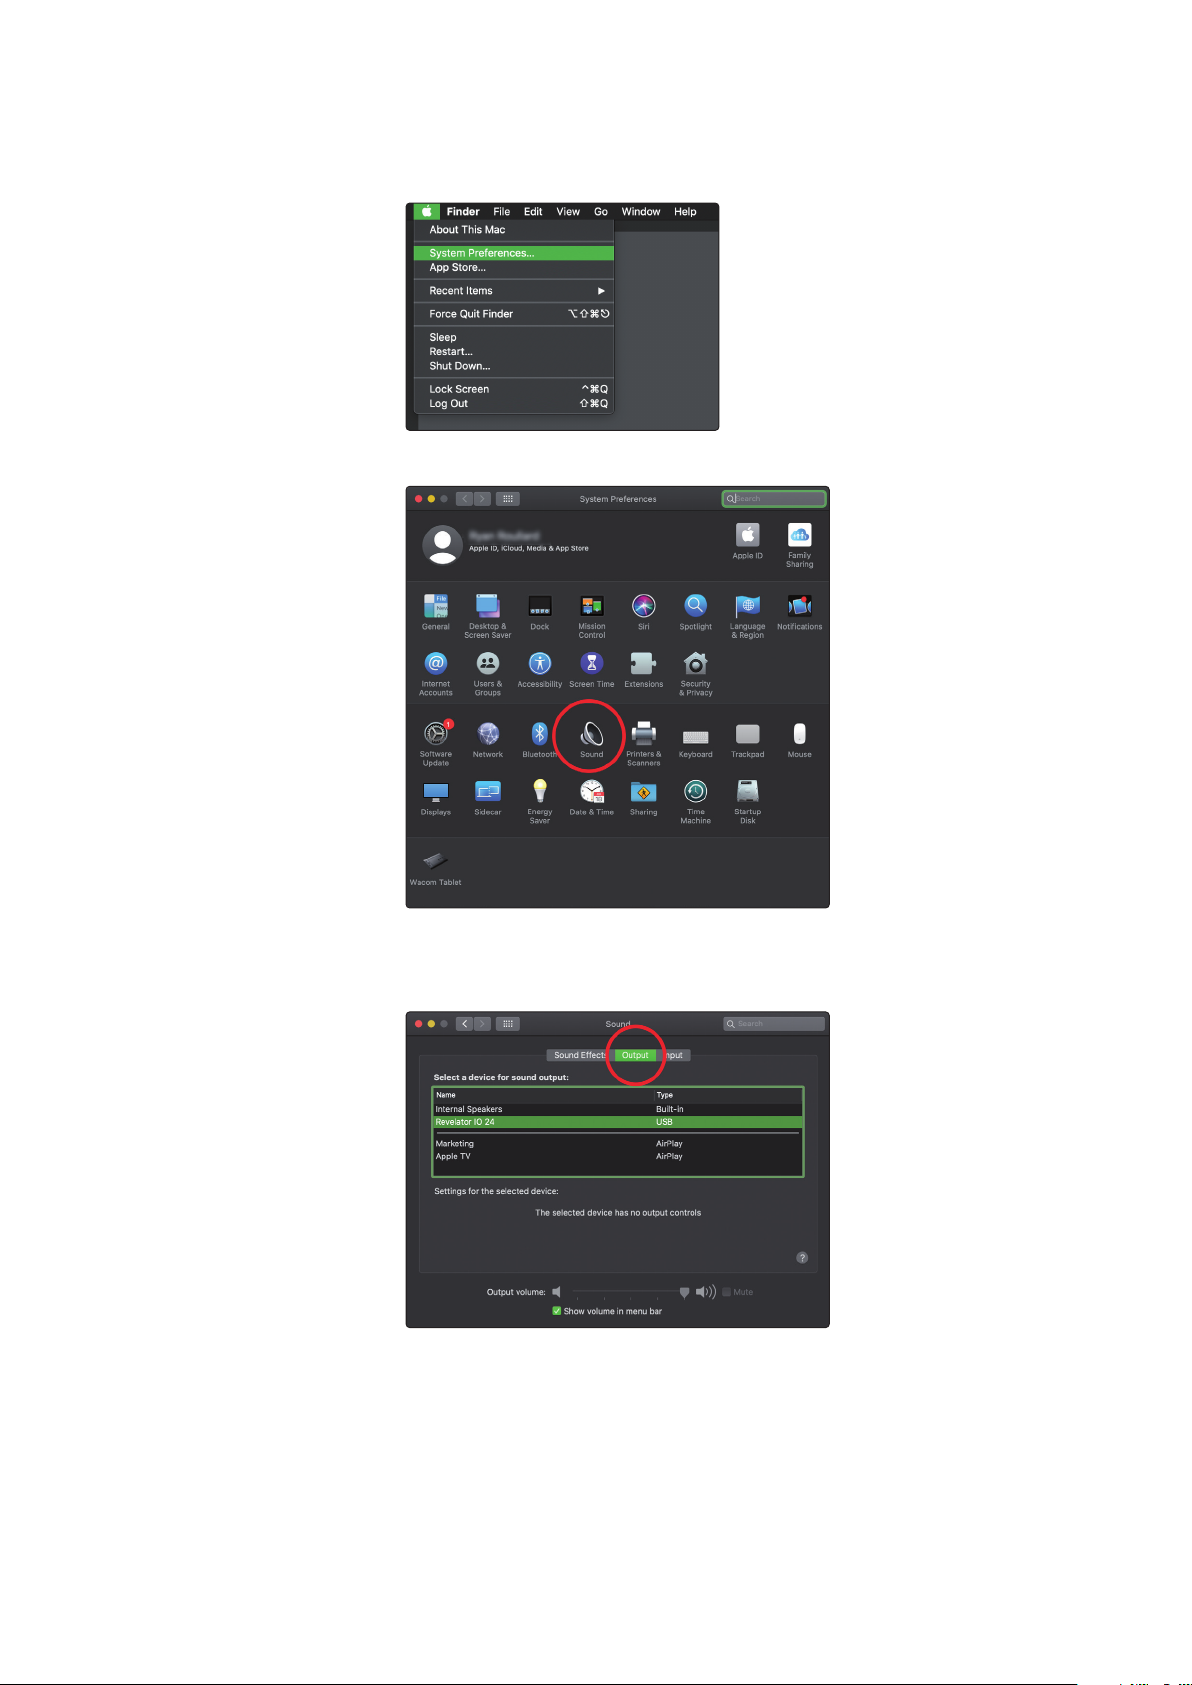
macOS
1. From the Apple Menu, go to System Preferences.
2. Click on Sound.
Revelator io24
Owner’s Manual
3. Click on the Outputs tab and select Revelator IO 24 from
the device list. This will route all audio from your computer
to the headphone output on your Revelator io24.
20
3 Universal Control
3.2 Using Your Revelator io24 with Popular Applications
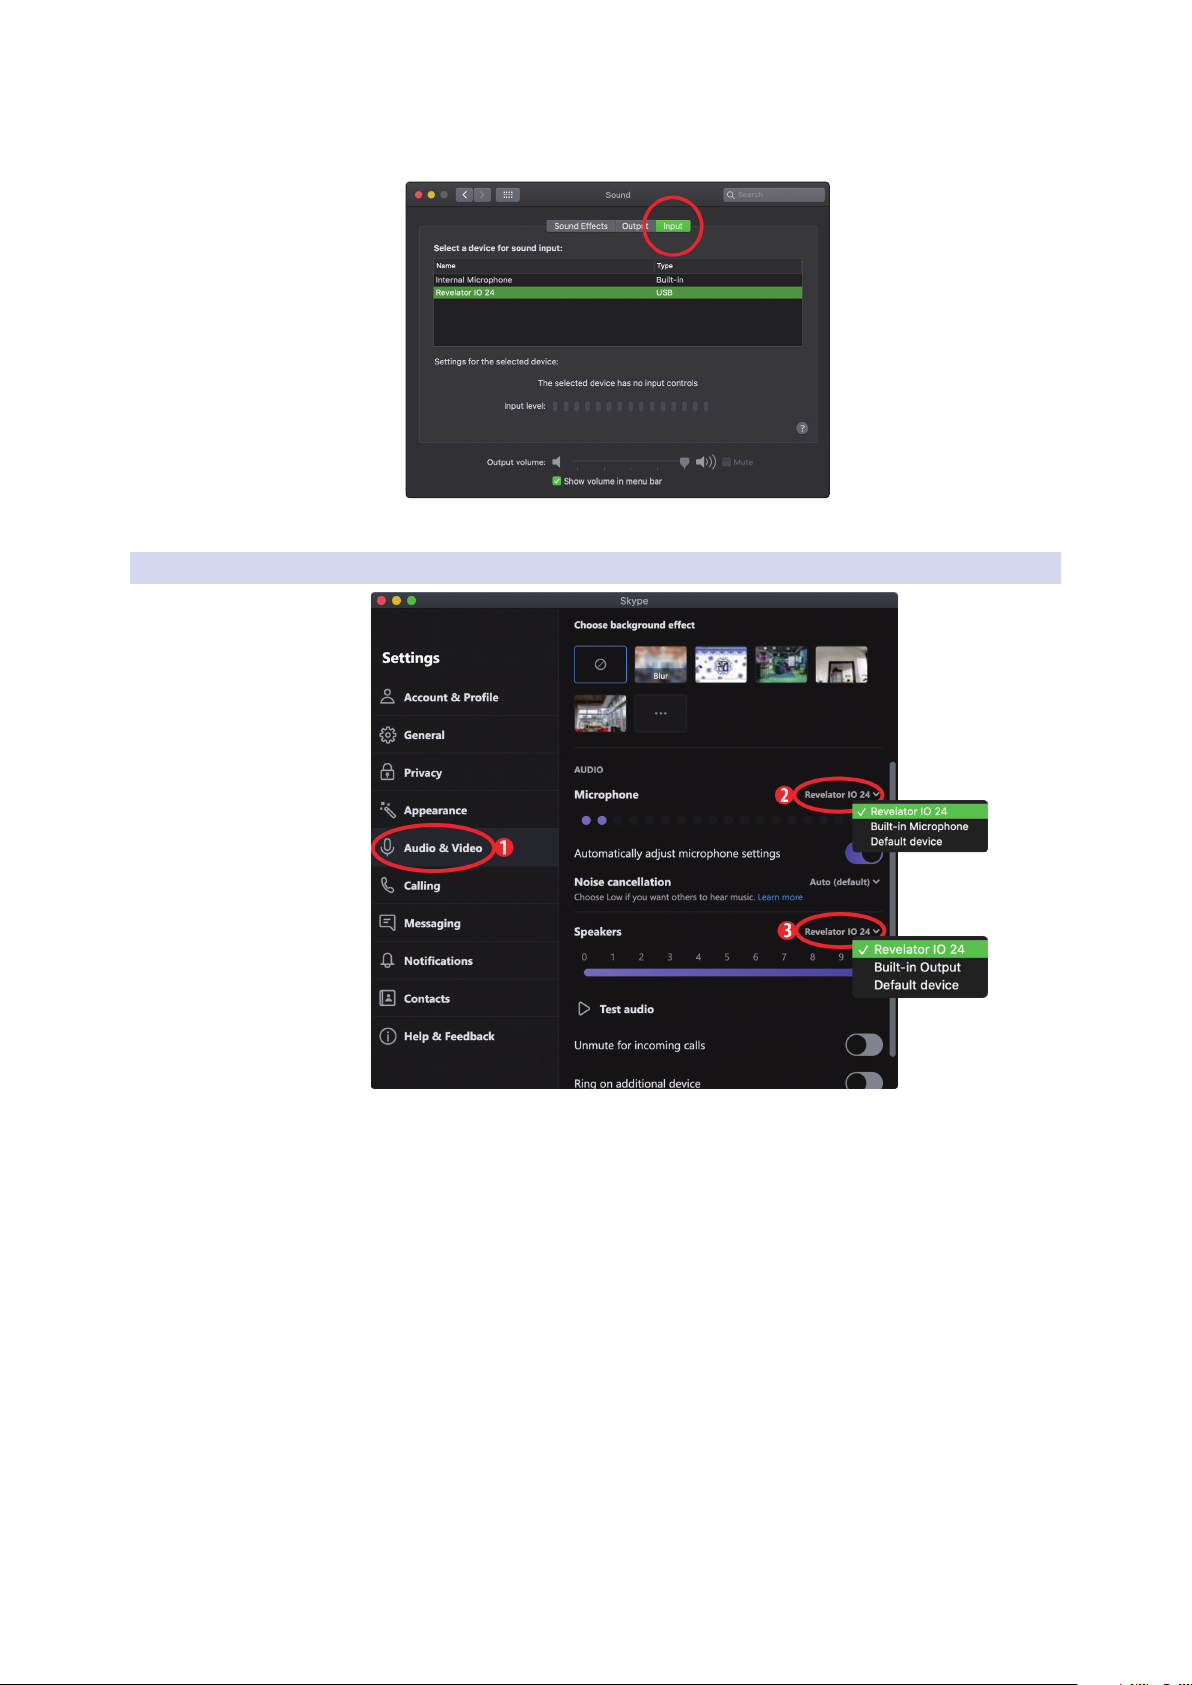
4. Click on the Inputs tab and select Revelator IO 24 from the device list. This
will set your Revelator io24 interface as the input source for your computer.
Your Revelator io24 is ready to use!
3.2.2 Using Revelator io24 for Skype
Revelator io24
Owner’s Manual
1. From the Skype menu, go to “Audio & Video Settings.”
2. Under Microphones, select “Revelator IO 24.” This will route
the audio from your Revelator io24 to your Skype call.
3. Under Speakers, select “Revelator IO 24.” This will route the audio from
your Skype call to the headphone output on your Revelator io24.
Power User Tip: If you would like to record your Skype call, select Revelator IO 24
Loopback 1 or Revelator IO 24 Loopback 2 from the Speaker menu. See Section 6 for
more information on using loopback audio.
21
3 Universal Control
3.2 Using Your Revelator io24 with Popular Applications
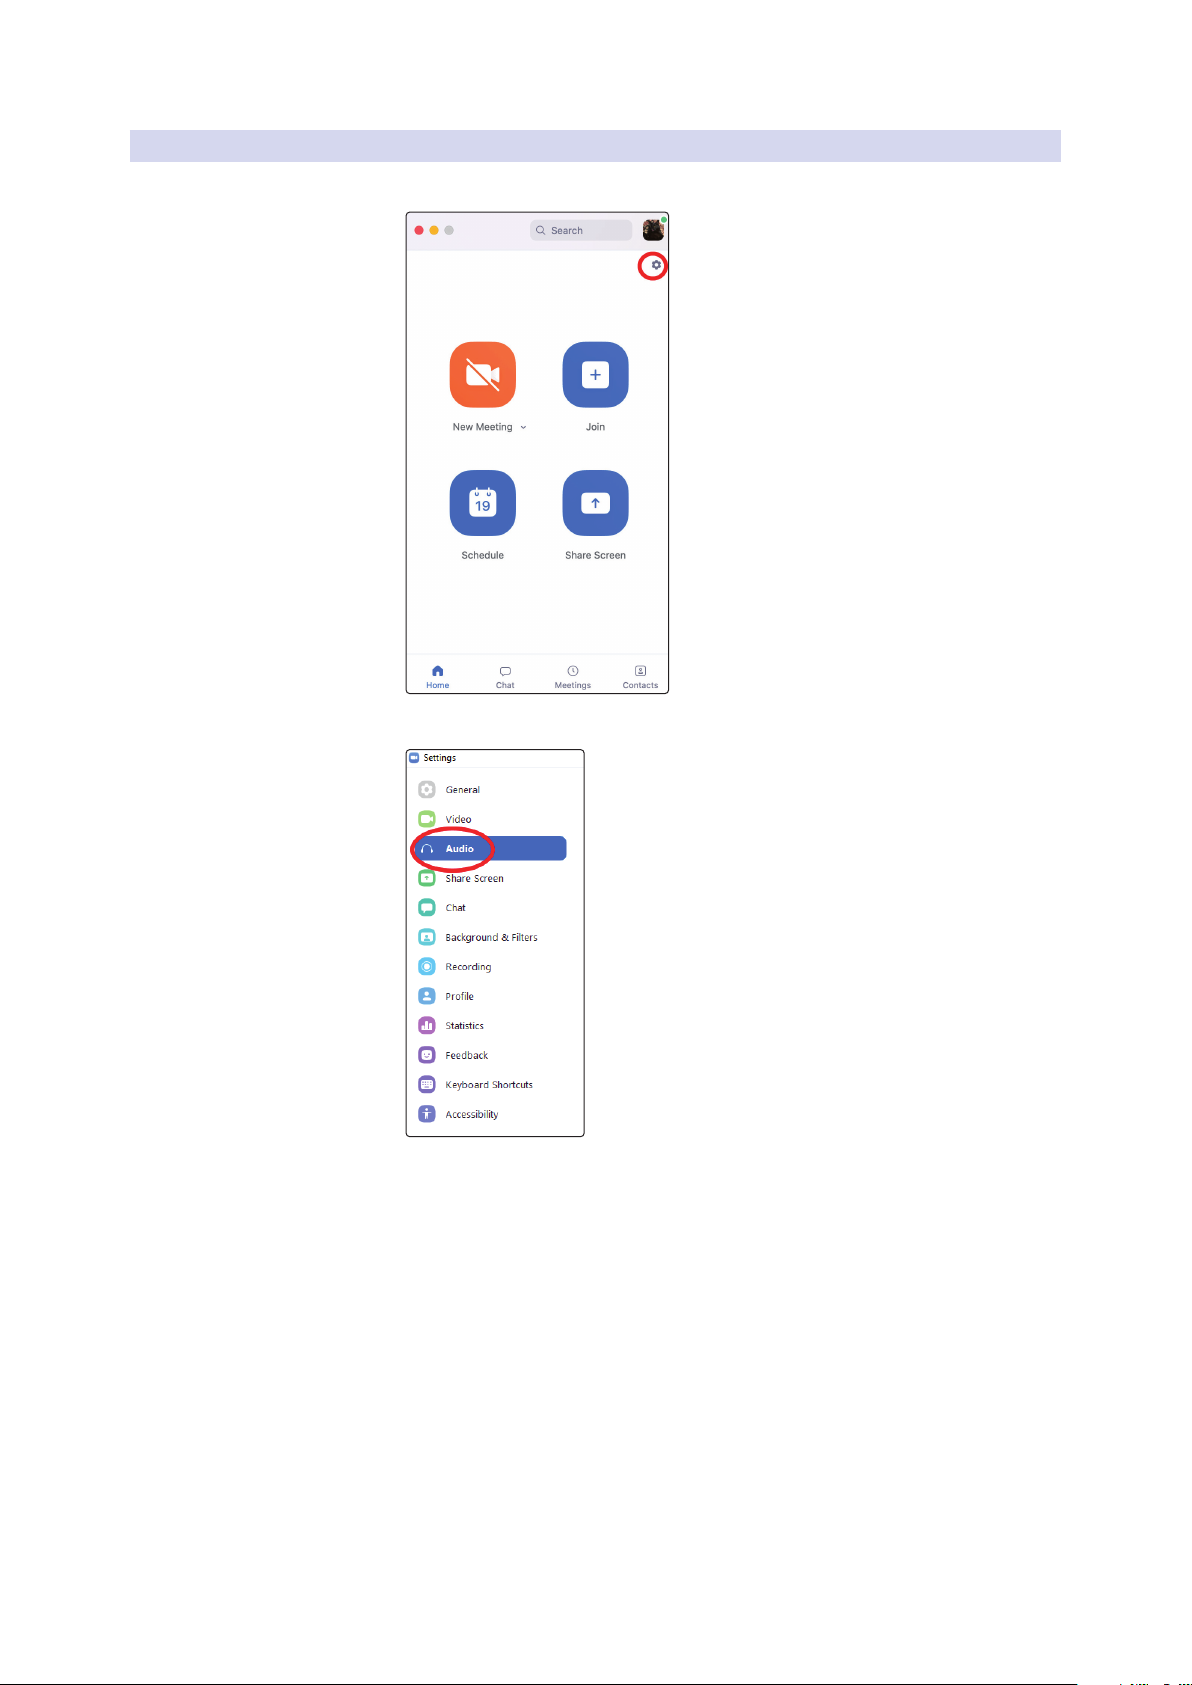
3.2.3 Using Revelator io24 for Zoom
1. Launch Zoom, and click the cog wheel icon to enter Zoom Preferences.
Revelator io24
Owner’s Manual
2. Click the “Audio” tab.
22
 Loading...