


Interactive
Digital Display
Owner’s Manual

1
Copyright 2014 Polaris Industries Inc.
All information contained within this publication is based on the latest product information available at the time of publication. Product improvements or other changes may result in differences between this manual and the product. Depictions and/or procedures in this publication are intended for reference use only.
No liability can be accepted for omissions or inaccuracies. Polaris Industries Inc. reserves the right to make changes at any time, without notice and without incurring obligation to make the same or similar changes to products previously built. Any reprinting or reuse of the depictions and/or procedures contained within, whether whole or in part, is expressly prohibited.
The following are trademarks of POLARIS Industries Inc.:
POLARIS® |
PERC® |
RANGER® |
RIDERX™ |
RZR® |
AXYS™ |
RiderX™ |
|
|
The Bluetooth® word mark and logos are registered trademarks owned by Bluetooth SIG, Inc. and any use of such marks by Polaris Industries Inc. is under license. Other trademarks and trade names are those of their respective owners.
Printed in U.S.A. P/N 9925416
2
Table of Contents
Welcome . . . . . . . . . . . . . . . . . . . . . . . . . . . . . . . . . . . .4
Quick Start Guide . . . . . . . . . . . . . . . . . . . . . . . . . . . . .5
Interactive Digital Display . . . . . . . . . . . . . . . . . . . . . .7
General Information . . . . . . . . . . . . . . . . . . . . . . . . .9
Display Keys . . . . . . . . . . . . . . . . . . . . . . . . . . . . .10
Maps/Trails . . . . . . . . . . . . . . . . . . . . . . . . . . . . . .13
Phone . . . . . . . . . . . . . . . . . . . . . . . . . . . . . . . . . .15
GPS Settings . . . . . . . . . . . . . . . . . . . . . . . . . . . . .17
System Settings. . . . . . . . . . . . . . . . . . . . . . . . . . .23
Diagnostics . . . . . . . . . . . . . . . . . . . . . . . . . . . . . .29
IDD For Snowmobiles. . . . . . . . . . . . . . . . . . . . . . . . .30
General Snowmobile IDD Information . . . . . . . . . .30
Initialization Process . . . . . . . . . . . . . . . . . . . . . . .32
Left Hand Controls. . . . . . . . . . . . . . . . . . . . . . . . .33
Vehicle Settings . . . . . . . . . . . . . . . . . . . . . . . . . . .35
Detonation Elimination Technology . . . . . . . . . . . .42
Engine Overheat Indicators . . . . . . . . . . . . . . . . . .43
Bluetooth . . . . . . . . . . . . . . . . . . . . . . . . . . . . . . . . . . .44
Before Connecting . . . . . . . . . . . . . . . . . . . . . . . . .44
Connection Management. . . . . . . . . . . . . . . . . . . .45
Phone . . . . . . . . . . . . . . . . . . . . . . . . . . . . . . . . . .53
RiderX . . . . . . . . . . . . . . . . . . . . . . . . . . . . . . . . . .58
Hardware . . . . . . . . . . . . . . . . . . . . . . . . . . . . . . . .58
Connect, Register and Update. . . . . . . . . . . . . . . .60
Update Process Flow Chart. . . . . . . . . . . . . . . . . .70
Frequently Asked Questions . . . . . . . . . . . . . . . . . . .71
3

Welcome
Thank you for purchasing a Polaris Interactive Digital Display (IDD), and welcome to the Polaris RiderX family. Your IDD is easy to use and will allow you to customize the information displayed through the use of alternate screen selections. The RiderX app gives you the power to plan, track and share your rides, as well as connect to radar weather, rider services and more.
For a safe and enjoyable riding experience with your new IDD, please read your vehicle’s owner’s manual and this IDD owner’s manual. If you should need additional assistance with IDD operation or software updates, please see your Polaris dealer or visit RiderX.com.
WARNING! Do not enter information or adjust this device while operating your vehicle. Distracted driving can result in loss of control, collision or accident, which may result in serious injury or death. Avoid using any features and devices while driving that may take your attention away from the road or trail and safe driving habits, even for a moment.
The operator assumes all risk associated with using this device. Please read the owner’s manual provided with your vehicle.
CAUTION! The speedometer may display incorrect values at the existence of electromagnetic radiation >= 10 V/m.
4
Quick Start Guide
Before Riding With Your New IDD
1.Read this entire manual.
2.Familiarize yourself with the features and operation of the IDD while the vehicle is stationary.
3.Register for a RiderX account (page 60).
4.Register your IDD (page 61).
5.Update trails data or maps/trails data to verify that the trails data on the IDD is current (page 61).
NOTE: Trails data expires 90 days from the file’s release date.
IDD Features
Key 1 |
Key 3 |
|
Key 5 |
|
Alternate Screen |
|
Bluetooth Menu or |
||
Selection |
Main Menu |
|
||
Key 4 |
Diagnostics |
|||
|
Key 2 |
|||
|
Battery Voltage / |
if present |
||
ODO / Trip 1 / Trip 2 |
||||
Temperature Reading |
|
|||
|
|
|
||
5

The icon bar at the top of the screen allows quick access to cell phone-related information, a real time clock and the GPS heading.
Phone
Phone Signal
Battery Strength
Missed |
Missed Text |
Real Time |
Blue if |
GPS |
Calls |
Messages |
Clock |
Bluetooth |
Heading |
|
|
|
Connected |
|
In most situations, the GPS and mapping features will function best while the vehicle is outdoors in an open space. The GPS signal may be impeded by overhead structures or by being too close to a structure.
Please follow the installation instructions provided in the accessory kit or see your dealer for assistance.
Getting Started
Use the ignition key to turn the IDD on or off or to reboot (when necessary).
Models With Battery
ON |
Turn the key to the ON/RUN position. |
OFF |
Turn the key to the OFF position. |
REBOOT |
Option 1: Turn the key OFF for 5 seconds, |
|
then turn the key to ON/RUN. |
|
Option 2: With the key ON, press and hold |
|
Display Key 5 for 20 seconds, then release. |
Models Without Battery |
|
|
|
ON |
Start the engine. |
OFF |
Turn the key to the OFF position. |
REBOOT |
Option 1: Turn the key OFF for 5 seconds, |
|
then start the engine. |
|
Option 2: With the engine running, press and |
|
hold Display Key 5 for 20 seconds, then |
|
release. |
NOTE: Using the auxiliary engine stop switch on a snowmobile to turn off the engine will not turn off the IDD.
6

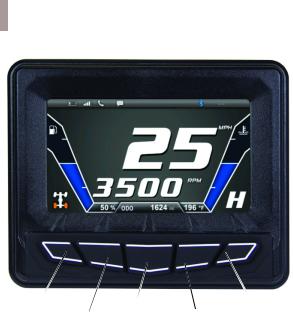
Interactive Digital Display
The Polaris IDD features a 4.3-inch high resolution full color LCD display that provides access to the following information and functions.
Performance
View the speedometer, tachometer, dual trip meters, odometer.
Operating Conditions
View fuel level, coolant temperature, battery voltage, gear position, all-wheel drive status, diagnostics and maintenance warnings.
Riding Conditions
View the clock, change display between day and night mode.
Bluetooth Functionality
Use Bluetooth-enabled communication with cell phone (with notification of incoming calls or texts and ability to view battery strength and signal strength).
GPS/Mapping
NOTE: The compass is controlled by the GPS system. Calibration is not required.
Use the compass and full-featured GPS when the GPS receiver is installed (includes the display of latitude, longitude and elevation). Mark and save waypoints and tracks.
Security (Snowmobiles)
If security is enabled, lock your vehicle using a security code.
Screen Options
Customize screens.
7

Software Upgrades
Update software for the life of the vehicle.
Update the IDD every 90 days or more often (especially before long trips) to ensure the most recent trails data is on your IDD at all times. Log in at RiderX.com to download the latest software updates. If you need assistance, please see your Polaris dealer.
NOTE: Trails data expires 90 days from the file’s release date. If an update is not performed within 90 days, a notification screen displays.
Maps/Trails are supplied as an aid and should not be used for any purpose requiring precise measurement of direction, distance or location. Polaris makes no warranty as to the accuracy or completeness of this map data. You assume all risks associated with using the maps/trails function.
8

General Information
Device Operating Requirements
Phone functionality is dependent on the capabilities of your cell phone. Text messaging functionality may vary depending on your phone’s operating system.
NOTE: Some cell phones or operating systems will not work as shown in this manual.
Care and Maintenance
Use a soft cloth to clean the housing. Mild soap and water may be used. Do not use harsh or abrasive cleaners.
For best results, use a microfiber towel to clean the screen. Window cleaner or alcohol may be used.
NOTICE: Immediately clean off any gasoline that splashes on the display.
Storage
When preparing the vehicle for storage, make sure the ignition switch is in the OFF position to prevent battery drain and a shortened battery life.
9
Display Keys
Use the five display keys to access the IDD menus. Press and release any key to display the IDD menu icons at the lower edge of the screen. With the menu icons displayed, press a specific key to view menu options for that key.
Key 1 |
Key 3 |
|
Key 5 |
||
Alternate Screen |
|
Bluetooth Menu or |
|||
Selection |
Main Menu |
|
|||
Key 4 |
Diagnostics |
||||
|
|
Key 2 |
|||
|
|
Battery Voltage / |
if present |
||
|
ODO / Trip 1 / Trip 2 |
||||
|
Temperature Reading |
|
|||
|
|
|
|
||
IDD Menu Icons
(varies by current screen displayed)
10

Key 1 - Alternate Home Screen Selection
1.Press any key to display the IDD screen icons.
2.Press Key 1 repeatedly to display each home screen option.
|
Off-Road Vehicle |
Snowmobile |
|
Home Screen Options |
Home Screen Options |
PRIMARY |
|
|
|
|
|
SECONDARY |
|
|
|
|
|
AUXILIARY |
|
|
|
|
|
Key 2 - Odometer / Trip Meter 1 / Trip Meter 2
1.Press any key to display the IDD screen icons.
2.Press Key 2 repeatedly to display each option.
•Odometer (ODO)
•Trip 1
•Trip 2
11
Key 3 - Main Menu
1.Press any key to display the IDD screen icons.
2.Press Key 3 to display the main menu options.
3.Toggle through the menu. Key 2: Toggle up
Key 4: Toggle down
4.Use the remaining keys to perform other actions in the main menu.
Key 1: Toggle between day and night screen (brightness) (See page 24 to adjust brightness levels for both screen options.)
Key 3: Select Key 5: Exit menu
Key 4 - Battery Voltage / Coolant Temperature
1.Press any key to display the IDD screen icons.
2.Press Key 4 repeatedly to display each option.
•Battery Voltage
•Coolant Temperature
Key 5 - Bluetooth Menu (or Diagnostics Menu)
1.Press any key to display the IDD screen icons.
2.Press Key 5 to display Bluetooth features. If a fault exists, Key 5 enters the Diagnostics menu (see page 29).
3.Use the display keys to access Bluetooth features. Key 1: Phone
Key 2: Text
Key 3: Toggle Bluetooth on/off Key 4: Settings
Key 5: Exit menu
12

Maps/Trails
View Map
1.Press any key to display the IDD screen icons.
2.Press Key 3 to display the main menu options.
3.Toggle to MAPS/TRAILS. Press Key 3 to select.
Key 1 |
Key 2 |
Key 3 |
Key 4 |
Key 5 |
4.Use the display keys to access the map features. Key 1: Zoom out
Key 2: Zoom in
Key 3: Display menu
Key 4: Pan (disabled above 10 MPH / 16 km/h) Key 5: Advance to next screen (GPS/Tracks Map)
13
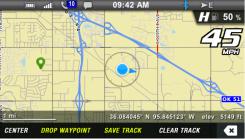
GPS/Tracks Map
Use the display keys to navigate the GPS/Tracks menu.
Key 1: Center the map on your GPS location. The centering will occur after vehicle speed exceeds 10 MPH (16 km/h).
Key 1 |
Key 2 |
Key 3 |
Key 4 |
Key 5 |
Key 2: Place a marker at your GPS location. If your vehicle is stopped, the keyboard will display so you can name and save the waypoint. (See Keyboard Operation on page 15.) If your vehicle is moving, the waypoint will be placed and automatically named. Press and hold Key 2 to enter the Waypoint Manager menu.
Key 3: Display the keyboard to name and save the track. Up to 10 tracks can be saved. Press and hold Key 3 to enter the Track Manager menu.
Key 4: Display a confirmation message before clearing the current track.
Key 5: Exit
14
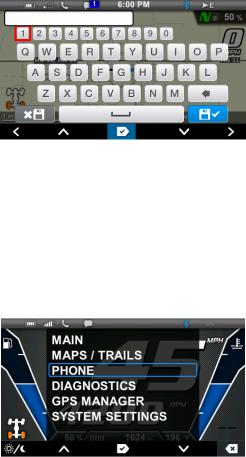
Keyboard Operation
1. Use the display keys to navigate the keyboard.
Key 1 |
Key 2 |
Key 3 |
Key 4 |
Key 5 |
Key 1: Move left
Key 2: Move up
Key 3: Select the letter or number
Key 4: Move down
Key 5: Move right
Phone
1.Press any key to display the IDD screen icons.
2.Press Key 3 to display the main menu options.
3.Toggle to PHONE. Press Key 3 to select.
Key 1 |
Key 2 |
Key 3 |
Key 4 |
Key 5 |
15

4. The phone main menu screen displays.
Key 1 |
Key 2 |
Key 3 |
Key 4 |
Key 5 |
5.Use the display keys to navigate the phone main menu.
Key 1: Missed Calls Key 2: Text Messages
Key 3: Turn Bluetooth on/off Key 4: Bluetooth Settings Key 5: Exit
6.When one of the IDD main screens is displayed, press any key to display the IDD screen icons. Press Key 5 to access the phone menu. (The diagnostic screen displays if an active fault exists. See page 29.)
Key 1 |
Key 2 |
Key 3 |
Key 4 |
Key 5 |
7.For more information about the Bluetooth functions, see page 44.
16
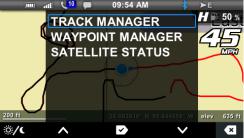
GPS Settings
1.Press any key to display the IDD screen icons.
2.Press Key 3 to display the main menu options.
3.Toggle to GPS MANAGER. Press Key 3 to select.
4.Toggle through the menu.
•Track Manager
•Waypoint Manager
•Satellite Status
5.Press Key 3 to select.
Key 1 |
Key 2 |
Key 3 |
Key 4 |
Key 5 |
Track Manager / Waypoint Manager
The Track Manager allows you to edit a track name, hide or display a track and import or export a track.
The Waypoint Manager allows you to edit, delete, import or export a waypoint or view a saved waypoint on the map.
17

When Go To is turned ON in the Waypoint Manager, an arrow displays on the map, pointing in the direction of the selected waypoint. This feature can be used for only one waypoint at a time.
1.Press Key 5 to toggle to the selection list.
2.Press Key 4 until Go To is highlighted. Press Key 5 to toggle the setting ON or OFF.
Key 1 |
Key 2 |
Key 3 |
Key 4 |
Key 5 |
3. Press Key 5 to exit the map.
Key 1 |
Key 2 |
Key 3 |
Key 4 |
Key 5 |
NOTE: When Go To is ON, the arrow points to the waypoint that was selected when Go To was turned ON.
18
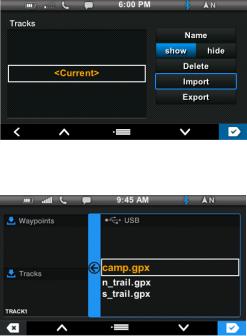
Importing and Exporting Tracks and Waypoints
Importing or exporting tracks and waypoints requires a USB drive in the accessory connector. An exported file will be a .gpx format file that can be read by various devices or imported into mapping software. Any files you import must be available on the USB drive at the root level (not in a folder) and must be .gpx format files.
1.Enter the desired manager menu (Tracks or Waypoints).
2.Press Key 5 to toggle to the selection list. Toggle to Import or Export. Press Key 5 to select.
Key 1 |
Key 2 |
Key 3 |
Key 4 |
Key 5 |
3.Toggle to the desired track or waypoint file name. Press Key 5 to select.
Key 1 |
Key 2 |
Key 3 |
Key 4 |
Key 5 |
19
4. Press Key 3 to confirm. Press Key 5 to reject.
|
|
|
|
|
|
Key 1 |
Key 2 |
Key 3 |
Key 4 |
Key 5 |
|
|
|
|
|
|
|
|
|
|
|
|
Key 1 |
Key 2 |
Key 3 |
Key 4 |
Key 5 |
Key 1 |
Key 2 |
Key 3 |
Key 4 |
Key 5 |
5. If exporting, the file will be saved to the USB drive.
20

6. If importing, the processing screen displays.
Possible Errors
One of the following screens displays if a processing error occurs.
•The device does not contain enough space to save the waypoint or track.
• The USB device is not seated properly.
21

• The file or file name contains an error.
Satellite Status
In the GPS Manager menu, select Satellite Status. The screen displays all available satellites in the area. Press Key 3 to exit.
Key 1 |
Key 2 |
Key 3 |
Key 4 |
Key 5 |
22
 Loading...