

Page 1

Contents
Safety Notes . . . . . . . . . . . . . . . . . . . . . . . . . . . . .2
1. Getting Acquainted . . . . . . . . . . . . . . . . . . . . .3
United States Postal Service Guidelines
Benefits
Parts o the Postage Meter
The Meter Stamp
Keypad Functions
Locating the Meter
2. Using the Meter . . . . . . . . . . . . . . . . . . . . . . . .9
Printing Postage
Printing Ads
Installing Custom Ads
The Refill Process - POSTAGE BY PHONE®
Using the Lock
3. Setup Options . . . . . . . . . . . . . . . . . . . . . . . .23
Setting the Time
Adjusting the Display Contrast
Changing the Dialing Prefix
Changing the Pitney Bowes Data Center Phone Number
Activating New Meters
E707 MET E R S
4. Ink Maintenance . . . . . . . . . . . . . . . . . . . . . .31
Refreshing the Printer
Replacing the Ink Cartridge
5. Troubleshooting . . . . . . . . . . . . . . . . . . . . . . .39
6. SUPPLIES . . . . . . . . . . . . . . . . . . . . . . . .43
Glossary . . . . . . . . . . . . . . . . . . . . . . . .45
Energy Star . . . . . . . . . . . . . . . . . . . . . . . .46
Specifications . . . . . . . . . . . . . . . . . . . . . . . .47
FCC Notes . . . . . . . . . . . . . . . . . . . . . . . .48
Industry Notes . . . . . . . . . . . . . . . . . . . . . . . .49
Index . . . . . . . . . . . . . . . . . . . . . . . .51
1
Page 2

E707 M E TER S
Safety Notes
Follow the normal safety precautions for office equipment when
using this postage meter.
• Use only the AC adapter/power supply included with this postage
meter.
• To protect against electric shock, plug the AC adapter into a
properly grounded wall outlet only.
• The wall outlet should be near the postage meter and easily
accessible.
• Do not remove the ground pin from the AC adapter and plug.
• Avoid using wall outlets controlled by wall switches or shared with
other equipment.
• Do not route the AC adapter cable over sharp edges or trap it
between furniture.
• Do not remove covers; if the postage meter has been dropped or
has otherwise had the enclosure stressed in any way, call Pitney
Bowes.
• Do not place lighted candles, cigarettes, cigars, etc., on the postage
meter.
• Use only United States Postal Service-approved, Pitney Bowes ink
cartridges.
• Keep fingers, long hair, jewelry and loose clothing away from
moving part at all times.
• Read all instructions before you attempt to operate the meter.
• Use the equipment only for its intended purpose.
This postage meter connects directly to telephone lines, therefore,
adherence to the following safety precautions is recommended:
• Never install telephone wiring during a lightning storm.
• Never install telephone jacks in wet locations unless the jack is
specifically designed for wet locations.
• Never touch uninsulated telephone wires or terminals unless the
telephone line has been disconnected at the network interface.
• Use caution when installing or modifying telephone lines.
• Avoid using a telephone or equipment that connects to a
telephone line during an electrical storm; there may be a remote
risk of electrical shock from lightning.
• Do not use the telephone or equipment connected to the
telephone line in the vicinity of a gas leak.
2
Page 3

E707 MET E R S
1. Getting Acquainted
United States Postal Service Guidelines . . . . . . . .4
Benefits . . . . . . . . . . . . . . . . . . . . . . . . . . . . . . . . .4
Parts of the Postage Meter . . . . . . . . . . . . . . . . . .5
The Meter Stamp . . . . . . . . . . . . . . . . . . . . . . . . . .6
Keypad Functions . . . . . . . . . . . . . . . . . . . . . . . . .6
Locating the Meter . . . . . . . . . . . . . . . . . . . . . . . . .7
3
Page 4

E 70 7 M E T E R S
United States Postal Service Guidelines
Since your meter is licensed by the United States Postal
Service (USPS) you must follow a few basic rules:
• Mail must have the correct date and postage amount
in the meter stamp.
• Metered mail must bear the ZIP code location of the
Post Office where the mail is being deposited.
• If you move to another ZIP code location, the USPS
requires you to update the ZIP code on your postage
meter. You can do this by calling Pitney Bowes.
• The USPS requires you to report the amount of
postage used at 90- day intervals. This is done automatically with each postage refill. If more than 90 days
elapses between refills, the meter will warn that an
inspection is due. If 120 days elapses, the inspection
must be performed in order for the meter to print
postage. See the Troubleshooting section for instruct-
tions on clearing the inspection messages.
Benefits
4
• Print official postage.
• Instantly refill postage by telephone 24 hours a day.
• Promote your business and give envelopes a personal
ized look with one of the preprogrammed ads that
come with your meter! Create personalized look by
ordering a custom advertisement for your business.
• Track and manage postage costs. Account for and keep
secure all postage. And when you use your meter with
a scale, you can save 10-20% on postage.
• Very easy to use. Quick reference guide conveniently
located at the base of the meter.
Page 5
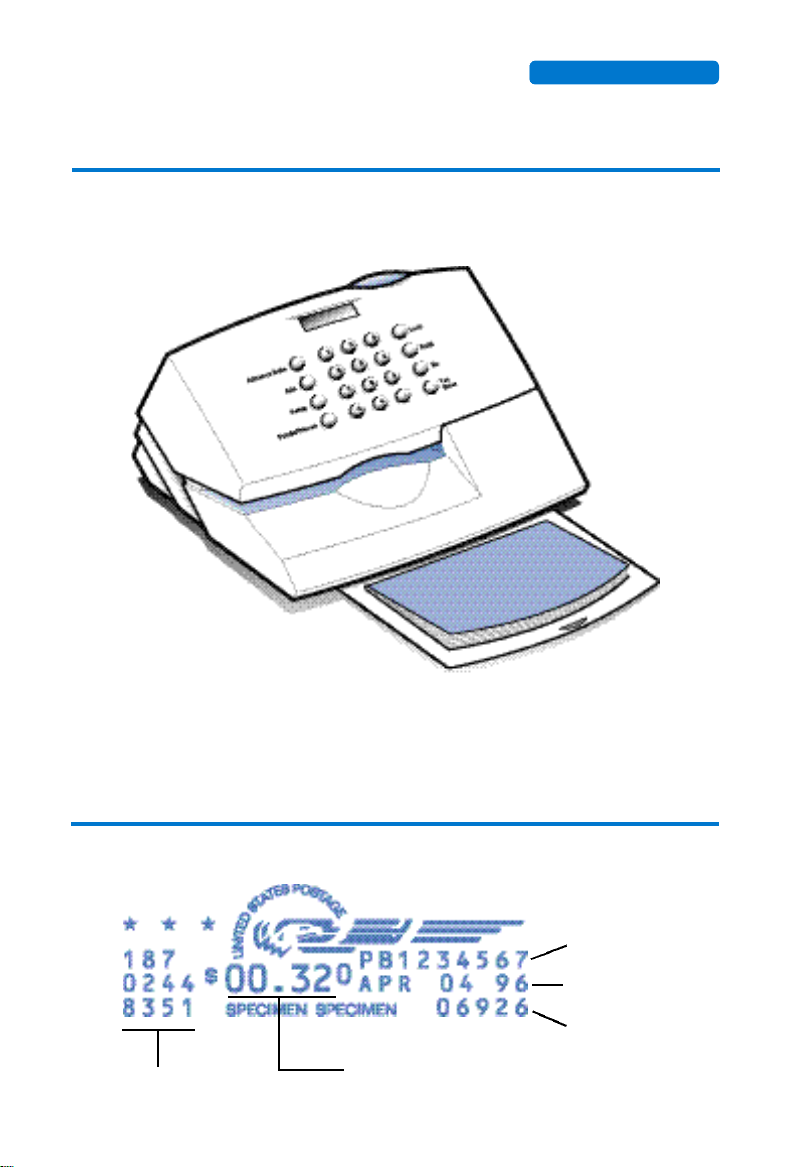
Parts of the Postage Meter
Card Slot
For Ad Cards
Mail Slot
Insert mailpiece
GET T IN G ACQUAINTED
The Meter Stamp
For USPS use
Quick Reference Guide
Covers most procedures
Meter Number
Date
Zip Code
Postage amount
5
Page 6
E 70 7 M E T E R S
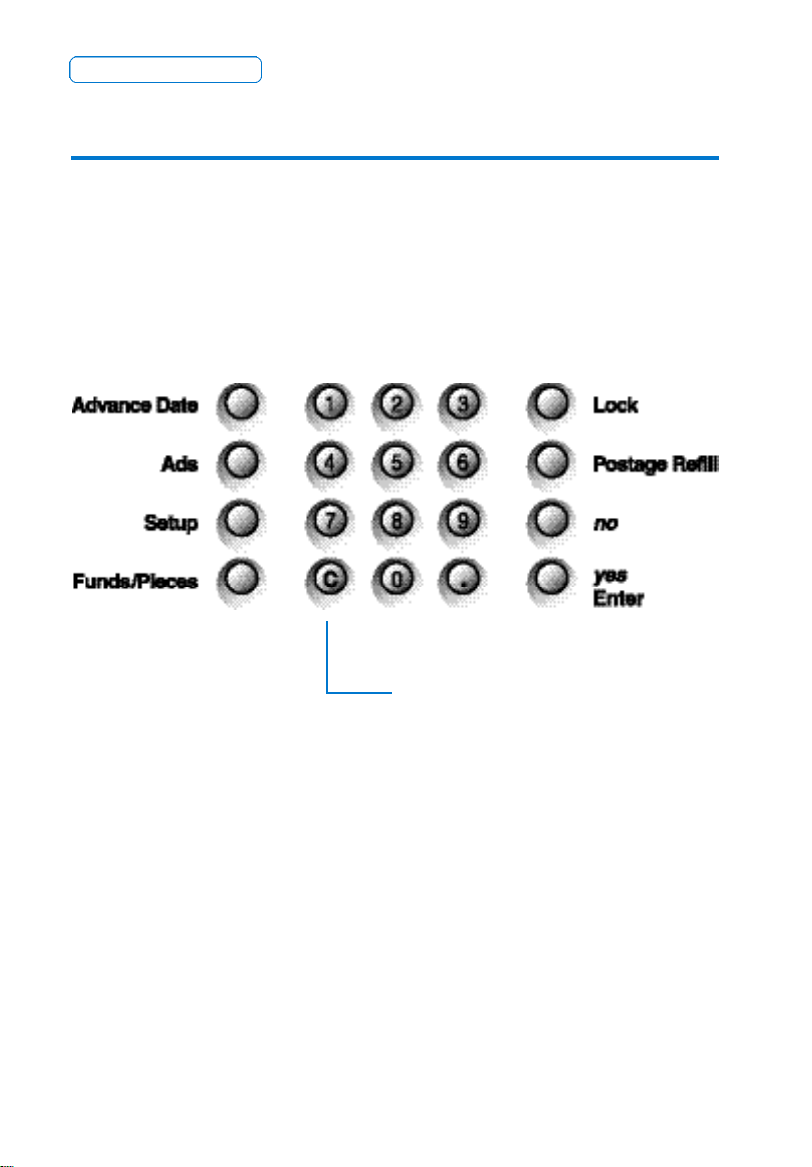
Keypad Functions
Advance Date
Temporarily set the date ahead
Ads
Select an ad to print
Setup
Turn Date Off/On
Change Date
Change Time
Install Custom Artwork
Enable/Disable Lock
Change Contrast
Change Phone Number
Change Account Number
Lock
Prevents unauthorized use of funds
Postage Refill
Add funds via POSTAGE BY PHONE®
Clear
Funds Pieces
$ Available
$ Used
Pieces Printed
Use Printer Functions
• Install Ink
• Maintenance
• Printer Test
6
Page 7
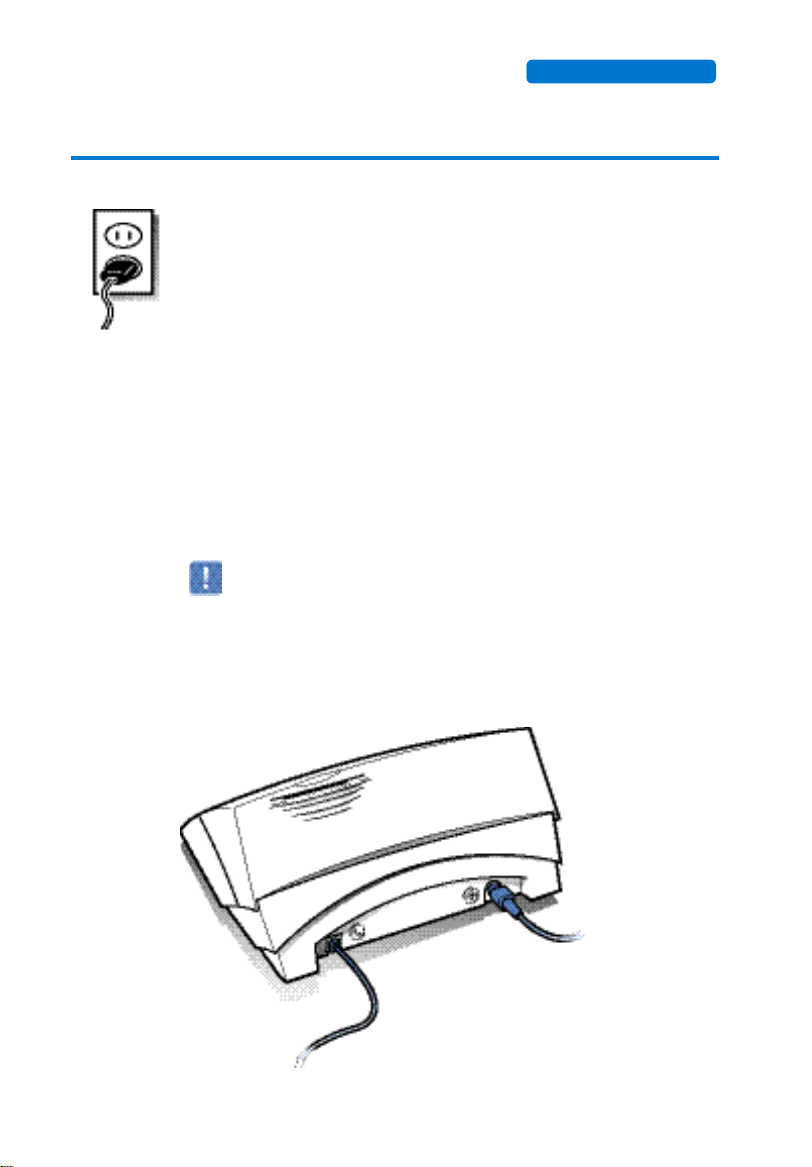
Locating the Meter
The meter must be plugged in to operate. It is on when it
is plugged in; there is no on/off switch.
To keep your meter printing clearly, choose a permanent
location for your meter where it will be continually supplied with power. This will ensure the printer maintenance will be performed on a regular basis.
Likewise, always keep fresh batteries in the meter in case
of a power failure or the meter is temporarily unplugged.
Fresh batteries store the date and keep printer maintenance on schedule.
After 10 minutes of inactivity, the meter enters sleep
mode and the display is blank. Press any key to wake it
up.
Do not tip the meter more than 45 degrees in any dire c t i o n
or stand it on end; ink may leak from the ink cartridge.
GET TI N G ACQUAINTED
Phone Cord
Connect when
refilling postage.
Power Cord
Always leave the
meter plugged in.
7
Page 8

E707 METERS
8
Page 9

E707 METERS
2. Using the Meter
Printing Postage . . . . . . . . . . . . . . . . . . . . . . . . . . .10
Checking the Date 10
Checking Postage Available 11
Determining the Postage Amount 11
Setting the Postage Value 12
Printing the Meter Stamp 12
Using Postage Tape Sheets 13
Turning Off Date Printing 14
Printing Ads . . . . . . . . . . . . . . . . . . . . . . . . . . . . . . .15
Installing Custom Ads . . . . . . . . . . . . . . . . . . . . . . . .16
Refill Process-POSTAGE BY PHONE® . . . . . . . . . . . 17
Making Payments to your Account 17
Phone Line Requirements 18
Adding Postage to the Meter 19
Checking Your Account Balance 20
Using the Lock . . . . . . . . . . . . . . . . . . . . . . . . . . . . . . 21
Turning On the Lock Function 20
Turning Off the Lock Function 21
Changing the Lock Code 22
Locking the Meter Funds 22
Unlocking the Meter Funds 22
9
Page 10

E707 METERS
Printing Postage
Step 1: Checking the Date
Since you must mail your envelope on the day that is
printed in the meter stamp, be sure to check the date
on the display before you print the postage.
If you plan to mail the envelope after the postal carrier has picked up the mail, set the date for the next day
using the advance date function.
To temporarily advance the date
Press the Advance Date key. The current
date displays.
Press the Advance Date key again to
advance the date.
Press Enter to set the date and return to
ready mode.
10
Always re s t o re the current date when finished. If you
do not, the date will remain inaccurate.
To reset to the meter date
Press the Advance Date key.
Press the Clear (C) key. The meter date is
displayed.
Press the Enter key.
Page 11

USING THE METER
Step 2: Checking Postage Available
Before printing postage, you may want to check how
much postage is left in the meter.
Press Funds/Pieces. The amount of postage
available displays.
Press the Clear (C) to return to ready mode.
Additional key presses of the Funds/Pieces key displays
the total amount of postage spent and the total number
of pieces printed.
Step 3: Determining the Postage Amount
One of the advantages of using a postage meter is that
you can print the exact amount of postage you need.
Using the postal scale, weigh the mail.
Using the Rate Circle which pulls out from under
the optional scale, look up the postage amount
for the weight and class of your mailpiece.
If there is a change in postage rates, contact Pitney Bowes to
order a new postage rate chart.
11
Page 12
E707 METERS
Step 4: Setting the Postage value
Step 5: Printing the Meter Stamp
Key in a postage amount and press Enter.
Two decimal places are assumed; you need not key in
the decimal point. For example, if you want $0.32, key in
3 2 Enter.
High Value
You can enter any amount up to $99.999. If you enter
a postage value of $1.00 or more, the display warns that
it is a high value. You must press yes to confirm the
large amount.
Advanced Use: Setting Fractional Postage
The United States Postal Service offers discounts to
mailers that comply with certain re g u l a t i o n s .
Discounted rates may require a fractional postage value
such as $0.165. In these cases, you must press the decimal key in order to enter the fractional amount. For
example, to set $0.165 press . 1 6 5 Enter.
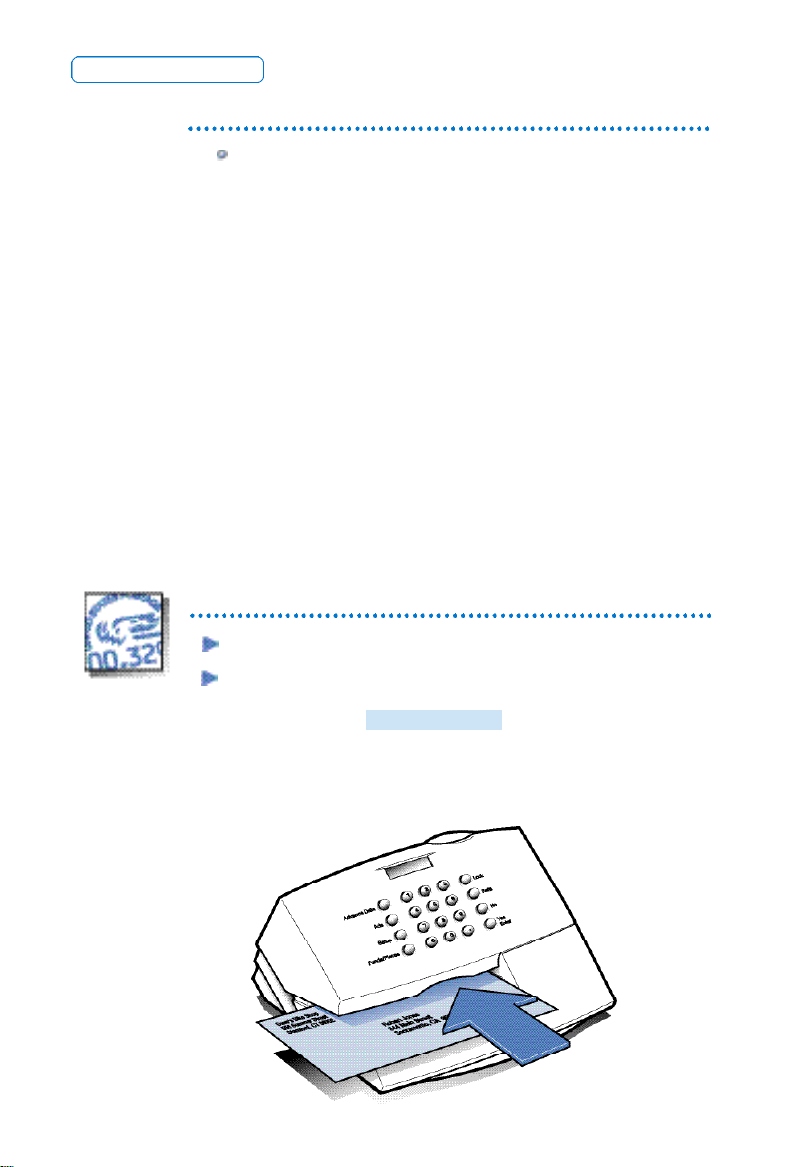
Hold the envelope by the bottom.
Insert it face up into the meter by aligning it with
the right wall and sliding it straight back until the
meter displays . PLEASE WAIT
12
The postage amount remains set until you
change it.
Page 13
USING THE METER
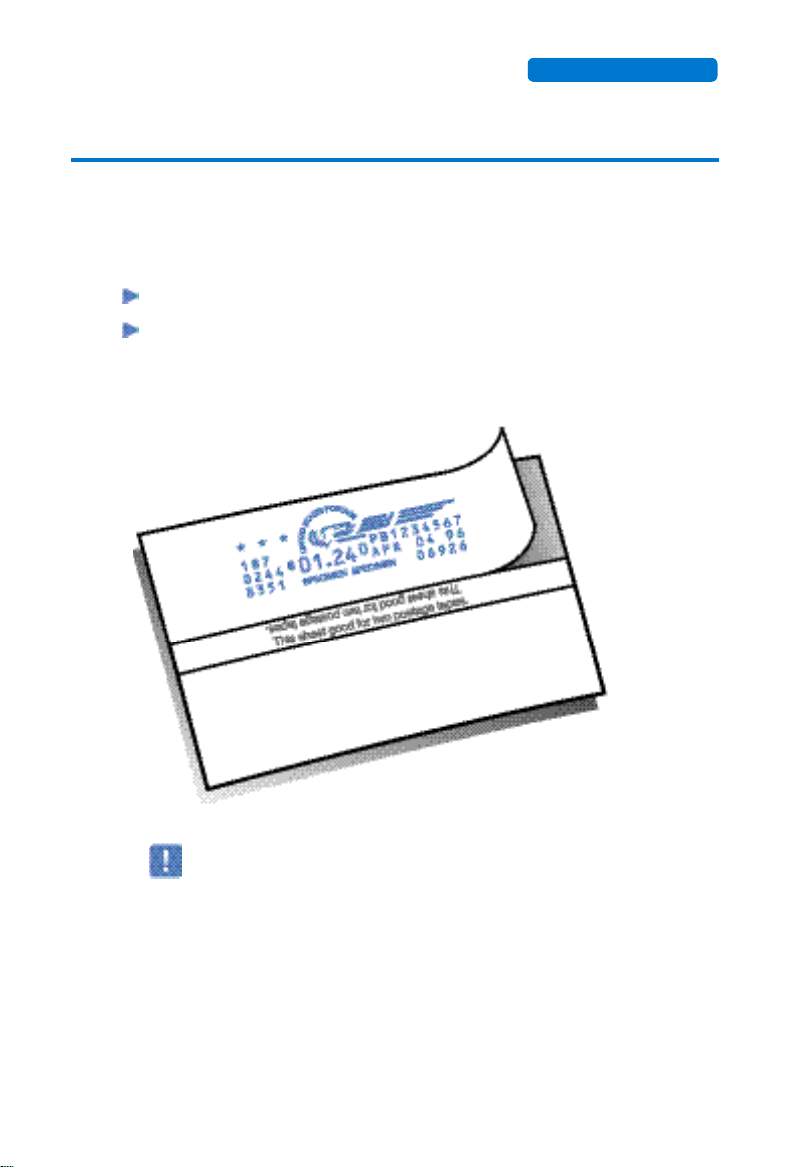
Using Postage Tape Sheets for Thick
Envelopes and Packages
If your mailpiece is too thick for the postage meter or difficult to print on, such as a red envelope, print the postage
on a tape sheet.
Print the postage on a postage tape sheet.
Peel the tape from the backing sheet and affix to
the mailpiece or package.
If the meter stamp smears, the envelope is too thick
for the meter. Use a postage tape sheet to avoid
damaging the printer.
Do not place objects such as paper clips in the meter
stamp section of the envelope. The raised area may
interfere with the printhead.
13
Page 14

E707 METERS
Advanced Use:
Turning OFF Date Printing
Turn Date Off is an option which allows you to prepay
the postage on a return envelope. In this instance, the
date is not shown in the meter stamp since you do not
know when the reply will be mailed.
Consult the United States Postal Service Domestic
Mailing Manual, your postal representative, or the local
postmaster for complete details on the latest information and when to use this feature.
To turn OFF date printing
Press Setup repeatedly until the
TURN DATE OFF?
prompt displays.
Press Clear (C) to return to ready mode.
Remember to tur n t he date back on when you are
finishing with the reply mail.
To turn ON date printing
Press Setup repeatedly until the
TURN DATE OFF?
prompt displays; press yes.
Press Clear (C) to return to ready mode.
14
Page 15
USING THE METER
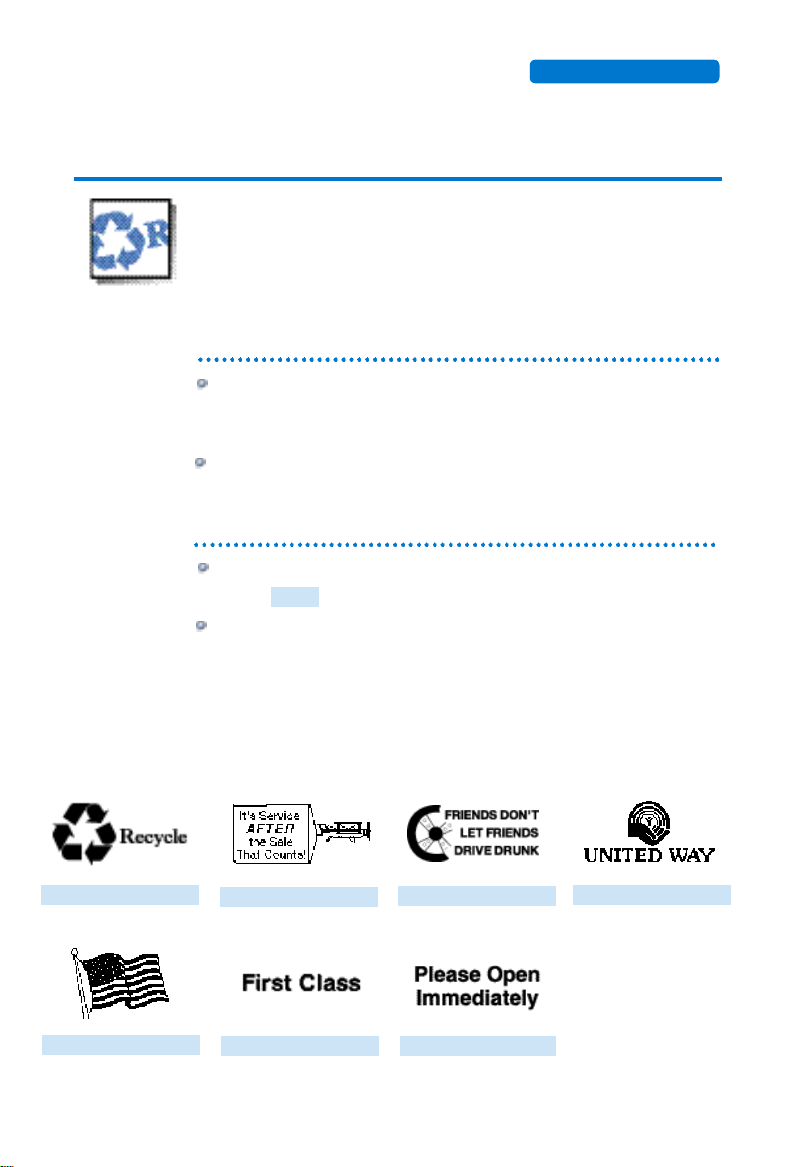
Printing Ads
You can select an ad slogan to print to the left of the
meter stamp. There are eight ads available; you may
also purchase additional standard and custom ads.
Custom ads display your personal message, logo, or
other design.
To select an ad
Press the Ads key. The currently selected ad is
displayed. Continue pressing the Ads key until you
find the ad you want.
Press Enter.
To turn ad printing off
Press the Ads key. Continue pressing the Ads key
until displays.
NONE
Press Enter.
These ads are included with your meter.
RECYCLE
FLAG
IT’S SERVICE
FIRST CLASS
FRIENDS DON’T
OPEN IMMEDIATELY
UNITED WAY
15
Page 16
E707 METERS
Installing Custom Ads
You may purchase ad cards from Pitney Bowes containing
customized messages you design or one of the many
other standard ads available. For more information on
ordering custom ads, see the catalogue included with
your meter, or call Pitney Bowes for a copy.
After installing a new ad in your meter, it remains
available until you replace it with another new ad.
Save custom ad cards in case you ever need to load
the ad to the meter again.
To install a custom ad
Press Setup repeatedly until the
INSTALL NEW AD?
displays.
Press yes.
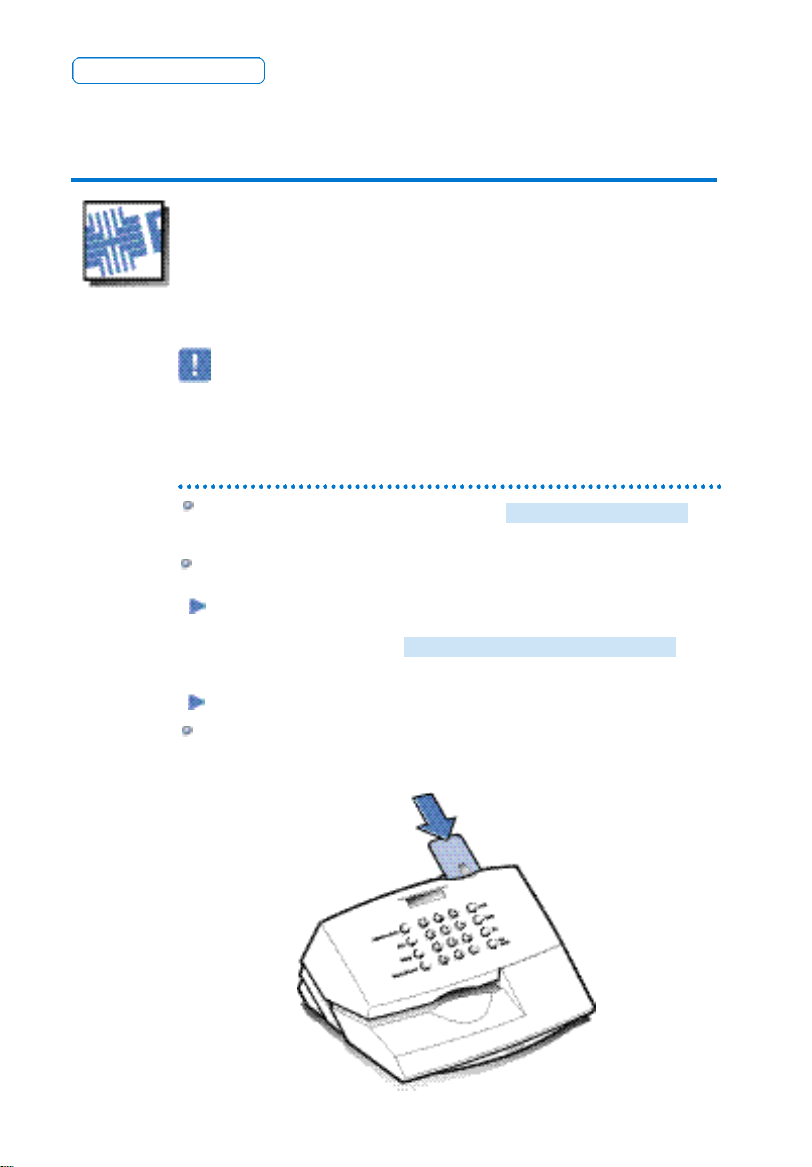
At the prompt, insert the ad card face up in the slot with
the gold, oval shaped microprocessor at the bottom as
shown. The prompt
INSTALL OK REMOVE CARD
displays when the process is complete.
Remove the ad card.
Press the Clear (C) key to return to ready mode.
16
Page 17
USING THE METER
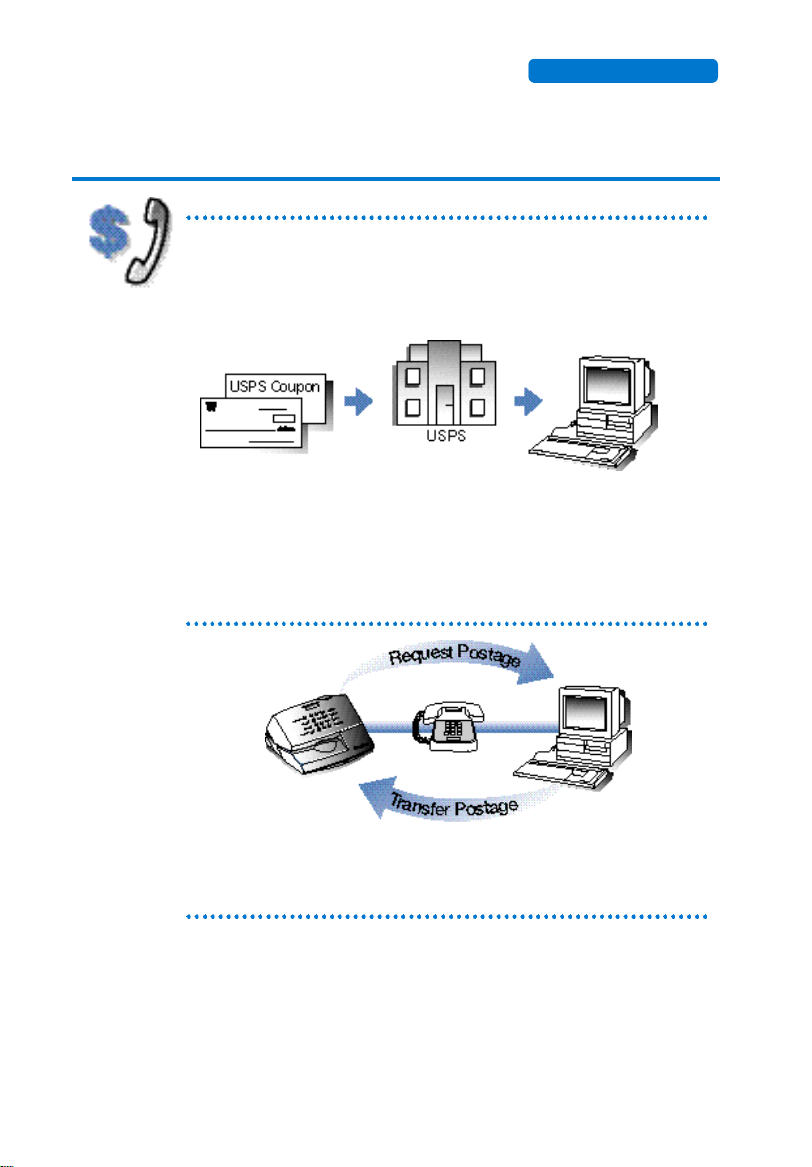
The Refill Process POSTAGE BY PHONE®
Step 1: Add funds to POSTAGE BY PHONE® account
You have the option to pay for postage three ways:
you can prepay for postage directly to the US Postal
Service, you can charge postage purchases to a
designated credit card account, or you can get a bill
for postage using our Postal PrivilegeSMprogram.
PB Data
Center
If you choose to prepay for postage, make your check
p a y a b l e to ”US Postal Service” and remit your postage
payment to the nearest payment-processing center. Please
allow up to 7 days from the date you mail your check to
the date your check will be posted to your account.
Step 2: Transfer postage to meter
With the postage meter connected to a telephone line,
perform a refill. The funds transfer securely to the meter.
Making payments to your account
C M R S - P B P
PO BOX 7247-0166
Philadelphia, PA
1 9 1 7 0 - 0
1 6 6
CMRS-PBP
PO BOX 0566
Carol Stream, IL
60132-0566
CMRS-PBP
PO BOX 894766
Los Angeles, CA
If you choose to pay for postage via credit card, please
contact our customer service team to provide us with a
credit card number for postage charges.
17
Page 18

E707 METERS
If you prefer to get a bill for postage using your Postal Privilege
SM
account, simply refill your meter up to your available funds amount
displayed on your meter. We’ll automatically send you a bill for the
postage you ordered and you can take up to 20 days to pay. You can
also use your Postal PrivilegeSMaccount to order and pay for Pitney
Bowes supplies. The Postal PrivilageSMpayment address is:
Postal Privilege
PO Box 856042
Louisville, KY 40285-6042
Visit www.postagebyphone.com for more information about your postage
payment options.
Phone line requirements
The modem requires an analog phone line such as a fax line, or residential phone line. If you have a commercial phone system, check
that it uses an analog line. If it does not, an analog phone line will
have to be installed or you can share use of an existing fax machine
line. Simply unplug the fax machine line and plug it into the meter
when buying postage. Common telephone jack splitters can also be
used to share one analog line.
An analog telephone line can usually be identified as follows:
18
A change in tone pitch when buttons are pressed.
Data label/inscription on telephone set has FCC
“Ringer Equivalence Number”.
The telephone line is connected to your facsimile
equipment or a credit card reader.
If you do not know whether your phone line is a digital or
analog line, consult your building facilities re p resentative or
the phone manufacturer.
Page 19

USING THE METER
Adding postage to the meter
Check that the phone cord is connected between the
back of the meter and the wall telephone jack.
Press the Postage Refill key.
Key in the refill amount in whole dollars. (See page
47 to determine the amount your meter can hold.)
Press Enter.
The meter dials the POSTAGE BY PHONE®Data
Center and displays a series of messages telling you
the progress of your refill.
At the prompt, insert
a postage tape sheet or piece of paper. Wait for the
meter to print your receipt. When finished, the display
returns to ready mode.
Number of times
remaining that meter
can be refilled
Amount remaining in
POSTAGE BY PHONE®
account at Pitney Bowes
INSERT FORM FOR RECEIPT
Amount moved from
POSTAGE BY PHONE®
account into meter
19
Page 20

E700/E707 METERS
Checking Postage Available
Checking the postage available in the meter
Use the Funds/Pieces key to display the amount
of postage in the meter. For detailed instructions,
see Step 2 of Printing Postage on page 11.
Checking your account balance at the Postage by
Phone Data Center
You can easily check your Postage by Phone®a v a i l a b l e
balance for refills by perf o rming the following steps.
Press the Refill key.
At the prompt, enter 0 (zero)
and press Enter. The meter dials into POSTAGE
BY PHONE and displays your account balance
available for refills.
Press the Clear (C) to return to ready mode.
If you are a Postal Privilege
account balance displayed is the total of any prepaid funds in your Postage by Phone®account plus
the available credit in your Postal Privilege
account.
REFILL AMT
SM
p a rticipant, the
S M
20
Page 21

USING THE METER
Using the Lock
Use the lock function to control access to the
meter funds.
Turning ON the lock function
When you receive your meter, the lock function
is off.
Press Setup repeatedly until the
CHANGE LOCK CODE?
prompt appears.
Press yes.
Choose a four digit code you will remember. Key
in the number and press Enter.
Press the Clear (C) to return to ready mode.
Turning OFF the lock function
Setting the lock code to 0000 will turn off the
lock function.
Press Setup repeatedly until the
CHANGE LOCK CODE?
prompt appears.
Press yes.
At the prompt, key in the
ENTER OLD CODE?
current lock code.
Press Enter.
At the prompt, key in
ENTER NEW CODE?
0000.
Press Enter.
Press the Clear (C) to return to ready mode.
21
Page 22

E707 METERS
Changing the lock code
Follow the directions above for turning off the
lock function except enter your new code in
place of the disable code 0000.
Locking the meter funds
Press Lock. The message
METER LOCKED
displays for two seconds. Then the message
ENTER CODE TO UNLOCK
displays.
The meter funds cannot be used without
entering the lock code.
Unlocking the meter funds
At the key in the lock
ENTER LOCK CODE
code. After verifying the code, the meter
returns to ready mode.
If you forget your lock code, call Pitney Bowes.
22
Page 23

E707 METERS
3. Setup Options
Setting the Time . . . . . . . . . . . . . . . . . . . . . . . . . . . . 24
Adjusting the Display Contrast . . . . . . . . . . . . . . . . . 26
Changing the Dialing Prefix . . . . . . . . . . . . . . . . . . . . 26
Changing the Pitney Bowes
Data Center Phone Number . . . . . . . . . . . . . . . . . . . . 27
Activating New Meters . . . . . . . . . . . . . . . . . . . . . . . . 28
23
Page 24

E707 METERS
Setting the Time
AutoDating
The meter clock allows the AutoDating feature to
advance the date at midnight each day.
Press Setup repeatedly until the
CHANGE TIME?
prompt appears.
Press yes.
Set the time as follows:
24
Set time
back by
hours or
minutes
Set time
ahead by
hours or
minutes
Move cursor
between
hours and
minutes
Press Enter.
Press the Clear (C) to return to ready mode.
Page 25

SETUP OPTIONS
Adjusting the Display Contrast
There are three levels of contrast for the display. The
best contrast depends on where your eye is relative to
the display and what sources of light are in the room.
Position the meter where you will use it.
Position yourself where you will be when using the
meter.
Press Setup repeatedly until the appears.
Press yes.
Press 1, 2, or 3. As you do so, the display shows the
change in contrast.
Once you have chosen your preference, press Enter.
Press Clear (C) to return to ready mode.
25
Page 26

E707 METERS
before dialing am 800 number, you need to set a dialing prefix.
To add a pause in the dialing, press the decimal
key (.).
To add an “asterisk”(*) in the dialing, press the
Postage Refill key.
To add a “pound sign” (#) in the dialing, press the
no key.
Press Setup repeatedly until
prompt appears.
Press yes.
Key in the prefix; press Enter.
Press Clear (C) to return to ready mode.
Changing the Dialing Prefix
If your phone system requires you to dial a number
It is recommended that you include a pause between
the dialing prefix and the number.
CHG DIAL PREFIX?
26
Page 27

SETUP OPTIONS
Changing the Pitney Bowes
Data Center Phone Number
The Pitney Bowes Data Center toll-free phone number is
1-800-848-3764. It is automatically dialed by the meter
when a refill is being performed.
Do not change this phone number unless instructed to
do so by Pitney Bowes.
Press Setup repeatedly until
CHG PB PHONE?
prompt appears.
Press yes.
Key in the new Data Center phone number;
press Enter.
Press Clear (C) to return to ready mode.
Changing the Pitney Bowes Account Number
Your account number is stored when you first set
up the meter.
Do not change the account number after performing
a successful refill unless instructed by Pitney Bowes.
27
Page 28

E707 METERS
Activating New Meters
Two steps must be performed to activate a meter:
(1) an account number must be installed;
(2) an inspection, using the POSTAGE BY PHONE
refill process, must be done.
We recommend that you record the account number
below for future reference.
POSTAGE BY PHONE Account Number
Step 1: Prepare new ink cartridge
Pull the tape off the ink cartridge.
Set cartridge in meter.
Snap cartridge cover in place.
®
28
Step 2: Connect Power
Connect power cord to meter.
Plug into wall outlet that is not
controlled by a switch.
This powers up the meter; there is no
on/off switch.
Page 29

Step 3: Prime print head
SETUP OPTIONS
At the prompt,
ADD INK-PRESS ENTER
press Enter.
Ink will pump into the print head. This process
takes about 3 minutes.
Step 4: Set POSTAGE BY PHONE® account number
Key in account number, press Enter. To change
what you have entered, press the Clear (C) key.
Clear key
Step 5: Connect phone line
Plug the phone cord into the back of the meter
and connect to an analog phone jack.
Press Enter.
To avoid possible damage to the meter:
If you use a commercial phone system check that your
phone line is an analog line. See p. 18 for more on
analog lines.
Phone
29
Page 30

E707 METERS
Step 6: Transfer funds to meter (Refill0
Key amount of postage to load into meter; press
Enter.
Meter dials Pitney Bowes an transfers postage
into the meter.
Insert blank envelope or tape sheet when
prompted for receipt.
Press Funds/Pieces key to view the postage
available in the meter.
If displays, see
CANNOT REACH DATA
Changing the Dialing Prefix on page 26.
Number of times
remaining that meter
can be refilled
Amount remaining in
POSTAGE BY PHONE®
account at Pitney Bowes
30
Amount moved from
POSTAGE BY PHONE®
account into meter
Page 31

E707 METERS
4. Ink Maintenance
Refreshing the Printer . . . . . . . . . . . . . . . . . . . . . . .32
Performing Maintenance 32
Repeat if Necessary 33
Replacing the Ink Cartridge 34
31
Page 32

E707 METERS
Refreshing the Printer
The meter performs automatic maintenance regularly to
keep the print nozzles clear. Occasionally, however, you
may find that the meter stamp is not complete. When
this happens, you may need to refresh the printer nozzles using the function, or
you may need to replace the ink cartridge using the
Step 1: Performing Maintenance
Press Setup.
Press yes at prompt.
Press no until the prompt
appears.
Wait while the printer goes through the
maintenance process. This takes about 1 minute.
At the prompt, insert
any blank envelope or postage tape sheet.
Check the test print to be sure that all nozzles are
printing.
If the test print is correct, press Clear (C) to return
to ready mode.
PERFORM MAINTENANCE
USE PRINTER FUNCTIONS?
INSERT FORM FOR TEST
function.INSTALL INK CARTRIDGE
Example of
missing lines
PERFORM
32
Page 33

Good Test print.
Bad test print. Notice missing lines.
Step 2: Repeat if Necessary
If the test print still has blank lines in it, press yes
to perform maintenance again.
At the
INSERT FORM FOR TEST
another test sheet.
Check the print test.
MAINTENANCE
prompt, insert
If more lines are missing, it is time to replace the
ink cartridge. Follow the directions in Step 3.
If the same lines are missing, perform maintenance again as described in Step 2.
If after three tries, the test print is still not complete, call Pitney Bowes.
33
Page 34

E707 METERS
Step 3: Replacing the Ink Cartridge
Before replacing the ink cartridge, perform printer maintenance as described in step 1. Refreshing the printer may
clear any clogged nozzles.
Take the following precautions to avoid damage to the
print mechanism:
• Do not leave printhead without an ink cartridge in place;
if the cartridge runs out of ink and you do not have
another, leave the empty cartridge in place until you
can replace it. This will prevent the printhead from drying out.
• Always use the function
INSTALL INK CARTRIDGE?
via the Setup key when replacing an ink cartridge.
• Never install a partially used ink cartridge; automatic
maintenance is based on installing new cartridges.
• Do not refill used ink cartridges; these cartridges contain
United States Postal Service-approved ink that is specially designed to work with your printer. Other inks will
likely cause damage to your printer and cause your mail
to be delayed in delivery or returned.
34
Page 35

MAINTENANCE
If you do not have a new ink cartridge, leave the empty
one in the meter to keep the nozzles from drying out.
To replace the ink cartridge
Press Setup.
Press yes at the prompt.
Press yes at the prompt.
USE PRINTER FUNCTIONS?
INSTALL INK CARTRIDGE?
At the prompt,
ADD INK - PRESS ENTER WHEN DONE
lift the meter cover.
Squeeze the tabs on each side of the protective bar securing
the ink cartridge and rotate the bar up and back.
Remove the old ink cartridge and discard. Handle it
carefully—there may be ink on the bottom of the cartridge.
procedure continues . . .
35
Page 36

E707 METERS
procedure continues . . .
On the new ink cartridge, remove the tape strip
covering the ink and vent holes.
Place the new ink cartridge on top of the
printhead with the label facing out.
Rotate the protective bar into place and press
down on it gently until both tabs snap in place.
Close the meter cover.
36
Page 37

MAINTENANCE
At the
INSTALL INK PRESS ENTER WHEN DONE
prompt, press Enter.
At the
IMPORTANT - IS INK INSTALLED?
prompt, press yes.
Wait while the printer goes through the ink
replenishment process. This takes about a
minute.
At the
INSERT FORM FOR PRINT TEST
prompt, insert any blank envelope or postage
tape sheet.
Check the test print to be sure that all nozzles are
printing.
If the test print is correct, press Clear (C) to return
to ready mode. If test print is not
complete, press yes to perform maintenance.
Follow the procedure described in previous
section Refreshing the Printer.
37
Page 38

E707 METERS
38
Page 39

E707 METERS
5. Troubleshooting
The information below lists corrections to problems that might arise
during use of your meter. If a problem persists, call Pitney Bowes.
Clearing errors
To clear most error conditions, press the Clear (C) key. If un-s u c c e s sful, unplug your meter, wait 30 seconds, and re c o n n e c t .
General
Display difficult to read
Adjust display contrast using Setup key or move meter to another
location.
No power display is blank
Check outlet and power supply connection. do not use an outlet
controlled by a switch.
A four-digit number displays / Clear (C). If
unsuccessful, umplug the meter, wait 30 seconds, and reconnect.
PRINTER JAMMED
The printhead is jammed. Remove any paper; press Clear (C).
METER ERROR:XXXX
READY
does not display
1. ZIP code not installed or inspection required. Press Postage Refill and
enter $0.00 to allow Pitney Bowes to install your ZIP.
2. Out of ink. Use function to install a
INSTALL INK CARTRIDGE?
new ink cartridge.
REMOVE ENVELOPE
This displays if one of the following occurs:
1. Printing is complete.
2. Enter was not pressed when a new postage value was being set. Remove
the envelope; press Enter; reinsert envelope to print postage.
3. The meter woke up when an envelope was inserted. Remove the envelope so the postage amount can be displayed before you print
postage.
39
Page 40

E707 METERS
Postage
ACCOUNT BALANCE LOW
You do not have enough money in your account at the Data Center to
pay for the refill amount. Perform refill procedure for smaller
amount or add to your account (see page 17).
CANNOT REACH DATA CENTER
Data Center connection could not be made. Repeat call. If unsuccessful, check the dialing prefix you may have added in the
CHANGE DIALING PREFIX?
at the end of the prefix to have the meter pause before dialing
the preprogrammed 800 number.
CONNECTION LOST-TRY AGAIN?
Data Center was disconnected before the refill transaction completed.
Press yes to repeat the call.
DATA CENTER PHONE IS BUSY
A busy signal was detected. Repeat call. If unsuccessful, check the
dialing prefix you may have added in the
CHANGE DIALING PREFIX?
NO DIAL TONE
No dial tone is found. Check that the phone cord is connected to
the postage meter and the wall outlet. If the line is connected,
check that the phone line is an analog phone line.
NOT ENOUGH FUNDS
Insufficient funds in meter. Key in postage amount again. If funds
are low, perform refill procedure.
POSTAGE VALUE EXCEEDS LIMIT
The postage amount entered is larger than the maximum amount the
postage meter can print. Key in a lower postage amount.
REFILL TO HIGH - MAX FUNDS LIMIT
funds in meter exceeds maximum amount meter can hold. P ress Clear
(C); enter a smaller refill amount.
REFILL FAILED - CHECK ACCT#
Connection was made to Data Center but transaction could not take
place. Check that the correct P O S TAGE BY PHONE® Account num-
ber is entered. Try refill again.
Setup Option. Try adding a decimal
Setup Option.
Refill amount plus
40
Page 41

T R O U B L E S H O O T I N G
Printing
Lines missing in the meter stamp
Printer maintenance required. May be clogged nozzles or low ink.
Perform printer maintenance up to three times. If more lines are
out, change ink cartridge using
function. If problem persists, call Pitney Bowes.
Meter stamp does not print
Printhead not primed with ink. Check that yellow nozzle cap is
removed and that tape on cartridge is removed.
Meter stamp is smudged
Envelope is contacting printhead during printing. Check that
envelope does not exceed 5/16” thickness. Do not place objects,
such as paper clips inside the envelope, in the meter stamp area.
LOW INK - ORDER CARTRIDGE SOON
Cartridge is low or out of ink. Replace cartridge using
INSTALL INK
Printer function under Setup key. If message
does not clear, see instructions on page 35.
INSTALL INK CARTRIDGE?
Refill Required
CANNOT FIND ZIP - REFILL REQUIRED
No ZIP has been installed in the meter by the Data Center. Perform a
refill to install the ZIP. Press Postage Refill. If you do not want to
add funds at this time, set the refill amount to $0.00
INSPECTION DUE - REFILL REQUIRED
No refill has been perf o r med for 90 days. P r ess Postage Refill. If you do
not want to add funds at this time, set the refill amount to $0.00.
INSPECTION REQUIRED- REFILL
No refill has been performed for 120 days. The refill procedure must be
performed in order for the postage meter to print postage. Press
Postage Refill. If you do not want to add funds at this time, set
the refill amount to $0.00.
41
Page 42

E707 METERS
Smart Card
CANNOT READ CARD
The card is inserted incorrectly. Remove card and reinsert with the
gold circle towards you and at the bottom.
NO AD FOUND - CHECK CARD
The card inserted does not contain an ad. Check that you inserted an ad
c a rd .
Lock Code
INCORRECT CODE
An incorrect lock code has been entered. Press Clear (C); key in code
again. If you cannot remember the correct code, call Pitney Bowes.
42
Page 43

6. Supplies
Ordering Supplies
For E700 supplies call; 1-800-468-8454
Item Order Number
Ink Cartridge #769-0
Postage tape sheets, 50 pack #612-9
Dust Cover #621-9
E-Z Seal® (4 oz. bottle) #601-7
Custom art cards
Replacing the Ink Cartridge
When replacing the ink cartridge, follow the Ink
Maintenance instructions on page 32 to ensure that
the ink from the new cartridge is pumped into the
printhead.
E707 METERS
43
Page 44

E707 METERS
44
Page 45

Glossary
Ad Card. A card that contains an advertising (ad) slogan
that can be added to the standard ads.
Ad Slogan. Lets you convey your own special message
alongside the meter stamp.
Analog Phone Line. Phone line typically used by fax
machines or found in residences. Many commercial phone
systems use non-analog lines.
Inspection Due/Required. A regulation of the United States
Postal Service (USPS) that re q u i res meter users to contact
the Pitney Bowes P O S TAGE BY P H O N E®Data Center
periodically.
Lock Code. A four-digit personal identification number
(PIN) you enter to allow access to meter funds.
Mailpiece. Any envelope, post card, package or meter tape.
Meter Serial Number. The USPS number found on the
bottom of the meter.
M o d e m. The part of the machine that dials the
B Y PHONE®Data Center and transfers data via the phone
line.
POSTAGE BY PHONE
Bowes that allows customers to buy postage and check
account status electronically over the phone. It also enables
convenient postal inspection by phone.
Postage Refill. The process of adding funds to your meter
using the Pitney Bowes POSTAGE BYPHONE®service.
Postage Tape Sheets. A strip of self-adhering paper on
which you may print postage and apply to a mailpiece.
Ready Mode. The meter display that shows the date, the
word READY, and the postage amount.
Sleep Mode. The energy-saving feature of your meter that
clears the display after 10 minutes of idle time. Pre s s i n g
any key will wake up the display.
E707 METERS
P O S TA G E
®
. A service available through Pitney
45
Page 46

e707 METERS
Energy Star
Pitney Bowes’ desire to advise customers about the
energy efficiency of our equipment not only includes
the bottom line savings but also evaluating our
equipment’s impact on the environment. Office
equipment is the fastest growing electricity load in
the world.
The U.S. Environmental Protection Agency (EPA) promotes energy efficiency because electricity generation
contributes to air pollution, including 35 percent of
all U.S. emissions of carbon dioxide. It also accounts
for 70 percent and 33 percent of all U.S. emissions of
sulfur dioxides and nitrogen oxides, respectively. By
using more energy efficient equipment like the new
Pitney Bowes Model E700 Postage Meter, we can
reduce this pollution, while saving money.
If there are no envelopes printed or no keys are
pressed on the Operator Panel, for a designated period of time, the Auto Shut-off function will activate
and the postage meter will enter an energy saving
mode.
46
As an ENERGY STAR partner, Pitney Bowes Inc. has
determined that the Model E700 meets the ENERGY
STAR guidelines energy efficiency.
Page 47

Specifications
Equipment
Power requirements: 120VAC, 60 Hz, 1.5A
Maximum imprint: $99.999
Refill method: POSTAGE BY PHONE
Maximum meter funds for E707 meter: $1000
Maximum meter funds for E709 meter: $100
Your meter type is indicated on the bar code label
on the bottom of the meter.
Material
Minimum size: 3" x 5" (125 mm x 76.2 mm)
Minimum thickness: 0.007" (0.18 mm)
Maximum thickness: 5/16" (8 mm)
Important: For best results, make sure your material
(envelopes, postcards) conforms fully to these specifications. If thicker than the maximum, use a selfadhesive postage tape sheet.
E707 METERS
®
47
Page 48

E707 METERS
FCC Notice Stand-alone Operation -Class B
Note: This equipment has been tested and found to comply with the
limits for a Class B digital device, pursuant to part 15 of the FCC rules.
These limits are designed to provide reasonable protection against
interference in a residential installation. This equipment generates, uses,
and can radiate radio frequency energy and, if not installed and used in
accordance with the instruction manual, may cause interference to radio
communication. However, there is no guarantee that interference will
not occur in a particular installation. If this equipment causes
interference to radio or television reception, which can be determined
by turning the equipment off and on, the user is encouraged to try to
correct the interference by one or more of the following measures.
- Reorient or relocate the receiving antenna.
- Increase the separation between the equipment and receiver.
- Connect the equipment into an outlet on a circuit different from that
to which the receiver is connected.
- Consult the dealer or an experienced radio/TV technician for help.
FCC Compliance of Postage By Phone® Modem
This equipment complies with Part 68 of FCC rules. On the label,
located on the inside cover, you will find the FCC registration number
and the ringer equivalence number (REN) for the Postage by Phone
Auto Meter Resetting Modem. If requested, this information must be
provided to the telephone company. This equipment is designed to
connect to a 2 wire local switch access loop start (facility Interface Code
02LS2) with a standard RJ11C interface. This modem device must not
be used with party lines or coin (pay telephone) lines.
The REN is used to determine the quantity of devices which may be
connected to the telephone line. Excessive RENs on the telephone line
may result in the devices not ringing in response to an incoming call.
In most, but not all areas, the sum of the RENs should not exceed five
(5). To be certain of the number of devices that may be connected to
the line contact the telephone company to determine the maximum
REN for your calling area.
If this Modem causes harm to the telephone network, the telephone
company may discontinue your service temporarily. If possible, they
will notify you in advance. If advance notice is not practical, you will
be notified as soon as possible. You will be advised of your right to register a complaint with the FCC.
The telephone company may make changes to its facilities, equipment
operations or procedures which could affect the operation of this equipment. If this happens, the telephone company will provide advance
notice in order for you to make the necessary modifications in order to
maintain uninterrupted service.
48
Page 49

E707 METERS
f trouble is experienced with this Modem, please refer to the warranty
information provided with this equipment. If the trouble is causing
harm to the network, the telephone company may request that you
remove the equipment from the network until the problem is resolved.
An FCC compliant telephone cord and modular plug is provided with
this equipment. This equipment is designed to be connected to the
telephone network or premises wiring using a compatible modular jack
which is part 68 compliant. See installation instructions for details.
Industry Canada Compliance
“NOTICE: The Industry Canada label identifies certified equipment.
This certification means that the equipment meets telecommunications
network protective, operational and safety requirements as prescribed
in the appropriate Terminal Equipment Technical Requirements document(s). The Department does not guarantee the equipment will operate to the user’s satisfaction.
Before installing this equipment, users should ensure that it is permissible to be connected to facilities of the local telecommunications com-
pany. The equipment must also be installed using an acceptable
method of connection. The customer should be aware that compliance
with the above conditions may not prevent degradation of services in
some situations.
Repairs to certified equipment should be coordinated by a representative designated by the supplier. Any repairs or alterations made by the
user to this equipment, or equipment malfunctions, may give the
telecommunications company cause to request the user to disconnect
the equipment.
Users should ensure for their own protection that the electrical ground
connections of the power utility, telephone lines and internal metallic
water pipe system, if present, are connected together. This precaution
may be particularly important in rural areas.
Caution
Users should not attempt to make such connections themselves, but
should contact the appropriate electric inspection authority, or electrician, as appropriate.”
“NOTICE: The Ringer Equivalence Number (REN) assigned to each
terminal device provides an indication of the maximum number of
terminals allowed to be connected to a telephone interface. The termination on an interface may consist of any combination of devices
subject only to the requirement that the sum of the Ringer
Equivalence Numbers of all the devices does not exceed 5.” REN=0.4B
for this product.
49
Page 50

E707 METERS
50
Page 51

Index
E707 METERS
A
Account
Balance 20, 40
Account Balance
Low 40
Account Number
Change 28, 40
Activating Meter 28
Ad
Buying Custom 43
Key 6
Not Found 42
Printing On/Off 15
Samples 15
Selecting 15
Ad Card
Installing 16
Add Postage 17-19
Adding
Ink 32-37
Postage 19
Adjusting
Display 25
Advance
Date Key 6, 10
Postage Payment 17
Advertisement see Ad
Amount
Postage 11, 12
Setting the Meter 12
Analog Phone Line 18
Art
Printing 15
Artwork
Install 16
Auto Dating 24
Available Postage 11, 20
B
Balance
Account 20
Blank Display
Sleep Mode 7,39,46
Busy signal 40
Buying Postage 17
C
Cannot Read Card 42
Change
Date 10
Lock Code 22
Time 24
Change Date 10
Change Postage
Account #
Prompt 27
Change Setup 6, 23
Changing
Data Center Phone
Number 27
Setup 23
Chart
Using Postage Rate11
Check
Account Balance 20
Date 10
Postage Available 11
Check Account 40
Choosing Ads 15
Class
Postage Rate 11
Clear Key 6
Clearing Errors 39
Clog
Printer Nozzles32, 39
Code
Incorrect 40
Lock 21-22
Connecting Power 7
Connection Lost 40
Contrast
Adjusting 6, 25
Level 25
Custom Ads
Buying 43
Installing 16
D
Data Center
Cannot Reach 40
Changing Phone #27
Connection 40
Phone Busy 40
Phone # 27, 40
POSTAGE BY
PHONE® 17
Date
Advancing 6, 10
Changing 6, 10
Checking 10
Turn On/Off 6, 14
Deposit Amount 17,19
Dial Tone 40
Discounts
Fractional Postage 12
Setting 12
Display
Adjust Contrast 25
Error 39
Not Ready 39
E
Enable Lock 21
Energy Star 46
Enter Key 6
Envelope
Remove 39
Specifications 47
Error Messages 39-42
Errors
Clearing 39
F
Features
meter 6
Format
Time 24
Fractional Postage 12
Functions
Keypad 6
Funds
Available 6, 11, 20
51
Page 52

E707 METERS
Insufficient 40
Locking 21-22
Unavailable 40
Used 6, 11
Verify 11
Funds/Pieces Key 6, 11
G
Guidelines
USPS 4
H
High Value
Error 41
Setting 12
I
Ink
Adding 32
Low 41
Needs Refill 33
Ink Cartridge
Precaution 2, 7
Replacing 32-37
Inspection Due
Refill Required 41
Inspection Required
Prompt 41
Refill 4, 28
Installing
Ad Card 16
Additional Ads16, 43
Custom Ads 16, 43
Ink 32-37
Meter 28
Insufficient Funds 40
J
Jammed
Printer 39
K
Keypad Functions 6
Keys
Ads 6
Advance Date 6
Clear 6
Description 6
Funds/Pieces 6
Lock 6
No 6
Refill 6
Setup 6
Yes/Enter 6
L
Limit
Postage Value 40
Refill 40
Line
No Dial Tone 18, 41
Lock
Code 21
Code Incorrect 42
Code Unknown22, 42
Enable/Disable 6, 21
Key 6
Turning On/Off 21
Locking
Funds 22
Meter 21-22
Lost
Connection 40
Low
Account Balance 40
Ink 41
M
Mailpiece
Meter Guidelines 47
Sizes 47
Maintaining Meter 32
Maintenance
Setup 6
Maximum
Imprint Amount 47
Postage Amount41, 47
Postage Setting 47
Size 47
Thickness 47
Maximum Funds 47
Message
Error 39-42
Meter
Activating 28
Guidelines 4
Installing 28
Locked 21-22
Locking/Unlocking22
Maintaining 32
Parts of 5
Setting Amount 12
Meter Stamp
Incomplete 39
Parts of 5
Printing 12
Sample 5
Minimum
Mailpiece Size 47
Thickness 47
Modem
Communications 18,
27
Internal 18
Refill 19
Moving Meter 4
N
No Ad Found 42
No Dial Tone 40
No Key 6
Nozzles
Clogged 32, 41
O
Options
Changing 6, 23
Setup 23
Ordering Supplies 43
P
Packages
Adding Postage 13
Payment Address 17
Phone
Busy 40
Line 18
No Dial Tone 40
Number 6,27,40
52
Page 53

Pieces Printed 6
Postage
Adding 17, 19
Advance Payment 17
Check Available11,20
Discounts 12
Fund Options 6
Inspection 4
Prepaid 17
Printing 12
Refilling 17, 18
Setting Fractions 12
Postage Amount
Determining 11
POSTAGE BY PHONE®
Payment Address 17
Phone Number 27
Problems 40
Postage Rate Chart 11
Postage Setting
Maximum 47
Postage Value
Exceeds Limit 40
Power
Connecting 7
Problems 39
Specifications 47
Turn On/Off 7
Prepaid Postage 17
Printer
Clogged 32
Jammed 41
Refreshing Nozzles32
Printer Test 6, 33
Printing
Ads 15
Date 10, 14
Meter Stamp 12
Meter Tape 13
Postage 12
Problems 39
Problem
Inspection 41
Printing 41
Refill 41, 42
Problems
Resolving 39
R
Rate Chart 11
Ready
Not Displaying 39
Receipt Printing 19
Refill
Failed 40
Inspection 4, 41
Key 6, 19
Limit 40, 47
Problem 40, 42
Process 17
Receipt 19
Required 4, 41
Refill Required
Inspection Due 41
Refilling
Ink Cartridge 2, 34
Postage 17, 19
Relocating Meter 4, 7
Remove Envelope 39
Replacing
Ink Cartridge 34
Reporting Postage 4
Resolving Problems 39
Rules
USPS 4
S
Selecting Ads 15
Setting
Date 10
Decimal Value 12
Fractional Value 12
High Value 12
Postage Amount 12
Postage Value 12
Time 24
Setup
Key 6
Options 23
Size
Maximum Envelope47
Minimum Envelope47
Sleep Mode 7, 46
Slogans
Printing 15
Specifications
Equipment 47
Mailpiece 47
E707 METERS
T
Tape Sheet
Printing 13, 41
Test Print 33
Thick Envelopes
Postage 13
Using Tape Sheets 13
Thickness
Maximum Envelope47
Minimum Envelope47
Time
Change 6, 24
Format 24
Setting 24
Turn Date On/Off 14
U
United States Postal
Service Guidelines 4
Unlocking Meter 22
V
Value
Setting Postage 12
Vault
Meter 47
Verify
Funds Available 11
W
Weight
Postage Rate 11
Y
Yes
Key 6
Z
ZIP Code
Cannot Find 41
Not Installed 41
Rules 4
53
Page 54

E707 METERS
54
Page 55

E707 METERS
55
 Loading...