

Page 1
Digital Mailing System
DM300c, DM400c
Operator Guide
Canada English Version
Page 2

SV61991 Rev. A ©2007 Pitney Bowes Inc.
All rights reserved. This book may not be reproduced in whole or in part in
any fashion or stored in a retrieval system of any type or transmitted by any
means, electronically or mechanically, without the express, written permission
of Pitney Bowes.
We have made every reasonable effort to ensure the accuracy and
usefulness of this manual; however, we cannot assume responsibility
for errors or omissions or liability for the misuse or misapplication of our
products.
Due to our continuing program of product improvement, equipment and
material specications as well as performance features are subject to
change without notice. Your digital mailing system may not have some of the
features described in this book. Available features vary, depending on the
model of your mailing system, installed options, system software level, how
your system is set up and the country it is designed to operate in.
E-Z Seal and Postage By Phone are trademarks or registered trademarks of
Pitney Bowes Inc. ENERGY STAR is a registered trademark of the United
States Environmental Protection Agency.
Page 3

FCC Part 15 Compliance
NOTE: This equipment has been tested and found to comply with the limits
for a Class B digital device, pursuant to part 15 of the FCC rules. These
limits are designed to provide reasonable protection against interference in
a residential installation. This equipment generates, uses, and can radiate
radio frequency energy and, if not installed and used in accordance with
the instruction manual, may cause interference to radio communications.
However, there is no guarantee that interference will not occur in a particular
installation. If this equipment does cause interference to radio or television
reception, which can be determined by turning the equipment off and on, the
user is encouraged to try to correct the interference by one or more of the
following measures:
• Reorient or relocate the receiving antenna.
• Increase the separation between the equipment and receiver.
• Connect the equipment into an outlet on a circuit different from that to
which the receiver is connected.
• Consult the dealer or an experienced radio/TV technician for help.
CAUTION: Changes or modications to this equipment not expressly
approved by the party responsible for compliance could void the user’s
authority to operate the equipment.
A shielded USB cable must be used with this equipment to ensure
compliance with the limits. Use of a unshielded cable is prohibited.
FCC Part 68 Compliance of the G900 Modem
This equipment complies with Part 68 of the FCC rules and the requirements
adopted by the ACTA. On the back of this equipment is a label that
contains, among other information, a product identier in the format US:
AAAEQ##TXXXX. If requested, this number must be provided to the
telephone company.
This equipment is designed to be connected to a Facility Interface Code
02LS2 network with RJ11C network interface.
A plug and jack used to connect this equipment to the premises wiring
and telephone network must comply with the applicable FCC Part 68 rules
and requirements adopted by the ACTA. A compliant telephone cord and
modular plug is provided with this product. It is designed to be connected to
a compatible modular jack that is also compliant. See installation instructions
for details.
The ringer equivalence number (REN) is used to determine the number
of devices that may be connected to a telephone line. Excessive RENs
on a telephone line may result in the devices not ringing in response to an
incoming call. In most but not all areas, the sum of RENs should not exceed
ve (5). To be certain of the number of devices that may be connected to a
line, as determined by the total RENs, contact the local telephone company.
The REN for this product is part of the product identier that has the format
US:AAAEQ##TXXXX. The digits represented by ## are the REN without a
decimal point (for example 03 is a REN of 0.3).
Page 4

If this equipment (3C00, 4C00 mailing machine) causes harm to the
telephone network, the telephone company will notify you in advance that
temporary discontinuance of service may be required. But if advance notice
isn’t practical, the telephone company will notify you as soon as possible.
Also, you will be advised of your right to le a complaint with the FCC if you
believe it is necessary.
The telephone company may make changes in its facilities, equipment,
operations, or procedures that could affect the operation of the equipment. If
this happens the telephone company will provide advance notice in order for
you to make necessary modications to maintain uninterrupted service.
If trouble is experienced with this equipment (3C00, 4C00 mailing machine),
please contact Pitney Bowes, One Elmcroft Rd., Stamford, CT at 1-800-5220020 for repair or warranty information. If the equipment is causing harm
to the telephone network, the telephone company may request that you
disconnect the equipment until the problem is resolved. This equipment is
not intended to be repaired by the customer.
Connection to party-line service is subject to state tariffs. Contact the
state public utility commission, public service commission, or corporation
commission for information.
If the installation site has specially wired alarm equipment connected to
the telephone line, ensure the installation of this mailing machine does not
disable the alarm equipment. If you have questions about what will disable
alarm equipment, consult your telephone company or a qualied installer.
Servicing
This equipment is not intended to be serviceable. Please refer to the
warranty information if problems occur. Failed units will be withdrawn by
Pitney Bowes service engineers and returned to the U.S. Service Center.
For reference purposes, the U.S. Service Center contact address is: Pitney
Bowes Inc., 1 Elmcroft Road, Stamford, CT, 06926-0700.
A plug and jack used to connect this equipment to the premises wiring and
telephone network must comply with the applicable FCC Part 68 rules and
requirements adopted by ACTA. A compliant telephone cord and modular
plug is provided with this product. It is designed to be connected to a
compatible modular jack that is also compliant. See installation instructions
for details.
Industry Canada
This product meets the applicable Industry Canada technical specications.
The Ringer Equivalence Number (REN) is an indication of the maximum
number of devices allowed to be connected to a telephone interface. The
Ringer Equivalence Number (REN) of this terminal equipment is 1.0. The
termination on an interface may consist of any combination of devices
subject only to the requirement that the sum of the RENs of all devices does
not exceed ve.
The abbreviation, IC, before the registration number signies that registration
was performed based on a Declaration of Conformity indicating that Industry
Canada technical specications were met. It does not imply that Industry
Canada approved the equipment.
Page 5

Contact Information List
Canada Contacts ................................................................. xi
1 • Introduction
About Your Digital Mailing System .....................................1-2
What is IntelliLink® .............................................................1-3
Postal Requirements .........................................................1-4
What's in this Guide ...........................................................1-5
Other Sources of Information ............................................1-6
Getting Help ...............................................................1-6
Important Safety Notes ......................................................1-6
Important Telephone Safety Instructions ...........................1-8
2 • Getting to Know Your System
Machine Features–Front (DM300c) ...................................2-2
Machine Features–Front (DM400c) ...................................2-4
Control Panel .....................................................................2-6
Machine Features—Rear ..................................................2-8
Table of Contents
3 • Running Mail
Before You Begin ............................................................... 3-3
Checklist ............................................................................ 3-3
The Ready Screen ............................................................. 3-3
Applying Postage and Running Mail .................................. 3-4
Selecting a Class or Special Service ................................. 3-5
Before Selecting or Changing a Class ........................3-5
Applying Postage ............................................................... 3-6
Processing Lettermail Using
the Integrated Weigh Platform .................................... 3-6
Processing Lettermail Using
Manual Weight Entry ................................................... 3-7
Processing Incentive Lettermail ..................................3-8
Printing Postage on an Envelope ................................ 3-8
Feeding Envelopes ............................................... 3-9
Processing a Parcel Using
the Optional Parcel Rate Module ..............................3-10
vSV61991 Rev. A
Page 6

Table of Contents
Processing a Parcel Without Using
the Optional Parcel Rate Module ..............................3-12
Printing Digital Indicia on Tapes ................................ 3-13
Adding Postage to Correct a Mail Piece ................... 3-14
Correcting a Date on a Mail Piece ............................ 3-15
Printing a Statement of Mailing or
Manifest Payment ..................................................... 3-16
Test Print / Zero Dollar Indicia ......................................... 3-17
Using Presets .................................................................. 3-17
Selecting the Normal Preset ..................................... 3-17
Selecting a Custom Preset ....................................... 3-17
Selecting an Account to Track Postage ........................... 3-18
Checking and Clearing the Batch Count .........................3-19
Checking the Batch Count ........................................ 3-19
Printing a Record of the Batch
Count Information ..................................................... 3-20
Clearing the Batch Count .......................................... 3-20
4 • Printing Options
Printing Options .................................................................4-2
Bypass Printing and Seal the Envelope Only ....................4-3
DM300c Only .............................................................4-3
DM400c Only .............................................................4-4
Printing the Date and Time or an Ad on Incoming Mail .....4-4
Setting or Advancing the Date on the Machine .................4-5
Printing an Envelope Advertisement ..................................4-6
Downloading an Envelope Ad Into Your Machine ...... 4-6
5 • Normal and Custom Presets
What is a Preset? ..............................................................5-2
Normal Preset / Default Screen ................................. 5-2
Custom Presets ......................................................... 5-3
Defining Presets ...............................................................5-3
Selecting a Preset .............................................................5-4
Selecting Custom Presets .......................................... 5-4
vi SV61991 Rev. A
Page 7

Table of Contents
Managing Custom Presets ................................................5-4
Viewing a Custom Preset .......................................... 5-4
Editing a Custom Preset Name .................................. 5-5
Overwriting a Custom Preset .....................................5-5
Deleting a Custom Preset ..........................................5-6
6 • Adding Postage/Connecting to the Data Centre
A Word About Adding Postage ..........................................6-2
Connecting Your System to an Analog Phone Line ...........6-2
Checking Funds (Postage) Availability in Machine ............6-2
Checking Your Postage By Phone® Account Balance ........6-3
Adding Postage .................................................................6-4
Printing a Funds Report .....................................................6-5
Downloads from the Data Centre to Your Machine ...........6-6
Connecting to the Data Centre (other than for Postage) .....6-9
Check for Updates ..................................................... 6-9
Phone Settings ......................................................... 6-10
Distributor Settings ................................................... 6-13
7 • System Options
System Options .................................................................7-2
Basic Options ....................................................................7-3
Setting the Time, Date, and Timeouts ........................ 7-3
Adjusting the Contrast of the Display ......................... 7-6
Setting Postage Limits (Funds Warnings) .................. 7-7
Enabling, Changing or Disabling Lock Codes and
Passwords ................................................................. 7-8
Configuring the Tape Button ......................................7-11
Advanced Options ...........................................................7-12
Meter Withdrawal (Withdrawing Postage Funds) ..... 7-12
Running Install Mode ............................................... 7-13
viiSV61991 Rev. A
Page 8

Table of Contents
8 • Reports
Overview of Reports ..........................................................8-2
Last 5 Refills Report ................................................... 8-3
Funds Report ............................................................. 8-3
Single Accounts Report .............................................. 8-3
Multi-Account Summary Report .................................8-3
Account List Report .................................................... 8-4
System Setup Report ................................................. 8-4
Error Report ...............................................................8-4
Configuration Report .................................................. 8-5
Software Version Report ............................................ 8-5
Printing a Report ................................................................8-6
Printing to an Attached Printer ...................................8-6
Printing on an Envelope or Tape Strip ........................8-6
9 • Departmental Accounting
Overview of the Accounting Feature ..................................9-2
Creating New Accounts .....................................................9-3
Deleting Accounts ..............................................................9-4
Editing Accounts ................................................................9-5
Viewing/Clearing Account Totals .......................................9-6
Clearing All Account Totals ................................................9-7
Turning Account Passwords On (Globally) ........................9-8
Turning Account Passwords Off (Globally) ........................9-9
Turning Accounting On ....................................................9-10
Turning Accounting Off ....................................................9-10
10 • Scale Options
Scale Options .................................................................10-2
Zeroing the Scale ..................................................... 10-3
Setting Weight Change Options ............................... 10-3
Setting Class Change Options ................................. 10-4
Turning Auto Scale On or Off ................................... 10-5
Setting the Scale Location Code .............................. 10-6
viii SV61991 Rev. A
Page 9

11 • Maintenance
Printer Maintenance ........................................................11-2
Printing a Test Pattern .....................................................11-3
Cleaning the Printer Nozzle .............................................11-4
Replacing the Ink Cartridge .............................................11-5
Replacing the Print Head .................................................11-8
Filling the Moistener (DM400c Only) .............................11-10
Filling the Moistener (DM300c Only) .............................11-11
Maintaining the Moistener .............................................11-12
Cleaning the Stripper Blade and Brush Assembly
(DM400c) ................................................................11-12
Cleaning the Shield and Wick (DM400c) ................11-13
Removing the Moistener (DM300c) ........................11-14
Removing the Shield and Wick (DM300c) ..............11-16
12 • Troubleshooting
Power Questions .............................................................12-2
Feeding Questions .........................................................12-2
Printing Questions ...........................................................12-3
Moistening Questions ......................................................12-3
Display Questions ............................................................12-4
Adding Postage Questions ..............................................12-4
Display Messages ...........................................................12-5
Viewing System Configuration Levels .............................12-5
Table of Contents
13 • Supplies and Options
Supplies and Accessories ...............................................13-2
Options ............................................................................13-3
Weighing Platform .................................................... 13-3
Moistener .................................................................13-3
Advertisements ........................................................13-3
Departmental Accounting ......................................... 13-3
ixSV61991 Rev. A
Page 10

Table of Contents
Equipment Specifications .................................................A-1
IntelliLink® Feature Settings ..............................................A-1
Material Specifications ...................................................... A-2
Glossary ...........................................................................B-1
Index ...................................................................................I-1
x SV61991 Rev. A
Page 11
Contact Information List
DM300c
DM400c
Canada Contacts
Product Name - DM300c or DM400c
Model Name - 3C00 or 4C00
Go to www.pitneybowes.ca to:
• View frequently asked questions (FAQs),
• Order PB supplies and accessories,
• Place requests for service,
• View order status for supplies, and
• Add postage to your Postage By Phone® account.
Our Help Desk
For direct questions, call: 1.800.672.6937. Customer Service
Representatives are available Monday through Friday,
8:00 AM - 7:45 PM EST.
xiSV61991 Rev. A
Page 12

11 • Maintenance
Printer Maintenance ........................................................11-2
Printing a Test Pattern .....................................................11-3
Cleaning the Printer Nozzle .............................................11-4
Replacing the Ink Cartridge .............................................11-5
Replacing the Print Head .................................................11-8
Filling the Moistener (DM400c Only) .............................11-10
Filling the Moistener (DM300c Only) .............................11-11
Maintaining the Moistener .............................................11-12
Cleaning the Stripper Blade and Brush Assembly
(DM400c) ................................................................11-12
Cleaning the Shield and Wick (DM400c) ................11-13
Removing the Moistener (DM300c) ........................11-14
Removing the Shield and Wick (DM300c) ..............11-16
12 • Troubleshooting
Power Questions .............................................................12-2
Feeding Questions .........................................................12-2
Printing Questions ...........................................................12-3
Moistening Questions ......................................................12-3
Display Questions ............................................................12-4
Adding Postage Questions ..............................................12-4
Display Messages ...........................................................12-5
Viewing System Configuration Levels .............................12-5
Table of Contents
13 • Supplies and Options
Supplies and Accessories ...............................................13-2
Options ............................................................................13-3
Weighing Platform .................................................... 13-3
Moistener .................................................................13-3
Advertisements ........................................................13-3
Departmental Accounting ......................................... 13-3
ixSV61991 Rev. A
Page 13

Table of Contents
Equipment Specifications .................................................A-1
IntelliLink® Feature Settings ..............................................A-1
Material Specifications ...................................................... A-2
Glossary ...........................................................................B-1
Index ...................................................................................I-1
x SV61991 Rev. A
Page 14

Contact Information List
Postage By Phone®
To contact Postage By Phone®, call 1.800.387.4660.
Pitney Bowes Supplies
To order genuine Pitney Bowes supplies, call the Supply LineTM at
1.800.672.6937 or visit us online at www.pitneybowes.ca.
xii SV61991 Rev. A
Page 15
1 • Introduction
DM300c
DM400c
This chapter lists the key features of your mailing system,
tells you what's in this guide, and presents important safety
information.
About Your Digital Mailing System......................................1-2
What is IntelliLink® ..............................................................1-3
Postal Requirements ..........................................................1-4
What's in this Guide ............................................................1-5
Other Sources of Information .............................................1-6
Getting Help .................................................................1-6
Important Safety Notes .......................................................1-6
Important Telephone Safety Instructions ............................1-8
1-1SV61991 Rev. A
Page 16

1 • Introduction
About Your Digital Mailing System
Your digital mailing system's advanced features include:
• Space-saving, compact footprint
• ENERGY STAR® compliant design lowers operating costs and
helps preserve the environment
• Large, easy-to-read display shows system status and prompts
you through setup operations
• Semi-automatic and automatic envelope feeding, transport, and
auto-eject
• Automatic date advance
• User-selectable ad slogans
• Convenient and simple postage refills via Postage By Phone
(requires analog phone line)
• Stacker neatly stacks finished envelopes
• Ink jet printing technology provides clear, crisp imprints
• Weighing platform weighs mail pieces
• Integrated rating feature calculates correct postage
• Date and time stamp for use on incoming mail or on sensitive
documents
• Accounting feature tracks postage costs by department*
• Password protection limits access to authorized personnel
• Full report printing capability provides hard-copy records of your
postage transactions
• In-line moistener wets and seals envelopes
• USB communication ports for exporting report data to a PC and
for adding peripherals (scanner, printer)*
*Optional feature
®
1-2
SV61991 Rev. A
Page 17

1 • Introduction
What is IntelliLink®
IntelliLink® provides you with a digital gateway to an entire suite of
services and information to help you move your mail more efficiently
and enhance your business performance. It allows you to:
Add Features On Demand
You can easily download envelope ads and optional product
enhancements such as departmental accounting.
Download Postal Rate Updates
The latest postal rates are downloaded precisely when you need
them.
Keep Your System Current
Software download capability means you'll always have the latest
version of your machine's operating system.
SV61991 Rev. A
1-3
Page 18

1 • Introduction
Postal Requirements
The postage meter on your mailing system is a Postal Security Device
(PSD) approved by the Canada Post Corporation to secure funds.
Since it is licensed by the Canada Post Corporation, you must follow a
few basic requirements.
Add Features On Demand
• Mail must have the correct date and postage amount in the
digital indicia.
• Metered mail must bear the postal code of the location where the
mail is originated.
• If you move to another Postal Code location, you must update
the Postal Code. You can do this by calling Postage By Phone®.
NOTE: If you move your mailing system to a different postal
code, you will need to update your system before processing
mail at your new location. (See the Contacts section at the
front of this guide for more information.)
• Each time you refill your postage meter (Postal Security
Device) through the modem, the Postage By Phone® computer
automatically performs a postal inspection. If the postage
meter in your mailing machine has not detected a modem
refill transaction at certain intervals, the message “Inspection
Required” appears on the main screen of the IntelliLinkTM Control
Centre. (The system will then prompt you to connect to Pitney
Bowes and perform an inspection.)
• The postage tape you use must meet Canada Post
specifications.To order approved supplies for your mailing
system refer to Chapter 13 - Supplies and Options
1-4
SV61991 Rev. A
Page 19

1 • Introduction
What's in this Guide
The Introduction describes the key features of your mailing system. It
also includes important safety notes.
Chapter 2, Getting to Know Your System explains the purpose and
shows the location of each control and machine feature.
Chapter 3, Running Mail explains how to process mail. The
operations covered here are the ones you'll use most often.
Chapter 4, Printing Options explains the various options for printing
on your system.
Chapter 5, Normal and Custom Presets explains the Normal and
Custom Presets feature for saving commonly-used settings on your
machine.
Chapter 6, Adding Postage/Connecting to Data Centre explains how to
add postage funds to your system using Pitney Bowes' Postage By
Phone® service and connecting to the Pitney Bowes Data Centre.
Chapter 7, System Setup provides step-by-step instructions for
customizing system operation to suit your own needs.
Chapter 8, Reports provides you with a description of reports you
can print on your system.
Chapter 9, Accounting Setup provides instructions for setting up the
optional accounting feature.
Chapter 10, Scale Options provides instructions for setting up the
weighing platform.
Chapter 11, Maintenance explains how to check print quality and take
care of the moistener.
Chapter 12, Troubleshooting provides answers to common questions
you may have about the performance of your mailing system.
Chapter 13, Supplies and Options lists the supplies available for your
mailing system. It also describes options that add to the versatility of
your mailing system and enhance the productivity of your mailroom.
Appendix A, Specifications provides material and equipment
specifications.
Appendix B, Glossary has a small glossary that explains some of the
terms unique to the world of mailing.
SV61991 Rev. A
1-5
Page 20

1 • Introduction
Other Sources of Information
Refer to the Quick Reference Guide and Quick Install guide provided
with your system for frequently used procedures and installation
instructions.
Getting Help
As you use your mailing system, there may be times when you
need help to solve a specific problem, or you may want additional
information about mailing system operation.
Refer to the Contact Information List at the front of this guide for
more information.
Important Safety Notes
Follow the normal safety precautions for all office equipment.
• Please read all instructions before you attempt to operate the
system. Save these instructions for future use.
• Use the power cord supplied with the machine and plug it into
a properly grounded wall outlet that's located near the machine
and easily accessible. Failure to properly ground the machine
can result in severe personal injury and/or fire.
• The power cord wall plug is the primary means of disconnecting
the machine from the AC supply. The unit is on whenever it is
plugged into a live receptacle, even though the operator display
may be off.
• Place the mailing machine base close to an easily accessible
wall outlet. DO NOT use a wall outlet controlled by a wall switch
or one that is shared with other equipment.
• Do not use an adapter plug on the line cord or wall outlet.
• Do not remove the ground pin from the line cord.
• Make sure the area in front of the wall outlet into which the
machine is plugged is free from obstruction.
• DO NOT route the power cord over sharp edges or trap it
between pieces of furniture. Make sure there is no strain on the
power cord.
1-6
SV61991 Rev. A
Page 21

1 • Introduction
Important Safety Notes (continued)
• To reduce the risk of fire or electrical shock, DO NOT attempt
to remove covers or disassemble the control panel or its base.
The cabinet encloses hazardous parts. If you should drop or
otherwise damage the unit, call Pitney Bowes.
• Keep fingers, long hair, jewelry and loose clothing away from
moving parts at all times.
• Keep your hands out of the ink cartridge refill holder.
• Avoid touching moving parts or materials while the machine is in
use. Before clearing a stall, be sure machine mechanisms come
to a complete stop.
• When removing stalled material, avoid using too much force
to protect against minor personal injury and damage to the
equipment.
• Use the equipment only for its intended purpose.
• Always follow the specific occupational safety and health
standards prescribed for your workplace.
• Do not place lighted candles, cigarettes, cigars, etc., on the
mailing machine.
• To prevent overheating, do not cover the vent openings.
• Use only Pitney Bowes ink, tape strips, and cleaners. Call the
Pitney Bowes Supply LineTM to place orders. If you need Material
Safety Data Sheets on the supplies for OSHA requirements,
please contact your local Pitney Bowes branch. Refer to the
Contact Information List at the front of this guide for more
information.
CAUTION: In case of an ink spill, leaking ink or
excessive ink accumulation, immediately disconnect the
power cord from the wall plug and contact Pitney Bowes.
Refer to the Contact Information List at the front of this
guide for more information.
SV61991 Rev. A
1-7
Page 22

1 • Introduction
Important Telephone Safety Instructions
The machine connects directly to analog telephone lines. For your
protection, basic safety precautions should always be followed to
reduce the risk of fire, electric shock, and injury to persons. These
safety precautions include:
CAUTION: To reduce the risk of re, use only 26 AWG
telecommunication line cord supplied with the machine.
• Never install telephone wiring during a lightning storm.
• Disconnect the system's telephone line during a lightning storm.
• Avoid using a telephone or equipment that connects to a
telephone line during an electrical storm; there may be a remote
risk of electrical shock from lightning.
• Do not use the telephone or equipment connected to the
telephone line to report a gas leak in the vicinity of the leak.
• Never install telephone jacks in wet locations.
• Do not use this product near water, for example, near a bath tub,
wash bowl, kitchen sink or laundry tub, in a wet basement or
near a swimming pool.
• Never touch uninsulated telephone wires or terminals unless the
telephone line has been disconnected at the network interface.
1-8
SV61991 Rev. A
Page 23
2 • Getting to Know
Your System
DM300c
DM400c
In this chapter you'll find out where everything is and what it does.
Machine Features–Front (DM300c)....................................2-2
Machine Features–Front (DM400c)....................................2-4
Control Panel ......................................................................2-6
Machine Features—Rear ...................................................2-8
2-1SV61991 Rev. A
Page 24
2 • Getting to Know Your System
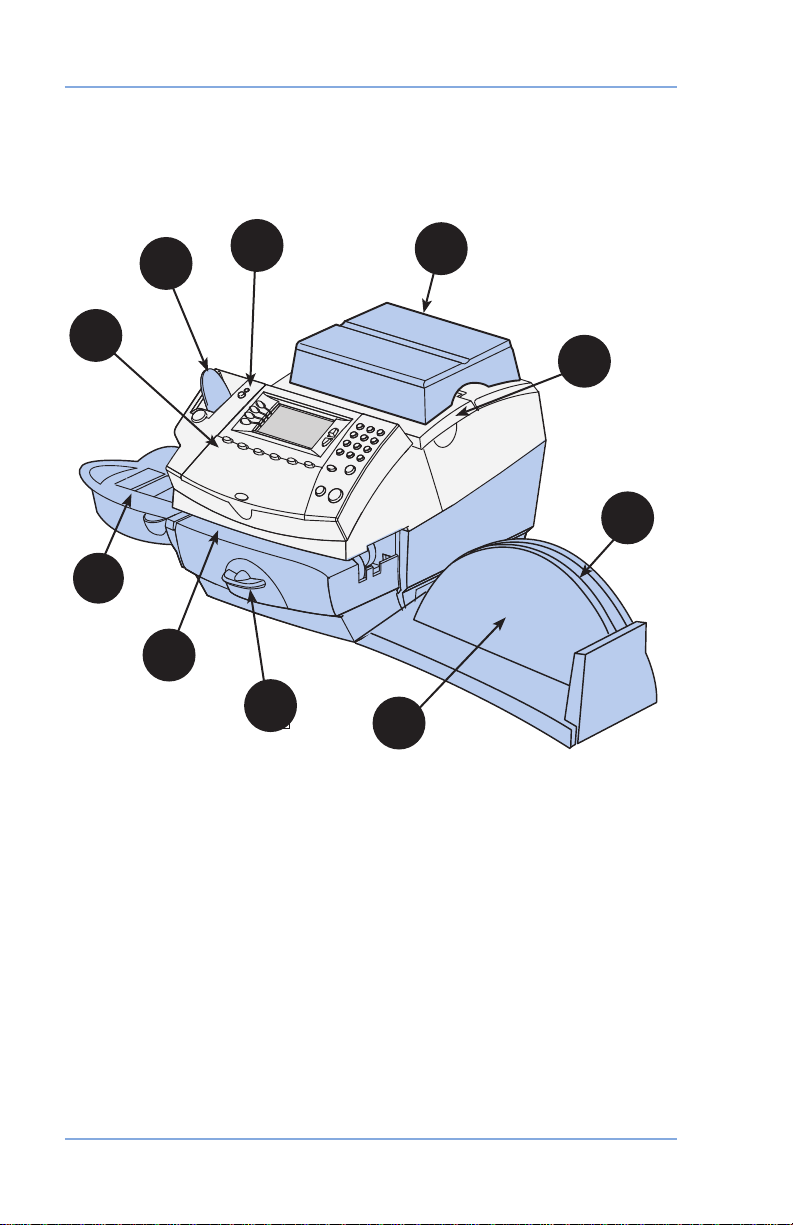
Machine Features–Front (DM300c)
3
4
2
1
10
9
8
7
(shown with weighing platform and moistener)
5
6
2-2
SV61991 Rev. A
Page 25

2 • Getting to Know Your System
1. Control Panel—allows you to enter and setup information on
your machine.
2. Tape Feeder—holds and feeds tapes for printing.
3. LED—lights green when your system is on; lights orange when
your system is in “sleep” mode.
4. Weighing Platform—allows you to weigh and calculate postage
of a mail piece based on the service selected.
5. Ink Access Cover—opens up to allow replacement of the ink
cartridge. See Chapter 11, Maintenance for instructions.
6. Quick Reference Guide Slot—allows you store the Quick
Reference Guide for easy access.
7. Stacker Tray—allows the neat stacking of finished mail pieces.
8. Clearance Lever (two position)
• Home - printer rollers engaged for processing mail (normal)
• Released - printer rollers disengaged; lower portion of printer
deck drops down so you can clear a stalled mail piece.
NOTE: The machine will not process mail when left in the
released position.
9. Printer Deck—supports your envelope, post card or tape strip
as it passes under the printer mechanism.
10. Moistener (optional)—applies sealing fluid to the envelope flap.
You can seal envelopes or leave them unsealed, depending on
how you feed them.
SV61991 Rev. A
2-3
Page 26

2 • Getting to Know Your System
Machine Features–Front (DM400c)
13
1
12
11
10
2
3
4
5
6
9
8
7
2-4
14
15
SV61991 Rev. A
Page 27

2 • Getting to Know Your System
1. Feeder Access Cover—open this cover to access the moistener
bottle.
2. Seal/No Seal Lever—allows you to turn envelope sealing on
and off.
3. LED—lights green when your system is on; lights orange when
your system is in "sleep" mode.
4. Ink Access Cover—opens up to allow replacement of the ink
cartridge. See Chapter 11, Maintenance for instructions.
5. Weighing Platform—allows you to weigh and calculate postage
of a mail piece based on the service selected.
6. Ink Waste Tank—prevents spillage of ink.
7. Control Panel—allows you to enter and setup information on
your machine.
8. Printer Clearance Lever (two position)
• Home - printer rollers engaged for processing mail (normal)
• Released - printer rollers disengaged; lower portion of printer
deck drops down so you can clear a stalled mail piece.
NOTE: The machine will not process mail when left in the
released position.
9. Printer Deck—supports your envelope, post card or tape strip
as it passes under the printer mechanism.
10. Tape Feeder—holds and feeds tape strips for printing.
11. Moistener—applies sealing fluid to the envelope flap. You
can seal envelopes or leave them unsealed, depending on the
position of the Seal/No Seal lever.
12. Side Guide—reduces the skewing of pieces of mail as you feed
them into the feeder.
13. Feeder Deck—supports your envelope, post card or tape strip
as it waits to be fed into the printer mechanism.
14. Quick Reference Guide Slot—allows you store the Quick
Reference Guide for easy access.
15. Stacker Tray—allows the neat stacking of finished mail pieces.
SV61991 Rev. A
2-5
Page 28
2 • Getting to Know Your System
QCW E R T Y U PI O
A S D F G H J K L
Z X C V B N M
1
2
3
4
5
6
7 9
0
.
8
#
$
%
-
_
+
,
'
/
(
!
)
@
:
Space
Shift
SymbolBack space
*
?
.
=
Refill
Postage Funds
Custom
Presets
Normal
Preset
Menu
Weigh/Rate
Tape
Back
Enter
Home
Start
Stop
®®
/
"BBNTM S
4B@KD8DHFGS
$K@RR
"%
/NMD
3DBXB KD
%NL4S@MC@QC
"#$* /$
*/4
F
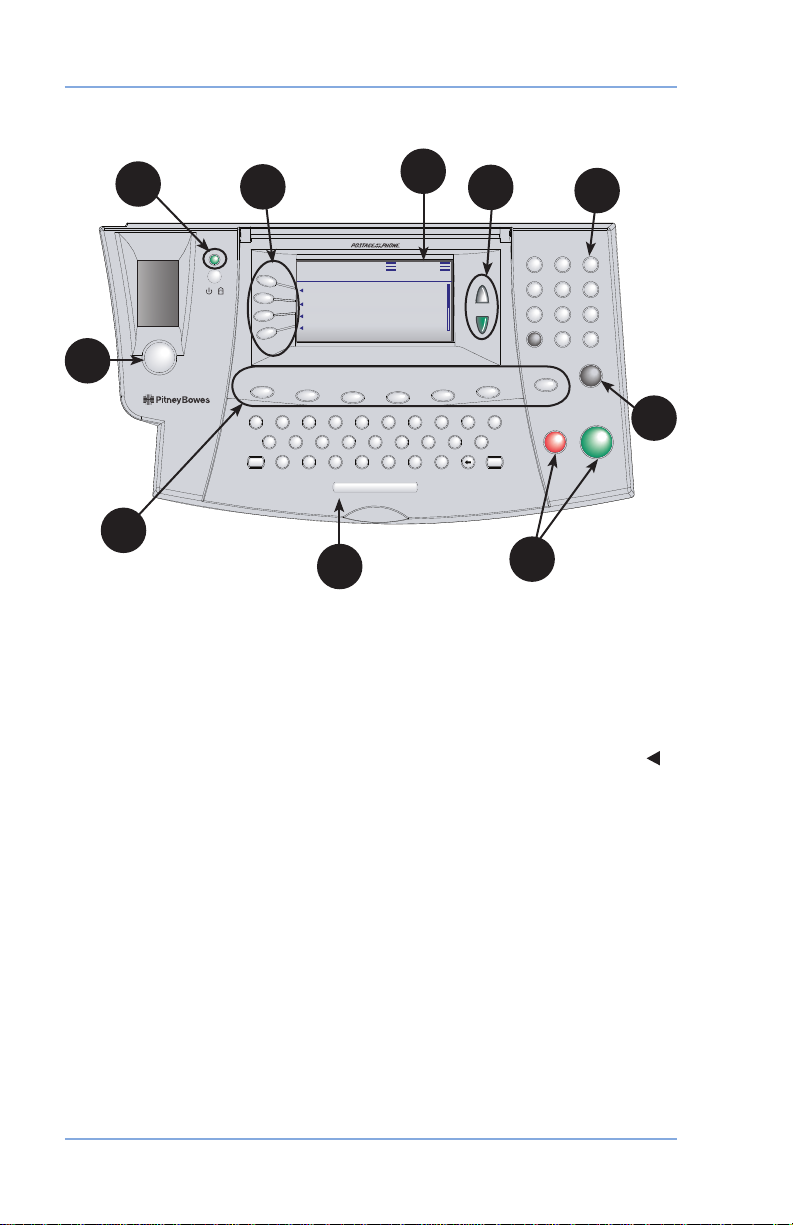
Control Panel
2
3
4
5
6
1
7
9
6
1. Tape Key—allows you to print tape(s).
2. Lock/Power Key—Dual function. Prevents unauthorized use
of your system if lock feature is setup and machine is in "sleep
mode"; entering your four-digit password unlocks (awakens) the
machine. Also allows you to power up or power down machine.
3. Screen Selection Keys—allows you to select a line (one key
for each line) on the operator display. Whenever the left arrow ( )
occupies the first position in one of the display lines, you may
press the corresponding Screen Selection key to select that line.
4. Operator Display—shows the current status of your system and
prompts you through all setup operations.
5. Up/Down Arrow Keys (Scroll Keys)—allows you to scroll up
and down through menu choices in the operator display. If a
Page/Up/Down key is lighted, it indicates additional choices
are available in a menu (up or down, depending on key) and
that Page Up/Down key can be pressed to access these further
choices.
6. Alpha/Numeric and Qwerty Keypads—allow you to type in
numbers and letters for account names, postage values, and
other information.
7. Enter Key—allows you to accept an entry or choice.
2-6
8
SV61991 Rev. A
Page 29

2 • Getting to Know Your System
8. Start and Stop Keys—allow you to start/stop the mailing system
when running envelopes.
9. Feature Keys—allows you quick access to the most common
features on the system. Pressing a Feature key takes you
immediately to the top-level screen of the feature for that key.
• Home—takes you back to the Home (date/postage) screen.
• Normal Preset—takes you back to the default/home screen.
See Chapter 5, Normal and Custom Presets for details.
• Custom Presets—press to select from a list of up to 10
custom settings.You can assign a number of values (e.g.,
class, weight ad, account number and others) to each
custom preset. See Chapter 5, Normal and Custom Presets
for details.
• Refill Postage—allows you to add (refill) postage funds to
your machine conveniently via modem (requires analog
phone line). See Chapter 6, Adding Postage for details.
• Funds—allows you to check your postage funds and
number of mail pieces processed. See Chapter 6, Adding
Postage for details.
• Weigh/Rate—allows you to weigh and calculate postage
based on service selected. See Chapter 3, Running Mail for
details.
• Menu—allows you to access system setup information such
as date, time, postage, accounts, phone parameters, etc.
See Chapter 7, System Options for details.
IMPORTANT: When you press a Feature key, any entry in
the preceding screen is lost unless you have rst pressed the
Enter key to conrm the entry. For example, if you entered an
account name and then immediately pressed another Feature
key, the account name will not be recorded by the system.
SV61991 Rev. A
2-7
Page 30
2 • Getting to Know Your System
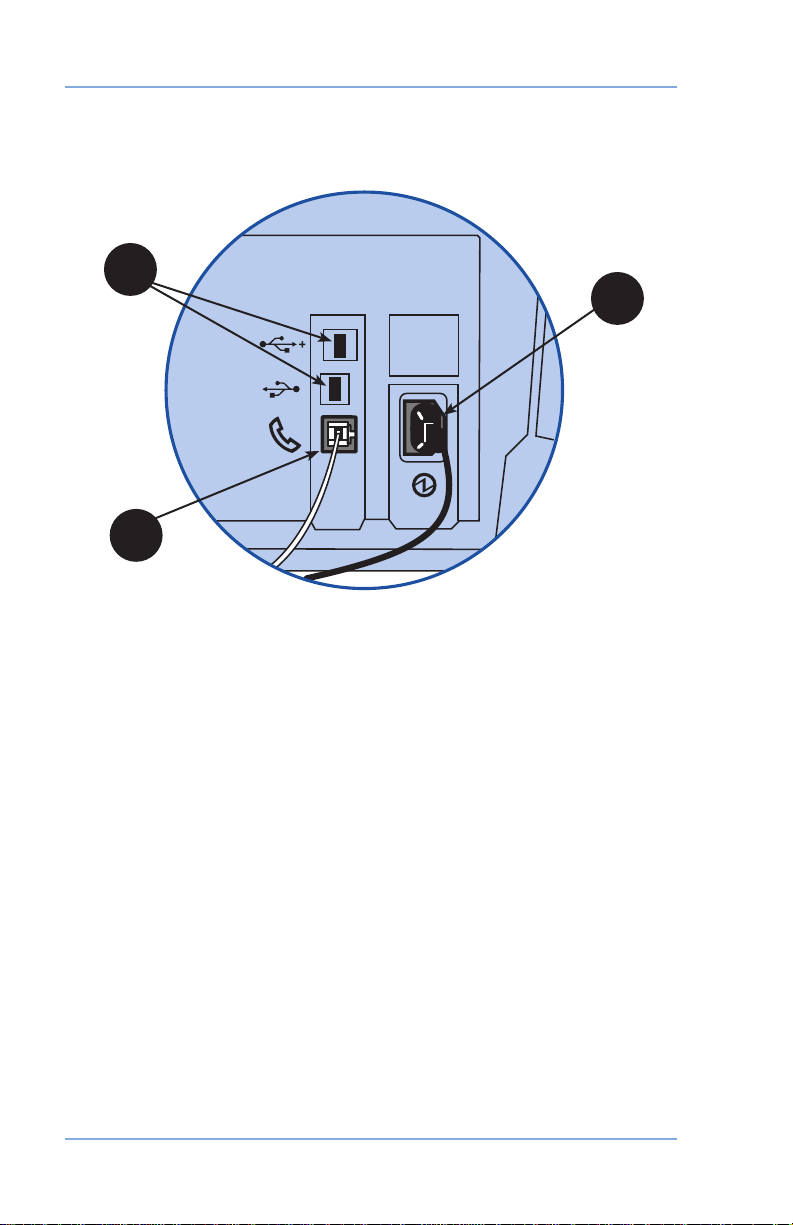
Machine Features—Rear
2
1
3
1. Phone Jack—allows you to connect an analog phone line,
such as one a Fax machine uses. The jack accepts a standard
RJ-11 phone plug (supplied). When your system is connected to
an analog phone line, you can add postage anytime by pressing
Refill Postage and following the prompts. See Chapter 6, Adding
Postage for details.
2. USB Ports—allow you to connect a USB cable and download
report data to a PC. Also allow you to connect external weighing
platform and scanner.
3. Power Receptacle—connects to AC power cord (supplied).
2-8
SV61991 Rev. A
Page 31

3 • Running Mail
DM300c
DM400c
This chapter explains how to run mail, your printing options,
and using the weighing platform.
Before You Begin ................................................................3-3
Checklist .............................................................................3-3
The Ready Screen..............................................................3-3
Applying Postage and Running Mail...................................3-4
Selecting a Class or Special Service ..................................3-5
Before Selecting or Changing a Class .........................3-5
Applying Postage................................................................3-6
Processing Lettermail Using
the Integrated Weigh Platform .....................................3-6
Processing Lettermail Using
Manual Weight Entry ....................................................3-7
Processing Incentive Lettermail ...................................3-8
Printing Postage on an Envelope .................................3-8
Feeding Envelopes ................................................3-9
Processing a Parcel Using
the Optional Parcel Rate Module ...............................3-10
3-1SV61991 Rev. A
Page 32

3 • Running Mail
Processing a Parcel Without Using
the Optional Parcel Rate Module ...............................3-12
Printing Digital Indicia on Tapes .................................3-13
Adding Postage to Correct a Mail Piece ....................3-14
Correcting a Date on a Mail Piece .............................3-15
Printing a Statement of Mailing or
Manifest Payment ......................................................3-16
Test Print / Zero Dollar Indicia ..........................................3-17
Using Presets ...................................................................3-17
Selecting the Normal Preset ......................................3-17
Selecting a Custom Preset ........................................3-17
Selecting an Account to Track Postage ............................3-18
Checking and Clearing the Batch Count ..........................3-19
Checking the Batch Count .........................................3-19
Printing a Record of the Batch Count Information .....3-20
Clearing the Batch Count ...........................................3-20
3-2
SV61991 Rev. A
Page 33

3 • Running Mail
Before You Begin
Before you run mail on your system, review the Checklist, Home
Screen, and Applying Postage sections below and on the next page.
Checklist
• Make sure your mailing system is plugged into a properly
grounded, 110 VAC receptacle. Always follow the safety
precautions in Chapter 1, Introduction.
• Check the level of sealing solution in the moistener. If you need
to add sealing solution, refer to Chapter 11, Maintenance.
• If you plan on printing tape strips, make sure you've got an
adequate supply. See Chapter 13, Supplies and Options for
ordering tape strips.
• Check that you have enough postage for your mail run. Press
the Funds key to view your current balance.
• If running mail longer than a #10 envelope (241.3 mm), slide the
stacker tray away from the system.
• The maximum stack height for mail is 3" (76.2 mm). This is the
height of the right wall of the stacker tray.
The Ready Screen
When you power up your system, the Ready screen appears on the
IntelliLinkTM Control Centre operating display. If your system has been
set up to require a lock code or password, you are prompted to enter it.
A typical Ready screen is show here:
Scale Weight $0.00
0g 2007.06.15
Class : None
AD : None
Inscrip. : None
Place item on the scale
NOTE: If your machine displays Seal Only on the screen simply
select the corresponding key to ‘Exit Seal Only’ to begin.
SV61991 Rev. A
3-3
Page 34

3 • Running Mail
• To process a mail piece from the Ready screen you must place
your mail piece on the scale or enter the weight of the mail piece
manually, and then select a class. For more information on processing mail, please refer to the specic topics later in Chapter 3.
• If you want to do something other than print postage on an
envelope or tape, press the Menu key. This provides you
with access to other mailing modes and the system setup
options. For information on the setup options refer to Chapter 7
in this guide.
Applying Postage and Running Mail
You can select several different modes for applying postage or
running mail on your DM300C or DM400C system. Refer to the
appropriate procedure listed here.
1. Applying Postage
2. Printing Postage on an Envelope.
3. Printing the Postage on a Tape Sheet or Tape Strip.
4.
Printing Postage Using Presets. Press a key to select certain
system values (for example, weight and class) assigned to that key.
5. Selecting an (optional feature) Account.
6. Checking and Clearing the Postage Batch Count on Your System.
7. Adding Postage or Correcting Postage
8. Printing a Statement of Mailing or Manifest Payment
9. Test Print / Zero Dollar Indicia
3-4
SV61991 Rev. A
Page 35

3 • Running Mail
Selecting a Class or Special Service
Selecting a class is a required action in order to generate the
appropriate rate for your mail piece. The procedure for setting a class
special service or carrier depends on whether you enter the weight
of the mail manually or use the interfaced scale to weigh your mail
piece. Each class has its own set of special services. When you
select a class only those options available for that selection appear
in the display.
Your system automatically calculates the correct postage for your
piece of mail based on its weight and the class of service you select
Before Selecting or Changing a Class
Before selecting a class or special feature, please note the following:
• The class that appears in the Ready screen is the one you last
selected.
• If you turn off and then turn on the power to your system, the
previously selected class automatically clears.
• If you place a piece of mail on the scale, or enter a weight
manually, the system automatically prompts you to select a new
class if the new weight requires a different class.
• If your system has an attached scale, we recommend that
you turn the AutoScale option ON. Refer to the Setting Up an
Attached Scale section in Chapter 10 of this guide.
SV61991 Rev. A
3-5
Page 36

3 • Running Mail
Applying Postage
Processing Lettermail Using the Integrated Weigh Platform
1. If you have the optional accounting feature, from the home
screen select Account and choose an account.
2.
Weigh Mail Piece – Place mail piece on the integrated weigh
platform.
3. If necessary select
next to the display.
4. Select your desired Lettermail sub-class (e.g., Dom Standard,
Dom Other, USA, International) by pressing the corresponding
key next to the display.
5. Select any desired special services (e.g., Registration) by
pressing the corresponding key next to the display. If no special
services are required press Enter.
6. The screen will now display the postage amount in the top right
hand corner with three lines on the left and right side. You are
now ready to print the postage.
7. Place envelope in feed deck to print postage (see section 3-9 on
Feeding Envelopes for additional instructions).
Letters by pressing the corresponding key
NOTE: Values between $0.52 and $3.49 cannot be entered as this
range is representative of the current Canada Post Lettermail rate
structure - these values will be adjusted based on future Canada
Post Rate Changes. If a value between $0.52 and $3.49 (the
restricted range at time of publication) is entered, the system will
indicate that this is an invalid entry and therefore will not print the
indicia. All mailing transactions must be processed by a combination
of weight entry (integrated weight platform or manual entry) and
making a class selection. The internal rating feature calculates the
accurate postage for each mail job.
3-6
SV61991 Rev. A
Page 37

3 • Running Mail
Processing Lettermail Using Manual Weight Entry
1. If you have the optional accounting feature, from the home
screen select Account and choose an account.
2. At Ready screen on the IntelliLink
Weigh/Rate button and then choose “Enter Weight Manually”.
3. Enter weight in grams or choose the
option to enter weight in kilograms and then press Enter or
choose “Accept”.
4. Based on your meter conguration you will be prompted to
perform 4a and 4b or skip ahead to 4b:
a) Select Letters to process Lettermail.
b) Select the desired sub-class (e.g., Domestic Standard,
Domestic Other, USA, etc.) by pressing the corresponding
key next to the display.
5.
Select any desired special services (e.g., Registration) by
pressing the corresponding key next to the display. If no special
services are required press Enter.
6.
The screen will now display the postage amount in the top right
hand corner with three lines on the left and right side. You are
now ready to print the postage.
7. Place envelope in feed deck to print postage (see section 3-9 on
Feeding Envelopes for additional instructions).
TM
Control Centre press the
Enter Weight in Kilograms
Manual Weight $0.52
10g 2007.06.08
Account : None
Class : Dom Standard
AD : None
Inscrip. : None
SV61991 Rev. A
3-7
Page 38

3 • Running Mail
Processing Incentive Lettermail
Incentive Lettermail is a category of Lettermail that consists of
identical items of Standard, Long and Oversize mail as dened
by Canada Post that must be deposited in Canada for delivery
in Canada. In order to access the applicable Incentive Lettermail
price, Customers must enter into an Agreement with Canada Post
and ensure that the mail meets certain requirements established by
Canada Post.
1. Place mail piece on the integrated weigh platform or key in a
weight using the “Enter Weight Manually” function by pressing the
Weigh/Rate key.
2. At the Select Carrier Screen using the arrow key scroll until you
see “Dom Incentive”. Select it by pressing the corresponding key
next to the display.
3. Select your desired Dom Incentive sub-class (e.g., Machinable,
Std Ltr Pres, Oversize Mach or Oversize Std) by pressing the
corresponding key next to the display.
4. The screen will now display the postage amount in the top right
hand corner with three lines on the left and right side. You are now
ready to print the postage.
5. Place envelope in feed deck to print postage (see section 3-9 on
Feeding Envelopes for additional instructions).
The following images represent a Machineable Incentive Lettermail
and a Presort Incentive Lettermail impression printed adjacent to the
Digital Indicia.
Machineable Incentive Lettermail Presort Incentive Lettermail
Printing Postage on an Envelope
The procedures for printing postage on an envelope are different for
the DM300C and DM400C systems. In addition, there are different
procedures when using the weigh platform or parcel rating module.
Refer to the appropriate procedure in this section.
3-8
SV61991 Rev. A
Page 39

Mr. John Smith
1925 Main Street
Your Town, US 12345
Sue Jones
Rte 223
Her Town, 54321
Mr. John Smith
1925 Main Stre
et
Your Town, US 123
45
Feeding Envelopes
Manually Feeding Envelopes (DM300c)
1. If using the moistener, place
flap along moistener and
move towards the right.
3 • Running Mail
2. Place the envelope up
against the registration wall
Registration
Wall
of the system and slide it
to the right until the system
grasps it. The system prints
the digital indicia and ejects
the envelope.
Automatically Feeding Envelopes (DM400c)
Load envelopes onto the feeder
and press Start. The system
automatically feeds the envelope,
prints the digital indicia and ejects
the envelope.
Start
key
SV61991 Rev. A
3-9
Page 40

3 • Running Mail
Processing a Parcel Using the Optional Parcel Rate Module
The following outlines the procedure for processing a parcel using
the optional Parcel rate module.
1. Place your mail piece on the integrated weigh platform or enter
the weight manually through the following steps:
a. Press the Weigh/Rate button and then select “Enter Weight
Manually”.
b. Enter the weight in kilograms and then press Enter or
choose Accept to confirm and the system will take you to
the class selection option menu (skip to step 3).
2. If you used the integrated weigh platform to weigh your mail
piece, you will be prompted to select the Class.
Additional sub-class selections and processing steps are required
depending on which class selection, and country destination
(Domestic, US, International) you select. The steps for the different
country destinations are outlined below.
Domestic (Canada) Destinations
3. For Canadian destinations you must select
and then press Enter to confirm
4. Select your desired sub-class. For more information on Canada
Post Distribution Services (shipping products and services) log
on to www.canadapost.ca.
5. Enter the destination code using the QWERTY keyboard
and/or the numeric keypad. Based on your entry the system
will indicate if it is a postal code or zone. Simply press the
corresponding key to continue.
6. Review your postage rate for your parcel and confirm service
selection by pressing the corresponding key.
7. Select any appropriate Special Services you desire by following the
prompts on the display. Press Enter when complete. The postage
value will be displayed in the top right hand corner with lines to the
left and right side. You are now ready to print the postage.
8. Press the
Digital Indicia on Tape for additional information).
Tape button to print postage (see section 3-13 Printing
Domestic Parcel
3-10
SV61991 Rev. A
Page 41

3 • Running Mail
US Destinations
3. For US destinations you must select
Enter to confirm.
4. Select your desired sub-class
Xpresspost. For more information on Canada Post Distribution
Services (shipping products and services) log on to
www.canadapost.ca.
5. The system will prompt you to enter a Zone. Key in the
appropriate Zone Code and press Enter or choose Accept.
6. Review your postage rate for your parcel and confirm service
selection by pressing the corresponding key.
7. Select any appropriate Special Services you desire by following the
prompts on the display. Press Enter when complete. The postage
value will be displayed in the top right hand corner with lines to the
left and right side. You are now ready to print the postage.
8. Press the Tape button to print postage (see section 3-13 Printing
Digital Indicia on Tape for additional information).
International Destinations
3. For International destinations you must select Int’l Parcels.
4. Select your desired sub-class Small Packet, Int’l Surface, Int’l
Air, or Int’l Xpresspost. For more information on Canada Post
Distribution Services (shipping products and services) log on to
www.canadapost.ca.
5. The system will prompt you to enter a Country name or Code. If
you know the country code enter it now. If you do not know the
country code enter the first one or two characters of the country
name. A list of all countries beginning with those characters
appears in the display. Press the number that corresponds to the
country you want and then press Enter to confirm.
6. Review your postage rate for your parcel and confirm service
selection by pressing the corresponding key.
7. Select any appropriate Special Services you desire by following the
prompts on the display. Press Enter when complete. The postage
value will be displayed in the top right hand corner with lines to the
left and right side. You are now ready to print the postage.
8. Press the Tape button to print postage (see section 3-13 Printing
Digital Indicia on Tape for additional information).
USA Parcel and then press
Expedited USA or US
SV61991 Rev. A
3-11
Page 42

3 • Running Mail
Processing a Parcel Without Using the Optional Parcel Rate Module
This procedure is used for processing Parcels (those mail pieces
whose dimensions – size and weight – and associated rates extend
outside of the Lettermail rating structure) if you did not purchase the
optional parcel rate module. Based on the rate structure provided in
your system a Parcel can be considered any mail piece that weighs
over 500 grams. In order to process a parcel you will need to know
the appropriate postage amount. If you need assistance determining
if a mail piece should be rated as Lettermail or as a Parcel or need to
obtain the postage rate for the mail piece, contact your local Canada
Post retail outlet or log on to www.canadapost.com.
The following outlines the procedure for processing a parcel without the
optional Parcel rate module.
1. Key in your desired postage value using the numeric keypad.
NOTE: Values between $0.52 and $3.49 cannot be entered as this
range is representative of the current Canada Post Lettermail rate
structure - these values will be adjusted based on future Canada
Post Rate Changes. If a value between $0.52 and $3.49 (the
restricted range at time of publication) is entered, the system will
indicate that this is an invalid entry and therefore will not print the
indicia.
2. Press Enter to confirm.
3. The amount you entered will appear in the top right corner of your
display with lines to the left and right side. You are now ready to
print the postage.
3-12
Key in Postage $xx.xx
2007.06.20
Class : None
AD : None
Inscrip. : None
SV61991 Rev. A
Page 43

3 • Running Mail
Printing Digital Indicia on Tapes
Printing a Single Tape
1. Push the tape lever to the right
and drop tapes down into the
slot.
NOTE: The printable side
of the tape should be facing
towards the control panel
display (to the right).
2. Press
Printing Multiple Tapes
NOTE: Ensure the system is congured to print multiple tapes.
Refer to Chapter 7, System Options, Conguring the Tape
Button for more information.
• If the system is ready to print postage and on the Home screen,
• Press
Please refer to Chapter 4 for available Printing Options.
Tape when ready to print.
By default, a single tape will be
printed.
simply type in number of tapes you wish to print and press Tape
OR
Tape. You will be prompted to enter the tape quantity.
Press Start to begin printing tapes.
SV61991 Rev. A
3-13
Page 44

3 • Running Mail
Adding Postage to Correct a Mail Piece
This procedure is used if you have applied the incorrect amount of
postage and need to make a correction to ensure that a mail piece
has sufficient postage.
1. At the Home screen:
• Press Menu and select “Printing Options”.
• Select “Postage Correction Mode”.
• Key in the postage correction using appropriate decimal places.
Please note that your machine may display a range where a
postage amount within a set range cannot be keyed in. For
example $0.52 to $3.49 is representative of the current Canada
Post Lettermail rate structure - these values will be adjusted
based on future Canada Post Rate Changes. If a value between
$0.52 and $3.49 (the restricted range at time of publication) is
entered, the system will indicate that this is an invalid entry and
therefore will not print the indicia.
2. Press Enter or choose Accept.
Correct Postage
Enter Postage Amount:
$0.52 ~ $3.49 Invalid
Accept
3. Run the mail piece through the system so the that indicia prints
on the upper right hand corner of the back side of the envelope
(opposite of where initial indicia is printed). Alternatively, you can
use a tape sheet to print the correction indicia and place it to the
left of the original indicia (for parcels) or as instructed above for
letters.
3-14
SV61991 Rev. A
Page 45

3 • Running Mail
Correcting a Date on a Mail Piece
This procedure is used if you have applied the wrong date to a mail
piece and need to make a correction. For example, if you already
ran your mail for the day but it was too late for that day's mail pickup,
you can apply the next business day's date on the mail pieces so
they can be processed correctly by the post office. However, you first
need to advance the date on the machine before correcting the date
on the mail piece.
NOTE: You cannot change the printed date to a date earlier than
the meter's internally held date (in an effort to “backdate” the mail).
1. Press
2. Select “Printing Options”.
3. Select “Date Correction Mode”:
A. Select “Advance One Day” to advance date by one day.
B. To advance by more than one day select “Specify Days to
4. Run the mail piece through the system so the that indicia prints
5. The display will ask if you want to print more date corrections.
Menu.
Advance” then key in a number (from 1-30) representing
the number of days you want to advance the date by. Press
Enter or choose Accept to complete.
in the upper right hand corner of the back side of the envelope
(opposite of where initial indicia is printed). Alternatively, you can
use a tape sheet to print the correction indicia and place it to the
left of the original indicia (for parcels) or as instructed above for
letters.
Choose Yes to continue or No to exit.
SV61991 Rev. A
3-15
Page 46

3 • Running Mail
Printing a Statement of Mailing or Manifest Payment
This procedure is used when you have multiple parcels to send and
want to evidence the postage payment for these shipments through
one single digital indicia.
1. At the Home screen:
• Press Menu and select “Printing Options”
• Scroll to “St.of Mailing/Manifest” and press the
corresponding key to select.
• You will be prompted to “Enter Postage Amount”
2. Key in the postage value for the Statement of Mailing or Manifest
Payment using appropriate decimal places and press Enter or
choose Accept.
3. The system will instruct you to “Insert Envelope or Press Tape” to
print the digital indicia.
• To print on a tape strip press the Tape button located on the
left side of the control panel.
• To print on an envelope simply place the envelope up
against the registration wall of the of the system and slide it
to the right until the system grasps it. The system prints the
digital indicia and ejects the envelope.
• You will need to submit the printed digital indicia with the
Statement of Mailing or Manifest which your local Canada
Post retail outlet can provide.
4. Press Tape to begin printing on a tape strip. The system prints
the digital indicia and ejects the tape. Place the tape on the
Statement of Mailing or Manifest which your local Canada Post
retail outlet can provide.
3-16
SV61991 Rev. A
Page 47

3 • Running Mail
Test Print / Zero Dollar Indicia
From time to time you or a Pitney Bowes Service Representative
may want to conduct a test print to determine if your DM Series
print mechanism is operating correctly. We recommend that you use
the Test Print or Zero dollar Indicia so that you do not waste your
postage funds. The following procedure outlines how to process a
Test Print:
1. At the “Home Screen” using the numeric keypad type in ‘0.00’
and press Enter.
2. The screen will now display “$0.00” in the top right hand corner
with three lines on the left and right side. You are now ready to
print the indicia.
3. Place envelope in feed deck to print (see section 3-9) or Press
the Tape button to print indicia on tape (see section 3-13).
Using Presets
Selecting the Normal Preset
The Normal Preset is the factory default setting which contains
no predetermined mail job settings (e.g., Postage Value, Class, or
Weight).
Pressing the Normal Preset key will clear your current mail job
settings and take you back into Seal Only Mode. From here you can
begin a new transaction.
Selecting a Custom Preset
1. At the Ready screen on the IntelliLinkTM Control Centre, press the
Custom Presets key. The display lists all presets stored.
2. Press the corresponding key of the preset you wish to select.
The display then shows the selected custom preset values.
3. Print the envelope as described in Printing Postage on an
Envelope in this chapter, or: Print tapes as described in Printing
Postage on Tape Strips (or Sheets) in this chapter.
If you'd like to set up custom preset values or change them, see
Chapter 5.
SV61991 Rev. A
3-17
Page 48

3 • Running Mail
Selecting an Account to Track Postage
You can select an account to track postage if the optional
departmental accounting feature is turned on. See Chapter 9,
Departmental Accounts, for information on setting up this feature.
1. From Home screen, press the selection key next to Account. The
“Select Account” screen displays
Select Account
Current: None
¸ None 0
Sales 1
Engineering 2
Marketing 3
(Use Keypad)
2. Press the down arrow key to see more choices (if lit). To select
an account:
A. You may either key in the first digit of the account number if
you know it and press Enter, OR
B. Use the appropriate selection key next to the display.
4. If a password has been assigned to this account, you will
be prompted to enter one. Key in the four-digit password if
necessary.
5. You will return to the Home screen with the name of the account
listed.
3-18
SV61991 Rev. A
Page 49

3 • Running Mail
Checking and Clearing the Batch Count
You can view the accumulated postage value and piece count
information from the batch register and print this for your records.
You can also clear or reset the batch count to zero.
Checking the Batch Count
1. Press Funds.
2. Press the green down arrow key to scroll through the menu and
view the Batch Count information. (Batch Count is the last item in
the Funds menu list.)
Funds
Batch Value : $ 11.65
Batch Count : 3
Funds Options (Menu)
3. Press
SV61991 Rev. A
Home to return to the Home screen.
3-19
Page 50

3 • Running Mail
Printing a Record of the Batch Count Information
1. Press Funds.
2. Press Menu and select “Print Funds Report”.
3. When prompted either:
• Insert an envelope (DM300c): Place the envelope up
against the back wall of the system and slide it to the right
until the system grasps it.
• Automatically feed an envelope (DM400c): Load envelope
onto the feeder and press Start.
• Press the Tape button.
The Funds Reports is printed (see sample below) and the
envelope/tape strip is ejected.
4. Press Home to return to the Home screen.
SEP 20 06
Used: $065.390
Available: $10333.610
Total Pieces: 6765
Funds
Report
Control Sum: $10399.000
Batch Count: 1
Batch Value: $000.000
PBP Serial Number: 8030397
4: 13P
Clearing the Batch Count
IMPORTANT: Make sure you really want to clear the batch
register; once you do, you can't restore the data.
1. Press
2. Press Menu and select “Clear Batch Value”.
3. At the Confirm Clear prompt, select “Yes, Clear Value” to confirm.
4. Press Home to return to the Home screen.
3-20
Funds.
The batch value and batch piece registers return to zero.
SV61991 Rev. A
Page 51

4 • Printing Options
DM300c
DM400c
This chapter explains your printing options for incoming and
outgoing mail.
Printing Options ..................................................................4-2
Bypass Printing and Seal the Envelope Only .....................4-3
DM300c Only ...............................................................4-3
DM400c Only ...............................................................4-4
Printing the Date and Time or an Ad on Incoming Mail ......4-4
Setting or Advancing the Date on the Machine ..................4-5
Printing an Envelope Advertisement...................................4-6
Downloading an Envelope Ad Into Your Machine ........4-6
4-1SV61991 Rev. A
Page 52

4 • Printing Options
Printing Options
There are various printing options available when processing mail
through the system. You can:
• Seal the envelope without printing the digital indicia.
• Print the date and time or an advertisement on incoming pieces
of mail.
• Set or advance the date.
• Print/download an envelope advertisement.
Many of these options are available by pressing Menu and selecting
“Printing Options” (see below).
Printing Options
No Printing (Seal Only)
Set or Advance Date
Text-Ad-Date – Time Mode
Date Correction Mode
Postage Correction Mode
St. of Mailing/Manifest
4-2
SV61991 Rev. A
Page 53

4 • Printing Options
Bypass Printing and Seal the Envelope Only
DM300c Only
If using the optional moistener with pre-addressed envelopes, you
can set up your mailing system to seal envelopes without printing a
digital indicia on them.
1. Press Menu.
2. Select “Printing Options.”
3. Select “No Printing (Seal Only).”
4. Place flap along moistener and
move towards the right.
5. Slide the envelope to the right
until the system takes hold of it.
The system seals and ejects the
piece.
6. Select “Return to Normal Mode”
when finished to return you to the
Home screen.
DM400c Only
You can set up your mailing system to seal envelopes without
printing a digital indicia on them.
1. Press Menu.
2. Select “Printing Options.”
3. Select “No Printing (Seal Only).”
4. Load unsealed envelopes onto the feeder and press Start.
SV61991 Rev. A
4-3
Page 54

4 • Printing Options
Printing the Date and Time or an Ad on Incoming Mail
You can set up your mailing system to print the date and time, or an
advertisement on incoming pieces of mail.
1. Press Menu.
2. Select “Printing Options.”
3. Select “Text-Ad-Date-Time Mode.”
When Ready Insert
Envelope or Press Tape
Date-Time : Print
Ad : None
Return to Normal Mode
Ad-Date-Time screen on Manual Feed System
•
Date-Time -This option allows you to toggle between “Print”
and “Do Not Print.”
• Ad - This option provides you to select advertisement to print
on the envelope/tape.
4. To manually feed envelopes (DM300c): Place the envelope up
against the registration wall of the system and slide it to the right
until the system grasps it. The system prints the digital indicia
and ejects the envelope.
To automatically feed envelopes (DM400c): Load envelopes
onto the feeder and press Start. The system automatically feeds
the envelope, printer the digital indicia and ejects the envelope.
To print tapes: Press Tape. Enter the number of tapes and press
Start.
NOTE: Make sure you orient the mail piece so the date and
time prints on a blank section of the mail piece.
5. Select “Return to Normal Mode” when finished to return to the
Home screen.
4-4
SV61991 Rev. A
Page 55

4 • Printing Options
Setting or Advancing the Date on the Machine
NOTE: You can only advance the date for your mail, you can
never “backdate” mail to a date less than the current date.
1. Press
2. Select “Printing Options”.
3. Select “Set or Advance Date”. The system displays the current
Menu.
date in YYYY.MM.DD format. You may either:
• Select “Set to today's date”. You will be returned to the Home
screen with the current (today's) date set.
• Select “Advance one day” to advance date one day for each
pressing of the key.
• Select “Specify days to advance” and key in a number (from
1-30) representing the number of days you want to advance
the date, then select “Accept”.
SV61991 Rev. A
4-5
Page 56

4 • Printing Options
Printing an Envelope Advertisement
1. From Home screen, select “Ad”.
Select AD
Current: None
¸ None 0
Centraide 1
Veuillez ouvrir 2
United Way 3
(Use Keypad)
2. The “Select Ad” screen displays. You may either:
A. Key in the Ad number and then press
B. Scroll through ads and then select the ad.
3. You return to the Home screen with the name of the ad listed.
Downloading an Envelope Ad Into Your Machine
Ready-made items can be purchased and downloaded directly into
your machine. We can also work with you to create custom ads. To
order, contact the Pitney Bowes Supply Line™. Refer to the Contact
Information List at the from of this guide for more information.
Enter to select the ad.
NOTE: Your machine must be connected to an analog phone line
to perform this download procedure.
Once the advertisement is ordered and available for download:
1. Press
Menu.
2. If necessary, press the green down arrow key to scroll through
the menu screens.
3. Select “Data Centre Options”.
4. Select “Check for Updates”. The system automatically dials in to
the centre.
5. After connection is made, follow the prompts. The appropriate
files are downloaded and you return to the Home screen.
4-6
SV61991 Rev. A
Page 57

5 • Normal and
Custom Presets
DM300c
DM400c
This chapter discusses the Normal and Custom Presets
feature available on your machine.
What is a Preset? ...............................................................5-2
Normal Preset / Default Screen ...................................5-2
Custom Presets ...........................................................5-3
Defining Presets ................................................................5-3
Selecting a Preset ..............................................................5-4
Selecting Custom Presets ............................................5-4
Managing Custom Presets .................................................5-4
Viewing a Custom Preset ............................................5-4
Editing a Custom Preset Name ....................................5-5
Overwriting a Custom Preset .......................................5-5
Deleting a Custom Preset ............................................5-6
5-1SV61991 Rev. A
Page 58

5 • Normal and Custom Presets
What is a Preset?
A preset is a setting you can call up at the touch of a key that holds
pre-defined settings such as class, manual weight, ad, account
number, etc. within your machine.
What's nice is that you don't have to program the settings that go
into a preset in the traditional sense. Instead, the system takes a
"snapshot" of the current settings on your machine when you define
if the machine is setup to run a mail job. For example, if the machine
is set up to print an ad, and a postage amount already on the screen,
this is the condition that will be recorded by the system when you
define a Custom preset.
If you need to change the settings of a preset, just change the
machine condition by pressing the appropriate Feature keys and
establishing the proper settings (such as No Ad, weight, a specific
class, etc.).
The Custom and Preset setting options are available by pressing
Menu and selecting "Preset Options".
Preset Options
Create New Custom Preset
View Preset Settings
Edit Preset Name
Preset Options
Overwrite Preset
Delete Presets
Normal Preset / Default Screen
Your system has a "normal" preset which takes you to the default
screen. Your system reverts to the Normal Preset when it powers on
or wakes up from sleep mode.
5-2
SV61991 Rev. A
Page 59

5 • Normal and Custom Presets
Custom Presets
Your system can store 10 custom presets which are accessed by
pressing Custom Preset and choosing the desired preset from the
menu.
Defining Custom Presets
To define new settings (change the settings) for the Custom Preset:
1. Establish the proper settings on the machine (such as No Ad,
manual weight, a specific class, etc.) that you want the preset
to contain.
2. Press Menu.
3. Press the green down arrow key to scroll through the menu
screens.
4. Select "Preset Options."
If you are defining a Custom Preset:
A. Select "Create New Custom Preset".
B. The system will prompt for the name of this preset. Type
in a name for the preset. It can be up to 16 alpha/numeric
characters long. When finished, select "Accept".
Preset Name
Enter Name:
Custom 1_
Accept
5. You will be prompted if all current settings are correct.
A. If you select "Yes" the new settings are saved and you return
to the preset options screen.
B. If you select "Not Sure, View Settings", the system will
display the preset name and the current settings. Press the
down arrow key to see the remainder of the defined settings
NOTE: The values that display will vary, depending upon
the settings you have established on the machine.
SV61991 Rev. A
5-3
Page 60

5 • Normal and Custom Presets
6. Press
7. Press Home to return to the Home screen.
Enter when done viewing the preset settings:
A. If you want to use the preset as is, select "Yes".
B. If you do not want to use the preset as is, select "Exit" to
return to the "Preset Options" screen.
Selecting a Preset
Selecting Custom Presets
1. Press Custom Presets.
2. The display lists all presets created on your system. Press the
down arrow key to see additional choices (if available).
3. Select the preset you want to use. You return to the Home
screen with the preset settings chosen.
Managing Custom Presets
You have the option of viewing, editing the name of, overwriting or
deleting a Custom Preset as necessary.
Viewing a Custom Preset
1. Press Menu.
2. If necessary, press the green down arrow key to scroll through
the menu screens.
3. Select "Preset Options."
4. Select "View Preset Settings". The display lists all presets.
5. Select the preset you want to view. The first screen of defined
settings for the Custom Preset is listed. Press the down arrow
key to see the remainder of the defined settings.
6. Press Enter when done viewing the preset settings.
5-4
SV61991 Rev. A
Page 61

5 • Normal and Custom Presets
Editing a Custom Preset Name
You may change the name of a preset if you want.
1. Press Menu.
2. If necessary, press the green down arrow key to scroll through
the menu screens.
3. Select "Preset Options."
4. Select "Edit Preset Name".
5. The display lists all the Custom Presets. Select the preset you
want to edit.
6. The system will prompt for the new name of this preset. Key in
the new name for this preset. It can be up to 16 alpha/numeric
characters long.
7. When finished, select "Accept". You return to the Preset Options
menu.
8. Press Home to return to the Home screen.
Overwriting a Custom Preset
Overwriting a preset allows you to save new settings to an existing
Custom Preset.
IMPORTANT: Once you overwrite a preset, its settings are gone.
You can't recover an overwritten preset.
1. Establish the proper settings on the machine (such as No Ad,
class/ weight, a specific departmental account, etc.) that you
want the preset to contain.
2. Press Menu.
3. If necessary, press the green down arrow key to scroll through
the menu screens.
4. Select "Preset Options."
5. Press the down arrow key and select "Overwrite Preset". The
display lists all presets.
6. Select the preset you want to overwrite.
7. At the "Confirm Current Selections" screen, select "Yes". The
preset is overwritten with the new settings. You return to the
Preset Options menu.
8. Press Home to return to the Home screen.
SV61991 Rev. A
5-5
Page 62

5 • Normal and Custom Presets
Deleting a Custom Preset
Deleting a preset removes all the settings assigned to it and removes
it from the Presets Menu.
IMPORTANT: Once you delete a preset, its settings are gone. You
can't recover a deleted preset.
1. Press
2. If necessary, press the green down arrow key to scroll through
3. Select "Preset Options."
4. Press the down arrow key and select "Delete Presets". The
5. Select the preset you want to delete.
6. At the "Confirm Delete" screen, select "Yes, Delete". The preset
7. Press Home to return to the Home screen.
Menu.
the menu screens.
display lists all presets.
is deleted. You return to the Preset Options menu.
5-6
SV61991 Rev. A
Page 63

6 • Adding Postage/
Connecting to the
Data Centre
DM300c
DM400c
This chapter explains how to add postage to your system
using Pitney Bowes' Postage By Phone® service and
connecting to the Pitney Bowes Data Centre.
A Word About Adding Postage ...........................................6-2
Connecting Your System to an Analog Phone Line ............6-2
Checking Funds (Postage) Availability in Machine .............6-2
Checking Your Postage By Phone® Account Balance ........6-3
Adding Postage ..................................................................6-4
Printing a Funds Report......................................................6-5
Downloads from the Data Centre to Your Machine ............6-6
Connecting to the Data Centre (other than for Postage) ......6-9
Check for Updates .......................................................6-9
Phone Settings ...........................................................6-10
Distributor Settings .....................................................6-13
6-1SV61991 Rev. A
Page 64

6 • Adding Postage/Connecting to Data Centre
A Word About Adding Postage
Adding postage funds to your system by modem is fast, easy and
convenient. Your system must be connected to an analog phone line
as described below.
Connecting Your System to an Analog Phone Line
The term analog phone line refers to a RJ11C or RJ11W compatible
(single line) telephone wall plug typically used for a residential
phone, analog dial-up computer modem or facsimile (fax) machine
hookup.
Plug the telephone line (supplied)
into the connector on the back of
the machine (see figure at right).
Remember to use an analog
phone line.
Checking Funds (Postage) Availability in Machine
1. Press Funds.
2. View funds used and pieces processed.
Telephone
Line plugs
in here
Funds
Available : $204.94
Used : $17.06
Total Pieces : 130
Ctl Sum : $222.00
More Options (Menu)
3. Press the down arrow key to view additional information.
Funds
Batch Value : $ 11.65
Batch Count : 3
More Options (Menu)
6-2
SV61991 Rev. A
Page 65

6 • Adding Postage/Connecting to Data Centre
Checking Your Postage By Phone® Account Balance
You can check your Postage By Phone® account balance at any
time, as long as your system is connected to an analog phone line.
1. Press Refill Postage.
2. Select “Check PBP Balance”.
3. The system dials into the Pitney Bowes Data Centre (this may
take a few moments). Various screens displays, letting you know
the status of the process.
4. The Prepaid and Other balances displays. Select "Continue" to
return to the Funds Options menu.
Requesting
PBP Balance
Please Wait....
PBP Balance
Prepaid : $ xxxxx
Other : $ xxxxx
Refill Postage
Continue
NOTE: You can elect to rell postage by selecting "Rell
Postage on the PBP Balance screen. Refer to Adding Postage
in this chapter for more information.
SV61991 Rev. A
6-3
Page 66

6 • Adding Postage/Connecting to Data Centre
Adding Postage
You can add postage to your machine any time you need to, as long
as you have enough funds in your Postage By Phone® account and
your system is connected to an analog phone line.
1. Press Refill Postage.
• You may select “Refill $xx.00” to add the amount shown.
• Select “Another Amount”. Key in the amount in whole dollars
that you want to add and select “Accept”. Select "Yes" to
verify the amount.
Refill Postage
Refill $ xx.00
Another Amount
Check PBP Balance
NOTE 1: The minimum amount of postage you can add is $1.
NOTE 2: The amount shown in the "Rell $xx.00" selection
line represents the amount of postage you added the last time.
3. The system dials into the Pitney Bowes Data Centre (this may
take a few moments). Various screens displays, letting you know
the status of the process.
4. The Postage Refill complete screen displays.
Postage Refill Complete
Refilled : $ xxxxx
Available : $ xxxxx
Print Receipt
Continue
5. If a receipt is desired, select "Print Receipt" and follow the
prompts OR simply press Home to return to Home Screen.
6-4
Refill: SEP 20 06 4:13P
Refill Amount: $200.00
Funds Available in Meter: $1033.610
Refill
Prepaid: $1600.00
Receipt
Additional Funds Available: $000.000
Account No: 12345678
Meter No.: 8030397
SEP 20 06
4: 13P
SV61991 Rev. A
Page 67

6 • Adding Postage/Connecting to Data Centre
Printing a Funds Report
1. Press Funds.
2. Press Menu and select "Print Funds Report".
3. When prompted either:
• Manually feed an envelope (DM300c): Place the envelope
up against the back wall of the system and slide it to the right
until the system grasps it.
• Automatically feed an envelope (DM400c): Load envelope
onto the feeder and press Start.
• Press the Tape key.
The Funds Reports is printed (see sample below) and the
envelope/tape strip is ejected.
SEP 20 06
Used: $065.390
Available: $10333.610
Total Pieces: 6765
Funds
Report
Control Sum: $10399.000
Batch Count: 1
Batch Value: $000.000
PBP Serial Number: 8030397
4: 13P
SV61991 Rev. A
6-5
Page 68

6 • Adding Postage/Connecting to Data Centre
Downloads from the Data Centre to Your Machine
When you connect to the Pitney Bowes Data Centre (using an
analog phone line) to add postage or perform other transactions, the
Data Centre may perform the following:
• Download required software updates to your machine
• Download advertisements you ordered
• Perform a remote inspection of your machine as required by the
Canada Post Corporation
• Download Postal Code changes, and new postal rates (as
required by the Canada Post)
Generally speaking, downloads are considered either mandatory
(you must do them at the time you are prompted to on the screen),
or non-mandatory (you may decide to download at a later time).
However, even non-mandatory downloads can become mandatory if
you wait too long to do the download.
Once a download is finished, you will either be prompted to select
“Restart Now” to restart the machine or select “Accept” to return
you to the screen that you started from, depending on the type of
download performed.
A description of the type of downloads that can occur in your
machine are presented on the following pages.
System Update
If there has been a feature enhancement or a minor update to the
software that runs your machine, you will be notified that a system
update is available.
Ad
If there are new ads available that you ordered, you will be notified
that you can perform a download to obtain these.
6-6
SV61991 Rev. A
Page 69

6 • Adding Postage/Connecting to Data Centre
Software Update (Mandatory)
If there has been an important update to the software that runs your
machine, you will be notified that a required update is necessary.
Postal Code Update (Mandatory)
If the Postal Code on record at the Postage By Phone® Data Centre
does not match the Postal Code of your mailing system, the code
will be downloaded into your machine. (When a machine is moved
to a new Postal Code, the Data Centre enters the new code into the
record. The system is updated when a connection is made to the
Data Centre.)
NOTE: If you move locations you must notify Pitney Bowes so
that the postal code chance can be made.
Postal Inspection (Mandatory)
Each time you add postage to the machine, the Pitney Bowes Data
Centre automatically performs a postal inspection as required by
Canada Post Corporation. If the interval between inspections is more
than 60 days, your machine's display prompts "Inspection Due." If
the interval between inspections is more than 90 days, the display
prompts "Inspection Required." You won't be able to use your mailing
system until your system is inspected.
To satisfy the inspection requirement, simply:
• Add postage (see Adding Postage earlier in chapter for
procedure) or conduct a Balance Inquiry.
• Connect to the Data Centre as described in the Connecting to
the Data Centre (other than for postage) later in this chapter.
When an inspection is performed, an "Inspection Complete" screen
displays upon completion. The display also notifies you of the date
the next inspection is due.
SV61991 Rev. A
6-7
Page 70

6 • Adding Postage/Connecting to Data Centre
Postal Rate Update (Mandatory)
Postal rates change periodically by the Canada Post Corporation.
If new rates are available, you can download them quickly and easily
directly from the Pitney Bowes Data Centre.
The new rates are normally available for download at least 7 days
before the effective date. If you connect to the Data Centre prior
to the effective date and the new rates are available, you will be
required to perform the downloaded. However the new rates will not
take effect until the effective date. Once the effective date has been
reached (or passed), and you have not downloaded the new rates
you are required to download the new rates immediately.
The display tells you when a rate change update is complete. It also
tells you if the update is immediate or takes effect at a later date by
listing the new date.
NOTE: Canada Post Rate Change downloads are mandatory
and therefore if you connect and a rate change download is
available you will not be given a "Skip" or "Get Later" option.
6-8
SV61991 Rev. A
Page 71

6 • Adding Postage/Connecting to Data Centre
Connecting to the Data Centre (other than for Postage)
You can modify the phone connection settings on your machine, from
basic settings (tone or pulse, dial prefix, etc.) to advanced settings
such as user ID, password, and server IP address.
CAUTION: Do not change these parameters unless
directed to do so by your Pitney Bowes representative.
Check for Updates
Use this feature to connect to the Pitney Bowes Data Centre for
software downloads, new updates, etc.
1. Press
2. If necessary, press the green down arrow key to scroll through
3. Select "Data Centre Options".
Menu.
the menu screens.
Main Menu
Preset Options
Maintenance
Data Centre Options
4. Select "Check for Updates".
Data Centre Options
Check for Updates
Phone Settings
Distributor Settings
The system automatically dials the centre.
NOTE: Make sure the machine is connected to a phone cord
that is attached to an analog phone line (the type your Fax
machine uses).
SV61991 Rev. A
6-9
Page 72

6 • Adding Postage/Connecting to Data Centre
5. After connection is made, if some type of software or postal
update or download is available, a message stating so displays.
A. If a download is not mandatory, you will be prompted with
either “Download Now” or “Skip, Return Home”. Select the
one that makes sense to you at that time.
B. If a download is mandatory, only “Download Now" displays
and you must perform the download.
6. After the download has completed, a message stating so
displays.
A. If you need to reboot the system, the prompt "Restart Now".
displays. Select this to restart the system.
B. If no rebooting is necessary, simply select "Return Home" to
return to the Home screen.
Phone Settings
This menu option allows you to modify the phone connection settings
on your machine (tone or pulse, dial prefix, etc.)
Phone Settings
Dial Type :
Dialing Prefix : None
PBP Phone# : xxxxxx....
Blind Dialing :
Done [Enter]
Phone Settings
Modem String : xxxxxx...
Done [Enter]
6-10
Tone
ON/OFF
SV61991 Rev. A
Page 73

6 • Adding Postage/Connecting to Data Centre
Selecting the Dialing Type (Tone/Pulse)
Use this to tell the system whether your have a tone or pulse type
phone.
1. Press Menu.
2. If necessary, press the green down arrow key to scroll through
the menu screens.
3. Select "Data Centre Options".
4. Select "Phone Settings".
5. Select "Dial Type" to toggle between "Tone" and "Pulse". Select
the appropriate option.
Entering the Dialing Prefix
Use this if you need to dial a prefix number (like 9) to get an outside
line.
1. Press Menu.
2. If necessary, press the green down arrow key to scroll through
the menu screens.
3. Select "Data Centre Options".
4. Select "Phone Settings".
5. Select "Dialing Prefix".
6. Key in the prefix number you want (such as a "9") and select
"Accept". You return to the Phone Settings menu.
SV61991 Rev. A
6-11
Page 74

6 • Adding Postage/Connecting to Data Centre
Changing the Postage By Phone® (PBP) Number
Use this if you need to change the number for Postage By Phone®,
but only if you are directed to by a Pitney Bowes representative.
1. Press Menu.
2. If necessary, press the green down arrow key to scroll through
the menu screens.
3. Select "Data Centre Options".
4. Select "Phone Settings".
5. Select "PBP Phone#".
6. A warning that you should only change this number if instructed
to by Pitney Bowes displays. Select "Continue".
7. Key in the new phone number and select "Accept". You return to
the Phone Settings menu.
Changing Modem Parameters
Use this if you need to change the modem settings used to dial into
the Pitney Bowes Data Centre but only if you are directed to by a
Pitney Bowes representative.
1. Press Menu.
2. If necessary, press the green down arrow key to scroll through
the menu screens.
3. Select "Data Centre Options".
4. Select "Phone Settings".
5. If necessary, press the green down arrow key to scroll through
the menu and select "Modem String".
6. A warning that you should only change this number if instructed
to by Pitney Bowes displays. Select "Continue".
7. Key in the new modem parameters as given by your Pitney
Bowes agent.
• To modify the existing parameter, select "Edit Options". You
can then select "Move the Cursor Right" or "Move the Cursor
Left" to insert a character within the existing string. Select
"OK" when done.
• To restore the default settings, select "Restore Defaults".
8. Select "Accept" when done. You return to the Phone Settings
menu.
6-12
SV61991 Rev. A
Page 75

6 • Adding Postage/Connecting to Data Centre
Distributor Settings
This option allows you to modify the phone connection parameters
that your machine uses to call to the Pitney Bowes Data Centre. A
brief description of each parameter is provided on the next page.
CAUTION: Do not change these parameters unless
directed to do so by your Pitney Bowes representative.
To access the Distributor Settings:
1. Press Menu.
2. If necessary, press the green down arrow key to scroll through
the menu screens.
3. Select "Data Centre Options".
4. Select "Distributor Settings".
5. Select the parameter you want to modify from the list appearing
in the display. Press the down arrow key if needed to access
your choice.
Distributor
Settings
Account ID : xxxxx...
Password : xxxxx...
Server IP : xxxxx...
Server Port : xxxxx...
Distributor
Settings
Primary DNS : xxxxx...
Secondary DNS : xxxxx...
URL : xxxxx...
Done [Enter]
NOTE: Refer to Distributor Setting Parameter Descriptions in
this chapter for an explanation of each of the Distributor Setting
parameters.
SV61991 Rev. A
6-13
Page 76

6 • Adding Postage/Connecting to Data Centre
6. A warning message displays that reminds you that entering a
wrong value may result in errors connecting to the Data Centre.
Select "Continue".
7. Key in a new entry for that parameter.
• To modify the existing parameter, select "Edit Options". You
can then move the cursor right or left to insert a character.
Select "OK" when done.
• To restore the default settings, select "Restore Defaults".
8. Select "Accept" when done. You return to the Distributor Settings
menu.
9. Press
Distributor Setting Parameter Descriptions
• Account and User ID - This is the account number and the user
•
• ANI/LCZ Server IP - This is the internet address of the
•
• Primary DNS Server - This is the internet address of the Pitney
• Secondary DNS Server - This is the internet address of the
•
Enter to return to the Data Centre Options menu.
ID that your system uses to dial into the internet service provider
(ISP) that allows you to connect to Pitney Bowes.
Global Password - This is the password your system uses to
dial into your Internet Service Provider.
Automatic Number Identification (ANI)/Least Cost Zone (LCZ)
server that identifies your system and routes your call to a zone
that ensures the lowest cost for the connection.
ANI/LCZ Server Port - The server port number identifies the port
number on the ANI/LCZ server to which your system connects
on dial-up.
Bowes primary Domain Name Server (DNS). The Domain Name
Server converts your system name to its IP address.
Pitney Bowes secondary Domain Name Server (DNS).
Distributor URL - The Universal Resource Locator, URL, is the
web page to which your system connects during dial-up.
6-14
SV61991 Rev. A
Page 77

7 • System Options
DM300c
DM400c
This chapter presents system options you can setup or
modify, such as setting time, date, passwords, warnings, etc.
System Options ..................................................................7-2
Basic Options .....................................................................7-3
Setting the Time, Date, and Timeouts ..........................7-3
Adjusting the Contrast of the Display ...........................7-6
Setting Postage Limits (Funds Warnings) ....................7-7
Enabling, Changing or Disabling Lock Codes
and Passwords ............................................................7-8
Configuring the Tape Button.......................................7-11
Advanced Options ............................................................7-12
Meter Withdrawal (Withdrawing Postage Funds) .......7-12
Running Install Mode .................................................7-13
7-1SV61991 Rev. A
Page 78

7 • System Options
System Options
System options allow you to customize the machine settings for
the way you run your mail and add security to those features that
are sensitive to your organization. Because of the many options
available, the options are categorized into "Basic" and "Advanced".
The basic system options are accessed by pressing Menu and
selecting "Setup Options." You can then select your choice from the
menu as shown below.
Setup
Time & Timeouts
Display Contrast & Language
Postage Limits
Lock Code/Password
Setup
Turn Feature ON/OFF
Configure Tape Button
Serial Port
The advanced options are accessed by pressing Menu, then
pressing the green down arrow key and selecting "Advanced
Features", which displays a menu of options as shown below.
Advanced Features
Meter Withdrawal
Run Install Model
7-2
SV61991 Rev. A
Page 79

7 • System Options
Basic Options
Setting the Time, Date, and Timeouts
You can change the system time/date, set the time/date to daylight
saving time, change the time at which your system advances the
date/time to the next day, and set the amount of time your system
can remain inactive before reverting to the Normal Preset values.
Setting the Time
Sometimes, the time on the machine may need to be corrected due
to internal drift or the change over to Daylight Saving Time.
1. Press Menu.
2. Select "Setup".
3. Select "Time and Timeouts".
4. Select "Correct Time Drift".
Correcting Time Drift
Current Time: 1:38 PM
Enter Time
Earliest time
you can set
Accept
:
(11:38 AM - 3:38 PM)
Latest time
you can set
NOTE: You can add/subtract up to 120 minutes (2 hours) from
the current time.
5. Key in the new time and select "Accept".
6. Select "Yes". The display returns to Time & Timeouts menu.
SV61991 Rev. A
7-3
Page 80

7 • System Options
Setting Auto Date Advance Time
Your system can automatically advances the date evey day at a time
you specify. The date advance time is factory set to 12:00 AM. If your
mail is picked up at a certain time each day, you can set the system
to advance the date after the mail pickup time. You can also turn the
Auto Date Advance Time Feature off.
1. Press
2. Select "Setup".
3. Select "Time and Timeouts".
4. Select "Auto Date Advance Time".
5. Select "Switch AM/PM" to toggle between "AM" and "PM".
6. If necessary, press the
7. Type in the time. Example: To enter one o’clock, type 1 - 0 - 0. To
8. Select "Accept". The display returns to Time & Timeouts menu.
Menu.
Auto Date
Advance Time
Enter Time
12 : 00
Switch AM/PM
Accept
AM
Clear key to remove the existing time
entry.
enter 12:01 o’clock, type 1 - 2 - 0 - 1. (Don't type the hyphens.)
7-4
SV61991 Rev. A
Page 81

7 • System Options
Setting the Normal Preset Timeout
The Normal Preset is a defaulted screen that your machine
automatically returns to after a set period of time. You can set the
amount of time the display takes before it reverts to the Normal
Preset.
1. Press Menu.
2. Select "Setup".
3. Select "Time and Timeouts".
4. Select "Normal Preset Timeout".
Normal Preset
Timeout
Enter Timeout
64
(1-240 minutes)
Accept
5. Key in the amount of minutes (from 1-240) you want the system
to wait before returning to the Normal Preset. The default time is
64 minutes.
6. Select "Accept". The display returns to Time & Timeouts menu.
Setting Sleep Mode Timeout
You can set the amount of time the machine waits before entering
"Sleep Mode". When the machine is in sleep mode, the display is
blank and you can't process mail. You "awaken" the machine by
pressing almost any key on the control panel.
NOTE: The Stop and Start keys will not wake the machine.
1. Press
Menu.
2. Select "Setup".
3. Select "Time and Timeouts".
4. Select "Sleep Mode"
5. Key in the amount of minutes (from 1-240) before the system
goes into Sleep Mode.
6. Select "Accept". The display returns to Time & Timeouts menu.
SV61991 Rev. A
7-5
Page 82

7 • System Options
Setting Daylight Saving Time
1. Press Menu.
2. Select "Setup".
3. Select "Time and Timeouts".
4. If necessary, press the green down arrow key to scroll through
the menu screens.
5. Select "Daylight Savings". The display shows the current setting.
Daylight Saving
Current Time: 1:38 PM
Daylight Saving :
6. Select "Daylight Saving" to toggle between:
• "Enable" if you want to use Daylight Saving Time, or
• "Disable" if you don not want to use Daylight Saving Time.
(This is the default setting.)
7. Press Enter to return to the Time & Timeouts menu.
Enable
Adjusting the Contrast of the Display
1. Press Menu.
2. Select "Setup".
3. Select "Display Contrast".
4. Select "Increase Contrast" or "Decrease Contrast" to change the
contrast level as necessary. The default is 6 lines (shown below).
Display Contrast
- l l l l l l +
Increase Contrast
Decrease Contrast
Accept
5. Select "Accept" to return to Setup menu.
7-6
SV61991 Rev. A
Page 83

7 • System Options
Setting Postage Limits (Funds Warnings)
You can specify values so that when your postage funds drop below
a certain level, or if you try to enter too much postage for a piece of
mail, the system displays a warning.
Setting the High Value Warning
You can have the system warn you when you manually key in a
postage value that is higher than a maximum amount that you
specify. This feature prevents you from accidentally printing a
postage value that's more than you need.
1. Press Menu.
2. Select "Setup".
3. Select "Postage Limits".
4. Select "High Postage".
High Postage Warning
Enter Amount:
10.00
$
Accept
5. Key in the amount you want, including the digits to the right of
the decimal point. You may enter a fractional value like .75 or
$1.50. (You cannot set the warning higher than 99.99.)
6. Select "Accept" to return to Setup menu.
Setting the Low Funds Warning
You can set up the system so that when the postage remaining
reaches a certain level, the system will remind you to add postage.
1. Press Menu.
2. Select "Setup".
3. Select "Postage Limits".
4. Select "Low Funds".
5. Key in the amount you want (in whole dollars only).
6. Select "Accept" to return to the Setup menu.
SV61991 Rev. A
7-7
Page 84

7 • System Options
Enabling, Changing or Disabling Lock Codes and Passwords
Enabling the Lock Code
The Lock Code prevents unauthorized access to your mailing system
after the machine has entered sleep mode.
1. Press Menu.
2. Select "Setup".
3. If necessary, press the green down arrow key to scroll through
the menu screens.
4. Select "Lock Code/Password".
5 Select "Enable Lock Code".
Change Lock Code
Enter New Lock Code
***_
Accept
6. Enter the new Lock Code and select "Accept".
7. Re-enter the new Lock Code again to confirm and select
"Accept".
8. At the "Lock Code Enabled" message, select "OK".
Disabling the Lock Code
You can disable the Lock Code if it has been enabled.
1. Press Menu.
2. Select "Setup".
3. If necessary, press the green down arrow key to scroll through
the menu screens.
4. Select "Lock Code/Password".
5. Select "Disable Lock Code".
6. When prompted, enter the current Lock Code and select
"Accept".
7-8
SV61991 Rev. A
Page 85

7 • System Options
Changing the Lock Code
You can change the Lock Code if it has been enabled.
1. Press
2. Select "Setup".
3. If necessary, press the green down arrow key to scroll through
4. Select "Lock Code/Password".
5. Select "Change Lock Code".
6. When prompted, enter the current Lock Code and select
7. Enter the new Lock Code, and select "Accept".
8. Re-enter the new Lock Code to confirm and select "Accept". At
Enabling the Supervisor Password
The Supervisor Password prevents unauthorized access to
accounting setup.
1. Press Menu.
2. Select "Setup".
3. If necessary, press the green down arrow key to scroll through
4. Select "Lock Code/Password".
5. Select "Enable Password".
Menu.
the menu screens.
"Accept".
the "Lock Code Enabled" message, select "OK".
the menu screens.
Change Password
Enter New Password
***_
Accept
5. Enter the new Supervisor Password and select "Accept".
6. Re-enter the new Supervisor Password to confirm and select
"Accept".
7. At the "Password Enabled" message, select "OK".
SV61991 Rev. A
7-9
Page 86

7 • System Options
Disabling the Supervisor Password
You can disable the Supervisor Password if it has been enabled.
1. Press
2. Select "Setup".
3. If necessary, press the green down arrow key to scroll through
4. Select "Lock Code/Password".
5. Select "Disable Password".
6. When prompted, enter the current Supervisor Password and
Changing the Supervisor Password
You can change the Supervisor Password if it has been enabled.
1. Press Menu.
2. Select "Setup".
3. If necessary, press the green down arrow key to scroll through
4. Select "Lock Code/Password".
5. Select "Change Password".
6. When prompted, enter the current Supervisor Password and
7. Enter the new Supervisor Password, and select "Accept".
8. Re-enter the new password to confirm and select "Accept".
9. At the "Password Enabled" message, select "OK".
Menu.
the menu screens.
select "Accept".
the menu screens.
select "Accept".
7-10
SV61991 Rev. A
Page 87

7 • System Options
Configuring the Tape Button
You can specify the action the system takes when the Tape button is
pressed.
1. Press
2. Select "Setup".
3. If necessary, press the green down arrow key to scroll through
4. Select "Configure Tape Button".
Once you make your selection, the system returns to the Setup
Menu.
the menu screens.
• If you always want to print one tape at a time, select "Always
Print One Tape".
• If you want to enter the number of tapes to print, select "Ask
For Tape Quantity".
Menu.
SV61991 Rev. A
7-11
Page 88

7 • System Options
Advanced Options
Advanced options allow you access to features that are used very
infrequently such as meter withdrawal, etc. The Advanced Feature
menu includes:
• Meter Withdrawal (for withdrawing postage funds)
• Run Install Mode
Meter Withdrawal (Withdrawing Postage Funds)
For a meter withdrawal, you need to move any remaining postage
from your machine to your Postage By Phone® account. Normally this
is done if you are no longer going to use the machine.
NOTES:
• Contact Pitney Bowes first before withdrawing funds.
• The system must be connected to an analog phone line before
you begin.
1. Press Menu.
2. If necessary, press the green down arrow key to scroll through
the menu screens.
3. Select "Advanced Features".
4. Select "Meter Withdrawal".
5. You will be prompted to "Transfer all funds from meter to PBP
account". Select "Continue".
6. The system dials into the Pitney Bowes Data Centre (this may
take a few moments). Various screens display, letting you know
the status of the process.
7. The Transfer Successful screen displays. Either:
• Select "Print Receipt" to print a meter withdrawal receipt.
Follow the prompts to print the receipt on an envelope or
tape strip.
• Select "Done" to return to the Home screen.
7-12
Used: $065.390
Available: $10333.610
Total Pieces: 6765
Funds
Report
Control Sum: $10399.000
SEP 20 06
4: 13P
Batch Count: 1
Batch Value: $000.000
PBP Serial Number: 8030397
SV61991 Rev. A
Page 89

7 • System Options
Running Install Mode
The Run Install Mode option allows you to clear your system,
resetting it to the default settings it was shipped with.
SV61991 Rev. A
7-13
Page 90

8 • Reports
DM300c
DM400c
This chapter explains how to take advantage of the reporting
capabilities of your system.
Overview of Reports ...........................................................8-2
Last 5 Refills Report .....................................................8-3
Funds Report ...............................................................8-3
Single Accounts Report ................................................8-3
Multi-Account Summary Report ...................................8-3
Account List Report ......................................................8-4
System Setup Report ...................................................8-4
Error Report .................................................................8-4
Configuration Report ....................................................8-5
Software Version Report ..............................................8-5
Printing a Report.................................................................8-6
Printing to an Attached Printer .....................................8-6
Printing on an Envelope or Tape Strip .........................8-6
8-1SV61991 Rev. A
Page 91

8 • Reports
Overview of Reports
Your system allows you to print reports for funds usage, postage
refills, postage tracked by account, and other valuable data. The
reports are accessed by pressing Menu and selecting "Reports".
NOTE: Reports may not appear in the same order as below.
Reports
Last 5 Refills
Funds Report
Accounts
Reports
System Setup
Error
Configuration
8-2
Reports
Software Version
SV61991 Rev. A
Page 92

8 • Reports
Last 5 Refills Report
This report lists the last 5 postage refills. It must be printed on an
envelope or tape strip.
Date of Refill:
DEC 08 06
Time:
4:32P
Refill Amount:
$025.000
Acct No.: 12345678
Meter No.: 0011989
Printed: DEC 12 06
Last 5 Refills
Funds Report
This report lists the postage used, postage available, pieces
processed, and other information about your machine usage. It must
be printed on an envelope or tape strip.
SEP 20 06
Used: $065.390
Available: $10333.610
Total Pieces: 6765
Funds
Report
Control Sum: $10399.000
Batch Count: 1
Batch Value: $000.000
PBP Serial Number: 0011989
4: 13P
Single Accounts Report
This report provides the postage history for a single account (if the
Departmental Accounting feature is set up on your system). It must
be printed on an envelope or tape strip.
Account Name: SALES
Acct Number: 1
Pieces: 5
Report
Account
Postage: 001.480
0011989
SEP 20 06
4: 13P
Multi-Account Summary Report
This report provides the postage history for multiple accounts (if the
Departmental Accounting feature is set up on your system). It can be
printed on an envelope or tape strip, or by an attached printer.
Account No.
Accounts
Summary
SV61991 Rev. A
1
2
Pieces
5
4
Postage
001.480
001.480
0011989
SEP 20 06
4: 13P
page 1 of 1
8-3
Page 93

8 • Reports
Account List Report
The Account List Report lists the names and numbers of all accounts
that are set up in your machine (if the Departmental Accounting
feature is set up on your system). It can be printed on an envelope or
tape strip, or by an attached printer.
List
Account
Account No.
1
2
Account Name
SALES
MARKETING
0011989
SEP 20 06
4: 13P
page 1 of 1
System Setup Report
The System Setup Report is an extensive report that gives you
comprehensive information about your total mailing machine. The
entire report must be printed on an attached printer. It provides
information on:
• Serial Numbers
• Software Versions
• Funds and Piece Information
• Warning Values
• Time Settings
• Advertisements
• Accounting Set Up
• Modem Set Up
• Scale Settings
• Presets
Error Report
This report provides a history of error codes that your machine has
encountered.
8-4
Error
Error Date:
DEC 08 06
NOV 15 06
Report
Time:
4:25P
3:14P
Identifier:
1879
Oaff
Count:
001
000
0011989
SEP 20 06
9:25A
page 1 of 1
SV61991 Rev. A
Page 94

8 • Reports
Configuration Report
This report lists configuration information about your machine and
Postage By Phone® account.
PBP Serial #: 0011969
PBP Account: 999999999
PSD Ser. #: 4C46000000007E4C
Print Head #: 50000104
Cfg Report
Printer Ser. #: D0 . 07
PCN: 0000
UIC: 510
Rate Data:
Rate Effective:
SEP 20 06
4: 13P
SMR 000
P7US002B01
P7US002B04
2005/08/09
2006/01/08
Software Version Report
This report provides system software version information. You may
be directed to print this report by a Pitney Bowes agent.
PBP Serial #: 0011969 PCN: 0000
UIC Software Version: 01.02.0042
Print Mgr.: 0118.0004
Low Sector: 01.06.11
Versions
Software
Protected Sector: 01.09.14
Rate Mgr. #: 03.10
Platform: B0.02
PHS: 01.01.0014
Feeder Ver.:
Feeder Profile:
SEP 20 06
4: 13P
SV61991 Rev. A
8-5
Page 95

8 • Reports
Printing a Report
The report printing options available to you will depend on the type of
report you have selected.
Printing to an Attached Printer
1. Press Menu.
2. Select "Reports".
3. Select the appropriate report from the list. You may need to
press the green down arrow key to view additional reports.
4. When prompted, select "Attached Printer".
5. A message will appear indicating the report will be printed to the
attached printer. Select "Return to Report Menu" to continue.
Printing on an Envelope or Tape Strip
1. Press Menu.
2. Select "Reports".
3. Select the appropriate report from the list. You may need to
press the down arrow key to view additional reports.
NOTE: If it have an attached printer, but want to print on
an envelope or tape strip, select "Mailing Machine" when
prompted.
Print on a manually fed envelope (DM300c): Place the
•
envelope up against the back wall of the system and slide it
to the right until the system grasps it.
NOTE: If it is a multi-page report, you will be prompted to
insert another envelope.
•
Print on an automatically fed envelope (DM400c): Load
envelopes into the feeder and press Start.
• Print on a tape strip: Press Tape.
4. You will be prompted to print another report once printing is
complete.
• Select "Yes" to print an additional report.
• Select "No" to return to the Home screen.
8-6
SV61991 Rev. A
Page 96

9 • Departmental
Accounting
DM300c
DM400c
This chapter explains how to take advantage of the
accounting feature of the system.
Overview of the Accounting Feature...................................9-2
Creating New Accounts ......................................................9-3
Deleting Accounts ...............................................................9-4
Editing Accounts .................................................................9-5
Viewing/Clearing Account Totals ........................................9-6
Clearing All Account Totals .................................................9-7
Turning Account Passwords On (Globally) .........................9-8
Turning Account Passwords Off (Globally) .........................9-9
Turning Accounting On .....................................................9-10
Turning Accounting Off .....................................................9-10
9-1SV61992 Rév. A
Page 97

9 • Departmental Accounting
Overview of the Accounting Feature
When using the accounting feature, you can set your system up to
track postage costs incurred by individuals or departments in your
organization (e.g., Engineering, Sales, A/R, etc.). The number of
accounts available on your system is based on the accounting option
you have. Your system stores the following information for each
account:
• A name up to 15 alphanumeric characters long.
• An account number (assigned by the system).
• The count total. This is the total number of pieces of mail
charged to an account since it was last cleared.
• The value total. This is the total amount of postage charged to an
account since it was last cleared.
• An account password
The maintenance of your accounts is done through programs on
the Accounts menu (below), accessible by pressing Menu key and
selecting "Accounts".
Accounts
Accounts In Use: 0/25
Create New Account
Delete Accounts
Edit Accounts
View/Clear Account Totals
Accounts
Accounts In Use: 0/25
Clear All Account Totals
Turn Acct Password ON/OFF
Turn Accounting ON/OFF
9-2
SV61992 Rév. A
Page 98

9 • Departmental Accounting
Creating New Accounts
You need to create an account before you can use the departmental
accounting feature to track postage.
1. Press Menu.
2. Select "Accounts".
Number of Accounts Created
Accounts
Accounts In Use: 0/25
Create New Account
Delete Accounts
Edit Accounts
View/Clear Account Totals
NOTE: If the supervisor password is enabled, you will need to
enter it to gain access to all of the accounting functions.
3. Select "Create New Account".
NOTE: If no accounts are present on the system, you will be
notied that you need to have at least one account in order to
use accounting. Select "Create an Account" to continue.
4. Type in a name for the account. It can be up to 15 alpha/numeric
characters long. Select "Accept" to continue.
5. The New Account Created screen appears.
A. Select "Name" to edit the account name. Select "Accept" to
return to the New Account created screen.
B. If the supervisor and account passwords are enabled, you
will have the option of adding an account password. Select
"Add Acct Password" and enter the 4-digit password. Select
"Accept" to return to the New Account Created screen.
C. Select "Number" if you would like to change the number
assigned to the account. Select a number from the list.
D. Select "Done" to return to the Accounts screen.
Number of
Accounts
Available
SV61992 Rév. A
9-3
Page 99

9 • Departmental Accounting
Deleting Accounts
You can delete an account from the system if necessary.
CAUTION: Make sure your really want to delete
an account. Once you do, the account cannot be
retrieved.
1. Press
Menu.
2. Select "Accounts".
NOTE: If the supervisor password is enabled, you will need to
enter it to gain access to all of the accounting functions.
3. Select "Delete Accounts".
4. Select an account to delete:
Select Account
To Delete
SALES 1
MARKETING 2
ENGINEERING 3
SERVICE 4
(Use Keypad)
• Key in the account number and press Enter, OR
• Select the appropriate account from the list. If necessary,
press the green down arrow key to scroll through the menu
screens.
5. The Confirm Delete screen displays. Select "Yes, Delete" to
delete the account.
• If the deleted account was the last account on the system
you will be prompted to "Create New Accounts" or "Turn
Accounting OFF". Select the appropriate option and follow
the prompts to continue.
• If the deleted account was not the last account on the
system you will be asked if you want to delete another
account. Select "Yes" to return to the Select Account screen
(step 5). Select "No" to return to the Accounts screen.
9-4
SV61992 Rév. A
Page 100

9 • Departmental Accounting
Editing Accounts
You can edit an account name and establish passwords for each
account if you wish.
1. Press Menu.
2. Select "Accounts".
NOTE: If the supervisor password is enabled, you will need to
enter it to gain access to all of the accounting functions.
3. Select "Edit Accounts".
4. Select an account to edit:
Select Account
To Edit
SALES 1
MARKETING 2
ENGINEERING 3
SERVICE 4
(Use Keypad)
• Key in the account number and press
Enter, OR
• Select the appropriate account from the list. If necessary,
press the green down arrow key to scroll through the menu
screens.
5. The Edit Account screen appears.
A. Select "Name" if you would like to edit the account name.
Select "Accept" to return to the Edit Account screen.
B. If the supervisor and account passwords are enabled,
you will have the option of editing the account password.
Select "Password" and enter the four-digit password. Select
"Accept" to return to the Edit Account screen.
C. Select "Number" if you would like to change the number
assigned to the account. Select a number from the list.
D. Select "Done" to return to the Accounts screen.
SV61992 Rév. A
9-5
 Loading...