

Page 1

DM100i / DM125 / DM200L / DM225
Digital Mailing Systems
Quick Install Guide
Page 2

Contents
Mailing System
Moistener
and EZ-Seal
(optional)
PBI Ink Cartridge
(Reorder #793-5)
Base
(DM200L and DM225
only)
Phone Cord Power Cord
Scale
(optional)
Print Head
in Package
Stacker
Tape Sheets
postage
tape sheets
USB Cable
Quick Reference
Quick Install Guide
(this document)
Page 3

For best results, we strongly encourage you to follow the steps in this guide in
sequential order.
Step 1 Remove Shipping Tape
You must remove your existing postage funds
first, if you have an existing meter that is being
replaced. Refer to other “return” or “Transfer”
documents provided.
Open the top cover of the meter and remove
any packing material, protective foam, or tape
that may be present. Close the cover.
Step 2 Select a Connection Method
and Setup Your Meter
You must connect to the Pitney Bowes Data Center to add postage funds,
download software updates, and perform USPS required inspections.
If you have Internet access, we recommend you install the PC Meter
Connect™ Desktop Application online at www.pb.com/support/pcmc. This
software provides the quickest data transfers.
DM100i and DM200L - Download and install the latest PC Meter
Connect Desktop Application from www.pb.com/support/pcmc.
After you have installed the PC Meter Connect Desktop Application,
you must return to this Guide and complete the meter setup starting
at Step 5. The PC onscreen directions will direct you to do so.
DMXXX
Product Description
PXXX
Product Code (PCN)
Request Service Support, Order Supplies or
Check Postage Account Balance On-Line
www.pb.com
Select “My Account”
XXXXXXX
Serial Number
or call
1-800-522-0020
DMXXX
Product Description
PXXX XXXXXXX
Serial NumberProduct Code (PCN)
Request Service Support, Order Supplies or
Check Postage Account Balance On-Line
www.pb.com
Select “My Account”
or call
1-800-522-0020
DM125 and DM225 - Download and install the latest PC Meter
Connect Desktop Application from www.pb.com/support/pcmc.
After you have installed the PC Meter Connect Desktop Application,
follow the PC onscreen instructions which guide you through the
complete system setup. You need not refer to this Guide again.
You can identify your model from the label on the front of your meter shown
in Step 1.
If you do not have Internet access, or choose not to use the PC Meter
Connect Desktop Application, simply continue with Step 3 in this Quick
Install Guide. You will not need to download the PC Meter Connect
Desktop Application.
1
Page 4

Step 3 Connect Phone Line
Select a location for the meter near an analog phone line and connect the
phone cord between the back of your meter and an analog phone jack.
Phone
or
depending upon your model
Phone systems installed in some businesses are not analog and may damage
your system. If you are unsure about your phone line, contact your telephone
company or local network administrator.
The following are usually analog phone lines:
• Fax lines
• Residential phone lines
• Lines used by modems or credit card readers
Step 4 Connect Power
Connect the power cord between the back of your meter and a
convenient outlet.
Keep the meter plugged in at all times to an outlet not controlled by a wall
switch.
Power
2
If you have this model,
turn the On/Off switch on.
On/Off Switch
Power
Page 5
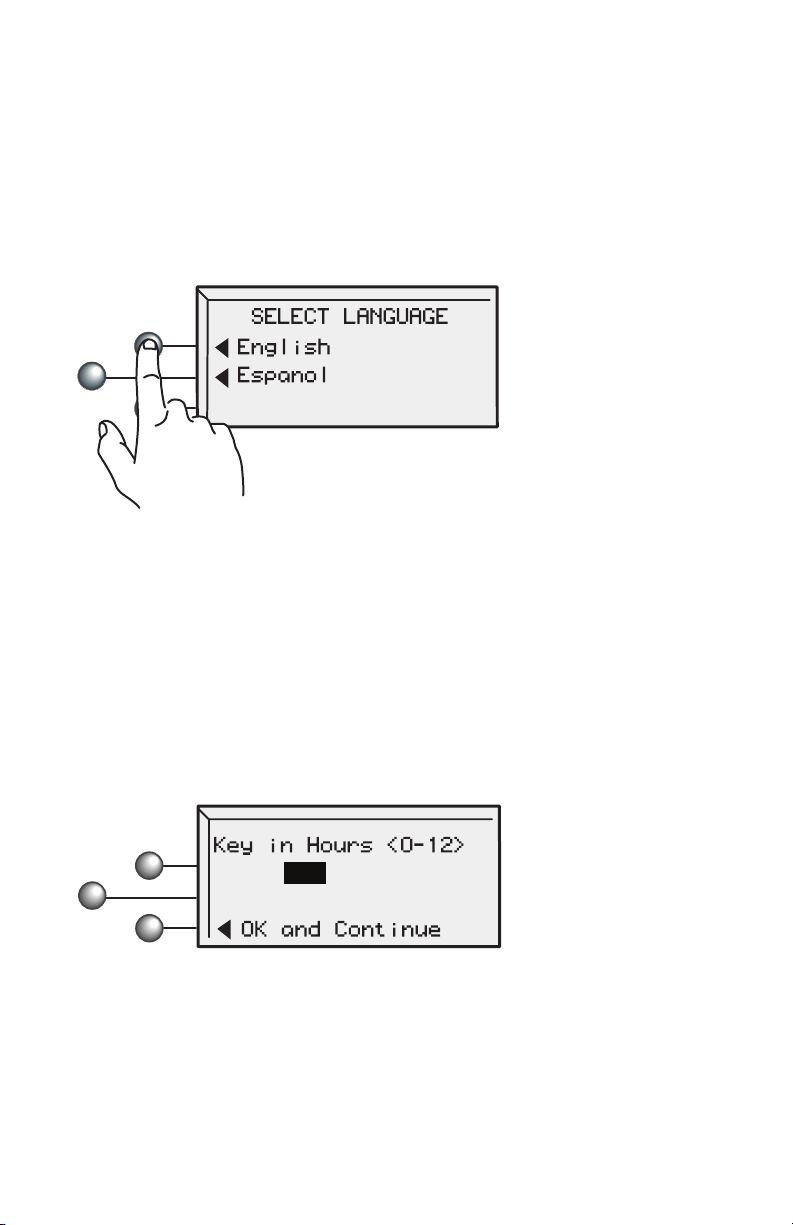
Step 5 Select Language
After the system powers up and completes a self-check, select the
language you wish to use. Simply press the small round button next
to your choice.
Step 6 Set Local Time
Your meter must be set to the correct local time.
HH:
If the hour value displayed (HH) is correct, simply select OK and
Continue. If the hour value is wrong, key in the correct value
before pressing OK and Continue.
3
Page 6
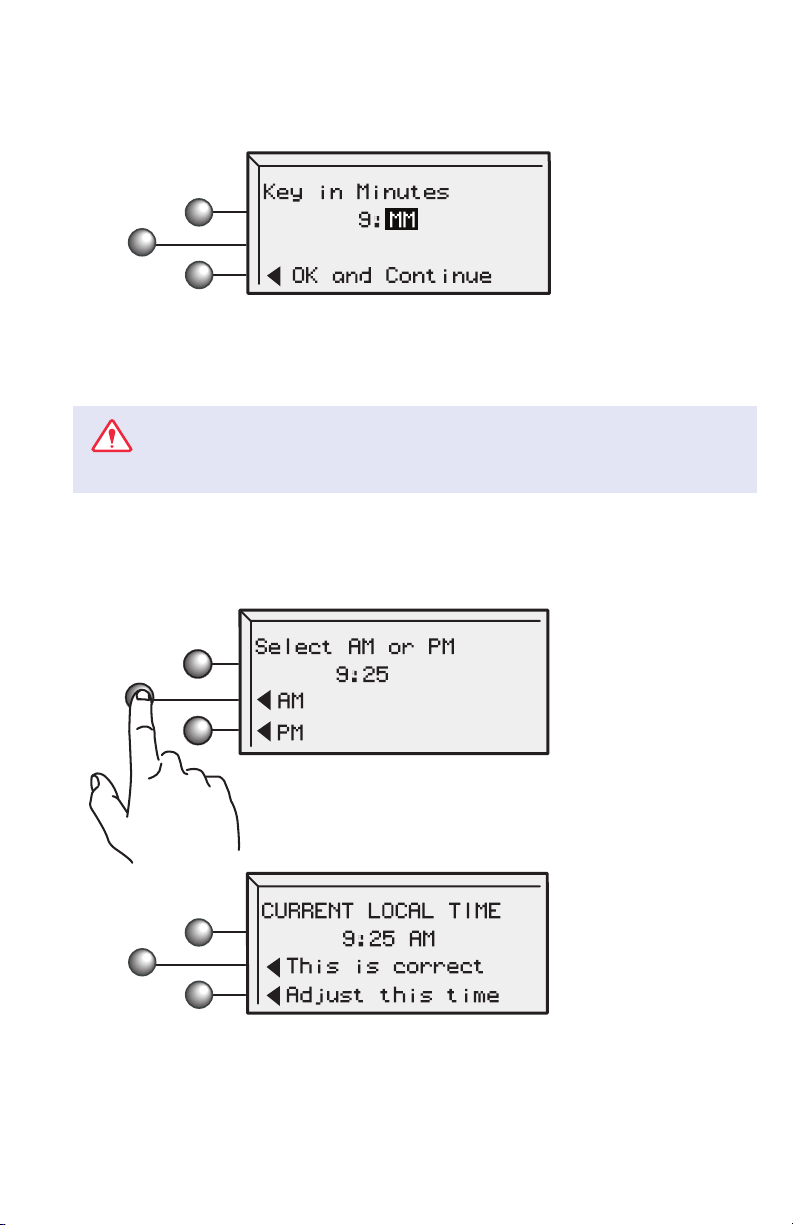
Step 6 Set Local Time (continued)
Again, if the minutes value displayed (MM) is correct, simply
select OK and Continue. If the minutes value is wrong, key in
the correct value before pressing OK and Continue.
ATTENTION:
You MUST set the AM/PM correctly. If the local time is off by 12 hours your system
may print the wrong date on your mail and it may be returned by the Post Office.
Check one last time, paying special attention to the
AM/PM setting. If the current local time is correct, select
This is correct.
4
Page 7
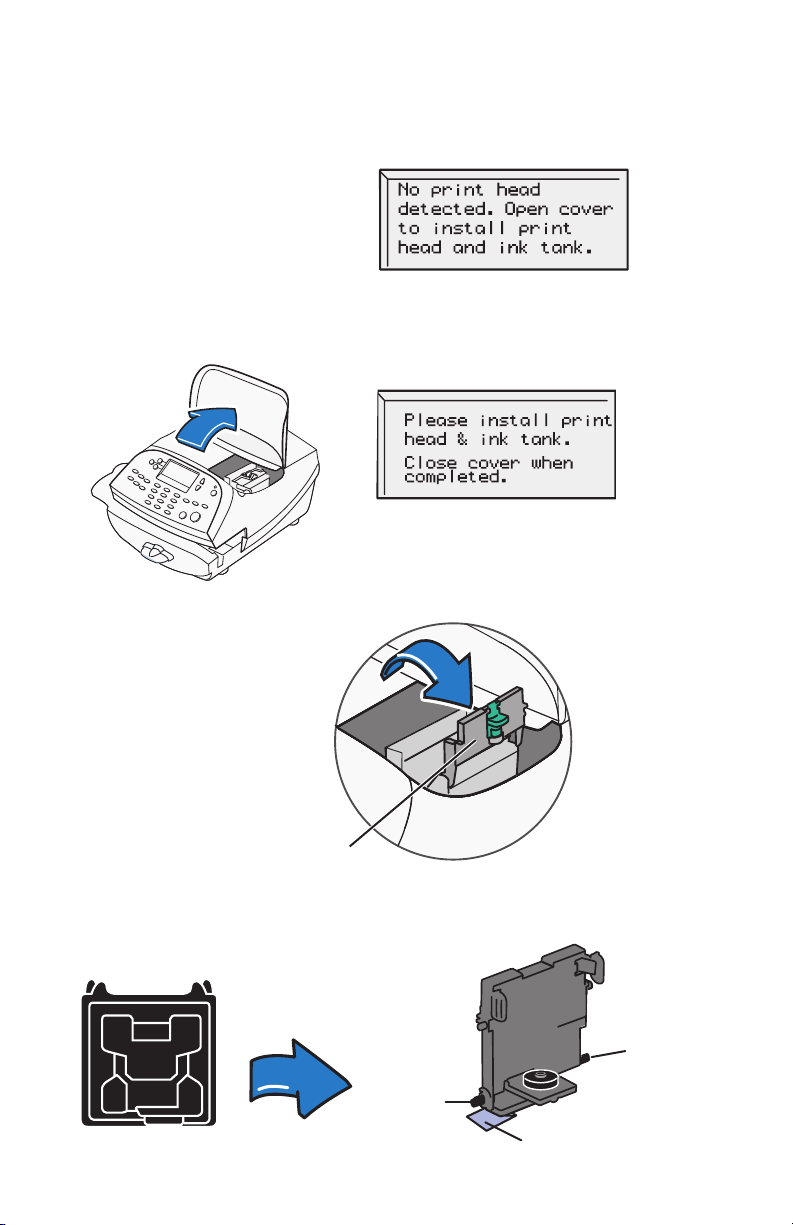
Step 7 Install the Print Head
The following screen will appear.
A. Open the top cover.
B. Unlatch and flip up
the guard.
When you open the cover
the screen will prompt....
Ink Cartridge Guard
C. Remove the print
head from its packaging.
Peg
Tape Strip
Peg
5
Page 8
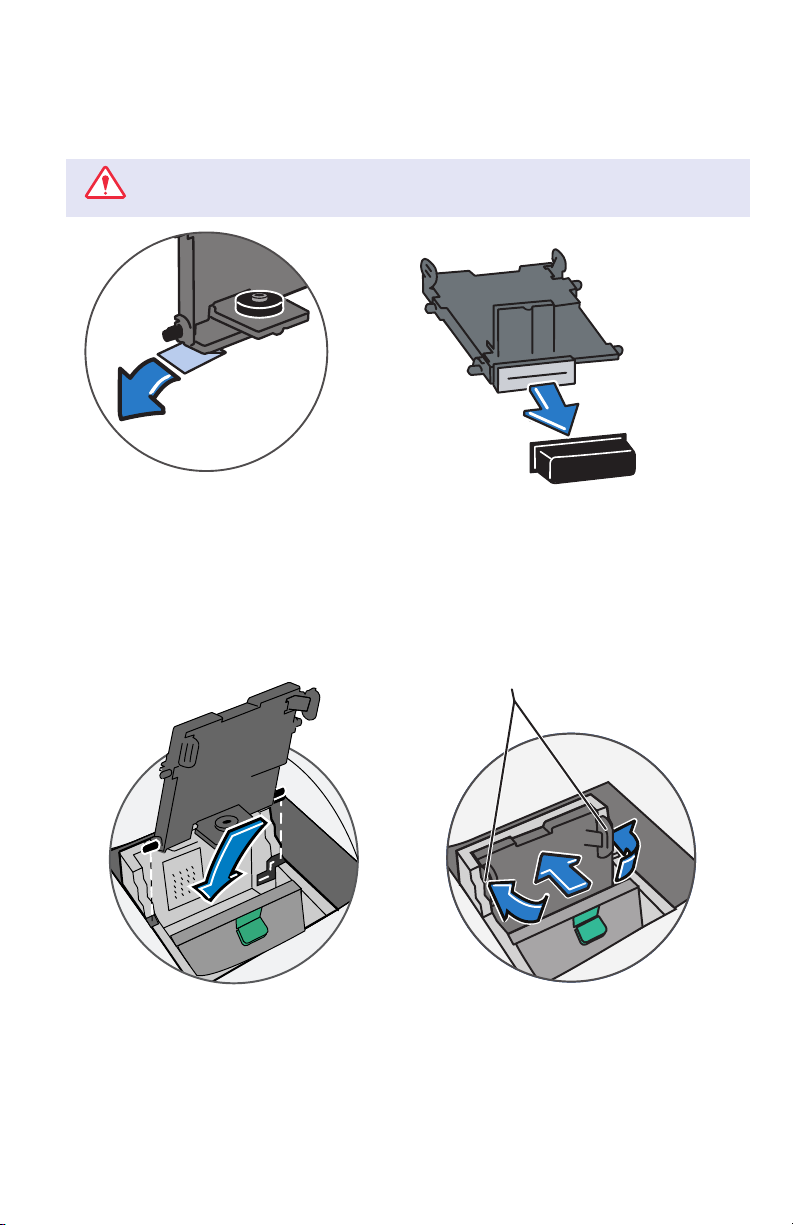
Step 7 Install the Print Head (continued)
ATTENTION:
This step is critical to prevent system damage.
Depending on
your model
D.
Remove the tape strip
from the bottom of the
print head.
OR
Remove the plastic cap
from the bottom of the
print head.
Tabs
E. F.
Slide the print head pegs
into the lower set of grooves.
6
Squeeze the tabs and push
the print head flush against
the wall.
Page 9

Step 8 Install the Ink Cartridge
Remove the ink cartridge
A.
from the bag. The silver foil
strip on the bottom of the
cartridge should remain in
the bag when the cartridge
is withdrawn.
C.
Close the guard and
click to secure.
“CLICK”
Drop the cartridge in next to
B.
the print head. The label on
the top of the cartridge should
face front.
D.
Close the top cover. The
meter will automatically
prepare the ink cartridge
for use.
7
Page 10

Step 9 Print a Test Pattern
When prompted, insert a spare envelope
or a tape sheet for a test print.
Registration
Wall
For proper printing, position
mail flat against registration
wall and gently slide mail to
the right on feed deck.
The system will detect
the envelope and
automatically pull it through
the printing mechanism.
Good test print - no missing lines
Poor test print
If the test print is good, press the green Yes/Enter
button on the front of the meter.
No
Yes/Enter
If the test print is poor, press No to perform
additional maintenance.
8
Page 11

Step 10 Contact Pitney Bowes Data Center
No
If your phone requires a number to reach an outside line (for example, if
you have to dial 9 first), press the Yes/Enter key.
If you select Yes, key in your dialing prefix and select Continue.
Yes/Enter
When you select Continue (or No on the initial screen), the phone will
connect to the Pitney Bowes Data Center.
9
Page 12

Step 11 Check Your Account Balance
For your security, your meter is not shipped with pre-loaded postage.
Dialing and Connecting screens will appear.
PBP= Postage by Phone
It is simply your account
balance.
When your account is accessed at the Postage-by-Phone Data Center, you
will see your current balance (Prepaid) and your current credit line (Other).
Some, or all, of the postage funds you have already purchased (Prepaid)
you will transfer into your meter in the next step.
• Select Yes/Enter to transfer postage into the meter.
For troubleshooting see page 18.
Step 12 Load Postage into Your System
You will now transfer postage into the meter from your account.
Key in the amount of postage you wish to add ~ whole dollars only.
• Select Continue.
10
Page 13

You will be asked to confirm your choice.
Press Yes/Enter or No for a receipt.
No
Step 13 Print Your Receipt
To print a receipt, follow the screen directions.
Yes/Enter
11
Page 14

Step 14 Update Your Software
The last step downloads the current USPS rates in addition to any
additional features you may have ordered.
• Select Get update now.
• The updated files will
be sent to, and installed
on, your system.
Follow the screen prompts.
.
• When the software installation
process has finished, select
Continue.
12
Page 15

Step 15 Congratulations!
Your Mailing System is Ready to Use
• Select OK.
To customize your meter settings and learn all about using
your system, see the Operator Guide, or check the Quick
Reference Guide.
Install Additional Components
If your system came with the optional scale, attach it now. The scale
consists of two pieces. Place the platform on top of the base unit, being
sure the pegs on the platform are inserted into the corresponding holes
in the base unit.
DM100i / DM125
platform
DM100i / DM125
base unit
DM200L / DM225
platform
DM200L / DM225
base unit
13
Page 16

Scale (continued)
Position the assembled scale as shown. Now plug the connector on the
bottom of the base unit into the matching connector on your system.
DM100i / DM125
DM200L / DM225
A scale code is needed to calibrate the scale. If you have just attached
your scale, key in the correct scale code for your location. Codes for
each state can be found in the back of this guide on Page 19-20.
Select Continue.
Moistener
The optional moistener allows you
to moisten, seal, and apply postage
to your envelopes all in one smooth
step.
Position the moistener on the left
side of the deck as shown. Hold
down the blue release lever and
slide moistener from left to right,
with the lip of the moistener above
the deck.
14
Release Lever
Moistener
Page 17

Moistener (continued)
Deck
Lip
Fill the moistener reservoir with
Pitney Bowes E-Z Seal sealing
solution. You may fill it later if
you don't plan on moistening and
sealing envelopes right now.
Solution
Level
Stacker
The stacker is a tray that catches your processed mail. Position the
stacker next to the system as shown. Just slide it into place. It does
not connect mechanically to the system.
Stacker
15
Page 18

Frequently Asked Questions
If I choose to connect via phone line, why must it be “analog?”
Your DM system contains an internal modem for connecting to the
Pitney Bowes Data Center over standard telephone lines.
Manufacturers of digital phone systems (so called PBX systems) are
not required to adhere to the same restrictions on their inside lines as
the phone companies mandate for standard analog lines. Several PBX
manufacturers have designed phone systems that deliver much more
current to the phone than does the phone company’s analog lines.
Your modem was designed to work with a small current, one that may
be substantially less than the power put out by some PBX systems. As
a result, if you connect your modem to a PBX line, thinking that it’s an
analog line, you could damage your modem with too much current and
not even know it.
Why must I add postage to my meter?
For your safety, and to prevent any unauthorized use, your meter is
shipped without money in it. The money you paid when you signed up
for your DM system has been deposited into your “Postage-by-Phone”
(PbP) account, and is immediately available to you. You will be required
to transfer an amount from your PbP account into the meter during the
installation process. Please note that this is not an “additional expense,”
just moving money you have already paid when you acquired your
meter.
What is PC Meter Connect?
PC Meter Connect is a small Desktop Application you install on your PC
to allow your meter to connect to the Pitney Bowes Data Center through
your PC’s Internet connection rather than over a standard telephone
line. Postage refills, and system software updates will be completed
efficiently and much quicker via the Internet.
16
Page 19

Frequently Asked Questions (continued)
How do I start up the PC Meter Connect Desktop Application?
You can start the PC Meter Connect software by double-
clicking on the desktop icon placed on your Windows desktop
during the installation process. Double-clicking places a much smaller PC
meter Connect icon in your Windows system tray at the bottom of your
screen.
PC Meter Connect is now running and you may connect to the Pitney
Bowes Data Center.
Alternately, you may click on the Start button >> All Programs >> Pitney
Bowes >> PC Meter Connect.
How do I know PC Meter Connect is running?
The small system tray icon will be visible whenever PC Meter Connect is
running.
What is a scale location code?
The accuracy of any scale is affected by its geographic location on the earth
(how far it is from the Equator) and its altitude above sea level. The scale
location code provided by Pitney Bowes helps calibrate the scale to be as
accurate as possible for your particular location.
Where is my Operator Guide?
The latest Operator Guide can be found using the Support URLs listed
below. The Guide is in Adobe PDF format, so you may easily view it and
print out individual sections or the entire Guide as you wish.
For product support go to:
Product Name: DM100i, Model P700 URL: http://www.pb.com/support/DM100
Product Name: DM200L, Model P7L1 URL: http://www.pb.com/support/DM200
Product Name: DM125, Model PR00 URL: http://www.pb.com/support/DM125
Product Name: DM225, Model PRL1 URL: http://www.pb.com/support/DM225
Where is my PC Meter Connect Desktop Application?
The latest PC Meter Connect Desktop Application can be found at
www.pb.com/support/pcmc.
17
Page 20

Troubleshooting
No Dial Tone –
Check that you are using an analog line such as
a) most fax machine lines;
b) lines used by computer modem or credit card reader;
c) residential phone lines.
Check that you have entered a dialing prex if your phone
system needs a number to reach an outside line.
If you are using a DSL line you may require a DSL lter.
Contact your telephone company or local network administrator
Cannot Reach Data Center –
Check that you have entered a dialing prex if your phone
system needs a number to reach an outside line.
Not Enough Funds –
You have tried to add more postage to your meter than you have in your
account at Pitney Bowes.
To Change Information Entered during the Install Procedure –
• Press Clear key on numeric keypad.
• At Install Not Complete, either go back to the previous step
or start the installation procedure over again.
To Change Selection after the Setup Program is Complete –
• Press the Options key.
• Press the green Page Down button twice.
• Select Advanced Features.
• Press Page Down.
• Select Run Install Mode.
Still have questions?
For installation support call: 1-877-817-2463. Alternately, your questions may be
answered in the Operator Guide or online. The Operator Guide can be found at
the following websites.
Product Name: DM100i Model: P700 Product Name: DM125 Model: PR00
http://
www.pb.com/support/DM100
Product Name: DM200L Model: P7L1 Product Name: DM225 Model: PRL1
http://
www.pb.com/support//DM200
18
http://
www.pb.com/support/DM125
http://
www.pb.com/support/DM225
Page 21

Scale codes for locations in
the United States
Locations near a boundary may enter either code.
State Code
Alabama
Birmingham and north 13
South of Birmingham 12
Alaska (see map on page 16)
Arizona
Phoenix and north 12
South of Phoenix 11
Arkansas 13
California (see map on page 16)
Colorado
Denver and north 13
South of Denver 12
Connecticut 16
Delaware 15
Florida
W Palm Beach and north 11
South of W Palm Beach 10
Georgia 12
Hawaii 9
Idaho
N of Salmon River Mtns. 17
S of Salmon River Mtns. 16
State Code
Illinois
North of Springeld 16
Springeld and south 15
Indiana
North of Indianapolis 16
Indianapolis and south 15
Iowa
North of Des Moines 17
Des Moines and south 16
Kansas
North of Wichita 15
Wichita and south 14
Kentucky 14
Louisiana 12
Maine 18
Maryland 15
Massachusetts 17
Michigan
NW of Lake Michigan 18
SE of Lake Michigan 17
Minnesota 18
Mississippi
Kosciusko and north 13
South of Kosciusko 12
19
Page 22

Scale codes for locations in
the United States
Locations near a boundary may enter either code.
State Code
Missouri
North of Springeld 15
Springeld and south 14
Montana
Helena and north 18
South of Helena 17
Nebraska 16
Nevada 13
New Hampshire 17
New Jersey 16
New Mexico 11
New York
Kingston and north 17
South of Kingston 16
North Carolina
Raleigh and north 14
South of Raleigh 13
North Dakota 18
Ohio
Akron and north 16
South of Akron 15
Oklahoma
North of Oklahoma City 14
Oklahoma City and south 13
State Code
Oregon
Salem and north 18
South of Salem 17
Pennsylvania 16
Rhode Island 16
South Carolina 13
South Dakota 17
Tennessee 13
Texas
NE of Colorado River 12
SE of Colorado River 11
Utah 13
Vermont 17
Virginia
North of Roanoke 15
Roanoke and south 14
Washington DC 15
Washington State 18
West Virginia 15
Wisconsin
Green Bay and north 18
South of Green Bay 17
Wyoming 15
20
Page 23

Scale codes for locations in
Alaska and California
Locations near a boundary may enter either code.
Location Code = 27
Location Code = 26
Anchorage
Location Code = 23
Location Code = 16
Chico
San Francisco
San Luis Obispo
Location Code = 15
Modesto
Location Code = 14
Bakersfield
Location Code = 13
21
Page 24

1 Elmcroft Road
Stamford, Connecticut 06926-0700
www.pitneybowes.com
Contact List
If you need assistance
For Setup or Getting Started questions, call 1-877-817-2463
Machine Identication
Product Name: DM100i Digital Mailing System
Model Number: P700
Product Name: DM125 Digital Mailing System
Model Number: PR00
Product Name: DM200L Digital Mailing System
Model Number: P7L1
Product Name: DM225 Digital Mailing System
Model Number: PRL1
Resources
To obtain product help through tutorials, troubleshooting pages,
downloads, chat, and forums, go to:
DM100i: http://www.pb.com/support/DM100
DM125: http://www.pb.com/support/DM125
DM200L: http://www.pb.com/support/DM200
DM225: http://www.pb.com/support/DM225
To order PB supplies and accessories, go to:
http://www.pb.com and click on Supplies
OR
order by phone at 1-800-243-7824 (M-F 8:00 AM to 8:00 PM E.T.)
To view a list of your equipment, pay invoices online, or you have
questions about your Postage-by-Phone account go to:
http://www.pb.com and click on My Account
For questions about your account or the product, call the Pitney
Bowes Customer Care Center at 1-800-522-0020 (M-F 8:00 AM to
8:00 PM E.T.).
To contact the United Stated Postal Service® (USPS), visit:
http://www.USPS.com
*AW22103REVE*
PB Form AW22103 Rev E 10/12
© 2012 Pitney Bowes Inc.
All Rights Reserved
Printed in the USA
 Loading...