

Pitney Bowes DM110i, DM160i, DM220i UK Installation Manual
Mailing and Shipping
Franking Machines
Franking machine
installation guide DM220i series
(models DM110i, DM160i and DM220i UK)
Read Now BEFORE you unpack your equipment
Continue reading below
Right, let’s get your franking
machine up and running
quickly…
Let’s first get together the things you will need:
• The box containing your new franking machine.
• A red letter from Royal Mail titled ‘Your Licence’.
If you have not received the letter from Royal Mail, do not go any
further with this installation. Please call Royal Mail Customer Services
on 08457 950950. If they ask you for the franking machine Serial
Number, it can be found on a label on the outside of the box.
If you have everything you need, check that the serial numbers on
your box and the letter from Royal Mail are identical. If they are,
continue to work through this set-up. If not, call Pitney Bowes on
08444 992 992.
Installation requires contact with our Data Centre. Please only
attempt installation during the opening hours of 8am to 8pm
weekdays or 8am to 5pm weekends and public holidays.
We all know that dierent people work in dierent ways, so we’ve
provided two alternative methods that you can use to install your
franking machine, depending on your preference:
7
• This paper guide Open the guide
fully and follow
steps 1 - 9.
• An online guide A step-by-step guide with helpful videos. Go to
www.pitneybowes.co.uk/dm220install
and click on the
‘installation guide’ link.
5
8
9
6
1 Open the box and unpack
1
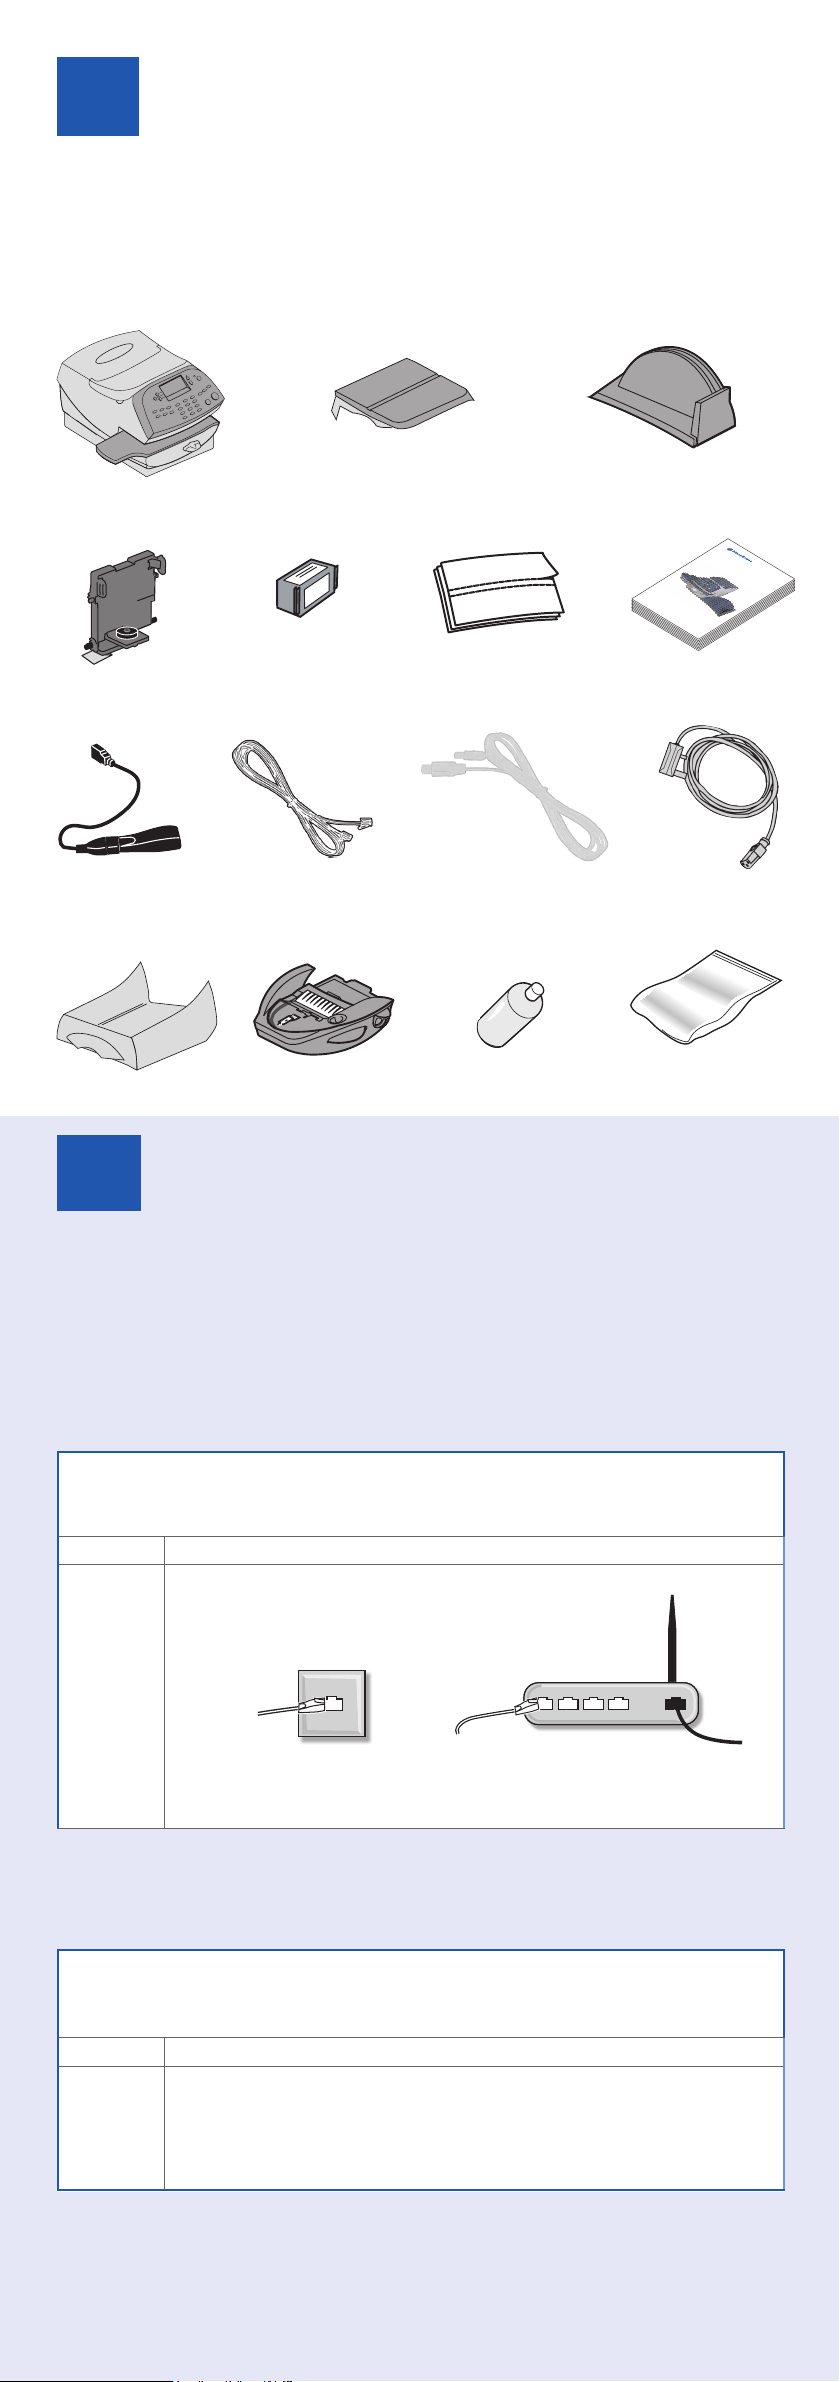
Here’s a diagram and explanation of the items you should find in your box, if
anything is missing give us a call on 08444 992992. Depending on how you
install your franking machine, you might not need all of these items.
If you have any problems during this installation, refer to ‘Troubleshooting’
overleaf.
Franking Machine Scale Stacker
Print Head (in
plastic packaging)
Adapter
Base Unit (some
models only)
Blue ink
Cartridge
LAN (network)
Cable
Moistener (some
models only)
Postage Meter
Labels
USB Cable Network
Sealing Solution
(only if moistener
supplied)
Operating Guide
Digital Mailing System
DM220i series
(models DM160i and DM220i)
Operator Guide
UK Version
Power Cord
DM220i only -
INVIEW Kit
Package contains USB memory
stick and other components
Decide where to site your
2
system and how to connect it
Please DO NOT connect power until instructed.
Your franking machine has to connect to the Pitney Bowes Data Centre to add
postage funds, get software updates, and carry out the required Postal Authority
inspections.
This connection is made via the internet using your LAN (network). This provides a
constant connection for ease of use and trouble free communications.
LAN (Network) Connection
You must use a suitably configured network connection (LAN) that gives access to the
internet.
Benefits Requirements
Fastest.
Always
connected.
Ease of
use.
A standard (RJ45) network connection on your router (as found in a normal
domestic wired setup) or an active network wall socket.
OR...
If you have purchased the optional Wi-Fi Communication Device, you can
connect to your network wirelessly.
As a backup and only if you cannot provide a direct connection to your network,
you can use the free Pitney Bowes PC Meter Connect™ (PCMC) software to
connect via any PC with an internet connection.
PCMC Connection (Internet connection via your PC)
If you have a PC with an internet connection nearby, you can install the free Pitney Bowes
PC Meter Connect™ (PCMC) software and use the PC’s internet connection.
Benefits Requirements
Backup
connecton
method if
LAN not
possible.
If you cannot meet the requirements of any connection method described above,
refer to Troubleshooting overleaf.
You must also ensure that the franking machine has a constant power supply and
you have space around it to work.
Requires a PC with an active internet connection to be nearby and turned
on.
The PC must run Windows Vista or 7 and have Pitney Bowes PCMC software
installed.
PCMC is not available for Mac.
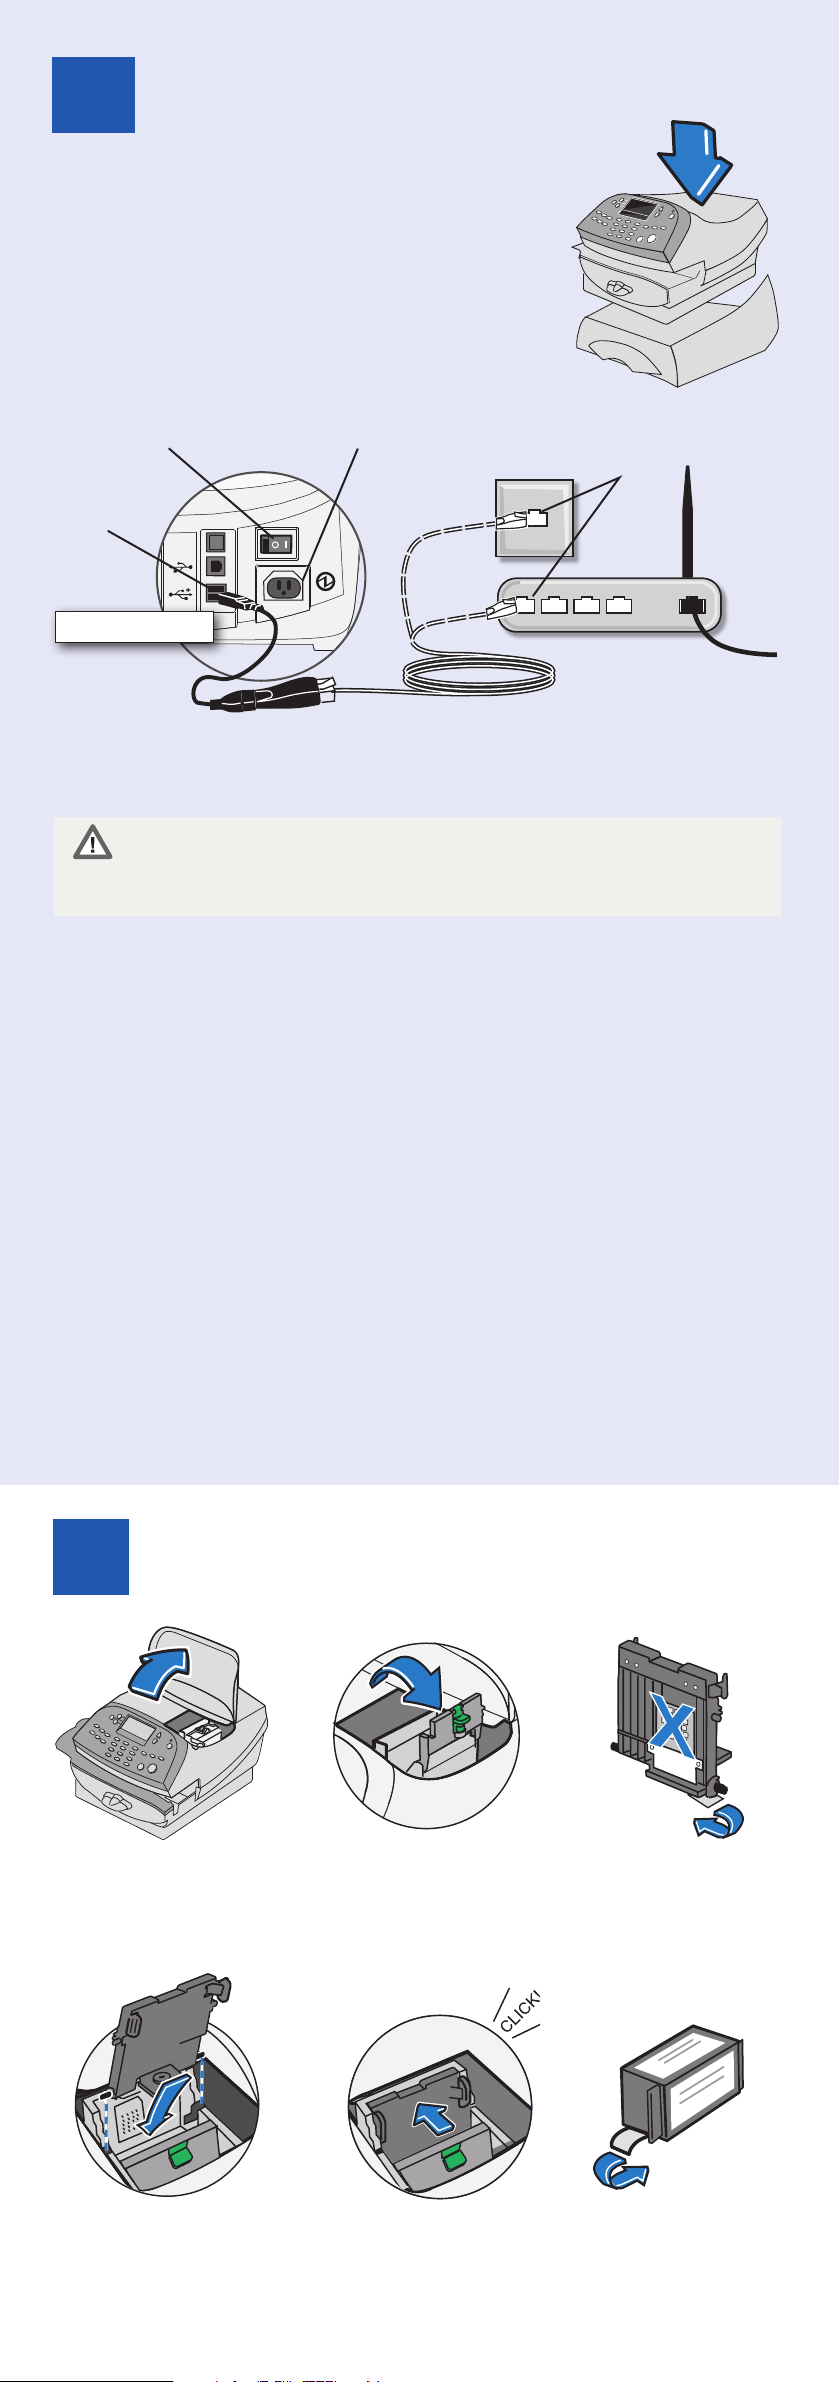
3. Connect to the outside world
3
Remove your franking machine from its packaging.
On models supplied with a base unit, place the machine
onto the base unit now.
Follow the relevant section below for the connection
method you‘ve chosen:
3a. Wired LAN (network) connection
Connect the franking machine to your network as shown
below:
Power switch
USB
connection
Rear of machine
Power connector
Network connection
on router or network
wall socket
Network
Cable
Network Adapter
Plug the power cord into a convenient outlet and into the machine. Turn the power
switch ON.
WARNING: Always plug the equipment into a properly grounded wall
outlet. The socket outlet should be near the equipment and should be easily
accessible. Use the mains lead supplied with your equipment.
When power is turned on, you should see either the 10 or 100 indicator on
the network adapter light and the ACT indicator may also flash. If none of the
indicators light, check your router/network socket is working correctly before
proceeding with step 4.
3b. Wireless LAN (network) connection
Instructions for setting up the Wi-Fi Communication Device are available on the
web. Go to europe.pitneybowes-support.com and enter the code 10959. Follow
the instructions in the guide to setup the device. When complete, return to step 4
of this guide to complete the franking machine installation.
3c. PCMC Connection (Internet connection via your PC)
Before you connect your franking machine to your PC, you need to install our FREE
PC Meter Connect™ software. To do this, you must have administrator rights on
your PC which may require you to contact your IT department. Please note that the
software is not Mac compatible.
To install, visit www.europe.pb.com/PCMeterConnect/setup.exe and choose the
‘Run’ option. Select ‘English (United Kingdom)’ as your installation language and
follow the on-screen instructions. This process installs the software and tests your
franking machine connection. When complete, you are asked to return to step 4 of
this guide to complete the franking machine installation.
Install the print head and ink
4
cartridge
4.1 When the display
shows ‘Print head not
detected. Open cover to
install print head and
ink tank’, open the top
cover.
4.2 Flip open the
guard.
4.3 Remove the print head
from its packaging and
peel the tape strip from
the print head. DO NOT
touch the contacts on
the print head.
4.4 Slide the print head
pegs down into the
grooves.
4.5 Push the print head
to the left until it
clicks into position.
4.6 Unwrap the ink
cartridge making sure
the tape is removed
from the bottom of
the cartridge.
 Loading...