

Page 1
Page 2
FCC Compliance
This equipment has been tested and found to comply with the limits for a Class A digital device, pursuant to part 15 of the
FCC rules. These limits are designed to provide reasonable protection against interference when the equipment is
operated in a commercial environment. This equipment generates, uses, and can radiate radio frequency energy and, if not
installed and used in accordance with the instruction manual, may cause interference to radio communications. Operation
of this equipment in a residential area is likely to cause interference, in which case the user will be required to correct the
interference at his own expense.
Use only a shielded interface cable to operate this equipment with a scale or other peripheral device.
CAUTION: Changes or modifications to this equipment not expressly approved by the party responsible for compliance
(Pitney Bowes) could void the user’s authority to operate the equipment.
FCC Compliance of the Modem
This equipment complies with Part 68 of FCC rules. The label on the equipment cover shows the FCC registration number
and the ringer equivalence number (REN) for the F900 modem. If requested, this information must be provided to the
telephone company. This equipment is designed to connect to a two-wire, local switch, access loop start (Facility Interface
Code 02LS2) with a standard RJ11C interface.
The REN is used to determine the quantity of devices that may be connected to the telephone line. Excessive RENs on the
telephone line may result in the devices not ringing in response to an incoming call. In most, but not all areas, the sum of the
RENs should not exceed five. To be certain of the number of devices that may be connected to the line, contact the
telephone company to determine the maximum REN for your calling area.
If this modem causes harm to the telephone network, the telephone company may discontinue your service temporarily.
You will be notified in advance or as soon as possible. You will be advised of your right to register a complaint with the FCC.
If the user experiences trouble using this equipment, the user shall disconnect the equipment from the telephone line to
determine if the equipment is malfunctioning. If the equipment is malfunctioning, the use of the equipment shall be discontinued until the problem is corrected.
The telephone company may make changes to its facilities, equipment operations, or procedures that could affect the
operation of this equipment. In this event, the telephone company will provide advance notice for you to make necessary
modifications to maintain uninterrupted service.
If you experience trouble with this modem, please refer to the warranty information provided with this equipment. If the
trouble is causing harm to the network, the telephone company may request that you remove the equipment from the
network until the problem is resolved.
This equipment may not be used with party lines or coin lines.
This equipment is not intended to be serviceable. Please refer to the warranty information if problems occur. Failed units will
be withdrawn by approved Pitney Bowes service engineers and returned to the U.S. Service Center. For reference purposes, the U.S. Service Center contact address is: Pitney Bowes Inc., Walter Wheeler Drive, Stamford, CT 06926-0700.
SV60951 Rev. A ©2002 Pitney Bowes Inc.
All rights reserved. This book may not be reproduced in whole or in part in any fashion or stored in a retrieval system of
any type or transmitted by any means, electronically or mechanically, without the express, written permission of Pitney
Bowes.
We have made every reasonable effort to ensure the
accuracy and usefulness of this manual; however, we
cannot assume responsibility for errors or omissions
or liability for the misuse or misapplication of our
products.
Due to our continuing program of product improvement, equipment and material specifications as well
as performance features are subject to change
without notice. Your postage meter may not have
some of the features described in this book.
E-Z Seal, Postage By Phone and BUDGET MANAGER
are trademarks or registered trademarks of Pitney
Bowes Inc. ENERGY STAR is a registered trademark
of the United States Environmental Protection Agency.
Page 3

Page 4

Contents - See Tabs
1 - Read This First
2 - Meet the DM1000
3 - Mail In a Minute
4 - Running Mail
5 - Set Up
6 - Adding Postage
7 - Accounting
8 - Reports
9 - Maintaining and Updating
10 - Troubleshooting
11 - Supplies and Options
Appendix A: Glossary
Appendix B: Checklist
Index
Page 5

Page 6

1
Read This First
Chapter Contents
In this Guide ................................................ 1-2
Other Information ........................................ 1-3
Publications ........................................... 1-3
On the System ....................................... 1-3
The Web................................................. 1-3
Our Help Desk ....................................... 1-3
What You Need to Know
USPS Requirements ............................. 1-4
Safety Requirements............................. 1-4
Telephone Safety ................................... 1-6
SV60951 Rev. A
Page 7

1 Read This First
In This Guide
Chapter 1— Read This First contains important information about USPS
requirements and important safety precautions.
Chapter 2—Meet the DM1000 gives an overview of the system and the
location of each control and system feature. Please read this section
carefully. It provides a foundation for the instructions in later sections of
this book.
Chapter 3—Mail in a Minute explains how to run mail as soon as your
DM1000 is installed.
Chapter 4—Running Mail explains how to run your jobs using different
mail modes, as well as how and when to use the available system
options.
Chapter 5—Mailing System Setup provides step-by-step instructions for
customizing your system to suit your needs.
Chapter 6—Adding Postage explains how to add postage funds to your
system using Pitney Bowes Postage By Phone
Chapter 7—Accounting Setup explains how to setup accounts and how
to track postage.
®
service.
Chapter 8—Reports explains the different types of reports available and
how to print them.
Chapter 9—Maintaining and Updating explains routine maintenance
procedures and how to update postal rates.
Chapter 10—Troubleshooting explains how to fix problems you may
encounter while using your mailing system.
Chapter 11—Supplies and Options lists the supplies available for your
system and explains how to order them.
Appendix A—The Glossary explains mailing terms that are frequently
used throughout the operator guide.
Appendix B—Operator Training Checklist is a list of procedures and
features the Pitney Bowes representative will review with you during
installation of your mailing system.
1-2 SV60951 Rev. A
Page 8

Other
Information
DM1000 Operating Guide
1
Publications
On the System
The Web
Postage By Phone® Guide
This booklet details all the features of the Pitney Bowes Postage By
Phone system.
Scale User Guide
If you purchase an attached scale, read this guide if you have questions
about its operation.
Quick Reference Cards
Many of the tasks you need to perform, such as how to set postage,
process mail, or clear jams, are summarized in the Quick Reference
Cards. The cards are located in a slot in the stacker of the DM1000.
Help Key
This key is located on the IntelliLink Control Center™. Press this to
access the DM1000 Help system. When you press the Help key, the help
information that appears on the main screen of the control center refers
to the current operation being performed by your mailing system.
To get answers to questions most frequently asked, go to:
http://www.pb.com.
Our Help Desk
To place requests for service or training, go to:
http://www.pb.com and click on My Account.
To order PB supplies and accessories, go to:
http://www.pb.com and click on Supplies Online.
To view and pay invoices online, go to:
http://www.pb.com and click on My Account.
To view inventory, go to:
http://www.pb.com and click on My Account.
To add postage to your Postage By Phone account, go to:
http://www.pb.com and click on Postage By Phone.
For direct questions, call: 1.800.522.0020. Customer Service
Representatives are available Monday through Friday, 8AM - 8:00PM
EST.
SV60951 Rev. A
1-3
Page 9

1 Read This First
What You Need
to Know
USPS
Requirements
Safety
Requirements
Since your postal security device is licensed by the United States
Postal Service (USPS), you must follow a few basic requirements.
• Mail must have the correct date and postage amount on the meter
stamp.
• Metered mail must bear the ZIP Code location of the post office
where the postal security device is registered.
• If you move to another ZIP Code location, you must update the ZIP
Code. You can do this by calling your local Pitney Bowes support
line.
• Each time you add postage through the modem, the Postage By
Phone
your mailing system has not detected a modem refill transaction at
certain intervals, the messages “Inspection Due” and “Inspection
Required” display on the IntelliLink Control Center.
• You must use Pitney Bowes tape which meets USPS specifications.
®
computer automatically performs a postal inspection. If
Warning! Follow normal safety precautions for all office
equipment whenever you use your DM1000 Mailing
System.
• Read all instructions thoroughly before attempting to operate the
equipment.
• Use this equipment only for its intended purpose.
• Always follow the specific occupational safety and health
standards prescribed for your workplace or area.
• Use the power cord supplied with the system and plug it into a
properly grounded wall outlet that’s located near the system and
easily accessible. Failure to properly ground the system can result
in severe personal injury and/or fire.
• The power cord wall plug is the primary means of disconnecting
the system from the AC supply.
• Avoid using wall outlets that are controlled by wall switches, or
shared with other equipment.
• Do not use an adapter plug on the line cord or wall outlet.
• Do not remove the ground pin from the line cord.
• Do not route the power cord over sharp edges or trap wire
between furniture.
• Make sure there is no strain on the power cord.
• Be certain the area in front of the wall outlet into which the system
1-4 SV60951 Rev. A
Page 10

DM1000 Operating Guide
Safety
Requirements
(Cont.)
is plugged is free from obstruction.
• Keep loose clothing, neck ties, jewelry, and long hair away from all
moving parts.
• Avoid touching moving parts or materials while the system is in use.
• Before clearing a jam, be sure system mechanisms come to a stop.
• When removing jammed material, avoid using too much force to
prevent minor personal injury and damaging equipment.
• To prevent overheating, do not cover the system vent openings.
• Do not place lighted candles, cigarettes, cigars, and the like, on the
system.
• Do not remove covers. Covers enclose hazardous parts that should
only be accessed by Pitney Bowes Customer Service. Report any
damage of covers to Pitney Bowes.
• If the IntelliLink Control Center™ display does not light, unplug the
system from the wall outlet and call for service.
• Use only Pitney Bowes approved ink, tape strips, and cleaners. Call
our Supply Line. If you need Material Data Safety Sheets on the
supplies for OSHA requirements, contact your local Pitney Bowes
branch.
1
If you use the AC adapter to power the IntelliLink Control Center:
• Use only the AC adapter designed specifically for the IntelliLink
Control Center. Third-party AC adapters may damage the control
center.
• To protect against electrical shock, plug the AC adapter into a
properly grounded wall outlet.
• Do not route the AC adapter cable over sharp edges or trap it
between furniture.
NOTE: Your system requires annual cleaning by your local Pitney
Bowes service representative. For continued safe operation, contact
your Pitney Bowes office to schedule this service.
SV60951 Rev. A
1-5
Page 11
1 Read This First
Telephone
Safety
The mailing system base and detachable IntelliLink Control Center
connect directly to an analog telephone line. For your protection, basic
safety precautions should always be followed to reduce the risk of fire,
electric shock, and injury to persons, including the following:
• Disconnect the telephone cord from the wall before removing the
User Interface.
• Do not use this product near water, for example, near a bath tub,
wash bowl, kitchen sink or laundry tub, in a wet basement or near a
swimming pool.
• Avoid using a telephone or equipment that connects to a telephone
line during an electrical storm. There may be a remote risk of
electrical shock from lightning.
• Do not use the telephone or equipment connected to the telephone
line to report a gas leak in the vicinity of the leak.
• Never touch uninsulated telephone wires or terminals unless the
telephone line has been disconnected at the network interface.
CAUTION! To reduce the risk of fire, use only 26 AWG or
smaller telecommunication line cord either supplied with
the system or acquired separately.
1-6 SV60951 Rev. A
Page 12

2
Meet the DM1000
Chapter Contents
Introducing the Mailing System.................. 2-2
Features and Benefits ................................. 2-3
IntelliLink Control Center ...................... 2-3
Energy Star Compliance ....................... 2-4
Postal Security Device .......................... 2-4
Communications Options ..................... 2-4
Equipment Options ............................... 2-4
Reporting and Accounting.................... 2-4
Advertisements and Inscriptions .......... 2-5
Permits .................................................. 2-5
The DM1000 Exterior Features ................... 2-6
The DM1000 Interior ................................... 2-8
The DM1000 IntelliLink
IntelliLink Control Center .......................... 2-10
Equipment Specifications......................... 2-14
Material Specifications ............................. 2-16
SV60951 Rev. A
Page 13

2 Meet the DM1000
Introducing the
Mailing System
Features and
Benefits
The DM1000 is a full-featured, easy-to-use digital mailing system that you
can easily customize to meet the unique requirements of each job you
process.
The system automatically:
• Feeds a stack of mixed mail envelopes
• Weighs envelopes, flats and packages (up to 1 lb.)
• Applies postage directly to envelopes or to postage tapes for larger
pieces of mail
• Seals envelopes with flaps open or closed
• Stacks finished pieces of mail
Your mailing system’s advanced features include:
• Large, easy-to-read graphic display shows the system’s status and
prompts you through all setup operations
• Easy loading of optional advertisements and inscriptions.
• Convenient, one-button funds refill through Postage By Phone
analog phone line)
• Easy-to-maintain ink jet printer provides clear, crisp meter stamp.
• Automatic date advance
®
(requires
IntelliLink Control
Center™
• Daily piece count printing
• Versatile accounting feature stores postage costs for 25 standard
accounts or 100 and 300 optional departmental accounts, depending on
the options purchased
• Password protection limits access to authorized personnel
• Moistening system for envelopes and tapes; also offers no-seal and seal-
only options
• Built-in roll tape, gummed or pressure-sensitive
• Communications port for an optional Pitney Bowes electronic scale,
printer, personal computer or other external devices
• Full report printing capability provides hard-copy records of your postage
transactions
The IntelliLink Control Center is mounted on the top of your mailing
system. It has a large, easy-to-read graphic display, function keys and
alpha and numeric keypads. A series of messages and menu options
appear in the display to prompt you through all setup and mailing
operations. You use the function keys and keypads to respond to the
system prompts and select your options.
2-2
SV60951 Rev. A
Page 14

DM1000 Operating Guide
IntelliLink Control
Center™
Energy Star
®
Compliance
The Modem
Your mailing system connects to an external modem which requires an
analog telephone line using 25AWG or smaller phone cord. The modem
allows data communications with Pitney Bowes support services as well
as external mail/parcel carriers.
Communications with Pitney Bowes provides many benefits:
• Convenient Postage By Phone refills: add more postage to your postal
security device at the touch of a button.
2
• Postal security device inspection by phone: you don’t have to carry
your postal security device to the local Post Office for an inspection.
• Support for USPS Confirmation services. You can upload Delivery
Confirmation, Signature Confirmation and E-Certified Mail transactions
directly from your postal security device. You can also easily check the
delivery status of these mail pieces using either the Pitney Bowes or
the USPS web site.
• Ability to download optional advertisements and inscriptions.
• Ability to download rate change and software updates.
As an ENERGY STAR Partner, Pitney Bowes has determined that
the DM1000 mailing systems meet ENERGY STAR guidelines for
energy efficiency. The postal security device automatically enters
a low power state called a “sleep mode” if you don’t use it for a
while. This keeps energy consumption low, while maintaining the high state
of readiness you expect from Pitney Bowes mailing equipment.
Postal Security
Device
SV60951 Rev. A
Office equipment is the fastest growing electricity load in the commercial
buildings sector. The U.S. Environmental Protection Agency (EPA)
promotes energy efficiency because electricity generation contributes to
air pollution, including 35 percent of all U.S. emissions of carbon dioxide,
one of the key contributors to global warming. It also accounts for 70
percent and 33 percent of all U.S. emissions of sulfur dioxides and
nitrogen oxides, respectively; these contribute to acid rain and urban
smog. By using more energy-efficient equipment, you can reduce both
pollution and energy costs.
The ENERGY STAR program is another example of how Pitney Bowes is
good for the environment and smart for business.
Your mailing system is equipped with a Postal Security Device (PSD) that
incorporates the latest technology approved by the United States Postal
Service to secure funds. This technology eliminates the need to perform
physical inspections of your postal security device. The PSD contains the
funds and performs all calculations necessary to print meter stamps that
comply with current USPS standards. The PSD is located in your mailing
system’s IntelliLink Control Center.
2-3
Page 15

2 Meet the DM1000
Communications
Options
Equipment
Options
USB Port
Your mailing system has a Universal Serial Bus (USB) port that allows you to
connect it to a personal computer (PC), optional scale, printer or other USBcompatible device. Your system can communicate with the following Pitney
Bowes software applications or equipment through the USB port:
• Pitney Bowes Data Exchange—Captures postage accounting data and
formats it for use in spreadsheet and database applications.
• Setup Software
• AccuTrac™ Mail Management System—Allows your mail system to
function as a station in a networked environment so you can capture and
analyze the actual costs of your entire mailing and shipping operation.
• Pitney Bowes Ascent
performance, integrated shipment processing.
These highly flexible connectivity options mean you can easily integrate your
DM1000 into your mailing operation and expand its capability at any time.
™
Mail Center Management—Provides high
Stacker
• U7P0 Power Stacker. This provides a larger area for stacking stamped
envelopes.
Reporting and
Accounting
• J624 Laser Printer. This printer is used to print reports.
Printer
Setting up your printer is easy. Simply plug it in to the USB port and the
mailing system recognizes it and automatically sets it up.
The accounting and reporting features allow you to store and retrieve
postage costs for up to 25 accounts, however, you may purchase options for
storing up to 100 or 300 accounts. You can specify up to three levels of
accounts to track your postage expenses with precision. You can also
prevent unauthorized access to any account by password protecting it.
You can print out reports for single or multiple accounts. (Note that some
reports may require you to connect a USB-compatible printer to your mailing
system). For more information on reports and accounts, refer to 8-Reports
and 7-Accounting in this guide.
BUDGET MANAGER
You can also purchase the enhanced accounting package, BUDGET
MANAGERTM. With BUDGET MANAGERTM you get all of the standard
accounting features plus the ability to create or store:
• Up to 3000 accounts • Customized classes, carriers and fees
TM
2-4
• Up to 50 operators • Up to 15,000 transactions
• Customized reports
SV60951 Rev. A
Page 16

DM1000 Operating Guide
Reporting and
Accounting (cont.)
Permits
A purchasable option. Not
in all systems
.
BUDGET MANAGERTM DM is an optional enhanced accounting package you
can purchase for your DM series mailing system. It contains all the standard
accounting features plus allows you to create and store up to 3000
accounts, 50 operators, and up to 15,000 transactions. You can also create
customized reports, carriers and fees, and apply budgets and surcharges to
individual accounts.
BUDGET MANAGER
• Define budgets that allow you to track individual accounts against a
predetermined budget
• Select from an expanded set of accounting periods such as Monthly,
Quarterly, Semiannual and Annual
• Apply several different types of surcharges (per piece, per
transaction, or percentage of transactions.
For more information on BUDGET MANAGER
MANAGERTM Accounting Operator Guide, SV60957.
You can print a permit on a piece of mail instead of a meter stamp. A permit
is a postal mark containing a permit number. You must bring permit mail to
the post office for special processing and discount rates.
TM
allows you to:
TM
, refer to BUDGET
2
Advertisements
and Inscriptions
Before you use permits, you must open a permit account with the Post
Office, then order permit artwork from Pitney Bowes. For information on
ordering permits, see 11 - Supplies and Options.
You can select the permit mode using the Mode key on the IntelliLink
Control Center. Weight is not displayed on the screen in the Permit Mode.
Advertisements and inscriptions contain, respectively, messages and postal
information that you can include in the meter stamp.
A number of advertisements and inscriptions are included with your postal
security device. You may order customized advertisements that bear your
personalized message as well as additional standard advertisements. You
can also order more inscriptions.
Advertisements and inscriptions are options you can buy through the Pitney
Bowes Supply Line
Advertisements and inscriptions are supplied on an art card that you insert
into a slot on the side of the IntelliLink Control Center. Once installed, you
can select an advertisement and/or inscription when you run a mail job.
SM
at 1.800.243.7824. (See 11 - Supplies and Options).
SV60951 Rev. A
2-5
Page 17
2 Meet the DM1000
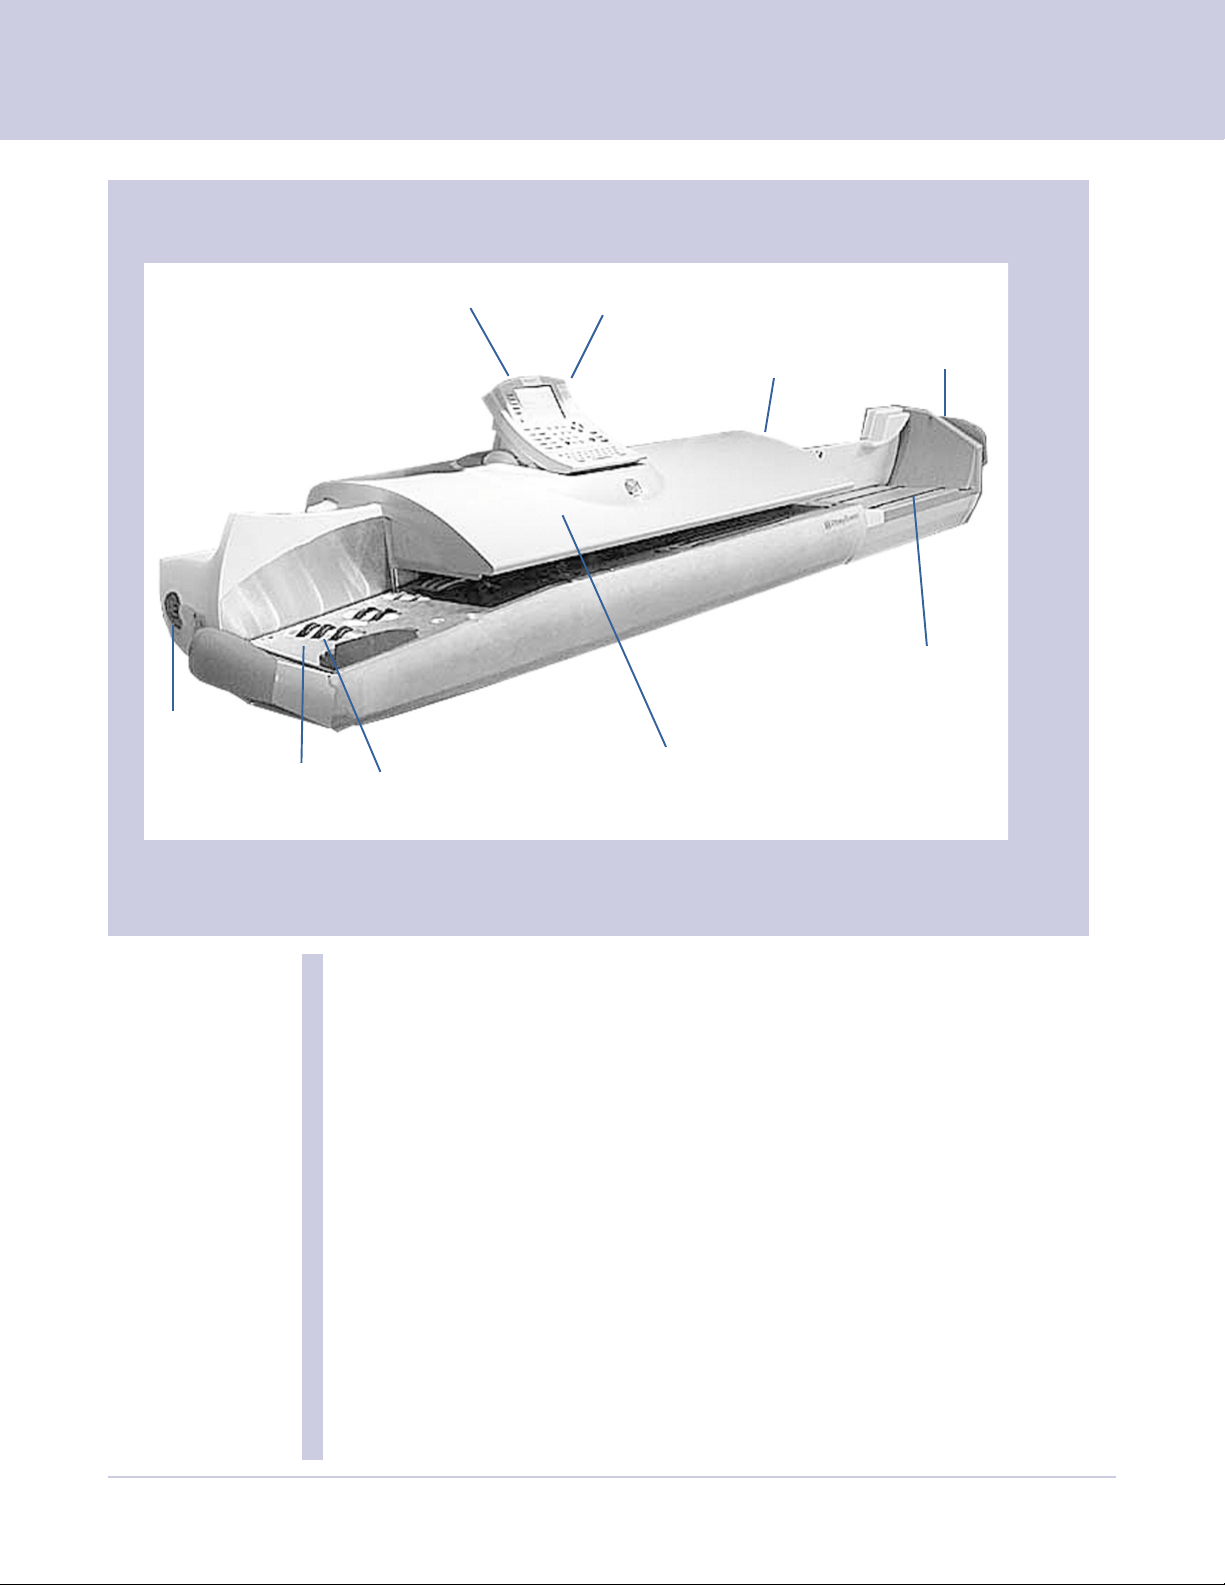
The DM1000 Exterior Features
On/Off
Switch
IntelliLink Control Center
Postal Security Device
Feed Deck Feeder Deck
Rollers
Art Card Slot
Main Cover
Tape Moistener Cover
Power Stacker
Quick
Reference
Cards
2-6
IntelliLink Use the keypad to tell your system what to do.
Control Center The display tells you what the system is doing
and prompts you through set up operations.
See page 2-10 for a complete description of all
controls.
Postal Security Device Stores postage funds and tracks postage
usage and is part of the IntelliLink Control
Center.
Art Card Slot Optional customized advertisements,
inscriptions and permits are furnished on art
cards. Insert the art card in the slot on the side
of the IntelliLink Control Center to load your
option.
Tape Moistener Cover Open this door to inspect and clean the
moistener brush, or adjust for wet or dry tape.
SV60951 Rev. A
Page 18

DM1000 Operating Guide
Wet/Dry Tape Lever Move this lever down for dry tapes or
pressure-sensitive tapes; move it up to wet
gummed tapes.
On/Off Switch Turns system on and off.
Quick Reference Cards Provides easy-to-use operating instructions.
Feed Deck Load envelopes on this platform.
Main Cover Encloses moving parts and prevents dust
contamination.
Power Stacker The mailing system deposits finished mail in
Drop Stacker the drop stacker or optional power stacker.
2
SV60951 Rev. A
2-7
Page 19
2 Meet the DM1000
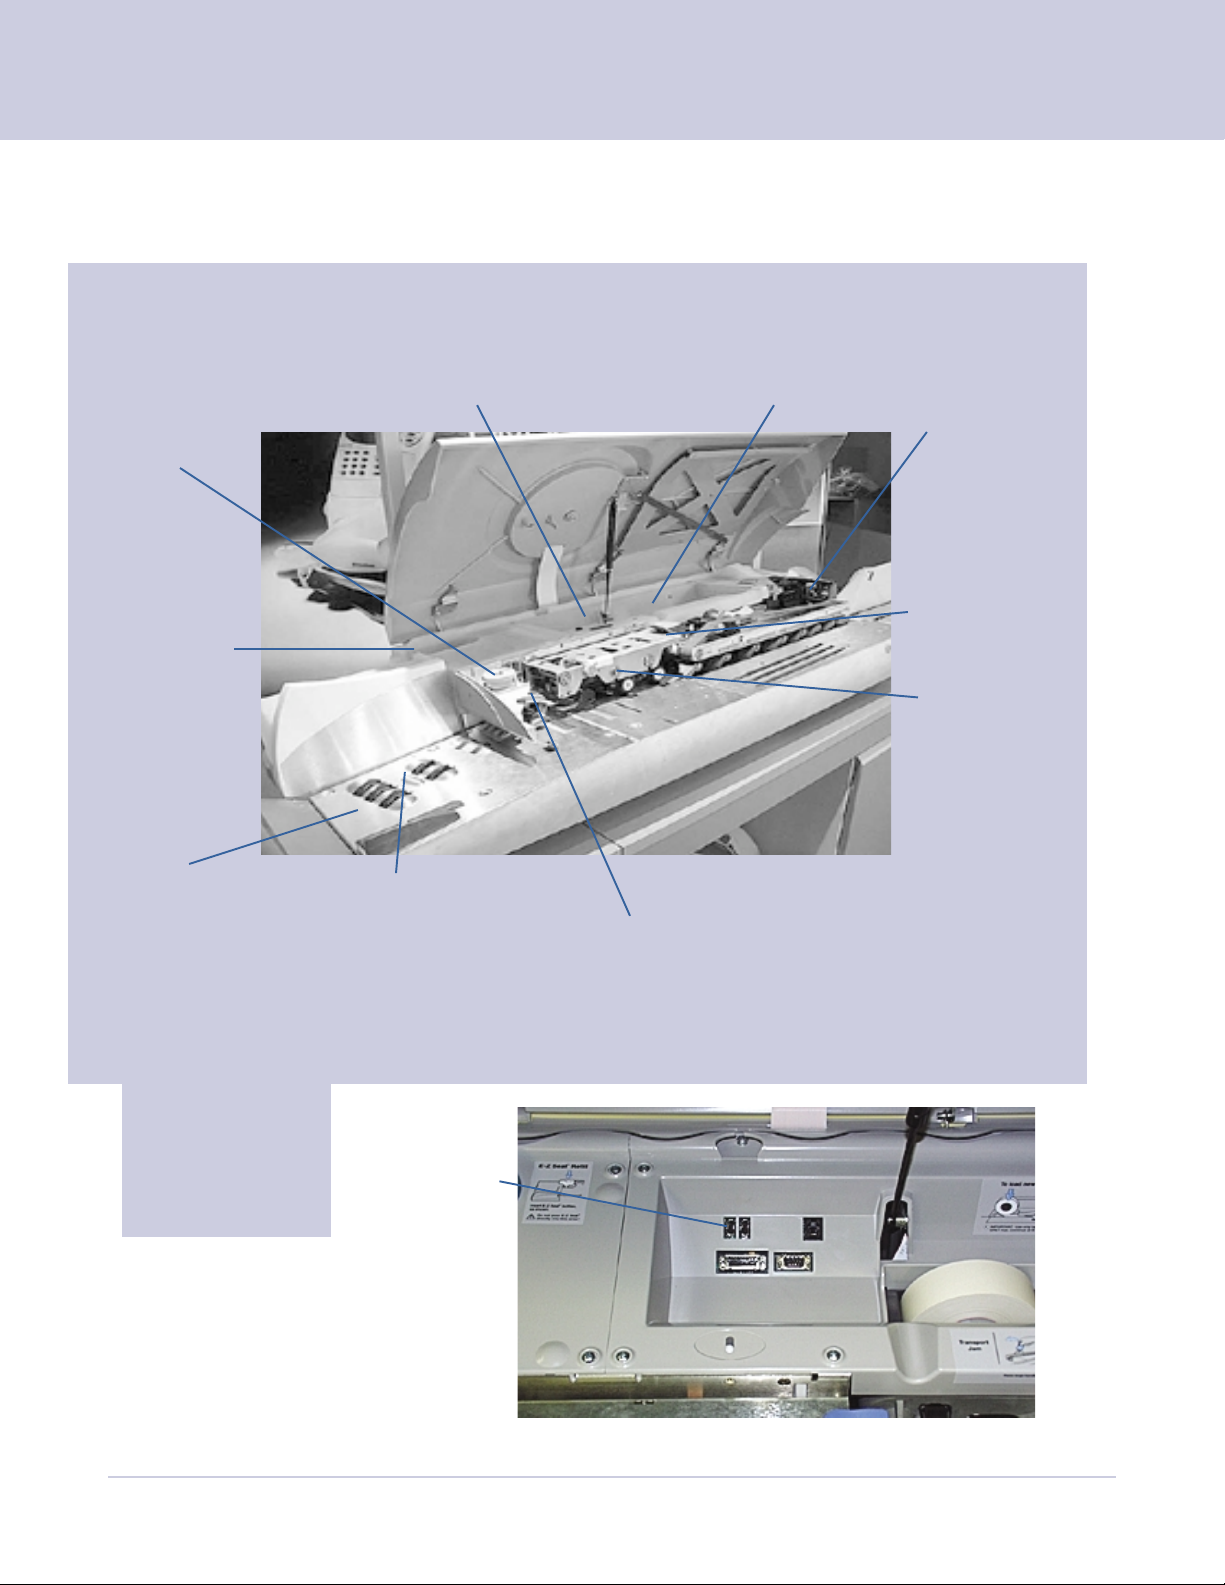
DM1000 Interior
Thickness
Adjustment
Knob
E-Z Seal
Moistener
Bottle
Feed Deck
External Device Ports
Feeder Rollers
Roll Tape
Feeder Jam
Release Lever
Print
Engine
Ink Cartridge
Transport Jam
Lever
Light mail/
Postcard
Selection
Knob
2-8
USB cable to
External Modem
External Device Ports: Your internal connection
to Postage By Phone
SV60951 Rev. A
Page 20

DM1000 Operating Guide
Roll Tape The tape supply is located here. Print meter
stamps on tape for pieces of mail that can’t
go through the system. You can also print
reports on tape.
Print Engine Contains the printer and the ink cartridge
that produce the meter stamp.
Ink Cartridge Contains ink used to produce the meter
stamp.
Transport Jam Lever Relieves tension on parts along feeder path
to clear jams.
Feed Deck Transports envelopes of mixed thicknesses
through the feeder path.
Feeder Rollers Rollers that move the mail on the transport
deck into the feeder.
Thickness Adjustment Sets the system to accommodate the
Knob thickness of the envelopes you are feeding.
Light mail/Postcard Applies pressure to envelopes to ensure
Selection Knob proper sealing.
Feeder Jam Release Lever Relieves tension on parts along feeder path
to clear jams.
E-Z Seal Moistener Bottles Hold the E-Z Seal used to seal mail and
tapes.
2
SV60951 Rev. A
2-9
Page 21
2 Meet the DM1000
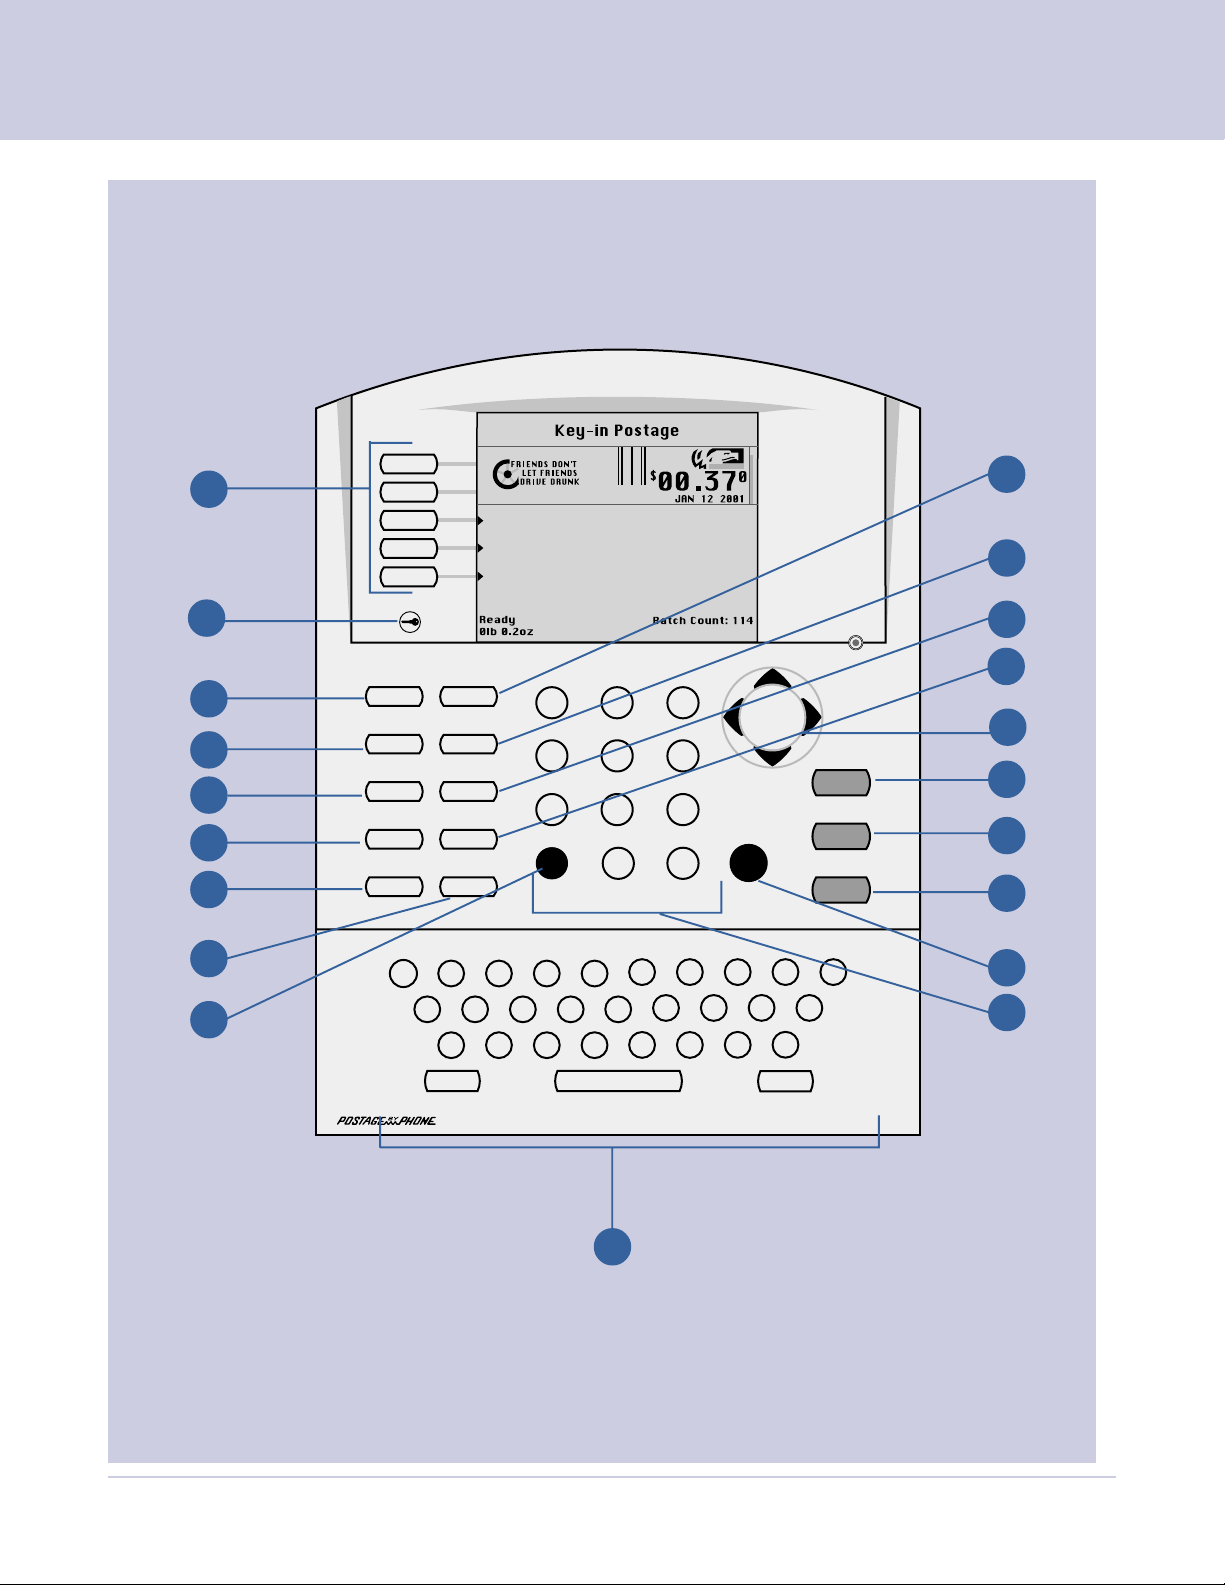
The DM1000 IntelliLink Control Center
1
2
3
4
5
6
7
12
20
Lock
Normal Preset
Mode
Class
Seal
Accounts Help
Q
#
A
Account:
Class:
Zip/Zone
Custom Presets
Menu
Funds
Reports
Engineering
First Class
06850-0123
1 2 3
4 5 6
7
Clear/Back
C
?
ERT
W
$
%
SDFG
(
*
ZXCV
-
)
+
Presorted
First Class
8 9
Enter
0 •
YU I OP
_
/
HJKL
,
'
BN
@
!
?
M
8
9
10
11
15
Start
16
Tape
17
Stop
18
:
14
13
2-10
Shift Space
19
Symbol
SV60951 Rev. A
Page 22

DM1000 Operating Guide
1. Five Screen Keys The five keys directly to the left of the display
screen allow you to select options displayed
on the screen.
2. Lock Button Deselects the current account. If no account
is selected it locks the IntelliLink Control
Center.
3. Normal Preset Key Returns you to the most commonly used
setting.
4. Mode Key Press to choose from variety of mail
processing modes.
5. Class Key Enables you to select the correct class for
your mailing (for example: First Class, Priority,
Media Mail.)
6. Seal Key Allows you to choose to moisten and seal
envelopes without applying postage or any
printing on the piece of mail.
7. Accounts Key Press to set up or edit accounts.
2
8. Custom Preset Key Press to choose frequently used system
settings for running different jobs.
9. Menu Key Press to view the settings and options
available:
• Meter Stamp Options
• Setup
• Zero Scale
• Rates Details
• Multiple Tapes
• Adjust Display Contrast
• Confirmation Services
• Maintenance
• Turn Features On
• Volume Control
• Currency Add
• Display Metric Weight
SV60951 Rev. A
2-11
Page 23
2 Meet the DM1000
10. Funds Key Allows you to obtain the following information:
• Funds Available in PSD
• Funds Used
• Total pieces of mail processed by the
• Quick Refill
• Other Refill Amount
• Get Postage By Phone® Balance
11. Reports Key Offers a selection of different types of reports
to run.
12. Help Key Press to get detailed information about a
screen you are viewing.
13. Number Keyboard Press numbered keys to enter postage
amounts and weight.
14. Enter Key Press to complete the entry of information you
have typed using the number and alpha keys.
system
15. Arrow Keys Allow you move between new menus, scroll
menus, or select options.
16. Start Key Begins processing the pieces of mail with the
options you have selected.
17. Tape Key Allows you to print postage tapes for
packages and pieces of mail that are too big
for processing through the mailing system.
18. Stop Key Ends a mail or tape processing job in
progress.
19. Alpha Keyboard Use to enter accounts and other setup
information. The keyboard is underneath a
cover that hinges open for access.
Press shift key for capital letters and the
space key for inserting space when needed.
The symbol key is not for use in the U.S.
20. Clear Key Press to clear an entry, or go to the previous
screen or screens.
2-12
Alpha Keyboard Fold Out Cover
SV60951 Rev. A
Page 24
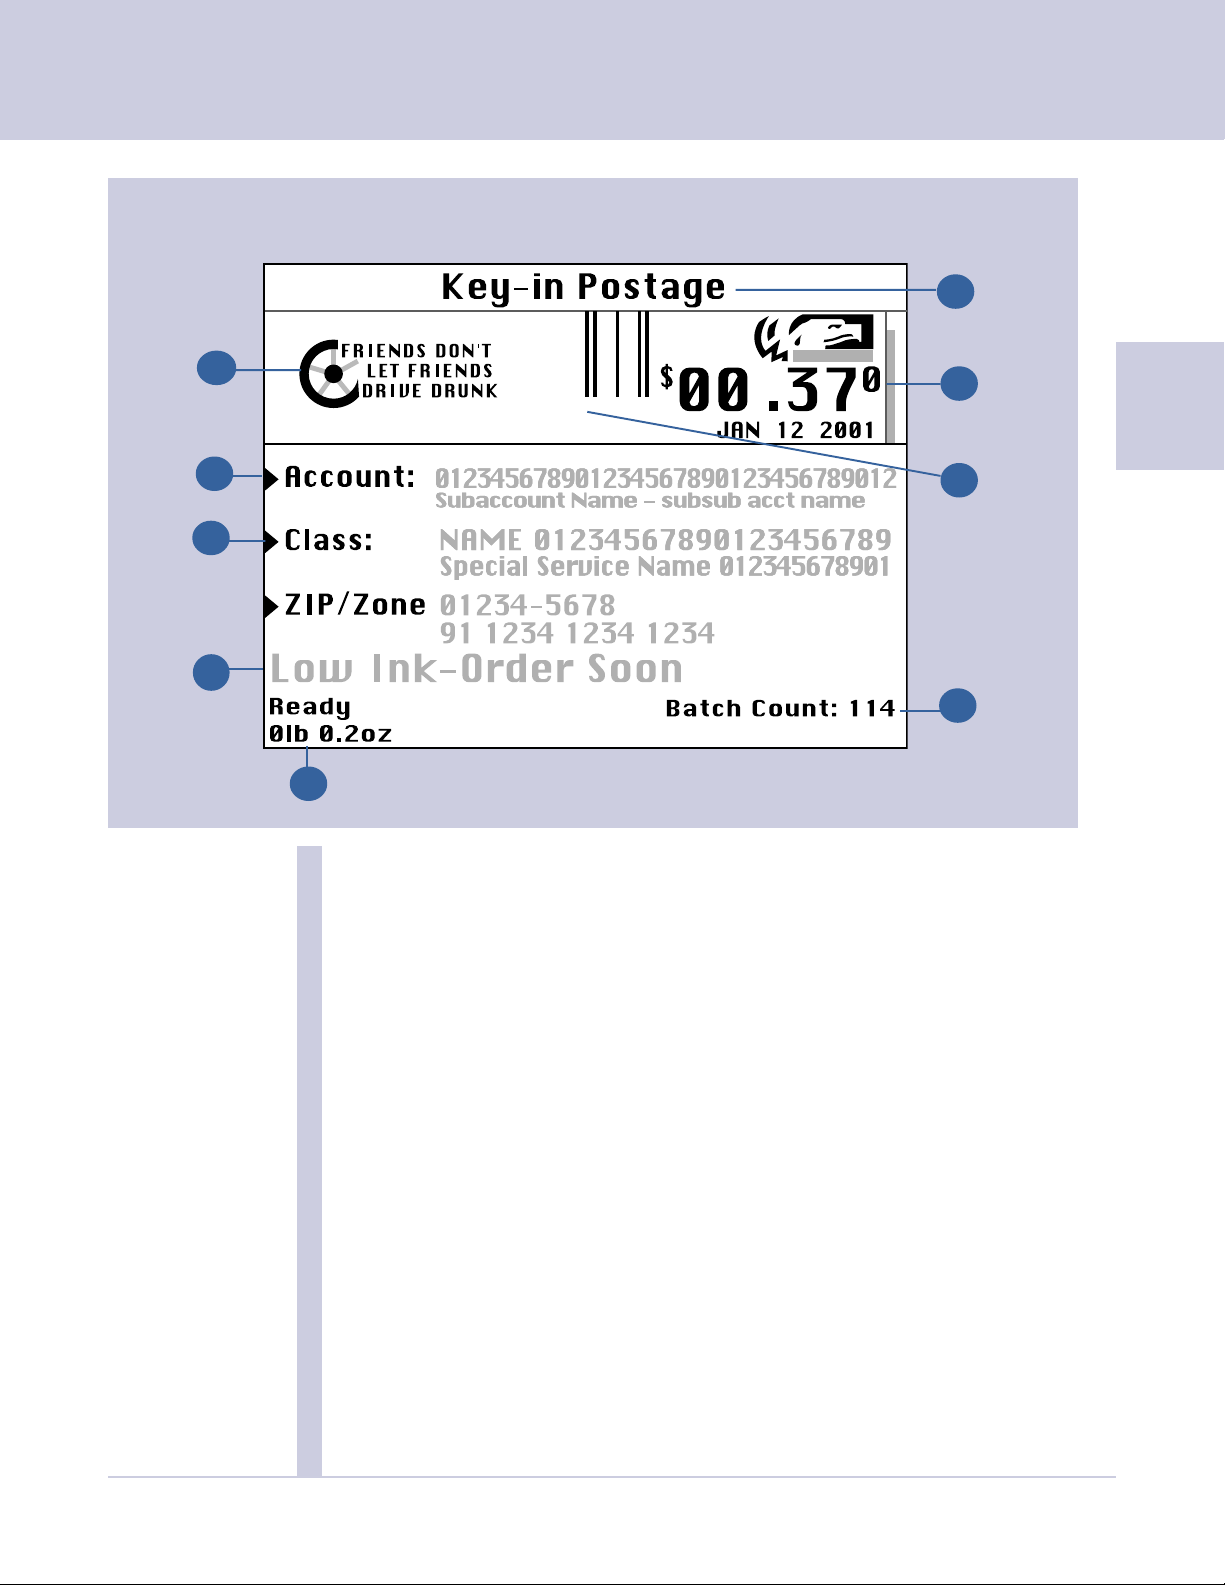
The Main Screen
DM1000 Operating Guide
6
1
Presorted
First Class
2
3
4
5
The content of the main screen depends upon the current mode of the
system. Only main screens contain a meter stamp and the main status.
1. Advertisement Display The optional message to be printed on the
envelopes or tape (if selected).
7
2
8
9
SV60951 Rev. A
2. Account The account name to which postage is
charged.
3. Class The currently selected class of the piece of
mail.
4. Main Status Area Displays important information such as
warnings.
5. Weight Display Area Displays the weight of the piece of mail.
6. Mode The mode in which the piece of mail will be
processed or what the next required action will
be.
7. Meter Stamp The official USPS stamp with postage printed
on an envelope or tape.
8. Inscription Optional postal message regarding class or
special services.
9. Batch Count The number of pieces of mail run in a job.
2-13
Page 25

2 Meet the DM1000
Equipment
Specifications
Length
• Without a Drop
Stacker or
Power Stacker
• With A DropStacker
• With Power Stacker
Width
Height (cover closed)
Power 100-240 VAC
Compliance
Operating 40°F (4°C) to 109°F (43°C)
Temperature Temperature will vary depending on the
BTUs per Hour Approximately 1295
:
56 inches (142.24cm)
68 inches (172.72cm)
100 inches (254cm)
24 inches (60.96 cm)
21 inches (53.34 cm)
UL 1950, UL Listed
material used
Ink Usage 45,000 pieces with no advertisements,
permits, or inscriptions
30,000 pieces with advertisements, permits,
or inscriptions
1.5 years shelf/installed life
Printhead Life 1,000,000 cycles
External Modem 56 bytes/sec
Phone Cord - Analog Line 25 AWG or smaller phone cord
2-14
SV60951 Rev. A
Page 26

DM1000 Operating Guide
Equipment
Specifications
Optimum
Performance
Mail Processing Speed Max. Pieces per Minute (PPM)
Model * In WOW Mode In Non-WOW Mode
DW00 120 PPM 240 PPM
DW01 N/A 240 PPM
The actual throughput of the system varies depending
on the material processed, system condition, and
operator skill.
*Model numbers are on labels located under the main
cover on the real panel of your mailing system.
• Gummed tape throughput 35-40 tapes per minute,
depending on the model
• Adhesive tape throughput is 40 tapes per minute
with meter stamp only and 35 tapes per minute
with advertisements and inscriptions
2
Advertisement • Up to 10 advertisement
Storage
Inscription Storage • Up to 20 inscriptions
Accounting • 25 accounts standard
100 or 300 accounts optional
• BUDGET MANAGER™ Optional
Postal Security • Maximum Stamp: $99.99
Reset Type: Postage By Phone
Device Settings
• Piece count: Up to 8 digits
(non-resettable)
• Batch count: Up to 8 digits
(resettable)
SV60951 Rev. A
2-15
Page 27

2 Meet the DM1000
Material
Specifications
Mailing Materials
You get the best results from your mailing system when the materials you
use conform to the specifications below. Apply tape to pieces of mail that are
too big for system processing.
Envelope Dimensions (see figure, next page)
Minimum: 3-1/2 in. x 5 in. (89 mm x 127 mm) postcard size.
Maximum: 13 in. x 15 in. (330 mm x 381 mm) without W-O-W®
13 in. x 13 in. (330 mm x 330 mm) with W-O-W
Envelope Flap Depth For Sealing
Flap Open
Minimum: .75 in. (19 mm)
Maximum: 4 in. (101.6 mm)
Flap Closed
Minimum: .75 in. (19 mm)
Maximum: 2.75 in. (69.8 mm)
NOTE: Certain types of envelopes must be fed flap open to
ensure proper sealing. These include: square flapped mail, mail
with deep, pointed flaps, and catalogs.
Envelope Thickness
Minimum: 0.007 in. (0.18 mm)
Maximum: 3/4 in. (18 mm)
Acceptable Envelope Materials Include
• Standard envelope paper
• Self-mailers
• Tri-fold mail
• Pre-sealed envelopes
Envelope Flap Profiles
• Commercial (square and baronial)
• Executive
• Monarch
Mail Weight
5 lbs. (2.27kg) maximum for each piece (Non W-O-W)
1 lb. (.45 k g) maximum for each piece (W-O-W)
2-16
Tape Roll Width
1 1/17 inches (36mm) wide
4.5 (114.3mm) or 5 inch (127mm) rolls
SV60951 Rev. A
Page 28

DM1000 Operating Guide
Envelope Specifications for DM1000
NOT Drawn to Scale
<
>
13 in. (330mm)
>
3-7/8 in. (98mm)
>
>
2
Maximum
15 in. (381mm) without W-O-W; 13
>
in. (330mm) with W-O-W
>
3.5 in.
(89mm)
>
<
5 in. (127mm)
1 in. (25.4mm)
>
>
>
Minimum
SV60951 Rev. A
2-17
Page 29

Page 30

3
Mail In A Minute
Chapter Contents
Mail in a Minute ........................................... 3-2
Preparing Your Mail .................................... 3-2
Running a Piece of Mail .............................. 3-2
Printing a Postage Tape .............................. 3-3
SV60951 Rev. A
Page 31

3 Mail In A Minute
Mail In A
Minute
Preparing Your
Mail
Running Mail
This chapter explains how to use the “Key In Postage” mode. It’s the
quickest and easiest way to run a piece of mail or print a postage tape.
Use Key In Postage if you know the correct amount of
postage for your piece of mail.
• Be sure you have checked 2 - Meet the DM1000 of this guide for
details on the types of mail the system accepts, the types that can be
run along the mailpath, and the types that require a tape.
• Adjust the light mail/postcard selection knob or the thickness
adjustment knob for envelope thickness (located under the cover). The
label on the knob shows the settings.
• If you are using presealed envelopes, make sure you press the Seal
key on the IntelliLink Control Center and select Sealer off or the
envelopes will jam.
How to Run Mail
1. Press the Mode key.
2. Select Key In Postage.
3. When the “Ready” screen appears, type in the postage amount
using the number keys on the IntelliLink Control Center.
4. Press Enter.
5. Place mail on feed deck (maximum height is 7 inches and
maximum weight is 5 lbs) with the address side up and with the
upper edge of the envelope
against the rear feed wall.
6. Remove the mail from the
stacker.
While the machine processes the mail, the screen:
• displays status of the current job,
• instructs the operator, if necessary:
- to insert envelope
- to turn off machine
• keeps a running count of processed mail, and
• displays errors, at which point the machine stops immediately.
3-2 SV60951 Rev. A
Page 32

DM1000 Operating Guide
Printing a
Postage Tape
For packages or mail thicker than 3/4 inch you must print a postage tape.
To use this feature you must know the amount of postage you want to
print. You can easily determine this using a scale.
How to Print a Postage Tape
1. Turn on the machine.
2. Make sure the date on the main screen is the same as the date you
are providing the mail to the Post Office. If it isn’t, see 5 - Mailing
System Set Up.
3. Press the Mode key on the IntelliLink Control Center.
4. Select Key In Postage.
5. When the “Ready“ screen appears, use the number keys on the
IntelliLink Control Center to enter in the postage amount.
6. Press Enter to confirm the postage amount.
7. Move the “wet/dry” tape lever:
• down for dry tapes or pressure-sensitive tapes,
• up for wetting gummed tapes.
3
SV60951 Rev. A
Dry Tape Setting
8. To print one tape: • Press the Tape key.
To print multiple tapes: • Enter the number of tapes you want
The DM1000 ejects dry tapes until the number you entered is
reached. The machine won’t print another wet tape until you
remove the previous one. This prevents tapes from sticking to each
other.
9. Remove tapes from the tape exit on the right side of the machine.
For instructions on other ways of running your mail, see 4 - Running
Mail.
Wet Tape Setting
to print using the number keys.
• Press the Tape key.
3-3
Page 33

Page 34

4
Running Mail
Chapter Contents
Navigating Hints .......................................... 4-2
Applying Postage and Running Mail .......... 4-3
Determining the Correct Mode .................. 4-4
Preparing Your Mail .................................... 4-6
Mailing Modes
Key In Postage ...................................... 4-9
W-O-W ................................................... 4-9
Weigh First Piece ................................ 4-10
Differential Weighing ........................... 4-11
Manual Weight Entry ........................... 4-12
Attached Scale .................................... 4-14
Attached Scale - AutoTape ................. 4-15
Print Permit ......................................... 4-16
Time and Date Stamp ......................... 4-17
Seal Only.............................................. 4-17
Selecting/Deselecting an Account ........... 4-18
Other Class Requirements
Selecting a Country............................. 4-19
Entering a ZIP/Zone ............................ 4-19
Meter Stamp Options................................ 4-20
Using Confirmation Services .................... 4-23
Adding Postage to a Piece of Mail ........... 4-28
Changing the Date .................................... 4-29
Clear Batch Count..................................... 4-29
SV60951 Rev. A
Page 35

4 Running Mail
Navigating Hints
• The maximum number of options displayed is 5. To view more options
press the down arrow key.
• You select numbered options by pressing the screen key next to the
option or by pressing the corresponding number on the numeric
keyboard.
• Press the Clear key to go back one screen or more, to clear an entry or
return to the “Ready” screen. Pressing the left arrow key returns you to
the main screen.
• Other selection navigation or help information appears at the bottom of
the screen. Also, check for messages next to the arrow keys on the
bottom right of the screen.
• The DM1000 has an Auto-On feature that allows you to process mail
without pressing the start button after you place mail on the feed deck.
The IntelliLink Control Center™ advises you of the mailing stage you
are in.
Sample Screen
Select Mode
1. Key In Postage
2. Differential Weighing
3. Manual Weight Entry
4. Attached Scale
5. Attached Scale - AutoTape
Home
More Modes
Screen Options
Arrow Keys and
Help Information
4-2 SV60951 Rev. A
Page 36

DM1000 Operating Guide
Applying
Postage and
Running Mail
To apply postage and run mail on the DM1000, follow the procedures
listed here.
You must follow procedures 1 and 2 before you run mail through the
system and apply postage. If you are using standard or BUDGET
MANAGER
Follow the other procedures listed here as needed.
1
2
3
4
5
6
TM
accounting, you must also follow procedure 4.
Determining the Correct Mode for your specific job.
Preparing your mail for the DM1000.
Running Your Mail and Tapes. Using the selected mode to run
mail.
Selecting or Deselecting an Account to Print Postage. Refer to
this section if your system uses accounting.
Other Class Requirements: International and Zip Zones
Selecting Meter Stamp Options. This section describes how to
change the elements printed on your piece of mail or tape.
4
7
Using USPS Confirmation Services. The USPS provides three
types of confirmation services: Delivery Confirmation, Signature
Confirmation, and E-Certified Mail.
Adding Postage or Changing the Date on a Piece of Mail. This
8
sections tells you how to add more postage or change the date of
your postage.
9
Clearing the Batch Count. Refer to this section if you want to
clear or reset the number of pieces of mail processed by your
system.
SV60951 Rev. A
4-3
Page 37

4 Running Mail
1
Determining
the Correct
Mode
Feeding Mail or Printing Tape?
1. If your mailpiece requires no application of postage, see Chart C on
the following page to choose your mode.
2. If your mailpiece requires postage, you must determine if you can print
directly on your mail.
You can feed mail if your pieces of mail are:
• under 3/4in. thick.
• over 3-1/2 in. x 5 in. or under 13 in. x 15 in.
• under 5 lbs.
• not too thin (such as fliers, or Tyvek
as air mail and onion skin envelopes) to pass through the feeder.
• of a size which meets the requirements for mail feeding listed in 2-
Meet the DM1000.
3. If your mail meets the above requirements for feeding, select the
appropriate mode from chart A below.
4. If your mail does NOT meet the requirements for direct printing, you
MUST print a postage tape. Select the applicable postage mode from
chart B on the following page.
®
envelopes) or too fragile (such
Chart A - Printing on Mail
If: Use this Mode:
You know the amount of postage Key In Postage
needed for your piece of mail.
You do not know the weight of your Attached Scale
piece of mail.
Pieces of mail are different weights, W-O-W*
but fall within the size guidelines listed. (Weigh-on-the-Way)
Under 1 lb. and under 13 in. x 13 in.
Your pieces of mail vary in types, Differential Weighing*
sizes, and/ or weights.
A purchaseable option.
Not in all systems.
A purchaseable option.
Not in all systems.
All pieces of mail are identical. Weigh First Piece
(Used only with W-O-W)
4-4 SV60951 Rev. A
Page 38

DM1000 Operating Guide
Chart B - Postage Tape Modes
If: Use this Mode:
You know the amount of postage Key In Postage
needed for your piece of mail.
You do not know the weight of your Attached Scale
piece of mail.
You have several pieces of mail and Attached Scale-AutoTape
you do not know their postage.
A purchaseable option.
Not in all systems.
A purchaseable option.
Not in all systems.
You know the weight. Manual Weight Entry*
Your pieces of mail vary in types, Differential Weighing*
sizes, and/or weights.
A purchaseable option.
Not in all systems.
A purchaseable option.
Not in all systems.
Chart C - Mailpiece Modes with NO Postage Application
If: Use this Mode:
Your mailing requires a permit. Print Permit
You only want to seal the envelope. Seal Only (No Printing)
You do NOT want to apply postage.
You want to print the date or time Time and Date Stamp
on incoming mail for record keeping.
A purchaseable option.
Not in all systems.
4
SV60951 Rev. A
4-5
Page 39

4 Running Mail
Preparing
2
Your Mail
About
Running Mail
If you intend to run pieces of mail, read About Running Mail below. If you
are going to print postage tapes, read About Printing Postage Tapes on
page 4-8.
Then, proceed to section .
• Be sure you have checked 2-Meet the DM1000 in this guide for details
on the types of mail the system accepts, the types that can be run
along the mailpath, and the types that require a tape.
• Sort mail by account and by envelope size, placing the largest,
heaviest pieces on the bottom.
• Adjust the light mail/postcard selection knob (located under the cover).
Turn to the left for postcards and light
mail or to the right for all other mail.
• Adjust the thickness adjustment knob
for envelope thickness. The label on the
knob shows the settings.
Setting 1 is best for thin mail or thick
mail.
Setting 3 is best for most business
envelopes.
If mail is not processing correctly in
Settings 1 or 3, adjust the thickness
knob to the next settings - 2 or 4.
To pick a setting, turn the knob to the
arrow located on the feed cover.
• If you are doing a large mail run, verify
that you have sufficient funds in your
postage meter. If you do not have
enough funds, see Chapter 6, Adding
Postage in this guide.
3
2
3
4
1
• If you enter an amount that is higher
than the set high value limit, a warning
appears. See High Value Warning in 5 -
Mailing System Setup.
• Place mail on feed deck (maximum
height is 7 inches and maximum weight
is 5 lbs) with the address side up and
with the upper edge of the envelope
against the rear feed wall. The mail stack
can consist of mail of different sizes and
flap orientation, however, smaller mail
should be placed on top of the stack
and larger pieces at the bottom.
4-6 SV60951 Rev. A
Page 40

DM1000 Operating Guide
Feeding Mail
Sealing Mail
• If you have AutoStart enabled, do NOT place the mail on
the deck until have made all your selections and are ready
to run mail.
• Do not lift any of the covers on the mailing system while the
system is printing or the system stops printing.
• When printing a meter stamp, you can run sealed flap, open flap and
closed flap mail in the same job run. However, when sealing, you can
run in the same batch only envelopes with:
• open and closed flaps, or
• open flaps and already sealed flaps
Important: You cannot run closed flap and already sealed envelopes
together. The system will rip the already sealed envelopes.
• To seal and print:
1. Press the Seal Key.
2. Select Seal and Print.
4
3. To seal and print:
Stacking Mail
• open flaps, closed flaps or a combination of the two, select: Flaps
are both Open and Closed.
• open flaps, already sealed flaps or a combination of the two, select
Flaps are Open and Nested.
• To seal only:
1. Press the Seal Key.
2. Select Seal and Print.
Do NOT run already sealed pieces in this mode.
• If the flap depth of your envelope is more than 2 3/4”, you must open
the flap and place it between the feed deck and the rear feed deck
wall. See the figure at right.
• Remove mail from the stacker when full.
Drop Stacker holds up to 200 envelopes.
Power Stacker hold up to 800 envelopes.
The system pauses processing when the stacker is full and restarts
after you empty the stacker.
SV60951 Rev. A
4-7
Page 41

4 Running Mail
About Printing
Postage Tapes
The DM1000 is designed to use gummed tape or a special pressure
sensitive adhesive tape made exclusively for it. You cannot print postage
tapes in the Seal Only, W-O-W, or Weigh First Piece modes.
To print one tape, you simply press the Tape key instead of placing mail
on the deck.
To print more than one tape, use the numeric keys to type in the number
of tapes you want, then press the Tape key. The tapes exit into the stacker
on the right side of the mailing system. You can request up to 50 tapes at
a time.
To moisten gummed tape, move the “wet/dry” tape lever up.
• Wet tapes exit one at a time. The machine pauses for you to
remove each wet tape before it prints and ejects another one.
• If you do not remove wet tape within the required time, the
machine stops. Remove the tape and press the Start button to
continue.
• If you use wet tapes make sure you have enough E-Z Seal
bottle.
For dry tapes or pressure-sensitive tapes, move the “wet/dry” tape
lever down.
®
in the
WARNING! Use only fresh rolls of Pitney Bowes tape to
avoid distortion or jams in the mechanism and possible
loss of postage.
Do not lift any of the covers on the mailing system while
the system is printing or the system stops printing.
4-8 SV60951 Rev. A
Page 42

DM1000 Operating Guide
35
3
Running
Your Mail
and Tapes
Mode:
Key In
Postage
The following pages contain all the modes available on the DM1000
mailing system. You have, by now, already decided which mode you will
be using. Follow the steps for your mode exactly. Watch the screen for
instructions and warnings.
While the machine processes the mail, the screen:
• displays status of the current job,
• instructs the operator, if necessary:
- to insert envelope
- to turn off machine
• keeps a running count of processed mail, and
• displays errors, at which point the machine
stops immediately.
Use Key In Postage if you know the correct amount of
postage for your piece of mail.
4
You can select the Key In Postage screen from the Mode menu. However,
the Key in Postage screen also appears as the main screen after power up.
How to Use Key In Postage
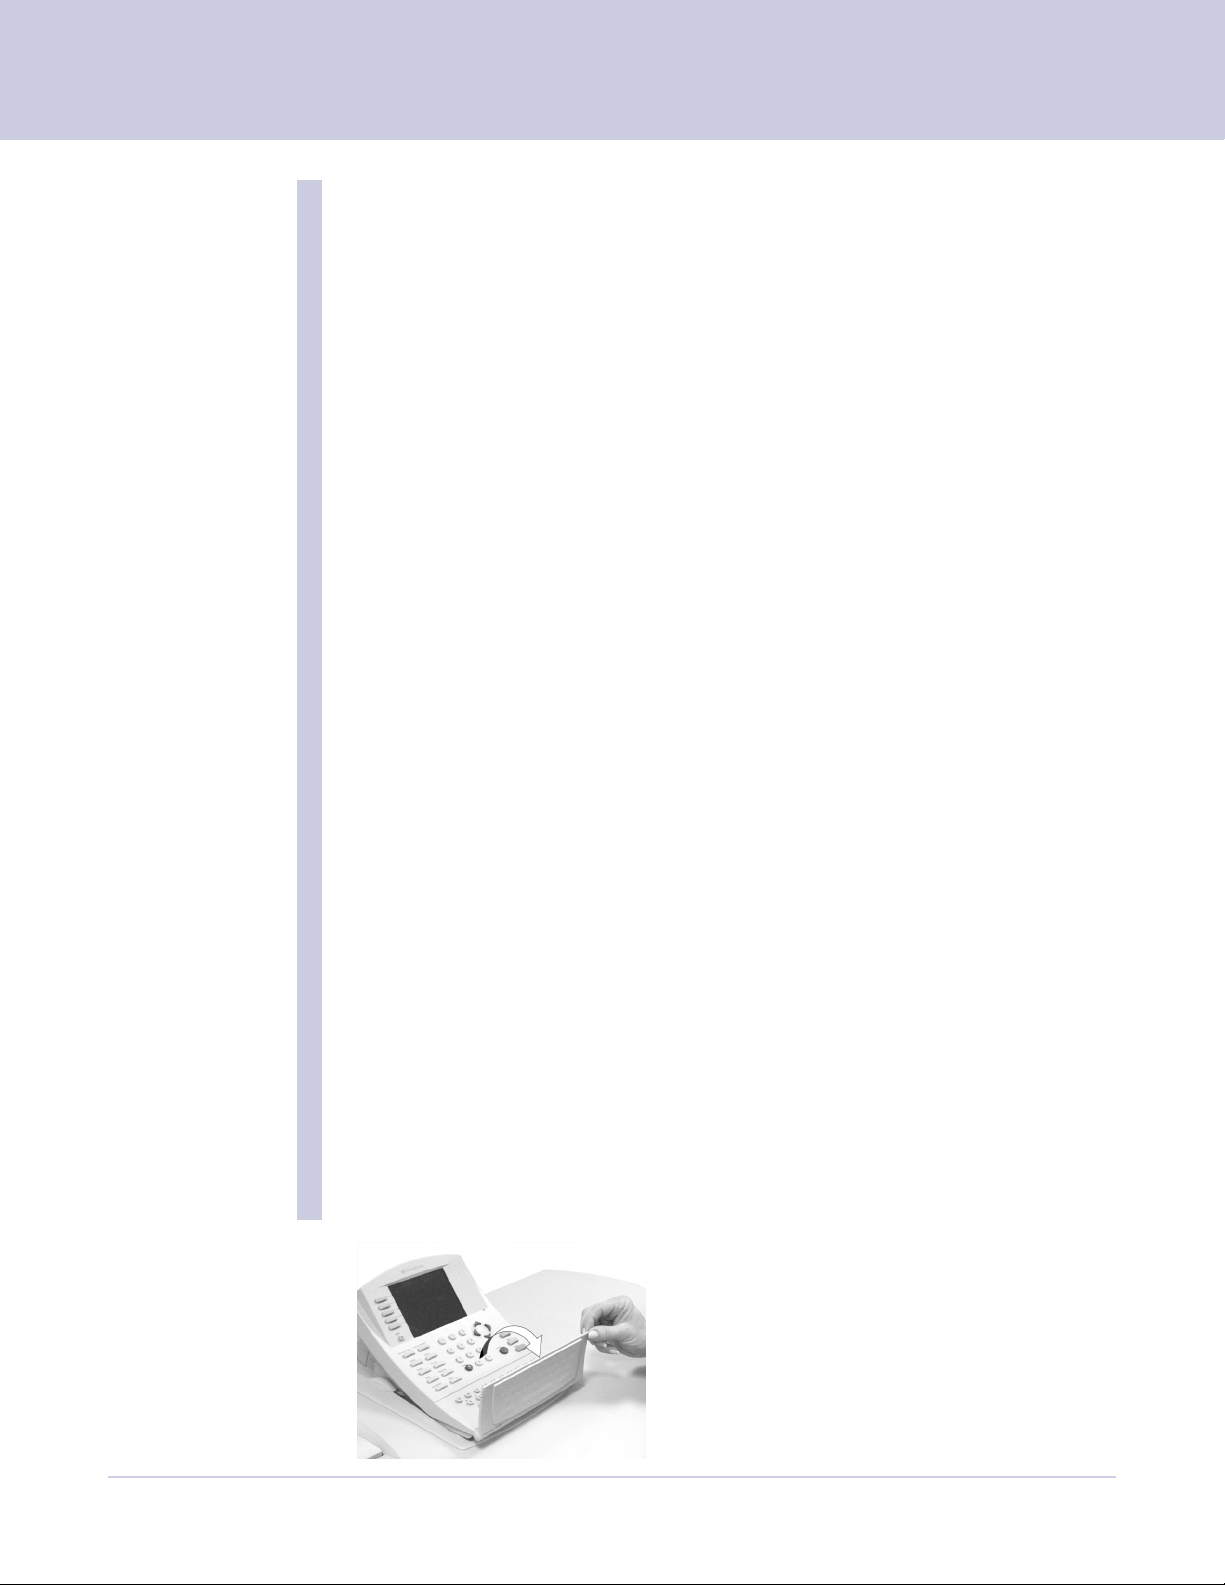
1. Press the Mode key.
2. Select Key In Postage.
3. When the “Ready” screen appears, type in the postage amount
using the number keys on the IntelliLink Control Center.
4. Press Enter.
5. Select Account and follow the prompts. (For further details, see
Selecting/Deselecting an Account to Print Postage.)
6. If printing on a piece of mail, press the Seal key and select your
sealing option.
If printing on a piece of tape, move the tape lever up for wet tape
and down for dry or pressure-sensitive tape.
7. If necessary, adjust the thickness adjustment knob and the light
mail/postcard selection knob.
8. To print on a piece of mail, place the mail on the feed deck. If you
have disabled Auto-Start, you must press Start to begin the mail
run.
To print tape, press the Tape key.
SV60951 Rev. A
4-9
Page 43

4 Running Mail
Mode:
Weigh-On-theWay
A purchaseable option.
Not in all systems
.
Use the W-O-W mode when:
• You do not know the weight of the pieces of mail.
• The pieces of mail are of different weights.
• You want to run mail quickly.
• Your machine has the W-O-W feature.
The Weigh-On-the-Way (W-O-W) feature increases productivity by
weighing the piece of mail and applying the correct postage as it travels
through the mailing machine.
WARNING!
Do not lean on or disturb the system while it is processing
mail in the W-O-W mode; it will affect the amount of
postage applied to the mail.
How To Run Mail in the W-O-W Mode
1. Press the Mode Key.
2. If the WOW mode is not listed, select Weighing Options.
3. Select W-O-W.
4. Press the Class key to select a class.
5. Select the appropriate class from the ones displayed. If more
than one carrier is listed for the class you select, use the right
arrow key to compare the rates.
6. If necessary, select a special service.
7. Press Enter. Even if you do not choose a special service, you
must press the Enter key to confirm the class.
8. Select Account and follow the prompts. (For further details, see
Selecting/Deselecting an Account to Print Postage.)
9. If necessary, adjust the thickness adjustment knob and the light
mail/postcard selection knob.
10. Press Seal key and select your sealing option.
11. Place the mail on the feed deck. If you have disabled Auto-Start,
you must press Start to begin the mail run.
4-10 SV60951 Rev. A
Page 44

DM1000 Operating Guide
Mode:
Weigh First
Piece
Use the Weigh First Piece mode if:
• You do not know the weight of your mail.
• All mail is identical.
The machine weighs only the first piece and processes the remaining
identical mail at the same postage rate.
How to Use Weigh First Piece
1. Press the Mode key.
2. If the Weigh First Piece mode is not listed, select Weighing Op-
tions.
3. Select Weigh First Piece.
4. Press the Class key to select a class.
5. Select the appropriate class from the ones displayed. If more than
one carrier is available for the class you select, use the right arrow
key to compare the rates.
6. If necessary, select a special service.
4
7. Press Enter. Even if you do not choose a special service, you must
press the Enter key to confirm the class.
8. Select Account and follow the prompts. (For further details, see
Selecting/Deselecting an Account to Print Postage.)
9. If necessary, adjust the thickness adjustment knob and the light
mail/postcard selection knob.
10. Press the Seal key and select your sealing option.
11. Place the mail on the feed deck. (See Preparing Your Mail in this
chapter.) If you have disabled Auto-Start, you must press Start to
begin the mail run.
SV60951 Rev. A
4-11
Page 45

4 Running Mail
Mode:
Differential
Weighing
A purchaseable option.
Not in all systems
.
Use the Differential Weighing mode if:
• You have mail that cannot be processed in the W-O-W mode.
• You have mixed mail of different sizes and weights.
• You have an attached scale.
When using differential weighing, you place all the mail on the scale at
once, then remove each piece, one at a time. The system calculates the
postage for each piece of mail as you remove it from the scale and applies
the postage to the piece as it goes through the mailing system.
Each piece of mail must weigh at least as much as the Differential Weigh
Trip Weight that was previously set. See Scales/Rates, Differential Weigh
Trip Weight in 5 - Mailing System Setup. If you remove a piece of mail
which does not meet the minimum weight, the scale does not recognize
the removal of the piece of mail.
If you mistakenly remove more than one piece of mail, put all of it back on
the scale. If you only put one piece back on, the system will not print the
correct postage.
How to Use Differential Weighing
1. Set the scale to zero by pressing the Menu key, then selecting
Zero Scale.
2. Press the Class key to choose a class if you have not done so. If
more than one carrier is available for the class you select, use the
right arrow key to compare the rates.
3. Select Account and follow the prompts. (For further details, see
Selecting/Deselecting an Account to Print Postage.)
4. If printing on a piece of mail, press the Seal key and select your
sealing option.
If printing on a piece of tape, move the tape lever up for wet tape
and down for dry or pressure-sensitive tape.
5. Press the Mode key.
6. If the Differential Weighing Mode is not listed, select Weighing
Options.
7. Select Differential Weighing. The system prompts you to place
the mail on the scale.
8. Place the mail on the scale. Once you place the mail on the scale,
the system displays the following prompt:
Print tapes automatically On or Off
9. To automatically print a tape when you remove each piece of mail,
select On.
To print on a piece of mail, select Off. Remove each piece of mail
4-12 SV60951 Rev. A
Page 46

DM1000 Operating Guide
from the scale, place on feed deck.
When you remove the last piece of mail from the scale, the system
asks you if you want to print postage.
10. If the last item you remove from the scale is a mail container, select
No.
Mode:
Manual Weight
Entry
A purchaseable option.
Not in all systems
.
Use the Manual Weight Entry mode if:
• You know the weight and class of your piece of mail.
• You want to know the price of postage.
How To Enter Weight Manually
1. Press the Mode Key.
2. If the Manual Weight Entry mode is not listed, select Weighing
Options.
3. Select Manual Weight Entry.
4. If the weight includes pounds, enter number of pounds.
5. Press the Right Arrow key to enter the number of ounces. Enter
the ounces.
6. Press Enter.
7. Press the Class key to choose a class if you have not done so. If
more than one carrier is available for the class you select, use the
right arrow key to compare the rates.
4
SV60951 Rev. A
8. If necessary, select a special service.
9. Press Enter. Even if you do not choose a special service, you must
press the Enter key to confirm the class.
10. Select Account and follow the prompts. (For further details, see
Selecting/Deselecting an Account to Print Postage.)
11. If necessary, adjust the thickness adjustment knob and the light
mail/postcard selection knob.
12. If printing on a piece of mail, press the Seal key and select your
sealing option.
If printing on a piece of tape, move the tape lever up for wet tape
and down for dry or pressure-sensitive tape.
13. If printing on a piece of mail, place the mail on the scale, then
remove it from the scale and place on feed deck. If you have
disabled Auto-Start, you must press Start to begin the mail run.
To print tape, press the Tape key.
4-13
Page 47

4 Running Mail
Mode:
Attached Scale
Use the Attached Scale mode if:
• You have a package that cannot go through the machine.
• You want to know the weight of an envelope that you want to
run through the machine.
The external scale is optional equipment that can be used with or without
tapes.
How to Use the Attached Scale
1. Press the Mode key.
2. If the Attached Scale mode is not listed, select Weighing Op-
tions.
3. Select Attached Scale. The “Attached Scale Mode” screen
appears.
4. Press the Class key to choose a class if you have not done so. If
more than one carrier is available for the class you select, use the
right arrow key to compare the rates.
5. If necessary, select a special service.
6. Press Enter. Even if you do not choose a special service, you must
press the Enter key to confirm the class.
7. If you want to charge this postage to an account, select Account
and follow the prompts. (For further details, see Selecting/Dese-
lecting an Account to Print Postage.)
8. If necessary, adjust the thickness adjustment knob and the light
mail/postcard selection knob.
9. If printing on a piece of mail, press the Seal key and select your
sealing option.
If printing on a piece of tape, move the tape lever up for wet tape
and down for dry or pressure-sensitive tape.
10. If printing on a piece of mail, remove piece of mail from the scale,
place on feed deck. If you have disabled Auto-Start, you must
press Start to begin the mail run.
To print tape, press the Tape key.
4-14 SV60951 Rev. A
Page 48

DM1000 Operating Guide
Mode:
Attached ScaleAutoTape
Use the Attached Scale-AutoTape if:
• You are processing several pieces of mail and need to
weigh the mail and print tapes.
The AutoTape mode is designed to save you time when you have several
pieces of mail that need to be weighed as well as have tapes printed. In
this mode each time a new weight is placed on the attached scale, a tape
with the correct postage automatically prints out.
How To Run Mail in the Attached Scale-AutoTape Mode
1. Verify that the Trip Weight value is correct or change if
necessary. Each mailpiece must be no less than this value.
(See 5 - Mailing System Setup, Setting the Differential Weigh
Trip Weight).
2. Check that the AutoScale feature set to On (See 5 - Mailing
System Setup, Scales/Rates in this guide).
3. Press the Mode key.
4. If the Attached Scale-Auto Tape mode is not listed, select
Weighing Options.
5. Select Attached Scale-AutoTape.
The “Print Tape Automatically” screen appears.
4
6. Press the Class key to choose a class if you have not done so.
If more than one carrier is available for the class you select,
use the right arrow key to compare the rates.
7. Select Account and follow the prompts. (For further details,
see Selecting/Deselecting an Account to Print Postage.)
8. Move the tape lever up for wet tape and down for dry or
pressure-sensitive tape.
9. Place each piece of mail, one at a time, on the scale. The
system prints a tape each time you place another piece of mail
on the scale.
SV60951 Rev. A
4-15
Page 49

4 Running Mail
Mode:
Print Permit
A purchaseable option.
Not in all systems
.
Use Permit mode if:
• You are doing a bulk mailing and you want to take advantage of
your USPS permit account discount.
• You want to apply prepaid postage to an enclosed reply
envelope.
You need:
• A permit available in the IntelliLink Control Center.
• A permit account with the Post Office.
A permit is a special postal mark with an identification number that is
issued by the Post Office and used instead of the usual meter stamp. Mail
with this postal mark must be brought to the Post Office for special
processing and rate discounts.
The permit is paid for directly to the Post Office. No Postage By Phone
funds are used.
Sample Permits
®
How To Use the Print Permit Mode
1. At the main screen press the Mode key.
2. Select Print Permit.
3. Select the permit you want. If there is only one permit available,
the permit appears on the screen as soon as you select Print
Permit mode.
4. Press Enter.
5. If necessary, adjust the thickness adjustment knob and the light
mail/postcard selection knob.
6. Press the Seal key and select your sealing option.
7. Place the mail on the feed deck. (See Preparing Your Mail in this
chapter.) If you have disabled Auto-Start, you must press Start to
begin the mail run.
4-16 SV60951 Rev. A
Page 50

DM1000 Operating Guide
Mode:
Time and
Date Stamp
A purchaseable option.
Not in all systems
.
Use the Time and Date Stamp mode if:
• You want to print the current time and date on
incoming mail for record keeping.
When you use the Time and Date Stamp the sealer automatically turns
off.
How To Use Time and Date Stamp Mode
1. Press the Mode key.
2. Select Time and Date Stamp.
3. Select Print Time and Date Stamp.
4. If necessary, adjust the thickness adjustment knob and the light
mail/postcard selection knob.
5. Place the mail on the feed deck. If you have disabled Auto-Start,
you must press Start to begin the mail run.
Time and Date Stamp
4
Mode:
Seal Only
(No Printing)
SV60951 Rev. A
Use Seal Only-No Printing mode if:
• You only want to seal envelopes and not apply any postage.
You may use this feature even if there is no tape or postage in
the machine.
How To Run Seal Only– No Printing
1. Press the Mode key.
2. Press the Seal key and select Seal Only- No Printing.
3. If necessary, adjust the thickness adjustment knob and the light
mail/postcard selection knob.
4. Place the mail on the feed deck. If you have disabled Auto-Start,
you must press Start to begin the mail run.
4-17
Page 51

4 Running Mail
4
Selecting/
Deselecting
an Account
to Print
Postage
How to Select An Account to Print Postage
1. Press the Accounts key. The system lists your accounts.
2. Use the down arrow key to view more accounts if necessary.
3. Select the account you want to use to charge postage.
If the account is password protected, you are prompted to enter
the password.
4. Enter the password.
The system displays the main screen showing the account name/
number as well as any subaccount or sub-subaccount names.
If you pressed “None”, the system deselects the current account
and “None selected” appears on the main screen.
For example, if you have a top-level account named Engineering
with a subaccount named Mechanical, the following account name
appears in the display:
“Engineering
Mechanical”
The lowest account name (in this case “Mechanical”) is the
account that is charged.
5. Press Enter.
4-18 SV60951 Rev. A
Page 52

DM1000 Operating Guide
5
Other Class
Requirements
Selecting a Country
If you are sending mail out of the country, you may select the desired
country by scrolling the list using the arrow keys, or by typing in the
country using the letter keys. You may also type in the first letter of the
country; a list of countries beginning with that letter appears.
How To Select a Country
1. Press Class.
2. Press the right arrow key for a list of USPS International classes.
3. Select an international class and service (if applicable) and a list of
countries appears.
4. You may scroll the countries using the up and down arrow keys or
you can type in the first letter or letters of the country where you
are sending the piece of mail. (If you know the country code you
may type it in.)
Either the country or a list of countries beginning with the same
letter(s) appears.
5. Select the country you want.
USPS ZIP/
Zone Codes
4
If you are using an external scale to weigh mail, depending on the class
and weight, you may need to enter a ZIP code or Zone to calculate the
postage. For the latest ZIP/Zone information contact your local post
office.
• If you do not know the zone, type in the ZIP Code and the machine
converts it to the proper zone.
• If you know the zone, you may type it in directly using the number
keyboard.
• Do not enter the zone if you are in the W-O-W mode; it will only
take a ZIP code.
How To Enter a ZIP Code or a Zone
1. Using the number keypad, enter ZIP Code or the number of the
zone when the system prompts you.
2. Press Enter.
SV60951 Rev. A
4-19
Page 53

4 Running Mail
6
Meter Stamp
Options:
Printing,
Advancing, or
Omitting the
Date/Day
The Meter Stamp Options selection allows you to change the elements
printed on your piece of mail or tape.
The list of options that displays depends on the model number of your
mailing system. The possible options are :
• Date
• Advertisement
• Inscription
• Print Position
If you select Date under Meter Stamp Options, your options are:
• Print entire date
• Don’t print date
• Print only month and year
• Advance the date
• Reset to today’s date
Meter Stamp
Options: Piece
ID Number
How to Advance or Omit Printing the Date/Day
1. Press Menu Key.
2. Select Meter Stamp Options.
3. Select Date.
4 Select the option you want for printing the date.
5. Follow screen instructions to complete your selection.
For international use only.
4-20 SV60951 Rev. A
Page 54

DM1000 Operating Guide
Meter Stamp
Options:
Advertisements
If you would like an advertisement to appear on your piece of mail, you
may select one that is installed in your machine.
If no advertisements have been installed, enabled, or downloaded from an
art card, this option does not appear.
How to Select or Deselect an Advertisement
1. Press the Menu key.
2. Select Meter Stamp Options.
3. Select Advertisement.
4. To add an advertisement use the screen menu key to select one of
the advertisements displayed. To deselect an advertisement, just
select a new one.
5. Press the Start key. The advertisement appears on the screen.
Advertisements Available
6
Sample Meter Stamp With Advertisement
4
URGENT
SV60951 Rev. A
4-21
Page 55

4 Running Mail
Meter Stamp
Options:
Inscriptions
An inscription is an optional message such as “First Class” or “Nonprofit”
that prints vertically to the left of the meter stamp.
How to Select or Deselect an Inscription
1. Press the Menu key.
2. Select Meter Stamp Options.
3. Select Inscription.
4. Select an inscription for the display.
5. The inscription appears next to the meter stamp in the display.
Sample Meter Stamp With Inscription
Meter Stamp
Options:
Print Position
Inscription
Inscriptions Available
Par Avion
Presorted Standard
Priority Mail
Standard
First Class
Use this feature to move the position of the meter stamp away from the
right edge of the envelope. Some countries’ postal services require this
repositioning of the meter stamp.
When you change the print position, the meter stamp prints in the new
position for all mail runs, until you select another position.
Non Profit Organization
Air Mail
Printed Matter
Presorted
How to Select the Meter Stamp Position
1. Press the Menu key.
2. Select Meter Stamp Options.
3. Select the Print Position option that is appropriate for your country.
4. Use the left and right arrow keys to switch between the possible
positions (1-9, where 1 is closest to the right edge).
4-22 SV60951 Rev. A
Page 56

DM1000 Operating Guide
7
Using
Confirmation
Services:
Overview
The United States Post Office provides three options of confirmation
services. Each service has its own set of barcode labels. For more on
delivery confirmation and tracking go to Pitney Bowes web site,
www.pb.com or refer to Using USPS Confirmation Services for Digital
Mailing Systems publication supplied by Pitney Bowes.
Confirmation Service When To Use This Service:
Delivery Confirmation To find out when your mail was
delivered
Signature Confirmation To find out who signed for the mail
Certified Mail To provide you with proof
that you mailed the piece of mail
Postage Calculation
• Your mailing system calculates the postage as soon as you weigh your
piece of mail and select the class and service.
NOTE: You cannot enter postage manually when using these services.
Discounts
• You receive a discount when you use these services and send the
barcode electronically through the mailing system.
• In some cases, such as adding electronic Delivery Confirmation to a
Priority letter, you only pay the postage required for Priority mail.
NOTE: Your discounts are valid only if you use the barcode labels
provided by Pitney Bowes and send the records electronically.
Sending Records to Pitney Bowes
• Your system stores up to 100 of your barcode records and
automatically connects to Pitney Bowes. It uploads these records
either at the specified scheduled time or whenever you process the
maximum number of pieces of mail on the system.
4
SV60951 Rev. A
• For directions on how to schedule uploads, refer to Set Up Scheduled
calls to Pitney Bowes in 5 - Mailing System Set Up in this guide.
4-23
Page 57

4 Running Mail
Using
Confirmation
Services:
Overview
(continued)
Tracking Information on the Internet
• You can track your mail after 24 hours on the internet using your
Pitney Bowes Postage By Phone account number and the barcode
number. Go to the site:
www.pb.com
Go to “Tools and Tracking” and look for USPS Delivery Confirmation.
• You can also track your mail by going to the U.S. Postal Service web
site at:
www.usps.com
Adding Services or Making Changes
• If you have already printed postage on your piece of mail and you
decide afterward you want to add a service, follow the instructions in
the section Add Postage and/or Change the Date in this chapter.
• If you need to add more postage to cover the confirmation services,
refer to the section Add Postage and/or Change the Date in this
chapter.
• If you realize you have put the wrong barcode on a piece of mail or
package, you can change it as long as you have not sent the records
to Pitney Bowes. Follow the instructions in this chapter for Editing,
Deleting or Sending Confirmation Services Records.
Using Confirmation
Services Before
Printing Postage
4-24 SV60951 Rev. A
USPS Confirmation Services are available when you are in the Attached
Scale mode, Manual Weight Entry mode, or Differential Weighing mode.
For more information, refer to Select the Postage Mode section in this
chapter.
The following procedure is based on using a Priority class and the E-Del
Con service. Your procedure may vary slightly depending on your class
and service.
1. Place the piece of mail or package on the scale.
2. Press the Class key.
3. Select the class, for example, Priority.
4. Select the service, for example, E-Del Con. As soon as you select the
service, a check mark appears in front of it.
5. Press the Enter key.
6. At this point, you are prompted to enter your 5-digit ZIP Code. Use the
numeric keyboard to enter the code.
Page 58

DM1000 Operating Guide
Using Confirmation
Services Before
Printing Postage
(continued)
7. Press the Enter key and the “Barcode” screen appears.
8. If this is the first time you are entering a confirmation service, the
screen is blank and you need to enter the entire barcode value.
a.) If you have used the confirmation service before, the next barcode
number (in the series of barcode labels) appears.
b.) If you have used all of the labels in a series of barcode labels, you
need to enter the part of the barcode numbers that corresponds to
the first label in the new series.
9. Press the Enter key to accept the barcode number and the system
returns to the main screen (“Attached Scale Mode” appears).
NOTE: Make sure the barcode on the label matches the barcode
number you just entered in the system.
10. Press the Tape key to print a tape. To print postage on a piece of mail,
place it on the feeder and press the Start key.
11. Apply the barcode label to the piece of mail.
12. Press the Enter key. The “More to Process?” screen appears. Follow
the screen prompts to process more confirmation pieces of mail.
4
SV60951 Rev. A
4-25
Page 59

4 Running Mail
Adding
Confirmation
Services After
Printing Postage
If you have already applied postage to a piece of mail and you now want
to add a confirmation service to it, follow the procedure here.
This procedure is based on using a Priority class and the E-Del Con
service. Your procedure may vary slightly depending on your class and
service.
1. Place the piece of mail or package on the scale.
2. Press the Menu key.
3. Press the down arrow key and then select Confirmation Services.
4. Select Add Record. The “Select Class” screen displays.
5. Select the class, for example, Priority Mail. The “Select Service”
screen displays.
6. Select the service, for example, E-Del Con. Press the Enter key.
7. At this point, you are prompted to enter your 5-digit ZIP Code. Use the
number keyboard to enter the code.
8. Press the Enter key and the “Barcode” screen appears.
9. If this is the first time you are entering a confirmation service, the
screen is blank and you need to enter the entire barcode number.
If you have used the confirmation service before, the next barcode
number (in the series of barcode labels) appears.
If you have used all of the labels in a series of barcode labels, you
need to enter the part of the barcode numbers that corresponds to the
first label in the new series.
10. Press the Enter Key. Once you have entered or accepted the displayed
barcode number, you get a screen that summarizes the information
you are sending.
NOTE: If you have selected a confirmation service that is not
free, the postage amount appearing in the summary is greater
than the amount of postage you have already applied. If this is
the case, you must add more postage after you have applied the
barcode label. Refer to the Add Postage section in this chapter.
11. Press the screen key for OK and the system stores the Confirmation
information and displays the “More to Process” screen. Follow the
prompts to process more pieces of mail.
4-26 SV60951 Rev. A
Page 60

DM1000 Operating Guide
Editing, Deleting or
Confirmation
Services Records
This procedure tells you how to edit, delete or send confirmation services
records once you have entered them into your system.
Your system can store up to 100 of your barcode records before sending
them to Pitney Bowes.
How To Edit or Delete Confirmation Service Records
1. Press the Menu key.
2. Press the down arrow key and then select Confirmation Services.
3. To edit an existing record, select Edit Records. You can edit either
the ZIP Code or barcode entry. To modify the class or service, you
need to delete the record and add it as a new record.
To delete a record, select Delete Unsent Records (you cannot
delete a record once you have sent it to Pitney Bowes).
4. As soon as the system sends all of your records, you can select to
print a receipt on a tape or an envelope, or you can skip printing a
receipt altogether.
4
SV60951 Rev. A
4-27
Page 61

4 Running Mail
Adding
8
Postage to a
Piece of Mail
If you do not have the correct postage on a piece of mail, you can add
more postage directly on a piece of mail or print the corrections on a tape
and then apply it to the piece of mail.
How to Add Postage
1. Turn the mail around so that the original meter stamp is on the
bottom left corner as shown. Place the mail on the feed deck with
the flap facing down.
00 30
00 30
00 30
2. Press Mode key.
3. Select Key In Postage.
4. Enter the additional amount of postage using the number keys and
press Enter.
5. Press the Start key to print on an envelope or press the Tape key
to print a tape.
00 07
00 30
4-28 SV60951 Rev. A
Page 62

DM1000 Operating Guide
Changing the
Date on a
Piece of Mail
If you do not have the correct date on a piece of mail, you can add more
postage directly on a piece of mail or print the corrections on a tape and
then apply it to the piece of mail.
How To Change the Date
1. Press the Mode key.
2. Select Key In Postage.
3. Enter $0.00 Postage and press Enter.
4. Press the Menu key and then select Meter Stamp Options.
5. Select the Date option and make the appropriate selection.
6. Follow the prompts on the main screen. Press Enter when
complete.
7. Turn the mail around so that the original meter stamp is on the
bottom left corner as shown. Place it on the feed deck with the
flap facing down If you are printing a tape, press the Tape key.
00 37
9
Clearing the
Batch
Count
00 37
00 30
8. The date correction prints on the envelope as shown below. If you
print a tape, apply the tape to the envelope below the existing
meter stamp.
00 00
JULY 03,2002
00 37
If you keep track of the number of pieces of mail you process for each job
or mail run, you may want to clear the batch count at the end of a run or
just before starting a new run. The batch count appears on the display in
the lower right corner.
How to Clear a Batch Count
1. Press the Funds key. The “View Funds” screen appears.
2. Press the right arrow key to clear the batch count.
4
SV60951 Rev. A
3. If you have specified that a supervisor password must be entered
in order to clear the batch count, the system prompts you to enter
the password. Enter the password.
4. Press the Enter key.
4-29
Page 63

4 Running Mail
4-30 SV60951 Rev. A
Page 64

5
Mailing System Setup
Chapter Contents
Navigating Hints .......................................... 5-2
Overview of Mailing System Setup ............ 5-3
Setting the Display Language ................ 5-4
Adjusting Display Contrast and
Volume Control ....................................... 5-4
Selecting Autostart. ................................ 5-4
Setting the Date and Time of Day .......... 5-5
Setting Up A Supervisor Password ....... 5-6
Setting A Lock Code .............................. 5-7
Setting Up the Scale/Selecting Rates ... 5-8
Setting Postage By Phone
Adding an Optional Printer................... 5-15
Configuring Funds Warnings................ 5-15
Configuring Low Ink Warnings ............. 5-16
Configuring System Timeouts.............. 5-16
Setting Up Scheduled Calls
to Pitney Bowes .................................... 5-19
Defining Custom Presets ..................... 5-20
Feature Code Enabling......................... 5-22
Taking the Meter Out of Service ............... 5-22
®
.................. 5-12
SV60951 Rev. A
Page 65

5 Mailing System Set Up
Navigating Hints
• The maximum number of options that display is 5. To view more
options, press the down arrow key.
• You can select a numbered option either by pressing the screen key
next to the option, or by pressing the corresponding number on the
keyboard and pressing the Enter key.
• To go back one screen or more, clear an entry, or return to the “Ready”
screen, press the Clear key. Pressing the left arrow key returns you to
the main screen.
• Other selections or navigation or help information appears at the
bottom of the screen. Also, check for messages next to the arrow
keys on the bottom right side of the screen.
Select Preset
0. Normal
1. Available
2. Available
3. Available
4. Available
Screen Options
Home
Sample Screen
More Presets
Set Up
Presets
Arrow Keys and
Help Information
5-2
SV60951 Rev. A
Page 66

DM1000 Operating Guide
Overview of
Mailing System
Setup
The following is a list of the setup procedures.
Depending on your requirements, you may need to follow all or only some
of the procedures listed here.
For details on each procedure, refer to the section number indicated here.
1
2
3
4
5
6
7
8
Setting the Display Language.
Adjusting the Display Contrast and Volume Control.
Setting the Date and Time of Day.
Selecting Autostart.
Setting up a Supervisor Password.
Setting up a Lock Code.
Setting up the Scale/Selecting Rates.
Setting up Postage By Phone.
9
10
11
12
13
14
15
Adding an the Optional Printer.
Configuring High and Low Funds Warnings.
Configuring Low Ink Warnings.
Configuring System Timeouts.
Setting up Scheduled Calls to Pitney Bowes.
Defining Custom Presets.
Feature Code Enabling
5
SV60951 Rev. A 5-3
Page 67

5 Mailing System Set Up
Setting the
1
Display
Language
Adjusting
2
Display
Contrast
and Volume
Control
SET UP
• Basic Settings
• Presets
• Account Set Up
• Change Language
• Phone Set Up
• Time of Day
• Updates and Add-Ons
• Scale/Rates
• Take Meter Out of
Service
SELECT OPTION
• Meter Stamp Options
• Set Up
• Zero Scale
• Rate Details
• Multiple Tapes
• Adjust Display
Contrast
• Confirmation Services
• Maintenance
• Turn Features On
• Volume Control
• Currency Add
• Display Metric Weight
Depending on the model of your mailing
system, you may be able to set the display
to any of the following languages:
• English
• Espanol
• Francais
To change the language of the display:
1. Press the Menu key.
2. Select Set Up.
3. Select Change Language.
4. Select the language you want to appear
in the display.
5. Press the Enter key.
You can adjust the contrast of your display
and set the volume of the speaker on your
mailing system.
To adjust the contrast level of your display:
1. Press the Menu Key.
2. Select Adjust Display Contrast.
3. Use the left or right arrow keys on the
control center to select the contrast
(1 - 9) you want. The screen updates to
the new setting.
4. Press the Enter key to save this setting.
To adjust the volume:
1. Press the Menu Key.
2. Press the down arrow key and then
select Volume Control.
5-4
3. Select the volume level you want
(0 = off, 1 = low, 2 = medium, 3 = high).
4. Press the Enter key.
SV60951 Rev. A
Page 68

DM1000 Operating Guide
Setting the
3
Date and
Time of Day
If your mail is picked up at a certain time each day, you can set your
system to advance the date at the mail pickup time.
NOTE: The date on the meter stamp should correspond
to the date when your mail goes to the post office.
If you enter an invalid time or date, the system beeps and the screen
displays the message: “Invalid Time”.
To adjust the time and enter date advance:
1. Press the Menu key.
2. Select Set Up.
3. Select Time of Day.
4. You can select:
Current Time
Date will advance after
Daylight Saving
5. For Current Time or Date will advance after, enter the correct time
and date. Use the right arrow key to toggle between AM and PM.
You do not need to enter the colon (:) between hours and minutes.
Selecting
4
AutoStart
Press Enter to accept the time. To return to the main screen, press
the left arrow key.
6. To turn the Daylight Saving mode on or off, use the right arrow key.
To exit the Daylight Saving mode, press the left arrow key.
You can select to have the feeding process begin automatically as soon as
you place mail on the feed deck.
To set the system to Auto-Start:
1. Press the Menu key on the control center, and select Set Up.
2. Select Basic Settings.
3. Select AutoStart.
4. Select On or Off.
5
SV60951 Rev. A 5-5
Page 69

5 Mailing System Set Up
Setting Up a
5
Supervisor
Password
You can limit access to the following operations by creating a supervisor
password.
• Adding Postage
• Clearing Batch Information (the number of pieces of mail your system
processes)
• Setting up Scale/Rates
Whenever you perform any of these operations, the system prompts you
for the password.
To create a supervisor password:
1. Press the Menu key.
2. Select Set Up, then select Basic Settings.
3. Select Supervisor Set Up.
4. Select Edit (or Add) Supervisor Password to create or change an
existing password. The system prompts you to enter the password
and then confirm it.
Passwords are case-sensitive and must be at least 4 characters or
digits long.
To password protect an operation:
1. Press the Menu key.
2. Select Set Up, then select Basic Settings.
3. Press the down arrow and select Supervisor Set Up.
4. Select the option that corresponds to the operation you want to
password protect. The options are:
a.) Refill - select this to require a password for adding postage.
b.) Clear Batch - select this to require a password before you can
clear the batch count information from the system. The batch
count corresponds to the number of pieces of mail processed by
the system.
c.) Scale/Rates - select this to require a password before you can
modify any of the Scale/Rates features.
See Section .
7
5-6
SV60951 Rev. A
Page 70

DM1000 Operating Guide
Setting Up a
6
Lock Code
Use the Lock Code option to enter a four-digit password to prevent
unauthorized use of your postage meter.
1. Press the Menu key.
2. Select Set Up, then select Basic Settings.
3. Select Lock Code and two options are displayed:
a.) Lock Code - On/Off
b.) Change Lock Code
If this is the first time you are setting up a lock code, “Off” appears
next to the Lock Code selection.
4. Select Lock Code and enter a four digit code. Press Enter and the
system prompts you to confirm it.
As soon as you confirm the code, “On” appears next to the Lock
Code selection.
5. Press the Clear key or the left arrow to exit and set the lock code.
6. To activate the system lock, press the Lock button on the IntelliLink
Control Center.
SV60951 Rev. A 5-7
5
Page 71

5 Mailing System Set Up
Setting Up
7
the Scale
and
Selecting
Rates
Scale/Rates:
Attached Scale
Motion Setting
SCALE/RATES SET UP
• Attached Scale
• Autoscale
• Diff Weigh Trip Weight
• Location Code
• Autoclear
• Clear Zone if New Class
• ZIP/Zone Prompt
• BMC Intra ZIP
• Add ZIPs to Zone 0
• Discount Code
• Confirm Svc Barcode
Prompt
This option appears only if you have an integrated scale or an attached
external scale connected to your mailing system.
Use this option to select how much time your system allows the scale to
settle (Normal or Adjust for Motion).
This section describes how to set up a
scale and select rates for your mailing
system.
1. To access the scale/rates options,
press the Menu key on the IntelliLink
Control Center and select Set Up from
the main screen. Press the down arrow
key and select Scale/Rates.
2. If you have set up a supervisor
password for Scale/Rates, you are
prompted to enter the password.
The list of options that displays
depends on the model number of your
mailing system. All of the options are
listed in the menu at left.
Scale/Rates:
AutoScale
Select Adjust for motion if your mailing system is in an environment subject
to vibrations, such as near air-conditioning vents or closing doors. If you
select this, the scale requires more time to settle.
1. Press the Menu key on the control center and select Set Up. Press the
down arrow key and select Scale/Rates.
2. Select Attached Scale. The “Vibration Setting” screen displays.
3. Press the screen key for the Attached Scale selection in this screen to
toggle between Normal and Adjust for Motion.
4. Press the Enter key to accept.
You can set AutoScale to On or Off.
Select On to enable the AutoScale feature.
Select Off to disable this feature.
If you disable this feature and your system has an attached scale, you
need to select the Attached Scale mode when running mail if you want
your system to weight the mail and calculate postage. Refer to the 4 -
Running Mail in this guide.
5-8
SV60951 Rev. A
Page 72

DM1000 Operating Guide
Scale/Rates:
AutoScale (cont.)
Scale/Rates:
Differential Trip
Weight
1. Press the Menu key on the control center and select Set Up. Press the
down arrow key and select Scale/Rates.
2. Press the screen key for the AutoScale selection to toggle between
On and Off.
3. Press Clear or press the left arrow to exit.
Use this option to set the minimum weight that a piece of mail must weigh
in order to use the differential weighing mode to print postage on a tape or
on a piece of mail. For more information on differential weighing, refer to
the Select the Postage Mode section in 4 - Running Mail in this guide.
1. Press the Menu key on the control center and select Set Up. Press the
down arrow key and select Scale/Rates.
2. Select the Diff Weigh Trip Weight option and use the numeric keypad
to enter the trip weight.
3. Press the Enter key to set the weight.
Scale/Rates:
Location Code
Scale/Rates:
Autoclear
Use this option to enter your geographical location code. You must enter
this code so that your mailing system can calibrate (set to zero) the scale
correctly.
1. Press the Menu key on the control center and select Set Up. Press the
down arrow key and select
Scale/Rates.
2. Select Location Code and then use the numeric keypad to enter the
code supplied by Pitney Bowes.
Press the Help key for a list of codes.
3. Press Enter.
Use this option to specify how you want your mailing system to clear Zone
and Class information when you add a new piece of mail to the scale.
1. Press the Menu key on the control center and select Set Up. Press the
down arrow key and select
Scale/Rates.
2. To clear Class information, select Class set to None when new
mailpiece is placed on scale.
5
3. To clear the Zone information, select Zone is cleared when new
mailpiece is placed on scale.
4. Press Enter.
SV60951 Rev. A 5-9
Page 73

5 Mailing System Set Up
Scale/Rates:
Clear zone if new
class
Scale/Rates:
ZIP/Zone prompt
If you enable this option then the current zone information clears if you
select a new class.
1. Press the Menu key on the control center and select Set Up. Press the
down arrow key and select Scale/Rates.
2. To enable this feature, select Yes. To disable, select No.
If the class and weight of your mail requires you to provide a destination
ZIP or Zone code, select this option to enter a ZIP or Zone code.
1. Press the Menu key on the control center and select Set Up. Press the
down arrow key and select
Scale/Rates.
2. Select ZIP/Zone prompt.
3. If you prefer to enter ZIP codes all the time when you are running mail,
select ZIP Code.
If you prefer to enter Zones all the time when you are running mail,
select Zone.
4. If you use both ZIP and Zones when running mail, select Prompt.
Scale/Rates:
BMC Intra ZIP
Use this option to edit a group of predefined zip code ranges, or create a
new group of ZIP Codes, within a Bulk Mailing Center (BMC).
1. Press the Menu key on the control center and select Set Up. Press the
down arrow key and select
Scale/Rates.
2. Select BMC Intra ZIP.
3. To create a new group, select Create new group and enter the new
beginning and ending ZIP Code. You only need to enter the first three
digits of the beginning and ending ZIP code.
4. To edit an existing group press the corresponding screen key for that
group. You are prompted to enter a new beginning and ending ZIP
Code. You only need to enter the first three digits of the beginning and
ending ZIP code.
5-10
SV60951 Rev. A
Page 74

DM1000 Operating Guide
Scale/Rates:
Add ZIPs to Zone 0
Scale/Rates:
Discount Code
Use this option to take advantage of local zone rates for one or more ZIP
codes. When you select this option, you can add a new ZIP Code to the
zone 0 rate, delete all ZIP Codes from the zone 0 rate, or edit an existing
ZIP Code in the zone 0 rate.
1. Press the Menu key on the control center and select Set Up. Press the
down arrow key and select
Scale/Rates.
2. Select Add ZIPs to Zone 0.
3. Select the option you want.
4. To add a new ZIP or edit an existing one, use the numeric keys to enter
all 5 digits of the new or edited ZIP Code.
5. Press Enter when complete.
This is for international use. Use this option to apply discounts and/or
surcharges to a different carriers and classes.
1. Press the Menu key on the control center and select Set Up. Press the
down arrow key and select Scale/Rates.
2. Select Discount Code.
Scale/Rates:
Confirm Svc
Barcode Prompt
3. Select Create new to create a new discount code.
Select one of the displayed carrier names to edit an existing discount
code.
4. Define or edit the carrier, class, sub and subsubclass, and whether you
are applying a discount or surcharge at a percentage or flat rate.
5. Follow the system prompts.
When using USPS Confirmation Services, you can turn this option ON to
have the system display the following prompt when it is time to apply a
barcode:
“Apply barcode label to package”
1. Press the Menu key on the control center and select Set Up. Press the
down arrow key and select
Scale/Rates.
2. Press the screen key for Confirm Svc Barcode Prompt to toggle
between on and off.
3. Press Clear or the left arrow to exit.
5
SV60951 Rev. A 5-11
Page 75

5 Mailing System Set Up
Setting Up
8
Postage By
Phone
Phone Set Up:
PBP Account #
®
PHONE SET UP
• PBP Account #
• Dialing Prefix
• PB Phone #
• Secondary PB #
• Machine Phone #
• Dialing Type
• Modem Sound
• Modem String
• Diagnostics
Your Pitney Bowes representative uses this to set up your Postage By
Phone® account when installing your mailing system. Your account
number is supplied by Pitney Bowes when you order your system.
Do not change this unless you are directed to do so by Pitney Bowes.
This section describes how to set up
Postage By Phone® on your mailing
system. It also includes advanced phone
setup instructions for modifying individual
phone connection parameters (user ID and
password and server IP address).
To access the Postage By Phone® setup
options, press the Menu key on the
IntelliLink Control Center, select Set Up
from the main screen, and then select
Phone Set Up.
All of the possible options are listed on the
menu at left.
Phone Set Up:
Dialing Prefix
Phone Set Up:
PB Phone #
If you need to dial a number in order to reach an outside line, use this
option to enter that prefix number.
1. Press the Menu key on the control center. Select Set Up from the
main screen, then select Phone Set Up.
2. Select Dialing Prefix.
3. Use the numeric keypad to enter the number you need to dial to reach
an outside line, for example, 9.
4. Press the Enter key.
Use this option to enter the Pitney Bowes phone number that you use to
add postage to your postage meter.
1. Press the Menu key on the control center. Select Set Up from the
main screen, then select Phone Set Up.
2. Select PB Phone #. This number is supplied by your Pitney Bowes
representative.
3. Use the numeric keypad to enter the phone number you need to dial to
connect to Pitney Bowes to add postage, or select Reset to Factory
Phone Number to change back to the number present when the
system was delivered.
5-12
4. Press the Enter key.
SV60951 Rev. A
Page 76

DM1000 Operating Guide
Phone Set Up:
Secondary PB #
Phone Set Up:
Machine Phone #
Use this option to enter a secondary or alternative Pitney Bowes phone
number to dial if the first or primary number is busy.
1. Press the Menu key on the control center. Select Set Up from the
main screen, then select Phone Set Up.
2. Select Secondary PB #. This number is supplied by your Pitney
Bowes representative.
3. Use the numeric keypad to enter the phone number you need to dial to
perform add postage.
4. Press the Enter key.
Use this option to enter your local phone number (the number to which
you mailing system is connected).
1. Press the Menu key on the control center. Select Set Up from the
main screen, then select Phone Set Up.
2. Select Machine Phone #.
3. Use the numeric keypad to enter your local phone number. Be sure
and include the area code with your number.
Also, use only digits and do not include spaces or dashes.
4. Press the Enter key.
Phone Set Up:
Dialing Type
Phone Set Up:
Modem Sound
Use this option to set the modem to tone or pulse dialing.
1. Press the Menu key on the control center. Select Set Up from the
main screen, then select Phone Set Up.
2. Select Dialing Type.
3. Use the right arrow key to toggle between tone or pulse dialing.
4. Press the Clear key or the left arrow to exit.
Use this option to set the modem sound. You can set the sound to be:
• Always on
• Always off
• On until connect.
1. Press the Menu key on the control center. Select Set Up from the
main screen, then select Phone Set Up.
2. Select Modem Sound.
3. Enter your option.
4. Press the Enter key.
5
SV60951 Rev. A 5-13
Page 77

5 Mailing System Set Up
Phone Set Up:
Modem String
Phone Set Up:
Diagnostics
The modem string is a series of numbers and letters that the modem
transmits when it calls Pitney Bowes. This string is entered by your Pitney
Bowes customer service representative.
CAUTION: If you enter this screen, do not press the
Clear key or you will clear the modem string entered
by your Pitney Bowes representative.
This option allows you to modify individual phone connection
parameters.
CAUTION: Changing these parameters may result in
errors when trying to contact Pitney Bowes. Contact
your Pitney Bowes representative or call for information
(1.800.522.0020) if you are not sure.
1. Press the Menu key on the control center. Select Set Up from the main
screen, then select Phone Set Up.
2. Select Diagnostics. The “Advanced Phone Set Up” screen appears.
3. Select Distributor Parameters and the system displays the following
connection parameters:
Global Account & User Id
Global Password
ANI/LCZ Server IP
ANI/LCZ Server Port #
Primary DNS Server
Secondary DNS Server
Distributor URL
4. Select the parameter you want to edit and make the changes.
5. Press Enter when complete.
5-14
SV60951 Rev. A
Page 78

DM1000 Operating Guide
Adding an
9
Optional
Printer
You can connect a Pitney Bowes J624 printer to your mailing system. To
add this optional external printer, plug the USB connector from the printer
into one of the two USB connectors. Your mailing system recognizes the
printer as soon as you plug it into the base.
The dual USB ports are located under the main cover of the system as
shown below.
USB cable to
Printer
Dual External
Device USB Ports
Configuring
10
High/Low
Funds
Warnings
BASIC SETTINGS
• Low Funds Warning
• High Value Warning
• Lock Code
• Supervisor Set Up
• Timeouts
• !st Low Ink Warning
• 2nd Low Ink Warning
• AutoStart Set Up
Setting the Low Funds Warning Value
Use this option to set a value at which the
mailing system warns you that the funds
remaining in the meter are getting low.
1. Press the Menu key on the control
center, select Set Up from the main
screen, and then select Basic Settings.
2. Select Low Funds Warning.
3. Enter the low value warning amount
using the numeric keyboard.
4. Press the Enter key.
Setting the High Value Warning
Use this option to set a value at which the mailing system warns you that
you have entered a postage value that is more than the amount you are
setting here. This feature prevents you from accidentally printing a postage
amount that is more than you need.
1. Select High Value Warning.
5
2. Enter the high value warning amount
($0 - $99.99) using the numeric keypad.
3. Press the Enter key.
SV60951 Rev. A 5-15
Page 79

5 Mailing System Set Up
Configuring
11
Low Ink
Warning
Configuring
12
System
Timeouts
BASIC SETTINGS
• Low Funds Warning
• High Value Warning
• Lock Code
• Supervisor Set Up
• Timeouts
• 1st Low Ink Warning
• 2nd Low Ink Warning
• AutoStart Set Up
(DM900 & DM1000 only)
TIMEOUTS
• Display Sleep
• System Sleep
• Normal Preset Timeout
• Feeding Timeout
• Waiting for Env
• Transaction Timeout
Use this option to specify how you want
the system to notify your when you are
running low on ink.
1st Low Ink Warning:
1. Press the Menu key on the control
center, and select Set Up.
2. Select Basic Settings.
3. Select 1st Low Ink Warning
4. Press the screen key corresponding to
the option you want. You can choose to
have the system notify you when there
is less than a 10-day supply of ink, or
you can choose to ignore the warning.
2nd Low Ink Warming
Repeat the above for 2 day notification.
This section describes how to set various
system timeouts for your mailing system.
1. To access the system timeouts, press
the Menu key on the control center,
and select Set Up.
2. Select Basic Settings and then
Timeouts to get all of the timeout
options.
The timeout options are listed at left.
Timeouts:
Display Sleep
5-16
All of these options are described in the
following sections.
This option allows you to specify how long the system can remain inactive
before the display turns off. You can set the timeout for 1 - 30 minutes, in
1 minute increments. The default timeout is 5 minutes.
The display turns on again when you press any key on the control center
or if you place mail in the feeder or on the scale (either integrated or
attached external scale).
1. Press the Menu key and select Set Up.
2. Select Basic Settings and then Timeouts.
3. Select Display Sleep.
4. Enter the number of minutes (1-30) using the numeric keyboard.
5. Press the Enter key.
SV60951 Rev. A
Page 80

DM1000 Operating Guide
Timeouts:
System Sleep
Timeouts:
Normal Preset
Timer
Use this option to specify how long the system can remain inactive before
it goes into “deep-sleep” and removes power from the printer and the
Postal Security Device (PSD).
You can set this timeout for 0 - 1440 minutes, in 1 minute increments. The
default timeout it 30 minutes. The system goes into display sleep before it
goes into system sleep.
The system wakes up again when you press any key on the control center
or if you place mail in the feeder or on the scale (either integrated or
attached external scale).
1. Press the Menu key and select Set Up.
2. Select Basic Settings and then Timeouts.
3. Select System Sleep.
4. Enter the number of minutes (0 - 1440 minutes) using the numeric
keyboard.
5. Press the Enter key.
The normal preset timer option allows you to specify how much time you
want to allow the system to remain idle before it returns to the Normal
Preset settings (refer to the Defining Custom Presets section in this
chapter for more information on Normal Presets).
13
You can set this timeout for 0 - 1440 minutes, in 1 minute increments. The
default timeout is 30 minutes.
1. Press the Menu key and select Set Up.
2. Select Basic Settings and then Timeouts.
3. Select Normal Preset Timer.
4. To set a timeout, enter the number of minutes (0-1440) using the
numeric keyboard.
5. If you want the system to stay at the last settings used, select Never
reset to Normal Preset.
6. Press the Enter key.
5
SV60951 Rev. A 5-17
Page 81

5 Mailing System Set Up
Timeouts:
Feeding Timeout
Timeouts:
Waiting for Env
Use this option to specify how much time to allow before the feeder stops
after the last envelope is processed. This reduces the wear on your
machine and acts as a safety measure if you leave the machine
unattended.
You can set this timeout for 5 - 90 seconds, in 1 second increments. The
default timeout is 5 seconds.
1. Press the Menu key and select Set Up.
2. Select Basic Settings and then Timeouts.
3. Select Feeding Timeout.
4. Select one of the following:
Turn Rollers off Immediately.
Run until Stop key is pressed.
Enter the timeout range from 1 to 60. Then, enter the number of
seconds (1 - 60) using the numeric keyboard. Press Enter.
This option allows you to specify how long the system continues to feed
mail placed on the feed deck without having to press the Start key.
You can set this timeout for 0 - 90 seconds, in 1 second increments. The
default timeout is 20 seconds.
Timeouts:
Transaction
Timeout
1. Press the Menu key and select Set Up.
2. Select Basic Settings and then Timeouts.
3. Select Waiting for Env.
4. Enter the number of seconds (0 - 90) using the numeric keyboard.
5. Press the Enter key.
This option is available only if your mailing machine is connected to the
AccuTrac Accounting system. Use this option if you routinely batch your
mail runs.
To specify how much time the system remains idle before it ends the
current accounting transaction, you set the timeout for 10 - 65520, in 1
second increments. The default timeout is 14,400 seconds.
1. Press the Menu key and select Set Up.
2. Select Basic Settings and then Timeouts.
3. Select Transaction Timer.
4. Enter the number of seconds (10 - 65520) using the numeric
keyboard.
5-18
5. Press the Enter key.
SV60951 Rev. A
Page 82

DM1000 Operating Guide
Setting Up
13
Scheduled
Calls to
Pitney Bowes
This section defines how you schedule a date and time when your
system automatically connects to Pitney Bowes to check for updates,
perform rate or software updates, perform a postal inspection or data
capture.
1. To schedule calls to Pitney Bowes, press the Menu key.
2. Select Set Up.
3. Select Updates and Add-Ons.
4. Select View Scheduled Calls to Pitney Bowes. The “Scheduled
Calls to Pitney Bowes” screen appears.
5. To see if any updates are available, select Check for Updates. If
updates are available, the list of updates are displayed on the
screen.
6. To perform or schedule a particular update, select one of the
following options:
Software Update
Rate Update
Inspection
Data Capture
Confirmation Servc
7. The system prompts you to:
Connect now
Reschedule event
Clear scheduled call
8. Select Connect now to connect now and perform the update.
Select Reschedule event to schedule a connection later. The
system prompts you to enter the date and the time at which it
connects and performs the update.
IMPORTANT
When entering a date, you must use the format: MMDDYY
When entering the time, you must use the format: HHSS
9. To clear scheduled calls, select Clear scheduled call.
5
SV60951 Rev. A 5-19
Page 83

5 Mailing System Set Up
9
14
Defining
Custom
Presets
You can define up to 10 sets (0 -9) of preset mailing system values, with
each set having different values for such items as the account name,
postage value, class, carrier, a special service, a mode such as Seal only
or Differential weighing, etc. You can use these presets for different mailing
jobs.
The 0 preset is the normal preset and the one you use to store your most
commonly used system values.
After you define all of your presets, you can invoke the normal preset
values simply by pressing the Normal Preset key. To select any of the
other presets, press the Custom Preset key and select the preset you
want for the particular mailing operation.
How to Define
Normal Preset
Values
1. Enter the values you use most often to run a mail job, for
example, the weighing mode, the postage value, class and
carrier, etc.
NOTE: Proceed as if you were actually running a job.
Select the mode and class and service, etc. By doing this,
you are entering the values that you will use for the normal
preset. Refer to 4 - Running Mail in this guide for more
information on selecting mode and class.
2. Press the Custom Presets key.
3. A list of presets, starting with 0 Normal appears. Do not press any of
the screen keys corresponding to these presets.
4. Press the right arrow key (Set up Presets appears next to the right
arrow key).
5. Press the screen key for Store Current Setting to Preset.
This automatically saves all the settings you defined within this session
to the 0 Normal preset. To restore these values any time in the future,
simply press the Normal Preset key.
5-20
After a certain period of inactivity, or when you power up, the system
restores the normal preset settings.
6. Press the Clear key to return to the main screen.
SV60951 Rev. A
Page 84

DM1000 Operating Guide
How to Define
Custom Preset
Values
1. Enter the values for the mail job (for example, the weighing
mode, the postage value, class and carrier, etc.) that
correspond to the values you want to be able to call up in the
future by selecting a custom preset key. For example, you may
want to define a set of conditions so that the envelopes are
sealed only (no postage applied).
NOTE: Proceed as if you were actually running a job.
Select the mode and class and service, etc. By doing this,
you are entering the values that you will use for the custom
preset. Refer to 4 - Running Mail in this guide for more
information on selecting mode and class.
2. Press the Custom Presets key.
3. A list of presets, starting with 0 Normal appears. Select one of the
presets that has not been defined yet. These presets are named
“Available”. To change an existing preset, refer to How to Edit a
Custom Preset Value in this section.
4. The system prompts you to: Enter New Preset Name.
5. Type in the name using the alpha and/or numeric keys.
How to Edit
Custom Preset
Values
6. Press the Enter key. The View Preset screen appears and displays
all of the values you defined in this session.
To use these values in the future, simply press the Custom Presets
Key and select the screen key corresponding to this preset name.
7. Press the Clear key to return to the main screen.
5
To edit an existing custom preset, you define its new values and then
overwrite the old values.
1. Enter the new values for the mail job that correspond to the custom
preset you want to change or edit.
2. Press the Custom Presets key.
3. Press the right arrow key (Set up Presets appears next to the right
arrow key).
4. Press the screen key for Store Current Setting to Preset.
5. The system prompts you to “Select Preset to Replace”.
6. Press the screen key next to the name of the preset you want to edit.
7. Press the Enter key, then the Clear key to return to the main screen.
SV60951 Rev. A 5-21
Page 85

5 Mailing System Set Up
How to View,
Rename, or
Delete Presets
Feature Code
15
Enabling
1. Press the Custom Presets key.
2. A list of presets, starting with 0 Normal appears. Select the
appropriate preset. 0 - 4 presets are displayed on the screen. To view
the other preset names, press the down arrow key.
3. Press the right arrow key (Set up Presets appears next to the right
arrow key).
4. The following options appear:
• View Preset
• Rename Preset
• Delete Preset
5. Select the screen key corresponding to the option you want. Follow
the screen prompts.
If you purchase a particular feature before your system is delivered, your
Pitney Bowes representative enters the feature code when installing your
system. If you purchase the feature after your system is delivered, Pitney
Bowes gives you the feature code when you purchase the feature.
To get a list of all the current features enabled on your system, select the
Feature Code, then press the right arrow key and a list of the features
appears.
Taking the Meter
Out of Service
1. Press the Menu key on the IntelliLink Control Center, select Set Up
from the main screen, and then
2. Select Updates and Add-Ons (press the down arrow to get to the
Updates and Add-Ons option).
3. Select Feature Code. The system prompts you to enter the numeric
value of the feature you want to enable.
4. Type in the code for the feature and press the Enter key. The system
notifies you that the feature is turned on.
If you need to return the postage meter (contained in the IntelliLink Control
Center) to Pitney Bowes, call your Pitney Bowes representative. When
instructed, follow the procedure here.
1. Press the Menu key and select Set Up.
2. Select Take Meter Out of Service.
3. Select Transfer Funds from Meter. This transfers the funds from your
meter back to your account.
The system transfers the funds and displays the amount transferred.
4. To print this amount on an envelope, place an envelope on the feed
deck and press the Start key. To print on a tape, simply press the Tape
key.
5-22
SV60951 Rev. A
Page 86

6
Adding Postage
Chapter Contents
Postage By Phone®..................................... 6-2
Your Postage Meter .................................... 6-2
USPS Requirements
Meter Inspections ................................. 6-2
Rekeying ................................................ 6-3
Managing Your Postage Funds .................. 6-3
Connecting Your Postage Meter to an
Analog Phone Line ................................ 6-4
Checking Available Funds in Your
Postage Meter ....................................... 6-5
Checking Your Postage By Phone
Account Balance ................................... 6-5
Adding Postage..................................... 6-6
Adding Funds to Your
Postage By Phone Account.................. 6-7
Moving Your System to New ZIP Code ...... 6-9
View Scheduled Rate
Update Calls to Pitney Bowes .................. 6-10
SV60951 Rev. A
Page 87

6 Adding Postage
Postage By
Phone
®
Your Postage
Meter
Your mailing system is designed to save you time and make adding
postage to your meter even more convenient. Postage By Phone is a
Pitney Bowes service that you use to add postage to your meter. You can
access Postage By Phone 24 hours a day, 7 days a week through your
IntelliLink Control Center. For more information, refer to the Postage By
Phone materials furnished with your system.
Postage By Phone allows you to:
• Check your postage account balance.
• Add more postage any time you need to – 24 hours a day, seven days
a week. Adding postage is a simple, quick and fully automated
process. Your mailing system is equipped with a built-in modem that is
set up to communicate with the Pitney Bowes Data Center.
If you need assistance with Postage By Phone
If you need assistance, have your account number ready and call Postage
By Phone at 1.800.243.7800.
Your mailing system contains a Postal Security Device (PSD) that
incorporates the latest technology approved by the United States Postal
Service to secure funds. The PSD (meter) contains the funds and performs
all calculations necessary to print meter stamps that comply with current
USPS standards. The PSD (postage meter) is located in your mailing
system’s IntelliLink Control Center™.
USPS
Requirements:
Meter
Inspections
6-2 SV60951 Rev. A
The Postal Security Device eliminates the need to perform physical
inspections thereby making the system easier and more convenient to
use.
The United States Postal Service (USPS) licenses your meter and requires
a modem inspection of the meter. Each time you refill your meter or check
your Postage By Phone
automatically performs a postal inspection.
If the meter in your mailing machine has not detected a modem refill
transaction in 90 days, the message “Inspection Due” displays on the
IntelliLink Control Center main screen. However, you can still use your
meter.
If the meter has not detected a refill in 120 days, the message “Inspection
Required” displays and you cannot use your meter.
In either case you must
this time, check your Postage By Phone account balance (see Checking
Your Postage By Phone
the inspection requirements.
If you have questions, call Postage By Phone (1.800.243.7800).
®
account balance, the Pitney Bowes Data Center
perform a refill. If you don’t need to add funds at
®
Account Balance in this chapter). This satisfies
Page 88

DM1000 Operating Guide
USPS
Requirements:
Rekeying
Managing Your
Postage Funds
The United States Postal Service (USPS) also requires, for security
reasons, that the meter keys expire after 3-6 years. Meter keys are
crytographic codes that your system uses to protect your funds during
printing and when connecting to your Postage By Phone account.
When the meter keys expire, the system reports that a rekey operation is
required.
To rekey your meter, perform a refill or a zero refill. This upgrades the keys.
If you do not perform a refill within three months of the rekey message, the
system locks the meter and does not allow you to print postage.
You may still perform a refill or a zero refill to upgrade the keys and resume
operation.
Refer to the appropriate section listed here for checking funds and
account balances, adding postage, and determining your payment options
when using Postage By Phone.
1
Connecting Your Postage Meter to an Analog Phone Line.
Refer to this section to see how to connect your postage meter
to an analog line. This shows the recommended connections for
when the analog line is close to your mailing system, and when
you have to remove the IntelliLink Control Center™ and take it to
a remote location.
SV60951 Rev. A
2
3
Checking Available Funds in Your Meter. Follow this procedure
to see if you have sufficient funds in your meter.
Checking Your Postage By Phone Account Balance. Follow
this procedure to see how many funds are in your account.
6
4
5
Adding Funds to Your Meter. Follow this procedure to add
funds from your Postage By Phone account to your postage
meter.
Adding Funds to Your Postage By Phone Account. Refer to
this section for a list of all the ways you can pay for your postage.
6-3
Page 89

6 Adding Postage
Connecting
1
Your
Postage
Meter to an
Analog
Phone Line
If you need to connect to a phone line not near your machine, you can
remove the IntelliLink Control Center.
How to Remove the IntelliLink Control Center and Connect to an
Analog Phone Line
1. Turn off the power.
2. Pull the blue release lever at
the right of the IntelliLink
Control Center towards you.
3. Slide the control center
forward to remove it.
4. Take the control center to an
analog phone line location.
• Connect the line (26 AWG
or smaller) to the telephone
jack in the back of the
control center.
• Connect the A/C Adapter
(P/N 1C85005) to the back
of the control center and
plug it into an outlet.
5. Add or check your postage
funds as described in
Checking Your Postage By
Phone Account Balance in this
chapter.
6. When you are done,
disconnect the telephone and
AC adapter.
7. Reinstall the control center by
sliding it into the docking
station on top of the mailing
system until you hear it click
into place.
3
Analog Phone
Line Connection
Analog
Telephone
Line
Connection
Cord
Control Center
Slides Forward
Blue Release Lever
Connection for AC
Adapter
AC Adapter
Power Cord
Connection
8. Turn the power back on.
6-4 SV60951 Rev. A
External
Modem
Page 90

DM1000 Operating Guide
Checking
2
Available
Funds in
Your
Postage
Meter
Checking
3
Your
Postage By
Phone
Account
Balance
If you are not sure you have enough money to run mail or print tapes, you
should check the amount of money (funds) in your postage meter.
To check available funds in your meter:
1. Press the Funds key. The funds available for your use and the funds
you have used, along with the total pieces of mail processed, display
on the screen.
2. To print this amount on an envelope, place an envelope on the feed
deck and press the Start key. To print on a tape, simply press the Tape
key.
3. Press the Clear key to exit. The system returns to the mailing screen.
If you do not have enough postage funds in your meter, check your
Postage By Phone account balance (see Checking Your Postage By
Phone Account Balance in this chapter). If there are enough funds in your
account, move funds to your postage meter (see Adding Funds to Your
Meter in this chapter).
Before adding postage to your meter, you should check the funds
available through Postage by Phone.
To check your Postage By Phone Account balance, you need to make
®
sure the Lock Code feature is turned off. Refer to the Basic Settings:
Lock Code section in 5 - Mailing System Set Up in this guide for more
information.
To check your Postage By Phone account balance:
3
4
1. Press the Funds key.
2. If you have set up a supervisor password and enabled it, the
system prompts you to enter the password now.
Enter the password and press the Enter key.
3. Select Get Postage by Phone Balance. The system dials Pitney
Bowes to connect to your account. When the connection is made,
the system displays your Postage By Phone balance.
4. Select Done to return to the main screen.
6
SV60951 Rev. A
6-5
Page 91

6 Adding Postage
Adding
4
Funds to
Your Meter
To add funds from your Postage By Phone account to your postage meter,
follow the steps below.
Before adding funds, make sure the Lock Code feature is turned off. Refer
to the Chapter 5 Mailing System Set Up in this guide for more information.
1. Press the Funds key.
If you have set up a supervisor password, the system prompts you to
enter the password now.
2. Enter the password and press the Enter key.
3. Select Quick Refill, or Other Refill Amount.
If you select Quick Refill, the system adds the same amount it did the
last time you added postage.
4. If you select Other Refill Amount, use the number keys and enter in
the amount you want to add (up to $1000). Use whole dollars only; do
not key in cents. Your meter automatically adds two decimal places.
5. Press the Enter key. The system dials Pitney Bowes to connect to your
account and begins to add the postage to your meter.
If there isn’t enough money available in your account to cover the cost
of adding postage, a warning displays.
To stop your refill click on the left arrow key. The system returns to
the main screen.
The system notifies you when it finishes adding your postage and
displays the message “Refill Complete”.
Refill Complete
Previous Funds: $146.82
Funds Added: $500.00
- - - - - - - - - - - - - - - - - - - - Funds Available: $646.82
The system offers you three options for a receipt.
6. To print on a tape, press Tape.
To print on an envelope, press Start.
For no receipt, select Don’t Print Receipt.
NOTE: To view or print a statement showing the details of the last five
times you added postage to your meter, press the Reports key on the
control center and select Last 5 Refills. For details of all system reports
refer to 8 - Reports in this guide.
6-6 SV60951 Rev. A
Page 92

DM1000 Operating Guide
Adding
5
Funds To
Your
Postage By
Phone
Account
You can pay for your postage two ways:
• You can add postage to your account whenever you need to and be
billed for the postage through Pitney Bowes Purchase Power account,
OR
• You can prepay for your postage. If you prepay, please allow for five to
seven business days for the funds to be available before you add the
postage to your meter. You can also prepay using ACH (Automated
Clearing House) and wire options. The payment options are described
in the table below.
Postage Payment Option
Pitney Bowes
Purchase Power
“Reset Now - Pay Later”
Transit Time
Allotment
No Delay Immediate
Access to
Postage
Description and Instructions
To get immediate access to
postage, use the Postage By Phone
automated response system at
800.243.7800 and follow the
Purchase Power prompts, or visit
us on the web at:
www.Postagebyphone.com
and click on Postage By Phone.
Pay for the postage you’ve used
when you get the bill. You can take
up to 20 days to pay your bill.
Also, if you choose not to prepay,
your system can dial Pitney Bowes
and automatically connect to your
Purchase Power account. Simply
add up to the “funds available”
amount displayed on the main
screen. Other advantages of
Purchase Power accounts and
www.Postagebyphone.com include
the ability to:
• Pay for Pitney Bowes supplies
• Obtain both online and hard
copies of your bill
• Consolidate billing for supplies
and postage
• Get online statement archives
6
SV60951 Rev. A
Postage By Phone
Reserve Account - earn
interest on prepaid
balances - 1.5%
If you are a high volume mailer, you
can prepay to Reserve Account and
earn interest on prepaid balances.
This is recommended if you are
spending over $1500.00 per month
on postage and you anticipate
having average balances in excess
of $5000.00 per month.
6-7
Page 93

6 Adding Postage
Adding Funds
To Your
Postage By
Phone
®
Account
continued
Postage Payment Option
Reserve Account
Reserve Account Overnight -
Reserve Account Same day, if
Transit Time
Allotment
5 - 7 Business
days
next day
posting
wired by
1:00PM EST
Description and Instructions
Mail Address:
Reserve Account
PO Box 952856
St. Louis MO 63195-2856
Overnight Address:
Reserve Account
1005 Convention Plaza
St. Louis MO 63101-1200
Fed Wire:
Destination Bank US Bank
Routing Number 0810 00210
City, State St. Louis MO
FDN (Beneficiary) Pitney Bowes
Reserve Account
AC (Account No.) 1005017981
OBI (Other info.) Company Name
FFC (For Further
Credit) Postage By Phone
Acct Number
Scheduled Pay Immediate
Based
Upon Prior
Notification
Prepayment - USPS Mail
7 Days Select the address that is closest to
Provides you with the ability to
automatically replenish your Reserve
Account based on predetermined
deposit criteria. Call Postage By
Phone (800.243.7800) or log on to
PostagebyPhone.com for more
information.
you:
• CMRS-PBP
PO Box 0566
Carol Stream, IL 60132-0566
• CMRS-PBP
PO Box 7247-0166
Philadelphia PA 19170-1066
• CMRS-PBP
PO Box 504766
The Lakes, NV 88905-4766
6-8 SV60951 Rev. A
Page 94

DM1000 Operating Guide
Adding Funds
To Your Postage
By Phone
®
Account
continued
Postage Payment Option
Prepayment - USPS Express Mail
Prepayment - USPS Wire Transfer
ACH Credit Transfer N/A Call Postage By Phone to receive
ACH Debit Transfer N/A Call Postage By Phone to receive
Transit Time
Allotment
2 Days
Description and Instructions
Citibank Lockbox Operations
Attn: Lockbox #0166
1615 Brett Rd.
New Castle, DE 19720
Citibank
CMRS/Pitney Bowes
Postage By Phone
Account # 4067-8633
Routing Transit # 21000089
Detail Payment Field - Include your
Postage By Phone account
number
credit transfer information.
debit transfer information.
Moving Your
Mailing Machine
To a New ZIP
Code
If you move from one city to another, the meter, located in your IntelliLink
Control Center, stays with you and you can download the new meter
stamp with the ZIP Code from your new location. This eliminates the
need to order a replacement meter.
If you move your mailing system:
1. Contact the Pitney Bowes Customer Care Center at
1.800.233.5280 to notify Pitney Bowes of your new location.
Pitney Bowes initiates a license application for your new address
and forwards it to the USPS.
2. Allow 5 to 7 business days and then perform a $0.00 refill using
Postage By Phone. The new ZIP Code should now appear on your
meter stamp.
3. If the ZIP Code continues to be the same after seven days, contact Customer Care Center at 1.800.233.5280
6
SV60951 Rev. A
6-9
Page 95

6 Adding Postage
View Scheduled
Rate Update
Calls To Pitney
Bowes
To View Scheduled Calls (To Pitney Bowes):
1. Press the Menu key.
2. Select Set Up.
3. Select Updates and Add Ons.
4. Select View Scheduled Calls to Pitney Bowes.
5. Follow the prompts on the screen.
6-10 SV60951 Rev. A
Page 96

7
Accounting Setup
Chapter Contents
Navigating Hints .......................................... 7-2
Overview of Accounting.............................. 7-3
Account Setup Procedures ........................ 7-3
Viewing Accounts or Subaccounts ...... 7-4
Creating Accounts ................................ 7-4
Creating Subaccounts .......................... 7-5
Editing Accounts ................................... 7-6
Setting an Account Period.................... 7-7
Turning Accounting On or Off ............... 7-7
Deleting Accounts & Subaccounts....... 7-8
Turning Account Password
Protection On or Off .............................. 7-8
Resetting (Clearing) All Accounts......... 7-9
Turning “Reset Individual
Accounts” On or Off .............................. 7-9
Transferring Funds/Pieces from
One Account to Another .................... 7-10
Setting the Station ID .......................... 7-11
Selecting the Account Type ................ 7-12
Your Accounting System Features ........... 7-12
Organizing Your Accounting ..................... 7-13
SV60951 Rev. A
Page 97

7 Accounting Setup
Navigating Hints
• You can access all of the accounting features by pressing the Account
key on the control panel. The system displays the account names in
the format shown here:
Select Account
1. Deselect Account
2. <Account Name>
<subacct> - <sub-subacct>
3. <Account Name>
<subacct> - <sub-subacct>
4. <Account Name>
<subacct> - <sub-subacct>
5. <Account Name>
<subacct> - <sub-subacct>
Press Enter to Accept
Home
More Accounts
Set Up
Accounts
Account Names
Arrow Keys and
Help Information
• To enter the account set up mode, press the right arrow key on the
control panel as indicated by the help information on the bottom on
the right side of the main screen. The “Set Up Accounts” screen
shown below appears:
Set Up Accounts
1. View Account
2. Edit Account
3. Create Account
Account Setup
Options
4. Transfer Funds
5. Accounting Period
Press Enter to Accept
Exit
More Options
Arrow Keys and
Help Information
• The maximum number of options that appears in the main screen is
5. To view more options, press the down arrow key.
• You can select a numbered option either by pressing the screen key
next to the option, or by pressing the corresponding number on the
keyboard and then pressing the Enter key.
• To go back one screen, press the Clear key. Pressing the left arrow
key returns you to the main screen.
7-2
SV60951 Rev. A
Page 98

DM1000 Operating Guide
Overview of
Accounting
The Account
Setup
Procedures
The information in this chapter describes how to set up the standard
accounting package provided with your mailing system.
If you purchased the enhanced accounting package, BUDGET
MANAGER
If your system is connected to an AccuTrac SA system, refer to the user
documentation: SV60955.
For information on your system’s accounting features or, if this is the first
time you are setting up accounts and would like some examples of
accounting structures and hierarchy, refer to Your Accounting System
Features and Organizing Your Accounting at the end of this chapter.
The following is a list of all the account setup procedures for the standard
package provided with your system. For details on each procedure, refer
to the section number listed here.
1
2
TM
, refer to the user documentation: SV60957.
Viewing Accounts or Subaccounts
Creating Accounts and Subaccounts
3
4
5
6
7
8
9
10
11
12
Editing Accounts
Setting an Accounting Period
Turning Accounting On or Off
Deleting Accounts
Turning Account Password Protection On or Off
Resetting (Clearing) All Accounts
Turning Reset Individual Accounts On of Off
Transferring Funds
Setting the Station ID
Selecting an Accounting Type
7
SV60951 Rev. A 7-3
Page 99

7 Accounting Setup
1
Viewing
Accounts or
Subaccounts
2
Creating
Accounts
and
Subaccounts
How To View Account Details
1. Press the Accounts key. If you have already set up accounts, pressing
the Accounts key displays a list of all the accounts.
If you have not set up any accounts yet, as soon as you press the
Accounts key on the IntelliLink Control Center™, the system prompts
you for the supervisor password. As soon as you enter the password,
the system displays the “Set Up Accounts” screen.
2. Press the right arrow key to enter the “Set Up Account” screen.
3. Select View Accounts. The names of your top level accounts appear.
4. Select the account you want.
The system displays the total funds and total pieces for that account
which includes the sum totals for all its subaccounts and
subsubaccounts.
5. If the account has subaccounts, you can also select View Subaccount
and View Subsubaccount to get the information for each.
How To Create A New Account
1. Press the Accounts key. If you have already set up accounts, pressing
the Accounts key displays a list of all the accounts.
If you have not set up any accounts yet, as soon as you press the
Accounts key on the IntelliLink Control Center™, the system prompts
you for the supervisor password. As soon as you enter the password,
the system displays the “Set Up Accounts” screen.
7-4
2. Press the right arrow key to enter the “Set Up Account” screen.
3. Select Create Account.
4. Select Create a New Account. The system prompts you to enter an
account name.
5. Type in the name using the alpha keyboard or number keypad and
press Enter. The “Account Information” screen appears and displays
the options:
Edit Name - To change the name of your account.
Change Number - By default, the system assigns the next available
account number to your new account. If you want to assign a different
number, select the Change Number option.
Add | Change Password - If you want to password protect this
account, select the Add Password option. The system prompts you to
enter a password and then confirm it. Passwords are case sensitive,
can be alphanumeric and must be at least four characters. (You need
to enable password protection before you can protect an individual
account.) Refer to Turning Accounting Password Protection On or
Off in this chapter.
7
SV60951 Rev. A
Page 100

DM1000 Operating Guide
When you attempt to create an account when all available accounts
have been used, the message “Cannot create any more accounts”
appears. You must delete an account before you can create another
account. Alternatively, if you have fewer accounts than your system is
capable of handling, you can upgrade to a higher number of accounts.
Add Subaccount (to account) | Subsubaccount (to subaccount)
Create Another Account | Subaccount | Subsubaccount
6. If you want to select an option, select the appropriate option and
follow the prompts.
7. When you are done, press the Enter key to save the account
information.
Creating
Subaccounts
The account number, password, total pieces, and funds used (if they exist)
are transferred to the first subaccount created (the next working,
chargeable, account). They are further transferred down when a
subsubaccount in this link is created (the new chargeable account).
How To Create A New Subaccount Or Subsubaccount
1. Press the Accounts key.
2. Press the right arrow key to enter the “Set Up Account” screen.
3. Select Create Account.
4. Select Add to an Existing Account. The system displays a list of all of
the accounts and prompts you to select the account to which you
would like to add a subaccount or subsubaccount.
If necessary use the down arrow key to scroll down through the list.
5. Select the account or subaccount.
6. Type in the name of the subaccount or subsubaccount and press
Enter. The “Account Information” screen appears and displays the
options:
Edit Name - To change the name of your account.
Edit Number - By default, the system assigns the next available
account number to your new subaccount. If you want to assign a
different number, select the Edit Number option.
Add | Change Password - If you want to password protect this
subaccount, select the Add Password option. The system prompts
you to enter a password and then confirm it. Passwords are case
sensitive, can be alphanumeric and must be at least four characters.
(You need to enable password protection before you can protect an
individual account.) Refer to Turning Accounting Password
Protection On or Off in this chapter.
SV60951 Rev. A 7-5
7
7
 Loading...