

Page 1
Operating Instructions –HOME MEDIA GALLERY–
Manual de instrucciones –HOME MEDIA GALLERY–
–HOME MEDIA GALLERY–
AUDIO/VIDEO MULTI-CHANNEL RECEIVER
RECEPTOR MULTICANAL DE AUDIO/VÍDEO
Page 2

01
Features
Chapter 1:
Features
About this operation manual
The Home Media Gallery feature of this receiver allows
you to play back audio files or listen to Internet radio
stations through your PC or other components
connected to the LAN terminal on this receiver. Also, the
Home Media Gallery lets you play back audio files stored
on your USB memory device connected to the USB
terminal on this receiver. This operation manual
describes the connection, setup, and playback
procedures required to enjoy these features. It is advisory
that you also refer to the operation manual supplied with
your network component.
Features of Home Media Gallery
This receiver is equipped with the LAN terminal and the
USB terminal, and you can enjoy the following features
by connecting your components to these terminals.
• Playback the music files stored in PCs
You can playback a lot of musics stored in your PCs
using this unit.
See
Playback with Home Media Gallery
and
Playing back audio files stored on components on
the network
• Listening to Internet radio stations
You can select and listen to your favorite Internet
radio station from the list of Internet radio stations
created, edited, and managed by the vTuner
database service exclusively for use with the Pioneer
products. Also, you can listen to Internet radio station
managed by Neural THX.
See
and
to Neural Music Direct
• Playing back audio files stored on a USB memory
device
You can directly play back your desired song right
from the folder/file list being displayed on the screen.
See
and
device
on page 6.
Playback with Home Media Gallery
Listening to Internet radio stations
on page 7.
Playback with Home Media Gallery
Playing back audio files stored on a USB memory
on page 6.
1
on page 4
on page 4
and
Listening
on page 4
Steps to enjoy the Home Media Gallery
Playing back audio files on the network and
listening to Internet radio stations
1 Connect to the network through LAN interface.
See
Connecting to the network through LAN interface
page 3 for more on this.
2 Configure the network settings.
The setup is necessary only when the router to be
connected does not have the built-in DHCP server
function.
See
Setting up the network
3 Play back with Home Media Gallery.
See
Playback with Home Media Gallery
on this.
on page 10 for more on this.
on page 4 for more
Playing back audio files stored on a USB
memory device
1 Connect USB memory device to the USB terminal.
See
Using the USB interface
2 Play back with Home Media Gallery.
See
Playback with Home Media Gallery
on this.
on page 3 for more on this.
on page 4 for more
on
2
En
Note
1 Besides a PC, you can also play back audio files stored on your other components with the built-in media server function based on DLNA 1.0 framework
and protocols (i.e. network-capable hard disks and audio systems).
Page 3
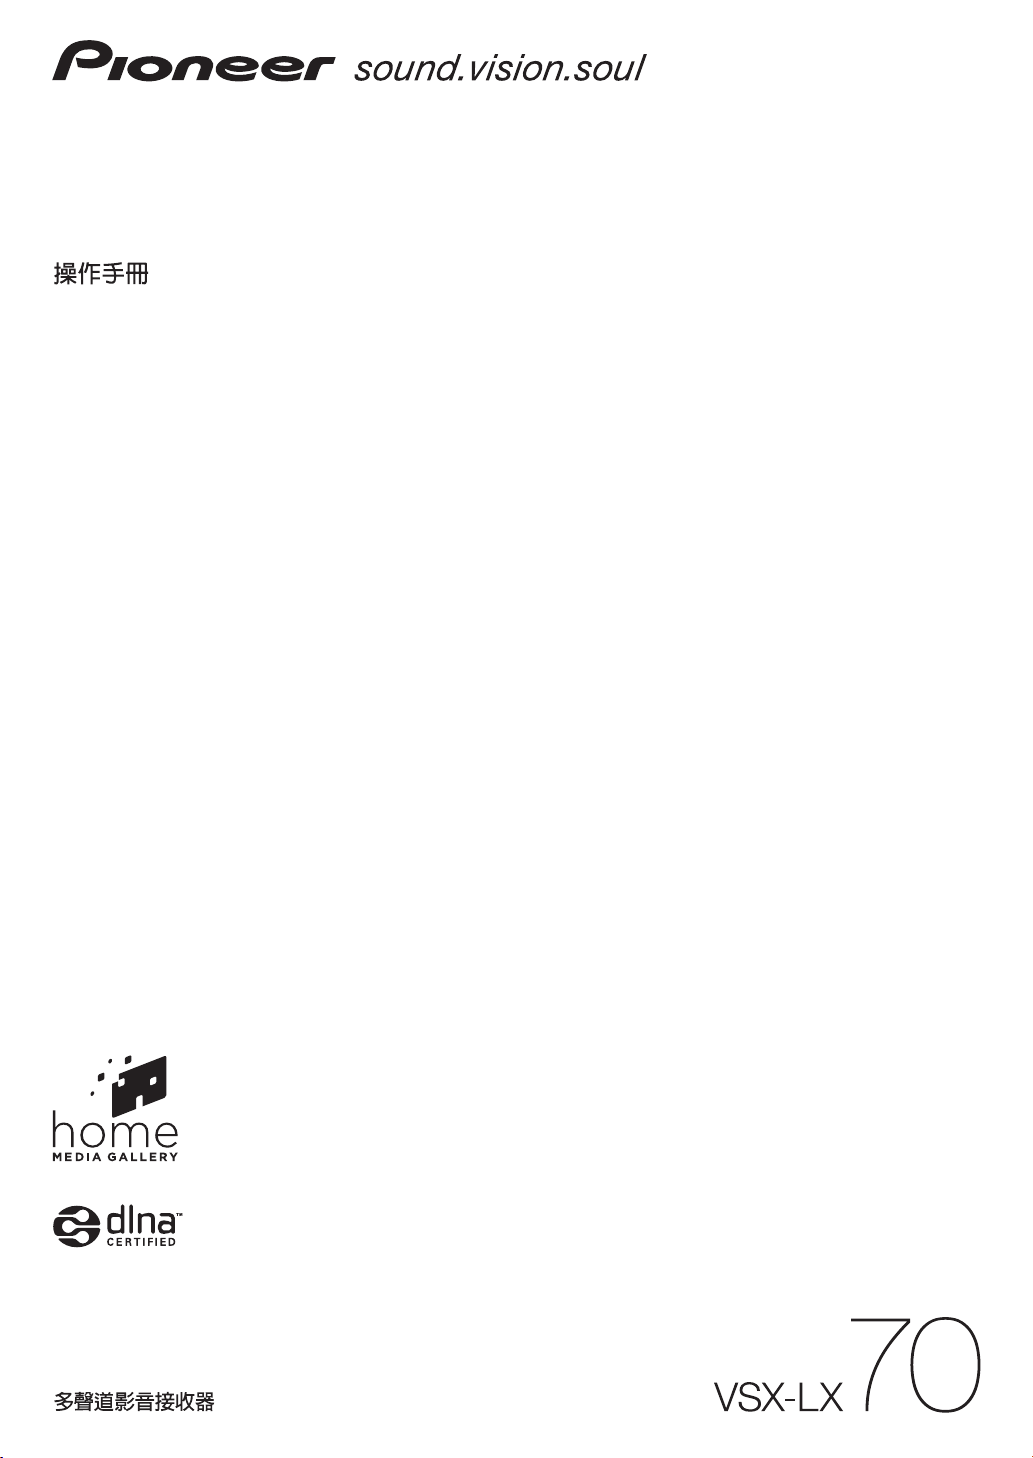
Connection
R
Chapter 2:
Connection
Connecting to the network through
LAN interface
Caution
• Before making or changing the connections, switch
off the power and disconnect the power cord from the
power outlet. Plugging in should be the final step.
VSX-LX70
MULTI-ZONE
& SOURCE
/REC SEL
OUT1
ZONE3
OUT2
LAN (10/100)
HDMI
OPTICAL
IN
1
IN
(TV/
)
SAT
2
IN
IN
(BD)
3
IN
(
DVR/
)
VCR 1
IN
4
IN
(
)
CD-R
4
1
ASSIGNABLE
1
21
IN
(
DVD/
IN
)
LD
(CD)
2
IN
COAXIAL
OUT
ASSIGNABLE
41
DIGITAL
LAN cable
(sold separately)
Router
IN
1
MAIN
IN
2
ZONE2
1
CONTROL
IN
OUT
2
IN
Y
(
DVD/
LD
3
P
PR
4
IN
Y
(BD)
P
PR
MULTI-ZONE
& SOURCE
(
1
DVD/LD
IN
(BD)
2
IN
ASSIGNABLE
1
)
B
2
B
(
VIDEO/GAME
ASSIGNABLE
COMPONENT VIDEO
FM UNBAL 75 Ω
IR
MULTI-ZONE & SOURCE
OUT
)
2
1
OUT
Y
B
P
PR
3
IN
Y
P
B
PR
1)
31
MONITOR
OUT
S-VIDEO
MONITOR
OUT
1
IN
2
IN
VIDEO AUDIO
DVD/LD
TV/SAT
VIDEO /
GAME 1
OUT
IN
BD
IN
IN
IN
OUT
DVR/
VCR 1
IN
OUT
DVR/
VCR 2
IN
AM LOOP
R
ANTENNA
ZONE2ZONE2
R L
AUDIO
PHONO
IN
L
CD
IN
OUT
CD-R/
TAPE/
MD
IN
R
R
SUB W.
SURROUND
SURROUND BACK
1
12 V TRIGGER
(
DC OUT 12V/
TOTAL 50 mA MAX
Modem
L
L
F
CENTE
LR
2
)
By connecting this receiver to the network via the LAN
terminal, you can play back audio files stored on
components on the network, including your PC, and
listen to Internet radio stations.
1
Connect the LAN terminal on this receiver to the LAN
terminal on your router (with or without the built-in DHCP
server function) with a straight LAN cable (CAT 5 or
higher).
Turn on the DHCP server function of your router. In case
your router does not have the built-in DHCP server
function, it is necessary set up the network manually. For
details, see
Setting up the network
on page 10.
The specifications of a LAN terminal
LAN terminal . . . . . . . . . . . . . . . . . . . . . . . . . . . .Ethernet jack
10BASE-T/100BASE-TX
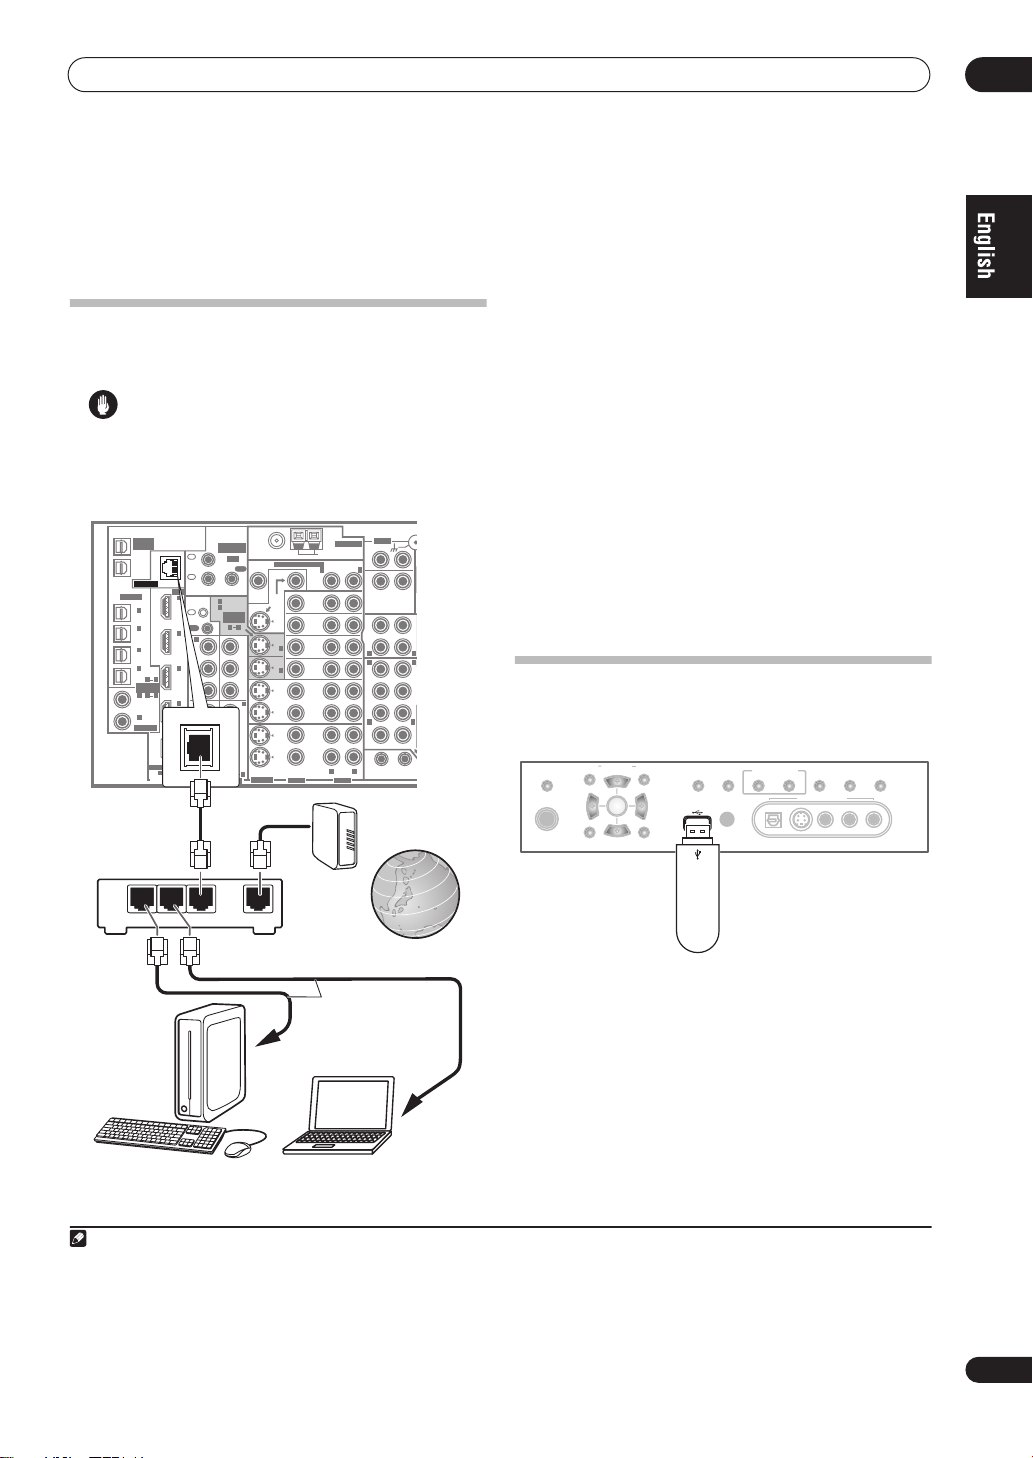
Using the USB interface
It is possible to listen to two-channel audio2 using the
USB interface on the front of this receiver.
PARAMETER
AUDIO VIDEO
PHONES
(ST) (ST)
SETUP
This receiver
(TUNE)
ENTER
(TUNE)
TUNER EDITSPEAKERS BAND
USB
RETURN
MCACC
SETUP MIC
MULTI – ZONE &
SOURCE/REC SEL
CONTROL ON/OFF
SIGNAL
SB ch
SELECT
PROCESSING
VIDEO/GAME 2 INPUT
DIGITAL IN S-VIDEO VIDEO L RAUDIO
STEREO/
F.S.SURR
02
LAN
321
WAN
Internet
USB mass
storage device
LAN cable
(sold separately)
to LAN port
to LAN port
PC 1
PC 2
Note
1• To listen to Internet radio stations, you must sign a contract with an ISP (Internet Service Provider) beforehand.
• Video files cannot be played back.
• With Windows Media Connect or Windows Media Player 11, you can even play back copyrighted audio files on this receiver.
2• Compatible USB devices include external magnetic hard drives, portable flash memory (particularly keydrives) and digital audio players (MP3 players)
of format FAT16/32. It is not possible to connect this unit to a personal computer for USB playback.
• Pioneer cannot guarantee compatibility (operation and/or bus power) with all USB mass storage devices and assumes no responsibility for any loss of
data that may occur when connected to this receiver.
3
En
Page 4

03
Playback with Home Media Gallery
Chapter 3:
Playback with Home Media Gallery
DLNA
Introduction
The Home Media Gallery allows you to play music on
media servers connected on an identical Local Area
Network (LAN) as the receiver. This unit allows for the
playing of files stored on the following:
• PCs running Microsoft Windows XP with Windows
Media Connect installed
• PCs running Microsoft Windows Vista or XP with
Windows Media Player 11 installed
• DLNA-compatible digital media servers (on PCs or
other components)
To play back audio files stored on components on the
network or listen to Internet radio stations, you must turn
on the DHCP server function of your router. In case your
router does not have the built-in DHCP server function, it
is necessary to set up the network manually. Otherwise,
you cannot play back audio files stored on components
on the network or listen to Internet radio stations. See
Setting up the network
on page 10 for more on this.
About network playback
The network playback function of this unit uses the
following technologies:
Windows Media Connect
See
Windows Media Player 11/ Windows Media Connect
on page 17 for more on this.
Windows Media DRM
Microsoft Windows Media Digital Rights Management
(WMDRM) is a platform to protect and securely deliver
content for playback on computers, portable devices and
network devices. Home Media Gallery functions as a
WMDRM 10 for networked devices. WMDRM protected
content can only be played on media servers supporting
WMDRM.
Content owners use WMDRM technology to protect their intellectual
property, including copyrights. This device uses WMDRM software to
access WMDRM protected content. If the WMDRM software fails to
protect the content, content owners may ask Microsoft to revoke the
software’s ability to use WMDRM to play or copy protected content.
Revocation does not affect unprotected content. When you download
licenses for protected content, you agree that Microsoft may include a
revocation list with the licenses. Content owners may require you to
upgrade WMDRM to access their content. If you decline an upgrade,
you will not be able to access content that requires the upgrade.
This product is protected by certain intellectual property rights of
Microsoft. Use or distribution of such technology outside of this
product is prohibited without a license from Microsoft.
DLNA CERTIFIED™ Audio Player
The Digital Living Network Alliance (DLNA) is a crossindustry organization of consumer electronics,
computing industry and mobile device companies.
Digital Living provides consumers with easy sharing of
digital media through a wired or wireless network in the
home.
The DLNA certification logo makes it easy to find
products that comply with the DLNA Interoperability
Guidelines. This unit complies with DLNA Interoperability
Guidelines v1.0.
When a PC running DLNA server software or other DLNA
compatible device is connected to this player, some
setting changes of software or other devices may be
required. Please refer to the operating instructions for
the software or device for more information.
DLNA and DLNA CERTIFIED are trademarks and/or service marks of
Digital Living Network Alliance.
Content playable over a network
• Even when encoded in a compatible format, some
files may not play correctly.
• Movie and photo files cannot be played back.
• There are cases where you cannot listen to an
Internet radio station even if the station can be
selected from a list of radio stations.
• Some functions may not be supported depending on
the server type or version used.
• Supported file formats vary by server. As such, files
not supported by your server are not displayed on this
unit. For more information check with the
manufacturer of your server.
4
En
Page 5

Playback with Home Media Gallery
SHIFT
VOL
STATUSSTATUS
MCACC S.DIRECT
MULTI OPE
SIGNAL SEL
T.DISP
SBch
STEREO/
F.S.SURR
JUKEBOX
TV CH
INPUT
SELECT
MPX
AUDIO SUBTITLE
ADV.SURR
STANDARD
PHASE
THX
INFO
MUTE
REC
TV VOL
REC STOP
HDD
CH
CH
DVD
DISP
RECEIVER
PHOTO
TV/DTV
A
BCDE
About playback behavior over a network
• Playback may stall when the PC is switched off or any
media files stored on it are deleted while playing
content.
• If there are problems within the network environment
(heavy network traffic, etc.) content may not be
displayed or played properly (playback may be
interrupted or stalled). For best performance, a
100BASE-TX connection between player and PC is
recommended.
• If several clients are playing simultaneously, as the
case may be, playback is interrupted or stalled.
• Depending on the security software installed on a
connected PC and the setting of such software,
network connection may be blocked.
Pioneer is not responsible for any malfunction of the
player and/or the Home Media Gallery features due to
communication error/malfunctions associated with your
network connection and/or your PC, or other connected
equipment. Please contact your PC manufacturer or
Internet service provider.
“Windows Media™” is a trademark of Microsoft Corporation.
This product includes technology owned by Microsoft Corporation and
cannot be used or distributed without a license from Microsoft
Licensing, Inc.
Microsoft®, Windows®Vista, Windows®XP, Windows®2000,
Windows®Millennium Edition, Windows®98, and WindowsNT® are
either registered trademarks or trademarks of Microsoft Corporation in
the United States and/or other countries.
Authorizing this receiver
In order to be able to play with Home Media Gallery, this
receiver must be authorized. This happens automatically
when the receiver makes a connection over the network
to the PC. If not, please authorize this receiver manually
on the PC. The authorization (or permission) method for
access varies depending on the type of server currently
being connected. For more information on authorizing
this receiver, refer to the instruction manual of your
server.
Playback
CD
CD-R
DVD TV
HOME MEDIA
DVR2
GALLERY
DVR1
i Pod
SLEEP
+
SR
D.ACCESS
CLEAR
+
10
A PARAMETER
TOP MENU
TUNE
ST ST
BAND
SETUPSETUP
TUNE
PROGRAM
TV CONTROL
Important
• For the names of folders, files, and Internet radio
stations, up to 21 characters are displayed on the
folder/file list screen of the Home Media Gallery while
up to 24 characters are displayed on the playback
screen.
• Note that non-roman characters are displayed as #.
• When you play back audio files,
displayed before playback starts. The display may
continue for several seconds depending on the type
of file.
• In case a domain is configured in a Windows network
environment, you cannot access a PC on the network
while you are logged onto the domain. Instead of
logging onto the domain, log onto the local machine.
• This receiver can play back audio files compressed in
VBR (Variable Bit rate) mode, but there are cases
where the time elapsed may not be correctly
displayed.
ENTER
BD TV CTRL
TUNER
DIMMER
GENRE
CH
LEVEL
V PARAMETER
MENU T.EDIT
HDMI
ZONE2/3
RECEIVER
CLASS
ENTER
RETURNRETURN
ANALOG
ATT
DISC
‘Connecting...’
03
is
5
En
Page 6
03
Playback with Home Media Gallery
1 Press
you press and hold
HOME MEDIA GALLERY
SHIFT
) to select
(press
HMG
iPod
while
as the input
source.
It may take several seconds for this receiver to access the
network. The following screen appears when the Home
Media Gallery is selected as the input source.
Home Media G
Top Menu
Pre 001/009
[ USB ]
[ Internet Radio ]
[ Neural Music Direct ]
[ Server1 ]
[ Server2 ]
[ Server3 ]
[ Server4 ]
[ Favorites ]
Next
-
55.0
dB
The server without the mark cannot be accessed.
2 Use
back, and then press
/
to select the category you want to play
ENTER
.
Select a category from the following list:
•
USB
– USB memory device
Internet Radio
•
•
Neural Music Direct
– Internet radio
– Internet radio that supports
Neural Surround
•
Server Name
•
Favorites
– Server components on the network
– Favorite songs currently being registered
Depending on the selected category, the names of
folders, files, and Internet radio stations are displayed.
3 Use
radio station to play back, and then press
Press the
select the desired item. When you press
/
to select the folder, music file or Internet
ENTER
/
buttons to scroll up and down the list and
ENTER
, playback
.
starts with the playback screen being displayed for the
selected item. To return to the list screen, press
RETURN
• In case of a USB memory device or a server
Home Media G
Server1
Pre 001/012
[ Group1 ]
[ Group2 ]
[ Group3 ]
[ Group4 ]
[ Group5 ]
[ Group6 ]
[ File1 ]
[ Song0 ]
Next Return
-
55.0
Home Media G
dB
Play
3:36
Return
Song1
Artist1
Album1
-
55.0
dB
• In case of Internet radio
Home Media G
Internet Radio
001/006
[ Location ]
[ Genre ]
[ Podcasts By Location ]
[ Podcasts By Genre ]
[ New Stations ]
[ Most Popular Station ]
Return
-
55.0
dB
Home Media G
Play
3:36
Return
Song1
Artist1
Album1
-
55.0
dB
Only the audio files with the mark can be played back.
In case of the folders with the mark, use
ENTER
to select the desired folder and audio file.
/
and
4 Repeat Step 3 to play back the desired song.
You can perform the following operations with the remote
control of this receiver. Note that some buttons are not
available for operation depending on the category currently
being played back.
Button(s) Function
/
DISP
/
ENTER
RETURN
TOP MENU
PROGRAM
CLEAR
Play
Pause
Stop
Skip forward and backward
: All repeat (available only
during playback)
: Repeat one song (available
1
only during playback)
Shuffle
Display
Scroll up and down
Select and confirm an item in the
selected list.
Previous Menu
Top Menu
Register in Favorites folder
Clear songs registered in the
Favorites folder or Internet radio
stations
Playing back audio files stored on
components on the network
.
About the playback screen
The following screen appears when you play back audio
files. Note that some items may not be displayed
depending on the type of file.
Home Media G
Play
We are all one
PRIDE of LIFE
3:36
Return
Beat Band
-
55.0
dB
Song
Artist
Album
Time elapsed
Playing back audio files stored on a USB
memory device
The maximum number of levels that you can select in
Steps 3 and 4 is 8. Also, you can display and play back up
to 2000 folders and files within a single folder.
1
6
En
Note
1• Playback stops when the last song in a folder is played back to the end.
• When a USB memory device with a large capacity is connected, it may take some time to read all the contents.
• This receiver does not support a USB hub.
• Copyrighted audio files cannot be played back on this receiver.
Page 7
Playback with Home Media Gallery
03
Listening to Internet radio stations
About Internet radio
Internet radio is an audio broadcasting service
transmitted via the Internet. There are a large number of
Internet radio stations broadcasting a variety of services
from every corner of the world. Some are hosted,
managed, and broadcast by private individuals while
others are by the corresponding traditional terrestrial
radio stations or radio networks. Whereas terrestrial, or
OTA (over-the-air), radio stations are geographically
restricted on the range of radio waves broadcast from a
transmitter through the air, Internet radio stations are
accessible from anywhere in the world, as long as there
is a connection to the Internet, as services are not
transmitted through the air but are delivered over the
World Wide Web. On this receiver you can select Internet
radio stations by genre as well as by region.
About the playback screen
The following screen appears when audio streams from
an Internet radio station are received. (The screen below
is just one example. The actual display depends on the
radio station.)
Home Media G
Play
We are all one
PRIDE of LIFE
3:36
Return
About list of Internet radio
The list of Internet radio stations on this receiver is
created, edited, and managed by the vTuner database
service exclusively for use with this receiver.
Saving and retrieving Internet radio stations
You can easily save and retrieve saved Internet radio
stations. See
Advanced operations for Internet radio
page 9 for more on this.
Beat Band
-
55.0
dB
Song
Artist
Album
Time elapsed
on
1
Listening to Neural Music Direct
About Neural Music Direct
Neural Music Direct is an Internet radio station managed
and operated by Neural THX. Neural radio stations deliver
multichannel surround sound. The Neural-THX Surround
mode is automatically selected and lets you enjoy a rich
multichannel surround sound experience. For details
about Neural THX, see the operation manual supplied
separately.
Neural Surround is a trademark owned by Neural Audio Corporation,
THX is a trademark of THX Ltd., which may be registered in some
jurisdictions. All rights reserved.
Playing back your favorite songs
About the Favorites folder
You can register up to 20 of your favorite songs in the
Favorites folder. Note that only the audio files stored on
components on the network can be registered.
Registering and deleting audio files and Internet
radio stations in and from the Favorites folder
Press
PROGRAM
stopped. The selected song is then registered in the
Favorites folder.
Up to 20 songs or Internet radio stations can be
registered. Songs stored on a USB memory device
cannot be registered.
To delete a registered song, select the Favorites folder,
select the song you want to delete from the folder, and
press
CLEAR
Favorites folder.
while a song is being played back or
. The selected song is then deleted from the
Note
1• To listen to Internet radio stations, you must have high-speed broadband Internet access. With a 56 K or ISDN modem, you may not enjoy the full
benefits of Internet radio.
• The port number varies depending on the Internet radio station. Check the firewall settings.
• A list of Internet radio stations provided by the vTuner database service is subject to change or deletion without notice due to various reasons.
• Broadcasts may be stopped or interrupted depending on the Internet radio station. In this case, you cannot listen to a radio station selected from the
list of Internet radio stations.
7
En
Page 8
03
Playback with Home Media Gallery
About playable file formats
The Home Media Gallery feature of this receiver supports the following file formats. Note that some file formats are not
available for playback although they are listed as playable file formats. Also, the compatibility of file formats varies depending
on the type of server. Check with your server to ensure the compatibility of file formats supported by your server.
Category Extension Stream
a
MP3
LPCM
WAV
WMA
AAC
FLAC
a.“MPEG Layer-3 audio decoding technology licensed from Fraunhofer IIS and Thomson multimedia.”
b.Only streaming data from servers is concerned, so there is no extension.
.mp3 MPEG-1 Audio Layer-3 Sampling frequency 8 kHz to 48 kHz
Quantization bitrate 16 bit
Channel 2 ch
Bitrate 8 kbps to 320 kbps
VBR/CBR Supported/Supported
b
—
.wav LPCM Sampling frequency 8 kHz to 44.1 kHz
.wma WMA2/7/8 Sampling frequency 8 kHz to 48 kHz
.m4a
.aac
.3gp
.3g2
.flac FLAC Sampling frequency 8 kHz, 16 kHz, 22 kHz, 32 kHz,
LPCM Sampling frequency 8 kHz to 44.1 kHz
Quantization bitrate 16 bit, 20 bit, 24 bit
Channel 2 ch
Quantization bitrate 16 bit, 20 bit, 24 bit
Channel 2 ch
Quantization bitrate 16 bit
Channel 2 ch
Bitrate 5 kbps to 320 kbps
VBR/CBR Supported/Supported
WMA9 Sampling frequency 8 kHz to 48 kHz
Quantization bitrate 16 bit
Channel 2 ch
Bitrate 5 kbps to 320 kbps
VBR/CBR Supported/Supported
MPEG-4 AAC LC
MPEG-4 HE AAC (aacPlus v1/2)
Sampling frequency 32 kHz to 48 kHz
Quantization bitrate 16 bit
Channel 2 ch
Bitrate 16 kbps to 320 kbps
VBR/CBR Supported/Supported
44.1 kHz, 48 kHz
Quantization bitrate 8 bit, 16 bit
Channel 2 ch (8-bit monaural audio is
Bitrate —
VBR/CBR Not supported/Supported
not supported)
8
En
Page 9

Playback with Home Media Gallery
Retrieving saved Internet radio stations
Advanced operations for Internet radio
D.ACCESS
CLEAR
+
10
A PARAMETER
TOP MENU
ST ST
BAND
SETUPSETUP
PROGRAM
TV CONTROL
INPUT
TV VOL
SELECT
Saving Internet radio stations
This receiver can remember the Internet radio stations
that you often listen to in 3 classes (A, B, and C) with up
to 10 stations in each class to make the total of 30
stations at its maximum capacity.
Before proceeding with the following steps, check
whether you have followed Steps 1 to 3 on page 6.
1 Tune into the Internet radio station that you want
to save.
Tune into the desired Internet radio station by following
Steps 1 to 3 on page 6.
2 Press
3 Press
save the station in.
Select the desired class from A, B, and C.
4 Use
save the station as, and then press
You can also select the station number by using the
number buttons. Select the desired number from 0 to 9.
T.EDIT
to switch to the station-saving mode.
CLASS
to select the class that you want to
/
to select the number that you want to
CLASS
DISC
CH
ENTER
LEVEL
V PARAMETER
MENU T.EDIT
TUNE
TV CH
RETURNRETURN
VOL
ENTER
.
ENTER
TUNE
You need to save Internet radio stations first before
retrieving them. If there are no Internet radio stations
currently being saved, see
above and save at least one Internet radio station before
proceeding with the following steps.
1 Select the class that you want to retrieve an
Internet radio station from.
Each time you press
and C in turn.
2 Use
want to retrieve.
You can also select the station number by using the
number buttons.
‘Preset Not Stored’
radio station currently not being saved.
Saving Internet radio stations
CLASS
, the class switches to A, B,
/
to select the station number that you
appears when you select an Internet
03
En
9
Page 10

04
DVD TV
BD TV CTRL
INPUT
Setup
Home Media G
-
55.0
dB
[ Information ]
[ Network Setup ]
Return
Setup
Chapter 4:
Setup
Setting up the network
In case the router connected to the LAN terminal on this
receiver is a broadband router (with the built-in DHCP
server function), simply turn on the DHCP server
function, and you will not need to set up the network
manually. You must set up the network as described
below only when you have connected this receiver to a
server without the DHCP server function. Before you set
up the network, consult with your ISP or the network
manager for the required settings. It is advisory that you
also refer to the operation manual supplied with your
network component.
IP Address
The IP address to be entered must be defined within the
following ranges. If the IP address defined is beyond the
following ranges, you cannot play back audio files stored
on components on the network or listen to Internet radio
stations.
Class A: 10.0.0.1 to 10.255.255.254
Class B: 172.16.0.1 to 172.31.255.254
Class C: 192.168.0.1 to 192.168.255.254
Subnet Mask
In case an xDSL modem or a terminal adapter is directly
connected to this receiver, enter the subnet mask
provided by your ISP on paper. In most of the cases, enter
255.255.255.0.
Gateway IP
In case a gateway (router) is connected to this receiver,
enter the corresponding IP address.
DNS Server Preferred/DNS Server Alternate
In case there is only one DNS server address provided by
your ISP on paper, enter
there are more than two DNS server addresses, enter
‘DNS Server Alternate’
field.
Proxy Hostname/Proxy Port
This setting is required when you connect this receiver to
the Internet via a proxy server. Enter the IP address of
your proxy server in the
enter the port number of your proxy server in the
Port’
field.
1
‘DNS Server Preferred’
in the other DNS server address
‘Proxy Hostname’
. In case
field. Also,
‘Proxy
Tip
• Press
/
or the numeric buttons to enter
alphanumeric characters. To delete alphanumeric
characters entered one at a time, press
CLEAR. ‘Cancel Key Editing Lose Changes?’
appears when you press
RETURN
or
or while the
cursor is placed in the leftmost position on the
alphanumeric character entry screen. In this case,
press
ENTER
to exit from the screen and
RETURN
to
return to the screen.
HOME MEDIA
DVR2
GALLERY
DVR1
i Pod
TUNER
SLEEP
DIMMER
+
GENRE
SR
D.ACCESS
CLEAR
+
10
CH
A PARAMETER
TOP MENU
BAND
SETUPSETUP
PROGRAM
1 Press
HOME MEDIA GALLERY
LEVEL
TUNE
ST ST
ENTER
TUNE
TV CONTROL
you press and hold
ZONE2/3
RECEIVER
CLASS
ENTER
V PARAMETER
MENU T.EDIT
RETURNRETURN
SHIFT
ANALOG
ATT
DISC
MULTI OPE
) to select
TV VOL
TV/DTV
MPX
AUDIO SUBTITLE
STATUSSTATUS
SHIFT
TV CH
SELECT
REC
A
BCDE
DISP
PHOTO
SIGNAL SEL
THX
PHASE
RECEIVER
(press
HMG
VOL
INFO
MUTE
REC STOP
JUKEBOX
HDD
DVD
CH
CH
T.DISP
STEREO/
SBch
F.S.SURR
ADV.SURR
STANDARD
MCACC S.DIRECT
iPod
as the input
while
source.
It may take several seconds for this receiver to access the
network. The following screen appears when the Home
Media Gallery is selected as the input source.
2 Select ‘
Setup
Home Media G
Top Menu
Pre 001/009
[ USB ]
[ Internet Radio ]
[ Neural Music Direct ]
[ Server1 ]
[ Server2 ]
[ Server3 ]
[ Server4 ]
[ Favorites ]
Next
’ and press
-
55.0
dB
ENTER
to confirm your
selection.
The ‘Setup’ screen appears.
Home Media G
Home Menu
Pre 009/009
[ Setup ]
[ USB ]
[ Internet Radio ]
[ Neural Music Direct ]
[ Server1 ]
[ Server2 ]
[ Server3 ]
[ Server4 ]
Next
-
55.0
dB
1 In case you make changes to the network configuration without the DHCP server function, make the corresponding changes to the network settings of
10
En
this receiver.
Note
Page 11
Setup
04
3 Select ‘
Network Setup
’ and press
ENTER
to confirm
your selection.
The
‘Network Connection’
4 Either ‘
Network Found
screen appears.
’ or ‘
No Network Found
’
appears. Check the network connection status and
press
ENTER
.
•
Network Found
– Connected to a component on the
network.
•
No Network Found
– Not connected to a
component on the network.
The
‘Network IP Settings’
5 Select ‘
Static IP Address
screen appears.
’ and press
ENTER
to
confirm your selection.
The
‘IP Address’
‘Automatic (DHCP)’
screen appears. When you select
, the network is automatically set up,
and you do not need to follow Steps 6 to 15. Proceed with
Step 16.
6 Select ‘
Change
Home Media G
Network IP Settings
[ Automatic (DHCP) ]
[ Static IP Address ]
Return
’ and press
-
55.0
dB
ENTER
to confirm your
selection.
The
‘Edit IP Address’
Home Media G
IP Address
[ 0.0.0.0 ]
1
[ Change ]
Return
screen appears.
Home Media G
-
55.0
dB
Edit IP Address
192:168:000:002
Return
-
55.0
dB
7 Enter the IP address.
Press the
/
buttons to select a number and the
/
buttons to move the cursor. After you select the last
number, press the
the numeric buttons to enter a number. The
Mask’
screen appears.
8 Select ‘
Change
button or
’ and press
ENTER
. You can also use
ENTER
to confirm your
‘Subnet
selection.
The
‘Edit Subnet Mask’
Home Media G
Subnet Mask
[ 0.0.0.0 ]
1
[ Change ]
Return
screen appears.
Home Media G
-
55.0
dB
Edit Subnet Mask
255:255:255:000
Return
-
55.0
dB
10 Select ‘
Change
’ and press
ENTER
to confirm your
selection.
The
‘Edit Gateway’
Home Media G
Gateway IP
[ 0.0.0.0 ]
1
[ Change ]
Return
screen appears.
-
55.0
dB
Home Media G
Edit Gateway IP
192:168:000:001
Return
-
55.0
11 Enter the default gateway IP address.
After entry, press the button or
Server Preferred’
12 Select ‘
Change
screen appears.
’ and press
ENTER
ENTER
to confirm your
. The
selection.
The
‘Edit DNS Preferred’
Home Media G
DNS Server Preferred
[ 0.0.0.0 ]
1
[ Change ]
Return
screen appears.
Home Media G
-
55.0
dB
Edit DNS Preferred
192:168:000:001
Return
-
55.0
13 Enter the preferred DNS server address.
After entry, press the button or
Server Alternate’
14 Select ‘
Change
screen appears.
’ and press
ENTER
ENTER
to confirm your
. The
selection.
The
‘Edit DNS Alternate’
Home Media G
DNS Server Alternate
[ 0.0.0.0 ]
1
[ Change ]
Return
15 Enter the alternate DNS server address.
screen appears.
Home Media G
-
55.0
dB
Edit DNS Alternate
192:168:000:001
Return
-
55.0
In case there is only one DNS address, you do not need
to enter the alternate DNS server adddress.
After entry, press the button or ENTER. The ‘Enable
Proxy Server’ screen appears.
16 Select ‘No’ or ‘
Yes
’ for the proxy server setting to
deactivate or activate the proxy server.
In case you select ‘No’, proceed with Step 21. In case you
select ‘Yes’, on the other hand, proceed with Step 17. The
‘Proxy Hostname’ screen appears.
Home Media G
Enable Proxy Server
[ No ]
[ Yes ]
-
55.0
dB
dB
‘DNS
dB
‘DNS
dB
9 Enter the subnet mask.
After entry, press the button or
IP’
screen appears.
ENTER
. The
‘Gateway
Return
11
En
Page 12
04
Setup
17 Select ‘
Change
’ and press
ENTER
to confirm your
selection.
The
‘Edit Proxy Hostname’
Home Media G
Proxy Hostname
[ ]
1
[ Change ]
Return
screen appears.
Home Media G
-
55.0
dB
Edit Proxy Hostname
proxy
Return
-
55.0
dB
18 Enter the address of your proxy server or the
domain name.
After entry, press the button or
Port’
screen appears.
19 Select ‘
Change
’ and press
ENTER
ENTER
to confirm your
. The
‘Proxy
selection.
The
‘Edit Proxy Port’
Home Media G
Proxy Port
[ 0 ]
1
[ Change ]
Return
screen appears.
Home Media G
-
55.0
dB
Edit Proxy Port
8080
Return
-
55.0
dB
20 Enter the port number of your proxy server.
Use the numeric buttons to enter the port number. After
entry, press the
button or
ENTER
. The
‘Setting OK?’
screen appears.
21 Press
ENTER
to complete the network setup
procedure.
The
‘Top Menu’
screen appears.
Checking the network settings
You can check the following network settings of this
receiver: the MAC address, the IP address, the gateway
IP address, the proxy server, the Subnet mask, and the
firmware version (for the Home Media Gallery of this
receiver).
Before proceeding with the following steps, check
whether you have followed Steps 1 and 2 on page 10.
3 Select ‘
your selection.
The
this receiver) screen appears.
(The version of the illustration is not the latest.)
4 Check the network settings.
Press the
you press the
follows.
Firmware Version
IP Address
Subnet Mask
5 Press
The
screen, press
Information
‘Firmware Version’
/
buttons to switch the display. Each time
/
’ and press
(for the Home Media Gallery of
Home Media G
Firmware Version
3.5.4.6292
Return
buttons, the display switches as
MAC Address
Gateway IP Proxy Server
RETURN
‘Setup’
.
screen appears. To return to the
RETURN
again.
-
55.0
ENTER
dB
to confirm
‘Top Menu’
12
En
Page 13
Additional information
Chapter 5:
Additional information
Troubleshooting
Refer to the following information if you come up with a problem. Operational mistakes may be misunderstood as
mechanical problems. Also, the cause of a problem may lie elsewhere other than this receiver. Check your audio
components on the network as well as your USB memory device. If problems persist or if the following information
does not provide you with an appropriate remedy, consult with your nearest Pioneer service center.
Symptoms
Cannot access the network. The LAN cable is not firmly connected. Firmly connect the LAN cable. 3
Playback does not start
while
‘Connecting...’
continues to be displayed.
The PC or Internet radio is
not properly operated.
The audio files stored on
components on the network,
such as a PC, cannot be
played back.
Cannot access the
component connected to
the network.
Causes Remedies Refer to
The router is not switched on. Switch on the router. —
Internet security software is currently installed in
the connected component.
The audio component on the network which has
been switched off is switched on.
The component is currently disconnected from
this receiver or the power supply.
The corresponding IP address is not properly set. Switch on the built-in DHCP server function of
The IP address is being automatically
configured.
Windows Media Player 11 is not currently
installed on your PC.
Audio files were recorded in formats other than
MP3, WAV (LPCM only), MPEG-4 AAC, FLAC,
and WMA.
Audio files recorded in MPEG-4 AAC or FLAC are
being played back on Windows Media Player 11
or Windows Media Connect.
The component connected to the network is not
properly operated.
The component connected to the network does
not permit file sharing.
The folder stored on the component connected
to the network has been deleted or damaged.
The component connected to the network is not
properly set.
There are no playable audio files on the
component connected to the network.
There are cases where a component with
Internet security software installed cannot be
accessed.
Switch on the audio component on the network
before switching on this receiver.
Check whether the component is properly
connected to this receiver or the power supply.
your router, or set up the network manually
according to your network environment.
The automatic configuration process takes time.
Please wait.
Install Windows Media Player 11 on your PC. 4
Play back audio files recorded in MP3, WAV
(LPCM only), MPEG-4 AAC, FLAC, or WMA. Note
that some audio files recorded in these formats
may not be played back on this receiver.
Audio files recorded in MPEG-4 AAC or FLAC
cannot be played back on Windows Media Player
11 or Windows Media Connect. Try using
another server.
Check whether the component is affected by
special circumstances or is in the sleep mode.
Try rebooting the component if necessary.
Try changing the settings for the component
connected to the network.
Check the folder stored on the component
connected to the network.
If the client is automatically authorized, you need
to enter the corresponding information again.
Check whether the connection status is set to
“Do not authorize”.
Check the audio files stored on the component
connected to the network.
—
—
—
10
—
—
Refer to the
operation
manual
supplied
with your
server.
—
—
—
—
—
05
13
En
Page 14

05
Additional information
Symptoms
Audio playback is
undesirably stopped or
disturbed.
Cannot access Windows
Media Player 11.
Cannot listen to Internet
radio stations
The folders/files stored on a
USB memory device are not
displayed.
A USB memory device is not
recognized.
A USB memory device is
connected and displayed,
but the audio files stored on
the USB memory device
cannot be played back.
The Home Media Gallery
cannot be operated with the
buttons on the remote
control.
Causes Remedies Refer to
The audio file currently being played back was
not recorded in a format playable on this
receiver.
The LAN cable is currently disconnected. Connect the LAN cable properly. 3
There is heavy traffic on the network with the
Internet being accessed on the same network.
You are currently logged onto the domain
through your PC with Windows XP installed.
The firewall settings for components on the
network are currently in operation.
You are currently disconnected from the
Internet.
The broadcasts from an Internet radio station are
stopped or interrupted.
The folders/files are currently stored in a region
other than the FAT (File Allocation Table) region.
The number of levels in a folder is more than 8. Limit the maximum number of levels in a folder
There are more than 2000 folders/files stored in a
single folder.
The audio files are copyrighted. Copyrighted audio files stored on a USB memory
The USB memory device does not support the
mass storage class specifications.
The USB memory device is not securely
connected.
A USB hub is currently being used. This receiver does not support a USB hub. 3
This receiver recognizes the USB memory device
as a fraud.
The USB memory device is formatted in FAT12,
NTFS or HSF.
The file format cannot be properly played back
on this receiver.
The remote control is not currently set to the
Home Media Gallery mode.
Check whether the audio file was recorded in a
format supported by this receiver.
Check whether the folder has been damaged or
corrupted.
Note that there are cases where even the audio
files listed as playable on this receiver cannot be
played back or displayed.
Use 100BASE-TX to access the components on
the network.
Instead of logging onto the domain, log onto the
local machine.
Check the firewall settings for components on
the network.
Check the connection settings for components
on the network, and consult with your network
service provider if necessary.
There are cases where you cannot listen to some
Internet radio stations even when they are listed
in the list of Internet radio stations on this
receiver.
Store the folders/files in the FAT region. —
to 8.
Limit the maximum number of folders/files
stored in a single folder to 2000.
device cannot be played back.
Try using a USB memory device compatible with
the mass storage class specifications. Note that
there are cases where even the audio files stored
on a USB memory device compatible with the
mass storage class specifications are not played
back on this receiver.
Connect the USB memory device and switch on
this receiver.
Switch off and on again this receiver. —
Check whether the format of your USB memory
device is either FAT 16 or FAT 32. Note that the
FAT 12, NTFS, and HFS formats cannot be played
back on this receiver.
See the list of file formats that can be played
back on this receiver.
Press and hold
remote control to the Home Media Gallery mode.
SHIFT
and press
iPod
to set the
7, 15
8
—
5
—
10
6
6
6
3
3
3
8
6
14
En
Page 15
Additional information
About status messages
Refer to the following information when you come up with a status message while operating the Home Media Gallery.
Status messages Descriptions
Please Wait
Connection Down
File Format Error
Track Not Found
Server Error
Server Disconnected
USB Error
empty
Preset Not Stored
Network Problem
Out of Range
License Error
A component on the network, including a PC, is currently being connected. Wait for a while.
The selected category or Internet radio station cannot be accessed.
Cannot be played back for some reasons.
The selected song has not been found anywhere on the network.
The selected server cannot be accessed.
The server has been disconnected.
The amount of electricity consumption for a USB memory device is too large.
There are no files stored in the selected folder.
The selected Internet radio station is not currently registered and saved.
There is a problem with the network settings. Check the network settings. The message also appears
then the network settings of this receiver have been changed. In this case, please wait.
The value entered is beyond the permitted range of the network settings.
The license for the contents to be played back is invalid.
05
15
En
Page 16

05
Additional information
Glossary
Default Gateway
Default Gateway is a node on a computer network that
serves as an access point to another network. A default
gateway (such as a computer and router) is used to
forward all traffic that is not addressed to a station within
the local subnet.
DHCP (Dynamic Host Configuration Protocol)
Server
A DHCP server is a server that allocates IP addresses to
hosts (network devices). In most cases, a broadband
router serves as a DHCP server in a home network.
DLNA
The Digital Living Network Alliance (DLNA) is a crossindustry organization of consumer electronics,
computing industry and mobile device companies.
Digital Living provides consumers with easy sharing of
digital media through a wired or wireless network in the
home.
The DLNA certification logo makes it easy to find
products that comply with the DLNA Interoperability
Guidelines. This unit complies with DLNA Interoperability
Guidelines v1.0.
DNS
DNS is an abbreviation for the Domain Name System,
which stores and associates many types of information
with domain names. Most importantly, DNS translates
domain names (computer hostnames or sitenames,
such as www.pioneerelectronics.com) to IP addresses
(such as 202.221.192.106).
Ethernet
A frame-based computer networking technology for local
area networks (LANs). This player supports 100BASE-TX
and 10BASE-T.
LAN
LAN is an abbreviation for the Local Area Network, which
is a computer network covering a small geographical
area, like a home, office, or group of buildings. Current
LANs are most likely to be based on switched IEEE 802.3
Ethernet technology, running at 10, 100, or 1000 Mbit/s,
or on IEEE 802.11 Wi-Fi technology.
MAC (Media Access Control) address
An address attached to the port of any device. The MAC
address cannot be changed.
Neural Surround
Neural Surround represents the latest advancement in
surround technology and has been adopted by FM Radio
and Neural Music Direct for broadcasts of surround
recordings and live events.
Neural Surround employs psychoacoustic frequency
domain processing which allows delivery of a more
detailed sound stage with superior localization of
surround elements. System playback is scalable from
stereo up to state-of-the-art multichannel surround.
Subnet mask
The IP address is divided into the network address part
and the host address part. The subnet mask is expressed
as ‘255.255.255.0’. In most cases, the subnet mask is
automatically assigned by the DHCP server.
vTuner
vTuner is an online database service that allows you to
listen to radio on the Internet. vTuner lists thousands of
stations from over 100 different countries around the
globe.
“This product is protected by certain intellectual property
rights of NEMS and BridgeCo. Use or distribution of such
technology outside of this product is prohibited without a
license from NEMS and BridgeCo or an authorized
subsidiary.”
16
En
FLAC
FLAC (Free Lossless Audio Codec) is an audio format
allows lossless codec. Audio is compressed in FLAC
without any loss in quality. For more details about FLAC,
visit the following website: http://flac.sourceforge.net/
IP (Internet Protocol) address
A unique number that devices use in order to identify and
communicate with each other on a network utilizing the
Internet Protocol standard, such as ‘192.168.0.1’. No
duplicate numbers are allowed in the network.
Page 17

Additional information
Windows Media
Windows Media is a multimedia framework for media
creation and distribution for Microsoft Windows.
Windows Media is either a registered trademark or
trademark of Microsoft Corporation in the U.S. and/or
other countries. Use an application licensed by Microsoft
Corporation to author, distribute, or play Windows Media
formatted content. Using an application unauthorized by
Microsoft Corporation is subject to malfunction.
Windows Media DRM
Windows Media DRM is a DRM (Digital Rights
Management) service for the Windows Media platform. It
is designed to provide secure delivery of audio and/or
video content over an IP network to a PC or other
playback device in such a way that the distributor can
control how that content is used. The WMDRM-protected
content can only be played back on a component
supporting the WMDRM service.
Windows Media Player 11/
Windows Media Connect
Windows Media Connect is software to deliver music,
photos and movies from a Microsoft Windows XP
computer to home stereo systems and TVs.
With this software, you can play back files stored on the
PC through various devices wherever you like in your
home.
At this time you cannot download the Windows Media
Connect software from Microsoft’s website. If your server
currently does not have Windows Media Connect
installed, install Windows Media Player 11 (for Windows
XP) instead. This software can be downloaded from
Microsoft’s website.
For more information check the official Microsoft
website.
05
About FLAC
FLAC Decoder
Copyright © 2000, 2001, 2002, 2003, 2004, 2005, 2006,
2007 Josh Coalson
Redistribution and use in source and binary forms, with
or without modification, are permitted provided that the
following conditions are met:
• Redistributions of source code must retain the above
copyright notice, this list of conditions and the
following disclaimer.
• Redistributions in binary form must reproduce the
above copyright notice, this list of conditions and the
following disclaimer in the documentation and/or
other materials provided with the distribution.
• Neither the name of the Xiph.org Foundation nor the
names of its contributors may be used to endorse or
promote products derived from this software without
specific prior written permission.
THIS SOFTWARE IS PROVIDED BY THE COPYRIGHT
HOLDERS AND CONTRIBUTORS “AS IS” AND ANY
EXPRESS OR IMPLIED WARRANTIES, INCLUDING, BUT
NOT LIMITED TO, THE IMPLIED WARRANTIES OF
MERCHANTABILITY AND FITNESS FOR A PARTICULAR
PURPOSE ARE DISCLAIMED. IN NO EVENT SHALL THE
FOUNDATION OR CONTRIBUTORS BE LIABLE FOR ANY
DIRECT, INDIRECT, INCIDENTAL, SPECIAL, EXEMPLARY,
OR CONSEQUENTIAL DAMAGES (INCLUDING, BUT NOT
LIMITED TO, PROCUREMENT OF SUBSTITUTE GOODS OR
SERVICES; LOSS OF USE, DATA, OR PROFITS; OR
BUSINESS INTERRUPTION) HOWEVER CAUSED AND ON
ANY THEORY OF LIABILITY, WHETHER IN CONTRACT,
STRICT LIABILITY, OR TORT (INCLUDING NEGLIGENCE OR
OTHERWISE) ARISING IN ANY WAY OUT OF THE USE OF
THIS SOFTWARE, EVEN IF ADVISED OF THE POSSIBILITY
OF SUCH DAMAGE.
About aacPlus
The AAC decoder uses aacPlus developed by Coding
Technologies (www.codingtechnologies.com).
17
En
Page 18

01
Capítulo 1:
Características
Acerca de este manual de instrucciones
La característica Home Media Gallery de este receptor le
permite reproducir archivos de audio o escuchar
emisoras de radio de Internet a través de su PC u otro
componente conectado al terminal LAN de este receptor.
Además, Home Media Gallery le permite reproducir
archivos de audio guardados en su dispositivo de
memoria USB conectado al terminal USB de este
receptor. Este manual de instrucciones describe los
procedimientos de conexión, ajuste y reproducción
necesarios para disfrutar de estas características. Se le
recomienda consultar también el manual de
instrucciones suministrado con su componente de red.
Características de Home Media Gallery
Este receptor está equipado con el terminal LAN y el
terminal USB, y conectando sus componentes a estos
terminales puede disfrutar de las características
siguientes.
• Reproducción de archivos de música guardados
• Recepción de emisoras de radio de Internet
• Reproducción de archivos de audio guardados en
1
en PC
Con esta unidad puede reproducir mucha música
guardada en sus PC.
Consulte Reproducción con Home Media Gallery en
la página 4 y Reproducción de archivos de audio
guardados en un componente de la red en la página 6.
Puede seleccionar y escuchar su emisora de radio de
Internet favorita que se encuentra en la lista de
emisoras de radio de Internet creada, editada y
administrada por el servicio de base de datos vTuner
para uso exclusivo con productos Pioneer. También
puede escuchar emisoras de radio de Internet
administradas por Neural THX.
Consulte Reproducción con Home Media Gallery en
la página 4, Recepción de emisoras de radio de
Internet y Recepción de Neural Music Direct en la
página 7.
un dispositivo de memoria USB
Puede reproducir directamente su canción deseada
desde la lista de carpetas/archivos visualizada en la
pantalla.
Consulte Reproducción con Home Media Gallery en
la página 4 y Reproducción de archivos de audio
guardados en un dispositivo de memoria USB en la
página 6.
Pasos para disfrutar de Home Media
Gallery
Reproducción de archivos de audio de la red
y escucha de emisoras de radio de Internet
1 Conecte a la red mediante la interfaz LAN.
Para más detalles, consulte Conexión a la red mediante la
interfaz LAN en la página 3.
2 Configure los ajustes de la red.
El ajuste sólo es necesario cuando el enrutador que va a
ser conectado no tiene función de servidor DHCP
incorporada.
Para más detalles, consulte Configuración de la red en la
página 10.
3 Reproduzca con Home Media Gallery.
Para más detalles, consulte Reproducción con Home
Media Gallery en la página 4.
Reproducción de archivos de audio
guardados en un dispositivo de memoria USB
1 Conecte su dispositivo de memoria USB al terminal
USB.
Para más detalles, consulte Uso de la interfaz USB en la
página 3.
2 Reproduzca con Home Media Gallery.
Para más detalles, consulte Reproducción con Home
Media Gallery en la página 4.
2
Sp
Nota
1 Además de un PC, también puede reproducir archivos de audio guardados en otros componentes empleando para ello la función del servidor de medios
incorporada basada en los protocolos y en el marco de DLNA 1.0 (es decir, sistemas de audio y discos duros compatibles con red).
Page 19

Capítulo 2:
R
Conexión
Conexión a la red mediante la interfaz
LAN
Precaución
• Antes de extablecer o modificar las conexiones,
desconecte la alimentación y desenchufe el cable de
alimentación de la toma de corriente. La conexión
debe ser el último paso.
VSX-LX70
MULTI-ZONE
& SOURCE
/REC SEL
OUT1
ZONE3
OUT2
LAN (10/100)
HDMI
OPTICAL
IN
1
IN
(TV/
)
SAT
2
IN
IN
(BD)
3
IN
(
DVR/
)
VCR 1
IN
4
IN
(
)
CD-R
1
4
ASSIGNABLE
1
21
IN
(
DVD/
IN
)
LD
(CD)
2
IN
COAXIAL
OUT
ASSIGNABLE
41
DIGITAL
Cable LAN
(vendido
separadamente)
Enrutador
IN
1
MAIN
IN
2
ZONE2
1
CONTROL
IN
OUT
2
1
IN
Y
(
DVD/
)
LD
3
B
P
PR
4
2
IN
Y
(BD)
P
B
PR
ASSIGNABLE
COMPONENT VIDEO
MULTI-ZONE
& SOURCE
1
IN
2
IN
(
VIDEO/GAME
(
DVD/LD
(BD)
ASSIGNABLE
FM UNBAL 75 Ω
IR
MULTI-ZONE & SOURCE
OUT
)
2
1
OUT
Y
B
P
PR
3
IN
Y
P
B
PR
1)
31
MONITOR
OUT
S-VIDEO
MONITOR
OUT
1
IN
2
IN
VIDEO AUDIO
DVD/LD
TV/SAT
VIDEO /
GAME 1
OUT
IN
BD
IN
IN
IN
OUT
DVR/
VCR 1
IN
OUT
DVR/
VCR 2
IN
AM LOOP
R
ANTENNA
ZONE2ZONE2
R L
AUDIO
PHONO
IN
L
CD
IN
OUT
CD-R/
TAPE/
MD
IN
R
R
SUB W.
SURROUND
SURROUND BACK
1
12 V TRIGGER
(
DC OUT 12V/
TOTAL 50 mA MAX
Modem
L
L
F
CENTE
LR
2
)
Conectando este receptor a la red mediante el terminal
LAN, usted podrá reproducir los archivos de audio
guardados en componentes de la red, incluyendo su PC,
y escuchar emisoras de radio de Internet.
1
Co ne cte el te rmin al LA N de e ste r ec ept or al term inal LAN
de su enrutador (con o sin la función del servidor DHCP
incorporada) con un cable LAN recto (CAT 5 o mejor).
Active la función del servidor DHCP en su enrutador. En
el caso de que su enrutador no tenga la función del
servidor DHCP incorporada, será necesario preparar
manualmente la red. Para conocer detalles, consulte
Configuración de la red en la página 10.
Las especificaciones de un terminal LAN
Terminal LAN . . . . . . . . . . . . . . . . . . . . . . . Conector Ethernet
10BASE-T/100BASE-TX
Uso de la interfaz USB
Usando la interfaz USB de la parte frontal de este
receptor se pueden escuchar dos canales de audio
AUDIO VIDEO
PHONES
PARAMETER
(TUNE)
(ST) (ST)
ENTER
(TUNE)
SETUP
RETURN
TUNER EDITSPEAKERS BAND
USB
MCACC
SETUP MIC
MULTI – ZONE &
SOURCE/REC SEL
CONTROL ON/OFF
SIGNAL
SELECT
VIDEO/GAME 2 INPUT
DIGITAL IN S-VIDEO VIDEO L RAUDIO
Este receptor
SB ch
PROCESSING
STEREO/
F.S.SURR
2
.
02
LAN
321
WAN
Dispositivo de almacenamiento
de gran capacidad USB
Internet
Cable LAN (vendido
separadamente)
A un puerto LAN
A un puerto
LAN
PC 1
PC 2
Nota
1 • Para escuchar emisoras de radio de Internet tendrá que firmar primero un contrato con un ISP (proveedor de servicios de Internet).
• Los archivos de vídeo no se pueden reproducir.
• Con Windows Media Connect o Windows Media Player 11, en este reproductor usted puede reproducir hasta archivos de audio protegidos por
derechos de autor.
2 • Los dispositivos USB compatibles incluyen unidades externas de disco duro magnético, memorias flash portátiles (particularmente “keydrives”) y
reproductores de audio digital (reproductores MP3) del formato FAT16/32. No se puede conectar esta unidad a un ordenador personal para hacer la
reproducción USB.
• Pioneer no puede garantizar la compatibilidad (funcionamiento y/o alimentación de bus) con todos los dispositivos de almacenamiento de gran
capacidad USB, y no asume ninguna responsabilidad por ninguna pérdida de datos que pueda ocurrir cuando se hagan conexiones a este receptor.
3
Sp
Page 20

03
Capítulo 3:
Reproducción con Home Media Gallery
DLNA
Introducción
Home Media Gallery le permite reproducir música en
servidores de medios conectados a un Área de Red Local
(LAN) idéntica a la que está conectado el receptor. Esta
unidad permite reproducir los archivos guardados en lo
siguiente:
• PC que ejecutan Microsoft Windows XP con
Windows Media Connect instalado
• PC que ejecutan Microsoft Windows Vista o XP con
Windows Media Player 11 instalado
• Servidores de medios digitales compatibles con
DLNA (en PCs o en otros componentes)
Para reproducir archivos de audio guardados en
componentes de la red o para escuchar emisoras de
radio de Internet, usted tendrá que activar la función del
servidor DHCP en su enrutador. En el caso de que su
enrutador no tenga la función del servidor DHCP
incorporada, será necesario preparar manualmente la
red. De lo contrario no podrá reproducir archivos de
audio guardados en componentes de la red ni escuchar
emisoras de radio de Internet. Para más detalles,
consulte Configuración de la red en la página 10.
DLNA CERTIFIED™ Audio Player
La Digital Living Network Alliance (DLNA) es una
organización industrial de compañías de la electrónica
para el consumidor, las computadoras y los aparatos
móviles. Digital Living permite que los consumidores
compartan fácilmente en casa medios digitales
mediante una red alámbrica o inalámbrica.
El logotipo con el certificado DLNA permite encontrar
fácilmente los productos que cumplen las directrices de
interoperabilidad de DLNA. Esta unidad cumple con las
directrices de interoperabilidad v1.0 de DLNA.
Cuando un PC que use software de servidor DLNA u otro
aparato compatible con DLNA se conecte a este
reproductor, puede que sea necesario hacer algunos
cambios de software o de otros aparatos. Consulte el
manual de instrucciones que acompaña al software o
aparato para tener más información.
Acerca de la reproducción de la red
La función de reproducción de la red de esta unidad usa
las tecnologías siguientes:
Windows Media Connect
Para más detalles, consulte Windows Media Player 11/
Windows Media Connect en la página 17.
Windows Media DRM
Microsoft Windows Media Digital Rights Management
(WMDRM) es una plataforma para proteger y enviar con
seguridad contenido para reproducirlo en
computadoras, aparatos portátiles y aparatos de red.
Home Media Gallery funciona como una WMDRM 10
para aparatos de red. El contenido protegido por
WMDRM sólo se puede reproducir en servidores de
medios compatibles con WMDRM.
Los propietarios del contenido usan la tecnología WMDRM para
proteger su propiedad intelectual, incluyendo derechos de autor. Este
aparato utiliza software WMDRM para acceder al contenido protegido
por WMDRM. Si el software WMDRM no protege el contenido, los
propietarios del mismo podrán pedir a Microsoft que revoque la facultad
del software para usar WMDRM para reproducir o copiar contenido
protegido. La revocación no afecta al contenido sin protección. Cuando
descarga licencias para el contenido protegido acepta que Microsoft
pueda incluir una lista de revocaciones con las licencias. Los
propietarios del contenido pueden pedirle que mejore la WMDRM para
acceder a su contenido. Si no quiere una mejora no podrá acceder al
contenido que requiera la mejora.
Este producto está protegido por ciertos derechos de propiedad
intelectual de Microsoft. El uso o distribución de tal tecnología fuera de
este producto está prohibida sin una licencia de Microsoft.
DLNA y DLNA CERTIFIED son marcas de fábrica y/o marcas de servicio
de Digital Living Network Alliance.
Contenido reproducible en una red
• Puede que algunos archivos no se reproduzcan
correctamente a pesar de estar codificados con un
formato compatible.
• Los archivos de películas y fotos no se pueden
reproducir.
• Hay casos en los que usted no podrá oír una emisora
de radio de Internet aunque la emisora haya sido
seleccionada de una lista de emisoras de radio.
• Dependiendo del tipo de servidor o versión que se
use puede que algunas funciones no sean
soportadas.
• Los formatos de archivos soportados cambian según
el servidor. Por lo tanto, los archivos no soportados
por su servidor no se visualizan en esta unidad. Para
más información, consulte con el fabricante de su
servidor.
4
Sp
Page 21

Acerca de la reproducción en una red
• La reproducción se puede detener cuando se apaga
el PC o cuando se borra cualquier archivo de medios
mientras se reproduce el contenido.
• Si hay problemas dentro del ambiente de la red
(tráfico de red pesado, etc.) puede que el contenido
no se visualice ni reproduzca correctamente (la
reproducción puede interrumpirse o detenerse).
Para obtener el mejor rendimiento se recomienda
una conexión 100BASE-TX entre el reproductor y el
PC.
• Si reproducen simultáneamente varios clientes
puede que la reproducción se interrumpa o se
detenga.
• Dependiendo del software de seguridad instalado en
un PC conectado y del ajuste de tal software puede
que la conexión de red se bloquee.
Pioneer no se hace responsable de ningún fallo de
funcionamiento del reproductor o de Home Media
Gallery debido a errores de comunicación/fallos de
funcionamiento asociados con su conexión de red y/o su
PC, u otros equipos conectados. Póngase en contacto
con el fabricante de su PC o con el proveedor de servicios
de Internet.
“Windows Media™” es una marca comercial de Microsoft Corporation.
Este producto incluye tecnología propiedad de Microsoft Corporation, y
no se puede usar ni distribuir sin licencia de Microsoft Licensing, Inc.
®
Microsoft
Windows
marcas registradas o marcas comerciales de Microsoft Corporation en
Estados Unidos y/o en otros países.
, Windows®Vista, Windows®XP, Windows®2000,
®
Millennium Edition, Windows®98 y WindowsNT® son
Autorización para este receptor
Para poder reproducir con Home Media Gallery, este
receptor deberá estar autorizado. Esto se hace
automáticamente cuando el receptor se conecta al PC a
través de la red. Si no, autorice manualmente a este
receptor en el PC. El método de autorización (o permiso)
para el acceso varía dependiendo del tipo de servidor que
esté siendo conectado. Para más información sobre la
autorización de este receptor, consulte el manual de
instrucciones de su servidor.
Reproducción
CD
CD-R
DVD TV
HOME MEDIA
DVR2
GALLERY
DVR1
i Pod
SLEEP
+
SR
D.ACCESS
CLEAR
+
10
A PARAMETER
TOP MENU
TUNE
ST ST
BAND
SETUPSETUP
TUNE
PROGRAM
TV CONTROL
Importante
• Para los nombres de carpetas, archivos y emisoras
de radio de Internet se visualizan hasta 21 caracteres
en l a p anta ll a d e lis ta s d e c arpe ta s/ arch iv os de Ho me
Media Gallery, mientras que en la pantalla de
reproducción se visualizan hasta 24 caracteres.
• Tenga en cuenta que los caracteres no romanos de la
lista de reproducción se mostrarán como #.
• Cuando reproduce archivos de audio se visualiza
‘Connecting...’ antes de empezar la reproducción.
La visualización puede continuar varios segundos
según el tipo de archivo.
• En el caso de un dominio configurado en el ambiente
de red de Windows, usted no podrá acceder a un PC
de la red mientras esté conectado al dominio. En
lugar de conectar al dominio, conecte a la máquina
local.
• Este receptor puede reproducir archivos de audio
comprimidos en el modo VBR (velocidad de bits
variable), pero habrá casos en los que el tiempo
transcurrido no se visualizará correctamente.
ENTER
BD TV CTRL
TUNER
RECEIVER
DIMMER
GENRE
CLASS
CH
ENTER
LEVEL
V PARAMETER
MENU T.EDIT
HDMI
ZONE2/3
RETURNRETURN
ANALOG
ATT
DISC
INPUT
TV VOL
TV/DTV
MPX
AUDIO SUBTITLE
STATUSSTATUS
MULTI OPE
SHIFT
TV CH
REC
REC STOP
T.DISP
STANDARD
VOL
INFO
MUTE
JUKEBOX
HDD
DVD
CH
CH
STEREO/
SBch
F.S.SURR
ADV.SURR
MCACC S.DIRECT
SELECT
A
BCDE
DISP
PHOTO
SIGNAL SEL
THX
PHASE
RECEIVER
03
Sp
5
Page 22

03
6
Sp
1Pulse
mantiene pulsado
fuente de entrada.
Este receptor puede tardar varios segundos en tener
acceso a la red. La pantalla siguiente aparece cuando se
selecciona Home Media Gallery como fuente de entrada.
No se puede acceder a un servidor que no tenga la
marca .
2Use
reproducir y luego pulse
Seleccione una categoría en la lista siguiente:
Dependiendo de la categoría seleccionada, los nombres
de las carpetas, archivos y emisoras de radio de Internet
no se visualizan.
3Use
música o emisora de radio de Internet que va a
reproducir y luego pulse
Pulse los botones / para desplazar la lista hacia
arriba y hacia abajo y seleccione el elemento deseado.
HOME MEDIA GALLERY
SHIFT
) para seleccionar
Home Media G
Top M enu
Pre 001/009
[ USB ]
[ Internet Radio ]
[ Neural Music Direct ]
[ Server1 ]
[ Server2 ]
[ Server3 ]
[ Server4 ]
[ Favorites ]
Next
/
para seleccionar la categoría que quiera
ENTER
(pulse
-
55.0
.
iPod
mientras
HMG
como
dB
• USB – Dispositivo de memoria USB
• Internet Radio – Radio de Internet
• Neural Music Direct – Radio de Internet que soporta
Neural Surround
• Server Name – Componentes del servidor en la red
• Favorites – Canciones favoritas que están siendo
registradas
/
para seleccionar la carpeta, archivo de
ENTER
.
4 Repita el paso 3 para reproducir la canción deseada.
Con el mando a distancia de este receptor puede realizar las
operaciones siguientes. Note que, dependiendo de la
categoría que esté siendo reproducida, algunos botones no
estarán disponibles para la operación.
Botón(es) Función
Reproducción
Pausa
Parad a
/ Salto hacia adelante y hacia atrás
: Repetición total (sólo
disponible durante la
reproducción)
: Repetición de una canción
1
(sólo disponible durante la
reproducción)
Aleatoria
DISP Indicadores
/ Desplazamiento hacia arriba y
ENTER Seleccione y confirme un
hacia abajo
elemento en la lista seleccionada.
RETURN Menú anterior
TOP MENU Menú inicial
PROGRAM Registro en la carpeta Favorites
CLEAR Borrado de canciones registradas
en la carpeta Favorites o de
emisoras de radio de Internet.
Reproducción de archivos de audio
guardados en un componente de la red
Cuando pulsa ENTER, la reproducción empieza con la
pantalla de reproducción que está siendo visualizada
para el elemento seleccionado. Para volver a la pantalla
de listas, pulse RETURN.
• En el caso de un servidor o dispositivo de memoria
USB
Home Media G
Server1
Pre 001/012
[ Group1 ]
[ Group2 ]
[ Group3 ]
[ Group4 ]
[ Group5 ]
[ Group6 ]
[ File1 ]
[ Song0 ]
Next Return
-
55.0
Home Media G
dB
Play
3:36
Return
Song1
Artist1
Album1
-
55.0
dB
• En el caso de la radio de Internet
Acerca de la pantalla de reproducción
La pantalla siguiente aparece cuando usted reproduce
archivos de audio. Note que, dependiendo del tipo de
archivo, algunos elementos puede que no se visualicen.
Home Media G
Play
We are all one
Beat Band
PRIDE of LIFE
3:36
Return
Reproducción de archivos de audio
guardados en un dispositivo de memoria USB
Home Media G
Internet Radio
001/006
[ Location ]
[ Genre ]
[ Podcasts By Location ]
[ Podcasts By Genre ]
[ New Stations ]
[ Most Popular Station ]
Return
Sólo se pueden reproducir los archivos de audio con la
marca . En el caso de las carpetas con la marca , use
/ y ENTER para seleccionar la carpeta y el archivo de
audio deseados.
Nota
1 • La reproducción se para cuando se reproduce hasta el final la última canción de una carpeta.
• Cuando se conecta un dispositivo de memoria USB de gran capacidad se tarda cierto tiempo en leer todo el contenido.
• Este receptor no soporta el concentrador USB.
• Este receptor no pueden reproducir los archivos de audio protegidos por derechos de autor.
-
55.0
dB
Home Media G
Play
3:36
Return
Song1
Artist1
Album1
-
55.0
dB
El máximo número de niveles que usted puede
seleccionar en los pasos 3 y 4 es 8. Además, usted puede
visualizar y reproducir hasta 2000 carpetas y archivos
dentro de una sola carpeta.
1
-
55.0
dB
Canción
Artista
Álbum
Tiempo
transcurrido
Page 23

Recepción de emisoras de radio de Internet
Acerca de la radio de Internet
La radio de Internet es un servicio de emisión de audio a
través de Internet. Hay un gran número de emisoras de
radio de Internet que emiten una variedad de servicios
desde cualquier parte del mundo. Algunas pertenecen a
individuos privados, que son quienes presentan los
programas, las administran y se encargan de las
emisiones, mientras que otras son las emisoras o redes
de radio terrestres tradicionales. Mientras que las
emisoras de radio terrestres, u OTA (por el aire), tienen
limitaciones geográficas para las emisiones de ondas de
radio desde sus transmisores, a las emisoras de radio de
Internet se puede acceder desde cualquier parte del
mundo, siempre que se disponga de una conexión a
Internet, porque los servicios no se transmiten por el aire,
sino a través de World Wide Web. En este receptor, usted
puede seleccionar emisoras de radio de Internet por
género y también por región.
Acerca de la pantalla de reproducción
La pantalla siguiente aparece cuando se reciben los
streams de audio de una emisora de radio de Internet.
(La pantalla de abajo sólo es un ejemplo. La visualización
real depende de la emisora de radio de Internet.)
Home Media G
Play
We are all one
PRIDE of LIFE
3:36
Return
Acerca de la lista de radio de Internet
La lista de emisoras de radio de Internet de este receptor
es creada, editada y administrada por el servicio de base
de datos vTuner para uso exclusivo con este receptor.
Para guardar y recuperar emisoras de radio de
Internet
Puede guardar y recuperar fácilmente las emisoras de
radio de Internet. Para más detalles, consulte
Operaciones avanzadas para radio de Internet en la
página 9.
1
Beat Band
-
55.0
dB
Canción
Artista
Álbum
Tiempo
transcurrido
Recepción de Neural Music Direct
Acerca de Neural Music Direct
Neural Music Direct es una emisora de radio de Internet
administrada y operada por Neural THX. Las emisoras de
radio Neural emiten sonido envolvente multicanal. El
modo Neural-THX Surround se selecciona
automáticamente y le permite disfrutar de un sonido
envolvente multicanal. Para conocer detalles de Neural
THX, consulte el manual de instrucciones suministrado
separadamente.
Neural Surround es una marca de fábrica propiedad de Neural Audio
Corporation y THX es una marca de fábrica de THX Ltd. Ambas marcas
pueden estar registradas en algunas jurisdicciones. Todos los derechos
reservados.
Reproducción de sus canciones favoritas
Acerca de la carpeta Favorites
En la carpeta Favorites puede registrar hasta 20 de sus
canciones favoritas. Note que sólo se pueden registrar
archivos de audio guardados en componentes de la red.
Registro de archivos de audio y emisoras de radio
de Internet en la carpeta Favorites y eliminación
de los mismos
Pulse PROGRAM mientras se reproduce una canción o
ésta está parada. La canción seleccionada se registra
luego en la carpeta Favorites.
Se pueden registrar hasta 20 canciones o emisoras de
radio de Internet. Las canciones guardadas en un
dispositivo de memoria USB no se pueden registrar.
Para eliminar una canción registrada, seleccione la
carpeta Favorites, elija en ella la canción que quiera
eliminar y pulse CLEAR. La canción seleccionada se
elimina de la carpeta Favorites.
03
Nota
1 • Para escuchar emisoras de radio de Internet tendrá que tener acceso a Internet de banda ancha de alta velocidad. Con un modelo de 56 K o ISDN tal
vez no pueda disfrutar de todos los beneficios de la radio de Internet.
• El número del puerto cambia dependiendo de la emisora de radio de Internet. Compruebe la configuración del servidor de seguridad.
• Una lista de emisoras de radio de Internet provista por el servicio de base de datos vTuner está sujeta a cambios sin previo aviso debido a diversas
razones.
• Las emisiones pueden detenerse o interrumpirse dependiendo de la emisora de radio de Internet. En este caso, usted no podrá oír una emisora de
radio seleccionada desde la lista de emisoras de radio.
7
Sp
Page 24

03
Acerca de los formatos de archivo reproducibles
La característica Home Media Gallery de este receptor soporta los formatos de archivo siguientes. Note que algunos formatos
de archivo no podrán reproducirse aunque estén en la lista de formatos de archivo reproducibles. Además, la compatibilidad
de formatos de archivo cambia dependiendo del tipo de servidor. Consulte con su servidor para asegurarse de que los
formatos de archivo que éste soporta son compatibles.
Categoría Extensión Stream
a
MP3
LPCM
WAV .wav LPCM Frecuencia de muestreo 8 kHz a 44,1 kHz
WMA .wma WMA2/7/8 Frecuencia de muestreo 8 kHz a 48 kHz
AAC .m4a
FLAC .flac FLAC Frecuencia de muestreo 8 kHz, 16 kHz, 22 kHz, 32 kHz,
a.“Tecnología de decodificación de audio MPEG Layer-3 bajo licencia de Fraunhofer IIS y Thomson multimedia.”
b.Sólo concierne a los datos de serie procedentes de servidores, así que no hay extensión.
.mp3 MPEG-1 Audio Layer-3 Frecuencia de muestreo 8 kHz a 48 kHz
—
.aac
.3gp
.3g2
Velocidad de bits de
cuantificación
Canal 2 canales
Velocidad de bits 8 kbps a 320 kbps
VBR/CBR Soportado/Soportado
b
LPCM Frecuencia de muestreo 8 kHz a 44,1 kHz
Velocidad de bits de
cuantificación
Canal 2 canales
Velocidad de bits de
cuantificación
Canal 2 canales
Velocidad de bits de
cuantificación
Canal 2 canales
Velocidad de bits 5 kbps a 320 kbps
VBR/CBR Soportado/Soportado
WMA9 Frecuencia de muestreo 8 kHz a 48 kHz
Velocidad de bits de
cuantificación
Canal 2 canales
Velocidad de bits 5 kbps a 320 kbps
VBR/CBR Soportado/Soportado
MPEG-4 AAC LC
MPEG-4 HE AAC (aacPlus v1/2)
Frecuencia de muestreo 32 kHz a 48 kHz
Velocidad de bits de
cuantificación
Canal 2 canales
Velocidad de bits 16 kbps a 320 kbps
VBR/CBR Soportado/Soportado
Velocidad de bits de
cuantificación
Canal 2 canales (no se soporta el
Velocidad de bits —
VBR/CBR No soportado/Soportado
16 bits
16 bits, 20 bits, 24 bits
16 bits, 20 bits, 24 bits
16 bits
16 bits
16 bits
44,1 kHz, 48 kHz
8 bits, 16 bits
audio monofónico de 8 bits)
8
Sp
Page 25

Operaciones avanzadas para radio de
Internet
D.ACCESS
CLEAR
+
10
A PARAMETER
TOP MENU
ST ST
BAND
SETUPSETUP
PROGRAM
TV CONTROL
INPUT
TV VOL
SELECT
Para guardar emisoras de radio de Internet
Este receptor puede recordar las emisoras de radio de
Internet que usted escucha con frecuencia en 3 clases
(A, B y C), con un máximo de 10 emisoras en cada clase,
lo que supone un máximo de 30 emisoras.
Antes de empezar con los pasos siguientes, verifique si
ha seguido los pasos 1 a 3 en página 6.
1 Sintonice la emisora de radio de Internet que desea
guardar.
Sintonice la emisora de radio de Internet deseada
siguiendo los pasos 1 a 3 en página 6.
2Pulse
emisoras.
3Pulse
quiere guardar la emisora.
Seleccione la clase deseada entre A, B y C.
4Use
quiera guardar la emisora y luego pulse
También puede seleccionar el número de la emisora con
los botones numéricos. Seleccione el número deseado
del 0 al 9.
T.EDIT
para cambiar al modo para guardar
CLASS
para seleccionar la clase en la que
/
para seleccionar el número con el que
CLASS
DISC
CH
ENTER
LEVEL
V PARAMETER
MENU T.EDIT
TUNE
TV CH
VOL
RETURNRETURN
ENTER
.
ENTER
TUNE
Recuperación de las emisoras de radio de
Internet guardadas
Antes de recuperar las emisoras de radio de Internet
tiene que guardarlas. Si no hay actualmente emisoras de
radio de Internet guardadas, consulte Para guardar
emisoras de radio de Internet más arriba y guarde al
menos una de ellas antes de proseguir con los pasos
siguientes.
1 Sintonice la clase de la que quiera recuperar una
emisora de radio de Internet.
Cada vez que pulsa CLASS, la clase cambia a A, B y C.
2Use
que quiera recuperar.
También puede seleccionar el número de la emisora con
los botones numéricos.
‘Preset Not Stored’ aparece cuando usted selecciona
una emisora de radio de Internet que no está guardada.
/
para seleccionar el número de la emisora
03
Sp
9
Page 26

04
DVD TV
BD TV CTRL
INPUT
Capítulo 4:
Configuración
Configuración de la red
En el caso de que el enrutador conectado al terminal LAN
de este receptor sea de banda ancha (con función de
servidor DHCP incorporada), active simplemente la
función del servidor DHCP y no tendrá que configurar
manualmente la red. Deberá configurar la red como se
describe abajo sólo cuando haya conectado este
receptor a un servidor sin la función de servidor de
DHCP. Antes de configurar la red, consulte a su ISP o al
administrador de la red para conocer los ajustes
necesarios. Se le recomienda consultar también el
manual de instrucciones suministrado con su
componente de red.
IP Address
La dirección de IP que vaya a introducirse deberá
definirse dentro de los márgenes siguientes. Si la
dirección IP definida sobrepasa los márgenes
siguientes, usted no podrá reproducir archivos de audio
guardados en componentes de la red ni escuchar
emisoras de radio de Internet.
Clase A: 10.0.0.1 a 10.255.255.254
Clase B: 172.16.0.1 a 172.31.255.254
Clase C: 192.168.0.1 a 192.168.255.254
Subnet Mask
En el caso de que un adaptador de terminal o un modem
xDSL esté conectado directamente a este receptor,
introduzca la máscara de subred provista por su ISP en
papel. En la mayoría de los casos, introduzca
255.255.255.0.
Gateway IP
En el caso de que haya una puerta de enlace (enrutador)
conectada a este receptor, introduzca la dirección IP
correspondiente.
DNS Server Preferred/DNS Server Alternate
En el caso de que sólo haya una dirección de servidor
DNS provista por su ISP en papel, introduzca ‘DNS
Server Preferred’. En el caso de que haya más de dos
direcciones de servidor DNS, introduzca ‘DNS Server
Alternate’ en el otro campo de dirección de servidor
DNS.
Proxy Hostname/Proxy Port
Este ajuste se requiere cuando usted conecta este
receptor a Internet mediante un servidor proxy.
Introduzca la dirección IP de su servidor proxy en el
campo ‘Proxy Hostname’. Además, introduzca el
número de puerto de su servidor proxy en el campo
‘Proxy Port’.
1
Sugerencia
•Pulse / o los botones numéricos para introducir
caracteres alfanuméricos. Para eliminar uno a uno
caracteres introducidos, pulse o CLEAR. ‘Cancel
Key Editing Lose Changes?’ aparece cuando usted
pulsa RETURN o mientras el cursor está en el
extremo izquierdo de la pantalla de introducción de
caracteres alfanuméricos. En este caso, pulse
ENTER para salir de la pantalla y RETURN para volver
a ella.
HOME MEDIA
DVR2
GALLERY
DVR1
i Pod
SLEEP
+
SR
D.ACCESS
CLEAR
+
10
A PARAMETER
TOP MENU
TUNE
ST ST
BAND
SETUPSETUP
PROGRAM
1Pulse
ENTER
TUNE
TV CONTROL
HOME MEDIA GALLERY
mantiene pulsado
ZONE2/3
TUNER
RECEIVER
ANALOG
DIMMER
ATT
GENRE
CLASS
DISC
CH
ENTER
LEVEL
V PARAMETER
MENU T.EDIT
RETURNRETURN
SHIFT
) para seleccionar
TV VOL
TV/DTV
MPX
AUDIO SUBTITLE
STATUSSTATUS
MULTI OPE
SHIFT
TV CH
REC
REC STOP
T.DISP
STANDARD
VOL
INFO
MUTE
JUKEBOX
HDD
DVD
CH
CH
STEREO/
SBch
F.S.SURR
ADV.SURR
MCACC S.DIRECT
iPod
mientras
SELECT
A
BCDE
DISP
PHOTO
SIGNAL SEL
THX
PHASE
RECEIVER
(pulse
HMG
como
fuente de entrada.
Este receptor puede tardar varios segundos en tener
acceso a la red. La pantalla siguiente aparece cuando se
selecciona Home Media Gallery como fuente de entrada.
2 Seleccione ‘
Home Media G
Top M enu
Pre 001/009
[ USB ]
[ Internet Radio ]
[ Neural Music Direct ]
[ Server1 ]
[ Server2 ]
[ Server3 ]
[ Server4 ]
[ Favorites ]
Next
Setup
’ y pulse
-
55.0
dB
ENTER
para confirmar su
elección.
Aparece la pantalla ‘Setup’.
Home Media G
Home Menu
Pre 009/009
[ Setup ]
[ USB ]
[ Internet Radio ]
[ Neural Music Direct ]
[ Server1 ]
[ Server2 ]
[ Server3 ]
[ Server4 ]
Next
Home Media G
-
55.0
dB
Setup
[ Information ]
[ Network Setup ]
Return
-
55.0
dB
10
Sp
Nota
1 En el caso de que haga cambios en la configuración de la red sin la función de servidor DHCP, haga los cambios correspondientes en los ajustes de red
de este receptor.
Page 27

3 Seleccione ‘
Network Setup
’ y pulse
ENTER
para
confirmar su elección.
Aparece la pantalla ‘Network Connection’.
4Aparece ‘
Network Found
’ o ‘
No Network Found
Compruebe el estado de la conexión a la red y pulse
ENTER
.
• Network Found – Conectado a un componente de la
red.
• No Network Found – No conectado a un
componente de la red.
Aparece la pantalla ‘Network IP Settings’.
5 Seleccione ‘
Static IP Address
’ y pulse
ENTER
para
confirmar su elección.
Aparece la pantalla ‘IP Address’. Cuando selecciona
‘Automatic (DHCP)’, la red se configura
automáticamente y usted no tiene que seguir los pasos 6
a 15. Prosiga con el paso 16.
Home Media G
Network IP Settings
[ Automatic (DHCP) ]
[ Static IP Address ]
-
55.0
dB
10 Seleccione ‘
Change
’ y pulse
ENTER
para confirmar
su elección.
Aparece la pantalla ‘Edit Gateway’.
’.
Home Media G
Gateway IP
[ 0.0.0.0 ]
1
[ Change ]
Return
-
55.0
dB
Home Media G
Edit Gateway IP
192:168:000:001
Return
11 Introduzca la dirección IP de la puerta de enlace
predeterminada.
Después de introducirla, pulse el botón o ENTER.
Aparece la pantalla ‘DNS Server Preferred’.
12 Seleccione ‘
Change
’ y pulse
ENTER
para confirmar
su elección.
Aparece la pantalla ‘Edit DNS Preferred’.
Home Media G
DNS Server Preferred
[ 0.0.0.0 ]
1
[ Change ]
-
55.0
Home Media G
dB
Edit DNS Preferred
192:168:000:001
04
-
55.0
dB
-
55.0
dB
Return
6 Seleccione ‘
Change
’ y pulse
ENTER
para confirmar
su elección.
Aparece la pantalla ‘Edit IP Address’.
Home Media G
IP Address
[ 0.0.0.0 ]
1
[ Change ]
Return
Home Media G
-
55.0
dB
Edit IP Address
192:168:000:002
Return
-
55.0
dB
7 Introduzca la dirección IP.
Pulse los botones / para seleccionar un número y los
botones / para mover el cursor. Después de
seleccionar el último número, pulse el botón o
ENTER. También puede usar los botones numéricos para
introducir un número. Aparece la pantalla ‘Subnet
Mask’.
8 Seleccione ‘
Change
’ y pulse
ENTER
para confirmar
su elección.
Aparece la pantalla ‘Edit Subnet Mask’.
Home Media G
Subnet Mask
[ 0.0.0.0 ]
1
[ Change ]
Return
Home Media G
-
55.0
dB
Edit Subnet Mask
255:255:255:000
Return
-
55.0
dB
9 Introduzca la máscara de subred.
Después de introducirla, pulse el botón o ENTER.
Aparece la pantalla ‘Gateway IP’.
Return
Return
13 Introduzca la dirección del servidor DNS preferido.
Después de introducirla, pulse el botón o ENTER.
Aparece la pantalla ‘DNS Server Alternate’.
14 Seleccione ‘
Change
’ y pulse
ENTER
para confirmar
su elección.
Aparece la pantalla ‘Edit DNS Alternate’.
Home Media G
DNS Server Alternate
[ 0.0.0.0 ]
1
[ Change ]
Return
Home Media G
-
55.0
dB
Edit DNS Alternate
192:168:000:001
Return
-
55.0
dB
15 Introduzca la dirección del servidor DNS alternativo.
En el caso de que sólo haya una dirección DNS, no
tendrá que introducir la dirección del servidor DNS
alternativo.
Después de introducir la dirección, pulse el botón o
ENTER. Aparece la pantalla ‘Enable Proxy Server’.
16 Seleccione ‘No’ o ‘
Yes
’ para el ajuste del servidor
proxy, para desactivar o activar el servidor proxy.
En el caso de seleccionar ‘No’, prosiga con el paso 21. Y
en el caso de seleccionar ‘Yes’, prosiga con el paso 17.
Aparece la pantalla ‘Proxy Hostname’.
Home Media G
Enable Proxy Server
[ No ]
[ Yes ]
Return
-
55.0
dB
11
Sp
Page 28

04
17 Seleccione ‘
Change
’ y pulse
ENTER
para confirmar
su elección.
Aparece la pantalla ‘Edit Proxy Hostname’.
-
55.0
Home Media G
Proxy Hostname
[ ]
1
[ Change ]
Return
-
55.0
Home Media G
dB
Edit Proxy Hostname
proxy
Return
dB
18 Introduzca la dirección de su servidor proxy en el
nombre del dominio.
Después de introducirla, pulse el botón o ENTER.
Aparece la pantalla ‘Proxy Port’.
19 Seleccione ‘
Change
’ y pulse
ENTER
para confirmar
su elección.
Aparece la pantalla ‘Edit Proxy Port’.
Home Media G
Proxy Port
[ 0 ]
1
[ Change ]
Return
Home Media G
-
55.0
dB
Edit Proxy Port
8080
Return
-
55.0
dB
20 Introduzca el número de puerto de su servidor
proxy.
Utilice los botones numéricos para introducir el número
de puerto. Después de introducirla, pulse el botón o
ENTER. Aparece la pantalla ‘Setting OK?’.
21 Pulse
ENTER
para completar la configuración de la
red.
Aparece la pantalla ‘Top Menu’.
Comprobación de los ajustes de la red
Puede comprobar los ajustes de red siguientes de este
receptor: las direcciones MAC, IP e IP de puerta de
enlace, el servidor proxy, la máscara de subred y la
versión de firmware (para Home Media Gallery de este
receptor).
Antes de empezar con los pasos siguientes, verifique si
ha seguido los pasos 1 y 2 en página 10.
3 Seleccione ‘
confirmar su elección.
Aparece la pantalla ‘Firmware Version’ (para Home
Media Gallery de este receptor).
(La versión de la ilustración no es la más reciente.)
4 Compruebe los ajustes de la red.
Pulse el botón / para cambiar la visualización. Cada
vez que pulse los botones /, la visualización
cambiará de la forma siguiente.
Firmware Version MAC Address
IP Address Gateway IP Proxy Server
Subnet Mask
5Pulse
Aparece la pantalla ‘Setup’. Para volver a la pantalla
‘Top Menu’, pulse de nuevo RETURN.
Information
RETURN
’ y pulse
Home Media G
Firmware Version
3.5.4.6292
Return
.
-
55.0
ENTER
dB
para
12
Sp
Page 29

Capítulo 5:
Información adicional
Solución de problemas
Consulte la información siguiente si surge algún problema. Los errores de operación pueden confundirse con
problemas mecánicos. Además, la causa de un problema puede encontrarse en otro lugar que no sea este receptor.
Verifique sus componentes de audio de la red y también su dispositivo de memoria USB. Si los problemas persisten,
o si la información siguiente no le proporciona un remedio apropiado, consulte en su centro de servicios Pioneer más
cercano.
Síntomas Causas Soluciones Consulte
No se puede acceder a la
red.
La reproducción no empieza
mientras continúa
visualizándose
‘Connecting...’.
El PC o la radio de Internet
no se utilizan
correctamente.
Los archivos de audio
guardados en componentes
de la red como, por ejemplo,
un PC no se pueden
reproducir.
No se puede acceder al
componente conectado a la
red.
El cable LAN no está conectado firmemente. Conecte firmemente el cable LAN. 3
El enrutador no está encendido. Encienda el enrutador. —
El componente conectado tiene instalado
software de seguridad de Internet.
Se enciende el componente de audio de la red
que ha sido apagada.
El componente está desconectado de este
receptor o de la fuente de alimentación.
La dirección IP correspondiente no está bien
puesta.
La dirección IP está siendo configurada
automáticamente.
Windows Media Player 11 no está instalado en
su PC.
Los archivos de audio fueron grabados en otros
formatos diferentes de MP3, WAV (sólo LPCM),
MPEG-4 AAC, FLAC y WMA.
Archivos de audio grabados en MPEG-4 AAC o
FLAC están siendo reproducidos con Windows
Media Player 11 ó Windows Media Connect.
El componente conectado a la red no se utilizan
correctamente.
El componente conectado a la red no permite
compartir archivos.
La carpeta guardada en el componente
conectado a la red ha sido eliminada o dañada.
El componente conectado a la red no están bien
ajustado.
No hay archivos de audio reproducibles en el
componente conectado a la red.
Hay casos en los que no se puede acceder a un
componente que tiene instalado software de
seguridad de Internet.
Encienda el componente de audio de la red
antes de encender este receptor.
Verifique si el componente está conectado
correctamente a este receptor o a la fuente de
alimentación.
Active la función de servidor DHCP incorporada
de su enrutador, o configure manualmente la
red según el ambiente de su red.
El proceso de configuración automática toma
tiempo. Espere.
Instale Windows Media Player 11 en su PC. 4
Reproduzca archivos de audio grabados en
MP3, WAV (sólo LPCM), MPEG-4 AAC, FLAC o
WMA. Note que algunos archivos de audio
grabados en estos formatos pueden no ser
reproducidos en este receptor.
Los archivos de audio grabados en MPEG-4 AAC
o FLAC no se pueden reproducir con Windows
Media Player 11 ó Windows Media Connect.
Pruebe usando otro servidor.
Verifique si al componente lo afectan
circunstancias especiales o está en el modo de
espera.
Intente reinicializar el componente si es
necesario.
Intente cambiar los ajustes del componente
conectado a la red.
Verifique la carpeta guardada en el componente
conectado a la red.
Si el cliente es autorizado automáticamente,
usted necesitará introducir de nuevo la
información correspondiente. Compruebe si el
estado de la conexión está en “No autorizar”.
Verifique los archivos de audio guardados en el
componente conectado a la red.
Consulte el
manual de
instrucciones
suministrado
con su
servidor.
—
—
—
10
—
—
—
—
—
—
—
05
13
Sp
Page 30

05
Síntomas Causas Soluciones Consulte
La reproducción de audio se
detiene sin querer o se
altera.
No se puede acceder a
Windows Media Player 11.
No se pueden oír las
emisoras de radio de
Internet.
Las carpetas/archivos
guardados en un dispositivo
de memoria USB no se
pueden visualizar.
No se reconoce un
dispositivo de memoria
USB.
Se ha conectado, y se
visualiza, un dispositivo de
memoria USB, pero los
archivos de audio
guardados en ese
dispositivo no se pueden
reproducir.
Home Media Gallery no se
puede controlar con los
botones del mando a
distancia.
El archivo de audio que está siendo reproducido
no fue grabado en un formato que pueda
reproducirse en este receptor.
El cable LAN está desconectado. Conecte correctamente el cable LAN. 3
Hay un tráfico pesado debido al acceso a
Internet en la misma red.
Está conectado al dominio a través de su PC con
Windows XP instalado.
Los ajustes de seguridad para los componentes
de la red están activados.
Está actualmente desconectado de Internet. Compruebe los ajustes de conexión para los
Las emisiones de una emisora de radio de
Internet se detienen o interrumpen.
Las carpetas/archivos están actualmente
guardados en una zona diferente de la zona FAT
(tabla de asignación de archivos).
El número de niveles de una carpeta es superior
a 8.
Hay más de 2000 carpetas/archivos guardados
en una sola carpeta.
Los archivos de audio están protegidos por
derechos de autor.
El dispositivo de memoria USB no es compatible
con las especificaciones de la clase para
guardar datos en masa.
El dispositivo de memoria USB no está bien
conectado.
Está utilizándose un concentrador USB. Este receptor no es compatible con un
Este receptor reconoce que el dispositivo de
memoria USB es un fraude.
El dispositivo de memoria USB está formateado
en FAT12, NTFS o HSF.
El formato de archivo no se pueden reproducir
correctamente en este receptor.
El mando a distancia no está actualmente en el
modo Home Media Gallery.
Compruebe si el archivo de audio fue grabado en
un formato compatible con este receptor.
Compruebe si la carpeta ha sido dañada.
Note que hay casos en los que los archivos de
audio listados como reproducibles en este
receptor no se pueden reproducir ni visualizar.
Use 100BASE-TX para acceder a los
componentes de la red.
En lugar de conectar al dominio, conecte a la
máquina local.
Compruebe los ajustes del servidor de seguridad
para los componentes de la red.
componentes de la red, y consulte con su
proveedor de servicios de la red si es necesario.
Hay casos en los que usted no podrá oír alguna
emisora de radio de Internet aunque la emisora
esté en la lista de emisoras de radio de Internet
de este receptor.
Guarde las carpetas/archivos en la zona FAT. —
Limite el máximo número de niveles de una
carpeta a 8.
Limite el máximo número de carpetas/archivos
guardados en una sola carpeta a 2000.
Los archivos de audio protegidos por derechos
de autor y guardados en un dispositivo de
memoria USB no se pueden reproducir.
Intente usar un dispositivo de memoria USB
compatible con las especificaciones de la clase
para guardar datos en masa. Note que hay casos
en los que hasta los archivos de audio
guardados en un dispositivo de memoria USB
compatible con las especificaciones de la clase
para guardar datos en masa no pueden
reproducirse en este receptor.
Conecte el dispositivo de memoria USB y
encienda este receptor.
concentrador USB.
Apague y encienda de nuevo este receptor. —
Compruebe si el formato de su dispositivo de
memoria USB es FAT 16 ó FAT 32. Note que los
formatos FAT 12, NTFS y HFS no se pueden
reproducir en este receptor.
Consulte la lista de formatos de archivos que se
pueden reproducir en este receptor.
Mantenga pulsado SHIFT y pulse iPod para
poner el mando a distancia en el modo Home
Media Gallery.
7, 15
8
—
5
—
10
6
6
6
3
3
3
3
8
6
14
Sp
Page 31

Acerca de los mensajes de estado
Consulte la información siguiente si surge algún mensaje de estado mientras utiliza Home Media Gallery.
Mensajes de estado Descripciones
Please Wait Un componente de la red, incluyendo un PC, está siendo conectado. Espere un poco.
Connection Down No se puede acceder a la categoría o emisora de radio de Internet seleccionada.
File Format Error No se puede reproducir por algunas razones.
Track Not Found La canción seleccionada no ha sido encontrada en ningún sitio de la red.
Server Error No se puede acceder al servidor seleccionado.
Server Disconnected El servidor ha sido desconectado.
USB Error El consumo de electricidad de un dispositivo de memoria USB es excesivo.
empty No hay archivos guardados en la carpeta seleccionada.
Preset Not Stored La emisora de radio de Internet seleccionada no está registrada ni guardada.
Network Problem Hay un problema con los ajustes de la red. Compruebe los ajustes de la red. El mensaje también
aparece cuando se han cambiado los ajustes de la red de este receptor. En este caso, espere.
Out of Range El valor introducido sobrepasa el margen permitido de los ajustes de la red.
License Error La licencia para el contenido que va a ser reproducido no es válida.
05
15
Sp
Page 32

05
Glosario
Puerta de enlace predeterminada
La puerta de enlace predeterminada es un nodo en una
red de computadoras que sirve como punto de acceso a
otra red. Una puerta de enlace predeterminada (como
una computadora o enrutador) se utiliza para redirigir
todo el tráfico que no va dirigido a una estación ubicada
dentro de una subred local.
Servidor DHCP (Dynamic Host Configuration
Protocol)
Un servidor DHCP es un servidor que asigna direcciones
IP a anfitriones (dispositivos de red). En la mayoría de los
casos, un enrutador de banda ancha sirve como servidor
DHCP en una red para el hogar.
DLNA
La Digital Living Network Alliance (DLNA) es una
organización industrial de compañías de la electrónica
para el consumidor, las computadoras y los aparatos
móviles. Digital Living permite que los consumidores
compartan fácilmente en casa medios digitales
mediante una red alámbrica o inalámbrica.
El logotipo con el certificado DLNA permite encontrar
fácilmente los productos que cumplen las directrices de
interoperabilidad de DLNA. Esta unidad cumple con las
directrices de interoperabilidad v1.0 de DLNA.
DNS
DNS son las siglas de Domain Name System (sistema de
nombres de dominios), el cual guarda y asocia muchos
tipos de información con nombres de dominios. Y lo que
es más importante, DNS traduce nombres de dominios
(nombres de anfitriones de computadoras o nombres de
sitios como, por ejemplo, www.pioneerelectronics.com)
a direcciones IP (como 202.221.192.106).
Ethernet
Una tecnología de redes de computadoras basada en
cuadros para redes de área local (LANs). Este
reproductor no es compatible con 100BASE-TX y
10BASE-T.
LAN
LAN son las siglas de Local Area Network (área de red
local), que es una red de computadoras que cubre una
pequeña zona geográfica, como un hogar, una oficina o
un grupo de edificios. Las LAN actuales se basan lo más
probable en la tecnología Ethernet IEEE 802.3
conmutada, funcionando a 10, 100 ó 1000 Mbit/s, o en la
tecnología Wi-Fi IEEE 802.11.
Dirección MAC (control de acceso a medios)
Una dirección adjunta al puerto de cualquier dispositivo.
La dirección MAC no se puede cambiar.
Neural Surround
Neural Surround representa el avance más reciente en
tecnología de sonido envolvente, y ha sido adoptado por
FM Radio y Neural Music Direct para las emisiones de
grabaciones hechas con sonido envolvente y para
actuaciones en directo.
Neural Surround emplea el proceso del dominio de
frecuencia sicoacústico, que permite reproducir una
etapa de sonido más detallada con mejor ubicación de
los elementos envolventes. La reproducción del sistema
es escalable, de estéreo a sonido envolvente multicanal
de vanguardia.
Máscara de subred
La dirección IP se divide en la parte de dirección de red y
en la parte de dirección de anfitrión. La máscara de
subred se expresa como ‘255.255.255.0’. En la mayoría de
los casos, la máscara de subred se asigna
automáticamente como servidor DHCP.
vTuner
vTuner es un servicio de base de datos en línea que le
permite escuchar emisiones de radio por Internet. vTuner
lista miles de emisoras de más de 100 países diferentes
de todo el mundo.
“Este producto está protegido por ciertos derechos de
propiedad intelectual de NEMS y BridgeCo. El uso o
distribución de tal tecnología fuera de este producto está
prohibido sin una licencia de NEMS y BridgeCo o de una
subsidiaria autorizada.”
16
Sp
FLAC
FLAC (Free Lossless Audio Codec) es un formato de
audio que permite la codificación y decodificación sin
pérdidas. El audio se comprime en FLAC sin ninguna
pérdida de calidad. Para conocer detalles acerca de
FLAC, visite el sitio Web siguiente: http://
flac.sourceforge.net/
Dirección IP (protocolo de Internet)
Un número único que los dispositivos usan para
identificarse y comunicarse entre sí en una red utilizando
la norma Internet Protocol, tal como ‘192.168.0.1’. En la
red no se permiten los números duplicados.
Page 33

Windows Media
Windows Media es un marco multimedia para la
creación y distribución de medios para Microsoft
Windows. Windows Media es una marca registrada o
una marca comercial de Microsoft Corporation en
Estados Unidos y/o en otros países. Use una aplicación
con licencia de Microsoft Corporation para autorizar,
distribuir o reproducir el contenido formateado con
Windows Media. El uso de una aplicación no autorizada
por Microsoft Corporation puede producir fallos.
Windows Media DRM
Windows Media DRM es un servicio de DRM
(administración de derechos digitales) para la
plataforma Windows Media. Ha sido diseñado para
proporcionar una entrega segura de audio y/o vídeo a
través de una red IP a un PC o a otro dispositivo de
reproducción de tal forma que el distribuidor puede
controlar cómo se va a usar el contenido. El contenido
protegido por WMDRM sólo se puede reproducir en un
componente compatible con el servicio WMDRM.
Windows Media Player 11/
Windows Media Connect
Windows Media Connect es un software para enviar
música, fotos y películas desde una computadora
Microsoft Windows XP a televisores y sistemas estéreo.
Con este software puede reproducir archivos guardados
en un PC en varios dispositivo ubicados donde usted
quiera en su casa.
De momento no puede descargar el software Windows
Media Connect desde el sitio Web de Microsoft. Si su
servidor no tiene instalado Windows Media Connect,
instale Windows Media Player 11 (para Windows XP) en
su lugar. Este software puede descargarse desde el sitio
Web de Microsoft.
Consulte el sitio Web oficial de Microsoft para obtener
más información.
Acerca de FLAC
Decodificador FLAC
Copyright © 2000, 2001, 2002, 2003, 2004, 2005, 2006,
2007 Josh Coalson
La redistribución y uso en formas de fuente y binaria, con
o sin modificación, están permitidas siempre que se
cumplan las condiciones siguientes:
• Las redistribuciones del código fuente deben
mantener el aviso de derechos de autor indicado más
arriba, esta lista de condiciones y el descargo de
responsabilidad siguiente.
• Las redistribuciones en forma binaria deben
reproducir el aviso de derechos de autor indicado
más arriba, esta lista de condiciones y el descargo de
responsabilidad en los documentos y/o en los
materiales provistos con la distribución.
• Ni el nombre de la Fundación Xiph.org ni los
nombres de sus contribuidores podrán usarse para
promocionar productos derivados de este software
sin el permiso previo por escrito específico.
THIS SOFTWARE IS PROVIDED BY THE COPYRIGHT
HOLDERS AND CONTRIBUTORS “AS IS” AND ANY
EXPRESS OR IMPLIED WARRANTIES, INCLUDING, BUT
NOT LIMITED TO, THE IMPLIED WARRANTIES OF
MERCHANTABILITY AND FITNESS FOR A PARTICULAR
PURPOSE ARE DISCLAIMED. IN NO EVENT SHALL THE
FOUNDATION OR CONTRIBUTORS BE LIABLE FOR ANY
DIRECT, INDIRECT, INCIDENTAL, SPECIAL, EXEMPLARY,
OR CONSEQUENTIAL DAMAGES (INCLUDING, BUT NOT
LIMITED TO, PROCUREMENT OF SUBSTITUTE GOODS OR
SERVICES; LOSS OF USE, DATA, OR PROFITS; OR
BUSINESS INTERRUPTION) HOWEVER CAUSED AND ON
ANY THEORY OF LIABILITY, WHETHER IN CONTRACT,
STRICT LIABILITY, OR TORT (INCLUDING NEGLIGENCE OR
OTHERWISE) ARISING IN ANY WAY OUT OF THE USE OF
THIS SOFTWARE, EVEN IF ADVISED OF THE POSSIBILITY
OF SUCH DAMAGE.
05
Acerca de aacPlus
El decodificador AAC usa aacPlus desarrollado por Coding
Technologies (www.codingtechnologies.com).
Publicado por Pioneer Corporation.
Copyright © 2007 Pioneer Corporation.
Todos los derechos reservados.
17
Sp
Page 34

01
功能
第 1章:
功能
關於本操作手冊
本接收器的
或連接至本接收器的
案,或者收聽網際網路廣播電台。 此外,
Gallery
端子的
這些功能的所需的接線、設定與播放程序。建議您也參
閱您的網路設備隨附的操作手冊。
Home Media Gallery
本接收器配備
備連接到這些端子來體驗下列功能。
•
播放儲存在
您可以使用本機播放很多儲存在您的
第
收聽網際網路廣播電台
•
您可以從先鋒產品獨家搭配使用的
務所建立、編輯和管理的網際網路廣播電台中,選
擇與收聽您喜愛的網際網路廣播電台。此外,您也
可以收聽由
第
Music Direct
•
播放儲存在
您可以從顯示在畫面上的資料夾檔案清單中直接
播放所需的歌曲。
第
Home Media Gallery
LAN
端子的其他設備播放音訊檔
還可以讓您播放儲存在連接至本接收器的
USB
隨身碟上的音訊檔案。本操作手冊說明體驗
功能可讓您透過
Home Media
的功能
端子和
LAN
PC
中的音樂檔案
頁的
請參閱第
頁的
播放儲存在網路設備上的音訊檔案
6
請參閱第
頁的
收聽網際網路廣播電台
7
使用
4
Neural THX
頁的
使用
4
。
USB
隨身碟上的音訊檔案
頁的
請參閱第
頁的
6
播放儲存在
使用
4
端子,您可以將您的設
USB
1
PC
Home Media Gallery
vTuner
管理的網際網路廣播電台。
Home Media Gallery
和
收聽
Home Media Gallery
隨身碟上的音訊檔案
USB
PC
LAN
中的音樂。
播放
。
資料庫服
播放
Neural
播放
。
享受
Home Media Gallery
播放網路上的音訊檔案與收聽網際網路廣播電
台
1
詳情請參閱第
2
只有在連線的路由器沒有內建的
需要設定。
詳情請參閱第
3
詳情請參閱第
節。
播放儲存在
和
1
詳情請參閱第
2
詳情請參閱第
節。
、
和
LAN
透過
配置網路設定。
使用
介面連線至網路。
3
頁的
頁的
10
Home Media Gallery
頁的
4
USB
連接
使用
隨身碟到
USB
頁的
3
Home Media Gallery
頁的
4
LAN
透過
設定網路
使用
介面連線至網路
DHCP
乙節。
播放。
Home Media Gallery
隨身碟上的音訊檔案
端子。
USB
使用
使用
介面
USB
Home Media Gallery
乙節。
播放。
功能的步驟
乙節。
伺服器功能時才
播放
播放
乙
乙
2
ChH
注
除了
1
訊檔案。
外,您也可以播放儲存在配備以
PC
DLNA 1.0
架構和通訊協定的內建媒體伺服器功能為基礎的其他設備 (例如網路硬碟和音響系統)上的音
Page 35

連線
R
第 2章:
連線
02
透過
•
在接線或變更接線之前,請關閉電源並將電源線插
介面連線至網路
LAN
注意
頭從電源插座上拔掉。完成後再插上電源。
VSX-LX70
MULTI-ZONE
& SOURCE
/REC SEL
OUT1
ZONE3
OUT2
LAN (10/100)
OPTICAL
IN
(TV/
IN
(BD)
IN
(
DVR/
VCR 1
IN
(
CD-R
IN
(
DVD/
LD
IN
COAXIAL
LAN連接線
(另售)
路由器
LAN
IN
1
MAIN
IN
2
ZONE2
HDMI
1
IN
CONTROL
1
IN
)
SAT
OUT
2
2
IN
1
IN
Y
3
(
DVD/
)
)
LD
3
IN
4
B
P
)
4
1
ASSIGNABLE
P
R
1
21
4
IN
2
IN
)
Y
(CD)
2
(BD)
P
B
OUT
P
R
ASSIGNABLE
41
ASSIGNABLE
DIGITAL
COMPONENT VIDEO
321
MULTI-ZONE
& SOURCE
1
IN
2
IN
(
VIDEO/GAME
(
DVD/LD
(BD)
ASSIGNABLE
FM UNBAL 75 Ω
IR
MULTI-ZONE & SOURCE
OUT
)
2
1
OUT
Y
B
P
P
R
3
IN
Y
P
B
P
R
1)
31
WAN
MONITOR
OUT
S-VIDEO
MONITOR
OUT
1
IN
2
IN
VIDEO AUDIO
GAME 1
OUT
DVD/LD
IN
BD
IN
TV/SAT
IN
VIDEO /
IN
OUT
DVR/
VCR 1
IN
OUT
DVR/
VCR 2
IN
ANTENNA
AM LOOP
ZONE2ZONE2
R
R L
AUDIO
PHONO
IN
L
CD
IN
OUT
CD-R/
TAPE/
MD
IN
R
R
SUB W.
SURROUND
SURROUND BACK
1
12 V TRIGGER
(
DC OUT 12V/
TOTAL 50 mA MAX
數據機
網際網路
透過
存在網路設備 (包括您的
際網路廣播電台。
使用直的
收器的
服器功能的路由器上的
開啟路由器的
內建的
路。詳情請參閱第
LAN
LAN
端子將本接收器連線至網路後,您可以播放儲
LAN
)上的音訊檔案與收聽網
1
連接線 (
LAN
端子連接到配備或沒有配備內建
LAN
DHCP
伺服器功能,您必須以手動的方式設定網
DHCP
PC
或更高等級),將本接
CAT 5
端子。
LAN
伺服器功能。如果您的路由器沒有
頁的
10
設定網路
乙節。
端子的規格
. . . . . . . . . . . . . . . . . . . . . . . . .
端子
伺
DHCP
乙太網路插孔
中文
10BASE-T/100BASE-TX
L
L
F
CENTE
LR
2
)
您可利用本接收器前面板的
2
訊。
PHONES
本接收器
使用
介面
USB
AUDIO VIDEO
PARAMETER
(TUNE)
(ST) (ST)
ENTER
(TUNE)
SETUP
RETURN
TUNER EDITSPEAKERS BAND
MCACC
USB
SETUP MIC
USB
介面,聆聽雙聲道音
MULTI – ZONE &
SIGNAL
SOURCE/REC SEL
CONTROL ON/OFF
SELECT
VIDEO/GAME 2 INPUT
DIGITAL IN S-VIDEO VIDEO L RAUDIO
USB 大量
儲存裝置
SB ch
PROCESSING
STEREO/
F.S.SURR
至LAN
連接埠
PC 1
注
要收聽網際網路廣播電台,您必須先與
1•
•
無法播放視訊檔案。
使用
•
Windows Media Connect
2•
電腦進行
USB
相容的
USB
•
先鋒概不保證所有
裝置包括
播放。
FAT16/32
USB
大量儲存裝置的相容性 (操作及或匯流排電源),以及承擔在連接至本接收器時可能造成資料遺失的相關責任。
LAN連接線
(另售)
至LAN
連接埠
PC 2
(網際網路服務供應商)簽約。
ISP
或
Windows Media Player 11
格式的磁碟機、可攜式快閃記憶體 (特殊隨身碟)及數位音訊播放器 (
甚至可以在本接收器上播放受版權保護的音訊檔案。
MP3
播放器)。 本接收器不能連接至個人
3
ChH
Page 36

03
使用
Home Media Gallery
第 3章:
播放
使用
Home Media Gallery
介紹
Home Media Gallery
路中,播放連接至該區域網路 (
的音樂。本機可播放儲存在下列設備上的檔案:
執行
•
Microsoft Windows XP
Media Connect
執行
•
Microsoft Windows Vista
Media Player 11
相容數位媒體伺服器 (在
DLNA
要播放儲存在網路設備上的音訊檔案或收聽網際網路廣
播電台時,您必須開啟路由器的
果您的路由器沒有內建的
手動的方式設定網路。否則您無法播放儲存在網路設備
上的音訊檔案或收聽網際網路廣播電台。詳情請參閱
第
頁的
設定網路
10
可讓您在與接收器相同的區域網
LAN
)的媒體伺服器上
的
PC
的
PC •
乙節。
及已安裝
DHCP
伺服器功能,您必須以
DHCP
Windows
及已安裝
Windows
或其他設備上)
PC
伺服器功能。如
關於網路播放
本機的網路播放功能使用下列技術:
Windows Media Connect
詳情請參閱第
Windows Media Connect
頁的
17
Windows Media Player 11/
乙節。
Windows Media DRM
Microsoft Windows Media
為保護並提供安全內容,以供電腦、可攜式裝置和網路
裝置進行播放的平台。
像是網路裝置的
容只能在支援
內容擁有者利用
WMDRM
用
無法保護內容,內容擁有者可要求
播放或複製受保護內容的功能。此撤銷不會影響受保護的內容。當
您下載受保護內容的授權時,表示您同意
撤銷清單。內容擁有者可要求您升級
果拒絕更新,您將無法存取需要升級的內容。
本產品受
者,禁止於本產品之外使用或散佈此類技術。
WMDRM
WMDRM
軟體存取
Microsoft
WMDRM 10
WMDRM
的某些智慧財產權保護。未經
數位版權管理
Home Media Gallery
的媒體伺服器上播放。
技術來保護版權等智慧財產。本裝置使
保護的內容。若
。受
Microsoft
WMDRM
WMDRM
WMDRM
撤銷軟體使
Microsoft
以存取其內容。如
Microsoft
(
WMDRM
的作用就
保護的內
軟體
WMDRM
在授權內包含
授權
播放
DLNA
DLNA CERTIFIED
音訊播放器
™
Digital Living Network Alliance
子商品、資訊服務業和行動裝置公司的跨企業組織。數
位生活網路聯盟讓消費者能透過家中有線或無線網路,
輕鬆共享數位媒體。
憑證標誌可方便您尋找符合
DLNA
的產品。本機符合
定。
當執行
裝置連接本播放器時,可能需要變更軟體或其他裝置的
一些設定。關於詳細資訊,請參閱軟體或裝置的操作手
冊。
DLNA
和
標及或服務標記。
伺服器軟體的
DLNA
DLNA CERTIFIED
可透過網路播放的內容
•
即使以相容格式編碼時,某些檔案可能仍然無法正
)
確播放。
•
電影和相片檔案無法播放。
即時從廣播電台清單選擇電台,仍會有無法收聽網
•
際網路廣播電台的情況。
有些使用的伺服器類型版本可能不支援某些功能。
•
支援的檔案格式會視伺服器不同而有所差異。就檔
•
案來說,您的伺服器不支援的檔案便不會顯示在本
機上。關於詳細資訊,請詢問伺服器的製造商。
(
DLNA
互通指導方針版本
DLNA
或其他與
PC
Digital Living Network Alliance
是
DLNA
)為消費性電
互通指導方針
的規
1.0
相容的
DLNA
的商
4
ChH
Page 37

使用
SHIFT
VOL
STATUSSTATUS
MCACC S.DIRECT
MULTI OPE
SIGNAL SEL
T.DISP
SBch
STEREO/
F.S.SURR
JUKEBOX
TV CH
INPUT
SELECT
MPX
AUDIO SUBTITLE
ADV.SURR
STANDARD
PHASE
THX
INFO
MUTE
REC
TV VOL
REC STOP
HDD
CH
CH
DVD
DISP
RECEIVER
PHOTO
TV/DTV
A
BCDE
Home Media Gallery
播放
關於透過網路的播放行為
•
PC
關機,或播放內容期間
當
遭刪除時,都可能出現播放問題。
•
若在網路環境中 (網路流量過大等)發生問題,可
PC
中儲存的任何媒體檔
能無法顯示或正常播放內容 (可能中斷或停滯播
PC
放)。為獲得最佳效能,建議您在播放器和
100BASE-TX
使用
如果同時播放多個用戶端,可能會中斷或停滯播放。
•
根據連線
•
PC
連線。
中安裝的安全性軟體以及此類軟體的設
之間
定而定,網路連線可能遭封鎖。
對於播放器及或
Home Media Gallery
生與您的電腦連線及或
有關的通訊錯誤及或故
PC
功能, 若因發
障,因而造成任何故障,先鋒一概不負責。請洽詢您的
廠商或網際網路服務供應商。
PC
Windows Media
“
本產品包含
Microsoft Licensing, Inc.
本產品。
Microsoft
Windows
和
Windows NT
家的商標或註冊商標。
™
Microsoft Corporation
”是
Microsoft Corporation
授權的情況下,任何人均不得使用或散佈
®
®
、
2000
Windows
®
Vista
、
Windows
®
是
Microsoft Corporation
所擁有的技術,在未經
、
Windows
®
Millennium Edition
®
XP
的商標。
、
、
Windows
於美國及或其他國
授權本接收器
為了能夠使用
須獲得授權。當接收器透過網路與
獲得授權。若未獲授權,請在
收器進行授權。存取的授權 (或許可)方法因目前連接
的伺服器類型而異。關於授權本接收器的詳細資訊,請
參閱伺服器的操作手冊。
Home Media Gallery
PC
播放, 本接收器必
PC
連線時,將自動
中以手動方式對本接
03
播放
CD
CD-R
DVD TV
HOME MEDIA
DVR2
GALLERY
DVR1
i Pod
SLEEP
+
SR
D.ACCESS
CLEAR
+
10
A PARAMETER
TOP MENU
TUNE
ST ST
BAND
®
98
SETUPSETUP
TUNE
PROGRAM
TV CONTROL
重要
•
資料夾、檔案與網際網路廣播電台的名稱在
Home Media Gallery
21
最多
字元。
注意,播放清單中非羅馬字元會顯示為
•
播放音訊檔案時,在開始播放之前顯示
•
「
鐘。
如果在
•
個字元,在播放畫面上則可顯示最多
Connecting...
Windows
域時,您無法存取網路上的
而不是登入網域。
本接收器可以播放在
•
縮的音訊檔案,但是仍會有無法正確顯示經過時間
的情況。
HDMI
BD TV CTRL
ZONE2/3
TUNER
RECEIVER
ANALOG
DIMMER
ATT
GENRE
CLASS
DISC
CH
ENTER
LEVEL
V PARAMETER
MENU T.EDIT
RETURNRETURN
ENTER
的資料夾檔案畫面上可顯示
」。顯示可能視檔案類型而持續數秒
網路環境中配置網域,當您登入網
。請登入本機電腦,
PC
(可變位元率)模式中壓
VBR
中文
24
個
。
#
5
ChH
Page 38

03
使用
Home Media Gallery
播放
1
按下
本接收器需要數秒鐘的時間才能進入網路。選擇
Home Media Gallery
無法存取沒有
2
從下列清單中選擇類別:
HOME MEDIA GALLERY
按下
iPod
)以選擇
使用
/
USB
– USB
Internet Radio
HMG
Home Media G
Top Menu
Pre 001/009
[ USB ]
[ Internet Radio ]
[ Neural Music Direct ]
[ Server1 ]
[ Server2 ]
[ Server3 ]
[ Server4 ]
[ Favorites ]
Next
標示的伺服器。
選擇您要播放的類別,然後按
隨身碟
–
Neural Music Direct
網路廣播
Server Name
Favorites
•
網路上的伺服器設備
–
目前正在登錄的喜愛歌曲
–
SHIFT
(按住
時同時
作為輸入來源。
作為輸入來源時,出現下列畫面。
-
55.0
dB
。
ENTER
•
•
網際網路廣播
支援
–
•
Neural Surround
•
的網際
視選擇的類別顯示資料夾、檔案和網際網路廣播電台的
名稱。
使用
3
路廣播電台,然後按
按下
/
目。按下
畫面。要回到清單畫面,請按
•
在使用
•
在使用網際網路廣播的情況
只能播放有
料夾,請使用
檔案。
選擇要播放的資料夾、音樂檔案或網際網
/
。
ENTER
按鍵以向上和向下捲動清單並選擇所需的項
時,開始播放並顯示所選擇項目的播放
ENTER
。
Song1
Artist1
Album1
USB
隨身碟或伺服器的情況
Home Media G
Server1
Pre 001/012
[ Group1 ]
[ Group2 ]
[ Group3 ]
[ Group4 ]
[ Group5 ]
[ Group6 ]
[ File1 ]
[ Song0 ]
Next Return
-
55.0
RETURN
Home Media G
dB
Play
3:36
Return
Home Media G
Internet Radio
001/006
[ Location ]
[ Genre ]
[ Podcasts By Location ]
[ Podcasts By Genre ]
[ New Stations ]
[ Most Popular Station ]
Return
-
55.0
dB
Home Media G
Play
Song1
Artist1
Album1
3:36
Return
標示的音訊檔案。如果使用有
/
和
選擇所需的資料夾和音訊
ENTER
-
55.0
dB
-
55.0
dB
標示的資
4
重複步驟
3
以播放所需的歌曲。
您可以使用本接收器的遙控器執行下列操作。請注意,某
些按鍵不能用於操作,視目前正在播放的類別而定。
按鍵 功能
/
DISP
/
ENTER
RETURN
TOP MENU
PROGRAM
CLEAR
播放
暫停
停止
向前跳和向後跳
:全部重播 (僅能在播放期
間使用)
:單曲重播 (僅能在播放期
1
間使用)
隨機播放
顯示
向上和向下捲動
在所選擇清單中選擇和確認
項目
上一個選單
上層選單
在
清除登錄在
際網路廣播電台中的歌曲
Favorites
資料夾中登錄
Favorites
資料夾或網
播放儲存在網路設備上的音訊檔案
關於播放畫面
播放音訊檔案時出現下列畫面。請注意,有些項目可能
因檔案類型而無法顯示。
Home Media G
Play
We are all one
PRIDE of LIFE
3:36
Return
播放儲存在
您可以在步驟
您也可以顯示和播放在單一資料夾內最多
夾與檔案。
1
隨身碟上的音訊檔案
USB
和
3
4
-
55.0
dB
Beat Band
歌曲
演出者
專輯
經過時間
中選擇的最大層數是
8
2000
層。
此外,
個資料
6
ChH
注
播完資料夾中的最後一首歌曲時,停止播放。
1•
•
連接大容量的
本接收器不支援
•
•
本接收器無法播放受版權保護的音訊檔案。
USB
隨身碟時,讀完所有內容可能需要一些時間。
USB
集線器。
Page 39

使用
Home Media Gallery
播放
03
收聽網際網路廣播電台
關於網際網路廣播
網際網路廣播是一種經由網際網路傳送廣播服務的音訊
廣播。全世界的每個角落有很多網際網路廣播電台播放
各式各樣的服務。有些電台是由私人主持、管理和廣
播,其他是傳統的地面廣播電台或廣播網路。地面或
OTA
(無線電波傳送)的廣播電台會受到發射器的從空
中傳送無線電波廣播的地理範圍限制,但只要您上網,
就可以從世界的任何角落收聽網際網路廣播電台,因為
網際網路廣播電台的服務不是透過無線電波傳送,而是
經由全球資訊網提供。在本接收器上,您可以依類型或
地區選擇網際網路廣播電台。
關於播放畫面
接收到來自網際網路廣播電台的音訊串流時,出現下列
畫面。(以下的畫面只是一個範例。實際顯示視廣播電
台而定。)
Home Media G
Play
We are all one
PRIDE of LIFE
3:36
Return
Beat Band
-
55.0
dB
歌曲
演出者
專輯
經過時間
關於網際網路廣播的清單
本接收器的網際網路廣播電台清單由本接收器獨家搭配
vTuner
使用的
資料庫服務所建立、編輯和管理。
儲存和擷取網際網路廣播電台
您可以輕易地儲存和擷取已儲存的網際網路廣播電台。
詳情請參閱第
9
頁的
網際網路廣播的進階操作
乙節。
Neural Music Direct
收聽
關於
Neural Music Direct
Neural Music Direct
際網路廣播電台。
Neural-THX
讓您體驗到豐富的多聲道環繞聲。關於
Neural
環繞聲模式是自動選擇的模式,而且可以
Neural THX
是由
廣播電台提供多聲道環繞聲。
詳細資料,請參閱個別隨附的操作手冊。
是
Neural Surround
THX Ltd.
保留所有權利。
的商標,這些商標在某些司法管轄區中可能是註冊商標。
Neural Audio Corporation
播放您喜愛的歌曲
Favorites
關於
您可以在
曲。請注意,只能登錄儲存在網路設備上的音訊檔案。
Favorites
從
際網路廣播電台
播放或停止播放歌曲時,按下
的歌曲即登錄在
最多可登錄
登錄儲存在
要刪除已登錄的歌曲,請選擇
擇您要從資料夾中刪除的歌曲,然後按
選擇的歌曲即從
1
資料夾
Favorites
資料夾中登錄最多
資料夾中來回登錄和刪除音訊檔案與網
PROGRAM
Favorites
首歌曲或
20
隨身碟上的歌曲。
USB
資料夾中。
個網際網路廣播電台。無法
20
Favorites
Favorites
資料夾中刪除。
管理和經營的網
Neural THX
的商標,
THX
首您喜愛的歌
20
。然後所選擇
資料夾,再選
。然後所
CLEAR
的
是
中文
注
要收聽網際網路廣播電台,您必須可以進入高速寬頻網際網路。如果使用
1•
•
連接埠號碼視網際網路廣播電台而異。請檢查防火牆設定。
資料庫服務提供的網際網路廣播電台清單可能基於多種原因而未經通知即變更或刪除。
• vTuner
•
廣播的停止或中斷視網際網路廣播電台而定。此時您無法收聽自網際網路廣播電台清單選擇的廣播電台。
56 K
或
數據機,您可能無法完全體驗到網際網路廣播的優點。
ISDN
7
ChH
Page 40

03
使用
Home Media Gallery
播放
關於可播放的檔案格式
本接收器的
Home Media Gallery
本機仍然可能無法播放它們。此外,檔案格式的相容性因伺服器類型而異。請檢查您的伺服器以確定您的伺服器所支援檔
案格式的相容性。
類別 副檔名 串流
a
MP3
LPCM
WAV
WMA
AAC
FLAC
「
a.
MPEG Layer-3
b.
僅和來自伺服器的串流資料有關,因此沒有副檔名。
.mp3 MPEG-1 Audio Layer-3
b
—
.wav LPCM
.wma WMA2/7/8
.m4a
.aac
.3gp
.3g2
.flac FLAC
音訊解碼技術獲得
功能支援下列檔案格式。請注意,雖然有些檔案格式是本機列出的可播放檔案格式,但
LPCM
WMA9
MPEG-4 AAC LC
MPEG-4 HE AAC
(aacPlus v1/2)
Fraunhofer IIS
取樣頻率
量化位元率
聲道 雙聲道
位元率
VBR/CBR
取樣頻率
量化位元率
聲道 雙聲道
取樣頻率
量化位元率
聲道 雙聲道
取樣頻率
量化位元率
聲道 雙聲道
位元率
VBR/CBR
取樣頻率
量化位元率
聲道 雙聲道
位元率
VBR/CBR
取樣頻率
量化位元率
聲道 雙聲道
位元率
VBR/CBR
取樣頻率
量化位元率
聲道 雙聲道 (不支援
位元率
VBR/CBR
和
Thomson Multimedia
的授權。」
8 kHz至 48 kHz
位元
16
8 kbps至 320 kbps
支援支援
8 kHz至 44.1 kHz
位元、 20位元、 24位元
16
8 kHz至 44.1 kHz
位元、 20位元、 24位元
16
8 kHz至 48 kHz
位元
16
5 kbps至 320 kbps
支援支援
8 kHz至 48 kHz
位元
16
5 kbps至 320 kbps
支援支援
32 kHz至 48 kHz
位元
16
16 kbps至 320 kbps
支援支援
8 kHz、 16 kHz、 22 kHz
32 kHz、 44.1 kHz、 48 kHz
位元、 16位元
8
音音訊)
不支援支援
—
位元的單
8
、
8
ChH
Page 41

使用
Home Media Gallery
網際網路廣播的進階操作
D.ACCESS
A PARAMETER
TOP MENU
BAND
SETUPSETUP
PROGRAM
TV VOL
CLEAR
+
10
ST ST
TV CONTROL
INPUT
SELECT
CLASS
CH
ENTER
LEVEL
V PARAMETER
MENU T.EDIT
TUNE
ENTER
TUNE
TV CH
VOL
DISC
RETURNRETURN
播放
03
擷取已儲存的網際網路廣播電台
擷取網際網路廣播電台之前必須先將它們儲存。如果目
前沒有已儲存的網際網路廣播電台,請參閱上文的
網際網路廣播電台
一個網際網路廣播電台。
1
選擇您要擷取網際網路廣播電台的類組。
使用
CLASS
/
每按一次
2
,然後在繼續下列步驟之前儲存至少
A
B
即輪流切換
、
C
和
類組。
選擇您要擷取的電台編號。
您也可以使用數字鍵選擇電台編號。
選擇目前未儲存的網際網路廣播電台時,出現 「
Not Stored
」。
Preset
儲存
儲存網際網路廣播電台
本接收器可以記憶您常聽的
網際網路廣播電台,每種類組可記憶最多
因此最大容量總共可以記憶
進行下列步驟之前,請檢查您是否有依照第
1
3
驟
至
。
1
調選您要儲存的網際網路廣播電台。
按
按
使用
6
頁上的步驟
T.EDIT
切換到儲存電台模式。
CLASS
選擇您要存入電台的類組。
A
B
C
、
和
/
選擇儲存電台所要使用的編號,然後按
。
請依照第
電台。
2
3
選擇所需的
4
ENTER
您也可以使用數字鍵選擇電台編號。選擇所需的編號
9
至
。
種類組 (
3
個電台。
30
1
3
至
調選所需的網際網路廣播
類組。
A
、
10
B
6
和
)的
C
個電台,
頁上的步
中文
0
ChH
9
Page 42

04
DVD TV
BD TV CTRL
INPUT
Setup
Home Media G
-
55.0
dB
[ Information ]
[ Network Setup ]
Return
設定
第 4章:
設定
設定網路
如果連接到本接收器的
(有內建的
DHCP
器的功能即可,而且您不必手動設定網路。您只有在本
接收器連接至沒有
下所述來設定網路。設定網路之前,請与您的
路管理員洽詢所需的設定。建議您也參閱您的網路設備
隨附的操作手冊。
位址
IP
所輸入的
位址必須定義在下列範圍內。如果
IP
的定義超出下列範圍,您無法播放儲存在網路設備上的
音訊檔案或收聽網際網路廣播電台。
類別:
類別:
類別:
10.0.0.1
172.16.0.1
192.168.0.1
A
B
C
子網路遮罩
如果
請輸入您的
中,請輸入
閘道
數據機或端子轉接頭直接連接至本接收器,
xDSL
ISP
255.255.255.0
IP
如果閘道器 (路由器)連接至本接收器,請輸入相應的
位址。
IP
慣用
如果您的
「
DNS Server Preferred
伺服器其他
DNS
ISP
書面只提供一個
器位址,請在另一個
「
DNS Server Alternate
Proxy
主機名稱
Proxy
透過
伺服器將本接收器連線至網際網路時需要使
用此設定。在 「
Proxy
伺服器的
輸入您的
Proxy
LAN
端子的路由器是寬頻路由器
伺服器功能),只要開啟
DHCP
伺服器功能時,才必須依照以
1
DHCP
ISP
IP
伺服
或網
位址
至
10.255.255.254
至
172.31.255.254
至
192.168.255.254
書面提供的子網路遮罩。在大部分情況
。
伺服器
DNS
伺服器位址,請輸入
DNS
」。如果有超過兩個
伺服器位址欄位中輸入
DNS
」。
/Proxy
連接埠
Proxy Hostname
IP
位址。另外在 「
」欄位中輸入您的
Proxy Port
伺服器的連接埠號碼。
DNS
」欄位中
伺服
提示
按
•
入的全部英數字元,請按
或數字鍵以輸入英數字元。要一次刪除所輸
/
或
在英數字元輸入畫面上的最左側位置時,當您按下
或
出現 「
RETURN
Changes?
畫面,然後按
A PARAMETER
TOP MENU
BAND
SETUPSETUP
PROGRAM
按下
1
按下
iPod
」畫面。在此情況中,按下
RETURN
HOME MEDIA
DVR2
GALLERY
DVR1
i Pod
TUNER
SLEEP
DIMMER
+
GENRE
SR
D.ACCESS
CLEAR
+
10
TUNE
ST ST
ENTER
TUNE
TV CONTROL
HOME MEDIA GALLERY
)以選擇
CH
LEVEL
V PARAMETER
HMG
ZONE2/3
RECEIVER
ANALOG
ATT
CLASS
DISC
ENTER
MENU T.EDIT
RETURNRETURN
Cancel Key Editing Lose
回到畫面。
TV VOL
SELECT
TV/DTV
A
MPX
BCDE
AUDIO SUBTITLE
DISP
PHOTO
SIGNAL SEL
STATUSSTATUS
THX
MULTI OPE
SHIFT
PHASE
RECEIVER
(按住
作為輸入來源。
本接收器需要數秒鐘的時間才能進入網路。選擇
Home Media Gallery
選擇 「
2
出現
Setup
「
」
Setup
Home Media G
Home Menu
Pre 009/009
[ Setup ]
[ USB ]
[ Internet Radio ]
[ Neural Music Direct ]
[ Server1 ]
[ Server2 ]
[ Server3 ]
[ Server4 ]
Next
作為輸入來源時,出現下列畫面。
Home Media G
Top Menu
Pre 001/009
[ USB ]
[ Internet Radio ]
[ Neural Music Direct ]
[ Server1 ]
[ Server2 ]
[ Server3 ]
[ Server4 ]
[ Favorites ]
Next
」,然後按
ENTER
-
55.0
dB
確認選擇。
畫面。
-
55.0
dB
CLEAR
TV CH
INFO
REC
REC STOP
HDD
CH
T.DISP
SBch
STANDARD
MCACC S.DIRECT
。游標位於
ENTER
VOL
MUTE
JUKEBOX
DVD
CH
STEREO/
F.S.SURR
ADV.SURR
時同時
SHIFT
退出
10
ChH
1
如果您變更沒有
注
DHCP
伺服器功能的網路配置,請對本接收器的網路設定進行相應的變更。
Page 43

設定
04
3
選擇 「
Network Setup
」,然後按
ENTER
擇。
Network Connection
出現 「
4
Network Found
出現「
檢查網路連線狀態,然後按
Network Found
–
No Network Found
出現 「
Network IP Settings
選擇 「
5
Static IP Address
」畫面。
」或「
ENTER
No Network Found
。
•
連線至網路上的設備。
–
未連線至網路上的設備。
」畫面。
」,然後按
擇。
出現 「
IP Address
」畫面。選擇 「
Automatic (DHCP)
時,網路自動設定,而且您不必依照步驟
續進行步驟
6
選擇 「
出現 「
輸入
7
按下
/
標。選擇最後一個數字後,按下
也可以使用數字鍵輸入數字。出現 「
面。
選擇 「
8
出現 「
輸入子網路遮罩。
9
輸入後,按
面。
。
16
Home Media G
Network IP Settings
[ Automatic (DHCP) ]
[ Static IP Address ]
Return
Change
」,然後按
Edit IP Address
Home Media G
IP Address
[ 0.0.0.0 ]
1
[ Change ]
Return
位址。
IP
」畫面。
-
55.0
按鍵選擇數字,然後按
」,然後按
Change
Edit Subnet Mask
Home Media G
Subnet Mask
[ 0.0.0.0 ]
1
[ Change ]
Return
按鍵或
-
55.0
ENTER
-
55.0
dB
ENTER
確認選擇。
Home Media G
dB
Edit IP Address
192:168:000:002
Return
/
按鍵或
Subnet Mask
確認選擇。
ENTER
」畫面。
dB
Home Media G
Edit Subnet Mask
255:255:255:000
Return
。出現 「
確認選
•
確認選
ENTER
至
6
15
-
55.0
dB
按鍵移動游
ENTER
-
55.0
dB
Gateway IP
。繼
。您
」畫
」畫
」。
」
10
出現 「
11
輸入後,按
Preferred
12
出現 「
13
輸入後,按
Alternate
14
出現 「
15
Change
選擇 「
Edit Gateway
Home Media G
Gateway IP
[ 0.0.0.0 ]
1
[ Change ]
Return
輸入預設的閘道
」畫面。
選擇 「
Change
Edit DNS Preferred
Home Media G
DNS Server Preferred
[ 0.0.0.0 ]
1
[ Change ]
Return
輸入慣用的
」畫面。
Change
選擇 「
Edit DNS Alternate
Home Media G
DNS Server Alternate
[ 0.0.0.0 ]
1
[ Change ]
Return
輸入其他
如果只有一個
位址。
輸入後,按下
Proxy Server
選擇用於
16
啟動
Proxy
如果選擇 「
選擇 「
Hostname
」,請繼續進行步驟
Yes
」畫面。
」,然後按
」畫面。
-
55.0
dB
IP
位址。
按鍵或
ENTER
」,然後按
-
55.0
dB
DNS
伺服器位址。
按鍵或
ENTER
」,然後按
-
55.0
dB
伺服器位址。
DNS
位址,您不必輸入其他
DNS
按鍵或
」畫面。
Proxy
伺服器設定的
伺服器。
」,請繼續進行步驟
No
Home Media G
Enable Proxy Server
[ No ]
[ Yes ]
Return
ENTER
確認選擇。
Home Media G
Edit Gateway IP
192:168:000:001
Return
。出現 「
ENTER
」畫面。
Home Media G
Edit DNS Preferred
192:168:000:001
Return
。出現 「
ENTER
」畫面。
Home Media G
Edit DNS Alternate
192:168:000:001
Return
ENTER
No
。出現 「
17
-
55.0
21
dB
DNS Server
確認選擇。
DNS Server
確認選擇。
。出現 「
或
Yes
。此外,如果您
-
55.0
dB
-
55.0
dB
-
55.0
dB
DNS
以關閉或
Proxy
伺服器
Enable
中文
11
ChH
Page 44

04
設定
17
出現 「
18
輸入後,按
面。
19
出現 「
20
Change
選擇 「
Edit Proxy Hostname
Home Media G
Proxy Hostname
[ ]
1
[ Change ]
Return
輸入
Proxy
」,然後按
伺服器的位址或網域名稱。
按鍵或
選擇 「
Edit Proxy Port
Home Media G
Proxy Port
[ 0 ]
1
[ Change ]
Return
輸入
Proxy
」,然後按
Change
伺服器的連接埠號碼。
」畫面。
Home Media G
-
55.0
dB
Edit Proxy Hostname
proxy
Return
。出現 「
ENTER
」畫面。
-
55.0
dB
Home Media G
Edit Proxy Port
8080
Return
ENTER
ENTER
確認選擇。
確認選擇。
使用數字鍵輸入連接埠號碼。輸入後,按
ENTER
按
21
出現 「
。出現 「
ENTER
Top Menu
Setting OK?
完成網路設定程序。
」畫面。
」畫面。
-
55.0
dB
Proxy Port
-
55.0
dB
按鍵或
」畫
檢查網路設定
您可以檢查本接收器的下列網路設定:
IP
位址、閘道
體版本 (適用於本接收器的
IP
位址、
Proxy
伺服器、子網路遮罩和韌
Home Media Gallery
進行下列步驟之前,請檢查您是否有依照第
1
步驟
3
出現「
Media Gallery
2
和
。
Information
選擇 「
Firmware Version
)畫面。
」,然後按
」(適用於本接收器的
Home Media G
Firmware Version
3.5.4.6292
Return
(圖示的版本不是最新版本。)
4
檢查網路設定。
/
按下
示畫面如下所示切換。
Firmware Version
IP Address
按鍵以切換顯示。每次按下
Gateway IP
MAC Address
Subnet Mask
5
出現 「
再按一次
按下
RETURN
Setup
RETURN
按鍵。
」畫面。要回到 「
。
MAC
ENTER
-
55.0
dB
/
Proxy Server
Top Menu
位址、
)。
10
頁上的
確認選擇。
Home
按鍵時,顯
」畫面,請
12
ChH
Page 45

其他資訊
第 5章:
其他資訊
疑難排解
如果遇到問題,請參閱下列資訊。操作錯誤可能被誤認為機械問題。此外,問題原因可能不在本接收器。檢查網路
的音訊設備與您的
服務中心。
問題狀況 原因 解決方法 參閱
無法進入網路。
持續顯示 「
時,無法開始播放。
PC
作用。
無法播放儲存在網路上的設
備 (例如
案。
無法存取連線至網路的設備。連線至網路的設備未正確設定。 如果用戶端已自動獲得授權,您必須再次輸入
Connecting...
或網際網路廣播未正確
PC
USB
)中的音訊檔
隨身碟。如果問題仍然存在,或下列資訊無法提供您適當的解決方法,請洽詢您就近的先鋒
請參閱您的
伺服器隨附
的操作手
冊。
3
—
—
—
—
10
—
4
—
—
—
—
—
—
LAN
連接線未穩固地接好。 請穩固地接好
未開啟路由器的電源。 請開啟路由器的電源。
連線的設備中目前安裝有網際網路安全性軟體。 在有些情況中,無法進入已安裝網際網路安全
開啟已關閉電源的網路音訊設備的電源。 開啟本接收器的電源之前,先開啟網路音訊設
」
設備目前與本接收器或電源中斷連接。 檢查設備是否正確連接至本接收器或電源。
相應的 IP位址未正確設定。 開啟路由器的內建
IP
位址未自動配置。 自動配置需要花費一些時間。請等待。
Windows Media Player 11
PC
上。
音訊檔案以
MPEG-4 AAC、 FLAC或 WMA
製。
Windows Media Player 11
Media Connect
FLAC
連線至網路的設備未正確設定。 檢查設備是否受特殊情況的影響,或是否在睡
連線至網路的設備不允許共用檔案。 請嘗試變更連線至網路的設備之設定。
儲存在連線至網路的設備上的資料夾已刪除或
損壞。
連線至網路的設備上沒有可播放的音訊檔案。 檢查儲存在連線至網路的設備上的音訊檔案。
MP3、 WAV
正在播放以
格式錄製的音訊檔案。
目前未安裝在您的
(僅適用於
LPCM
以外的格式錄
Windows
或
MPEG-4 AAC
性軟體的設備。
備的電源。
您的網路環繞手動設定網路。
Windows Media Player 11
將
上。
)、
播放以
MPEG-4 AAC、 FLAC或 WMA
案。請注意,本接收器可能無法播放以這些格
式錄製的音訊檔案。
Windows Media Player 11或 Windows
Media Connect
或
FLAC
伺服器。
眠模式中。
必要時請嘗試將設備重新開機。
檢查儲存在連線至網路的設備上的資料夾。
相應資訊。
not authorize
LAN
連接線。
DHCP
伺服器功能,或根據
安裝在您的
MP3、 WAV
(僅適用於
LPCM
錄製的音訊檔
格式錄製的音訊檔案。請嘗試使用另一台
無法播放以
檢查連線狀態是否設定為 「
」。
MPEG-4 AAC
PC
)、
或
Do
05
中文
13
ChH
Page 46

05
其他資訊
問題狀況 原因 解決方法 參閱
音訊播放意外停止或中斷。 目前正在播放的音訊檔案未以本接收器可以播
Windows Media
無法存取
Player 11
。
無法收聽網際網路廣播
電台。
USB
儲存在
資料夾檔案沒有顯示。
USB
USB
但是無法播放儲存在
隨身碟上的音訊檔案。
遙控器的按鍵無法操作
隨身碟上的
隨身碟無法辨識。
隨身碟已連接並顯示,
Home Media Gallery
能。
放的格式錄製。
LAN
連接線目前已拔下。 請正確連接
在相同網路上的網際網路存取流量太大。 使用
Windows XP的 PC
您目前透過已安裝
網路設備的防火牆設定目前作用中。 檢查網路設備的防火牆設定。
您目前未與網際網路連線。 檢查網路設備的連線設定,必要時請洽詢您的
網際網路廣播電台的廣播停止或中斷。 有時您可能無法收聽即使是列在本接收器的網
資料夾檔案目前儲存在
區域以外的區域。
資料夾的層數超過 8層。 將資料夾的最大層數限制在 8層。
單一資料夾中儲存超過
音訊檔案受到版權保護。 無法播放儲存在
隨身碟不支援大量儲存裝置規格。 嘗試使用與大量儲存裝置規格相容的
USB
隨身碟未牢牢連接。 連接
USB
集線器正在使用中。 本接收器不支援
USB
本接收器辨識
隨身碟的格式是
USB
USB
本接收器無法正確播放檔案格式。 請參閱本接收器的可播放檔案格式清單。
遙控器目前不是設定為
功
模式。
FAT
2000
隨身碟為假裝置。 先關閉後再重新開啟本接收器的電源。
USB
FAT12、 NTFS或 HSF
Home Media Gallery
登入網域。請登入本機電腦,而不是登入網域。
(檔案分配表)
個資料夾檔案。 將單一資料夾中儲存的資料夾檔案最大數目
檢查是否以本接收器支援的格式錄製音訊檔案。
檢查資料夾是否損壞或損毀。
請注意,有時即使檔案即使是本接收器列出的
可播放格式,仍有可能無法播放或顯示該檔案。
LAN
連接線。
100BASE-TX
網路服務供應商。
際網路廣播電台清單中的網際網路廣播電台。
將資料夾檔案儲存在
2000
限制在
訊檔案。
碟。請注意,有時本接收器仍無法播放儲存在
與大量儲存裝置規格相容的
訊檔案。
USB
。 檢查您的
FAT 32。
NTFS和 HFS
按住
SHIFT
Home Media Gallery
存取網路上的設備。
FAT
區域中。
個。
隨身碟上受版權保護的音
USB
隨身碟上的音
USB
隨身碟並開啟本接收器的電源。
集線器。
USB
隨身碟的格式是
USB
請注意,本接收器無法播放
格式。
,同時按下
將遙控器設定為
iPod
模式。
FAT 16
USB
或
FAT 12
隨身
8
3
—
5
—
10
7, 15
—
6
6
6
3
3
3
—
3
、
8
6
14
ChH
Page 47

其他資訊
關於狀態訊息
Home Media Gallery
操作
狀態訊息 說明
Please Wait
Connection Down
File Format Error
Track Not Found
Server Error
Server Disconnected
USB Error
empty
Preset Not Stored
Network Problem
Out of Range
License Error
時若產生狀態訊息,請參閱下列資訊。
正在連接包括 PC的網路設備。請等待片刻。
無法存取所選擇的類別或網際網路廣播電台。
基於某些因素而無法播放。
在網路上找不到所選擇的歌曲。
無法存取所選擇的伺服器。
伺服器已中斷連線。
USB
所選擇的資料夾中沒有儲存任何檔案。
所選擇的網際網路廣播電台目前未登錄和儲存。
網路設定有問題。檢查網路設定。本訊息在本接收器的網路設定遭到變更時也會出現。這時請等
待。
輸入的值超出網路設定的允許範圍。
要播放的內容之授權無效。
05
隨身碟的耗電量太大。
中文
15
ChH
Page 48

05
其他資訊
詞彙寶庫
預設閘道
預設閘道是電腦網路上的節點,可作為其他網路的存取
點。預設閘道 (如電腦和路由器)可用來轉寄本機子網
路內不傳送給工作站的所有流量。
(動態主機設定通訊協定)伺服器
DHCP
伺服器就是將
DHCP
的伺服器。多半時候,寬頻路由器都作為家庭網路中的
伺服器使用。
DHCP
位址分配給主機 (網路裝置)
IP
DLNA
Digital Living Network Alliance
子商品、資訊服務業和行動裝置公司的跨企業組織。數
位生活網路聯盟讓消費者能透過家中有線或無線網路,
輕鬆共享數位媒體。
憑證標誌可方便您尋找符合
DLNA
的產品。本機符合
定。
互通指導方針版本
DLNA
DNS
是
DNS
寫,可儲存與關聯很多資訊類型與網域名稱。最重要的
是,
Domain Name System
將網域名稱 (電腦主機名稱或網站名稱,如
DNS
www.pioneerelectronics.com
(如
202.221.192.106
)。
乙太網路
以訊框為主的電腦網路技術,可用於區域網路
(
)。本播放器支援
LAN
100BASE-TX
(
(網域名稱系統)的縮
)轉譯成
DLNA
DLNA
和
)為消費性電
互通指導方針
的規
1.0
位址
IP
10BASE-T
。
LAN
LAN
Local Area Network
是
是一種涵蓋如住家、辦公室或一群大樓等小地理區域的
電腦網路。目前的
1000 Mbit/s
IEEE 802.11 Wi-Fi
術或
(媒體存取控制)位址
MAC
所有裝置連接埠的附加位址。
Neural Surround
Neural Surround
FM
由
廣播和
現場活動的廣播中。
Neural Surround
有更好的環繞聲定位的精細音場。系統播放從立體聲到
最先進的多聲道環繞聲。
LAN
速度執行的交換式
代表環繞聲技術的最新進步,並且已
Neural Music Direct
採用心理聲學頻率範圍處理,可提供
(區域網路)的縮寫,它
最常根據以
技術建置。
10
、
IEEE 802.3
MAC
位址無法變更。
採用在環繞聲錄製和
子網路遮罩
IP
位址分成網路位址部分和主機位址部分。
可表示為 「
路遮罩由
255.255.255.0
DHCP
伺服器自動指定。
」。在大多數情況中,子網
vTuner
vTuner
是一種可以讓您收聽網際網路廣播的線上資料庫
vTuner
服務。
家的電台。
「本產品受
護。
未經
者,禁止於本產品之外使用或散佈此類技術。」
列出數千個來自全球超過
和
NEMS
NEMS
和
BridgeCo
BridgeCo
的某些智慧財產權保
或其授權子公司的授權
100
或
乙太網路技
子網路遮罩
100
個不同國
16
ChH
FLAC
(無損音訊壓縮編碼)是一種不會損失編碼的音
FLAC
訊格式。音訊以不會損失品質的
的詳細資料,請造訪下列網站:
FLAC
FLAC
格式壓縮。
有關
http://flac.sourceforge.net/
(網際網路通訊協定)位址
IP
裝置使用的特殊數字,以在使用 「網際網路通訊協定」
標準的網路上辨識彼此並相互通訊,如
「
192.168.0.1
」。此網路中不允許重複的數字。
Page 49

其他資訊
Windows Media
Windows Media
傳播的多媒體架構。
Corporation
標。使用
寫、散佈或播放
Microsoft Corporation
經
障。
Windows Media DRM
Windows Media DRM
DRM
平台的
散佈者可以控制內容如何受到使用,然後透過
全提供音訊及或視訊內容安全地傳送給
放裝置。
務的設備上播放。
Windows Media Player 11/
Windows Media Connect
Windows Media Connect
Windows XP
體聲系統和電視機。
利用此軟體,您可以在家中任何地方,透過不同的裝置
播放儲存在
此時您將無法從
Connect
Media Connect
(適用於
網站下載。
關於詳細資訊,請參閱
Microsoft Windows
是
Windows Media
於美國及或其他國家的註冊商標或商
Microsoft Corporation
Windows Media
授權的應用程式會導致故
是一種使用於
(數位版權管理)服務。它的設計旨在讓
WMDRM
軟體。若您的伺服器目前沒有安裝
Windows XP
保護的內容只能在支援
軟體可將
電腦中的音樂、相片和電影傳送至家用立
PC
中的檔案。
Microsoft
,請安裝
網站下載
Windows Media Player 11
)。
此軟體可以從
Microsoft
的媒體建立與
Microsoft
是
授權的應用程式編
格式的內容。使用未
Windows Media
PC
Microsoft
Windows Media
Microsoft
官方網站。
IP
網路安
或其他播
WMDRM
Windows
FLAC
關於
解碼器
FLAC
版權所有
© 2000, 2001, 2002, 2003, 2004, 2005,
2006, 2007 Josh Coalson
只要滿足以下條件,無論有無修改,便允許您以原始及
可執行碼重新散佈及使用:
•
重新散佈原始碼必須保留以上的版權聲明、本條件
清單以及以下的免責聲明。
•
以可執行碼重新散佈必須在隨散佈版本提供的說明
文件中,重新產生以上的版權聲明,本條件清單及
以下的免責聲明和或其他內容。
在未事先獲得指定的書面同意之前,
•
服
會的名稱和其參與人的姓名皆不可使用於擔保或促
銷此軟體衍生的產品。
THIS SOFTWARE IS PROVIDED BY THE COPYRIGHT
HOLDERS AND CONTRIBUTORS "AS IS" AND ANY
EXPRESS OR IMPLIED WARRANTIES, INCLUDING,
BUT NOT LIMITED TO, THE IMPLIED WARRANTIES OF
MERCHANTABILITY AND FITNESS FOR A
PARTICULAR PURPOSE ARE DISCLAIMED. IN NO
EVENT SHALL THE FOUNDATION OR CONTRIBUTORS
BE LIABLE FOR ANY DIRECT, INDIRECT, INCIDENTAL,
SPECIAL, EXEMPLARY, OR CONSEQUENTIAL
DAMAGES (INCLUDING, BUT NOT LIMITED TO,
PROCUREMENT OF SUBSTITUTE GOODS OR
SERVICES; LOSS OF USE, DATA, OR PROFITS; OR
的
BUSINESS INTERRUPTION) HOWEVER CAUSED AND
ON ANY THEORY OF LIABILITY, WHETHER IN
CONTRACT, STRICT LIABILITY, OR TORT (INCLUDING
NEGLIGENCE OR OTHERWISE) ARISING IN ANY WAY
OUT OF THE USE OF THIS SOFTWARE, EVEN IF
ADVISED OF THE POSSIBILITY OF SUCH DAMAGE.
Xiph.org
基金
05
中文
aacPlus
關於
AAC
解碼器使用
www.codingtechnologies.com
(
術。
Coding Technologies
版權
)開發的
©2007
aacPlus
日本先鋒公司出版。
日本先鋒公司。
版權所有。
技
17
ChH
Page 50

g
g
.
PIONEER CORPORATION
4-1, Meguro 1-Chome, Meguro-ku, Tokyo 153-8654, Japan
PIONEER ELECTRONICS (USA) INC.
P.O. BOX 1540, Long Beach, California 90801-1540, U.S.A. TEL: (800) 421-1404
PIONEER ELECTRONICS OF CANADA, INC.
300 Allstate Parkway, Markham, Ontario L3R 0P2, Canada TEL: 1-877-283-5901, 905-479-4411
PIONEER EUROPE NV
Haven 1087, Keetberglaan 1, B-9120 Melsele, Belgium TEL: 03/570.05.11
PIONEER ELECTRONICS ASIACENTRE PTE. LTD.
253 Alexandra Road, #04-01, Singapore 159936 TEL: 65-6472-7555
PIONEER ELECTRONICS AUSTRALIA PTY. LTD.
178-184 Boundary Road, Braeside, Victoria 3195, Australia, TEL: (03) 9586-6300
PIONEER ELECTRONICS DE MEXICO S.A. DE C.V.
Blvd.Manuel Avila Camacho 138 10 piso Col.Lomas de Chapultepec, Mexico,D.F. 11000 TEL: 55-9178-4270
K002_B_En
ublished by Pioneer Corporation.
ht
Copyri
All ri
2007 Pioneer Corporation.
hts reserved
<ARE7634-A>
Printed in
 Loading...