

Page 1

PLASMA DISPLAY SYSTEM
SYSTEME D’ÉCRAN PLASMA
SISTEMA DE PANTALLA DE PLASMA
PDP-6072HD
PDP-5072HD
PDP-4272HD
PDP-6071HD
PDP-5071HD
PDP-4271HD
PDP-6070HD
PDP-5070HD
PDP-4270HD
Register Your Product at
www.pioneerelectronics.com
www.pioneerelectronics.ca
Enregistrez votre appareil sur:
www.pioneerelectronics.com
(US)
(Canada)
(États-Unis)
www.pioneerelectronics.ca
Operating Instructions
Mode d’emploi
Manual de instrucciones
(Canada)
Page 2
1)
Read these instructions.
2)
Keep these instructions.
3)
Heed all warnings.
4)
Follow all instructions.
5)
Do not use this apparatus near water.
6)
Clean only with dry cloth.
7)
Do not block any ventilation openings. Install in
accordance with the manufacturer’s instructions.
8)
Do not install near any heat sources such as
radiators, heat registers, stoves, or other apparatus
(including amplifiers) that produce heat.
9)
Do not defeat the safety purpose of the polarized or
grounding-type plug. A polarized plug has two
blades with one wider than the other. A grounding
type plug has two blades and a third grounding
prong. The wide blade or the third prong are
provided for your safety. If the provided plug does
not fit into your outlet, consult an electrician for
replacement of the obsolete outlet.
10)
Protect the power cord from being walked on or
pinched particularly at plugs, convenience
receptacles, and the point where they exit from the
apparatus.
11)
Only use attachments/accessories specified by the
manufacturer.
12)
Use only with the cart, stand, tripod, bracket, or
table specified by the manufacturer, or sold with the
apparatus. When a cart is used, use caution when
moving the cart/apparatus combination to avoid
injury from tip-over.
13)
Unplug this apparatus during lightning storms or
when unused for long periods of time.
14)
Refer all servicing to qualified service personnel.
Servicing is required when the apparatus has been
damaged in any way, such as power-supply cord or
plug is damaged, liquid has been spilled or objects
have fallen into the apparatus, the apparatus has
been exposed to rain or moisture, does not operate
normally, or has been dropped.
NOTE TO CATV SYSTEM INSTALLER
THIS REMINDER IS PROVIDED TO CALL THE CATV
SYSTEM INSTALLER’S ATTENTION TO ARTICLE
820-40 OF THE NEC THAT PROVIDES GUIDELINES
FOR PROPER GROUNDING AND, IN PARTICULAR,
SPECIFIES THAT THE CABLE GROUND SHALL BE
CONNECTED TO THE GROUNDING SYSTEM OF
THE BUILDING, AS CLOSE TO THE POINT OF
CABLE ENTRY AS PRACTICAL.
D1-4-2-8_En
WARNING: This product equipped with a three-
wire grounding (earthed) plug - a plug that has a third
(grounding) pin. This plug only fits a grounding-type
power outlet. If you are unable to insert the plug into an
outlet, contact a licensed electrician to replace the
outlet with a properly grounded one. Do not defeat the
safety purpose of the grounding plug
D3-4-2-1-6_A_En
WARNING: To prevent a fire hazard, do not place
any naked flame sources (such as a lighted candle) on
the equipment.
D3-4-2-1-7a_A_En
This digital television is capable of receiving analog
basic, digital basic and digital premium cable
television programming by direct connection to a cable
system providing such programming. A security card
provided by your cable operator is required to view
encrypted digital programming. Certain advanced and
interactive digital cable services such as video-ondemand, a cable operator’s enhanced program guide
and data-enhanced television services may require the
use of a set-top box. For more information call your
local cable operator.
VENTILATION CAUTION:
When installing this unit, make sure to leave space
around the unit for ventilation to improve heat
radiation. For the minimum space required, see page
20.
WARNING: Slots and openings in the cabinet are
provided for ventilation to ensure reliable operation of
the product, and to protect it from overheating. To
prevent fire hazard, the openings should never be
blocked or covered with items (such as newspapers,
table-cloths, curtains) or by operating the equipment
on thick carpet or a bed.
Page 3

WARNING: THE APPARATUS IS NOT
WATERPROOFS, TO PREVENT FIRE OR SHOCK
HAZARD, DO NOT EXPOSE THIS APPLIANCE TO RAIN
OR MOISTURE AND DO NOT PUT ANY WATER
SOURCE NEAR THIS APPARATUS, SUCH AS VASE,
FLOWER POT, COSMETICS CONTAINER AND
MEDICINE BOTTLE ETC.
FEDERAL COMMUNICATIONS
COMMISSION DECLARATION OF
CONFORMITY
This device complies with part 15 of the FCC Rules.
Operation is subject to the following two conditions: (1)
This device may not cause harmful interference, and
(2) this device must accept any interference received,
including interference that may cause undesired
WARNING: Handling the cord on this product or
cords associated with accessories sold with the
product will expose you to lead, a chemical known to
the State of California and other governmental entities
to cause cancer and birth defects or other reproductive
harm. Wash hands after handling.
Information to User
Alteration or modifications carried out without
appropriate authorization may invalidate the user’s
right to operate the equipment.
[For Canadian model]
This Class B digital apparatus complies with Canadian
ICES-003.
operation.
Product Name: Plasma Display System
Model Number: PDP-6072HD/PDP-5072HD/PDP-
4272HD/PDP-6071HD/PDP-5071HD/PDP-4271HD/
PDP-6070HD/PDP-5070HD/PDP-4270HD
Product Category: Class B Personal Computers &
Peripherals
Responsible Party Name: PIONEER ELECTRONICS
SERVICE, INC.
Address: 1925 E. DOMINGUEZ ST. LONG BEACH, CA
90801-1760, U.S.A.
Phone: 800-421-1625
For Business Customer URL
http://www.PioneerUSA.com
NOTE: This equipment has been tested and found to comply with the limits for a Class B digital device, pursuant
to Part 15 of the FCC Rules. These limits are designed to provide reasonable protection against harmful
interference in a residential installation.
This equipment generates, uses, and can radiate radio frequency energy and, if not installed and used in
accordance with the instructions, may cause harmful interference to radio communications. However, there is
no guarantee that interference will not occur in a particular installation. If this equipment does cause harmful
interference to radio or television reception, which can be determined by turning the equipment off and on, the
user is encouraged to try to correct the interference by one or more of the following measures:
English
– Reorient or relocate the receiving antenna.
– Increase the separation between the equipment and receiver.
– Connect the equipment into an outlet on a circuit different from that to which the receiver is connected.
– Consult the dealer or an experienced radio/TV technician for help.
D8-10-1-2_En
CAUTION: This product satisfies FCC regulations when shielded cables and connectors are used to connect the
unit to other equipment. To prevent electromagnetic interference with electric appliances such as radios and
televisions, use shielded cables and connectors for connections.
D8-10-3a_En
IMPORTANT NOTICE – THE SERIAL NUMBER FOR THIS EQUIPMENT IS LOCATED IN THE REAR.
PLEASE WRITE THIS SERIAL NUMBER ON YOUR ENCLOSED WARRANTY CARD AND
KEEP IN A SECURE AREA. THIS IS FOR YOUR SECURITY.
D1-4-2-6-1_En
CAUTION: The power switch does not completely separate the unit from the mains in off position. Therefore
install the unit suitable places easy to disconnect the mains plug in case of the accident. The mains plug of unit
should be unplugged from the wall socket when left unused for a long period of time.
STANDBY: When placed into the standby mode, the main power flow is cut and the unit is no longer
fully operational.
STANDBY/ON Indicator: The indicator is lit red when the unit is in the standby mode and lit blue when it is in the
power-on mode. No operation can be performed when the indicator is off. However, the
Plasma Display system will still consume some power as long as the power cord is
inserted into the power outlet.
CAUTION:
Operating Environment
Operating environment temperature and humidity:
+0 ˚C to +40 ˚C (+32 ˚F to +104 ˚F), less than 85 %RH (cooling vents not blocked) Do not install this unit in a
poorly ventilated area, or in locations exposed to high humidity or direct sunlight (or strong artificial light)
Page 4

Contents
Contents
Thank you for buying this Pioneer product.
Please read through these operating instructions so you will know how to operate your model properly. After you have finished
reading the instructions, put them away in a safe place for future reference.
In some countries or regions, the shape of the power plug and power outlet may sometimes differ from that shown in the
explanatory drawings. However the method of connecting and operating the unit is the same.
Illustrations shown in this manual are for the PDP-5072HD/PDP-5071HD/PDP-5070HD unless otherwise specified.
01 Important User Guidance Information
02 Safety Precautions
03 Supplied Accessories
Speaker accessories ..................................12
04 Part Names
Plasma Display ...........................................13
Remote control unit ...................................19
05 Preparation
Installing the Plasma Display ...................20
Moving the Plasma Display .......................20
Installing the PIONEER speaker
(PDP-5072HD/PDP-5071HD/
PDP-5070HD) .............................................21
When using the hung on wall unit: .....24
Preventing the Plasma Display from
Falling Over .................................................25
Attaching/detaching the PIONEER
stand ...........................................................26
PDP-5072HD/PDP-5071HD/
PDP-5070HD ..........................................26
PDP-4272HD/PDP-4271HD/
PDP-4270HD ..........................................28
Cable connections for watching digital
and/or conventional TV channels .............29
Connecting VHF/UHF antennas and
a Cable ....................................................29
Inserting the CableCARD™ .......................29
Switching between antenna A and B .......29
Preparing the remote control unit ............30
Inserting batteries .................................30
Cautions regarding batteries ................30
Allowed operation range of the remote
control unit .............................................30
Cautions regarding the remote control
unit ..........................................................30
Connecting the power cord .......................31
Routing cables ...........................................31
06 Basic Operations
Turning on the power ................................ 32
Turning off the power ................................ 32
Watching TV channels .............................. 33
Selecting the antenna .......................... 33
Changing channels .............................. 33
Changing the volume and sound ........ 34
Changing the language ....................... 34
Setting MTS/SAP mode ....................... 35
Viewing a channel banner ................... 36
Using the POD service ......................... 36
Using the multiscreen functions ............. 36
Splitting the screen .............................. 36
Freezing images .................................... 37
07 TV Guide On Screen™ System Setup
About the TV Guide On Screen™
system ........................................................ 38
Setting up the TV Guide On Screen™
system ........................................................ 38
08 Menu Setup
Menu Configuration .................................. 42
AV mode menus ................................... 42
PC mode menus ................................... 42
Menu operations ................................... 42
09 Tuner Setup
Setting up TV channels ............................. 43
Using Auto Channel Preset ................. 43
Setting for skipping unwanted
channels ................................................ 43
Setting up TV channels manually ....... 43
Checking signal strength ..................... 43
Checking the CableCARD™ ID ............ 44
Parental Control ........................................ 44
Changing the password ....................... 44
Clearing the password ......................... 45
Activating the Parental Control ........... 45
Setting the voluntary movie rating
system (MPAA) ..................................... 45
Setting the TV ratings ........................... 45
4
En
Page 5

Contents
Setting the TV Parental Guidelines
(TV Guidelines) ...................................... 46
Blocking Not Rated TV programs ........ 46
Canadian rating systems ..................... 46
Setting Canadian English ratings ....... 47
Setting Canadian French ratings ........ 47
Setting new ratings .............................. 47
Deleting new ratings ............................ 48
Temporarily deactivating the Parental
Control ................................................... 48
Setting your favorite channels ................. 49
Setting up closed captions ....................... 49
Activating the closed caption .............. 49
Selecting the type of conventional
closed captions ..................................... 49
Selecting digital closed captions ........ 50
Selecting digital closed caption
parameters ............................................ 50
Clock Setting ............................................. 50
10 TV Guide On Screen™ System Operation
Using the TV Guide On Screen™
system ........................................................ 52
Screen components .................................. 52
TV Guide On Screen™ icons ................ 52
TV Guide On Screen™ navigation ....... 53
The Listings screen ................................... 53
Recording programs ................................. 54
Setting program reminders ...................... 55
Searching for programs ........................... 57
Searching by category .......................... 57
Searching by keyword .......................... 58
Alphabetical search ............................. 59
The search Episode Options menu ..... 59
Scheduling recordings and reminders ... 60
The Schedule Options menu ............... 60
Changing setup options ........................... 61
Changing the System Settings ............ 61
Changing the Channel Display
settings .................................................. 61
Changing the Default Options ............. 62
11 Adjustments and Settings
Sleep Timer ................................................ 63
AV Selection .............................................. 63
Basic picture adjustments ....................... 64
Advanced picture adjustments ................ 65
Using PureCinema ............................... 65
Using Color Temp ................................. 65
Using CTI ............................................... 65
Eliminating noise from images ........... 65
Sound adjustments ................................... 66
FOCUS ................................................... 66
Front Surround ...................................... 66
Power Control ............................................67
Energy Save ........................................... 67
No Signal off (AV mode only) ............... 67
No Operation off (AV mode only) ......... 67
Power Management
(PC mode only) ...................................... 67
Image position adjustment
(AV mode only) .......................................... 68
Automatic image position and clock
adjustments (PC mode only) .................... 68
Manual image position and clock
adjustments (PC mode only) .................... 68
Selecting a screen size manually ............. 69
Selecting a screen size automatically ..... 70
Selecting a screen size for received
4:3 aspect ratio signals ........................ 70
Changing the brightness at both sides
of the screen (Side Mask) ......................... 70
Language setting ....................................... 70
12 Enjoying through External Equipment
About External Equipment ....................... 71
Watching a DVD image ............................ 71
Connecting a DVD player ..................... 71
Displaying a DVD image ...................... 71
Watching a VCR image ............................. 71
Connecting a VCR ................................. 71
Displaying a VCR image ....................... 71
Using HDMI Input ..................................... 72
Connecting HDMI equipment ............. 72
Enjoying a game console or watching
camcorder images ....................................73
Connecting a game console or
camcorder ............................................. 73
Displaying an image of the game
console or camcorder .......................... 73
Recording digital TV programs using
a VCR .......................................................... 73
Avoiding unwanted feedback .............. 73
Connecting a recorder ......................... 74
Connecting other audio equipment ......... 74
Connecting an AV receiver .................. 74
Watching an image from a personal
computer .................................................... 75
English
5
En
Page 6

Contents
Connecting a personal computer ........75
Displaying an image from a personal
computer ................................................75
Computer compatibility chart ...................76
G-LINK™ connection .................................76
Connecting control cords ..........................77
About SR+ .............................................77
Enjoying through USB interface
(Home Gallery function) ............................78
Readable memory cards .......................78
Readable data files ................................78
Connecting a USB device .....................78
Removing a USB device .......................78
Displaying a device list .........................79
Starting the initial Home Gallery
screen .....................................................79
Selecting a folder ..................................79
Starting a thumbnail screen .................79
Starting a standard single-image
screen .....................................................80
Starting the Slide Show Setup
screen .....................................................80
Starting the Slide Show screen ............80
13 Useful Remote Control Features
Presetting manufacturer codes to control
other devices ..............................................81
Presetting manufacturer codes ...........81
Library Search ........................................81
Manufacturing Reset ............................81
Programming codes ............................82
CABLE ....................................................82
SATELLITE ..............................................82
VCR .........................................................83
PVR .........................................................85
DVD .........................................................85
DVD-R .....................................................86
LD ............................................................86
Using the remote control unit to control
other devices ..............................................87
Receiver control buttons .......................87
CBL/SAT control buttons ......................88
VCR control buttons ..............................89
DVD/DVR control buttons .....................90
14 Appendix
6
En
Troubleshooting .........................................91
Specifications ...........................................101
Page 7

Important User Guidance Information
Important User Guidance Information
01
In order to obtain maximum enjoyment from this Pioneer
PureVision PDP-6072HD/PDP-5072HD/PDP-4272HD/PDP6071HD/PDP-5071HD/PDP-4271HD/PDP-6070HD/PDP5070HD/PDP-4270HD Plasma Display System, please first
read this information carefully.
With the Pioneer PureVision PDP-6072HD/PDP-5072HD/PDP4272HD/PDP-6071HD/PDP-5071HD/PDP-4271HD/PDP6070HD/PDP-5070HD/PDP-4270HD, you can be assured of a
high quality Plasma Display System with long-life and high
reliability. To achieve images of exceptional quality, this
Pioneer Plasma Display System incorporates state-of-the-art
design and construction, as well as very precise and highly
advanced technology.
The Pioneer PureVision PDP-6072HD/PDP-5072HD/PDP4272HD/PDP-6071HD/PDP-5071HD/PDP-4271HD/PDP6070HD/PDP-5070HD/PDP-4270HD incorporates the latest in
color filter technology – Direct Color Filter. This improves the
color / picture reproduction of these models as compared to
previous models. It also eliminates the need for a physical
glass panel to be placed in front of the plasma panel, which
furthers Pioneer’s continued goal of reducing environmental
waste in consumer electronics, now during the manufacturing
process and in the future during the recycling process.
Over the course of its lifetime, the luminosity of the Pioneer
PDP-6072HD/PDP-5072HD/PDP-4272HD/PDP-6071HD/PDP5071HD/PDP-4271HD/PDP-6070HD/PDP-5070HD/PDP4270HD Plasma Display System will diminish very slowly, such
as with all phosphor-based screens (for example, a traditional
tube-type television). To enjoy beautiful and bright images on
your Pioneer Plasma Display System for many years to come,
please carefully read and follow the usage guidelines below.
Usage guidelines
All phosphor-based screens (including conventional tube-type
televisions) can be affected by displaying static images for a
prolonged period. Plasma Display Systems are no exception to
this rule. After-image and permanent effects on the screen can
be avoided by taking some basic precautions. By following the
recommendations listed below, you can ensure longer and
satisfactory results from your plasma:
• Whenever possible, avoid frequently displaying the same
image or virtually still moving pictures (e.g. closed-captioned
images or video game images which have static portions).
• Avoid viewing the On Screen Display for extended periods,
from a DVD player, VCR, and all other components.
• Do not leave the same picture freeze-framed or paused
continuously over a long period of time, when using the still
picture mode from a TV, VCR, DVD player or any other
component.
• Images which have both very bright areas and very dark
areas side by side should not be displayed for a prolonged
period of time.
• When playing a game, the “GAME” mode setting within “AV
Selection” is strongly recommended. However, please limit
its use to less than 2 hours at a time.
• After playing a game, or displaying a PC image or any still
image, it is best to view a normal moving picture in the
“WIDE” or “FULL” screen setting for over 3 times longer than
the previous still/moving image.
• After using the Plasma Display System, always switch the
display to “STANDBY” mode.
• Extensive viewing of content with top, bottom, or side masks
may cause uneven wear. After viewing masked content, it is
recommended to view full screen motion video for an equal
or greater amount of time.
Installation guidelines
The Pioneer PureVision PDP-6072HD/PDP-5072HD/PDP4272HD/PDP-6071HD/PDP-5071HD/PDP-4271HD/PDP6070HD/PDP-5070HD/PDP-4270HD Plasma Display System
incorporates a very thin design. To ensure safety, please take
the proper measures to mount or install the Plasma Display, in
order to prevent the unit from tipping over in the event of
vibration or accidental movement.
This product should be installed by using only parts and
accessories designed by PIONEER. Use of accessories other
than the PIONEER stand or installation bracket may result in
instability, and could cause injury. For custom installation,
please consult the dealer where the unit was purchased. To
ensure correct installation, experienced and qualified experts
must install the unit. PIONEER will not be held responsible for
accident or damage caused by the use of parts and
accessories manufactured by other companies.
To avoid malfunction and overheating when installing, make
sure that the vents on the main unit are not blocked. To ensure
proper heat emission:
• Distance the unit slightly from other equipment, walls, etc.
For the minimum space required around the unit, see page
20.
• Do not fit the unit inside narrow spaces where ventilation is
poor.
• Do not cover with a cloth, etc.
• Clean the vents on the sides and rear of the unit to remove
dust build-up by using a vacuum cleaner set to its lowest
suction setting.
• Do not place the product on a carpet or blanket.
• Do not leave the product tilted over.
• Do not invert the product.
Using the unit without proper ventilation may cause the
internal temperature to rise, and could result in possible
malfunction. When the surrounding or internal temperature
exceeds a certain degree, the display will automatically power
off in order to cool the internal electronics and prevent a
hazardous occurrence.
Malfunction can be caused by many factors: inappropriate
installation site, improper assembly/installation/mounting,
improper operation of or modifications made to this product.
However, PIONEER cannot be held responsible for accidents
or malfunction caused by the above.
NOTE
The following are typical effects and characteristics of a
phosphor-based matrix display and as such, are not covered by
the manufacturer’s limited warranties:
• Permanent residual images upon the phosphors of the
panel.
• The existence of a minute number of inactive light cells.
• Panel generated sounds, examples: Fan motor noise, and
electrical circuit humming / glass panel buzzing
English
7
En
Page 8

01
Important User Guidance Information
CAUTION
PIONEER bears no responsibility for any damage arising from
incorrect use of the product by you or other people,
malfunctions when in use, other product related problems,
and use of the product except in cases where the company
must be liable.
Plasma Display protection function
When still images (such as photos and computer images) stay
on the screen for an extended period of time, the screen will be
slightly dimmed. This is because the protection function of the
Plasma Display automatically adjusts the brightness to protect
the screen when detecting still images; so this does not
designate malfunction. The screen is dimmed when a still
image is detected for about three minutes.
Information of pixel defect
Plasma screens display information using pixels. Pioneer
plasma display panels contain a very large number of pixels.
(Depending on the panel size; over 2.3 million pixels in case of
a 42 inch display, over 3.1 million pixels in case of a 50 inch
display and over 3.1 million pixels in case of a 60 inch display).
All Pioneer display panels are manufactured using a very high
level of ultra-precision technology and undergo individual
quality control.
In rare cases, some pixels can be permanently switched off, or
on, resulting in either a black or colored pixel permanently fixed
on the screen.
This effect is common to all plasma displays because it is a
consequence of the technology.
If the defective pixels are visible at a normal viewing distance of
between 2.5 and 3.5 meters (8.2 and 11.5 feet) while viewing a
normal broadcast (i.e. not a test card, still image or single color
display) please contact Pioneer Customer Support Div. (USA) or
Customer Satisfaction Dept. (CANADA). See back cover.
If, however, they can only be seen close up or during single
color displays then this is considered normal for this
technology.
Infrared rays
The Plasma Display releases infrared rays because of its
characteristics. Depending on how the Plasma Display is in
use, the remote controls of nearby equipment may be
adversely affected or wireless headphones using infrared rays
are interfered with by noise. If this is the case, place that
equipment at a location where its remote control sensor is not
affected.
Radio interference
While this product meets the required specifications, it emits a
small amount of noise. If you place such equipment as an AM
radio, personal computer, and VCR close to this product, that
equipment may be interfered. If this happens, place that
equipment far enough from this product.
Plasma Display driving sound
The screen of the Plasma Display is composed of extremely
fine pixels and these pixels emit light according to received
video signals. This principle may cause you to hear a buzz or
electrical hum coming from the Plasma Display.
Do not attach such items as labels and tape to the
product.
• This may result in the discoloration or scratch of the cabinet.
When not using the product for a long period of
time
• If you do not use the product for a long period of time, the
functions of the product may be adversely affected. Switch
on and run the product occasionally.
Condensation
• Condensation may take place on the surface or inside of the
product when the product is rapidly moved from a cold place
to a warm place or just after a heater is switched on on a
winter morning, for example. When condensation takes
place, do not switch on the product until condensation
disappears. Using the product with condensation may result
in malfunction.
Cleaning the surface of the screen and the glossy
surface of the front cabinet
• When cleaning the surface of the screen or the glossy
surface of the front cabinet, gently wipe it with a dry soft
cloth; the supplied cleaning cloth or other similar cloths
(e.g., cotton and flannel). If you use a dusty or hard cloth or
if you rub the screen hard, the surface of the product will be
scratched.
• If you clean the surface of the screen with a wet cloth, water
droplets on the surface may enter into the product, resulting
in malfunction.
Cleaning the cabinet
• When cleaning the cabinet of this product, gently wipe it
with a clean soft cloth (e.g., cotton and flannel). If you use a
dusty or hard cloth or if you rub the cabinet hard, the surface
of the cabinet will be scratched.
• The cabinet of this product is mostly composed of plastic. Do
not use chemicals such as benzene or thinner to clean the
cabinet. Using these chemicals may result in quality
deterioration or coating removal.
• Do not expose the product to volatile gas or fluid such as
pesticide. Do not bring the product in contact with rubber or
vinyl products for a long period of time. The effect of
plasticizer in the plastic may result in quality deterioration or
coating removal.
• If you clean the surface of the cabinet with a wet cloth, water
droplets on the surface may enter into the product, resulting
in malfunction.
Handles at the rear of the Plasma Display
• Do not remove the handles from the rear of the Plasma
Display.
• When moving the Plasma Display, ask another person for
help and use the handles attached to the rear of the Plasma
Display. Do not move the Plasma Display by holding only a
single handle. Use the handles as shown on page 20.
• Do not use the handles to hang the product when installing
or carrying the product, for example. Do not use the handles
for the purpose of preventing the product from tilting over.
8
En
Page 9
Important User Guidance Information
01
Fan motor noise
The rotation speed of the cooling fan motor increases when the
ambient temperature of the Plasma Display becomes high.
You may hear the sound of the fan motor at that time.
About the menu window size following video
format switch
The video program that you watch may be high definition (HD)
or standard definition (SD). This Plasma Display is designed to
scale to each type of definition properly. If the video program’s
definition type changes while a menu window is displayed on
the screen (for example: HD → SD or SD → HD), the menu size
may temporarily shrink or enlarge until the scaling is
completed. This may happen, for example, when you switch
between television and an external digital video recorder
(D-VHS), or when your recorded program switches between
different definition types, while the on-screen menu is being
shown.
If this happens, the menu will return to its normal size after two
to three seconds. This action is normal, and does not indicate
a problem with your Plasma Display system.
Image Retention
When a static image is left frozen on a display for several hours,
a faint imprint of the image, known as image retention, can
remain. This image retention may be temporary or permanent.
Although caused by different things, image retention can
occur on all display technologies, including plasma and LCD.
On today’s plasma displays, permanent image retention is less
of a worry. Most image retention can be improved simply by
watching moving video.
Image retention, also known as burn-in, can occur in all
phosphor-based display systems (including CRT television
systems–both direct view and projection–as well as plasma
display systems). Displaying the same still images for long
periods should be avoided as permanent image retention or
burn-in may occur. Recommended guidelines are as follows:
Do not display static images for long periods (such as still
images, fixed images from PC or TV game equipment, and/or
fixed images such as time of day indicator or channel logo
display).
Do not display content in the 4:3 aspect ratio (black or gray
bars on left and right side of content) or letter-box content
(black bars above and below content) for extended periods of
time, or use either of these viewing modes repeatedly within a
short period of time. This plasma display system is equipped
with multiple wide-screen viewing modes; use one of these
screen modes to fill the entire screen with content.
Displaying dark images after displaying still images for a
period of time may cause image retention. In most cases, the
image retention can be corrected by displaying bright images
for a similar period of time.
If you display still images on your plasma display system for
long periods of time, image retention may be irreparable.
CAUTION
Panel sticking and after-image lag
• Displaying the same images such as still images for a long
time may cause after-image lagging. This may occur in the
following two cases.
1 After-image lagging due to remaining electric load
When image patterns with very high peak luminance are
displayed more than 1 minute, after-image lagging may occur
due to the remaining electric load. The after-images remaining
on the screen will disappear when moving images are
displayed. The time for the after-images to disappear depends
on the luminance of the still images and the time they had
been displayed.
2 After-image (lag image) due to burning
Avoid displaying the same image on the Plasma Display
continuously over a long period of time. If the same image is
displayed continuously for several hours, or for shorter periods
of time over several days, a permanent after-image may remain
on the screen due to burning of the fluorescent materials.
Such images may become less noticeable if moving images
are later displayed, but they will not disappear completely.
NOTE
• When a program menu, TV Guide screen or frozen image is
displayed for 5 to 10 minutes, the system automatically turns
the image off to prevent damage from screen burning.
Preventing damage from screen burning
• It is recommended that you enjoy watching images
displayed in full screen, except when doing so may result in
copyright infringement. See page 69.
• The Energy save function can be set to help prevent damage
from screen burning. See page 67.
CAUTION
DO NOT PLACE THIS PRODUCT ON AN UNSTABLE CART,
STAND, TRIPOD, BRACKET, OR TABLE. THE PRODUCT MAY
FALL, CAUSING SERIOUS PERSONAL INJURY AND SERIOUS
DAMAGE TO THE PRODUCT. USE ONLY WITH A CART,
STAND, TRIPOD, BRACKET, OR TABLE RECOMMENDED BY
THE MANUFACTURER, OR SOLD WITH THE PRODUCT.
FOLLOW THE MANUFACTURER’S INSTRUCTIONS WHEN
INSTALLING THE PRODUCT AND USE MOUNTING
ACCESSORIES RECOMMENDED BY THE MANUFACTURER.
A PRODUCT AND CART COMBINATION SHOULD BE MOVED
WITH THE CARE. QUICK STOPS, EXCESSIVE FORCE, AND
UNEVEN SURFACES MAY CAUSE THE PRODUCT AND CART
COMBINATION TO OVERTURN.
English
En
9
Page 10

02
Safety Precautions
Safety Precautions
Electricity is used to perform many useful functions, but it can
also cause personal injuries and property damage if improperly
handled. This product has been engineered and manufactured
with the highest priority on safety. However, improper use can
result in electric shock and/or fire. In order to prevent potential
danger, please observe the following instructions when
installing, operating and cleaning the product. To ensure your
safety and prolong the service life of your product, please read
the following precautions carefully before using the product.
1. Read instructions—All operating instructions must be read
and understood before the product is operated.
2. Keep this manual in a safe place—These safety and
operating instructions must be kept in a safe place for
future reference.
3. Observe warnings—All warnings on the product and in the
instructions must be observed closely.
4. Follow instructions—All operating instructions must be
followed.
5. Cleaning—Unplug the power cord from the AC outlet
before cleaning the product. To clean the product, use the
supplied cleaning cloth or other soft cloth (e.g., cotton,
flannel). Do not use liquid cleaners or aerosol cleaners.
6. Attachments—Do not use attachments not recommended
by the manufacturer. Use of inadequate attachments can
result in accidents.
7. Water and moisture—Do not use the product near water,
such as bathtub, washbasin, kitchen sink and laundry tub,
swimming pool and in a wet basement.
8. Stand—Do not place the product on an unstable cart,
stand, tripod or table. Placing the product on an unstable
base can cause the product to fall, resulting in serious
personal injuries as well as damage to the product. Use
only a cart, stand, tripod, bracket or table recommended by
the manufacturer or sold with the product. When mounting
the product on a wall, be sure to follow the manufacturer’s
instructions. Use only the mounting hardware
recommended by the manufacturer.
9. When relocating the product placed on a cart, it must be
moved with utmost care. Sudden stops, excessive force
and uneven floor surface can cause the product to fall from
the cart.
10. Ventilation—The vents and other openings in the cabinet
are designed for ventilation. Do not cover or block these
vents and openings since insufficient ventilation can cause
overheating and/or shorten the life of the product. Do not
place the product on a bed, sofa, rug or other similar
surface, since they can block ventilation openings. This
product is not designed for built-in installation; do not
place the product in an enclosed place such as a bookcase
or rack, unless proper ventilation is provided or the
manufacturer’s instructions are followed.
11. Power source—This product must operate on a power
source specified on the specification label. If you are not
sure of the type of power supply used in your home, consult
your dealer or local power company.
12. Power cord protection—The power cords must be routed
properly to prevent people from stepping on them or
objects from resting on them. Check the cords at the plugs
10
En
and product.
13. The plasma Display used in this product is made of glass.
Therefore, it can break when the product is dropped or
applied with impact. Be careful not to be injured by broken
glass pieces in case the plasma Display breaks.
14. Overloading—Do not overload AC outlets or extension
cords. Overloading can cause fire or electric shock.
15. Entering of objects and liquids—Never insert an object into
the product through vents or openings. High voltage flows
in the product, and inserting an object can cause electric
shock and/or short internal parts. For the same reason, do
not spill water or liquid on the product.
16. Servicing—Do not attempt to service the product yourself.
Removing covers can expose you to high voltage and other
dangerous conditions. Request a qualified service person
to perform servicing.
17. Repair—If any of the following conditions occurs, unplug
the power cord from the AC outlet, and request a qualified
service person to perform repairs.
a. When the power cord or plug is damaged.
b. When a liquid was spilled on the product or when
objects have fallen into the product.
c. When the product has been exposed to rain or water.
d. When the product has been dropped or damaged.
e. When the product displays an abnormal condition. Any
noticeable abnormality in the product indicates that the
product needs servicing.
18. Replacement parts—In case the product needs
replacement parts, make sure that the service person uses
replacement parts specified by the manufacturer, or those
with the same characteristics and performance as the
original parts. Use of unauthorized parts can result in fire,
electric shock and/or other danger.
19. Safety checks—Upon completion of service or repair work,
request the service technician to perform safety checks to
ensure that the product is in proper operating condition.
20. Wall or ceiling mounting—When mounting the product on
a wall or ceiling, be sure to install the product according to
the method recommended by the manufacturer.
21. Heat sources—Keep the product away from heat sources
such as radiators, heaters, stoves and other heatgenerating products (including amplifiers).
22. Unplug the power cord from the AC outlet before installing
the speakers (for PDP-6072HD/PDP-5072HD/PDP6071HD/PDP-5071HD/PDP-6070HD/PDP-5070HD only).
23. Never expose the screen of the Plasma Display to a strong
impact, for example, by hitting it. The screen may be
broken, resulting in fire or personal injury.
24. Do not expose the Plasma Display to direct sunlight for a
long period of time. The optical characteristics of the front
protection panel changes, resulting in discoloration or
warp.
25. The Plasma Display weighs about 51.5 kg (113.6 lbs.) for the
PDP-6072HD/PDP-6071HD/PDP-6070HD, about 41.7 kg
(92 lbs.) for the PDP-5072HD/PDP-5071HD/PDP-5070HD
(including the stand and speaker) and about 31.5 kg (69.5
lbs.) for the PDP-4272HD/PDP-4271HD/PDP-4270HD
(including the stand). Because it has small depth and is
unstable, unpack, carry, and install the product with one
more person at least and use the handles.
Page 11
Safety Precautions
02
Installation Precautions
Observe the following precautions when installing with any
items such as the optional bracket.
When using the optional brackets or equivalent
items
• Ask your dealer to perform the installation.
• Be sure to use the supplied bolts.
• For details, see the instruction manual that comes with the
optional bracket (or equivalent items).
When using other items
• Consult your dealer.
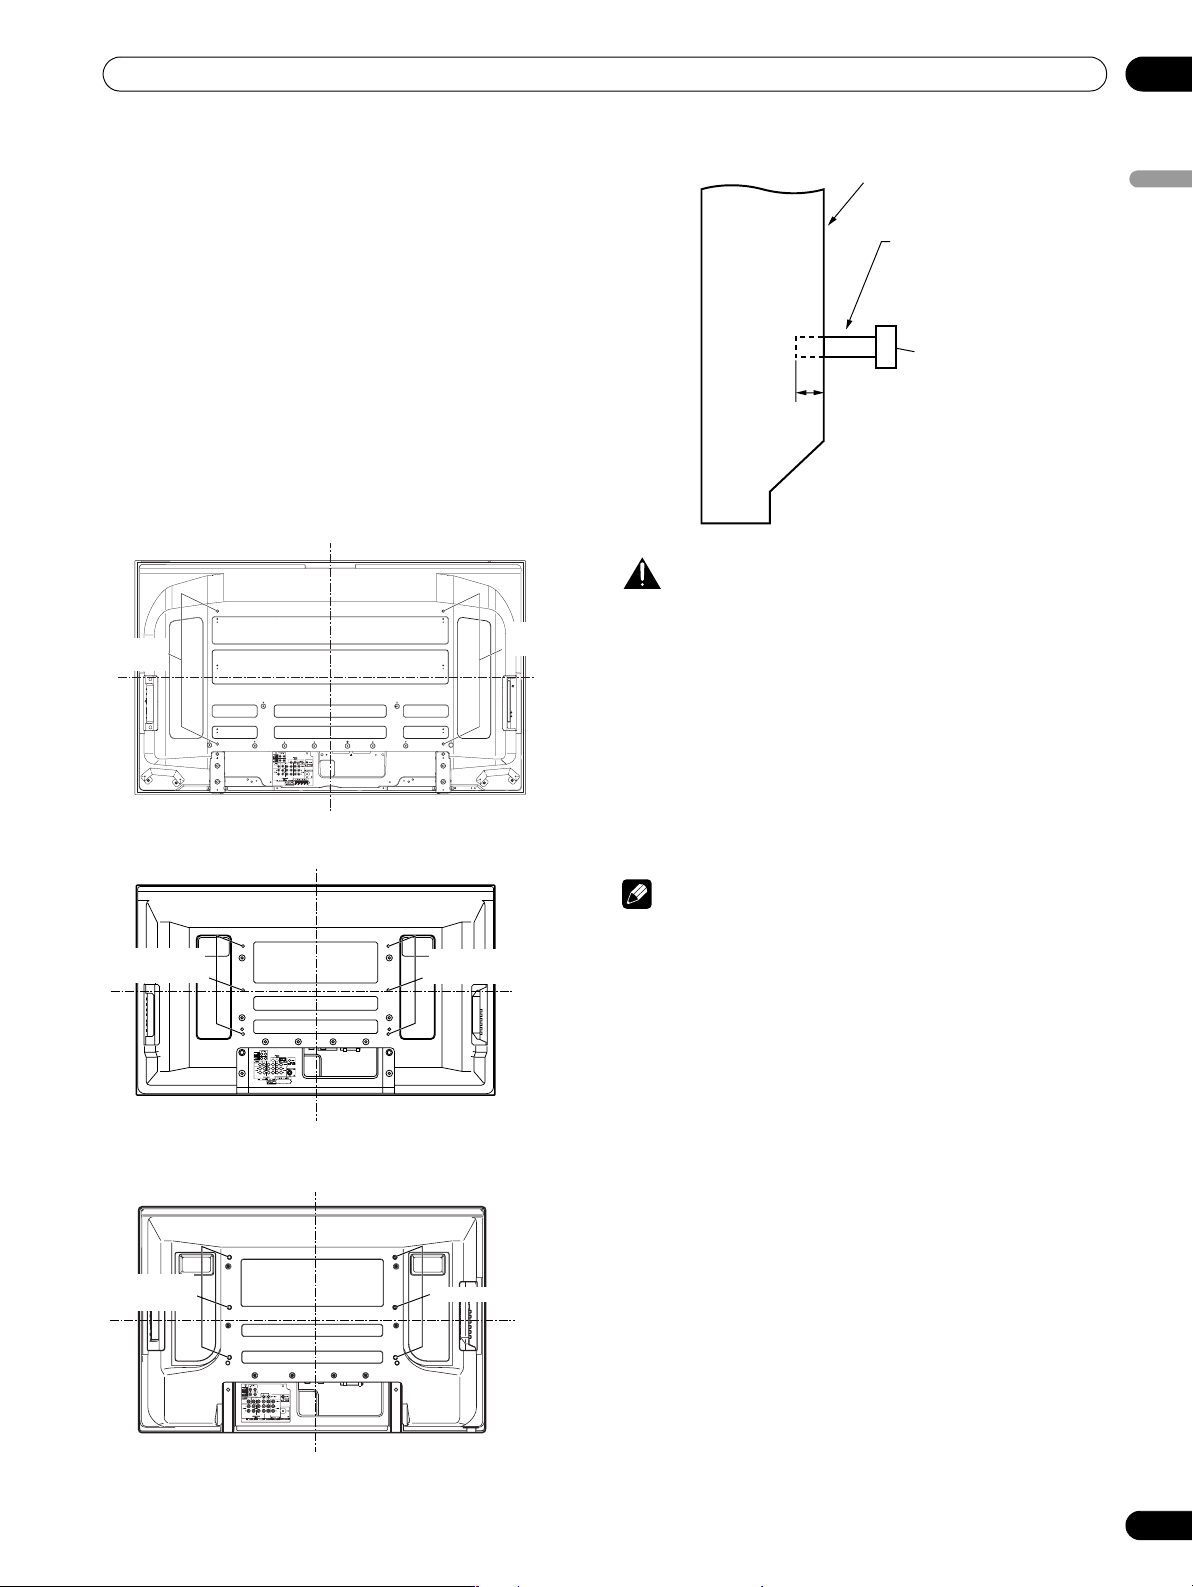
• The following six mounting holes (four holes for the PDP6072HD/PDP-6071HD/PDP-6070HD) can be used for the
installation:
Rear view (PDP-6072HD/PDP-6071HD/PDP-6070HD)
Mounting
hole
Median line
Mounting
hole
Median
line
Rear view (PDP-5072HD/PDP-5071HD/PDP-5070HD)
Side view
Mounting surface
Plasma
Display
12 mm to 18 mm
(1/2 inches to 11/16 inches)
Mounting
bracket (or
equivalent item)
M8 screw
CAUTION
• Be sure to use four or more mounting holes symmetrical to
the vertical and horizontal median lines.
• Use M8 screws, which go 12 mm to 18 mm (1/2 inches to
11/16 inches) in depth from the mounting surface of the
Plasma Display. See the side view above.
• Be careful not to block the ventilation opening at the rear of
the Plasma Display.
• Be sure to install the Plasma Display on a flat surface
because it contains glass.
• The screw holes other than the above are to be used only for
the specified products. Never use them for mounting nonspecified products.
English
Mounting
hole
Median line
Mounting
hole
Median
line
Rear view (PDP-4272HD/PDP-4271HD/PDP-4270HD)
Mounting
hole
Median line
Mounting hole
Median
line
NOTE
• It is strongly recommended to use the optional PIONEER
mounting products.
• PIONEER shall not be liable for any personal injury or
product damage that results from the use of mounting items
other than the optional PIONEER products.
11
En
Page 12
03
Supplied Accessories
Supplied Accessories
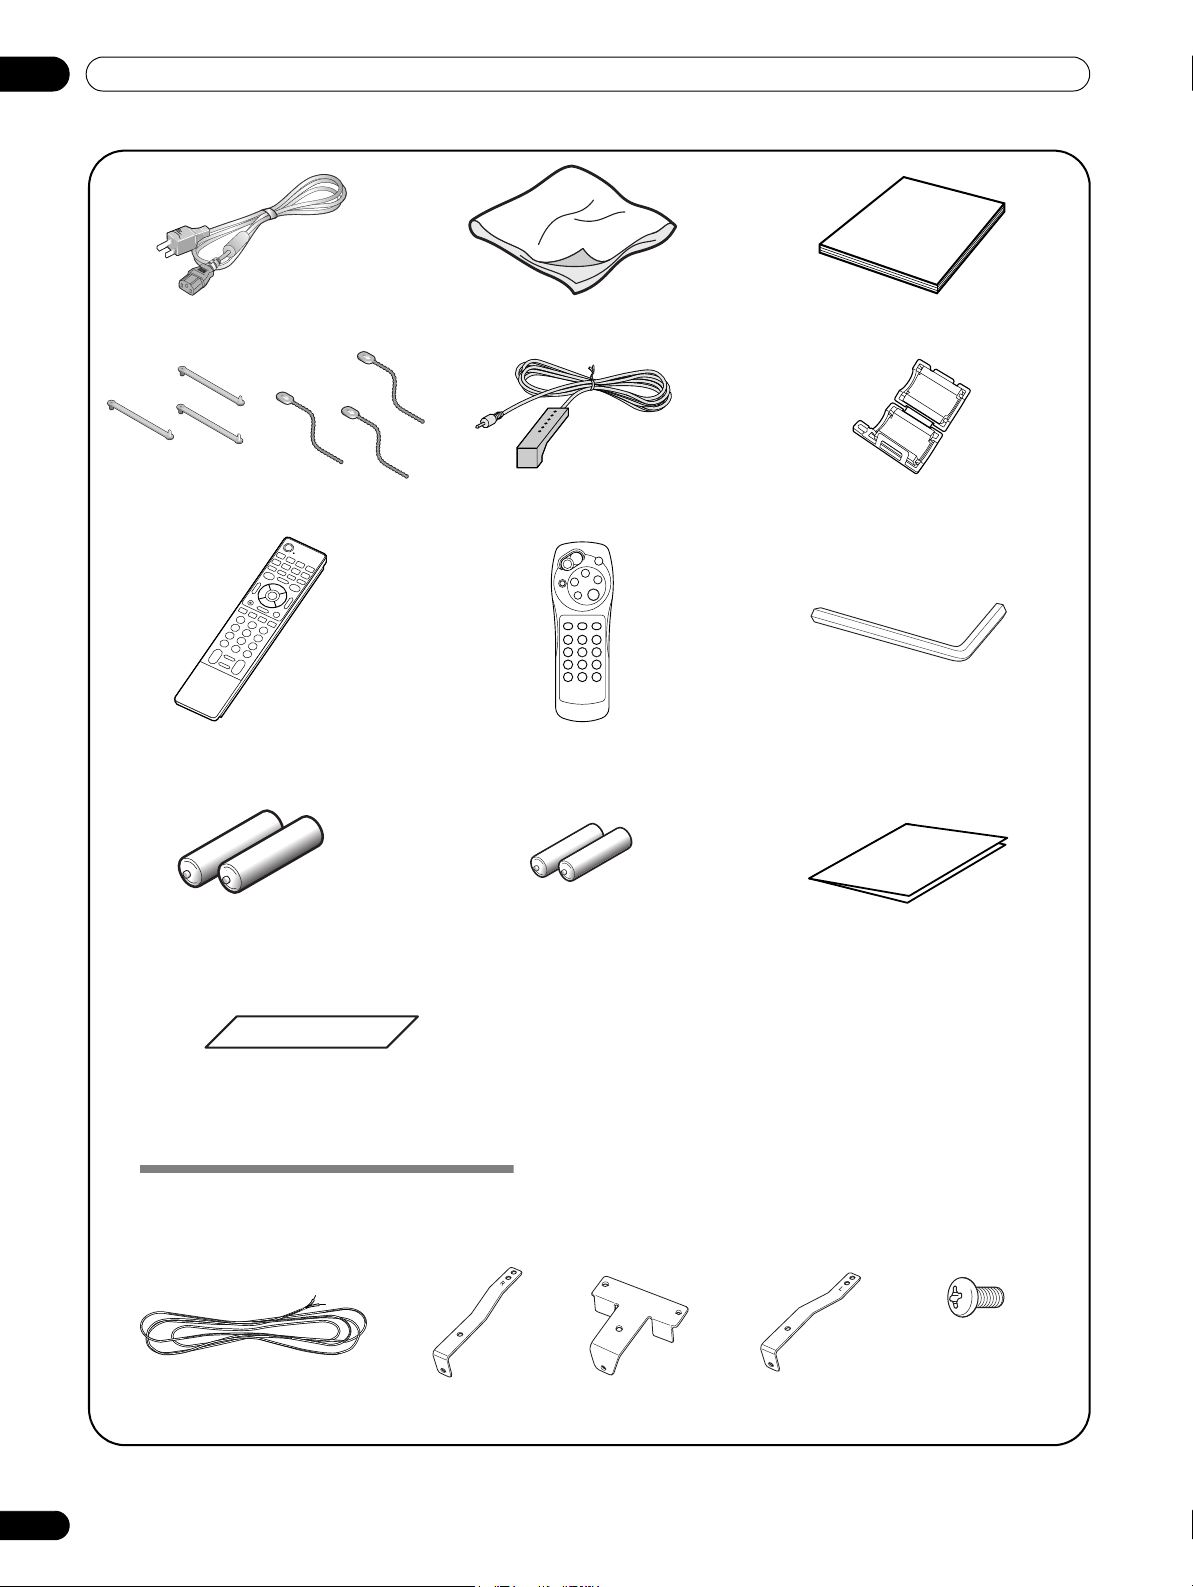
Power cord (2 m/6.6 feet)
×
Speed clamp
3
Remote control unit
Bead band
Cleaning cloth
×
3
G-LINK cable (3 m/9.8 feet)
Simplified remote control unit*
(for PDP-6071HD/PDP-5071HD/
PDP-4271HD only)
Operating instructions
Ferrite core
Hexagonal wrench x 1
(Diagonal size: 6 mm)
(except 60-inch models)
AA size battery x 2
(Alkaline battery for
remote control unit)
Terminal position sheet
(for use when mounting the Plasma Display on the wall)
(PDP-6072HD/PDP-6071HD/PDP-6070HD only)
AAA size battery x 2
(Manganese battery for simplified
remote control unit)
(for PDP-6071HD/PDP-5071HD/
PDP-4271HD only)
Warranty card
Speaker accessories
(for PDP-5072HD/PDP-5071HD/PDP-5070HD only)
Speaker Mounting Fittings
Speaker Mounting Screw
×
10 mm: Black) x 9
(M5
Speaker Cable
* Buttons used for only basic operations are provided on the simplified remote control unit. You can use it as
necessary.
12
En
×
2
Bracket for Right Side Bracket for Center Bracket for Left Side
Page 13
Part Names
Part Names
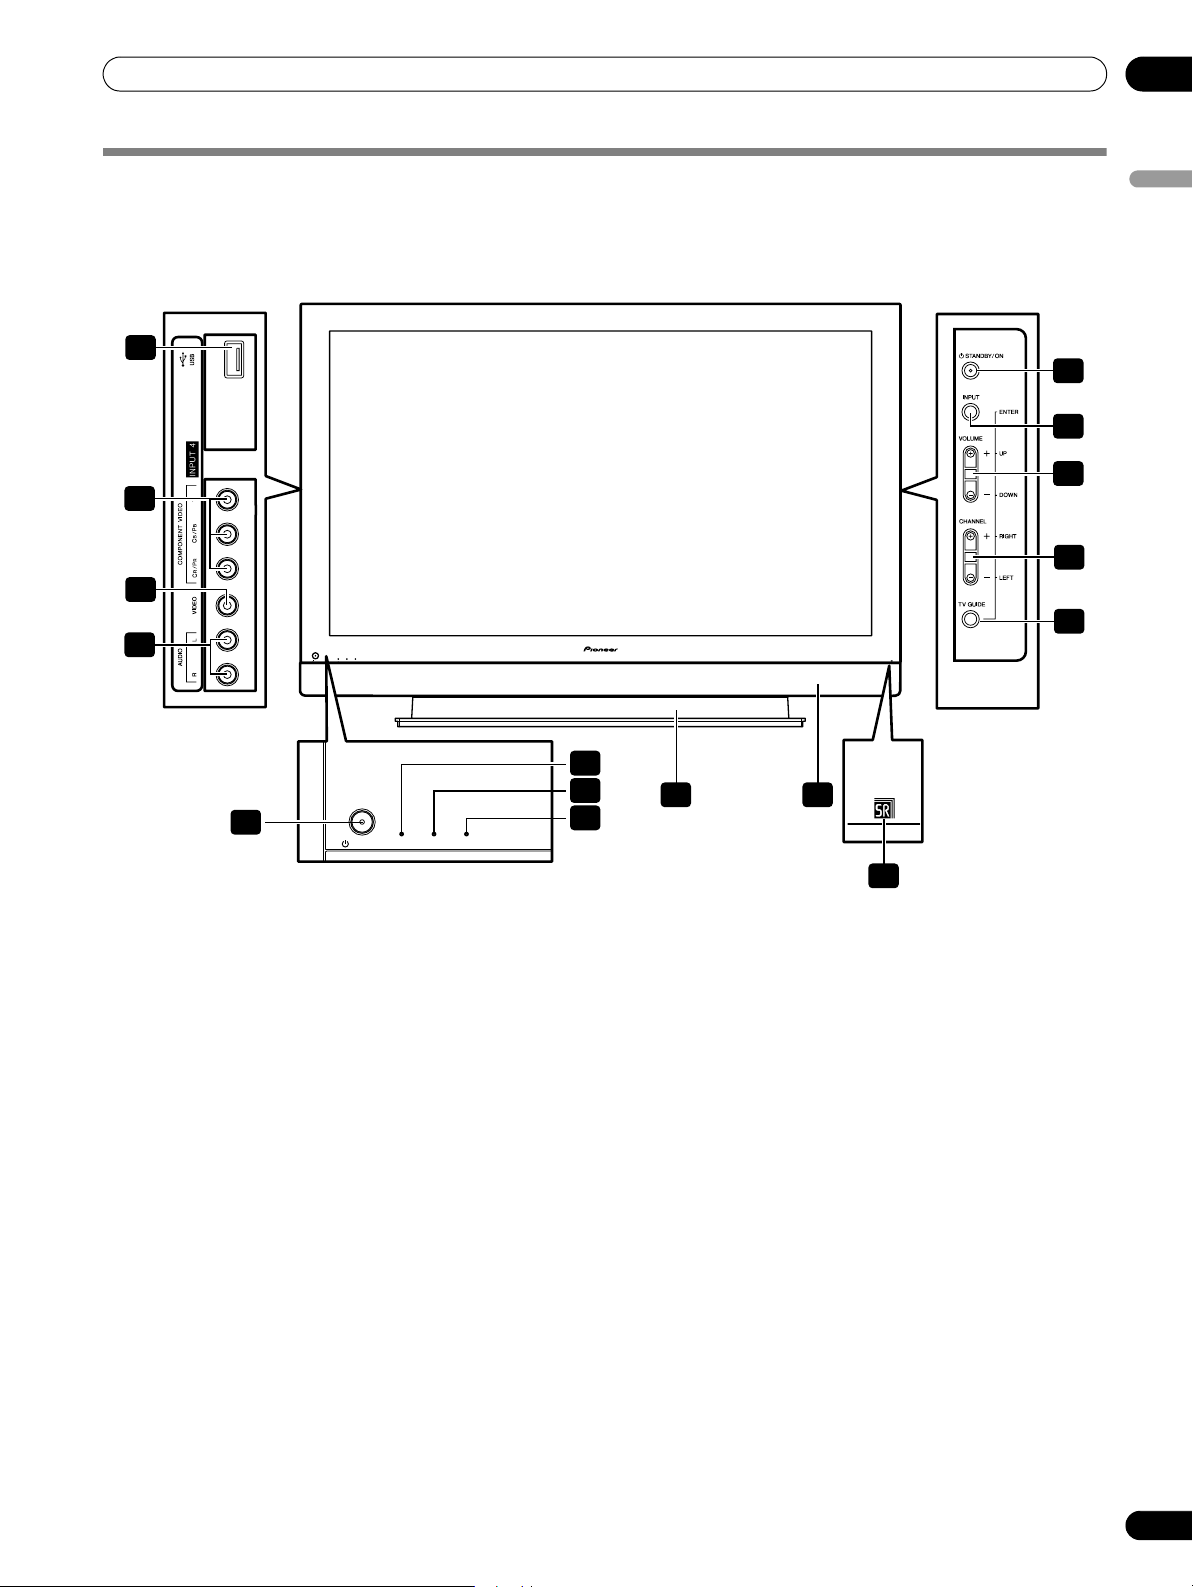
Plasma Display
Front/side view
(PDP-6072HD/PDP-6071HD/PDP-6070HD)
11
12
13
14
ON REC TIMERSTANDBYPOWER
04
English
6
7
8
9
10
1
1 a POWER
(See page 32.)
2
POWER ON indicator
(See page 32.)
3
STANDBY indicator
(See page 32.)
4
REC TIMER indicator
5
Remote control sensor
(Side view)
6 STANDBY/ON
7INPUT
8 VOLUME UP/DOWN
buttons*)
9 CHANNEL UP/DOWN
RIGHT
button
button
button (
ENTER
buttons*)
ON STANDBY REC TIMERPOWER
button*)
buttons (
buttons (
UP/DOWN
LEFT/
2
3
15 16
4
5
10 TV GUIDE
11
USB port
12
INPUT 4 terminals (COMPONENT VIDEO: Y,
CB/PB, CR/PR)
13
INPUT 4 terminal (VIDEO)
14
INPUT 4 terminals (AUDIO)
15
Stand: PDK-TS15 for the PDP-6072HD
16
Speaker: PDP-S41
For details, refer to the operation manual that
came with the stand or speaker.
The buttons with asterisks (*) can operate the TV Guide On
Screen™ system.
button*
PDK-TS15U for the PDP-6071HD/
PDP-6070HD
13
En
Page 14

04
Part Names
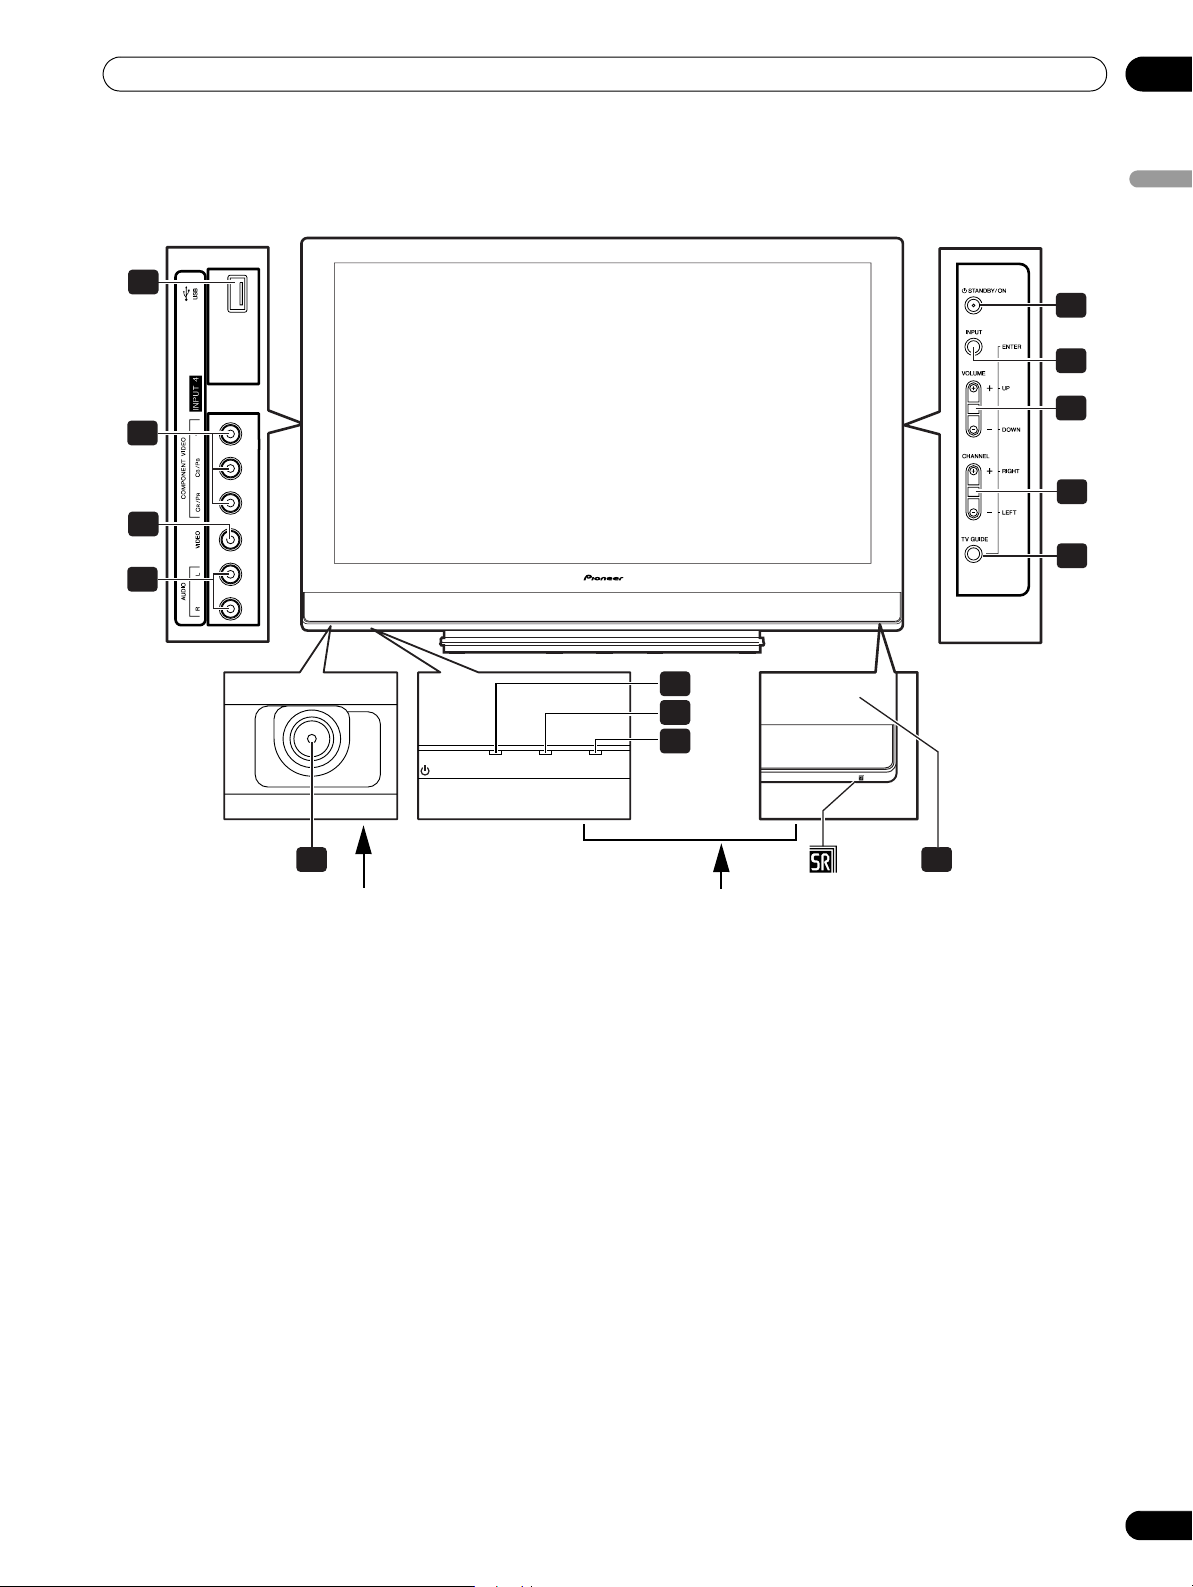
Front/side view
(PDP-5072HD/PDP-5071HD/PDP-5070HD)
11
6
7
8
12
9
13
10
14
1
1 a POWER
(See page 32.)
2
POWER ON indicator
(See page 32.)
3
STANDBY indicator
(See page 32.)
4
REC TIMER indicator
5
Remote control sensor
button
2
3
ON STANDBYPOWER
REC TIMER
54
(Side view)
6 STANDBY/ON
7INPUT
button (
8 VOLUME UP/DOWN
buttons*)
9 CHANNEL UP/DOWN
RIGHT
buttons*)
10 TV GUIDE
11
USB port
12
INPUT 4 terminals (COMPONENT VIDEO: Y,
CB/PB, CR/PR)
13
INPUT 4 terminal (VIDEO)
14
INPUT 4 terminals (AUDIO)
button
ENTER
button*
button*)
buttons (
buttons (
UP/DOWN
LEFT/
14
En
The buttons with asterisks (*) can operate the TV Guide On
Screen™ system.
Page 15
Part Names
Front/side view
(PDP-4272HD/PDP-4271HD/PDP-4270HD)
11
12
13
14
04
English
6
7
8
9
10
Viewed from below of the display
1 a POWER
button
(See page 32.)
2
POWER ON indicator
(See page 32.)
3
STANDBY indicator
(See page 32.)
4
REC TIMER indicator
5
Remote control sensor
2
3
4
POWER
1
REC TIMERON STANDBY
Viewed from the front side of the display
(Side view)
6 STANDBY/ON
7INPUT
button (
8 VOLUME UP/DOWN
buttons*)
9 CHANNEL UP/DOWN
RIGHT
10 TV GUIDE
11
USB port
12
INPUT 4 terminals (COMPONENT VIDEO: Y,
C
13
INPUT 4 terminal (VIDEO)
14
INPUT 4 terminals (AUDIO)
B/PB
buttons*)
button*
, CR/PR)
button
ENTER
5
button*)
buttons (
buttons (
UP/DOWN
LEFT/
The buttons with asterisks (*) can operate the TV Guide On
Screen™ system.
15
En
Page 16

04
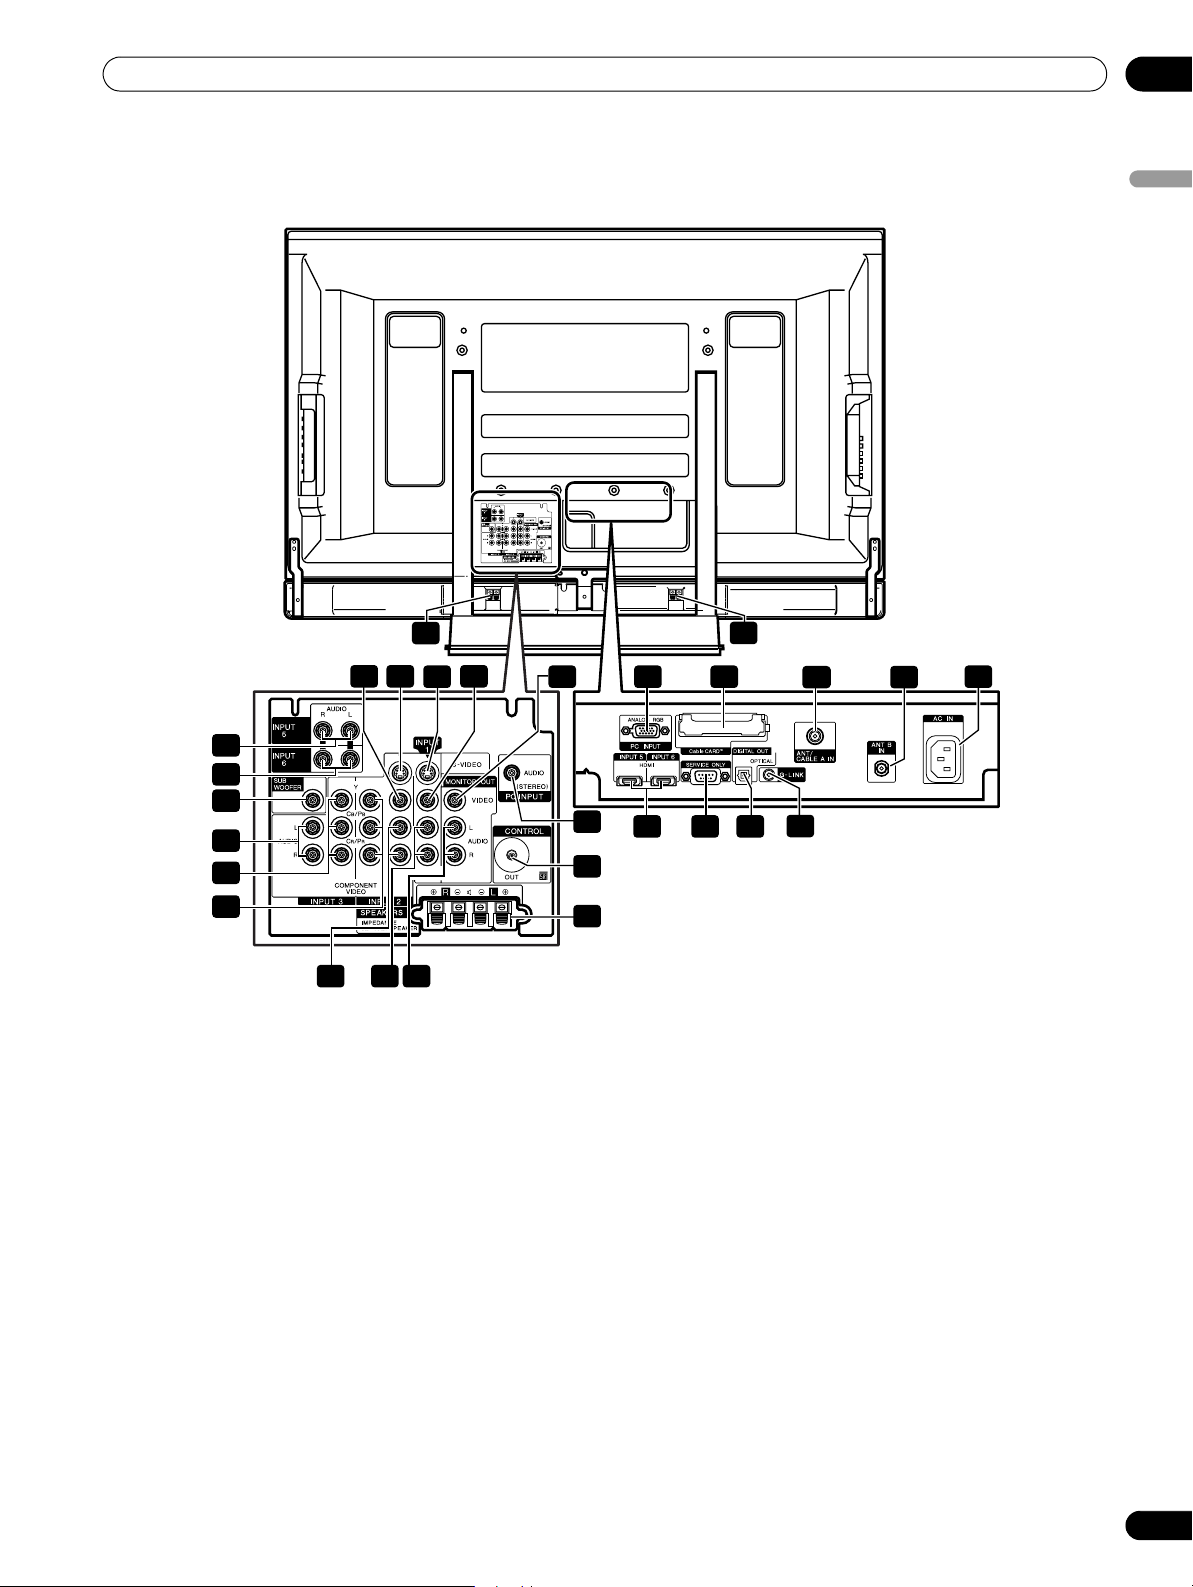
Part Names
Rear view
(PDP-6072HD/PDP-6071HD/PDP-6070HD)
28
27
16
En
162017 21
10
11
12
13
14
15
18 1923
1
PC INPUT terminal (ANALOG RGB)
2
CableCARD™ slot
3
ANT/CABLE A IN terminal
4
ANT B IN terminal
5
AC IN terminal
6
HDMI terminals (INPUT 5/INPUT 6)
7
RS-232C terminal (used for factory setup)
8
DIGITAL OUT terminal (OPTICAL)
9
G-LINK terminal
10
INPUT 5 terminals (AUDIO)
11
INPUT 6 terminals (AUDIO)
12
SUB WOOFER terminal
13
INPUT 3 terminals (AUDIO)
14
INPUT 3 terminals (COMPONENT VIDEO: Y,
C
B/PB
, CR/PR)
15
INPUT 2 terminals (COMPONENT VIDEO: Y,
C
B/PB
, CR/PR)
22
1 2
24
(Terminals located on the upper
25
edge of the compartment)
76 8
9
26
16
INPUT 2 terminal (VIDEO)
17
INPUT 2 terminal (S-VIDEO)
18
INPUT 2 terminals (AUDIO)
19
INPUT 1 terminals (AUDIO)
20
INPUT 1 terminal (S-VIDEO)
21
INPUT 1 terminal (VIDEO)
22
MONITOR OUT terminal (VIDEO)
23
MONITOR OUT terminals (AUDIO)
24
PC INPUT terminal (AUDIO)
25
CONTROL OUT terminal
26
SPEAKER (R/L) terminals
27
Stand: PDK-TS15 for the PDP-6072HD
PDK-TS15U for the PDP-6071HD/
PDP-6070HD
28
Speaker: PDP-S41
For details, refer to the operation manual that
came with the stand or speaker.
3
4
5
Page 17
Part Names
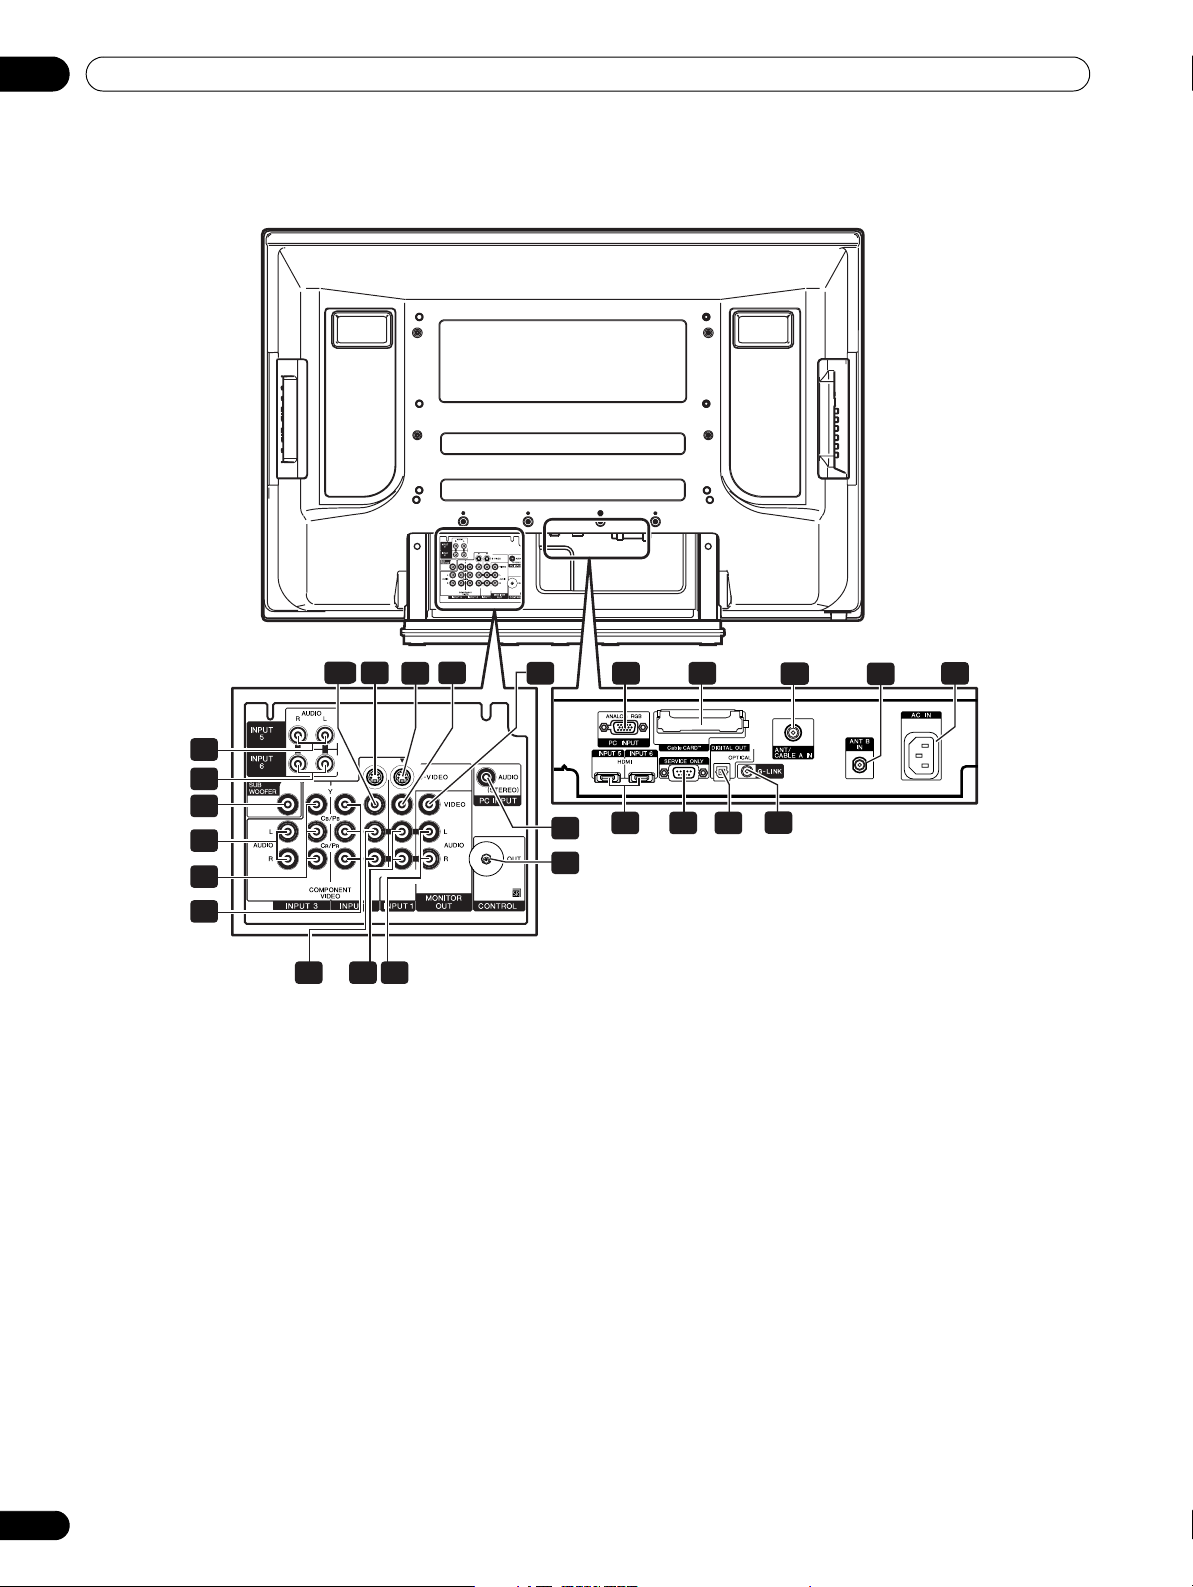
Rear view
(PDP-5072HD/PDP-5071HD/PDP-5070HD)
04
English
27
162017 21
10
11
12
13
14
15
18 1923
1
PC INPUT terminal (ANALOG RGB)
2
CableCARD™ slot
3
ANT/CABLE A IN terminal
4
ANT B IN terminal
5
AC IN terminal
6
HDMI terminals (INPUT 5/INPUT 6)
7
RS-232C terminal (used for factory setup)
8
DIGITAL OUT terminal (OPTICAL)
9
G-LINK terminal
10
INPUT 5 terminals (AUDIO)
11
INPUT 6 terminals (AUDIO)
12
SUB WOOFER terminal
13
INPUT 3 terminals (AUDIO)
14
INPUT 3 terminals (COMPONENT VIDEO: Y,
B/PB
, CR/PR)
C
22
28
1 2
24
(Terminals located on the upper
25
edge of the compartment)
76 8
9
26
15
INPUT 2 terminals (COMPONENT VIDEO: Y,
CB/PB, CR/PR)
16
INPUT 2 terminal (VIDEO)
17
INPUT 2 terminal (S-VIDEO)
18
INPUT 2 terminals (AUDIO)
19
INPUT 1 terminals (AUDIO)
20
INPUT 1 terminal (S-VIDEO)
21
INPUT 1 terminal (VIDEO)
22
MONITOR OUT terminal (VIDEO)
23
MONITOR OUT terminals (AUDIO)
24
PC INPUT terminal (AUDIO)
25
CONTROL OUT terminal
26
SPEAKER (R/L) terminals
27
SPEAKER (R) terminal (Speaker side)
28
SPEAKER (L) terminal (Speaker side)
3
4
5
17
En
Page 18
04
Part Names
Rear view
(PDP-4272HD/PDP-4271HD/PDP-4270HD)
162017 21
10
11
12
13
14
15
18 1923
1
PC INPUT terminal (ANALOG RGB)
2
CableCARD™ slot
3
ANT/CABLE A IN terminal
4
ANT B IN terminal
5
AC IN terminal
6
HDMI terminals (INPUT 5/INPUT 6)
7
RS-232C terminal (used for factory setup)
8
DIGITAL OUT terminal (OPTICAL)
9
G-LINK terminal
10
INPUT 5 terminals (AUDIO)
11
INPUT 6 terminals (AUDIO)
12
SUB WOOFER terminal
13
INPUT 3 terminals (AUDIO)
14
INPUT 3 terminals (COMPONENT VIDEO: Y,
B/PB
, CR/PR)
C
22
1 2
24
(Terminals located on the upper
25
edge of the compartment)
15
16
17
18
19
20
21
22
23
24
25
76 8
INPUT 2 terminals (COMPONENT VIDEO: Y,
CB/PB, CR/PR)
INPUT 2 terminal (VIDEO)
INPUT 2 terminal (S-VIDEO)
INPUT 2 terminals (AUDIO)
INPUT 1 terminals (AUDIO)
INPUT 1 terminal (S-VIDEO)
INPUT 1 terminal (VIDEO)
MONITOR OUT terminal (VIDEO)
MONITOR OUT terminals (AUDIO)
PC INPUT terminal (AUDIO)
CONTROL OUT terminal
9
3
4
5
18
En
Page 19
Part Names
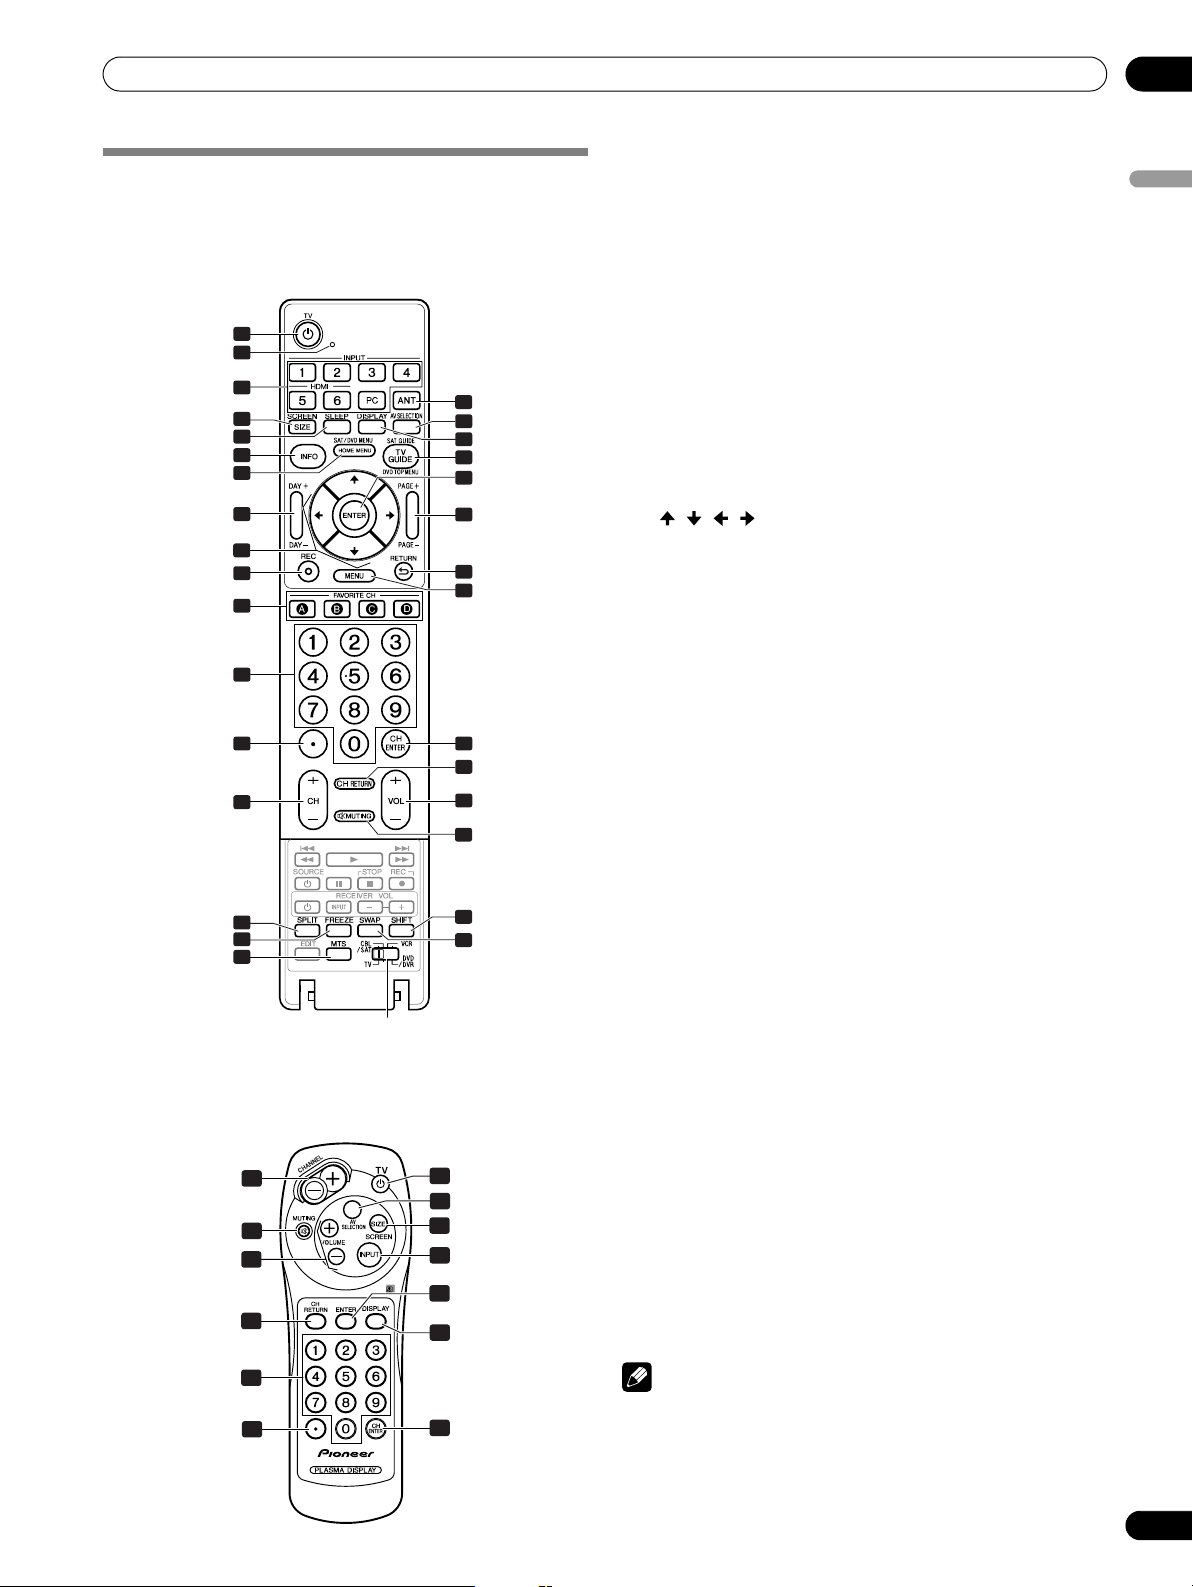
Remote control unit
This section describes the functions of the buttons available
when the mode switch has been set to TV. For the buttons for
controlling other equipment, see “Using the remote control
unit to control other devices” starting from page 87.
1
2
3
4
5
6
7
8
9
10
11
12
13
14
15
16
17
Mode switch
(with “TV” selected)
Simplified remote control unit
(PDP-6071HD/PDP-5071HD/PDP-4271HD only)
14
29
28
27
18
19
20
21
22
23
24
25
26
27
28
29
30
31
1
19
4
3
22
20
1TV a: Turns on the power to the Plasma Display System or
places it into standby mode.
2
Transmission confirmation LED
3 INPUT
: Selects an input source of the Plasma Display
System. (INPUT 1, INPUT 2, INPUT 3, INPUT 4, INPUT 5,
INPUT 6 and PC) (With the simplified remote control unit,
INPUT
toggles between ANT-A, ANT-B, INPUT 1, INPUT 2,
INPUT 3, INPUT 4, INPUT 5, INPUT 6 and PC.)
4 SCREEN SIZE
5 SLEEP
6INFO
: Displays a channel banner when a TV program is being
: Selects the screen size.
: Sets the sleep timer.
watched.
When the TV Guide On Screen™ system is in operation,
displays information about the currently highlighted channel
(if available).
7HOME MENU
8 DAY +/–
: Displays the Home Menu screen.
: Jumps to the next or previous day of program
listings in the TV Guide On Screen™ Listing service.
9
///: Selects a desired item on the menu screen.
10 REC
: When using the TV Guide On Screen™ System, starts
recording with a connected VCR.
11 FAVORITE CH (A, B, C, D)
:
Selects any of the four preset channels. See page 49 for
details to set the FAVORITE CH.
While watching, you can toggle the set channels by pressing
A, B, C
12 0 – 9
13 •(dot)
14 CH +/–
15 SPLIT
and D.
: Selects the channel.
: Enters a dot.
: Selects the channel.
: Switches the screen mode among 2-screen, picture-in-
picture, and single-screen.
16 FREEZE
: Freezes a frame from a moving image. Press again
to cancel the function.
17 MTS
: Selects MTS/SAP or language depending on the
program being watched.
18 ANT
19 AV SELECTION
: Selects the antenna (A, B). See page 29 for details.
: Selects audio and video settings.
(AV mode:
STANDARD, DYNAMIC, MOVIE, GAME, USER. PC mode:
STANDARD, USER.)
20 DISPLAY
21 TV GUIDE
22 ENTER
23 PAGE +/–
: Displays the channel information.
: Displays the TV Guide On Screen™ system.
: Executes a command.
(for the TV Guide On Screen™ system): Scrolls the
program listing screen vertically.
24 RETURN
25 MENU
: Returns to the previous menu screen.
: Displays a panel menu in the TV Guide On Screen™
system.
26 CH ENTER
27 CH RETURN
: Executes a channel number.
: Returns to the previous channel. This button is
disabled while the TV Guide On Screen™ system is displayed.
28 VOL +/–
29 M MUTING
30 SHIFT
: Sets the volume.
: Mutes the sound.
: Moves the location of the small screen when in the
picture-in-picture mode.
31 SWAP
: Switches between the two screens when in the 2-
screen or picture-in-picture mode.
Luminous remote control buttons (main unit only)
All buttons on the main remote control unit are luminous and
gather and store light. This enables quick access to the
desired function when performing operations in dark places.
04
English
12
13
26
NOTE
• When using the remote control unit, point it at the Plasma
Display.
• See pages 81 to 90 for operating buttons not listed on this
page.
19
En
Page 20
05
Preparation
Preparation
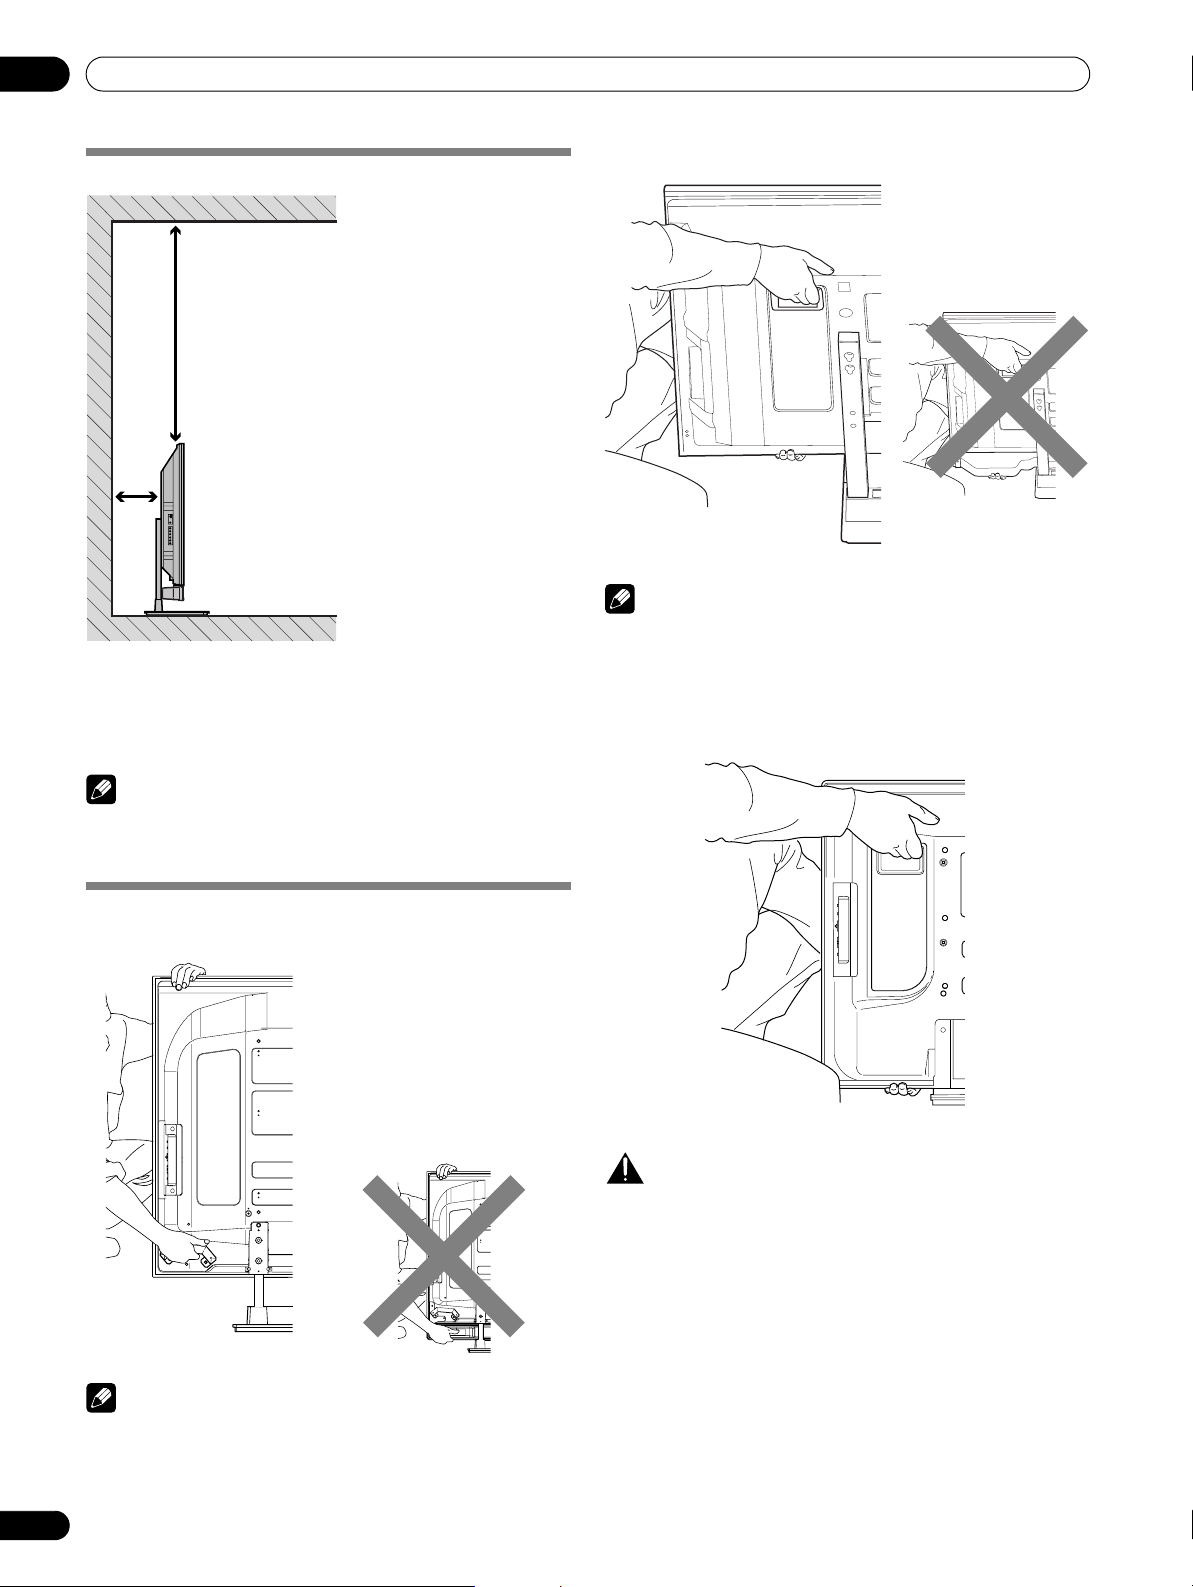
Installing the Plasma Display
Over 50 cm
(19 11/16 inches)
Over
10 cm
(3 15/16
inches)
COMPONENT
@@@@@
VIDEO
Y
B
/ P
B
C
CR / P
R
VIDEO
AUDIO
L
R
Location
• Avoid direct sunlight. Maintain adequate ventilation.
• Because the Plasma Display is heavy, be sure to have
someone help you when moving it.
(PDP-5072HD/PDP-5071HD/PDP-5070HD)
NOTE
• Do not hold by the speaker.
• When moving the Plasma Display, make sure to remove the
speaker first. Do not hold by the speaker mounting fittings.
(PDP-4272HD/PDP-4271HD/PDP-4270HD)
NOTE
• Allow enough space around the upper and back parts when
installing to ensure adequate ventilation of the rear of the
unit.
Moving the Plasma Display
(PDP-6072HD/PDP-6071HD/PDP-6070HD)
Stand: PDK-TS15 for the
PDP-6072HD
PDK-TS15U for the
PDP-6071HD/PDP-
6070HD
Speaker: PDP-S41
For details, refer to the operation
manual that came with the stand
or speaker.
CAUTION
When installing on a rack, etc., hold the Plasma Display.
NOTE
• Do not hold by the speaker.
• When moving the Plasma Display, make sure to remove the
speaker first. Do not hold by the speaker mounting fittings.
20
En
Page 21
Preparation
Installing the PIONEER speaker
(PDP-5072HD/PDP-5071HD/PDP-5070HD)
CAUTION
• If you want to move the Plasma Display unit, make sure that
you remove the speaker first. In addition, do not move the
display holding on to the mounting fittings. This can result in
injury or damage to the unit.
About the speaker
• In order to prevent damage to the speaker system resulting
from input overload, please observe the following
precautions:
• Do not use the speaker with anything other than the
Plasma Display. Doing so may result in damage or fire.
• Be sure to turn the connected devices off and remove
the power cord from the power outlet beforehand when
changing the connection or installation method.
• When using a tone control function to greatly
emphasize treble sounds, do not use excessive amplifier
volume.
• Please handle the speaker with sufficient care, as the grille
net and the cabinet can become damaged or broken when
they are subjected to strong external impacts.
• Placing a CRT computer screen or CRT monitor near to the
speaker may result in interference or color distortion. If this
happens, distance the monitor from the speaker.
Installation
• The speaker is wide, and may become unstable when
installed by a one person alone. This may result in injury or
product damage. Therefore, at least two people must
assemble and install it.
• When installing the speaker, do not use any screws other
than those supplied, otherwise the speaker may come off
from the main unit and fall over.
• When installing the speaker, tighten the screws firmly.
• Be sure to turn the connected devices off and remove the
power cord from the power outlet beforehand when
changing the connection or installation method.
NOTE
• Before installing the speaker, make sure that the PIONEER
table top stand is attached to the Plasma Display.
05
English
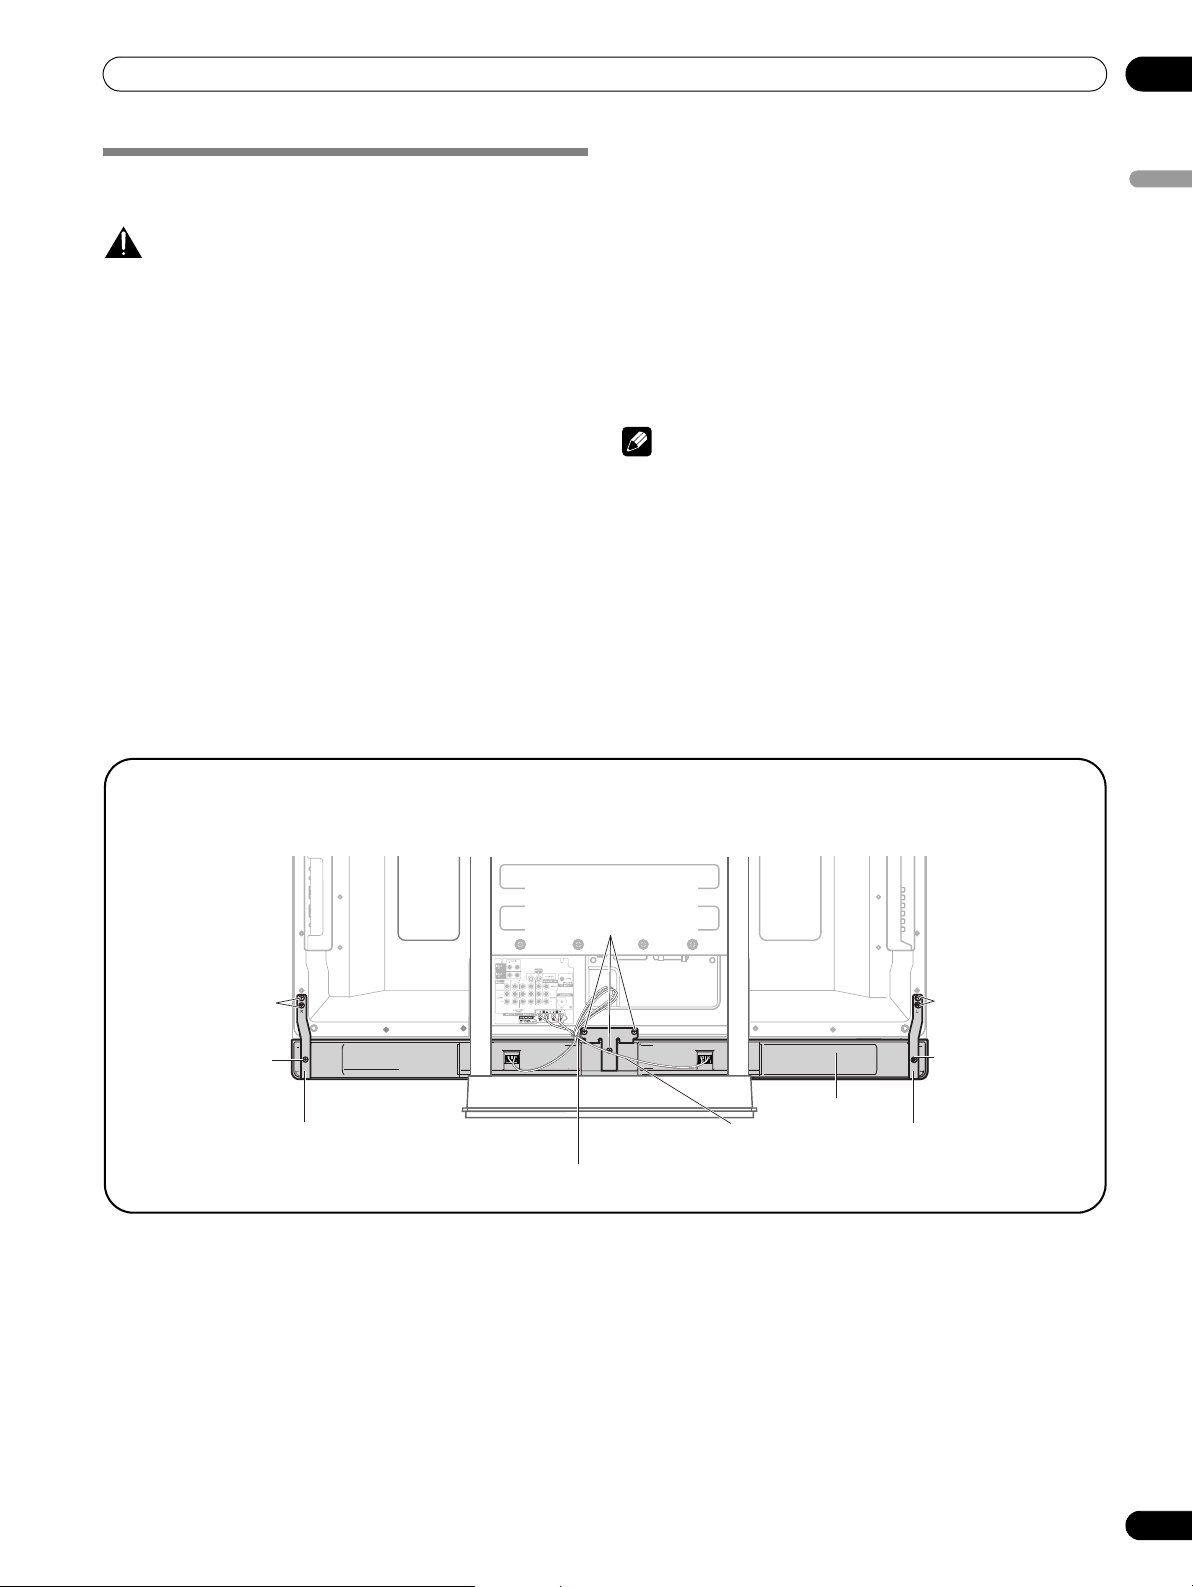
PDP-5072HD/PDP-5071HD/PDP-5070HD with the speaker installed
(with the PIONEER table top stand)
Speaker mounting
screw (M5 x 10 mm)
Speaker mounting
screw (M5 x 10 mm)
Speaker mounting
screw (M5 x 10 mm)
Speaker mounting fitting
(right side)
Speaker cable
Speaker mounting fitting
(center)
Speaker mounting
screw (M5 x 10 mm)
Speaker mounting
screw (M5 x 10 mm)
Speaker
Speaker mounting fitting
(left side)
21
En
Page 22
05
Preparation
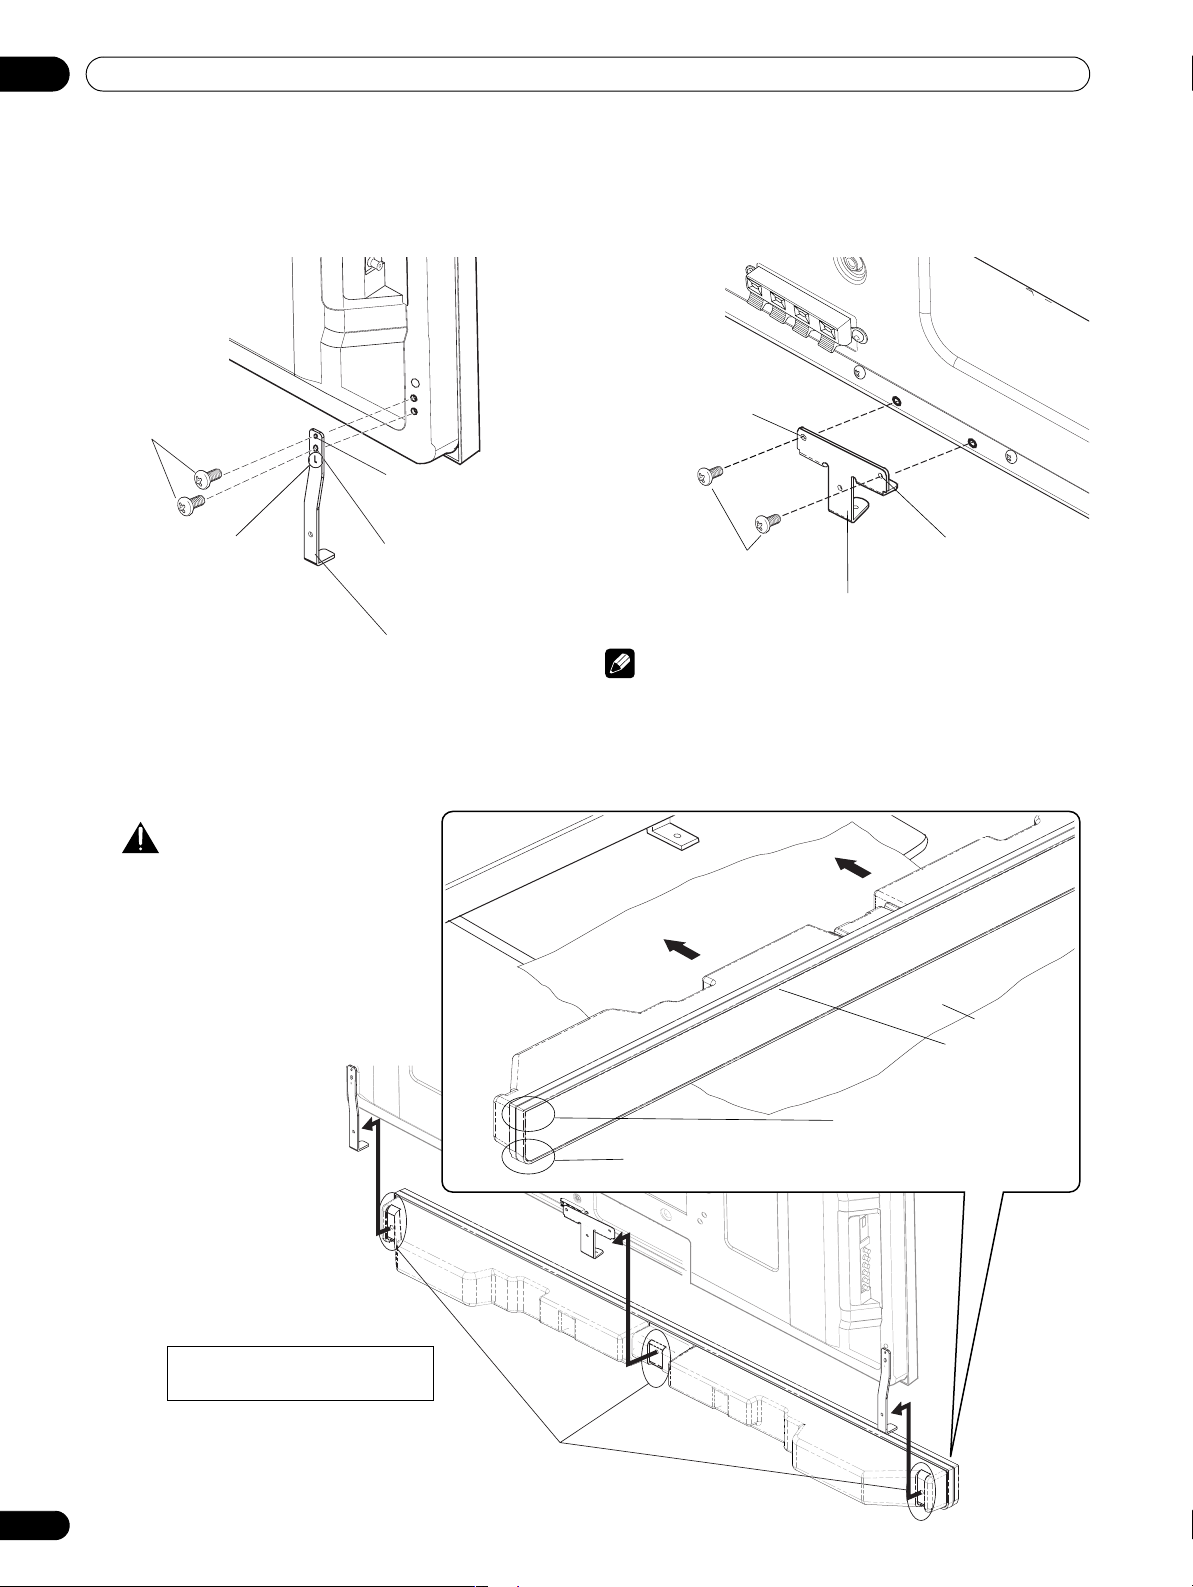
1. Attach the speaker mounting fittings to the
rear of the Plasma Display.
• Attach the fittings for right and left sides to the bottom
right and left on the rear panel of the Plasma Display
using the supplied screws.
Speaker mounting screw
(M5 x 10 mm)
➀
Tighten the screw in
the upper screw hole
first.
➁
“L” is inscribed
(“R” is inscribed on
the fitting for the
right side).
Speaker mounting fitting for the left side
(the fitting method is the same as the
fitting for the right side.)
Then, tighten the
screw in the screw
hole right under the
upper hole.
2. Attach the center fitting to the lower center
on the rear panel of the Plasma Display.
• Attach the center fitting to the lower center on the rear
panel of the Plasma Display using the two supplied
screws.
➁
Then, tighten the screw
in the oval-shaped
screw hole.
➀
Speaker mounting screw
(M5 x 10 mm)
Speaker mounting fitting for center
Tighten the screw in the
round-shaped hole first.
NOTE
• See page 24 for speaker mounting procedures when using
the hung on wall unit.
3. Fit the speaker to the mounting fittings in the correct direction.
• Be sure not to mount the speaker upside down.
CAUTION
• To avoid any damage to
the speaker and/or table
top stand from striking
against each other, fit the
speaker to the mounting
fittings while confirming
their locations. As you
may easily strike the
stand, use the protective
sheet in which the
speaker was wrapped
between the speaker and
stand.
• When the speaker
mounting fittings do not
fit the grooves at the rear
of the speaker, adjust the
insertion angle.
The bottom side of the speaker has a round corner
when viewed from the front side of the Plasma Display.
Sheet
Front side of the
speaker
The upper side of the speaker
does not have a round corner.
22
En
For illustrative purposes, the table
top stand is not presented here.
Insert the speaker mounting
fittings into the grooves at the
rear of the speaker.
Page 23
Preparation
4. Fix the speaker mounting fittings and the speaker with the supplied screws.
Attach the speaker in the center first, and then both sides with the supplied screws.
The screw hole at the bottom of the speaker
mounting fitting is used when the Plasma
Display is installed on the wall. It is not used
when installed with the stand.
NOTE
• If after attaching the speaker its position
Speaker mounting screw
(M5 x 10 mm)
Screw hole
Speaker mounting screw
(M5 x 10 mm)
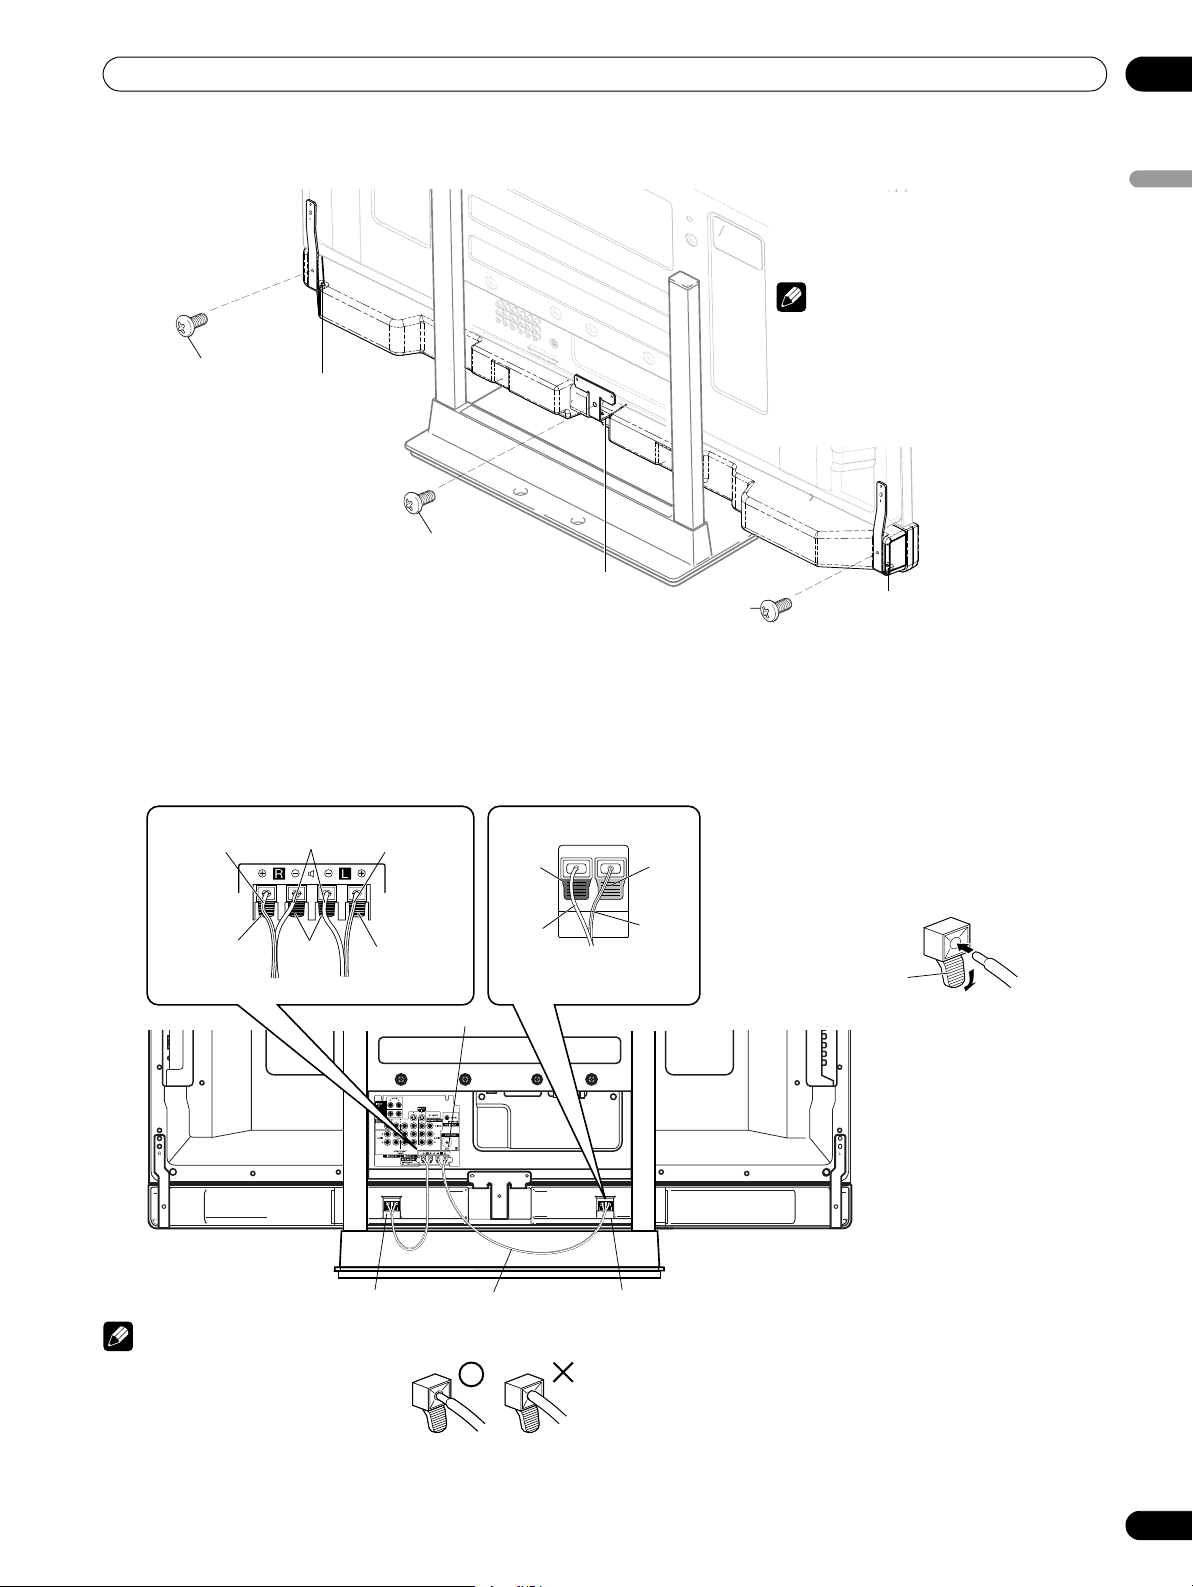
5. Connect the supplied speaker cables to
the back of Plasma Display.
Connect the cables correctly with respect to the polarity of
the Plasma Display and the speaker terminals, that is,
cable to
terminals and cable to terminals. To do so,
connect the cable with the gray line to the
the white cable to the
Gray line
Red
White
Black
terminals.
Gray line
Red
terminals and
Black
(–)
White
Screw hole
Speaker mounting screw
(M5 x 10 mm)
Red
(+)
Gray
line
6. Connect the other end of the
• Press the lever and insert the end of the cable.
• When you release the lever, it clamps onto the
needs to be adjusted horizontally or
vertically, first loosen the speaker
mounting screws, reposition and then
tighten the screws again at the
appropriate position.
Screw hole
speaker cables to the speaker.
Connect the cables correctly with respect to
the polarity of the Plasma Display and the
speaker terminals, that is, cable to
terminals and cable to terminals. To do
so, connect the cable with the gray line to
the terminals and the white cable to the
terminals.
speaker cable.
Lever
05
English
Speaker terminal
Speaker terminal
Speaker cable Speaker terminal
NOTE
• If you insert the speaker cable
too far so that the insulation is
touching the speaker terminal,
you may not get any sound.
• Check if the end of the speaker cables are securely
connected to the terminals by slightly tugging on the cable
after making connections. Loose connections may result in
sound dropouts or noise.
• If there is a short in the + and – cables caused by an exposed
lead wire, excessive load may be applied to the Plasma
Display, resulting in interrupted operation or malfunction.
• Incorrect connections of the speaker cable to the right or left
of the Plasma Display terminals with respect to the polarity
may result in insufficient stereo sound effects, delivering
poor bass sounds or unstable sound image.
23
En
Page 24
05
Preparation
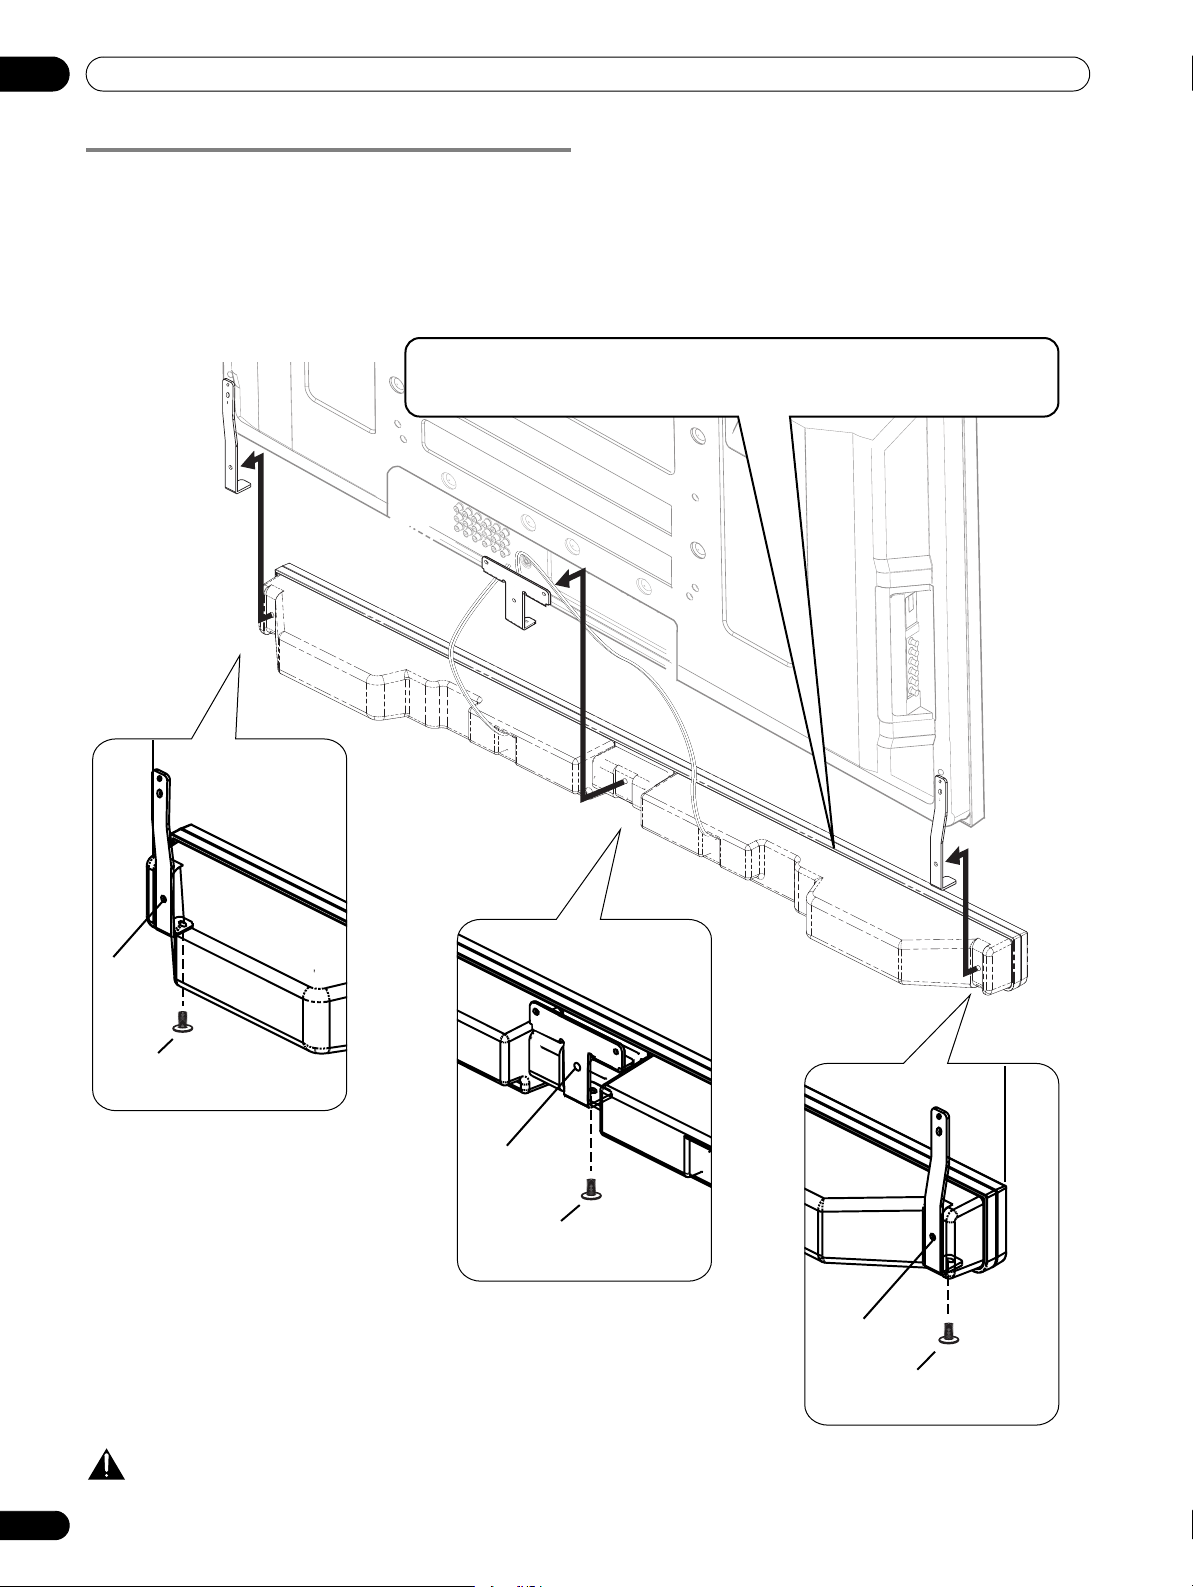
When using the hung on wall unit:
First install the Plasma Display on the wall with only the
speaker mounting fittings and speaker cable attached to the
display, and then attach the speaker.
1. Connect the supplied speaker cables to the
back of the Plasma Display.
4. Place the speaker on the speaker mounting fittings in the
correct direction.
2. Place the Plasma Display on the mounting
fittings of the hung on wall unit.
For details, refer to the instruction manual supplied with
the hung on wall unit.
3. Connect the other end of the speaker cables
to the speaker.
*
Speaker mounting screw
(M5 x 10 mm)
5. Tighten from below using the supplied screws
(3 locations).
Attach the speaker in the center first, and then both sides with
the supplied screws.
CAUTION
• Be careful not to be injured by the speaker mounting fittings
24
En
during installation or cable wiring.
*
Speaker mounting screw
(M5 x 10 mm)
*
Speaker mounting screw
(M5 x 10 mm)
The screw hole at the bottom of the
speaker mounting (indicated with an
asterisk) is not used when the Plasma
Display is installed on the wall.
Page 25
Preparation
05
Preventing the Plasma Display from
Falling Over
For installation, be sure to take special care to ensure that the
Plasma Display will not fall over.
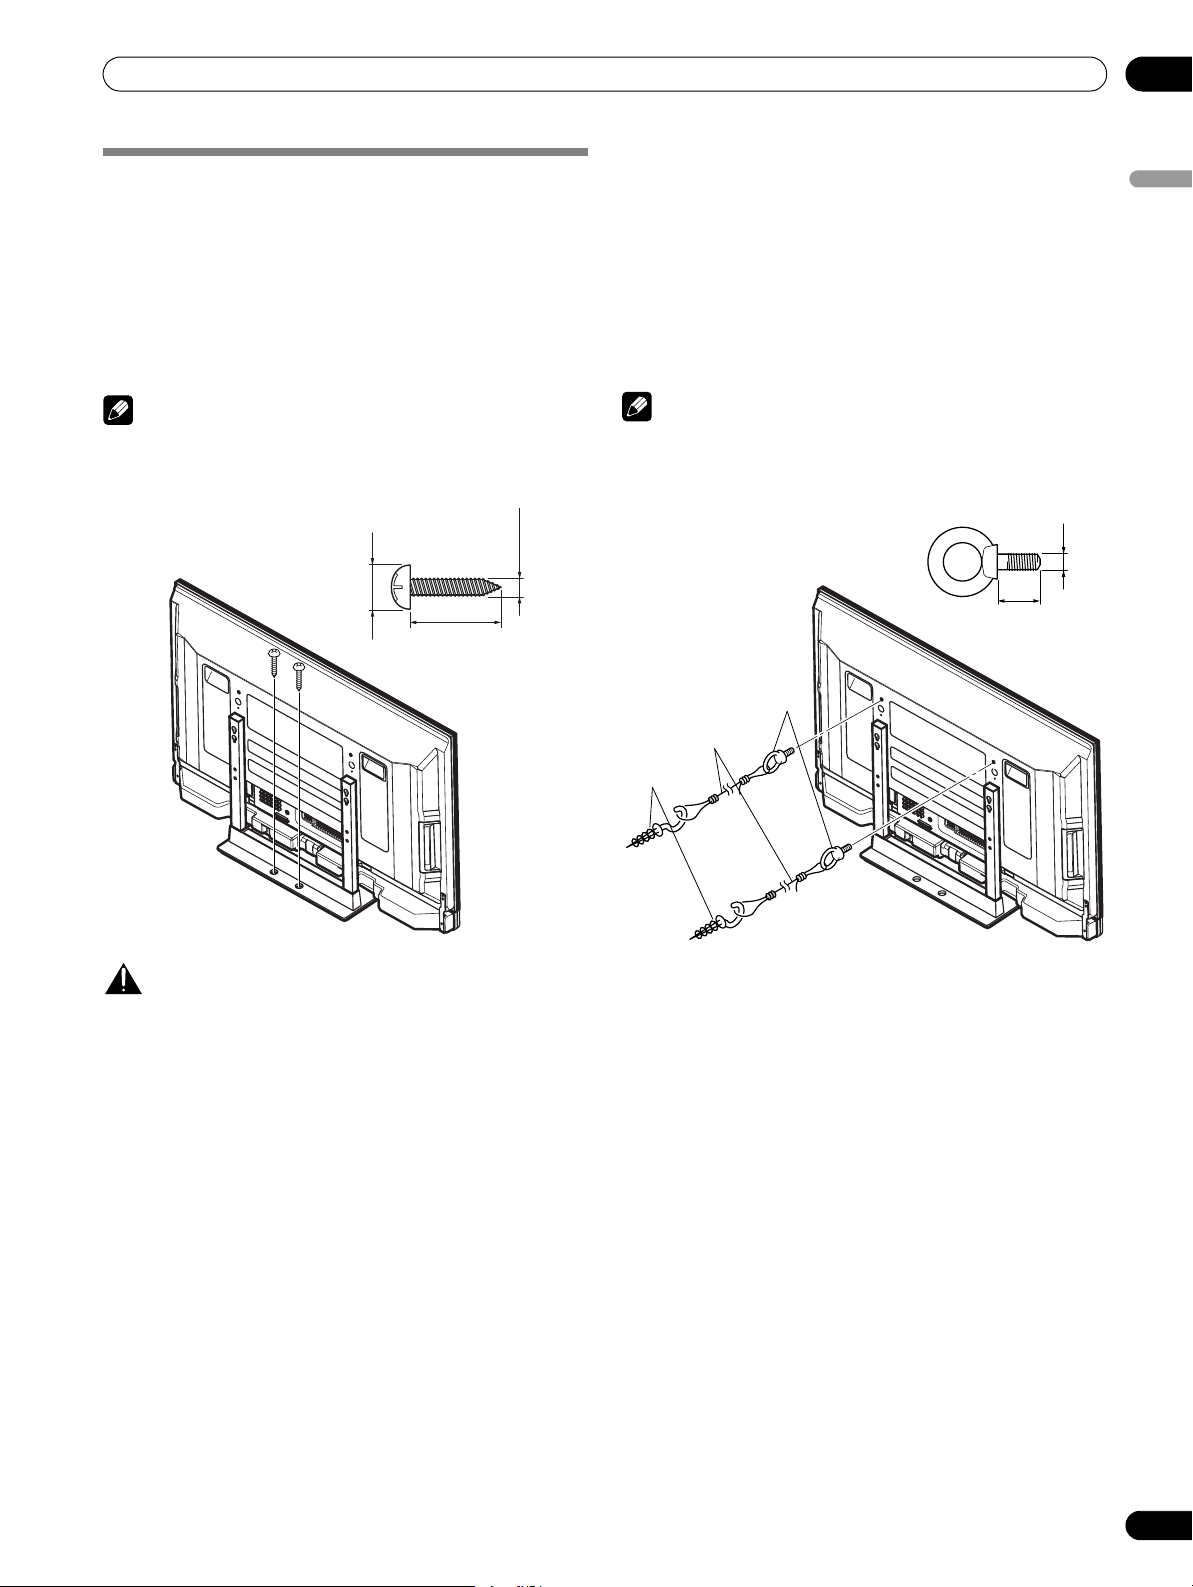
Stabilizing on a table or floor
Stabilize the Plasma Display as shown in the diagram using
screws that are available on the market.
NOTE
To stabilize the Plasma Display on a table or on the floor, use
screws that have a nominal diameter of 6 mm (1/4 inch) and
that are at least 20 mm (13/16 inch) long.
6 mm
9 mm to 15 mm
(3/8 inch to 5/8 inch)
20 mm min.
(13/16 inch min.)
(1/4 inch)
Using a wall for stabilization
1. Attach fall-prevention bolts (hooks) to the
Plasma Display.
2. Use strong cords to stabilize it
appropriately and firmly to a wall, pillar, or
other sturdy element.
• Perform this work in the same way on the left and right sides.
NOTE
Use hooks, cords and fittings that are available on the market.
Recommended hook: Nominal diameter 8 mm (3/8 inch)
Length 12 mm to 15 mm (1/2 inch to 5/8 inch)
M8
12 mm to 15 mm
(1/2 inch to 5/8 inch)
➀ Hook
English
CAUTION
A table or an area of the floor with adequate strength should
always be used to support the Plasma Display. Failure to do so
could result in personal injury and physical damage.
When installing the Plasma Display, please take the necessary
safety measures to prevent it from falling or overturning in case
of emergencies, such as earthquakes, or of accidents.
If you do not take these precautions, the Plasma Display could
fall down and cause injury.
The screws, hooks, chains and other fittings that you use to
secure the Plasma Display to prevent it from overturning will
vary according to the composition and thickness of the surface
to which it will be attached.
Select the appropriate screws, hooks, chains, and other fittings
after first inspecting the surface carefully to determine its
thickness and composition and after consulting a professional
installer if necessary.
➁ Cord
Fitting
25
En
Page 26
05
Preparation
Attaching/detaching the PIONEER stand
The Plasma Display comes with the PIONEER table top stand
attached. You can also install the display on a rack by
detaching the stand. The method for attaching/detaching the
stand varies depending on the product.
CAUTION
This product can be used only with the attached stand. Using
other stands can result in instability, possibly causing injury.
PDP-5072HD/PDP-5071HD/PDP-5070HD
CAUTION
The weight of a 50 inch Plasma Display is about 34.1 kg (75.2 lbs.),
it has no depth, and is unstable. Therefore, at least two people
must assemble and install it.
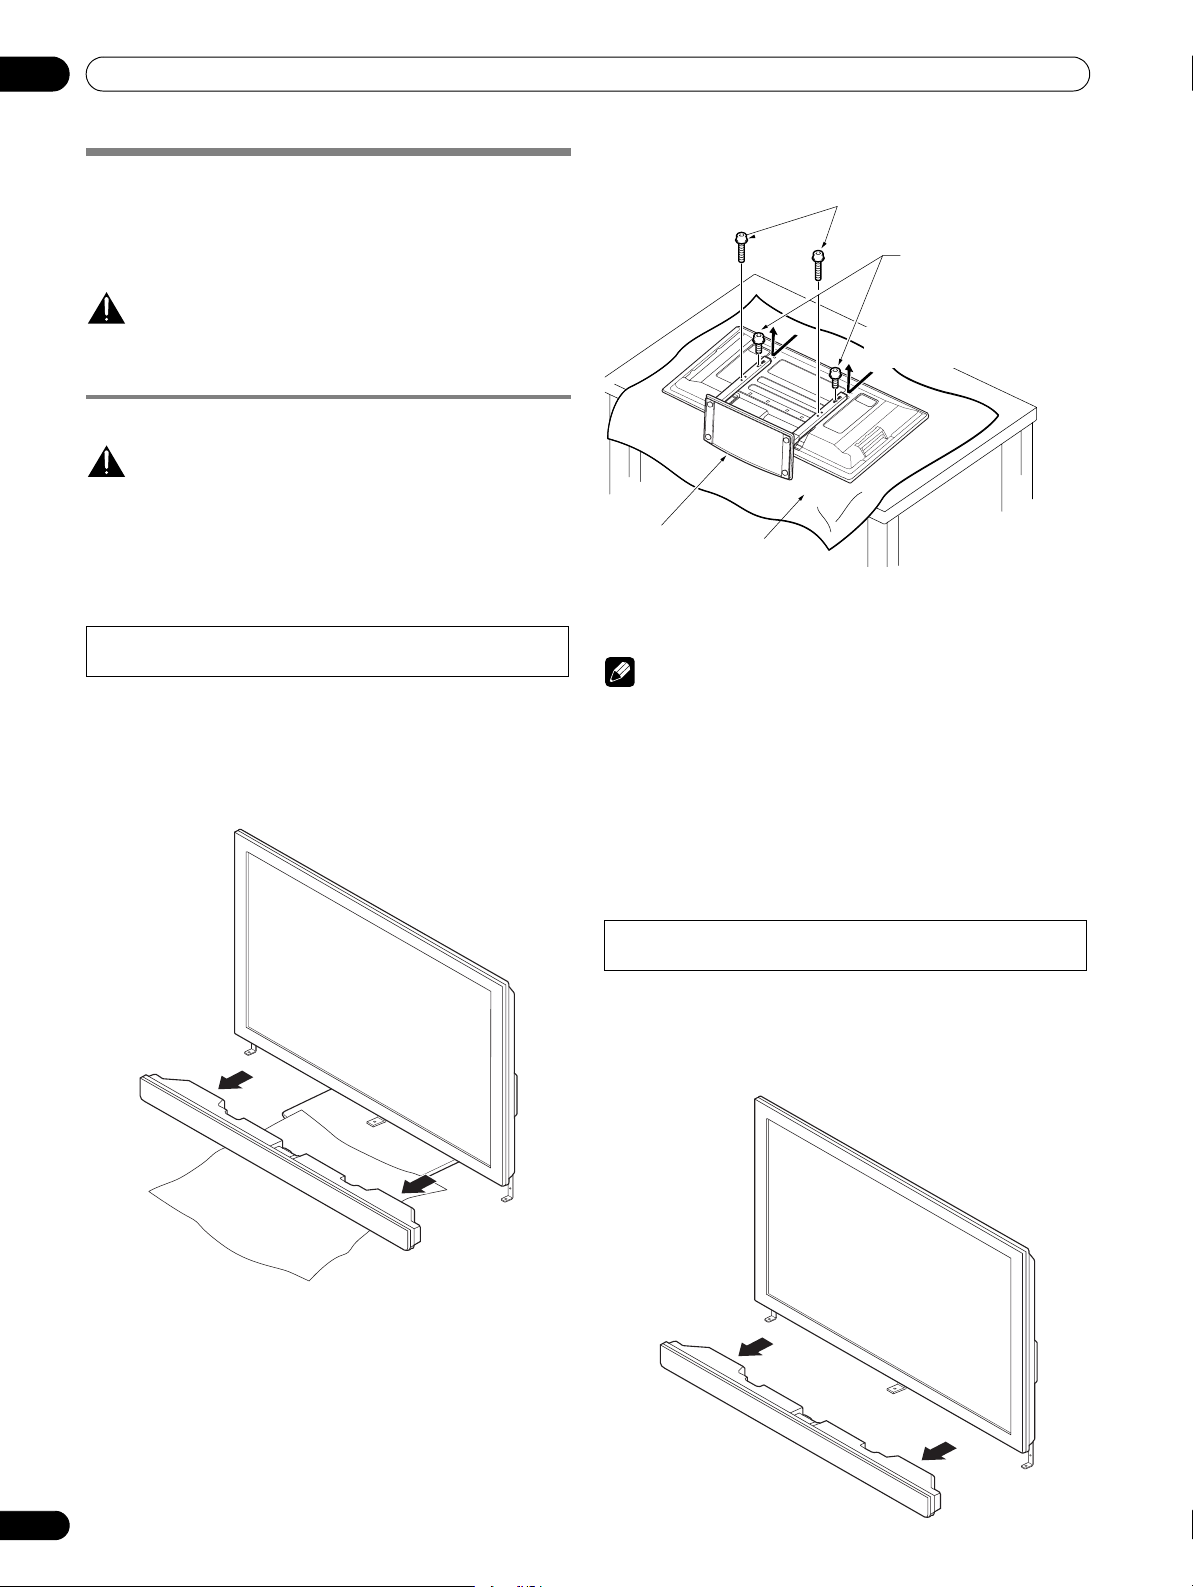
Detaching the stand
When removing the stand before you install the speaker,
begin with step 2.
1 Detach the supplied speaker if it has already been
installed.
• To detach the speaker, remove the cable wiring for the
speaker at the rear and screws at the rear of the speaker
and pull it out.
3 Loosen the two installation bolts ➁ halfway using the
enclosed hexagonal wrench.
Table top stand
Installation bolts
(M8 x 40 mm: black)
Installation bolts ➁
(M8 x 40 mm: black)
(Step 2)
Slide the stand
(Step 3)
Sheet
➀
(Step 1)
4 While holding the stand securely, slide down the two
installation bolts ➁ in the direction indicated by arrows
and remove them.
NOTE
• Make sure to keep the installation bolts ➀ and ➁ that have
been removed as they are re-used when attaching the stand
to the Plasma Display.
• Place a sheet or protective cover to protect the display from
scratches or damage.
• Work only with the Plasma Display lying flat on a table or
similar surface.
• When lying the Plasma Display down, be careful not to
scratch or damage it.
• Use the protective sheet in which the speaker was
wrapped between the speaker and stand.
• Make sure to remove the speaker mounting fittings.
2 With the Plasma Display lying flat, loosen and remove the
two installation bolts ➀ using the enclosed hexagonal
wrench.
Attaching the stand again
When the Plasma Display is mounted without the supplied
speaker, begin with step 2.
1 Detach the supplied speaker when the Plasma Display is
being mounted on the wall, with the speaker attached.
• To detach the speaker, remove the cable wiring for the
speaker at the rear and screws at the bottom of the
speaker and pull it out.
26
En
Page 27
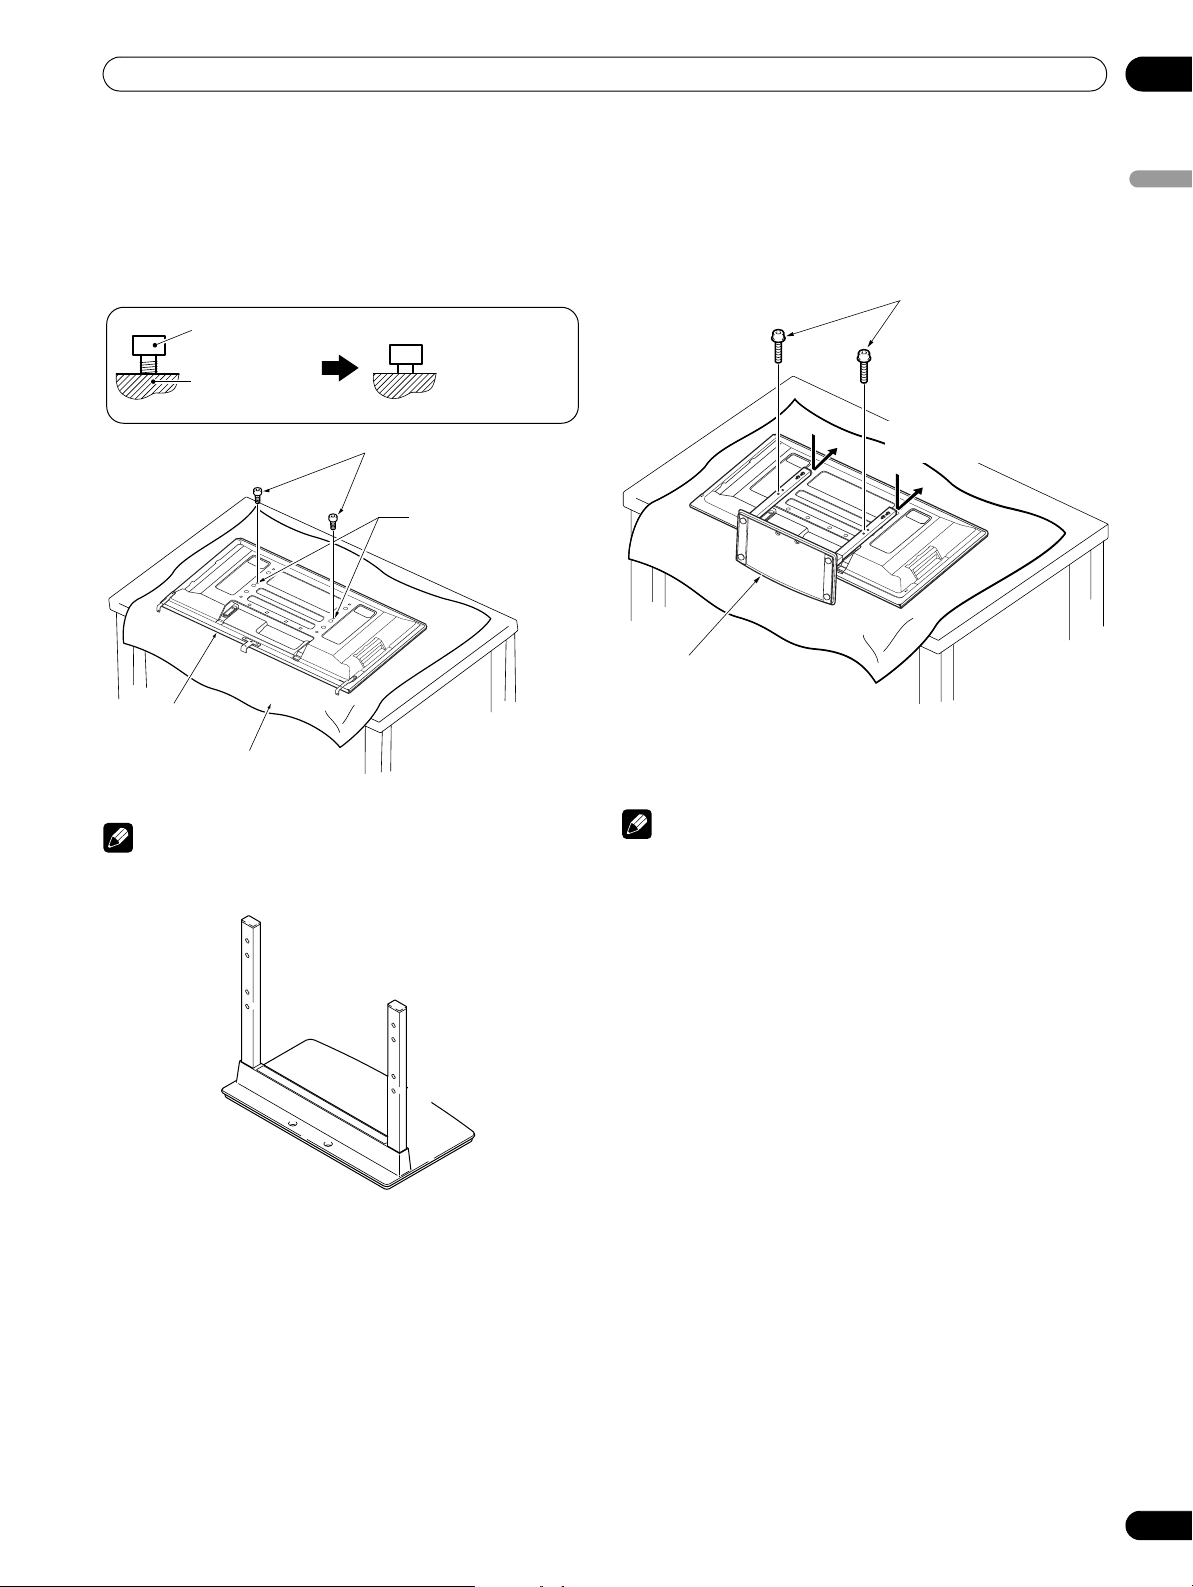
Preparation
05
2 With the Plasma Display lying flat, insert and secure the
two installation bolts ➁ (M8 x 20 mm: black) in the holes
“a” located in center of the Plasma Display housing.
• At this point, tighten these bolts ➁ only until the threads
are no longer visible when viewed from the side (you will
be unable to attach the display if the bolts are screwed
in completely).
Installation
➁
bolt
Plasma Display
housing
Installation bolts
(M8 x 20 mm: black)
Plasma Display
Sheet
• Make sure to remove the speaker mounting fittings.
NOTE
• When lying the Plasma Display down, be careful not to
scratch or damage it.
B
A
B´
A´
Stop screwing
down the bolt
when the
threads are no
longer visible.
➁
Holes “a”
(holes in center of
Plasma Display)
B
A
4 Pass the installation bolts ➀ (M8 x 40 mm: black) through
the stand pipes and tighten the installation bolts firmly
using the enclosed hexagonal wrench. (The holes should
be used in the proper combinations, “B” - “B”).
5 Tighten the installation bolts ➁ firmly using the enclosed
hexagonal wrench.
Installation bolts
(M8 x 40 mm: black)
(Step 4)
Slide the stand
(Step 3)
Table top stand
➀
6 Replace the Plasma Display to stand upright.
• For speaker installation, see “Installing the PIONEER
speaker” on page 20.
NOTE
• Insert the bolts in the holes vertically and do not tighten them
with more force than necessary.
• Place a sheet or protective cover to protect the display from
scratches or damage.
• Work only with the Plasma Display lying flat on a table or
similar surface.
• Move the stand so that the stand screw holes and the nuts
that connect the main display line up correctly.
English
B´
A´
3 As shown in the above figure, hook the stand pipe holes
(pipe “B”) onto the screw heads of the installation bolts ➁,
then slide the stand upwards to the main Plasma Display
until it engages the installation bolts ➁ (once put together
with the display, the stand will slide no more than 19 mm
(3/4 inch)).
27
En
Page 28
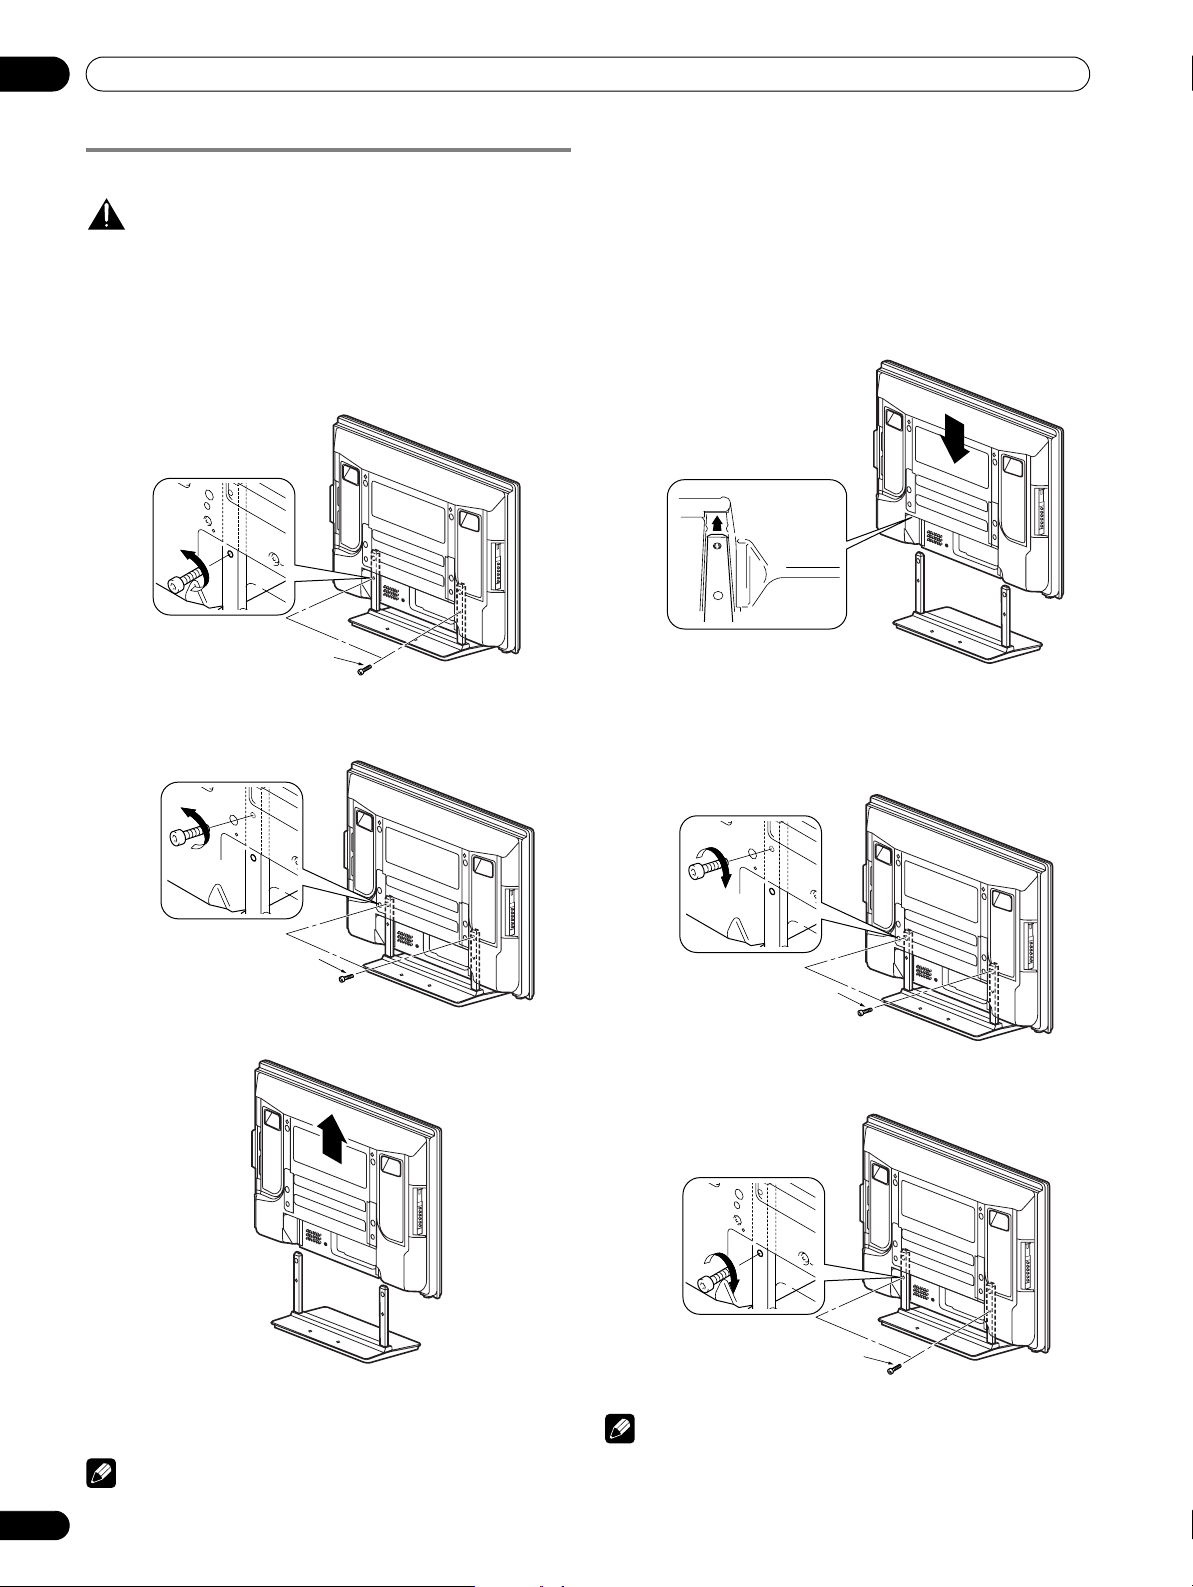
05
Preparation
PDP-4272HD/PDP-4271HD/PDP-4270HD
CAUTION
The weight of a 42 inch Plasma Display is about 29 kg (64 lbs.),
it has no depth, and is unstable. Therefore, at least two people
must assemble and install it.
Detaching the stand
1 Loosen and remove the two installation bolts ➀ using the
enclosed hexagonal wrench.
Installation bolts
(M8 x 30 mm: silver)
➀
2 Loosen and remove the two installation bolts ➁ using the
enclosed hexagonal wrench.
Attaching the stand again
1 Fit the stand’s support columns to the bottom of the
Plasma Display as indicated by arrows, then slowly insert
them vertically.
• Be extremely careful not to insert the support columns
of the stand into any part of the Plasma Display other
than the stand insertion slots. Doing so might damage
the Plasma Display panel or its ports or result in the
warping of the stand.
Line up the column supports with
the bottom of the Plasma Display as
indicated in the accompanying diagram.
2 Attach the Plasma Display at the points indicated by the
arrows and tighten the installation bolts ➁ firmly using the
enclosed hexagonal wrench.
Installation bolts
(M8 x 60 mm: silver)
➁
3 Remove the Plasma Display from the stand.
• Make sure to keep the installation bolts ➀ and ➁ that
have been removed as they are re-used when attaching
the stand to the Plasma Display.
NOTE
• Be sure to install it on a flat, stable location.
28
En
Installation bolts
(M8 x 60 mm: silver)
➁
3 Tighten the installation bolts ➀ firmly using the enclosed
hexagonal wrench.
Installation bolts
(M8 x 30 mm: silver)
NOTE
• Be sure to install it on a flat, stable location.
• Insert the screws in the holes vertically and do not tighten
them with more force than necessary.
➀
Page 29
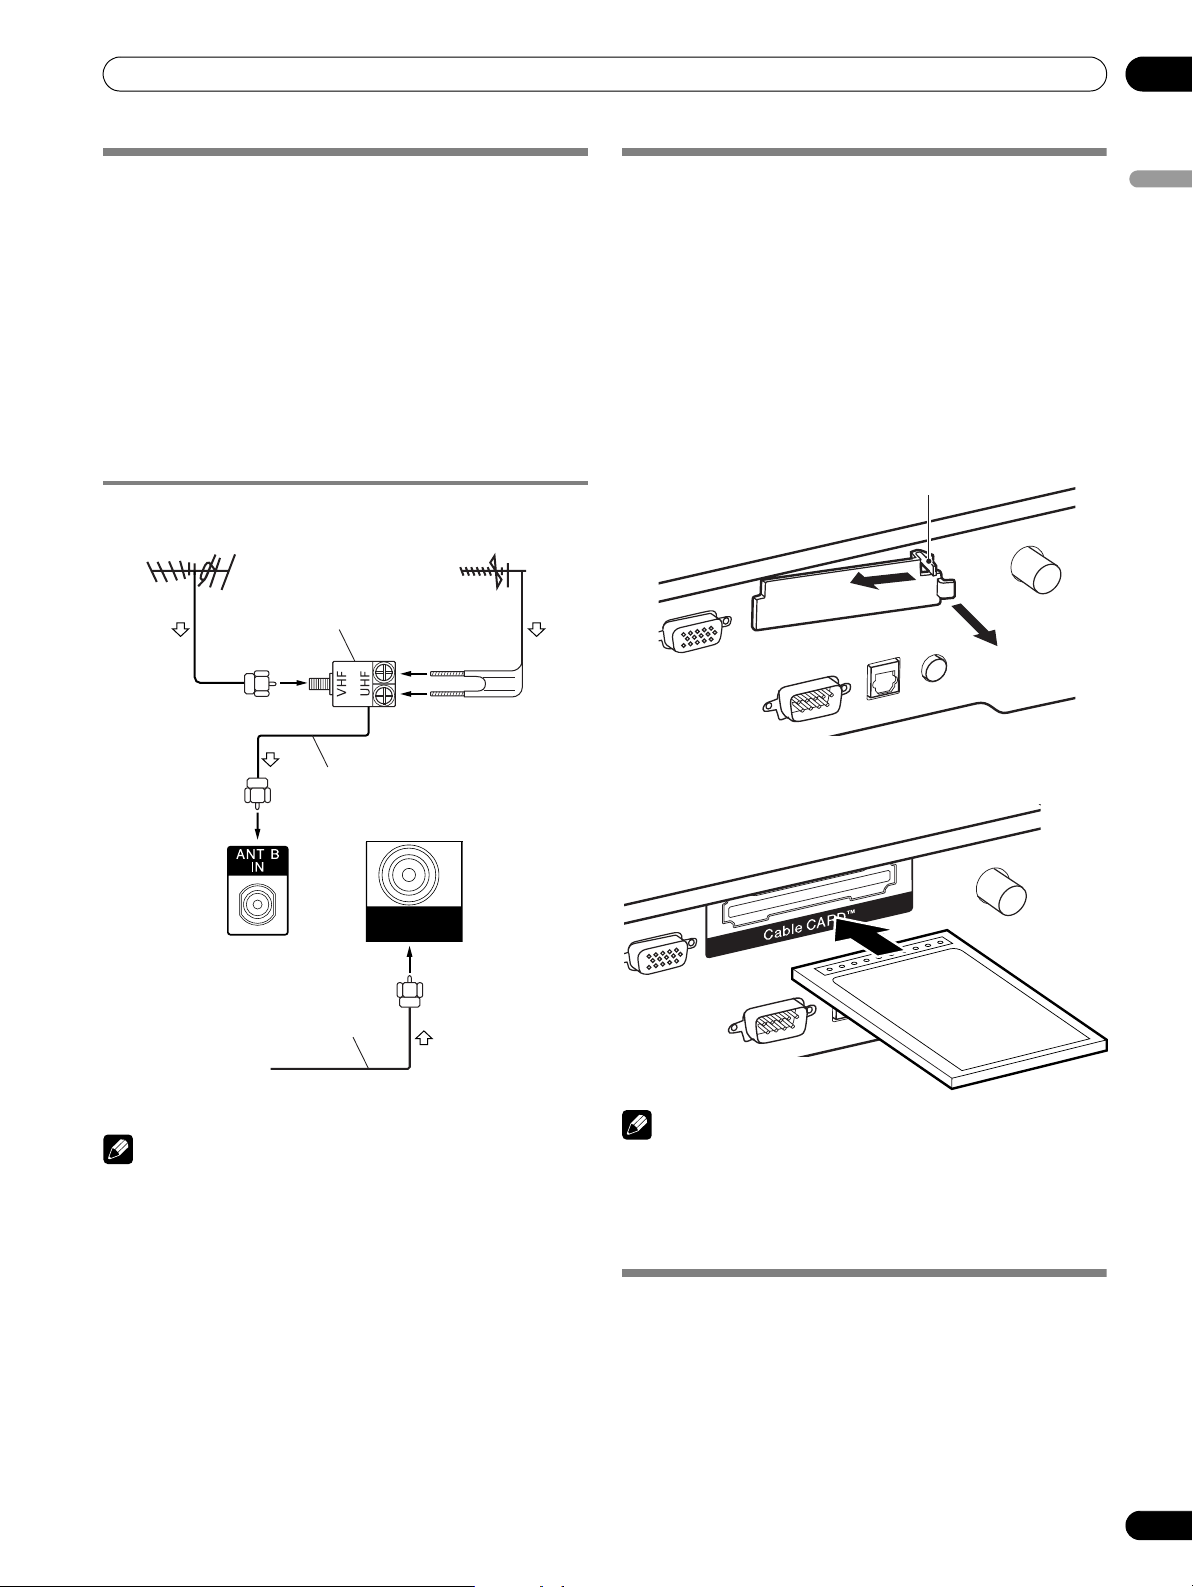
Preparation
05
Cable connections for watching digital
and/or conventional TV channels
This system is equipped with two terminals for inputting TV
broadcasting signals: ANT/CABLE A IN and ANT B IN. The
ANT/CABLE A IN terminal accepts both digital and
conventional TV broadcasting signals while the ANT B IN
terminal accepts only conventional TV broadcasting signals.
When using cable TV to watch digital and/or conventional TV
channels, connect to the ANT/CABLE A IN terminal as shown.
In addition, you may connect an antenna to the ANT B IN
terminal as shown; use an outdoor antenna to enjoy clearer
pictures. If your outdoor antenna uses a 75-ohm coaxial cable
with an F-type connector, plug it into the antenna terminal at
the rear of the Plasma Display.
Connecting VHF/UHF antennas and a Cable
VHF antenna
U/Vmixer
UHF antenna
Inserting the CableCARD™
The Plasma Display is equipped with a slot for inserting a
CableCARD™. When you are watching digital and/or High
Definition TV channels over cable, the card allows you to use
the POD service provided by the cable TV company; the POD
stands for Point of Deployment. This service presents various
types of useful information, using HTML text.
1 Confirm that the ANT/CABLE A IN terminal has been
connected with the coaxial cable from the Cable
Converter.
2 Hold and push the tab of the slot cover on the rear of the
Plasma Display leftward, and remove the cover while
pulling the tab’s latch downward.
(Viewed from below of the
Plasma Display)
1
Tab
2
English
Coaxial
ANT/
CABLE A IN
Plasma Display (rear)
Coaxial
Cable TV
NOTE
• Be sure to connect coaxial cables as shown above. Signal
reception may fail if not properly connected.
• In order to watch cable TV channels, be sure to connect the
cable to the ANT/CABLE A IN terminal.
• The ANT/CABLE A IN and ANT B IN terminals must not
receive the same signals. For example, do not connect a
cable from a cable TV to both the ANT/CABLE A IN and ANT
B IN terminals. Similarly, do not connect a cable from an
antenna to both the ANT/CABLE A IN and ANT B IN
terminals.
• TV Guide may not be available in all areas and is not available
with satellite systems. In addition, as content providers move
to digital programming and broadcasting, TV Guide Data
may be unavailable or become unavailable.
3 Insert the specified CableCARD™ into the Cable CARD
slot as far as it goes.
NOTE
• Be sure to insert only the specified CableCARD™.
• Do not insert a PC card.
• When you use a CableCARD™, you need not execute Auto
Channel Preset; the CableCARD™ automatically generates a
cable channel list.
Switching between antenna A and B
To watch broadcasts via the two antennas, you can select it by
pressing ANT on the remote control unit.
• While watching a broadcast, press ANT to view the image
received from the other antenna.
•Pressing ANT while watching in the 2-screen mode (TV
image and video image) with TV selected will display the TV
image of the other antenna.
•Pressing ANT while watching in the 2-screen mode with two
TV images displayed will not have any effect.
29
En
Page 30
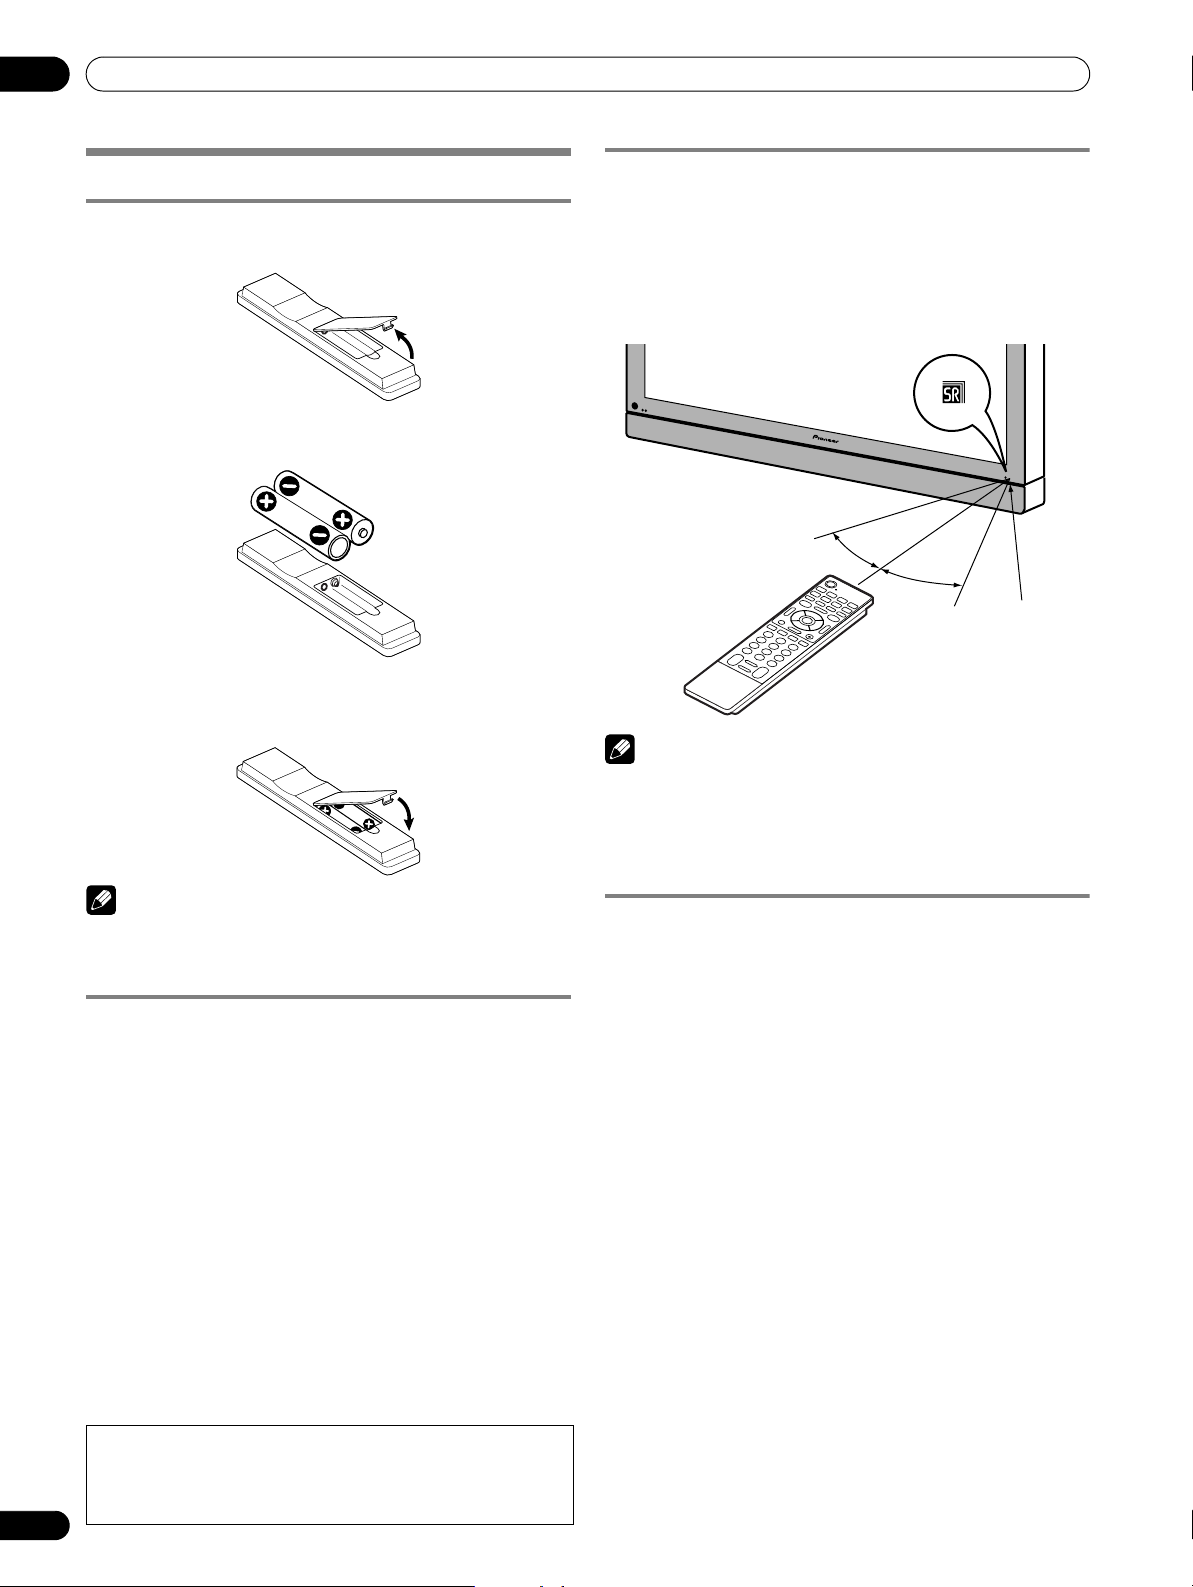
05
Preparation
Preparing the remote control unit
Inserting batteries
1 Open the battery cover.
2 Load the supplied two AA size batteries while inserting
their respective negative polarity (–) ends first.
• The battery polarities must correspond with the (+) and
(–) indicators in the battery compartment.
3 Close the battery cover.
Allowed operation range of the remote control
unit
Operate the remote control unit (both main and simplified)
while pointing it toward the remote control sensor located at
the bottom right of the front panel of the Plasma Display. The
distance from the remote control sensor must be within 7 m
(23 feet) and the angle relative to the sensor must be within 30
degrees in the right or left direction.
7 m
30º
NOTE
• With the PDP-4272HD/PDP-4271HD/PDP-4270HD, the SR
logo is located at the lower right on the speaker but the
location of the remote control sensor is the same as with the
PDP-6072HD/PDP-6071HD/PDP-6070HD/PDP-5072HD/
PDP-5071HD/PDP-5070HD.
(23 feet)
30º
Remote control
sensor
NOTE
As with the simplified remote control unit, the method for
inserting batteries is the same except the type of batteries (two
AAA size).
Cautions regarding batteries
• The remote control unit cannot operate the system if the
batteries in the unit are weak. When this happens, replace
the batteries with new ones.
• When you replace the batteries, use alkaline batteries for the
main remote control unit and manganese batteries for the
simplified remote control unit.
• Do not mix batteries of different types. Different types of
batteries have different characteristics.
• Do not mix old and new batteries. Mixing old and new
batteries can shorten the life of new batteries or cause
chemical leakage in old batteries.
• Do not leave dead batteries in the remote control unit;
chemical leakage will occur. If you find any chemical
leakage, wipe thoroughly with a cloth.
• The batteries supplied with this product may have a shorter
life expectancy due to storage conditions.
• If you will not use the remote control unit for an extended
period of time, remove the batteries from it.
Battery disposal
When disposing of used batteries, please comply with
governmental regulations or environmental public
institution’s rules that apply in your country/area.
30
En
Cautions regarding the remote control unit
• Do not expose the remote control unit to shock, liquid, or
high humidity.
• Do not place the remote control unit under direct sunlight;
the unit may deform.
• The remote control unit may not work properly if the remote
sensor window of the Plasma Display is under direct
sunlight or strong lighting. In such case, change the angle of
the lighting or Plasma Display, or operate the remote control
unit closer to the remote sensor window.
• When any obstacle exists between the remote control unit
and the remote control sensor, the remote control unit may
not function.
• As the batteries become weak, the remote control unit can
function within a shorter distance from the remote control
sensor. Replace the batteries with new ones if necessary.
• The Plasma Display emits very weak infrared rays from its
screen. If you place such equipment operated through
infrared remote control as a VCR nearby, that equipment
may not receive commands from its remote control unit
properly or entirely. If this is the case, place that equipment
at a location far enough from the Plasma Display.
• Depending on the installation environment, infrared rays
from the Plasma Display may not allow this system to
properly receive commands from the remote control unit or
may shorten allowable distances between the remote
control unit and the remote control sensor. The strength of
infrared rays emitted from the screen differs, depending on
images displayed on the screen.
Page 31

Preparation
Connecting the power cord
Connect the power cord after all component connections have been completed.
Plasma Display (rear view)
AC IN terminal is located on the
upper edge of the compartment.
05
English
Power cord
Noise filter
Partially eliminates noise
caused by the power source.
CAUTION
• Use only the supplied power cord.
• Be sure to use the specified power supply voltage;
neglecting this can result in fire or electric shock.
• For the Plasma Display System, a three-core power
cord with a ground terminal is used for efficient
protection. Always connect the power cord to a
three-pronged outlet and make sure that the cord
is properly grounded.
NOTE
• Always turn off the power of the Plasma Display when
connecting or disconnecting power cords.
• Disconnect the power cord from the power outlet when the
Plasma Display System is not going to be used for a long
period of time.
Routing cables
When the speaker is installed under the display panel of the PDP-5072HD/PDP-5071HD/PDP-5070HD:
Rear view
Speaker cable
Bead band
Attaching speed clamps to the main unit
Attach the speed clamps using any of the 4 holes you prefer (50
inches, 3 holes; 42 inches, 2 holes) marked with below,
depending on your routing system.
for PDP-6072HD/PDP-6071HD/PDP-6070HD
for PDP-5072HD/PDP-5071HD/PDP-5070HD
for PDP-4272HD/PDP-4271HD/PDP-4270HD
Attaching and removing speed clamps
Insert [1] into an appropriate hole on the rear of the Plasma
Display and snap [2] into the back of [1] to lock the clamp.
Speed clamps are designed to be difficult to undo once in
place. Please attach them carefully.
Use pliers to twist the clamp 90º, pulling outward. The clamp
may deteriorate over time and become damaged if removed.
2
1
NOTE
• Use the supplied bead bands and speed clamps as
necessary.
• When tidying up your speaker cables, make sure to bundle
them so that they are not subjected to any pressure.
31
En
Page 32

06
Basic Operations
Basic Operations
Turning on the power
(from standby mode)
1 Press a POWER on the Plasma Display if the POWER ON
and STANDBY indicators are off.
• The STANDBY indicator on the Plasma Display lights up
red.
2 Confirm that the STANDBY indicator lights up red, and
then press TV a on the remote control unit or STANDBY/
ON on the Plasma Display to turn the system on.
• The POWER ON indicator on the Plasma Display lights
up blue.
Turning off the power
(to standby mode)
1 Press TV a on the remote control unit or STANDBY/ON
on the Plasma Display.
• The system enters the standby mode and the image on
the screen disappears.
•The STANDBY indicator lights up red.
• This will allow the system to automatically receive digital
TV program information while in the standby mode.
NOTE
• If you are not going to use this system for a long period of
time, remove the power cord from the power outlet.
Plasma Display
(PDP-6072HD/PDP-6071HD/PDP-6070HD)
POWER
button
POWER ON indicator
STANDBY indicator
REC TIMERSTANDBYONPOWER
REC TIMER indicator
(PDP-5072HD/PDP-5071HD/PDP-5070HD)
POWER
POWER
ON STANDBY
button
POWER ON indicator
STANDBY indicator
Plasma Display status indicators
The table below shows the operational status of the Plasma
Display System. You can check the current status of the system
with the indicators on the Plasma Display.
Indicator
Status
POWER ON STANDBY
The power cord of the Plasma Display has
been disconnected or the POWER button
on the Plasma Display is off.
Power to the system is on.
The system is in the standby mode.
For other than the above, see “Troubleshooting”on page 91.
System Status
CAUTION
• While the POWER ON and STANDBY indicators are off, the
system cannot be placed into the power-on mode even when
TV a or STANDBY/ON button is pressed. Make sure to
press POWER and see if the standby indicator lights up red.
• The Plasma Display System will still consume some power
as long as the power cord is inserted into the power outlet.
(PDP-4272HD/PDP-4271HD/PDP-4270HD)
POWER ON
indicator
STANDBY
REC TIMERON STANDBY
Viewed from below of the display (left).
STANDBY/ON
button
indicator
POWER
button
32
En
(Right side view)
Page 33

Basic Operations
06
Watching TV channels
Unless you set up TV channels that you can watch under the
current conditions, you cannot tune in those channels. For the
procedure, see “Setting up TV channels” on page 43.
NOTE
• When watching a digital TV program, you may see
emergency alert messages scrolling at the top of the screen.
Those messages are broadcasted by TV stations as
necessary when in emergency situations.
Selecting the antenna
After confirming that the Mode switch on the remote control
unit has been set to “TV”, press ANT on the remote control unit
to select antenna A or B.
• Make this selection depending on the connections to the
antenna input terminals at the rear of the Plasma Display
(page 29).
Changing channels
To increase the channel number, press CH + on the remote
control unit. To decrease the channel number, press CH –.
• CHANNEL +/– on the Plasma Display operates the same as
CH +/– on the remote control unit.
•Press CH RETURN to switch the currently tuned channel to
the previously tuned channel.
Press CH RETURN again to restore the currently tuned
channel.
Plasma Display (right side view)
English
CHANNEL +/–
Using 0 – 9 and • (dot) on the remote control unit
Select channels directly by pressing buttons 0 to 9. To select
subchannels, also use the • (dot) button.
EXAMPLE
• To select channel 5 (1-digit channel), press 5.
• To select channel 25 (2-digit channel), press 2 then 5.
• To select channel 125 (3-digit channel), press 1, 2, then 5.
• To select subchannel 10.01, press 1, 0, • (dot), 0, then 1.
• To select subchannel 10.001 (for cable TV), press 1, 0,
• (dot), 0, 0, then 1.
NOTE
• After entering a channel or subchannel number, you may
press CH ENTER to tune in the channel more quickly.
• Each time you change a channel, a channel banner appears
that shows information about the currently selected
channel. To clear the channel banner, press INFO.
• If you do not setup the TV Guide On Screen™ system, the
channel banner may not display certain types of program
information.
Channel banner
12:33pm
DTV 2 • 1002.102 A
XXXXXXXXXX
12:30pm — 2:00pm
XXX
33
En
Page 34

06
Basic Operations
Changing the volume and sound
To increase the volume, press VOL + on the remote control
unit. To decrease the volume, press VOL –.
• VOLUME +/– on the Plasma Display operates the same as
VOL +/– on the remote control unit.
• To mute the sound output, press MUTING. “ ” appears on
the screen. To quit muting, press MUTING again. Pressing
VOL + also quits muting.
Plasma Display (right side view)
VOLUME +/–
Changing the language
If you have selected a digital TV program that provides multilanguage services, you can switch among the languages by
pressing MTS on the remote control unit.
Each time you press MTS, the language switches.
NOTE
• Switchable languages differ depending on the current
broadcast.
• If the language selected through language setting is
available when the channel or program is changed, you will
hear that language.
• If you are watching a digital TV program without sound or
language information, “N/A” appears on the screen. With a
language other than English, French, and Spanish are
selected, “Others” will appear.
Volume adjustment display
Muting display
34
En
Page 35

Basic Operations
06
Setting MTS/SAP mode
When watching conventional TV programs, you may enjoy
stereo sound and/or Secondary Audio Programs (SAP), using
the Multi-channel Television Sound (MTS) function.
• Stereo broadcasts
You can enjoy, for example, sports, shows, and concerts in
dynamic stereo sound.
• SAP broadcasts
MAIN sound: The normal program soundtrack (either in
mono or stereo).
SAP sound: Listen to second language, supplementary
commentary and other information. (SAP is mono sound.)
NOTE
• Conventional TV channels in this manual designate TV
channels that are received through the conventional VHF/
UHF frequencies or conventional cable TV channels.
• When stereo sound is difficult to hear, you may manually
switch to the MONO mode to obtain clearer sound.
• Once the MONO mode is selected, the Plasma Display
System sound remains mono even if the system receives a
stereo broadcast. You must reselect the STEREO mode if you
want to hear stereo sound again.
• Selecting MTS while the input source is INPUT 1 to 6 or PC
does not change the type of sound. In this case, sound is
determined by the video source.
When receiving STEREO sound signals
A 125
STEREO
A 125
STEREO
A 125
MONO
In STEREO mode
In SAP mode
In MONO mode
When receiving MONO + SAP sound signals
A 125
MONO (SAP)
A 125
SAP (MAIN)
A 125
MONO (SAP)
In STEREO mode
In SAP mode
In MONO mode
English
Each time you press MTS, MTS toggles as shown below.
STEREO mode
STEREO
SAP mode
SAP
MONO mode
MONO
NOTE
•The MTS button is disabled while the TV Guide On Screen™
system is displayed.
• In each of the MTS/SAP modes selected, the display
changes depend on broadcast signals being received.
When receiving STEREO + SAP sound signals
A 125
STEREO (SAP)
A 125
SAP (STEREO)
A 125
MONO (SAP)
In STEREO mode
In SAP mode
In MONO mode
When receiving MONO sound signals
A 125
MONO
A 125
MAIN
A 125
MONO
In STEREO mode
In SAP mode
In MONO mode
35
En
Page 36

06
Basic Operations
Viewing a channel banner
While watching a TV program, pressing INFO causes the
following banner to appear. Pressing INFO again causes the
banner to disappear.
2
1
12:33pm
DTV 2 • 1002.102 A
XXXXXXXXXX
12:30pm — 2:00pm
5
6 7 8
3
XXX
4
1 Station name
2 Current time
3 Channel number
4 Input (Ant. A or Ant. B)
5 Program title
6 Program time schedule
7 Channel logo
8 TV rating name or icon
Using the multiscreen functions
Splitting the screen
Use the following procedure to select the 2-screen or picturein-picture mode.
2-screen
Picture-in-picture
NOTE
• The above information is not displayed if not included in
broadcast signals.
• If you do not setup the TV Guide On Screen™ system, the
channel banner may not display certain types of program
information.
Using the POD service
If you have watched digital and/or High Definition TV channels
over cable, you can use the POD service provided by the cable
TV company. This service presents various types of useful
information, using HTML text.
1 Press SPLIT to select the display mode.
• Each time you press SPLIT, the display mode is switched
among 2-screen, picture-in-picture, and single-screen.
Press HOME MENU, 9, 9, then 9 to view the POD display.
36
En
Page 37

Basic Operations
06
• In 2-screen or picture-in-picture mode, press SWAP to
switch the position of the 2 screens shown.
Left screen is the active screen which will be indicated
by “ ”. The user is allowed to operate picture and
sound.
• In 2-screen mode, press SCREEN SIZE to change the size
of the left screen.
• In picture-in-picture mode, press SHIFT to move the
position of the small screen in anti-clockwise.
Freezing images
Use the following procedure to capture and freeze one frame
from a moving image that you are watching.
Moving image Still image
English
2 To select the desired input source, press the appropriate
input source button.
• If watching TV programs, press CH +/– to change the
channel.
NOTE
•The SPLIT button is disabled while the TV Guide On Screen™
system is displayed.
• The multiscreen function cannot display images from the
same input source or two external input sources at the same
time. If you make such an attempt, a warning message
appears.
• When you press HOME MENU, the single-screen mode is
restored and the corresponding menu is displayed.
• When the two screens show the same analog broadcasting
coming through antenna A and B, the picture quality may
differ between the two screens.
• If you select 19201080p@24Hz for the main screen in the
SPLIT mode, video images may not be displayed properly
because of the system’s capability.
• Displaying pictures in multi-screen mode for an extended
period may cause an after-image.
1 Press FREEZE.
• A still image appears on the right screen while a moving
image is shown on the left screen.
2 Press FREEZE again to cancel the function.
NOTE
• With the screen split, any image cannot be frozen.
• When you try to use this function when it is not available, a
warning message appears.
• Image FREEZE is canceled automatically if you do not
perform any operation for five minutes.
• Displaying pictures in FREEZE mode for an extended period
may cause an after-image.
37
En
Page 38

07
TV Guide On Screen™ System Setup
TV Guide On Screen™ System Setup
About the TV Guide On Screen™ system
The TV Guide On Screen™ system is a free, interactive onscreen television program guide. The system offers program
listings, searching by keyword, timer recording, reminders and
more. The TV Guide On Screen™ system is a convenient way to
find out what’s on right now or during the coming week, by
channel or by genre. It also allows you to automatically set your
viewing and recording selections quickly and easily.
Before you can start using the TV Guide On Screen™ system,
you’ll need to set it up.
Legal Notices
In the United States, TV GUIDE and other related marks are registered
marks of Gemstar-TV Guide International, Inc. and/or one of its affiliates.
In Canada, TV GUIDE is a registered mark of Transcontinental, Inc. and is
used under license by Gemstar-TV Guide International, Inc.
NOTE
• The TV Guide On Screen™ interactive program guide
provides listings for cable-ready and digital cable services as
well as over-the-air broadcast. It does not provide listings for
satellite services.
• Depending on the current settings and selected items, the
order of the setup screens may differ from the one given in
this manual. Follow the instructions shown on the screens.
• TV Guide may not be available in all areas. As content
providers move to digital programming and broadcasting, TV
Guide data may be unavailable or become unavailable.
Reminder Screen
If you previously skipped Guide setup, you see the Reminder
Screen when you power on your TV.
To make a selection, press / to highlight an option, and
press ENTER.
• “Set up TV Guide On Screen now” displays Screen 1.
• “Remind me to set it up later” returns you to watching TV.
• “Don’t remind me again” returns you to watching TV and
stops the reminder screen from appearing upon power on.
NOTE
• If you decide not to set up the Guide now, this reminder
screen will appear each time you power on the TV (except if
you selected “Don’t remind me again”).
Setting up the TV Guide On Screen™
system
When the Plasma Display System is powered on for the very
first time, you are automatically taken through the setup
process. Immediately thereafter the TV Guide On Screen™
setup process begins, starting with the Welcome Screen.
Setup may be accessed from the initial Setup reminder
screens, or by pressing TV GUIDE for a device in which TV
Guide On Screen™ has not yet been setup.
NOTE
• Once you set up the TV Guide On Screen™ system it may
take up to 24 hours to begin to receive TV program listings.
Receipt of all eight days of listings may take up to one week
(see Screen 7).
Welcome Screen
Initial TV set up leads you to the Welcome screen.
Or press TV GUIDE to begin setup.
• The Welcome Screen lists features in the Guide.
•Press ENTER to display Screen 1 (shown on the right column
of this page).
System Setup Screens
NOTE
• Once you start the setup procedure, you cannot return to the
previous screens. If you realize you entered incorrect
information, continue with setup. The last screen of the
procedure gives you the opportunity to correct any mistakes
before you exit setup.
Screen 1: Country
• This screen asks you the location of your TV.
• Press / to highlight a country.
•Press ENTER to display Screen 2.
38
En
Page 39

TV Guide On Screen™ System Setup
07
Screen 2: Enter ZIP or Postal Code
• If you selected USA in Screen 1, you see the ZIP Code screen.
• Input ZIP Code by either
• pressing the number keys or
• pressing / to display a number, and then / to
move to another field.
•Press ENTER to display Screen 3.
• If you selected Canada in Screen 1, you see the Postal Code
screen.
• Input Postal Code by pressing / to display a character or
number and then / to move to another field.
•Press ENTER to display Screen 3.
Screen 3: Do you have Cable?
• If you select “Yes”, you see Screen 4.
• If you select “No”, you see Screen 5.
Screen 5: Do you have an antenna connected?
• If you select “Yes”, you see Screen 6. (Depending on your
setup configuration, you may see an additional screen. After
that screen, you see Screen 6.)
• If you select “No”, you see Screen 6.
NOTE
• If you selected “No” in Screen 3 then you must select “Yes” in
this screen to receive a channel lineup and listings.
If you select “Yes”, depending on your setup configuration,
you may see an additional screen. After that screen, you see
Screen 6.
Screen 6: Are the settings correct?
• If you select “Yes”, you see Screen 7.
• If you select “No”, you see Screen 1.
English
Screen 4: Which input terminal is the system plugged
into?
• Select “ANT/CABLE A IN” or “ANT B IN” and you see Screen
5.
Screen 7: Congratulations
•Press ENTER to display Screen 8.
39
En
Page 40

07
TV Guide On Screen™ System Setup
Screen 8: Is a VCR Connected?
• If you select “Yes”, you see Screen 9.
• If you select “No”, you see Screen 14.
Screen 9: VCR Configuration Diagram
• This screen shows the correct way to install the G-LINK cable
from the back of the device to the recording device. Make
sure the G-LINK cable is properly installed.
•Press ENTER, and you see Screen 10.
Screen 11: VCR Preparation
• Follow the on-screen instructions, and press ENTER to
display Screen 12.
Screen 12: VCR Code Testing
• When testing is done, Screen 13 displays automatically.
Screen 10: VCR Brand Name
• Press / to select the brand of the recording device.
•Press ENTER, and you see Screen 11.
Screen 13: Did your VCR stop playing?
• If you select “Yes”, you see Screen 14.
• If you select “No”, a different code is tested in Screen 12.
NOTE
• Many VCRs require testing more than one code.
If you select “Test this code again”, the same code is tested
again in Screen 12.
40
En
Page 41

TV Guide On Screen™ System Setup
Screen 14: Confirming Your Settings
Verify the Setup information is correct.
• If it is, select “Yes, end setup”, and you see Screen 15.
• If it is not, select “No, repeat setup process”, and you see
Screen 1.
Screen 15: Congratulations
• You have successfully completed Setup!
•Press ENTER and you see Screen 16.
07
English
Screen 16: Helpful Information
• This screen tells you valuable information on using your
Guide.
•Press ENTER to watch TV.
41
En
Page 42

08
Menu Setup
Menu Setup
Menu Configuration
AV mode menus
Home Menu Item Page
Picture AV Selection 63
Contrast 64
Brightness 64
Color 64
Tint 64
Sharpness 64
Pro Adjust 64
Reset 64
Sound Treble 66
Bass 66
Balance 66
Reset 66
FOCUS 66
Front Surround 66
PC mode menus
Home Menu Item Page
Picture AV Selection 63
Contrast 64
Brightness 64
Red 64
Green 64
Blue 64
Reset 64
Sound Treble 66
Bass 66
Balance 66
Reset 66
FOCUS 66
Front Surround 66
Power Control Energy Save 67
Power Management 67
Sleep Timer 63
Power Control Energy Save 67
No Signal off 67
No Operation off 67
Sleep Timer 63
Option Position 68
Auto Size 70
4:3 Mode 70
Side Mask 70
HDMI Input 72
Monitor Out 73, 74
Digital Audio Out 75
Language 70
Tuner Setup Parental Control 44 – 48
Favorites 49
Channel Setup 43
Closed Captions 49 – 50
Clock 50
Home Gallery 78 – 80
Option Auto Setup 68
Manual Setup 68
Home Gallery 78 – 80
Menu operations
The following describes the typical procedure for setting up the
menus. For the actual procedures, see the appropriate pages
that describe individual functions.
1 Press HOME MENU.
2 Press / to select a menu item, and then press ENTER.
3 Repeat step 2 until you access the desired submenu item.
• The number of menu layers differs depending on the
menu items.
• If you select “Tuner Setup”, a menu bar appears at the
bottom of the screen. To select a submenu item on the
bar, press / instead of / .
4 Press / to select an option (or parameter), and then
press ENTER.
• For some menu items, press / instead of / .
5 Press HOME MENU to exit the menu.
42
En
NOTE
• You can return to the upper menu levels by pressing
RETURN.
Page 43

Tuner Setup
Tuner Setup
Setting up TV channels
This section describes how to search and set up TV channels
that you can watch under the current conditions. Unless you
set up TV channels using Auto Channel Preset, you may not be
able to tune in those channels.
Using Auto Channel Preset
Auto Channel Preset automatically searches and sets up TV
channels.
1 Press HOME MENU.
2 Select “Tuner Setup”. ( / then ENTER)
3 Select “Channel Setup”. ( / then ENTER)
4 Select “Ant. A” or “Ant. B”. ( / then ENTER)
5 Select “Auto Channel Preset”. ( / then ENTER)
6 Select “Air” or “Cable”. ( / then ENTER)
Channel Setup
Ant. A
Ant. A Auto Channel Preset
Enter
Begin Preset
• Channel search automatically starts.
Channel Setup
Ant. A Auto Ch. Preset
Ant. A Auto Channel Preset
• To quit Auto Channel Preset halfway, press D.
7 After Auto Channel Preset has been finished, press HOME
MENU to exit the menu.
NOTE
• When using the Cable Converter, you may need to manually
add Cable Converter output channels.
• When an inserted CableCARD™ is functioning, you can
execute Auto Channel Preset by selecting “Ant.B” in step 4.
Setting for skipping unwanted channels
From among TV channels searched and set up using Auto
Channel Preset, you can select channels to be skipped when
CH+/- are operated.
1 Press HOME MENU.
2 Select “Tuner Setup”. ( / then ENTER)
3 Select “Channel Setup”. ( / then ENTER)
4 Select “Ant. A” or “Ant. B”. ( / then ENTER)
5 Select “Channel Keep/Skip”. ( / then ENTER)
6 Select a channel to be skipped. ( / then ENTER)
Auto Ch. Preset
• Cable
D
Cancel
Air
Cable
Cable
2.0
4.0
Cancel
6.0
D
Cable
One Moment Please …
xxxxxxxxxxxxxxxxxxxxx
xxxxxxxxxxxxxxxxxxxxx
xxxxxxxxxxxxxxxxxxxxx
Home Menu
Exit
xxxxxxxxxxxxxxxx
xxxxxxxxxxxxxxxx
xxxxxxxxxxxxxxxx
Home Menu
Exit
• For the skipped channel, a check mark disappears.
7 Press HOME MENU to exit the menu.
NOTE
• To restore skipped channels, use the above procedure
except that you select a skipped channel in step 6.
• When using the Cable Converter, you may need to manually
add Cable Converter output channels.
Setting up TV channels manually
This section describes how to manually set up TV channels that
have not been set up by Auto Channel Preset.
1 Press HOME MENU.
2 Select “Tuner Setup”. ( / then ENTER)
3 Select “Channel Setup”. ( / then ENTER)
4 Select “Ant. A” or “Ant. B”. ( / then ENTER)
5 Select “Add Channel”. ( / then ENTER)
6 Select a channel number to be added. ( / then ENTER)
• You can also use buttons 0 – 9 to enter a channel
number.
Channel Setup Ant. A
Ant. A Add Channel
Add Channel
000
1
xxxxxxxxxxxxxxxxxxxxx
xxxxxxxxxxxxxxxxxxxxx
xxxxxxxxxxxxxxxxxxxxx
Home Menu
Exit
•After ENTER has been pressed, a confirmation screen
appears.
7 Press A to complete the setup process.
8 Press HOME MENU to exit the menu.
NOTE
• Adding channels manually is for adding analog channels
only. Digital channels cannot be added.
Checking signal strength
When you have selected antenna A, you can check the current
channel’s signal strength. You may use this function when
receiving a channel through a VHF/UHF antenna.
1 Press HOME MENU.
2 Select “Tuner Setup”. ( / then ENTER)
3 Select “Channel Setup”. ( / then ENTER)
4 Select “Ant. A”. ( / then ENTER)
5 Select “Signal Strength”. ( / then ENTER)
Channel Setup
Ant. A
Ant. A
Signal Strength
Signal Strength
Maximum: 100
Current: 100
xxxxxxxxxxxxxxxxxxxxx
xxxxxxxxxxxxxxxxxxxxx
xxxxxxxxxxxxxxxxxxxxx
Home Menu
Exit
09
English
Channel Setup Ant. A
Ant. A Channel Keep/Skip
Channel Keep/Skip
2.0
4.0
6.0
xxxxxxxxxxxxxxxxxxxxx
xxxxxxxxxxxxxxxxxxxxx
xxxxxxxxxxxxxxxxxxxxx
Home Menu
Exit
• Adjust the direction of the antenna so that the current
signal strength reaches as close to the maximum signal
strength as possible.
6 Press HOME MENU to exit the menu.
43
En
Page 44

09
Tuner Setup
NOTE
• This function is available only when receiving digital
broadcasting signals over air.
• When you use the TV Guide On Screen™ system with a cable
service, select “Cable” for “Auto Channel Preset”.
• Executing more than one scan for cables will result in
broadcasting reception failures.
Checking the CableCARD™ ID
The Plasma Display has a slot for a CableCARD™ that is used
for managing your information by the cable TV company. You
will locate the CableCARD™ slot on the rear of the Plasma
Display. The following procedure allows you to check your
CableCARD™ ID and the Host ID.
1 Press HOME MENU.
2 Select “Tuner Setup”. ( / then ENTER)
3 Select “Channel Setup”. ( / then ENTER)
4 Select “POD ID”. ( / )
• The Host ID and CableCARD™ ID appear.
5 Press HOME MENU to exit the menu.
Parental Control
With the Parental Control, parents can prevent their children
from watching inappropriate TV programs, VCR or DVD
contents. When an attempt is made to watch a program (or
content) blocked by parents, the Plasma Display shows
nothing but a message. The Parental Control functions for both
conventional and digital TV channels.
In the U.S. three rating systems have been provided: the TV
ratings, TV Parental Guidelines, and movie ratings. Movie
ratings are provided by the Motion Picture Association of
America (MPAA) and are used for original movies not edited
for television.
For the rating system in Canada, see page 46.
Voluntary movie rating system (MPAA)
Rating Description
N/A Not applicable for MPAA ratings
G General audiences. All ages admitted.
PG Parental guidance suggested. Some material may
PG-13 Parents strongly cautioned. Some material may be
Age-Base
R Restricted. Under 17 requires accompanying
NC-17 No one 17 and under admitted.
NR Not rated.
not be suitable for children.
inappropriate for children under 13.
parent or adult guardian (age varies in some
jurisdictions).
NOTE
• The voluntary movie rating system only uses an age-based
rating.
TV ratings
Rating Description
TV-Y All children
TV-Y7 Children 7 and above
Age-Base
TV-G General audiences
TV-PG Parental guidance suggested
TV-14 Parents strongly cautioned
TV-MA Mature audiences only
NOTE
• The system also allows you to select “None”, which blocks
programs with a rating of “None”. For the examples of such
programs, see “NOTE” on the left column on this page.
NOTE
• In the U.S. TV Parental Guideline Rating System, programs
with a rating of “None” may be blocked on this product.
Examples of programs with a “None” rating include:
• Emergency Bulletins (such as EAS messages, weather
warning and others)
• Locally originated programming
•News
•Political
• Public Service Announcements
•Religious
• Sports
• Weather
• No Parental Control settings can be entered for INPUT 5 and
INPUT 6.
44
En
Changing the password
Using a password prevents other persons from changing
Parental Control settings. A default password (1234) has been
set before shipment. Use the following procedure to change
the password.
1 Press HOME MENU.
2 Select “Tuner Setup”. ( / then ENTER)
3 Select “Parental Control”. ( / then ENTER)
4 Select “Password”. ( / then ENTER)
5 Select “Change Password”. ( / then ENTER)
Parental Control
Password
Password
Change Password
Clear Password
xxxxxxxxxxxxxxxxxxxxx
xxxxxxxxxxxxxxxxxxxxx
xxxxxxxxxxxxxxxxxxxxx
Home Menu
Exit
6 Enter the current 4-digit password, using buttons 0 – 9.
7
Enter a 4-digit password to be newly set, using buttons
0 – 9
8 Enter the same password that you have entered in step 7.
• A confirmation screen appears.
.
Page 45

Tuner Setup
09
9 Press A.
10 Press HOME MENU to exit the menu.
NOTE
• Take note of the newly set password and keep it handy.
Clearing the password
Use the following procedure to clear the password.
1 Press HOME MENU.
2 Select “Tuner Setup”. ( / then ENTER)
3 Select “Parental Control”. ( / then ENTER)
4 Select “Password”. ( / then ENTER)
5 Select “Clear Password”. ( / then ENTER)
Parental Control
Password
Password
Change Password
Clear Password
xxxxxxxxxxxxxxxxxxxxx
xxxxxxxxxxxxxxxxxxxxx
xxxxxxxxxxxxxxxxxxxxx
Home Menu
Exit
6 Enter the current 4-digit password, using buttons 0 – 9.
• A confirmation screen appears.
7 Press A.
8 Press HOME MENU to exit the menu.
NOTE
• The above procedure will reset the password to the factory
default (1234).
Activating the Parental Control
1 Press HOME MENU.
2 Select “Tuner Setup”. ( / then ENTER)
3 Select “Parental Control”. ( / then ENTER)
4 Select “Status”. ( / then ENTER)
5 Select “On”. ( / then ENTER)
• The password entry screen appears. Enter your 4-digit
password using buttons 0 – 9.
6 Press HOME MENU to exit the menu.
Setting the voluntary movie rating system
(MPAA)
1 Press HOME MENU.
2 Select “Tuner Setup”. ( / then ENTER)
3 Select “Parental Control”. ( / then ENTER)
4 Select “MPAA Ratings”. ( / then ENTER)
5 Select the desired rating and change the setting. ( /
then ENTER)
Parental Control
MPAA Ratings
MPAA Ratings
N/A
G
PG
Blocked MPAA Ratings
N/A, G, PG,PG-13, R, NC-17
xxxxxxxxxxxxxxxxxxxxx
xxxxxxxxxxxxxxxxxxxxx
xxxxxxxxxxxxxxxxxxxxx
Home Menu
Exit
• The password entry screen appears. Enter your 4-digit
password using buttons 0 – 9.
• Each time you press ENTER, the setting is switched.
• A lock icon appears beside the blocked rating.
• All the ratings have been unblocked before shipment.
6 Press HOME MENU to exit the menu.
NOTE
• Blocking a rating causes more severe ratings to be
automatically blocked as well. Likewise, unblocking a rating
causes less severe ratings to be automatically unblocked.
Setting the TV ratings
1 Press HOME MENU.
2 Select “Tuner Setup”. ( / then ENTER)
3 Select “Parental Control”. ( / then ENTER)
4 Select “TV Ratings”. ( / then ENTER)
5 Select the desired rating and change the setting. ( /
then ENTER)
Parental Control
TV Ratings
TV Ratings
TV-None
TV-Y
TV-Y
TV-Y7
TV-G
TV-PG
Blocked TV Ratings
xxxxxxxxxxxxxxxxxxxxx
xxxxxxxxxxxxxxxxxxxxx
xxxxxxxxxxxxxxxxxxxxx
Home Menu
Exit
• The password entry screen appears. Enter your 4-digit
password using buttons 0 – 9.
• Each time you press ENTER, the setting is switched.
• A lock icon appears beside the blocked rating.
• All the ratings have been unblocked before shipment.
6 Press HOME MENU to exit the menu.
English
We suggest you write down your password so you don’t forget it.
PDP-6072HD/PDP-6071HD/PDP-6070HD
PDP-5072HD/PDP-5071HD/PDP-5070HD
PDP-4272HD/PDP-4271HD/PDP-4270HD
Your password No.:
If you forget the password
When the message “Enter your Password” is displayed in step 6
under “Clearing the password”, press the ENTER button on the
remote control unit and hold it down for 3 seconds or longer.
The password reverts to “1234”.
45
En
Page 46

09
Tuner Setup
NOTE
• Blocking a rating causes more severe ratings to be
automatically blocked as well. Likewise, unblocking a rating
causes less severe ratings to be automatically unblocked.
Setting the TV Parental Guidelines (TV
Guidelines)
1 Press HOME MENU.
2 Select “Tuner Setup”. ( / then ENTER)
3 Select “Parental Control”. ( / then ENTER)
4 Select “TV Parental Guidelines”. ( / then ENTER)
5 Select the desired rating and change the setting. ( /
then ENTER)
Parental Control
TV Parental Guidelines
TV Parental Guidelines
Fantasy Violence
Violence
Sexual Situations
Blocked TV Parental Guidelines
xxxxxxxxxxxxxxxxxxxxx
xxxxxxxxxxxxxxxxxxxxx
xxxxxxxxxxxxxxxxxxxxx
Home Menu
Exit
• The password entry screen appears. Enter your 4-digit
password using buttons 0 – 9.
• Each time you press ENTER, the setting is switched.
• A lock icon appears beside the blocked rating.
• All the ratings have been unblocked before shipment.
6 Press HOME MENU to exit the menu.
Blocking Not Rated TV programs
Use the following procedure to block TV programs whose
rating information is unavailable.
1 Press HOME MENU.
2 Select “Tuner Setup”. ( / then ENTER)
3 Select “Parental Control”. ( / then ENTER)
4 Select “Unavailable Ratings”. ( / then ENTER)
5 Select “Block” or “Don’t Block”. ( / then ENTER)
Canadian rating systems
In Canada you can choose the Canadian English ratings or the
Canadian French ratings. These ratings are based on the
Canadian Radio-Television and Telecommunications
Commission (CRTC) policy.
Canadian English ratings
Rating Description
E Exempt: Includes news, sports, documentaries
C Children: Intended for younger children under the
C8+ Children over 8 years old: Contains no portrayal of
G General: Considered acceptable for all age
Age-Base
PG Parental Guidance: Intended for a general
14+ Over 14 Years: Could contain themes where
18+ Adults: Intended for viewers 18 years and older
and other information programming; talk shows,
music videos, and variety programming.
age of 8 years. Pays careful attention to themes
that could threaten their sense of security and
well-being.
violence as the preferred, acceptable, or only way
to resolve conflict; nor encourages children to
imitate dangerous acts which they may see on the
screen.
groups. Appropriate viewing for the entire family,
contains very little violence, physical, verbal or
emotional.
audience, but may not be suitable for younger
children (under the age of 8) because it could
contain controversial themes or issues.
violence is one of the dominant elements of the
storyline, but it must be integral to the
development of plot or character. Language usage
could be profane and nudity present within the
context of the theme.
and might contain depictions of violence, which
while related to the development of plot, character
or themes, are intended for adult viewing. Could
contain graphic language and portrayals of sex
and nudity.
Parental Control
Unavailable Ratings
Unavailable Ratings
Block
Don’t Block
• The password entry screen appears. Enter your 4-digit
password using buttons 0 – 9.
• The factory default is “Don’t Block”.
6 Press HOME MENU to exit the menu.
46
En
xxxxxxxxxxxxxxxxxxxxx
xxxxxxxxxxxxxxxxxxxxx
xxxxxxxxxxxxxxxxxxxxx
Home Menu
Exit
Page 47

Tuner Setup
09
Canadian French ratings
Rating Description
E Exempt programming.
G General: All ages and children, contains minimal
8ans+ General but inadvisable for young children: May
Age-Base
13ans+ Over 13 years: Could contain scenes of frequent
16ans+ Over 16 years: Could contain frequent violent
18ans+ Over 18 years: Only for adult viewing. Could
direct violence, but may be integrated into the plot
in a humorous or unrealistic manner.
be viewed by a wide public audience, but could
contain scenes disturbing to children under eight
who cannot distinguish between imaginary and
real situations. Recommended for viewing with
parent.
violent scenes and therefore recommended for
viewing with parent.
scenes and intense violence.
contain frequent violent scenes and extreme
violence.
Setting Canadian English ratings
1 Press HOME MENU.
2 Select “Tuner Setup”. ( / then ENTER)
3 Select “Parental Control”. ( / then ENTER)
4 Select “Canadian English Ratings”. ( / then ENTER)
5 Select the desired rating and change the setting. ( /
then ENTER)
Parental Control
Canadian English Ratings
Canadian English Ratings
E
C
C8+
Blocked Canadian English Ratings
xxxxxxxxxxxxxxxxxxxxx
xxxxxxxxxxxxxxxxxxxxx
xxxxxxxxxxxxxxxxxxxxx
Home Menu
Exit
• The password entry screen appears. Enter your 4-digit
password using buttons 0 – 9.
• Each time you press ENTER, the setting is switched.
• A lock icon appears beside the blocked rating.
• All the ratings have been unblocked before shipment.
6 Press HOME MENU to exit the menu.
Setting Canadian French ratings
1 Press HOME MENU.
2 Select “Tuner Setup”. ( / then ENTER)
3 Select “Parental Control”. ( / then ENTER)
4 Select “Canadian French Ratings”. ( / then ENTER)
5 Select the desired rating and change the setting. ( /
then ENTER)
Parental Control
Canadian French Ratings
Canadian French Ratings
E
G
8 ans+
Blocked Canadian French Ratings
E, G, 8 ans+, 13 ans+, 16 ans+, 18
ans+
xxxxxxxxxxxxxxxxxxxxx
xxxxxxxxxxxxxxxxxxxxx
xxxxxxxxxxxxxxxxxxxxx
Home Menu
Exit
• The password entry screen appears. Enter your 4-digit
password using buttons 0 – 9.
• Each time you press ENTER, the setting is switched.
• A lock icon appears beside the blocked rating.
• All the ratings have been unblocked before shipment.
6 Press HOME MENU to exit the menu.
NOTE
• Blocking a rating causes more severe ratings to be
automatically blocked as well. Likewise, unblocking a rating
causes less severe ratings to be automatically unblocked.
Setting new ratings
Digital broadcasts are now carrying new ratings that are not
compatible with the Plasma Display System’s original Parental
Control settings. When you first tune in one of these
broadcasts, a New Parental Control menu appears on the
screen. This tells you that you must now change your Parental
Control settings to handle these new ratings. Otherwise,
ratings you had previously blocked may become unblocked.
1 Press HOME MENU.
2 Select “Tuner Setup”. ( / then ENTER)
3 Select “Parental Control”. ( / then ENTER)
Parental Control
Status
MPAA Ratings
TV Ratings
Status
New XXXXXXXXXXXXX
xxxxxxxxxxxxxxxxxxxxx
xxxxxxxxxxxxxxxxxxxxx
xxxxxxxxxxxxxxxxxxxxx
Home Menu
Exit
English
NOTE
• Blocking a rating causes more severe ratings to be
automatically blocked as well. Likewise, unblocking a rating
causes less severe ratings to be automatically unblocked.
• The new menu is displayed when Status is selected and
the message “Regional ratings have changed. Set
Parental Control ratings again.” appears on the right of
the screen.
47
En
Page 48

09
Tuner Setup
4 Select the desired rating and change the setting. ( /
then ENTER)
Parental Control
Unavailable Ratings
New (xxx)
New (xxx)
New (xxx)
Password
New (xxx)
XX
XX
xxxxxxxxxxxxxxxxxxxxx
xxxxxxxxxxxxxxxxxxxxx
xxxxxxxxxxxxxxxxxxxxx
Home Menu
Exit
• The menu is added between “Unavailable Ratings” and
“Password”.
• The password entry screen appears. Enter your 4-digit
password using buttons 0 - 9.
• Each time you press ENTER, the setting is switched.
• A lock icon appears beside the blocked rating.
• When you are finished, the word “New” disappears from
the Parental Control menu.
5 Press HOME MENU to exit the menu.
Deleting new ratings
You can delete a New Parental Control menu. When deleted,
the past blocking settings you had entered are also cleared and
removed from the menu.
1 Press HOME MENU.
2 Select “Tuner Setup”. ( / then ENTER)
3 Select “Parental Control”. ( / then ENTER)
4 Select “Status” and then “Off”. ( / then ENTER)
Temporarily deactivating the Parental Control
When the Parental Control is working and senses a blocked TV
program (or content), the Plasma Display shows nothing but a
message.
The method for temporarily deactivating the Parental Control
differs, depending on the currently selected input source.
Antenna A or antenna B:
The following screen appears. Press ENTER.
Parental Control
WWWWWWW
1000.0000
(Ant. B)
Enter your 4-digit password.
Parental Control
Enter your Password
xxxxxxxxxxxxxxxxxxxxx
xxxxxxxxxxxxxxxxxxxxx
A
Clear Entry
• The password entry screen stays only for one minute. After
the screen disappears, pressing ENTER causes it to appear
again.
Input 1 – 4:
Enter your 4-digit password. You need not press ENTER first;
pressing ENTER causes the password entry screen to
disappear.
xxxxxxxxxxxxxxxxxxxxx
xxxxxxxxxxxxxxxxxxxxx
xxxxxxxxxxxxxxxxxxxxx
Enter
Disable Parental Control
D
Cancel
Parental Control
Status
Status
Change Password
Off
Clear Password
Enter your Password
xxxxxxxxxxxxxxxxxxxxx
xxxxxxxxxxxxxxxxxxxxx
A
A
Clear Entry
D
Cancel
xxxxxxxxxxxxxxxxxxxxx
xxxxxxxxxxxxxxxxxx
xxxxxxxxxxx
Home Menu
• The password entry screen appears. Enter your 4-digit
password using buttons 0 - 9.
5 Select A for “Accept” or D for “Cancel”.
Parental Control
Status
• The New Parental Control menu remains, however,
when the selection screen for deleting new ratings
disappears in approximately 60 seconds after no
settings are entered.
Status
Change Password
Off _ _ _ _
Clear Password
Reset Digital regional ratings?
xxxxxxxxxxxxxxxxxxxxx
xxxxxxxxxxxxxxxxxxxxx
A
A
Accept
D
Cancel
xxxxxxxxxxxxxxxxxxxxx
xxxxxxxxxxxxxxxxxx
xxxxxxxx
Home Menu
6 Press HOME MENU to exit the menu.
NOTE
• While the Parental Control menu is opened, the status
display remains unchanged even if the system had received
broadcasts carrying new ratings.
• Blocking a rating causes more severe ratings to be
automatically blocked as well. Likewise, unblocking a rating
causes less severe ratings to be automatically unblocked.
Exit
Exit
Please Input Your Password.
• The above password entry screen will also be shown during
2-screen mode, picture-in-picture, and while freezing an
image.
• The password entry screen stays only for one minute. After
the screen disappears, pressing ENTER causes it to appear
again.
48
En
Page 49

Tuner Setup
09
Setting your favorite channels
Set up to 10 TV channels to each of the four color buttons on
the remote control unit (40 channels in total). You can then
quickly select from only your favorite channels.
1 Press HOME MENU.
2 Select “Tuner Setup”. ( / then ENTER)
3 Select “Favorites”. ( / then ENTER)
4 Select a color button (A, B, C, D). ( / then ENTER)
5 Select a TV channel to be registered. ( / then ENTER)
Favorites Favorites
A
Favorites
• A star appears beside the favorite channels currently
selected.
• To register another TV channel under the same color
button, repeat step 5. To register another TV channel
under a different color button, repeat steps 4 and 5.
B 8.0
A 9.0
B 9.0
A 11.0
B 11.0
A
Current Favorites A Line Up
B0008.000 A0009.000
A0011.000
xxxxxxxxxxxxxxxxxxxxx
xxxxxxxxxxxxxxxxxxxxx
xxxxxxxxxxxxxxxxxxxxx
Home Menu
Exit
6 Press HOME MENU to exit the menu.
Setting up closed captions
Your Plasma Display System is equipped with an internal
closed caption decoder. Closed caption allows you to view
conversations, narration, and sound effects in TV programs
and home videos as subtitles on your Plasma Display screen.
You may enjoy digital closed captions when watching digital TV
programs. Digital closed captions allow you to change
parameters such as fonts and colors.
• Not all programs and videos offer closed caption. Please look
for the “ ” symbol to ensure that captions will be shown.
Activating the closed caption
1 Press HOME MENU.
2 Select “Tuner Setup”. ( / then ENTER)
3 Select “Closed Captions”. ( / then ENTER)
4 Select “Status”. ( / then ENTER)
5 Select “On” or “On If Mute”. ( / then ENTER)
Closed Captions
Status
Item Description
Off
(factory default)
On Always shows closed captions.
On If Mute Shows closed captions only while sound is being
Status
Off
On
On If Mute
Does not show closed captions.
muted.
xxxxxxxxxxxxxxxxxxxxx
xxxxxxxxxxxxxxxxxxxxx
xxxxxxxxxxxxxxxxxxxxx
Home Menu
Exit
6 Press HOME MENU to exit the menu.
Selecting the type of conventional closed
captions
Select the type of conventional closed captions that you will
watch after tuning to a conventional TV channel. This selection
also becomes effective when a selected digital TV program
provides only conventional closed captions.
• “CC1”, “CC2”, “CC3”, or “CC4” displays subtitles of TV dramas
and news programs while allowing a full view of the picture.
• “Text1”, “Text2”, “Text3”, or “Text4” superimposes on the
picture other information (e.g. TV guide, weather) that is
independent of the TV program in progress.
1 Press HOME MENU.
2 Select “Tuner Setup”. ( / then ENTER)
3 Select “Closed Captions”. ( / then ENTER)
4 Select “Analog Settings”. ( / then ENTER)
5 Select the desired closed caption. ( / then ENTER)
English
Closed Captions
Analog Settings
Analog Settings
CC1
CC2
CC3
CC4
Text 1
• The factory default is “CC1”.
6 Press HOME MENU to exit the menu.
xxxxxxxxxxxxxxxxxxxxx
xxxxxxxxxxxxxxxxxxxxx
xxxxxxxxxxxxxxxxxxxxx
Home Menu
Exit
49
En
Page 50

09
Tuner Setup
Selecting digital closed captions
Use the following procedure to select digital closed captions:
Service 1 to 6.
1 Press HOME MENU.
2 Select “Tuner Setup”. ( / then ENTER)
3 Select “Closed Captions”. ( / then ENTER)
4 Select “Digital Settings”. ( / then ENTER)
5 Select “Digital Service”. ( / then ENTER)
6 Select the desired closed caption. ( / then ENTER)
Closed Captions
Digital Settings Digital Service
• The factory default is “Service 1”.
Digital Settings
Digital Service
Service 1
Service 2
Service 3
Service 4
Service 5
xxxxxxxxxxxxxxxxxxxxx
xxxxxxxxxxxxxxxxxxxxx
xxxxxxxxxxxxxxxxxxxxx
Home Menu
Exit
7 Press HOME MENU to exit the menu.
NOTE
• The Primary Caption Service is usually offered for Service 1,
and the Secondary Language Service is usually offered for
Service 2 if these services are available.
Selecting digital closed caption parameters
Use the following procedure to change such parameters of
digital closed captions as font size, font type, foreground and
background colors.
1 Press HOME MENU.
2 Select “Tuner Setup”. ( / then ENTER)
3 Select “Closed Captions”. ( / then ENTER)
4 Select “Digital Settings”. ( / then ENTER)
5 Select “Font Size”, “Font”, or any other item. ( / then
ENTER)
6 Select the desired parameter. ( / then ENTER)
Closed Captions
Digital Settings Font Size
Digital Settings
Font Size
Large
Standard
Small
xxxxxxxxxxxxxxxxxxxxx
xxxxxxxxxxxxxxxxxxxxx
xxxxxxxxxxxxxxxxxxxxx
Home Menu
Exit
7 Repeat steps 5 and 6 as necessary. ( , / )
8 Press HOME MENU to exit the menu.
The following table shows the parameters selectable for each
item.
Item Selection
Font Size Auto/ Large/ Standard/ Small
1
Font
Font Color Auto/ Black/ White/ Red/ Green/ Blue/ Yellow/
Font Opacity Auto/ Solid/ Transparent/ Translucent/Flashing
Background
Color
Background
Opacity
1
Font 1 (monospaced with serifs)/ Font 2 (proportionally spaced with serifs)/
Font 3 (monospaced without serifs)/ Font 4 (proportionally spaced without serifs)/ Font 5 (casual font)/ Font 6 (cursive font)/ Font 7 (small capitals font)
Auto/ Font 1/ Font 2/ Font 3/ Font 4/ Font 5/ Font 6/
Font 7
Magenta/ Cyan
Auto/ Black/ White/ Red/ Green/ Blue/ Yellow/
Magenta/ Cyan
Auto/ Solid/ Transparent/ Translucent
With “Auto” selected, parameters specified by the provider are
used; if not specified by the provider, the bolded default
parameters are used. If you select parameters other than
“Auto”, the selected parameters are used regardless of the
provider’s specifications.
Clock Setting
With “Auto Set” selected for Clock Setting, the system acquires
and sets time information automatically. You can also
manually set the correct time. If you disconnect the power cord
from the power outlet or power blackout occurs, the set time is
cleared.
1 Press HOME MENU.
2 Select “Tuner Setup”. ( / then ENTER)
3 Select “Clock”. ( / then ENTER)
4 Select “Time Zone”. ( / then ENTER)
5 Select a time zone for your area. ( / then ENTER)
Clock
Time Zone
Time Zone
Atlantic
Eastern
Central
Mountain
Current Time:
9:55 pm EDT
Monday
05/17/04
6 Select “D.S.T.”. ( , / , then ENTER)
7 Select “Applies” or “Does Not Apply”. ( / then ENTER)
• Make this selection, depending on whether summer
time is employed in your area.
Daylight Savings Time
Clock
Current Time:
D.S.T.
Applies
Does Not Apply
9:56 pm EDT
Monday
05/17/04
xxxxxxxxxxxxxxxxxxxxx
xxxxxxxxxxxxxxxxxxxxx
xxxxxxxxxxxxxxxxxxxxx
Home Menu
Exit
xxxxxxxxxxxxxxxxxxxxx
xxxxxxxxxxxxxxxxxxxxx
xxxxxxxxxxxxxxxxxxxxx
Home Menu
Exit
50
En
8 Select “Auto/Manual Set”. ( , / , then ENTER)
9 Select “Auto Set” or “Manual Set”. ( / then ENTER)
Page 51

Tuner Setup
10 If you select “Auto Set”, select an antenna (A or B) and a
channel number using / and ENTER.
Auto/Manual Set
Clock
Auto/Manual Set
•Auto Set 2.0
• The date and time will be automatically corrected using
data from the selected channel.
If you select “Manual Set”, manually set the date and time
using /, / and ENTER.
Auto/Manual Set
Clock
Auto/Manual Set
•Manual Set
11 Press HOME MENU to exit the menu.
NOTE
• If you setup the TV Guide On Screen™ system, the Plasma
Display System acquires clock information through the TV
Guide On Screen™ system; in this situation you cannot set
up the clock using the menu. If you select a parameter for the
Clock menu and press ENTER, the menu screen disappears
and a dialog box appears instead; press A to clear the dialog
box.
Clock Set Channel
Ant. A
Date and Time
3
4
3 /17/04
11:58pm
5
6
Current Time:
11:58 pm PDT
Monday
05/17/04
Current Time:
11:58 pm PDT
Monday
05/17/04
xxxxxxxxxxxxxxxxxxxxx
xxxxxxxxxxxxxxxxxxxxx
xxxxxxxxxxxxxxxxxxxxx
Home Menu
Exit
xxxxxxxxxxxxxxxxxxxxx
xxxxxxxxxxxxxxxxxxxxx
xxxxxxxxxxxxxxxxxxxxx
Home Menu
Exit
09
English
51
En
Page 52

10
TV Guide On Screen™ System Operation
TV Guide On Screen™ System Operation
Using the TV Guide On Screen™ system
Before you can start using the TV Guide On Screen™ system,
you’ll need to set it up. If you haven’t already done this, please
turn to “TV Guide On Screen™ System Setup”on page 38 before
proceeding.
In order to record TV programs with a VCR, you need to
correctly connect the equipment to the Plasma Display. For the
connections with a VCR, see page 74.
Legal Notices
In the United States, TV GUIDE and other related marks are registered
marks of Gemstar-TV Guide International, Inc. and/or one of its affiliates.
In Canada, TV GUIDE is a registered mark of Transcontinental, Inc. and is
used under license by Gemstar-TV Guide International, Inc.
NOTE
• The TV Guide On Screen™ interactive program guide
provides listings for cable-ready and digital cable services as
well as over-the-air broadcast. It does not provide listings for
satellite services.
• Once you set up the TV Guide On Screen™ system it may
take up to 24 hours to begin to receive TV program listings.
Receipt of all eight days of listings may take up to one week.
• TV Guide may not be available in all areas. As content
providers move to digital programming and broadcasting, TV
Guide data may be unavailable or become unavailable.
12 Info Box – Shows information about the highlighted item.
13 Channel ads – Space for show advertising.
TV Guide On Screen™ icons
Various icons are used to convey information or show the
status of an item. You will locate these icons on the Info Bar,
inside the Info Box, or beside program titles.
• Info icon – Additional information is available; press
the INFO button to display.
• Progress Bar – Shows the elapsed time of the
current program.
• HDTV – Indicates that a program is a high-definition
broadcast.
• New – The program is new (not a repeat).
• Stereo – The program is broadcast in stereo.
• CC – The program is broadcast with closed captioning.
• TV Rating – Indicates the age rating for the program.
• Record Once – One-time only recording
Screen components
Many of the screens have common elements to make using the
system easier.
1
9
10
3
2
11
4
12
1 TV GUIDE logo
2Clock – Shows the current time.
3Time slot – Half-hour time slots are displayed horizontally.
4Time tab – Indicates the currently selected time slot.
5 Current service label – Indicates the currently selected
service.
6 Service bar – Gives access to the various services of the
Guide.
7 Title – Shows the title of the TV program.
8 Info Bar – Shows various icons to convey information or
show the status of an item.
9 Video window – Allows you to continue watching the
current program while using the Guide.
10 Panel ads and panel menu entry – Space for show or
product advertising (and the panel menu).
11 Channel logo
52
En
5
13
• Record Daily – Records the same channel and time
every Monday through Friday (manual recording only).
• Record Regularly – Records the same program any day
it airs on the same channel at the same time.
• Record Weekly – Records a program every week at the
6
7
8
same time/day.
• Record Suspend – The program is set to record, but is
suspended because of a conflict with another recording or
auto tune reminder. The recording resumes when the
conflict is cleared.
• Record Off – The program remains in the SCHEDULE
list, but will not be recorded until the frequency is changed
to one of the above.
• Remind Once – One-time only reminder
• Remind Daily – Reminds for the same channel and time
every Monday through Friday (manual reminder only).
• Remind Regularly – Reminds the same program any
day it airs on the same channel at the same time.
• Remind Weekly – Reminds every week at the same
time/day.
• Remind Suspend – A reminder is set for the program,
but is suspended because of a conflict with another auto
tune reminder or recording. The reminder resumes when the
conflict is cleared.
• Remind Off – The program remains in the SCHEDULE
list, but will not remind until the frequency is changed to one
of the above.
Page 53

TV Guide On Screen™ System Operation
10
TV Guide On Screen™ navigation
The table below shows a summary of the remote buttons you’ll
use to navigate the TV Guide On Screen™ system.
Key What it does
TV GUIDE Press to display the TV Guide On Screen™ system
///
ENTER Press to confirm a selection or execute an action.
MENU Press to display a panel menu.
INFO Press to cycle through the available information
REC Press to set the highlighted program to record.
Number buttons Use for numeric entry.
PAGE +/– Press to select the previous/next page of
DAY +/– Press to jump to the next/previous day of program
You can also use the TV GUIDE, ENTER, UP/DOWN, and LEFT/
RIGHT buttons on the Plasma Display. The UP/DOWN and
LEFT/RIGHT buttons operate the same as the / and /
buttons on the remote control unit.
(also use to exit).
Use to navigate screens (highlight an item).
Can also be used to display the panel menu when
a future program is highlighted.
for the current program or screen.
information (where applicable).
listings (if applicable).
The Listings screen
You can consider the Listings screen as the “home” screen of
the TV Guide On Screen™ system. This is the screen you see
when you press TV GUIDE.
From the Listings screen you can:
• View eight days of program listings.
• Display information about individual programs.
• Select a program to start watching.
• Set a program to remind.
• Set a program to record.
• See a thumbnail display of any channel in the video window.
• Access panel and channel ads.
1 Press TV GUIDE to display the Listings screen.
• With “LISTINGS” highlighted in the Service bar at the top
of the screen, press INFO to display (and then close)
Help information.
• Press TV GUIDE anytime to exit.
2 Press /// to navigate the Listings screen.
• With a currently showing program highlighted, press
ENTER to start watching.
• Move right for later time slots.
• Press PAGE+/– to scroll one vertical screen at a time.
• Press INFO to display additional information (if
available) about the currently selected show.
• Press DAY+/– to jump to the next/previous day in the
listings grid.
3 To set the highlighted program to record, press REC.
English
Pressing REC just once will set the program to record. Press
REC repeatedly to change the frequency of the recording:
• Once – Just records the highlighted program.
• Regularly – Records the same program any day it airs
on the same channel at the same time
1
.
53
En
Page 54

10
TV Guide On Screen™ System Operation
• Weekly – Records the same program at the same time1/
day every week.
• No record icon – Don’t set a recording.
1
The program will still be recorded if it starts any time up to
the midway point of the originally scheduled program. For
example, up to 9:15 for a 9:00 to 9:30 program.
Note that setting a program to record in this way will result in
a recording using all the default options.
If you want to set a recording using settings other than the
default, use the panel menu, as described next.
NOTE
• When TV Guide On Screen™ is not being displayed, you can
record a program simply by pressing the REC button on the
remote. Press the REC button to record the program once.
Recording begins immediately. If the program is listed in the
TV Guide On Screen™, recording ends at the end of the
program. If the program is not listed in the TV Guide On
Screen™, recording continues for 30 minutes.
• When TV Guide On Screen™ is not displayed, pressing the
REC button more than once does nothing.
Recording programs
The simplest way to record a program is to highlight the
program you want to record and press REC (as described
above), but if you want to set the recording options to anything
other than the default, the place to do it is the Recording
Options panel menu. Here you can adjust the start and end
times, the destination of the recording and so on.
1 From LISTINGS, SCHEDULE, or SEARCH, highlight the
program you want to record.
3 Highlight “set recording” and press ENTER.
4 Set the recording options:
Press / to highlight a field; press / to change the
setting.
• frequency – select whether the program will be
recorded just Once, Regularly (at the same time on the
same channel), or Weekly (every week at the same
time/day). There’s also an Off option which puts the
program in the recording schedule but doesn’t record it
(you can set it to record later).
• start – set the start time of the recording to On time, or
up to 120 minutes before or after the scheduled time.
• end – set the end time of the recording to On time, or
up to 120 minutes before or after the scheduled time.
• recorder – select a recorder to be used for recording.
• If you want to cancel the recording, highlight cancel and
press ENTER.
5 Once all the settings have been made, press ENTER to
highlight “schedule recording”, then press ENTER again.
• The recording is now set (and will appear in SCHEDULE)
and the appropriate icon appears on the show tile.
If there is a time conflict with a previously scheduled recording
or auto-tune reminder, you will be alerted to this. You can select
to record the conflicting program, or cancel the recording. The
following screens appear depending on whether it will override
a scheduled recording or reminder.
2 Press MENU to display the Episode Options panel menu.
54
En
Page 55

TV Guide On Screen™ System Operation
10
When the recording is about to start
The TV Guide On Screen™ system alerts you when a scheduled
recording is about to start and gives you the chance to cancel
the recording.
When you see the on-screen alert, select either;
• “change channel, start recording”; or
• “don’t change channel; cancel recording”.
Depending on the situation, the following screens will appear.
4-+
Timer Alert
The following timer is about to begin:
Tues. 12/30 12:30am-12:59am
Ant. A 1000.000 BRAV022
DA
Cancel TimerAccept
4-+
Timer Alert
The following timer is about to begin:
Wed.
1/5 4 : 06am- 9 : 08
Ant. A 1000. 5 BRAV022
A
Accept
Press A to start recording as scheduled or D to cancel
recording.
am
D
Cancel Timer
PLASMA DISPLAY
Setting program reminders
By setting a program reminder you can have the TV alert you
when a program is about to start on another channel. You can
set reminders for individual episodes of a program, or every
time a program airs.
1 From LISTINGS, SCHEDULE, or SEARCH, highlight the
program for which you want to set a reminder.
2 Press MENU to display the Episode Options panel menu.
English
While recording is in progress
If you attempt to change the channel while recording is in
progress, the following screen appears.
Select either;
• “don’t change; keep recording” or
• “change; stop recording”.
Depending on the situation, the following screens will appear.
In this case, the reminder will remain on-screen for 15 seconds
before it automatically disappears.
4-+
Recording In Progress
Changing channels will interrupt a recording in progress.
A
Change Channel Now
REC
Recording In Progress
Changing channels will interrupt a recording in progress.
Press A to change the channel and quit recording; or press D
not to change the channel and to continue recording.
D
Don't Change Channel
PLASMA DISPLAY
DA
Don't Change ChannelChange Channel Now
3 Highlight “set reminder” and press ENTER.
4 Set the reminder options:
Press / to highlight a field; press / to change the
setting.
• frequency – select whether to be reminded just Once,
Regularly (at the same time on the same channel), or
Weekly (every week at the same time/day). There’s also
an Off option which puts the program in the reminder
schedule but no reminder is given (you can set it to
remind later).
• auto tune – choose whether or not the TV should
automatically change channels when a reminder is due.
• when – set when the reminder is displayed (before, on
time, or after a program has started).
55
En
Page 56

10
TV Guide On Screen™ System Operation
5 Once all the settings have been made, press ENTER to
highlight “schedule reminder”, then press ENTER again.
• The reminder is now set (and will appear in SCHEDULE)
and the appropriate icon appears on the show tile.
If there is a time conflict with a previously scheduled auto-tune
reminder or recording, you will be alerted to this. You can
select to set a reminder for the conflicting program, or cancel
the reminder. The following screens appear depending on
whether it will override a scheduled reminder or recording.
Depending on the situation, the following screens will appear.
In this case, the reminder will remain on-screen for 15 seconds
before it automatically disappears.
Timer Alert
Tues. 12/30 12:30am-12:59am
Ant. A 1000.000 BRAV022
DA
Cancel TimerAccept
Timer Alert
Wed.
1/5 4 : 06am- 9 : 08
Ant. A 1000. 5 BRAV022
A
Accept
A to leave the reminder effective, or D to dismiss the
Press
am
D
Cancel Timer
PLASMA DISPLAY
reminder.
When scheduled reminder is due (auto-tune is ON)
If the “auto-tune” setting was set to “yes” in the Remind
Options, one of the following screens appears, depending on
the situation.
The screen will remain for 15 seconds before it automatically
disappears.
Timer Alert
When scheduled reminder is due (auto-tune is OFF)
Depending on the settings you made, your program reminder
will appear on your TV screen around the time the program is
scheduled to start. This happens when you have selected “NO”
for the auto tune. The reminder will remain on-screen for three
minutes before it automatically disappears.
Press
ENTER
reminder; or highlight “hide reminders” to dismiss the reminder.
to tune to the highlighted program in the
Tues. 12/30 12:30am-12:59am
Ant. A 1000.000 BRAV022
A
Accept
Timer Alert
Wed.
1/5 4 : 06am- 9 : 08
Ant. A 1000. 5 BRAV022
A
Accept
PLASMA DISPLAY
am
Press A to make the Timer Alert screen disappear.
If more than one reminder is set for the same time, select the
program you want by pressing / .
56
En
Page 57

TV Guide On Screen™ System Operation
10
Searching for programs
The Search screen lets you search for programs alphabetically,
by category or by keyword. You can also search for HDTV
programs.
Searching by category
Here you can search for programs by category, and then by a
further sub-category if you want.
1 Select “SEARCH” from the Service bar at the top of the
screen.
2 Press to move to the search category bar, then press /
to select a search category.
• Available categories may include:
•Movies
• Sports
• Children
•Educational
•News
•Variety
•Series
•HDTV
3 Press to move to the search sub-categories and select
the sub-category you want.
4 Press ENTER to display a listing of upcoming programs
that match the categories you chose.
English
5 Highlight a program listing and press MENU to display the
Episode Options panel menu.
• If the program listing is a program now being broadcast you
can press ENTER to start watching it immediately.
• The sub-categories available depend on the category
you chose in the last step.
57
En
Page 58

10
TV Guide On Screen™ System Operation
Searching by keyword
Here you search for shows based on keywords you enter. The
keywords you create are stored so you can use them again in
the future.
1 Select “SEARCH” from the Service bar at the top of the
screen.
2 Press to move to the search category bar, then press /
to select “KEYWORD”.
• If you already entered any keywords, they are displayed.
Just select one if you want to search for it again.
• To edit or delete one of the displayed keywords, highlight
it and then press MENU. From the panel menu you can
choose “edit search” or “delete search”.
3 Press ENTER to display the Keyword Search menu.
7 Input the keyword for the search.
•Highlight characters by pressing ///, then
pressing ENTER to input them.
• The keyword you input is stored so that you can use it
again whenever you need it.
8 Select “DONE” to start the search.
9 Highlight a program listing, then press MENU to display
the Episode Options panel menu.
4 Select “new search”.
5 If you want to change the category, move up and select the
category you want.
•To search using only the keyword, leave the category set
to “All”.
• If you select a category (“HDTV”, for example) then you’ll
only see programs in that category that also match the
keyword.
6 Highlight “enter keyword” and press ENTER.
• If the program listing is a program now being broadcast you
can press ENTER to start watching it immediately.
58
En
Page 59

TV Guide On Screen™ System Operation
10
Alphabetical search
This search is designed to display all programs that start with
a particular letter.
1 Select “SEARCH” from the Service bar at the top of the
screen.
2 Press to move to the search category bar, then press /
to select “ALPHABETICAL”.
3 Press ENTER.
4 Select a letter, then press ENTER to display all programs
starting with that letter.
5 Highlight a program listing and press MENU to display the
Episode Options panel menu.
The search Episode Options menu
From the Episode Options menu you can select:
• go to Service bar – closes the panel menu and returns to
the Service bar at the top of the screen.
• tune to channel / watch now – exits the TV Guide On
Screen™ guide and tunes to the channel.
• set recording – goes to the Record Options menu.
• set reminder – goes to the Remind Options menu.
• cancel – closes the panel menu and returns to the
highlighted program listing.
Navigation and search tips
• The / buttons move the highlight between options in the
panel menu. Use the number buttons to input information.
• If a highlighted field has arrows on either side, press / to
cycle through the options.
•Press ENTER on any option to highlight the default
command (e.g., Done), then press ENTER again to execute
and close the panel menu.
• Select Cancel and press ENTER to close the panel menu and
return to the previous screen, or press MENU to cancel any
changes and close the menu.
English
• If the program listing is a program now being broadcast you
can press ENTER to start watching it immediately.
59
En
Page 60

10
TV Guide On Screen™ System Operation
Scheduling recordings and reminders
From the Schedule area you can review, edit or delete
recordings and reminders.
1 Select “SCHEDULE” from the Service bar at the top of the
screen.
A list of programs that have record or remind events scheduled
appears. The icons on the right side indicate the status of the
events.
• Once only recording
• Daily Records the same channel and time every
Monday through Friday (manual recording only)
• Regularly – Records the same program any day it airs
on the same channel at the same time
• Weekly recording (every week at the same time/day)
• Record Suspend – The program is set to record, but is
suspended because of a conflict with another recording or
auto tune reminder. The recording resumes when the
conflict is cleared.
• Off: The program remains in the SCHEDULE list, but will
not be recorded until the frequency is changed to one of the
above.
• Once only reminder
• Daily Reminds for the same channel and time every
Monday through Friday (manual reminder only)
• Regularly – Reminds the same program any day it airs
on the same channel at the same time
• Weekly reminder (every week at the same time/day)
• Remind Suspend – A reminder is set for the program,
but is suspended because of a conflict with another auto
tune reminder or recording. The reminder resumes when the
conflict is cleared.
• Off: The program remains in the SCHEDULE list, but
will not remind until the frequency is changed to one of the
above.
1
The program will still be recorded if it starts any time up to
the midway point of the originally scheduled program. For
example, up to 9:15 for a 9:00 to 9:30 program.
2
The reminder will still appear if the program starts any time
up to the midway point of the original schedule. For example,
60
En
up to 9:15 for a 9:00 to 9:30 program.
1
.
2
.
2 Highlight a program in the list and press MENU to display
the Schedule Options panel menu.
• When you highlight a program in the list you’ll see
information related to that program appear in the Info
Box.
The Schedule Options menu
The Schedule Options menu is accessible by pressing MENU
when either “SCHEDULE” is highlighted in the Service bar, or
a program is highlighted.
When “SCHEDULE” is highlighted in the service bar:
• go to Service Bar – closes the panel menu and returns to
the Service bar at the top of the screen.
• sort by – select a sort order for the program listings.
• new manual recording – select and then fill in all the
necessary fields to set the recording. Select “schedule
recording” when you’re done to save and exit, or select
“cancel” to exit without saving.
• new manual reminder – select and then fill in all the
necessary fields to set the reminder. Select “schedule
reminder” when you’re done to save and exit, or select
“cancel” to exit without saving.
• done – closes the panel menu and returns to the Service bar
at the top of the screen.
• cancel – closes the panel menu without saving any changes
and returns to the Service bar at the top of the screen.
When a program is highlighted:
• go to Service Bar – closes the panel menu and returns to
the Service bar at the top of the screen.
• watch now – start watching the selected program (this
option is “tune to channel” for a program that isn’t showing
now).
• cancel – closes the panel menu and returns to the
highlighted program listing.
For recording:
• set recording – set the program to record (opens the Record
Options menu).
• delete recording – remove the recording from the schedule
(requires confirmation).
• edit recording – edit the recording settings (opens the
Record Options menu).
For reminder:
• set reminder – set the program to remind (opens the
Remind Options menu).
• delete reminder – remove the reminder from the schedule
(requires confirmation).
• edit reminder – edit the reminder settings (opens the
Remind Options menu).
Page 61

TV Guide On Screen™ System Operation
10
Changing setup options
You can change TV Guide On Screen™ settings from the Setup
menu. Setup options are divided into three categories: System
Settings, Channel Display, and Default Options.
1 Select “SETUP” from the Service bar at the top of the
screen.
2 Press to select one of the setup areas.
As you highlight an option you can see the settings you
can adjust in that area:
• System Settings – ZIP/postal code, cable setup, etc.
• Channel Display – Channel position, tuning channel,
display on/off, etc.
• Default Options – General, recording and reminder
defaults
2 Press ENTER to display the current settings and the
options to change them.
English
3 Select one of the options, then follow the on-screen
instructions.
• Yes, everything is correct: displays a helpful information
screen. Press ENTER to quit the TV Guide On Screen™.
• Yes, but my channel lineup is incorrect: displays a
screen from which you may choose the correct channel
lineup. Press ENTER to display the Channel Editor
screen.
• No, repeat setup process: displays screen 1 shown on
page 38.
Changing the Channel Display settings
From the Channel Display settings you can set/change:
• the display setting to always display (On), never display (Off),
or display only when channel information is available (Auto
Hide).
• the tuned channel number.
• the channel position in the channel listing.
1 Highlight the “Change Channel Display” item.
Changing the System Settings
The System Settings include your ZIP/postal code and your
cable TV setup.
1 Highlight the “Change System Settings” item.
2 Press ENTER to display the channel editor.
61
En
Page 62

10
TV Guide On Screen™ System Operation
3 Press / to highlight a channel then press ENTER to go
to the Grid Options menu.
From the Grid Options menu you can set:
• channel – On (display in channel list), Off (don’t display)
or Auto Hide (hide when no program information is
available)
• service – the type of service that the channel operates
on (cable, etc.)
• tune channel – the channel number that the channel
listing is tuned to
• position – place that the channel appears in the
channel list
4 When you’ve made all the settings you want for the
channel, highlight “done” then press ENTER.
• To cancel without saving any of the changes you made,
select “cancel”.
Changing the Default Options
This is the place to change the default settings for recordings,
reminders and other general settings.
1 Select the “Change Default Options” item.
2 Select one of the three default option categories.
A different panel menu appears for each option:
General default options
• box size – the initial size of the Info Box (no, small,
large, last used)
• box cycle – the cycle behavior of the Info Box (no only, small
only, large only, no & small, no & large, small & large, all)
• auto guide – Display TV Guide On Screen™ guide
automatically when you switch on the TV (On, Off)
Record defaults
• start – when to start a recording (up to 120 minutes earlier
or later than the program start time, or On time)
• end – when to end a recording (up to 120 minutes earlier or
later than the program end time, or On time)
• recorder – selects a recorder to be used for recording.
Remind defaults
• auto tune – automatically tunes to the correct channel
when a reminder becomes due (Yes or No)
• when – when to display the reminder (15 minutes early to 15
minutes late, or On time)
3 When you’ve made all the settings you want, highlight
“done” then press ENTER.
• To cancel without saving any of the changes you made,
select “cancel”.
62
En
Page 63

Adjustments and Settings
Adjustments and Settings
11
Sleep Timer
When the selected time elapses, the Sleep Timer automatically
places the system into the standby mode.
Press SLEEP to select the desired time.
• The timer starts counting.
• Each time you press SLEEP, the selection is switched as
below:
30 60 90
(cancel) (minutes)
• The factory default is “Off”.
Off
120
NOTE
• To cancel the Sleep Timer, select “Off” by pressing SLEEP.
• Five minutes before the selected time elapses, the remaining
time appears every minute.
You can also use the menu to set the Sleep Timer.
1 Press HOME MENU.
2 Select “Sleep Timer”. ( / then ENTER)
3 Select the desired time. ( / then ENTER)
4 Press HOME MENU to exit the menu.
AV Selection
Select from the five viewing options, depending on the current
environment (e.g., room brightness), the type of the current TV
program, or the type of images input from external equipment.
1 Press AV SELECTION.
• The current AV Selection mode appears.
2 Press AV SELECTION again before the displayed mode
disappears.
• For AV source, the mode is switched in this order;
STANDARD, DYNAMIC, MOVIE, GAME, then USER.
• For PC source, the mode is switched between
STANDARD and USER.
4 Select the desired option. ( / then ENTER)
AV Selection
STANDARD
DYNAMIC
MOVIE
GAME
USER
For AV source
Item Description
STANDARD For a highly defined image in a normally bright
room
This selection is shared by the external input and
TV input sources.
DYNAMIC For a very sharp image with maximum contrast
This mode does not allow manual image quality
adjustment.
This selection is shared by the external input and
TV input sources.
MOVIE For movies
This selection is shared by the external input and
TV input sources.
GAME Lowers image brightness for easier viewing.
This selection is shared by the external input and
TV input sources.
USER Allows you to customize settings as desired. You
can set the mode for each input source.
For PC source
Item Description
STANDARD For a highly defined image in a normally bright room
USER Allows you to customize settings as desired. You can
set the mode for each input source.
5 Press HOME MENU to exit the menu.
English
You can also use the menu to change the options.
1 Press HOME MENU.
2 Select “Picture”. ( / then ENTER)
3 Select “AV Selection”. ( / then ENTER)
NOTE
• You can also press AV SELECTION on the remote control
unit to switch the viewing option.
• If you have selected “DYNAMIC”, you cannot select
“Contrast”, “Brightness”, “Color”, “Tint”, “Sharpness”, “Pro
Adjust” and “Reset”; these menu items are dimmed.
• To prevent the screen from damage, you can freely change
the AV selection mode while enjoying the Home Gallery
function. However, when you resume the Home Gallery after
having quit it, “STANDARD” is automatically selected for the
AV source.
• While enjoying the Home Gallery, you can freely change the
AV selection mode, but you cannot select “USER”.
63
En
Page 64

11
Adjustments and Settings
Basic picture adjustments
Adjust the picture to your preference for the chosen AV
Selection option (except DYNAMIC).
1 Press HOME MENU.
2 Select “Picture”. ( / then ENTER)
3 Select an item to be adjusted. ( / then ENTER)
Picture
AV Selection
Contrast
Brightness
Color
Tint
Sharpness
Pro Adjust
Reset
4 Select the desired level. ( / )
Contrast
STANDARD
40
0
0
0
0
40
For PC source, the following screen appears:
Picture
AV Selection
Contrast
Brightness
Red
Green
Blue
Reset
STANDARD
40
0
0
0
0
NOTE
• To perform advanced picture adjustments, select “Pro
Adjust” in step 3 and then press ENTER. For the subsequent
procedures see “Advanced picture adjustments” on page 65.
• To restore the factory defaults for all items, press / to
select “Reset” in step 3, and then press ENTER. A
confirmation screen appears. Press / to select “Yes”, and
then press ENTER.
• When an adjustment screen is displayed, you can also
change the item to be adjusted, by pressing / .
5 Press HOME MENU to exit the menu.
For AV source
Item
Contrast For less contrast For more contrast
Brightness For less brightness For more brightness
Color For less color intensity For more color intensity
Tint Skin tones become
Sharpness For less sharpness For more sharpness
For PC source
Item
Contrast For less contrast For more contrast
Brightness For less brightness For more brightness
Red For weaker red For stronger red
Green For weaker green For stronger green
Blue For weaker blue For stronger blue
button button
purplish
button button
Skin tones become
greenish
64
En
Page 65

Adjustments and Settings
11
Advanced picture adjustments
The Plasma Display System provides various advanced
functions for optimizing the picture quality. For details on these
functions, see the tables.
Using PureCinema
1 Press HOME MENU.
2 Select “Picture”. ( / then ENTER)
3 Select “Pro Adjust”. ( / then ENTER)
4 Select “PureCinema”. ( / then ENTER)
5 Select the desired parameter. ( / then ENTER)
• For the selectable parameters, see the table.
PureCinema
Automatically detects a film-based source (originally encoded at 24
frames/second), analyzes it, then recreates each still film frame for highdefinition picture quality.
Selections Off Deactivates the PureCinema.
Standard Produces smooth and vivid moving
images (film specific) by automatically
detecting recorded image information
when displaying DVD or high-definition
images (e.g., movies) having 24 frames
per second.
ADV Produces smooth and quality moving
images (as shown on theatre screens) by
converting to 72 Hz when displaying DVD
images (e.g., movies) having 24 frames
per second.
NOTE
• “Standard” is not selectable when 480p or 720p@60Hz or
1080p@24Hz (HDMI) signals are input.
• “ADV” is not selectable when 1080p@24Hz (HDMI) signals
are input.
Using CTI
1 Press HOME MENU.
2 Select “Picture”. ( / then ENTER)
3 Select “Pro Adjust”. ( / then ENTER)
4 Select “Color Detail”. ( / then ENTER)
5 Select “CTI”. ( / then ENTER)
6 Select the desired parameter. ( / then ENTER)
CTI
Provides images with clearer color contours. The CTI stands for Color
Transient Improvement.
Selections Off Deactivates the CTI.
On Activates the CTI.
7 Press HOME MENU to exit the menu.
Eliminating noise from images
1 Press HOME MENU.
2 Select “Picture”. ( / then ENTER)
3 Select “Pro Adjust”. ( / then ENTER)
4 Select “NR”. ( / then ENTER)
5 Select an item to be adjusted. ( / then ENTER)
• You can select “DNR” or “MPEG NR”.
6 Select the desired parameter. ( / then ENTER)
DNR
Eliminates video noise for clean, crisp images. DNR stands for Digital
Noise Reduction.
Selections Off Deactivates the DNR.
High Enhanced DNR
Mid Standard DNR
Low Moderate DNR
English
Using Color Temp
1 Press HOME MENU.
2 Select “Picture”. ( / then ENTER)
3 Select “Pro Adjust”. ( / then ENTER)
4 Select “Color Detail”. ( / then ENTER)
5 Select “Color Temp”. ( / then ENTER)
6 Select the desired parameter. ( / then ENTER)
Color Temp
Adjusts the color temperature, resulting in a better white balance.
Selections High White with bluish tone
Mid Natural tone
Low White with reddish tone
7 Press HOME MENU to exit the menu.
MPEG NR
Eliminates mosquito noise from video images when a DVD is played,
resulting in noise-free images.
Selections Off Deactivates the MPEG NR.
High Enhanced MPEG NR
Mid Standard MPEG NR
Low Moderate MPEG NR
7 Press HOME MENU to exit the menu.
65
En
Page 66

11
Adjustments and Settings
Sound adjustments
Adjust the sound to your preference for the chosen AV
Selection option. See page 63.
1 Press HOME MENU.
2 Select “Sound”. ( / then ENTER)
3 Select an item to be adjusted. ( / )
4 Select the desired level. ( / )
Sound STANDARD
Treble
Bass
Balance
Reset
FOCUS
Front Surround
Item
Tre bl e For weaker treble For stronger treble
Bass For weaker bass For stronger bass
Balance Decreases audio from the
button button
right speaker.
5 Press HOME MENU to exit the menu.
NOTE
• To restore the factory defaults for all the items, press / to
select “Reset” in step 3, and then press ENTER. A
confirmation screen appears. Press / to select “Yes”, and
then press ENTER.
2
0
0
Off
Off
Decreases audio from the
left speaker.
FOCUS
This shifts the sound-source direction (sound image) upward
and produces clear sound contours.
1 Press HOME MENU.
2 Select “Sound”. ( / then ENTER)
3 Select “FOCUS”. ( / )
4 Select the desired parameter. ( / )
Item Description
Off Deactivates the FOCUS.
On Activates the FOCUS.
5 Press HOME MENU to exit the menu.
Front Surround
This provides three-dimensional sound effects and/or deep,
rich bass.
1 Press HOME MENU.
2 Select “Sound”. ( / then ENTER)
3 Select “Front Surround”. ( / )
4 Select the desired parameter. ( / )
Item Description
Off Deactivates both the SRS and TruBass.
SRS Reproduces highly effective three-dimensional sound.
Tru Ba ss
(factory default)
TruBass + SRS Provides both TruBass and SRS effects.
Provides deep, rich bass using a new technology.
5 Press HOME MENU to exit the menu.
66
En
NOTE
• (WOW) designates a status where the FOCUS is on
and TruBass + SRS has been selected for Front Surround.
• is a trademark of SRS Labs, Inc.
• WOW technology is incorporated under license from SRS
Labs, Inc.
Page 67

Adjustments and Settings
11
Power Control
Power Control provides convenient functions for saving power.
Energy Save
You may use one of the three Energy Save modes to save power
consumption.
1 Press HOME MENU.
2 Select “Power Control”. ( / then ENTER)
3 Select “Energy Save”. ( / then ENTER)
4 Select “Save1”, “Save2”, or “Picture Off”. ( / then
ENTER)
Item Description
Standard Maximum picture brightness; may increase glass
Save1 Slightly reduced power consumption and brightness;
Save2 Lowest power consumption; slightly decreased
Picture Off Deactivates the screen to save power. To restore the
5 Press HOME MENU to exit the menu.
NOTE
• You can also select this function using the Home menu
when the input source is a PC.
No Signal off (AV mode only)
The system will be automatically placed into the standby mode
if no signal is received for 15 minutes.
1 Press HOME MENU.
2 Select “Power Control”. ( / then ENTER)
3 Select “No Signal off”. ( / then ENTER)
4 Select “Enable”. ( / then ENTER)
Item Description
Disable
(factory default)
Enable Places the system into the standby mode if no signal
panel buzzing.
optimal setting for most uses.
brightness.
screen display, press any button other than VOL +/–
and MUTING.
This setting is not memorized by the system.
Does not place the system into the standby mode.
is received for 15 minutes.
No Operation off (AV mode only)
The system will be automatically placed into the standby mode
when no operation is performed for three hours.
1 Press HOME MENU.
2 Select “Power Control”. ( / then ENTER)
3 Select “No Operation off”. ( / then ENTER)
4 Select “Enable”. ( / then ENTER)
Item Description
Disable
(factory default)
Enable Places the system into the standby mode if no
Does not place the system into the standby mode.
operation is performed for three hours.
5 Press HOME MENU to exit the menu.
NOTE
• Five minutes before the system is placed into the standby
mode, a message appears every minute.
Power Management (PC mode only)
The system will be automatically placed into the standby mode
when no signal is received from the personal computer.
1 Press HOME MENU.
2 Select “Power Control”. ( / then ENTER)
3 Select “Power Management”. ( / then ENTER)
4 Select “Mode1” or “Mode2”. ( / then ENTER)
Item Description
Off
(factory default)
Mode1 • Places the system into the standby mode when no
Mode2 • Places the system into the standby mode when no
No power management
signal is received from the personal computer for
eight minutes.
• Even when you start using the computer and a
signal is received again, the system stays off.
• The system is switched on again by pressing
STANDBY/ON on the Plasma Display or TV on
the remote control unit.
signal is received for eight seconds.
• When you start using the computer and a signal is
received again, the system is switched on.
• The system is switched on again by pressing
STANDBY/ON on the Plasma Display or TV on
the remote control unit.
English
5 Press HOME MENU to exit the menu.
NOTE
• Five minutes before the system is placed into the standby
mode, a message appears every minute.
• The system may not be placed into the standby mode when
noise signals are present at the Plasma Display System after
a TV program finishes.
5 Press HOME MENU to exit the menu.
67
En
Page 68

11
Adjustments and Settings
Image position adjustment
(AV mode only)
Adjusts the horizontal and vertical positions of images on the
Plasma Display.
1 Press HOME MENU.
2 Select “Option”. ( / then ENTER)
3 Select “Position”. ( / then ENTER)
4 Select “H/V Position Adjust”. ( / then ENTER)
Position
H/V Position Adjust
Reset
5 Adjust the vertical position ( / ) or horizontal position
(/).
6 Press HOME MENU to exit the menu.
NOTE
• To restore the factory defaults for all the items, press / to
select “Reset” in step 4, and then press ENTER. A
confirmation screen appears. Press / to select “Yes”, and
then press ENTER.
• Adjustments are stored separately for each input source.
Automatic image position and clock
adjustments (PC mode only)
Use Auto Setup to automatically adjust positions and clock of
images coming from a personal computer.
1 Press HOME MENU.
2 Select “Option”. ( / then ENTER)
3 Select “Auto Setup”. ( / then ENTER)
Manual image position and clock
adjustments (PC mode only)
Usually you can easily adjust the positions and clock of images
using Auto Setup. Use Manual Setup to optimize the positions
and clock of images when necessary.
1 Press HOME MENU.
2 Select “Option”. ( / then ENTER)
3 Select “Manual Setup”. ( / then ENTER)
4 Select an item to be adjusted. ( / then ENTER)
Manual Setup
H/V Position Adjust
Clock
Phase
Reset
5 Perform adjustment. ( / or / )
• With “Clock” or “Phase” selected, you can change the
parameter using / .
6 Press HOME MENU to exit the menu.
NOTE
• To restore the factory defaults for all the items, press / to
select “Reset” in step 4, and then press ENTER. A
confirmation screen appears. Press / to select “Yes”, and
then press ENTER.
0
0
Option
Auto Setup
Manual Setup
• Auto Setup starts.
4 Press HOME MENU to exit the menu.
NOTE
• When Auto Setup is finished, “Auto Setup completed.”
appears.
• Even when “Auto Setup completed.” appears, Auto Setup
may have failed, depending on conditions.
• Auto Setup may fail with a PC image composed of similar
patterns or monochrome. If not successful, change the PC
image and try again.
• Be sure to connect the computer to the Plasma Display and
switch it on before starting Auto Setup.
68
En
Page 69

Adjustments and Settings
Selecting a screen size manually
In single-screen mode, press SCREEN SIZE to change the size
of the screen from among the selectable options for the type of
video signals currently received.
• The selectable screen sizes differ depending on the types of
input signals.
AV mode
Item Description
4:3 For 4:3 “standard” pictures. A side bar appears on each
side.
FULL For 16:9 squeezed pictures.
ZOOM For 16:9 letterbox pictures. Bars may appear on the top
and bottom on some programs.
CINEMA For 14:9 letterbox pictures. Bars may appear on the top
and bottom on some programs.
WIDE In this mode pictures are progressively stretched toward
each side of the screen.
• While watching High Definition TV broadcasting, pressing
SCREEN SIZE switches among FULL, ZOOM, WIDE, and 4:3.
• If you watch High Definition TV broadcasting with WIDE
selected, part of the screen (e.g., images, graphic interface)
may not appear on the display. If this is the case, select FULL.
• Some HD broadcasts may display 4:3 content with side
masks, which may cause uneven wear. After viewing, it is
recommended to view full screen motion video.
• The selectable screen sizes may differ depending on the
conditions.
• You can freely change the screen size while watching HD
broadcasts or enjoying other HD input sources. However,
when you resume the HD programs after having quit them,
“FULL” is automatically selected for the screen size.
AV mode
4:3
11
English
NOTE
• It is not recommended to consistently display signals that do
not completely fill the screen. This may cause temporary or
permanent image retention depending on the frequency and
duration.
PC mode except for XGA signals
Item Description
4:3 Fills the screen without altering the input signal aspect
ratio.
FULL Full 16:9 screen display
Dot by Dot Matches input signal with same number of screen
pixels.
PC mode for XGA signals
(Ex. 1024 × 768 input with PDP-5072HD/PDP-5071HD/PDP5070HD)
Item Description
4:3 Matches input signal with the same number of screen
pixels.
Optimized for 1024 × 768 display
FULL1 Full 16:9 screen display
Optimized for 1024 × 768 display
FULL2 For wide signal display
Use when displaying 1360 × 768 signal resolution.
WIDE FULL
CINEMA ZOOM
PC mode except for XGA signals
4:3
Dot by
Dot
PC mode for XGA signals
4:3
FULL
NOTE
• In 2-screen mode, press SCREEN SIZE to change the size of
the left screen.
• For the PDP-6072HD/PDP-6071HD/PDP-6070HD/PDP4272HD/PDP-4271HD/PDP-4270HD the number of panel
pixels is different, so signal processing and actual viewing
conditions will vary slightly.
FULL2 FULL1
NOTE
• The selectable screen sizes may differ depending on the
conditions.
69
En
Page 70

11
Adjustments and Settings
Selecting a screen size automatically
The Plasma Display automatically selects an appropriate
screen size when video signals are received from a connected
HDMI equipment (see page 72). To activate this function, use
the following procedure.
1 Press HOME MENU.
2 Select “Option”. ( / then ENTER)
3 Select “Auto Size”. ( / then ENTER)
4 Select “On”. ( / then ENTER)
Auto Size
Off
On
Item Description
Off
(factory default)
On Activates the Auto Size function.
5 Press HOME MENU to exit the menu.
NOTE
• Manually select an appropriate screen size if an image does
not automatically switch to a correct screen format.
• When the video signal contains no aspect ratio information,
the function will not work even with “On” selected.
Selecting a screen size for received 4:3 aspect
ratio signals
Specify whether the Plasma Display should choose the 4:3
mode or WIDE mode when 4:3 aspect ratio signals are received
with the Auto Size function activated.
1 Press HOME MENU.
2 Select “Option”. ( / then ENTER)
3 Select “4:3 Mode”. ( / then ENTER)
4 Select “WIDE” or “4:3”. ( / then ENTER)
Deactivates the Auto Size function.
Changing the brightness at both sides
of the screen (Side Mask)
With the 4:3 screen size selected for the AV mode, you can
change the brightness of the gray side masks that appear at
both sides of the screen.
1 Press HOME MENU.
2 Select “Option”. ( / then ENTER)
3 Select “Side Mask”. ( / then ENTER)
4 Select the desired parameter. ( / then ENTER)
Item Description
Fixed
(factory default)
Auto Adjusts the brightness of the gray side masks
Always sets the same brightness for the gray side
masks.
according to the brightness of images.
5 Press HOME MENU to exit the menu.
NOTE
• Displaying pictures in 4:3 screen mode for an extended
period may cause an after-image.
Language setting
You can select a language to be used for on-screen display
such as menus from among three languages: English, French,
and Spanish.
1 Press HOME MENU.
2 Select “Option”. ( / then ENTER)
3 Select “Language”. ( / then ENTER)
4 Select a language. ( / )
Language
Menu
English
4:3 Mode
WIDE
4:3
Item Description
WIDE
(factory default)
4:3 Keeps the 4:3 aspect ratio and presents side
Wide image without side masks
masks.
5 Press HOME MENU to exit the menu.
70
En
5 Press HOME MENU to exit the menu.
4:3WIDE
Page 71

Enjoying through External Equipment
Enjoying through External Equipment
12
About External Equipment
You can connect many types of external equipment to your
Plasma Display System, like a DVD player, VCR, personal
computer, game console, and camcorder.
To view images coming from external equipment, select the
input source using the INPUT buttons on the remote control or
the INPUT button on the Plasma Display.
CAUTION
• To protect all equipment, always unplug the Plasma Display
from the power outlet before connecting to a DVD player,
VCR, personal computer, game console, camcorder, or other
external equipment.
NOTE
• Refer to the relevant instruction manual (DVD player,
personal computer, etc.) carefully before making
connections.
Watching a DVD image
Connecting a DVD player
Use the INPUT 2 terminals when connecting a DVD player and
other audiovisual equipment.
Plasma Display (rear view)
Displaying a DVD image
To watch a DVD image, press INPUT 2 on the remote control
unit or press INPUT on the Plasma Display to select INPUT2.
NOTE
• Refer to your DVD player instruction manual for the signal
type.
• The INPUT 2 terminals are checked whether they are
connected in the following order; 1) Component Video, 2) SVideo, 3) Video.
Use the desired connection for viewing.
• Connect external equipment to only terminals that are to be
actually used.
Watching a VCR image
Connecting a VCR
Use the INPUT 1 terminals when connecting a VCR and other
audiovisual equipment.
Plasma Display (rear view)
S-Video cable
(commercially available)
AV cable
(commercially available)
English
Component Video cable
(commercially available)
S-Video cable
(commercially available)
AV cable
(commercially available)
DVD player
VCR
Displaying a VCR image
To watch a VCR image, press INPUT 1 on the remote control
unit or press INPUT on either the Plasma Display or the
simplified remote control unit to select INPUT1.
NOTE
• The INPUT 1 terminals are checked whether they are
connected in the following order; 1) S-Video, 2) Video.
Use the desired connection for viewing.
71
En
Page 72

12
Enjoying through External Equipment
Using HDMI Input
The INPUT 5 and INPUT 6 terminals are HDMI terminals to
which digital video and audio signals can be input. To use the
HDMI terminal, specify the types of video and audio signals to
be received from the connected equipment. For the types of
these signals, see the operation manual that came with the
connected equipment.
Before starting the menu, press INPUT 5 (or INPUT 6) on the
remote control unit or press INPUT on the Plasma Display to
select INPUT 5 (or INPUT 6).
Input signal correlation table
19201080i@59.94/60Hz
720480p@59.94/60Hz
1280720p@59.94/60Hz
720(1440)480i@59.94/60Hz
19201080p@24Hz
For audio, the system supports the following:
• Linear PCM (STEREO 2ch)
• Sampling frequency: 32 kHz, 44.1 kHz, 48 kHz
NOTE
• PC signals are not supported.
• It may take time until an image is displayed depending on the
equipment connected.
Connecting HDMI equipment
Plasma Display (rear view)
Viewed from below of
the Plasma Display
HDMI cable having the
HDMI mark
(commercially available)
Audio cable
(commercially available)
Make this connection
when inputting analog
audio signals.
To specify the type of digital video signals:
1 Press HOME MENU.
2 Select “Option”. ( / then ENTER)
3 Select “HDMI Input”. ( / then ENTER)
4 Select “Video”. ( / then ENTER)
5 Select the type of digital video signals. ( / then ENTER)
• If you select “Auto”, an attempt will be made to identify
the type of digital video signals when digital video
signals are received.
Item Description
Auto
(factory default)
Color-1 Digital Component Video signals (4:2:2) locked
Color-2 Digital Component Video signals (4:4:4) locked
Color-3 Digital RGB signals locked
Automatically identifies input digital video signals.
6 Press HOME MENU to exit the menu.
NOTE
• If you select a parameter other than “Auto”, make such a
setting that results in natural color.
• If no image appears, specify another digital video signal type.
• For the digital video signal types to be specified, check the
operation manual that came with the connected equipment.
To specify the type of audio signals:
1 Press HOME MENU.
2 Select “Option”. ( / then ENTER)
3 Select “HDMI Input”. ( / then ENTER)
4 Select “Audio”. ( / then ENTER)
5 Select the type of audio signals. ( / then ENTER)
• If you select “Auto”, an attempt will be made to identify
the type of audio signals when audio signals are
received.
Item Description
Auto
(factory default)
Digital Accepts digital audio signals.
Analog Accepts analog audio signals.
Automatically identifies input audio signals.
6 Press HOME MENU to exit the menu.
72
En
HDMI equipment
NOTE
• If no sound is output, specify another audio signal type.
• For the audio signal types to be specified, check the
operation manual that came with the connected equipment.
• Depending on the equipment to be connected, you also need
to connect analog audio cables.
Page 73

Enjoying through External Equipment
12
Enjoying a game console or watching
camcorder images
Connecting a game console or camcorder
Use the INPUT 4 terminals to connect a game console,
camcorder and other audiovisual equipment.
Plasma Display (left side view)
Component Video cable
(commercially available)
AV cable
(commercially available)
NOTE
• The INPUT 4 terminals are checked whether they are
connected in the following order; 1) Component Video, 2)
Video.
Use the desired connection for viewing.
• Connect external equipment to only terminals that are to be
actually used.
Displaying an image of the game console or
camcorder
To watch an image coming from the game console or
camcorder, press INPUT 4 on the remote control unit or press
INPUT on either the Plasma Display or the simplified remote
control unit to select INPUT4.
Recording digital TV programs using a
VCR
If you connect recording equipment such as a VCR to the
MONITOR OUT terminals on the rear of the Plasma Display,
you can record, for example, digital TV programs using the
recording equipment.
You can also record digital TV programs more easily by using
the TV Guide On Screen™ system. Connect the supplied GLINK cable to the G-LINK terminal on the rear of the Plasma
Display and then position the G-LINK cable’s wand so that its
light emitting section faces the remote control sensor on the
recording equipment. For more information, see page 76.
English
Camcorder/Game console
Avoiding unwanted feedback
You can prevent unwanted feedback from adversely affecting
the quality of images. Specify the output terminal whose
output is to be inhibited.
1 Press HOME MENU.
2 Select “Option”. ( / then ENTER)
3 Select “Monitor Out”. ( / then ENTER)
4 Select “INPUT1 Prohibit”, “INPUT2 Prohibit”, “INPUT3
Prohibit”, “INPUT4 Prohibit”, “INPUT 5 Prohibit” or
“INPUT 6 Prohibit”. ( / then ENTER)
5 Press HOME MENU to exit the menu.
73
En
Page 74

12
Enjoying through External Equipment
Connecting a recorder
Plasma Display (rear view)
G-LINK cable (supplied)
AV cable
(commercially available)
Viewed from below of
the Plasma Display
Connecting other audio equipment
The digital audio output terminal (optical) on this system can
output Dolby Digital signals. Using an optical digital cable,
connect an AV receiver to the digital audio output terminal
(optical) on the rear of the Plasma Display. This allows audio
such as digital TV broadcasting to be played in high quality.
If your AV receiver does not have a digital audio input terminal
(optical), you may connect the MONITOR OUT terminals
(AUDIO) on the rear of the Plasma Display to the audio input
terminals on the AV receiver. However, this method may result
in audio delay between the speakers and AUDIO, which may be
reduced by muting the speakers on the Plasma Display.
Nonetheless, you may experience delay between audio and
video.
NOTE
• When using the digital audio output terminal (optical), you
need to make settings depending on your AV receiver. For
more information, see the instruction manual that came
with the AV receiver.
Connecting an AV receiver
Plasma Display (rear view)
VCR
NOTE
• About the MONITOR OUT terminals
The MONITOR OUT terminals cannot output the following
signals:
1 Video signals input from the COMPONENT VIDEO
terminal
2 Video signals from a personal computer
3 Digital video and audio signals from the HDMI terminals
• When watching images played back on a VCR connected to
the MONITOR OUT terminals, select an input source (e.g., TV
channel reception) on the recording equipment other than
external input sources. Selecting an external input source
may result in distorted images or noise.
• Make sure to place the VCR into the standby status when
presetting TV programs for recording with the TV Guide On
Screen™ system.
• The MONITOR OUT terminal may result in audio delay
between the speaker and AUDIO. This may be reduced by
muting the speakers on the Plasma Display. Nonetheless,
you may experience delay between audio and video.
• If degraded picture quality is observed while viewing copyprotected VOD movies connect the Plasma Display directly
to other TV sets. Do not connect through a VCR.
Viewed from below of
the Plasma Display
Optical digital cable
(commercially available)
This connection is
not required when
connecting an AV
amp equipped
with the surround
function to a
subwoofer.
Subwoofer
AV cable
(commercially available)
AV receiver
NOTE
• For details, refer to the operation manual for the audio
equipment to be connected.
• The audio accompanying the images shown on the display
are always output to the SUBWOOFER OUTPUT terminal.
• When signals are input from the HDMI terminals, no digital
or analog signals are output from the DIGITAL OUT terminal.
74
En
Page 75

Enjoying through External Equipment
12
Switching the optical audio signal type
Set up for the DIGITAL AUDIO output terminal (OPTICAL),
depending on your AV receiver.
1 Press HOME MENU.
2 Select “Option”. ( / then ENTER)
3 Select “Digital Audio Out”. ( / then ENTER)
4 Select “Dolby Digital” or “PCM”. ( / then ENTER)
Item Description
Dolby Digital
(factory default)
PCM Always outputs in the PCM format regardless of the
For Dolby Digital encoded signals, outputs in the
Dolby Digital format. For PCM encoded signals,
outputs in the PCM format.
types of signals.
5 Press HOME MENU to exit the menu.
Watching an image from a personal
computer
Connecting a personal computer
Use the PC terminals to connect a personal computer.
NOTE
• The PC input terminals are DDC2B-compatible.
• Plug & Play may not correctly function, depending on the
personal computer in use.
Plasma Display (rear view)
Viewed from below of
the Plasma Display
RGB cable
(commercially
available)
AV cable with a mini plug
(commercially available)
(When PC audio is
connected)
Displaying an image from a personal computer
When connected to a personal computer, the input signal type
is automatically identified. If the personal computer image
does not come in clearly, you may need to use Auto Setup. See
page 68.
To watch an image coming from the personal computer, press
PC on the remote control unit or press INPUT on the Plasma
Display to select “PC”.
NOTE
• The PC terminals cannot be used for audio-visual
equipment.
Signal names for 15-pin mini D-sub connector
5
4 321
10
9
15
141312
(front view)
Pin No. Signal name
1 R
2 G
3 B
4 Not connected
5 Not connected
6 GND (ground)
7 GND (ground)
8 GND (ground)
9 +5V
10 GND (ground)
11 Not connected
12 SDA
13 HD
14 VD
15 SCL
NOTE
• A Macintosh adaptor may be required for use with some
Macintosh computers.
6
7
8
11
English
Personal computer
75
En
Page 76

12
Enjoying through External Equipment
Computer compatibility chart
Resolution Frequency
720 × 400 70 Hz
640 × 480 60 Hz
72 Hz
75 Hz
800 × 600 56 Hz
60 Hz
72 Hz
75 Hz
1024 × 768 60 Hz
70 Hz
75 Hz
1360 x 768 60 Hz
G-LINK™ connection
You need to make this connection, so that the TV Guide On
Screen™ system works with the Plasma Display System to
enable the system’s recording features with your VCR.
NOTE
• In order to use your VCR with the TV Guide On Screen™
system, you have to correctly set up for the TV Guide On
Screen™ system. See “TV Guide On Screen™ System Setup”
on page 38.
• Make sure to position the G-LINK cable’s wand so that its
light emitting section faces the remote control sensor on the
VCR.
• Make sure to place the VCR into the standby status when
presetting TV programs for recording with the TV Guide On
Screen™ system.
• Be careful not to leave the cable looped when making the
connection.
Attaching the ferrite core
To help prevent noise, attach the supplied ferrite core to the
connector end of the G-LINK cable as shown.
G-LINK cable
Ferrite core
Pull the cable slightly to
take up any slack .
A
A
As close as possible
CAUTION
• Regarding the G-LINK cable, attach the supplied ferrite core.
If you do not do this, this Plasma Display will not conform to
mandatory FCC standards.
When connecting the VCR
Plasma Display (rear view)
76
En
AV cable
(commercially
available)
VCR
Viewed from below of
the Plasma Display
G-LINK cable (supplied)
G-LINK cable’s wand
Point to the remote
control sensor
Page 77

Enjoying through External Equipment
12
Connecting control cords
Connect control cords between the Plasma Display and other
PIONEER equipment having the logo. You can then operate
the connected equipment by sending commands from its
remote control unit to the remote control sensor on the Plasma
Display.
After the CONTROL IN terminals have been connected, the
remote control sensors on the connected equipment do not
accept commands from the remote control units. Face the
remote control units to the remote control sensor on the
Plasma Display when operating the connected equipment.
NOTE
• Make sure that the power is turned off when making
connections.
• Complete all component connections before making control
cord connections.
About SR+
The CONTROL OUT terminal on the rear of the Plasma Display
supports SR+, which allows linked operations with a PIONEER
AV receiver. SR+ presents functions such as the input switch
linkage operation function and the DSP surround mode display
function. For more information, see the instruction manual
that came with the PIONEER AV receiver supporting SR+.
Plasma Display (rear view)
CONTROL
IN
OUT
CONTROL
IN
OUT
English
NOTE
• When making control cord connections, use the SR+ cable.
• When making control cord connections with one or more
pieces of Pioneer equipment, directly connect the Plasma
Display and the Pioneer amplifier that supports SR+. Do not
connect other equipment between them.
• When the connected equipment is being operated using
SR+, the volume on the Plasma Display System is
temporarily reduced.
CONTROL
IN
OUT
When
SR+
is not used:
The control cables (commercially
available) are mono sound cables with
mini plugs (no resistance).
SR+
When
is used:
Use the SR+ cable (available as option).
77
En
Page 78

12
Enjoying through External Equipment
Enjoying through USB interface (Home
Gallery function)
On this system, you can watch JPEG images that have been
captured and stored in memory cards using a digital still
camera. You can also connect your digital camera directly to
the Plasma Display using a USB connector cable.
Digital still
camera
USB connector cable
USB memory
Multi-card reader
NOTE
• A single USB device can only be connected at a time. No
USB hub can be connected.
• Such devices as a printer or keyboard cannot be connected
and used.
Readable memory cards
This system can read memory cards whose formats are FAT12,
FAT16, FAT32, or VFAT.
Readable data files
This system can read only JPEG files that meet the following
conditions:
• Extensions are JPG or JPEG.
• JPEG 4:2:2 and 4:2:0 format
• The image resolution must be less than 3264 pixels in the
horizontal direction and 2448 pixels in the vertical direction.
• The image resolution must be higher than 160 pixels in the
horizontal direction and 120 pixels in the vertical direction.
Image data display
Connecting a USB device
Hold the USB device’s connector with its top side facing
the front panel, and then insert it into the USB port on the
side of the Plasma Display.
• Insert the USB device’s connector as far as it goes.
• When using the USB connector of your device, connect
it directly to the USB port.
Side of the Plasma Display
USB memory or
multi-card reader
Removing a USB device
To remove a USB device’s connector, quit the Home Gallery
screen and then remove it.
NOTE
• This system may not be able to display images, depending on
the type of your memory card.
• This system may not be able to display images modified or
edited using a personal computer or other equipment.
• This system complies with the USB Mass Storage Class.
78
En
NOTE
• For details on connectable devices, see Pioneer’s website:
http://www.pioneerelectronics.com
• Be sure to quit the Home Gallery screen before removing the
USB device. If you remove the USB device while the Home
Gallery screen is displayed, data inside the memory may be
damaged.
• Do not insert or remove the USB device immediately after the
system is switched on or off. This may cause data inside the
memory to be damaged.
• Do not turn the digital camera off while the Home Gallery
screen is displayed.
Page 79

Enjoying through External Equipment
12
Displaying a device list
After connecting a USB device, a device list screen appears
highlighting the device being selected.
Starting the initial Home Gallery screen
1 Press HOME MENU.
2 Select “Home Gallery”. ( / then ENTER)
Home Gallery
Device selection
HOME MENU
USB device
IC1210 CF
IC1210 MS
IC1210 MMC/SD
IC1210 SM
Exit
1/4
3 Select a device. ( / then ENTER)
Selecting a folder
The initial Home Gallery screen shows folders saved in the
memory card. Different types of icons appear depending on the
contents of folders.
— Designates a folder that contains another folder.
— Designates a folder that contains no image file.
Starting a thumbnail screen
When a folder is selected on the initial Home Gallery screen,
images in the folder are displayed in thumbnail format.
13
2
4
Home Gallery
[PICTURE SIZE]
[SAVED DATE]
[FILE NAME]
[ROTATION ANGLE]
Slide Show
StartA
SetupB
HOME MENU
Exit
Thumbnail 1/25
1600 1200
2005.08.29
2
0˚
➀ Picture size
➁ Saved date
➂ File name
➃ Rotation angle
➄ Image selection cursor
➅ Appears for unreadable images.
➆ Total number of images in the folder
➇ Appears when the folder contains more than 16 images.
➈ Indicates that the picture has been rotated.
Press / to scroll the screen.
To highlight a desired image, press / and / to move the
cursor. Information about the highlighted image appears at the
top left of the screen.
Press HOME MENU to quit the Home Gallery function.
95 7
001 002 003 004
005 006 007 008
009 010 011 012
013 014 015 016
6
8
English
— Designates a folder that contains one or more image
files.
— Designates one or more image files saved under the
root directory.
To select a desired folder, press / and then ENTER. Images
in the selected folder are displayed in thumbnail format.
79
En
Page 80

12
Enjoying through External Equipment
Starting a standard single-image screen
When the thumbnail screen is displayed, press / and /
to highlight a desired image, and then press ENTER. The
thumbnail screen closes, and only the selected image is
displayed.
Home Gallery
[PICTURE SIZE]
[SAVED DATE]
[FILE NAME]
[ROTATION ANGLE]
With the above screen displayed, you can use the following
keys to perform various operations:
BLUE:
Displays the previous image in the normal or full screen.
RED:
Displays the next image in the normal or full screen.
GREEN:
Rotates the displayed image clockwise. Each press rotates the
image in the sequence; 90°, 180°, and then 270°.
ENTER:
Each press switches between the normal screen and the full
screen.
PreviousA
NextB
RotationC
HOME MENU
1600 1200
2005.08.29
002
0˚
Exit
7 Select “Playback Mode”. ( / )
8 Select “Auto” or “Manual”. ( / )
• With “Auto” selected, images are automatically
changed at the specified intervals.
• With “Manual” selected, the previous image is displayed
by pressing BLUE or the next image by pressing RED.
Home Gallery
HOME MENU
Slide Show Setup
Display Mode
Playback Order
Number of Times of Playback
Playback Mode
Interval(sec)
Exit
Nomal
Name Order
Single time
Auto
3sec
9 If you have selected “Auto” in step 8, press / to select
“Interval(sec)”, and then press / to select the desired
display duration for individual images.
• You can select from among 3 seconds, 5 seconds, 10
seconds, 20 seconds, 30 seconds, 60 seconds, and 90
seconds.
10 To start the Slide Show screen, press RETURN to display
the thumbnail screen and then press BLUE.
• To quit the Home Gallery function, press HOME MENU.
NOTE
• If you intend to display the Slide Show screen for an extend
period of time, select “FULL” for the screen size in order to
avoid image retention on the screen.
HOME MENU:
Quits the Home Gallery function.
NOTE
• Be careful not to display the same image for an extended
period of time. The image may be burnt into the screen,
resulting in a residual image.
• Images smaller than 1024 × 768 pixels are displayed with
blank surrounding.
Starting the Slide Show Setup screen
When the thumbnail screen is displayed, press
screen to set up the Slide Show that sequentially changes images.
RED
1 Select “Display Mode”. ( / )
2 Select “Normal” or “Full”. ( / )
• With “Full” selected, images are displayed using the full
screen.
3 Select “Playback Order”. ( / )
4 Select “Name Order” or “Random”. ( / )
5 Select “Number of Times of Playback”. ( / )
6 Select “Single Time” or “Loop”. ( / )
• With “Loop” selected, Slide Show is repeated until
80
En
RETURN is pressed.
to start the
Starting the Slide Show screen
After setting up the Slide Show, you can start it to sequentially
change the images.
1 To start the Slide Show screen, press BLUE when a
thumbnail screen is displayed.
• With “Auto” selected for “Playback Mode”, images are
automatically changed at the specified intervals.
• With “Manual” selected for “Playback Mode”, press
BLUE to display the previous image or RED to display the
next image.
• While images are automatically changed, you can stop
and hold automatic image change for approximately 300
seconds by pressing BLUE. To resume, press and hold
BLUE again.
2 When quitting the Slide Show screen, press RETURN to
restore the thumbnail screen or HOME MENU to quit the
Home Gallery function.
3 Select from normal screen or full screen by pressing
ENTER.
• Each press switches between the normal screen and the
full screen.
Page 81

Useful Remote Control Features
Useful Remote Control Features
13
Presetting manufacturer codes to
control other devices
Presetting manufacturer codes
1 Slide the Mode switch to match the device to which you
want to preset the remote control signal.
2 Press EDIT and 1 at the same time.
• The LED flashes.
3 Press 0 – 9 to enter the manufacturer code. See page 82.
• Preset mode is finished once the LED no longer lights
up.
Library Search
In the event that the device code for a particular target unit is
unknown, you can cycle the remote through the available
codes for that device mode and sample functions from each
code in order to find the code that properly operates the
desired target device.
1 Slide the Mode switch to match the device to which you
want to preset the remote control signal.
2 Press EDIT and 3 at the same time.
• The LED indicator flashes and the remote control unit
enters the Library Search programming mode.
3 Press either SOURCE POWER, PLAY, 1 or CH+ to sample
the selected code.
4 When the code could not be found, press / to advance
to the next code or return to the previous code and repeat
step 3.
5 Press ENTER when the code that properly operates the
desired target device is found.
• All the available buttons for the selected mode are
programmed in. The remote control unit returns to
normal operation after turning the LED indicator on for
one second for confirmation.
Manufacturing Reset
You can reset all the learned and preset codes to default
regardless of the mode.
1 Press EDIT and POWER in any Mode switch position at
the same time.
• The LED indicator flashes and the remote control unit
enters the Manufacturing Reset mode.
2 Press D.
• A manufacturing reset is completed. The LED indicator
flashes for one second and the remote control unit
returns to normal operation.
NOTE
• To exit the Edit mode before it is complete, press EDIT again.
•If the Mode switch selection is changed when in the Edit
mode, the Edit mode is canceled.
• If no operation is performed for more than one minute, the
Edit mode is canceled.
• When you enter a code not listed, the LED flashes quickly.
• The initial mode is “PIONEER”.
English
81
En
Page 82

13
Useful Remote Control Features
Programming codes
CABLE
Brand Codes Brand Codes Brand Codes Brand Codes
ABC 0003 0008 0014 0011
Americast 0899 GoldStar 0144 Paragon 0000 Starcom 0003 0014
Amino 1602 1822 Hamlin 0009 0273 Philips 1305 0317 Supercable 0276
Bell & Howell 0014 Hitachi 0014 0011 0154 Pioneer 1877 0877 0144 0533
Bell South 0899 i3 Micro 1602 Thomson 1256
Birmingham Cable Communications
British Telecom 0003
Clearmaster 0883 KNC 0008 Quasar 0000 Toshiba 0000
ClearMax 0883 LG 0144 RadioShack 0883 Trans PX 0276
Cleartron 1327 Memorex 0000 RCA 1256 0021 Tristar 0883
Coolmax 0883 Motorola 1376 0476 0810 0276
Daeryung 1877 0877 0477 0008 Rembrandt 0011 United Cable 0003
Digeo 1187 Multitech 0883 Runco 0000 V2 0883
Digi 0637 MultiVision 0012 Samsung 0000 0144 Viewmaster 0883
Director 0476 Myrio 1602 1822 Scientific Atlanta 1877 0877 0477 0008
Dumont 0637 NTL 0003 Vision 0883
Gehua 0476 Optimus 0021 Sejin 1602 Vortex View 0883
General Instrument 0476 0810 0276 0003 Pace 1877 0237 0008 Signature 0011 Zenith 0000 0525 0899
General Instrument 0014 0011 Panasonic 0000 0008 0107 0021 Sony 1006 1506 1606
0017
0276 Jerrold 0476 0810 0276 0003
Global 1327 Panther 0637 Sprucer 0021
0012 0014 0011
1187 1254 0014 1106
Supermax 0883
0023 0260 1021
Pulsar 0000 Tocom 0012
PVP Stereo Visual Matrix
Regal 0279 0273 TS 0003
0003 Torx 0003
ViewmaxPro 1544
0017
SATELLITE
Brand Codes Brand Codes Brand Codes Brand Codes
AlphaStar 0772 Fortec Star 1550 Legend 0269 Realistic 0052
Amino 1615 Galaxis 0270 LG 1226 1414 1750 Samsung 1377 1142 1276 1108
BeauSAT 1586 GE 0392 0566 Magnavox 0724 0722
Century 0856 General Instrument 0869 MegaSat 1551
Channel Master 0212 GOI 0775 1775 Memorex 0724 0269 Sanyo 1219
Chaparral 0053 0209 0216 Goodmans 1246 Mitsubishi 0749 SKY 0856 1856 0099
Coolsat 1806 Gradiente 0856 Motorola 0869 0856 Sony 0639 1639 1640
Crossdigital 1109 Hisense 1535
Digiturk 1076 Hitachi 0819 1250 Netsat 0099 Star Trak 0180
DirecTV 1377 0392 0566 0639
1639 1142 0247 0749
1749 0724 0819 1856
1076 1108 0099 1109
1392 1414 1442 1443
1444 1538 1609 1640
1750
Dish Network System 1505 1005 0775 1170
1775
Dishpro 1505 1005 0775 1775 IQ Prism 0210 Proscan 0392 0566 US Digital 1535
Eastern 1612 Janeil 0152 Proton 1535 USDTV 1535
Echostar 1505 1005 0775 0159
0269 0280 1170 1775
Expressvu 0775 1775 Lava 1631
Homecable 0238 Next Level 0869 STS 0210
HTS 0775 1775 OctalTV 1505 Tivo 1142 1442 1443 1444
Hughes 0749 1749 1442 Panasonic 0247 0701 0152
Hughes Network Systems
Humax 1790 Philips 1142 0749 1749 0724
iLo 1535 Ultrasat 1806
Innova 0099 Uniden 0724 0722 0052 0074
IQ 0210 Pioneer 0329 1442
Jerrold 0869 RadioShack 0869 Voom 0869
JVC 0775 1170 1775 RCA 0392 0566 0855 0143
1142 0749 1749 1442
1443 1444 1538 1750
NEC
Pansat 0647 1551 1807 Toshiba 0749 1749 0790 0819
Paysat 0724
0102 0178 1270 Star Choice 0869
UltimateTV 1392 1640
0819 0856 1076 0722
0099 1442
Zenith 0856 1856
1392
1109 0270 1243 1442
1609
1538
0082 1285
0076 0238
82
En
Page 83

Useful Remote Control Features
VCR
Brand Codes Brand Codes Brand Codes Brand Codes
ABS 1972 Craig 0271 Go Video 0240 0432 0526 0649
Admiral 0048 0209 0479 Crown 0072 0278 0020
Adventura 0000 Curtis Mathes 0060 0035 0162 0041
Aiko 0278 GoldStar 0037 0209 0038 0225
Aiwa 0037 0000 0124 0307
0479 1137
Akai 0041 0061 0106 0175
0242
Akura 0271 Granada 0081 0104 0046 LXI 0037
Alba 0209 0072 0278 0020 Dansai 0072 Grandin 0037 0000 0072 M Electronic 0000 0038
Alienware 1972 Daytron 0020 Grundig 0081 0072 0034 0207
Allegro 1137 De Graaf 0042 0166 Magnavox 0035 0039 0081 0000
America Action 0278 Dell 1972 Haojie 0240 Magnin 0240
American High 0035 Denon 0042 Harley Davidson 0000 Manesth 0045 0072
Amoisonic 0479 DirecTV 0739 Harman/Kardon 0081 0038 0075 Marantz 0035 0081 0062
Amstrad 0000 Dual 0041 Harwood 0072 Marta 0037
Anam 0162 0037 0240 0278
0226 1037
Anitech 0072 Elbe 0038 HI-Q 0047 Media Center PC 1972
ASA 0037 0081 Elcatech 0072 Hinari 0240 0072 0208 MEI 0035
Asha 0240 Electrohome 0037 0043 Hitachi 0037 0240 0000 0042
Asuka 0037 Electrophonic 0037
Audiovox 0037 0278 Emerex 0032
Awa 0043 Emerson 0035 0037 0184 0240
Baird 0000 0104 0041 Howard Computers 1972
Basic Line 0072 0278 0020 HP 1972 Memphis 0072
Beaumark 0240 Hughes Network Systems 0042 0739 Metronic 0081
Bell & Howell 0104 Humax 0739 Metz 0162 0037 0227
Blaupunkt 0162 0034 0226 0227 ESA 1137 Hush 1972 MGA 0240 0043 0061
BPL 0046 ESC 0240 0278 Hypson 0072 MGN Technology 0240
Brandt Electronique 0041 EverFocus 1346 iBUYPOWER 1972 Microsoft 1972
Broksonic 0184 0121 0209 0002
0479 1479 1815
Bush 0209 0072 0278 Finlandia 0081 0104 ITT 0240 0104 0041 0046
Calix 0037 Finlux 0081 0000 0042 0104
Capehart 0020 Firstline 0037 0045 0043 0209
Carver 0081 JVC 0045 0067 0041 0008
Catron 0020 Fisher 0047 0104 0046 Multitech 0000 0072
CCE 0072 0278 Frontech 0020 Murphy 0000
CGE 0000 Fuji 0035 0033 Kaisui 0072 Myryad 0081
Changhong 0048 0081 Fujitsu 0045 0000 0366 KEC 0037 0278 NAD 0104 0058
Cimline
Cineral 0278 Garrard 0000 Kenwood 0067 0041 0038 NEC 0035 0037 0048 0104
CineVision 1137 Gateway 1195 1196 1972 KLH 0072
Citizen 0037 0278 1278 GE 0060 0035 0240 0065
Clatronic 0020 Kolin 0043 0041
Colt 0072 Korpel 0072 Neckermann 0081
Condor 0020 GEC 0081 Lenco 0278 Nesco 0072
Craig 0037 0047 0240 0072 General 0045 0020 0366 Leyco 0072 Newave 0037
0072 Funai 0000 0593 1335 1593 Kendo 0209 0106 National 0226
Cybernex 0240 Loewe 0037 0081
CyberPower 1972 Goodmans 0037 0000 0072 0278
Cyrus 0081 Lunatron 1137
Daewoo 0045 0104 0278 0020
Dumont 0081 0000 0104 0105 HCM 0072 Matsui 0209 0208
Durabrand 0039 0038 Headquarter 0046 Matsushita 0035 0162 0226 0227
Ferguson 0041 Imperial 0000 Mind 1972
Fidelity 0000 Interfunk 0081 Minolta 0042 0105
0760 1035
0046 0210 0212 0561
1137 1278
0045 0000 0121 0043
0209 0002 0278 0208
0061 0212 0479 0561
0593 1278 1479 1593
0105Canon 0035 1143 ITV 0037 0278
0072
0202 0226 0760 0761
0807 1035 1060
GoldHand 0072 Linksys 1972
Gradiente
Jensen 0041 Motorola 0035 0048
Kodak 0035 0037
0663 1137 1150
0226 1137 1237
0020 0062
0000 0008 Luxor 0048 0104 0043 0046
0226 0378
0041 0065 0082 0089
0105 0166 0235 0292
1037
0106
0206 0207 0366 1162
1707
LG 0037 0045 0042 0209
0038 0040 1037 1137
Lloyd’s 0000 0208
Logik 0240 0072
0062 0106Akiba 0072 Graetz 0240 0104 0041
Magnasonic 0593 1278
0149 0563 0593 1781Ambassador 0020 Decca 0081 0000 Hanseatic 0037
1162Anam National 0162 0226 Dynatech 0000 Hewlett Packard 1972
Memorex 0035 0162 0037 0048
0039 0047 0240 0000
0104 0209 0046 0307
0479 1037 1048 1162
1237 1262
Mitsubishi 0081 0067 0043 0041
0061 0075 0173 0214
0242 0443 0807
MTC 0240 0000
0067 0041 0038 0008
0040 0050 0082 0206
0457
13
English
83
En
Page 84

13
Useful Remote Control Features
VCR
Brand Codes Brand Codes Brand Codes Brand Codes
Nikko 0037 Pye 0081 SEG 0240 Tensai 0000
Nikon 0034 Qisheng 0060 SEI 0081 Thomas 0000
Niveus Media 1972 Quarter 0046 Seleco 0041 Thomson 0060 0067 0041 0202
Noblex 0240 Quartz 0046 Semp 0045 Thorn 0104 0041
Nokia 0240 0104 0041 0046
0106
Nordmende 0041 Quelle 0081 Sharp 0048 0209 0062 0807
Northgate 1972 Radiola 0081 Toshiba 0081 0045 0042 0067
Oceanic 0000 0041 RadioShack 0000 1037 Shinco 0000
Olympus 0035 0226 Radix 0037 Shintom 0104 0072
Onkyo 0222 Randex 0037 Shogun 0240
Optimus 1062 0162 0037 0048
0104 0058 0432 0593
1048 1162 1262
Optonica 0062 Sinudyne 0081 Triumph 0208
Orion 0184 0121 0209 0002
0208 0479 1479 1815
Osaki 0037 0000 0072 Sonolor 0046 0062 Universum 0037 0081 0240 0000
Palladium 0037 0041 0072 Rex 0041 Sony 0035 0032 0033 0000
Panasonic 1062 0035 0162 0077
0225 0226 0227 0246
0378 0616 1035 1162
1262
Pathe Marconi 0041 Runco 0039 STS 0042 Videosonic 0240
Penney 0035 0037 0240 0042
0038 0040 1035 1237
Pentax 0042 0065 0105 Salora 0043 0046 0075 0106
Perdio 0000 Wards 0060 0035 0048 0047
Philco 0035 0000 0209 0038
0226 0479 0561
Philips 0035 0081 0000 0062
0226 0563 0593 0618
0739 1081 1181 1266
Phonola 0081 Sansui 0000 0067 0209 0041
Pilot 0037 Yamaha 0041 0038
Pioneer 0081 0042 0067 0058
0168 0206 0235 1337
Polk Audio 0081 SBR 0081 Tec 0020 Yoko 0240 0020
Portland 0020 Schaub Lorenz 0000 0104 0041 Technics 0035 0162 0226 0246 Zenith 0039 0033 0000 0209
Profitronic 0240 Schneider 0081 0000 0072 Teco 0035 0037 0048 0041
Proline 0000 Scott 0184 0045 0121 0043
Proscan 0060 0202 0760 0761
1060
Protec 0072 Telefunken 0041
Pulsar 0039 Tenosal 0072
Quasar 0035 0162 0077 1035
1162
RCA 0060 0035 0240 0000
0042 0149 0077 0105
0106 0065 0202 0226
0058 0760 0761 0807
0880 1035 1060
Realistic 0035 0037 0048 0047
0000 0104 0046 0062
Ricavision 1972 Vector Research 0038 0040
Ricoh 0034 Victor 0067 0041 0008
Rio 1137 Video Concepts 0045 0040 0061
Roadstar 0037 0240 0072 0278 Stack 9 1972 Videomagic 0037
Saba 0041 0206 0207 Sunstar 0000 Viewsonic 1972
Saisho 0209 0208 Suntronic 0000 Villain 0000
0443
Sampo 0037 0048 Symphonic 0000 0593 1593
Samsung 0240 0045 0210 0212
0432 0649 0663 0739
0760 1014
Sanky 0048 0039 Tashiko 0037 0000 White Westinghouse 0209 0072
0082 0271 0479 1479
Sanyo 0047 0240 0104 0046
0159 0372
0210 0212
Sears 0035 0037 0047 0000
0042 0104 0046 0057
0105 1237
Sensory Science 0649 1155 Tivo 0618 0636 0739 1337
Sentra 0020
TMK 0240 0208
0848 1048
Siemens 0037 0081 0104
Silva 0037 Totevision 0037 0240
Singer 0045 0072 Touch 1972
Solavox 0020 Uher 0240
Sonic Blue 0614 0616 1137 Unitech 0240
Vector 0045
0011 0022 0034 0275
0636 1032 1232 1546
1702 1703 1896 1972
Sylvania 0035 0081 0000 0043
0593 1593 1781
Systemax 1972
Tagar Systems 1972
Tandy 0000 0104 Wharfedale 0593
Tatung 0081 0045 0000 0067
0041 0008 0366
Teac 0000 0041 0278 0307
0526 0593
0038 0040
Teknika 0035 0037 0000 ZT Group 1972
Teleavia 0041
Voodoo 1972
XR-1000 0035 0000 0072
Yam is hi 00 72
Yok an 0 07 2
1996
0043 0209 0041 1996
1972 1145 1008 0845
0377 0366 0212 0210
0057 0008
0106Otto Versand 0081 ReplayTV 0614 0616 Sontec 0037
0081 0240 0000 0042
0072 0149 0062 0212
0760
0034 0479 1137 1139
1479
84
En
Page 85

Useful Remote Control Features
PVR
Brand Codes Brand Codes Brand Codes Brand Codes
ABS 1972 HP 1972 Niveus Media 1972 Systemax 1972
Alienware 1972 Hughes Network Systems 0739 Northgate 1972 Tagar Systems 1972
CyberPower 1972 Humax 0739 Panasonic 0616 Tivo 0618 0636 0739
Dell 1972 Hush 1972 Philips 0618 0739 Toshiba 1008 1972
DirecTV 0739 iBUYPOWER 1972 RCA 0880 Touch 1972
EverFocus 1346 Linksys 1972 ReplayTV 0614 0616 Viewsonic 1972
Gateway 1195 1196 1972 Media Center PC 1972 Sonic Blue 0614 0616 Voodoo 1972
Hewlett Packard 1972 Microsoft 1972
Howard Computers 1972 Mind 1972 Stack 9 1972
DVD
Brand Codes Brand Codes Brand Codes Brand Codes
Acoustic Solutions 0730 1242 CineVision 0876 0833 0869 Gateway 1073 1077 1158 1194 Landel 0826
Adcom 1094 Citizen 1277 GE 0522 0815 0717 Lasonic 0798 1173
Advent 1016 Classic 1385 Go Video 0744 0715 0741 0783
Afreey 0698 Clatronic 1165 Lenoxx 1127
Aiwa 0641 Coby 0778 0852 1086 1107
Akai 0695 0770 0899 1089
Alba 0672 0539 0717 Craig 0831 Go Vision 1071 1072 LiteOn 1058 1158 1416 1440
Alco 0790 Curtis Mathes 1087
Allegro 0869 CyberHome 0816 0874 1019 1023
Altacom 1224 GPX 0699 0769 Lunatron 0741
Amphion Media Works 0872 1176 1245 Gradiente 0490 0651 Magnavox 0503 0539 0646 0675
AMW 0872 1176 1245 Cydectin 1074 Greenhill 0717
Apex Digital 0672 0717 0755 0794
0796 0797 0830 1004
1020 1056 1061 1100
Arcam 0732 Dansai 0770 Harman/Kardon 0582 0702 McIntosh 1533 1273 1373
Aspire Digital 1168 1407 Dantax 1089 Hitachi 0573 0664 0695 1247 Memorex 0690 0695 0831 1270
Audiologic 0736 Daytek 0872 Hiteker 0672 Metronic 0690
Audiovox 0790 1041 1071 1072
1121 1122
Axion 1071 1072 1193 Denver 0778 1107 1316 Innovative Technology 1542 Minowa 1165
B & K 0655 0662 Desay 1407 1455 Integra 0571 0627 Mintek 0839 0717 1472
BBK 1224 Diamond Vision 1316 1609 1610 IRT 0783 Mirror 0752
Bel Canto Design 1571 Dick Smith Electronics 0833 1730 Jaton 1078 Mitsubishi 1521 0521
Bellagio 1245 Digitor 0690 JBL 0702 MixSonic 1130 1611
Blaupunkt 0717 Digitrex 0672 1056 Jensen 1016 Momitsu 1082
Blue Parade 0571 Digix 1272 JMB 0695 MTlogic 1265
Broksonic 0695 0868 1419 Disney 0675 1270 JSI 1423 Mustek 0730 1730
Bush 0690 DiViDo 0705 JVC 0558 0623 0867 1164
Byd:sign 0872 DSE 0833 1730 NAD 0591 0692 0741
California Audio Labs 0490 Dual 1068 1085 jWin 1049 1051 Nakamichi 1222
Cambridge Soundworks 0690 Durabrand 1127 Kawasaki 0790 NEC 0785 0869
Cary Audio Design 1477 DVD2000 0521 Kenwood 0490 0534 0682 0737 Nesa 0717
CAVS 1057 ECC 0730 KLH 0717 0790 1020 1149
Celestial 1020 Emerson 0591 0675 0821 1268 NexxTech 1402
Centrex 0672 1004 Enterprise 0591 Konka 0711 0719 0720 0721 Nintaus 1051
Centrios 1577 ESA 1443 Koss 0651 0896 1423 Norcent 1003 0872 1107 1265
Changhong 0627 1061 Fintec 1169 Kreisen 1421
Cinea 0831 Fisher 0670 Krell 1498 Olidata 0672
Cinego 1399 Funai 0675 1268 1334 Lafayette 1369 Onkyo 0503 0627 0792
Daewoo
Decca 0770 iLo 1348 1472 Microsoft 0522
Denon 0490 0634 Initial 0717 1472 Minato 0752
1165 1177 1351
1024 1117 1129 1502
1537
0784 0705 0770 0833
0869 1169 1172 1234
1242 1441 1443
Sony
GoldStar
Goodmans 0790 1004 Logix 0783
Grundig 0539 0695 0705 Malata 0782 1159
GVG 1169 Marantz 0539
H & B 1421 Matsui 0672
0636 1972 ZT Group 1972
Lecson 1533
0833 0869 1044 1075
1099 1144 1148 1158
1304 1443 1730
0741 Loewe 0511 0741
1275 1602
1261
LG 0591 0741 0801 0869
1526
0821 1268 1506
Myryad 0894
Next Base 0826
1457
13
English
85
En
Page 86

13
Useful Remote Control Features
DVD
Brand Codes Brand Codes Brand Codes Brand Codes
Oppo 1224 Proscan 0522 Shinco 0717 Toshiba 0503 0695 1045 1154
OptoMedia Electronics 0896 ProVision 0778 Shinsonic 0533 0839 TRANS-continents 0831 1165
Orion 1419 Qwestar 0651 Sigma Designs 0674 Tredex 0799 0800 0803 0804
Oritron 0651 RCA 0522 0571 0717 0790
Otic 0826 SM Electronic 0690 0730 Umax 0690
Pacific 0831 Recco 0698 Sonic Blue 0869 1099 Universum 0591
Palsonic 0672 0852 Reoc 0752 Sony 0533 1533 0864 1033
Panasonic 0503 0490 0632 0703
1010 1011 1362 1462
1490 1762
peeKTon 1224 Roadstar 1051 Sungale 1074 1342 1532 Viewmaster 1224
Philco 0690 0790 Rotel 0623 1178 Superscan 0821 Vizio 1064 1226
Philips 0503 0539 0646 0675
0854 1158 1260 1267
1354
PianoDisc 1024 TAG McLaren 0894 Xbox 0522
Pioneer 0525 0571 0631 0632
1475 1476 1571
Polaroid 1020 1061 1086 1245
1316 1478 1480 1482
Portland 0770 Sensory Science 1158 Techwood 0692 Yamaha 0490 0539 0545 0817
Prima 1016 Sharp 0630 0675 0752 1256
Primare 0886 1467 1618 Terapin 1031 Zenith 0503 0591 0741 0869
Princeton 0674 Sharper Image 1117 Theta Digital 0571 Zeus 0784
Proceed 0672
Revoy 0699 US Logic 0839
Rio
RJTech 1360 Sova 1122 Vialta 1509
Rowa 0823 1004 SVA 0717 0860 1105 Vocopro 1027
Sampo 0698 0752 1501 Sylvania 0675 0821 1268 Wesder 0699
Samsung 0490 0573 0744 0820
Sansui 0695 Tatung 0770 XMS 0770
Sanyo 0670 0695 0873 Teac 0571 0717 0692 0790
Schneider 0783 Xwave 1001
Schwaiger 0752 Technics 0490 0703 Yamada 0872 1004 1056 1158
Sherwood
0822 1022 1132 1193
0869 Venturer 0790
0899 1044 1075
1419
0633 0770 1043 1077 Thomson 0522 Zoece 1265
Slim Art 0784 TYT 0705
Urban Concepts 0503
1069 1070 1431 1432
1433 1548
Symphonic 0675 1268 Wintel 1130
Xoro 1173
0809 0833
1416Polk Audio 0539 Semp 0503 Technosonic 0730
Tedelex 0690 Yamakawa 0872
DVD-R
Brand Codes Brand Codes Brand Codes Brand Codes
Apex Digital 1056 Funai 0675 1334 Loewe 0741 Sensory Science 1158
Aspire Digital 1168 Gateway 1073 1158 1194 Magnavox 0646 1506 Sharp 0630 0675 1419
Coby 1086 Go Video 0741 1158 1304 1730 Mustek 1730 Sony 1033 1069 1070 1431
CyberHome 1129 1502 H & B 1421 Panasonic 0490 1010 1011
Denon 0490 iLo 1348 Philips 0646 1158 Sylvania 0675
Dick Smith Electronics 1730 JVC 1164 1275 Pioneer 0631 1475 1476 Yamada 1056 1158 1416
Digitrex 1056 Kreisen 1421 Polaroid 1086 Zenith 0741
DSE 1730 LG 0741
Emerson 0675 LiteOn 1158 1416 1440 Samsung 0490
RCA
0522
1432 1433
LD
Brand Codes Brand Codes Brand Codes Brand Codes
Aiwa 0203 Magnavox 0194 0217 0241 Philips 0064 0194 Sega 0023
Carver 0064 0194 0323 Marantz 0064 0194 Pioneer 0059 0023 Sharp 0001
Denon 0059 0172 0241 Mitsubishi 0059 0241 Polk Audio 0194 Sony 0193 0201 0270
Disco Vision 0023 NAD 0059 Quasar 0204 Technics 0204
Funai 0203 Nagsmi 0059 Realistic 0203 Telefunken 0059
GoldStar 0172 NEC 0286 Renaissance 0323 Theta Digital 0194
Harman/Kardon 0194 Optimus 0059 Salora 0064 Victor 0245
Hitachi 0023 0395 Panasonic 0204
Samsung
0323 Yamaha 0217
86
En
Page 87

Useful Remote Control Features
13
Using the remote control unit to control
other devices
Receiver control buttons
When a Pioneer receiver is connected to the display, the
receiver can be operated using buttons 1 to 3.
1RECEIVER (STANDBY/ON)
Turns the Pioneer receiver power on and off.
2 RECEIVER INPUT
Selects the input source connected to the Pioneer
receiver.
3 RECEIVER VOL +/–
Adjusts the Pioneer receiver volume level. Press VOL + to
increase the volume and VOL – to decrease it.
English
1
2
3
Mode switch
(with “TV”
selected)
87
En
Page 88

13
Useful Remote Control Features
CBL/SAT control buttons
When the Mode switch is set to CBL/SAT, the cable converter
or satellite broadcast tuner connected to the display can be
operated using the buttons shown below (3, 4, 5, 8 and 9 for
cable converters and 1 to 7 for satellite tuners):
1
6
1SAT MENU
Displays the satellite broadcasting menu screen.
2ENTER, ///
2
ENTER: Activates the selected function.
///: Selects items on the SAT GUIDE screen or
7
SAT MENU screen.
3 0 – 9
Press a button (or buttons) that corresponds to the
channel that you want to watch.
3
4CH +/–
Selects a higher or lower channel.
5 SOURCE
8
Turns the equipment power on and off.
6 SAT GUIDE
4
9
Displays the satellite broadcasting guide screen.
7RETURN
When the CBL/SAT menu is displayed, restores the
5
immediately previous screen.
8CH ENTER*
Enters the selected channel with the direct channel
Mode switch
(with “CBL/SAT”
selected)
selection buttons.
9 CH RETURN*
Switches between the current channel and the channel
you were watching immediately before.
88
En
* Some cable converter manufacturers do not preset CH
ENTER and CH RETURN.
NOTE
• CABLE and SAT cannot be selected at the same time.
Page 89

Useful Remote Control Features
VCR control buttons
When the Mode switch is set to VCR, VCRs connected to the
display can be operated with the remote control unit.
• Press the input selector button INPUT 1–6 that matches the
input terminal number to which the VCR is connected, then
the VCR can be operated using 1 to 8.
• VCRs made by other manufacturers can also be operated
using the remote control unit if the remote control signals of
the devices have been preset. See page 81.
1CH +/–
Selects the channel on the VCR.
2 (PLAY)
Selects playback.
3 (REW)
Rewinds the tape and allows picture search.
4SOURCE
Turns the power of the VCR on and off.
5 (PAUSE/STILL)
Pauses playback and displays still pictures.
13
English
1
2
3
4
6
7
85
6 (FF)
Rapidly advances the tape and allows picture search.
7 (REC)
Starts recording.
8 (STOP)
Stops tape transport.
Mode switch
(with “VCR”
selected)
89
En
Page 90

13
Useful Remote Control Features
1 CH +/– (DVD recorder only)
Changes the channel of the tuner built into the DVD
recorder.
2 (PLAY)
Selects playback.
6
7
8
3 (SCAN)/ (CHAPTER SEARCH)
Continue pressing to go backward.
Pressing quickly once takes you to the start of the chapter
currently playing. Each time you press it, you move back to
the start of the previous chapter.
4 SOURCE
9
Turns the power of the DVD player or DVD recorder on and
off.
5 (PAUSE/STILL)
Pauses playback and displays still pictures.
6 DVD MENU (DVD, DVD recorder)
Displays the DVD menu.
7 DVD TOP MENU (DVD, DVD recorder)
Displays the DVD top menu.
1
2
3
4
10
11
125
Mode switch
(with “DVD/
DVR” selected)
8 ENTER, /// (DVD, DVD recorder)
ENTER: Activates the selected function.
///: Selects items on the DVD MENU screen.
9RETURN
When the DVD menu is displayed, restores the
immediately previous screen.
10 (SCAN)/ (CHAPTER SEARCH)
Continue pressing for fast forward.
Pressing quickly once takes you to the start of the next
chapter. Each time you press it, you move ahead to the
start of the next chapter.
DVD/DVR control buttons
When the Mode switch is set to DVD/DVR, DVD players or
DVD recorders connected to the display can be operated with
the remote control unit.
• When the input selector button having the same number as
the input terminal connected to a DVD player or DVD recorder
is pressed, these players can be operated using 1 to 12.
• DVD players or DVD recorders made by other manufacturers
can also be operated using the remote control unit if the
remote control signals of the devices have been preset. See
page 81.
11 (REC) (DVD recorder only)
Starts recording.
12 (STOP)
Stops playback.
With some DVD players or DVD recorders, press twice to
open the disc tray.
11, 12 STOP REC (DVD recorder only)
Press and hold , and then press to stop recording.
This operation applies to only Pioneer DVD recorders.
NOTE
• A DVD player and a DVD recorder cannot be selected at the
same time.
• For some LD players, the buttons on the remote control unit
function as above. For the supported LD players, see the LD
brands and codes on page 86.
90
En
Page 91

Appendix
Appendix
Troubleshooting
Problem Possible Solution
GENERAL
• No power. • Is the power cord disconnected? (See page 31.)
• Power is suddenly turned off. • Is the sleep timer set? (See page 63.)
• The system cannot be operated. • External influences such as lightning, static electricity, etc., may cause improper operation.
• Remote control unit does not operate. • Check if POWER is off. Turn the button on when the POWER ON and STANDBY indicators are off.
• POWER ON indicator or STANDBY
indicator is quickly flashing.
PICTURE/SOUND
• No image and audio is presented. • Check if the input source for video or PC has been unintentionally selected although you want to watch a TV
• No picture. • Is connection to other components correct? (See pages 71 to 76.)
• Audio is output but no image is
presented.
• Images are presented but no audio is
output.
• Sound is reversed between the right and
left.
• Sound is output from only a single
speaker.
• Picture is cut off. •Is the image position correct? (See page 68.)
• Strange color, light color, dark or color
misalignment.
•Has POWER been turned on? (See page 32.)
• Check if you pressed TV on the remote control unit. (See page 32.)
If the indicator on the system lights up red, press TV .
• Check the power control setting. (See page 67.)
• The system’s internal temperature has increased. Clean the vents, or remove any blocking objects.
(See page 20.)
In this case, operate the system after first turning the power of the Plasma Display, or unplugging the power
cord and re-plugging it in after 1 or 2 minutes.
• Is the Mode switch set correctly? Slide it to the TV position. (See page 19.)
• Are batteries inserted with polarity aligned (+, –)? (See page 30.)
• Are batteries worn out? (Replace with new batteries.) (See page 30.)
• Operate the remote control unit while pointing it toward the remote control sensor on the Plasma Display.
(See page 30.)
• Are you using it under strong or fluorescent lighting?
• Is a fluorescent light illuminating the remote control sensor?
• Internal protective circuits may have been activated.
First turn the main power off by removing the AC power cord from the power outlet, and then turn the power
on again in after one minute or more. If the problem is not solved with this, contact the nearest Pioneer
Authorized Independent Service Company, or the Customer Support Division (see back cover).
channel. (See page 33.)
• Check if you have activated the Parental Control function. (See page 44.)
Enter a password to temporarily cancel the Parental Control function. (See page 48.)
• Check the cable connection with the antenna. (See page 29.)
• Check the cable connection with the other equipment. (See pages 71 to 77.)
• Is a non-compatible PC signal being input? (See page 75.)
• Is picture adjustment correct? (See page 64.)
• Check if you have selected “Picture Off” for Energy Save. With this option selected, the screen is deactivated;
only audio is output. To restore the screen display, press any button other than VOL +/– and MUTING. (See
page 67.)
• Check if you have selected the minimum volume. (See page 34.)
• Check if you have muted sound. (See page 34.)
• When using a video or PC input source, check that the audio terminals are also connected.
(See pages 71 to 73 and 75.)
• Check if the speaker cable connections have been reversed between the right and left or if the speaker cable
from either speaker has been disconnected. (See page 23.)
• Has the balance been correctly adjusted? (See page 66.)
• Has the correct screen size been selected? (See page 70.)
• Adjust the picture tone. (See page 64.)
• Is the room too bright? The picture may look dark in a room that is too bright.
14
English
91
En
Page 92

14
Appendix
Problem Possible Solution
OTHER
• TV-Guide data cannot be obtained. • If TV-Guide data cannot be obtained with ANT.A selected for cable connection, select ANT.B for over the air.
• An external device connected to the
USB terminal does not operate.
• Photo data stored in a digital still
camera cannot be read through USB
interface.
• Panel sounds / noises • Panel generated sounds, examples: Fan motor noise, Electrical Circuit Humming/Glass Panel buzzing are
• Screen Displays uneven brightness on
the sides.
In addition, try the TV-Guide setup again by performing the following procedure (see page 39):
- Select “No” for cable service on Screen 3.
- Select “Yes” for antenna service on Screen 5.
- Select “ANT B IN” on Screen 4.
• Check if the device is connectable to the display. (See page 78.)
• Re-insert the USB cable. (See page 78.)
• For connection, use a USB cable shorter than 5 m. (See page 78.)
• Check if the USB cable is properly connected. (See page 78.)
• First turn the main power off and then turn it on again in order to check if the external device works correctly.
• Check if the external device works correctly after the USB device was restarted.
• Check if the digital still camera is in the viewing mode.
• Refer to the instruction manual for the digital still camera.
• Check if the device is connectable to the display. (See page 78.)
• Check if the digital still camera is turned on.
normal operation of a phosphor-based matrix display. Experiment with the available Energy Save modes to
find the best setting for your use.
• Display content that completely fills the screen until unevenness is minimized. Some signals may require to
change the AV mode setting. (See page 69.)
If the following error codes appear on the screen, check the corresponding items in the table.
Code Message Check
SD04 and
SD11
SD05 (PDP-6072HD/PDP-6071HD/PDP-6070HD/
Powering off. Internal temperature too high.
Check temperature around PDP.
PDP-5072HD/PDP-5071HD/PDP-5070HD)
Internal protection circuit turns power off.
Is there a short in speaker cable?
(PDP-4272HD/PDP-4271HD/PDP-4270HD)
Internal protection circuit turns power off.
Check if the ambient temperature of the Plasma Display is high.
Check the speaker cable connections between the Plasma Display and the speakers.
Contact the nearest Pioneer Authorized Independent Service Company, or the
Customer Support Division. (See back cover.)
92
En
Page 93

Appendix
This product in part uses “OpenSSL” software.
To the extent the OpenSSL software is being used, the following notification applies:
Copyright (c) 1998-2004 The OpenSSL Project. All rights reserved.
Redistribution and use in source and binary forms, with or without modification, are permitted provided that the following
conditions are met:
1. Redistributions of source code must retain the above copyright notice, this list of conditions and the following disclaimer.
2. Redistributions in binary form must reproduce the above copyright notice, this list of conditions and the following disclaimer
in the documentation and/or other materials provided with the distribution.
3. All advertising materials mentioning features or use of this software must display the following acknowledgment: “This product
includes software developed by the OpenSSL Project for use in the OpenSSL Toolkit. (http://www.openssl.org/)”
4. The names “OpenSSL Toolkit” and “OpenSSL Project” must not be used to endorse or promote products derived from this
software without prior written permission. For written permission, please contact openssl-core@openssl.org.
5. Products derived from this software may not be called “OpenSSL” nor may “OpenSSL” appear in their names without prior
written permission of the OpenSSL Project.
6. Redistributions of any form whatsoever must retain the following acknowledgment: “This product includes software developed
by the OpenSSL Project for use in the OpenSSL Toolkit (http://www.openssl.org/)”
THIS SOFTWARE IS PROVIDED BY THE OpenSSL PROJECT “AS IS” AND ANY EXPRESSED OR IMPLIED WARRANTIES,
INCLUDING, BUT NOT LIMITED TO, THE IMPLIED WARRANTIES OF MERCHANTABILITY AND FITNESS FOR A PARTICULAR
PURPOSE ARE DISCLAIMED. IN NO EVENT SHALL THE OpenSSL PROJECT OR ITS CONTRIBUTORS BE LIABLE FOR ANY
DIRECT, INDIRECT, INCIDENTAL, SPECIAL, EXEMPLARY, OR CONSEQUENTIAL DAMAGES (INCLUDING, BUT NOT LIMITED TO,
PROCUREMENT OF SUBSTITUTE GOODS OR SERVICES; LOSS OF USE, DATA, OR PROFITS; OR BUSINESS INTERRUPTION)
HOWEVER CAUSED AND ON ANY THEORY OF LIABILITY, WHETHER IN CONTRACT, STRICT LIABILITY, OR TORT (INCLUDING
NEGLIGENCE OR OTHERWISE) ARISING IN ANY WAY OUT OF THE USE OF THIS SOFTWARE, EVEN IF ADVISED OF THE
POSSIBILITY OF SUCH DAMAGE.
14
English
This product includes cryptographic software written by Eric Young (eay@cryptsoft.com). This product includes software written
by Tim Hudson (tjh@cryptsoft.com).
Original SSLeay License
Copyright (C) 1995-1998 Eric Young (eay@cryptsoft.com)
All rights reserved.
This package is an SSL implementation written by Eric Young (eay@cryptsoft.com). The implementation was written so as to
conform with Netscapes SSL.
This library is free for commercial and non-commercial use as long as the following conditions are ahered to. The following
conditions apply to all code found in this distribution, be it the RC4, RSA, lhash, DES, etc., code; not just the SSL code. The SSL
documentation included with this distribution is covered by the same copyright terms except that the holder is Tim Hudson
(tjh@cryptsoft.com).
Copyright remains Eric Young’s, and as such any Copyright notices in the code are not to be removed. If this package is used in a
product, Eric Young should be given attribution as the author of the parts of the library used. This can be in the form of a textual
message at program startup or in documentation (online or textual) provided with the package.
Redistribution and use in source and binary forms, with or without modification, are permitted provided that the following
conditions are met:
1. Redistributions of source code must retain the copyright notice, this list of conditions and the following disclaimer.
2. Redistributions in binary form must reproduce the above copyright notice, this list of conditions and the following disclaimer
in the documentation and/or other materials provided with the distribution.
3. All advertising materials mentioning features or use of this software must display the following acknowledgement: “This
product includes cryptographic software written by Eric Young (eay@cryptsoft.com)” The word ’cryptographic’ can be left out
if the rouines from the library being used are not cryptographic related :-).
4. If you include any Windows specific code (or a derivative thereof) from the apps directory (application code) you must include
an acknowledgement: “This product includes software written by Tim Hudson (tjh@cryptsoft.com)”
THIS SOFTWARE IS PROVIDED BY ERIC YOUNG “AS IS” AND ANY EXPRESS OR IMPLIED WARRANTIES, INCLUDING, BUT NOT
LIMITED TO, THE IMPLIED WARRANTIES OF MERCHANTABILITY AND FITNESS FOR A PARTICULAR PURPOSE ARE
DISCLAIMED. IN NO EVENT SHALL THE AUTHOR OR CONTRIBUTORS BE LIABLE FOR ANY DIRECT, INDIRECT, INCIDENTAL,
SPECIAL, EXEMPLARY, OR CONSEQUENTIAL DAMAGES (INCLUDING, BUT NOT LIMITED TO, PROCUREMENT OF SUBSTITUTE
GOODS OR SERVICES; LOSS OF USE, DATA, OR PROFITS; OR BUSINESS INTERRUPTION) HOWEVER CAUSED AND ON ANY
THEORY OF LIABILITY, WHETHER IN CONTRACT, STRICT LIABILITY, OR TORT (INCLUDING NEGLIGENCE OR OTHERWISE)
ARISING IN ANY WAY OUT OF THE USE OF THIS SOFTWARE, EVEN IF ADVISED OF THE POSSIBILITY OF SUCH DAMAGE.
The licence and distribution terms for any publically available version or derivative of this code cannot be changed. i.e. this code
cannot simply be copied and put under another distribution licence [including the GNU Public Licence.]
93
En
Page 94

14
Appendix
Linux Source Notice
The Pioneer Plasma Television is powered by utilizing the Linux operating system. The machine readable copy of the corresponding
source code is available for the cost of distribution. To obtain a copy, please visit
http://www.pioneerelectronics.com/ for more information.
GNU General Public License
Version 2, June 1991
Copyright (C) 1989, 1991 Free Software Foundation, Inc.
59 Temple Place - Suite 330, Boston, MA 02111-1307, USA
Everyone is permitted to copy and distribute verbatim copies of this license document, but changing it is not allowed.
Preamble
The licenses for most software are designed to take away your freedom to share and change it. By contrast, the GNU General Public
License is intended to guarantee your freedom to share and change free software-to make sure the software is free for all its users.
This General Public License applies to most of the Free Software Foundation’s software and to any other program whose authors
commit to using it. (Some other Free Software Foundation software is covered by the GNU Library General Public License instead.)
You can apply it to your programs, too.
When we speak of free software, we are referring to freedom, not price. Our General Public Licenses are designed to make sure
that you have the freedom to distribute copies of free software (and charge for this service if you wish), that you receive source
code or can get it if you want it, that you can change the software or use pieces of it in new free programs; and that you know you
can do these things.
To protect your rights, we need to make restrictions that forbid anyone to deny you these rights or to ask you to surrender the rights.
These restrictions translate to certain responsibilities for you if you distribute copies of the software, or if you modify it.
For example, if you distribute copies of such a program, whether gratis or for a fee, you must give the recipients all the rights that
you have. You must make sure that they, too, receive or can get the source code. And you must show them these terms so they
know their rights.
We protect your rights with two steps: (1) copyright the software, and (2) offer you this license which gives you legal permission to
copy, distribute and/or modify the software.
Also, for each author’s protection and ours, we want to make certain that everyone understands that there is no warranty for this
free software. If the software is modified by someone else and passed on, we want its recipients to know that what they have is not
the original, so that any problems introduced by others will not reflect on the original authors’ reputations.
Finally, any free program is threatened constantly by software patents. We wish to avoid the danger that redistributors of a free
program will individually obtain patent licenses, in effect making the program proprietary. To prevent this, we have made it clear
that any patent must be licensed for everyone’s free use or not licensed at all.
The precise terms and conditions for copying, distribution and modification follow.
GNU General Public License
TERMS AND CONDITIONS FOR COPYING, DISTRIBUTION AND MODIFICATION
0. This License applies to any program or other work which contains a notice placed by the copyright holder saying it may be
distributed under the terms of this General Public License. The “Program”, below, refers to any such program or work, and a
“work based on the Program” means either the Program or any derivative work under copyright law: that is to say, a work
containing the Program or a portion of it, either verbatim or with modifications and/or translated into another language.
(Hereinafter, translation is included without limitation in the term “modification”.) Each licensee is addressed as “you”.
Activities other than copying, distribution and modification are not covered by this License; they are outside its scope. The act
of running the Program is not restricted, and the output from the Program is covered only if its contents constitute a work
based on the Program (independent of having been made by running the Program). Whether that is true depends on what the
Program does.
1. You may copy and distribute verbatim copies of the Program’s source code as you receive it, in any medium, provided that you
conspicuously and appropriately publish on each copy an appropriate copyright notice and disclaimer of warranty; keep intact
all the notices that refer to this License and to the absence of any warranty; and give any other recipients of the Program a copy
of this License along with the Program.
You may charge a fee for the physical act of transferring a copy, and you may at your option offer warranty protection in
exchange for a fee.
2. You may modify your copy or copies of the Program or any portion of it, thus forming a work based on the Program, and copy
and distribute such modifications or work under the terms of Section 1 above, provided that you also meet all of these
conditions:
a) You must cause the modified files to carry prominent notices stating that you changed the files and the date of any change.
b) You must cause any work that you distribute or publish, that in whole or in part contains or is derived from the Program or
any part thereof, to be licensed as a whole at no charge to all third parties under the terms of this License.
c) If the modified program normally reads commands interactively when run, you must cause it, when started running for
such interactive use in the most ordinary way, to print or display an announcement including an appropriate copyright
notice and a notice that there is no warranty (or else, saying that you provide a warranty) and that users may redistribute
94
En
the program under these conditions, and telling the user how to view a copy of this License.
Page 95

Appendix
(Exception: if the Program itself is interactive but does not normally print such an announcement, your work based on the
Program is not required to print an announcement.)
These requirements apply to the modified work as a whole. If identifiable sections of that work are not derived from the
Program, and can be reasonably considered independent and separate works in themselves, then this License, and its terms,
do not apply to those sections when you distribute them as separate works. But when you distribute the same sections as part
of a whole which is a work based on the Program, the distribution of the whole must be on the terms of this License, whose
permissions for other licensees extend to the entire whole, and thus to each and every part regardless of who wrote it.
Thus, it is not the intent of this section to claim rights or contest your rights to work written entirely by you; rather, the intent is
to exercise the right to control the distribution of derivative or collective works based on the Program.
In addition, mere aggregation of another work not based on the Program with the Program (or with a work based on the
Program) on a volume of a storage or distribution medium does not bring the other work under the scope of this License.
3. You may copy and distribute the Program (or a work based on it, under Section 2) in object code or executable form under the
terms of Sections 1 and 2 above provided that you also do one of the following:
a) Accompany it with the complete corresponding machine-readable source code, which must be distributed under the terms
of Sections 1 and 2 above on a medium customarily used for software interchange; or,
b) Accompany it with a written offer, valid for at least three years, to give any third party, for a charge no more than your cost
of physically performing source distribution, a complete machine-readable copy of the corresponding source code, to be
distributed under the terms of Sections 1 and 2 above on a medium customarily used for software interchange; or,
c) Accompany it with the information you received as to the offer to distribute corresponding source code. (This alternative is
allowed only for noncommercial distribution and only if you received the program in object code or executable form with
such an offer, in accord with Subsection b above.)
The source code for a work means the preferred form of the work for making modifications to it. For an executable work,
complete source code means all the source code for all modules it contains, plus any associated interface definition files, plus
the scripts used to control compilation and installation of the executable. However, as a special exception, the source code
distributed need not include anything that is normally distributed (in either source or binary form) with the major components
(compiler, kernel, and so on) of the operating system on which the executable runs, unless that component itself accompanies
the executable.
If distribution of executable or object code is made by offering access to copy from a designated place, then offering equivalent
access to copy the source code from the same place counts as distribution of the source code, even though third parties are
not compelled to copy the source along with the object code.
4. You may not copy, modify, sublicense, or distribute the Program except as expressly provided under this License. Any attempt
otherwise to copy, modify, sublicense or distribute the Program is void, and will automatically terminate your rights under this
License.
However, parties who have received copies, or rights, from you under this License will not have their licenses terminated so
long as such parties remain in full compliance.
5. You are not required to accept this License, since you have not signed it. However, nothing else grants you permission to modify
or distribute the Program or its derivative works. These actions are prohibited by law if you do not accept this License. Therefore,
by modifying or distributing the Program (or any work based on the Program), you indicate your acceptance of this License to
do so, and all its terms and conditions for copying, distributing or modifying the Program or works based on it.
6. Each time you redistribute the Program (or any work based on the Program), the recipient automatically receives a license from
the original licensor to copy, distribute or modify the Program subject to these terms and conditions. You may not impose any
further restrictions on the recipients’ exercise of the rights granted herein. You are not responsible for enforcing compliance
by third parties to this License.
7. If, as a consequence of a court judgment or allegation of patent infringement or for any other reason (not limited to patent
issues), conditions are imposed on you (whether by court order, agreement or otherwise) that contradict the conditions of this
License, they do not excuse you from the conditions of this License. If you cannot distribute so as to satisfy simultaneously your
obligations under this License and any other pertinent obligations, then as a consequence you may not distribute the Program
at all. For example, if a patent license would not permit royalty-free redistribution of the Program by all those who receive copies
directly or indirectly through you, then the only way you could satisfy both it and this License would be to refrain entirely from
distribution of the Program.
If any portion of this section is held invalid or unenforceable under any particular circumstance, the balance of the section is
intended to apply and the section as a whole is intended to apply in other circumstances.
It is not the purpose of this section to induce you to infringe any patents or other property right claims or to contest validity of
any such claims; this section has the sole purpose of protecting the integrity of the free software distribution system, which is
implemented by public license practices. Many people have made generous contributions to the wide range of software
distributed through that system in reliance on consistent application of that system; it is up to the author/donor to decide if he
or she is willing to distribute software through any other system and a licensee cannot impose that choice.
This section is intended to make thoroughly clear what is believed to be a consequence of the rest of this License.
8. If the distribution and/or use of the Program is restricted in certain countries either by patents or by copyrighted interfaces, the
original copyright holder who places the Program under this License may add an explicit geographical distribution limitation
excluding those countries, so that distribution is permitted only in or among countries not thus excluded. In such case, this
License incorporates the limitation as if written in the body of this License.
14
English
95
En
Page 96

14
Appendix
9. The Free Software Foundation may publish revised and/or new versions of the General Public License from time to time. Such
new versions will be similar in spirit to the present version, but may differ in detail to address new problems or concerns.
Each version is given a distinguishing version number. If the Program specifies a version number of this License which applies
to it and “any later version”, you have the option of following the terms and conditions either of that version or of any later
version published by the Free Software Foundation. If the Program does not specify a version number of this License, you may
choose any version ever published by the Free Software Foundation.
10. If you wish to incorporate parts of the Program into other free programs whose distribution conditions are different, write to
the author to ask for permission. For software which is copyrighted by the Free Software Foundation, write to the Free Software
Foundation; we sometimes make exceptions for this. Our decision will be guided by the two goals of preserving the free status
of all derivatives of our free software and of promoting the sharing and reuse of software generally.
NO WARRANTY
11. BECAUSE THE PROGRAM IS LICENSED FREE OF CHARGE, THERE IS NO WARRANTY FOR THE PROGRAM, TO THE EXTENT
PERMITTED BY APPLICABLE LAW. EXCEPT WHEN OTHERWISE STATED IN WRITING THE COPYRIGHT HOLDERS AND/OR
OTHER PARTIES PROVIDE THE PROGRAM “AS IS” WITHOUT WARRANTY OF ANY KIND, EITHER EXPRESSED OR IMPLIED,
INCLUDING, BUT NOT LIMITED TO, THE IMPLIED WARRANTIES OF MERCHANTABILITY AND FITNESS FOR A PARTICULAR
PURPOSE. THE ENTIRE RISK AS TO THE QUALITY AND PERFORMANCE OF THE PROGRAM IS WITH YOU. SHOULD THE
PROGRAM PROVE DEFECTIVE, YOU ASSUME THE COST OF ALL NECESSARY SERVICING, REPAIR OR CORRECTION.
12. IN NO EVENT UNLESS REQUIRED BY APPLICABLE LAW OR AGREED TO IN WRITING WILL ANY COPYRIGHT HOLDER, OR
ANY OTHER PARTY WHO MAY MODIFY AND/OR REDISTRIBUTE THE PROGRAM AS PERMITTED ABOVE, BE LIABLE TO YOU
FOR DAMAGES, INCLUDING ANY GENERAL, SPECIAL, INCIDENTAL OR CONSEQUENTIAL DAMAGES ARISING OUT OF THE
USE OR INABILITY TO USE THE PROGRAM (INCLUDING BUT NOT LIMITED TO LOSS OF DATA OR DATA BEING RENDERED
INACCURATE OR LOSSES SUSTAINED BY YOU OR THIRD PARTIES OR A FAILURE OF THE PROGRAM TO OPERATE WITH
ANY OTHER PROGRAMS), EVEN IF SUCH HOLDER OR OTHER PARTY HAS BEEN ADVISED OF THE POSSIBILITY OF SUCH
DAMAGES.
END OF TERMS AND CONDITIONS
How to Apply These Terms to Your New Programs
If you develop a new program, and you want it to be of the greatest possible use to the public, the best way to achieve this is to
make it free software which everyone can redistribute and change under these terms.
To do so, attach the following notices to the program. It is safest to attach them to the start of each source file to most effectively
convey the exclusion of warranty; and each file should have at least the “copyright” line and a pointer to where the full notice is
found.
<one line to give the program’s name and an idea of what it does.>
Copyright (C) yyyy name of author
This program is free software; you can redistribute it and/or modify it under the terms of the GNU General Public License as
published by the Free Software Foundation; either version 2 of the License, or (at your option) any later version.
This program is distributed in the hope that it will be useful, but WITHOUT ANY WARRANTY; without even the implied warranty of
MERCHANTABILITY or FITNESS FOR A PARTICULAR PURPOSE. See the GNU General Public License for more details.
You should have received a copy of the GNU General Public License along with this program; if not, write to the Free Software
Foundation, Inc., 59 Temple Place - Suite 330, Boston, MA 02111-1307, USA.
Also add information on how to contact you by electronic and paper mail.
If the program is interactive, make it output a short notice like this when it starts in an interactive mode:
Gnomovision version 69, Copyright (C) year name of author
Gnomovision comes with ABSOLUTELY NO WARRANTY; for details type ‘show w’. This is free software, and you are welcome
to redistribute it under certain conditions; type ’show c’ for details.
The hypothetical commands ’show w’ and ’show c’ should show the appropriate parts of the General Public License. Of course,
the commands you use may be called something other than ’show w’ and ’show c’; they could even be mouse-clicks or menu
items-whatever suits your program.
You should also get your employer (if you work as a programmer) or your school, if any, to sign a “copyright disclaimer” for the
program, if necessary. Here is a sample; alter the names:
Yoyodyne, Inc., hereby disclaims all copyright interest in the program ’Gnomovision’ (which makes passes at compilers) written
by James Hacker.
signature of Ty Coon, 1 April 1989
Ty Coon, President of Vice
This General Public License does not permit incorporating your program into proprietary programs. If your program is a subroutine
library, you may consider it more useful to permit linking proprietary applications with the library. If this is what you want to do,
use the GNU Lesser General Public License instead of this License.
96
En
Page 97

Appendix
GNU Lesser General Public License
Version 2.1, February 1999
Copyright (C) 1991, 1999 Free Software Foundation, Inc.
59 Temple Place, Suite 330, Boston, MA 02111-1307, USA
Everyone is permitted to copy and distribute verbatim copies of this license document, but changing it is not allowed.
[This is the first released version of the Lesser GPL. It also counts as the successor of the GNU Library Public License, version 2,
hence the version number 2.1.]
Preamble
Th e lice nses for most sof tware ar e design ed to tak e away your freedom to share and change it. By contrast, the GNU General Public
Licenses are intended to guarantee your freedom to share and change free software-to make sure the software is free for all its
users. This license, the Lesser General Public License, applies to some specially designated software packages-typically librariesof the Free Software Foundation and other authors who decide to use it. You can use it too, but we suggest you first think carefully
about whether this license or the ordinary General Public License is the better strategy to use in any particular case, based on the
explanations below.
When we speak of free software, we are referring to freedom of use, not price. Our General Public Licenses are designed to make
sure that you have the freedom to distribute copies of free software (and charge for this service if you wish); that you receive source
code or can get it if you want it; that you can change the software and use pieces of it in new free programs; and that you are
informed that you can do these things.
To protect your rights, we need to make restrictions that forbid distributors to deny you these rights or to ask you to surrender these
rights. These restrictions translate to certain responsibilities for you if you distribute copies of the library or if you modify it.
For example, if you distribute copies of the library, whether gratis or for a fee, you must give the recipients all the rights that we
gave you. You must make sure that they, too, receive or can get the source code. If you link other code with the library, you must
provide complete object files to the recipients, so that they can relink them with the library after making changes to the library and
recompiling it. And you must show them these terms so they know their rights.
We protect your rights with a two-step method: (1) we copyright the library, and (2) we offer you this license, which gives you legal
permission to copy, distribute and/or modify the library.
To protect each distributor, we want to make it very clear that there is no warranty for the free library. Also, if the library is modified
by someone else and passed on, the recipients should know that what they have is not the original version, so that the original
author’s reputation will not be affected by problems that might be introduced by others.
Finally, software patents pose a constant threat to the existence of any free program. We wish to make sure that a company cannot
effectively restrict the users of a free program by obtaining a restrictive license from a patent holder.
Therefore, we insist that any patent license obtained for a version of the library must be consistent with the full freedom of use
specified in this license.
Most GNU software, including some libraries, is covered by the ordinary GNU General Public License. This license, the GNU Lesser
General Public License, applies to certain designated libraries, and is quite different from the ordinary General Public License. We
use this license for certain libraries in order to permit linking those libraries into non-free programs.
When a program is linked with a library, whether statically or using a shared library, the combination of the two is legally speaking
a combined work, a derivative of the original library. The ordinary General Public License therefore permits such linking only if the
entire combination fits its criteria of freedom. The Lesser General Public License permits more lax criteria for linking other code
with the library.
We call this license the “Lesser” General Public License because it does Less to protect the user’s freedom than the ordinary
General Public License. It also provides other free software developers Less of an advantage over competing non-free programs.
These disadvantages are the reason we use the ordinary General Public License for many libraries. However, the Lesser license
provides advantages in certain special circumstances.
For example, on rare occasions, there may be a special need to encourage the widest possible use of a certain library, so that it
becomes a de-facto standard. To achieve this, non-free programs must be allowed to use the library.
A more frequent case is that a free library does the same job as widely used non-free libraries. In this case, there is little to gain by
limiting the free library to free software only, so we use the Lesser General Public License.
In other cases, permission to use a particular library in non-free programs enables a greater number of people to use a large body
of free software. For example, permission to use the GNU C Library in non-free programs enables many more people to use the
whole GNU operating system, as well as its variant, the GNU/Linux operating system.
Although the Lesser General Public License is Less protective of the users’ freedom, it does ensure that the user of a program that
is linked with the Library has the freedom and the wherewithal to run that program using a modified version of the Library.
The precise terms and conditions for copying, distribution and modification follow. Pay close attention to the difference between
a “work based on the library” and a “work that uses the library”. The former contains code derived from the library, whereas the
latter must be combined with the library in order to run.
14
English
97
En
Page 98

14
Appendix
GNU Lesser General Public License
TERMS AND CONDITIONS FOR COPYING, DISTRIBUTION AND MODIFICATION
0. This License Agreement applies to any software library or other program which contains a notice placed by the copyright holder
or other authorized party saying it may be distributed under the terms of this Lesser General Public License (also called “this
License”). Each licensee is addressed as “you”.
A “library” means a collection of software functions and/or data prepared so as to be conveniently linked with application
programs (which use some of those functions and data) to form executables.
The “Library”, below, refers to any such software library or work which has been distributed under these terms. A “work based
on the Library” means either the Library or any derivative work under copyright law: that is to say, a work containing the Library
or a portion of it, either verbatim or with modifications and/or translated straightforwardly into another language. (Hereinafter,
translation is included without limitation in the term “modification”.)
”Source code” for a work means the preferred form of the work for making modifications to it. For a library, complete source
code means all the source code for all modules it contains, plus any associated interface definition files, plus the scripts used
to control compilation and installation of the library.
Activities other than copying, distribution and modification are not covered by this License; they are outside its scope. The act
of running a program using the Library is not restricted, and output from such a program is covered only if its contents
constitute a work based on the Library (independent of the use of the Library in a tool for writing it). Whether that is true
depends on what the Library does and what the program that uses the Library does.
1. You may copy and distribute verbatim copies of the Library’s complete source code as you receive it, in any medium, provided
that you conspicuously and appropriately publish on each copy an appropriate copyright notice and disclaimer of warranty;
keep intact all the notices that refer to this License and to the absence of any warranty; and distribute a copy of this License
along with the Library.
You may charge a fee for the physical act of transferring a copy, and you may at your option offer warranty protection in
exchange for a fee.
2. You may modify your copy or copies of the Library or any portion of it, thus forming a work based on the Library, and copy and
distribute such modifications or work under the terms of Section 1 above, provided that you also meet all of these conditions:
a) The modified work must itself be a software library.
b) You must cause the files modified to carry prominent notices stating that you changed the files and the date of any change.
c) You must cause the whole of the work to be licensed at no charge to all third parties under the terms of this License.
d) If a facility in the modified Library refers to a function or a table of data to be supplied by an application program that uses
the facility, other than as an argument passed when the facility is invoked, then you must make a good faith effort to ensure
that, in the event an application does not supply such function or table, the facility still operates, and performs whatever
part of its purpose remains meaningful.
(For example, a function in a library to compute square roots has a purpose that is entirely well-defined independent of the
application. Therefore, Subsection 2d requires that any application-supplied function or table used by this function must be
optional: if the application does not supply it, the square root function must still compute square roots.) These requirements
apply to the modified work as a whole. If identifiable sections of that work are not derived from the Library, and can be
reasonably considered independent and separate works in themselves, then this License, and its terms, do not apply to those
sections when you distribute them as separate works. But when you distribute the same sections as part of a whole which is
a work based on the Library, the distribution of the whole must be on the terms of this License, whose permissions for other
licensees extend to the entire whole, and thus to each and every part regardless of who wrote it.
Thus, it is not the intent of this section to claim rights or contest your rights to work written entirely by you; rather, the intent is
to exercise the right to control the distribution of derivative or collective works based on the Library.
In addition, mere aggregation of another work not based on the Library with the Library (or with a work based on the Library)
on a volume of a storage or distribution medium does not bring the other work under the scope of this License.
3. You may opt to apply the terms of the ordinary GNU General Public License instead of this License to a given copy of the Library.
To do this, you must alter all the notices that refer to this License, so that they refer to the ordinary GNU General Public License,
version 2, instead of to this License. (If a newer version than version 2 of the ordinary GNU General Public License has
appeared, then you can specify that version instead if you wish.) Do not make any other change in these notices.
Once this change is made in a given copy, it is irreversible for that copy, so the ordinary GNU General Public License applies
to all subsequent copies and derivative works made from that copy. This option is useful when you wish to copy part of the code
of the Library into a program that is not a library.
4. You may copy and distribute the Library (or a portion or derivative of it, under Section 2) in object code or executable form under
the terms of Sections 1 and 2 above provided that you accompany it with the complete corresponding machine-readable source
code, which must be distributed under the terms of Sections 1 and 2 above on a medium customarily used for software
interchange.
If distribution of object code is made by offering access to copy from a designated place, then offering equivalent access to
copy the source code from the same place satisfies the requirement to distribute the source code, even though third parties
are not compelled to copy the source along with the object code.
5. A program that contains no derivative of any portion of the Library, but is designed to work with the Library by being compiled
or linked with it, is called a “work that uses the Library”. Such a work, in isolation, is not a derivative work of the Library, and
therefore falls outside the scope of this License. However, linking a “work that uses the Library” with the Library creates an
executable that is a derivative of the Library (because it contains portions of the Library), rather than a “work that uses the
library”. The executable is therefore covered by this License. Section 6 states terms for distribution of such executables.
98
En
Page 99

Appendix
When a “work that uses the Library” uses material from a header file that is part of the Library, the object code for the work may
be a derivative work of the Library even though the source code is not. Whether this is true is especially significant if the work
can be linked without the Library, or if the work is itself a library. The threshold for this to be true is not precisely defined by law.
If such an object file uses only numerical parameters, data structure layouts and accessors, and small macros and small inline
functions (ten lines or less in length), then the use of the object file is unrestricted, regardless of whether it is legally a derivative
work. (Executables containing this object code plus portions of the Library will still fall under Section 6.)
Otherwise, if the work is a derivative of the Library, you may distribute the object code for the work under the terms of Section
6. Any executables containing that work also fall under Section 6, whether or not they are linked directly with the Library itself.
6. As an exception to the Sections above, you may also combine or link a “work that uses the Library” with the Library to produce
a work containing portions of the Library, and distribute that work under terms of your choice, provided that the terms permit
modification of the work for the customer’s own use and reverse engineering for debugging such modifications.
You must give prominent notice with each copy of the work that the Library is used in it and that the Library and its use are
covered by this License. You must supply a copy of this License. If the work during execution displays copyright notices, you
must include the copyright notice for the Library among them, as well as a reference directing the user to the copy of this
License.
Also, you must do one of these things:
a) Accompany the work with the complete corresponding machine-readable source code for the Library including whatever
changes were used in the work (which must be distributed under Sections 1 and 2 above); and, if the work is an executable
linked with the Library, with the complete machine-readable “work that uses the Library”, as object code and/or source
code, so that the user can modify the Library and then relink to produce a modified executable containing the modified
Library. (It is understood that the user who changes the contents of definitions files in the Library will not necessarily be
able to recompile the application to use the modified definitions.)
b) Use a suitable shared library mechanism for linking with the Library. A suitable mechanism is one that (1) uses at run time
a copy of the library already present on the user’s computer system, rather than copying library functions into the
executable, and (2) will operate properly with a modified version of the library, if the user installs one, as long as the
modified version is interface-compatible with the version that the work was made with.
c) Accompany the work with a written offer, valid for at least three years, to give the same user the materials specified in
Subsection 6a, above, for a charge no more than the cost of performing this distribution.
d) If distribution of the work is made by offering access to copy from a designated place, offer equivalent access to copy the
above specified materials from the same place.
e) Verify that the user has already received a copy of these materials or that you have already sent this user a copy.
For an executable, the required form of the “work that uses the Library” must include any data and utility programs needed for
reproducing the executable from it. However, as a special exception, the materials to be distributed need not include anything
that is normally distributed (in either source or binary form) with the major components (compiler, kernel, and so on) of the
operating system on which the executable runs, unless that component itself accompanies the executable.
It may happen that this requirement contradicts the license restrictions of other proprietary libraries that do not normally
accompany the operating system. Such a contradiction means you cannot use both them and the Library together in an
executable that you distribute.
7. You may place library facilities that are a work based on the Library side-by-side in a single library together with other library
facilities not covered by this License, and distribute such a combined library, provided that the separate distribution of the work
based on the Library and of the other library facilities is otherwise permitted, and provided that you do these two things:
a) Accompany the combined library with a copy of the same work based on the Library, uncombined with any other library
facilities. This must be distributed under the terms of the Sections above.
b) Give prominent notice with the combined library of the fact that part of it is a work based on the Library, and explaining
where to find the accompanying uncombined form of the same work.
8. You may not copy, modify, sublicense, link with, or distribute the Library except as expressly provided under this License. Any
attempt otherwise to copy, modify, sublicense, link with, or distribute the Library is void, and will automatically terminate your
rights under this License. However, parties who have received copies, or rights, from you under this License will not have their
licenses terminated so long as such parties remain in full compliance.
9. You are not required to accept this License, since you have not signed it. However, nothing else grants you permission to modify
or distribute the Library or its derivative works. These actions are prohibited by law if you do not accept this License. Therefore,
by modifying or distributing the Library (or any work based on the Library), you indicate your acceptance of this License to do
so, and all its terms and conditions for copying, distributing or modifying the Library or works based on it.
10. Each time you redistribute the Library (or any work based on the Library), the recipient automatically receives a license from
the original licensor to copy, distribute, link with or modify the Library subject to these terms and conditions. You may not
impose any further restrictions on the recipients’ exercise of the rights granted herein. You are not responsible for enforcing
compliance by third parties with this License.
11. If, as a consequence of a court judgment or allegation of patent infringement or for any other reason (not limited to patent
issues), conditions are imposed on you (whether by court order, agreement or otherwise) that contradict the conditions of this
License, they do not excuse you from the conditions of this License. If you cannot distribute so as to satisfy simultaneously your
obligations under this License and any other pertinent obligations, then as a consequence you may not distribute the Library
at all.
For example, if a patent license would not permit royalty-free redistribution of the Library by all those who receive copies directly
or indirectly through you, then the only way you could satisfy both it and this License would be to refrain entirely from
distribution of the Library.
14
English
99
En
Page 100

14
Appendix
If any portion of this section is held invalid or unenforceable under any particular circumstance, the balance of the section is
intended to apply, and the section as a whole is intended to apply in other circumstances.
It is not the purpose of this section to induce you to infringe any patents or other property right claims or to contest validity of
any such claims; this section has the sole purpose of protecting the integrity of the free software distribution system which is
implemented by public license practices. Many people have made generous contributions to the wide range of software
distributed through that system in reliance on consistent application of that system; it is up to the author/donor to decide if he
or she is willing to distribute software through any other system and a licensee cannot impose that choice.
This section is intended to make thoroughly clear what is believed to be a consequence of the rest of this License.
12. If the distribution and/or use of the Library is restricted in certain countries either by patents or by copyrighted interfaces, the
original copyright holder who places the Library under this License may add an explicit geographical distribution limitation
excluding those countries, so that distribution is permitted only in or among countries not thus excluded. In such case, this
License incorporates the limitation as if written in the body of this License.
13. The Free Software Foundation may publish revised and/or new versions of the Lesser General Public License from time to time.
Such new versions will be similar in spirit to the present version, but may differ in detail to address new problems or concerns.
Each version is given a distinguishing version number. If the Library specifies a version number of this License which applies
to it and “any later version”, you have the option of following the terms and conditions either of that version or of any later
version published by the Free Software Foundation. If the Library does not specify a license version number, you may choose
any version ever published by the Free Software Foundation.
14. If you wish to incorporate parts of the Library into other free programs whose distribution conditions are incompatible with
these, write to the author to ask for permission. For software which is copyrighted by the Free Software Foundation, write to
the Free Software Foundation; we sometimes make exceptions for this. Our decision will be guided by the two goals of
preserving the free status of all derivatives of our free software and of promoting the sharing and reuse of software generally.
NO WARRANTY
15. BECAUSE THE LIBRARY IS LICENSED FREE OF CHARGE, THERE IS NO WARRANTY FOR THE LIBRARY, TO THE EXTENT
PERMITTED BY APPLICABLE LAW. EXCEPT WHEN OTHERWISE STATED IN WRITING THE COPYRIGHT HOLDERS AND/OR
OTHER PARTIES PROVIDE THE LIBRARY “AS IS” WITHOUT WARRANTY OF ANY KIND, EITHER EXPRESSED OR IMPLIED,
INCLUDING, BUT NOT LIMITED TO, THE IMPLIED WARRANTIES OF MERCHANTABILITY AND FITNESS FOR A PARTICULAR
PURPOSE. THE ENTIRE RISK AS TO THE QUALITY AND PERFORMANCE OF THE LIBRARY IS WITH YOU. SHOULD THE
LIBRARY PROVE DEFECTIVE, YOU ASSUME THE COST OF ALL NECESSARY SERVICING, REPAIR OR CORRECTION.
16. IN NO EVENT UNLESS REQUIRED BY APPLICABLE LAW OR AGREED TO IN WRITING WILL ANY COPYRIGHT HOLDER, OR
ANY OTHER PARTY WHO MAY MODIFY AND/OR REDISTRIBUTE THE LIBRARY AS PERMITTED ABOVE, BE LIABLE TO YOU
FOR DAMAGES, INCLUDING ANY GENERAL, SPECIAL, INCIDENTAL OR CONSEQUENTIAL DAMAGES ARISING OUT OF THE
USE OR INABILITY TO USE THE LIBRARY (INCLUDING BUT NOT LIMITED TO LOSS OF DATA OR DATA BEING RENDERED
INACCURATE OR LOSSES SUSTAINED BY YOU OR THIRD PARTIES OR A FAILURE OF THE LIBRARY TO OPERATE WITH ANY
OTHER SOFTWARE), EVEN IF SUCH HOLDER OR OTHER PARTY HAS BEEN ADVISED OF THE POSSIBILITY OF SUCH
DAMAGES.
END OF TERMS AND CONDITIONS
How to Apply These Terms to Your New Libraries
If you develop a new library, and you want it to be of the greatest possible use to the public, we recommend making it free software
that everyone can redistribute and change. You can do so by permitting redistribution under these terms (or, alternatively, under
the terms of the ordinary General Public License).
To apply these terms, attach the following notices to the library. It is safest to attach them to the start of each source file to most
effectively convey the exclusion of warranty; and each file should have at least the “copyright” line and a pointer to where the full
notice is found.
<one line to give the library’s name and an idea of what it does.>
Copyright (C) year name of author
This library is free software; you can redistribute it and/or modify it under the terms of the GNU Lesser General Public License as
published by the Free Software Foundation; either version 2.1 of the License, or (at your option) any later version.
This library is distributed in the hope that it will be useful, but WITHOUT ANY WARRANTY; without even the implied warranty of
MERCHANTABILITY or FITNESS FOR A PARTICULAR PURPOSE. See the GNU Lesser General Public License for more details.
You should have received a copy of the GNU Lesser General Public License along with this library; if not, write to the Free Software
Foundation, Inc., 59 Temple Place, Suite 330, Boston, MA 02111-1307, USA
Also add information on how to contact you by electronic and paper mail.
You should also get your employer (if you work as a programmer) or your school, if any, to sign a “copyright disclaimer” for the
library, if necessary. Here is a sample; alter the names:
Yoyodyne, Inc., hereby disclaims all copyright interest in the library ’Frob’ (a library for tweaking knobs) written by James Random
Hacker.
signature of Ty Coon, 1 April 1990
Ty Coon, President of Vice
100
En
That’s all there is to it!
 Loading...