

Page 1

Page 2

The exclamation point within an equilateral
triangle is intended to alert the user to the
presence of important operating and
maintenance (servicing) instructions in the
literature accompanying the appliance.
The lightning flash with arrowhead symbol, within an
equilateral triangle, is intended to alert the user to the
presence of uninsulated "dangerous voltage" within the
product's enclosure that may be of sufficient magnitude
to constitute a risk of electric shock to persons.
CAUTION:
TO PREVENT THE RISK OF ELECTRIC SHOCK, DO
NOT REMOVE COVER (OR BACK). NO USERSERVICEABLE PARTS INSIDE. REFER SERVICING
TO QUALIFIED SERVICE PERSONNEL.
CAUTION
RISK OF ELECTRIC SHOCK
DO NOT OPEN
IMPORTANT
D3-4-2-1-1_En-A
Read these instructions.
Keep these instructions.
Heed all warnings.
Follow all instructions.
Do not use this apparatus near water.
Clean only with dry cloth.
Do not block any ventilation openings. Install in
accordance with the manufacturer’s instructions.
Do not install near any heat sources such as
radiators, heat registers, stoves, or other apparatus
(including amplifiers) that produce heat.
Do not defeat the safety purpose of the polarized or
grounding-type plug. A polarized plug has two
blades with one wider than the other. A grounding
type plug has two blades and a third grounding
prong. The wide blade or the third prong are
provided for your safety. If the provided plug does
not fit into your outlet, consult an electrician for
replacement of the obsolete outlet.
Protect the power cord from being walked on or
pinched particularly at plugs, convenience
receptacles, and the point where they exit from the
apparatus.
1)
2)
3)
4)
5)
6)
7)
8)
9)
10)
Only use attachments/accessories specified by the
manufacturer.
Use only with the cart, stand, tripod, bracket, or
table specified by the manufacturer, or sold with the
apparatus. When a cart is used, use caution when
moving the cart/apparatus combination to avoid
injury from tip-over.
Unplug this apparatus during lightning storms or
when unused for long periods of time.
Refer all servicing to qualified service personnel.
Servicing is required when the apparatus has been
damaged in any way, such as power-supply cord or
plug is damaged, liquid has been spilled or objects
have fallen into the apparatus, the apparatus has
been exposed to rain or moisture, does not operate
normally, or has been dropped.
P1-4-2-2_En
11)
12)
13)
14)
IMPORTANT NOTICE – THE SERIAL NUMBER FOR THIS EQUIPMENT IS LOCATED IN THE REAR. PLEASE
WRITE THIS SERIAL NUMBER ON YOUR ENCLOSED WARRANTY CARD AND KEEP IN
A SECURE AREA. THIS IS FOR YOUR SECURITY.
WARNING: Handling the cord on this product or cords
associated with accessories sold with the product will
expose you to chemicals listed on proposition 65 known
to the State of California and other governmental
entities to cause cancer and birth defect or other
reproductive harm.
Wash hands after handling
D36-P4-A_En
D1-4-2-6-1_En
Page 3

TABLE OF CONTENTS
Congratulations on your purchase of a Pioneer KURO flat panel television.
KURO is the future of Pioneer flat-panel displays. It’s a world without boundaries. A place where the senses evolve, colors
are felt and sounds can be tasted. An experience that changes not only the way you look at television, but the way you
look at the world.
We are proud to incorporate this philosophy of exceptional quality, state-of-the-art design and meticulous engineering to
make the KURO undeniably unique and bring you one of the best entertainment experiences possible.
Please take some time to read through this owner’s guide and manual to learn about the many features and benefits that
set the KURO apart. We hope you enjoy the experience of owning the KURO and invite you to enter a new world of seeing
and hearing like never before.
TABLE OF CONTENTS
1 Introduction to the 20FD Series Flat Panel TVs .....................................................................................6
1.1 Flat Panel TV Shipment Checklist ...................................................................................................................................6
1.2 Control Options: Get to Know Your Flat Panel TV .......................................................................................................... 8
1.2.1 Control Buttons and More on the Flat Panel TV .................................................................................................... 8
1.2.2 Operating the Remote Control.............................................................................................................................. 10
1.2.3 Buttons on the Remote Control ............................................................................................................................ 12
2 Install Your Flat Panel TV ......................................................................................................................14
2.1 Choose a Location and the Mounting Method............................................................................................................. 14
2.1.1 Check the Location for Suitability ......................................................................................................................... 15
2.1.2 Lift and/or Move Your Panel (the How To’s)......................................................................................................... 15
2.2 Install the Panel Using a Stand ..................................................................................................................................... 16
2.2.1 Use or Remove the Included Stand ......................................................................................................................16
2.2.2 Connect the Speaker Cables ................................................................................................................................. 20
2.3 Wall/Ceiling Mounting.................................................................................................................................................... 22
2.4 Mount the Flat Panel TV .................................................................................................................................................24
2.5 Connect to Broadcast TV & Other Devices (DVR, Receiver, BDR, etc.) ..................................................................... 26
2.5.1 Add Analog (conventional) and Digital TV Channels ..........................................................................................26
2.5.2 Connect Your Other Pioneer Equipment.............................................................................................................. 26
2.5.3 Connect the Power Cord to the Panel .................................................................................................................. 29
2.6 Route then Bundle the Power Cord and Cables .......................................................................................................... 29
3 Basic Operations For Television Viewing .............................................................................................31
3.1 Turn the Flat Panel TV ON/OFF...................................................................................................................................... 31
3.2 Program the Flat Panel TV for Television Viewing........................................................................................................ 32
3.2.1 Choose Analog or Digital TV Channels ................................................................................................................ 32
3.2.2 Explore the Home Menu ........................................................................................................................................ 32
3.2.3 Assign a Language................................................................................................................................................. 34
3.2.4 Set the Clock........................................................................................................................................................... 35
3.2.5 Create the List of Channels ................................................................................................................................... 35
3.2.6 Skip or Delete Unwanted Channels...................................................................................................................... 38
3.2.7 Channel List ............................................................................................................................................................ 39
3.3 Quick Start for Watching Television.............................................................................................................................. 41
3.3.1 Change the Channel/Sub-Channel....................................................................................................................... 41
3.3.2 Adjust the Volume/Sound...................................................................................................................................... 41
3.3.3 Turn On the Sleep Timer........................................................................................................................................ 41
3.4 Adjust the Picture and Sound Quality .......................................................................................................................... 42
3.4.1 Adjust the Picture for Your Room Lighting .......................................................................................................... 42
3.4.2 General Picture (Video) Adjustment for an AV Source ....................................................................................... 43
3.4.3 Compare Images When Adjusting the Picture....................................................................................................44
3.4.4 Display a Graphical Picture/Sound Adjustment Screen..................................................................................... 45
3.4.5 Sound Control......................................................................................................................................................... 46
3.4.6 General Sound (Audio) Adjustment...................................................................................................................... 46
English
3
En
Page 4

TABLE OF CONTENTS
3.5 Block Programs, Channels, or Content.........................................................................................................................47
3.5.1 Assign a Parental Control (Block) Password .......................................................................................................47
3.5.2 Activate Parental Control .......................................................................................................................................48
3.5.3 Assign a Rating System to Create Blocks ............................................................................................................48
3.5.4 Temporarily Remove a Block .................................................................................................................................51
3.6 Smart Starts for New Owners ........................................................................................................................................52
3.6.1 Use the TOOLS Menu.............................................................................................................................................52
3.6.2 Extend Your Panel Life............................................................................................................................................52
3.6.3 Turn On the Image Orbiter.....................................................................................................................................53
3.6.4 Trigger the Screen-Saving Video Pattern Periodically.........................................................................................53
3.6.5 Activate Energy Save to Reduce Power Usage ....................................................................................................53
4 Additional Picture and Sound Adjustment Options ........................................................................... 54
4.1 Choose an AV Option (Video, Game, etc.).....................................................................................................................54
4.1.1 AV Source through the Remote Control...............................................................................................................54
4.1.2 Choose an AV Source through the Home Menu .................................................................................................55
4.1.3 Choose a PC Source...............................................................................................................................................55
4.1.4 Set the Panel to Recognize a Game Console .......................................................................................................56
4.2 Adjust Specific Picture Elements ..................................................................................................................................56
4.2.1 Choose a Screen Size (Automatically or Manually).............................................................................................56
4.2.2 Correct the Picture for an AV or PC Source .........................................................................................................58
4.3 Assign Advanced Picture Functions .............................................................................................................................59
4.3.1 Adjust for Screen Masking (black bars on sides) ................................................................................................59
4.3.2 Select a PureCinema Level for High Quality Image.............................................................................................60
4.4 View in Multi-Screen .......................................................................................................................................................61
4.4.1 Split/Swap/Shift the Screen...................................................................................................................................61
4.5 Freeze the Picture ...........................................................................................................................................................62
4.6 Use the Banner Feature..................................................................................................................................................63
4.7 Select Alternatives for/to Sound ....................................................................................................................................64
4.7.1 Activate Closed Captioning (CC) ...........................................................................................................................64
4.7.2 Switch Languages Using MTS...............................................................................................................................66
4.7.3 Select SAP...............................................................................................................................................................66
4.7.4 Apply Sound Effect Settings ..................................................................................................................................67
4.7.5 Use Auto Volume Control (AVC)............................................................................................................................67
4.8 Manage the Power ..........................................................................................................................................................67
5 Use Other Equipment With Your Flat Panel TV ................................................................................... 69
5.1 Program the Remote Control to Operate Other Equipment........................................................................................69
5.1.1 Assign a Manufacturing Code to the Remote Control ........................................................................................69
5.1.2 Issue a Library Search for a Manufacturer Code.................................................................................................69
5.1.3 Clear Added Manufacturer Codes from the Remote Control .............................................................................70
5.1.4 Control a Pioneer Receiver ....................................................................................................................................70
5.1.5 Control a Cable (CBL) or Satellite (SAT) System..................................................................................................71
5.1.6 Control a Video Cassette Recorder (VCR) ............................................................................................................72
5.1.7 Control a DVD Player/DVR Recorder/BD Player..................................................................................................73
5.2 Use HDMI Inputs.............................................................................................................................................................74
5.2.1 Specify the HDMI Input Type .................................................................................................................................74
5.2.2 Specify a Digital HDMI Signal Type ......................................................................................................................75
5.2.3 Specify an Audio HDMI Signal Type .....................................................................................................................75
5.3 Control Equipment with the Panel’s Remote Through HDMI .....................................................................................76
5.3.1 Control an AV System.............................................................................................................................................78
5.3.2 Control a Recorder .................................................................................................................................................79
5.3.3 Control a Player.......................................................................................................................................................79
5.3.4 Add an AV Amp or a BD Player.............................................................................................................................80
5.4 Specific HDMI Control Commands ...............................................................................................................................81
5.4.1 Play Source Sound Using an HDMI Command...................................................................................................81
5.4.2 Turn OFF the Power With an HDMI Command ...................................................................................................81
5.4.3 Turn ON the Power With an HDMI Command.....................................................................................................81
4
En
5.4.4 Test the Power Control (On/Off) ............................................................................................................................82
Page 5

TABLE OF CONTENTS
5.5 Connect a Game Console or Camcorder ...................................................................................................................... 82
5.6 Operate the Home Media Gallery .................................................................................................................................. 83
5.6.1 Network Connections............................................................................................................................................. 84
5.6.2 Connect a USB Device........................................................................................................................................... 86
5.7 Run the Home Media Gallery......................................................................................................................................... 88
5.7.1 Show Your Movie Files on the Flat Panel TV ........................................................................................................ 91
5.7.2 Play Your Music Files on the Flat Panel TV .......................................................................................................... 93
5.7.3 Show Your Photo File on the Flat Panel TV .......................................................................................................... 94
5.8 Use the TOOLS Menu ..................................................................................................................................................... 96
5.9 HMG Setup .................................................................................................................................................................... 108
5.10 Other useful functions................................................................................................................................................ 109
5.11 Add Other Audio Equipment...................................................................................................................................... 111
5.12 Add a Computer (PC) ................................................................................................................................................. 112
5.12.1 Automatic Image Position and Clock Adjustments ........................................................................................ 112
5.12.2 Manual Image Position and Clock Adjustments ............................................................................................. 112
6 Helpful Information .............................................................................................................................113
6.1 Frequently Asked Questions (FAQs) ........................................................................................................................... 113
6.2 Check Your Software/Hardware Version..................................................................................................................... 114
6.3 Cleaning Methods......................................................................................................................................................... 114
6.4 Troubleshooting & Service Information....................................................................................................................... 115
6.4.1 Check the Signal Strength................................................................................................................................... 120
7 Cautions and Warnings........................................................................................................................121
7.1 Installation Details........................................................................................................................................................ 121
7.2 Physical Location & Temperature Considerations..................................................................................................... 121
7.3 Usage Guidelines .......................................................................................................................................................... 121
7.4 Signal Interference or Noise ........................................................................................................................................ 122
7.5 Phosphor Properties..................................................................................................................................................... 122
7.6 Image Information Including Retention & After-Image Lag ......................................................................................122
7.7 Safety Precautions........................................................................................................................................................ 124
7.8 Legal Notices................................................................................................................................................................. 124
7.8.1 Safety..................................................................................................................................................................... 124
7.8.2 Radio Interference................................................................................................................................................125
8 Appendix ..............................................................................................................................................126
8.1 Ratings Charts (for Various Audience Classifications) ............................................................................................. 126
8.1.1 TV Ratings (age-based) ........................................................................................................................................ 126
8.1.2 U.S. TV Parental Guideline Ratings (age/category-based)................................................................................126
8.1.3 MPAA Movie Ratings (age-based)...................................................................................................................... 126
8.1.4 Canadian - English Ratings (age-based) ............................................................................................................ 127
8.1.5 Canadian - French Ratings (age-based)............................................................................................................. 127
8.2 Manufacturer Codes to Program into the Remote Control....................................................................................... 128
8.2.1 Cable...................................................................................................................................................................... 128
8.2.2 Satellite.................................................................................................................................................................. 128
8.2.3 VCR (Brands A - F)................................................................................................................................................129
8.2.4 VCR (Brands G - O)............................................................................................................................................... 130
8.2.5 VCR (Brands P - V) ............................................................................................................................................... 131
8.2.6 VCR (Brands W - Z) .............................................................................................................................................. 131
8.2.7 PVR ........................................................................................................................................................................ 132
8.2.8 BD (HD-DVD)........................................................................................................................................................ 132
8.2.9 DVD-R.................................................................................................................................................................... 132
8.2.10 DVD (Brands A - N) ............................................................................................................................................ 133
8.2.11 DVD (Brands O - Z)............................................................................................................................................. 134
8.2.12 LD......................................................................................................................................................................... 134
8.3 Specifications................................................................................................................................................................ 135
8.4 Glossary ......................................................................................................................................................................... 152
8.5 Index............................................................................................................................................................................... 154
8.6 Trademarks, Licenses, & Patent Information ............................................................................................................. 155
English
5
En
Page 6
01
Introduction to the 20FD Series Flat Panel TVs
1 Introduction to the 20FD Series Flat Panel
TVs
The Pioneer 20FD Series Flat Panel TV models include the 60-inch PDP-6020FD and the 50-inch PDP-5020FD
(screen sizes measured diagonally). Below is a list of all accessories shipped with your panel. If an item is
missing, please contact your dealer or our Service organization immediately. Service contact information is listed
on the back of this manual.
1.1 Flat Panel TV Shipment Checklist
In addition to the flat panel TV, there are several accessories included to make installation quick and easy. Please
check for contents before discarding or allowing your installer to discard any packing material.
The PDP-6020FD and PDP-5020FD shipments have slightly different pieces. Identify the accessories from the
appropriate list below.
You will need a Philips screwdriver when mounting the speaker and attaching the stand.
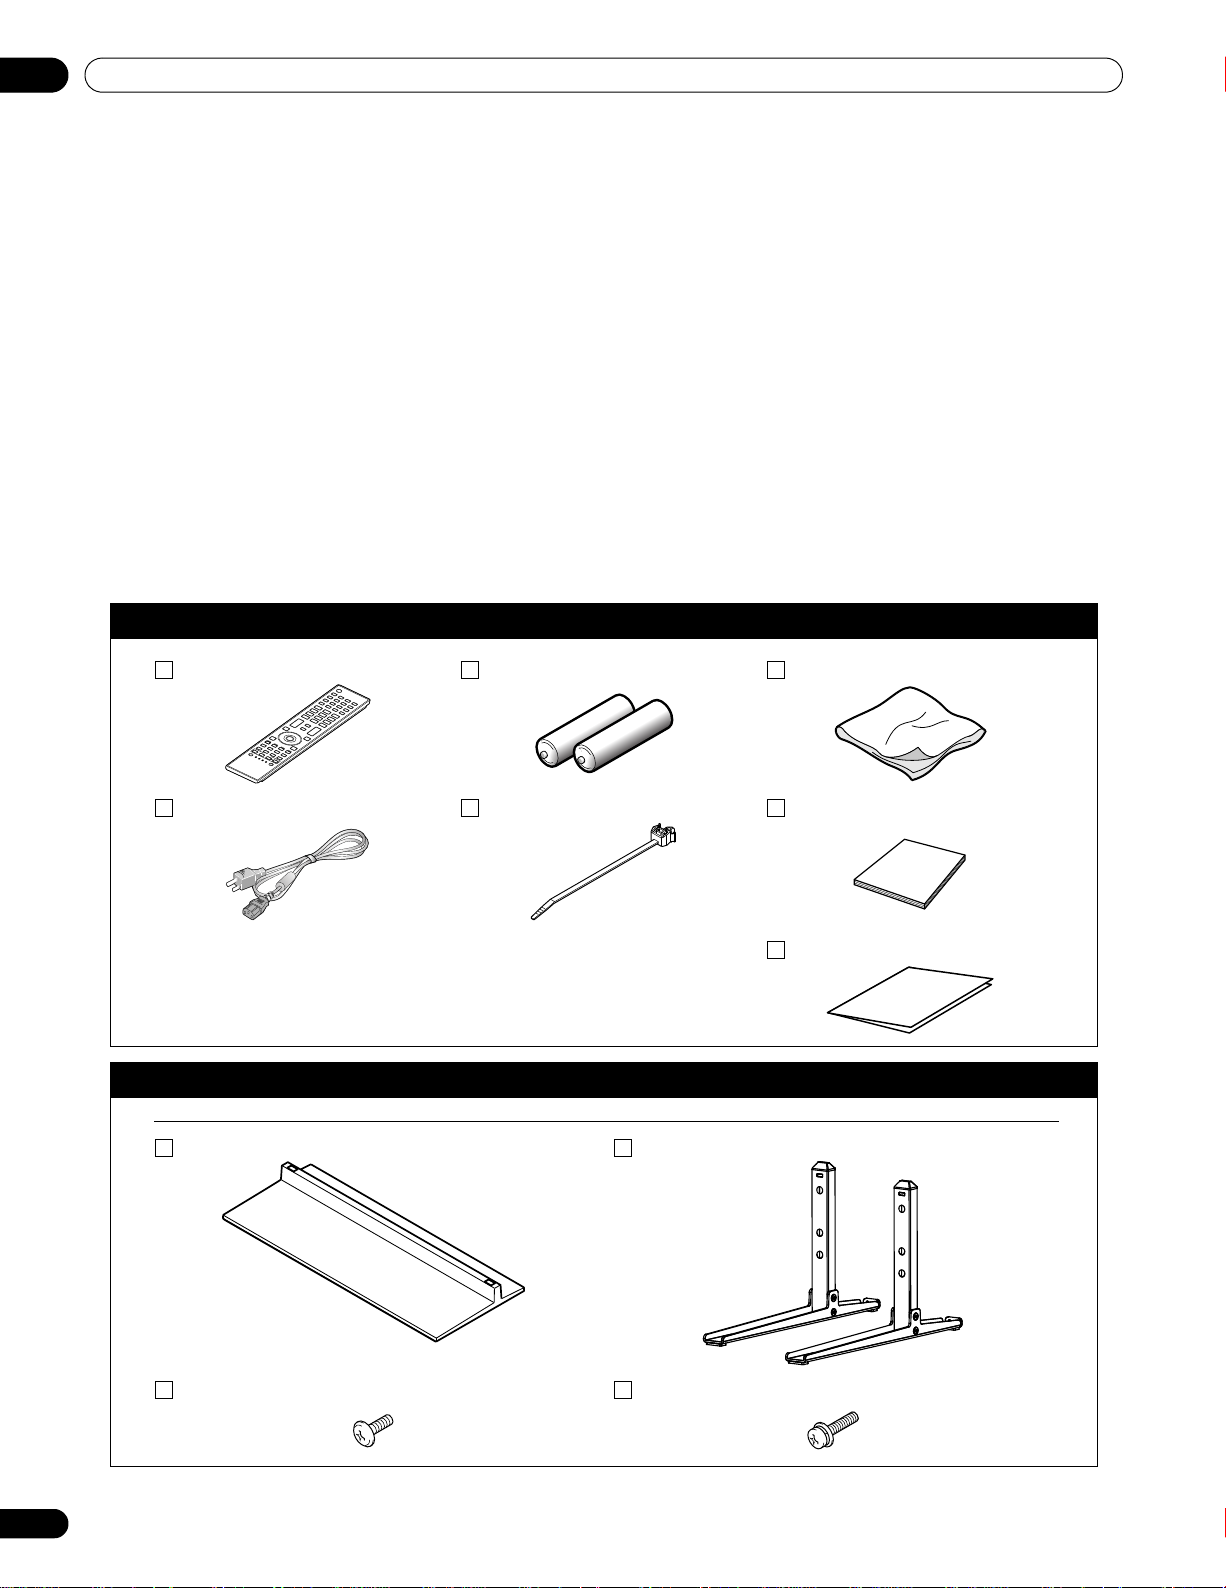
Shipped with both models
Remote Control Batteries for Remote (2) Cleaning Cloth
Power Cord (2 m/6.6 feet) Cable Clamps (4) Operating Instructions
Warranty Card
Also shipped with the PDP-6020FD (60” panel)
Stand kit
Base Cover Stand Pipes (2)
6
En
Silver Screws (4) (4×10 mm) Black Screws (4) (M6×20 mm)
Page 7

Introduction to the 20FD Series Flat Panel TVs
Also shipped with the PDP-6020FD (60” panel)
Falling Prevention
Metal Fittings (2)
Speaker accessories
Speaker Cables (2) Speaker
Speaker Mounting Screws (9) (M5×10 mm)
Speaker Bracket (Center) Speaker Brackets (Left & Right)
Screws to Metal Fittings (4)
(M4×35 mm)
01
English
Also shipped with the PDP-5020FD (50” panel)
Stand kit
Falling Prevention
Metal Fittings (2)
Screws to Metal Fittings (2)
(M4×35 mm)
Speaker accessories
Speaker Cables (2) Speaker Brackets (Side) (2) Speaker
Speaker Mounting Screws (9)
(M5×10 mm)
Speaker Bracket (Center)
En
7
Page 8
01
(PDP-5020FD)
Command Side of the Panel (left side)
Introduction to the 20FD Series Flat Panel TVs
1.2 Control Options: Get to Know Your Flat Panel TV
You can operate your flat panel TV from the panel buttons or with the remote control. The following sections
provide button locations/operations for the panel and the remote control.
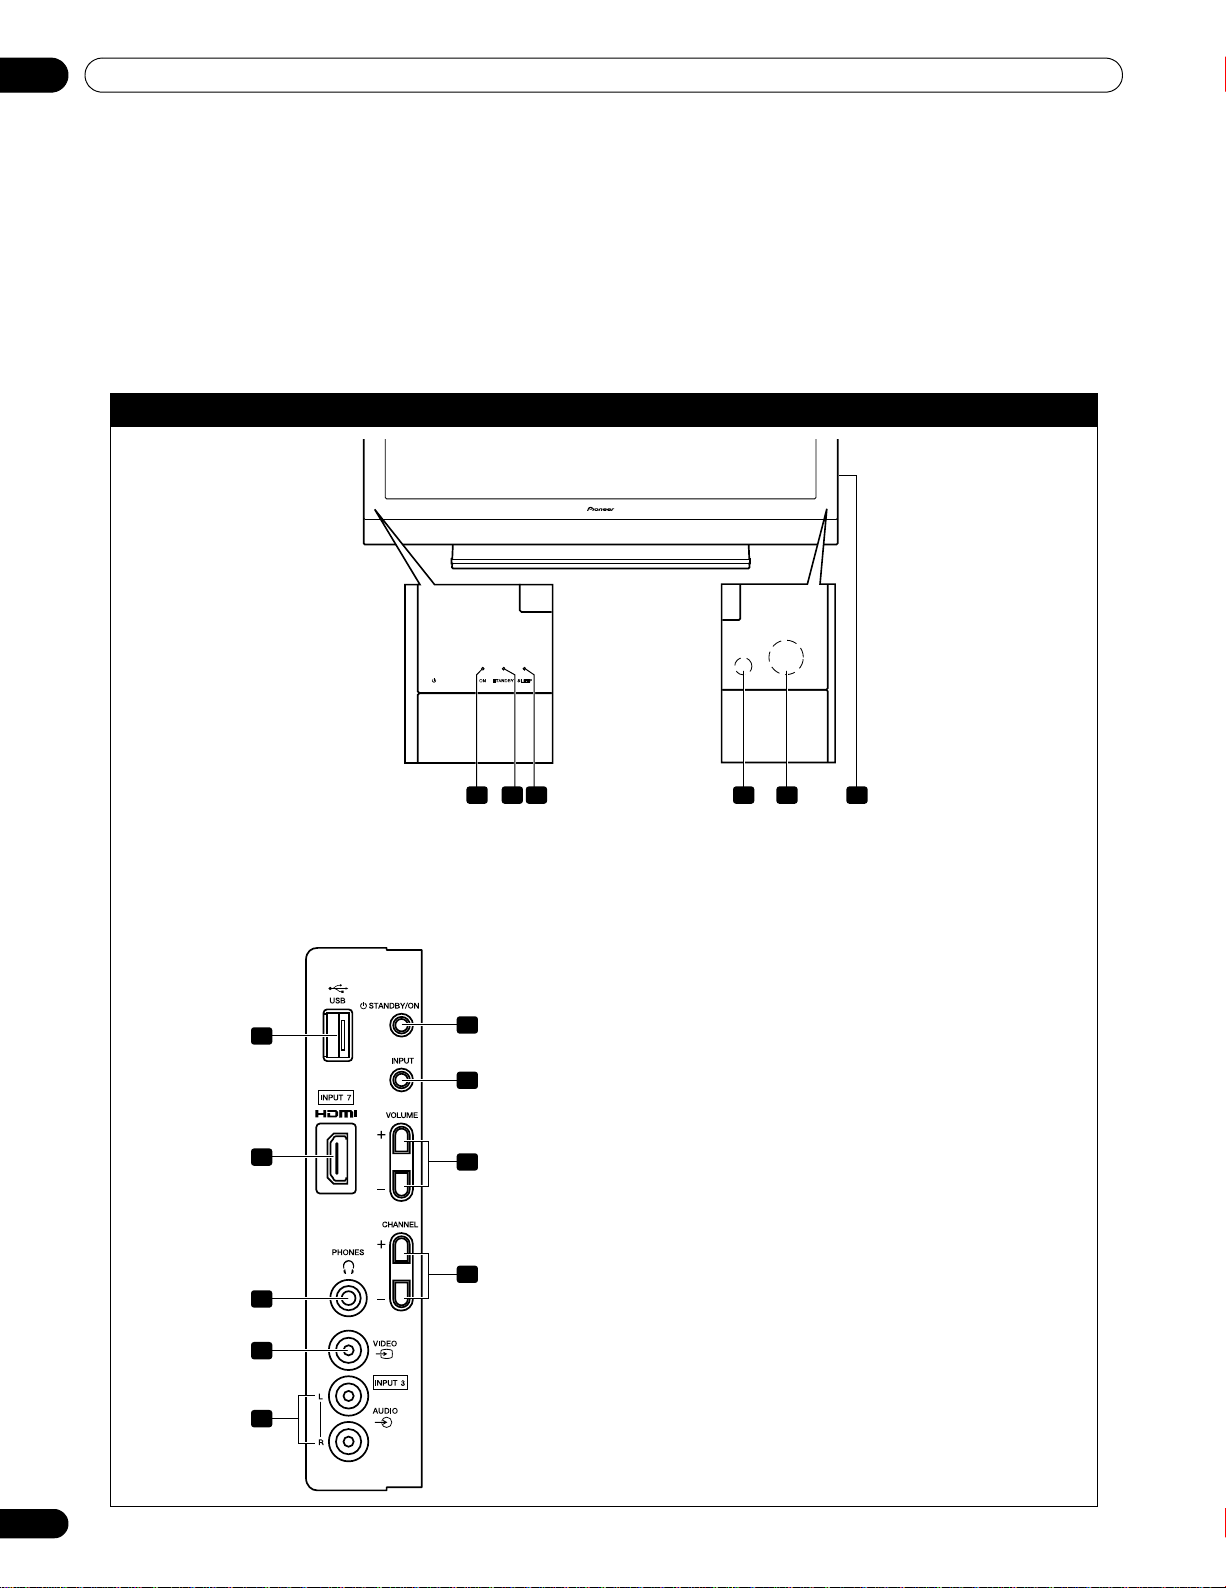
1.2.1 Control Buttons and More on the Flat Panel TV
Your flat panel TV has buttons, indicators, and sensors on the lower front bezel with more buttons, toggles, and
ports on the panel sides. Refer to the drawings below for specific locations and functions. Or, for the back ports
and terminals only, check the terminal position sheet located near the panel’s terminal compartment to identify
the various options.
20FD Series Models: Face of Panel
1 -Power ON indicator
2 -STANDBY indicator
3 -SLEEP indicator
7
8
9
10
1 2 3 4 5 6
4 -Room Light sensor
5 -Remote Control sensor
6 -Bezel (some call it the front frame)
7 -USB terminal
8 -INPUT 7 terminal (HDMI)
12
13
14
15
9 -PHONES terminal
10 -INPUT 3 terminal (Video)
11 -INPUT 3 terminals (Audio)
12 -STANDBY/ON button
13 -INPUT button
14 -VOLUME Up/Down buttons
15 -CHANNEL Up/Down buttons
8
En
11
Page 9
Introduction to the 20FD Series Flat Panel TVs
1 2 3
(middle bank)
(PDP-6020FD)
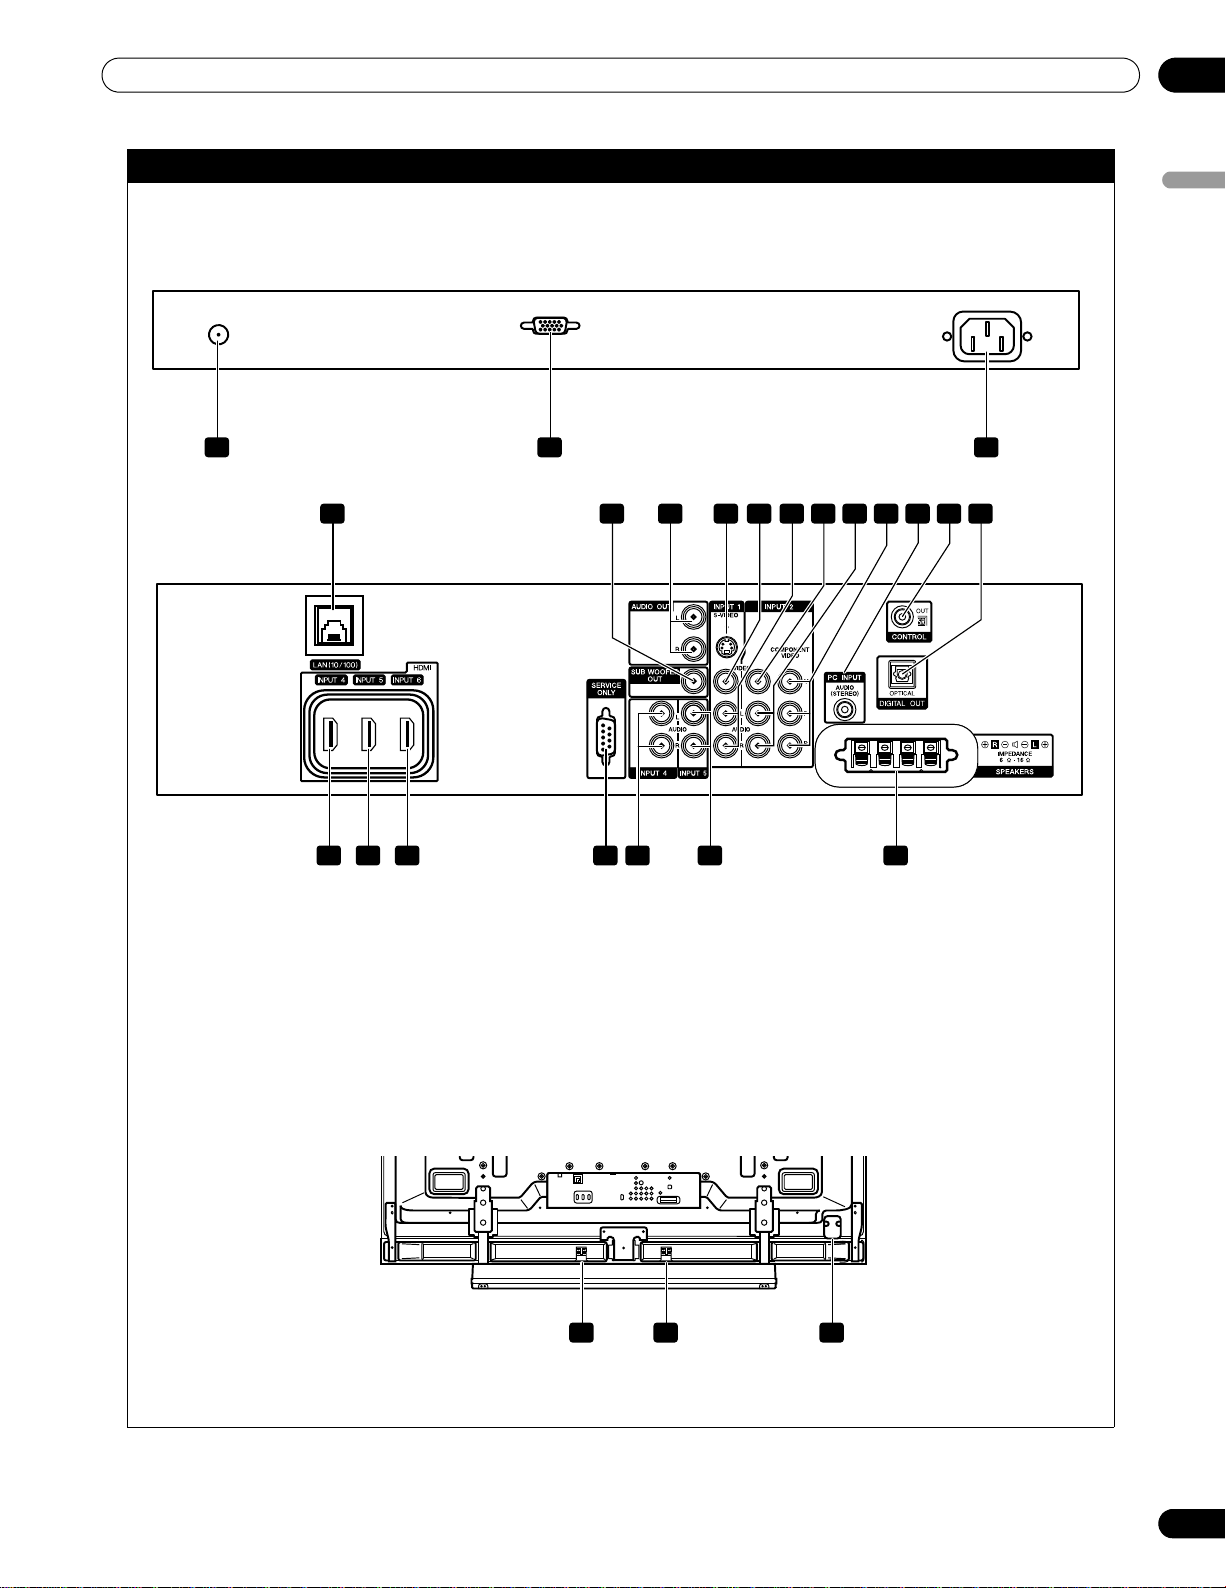
Back of the Panel
1 -ANT terminal
2 -PC Input terminal (Analog RGB)
3 -AC In terminal
(upper bank)
12114 13 14 15 16 17 18 19 20 21
01
English
6 7 8
4 -Ethernet cable port
5 -INPUT 4 terminal (HDMI)
6 -INPUT 5 terminal (HDMI)
7 -INPUT 6 terminal (HDMI)
8 -RC-232C terminal (for factory use)
9 -INPUT 4 terminals (Audio)
10 -INPUT 5 terminals (Audio)
11 -SUB WOOFER OUT terminal
12 -AUDIO OUT terminals (Audio)
13 -INPUT 1 terminal (S-Video)
(lower bank)
23 -Speakers (R) terminal (speaker side)
24 -Speakers (L) terminal (speaker side)
9 10 225
14 -INPUT 1 terminal (Video)
15 -INPUT 1 terminals (Audio)
16 -INPUT 2 terminal (Video)
17 -INPUT 2 terminals (Audio)
18 -INPUT 2 terminals (Component, Y, P
19 -PC INPUT terminal (Audio)
20 -CONTROL OUT terminal
21 -DIGITAL OUT terminal (Optical)
22 -SPEAKERS (right/left) terminal
23 24 25
25 -Power On button
, PR)
B
Terminals on side and rear panels are common to both 20FD models.
9
En
Page 10
01
When disposing of used batteries, please comply with
governmental regulations or environmental public institution’s
rules that apply in your country/area.
Introduction to the 20FD Series Flat Panel TVs
1.2.2 Operating the Remote Control
The remote control for the 20FD Series panels is a powerful tool. This section provides a brief introduction to your
remote control while later sections explore more advanced operations.
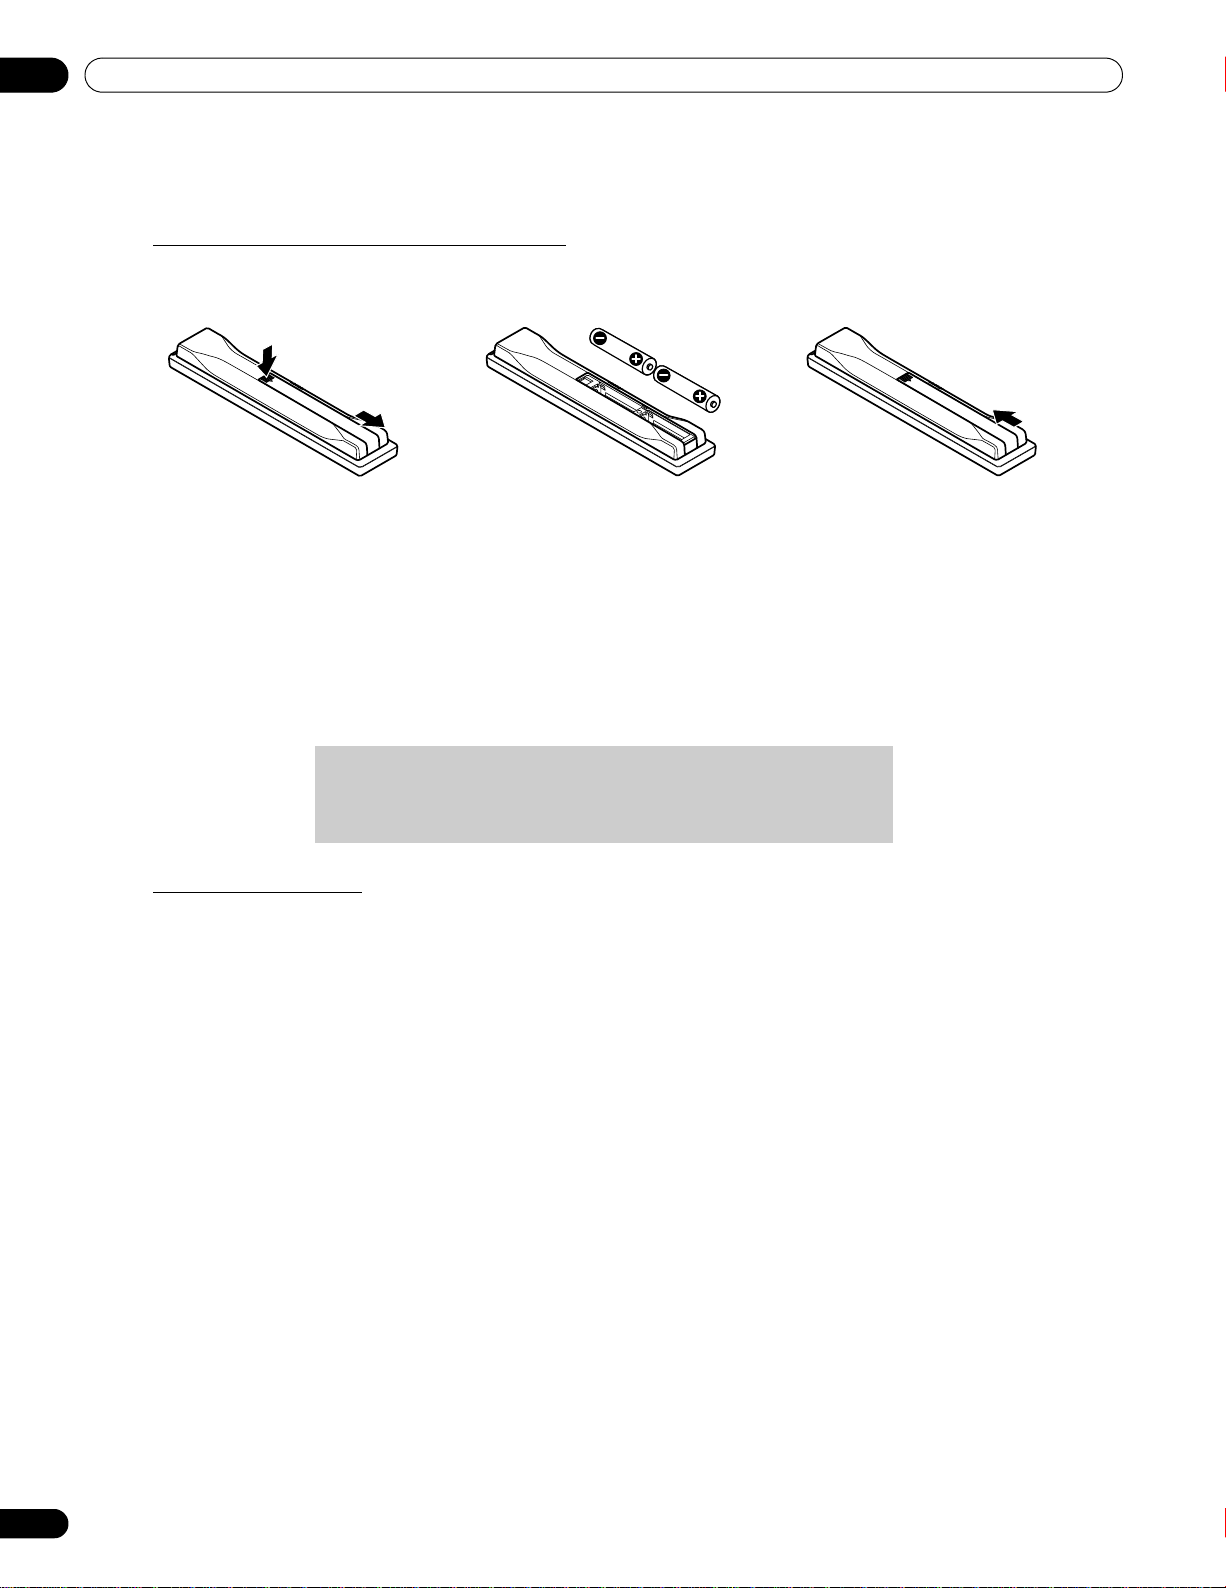
Insert the Batteries into the Remote Control
To open push and slide the battery cover in the direction of the arrows.
Load the supplied two AA size batteries by the negative polarity (–) ends first.
The batteries supplied with this product may have a shorter life expectancy due to storage conditions. If the
remote control seems to be failing or is weak, replace the provided batteries with new alkaline batteries.
Never mix old and new batteries. Mixing old and new batteries can shorten the life of new batteries or cause
chemical leaks in old batteries. Also, mixing different types or brands of batteries can cause issues as batteries
brands have slightly different characteristics.
Note: If the flat panel TV’s remote control is not needed for an extended length of time, remove the batteries.
Remote Control Issues
There are several issues that can affect your remote control but the most common problem is weak batteries.
Weak batteries in the remote control can cause communication to fail or only operate sporadically. In this
situation, try moving closer to the panel and attempt to control the panel with the remote. If the panel responds
then change the batteries. If moving closer has no effect on the panel, check the surroundings for objects that
might be blocking the signal. Also consider other equipment with remote controls that are in the area around the
panel. Objects and other IR signals can disrupt the remote. For more help with your remote control, refer to “6.1
Frequently Asked Questions (FAQs)”.
10
En
Page 11
Introduction to the 20FD Series Flat Panel TVs
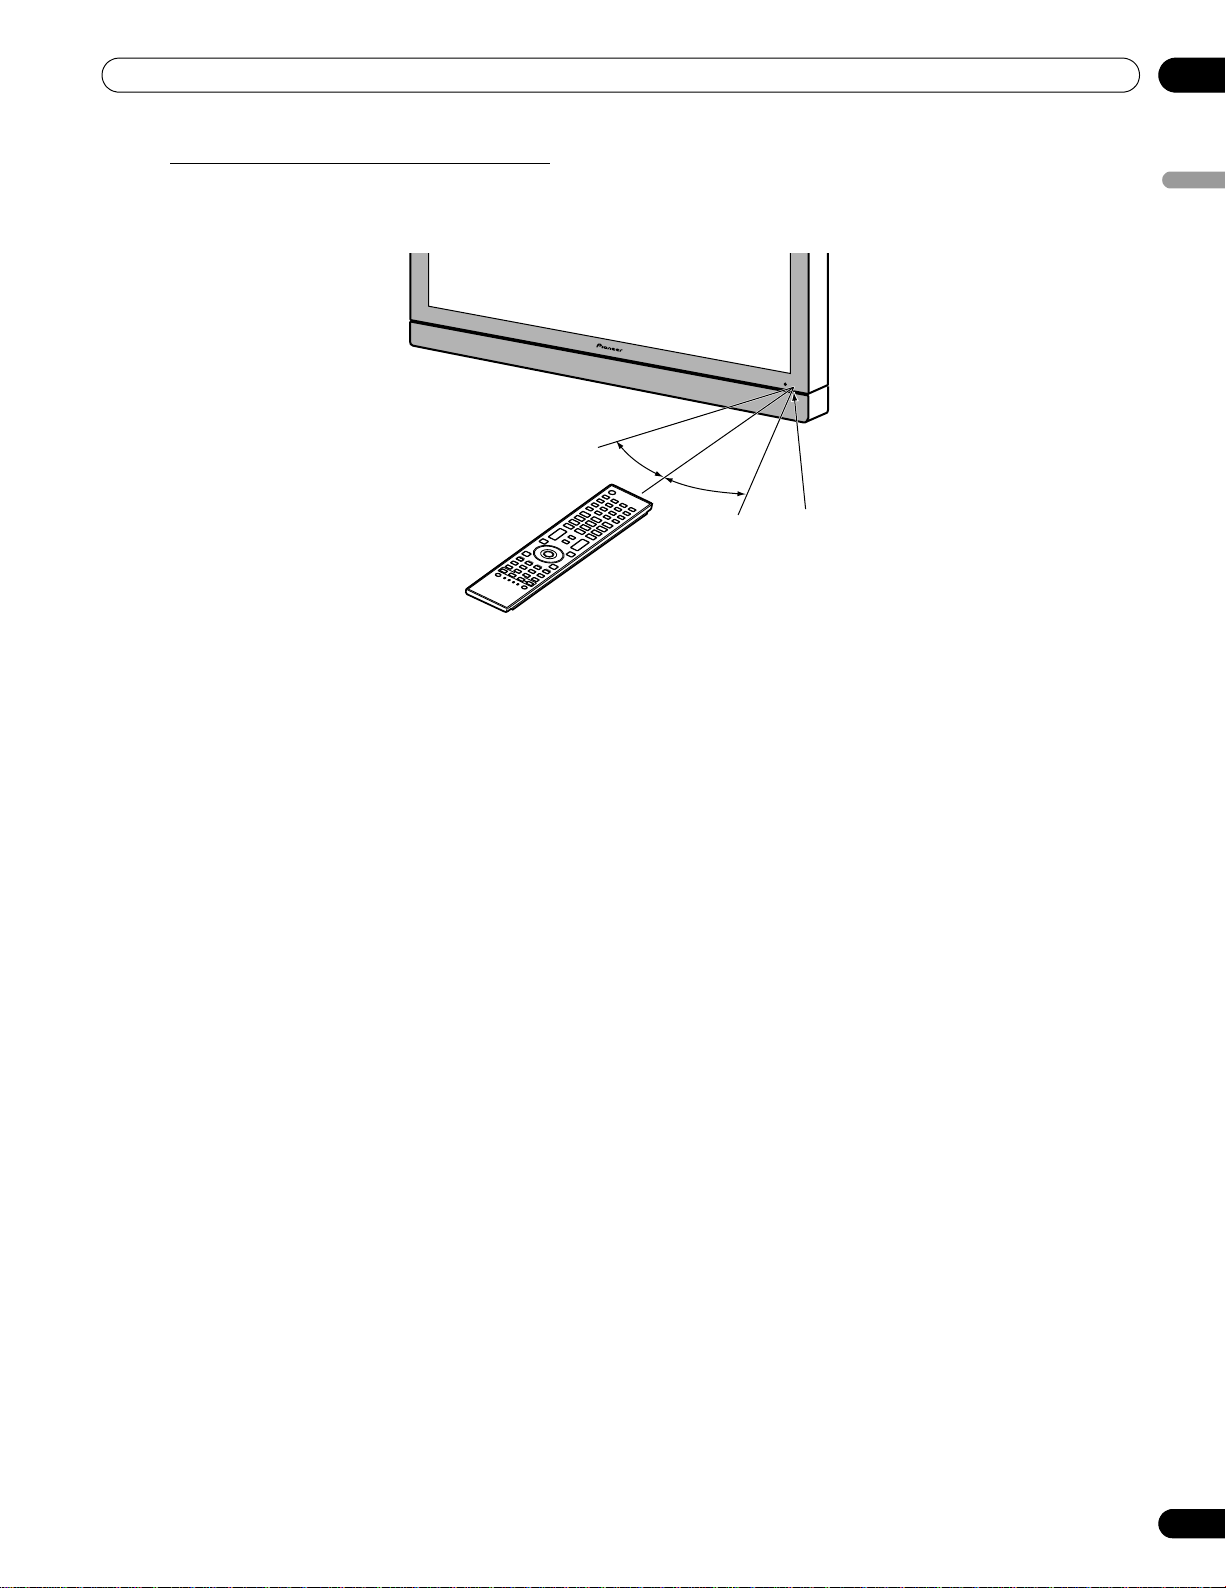
30º
Sensor
30º
7 m
(23 feet)
Operating Range for the Remote Control
To control the flat panel TV, point the remote towards the sensor on the panel’s bottom right corner. For easy
operation, keep the distance between the remote control and the sensor less than 7m (23 feet) and at an angle of
less than 30 degrees.
The remote control may not work properly if the sensor is in direct sunlight or very bright lighting. If your viewing
room is naturally bright, change the position of the panel or physically use the remote control closer to the panel’s
sensor.
01
English
Note: If the remote control is left sitting in direct sunlight or under a very strong light, the case could warp or
deform.
11
En
Page 12
01
Introduction to the 20FD Series Flat Panel TVs
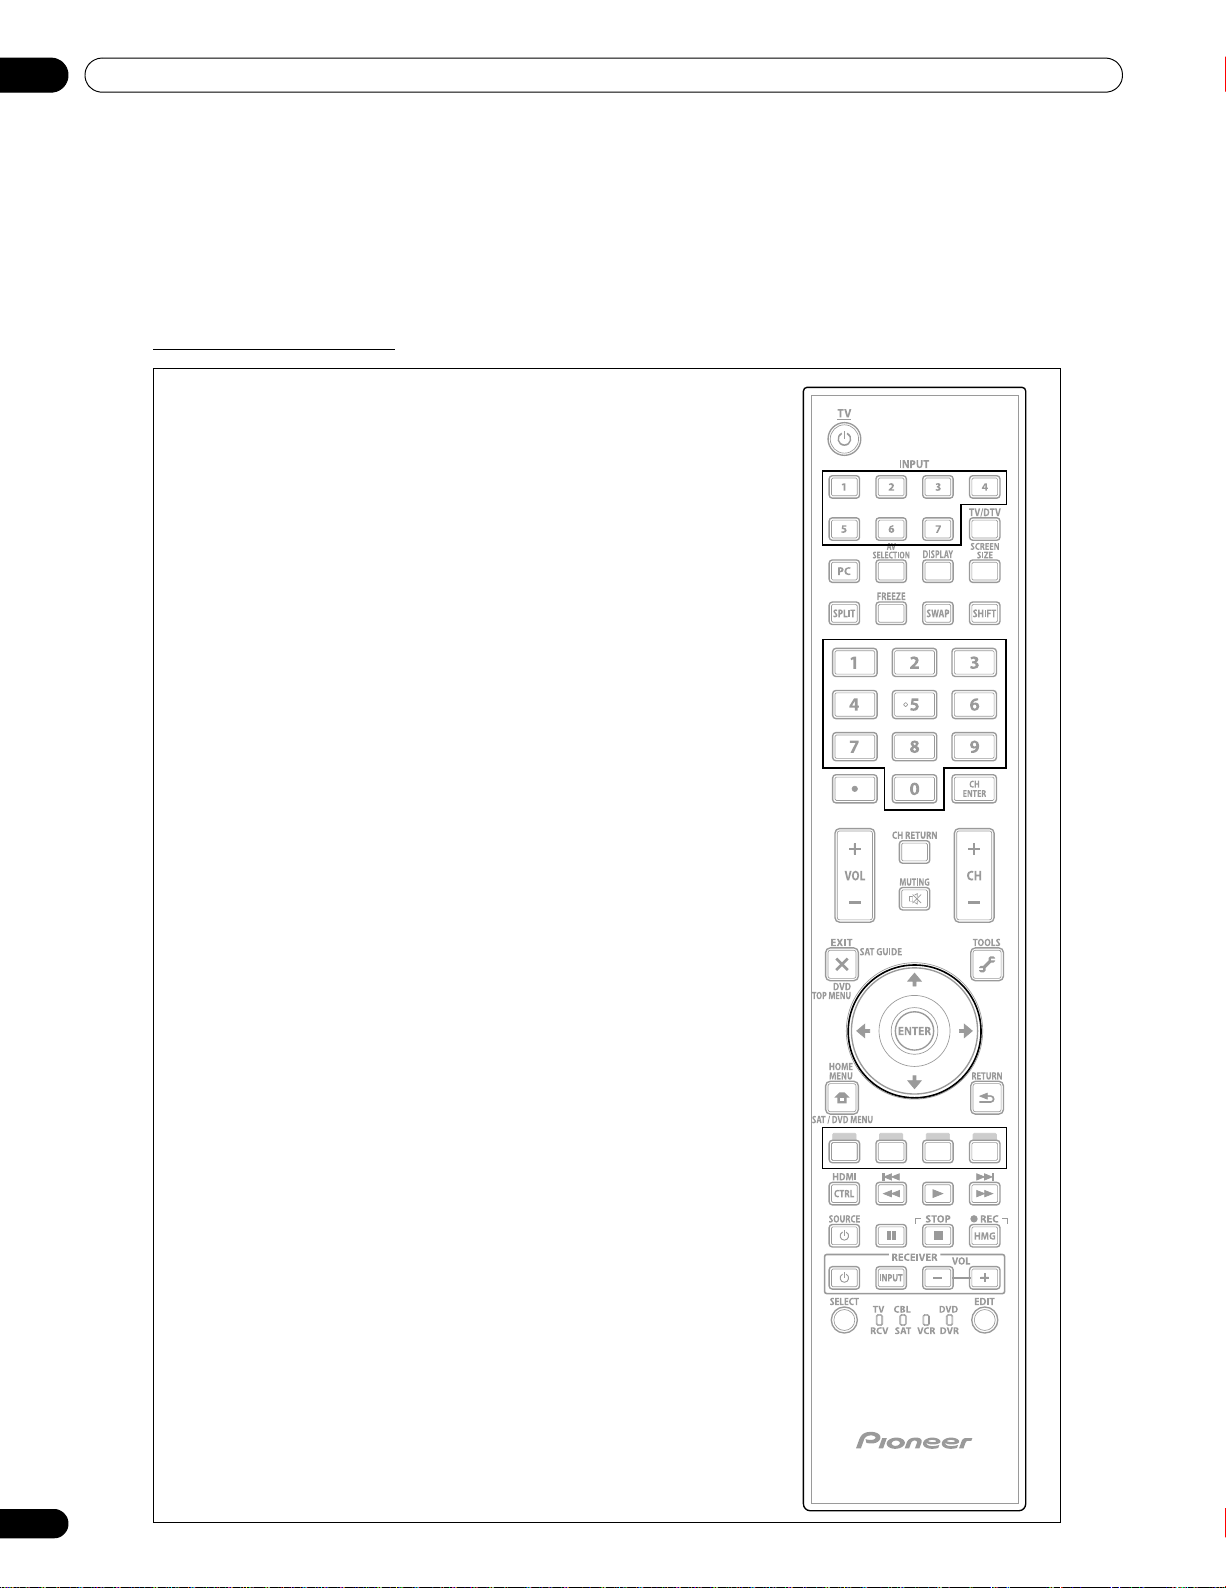
1.2.3 Buttons on the Remote Control
Except for a few options, commands available through the buttons on the flat panel TV are duplicated on the
remote control. The remote control can be programmed to control other equipment such as a DVD Player,
Surround Sound system, etc. A later section entitled “5 Use Other Equipment With Your Flat Panel TV” explains
how to use the remote to control other equipment.
This section identifies and describes the buttons on the remote control.
Remote: Left side buttons
Select a source (INPUT 1 thru INPUT 7)
Select the PC terminal as an input source
AV Source: OPTIMUM, PERFORMANCE, DYNAMIC,
Cycle view thru single-screen, 2-screen,
Freeze a frame from a moving image then
press again to cancel the freeze function
(top to bottom, left to right)
TV :
Turn On or place panel in Standby
INPUT:
AV SELECTION:
Select audio/video settings
MOVIE, GAME, SPORT, Standard
PC Source: STANDARD, USER
SPLIT:
picture-in-picture
FREEZE:
Number buttons 0 thru 9:
Select a channel
PC:
1
2
3
4
1
2
34
56
5
6
7
7
8
9
12
En
•(dot):
Enter a dot for selecting a sub-channel
VOL +/–:
Set the volume
EXIT:
Exit the menu to return to the normal screen
Arrow buttons:
Navigate the menu screens
HOME MENU:
Display the HOME MENU
Color buttons (Red, Green, Blue, Yellow):
Control a BD player for HDMI Control functions only
HDMI CONTROL:
Select the HDMI Control functions
SELECT:
Select for TV/RCV, CBL/SAT, VCR, or DVD/DVR
10
11
12
13
14
15
8
10
9
11
12
13
14
15
Page 13
Introduction to the 20FD Series Flat Panel TVs
01
English
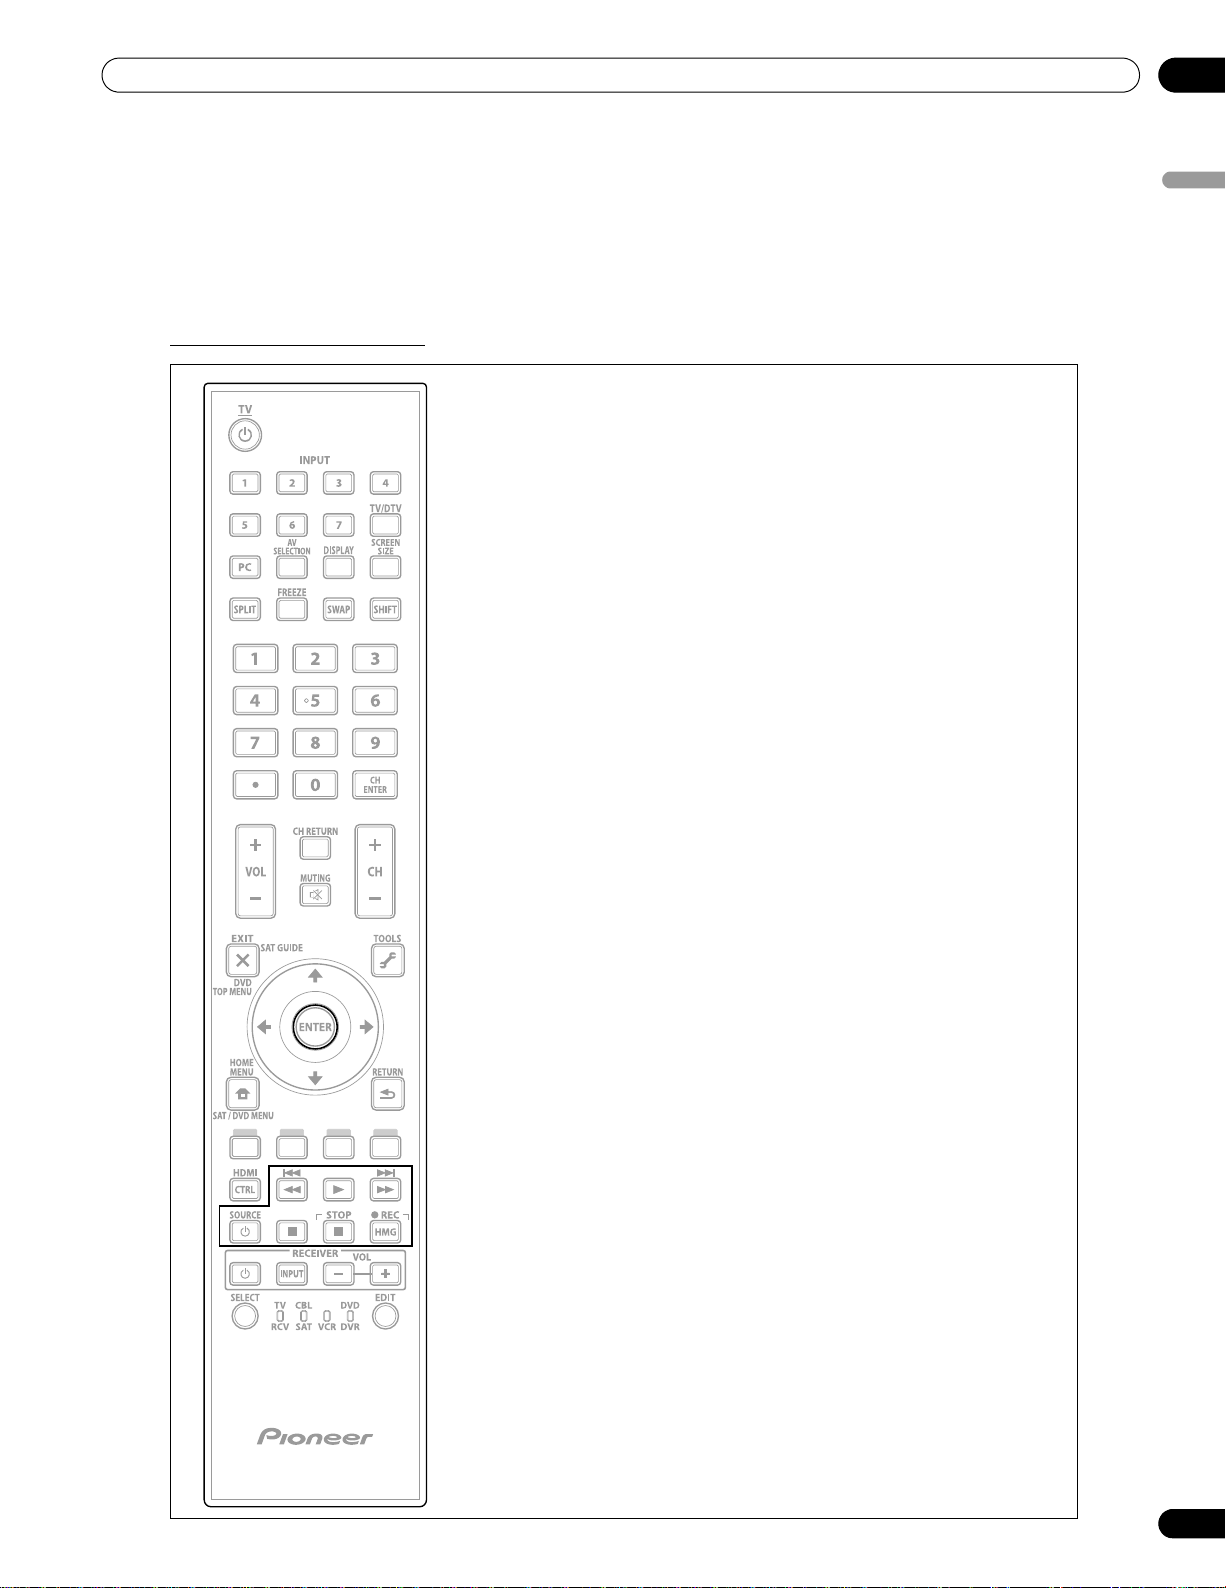
Remote: Right side buttons
16
17 18
19 20
21
22
24
23
(top to bottom, left to right)
16 TV/DTV:
Select analog or digital TV channels
17 DISPLAY:
Display the channel information
18 SCREEN SIZE:
Select the screen size
19 SWAP:
Switch between the two screens when
viewing as 2-screen or picture-in-picture
20 SHIFT:
Move the location of the small screen when
viewing as picture-in-picture
21 CH ENTER:
Change the channel
22 CH RETURN:
Return to the previous channel
23 MUTING:
Turn off the sound while the video continues to play
26
28
25
27
29
24 CH +/–:
Cycle through channels
25 TOOLS:
Display the TOOLS Menu - refer to “3.6 Smart Starts for New
Owners”
26 ENTER:
Execute a command
27 RETURN:
Return to the previous menu screen
28 Player/Recorder Control:
Use buttons for control of connected equipment
29 HMG (Home Media Gallery):
Display the Home Media Gallery menu
Use this button to start recording (for VCR/DVD recorder only)
13
En
Page 14
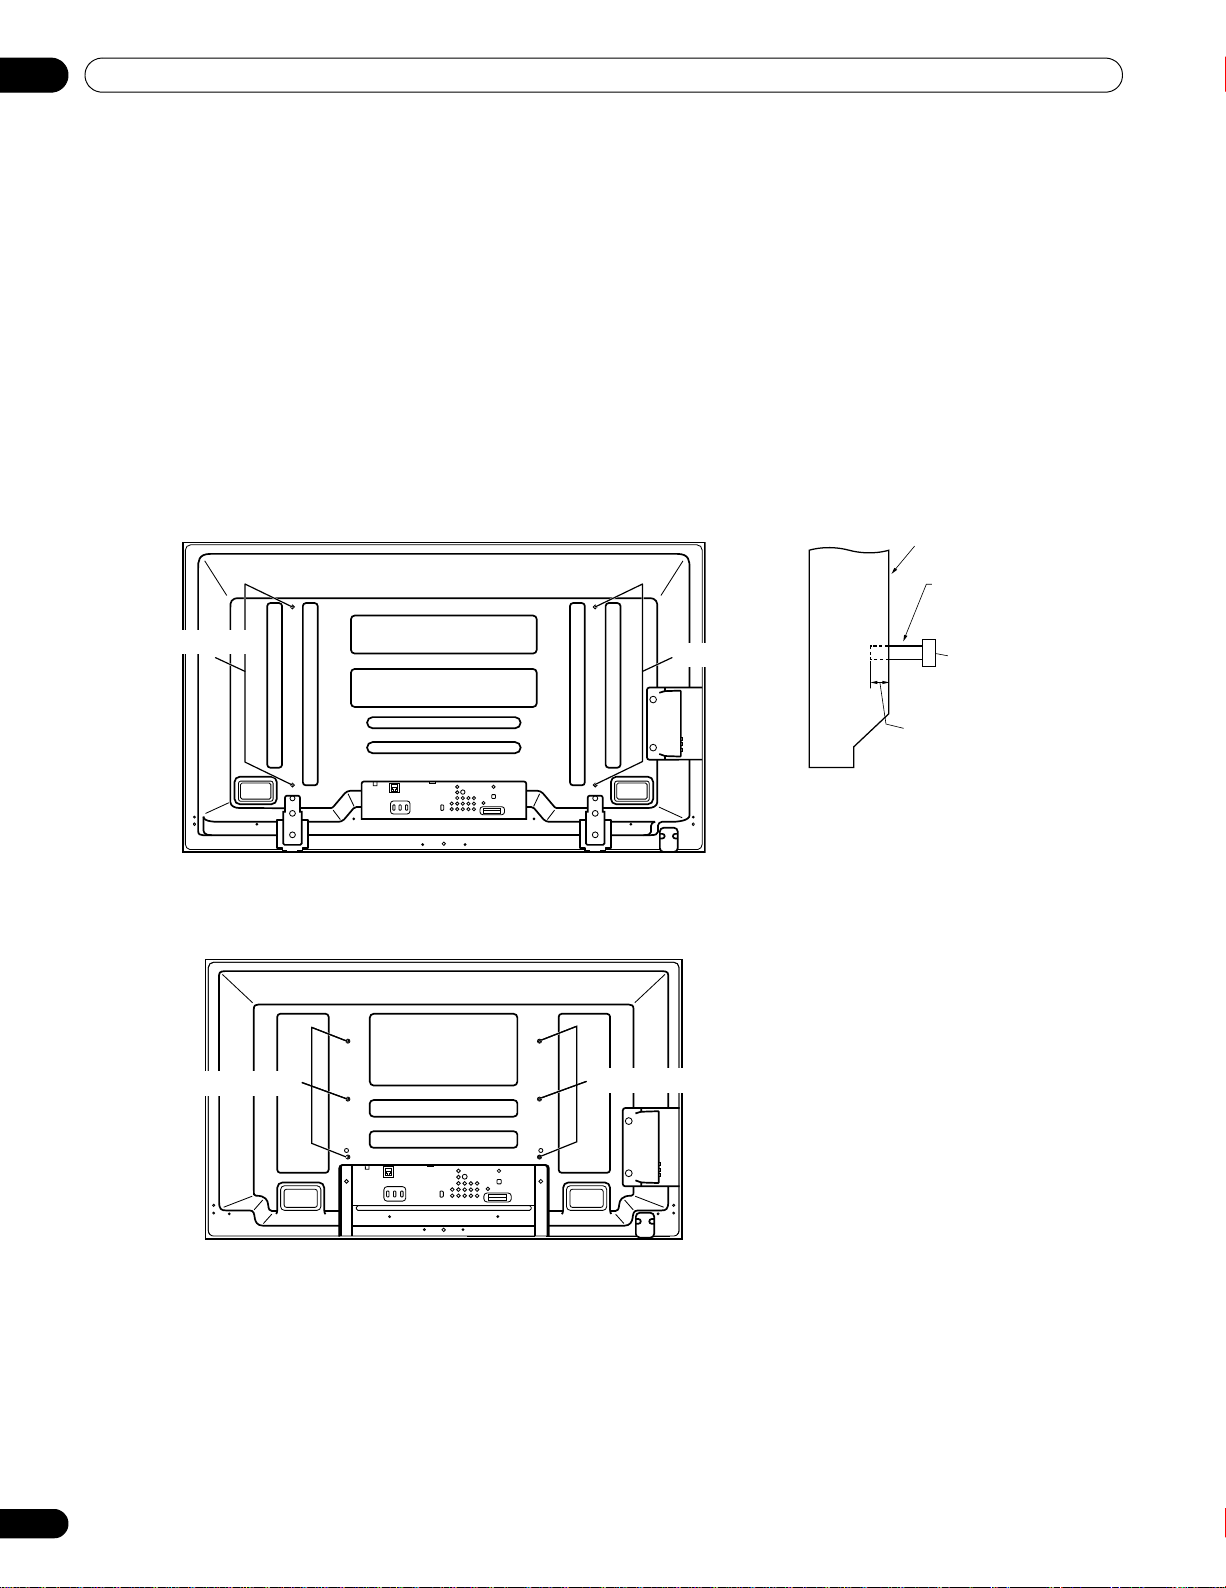
02
Rear view (PDP-6020FD)
Side view
Mounting surface
Mounting
bracket (or
equivalent item)
M8 screw
12 mm to 18 mm
(0.5 inches to
0.7 inches)
Rear view (PDP-5020FD)
Mounting hole
Mounting hole
Mounting hole
Mounting hole
Install Your Flat Panel TV
2 Install Your Flat Panel TV
There are several installation options for your flat panel TV. This chapter walks you through how to choose an
installation site, the best mounting methods, and how to install your panel.
2.1 Choose a Location and the Mounting Method
Your flat panel TV is very thin. The panel needs a solid surface and some sort of support structure (a stand, table,
etc.) to protect it from being tipped over or knocked down. Use installation accessories and parts included with
the shipment. Pioneer recommends working with a qualified installer whenever possible.
Regardless of the mounting method, anchor or secure your flat panel TV using a combination of the mounting
holes and/or supplied bolts.
Note: Some installation options require a different type of bolt. Check with your installer or dealer to purchase the
W
W
T
W
appropriate bolt(s).
W
W
T
W
14
En
Page 15
Install Your Flat Panel TV
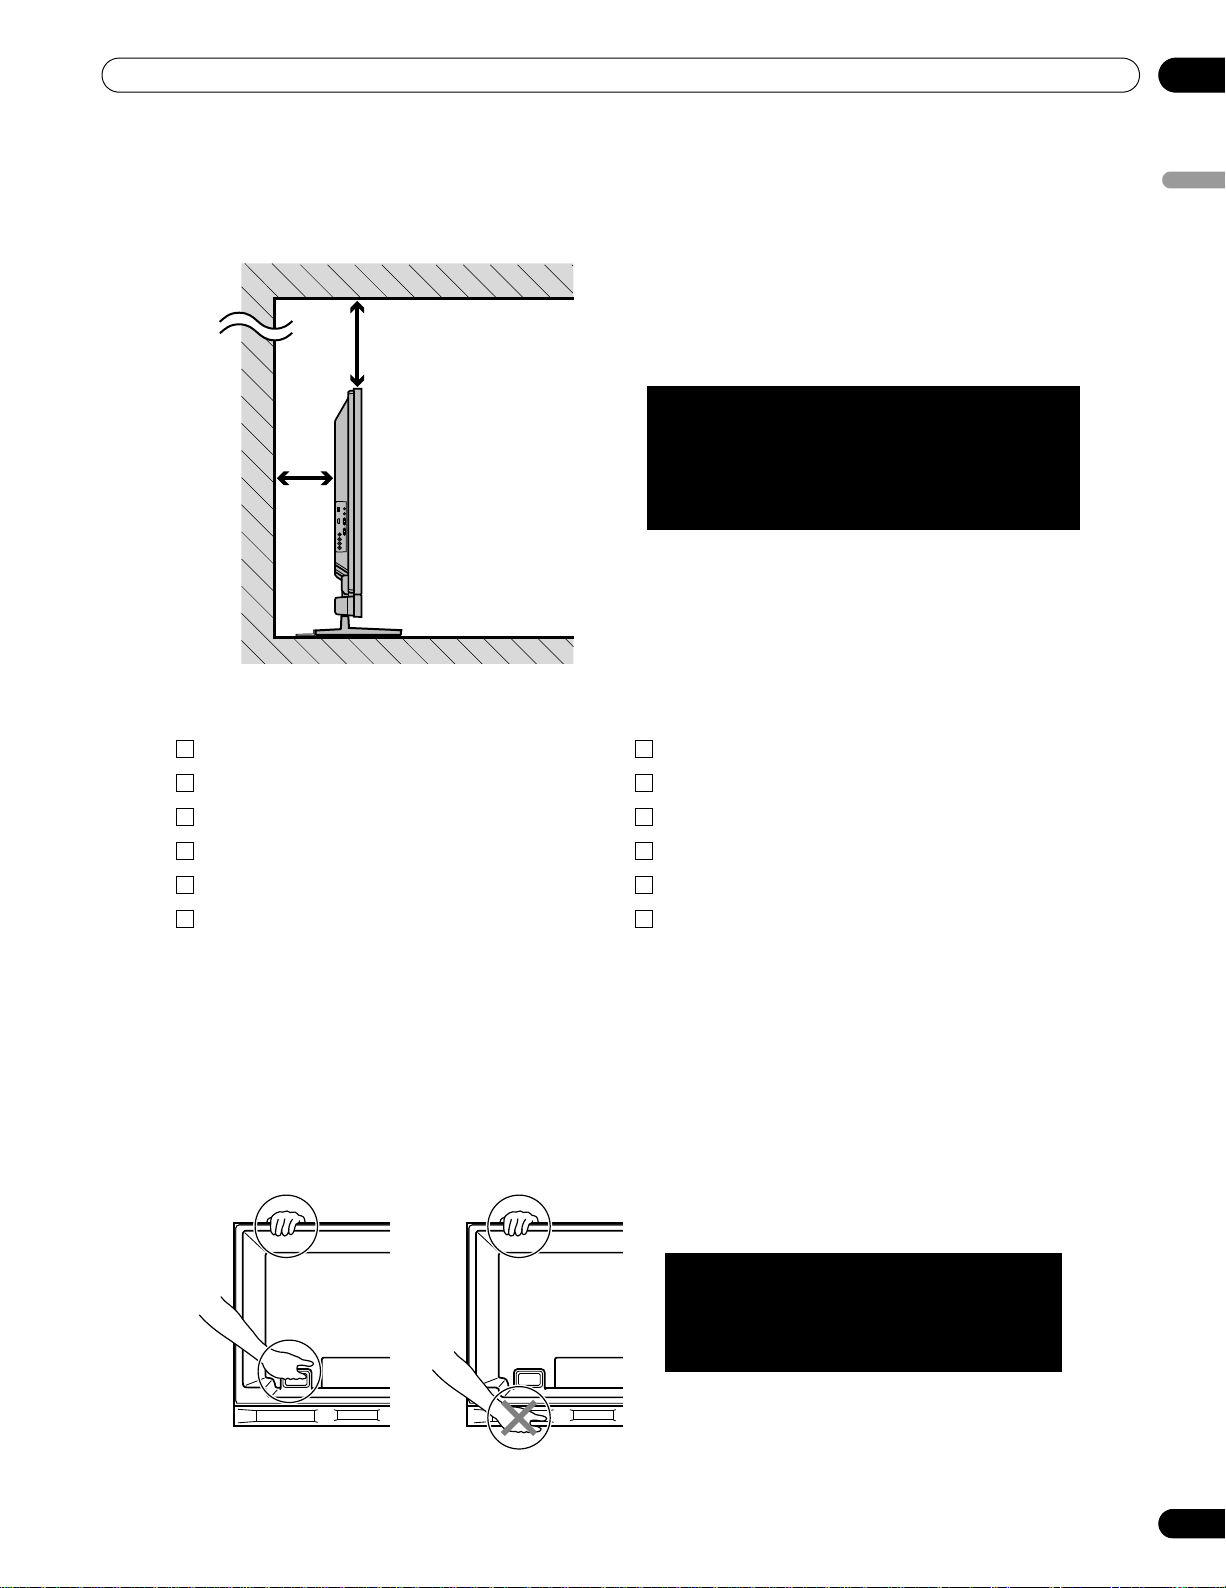
Over
10 cm
(3 15/16
inches)
Over 50 cm
(19 11/16 inches)
The distance behind and above the panel
changes depending on your choice of mount.
Consult with your dealer or professional
installer for proper ventilation.
Use the handles to move the panel.
Do not move the panel by holding the
speaker or speaker brackets.
2.1.1 Check the Location for Suitability
When choosing the location for your panel, there are several factors you need to keep in mind. The installation
site should be out of direct sunlight and have sufficient ventilation around the flat panel TV to allow cooling. The
diagram below is an example of a stand-mounted panel with proper ventilation.
02
English
Use the checklist below to judge possible installation sites.
Sufficient ventilation No danger of power overloads
Safe from excessive vibrations Separate from other IR equipment
Away from air conditioners Protected from hits or shocks
Free of moisture or dampness Distance from heat sources
No danger of splashing water Out of direct sunlight
Route cords and cables safely Away from strong lighting sources
For specific cautions and safety information, refer to “7.2 Physical Location & Temperature Considerations” and
“7.7 Safety Precautions.”
2.1.2 Lift and/or Move Your Panel (the How To’s)
This flat panel TV is built for endurance but because of the technology, the panel must be handled with care. Use
the handles attached to the rear of the flat panel TV to lift the unit. To avoid flexing or twisting the unit, you need
at least two people to lift and move the panel. Do not move the flat panel TV by holding only a single handle or by
dragging the panel by its handles.
Note: Do not use the handles to hang the flat panel TV or as anchors to prevent the panel from slipping or tipping
after it is mounted.
15
En
Page 16

02
Installation screws
(M4 × 35 mm: black)
Falling prevention
metal fitting
(PDP-5020FD)
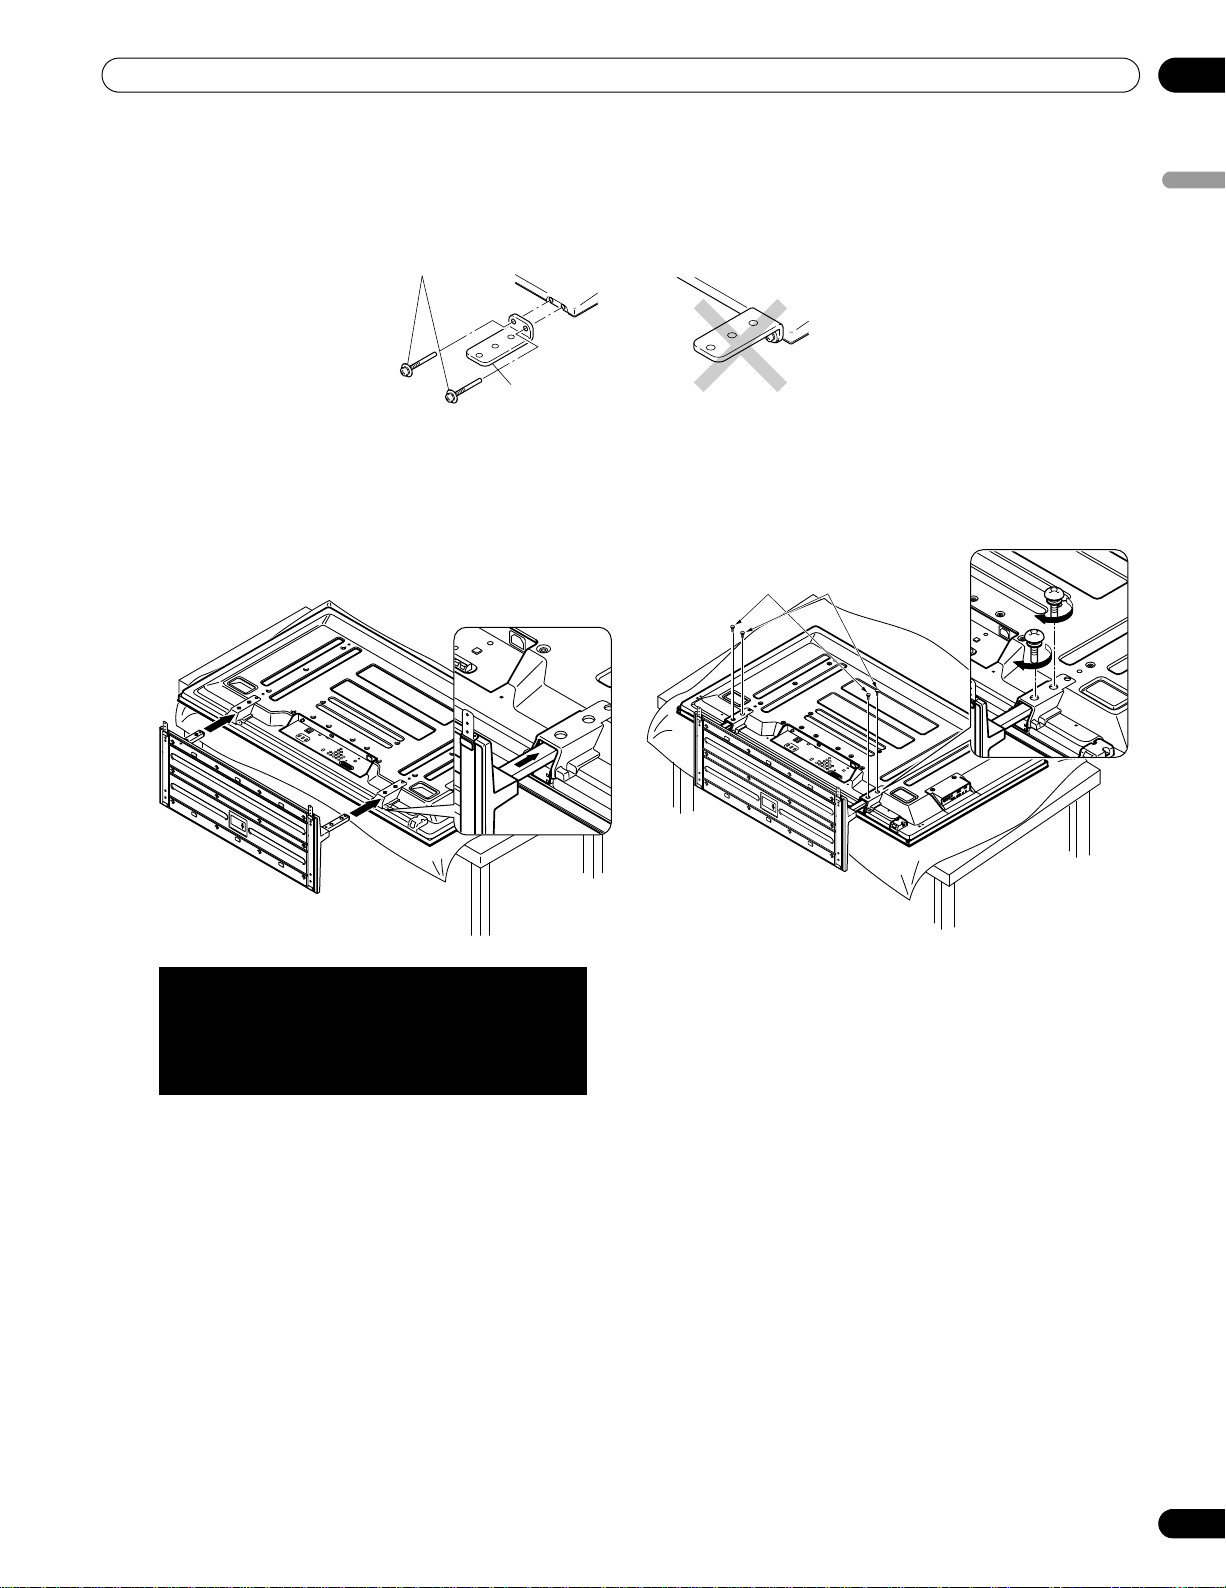
Do not handle the flat panel TV on a wagon or pallet that is
smaller than its stand. The stand will bend.
Screws
(4 x 10 mm: silver)
Completed
stand
Sheet
Screws
(4 x 10 mm: silver)
Front
Rear
Base cover
Install Your Flat Panel TV
2.2 Install the Panel Using a Stand
2.2.1 Use or Remove the Included Stand
The PDP-5020FD ships with the Pioneer table top stand (stand) attached. Attach the included stand to the panel
for the PDP-6020FD. For PDP-5020FD, attach the falling prevention metal fittings after placing the panel to stand
upright.
Attach the Stand to the Panel
1 ) Detach the speaker if it has already been added.
Refer to “Attach/Detach the Speaker” on page 18 for assistance.
2 ) Lay the flat panel TV down on a raised surface with the stand base hanging over the edge.
3 ) Place all stand parts on a soft cloth to avoid scratching.
If you are mounting the PDP-6020FD continue with Steps 4 and 5. If you are mounting the PDP-5020FD skip
to Step 7.
4 ) Turn the base cover over so that the bottom is facing up.
5 ) Insert the stand supports (legs) into the base cover.
Please carefully install the supports (left and right) so that they are in the correct positions. Misaligned supports
can damage the base and/or the supports.
6 ) Tighten the base screws to lock the supports in to place.
16
En
Note: Assemble the stand with a soft sheet placed under the base cover. If a sheet is not laid before assembly,
the front surface of the base cover may be scratched.
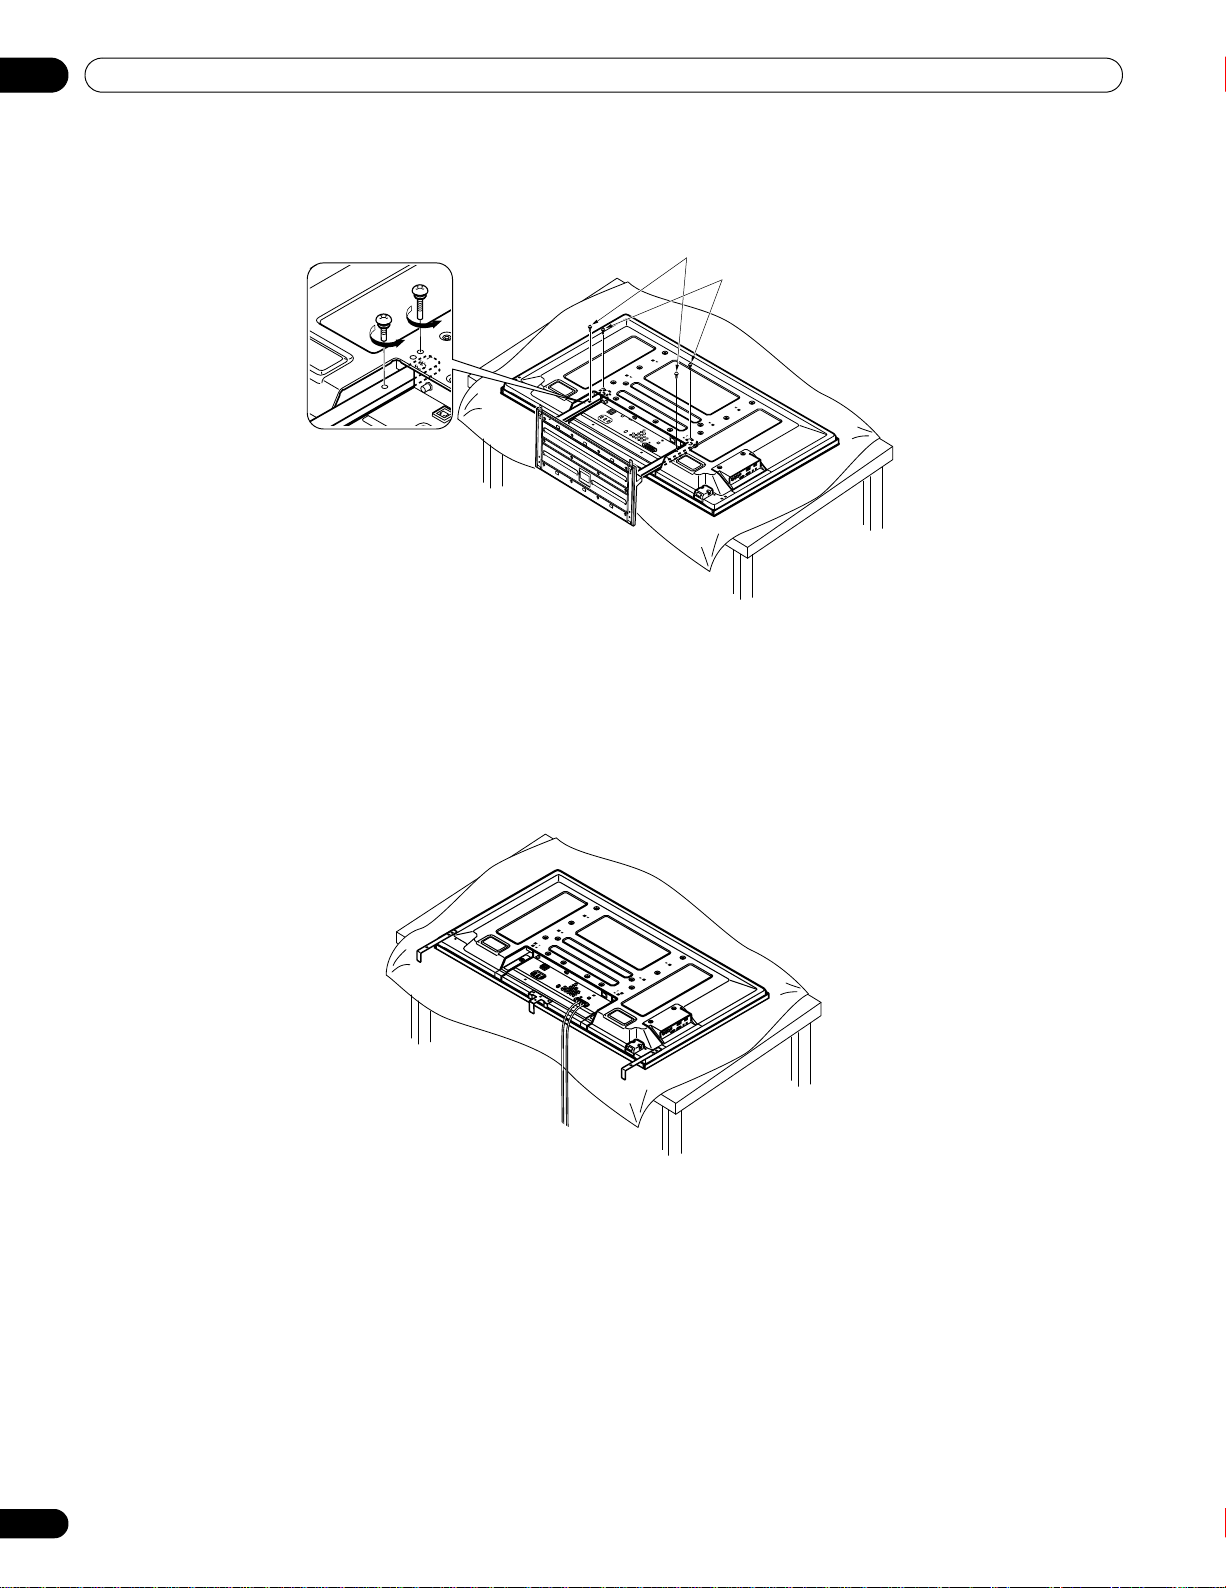
Page 17
Install Your Flat Panel TV
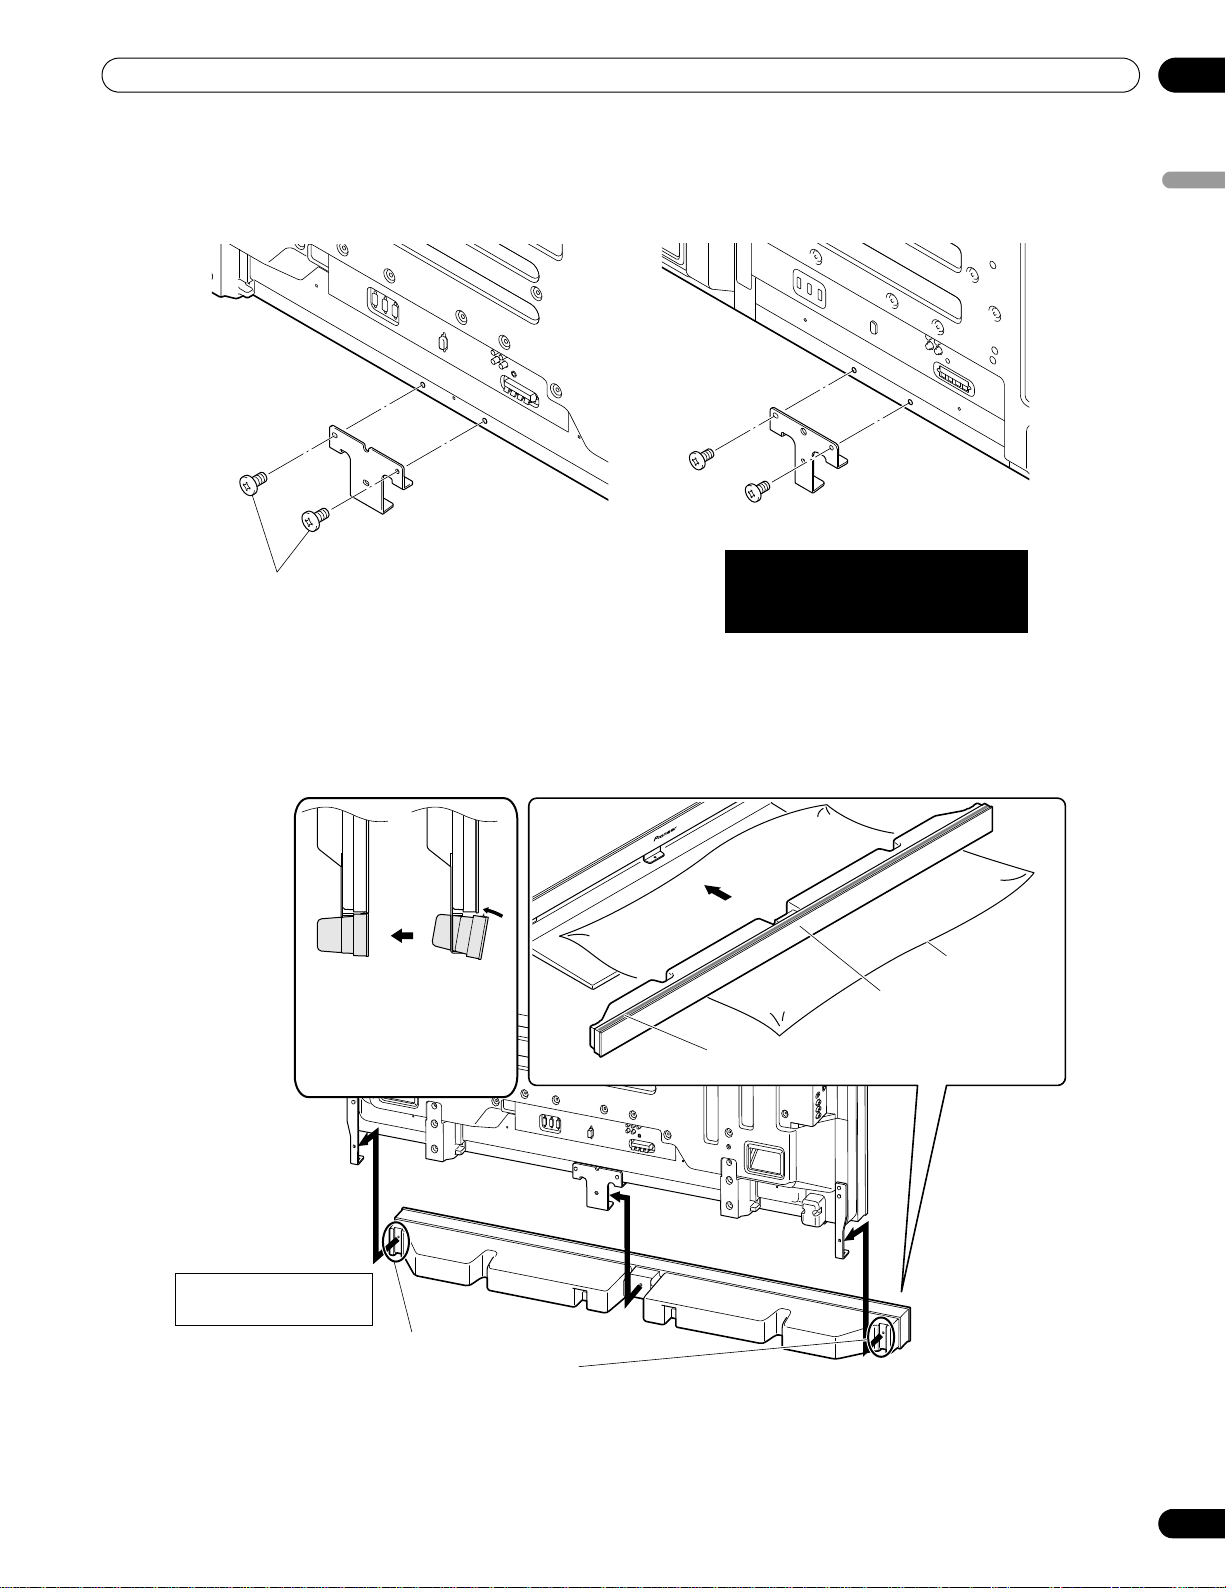
Installation screws
(M4 x 35 mm: black)
(PDP-6020FD)
Falling prevention
metal fitting
Line up the column supports with the
bottom of the flat panel TV.
Insert the stand supports into the flat panel
TV so that the arrow marked “FRONT/FACE
AVANT” on the bottom of the stand
points down.
Installation bolts
(M6 x 20 mm)
Installation bolts
(M6 x 20 mm)
7 ) After assembling the stand, attach the falling prevention metal fittings using the installation screws.
8 ) With the flat panel TV still face down, insert the stand’s supports into the bottom of the panel then tighten
the screws.
02
English
9 ) With the assistance of at least one other person, lift the panel upright then move it in to position.
17
En
Page 18

02
• Connecting this speaker to another panel or device can
damage the unit or cause a fire.
• When using tone control to increase treble, avoid overamplifying the volume.
When looking at the back of the
flat panel TV, sides are reversed.
Tighten screws in the order
shown above.
Speaker mounting
screw (M5 x 10 mm)
1 ) Tighten the screw in the
upper screw hole first.
2 ) Then, tighten the screw in
the screw hole right under
the upper hole.
(PDP-6020FD)
(PDP-5020FD)
Speaker bracket (side)
Install Your Flat Panel TV
Attach/Detach the Speaker
The flat panel TV’s speaker delivers high-quality, clear sound. The left/right balance is enclosed in a single unit for
ease of installation and compactness. Although other devices can be added or removed from the mounted panel,
physically attach the speaker last. Disconnect the cables from the Speaker and REMOVE THE SPEAKER before
mounting or moving the panel.
Before attaching the speaker to your mounted panel, review the information below.
• Lay the panel face down on a stable surface when attaching speaker brackets.
• Use only the supplied screws and tighten securely before stepping away.
• The speaker is wide and requires more than a single person to manage.
• Handle the speaker carefully to protect the cabinet and grille net from scratches and other damage.
• Placing a CRT monitor near the speaker can cause a blur on the flat panel TV. Keep the distance between the
speaker and the monitor.
Note: Use the foam packing materials to protect the equipment from scratches or other damage during
mounting.
Stand-Mounted Panel
It is possible to attach the speaker brackets to the flat panel TV while it is standing upright though it is easier to
mount the brackets while the panel is laying flat. Once the brackets are attached, stand the panel upright then
move it into the final position before mounting the speaker.
1 ) Attach the side speaker brackets (left and right) to the back of the panel using the supplied screws.
➀
➀
➁
➁
18
En
Page 19
Install Your Flat Panel TV
➀
➁
➀
➁
(PDP-6020FD)
(PDP-5020FD)
Speaker bracket
for center
Speaker mounting screw
(M5 x 10 mm)
Tighten screws in the order
shown above.
Insert the speaker brackets into the
grooves at the rear of the speaker.
The side with the padding
strip is face-up.
Protective
wrapping
Front side of the
speaker
For illustrative purposes,
the stand is not shown.
•Insert the speaker from the
bottom in an angle.
•Straighten it when it touches
the speaker bracket.
Note: Reverse procedure to
remove the speaker.
2 ) Attach the center speaker bracket using the supplied screws.
When fitting the screws, place screws 1 and 2 through the holes in the center bracket.
02
English
3 ) Position the speaker by the brackets.
It is very easy to mount the speaker upside-down so confirm that the speaker is aligned properly before
continuing.
4 ) Insert the speaker bracket into the grooves at the rear of the speaker.
If the speaker fails to mount easily, adjust the angle of the brackets.
5 ) Attach the speaker to the center bracket using the supplied screws.
The drawing in the next Step shows the proper order for tightening screws.
19
En
Page 20
02
➀
➂
➁
Speaker mounting
screw (M5 x 10 mm)
The bottom screw hole on each
speaker bracket is not used when
the panel remains on the stand.
tab
Gray
Speaker cable
Gray
Black
Speaker terminal
Black
Red
Red
(PDP-6020FD)
Install Your Flat Panel TV
6 ) Attach the speaker to the side brackets using the supplied screws.
.
Note: If the speaker needs to be repositioned (horizontally or vertically) after it is attached, loosen the speaker
mounting screws first. Adjust the position then retighten the screws.
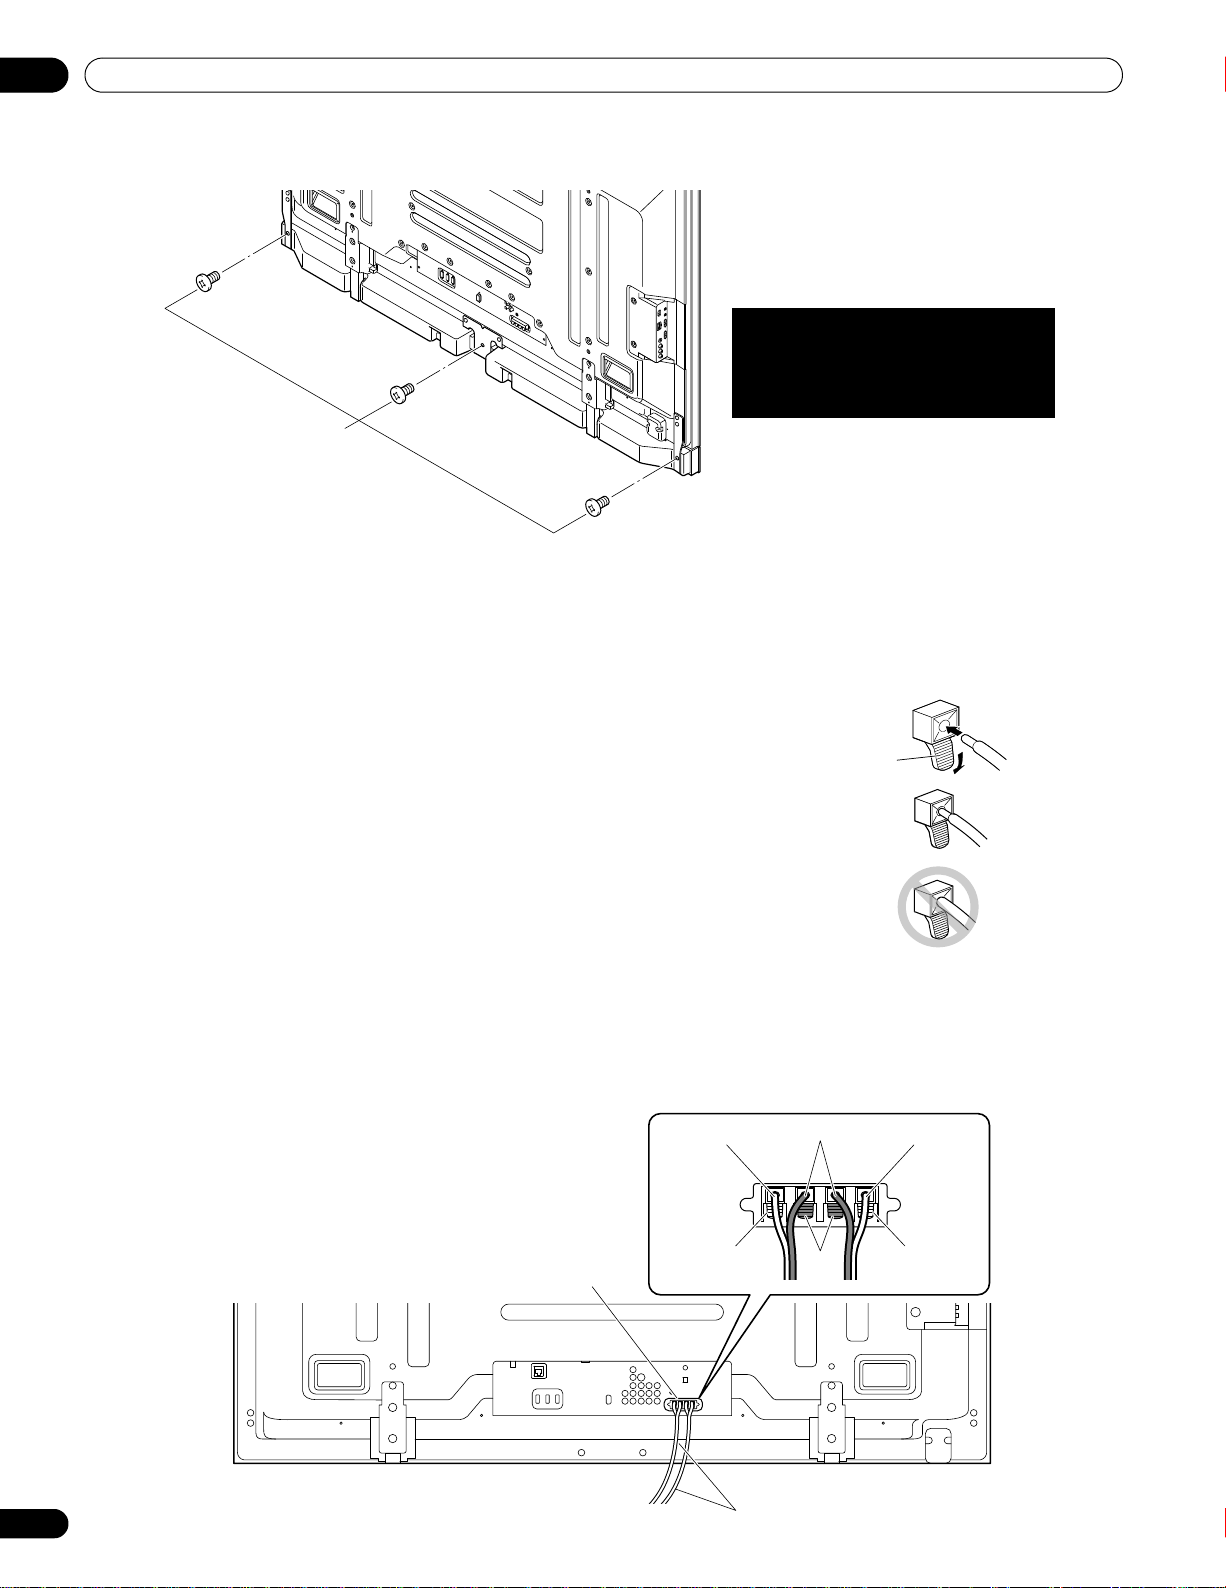
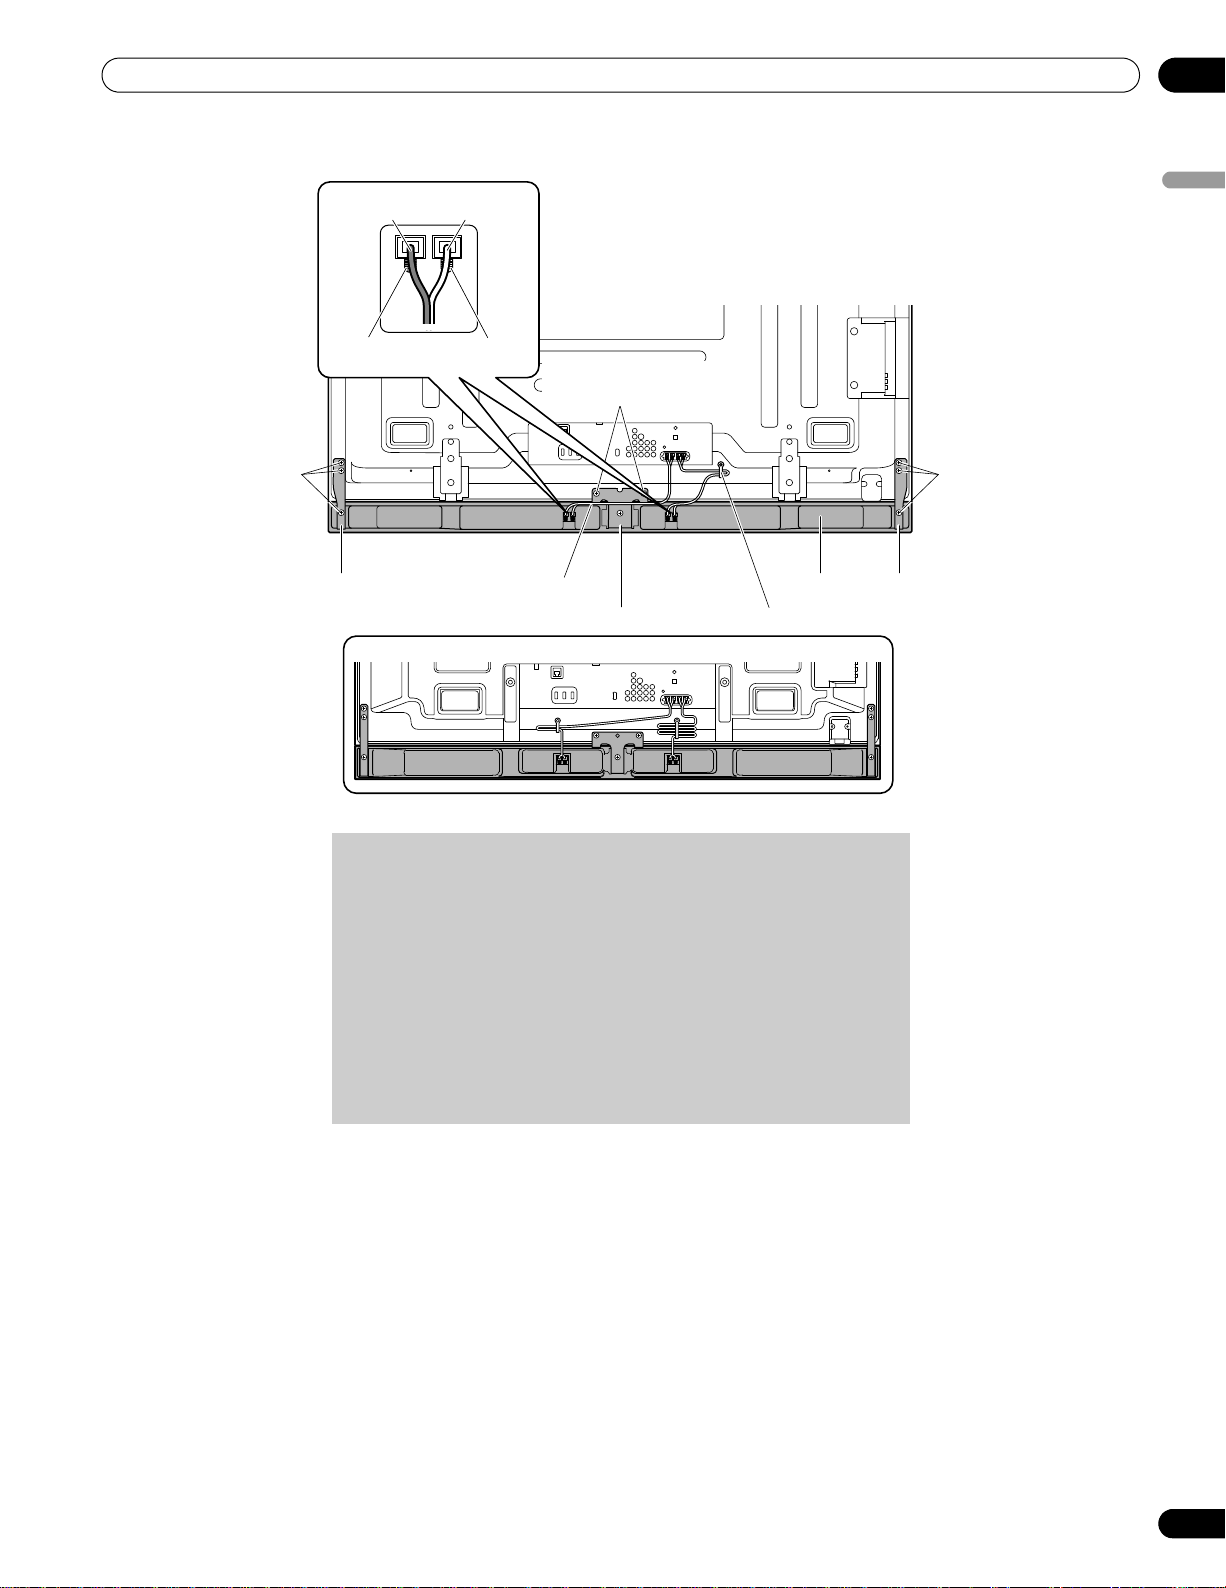
2.2.2 Connect the Speaker Cables
1 ) Press down on the tab.
2 ) Insert the appropriately colored wire into the opening.
3 ) Allow a small percentage of the cable’s bare wire to remain visible.
4 ) Release the tab to clamp the wire.
If the bare wire is hidden when the tab is released, repeat Steps 1
through 4 until the proper amount of cable is showing.
5 ) Repeat this process for each cable, matching the color of the wire to the
appropriate terminal.
6 ) Connect the speaker cables to the speaker.
7 ) Bundle the speaker cables, power cord and other cables in the cable
clamp then insert the clamp into an appropriate hole on the rear of the
flat panel TV.
Refer to “2.6 Route then Bundle the Power Cord and Cables.”
Use the clamps as necessary (see page 30).
20
En
Page 21
Install Your Flat Panel TV
Speaker bracket (left)
Speaker bracket (center)
Speaker cable
Speaker bracket (right)
Speaker
mounting screw
(M5 x 10 mm)
Speaker
mounting screw
(M5 x 10 mm)
Speaker mounting
screw (M5 x 10 mm)
Speaker
PDP-6020FD with the speaker installed
Black
Black
Red
Gray
Cable clamp
(PDP-5020FD)
• Before connecting the speaker to the flat panel TV, unplug
the panel from the power outlet. Connecting the speaker
cable with the power cord plugged in can cause malfunction
or damage to the panel if the cable’s bare wire touches other
equipment. Plug in the power cord after connecting the
speaker.
• Do not leave speaker cable wires bare and exposed at the
terminals. Exposed wires can result in an electrical short
causing malfunction or damage to the system.
• Do not connect any devices to the speaker terminals other
than the speakers specified.
02
English
21
En
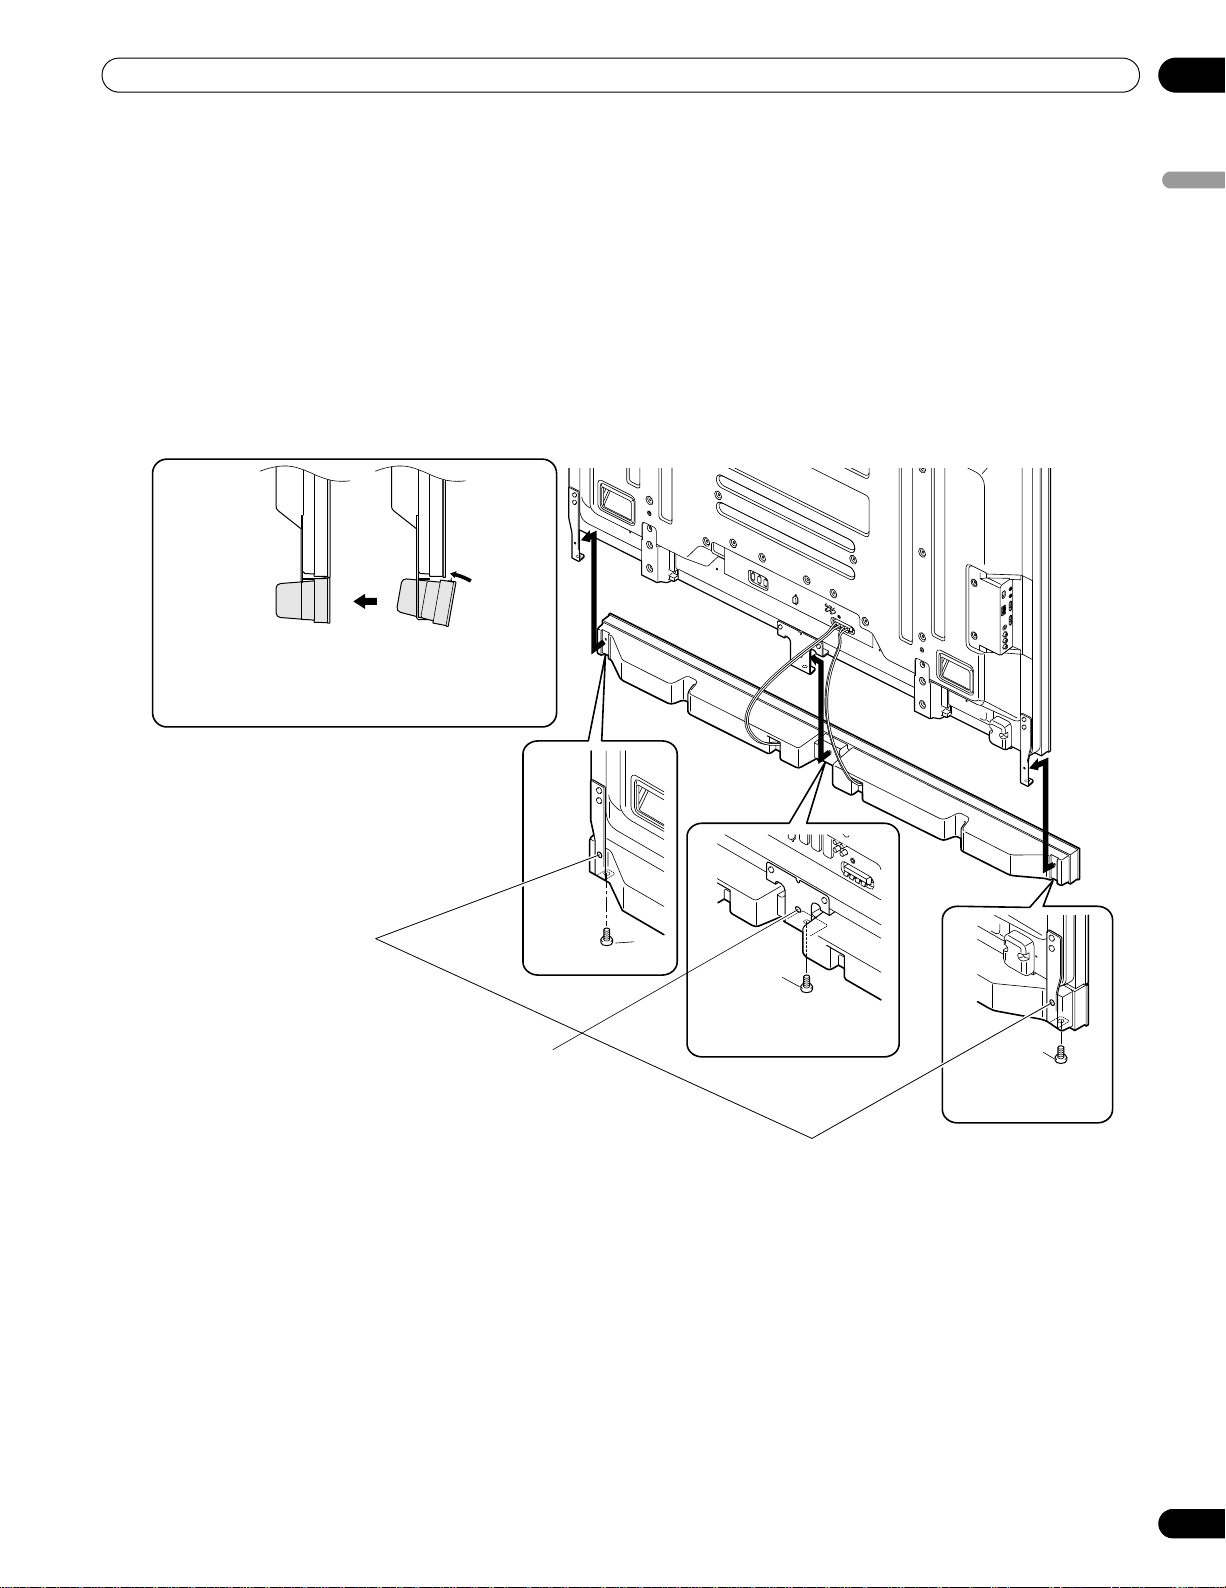
Page 22
02
(PDP-5020FD)
Installation bolts (1)
Installation bolts (2)
(PDP-5020FD)
Install Your Flat Panel TV
2.3 Wall/Ceiling Mounting
Lay the 50” panel down on a raised surface then remove the stand.
A common flat panel TV mounting option is to hang the panel on a sturdy wall or from a reinforced ceiling. When
mounting in this way, some preparations must be completed first. Follow the steps below to prepare the panel for
mounting.
1 ) Attach the speaker brackets but not the Speaker.
Refer to “Attach/Detach the Speaker” for instructions.
2 ) Connect the speaker cables to the panel if they are not already attached.
Connect the cables ONLY to the panel, not to the speaker.
3 ) Connect cables for any other devices to the panel.
When deciding on a location for your flat panel TV, consider other equipment in the room. Equipment such
as a DVR, Receiver, VCR, etc. requires some way to communicate with the panel, either directly or through
another device. Review the instructions that came with the other equipment for available ports and
terminals.
After deciding which ports and terminals are needed, mark the connections on the flat panel TV for easier
identification once the panel is mounted.
22
En
4 ) Temporarily bundle loose cables with rubber bands (not included).
5 ) Plug the flat panel TV’s power cord in to the panel but do NOT plug in to the power outlet.
6 ) Follow installation directions provided with your selected wall/ceiling mount.
Note: When attaching the speaker, refer to diagram in the following section regarding specific screw holes to use
for wall or ceiling mounting.
Page 23
Install Your Flat Panel TV
Speaker
mounting
screw
(M5 x 10 mm)
Do NOT use these holes when
mounting on a wall or ceiling
Speaker
mounting
screw (M5 x 10 mm)
Speaker
mounting screw
(M5 x 10 mm)
•Insert the speaker from the bottom in an angle.
•Straighten it when it touches the speaker
bracket.
Note: Reverse procedure to remove the speaker.
Once your flat panel TV is mounted on the wall or suspended from the ceiling, follow the steps below to attach
the speaker.
1 ) Confirm that the speaker brackets are ready to support the speaker.
It is possible to jar the brackets out of alignment while installing the panel.
2 ) Connect the loose ends of the speaker cables to the speaker.
If the cables were bundled with rubber bands during installation, remove them before continuing.
3 ) Align the speaker with the brackets.
It is very easy to mount the speaker upside-down so confirm that the speaker is aligned properly before
continuing.
4 ) Insert the speaker brackets into the grooves at the rear of the speaker.
If the speaker fails to attach easily, adjust the angle of the brackets
02
English
5 ) Tighten the center screw then the side screws in the order shown above.
When installing the panel on a wall or ceiling, use the bottom screw holes on each speaker bracket.
Note: If the speaker needs to be repositioned (horizontally) after it is attached, loosen the speaker mounting
screws first. Adjust the position then retighten the screws.
➂
➀
➁
23
En
Page 24
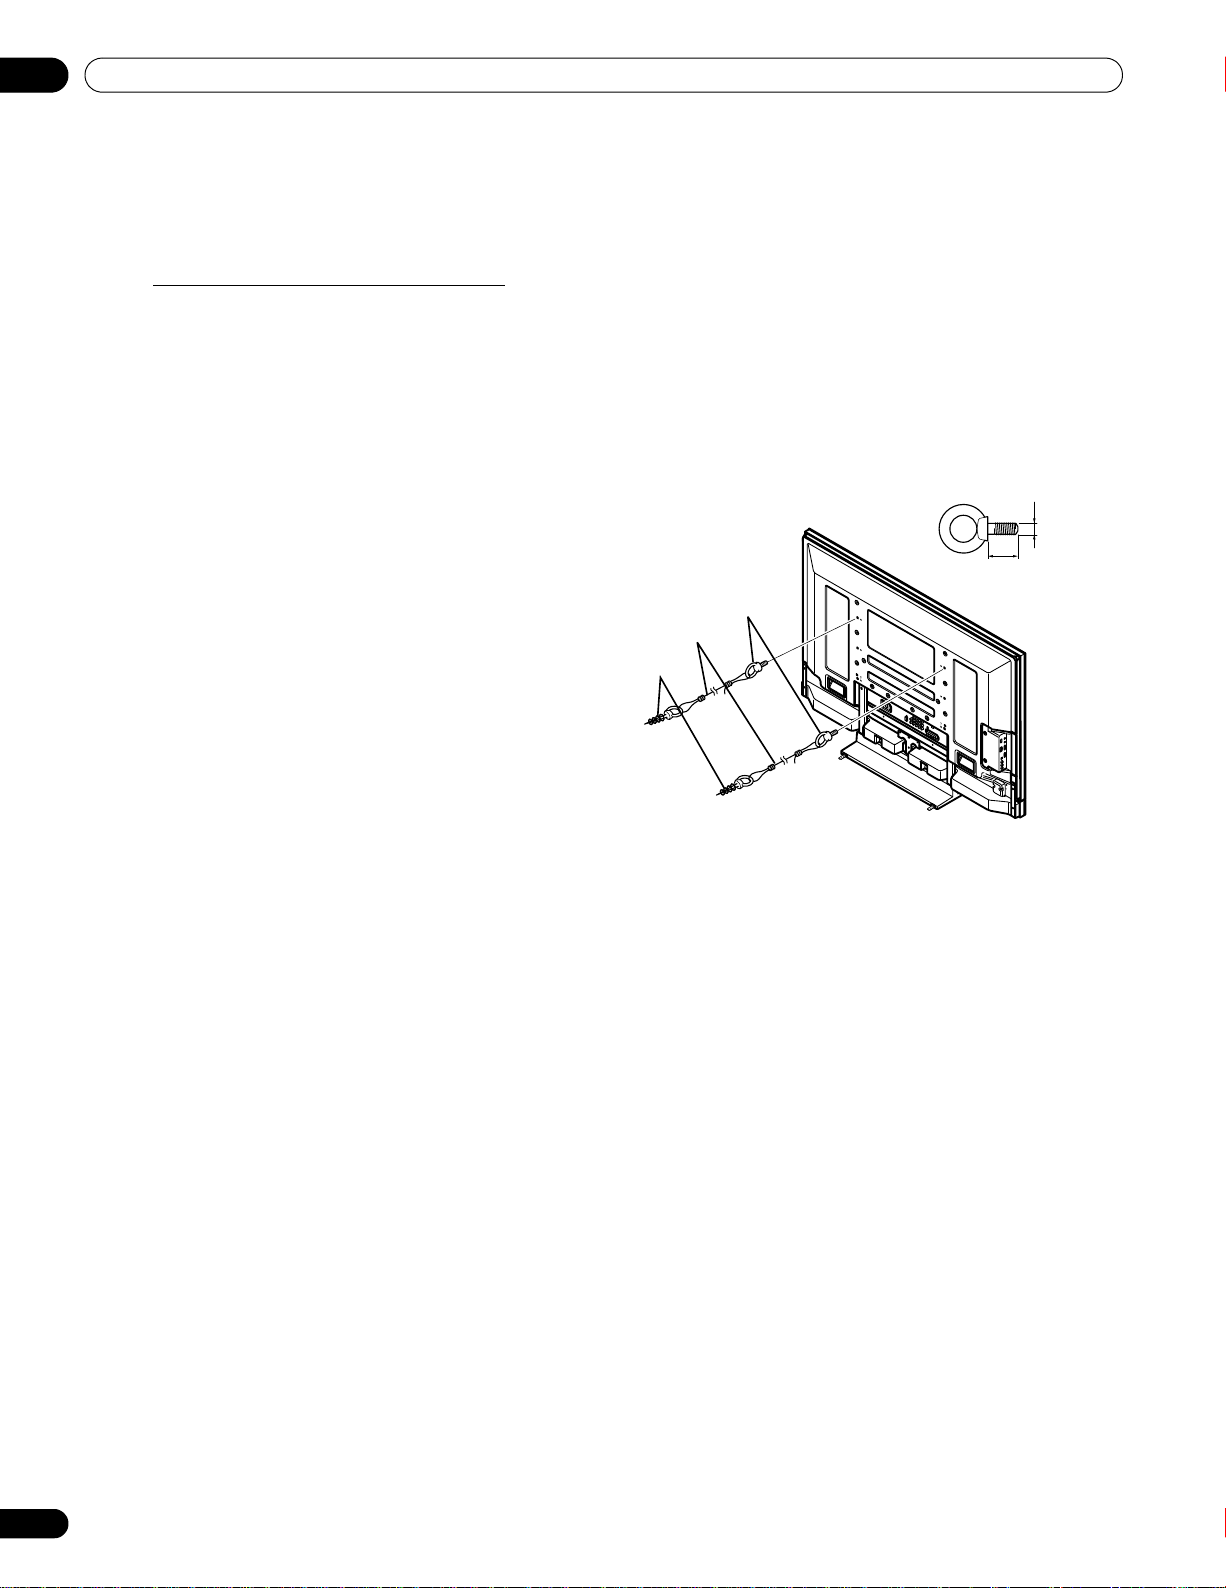
02
Fitting
2. Cord
1. Hook
M8
12 mm to 18 mm
(0.5 inches to 0.7 inches)
Install Your Flat Panel TV
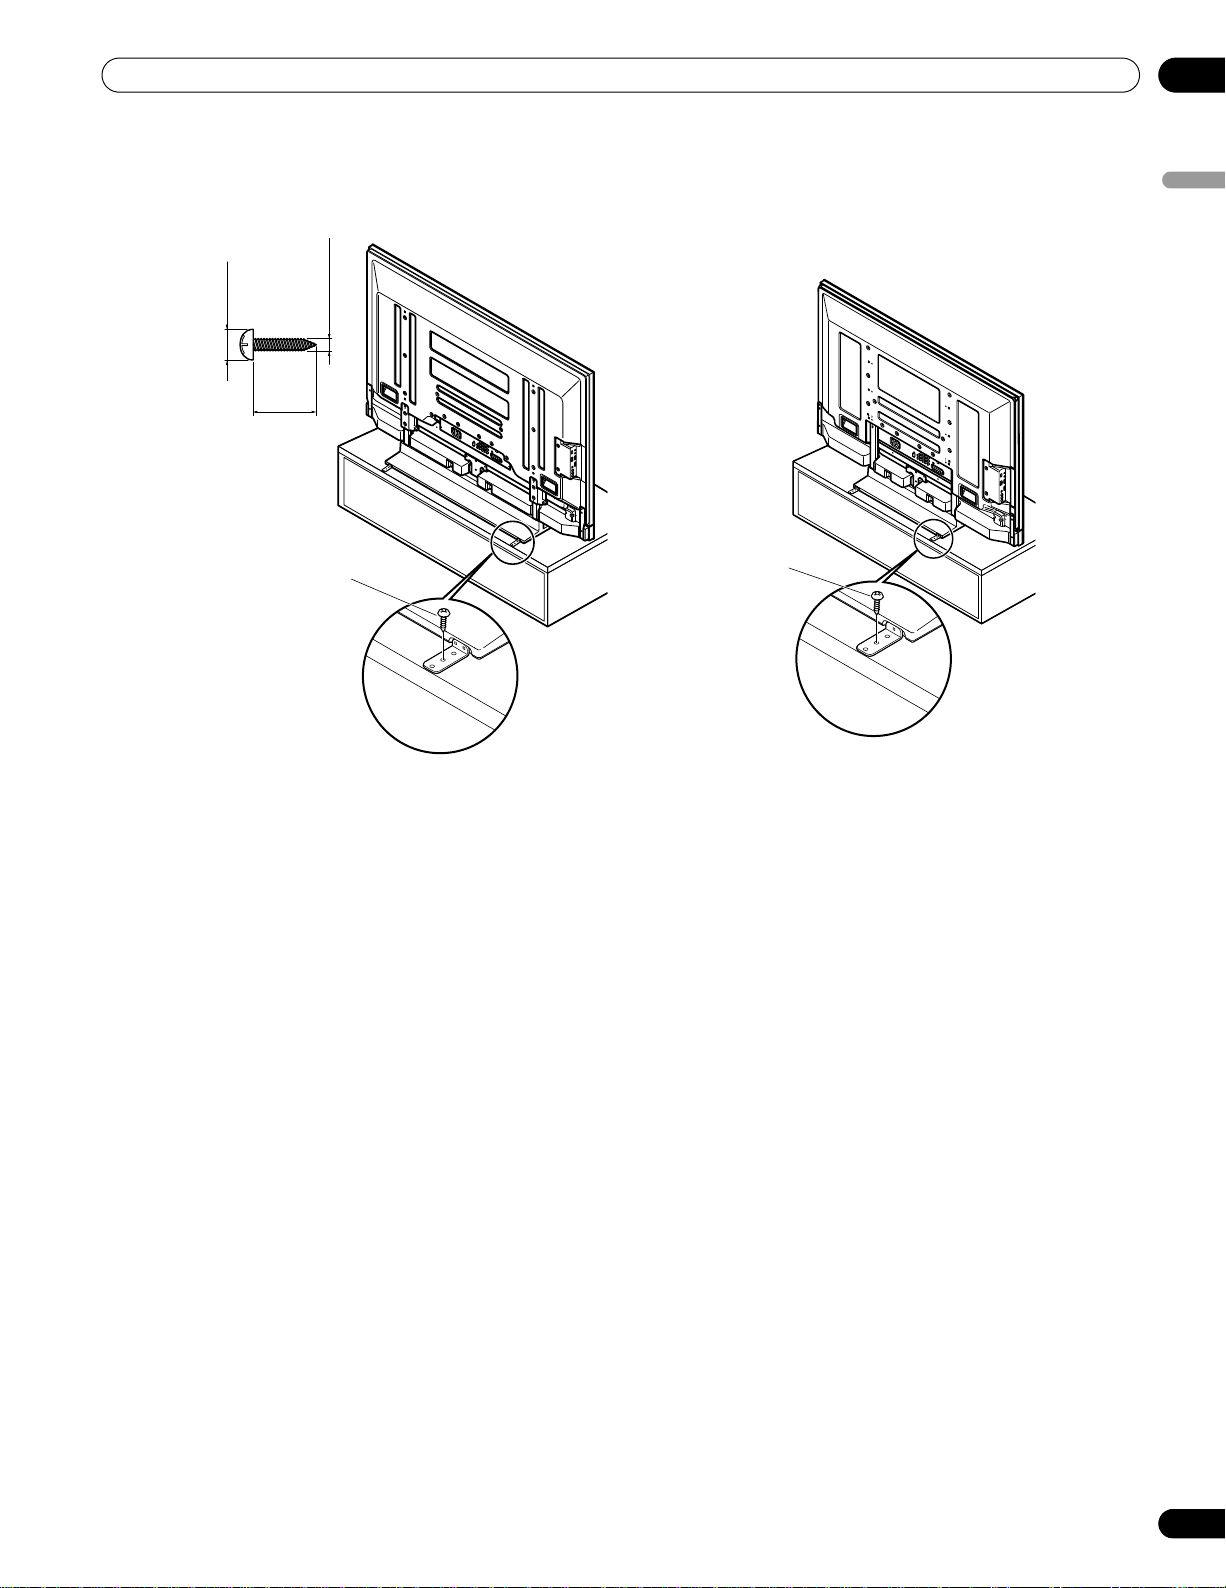
2.4 Mount the Flat Panel TV
Because your flat panel TV is slim but heavy, have at least two people mount and/or position the panel. The
following sections provide instructions for the different mounting and anchoring options.
Anchor the Panel When Using a Stand
When using a stand, stabilize the panel to keep it from tipping over. Please use the supplied metal fittings and
screws to anchor the panel to a wall or other solid support structure.
Another option is to purchase hooks, cords, and fittings through your installer or from your local hardware store.
The hardware size and strength depends on the composition and thickness of the anchoring surface.
Recommended hook: Nominal diameter 8 mm (3/8 inch), length 12 mm to 18 mm (0.5 inches to 0.7 inches)
To anchor the panel when using the provided stand, follow the steps below.
1 ) Attach the hooks to the mounting holes on the
back of the panel.
2 ) Sink the fittings into the wall or support structure.
3 ) Run cords between the hooks and the fittings.
4 ) Tighten the cords until the panel is anchored but
not pulled off balance.
To stabilize the flat panel TV on a table or platform, use the supplied metal fittings and screws as well as
commercially available wood screws. The wood screws are to anchor the metal fittings when mounting on a
wooden surface. These screws should have a nominal diameter of 4 mm (5/32 inch) and are at least 20 mm (13/
16 inch) long.
Notes: Avoid moving the table after the panel is attached.
Do not use bare wires for the cord. If any part of the wire is introduced into the ventilation port on the back
of the display panel, fire or electrical shock could result.
24
En
Page 25
Install Your Flat Panel TV
(PDP-6020FD)
(PDP-5020FD)
20 mm
(13/16 inch)
min.
8 mm to 15 mm
(3/8 inch to 5/8 inch)
4 mm (5/32 inch)
Wood screw
(commercially
available, 4 mm x
20 mm (5/32 inch x
13/16 inch) min.)
Wood screw
(commercially
available,
4 mm x 20 mm
(5/32 inch x 13/
16 inch) min.)
Follow the steps below to secure your flat panel TV.
1 ) Mark locations for metal fittings and screws on the back edge of the table using the panel stand to determine
placement.
02
English
2 ) Drill holes in the table or platform edge at the marked locations.
3 ) Lift panel into place with the assistance with at least one other person.
4 ) Use wood screws (not included) to secure the metal fittings to the table.
25
En
Page 26
02
In order to watch both analog and
digital broadcasts through your
terrestrial antenna or cable
connection, you must first connect the
antenna cable to a splitter.
Rear view
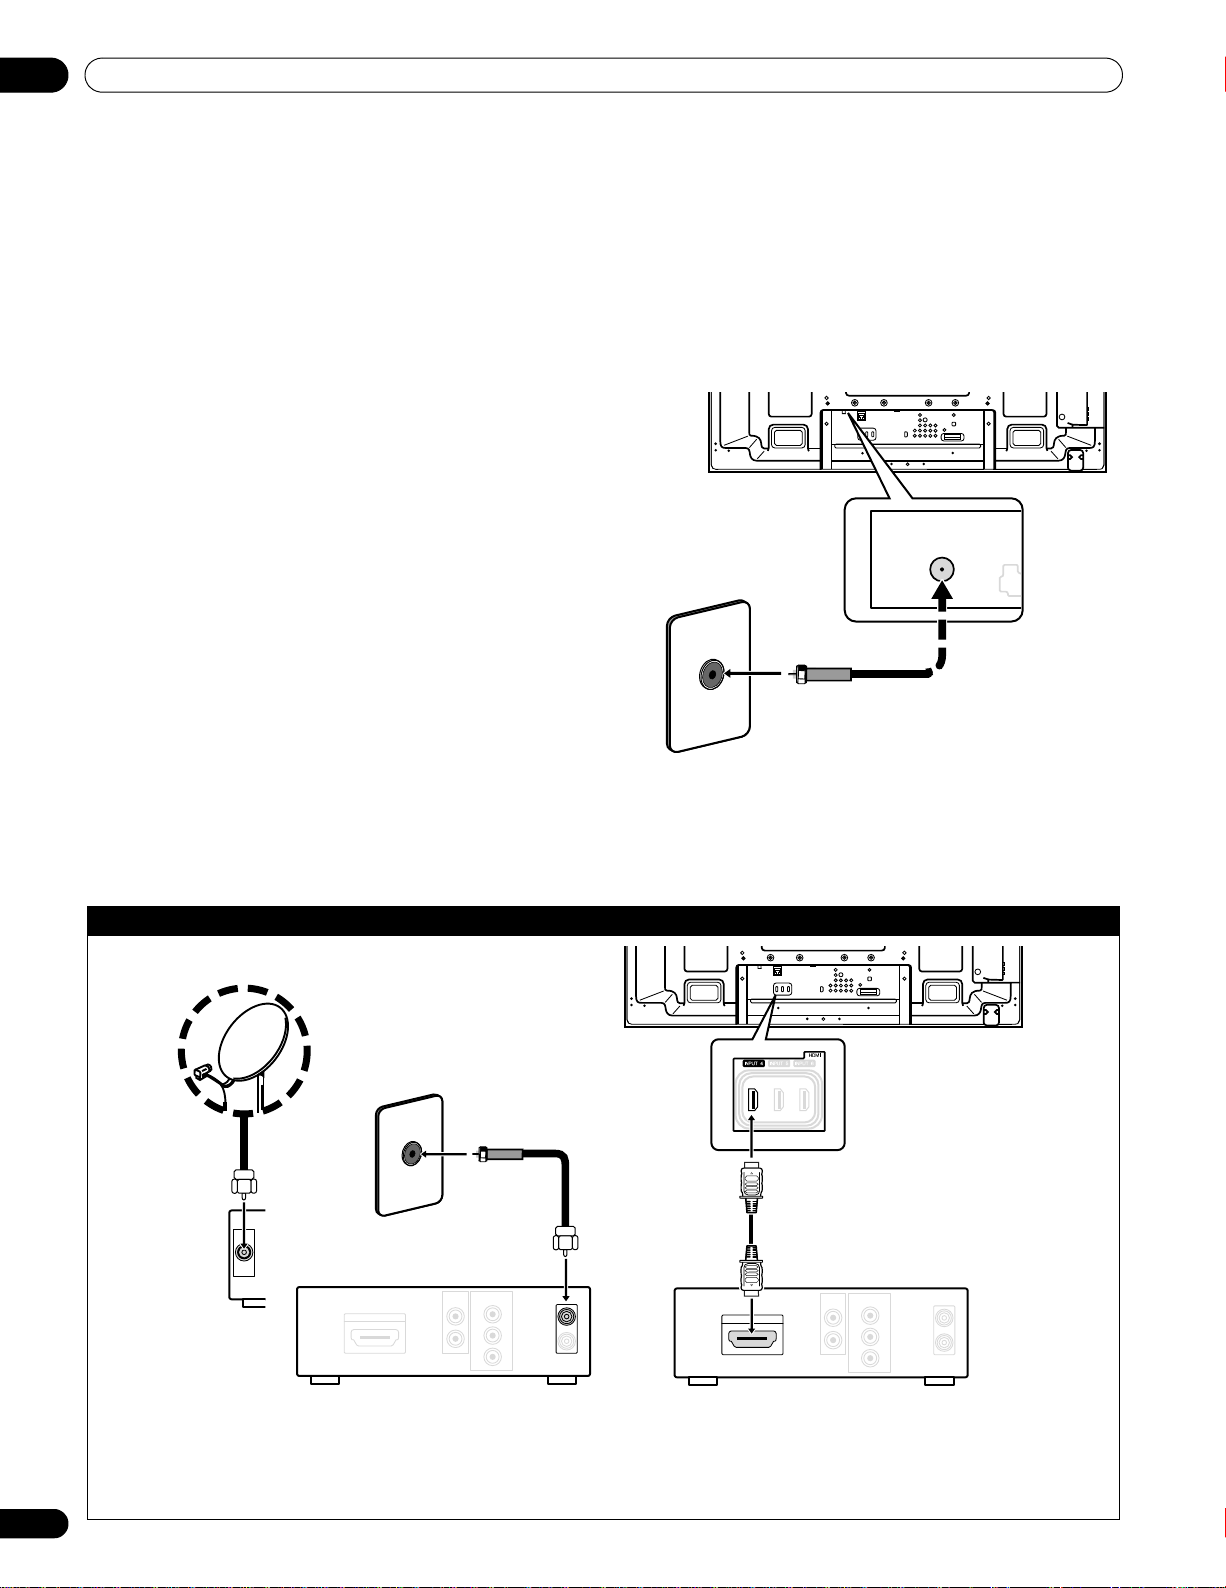
When using a cable STB or Satellite STB, plug in to the antenna/cable TV wall outlet using the STB cable provided
with your STB. If your STB has an HDMI terminal, use any of INPUT 4 through INPUT 6 (HDMI terminal) on the
rear or INPUT 7 (HDMI terminal) on the side of the flat panel TV instead of making video connections. If you
connect an antenna cable directly to TV, you must first connect the cable to a splitter. For details, refer to the
operating manual that came with the STB.
Rear view
Satellite antenna
Cable STB/Satellite STB Cable STB/Satellite STB
Install Your Flat Panel TV
2.5 Connect to Broadcast TV & Other Devices (DVR, Receiver, BDR, etc.)
The type of equipment attached to your flat panel TV determines which panel ports are used. The following
sections explain how to connect broadcast TV and playback equipment such as a DVD player, Surround Sound
system, video recorder, etc. to the panel. If your equipment is not listed, please refer to the operating instructions
that came with the device(s) for connection assistance.
2.5.1 Add Analog (conventional) and Digital TV Channels
Whether a TV station broadcasts in Analog or Digital, your flat panel TV shows the programs as long as the panel
is programmed to accept the signal. To program your panel for broadcast TV, select terminal ANT.
The ANT terminal accepts both analog and digital
broadcasts. Connect a VHF/UHF antenna and/or cable
TV to the panel’s rear ANT terminal, then press TV/DTV
on the remote control to toggle between analog and
digital broadcasts. When watching analog TV
channels, you can also use an outdoor antenna for the
clearest analog picture.
If your outdoor antenna uses a 75-ohm coaxial cable
with an F-type connector, plug it into the panel’s
antenna terminal on the back.
T
W
T
W
2.5.2 Connect Your Other Pioneer Equipment
This section provides cabling information for your other Pioneer equipment when combined with the panel. Each
diagram can also be used as a reference tool for non-Pioneer devices but port locations may differ or be unavailable.
Connect cable or Satellite using STB (Set Top Box):
T
W
SAT IN
COMPONENT
AUDIO
VIDEO OUTPUT
OUT
Y
HDMI OUT
IN
P
B
OUT
PR
HDMI OUT
AUDIO
OUT
COMPONENT
VIDEO OUTPUT
T
W
Y
IN
P
B
OUT
PR
26
En
Page 27
Install Your Flat Panel TV
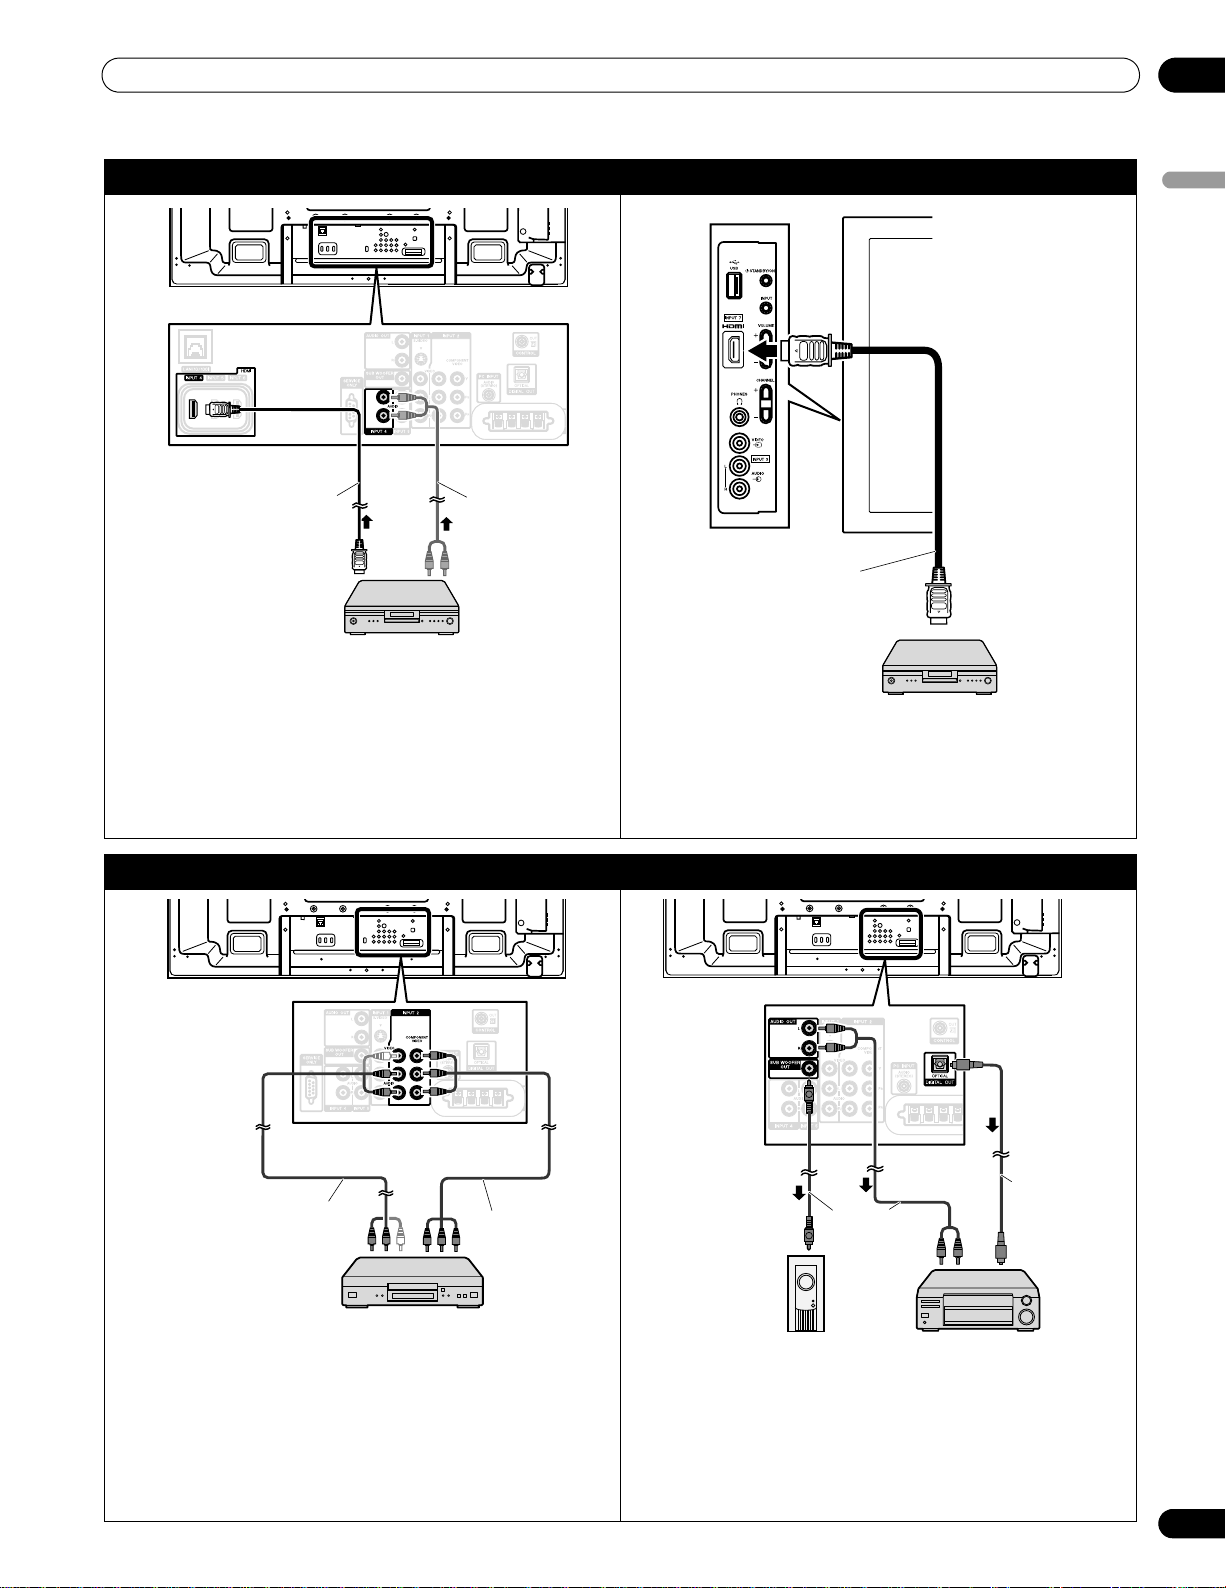
HDMI equipment
HDMI compliant
cable (HDMI cable
having the HDMI
mark)
Rear view
INPUT
4 through
INPUT
6 are HDMI terminals. Use
INPUT
4 or
INPUT
5 (HDMI) terminal when you also input
analog audio signals. For details, refer to “5.2 Use HDMI
Inputs.”
Audio cable
(commercially
available)
Make this
connection when
inputting analog
audio signals.
HDMI equipment
Left side view
Also use INPUT 7 (HDMI terminal) on the side of the
panel when connecting HDMI equipment. For details,
refer to “5.2 Use HDMI Inputs.”
HDMI compliant
cable (HDMI cable
having the HDMI
mark)
Use INPUT 2 terminals when connecting a DVD player
or other audiovisual equipment. If your DVD player has
an HDMI terminal, use this connection instead of
making video connections. For details, refer to the
operation manual that came with the DVD player.
DVD player
Component
video cable
(commercially
available)
AV cable
(commercially available)
Rear view
Use an optical digital cable to connect an AV receiver to
DIGITAL OUT terminal (optical). If your AV receiver does
not have a DIGITAL IN terminal (optical), you may
connect the panel’s AUDIO OUT terminal (audio) to the
audio input terminal on the AV receiver. For details, refer
to the operation manual that came with the AV receiver.
This connection is
not required when
connecting an AV
amp equipped with
the surround
function to a
subwoofer.
Optical digital
cable
(commercially
available)
Subwoofer
AV cable
(commercially
available)
Rear view
AV receiver
02
Connect HDMI equipment (INPUT 4 through INPUT 6):
T
W
T
W
Connect HDMI equipment (INPUT 7):
English
Connect a DVD player: Connect an AV receiver:
T
W
T
W
T
W
T
W
27
En
Page 28
02
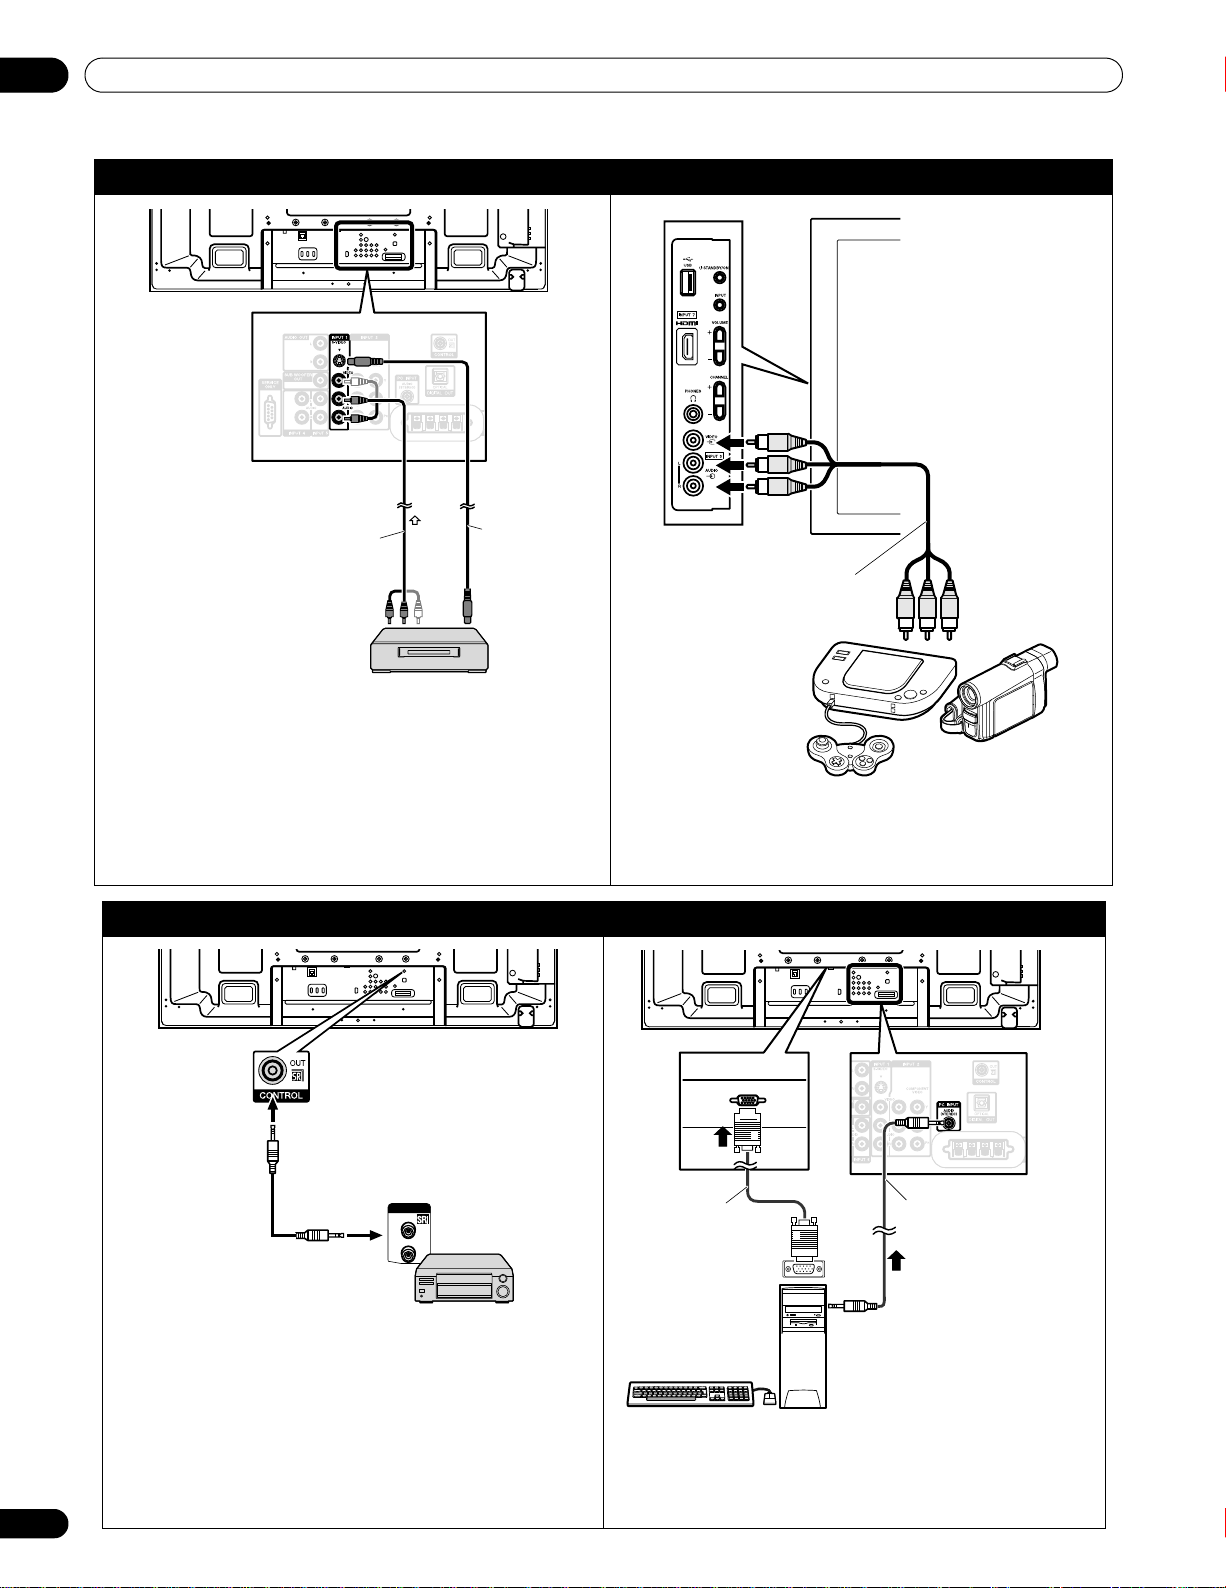
Use INPUT 1 terminals when connecting a VCR or other
equipment. For details, refer to the operation manual
that came with the VCR.
VCR
S-Video cable
(commercially
available)
AV cable
(commercially
available)
Rear view
Use
INPUT
3 terminals when connecting a game
console, camcorder or other audiovisual equipment.
For details, refer to the operation manual that came
with the game console or camcorder.
Left side view
AV cable
(commercially
available)
Camcorder/Game console
Rear view
Connect control cords between the panel’s
CONTROL (OUT) terminal and other Pioneer
equipment having the SR logo. Use a mono sound
cable with a mini plug (not provided).
Personal computer
Rear view
Use the PC INPUT terminal (Analog RGB) when
connecting a PC. If you also connect PC audio, use PC
INPUT (Audio) with a stereo sound cable with a mini
plug (not provided). For details, refer to the operation
manual that came with the PC.
RGB cable
(commercially
available)
Stereo sound cable with
a mini plug
(commercially available)
(When PC audio is
connected)
Install Your Flat Panel TV
Connect a VCR: Connect a game console or camcorder:
T
W
T
W
Connect control cords: Connect a PC:
T
W
T
W
CONTROL
IN
OUT
28
En
T
W
T
W
Page 29

Install Your Flat Panel TV
T
W
T
W
Speaker cable
Cable clamp
PDP-6020FD
Bundle cables in small
groups when possible for
easier separation later,
if necessary.
Speaker cable
Cable clamp
PDP-5020FD
T
W
T
W
PDP-6020FD
PDP-5020FD
2.5.3 Connect the Power Cord to the Panel
The final connection is the power cord. Always connect the panel’s power cord to a three-pronged outlet, verifying
that the cord is properly grounded. The cord includes a noise filter that reduces electrical interference from the
wall outlet.
As long as the flat panel TV is plu gge d in to a n ou tlet, some power is drawn thr oug h th e panel. When the flat panel
TV is not going to be used for a long period, unplug the panel from the power outlet. Unplugging the panel extends
the life of the plasma as well as saves energy.
Plug the cord in to the panel but do NOT plug it in to a power outlet yet.
2.6 Route then Bundle the Power Cord and Cables
Once the flat panel TV is mounted and the speaker is attached, place additional equipment in the final position(s).
Lay out the power cord, panel cables and any other device cables in a logical pattern that works for the location.
Please consider the following points when routing cables:
• Access to a 3-prong (grounded) power outlet
• Space for the noise filter between the panel and outlet
• Placement of cables under carpets or across walking paths
02
English
Usually the cord/cables have slack or are too long. Although rubber bands are a good temporary solution to
bundle cables, they tend to break down too quickly. To keep cables organized and neat, use the included cable
clamps to bundle cables. The diagram below shows a bundled speaker cable.
A reusable cable clamp is designed to lock the bundled cables in place. Your flat panel TV has a total of four holes
to attach cable clamps to the back of the panel. Use the cable clamps as necessary.
29
En
Page 30
02
Cable clamp
Latch
Lever
Lever
Install Your Flat Panel TV
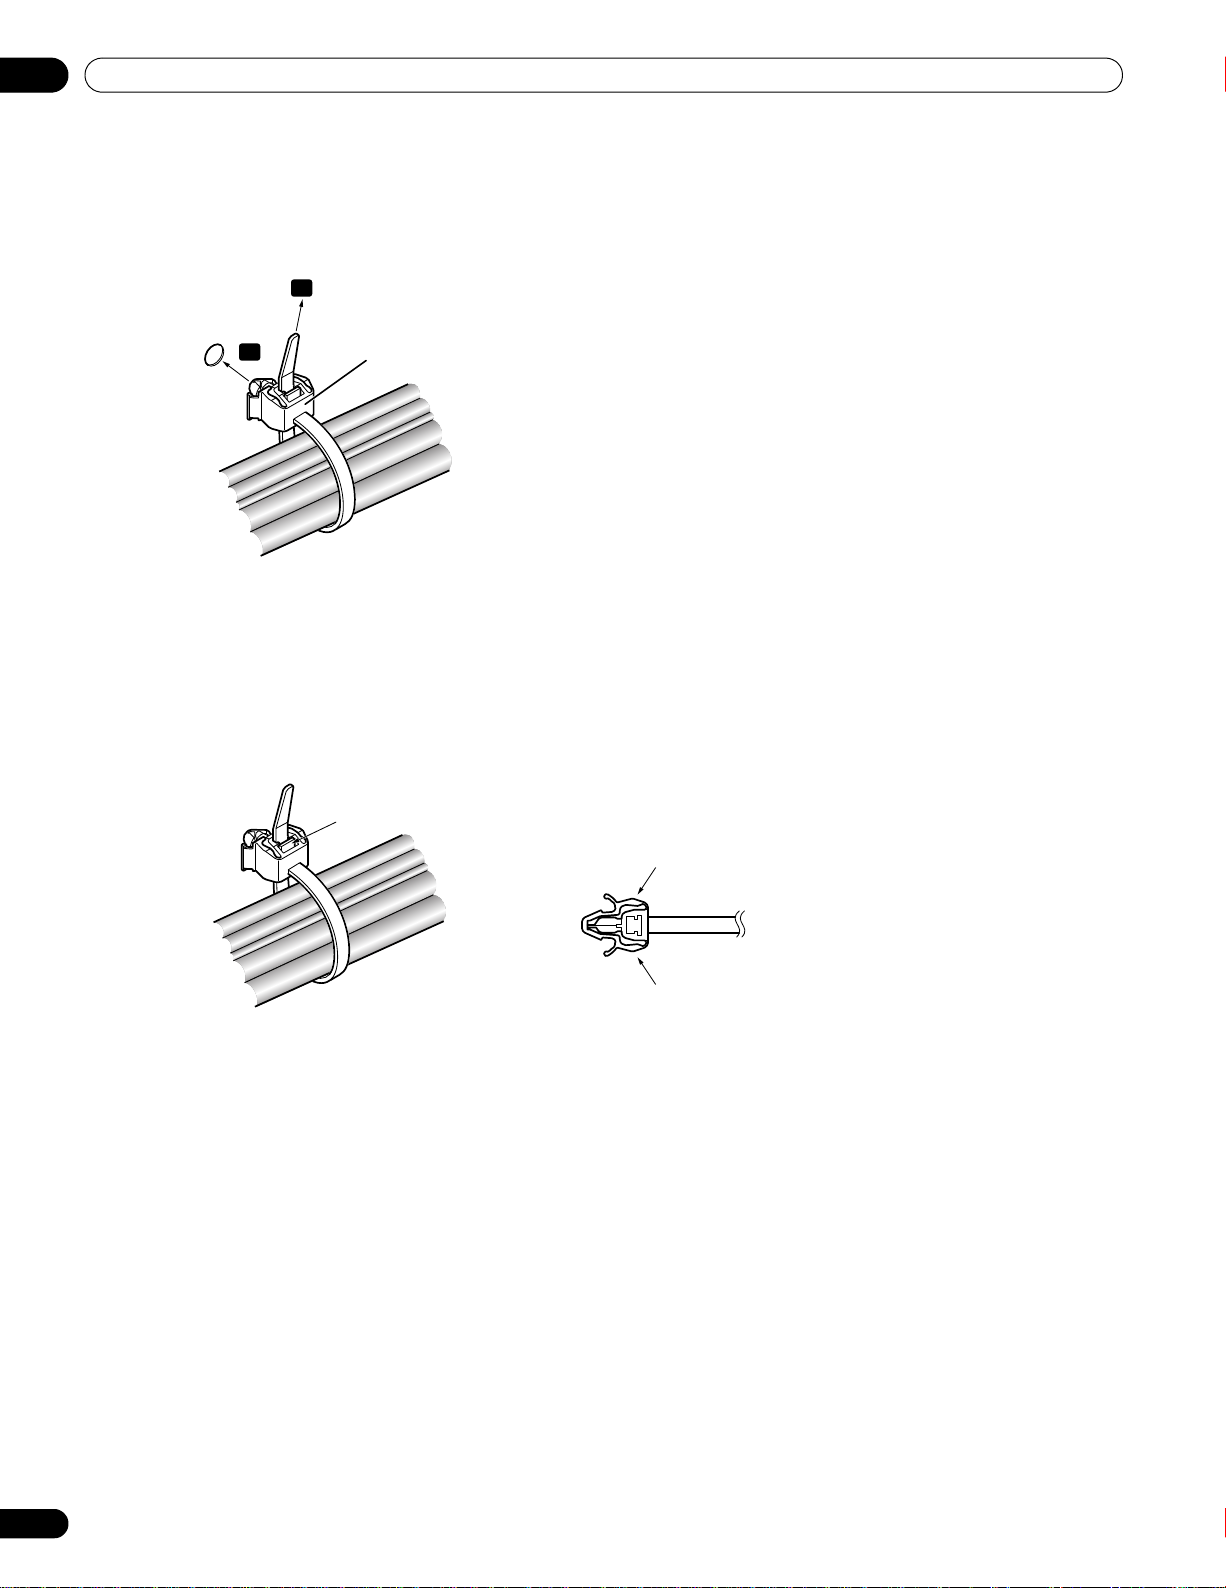
Follow the steps below to attach a cable clamp.
1 ) Thread the clamp band through the holder and bundle the cable(s) in the cable clamp.
2 ) Push and hold the levers then insert the hook into an appropriate hole on the rear of the flat panel TV.
3 ) Pull up the clamp band to lock.
1
2
4 ) Confirm that the cable clamp is seated firmly in the panel.
Note: Avoid pinching or creating pressure points when routing or bundling cables.
To remove the clamp band, pull and hold the latch to release.
To remove the cable clamp, push and hold the levers then pull it out from the hole.
Note: The longer a clamp is in place, the better chance of deterioration. An older clamp is more easily damaged
while being removed and may not be reusable.
30
En
Page 31

Basic Operations For Television Viewing
Power On indicator
Standby indicator
Sleep indicator
3 Basic Operations For Television Viewing
This chapter explores day-to-day operations such as powering on your flat panel TV, using the Home Menu, and
adjusting the panel for the viewing area/room. The final section in this chapter provides hints and suggestions for
those new to flat panel TV features.
3.1 Turn the Flat Panel TV ON/OFF
Your flat panel TV has three activity levels: Power On, Standby, and Power Off. Standby saves energy but allows
the remote control to turn on the panel
The following instructions use the remote control. To operate the flat panel TV through the side panel buttons,
refer to “1.2.1 Control Buttons and More on the Flat Panel TV” for button locations.
Turn ON the Flat Panel TV
To turn on the panel, follow the steps below.
1 ) Plug the flat panel TV’s power cord in to a properly grounded outlet.
2 ) Press any of the following buttons to turn the flat panel TV On.
• Power On button (a) on the panel’s back lower-left section (see page 9)
• STANDBY/ON button on the side of the panel (see page 8)
• Remote control’s TV (a) button located in the upper left corner (see page 12).
Images appear on the panel screen.
.
03
English
Note: Use the remote control’s
3 ) Confirm that the Power On indicator lights blue.
MUTING
button to reduce any excessive static noise.
Note: While in Standby, pressing the remote control’s TV ( a) button causes the flat panel TV to turn On.
Turn OFF the Flat Panel TV
Turning off the flat panel TV can mean entering Standby so features such as Sleep are still functional or it can
mean cutting power to the panel. Unless the flat panel TV is to sit idle for long periods, leave the panel in Standby.
Note: While in Standby or when powered off, the flat panel TV continues to draw some power as long as the panel
is plugged in to an outlet.
Follow the steps below to place the panel in Standby.
1 ) Press the remote control’s TV ( a ) button or
panel’s STANDBY/ON button.
2 ) Confirm that the Standby indicator lights red.
The table to the right provides samples of how the
indicators light. Monitor the indicators on the
front of the panel to check the power status.
Power On
Indicator
Standby
Indicator
Flat Panel TV Status
Panel’s power cord is disconnected or
the power cord is connected but the
flat panel TV’s Power On button ( a )
is off
Power is on but waiting for activation
Panel is in Standby
31
En
Page 32

03
Remote control
Home Menu screen
Basic Operations For Television Viewing
3.2 Program the Flat Panel TV for Television Viewing
To watch TV and take advantage of some built-in features, choose the channel type or types (Analog, Digital),
select a language, set your time zone, and program the channels. The sections below include how to set your
channel type and how to use the Home Menu for each programming option.
3.2.1 Choose Analog or Digital TV Channels
To choose a channel setting, note the antenna input terminal connected to the back of the panel. Follow the
directions below to select analog or digital TV channels.
1) Confirm that the remote control is set to TV.
Located at the bottom of the remote control.
2) Press TV/DTV on the remote control.
Located at the top of the remote control.
3) Select a channel option, analog or digital.
During operation, press
TV signals.
TV/DTV
to toggle between
Note: See
“2.5.1 Add Analog (conventional) and Digital
TV Channels”
for more information about
channel setting options.
Note: When watching TV and separate video image (multi-screen), pressing the remote control’s
TV/DTV
button
changes only the TV signal appearing on the left side of the panel.
3.2.2 Explore the Home Menu
The Home Menu is the main menu for the flat panel TV. Most commands and settings are programmed through
this menu. The following section describes a typical method for working with the panel’s menus. For actual
procedures, see the appropriate page(s) that describe a function.
1) Press HOME MENU on the remote
to access the main menu.
2) Use the Up/Down arrows ( / ) to
highlight a menu item.
3) Use the Left/Right arrows ( / ) to
scroll through options for that menu
item.
4) Highlight the selected menu option.
Channel
Favorites
Input
Home Media Gallery
HDMI Control
Setup
32
En
5) Press ENTER to lock in the change.
6) Press RETURN to move back to a previous menu/submenu page when changing more than a single option.
7) Press HOME MENU again to exit the menu screen.
Page 33

Basic Operations For Television Viewing
This chart provides a breakdown of the Home Menu for both AV and PC sources.
03
AV Source Pg Option
Channel 39 —
Favorites 39 —
Input 39 —
Home Media Gallery 83 —
HDMI Control 76 —
Setup Picture 54 AV Selection
58 Contrast*
58 Brightness*
58 Color*
58 Tint*
58 Sharpness*
60 PureCinema
46 Sound Control**
45 OPTIMUM
Performance**
58 Reset
Sound 46 Treble
46 Bass
46 Balance
67 Sound Effect
46 Reset
67 AVC
Power Control 53 Energy Save
68 No Signal off
68 No Operation off
Sleep Timer 41 —
Option 44 Position
56 Auto Size
59 Side Mask
74 HDMI Input
81 HDMI Control Setting
53 Orbiter
53 Video Pattern
56 Game Control Pref
42 Room Light Sensor
52 Screen Protection
40 Label Input
System Setup 35 Auto Installation
36 Analog TV Setup
38 Digital Tuner Setup
47 Parental Control
64 Closed Captions
111 Digital Audio Output
47 Change Password
34 Language
114 Technical Info
Favorites Setup 39 Channel Mode
40 Sort Favorites
* Available when any option other than
OPTIMUM is selected from the AV Selection
menu.
** Available only when OPTIMUM is selected
from the AV Selection menu
PC Source Pg Option
Channel 39 —
Favorites 39 —
Input 39 —
Home Media Gallery 83 —
HDMI Control 76 —
Setup Picture 54 AV Selection
58 Contrast
58 Brightness
58 Red
58 Green
58 Blue
58 Reset
Sound 46 Treble
46 Bass
46 Balance
67 Sound Effect
46 Reset
67 AVC
Power Control 53 Energy Save
68 Power Management
Sleep Timer 41 —
Option 112 Auto Setup
112 Manual Setup
74 HDMI Input
81 HDMI Control Setting
53 Orbiter
40 Label Input
Favorites Setup 39 Channel Mode
40 Sort Favorites
English
33
En
Page 34

03
Basic Operations For Television Viewing
TV Screen Components
Your flat panel TV has easy-to-read menus and graphic symbols that provide quick access to the desired options.
Menus appearing in this manual may differ slightly from the actual menus but the functionality remains the
same.
1
Exit
Treble : 0
Bass : 0
4 8
Balance : 0
Sound Effect :
Reset
AVC : Off
xxxxxxxxxxxxxxxxxxxx
xxxxxxxxxxxxxxxxxxxxxx
HOME MENU Return
5 6 7
1 - Exit button: Close the menu to return to TV
viewing
2 - Menu title: Display the selected menu title
3 - TOOLS button: Display the TOOLS Menu
4 - Menu: Select an option
2 3
Sound
TELEVISION
6 - Operation Guide area: Display the operational
guidelines for the selected option(s)
7 - Return button: Return to the previous menu
screen
8 - Picture preview (in reduced size)
5 - HOME MENU button: Close the menu to return
to TV viewing
3.2.3 Assign a Language
The default menu language is English. To assign a different language for menus and on-screen information,
follow the steps below.
1 ) Press HOME MENU.
Setup
2 ) Select
Use the arrow buttons to highlight an option then press
3 ) Select
4 ) Select
from the main menu.
System Setup
Language
from the System Setup menu.
from the Setup menu.
ENTER
.
5 ) Select a language from the submenu.
Menu : English
34
En
6 ) Press HOME MENU again to exit the menu.
Page 35

Basic Operations For Television Viewing
3.2.4 Set the Clock
Set the flat panel TV’s clock to take advantage of many built-in features such as Time Zone and D.S.T. (Daylight
Saving Time) activation for digital TV broadcast.
Note: If the panel’s power cord is unplugged or there is a power outage, the time must be reset.
Follow the steps below to set the clock.
03
English
1 ) Access the
2 ) Select
3 ) Select
4 ) Select
5 ) Select the time zone for your area.
6 ) Select the menu option
7 ) Select the proper option for your location.
8 ) Press HOME MENU to close the menu and exit.
System Setup
Digital Tuner Setup
Clock
from the Digital Tuner Setup menu.
Time Zone
from the options.
through the
from the System Setup menu.
Time Zone : Atlantic
D.S.T. : On
D.S.T.
to activate/deactivate Daylight Saving Time.
Setup
.
3.2.5 Create the List of Channels
This section describes how to search for and set up TV channels. There are two ways to add channels to your flat
panel TV, Auto Installation for automatic channel selection or manual channel assignments. The Auto Installation
adds all available channels from your selected TV provider. Once all channels are added to the list, simply delete
any unwanted channels. This section provides steps to add/remove channels.
Auto Installation
Auto Installation searches for and adds TV channels to your list of viewable channels. Using the remote control,
follow the steps below to automatically select all available channels.
1 ) Access the
2 ) Select
3 ) Select
4 ) Select an option.
•Signal Type: Air or Cable
•Language: English, Français or Español
•Time Zone: Atlantic, Eastern, Central, Mountain, Pacific, Alaska, or Hawaii
System Setup
Auto Installation
Air/Cable, Language
through the
from the System Setup menu.
, or
Time Zone
Setup
.
from the Auto Installation menu.
35
En
Page 36

03
Basic Operations For Television Viewing
5 ) Select
Start
.
The panel automatically begins creating your list of channels.
Language : English
Air/Cable : Cable
Time Zone : Atlantic
Start
Note: To quit Auto Installation before it is complete, press
EXIT
.
Manual Channel Selection
To add channels without using the Auto Installation option, follow the directions below. Also, if a channel is
skipped in error, use this method to add the channel to your list.
1 ) Access the
2 ) Select
3 ) Select
Analog TV Setup
Manual Adjust
System Setup
through the
from the System Setup menu.
from the Analog TV Setup menu.
Setup
.
RETURN
to recall the Auto Installation screen then
4 ) Select
5 ) Select a channel number to be added.
6 ) Select
7 ) Select
8 ) Press HOME MENU to exit the menu after all wanted channels have been added.
Program Entry
.
Use the arrow buttons (
Store
from the Manual Adjust menu.
Yes
from the submenu.
/
) to enter a channel number.
Program Entry : 1
Store : Yes
Tuner NR : On
Note: Analog channels can be added manually but digital channels can only be added using the Add New
Channels button on the Digital Tuner Setup menu.
Add New Channels
To add new channels, follow the steps below.
1 ) Access the
System Setup
through the
Setup
.
36
En
2 ) Select
Digital Tuner Setup
from the System Setup menu.
Page 37

Basic Operations For Television Viewing
03
3 ) Select
4 ) Select
Installation
from the Digital Tuner Setup menu.
Add New Channels
Installation
Channel management
Clock
.
Channel search starts automatically. If a new channel is found, it is stored automatically in the flat panel
TV.
To cancel channel search before it finishes, press
RETURN
.
Software Keyboard
This on-screen keyboard allows labeling manually added TV channels. Channel labels can be up to eight
characters long to help channel identification.
To use the Software Keyboard for labeling TV channels, follow the steps below.
1 ) Access the
2 ) Select
3 ) Select
Analog TV Setup
Label
System Setup
from the Analog TV Setup menu.
through the
Setup
.
from the System Setup menu.
English
4 ) Select
Program Entry
from the submenu.
5 ) Select a program number.
• Cable: 1 through 135
• Air: 2 through 69
6 ) Select
Label
.
The Software Keyboard screen appears.
Label
INPU
1234567890
ABCDEFGH I J
KLMNOPQRST
UVWXY Z , . : ;
&'()+-* /_@
Delete
Space
Caps
OK Cancel
7 ) Select the first character.
The cursor moves to the next character space.
8 ) Repeat the previous step to enter up to eight characters.
• To change a character, use or to highlight the character then press
ENTER
. The cursor moves to the
previous or next character.
ENTER
• To delete the entered character, highlight the character, select Delete then press
• To put a space after the entered character, highlight the space, select Space then press
.
ENTER
• To toggle between upper case and lower case, highlight the character, select Caps then press
.
ENTER
.
9 ) Select OK then press ENTER.
The entry is complete.
10 ) Press HOME MENU to exit the menu.
37
En
Page 38

03
Basic Operations For Television Viewing
3.2.6 Skip or Delete Unwanted Channels
The Auto Installation process adds all channels available from your TV service provider. However, there may be
some channels that are unwanted or are not age-appropriate for your home. This section explains how to bypass
or delete unwanted channels when moving up/down one channel at a time and what programs are available for
viewing.
To skip or delete unwanted channels, use the remote’s CH+/CH– buttons to reset the status for those channels.
Follow the steps below to change a channel’s status.
1 ) Access the
System Setup
through the
Setup
.
2 ) Select
Digital Tuner Setup
or
Analog TV Setup
from the System Setup menu.
• Digital TV channels: Channel management > Channel Options > (Channel Delete) > (On)
XXXX 00001.000
XXXX 00002.000
XXXX 00003.000
XXXX 00004.000
XXXX 00005.000
XXXX 00006.000
XXXX 00007.000
XXXX 00008.000
XXXX 00009.000
3 ) Scroll to or highlight an unwanted channel number.
4 ) Press ENTER to reverse the status for that channel.
When there is a check mark next to the channel, it disappears.
5 ) Press RETURN.
A confirmation screen appears.
6 ) Select
Yes
then press ENTER.
The Channel Delete setting is complete.
38
En
7 ) Press HOME MENU to exit the menu.
If you select the (Channel Skip) option in Step 3, the setting is complete when exiting the Channel
Options menu (no confirmation screen appears). Skip Steps 5 and 6.
The instructions for restoring a skipped channel are the same as above. In Step 4 a check mark appears next to
the added/restored channel.
To skip an analog channel, follow the steps below.
• Analog TV channels: Manual Adjust > Store > No
Radio Skip
This function allows skipping of radio channels at a time. To set this option, follow the steps below.
1 ) Access the
2 ) Select
3 ) Select
4 ) Select
5 ) Select
Digital Tuner Setup
Channel management
Radio Skip
On
.
System Setup
from the Channel management menu.
through the
Setup
.
from the System Setup menu.
from the Digital Tuner Setup menu.
6 ) Press HOME MENU to exit the menu.
Page 39

Basic Operations For Television Viewing
3.2.7 Channel List
Your flat panel TV offers three channel lists for quick access to a desired channel: Favorites List, Channel List and
Input List.
Favorites List: Display your favorite channel numbers/names up to 20 channels (analog channels, Input 1 through
7, PC), 20 digital channels, and 1 Home Media Gallery
Store your most frequently viewed channels in the Favorites List.
To display the Favorites List, press ENTER while showing a TV channel. For another method to access the Favorites
List, follow the directions below.
1 ) Press HOME MENU.
03
English
2 ) Select
Favorites
from the main menu.
Pressing the / button while showing the Channel List or Input List also causes the Favorites List to
appear.
Channel List: Display all analog/digital TV channels in each broadcast network group
To display the Channel List, follow the directions below.
1 ) Press HOME MENU.
2 ) Select
Channel
from the main menu.
Pressing the / button while showing the Favorites List or Input List also causes the Channel List to
appear.
Input List: Display external input source names from INPUT 1 through INPUT 7 and PC
To display the Input List, follow the directions below.
1 ) Press HOME MENU.
Input
2 ) Select
from the main menu.
Pressing the / button while showing the Favorites List or Channel List also causes the Input List to
appear.
Note: After selecting the desired channel, pressing
screen appears. Pressing
RETURN
or
ENTER
causes the Channel List to close and the selected
EXIT
causes the Channel List to close and the screen before
selection returns.
Press an arrow button to cycle through the lists when viewing any of the lists.
Favorites
INPUT 6
XXXXXX 00001.000
XXXXXX 00004.000
XXXXXX 00007.000
XXXXXX 00009.000
PC
XXXXXX
XXXXXX 00013.002
XXXXXX 00015.000
XXXXXX 00024.000
1/2
Set Favorite Channels
Select up to ten (10) channels per list page, up to five pages for a total of 41 favorite channels. To assign channels
to your
Favorites
1 ) Access the
2 ) Select
3 ) Select
or All, follow the steps below.
Favorites Setup
Channel Mode
All
or
Favorites
through the
from the Favorites Setup menu.
from the Channel Mode menu.
Setup
.
• To assign all channels, select All. To assign the registered channels, select Favorites.
39
En
Page 40

03
Basic Operations For Television Viewing
4 ) Select a TV channel to store.
If the screen fails to fit in the window, a scroll bar appears.
Pressing
ENTER
Favorites List is empty, “No Favorites List.” appears.
5 ) Press HOME MENU to exit the menu.
Alternate Method to Store Your Favorite Channels
Use the TOOLS Menu to store TV channels, external input sources including PC, and Home Media Gallery
contents. To store channels, follow the steps below.
1 ) Press TOOLS.
The TOOLS Menu appears on screen.
while watching a TV program also causes the favorite channel list to appear. If the
2 ) Select
Favorites Entry
.
Use the arrow buttons to highlight an option.
3 ) Select On ( / ).
The channel you are watching is stored in the favorite list.
To cancel, use the arrow button to select Off.
Notes:
•Pressing
EXIT, RETURN
, or
TOOLS
again causes the TOOLS Menu to disappear.
• Once the maximum number of channels are stored, a warning screen appears.
• To quit the procedure before it finishes, press
RETURN
on the remote control.
EXIT
or
Sort Favorite Channels
To sort through the stored channels, follow the steps below.
1 ) Access the
2 ) Select
Sort Favorites
Favorites Setup
through the
Setup
.
from the Favorites Setup menu.
3 ) Select a channel to move.
4 ) Select a new location then press ENTER.
The selected channel is moved to the new location. To sort another channel(s), repeat Steps 3 and 4.
5 ) Press HOME MENU to exit the menu.
Edit the Input List
To change name of an Input, follow the steps below.
Option
1 ) Access the
through the
Setup
.
40
En
2 ) Select
Label Input
from the Option menu.
3 ) Select an input or PC.
The software keyboard appears.
4 ) Enter the new name.
OK
5 ) Select
To cancel, press
to save the name and exit the menu.
HOME MENU
Label
KIDS
1234567890
ABCDEFGH I J
KLMNOPQRST
UVWXY Z , . : ;
&'()+-* /_@
.
Delete
Space
Caps
OK Cancel
Page 41

Basic Operations For Television Viewing
3.3 Quick Start for Watching Television
Your flat panel TV has many functions and features, some of which you may simply lack the time to set when first
installing the panel. To begin watching TV quickly, refer to the basic information within this section. However, when
it is convenient, we strongly suggest going through the rest of this manual and learning all that your flat panel TV
can do.
3.3.1 Change the Channel/Sub-Channel
With the remote control pointed at the panel’s remote
sensor, press the CH + button to sequentially change to the
next highest available channel. The CH – button
sequentially changes down to the next lowest available
channel. Each press of CH + or CH – causes the channel to
change sequentially from station to station. To return to the
previous channel, press CH RETURN. To toggle between
the two channels, press CH RETURN again. Each press of
this button switches the channel between these two
stations.
03
English
Another option for changing the channel is to use the number buttons (0 through 9). Simply press the number
buttons in the order needed for that channel. For example, enter Channel 231 as 2
number, 4
A recent addition to TV viewing is the Sub-channel. A digital channel can be split in to multiple signals. Each
signal, called a sub-channel, can carry a different program. To watch a sub-channel, use a combination of number
buttons and the dot (.) button. For example, if Channel 5 is digital and has three active sub-channels, enter 5 . 2
to reach the second sub-channel.
.
Note: To tune in a program more quickly, enter the channel or sub-channel then press
- 3 - 1 or Channel 4 as the single
CH ENTER
.
3.3.2 Adjust the Volume/Sound
With the remote control pointed at the panel’s remote sensor, press and hold VOL+ to increase the sound volume
gradually. Holding down VOL– decreases the volume at the same rate. A single press of VOL+ or VOL– causes
the volume to adjust by minor increments.
To silence all sound, press MUTING. The muting symbol (
previous level, press MUTING again. Pressing VOL+ once also increases the volume one step higher than the
current level and cancels the muting mode.
If the panel’s default sound level is too loud or too soft, refer to “3.4.6 General Sound (Audio) Adjustment.”
e ) appears on screen. To return the volume to the
3.3.3 Turn On the Sleep Timer
To save energy and to maximize the life of your flat panel TV, try using the Sleep Timer for occasions when the
panel may be left on by accident. The Sleep Timer places the panel in Standby when the selected time elapses.
The Sleep Timer provides time periods of 30, 60, 90, or 120 minutes. When the Timer is down to five minutes, a
reminder appears on screen each minute until the time has elapsed.
To set the Sleep Timer, follow the steps below.
1 ) Access the
Sleep Timer
through the
Setup.
2 ) Select the desired time period.
Select between 30 minutes and 2 hours (120 minutes).
3 ) Press HOME MENU to exit the menu.
41
En
Page 42

03
Basic Operations For Television Viewing
The SLEEP indicator on the front of the flat panel TV lights orange when the Sleep Timer is set. To check the
remaining time, press TOOLS then select Sleep. “Remain ---min” appears at the top of the menu screen. After
checking the time, press EXIT to return to your program without losing the Sleep Timer setting.
Note: When the sleep timer has been set, “Remain ---min” appears at the top of the menu. However, the Video
Pattern timer has priority over the sleep timer. When the Video Pattern timer is on, the sleep timer is
deactivated. Video Pattern is explained fully later in this manual.
3.4 Adjust the Picture and Sound Quality
Your flat panel TV has many adjustment options for the picture and the sound to make it just right for you. This
section provides basic adjustments but for detailed video/audio modifications, refer to “4 Additional Picture and
Sound Adjustment Options” and “4.7 Select Alternatives for/to Sound.”
3.4.1 Adjust the Picture for Your Room Lighting
The flat panel TV senses the amount of light in your room and automatically adjusts the screen brightness for the
best picture. Bright rooms require stronger coloring so images appear crisp while dimly lit rooms allow the
picture to use more subtle coloring.
The panel ships with the Room Light Sensor turned Off. The sections below provide directions to turn the room
lighting sensor On/Off.
Room Lighting Sensor
To deactivate/reactivate the room lighting sensor, follow the steps below.
Option
1 ) Access the
2 ) Select
3 ) Select
4 ) Press HOME MENU to exit the menu.
Room Light Sensor
On
(or
through the
Off
) from the submenu.
Setup
.
from the Option menu.
Game Control Pref : Off
Room Light Sensor : Off
Screen Protection
Label Input
42
En
Page 43

Basic Operations For Television Viewing
3.4.2 General Picture (Video) Adjustment for an AV Source
The directions below apply to all AV sources except OPTIMUM and DYNAMIC. If the viewing option is OPTIMUM,
your flat panel TV automatically adjusts the picture to the best possible level. If the preferred viewing option is
DYNAMIC, please refer to “4.1 Choose an AV Option (Video, Game, etc.).” For standard picture adjustments, follow
the steps below.
1 ) Access the
Picture
2 ) Select an item to be adjusted.
Contrast is used in the example below.
through the
AV Selection : PERFORMANCE
Contrast : 40
Brightness : 0
Color : 0
Tint : 0
Sharpness : 0
PureCinema
Reset
Setup
.
Picture
03
English
3 ) Use the arrow buttons (/) to adjust to the desired level.
Contrast
32
4 ) Press HOME MENU to exit the menu.
Reduce Noise from Analog TV
Sometimes electronic signal static can cause imperfections in the picture. This static is called Video Noise. Your
flat panel TV can reduce video noise from an analog TV channel, depending on the broadcast signal level.
Sometimes the broadcast signal has higher interference levels so that some video noise is noticeable.
This function is only selectable for signals from an antenna. Follow the steps below to reduce noise on an analog
TV channel.
1 ) Access the
2 ) Select
3 ) Select
Analog TV Setup
Manual Adjust
System Setup
through the
Setup
.
from the System Setup menu.
from the submenu.
Only analog channels set using Auto Installation are manually adjustable.
4 ) Select
Program Entry
.
5 ) Select a channel number to be added.
Use the arrow buttons (
6 ) Select
Tuner NR
.
/
) to enter a channel number.
7 ) Select
On
.
The default setting is On.
8 ) Press HOME MENU to exit the menu.
43
En
Page 44

03
Basic Operations For Television Viewing
Picture Image Position
Each input source stores the picture adjustment settings for that view. Although repositioning is available in most
screen views, when the screen is set to Dot-by-Dot, the Position menu is unavailable. Also, depending on the
displayed video, the image position may not change after an adjustment.
To adjust the picture’s horizontal and vertical position, follow the steps below.
Option
1 ) Access the
through the
Setup
.
2 ) Select
3 ) Select
4 ) Adjust the vertical and/or horizontal positioning using the arrow buttons.
5 ) Press HOME MENU to exit the menu.
Restore Default Picture
After making multiple adjustments, it may be difficult to reverse improper settings. To restore the factory default
video settings, follow the directions below.
1 ) Highlight
2 ) Press ENTER to continue with the picture reset.
Position
from the Option menu.
H/V Position Adjust
Reset
from the Picture menu.
Position
Auto Size : Off
Side Mask
HDMI Input
HDMI Control Setting
Orbiter : Off
Video Pattern
from the submenu.
A confirmation screen appears asking if settings should be returned to the factory defaults.
44
En
3 ) Use the arrow buttons to highlight
4 ) Press ENTER.
Yes
.
All video settings return to the original default values when selecting options other than OPTIMUM or PC.
When OPTIMUM is selected, video settings for OPTIMUM, AV Selection menus, and Sound Control
settings return to the original default values.
3.4.3 Compare Images When Adjusting the Picture
When adjusting the picture, look for an overall improvement by adjusting each parameter or option one at a time.
Many small adjustments lead to the best picture for your viewing area. As each option changes, refer back to the
previously set image for comparison. This section includes adjustment notes and steps to adjust the flat panel
TV’s picture.
Each parameter/option must be adjusted separately. For example, if two options under AV Selection,
PERFORMANCE and MOVIE need adjustment, change/compare one option then save the preferred setting
before moving on to the other option. Below are other guidelines to follow when adjusting the picture.
Before
• Adjustments are available while on the After screen. Trying to make adjustments while on the
a warning message to appear.
After
• Switch to another parameter/option only from the
Before
another option, the
• Exiting an option from the
button.
• Exiting an option from the
data is lost.
Before
screen stores that previous entry in memory and deactivates the TOOLS
After
screen stores the new entry in memory and deactivates the button.
screen. If viewing the
Before
screen when selecting
causes
Page 45

Basic Operations For Television Viewing
• Moving/changing the AV Selection parameter/option stores the option setting in memory (button continues
to work).
Follow the steps below to adjust options for the preferred picture quality.
1 ) Access the
Picture
2 ) Select an option.
3 ) Use the TOOLS button to toggle between the previous and adjusted images.
4 ) Repeat Steps 2 and 3 to continue adjusting the option as needed.
5 ) Repeat Steps 2 through 4 to adjust other picture options.
6 ) Press HOME MENU to exit the menu.
Note: if no selections are made within 60 seconds, the menu closes automatically and the current settings are
saved to memory.
To exit the menu without saving the changes, switch to the Before screen then press HOME MENU.
3.4.4 Display a Graphical Picture/Sound Adjustment Screen
Selecting
OPTIMUM
submenus. Select
Performance provides an on-screen graphic monitor for multiple picture and sound adjustments.
through the
Setup
.
from the AV Selection menu causes the Picture menu to display different AV source
On
for the Sound Control option to automatically adjust the sound quality, and OPTIMUM
03
English
OPTIMUM Performance
OPTIMUM Performance displays on-going picture and sound adjustments using graphical data when selecting
OPTIMUM from the AV Selection menu. OPTIMUM Performance provides the following bar graph data:
• Analyzer: Histogram, RGB, Room Light
• Picture: Contrast, Brightness, Color, Sharpness, Color Temp., Gamma
• Sound: Level
OPTIMUM Performance
[OPTIMUM] On
OPTIMUM On/Off
[Analyzer]
Histogram
RGB
Room Light
[Picture] Contrast
Brightness
Color
Sharpness
Color Temp
Gamma
[Sound]
60 1k 12k(Hz)
To display OPTIMUM Performance, follow the procedure below.
1 ) Access the
2 ) Select
3 ) Select
4 ) Select
Picture
AV Selection
OPTIMUM
OPTIMUM Performance
The OPTIMUM Performance appears. To cancel the OPTIMUM Performance option, press
Note: When OPTIMUM is selected, press and hold
through the
Setup
.
from the Picture menu.
from the AV Selection menu.
from the Picture menu.
DISPLAY
EXIT
.
on the remote control to show OPTIMUM
Performance.
OPTIMUM Performance compares the picture and sound quality between “Off” (unadjusted) and “On”
(adjusted using the
TOOLS
button).
45
En
Page 46

03
Basic Operations For Television Viewing
3.4.5 Sound Control
Setting the Sound Control option to On automatically adjusts to the highest sound quality possible for the
selected image and viewing environment. This option is also available when OPTIMUM is selected in the AV
Selection menu. To activate Sound Control, follow the procedure below.
1 ) Access the
Picture
through the
Setup
.
2 ) Select
3 ) Select
4 ) Select
5 ) Select
6 ) Press HOME MENU to exit the menu.
AV Selection
OPTIMUM
from the Picture menu.
from the AV Selection menu.
Sound Control
On
.
from the Picture menu.
Note: When Sound Control from the Picture menu is selected, the only Sound menu option available is AVC (Auto
Volume Control).
3.4.6 General Sound (Audio) Adjustment
Many prefer a heavier base when watching movies or music videos from an AV source or on TV. Others like a more
balanced sound. To adjust the sound to your preference, follow the directions below.
Sound
1 ) Access the
2 ) Select an option for adjustment.
through the
Setup
.
Treble : 0
Bass : 0
Balance : 0
Sound Effect
Reset
AVC : Off
46
En
3 ) Use the left/right arrow buttons ( / ) to adjust the option.
Option Left Button Right Button
Treble weakens tone strengthens tone
Base weakens tone strengthens tone
Balance shifts audio balance to the left shifts audio balance to the right
4 ) Press HOME MENU to exit the menu.
Restore Default Sound Settings
To restore the factory default sound settings, follow the directions below.
Reset
1 ) Highlight
2 ) Press ENTER to continue with the sound reset.
from the Sound menu.
A confirmation screen appears asking if settings should be returned to the factory defaults.
3 ) Use the arrow buttons to highlight
4 ) Press ENTER to restore all sound settings to the original default values.
Yes
.
Note: The Auto Volume Control (AVC) setting cannot be restored to the factory default.
Page 47

Basic Operations For Television Viewing
3.5 Block Programs, Channels, or Content
Although blocking programs, channels, or content is optional, some images may be inappropriate for all family
members. Your flat panel TV supports a blocking function known as Parental Control. With Parental Control
activated, certain material fails to appear on screen if it is beyond your select viewing level. Parental Control uses
recognized rating systems but also allows blocks placed at your discretion. This section explains the different
blocking functions and how to assign each type.
Note: When watching a TV program, you may see an emergency alert message scrolling at the top of the screen.
The television station is broadcasting the emergency message as a test or an alert in a real emergency. The
flat panel TV ships with this function active. For information about emergency messages, refer to “3.5.3
Assign a Rating System to Create Blocks.”
3.5.1 Assign a Parental Control (Block) Password
With Parental Control, inappropriate TV programs, VCR recordings, and DVD content can be blocked. When
someone attempts to watch a blocked program or content, the flat panel TV displays the password window.
Parental Control applies to both analog and digital material.
To ensure that your blocks are not removed in error, the flat panel TV requires a password to change access to
blocked programs, channels, or content. The default password for your panel is 1234
changing the password to a four-digit code that is meaningful to you.
Follow the steps below to change the password.
1 ) Access the
System Setup
through the
Setup
.
. We strongly recommend
03
English
2 ) Select
3 ) Enter the current four-digit code using the 0 through 9 buttons.
Change Password
from the System Setup menu.
Please Input Your Passwor d.
A confirmation message appears on screen.
4 ) Enter your new password.
5 ) Enter your new password a second time when prompted.
6 ) Press HOME MENU to exit the menu.
Write your new password:
If you forget your password:
When “Enter your Password”
appears at Step 4, press and hold
the
ENTER
button for three or
more seconds.
The password reverts to the
default password, 1234.
47
En
Page 48

03
The lock symbol here marks
blocked TV ratings.
Basic Operations For Television Viewing
3.5.2 Activate Parental Control
The Parental Control function must be active for the panel to block content. If this option is turned Off, blocked
programs appear on screen. To activate Parental Control blocking, follow the steps below.
1 ) Access the
System Setup
through the
Setup
.
2 ) Select
Parental Control
.
The password entry screen appears.
3 ) Enter your four-digit code using the 0 through 9 buttons.
4 ) Select
5 ) Select
Status
.
Status : Off
MPAA Ratings
TV Parental Guidelines
Canadian English Ratings
Canadian French Ratings
Unavailable Ratings : View
Digital Regional Ratings
On
to activate Parental Control.
6 ) Press HOME MENU to exit the menu.
When a program is blocked, a (B) appears next to the channel number. If a channel is blocked but the Parental
Control system is turned off, the symbol is a (V) and the channel/program is viewable.
FV D
B
B
B
B
V
3.5.3 Assign a Rating System to Create Blocks
Besides choosing to block certain channels, you may use one of the recognized rating systems to block programs
and/or content. Your panel recognizes the following rating systems:
•TV ratings
• TV Parental Guidelines including unrated programming
• Motion Picture Association of America (MPAA for movies)
• Canadian English/French rating systems
Note: Your flat panel TV ships with all ratings unblocked.
To block TV or other content using a rating system, follow the steps below.
1 ) Access the
2 ) Select
Parental Control
3 ) Select one of the rating systems from the submenu.
48
En
System Setup
through the
Setup.
from the System Setup menu.
Page 49

Basic Operations For Television Viewing
MPAA Ratings menu TV Parental Guidelines menu
N/A : View
G : View
PG : View
PG-13 : View
R : View
NC-17 : View
NR : View
Canadian English Ratings menu Canadian French Ratings menu
TV-None
TV-Y
TV-Y7
TV-G
TV-PG
TV-14
TV-MA
FV D L S V
B
B
B
B
V
V
V
V
VVV
V
V
03
English
V
V
V
V
V
V
E : View
C : View
C8+ : View
G : Block
PG : Block
14+ : Block
18+ : Block
E : View
G : View
8 ans+ : View
13 ans+ : View
16 ans+ : View
18 ans+ : View
Unavailable Ratings menu Digital Regional Ratings menu
Status : Off
MPAA Ratings
TV Parental Guidelines
Canadian English Ratings
Canadian French Ratings
Unavailable Ratings : View
Digital Regional Ratings
Status : Off
MPAA Ratings
TV Parental Guidelines
Canadian English Ratings
Canadian French Ratings
Unavailable Ratings : View
Digital Regional Ratings
4 ) Use the arrow buttons to highlight a block level for that rating system.
5 ) Press ENTER to reverse the blocked status for the highlighted TV Parental Guideline option.
A block (B) or view (V) symbol appears in appropriate rating boxes. For other rating options, press
toggle between block and view.
/
to
6 ) Press HOME MENU to exit the menu.
When a rating is blocked, all more severe ratings are blocked as well. For example, blocking TV rating TV-PG
(Parental guidance suggested) automatically blocks TV-14 (Parents strongly cautioned) and TV-MA (Mature
audiences only). In turn, unblocking a rating causes less severe ratings to become automatically available.
Program Rating of “None”
The flat panel TV also provides a rating setting that blocks programs with a rating of
None
Guidelines Rating system identifies programs with a
None
are as follows:
rating level. Examples of programs with a rating of
None
. The US TV Parental
• Emergency Bulletins (such as EAS messages, weather warning and others)
• Locally originated programming
• Public Service Announcements
•News
• Politics
• Religion
•Sports
49
En
Page 50

03
Basic Operations For Television Viewing
To block a program with a rating of
1 ) Access the
2 ) Select
3 ) Select
4 ) Select
5 ) Select an option (
6 ) Press HOME MENU to exit the menu.
Refer to “8.1 Ratings Charts (for Various Audience Classifications)” for detailed information about the different
rating systems.
Block Not Rated Programs
With some TV programs, the rating information is unavailable. To block these programs, follow the steps below.
1 ) Access the
2 ) Select
3 ) Select
4 ) Select an option (
5 ) Press HOME MENU to exit the menu.
System Setup
Parental Control
TV Parental Guidelines
TV-None
from the submenu.
View
or
System Setup
Parental Control from
Unavailable Ratings
View
or
None
, follow the steps below.
through the
from the System Setup menu.
from the Parental Control menu.
Block
through the
the System Setup menu.
from the Parental Control menu.
Block
).
Setup
.
).
Setup
.
Note: Your flat panel TV ships with this option set to View.
New Ratings System for Digital Broadcasts
Some Digital broadcasts carry new ratings that are not compatible with the panel’s original Parental Control
settings. When first tuning to one of these broadcasts, the Digital Regional Ratings menu appears on screen.
Change the Parental Control settings to handle the new ratings. Otherwise, previous blocked ratings may become
unblocked.
Note: Adding the new rating does not cause programs with this rating system to be blocked automatically.
To add the new rating system to your panel, follow the directions below.
1 ) Access the
2 ) Select
3 ) Select
Parental Control
Digital Regional Ratings
System Setup
through the
from the System Setup menu.
from the submenu.
Setup
.
A list of available ratings appears.
4 ) Select from the available ratings.
5 ) Select a level from the available ratings.
6 ) Select
7 ) Press HOME MENU to exit the menu.
View
or
Block
.
50
En
Page 51

Basic Operations For Television Viewing
Delete a New Ratings System
If an added ratings system is no longer ne eded, delete the ratings system from your flat pane l TV. It is unnecessary
to remove blocks from individual channels or programs. Deleting the ratings line removes any/all blocks initiated
with that system.
1 ) Access the
System Setup
through the
Setup
.
03
English
2 ) Select
3 ) Select
4 ) Select
Parental Control
from the System Setup menu.
Digital Regional Ratings
RRT Reset
to delete the new ratings system from the flat panel TV.
from the submenu.
The message “Reset digital regional ratings?” appears.
5 ) Select OK.
6 ) Press HOME MENU to exit the menu.
While the Parental Control menu is open, the status display remains unchanged even if the system receives
broadcasts carrying new ratings.
3.5.4 Temporarily Remove a Block
The password entry screen appears when detecting the blocked rating signals (with the picture and sound turned
off). Entering your four-digit password allows you to view the program until your flat panel TV is placed into
Standby or turned Off. To temporarily remove a block, follow the steps below.
1 ) Tune the flat panel TV to the blocked channel.
2 ) Wait for the Block message to appear on screen.
3 ) Enter the four-digit password.
The password window appears. When a four-digit password is entered, or no operation is performed within
60 seconds, the window disappears. To recall the window after it disappears, change the channel or input
source then return before repeating the above steps.
Please Input Your Passwor d.
For INPUT 2 (except 480i signals) and INPUT 4 through INPUT 7, the password entry screen appears when
is selected from the Unavailable Ratings menu.
Block
51
En
Page 52

03
The TOOLS Menu provides short-cuts to the selectable menu options
while watching a program.
Basic Operations For Television Viewing
3.6 Smart Starts for New Owners
Many of the flat panel TV features make it easy to use but also environmentally friendlier. This section explains
how to extend the life of your panel while being energy efficient. We suggest applying all of the following functions
below for the simplest usage, best quality, and longest life span.
3.6.1 Use the TOOLS Menu
To change the current menu to another option, the on-screen TOOLS Menu provides short-cuts to the available
selections even while watching a program. To display the menu, press TOOLS on the remote control. The menus
shown in this section differ, depending upon the menu.
TELEVISION
TOOLS
All Play Mode : Single
Sound
Random
Repeat
A-B Repeat
Time Search
Use the arrow buttons to toggle between options. The setting is complete as soon as the selected option appears
in the center of the screeen. When showing two screens, the TOOLS Menu appears on the main screen.
3.6.2 Extend Your Panel Life
This function provides short-cuts to your panel’s longer service life. Your flat panel TV includes the Screen
Protection option. Activating this option causes the panel to automatically select the several different features
that can prolong the life of your panel and help alleviate after-image ghosts or burn-in. To set this option, follow
the steps below.
1 ) Access the
2 ) Select
Screen Protection
through the
Setup
.
from the Option menu.
Option
A confirmation screen appears.
3 ) Select
Yes
from the submenu.
The following settings are automatically entered:
•Auto Size: Wide-Zoom
•Side Mask - Detection: Mode 1
•Orbiter (AV source): Mode 1
•Orbiter (PC source): Mode 1
•Energy Save: Mode 1
•AV Selection: OPTIMUM (when DYNAMIC is selected for AV Selection)
52
En
4 ) Press HOME MENU to exit the menu.
Page 53

Basic Operations For Television Viewing
3.6.3 Turn On the Image Orbiter
A built-in feature to protect against burn-in is the Orbiter function. Orbiter automatically changes the position of
the picture imperceptibly while the image is on screen. To activate the Orbiter, follow the steps below. To cancel
this function, select Off in Step 3.
Option
1 ) Access the
through the
Setup
.
03
English
2 ) Select
3 ) Select
Orbiter from the Option menu.
Mode 1
or
Mode 2.
• AV source Mode 1: for any screen mode except Dot by Dot
• AV source Mode 2: for all available screen modes
• PC source Mode 1: to enable Orbiter
• PC source Mode 2: to smooth the text/character appearance
4 ) Press HOME MENU to exit the menu.
Note: The farthest edges of an image may be hidden at times as the picture position shifts. Also, when the Orbiter
function is set to Mode 1 or Mode 2, the image may appear to drop slightly on the screen.
3.6.4 Trigger the Screen-Saving Video Pattern Periodically
The Video Pattern function causes the screen to appear white, which helps to alleviate after-image ghosts or burnin. While the Video Pattern screen is on, only the remote’s TV ( a ) button and the panel’s STANDBY/ON button
are available. The panel automatically switches to Standby one hour after running the Video Pattern screen. To
cancel the Video Pattern screen, press the remote’s TV ( a ) or press the panel’s STANDBY/ON.
To activate the Video Pattern screen, follow the steps below.
Option
1 ) Access the
2 ) Select
Video Pattern
through the
from the Option menu.
Setup
.
A confirmation screen appears.
3 ) Select
Start
from the submenu.
The Video Pattern screen appears.
4 ) Leave the panel alone for a minimum of one hour.
Note: The Video Pattern timer has priority over Sleep Timer, No Signal off, and No Power off (Power Management )
settings.
3.6.5 Activate Energy Save to Reduce Power Usage
The Energy Save option decreases picture brightness and lowers power consumption. The recommended setting,
Energy Save Mode 1, extends the life of your panel while keeping power usage at a minimum.
Follow the steps below to activate an Energy Save option.
1 ) Access the
2 ) Select
3 ) Select an option from the Energy Save submenu.
4 ) Press HOME MENU to exit the menu.
Power Control
Energy Save
Off No effect
Mode 1 consumes less power than Off
Mode 2 consumes less power than Mode 1
from the menu.
Option Description
through the
Setup
.
53
En
Page 54

04
Additional Picture and Sound Adjustment Options
4 Additional Picture and Sound Adjustment
Options
To take advantage of all that your flat panel TV offers, browse this chapter for features and functions that enhance
your viewing experience. Most sections deal with adjusting the picture and arranging screen/menu items while
the remaining sections provide sound and power management options. Apply as many or as few of these changes
as desired.
4.1 Choose an AV Option (Video, Game, etc.)
Similar to the purpose for the room light sensor, the AV Option or Selection depends upon the brightness of the
environment and the program or movie on screen. Images can be from either an AV Source or from a PC. Both
sources are discussed below.
Choose from among the seven AV Selections for the best image from an external AV Source. Use either the
remote control or the Home Menu to select the AV source. For a PC, skip down to “4.1.3 Choose a PC Source.”
If the AV source is a Game Control, select GAME and refer to “4.1.4 Set the Panel to Recognize a Game Console”
for more information.
4.1.1 AV Source through the Remote Control
Follow the directions below to set an AV Selection for an external AV Source using the remote control.
1 ) Press AV SELECTION on the remote control.
The current AV selection appears.
2 ) Press AV SELECTION again before the displayed mode disappears.
Each press cycles the options in the order shown below.
AV Selection
OPTIMUM automatically adjusts the image quality for the
brightness level of the viewing area (shared by
external input and TV input sources)
PERFORMANCE for a highly defined image in a normally bright
room (shared by external input and TV input
sources)
DYNAMIC for a very sharp image with maximum contrast but
manual image quality adjustment unavailable
(shared by external input and TV input sources)
MOVIE for movies (shared by external input and TV input
sources)
SPORT for sports programs (shared by external input and
TV input sources)
Description
54
En
GAME lowers image brightness for easier viewing (shared
by external input and TV input sources)
Standard allows customizing settings as desired (set the
mode for each input source)
3 ) Allow the AV Selection screen to disappear.
When the screen disappears, the panel locks in last viewed option and the menu closes.
Page 55

Additional Picture and Sound Adjustment Options
When OPTIMUM is selected,
images are reproduced based on
the information collected at the
Room Light Sensor.
4.1.2 Choose an AV Source through the Home Menu
The other method for choosing an AV Selection uses the Home Menu. Follow the directions below to set an AV
Selection for an external AV Source.
The AV Selection, OPTIMUM, automatically adjusts to the highest image quality possible for the selected source
and viewing environment. Your flat panel TV employs advanced sound reproduction technologies, such as SRS
WOW HD
gradual so changes to the tint and brightness may be visible. This is normal and is not a malfunction.
DYNAMIC locks out manual adjustments for specific options. The DYNAMIC setting blocks Contrast, Brightness,
Color, Tint, Sharpness, and Reset. Unavailable options are dimmed on the menu.
To choose an AV source through the Home Menu, follow the steps below.
1 ) Access the
TM
, OPTIMUM also automatically adjusts to the optimum sound for the selected scene. This process is
Picture
through the
Setup.
04
English
2 ) Select
AV Selection
from the Picture menu.
3 ) Select an option from the submenu.
AV Selection
OPTIMUM
PERFORMANCE
DYNAMIC
MOVIE
SPORT
GAME
Standard
AV Selection : OPTIMUM
PureCinema
Sound Control : Off
OPTIMUM Performance
Reset
Picture
(Submenu when OPTIMUM is selected for AV Selection)
4 ) Press HOME MENU to close and exit the menu.
4.1.3 Choose a PC Source
From a PC, choose between the two AV Selections for the best image. The options are as follows:
• STANDARD: for a highly defined image in a normally bright room
• USER: allows customizing settings as desired for each input source
55
En
Page 56

04
Additional Picture and Sound Adjustment Options
4.1.4 Set the Panel to Recognize a Game Console
When adding a game console to your flat panel TV, use the Game function to establish a preference for image
quality or for operability.
To have the panel store your Game preference, follow the steps below.
Option
1 ) Access the
through the
Setup
.
2 ) Select
3 ) Select
4 ) Press HOME MENU to exit the menu.
To activate the Game Control Pref option, set the AV Selection to GAME and use an external input (unless the
source is coming from a PC). When a PC source menu is on screen, the
Also, the
in Multi-Screen”) or image freezing
Game Control Pref
On
(operability preferred) or
Game Control Pref
from the menu.
Off
(image quality preferred).
Game Control Pref
option for operability (on) is ignored during multi-screen viewing (refer to “4.4 View
(refer to “4.5 Freeze the Picture”).
option is ignored.
4.2 Adjust Specific Picture Elements
Plasma technology delivers one of the best images available today. However, the viewing area/environment and
personal preferences affect how the picture appears. This section provides methods to adjust the picture and sound
for your best viewing experience.
4.2.1 Choose a Screen Size (Automatically or Manually)
Automatic Screen Sizing
The flat panel TV can automatically select an appropriate screen size for the incoming video signal from a
connected HDMI device. To allow automatic screen sizing, follow the steps below.
Option
1 ) Access the
2 ) Select
3 ) Select
Auto Size
Natural
through the
from the Option menu.
or
Wide-Zoom
Setup
.
from the submenu.
Option Description
Off deactivates the Auto Size function
Natural adjusts the image to the screen size
Wide-Zoom enlarges and displays only the 4:3 aspect ratio
portion in full and wide screen
4 ) Press HOME MENU to exit the menu.
Note: When a video signal contains no aspect ratio information, the Automatic Screen Size function is
unavailable.
56
En
Page 57

Additional Picture and Sound Adjustment Options
Manual Screen Sizing
Manually select an appropriate screen size if an image fails to appear in the correct format. Browse the menu for
the correct screen size for a specific program.
The selectable screen sizes differ depending on the types of input signals. While watching a TV broadcast, press
SCREEN SIZE on the remote control to cycle the picture through Auto, FULL, Dot by Dot, ZOOM, CINEMA, 4:3,
WIDE, WIDE 1 and WIDE 2. Freely change the screen size during broadcasts or video from other input sources.
Auto is available when receiving HD broadcasts.
The following chart provides information about how the screen appears for each option.
AV Option Description
Auto adds side masks or displays the image in full
screen when detecting HD pictures containing side
masks. See Detect Masks on page 59.
FULL squeezes 16:9 images
04
English
Dot by Dot
ZOOM bars may appear on the top and bottom on some
CINEMA bars may appear on the top and bottom on some
4:3 side bars appear on each side
WIDE pictures progressively stretch toward each side
WIDE 1 pictures progressively stretch toward each side
WIDE 2 pictures evenly stretch toward each side (available
PC Option Description
4:3 fills without altering the input signal aspect ratio
FULL shows 16:9 screen display
With WIDE 1 or WIDE 2 selected, a High Definition (HD) TV broadcast may crop part of an image or menu. If an
image or menu appears cut or runs off the screen, change the option to FULL.
Avoid showing signals that fill only part of the screen. Images that fail to fill the screen may cause temporary or
permanent image retention depending on the frequency and duration. For example, an HD broadcast with side
masks (4:3 content) causes uneven wear of the plasma cells. If side masks appear around a broadcast, after that
program or movie is over, switch to a full screen motion video. This action helps the panel balance wear for the
plasma cells and guard against after-image issues. For more information about Masks, refer to “4.3.1 Adjust for
Screen Masking (black bars on sides).”
matches input signal to the same number of screen
pixels (available for 1080i or 1080p signals only)
programs that are 16:9 letterbox
programs that are 14:9 letterbox (available for SD
signals only)
(available for SD signals only)
(available for HD signals only)
for HD signals only)
Note: Not all broadcast programs carry alternative screen sizes.
57
En
Page 58

04
Additional Picture and Sound Adjustment Options
4.2.2 Correct the Picture for an AV or PC Source
Although picture adjustments are to your personal preferences, often the source causes unanticipated image
changes. Your flat panel TV offers several adjustment options.
AV Source
Option Left Arrow Right Arrow
Contrast less contrast more contrast
Brightness dimmer brighter
Color decreased intensity increased intensity
Tint purplish skin tones greenish skin tones
Sharpness softer definition crisper definition
PC Source
Option Left Arrow Right Arrow
Contrast less contrast more contrast
Brightness dimmer brighter
Red weaker color stronger color
Green weaker color stronger color
Blue weaker color stronger color
To correct the picture for an AV or a PC source, follow the steps below.
1 ) Access the
Picture
through the
Setup
.
2 ) Select an option to adjust.
AV Source PC Source
Picture
AV Selection : PERFORMANCE
Contrast : 40
Brightness : 0
Color : 0
Tint : 0
Sharpness : 0
PureCinema
Reset
AV Selection : STANDARD
Contrast : 40
Brightness : 0
Red : 0
Green : 0
Blue : 0
Reset
3 ) Select the desired level for that option using the left/right arrows (/).
Picture
58
En
Contrast
32
4 ) Repeat the process for any additional adjustments.
5 ) Press HOME MENU to exit the menu after all adjustments are complete.
Note: Reset returns all settings to the factory defaults.
Page 59

Additional Picture and Sound Adjustment Options
4.3 Assign Advanced Picture Functions
Your flat panel TV provides various advanced functions for optimizing the picture quality that go beyond the basic
adjustments explained earlier in this manual. This section explores the value offered through Pioneer’s
PureCinema High Definition (HD) support, top quality blacks, better balanced whites, and overall color
improvements.
4.3.1 Adjust for Screen Masking (black bars on sides)
Screen Masks fill areas on both sides of a picture. Some content fails to fill the screen so bars appear on each
side of the picture. This section explains how to adjust screen masking.
Detect Masks
Some HD broadcasts transmit in 4:3 content with side masks. Side masks are black bars that appear on the
picture’s left and right sides. If the flat panel TV’s Screen Size is set to Natural during the Auto Size process, gray
bars replace the black bars. When the panel is set to Wide-Zoom, the bars are hidden. These responses reduce
after-image concerns.
To allow the panel to detect side masks, follow the steps below.
Option
1 ) Access the
through the
Setup
.
04
English
2 ) Select
3 ) Select
4 ) Select
Side Mask
Detection
Mode 1
or
from the Option menu.
from the submenu.
Mode 2
to activate Side Mask Detection.
Mode 1 detects only black side masks and Mode 2 detects both black and illustrated side masks. Select Off
to deactivate this function.
5 ) Press HOME MENU to exit the menu.
6 ) Confirm that the word “AUTO” appears in the InfoBanner.
Video signals can affect the Side Mask Detection function differently. For High Definition broadcasts, if Side Mask
Detection is on, the panel automatically detects images containing side masks and shows the picture in full
screen. Cycle the screen size to select Auto for video signals without aspect ratio information.
Video content also can affect the Side Mask Detection function. If a detection error occurs when trying to watch
HD content, manually change the screen size to the proper setting for the content.
HD Wide Mode
The HD Wide Mode allows selecting the display mode (WIDE 1 or WIDE 2) when detecting side masks that appear
in a 4:3 image. This option is available when the Auto Size menu is set to Wide-Zoom and Side Mask Detection to
Mode 1 or Mode 2. To allow the HD Wide Mode, follow the steps below.
Option
1 ) Access the
2 ) Select
3 ) Select
Side Mask
HD Wide Mode
through the
from the Option menu.
from the submenu.
Setup
.
4 ) Select
Mode 1
or
Mode 2
to activate HD Wide Mode.
• Mode 1: screen mode sets to WIDE 1 when detecting side masks.
• Mode 2: screen mode sets to WIDE 2 when detecting side masks.
5 ) Press HOME MENU to exit the menu.
59
En
Page 60

04
Additional Picture and Sound Adjustment Options
Lighten Side Masks
If content appears with bars (side masks) on each side of a picture when the screen size is 4:3 and Side Mask
Detection is set to Mode 1 or Mode 2, the bars automatically change from black to gray. However, the gray is fairly
dark. To change the bars to a lighter shade of gray, follow the steps below.
Option
1 ) Access the
through the
Setup
.
2 ) Select
3 ) Select
4 ) Select the desired parameter.
5 ) Press HOME MENU to exit the menu.
Side Mask
Brightness Sync.
Fixed sets the same brightness for gray side masks
Auto adjusts the side mask brightness according to the
from the Option menu.
from the submenu.
Parameter Description
brightness of screen images
4.3.2 Select a PureCinema Level for High Quality Image
Pioneer’s PureCinema automatically detects and analyses a film-based source (originally encoded at 24 frames/
second) then recreates each still film frame for HD picture quality. The function supports both film and text
material.
To set the PureCinema level for your HD material, follow the steps below.
1 ) Access the
2 ) Select
3 ) Select
PureCinema
Film Mode
Picture
through the
from the submenu.
or
Text Optimization
Setup
.
depending on the material.
4 ) Select the desired parameter.
Mode Parameter Description
Film Mode Off deactivates PureCinema
Standard (not available for
input signals 480p, 720p @60
Hz, or 1080p @60 Hz)
Smooth (not available for input
signals 1080p @60 Hz)
Advance (not available for input
signals 1080p @60 Hz)
Text Off deactivates text optimization
Optimization On improves subtitle display
automatically detects recorded
image data when displaying
DVD or high-definition images
(e.g., movies) having 24 frames
per second for smooth and vivid
playback
produces smoother and more
vivid moving images
converts theatre-quality images
to 72 Hz when displaying DVD
images (e.g., movies) having 24
frames per second for smooth
and vivid playback
quality
60
En
5 ) Press HOME MENU to exit the menu.
Note: Activating the Game Control Pref setting under the Option menu disables the PureCinema setting.
Page 61

Additional Picture and Sound Adjustment Options
2-Screen
Picture-in-Picture (P-in-P)
4.4 View in Multi-Screen
The flat panel TV can show multiple screens at the same time; two-screen or picture-in-picture. The pictures may
be reversed (in 2-screen and P-in-P) or moved to various locations on the screen (P-in-P).
4.4.1 Split/Swap/Shift the Screen
To split the screen so that two channels appear, press the SPLIT button on the remote control. Each press of the
button cycles the screen through two-screen, picture-in-picture, and single-screen views.
To switch the images between screen sides/locations, press the SWAP button.
04
English
To move the Picture-In-Picture (P-in-P) small image counter-clockwise, press the SHIFT button.
61
En
Page 62

04
Press
SPLIT
to cycle through the
different multi-screen views.
Press
SWAP
to switch the position
of the two screens.
Press
SHIFT
to move the position of
the small screen counter-clockwise.
Warning: Displaying pictures in multi-screen mode
for an extended period may cause an after-image.
Additional Picture and Sound Adjustment Options
.
The multi-screen function is unavailable when viewing source from a single input or from two
sources.
To return to a single picture, press EXIT.
Another option is to select a multi-screen mode from the TOOLS Menu. To select a multi-screen mode, follow the
steps below.
1 ) Press TOOLS.
external
The TOOLS Menu screen appears.
2 ) Select
3 ) Select a mode.
Split, Swap
or
Shift
from the menu.
Use the arrow buttons to highlight an option (then press
ENTER
if you select Swap).
Select Off, 2-screen or P-in-P for the Split mode. The selected mode is displayed in the center of the TOOLS
Menu.
4.5 Freeze the Picture
During fast-action sequences or detailed pictures, try capturing the image with the FREEZE option. FREEZE
allows you to better understand the action or picture details if desired. To freeze a picture from a TV broadcast or
movie, follow the steps below.
1 ) Press FREEZE to create a still image picture (copy)
of the currently showing image.
The copy appears to the right of the still-moving
video sequence thus splitting the screen.
input
2 ) Press FREEZE again to release the image.
The frozen image disappears, returning the picture
to a single screen with the video sequence still in
progress.
• With the screen split, an image cannot be frozen.
A warning message appears if you attempt to use this function when there is already a frozen image on
screen. If an image is left frozen on the screen, the panel automatically releases the image after five minutes.
Note: Using FREEZE for an extended period may cause an after-image.
62
En
Page 63

Additional Picture and Sound Adjustment Options
4.6 Use the Banner Feature
04
When tuning in a TV channel or an input signal
changes, any available information appears on
the screen if the signal carries information
about the program (See InfoBanner below).
Pressing DISPLAY causes the InfoBanner
(additional) to appear. Press EXIT or DISPLAY
again to hide the banner.
InfoBanner
D
00001.000 ABCDEFGH
132456
XXXXXXXXXXXXXXXXXXXXXXXXXXXXXX
English
STEREO 9:30AM
InfoBanner (additional)
D00001.000 ABCDE
1 -Broadcast signal (Digital/Analog)
2 -Channel number
3 -Station name
4 -Program title
5 -Sound multiplex information
6 -Current time
XXXXXXXXXXXXXXXXXXXXXXXXXXXXX
7:07PM-8:08PM
7 8 9 11 1210
7 -Program time schedule
8 -Parental Control information
9 -Parental icon
10 -Parental name
11 -Signal information (HD/SD)
12 -Favorite icon
STEREO
PRT_10
TV
PG
9:30AM
HDV
A separate banner also appears at the bottom of the screen showing the AV Selection mode (bottom left) and
screen size (bottom right).
The above information is only appears if it is included in the broadcast signal. During multi-screen mode, the
banner appears in both main and sub screens.
63
En
Page 64

04
Additional Picture and Sound Adjustment Options
4.7 Select Alternatives for/to Sound
There are four sound alternatives for your flat panel TV; CC, MTS, SAP, and Sound Effect. This section defines each
of these alternatives then explains how/when to use.
4.7.1 Activate Closed Captioning (CC)
Your flat panel TV is equipped with an internal closed caption (CC) decoder. CC allows conversations, narration,
and sound effects in TV programs and home videos to appear as subtitles on the screen. For digital channels,
some parameters can be changed such as the text font and color. However, not all programs/videos offer closed
caption. Please look for the “ “ symbol to confirm that the channel or program provides closed captioning.
To activate closed captioning when available, follow the steps below.
1 ) Access the
System Setup
through the
Setup.
2 ) Select
3 ) Select
4 ) Select an option.
5 ) Press HOME MENU to exit the menu.
Types of Closed Caption
Broadcast TV offers different types of closed captioning. Your flat panel TV provides support for the recognized
types on Analog programming as well as Digital signals that carry analog closed captions.
• CC 1, CC 2, CC 3, or CC 4: provides subtitles with a full view of the picture
• Text 1, Text 2, Text 3, or Text 4: superimposes other information (e.g. weather) that is independent of the TV
To change the closed caption type from the default CC 1, follow the steps below.
1 ) Access the
Closed Captions
Status
from the submenu.
Parameter Description
Off does not show closed captioning (default)
On shows closed captioning when available
On If Mute shows closed captions only while sound is muted
program in progress
System Setup
from the System Setup menu.
through the
Setup
.
64
En
2 ) Select
3 ) Select
4 ) Select the desired closed caption.
5 ) Press HOME MENU to exit the menu.
Closed Captions
Analog Settings
from the System Setup menu.
from the submenu.
Status : Off
Analog Settings : CC 1
Digital Settings
Page 65

Additional Picture and Sound Adjustment Options
Closed Caption for Digital Programs
There are six different closed caption options for digital programming, called Service levels. The Primary Caption
Service is on Service 1 and the Secondary Language Service is on Service 2. More information about these
offerings is found later in this chapter.
To change the digital closed caption from the default Service 1, follow the steps below.
1 ) Access the
System Setup
through the
Setup
.
04
English
2 ) Select
3 ) Select
4 ) Select
Closed Captions
Digital Settings
Digital Service
.
from the System Setup menu.
from the submenu.
5 ) Select the desired closed caption service level (/).
Digital Settings
Digital Service : Service 1
Font Size : Auto
Font : Auto
Font Color : Auto
Font Opacity : Auto
Background Color : Auto
Background Opacity : Auto
6 ) Press HOME MENU to exit the menu.
To change the appearance of closed captioning on a digital program, follow the steps below.
1 ) Access the
2 ) Select
System Setup
Closed Captions
through the
Setup
.
from the System Setup menu.
3 ) Select
Digital Settings
from the submenu.
4 ) Select an option to change.
5 ) Select the desired parameter for that option.
The default parameter for each option is Auto.
Option Description
Font Size Auto, Large, Standard, Small
1
Font
Auto, Font 1, Font 2, Font 3, Font 4, Font 5, Font 6,
Font 7
Font Color Auto, Black, White, Red, Green, Blue, Yellow,
Magenta, Cyan
Font Opacity Auto, Solid, Transparent, Translucent, Flashing
Background Color Auto, Black, White, Red, Green, Blue, Yellow,
Magenta, Cyan
Background Opacity Auto, Solid, Transparent, Translucent
1
Font 1 (monospaced with serifs)/ Font 2 (proportionally spaced with serifs)/ Font 3
(monospaced without serifs)/ Font 4 (proportionally spaced without serifs)/ Font 5 (casual
font)/ Font 6 (cursive font)/ Font 7 (small capitals font)
6 ) Press HOME MENU to exit the menu.
65
En
Page 66

04
STEREO SAP MONO
STEREO mode SAP mode MONO mode
STEREO SAP MONO
STEREO 9:30AM STEREO (SAP) 9:30AM MONO (SAP) 9:30AM MONO 9:30AM
STEREO 9:30AM SAP (STEREO) 9:30AM SAP (MAIN) 9:30AM MAIN 9:30AM
MONO 9:30AM MONO (SAP) 9:30AM MONO (SAP) 9:30AM MONO 9:30AM
In STEREO mode In STEREO mode In STEREO mode In STEREO mode
In SAP mode In SAP mode In SAP mode In SAP mode
In MONO mode In MONO mode In MONO mode In MONO mode
STEREO mode SAP mode MONO mode
STEREO signals STEREO + SAP MONO + SAP MONO signals
Additional Picture and Sound Adjustment Options
4.7.2 Switch Languages Using MTS
Multi-channel Television Sound (MTS) allows switching the audible
language if it is available for that program. Available languages differ
depending on the current broadcast.
When watching a digital TV program that provides multi language
services, follow the steps below.
1 ) Press TOOLS on the remote control.
MTS
2 ) Select
from the TOOLS Menu.
3 ) Select
English, Français
or
Español.
A digital TV program without sound or language information causes “N/A” to appear on the screen. For languages
other than English, French, or Spanish, the word “Others” appears instead. If the selected language is available
when the channel or program is changed, that language is heard.
4.7.3 Select SAP
When watching TV programs on the VHF/UHF frequencies or from analog cable TV channels, the TOOLS button
can activate Stereo Sound and/or Secondary Audio Programs (SAP) if available.
To select Stereo/SAP options, follow the steps below.
1 ) Press TOOLS.
MTS
2 ) Select
3 ) Select
from the TOOLS Menu.
STEREO, SAP
or
MONO
.
The chart below breaks down the Stereo/SAP options.
66
En
Page 67

Additional Picture and Sound Adjustment Options
When stereo sound is difficult to hear, manually switch to MONO for clearer sound. The panel’s sound remains
in mono even if the system receives a stereo broadcast. Reselect STEREO to hear broadcasts in stereo where
available.
Selecting MTS while the input source is INPUT 1 to INPUT 7 or a PC does not change the type of sound. In this
case, the video source determines the sound.
4.7.4 Apply Sound Effect Settings
Your flat panel TV offers four sound effects: SRS FOCUS, SRS, SRS TruBass and SRS Definition.
TM
•SRS FOCUS
®
•SRS
effortlessly produces a three-dimensional sound field
•SRS TruBass
•SRS Definition
To activate one or more of the sound effects, follow the directions below.
1 ) Access the
moves sound source direction vertically and makes sound and voice clearly audible
®
produces a clear, rich bass tone
®
improves midrange quality and clarifies voice and instrument sound
Sound
through the
Setup
.
04
English
2 ) Select
Sound Effect
from the Sound menu.
3 ) Select a sound effect option.
(SRS FOCUS, SRS, SRS TruBass, SRS Definition)
4 ) Select
Low
(moderate),
Mid
(standard),
High
(enhanced) or
Off
for that option.
5 ) Press HOME MENU to exit the menu.
Note: How a Sound Effect changes the Audio depends on the signal.
TM
(SRS WOW HD
) indicates that SRS FOCUS, SRS, SRS TruBass and SRS Definition are on.
4.7.5 Use Auto Volume Control (AVC)
Auto Volume Control, or AVC, reduces sudden volume change and compensates source sound level.
To select this option, follow the procedure below.
1 ) Access the
2 ) Select
3 ) Select
AVC
On
through the
from the Sound menu.
(or
Off
).
Setup
.
Sound
4 ) Press HOME MENU to exit the menu.
4.8 Manage the Power
Your flat panel TV is energy efficient but includes functions to save additional power. In an earlier section entitled
“3.6 Smart Starts for New Owners”, you were told how to activate the Energy Save feature. This section provides
more advanced functions to save power and to extend the panel life.
AV/PC Source - Picture Off
To save energy and extend the life of your flat panel TV, have the screen turn Off. To deactivate the screen, follow
the steps below.
1 ) Press TOOLS on the remote control.
2 ) Select
Picture Off
from the TOOLS Menu.
3 ) Press ENTER.
The screen display turns Off.
To restore the screen display, press any buttons other than
Note: The Picture Off setting is not memorized by the system.
VOL +/–
and
MUTING
.
67
En
Page 68

04
Additional Picture and Sound Adjustment Options
AV Source - No Signal
To save energy and extend the life of your flat panel TV, the panel can enter Standby automatically if the AV source
signal fails for 15 consecutive minutes. At five minutes before and at every minute after that, a warning message
appears on the screen. When the final minute elapses, the panel switches to Standby.
To have the panel switch to Standby when an AV source signal fails, follow the steps below.
1 ) Access the
Power Control
through the
Setup
.
2 ) Select
3 ) Select
4 ) Press HOME MENU to exit the menu.
No Signal off
Enable
from the Power Control menu.
to activate the AV Signal off power function.
Note: The flat panel TV may switch to Standby when there is noise (signal interference) at the end of a broadcast
schedule (channel goes off-air).
AV Source - Non-Operational
To save energy and extend the life of your flat panel TV, the panel can enter Standby automatically if there are no
commands from the AV source for three consecutive hours. At five minutes before and at every minute after that,
a warning message appears on the screen. When the final minute elapses, the panel switches to Standby.
For the panel to enter Standby automatically when there are no commands from the AV source, follow the steps
below.
1 ) Access the
2 ) Select
3 ) Select
4 ) Press HOME MENU to exit the menu.
PC Source -Power Management
When receiving signals from a PC, the panel can enter Standby automatically if the signal fails. Follow the steps
below to activate this function.
1 ) Access the
Power Control
No Operation off
Enable
from the No Operation off menu.
Power Control
through the
from the Power Control menu.
through the
Setup
Setup
.
.
68
En
2 ) Select
3 ) Select an option from the submenu.
Note: Pressing the remote’s
4 ) Press HOME MENU to exit the menu.
These power management options are unavailable when a PC is connected to the panel through the HDMI port/
terminal.
Power Management
Option Description
Off no power management (default)
On panel enters Standby when no signal is received
from the Power Control menu.
from the PC for
no effect on the panel
TV a
or the panel’s
STANDBY/ON
eight minutes
reactivates the flat panel TV.
; using the PC has
Page 69

Use Other Equipment With Your Flat Panel TV
5 Use Other Equipment With Your Flat Panel
TV
Although earlier sections have mentioned other equipment for playing back video, this section provides control
and operation information for specific types of equipment.
5.1 Program the Remote Control to Operate Other Equipment
To operate other equipment or devices through your flat panel TV, program the panel’s remote control with the
equipment’s manufacturing code. A manufacturing code is a series of numbers that identify the type of device
and the brand. These codes are available in the section entitled “8.2 Manufacturer Codes to Program into the
Remote Control” in Appendix 8.2 of this manual.
5.1.1 Assign a Manufacturing Code to the Remote Control
To assign a preset Manufacturing code to the panel’s remote control,
follow the directions below. (For Manufacturing codes, refer to “8.2
Manufacturer Codes to Program into the Remote Control”)
1 ) Press SELECT to choose the device to program.
05
English
2 ) Press EDIT and 1 at the same time.
The selected mode indicator flashes when the remote control is
ready to be programmed.
3 ) Use the number buttons to enter a manufacturer code.
When the indicator turns off, the code has been programmed into
the remote control.
5.1.2 Issue a Library Search for a Manufacturer Code
If the code for a particular device is unknown, cycle through the available
codes for a similar unit then sample some functions for that code.
To find the code that properly operates the unit, follow the steps below
using different codes to find the best match.
1 ) Press SELECT to choose the device to program.
2 ) Press EDIT and 3 at the same time.
The selected mode indicator flashes when the remote control is
ready to search the code library.
3 ) Sample the code using a SOURCE POWER, PLAY, 1 or CH+
command.
4 ) Use the up/down arrow (/) buttons to advance to the next code
if the code fails to control the device.
Another option is to return to the previous code and repeat Step 3.
5 ) Press ENTER to lock in the code that properly operates the device.
All the available buttons for the selected mode are added when the
mode indicator flashes on for one second. The remote control then
returns to normal operation.
69
En
Page 70

05
Use Other Equipment With Your Flat Panel TV
5.1.3 Clear Added Manufacturer Codes from the Remote Control
To return all learned and preset codes to the defaults (PIONEER), follow the steps below.
1 ) Press EDIT and TV at the same time.
Selection can be in any mode.
2 ) Press the Yellow button.
Confirm that the selected mode indicator flashes.
The remote control enters the Manufacturing Reset mode. The reset is
complete when the mode indicator flashes on for one second. The
remote control then returns to normal operation.
Note: The panel’s remote control may not control or have complete control
of some equipment listed in the tables.
To exit before the reset is complete, press the EDIT button again. The reset is cancelled if no action is taken within
60 seconds. Also, switching the Mode during this procedure cancels the reset.
5.1.4 Control a Pioneer Receiver
The flat panel TV’s remote control has a bank of buttons specifically for controlling a Pioneer receiver. The active
buttons, left to right, are as follows:
• RECEIVER STANDBY/ON
(turns the Pioneer Receiver On/Off)
• RECEIVER INPUT
(cycles through/selects an input)
• RECEIVER VOL –
(adjusts the volume lower)
• RECEIVER VOL +
(adjusts the volume higher)
70
En
Page 71

Use Other Equipment With Your Flat Panel TV
5.1.5 Control a Cable (CBL) or Satellite (SAT) System
When Mode is set to CBL/SAT, a cable converter uses the buttons 1, 6, 7, 8, and 9 while satellite tuners use the
buttons 1 to 8. However, the panel only recognizes a single system (cable or satellite) at a time.
1
• Number buttons
(press to enter a channel number)
2
• SAT GUIDE
(displays the satellite broadcasting guide screen)
3
• ENTER
(Enter activates the selected function)
(arrows to select from SAT GUIDE or MENU
screens)
4
• SAT MENU
(displays the satellite broadcasting menu screen)
5
• SOURCE
(turns the equipment power on and off)
6
• CH ENTER*
(enters the selected channel with the direct
channel selection buttons)
7
• CH RETURN*
(press buttons that correspond to a channel)
8
• CH +/–
(selects a higher or lower channel)
9
• RETURN
(restores the immediately previous screen)
1
05
English
6
7
8
* Some cable converter manufacturers do not preset
CH ENTER and CH RETURN.
2
3
4
9
5
71
En
Page 72

05
Use Other Equipment With Your Flat Panel TV
5.1.6 Control a Video Cassette Recorder (VCR)
When Mode is set to VCR, verify that the proper Input is selected (INPUT 1 to INPUT 7) then use 1 to 8 to control
the device.
1
• REWind
(rewinds the VCR tape and allows searches)
2
• PAUSE/STILL
(pauses playback and displays still images)
3
• SOURCE
(turns the VCR’s power on and off)
4
• CH +/–
(selects a higher or lower channel)
5
• PLAY
(selects playback)
6
• FF
(advances the VCR tape and allows searches)
7
• STOP
(halts VCR tape transport)
8
• RECord
(begins recording)
1
2
3
4
5
6
7
8
72
En
Page 73

Use Other Equipment With Your Flat Panel TV
5.1.7 Control a DVD Player/DVR Recorder/BD Player
When Mode is set to DVD/DVR, the remote control can operate DVD players, DVD recorders or BD players
connected to the flat panel TV. Verify that the proper Input is selected for the device then use 1 to 14 to control it.
Note: Equipment from other manufacturers (DVD players, DVD recorders, BD players, and HD-DVD players) can
also be operated using the remote control if the remote is preset for the device(s).
1
• DVD TOP MENU
(displays the top menu on the DVD)
2
• ENTER
(Enter activates the selected function)
(arrows to select from SAT GUIDE or MENU
screens)
3
• DVD MENU
(displays the DVD menu)
4
• Red/Green/Blue/Yellow (BD only)
(Controls a BD-J application)
5
• REVERSE SCAN/CHAPTER SEARCH
(press once quickly to go to beginning of current
chapter; press again to go back to the beginning of
the previous chapter; continue pressing to go
backward)
6
• PAUSE/STILL
(Pauses playback and displays still image)
7
• SOURCE
(turns the equipment power on or off)
8
• CH +/– (DVD Recorder only)
(selects a higher or lower channel)
9
• TOOLS
(assigns the code for a Pioneer BD player)
10
• RETURN
(restores the immediately previous screen)
11
• PLAY
(selects playback)
12
• FORWARD SCAN/CHAPTER SEARCH
(press once quickly to go to beginning of next
chapter; press again to advance to beginning of
next chapter; continue pressing for fast forward)
13
• STOP
(halts DVD playback, some DVD players/recorders
open the disc tray if this button is pressed twice)
14
• RECord (DVD Recorder only)
(begins recording)
1
2
3
4
5
6
7
8
9
10
11
12
13
14
05
English
13 14
& STOP RECord (DVD Recorder only)
(press and hold then press to stop recording applies to Pioneer DVD recorders only)
73
En
Page 74

05
Use Other Equipment With Your Flat Panel TV
5.2 Use HDMI Inputs
High Definition Multimedia Interface (HDMI) is a communication method commonly used by digital and/or
high definition equipment. Your flat panel TV’s INPUT 4, INPUT 5, INPUT 6, INPUT 7 are HDMI terminals for
incoming digital video and audio signals. The flat panel TV supports HDMI Control functions so that when a piece
of equipment is connected to the panel, it can control the equipment. To use an HDMI terminal, specify the types
of video and audio signals being sent from the connected equipment. For the signal types, see the operating
manual(s) that came with the equipment.
One of the benefits of using your flat panel TV to control other equipment is the support of Deep Color. Deep Color
is the color depth that describes the number of bits used to represent the color of a single pixel in a bitmapped
image. Besides the conventional RGB/YCbCr16bit/20bit/24bit signals, the flat panel TV also supports RGB/
YCbCr30bit/36bit signals. This enables finer color reproduction when a device that supports Deep Color signals
(HDMI1.3 Deep Color) is connected to the panel. The color depth appears on the InfoBanner if a program
supports Deep Color.
The flat panel TV supports the following Video signals:
Supported Video Signals Supported PC Signals
• 1920 x 1080p@60 Hz
• 1920 x 1080p@24 Hz
• 1920 x 1080i@59.94 Hz/60 Hz
• 1280 x 720p@59.94 Hz/60 Hz
• 720 x 480p@59.94 Hz/60 Hz
• 720 (1440) x 480i@59.94 Hz/60 Hz
• 1280 x 1024 (SXGA) 60 Hz
• 1360 x 768 (Wide - XGA) 60 Hz
• 1024 x 768 (XGA) 60 Hz
• 800 x 600 (SVGA) 60 Hz
• 640 x 480 (VGA) 60 Hz
Note: It may take a short period for the image to appear on the other equipment, depending on the type of device.
The flat panel TV supports the following Audio signals:
• Linear PCM (STEREO 2ch)
• Sampling frequency: 32 kHz, 44.1 kHz, 48 kHz
When connecting a PC to one of the panel’s HDMI inputs, use an HDMI-compliant PC or video card. Using DVI
output from the PC to the flat panel TV may cause the sound or picture to fail or seem distorted. If a DVI output is
your only option then contact the PC manufacturer for assistance.
5.2.1 Specify the HDMI Input Type
To select a signal type, follow the steps below.
1 ) Select the Input for the connected equipment.
Press the
INPUT
button (remote control or panel) until the correct input is showing (INPUT 4, INPUT 5,
INPUT 6, or INPUT 7).
74
En
Note: For INPUT 4 and INPUT 5, add Audio cables to support analog signals.
2 ) Access the
3 ) Select
4 ) Select
5 ) Select the appropriate option.
6 ) Press HOME MENU to exit the menu.
Option
through the
HDMI Input
Signal Type
Video use except when a PC is connected (default)
PC when a PC is connected to HDMI input terminal
from the Option menu.
from the submenu.
Option Description
Setup
.
Page 75

Use Other Equipment With Your Flat Panel TV
Video (over-scan)
PC (under-scan)
In Video mode, the image is over-scanned (enlarged) but the panel automatically switches to PC when receiving
computer signals. In PC mode, the image displays in full size for optimum image quality.
5.2.2 Specify a Digital HDMI Signal Type
For the necessary digital video signal type, check the operating manual that came with the other equipment.
To assign the type of digital signal, follow the steps below.
Option
1 ) Access the
through the
Setup
.
05
English
2 ) Select
3 ) Select
4 ) Select the type of digital video signal recommended for the attached device.
5 ) Press HOME MENU to exit the menu.
If an image fails to appear, specify another digital video signal type. Type parameters other than Auto need to be
checked for natural colorings.
HDMI Input
Video
Auto automatically identifies input digital signals
Color-1 Digital Component Video signals (4:2:2) locked
Color-2 Digital Component Video signals (4:4:4) locked
Color-3 Digital RGB signals (16 to 235) locked
Color-4 Digital RGB signals (0 to 255) locked
from the Option menu.
from the submenu.
Type Description
(default)
5.2.3 Specify an Audio HDMI Signal Type
For the necessary audio signal type, check the operating manual that came with the other equipment. When
using INPUT 4 or INPUT 5 for HDMI, select the terminal for the desired input source.
To specify the audio type, follow the steps below.
Option
1 ) Access the
through the
Setup
.
2 ) Select
3 ) Select
4 ) Select the type of audio signal recommended for the attached device.
5 ) Press HOME MENU to exit the menu.
HDMI Input
Audio
from the submenu.
Auto
Digital accepts digital audio signals
Analog accepts analog audio signals
from the Option menu.
Type Description
automatically identifies input audio signals (default)
75
En
Page 76

05
Use Other Equipment With Your Flat Panel TV
If there is no sound, specify another audio signal type. Depending on the type of equipment, sound output may
require analog audio cables in addition to the HDMI connection(s).
Note: When signals come through the HDMI terminals, no signals are output from the DIGITAL OUT terminal if
they are copy guarded.
5.3 Control Equipment with the Panel’s Remote Through HDMI
Your flat panel TV’s remote can control other equipment such as a recorder, player, or AV system through the HDMI
Control functions. The HDMI Control functions include playback of content using an on-screen control panel.
However, not all device operations may be available through HDMI control. For details, see the charts below.
Control Function
Playback of
content
On-screen control Recorder
Display Language
Setup
AV system control AV system Receiver/amplifier operation can also
Power ON Recorder
Power OFF Recorder
Controlled
Equipment
Recorder
Player
Player
Recorder
Player
Player
Player
AV system
Function Description
Pressing PLAY on a connected device
automatically selects the source and
begins playback.
Recorder/player operation can be
controlled on-screen or with the
panel’s remote (play, stop, fast
forward/reverse, etc.).
Information on the display menu
language transfers to the recorder or
player connected to the flat panel TV.
For details, see the operation manual
that came with the recorder or player.
be controlled with the panel’s remote,
(volume, surround mode and input
selection of the HDMI terminal).
The flat panel TV can be turned On
when a connected recorder(s) or
player(s) is turned On and images are
input to the flat panel TV.
The connected device(s) can be
turned Off when the flat panel TV is
turned Off.
76
En
Notes: The KURO LINK function name used on the web and in catalogs is referred to as HDMI Control in the
operating instructions and on the product.
Except for Power Off and Display Language Setup functions, only a single HDMI terminal may be active at
a time.
Page 77

Use Other Equipment With Your Flat Panel TV
The flat panel TV’s remote can control a maximum of two (2) recorders, two (2) playback devices, and one (1) AV
system at a time.
To select and use the various HDMI Control functions for a connected Pioneer AV system, recorder, or player, use
the panel’s HDMI Control menu.
To access the menu, follow the steps below.
1 ) Press HOME MENU.
05
English
2 ) Select
HDMI Control
from the main menu.
Use the arrow buttons to highlight an option then press
Disc Navigator
CTRL Panel(AV-SYS)
Playback CTRL Panel
Switch to AV Sound
Note: Pressing
Disc Navigator displays a title list of connected recorder or player
CTRL Panel (AV-SYS) displays the control panel for connected AV system
Playback CTRL Panel displays the control panel for connected recorder
Switch to AV Sound/
(Switch to TV Sound)
HDMI CTRL
Option Description
on the remote also causes the HDMI Control menu to open.
or player
switches between the flat panel TV screen and the
connected AV system for sound output
ENTER
.
Use the following buttons to control functions such as the disc
navigator on a recorder or player.
1
1
• VOL +/–
2
5
6
3
7
4
(adjusts the volume for an AV system)
2
• MUTING
(turns off the sound while the video continues to play)
3
• Arrow buttons
(navigates the menu screen)
4
• Color buttons (Red, Green, Blue, Yellow)
(controls a BD player)
5
• TOOLS
(assigns the code for a Pioneer BD player)
6
• ENTER
(activates the selected function)
7
• RETURN
(returns to the previous menu screen)
77
En
Page 78

05
Use Other Equipment With Your Flat Panel TV
To connect a device for HDMI Control, follow the steps below.
1 ) Turn on the flat panel TV and all other equipment.
2 ) Confirm that the panel’s Input Setting for HDMI Control Setting options comply with directions in the
operating instructions for the other device(s).
3 ) Confirm that the other equipment is set for HDMI Control.
4 ) Check that the audio and video are playing back properly from the equipment connected to the HDMI
terminal(s).
5 ) Turn Off the flat panel TV.
6 ) Pause for a few seconds before turning the power back on.
7 ) Verify that all equipment is functioning properly.
To select the device to control via HDMI Control, follow the steps below.
Option
1 ) Access the
through the
Setup
.
2 ) Select
3 ) Select
HDMI Control Setting
Input Setting
from the submenu.
from the Option menu.
Input Setting : INPUT 4
Power Off Control : On
Power-On Ready : On
Hold Sound Status : Off
Power On Test
Power Off Test
4 ) Select the desired Input (INPUT 4, INPUT 5, INPUT 6, or INPUT 7).
5 ) Press HOME MENU to exit the menu.
If operating an HDMI supported device using an HDMI port other than the terminal selected in Input Setting, the
system malfunctions. When connecting to an HDMI terminal other than that selected in Input Setting, the
equipment settings should block HDMI Control functions. The HDMI Control menu is not selectable when the
option Input Setting under the HDMI Control Setting menu is set to Off.
The control menu changes to suit the type of HDMI-compatible equipment. When adding, changing, or removing
equipment from HDMI Control, refer to the sections below for installation notes and the supported commands.
78
En
5.3.1 Control an AV System
When adding an AV System, connect the unit between the panel and any recorders and/or players. To function
properly, an Audio/Video system should support the HDMI Control functions between the panel and any other
connected equipment.
If the AV system does not support HDMI Control but the other equipment (player/recorder) accepts this type of
control than connect the AV System through the panel’s DIGITAL OUT using an optical digital cable and AUDIO
OUT using an AV cable (commercially available). The other equipment connects to the HDMI port using an HDMI
compliant cable. Signals input from the HDMI are not output from DIGITAL OUT.
Page 79

Use Other Equipment With Your Flat Panel TV
During playback, use the remote control’s up/down arrows (/) to cycle through the surround sound options.
Use the left/right arrows (/) to change the input. To resume playback, return to the HDMI Control menu then
select the function again.
AV Systems
HDMI Control
1 Cycles the surround mode in sequence
2 Switches the input source in reverse order
3 Switches the surround mode in reverse order
4 Closes the screen to return to HDMI Control
menu
5 Lists the connected equipment
(model number)
6 Switches the input source in sequence
7 Reserved/Void
5.3.2 Control a Recorder
Press ENTER to start playback or press HDMI CONTROL to return to the menu. This process also applies to
Players. Refer to the chart below for available commands.
1
2
3
4
****
SURROUND+
INPUT+INPUT-
SURROUND-
Exit
5
6
7
05
English
Recorders
HDMI Control
1 Skips commercials
2 Fast reverse
3 Stops playback
4 Closes the screen to return to HDMI Control
menu
5 Lists the connected equipment
(model number)
6 Fast forward
7 Starts playback
Note: You can also use (Play), (Stop), (Pause), (Fast Forward) and (Fast Reverse) on the remote
control to conduct the same operations as the control menu buttons.
5.3.3 Control a Player
Press ENTER to start playback or press HDMI CONTROL to return to the menu. This process also applies to
Recorders. Refer to the chart below for available commands.
Players
1 Displays the DVD/Blu-ray disc menu on the
player
2 Fast reverse
3 Stops playback
4 Closes the screen to return to HDMI Control
menu
5 Lists the connected equipment
(model number)
6 Fast forward
7 Starts playback
1
2
3
4
1
2
3
4
****
Exit
HDMI Control
****
MENU
Exit
5
6
7
5
6
7
Note: You can also use (Play), (Stop), (Pause), (Fast Forward) and (Fast Reverse) on the remote
control to conduct the same operations as the control menu buttons.
79
En
Page 80

05
T
W
T
W
Rear view
HDMI compliant
cable (HDMI cable
having the HDMI
mark)
AV cable
(commercially
available)
Optical digital cable
(commercially
available)
BD player
AV amp
HDMI compliant
cable (HDMI cable
having the HDMI
mark)
AV cable
(commercially
available)
Optical digital
cable
(commercially
available)
BD player AV amp
Rear view
HDMI compliant cable
(HDMI cable having the
HDMI mark)
Rear view
BD player
Use Other Equipment With Your Flat Panel TV
5.3.4 Add an AV Amp or a BD Player
To add an AV amp and/or a BD Player, refer to the appropriate cabling diagram below.
AV Amp & BD Player
T
W
T
W
80
En
BD Player only
T
W
T
W
Page 81

Use Other Equipment With Your Flat Panel TV
5.4 Specific HDMI Control Commands
When using HDMI equipment with your flat panel TV, some options include when to power the panel and ways to
turn other devices or features On and Off. This section provides steps for commonly desirable setting changes.
5.4.1 Play Source Sound Using an HDMI Command
When sound is coming from a Pioneer AV System through the flat panel TV, placing the panel in Standby causes
the sound to stop. To have the sound continue when the flat panel TV turns On, follow the steps below.
Option
1 ) Access the
through the
Setup
.
05
English
2 ) Select
3 ) Select
4 ) Select
5 ) Press HOME MENU to exit the menu.
HDMI Control Setting
Hold Sound Status
On
to allow sound from an AV System to play when the panel turns On.
from the Option menu.
from the submenu.
Note: To have the sound continue when the flat panel TV turns On, confirm that the Switch to TV Sound option
appears on the HDMI Control menu before turning the panel Off (see page 77).
5.4.2 Turn OFF the Power With an HDMI Command
The “Power Off Control” function is valid for the devices connected to any of the panel’s HDMI ports. To power off
a connected device when the flat panel TV is turned Off, follow the steps below.
Option
1 ) Access the
2 ) Select
3 ) Select
4 ) Select
5 ) Press HOME MENU to exit the menu.
HDMI Control Setting
Power Off Control
On
to allow the panel to power off the connected equipment.
through the
Setup
.
from the Option menu.
from the submenu.
5.4.3 Turn ON the Power With an HDMI Command
The panel ships from the factory with the Power On command activated. If this feature is turned off in error, it can
be reactivated. To power on the flat panel TV automatically when a connected Pioneer recorder or player is turned
On and images are sent to the panel, follow the steps below.
Option
1 ) Access the
through the
Setup
.
2 ) Select
3 ) Select
4 ) Select
5 ) Press HOME MENU to exit the menu.
HDMI Control Setting
Power-On Ready
On
to have another device power-on the panel.
from the Option menu.
from the submenu.
81
En
Page 82

05
Use Other Equipment With Your Flat Panel TV
5.4.4 Test the Power Control (On/Off)
Your flat panel TV provides an HDMI control option to test equipment power when it is connected to the panel’s
HDMI ports and it has been properly assigned to an Input.
To confirm that the Power On/Off control function is working, follow the steps below.
Option
1 ) Access the
through the
Setup
.
2 ) Select
3 ) Select a test option (
HDMI Control Setting
Power On Test
from the Option menu.
or
Power Off Test
) from the submenu.
A list containing all HDMI connected equipment appears.
4 ) Select a piece of equipment from the list.
5 ) Repeat this process to test other equipment from the list.
6 ) Press HOME MENU to exit the menu when all testing is complete.
If the Power On/Off Test fails, check the connection points and the settings.
5.5 Connect a Game Console or Camcorder
Your flat panel TV supplies direct connections for a game console, camcorder, or other Audio/Visual (AV)
equipment through INPUT 3. To watch an image coming from a game console or camcorder, press INPUT 3 on
the remote control or repeatedly press INPUT on the panel to select INPUT 3. For details on game console
settings, refer to “2.5.2 Connect Your Other Pioneer Equipment” and to “4.1.4 Set the Panel to Recognize a Game
Console.”
Use the connection type specified by the equipment. Connect equipment only to terminals that are actually to be
used.
82
En
Page 83

Use Other Equipment With Your Flat Panel TV
5.6 Operate the Home Media Gallery
With Home Media Gallery, you can enjoy digital content such as movies, music, and photo files on your high-end
flat panel TV. Play content from files stored on one or more media servers connected by a home or local area
network (LAN) or those stored on a USB flash drive. After connecting via a broadband router or an Ethernet hub
to a media server with network software, navigate through the digital content visible on the Home Media Gallery.
The flat panel TV supports Mass Storage Class and PTP devices through USB interface and DLNA-compatible
devices through a network.
DLNA CERTIFIED™ Audio/Video/Image Player
This unit complies with the DLNA Networked Device Interoperability Guidelines - expanded: October 2006 (v1.5).
When a PC running DLNA server software or other DLNA-compatible device is connected to this player, some
setting changes of software or other devices may be required. Please refer to the operating instructions for the
software or device for more information.
PlaysForSure
PlaysForSure is a marketing certification given by Microsoft. The PlaysForSure logo makes it easy to find digital
media stores and devices that work together. Digital media purchased from online stores carrying the
PlaysForSure logo is available for use on this unit. This unit complies with PlaysForSure Version 2.20
Requirements Specification for Network Devices.
Supported File Formats
The following sections show supported file formats that can be played back or displayed on the flat panel TV. These
formats are applicable to network sources. Most are also applicable to USB sources. However, media server
content protected by digital rights management such as WMDRM10 (Windows Media Digital Rights
Management 10), may not play on the panel.
05
English
Supported Video Formats
• Windows Media Video 9 (WMV9): MP@ML
• Windows Media Video 9 (WMV9) Advanced Profile (VC-1): AP@L1, MP@ML
• MPEG-2 PS: MP@ML
• MPEG-2 TS: MP@ML
• MPEG-1
• MPEG-4 Part2 (SP/ASP): SP@L3, ASP@L5
• MPEG-4 Part10 (H.264/AVC): Main Profile 3.0
Supported Audio Formats
• Windows Media Audio 9 (WMA9): Sampling rates; 44.1 kHz or 48 kHz
• MPEG-1 Audio Layer 3 (MP3): Sampling rates; 32 kHz, 44.1 kHz or 48 kHz
• Linear PCM (WAV): Sampling rates; 44.1 kHz or 48 kHz
• MPEG-4 AAC: Sampling rates; 16 kHz, 32 kHz, 44.1 kHz or 48 kHz
• HE-AAC: Sampling rates; 16 kHz, 32 kHz, 44.1 kHz or 48 kHz
Supported Image Formats
• JPEG: Resolution; up to 3680 x 2760 pixels
• PNG: Resolution; up to 3680 x 2760 pixels
• GIF: Resolution; up to 3680 x 2760 pixels
• TIFF: Resolution; up to 1600 x 1200 pixels
• BMP: Resolution; up to 3072 x 2304 pixels
Supported File Extensions
This product supports the playback of files with the following extensions.
• Video: .wmv, .asf, .mpg, .mpeg, .mpe, .m2p, .m4v, .mp4v, .mp4, .mov
• Audio: .wma, .mp3, .wav, .m4a, .aac
• Image: .jpg, .jpeg, .png, .gif, .bmp, .tif, .tiff
Note: Even the supported format files that are listed above may or may not play properly or completely, depending
on the media server, USB device, bit rate stream and other content characteristics, as well as other factors.
83
En
Page 84

05
Use Other Equipment With Your Flat Panel TV
Even when files have a supported file extension, some files may not play or display properly, depending on the
content or media server type.
Some formats may not be supported nor displayed on Home Media Gallery as formats that individual media
servers support vary. Refer to the media server manufacturer’s or other relevant websites for supported formats.
Although a particular format is supported, not all content functions may operate properly. If the content fails to
appear properly, contact the content producer for assistance. In addition, some supported file formats may fail to
play properly when imported from an unknown USB device.
Note: You cannot use the Home Media Gallery until dimmed elements on the menu screen turn white.
Some Home Media Gallery functions, such as trick play during Fast Forward and Rewind, Time Search and
Search, may not work depending on the media server’s capability and functionality.
Home Media Gallery complies with the DLNA Networked Device Interoperability Guidelines - expanded:
October 2006 (v1.5) and PlaysForSure Version 2.20 Requirements Specification for Network Devices. If your
media server supports different DLNA and/or PlaysForSure version(s), some Home Media Gallery
function(s) and content format(s) may not be supported.
Pioneer is not responsible for any malfunction of the Home Media Gallery features due to communication
error/malfunctions associated with your network connection and/or your PC, or other connected
equipment. Contact your PC manufacturer or Internet service provider.
Content may not play or display properly, depending on the conditions of use or media server in use.
The Home Media Gallery functions as a WMDRM10-ND (Microsoft Windows Media DRM for networked
devices). Content can only be navigated from the media servers that support WMDRM10-ND. Content may
not play, depending on the DRM protection level.
This system may not display content from incompatible memory cards.
5.6.1 Network Connections
To connect to a network, set up the Home Media Gallery through the Home Media Gallery menu. Press the HMG
button on the remote control to cause the menu to appear. To use the Home Media Gallery, connect to a home
network (LAN) via an Ethernet hub or cable directly to a media server.
Usable Media Servers
A media server contains digital content such as movies, music, and photo files. PCs that have pre-installed media
server software and recorders with a media server function are considered the media server. There are some
media servers that you can choose from; for example, Windows Media Connect, Windows Media Player that has
a media sharing function, and DLNA compliant servers.
• Windows Media Connect 2.0
Windows Media Connect runs on a 32-bit PC with Windows XP Service Pack 2 (SP2) installed.
When it is already installed, you can enjoy Home Media Gallery using your PC.
• Windows Media Player 11 for Windows XP
Windows Media Player 11 features Media Sharing that runs on a 32-bit PC with Windows XP Service Pack 2
(SP2) installed.
If Windows Media Connect 2.0 is not installed in your PC, you can download Windows Media Player 11 from
Microsoft’s website.
• Windows Media Player 11 for Windows Vista
Windows Media Player 11 is featured in 32-bit Windows Vista PCs.
When selecting the most suitable media server, please visit Microsoft’s website for system requirements, known
issues, installation procedures, and other updated information.
84
En
• DLNA CERTIFIED™ digital media servers
The server is a DLNA-certified digital media server such as PC software, PCs and other devices installed with
DLNA-certified software. When a PC running DLNA server software or other DLNA-compatible device is
connected to this player, some setting changes of the software or device may be required. Refer to the
device(s) operating instructions for more information.
Page 85

Use Other Equipment With Your Flat Panel TV
Media server 2
Media server 1
Ethernet hub
(Router with hub function)
Straight-through
cable
Rear view
Media server 1
Rear view
Cross-over cable
Connect via an Ethernet Hub
If already operating one or more media servers on a home or local area network (LAN), connect the flat panel TV
to the Ethernet (LAN) hub using a standard (“straight-through”) Ethernet (LAN) cable. See the diagram below.
Note: Although the Home Media Gallery supports 10BASE-T, it is better to use 100BASE-TX for improved display
quality and speed.
05
English
T
W
T
W
Connect directly to a Media Server
To run a PC as a media server, connect the flat panel TV directly to the PC using a twisted (“cross-over”) Ethernet
(LAN) cable. See the diagram below.
T
W
T
W
85
En
Page 86

05
Use Other Equipment With Your Flat Panel TV
Confirm the IP Address
After making the network connection, follow the instructions below to confirm the IP Address before accessing
the network. (The setup is effective for Auto only. To perform the procedure, DHCP on your server or router must
be valid. See “5.9 HMG Setup”)
1 ) Press HMG on the remote control.
The Home Media Gallery menu appears on screen.
2 ) Select
HMG Setup
.
Use the arrow buttons to highlight an option.
3 ) Press ENTER.
4 ) Select
5 ) Select
Network Setup
Auto DHCP
.
.
The screen turns from “Select” mode to “Input” mode.
6 ) Select
7 ) Press RETURN.
Yes
.
The HMG Setup screen returns.
The IP Address is assigned.
The Home Media Gallery supports Auto IP and DHCP (Dynamic Host Configuration Protocol). If the system
failed to assign the IP Address or if you want to obtain different addresses, select No then enter IP Address
and Subnet mask. See Network Setup or HMG Setup to enter an address manually.
For information on DHCP, refer to network device’s operating instructions.
You may need to contact your service provider or network administrator when manually entering an IP Address.
Some media servers block or are programmed to block access to client servers. When connecting the flat panel
TV, check the media server for client server access rights.
5.6.2 Connect a USB Device
You can also enjoy content stored on memory cards by connecting a USB device to the flat panel TV. The root
directory or Device List screen appears as soon as a USB flash drive or a multi-card reader is connected to the
USB port. Another option is to connect your digital camera directly to the flat panel TV using a commercially
available USB connector cable.
If for any reason, the Folder/Content List or Device List fails to appear, follow the steps below.
1 ) Press HMG.
The Home Media Gallery menu appears on screen.
86
En
2 ) Select
USB
.
Use the arrow buttons to highlight an option.
3 ) Press ENTER to confirm the selection.
4 ) Select the desired device.
The USB Device screen must be displayed.
5 ) Press ENTER to navigate to a folder or play a file/content.
To return to the previous screen, press
6 ) Press EXIT or HMG to exit Home Media Gallery.
RETURN
.
Notes: The flat panel TV displays the USB Device screen or root directory immediately after inserting a USB
device. In this case, start from Step 5.
When a multi-card reader is inserted, the USB Device screen is displayed. In this case, start from Step 4.
Page 87

Use Other Equipment With Your Flat Panel TV
Flat Panel TV
USB flash drive
Digital Camera with USB
Mass Storage Class
(PTP also supported)
Flash media via USB adapter (Multi-card Reader )
05
English
Note: Do not use any USB devices other than those specified. Using other devices can cause a malfunction.
Readable Data Format
This system reads FAT16, FAT32 or NTFS.
Readable Data Files
Movie, music, and photo files play with the exception of Digital Rights Management (WMDRM10) protected files.
Your flat panel TV supports a single USB device at a time. Also, the panel does not support USB hubs.
This system may not be able to display modified or edited content from a PC or other equipment.
Your flat panel TV supports the USB Mass Storage Class and PTP devices.
Some digital cameras may require a setup procedure for Mass Storage Class data transfer. The setup is done on
the camera. See the operating instructions supplied with the digital camera. Depending on the type of your
memory card or camera, some images may fail to display.
Remove a USB Device
To remove a USB device, exit the Home Media Gallery first then disconnect the device.
Be sure to exit the Home Media Gallery screen before removing the USB device. If you remove the USB device
while the Home Media Gallery screen is displayed, data inside the memory may be damaged.
Do not insert or remove the USB device immediately after the system is switched On or Off. This action may cause
data inside the memory to be damaged.
Pioneer is not liable for any loss or damage to the data inside the USB flash drive.
87
En
Page 88

05
e
c
o
s
(Sample screen)
Use Other Equipment With Your Flat Panel TV
5.7 Run the Home Media Gallery
1 ) Press HMG.
The Home Media Gallery menu appears on screen.
2 ) Select
Media Navigator, USB, HMG Playlist
or
HMG Setup
Use the arrow buttons to highlight an option then press
To return to the previous screen, press
RETURN
.
.
ENTER
.
3 ) Press EXIT or HMG to exit Home Media Gallery.
Media Navigator
USB
HMG Playlist
HMG Setup
Use the Media Navigator
By selecting Media Navigator, the previously selected server menu automatically appears on the screen. When
only one server is found, the system automatically connects the server. You can also use the TOOLS Menu to
switch to another server or manually select a server from the Server List. The screen automatically changes to
the Server List if there are no previous servers.
HMG
1 ) Press
.
The Home Media Gallery menu appears on screen.
2 ) Select
Media Navigator
.
Use the arrow buttons to highlight an option then press
ENTER
.
A server menu appears. The file/folder configuration may vary depending on the server selected.
3 ) Select a desired server from the Server List.
4 ) Select the desired folder to navigate or file/content to play.
Movi
Musi
Phot
ser File
4
5 ) Press ENTER.
The appropriate Player launches and begins playing the selected file.
To return to the previous screen, press
RETURN
.
6 ) Press EXIT or HMG to exit Home Media Gallery.
Note: The Media Navigator launch depends on the option selected in
Auto Connection under
Select a server from the Server list to open Media Navigator.
“5.9 HMG Setup.”
88
En
Page 89

Use Other Equipment With Your Flat Panel TV
(Sample screen)
Navigate through a USB Device’s Files and Folders
Like navigating through media servers, select the specific file from a device on the USB Device screen to start an
appropriate player. For details, follow the steps below.
1 ) Press HMG.
The Home Media Gallery menu appears on screen.
05
English
2 ) Select
USB
.
Use the arrow buttons to highlight an option then press
ENTER
.
The USB Device screen appears. Select the device. When using a single directory device (USB flash drive),
the USB Device screen does not appear.
USB A
USB B
USB C
USB D
USB E
USB F
USB G
15
3 ) Select the desired folder to navigate or file/content to play.
4 ) Press ENTER.
The appropriate Player launches and begins playing the selected file.
To return to the previous screen, press
RETURN
.
5 ) Press EXIT or HMG to exit Home Media Gallery.
Note: The USB Device screen appears when using a multi-card reader or multiple flash drive devices. In this case,
select the device containing the desired content.
89
En
Page 90

05
0
1
2
3
3
2
5
4
0
3
1
2
Thumbnail screen
Thumbnail List screen
List screen
(Sample screens)
Use Other Equipment With Your Flat Panel TV
Screen Components
Screen display options are:
•List
•Thumbnail
• Thumbnail List
Press TOOLS then select Change view from the TOOLS Menu to choose from the screen display options. The
options are available for Movie, Music and Photo menus.
lder
lder
older
1
4
ontent
ontent
ontent
ontent
4
1. Item being selected
2. Number of total items
3. Scroll bar (displayed when one or more pages follow)
Folder
3
4
ontent
40
Content 2Folder
Content 3
312
90
En
4. Icon or thumbnail of the selected item (if obtained)
Page 91

Use Other Equipment With Your Flat Panel TV
e
c
o
6
e
/00:05:24
D
During A-B Repeat mode
(Content information)
1. Album name
2. Content title
3. Date
(Player status)
4. Playback status (status icon, status information,
current time/total time)
5. Progress bar
6. Sound mode
7. Play mode
8. Random mode
9. A-B Repeat mode
HMG Playlist
Each category (Movie, Music, and Photo) has five different Playlists with up to 100 files each. The HMG Playlist can
contain sound and image files selected in “Media Navigator”. To edit a Playlist, use the TOOLS Menu.
1 ) Press HMG.
The Home Media Gallery menu appears on screen.
05
English
2 ) Select
3 ) Select
HMG Playlist
.
Use the arrow buttons to highlight an option then press
Movie, Music or Photo
from the HMG Playlist screen.
Movi
Musi
Phot
3
ENTER
.
4 ) Select a desired list from Playlist 1 through Playlist 5.
5 ) Select the desired content.
This menu can appear as a List, Thumbnail or Thumbnail List screen. Press
view from the TOOLS Menu to cycle through the views.
6 ) Press ENTER to play the content.
The appropriate Player launches and begins playing the selected file.
To return to the previous screen, press
RETURN
.
7 ) Press EXIT or HMG to exit Home Media Gallery.
TOOLS
then select Change
5.7.1 Show Your Movie Files on the Flat Panel TV
When selecting movie content from the server menu on the Media Navigator screen or USB Device screen, the
Movie Player automatically launches. Select a category, folder, or device to access the submenu containing the
file or content.
Selecting a movie file from the HMG Playlist causes the Movie Player screen to appear, just like selecting a file
from a server.
Screen Components
The following information automatically appears on screen for a few seconds when Movie Player launches or
playback status changes (controlled by the remote, for example). Pressing DISPLAY or selecting Information on
the TOOLS Menu also causes the information to appear.
1 2
Album Nam
layback
MovieTITLE_012345
:02:01
3
YYYY/MM/D
91
En
Page 92

05
Use Other Equipment With Your Flat Panel TV
Movie Player key guide
Mode Key(s) used Function
Playback ENTER, (PLAY) Plays back the content.
Stop (STOP),
RETURN
PAUSE ENTER,
(PAUSE)
Fast Forward
Fast Reverse
Slow Forward + ,
(FF), Fast forward while playback.
(RWD), Fast reverse while playback.
+
Stops the Movie Player and returns to the previous screen
(List/Thumbnail/Thumbnail List)
Pauses the playback
Each press toggles the Fast Forward speed. To discontinue
Fast Forward, press ENTER or PLAY. Normal playback mode
returns.
Each press toggles the Fast Reverse speed. To discontinue
Fast Reverse, press ENTER or PLAY. Normal playback mode
returns.
Slow forward when in PAUSE.
Each press toggles the Slow Forward speed. To discontinue
Slow Forward, press ENTER or PLAY. Normal playback
mode returns.
Note: This function may not be supported, depending on the
content.
Forward (15 sec.)
Reverse (15 sec.) Skips 15 seconds backward
Time Search TOOLS See Use the TOOLS Menu
Add to HMG Playlist TOOLS See Use the TOOLS Menu
Skips 15 seconds forward then plays back the video or pauses
while in PAUSE
pauses while in PAUSE
then
plays back the video or
A-B Repeat Mode TOOLS See Use the TOOLS Menu
Random TOOLS See Use the TOOLS Menu
Play Mode TOOLS See Use the TOOLS Menu
Audio TOOLS See Use the TOOLS Menu
Picture TOOLS See Use the TOOLS Menu
Sound TOOLS See Use the TOOLS Menu
Information TOOLS See Use the TOOLS Menu
Note: Some functions may not be supported depending on the server type or software version.
During playback, an error may arise in time-related information, depending on the content or server
software.
Also, some functions may not be supported, depending on the content.
92
En
Page 93

Use Other Equipment With Your Flat Panel TV
X
X
1. Artist/album information
2. Music Player thumbnail icon/jacket image
3. Player list
4. Play mode
5. Random mode
6. Playback status (status icon, status information,
current time/total time)
7. Progress bar
8. A-B Repeat mode
9. Date
During A-B Repeat mode
Content obtained from a digital video camera that supports H.264/AVC format can be played through the USB
port.
To play content from this type of camera, follow the steps below.
1 ) Insert the USB flash drive containing the content into a card reader connected to the flat panel TV.
The USB device’s Folder/Contents List appears on screen.
Refer to the operation manual that came with the individual device for connection and setting help.
2 ) Select a Folder/Contents List.
Use the arrow buttons to highlight an option then press
3 ) Select the desired content.
Note: Some content may not be played back or may be a short delay between audio and video, depending on the
file.
Not all files (including edited files) may be supported with the Movie Player. Stored content may not appear in
the “Shortcut” folder, depending on the saved position in the memory device.
Also, content may not play properly, depending on the USB card reader used.
5.7.2 Play Your Music Files on the Flat Panel TV
When selecting music content from the server menu (on the Media Navigator screen or from the USB Device
screen), the Music Player automatically launches. Select a category, folder, or device to access the submenu
containing your file or content. Selecting a music file from HMG Playlist causes the Music Player screen to
appear, just like selecting a file from a server.
After playing music content through once, the music content loops as background music (BGM). To stop looping,
stop the playback, exit the Home Media Gallery or start playing content other than photo content.
ENTER
.
05
English
Screen Components
1
Artist : XXXX
Album : XXXX
XXXXXX.mp3
Previous Song
2
XXXXXX.mp3
Next Song
3
The following information and playback status appear on the Music Player screen.
4 5
layback 00:02:01/00:05:24
6 97
8
YYYY/MM/DD
93
En
Page 94

05
(Content information)
1. Album name
2. Content title
3. Date
(Player status)
4. Playback status
(status icon, status information,
current number/total number)
5. Progress bar
6. Play mode
7. Random mode
Use Other Equipment With Your Flat Panel TV
Music Player key guide
Mode Key(s) used Function
Playback ENTER, (PLAY) Plays back the selected content.
Stop (STOP), Stops the playback
PAUSE ENTER,
(PAUSE)
Fast Forward
(FF) See the Movie Player key guide.
Press and hold to start Fast Forward. When in Fast
Fast Reverse
(RWD) See the Movie Player key guide.
Press and hold to start Fast Reverse. When in Fast
Next Selects the next content
Previous Selects the previous content
Time Search TOOLS See Use the TOOLS Menu
Add to HMG Playlist TOOLS See Use the TOOLS Menu
Random TOOLS See Use the TOOLS Menu
A-B Repeat TOOLS See Use the TOOLS Menu
Play Mode TOOLS See Use the TOOLS Menu
Sound TOOLS See Use the TOOLS Menu
Pauses the playback
Forward, press to change the playback speed. To
discontinue Fast Forward, press ENTER or PLAY. Normal
playback mode returns.
Reverse, press to change the playback speed. To
discontinue Fast Reverse, press ENTER or PLAY. Normal
playback mode returns.
94
En
Note: Files may not play properly, depending on the content.
Some functions may not be supported, depending on the server type or software version.
Playback continues. Pressing
RETURN
to move from the Player screen to the previously selected screen
has no effect.
5.7.3 Show Your Photo File on the Flat Panel TV
When selecting photo content from the Media Navigator’s server menu or from the USB Device screen, the Photo
Player automatically launches. Press ENTER to show content in full screen. Select a category, folder or device to
access the submenu containing your file or content.
Selecting a photo file from the HMG Playlist causes the Photo Player screen to appear, just like selecting a file
from the server.
Screen Components
The following information automatically appears on screen for a few seconds when Photo Player launches or
playback status changes (controlled by the remote, for example). Pressing DISPLAY or selecting Information on
the TOOLS Menu also causes the information to appear.
1 2
Photo TITLE_0123456Album Name
layback 45678/99999
4
5 6 7
3
YYYY/MM/DD
Page 95

Use Other Equipment With Your Flat Panel TV
Photo Player key guide
05
Mode Key(s) used Function
Playback ENTER, (PLAY) Starts displaying a photo or playing a slideshow when in
playback
Stop (STOP),
RETURN
PAUSE ENTER while
Stops the Player and returns to the previous screen (List/
Thumbnail/Thumbnail List)
Pauses the slideshow
playback,
(PAUSE)
Move File Forward Displays the next image content
Move File Backward Displays the previous image content
Rotate (clockwise)
(FF), TOOLS Rotates the image 90o clockwise.
Each press toggles the rotation angle by 90
o
, 270o and 0o.
180
o
between 90o,
(See Use the TOOLS Menu)
Rotate (counterclockwise)
Change BGM
(RWD) Rotates the image 90o counter-clockwise.
Each press toggles the rotation angle by 90
o
, 90o and 0o.
180
,
Switches BGM content while playing BGM
o
between 270o,
Zoom TOOLS See Use the TOOLS Menu
Add to HMG Playlist TOOLS See Use the TOOLS Menu
English
Random TOOLS See Use the TOOLS Menu
Play Mode TOOLS See Use the TOOLS Menu
Slide Show TOOLS See Use the TOOLS Menu
Music Player TOOLS See Use the TOOLS Menu
Picture TOOLS See Use the TOOLS Menu
Sound TOOLS See Use the TOOLS Menu
Information TOOLS See Use the TOOLS Menu
Note: Some functions may not be supported, depending on the server type or software version.
Even files in the supported format may fail to play properly, depending on the content.
95
En
Page 96

05
Use Other Equipment With Your Flat Panel TV
5.8 Use the TOOLS Menu
Pressing TOOLS on the remote control causes the TOOLS Menu to appear. Select various play and display modes
from this menu. The selectable menu items differ, depending on the current menu (refer to “3.6.1 Use the TOOLS
Menu”).
Update Server List
Use this function to update the currently selected Server List. This option is available on the Server List screen
regardless if the server is connected to your flat panel TV.
1 ) Press TOOLS while showing the Server List.
The TOOLS Menu appears on screen.
TELEVISION
TOOLS
Update Server List
Music Player
2 ) Select
Update Server List
from the TOOLS Menu.
Use the arrow buttons to highlight an option then press
ENTER
.
Information on the connected server is updated.
Delete Server
Your flat panel TV allows disconnected servers to be removed from the Server List.
To delete a server, follow the steps below. This option is available on the Server List screen (server not connected).
1 ) Press TOOLS while the cursor is on the unconnected server on the Server List screen.
The TOOLS Menu appears on screen.
TELEVISION
TOOLS
Delete Server
Update Server List
2 ) Select
Delete Server
from the TOOLS Menu.
A Delete Server screen appears.
3 ) Select
Yes
then press ENTER.
The server disappears from the list.
To cancel the server deletion, select No.
USB Device
The TOOLS menu provides a screen to see what USB device(s) are connected or supported. Follow the directions
below to open the USB Device screen. This option is available on the Folder/Contents List (USB) screen.
1 ) Press TOOLS.
The TOOLS Menu appears on screen.
96
En
TELEVISION
TOOLS
USB Device
Picture
2 ) Select
USB Device
from the TOOLS Menu.
A USB Device screen appears, showing currently connected USB devices.
Page 97

Use Other Equipment With Your Flat Panel TV
Favorites Entry
Registering the Home Media Gallery in Favorites (TOOLS Menu) provides quick access to the Home Media Gallery
top screen while watching TV or other programs. This option is available on the Home Media Gallery screen.
1 ) Press TOOLS.
The TOOLS Menu appears on screen.
TELEVISION
TOOLS
Favorite Entry : Off On
Delete from HMG Playlist
05
English
2 ) Select
Favorites Entry.
3 ) Set the option to On then press ENTER.
Registration completes.
To remove the Home Media Gallery from Favorites, select Off.
Detailed Display
Select this option to display the detailed information on the current content. This option is available on the Media
Navigator, Playlist List (Movie/Music/Photo), and Folder/Contents List screens.
1 ) Press TOOLS.
The TOOLS Menu appears on screen.
TELEVISION
TOOLS
Detailed Display
Delete Server
2 ) Select
Detailed Display
from the TOOLS Menu.
Detailed information appears.
Pressing
RETURN
causes the information to disappear and the previous screen to return.
Sort
A sort option is available under Media Navigator and Folder/Contents List screens. This function is unavailable
for folders or content on a USB device. To sort the items contained in the Folder/Contents List, follow the steps
below.
1 ) Press HMG.
The Home Media Gallery menu appears on screen.
2 ) Select the desired folder and/or content in the Media Navigator.
Use the arrow buttons to highlight an option then press
3 ) Press TOOLS then select
Sort
from the TOOLS Menu.
ENTER.
A Sort dialog screen appears.
Sort
Condition : Title
Order : Bottom-Up
Start
4 ) Select the appropriate option on the Sort dialog screen.
• Condition: Title, Track Number, Genre, Artist or Date.
97
En
Page 98

05
Use Other Equipment With Your Flat Panel TV
• Order: Bottom-Up or Top-Down
5 ) Select
Start
on the Sort dialog screen.
The sorting starts based on your selection and sort results are displayed.
While sorting continues, content playback is available. To return to the sort screen, press
RETURN
any time
during playback.
To cancel the sort mode, press
RETURN
.
Notes: The “Select a sorting order.” screen is available and may be left on the screen while navigating through the
music categories.
Sort may not be available, depending on the server used.
Available submenus for Condition vary, depending on the server used.
Search
The flat panel TV’s built-in Search function provides a convenient way to find items held in a Folder/Contents List.
However, the searching function is unavailable for folders or content on a USB device.
Simply enter a word and the results appear on screen. To begin a Search, follow the directions below. This option
is available on the Media Navigator and Folder/Contents List screens.
1 ) Press HMG.
The Home Media Gallery menu appears on screen.
2 ) Select the desired folder and/or content in the Media Navigator.
Use the arrow buttons to highlight an option then press
3 ) Press TOOLS.
ENTER
.
The TOOLS Menu appears on screen.
4 ) Select
Search
from the TOOLS Menu.
A Search dialog screen appears.
Search
Condition : Title
Keyword : ----
Start
5 ) Select
6 ) Enter the word on the software keyboard.
Title, Genre
Pressing
ENTER
or
Artist
for
Condition
, or enter a
Keyword
.
on the Keyword menu causes the software keyboard to appear on the screen.
Refer to “Software Keyboard” under “3.2.5 Create the List of Channels” for operation details.
7 ) Select OK on the software keyboard to bring up the Search dialog screen and hide the keyboard.
To cancel the key word entry, select Cancel.
8 ) Select
Start
on the Search dialog screen.
The searching starts based on the word entered with results are appearing on screen.
While searching continues, content is playable. To return to the search screen, press
RETURN
during playback.
To cancel the search mode, press
RETURN
.
Notes: The Search function may not be available, depending on the server.
Available submenus for Condition vary, depending on the server used.
any time
98
En
Page 99

Use Other Equipment With Your Flat Panel TV
Slide Show
A slideshow is simply a series of still pictures, appearing one after the other, usually in a timed procession. Select
the desired photo file to display a still picture then press ENTER to start a slideshow. After a slideshow launches,
pressing ENTER toggles between PLAY and PAUSE. Or press PLAY to start the slideshow immediately. This option
is available on the Media Navigator, Folder/Contents List, and Photo Player. You can set the Photo Player to play
a slideshow with background music (BGM) and various visual effects. To begin a slideshow, follow the directions
below.
1 ) Press HMG.
The Home Media Gallery menu appears on screen.
05
English
2 ) Select
3 ) Select a folder containing photo content.
Media Navigator
or
USB
from the menu.
Use the arrow buttons to highlight an option then press
Use the arrow buttons to highlight a folder then press
ENTER
ENTER
.
.
The Thumbnail screen appears (Thumbnail List or List screen appears, depending on the setting).
4 ) Select the desired photo file.
The selected photo content appears in full screen.
5 ) Press TOOLS.
The TOOLS Menu appears on screen.
6 ) Select a slideshow option.
7 ) Select
Random, Off, Black Out, Cross Sweep, Horizontal Blinds, Boxed In/Out, Panoramic
Effect.
8 ) Select Off or On for
9 ) Select a time interval:
Monochrome
.
3Seconds, 5Seconds, 10Seconds, 15Seconds, 30Seconds
Slide Show
Effect : Black Out
Monochrome : Off
Interval : 5Seconds
Random : Off
Play Mode : Repeat All
BGM : Off
or
60Seconds
or
Scenic for
.
Start
Off
10 )Turn the Random option
or On.
For details, refer to Random.
11 ) Select the desired option for
Select Single, Repeat, Repeat All or All. For details, refer to
12 ) Select any desired
BGM
.
Play Mode
.
“Play Mode”
(page 101).
Select music content from Playlist 1 through 5 or the USB device.
13 ) Select
Start
.
The slideshow starts and photo images in the folder automatically appear one by one.
To force the next image to appear, press
To force the previous image to return, press
14 ) Press ENTER or (Pause) to stop the slideshow.
.
.
The Photo Player pauses.
15 ) Press ENTER again to resume the slideshow.
To cancel the slideshow and stop the Photo Player, press
RETURN
or (Stop) during playback. The
previous screen returns.
99
En
Page 100

05
(Sample screen)
Use Other Equipment With Your Flat Panel TV
Note: After setting the Interval time, it may take longer than the preset time. As the Interval time refers to the time
length up until the Home Media Gallery starts to obtain the next image. Key operations may not work while
obtaining the next image.
Add to HMG Playlist
The Home Media Gallery function provides “HMG Playlist” - a self-contained play list that allows bookmarking
favorite movie, music, and photo files from the network. You can store, edit, and sort up to 100 files in each Playlist
List. This option is available on the Media Navigator, Folder/Contents List, Movie Player, Music Player, and Photo
Player screens.
1 ) While navigating or playing, select the file to be added to a HMG Playlist.
2 ) Press TOOLS.
The TOOLS Menu appears on screen.
3 ) Select
Add to HMG Playlist
from the TOOLS Menu.
An Add to HMG Playlist dialog screen appears.
4 ) Select a Playlist.
Press / to select from Playlist 1 to Playlist 5.
Add to HMG Playlist
Add to : Playlist 1
[Total] : 050/100
OK
5 ) Select OK.
To select other Playlist(s), repeat Steps 2 to 5.
The file is added to the selected Playlist. The Total field changes as content is added to the playlist.
To cancel the operation, press
RETURN
.
Select Server
When one or more servers are connected within the network, you can switch between servers. This option is
available on the Media Navigator and Folder/Contents List screens.
1 ) Press TOOLS.
The TOOLS Menu appears on screen.
100
En
2 ) Select
Select Server
from the TOOLS Menu.
The Server List appears.
Server 01
Server 02
Server 03
Server 04
4
3 ) Select the desired server.
The screen changes to Media Navigator on the selected server.
Notes: The Home Media Gallery can memorize previously connected servers. When the Media Navigator is
launched, available servers are automatically located and connected.
If a previously connected server cannot be found or if the server is in sleep mode, the server name is
dimmed.
 Loading...