


Operation Manual
CD Receiver
DEH-2950MP
(B) Português Español English


 Contents
Thank you for buying this Pioneer product.
Please read through these operating instructions so you will know how to operate your model properly. After you have finished reading the instructions, keep this manual in a safe place for future reference.
Before You Start |
|
|
|
|
||||
About this unit |
3 |
|
|
|
|
|||
About WMA |
3 |
|
|
|
|
|
||
About MP3 |
3 |
|
|
|
|
|
|
|
Visit our website |
3 |
|
|
|
|
|||
Protecting your unit from theft |
3 |
|
||||||
– |
Removing the front panel |
3 |
|
|||||
– |
Attaching the front panel |
4 |
|
|||||
Use and care of the remote control |
4 |
|||||||
– |
Installing the battery |
4 |
|
|
||||
– |
Using the remote control |
4 |
|
|||||
Operating this unit |
|
|
|
|
||||
What’s What |
|
5 |
|
|
|
|
|
|
– |
Head unit |
5 |
|
|
|
|
||
– |
Remote control |
6 |
|
|
|
|||
– |
LCD display |
6 |
|
|
|
|
||
Basic Operations |
7 |
|
|
|
|
|||
– |
Turning the unit on and selecting a |
|||||||
|
source |
|
7 |
|
|
|
|
|
– |
Adjusting the volume |
7 |
|
|
||||
– |
Turning the unit off 7 |
|
|
|
||||
Tuner |
7 |
|
|
|
|
|
|
|
– |
Listening to the radio |
7 |
|
|
||||
– |
Storing and recalling broadcast |
|||||||
|
frequencies |
7 |
|
|
|
|
||
– |
Tuning in strong signals |
7 |
|
|||||
– |
Storing the strongest broadcast |
|||||||
|
frequencies |
8 |
|
|
|
|
||
Built-in Player |
8 |
|
|
|
|
|
||
– |
Playing a disc |
8 |
|
|
|
|||
– |
Repeating play |
8 |
|
|
|
|||
– |
Playing tracks in random order |
9 |
||||||
– |
Scanning tracks or folders 9 |
|
||||||
– |
Pausing disc playback |
9 |
|
|
||||
– |
Using compression and BMX |
9 |
||||||
– |
Searching every 10 tracks in the current |
|||||||
|
disc or folder |
9 |
|
|
|
|||
– |
Displaying text information on disc 10 |
|||||||
Audio Adjustments 10 |
|
|
|
|
– |
Using balance adjustment |
10 |
||
– |
Using the equalizer |
10 |
|
|
– |
Adjusting equalizer curves |
10 |
||
– |
Adjusting loudness |
11 |
|
|
– |
Adjusting source levels |
11 |
|
|
Other Functions 11 |
|
|
|
|
– |
Adjusting initial settings |
11 |
||
– |
Setting the clock 11 |
|
|
|
– |
Setting the FM tuning step |
12 |
||
– |
Setting the AM tuning step |
12 |
||
– |
Switching the auxiliary setting 12 |
|||
Additional Information |
|
||
Error messages |
13 |
|
|
Handling guideline of discs and player |
13 |
||
Dual Discs 13 |
|
|
|
WMA, MP3 and WAV files 14 |
|
||
– |
Example of a hierarchy 14 |
|
|
– |
Compressed audio compatibility |
14 |
|
Specifications |
16 |
|
|
 2
2 En
En
|
Section |
Before You Start |
01 |
|
|
About this unit
 CAUTION
!Do not allow this unit to come into contact with liquids. Electrical shock could result. Also, this unit damage, smoke, and overheat could result from contact with liquids.
!Keep this manual handy as a reference for operating procedures and precautions.
!Always keep the volume low enough so that you can hear sounds from outside the vehicle.
!Protect this unit from moisture.
!If the battery is disconnected or discharged, the preset memory will be erased and must be reprogrammed.
!If this unit does not operate properly, contact
your dealer or nearest authorized Pioneer Service Station.
About MP3
Supply of this product only conveys a license for private, non-commercial use and does not convey a license nor imply any right to use this product in any commercial (i.e. revenuegenerating) real time broadcasting (terrestrial, satellite, cable and/or any other media), broadcasting/streaming via internet, intranets and/ or other networks or in other electronic content distribution systems, such as pay-audio or audio-on-demand applications. An independent license for such use is required. For details, please visit http://www.mp3licensing.com.
Visit our website
Visit us at the following site:
English
About WMA
The Windows Media™ logo printed on the box indicates that this unit can play back WMA data.
WMA is short for Windows Media Audio and refers to an audio compression technology that is developed by Microsoft Corporation. WMA data can be encoded by using Windows Media Player version 7 or later.
Windows Media and the Windows logo are trademarks or registered trademarks of Microsoft Corporation in the United States and/or other countries.
 Note
Note
This unit may not operate correctly depending on the application used to encode WMA files.
!We offer the latest information about Pioneer Corporation on our website.
Protecting your unit from theft
The front panel can be detached to deter theft.
 Important
!Handle gently when removing or attaching the front panel.
!Avoid subjecting the front panel to excessive shocks.
!Keep the front panel out of direct sunlight and high temperatures.
Removing the front panel
1 Press DETACH to release the front panel.
En |
3 |
Section
01  Before You Start
2Grab the front panel and remove.
3Put the front panel into provided protective case for safe keeping.
Attaching the front panel
1Slide the front panel to the left until it clicks.
Front panel and the head unit are jointed on the left side. Make sure that the front panel has been jointed to the head unit.
2Press the right side of the front panel until it is firmly seated.
# If you can’t attach the front panel to the head unit successfully, try again. Front panel may be damaged if you attach the front panel forcedly.
Use and care of the remote control
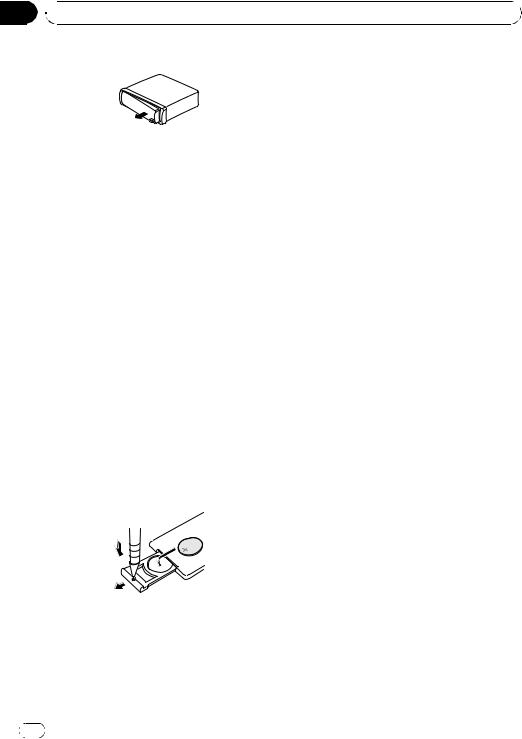
Installing the battery
Slide the tray out on the back of the remote control and insert the battery with the plus (+) and minus (–) poles pointing in the proper direction.
 CAUTION
!Use only one CR2025 (3 V) lithium battery.
!Remove the battery if the remote control is not used for a month or longer.
!Danger of explosion if battery is incorrectly replaced. Replace only with the same or equivalent type.
!Do not handle the battery with metallic tools.
!Do not store the battery with metallic materials.
!In the event of battery leakage, wipe the remote control completely clean and install a new battery.
!When disposing of used batteries, please comply with governmental regulations or environmental public institutions’ rules that apply in your country/area.
Using the remote control
Point the remote control in the direction of the front panel to operate.
 Important
!Do not store the remote control in high temperatures or direct sunlight.
!The remote control may not function properly in direct sunlight.
!Do not let the remote control fall onto the
floor, where it may become jammed under the brake or accelerator pedal.
 WARNING
Keep the battery out of the reach of children. Should the battery be swallowed, immediately consult a doctor.
4 |
En |
|
Section |
Operating this unit |
02 |
|
|
1 23 |
4 |
e d c
What’s What
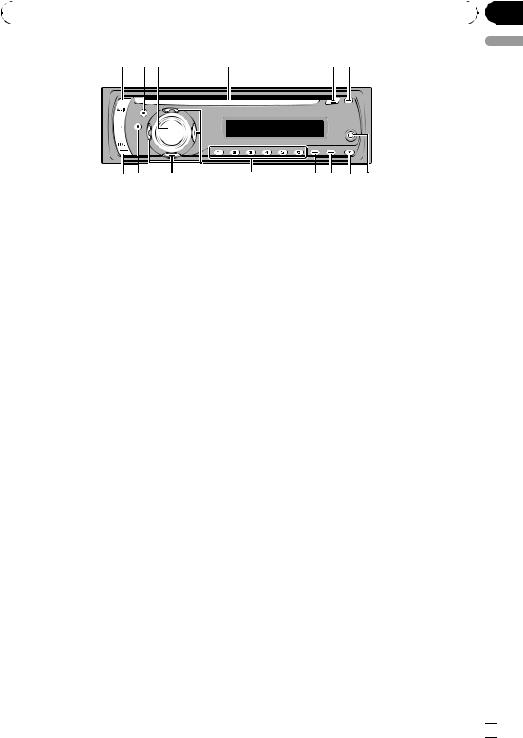
Head unit
1 AUDIO button
Press to select various sound quality controls.
2 EQ button
Press to select various equalizer curves.
3 SOURCE button, VOLUME
This unit is turned on by selecting a source. Press to cycle through all the available sources.
Press and hold to recall the initial setting menu when the sources are off.
Rotate it to increase or decrease the volume.
4Disc loading slot
Insert a disc to play.
5EJECT button
Press to eject a CD from your built-in CD player.
6 CLOCK button
Press to change to the clock display.
7AUX input jack (3.5 mm stereo jack)
Use to connect an auxiliary equipment.
8DETACH button
Press to remove the front panel from the head unit.
5 6
b a 9 8 7
9 DISPLAY button
Press to select different displays.
a LOUD button
Press to turn loudness on or off.
b 1 to 6 buttons
Press for preset tuning.
c a/b/c/d buttons
Press to perform manual seek tuning, fast forward, reverse and track search controls. Also used for controlling functions.
d BAND button
Press to select among three FM bands and one AM band and to cancel the control mode of functions.
e FUNCTION button
Press to recall the function menu when operating a source.
English
En  5
5

Section
02  Operating this unit
Remote control
 f
f
d


 g
g
 c e
c e


 1
1
h


 j
j
i
Operation is the same as when using the buttons on the head unit. See the explanation of the head unit about the operation of each button with the exception of ATT, which is explained below.
f VOLUME button
Press to increase or decrease the volume.
g ATT button
Press to quickly lower the volume level, by about 90%. Press once more to return to the original volume level.
h SOURCE button
Press to cycle through all the available sources. Press and hold to turn the source off.
i PAUSE button
Press to turn pause on or off.
j DISPLAY button
Not used.
LCD display
1 2
3 4 5 6 7
1 Main display section
Shows the various information such as band, play time, and other setting.
!Tuner
Band and frequency are displayed.
!Built-in CD Player (Audio CD) Erapsed play time is displayed.
!Built-in CD Player (WMA/MP3/WAV disc) Folder number and erapsed play time are displayed.
!Audio and initial setup
Function names and setup status are displayed.
2Preset number/track number indicator
Shows the track number or preset number.
!If a track number 100 or more is selected, d on the left of the track number indicator will light.
3MP3/WMA indicator
Shows the type of the currently playing disc.
4 RPT indicator
Shows when repeat play is turned on.
5 LOUD indicator
Appears in the display when loudness is turned on.
6 Stereo (5) indicator
Shows when the selected frequency is being broadcast in stereo.
7 LOC indicator
Shows when local seek tuning is on.
6 |
En |

 Operating this unit
Basic Operations |
1 |
Press SOURCE to select the tuner. |
Turning the unit on and |
2 |
Press BAND to select a band. |
selecting a source |
Press BAND until the desired band (F1, F2, F3 |
|
You can select a source you want to listen to. |
for FM or AM) is displayed. |
|
|
|
|
To switch to the built-in CD player, load a disc |
3 |
To perform manual tuning, briefly press |
in the unit (refer to the next page). |
c |
d |
|
|
or . |
% Press SOURCE to select a source. |
4 |
To perform seek tuning, press and hold |
Press SOURCE repeatedly to switch between |
c or d for about one second and release. |
|
the following sources: |
The tuner will scan the frequencies until a |
|
Tuner—Built-in CD player—AUX |
broadcast strong enough for good reception is |
|
|
found. |
|
 Notes
Notes
!In the following cases, the sound source will not change:
—When there is no disc in the unit.
—When the AUX (auxiliary input) is set to off (refer to page 12).
!AUX is set to on by default. Turn off the AUX when not in use (refer to Switching the auxiliary setting on page 12).
!When this unit’s blue/white lead is connected to the vehicle’s auto-antenna relay control terminal, the vehicle’s antenna extends when this unit’s source is turned on. To retract the antenna, turn the source off.
Adjusting the volume
% Use VOLUME to adjust the sound level.
Turning the unit off
% Press SOURCE and hold until the unit turns off.
Tuner
Listening to the radio
 Important
If you are using this unit in North, Central or South America, reset the AM tuning step (see
Setting the AM tuning step on page 12).
#You can cancel seek tuning by briefly pressing c or d.
#If you press and hold c or d you can skip stations. Seek tuning starts as soon as you release the button.
Storing and recalling broadcast frequencies
% When you find a frequency that you want to store in memory, press one of preset tuning buttons 1 to 6 and hold until the preset number stops flashing.
Memorized radio station frequency can be recalled by pressing the preset tuning button.
#Up to 18 FM stations, six for each of the three FM bands, and six AM stations can be stored in memory.
#You can also use a and b to recall radio station frequencies assigned to preset tuning buttons 1 to 6.
Tuning in strong signals
Local seek tuning lets you tune in only those radio stations with sufficiently strong signals for good reception.
1Press FUNCTION to select LOCAL.
2Press a or b to turn local seek tuning on or off.
Section
02
English
En |
7 |

Section
02  Operating this unit
3 Press c or d to set the sensitivity. FM: LOCAL 1—LOCAL 2—LOCAL 3— LOCAL 4
AM: LOCAL 1—LOCAL 2
The LOCAL 4 setting allows reception of only the strongest stations, while lower settings let you receive progressively weaker stations.
Storing the strongest broadcast frequencies
BSM (best stations memory) lets you automatically store the six strongest broadcast frequencies under preset tuning buttons 1 to 6. Once stored you can tune in to those frequencies with the touch of button.
!Storing broadcast frequencies with BSM may replace broadcast frequencies you have saved using buttons 1 to 6.
1Press FUNCTION to select BSM.
2Press a to turn BSM on.
Six strongest broadcast frequencies will be stored in the order of their signal strength.
# To cancel the storage process, press b.
Built-in Player
Playing a disc
1Insert a CD (CD-ROM) into the disc loading slot.
Playback will automatically start.
# Be sure to turn up the label side of a disc.
# After a CD (CD-ROM) has been inserted, press
SOURCE to select the built-in CD player.
# You can eject a CD (CD-ROM) by pressing
EJECT.
2Press a or b to select a folder when playing a WMA/MP3/WAV disc.
#You cannot select a folder that does not have a WMA/MP3/WAV file recorded in it.
#To return to folder 01 (ROOT), press and hold BAND. However, if folder 01 (ROOT) contains no files, playback commences with folder 02.
3 To perform fast forward or reverse, press and hold c or d.
# If you select ROUGH, pressing and holding c or d enables you to search every 10 tracks in the current disc (folder). (Refer to Searching every 10 tracks in the current disc or folder on the next page.)
4 To skip back or forward to another track, press c or d.
 Notes
Notes
!Read the precautions with discs and player on page 13.
!If an error message such as ERROR-11 is displayed, refer to Error messages on page 13.
!There is sometimes a delay between starting up disc playback and the sound being issued. When being read, FRMTREAD is displayed.
!When playing CD-EXTRA or MIXED-MODE CDs, WMA/MP3/WAV and CD-DA can be swithced by pressing BAND.
!If you have switched between WMA/MP3/ WAV files and audio CD-DA, playback starts at the first track on the disc.
!The built-in CD player can play back a WMA/ MP3/WAV file recorded on CD-ROM. (Refer to page 14 for files that can be played back.)
!When playing back VBR (variable bit rate) recorded files, erapsed play time may not be displayed correctly.
!When playing WMA/MP3/WAV disc, there is no sound on fast forward or reverse.
Repeating play
Repeat play plays the same track/folder within the selected repeat play range.
1Press FUNCTION to select RPT.
2Press c or d to select the repeat range. DSC – Repeat all tracks
TRK – Repeat just the current track
FLD – Repeat the current folder
# If you select another folder during repeat play, the repeat play range changes to disc repeat.
8 |
En |

|
Section |
Operating this unit |
02 |
|
|
#When playing CD, performing track search or fast forward/reverse cancels the repeat play automatically.
#When playing WMA/MP3/WAV disc, performing track search or fast forward/reverse during TRK (track repeat) changes the repeat play range to folder repeat.
#When FLD (folder repeat) is selected, it is not possible to play back a subfolder of that folder.
#To return to the normal display, press BAND.
Playing tracks in random order
Random play plays tracks in a random order within the selected repeat range.
1 Select the repeat range.
Refer to Repeating play on the previous page.
2 Press FUNCTION to select RDM.
4 When you find the desired track press b to turn scan play off.
#If the display has automatically returned to the playback display, select SCAN again by pressing FUNCTION.
#After scanning of a disc (folder) is finished, normal playback of the tracks will begin again.
Pausing disc playback
Pause lets you temporarily stop playback of the disc.
1Press FUNCTION to select PAUSE.
2Press a or b to turn pause on or off.
# To return to the normal display, press BAND.
# You can also turn pause on or off by pressing PAUSE on the remote control.
English
3 Press a or b to turn random play on or off.
When random play is on, RDM appears in the display.
If you turn random play on during folder repeat, FRDM appears in the display.
# To return to the normal display, press BAND.
Scanning tracks or folders
Scan play searches the song within the selected repeat range.
1 Select the repeat range.
Refer to Repeating play on the previous page.
2Press FUNCTION to select SCAN.
3Press a to turn scan play on.
SCAN appears in the display. The first 10 seconds of each track is played.
# If you turn scan play on during FLD, FSCN appears in the display.
Using compression and BMX
Using the COMP (compression) and BMX functions let you adjust the sound playback quality of this unit.
1Press FUNCTION to select COMP OFF.
2Press a or b to select your favorite setting.
COMP OFF—COMP 1—COMP 2— COMP OFF—BMX 1—BMX 2
# To return to the normal display, press BAND.
Searching every 10 tracks in the current disc or folder
You can switch the search method between fast forward/reverse and searching every 10 tracks. Selecting ROUGH enables you to search every 10 tracks.
1 Press FUNCTION to select FF/REV.
# If the search method ROUGH has been previously selected, ROUGH will be displayed.
2Press d to select ROUGH.
!FF/REV – Fast forward and reverse
En  9
9

Section
02  Operating this unit
!ROUGH – Searching every 10 tracks
#To select FF/REV, press c.
3Press BAND to return to the playback display.
4Press and hold c or d to search every
10tracks on a disc (folder).
# If the rest of track number is less than 10, press and hold c or d recalls the first (last) one.
Displaying text information on disc
% Press DISPLAY.
Press DISPLAY repeatedly to switch between the following settings:
For CD TEXT discs
Play time—DISC TTL (disc title)—DISC ART (disc artist name)—TRK TTL (track title)— TRK ART (track artist name)
For WMA/MP3 discs
Play time—FOLDER (folder name)—FILE (file name)—TRK TTL (track title)—ARTIST (artist name)—ALBUM (album title)—COMMENT (comment)—Bit rate
For WAV discs
Play time—FOLDER (folder name)—FILE (file name)—Sampling frequency
 Notes
Notes
!You can scroll to the left of the title by pressing and holding DISPLAY.
!Audio CD that contain certain information such as text and/or number are CD TEXT.
!If specific information has not been recorded on a disc, NO XXXX will be displayed (e.g.,
NO T-TTL).
!When playing back VBR-recorded WMA files, the average bit rate value is displayed.
!When playing back VBR (variable bit rate)-re- corded MP3 files, VBR is displayed instead of bit rate value.
!Depending on the version of iTunes® used to write MP3 files onto a disc, comment information may not be correctly displayed.
—iTunes is a trademark of Apple Computer, Inc., registered in the U.S. and other countries.
!The sampling frequency shown in the display may be abbreviated.
Audio Adjustments
Using balance adjustment
Fader/balance setting creates an ideal listening environment in all occupied seats.
1Press AUDIO to select FAD.
2Press a or b to adjust front/rear speaker balance.
FAD F15 to FAD R15 is displayed.
# FAD 0 is the proper setting when only two speakers are used.
3 Press c or d to adjust left/right speaker balance.
BAL L15 to BAL R15 is displayed.
# To return to the normal display, press BAND.
Using the equalizer
There are six stored equalizer settings such as
DYNAMIC, VOCAL, NATURAL, CUSTOM,
FLAT and POWERFUL that can easily be recalled at any time.
!CUSTOM is an adjusted equalizer curve that you create.
!When FLAT is selected no supplement or correction is made to the sound.
% Press EQ to select the equalizer.
Press EQ repeatedly to switch between the following equalizers:
DYNAMIC—VOCAL—NATURAL—CUSTOM
—FLAT—POWERFUL
Adjusting equalizer curves
You can adjust the currently selected equalizer curve setting as desired. Adjusted equalizer curve settings are memorized in CUSTOM.
 10
10 En
En
 Operating this unit
Adjusting bass/mid/treble |
Other Functions |
You can adjust the bass/mid/treble level. |
Adjusting initial settings |
|
1Press AUDIO to select BASS/MID/ TREBLE.
2Press a or b to adjust the level.
+6 to –6 is displayed as the level is increased or decreased.
# To return to the normal display, press BAND.
Adjusting loudness
Using the initial settings, you can customize various system settings to achieve optimal performance from this unit.
1Press SOURCE and hold until the unit turns off.
2Press SOURCE and hold until function name appears in the display.
Section
02
English
Loudness compensates for deficiencies in the lowand high-sound ranges at low volume.
1Press AUDIO to select LOUD.
2Press a or b to turn loudness on or off.
# You can also turn loudness on or off by pressing LOUD.
3Press c or d to select a desired level.
LOW (low)—HI (high)
# To return to the normal display, press BAND.
3 Press FUNCTION to select one of the initial settings.
Press FUNCTION repeatedly to switch between the following settings:
Clock—FM (FM tuning step)—AM (AM tuning step)—AUX (auxiliary input)
Use the following instructions to operate each particular setting.
#To cancel initial settings, press BAND.
#You can also cancel initial settings by holding down SOURCE until the unit turns off.
Adjusting source levels
SLA (source level adjustment) lets you adjust the volume level of each source to prevent radical changes in volume when switching between sources.
!Settings are based on the FM tuner volume level, which remains unchanged.
!The AM tuner volume level can also be adjusted with source level adjustments.
1Compare the FM tuner volume level with the level of the source you wish to adjust.
2Press AUDIO to select SLA.
3Press a or b to adjust the source volume.
SLA +4 to SLA –4 is displayed as the source
volume is increased or decreased.
# To return to the normal display, press
BAND.
Setting the clock
Use these instructions to set the clock.
1Press FUNCTION to select clock.
2Press c or d to select the segment of the clock display you wish to set.
Pressing c or d will select one segment of the clock display:
Hour—Minute
3Press a or b to set the clock.
#To cancel clock settings, press BAND.
#You can also cancel clock settings by holding down AUDIO until the unit turns off.
Turning the clock display on or off
You can turn the clock display on or off.
!Even when the sources are off, the clock display appears on the display.
En  11
11

Section
02  Operating this unit
% Press CLOCK to turn the clock display on or off.
Each press of CLOCK turns the clock display on or off.
# The clock display disappears temporarily when you perform other operations, but the clock display appears again after 25 seconds.
Setting the FM tuning step
The FM tuning step employed by seek tuning can be switched between 100 kHz, the preset step, and 50 kHz.
!If seek tuning is performed in 50 kHz steps, stations may be tuned in imprecisely. Tune in the stations with manual tuning or use seek tuning again.
1Press FUNCTION to select FM.
2Press c or d to select the FM tuning step.
Press c to select 50 (50 kHz). Press d to select 100 (100 kHz).
Setting the AM tuning step
The AM tuning step can be switched between 9 kHz, the preset step, and 10 kHz. When using the tuner in North, Central or South America, reset the tuning step from 9 kHz (531 kHz to 1 602 kHz allowable) to 10 kHz (530 kHz to 1 640 kHz allowable).
1Press FUNCTION to select AM.
2Press c or d to select the AM tuning step.
Press c to select 9 (9 kHz). Press d to select
10(10 kHz).
Switching the auxiliary setting
It is possible to use auxiliary equipment with this unit. Activate the auxiliary setting when using auxiliary equipment connected to this unit.
1Press FUNCTION to select AUX.
2Press a or b to turn the auxiliary setting on or off.
 12
12 En
En
Appendix
 Additional Information
Error messages
When you contact your dealer or your nearest Pioneer Service Center, be sure to record the error message.
!Use only conventional, fully circular discs. Do not use shaped discs.
English
Message |
Cause |
Action |
|
|
|
ERROR-11, 12, |
Dirty disc |
Clean disc. |
17, 30 |
|
|
|
|
|
ERROR-11, 12, |
Scratched disc |
Replace disc. |
17, 30 |
|
|
|
|
|
ERROR-10, 11, |
Electrical or me- |
Turn the ignition |
12, 15, 17, 30, |
chanical |
ON and OFF, or |
A0 |
|
switch to a differ- |
|
|
ent source, then |
|
|
back to the CD |
|
|
player. |
|
|
|
ERROR-15 |
The inserted disc |
Replace disc. |
|
does not contain |
|
|
any data |
|
|
|
|
ERROR-22, 23 |
The CD format |
Replace disc. |
|
cannot be played |
|
|
back |
|
|
|
|
NO AUDIO |
The inserted disc |
Replace disc. |
|
does not contain |
|
|
any files that can |
|
|
be played back |
|
|
|
|
PROTECT |
All the files on |
Replace disc. |
|
the inserted disc |
|
|
are secured by |
|
|
DRM |
|
|
|
|
SKIPPED |
The inserted disc |
Replace disc. |
|
contains WMA |
|
|
files that are pro- |
|
|
tected by DRM |
|
|
|
|
Handling guideline of discs and player
!Use only discs featuring either of following two logos.
!Use 12-cm or 8-cm CD. Do not use an adapter when playing 8-cm CDs.
!Do not insert anything other than a CD into the CD loading slot.
!Do not use cracked, chipped, warped, or otherwise damaged discs as they may damage the player.
!Unfinalized CD-R/CD-RW disc playback is not possible.
!Do not touch the recorded surface of the discs.
!Store discs in their cases when not in use.
!Avoid leaving discs in excessively hot environments including under direct sunlight.
!Do not attach labels, write on or apply chemicals to the surface of the discs.
!To clean a CD, wipe the disc with a soft cloth outward from the center.
!Condensation may temporarily impair the player’s performance. Leave it to adjust to the warmer temperature for about one hour. Also, wipe any dump discs with a soft cloth.
!Playback of discs may not be possible because of disc characteristics, disc format, recorded application, playback environment, storage conditions and so on.
!Text information may not be correctly displayed depending on the recorded environment.
!Road shocks may interrupt disc playback.
!Read the precautions with discs before using them.
Dual Discs
!Dual Discs are two-sided discs that have a recordable CD for audio on one side and a recordable DVD for video on the other.
En  13
13
Appendix

 Additional Information
!Since the CD side of Dual Discs is not physically compatible with the general CD standard, it may not be possible to play the CD side with this unit.
!Frequent loading and ejecting of a Dual Disc may result in scratches on the disc. Serious scratches can lead to playback problems on this unit. In some cases, a Dual Disc may become stuck in the disc loading slot and will not eject. To prevent this, we recommend you refrain from using Dual Disc with this unit.
!Please refer to the information from the
disc manufacturer for more detailed information about Dual Discs.
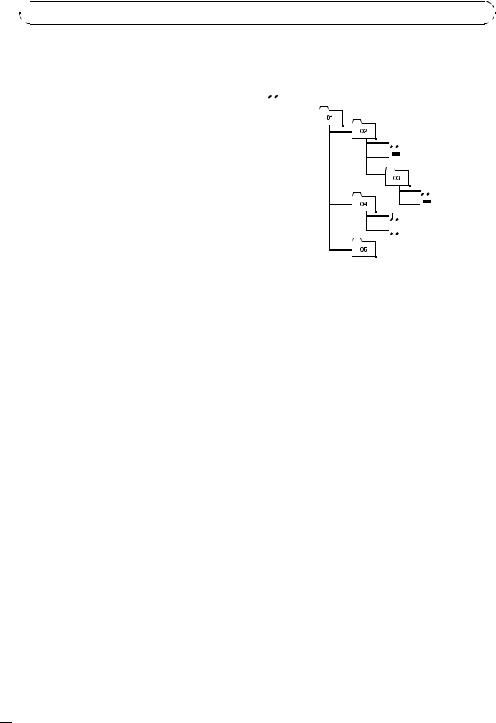
Example of a hierarchy
 : Folder

 : File

 1
1 
 2
2

 3
3

 4
4
 5
5 
 6
6
Level 1 |
Level 2 Level 3 Level 4 |
WMA, MP3 and WAV files
!Depending on the version of Windows Media Player used to encode WMA files, album names and other text information may not be correctly displayed.
!There may be a slight delay when starting playback of WMA files encoded with image data.
!ISO 9660 Level 1 and 2 compliant. Romeo and Joliet file systems are both compatible with this player.
!Multi-session playback is possible.
!WMA/MP3/WAV files are not compatible with packet write data transfer.
!Only 64 characters from the beginning can be displayed as a file name (including the extension such as .wma, .mp3 or .wav) or a folder name.
!Folder selection sequence or other operation may be altered depending on the encoding or writing software.
!Regardless of the length of blank section between the songs of original recording, WMA/MP3/WAV discs will play with a short pause between songs.
!File extensions such as .wma, .mp3 or .wav must be used properly.
!This unit assigns folder numbers. The user cannot assign folder numbers.
!Folder hierarchy is allowed up to eight tiers. However, practical hierarchy of folder is less than two tiers.
!Up to 99 folders on a disc can be played back.
Compressed audio compatibility
WMA
!Compatible format: WMA encoded by Windows Media Player Ver. 7, 7.1, 8, 9 or 10
!Bit rate: 48 kbps to 320 kbps (CBR), 48 kbps to 384 kbps (VBR)
!Sampling frequency: 32 kHz to 48 kHz
!Windows Media Audio 9 Professional, Lossless, Voice: No
MP3
!Bit rate: 8 kbps to 320 kbps
!Sampling frequency: 16 kHz to 48 kHz (32, 44.1, 48 kHz for emphasis)
!Compatible ID3 tag version: 1.0, 1.1, 2.2, 2.3, 2.4 (ID3 tag Version 2.x is given priority than Version 1.x.)
!M3u playlist: No
!MP3i (MP3 interactive), mp3 PRO: No
 14
14 En
En

 Additional Information
WAV
!Compatible format: Linear PCM (LPCM), MS ADPCM
!Quantization bits: 8 and 16 (LPCM), 4 (MS ADPCM)
!Sampling frequency: 16 kHz to 48 kHz
(LPCM), 22.05 kHz to 44.1 kHz (MS ADPCM)
Appendix
English
En  15
15
 Loading...