


DEH-7350BT
Português (B)
Español
English
Owner’s Manual
Manual de instrucciones
Manual do proprietário
DEH-7350BT
CD RDS RECEIVER
REPRODUCTOR DE CD CON RECEPTOR RDS
RECEPTOR DE CD RDS
Thank you for purchasing this PIONEER
product.
To ensureproperuse,please read through this
manual before using this product. It is especially
important that you read and obser ve WARN-
INGs and CAUTIONs in this manual. Please
keep the manual in a safe and accessible place for
future reference.
FCC ID: AJDK033
MODEL NO.: DEH-7350BT
This equipment complies with FCC/IC radia-
tion exposure limits set forth for uncontrolled
equipment and meets the FCC/IC radio fre-
quency (RF) Exposure Guidelines in Supple-
ment C to OET65. This equipment has very
low levels of RF energy that it deemed to com-
ply without maximum permissive exposure
evaluation (MPE). But it is desirable that it
should be installed and operated with at least
20 cm and more between the radiator and
person’s body (excluding extremities: hands,
wrists, feet and ankles).
This transmitter must not be co-located or oper-
ated in conjunction with any other antenna or
transmitter.
Information to User
Alteration or modifications carried out with-
out appropriate authorization may invalidate
the user ’s right to operate the equipment.
About this unit
CAUTION
! Do not allow this unit to come into contact
with liquids. Electrical shock could result.
Also, damage to this unit, smoke, and over-
heating could result from contact with
liquids.
! Always keep the volume low enough to hear
outside sounds.
! Avoid exposure to moisture.
! If the battery is disconnected or discharged,
any preset memory will be erased.
CAUTION
This product is a class 1 laser product classi-
fied under the Safety of laser products, IEC
60825-1:2007, and contains a class 1M laser
module. To ensure continued safety, do not re-
move any covers or attempt to gain access to
the inside of the product. Refer all servicing to
qualified personnel.
CAUTION—CLASS 1M INVISIBLE LASER
RADIATION WHEN OPEN, DO NOT VIEW
DIRECTLY WITH OPTICAL INSTRUMENTS.
CAUTION:
USE OF CONTROL OR ADJUSTMENT OR
PERFORMANCE OF PROCEDURES
OTHER THAN THOSE SPECIFIED HEREIN
MAY RESULT IN HAZARDOUS RADIATION
EXPOSURE.
CAUTION:
THE USE OF OPTICAL INSTRUMENTS
WITH THIS PRODUCT WILL INCREASE
EYE HAZARD.
Notes
! Function setting operations are completed
even if the menu is cancelled before the op-
erations are confirmed.
! In this manual, iPod and iPhone will be re-
ferred to as “iPod”.
Demo mode
Important
! Failure to connect the red lead (ACC) of this
unit to a terminal coupled with ignition
switch on/off operations may lead to battery
drain.
! Remember that if the feature demo contin-
ues operating when the car engine is turned
off, it may drain battery power.
The demo automatically starts when the ignition
switch is set to ACC or ON while the unit is
turned off. Turning off the unit does not cancel
demo mode. To cancel the demo mode, operate
the function in the initial setting menu. Operat-
ing the demo while the ignition switch is set to
ACC may drain battery power.
Before You Start
01
2
Section
Before You Start
En
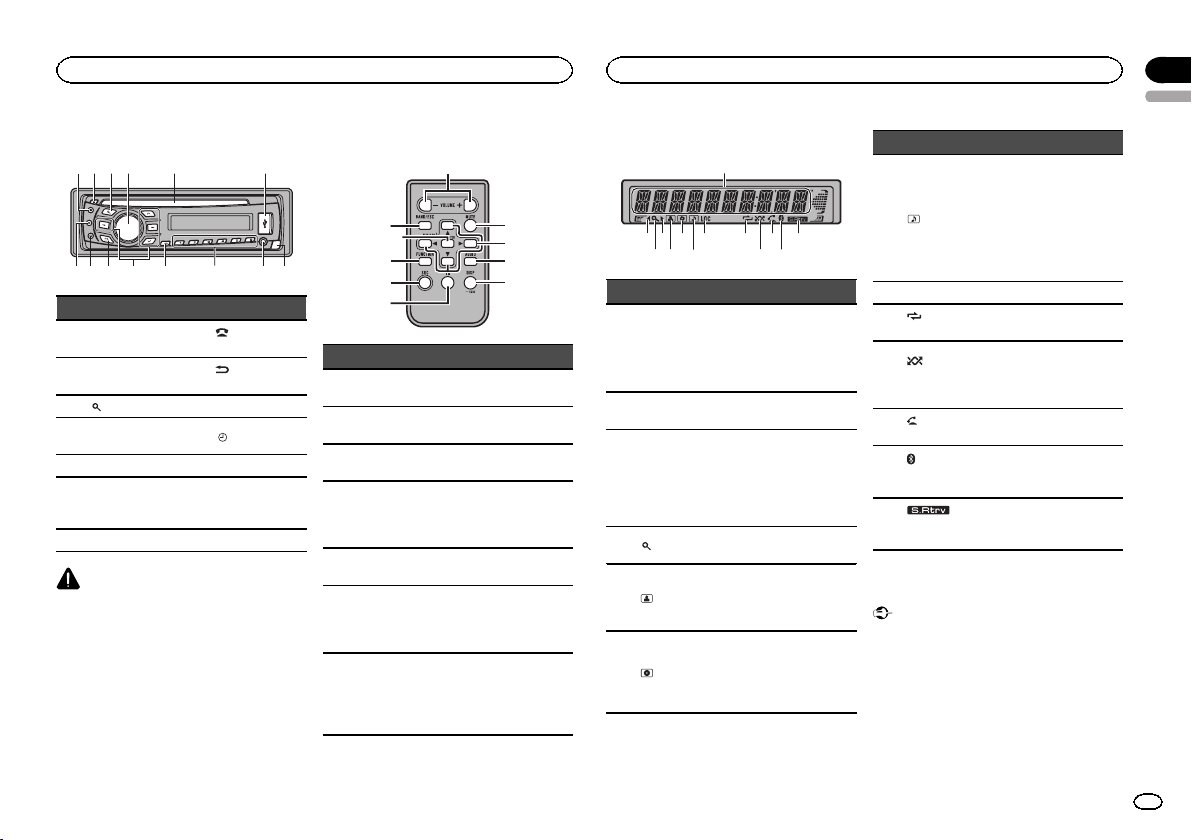
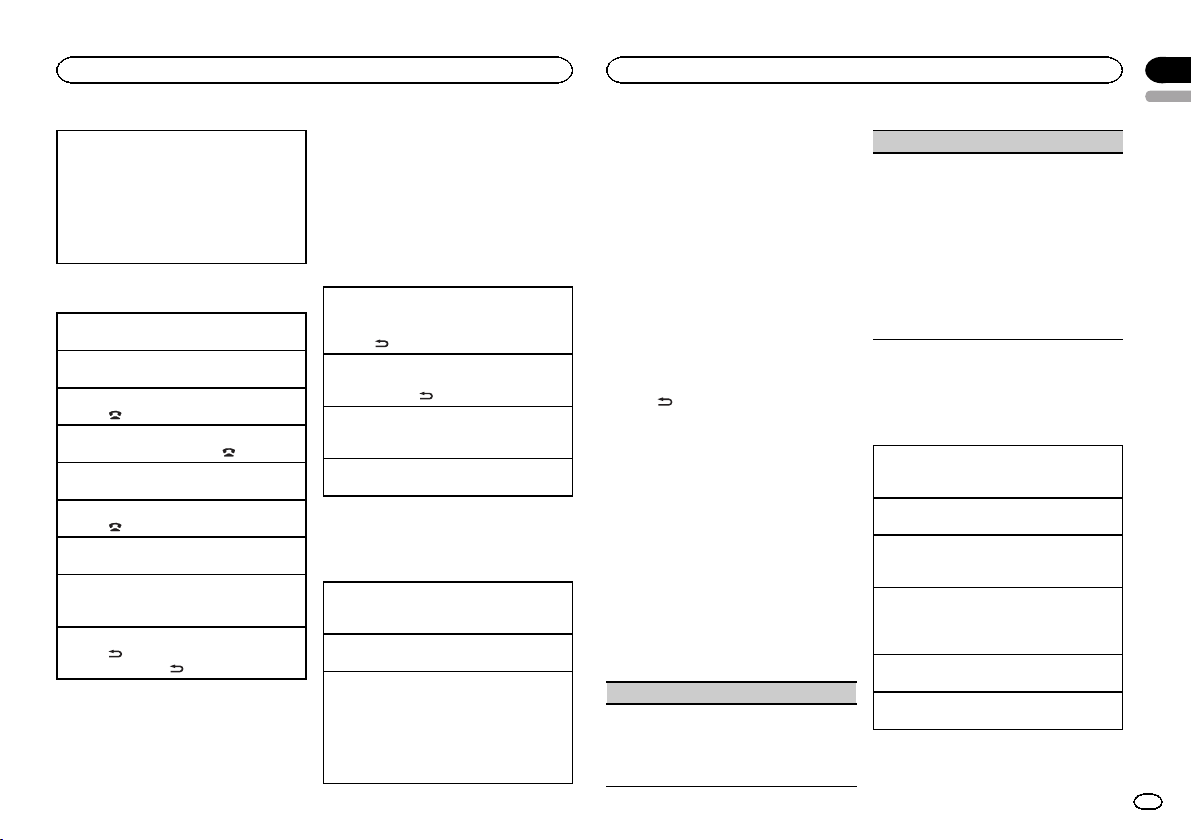
Head unit
1
24 5 63
78 a b c ed9
Part Part
1 S (SRC/OFF) 8
(phone/on
hook)
2 h (eject) 9
(Back/display/
scroll)
3
(list) a a/b/c/d
4
MULTI-CONTROL
(M.C.)
b
/DISP OFF
5 Disc loading slot c 1 to 6
6 USB port d
AUX input jack
(3.5 mm stereo
jack)
7 B (BAND/ESC) e Detach button
CAUTION
! Use an optional Pioneer USB cable (CD-
U50E) to connect the USB audio player/USB
memory as any device connected directly to
the unit will protrude out from the unit and
may be dangerous.
! Do not use unauthorized products.
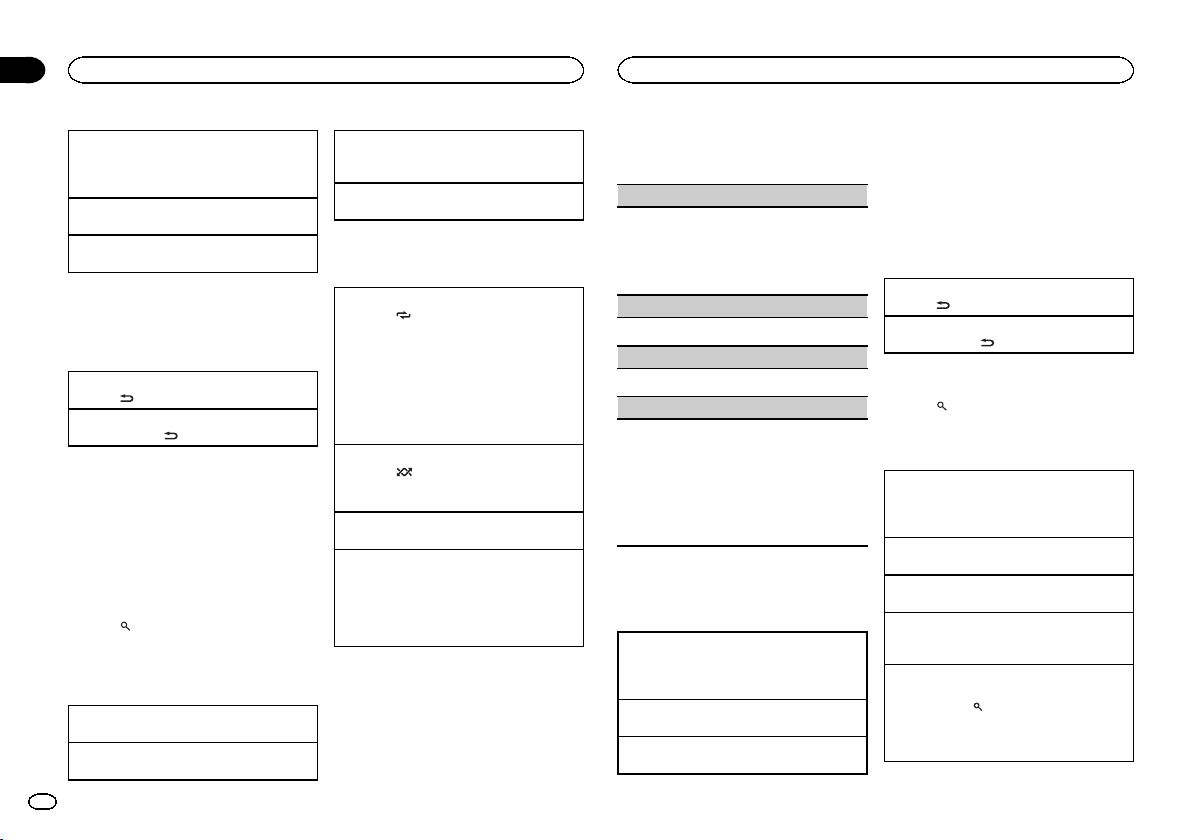
Remote control
f
l
j
g
i
hk
7
1
a
Part Operation
f VOLUME
Press to increase or decrease
volume.
g MUTE
Press to mute. Press again to
unmute.
h AUDIO
Press to select an audio func-
tion.
i DISP/SCRL
Press to select different dis-
plays.
Press and hold to scroll
through the text information.
j e
Press to pause or resume play-
back.
k
FUNC-
TION
Press to select functions.
Press and hold to recall the ini-
tial setting menu when the
sources are off.
l
LIST/
ENTER
Press to display the disc title,
track title, folder, or file list de-
pending on the source.
While in the operating menu,
press to control functions.
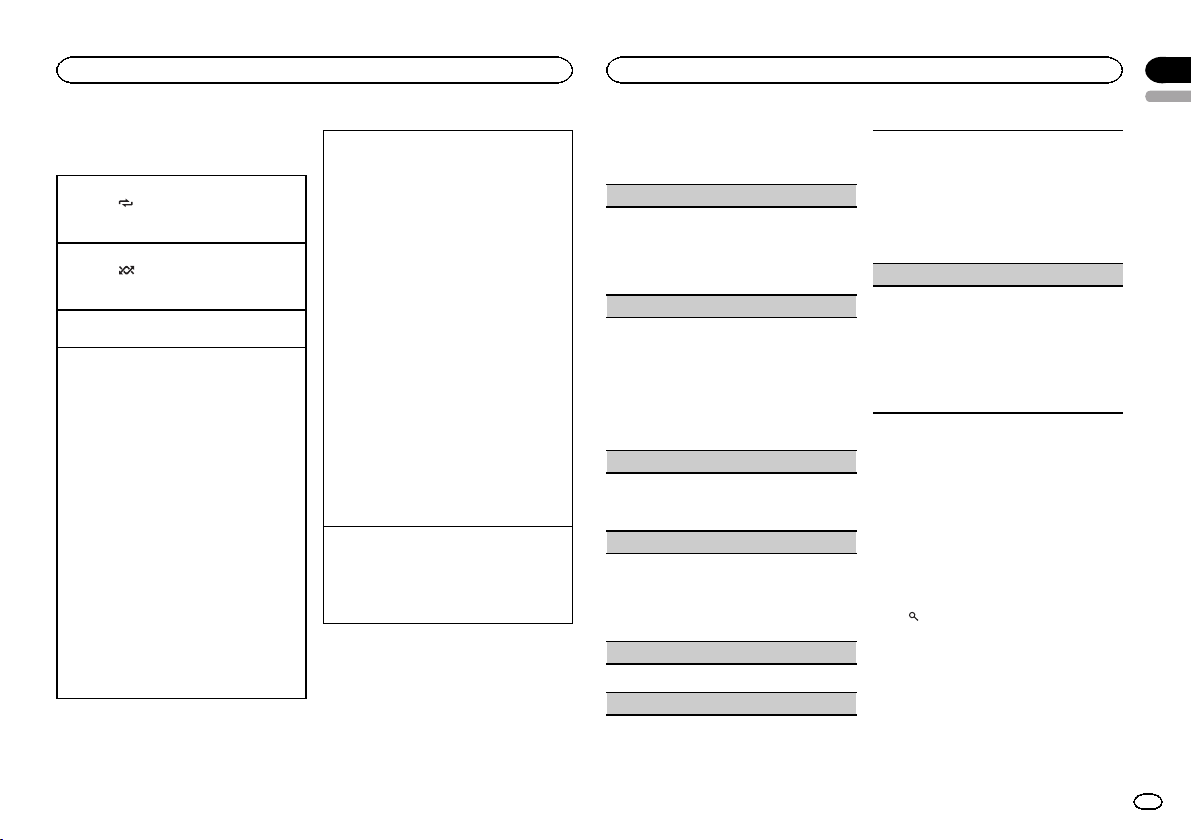
Display indication
4 5
6
3
8
a
c
9
1
2
7
b d
Indicator State
1
Main dis-
play sec-
tion
! Tuner: band and frequency
! Built-in CD, USB storage
device and iPod: elapsed
playback time and text in-
formation
2 c
An upper tier of the folder or
menu exists.
3 d
A lower tier of the folder or
menu exists.
This flashes when a song/
album related to the song cur-
rently playing is selected from
the iPod.
4
(list)
The list function is being oper-
ated.
5
(artist)
The artist name is displayed.
Artist search refinement of the
iPod browsing function is in
use.
6
(disc)
The disc (album) name is dis-
played.
Album search refinement of
the iPod browsing function is
in use.
Indicator State
7
(song)
The track (song) name is dis-
played.
A playable audio file has been
selected during operation of
the list.
Song search refinement of the
iPod browsing function is in
use.
8 LOC Local seek tuning is on.
9
(re-
peat)
Track or folder repeat is on.
a
(ran-
dom/shuf-
fle)
Random play is on.
The iPod source is selected
and the shuffle or shuffle all
function is on.
b
(auto
answer)
Shows when the automatic an-
swering function is on.
c
(Blue-
tooth indi-
cator)
Connected to a Bluetooth de-
vice.
The line is on hold.
d
(sound re-
triever)
The sound retriever function is
on.
Basic Operations
Important
! Handle gently when removing or attaching
the front panel.
! Avoid subjecting the front panel to excessive
shock.
! Keep the front panel out of direct sunlight
and high temperatures.
! To avoid damaging the device or vehicle inte-
rior, remove any cables and devices attached
to the front panel before detaching it.
English
Operating this unit
02
3
Section
Operating this unit
En
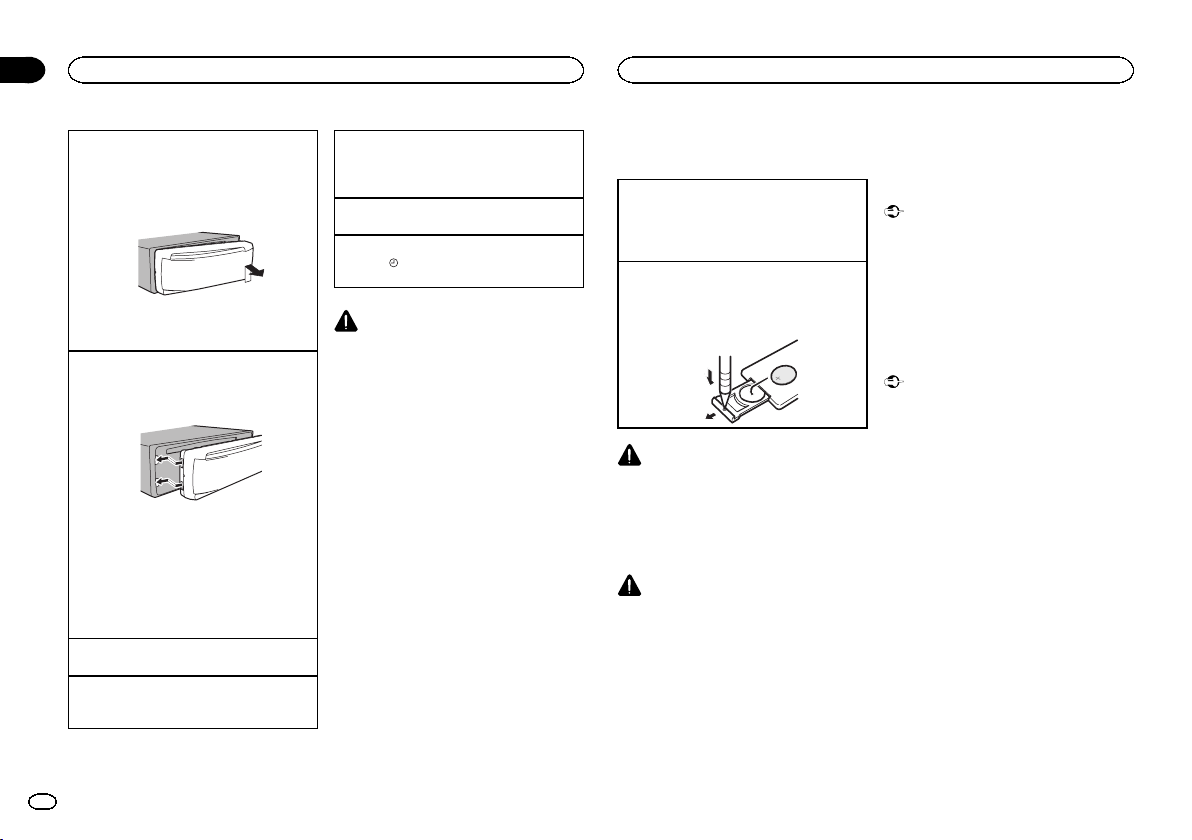
Removing the front panel to protect your unit from
theft
1 Press the detach button to release the front
panel.
2 Push the front panel upward and pull it toward
you.
3 Always keep the detached front panel in a pro-
tection device such as a protection case.
Re-attaching the front panel
1 Slide the front panel to the left.
Make sure to insert the tabs on the left side of
the head unit into the slots on the front panel.
2 Press the right side of the front panel until it is
firmly seated.
If you cannot attach the front panel to the
head unit successfully, make sure that you are
placing the front panel onto the head unit cor-
rectly. Forcing the front panel into place may
result in damage to the front panel or head
unit.
Turning the unit on
1 Press S (SRC/OFF) to turn the unit on.
Turning the unit off
1 Press S (SRC/OFF) and hold until the unit
turns off.
Selecting a source
1 Press S (SRC/OFF) to cycle between:
TUNER (tuner)—CD (built-in CD player)—USB
(USB)/iPod (iPod)—AUX (AUX)
Adjusting the volume
1 Turn M.C. to adjust the volume.
Turning the display off and on
1 Press
/DISP OFF and hold until the display
turns off and on.
CAUTION
For safety reasons, park your vehicle when re-
moving the front panel.
Note
When this unit’s blue/white lead is connected to
the vehicle’s auto-antenna relay control termi-
nal, the vehicle’s antenna extends when this
unit’s source is turned on. To retract the anten-
na, turn the source off.
Use and care of the remote
control
Using the remote control
1 Point the remote control in the direction of the
front panel to operate.
When using for the first time, pull out the film
protruding from the tray.
Replacing the battery
1 Slide the tray out on the back of the remote
control.
2 Insert the battery with the plus (+) and minus
(–) poles aligned properly.
WARNING
! Keep the battery out of the reach of children.
Should the battery be swallowed, consult a
doctor immediately.
! Batteries (battery pack or batteries installed)
must not be exposed to excessive heat such
as sunshine, fire or the like.
CAUTION
! Use one CR2025 (3 V) lithium battery.
! Remove the battery if the remote control is
not used for a month or longer.
! There is a danger of explosion if the battery is
incorrectly replaced. Replace only with the
same or equivalent type.
! Do not handle the battery with metallic tools.
! Do not store the battery with metallic ob-
jects.
! If the battery leaks, wipe the remote control
completely clean and install a new battery.
! When disposing of used batteries, comply
with governmental regulations or environ-
mental public institutions’ rules that apply in
your country/area.
Important
! Do not store the remote control in high tem-
peratures or direct sunlight.
! The remote control may not function properly
in direct sunlight.
! Do not let the remote control fall onto the
floor, where it may become jammed under
the brake or accelerator pedal.
Using Bluetooth telephone
Important
! Since this unit is on standby to connect with
your cellular phone via Bluetooth wireless
technology, using it without the engine run-
ning can drain the battery power.
! Operations may vary depending on the kind
of cellular phone.
! Advanced operations that require attention
such as dialing numbers on the monitor,
using the phone book, etc., are prohibited
while driving. Park your vehicle in a safe
place when using these advanced opera-
tions.
Setting up for hands-free phoning
Before you can use the hands-free phoning
function you must set up the unit for use with
your cellular phone.
Operating this unit
02
4
Section
Operating this unit
En
1 Connection
Operate the Bluetooth telephone connection
menu. Refer to Connection menu operation on
page 8.
2 Function settings
Operate the Bluetooth telephone function
menu. Refer to Phone menu operation on page
8.
Basic Operations
Making a phone call
1 Refer to Phone menu operation on page 8.
Answering an incoming call
1 When a call is received, press M.C.
Ending a call
1 Press
.
Rejecting an incoming call
1 When a call is received, press
.
Answering a call waiting
1 When a call is received, press M.C.
Canceling call waiting
1 Press
.
Adjusting the other party’s listening volume
1 Press a or b while talking on the phone.
Turning private mode on or off.
1 Press B (BAND/ESC) while talking on the
phone.
Switching the information display
1 Press
while talking on the phone.
! Press and hold
to scroll.
Notes
! If private mode is selected on the cellular
phone, hands-free phoning may not be avail-
able.
! The estimated call time appears in the dis-
play (this may differ slightly from the actual
call time).
Menu operations identical
for function settings/audio
adjustments/initial settings/
lists
Returning to the previous display
Returning to the previous list (the folder one level
higher)
1 Press
.
Returning to the main menu
Returning to the top tier of list
1 Press and hold
.
Returning to the ordinary display
Canceling the initial setting menu
1 Press B (BAND/ESC).
Returning to the ordinary display from the list
1 Press B (BAND/ESC).
Tuner
Basic Operations
Selecting a band
1 Press B (BAND/ESC) until the desired band
(F1, F2, F3 for FM or AM) is displayed.
Manual tuning (step by step)
1 Press c or d .
Seeking
1 Press and hold c or d, and then release.
You can cancel seek tuning by briefly pressing
c or d.
While pressing and holding c or d, you can
skip stations. Seek tuning starts as soon as
you release c or d.
Storing and recalling stations
for each band
Using preset tuning buttons
1 When you find a station that you want
to store in memory, press one of the preset
tuning buttons (1 to 6) and hold until the
preset number stops flashing.
2 Press one of the preset tuning buttons (1
to 6) to select the desired station.
# You can also recall stored radio stations by press-
ing a or b during the frequency display.
Switching the display
Selecting the desired text information
% Press
.
Program service name—Frequency
# The frequency appear on the display for eight
seconds.
Note
Depending on the area, you cannot switch the
display.
Function settings
1 Press M.C. to display the main menu.
2 Turn M.C. to change the menu option
and press to select FUNCTION.
3 Turn M.C. to select the function.
After selecting, perform the following proce-
dures to set the function.
BSM (best stations memory)
BSM (best stations memory) automatically stores
the six strongest stations in the order of their sig-
nal strength.
1 Press M.C. to turn BSM on.
To cancel, press M.C. again.
LOCAL (local seek tuning)
Local seek tuning lets you tune in to only those
radio stations with sufficiently strong signals for
good reception.
1 Press M.C. to display the setting mode.
2 Turn M.C. to select the desired setting.
FM: OFF—LEVEL 1—LEVEL 2—LEVEL 3—
LEVEL 4
AM: OFF—LEVEL 1—LEVEL 2
The highest level setting allows reception of
only the strongest stations, while lower levels
allow the reception of weaker stations.
3 Press M.C. to confirm the selection.
CD/CD-R/CD-RW and USB
storage devices
Basic Operations
Playing a CD/CD-R/CD-RW
1 Insert the disc into the disc loading slot with
the label side up.
Ejecting a CD/CD-R/CD-RW
1 Press h.
Playing songs on a USB storage device
1 Open the USB connector cover and plug in
the USB storage device using a USB cable.
Stopping playback of files on a USB storage de-
vice
1 You may disconnect the USB storage device at
any time.
Selecting a folder
1 Press a or b .
Selecting a track
1 Press c or d .
English
Operating this unit
02
5
Section
Operating this unit
En
Fast forwarding or reversing
1 Press and hold c or d.
! When playing compressed audio, there is no
sound during fast forward or reverse.
Returning to root folder
1 Press and hold B (BAND/ESC).
Switching between compressed audio and CD-DA
1 Press B (BAND/ESC).
Note
Disconnect USB storage devices from the unit
when not in use.
Displaying text information
Selecting the desired text information
1 Press
.
Scrolling the text information to the left
1 Press and hold
.
Notes
! Depending on the version of iTunes used to
write MP3 files to a disc or media file types,
incompatible text stored within an audio file
may be displayed incorrectly.
! Text information items that can be changed
depend on the media.
Selecting and playing files/
tracks from the name list
1 Press to switch to the file/track name
list mode.
2 Use M.C. to select the desired file name
(or folder name).
Changing the file or folder name
1 Turn M.C.
Playing
1 When a file or track is selected, press M.C.
Viewing a list of the files (or folders) in the se-
lected folder
1 When a folder is selected, press M.C.
Playing a song in the selected folder
1 When a folder is selected, press and hold M.C.
Advanced operations using
special buttons
Selecting a repeat play range
1 Press 6/
to cycle between the following:
CD/CD-R/CD-RW
! DISC – Repeat all tracks
! TRACK – Repeat the current track
! FOLDER – Repeat the current folder
USB audio player/USB memory
! ALL – Repeat all files
! TRACK – Repeat the current file
! FOLDER – Repeat the current folder
Playing tracks in random order
1 Press 5/
to turn random play on or off.
Tracks in a selected repeat range are played in
random order.
Pausing playback
1 Press 2/PAUSE to pause or resume.
Enhancing compressed audio and restoring rich
sound (sound retriever)
1 Press 1/S.Rtrv to cycle between:
OFF (off)—1—2
1 is effective for low compression rates, and 2
is effective for high compression rates.
Function settings
1 Press M.C. to display the main menu.
2 Turn M.C. to change the menu option
and press to select FUNCTION.
3 Turn M.C. to select the function.
After selecting, perform the following proce-
dures to set the function.
REPEAT (repeat play)
1 Press M.C. to display the setting mode.
2 Turn M.C. to select a repeat play range.
For details, refer to Selecting a repeat play range
on this page.
3 Press M.C. to confirm the selection.
RANDOM (random play)
1 Press M.C. to turn random play on or off.
PAUSE (pause)
1 Press M.C. to pause or resume.
S.RTRV (sound retriever)
Automatically enhances compressed audio and
restores rich sound.
1 Press M.C. to display the setting mode.
2 Turn M.C. to select the desired setting.
For details, refer to Enhancing compressed
audio and restoring rich sound (sound retriever)
on this page.
3 Press M.C. to confirm the selection.
iPod
Basic Operations
Playing songs on an iPod
1 Open the USB connector cover.
2 Connect an iPod to the USB cable using an
iPod Dock Connector.
Selecting a track (chapter)
1 Press c or d .
Fast forwarding or reversing
1 Press and hold c or d.
Notes
! The iPod cannot be turned on or off when the
control mode is set to CTRL AUDIO.
! Disconnect headphones from the iPod be-
fore connecting it to this unit.
! The iPod will turn off about two minutes after
the ignition switch is set to OFF.
Displaying text information
Selecting the desired text information
1 Press
.
Scrolling the text information to the left
1 Press and hold
.
Browsing for a song
1 Press to switch to the top menu of list
search.
2 Use M.C. to select a category/song.
Changing the name of the song or category
1 Turn M.C.
Playlists—artists—albums—songs—podcasts
—genres—composers—audiobooks
Playing
1 When a song is selected, press M.C.
Viewing a list of songs in the selected category
1 When a category is selected, press M.C.
Playing a song in the selected category
1 When a category is selected, press and hold
M.C.
Searching the list by alphabet
1 When a list for the selected category is dis-
played, press
to switch to alphabet search
mode.
2 Turn M.C. to select a letter.
3 Press M.C. to display the alphabetical list.
Operating this unit
02
6
Section
Operating this unit
En
Advanced operations using
special buttons
Selecting a repeat play range
1 Press 6/
to cycle between the following:
! ONE – Repeat the current song
! ALL – Repeat all songs in the selected list
Playing all songs in random order (shuffle all)
1 Press 5/
to turn shuffle all on.
! When the control mode is set to CTRL iPod/
CTRL APP,shuffle play is on.
Pausing playback
1 Press 2/PAUSE to pause or resume.
Playing songs related to the currently playing
song
You can play songs from the following lists.
• Album list of the currently playing artist
• Song list of the currently playing album
• Album list of the currently playing genre
1 Press and hold M.C. to switch to link play
mode.
2 Turn M.C. to change the mode; press to select.
! ARTIST – Plays an album of the artist cur-
rently being played.
! ALBUM – Plays a song from the album
currently being played.
! GENRE – Plays an album from the genre
currently being played.
The selected song/album will be played after
the currently playing song.
The selected song/album may be canceled if you
operate functions other than link search (e.g. fast
forward and reverse).
Depending on the song selected to play, the end
of the currently playing song and the beginning of
the selected song/album may be cut off.
Operating this unit’s iPod function from your iPod
You can listen to the sound from your iPod appli-
cations using your car's speakers, when CTRL
APP is selected.
This function is not compatible with the following
iPod models.
! iPod nano 1st generation
! iPod 5th generation
APP mode is compatible with the following iPod
models.
! iPhone 3GS (software version 4.0 or later)
! iPhone 3G (software version 4.0 or later)
! iPhone (software version 3.1.3 or later)
! iPod touch 3rd generation (software version
4.0 or later)
! iPod touch 2nd generation (software version
4.0 or later)
! iPod touch 1st generation (software version
3.13 or later)
1 Press 4/iPod to switch the control mode.
! CTRL iPod – This unit’s iPod function can
be operated from the connected iPod.
! CTRL APP – Play back the sound from your
iPod applications.
! CTRL AUDIO – This unit’s iPod function
can be operated from this unit.
Enhancing compressed audio and restoring rich
sound (sound retriever)
1 Press 1/S.Rtrv to cycle between:
OFF (off)—1—2
1 is effective for low compression rates, and 2
is effective for high compression rates.
Function settings
1 Press M.C. to display the main menu.
2 Turn M.C. to change the menu option
and press to select FUNCTION.
3 Turn M.C. to select the function.
After selecting, perform the following proce-
dures to set the function.
REPEAT (repeat play)
1 Press M.C. to display the setting mode.
2 Turn M.C. to select a repeat play range.
For details, refer to Selecting a repeat play range
on this page.
3 Press M.C. to confirm the selection.
SHUFFLE (shuffle)
1 Press M.C. to display the setting mode.
2 Turn M.C. to select your favorite setting.
! SONGS – Play back songs in the selected
list in random order.
! ALBUMS – Play back songs from a ran-
domly selected album in order.
! OFF – Cancel random play.
3 Press M.C. to confirm the selection.
SHUFFLE ALL (shuffle all)
1 Press M.C. to turn shuffle all on.
To turn off, set SHUFFLE in the FUNCTION
menu to off.
LINK PLAY (link play)
1 Press M.C. to display the setting mode.
2 Turn M.C. to change the mode; press to select.
For details about the settings, refer to Playing
songs related to the currently playing song on
this page.
PAUSE (pause)
1 Press M.C. to pause or resume.
AUDIO BOOK (audiobook speed)
1 Press M.C. to display the setting mode.
2 Turn M.C. to select your favorite setting.
! FASTER – Playback at a speed faster than
normal
! NORMAL – Playback at normal speed
! SLOWER – Playback at a speed slower
than normal
3 Press M.C. to confirm the selection.
S.RTRV (sound retriever)
Automatically enhances compressed audio and
restores rich sound.
1 Press M.C. to display the setting mode.
2 Turn M.C. to select the desired setting.
For details, refer to Enhancing compressed
audio and restoring rich sound (sound retriever)
on this page.
3 Press M.C. to confirm the selection.
Notes
! Switching the control mode to CTRL iPod
pauses song playback. Operate the iPod to
resume playback.
! The following functions are still accessible
from the unit even if the control mode is set
to CTRL iPod/CTRL APP.
— Pausing
— Fast forward/reverse
— Track up/down
— Repeat play (ONE/ALL/OFF)
— Random play (shuffle)
—
(list) to use iPod menu
— a to turn the iPod click wheel to the left
— b to turn the iPod click wheel to the right
! When the control mode is set to CTRL iPod,
operations are limited as follows:
— The function settings are not available.
— The browse function cannot be operated from
this unit.
English
Operating this unit
02
7
Section
Operating this unit
En
Bluetooth Telephone
Connection menu operation
Important
Be sure to park your vehicle in a safe place and
apply the parking brake when per forming this
operation.
1 Press and hold
to display the connec-
tion menu.
# You cannot operate this step during a call.
2 Turn M.C. to select the function.
After selecting, perform the following proce-
dures to set the function.
DEVICELIST (connecting or disconnecting a cellu-
lar phone from the device list)
1 Press M.C. to display the setting mode.
2 Turn M.C. to select the name of a device you
want to connect/disconnect.
! Press and hold M.C. to switch the BD ad-
dress and device name.
3 Press M.C. to connect/disconnect the selected
cellular phone.
If the connection is established, * is indicated
on the device name.
DEL DEVICE (deleting a cellular phone from the
device list)
1 Press M.C. to display the setting mode.
2 Turn M.C. to select the name of a device you
want to delete.
! Press and hold M.C. to switch the BD ad-
dress and device name.
3 Press M.C. to display DELETE YES.
4 Press M.C. to delete a cellular phone informa-
tion from the device list.
! While this function is in use, do not turn off
the engine.
ADD DEVICE (connecting a new cellular phone)
1 Press M.C. to start searching.
! To cancel, press M.C. while searching.
2 Turn M.C. to select a device from the device
list.
! If the desired device is not displayed, select
RE-SEARCH.
3 Press and hold M.C. to switch the BD address
and device name.
4 Press M.C. to connect the selected cellular
phone.
! To complete the connection, check the de-
vice name (DEH-7350BT) and enter the
link code on your cellular phone.
! PIN code is set to 0000 as the default. You
can change this code. Refer to PIN CODE
(PIN code input) on this page.
! If five devices are already paired, DEVICE-
FULL is displayed and it is not possible to
perform this operation. In this case, delete
a paired device first.
SPCL. DEV. (setting a special device)
Bluetooth devices that are difficult to establish a
connection with are called special devices. If your
Bluetooth device is listed as a special device, se-
lect the appropriate one.
1 Press M.C. to display the setting mode.
2 Use M.C. to select a special device.
Turn to change the menu option. Press to se-
lect.
! If five devices are already paired, DEVICE-
FULL is displayed and it is not possible to
perform this operation. In this case, delete
a paired device first.
3 Turn M.C. to display this unit’s device name,
BD address and pincode.
4 Use a cellular phone to connect to this unit.
! To complete the connection, check the de-
vice name (DEH-7350BT) and enter the
link code on your cellular phone.
! PIN code is set to 0000 as the default. You
can change this code. Refer to PIN CODE
(PIN code input) on this page.
A. CONN (connecting to a Bluetooth device auto-
matically)
1 Press M.C. to turn automatic connection on or
off.
VISIBLE (setting the visibility of this unit)
To check the availability of this unit from other de-
vices, Bluetooth visibility of this unit can be turned
on.
1 Press M.C. to turn the visibility of this unit on
or off.
! While setting SPCL. DEV., Bluetooth visibil-
ity of this unit is turned on temporarily.
PIN CODE (PIN code input)
To connect your cellular phone to this unit via
Bluetooth wireless technology, you need to enter a
PIN code on your phone to verify the connection.
The default code is 0000, but you can change it
with this function.
1 Press M.C. to display the setting mode.
2 Press a or b to select a number.
3 Press d to move the cursor to the next posi-
tion.
4 After inputting PIN code, press and hold M.C.
The PIN code can be stored in the memory.
! After inputting 8 digits PIN code, press d
to store in memory.
! After inputting, pressing M.C. returns you
to the PIN code input display, and you can
change the PIN code.
DEV. INFO (BD (Bluetooth device) address dis-
play)
1 Press M.C. to display the setting mode.
2 Turn M.C. left to switch to the BD address.
Turning M.C. right returns to the device name.
Phone menu operation
Important
Be sure to park your vehicle in a safe place and
apply the parking brake when per forming this
operation.
1 Press
to display the phone menu.
2 Turn M.C. to select the function.
After selecting, perform the following proce-
dures to set the function.
MISSED (missed call history)
DIALED (dialed call history)
RECENT (received call history)
1 Press M.C. to display the phone number list.
2 Turn M.C. to select a name or phone number.
3 Press M.C. to make a call.
4 When you find a phone number that you want
to store in memory, press and hold one of the
preset tuning buttons (1 to 6).
! Press one of preset buttons 1 to 6 to recall
the desired preset number.
PHONE BOOK (phone book)
Operating this unit
02
8
Section
Operating this unit
En

! The phone book in your cellular phone will be
transferred automatically when the phone is
connected to this unit.
! Depending on the cellular phone, the phone
book may not be transferred automatically. In
this case, operate your cellular phone to trans-
fer the phone book. The visibility of this unit
should be on. Refer to VISIBLE (setting the visi-
bility of this unit) on the previous page.
1 Press M.C. to display SEARCH (alphabetical
list).
2 Turn M.C. to select the first letter of the name
you are looking for.
! Press and hold M.C. to select the desired
character type.
3 Press M.C. to display a registered name list.
4 Turn M.C. to select the name you are looking
for.
5 Press M.C. to display the phone number list.
6 Turn M.C. to select a phone number youwant
to call.
! When you find a phone number that you
want to store in memory, press and hold
one of the preset tuning buttons (1 to 6).
! Press one of preset buttons 1 to 6 to recall
the desired preset number.
7 Press M.C. to make a call.
PRESET (preset phone numbers)
1 Press M.C. to display the setting mode.
2 Use M.C. to select the desired preset number.
Turn to change the menu option. Press to se-
lect.
! You can also press one of the preset num-
ber buttons 1 to 6 to select a number.
3 Press M.C. to make a call.
PHONE FUNC (phone function)
You can set A. ANSR and RING TONE from this
menu. For details, refer to Function and operation
on this page.
Function and operation
1 Display PHONE FUNC.
Refer to PHONE FUNC (phone function) on this
page.
2 Press M.C. to display the function menu.
3 Turn M.C. to select the function.
After selecting, perform the following proce-
dures to set the function.
A. ANSR (automatic answering)
1 Press M.C. to turn automatic answering on or
off.
RING TONE (ring tone select)
1 Press M.C. to turn the ring tone on or off.
Audio Adjustments
1 Press M.C. to display the main menu.
2 Turn M.C. to change the menu option
and press to select AUDIO.
3 Turn M.C. to select the audio function.
After selecting, perform the following proce-
dures to set the audio function.
FAD/BAL (fader/balance adjustment)
1 Press M.C. to display the setting mode.
2 Press M.C. to cycle between fader (front/rear)
and balance (left/right).
3 Turn M.C. to adjust speaker balance.
! When the rear output and RCA output setting
are SW, you cannot adjust front/rear speaker
balance. Refer to SW CONTROL (rear output
and subwoofer setting) on the next page.
EQUALIZER (equalizer recall)
1 Press M.C. to display the setting mode.
2 Turn M.C. to select the equalizer.
DYNAMIC—VOCAL—NATURAL—CUSTOM
—FLAT—POWERFUL
3 Press M.C. to confirm the selection.
TONE CTRL (equalizer adjustment)
! Adjusted equalizer curve settings are stored in
CUSTOM.
1 Press M.C. to display the setting mode.
2 Press M.C. to select BASS (bass)/MID (mid)/
TREBLE (treble).
3 Turn M.C. to adjust the level.
Adjustment range: +6 to -6
LOUDNESS (loudness)
Loudness compensates for deficiencies in the low-
and high-frequency ranges at low volume.
1 Press M.C. to display the setting mode.
2 Turn M.C. to select the desired setting.
OFF (off)—LOW(low)—HIGH (high)
3 Press M.C. to confirm the selection.
SUBWOOFER1 (subwoofer on/off setting)
This unit is equipped with a subwoofer output
which can be turned on or off.
1 Press M.C. to display the setting mode.
2 Turn M.C. to select the desired setting.
NORMAL (normal phase)—REVERSE (reverse
phase)—OFF (subwoofer off)
3 Press M.C. to confirm the selection.
SUBWOOFER2 (subwoofer adjustment)
The cut-off frequency and output level can be ad-
justed when the subwoofer output is on.
Only frequencies lower than those in the selected
range are outputted from the subwoofer.
1 Press M.C. to display the setting mode.
2 Press M.C. to cycle between the cut-off fre-
quency and output level of the subwoofer.
Cut-off frequency (Cut-off frequency display
flashes.)—Output level (Output level display
flashes.)
3 Turn M.C. to select the desired setting.
Cut-off frequency: 50HZ—63HZ—80HZ—
100HZ—125HZ
Output level: -24 to +6
SLA (source level adjustment)
SLA (Source Level Adjustment) lets you adjust the
volume level of each source to prevent radical
changes in volume when switching between sour-
ces.
! Settings are based on the FM volume level,
which remains unchanged.
! The AM volume level can also be adjusted with
this function.
! When selecting FM as the source, you cannot
switch to SLA.
1 Press M.C. to display the setting mode.
2 Turn M.C. to adjust the source volume.
Adjustment range: +4 to –4
3 Press M.C. to confirm the selection.
Initial Settings
1 Press S (SRC/OFF) and hold until the unit
turns off.
2 Press M.C. and hold until function name
appears in the display.
3 Turn M.C. to select the initial setting.
After selecting, perform the following proce-
dures to set the initial setting.
English
Operating this unit
02
9
Section
Operating this unit
En

CLOCK SET (setting the clock)
1 Press M.C. to display the setting mode.
2 Press M.C. to select the segment of the clock
display you wish to set.
Hour—Minute
3 Turn M.C. to adjust the clock.
FM STEP (FM tuning step)
The FM tuning step employed by seek tuning can
be switched between 100 kHz, the preset step, and
50 kHz.
! If seek tuning is performed in 50 kHz steps,
stations may be tuned in imprecisely. Tune in
the stations with manual tuning or use seek
tuning again.
! The tuning step remains at 50 kHz during man-
ual tuning.
1 Press M.C. to display the setting mode.
2 Turn M.C. to select the FM tuning step.
50 KHZ (50 kHz)—100 KHZ (100 kHz)
3 Press M.C. to confirm the selection.
AM STEP (AM tuning step)
The AM tuning step can be switched between 9
kHz, the preset step, and 10 kHz. When using the
tuner in North, Central or South America, reset
the tuning step from 9 kHz (531 kHz to 1 602 kHz
allowable) to 10 kHz (530 kHz to 1 640 kHz allow-
able).
1 Press M.C. to display the setting mode.
2 Turn M.C. to select the AM tuning step.
9 KHZ (9 kHz)—10 KHZ (10 kHz)
3 Press M.C. to confirm the selection.
AUX (auxiliary input)
Activate this setting when using an auxiliary de-
vice connected to this unit.
1 Press M.C. to turn AUX on or off.
USB (plug and play)
This setting allows you to switch your source to
USB/iPod automatically.
1 Press M.C. to turn the plug and play function
on or off.
ON – When a USB storage device/iPod is con-
nected, depending on the type of device, the
source is automatically switched to USB/iPod
when you turn on the engine. If you disconnect
your USB storage device/iPod, this unit’s
source is turned off.
OFF – When a USB storage device/iPod is con-
nected, the source is not switched to USB/
iPod automatically. Please change the source
to USB/iPod manually.
SW CONTROL (rear output and subwoofer set-
ting)
The rear speaker leads output and RCA output
can be used for full-range speaker or subwoofer
connection.
If you switch to REAR-SP :SW,you can connect a
rear speaker lead directly to a subwoofer without
using an auxiliary amp.
Initially, REAR-SP is set for rear full-range speaker
connection (FUL).
1 Press M.C. to display the setting mode.
2 Turn M.C. to change the output and press to
select.
REAR-SP—PREOUT
3 Turn M.C. to change the setting.
REAR-SP: FUL—SW
PREOUT: SW—REA
! Even if you change this setting, there will
be no output unless you turn the sub-
woofer output on (refer to SUBWOOFER1
(subwoofer on/off setting) on the previous
page).
! If you change this setting, subwoofer out-
put in the audio menu will return to the fac-
tory settings.
DEMO (demo display setting)
1 Press M.C. to turn the demo display on or off.
SCROLL (scroll mode setting)
When ever scroll is set to ON, recorded text infor-
mation scrolls continuously in the display. Set to
OFF if you prefer the information to scroll just
once.
1 Press M.C. to turn the ever scroll on or off.
BT CLEAR (resetting the Bluetooth wireless tech-
nology module)
Bluetooth telephone data can be deleted. To pro-
tect personal information, we recommend deleting
this data before transferring the unit to other per-
sons. The following settings will be deleted.
! phone book entries on the Bluetooth tele-
phone
! preset numbers on the Bluetooth telephone
! registration assignment of the Bluetooth tele-
phone
! call history of the Bluetooth telephone
! information of the connected Bluetooth tele-
phone
1 Press M.C. to show the confirmation display.
YES is displayed. Clearing memory is now on
standby.
If you do not want to reset phone memory,
press
. The display reverts.
2 Press M.C. to clear the memory.
CLEARED is displayed and the settings are de-
leted.
! While this function is in use, do not turn
off the engine.
VER INFO (Bluetooth version display)
You can display the system versions of this unit
and of Bluetooth module.
1 Press M.C. to display the information.
S/W UPDATE (updating the software)
This function is used to update this unit with the
latest software. For information on the software
and updating, refer to our website.
! Never turn the unit off while the software is
being updated.
1 Press M.C. to display the data transfer mode.
Follow the on-screen instructions to finish up-
dating the software.
Using an AUX source
1 Insert the stereo mini plug into the AUX
input jack.
2 Press S (SRC/OFF) to select AUX as the
source.
Note
AUX cannot be selected unless the auxiliary set-
ting is turned on. For more details, refer to AUX
(auxiliary input) on this page.
Operating this unit
02
10
Section
Operating this unit
En
Connections
WARNING
! Use speakers over 50 W (output value) and
between 4 W to 8 W (impedance value). Do
not use 1 W to 3 W speakers for this unit.
! The black cable is ground. When installing
this unit or power amp (sold separately),
make sure to connect the ground wire first.
Ensure that the ground wire is properly con-
nected to metal parts of the car ’s body. The
ground wire of the power amp and the one of
this unit or any other device must be con-
nected to the car separately with different
screws. If the screw for the ground wire loos-
ens or falls out, it could result in fire, genera-
tion of smoke or malfunction.
Ground wire
Metal parts of car’s bod
y
POWER AMP
Other devices
(Another electronic
device in the car)
Important
! When installing this unit in a vehicle without
an ACC (accessory) position on the ignition
switch, failure to connect the red cable to the
terminal that detects operation of the ignition
key may result in battery drain.
O
N
S
T
A
R
T
O
F
F
ACC position No ACC position
! Use this unit with a 12-volt battery and nega-
tive grounding only. Failure to do so may re-
sult in a fire or malfunction.
! To prevent a short-circuit, overheating or mal-
function, be sure to follow the directions
below.
— Disconnect the negative terminal of the bat-
tery before installation.
— Secure the wiring with cable clamps or adhe-
sive tape. Wrap adhesive tape around wiring
that comes into contact with metal parts to
protect the wiring.
— Place all cables away from moving parts,
such as the gear shift and seat rails.
— Place all cables away from hot places, such
as near the heater outlet.
— Do not connect the yellow cable to the battery
by passing it through the hole to the engine
compartment.
— Cover any disconnected cable connectors
with insulating tape.
— Do not shorten any cables.
— Never cut the insulation of the power cable of
this unit in order to share the power with
other devices. The current capacity of the
cable is limited.
— Use a fuse of the rating prescribed.
— Never wire the negative speaker cable directly
to ground.
— Never band together negative cables of multi-
ple speakers.
! When this unit is on, control signals are sent
through the blue/white cable. Connect this
cable to the system remote control of an ex-
ternal power amp or the vehicle’s auto-anten-
na relay control terminal (max. 300 mA 12 V
DC). If the vehicle is equipped with a glass
antenna, connect it to the antenna booster
power supply terminal.
! Never connect the blue/white cable to the
power terminal of an external power amp.
Also, never connect it to the power terminal
of the auto antenna. Doing so may result in
battery drain or a malfunction.
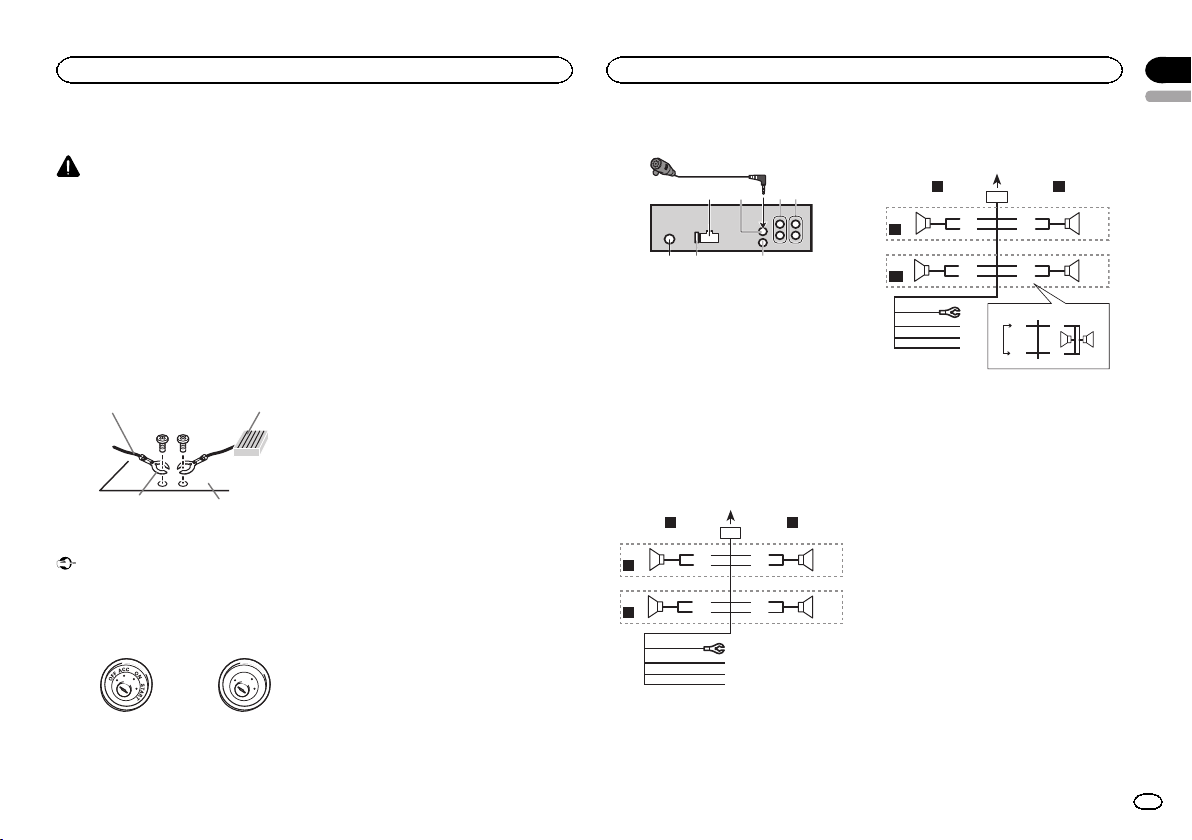
This unit
1
3
2
6
7 8
4 5
1 Power cord input
2 Microphone input
3 Microphone
4 Rear output or subwoofer output
5 Front output
6 Antenna input
7 Fuse (10 A)
8 Wired remote input
Hard-wired remote control adaptor can be
connected (sold separately).
Power cord
Perform these connections when not connect-
ing a rear speaker lead to a subwoofer.
1
8
9
c
d
6
32
4
5
7
a
b
e
f
h
g
LR
F
R
Perform these connections when using a sub-
woofer without the optional amplifier.
1
8
9
c
d
6
32
4
7
a
b
a
b
e
f
h
g
LR
F
SW
i
j
d
c
k l
1 To power cord input
2 Left
3 Right
4 Front speaker
5 Rear speaker
6 White
7 White/black
8 Gray
9 Gray/black
a Green
b Green/black
c Violet
d Violet/black
e Black (chassis ground)
Connect to a clean, paint-free metal location.
f Yellow
Connect to the constant 12 V supply termi-
nal.
g Red
Connect to terminal controlled by ignition
switch (12 V DC).
h Blue/white
Connect to system control terminal of the
power amp or auto-antenna relay control ter-
minal (max. 300 mA 12 V DC).
i Subwoofer (4 Ω)
English
Installation
03
11
Section
Installation
En
j When using a subwoofer of 70 W (2 Ω), be
sure to connect the subwoofer to the violet
and violet/black leads of this unit. Do not
connect anything to the green and green/
black leads.
k Not used.
l Subwoofer (4 Ω)× 2
Notes
! With a 2 speaker system, do not connect any-
thing to the speaker leads that are not con-
nected to speakers.
! Change the initial setting of this unit. Refer
to SW CONTROL (rear output and subwoofer
setting) on page 10.
The subwoofer output of this unit is monau-
ral.
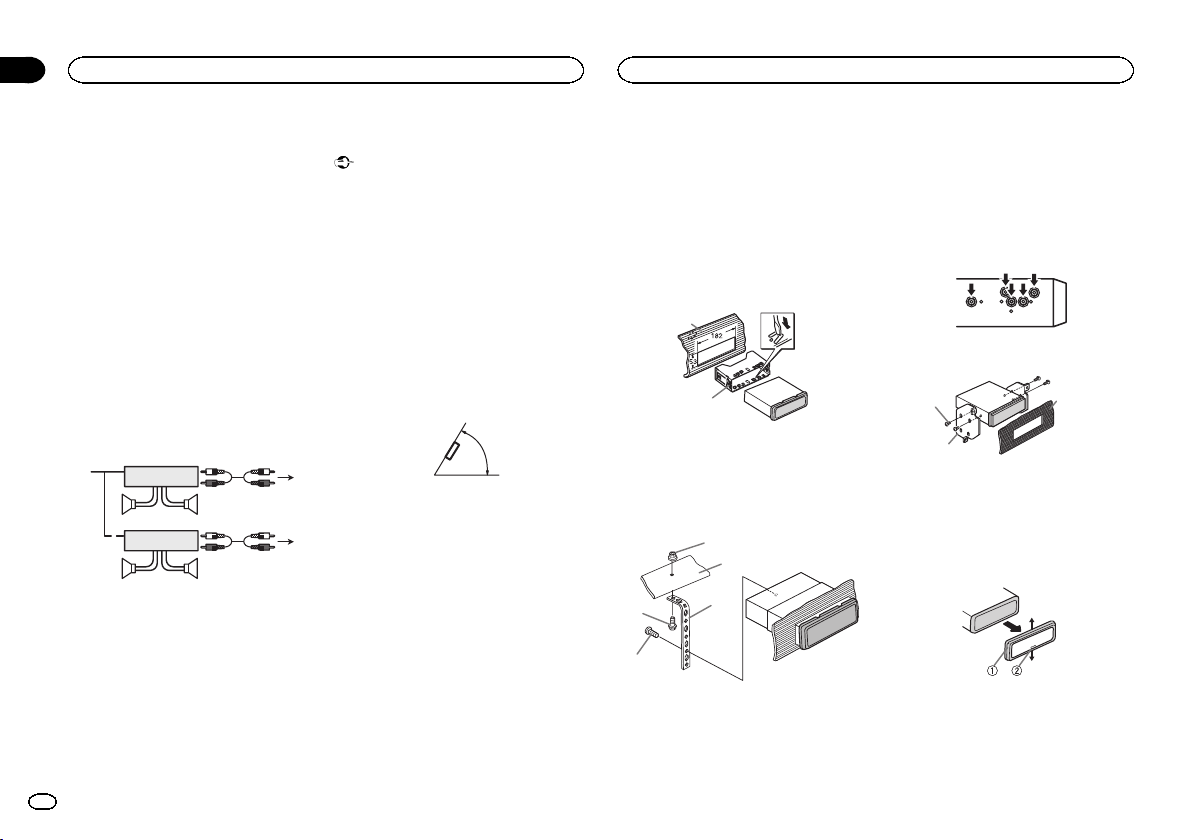
Power amp (sold separately)
Perform these connections when using the op-
tional amplifier.
1
1
3
2
4
55
3
2
6
77
1 System remote control
Connect to Blue/white cable.
2 Power amp (sold separately)
3 Connect with RCA cables (sold separately)
4 To Rear output or subwoofer output
5 Rear speaker or subwoofer
6 To Front output
7 Front speaker
Installation
Important
! Check all connections and systems before
final installation.
! Do not use unauthorized parts as this may
cause malfunctions.
! Consult your dealer if installation requires
drilling of holes or other modifications to the
vehicle.
! Do not install this unit where:
— it may interfere with operation of the vehicle.
— it may cause injur y to a passenger as a result
of a sudden stop.
! The semiconductor laser will be damaged if
it overheats. Install this unit away from hot
places such as near the heater outlet.
! Optimum performance is obtained when the
unit is installed at an angle of less than 60°.
60°
! To ensure proper heat dispersal when using
this unit, make sure you leave ample space
behind the rear panel and wrap any loose ca-
bles so they are not blocking the vents when
installing the unit.
DIN front/rear mount
This unit can be properly installed using either
front-mount or rear-mount installation.
Use commercially available parts when instal-
ling.
DIN Front-mount
1 Insert the mounting sleeve into the dash-
board.
For installation in shallow spaces, use the sup-
plied mounting sleeve. If there is enough space,
use the mounting sleeve that came with the ve-
hicle.
2 Secure the mounting sleeve by using a
screwdriver to bend the metal tabs (90°) into
place.
1
2
1 Dashboard
2 Mounting sleeve
3 Install the unit as illustrated.
Use commercially available parts when instal-
ling.
1
2
3
4
5
1 Nut
2 Firewall or metal support
3 Metal strap
4 Screw
5 Screw (M4 × 8)
# Make sure that the unit is installed securely in
place. An unstable installation may cause skipping
or other malfunctions.
DIN Rear-mount
1 Determine the appropriate position
where the holes on the bracket and the side
of the unit match.
2 Tighten two screws on each side.
1
2
3
1 Truss screw (5 mm × 8 mm)
2 Mounting bracket
3 Dashboard or console
Removing the unit
1 Remove the trim ring.
1 Trim ring
2 Notched tab
! Releasing the front panel allows easier ac-
cess to the trim ring.
! When reattaching the trim ring, point the
side with the notched tab down.
Installation
03
12
Section
Installation
En
2 Insert the supplied extraction keys into
both sides of the unit until they click into
place.
3 Pull the unit out of the dashboard.
Removing and re-attaching the
front panel
You can remove the front panel to protect your
unit from theft.
Press the detach button and push the front
panel upward and pull it toward you.
For details, refer to Removing the front panel to
protect your unit from theft and Re-attaching the
front panel on page 4.
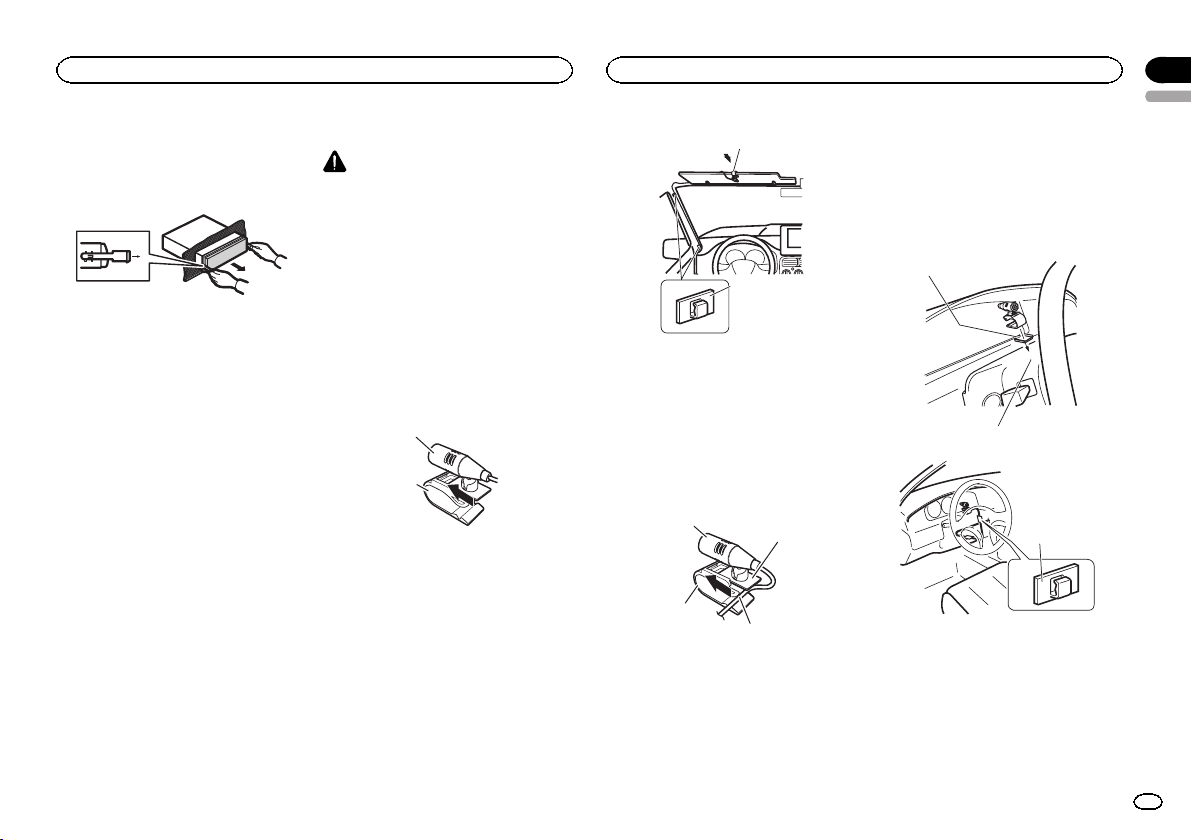
Installing the microphone
CAUTION
It is extremely dangerous to allow the micro-
phone lead to become wound around the steer-
ing column or gearstick. Be sure to install the
unit in such a way that it will not obstruct driv-
ing.
Note
Install the microphone in a position and orienta-
tion that will enable it to pick up the voice of the
person operating the system.
When installing the microphone on
the sun visor
1 Install the microphone on the micro-
phone clip.
1
2
1 Microphone
2 Microphone clip
2 Install the microphone clip on the sun
visor.
With the sun visor up, install the microphone
clip. (Lowering the sun visor reduces the voice
recognition rate.)
1
2
1 Microphone clip
2 Clamp
Use separately sold clamps to secure the
lead where necessary inside the vehicle.
When installing the microphone on
the steering column
1 Install the microphone on the micro-
phone clip.
2
1
3
4
1 Microphone
2 Microphone base
3 Microphone clip
4 Fit the microphone lead into the groove.
# Microphone can be installed without using mi-
crophone clip. In this case, detach the microphone
base from the microphone clip. To detach the micro-
phone base from the microphone clip, slide the mi-
crophone base.
2 Install the microphone clip on the steer-
ing column.
1
2
3
1 Double-sided tape
2 Install the microphone clip on the rear side of
the steering column.
3 Clamp
Use separately sold clamps to secure the
lead where necessary inside the vehicle.
English
Installation
03
13
Section
Installation
En
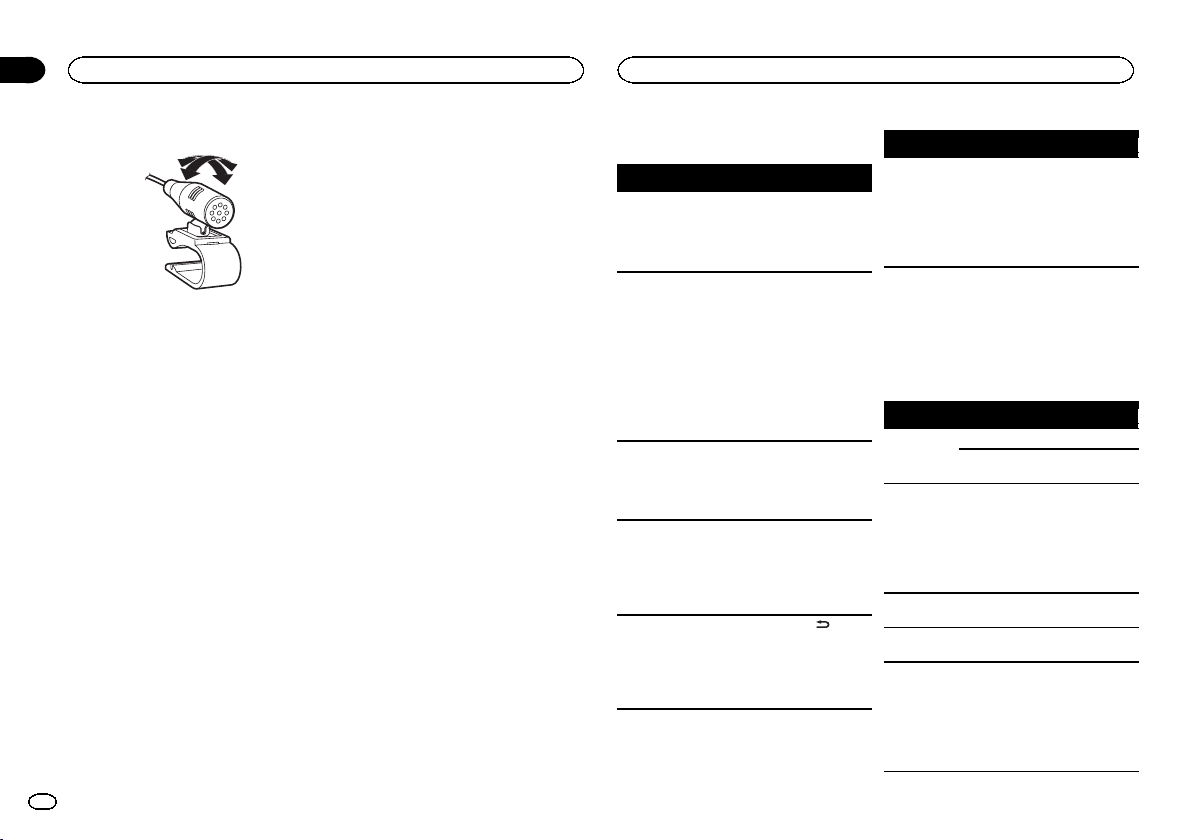
Adjusting the microphone angle
The microphone angle can be adjusted.
Troubleshooting
Symptom Cause Action
The display
automatically
returns to the
ordinary dis-
play.
You did not per-
form any opera-
tion within
about 30 sec-
onds.
Perform operation
again.
The repeat
play range
changes un-
expectedly.
Depending on
the repeat play
range, the se-
lected range
may change
when another
folder or track is
being selected
or during fast
forwarding/re-
versing.
Select the repeat
play range again.
A subfolder is
not played
back.
Subfolders can-
not be played
when FOLDER
(folder repeat) is
selected.
Select another re-
peat play range.
NO XXXX ap-
pears when a
display is
changed (NO
TITLE, for ex-
ample).
There is no em-
bedded text in-
formation.
Switch the display
or play another
track/file.
The display is
illuminated
when the unit
is turned off.
Demo mode is
on.
! Press
to
cancel demo
mode.
! Turn off the
demo display set-
ting.
Symptom Cause Action
The unit is
malfunction-
ing.
There is inter-
ference.
You are using a
device, such as
a cellular
phone, that
transmits elec-
tric waves near
the unit.
Move electrical
devices that may
be causing the in-
terference away
from the unit.
Error messages
When you contact your dealer or your nearest
Pioneer Service Center, be sure to note the error
message.
Built-in CD Player
Message Cause Action
ERROR-11,
12, 17, 30
The disc is dirty. Clean the disc.
The disc is
scratched.
Replace the disc.
ERROR-10,
11, 12, 15,
17, 30, A0
There is an elec-
trical or me-
chanical error.
Turn the ignition
switch OFF and
back ON, or
switch to a differ-
ent source, then
back to the CD
player.
ERROR-15 The inserted
disc is blank
Replace the disc.
ERROR-23 Unsupported
CD format
Replace the disc.
FRMT READ Sometimes
there is a delay
between the
start of playback
and when you
start to hear any
sound.
Wait until the
message disap-
pears and you
hear sound.
Installation
14
Appendix
Additional Information
En

Message Cause Action
NO AUDIO The inserted
disc does not
contain any
playable files.
Replace the disc.
SKIPPED The inserted
disc contains
DRM protected
files.
Replace the disc.
PROTECT All the files on
the inserted
disc are em-
bedded with
DRM.
Replace the disc.
USB storage device/iPod
Message Cause Action
NO DEVICE When plug and
play is off, no
USB storage de-
vice or iPod is
connected.
! Turn the plug
and play on.
! Connect a com-
patible USB stor-
age device/iPod.
FRMT READ Sometimes
there is a delay
between the
start of playback
and when you
start to hear any
sound.
Wait until the
message disap-
pears and you
hear sound.
NO AUDIO There are no
songs.
Transfer the audio
files to the USB
storage device
and connect.
The connected
USB storage de-
vice has secur-
ity enabled
Follow the USB
storage device in-
structions to dis-
able the security.
Message Cause Action
SKIPPED The connected
USB storage de-
vice contains
files embedded
with Windows
Mediaä DRM 9/
10
Play an audio file
not embedded
with Windows
Media DRM 9/10.
PROTECT All the files in
the USB storage
device are em-
bedded with
Windows Media
DRM 9/10
Transfer audio
files not em-
bedded with
Windows Media
DRM 9/10 to the
USB storage de-
vice and connect.
N/A USB The connected
USB storage de-
vice is not sup-
ported by this
unit.
! Connect a USB
Mass Storage
Class compliant
device.
! Disconnect
your device and
replace it with a
compatible USB
storage device.
Message Cause Action
CHECK USB The USB con-
nector or USB
cable has short-
circuited.
Check that the
USB connector or
USB cable is not
caught in some-
thing or dam-
aged.
The connected
USB storage de-
vice consumes
more than 500
mA (maximum
allowable cur-
rent).
Disconnect the
USB storage de-
vice and do not
use it. Turn the
ignition switch to
OFF, then to ACC
or ON and then
connect only
compliant USB
storage devices.
The iPod oper-
ates correctly
but does not
charge
Make sure the
connection cable
for the iPod has
not shorted out
(e.g., not caught
in metal objects).
After checking,
turn the ignition
switch OFF and
back ON, or dis-
connect the iPod
and reconnect.
Message Cause Action
ERROR-19 Communication
failed.
! Perform one of
the following op-
erations.
–Turn the ignition
switch OFF and
back ON.
–Disconnect the
USB storage de-
vice.
–Change to a dif-
ferent source.
Then, return to
the USB source.
! Disconnect the
cable from the
iPod. Once the
iPod's main menu
is displayed, re-
connect the iPod
and reset it.
iPod failure Disconnect the
cable from the
iPod. Once the
iPod's main menu
is displayed, re-
connect the iPod
and reset it.
ERROR-23 USB storage de-
vice was not for-
matted with
FAT12, FAT16 or
FAT32
USB storage de-
vice should be for-
matted with
FAT12, FAT16 or
FAT32.
English
Additional Information
15
Appendix
Additional Information
En
Message Cause Action
ERROR-16 The iPod firm-
ware version is
old
Update the iPod
version.
iPod failure Disconnect the
cable from the
iPod. Once the
iPod's main menu
is displayed, re-
connect the iPod
and reset it.
STOP There are no
songs in the
current list.
Select a list that
contains songs.
NOT FOUND No related
songs
Transfer songs to
the iPod.
Bluetooth Telephone
Message Cause Action
ERROR-10 The power failed
for the Blue-
tooth module of
this unit.
Turn the ignition
switch OFF and
then to ACC or
ON.
If the error mes-
sage is still dis-
played after
performing the
above action,
please contact
your dealer or an
authorized
Pioneer Service
Station.
Handling guidelines
Discs and player
Use only discs that feature either of the following
two logos.
Use 12-cm discs. Do not use 8-cm discs or an
adapter for 8-cm discs.
Use only conventional, fully circular discs. Do not
use shaped discs.
Do not insert anything other than a CD into the
CD loading slot.
Do not use cracked, chipped, warped, or other-
wise damaged discs as they may damage the play-
er.
Unfinalized CD-R/CD-RW discs cannot be played
back.
Do not touch the recorded surface of the discs.
Store discs in their cases when not in use.
Do not attach labels, write on or apply chemicals
to the surface of the discs.
To clean a CD, wipe the disc with a soft cloth out-
ward from the center.
Condensation may temporarily impair the player ’s
performance. Let it rest for about one hour to ad-
just to a warmer temperature. Also, wipe any
damp discs off with a soft cloth.
Playback of discs may not be possible because of
disc characteristics, disc format, recorded applica-
tion, playback environment, storage conditions,
and so on.
Road shocks may interrupt disc playback.
USB storage device
Connections via USB hub are not supported.
Do not connect anything other than a USB stor-
age device.
Firmly secure the USB storage device when driv-
ing. Do not let the USB storage device fall onto the
floor, where it may become jammed under the
brake or accelerator pedal.
Depending on the USB storage device, the follow-
ing problems may occur.
! Operations may vary.
! The storage device may not be recognized.
! Files may not be played back properly.
! The device may generate noise in the radio.
iPod
Do not leave the iPod in places with high tempera-
tures.
To ensure proper operation, connect the dock con-
nector cable from the iPod directly to this unit.
Firmly secure the iPod when driving. Do not let the
iPod fall onto the floor, where it may become
jammed under the brake or accelerator pedal.
About iPod settings
! When an iPod is connected, this unit changes
the EQ (equalizer) setting of the iPod to off in
order to optimize the acoustics. When you dis-
connect the iPod, the EQ returns to the original
setting.
! You cannot set Repeat to off on the iPod when
using this unit. Repeat is automatically
changed to All when the iPod is connected to
this unit.
Incompatible text saved on the iPod will not be dis-
played by the unit.
DualDiscs
DualDiscs are two-sided discs that have a record-
able CD for audio on one side and a recordable
DVD for video on the other.
Since the CD side of DualDiscs is not physically
compatible with the general CD standard, it may
not be possible to play the CD side with this unit.
Frequent loading and ejecting of a DualDisc may
result in scratches on the disc. Serious scratches
can lead to playback problems on this unit. In
some cases, a DualDisc may become stuck in the
disc loading slot and will not eject. To prevent this,
we recommend you refrain from using DualDisc
with this unit.
Please refer to the information from the disc man-
ufacturer for more detailed information about
DualDiscs.
Compressed audio
compatibility (disc, USB)
WMA
File extension: .wma
Bit rate: 48 kbps to 320 kbps (CBR), 48 kbps to 384
kbps (VBR)
Additional Information
16
Appendix
Additional Information
En
Sampling frequency: 32 kHz, 44.1 kHz, 48 kHz
Windows Media Audio Professional, Lossless,
Voice/DRM Stream/Stream with video: Not com-
patible
MP3
File extension: .mp3
Bit rate: 8 kbps to 320 kbps (CBR), VBR
Sampling frequency: 8 kHz to 48 kHz (32 kHz, 44.1
kHz, 48 kHz for emphasis)
Compatible ID3 tag version: 1.0, 1.1, 2.2, 2.3, 2.4
(ID3 tag Version 2.x is given priority over Version 1.
x.)
M3u playlist: Not compatible
MP3i (MP3 interactive), mp3 PRO: Not compatible
WAV
File extension: .wav
Quantization bits: 8 and 16 (LPCM), 4 (MS
ADPCM)
Sampling frequency: 16 kHz to 48 kHz (LPCM),
22.05 kHz and 44.1 kHz (MS ADPCM)
Supplemental information
Only the first 32 characters can be displayed as a
file name (including the file extension) or a folder
name.
This unit may not operate correctly depending on
the application used to encode WMA files.
There may be a slight delay at the start of playback
of audio files embedded with image data or audio
files stored on a USB storage device that has nu-
merous folder hierarchies.
Disc
Playable folder hierarchy: up to eight tiers (A prac-
tical hierarchy is less than two tiers.)
Playable folders: up to 99
Playable files: up to 999
File system: ISO 9660 Level 1 and 2, Romeo, Joliet
Multi-session playback: Compatible
Packet write data transfer: Not compatible
Regardless of the length of blank sections be-
tween the songs from the original recording, com-
pressed audio discs play with a short pause
between songs.
USB storage device
Playable folder hierarchy: up to eight tiers (A prac-
tical hierarchy is less than two tiers.)
Playable folders: up to 500
Playable files: up to 15 000
Playback of copyright-protected files: Not compati-
ble
Partitioned USB storage device: Only the first par-
tition can be played.
There may be a slight delay when starting play-
back of audio files on a USB storage device with
numerous folder hierarchies.
CAUTION
Do not leave discs or a USB storage device in
any place that is subject to high temperatures.
iPod compatibility
This unit supports only the following iPod models.
Supported iPod software versions are shown
below. Older versions may not be supported.
! iPhone 3GS (software version 4.0)
! iPhone 3G (software version 4.0)
! iPhone (software version 3.1.3)
! iPod nano 5th generation (software version
1.0.2)
! iPod nano 4th generation (software version
1.0.4)
! iPod nano 3rd generation (software version
1.1.3)
! iPod nano 2nd generation (software version
1.1.3)
! iPod nano 1st generation (software version
1.3.1)
! iPod touch 3rd generation (software version
4.0)
! iPod touch 2nd generation (software version
4.0)
! iPod touch 1st generation (software version
3.1.3)
! iPod classic 160GB (software version 2.0.4)
! iPod classic 120GB (software version 2.0.1)
! iPod classic (software version 1.1.2)
! iPod 5th generation (software version 1.3)
Depending on the generation or version of the
iPod, some functions may not be available.
Operations may vary depending on the software
version of iPod.
When using an iPod, an iPod Dock Connector to
USB Cable is required.
A Pioneer CD-IU50 interface cable is also avail-
able. For details, consult your dealer.
About the file/format compatibility, refer to the
iPod manuals.
Audio Book, Podcast: Compatible
CAUTION
Pioneer accepts no responsibility for data lost
on the iPod, even if that data is lost while this
unit is used.
Sequence of audio files
The user cannot assign folder numbers and
specify playback sequences with this unit.
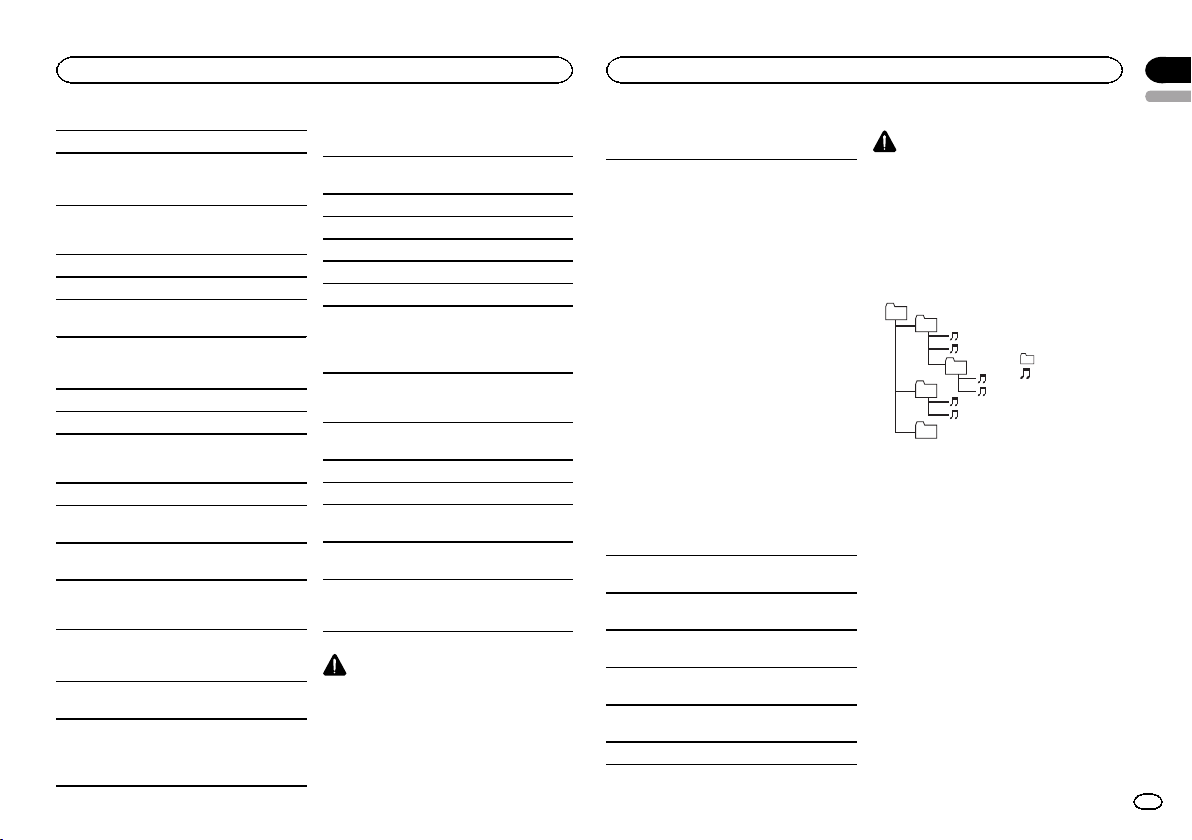
Example of a hierarchy
Level 1 Level 2 Level 3 Level 4
01
02
03
04
05
: Folder
: Compressed
audio file
01 to 05: Folder
number
1 to 6: Playback
sequence
Disc
Folder selection sequence or other operation
may differ depending on the encoding or writing
software.
USB storage device
Playback sequence is the same as recorded se-
quence in the USB storage device.
To specify the playback sequence, the following
method is recommended.
1 Create a file name that includes numbers
that specify the playback sequence (e.g.,
001xxx.mp3 and 099yyy.mp3).
2 Put those files into a folder.
3 Save the folder containing files on the USB
storage device.
However,depending on the system environment,
you may not be able to specify the playback se-
quence.
English
Additional Information
17
Appendix
Additional Information
En

For USB portable audio players, the sequence is
different and depends on the player.
Bluetooth profiles
! In order to use Bluetooth wireless technol-
ogy, devices must be able to interpret certain
profiles. This unit is compatible with the fol-
lowing profiles.
— GAP (Generic Access Profile)
— SDP (Service Discovery Protocol)
— OPP (Object Push Profile)
— HFP (Hands Free Profile)
Copyright and trademark
Bluetooth
The Bluetooth
â
word mark and logos are regis-
tered trademarks owned by Bluetooth SIG, Inc.
and any use of such marks by Pioneer
Corporation is under license. Other trademarks
and trade names are those of their respective
owners.
iTunes
Apple and iTunes are trademarks of Apple Inc.,
registered in the U.S. and other countries.
MP3
Supply of this product only conveys a license for
private, non-commercial use and does not con-
vey a license nor imply any right to use this prod-
uct in any commercial (i.e. revenue-generating)
real time broadcasting (terrestrial, satellite,
cable and/or any other media), broadcasting/
streaming via internet, intranets and/or other
networks or in other electronic content distribu-
tion systems, such as pay-audio or audio-on-de-
mand applications. An independent license for
such use is required. For details, please visit
http://www.mp3licensing.com.
WMA
Windows Media and the Windows logo are
trademarks or registered trademarks of
Microsoft Corporation in the United States and/
or other countries.
This product includes technology owned by
Microsoft Corporation and cannot be used or
distributed without a license from Microsoft
Licensing, Inc.
iPod & iPhone
iPhone, iPod, iPod classic, iPod nano, and iPod
touch are trademarks of Apple Inc., registered in
the U.S. and other countries.
“Made for iPod” and “Made for iPhone” mean
that an electronic accessory has been designed
to connect specifically to iPod or iPhone, respec-
tively, and has been certified by the developer to
meet Apple performance standards.
Apple is not responsible for the operation of this
device or its compliance with safety and regula-
tory standards.
Specifications
General
Rated power source ......... 14.4 V DC
(allowable voltage range: 12.0
V to 14.4 V DC)
Grounding system ............ Negative type
Maximum current consumption
................................... 10.0 A
Dimensions (W × H × D):
DIN
Chassis .............. 178 mm × 50 mm × 165
mm
Nose .................. 188 mm × 58 mm × 17
mm
D
Chassis .............. 178 mm × 50 mm × 165
mm
Nose .................. 170 mm × 46 mm × 17
mm
Weight ............................. 1.2 kg
Audio
Maximum power output ... 50 W × 4
70 W × 1/2 W (for subwoofer)
Continuous power output
................................... 22 W × 4 (50 Hz to 15 000 Hz,
5 % THD, 4 W load, both chan-
nels driven)
Load impedance .............. 4 W (4 W to 8 W allowable)
Preout maximum output level
................................... 2.0 V
Tone controls:
Bass
Frequency .......... 100 Hz
Gain .................. ±12 dB
Mid
Frequency .......... 1 kHz
Gain .................. ±12 dB
Treble
Frequency .......... 10 kHz
Gain .................. ±12 dB
Subwoofer (mono):
Frequency ................. 50/63/80/100/125 Hz
Slope ........................ –18 dB/oct
Gain ......................... +6 dB to –24 dB
Phase ....................... Normal/Reverse
CD player
System ............................ Compact disc audio system
Usable discs .................... Compact disc
Signal-to-noise ratio ......... 94 dB (1 kHz) (IEC -A network)
Number of channels ........ 2 (stereo)
WMA decoding format ..... Ver. 7, 7.1,8, 9, 10, 11, 12 (2ch
audio)
(Windows Media Player)
MP3 decoding format ...... MPEG-1 & 2 Audio Layer 3
WAV signal format ........... Linear PCM & MS ADPCM
(Non-compressed)
USB
USB standard specification
................................... USB 2.0 full speed
Maximum current supply
................................... 500 mA
USB Class ....................... MSC (Mass Storage Class)
File system ....................... FAT12, FAT16, FAT32
WMA decoding format ..... Ver. 7, 7.1,8, 9, 10, 11, 12 (2ch
audio)
(Windows Media Player)
MP3 decoding format ...... MPEG-1 & 2 Audio Layer 3
WAV signal format ........... Linear PCM & MS ADPCM
(Non-compressed)
FM tuner
Frequency range .............. 87.5 MHz to 108.0 MHz
Usable sensitivity ............. 9 dBf (0.8 µV/75 W, mono, S/N:
30 dB)
Signal-to-noise ratio ......... 72 dB (IEC-A network)
AM tuner
Frequency range .............. 531 kHz to 1 602 kHz (9 kHz)
530 kHz to 1 640 kHz (10 kHz)
Usable sensitivity ............. 25 µV (S/N: 20 dB)
Signal-to-noise ratio ......... 62 dB (IEC-A network)
Bluetooth
Version ............................ Bluetooth 2.0 certified
Output power ................... +4 dBm Max.
(Power class 2)
Infrared remote control
Wavelength ...................... 940 nm ±50 nm
Output ............................. typ; 12 mw/sr per Infrared LED
Note
Specifications and the design are subject to
modifications without notice.
Additional Information
18
Appendix
Additional Information
En

English
19En
Gracias por haber adquirido este producto
PIONEER.
Lea con detenimiento este manual antes de utili-
zar el producto por primera vez para que pueda
darle el mejor uso posible. Es muy importante
que lea y observe la información que aparece
bajo los mensajes de ADVERTENCIA y PRE-
CAUCIÓN en este manual. Una vez leído, guar-
de el manual en un lugar seguro y a mano para
que pueda consultarlo en el futuro.
Acerca de esta unidad
PRECAUCIÓN
! No permita que esta unidad entre en contac-
to con líquidos, ya que puede producir una
descarga eléctrica. Además, el contacto con
líquidos puede causar daños en la unidad,
humo y recalentamiento.
! Mantenga siempre el volumen lo suficiente-
mente bajo como para poder escuchar los
sonidos que provienen del exterior.
! Evite la exposición a la humedad.
! Si se desconecta o se descarga la batería,
todas las memorias preajustadas se borra-
rán.
PRECAUCIÓN
Este producto contiene un diodo de láser de
clase 1, clasificado en la directiva IEC 60825-
1:2007 concerniente a la Seguridad de los pro-
ductos láser. Para garantizar la seguridad
continua, no extraiga ninguna tapa ni intente
acceder a la parte interna del producto. Solici-
te a personal cualificado que realice todos los
trabajos de mantenimiento.
PRODUCTO LASER CLASE 1
PRECAUCIÓN—LOS PRODUCTOS LÁSER CLASE 1M
EMITEN RADIACIÓN INVISIBLE UNA VEZ ABIERTOS. NO
LOS MIRE DIRECTAMENTE CON INSTRUMENTOS ÓPTICOS.
Notas
! Las operaciones se realizan incluso si se
cancela el menú antes de confirmar.
! En este manual, se utiliza el término “iPod”
para denominar tanto a iPod como a iPhone.
Modo demo
Importante
! Si no se conecta el cable rojo (ACC) de esta
unidad a un terminal acoplado con las fun-
ciones de activación/desactivación de la
llave de encendido del automóvil, se puede
descargar la batería.
! Recuerde que si este modo de demostración
sigue funcionando cuando el motor del ve-
hículo está apagado, se puede descargar la
batería.
La demostración se inicia automáticamente
cuando la llave de encendido del automóvil está
en ACC o en ON mientras la unidad está apaga-
da. Aunque la unidad se apague, el modo de de-
mostración seguirá activado. Para cancelar el
modo de demostración, utilice la función del
menú de ajuste inicial. Si utiliza el modo de de-
mostración cuando la llave de encendido está
en ACC, se puede descargar la batería.
Antes de comenzar
01
20
Sección
Antes de comenzar
Es
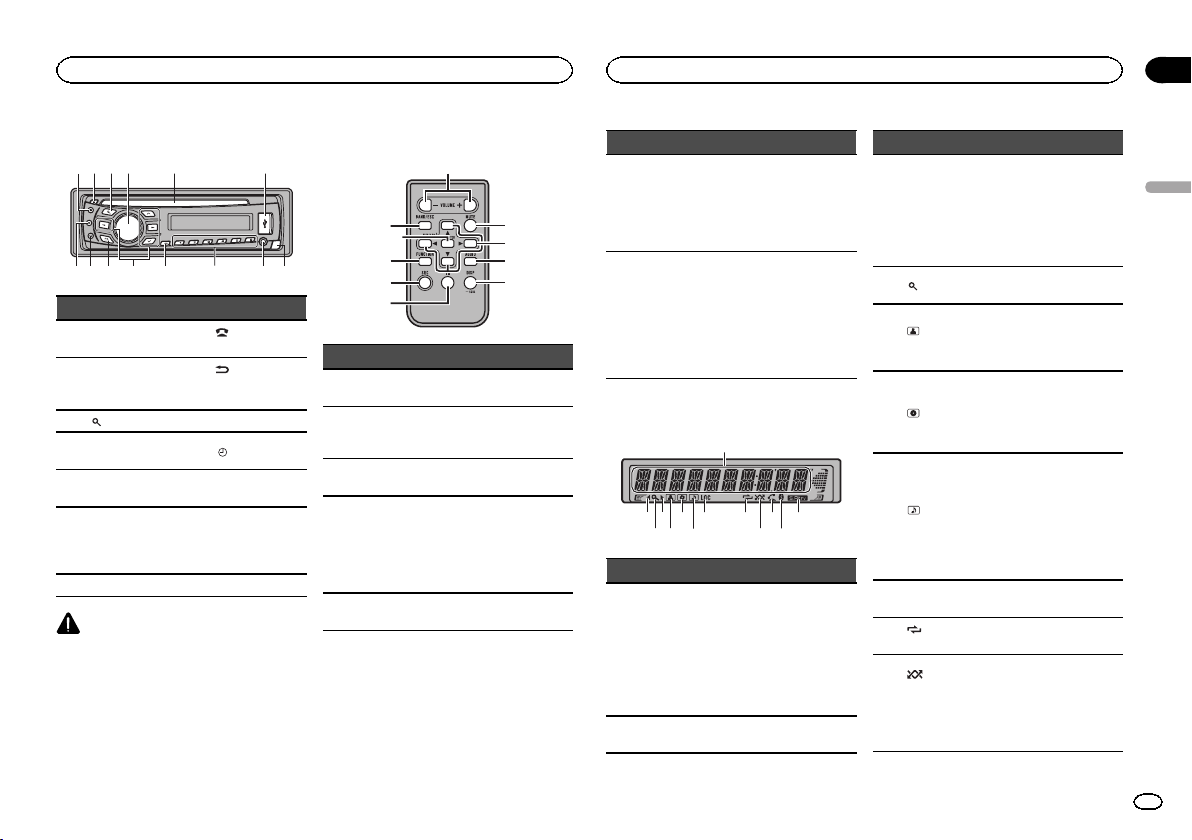
Unidad principal
1
24 5 63
78 a b c ed9
Parte Parte
1 S (SRC/OFF) 8
(teléfono/co-
nectado)
2 h (expulsar) 9
(Atrás/visuali-
zación/desplaza-
miento)
3
(lista) a a/b/c/d
4
MULTI-CONTROL
(M.C.)
b
/DISP OFF
5
Ranura de inser-
ción de discos
c 1 a 6
6 Puerto USB d
Conector de en-
trada AUX (co-
nector estéreo de
3,5 mm)
7 B (BAND/ESC) e Botón de soltar
PRECAUCIÓN
! Utilice un cable USB Pioneer opcional (CD-
U50E) para conectar el reproductor de audio
USB / memoria USB, ya que cualquier dispo-
sitivo conectado directamente a la unidad
sobresaldrá de ésta y podría resultar peligro-
so.
! No utilice productos no autorizados.
Mando a distancia
f
l
j
g
i
hk
7
1
a
Parte Operación
f VOLUME
Pulse para aumentar o dismi-
nuir el volumen.
g MUTE
Pulse para silenciar. Pulse de
nuevo para desactivar el silen-
ciamiento.
h AUDIO
Pulse para seleccionar una
función de audio.
i DISP/SCRL
Pulse este botón para seleccio-
nar diferentes modos de visua-
lización.
Manténgalo pulsado para des-
plazarse por la información de
texto.
j e
Pulse este botón para pausar o
reanudar.
Parte Operación
k
FUNC-
TION
Pulse este botón para seleccio-
nar las funciones.
Mantenga pulsado este botón
para acceder al menú de ajus-
tes iniciales si las fuentes
están desactivadas.
l
LIST/
ENTER
Pulse para visualizar la lista de
título del disco, la lista de título
de la pista, la lista de carpetas
o la lista de archivos según la
fuente.
Cuando esté en el menú de
funcionamiento, pulse para
controlar las funciones.
Indicaciones del display
4 5
6
3
8
a
c
9
1
2
7
b d
Indicador Estado
1
Sección
principal
del display
! Sintonizador: banda y fre-
cuencia
! Reproductor de CD incor-
porado, dispositivo de al-
macenamiento USB e iPod:
tiempo de reproducción
transcurrido e información
de texto
2 c
Existe un nivel, carpeta o menú
superior.
Indicador Estado
3 d
Existe un nivel, carpeta o menú
inferior.
Este indicador parpadea cuan-
do se selecciona desde el iPod
una canción o un álbum rela-
cionado con la canción que se
está reproduciendo.
4
(lista)
Se está utilizando la función de
la lista.
5
(artis-
ta)
Muestra el nombre del artista.
La búsqueda precisa de artista
en la función de exploración
del iPod está en uso.
6
(disco)
Se muestra el nombre del
disco (álbum).
La búsqueda precisa de álbum
en la función de exploración
del iPod está en uso.
7
(can-
ción)
Se muestra el nombre de la
pista (canción).
Se ha seleccionado un archivo
de audio reproducible mientras
se examinaba la lista.
La búsqueda precisa de can-
ción en la función de explora-
ción del iPod está en uso.
8 LOC
Sintonización por búsqueda
local activada.
9
(repeti-
ción)
La repetición de carpeta o
pista está activada.
a
(alea-
torio/re-
produc-
ción alea-
toria)
La reproducción aleatoria está
activada.
Está seleccionado iPod como
fuente y están activadas las
funciones de reproducción
aleatoria.
Español
Utilización de esta unidad
02
21
Sección
Utilización de esta unidad
Es
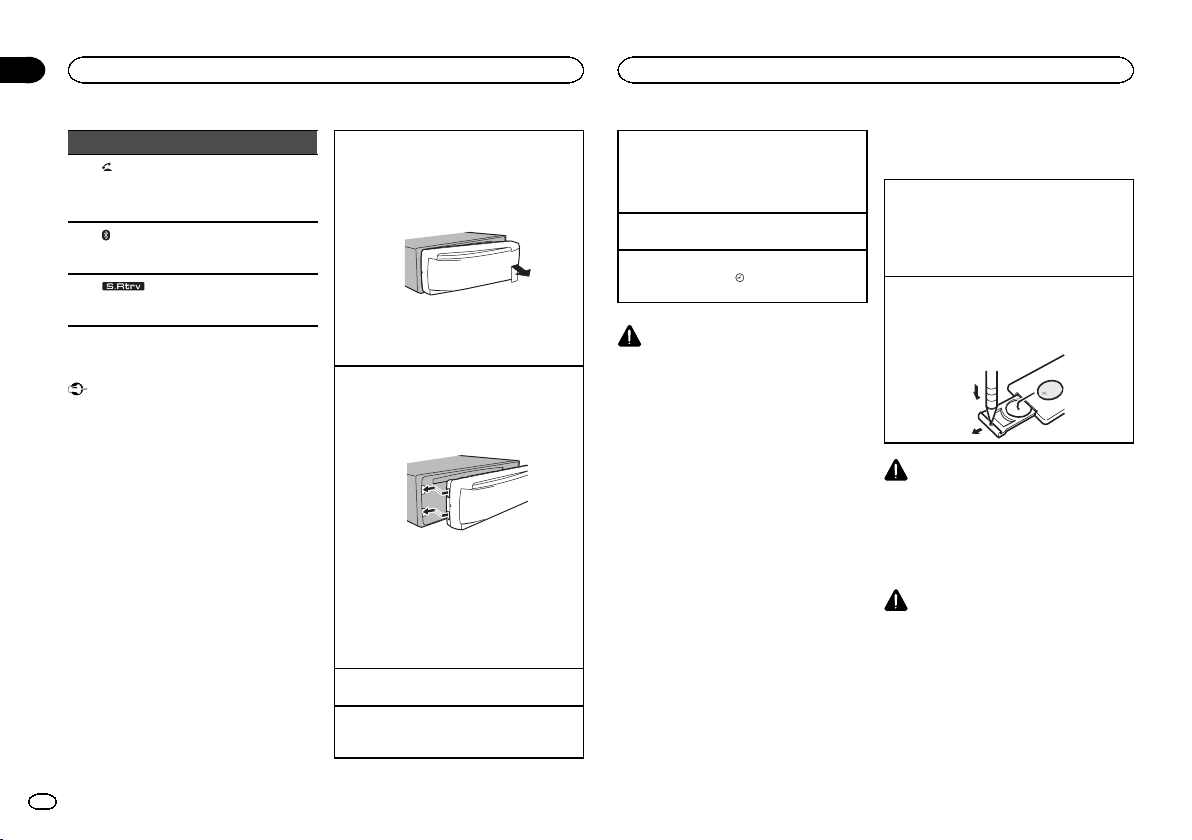
Indicador Estado
b
(res-
puesta
automáti-
ca)
Aparece cuando está activada
la función de respuesta auto-
mática.
c
(indica-
dor de
Bluetooth)
Hay conexión con un dispositi-
vo Bluetooth.
La línea está en espera.
d
(Sound
Retriever)
La función Sound Retriever
(restauración del sonido) está
activada.
Funciones básicas
Importante
! Proceda con cuidado al retirar o colocar el
panel delantero.
! Evite someter el panel delantero a impactos
excesivos.
! Mantenga la panel delantero fuera del alcan-
ce de la luz solar directa y no la exponga a
temperaturas elevadas.
! Para evitar que el dispositivo o el interior del
vehículo sufran daños, retire todos los cables
o dispositivos conectados al panel delantero
antes de extraerlo.
Extracción del panel delantero para proteger la
unidad contra robo
1 Pulse el botón de soltar para liberar el panel
delantero.
2 Empuje el panel delantero hacia arriba y tire
de él hacia sí.
3 Mantenga siempre el panel delantero que se
ha extraído en su medio de protección, como
por ejemplo su caja protectora.
Colocación del panel delantero
1 Deslice la carátula hacia la izquierda.
Inserte las pestañas que hay en la parte iz-
quierda de la unidad principal dentro de las ra-
nuras del panel delantero.
2 Pulse el lado derecho del panel delantero
hasta que se ajuste correctamente.
Si no logra encajar adecuadamente el panel
delantero a la unidad principal, colóquelo en
la unidad principal de la forma correcta. No
apriete ni use la fuerza para encajarlo, ya que
puede provocar daños en el panel delantero o
en la unidad principal.
Encendido de la unidad
1 Pulse S (SRC/OFF) para encender la unidad.
Apagado de la unidad
1 Mantenga presionado S (SRC/OFF) hasta que
se apague la unidad.
Selección de una fuente
1 Pulse S (SRC/OFF) para desplazarse entre:
TUNER (sintonizador)—CD (reproductor de
CD incorporado)—USB (USB)/iPod (iPod)—
AUX (AUX)
Ajuste del volumen
1 Haga girar M.C. para ajustar el volumen.
Encendido y apagado de la pantalla
1 Mantenga pulsado
/DISP OFF hasta que la
pantalla se encienda o se apague.
PRECAUCIÓN
Por motivos de seguridad, detenga su vehículo
antes de extraer el panel delantero.
Nota
Si el cable azul/blanco de esta unidad está co-
nectado al terminal de control del relé de la an-
tena automática del vehículo, la antena se
extiende cuando se enciende el equipo. Para re-
traer la antena, apague la fuente.
Uso y cuidado del mando a
distancia
Uso del mando a distancia
1 Apunte el mando a distancia hacia el panel
delantero para que funcione la unidad.
Al utilizar el mando a distancia por primera
vez, extraiga la película que sobresale de la
bandeja.
Reemplazo de la batería
1 Deslice y extraiga la bandeja de la parte poste-
rior del mando a distancia.
2 Inserte la pila con los polos positivo (+) y ne-
gativo (–) en la dirección correcta.
ADVERTENCIA
! Mantenga la pila fuera del alcance de los
niños. En caso de ingestión accidental de
ésta, consulte a un médico de inmediato.
! Las pilas o baterías no deben exponerse a
altas temperaturas ni fuentes de calor como
el sol, el fuego, etc.
PRECAUCIÓN
! Utilice una sola batería de litio CR2025
(3 V).
! Extraiga la pila si no piensa utilizar el mando
a distancia durante un mes o más tiempo.
! Si la pila se sustituye de forma incorrecta
existe cierto riesgo de explosión. Reempláce-
la sólo por una del mismo tipo o equivalente.
! No manipule la pila con herramientas metáli-
cas.
! No guarde la pila junto a objetos metálicos.
Utilización de esta unidad
02
22
Sección
Utilización de esta unidad
Es
! En el caso de que se produzcan fugas de la
pila, limpie completamente el mando a dis-
tancia e instale una pila nueva.
! Para desechar las pilas usadas, cumpla con
los reglamentos gubernamentales o las nor-
mas ambientales pertinentes de las institu-
ciones públicas aplicables en su país/zona.
Importante
! No guarde el mando a distancia en lugares
expuestos a altas temperaturas o a la luz
solar directa.
! Es posible que el mando a distancia no fun-
cione correctamente si lo expone a la luz
solar directa.
! No deje caer el mando a distancia al suelo,
ya que puede quedar atascado debajo del
freno o del acelerador.
Uso del teléfono Bluetooth
Importante
! Puesto que esta unidad se encuentra en es-
pera, si se conecta con su teléfono móvil me-
diante la tecnología inalámbrica Bluetooth
sin encender el motor, se puede descargar la
batería.
! El funcionamiento puede variar según el tipo
de teléfono móvil.
! Las operaciones avanzadas que exigen con-
centración, como marcar números en la pan-
talla, usar el directorio de teléfonos, etc.,
están prohibidas mientras se conduce. De-
tenga su vehículo en un lugar seguro cuando
tenga que utilizar estas funciones avan-
zadas.
Configuración de la función
manos libres
Antes de poder hacer uso de la función manos
libres, deberá configurar la unidad para su utili-
zación con el teléfono móvil.
1 Conexión
Ponga en funcionamiento el menú de cone-
xión del teléfono Bluetooth. Consulte Funcio-
namiento del menú de conexión en la página
26.
2 Ajustes de funciones
Utilice el menú de funciones del teléfono Blue-
tooth. Consulte Funcionamiento del menú del
teléfono en la página 27.
Funciones básicas
Realización de una llamada telefónica
1 Consulte Funcionamiento del menú del teléfono
en la página 27.
Atender una llamada entrante
1 Cuando reciba una llamada, pulse M.C.
Finalización de una llamada
1 Pulse
.
Rechazo de una llamada entrante
1 Cuando reciba una llamada, pulse
.
Atender una llamada en espera
1 Cuando reciba una llamada, pulse M.C.
Cancelación de una llamada en espera
1 Pulse
.
Ajuste del volumen de escucha de la parte a la
que se llama
1 Pulse a o b mientras habla por teléfono.
Activación o desactivación del modo privado.
1 Pulse B (BAND/ESC) mientras habla por telé-
fono.
Cambio de la visualización de información
1 Pulse
mientras habla por teléfono.
! Mantenga pulsado
para desplazarse.
Notas
! Si en el teléfono móvil está seleccionado el
modo privado, puede que la función manos
libres no esté disponible.
! El tiempo estimado de la llamada aparece en
el display (esto puede diferir ligeramente del
tiempo de llamada real).
Las operaciones del menú
son idénticas para los
ajustes de función/ajustes de
audio/ajustes iniciales/listas
Para volver a la visualización anterior
Para volver a la lista anterior (la carpeta de un
nivel superior)
1 Pulse
.
Para volver al menú principal
Para volver al nivel superior de la lista
1 Mantenga pulsado
.
Para volver a la visualización normal
Para cancelar el menú de ajustes iniciales
1 Pulse B (BAND/ESC).
Para volver a la visualización normal desde la lista
1 Pulse B (BAND/ESC).
Sintonizador
Funciones básicas
Selección de una banda
1 Presione B (BAND/ESC) hasta que se visualice
la banda deseada (F1, F2, F3 para FM o AM).
Sintonización manual (paso a paso)
1 Pulse c o d.
Búsqueda
1 Mantenga pulsado c o d y luego suéltelo.
Se puede cancelar la sintonización por bús-
queda pulsando brevemente c o d.
Al mantener pulsado c o d se pueden saltar
las emisoras. La sintonización por búsqueda
comienza inmediatamente después de que
suelte c o d.
Almacenamiento y recuperación
de emisoras para cada banda
Uso de los botones de ajuste de
presintonías
1 Cuando encuentre la emisora que desea
almacenar en la memoria, pulse uno de los
botones de ajuste de presintonías (1 a 6) y
manténgalo pulsado hasta que el número de
presintonía deje de parpadear.
2 Pulse uno de los botones de ajuste de
presintonías (1 a 6) para seleccionar la emiso-
ra deseada.
# También se pueden recuperar las emisoras de
radio almacenadas pulsando a o b durante la visua-
lización de frecuencias.
Cambio de la visualización
Selección de la información de texto deseada
% Pulse
.
Nombre del servicio de programa—Frecuencia
Español
Utilización de esta unidad
02
23
Sección
Utilización de esta unidad
Es
# La frecuencia aparece en el display durante ocho
segundos.
Nota
En determinadas zonas no es posible cambiar la
visualización.
Ajustes de funciones
1 Pulse M.C. para acceder al menú princi-
pal.
2 Haga girar M.C. para cambiar la opción
de menú y pulse para seleccionar FUNCTION.
3 Gire M.C. para seleccionar la función.
Una vez seleccionada, siga los siguientes pasos
para ajustar la función:
BSM (memoria de las mejores emisoras)
BSM (memoria de las mejores emisoras) guarda
automáticamente las seis emisoras más fuertes
ordenadas por la intensidad de la señal.
1 Pulse M.C. para activar la función BSM.
Para cancelar, vuelva a pulsar M.C.
LOCAL (sintonización por búsqueda local)
La sintonización por búsqueda local le permite
sintonizar sólo las emisoras de radio con señales
lo suficientemente intensas como para asegurar
una correcta recepción.
1 Pulse M.C. para mostrar el modo de ajuste.
2 Gire M.C. para seleccionar el ajuste deseado.
FM: OFF—LEVEL 1—LEVEL 2—LEVEL 3—
LEVEL 4
AM: OFF—LEVEL 1—LEVEL 2
El ajuste de nivel superior sólo permite recibir
las emisoras con las señales más intensas,
mientras que los ajustes más bajos permiten
recibir las emisoras con señales más débiles.
3 Pulse M.C. para confirmar la selección.
CD/CD-R/CD-RW y dispositivos
de almacenamiento USB
Funciones básicas
Reproducción de un CD/CD-R/CD-RW
1 Inserte el disco en la ranura de carga de dis-
cos con el lado de la etiqueta hacia arriba.
Expulsión de un CD/CD-R/CD-RW
1 Pulse h.
Reproducción de canciones de un dispositivo de
almacenamiento USB
1 Abra la tapa del conector USB y conecte el dis-
positivo de almacenamiento USB mediante un
cable USB.
Detención de la reproducción de archivos en un
dispositivo de almacenamiento USB
1 Puede desconectar el dispositivo de almace-
namiento USB en cualquier momento.
Selección de una carpeta
1 Pulse a o b.
Selección de una pista
1 Pulse c o d.
Avance rápido o retroceso
1 Mantenga pulsado c o d .
! Al reproducir audio comprimido, no hay soni-
do durante el avance rápido o el retroceso.
Regreso a la carpeta raíz
1 Mantenga presionado B (BAND/ESC).
Cambio entre audio comprimido y CD-DA
1 Pulse B (BAND/ESC).
Nota
Desconecte los dispositivos de almacenamiento
USB de la unidad cuando no los utilice.
Visualización de información de
texto
Selección de la información de texto deseada
1 Pulse
.
Desplazamiento de la información de texto a la iz-
quierda
1 Mantenga pulsado
.
Notas
! Según la versión de iTunes utilizada para gra-
bar archivos MP3 en un disco u otro tipo de
archivos de medios, es posible que los textos
contenidos en el archivo de audio no se
muestren correctamente si su formato es in-
compatible.
! Los elementos de información de texto pue-
den cambiar según el tipo de medio.
Selección y reproducción de
archivos/pistas de la lista de
nombres
1 Pulse para cambiar al modo de lista
por nombre de archivo/pista.
2 Utilice M.C. para seleccionar el nombre
del archivo deseado (o de la carpeta).
Cambio del nombre del archivo o la carpeta
1 Haga girar M.C.
Reproducción
1 Tras seleccionar un archivo o una pista, pulse
M.C.
Visualización de una lista de los archivos (o las
carpetas) de la carpeta seleccionada
1 Tras seleccionar una carpeta, pulse M.C.
Reproducción de una canción de la carpeta selec-
cionada
1 Tras seleccionar una carpeta, mantenga pulsa-
do M.C.
Operaciones avanzadas mediante
el uso de botones especiales
Selección de una gama de repetición de reproduc-
ción
1 Pulse 6/
para desplazarse entre las siguien-
tes opciones:
CD/CD-R/CD-RW
! DISC – Repite todas las pistas
! TRACK – Repite la pista actual
! FOLDER – Repite la carpeta actual
Reproductor de audio USB/memoria USB
! ALL – Repite todos los archivos
! TRACK – Repite el archivo actual
! FOLDER – Repite la carpeta actual
Reproducción de las pistas en orden aleatorio
1 Pulse 5/
para activar o desactivar la repro-
ducción aleatoria.
Las pistas de una gama de repetición seleccio-
nada se reproducen en orden aleatorio.
Interrupción de la reproducción
1 Pulse 2/PAUSE para pausar o reanudar.
Mejora del audio comprimido y restauración del
sonido óptimo (Sound Retriever)
1 Pulse 1/S.Rtrv para desplazarse entre:
OFF (desactivado)—1—2
1 es efectivo para tasas de compresión baja, y
2 para tasas de compresión alta.
Ajustes de funciones
1 Pulse M.C. para acceder al menú princi-
pal.
2 Haga girar M.C. para cambiar la opción
de menú y pulse para seleccionar FUNCTION.
3 Gire M.C. para seleccionar la función.
Una vez seleccionada, siga los siguientes pasos
para ajustar la función:
Utilización de esta unidad
02
24
Sección
Utilización de esta unidad
Es
REPEAT (repetición de reproducción)
1 Pulse M.C. para mostrar el modo de ajuste.
2 Haga girar M.C. para seleccionar una gama
de repetición de reproducción.
Para obtener más información, consulte Selec-
ción de una gama de rep etición de reproducción
en la página anterior.
3 Pulse M.C. para confirmar la selección.
RANDOM (reproducción aleatoria)
1 Pulse M.C. para activar o desactivar la repro-
ducción aleatoria.
PAUSE (pausa)
1 Pulse M.C. para pausar o reanudar.
S.RTRV (Sound Retriever)
Mejora automáticamente el audio comprimido y
restaura el sonido óptimo.
1 Pulse M.C. para mostrar el modo de ajuste.
2 Gire M.C. para seleccionar el ajuste deseado.
Para obtener más información, consulte Mejo-
ra del audio comprimido y re stauración del soni-
do óptimo (Sound Retriever) en la página
anterior.
3 Pulse M.C. para confirmar la selección.
iPod
Funciones básicas
Reproducción de canciones en un iPod
1 Abra la tapa del conector USB.
2 Conecte un iPod al cable USB utilizando un
conector del Dock del iPod.
Selección de una pista (capítulo)
1 Pulse c o d.
Avance rápido o retroceso
1 Mantenga pulsado c o d .
Notas
! El iPod no puede encenderse o apagarse
cuando el modo de control está ajustado en
CTRL AUDIO.
! Desconecte los auriculares del iPod antes de
conectarlo a esta unidad.
! El iPod se apagará aproximadamente dos mi-
nutos después de que la llave de encendido
del automóvil se ponga en OFF.
Visualización de información de
texto
Selección de la información de texto deseada
1 Pulse
.
Desplazamiento de la información de texto a la iz-
quierda
1 Mantenga pulsado
.
Para buscar una canción
1 Para ir al menú superior de la búsqueda
de listas, pulse
.
2 Utilice M.C. para seleccionar una catego-
ría/canción.
Cambio del nombre de la canción o la categoría
1 Haga girar M.C.
Listas de reproducción—artistas—álbumes—
canciones—podcasts—géneros—composito-
res—audiolibros
Reproducción
1 Tras seleccionar una canción, pulse M.C.
Visualización de una lista de canciones de la cate-
goría seleccionada
1 Tras seleccionar una categoría, pulse M.C.
Reproducción de una canción de la categoría se-
leccionada
1 Tras seleccionar una categoría, mantenga pul-
sado M.C.
Búsqueda alfabética en las listas
1 Cuando se visualice una lista de la categoría
seleccionada, pulse
para cambiar al modo
de búsqueda alfabética.
2 Haga girar M.C. para seleccionar una letra.
3 Pulse M.C. para visualizar la lista alfabética.
Operaciones avanzadas mediante
el uso de botones especiales
Selección de una gama de repetición de reproduc-
ción
1 Pulse 6/
para desplazarse entre las siguien-
tes opciones:
! ONE – Repite la canción actual
! ALL – Repite todas las canciones de la
lista seleccionada
Reproducción de todas las canciones en orden
aleatorio (shuffle all)
1 Pulse 5/
para activar la función de repro-
ducción aleatoria.
! Cuando el modo de control está ajustado en
CTRL iPod/CTRL APP, está activada la repro-
ducción aleatoria.
Interrupción de la reproducción
1 Pulse 2/PAUSE para pausar o reanudar.
Reproducción de canciones relacionadas con la
canción que se está reproduciendo
Se pueden reproducir canciones de las siguientes
listas.
• Lista de álbumes del artista que se está reprodu-
ciendo
• Lista de canciones del álbum que se está repro-
duciendo
• Lista de álbumes del género que se está repro-
duciendo
1 Mantenga pulsado M.C. para cambiar al
modo de reproducción de enlace.
2 Haga girar M.C. para cambiar el modo y pulse
para seleccionarlo.
! ARTIST – Reproduce un álbum del artista
que se está reproduciendo.
! ALBUM – Reproduce una canción del
álbum que se está reproduciendo.
! GENRE – Reproduce un álbum del género
que se está reproduciendo.
La canción o el álbum seleccionado se repro-
ducirá después de la canción que se esté re-
produciendo en ese momento.
Se puede cancelar la canción o el álbum seleccio-
nado si utiliza funciones diferentes a la búsqueda
de enlace (p. ej., avance rápido y retroceso).
Según la canción seleccionada, pueden cortarse
el final de la canción que se está reproduciendo o
el principio de la canción o del álbum selecciona-
dos.
Español
Utilización de esta unidad
02
25
Sección
Utilización de esta unidad
Es

Uso de la función iPod de esta unidad desde el
iPod
Puede escuchar el sonido de las aplicaciones que
tenga en el iPod a través de los altavoces del auto-
móvil cuando está seleccionado CTRL APP.
Esta función no es compatible con los siguientes
modelos de iPod.
! iPod nano 1ª generación
! iPod 5ª generación
Dicho modo APP es compatible con los siguien-
tes modelos de iPod:
! iPhone 3GS (versión del software 4.0 o poste-
rior)
! iPhone 3G (versión del software 4.0 o poste-
rior)
! iPhone (versión del software 3.1.3 o posterior)
! iPod touch de 3ª generación (versión del soft-
ware 4.0 o posterior)
! iPod touch de 2ª generación (versión del soft-
ware 4.0 o posterior)
! iPod touch de 1ª generación (versión del soft-
ware 3.13 o posterior)
1 Pulse 4/iPod para cambiar el modo de control.
! CTRL iPod – La función iPod de esta uni-
dad se puede utilizar desde el iPod conec-
tado.
! CTRL APP – Reproduce el sonido de las
aplicaciones del iPod.
! CTRL AUDIO – La función iPod de esta
unidad se puede utilizar desde esta uni-
dad.
Mejora del audio comprimido y restauración del
sonido óptimo (Sound Retriever)
1 Pulse 1/S.Rtrv para desplazarse entre:
OFF (desactivado)—1—2
1 es efectivo para tasas de compresión baja, y
2 para tasas de compresión alta.
Ajustes de funciones
1 Pulse M.C. para acceder al menú princi-
pal.
2 Haga girar M.C. para cambiar la opción
de menú y pulse para seleccionar FUNCTION.
3 Gire M.C. para seleccionar la función.
Una vez seleccionada, siga los siguientes pasos
para ajustar la función:
REPEAT (repetición de reproducción)
1 Pulse M.C. para mostrar el modo de ajuste.
2 Haga girar M.C. para seleccionar una gama
de repetición de reproducción.
Para obtener más información, consulte Selec-
ción de una gama de rep etición de reproducción
en la página anterior.
3 Pulse M.C. para confirmar la selección.
SHUFFLE (reproducción aleatoria)
1 Pulse M.C. para mostrar el modo de ajuste.
2 Gire M.C. para seleccionar su ajuste favorito.
! SONGS – Reproduce canciones siguiendo
un orden aleatorio dentro de la lista.
! ALBUMS – Reproduce canciones siguien-
do un orden aleatorio dentro del álbum.
! OFF – Cancela la reproducción aleatoria.
3 Pulse M.C. para confirmar la selección.
SHUFFLE ALL (reproducción aleatoria de todas las
canciones)
1 Pulse M.C. para activar la función de repro-
ducción aleatoria de todas las canciones
(shuffle all).
Para desactivarla, desactive SHUFFLE en el
menú FUNCTION.
LINK PLAY (reproducción de enlace)
1 Pulse M.C. para mostrar el modo de ajuste.
2 Haga girar M.C. para cambiar el modo y pulse
para seleccionarlo.
Para obtener detalles sobre los ajustes, consul-
te Reproducción de canciones relacionadas con
la canción que se está reproduciendo en la pági-
na anterior.
PAUSE (pausa)
1 Pulse M.C. para pausar o reanudar.
AUDIO BOOK (velocidad del audiolibro)
1 Pulse M.C. para mostrar el modo de ajuste.
2 Gire M.C. para seleccionar su ajuste favorito.
! FASTER – Reproducción con velocidad su-
perior a la normal
! NORMAL – Reproducción con velocidad
normal
! SLOWER – Reproducción con velocidad in-
ferior a la normal
3 Pulse M.C. para confirmar la selección.
S.RTRV (Sound Retriever)
Mejora automáticamente el audio comprimido y
restaura el sonido óptimo.
1 Pulse M.C. para mostrar el modo de ajuste.
2 Gire M.C. para seleccionar el ajuste deseado.
Para obtener más información, consulte Mejo-
ra del audio comprimido y re stauración del soni-
do óptimo (Sound Retriever) en esta página.
3 Pulse M.C. para confirmar la selección.
Notas
! Al cambiar el modo de control a CTRL iPod,
se pausa la reproducción de la canción. Utili-
ce el iPod para reanudar la reproducción.
! Las siguientes funciones estarán disponibles
en esta unidad incluso si se ajusta el modo
de control en CTRL iPod/CTRL APP.
— Pausa
— Avance rápido/retroceso
— Pista arriba/abajo
— Repetición de reproducción (ONE/ALL/OFF)
— Reproducción aleatoria (shuffle)
—
(lista) para el menú de iPod
— a para girar la rueda pulsable del iPod hacia
la izquierda
— b para girar la rueda pulsable del iPod hacia
la derecha
! Cuando el modo de control esté ajustado en
CTRL iPod, las operaciones estarán limitadas
de la siguiente manera:
— No se puede ajustar la configuración.
— La función de exploración no puede utilizarse
desde esta unidad.
Teléfono Bluetooth
Funcionamiento del menú de
conexión
Importante
Asegúrese de estacionar el vehículo en un lugar
seguro y poner el freno de mano para realizar
esta operación.
1 Mantenga pulsado
para mostrar el
menú de conexión.
# No se puede realizar este paso durante una lla-
mada.
2 Gire M.C. para seleccionar la función.
Una vez seleccionada, siga los siguientes pasos
para ajustar la función:
Utilización de esta unidad
02
26
Sección
Utilización de esta unidad
Es
DEVICELIST (conexión o desconexión de un teléfo-
no móvil desde la lista de dispositivos)
1 Pulse M.C. para mostrar el modo de ajuste.
2 Gire M.C. para seleccionar el nombre del dis-
positivo que desea conectar o desconectar.
! Mantenga pulsado M.C. para cambiar la
dirección BD y el nombre del dispositivo.
3 Pulse M.C. para conectar o desconectar el te-
léfono móvil seleccionado.
Si se establece la conexión, se indicará * en
el nombre de dispositivo.
DEL DEVICE (eliminación de un teléfono móvil
desde la lista de dispositivos)
1 Pulse M.C. para mostrar el modo de ajuste.
2 Gire M.C. para seleccionar el nombre del dis-
positivo que desee eliminar.
! Mantenga pulsado M.C. para cambiar la
dirección BD y el nombre del dispositivo.
3 Pulse M.C. para visualizar DELETE YES.
4 Pulse M.C. para eliminar la información del te-
léfono móvil de la lista de dispositivos.
! No apague el motor mientras se esté utilizan-
do esta función.
ADD DEVICE (conexión de un teléfono móvil
nuevo)
1 Pulse M.C. para comenzar la búsqueda.
! Para cancelar, pulse M.C. mientras se reali-
za la búsqueda.
2 Gire M.C. para seleccionar un dispositivo de la
lista.
! Si no aparece el dispositivo deseado, selec-
cione RE-SEARCH.
3 Mantenga pulsado M.C. para cambiar la direc-
ción BD y el nombre del dispositivo.
4 Pulse M.C. para conectar el teléfono móvil se-
leccionado.
! Para completar la conexión, verifique el
nombre del dispositivo (DEH-7350BT) e in-
troduzca el código de enlace de su teléfono
móvil.
! El ajuste predefinido del código PIN es
0000. Si desea cambiar este código, con-
sulte PIN CODE (introducción del código
PIN) en esta página.
! Si ya hay cinco dispositivos emparejados,
aparecerá DEVICEFULL y no se podrá em-
plear esta función. En este caso, será preci-
so eliminar primero un dispositivo
emparejado.
SPCL. DEV. (ajuste de un dispositivo especial)
Los dispositivos Bluetooth con los que resulta difí-
cil establecer una conexión se denominan disposi-
tivos especiales. Si su dispositivo Bluetooth
aparece en la lista de dispositivos especiales, se-
leccione el dispositivo adecuado.
1 Pulse M.C. para mostrar el modo de ajuste.
2 Utilice M.C. para seleccionar un dispositivo es-
pecial.
Gire el control para cambiar la opción de
menú. Pulse para seleccionar.
! Si ya hay cinco dispositivos emparejados,
aparecerá DEVICEFULL y no se podrá em-
plear esta función. En este caso, será preci-
so eliminar primero un dispositivo
emparejado.
3 Gire M.C. para mostrar el nombre de dispositi-
vo de esta unidad, la dirección BD y el código
PIN.
4 Use un teléfono móvil para la conexión a esta
unidad.
! Para completar la conexión, verifique el
nombre del dispositivo (DEH-7350BT) e in-
troduzca el código de enlace de su teléfono
móvil.
! El ajuste predefinido del código PIN es
0000. Si desea cambiar este código, con-
sulte PIN CODE (introducción del código
PIN) en esta página.
A. CONN (conexión automática con un dispositivo
Bluetooth)
1 Pulse M.C. para activar o desactivar la cone-
xión automática.
VISIBLE (ajuste de la visibilidad de esta unidad)
Para comprobar la disponibilidad de esta unidad
desde otros dispositivos, se podrá activar la visibi-
lidad Bluetooth de esta unidad.
1 Pulse M.C. para activar o desactivar la visibili-
dad de esta unidad.
! Si se ajusta SPCL. DEV., se activa temporal-
mente la visibilidad Bluetooth de esta uni-
dad.
PIN CODE (introducción del código PIN)
Para conectar su teléfono móvil a esta unidad a
través de tecnología inalámbrica Bluetooth, debe
introducir el código PIN en el teléfono para verifi-
car la conexión. El código predefinido es 0000,
aunque se puede cambiar en esta función.
1 Pulse M.C. para mostrar el modo de ajuste.
2 Pulse a o b para seleccionar un número.
3 Pulse d para mover el cursor a la posición si-
guiente.
4 Introduzca el código PIN y mantenga pulsado
M.C.
El código PIN se podrá almacenar en la me-
moria.
! Una vez que haya introducido los 8 dígitos
del código PIN, pulse d para guardarlo en
la memoria.
! Una vez introducido, al pulsar M.C. se vol-
verá a la pantalla de introducción de códi-
go PIN y se podrá cambiar.
DEV. INFO (visualización de la dirección BD (dis-
positivo Bluetooth))
1 Pulse M.C. para mostrar el modo de ajuste.
2 Pulse M.C. hacia la izquierda para visualizar la
dirección BD.
Pulse M.C. hacia la derecha para regresar al
nombre del dispositivo.
Funcionamiento del menú del
teléfono
Importante
Asegúrese de estacionar el vehículo en un lugar
seguro y poner el freno de mano para realizar
esta operación.
1 Pulse
para mostrar el menú del teléfo-
no.
Español
Utilización de esta unidad
02
27
Sección
Utilización de esta unidad
Es
2 Gire M.C. para seleccionar la función.
Una vez seleccionada, siga los siguientes pasos
para ajustar la función:
MISSED (historial de llamadas perdidas)
DIALED (historial de llamadas marcadas)
RECENT (historial de llamadas recibidas)
1 Pulse M.C. para mostrar la lista de números
de teléfono.
2 Gire M.C. para seleccionar un número de telé-
fono o un nombre.
3 Pulse M.C. para hacer una llamada.
4 Cuando encuentre el número de teléfono que
desea almacenar en la memoria, mantenga
pulsado uno de los botones de ajuste de pre-
sintonías (de 1 a 6).
! Pulse uno de los botones prefijados 1 a 6
para volver a llamar al número prefijado de-
seado.
PHONE BOOK (directorio de teléfonos)
! El directorio de teléfonos del teléfono móvil se
transferirá automáticamente cuando el teléfo-
no esté conectado a esta unidad.
! En función del teléfono móvil, puede que no se
transfiera automáticamente el directorio de te-
léfonos. En este caso, utilice el teléfono móvil
para transferir el directorio. La visibilidad de
esta unidad debe estar activada. Consulte
VISIBLE (ajuste de la visibilidad de esta unidad)
en la página anterior.
1 Pulse M.C. para visualizar SEARCH (lista alfa-
bética).
2 Haga girar M.C. para seleccionar la primera
letra del nombre que está buscando.
! Mantenga pulsado M.C. para seleccionar
el tipo de carácter deseado.
3 Presione M.C. para seleccionar una lista de
nombres registrados.
4 Gire M.C. para seleccionar el nombre que está
buscando.
5 Pulse M.C. para mostrar la lista de números
de teléfono.
6 Gire M.C. para seleccionar el número de telé-
fono al que desea llamar.
! Cuando encuentre el número de teléfono
que desea almacenar en la memoria, man-
tenga pulsado uno de los botones de ajus-
te de presintonías (de 1 a 6).
! Pulse uno de los botones prefijados 1 a 6
para volver a llamar al número prefijado de-
seado.
7 Pulse M.C. para hacer una llamada.
PRESET (números de teléfono prefijados)
1 Pulse M.C. para mostrar el modo de ajuste.
2 Utilice M.C. para seleccionar el número de
presintonía que desee.
Gire el control para cambiar la opción de
menú. Pulse para seleccionar.
! También puede presionar uno de los boto-
nes de número de presintonía 1 a 6 para
seleccionar un número.
3 Pulse M.C. para hacer una llamada.
PHONE FUNC (función del teléfono)
Se puede ajustar A. ANSR y RING TONE en este
menú. Para obtener más información, consulte
Función y operación en esta página.
Función y operación
1 Muestre PHONE FUNC.
Consulte PHONE FUNC (función del teléfono) en
esta página.
2 Pulse M.C. para visualizar el menú de fun-
ciones.
3 Gire M.C. para seleccionar la función.
Una vez seleccionada, siga los siguientes pasos
para ajustar la función:
A. ANSR (respuesta automática)
1 Pulse M.C. para activar o desactivar la res-
puesta automática.
RING TONE (selección del tono de llamada)
1 Pulse M.C. para activar o desactivar el tono de
llamada.
Ajustes de audio
1 Pulse M.C. para acceder al menú princi-
pal.
2 Haga girar M.C. para cambiar la opción
de menú y pulse para seleccionar AUDIO.
3 Haga girar M.C. para seleccionar la fun-
ción de audio.
Una vez seleccionada, siga los siguientes pasos
para ajustar la función de audio:
FAD/BAL (ajuste del fader/balance)
1 Pulse M.C. para mostrar el modo de ajuste.
2 Pulse M.C. para cambiar entre fader (delante-
ro/trasero) y balance (izquierdo/derecho).
3 Gire M.C. para ajustar el balance entre los alta-
voces.
! Cuando el ajuste de las salidas posterior y
RCA es SW, no se puede ajustar el balance
entre los altavoces delanteros/traseros. Con-
sulte SW CONTROL (ajuste de la salida poste-
rior y del altavoz de subgraves) en la página
siguiente.
EQUALIZER (recuperación de ecualizador)
1 Pulse M.C. para mostrar el modo de ajuste.
2 Haga girar el M.C. para seleccionar el ecuali-
zador.
DYNAMIC—VOCAL—NATURAL—CUSTOM
—FLAT—POWERFUL
3 Pulse M.C. para confirmar la selección.
TONE CTRL (ajuste de ecualizador)
! Los ajustes de la curva de ecualización confi-
gurados se almacenan en CUSTOM.
1 Pulse M.C. para mostrar el modo de ajuste.
2 Pulse M.C. para seleccionar BASS (graves)/
MID (medios)/TREBLE (agudos).
3 Gire M.C. para ajustar el nivel.
Gama de ajuste: +6 a -6
LOUDNESS (sonoridad)
Utilización de esta unidad
02
28
Sección
Utilización de esta unidad
Es

La sonoridad compensa las deficiencias en las
gamas de frecuencias bajas y altas cuando se es-
cucha a un volumen bajo.
1 Pulse M.C. para mostrar el modo de ajuste.
2 Gire M.C. para seleccionar el ajuste deseado.
OFF (desactivado)—LOW (bajo)—HIGH (alto)
3 Pulse M.C. para confirmar la selección.
SUBWOOFER1 (ajuste de subgraves activado/de-
sactivado)
Esta unidad está equipada con una salida de sub-
graves que se puede activar o desactivar.
1 Pulse M.C. para mostrar el modo de ajuste.
2 Gire M.C. para seleccionar el ajuste deseado.
NORMAL (fase normal)—REVERSE (fase inver-
sa)—OFF (subgraves desactivados)
3 Pulse M.C. para confirmar la selección.
SUBWOOFER2 (ajuste de subgraves)
Se puede ajustar la frecuencia de corte y el nivel
de salida cuando la salida de subgraves está acti-
vada.
Sólo las frecuencias más bajas que aquellas en la
gama seleccionada se generan por el altavoz de
subgraves.
1 Pulse M.C. para mostrar el modo de ajuste.
2 Pulse M.C. para desplazarse entre la frecuen-
cia de corte y el nivel de salida del altavoz de
subgraves.
Frecuencia de corte (se ilumina el display de la
frecuencia de corte)—Nivel de salida (se ilumi-
na el display del nivel de salida).
3 Gire M.C. para seleccionar el ajuste deseado.
Frecuencia de corte: 50HZ—63HZ—80HZ—
100HZ—125HZ
Nivel de salida: de -24 a +6
SLA (ajuste del nivel de fuente)
SLA (ajuste del nivel de fuente) le permite ajustar
el nivel de volumen de cada fuente para evitar
cambios radicales en el volumen cuando se cam-
bia entre las fuentes.
! Los ajustes se basan en el nivel de volumen de
FM, que se mantiene inalterado.
! El nivel del volumen de AM también se puede
ajustar con esta función.
! Al seleccionar FM como fuente, no se puede
cambiar a SLA.
1 Pulse M.C. para mostrar el modo de ajuste.
2 Gire M.C. para ajustar el volumen de la fuente.
Gama de ajuste: de +4 a –4
3 Pulse M.C. para confirmar la selección.
Ajustes iniciales
1 Mantenga presionado S (SRC/OFF) hasta
que se apague la unidad.
2 Presione M.C. y mantenga presionado
hasta que el nombre de la función aparezca
en el display.
3 Haga girar M.C. para seleccionar el ajuste
inicial.
Una vez seleccionada, siga los siguientes pasos
para configurar el ajuste inicial:
CLOCK SET (ajuste del reloj)
1 Pulse M.C. para mostrar el modo de ajuste.
2 Pulse M.C. para seleccionar el segmento de la
pantalla del reloj que desea ajustar.
Hora—Minuto
3 Haga girar M.C. para ajustar el reloj.
FM STEP (paso de sintonía de FM)
El paso de sintonía de FM que utiliza la sintoniza-
ción por búsqueda se puede cambiar entre 100
kHz, el paso predefinido y 50 kHz.
! Si la sintonización por búsqueda se realiza en
pasos de 50 kHz, es posible que las emisoras
se sintonicen de manera imprecisa. En ese
caso, sintonícelas manualmente o vuelva a uti-
lizar la función de sintonización por búsqueda.
! El paso de sintonía es de 50 kHz durante la sin-
tonización manual.
1 Pulse M.C. para mostrar el modo de ajuste.
2 Gire M.C. para seleccionar el paso de sintonía
de FM.
50 KHZ (50 kHz)—100 KHZ (100 kHz)
3 Pulse M.C. para confirmar la selección.
AM STEP (paso de sintonía de AM)
El paso de sintonía de AM se puede cambiar entre
9 kHz, el paso predefinido y 10 kHz. Si se utiliza el
sintonizador en América del Norte, América Cen-
tral o América del Sur, se deberá cambiar el paso
de sintonía de 9 kHz (531 a 1 602 kHz permisibles)
a 10 kHz (530 a 1 640 kHz permisibles).
1 Pulse M.C. para mostrar el modo de ajuste.
2 Gire M.C. para seleccionar el paso de sintonía
de AM.
9 KHZ (9 kHz)—10 KHZ (10 kHz)
3 Pulse M.C. para confirmar la selección.
AUX (entrada auxiliar)
Active este ajuste si utiliza un dispositivo auxiliar
conectado a esta unidad.
1 Pulse M.C. para activar o desactivar la función
AUX.
USB (plug and play)
Este ajuste permite cambiar la fuente a USB/iPod
automáticamente.
1 Pulse M.C. para activar o desactivar Plug and
Play.
ON – Si está conectado un dispositivo de al-
macenamiento USB o un iPod, y dependiendo
del tipo de dispositivo, la fuente cambia auto-
máticamente a USB/iPod al arrancar el motor.
Si se desconecta el dispositivo de almacena-
miento USB o el iPod, se apaga la fuente de la
unidad.
OFF – Cuando un dispositivo de almacena-
miento USB o un iPod está conectado, la fuen-
te no cambia automáticamente a USB/iPod.
Cambie la fuente a USB/iPod manualmente.
SW CONTROL (ajuste de la salida posterior y del
altavoz de subgraves)
La salida de cables de altavoces traseros y la sali-
da RCA se pueden usar para la conexión de alta-
voces de toda la gama o de subgraves.
Si cambia a REAR-SP :SW, puede conectar un
cable de altavoz trasero directamente a un altavoz
de subgraves sin tener que usar un amplificador
auxiliar.
En principio, REAR-SP está ajustado para una co-
nexión de altavoces traseros de toda la gama
(FUL).
1 Pulse M.C. para mostrar el modo de ajuste.
2 Gire M.C. para cambiar la salida y púlselo para
realizar la selección.
REAR-SP—PREOUT
3 Gire M.C. para cambiar de ajuste.
REAR-SP: FUL—SW
PREOUT: SW—REA
! Aunque cambie este ajuste, no se produci-
rá ningún sonido a menos que active la sa-
lida de subgraves (consulte
SUBWOOFER1 (ajuste de subgraves activa-
do/desactivado) en esta página).
! Si cambia este ajuste, la salida de subgra-
ves retomará los ajustes de fábrica en el
menú de audio.
Español
Utilización de esta unidad
02
29
Sección
Utilización de esta unidad
Es
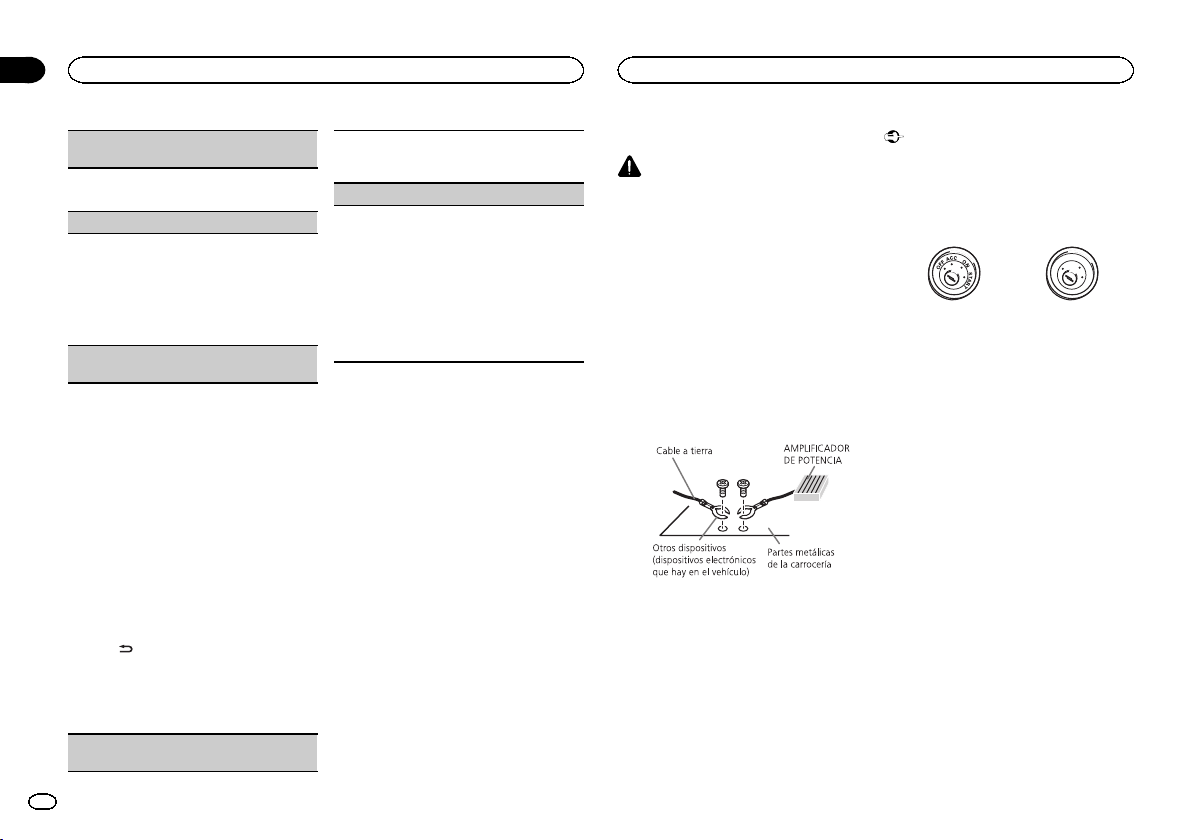
DEMO (ajuste de la visualización de la demostra-
ción)
1 Pulse M.C. para activar o desactivar la visuali-
zación de la demostración.
SCROLL (ajuste del modo de desplazamiento)
Si la función de desplazamiento continuo está ac-
tivada (ON), la información de texto que hay regis-
trada se desplaza de manera ininterrumpida por el
display. Desactive la función (OFF) si desea que la
información se desplace una sola vez.
1 Pulse M.C. para activar o desactivar el despla-
zamiento continuo.
BT CLEAR (restablecimiento del módulo de tecno-
logía inalámbrica Bluetooth)
Es posible eliminar los datos del teléfono Blue-
tooth. Para proteger la información personal, le re-
comendamos eliminar estos datos antes de
transferir la unidad a otras personas. Se elimina-
rán los siguientes ajustes:
! entradas del directorio de teléfonos en el telé-
fono Bluetooth
! números de presintonía que haya en el teléfo-
no Bluetooth
! asignación de registro del teléfono Bluetooth
! historial de llamadas del teléfono Bluetooth
! Información del teléfono Bluetooth conectado
1 Pulse M.C. para mostrar la pantalla de confir-
mación.
Se visualiza YES. La función Borrar memoria
se ajustará ahora en modo en espera.
Si no desea reajustar la memoria del teléfono,
pulse
. El display vuelve a mostrarse.
2 Pulse M.C. para borrar la memoria.
Se muestra CLEARED y se eliminan los ajus-
tes.
! No apague el motor mientras se esté utili-
zando esta función.
VER INFO (visualización de la versión de Blue-
tooth)
Se pueden visualizar las versiones del sistema de
esta unidad y del módulo Bluetooth.
1 Pulse M.C. para mostrar la información.
S/W UPDATE (actualización del software)
Esta función se utiliza para actualizar esta unidad
con la última versión del software disponible. Para
más información sobre el software y la actualiza-
ción, consulte nuestro sitio web.
! Nunca desconecte la unidad mientras el soft-
ware se esté actualizando.
1 Pulse M.C. para mostrar el modo de transfe-
rencia de datos.
Para finalizar la actualización, siga las instruc-
ciones en pantalla.
Uso de una fuente AUX
1 Inserte el miniconector estéreo en el co-
nector de entrada AUX.
2 Presione S (SRC/OFF) para seleccionar
AUX como la fuente.
Nota
No se puede seleccionar AUX si no se activa el
ajuste auxiliar.Para obtener más información,
consulte AUX (entrada auxiliar) en la página an-
terior.
Conexiones
ADVERTENCIA
! Utilice altavoces de más de 50 W (valor de
salida) y de entre 4 W y8W (valor de impe-
dancia). No utilice altavoces de 1 W a3W
con esta unidad.
! El cable negro es el cable a tierra. Cuando
instale esta unidad o el amplificador de po-
tencia (vendido por separado), siempre co-
necte primero el cable a tierra. Compruebe
que el cable de tierra está conectado adecua-
damente a las partes metálicas de la carroce-
ría del automóvil. El cable a tierra del
amplificador, el de esta unidad o el de cual-
quier otro dispositivo debe conectarse al
automóvil por separado usando tornillos dife-
rentes. Si el tornillo para el cable a tierra se
afloja o se cae, puede provocar incendios,
humo o averías.
Importante
! Cuando esta unidad se instale en un ve-
hículo sin posición ACC (accesorio) en la
llave de encendido, el cable rojo se debe co-
nectar al terminal que pueda detectar la ope-
ración de la llave de encendido. De lo
contrario, puede descargarse la batería.
O
N
S
T
A
R
T
O
F
F
Posición ACC Sin posición ACC
! Utilice esta unidad únicamente con una ba-
tería de 12 voltios y conexión a tierra negati-
va. De lo contrario, pueden producirse
incendios o averías.
! Para evitar cortocircuitos, sobrecalentamien-
to o fallos de funcionamiento, asegúrese de
seguir las siguientes instrucciones.
— Desconecte el terminal negativo de la batería
antes de la instalación.
— Asegure el cableado con pinzas para cables
o cinta adhesiva. Envuelva con cinta adhesiva
las partes en contacto con piezas metálicas
para proteger el cableado.
— Coloque todos los cables alejados de las par-
tes móviles, como la palanca de cambios y
los rieles de los asientos.
— Coloque todos los cables alejados de lugares
calientes, como cerca de la salida del calefac-
tor.
— No conecte el cable amarillo a la batería pa-
sándolo a través del orificio hasta el compar-
timiento del motor.
— Cubra con cinta aislante los conectores de
cables que queden desconectados.
— No acorte ningún cable.
— Nunca corte el aislamiento del cable de ali-
mentación de esta unidad para compartir la
corriente con otros equipos. La capacidad de
corriente del cable es limitada.
Utilización de esta unidad
03
30
Sección
Instalación
Es
 Loading...