

Page 1

CD RECEIVER
AUTORADIO CD
RADIO CD
DEH-1300MP
EspañolFrançaisEnglish
Owner’s Manual
Mode d’emploi
Manual de instrucciones
Page 2

Section
01
Before You Start
Thank you for purchasing this PIONEER
product.
To ensure proper use, please read through this
manual before using this product. It is especially important that you read and observe
WARNINGs and CAUTIONs in this manual.
Please keep the manual in a safe and accessible
place for future reference.
This device complies with part 15 of the FCC
Rules. Operation is subject to the following
two conditions:
(1) This device may not cause harmful interference, and (2) this device must accept any interference received, including interference that
may cause undesired operation.
Information to User
Alteration or modifications carried out without
appropriate authorization may invalidate the
user’s right to operate the equipment.
ESTABLISH A SAFE LEVEL:
! Set your volume control at a low setting.
! Slowly increase the sound until you can
hear it comfortably and clearly, without distortion.
! Once you have established a comfortable
sound level, set the dial and leave it there.
BE SURE TO OBSERVE THE FOLLOWING
GUIDELINES:
! Do not turn up the volume so high that you
can’t hear what’s around you.
! Use caution or temporarily discontinue use
in potentially hazardous situations.
! Do not use headphones while operating a
motorized vehicle; the use of headphones
may create a traffic hazard and is illegal in
many areas.
About this unit
The tuner frequencies on this unit are allocated for use in North America. Use in other
areas may result in poor reception.
For Canadian model
This Class B digital apparatus complies with
Canadian ICES-003.
The Safety of Your Ears is in
Your Hands
Get the most out of your equipment by playing
it at a safe level—a level that lets the sound
come through clearly without annoying blaring or distortion and, most importantly, without affecting your sensitive hearing. Sound
can be deceiving. Over time, your hearing
“comfort level” adapts to higher volumes of
sound, so what sounds “normal” can actually
be loud and harmful to your hearing. Guard
against this by setting your equipment at a
safe level BEFORE your hearing adapts.
WARNING
Handling the cord on this product or cords associated with accessories sold with the product
may expose you to chemicals listed on proposition 65 known to the State of California and other
governmental entities to cause cancer and birth
defect or other reproductive harm. Wash hands
after handling.
CAUTION:
USE OF CONTROL OR ADJUSTMENT OR
PERFORMANCE OF PROCEDURES
OTHER THAN THOSE SPECIFIED HEREIN
MAY RESULT IN HAZARDOUS RADIATION
EXPOSURE.
CAUTION:
THE USE OF OPTICAL INSTRUMENTS
WITH THIS PRODUCT WILL INCREASE
EYE HAZARD.
2
En
Page 3
Section
Before You Start
CAUTION
! Do not allow this unit to come into contact
with liquids. Electrical shock could result.
Also, damage to this unit, smoke, and overheating could result from contact with liquids.
! Always keep the volume low enough to hear
outside sounds.
! Avoid exposure to moisture.
! If the battery is disconnected or discharged,
any preset memory will be erased.
Important (Serial number)
The serial number is located on the bottom of
this unit. For your own security and convenience,
be sure to record this number on the enclosed
warranty card.
After-sales service for
Pioneer products
Please contact the dealer or distributor from
where you purchased this unit for after-sales
service (including warranty conditions) or any
other information. In case the necessary information is not available, please contact the
companies listed below:
Please do not ship your unit to the companies
at the addresses listed below for repair without
advance contact.
01
English
In case of trouble
Should this unit fail to operate properly, please
contact your dealer or nearest authorized
PIONEER Service Station.
Visit our website
http://www.pioneerelectronics.com
in Canada
http://www.pioneerelectronics.ca
! Learn about product updates (such as firm-
ware updates) for your product.
! Register your product to receive notices
about product updates and to safeguard
purchase details in our files in the event of
loss or theft.
! Access owner's manuals, spare parts infor-
mation, service information, and much
more.
U.S.A.
Pioneer Electronics (USA) Inc.
CUSTOMER SUPPORT DIVISION
P.O. Box 1760
Long Beach, CA 90801-1760
800-421-1404
CANADA
Pioneer Electronics of Canada, Inc.
CUSTOMER SATISFACTION DEPARTMENT
300 Allstate Parkway
Markham, Ontario L3R 0P2
1-877-283-5901
905-479-4411
For warranty information please see the Limited Warranty sheet included with this unit.
En
3
Page 4
a 6789bcd
3
Section
02
Operating this unit
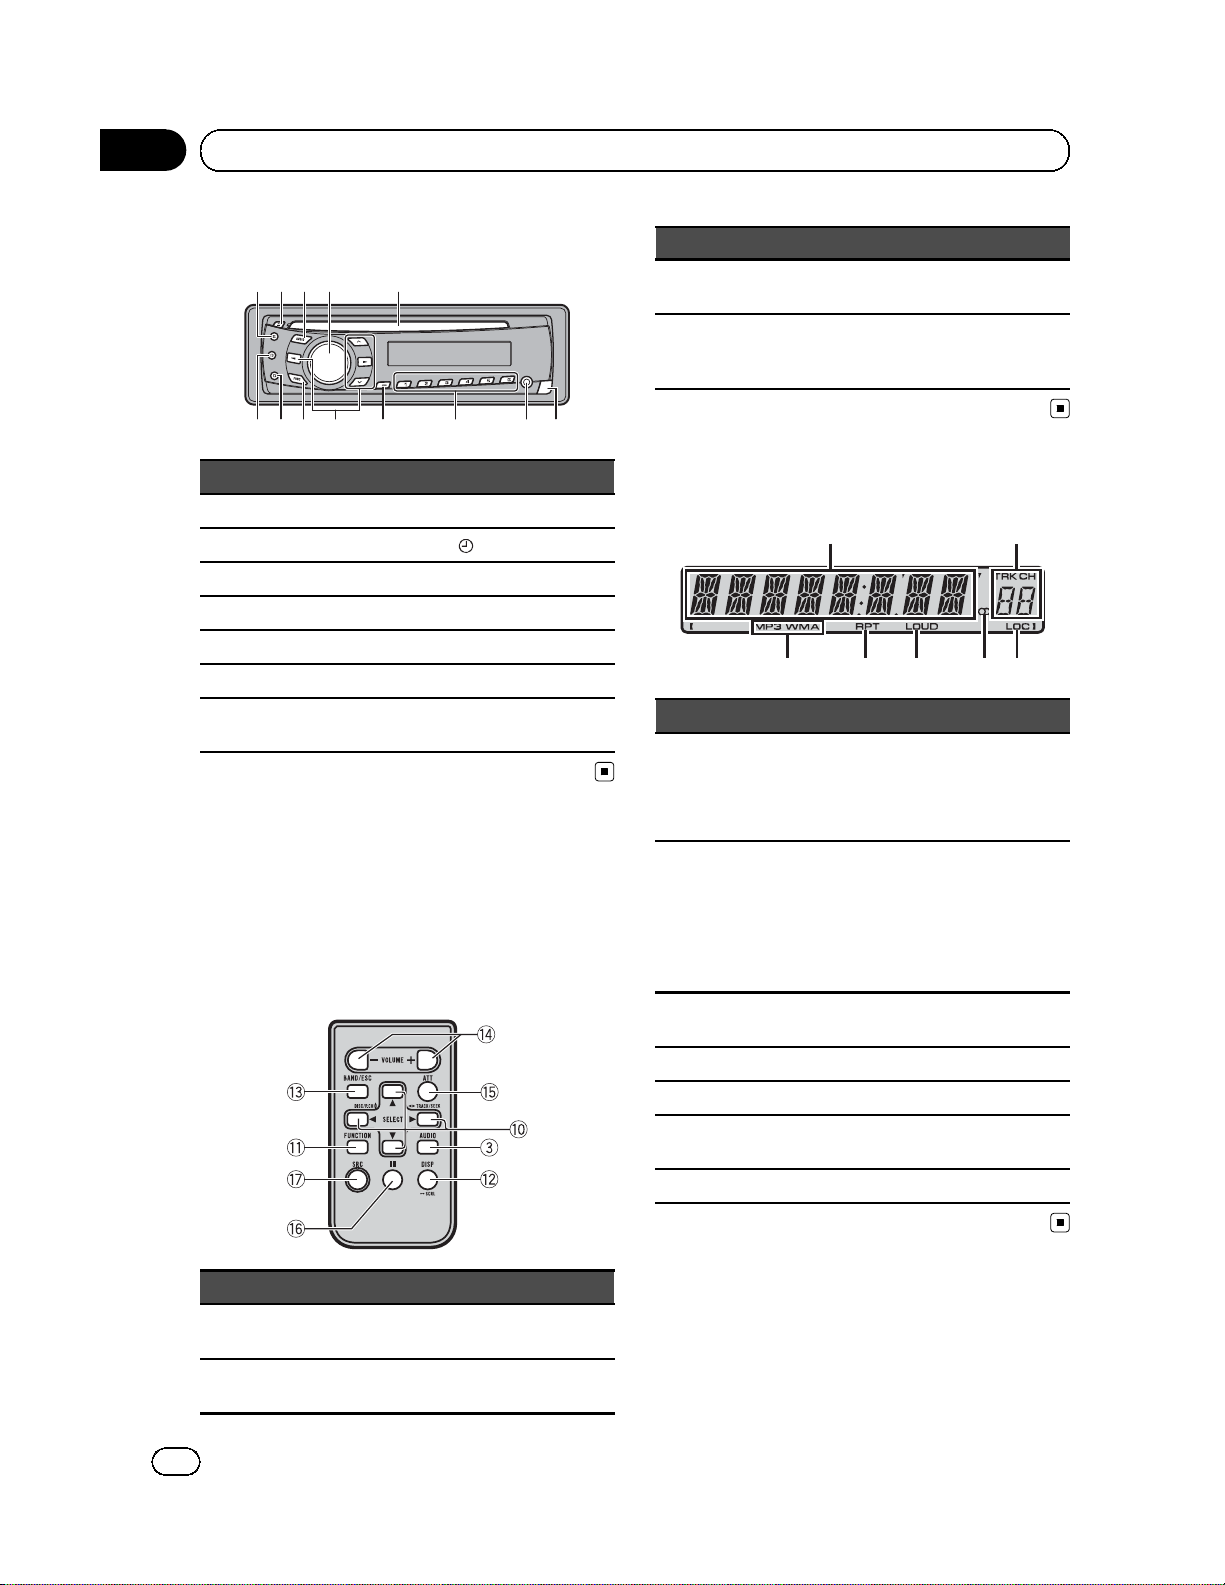
Head unit
123 4 5
Button Button
1 E (EQ/LOUD) 8 1 to 6
2 h (eject) 9
3 AUDIO a a/b/c/d
4 SRC/OFF b FUNC
5 Disc loading slot c D (DISP/SCRL)
6 Detach button d B (BAND/ESC)
AUX input jack (3.5
7
mm stereo jack)
(clock)
Remote control
Operation is the same as when using the buttons on the head unit. See the explanation of
the head unit about the operation of each button with the exception of ATT, which is explained below.
Part State
g e (pause)
SRC
h
(source)
Press to pause or resume playback.
Press to cycle through all the
available sources. Press and hold
to turn the source off.
Display indication
1
4 5 6 7
Indicator State
Main dis-
1
play section
Preset
number/
2
track number
MP3/
3
WMA
4 RPT Repeat play is turned on.
5 LOUD Loudness is on.
6 5 (stereo)
7 LOC Local seek tuning is on.
! Tuner: band and frequency
! Built-in CD player: elapsed
playback time and text information
! The track number or preset
number.
! If a track number 100 or more
is selected, d on the left of
the track number indicator
will light.
The type of the currently playing
file.
Receiving the stereo broadcasting.
2
Part State
VOLUME
e
(+/-)
f ATT
4
En
Press to increase or decrease volume.
Press to mute. Press again to unmute.
Page 5
Section
Operating this unit
Use and care of the remote
control
Using the remote control
1 Point the remote control in the direction of the
front panel to operate.
When using for the first time, pull out the film
protruding from the tray.
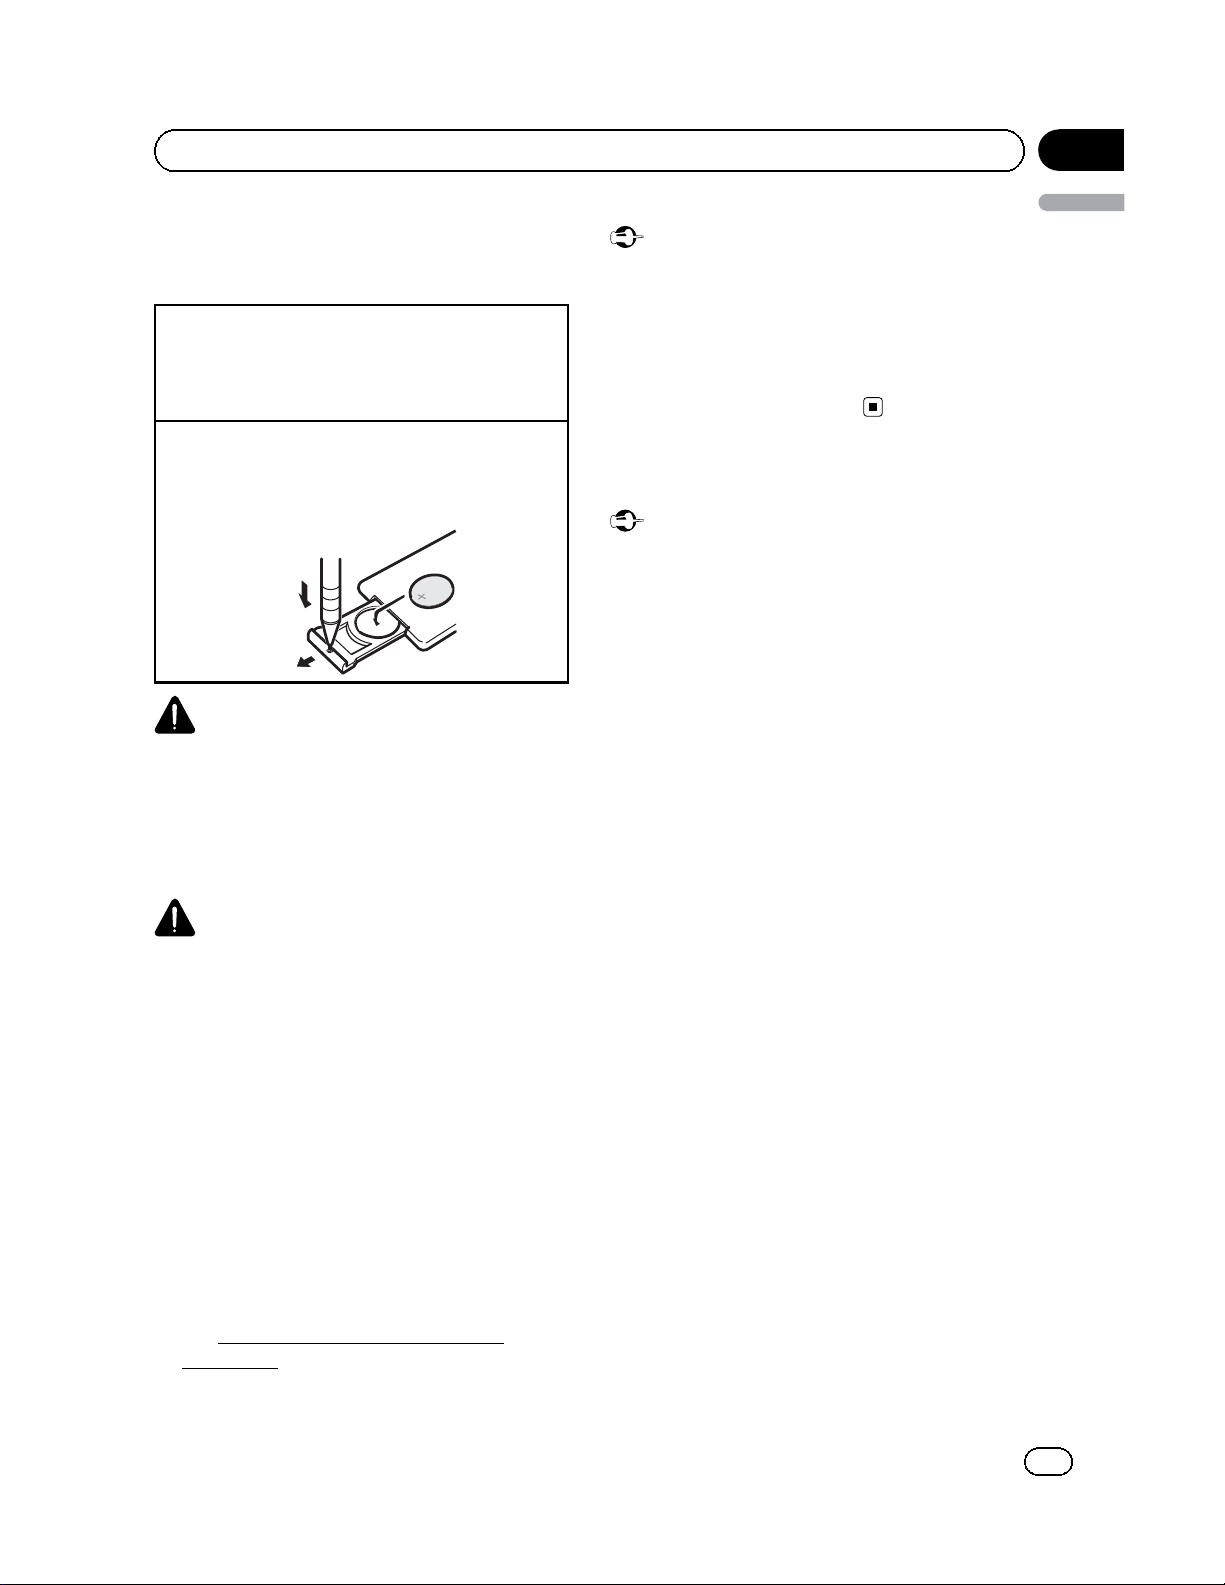
Replacing the battery
1 Slide the tray out on the ba ck of the remote con-
trol.
2 Insert the battery with the plus (+) and minus (–)
poles aligned properly.
WARNING
! Keep the battery out of the reach of children.
Should the battery be swallowed, consult a
doctor immediately.
! Batteries (battery pack or batteries installed)
must not be exposed to excessive heat such
as sunshine, fire or the like.
02
English
Important
! Do not store the remote control in high tem-
peratures or direct sunlight.
! The remote control may not function properly
in direct sunlight.
! Do not let the remote control fall onto the
floor, where it may become jammed under the
brake or accelerator pedal.
Basic Operations
Important
! Handle gently when removing or attaching
the front panel.
! Avoid subjecting the front panel to excessive
shock.
! Keep the front panel out of direct sunlight and
high temperatures.
! To avoid damage to the device or vehicle inter-
ior, remove any cables and devices attached
to the front panel before detaching it.
CAUTION
! Use one CR2025 (3 V) lithium battery.
! Remove the battery if the remote control is not
used for a month or longer.
! There is a danger of explosion if the battery is
incorrectly replaced. Replace only with the
same or equivalent type.
! Do not handle the battery with metallic tools.
! Do not store the battery with metallic objects.
! If the battery leaks, wipe the remote control
completely clean and install a new batter y.
! When disposing of used batteries, comply
with governmental regulations or environmental public institutions’ rules that apply in your
country/area.
! “Perchlorate Material – special handling may
apply.
www.dtsc.ca.gov/hazardouswaste/
See
perchlorate. (Applicable to California, U.S.A.)”
En
5
Page 6

Section
02
Operating this unit
Removing the front panel to protect your unit from
theft
1 Press the detach button to release the front
panel.
2 Push the front panel upward and pull it toward
you.
3 Always keep the detached front panel in a protec-
tion device such as a protection case.
Re-attaching the front panel
1 Slide the front panel to the left.
Make sure to insert the tabs on the left side of the
head unit into the slots on the front panel.
Note
When this unit’s blue/white lead is connected to
the vehicle’s auto-antenna relay control terminal,
the vehicle’s antenna extends when this unit’s
source is turned on. To retract the antenna, turn
the source off.
Menu operations identical
for function settings/audio
adjustments/initial settings
Returning to the ordinary display
Canceling the initial setting menu
! Press B (BAND/ESC).
You can also cancel initial settings by holding
down SRC/OFF until the unit turns off.
2 Press the right side of the front panel until it is
firmly seated.
If you cannot attach the front panel to the head
unit successfully, make sure that you are placing
the front panel onto the head unit correctly. Forcing the front panel into place may result in damage to the front panel or head unit.
Turning the unit on
1 Press SRC/OFF to turn the unit on.
Turning the unit off
1 Press SRC/OFF and hold until the unit turns off.
Selecting a source
1 Press SRC/OFF to cycle through the sources
listed below:
TUNER (tuner)—CD (built-in CD player)—AUX
(AUX)
Adjusting the volume
1 Turn SRC/OFF to adjust volume.
CAUTION
For safety reasons, park your vehicle when removing the front panel.
Tuner
Basic Operations
Selecting a band
1 Press B (BAND/ESC) until the desired band (F1,
F2, F3 for FM or AM) is displayed.
Manual tuning (step by step)
1 Press c or d.
Seeking
1 Press and hold c or d, and then release.
You can cancel seek tuning by briefly pressing c
or d.
While pressing and holding c or d, you can skip
stations. Seek tuning starts as soon as you release c or d.
Storing and recalling stations
for each band
% When you find a station that you want
to store in memory, press one of the preset
tuning buttons (1 to 6) and hold until the
preset number stops flashing.
Stored radio station frequency can be recalled
by pressing the preset tuning button.
# Press a or b to recall radio station frequen-
cies.
6
En
Page 7

Section
Operating this unit
Function settings
% Press FUNC to select the function.
After selecting, perform the following procedures to set the function.
BSM (best stations memory)
BSM (best stations memory) automatically stores the
six strongest stations in the order of their signal
strength.
Storing broadcast frequenc ies with BSM may replace
broadcast frequencies you have saved using 1 to 6.
1 Press a to turn BSM on.
The six strongest broadcast frequencies are
stored in the order of their signal strength.
To cancel the storage process, press b.
LOCAL (local seek tuning)
Local seek tuning lets you tune in to only those radio
stations with sufficiently strong signals for good reception.
1 Press a or b to turn local seek tuning on or off.
2 Press c or d to set the sensitivity.
FM: LOCAL 1—LOCAL 2—LOCAL 3—LOCAL 4
AM: LOCAL 1—LOCAL 2
The highest level setting allows reception of only
the strongest stations, while lower levels allow the
reception of weaker stations.
02
English
Displaying text information
Selecting the desired text information
1 Press D (DISP/SCRL).
Scrolling the text information to the left
1 Press and hold D (DISP/SCRL).
Notes
! Depending on the version of iTunes used to
write MP3 files to a disc or media file types, incompatible text stored within an audio file
may be displayed incorrectly.
! Text information items that can be changed
depend on the media.
Function settings
% Press FUNC to select the function.
After selecting, perform the following procedures to set the function.
RPT (repeat play)
1 Press c or d to select the repeat range.
DSC – Repeat all tracks
TRK – Repeat the current track
FLD – Repeat the current folder
RDM (random play)
CD
Basic Operations
Playing a CD/CD-R/CD-RW
1 Insert the disc into the disc loading slot with the
label side up.
Ejecting a CD/CD-R/CD-RW
1 Press h.
Selecting a folder
1 Press a or b.
Selecting a track
1 Press c or d.
Fast forwarding or reversing
1 Press and hold c or d.
When playing compressed audio, there is no
sound during fast forward or reverse.
Switching between compressed audio and CD-DA
1 Press B (BAND/ESC).
1 Press a or b to turn random play on or off.
When random play is on, RDM appears in the display.
If you turn random play on during folder repeat,
FRDM appears in the display.
SCAN (scan play)
Scan play searches for a song within the selected repeat range.
1 Press a to turn scan play on.
If you turn scan play on during FLD, FSCN appears in the display.
2 When you find the desired track press b to turn
scan play off.
If the display has automatically returned to the
playback display, select SCAN again by pressing
FUNC.
After scanning of a disc (folder) is finished, normal playback of the tracks begins.
PAUSE (pause)
1 Press a or b to pause or resume.
SRTRV (sound retriever)
En
7
Page 8

Section
02
Operating this unit
Automatically enhances compressed audio and restores rich sound.
1 Press a or b to select your favorite setting.
OFF (off)—1—2
1 is effective for low compression rates, and 2 is
effective for high compression rates.
FF/REV (fast forward/reverse)
You can switch the search method between fast forward/reverse and searching every 10 tracks. Selecting
ROUGH enables you to search every 10 tracks.
1 Press d to select ROUGH.
FF/REV – Fast forward and reverse
ROUGH – Searching every 10 tracks
To select FF/REV, press c.
2 Press B (BAND/ESC) to return to the playback dis-
play.
3 Press and hold c or d to search every 10 tracks
on a disc (folder).
If the rest of track number is less than 10, press
and hold c or d recalls the first (last) one.
SLA (source level adjustment)
SLA (Source Level Adjustment) lets you adjust the vo-
lume level of each source to prevent radical changes
in volume when switching between sources.
! When selecting FM as the source, you cannot
switch to SLA.
! Settings are based on the FM volume level, which
remains unchanged.
! The AM volume level can also be adjusted with
this function.
1 Press a or b to adjust the source volume.
Adjustment range: SLA +4 to SLA –4
Using the equalizer
% Press E (EQ/LOUD) to select the equalizer.
DYNAMIC—VOCAL—NATURAL—CUSTOM
—FLAT—POWERFUL
! CUSTOM allows you to create a customized
setting.
Audio Adjustments
Audio Adjustments
% Press AUDIO to select the audio function.
After selecting, perform the following procedures to set the audio function.
FAD (fader/balance adjustment)
1 Press a or b to adjust fader (front/rear speaker
balance).
2 Press c or d to adjust the balance (left/right
speaker balance).
BASS/MID/TREBLE (equalizer adjustment)
! Adjusted equalizer curve settings are stored in
CUSTOM.
1 Press a or b to adjust the level.
Adjustment range: +6 to -6
LOUD (loudness)
Loudness compensates for deficiencies in the lowand high-frequency ranges at low volume.
1 Press a or b to turn loudness on or off.
2 Press c or d to select the desired setting.
LOW (low)—HI (high)
! You can also turn loudness on or off by pressing
and holding E (EQ/LOUD).
Other Functions
Adjusting initial settings
1 Press SRC/OFF and hold until the unit
turns off.
2 Press SRC/OFF and hold until the clock
appears in the display.
3 Press FUNC to select the initial setting.
After selecting, perform the following procedures to set the initial setting.
Setting the clock
1 Press c or d to select the segment of the clock
display you wish to set.
Hour—Minute
2 Press a or b to put a clock right.
AUX (auxiliary input)
Activate this setting when using an auxiliary device
connected to this unit.
1 Press a or b to turn auxiliary setting on or off.
8
En
Page 9

Section
Operating this unit
Displaying the clock
% Press to turn the clock display on or
off.
# The clock display disappears temporarily
when you perform other operations, but the clock
display appears again af ter 25 seconds.
Using an AUX source
1 Insert the stereo mini plug into the
AUX input jack.
2 Press SRC/OFF to select AUX as the
source.
# AUX cannot be selected unless the auxiliary
setting is turned on. For more details, refer to
AUX (auxiliary input) on the previous page.
02
English
En
9
Page 10

Section
03
Installation
Connections
WARNING
! Use speakers over 50 W (output value) and be-
tween 4 W to 8 W (impedance value). Do not
use 1 W to 3 W speakers for this unit.
! The black cable is ground. When installing
this unit or power amp (sold separately), make
sure to connect the ground wire first. Ensure
that the ground wire is properly connected to
metal parts of the car’s body. The ground wire
of the power amp and the one of this unit or
any other device must be connected to the car
separately with different screws. If the screw
for the ground wire loosens or falls out, it
could result in fire, generation of smoke or
malfunction.
Ground wire
Other devices
(Another electronic
device in the car)
Important
! When installing this unit in a vehicle without
an ACC (accessory) position on the ignition
switch, failure to connect the red cable to the
terminal that detects operation of the ignition
key may result in battery drain.
ACC position No ACC position
Metal parts of car’s body
POWER AMP
O
F
N
F
O
S
T
A
R
T
— Disconnect the negative terminal of the
battery before installation.
— Secure the wiring with cable clamps or ad-
hesive tape. Wrap adhesive tape around
wiring that comes into contact with metal
parts to protect the wiring.
— Place all cables away from moving parts,
such as the gear shift and seat rails.
— Place all cables away from hot places,
such as near the heater outlet.
— Do not connect the yellow cable to the bat-
tery by passing it through the hole to the
engine compartment.
— Cover any disconnected cable connectors
with insulating tape.
— Do not shorten any cables.
— Never cut the insulation of the power cable
of this unit in order to share the power
with other devices. The current capacity of
the cable is limited.
— Use a fuse of the rating prescribed.
— Never wire the negative speaker cable di-
rectly to ground.
— Never band together negative cables of
multiple speakers.
! When this unit is on, control signals are sent
through the blue/white cable. Connect this
cable to the system remote control of an external power amp or the vehicle’s auto-antenna
relay control terminal (max. 300 mA 12 V DC).
If the vehicle is equipped with a glass antenna, connect it to the antenna booster power
supply terminal.
! Never connect the blue/white cable to the
power terminal of an external power amp.
Also, never connect it to the power terminal of
the auto antenna. Doing so may result in battery drain or a malfunction.
! Use this unit with a 12-volt battery and nega-
tive grounding only. Failure to do so may result
in a fire or malfunction.
! To prevent a short-circuit, overheating or mal-
function, be sure to follow the directions
below.
10
En
Page 11

h
Section
Installation
This unit
123 4
1 Antenna input
2 Fuse (10 A)
3 Power cord input
4 Rear output
Power cord
e
f
g
1
8
9
c
d
32
LR
6
7
a
b
4
F
5
R
1 To power cord input
2 Left
3 Right
4 Front speaker
5 Rear speaker
6 White
7 White/black
8 Gray
9 Gray/black
a Green
b Green/black
c Violet
d Violet/black
e Black (chassis ground)
Connect to a clean, paint-free metal location.
f Yellow
Connect to the constant 12 V supply terminal.
g Red
Connect to terminal controlled by ignition
switch (12 V DC).
h Blue/white
Connect to system control terminal of the
power amp or auto-antenna relay control
terminal (max. 300 mA 12 V DC).
Note
With a 2 speaker system, do not connect anything
to the speaker leads that are not connected to
speakers.
Power amp (sold separately)
Perform these connections when using the
optional amplifier.
1
2
55
1 System remote control
Connect to Blue/white cable.
2 Power amp (sold separately)
3 Connect with RCA cables (sold separately)
4 To Rear output
5 Rear speaker
3
4
Installation
Important
! Check all connections and systems before
final installation.
! Do not use unauthorized parts as this may
cause malfunctions.
! Consult your dealer if installation requires dril-
ling of holes or other modifications to the vehicle.
! Do not install this unit where:
— it may interfere with operation of the vehi-
cle.
— it may cause injury to a passenger as a re-
sult of a sudden stop.
03
English
En
11
Page 12

Section
03
Installation
! The semiconductor laser will be damaged if it
overheats. Install this unit away from hot
places such as near the heater outlet.
! Optimum performance is obtained when the
unit is installed at an angle of less than 60°.
60°
DIN front/rear mount
This unit can be properly installed using either
front-mount or rear-mount installation.
DIN Front-mount
1 Insert the mounting sleeve into the
dashboard.
For installation in shallow spaces, use the supplied mounting sleeve. If there is enough
space, use the mounting sleeve that came
with the vehicle.
2 Secure the mounting sleeve by using a
screwdriver to bend the metal tabs (90°)
into place.
1
2
3
4
5
1 Nut
2 Firewall or metal support
3 Metal strap
4 Screw
5 Screw (M4 × 8)
# Make sure that the unit is installed securely in
place. An unstable installation may cause skipping or other malfunctions.
DIN Rear-mount
1 Determine the appropriate position
where the holes on the bracket and the
side of the unit match.
1
2
1 Dashboard
2 Mounting sleeve
3 Install the unit as illustrated.
Use commercially available parts when installing.
12
En
2 Tighten two screws on each side.
1
2
1 Screw
2 Mounting bracket
3 Dashboard or console
3
Use either truss (5 mm × 8 mm) or flush surface (5 mm × 9 mm) screws, depending on
the bracket screw holes.
Page 13

Section
Installation
Removing the unit
1 Remove the trim ring.
1 Trim ring
2 Notched tab
! Releasing the front panel allows easier ac-
cess to the trim ring.
! When reattaching the trim ring, point the
side with the notched tab down.
2 Insert the supplied extraction keys into
both sides of the unit until they click into
place.
03
English
Securing the front panel
The front panel can be secured with the supplied screw.
1
1 Screw
3 Pull the unit out of the dashboard.
Removing and re-attaching the front
panel
You can remove the front panel to protect your
unit from theft.
Press the detach button and push the front
panel upward and pull it toward you.
For details, refer to Removing the front panel to
protect your unit from theft and Re-attaching
the front panel on page 6.
En
13
Page 14

Appendix
Additional Information
Troubleshooting
Symptom Cause Action
The display
automatically
returns to the
ordinary display.
The repeat play
range changes
unexpectedly.
A subfolder is
not played
back.
NO XXXX appears when a
display is changed (NO T-TTL,
for example).
The unit is malfunctioning.
There is interference.
You did not perform any operation within about
30 seconds.
Depending on
the repeat play
range, the selected range may
change when selecting another
folder or track, or
when fast forwarding/reversing.
Subfolders cannot be played
when FLD (folder
repeat) is selected.
There is no text
information embedded.
You are using a
device, such as a
cellular phone,
that transmits
electric waves
near the unit.
Perform operation
again.
Select the repeat
play range again.
Select another repeat play range.
Switch the display
or play another
track/file.
Move electrical devices that may be
causing the interference away from
the unit.
Message Cause Action
ERROR-10, 11,
12, 15, 17, 30,
A0
ERROR-15 The inserted disc
ERROR-23 Unsupported CD
FRMTREAD Sometimes there
NO AUDIO The inserted disc
PROTECT All the files on
SKIPPED The inserted disc
There is an electrical or mechanical error.
is blank
format
is a delay between the start of
playback and
when you start to
hear any sound.
does not contain
any playable
files.
the inserted disc
are embedded
with DRM.
contains DRM
protected WMA
files.
Turn the ignition
switch OFF and
back ON, or switch
to a different
source, then back
to the CD player.
Replace the disc.
Replace the disc.
Wait until the message disappears
and you hear
sound.
Replace the disc.
Replace the disc.
Replace the disc.
Handling guideline
Error messages
When you contact your dealer or your nearest
Pioneer Service Center, be sure to note the
error message.
Message Cause Action
ERROR-11, 12,
17, 30
14
En
The disc is dirty. Clean the disc.
The disc is
scratched.
Replace the disc.
Discs and player
Use only discs featuring either of following two logos.
Use 12-cm disc. Do not use 8-cm disc or an adapter
for 8-cm disc.
Page 15

Additional Information
Use only conventional, fully circular discs. Do not use
shaped discs.
Do not insert anything other than a CD into the CD
loading slot.
Do not use cracked, chipped, warped, or otherwise
damaged discs as they may damage the player.
Unfinalized CD-R/CD-RW disc playback is not possible.
Do not touch the recorded surface of the discs.
Store discs in their cases when not in use.
Avoid leaving discs in excessively hot environments
including under direct sunlight.
Do not attach labels, write on or apply chemicals to
the surface of the discs.
To clean a CD, wipe the disc with a soft cloth outward
from the center.
Condensation may temporarily impair the player ’s
performance. Leave it to adjust to the warmer temperature for about one hour. Also, wipe any damp
discs with a soft cloth.
Playback of discs may not be possible because of
disc characteristics, disc format, recorded application, playback environment, storage conditions, and
so on.
Road shocks may interrupt disc playback.
Appendix
English
Compressed audio
compatibility
WMA
File extension: .wma
Bit rate: 48 kbps to 320 kbps (CBR), 48 kbps to 384
kbps (VBR)
Sampling frequency: 32 kHz to 48 kHz
Windows Media Audio Professional, Lossless, Voice:
No
MP3
File extension: .mp3
Bit rate: 8 kbps to 320 kbps (CBR), VBR
Sampling frequency: 8 kHz to 48 kHz (32, 44.1, 48 kHz
for emphasis)
Compatible ID3 tag version: 1.0, 1.1, 2.2, 2.3, 2.4 (ID3
tag Version 2.x is given priority over Version 1.x.)
M3u playlist: No
MP3i (MP3 interactive), mp3 PRO: No
WAV
File extension: .wav
Quantization bits: 8 and 16 (LPCM), 4 (MS ADPCM)
Sampling frequency: 16 kHz to 48 kHz (LPCM), 22.05
kHz and 44.1 kHz (MS ADPCM)
DualDiscs
DualDiscs are two-sided discs that have a recordable
CD for audio on one side and a recordable DVD for
video on the other.
Since the CD side of DualDiscs is not physically compatible with the general CD standard, it may not be
possible to play the CD side with this unit.
Frequent loading and ejecting of a DualDisc may result in scratches on the disc. Serious scratches can
lead to playback problems on this unit. In some
cases, a DualDisc may become stuck in the disc loading slot and will not eject. To prevent this, we recommend you refrain from using DualDisc with this unit.
Please refer to the information from the disc manufacturer for more detailed information about DualDiscs.
Supplemental information
Only the first 32 characters can be displayed as a file
name (including the file extension) or a folder name.
This unit may not operate correctly depending on the
application used to encode WMA files.
There may be a slight delay when starting playback of
audio files embedded with image data.
Disc
Playable folder hierarchy: up to eight tiers (A practical
hierarchy is less than two tiers.)
Playable folders: up to 99
Playable files: up to 999
En
15
Page 16

Appendix
Additional Information
File system: ISO 9660 Level 1 and 2, Romeo, Joliet
Multi-session playback: Yes
Packet write data transfer: No
Regardless of the length of blank section between the
songs of the original recording, compr essed audio
discs play with a short pause between songs.
Sequence of audio files
The user cannot assign folder numbers and
specify playback sequences with this unit.
Example of a hierarchy
01
02
04
05
Level 1 Level 2 Level 3 Level 4
03
: Folder
: Compressed
audio file
01 to 05: Folder
number
1 to 6: Playback
sequence
Disc
! Folder selection sequence or other opera-
tion may differ depending on the encoding
or writing software.
Copyright and trademark
iTunes
Apple and iTunes are trademarks of Apple
Inc., registered in the U.S. and other countries.
MP3
Supply of this product only conveys a license
for private, non-commercial use and does not
convey a license nor imply any right to use
this product in any commercial (i.e. revenuegenerating) real time broadcasting (terrestrial,
satellite, cable and/or any other media), broadcasting/streaming via internet, intranets and/
or other networks or in other electronic content distribution systems, such as pay-audio or
audio-on-demand applications. An independent license for such use is required. For details, please visit
http://www.mp3licensing.com.
WMA
Windows Media and the Windows logo are trademarks or registered trademarks of Microsoft
Corporation in the United States and/or other
countries.
This product includes technology owned by
Microsoft Corporation and cannot be used or
distributed without a license from Microsoft
Licensing, Inc.
Specifications
General
Power source ............................. 14.4 V DC (10.8 V to 15.1 V
allowable)
Grounding system ................... Negative type
Maximum current consumption
..................................................... 10.0 A
Dimensions (W × H × D):
DIN
Chassis ..................... 178 mm × 50 mm × 165
mm
(7 in. × 2 in. × 6-1/2 in.)
Nose ........................... 188 mm × 58 mm × 17 mm
(7-3/8 in.× 2-1/4 in.× 5/8 in.)
D
Chassis ..................... 178 mm × 50 mm × 165
mm
(7 in.× 2 in.× 6-1/2 in.)
Nose ........................... 170 mm × 46 mm × 17 mm
(6-3/4 in.× 1-3/4 in.× 5/8 in.)
Weight .......................................... 1.3 kg (2.9 lbs)
Audio
Maximum power output ....... 50 W × 4
Continuous power output ... 22 W × 4 (50 Hz to 15 000
Hz, 5 % THD, 4 W load, both
channels driven)
Load impedance ...................... 4 W (4 W to 8 W allowable)
Preout maximum output level
..................................................... 2.0 V
Tone controls:
Bass
Frequency ................ 100 Hz
Gain ............................ ±12 dB
16
En
Page 17

Additional Information
Appendix
Mid
Frequency ................ 1 kHz
Gain ............................ ±12 dB
Treble
Frequency ................ 10 kHz
Gain ............................ ±12 dB
CD player
System .......................................... Compact disc audio system
Usable discs .............................. Compact disc
Signal-to-noise ratio ............... 94 dB (1 kHz) (IHF-A net-
work)
Number of channels .............. 2 (stereo)
WMA decoding format ......... Ver. 7, 7.1, 8, 9, 10, 11, 12
(2ch audio)
(Windows Media Player)
MP3 decoding format ........... MPEG-1 & 2 Audio Layer 3
WAV signal format .................. Linear PCM & MS ADPCM
FM tuner
Frequency range ...................... 87.9 MHz to 107.9 MHz
Usable sensitivity ..................... 11 dBf (0.7 μV/75 W, mono,
S/N: 30 dB)
Signal-to-noise ratio ............... 72 dB (IHF-A network)
AM tuner
Frequency range ...................... 530 kHz to 1 710 kHz
Usable sensitivity ..................... 25 μV (S/N: 20 dB)
Signal-to-noise ratio ............... 62 dB (IHF-A network)
English
CEA2006 Specifications
Power output ............................. 14 W RMS × 4 Channels (4
W and ≦ 1 % THD+N)
S/N ratio ....................................... 91 dBA (reference: 1 W into
4 W)
Note
Specifications and the design are subject to modifications without notice.
En
17
Page 18

PIONEER CORPORATION
1-1, Shin-ogura, Saiwai-ku, Kawasaki-shi,
Kanagawa 212-0031, JAPAN
PIONEER ELECTRONICS (USA) INC.
P.O. Box 1540, Long Beach, California 90801-1540, U.S.A.
TEL: (800) 421-1404
PIONEER EUROPE NV
Haven 1087, Keetberglaan 1, B-9120 Melsele, Belgium/Belgique
TEL: (0) 3/570.05.11
PIONEER ELECTRONICS ASIACENTRE PTE. LTD.
253 Alexandra Road, #04-01, Singapore 159936
TEL: 65-6472-7555
PIONEER ELECTRONICS AUSTRALIA PTY. LTD.
178-184 Boundary Road, Braeside, Victoria 3195, Australia
TEL: (03) 9586-6300
PIONEER ELECTRONICS OF CANADA, INC.
300 Allstate Parkway, Markham, Ontario L3R 0P2, Canada
TEL: 1-877-283-5901
TEL: 905-479-4411
PIONEER ELECTRONICS DE MEXICO, S.A. de C.V.
Blvd.Manuel Avila Camacho 138 10 piso
Col.Lomas de Chapultepec, Mexico, D.F. 11000
TEL: 55-9178-4270
ܜ䢦㙵ӑ᳝䰤݀ৌ
㐑݀ৌ˖ ৄ࣫ᏖЁቅ࣫䏃Ѡ↉44㰳13ῧ
䳏䁅˖
(02) 2521-3588
ܜ䢦䳏ᄤ˄佭␃˅᳝䰤݀ৌ
佭␃б啡ᇪ≭ఈ⍋␃ඳϪ⬠ଚὁЁᖗ
9ῧ901-6
䳏䁅˖
ᅸ
(0852) 2848-6488
Published by Pioneer Corporation. Copyright ©2010 by Pioneer Corporation. All rights reserved.
Publié par Pioneer Corporation. Copyright ©2010 par Pioneer Corporation. Tous droits réservés.
<KNAZX> <10F00000>
Printed in Thailand
Imprimé en Thaïlande
<QRD3061-A/N> UC
Page 19

PIONEER ELECTRONICS
(USA)
INC. PIONEER ELECTRONIQUES DU
GARANTIE
VALIDE
SEULEMENT
GARANTIE
DANSLEPAYSOULE
L1MITl~E
PRODUITAETE
. . .
ACHETE
CANADA,
INC.
GARANTIE
Pioneer Electronics (USA) Inc. (PUSA) et Pioneer Electronique du Canada, Inc. (POC) garantissent
avoir ete installes
vice de fabrication, seront repares ou remplaces par une unite devaleur comparable, au choix de
Les unites ou piecesderechange fournies en vertudela presente
LA
PRESENTE
A
CONDITION
OU
UNE
AUTRE
LA
PREMIERE
PAYSOUL'ACHAT A
PUSAOUPOC,LECAS
et
utilises conformement au manuel de I'utilisateur inclus
GARANTIE
QUELEPRODUIT
LOCATION.51JAMAISUNSERVICEDEREPARATION
PREUVE
ETE
L1MITEE
D'ACHAT
EFFECTUE
ECHEANT,
S'APPLIQUEAUPROPRIETAIRE
AIT
ETE
ACHETE
VAllDEINDIQUANT LA
SEULEMENT.
PAIERA
CHEZUND1STRIBUTEUROUMARCHAND
TEL
POUR
QU'IL
VOUS
RETOURNERLEPRODUIT
DATEDEL'ACHAT INITIAL
EST
avec
garantie
INITIALAINSI QU'A
EST
EXPLIQUE
peuvent etre
REQUIS.LEPRODUIT
DANSLEPRESENT
I'unite, ne fonctionnent pas de favon appropriee dans
TOUT
PROPRIETAIRE
PIONEER
OU,51VOUS
REPAREOUREMPLACE. A L'INTERIEURDUPAYSOUL'ACHAT A
PERIODE DE GARANTIE DES PRODUITS
Produits
La
ELEMENTS
UN
IMPLICITE DE QUALITE MARCHANDEOUD'ADAPTATION
..
PIONEER N'EST PAS
PIONEER NE
DE
LA PRESENTE GARANTIE NE S'APPLIQUE PAS SI LE PRODUIT A ETE SOUMIS
DOCUMENTS S'Y APPLIOUANT.
LA PRESENTE GARANTlE NE COUVRE PAS LES TELEVISEURS
PENDANTDELONGUES PERIODES (IMAGES REMANENTES).
LA
DISQUESOUAUX
PAR ECRIT PAR PIONEER, D'UN ACCIDENT, D'UN USAGE INAPPROPRIEOUD'UN USAGE ABUSIF, LES DOMMAGES PRODUITS PARLAFOUDRE OU LA SURTENSION,
LES DOMMAGES SUBSEOUENTS
CONFORMES
LA PRESENTE GARANTIE NE COUVRE PAS LE COUT DES PIECES
PRESENTE GAR ANTlE, SI ELLES SONT OBTENUES AUPRES D'UNE SOURCE AUTRE QU'UNE SOCIETEOESERVICE OU AUTRE AUTORISEE OU DESIGNEE
PIONEER.LAPRESENTE GARANTIENECOUVRE
NON AUTORISEES,
LES NUMEROSDESERlE MODIFIES, OBLITERESOUENLEVES ANNULENTLAPRESENTE GARANTIE DANSSATOTALITE.
INVALIDITE DE TOUTE AUTRE
AUX ETATS-UNIS - PIONEER LIMITE SES OBLIGATIONSENVERTUDETOUTE GARANTIE IMPLICITE QUE CE SOIT, Y COMPRIS ENTRE AUTRES LES
DE
APRES LA PERIODE
L'EXCLUSIONauLA
S'APPLIQUER
ETAT
AU
QU'ELLE
SERVICE
Pour
indiquant
AUX
Votre
de
Votre
Veuillez
de
Pioneer Electronics Service -Ceservice
ci-dessous
AU
Communiquez
Expeditiondevotre
en
pendanl
Pourtoutes
Satisfaction
PourIeraccordement
stereo
pour
I'auto
periodedegaranne
PRODUIT ACHETE CHEZ UN DISTRIBUTEUR NON AUTORISE N'EST COUVERT PAR AUCUNE
AVEC TOUS SES DEFAUTS EVENTUELS ".
TOUTE APPLICATION
PRESENTE GARANTIE NE COUVRE PAS LE COFFRAGEOULES ELEMENTS ESTHETIOUES, LES ANTENNES
pour
les
clients
qui
lauentIeproduit
NON
COUVERTS
RESPONSABLE
GARANTIT
Po.
PAS
LES PRODUITS ENUMERES CI-DESSUS
INDUSTRIELLEOUCOMMERCIALE
RUBANSOUDISOUES D'ENREGISTREMENT, LES DOMMAGES AU PRODUIT
CELLES QUI SONT SPECIFIEES DANS LE MANUELDEL'UTILISATEUR.
NI
D'UN ENTRETIEN INADEQUAT.
DECOULANT
commenceIejourauIe
produ~
esl
utilise
pourlapremiere
PARLAGARANTIE
Po.
UN
USAGE
PARTICULIER QUE CE SOIT, DE PLUS, CE PRODUIT EST STRICTEMENT VENDU..TEL
DE QUELQUE DOMMAGE CONSECUTIF ET(OU) INDIRECT QUECESOIT.
DE FUITES,
PAS
LES
LES DEFECTUOSITESOULES DOMMAGES CAUSES PAR L'UTILISATION D'UNE MAIN-D'CEUVREOUDE PIECES
LORSQU'ILS
QUE CE SOIT.
OU
LES ECRANS ENDOMMAGESENRAISONDEL'APPLICATION
DOMMAGES
OUDELA
Po.
UNE PUISSANCE NOMINALE EXCEDANT CELLE QUI A ETE
DECOULANTDEPILES
MAIN-D'CEUVRE QUI SERAIENT AUTREMENT OFFERTES SANS FRAISENVERTUDELA
GARANTIE
QUALITE MARCHANDEOUD'ADAPTATION
Po.
L'AUTRE.
CANADA
SOIT IMPLICITE,
profiterduserviceenvertudela
I'endroitetla
ETATS-UNIS-Communiquez
marchand
caisse
devrait
societedeservice
acceder
service
Pioneerlaplus
CANADA-POCadesigneuncertain
port
prepayeetselon
Ie transport.
DE
GARANTIE. CERTAINS ETATSNEPERMETTENT PASLALIMITATIONDELA DUREE D'UNE GARANTIE IMPLICITE,ETCERTAINS NE PERMETTENT PAS
LIMiTATiON
Po.
VOUS. LA PRESENTE GARANTIE VOUS DONNE DES DROITS LEGAUX SPECIFIQUES. VOUS POUVEZ JOUIR D'AUTRES DROITS, QUI PEUVENT VARIER D'UN
- SOUS RESERVEDECE QUI EST EXPRESSEMENT STIPULE DANS LES PRESENTES, AUCUNE REPRESENTATION. GARANTIE,
datedela
Pioneer
autorise-Votre
enumerer
autorisee-Celle-ci
au site
WebdePioneerawww.pioneerelectronics.com.cliquer
pour
communiquer
avec
Pioneer
unite
une
Incluez
les
plainteselproblemes
de la
clienteleau1-877-283-5901.
ou Ie
DES DOMMAGES CONSECUTiFS OU
OBLIGATOIRE
transaction
avecundes
ses
coordonnees
proche.
avec
Pioneer
ElectroniqueduCanada
aux
finsdeservice·Sivous
methodedetransport
volre
nom,
fonctionnementdevolre
PIONEER
LONG
http://www.pioneerelectronics.com
Po.
UN
USAGE PARTICULIER,
OU AUTRE. NE
garantie
aux
parIepremier
partenaires
marchand
(numerosdetelephoneetde
peut
reparerlaplupart
peut vous aviser
par
telephone,
nombredesocietesdeservice
votre
adresseetun
aux
Etats-Unis,
AUX
ETATS-UNIS
ELECTRONICS
P.O.
BOX
BEACH,
CALIFORNIA
1-800-421-1404
S'APPLIQUE
Etats-Unisetau
proprietaire.
Pioneer
Pioneer
peut
des
options de service optimales
par
(Ies
coordonneessetrouvent
expediez
pouvant
etre
numerodetelephoneounous
communiquez
unite.oupour
SERVICE,
1760
Po.
UNE PERIODE N'EXCEDANT PASLAPERIODEDEGARANTIE. AUCUNE GARANTIE NE S'APPLIQUE
iNDiRECTS.
Po.
CE PRODUIT.
Canada,
vous
suivants
reparerouremplacer
courrieroupar
suivieetassuree.
INC.
90801
telecopieur,
des
produits
autorisees
I'unite,
vous
avecIeservicedeSoutien
lrouver
une
devez
pourIeservice:
electroniques
sur I'onglet..Service
Ie biaisdeson
partoutauCanadasijamais
ci-dessous)
devez
EmballezIeproduitaumoyendemateriaux
societedeservice
que
les produits distribues par
PUSA
neuves
DOlT
SONT UTILISES
votre
ou de POC, sans que vousdeviezpayer pour les piecesou les travaux dereparation.
ou
remises aneuf, au choix
SUBSEQUENTDUPRESENT
AUTORISE
LOUEZLEPRODUIT,
ETRE
DOCUMENT.
LES
presenter
courriel, etc.).
pour
I'emballer
AUX
ETATS-UNISOUAU
EXPEDIE
PENDANTLAPERIODEDEGARANTIE,ENPORT
VOUS
ETES
fois
(a)
pendantlapenodedelocationau(b)
GARANTIE
Po.
DES FINS
DECOULANT
DEFECTUEUSESOUDE
LiMiTATIONSETEXCLUSiONS
votre
rei
unite,
ou bien
vous
pour
I'autoetvous
and
Support..et
votre
modeleetvotre emplacement geographique.
site
Web.
pour
trouver
soigneusementelI'envoyeraune
pouvons
vous
ala
joindre
clienteleau1-800-421-1404.AuCanada.
autorisee,
GROUPEDESATISFACTIONDELA
PIONEER
PUSA
aux
Etats-Unisetpar
des
conditions d'utilisation normales en raison d'un
de
PUSAoude
PRODUIT
VOTRECONT
RESPONSABLEDUDEMONTAGEETDE
CANADA.
RATDELOCATION
POCo
PIONEER
VOUS
DEVREZ
INDIQUANT L'ENDROITETLA
ETE
EFFECTUE.
POC
au Canada qui, apres
PENDANTLAPERIODEDEGARANTIE.
FOURNIRUNRELEVEDECAISSE
PREPAYE.
L'INSTALLATIONDUPRODUIT.
Pieces
1
an
apreslaventeaudetail,
EXPRESSE OU IMPLICITE, Y COMPRIS
COMMERCIALESOUPROFESSIONNELLES, OU AU SEIN
D'IMAGES STATIOUESET1M
INSTALLEES
D'UNE RETOUCHE, D'UNE MODIFICATION NON
evedecaisse
diriger
vers
aviser
choisir"Authorized
vous
avez
une
societedeservice
pendant
appelezouecrivez
ELECTRONIQUESDUCANADA,
300
MARKHAM.ONL3R
http://www.pioneerelectronics.ca
PAR L'UTILISATEUR, LES
L'UTILISATIONDEPILES
t:TAi>LiES
ou, si
vous
louezIeproduit.
une
societedeservice
des
options
supplementaires
besoindeservicesdereparation
autorisee.
socieledeservice
coussines
les
heuresdebureau.
a:
AU
CANADA
ALLSTATE
(905)
1-877-283-5901
PARKWAY
479-4411
selancequisepraduitenpremier.
QUELQUE
Ci-IjESSUS
Service
Locator"
Veuillez
adequats
communiquez
CLIENTELE
OP2
ETABLIE
DANS
GARANTIES
PEUvENT
OBLIGATIONOUCONDITION,
votre
Pioneer
autorisee.
qui
pourraient
pour
consulter
aulorisee
pour
eviler
INC
DOMMAGES
NON
DATE
A L'INTERIEUR
Main-d'ceuvre
1
an
GARANTIE
QUEL..ET
LES
MOBILES
AUTORISEE
PAR
IMPLICITES
DONt;
Nt:
contratdelocation
Votre
s'appliquer.
trouverlasociete
les
coordonnees
pour
votre
produit.
ouaPioneer.
les
dommages
avecIegroupe
REGLEMENT DES CONFLITS
AUX
ETATS·UNIS
recoursauProgrammederesolution
de
resolution
Improvement
Pour
avoir
probleme
dlstributeurImarchand
resolution
par
a
AU
NO.dumodele:
Dated'achat:
auquel
ecrit
pour
votre
plainte
CANADA-Communiquez
• Siunconflilseproduit
des
plalntes
vous
faites
communique.
aviser
ecrit
avantdevous
autorise
des
pour
Act,15U.S.C. 2301
recoursauProgrammederesolution
vous
sera
vous
par
des
plaintesdePioneer
prevaloirdevos
et
S.S.
faceetles
vous
avecIedirecteurdela
demarches
aupres
duquel
Pioneer
demarches
etudieraIeconflit
qU'elie
indiquer
PRENEZSOINDEGARDERCETTEINFORMATK:JNETVOTRERE<;;UDACHATDANSUNENDROrrSUR
entre
vousetPioneer
droitsoude
des
plaintes,
que
vous
vous vous
entreprendra
les
raisons
pour
Satisfactiondela
ENREGISTREZ LE LIEU ETLA DATE D'ACHAT POUR REFERENCE ULTERIEURE
apreslareponseaune
pour
resoudreIecon
chercher
appelezau1
avez
entreprises
etes
procureIeproduit
et,
dansundelaidequarante
pour
resoudreIecanflit,etindiquera
lesquelles
elle
clienteleau(905)
NO.
flit.Ceprogramme
reparationenvertuduTitreIdelaloi
800421-1404etexpliquezaurepresentantduservice
pour
n'entreprendra
de serie : _
Achelede:
demande
faire
reparerIeprodult
Pioneer.
946-7446
Une
(40)
aucune
initiale
faiteauservicedeSoutlen
vous
est
offert
sans
Magnuson-Moss
fois
jours
pour
pendantlaperi
que
votre
apreslareceptiondevotre
demarche.
plainteaete
combiendetemps
discuterdevotre
ala
frals.
Vous
odedegarantie,
expliqueeaurepresentant,unnumero
ces
demarches
plainteetresoudre
_
clientele,
devez
avoir
Warranty-Federal
a la
clientele
plainte,
(1)
prendront;ou
vous
recoursauProgramme
Trade
qui
puis
vous
donnez-IuiIenom
repondraavotre
rapidementIeprobleme.
< CRY1276-A/N >
ImprimeenTha'ilande
pouvez
Commission
repondra
plainte
(2)
repondra
AUX
.. AS
revu
avoir
DE
DU
de
du
de
Ie
Page 20

PIONEER
ELECTRONICS
(USA)
INC.
PIONEER
ELECTRONICSOFCANADA,
INC.
LIMITED WARRANTY
WARRANTY
WARRANTY
Pioneer Electronics (USA) Inc. (PUSA), and Pioneer ElectronicsOfCanada, Inc. (POC), warrant that products distributed by PUSAinthe U.S.A., and by POCinCanada that fail to
function property under normal use due to a manufacturing defect when installed and operated according to the owner's manual enclosed with the unit will
unit
of
comparable value, at the option of PUSA or POC, without charge to you for parts or actual repair work. Replacement units and/or parts supplied under this warranty may be
new or rebuilt at the option
THIS LIMITEDWARRANTY APPLIES TO THEORIGINALORANY SUBSEQUENTOWNER
PRODUCT
RECEIPTOR OTHER
ANDDATEOF
ONLY FROMWITHIN
PRODUCT. PUSA OR POC,ASAPPROPRIATE, WILL PAY TO RETURN THE REPAIRED OR REPLACEMENT PRODUCT TO YOU WITHIN THE COUNTRY OF PURCHASE.
PRODUCT
Car
The warranty period for retail customers who rent the product commences upon the date product is first put into use
StereQ
WAS
RRST
WARRANTY
PrQducts
WHATISNOT
IFTHISPRODUCTWASPURCHASED FROM ANUNAUTHORIZEDDISTRIBUTOR,THERE ARE NOWARRANTIES, EXPRESSORIMPLIED,INCLUDING THEIMPUEDWARRANTY
OFMERCHANTABIUTY ANDTHEIMPLIEDWARRANTY OFRTNESSFOR A PARTICULARPURPOSE ANDTHIS PRODUCTIS SOLDSTRICTLY
PIONEER SHALLNOTBE LIABLE
PIONEER DOESNOT WARRANT ANY PRODUCTLISTED ABOVEWHEN ITIS USED
THISWARRANTY DOES NOTAPPLY IFTHEPRODUCTHAS BEENSUBJECTED TOPOWER
THISWARRANTY DOESNOTCOVER DISPLAYSCREENS DAMAGED BY STATIC,NON-MOVING,IMAGES APPLIEDFOR LENGTHYPERIODS(BURN-IN).
THSWARRANTYDOESNOTCOVERTHECABINETORANYAPPEARANCEITEM, USERATTACHEDANTENNA,ANYDAMAGETORECORDSORRECORDINGTAPESORDl5CS,ANY
DAMAGETOTHEPRODUCTRESULTING FROM ALTERATIONS,MODIRCATIONSNOTAUTHORIZED
UGHTNINGOR
SPECIREDINTHEOWNER'S
THISWARRANTYDOESNOTCOVERTHECOSTOFPARTSORLABORWHICH WOULDBEOTHERWlSEPROVlDEDWlTHOUTCHARGEUNDERTHISWARRANTYOBTAINEDFROM
ANYSOURCEOTHERTHANA~ONEERAunHORlZEDSERVlCECOMPANYOROTHERDE~GNATEDLOCATIO~~SWARRANTYDOESNOTCOVERDEFECTSORDAMAGECAUSED
BY
THEUSE OFUNAUTHORIZEDPARTSOR LABORORFROM IMPROPERMAINTENANCE.
ALTERED, DEFACED,
TO
of
PUSA or
POCo
PURCHASEDFROM AN AUTHORIZED PIONEER DISTRIBUTORIDEALERIN THEU.S.A. OR CANADA. YOU WILLBE REQUIREDTO PROVIDEA
VALID
PROOFOF PURCHASE SHOWING
RENTAL. IN THEEVENTSERVICEISREQUIRED, THEPRODUCTMUST BEDELIVEREDWITHIN THEWARRANTYPERIOD, TRANSPORTATIONPREPAID,
THE
COUNTRYOFPURCHASEASeXPLAINED
PERIOD
COVERED
FOR
ANYCONSEQUENTIALANDIORINCIDENTALDAMAGES.
POWERSURGES,SUBSEQUENTDAMAGEFROM LEAKING,DAMAGE
MANUAL
OR
REMOVEDSERIALNUMBERS
NOOTHER WARRANTIES
IN
THE
U.S.A. - PIONEER
MERCHANTABILITYANDRTNESS FORA PARTICULARPURPOSE, TOA PERIOD
WARRANTYPERIOD. SOMESTATESDO NOTALLOWLIMITATIONSON
OR
LIMITATIONSOFINCIDENTAL ORCONSEQUENTIAL DAMAGES.SO THE
YOU
SPECIRC
IN
CANADA
OR
OTHERWISE, APPLICABLE TO THIS PRODUCT.
LEGAL
-EXCEPT ASEXPRESSLY PROVIDED HEREIN, THEREARE NO REPRESENTATIONS,WARRANTIES, OBLIGATIONS OR CONDITIONS, IMPLIED,STATUTORY
LIMITS
ITS
OBLIGATIONS
RIGHTS ANDYOU MAYHAVE OTHER RIGHTSWHICH MAY VARYFROM STATETOSTATE.
TO OBTAIN SERVICE
In the U.S.A. or Canada to receive warranty service you need to present your sales receiptoryour rental contract showing place and dateoforiginal
!!SA -
Please
CQntact
oneQfthe
Your Authorized Pioneer Dealer - Your Pioneer Dealer may repairorreplace your unit,orrefer you to an Authorized Pioneer Service Company. Your sales receipt should
list the contact information (phone number, fax, email, etc.) for your Dealer.
Your Authorized Pioneer Service Company - Can perform repairs
Pioneer website at
Pioneer Electronics Service - Can advise the optimal service option for your model and geographic location. Please reference
email or access the Pioneer website to contact Pioneer.
CANApA
Shipping
Use adequate padding material to prevent damage in transit. Include your name, address and telephone number where you can be reached during business hours.
- POC has a numberof Authorized Service Companies should your productrequire service. Contact PioneerofCanada as listed below to obtain a local service location.
YQur
www.piQneerelectrQnlcs.cQm
Unit
fQr
Service
fQIIQwing
- Please package itcarefully and send it, transportation prepaid by a traceable, insured method, to an Authorized Service CompanyorPioneer.
PiQneer
On all complaints and concerns in the U.S.A. call
IN
THE U.S.A.
of
For hook-up and operation
your unit or to locate an For additional information on this warranty, please callorwrite:
Authorized Service Company, please callorwrite: CUSTOMERSATISFACTIONGROUP
PIONEERELECTRONICSSERVICE,INC. PIONEER ELECTRONICSOF CANADA,INC.
P.O. BOX 1760 300
LONG BEACH, CALIFORNIA 90801 MARKHAM, ON L3R
1-800-421-1404
http://www.pioneerelectronics.com
DISPUTERESOLUTION
IN THE U.S.A. - Following our response to
Resolution Program to resolve the dispute. The Complaint Resolution Program is available to you without charge. You are required to use the Complaint Resolution Program
before you exercise any rights under,
To use the Complaint Resolution Program call 1-800-421-1404 and explain to the customer service representative the problem you are experiencing, steps you have taken
to have the product repaired during the warranty period and the name of the authorized Distributor/Dealer from whom the Pioneer product was purchased. After the complaint
has been explained to the representative, a resolution number will be issued. Within 40 days
(1) respond to your complaint in writing informing you
informing you
IN
CANADA
why
it will not take any action.
- Call the Customer Satisfaction Manager at (905) 946-7446 to discuss your complaint and to obtain a prompt resolution.
any
initial request to Customer Support, should a dispute arise between you and Pioneer, Pioneer makes available its Complaint
or
seek any remedies, created by Title I of the Magnuson-Moss Warranty-Federal Trade Commission Improvement Act,15U.S.C.
VALID
THE
VOID
THISENTlREWARRANTY
UNDER
ANY
partnerstoQbtain
and click on
for
Service
Customer
ONLYINCOUNTRYOFPRODUCT
OFTHIS
PIONEER PRODUCT DURING THE WARRANTYPERIOD PROVIDEDTHE
DATEOF ORIGINAL PURCHASE OR, IF RENTED, YOUR
INTHIS DOCUMENT. YOU
IN
ATRADEORBUSINESSORIN
IN
FROM
IMPLIED
HOWLONGAN
most
WARRANTIES
NOTTO
IMPLIEDWARRANTYLASTSAND
ABOVE
LIMITATIONSOR
service:
Car
Electronics products and can advise other options as applicable. Please access the
and
SUPPQrt and select
WILLBERESPONSIBLE FOR
EXCESS OFITSPUBLISHED POWER RATING.
INWRmNG
INOPERATlVEBATTERIES, ORTHEUSEOF
INCLUDING,
EXCEEDTHEWARRANTYPERIOD. NOWARRANTIES
Authorized
Support at 1-800-421-1404, or, in Canada, call
PURCHASE
be
repaired or replaced with a
RENTAL
(a)
duringthe rental periodQr(b)
ANYINDUSTRIALORCOMMERCIALAPPLICATION.
BYPIONEER,ACCIDENT, MISUSEORABUSE, DAMAGEDUETO
BUT
NOT
LIMITED
EXCLU~ONS
SOMESTATESDO
MAY
NOTAPPLY TOYOU. THIS WARRANTY GIVES
Service
LQcatQr to find the nearest Pioneer servicer.
Customer
IN
CANAPA
ALLSTATE
CONTRACT SHOWING
REMOVAL
BATTERIESNOTCONFORMINGTOTHOSE
the
AND
INSTALLATION
~
1
retail sale, whichever occurs first.
"AS
TO,
THE
information listed below and phone,
Year
IS"AND'WITH
IMPLIED
NOTALLOWTHE
WARRANTIES
SHALLAPPL
owner's
Satisfactionat1-877-283-5901.
PARKWAY
OP2
(905) 479-4411 1-877-283-5901
http://www.pioneerelectronics.ca
of
what
action Pioneer will take, and in what time period, to resolve the dispute;or(2) respond to your complaint in writing
receiving your complaint, Pioneerwill investigate the dispute and will either:
SALES
THEPLACE
OFTHE
LabQr
1
Year
ALL
FAULTS".
YAFTERTHE
EXCLUSIONS
transaction.
2301
et
OF
seq.
RECORD THEPLACE AND DATEOFPURCHASE FOR FUTURE REFERENCE
Model
No.
Purchased From _
KEEP THIS INFORMATION AND YOUR SALES RECEIPT
Serial No. Purchase Date _
IN
A SAFE PLACE
< CRY1276-AlN >
PrintedinThailand
 Loading...