

Page 1

CD RECEIVER
AUTORADIO CD
RADIO CD
DEH-12E
English Français Español
Owner’s Manual
Mode d’emploi
Manual de instrucciones
Page 2
Section
01
Before You Start
Thank you for purchasing this PIONEER
product.
To ensure proper use, please read through this
manual before using this product. It is especially important that you read and observe
WARNINGs and CAUTIONs in this manual.
Please keep the manual in a safe and accessible
place for future reference.
This device complies with part 15 of the FCC
Rules. Operation is subject to the following
two conditions:
(1) This device may not cause harmful interference, and (2) this device must accept any interference received, including interference that
may cause undesired operation.
Information to User
Alteration or modifications carried out without
appropriate authorization may invalidate the
user’s right to operate the equipment.
For Canadian model
This Class B digital apparatus complies with
Canadian ICES-003.
or other reproductive harm. Wash hands after
handling.
CAUTION:
USE OF CONTROL OR ADJUSTMENT OR
PERFORMANCE OF PROCEDURES
OTHER THAN THOSE SPECIFIED HEREIN
MAY RESULT IN HAZARDOUS RADIATION
EXPOSURE.
CAUTION:
THE USE OF OPTICAL INSTRUMENTS
WITH THIS PRODUCT WILL INCREASE
EYE HAZARD.
CAUTION
! Do not allow this unit to come into contact
with liquids. Electrical shock could result.
Also, damage to this unit, smoke, and overheating could result from contact with liquids.
! Always keep the volume low enough to hear
outside sounds.
! Avoid exposure to moisture.
! If the battery is disconnected or discharged,
any preset memory will be erased.
Important (Serial number)
The serial number is located on the bottom of
this unit. For your own security and convenience,
be sure to record this number on the enclosed
warranty card.
About this unit
The tuner frequencies on this unit are allocated for use in North America. Use in other
areas may result in poor reception.
WARNING
Handling the cord on this product or cords associated with accessories sold with the product will
expose you to chemicals listed on proposition 65
known to the State of California and other governmental entities to cause cancer and birth defect
2
En
Page 3
Before You Start
After-sales service for
Pioneer products
Please contact the dealer or distributor from
where you purchased this unit for after-sales
service (including warranty conditions) or any
other information. In case the necessary information is not available, please contact the
companies listed below:
Please do not ship your unit to the companies
at the addresses listed below for repair without
advance contact.
U.S.A.
Pioneer Electronics (USA) Inc.
CUSTOMER SUPPORT DIVISION
P.O. Box 1760
Long Beach, CA 90801-1760
800-421-1404
CANADA
Pioneer Electronics of Canada, Inc.
CUSTOMER SATISFACTION DEPARTMENT
300 Allstate Parkway
Markham, Ontario L3R 0P2
1-877-283-5901
905-479-4411
Section
01
English
For warranty information please see the Limited Warranty sheet included with this unit.
Visit our website
http://www.pioneerelectronics.com
! Learn about product updates (such as firm-
ware updates) for your product.
! Register your product to receive notices
about product updates and to safeguard
purchase details in our files in the event of
loss or theft.
! Access owner's manuals, spare parts infor-
mation, service information, and much
more.
En
3
Page 4
Section
02
Operating this unit
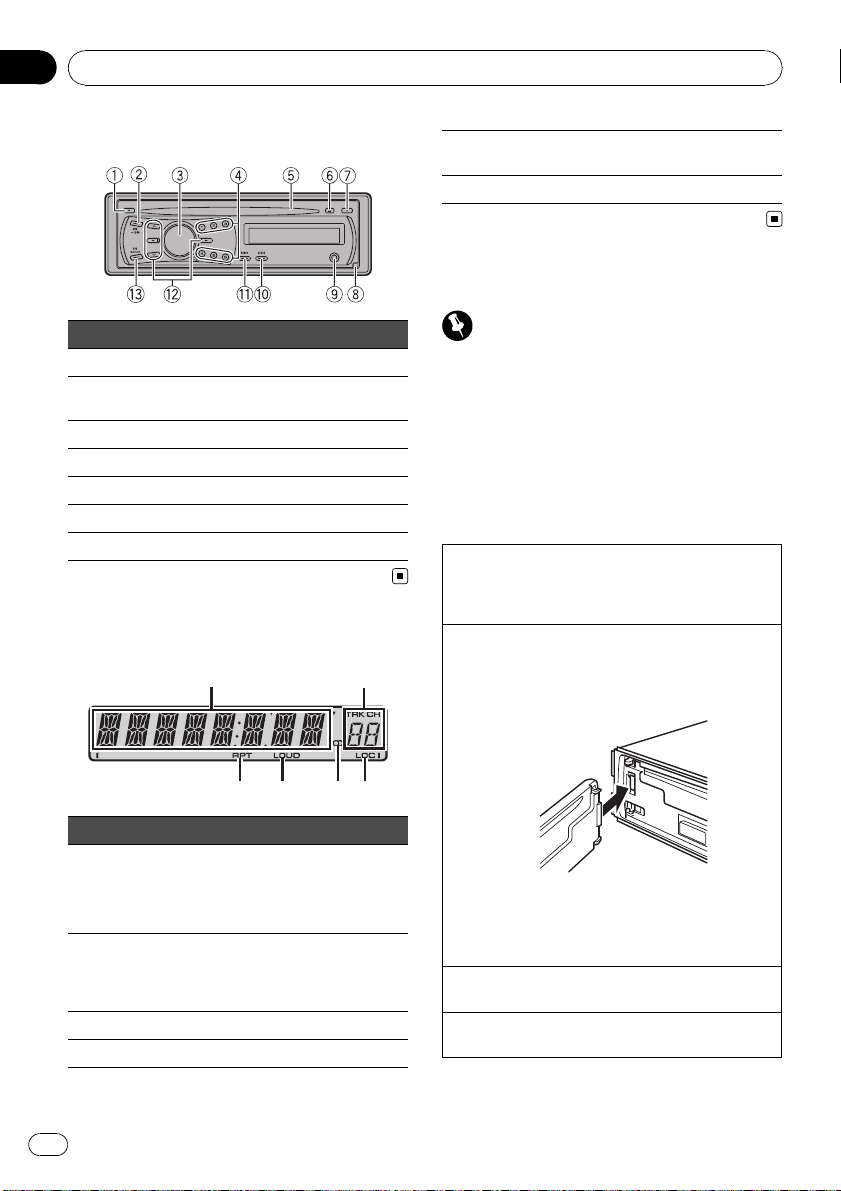
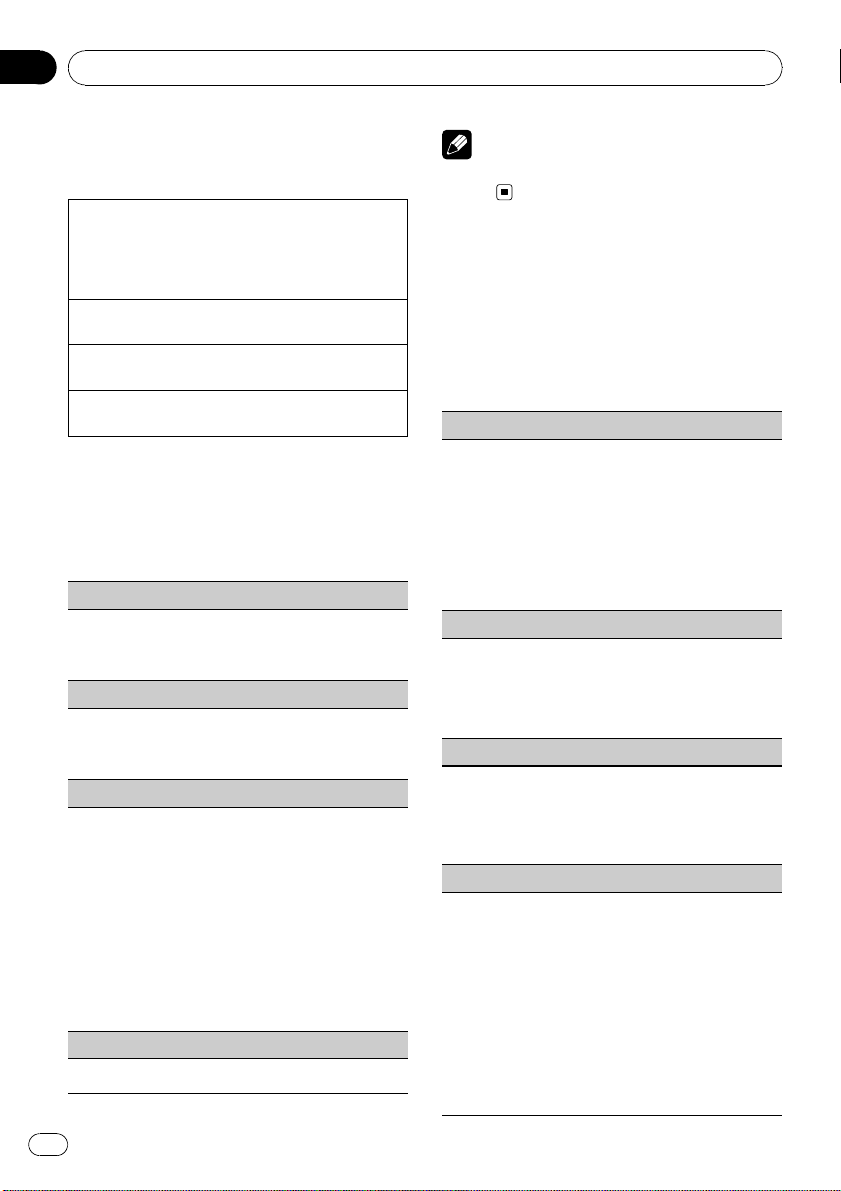
Head unit
Button Button
1 F (function) 8 Detach
2 EQ/LOUD 9
3 SRC/OFF a CLOCK
4 1 to 6 b PAUSE
5 Disc loading slot c a/b/c/d
6 h (eject) d BAND/ESC
7 A (audio)
AUX input jack (3.5
mm stereo jack)
Display indication
5 5 (stereo)
6 LOC Local seek tuning is on.
The selected frequency is being
broadcasted in stereo.
Basic Operations
Important
! Handle gently when removing or attaching
the front panel.
! Avoid subjecting the front panel to excessive
shock.
! Keep the front panel out of direct sunlight and
high temperatures.
! Remove any cables and devices attached to
this unit before detaching the front panel to
avoid damage to the device or vehicle interior.
Removing the front panel to protect your unit from
theft
1 Press detach to release the front panel.
2 Grab the front panel and remove.
Re-attaching the front panel
1 Slide the front panel to the left until it clicks.
Front panel and the head unit are connected on
the left side. Make sure that the front panel has
been properly connected to the head unit.
Indicator State
Main dis-
1
play section
Preset
number/
2
track number
3 RPT Repeat play is turned on.
4 LOUD Loudness is on.
4
En
! Tuner: band and frequency
! Built-in CD player: elapsed
playback time and text information
! The track number or preset
number.
2 Press the right side of the front panel until it is
firmly seated.
If you can’t attach the front panel to the head unit
successfully, try again. However, forcing the front
panel into place may result in damage.
Turning the unit on
1 Press SRC/OFF to turn the unit on.
Turning the unit off
1 Press SRC/OFF and hold until the unit turns off.
Page 5
Operating this unit
Selecting a source
1 Press SRC/OFF to cycle between:
TUNER (tuner)—CD (built-in CD player)—AUX
(AUX)
Adjusting the volume
1 Tur n SRC/OFF to adjust volume.
Note
When this unit’s blue/white lead is connected to
the vehicle’s auto-antenna relay control terminal,
the vehicle’s antenna extends when this unit’s
source is turned on. To retract the antenna, turn
the source off.
Menu operations identical
for function settings/audio
adjustments/initial settings
Returning to the ordinary display
Canceling the initial setting menu
1 Press BAND/ESC.
You can also cancel initial settings by holding
down SRC/OFF until the unit turns off.
Tuner
Basic Operations
Selecting a band
1 Press BAND/ESC until the desired band (F1, F2,
F3 for FM or AM) is displayed.
Manual tuning (step by step)
1 Press c or d.
Seeking
1 Press and hold c or d, and then release.
You can cancel seek tuning by briefly pressing c
or d.
While pressing and holding c or d, you can skip
stations. Seek tuning starts as soon as you release c or d.
Section
02
English
Storing and recalling stations
You can easily store up to six stations as presets.
% When you find a station that you want
to store in memory, press one of the preset
tuning buttons (1 to 6) and hold until the
preset number stops flashing.
Stored radio station frequency can be recalled
by pressing the preset tuning button.
# Press a or b to recall radio station frequen-
cies.
Function settings
% Press F (function) to select the function.
After selecting, perform the following procedures to set the function.
LOCAL (local seek tuning)
Local seek tuning lets you tune in only those radio stations with sufficiently strong signals for good reception.
1 Press a or b to turn local seek tuning on or off.
2 Press c or d to set the sensitivity.
FM: LOCAL 1—LOCAL 2—LOCAL 3—LOCAL 4
AM: LOCAL 1—LOCAL 2
Larger setting number is higher level. The highest
level setting allows reception of only the strongest
stations, while lower settings let you receive progressively weaker stations.
BSM (best stations memory)
BSM (best stations memory) automatically stores the
six strongest stations in the order of their signal
strength.
Storing broadcast frequencies with BSM may replace
broadcast frequencies you have saved using 1 to 6.
1 Press a to turn BSM on.
The six strongest broadcast frequencies are
stored in the order of their signal strength.
To cancel the storage process, press b.
En
5
Page 6
Section
02
Operating this unit
CD
Basic Operations
Playing a CD
1 Insert the disc, label side up, into the disc loading
slot.
1 If a disc has already been inserted, press SRC/
OFF to select the built-in CD player.
Ejecting a CD
1 Press h.
Selecting a track
1 Press c or d.
Fast forwarding or reversing
1 Press and hold c or d.
Function settings
% Press F (function) to select the function.
After selecting, perform the following procedures to set the function.
RPT (repeat play)
1 Press c or d to select the repeat range.
DSC – Repeat all tracks
TRK – Repeat the current track
RDM (random play)
1 Press a or b to turn random play on or off.
When random play is on, RDM appears in the display.
SCAN (scan play)
Scan play searches for a song within the selected repeat range.
1 Press a to turn scan play on.
SCAN appears in the display. The first 10 seconds
of each track is played.
2 When you find the desired track press b to turn
scan play off.
If the display has automatically returned to the
playback display, select SCAN again by pressing F
(function).
After scanning of a CD is finished, normal playback of the tracks will begin again.
PAUSE (pause)
1 Press a or b to pause or resume.
Note
You can also turn pause on or off by pressing
PAUSE.
Audio Adjustments
Audio Adjustments
% Press A (audio) to select the audio function.
After selecting, perform the following procedures to set the audio function.
FAD (fader/balance adjustment)
You can change the fader/balance setting.
1 Press a or b to adjust front/rear speaker balance.
Adjustment range (front/rear): FAD F15 to FAD
R15
FAD 0 is the proper setting when only two speak-
ers are used.
2 Press c or d to adjust left/right speaker balance.
Adjustment range (left/right): BAL L15 to BAL
R15
BASS/MID/TREBLE (equalizer adjustment)
You can adjust the bass/mid/treble level.
! Adjusted equalizer curve settings are stored in
CUSTOM.
1 Press a or b to adjust the level.
Adjustment range: +6 to -6
LOUD (loudness)
Loudness compensates for deficiencies in the lowand high-frequency ranges at low volume.
1 Press a or b to turn loudness on or off.
2 Press c or d to select the desired setting.
LOW (low)—HI (high)
SLA (source level adjustment)
SLA (Source level adjustment) lets you adjust the vo-
lume level of each source to prevent radical changes
in volume when switching between sources.
! Settings are based on the FM volume level, which
remains unchanged.
Before adjusting source levels, compare the FM
volume level with the level of the source you wish
to adjust.
! The AM volume level can also be adjusted with
source level adjustments.
1 Press a or b to adjust the source volume.
Adjustment range: SLA +4 to SLA –4
6
En
Page 7
Operating this unit
Note
You can also turn loudness on or off by pressing
and holding EQ/LOUD.
Using the equalizer
% Press EQ/LOUD to select the equalizer.
DYNAMIC—VOCAL—NATURAL—CUSTOM
—FLAT—POWERFUL
! CUSTOM allows you to create a customized
setting.
! When FLAT is selected no adjustments are
made to the sound.
Other Functions
Adjusting initial settings
1 Press SRC/OFF and hold until the unit
turns off.
2 Press SRC/OFF and hold until the clock
appears in the display.
Section
02
English
Turning the clock display on or off
% Press CLOCK to turn the clock display
on or off.
Each press of CLOCK turns the clock display
on or off.
# The clock display disappears temporarily
when you perform other operations, but the clock
display appears again after 25 seconds.
Using the AUX source
1 Insert the stereo mini plug into the
AUX input jack.
2 Press SRC/OFF to select AUX as the
source.
3 Press F (function) to select the initial
setting.
After selecting, perform the following procedures to set the initial setting.
Setting the clock
1 Press c or d to select the segment of the clock
display you wish to set.
Hour—Minute
2 Press a or b to put a clock right.
AUX (auxiliary input)
Activate this setting when using auxiliary device connected to this unit.
1 Press a or b to turn auxiliary setting on or off.
En
7
Page 8
Section
03
Connections
WARNING
! Use speakers over 50 W (output value) and be-
tween 4 W to 8 W (impedance value). Do not
use 1 W to 3 W speakers for this unit.
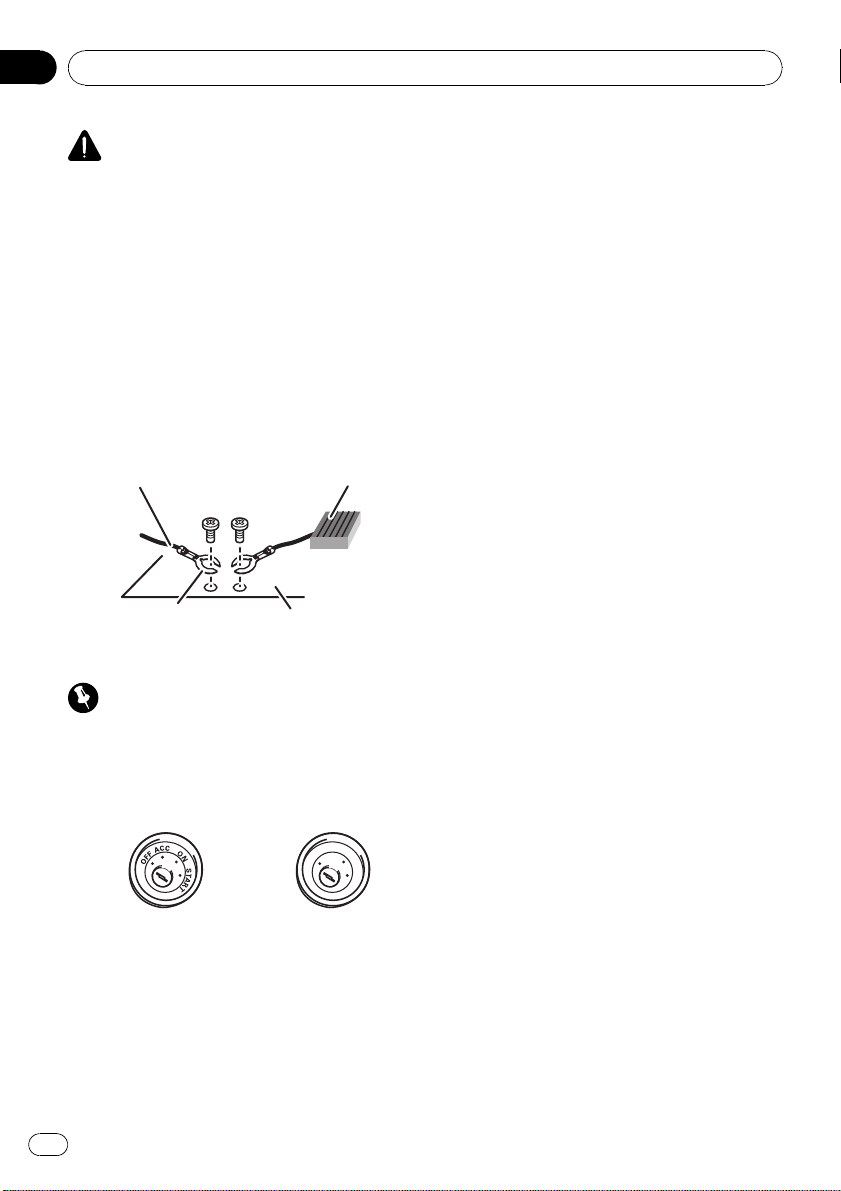
! The black cable is ground. When installing
this unit or power amp (sold separately), make
sure to connect the ground wire first. Ensure
that the ground wire is properly connected to
metal parts of the car’s body. The ground wire
of the power amp and the one of this unit or
any other device must be connected to the car
separately with different screws. If the screw
for the ground wire loosens or falls out, it
could result in fire, generation of smoke or
malfunction.
Ground wire
Other devices
(Another electronic
device in the car)
Metal parts of car’s body
Important
! When installing this unit in a vehicle without
an ACC (accessory) position on the ignition
switch, failure to connect the red cable to the
terminal that detects operation of the ignition
key may result in battery drain.
POWER AMP
O
F
N
F
O
S
T
A
R
T
— Secure the wiring with cable clamps or ad-
hesive tape. Wrap adhesive tape around
wiring that comes into contact with metal
parts to protect the wiring.
— Place all cables away from moving parts,
such as the gear shift and seat rails.
— Place all cables away from hot places,
such as near the heater outlet.
— Do not connect the yellow cable to the bat-
tery by passing it through the hole to the
engine compartment.
— Cover any disconnected cable connectors
with insulating tape.
— Do not shorten any cables.
— Never cut the insulation of the power cable
of this unit in order to share the power
with other devices. The current capacity of
the cable is limited.
— Use a fuse of the rating prescribed.
— Never wire the negative speaker cable di-
rectly to ground.
— Never band together negative cables of
multiple speakers.
! When this unit is on, control signals are sent
through the blue/white cable. Connect this
cable to the system remote control of an external power amp or the vehicle’s auto-antenna
relay control terminal (max. 300 mA 12 V DC).
If the vehicle is equipped with a glass antenna, connect it to the antenna booster power
supply terminal.
! Never connect the blue/white cable to the
power terminal of an external power amp.
Also, never connect it to the power terminal of
the auto antenna. Doing so may result in battery drain or a malfunction.
ACC position No ACC position
! Use this unit with a 12-volt battery and nega-
tive grounding only. Failure to do so may result
in a fire or malfunction.
! To prevent a short-circuit, overheating or mal-
function, be sure to follow the directions
below.
— Disconnect the negative terminal of the
battery before installation.
8
En
Page 9
Connections
Connection diagram
Section
03
English
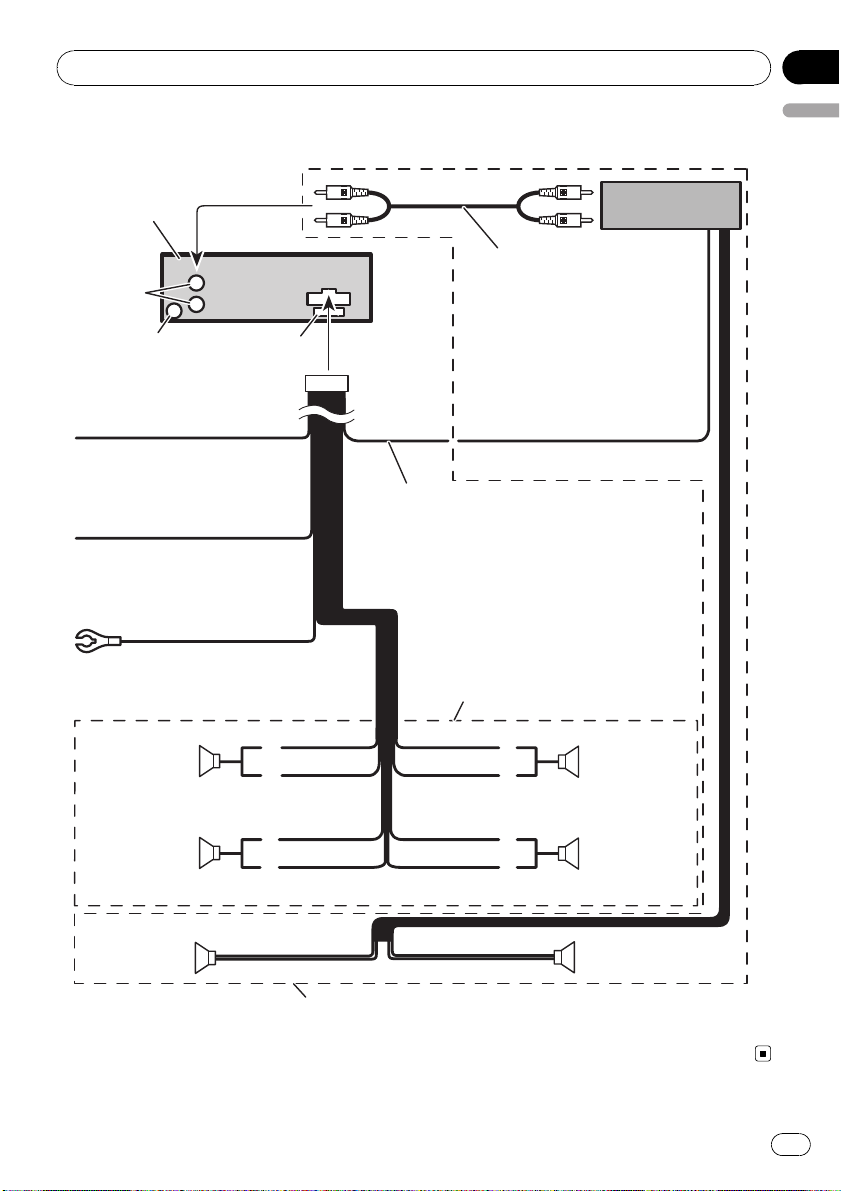
This product
Connect with RCA cables
Rear output
Antenna jack
Yellow
Connect to the constant 12 V
supply terminal.
Red
Connect to terminal controlled
by ignition switch (12 V DC).
Black (chassis ground)
Connect to a clean, paint-free
metal location.
Front speaker Front speaker
Left Right
Rear speaker Rear speaker
Fuse (10 A)
Blue/white
Connect to system control terminal of the
power amp or auto-antenna relay control
terminal (max. 300 mA 12 V DC).
With a 2 speaker system, do not connect
anything to the speaker leads that are not
connected to speakers.
White
White/black
Green
Green/black
(sold separately)
Gray
Gray/black
Violet
Violet/black
System remote control
Power amp
(sold separately)
Rear speaker Rear speaker
Perform these connections when using
the optional amplifier.
En
9
Page 10
Section
04
Installation
Important
! Check all connections and systems before
final installation.
! Do not use unauthorized parts as this may
cause malfunctions.
! Consult your dealer if installation requires dril-
ling of holes or other modifications to the vehicle.
! Do not install this unit where :
— it may interfere with operation of the vehi-
cle.
— it may cause injury to a passenger as a re-
sult of a sudden stop.
! The semiconductor laser will be damaged if it
overheats. Install this unit away from hot
places such as near the heater outlet.
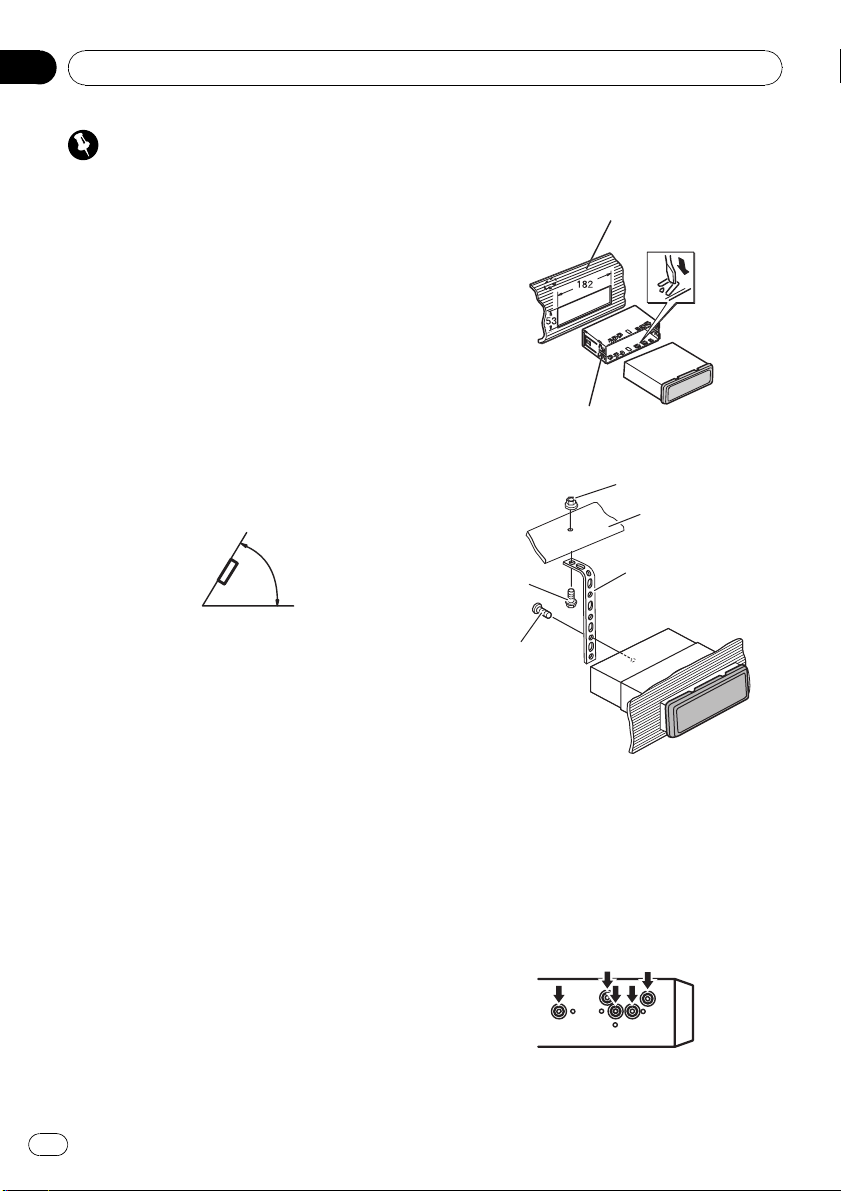
! Optimum per formance is obtained when the
unit is installed at an angle of less than 60°.
60°
DIN front/rear mount
This unit can be properly installed either from
“Front” (conventional DIN front-mount) or
“Rear” (DIN rear-mount installation, utilizing
threaded screw holes on the sides of unit
chassis). For details, refer to the following installation methods.
! Use commercially available parts when in-
stalling.
DIN Front-mount
1 Insert the mounting sleeve into the
dashboard.
For installation in shallow spaces, use the supplied mounting sleeve. If there is enough
space, use the mounting sleeve that came
with the vehicle.
2 Secure the mounting sleeve by using a
screwdriver to bend the metal tabs (90°)
into place.
Dashboard
Mounting sleeve
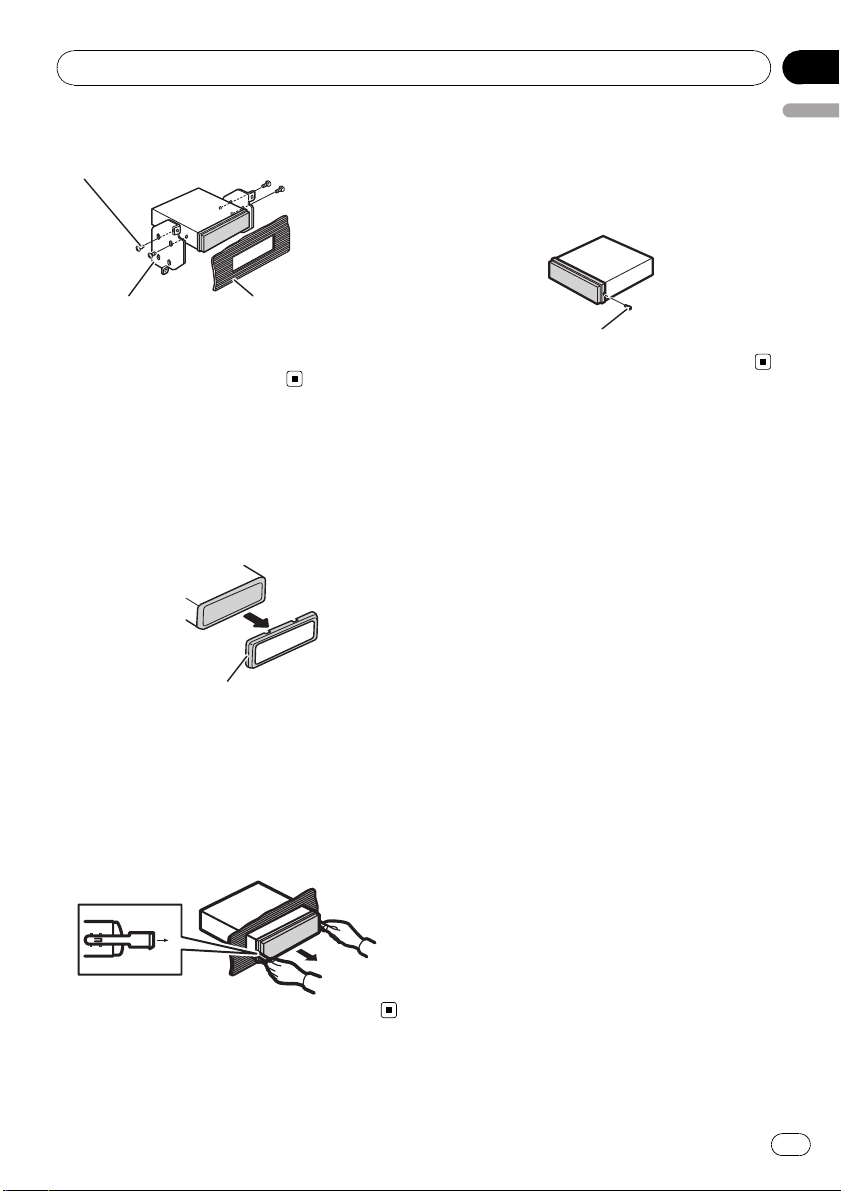
3 Install the unit as illustrated.
Nut
Firewall or
metal support
Screw
Screw (M48)
# Make sure that the unit is installed securely in
place. An unstable installation may cause skipping or other malfunctions.
Metal strap
DIN Rear-mount
1 Determine the appropriate position
where the holes on the bracket and the
side of the unit match.
10
En
Page 11
Installation
Section
04
2 Tighten two screws on each side.
Screw
Mounting bracket Dashboard or console
! Use either truss (5 mm × 8 mm) or flush
surface (5 mm × 9 mm) screws, depending
on the bracket screw holes.
Removing the unit
1 Extend top and bottom of the trim ring
outwards to remove the trim ring. (When
reattaching the trim ring, point the side
with the groove down.)
Trim ring
! Releasing the front panel allows easier ac-
cess to the trim ring.
English
Fastening the front panel
If you do not plan to detach the front panel,
the front panel can be fastened with the supplied screw.
Screw
2 Insert the supplied extraction keys into
both sides of the unit until they click into
place.
3 Pull the unit out of the dashboard.
En
11
Page 12
Appendix
Additional Information
Troubleshooting
Symptom Cause Action (See)
The display
automatically
returns to the
ordinary display.
The repeat play
range changes
unexpectedly.
The unit is malfunctioning.
There is interference.
You did not perform any operation within about
30 seconds.
Depending on
the repeat play
range, the selected range may
change when selecting another
folder or track, or
when fast forwarding/reversing.
You are using a
device, such as a
cell phone, that
transmits electromagnetic waves
near the unit.
Perform operation
again.
Select the repeat
play range again.
Move electrical devices that may be
causing the interference away from
the unit.
Error messages
When you contact your dealer or your nearest
Pioneer Service Center, be sure to note the
error message.
Message Cause Action
ERROR-11, 12,
17, 30
ERROR-11, 12,
17, 30
ERROR-10, 11,
12, 15, 17, 30,
A0
ERROR-15 The inserted disc
ERROR-22, 23 Unsupported CD
CD-ROM CD-ROM is in-
Dirty disc Clean disc.
Scratched disc Replace disc.
Electrical or mechanical
is blank
format
serted
Turn the ignition
switch OFF and
back ON, or switch
to a different
source, then back
to the CD player.
Replace disc.
Replace disc.
Replace disc.
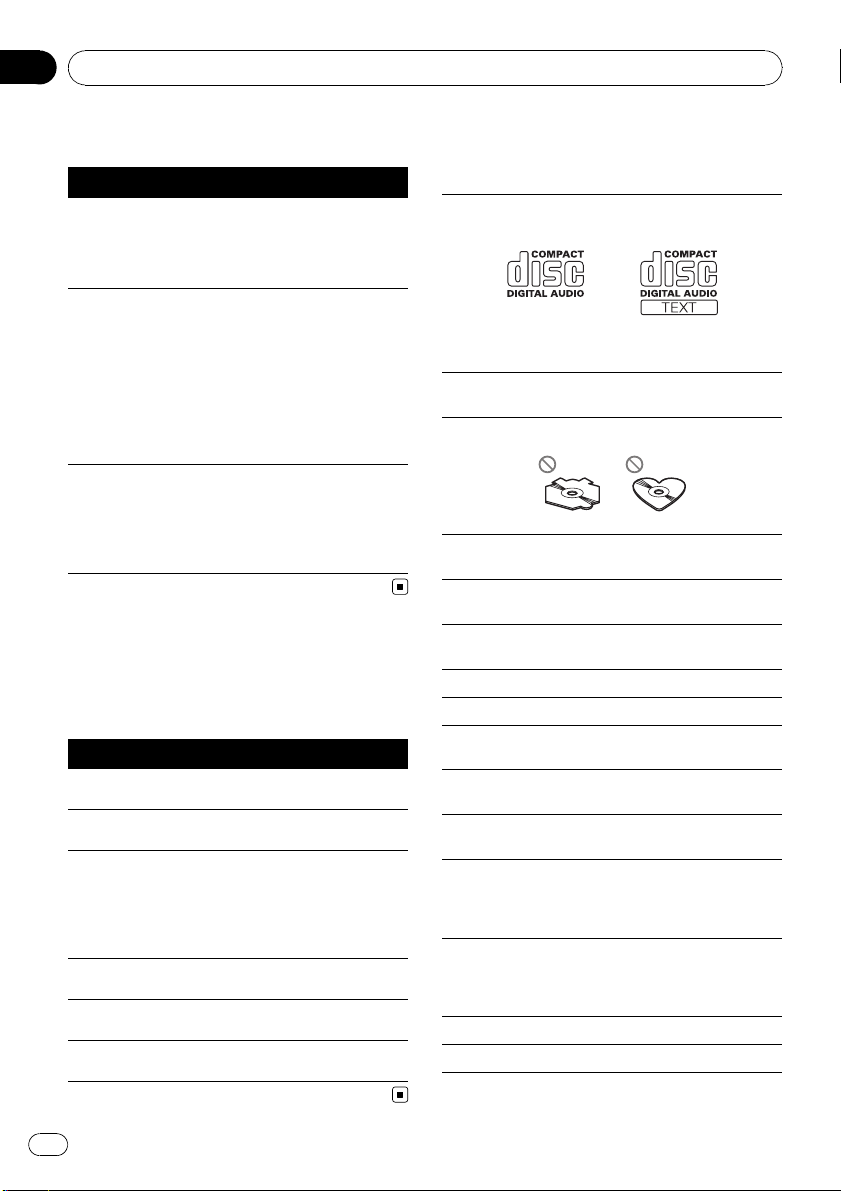
Handling guideline
Discs and player
Use only discs featuring either of following two logos.
Use 12-cm or 8-cm CD. Do not use an adapter when
playing 8-cm CDs.
Use only conventional, fully circular discs. Do not use
shaped discs.
Do not insert anything other than a CD into the CD
loading slot.
Do not use cracked, chipped, warped, or otherwise
damaged discs as they may damage the player.
Unfinalized CD-R/CD-RW disc playback is not possible.
Do not touch the recorded surface of the discs.
Store discs in their cases when not in use.
Avoid leaving discs in excessively hot environments
including under direct sunlight.
Do not attach labels, write on or apply chemicals to
the surface of the discs.
To clean a CD, wipe the disc with a soft cloth outward
from the center.
Condensation may temporarily impair the player’s
performance. Leave it to adjust to the warmer temperature for about one hour. Also, wipe any damp
discs with a soft cloth.
Playback of discs may not be possible because of
disc characteristics, disc format, recorded application, playback environment, storage conditions, and
so on.
Road shocks may interrupt disc playback.
Read the precautions for discs before using them.
12
En
Page 13

Additional Information
Appendix
DualDiscs
DualDiscs are two-sided discs that have a recordable
CD for audio on one side and a recordable DVD for
video on the other.
Since the CD side of DualDiscs is not physically compatible with the general CD standard, it may not be
possible to play the CD side with this unit.
Frequent loading and ejecting of a DualDisc may result in scratches on the disc. Serious scratches can
lead to playback problems on this unit. In some
cases, a DualDisc may become stuck in the disc loading slot and will not eject. To prevent this, we recommend you refrain from using DualDisc with this unit.
Please refer to the information from the disc manufacturer for more detailed information about DualDiscs.
English
En
13
Page 14

Appendix
Additional Information
Specifications
General
Power source ............................. 14.4 V DC (10.8 V to 15.1 V
allowable)
Grounding system ................... Negative type
Maximum current consumption
..................................................... 10.0 A
Dimensions (W × H × D):
DIN
Chassis ..................... 178 mm × 50 mm × 162
mm
(7 in. × 2 in. × 6-3/8 in.)
Nose ........................... 188 mm × 58 mm × 15 mm
(7-3/8 in.× 2-1/4 in.× 5/8 in.)
D
Chassis ..................... 178 mm × 50 mm × 162
mm
(7 in.× 2 in.× 6-3/8 in.)
Nose ........................... 170 mm × 48 mm × 15 mm
(6-3/4 in.× 1-7/8 in.× 5/8 in.)
Weight .......................................... 1.3 kg (2.9 lbs)
Audio
Maximum power output ....... 50 W × 4
Continuous power output ...22 W × 4 (50 Hz to 15 000
Hz, 5 % THD, 4 W load, both
channels driven)
Load impedance ...................... 4 W (4 W to 8 W allowable)
Preout maximum output level
..................................................... 2.0 V
Tone controls:
Bass
Frequency ................ 100 Hz
Gain ............................ ±12 dB
Mid
Frequency ................ 1 kHz
Gain ............................ ±12 dB
Treble
Frequency ................ 10 kHz
Gain ............................ ±12 dB
AM tuner
Frequency range ...................... 530 kHz to 1 710 kHz
Usable sensitivity ..................... 25 µV (S/N: 20 dB)
Signal-to-noise ratio ............... 62 dB (IHF-A network)
CEA2006 Specifications
Power output ............................. 14 W RMS × 4 Channels (4
W and ≦ 1 % THD+N)
S/N ratio ....................................... 91 dBA (reference: 1 W into
4 W)
Note
Specifications and the design are subject to modifications without notice.
CD player
System .......................................... Compact disc audio system
Usable discs .............................. Compact disc
Signal-to-noise ratio ............... 94 dB (1 kHz) (IHF-A net-
Number of channels .............. 2 (stereo)
work)
FM tuner
Frequency range ...................... 87.9 MHz to 107.9 MHz
Usable sensitivity ..................... 11 dBf (0.7 µV/75 W, mono,
Signal-to-noise ratio ............... 72 dB (IHF-A network)
14
En
S/N: 30 dB)
Page 15

Avant de commencer
Section
01
Nous vous remercions d’avoir acheté cet
appareil PIONEER.
Pour garantir une utilisation correcte, lisez
bien ce mode d’emploi avant d’utiliser cet appareil. Il est particulièrement important que
vous lisiez et respectiez les indications AT-
TENTION et PRÉCAUTION de ce mode
d’emploi. Conservez-le dans un endroit sûr et
facilement accessible pour toute consultation
ultérieure.
Pour le modèle canadien
Cet appareil numérique de la classe B est
conforme à la norme NMB-003 du Canada.
Quelques mots sur cet appareil
Les fréquences du syntoniseur de cet appareil
sont attribuées pour une utilisation en Amérique du Nord. Son utilisation dans d’autres
régions peut se traduire par une réception de
mauvaise qualité.
PRÉCAUTION
! Ne laissez pas cet appareil entrer en contact
avec des liquides. Cela pourrait provoquer une
électrocution. Tout contact avec des liquides
pourrait aussi provoquer des dommages, de
la fumée et une surchauffe de l’appareil.
! Maintenez le niveau d’écoute à une valeur
telle que vous puissiez entendre les sons provenant de l’extérieur.
! Évitez tout contact avec l’humidité.
! Si la batterie est débranchée ou déchargée, le
contenu de la mémoire sera effacé.
Service après-vente des
produits Pioneer
Veuillez contacter le revendeur ou le distributeur auprès duquel vous avez acheté cet appareil pour le service après vente (y compris les
conditions de garantie) ou pour toute autre information. Dans le cas où les informations né-
cessaires ne sont pas disponibles, veuillez
contacter les sociétés indiquées ci-dessous :
N’expédiez pas l’appareil pour réparation à
l’une des adresses figurant ci-dessous sans
avoir pris contact au préalable.
États-Unis
Pioneer Electronics (USA) Inc.
CUSTOMER SUPPORT DIVISION
P.O. Box 1760
Long Beach, CA 90801-1760
800-421-1404
CANADA
Pioneer Électroniques du Canada, Inc.
Département de service aux consommateurs
300 Allstate Parkway
Markham, Ontario L3R 0P2
1-877-283-5901
905-479-4411
Pour connaître les conditions de garantie, reportez-vous au document Garantie limitée qui
accompagne cet appareil.
Visitez notre site Web
http://www.pioneerelectronics.com
! Informez-vous sur les mises à jour disponi-
bles pour votre produit (telles que les mises
à jour du firmware).
! Enregistrez votre produit afin de recevoir
des notifications concernant les mises à
jour du produit, ainsi que pour sauvegarder
les détails de votre achat dans nos fichiers
en cas de perte ou de vol.
! Accédez aux modes d’emploi, aux informa-
tions relatives aux pièces de rechange et à
l’entretien, et à beaucoup d’autres
informations.
Français
15
Fr
Page 16

Section
02
Utilisation de l’appareil
Appareil central
Touche Touche
1 F (fonction) 8
2 EQ/LOUD 9
3 SRC/OFF a CLOCK
4 1 à 6 b PAUSE
Fente de charge-
5
ment des disques
6 h (éjection) d BAND/ESC
7 A (audio)
Retrait de la face
avant
Jack d’entrée AUX
(jack stéréo 3,5
mm)
c a/b/c/d
Indications affichées
3 RPT
4 LOUD
5 5 (stéréo)
6 LOC
La répétition de la lecture est en
service.
La correction physiologique est
en service.
La station sélectionnée émet en
stéréo.
L’accord automatique sur une sta-
tion locale est en service.
Opérations de base
Important
! Lorsque vous enlevez ou remontez la face
avant, manipulez-la doucement.
! Évitez de heurter la face avant.
! Conservez la face avant à l’abri des tempéra-
tures élevées et de la lumière directe du soleil.
! Retirez les câbles et les périphériques connec-
tés à cet appareil avant d’enlever la face avant
pour éviter d’endommager le périphérique ou
l’intérieur du véhicule.
16
Indicateur État
Section
1
d’affichage
principal
Numéro de
présélec-
2
tion/numéro de plage
Fr
! Syntoniseur : gamme et fré-
quence
! Lecteur de CD intégré : temps
de lecture écoulé et informations textuelles
! Le numéro de plage ou le nu-
méro de présélection.
Page 17

Utilisation de l’appareil
Section
02
Retrait de la face avant pour protéger l’appareil
contre le vol
1 Appuyez sur la touche de retrait pour libérer la
face avant.
2 Saisissez la face avant et retirez-la.
Remontage de la face avant
1 Faites glisser la face avant vers la gauche jusqu’à
ce qu’elle s’enclenche en position.
La face avant et l’appareil central sont connectés
sur le côté gauche. Assurez-vous que la face
avant soit correctement connectée à l’appareil
central.
2 Appuyez sur le côté droit de la face avant jusqu’à
ce qu’elle soit bien en place.
Si vous ne pouvez pas monter la face avant sur
l’appareil central, réessayez. Cependant, forcer la
face avant en position risque de l’endommager.
Mise en service de l’appareil
1 Appuyez sur SRC/OFF pour mettre en service l’ap-
pareil.
Mise hors service de l’appareil
1 Maintenez la pression sur SRC/OFF jusqu’àce
que l’appareil soit mis hors service.
Choix d’une source
1 Appuyez sur SRC/OFF pour parcourir les options
disponibles :
TUNER (syntoniseur)—CD (lecteur de CD intégré)
—AUX (AUX)
Réglage du volume
1 Tournez SRC/OFF pour régler le volume.
Remarque
Si le fil bleu/blanc de l’appareil est relié à la prise
de commande du relais de l’antenne motorisée
du véhicule, celle-ci se déploie lorsque la source
est mise en service. Pour rétracter l’antenne, mettez la source hors service.
Opérations communes des
menus pour les réglages
des fonctions/réglages
audio/réglages initiaux
Retour à l’affichage ordinaire
Annulation du menu des réglages initiaux
1 Appuyez sur BAND/ESC.
Vous pouvez également abandonner les réglages
initiaux en maintenant la pression sur SRC/OFF
jusqu’à ce que l’appareil se mette hors service.
Syntoniseur
Opérations de base
Sélection d’une gamme
1 Appuyez sur BAND/ESC jusqu’à ce que la
gamme désirée, F1, F2, F3 en FM ou AM (PO/
GO), soit affichée.
Accord manuel (pas à pas)
1 Appuyez sur c ou d.
Recherche
1 Appuyez de façon continue sur c ou d, puis relâ-
chez.
Vous pouvez annuler l’accord automatique en appuyant brièvement sur c ou d.
Lorsque vous appuyez sur c ou d de façon pro-
longée, vous pouvez sauter des stations. L’accord
automatique démarre dès que vous relâchez c
ou d.
Mise en mémoire et rappel des
stations
Vous pouvez facilement mettre en mémoire
jusqu’à six stations.
Français
17
Fr
Page 18

Section
02
Utilisation de l’appareil
% Lorsque se présente une station que
vous désirez mettre en mémoire, maintenez la pression sur une des touches de présélection (1 à 6) jusqu’à ce que le numéro
de la présélection cesse de clignoter.
La fréquence d’une station radio mémorisée
peut être rappelée en appuyant sur le bouton
de présélection.
# Appuyez sur a ou b pour rappeler les fré-
quences des stations de radio.
Réglages des fonctions
% Appuyez sur la touche F (fonction) pour
sélectionner la fonction.
Après avoir sélectionné la fonction, effectuez
les procédures de paramétrage suivantes.
LOCAL (accord automatique sur une station locale)
L’accord automatique sur une station locale ne s’inté-
resse qu’aux stations de radio dont le signal reçu est
suffisamment puissant pour garantir une réception
de bonne qualité.
1 Appuyez sur a ou b pour mettre l’accord automa-
tique sur une station locale en service ou hors service.
2 Appuyez sur c ou d pour régler la sensibilité.
FM : LOCAL 1—LOCAL 2—LOCAL 3—LOCAL 4
AM : LOCAL 1—LOCAL 2
Un numéro de réglage plus élevé correspond à un
niveau plus élevé. La valeur la plus élevée permet
la réception des seules stations très puissantes ;
les autres valeurs autorisent, dans l’ordre décroissant, la réception de stations de moins en moins
puissantes.
BSM (mémoire des meilleures stations)
La fonction BSM (mémoire des meilleures stations)
mémorise automatiquement les six stations les plus
fortes dans l’ordre de la force du signal.
La mise en mémoire de fréquences à l’aide de la fonction BSM peut provoquer le remplacement d’autres
fréquences déjà conservées grâce aux touches 1 à 6.
1 Appuyez sur a pour mettre en service BSM.
Les six fréquences d’émission les plus puissantes
sont mémorisées dans l’ordre de la force du si-
gnal.
Pour annuler la mise en mémoire, appuyez sur b.
CD
Opérations de base
Écoute d’un CD
1 Introduisez un disque, l’étiquette vers le haut,
dans le logement de chargem ent des disques.
1 Si un disque a déjà été introduit, appuyez sur
SRC/OFF pour choisir le lecteur de CD intégré.
Éjection d’un CD
1 Appuyez sur h .
Sélection d’une plage
1 Appuyez sur c ou d.
Avance ou retour rapide
1 Appuyez de façon continue sur c ou d.
Réglages des fonctions
% Appuyez sur la touche F (fonction) pour
sélectionner la fonction.
Après avoir sélectionné la fonction, effectuez
les procédures de paramétrage suivantes.
RPT (répétition de la lecture)
1 Appuyez sur c ou d pour choisir l’étendue de ré-
pétition.
DSC – Répétition de toutes les plages
TRK – Répétition de la plage en cours de lecture
RDM (lecture aléatoire)
1 Appuyez sur a ou b pour mettre la lecture aléa-
toire en service ou hors service.
Quand la fonction lecture aléatoir e est en service,
RDM est affiché sur l’écran.
SCAN (examen du disque)
18
Fr
Page 19

Utilisation de l’appareil
Section
02
L’examen du disque recherche une plage à l’intérieur
de l’étendue de répétition sélectionnée.
1 Appuyez sur a pour activer la lecture du contenu
du disque.
SCAN apparaît sur l’écran. Les 10 premières se-
condes de chaque plage sont lues.
2 Quand vous trouvez la plage désirée appuyez sur
b pour arrêter la lecture du contenu du disque.
Si l’écran est revenu automatiquement à l’affi-
chage des conditions de lecture, sélectionnez
SCAN à nouveau en appuyant sur la touche F
(fonction).
Lorsque l’examen du disque est terminé, la lecture normale reprend.
PAUSE (pause)
1 Appuyez sur a ou b pour mettre en pause ou re-
prendre la lecture.
Remarque
Vous pouvez également activer ou désactiver la
pause en appuyant sur PAUSE.
Réglages sonores
Réglages sonores
% Appuyez sur A (audio) pour sélectionner la fonction audio.
Après avoir sélectionné la fonction audio, effectuez les procédures de paramétrage suivantes.
FAD (réglage de l’équilibre avant-arrière/droite-gau-
che)
Vous pouvez modifier le réglage d’équilibre avant-ar-
rière/droite-gauche.
1 Appuyez sur a ou b pour régler l’équilibre des
haut-parleurs avant-arrière.
Plage de réglage (avant/arrière) : FAD F15 à FAD
R15
FAD 0 est le réglage convenable dans le cas où
seulement deux haut-parleurs sont utilisés.
2 Appuyez sur c ou d pour régler l’équilibre des
haut-parleurs gauche-droite.
Plage de réglage (gauche/droite) : BAL L15 à BAL
R15
BASS/MID/TREBLE (réglage de l’égaliseur)
Vous pouvez régler le niveau des graves, des médiums et des aigus.
! Les réglages de la courbe d ’ égalisation ajustée
sont mémorisés dans CUSTOM.
1 Appuyez sur a ou b pour régler le niveau.
Plage de réglage : +6 à -6
LOUD (correction physiologique)
La correction physiologique a pour objet d’accentuer
les hautes et les basses fréquences à bas niveaux d’écoute.
1 Appuyez sur a ou b pour mettre la correction
physiologique en service ou hors service.
2 Appuyez sur c ou d pour sélectionner le réglage
désiré.
LOW (faible)—HI (élevé)
SLA (réglage du niveau de la source)
La fonction SLA (réglage du niveau de la source) permet d’ajuster les niveaux sonores de chaque source
afin d’éviter que ne se produisent de fortes variations
d’amplitude sonore lorsque vous passez d’une source
àl’autre.
! Les réglages sont basés sur le niveau du volume
FM qui lui, demeure inchangé.
Avant d’ajuster les niveaux de la source, comparez le niveau du volume FM au niveau de la source
que vous voulez régler.
! Le niveau du volume AM peut également être
réglé à l’aide de cette fonction.
1 Appuyez sur a ou b pour régler le volume de la
source.
Plage de réglage : SLA +4 à SLA –4
Remarque
Vous pouvez également mettre en service, ou
hors service, la correction physiologique en appuyant sur EQ/LOUD et en maintenant cette touche enfoncée.
Utilisation de l’égaliseur
% Appuyez sur EQ/LOUD pour sélectionner l’égaliseur.
DYNAMIC—VOCAL—NATURAL—CUSTOM
—FLAT—POWERFUL
! CUSTOM vous permet de créer un réglage
personnalisé.
! Quand FLAT est sélectionné, aucun ajuste-
ment n’est apporté au son.
Français
19
Fr
Page 20

Section
02
Utilisation de l’appareil
Autres fonctions
Ajustement des réglages initiaux
1 Maintenez la pression sur SRC/OFF jusqu’à ce que l’appareil soit mis hors service.
2 Appuyez sur la touche SRC/OFF et
maintenez-la enfoncée jusqu’à ce que l’horloge apparaisse sur l’afficheur.
3 Appuyez sur F (fonction) pour sélectionner le réglage initial.
Après avoir sélectionné le réglage initial, effectuez les procédures de paramétrage suivantes.
Réglage de l’horloge
1 Appuyez sur c ou d pour sélectionner le segment
de l’affichage de l’horloge que vous voulez régler.
Heure—Minute
2 Appuyez sur a ou b pour régler l’horloge.
AUX (entrée auxiliaire)
Activez ce réglage lorsque vous utilisez un appareil
auxiliaire connecté à cet appareil.
1 Appuyez sur a ou b pour mettre le réglage auxi-
liaire en service ou hors service.
Mise en service ou hors service
de l’affichage de l’horloge
% Appuyez sur CLOCK pour mettre l’affi-
chage de l’horloge en service ou hors service.
Chaque pression sur CLOCK provoque l’affichage de l’horloge ou son extinction.
# L’affichage de l’horloge disparaît momentané-
ment quand une autre opération est réalisée ; il
apparaît à nouveau 25 secondes plus tard.
Utilisation de la source AUX
1 Insérez la mini prise stéréo dans le jack
d’entrée AUX.
2 Appuyez sur SRC/OFF pour choisir AUX
comme source.
20
Fr
Page 21

Connexions
Section
03
ATTENTION
! Utilisez des haut-parleurs avec une puissance
de sortie de 50 W et une impédance de 4 W à
8 W.N’utilisez pas des haut-parleurs d’impé-
dance 1 W à3W avec cet appareil.
! Le câble noir est la masse. Lorsque vous in-
stallez cet appareil ou un amplificateur de
puissance (vendu séparément), assurez-vous
de connecter le fil de masse en premier. Assurez-vous que le fil de masse est connecté correctement aux parties métalliques de la
carrosserie du véhicule. Le fil de masse de
l’amplificateur de puissance et celui de cet appareil ou de tout autre appareil doivent être
connectés au véhicule séparément et avec
des vis différentes. Si la vis du fil de masse se
desserre ou tombe, il peut en résulter un incendie, de la fumée ou un dysfonctionnement.
Important
! Lors de l’installation de cet appareil dans un
véhicule sans position ACC (accessoire) sur le
contacteur d’allumage, ne pas connecter le
câble rouge à la borne qui détecte l’utilisation
de la clé de contact peut entraîner le déchargement de la batterie.
O
F
N
F
O
S
T
A
R
T
Avec position ACC Sans positio n ACC
! Utilisez cet appareil uniquement sur des véhi-
cules avec une batterie 12 volts et une mise à
la masse du négatif. Le non respect de cette
prescription peut engendrer un incendie ou
un dysfonctionnement.
! Pour éviter un court-circuit, une surchauffe ou
un dysfonctionnement, assurez-vous de respecter les instructions suivantes.
— Déconnectez la borne négative de la batte-
rie avant l’installation.
— Fixez le câblage avec des serre-fils ou de la
bande adhésive. Pour protéger le câblage,
enroulez dans du ruban adhésif les parties
du câblage en contact avec des pièces en
métal.
— Placez les câbles à l’écart de toutes les
parties mobiles, telles que le levier de vitesse et les rails des sièges.
— Placez les câbles à l’écart de tous les en-
droits chauds, par exemple les sorties de
chauffage.
— Ne reliez pas le câble jaune à la batterie à
travers le trou dans le compartiment moteur.
— Recouvrez tous les connecteurs de câbles
qui ne sont pas connectés avec du ruban
adhésif isolant.
— Ne raccourcissez pas les câbles.
— Ne coupez jamais l’isolation du câble d’ali-
mentation de cet appareil pour partager
l’alimentation avec d’autres appareils. La
capacité en courant du câble est limitée.
— Utilisez un fusible correspondant aux ca-
ractéristiques spécifiées.
— Ne câblez jamais le câble négatif du haut-
parleur directement à la masse.
— Ne réunissez jamais ensemble les câbles
négatifs de plusieurs haut-parleurs.
! Lorsque cet appareil est sous tension, les si-
gnaux de commande sont transmis via le
câble bleu/blanc. Connectez-le à la télécommande du système d’un amplificateur de puissance externe ou à la borne de commande du
relais de l’antenne automatique du véhicule
(max. 300 mA 12 V CC). Si le véhicule est
équipé d’une antenne intégrée à la lunette arrière, connectez-le à la borne d’alimentation
de l’amplificateur d’antenne.
Français
21
Fr
Page 22

Section
03
Connexions
! Ne reliez jamais le câble bleu/blanc à la borne
d’alimentation d’un amplificateur de puissance externe. De même, ne le reliez pas à la
borne d’alimentation de l’antenne motorisée.
Dans le cas contraire, il peut en résulter un
déchargement de la batterie ou un dysfonctionnement.
22
Fr
Page 23

Connexions
Schéma de connexion
Ce produit
Sortie
arrière
Amplificateur de
puissance (vendu
séparément)
Connectez avec des câbles
RCA (vendus séparément)
Section
03
Français
Jack d’antenne
Jaune
Connectez à la borne d’alimentation
12 V permanente.
Rouge
Connectez à la borne contrôlée par
le contact d’allumage (12 V CC).
Noir (masse du châssis)
Connectez sur un endroit métallique
propre, non recouvert de peinture.
Haut-parleur
avant
Gauche Droite
Haut-parleur
arrière
Fusible (10 A)
Blanc
Blanc/noir
Vert
Vert/noir
Télécommande du système
Bleu/blanc
Connectez à la broche de commande du système
de l’amplificateur de puissance ou à la broche de
commande du relais de l’antenne automatique
(max. 300 mA 12 V CC).
Avec un système à 2 haut-parleurs, ne
connectez rien aux fils des haut-parleurs qui
ne sont pas connectés à des haut-parleurs.
Gris
Gris/noir
Violet
Violet/noir
Haut-parleur
avant
Haut-parleur
arrière
Haut-parleur
arrière
Réalisez ces connexions lors de l’utilisation
d’un amplificateur optionnel.
Haut-parleur
arrière
23
Fr
Page 24

Section
04
Installation
Important
! Vérifiez toutes les connexions et tous les systè-
mes avant l’installation finale.
! N’utilisez pas de pièces non autorisées car il
peut en résulter des dysfonctionnements.
! Consultez votre revendeur si l’installation né-
cessite le perçage de trous ou d’autres modifications du véhicule.
! N’installez pas cet appareil là où :
— il peut interférer avec l’utilisation du véhi-
cule.
— il peut blesser un passager en cas d’arrêt
soudain du véhicule.
! Le laser à semi-conducteur sera endommagé
s’il devient trop chaud. Installez cet appareil à
l’écart de tous les endroits chauds, par exemple les sorties de chauffage.
! Des performances optimales sont obtenues
quand l’appareil est installé à un angle inférieur à 60°.
60°
Montage avant/arrière DIN
Cet appareil peut être installé correctement
soit à partir de “l’avant” (montage frontal DIN
conventionnel) ou de “l’arrière” (installation en
montage arrière DIN, utilisant des trous de vis
filetés sur les côtés du châssis de l’appareil).
Pour les détails, reportez-vous aux méthodes
d’installation suivantes.
! Utilisez des pièces disponibles dans le
commerce lors de l’installation.
montage fourni. Si l’espace est insuffisant, utilisez le manchon de montage fourni avec le véhicule.
2 Fixez le manchon de montage en utilisant un tour nevis pour courber les pattes
métalliques (90°) en place.
Tableau de bord
Manchon de montage
3 Installez l’appareil comme indiqué sur
la figure.
Écrou
Pare-feu ou support
métallique
Vis
Vis (M48)
# Assurez-vous que l’appareil est correctement
mis en place. Toute installation instable peut entraîner des sauts ou autres dysfonctionnements.
Attache en métal
Montage frontal DIN
1 Insérez le manchon de montage dans le
tableau de bord.
Lors de l’installation de cet appareil dans un
espace peu profond, utilisez le manchon de
24
Fr
Page 25

Installation
Section
04
Montage arrière DIN
1 Déterminez la position appropriée où
les trous sur le support et sur le côté de
l’appareil se correspondent.
2 Serrez deux vis de chaque côté.
Vis
Support de montage Tableau de bord ou
console
! Utilisez des vis à tête bombée (5 mm × 8
mm) ou des vis en affleurement (5 mm × 9
mm), selon la forme des trous de vis dans
le support.
Enlèvement de l’appareil
1 Étirez le haut et le bas de l’anneau de
garniture vers l’extérieur pour retirer la
garniture. (Quand vous remontez l’anneau
de garniture, pointez le côté avec la rainure
vers le bas.)
3 Tirez l’appareil hors du tableau de
bord.
Français
Fixation de la face avant
Si vous ne souhaitez pas détacher la face
avant, elle peut être fixée avec les vis fournies.
Vis
Anneau de garniture
! Relâcher la face avant permet d’accéder
plus facilement à l’anneau de garniture.
2 Insérez les clés d’extraction fournies
dans les deux côtés de l’appareil jusqu’àce
qu’elles s’enclenchent en place.
25
Fr
Page 26

Annexe
Informations complémentaires
Dépannage
Symptôme Causes possi-
L’affichage or-
dinaire est automatiquement
restauré.
L’étendue de ré-
pétition de lecture change de
manière inattendue.
L’appareil ne
fonctionne pas
correctement.
Il y a des interférences.
bles
Vous n’avez exé-
cuté aucune opération pendant
30 secondes.
En fonction de
l’étendue de répétition de lecture, l’étendue
sélectionnée
peut changer
lors de la sélection d’un autre
dossier ou d’une
autre plage ou en
cas d’avance/re-
tour rapide.
Vous utilisez un
autre appareil, tel
qu’un téléphone
cellulaire, qui
transmet des
ondes électromagnétiques à
proximité de l’appareil.
Action correctiveeportez-vous à
Réexécutez l’opération.
Resélectionnez l’étendue de répétition de lecture.
Éloignez tous les
appareils électriques qui pourrait
provoquer des interférences.
Anomalie élec-
ERROR-10, 11,
12, 15, 17, 30,
A0
ERROR-15 Le disque inséré
ERROR-22, 23 Format CD non
CD-ROM Le disque intro-
trique ou mécanique
est vierge.
pris en charge
duit est un CDROM
Coupez et remettez
le contact d’allumage ou choisissez une autre
source, puis revenez au lecteur de
CD.
Utilisez un autre
disque.
Utilisez un autre
disque.
Utilisez un autre
disque.
Conseils sur la manipulation
Disques et lecteur
Utilisez uniquement des disques affichant l’un ou
l’autre des logos suivants.
Messages d’erreur
Quand vous contactez votre distributeur ou le
Service d’entretien agréé par Pioneer le plus
proche, n’oubliez pas de noter le message
d’erreur.
Message Causes possi-
ERROR-11, 12,
17, 30
ERROR-11, 12,
17, 30
26
Fr
bles
Disque sale Nettoyez le disque.
Disque rayé Utilisez un autre
Action corrective
disque.
Utilisez un CD 12 cm ou 8 cm. N’utilisez pas un adaptateur lorsque vous lisez des CD 8 cm.
Utilisez seulement des disques conventionnels de
forme circulaire. N’utilisez pas de disques ayant une
forme particulière.
N’introduisez aucun objet dans le logement pour CD
autre qu’un CD.
N’utilisez pas de disques fendillés, ébréchés, voilés
ou présentant d’autres défauts, car ils peuvent en-
dommager le lecteur.
La lecture de disques CD-R/CD-RW non finalisés
n’est pas possible.
Ne touchez pas la surface enregistrée des disques.
Page 27

Informations complémentaires
Rangez les disques dans leur coffret dès que vous ne
les écoutez plus.
Évitez de laisser les disques dans des environnements
trop chauds, en particulier à la lumière directe du soleil.
Ne posez aucune étiquette sur la surface des disques,
n’écrivez pas sur un disque, n’appliquez aucun agent
chimique sur un disque.
Pour nettoyer un CD, essuyez le disque avec un chiffon doux en partant du centre vers l’extérieur.
La condensation peut perturber temporairement le
fonctionnement du lecteur. Laissez celui-ci s’adapter
à la température plus élevée pendant une heure environ. Essuyez également les disques humides avec un
chiffon doux.
La lecture de certains disques peut être impossible en
raison des caractéristiques du d isque, de son format,
de l’application qui l’a enregistré, de l’environnement
de lecture, des conditions de stockage ou d’autres
conditions.
Les cahots de la route peuvent interrompre la lecture
d’un disque.
Lisez les précautions d’emploi des disques avant de
les utiliser.
Annexe
Français
DualDiscs
Les DualDiscs sont des disques à deux faces avec un
CD enregistrable pour l’audio sur une face et un DVD
enregistrable pour la vidéo sur l’autre.
Comme la face CD des DualDiscs n’est pas physiquement compatible avec le standard CD général, la lecture de la face CD sur cet appareil peut ne pas être
possible.
Charger et éjecter fréquemment un DualDisc peut
provoquer des rayures sur le disque. Des rayures importantes peuvent entraîner des problèmes de lecture
sur cet appareil. Dans certains cas, un DualDisc peut
se retrouver bloqué dans le logement pour CD et ne
sera pas éjecté. Pour éviter cela, nous vous recommandons de vous abstenir d’ utiliser des DualDiscs
avec cet appareil.
Pour des informations plus détaillées sur les DualDiscs, veuillez vous reporter aux informations fournies par le fabricant des disques.
27
Fr
Page 28

Annexe
Informations complémentaires
Caractéristiques techniques
Généralités
Tension d’alimentation ......... 14,4 V CC (10,8 V à 15,1 V
acceptable)
Mise à la masse ....................... Pôle négatif
Consommation maximale ...10,0 A
Dimensions (L × H × P) :
DIN
Châssis ..................... 178 mm × 50 mm × 162
mm
Panneau avant ...... 188 mm × 58 mm × 15 mm
D
Châssis ..................... 178 mm × 50 mm × 162
mm
Panneau avant ...... 170 mm × 48 mm × 15 mm
Poids .............................................. 1,3 kg
Audio
Puissance de sortie maximale
..................................................... 50 W × 4
Puissance de sortie continue
..................................................... 22 W × 4 (50 Hz à 15 000
Hz, DHT 5 %, impédance de
charge 4 W, avec les deux
canaux entraînés)
Impédance de charge ........... 4 W (4 W à8W acceptable)
Niveau de sortie maximum de la sortie préamp
..................................................... 2,0 V
Contrôles de tonalité :
Grave
Fréquence ............... 100 Hz
Gain ............................ ±12 dB
Moyen
Fréquence ............... 1 kHz
Gain ............................ ±12 dB
Aigus
Fréquence ............... 10 kHz
Gain ............................ ±12 dB
Sensibilité utile ......................... 11 dBf (0,7 µV/75 W, mono,
S/B : 30 dB)
Rapport signal/bruit ............... 72 dB (réseau IHF-A)
Syntoniseur AM
Gamme de fréquence ............ 530 kHz à 1 710 kHz
Sensibilité utile ......................... 25 µV (S/B : 20 dB)
Rapport signal/bruit ............... 62 dB (réseau IHF-A)
Caractéristiques CEA2006
Puissance de sortie ................ 14 W RMS x 4 Canaux (4 W
et ≦ 1 % DHT+B)
Rapport S/B ................................ 91 dBA (référence : 1 W sur
4 W)
Remarque
Les caractéristiques et la présentation peuvent
être modifiées sans avis préalable.
Lecteur de CD
Système ....................................... Compact Disc Digital Audio
Disques utilisables ................. Disques compacts
Rapport signal/bruit ............... 94 dB (1 kHz) (Réseau
Nombre de canaux ................. 2 (stéréo)
IHF-A)
Syntoniseur FM
Gamme de fréquence ............ 87,9 MHz à 107,9 MHz
28
Fr
Page 29

Antes de comenzar
Sección
01
Gracias por haber adquirido este producto
PIONEER.
Lea con detenimiento este manual antes de
utilizar el producto por primera vez para que
pueda darle el mejor uso posible. Es muy importante que lea y observe las ADVERTEN-
CIAS y PRECAUCIONES de este manual.
Una vez leído, guarde el manual en un lugar seguro y a mano para que pueda consultarlo en el
futuro.
Acerca de esta unidad
Las frecuencias del sintonizador de esta unidad están asignadas para su uso en América
del norte. El uso en otras áreas puede causar
una recepción deficiente.
PRECAUCIÓN
! No permita que esta unidad entre en contacto
con líquidos, ya que puede producir una descarga eléctrica. Además, el contacto con líquidos puede causar daños en la unidad, humo y
recalentamiento.
! Mantenga siempre el volumen lo suficiente-
mente bajo como para que pueda escuchar
los sonidos que provienen del exterior.
! Evite la exposición a la humedad.
! Si se desconecta o se descarga la batería,
cualquier memoria preajustada se borrará.
Servicio posventa para
productos Pioneer
Póngase en contacto con el concesionario o
distribuidor al que compró esta unidad para
obtener el servicio posventa (incluidas las condiciones de garantía) o cualquier otra información. En caso de que no esté disponible la
información necesaria, póngase en contacto
con las empresas enumeradas abajo.
No envíe su producto para su reparación a las
empresas cuyas direcciones se indican abajo
sin haberse puesto antes en contacto con
ellas.
EE.UU.
Pioneer Electronics (USA) Inc.
CUSTOMER SUPPORT DIVISION
P.O. Box 1760
Long Beach, CA 90801-1760
800-421-1404
CANADÁ
Pioneer Electronics of Canada, Inc.
CUSTOMER SATISFACTION DEPARTMENT
300 Allstate Parkway
Markham, Ontario L3R 0P2
1-877-283-5901
905-479-4411
Para obtener información sobre la garantía,
véase la hoja de Garantía limitada adjunta a
este producto.
Visite nuestro sitio Web
http://www.pioneerelectronics.com
! Infórmese de las últimas actualizaciones
(por ejemplo, acutalizaciones de firmware)
para su producto.
! Registre su producto para recibir informa-
ción sobre acualizaciones del producto y
para mantener la seguridad de los detalles
de su compra en nuestros archivos en caso
de pérdida o robo.
! Acceso a manuales del propietario, infor-
mación sobre piezas de recambio y mucho
más.
Español
29
Es
Page 30

Sección
02
Utilización de esta unidad
Unidad principal
Botón Botón
1 F (función) 8 Soltar
2 EQ/LOUD 9
3 SRC/OFF a CLOCK
4 1 a 6 b PAUSE
Ranura de carga de
5
discos
6 h (expulsar) d BAND/ESC
7 A (audio)
Conector de entrada AUX (conector
estéreo de 3,5 mm)
c a/b/c/d
Indicaciones de pantalla
3 RPT
4 LOUD Sonoridad activada.
5 (esté-
5
reo)
6 LOC
La repetición de reproducción
está activada.
La frecuencia seleccionada se
está transmitiendo en estéreo.
Sintonización por búsqueda local
activada.
Funciones básicas
Importante
! Proceda con cuidado al retirar o colocar el
panel frontal.
! Evite someter la carátula a impactos excesi-
vos.
! Mantenga la carátula fuera del alcance de la
luz solar directa y no la exponga a temperaturas elevadas.
! Extraiga cualquier cable o dispositivo conec-
tado a esta unidad antes de extraer el panel
delantero para evitar que el dispositivo o el interior del vehículo sufran daños.
30
Indicador Estado
Sección
principal
1
de la pantalla
Númeo de
presinto-
2
nía/número de pista
Es
! Sintonizador: banda y fre-
cuencia
! Reproductor de CD incorpora-
do: tiempo de reproducción
transcurrido e información de
texto
! El número de pista o de pre-
sintonía.
Page 31

Utilización de esta unidad
Sección
02
Extracción del panel delantero para proteger la unidad contra robo
1 Pulse el botón de soltar para liberar el panel de-
lantero.
2 Sujete la carátula y extráigala.
Colocación del panel frontal
1 Deslice la carátula hacia la izquierda hasta que
oiga un chasquido.
El panel delantero y la unidad principal están conectados por el lado izquierdo. Asegúrese de que
el panel delantero está conec tado correctamente
a la unidad principal.
2 Pulse el lado derecho de la carátula hasta que se
asiente firmemente.
Si no puede volver a colocar el panel frontal a la
unidad principal, inténtelo de nuevo. Sin embargo, si intenta forzar el panel delantero para fijarlo,
puede que éste resulte dañado.
Encendido de la unidad
1 Pulse SRC/OFF para encender la unidad.
Apagado de la unidad
1 Mantenga pulsado SRC/OFF hasta que se apague
la unidad.
Selección de una fuente
1 Pulse SRC/OFF para desplazarse entre:
TUNER (sintonizador)—CD (reproductor de CD
incorporado)—AUX (AUX)
Ajuste del volumen
1 Haga girar SRC/OFF para ajustar el volumen.
Nota
Si el cable azul/blanco de esta unidad está conectado al terminal de control del relé de la antena
automática del vehículo, la antena se extiende
cuando se enciende el equipo. Para retraer la antena, apague la fuente.
Las operaciones del menú
son idénticas para los
ajustes de función/ajustes
de audio/ajustes iniciales
Para volver a la visualización normal
Para cancelar el menú de ajustes iniciales
1 Pulse BAND/ESC.
También se pueden cancelar los ajustes iniciales
presionando SRC/OFF hasta que se apague la
unidad.
Español
Sintonizador
Funciones básicas
Selección de una banda
1 Presione BAND/ESC hasta que se visualice la
banda deseada (F1, F2, F3 para FM o AM).
Sintonización manual (paso a paso)
1 Pulse c o d.
Búsqueda
1 Mantenga pulsado c o d y luego suéltelo.
Se puede cancelar la sintonización por búsqueda
pulsando brevemente c o d.
Al mantener pulsado c o d se pueden saltar las
emisoras. La sintonización por búsqueda comienza inmediatamente después de que suelte c o d.
Almacenamiento y
recuperación de emisoras
Se pueden almacenar con facilidad hasta seis
emisoras presintonizadas.
% Cuando encuentre la emisora que
desea almacenar en la memoria, pulse uno
de los botones de ajuste de presintonías (1
a 6) y manténgalo pulsado hasta que el número de presintonía deje de destellar.
Una frecuencia de emisora de radio almacenada se puede recuperar pulsando el botón de
ajuste de presintonías.
# Presione a o b para recuperar las frecuen-
cias de las emisoras de radio.
31
Es
Page 32

Sección
02
Utilización de esta unidad
Ajustes de funciones
% Pulse F (función) para seleccionar la
función.
Una vez seleccionada, siga los siguientes
pasos para ajustar la función:
LOCAL (sintonización por búsqueda local)
La sintonización por búsqueda local le permite sintonizar sólo las emisoras de radio con señales lo suficientemente intensas como para asegurar una buena
recepción.
1 Presione a o b para activar o desactivar la sinto-
nización por búsqueda local.
2 Presione c o d para ajustar la sensibilidad.
FM: LOCAL 1—LOCAL 2—LOCAL 3—LOCAL 4
AM: LOCAL 1—LOCAL 2
El ajuste de número mayor se corresponde con el
nivel superior. El ajuste de nivel superior sólo permite recibir las emisoras con las señales más intensas, mientras que los ajustes más bajos
permiten recibir de manera progresiva las emisoras con las señales más débiles.
BSM (memoria de las mejores emisoras)
BSM (memoria de las mejores emisoras) guarda
automáticamente las seis emisoras más fuertes
según el orden de intensidad de la señal.
Al almacenar frecuencias con la función BSM, se
pueden reemplazar las frecuencias que se almacenaron con las teclas 1 a 6.
1 Presione a para activar la función BSM.
Las seis frecuencias de las emisoras de mayor intensidad se almacenarán en orden según la intensidad de las señales.
Para cancelar el proceso de almacenamiento, presione b.
CD
Funciones básicas
Reproducción de un CD
1 Inserte el disco en la ranura de carga de discos
con el lado de la etiqueta hacia arriba.
1 Si ya se ha insertado un disco, pulse SRC/OFF
para seleccionar el reproductor de CD incorporado.
Expulsión de un CD
1 Pulse h.
Selección de una pista
1 Pulse c o d.
Avance rápido o retroceso
1 Mantenga pulsado c o d.
Ajustes de funciones
% Pulse F (función) para seleccionar la
función.
Una vez seleccionada, siga los siguientes
pasos para ajustar la función:
RPT (repetición de reproducción)
1 Presione c o d para seleccionar la gama de repe-
tición.
DSC – Repite todas las pistas
TRK – Repite la pista actual
RDM (reproducción aleatoria)
1 Presione a o b para activar o desactivar la repro-
ducción aleatoria.
Cuando la repetición aleatoria está activada, en el
display aparece RDM.
SCAN (reproducción con exploración)
La reproducción con exploración busca una canción
dentro de la gama de repetición seleccionada.
1 Presione a para activar la reproducción con ex-
ploración.
SCAN aparece en el display. Se reproducirán los
primeros 10 segundos de cada pista.
2 Cuando encuentre la pista deseada, presione b
para desactivar la reproducción con exploración.
Si la pantalla vuelve automáticamente a la visualización de reproducción, seleccione de nuevo
SCAN pulsando F (función).
Una vez finalizada la exploración del CD, volverá a
comenzar la reproducción normal de las pistas.
PAUSE (pausa)
1 Pulse a o b para pausar o reanudar.
Nota
También se puede activar o desactivar la pausa
presionando PAUSE.
32
Es
Page 33

Utilización de esta unidad
Sección
02
Ajustes de audio
Ajustes de audio
% Pulse A (audio) para seleccionar la función de audio.
Una vez seleccionada, siga los siguientes
pasos para ajustar la función de audio:
FAD (ajuste del fader/balance)
Puede cambiar el ajuste de fader/balance.
1 Pulse a o b para ajus tar el balance entre los alta-
voces delanteros y traseros.
Gama de ajuste (delanteros/traseros): FAD F15 a
FAD R15
FAD 0 es el ajuste apropiado cuando se usan sólo
dos altavoces.
2 Pulse c o d para ajus tar el balance entre los alta-
voces izquierdos y derechos.
Gama de ajuste (izquierda/derecha): BAL L15 a
BAL R15
BASS/MID/TREBLE (ajuste de ecualizador)
Se puede ajustar el nivel de graves/medios/agudos.
! Los ajustes de la curva de ecualización configura-
dos se almacenan en CUSTOM.
1 Pulse a o b para ajus tar el nivel.
Gama de ajuste: +6 a -6
LOUD (sonoridad)
La sonoridad compensa las deficiencias en las
gamas de frecuencias bajas y altas cuando se escucha a un volumen bajo.
1 Pulse a o b para activar o desactivar la sonori-
dad.
2 Pulse c o d para seleccionar el ajuste deseado.
LOW (bajo)—HI (alto)
SLA (ajuste del nivel de fuente)
SLA (ajuste del nivel de fuente) le permite ajustar el
nivel de volumen de cada fuente para evitar cambios
radicales en el volumen cuando se cambia entre las
fuentes.
! Los ajustes se basan en el nivel de volumen de
FM, que se mantiene inalterado.
Antes de ajustar los niveles de la fuente, compare
el nivel de volumen de FM con el de la fuente que
desea ajustar.
! El nivel del volumen de AM también se puede re-
gular con el ajuste del nivel de fuente.
1 Pulse a o b para ajus tar el volumen de la fuente.
Gama de ajuste: SLA +4 a SLA –4
Nota
También se puede activar o desactivar la sonoridad presionando EQ/LOUD.
Uso del ecualizador
% Pulse EQ/LOUD para seleccionar el
ecualizador.
DYNAMIC—VOCAL—NATURAL—CUSTOM
—FLAT—POWERFUL
! CUSTOM le permite crear un ajuste perso-
nalizado.
! Cuando se selecciona FLAT no se hacen
ajustes al sonido.
Otras funciones
Configuración de los ajustes
iniciales
1 Mantenga pulsado SRC/OFF hasta que
se apague la unidad.
2 Presione SRC/OFF y mantenga presionado hasta que el reloj aparezca en el display.
3 Pulse F (función) para seleccionar la
configuración inicial.
Una vez seleccionada, siga los siguientes
pasos para configurar el ajuste inicial:
Ajuste del reloj
1 Presione c o d para seleccionar el segmento de
la visualización del reloj que desea ajustar.
Hora—Minuto
2 Presione a o b para poner el reloj en hora.
AUX (entrada auxiliar)
Active este ajuste si utiliza un dispositivo auxiliar conectado a esta unidad.
1 Pulse a o b para activar o desactivar el ajuste au-
xiliar.
Español
33
Es
Page 34

Sección
02
Utilización de esta unidad
Activación y desactivación de la
visualización del reloj
% Pulse CLOCK para activar o desactivar
la visualización del reloj.
Cada vez que se presiona CLOCK, se activa o
desactiva la visualización del reloj.
# La visualización del reloj desaparece momentáneamente cuando se utilizan otras funciones,
pero vuelve a aparecer después de 25 segundos.
Uso de la fuente AUX
1 Inserte el miniconector estéreo en el conector de entrada AUX.
2 Pulse SRC/OFF para seleccionar AUX
como la fuente.
34
Es
Page 35

Conexiones
Sección
03
ADVERTENCIA
! Utilice altavoces de más de 50 W (valor de sa-
lida) y de entre 4 W y8W (valor de impedancia). No utilice altavoces de 1 W a3W con esta
unidad.
! El cable negro es el cable a tierra. Cuando ins-
tale esta unidad o el amplificador de potencia
(vendido por separado), siempre conecte primero el cable a tierra. Compruebe que el
cable de tierra está conectado adecuadamente a las partes metálicas de la carrocería del
automóvil. El cable a tierra del amplificador, el
de esta unidad o el de cualquier otro dispositivo debe conectarse al automóvil por separado
usando tornillos diferentes. Si el tornillo para
el cable a tierra se afloja o se cae, puede provocar incendios, humo o averías.
Importante
! Cuando esta unidad se instale en un vehículo
sin posición ACC (accesorio) en la llave de encendido, el cable rojo se debe conectar al terminal que pueda detectar la operación de la
llave de encendido. De lo contrario, puede
descargarse la batería.
O
F
N
F
O
S
T
A
R
T
Posición ACC Sin posición ACC
! Utilice esta unidad únicamente con una bate-
ría de 12 voltios y conexión a tierra negativa.
De lo contrario, pueden producirse incendios
o averías.
! Para evitar cortocircuitos, sobrecalentamiento
o fallos de funcionamiento, asegúrese de seguir las siguientes instrucciones.
— Desconecte el terminal negativo de la bate-
ría antes de la instalación.
— Asegure el cableado con pinzas para ca-
bles o cinta adhesiva. Envuelva con cinta
adhesiva las partes en contacto con piezas
metálicas para proteger el cableado.
— Coloque todos los cables alejados de las
partes móviles, como la palanca de cambios y los rieles de los asientos.
— Coloque todos los cables alejados de luga-
res calientes, como cerca de la salida del
calefactor.
— No conecte el cable amarillo a la batería
pasándolo a través del orificio hasta el
compartimiento del motor.
— Cubra con cinta aislante los conectores de
cables que queden desconectados.
— No acorte ningún cable.
— Nunca corte el aislamiento del cable de ali-
mentación de esta unidad para compartir
la corriente con otros equipos. La capacidad de corriente del cable es limitada.
— Utilice un fusible con la tensión nominal
indicada.
— Nunca conecte el cable negativo de los al-
tavoces directamente a tierra.
— Nunca empalme los cables negativos de
varios altavoces.
! Cuando se enciende esta unidad, se emite
una señal de control a través del cable azul/
blanco. Conecte este cable al mando a distancia del sistema de un amplificador de potencia externo o al terminal de control del relé de
la antena automática del vehículo (máx. 300
mA 12 V CC). Si el vehículo posee una antena
integrada en el cristal del parabrisas, conéctela al terminal de la fuente de alimentación del
amplificador de la antena.
! Nunca conecte el cable azul/blanco al termi-
nal de potencia de un amplificador de potencia externo. Ni tampoco lo conecte al terminal
de potencia de la antena automática. De lo
contrario, puede descargarse la batería o pro ducirse un fallo de funcionamiento.
Español
35
Es
Page 36

Sección
03
Conexiones
Diagrama de conexión
Este producto
Salida
trasera
Amplificador de
potencia (se vende
por separado)
Conectar con cables RCA
(se venden por separado)
Conector de antena
Amarillo
Conectar al terminal de alimentación
constante 12 V.
Rojo
Conectar al terminal controlado por
la llave de encendido (12 V CC).
Negro (toma de tierra del chasis)
Conectar a una parte metálica limpia,
sin pintura.
Altavoz delantero Altavoz delantero
Izquierda Derecha
Altavoz trasero Altavoz trasero
Fusible (10 A)
Blanco
Blanco/negro
Verd e
Verde/negro
Control remoto del sistema
Azul/blanco
Conectar al terminal de control del sistema del
amplificador de potencia o al terminal de control
del relé de la antena (máx. 300 mA 12 V CC).
Con un sistema de 2 altavoces, no conecte
ningún otro aparato a las salidas de cable que
no estén conectadas a los altavoces.
Gris
Gris/negro
Violeta
Violeta/negro
Altavoz trasero Altavoz trasero
36
Es
Realice estas conexiones cuando utilice
el amplificador opcional.
Page 37

Instalación
Sección
04
Importante
! Compruebe todas las conexiones y sistemas
antes de la instalación final.
! No utilice piezas no autorizadas, ya que pue-
den causar fallos de funcionamiento.
! Consulte a su concesionario si para la instala-
ción es necesario taladrar orificios o hacer
otras modificaciones al vehículo.
! No instale esta unidad en un lugar donde:
— pueda interferir con el manejo del ve-
hículo.
— pueda lesionar a un pasajero como conse-
cuencia de un frenazo brusco.
! El láser semiconductor se dañará si se sobre-
calienta. Instale esta unidad alejada de zonas
que alcancen altas temperaturas, como cerca
de la salida del calefactor.
! Se logra un rendimiento óptimo si la unidad
se instala en un ángulo inferior a 60°.
60°
Montaje delantero/
posterior DIN
Esta unidad se puede instalar adecuadamente
ya sea de manera “delantera” (montaje delantero convencional DIN) o “posterior” (instalación de montaje posterior DIN, utilizando
agujeros roscados para tornillos en los laterales del bastidor de la unidad). Para obtener detalles, consulte los siguientes métodos de
instalación.
Montaje delantero DIN
1 Inserte el manguito de montaje en el
salpicadero.
Si realiza la instalación en un espacio poco
profundo, utilice el manguito de montaje suministrado. Si hay suficiente espacio, utilice el
manguito de montaje que venía con el vehículo.
2 Fije el manguito de montaje utilizando
un destornillador para doblar las pestañas
metálicas (90°) y colocarlas en su lugar.
Salpicadero
Manguito de montaje
3 Instale la unidad según la ilustración.
Tuerca
Muro cortafuego
o soporte de metal
Tornillo
Tornillo (M48)
Correa metálica
Español
! En la instalación, emplee piezas disponi-
bles en el mercado.
# Asegúrese de que la unidad esté firmemente
instalada en su lugar. Una instalación inestable
puede causar saltos en el audio o un mal funcionamiento de la unidad.
Es
37
Page 38

Sección
04
Instalación
Montaje trasero DIN
1 Determine la posición correcta, de
modo que los orificios del soporte y del lateral de la unidad coincidan.
2 Apriete los dos tornillos en cada lado.
Tornillo
Carcasa Salpicadero o consola
! Utilice tornillos de cabeza redonda (5 mm
× 8 mm) o tornillos de cabeza embutida (5
mm × 9 mm), según los orificios roscados
del soporte.
Retirada de la unidad
1 Extienda hacia afuera la parte superior
e inferior del anillo de guarnición para retirarlo. (Al volver a colocar el anillo de guarnición, oriente el lado que tiene una ranura
hacia abajo.)
3 Extraiga la unidad del salpicadero.
Fijación de la caratula
Si no tiene previsto sacar la carátula, ésta se
puede fijar con el tornillo suministrado.
Tornillo
Anillo de guarnición
! Libere el panel delantero para acceder más
fácilmente al anillo de guarnición.
2 Inserte en ambos lados de la unidad las
llaves de extracción provistas hasta que se
escuche un ligero chasquido.
38
Es
Page 39

Información adicional
Apéndice
Solución de problemas
Síntoma Causa Acción (Consul-
La pantalla
vuelve automáticamente a la
visualización
normal.
La gama de repetición de reproducción
cambia de manera inesperada.
La unidad no
funciona correctamente.
Hay una interferencia.
No ha realizado
ninguna operación en aproximadamente 30
segundos.
Dependiendo de
la gama de repetición de reproducción, la gama
seleccionada
puede cambiar
cuando seleccione otra carpeta o
pista o cuando
utilice el avance
rápido/retroceso.
Está usando un
dispositivo, como
un teléfono
móvil, que transmite ondas electromagnéticas
cerca de la unidad.
te)
Realice la operación de nuevo.
Seleccione de
nuevo la gama de
repetición de reproducción.
Aleje de la unidad
los dispositivos
eléctricos que puedan estar causando interferencias.
Problema eléctri-
ERROR-10, 11,
12, 15, 17, 30,
A0
ERROR-15 El disco inser-
ERROR-22, 23 Formato de CD
CD-ROM Hay un CD-ROM
co o mecáni co
tado aparece en
blanco
no compatible
insertado
Cambie la llave de
encendido del
automóvil a la posición de desactivación y luego pase
de nuevo a activación, o cambie a
una fuente diferente, y después vuelva a acti var el
reproductor de CD.
Reemplace el
disco.
Reemplace el
disco.
Reemplace el
disco.
Pautas para el manejo
Discos y reproductor
Use únicamente discos que tengan uno de los siguientes dos logos.
Español
Mensajes de error
Cuando contacte con su concesionario o con
el servicio técnico Pioneer más cercano, asegúrese de anotar el mensaje de error.
Mensaje Causa Acción
ERROR-11, 12,
17, 30
ERROR-11, 12,
17, 30
Disco sucio Limpie el disco.
Disco rayado Reemplace el
disco.
Utilice un CD de 12 cm u 8 cm. No utilice un adaptador cuando reproduzca un CD de 8 cm.
Utilice sólo discos convencionales y completamente
circulares. No use discos con formas irregulares.
No inserte ningún otro elemento que no sea un CD
en la ranura de inserción de CD.
No use discos con roturas, picaduras, deformados o
dañados de otro modo, ya que pueden causar daños
al reproductor.
No es posible reproducir discos CD-R/CD-RW no finalizados.
Es
39
Page 40

Apéndice
Información adicional
No toque la superficie grabada de los discos.
Cuando no utilice los discos guárdelos en sus cajas.
Evite dejar discos en ambientes excesivamente calientes o expuestos a la luz solar directa.
No fije etiquetas, no escriba ni aplique sustancias
químicas en la superficie de los discos.
Para limpiar un CD, pásele un paño suave desde el
centro hacia afuera.
La condensación puede afectar temporalmente al
rendimiento del reproductor. Deje que se adapte a la
temperatura más cálida durante aproximadamente
una hora. Además, si los discos tienen humedad, séquelos con un paño suave.
Quizás no pueda reproducir algunos discos debido a
sus características, formato, aplicación grabada, entorno de reproducción, condiciones de almacenamiento u otras causas.
Las vibraciones en las carreteras pueden interrumpir
la reproducción de un disco.
Lea las advertencias de los discos antes de utilizarlos.
Discos dobles
Los discos dobles son discos de dos caras que incluyen un CD grabable de audio en una cara y un DVD
grabable de vídeo en la otra cara.
Debido a que la cara del CD de los discos dobles no
es físicamente compatible con el estándar general de
CD, es posible que no se pueda reproducir la cara del
CD en esta unidad.
La carga y expulsión frecuente de un disco doble
puede producir ralladuras en el disco. Las ralladuras
graves pueden producir problemas de reproducción
en esta unidad. En algunos casos, un disco doble
puede atascarse en la ranura de carga del disco y no
se expulsará. Para evit arlo, recomendamos que no
utilice un disco doble en esta unidad.
Consulte la información del fabricante del disco para
obtener más información sobre los discos dobles.
40
Es
Page 41

Información adicional
Apéndice
Especificaciones
Generales
Fuente de alimentación ........ 14,4 V CC (10,8 V a 15,1 V
permisible)
Sistema de conexión a tierra
..................................................... Tipo negativo
Consumo máximo de corriente
..................................................... 10,0 A
Dimensiones (An × Al × Pr):
DIN
Bastidor .................... 178 mm × 50 mm × 162
mm
Cara anterior .......... 188 mm × 58 mm × 15 mm
D
Bastidor .................... 178 mm × 50 mm × 162
mm
Cara anterior .......... 170 mm × 48 mm × 15 mm
Peso ............................................... 1,3 kg
Audio
Potencia de salida máxima
..................................................... 50 W × 4
Potencia de salida continua
..................................................... 22 W × 4 (50 a 15 000 Hz ,
5% THD, 4 W de carga,
ambos canales activados)
Impedancia de carga ............. 4 W (4 W a8W permisible)
Nivel de salida máxima del preamplificador (Pre-out)
..................................................... 2,0 V
Controles de tono:
Graves
Frecuencia .............. 100 Hz
Ganancia ................. ±12 dB
Media
Frecuencia .............. 1 kHz
Ganancia ................. ±12 dB
Agudos
Frecuencia .............. 10 kHz
Ganancia ................. ±12 dB
Sintonizador de AM
Gama de frecuencias ............ 530 kHz a 1 710 kHz
Sensibilidad utilizable ........... 25 µV (Señal/ruido: 20 dB)
Relación de señal a ruido .... 62 dB (red IHF-A)
Especificaciones CEA2006
Potencia de salida ................... 14 W RMS × 4 canales (4 W
y ≦ 1 % THD+N)
Relación de señal a ruido .... 91 dBA (referencia: 1 W a 4
W)
Nota
Las especificaciones y el diseño están sujetos a
modificaciones sin previo aviso.
Español
Reproductor de CD
Sistema ........................................ Sistema de audio de discos
compactos
Discos utilizables .................... Disco compacto
Relación de señal a ruido .... 94 dB (1 kHz) (red IHF-A)
Número de canales ................ 2 (estéreo)
Sintonizador de FM
Gama de frecuencias ............ 87,9 MHz a 107,9 MHz
Sensibilidad utilizable ........... 11 dBf (0,7 µV/75 W, mono,
Señal/ruido: 30 dB)
Relación de señal a ruido .... 72 dB (red IHF-A)
41
Es
Page 42

PIONEER CORPORATION
4-1, MEGURO 1-CHOME, MEGURO-KU
TOKYO 153-8654, JAPAN
PIONEER ELECTRONICS (USA) INC.
P.O. Box 1540, Long Beach, California 90801-1540, U.S.A.
TEL: (800) 421-1404
PIONEER EUROPE NV
Haven 1087, Keetberglaan 1, B-9120 Melsele, Belgium/Belgique
TEL: (0) 3/570.05.11
PIONEER ELECTRONICS ASIACENTRE PTE. LTD.
253 Alexandra Road, #04-01, Singapore 159936
TEL: 65-6472-7555
PIONEER ELECTRONICS AUSTRALIA PTY. LTD.
178-184 Boundary Road, Braeside, Victoria 3195, Australia
TEL: (03) 9586-6300
PIONEER ELECTRONICS OF CANADA, INC.
300 Allstate Parkway, Markham, Ontario L3R 0P2, Canada
TEL: 1-877-283-5901
TEL: 905-479-4411
PIONEER ELECTRONICS DE MEXICO, S.A. de C.V.
Blvd.Manuel Avila Camacho 138 10 piso
Col.Lomas de Chapultepec, Mexico, D.F. 11000
TEL: 55-9178-4270
先鋒股份有限公司
總公司: 台北市中山北路二段44號13樓
電話: (02) 2521-3588
先鋒電子(香港)有限公司
香港九龍尖沙嘴海港域世界商業中心
9樓901-6室
電話: (0852) 2848-6488
Published by Pioneer Corporation.
Copyright ã 2009 by Pioneer Corporation.
All rights reserved.
Publié par Pioneer Corporation. Copyright
ã 2009 par Pioneer Corporation. Tous
droits réservés.
<KOMZX> <09G00000>
Printed in Thailand
Imprimé en Thaïlande
<QRD3041-A/N>UC
 Loading...