

Page 1
Quick Start Guide
MULTIMEDIA NAVIGATION RECEIVER
AVIC-6200NEX/AVIC-5200NEX
This guide is intended to guide you through the basic functions of
this navigation system. For details, please refer to the Operation
Manual provided with the product.
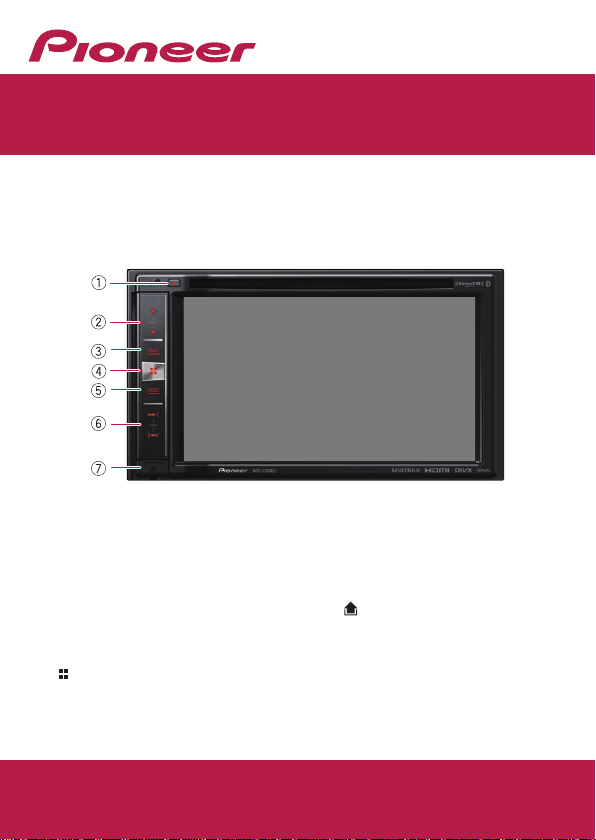
Basic hardware buttons
1 h button
2 VOL (+/–) button
Press to adjust the AV
(Audio and Video) source
volume.
3 MAP button
Press to display the Map
screen.
4 button
Press to display the Top
menu screen.
© 2016 PIONEER CORPORATION.
All rights reserved.
< KOKZ15L >
5 MODE button
Press to switch between the
Application screen and the
AV operation screen.
6 TRK button
7 button
Press to remove the
detachable faceplate from
this product.
English
< CRB4841-A > UC
Page 2
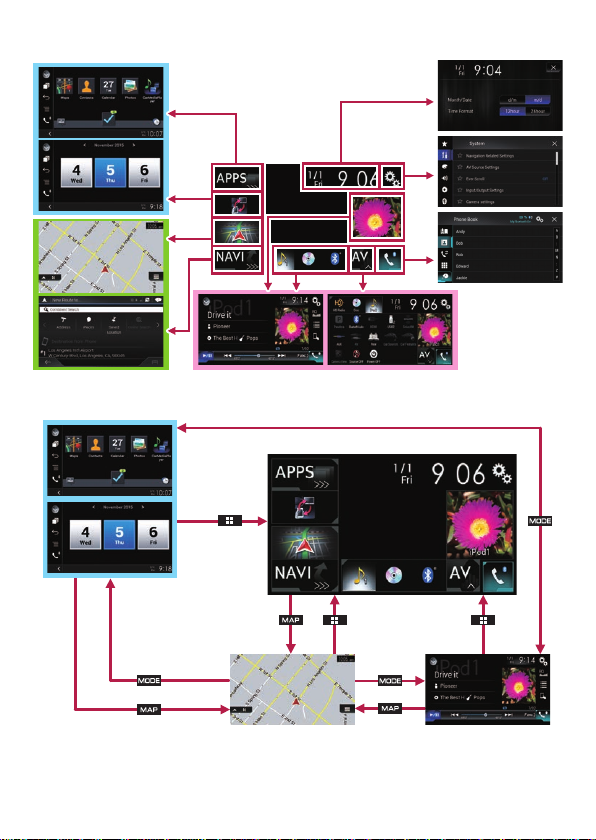
Switching screens using the touch panel keys
Switching screens using the hardware buttons
Page 3

How to use the navigation menu screens
You can use various functions such as the route guidance and
related settings.
21 63 4
5
cb d
789
1 Returns to the Map screen.
2 Searches for your
destination by the address
or coordinates, or searches
for the selected place of
interest, etc.
3 Builds your route or edits
the route currently set.
4 Displays the traffic
information.
5 Displays useful information
to support your driving.
6 Displays notifications
that contain important
information.
7 Displays the location that
you saved as a favorite.
8 Switches among 2D, 3D,
and 2D North up view
modes.
a
9 Displays the “User Profiles”
screen where you can create
new profiles or edit the
existing profiles.
a Displays the next page of
the navigation menu.
b Displays the previous page
of the navigation menu.
c Configures the navigation-
related settings and
enables you to access the
“SyncTool” screen.
d Displays the information
of your navigation system
(the version information, or
licenses, for example).
Page 4

Searching for a location by address
1 Press the MAP button.
The Map screen appears.
2 Touch
navigation menu on the
Map screen.
3 Touch [New Route].
4 Touch [Address].
The “Find Address” screen
appears.
5 Input the information for
the location you want to
set as the destination.
Touching the item next
to each option displays
the screen to enter the
character or select one of
options. After narrowing
down your destination, the
searched location appears
on the Map screen.
to display the
6 Touch [Select as
Destination].
After a short summary of
the route parameters, a
map appears showing the
entire route. The route is
automatically calculated.
7 Touch [Start Navigation].
Your navigation system
starts the route guidance.
Page 5

How to use the map
Most of the information provided by your navigation system can
be seen on the map. You need to become familiar with how the
information appears on the map.
The following information marked with an asterisk (*) appears only
when a route is set.
AV information is displayed at the bottom of the Map screen.
1 Shows the number and
name of the street to be
used (or next guidance
point).*
2 Shows the next guidance
point (maneuver).*
3 Shows the distance to
the next guidance point
(maneuver).*
4 Shows the maneuver after
the next maneuver.*
5 Indicates the current
location of your vehicle.
6 Displays the time and
distance information for
your route.*
7 Shows the name of the
street (or city) that your
vehicle is traveling on (or
in).
8 Indicates the current route.*
9 Displays the Navigation
menu screen.
a Indicates the progress to the
final destination.*
Page 6

Pairing your Bluetooth® devices
You can use various functions (hands-free phoning and Bluetooth
audio etc.) by connecting your Bluetooth devices to this navigation
system. To use the functions, pair the devices with the navigation
system in advance.
1 Activate the Bluetooth
wireless technology on
your devices.
2 Press the
display the Top menu
screen.
3 Touch
The “Bluetooth” screen
appears.
4 Touch [Connection].
5 Touch
The system searches for
Bluetooth devices waiting
for a connection and
displays them in the list if a
device is found.
button to
and then .
.
6 Touch the Bluetooth
device name you want to
register.
While connecting,
“Pairing… Please wait.” is
displayed. If the connection
is established, “Paired.” is
displayed.
Page 7

Using hands-free phoning
If your cellular phone features Bluetooth technology, this
navigation system can be connected to your cellular phone
wirelessly. Using this hands-free function, you can operate the
navigation system to make or receive phone calls. You can also
transfer the phone book data stored in your cellular phone to the
navigation system.
1 Displays the preset dial
screen.
2 Switches to the phone book
list.
3 Switches to the missed,
received and dialed call lists.
4 Switches the mode to enter
the phone number directly.
5 Switches to the voice
recognition function (for
iPhone).
6 Displays the Setting menu
screen.
7 Closes the screen.
8 Performs the alphabet
search in the phone book.
Page 8

Using the radio
You can listen to the radio using this product.
Once you have stored broadcast channels, you can easily recall
preset channels from memory with a single touch of a key.
AVIC-6200NEX AVIC-5200NEX
1 Displays the source list.
2 Selects a band.
3 Displays the Time and date
setting screen.
4 Displays the Setting menu
screen.
5 Recalls equalizer curves.
6 Switches the text display
between the main channel
and sub channels.
7 Displays the Phone menu
screen.
8 Stores song information to
an iPod.
9 Performs manual tuning or
seek tuning.
a Displays the preset
channels.
b Recalls the preset channel
stored to a key from memory
with a single touch of the
key.
Stores the current broadcast
frequency to a key for later
recall by continuing to touch
the key.
 Loading...