

Page 1

English
Español
Português (B)
Operation Manual
AV Receiver / CD Player with 6.5 inch Wide Display
AVH-P6450CD
AV Receiver with 6.5 inch Wide Display
AVH-P6450
Page 2
Before You Start
IMPORTANT SAFEGUARDS 5
About this manual 5
To ensure safe driving 6
• When Using a Display connected to
Rear Video Output 6
Precautions 6
CD playback (Only AVH-P6450CD) 6
To avoid battery exhaustion 7
To protect the LCD screen of the display 7
When viewing is difficult, use BRIGHT and
DIMMER to adjust 7
Remote control and care 7
• Battery 8
Protecting your unit from theft 8
• Removing the operation panel 8
• Attaching the operation panel 9
Resetting the Microprocessor 9
What’s what 11
Remote control 12
Power ON/OFF
Turning the unit on 13
Closing the Display 13
Screen Angle Adjustment 13
Selecting a source 14
Turning the unit off 14
Common Operations
Source display 15
Displays menus (e.g., Tuner) 15
Display
Changing the wide mode 16
Video Adjust 17
DIMMER Settings 18
Tuner
Listening to the radio 19
Introduction of advanced tuner
operation 20
Storing broadcast frequencies 20
Tuning in strong signals 21
Storing the strongest broadcast
frequencies 21
Built-in CD Player
Playing a CD (Only AVH-P6450CD) 22
Introduction of advanced built-in CD player
operation (Only AVH-P6450CD) 23
Repeating play 23
Playing tracks in a random order 23
Scanning tracks of a CD 24
Playing back from the track list 24
Pausing CD playback 24
Using disc title functions 24
• Entering disc titles 25
• Displaying titles on CD TEXT discs 25
Multi-CD Player
Playing a CD 26
50-disc multi-CD player 26
Introduction of advanced multi-CD player
operation 27
Repeating play 27
Playing tracks in a random order 28
Scanning CDs and tracks 28
Playing back from the track list 28
Pausing CD playback 29
Using compression and bass emphasis 29
Using ITS playlists 29
• Creating a playlist with ITS
programming 29
• Erasing a track from your ITS
playlist 30
• Playback from your ITS playlist 30
Thank you for buying this Pioneer product.
Please read through these operating instructions so you will know how to operate your model properly. After you have finished reading the instructions, put them
away in a safe place for future reference.
Contents
En
2
00
Section
Page 3
• Erasing a CD from your ITS playlist 31
Using disc title functions 31
• Entering disc titles 31
• Displaying disc titles 32
Using CD TEXT functions 32
• Displaying titles on CD TEXT discs 32
TV Tuner
Display and indicators 33
Basic operation 33
Storing broadcast stations 33
Recalling broadcast stations 34
Changing a band 34
TV menu 34
BSSM (Best Station Sequential Memory) 34
Selecting the country group 35
Selecting channels from the
preset channel list 35
DVD
Display and indicators 35
Introduction of advanced DVD player
operation 36
About Remote Control Operation mode
switch 37
Information indications are displayed 37
Disc Playback 38
Chapter and Track Advance/Return 38
Returning to the Previous Chapter/Track 38
Specifying Title/Chapter/Track (Direct
Search) 39
• Specifying Title 39
• Specifying Chapter 39
• Specifying Track 39
Disc Fast Forward/Reverse 40
• Fast Forward 40
• Fast Reverse 40
Stopping Playback 41
Still, Frame-by-Frame and Slow Motion
Playback 41
• Still Playback 41
• Frame-by-Frame Playback 41
• Slow Motion Playback 41
Operating using Information Display 1 42
• Specifying time 42
• Switching audio, subtitle and angle 43
Operating with Information Display 2 43
• Switching Repeat play range 43
• Switching audio L/R 43
Audio Adjustments
Introduction of audio adjustments 44
Setting the sound focus equalizer 45
Using balance adjustment 45
Using the equalizer 46
• Recalling equalizer curves 46
• Adjusting equalizer curves 46
Adjusting bass 47
Adjusting treble 47
Adjusting loudness 48
Using subwoofer output 48
Using non fading output 48
Using the high pass filter 49
Adjusting source levels 49
Initial Settings
Adjusting initial settings 50
Setting the FM tuning step 50
Setting the AM tuning step 50
Switching the warning tone 51
Switching the auxiliary setting 51
Setting the rear output and
subwoofer controller 51
Switching the Telephone
Muting/Attenuation 52
Contents
En
3
English
Español
Deutsch
Français
Italiano
Nederlands
00
Section
Page 4

Other Functions
Setting remote control code type 52
Using different entertainment audio
displays 52
Using the AUX source 53
• Selecting AUX as the source 53
• Setting the AUX title 53
Introduction of set up 54
Selecting the video 54
Setting the automatic open mode 55
Setting the time 55
Additional Information
CD player and care (Only AVH-P6450CD) 56
CD-R/CD-RW discs 56
Understanding built-in CD player error
messages (Only AVH-P6450CD) 57
Using the Display Correctly 57
• Handling the Display 57
• About the Liquid Crystal Display (LCD)
Screen 58
• Keeping the Display in Good
Condition 58
• About the Small Fluorescent Tube 58
Specifications 59
Contents
En
4
00
Section
Page 5

Before You Start
En
5
IMPORTANT SAFEGUARDS
Please read all of these instructions regarding
your display and retain them for future reference
1 Read this manual fully and carefully
before operating your display.
2 Keep this manual handy for future reference.
3 Pay close attention to all warnings in this
manual and follow the instructions carefully.
4 Do not allow other persons to use this
system until they have read and understood
the operating instructions.
5 Do not install the display where it may (i)
obstruct the driver’s vision, (ii) impair the
performance of any of the vehicle’s operating
systems or safety features, including air bags,
or (iii) impair the driver’s ability to safely
operate the vehicle.
6 As with any accessory in your vehicle’s
interior, the display should not divert your
attention from the safe operation of your vehicle. If you experience difficulty in operating
the system or reading the display, please park
safely before making adjustments.
7 Do not attempt to install or service your
display by yourself. Installation or servicing
of the display by persons without training and
experience in electronic equipment and automotive accessories may be dangerous and
could expose you to the risk of electric shock
or other hazards.
8 Please remember to wear your seat belt at
all times while operating your vehicle. If you
are ever in an accident, your injuries can be
considerably more severe if your seat belt is
not properly buckled.
About this manual
This unit features a number of sophisticated
functions ensuring superior reception and operation. All the functions have been designed for
the easiest possible use, but many are not selfexplanatory. This operation manual will help you
benefit fully from this product’s potential and to
maximize your listening enjoyment.
We recommend that you familiarize yourself
with the functions and their operation by reading through the manual before you begin using
this product. It is especially important that you
read and observe precautions on this page and
in other sections.
This manual explains head unit operation. You
can perform the same operations with the
remote control.
English
Español
Deutsch
Français
Italiano
Nederlands
01
Section
Page 6
Before You Start
En
6
01
Section
To ensure safe driving
WARNING
• To avoid the risk of accident and the potential
violation of applicable laws, this product is
not for use with a video screen that is visible
to the driver.
• In some countries or states the viewing of
images on a display inside a vehicle even by
persons other than the driver may be illegal.
Where such regulations apply, they must be
obeyed.
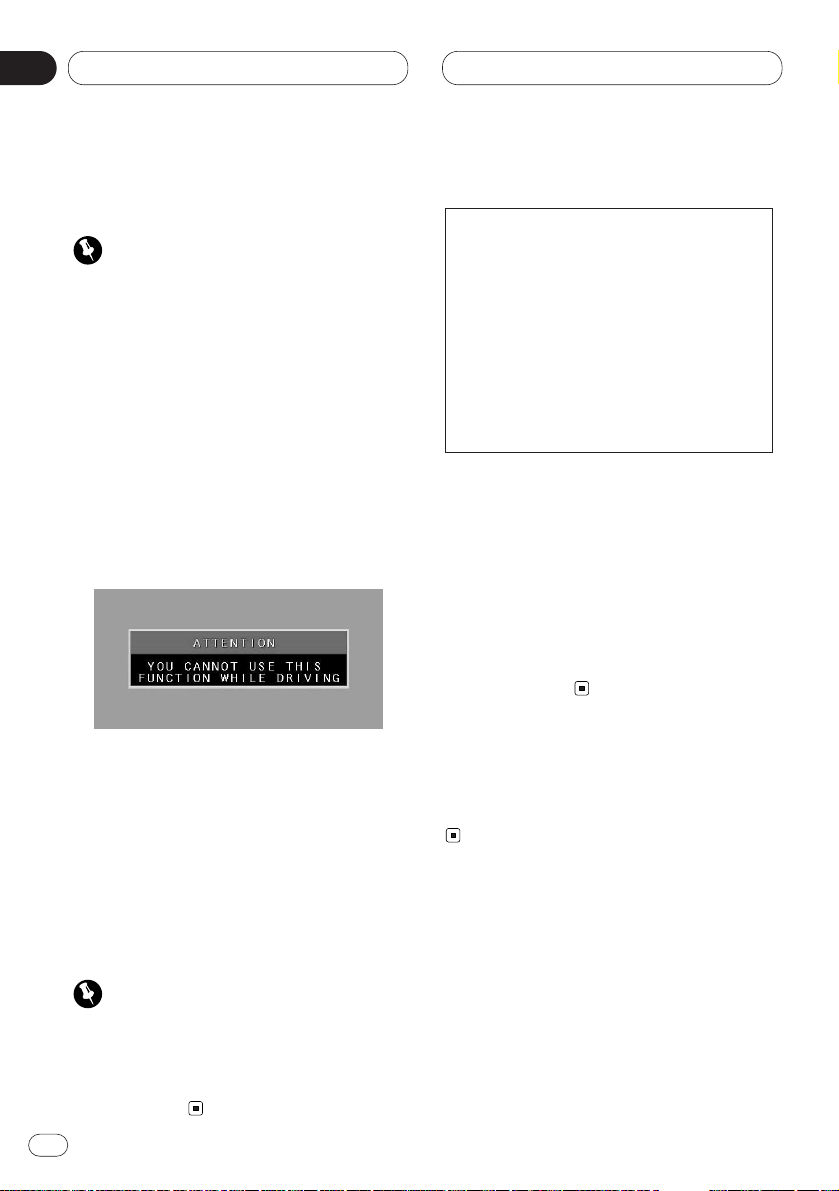
To ensure safe vehicle operation, do not operate
this product during driving. If you try to view
pictures from a TV-tuner and, DVD-Video disc or
other sources etc. on the front display while the
parking brake is not engaged, this warning will
appear:
When you park your car in a safe place and
apply the parking brake, the picture appears on
the screen.
When Using a Display connected to
Rear Video Output
This product’s Rear video output is for connection of a display to enable passengers in the
Rear seats to watch the DVD, etc.
WARNING
• NEVER install the rear display connected to
this product’s rear video output in a location
that enables the Driver to watch the TV-tuner
and, DVD-Video disc or other sources etc.
while Driving.
Precautions
• Keep this manual handy as a reference for
operating procedures and precautions.
• Always keep the volume low enough so you
can hear sounds outside of the car.
• Protect this product from moisture.
• If the battery is disconnected or discharged,
the preset memory will be erased and must
be reprogrammed.
• If this unit does not operate properly, contact
your dealer or nearest authorized Pioneer
Service Station.
CD playback (Only AVH-P6450CD)
Music CD/CD-R/CD-RW playback is possible.
CAUTION: USE OF CONTROL OR
ADJUSTMENT OR PERFORMANCE OF PROCEDURES OTHER THAN
THOSE SPECIFIED
HEREIN MAY RESULT IN
HAZARDOUS RADIATION
EXPOSURE.
CAUTION: THE USE OF OPTICAL
INSTRUMENTS WITH
THIS PRODUCT WILL
INCREASE EYE HAZARD.
Page 7
Before You Start
En
7
To avoid battery exhaustion
Always run the the vehicle engine while using
this unit. Using this unit without running the
engine can result in battery drainage.
To protect the LCD screen of the
display
• Do not allow direct sunlight to fall on the
Display when this unit is not being used.
Extended exposure to direct sunlight can
result in LCD screen malfunction due to the
resulting high temperatures.
• When using a portable phone, keep the
antenna of the portable phone away from the
Display to prevent disruption of the video by
the appearance of spots, colored stripes, etc.
When viewing is difficult, use
BRIGHT and DIMMER to adjust
Due to its construction, the view angle of the
LCD screen is limited. The viewing angle (vertical and horizontal) can be increased, however,
by using BRIGHT to adjust the black density of
the video. When using for the first time, adjust
the black density in accordance with the viewing angle (vertical and horizontal) to adjust for
clear viewing.
DIMMER can also be used to adjust the bright-
ness of the LCD screen itself to suit your personal preference.
Remote control and care
This product is equipped with a remote control
for convenient operation.
• Point the control in the direction of the signal
reception on the color display to operate.
Notes
• Do not store the remote control in high temperatures or direct sunlight.
• The remote control may not function properly
in direct sunlight.
• Do not let the remote control fall onto the
floor, where it may become jammed under the
brake or accelerator pedal.
English
Español
Deutsch
Français
Italiano
Nederlands
01
Section
Page 8
En
8
01
Section
Before You Start
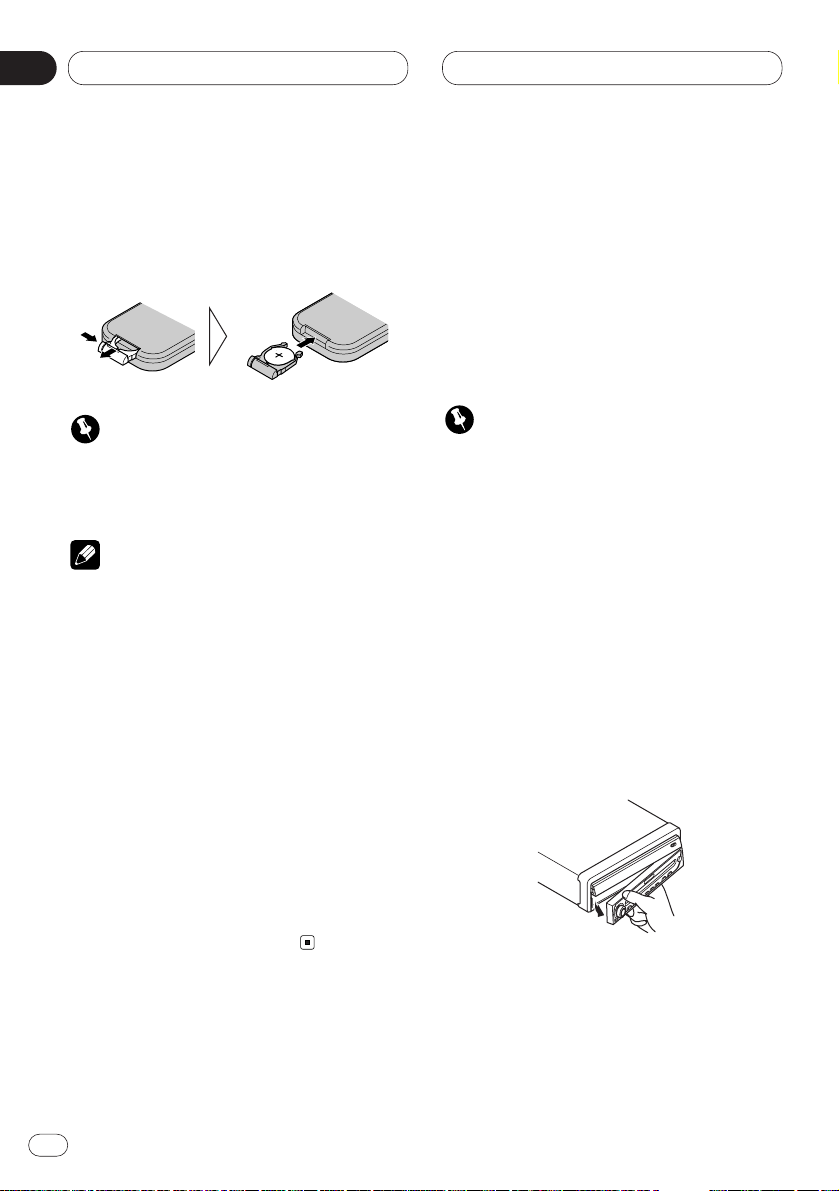
Battery
Slide the tray out on the back of the remote
control and insert the battery with the (+) and
(–) poles pointing in the proper direction.
Important
• Keep the lithium battery out of reach of children. Should the battery be swallowed, immediately consult a doctor.
Notes
• When using for the first time, pull out the film
protruding from the tray.
• Do not recharge, disassemble, heat or dispose of battery in a fire.
• Use a CR2025 (3 V) lithium battery only. Never
use other types of battery with this unit.
• Do not handle the battery with metallic tools.
• Do not store the lithium battery with metallic
materials.
• When disposing of used batteries, please
comply with governmental regulations or
environmental public institution’s rules that
apply in your country/area.
• Always check carefully that you are loading
the battery with its (+) and (–) poles facing in
the proper directions.
• Remove the battery if remote control is not to
be used for a month or longer.
Protecting your unit from theft
The operation panel can be detached from the
head unit and stored in the protective case provided to discourage theft.
• If the operation panel is not detached from the
head unit within five seconds of turning off
the ignition, a warning tone will sound.
• You can turn off the warning tone. See
Switching the warning tone on page 51.
Important
• Never use force or grip the display and the
buttons tightly when removing or attaching.
• Avoid subjecting the operation panel to excessive shocks.
• Keep the operation panel out of direct sunlight and high temperatures.
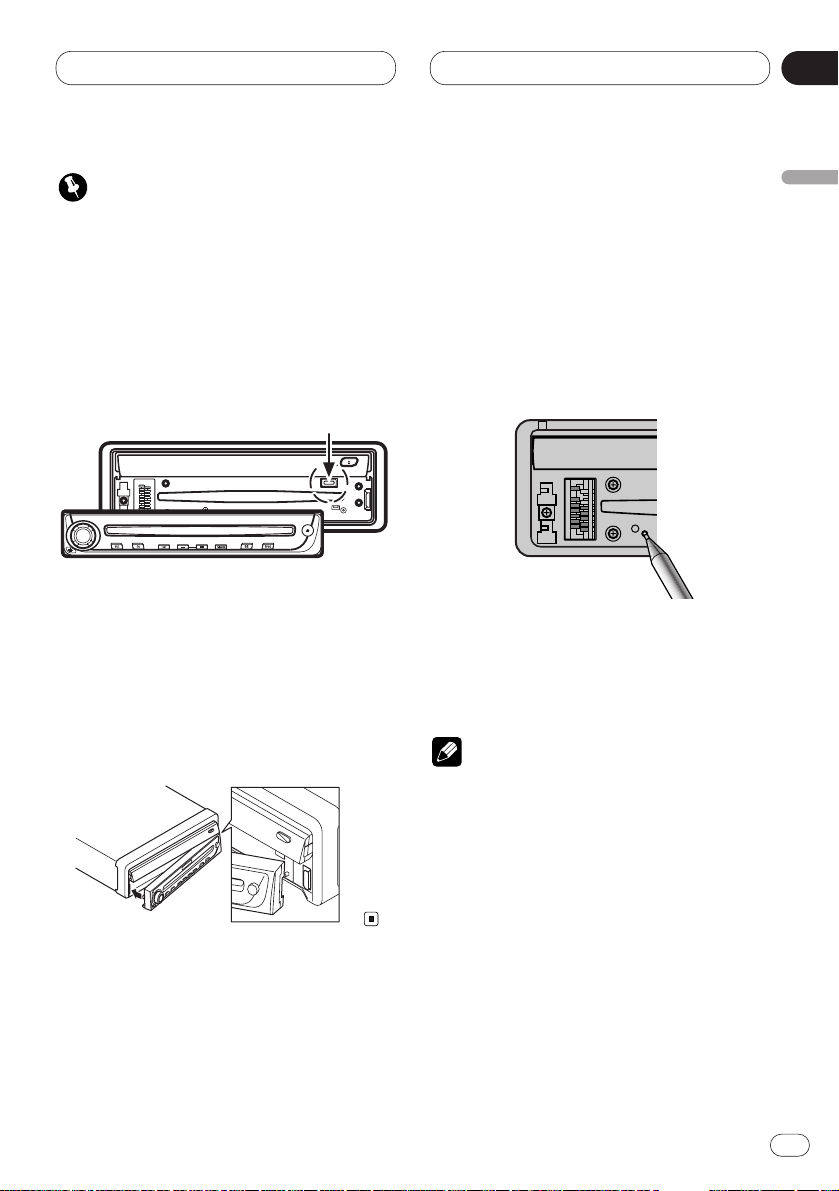
Removing the operation panel
1 Press DETACH to remove the operation
panel.
2 Grip the left side of the operation panel
and pull it gently outward.
Take care not to grip it tightly or drop it.
3 Put the operation panel into the protective
case provided for safe keeping.
Page 9
Before You Start
En
9
Important
• Do not drive with the operation panel removed
and the display up as the angle of the display
may change resulting in scratching or damage.
• Be careful of the magnetic part of this product. Do not place magnetic products such as
credit cards, cassette tapes and watches near
it. Doing so may result in damage to those
products or the loss of information recorded
on them.
Attaching the operation panel
Replace the operation panel by holding it
upright to this unit and clipping it securely
into the mounting hooks.
Do not use this product when it is just hanging
on hooks.
Resetting the Microprocessor
When the ignition switch is turned OFF, pressing
RESET
lets you reset the microprocessor to
its initial settings without changing SET UP
MENU settings, Condition Memory and other
settings.
Press
RESET
in the following cases.
• When this unit fails to operate correctly.
• When strange (incorrect) messages appear
on the display.
1 Turn the ignition switch OFF.
2 Press RESET.
Use a pen tip or other pointed instrument.
Notes
• When using with a Pioneer Navigation
System, if you press RESET, be sure the ACC
OFF is selected. If ACC ON is selected, correct
operation may not be possible even if you
press RESET.
• After completing connections or when you
want to erase all memorized settings or return
the unit to its initial (factory) settings, switch
your engine ON or set the ignition switch to
ACC ON before pressing RESET.
English
Español
Deutsch
Français
Italiano
Nederlands
01
Section
Page 10

PAUSE ATT
2
5
7
9
1
3
4
6
0-=~!@#
8
PAUSE ATT
2
5
^
%
7
9
1
3
4
6
0-=~!@#
8
$
$
Before You Start
01
Section
AVH-P6450CD
AVH-P6450
En
10
Page 11

Before You Start
En
11
English
Español
Deutsch
Français
Italiano
Nederlands
01
Section
What’s what
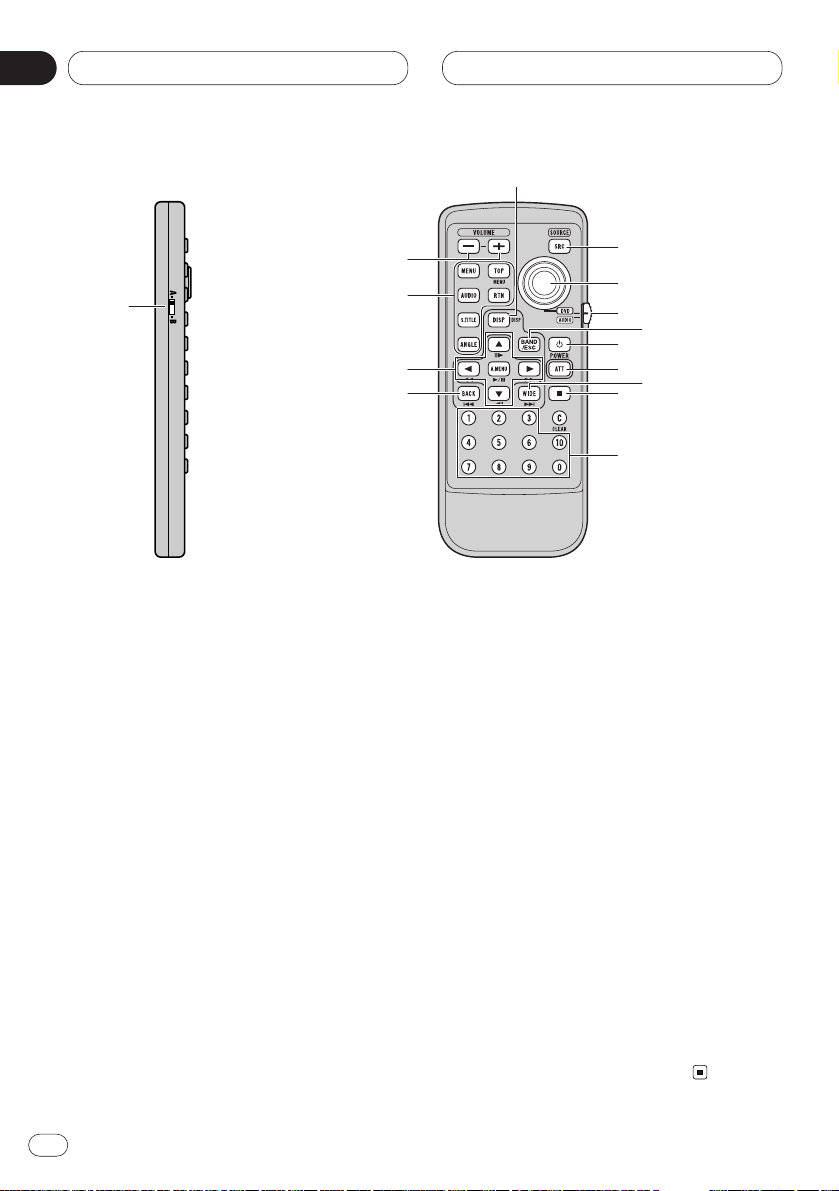
1 VOLUME
Rotate to increase or decrease the volume.
2 OPEN/CLOSE button
Press to open or close the display panel.
3 Ambient light sensor
Senses ambient light. This system automatically adjusts the brightness of the display to
compensate for ambient light.
4 DISPLAY button
Press to select different displays.
5 ENTERTAIN button
Switches between still picture and video
entertainment displays.
6 WIDE/V.ADJ button
Change the method of enlarging 4:3 video to
16:9 video. Pressing this button for 2 seconds, and displayed the Video adjustment.
Once the picture adjustment is displayed, its
adjustment is switched each time the button
is pressed.
Video adjustment cannot be done with the
remote control.
7 AUDIO controller/ENTER button
Use to operate AUDIO MENU, select stations
etc.
8 Remote control signal receiver
9 SFEQ button
Press to select a natural sound with presence.
0 BAND/ESC button
Press to select among three FM or AM bands
and cancel the control mode of functions.
-
ATT button
Press to switch traffic announcements function on or off.
= ANGLE buttons
Adjust the screen to an easily viewable
angle.
~ PAUSE button
Press to switch PAUSE function on or off.
! EQ button
Press to select various equalizer curves.
@ SOURCE button
This unit is switched on by selecting a
source. Press to cycle through all of the
available sources.
# DETACH button
Detaches the operation panel.
$ RESET button
Only AVH-P6450CD
% CD loading slot
Insert a CD.
^ CD EJECT button
Press to eject a CD.
Notes
• Pressing WIDE on the head unit returns you to
the previous display.
• Cancel the MENU display with BAND/ESC.
Page 12
En
12
01
Section
Before You Start
Remote control
& Volume control (–/+) buttons
Press to – or + the volume.
* Joystick
Use when using with a Pioneer DVD component. If you set the switch to DVD, you can
perform some Pioneer DVD unit operations.
( Picture source switch
Press to cycle through all of the available
sources. Performs the same operation as @
on the head unit.
) Power button
Use when using with a Pioneer DVD component.
_ ATT button
Press to quickly lower the volume level, by
about 90%. Press once more to return to the
original volume level.
+ STOP button
Use when using with a Pioneer DVD component.
¡ NUMBER button
Use when using with a Pioneer component
enabling DVD playback.
™ BACK button
Returns you to the display before a MENU or
PICTURE ADJUST display.
£ MENU, TOP, AUDIO, RTN, S.TITLE,
ANGLE buttons
Use when using with a Pioneer DVD component.
¢ Audio control buttons and DVD control
buttons
Use to operate AUDIO MENU, select stations
etc. Performs the same operation as 7 on
the head unit.
Switch § to the DVD position, and use when
using with a Pioneer component that
enables DVD playback.
∞ Remote control selection switch
Switch to change the setting of the remote
control. (Refer to page 50.)
§ Remote control operation mode switch
Switch the operation mode between AUDIO
mode (sources can be operated by remote
control) or DVD mode (only DVD player can
be operated by remote control).
(
§
*
)
_
+
¡
™
¢
&
4
0
6
£
∞
Page 13
En
13
English
Español
Deutsch
Français
Italiano
Nederlands
02
Section
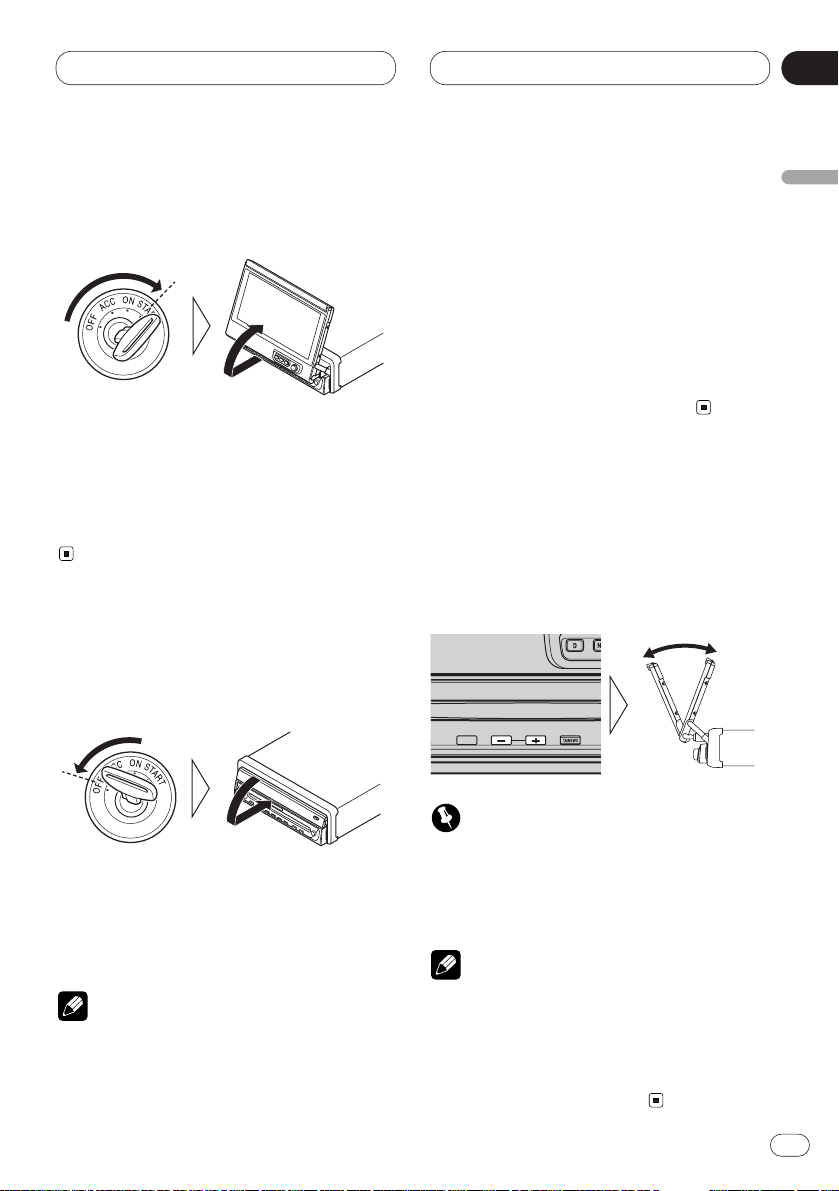
Turning the unit on
1 Turn your vehicle’s engine ON.
The display will be automatically deployed by
the automatic close/open mode.
If the display is not automatically deployed,
press OPEN/CLOSE.
2 Press SOURCE to select the tuner.
Press SOURCE until you see Tuner displayed.
Closing the Display
Turn the vehicle’s engine OFF.
The display will be automatically closed by the
automatic close/open mode. If the display does
not close automatically, turn the ignition switch
ON again (or turning it to ACC) and press
OPEN/CLOSE.
Notes
• The automatic close/open mode will operate
the display as follows.
— When the ignition switch is turned OFF
while the display is deployed, the display
will be closed after approximately 6 seconds.
— When the ignition switch is turned ON
again (or turned to ACC), the display will be
deployed automatically.
— Installing the operation panel will automat-
ically deploy the display. (Refer to page 8.)
• The automatic close/open mode can be
switched ON/OFF. (Refer to page 55.)
• When the ignition switch is turned OFF after
the display has been closed, turning the ignition switch ON again (or turning it to ACC)
will not deploy the display. In this case, press
OPEN/CLOSE to deploy the display.
Screen Angle Adjustment
The angle of this product’s screen continues
changing as long as you keep pressing the
ANGLE button.
Adjust the screen to an easily viewable angle.
Important
• If you can hear the display knocking against
your vehicle’s console or dashboard, press
ANGLE on the (–) side to move the screen a
little forward.
Notes
• When adjusting the angle, be sure to press
ANGLE. Forcible adjusting of the display by
hand may damage it.
• The adjusted angle of the display will be memorized and automatically returned to the next
time the display is deployed.
TEXT
Power ON/OFF
02
Page 14

En
14
02
Section
Selecting a source
You can select a source you want to listen to. To
switch to the built-in CD player, load a disc in
this product (AVH-P6450CD only) (refer to page
22).
Press SOURCE to select a source.
Press SOURCE repeatedly to switch between
the following sources:
Built-in CD player (AVH-P6450CD)—TV—
VIDEO—Tuner—DVD (one disc only/multi-DVD
player)—Multi-CD player—External unit 1—
External unit 2 —AUX
Notes
• In the following cases, the sound source will
not change:
— When a product corresponding to each
source is not connected to this product.
— When no disc is set in this product (AVH-
P6450CD only).
— When no magazine is set in the multi-CD
player.
— When no magazine is set in the multi-DVD
player.
— When the AUX (auxiliary input) is set to off
(refer to page 51).
• External unit refers to a Pioneer product (such
as one available in the future) that, although
incompatible as a source, enables control of
basic functions by this product. Two external
units can be controlled by this product. When
two external units are connected, the allocation of them to external unit 1 or external unit
2 is automatically set by this product.
• When this product’s blue/white lead is connected to the car’s auto-antenna relay control
terminal, the car’s antenna extends when this
product’s source is switched on. To retract the
antenna, switch the source off.
Turning the unit off
Press SOURCE and hold for at least one second to turn the unit off.
Power ON/OFF
Page 15
Common Operations
En
15
English
Español
Deutsch
Français
Italiano
Nederlands
03
Section
Source display
Information of each source is displayed.
1 SOURCE name
Name of the selected source.
2 Source status
Status of the selected source.
3 Equalizer display
Equalizer setting status.
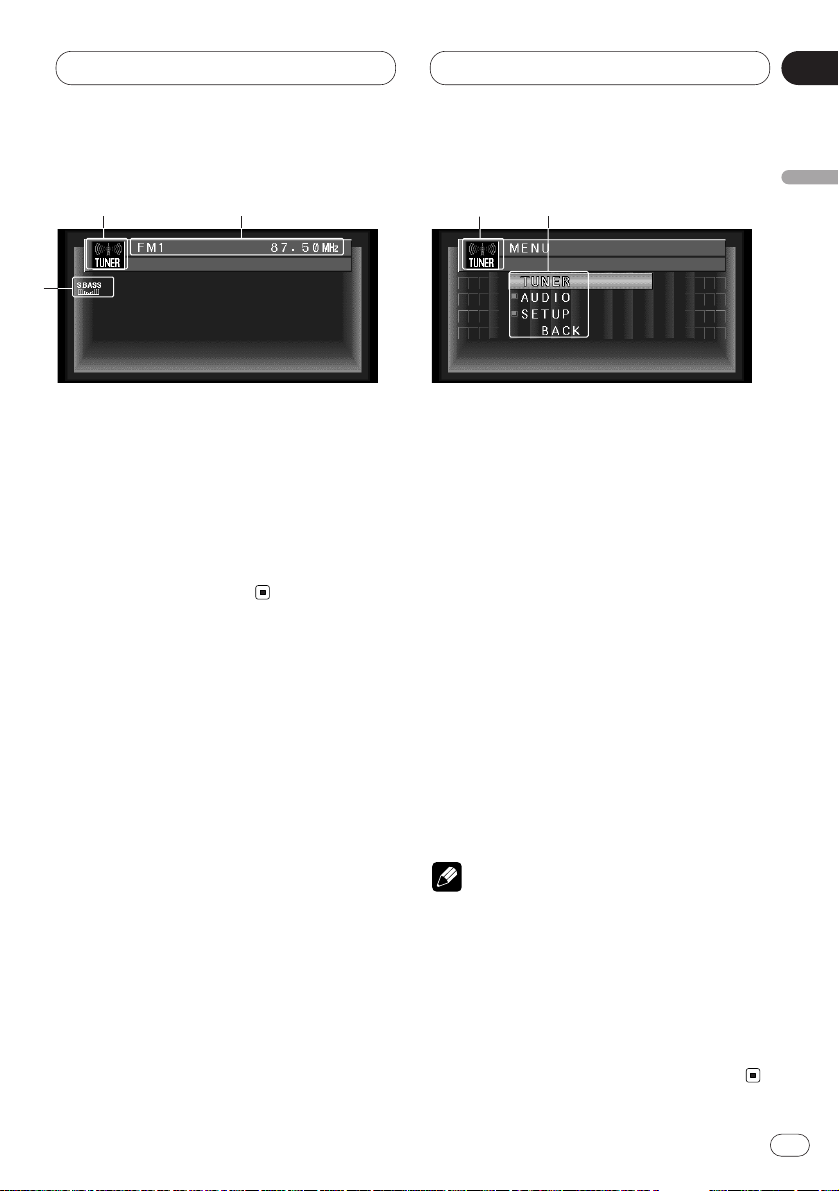
Displays menus (e.g., Tuner)
Displays menus of each source, and enables
adjustments.
1 SOURCE menu
You can access MENUS to make various
adjustments for each source. AUDIO and
SET UP settings are the same for each
source.
2 Indicates there is more for this item.
Press ∞ and the continuation of the item is
displayed. Pressing 5 takes you to the previous item.
1 Press A.MENU in each source display.
The menu for the displayed source is displayed.
e.g., TUNER MENU
2 Press 5 or ∞ to select a menu item, and
press A.MENU.
Executes the selected item.
Notes
• Select BACK in the MENU display or press
BACK to return to the previous display.
Pressing WIDE on the head unit returns you to
the previous display.
• If you do not operate the audio function within
about 30 seconds, the display is automatically
returned to the source display. The MENU
display is automatically canceled if no operations are performed for about 30 seconds.
3
1 2
1
2
Page 16
Display
En
16
04
Section
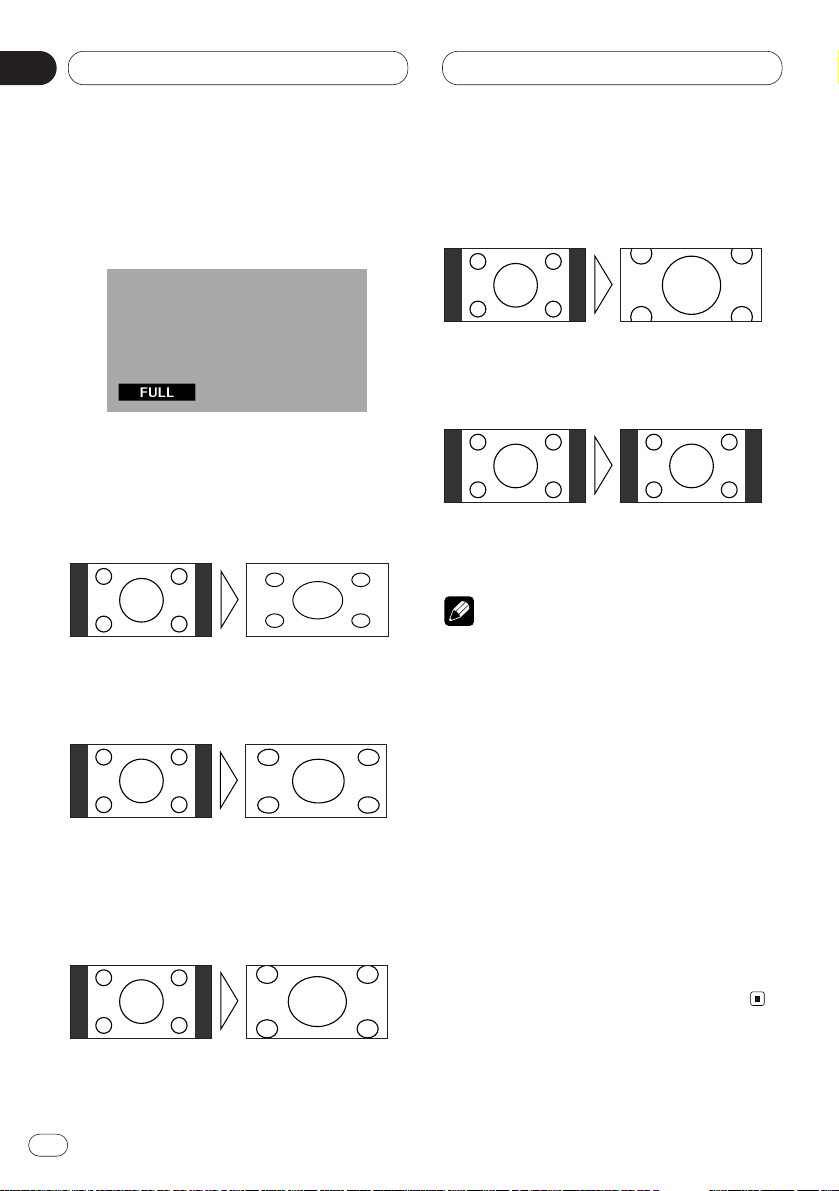
Changing the wide mode
You can select a desired mode for enlarging a
4:3 picture to a 16:9 one.
1 When viewing an image, press WIDE.
Wide mode in the following order:
Full (FULL) — Just (JUST) — Cinema (CINEMA)
— Zoom (ZOOM) — Normal (NORMAL)
Full (FULL)
A 4:3 picture is enlarged in the horizontal direction
only, enabling you to enjoy a 4:3 TV picture (normal
picture) without any omissions.
Just (JUST)
The picture is enlarged slightly at the center and
the amount of enlargement increases horizontally
to the ends, enabling you to enjoy a 4:3 picture
without sensing any disparity even on a wide
screen.
Cinema (CINEMA)
A picture is enlarged by the same proportion as
FULL or ZOOM in the horizontal direction and by
an intermediate proportion between FULL and
ZOOM in the vertical direction; ideal for a cinema-
sized picture (wide-screen picture) where captions
lie outside.
Zoom (ZOOM)
A 4:3 picture is enlarged in the same proportion
both vertically and horizontally; ideal for a cinemasized picture (wide-screen picture).
Normal (NORMAL)
A 4:3 picture is displayed as it is, giving you no
sense of disparity since its proportions are the
same as that of the normal picture.
Notes
• Different settings can be memorized for the
AV and VIDEO. In addition, different settings
can also be memorized for a component (AV)
connected to the AV-BUS input.
• The Wide Mode used for menu setting is
switched to Full (FULL). The Wide Mode will
return when the menu setting is deleted.
• When video is viewed in a wide mode that
dose not match its original aspect ratio, it may
appear differently.
• Remember that using the wide mode feature
of this system for commercial or public viewing purpose may constitute an infringement
on the author’s rights protected by the
Copyright Law.
• Video will appear roughened when viewed in
CINEMA or ZOOM mode.
• The source without video is always FULL.
Page 17
En
17
English
Español
Deutsch
Français
Italiano
Nederlands
04
Section
Display
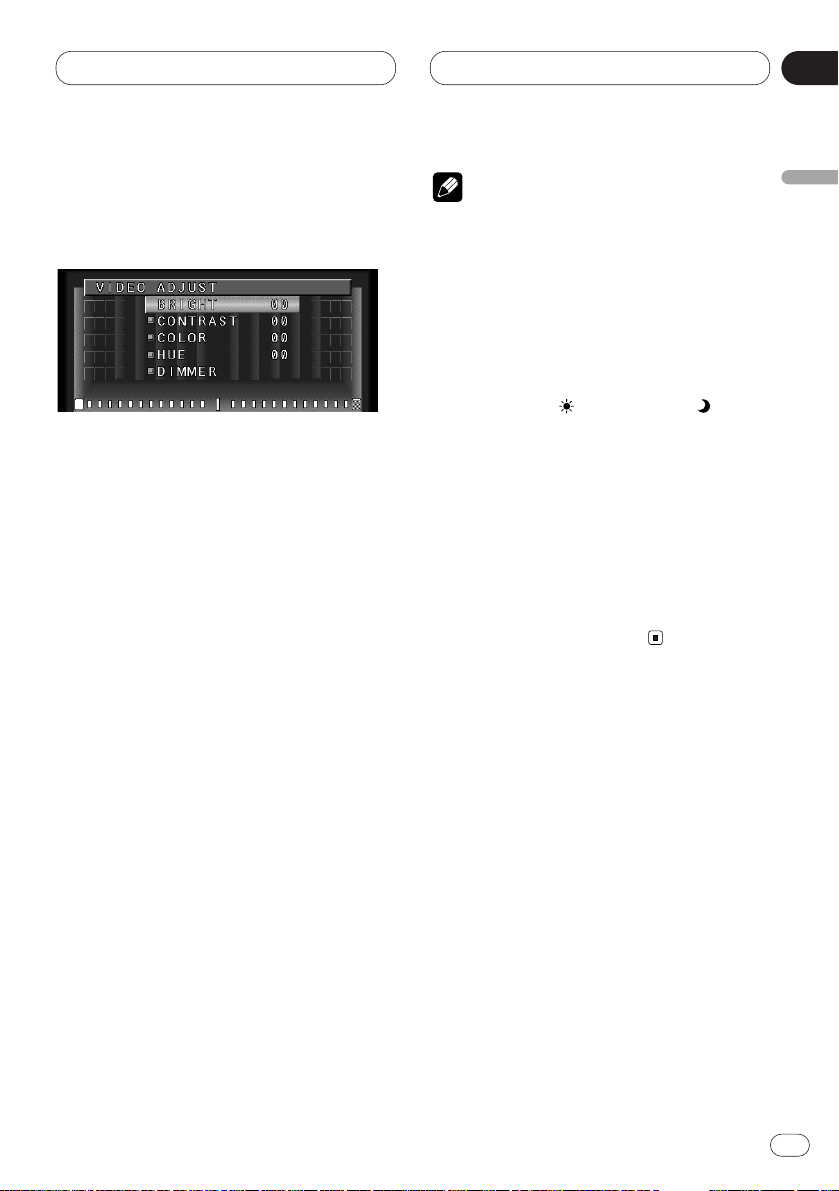
Video Adjust
BRIGHT, CONTRAST, COLOR, and HUE set-
tings are stored for each source .
1 Press WIDE on the head unit for 2 seconds
or more, in the display of the source you want
to adjust.
VIDEO ADJUST is displayed.
2 Press 5 or ∞ and select an item:
Adjustable parameters:
• BRIGHT (black intensity)
• CONTRAST (contrast)
• COLOR (color intensity)
• HUE (hue)
• DIMMER (brightness)
3 Adjust parameter settings with 2 or 3.
4 Press BAND/ESC to cancel the VIDEO
ADJUST.
Notes
• Pressing WIDE on the head unit returns you to
the previous display.
• To return to the frequency display, press
BAND/ESC.
• BRIGHT, CONTRAST, COLOR and HUE can
be adjusted within a range of –24 to +24.
• The settings of BRIGHT and CONTRAST are
stored separately for light ambient (daytime)
and dark ambient (nighttime).
• A yellow mark ( ) or blue mark ( ) is
displayed to the right of BRIGHT and
CONTRAST on the screen, respectively, as the
front-panel ambient light sensor determines
brightness or darkness.
• HUE cannot be adjusted for PAL video.
• You cannot adjust picture COLOR and HUE for
the source without video.
• Different settings can be memorized for the
AV and VTR. In addition, different settings can
also be memorized for a component (AV) connected to the AV-BUS input.
Page 18
Display
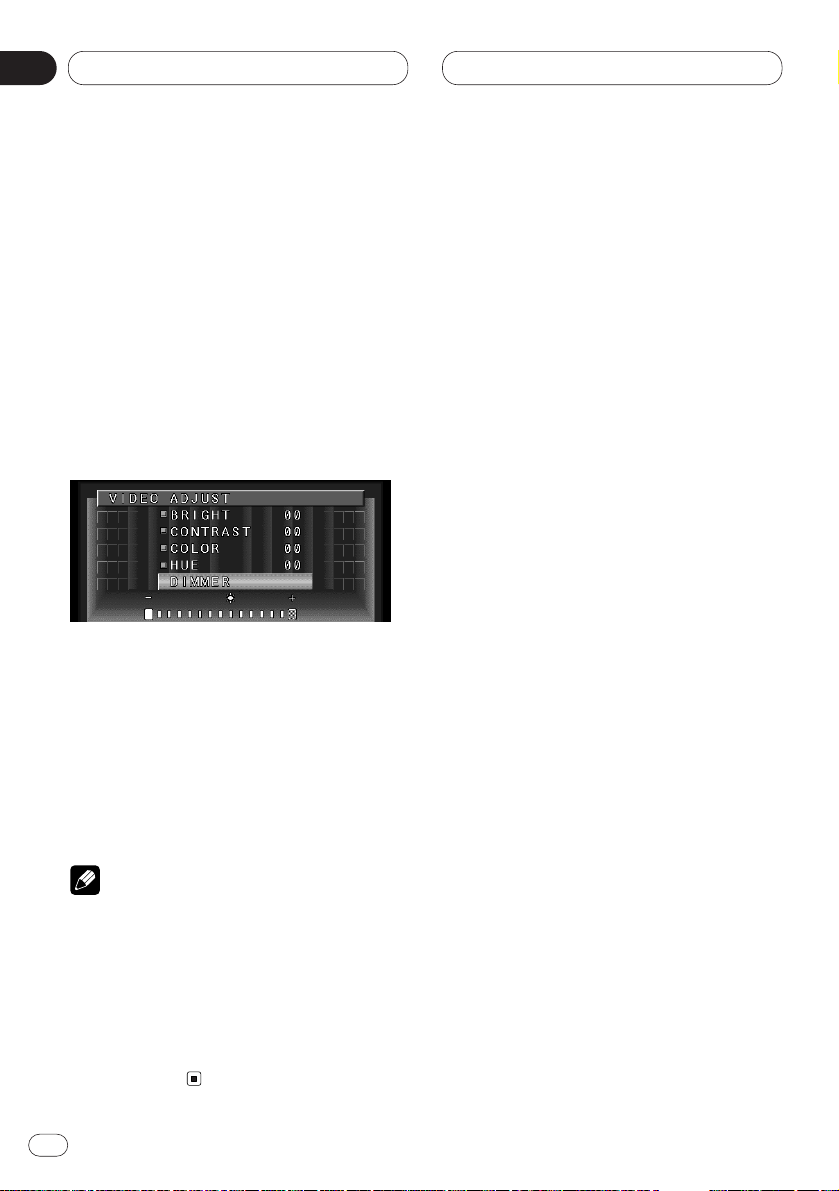
DIMMER settings
Viewing can become difficult after extended
video viewing if the screen is too bright at night
or when ambient light darkens. You can select
the brightness level from three settings; daytime, evening and nighttime viewing, after
which this product will automatically adjusts
the brightness to an optimum level within the
setting range you selected and in relationship
with the ambient light.
1 Select DIMMER from the PICTURE
SELECT MENU. (Refer to Video adjust.)
External light level
Yellow: bright (daytime)
Red: intermediate brightness (evening)
Blue: dark (nighttime)
2 Adjust brightness. Adjust parameter settings with 2 or 3.
Level indicates the brightness of the screen
being adjusted. The farther yellow moves to the
right, the brighter the screen.
Notes
• The optimum light level used as the standard
for adjusting DIMMER is indicated by the
mark shown in step 3 and its position. The
marks indicating the current ambient brightness used for adjusting BRIGHT and
CONTRAST may differ slightly.
• The external light level can be adjusted to
Dark, Intermediate or Bright and the each
setting saved.
En
18
04
Section
Page 19
Tuner
En
19
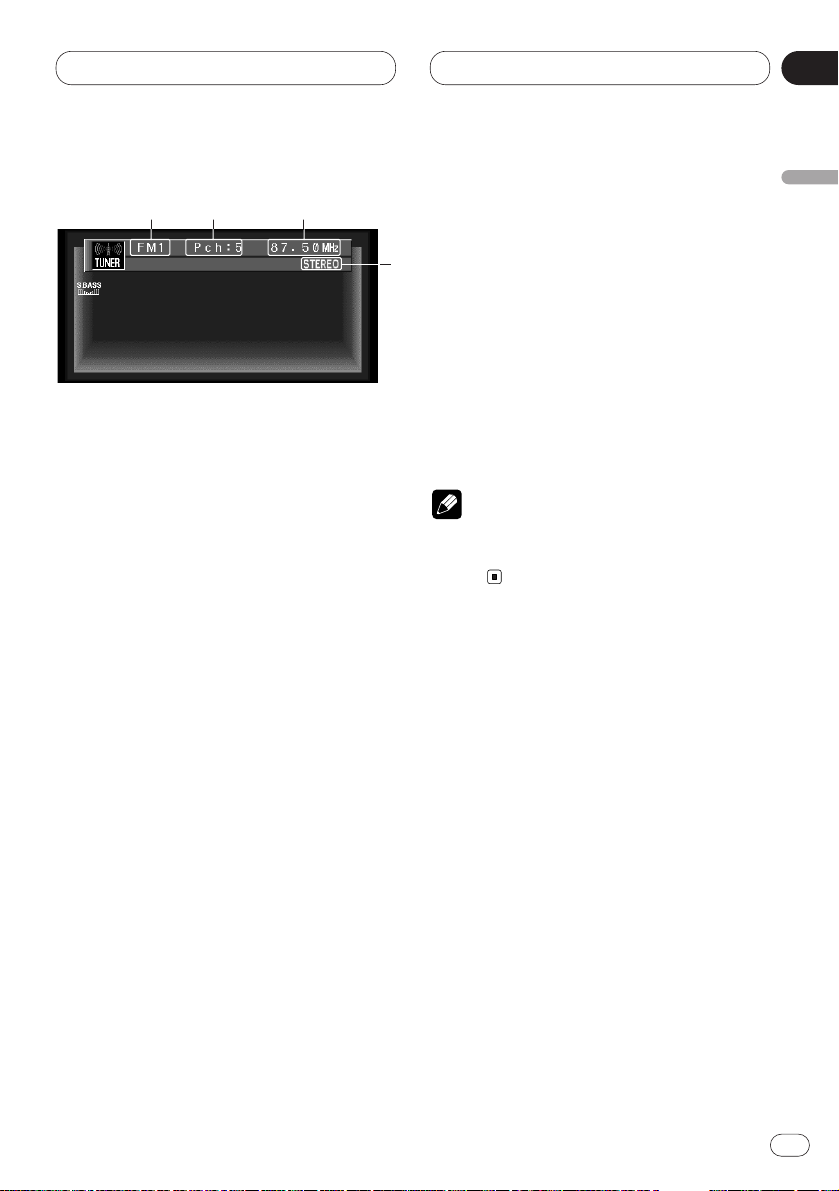
Listening to the radio
These are the basic steps necessary to operate
the radio. More advanced tuner operation is
explained starting on page 20.
1 BAND indicator
Shows which band the radio is tuned to, AM
or FM.
2 FREQUENCY indicator
Shows to which frequency the tuner is
tuned.
3 STEREO (ST) indicator
Shows that the frequency selected is being
broadcast in stereo.
4 PRESET NUMBER indicator
Shows what preset has been selected.
1 Press SOURCE to select the tuner.
Press SOURCE until you see Tuner displayed.
2Use VOLUME to adjust the sound level.
Rotate to increase or decrease the volume.
3 Press BAND/ESC to select a band.
Press BAND/ESC until the desired band is dis-
played, FM1, FM2, FM3 for FM or AM.
4 To perform manual tuning, press 2 or 3
with quick presses.
The frequencies move up or down step by step.
5 To perform seek tuning, press and hold 2
or 3 for about one second and release.
The tuner will scan the frequencies until a
broadcast strong enough for good reception is
found.
• You can cancel seek tuning by pressing either
2 or 3 with a quick press.
• If you press and hold 2 or 3 you can skip
broadcasting stations. Seek tuning starts as
soon as you release the buttons.
Note
• When the frequency selected is being broadcast in stereo the STEREO (ST ) indicator will
light.
English
Español
Deutsch
Français
Italiano
Nederlands
05
Section
1 24
3
Page 20
En
20
05
Section
Tuner
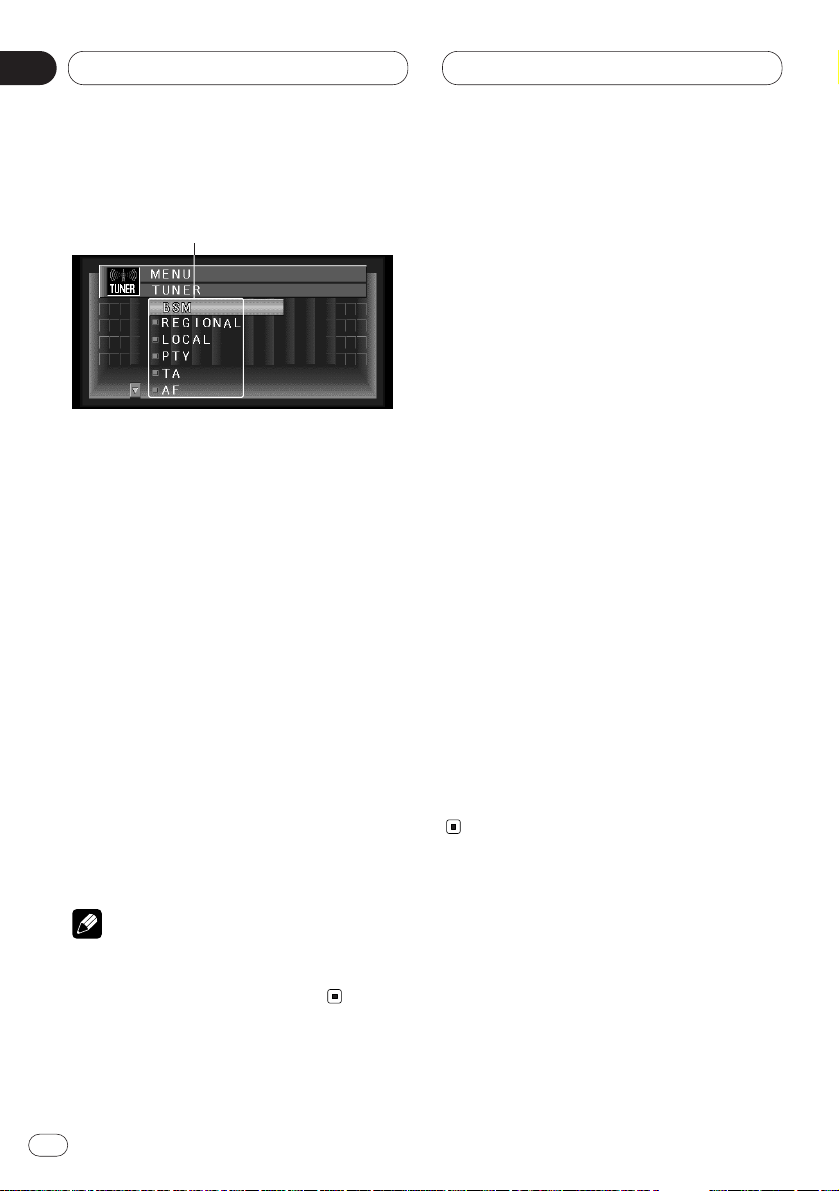
Introduction of advanced tuner
operation
1 FUNCTION display
Shows the function status.
1 Press A.MENU when TUNER source indications are displayed.
MENU is displayed.
2 Select TUNER and press A.MENU.
TUNER MENU indications are displayed as
follows:
BSM (best stations memory)
LOCAL (local seek tuning)
P.CH MEMORY (preset channel memory)
• Select BACK in the MENU display or press
BACK to return to the previous display.
Pressing WIDE on the head unit returns you to
the previous display.
• To return to the frequency display, press both
BAND/ESC and DISP.
• If AM band is selected, you can only select
BSM, LOCAL and P. CH MEMORY.
Note
• If you do not operate the function within about
30 seconds, the display is automatically
returned to the frequency display.
Storing broadcast frequencies
You can easily store up to six broadcast frequencies for later recall with 5 or ∞.
1 Press 5 or ∞ to select P.CH MEMORY from
the TUNER MENU, and press A.MENU.
P.CH MEMORY adjustment indications are displayed.
2 Adjust frequency with 2 or 3.
If you continue pressing 2 or 3, a strong broadcast frequency is automatically searched for,
and search ends when it is found.
3 Select a preset channel number with 5 or
∞ and press A.MENU to preset that frequency.
4 If you want to preset frequencies one after
another, use 5 or ∞ to move to the next preset
channel you want to use to store a frequency,
and perform the same operation.
When you have finished, press BAND/ESC to
return to the source display.
The number you have pressed will flash in the
PRESET NUMBER indicator and then remain lit.
The selected radio station frequency has been
stored in memory.
You can use 5 and ∞ to recall radio station
frequencies assigned to P1-6 (P.CH MEMORY).
1
Page 21
En
21
English
Español
Deutsch
Français
Italiano
Nederlands
05
Section
Tuner
Tuning in strong signals
Local seek tuning lets you tune in only those
radio stations with sufficiently strong signals for
good reception.
1 Press 5 or ∞ in the TUNER MENU to
select LOCAL, and press A.MENU.
LOCAL adjustment indications are displayed.
2 Press 2 or 3 to set the sensitivity.
There are four levels of sensitivity for FM and
two levels for AM:
FM:OFF—1—2—3—4
AM:OFF—1—2
The 4 setting allows reception of only the
strongest stations, while lower settings let you
receive progressively weaker stations.
Storing the strongest broadcast
frequencies
BSM (Best Station Memory) lets you automatically store the six strongest broadcast frequencies. The stored frequencies are displayed.
1 Select BSM from the TUNER MENU, and
press A.MENU.
BSM adjustment indications are displayed.
2 Press 5 to turn BSM on.
BSM begins to flash. While BSM is flashing the
six strongest broadcast frequencies will be
stored in order of their signal strength. When
finished, BSM stops flashing.
• To cancel the storage process, press ∞.
Notes
• Up to 18 FM stations, 6 for each of the three
FM bands, and 6 AM stations can be stored in
memory.
• You can also use 5 and ∞ to recall radio sta-
tion frequencies assigned to PRESET TUNING
buttons.
• If there are fewer than six strong broadcast
frequencies, previously stored frequencies
may remain in memory.
Page 22
En
22
06
Section
Built-in CD Player
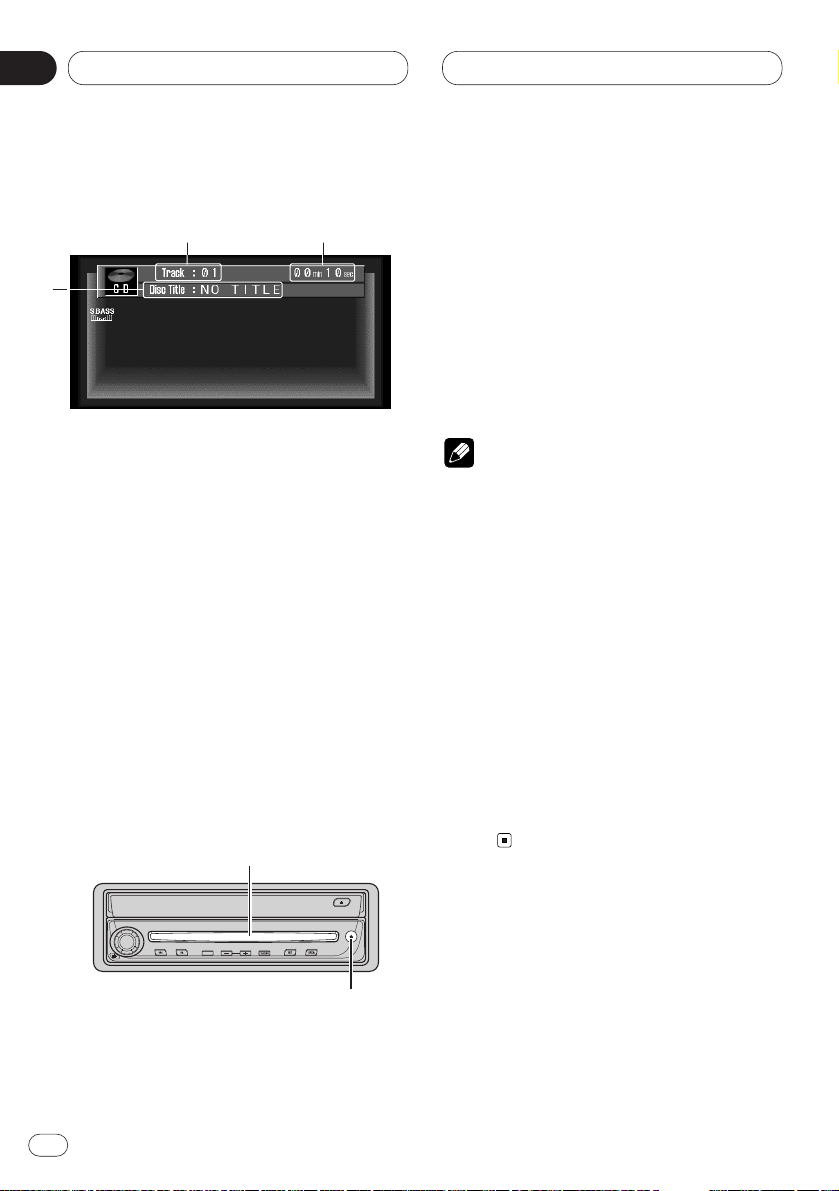
Playing a CD
(Only AVH-P6450CD)
These are the basic steps necessary to play a
CD with your built-in CD player. More advanced
CD operation is explained starting on page 23.
1 TRACK NUMBER indicator
Shows the track currently playing.
2
PLAY TIME indicator
Shows the elapsed playing time of the current track.
3 DISC TITLE
When playing a CD TEXT disc, the DISC
TITLE is displayed. With regular CDs that do
not usually have the titles recorded on them,
NO TITLE is displayed (refer to page 25).
1 Insert a CD into the CD loading slot.
Playback will automatically start.
• After inserting a CD, press SOURCE to select
the built-in CD player.
CD loading slot
EJECT button
• You can eject a CD by pressing EJECT on the
head unit.
• To avoid a malfunction, make sure that no
metal object comes into contact with the operation panel when it is detached.
2Use VOLUME to adjust the sound level.
Rotate to increase or decrease the volume.
3 To perform fast forward or reverse, press
and hold 2 or 3.
4 To skip back or forward to another track,
press 2 or 3.
Pressing 3 skips to the start of the next track.
Pressing 2 once skips to the start of the current
track. Pressing again will skip to the previous
track.
Notes
• The built-in CD player plays one, standard,
12-cm or 8-cm (single) CD at a time. Do not
use an adapter when playing 8-cm CDs.
• Do not insert anything other than a CD into
the CD loading slot.
• If you cannot insert a disc completely or if
after you insert a disc the disc does not play,
check that the label side of the disc is up.
Press EJECT on the head unit to eject the
disc, and check the disc for damage before
inserting the disc again.
• If the built-in CD player does not operate properly, an error message such as ERROR-11 may
be displayed. Refer to Understanding built-in
CD player error messages on page 57.
• Do not detach with a CD partially inserted in
the CD slot as it may scratch or damage the
disc.
TEXT
3
1 2
Page 23
En
23
English
Español
Deutsch
Français
Italiano
Nederlands
06
Section
Built-in CD Player
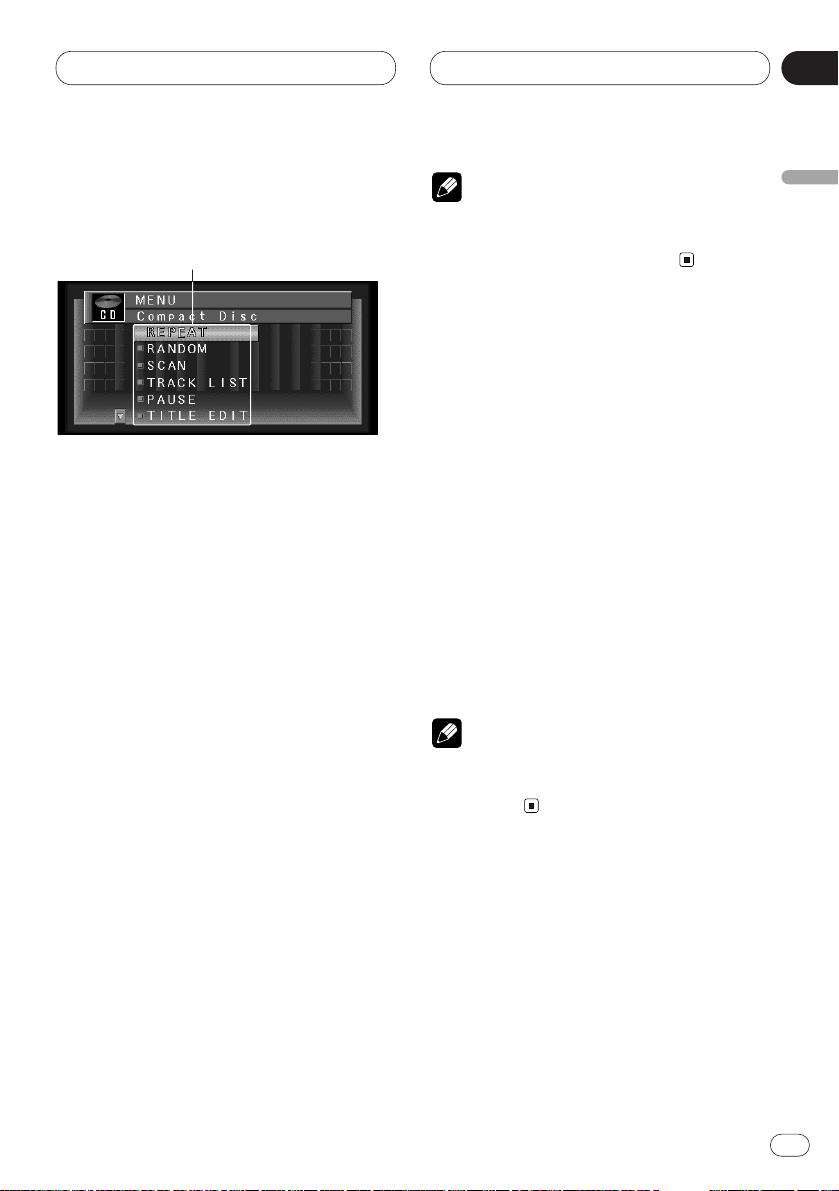
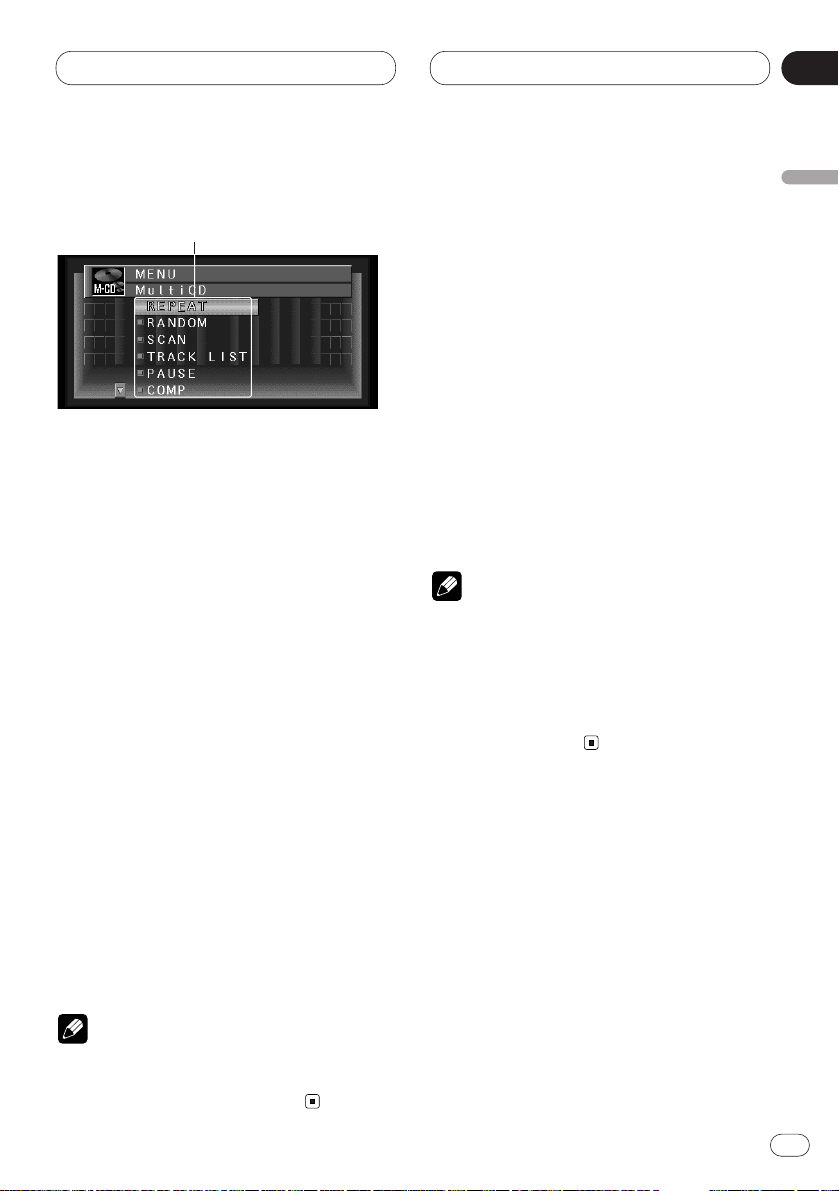
Introduction of advanced built-in
CD player operation (Only AVHP6450CD)
1 FUNCTION display
Shows the function status.
1 Press A.MENU when CD source indications
are displayed.
MENU is displayed.
2 Select Compact Disc and press A.MENU.
The CD MENU is displayed as follows:
REPEAT (repeat play)
RANDOM (random play)
SCAN (scan play)
TRACK LIST (track list)
PAUSE (pause)
TITLE EDIT (title edit)
You can operate a desired function. For details,
refer to the pages for each of the functions.
• When playing regular CDs that are not CD
TEXT discs, you cannot select TRACK LIST.
• During playback of a CD Text disc, you cannot
select TITLE EDIT.
• Select BACK in the MENU display or press
BACK to return to the previous display.
Pressing WIDE on the head unit returns you to
the previous display.
• To return to the playback display, press
BAND/ESC.
Note
• If you do not operate the function within about
30 seconds, the display is automatically
returned to the playback display.
Repeating play
Repeat play lets you hear the same track over
again.
1 Press 5 or ∞ to select REPEAT from the CD
MENU, and press A.MENU.
REPEAT ON/OFF indications are displayed.
2 Press 5 to turn repeat play on.
REPEAT :ON appears in the display. The track
presently playing will play and then repeat.
3 Press ∞ to turn repeat play off.
REPEAT :OFF appears in the display. The track
presently playing will continue to play and then
play the next track.
Note
• If you perform track search or fast
forward/reverse, repeat play is automatically
cancelled.
Playing tracks in a random order
Random play lets you play back tracks on the
CD in a random order.
1 Press 5 or ∞ to select RANDOM from the
CD MENU, and press A.MENU.
RANDOM ON/OFF indications are displayed.
2 Press 5 to turn random play on.
RANDOM :ON appears in the display. Tracks will
play in a random order.
1
Page 24
En
24
06
Section
Built-in CD Player
3 Press ∞ to turn random play off.
RANDOM :OFF appears in the display. Tracks
will continue to play in order.
Scanning tracks of a CD
Scan play lets you hear the first 10 seconds of
each track on the CD.
1 Press 5 or ∞ to select SCAN from the CD
MENU, and press A.MENU.
SCAN ON/OFF indications are displayed.
2 Press 5 to turn scan play on.
SCAN:ON appears in the display. The first 10
seconds of each track is played.
3 When you find the desired track press ∞ to
turn scan play off.
SCAN:OFF appears in the display. The track will
continue to play.
• If the display has automatically returned to
the playback display, select SCAN again by
pressing A.MENU.
Note
• After scanning of a CD is finished, normal
playback of the tracks will begin again.
Playing back from the track list
When playing CD TEXT discs, you can select
and playback tracks from the title’s displayed
track list.
1 Press 5 or ∞ to select TRACK LIST from the
CD MENU, and press A.MENU.
The TRACK LIST is displayed.
2 Press 5 or ∞ to select the track you want
to play in the LIST, and press A.MENU.
Playback of the selected track begins. After
that, tracks play in order.
Notes
• During playback of the track, list indications
turn green.
• Up to six tracks in the list can be displayed at
once. Press 2 or 3 to display previous or next
list. When the first or sixth track is indicated
in the displayed list, pressing 5 or ∞ takes
you to the previous or next page.
• Titles of up to 10 characters can be displayed.
• Display of some characters may not be possi-
ble.
Pausing CD playback
Pause lets you temporarily stop playback of the
CD.
1 Press 5 or ∞ to select PAUSE from the CD
MENU, and press A.MENU.
PAUSE ON/OFF indications are displayed.
2 Press 5 to turn pause on.
PAUSE :ON appears in the display. Play of the
current track pauses.
3 Press ∞ to turn pause off.
PAUSE :OFF appears in the display. Play will
resume at the same point that you turned pause
on.
Using disc title functions
You can input CD titles and display the title. The
next time you insert a CD for which you have
entered a title, the title of that CD will be displayed.
Page 25
En
25
English
Español
Deutsch
Français
Italiano
Nederlands
06
Section
Built-in CD Player
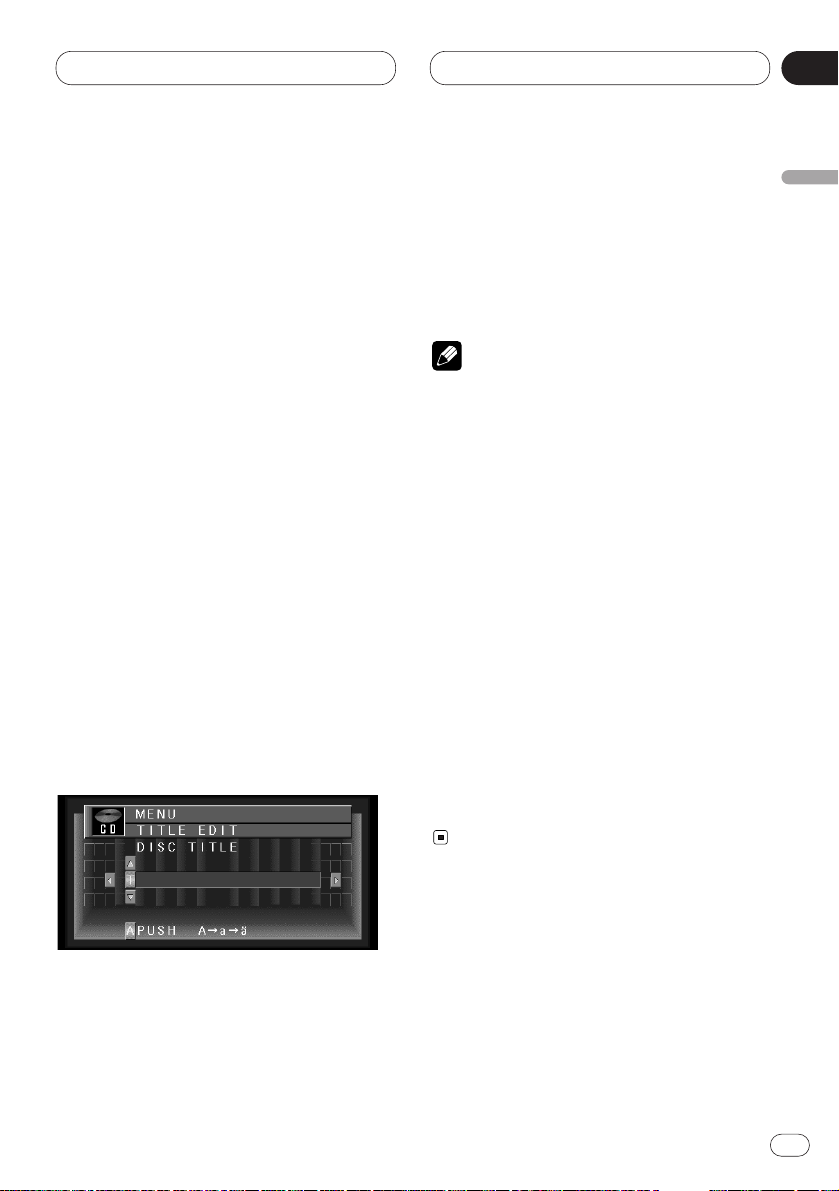
Entering disc titles
Disc title input lets you input CD titles up to 10
letters long and up to 48 disc titles into the builtin CD player.
1 Play a CD that you want to enter the title.
2 Press 5 or ∞ to select TITLE EDIT from the
CD MENU, and press A.MENU.
TITLE EDIT adjustment indications are
displayed.
• When playing a CD TEXT disc, you cannot
select to TITLE EDIT. The disc title will have
already been recorded on a CD TEXT disc.
3 Press A.MENU to select the desired character type.
Press A.MENU repeatedly to switch between the
following character type:
Alphabet (upper case), Numbers and Symbols—
Alphabet (lower case)
4 Press 5 or ∞ to select a letter of the alpha-
bet.
Each press of 5 will display a letter of the alphabet in A B C ... X Y Z, numbers and symbols in 1 2
3 ... @ # < order. Each press of ∞ will display a
letter in the reverse order, such as Z Y X ... C B A
order.
5 Press 3 to move the cursor to the next
character position.
When the letter you want is displayed, press 3
to move the cursor to the next position and then
select the next letter. Press 2 to move backwards in the display.
6 Move the cursor to the last position by
pressing 3 after entering the title.
When you press 3 one more time, the entered
title is stored in memory.
7 Press BAND/ESC to return to the playback
display.
Notes
• Titles remain in memory, even after the disc
has been removed from built-in CD player, and
are recalled when the disc is reinserted.
• After data for 48 discs has been stored in
memory, data for a new disc will overwrite the
oldest one.
• If you connect a multi-CD player, you can
input disc titles for up to 100 discs.
Displaying titles on CD TEXT discs
Press DISP when playing a CD TEXT disc.
Press DISP repeatedly to switch between the
following settings:
Track Title (track title)—Disc-Artist Name (disc
artist name)—Track Artist Name (track artist
name)
The lowest part of the source status display
changes as above.
• If specific information has not been recorded
on a CD TEXT disc, NO TITLE will be displayed.
Page 26
En
26
07
Section
Multi-CD Player
Playing a CD
You can use this unit to control a multi-CD player,
which is sold separately.
These are the basic steps necessary to play a
CD with your multi-CD player. More advanced
CD operation is explained starting on page 27.
1 DISC NUMBER indicator
Shows the disc currently playing.
2 TRACK NUMBER indicator
Shows the track currently playing.
3 PLAY TIME indicator
Shows the elapsed playing time of the current track.
4 DISC TITLE
When playing a CD TEXT disc, the DISC
TITLE is displayed. With regular CDs that do
not usually have the titles recorded on them,
NO TITLE is displayed (refer to page 32).
1 Press SOURCE to select the multi-CD
player.
Press SOURCE until you see Multi-CD displayed.
2Use VOLUME to adjust the sound level.
Rotate to increase or decrease the volume.
3 Select a disc you want to listen to with the
5 or ∞.
• Press 5 to select 1, 2, 3..., press ∞ to select 1,
6, 5...
4 To perform fast forward or reverse, press
and hold 2 or 3.
5 To skip back or forward to another track,
press 2 or 3.
Pressing 3 skips to the start of the next track.
Pressing 2 once skips to the start of the current
track. Pressing again will skip to the previous
track.
Notes
• When the multi-CD player performs the
preparatory operations, Ready is displayed.
• If the multi-CD player does not operate properly, an error message such as ERROR-11 may
be displayed. Refer to the multi-CD player
owner’s manual.
• If there are no discs in the multi-CD player
magazine, NO DISC is displayed. Depending
on the multi-CD player you use with this product, the display may be blank.
50-disc multi-CD player
Only those functions described in this manual
are supported for 50-disc multi-CD players.
1
2
3
4
Page 27
En
27
English
Español
Deutsch
Français
Italiano
Nederlands
07
Section
Multi-CD Player
Introduction of advanced multiCD player operation
1 FUNCTION display
Shows the function status.
1 When M-CD indications are displayed,
press A.MENU.
MENU is displayed.
2 Select Multi CD, and press A.MENU.
The M-CD MENU is displayed as follows:
REPEAT (repeat play)
RANDOM (random play)
SCAN (scan play)
TRACK.LIST (track title list)
PAUSE (pause)
COMP (compression and DBE)
ITS-PLAY (ITS play)
ITS-MEMORY (ITS memory)
TITLE EDIT (title edit)
You can operate a desired function. For details,
refer to the pages for each of the functions.
• Select BACK in the MENU display or press
BACK to return to the previous display.
Pressing WIDE on the head unit returns you to
the previous display.
• To return to the playback display, press
BAND/ESC.
Note
• If you do not operate the function within about
30 seconds, the display is automatically
returned to the playback display.
Repeating play
There are three repeat play ranges for the multiCD player: M-CD (multi-CD player repeat),
TRACK (one-track repeat), and DISC (disc
repeat).
1 Press 5 or ∞ to select REPEAT from the M-
CD MENU, and press A.MENU.
REPEAT ON/OFF indications are displayed.
2 Press 2 or 3 to select the repeat range.
Press 2 or 3 until the desired repeat range
appears in the display.
• M-CD — Repeat all discs in the multi-CD
player
• TRACK — Repeat just the current track
• DISC — Repeat the current disc
Notes
• If you select other discs during repeat play,
the repeat play range changes to M-CD (multiCD player repeat).
• If you perform track search or fast
forward/reverse during TRACK (one-track
repeat), the repeat play range changes to
DISC (disc repeat).
1
Page 28
En
28
07
Section
Multi-CD Player
Playing tracks in a random order
Random play lets you play back tracks in a random order within the repeat range, M-CD (multiCD player repeat) and DISC (disc repeat).
1 Select the repeat range.
Refer to Repeating play on page 27.
2 Press 5 or ∞ to select RANDOM from the
M-CD MENU, and press A.MENU.
RANDOM ON/OFF indications are displayed.
3 Press 5 to turn random play on.
Random :ON appears in the display. Tracks will
play in a random order within the previously
selected M-CD (multi-CD player repeat) or DISC
(disc repeat) ranges.
4 Press ∞ to turn random play off.
Random :OFF appears in the display. Tracks will
continue to play in order.
Scanning CDs and tracks
While you are using DISC (disc repeat), the
beginning of each track on the selected disc
plays for about 10 seconds. When you are using
M-CD (multi-CD player repeat), the beginning of
the first track of each disc is played for about 10
seconds.
1 Select the repeat range.
Refer to Repeating play on page 27.
2 Press 5 or ∞ to select SCAN from the M-
CD MENU, and press A.MENU.
SCAN ON/OFF indications are displayed.
3 Press 5 to turn scan play on.
Scan :ON appears in the display. The first 10
seconds of each track of the present disc (or the
first track of each disc) is played.
4 When you find the desired track (or disc)
press ∞ to turn scan play off.
Scan :OFF appears in the display. The track (or
disc) will continue to play.
• If the display has automatically returned to
the playback display, select SCAN again by
pressing A.MENU.
Note
• After track or disc scanning is finished, normal playback of the tracks will begin again.
Playing back from the track list
When playing CD TEXT discs, you can select
and playback tracks from the title’s displayed
track list.
1 Press 5 or ∞ to select TRACK LIST from the
M-CD MENU, and press A.MENU.
The TRACK LIST is displayed.
2 Press 5 or ∞ to select the track you want
to play in the LIST, and press A.MENU.
Playback of the selected track begins. After
that, tracks play in order.
Notes
• During playback of the track, list indications
turn green.
• Up to six tracks in the list can be displayed at
once. Press 2 or 3 to display previous or next
list. When the first or sixth track is indicated
in the displayed list, pressing 5 or ∞ takes
you to the previous or next page.
• Titles of up to 10 characters can be displayed.
• Display of some characters may not be possi-
ble.
Page 29

En
29
English
Español
Deutsch
Français
Italiano
Nederlands
07
Section
Multi-CD Player
Pausing CD playback
Pause lets you temporarily stop playback of the
CD.
1 Press 5 or ∞ to select PAUSE from the M-
CD MENU, and press A.MENU.
PAUSE ON/OFF indications are displayed.
2 Press 5 to turn pause on.
Pause :ON appears in the display. Play of the
current track pauses.
3 Press ∞ to turn pause off.
Pause :OFF appears in the display. Play will
resume at the same point that you turned pause
on.
Using compression and bass
emphasis
You can use these functions only with a multi-CD
player that supports them.
Using COMP (compression) and DBE (dynamic
bass emphasis) functions let you adjust the
sound playback quality of the multi-CD player.
Each of the functions have a two-step adjustment. The COMP function balances the output
of louder and softer sounds at higher volumes.
DBE boosts bass levels to give playback a fuller
sound. Listen to each of the effects as you select
through them and use the one that best
enhances the playback of the track or CD that
you are listening to.
1 Press 5 or ∞ to select COMP from the M-
CD MENU, and press
A.MENU.
COMP adjustment indications are displayed.
• If the multi-CD player does not support
COMP/DBE,
NO COMP is displayed when you
attempt to select it.
2 Press 5 or ∞ to select your favorite setting.
Press 5 or ∞ repeatedly to switch between the
following settings:
COMP OFF—COMP 1—COMP 2—COMP OFF—
DBE 1—DBE 2
Using ITS playlists
ITS (instant track selection) lets you make a
playlist of favorite tracks from those in the multiCD player magazine. After you have added your
favorite tracks to the playlist you can turn on ITS
play and play just those selections.
Creating a playlist with ITS programming
You can use ITS to enter and playback up to 99
tracks per disc, up to 100 discs (with the disc
title). (With multi-CD players sold before the
CDX-P1250 and CDX-P650, up to 24 tracks can
be stored in the playlist.)
When using a multi-CD player that does not
feature an ITS function, you cannot select ITS
PLAY.
1 Play a CD that you want to program.
Press 5 or ∞ to select a CD.
2 Press 5 or ∞ to select ITS MEMORY from
the M-CD MENU, and press A.MENU.
ITS MEMORY adjustment indications are displayed.
3 Select a desired track by pressing 2 or 3.
4 Press 5 to store the currently playing track
in the ITS MEMORY.
MEMORY is displayed briefly and the currently
playing selection is added to your playlist. The
display then shows ITS again.
Page 30
En
30
07
Section
Multi-CD Player
Notes
• After data for 100 discs has been stored in
memory, data for a new disc will overwrite the
oldest one.
• If you do not operate the function within about
30 seconds, the display is automatically
returned to the playback display.
Erasing a track from your ITS playlist
When you want to delete a track from your ITS
playlist, you can if ITS play is on.
If ITS play is already on, skip to step 2. If ITS play
is not already on, press A.MENU.
1 Play a CD you want to delete a track from
your ITS playlist, and turn ITS play on.
Refer to Playback from your ITS playlist on this
page.
2 Press 5 or ∞ to select ITS MEMORY from
the M-CD MENU, and press A.MENU.
ITS MEMORY adjustment indications are displayed.
3 Select a desired track by pressing 2 or 3.
4 Press ∞ to erase a track from your ITS
playlist.
The currently playing selection is erased from
your ITS playlist and playback of the next track
from your ITS playlist begins.
• If there are no tracks from your playlist in the
current range, EMPTY is displayed and normal
play resumes.
5 Press BAND/ESC to return to the playback
display.
Note
• If you do not operate the function within about
30 seconds, the display is automatically
returned to the playback display.
Playback from your ITS playlist
ITS play lets you listen to the tracks that you
have entered into your ITS playlist. When you
turn on ITS play, tracks from your ITS playlist in
the multi-CD player will begin to play.
1 Select the repeat range.
Refer to Repeating play on page 27.
2 Press 5 or ∞ to select ITS PLAY from the
M-CD MENU, and press A.MENU.
ITS PLAY ON/OFF indications are displayed.
3 Press 5 to turn ITS play on.
ITS PLAY :ON appears in the display. Playback
begins of those tracks from your playlist within
the previously selected M-CD (multi-CD player
repeat) or DISC (disc repeat) ranges.
• If no tracks in the current range are
programmed for ITS play then EMPTY is displayed.
4 Press ∞ to turn ITS play off.
ITS PLAY :OFF appears in the display. Playback
will continue in normal order from the currently
playing track and CD.
Note
• If you do not operate the function within about
30 seconds, the display is automatically
returned to the playback display.
Page 31

En
31
English
Español
Deutsch
Français
Italiano
Nederlands
07
Section
Multi-CD Player
Erasing a CD from your ITS playlist
When you want to delete all tracks of a CD from
your ITS playlist, you can if ITS play is off.
1 Play a CD that you want to delete.
Press 5 or ∞ to select a CD.
2 Press 5 or ∞ to select ITS MEMORY from
the M-CD MENU, and press A.MENU.
3 Press ∞ to erase all tracks on the currently
playing CD from your ITS playlist.
All tracks on the currently playing CD are erased
from your playlist and CLEAR is displayed.
4 Press BAND/ESC to return to the playback
display.
Using disc title functions
You can input CD titles and display the title.
Then you can easily search for and select a
desired disc for play.
Entering disc titles
Disc title input lets you input CD titles up to 10
letters long and up to 48 disc titles into the
multi-CD player.
1 Play a CD that you want to enter the title.
Press 5 or ∞ to select a CD.
2 Press 5 or ∞ to select TITLE EDIT from the
M-CD MENU, and press A.MENU.
TITLE EDIT adjustment indications are
displayed.
• When playing a CD TEXT disc, you cannot
select to TITLE EDIT. The disc title will have
already been recorded on a CD TEXT disc.
3 Press A.MENU to select the desired character type.
Press A.MENU repeatedly to switch between the
following character type:
Alphabet (Upper case), Numbers and Symbols—
Alphabet (Lower case)
4 Press 5 or ∞ to select a letter of the alphabet.
Each press of 5 will display a letter of the alphabet in A B C ... X Y Z, numbers and symbols in 1 2
3 ... @ # < order. Each press of ∞ will display a
letter in the reverse order, such as Z Y X ... C B A
order.
5 Press 3 to move the cursor to the next
character position.
When the letter you want is displayed, press 3
to move the cursor to the next position and then
select the next letter. Press 2 to move backwards in the display.
6 Move the cursor to the last position by
pressing 3 after entering the title.
When you press 3 one more time, the entered
title is stored in memory.
7 Press BAND/ESC to return to the playback
display.
Notes
• Titles remain in memory, even after the disc
has been removed from the magazine, and
are recalled when the disc is reinserted.
• After data for 100 discs has been stored in
memory, data for a new disc will overwrite the
oldest one.
Page 32

En
32
07
Section
Multi-CD Player
Displaying disc titles
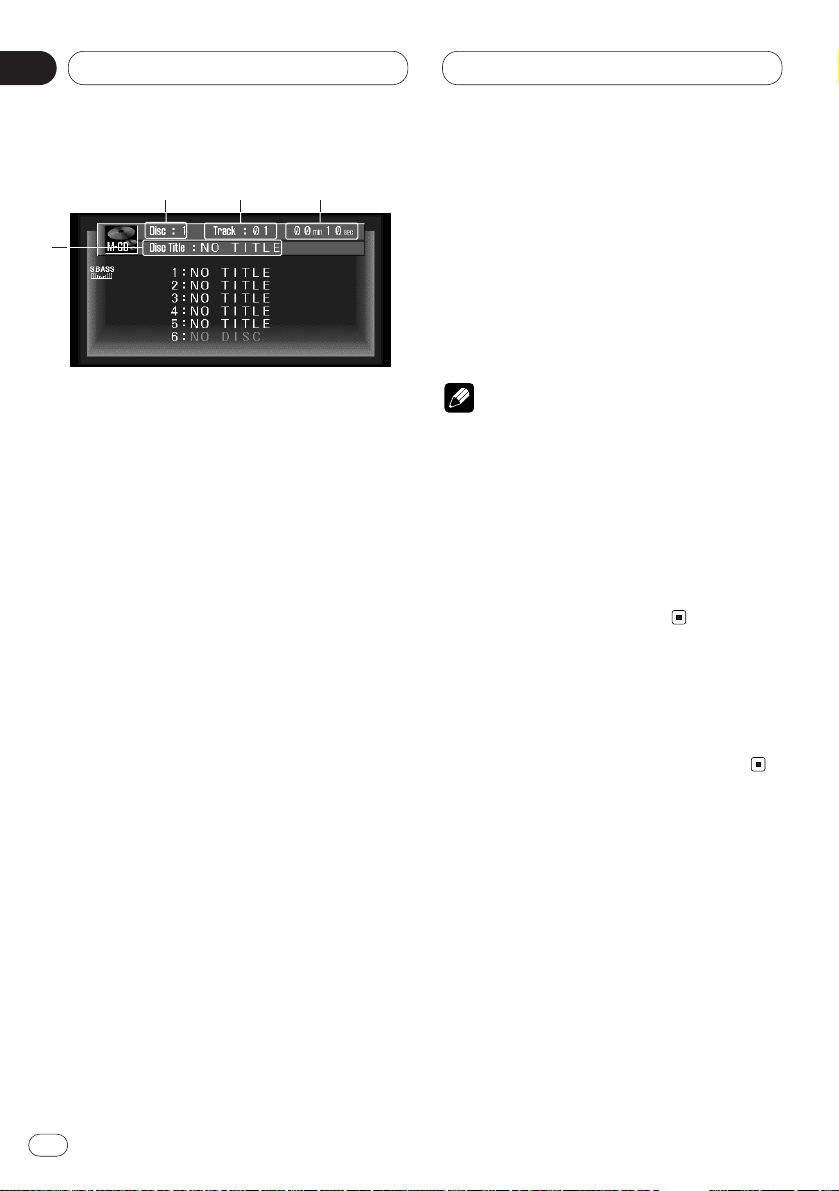
You can display the title of any disc that has had
a disc title entered.
Press DISP.
Press DISP repeatedly to switch between the
following settings:
PLAYBACK MODE (play time)—Disc List
The lowest part of the display changes as above.
When you select Disc List, the title of the discs
set in multi-CD player is shown in the display.
• If no title has been entered for the currently
playing disc, NO TITLE is displayed.
Using CD TEXT functions
You can use these functions only with a CD TEXT
compatible multi-CD player.
Some discs have certain information encoded
on the disc during manufacture. These discs
may contain such information as the CD title,
track title, artist’s name and playback time and
are called CD TEXT discs. Only these specially
encoded CD TEXT discs support the functions
listed below.
Displaying titles on CD TEXT discs
Press DISP when playing a CD TEXT disc
from the multi-CD player.
Press DISP repeatedly to switch between the
following settings:
Track Title (track title)—Disc Artist Name (disc
artist name)—T-Artist Name (track artist name)
• If specific information has not been recorded
on a CD TEXT disc, NO TITLE will be displayed.
Page 33

En
33
English
Español
Deutsch
Français
Italiano
Nederlands
08
Section
TV Tuner
Display and indicators
The following explains how to use this product
to control a TV tuner, which is sold separately.
• With this product, you can operate preset
channel list as one additional function.
• Press DISP to switch between TV and P.CH list
displays.
1 BAND indicator
Shows which band the TV is tuned to, TV1,
TV2.
2 PRESET NUMBER indicator
Shows what preset has been selected.
3 CHANNEL indicator
Shows what channel has been selected.
Basic operation
1 Press SOURCE to select the TV tuner.
Press SOURCE until TV appears.
2 Use VOLUME to adjust the sound level.
Rotate to increase or decrease the volume.
3 Press 2 or 3 to tune in to a station.
• If you press and hold 2 or 3 for about one
second and then release, you can perform seek
tuning.
Storing broadcast stations
1 Press 5 or ∞ to select P.CH MEMORY from
the TV MENU, and press A.MENU.
P.CH MEMORY indications are displayed.
2 Pressing 2 or 3 for one second enables
fine frequency adjustment.
3 Press 5 or ∞ to select the Preset No. you
want to use to memorize.
Press 2 or 3 for two or more seconds. When
you stop pressing, a strong broadcast is
received.
3: Starts seek from a high frequency.
2: Starts seek from a low frequency.
Press the opposite 2 or 3 to the one you
pressed to start seek to stop it.
4 Press A.MENU and the frequency is memorized.
Note
• Up to 12 stations can be memorized in one
band.
1 32
Page 34

TV Tuner
Recalling broadcast stations
Press 5 or ∞ to select a Preset CH.
Changing a band
Press BAND to select the desired band.
Press BAND repeatedly to switch between the
following bands:
TV 1 = TV 2
TV menu
The TV menu has the following functions:
BSSM (best stations sequential memory)
P.CH MEMORY (preset channel memory) (Refer
to page 33.)
COUNTRY (country select)
Press BSSM repeatedly to turn BSSM on or off.
When finished, the display switches to the preset channel list mode.
Note
• If you do not operate the function within about
30 seconds, the display is automatically
returned.
BSSM (Best Station Sequential
Memory)
The BSSM function automatically memorizes
strongly transmitted broadcast stations in order
from the lowest channel up.
1 Press BAND/ESC to display the BAND you
want to use for BSSM.
2 Select BSSM from the TV MENU, and
press A.MENU.
BSSM adjustment indications are displayed.
3 Press 5 to turn BSSM on.
BSSM begins to flash. While BSSM is flashing
the six strongest broadcast frequencies will be
stored in order of their signal strength. When
finished, BSSM stops flashing.
• To cancel the storage process, press ∞.
Notes
• Up to 12 stations can be memorized in 1
Band.
• In regions where reception of no more than 12
station is possible, previously memorized
stations may remain in memory.
En
34
08
Section
Page 35

TV Tuner DVD
En
35
Selecting the country group
In this product, channels are preset for each
country group. Selecting the appropriate country group for your reception area enables reception of multiple channels.
1 Press 5 or ∞ to select COUNTRY CODE
from the TV MENU, and press A.MENU.
COUNTRY CODE indications are displayed.
2 Press 5 or ∞ to select a country code.
For details concerning the country code, refer to
the tuner’s Operation Manual.
Note
• With a tuner that does not enable changing of
the country code, you cannot select a different country code.
Selecting channels from the
preset channel list
The preset channel list lets you see the list of
preset channels and see.
When the source is TV, press the DISP.
Preset CH 1 through 12 are displayed.
Display and indicators
The following explains how to use this product
to control a DVD, which is sold separately. For
details of DVD player or Multi-DVD player operation/features, see your product’s manual.
1 TITLE NUMBER indicator
Shows the title currently playing.
2 CHAPTER (or TRACK) NUMBER indicator
Shows the chapter currently playing.
3
PLAY TIME indicator
Shows the elapsed playing time of the current chapter (or track).
English
Español
Deutsch
Français
Italiano
Nederlands
09
Section
1 32
Page 36

DVD
1 Set a DVD (or CD) to DVD player.
Playback will automatically start.
The DVD disc’s menu may be displayed.
2Use VOLUME to adjust the sound level.
Rotate to increase or decrease the volume.
3 To perform fast forward or reverse, press
and hold 2 or 3.
4 To skip back or forward to another track,
press
2 or 3.
Pressing 3 skips to the start of the next chapter
(or track). Pressing 2 once skips to the start of
the current chapter (or track). Pressing again
will skip to the previous track.
Note
• If you continue pressing FORWARD (¡) or
REVERSE (1) for 5 seconds, the color of the
fast forward mark changes from white to blue.
When this happens, fast forward continues
even if you release FORWARD (¡) or
REVERSE (1). To resume playback at a
desired point, press PLAY/PAUSE (6).
Introduction of advanced DVD
player operation
1 FUNCTION display
Shows the function status.
1 Press A.MENU when DVD source indications are displayed.
MENU is displayed.
2 Select DVD and press A.MENU.
The DVD MENU is displayed as follows:
REPEAT (repeat play) <Refer to page 43.>
RANDOM (random play)
SCAN (scan play)
PAUSE (pause)
ITS-PLAY (ITS play)
ITS-MEMORY (ITS memory)
You can operate a desired function. For details,
refer to the pages for each of the functions.
• RANDOM, SCAN and PAUSE are available of
the playing CDs.
• ITS-PLAY and ITS-MEMORY are available of
the connecting the Multi-DVD player. (As this
function and operation, refer to the Owner’s
manual of the Multi-DVD player.)
• Select BACK in the MENU display or press
BACK to return to the previous display.
Pressing WIDE on the head unit returns you to
the previous display.
• To return to the playback display, press
BAND/ESC.
En
36
09
Section
1
Page 37

DVD
En
37
Note
• If you do not operate the function within about
30 seconds, the display is automatically
returned to the playback display.
About Remote Control Operation
mode switch
When performing operations other than those
above, set the remote control operation mode
switch to the DVD position. (This enables operation of a connected DVD player.)
Information indications are
displayed
1 When the source is DVD, press DISP.
Each time you press DISP, the displayed information changes.
When the remote control operation mode
switch is AUDIO:
PLAYBACK MODE (play time)—DVD Display
(DVD’s video)
When the remote control operation mode
switch is DVD:
Information Display 1 = Information Display 2
= No information display = Return to
Information Display 1
Notes
• The DISP on head unit is the same function,
as DISP on the remote control when the operation mode switch is AUDIO.
• With Information Display 1, you can search for
a desired scene by specifying Title, Chapter or
Time, and switch the audio, subtitle and angle
settings.
• You can also specify Title, Chapter and Time
with Information Display 2. With this unit,
Track up/down does not work with the MultiDVD player.
English
Español
Deutsch
Français
Italiano
Nederlands
09
Section
Page 38

DVD
Disc Playback
Press PLAY/PAUSE.
The playback mark is displayed for 4 seconds
and the disc starts playing.
Notes
• Pressing PLAY/PAUSE when a disc is playing,
pauses playback.
• If the last disc played was a DVD, playback
starts from the point on that disc where you
stopped play previously. With some discs, a
menu may be displayed and playback may not
be possible from where you left off previously.
Chapter and Track
Advance/Return
Skipping to the Next Chapter/Track.
During play, press NEXT (¢).
Chapter/track numbers are displayed for 8 seconds and you advance to the next chapter/track.
Returning to the Previous
Chapter/Track
1 During play, press PREVIOUS (4).
Chapter/track numbers are displayed for 8 seconds and you return to the beginning of the
current chapter/track.
Press PREVIOUS (4) twice in succession
takes you to the beginning of the chapter/track
before the current chapter/track.
Note
• Pressing and holding 2 or 3 on the head unit
also performs the same operation.
En
38
09
Section
Page 39

DVD
En
39
Specifying Title/Chapter/Track
(Direct Search)
Specifying Title
1 Press the number button corresponding to
a desired title number when the disc is
stopped.
Title number is displayed for 8 seconds and
playback starts from the selected title.
To select 3, press 3.
To select 10, press 10 and 0 in order.
To select 23, press 10, 10 and 3 in order.
Specifying Chapter
1 Press the number button corresponding to
a desired chapter number during playback.
Chapter number is displayed for 8 seconds and
playback starts from the selected chapter.
To select 3, press 3.
To select 10, press 10 and 0 in order.
To select 23, press 10, 10 and 3 in order.
Specifying Track
1 Press the number button corresponding to
a desired track number.
Track number is displayed for 8 seconds and
playback starts from the selected track.
To select 3, press 3.
To select 10, press 10 and 0 in order.
To select 23, press 10, 10 and 3 in order.
Notes
• With some discs, the prohibited mark may be
displayed and operation may not be possible.
• With Video CD, Direct Search is not possible
during PBC playback.
English
Español
Deutsch
Français
Italiano
Nederlands
09
Section
Page 40

DVD
Disc Fast Forward/Reverse
Fast Forward
1 During play, continue pressing FORWARD
(¡).
The fast forward mark is displayed while pressing the button and disc fast forward is
performed.
2 Release FORWARD (¡) at the point you
want to watch/listen.
Playback resumes from that point.
Notes
• If you continue pressing FORWARD (¡) for 5
seconds, the color of the fast forward mark
changes from white to blue. When this happens, fast forward continues even if you
release FORWARD (¡). To resume playback
at a desired point, press PLAY/PAUSE (6).
• If you fast forward to the end of a CD, fast
forward continues from the beginning of the
disc.
• Fast forward may not be possible at certain
locations on some discs. If this happens,
normal playback automatically resumes.
Fast Reverse
1 During play, continue pressing REVERSE
(1).
The fast reverse mark is displayed while pressing the button and disc fast reverse is
performed.
2 Release REVERSE (1) at the point you
want to watch/listen.
Playback resumes from that point.
Notes
• If you continue pressing REVERSE (1) for 5
seconds, the color of the fast reverse mark
changes from white to blue. When this happens, fast reverse continues even if you
release REVERSE (1). To resume playback
at a desired point, press PLAY/PAUSE (6).
• If you fast reverse to the beginning of a CD,
normal playback resumes.
• Fast reverse may not be possible at certain
locations on some discs. If this happens,
normal playback automatically resumes.
En
40
09
Section
Page 41

DVD
En
41
Stopping Playback
Press STOP (7).
Note
• When you stop DVD or Video CD playback
(during PBC playback only) by pressing STOP
(7), that location on the disc is memorized
enabling playback from that point when you
play the disc again.
Still, Frame-by-Frame and Slow
Motion Playback
Still Playback
This lets you pause playback and view a still
picture.
Press PLAY/PAUSE (6) during playback.
The still mark is displayed for 4 seconds and
playback is paused letting you view a still image.
• To return to normal playback, press
PLAY/PAUSE (6) once more.
Frame-by-Frame Playback
This lets you move ahead one frame at a time
during playback.
Press STEP (E).
Each time you press STEP (E), you move
ahead one frame.
• To return to normal playback, press
PLAY/PAUSE (6).
Slow Motion Playback
This lets you slow down playback speed.
Press STEP (E) for 1 second during
playback.
The slow playback mark is displayed, forward
Slow Motion playback begins.
• To return to normal playback, press
PLAY/PAUSE (6).
Notes
• There is no sound during Still, Frame-byFrame or Slow Motion playback.
• Depending on the disc and the playback location on the disc, the prohibited mark may be
displayed indicating that Still, Frame-byFrame and Slow Motion playback are not possible.
• With some discs, images may be unclear
during Frame-by-Frame and Slow Motion playback.
• Reverse Frame-by-Frame playback and
Reverse Slow Motion playback are possible,
only connecting the XDV-P9.
English
Español
Deutsch
Français
Italiano
Nederlands
09
Section
Page 42

DVD
Operating using Information
Display 1
Specify Title, Chapter or Time to search for a
desired scene and play it back.
1 Push the remote control’s joystick
left/right to select Title or Chapter (or Track)
in Information Display 1.
The selected item is indicated in green.
2 Push the remote control’s joystick
up/down to indicate the desired number.
3 Press the remote control’s joystick directly
down to complete selection.
Notes
• You can also specify a Title, Chapter (or Track)
or Time directly without using an Information
Display. (Refer to 39.)
• With discs that feature menus, you can press
MENU to select for display of menu indica-
tions.
• Some discs may feature a prohibited mark,
indicating that display of Title and Chapter
indications is not possible.
• You cannot specify a Chapter when in the
Stop mode.
• If you perform no operation for about eight
seconds, the specified number becomes
invalid.
Specifying time
You can specify a time from which playback
starts (Time search).
1 Push the remote control’s joystick
left/right to select Time in Information
Display 1.
The selected item is indicated in green.
2 Input the desired time with the remote
control’s number keys.
e.g.,
10 minutes 09 seconds: press 1, 0, 0, and 9 in
order.
78 min 00 sec: press 7, 8, 0 and 0 in order.
Press C to delete input numbers.
3 Press the remote control’s joystick directly
down to complete selection.
Notes
• Some discs may feature a prohibited mark,
indicating that display of Title and Chapter
indications is not possible.
• You cannot specify a Time in the Stop mode.
• If you perform no operation for about eight
seconds, the specified number becomes
invalid.
En
42
09
Section
Page 43

DVD
En
43
Switching audio, subtitle and angle
You can change audio, subtitle and angle if that
information is recorded on the disc.
1 Push the remote control’s joystick
left/right to select Audio, S.TITLE or ANGLE in
Information Display 1.
The selected item is indicated in green.
2 Push the remote control’s joystick
up/down to select a desired setting, and
press.
Note
• You can change audio, subtitle and angle
settings during playback with AUDIO, S.TITLE
and ANGLE.
Operating with Information
Display 2
With Information Display 2, you can set Repeat
play range and audio L/R settings. You can also
specify a Title, Chapter and Time.
Switching Repeat play range
You can set Repeat play range for a Disc, Title or
Chapter. (Repeat play)
1 Push the remote control’s joystick
left/right to select Repeat play range in
Information Display 2.
The selected item is indicated in green.
2 Push the remote control’s joystick
up/down to select the desired setting, and
press.
Notes
• With Repeat play of a Disc, when the last track
on the disc has been played, a menu is displayed or playback stops.
• Push the remote control’s joystick left/right to
select Audio, S.TITLE or ANGLE in
Information Display 1.
Switching audio L/R
You can select between Audio L+R and L+R.
1 Push the remote control’s joystick
left/right to select Audio in Information
Display 2.
The selected item is indicated in green.
2 Push the remote control’s joystick
up/down to select the desired setting.
For details concerning operation using the
DVD player’s SET-UP menu, refer to the DVD
player’s Owner ’s manual.
English
Español
Deutsch
Français
Italiano
Nederlands
09
Section
Page 44

Audio Adjustments
Introduction of audio
adjustments
The display for this MENU is the same regardless of which source you operate from.
1 AUDIO display
Shows the audio adjustments status.
1 Press A.MENU in each source display.
MENU is displayed.
2 Press 5 or ∞ to select AUDIO, and press
A.MENU.
The AUDIO MENU is displayed as follows:
FAD/BAL (fader/balance adjustment)—EQ
MENU (equalizer curve adjustment)—BASS
(bass)—TREBLE (treble)—LOUDNESS (loudness)—SUB WOOFER (subwoofer)—NON FAD-
ING (non fading)—HPF (high pass filter)—SLA
(source level adjustment)
You can operate a desired function. For details,
refer to the pages for each of the functions.
NON FADING is only displayed when S.W
CTRL:EXTERNAL is set in INIT MENU. (SUB
WOOFER is not displayed.)
• When the subwoofer controller setting is
S.W
CTRL:EXTERNAL or REAR SP: S.W, you cannot
switch the SUB WOOFER. (Refer to page 48.)
• When the subwoofer controller setting is only
S.W CTRL:EXTERNAL, you can switch the non
fading output on/off mode. (Refer to page 48.)
• When selecting the FM tuner as the source,
you cannot switch to SLA.
• Select BACK in the MENU display or press
BACK to return to the previous display.
Pressing WIDE on the head unit returns you to
the previous display.
• To return to the playback display, press
BAND/ESC or WIDE on the remote control.
• When the setting is REAR SP:S.W, FAD/BAL
indications are for BAL.
Note
• If you do not operate the audio function within
about 30 seconds, the display is automatically
returned to the source display.
En
44
10
Section
1
Page 45

Audio Adjustments
En
45
Setting the sound focus equalizer
Clarifying the sound image of vocals and instruments allows the simple staging of a natural,
pleasant sound environment.
Even greater listening enjoyment will be
obtained if seating positions are chosen carefully.
• FRT1 boosts the treble on the front output and
the bass on the rear output.
FRT2 boosts the treble and the bass on the front
output and the bass on the rear output. (The
bass boost is the same for both front and rear.)
For both FRT1 and FRT2 the H setting provides a
more pronounced effect than the L setting.
1 Press SFEQ on the head unit to select the
desired SFEQ mode.
Press SFEQ on the head unit repeatedly to
switch between the following sound focus
equalizer.
FRT1-H (front1-high) —FRT1-L (front1-low) —
FRT2-H (front2-high) —FRT2-L (front2-low) —
CUSTOM (custom) —OFF (off)
2 Press 2 or 3 to select the desired position.
Press 2 or 3 until the desired position appears
in the display.
LEFT (left) —CENTER (center) —RIGHT (right)
Notes
• If you adjust the bass or treble, CUSTOM
memorizes an SFEQ mode in which the bass
and treble are adjusted for personal preference.
• If you switch the SFEQ mode, the HPF function is automatically switched off. By switching the HPF function on after selecting the
SFEQ mode, you can combine HPF function
with SFEQ function.
Using balance adjustment
You can select a fader/balance setting that provides an ideal listening environment in all occupied seats.
1 Press 5 or ∞ to select AUDIO from the
MENU, and press A.MENU.
AUDIO MENU is displayed.
2 Select FAD/BAL (or BAL), and press
A.MENU.
FADER/BALANCE adjustment indications are
displayed.
Each press of 5 or ∞ moves the front/rear
speaker balance towards the front or the rear.
• FRONT:15 – REAR:15 is displayed as the
front/rear speaker balance moves from front to
rear.
• FR:00 is the proper setting when only two
speakers are used.
• When the rear output setting is REAR SP:S.W,
you cannot adjust front/rear speaker balance.
Refer to Setting the rear output and subwoofer
controller on page 51.
3 Press 2 or 3 to adjust left/right speaker
balance.
When you press 2 or 3, LR:0 is displayed. Each
press of 2 or 3 moves the left/right speaker
balance towards the left or the right.
• LEFT:9 – RIGHT:9 is displayed as the left/right
speaker balance moves from left to right.
English
Español
Deutsch
Français
Italiano
Nederlands
10
Section
Page 46

En
46
10
Section
Audio Adjustments
Using the equalizer
The graphic equalizer lets you adjust the equalization to match car interior acoustic characteristics as desired.
Recalling equalizer curves
There are seven stored equalizer curves which
you can easily recall at any time. Here is a list of
the equalizer curves:
Display Equalizer curve
SUPER BASS Super bass
POWERFUL Powerful
NATURAL Natural
VOCAL Vocal
CUSTOM1,2 Custom1,2
FLAT Flat
• CUSTOM1 and CUSTOM2 are adjusted equal-
izer curves.
• A separate CUSTOM1 curve can be created
for each source. (The Built-in CD player and
Multi-CD player are set to the same Equalizer
Curve Adjustment setting automatically when
using the AVH-P6450CD.)
• If you make adjustments when a curve other
than CUSTOM2 is selected, the equalizer curve
settings are memorized in CUSTOM1.
• A CUSTOM2 curve can be created common to
all sources.
• If you make adjustments when the CUSTOM2
curve is selected, the CUSTOM2 curve is
updated.
• When
FLAT is selected no supplement or
correction is made to the sound. This is useful
to check the effect of the equalizer curves by
switching alternatively between
FLAT and a set
equalizer curve.
Press EQ on the head unit to select the desired
equalizer.
Press EQ on the head unit repeatedly to switch
between the following equalizer.
SUPER BASS—POWERFUL—NATURAL—
VOCAL—CUSTOM1—CUSTOM2—FLAT
Adjusting equalizer curves
You can adjust the currently selected equalizer
curve setting as desired. Adjusted equalizer
curve settings are memorized in CUSTOM1 or
CUSTOM2.
1 Press 5 or ∞ to select EQ MENU from the
AUDIO MENU, and press A.MENU.
EQ MENU is displayed.
BAND (band)
LEVEL (adjustment level)
FREQUENCY (center frequency)
Q FACTOR (quality factor)
2 Select the equalizer band you want to
adjust with 2/3.
BAND (band)
LOW (low)—MID (mid)—HIGH (high)
LEVEL (adjustment level)
• +6 – –6 is displayed as the adjustment level is
increased or decreased.
FREQUENCY (center frequency)
LOW : 40—80—100—160 (Hz)
MID : 200—500—1 k—2 k (Hz)
HIGH : 3.15 k—8 k—10 k—12.5 k (Hz)
Q FACTOR (quality factor)
2 N—1 N—1 W—2 W
En
46
Level (dB)
Center frequency
Frequency (Hz)
Q=2N
Q=2W
Page 47

En
47
English
Español
Deutsch
Français
Italiano
Nederlands
10
Section
Audio Adjustments
Note
• If you make adjustments when a curve other
than CUSTOM2 is selected, CUSTOM1 curve
is updated.
Adjusting bass
You can adjust the cut-off frequency and the
bass level.
• In FRT1 mode, bass adjustment affects only
the rear output: front output cannot be
adjusted.
1 Press 5 or ∞ to select BASS from the
AUDIO MENU, and press A.MENU.
BASS adjustment indications are displayed.
2 Press 5 or ∞ to adjust the bass level.
Each press of 5 or ∞ increases or decreases
the bass level. +6 – –6 is displayed as the level is
increased or decreased.
3 Select the desired frequency with 2/3.
Press 2 or 3 until the desired frequency
appears in the display.
40—63—100—160 (Hz)
Adjusting treble
You can adjust the cut-off frequency and the
Treble level.
• In FRT1 and FRT2 modes, treble adjustment
affects only the front output: rear output cannot
be adjusted.
1 Press 5 or ∞ to select TREBLE from the
AUDIO MENU, and press A.MENU.
TREBLE adjustment indications are displayed.
2 Press 5 or ∞ to adjust the treble level.
Each press of 5 or ∞ increases or decreases
the treble level. +6 – –6 is displayed as the level
is increased or decreased.
3 Select the desired frequency with 2/3.
Press 2 or 3 until the desired frequency
appears in the display.
2.5k—4k—6.3k—10k (Hz)
Page 48

Adjusting loudness
Loudness compensates for deficiencies in the
low- and high-sound ranges at low volume.
1 Press 5 or ∞ to select LOUDNESS from the
AUDIO MENU, and press A.MENU.
LOUDNESS adjustment indications are displayed.
2 Press 5 to turn loudness on.
Loudness level (e.g., LOUDNESS:ON/
MODE:MID) appears in the display.
3 Press 2 or 3 to select the level.
Press 2 or 3 until the desired level appears in
the display.
LOW (low)—MID (mid)—HIGH (high)
4 Press ∞ to turn loudness off.
LOUDNESS:OFF appears in the display.
Using subwoofer output
This unit is equipped with a subwoofer output
which can be switched on or off.
1 Press 5 or ∞ to select SUB WOOFER from
the AUDIO MENU, and press A.MENU.
SUB WOOFER adjustment indications are displayed. When the subwoofer controller setting
is S.W CTRL:EXTERNAL, you cannot select SUB
WOOFER.
2 Press 3 to turn subwoofer output on.
SUB WOOFER:ON appears in the display.
Subwoofer output is now on.
• You can turn off subwoofer output by pressing
2. If you do not set to ON, you cannot select
PHASE, LEVEL or FREQUENCY.
3 Press 5 or ∞ to select the item you want to
adjust.
4 Press 2
or 3 to adjust the item.
PHASE (phase)
NORMAL (normal)—REVERSE (reverse)
LEVEL (adjustment level)
• +6 – –6 is displayed as the adjustment level is
increased or decreased.
FREQUENCY (cut-off frequency)
50—125 (Hz)
• Only frequencies lower than those in the
selected range are output from the subwoofer.
Using non fading output
When the non fading output setting is on, the
audio signal does not pass through this unit’s
low pass filter (for the subwoofer), but is output
through the RCA output.
When the non fading output is on, you can
adjust the level of non fading output.
1 Press 5 or ∞ to select NON FADING from
the AUDIO MENU, and press A.MENU.
NON FADING adjustment indications are displayed. When the subwoofer controller setting
is S.W CTRL:EXTERNAL, you can select non
fading output on/off mode.
2 Press 5 to turn non fading output on.
NON FADING:ON appears in the display. non
fading output is now on.
• You can turn off non fading output by pressing
∞.
3 Press 2 or 3 to adjust the output level of
the non fading.
Each press of 2 or 3 increases or decreases
the level of the non fading (e.g., +6 to –6).
Press 2 or 3 until you see the desired value
displayed.
En
48
10
Section
Audio Adjustments
Page 49

En
49
English
Español
Deutsch
Français
Italiano
Nederlands
10
Section
Audio Adjustments
Using the high pass filter
When you do not want low sounds from the
subwoofer output frequency range to play from
the front or rear speakers, switch the HPF (high
pass filter) on. Only frequencies higher than
those in the selected range are output from the
front and rear speakers.
1 Press 5 or ∞ to select HPF from the AUDIO
MENU, and press A.MENU.
HPF adjustment indications are displayed.
2 Press 5 to turn high pass filter on.
HPF:ON appears in the display. High pass filter
is now on.
• To turn high pass filter off, press ∞.
3 Press 2 or 3 to select a high pass filter
range.
Press 2 and FREQUENCY:50 Hz is displayed.
Press 3 and 80 Hz, 125 Hz is displayed. Only
frequencies higher than those in the selected
range are output from the front or rear speakers.
Note
• If you switch the SFEQ mode, the HPF function is automatically switched off. By switching the HPF function on after selecting the
SFEQ mode, you can combine HPF function
with SFEQ function.
Adjusting source levels
SLA (Source level adjustment) lets you adjust
the volume level of each source to prevent radical changes in volume when switching between
sources.
• Settings are based on the volume level of the
FM tuner, which remains unchanged.
1 Compare the FM tuner volume level with
the level of the source you wish to adjust.
2 Press 5 or ∞ to select SLA from the AUDIO
MENU, and press A.MENU.
SLA adjustment indications are displayed.
3 Press 5 or ∞ to adjust the source volume.
Each press of 5 or ∞ increases or decreases
the source volume.
• LEVEL:+4 – LEVEL: –4 is displayed as the
source volume is increased or decreased.
Notes
• Since the FM tuner volume is the control, it is
not possible to apply source level adjustments
to the FM tuner.
• The AM tuner volume level can also be
adjusted with source level adjustments.
• The built-in CD and the multi-CD players are
both set to the same source level adjustment
volume automatically when using the AVHP6450CD.
• External unit 1 and External unit 2 are set to
the same volume adjustment setting automatically.
Page 50

En
50
11
Section
Initial Settings
Adjusting initial settings
Initial settings lets you perform initial set up of
different settings for this unit.
1 FUNCTION display
Shows the function status.
You cannot select AUDIO MENU from the OFF
SOURCE MENU.
1 Press SOURCE and hold until the unit turns
off.
2 Press A.MENU and the OFF SOURCE
MENU is displayed.
3 Press 5 or ∞ to select INIT, and press
A.MENU.
FM STEP (FM tuning step)
AM STEP (AM tuning step)
DETACH WARNING (Warning tone)
AUX (Auxiliary)
REAR SP (Rear output and subwoofer)
TEL/GUIDE (Telephone muting)
You can operate a desired function. For details,
refer to the pages for each of the functions.
Use the following instructions to operate each
particular setting.
• To cancel initial settings, press BAND/ESC or
WIDE on the remote control.
Setting the FM tuning step
The FM tuning step employed by seek tuning
can be switched between 100 kHz, the preset
step, and 50 kHz.
1 Press 5 or ∞ to select FM STEP from the
INIT MENU, and press A.MENU.
FM STEP adjustment indications are displayed.
2 Select the FM tuning step with 2/3.
Pressing 2/3 will switch the FM tuning step
between 50 kHz and 100 kHz. The selected FM
tuning step will appear in the display.
Note
• If seek tuning is performed in 50 kHz steps,
stations may be tuned in imprecisely. Tune in
the stations with manual tuning or use seek
tuning again.
Setting the AM tuning step
The AM tuning step can be switched between 9
kHz, the preset step, and 10 kHz. When using
the tuner in North, Central or South America,
reset the tuning step from 9 kHz (531 – 1,602
kHz allowable) to 10 kHz (530 – 1,640 kHz allowable).
1 Press 5 or ∞ to select AM STEP from the
INIT MENU, and press A.MENU.
AM STEP adjustment indications are displayed.
2 Select the AM tuning step with 2/3.
Pressing 2/3 will switch the AM tuning step
between 9 kHz and 10 kHz. The selected AM
tuning step will appear in the display.
1
Page 51

En
51
English
Español
Deutsch
Français
Italiano
Nederlands
11
Section
Initial Settings
Switching the warning tone
If the operation panel is not detached from the
head unit within five seconds of turning off the
ignition, a warning tone will sound. You can turn
off this warning tone.
1 Press 5 or ∞ to select DETACH WARNING
from the INIT MENU, and press A.MENU.
DETACH WARNING adjustment indications are
displayed.
2 Select WARNING: ON or OFF with 5/∞.
Pressing 5/∞ will switch WARNING between
ON and OFF and that status will be displayed
(e.g., WARNING :ON).
Switching the auxiliary setting
It is possible to use auxiliary equipment with
this unit. Activate the auxiliary setting when
using auxiliary equipment connected to this
unit.
1 Press 5 or ∞ to select AUX from the INIT
MENU, and press A.MENU.
AUX adjustment indications are displayed.
2 Select AUX ON or OFF with 5/∞.
Pressing 5/∞ will switch AUX between ON and
OFF and that status will be displayed (e.g.,
AUX :ON).
Setting the rear output and subwoofer controller
This product’s rear output (rear speaker leads
output and RCA rear output) can be used for
full-range speaker (REAR SP:FULL) or
subwoofer (REAR SP:S.W) connection. If you
switch rear output setting to the REAR SP:S.W,
you can connect a rear speaker lead directly to a
subwoofer without using an auxiliary amp.
Initially, the unit is set for rear full-range speaker
connection (REAR SP:FULL).
When rear output are connected to full range
speakers (when REAR SP:FULL is selected), you
can connect the RCA subwoofer output to a
subwoofer. In this case, you can select whether
to use the subwoofer controller’s (low pass
filter, phase) built-in S.W CTRL:INTERNAL or
the auxiliary S.W CTRL:EXTERNAL.
Notes
• Even if you change this setting, there is no
output unless you switch the non fading output (refer to page 48) or subwoofer output
(refer to page 48) in the audio menu on.
• If you change the subwoofer controller, subwoofer output and non fading output in the
audio menu return to the factory settings.
• Both rear speaker leads output and RCA rear
output are switched simultaneously in this
setting mode.
1 Press 5 or ∞ to select REAR SP from the
INIT MENU, and press A.MENU.
REAR SP adjustment indications are displayed.
2 Change the rear output setting with 5/∞.
Pressing 5/∞ will switch between REAR SP
:FULL (full-range speaker) and REAR.SP :S.W
(subwoofer) and that status will be displayed.
Page 52

Other Functions
En
52
11
Section
Initial Settings
Notes
• When no subwoofer is connected to the rear
output, select REAR SP:FULL.
• When a subwoofer is connected to the rear
output, set for subwoofer REAR SP:S.W.
• When the rear output setting is REAR SP:S.W,
you cannot change the subwoofer controller.
3 Change the subwoofer controller with
2/3.
Pressing 2/3 will switch between S.W CTRL
:INTERNAL and S.W CTRL:EXTERNAL and that
status will be displayed.
Switching the Telephone
Muting/Attenuation
When a call is made or received using a cellular
telephone connected to this product, you can
select between muting and attenuation when
using the Handsfree Telephone Unit.
1 Press 5 or ∞ to select TEL/GUIDE from the
INIT MENU, and press A.MENU.
TEL/GUIDE adjustment indications are
displayed.
2 Switch the telephone muting/attenuation
with 2/3.
Pressing 2/3 will switch between
TEL/GUIDE:MUTE (muting), TEL/GUIDE:ATT
(attenuation) and TEL/GUIDE:NORMAL (normal)
and that status will be displayed.
Setting remote control code type
When the remote control operation switch is set
to DVD, changing the remote control code type
enable to operate the Pioneer DVD player by the
supplied remote control. There are two remote
codes, code type A and code type B.
When using this unit with an “XDV-P9” MultiDVD Player, select code A.
When using this unit with “SDV-P7” DVD player,
select code A or B (depending on reception
signal setting of DVD player).
Set the remote control selection switch on the
left side of the remote control to appropriate
position with a pen tip or other pointed instrument .
• If you selected B mode, read the following
procedure and change the code type into the
appropriate one.
Using different entertainment
audio displays
You can enjoy displays while listening to each
sound source. The display for this MENU is the
same regardless of which source you operate
from.
Press ENT
on the head unit
.
Each time you press ENT on the head unit the
display changes in the following order:
MOVIE SCREEN—PICTURE 1—PICTURE 2
Page 53

En
53
English
Español
Deutsch
Français
Italiano
Nederlands
12
Section
Other Functions
Using the AUX source
An IP-BUS-RCA Interconnector such as the
CD-RB20 or CD-RB10 (sold separately) lets you
connect this unit to auxiliary equipment featuring RCA output. For more details, refer to the
IP-BUS-RCA Interconnector owner’s manual.
Selecting AUX as the source
Press SOURCE to select AUX as the source.
Press SOURCE until AUX appears in the display.
• If the auxiliary setting is not switched on, AUX
cannot be selected. For more details, see
Switching the auxiliary setting on page 51.
Setting the AUX title
The title displayed for the AUX source can be
changed.
1 After you have selected AUX as the source,
press A.MENU and the AUX SOURCE MENU is
displayed.
2 Press 5 or ∞ to select AUX, and press
A.MENU.
AUX MENU is displayed.
3 Press 5 or ∞ to select NAME EDIT, and
press A.MENU.
NAME EDIT adjustment indications are displayed.
4 Press A.MENU to select the desired character type.
Press A.MENU repeatedly to switch between the
following character type:
Alphabet (Upper case), Numbers and Symbols—
Alphabet (Lower case)
5 Press 5 or ∞ to select a letter of the alpha-
bet.
Each press of 5 will display a letter of the alphabet in A B C ... X Y Z, numbers and symbols in 1 2
3 ... @ # < order. Each press of ∞ will display a
letter in the reverse order, such as Z Y X ... C B A
order.
6 Press 3 to move the cursor to the next
character position.
When the letter you want is displayed, press 3
to move the cursor to the next position and then
select the next letter. Press 2 to move backwards in the display.
7 Move the cursor to the last position by
pressing 3 after entering the title.
When you press 3 one more time, the entered
title is stored in memory.
8 Press BAND/ESC to return to the playback
display.
Page 54

En
54
12
Section
Other Functions
Introduction of set up
Customize the settings to suit your taste and
environment.
1 Press A.MENU in each source display.
MENU is displayed.
2 Press 5 or ∞ to select SET UP, and press
A.MENU.
SET UP MENU is displayed as follows:
VIDEO SETTING (video setting)
AUTO FLAP (auto flap setting)
CLOCK ADJUST (clock adjust)
You can operate a desired function. For details,
refer to the pages for each of the functions.
Select BACK in the MENU display or press
BACK to return to the previous display.
Pressing WIDE on the head unit returns you to
the previous display.
• To return to the playback display, press both
BAND/ESC and WIDE on the remote control.
Selecting the video
Set so that only the display video can be
selected. The display for this MENU is the same
regardless of which source you operate from.
1 Press 5 or ∞ to select VIDEO SETTING from
the SET UP MENU, and press A.MENU.
VIDEO SETTING adjustment indications are
displayed.
2 Press 2/3 to select the VIDEO.
Press 2 or 3 until the desired video setting
appears in the display.
OFF (off)—VIDEO (video)—BACK UP CAMERA
(back up camera)—M-DVD (Multi-DVD)
• If the equipment is connected to a RCA video
input, choose VIDEO to view video of the equipment.
• When using a DVD player unit connected with
an RCA cable, if you do not select
M-DVD, there
will be no picture even if you switch sources.
• When using a DVD player unit connected with
an AV-BUS cable, do not select M-DVD. If you
do, there will be no picture.
• If you select BACK UP CAMERA, press ∞ to
move to BACK UP POLARITY, or use 2 or 3 to
select BATTERY and GND.
BATTERY: When the gear shift is moved to the
REVERSE (R) position, and the polarity of the
connected lead wire is positive.
GND: When the gear shift is moved to the
REVERSE (R) position, and the polarity of the
connected lead wire (refer to page 30) is negative.
• This product features a function that automatically switches to the video input into the video
or back camera jack when a back-up camera is
installed on your car. If this is the case, when
the gear shift is in the REVERSE (R) position,
the video automatically switches to video or
back camera. (The default setting is BATTERY.
For more details, consult with your dealer.)
Notes
• If you do not operate the function within about
30 seconds, the display is automatically
returned to the playback display.
• If you select BACK UP CAMERA, switching to
the correct video setting may not occur.
Confirm that directly after changing the setting, it changes to VIDEO when the gear shift
is moved to REVERSE from another position.
• If you select BACK UP CAMERA and the dis-
play changes to VIDEO during normal drivings, reverse the settings.
Page 55

En
55
English
Español
Deutsch
Français
Italiano
Nederlands
12
Section
Other Functions
Setting the automatic open
mode
To prevent the display from hitting the shift lever
of an automatic vehicle when it is in the “P”
(park) position, or when you do not wish opening/closing of the display to be carried out automatically, you can switch this function ON/OFF.
1 Press 5 or ∞ to select AUTO FLAP from the
SET UP MENU, and press A.MENU.
AUTO FLAP adjustment indications are displayed.
2 Press 2 to select the manual.
Press 2 until the OPEN/CLOSE:MANUAL
setting appears in the display. Each time you
press a manually set display’s EJECT, the display opens or closes.
3 Press 3 to select the auto.
Press 3 until the OPEN/CLOSE:AUTO setting
appears in the display. With auto setting, the
display automatically opens or closes when
power to this unit is switched ON.
Note
• If you do not operate the function within about
30 seconds, the display is automatically
returned to the playback display.
Setting the time
This is used to set the time on the unit’s clock
display.
1 Press 5 or ∞ to select CLOCK ADJUST from
the SET UP MENU, and press A.MENU.
CLOCK ADJUST indications are displayed.
2 Press 5 or ∞ to select ON or OFF.
When ON is selected, the clock is shown in the
display.
When OFF is selected, the clock is not shown in
the display.
3 Select the portion of the time display you
wish to set with 2/3.
Pressing 2/3 will select a portion of the clock
display:
HOUR—MINUTE—ADJUST
4 Press 5 or ∞ to slide to ADJUST, and the
minute is reset.
After reset, 00 is displayed.
Note
• If you do not operate the function within about
30 seconds, the display is automatically
returned to the playback display.
Page 56

En
56
13
Section
Additional Information
CD player and care (Only AVHP6450CD)
• Use only CDs that have either of the two
Compact Disc Digital Audio marks as show
below.
• Use only normal, round CDs. If you insert
irregular, non-round, shaped CDs they may
jam in the CD player or not play properly.
• Check all CDs for cracks, scratches or warped
discs before playing. CDs that have cracks,
scratches or are warped may not play properly. Do not use such discs.
• Avoid touching the recorded (non-printed
side) surface when handling the disc.
• Store discs in their cases when not in use.
• Keep discs out of direct sunlight and do not
expose the discs to high temperatures.
• Do not attach labels, write on or apply chemicals to the surface of the discs.
• To clean dirt from a CD, wipe the disc with a
soft cloth outward from the center of the disc.
• If the heater is used in cold weather, moisture
may form on components inside the CD
player. Condensation may cause the CD
player to not operate properly. If you think that
condensation is a problem turn off the CD
player for an hour or so to allow the CD player
to dry out and wipe any damp discs with a soft
cloth to remove the moisture.
• Road shocks may interrupt CD playback.
CD-R/CD-RW discs
• It may not be possible to play back CD-R/CDRW discs recorded on a music CD recorder or
a personal computer because of disc characteristics, scratches or dirt on the disc, or dirt,
condensation, etc. on the lens of this unit.
• Playback of discs recorded on a personal
computer may not be possible depending on
the application settings and the environment.
Please record with the correct format. (For
details, contact the manufacturer of the application.)
• Playback of CD-R/CD-RW discs may become
impossible in case of direct exposure to sunlight, high temperatures, or the storage conditions in the car.
• Titles and other text information recorded on a
CD-R/CD-RW disc may not be displayed by
this product (in the case of audio data (CDDA)).
• This product conforms to the track skip function of the CD-R/CD-RW disc. The tracks containing the track skip information are skipped
over automatically (in the case of audio data
(CD-DA)).
• If you insert a CD-RW disc into this product,
time to playback will be longer than when you
insert a conventional CD or CD-R disc.
• Read the precautions with the CD-R/CD-RW
discs before using.
Page 57

En
57
English
Español
Deutsch
Français
Italiano
Nederlands
13
Section
Additional Information
Understanding built-in CD player
error messages (Only AVHP6450CD)
When problems occur during CD play an error
message may appear on the display. If an error
message appears on the display refer to the
table below to see what the problem is and the
suggested method of correcting the problem. If
the error cannot be corrected, contact your
dealer or your nearest Pioneer Service Center.
Using the Display Correctly
CAUTION
• If moisture or foreign matter should get
inside the product, turn OFF the power immediately and consult your dealer or the nearest
authorized PIONEER Service Station. Using
the product in this condition may result in a
fire or electric shock, or other failure.
• If you notice smoke, a strange noise or
smell, or any other abnormal signs from the
display, turn OFF the power immediately and
consult your dealer or the nearest authorized
PIONEER Service Station. Using the product
in this condition may result in failure of the
system.
• Do not remove the rear cover of the display,
as there are high-voltage components inside
which may cause an electric shock. Be sure to
consult your dealer or the nearest authorized
PIONEER Service Station for internal inspection, adjustments or repairs.
Handling the Display
• When the display is subjected to direct sunlight for a long period of time, it will become
very hot resulting in possible damage to the
LCD screen. When not using this product, close
the display and avoid exposing it to direct sunlight as much as possible.
• The display should be used within the temperature ranges shown below.
Operating temperature range: –10 to +50 °C
[+14 to +120 °F]
Storage temperature range: –20 to +80 °C
[–4 to +176 °F]
At temperatures higher or lower than the operating temperature range the display may not
operate normally.
Message Cause Action
ERROR-11, 12,
17, 30
Dirty disc Clean disc.
ERROR-11, 12,
17, 30
Scratched disc Replace disc.
ERROR-22, 23 The CD format
cannot be
played back.
Replace disc.
ERROR-10, 11,
12, 17, 30, A0
Electrical or
mechanical
Turn the ignition
ON and OFF, or
switch to a
different source,
then back to the
CD player.
ERROR-44 All tracks are
skip tracks
Replace disc.
Page 58

• The LCD screen of this product is exposed in
order to increase its visibility within the vehicle.
Please do not press strongly on it as this may
damage it.
• Do not place anything on the display when it
is deployed. Also, do not attempt to carry out
angle adjustment, or opening/closing of the
display by hand. Applying strong force to the
display may damage it.
• Do not touch the LCD screen as this may
scratch it or dirty it.
• Be careful not to place anything between the
display and the main body when the
display is opening or closing. If an object gets
between the display and main body,
the display may stop working.
About the Liquid Crystal Display
(LCD) Screen
• If the display is near the vent of an air conditioner when it is deployed, make sure that air
from the air conditioner is not blowing on it.
Heat from the heater may break the LCD screen,
and cool air from the cooler may cause moisture to form inside the display resulting in possible damage. Also, if the display is cooled down
by the cooler, the screen may become dark, or
the life span of the small fluorescent tube used
inside the display may be shortened.
• Small black dots or white dots (bright dots)
may appear on the LCD screen. These are due to
the characteristics of the LCD screen and do
not indicate a problem with the display.
• At low temperatures, the LCD screen may be
dark for a while after the power is turned ON.
• The LCD screen will be difficult to see if it is
exposed to direct sunlight.
• When using a portable phone, keep the
antenna of the portable phone away from the
Display to prevent disruption of the video by the
appearance of spots, colored stripes, etc.
Keeping the Display in Good
Condition
• When removing dust from the screen or
cleaning the display, first turn the system power
OFF, then wipe with a soft dry cloth.
• When wiping the screen, take care not to
scratch the surface. Do not use harsh or abrasive chemical cleaners.
About the Small Fluorescent Tube
• A small fluorescent tube is used inside the
display to illuminate the LCD screen.
*The fluorescent tube should last for approxi-
mately 10,000 hours, depending on operating conditions. (Using the display at low
temperatures reduces the service life of the
fluorescent tube.)
*When the fluorescent tube reaches the end
of its useful life, the screen will be dark and
the image will no longer be projected. If
this happens, consult your dealer or the
nearest authorized PIONEER Service
Station.
En
58
13
Section
Additional Information
Page 59

En
59
Specifications
General
Power source ...................... 14.4 V DC
(10.8 – 15.1 V allowable)
Grounding system .............. Negative type
Max. current consumption
............................................. 10.0 A
Dimensions
(W × H × D)
(DIN)
(chassis) .................. 178
× 50 × 160 mm
(nose) ....................... 188
× 58 × 37.6 mm
(D)......................................
(chassis) .................. 178
× 50× 165 mm
(nose) ....................... 178
× 50 × 32.6 mm
Remote control ........................... 51.5 × 123 × 10.9 mm
Weight
Head Unit
AVH-P6450CD ..... 2.4 kg
AVH-P6450 ........... 1.9 kg
Remote control ........... 49.4 g (including battery)
Amplifier
Continuous power output is 27 W per channel min. into
4 ohms, both channels driven 50 to 15,000 Hz with no
more than 5% THD.
Maximum power output ..... 50 W
× 4
50 W
×
2 ch/4 Ω+70 W ×1 ch/2 Ω (for Subwoofer)
Load impedance ................. 4
Ω (4 – 8 Ω [2 Ω for 1 ch]
allowable)
Preout maximum output level/output impedance
............................................. 4.0 V/100
Ω
Equalizer (3-Band Parametric Equalizer)
(Low)
Frequency ............ 40/80/100/160 Hz
Q Factor ............... 0.35/0.59/0.95/1.15
(+6 dB when boosted)
Gain ..................... ±12 dB
(Mid)
Frequency ............ 200/500/1k/2k Hz
Q Factor ............... 0.35/0.59/0.95/1.15
(+6 dB when boosted)
Gain ..................... ±12 dB
(High)
Frequency ............ 3.15k/8k/10k/12.5k Hz
Q Factor ............... 0.35/0.59/0.95/1.15
(+6 dB when boosted)
Gain ..................... ±12 dB
Loudness contour
(Low) ............................ +3.5 dB (100 Hz)
+3 dB (10 kHz)
(Mid) ............................ +10 dB (100 Hz)
+6.5 dB (10 kHz)
(High) .......................... +11 dB (100 Hz)
+11 dB (10 kHz)
(volume: –30 dB)
Tone controls
(Bass)
Frequency ............ 40/63/100/160 Hz
Gain ..................... ±12 dB
(Treble)
Frequency ............ 2.5k/4k/6.3k/10k Hz
Gain ..................... ±12 dB
HPF
Frequency .................... 50/80/125 Hz
Slope ........................... –12 dB/oct.
Subwoofer output
Frequency .................... 50/80/125 Hz
Slope ........................... –18 dB/oct.
Gain ............................. ±12 dB
Phase .......................... Normal/Reverse
CD player (AVH-P6450CD only)
System ................................... Compact disc audio system
Usable discs ....................... Compact disc
Signal format ........................... Sampling frequency: 44.1 kHz
Number of quantization bits: 16; linear
Frequency characteristics
............................................. 5 – 20,000 Hz (±1 dB)
Signal-to-noise ratio ........... 96 dB (1 kHz)
(IEC-A network)
Dynamic range ................... 95 dB (1 kHz)
Number of channels .......... 2 (stereo)
FM tuner
Frequency range ................. 87.5 – 108 MHz
Usable sensitivity ................ 9 dBf
(0.8
µV/75 Ω, mono,
S/N: 30 dB)
50 dB quieting sensitivity ... 14 dBf
(1.5
µV/75 Ω, mono)
Signal-to-noise ratio ........... 70 dB (IEC-A network)
Distortion ............................ 0.3%
(at 65 dBf, 1 kHz, stereo)
Frequency response ........... 30 – 15,000 Hz (±3 dB)
Stereo separation ............... 40 dB (at 65 dBf, 1 kHz)
English
Español
Deutsch
Français
Italiano
Nederlands
13
Section
Additional Information
Page 60

Additional Information
AM tuner
Frequency range ................. 531 – 1,602 kHz (9 kHz)
530 – 1,640 kHz (10 kHz)
Usable sensitivity ............... 18
µV (S/N: 20 dB)
Selectivity ............................ 50 dB (±9 kHz)
50 dB (±10 kHz)
Video
Composit input level .......... 1Vp-p/75
Ω
Composit output level ........ 1Vp-p/75 Ω
Display
Screen size/Aspect ratio .... 6.5 inch wide/16:9
(effective display area: 146.72
× 79.10 mm)
Pixels ................................... 336,960 (1,440
× 234)
Type ..................................... TFT active matrix,
transmissive type
Color system ....................... NTSC/PAL Compatible
Operating temperature range
............................................. –10 to +50° C
Storage temperature range
............................................. –20 to +80° C
Angle Adjustment .............. 55 — 110°
Initial setting angle: 100°
Dimensions
(W × H × D)
....... 155.54 × 89.2 × 6.1 mm
Infrared remote control
Wavelength ......................... 940 nm ± 50 nm
Output ................................. typ; 5 nw/sr per infrared
LED
Note
• Specifications and the design are subject to
possible modifications without notice due to
improvements.
En
60
13
Section
Page 61

En
61
English
Español
Deutsch
Français
Italiano
Nederlands
Page 62

Antes de empezar
PRECAUCIONES IMPORTANTES 5
Acerca de este manual 5
Para asegurar una conducción segura 6
• Cuando utilice un visualizador conec-
tado a la salida de vídeo trasera 6
Precauciones 6
CD playback (Solamente AVH-P6450CD) 6
Para evitar la descarga de la batería 7
Para proteger la pantalla LCD de la pantalla 7
Cuando la pantalla sea difícil de ver, utilice los
mandos BRIGHT (brillo) y DIMMER
(Reductor de luz) 7
Control remoto y cuidados 7
• Pila 8
Protección del producto contra robo 8
• Extracción del panel de operación 8
• Colocación del panel de operación 9
Reposición del microprocesador 9
Qué es cada cosa 11
Control remoto 12
Encendido y Apagado
Encendido del sistema 13
Cierre de la presentación visual 13
Ajuste del ángulo de la pantalla 13
Selección de una fuente 14
Apagado del sistema 14
Operaciones comunes
Visualización de fuente 15
Visualización de los menús (e.j., Sintonizador)
15
Visualizador
Cambio del modo amplio 16
Ajuste de vídeo 17
Ajustes DIMMER (regulador de la intensidad
luminosa) 18
Sintonizador
Audición de radio 19
Introducción a las operaciones avanzadas del
sintonizador 20
Almacenaje de frecuencias 20
Sintonía de señales fuertes 21
Almacenaje de las frecuencias de radio más
fuertes 21
Lector de CD incorporado
Reproducción de un CD
(Solamente AVH-P6450CD) 22
Introducción a las operaciones avanzadas del
lector de CD incorporado
(Solamente AVH-P6450CD) 23
Repetición de reproducción 23
Reproducción de pistas en un orden
aleatorio 23
Exploración de las pistas de un CD 24
Reproducción de la lista de pistas 24
Pausa de la reproducción de CD 24
Uso de las funciones de título de disco 25
• Introducción de títulos de disco 25
• Visualización de títulos en discos
CD TEXT 25
Lector de Multi-CD
Reproducción de un CD 26
Lector de Multi-CD de 50 discos 26
Introducción a las operaciones avanzadas de
lector de Multi-CD 27
Repetición de reproducción 27
Reproducción de las pistas en un orden
aleatorio 28
Exploración de CDs y pistas 28
Reproducción de la lista de pistas 28
Pausa de la reproducción de un CD 29
Uso de la compresión y énfasis de
los graves 29
Uso de listas de reproducción ITS 29
Gracias por haber comprado este producto Pioneer.
Sírvase leer con detención estas instrucciones sobre la operación de modo que
aprenda el modo de operar correctamente su modelo. Una vez que haya leído las
instrucciones, consérvelas en un lugar seguro para consultarlas en el futuro.
Contenido
Sp
2
00
Sección
Page 63

• Creación de una lista de reproducción
con la programación ITS 29
• Borrado de una pista de la lista de
reproducción ITS 30
• Reproducción de la lista de reproduc-
ción ITS 30
• Borrado de un CD de la lista de
reproducción ITS 31
Uso de las funciones de título de disco 31
• Introducción de títulos de disco 31
• Visualización de los títulos de discos
32
Uso de las funciones CD TEXT 32
• Visualización de títulos en discos CD
TEXT 32
Sintonizador de TV
Visualización e indicadores 33
Operaciones básicas 33
Almacenamiento de las emisoras 33
Llamada de las emisoras 34
Cambio de una banda 34
Menú de TV 34
BSSM (Memoria Secuencial de las Mejores
Emisoras) 34
Selección de grupo de países 35
Selección de canales de la lista de canales
preajustados 35
DVD
Visualización e indicadores 35
Introducción a las operaciones avanzadas
del lector de DVD 36
Acerca del interruptor de modo de operación
de control remoto 37
Visualización de información 37
Reproducción de disco 38
Avance y retorno de capítulo y pista 38
Retorno al capítulo/pista precedente 38
Especificación de título/capítulo/pista
(búsqueda directa)
39
• Especificación de título 39
• Especificación de capítulo 39
• Especificación de pista 39
Avance/retroceso rápido de disco 40
• Avance rápido 40
• Retroceso rápido 40
Parada de la reproducción 41
Reproducción de imagen congelada,
cuadro a cuadro y cámara lenta 41
• Reproducción de imagen congelada 41
• Reproducción de cuadro a cuadro 41
• Reproducción en cámara lenta 41
Operación utilizando la visualización de
información 1 42
• Especificación del tiempo 42
• Cambio del audio, subtítulo
y ángulo 43
Operación con la visualización de
información 2 43
• Cambio de la gama de la reproducción
repetida 43
• Cambio de los canales izquierdo/
derecho de audio 43
Ajustes de audio
Introducción a los ajustes de audio 44
Ajuste del ecualizador de enfoque
de sonido 45
Uso del ajuste del equilibrio 45
Uso del ecualizador 46
• Llamada de las curvas de
ecualización 46
• Ajuste de las curvas de ecualización 46
Ajuste de los graves 47
Ajuste de los agudos 47
Ajuste de la sonoridad 48
Uso de la salida de subgraves 48
Uso de la salida sin extinción 48
Uso del filtro de paso alto 49
Ajuste de los niveles de la fuente 49
Contenido
Sp
3
Español
Deutsch
Français
Italiano
Nederlands
00
Sección
Page 64

Ajustes iniciales
Configuración de los ajustes
iniciales 50
Ajuste del paso de sintonía de FM 50
Ajuste del paso de sintonía de AM 50
Cambio del tono de advertencia 51
Cambio del ajuste de componente auxiliar 51
Ajuste de la salida trasera y controlador de
graves secundario 51
Conmutación del enmudecimiento/
atenuación del teléfono 52
Otras funciones
Ajuste del tipo de código de control
remoto 52
Uso de las visualizaciones de
entretenimiento/audio diferentes 52
Uso de la fuente AUX 53
• Selección de AUX como la fuente 53
• Ajuste del título del componente
auxiliar 53
Introducción a la configuración 54
Selección de vídeo 54
Ajuste del modo de apertura automática 55
Puesta en hora 55
Informaciones adicionales
Lector de CD y cuidados (Solamente AVH-
P6450CD) 56
Discos CD-R/CD-RW 56
Comprensión de los mensajes de error del
lector de CD incorporado (Solamente AVHP6450CD) 57
Uso correcto de la presentación visual 57
• Manejo de la presentación visual 57
• Acerca de la presentación visual de
cristal líquido (LCD) 58
• Mantenimiento de la presentación
visual en buenas condiciones 58
• Acerca del tubo fluorescente
pequeño 58
Especificaciones 59
Contenido
Sp
4
00
Sección
Page 65

Antes de empezar
Sp
5
PRECAUCIONES IMPORTANTES
Lea todas estas instrucciones relacionadas con
su presentación visual y guárdelas para
emprearlas como referencia en el futuro
1 Lea completa y cuidadosamente este manual antes de instalar su presentación visual.
2 Guarde a mano este manual para utilizarlo
como referencia en el futuro.
3 Ponga mucha atención a todas las advertencias de este manual y siga
cuidadosamente las instrucciones.
4 No permita que otras personas utilicen
este sistema mientras no nayan entendido las
instrucciones de operación.
5 No instale la presentación visual donde (i)
pueda obstruir la visión del conductor, (ii)
afecte al rendimiento de cualquier sistema de
funcionamiento o sistema de seguridad del
vehículo, incluyendo el air-bag, o (iii) afecte a
la habilidad del conductor para manejar con
seguridad el vehículo.
6 Como con cualquier accesorio del interior
de su vehículo, la presentación visual no
deberá ser una distracción para couducir con
seguridad su vehículo. Si tiene dificultades al
utilizar el sistema o al leer el contenido de la
presentación visual, estacione el vehículo en
un lugar seguro antes de hacer ajustes.
7 No intente instalar o revisar usted mismo
su presentación visual. La instalación o
revisión de la presentación visual por personas sin formación ni experiencia en
equipos electrónicos y accesorios para
automóviles puede ser peligroso y podría
exponerle a una descarga eléctrica o a otros
peligros.
8 Recuerde ponerse siempre el cinturón de
seguridad cuando maneje su vehículo. En el
caso de sufrir un accidente, sus lesiones
pueden ser mucho más graves si no tiene
bien puesto su cinturón de seguridad.
Acerca de este manual
Este producto viene con diversas funciones
sofisticadas que aseguran una recepción y
operación superior. Todas las funciones han sido
proyectadas para facilitar su uso al máximo, pero
muchas funciones requieren explicación. El
propósito de este manual de instrucciones es
ayudarle a beneficiarse completamente del
potencial del producto y maximizar su disfrute de
audición.
Se recomienda familiarizarse con las funciones
y operaciones leyendo con detención el manual
antes de usar el producto. Es especialmente
importante leer y observar las precauciones en
página seguiente y en otras secciones.
Este manual explica la operación de la unidad
principal. Las mismas operaciones se pueden
realizar en el control remoto de volante de
dirección.
English
Español
Deutsch
Français
Italiano
Nederlands
01
Sección
Page 66

Antes de empezar
Sp
6
01
Sección
Para asegurar una conducción
segura
ADVERTENCIA
• Para evitar el riesgo de accidentes y violación
potencial de las leyes aplicables, este producto no es para uso con una pantalla de
vídeo que es visible al motorista.
• En algunos países o estados, la visualización
de la imagen en una pantalla dentro de un
vehículo, aunque por los pasajeros puede ser
ilegal. En donde tales leyes son aplicables,
éstas deben ser obedecidas.
Para asegurar la conducción segura del
vehículo, no opere este producto mientras conduce. Si se intenta ver las imágenes de un sintonizador de TV, un disco DVD-Video u otras
fuentes etc. en el visualizador frontal mientras
el freno de estacionamiento no está engranado,
la siguiente advertencia aparecerá:
Al estacionar el vehículo en un lugar seguro y
aplicar el freno de estacionamiento, la imagen
aparece en la pantalla.
Cuando utilice un visualizador conectado a la salida de vídeo trasera
La salida de vídeo trasera de este producto es
para la conexión de un visualizador para permitir que los pasajeros en los asientos traseros
puedan ver DVD, etc.
ADVERTENCIA
• NUNCA instale la pantalla trasera conectada
a la salida de vídeo trasera de este producto
en un lugar que permita al conductor ver el
sintonizador de TV, discos DVD u otras
fuentes con imagen mientras conduce el
automóvil.
Precauciones
• Mantenga este manual a mano como una
referencia para los procedimientos de
operación y precaución.
• Siempre mantenga el volumen
suficientemente bajo de modo que pueda
escuchar los sonidos fuera del coche.
• Proteja este producto de la humedad.
• Si se desconecta o se descarga la batería, la
memoria preajustada se borrará y se debe
reprogramarla.
• Cuando este producto no funciona correctamente, comuníquese con su concesionario o
centro de servicio Pioneer autorizado.
CD playback (Solamente AVHP6450CD)
Es posible la reproducción de Music CD/CDR/CD-RW.
Page 67

Antes de empezar
Sp
7
Para evitar la descarga de la
batería
Siempre ponga el motor en marcha cuando
utilice esta unidado. La utilización con el motor
apagado podrá provocar la descarga de la
batería.
Para proteger la pantalla LCD de
la pantalla
• No permita que la luz directa del sol incida
directamente sobre la pantalla cuando no
está usando esta unidado. La exposición prolongada a la luz directa del sol puede producir
fallos de funcionamiento del la pantalla LCD
debido a las altas temperaturas.
• Cuando utilice un teléfono celular, mantenga
la antena del teléfono alejada de la pantalla
para evitar perturbaciones de la imagen como
puntos, franjas de color, etc.
Cuando la pantalla sea difícil de
ver, utilice los mandos BRIGHT
(brillo) y DIMMER (Reductor de
luz)
Debido a su propia construcción, la pantalla
LCD tiene un ángulo de visión limitado. Sin
embargo, es posible aumentar el ángulo de
visión (vertical y horizontal) utilizando el mando
BRIGHT para ajustar la densidad del negro de
la imagen. Cuando lo utilice por primera vez,
ajuste la densidad del negro de acuerdo con el
ángulo de visión (vertical y horizontal) para
obtener una imagen nítida.
Tambi én podrá usar el mando DIMMER para
ajustar el brillo de la pantalla LCD según sus
preferencias.
Control remoto y cuidados
Este producto se equipa con un controlador
remoto para conveniencia en su operación.
• Apunte el controlador en la dirección del
receptor de señal en el visualizador en color (en
venta por separado) para operarlo.
Notas
• No almacene el controlador remoto en altas
temperaturas o a la luz directa del sol.
• El controlador remoto puede no funcionar
adecuadamente a la luz directa del sol.
• No permita que el controlador remoto se caiga
al piso, en donde puede quedar aprisionado
debajo del pedal de freno o acelerador.
English
Español
Deutsch
Français
Italiano
Nederlands
01
Sección
Page 68

Sp
8
01
Sección
Antes de empezar
Pila
Deslice la bandeja hacia afuera desde la parte
trasera del controlador remoto e inserte la pila
con los polos (+) y (–) hacia las direcciones
apropiadas.
Importante
• Mantenga la pila de litio fuera del alcance de
los niños. Si la pila fuese tragada, consulte un
médico inmediatamente.
Notas
• Cuando utilice por primera vez, tire la parte
saliente de la película desde la bandeja.
• No recargue, desarme, caliente ni tire la pila
al fuego.
• Utilice solamente una pila de litio CR2025
(3 V). No utilice otros tipos de pilas con este
producto.
• No toque la pila con instrumentos metálicos.
• No guarde la pila de litio con materiales
metálicos.
• Para deshacerse de pilas usadas, siga los
reglamentos gubernamentales y leyes públicas del medio ambiente de su país/área.
• Siempre revise cuidadosamente que está
cargando la pila con los polos (+) y (–)
dirigidos en las direcciones correctas.
• Quite la pila si no usará el control remoto
durante un mes o más.
Protección del producto contra
robo
El panel delantero se puede extraer de la unidad
principal y almacenar en su caja protectora
provista como una medida antirrobo.
• Si el panel delantero no se extrae de la unidad
principal dentro de cinco segundos después
de desconectar la llave de encendido, un tono
de advertencia suena.
• Puede desactivar el tono de advertencia.
Consulte Cambio del tono de advertencia en la
página 51.
Importante
• Nunca presione ni agarre la pantalla y los
botones con fuerza excesiva al extraer o
colocar el panel delantero.
• Evite someter el panel delantero a impactos
excesivos.
• Mantenga el panel delantero fuera del
alcance de los rayos de luz del sol o altas
temperaturas.
Extracción del panel de operación
1 Presione DETACH para extraer el panel de
operación.
2 Agarre el lado izquierdo del panel de
operación y tire suavemente del mismo hacia
fuera.
Tenga cuidado en no agarrarlo con mucha
fuerza o derribarlo.
3 Ponga el panel de operación en la caja
protectora para almacenamiento seguro.
Page 69

Antes de empezar
Sp
9
Importante
• No conduzca el automóvil con el panel de
operación y con el monitor levantado, ya que
el ángulo del monitor puede cambiar, resultando en arañazos y daños.
• Tenga cuidado con la parte magnética de este
producto. No coloque productos magnética
tales como tarjetas de crédito, casetes y relojes cerca de este producto. Hacer esto podría
resultar en daños de los productos o en la
pérdida de las informaciones grabadas en
ellos.
Colocación del panel de operación
Vuelva a poner el panel de operación agarrán-
dolo verticalmente con respecto a esta unidad
y encajándolo firmemente en los ganchos de
montaje.
No utilice este producto cuando esté solamente
suspendido en los ganchos.
Reposición del microprocesador
Cuando se gira la llave de encendido a OFF,
presionar RESET le permite reposicionar el
microprocesador a sus ajustes iniciales sin
cambiar los ajustes del menú de configuración,
memoria de condición y otros ajustes.
Presione RESET en los siguientes casos.
• Cuando este producto no funciona correctamente.
• Cuando mensajes extraños (incorrectos)
aparecen en el visualizador.
1 Gire la llave de ignición a OFF.
2 Presione el botón RESET.
Utilice la punta de un bolígrafo u otro objeto
puntiagudo.
Notas
• Cuando utilice con un Sistema de Navegación
Pioneer, si presiona RESET, asegúrese de que
el ajuste ACC OFF está seleccionado. Si ACC
ON está seleccionado, la operación correcta
no será posible, aunque presione RESET.
• Después de completar las conexiones o
cuando desea borrar todos los ajustes de la
memoria o volver el producto a sus ajustes
iniciales (de fábrica), arranque el motor o
ajuste la llave de ignición a ACC ON antes de
presionar el botón RESET.
English
Español
Deutsch
Français
Italiano
Nederlands
01
Sección
Page 70

PAUSE ATT
2
5
7
9
1
3
4
6
0-=~!@#
8
Antes de empezar
01
Sección
PAUSE ATT
2
5
^
%
7
9
1
3
4
6
0-=~!@#
8
AVH-P6450CD
AVH-P6450
Sp
10
$
$
Page 71

Antes de empezar
Sp
11
English
Español
Deutsch
Français
Italiano
Nederlands
01
Sección
Qué es cada cosa
1 VOLUME
Presione para aumentar o disminuir el
volumen.
2 Botón OPEN/CLOSE
Presione para abrir o cerrar el panel del
monitor.
3 Sensor de luz ambiental
Detecta la luz ambiental. Este sistema ajusta
automáticamente el brillo de la pantalla para
compensar la luz ambiental.
4 Botón DISPLAY
Presione para seleccionar las diferentes
visualizaciones.
5 Botón ENTERTAIN
Cambia entre las visualizaciones de imagen
congelada y de entretenimiento de vídeo.
6 Botón WIDE/-V.ADJ
Cambia el método de ampliación de vídeo
4:3 a vídeo 16:9. Presione este botón durante
2 segundos para visualizar el ajuste de vídeo.
Después que se visualice el ajuste de imagen, su ajuste cambia cada vez que se presiona el botón.
El ajuste de vídeo no puede realizarse con el
control remoto.
7 Controlador AUDIO/Botón ENTER
Utilice para operar el menú de audio, seleccionar emisoras, etc.
8 Receptor de señal de control remoto
9 Botón SFEQ
Presione para seleccionar un sonido natural
con presencia.
0
Botón BAND/ESC
Presione para seleccionar entre FM o una
banda AM y cancelar el modo de control de
funciones.
- Botón ATT
Presione para activar o desactivar la función
de anuncio de tráfico.
= Botones ANGLE
Ajuste la pantalla para un ángulo de visión
mejor.
~ Botón PAUSE
Presione para activar o desactivar la función
de PAUSE.
! Botón EQ
Presione para seleccionar diversas curvas
de ecualización.
@ Botón SOURCE
Esta unidad se enciende por la selección de
una fuente. Presione para cambiar a través
de todas las fuentes disponibles.
# Botón DETACH
Suelta el panel de operación.
$ Botón RESET
Solamente AVH-P6450CD
% Abertura para CD
Coloque un CD.
^ Botón CD EJECT
Presione para expulsar un CD.
Notas
• Presione WIDE en la unidad principal para
volver a la visualización precedente.
• Cancele la visualización de MENU con
BAND/ESC.
Page 72

Sp
12
01
Sección
Antes de empezar
Control remoto
& Botones de volumen (–/+)
Presione para aumentar (+) o disminuir (–)
el volumen.
* Palanca de mando
Utilice junto con un componente DVD
Pioneer. Si ajuste el interruptor a DVD,
puede realizar algunas operaciones de la
unidad DVD Pioneer.
( Interruptor de fuente de imagen
Presione para cambiar a través de las
fuentes disponibles. Realiza la misma
operación que @ en la unidad principal.
) Botón de alimentación
Utilice con un componente DVD Pioneer.
_ Botón ATT
Presione para bajar rápidamente el nivel de
volumen, aproximadamente 90%. Presione
una vez más para volver al nivel de volumen
original.
+ Botón STOP
Utilice con un componente DVD Pioneer.
¡ Botón NUMBER
Utilice con un componente Pioneer que
permita reproducción de DVD.
™
Botón BACK
Vuelve a la visualización anterior a una visualización de MENU o de PICTURE ADJUST.
£ Botones MENU, TOP, AUDIO, RTN, S.TITLE,
ANGLE
Utilice con un componente DVD Pioneer.
¢ Botones de control de audio y botones de
control de DVD
Utilice para operar el AUDIO MENU,
seleccionar emisoras, etc. Realiza la misma
operación que 7 en la unidad principal.
Cambie § a la posición DVD, y utilice con un
componente Pioneer que permita la reproducción de DVD.
∞ Interruptor de selección de control remoto
Cambia el ajuste del control remoto.
(Refiérase a la página 50.)
§ Interruptor del modo de operación de con-
trol remoto
Cambia el modo de operación entre modo de
AUDIO (las fuentes pueden operarse por el
control remoto) o modo de DVD (solamente
le lector de DVD pueden operarse por el
control remoto).
(
§
*
)
_
+
¡
™
¢
&
4
0
6
£
∞
Page 73

Sp
13
English
Español
Deutsch
Français
Italiano
Nederlands
02
Sección
Encendido del sistema
1 Encienda el motor de su vehículo.
La presentación visual será automáticamente
desplegada mediante el modo de
apertura/cierre automático.
Si la presentación visual no es
automáticamente desplegada, presione el
botón OPEN/CLOSE.
2 Presione SOURCE para seleccionar el sintonizador.
Presione SOURCE hasta que se visualice Tuner.
Cierre de la presentación visual
Apague el motor del vehículo.
La presentación visual será automáticamente
cerrada por el modo de apertura/cierre
automático. Si la presentación visual no cierra
automáticamente, gire de nuevo el interruptor
de encendido a ON (o a ACC) y presione
OPEN/CLOSE.
Notas
• El modo de apertura/cierre automático operará la presentación visual de la manera siguiente.
— Cuando el interruptor de encendido está en
OFF (desactivado) mientras la
presentación visual es desplegada, la presentación visual será cerrada en aproximadamente 6 segundos.
— Cuando el interruptor de encendido está en
ON (o girado a ACC), la presentación visual
será desplegada automáticamente.
— Instalar el panel de operación despliega la
presentación visual automáticamente.
(Refiérase a la página 8).
• El modo de apertura/cierre automático se
puede activar/desactivar. (Refiérase la página
55.)
• Cuando el interruptor de encendido está
girado a OFF (desactivado) después que la
presentación visual haya sido cerrada,
girando el interruptor de encendido de nuevo
a ON (o girándolo a ACC), no despliega la
presentación visual. En este caso, presione
OPEN/CLOSE para desplegar la presentación
visual.
Ajuste del ángulo de la pantalla
El ángulo de la pantalla de este producto cambia en tanto se mantiene presionando el botón
ANGLE.
Ajuste la pantalla a un ángulo que sea fácilmente visible.
Importante
• Si escucha la presentación visual golpeando
contra la consola o tablero de su vehículo,
presione ANGLE en el lado (–) para mover la
pantalla un poco hacia adelante.
TEXT
Encendido y Apagado
Page 74

Sp
14
02
Sección
Notas
• Cuando ajuste el ángulo, asegúrese de
presionar el botón ANGLE. Forzando el ajuste
de la presentación visual a mano puede
dañarla.
• Al ángulo ajustado de la presentación visual
será memorizada y retornará
automáticamente la siguiente vez que la
presentación visual sea desplegado.
Selección de una fuente
Puede seleccionar la fuente que desea
escuchar. Para cambiar al lector de CD i
ncorporado, coloque un disco en este producto
(solamente AVH-P6450CD) (refiérase a la
página 22).
Presione SOURCE para seleccionar una
fuente.
Presione SOURCE repetidamente para cambiar
entre las siguientes fuentes:
Lector de CD incorporado (AVH-P6450CD)—
Televisor—VIDEO—Sintonizador—DVD (uno
sólo disco/lector de multi-DVD)—Lector de
Multi-CD—Unidad externa 1—Unidad externa
2—AUX
Notas
• En los siguientes casos, la fuente sonora no
cambiará:
— Cuando un producto correspondiente a
cada fuente no esté conectado a este
producto.
— Cuando no hay un disco cargado en este
producto (solamente AVH-P6450CD).
— Cuando no hay un cargador cargado en el
lector de Multi-CD.
— Cuando no hay un cargador cargado en el
lector de Multi-DVD.
— Cuando AUX (entrada auxiliar) no está
desactivada (refiérase a la página 51).
• Unidad externa se refiere a un producto
Pioneer (tal como un producto disponible en
el futuro) que, mientras sea incompatible
como una fuente, permite el control de
funciones básicas por este producto. Dos
unidades externas se pueden controlar por
este producto. Cuando se conectan dos
unidades externas, la asignación de ellas
para unidad externa 1 o unidad externa 2 se
ajusta automáticamente por este producto.
• Cuando se conecta el cable azul/blanco de
este producto al terminal de control de relé de
antena automática del automóvil, la antena
del automóvil se extiende cuando se enciende
el producto. Para retraer la antena, cambie a
otra fuente.
Apagado del sistema
Presione SOURCE durante por lo menos un
segundo para apagar el sistema.
Encendido y Apagado
Page 75

Operaciones comunes
Sp
15
English
Español
Deutsch
Français
Italiano
Nederlands
03
Sección
Visualización de fuente
Se visualiza la información de cada fuente.
1 Nombre de la fuente
Nombre de la fuente seleccionada.
2 Estado de la fuente
Estado de la fuente seleccionada.
3 Visualización del ecualizador
Estado de ajuste del ecualizador.
Visualización de los menús
(e.j., Sintonizador)
VVisualización de los menús de cada fuente,
para la realización de ajustes.
1 Menú de fuente
Puede acceder a los menús para realizar
varios ajustes para cada fuente. Los ajustes
AUDIO y SET UP son iguales para cada
fuente.
2 Indica si hay más para este ítem.
Presione ∞ y se visualiza la continuación del
ítem. Presione 5 para volver al ítem prece-
dente.
1 Presione A.MENU en cada visualización de
fuente.
Se visualiza el menú para la fuente visualizada.
e.j., Menú del sintonizador
2 Presione 5 o ∞ para seleccionar un ítem
de menú, y presione A.MENU.
Ejecuta el ítem seleccionado.
Notas
• Seleccione BACK en la visualización de
MENU o presione BACK para volver a la visualización precedente.
También puede presionar WIDE en la unidad
principal para volver a la visualización precedente.
• Si no opera la función de audio dentro de
aproximadamente 30 segundos, la unidad
vuelve automáticamente a la visualización de
fuente. Si no se realiza ninguna operación
dentro de aproximadamente 30 segundos, la
visualización de MENU se cancela automáticamente.
3
1 2
1
2
Page 76

Visualizador
Sp
16
04
Sección
Cambio del modo amplio
Puede seleccionarse un modo deseado para
ampliar una imagen de 4:3 a una de 16:9.
1 Cuando esté vendo una imagen, presione
WIDE.
El modo amplio cambia en el siguiente orden:
Completo (FULL) — Justo (JUST) — Cine (CINEMA) — Zoom (ZOOM) — Normal (NORMAL)
Completo (FULL)
Una imagen de 4:3 es ampliada solamente en la
dirección horizontal, permitiéndole disfrutar
una imagen de TV (imagen normal) sin ninguna
omisión.
Justo (JUST)
La imagen es ampliada ligeramente en el centro
y la cantidad de ampliación aumenta horizontalmente en los extremos, permitiéndolo disfrutar
una imagen de 4:3 sin observar ninguna distorsión aun en una pantalla amplia.
Cine (CINEMA)
Una imagen es ampliada en la misma proporción como FULL o ZOOM en la dirección horizontal, y mediante una proporción intermedia
entre FULL y ZOOM en la dirección vertical; es
ideal para una imagen de tamaño cine (imagen
de pantalla amplia) en donde los subtítulos
quedan afuera.
Zoom (ZOOM)
Una imagen de 4:3 es ampliada en la misma
proporción tanto horizontal como vertical, es
ideal para una imagen de tamaño cine (imagen
de pantalla amplia).
Normal (NORMAL)
Una imagen de 4:3 es visualizada tal como es,
sin proporcionar una sensación de distorsión ya
que sus proporciones son las mismas que en la
de una imagen normal.
Notas
• Se pueden memorizar ajustes diferentes para
el video de AV y VIDEO. Además, también se
pueden memorizar diferentes ajustes para un
componente (AV) conectado a la entrada
AV-BUS.
• El modo amplio usado para el ajuste de menú
se conmuta a Completo (FULL). El modo
amplio vuelve a su ajuste normal cuando se
borra el ajuste del menú.
Page 77

Sp
17
English
Español
Deutsch
Français
Italiano
Nederlands
04
Sección
Visualizador
• Cuando se ve vídeo en un modo amplio que
no coincida con su razón de aspecto original,
la imagen puede aparecer da manera diferente.
• Recuerde que usar la función de modo amplio
de este sistema para propósitos comerciales
o públicos puede constituir una infracción de
los derechos de autor protegidos por la Ley de
Propiedad Intelectual.
• La imagen puede aparecer un poco indefinida
cuando se ve en el modo CINEMA o ZOOM.
• La fuente sin vídeo es siempre FULL.
Ajuste de vídeo
Los ajustes BRIGHT, CONTRAST, COLOR y HUE
se almacenan para cada fuente.
1 Presione WIDE en la unidad principal
durante 2 segundos o más en la visualización
de la fuente que desea ajustar.
Se visualiza VIDEO ADJUST.
2 Presione 5 o ∞ y seleccione un ítem:
Parámetros ajustables:
• BRIGHT (intensidad del negro)
• CONTRAST (contraste)
• COLOR (intensidad del color)
• HUE (matiz)
• DIMMER (brillo)
3 Ajuste el parámetro con 2 o 3.
4 Presione BAND/ESC para cancelar el ajuste
de vídeo.
Notas
• Presione WIDE en la unidad principal para
volver a la visualización precedente.
• Para volver a la visualización de frecuencia,
presione BAND/ESC.
• Los parámetros BRIGHT, CONTRAST, COLOR
y HUE pueden ajustarse dentro de una gama
de –24 a +24.
• Las configuraciones de BRIGHT y CONTRAST
se almacenan separadamente para ambientes luminosos (de día) y ambientes oscuros
(de noche).
• Una marca amarilla ( ) o marca azul ( )
se visualiza a la derecha de BRIGHT y
CONTRAST en la pantalla, respectivamente,
según que el sensor de luz ambiental del
panel frontal determine brillantez u oscuridad.
• No es posible ajustar HUE para vídeo PAL.
• No se puede ajustar los ítems COLOR y HUE
de la imagen para la fuente sin vídeo.
• Se pueden memorizar ajustes diferentes para
el video de AV y VTR. Además, también se
pueden memorizar diferentes ajustes para un
componente (AV) conectado a la entrada
AV-BUS.
Page 78

Visualizador
Ajustes DIMMER (regulador de
la intensidad luminosa)
La visualización puede ponerse difícil si se ve
vídeo durante un tiempo prolongado con la
pantalla demasiado brillante de noche o cuando
la luz ambiental se oscurece. Es posible seleccionar el nivel de brillo de tres configuraciones:
visualización de día, al atardecer, o de noche.
Después de la selección, este producto ajusta
automáticamente el brillo a un nivel óptimo
dentro del margen de ajuste seleccionado y con
relación a la luz ambiental.
1 Seleccione DIMMER del PICTURE SELECT
MENU. (Refiérase al ajuste de vídeo.)
Nivel de luz externa
Amarillo: brillante (de día)
Rojo: brillo intermedio (atardecer)
Azul: oscuro (de noche)
2 Ajuste el brillo. Ajuste los parámetros con
2 o 3.
Este nivel indica el brillo de la pantalla que está
siendo ajustada. Cuanto más se mueve el
amarillo a la derecha, más brillante quedará la
pantalla.
Notas
• El nivel óptimo de luz usado como un estándar para el ajuste DIMMER se indica por la
marca que se muestra en el paso 3 y su posición. Las marcas que indican el brillo actual
para las opciones BRIGHT y CONTRAST
pueden diferir ligeramente.
• El nivel de luz externa se puede ajustar a
oscuro, intermedio y brillante, y cada configuración se almacena.
Sp
18
04
Sección
Page 79

Sintonizador
Sp
19
Audición de radio
Estos son los pasos básicos necesarios para
operar la radio. Operaciones más avanzadas del
sintonizador se proveen desde la página 20.
1 Indicador BAND
Visualiza cuál banda la radio está
sintonizada: AM o FM.
2 Indicador FREQUENCY
Visualiza la frecuencia en que el sintonizador
está sintonizado.
3 Indicador STEREO (ST)
Visualiza que la frecuencia seleccionada
está siendo transmitida en estéreo.
4 Indicador PRESET NUMBER
Visualiza la emisora preajustada
seleccionada.
1 Presione SOURCE para seleccionar el
sintonizador.
Presione SOURCE hasta que se visualice Tuner.
2 Utilice VOLUME para ajustar el nivel de
sonido.
Gire para aumentar o disminuir el volumen.
3 Presione BAND/ESC para seleccionar una
banda.
Presione BAND/ESC hasta que se visualice la
banda deseada: FM1, FM2, FM3 para FM o AM.
4 Para realizar la sintonía manual, presione
2 o 3 rápidamente.
Las frecuencias se desplazan hacia arriba o
hacia abajo paso por paso.
5 Para realizar la sintonía por búsqueda,
presione 2 o 3 durante aproximadamente un
segundo y suelte.
El sintonizador explorará las frecuencias hasta
que encuentre una emisora con suficiente
intensidad para una buena recepción.
• Se puede cancelar la sintonía por búsqueda
presionando 2 o 3 rápidamente.
• Si mantiene presionado 2 o 3, puede saltar
las emisoras. La sintonía por búsqueda empieza
así que se suelta el botón.
Nota
• Cuando la frecuencia seleccionada está
siendo transmitida en estéreo, el indicador
STEREO (ST) se ilumina.
English
Español
Deutsch
Français
Italiano
Nederlands
05
Sección
1 24
3
Page 80

Sp
20
05
Sección
Sintonizador
Introducción a las operaciones
avanzadas del sintonizador
1 Visualización FUNCTION
Visualiza el estado de función.
1 Presione A.MENU cuando se visualicen las
indicaciones de la fuente del TUNER.
Se visualiza el menú.
2 Seleccione TUNER y presione A.MENU.
Se visualizan las indicaciones del TUNER
MENU de la siguiente manera:
BSM (memoria de las mejores emisoras)
LOCAL (sintonía por búsqueda local)
P.CH MEMORY (memoria de canal preajustado)
• Seleccione BACK en la visualización del
menú o presione BACK para volver a la visualización precedente.
También puede presionar WIDE en la unidad
principal para volver a la visualización precedente.
• Para volver a la visualización de la frecuencia,
presione BAND/ESC y DISP.
• Si se selecciona la banda AM, se puede seleccionar solamente BSM, LOCAL o P. C H
MEMORY.
Nota
• Si no se opera la función dentro de
aproximadamente 30 segundos, la pantalla
vuelve automáticamente a la visualización de
la frecuencia.
Almacenaje de frecuencias
Se puede fácilmente almacenar hasta seis
frecuencias de emisoras para una llamada
subsiguiente con 5 o ∞.
1 Presione 5 o ∞ para seleccionar P.CH MEM-
ORY del TUNER MENU, y presione A.MENU.
Se visualizan las indicación de ajuste de P.CH
MEMORY.
2 Ajuste la frecuencia con 2 o 3.
Si continua presionando 2 o 3, se busca una
frecuencia de señal fuerte automáticamente,
que termina cuando se encuentra una.
3 Seleccione un número de canal
preajustado con 5 o ∞ y presione A.MENU
para preajustar tal frecuencia.
4 Si quiere preajustar las frecuencias una
tras la otra, utilice 5 o ∞ para mover al próx-
imo canal preajustado que desea utilizar para
almacenar una frecuencia, y realice la misma
operación.
Cuando termine, presione BAND/ESC para
volver a la visualización precedente.
El número seleccionado destellará en el indicador
PRESET NUMBER y permanecerá iluminado. La
frecuencia de la emisora seleccionada ha sido
almacenada en la memoria.
Se puede usar 5 y ∞ para llamar las frecuencias
de radio designadas a P1-6 (P.CH MEMORY).
1
Page 81

Sp
21
English
Español
Deutsch
Français
Italiano
Nederlands
05
Sección
Sintonizador
Sintonía de señales fuertes
La sintonía por búsqueda local le permite
sintonizar solamente las emisoras con señales
suficientemente fuertes para una buena
recepción.
1 Presione 5 o ∞ en el TUNER MENU para
seleccionar LOCAL, y presione A.MENU.
Se visualizan las indicaciones de ajuste LOCAL.
2 Presione 2 o 3 para ajustar la sensibilidad.
Hay cuatro niveles de sensibilidad para FM y
dos niveles para AM:
FM: OFF—1—2—3—4
AM: OFF—1—2
El ajuste 4 permite la recepción solamente de
las emisoras más fuertes, mientras los ajustes
más bajos permiten la recepción
progresiva de las emisoras más débiles.
Almacenaje de las frecuencias de
radio más fuertes
La función BSM (Memoria de las Mejores
Emisoras) le permite almacenar automática-
mente las seis frecuencias de radiodifusión
más fuertes.
1 Seleccione BSM del TUNER MENU, y
presione A.MENU.
Se visualizan las indicaciones del ajuste BSM.
2 Presione 5 para activar la función BSM.
BSM comienza a destellar. Mientras BSM está
destellando, las seis emisoras más fuertes se
almacenan en el orden de las señales más
fuertes. Cuando se completa la operación, BSM
para de destellar.
• Para cancelar el proceso de almacenaje,
presione ∞.
Notas
• Hasta 18 emisoras FM, 6 para cada una de las
tres bandas FM, y 6 emisoras AM se pueden
almacenar en la memoria.
• Ta mb ién se puede usar 5 y ∞ para llamar las
frecuencias de radio designadas a los
botones PRESET TUNING.
• Si hay menos de seis frecuencias de radiodifusión, las frecuencias almacenadas anteriormente permanecen en la memoria.
Page 82

Sp
22
06
Sección
Lector de CD incorporado
Reproducción de un CD
(Solamente AVH-P6450CD)
Estos son los pasos básicos necesarios para
reproducir un CD con su lector de CD incorporado.
Las operaciones más avanzadas del lector de
CD se proveen desde la página 23.
1
Indicador TRACK NUMBER
Visualiza la pista que está siendo
reproducida actualmente.
2
Indicador PLAY TIME
Visualiza el tiempo transcurrido de
reproducción de la pista actual.
3 DISC TITLE
Cuando reproduce un disco CD TEXT, se
visualiza el título del disco. Con CDs normales que usualmente no tienen los títulos
grabados en los mismos, se visualiza NO
TITLE (refiérase a la página 25).
1 Coloque un CD en la abertura para CD.
La reproducción comenzará automáticamente.
• Después de insertar un CD, presione SOURCE
para seleccionar el lector de CD incorporado.
Abertura para CD
Botón
EJECT
• Se puede expulsar un CD presionando EJECT
en la unidad principal.
• Para evitar un malo funcionamiento,
asegúrese de que ningún metal póngase en
contacto con el panel de operación cuando éste
esté extraído.
2 Utilice VOLUME para ajustar el nivel de
sonido.
Gire para aumentar o disminuir el volumen.
3 Para realizar el avance rápido o retroceso,
mantenga presionado 2 o 3.
4 Para saltar hacia atrás o hacia adelante
para otra pista, presione 2 o 3.
Presionar 3 salta al inicio de la próxima pista.
Presionar 2 una vez salta al inicio de la pista
actual. Presionar de nuevo salta a la pista
precedente.
Notas
• El lector de CD incorporado reproduce un CD
estándar, de 12 o 8 cm (simple) a la vez. No
utilice un adaptador para reproducir discos
de 8 cm.
• No coloque nada que no sea un CD en la
abertura para CD.
• Si no se puede insertar un disco completamente
o si después de insertar un disco, el disco no
se reproduce, compruebe que el lado de la
etiqueta del disco está hacia arriba. Presione
EJECT en la unidad principal para expulsar el
disco, y verifique si no hay daños en el disco
antes de insertarlo de nuevo.
• Si el lector de CD incorporado no funciona
apropiadamente, un mensaje de error como
ERROR-11 puede aparecer. Consulte
Comprensión de los mensajes de error del
lector de CD incorporado en la página 57.
• No suelte el panel de operación con un CD
insertado parcialmente en la abertura para
CD, ya que esto puede arañar o dañar el
disco.
TEXT
3
1 2
Page 83

Sp
23
English
Español
Deutsch
Français
Italiano
Nederlands
06
Sección
Lector de CD incorporado
Introducción a las operaciones
avanzadas del lector de CD
incorporado (Solamente AVHP6450CD)
1 Visualización FUNCTION
Visualiza el estado de la función.
1 Presione A.MENU cuando se visualicen las
indicaciones de la fuente de CD.
Se visualiza MENU.
2 Seleccione el disco compacto y presione
A.MENU.
El menú de CD se visualiza de la siguiente manera:
REPEAT (reproducción repetida)
RANDOM (reproducción aleatoria)
SCAN (reproducción con exploración)
TRACK LIST (lista de las pistas)
PAUSE (pausa)
TITLE EDIT (edición de título)
Puede operar una función deseada. Para los
detalles, refiérase a las páginas para cada una
de las funciones.
• Cuando reproduce CDs normales que no sean
discos CD TEXT, no se puede seleccionar
TRACK LIST.
• Durante la reproducción de un disco CD TEXT,
no se puede seleccionar TITLE EDIT.
• Seleccione BACK en la visualización de menú
o presione BACK para volver a la visualización
precedente.
También puede presionar WIDE en la unidad
principal para volver a la visualización
precedente.
• Para volver a la visualización de reproducción,
presione BAND/ESC.
Nota
• Si no se opera la función dentro de
aproximadamente 30 segundos, la pantalla
vuelve automáticamente a la visualización de
reproducción.
Repetición de reproducción
La reproducción repetida le permite escuchar la
misma pista de nuevo.
1 Presione 5 o ∞ para seleccionar REPEAT
del CD MENU, y presione A.MENU.
Se visualizan las indicaciones de REPEAT
ON/OFF.
2 Presione 5 para activar la reproducción
repetida.
REPEAT :ON aparece en la pantalla. La pista
que está siendo reproducida se reproducirá y se
repetirá.
3 Presione ∞ para desactivar la reproducción
repetida.
REPEAT :OFF aparece en la pantalla. La pista
que está siendo reproducida continuará con la
reproducción y después reproducirá la próxima
pista.
Nota
• Si no se realiza una búsqueda musical o
avance rápido/retroceso, la reproducción
repetida se cancela automáticamente.
Reproducción de pistas en un
orden aleatorio
La reproducción aleatoria le permite reproducir
las pistas en el CD en un orden aleatorio.
1 Presione 5 o ∞ para seleccionar RANDOM
del CD MENU, y presione A.MENU.
Se visualizan las indicaciones de RANDOM
ON/OFF.
2 Presione 5 para activar la reproducción
aleatoria.
1
Page 84

Sp
24
06
Sección
Lector de CD incorporado
RANDOM :ON aparece en la pantalla. Las pistas
se reproducirán en un orden aleatorio.
3 Presione ∞ para desactivar la reproducción
aleatoria.
RANDOM :OFF aparece en la pantalla. La
reproducción de las pistas continuará en el
orden normal.
Exploración de las pistas de un CD
La reproducción con exploración le permite
escuchar los primeros 10 segundos de cada
pista de un CD.
1 Presione 5 o ∞ para seleccionar SCAN del
CD MENU, y presione A.MENU.
Se visualizan las indicaciones de SCAN
ON/OFF.
2 Presione 5
para activar la reproducción
con exploración.
SCAN:ON aparece en la pantalla. Los primeros
10 segundos de cada pista se
reproducirán.
3 Cuando encuentre la pista deseada,
presione ∞ para desactivar la reproducción
con exploración.
SCAN:OFF aparece en la pantalla. La
reproducción de la pista continuará.
• Si la pantalla ha vuelto automáticamente a la
visualización de reproducción, seleccione
SCAN de nuevo presionando A.MENU.
Nota
• En el término de la exploración de un CD, la
reproducción normal de las pistas comenzará
de nuevo.
Reproducción de la lista de pistas
Cuando reproduce discos CD TEXT, puede
seleccionar y reproducir las pistas desde la lista
de pistas visualizada del título.
1 Presione 5 o ∞ para seleccionar TRACK
LIST del CD MENU, y presione A.MENU.
Se visualiza el TRACK LIST.
2 Presione 5 o ∞ para seleccionar la pista
que desea reproducir del LIST, y presione
A.MENU.
La reproducción de la pista seleccionada
comienza. Después de esto, las pistas se reproducen en orden.
Notas
• Durante la reproducción de pista, las indicaciones de lista se ponen en verde.
• Hasta seis pistas en la lista pueden
visualizarse a la vez. Presione 2 o 3 para
visualizar la lista anterior o siguiente. Cuando
la primera o sexta pista se indica en la lista
visualizada, presionar 5 o ∞ cambia a la
página anterior o siguiente.
• Títulos de hasta 10 caracteres pueden visualizarse.
• La visualización de algunos caracteres
pueden que no sea posible.
Pausa de la reproducción de CD
La pausa le permite parar temporalmente la
reproducción del CD.
1 Presione 5 o ∞ para seleccionar PAUSE del
CD MENU, y presione A.MENU.
Se visualizan las indicaciones de PAUSE
ON/OFF.
2 Presione 5
para activar la pausa.
PAUSE :ON aparece en la pantalla. La
reproducción de la pista actual se detiene.
3 Presione ∞ para desactivar la pausa.
PAUSE :OFF aparece en la pantalla. La
reproducción continuará desde el mismo punto
donde la pausa ha sido activada.
Page 85

Sp
25
English
Español
Deutsch
Français
Italiano
Nederlands
06
Sección
Lector de CD incorporado
Uso de las funciones de título de
disco
Se pueden introducir títulos de CD y visualizarlos.
Al colocar el CD con título la próxima vez, el
título del CD se visualizará.
Introducción de títulos de disco
El título de disco le permite introducir títulos de
CD de hasta 10 letras, y hasta 48 títulos de CD
se pueden almacenar en el lector de CD
incorporado.
1 Reproduzca el CD al cual desea introducir
un título.
2 Presione 5 o ∞ para seleccionar TITLE
EDIT del CD MENU, y presione A.MENU.
Se visualizan las indicaciones del ajuste TITLE
EDIT.
• Cuando reproduce un disco CD TEXT, no se
puede seleccionar TITLE EDIT. El título de disco
ya se ha grabado en un disco CD TEXT.
3 Presione A.MENU para seleccionar el tipo
de carácter deseado.
Presione A.MENU repetidamente para cambiar
entre los siguientes tipos de carácter:
Alfabeto (mayúsculas), Números y símbolos —
Alfabeto (minúsculas)
4 Presione 5 o ∞ para seleccionar una letra
del alfabeto.
Cada presión de 5 visualiza una letra del
alfabeto en el orden de A B C ... X Y Z, números y
símbolos en 1 2 3 ... @ # <. Cada presión de ∞
visualiza una letra en el orden inverso, tal como
Z Y X ... C B A.
5 Presione 3 para mover el cursor a la
próxima posición de carácter.
Cuando se visualice la letra deseada, presione
3 para mover el cursor a la próxima posición y
seleccione la próxima letra. Presione 2 para
mover hacia atrás en la pantalla.
6 Mueva el cursor a la última posición
presionando 3 después de introducir el título.
Al presionar 3 una vez más, el título se almacena
en la memoria.
7 Presione BAND/ESC para volver a la
visualización de reproducción.
Notas
• Los títulos permanecen en la memoria, aún
después que se quita el disco del lector de CD
incorporado, y se llaman cuando se colocan
los discos correspondientes de nuevo.
• Después que datos para 48 discos han sido
almacenados en la memoria, los datos para un
nuevo disco sobreponen los dados más antiguos.
• Si se conecta un reproductor de Multi-CD, se
puede ingresar títulos para hasta 100 discos.
Visualización de títulos en discos
CD TEXT
Presione DISP cuando reproduzca un disco
CD TEXT.
Presione DISP repetidamente para cambiar
entre las siguientes visualizaciones:
Track Title (Título de pista) — Disc Artist Name
(Nombre de artista del disco) —Track Artist
Name (Nombre de artista de la pista)
La parte más baja de la visualización de estado
de fuente cambia como se muestra arriba.
• Si una información específica no ha sido
grabada en un disco CD TEXT, se visualizará
NO TITLE.
Page 86

Sp
26
07
Sección
Lector de Multi-CD
Reproducción de un CD
Se puede usar este sistema para controlar un
lector de Multi-CD, que se vende separadamente.
Estos son los pasos básicos necesarios para
reproducir un CD con su lector de Multi-CD. Las
operaciones más avanzadas del lector de MultiCD se proveen desde la página 27.
1
Indicador DISC NUMBER
Visualiza el disco que está siendo
reproducido actualmente.
2
Indicador TRACK NUMBER
Visualiza la pista que está siendo
reproducida actualmente.
3
Indicador PLAY TIME
Visualiza el tiempo transcurrido de
reproducción de la pista actual.
4 DISC TITLE
Cuando reproduce un disco CD TEXT, se
visualiza el título del disco. Con CDs normales que usualmente no tienen los títulos
grabados en los mismos, se visualiza NO
TITLE (refiérase a la página 32).
1 Presione SOURCE para seleccionar el lector
de Multi-CD.
Presione SOURCE hasta que se visualice Multi-
CD.
2 Utilice VOLUME para ajustar el nivel de
sonido.
Gire para aumentar o disminuir el volumen.
3 Seleccione un disco con 5 o ∞.
• Presione 5 para seleccionar 1, 2, 3..., presione
∞ para seleccionar 1, 6, 5...
4 Para realizar el avance rápido o retroceso,
mantenga presionado 2 o 3.
5 Para saltar hacia atrás o hacia adelante
para otra pista, presione 2 o 3.
Presionar 3 salta al inicio de la próxima pista.
Presionar 2 una vez salta al inicio de la pista
actual. Presionar de nuevo salta a la pista
precedente.
Notas
• Mientras el lector de Multi-CD realiza las
operaciones preparatorias, se visualiza Ready.
• Si el lector de Multi-CD no funciona
apropiadamente, un mensaje de error como
ERROR-11 puede aparecer. Consulte el
manual de instrucciones del lector de
Multi-CD.
• Si no hay discos en el cargador de CD del
lector de Multi-CD, se visualiza NO DISC.
Dependiendo del lector de Multi-CD que
utilice con este producto, la visualización
puede ser blanca.
Lector de Multi-CD de 50 discos
Solamente las funciones descritas en este
manual se soportan para los lectores de MultiCD de 50 discos.
1
2
3
4
Page 87

Sp
27
English
Español
Deutsch
Français
Italiano
Nederlands
07
Sección
Lector de Multi-CD
Introducción a las operaciones
avanzadas de lector de Multi-CD
1 Visualización FUNCTION
Visualiza el estado de la función.
1 Cuando se visualizan las indicaciones MCD, presione A.MENU.
Se visualiza el MENU.
2 Seleccione Multi-CD, y presione A.MENU.
El M-CD MENU se visualiza de la siguiente manera:
REPEAT (reproducción repetida)
RANDOM (reproducción aleatoria)
SCAN (reproducción con exploración)
TRACK.LIST (lista de títulos de disco)
PAUSE (pausa)
COMP (compresión y DBE)
ITS-PLAY (reproducción ITS)
ITS-MEMORY (memoria ITS)
TITLE EDIT (edición de título)
Puede operar las funciones deseadas. Para los
detalles, refiérase a las páginas para cada una
de las funciones.
• Seleccione BACK en la visualización del
menú o presione BACK para volver a la visualización precedente.
También puede presionar WIDE en la unidad
principal para volver a la visualización precedente.
• Para volver a la visualización de reproducción,
presione BAND/ESC.
Nota
• Si no se opera la función dentro de
aproximadamente 30 segundos, la pantalla
vuelve automáticamente a la visualización de
reproducción.
Repetición de reproducción
Hay tres gamas de repetición para el lector de
Multi-CD: M-CD (repetición de todos los discos
en el lector de Multi-CD), TRACK (repetición de
una pista), y DISC (repetición de disco)
1 Presione 5 o ∞ para seleccionar REPEAT
del M-CD MENU, y presione A.MENU.
Se visualizan las indicaciones de REPEAT
ON/OFF.
2 Presione 2 o 3 para seleccionar la gama
de repetición.
Presione 2 o 3 hasta que la gama de repetición
deseada aparezca en la pantalla.
• M-CD — Repite todos los discos en el lector de Multi-CD
• TRACK — Repite solamente la pista actual
• DISC — Repite el disco actual
Notas
• Si se seleccionan otros discos durante la
reproducción repetida, la gama de repetición
cambia a M-CD (repetición de todos los discos
en el lector de Multi-CD).
• Si se realiza la búsqueda musical o avance
rápido/retroceso durante la repetición TRACK
(repetición de una pista), la gama de repetición
cambia a DISC (repetición de disco).
1
Page 88

Sp
28
07
Sección
Lector de Multi-CD
Reproducción de las pistas en un
orden aleatorio
La reproducción aleatoria le permite reproducir
las pistas en un orden aleatorio dentro da gama
de repetición M-CD (repetición de todos los
discos en el lector de Multi-CD) y DISC (repetición de disco).
1 Seleccione la gama de repetición.
Consulte Repetición de reproducción en la
página 27.
2 Presione 5 o ∞ para seleccionar RANDOM
del M-CD MENU, y presione A.MENU.
Se visualizan las indicaciones de RANDOM
ON/OFF.
3 Presione 5
para activar la reproducción
aleatoria.
Random :ON aparece en la pantalla. Las pistas
se reproducirán en un orden aleatorio dentro de
la gama M-CD (repetición de todos los discos en
el lector de Multi-CD) o DISC (repetición de
disco) seleccionada anteriormente.
4 Presione ∞ para desactivar la reproducción
aleatoria.
Random :OFF aparece en la pantalla. La
reproducción de las pistas continuará en el
orden normal.
Exploración de CDs y pistas
Mientras usa la gama de repetición DISC
(repetición de disco), el comienzo de cada pista
en el disco seleccionado se reproduce cerca de
10 segundos. Mientras usa la gama de repetición
M-CD (repetición de todos los discos en el lector
de Multi-CD), el comienzo de cada pista de cada
disco se reproduce cerca de 10 segundos.
1 Seleccione la gama de repetición.
Consulte Repetición de reproducción en la
página 27.
2 Presione 5 o ∞ para seleccionar SCAN del
M-CD MENU, y presione A.MENU.
Se visualizan las indicaciones de SCAN
ON/OFF.
3 Presione 5
para activar la reproducción
con exploración.
Scan :ON aparece en la pantalla. Los primeros
10 segundos de cada pista del disco actual (o la
primera pista de cada disco) se reproducirán.
4 Cuando encuentre la pista (o disco)
deseada(o), presione ∞ para desactivar la
exploración.
Scan :OFF aparece en la pantalla. La reproducción
de la pista (o disco) continuará.
• Si la pantalla ha vuelto automáticamente a la
visualización de reproducción, seleccione
SCAN de nuevo presionando A.MENU.
Nota
• Al término de la exploración de pistas o discos,
la reproducción normal de las pistas comenzará
de nuevo.
Reproducción de la lista de
pistas
Cuando reproduce discos CD TEXT, se puede
seleccionar y reproducir las pistas de la lista de
pistas visualizada del título.
1 Presione 5 o ∞ para seleccionar TRACK
LIST del M-CD MENU, y presione A.MENU.
Se visualiza la lista de pistas.
2 Presione 5 o ∞ para seleccionar la pista
que desea reproducir de la lista, y presione
A.MENU.
La reproducción de la pista seleccionada
comienza. Después de esto, las pistas se reproducen en orden.
Page 89

Sp
29
English
Español
Deutsch
Français
Italiano
Nederlands
07
Sección
Lector de Multi-CD
Notas
• Durante la reproducción de pista, las indicaciones de lista se ponen en verde.
• Hasta seis pistas en la lista pueden
visualizarse a la vez. Presione 2 o 3 para
visualizar la lista anterior o siguiente. Cuando
la primera o sexta pista se indica en la lista
visualizada, presionar 5 o ∞ cambia a la
página anterior o siguiente.
• Títulos de hasta 10 caracteres pueden visualizarse.
• La visualización de algunos caracteres
pueden que no sea posible.
Pausa de la reproducción de un
CD
La pausa le permite parar temporalmente la
reproducción del CD.
1 Presione 5 o ∞ para seleccionar PAUSE del
M-CD MENU, y presione A.MENU.
Se visualizan las indicaciones de PAUSE
ON/OFF.
2 Presione 5 para activar la pausa.
Pause :ON aparece en la pantalla. La
reproducción de la pista actual se detiene.
3 Presione ∞ para desactivar la pausa.
Pause :OFF aparece en la pantalla. La
reproducción continuará desde el mismo punto
donde la pausa ha sido activada.
Uso de la compresión y énfasis
de los graves
Estas funciones se pueden usar solamente con
un lector de Multi-CD que las soporta.
El uso de las funciones COMP (compresión) y
DBE (énfasis de graves dinámicos) le permite
ajustar la calidad sonora de la reproducción del
lector de Multi-CD. Cada una de las funciones
tiene un ajuste de dos pasos. La función COMP
equilibra la salida de los sonidos más fuertes y
más suaves en volúmenes altos. La función
DBE intensifica los niveles de graves para
proporcionar un sonido de reproducción más
fuerte. Escuche cada uno de los efectos y utilice
la función que enfatiza más la reproducción de
la pista o CD que esté escuchando.
1 Presione 5 o ∞ para seleccionar COMP del
M-CD MENU, y presione A.MENU.
Se visualizan las indicaciones del ajuste COMP.
• Si el lector de Multi-CD no soporta la función
COMP/DBE, se visualiza NO COMP cuando se
intenta seleccionar la función.
2 Presione 5 o ∞ para seleccionar el ajuste
favorito.
Presione 5 o ∞ repetidamente para cambiar
entre los siguientes ajustes:
COMP OFF—COMP 1—COMP 2—COMP OFF—
DBE 1—DBE 2
Uso de listas de reproducción ITS
La función ITS (selección instantánea de pista) le
permite crear una lista de reproducción de sus
pistas favoritas desde el cargador en el lector de
Multi-CD. Después de añadir sus pistas favoritas a la
lista de reproducción, puede activar la reproducción
ITS y reproducir solamente sus pistas favoritas.
Creación de una lista de reproducción
con la programación ITS
Se puede usar la función ITS para introducir y
reproducir hasta 99 pistas por disco, para hasta
100 discos (con título de disco).
Con los reproductores de multi-CD vendidos antes
de CDX-P1250 y CDX-P650, se pueden almacenar
hasta 24 pistas en la lista de reproducción).
Page 90

Sp
30
07
Sección
Lector de Multi-CD
Cuando utilice un lector de Multi-CD que no
tenga una función ITS, no se puede seleccionar
la reproducción ITS PLAY.
1 Reproduzca el CD que desea programar.
Presione 5 o ∞ para seleccionar el CD.
2 Presione 5 o ∞ para seleccionar ITS MEM-
ORY del M-CD MENU, y presione A.MENU.
Se visualizan las indicaciones del ajuste ITS
MEMORY.
3 Seleccione la pista deseada presionando
2 o 3.
4 Presione 5
para almacenar la pista que
está siendo reproducida actualmente en ITS
MEMORY.
MEMORY se visualiza brevemente y la selección
actual se añade a la lista de reproducción. La
pantalla visualiza ITS de nuevo.
Notas
• Después que datos para 100 discos han sido
almacenados en la memoria, los datos para
un nuevo disco sobreponen los dados más
antiguos.
• Si no opera la función dentro de aproximada-
mente 30 segundos, la pantalla vuelve
automáticamente a la visualización de reproducción.
Borrado de una pista de la lista de
reproducción ITS
Cuando se desea borrar una pista de la lista de
reproducción ITS, se puede hacerlo si la
reproducción ITS está activada.
Si la reproducción ITS ya está activada, salte al
paso 2. Si la reproducción ITS todavía no está
activada, presione A.MENU.
1 Reproduzca el CD que desea borrar una
pista de la lista de reproducción ITS, y active
la reproducción ITS.
Consulte Reproducción de la lista de reproducción
ITS en eata página.
2 Presione 5 o ∞ para seleccionar ITS MEM-
ORY del M-CD MENU, y presione A.MENU.
Se visualizan las indicaciones del ajuste ITS
MEMORY.
3 Seleccione una pista deseada presionando
2 o 3.
4 Presione ∞ para borrar una pista de la lista
de reproducción ITS.
La pista que está siendo reproducida actualmente
se borra de la lista de reproducción ITS y la
reproducción de la próxima pista de la lista
comienza.
• Si no hay pistas de la lista de reproducción en
la gama actual, se visualiza EMPTY y la reproducción normal continua.
5 Presione BAND/ESC para volver a la
visualización de reproducción.
Notas
• Si no opera la función dentro de aproximadamente 30 segundos, la pantalla vuelve
automáticamente a la visualización de reproducción.
Reproducción de la lista de reproducción
ITS
La reproducción ITS le permite escuchar las
pistas que ha introducido en su lista de
reproducción ITS. Cuando se activa la
reproducción ITS, las pistas de la lista de
reproducción ITS en el lector de Multi-CD
comenzarán a reproducirse.
1 Seleccione la gama de repetición.
Consulte Repetición de reproducción en la
página 27.
2 Presione 5 o ∞ para seleccionar ITS PLAY
del M-CD MENU, y presione A.MENU.
Page 91

Sp
31
English
Español
Deutsch
Français
Italiano
Nederlands
07
Sección
Lector de Multi-CD
Se visualizan las indicaciones de ITS PLAY
ON/OFF.
3 Presione 5 para activar la reproducción
ITS.
ITS PLAY :ON aparece en la pantalla. La
reproducción de las pistas en la lista de
reproducción comienza dentro de la gama de
repetición M-CD (repetición de todos los discos
en el lector de Multi-CD) o DISC (repetición de
disco) seleccionada anteriormente.
• Si no hay pistas programadas en la gama de
repetición actual, se visualiza EMPTY.
4 Presione ∞ para desactivar la reproducción
ITS.
ITS PLAY :OFF aparece en la pantalla. La
reproducción continuará en el orden normal
desde la pista o CD que está siendo
reproducida(o) actualmente.
Nota
• Si no opera la función dentro de aproximadamente 30 segundos, la pantalla vuelve
automáticamente a la visualización de reproducción.
Borrado de un CD de la lista de
reproducción ITS
Cuando se desea borrar todas las pistas de un
CD de la lista de reproducción ITS, se puede
hacerlo si la reproducción ITS está desactivada.
1 Reproduzca el CD que desea borrar.
Presione 5 o ∞ para seleccionar el CD.
2 Presione 5 o ∞ para seleccionar ITS
MEMORY
del menú de Multi-CD, y presione
A.MENU.
3 Presione ∞
para borrar todas las pistas del
CD que está siendo reproducido actualmente
de la lista de reproducción ITS.
Todas las pistas del CD que está siendo
reproducido actualmente se borran de la lista
de reproducción y se visualiza CLEAR .
4 Presione BAND/ESC para volver a la visualización de reproducción.
Uso de las funciones de título de
disco
Se puede introducir títulos de CD y visualizarlos.
Después, se puede fácilmente buscar y seleccionar un disco deseado para reproducción.
Introducción de títulos de disco
El título de disco le permite introducir títulos de
CD de hasta 10 letras, y hasta 48 títulos de disco
en el lector de Multi-CD.
1 Reproduzca el CD al cual desea introducir
un título.
Presione 5 o ∞ para seleccionar el CD.
2 Presione 5 o ∞ para seleccionar TITLE
EDIT del M-CD MENU, y presione A.MENU.
Se visualizan las indicaciones del ajuste TITLE
EDIT.
• Cuando reproduce un disco CD TEXT, no se
puede seleccionar TITLE EDIT. El título de disco
ya ha sido grabado en el disco CD TEXT.
3 Presione A.MENU para seleccionar el tipo
de carácter deseado.
Presione repetidas veces A.MENU para cambiar
entre los tipos de caracteres siguientes:
Alfabeto (mayúsculas), Números y símbolos —
Alfabeto (minúsculas)
Page 92

Sp
32
07
Sección
Lector de Multi-CD
4 Presione 5 o ∞ para seleccionar una letra
del alfabeto.
Cada presión de 5 visualiza una letra del
alfabeto en el orden de A B C ... X Y Z, números y
símbolos en 1 2 3 ... @ # <. Cada presión de ∞
visualiza una letra en el orden inverso, tal como
Z Y X ... C B A.
5 Presione 3 para mover el cursor a la
próxima posición de carácter.
Cuando se visualice la letra deseada, presione
3 para mover el cursor a la próxima posición y
seleccione la próxima letra. Presione 2 para
mover hacia atrás en la pantalla.
6 Mueva el cursor a la última posición
presionando 3 después de introducir el título.
Al presionar 3 una vez más, el título se almacena en la memoria.
7 Presione BAND/ESC para volver a la
visualización de reproducción.
Notas
• Los títulos permanecen en la memoria, aún
después que se quita el disco del cargador, y
se llaman cuando se colocan los discos
correspondientes de nuevo.
• Después que datos para 100 discos han sido
almacenados en la memoria, los datos para
un nuevo disco sobreponen los dados más
antiguos.
Visualización de los títulos de discos
Se puede visualizar el título de cualquier disco
que tenga sido almacenado con un título.
Presione DISP.
Presione DISP repetidamente para cambiar
entre las siguientes visualizaciones:
PLAYBACK MODE (Tiempo de reproducción) —
Disc List
La parte más baja de la pantalla cambia como
se indica arriba.
Cuando seleccione Disc List, los títulos de los
discos cargados en el lector de Multi-CD se
visualizan en la pantalla.
• Si no ha sido introducido un título para el
disco, se visualizará NO TITLE.
Uso de las funciones CD TEXT
Estas funciones se pueden usar solamente con
un lector de Multi-CD compatible con CD TEXT.
Algunos discos contienen ciertas informaciones
codificadas durante la fabricación. Estos discos
pueden contener informaciones tales como el
título del disco, título de las pistas, nombre del
artista y tiempo de reproducción, y se llaman
discos CD TEXT. Solamente estos discos CD
TEXT especialmente codificados soportan las
funciones enumeradas a continuación.
Visualización de títulos en discos CD
TEXT
Presione DISP mientras reproduzca un disco
CD TEXT.
Presione DISP repetidamente para cambiar
entre las siguientes visualizaciones:
Track Title (Título de pista)—Disc Artist Name
(Nombre de artista del disco) — T-Artist Name
(Nombre de artista de la pista
• Si una información específica no ha sido
grabada en un disco CD TEXT, se visualizará
NO TITLE.
Page 93

Sp
33
English
Español
Deutsch
Français
Italiano
Nederlands
08
Sección
Sintonizador de TV
Visualización e indicadores
A continuación se explica cómo utilizar este
producto para controlar un sintonizador de TV,
que se vende separadamente.
• Con este producto, puede operar la lista de
canales preajustados como una función
adicional.
• Presione DISP para cambiar entre las
visualizaciones de TV y P.CH.
1 Indicador BAND
Visualiza la banda en que el TV está
sintonizada: TV1, TV2.
2 Indicador PRESET NUMBER
Visualiza el número preajustado que se ha
seleccionado.
3 Indicador CHANNEL
Visualiza el canal que se ha seleccionado.
Operaciones básicas
1 Presione SOURCE para seleccionar el sintonizador de TV.
Presione SOURCE hasta que aparezca TV.
2 Utilice VOLUME para ajustar el nivel del
sonido.
Gire para aumentar o disminuir el volumen.
3 Presione 2 o 3 para sintonizar una
emisora.
• Si presiona 2 o 3 durante aproximadamente
un segundo y suelta, puede realizar la
sintonización por búsqueda.
Almacenamiento de las emisoras
1 Presione 5 o ∞ para seleccionar P.CH MEM-
ORY del menú de TV, y presione A.MENU.
Se visualizan las indicaciones P.CH MEMORY.
2 La presión de 2 o 3 durante un segundo
permite el ajuste fino de la frecuencia.
3 Presione 5 o ∞ para seleccionar el número
preajustado que desea utilizar para memorizar.
Presione 2 o 3 durante dos segundos o más.
Al soltar el botón, se recibe una emisora fuerte.
3: La búsqueda comienza desde una frecuencia
alta.
2: La búsqueda comienza desde una frecuen-
cia baja.
Presione el botón 2 o 3 opuesto al presionado
para iniciar la búsqueda para detenerla.
4 Presione A.MENU y se memoriza la
frecuencia.
Nota
• Hasta 12 emisoras pueden memorizarse en
una banda.
1 32
Page 94

Sintonizador de TV
Sp
34
08
Sección
Llamada de las emisoras
Presione 5 o ∞ para seleccionar un canal
preajustado.
Cambio de una banda
Presione BAND para seleccionar la banda
deseada.
Presione BAND repetidamente para cambiar
entre las siguientes bandas:
TV 1 = TV 2
Menú de TV
El menú de TV tiene las siguientes funciones:
BSSM (memoria secuencial de las mejores
emisoras)
P.CH MEMORY (memoria de canal preajustado)
(Refiérase a la página 33.)
COUNTRY (Selección de países)
Presione BSSM repetidamente para activar o
desactivar la función BSSM. Cuando termine, la
pantalla cambia al modo de lista de canales
preajustados.
Nota
• Se no opera la función dentro de aproximadamente 30 segundos, la pantalla vuelve
automáticamente a la visualización precedente.
BSSM (Memoria Secuencial de
las Mejores Emisoras)
La función BSSM memoriza automáticamente
las emisoras de radiodifusión con señal más
fuerte en orden ascendente desde el canal más
bajo.
1 Presione BAND/ESC para visualizar la
banda que desea usar para BSSM.
2 Seleccione BSSM desde el TV MENU, y
presione A.MENU.
Se visualizan las indicaciones del ajuste BSSM.
3 Presione 5 para activar la función BSSM.
BSSM empieza a destellar. Mientras BSSM esté
destellando, las seis frecuencias más fuertes se
almacenan en el orden de intensidad de la
señal. Cuando se termina, BSSM deja de
destellar.
• Para cancelar el proceso de almacenaje,
presione ∞.
Notas
• Hasta 12 emisoras pueden memorizarse en 1
banda.
• En regiones donde la recepción de no más
que 12 emisoras es posible, las emisoras
memorizadas anteriormente permanecen en
la memoria.
Page 95

Sintonizador de TV DVD
Sp
35
Selección de grupo de países
En este producto, los canales están
preajustados para cada grupo de países.
Seleccionando el grupo de países adecuado
para su área de recepción permite la recepción
de múltiples canales.
1 Presione 5 o ∞ para seleccionar COUN-
TRY CODE del TV MENU, y presione A.MENU.
Se visualizan las indicaciones COUNTRY CODE.
2 Presione 5 o ∞ para seleccionar un código
de país.
Para los detalles acerca del código de país,
consulte el manual de operación del
sintonizador.
Nota
• Con un sintonizador que no permita el cambio
del código de país, no se puede seleccionar
un código de país diferente.
Selección de canales de la lista
de canales preajustados
La lista de canales preajustados le permite ver y
seleccionar canales de la lista de canales preajustados.
Cuando la fuente es TV, presione DISP.
Se visualizan los canales preajustados de CH 1
a CH12.
Visualización e indicadores
A continuación se explica cómo utilizar este
producto para controlar un DVD, que se vende
separadamente. Para los detalles de las operaciones/funciones del lector de DVD o lector de
Multi-DVD, consulte o manual de instrucciones
del respectivo producto.
1 Indicador TITLE NUMBER
Visualiza el título que está siendo
reproducido.
2 Indicador CHAPTER (or TRACK) NUMBER
indicator
Visualiza el capítulo (pista) que está siendo
reproducido(a).
3
Indicador PLAY TIME
Visualiza el tiempo transcurrido del capítulo
(pista) actual.
English
Español
Deutsch
Français
Italiano
Nederlands
09
Sección
1 32
Page 96

DVD
1 Ponga un DVD (o CD) en el lector de DVD.
La reproducción comenzará automáticamente.
El menú del disco DVD puede visualizarse.
2 Utilice VOLUME para ajustar el nivel del
sonido.
Gire para aumentar o disminuir el volumen.
3 Para realizar el avance o retroceso rápido,
mantenga presionado 2 o 3.
4 Para saltar hacia atrás o hacia adelante
para otra pista, presione 2 o 3.
Presionar 3 salta al inicio del próximo capítulo
(o pista). Presionar 2 una vez salta al inicio del
capítulo (o pista) actual. Presionar de nuevo
salta a la pista anterior.
Nota
• Si continua presionando FORWARD (¡) o
REVERSE (1) durante 5 segundos, el color
de la marca de avance rápido cambia de
blanco a azul. Cuando esto ocurrir, el avance
rápido continúa aunque se suelte FORWARD
(¡) o REVERSE (1). Para continuar la
reproducción en un punto deseado, presione
PLAY/PAUSE (6).
Introducción a las operaciones
avanzadas del lector de DVD
1 Visualización FUNCTION
Visualiza el estado de la función.
1 Presione A.MENU cuando se visualicen las
indicaciones de la fuente DVD.
Se visualiza el menú.
2 Seleccione DVD y presione A.MENU.
El menú de DVD se visualiza de la siguiente
manera:
REPEAT (reproducción repetida)
<Vea la página 43.>
RANDOM (reproducción aleatoria)
SCAN (reproducción con exploración)
PAUSE (pausa)
ITS-PLAY (reproducción ITS)
ITS-MEMORY (memoria ITS)
Puede operar una función deseada. Para los
detalles, refiérase a las páginas para cada una
de las funciones.
• RANDOM, SCAN y PAUSE están disponibles
para la reproducción de CDs.
• ITS-PLAY y ITS-MEMORY están disponibles
para un lector de Multi-DVD conectado. (Para
los detalles sobre la estas funciones y
operación, consulte el manual de instrucciones
del lector de Multi-DVD.)
• Seleccione BACK en la visualización de menú
o presione BACK para volver a la visualización
anterior.
También puede presionar WIDE en la unidad
principal para volver a la visualización anterior.
Sp
36
09
Sección
1
Page 97

DVD
Sp
37
• Para volver a la visualización de reproducción,
presione BAND/ESC.
Nota
• Si no opera la función dentro de aproximadamente 30 segundos, la pantalla vuelve
automáticamente a la visualización de reproducción.
Acerca del interruptor de modo
de operación de control remoto
Cuando realice operaciones que no sean aquellas descritas anteriormente, ajuste el interruptor de modo de operación de control remoto a la
posición DVD. (Esto permite la operación del
lector de DVD conectado.)
Visualización de información
1 Cuando la fuente es DVD, presione DISP.
Cada vez que se presiona DISP, la información
visualizada cambia.
Cuando el interruptor de modo de operación de
control remoto es AUDIO:
PLAYBACK MODE (tiempo de reproducción)—
DVD Display (Vídeo de DVD)
Cuando el interruptor de modo de operación de
control remoto es DVD:
Visualización de información 1 = Visualización
de información 2 = Ninguna visualización de
información = Retorno a la visualización de
información 1
Notas
• La función DISP en la unidad principal es
igual que la función DISP en el control
remoto cuando el interruptor de modo de
operación es AUDIO.
• Con la visualización de información 1, se
puede buscar por una cena deseada especificando el título, capítulo o tiempo, y cambiar a
los ajustes de audio, subtítulo y ángulo.
• Ta mb ién se puede especificar el título, capítulo y tiempo con la visualización de información 2. Con esta unidad, la pista hacia
arriba/hacia abajo no funciona con el lector
de Multi-DVD.
English
Español
Deutsch
Français
Italiano
Nederlands
09
Sección
Page 98

DVD
Reproducción de disco
Presione PLAY/PAUSE.
La marca de reproducción se visualiza durante
4 segundos y la reproducción del disco
comienza.
Notas
• Presionar PLAY/PAUSE durante la reproduc-
ción de un disco pausa la reproducción.
• Si el último disco reproducido fuera un DVD,
la reproducción comienza desde el punto en
el disco en donde se interrumpió la reproducción anteriormente. Con algunos discos,
puede que aparezca un menú y la reproducción puede que no sea posible desde donde
se interrumpió anteriormente.
Avance y retorno de capítulo y
pista
Salto al capítulo/pista siguiente
Durante la reproducción, presione NEXT (¢).
Los números de capítulo/pista se visualizan
durante 8 segundos y se puede avanzar al capí-
tulo/pista siguiente.
Retorno al capítulo/pista
precedente
Durante la reproducción, presione PREVIOUS
(4).
Los números de capítulo/pista se visualizan
durante 8 segundos y se puede retornar al
comienzo del capítulo/pista actual.
Presione PREVIOUS (4) dos veces en suce-
sión para ir al comienzo del capítulo/pista antes
del capítulo/pista actual.
Nota
• Mantener presionado 2 o 3 en la unidad
principal también realiza la misma operación.
Sp
38
09
Sección
Page 99

DVD
Sp
39
Especificación de título/capítulo/
pista (búsqueda directa)
Especificación de título
Cuando el disco esté parado, presione el
botón numérico correspondiente al número
del título deseado.
El número del título se visualiza durante 8
segundos y la reproducción comienza desde el
título seleccionado.
Para seleccionar 3, presione 3.
Para seleccionar 10, presione 10 y 0 en orden.
Para seleccionar 23, presione 10, 10 y 3 en orden.
Especificación de capítulo
Presione el botón numérico correspondiente
al número del capítulo deseado durante la
reproducción.
El número del capítulo se visualiza durante 8
segundos y la reproducción comienza desde el
capítulo seleccionado.
Para seleccionar 3, presione 3.
Para seleccionar 10, presione 10 y 0 en orden.
Para seleccionar 23, presione 10, 10 y 3 en orden.
Especificación de pista
Presione el botón numérico correspondiente
al número de la pista deseada.
El número de la pista se visualiza durante 8
segundos y la reproducción comienza desde la
pista seleccionada.
Para seleccionar 3, presione 3.
Para seleccionar 10, presione 10 y 0 en orden.
Para seleccionar 23, presione 10, 10 y 3 en orden.
Notas
• Con algunos discos, la marca de prohibido
puede visualizarse y la operación puede que
no sea posible.
• Con Video CD, la búsqueda directa no es
posible durante la reproducción PBC.
English
Español
Deutsch
Français
Italiano
Nederlands
09
Sección
Page 100

DVD
Avance/retroceso rápido de disco
Avance rápido
1 Durante la reproducción, continúe presionando FORWARD (¡).
La marca de avance rápido se visualiza mientras se presiona el botón, realizándose el
avance rápido del disco.
2 Suelte FORWARD (¡) en el punto que
desea ver/escuchar.
La reproducción continúa desde este punto.
Notas
• Si continua presionando FORWARD (¡)
durante 5 segundos, el color de la marca de
avance rápido cambia de blanco a azul. En
este caso, el avance rápido continúa aun
cuando se suelte FORWARD (¡). Para continuar la reproducción desde un punto
deseado, presione PLAY/PAUSE (6).
• Si realiza el avance rápido hasta el fin de un
CD, el avance rápido continúa desde el
comienzo del disco.
• El avance rápido puede que no sea posible en
ciertas localizaciones en algunos discos. Si
esto ocurrir, la reproducción normal continuará automáticamente.
Retroceso rápido
1 Durante la reproducción, continúe presionando REVERSE (1).
La marca de retroceso rápido se visualiza mientras se presiona el botón, realizándose el retroceso rápido del disco.
2 Suelte REVERSE (1) en el punto que
desea ver/escuchar.
La reproducción continuará desde este punto.
Notas
• Si continúa presionando REVERSE (1)
durante 5 segundos, el color de la marca de
retroceso rápido cambia de blanco a azul. En
este caso, el retroceso rápido continúa aun
cuando se suelta REVERSE (1). Para continuar la reproducción en un punto deseado,
presione PLAY/PAUSE (6).
• Si realiza el retroceso rápido hasta el
comienzo de un CD, la reproducción normal
continuará.
• El retroceso rápido puede que no sea posible
en ciertas localizaciones en algunos discos.
Si esto ocurrir, la reproducción normal continuará automáticamente.
Sp
40
09
Sección
 Loading...