

Page 1

Operation Manual
DVD AV RECEIVER
AVH-P5900DVD
English
Page 2
Contents
Thank you for buying this Pioneer product.
Please read through these operating instructions so you will know how to operate
your model properly. After you have finished reading the instructions, keep this man-
ual in a safe place for future reference.
Be sure to read this
! Playable discs 9
! DVD video disc region numbers 9
! When an operation is prohibited 13
Precautions
IMPORTANT SAFEGUARDS 6
To ensure safe driving 6
– Parking brake interlock 7
– When using a display connected to
REAR MONITOR OUTPUT 7
To avoid battery exhaustion 7
Before You Start
Information to User 8
For Canadian model 8
About this unit 8
– Playable discs 9
– DVD video disc region numbers 9
About this manual 9
After-sales service for Pioneer products 9
Visit our website 10
Features 10
– About WMA 11
– About MP3 11
– About AAC 11
– About DivX 12
– About the SAT RADIO READY
mark 12
To protect the LCD screen 12
For viewing LCD comfortably 13
– Changing the wide screen size 13
– Changing the picture adjustment 13
What the marks on DVDs indicate 13
– When an operation is prohibited 13
Protecting your unit from theft 13
– Removing the front panel 14
– Attaching the front panel 14
2
En
Resetting the microprocessor 14
Feature demo mode 14
Operating this unit
What’s What 15
– Head unit 15
– Optional remote control 16
Basic Operations 16
– Power ON/OFF 16
– Selecting a source 16
– Adjusting the volume 17
– Touch panel key basic operation 17
– Opening and closing the LCD
panel 18
Radio 20
– Basic Operations 20
– Storing and recalling broadcast
frequencies 20
– Introduction of advanced
operations 21
– Storing the strongest broadcast
frequencies 21
– Tuning in strong signals 21
Built-in DVD player 22
– Basic Operations 22
– Basic playback controls 23
– Switching the media file type 23
– Operating the DVD menu 23
– PBC playback 24
– Playing DivX® VOD content 24
– Skipping back or forward to another
title 25
– CM skip/CM back 25
– Resume playback (Bookmark) 25
– Searching for the part you want to
play 25
– Changing audio language during
playback (Multi-audio) 26
– Changing the subtitle language during
playback (Multi-subtitle) 26
Page 3

Contents
– Changing the viewing angle during
playback (Multi-angle) 27
– Frame-by-frame playback 27
– Slow motion playback 27
– Return to the specified scene 27
– Automatic playback of DVDs 28
– Text information 28
– Selecting tracks from the track list 28
– Selecting files from the file name
list 28
– Introduction of advanced
operations 29
– Repeating play 29
– Playing tracks in random order 29
– Scanning tracks or folders 30
– Selecting audio output 30
– Using compression 30
Playing songs on iPod 31
– Basic Operations 31
– Browsing for a song 31
– Displaying text information on
iPod 32
– Repeating play 32
– Playing songs in a random order
(shuffle) 32
– Playing all songs in a random order
(shuffle all) 32
– Pausing a song 33
– Changing audiobook speed 33
– Playing video 33
Audio Adjustments 33
– Introduction of audio adjustments 33
– Using balance adjustment 33
– Using the equalizer 34
– Adjusting loudness 35
– Using subwoofer output 35
– Boosting the bass 36
– Using the high pass filter 36
– Adjusting source levels 36
– Staging for car environment 37
Setting up the DVD player 37
– Introduction of DVD setup
adjustments 37
– Setting the subtitle language 37
– Setting the audio language 38
– Setting the menu language 38
– Switching the assist subtitle on or
off 39
– Setting the angle icon display 39
– Setting the aspect ratio 39
– Setting the parental lock 39
– Setting the DivX subtitle file 40
– Displaying your DivX® VOD
registration code 41
– Setting for digital output 41
Initial Settings 41
– Adjusting initial settings 41
– Switching the auxiliary setting 42
– Setting the rear output and subwoofer
controller 42
– Selecting the OSD color 42
– Selecting the illumination color 42
– Changing languages for CAUTION 43
– Switching the sound muting/
attenuation 43
– Switching the warning tone 43
– Entering PIN code for Bluetooth
wireless connection 43
– Correcting distorted sound 44
– Resetting the audio functions 44
Other Functions 44
– Introduction of system
adjustments 44
– Changing the wide screen mode 44
– Changing the picture adjustment 45
– Selecting the background display 46
– Setting the AV input 46
– Setting the clock 46
En
3
Page 4

Contents
– Setting for rear view camera (back up
camera) 47
– Adjusting the LCD panel slide
position 47
– Setting the automatic open
function 48
– Switching the iPod charge setting 48
– Adjusting the response positions of the
touch panels (Touch Panel
Calibration) 48
– Using the AUX source 49
– Using the PGM button 50
Available accessories
Playing songs on USB portable audio player/
USB memory 51
– Basic Operations 51
– Pausing compressed audio
playback 51
– Introduction of advanced
operations 51
– Displaying text information of an audio
file 52
– Selecting files from the file name
list 52
XM tuner 52
– Basic Operations 52
– Storing and recalling broadcast
stations 53
– Switching the XM channel select
mode 53
– Selecting an XM channel directly 54
– Using the MyMix function 54
– Displaying the Radio ID 55
– Switching the XM display 55
SIRIUS Satellite Radio tuner 56
– Basic Operations 56
– Storing and recalling broadcast
stations 56
– Selecting the SIRIUS channel select
mode 57
– Selecting a SIRIUS channel
directly 57
– Using the MyMix function 57
– Using the Game Alert function 59
– Displaying the Radio ID 60
– Switching the SIRIUS display 60
Bluetooth Audio 60
– Basic Operations 60
– Pausing playback 61
– Introduction of advanced
operations 61
– Connecting a Bluetooth audio
player 61
– Disconnecting a Bluetooth audio
player 62
– Displaying BD (Bluetooth Device)
address 62
Bluetooth Telephone 62
– Basic Operations 62
– Setting up for hands-free phoning 63
– Making a phone call 64
– Taking a phone call 64
– Introduction of advanced
operations 64
– Connecting a cellular phone 64
– Disconnecting a cellular phone 65
– Registering connected cellular
phone 65
– Deleting a registered phone 65
– Connecting to a registered cellular
phone 66
– Using the Phone Book 66
– Using the Call History 68
– Using preset numbers 68
– Making a call by entering phone
number 69
– Clearing memory 69
4
En
Page 5

Contents
– Setting the automatic answering 69
– Setting the automatic rejecting 69
– Switching the ring tone 69
– Echo canceling and noise
reduction 69
– Displaying BD (Bluetooth Device)
address 70
Multi-CD Player 70
– Basic Operations 70
– Selecting a disc 71
– Pausing CD playback 71
– Introduction of advanced
operations 71
– Using CD TEXT functions 71
DVD Player 72
– Basic Operations 72
– Selecting a disc 73
– Selecting a folder 73
– Pausing disc playback 73
– Introduction of advanced
operations 73
TV tuner 75
– Basic Operations 75
– Storing and recalling broadcast
stations 75
– Storing the strongest broadcast
stations sequentially 76
Digital Signal Processor 76
– Introduction of DSP adjustments 76
– Using the sound field control 77
– Using the position selector 78
– Using balance adjustment 78
– Adjusting source levels 78
– Using the dynamic range control 79
– Using the down-mix function 79
– Using the direct control 79
– Using the Dolby Pro Logic II 79
– Setting the speaker setting 80
– Adjusting the speaker output
levels 81
– Selecting a cross-over frequency 82
– Adjusting the speaker output levels
using a test tone 82
– Using the time alignment 83
– Using the equalizer 84
– Using the auto-equalizer 85
– Auto TA and EQ (auto-time alignment
and auto-equalizing) 85
Additional Information
Troubleshooting 89
Error messages 91
Understanding auto TA and EQ error
messages 92
Handling guideline of discs and player 94
DVD discs 94
DVD-R/DVD-RW discs 94
AVCHD recorded discs 94
CD-R/CD-RW discs 94
Dual Discs 95
Compressed audio files on the disc 95
– Example of a hierarchy 96
– Compressed audio compatibility 96
DivX video files 96
– DivX compatibility 96
About handling the iPod 97
– About iPod settings 97
Using the display correctly 97
– Handling the display 97
– Liquid crystal display (LCD) screen 98
– Keeping the display in good
condition 98
– Small fluorescent tube 98
Language code chart for DVD 99
Terms 100
Specifications 103
Index 105
En
5
Page 6
Section
01
Precautions
IMPORTANT SAFEGUARDS
Please read all of these instructions regarding
your display and retain them for future reference.
1 Read this manual fully and carefully be-
fore operating your display.
2 Keep this manual handy as a reference for
operating procedures and safety information.
3 Pay close attention to all warnings in this
manual and follow the instructions carefully.
4 Do not allow other persons to use this sys-
tem until they have read and understood
the operating instructions.
5 Do not install the display where it may (i)
obstruct the driver’s vision, (ii) impair the
performance of any of the vehicle’s operating systems or safety features, including air bags, hazard lamp buttons or (iii)
impair the driver ’s ability to safely operate the vehicle.
6 Do not operate this display if doing so in
any way will divert your attention from
the safe operation of your vehicle. Always
observe safe driving rules and follow all
existing traffic regulations. If you experience difficulty in operating the system or
reading the display, park your vehicle in a
safe location and make necessary adjustments.
7 Please remember to wear your seat belt at
all times while operating your vehicle. If
you are ever in an accident, your injuries
can be considerably more severe if your
seat belt is not properly buckled.
8 Never use headphones while driving.
9 To promote safety, certain functions are
disabled unless the parking brake is on,
and the vehicle is not in motion.
10 Never set the volume of your display so
high that you cannot hear outside traffic
and emergency vehicles.
WARNING
! Do not attempt to install or service your
display by yourself. Installation or servicing of the display by persons without
training and experience in electronic
equipment and automotive accessories
may be dangerous and could expose you
to the risk of electric shock or other
hazards.
To ensure safe driving
WARNING
! LIGHT GREEN LEAD AT POWER CON-
NECTOR IS DESIGNED TO DETECT
PARKED STATUS AND MUST BE CONNECTED TO THE POWER SUPPLY SIDE
OF THE PARKING BRAKE SWITCH. IMPROPER CONNECTION OR USE OF
THIS LEAD MAY VIOLATE APPLICABLE
LAW AND MAY RESULT IN SERIOUS INJURY OR DAMAGE.
! To avoid the risk of damage and injury and the
potential violation of applicable laws, this unit
is not for use with a video screen that is visible
to the driver.
! To avoid the risk of accident and the potential
violation of applicable laws, the front DVD or
TV (sold separately) feature should never be
used while the vehicle is being driven. Also,
rear displays should not be in a location
where it is a visible distraction to the driver.
! In some countries or states the viewing of
images on a display inside a vehicle even by
persons other than the driver may be illegal.
Where such regulations apply, they must be
obeyed and this unit’s DVD features should
not be used.
6
En
Page 7
Precautions
Section
01
Precautions
When you attempt to watch a DVD, Video CD
or TV while driving, the warning Viewing of
front seat video source while driving is
strictly prohibited. will appear on the front
display.
To watch a DVD, Video CD or TV on the front
display, park your vehicle in a safe place and
apply the parking brake.
Parking brake interlock
Certain functions (DVD/TV viewing and certain
touch panel keys) offered by this unit could be
dangerous and/or unlawful if used while driving. To prevent such functions from being
used while the vehicle is in motion, there is an
interlock system that senses when the parking
brake is set. If you attempt to use the functions
described above while driving, they will become disabled until you stop the vehicle in a
safe place, and (1) apply the parking brake, (2)
release the parking brake, and then (3) apply
the parking brake again. Please keep the
brake pedal pushed down before releasing the
parking brake.
When using a display connected
to REAR MONITOR OUTPUT
This unit’s REAR MONITOR OUTPUT is for
connection of a display to enable passengers
in the rear seats to watch the DVD or TV.
To avoid battery exhaustion
Be sure to run the vehicle engine while using
this unit. Using this unit without running the
engine can result in battery drainage.
! When no power is supplied to this unit be-
cause of a replacement of the vehicle battery or for some similar reason, the
microcomputer of this unit is returned to
its initial condition. We recommend that
you transcribe the audio adjustment data.
WARNING
Do not use with vehicles that do not feature an
ACC position.
WARNING
NEVER install the rear display in a location that
enables the driver to watch the DVD or TV while
driving.
En
7
Page 8
Section
02
Before You Start
Information to User
Alteration or modifications carried out without
appropriate authorization may invalidate the
user’s right to operate the equipment.
For Canadian model
This Class B digital apparatus complies with
Canadian ICES-003.
About this unit
The tuner frequencies on this unit are allocated for use in North America. Use in other
areas may result in poor reception.
WARNING
Handling the cord on this product or cords associated with accessories sold with the product
may expose you to chemicals listed on proposition 65 known to the State of California and other
governmental entities to cause cancer and birth
defects or other reproductive harm. Wash hands
after handling.
This product contains mercury. Disposal of this material may be regulated due to environmental
considerations. For disposal or recycling information, please contact
your local authorities or the Electronics Industries Alliance:
www.eiae.org
The backlighting lamp of LCD in this
equipment contains mercury. Disposal of this material may be regulated
due to environmental considerations
according to Local, State or Federal
Laws. For disposal or recycling information, please contact your local
authorities or the Electronics Industries Alliance:
CAUTION:
USE OF CONTROL OR ADJUSTMENT OR
PERFORMANCE OF PROCEDURES
OTHER THAN THOSE SPECIFIED HEREIN
MAY RESULT IN HAZARDOUS RADIATION
EXPOSURE.
CAUTION:
THE USE OF OPTICAL INSTRUMENTS
WITH THIS PRODUCT WILL INCREASE
EYE HAZARD.
CAUTION
! Do not allow this unit to come into contact
with liquids. Electrical shock could result.
Also, this unit damage, smoke, and overheat
could result from contact with liquids.
! Keep this manual handy as a reference for op-
erating procedures and precautions.
! Always keep the volume low enough so that
you can hear sounds from outside the vehicle.
! Protect this unit from moisture.
! If the battery is disconnected or discharged,
the preset memory will be erased and must be
reprogrammed.
Important (Serial number)
The serial number is located on the bottom of
this unit. For your own security and convenience,
be sure to record this number on the enclosed
warranty card.
www.eiae.org
8
En
Page 9
Before You Start
Section
02
Playable discs
DVD, Video CD and CD discs that display the
logos shown below can be played back on this
player.
DVD video
Video CD
CD
Notes
!
! This player can only play back discs bearing
is a trademark of DVD Format/Logo
Licensing Corporation.
the marks shown above.
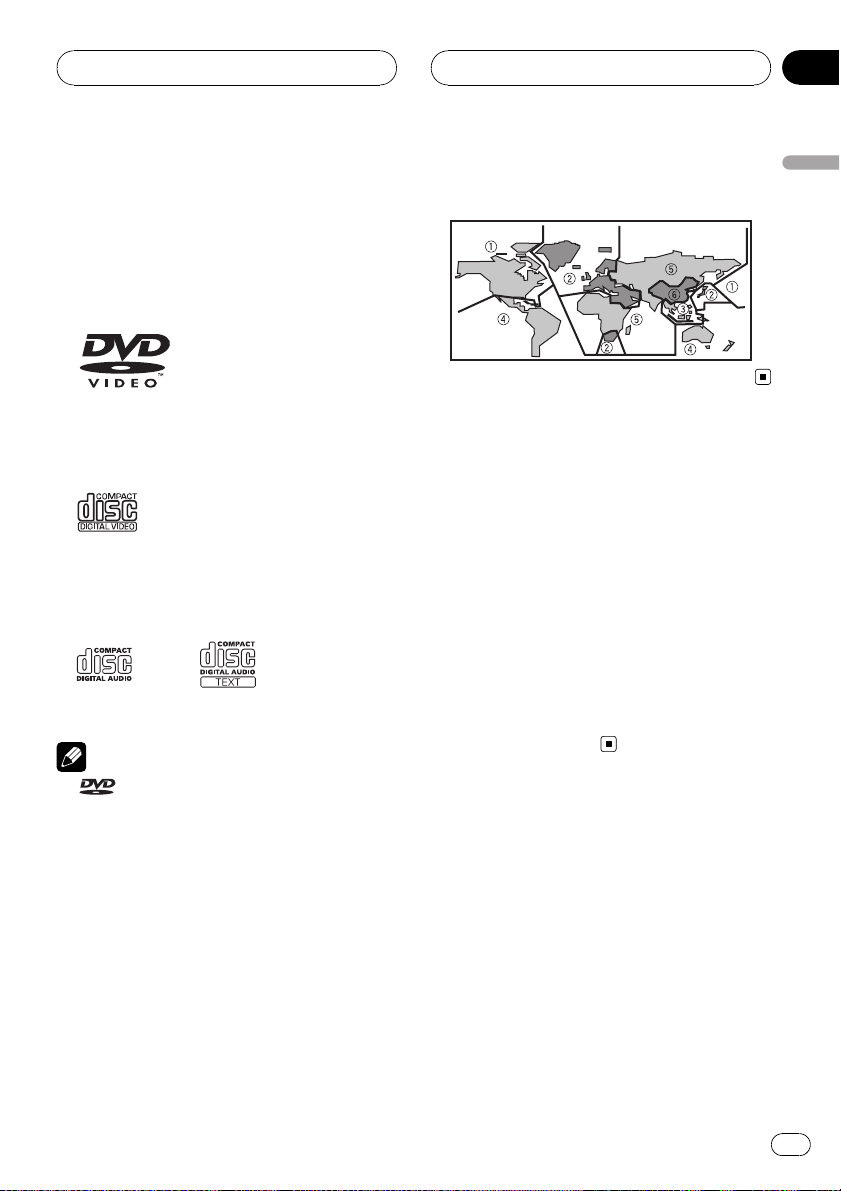
DVD video disc region numbers
DVD video discs that have incompatible region
numbers cannot be played on this player. The
region number of the player can be found on
the bottom of this unit.
The illustration below shows the regions and
corresponding region numbers.
About this manual
This unit features a number of sophisticated
functions ensuring superior reception and operation. All the functions have been designed
for the easiest possible use, but many are not
self-explanatory. This operation manual will
help you benefit fully from this unit’s potential
and to maximize your listening enjoyment.
We recommend that you familiarize yourself
with the functions and their operation by reading through the manual before you begin
using this unit. It is especially important that
you read and observe WARNINGs and CAU-
TIONs in this manual.
After-sales service for
Pioneer products
Please contact the dealer or distributor from
where you purchased this unit for after-sales
service (including warranty conditions) or any
other information. In case the necessary information is not available, please contact the
companies listed below:
Please do not ship your unit to the companies
at the addresses listed below for repair without
advance contact.
Before You Start
En
9
Page 10
Section
02
Before You Start
U.S.A.
Pioneer Electronics (USA) Inc.
CUSTOMER SUPPORT DIVISION
P.O. Box 1760
Long Beach, CA 90801-1760
800-421-1404
CANADA
Pioneer Electronics of Canada, Inc.
CUSTOMER SATISFACTION DEPARTMENT
300 Allstate Parkway
Markham, Ontario L3R OP2
1-877-283-5901
For warranty information please see the Limited Warranty sheet included with this unit.
Visit our website
Visit us at the following site:
1 Register your product. We will keep the details
of your purchase on file to help you refer to
this information in the event of an insurance
claim such as loss or theft.
2 Receive updates on the latest products and
technologies.
3 Download owner’s manuals, order product
catalogues, research new products, and
much more.
DVD-R/RW compatibility
It is possible to play back DVD-R/RW discs recorded with the video format. (Refer to DVD-R/
DVD-RW discs on page 94.)
Video CDs featuring PBC compatibility
It is possible to play back Video CDs featuring
PBC (playback control).
WMA, MP3 and AAC compatibility
Refer to Compressed audio compatibility on
page 96.
®
DivX
video compatibility
Refer to DivX compatibility on page 96.
Dolby Digital/DTS compatibility
When using this unit with a Pioneer multichannel processor, you can enjoy the atmosphere and excitement provided by DVD movie
and music software featuring 5.1 channel recordings.
! Manufactured under license from Dolby
Laboratories. “Dolby”, “Pro Logic”, and the
double-D symbol are trademarks of Dolby
Laboratories.
! “DTS” and “DTS Digital Out” are registered
trademarks of DTS, Inc.
Features
Touch panel key operation
It is possible to operate this unit by using
touch panel key.
10
En
iPod®compatibility
This unit can control and listen to songs on an
iPod.
Page 11

Before You Start
Section
02
! This unit supports only an iPod with Dock
Connector.
! This unit controls the iPod listed below.
— iPod fifth generation (software version
1.2 or later)
— iPod nano (second generation) (soft-
ware version 1.0.2 or later)
— iPod nano (software version 1.2 or later)
— iPod photo (software version 1.2.1 or
later)
— iPod (click wheel) (software version 3.1.1
or later)
— iPod mini (software version 1.4.1 or
later)
— iPod (dock connector) (software version
2.3 or later)
To obtain maximum performance, we recommend that you use the latest version of
the iPod software.
! Operations may vary depending on the soft-
ware version of iPod.
! iPod is a trademark of Apple Computer,
Inc., registered in the U.S. and other countries.
Note
This product incorporates copyright protection
technology that is protected by method claims of
certain U.S. patents and other intellectual property rights owned by Macrovision Corporation
and other rights owners. Use of this copyright
protection technology must be authorized by
Macrovision Corporation, and is intended for
home and other limited viewing uses only unless
otherwise authorized by Macrovision Corporation.
Reverse engineering or disassembly is prohibited.
About WMA
The Windows Media™ logo printed on the box
indicates that this unit can play back WMA
data.
WMA is short for Windows Media Audio and
refers to an audio compression technology
that is developed by Microsoft Corporation.
WMA data can be encoded by using Windows
Media Player version 7 or later.
! Windows Media and the Windows logo are
trademarks or registered trademarks of
Microsoft Corpo ration in the United States
and/or other countries.
! This unit may not operate correctly depend-
ing on the application used to encode
WMA files.
About MP3
Supply of this product only conveys a license
for private, non-commercial use and does not
convey a license nor imply any right to use
this product in any commercial (i.e. revenuegenerating) real time broadcasting (terrestrial,
satellite, cable and/or any other media), broadcasting/streaming via internet, intranets and/
or other networks or in other electronic content distribution systems, such as pay-audio or
audio-on-demand applications. An independent license for such use is required. For details, please visit
http://www.mp3licensing.com.
Before You Start
About AAC
AAC is short for Advanced Audio Coding and
refers to an audio compression technology
standard used with MPEG 2 and MPEG 4.
En
11
Page 12

Section
02
Before You Start
Several applications can be used to encode
AAC files, but file formats and extensions differ depending on the application which is
used to encode.
This unit plays back AAC files encoded by
®
iTunes
version 6.0.5.
! iTunes is a trademark of Apple Computer,
Inc., registered in the U.S. and other countries.
About DivX
DivX is a compressed digital video format created by the DivX
This unit can play DivX video files recorded on
CD-R/RW/ROM and DVD-R/RW/ROM discs.
Keeping the same terminology as DVD video,
individual DivX video files are called “Titles”.
When naming files/titles on a CD-R/RW or a
DVD-R/RW disc prior to burning, keep in mind
that by default they will be played in alphabetical order.
Official DivX
Plays all versions of DivX
®
DivX
6) with standard playback of DivX
media files
! DivX, DivX Certified, and associated logos
are trademarks of DivX, Inc. and are used
under license.
®
video codec from DivX, Inc.
®
Certified product
®
video (including
®
About the SAT RADIO READY mark
tellite tuner which are sold separately) can be
controlled by this unit. Please inquire to your
dealer or nearest authorized Pioneer service
station regarding the satellite radio tuner that
can be connected to this unit. For satellite
radio tuner operation, please refer to the satellite radio tuner owner ’s manual.
! The system will use direct satellite-to-recei-
ver broadcasting technology to provide listeners in their cars and at home with
crystal-clear sound seamlessly from coast
to coast. Satellite radio will create and
package over 100 channels of digital-quality
music, news, sports, talk and children’s
programming.
! “SAT Radio”, the SAT Radio logo and all re-
lated marks are trademarks of Sirius Satellite Radio inc., and XM Satellite Radio
Inc.
To protect the LCD screen
! Do not allow direct sunlight to fall on the
display when this unit is not being used.
Extended exposure to direct sunlight can
result in LCD screen malfunction due to
the resulting high temperatures.
! When using a cellular phone, keep the an-
tenna of the cellular phone away from the
display to prevent disruption of the video by
the appearance of spots, colored stripes,
etc.
! Never touch the screen with anything be-
sides your finger when operating the touch
panel function. The screen can scratch
easily.
The SAT RADIO READY mark printed on the
front panel indicates that the Satellite Radio
Tuner for Pioneer (i.e., XM tuner and Sirius sa-
12
En
Page 13
Before You Start
Section
02
For viewing LCD comfortably
Due to its construction, the viewing angle of
the LCD screen is limited. You can adjust it by
changing either screen size or picture adjustment.
Changing the wide screen size
By changing the screen size from 4:3 to 16:9,
you can adjust the screen so that the screen
can fit to the video image you are playing.
For details concerning operation, refer to
Changing the wide screen mode on page 44.
Changing the picture adjustment
You can make the best adjustment to the picture display by changing BRIGHTNESS,
CONTRAST, COLOR and HUE. You can also
dim or enlight the overall picture image using
DIMMER.
For details concerning operation, refer to
Changing the picture adjustment on page
45.
What the marks on DVDs
indicate
The marks below may be found on DVD disc
labels and packages. They indicate the type of
images and audio recorded on the disc, and
the functions you can use.
Mark Meaning
2
Indicates the number of audio systems.
Indicates the number of subtitle lan-
2
guages.
Indicates the number of viewing an-
3
gles.
Mark Meaning
16 : 9 LB
ALL
Indicates the picture size (aspect ratio:
screen width-to-height ratio) type.
1
Indicates the number of the region
where playback is possible.
When an operation is prohibited
When you are watching a DVD and attempt to
perform an operation, it may not be performed
because of the programming on the disc.
When this happens, the icon
appears on
the screen.
! The icon
may not appear with certain
discs.
Protecting your unit from
theft
The front panel can be detached to deter theft.
! If the front panel is not detached from the
head unit within four seconds of turning off
the ignition, a warning tone will sound.
! You can turn off the warning tone. See
Switching the warning tone on page 43.
Important
! Handle gently when removing or attaching
the front panel.
! Avoid subjecting the front panel to excessive
shocks.
! Keep the front panel out of direct sunlight and
high temperatures.
! If removed, replace the front panel on the unit
before starting up your vehicle.
Before You Start
En
13
Page 14
Section
02
Before You Start
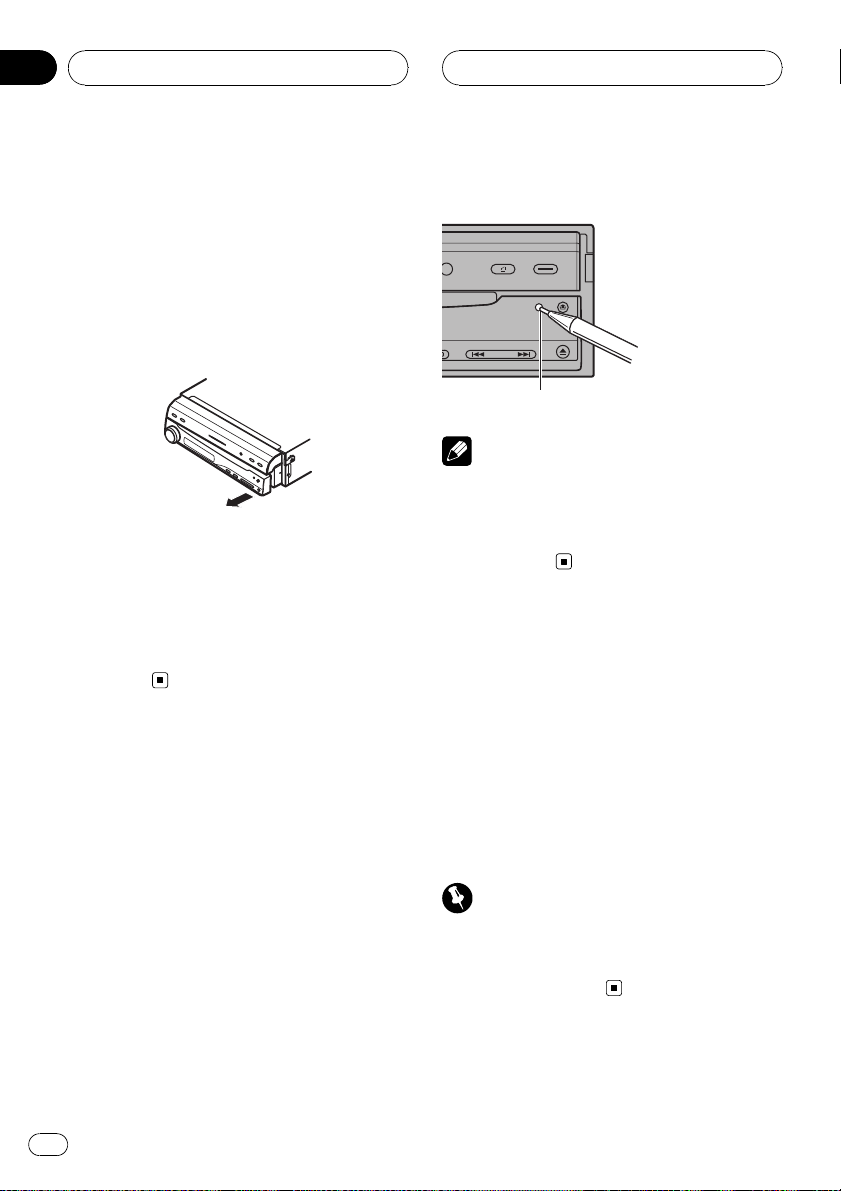
Removing the front panel
1 Press DETACH to release the front
panel.
2 Grab the front panel and remove.
Take care not to grip it too tightly or to drop
the front panel and protect it from contact
with water or other fluids to prevent permanent damage.
3 Put the front panel into provided protective case for safe keeping.
Attaching the front panel
% Replace the front panel by clipping it
into place.
Resetting the microprocessor
Pressing RESET lets you reset the microprocessor to its initial settings without changing
the bookmark information.
The microprocessor must be reset under the
following conditions:
! Prior to using this unit for the first time
after installation
! If the unit fails to operate properly
! When strange or incorrect messages ap-
pear on the display
2 Press RESET with a pen tip or other
pointed instrument.
RESET button
Note
After completing connections or when you want
to erase all memorized settings or return the unit
to its initial (factory) settings, switch your engine
ON or set the ignition switch to ACC ON before
pressing RESET.
Feature demo mode
The feature demo automatically starts when
you select the source OFF. The demo continues while the ignition switch is set to ACC
or ON. To cancel the feature demo, press and
hold VOLUME/ATT. To restart the feature
demo, press and hold VOLUME/ATT again.
Remember that if the feature demo continues
operating when the car engine is turned off, it
may drain battery power.
Important
The red lead (ACC) of this unit should be connected to a terminal coupled with ignition switch
on/off operations. If this is not done, the vehicle
battery may be drained.
1 Turn the ignition switch OFF.
14
En
Page 15
12345
6
7
89abc
d
Operating this unit
Section
03
Operating this unit
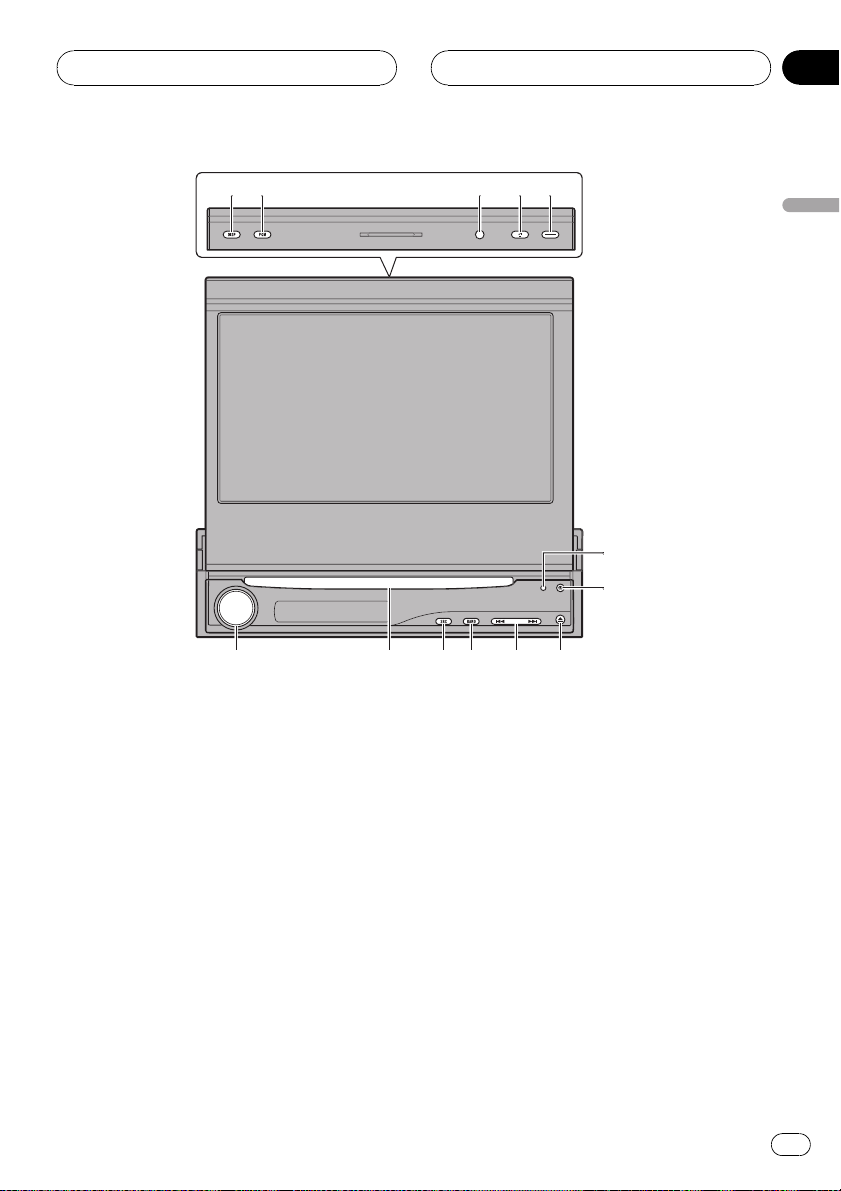
What’s What
Head unit
1 DISPLAY button
Press to turn the information display on or
off when the video is displayed.
Press and hold to switch between the displays on the sub-display.
! When a rear view camera video is dis-
2 PGM button
Press to operate the preprogrammed functions for each source. (Refer to Using the
PGM button on page 50.)
played, press and hold DISPLAY return
to the source display.
3 Ambient light sensor
Senses ambient light. This system automatically adjusts the brightness of the display to
compensate for ambient light.
4 FLIP DOWN button
Press to turn the LCD panel horizontal temporarily from upright position.
5 OPEN/CLOSE button
Press to open or close the LCD panel.
6 RESET button
Press to return to the factory settings (initial
settings).
7 DETACH button
Press to remove the front panel from the
head unit.
En
15
Page 16
1
Section
03
Operating this unit
8 EJECT button
Press to eject a disc from this unit.
9 o/p button
Press to do manual seek tuning, fast forward, reverse and track search controls.
a BAND/ESC button
Press to select among three FM bands and
one AM band and to cancel the control
mode of functions.
b SOURCE button
This unit is turned on by selecting a source.
Press to cycle through all the available
sources.
c Disc loading slot
Insert a disc to play.
d VOLUME/ATT button
Rotate it to increase or decrease the volume.
Press to quickly lower the volume level, by
about 90%. Press once more to return to the
original volume level.
Optional remote control
The remote control CD-R55 is sold separately.
For details concerning operations, see the remote control manual.
Basic Operations
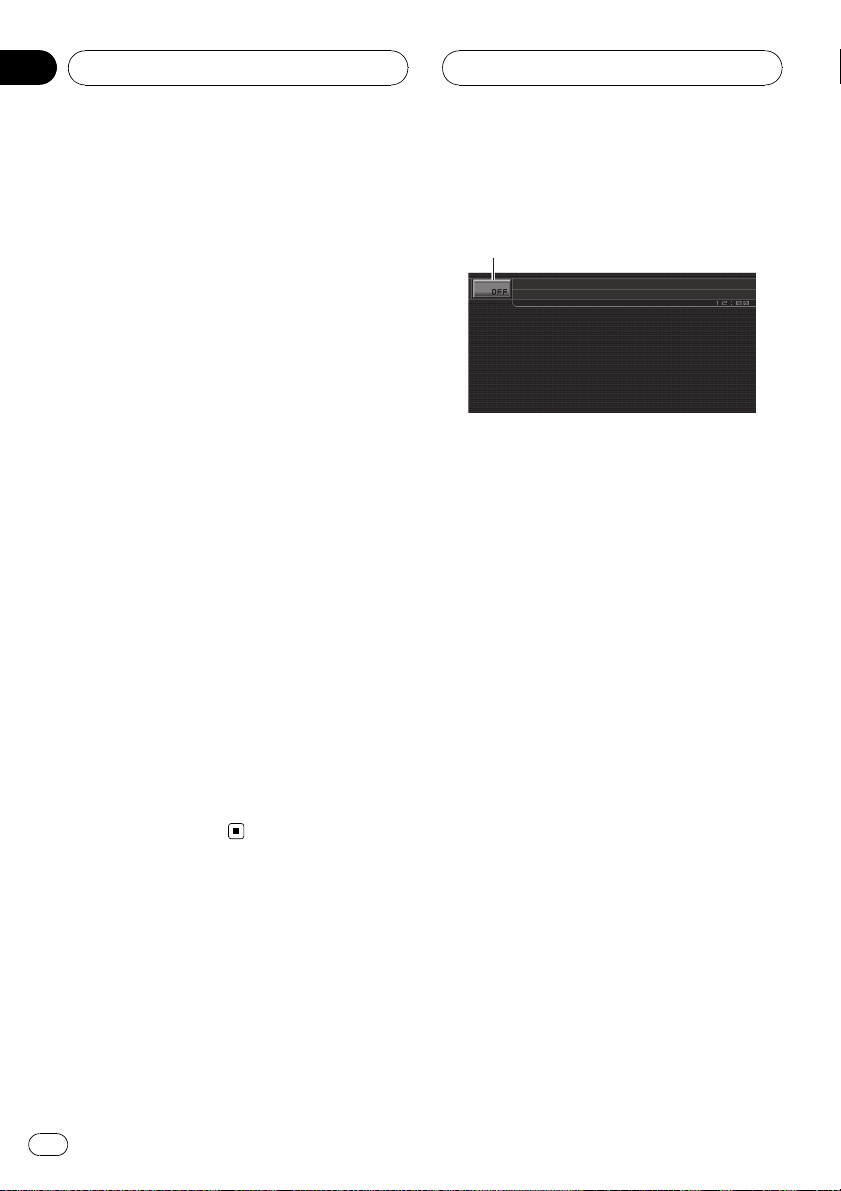
Power ON/OFF
1 Source icon
Turning the unit on
% When using the touch panel keys,
touch the source icon and then touch the
desired source name.
The source names are displayed and selectable ones are highlighted.
% When using the button, press SOURCE
to turn the unit on.
Turning the unit off
% When using the touch panel keys,
touch the source icon and then touch OFF.
# When the source icon is not displayed, you
can display it by touching the screen.
% When using the button, press SOURCE
and hold until the unit turns off.
16
Selecting a source
You can select a source you want to listen to.
To switch to the DVD player, load a disc in the
unit. To switch to the iPod, connect an iPod to
this unit.
En
Page 17
2
1
Operating this unit
Section
03
% When using the touch panel keys,
touch the source icon and then touch the
desired source name.
The source names are displayed and selectable ones are highlighted.
! DVD – Built-in DVD player
! RADIO – Radio
! iPod – iPod
! USB – USB portable audio player/USB
memory
! TEL – BT telephone
! BT Audio – Bluetooth audio player
! S-DVD – DVD player/multi-DVD player
! MCD – Multi-CD player
! AUX 1 – AUX 1
! AUX 2 – AUX 2
! AV – AV input
! TV – Television
! EXT 1 – External unit 1
! EXT 2 – External unit 2
! XM – XM tuner
! SIRIUS – SIRIUS tuner
! OFF – Turn the unit off
# When the source icon is not displayed, you
can display it by touching the screen.
# While operating the menu, you cannot select
a source by touching the source icon.
# To close source select menu, touch ESC.
! AUX1 is set to VIDEO by default. Set the AUX1
to OFF when not in use (refer to Switching the
auxiliary setting on page 42).
! External unit refers to a Pioneer product (such
as one available in the future) that, although
incompatible as a source, enables control of
basic functions by this unit. Two external units
can be controlled by this unit. When two external units are connected, the allocation of
them to external unit 1 or external unit 2 is
automatically set by this unit.
! When this unit’s blue/white lead is connected
to the vehicle’s auto-antenna relay control
terminal, the vehicle’s antenna extends when
this unit’s source is turned on. To retract the
antenna, turn the source off.
Adjusting the volume
% Use VOLUME/ATT to adjust the sound
level.
Rotate VOLUME/ATT to increase or decrease
the volume.
Touch panel key basic operation
Activating the touch panel keys
Operating this unit
% When using the button, press SOURCE
repeatedly to select a desired source.
Notes
! In the following cases, the sound source will
not change:
— When there is no unit corresponding to the
selected source connected to this unit.
— When there is no disc or magazine in the
player.
— When the AUX (auxiliary input) is set to off
(refer to page 42).
— When the AV (AV input) is not set to
VIDEO (refer to page 46).
1 TILT ( / ) keys
Touch to adjust the LCD panel angle.
2 Touch panel keys
Touch to do various operations.
En
17
Page 18
123
4
Section
03
Operating this unit
1 Touch the screen to activate the touch
panel keys corresponding to each source.
The touch panel keys appear on the display.
# To go to the next group of touch panel keys,
touch NEXT.
# To return to the previous group of touch panel
keys, touch PREV.
2 Touch HIDE to hide the touch panel
keys.
Note
If you do not use the touch panel keys within 30
seconds, they will be hidden automatically when
selecting video sources.
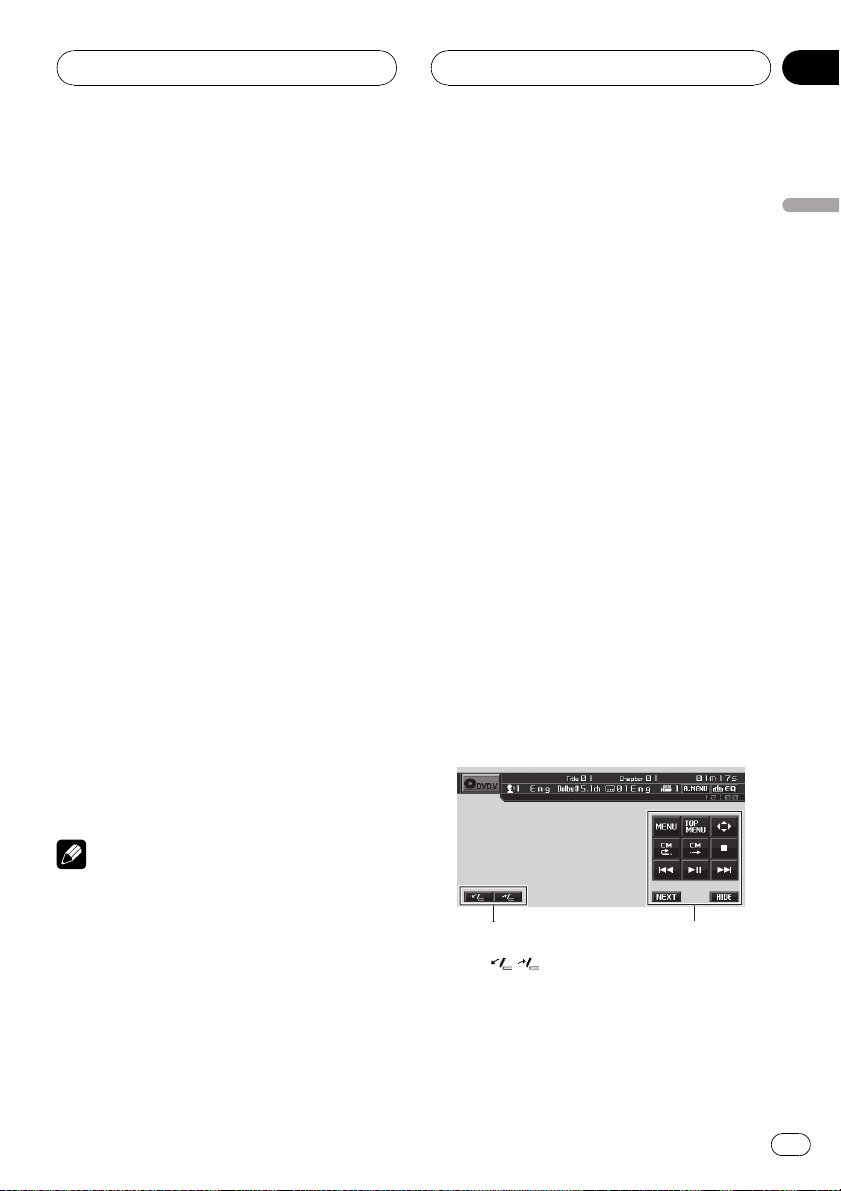
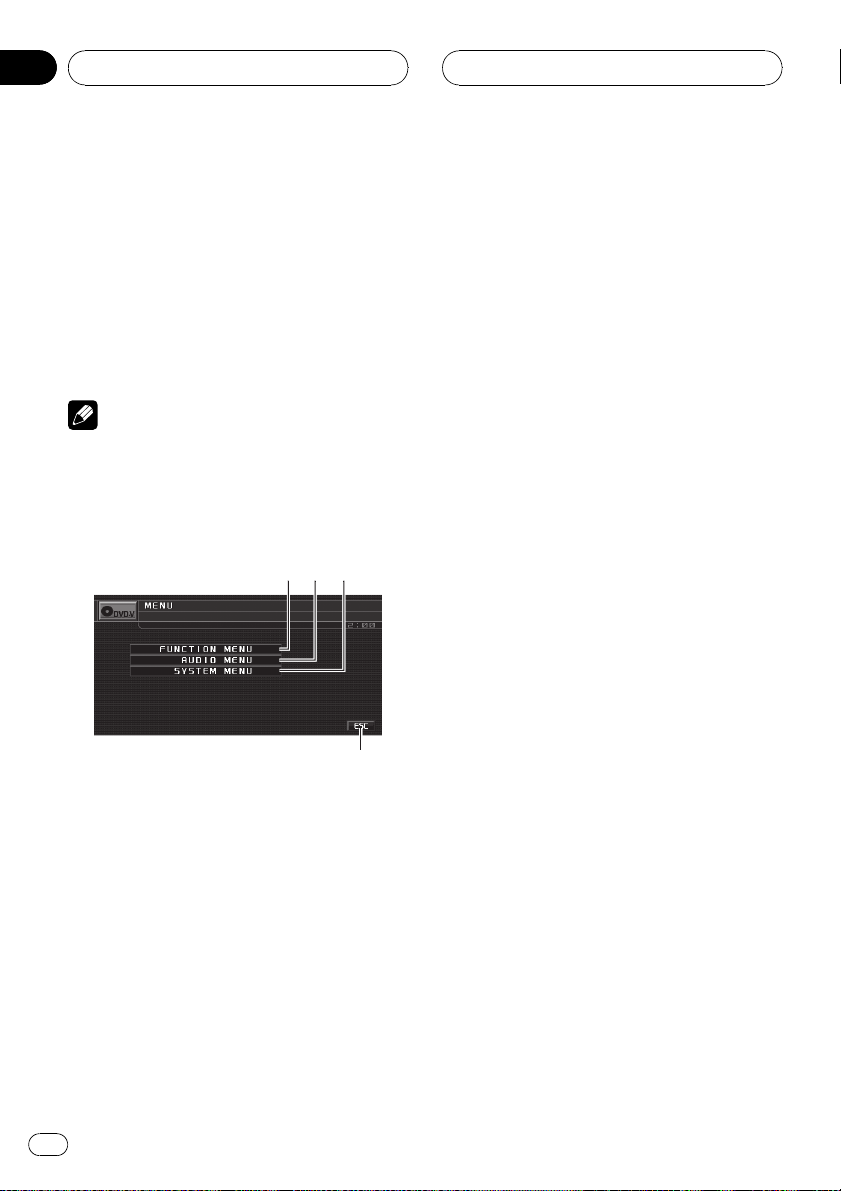
Operating the menu
1 FUNCTION MENU key
Touch to select functions for each source.
2 AUDIO MENU key
Touch to select various sound quality controls.
3 SYSTEM MENU key
Touch to select various setup functions.
4 ESC key
Touch to cancel the control mode of functions.
1 Touch A.MENU to display MENU.
The menu names are displayed and operable
ones are highlighted.
# When A.MENU is not displayed, you can dis-
play it by touching the screen.
2 Touch the desired key to display the
function names you want to operate.
# To go to the next group of function names,
touch NEXT.
# To return to the previous group of function
names, touch PREV.
3 Touch ESC to return to the display of
each source.
Opening and closing the LCD panel
The LCD panel will be opened or closed automatically with the turning of the ignition
switch on or off. You can turn off the automatic
close/open function. (Refer to page 48.)
! Do not close the LCD panel with hands by
force. That cause malfunction.
! The automatic close/open function will op-
erate the display as follows.
— When the ignition switch is turned OFF
while the LCD panel is opened, the LCD
panel will close after six seconds.
— When the ignition switch is turned ON
again (or turned to ACC), the LCD panel
will be opened automatically.
— Removing or attaching the front panel
will automatically close or open the LCD
panel. (Refer to page 13.)
! When the ignition switch is turned OFF
after the LCD panel has been closed, turning the ignition switch ON again (or turning
it to ACC) will not open the LCD panel. In
this case, press OPEN/CLOSE to open the
LCD panel.
! When closing the LCD panel, check to
make sure that it has closed completely. If
the LCD panel has stopped halfway, leaving
it like this could result in damage.
18
En
Page 19
Operating this unit
CAUTION
Keep hands and fingers clear of the unit when
opening, closing, or adjusting the LCD panel. Be
especially cautious of children’s hands and fingers.
% Press OPEN/CLOSE to open the LCD
panel.
# To close the LCD panel, press OPEN/CLOSE
again.
Section
03
Operating this unit
# The adjusted LCD panel angle will be memorized and automatically returned to the next time
the LCD panel is opened.
Adjusting the LCD panel angle
Important
! If you can hear the LCD panel knocking
against your vehicle’s console or dashboard,
touch TILT (
forward.
! When adjusting the LCD panel angle, be sure
to touch TILT (
LCD panel by hand may damage it.
) to move the LCD panel a little
/ ). Forcibly adjusting the
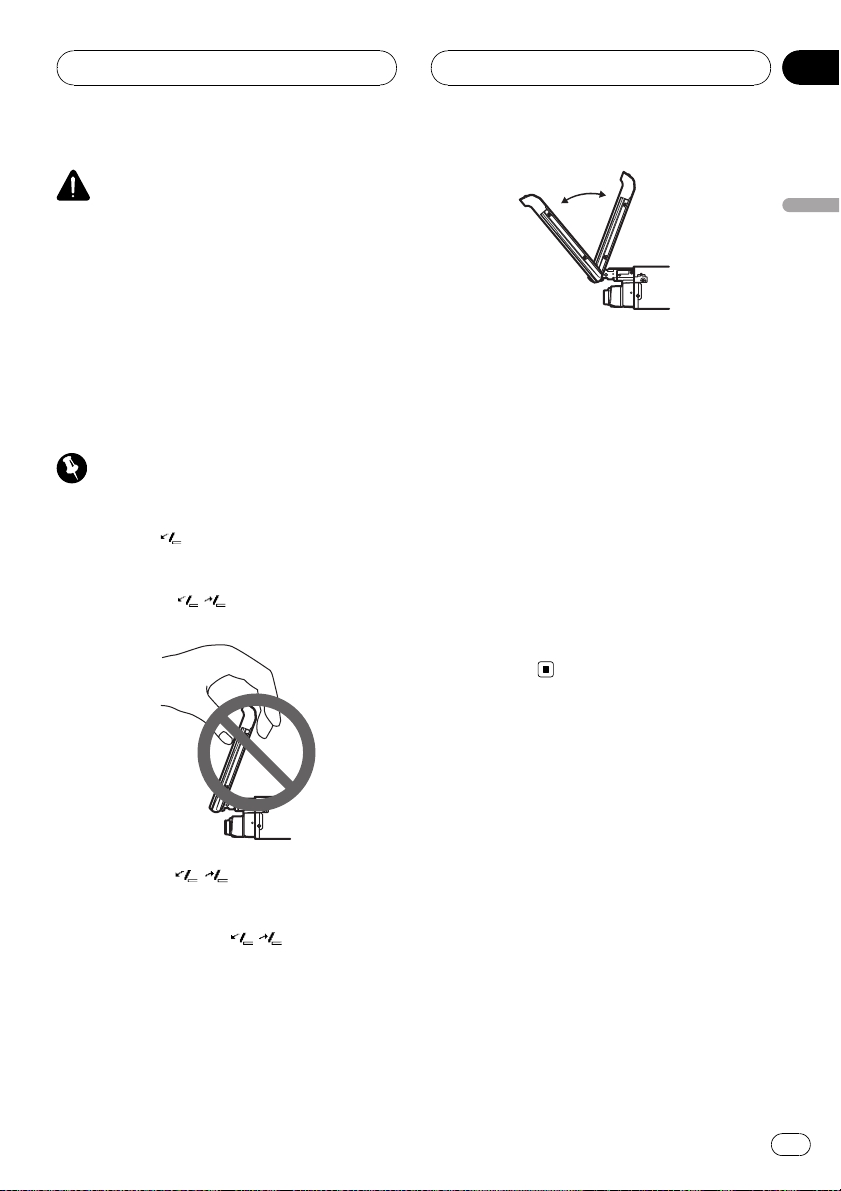
% Touch TILT ( / ) to adjust the LCD
panel to an easily viewable angle.
The LCD panel angle continues changing as
long as you touch TILT (
/ ) and hold.
Turning the LCD panel horizontal
When the LCD panel is upright and it hinders
the operation of the air conditioner, the panel
can be turned horizontal temporarily.
% Press FLIP DOWN to turn the LCD panel
horizontal.
# To return to original position, press
FLIP DOWN again.
# The LCD panel returns to the original position
automatically with beeping sound 10 seconds
after operation.
En
19
Page 20
25134
6
Section
03
Operating this unit
Radio
Basic Operations
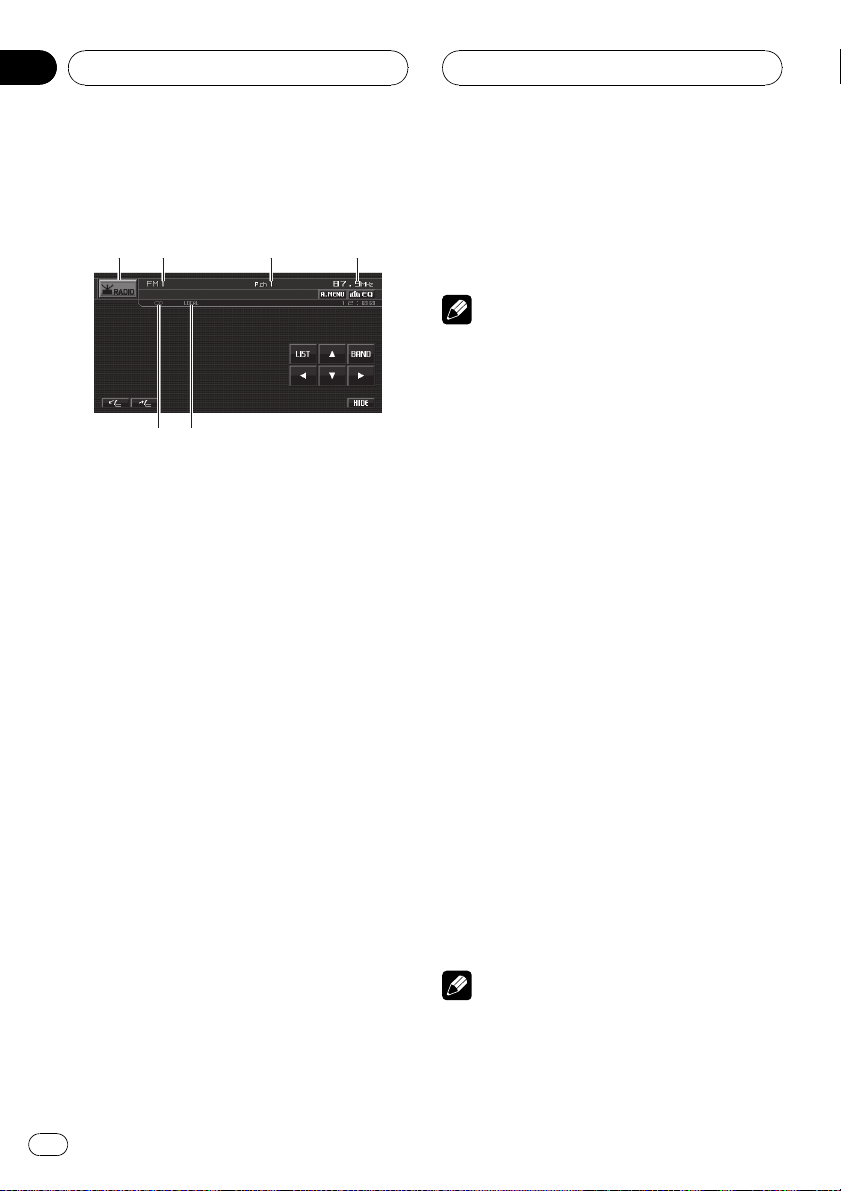
1 Source icon
2 Band indicator
3 Preset number indicator
4 Frequency indicator
5 LOCAL indicator
Shows when local seek tuning is on.
6 Stereo (5) indicator
Shows when the selected frequency is being
broadcast in stereo.
1 Touch the source icon and then touch
RADIO to select the radio.
2 Touch BAND to select a band.
Touch BAND until the desired band (FM1,
FM2, FM3 for FM or AM) is displayed.
3 To perform manual tuning, briefly
touch c or d.
# You can also perform manual tuning by pressing o or p.
4 To perform seek tuning, keep touching
c or d for about one second and release.
The tuner will scan the frequencies until a
broadcast strong enough for good reception is
found.
# You can cancel seek tuning by briefly touching
either c or d.
# If you keep touching c or d you can skip sta-
tions. Seek tuning starts as soon as you release
the key.
# You can also perform seek tuning by pressing
and holding o or p.
Note
Listening AM radio while an iPod is charged from
this unit may generate noise. In this case, turn
the iPod charge setting off and noise is disappeared. (Refer to Switching the iPod charge setting
on page 48.)
Storing and recalling broadcast
frequencies
You can easily store up to six broadcast frequencies for later recall.
! Up to 18 FM stations, six for each of the
three FM bands, and six AM stations can
be stored in memory.
1 Touch LIST to display the preset list.
2 When you find a frequency that you
want to store in memory keep touching
one of preset tuning keys P1 to P6 until the
beep sounds.
The selected radio station frequency has been
stored in memory.
The next time you touch the same preset tuning key the radio station frequency is recalled
from memory.
3 Touch ESC to return to the ordinary display.
Note
You can also use a and b to recall radio station
frequencies assigned to preset tuning keys P1 to
P6.
20
En
Page 21

Operating this unit
Section
03
Introduction of advanced
operations
1 Touch A.MENU and then touch
FUNCTION MENU to display the function
names.
The function names are displayed and operable ones are highlighted.
2 Touch ESC to return to the frequency
display.
# To return to the previous display, touch BACK.
Storing the strongest broadcast
frequencies
BSM (best stations memory) lets you automatically store the six strongest broadcast frequencies under preset tuning keys P1 to P6
and once stored there you can tune in to those
frequencies with the touch of a key.
! Storing broadcast frequencies with BSM
may replace broadcast frequencies you
have saved using P1 to P6.
% Touch BSM on the function menu to
turn BSM on.
BSM begins to flash. While BSM is flashing
the six strongest broadcast frequencies will be
stored under preset tuning keys P1 to P6 in
order of their signal strength. When finished,
BSM stops flashing.
# To cancel the storage process, touch BSM
again.
% Touch LOCAL on the function menu to
set the sensitivity.
Touch LOCAL repeatedly until the desired level
of sensitivity appears in the display.
There are four levels of sensitivity for FM and
two levels for AM:
FM: OFF—LEVEL1—LEVEL2—LEVEL3—
LEVEL4
AM: OFF—LEVEL1—LEVEL2
The LEVEL4 setting allows reception of only
the strongest stations, while lower settings let
you receive progressively weaker stations.
Operating this unit
Tuning in strong signals
Local seek tuning lets you tune in only those
radio stations with sufficiently strong signals
for good reception.
En
21
Page 22
3
26145
Section
03
Operating this unit
Built-in DVD player
Basic Operations
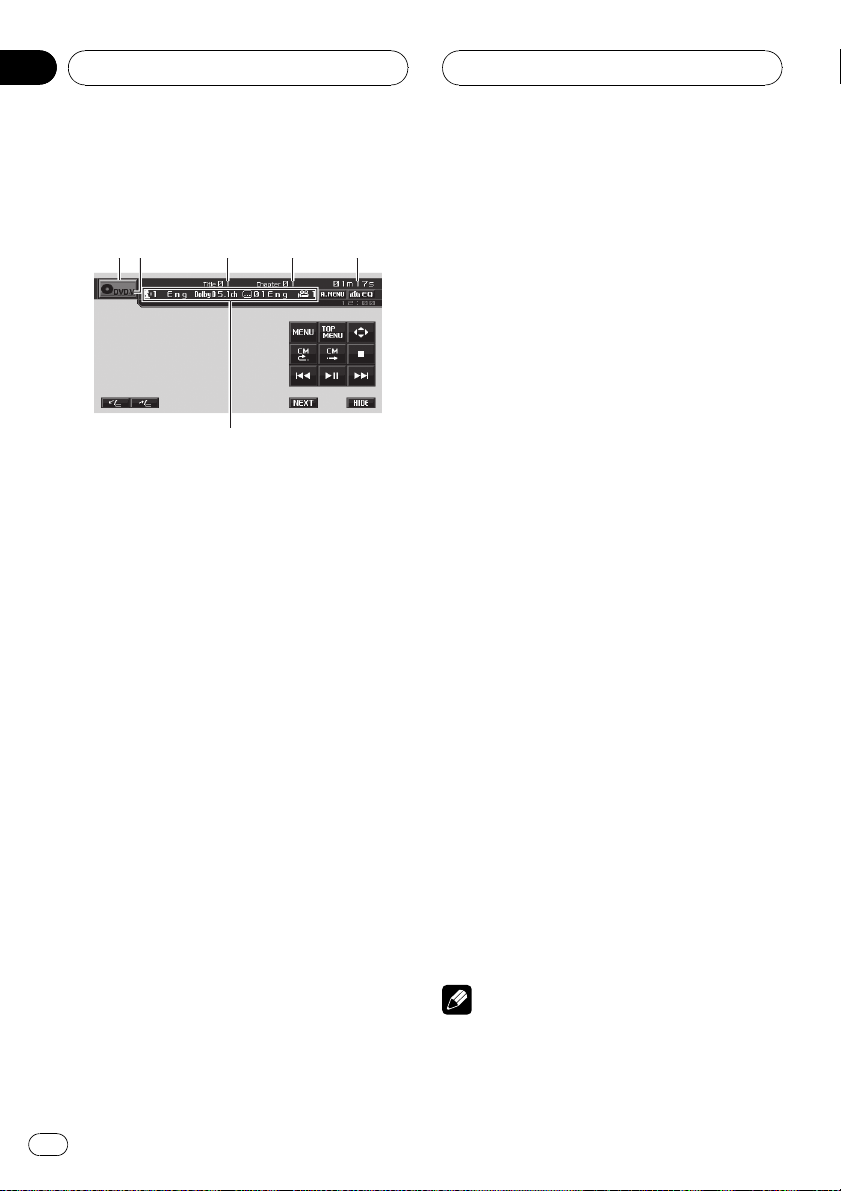
1 Source icon
2 Media indicator
Shows the type of disc currently playing.
3 Title/Folder number indicator
DVD: shows the title currently playing.
Compressed audio and DivX: shows the folder
currently playing.
4 Chapter/track/file number indicator
DVD: shows the chapter currently playing.
Video CD and CD: shows the track currently
playing.
Compressed audio and DivX: shows the file
currently playing.
5 Play time indicator
6 Variable message area
DVD: shows the subtitle language, audio language and viewing angle.
CD TEXT, compressed audio and DivX: shows
the text information of currently playing disc.
1 Insert a disc into the disc loading slot.
Playback will automatically start.
# Be sure to turn up the label side of a disc.
# After a disc has been inserted, use touch
panel keys to select the DVD player.
# When the automatic playback function is on,
this unit will cancel the DVD menu and automatically start playback from the first chapter of the
first title. Refer to Automatic playback of DVDs on
page 28.
# With some DVD discs, a menu may be displayed. (Refer to Operating the DVD menu on the
next page.)
# With a Video CD featuring the PBC (playback
control) function, a menu is displayed. (Refer to
PBC playback on page 24.)
# To eject a disc, press EJECT.
2 Touch the screen to display the touch
panel keys.
3 When playing a compressed audio or
DivX, touch a or b to select a folder.
# To return to folder 01 (ROOT), press and hold
BAND/ESC. However, if folder 01 (ROOT) con-
tains no files, playback commences with folder
02.
4 To skip back or forward to another
chapter/track, briefly touch o or p.
# You can also skip back or forward to another
chapter/track by pressing o or p.
# During PBC playback, a menu may be displayed if you perform these operations.
5 To perform fast forward or reverse,
keep touching o or p.
When DVD, DivX disc or Video CD is playing, if
you keep touching o or p for five seconds, the icon m or n is highlighted.
When this happens, fast reverse/fast forward
continues even if you release o or p.To
resume playback at a desired point, touch
de.
# When playing DVD video or Video CD, fast forward/fast reverse may not be possible at certain
locations on some discs. If this happens, normal
playback automatically resumes.
Notes
! If you do not use the touch panel keys within
30 seconds, they will be hidden automatically
when displaying video image.
22
En
Page 23

Operating this unit
! Read the precautions with discs and player on
Handling guideline of discs and player on page
94.
! If an error message such as ERROR-02-XX is
displayed, refer to Error messages on page 91.
! If bookmark function is on, DVD playback re-
sumes from the selected point. For more details, refer to Resume playback (Bookmark) on
page 25.
! If a disc contains a mixture of various media
file types such as DivX and MP3, you can
switch between media file types to play. Refer
to Switching the media file type on this page.
! There is sometimes a delay between starting
up disc playback and the sound being issued.
When being read, FORMAT READ is displayed.
! When playing back files recorded as VBR
(variable bit rate) files, the play time will not be
correctly displayed if fast forward or reverse
operations are used.
! When playing back WMA files, album title list
does not appear.
! If the characters recorded on the disc are not
compatible with this unit, those characters
will not be displayed.
Basic playback controls
The table below shows the basic controls for
playing discs. The following chapters cover
other playback features in more details.
Key What it does
Starts playback, pauses a disc that’s playing or
de
restarts a paused disc.
g Stops playback.
Skips to the start of the current track, chapter
or file, then to previous tracks/chapters/files.
o
! Performs fast reverse by touching and
holding o.
Skips to the next track, chapter or file.
! Performs fast forward by touching and
p
holding p.
Note
You may find with some DVD or Video CD discs
that some playback controls do not work in certain parts of the disc. This is not a malfunction.
Switching the media file type
When playing a disc containing a mixture of
various media file types such as DivX and
MP3, you can switch between media file types
to play.
! This unit allows playback of the following
media file type recorded on CD-R/RW/ROM
discs.
— Audio data (CD-DA)
— Compressed audio files
— DivX video files
! In case of DVD-R/RW/ROM, this unit does
not allow playback of audio data (CD-DA).
% Touch MEDIA to switch between media
file types.
Touch MEDIA repeatedly to switch between
the following media file types:
CD (audio data (CD-DA))—WMA/MP3/AAC
(compressed audio)—DivX (DivX video files)
Operating the DVD menu
Some DVDs allow you to select from the disc
contents using a menu.
! This function is available for DVD.
! You can display the menu by touching
MENU or TOP MENU while a disc is playing. Touching either of these keys again
lets you start playback from the location selected from the menu. For details, refer to
the instructions provided with the disc.
Section
03
Operating this unit
En
23
Page 24
Section
03
Operating this unit
Using DVD menu direct touch control
This function allows you to operate the DVD
menu by touching the menu item directly.
% Touch the desired menu item on the
DVD menu directly.
# Depending on the contents of DVD discs, this
function may not work properly. In this case,
using touch panel keys operate the DVD menu.
Using the touch panel keys
1 Touch to display touch panel keys
to operate the DVD menu.
# When the touch panel keys are not displayed,
you can display them by touching the screen.
# To switch to the DVD menu direct touch control, touch TOUCH.
2 Touch a, b, c or d to select the desired
menu item.
3 Touch ENTER.
Playback starts from the selected menu item.
# The way to display the menu differs depending
on the disc.
PBC playback
During playback of Video CDs featuring PBC
(Playback Control), PBC ON is displayed. You
can operate PBC menu with 10Key.
! This function is available for Video CD.
3 Touch ESC to hide the touch panel keys.
Notes
! You can display the menu by touching
RETURN during PBC playback. For details,
refer to the instructions provided with the
disc.
! PBC playback of Video CD cannot be can-
celled.
! During playback of Video CDs featuring PBC
(Playback Control), PBC ON, search and time
search functions cannot be used nor can you
select the range for repeat play.
Playing DivX®VOD content
Some DivX VOD (video on demand) content
may only be playable a fixed number of times.
When you load a disc containing this type of
DivX VOD content, the remaining number of
plays is shown on-screen and you then have
the option of playing the disc (thereby using
up one of the remaining plays), or stopping. If
you load a disc that contains expired DivX
VOD content (for example, content that has
zero remaining plays), RENTAL EXPIRED is
displayed.
! If your DivX VOD content allows an unlim-
ited number of plays, then you may load
the disc into your player and play the content as often as you like, and no message
will be displayed.
1 When PBC menu is displayed, touch
SEARCH and then touch 10Key.
# Depending on the discs, the menu may be
two or more pages long. In such case, touch o
or p to display the next or previous menu.
2 Touch 0 to 9 corresponding to a menu
number and then touch ENTER to start
playback.
Playback starts from the selected menu item.
24
En
Important
! In order to play DivX VOD content on this unit,
you first need to register the unit with your
DivX VOD content provider. About your registration code, refer to Displaying your DivX
VOD registration code on page 41.
! DivX VOD content is protected by a DRM (Di-
gital Rights Management) system. This restricts playback of content to specific,
registered devices.
®
Page 25

Operating this unit
Section
03
% If the message is displayed after loading a disc containing DivX VOD content,
touch PLAY.
Playback of the DivX VOD content will start.
# To skip to the next file, touch NEXT PLAY.
# If you do not want to play the DivX VOD con-
tent, touch STOP.
Skipping back or forward to
another title
! This function is available for DVD.
% To skip back or forward to another title,
touch a or b.
Touching a skips to the start of the next title.
Touching b skips to the start of the previous
title.
Title numbers are displayed for eight seconds.
# To switch between groups of touch panel keys,
touch NEXT or PREV.
CM skip/CM back
This function skips a reproduced image for a
specified time. If the currently playing disc
contains commercials, it is possible to skip
them.
! This function is available for DVD.
% To skip progressively backward or for-
ward, touch
Each time you touch
in the following order:
CM back
5 sec.—15 sec.—30 sec.—1.0 min.—2.0
min.—3.0 min.
CM skip
30 sec.—1.0 min.—1.5 min.—2.0 min.—3.0
min.—5.0 min.—10.0 min.
or .
or it changes steps
Resume playback (Bookmark)
The Bookmark function lets you resume playback from a selected scene the next time the
disc is loaded.
! This function is available for DVD.
% During playback, touch BOOKMARK at
the point you want to resume playback
next time.
The selected scene will be bookmarked so that
playback resumes from that point next time.
You can bookmark up to five discs. After that,
the oldest bookmark is replaced by the new
one.
# To switch between groups of touch panel keys,
touch NEXT or PREV.
# To clear the bookmark on a disc, keep touching BOOKMARK during playback.
# You can also bookmark a disc by pressing and
holding EJECT at the point you want to bookmark.
Next time you load the disc, playback will resume
from the bookmarked point. Note that you can
only bookmark one disc using this method. To
clear the bookmark on a disc, press EJECT.
Searching for the part you
want to play
You can use the search function to find the
part you want to play.
! This function is available for DVD, DivX
disc and Video CD.
! Chapter search, track search and time
search are not possible when disc playback
has been stopped.
! During playback of Video CDs featuring
PBC (playback control), this function cannot be operated.
1 Touch SEARCH.
# To switch between groups of touch panel keys,
touch NEXT or PREV.
Operating this unit
En
25
Page 26
Section
03
Operating this unit
2 Touch the desired search option (e.g.,
CHAP.).
# You cannot operate this step during DivX disc
playback.
3 Touch 0 to 9 to input the desired number.
# To cancel the inputted numbers, touch C.
# In the time search function, to select 1 hour
11 minutes, convert the time into 71 minutes 00
seconds and touch 7, 1, 0 and 0 in that order.
4 Touch ENTER.
This starts playback from the selected part.
Note
With DVD discs featuring a menu, you can also
touch MENU or TOP MENU and then make selections from the displayed menu.
Changing audio language
during playback (Multi-audio)
DVDs can provide audio playback with different languages and different systems (Dolby Digital, DTS etc.). With DVDs featuring multiaudio recordings, you can switch between languages/audio systems during playback.
! This function is available for DVD and DivX
disc.
% Touch AUDIO during playback.
Each time you touch AUDIO it switches between audio systems.
# To switch between groups of touch panel keys,
touch NEXT or PREV.
Notes
! With some DVDs, switching between lan-
guages/audio systems may only be possible
using a menu display.
! You can also switch between languages/audio
systems using DVD SETUP. For details, refer
to Setting the audio language on page 38.
! Only digital output of DTS audio is possible. If
this unit’s optical digital outputs are not connected, DTS audio will not be output, so select
an audio setting other than DTS.
! Display indications such as Dolby D and
5.1ch indicate the audio system recorded on
the DVD. Depending on the setting, playback
may not be with the same audio system as
that indicated.
! Touching AUDIO during fast forward/fast re-
verse, pause or slow motion playback returns
you to normal playback.
Changing the subtitle language
during playback (Multi-subtitle)
With DVDs featuring multi-subtitle recordings,
you can switch between subtitle languages
during playback.
! This function is available for DVD and DivX
disc.
% Touch SUBTITLE during playback.
Each time you touch SUBTITLE it switches between subtitle languages.
# To switch between groups of touch panel keys,
touch NEXT or PREV.
Notes
! With some DVDs, switching between subtitle
languages may only be possible using a menu
display.
! You can also switch between subtitle lan-
guages using DVD SETUP. For details, refer to
Setting the subtitle language on page 37.
! Touching SUBTITLE during fast forward/fast
reverse, pause or slow motion playback returns you to normal playback.
26
En
Page 27
Operating this unit
Section
03
Changing the viewing angle
during playback (Multi-angle)
With DVDs featuring multi-angle (scenes shot
from multiple angles) recordings, you can
switch among viewing angles during playback.
! This function is available for DVD.
! During playback of a scene shot from mul-
tiple angles, the angle icon
is dis-
played. Turn angle icon display on or off
using DVD SETUP. For details, refer to Set-
ting the angle icon display on page 39.
% Touch ANGLE during playback of a
scene shot from multiple angles.
Each time you touch ANGLE it switches between angles.
# To switch between groups of touch panel keys,
touch NEXT or PREV.
Note
Touching ANGLE during fast forward/fast reverse,
pause or slow motion playback returns you to
normal playback.
Frame-by-frame playback
This lets you move ahead one frame at a time
during playback.
! This function is available for DVD and
Video CD.
% Touch r during playback.
Each time you touch r, you move ahead one
frame.
# To return to normal playback, touch de.
# To switch between groups of touch panel keys,
touch NEXT or PREV.
# With some discs, images may be unclear during frame-by-frame playback.
Slow motion playback
This lets you slow down playback speed.
! This function is available for DVD and
Video CD.
% Keep touching r until
is displayed
during playback.
The icon
is displayed, forward slow motion
playback begins.
# Touching q or r during slow motion play-
back, you can change the playback speed in four
steps as follows:
1/16—1/8—1/4—1/2
! During DVD playback, only the remote con-
trol can perform this operation.
# To switch between groups of touch panel keys,
touch NEXT or PREV.
# To return to normal playback, touch de.
Notes
! There is no sound during slow motion play-
back.
! With some discs, images may be unclear dur-
ing slow motion playback.
! Reverse slow motion playback is not possible.
Return to the specified scene
You can return to the specified scene where
the DVD you are currently playing has been
preprogrammed to return.
! This function is available for DVD.
% Touch RETURN to return to the speci-
fied scene.
# To switch between groups of touch panel keys,
touch NEXT or PREV.
# If a specified scene has not been preprogrammed in DVD disc, this function is not possible.
Operating this unit
En
27
Page 28
Section
03
Operating this unit
Automatic playback of DVDs
When a DVD disc with DVD menu is inserted,
this unit will cancel the DVD menu automatically and start playback from the first chapter
of the first title.
! This function is available for DVD.
! Some DVDs may not operate properly. If
this function is not fully operated, turn this
function off and start playback.
% Touch AUTO PLAY to turn automatic
playback on.
# To turn automatic playback off, touch
AUTO PLAY again.
# To switch between groups of touch panel keys,
touch NEXT or PREV.
# When the automatic playback is on, you cannot operate repeating play of DVD disc (refer to
Repeating play on the next page).
Text information
Text information recorded on a disc can be displayed. Text information is displayed on variable message area.
! This function is available for CD TEXT, com-
pressed audio disc and DivX disc.
Notes
! Some discs have certain information encoded
on the disc during manufacture. These discs
may contain such information as the CD title,
track title, artist’s name and playback time
and are called CD TEXT discs.
! If specific information has not been recorded
on a CD TEXT disc, No XXXX will be displayed
(e.g., No Name).
! If specific information has not been recorded
on a compressed audio disc, no xxxx will be
displayed (e.g., no artist).
! When playing back WMA files, album title is
not displayed.
Selecting tracks from the track list
Track list lets you see the list of tracks on a
disc and select one of them to play back.
When playing a CD TEXT disc, track titles are
displayed.
! This function is available for CD.
1 Touch LIST.
2 Touch
lists of tracks.
or to switch between the
Displaying text information
% Touch INFO.
Touch INFO repeatedly to switch between the
following settings:
For CD TEXT discs
: disc title— : disc artist name— : track
title—
For compressed audio discs
title—
For DivX discs
28
: track artist name
: folder name— : file name— : album
: track title— : artist name
: folder name— : file name
En
3 Touch your favorite track.
That selection will begin to play.
4 Touch ESC to return to the ordinary display.
Selecting files from the file
name list
File name list lets you see the list of file names
(or folder names) and select one of them to
playback.
! This function is available for compressed
audio disc and DivX disc.
Page 29
Operating this unit
Section
03
1 Touch LIST.
2 Touch
or to switch between the
lists of titles.
3 Touch your favorite file name (or folder
name).
That selection will begin to play.
# When you have selected a folder, a list of the
names of the files (or the folders) in it can be
viewed. Repeat steps 2 and 3 to select the desired
file name.
# To return to the previous list (the folder one
level higher), touch
.
4 Touch ESC to return to the ordinary display.
Introduction of advanced
operations
1 Touch A.MENU and then touch
FUNCTION MENU to display the function
names.
The function names are displayed and operable ones are highlighted.
2 Touch ESC to return to the playback display.
# To return to the previous display, touch BACK.
Repeating play
Repeat play plays the same play range repeatedly. Play range varies depending on the
media.
For DVD, play range can be selected from
DISC (disc repeat), TITLE (title repeat) and
CHAPTER (chapter repeat).
For Video CD and CD, play range can be selected from DISC (disc repeat) and TRACK
(track repeat).
For compressed audio and DivX, play range
can be selected from DISC (disc repeat),
FOLDER (folder repeat) and FILE (file repeat).
! During playback of Video CDs featuring
PBC (playback control), this function cannot be operated.
% Touch REPEAT on the function menu to
select the repeat range.
! TITLE – Repeat just the current title
! CHAPTER – Repeat just the current chapter
! TRACK – Repeat just the current track
! FILE – Repeat just the current file
! FOLDER – Repeat the current folder
! DISC – Play through the current disc
Notes
! If you perform chapter search or fast forward/
reverse, the repeat play range changes to
DISC.
! If you select another folder during repeat play,
the repeat play range changes to DISC.
! When playing back compressed audio or
DivX, if you perform track search or fast forward/reverse during FILE, the repeat play
range changes to FOLDER.
! When playing back Video CD or CD, if you per-
form track search or fast forward/reverse during TRACK, the repeat play range changes to
DISC.
! When FOLDER is selected, it is not possible to
play back a subfolder of that folder.
! When playing discs with compressed audio
and audio data (CD-DA), repeat play performs
within the currently playing data type even if
DISC is selected.
Playing tracks in random order
Random play plays tracks in a random order
within the selected repeat range.
! This function is available for CD and com-
pressed audio disc.
Operating this unit
En
29
Page 30
Section
03
Operating this unit
1 Select the repeat range.
Refer to Repeating play on the previous page.
2 Touch RANDOM on the function menu
to turn random play on.
Tracks will play in a random order within the
previously selected repeat range.
# To turn random play off, touch RANDOM
again.
Scanning tracks or folders
Scan play lets you hear the first 10 seconds of
each track on the CD.
When playing the compressed audio disc, the
first 10 seconds of each track of the current
folder (or the first track of each folder) is
played.
! This function is available for CD and com-
pressed audio disc.
1 Select the repeat range.
Refer to Repeating play on the previous page.
2 Touch SCAN on the function menu to
turn scan play on.
The first 10 seconds of each track is played.
3 When you find the desired track (or
folder) touch SCAN again.
Note
After track or folder scanning is finished, normal
playback of the tracks will begin again.
! This function is not possible when disc
playback has been stopped.
! If you select Linear PCM, when playing a
disc recorded on a dual mono mode, you
can operate this function. (Refer to Setting
for digital output on page 41.)
% Touch L/R SELECT on the function menu
to select the audio output.
Touch L/R SELECT repeatedly until the desired
audio output appears in the display.
! L+R – left and right
! LEFT – left
! RIGHT – right
! MIX – mixing left and right
Note
Depending on the disc and the playback location
on the disc, the function may not be selectable,
indicating that operating this function is not possible.
Using compression
Using the COMP (compression) function lets
you adjust the sound playback quality of this
unit.
% Touch COMPRESSION on the function
menu to select your favorite setting.
OFF—COMP1—COMP2
Selecting audio output
When playing DVD video discs recorded with
LPCM audio, you can switch the audio output.
When playing Video CD discs, you can switch
between stereo and monaural audio output.
! This function is available for DVD and
Video CD.
30
En
Page 31

32165
4
7
8
Operating this unit
Section
03
Playing songs on iPod
Basic Operations
You can use this unit to control an iPod by
using a cable (e.g., CD-I200), which is sold separately.
1 Source icon
2 Repeat indicator
Shows when repeat range is set to ONE or
ALL.
3 Song number indicator
4 Song title indicator
5 Shuffle indicator
Shows when random play is set to SONGS or
ALBUMS.
6 Play time indicator
7 Song information
Shows detailed information of currently playing song.
8 Battery charging indicator
Shows when the battery charge setting is on.
1 Connect the iPod to this unit.
Playback will automatically start.
While the iPod is connected to this unit,
PIONEER (or
the iPod.
# Before connecting the dock connector of this
unit to the iPod, disconnect the headphones from
the iPod.
# After the iPod has been connected to this
unit, use touch panel keys to select the iPod.
(check mark)) is displayed on
# When removing the iPod from this unit, this
unit is turned off.
Operating this unit
2 To skip back or forward to another
song, touch o or p.
# You can also skip back or forward to another
song by pressing o or p.
3 To perform fast forward or reverse,
keep touching o or p.
# You can also perform fast reverse/fast forward
by pressing and holding o or p.
4 When playing Audiobook or Podcast
(with chapter) on iPod, touch CHAPa or
CHAPb to select a chapter.
# To switch between groups of touch panel keys,
touch NEXT or PREV.
Notes
! Read the precautions with iPod on page 97.
! If an error message such as ERROR-11 is dis-
played, refer to Error messages on page 91.
! Connect directly the dock connector of this
unit to the iPod so that this unit works properly.
! When the ignition switch is set to ACC or ON,
the iPod’s battery is charged while the iPod is
connected to this unit.
! While the iPod is connected to this unit, the
iPod itself cannot be turned on or off.
! The iPod connected to this unit is turned off
about two minutes after the ignition switch is
set to OFF.
Browsing for a song
The operation of this unit to control an iPod is
designed to be as close to the operation of the
iPod as possible for easy operation and song
search.
! If the characters recorded on the iPod are
not compatible with this unit, those characters will not be displayed.
En
31
Page 32

Section
03
Operating this unit
1 Touch MENU to display iPod menus.
2 Touch one of the categories in which
you want to search for a song.
! PLAYLISTS (playlists)
! ARTISTS (artists)
! ALBUMS (albums)
! SONGS (songs)
! PODCASTS (podcasts)
! GENRES (genres)
! AUDIOBOOKS (audiobooks)
# To switch between groups of categories, touch
PREV or NEXT.
3 Touch a list title that you want to play.
Repeat this operation until you find the desired song.
# You can start playback throughout the selected list by touching and holding desired list
title.
# You can start a playback of all the songs in the
selected list (GENRES, ARTISTS or ALBUMS). To
do this, touch ALL.
# To switch between the lists of titles, touch
.
# To return to the previous menu, touch MENU.
4 Touch ESC to return to the ordinary display.
Repeating play
For playback of the songs on the iPod, there
are two repeat play ranges: ONE (repeat one
song) and ALL (repeat all songs in the list).
! While repeat play range is set to ONE, you
cannot select the other songs.
% Touch
! ONE – Repeat just the current song
! ALL – Repeat all songs in the selected list
# To switch between groups of touch panel keys,
touch NEXT or PREV.
to select the repeat range.
Playing songs in a random
order (shuffle)
For playback of the songs on the iPod, there
are two random play methods: SONGS (play
back songs in a random order) and ALBUMS
(play back albums in a random order).
% Touch
method.
or
! SONGS – Play back songs in a random
order within the selected list
! ALBUMS – Select an album randomly, and
then play back all the songs in it in order
# To cancel the random play, touch
edly until the shuffle icon is turned off.
to select the random play
repeat-
Displaying text information on
iPod
% Touch INFO to select the desired text information.
: song title— : artist name— : album title
# If the characters recorded on the iPod are not
compatible with this unit, those characters will
not be displayed.
32
En
Playing all songs in a random
order (shuffle all)
This method plays all songs on the iPod randomly.
% Touch
All songs on the iPod will play randomly.
to turn shuffle all on.
Page 33

1
Operating this unit
Section
03
Pausing a song
% Touch de during playback.
# To resume playback at the same point that you
turned pause on, touch de again.
Changing audiobook speed
While listening to an audiobook on iPod, playback speed can be changed.
% Touch A.Book to select your favorite
setting.
! FASTER – Playback faster than normal
speed
! NORMAL – Playback in normal speed
! SLOWER – Playback slower than normal
speed
# To switch between groups of touch panel keys,
touch NEXT or PREV.
Playing video
This unit can play video if an iPod with video
capabilities is connected. However, only the
following touch panel keys can be used for
iPod operation: de, o and p. Use the
iPod to operate other functions.
! Change the video setting on the iPod so
that the iPod can output the video to an external device, before you display the video
screen.
! For details, refer to the iPod’s manuals.
1 Touch Video.
# To return to the music operation screen, touch
Music.
2 Play video on the iPod by operating the
iPod.
Audio Adjustments
Introduction of audio adjustments
1 Audio display
Shows the audio adjustment status.
Important
If the multi-channel processor (DEQ-P8000) is
connected to this unit, the audio function will be
changed to the multi-channel processor’s audio
menu. For details, refer to Introduction of DSP ad-
justments on page 76.
1 Touch A.MENU and then touch
AUDIO MENU to display the audio function
names.
The audio function names are displayed and
operable ones are highlighted.
# To go to the next group of function names,
touch NEXT.
# To return to the previous group of function
names, touch PREV.
# When selecting the FM as the source, you
cannot switch to SLA.
2 Touch ESC to return to the ordinary display.
# To return to the previous display, touch BACK.
Using balance adjustment
You can change the fader/balance setting so
that it can provide you an ideal listening environment in all occupied seats.
Operating this unit
En
33
Page 34

Section
03
Operating this unit
1 Touch FADER/BALANCE on the audio
function menu.
# When the rear output setting is S.W,
BALANCE will be displayed instead of
FADER/BALANCE. Refer to Setting the rear output
and subwoofer controller on page 42.
2 Touch a or b to adjust front/rear
speaker balance.
Each time you touch a or b it moves the
front/rear speaker balance towards the front or
the rear.
FRONT:15 to REAR:15 is displayed as the
front/rear speaker balance moves from front to
rear.
# FR: 0 is the proper setting when only two
speakers are used.
# When the rear output setting is S.W, you can-
not adjust front/rear speaker balance. Refer to
Setting the rear output and subwoofer controller
on page 42.
3 Touch c or d to adjust left/right speaker balance.
Each time you touch c or d it moves the left/
right speaker balance towards the left or the
right.
LEFT:15 to RIGHT:15 is displayed as the left/
right speaker balance moves from left to right.
Display Equalizer curve
POWERFUL Powerful
NATURAL Natural
VOCAL Voca l
CUSTOM1 Custom 1
CUSTOM2 Custom 2
FLAT Flat
SUPER BASS Super bass
! CUSTOM1 and CUSTOM2 are adjusted
equalizer curves that you create. Adjustments can be made with a 7-band graphic
equalizer.
! When FLAT is selected no supplement or
correction is made to the sound. This is
useful to check the effect of the equalizer
curves by switching alternatively between
FLAT and a set equalizer curve.
% On the normal display, touch EQ to select the equalizer.
Touch EQ repeatedly to switch between the following equalizers:
POWERFUL—NATURAL—VOCAL—
CUSTOM1—CUSTOM2—FLAT—
SUPER BASS
Using the equalizer
The equalizer lets you adjust the equalization
to match car interior acoustic characteristics
as desired.
Recalling equalizer curves
There are seven stored equalizer curves which
you can easily recall at any time. Here is a list
of the equalizer curves:
34
En
Adjusting equalizer curves
The factory supplied equalizer curves, with the
exception of FLAT, can be adjusted to a fine
degree (nuance control).
1 Touch GRAPHIC EQ on the audio function menu.
2 Touch c or d to select an equalizer
curve.
POWERFUL—NATURAL—VOCAL—
CUSTOM1—CUSTOM2—FLAT—
SUPER BASS
Page 35

Operating this unit
Section
03
3 Touch c or d to adjust the equalizer
curve.
+6 to –4 (or –6) is displayed as the equalizer
curve is increased or decreased.
# The actual range of the adjustments are different depending on which equalizer curve is selected.
# The equalizer curve with all frequencies set to
0 cannot be adjusted.
Adjusting 7-band graphic equalizer
For CUSTOM1 and CUSTOM2 equalizer
curves, you can adjust the level of each band.
! A separate CUSTOM1 curve can be cre-
ated for each source. If you make adjustments when a curve other than CUSTOM2
is selected, the equalizer curve settings will
be memorized in CUSTOM1.
! A CUSTOM2 curve can be created com-
mon to all sources. If you make adjustments when the CUSTOM2 curve is
selected, the CUSTOM2 curve will be updated.
1 Touch GRAPHIC EQ on the audio function menu.
2 Touch c or d to select an equalizer
curve.
POWERFUL—NATURAL—VOCAL—
CUSTOM1—CUSTOM2—FLAT—
SUPER BASS
3 Touch c or d to select the equalizer
band to adjust.
50Hz—125Hz—315Hz—800Hz—2kHz—
5kHz—12.5kHz
4 Touch a or b to adjust the level of the
equalizer band.
+12dB to -12dB is displayed as the level is in-
creased or decreased.
# You can then select another band and adjust
the level.
Adjusting loudness
Loudness compensates for deficiencies in the
low- and high-sound ranges at low volume.
1 Touch LOUDNESS on the audio function
menu.
2 Touch d to turn loudness on.
# To turn loudness off, touch c.
3 Touch c or d to select a desired level.
LOW (low)—MID (mid)—HIGH (high)
Using subwoofer output
This unit is equipped with a subwoofer output
which can be turned on or off.
! When the subwoofer output is on, you can
adjust the cut-off frequency and the output
level of the subwoofer.
1 Touch SUB WOOFER on the audio function menu.
2 Touch d next to SUB WOOFER to turn
subwoofer output on.
# To turn subwoofer output off, touch c.
3 Touch c or d next to PHASE to select
the phase of subwoofer output.
Touch d to select normal phase and
NORMAL appears in the display. Touch c to
select reverse phase and REVERSE appears in
the display.
4 Touch c or d next to FREQUENCY to select cut-off frequency.
Each time you touch c or d selects cut-off frequencies in the following order:
50Hz—63Hz—80Hz—100Hz—125Hz
Only frequencies lower than those in the selected range are outputted from the subwoofer.
Operating this unit
En
35
Page 36

Section
03
Operating this unit
5 Touch c or d next to LEVEL to adjust
the output level of the subwoofer.
+6 to –24 is displayed as the level is increased
or decreased.
Boosting the bass
Bass boost function boosts the bass level of
sound lower than 100 Hz. The more the bass
level is increased, the more the bass sound is
emphasized and the entire sound becomes
powerful. When using this function with the
subwoofer, the sound under the cut-off frequency is boosted.
1 Touch BASS BOOSTER on the audio
function menu.
2 Touch c or d to select a desired level.
0 to +6 is displayed as the level is increased or
decreased.
Using the high pass filter
When you do not want low sounds from the
subwoofer output frequency range to play
from the front or rear speakers, turn on the
HPF (high pass filter). Only frequencies higher
than those in the selected range are outputted
from the front or rear speakers.
1 Touch HPF on the audio function menu.
2 Touch d next to HPF to turn high pass
filter on.
# To turn high pass filter off, touch c.
3 Touch c or d next to FREQUENCY to select cut-off frequency.
Each time you touch c or d selects cut-off frequencies in the following order:
50Hz—63Hz—80Hz—100Hz—125Hz
Only frequencies higher than those in the selected range are outputted from the front or
rear speakers.
Adjusting source levels
SLA (source level adjustment) lets you adjust
the volume level of each source to prevent radical changes in volume when switching between sources.
! Settings are based on the FM volume level,
which remains unchanged.
1 Compare the FM volume level with the
level of the source you wish to adjust.
2 Touch NEXT on the audio function
menu.
3 Touch SLA.
4 Touch c or d to adjust the source volume.
Each time you touch c or d it increases or decreases the source volume.
+4 to –4 is displayed as the source volume is
increased or decreased.
Notes
! The AM volume level can also be adjusted
with source level adjustments.
! Video CD, CD, compressed audio and DivX
are set to the same source level adjustment
volume automatically.
! XM tuner and SIRIUS tuner are set to the
same source level adjustment volume automatically.
! External unit 1 and external unit 2 are set to
the same source level adjustment volume
automatically.
36
En
Page 37

1
Operating this unit
Section
03
Staging for car environment
You can create in car a sound environment
that can be best matched with the type of your
listening music (or movie).
1 Touch NEXT on the audio function
menu.
2 Touch STAGING.
3 Touch c or d next to STAGING to select
the desired staging field.
OFF (off)—STUDIO (studio)—THEATER (thea-
ter)—STAGE (stage)—LIVING (living)
4 Touch c or d next to POSITION to select
a listening position.
LEFT (left)—CENTER (center)—RIGHT
(right)
Setting up the DVD player
Introduction of DVD setup
adjustments
You can use this menu to change audio, subtitle, parental lock and other DVD settings.
1 DVD setup menu display
Shows the DVD setup menu names.
1 Touch g.
SETUP will be displayed instead of MENU.
2 Touch SETUP.
The DVD setup function names are displayed.
# To go to the next group of function names,
touch NEXT.
# To return to the previous group of function
names, touch PREV.
Operating this unit
3 Touch ESC to return to the playback display.
# To return to the previous display, touch BACK.
Setting the subtitle language
You can set a desired subtitle language. If the
selected subtitle language is recorded on the
DVD, subtitles are displayed in that language.
1 Touch SUB TITLE LANGUAGE on the
DVD setup menu.
A subtitle language menu is displayed.
En
37
Page 38

Section
03
Operating this unit
2 Touch the desired language.
A subtitle language is set.
# To switch to the second language select
menu, touch NEXT.
# To return to the first language select menu,
touch PREV.
# If you have selected OTHERS, refer to When
you select OTHERS on this page.
Notes
! If the selected language is not recorded on
the disc, the language specified on the disc is
displayed.
! You can also switch the subtitle language by
touching SUBTITLE during playback. (Refer to
Changing the subtitle language during playback (Multi-subtitle) on page 26.)
! Even if you use SUBTITLE during playback to
switch the subtitle language, this does not affect the settings here.
When you select OTHERS
When you select OTHERS, a language code
input display is shown. Refer to Language code
chart for DVD on page 99 to input the four-digit
code of the desired language.
1 Touch 0 to 9 to input the language
code.
# To cancel the inputted numbers, touch C.
2 Touch ENTER.
Setting the audio language
You can set the preferred audio language.
1 Touch AUDIO LANGUAGE on the DVD
setup menu.
An audio language menu is displayed.
2 Touch the desired language.
The audio language is set.
# To switch to the second language select
menu, touch NEXT.
# To return to the first language select menu,
touch PREV.
# If you have selected OTHERS, refer to When
you select OTHERS on this page.
Notes
! If the selected language is not recorded on
the disc, the language specified on the disc is
outputted.
! You can also switch the audio language by
touching AUDIO during playback. (Refer to
Changing audio language during playback
(Multi-audio) on page 26.)
! Even if you use AUDIO during playback to
switch the audio language, this does not affect the settings here.
Setting the menu language
You can set the preferred language for displays of menus recorded on a disc.
1 Touch MENU LANGUAGE on the DVD
setup menu.
A menu language menu is displayed.
2 Touch the desired language.
The menu language is set.
# To switch to the second language select
menu, touch NEXT.
# To return to the first language select menu,
touch PREV.
# If you have selected OTHERS, refer to When
you select OTHERS on this page.
Note
If the selected language is not recorded on the
disc, the language specified on the disc is displayed.
38
En
Page 39

Operating this unit
Section
03
Switching the assist subtitle on
or off
If assist subtitles are recorded on a DVD disc,
you can display them by turning the assist
subtitle function on.
You can turn assist subtitles on or off as desired.
% Touch ASSIST SUB TITLE on the DVD
setup menu to turn assist subtitles on.
# To turn the assist subtitle off, touch
ASSIST SUB TITLE again.
Setting the angle icon display
You can set it up so that the angle icon appears on scenes where the angle can be
switched.
% Touch MULTI ANGLE on the DVD setup
menu to turn angle icon display on.
# To turn the angle icon display off, touch
MULTI ANGLE again.
Setting the aspect ratio
There are two kinds of display. A wide screen
display has a width-to-height ratio (TV aspect)
of 16:9, while a regular display has a TV aspect
of 4:3. Be sure to select the correct TV aspect
for the display connected to REAR MONITOR
OUTPUT.
! When using a regular display, select either
LETTER BOX or PAN SCAN. Selecting
16 : 9 may result in an unnatural picture.
! If you select the TV aspect, the unit’s dis-
play changes to the same setting.
% Touch TV ASPECT on the DVD setup
menu to select the TV aspect.
Touch TV ASPECT repeatedly until the desired
TV aspect appears in the display.
! 16 : 9 – Wide screen picture (16:9) is dis-
played as it is (initial setting)
! LETTER BOX – The picture is the shape of a
letterbox with black bands at the top and
bottom of the screen
! PAN SCAN – The picture is cut short at the
right and left of the screen
Notes
! When playing discs that do not specify
PAN SCAN, playback is with LETTER BOX
even if you select PAN SCAN setting. Confirm
whether the disc package bears the
mark. (See page 13.)
! Some discs do not enable changing of the TV
aspect. For details, refer to the disc’s instructions.
16 : 9 LB
Setting the parental lock
Some DVD video discs let you use parental
lock to restrict children from viewing violent
and adult-oriented scenes. You can set the parental lock to your desired level.
! When you set a parental lock level and then
play a disc featuring parental lock, code
number input indications may be displayed. In this case, playback will begin
when the correct code number is input.
Setting the code number and level
You need to have registered a code number for
playing back discs with parantal lock.
1 Touch NEXT on the DVD setup menu.
2 Touch PARENTAL.
3 Touch 0 to 9 to input a four digit code
number.
# To cancel the inputted numbers, touch C.
Operating this unit
En
39
Page 40

Section
03
Operating this unit
4 Touch ENTER.
The code number is set, and you can now set
the level.
5 Touch any of 1 to 8 to select the desired
level.
The parental lock level is set.
! LEVEL 8 – Playback of the entire disc is pos-
sible (initial setting)
! LEVEL 7 to LEVEL 2 – Playback of discs for
children and non-adult-oriented discs is
possible
! LEVEL 1 – Playback of discs for children
only is possible
Notes
! We recommend to keep a record of your code
number in case you forget it.
! The parental lock level is recorded on the disc.
Look for the level indication written at the disc
package, included literature or on the disc itself. Parental lock of this unit is not possible if
a parental lock level is not recorded in the
disc.
! With some discs, the parental lock may be ac-
tive only on the scenes with certain levels. The
playback of those scenes will be skipped. For
details, refer to the instruction manual that
came with the discs.
Changing the level
You can change the set parental lock level.
1 Touch NEXT on the DVD setup menu.
2 Touch PARENTAL.
3 Touch 0 to 9 to input the registered
code number.
# If you input an incorrect code number, the
icon
is displayed. Touch C and input the cor-
rect code number.
# If you forget your code number, refer to If you
forget your code number on this page.
5 Touch any of 1 to 8 to select the desired
level.
The new parental lock level is set.
If you forget your code number
Refer to Changing the level on this page, and
touch C 10 times. The registered code number
is canceled, letting you register a new one.
Setting the DivX subtitle file
You can select whether to display DivX external subtitles or not.
! The DivX subtitles will be displayed even
when CUSTOM is selected if no DivX external subtitle files exist.
1 Touch NEXT on the DVD setup menu.
2 Touch DivX SUB TITLE to select the desired subtitle setting.
! ORIGINAL – Display the DivX subtitles
! CUSTOM – Display the DivX external subti-
tles
Notes
! Up to 42 characters can be displayed on one
line. If more than 42 characters are set, the
line breaks and the characters are displayed
on the next line.
! Up to 126 characters can be displayed on one
screen. If more then 126 characters are set,
the excess characters will not be displayed.
4 Touch ENTER.
This enters the code number, and you can now
change the level.
40
En
Page 41

1
Operating this unit
Section
03
Displaying your DivX®VOD
registration code
In order to play DivX VOD (video on demand)
content on this unit, you first need to register
the unit with your DivX VOD content provider.
You do this by generating a DivX VOD registration code, which you submit to your provider.
1 Touch NEXT on the DVD setup menu.
2 Touch DivX VOD.
Your 8-digit registration code is displayed.
! Make a note of the code as you will need it
when you register with a DivX VOD provider.
Setting for digital output
Audio which is outputted from digital output
of this unit can be selected. Normally, set to
STREAM. If this unit’s digital output is not
used, there is no need to change settings.
! Selecting Linear PCM enables you to
switch the output channel if playing the
dual mono mode DVD video discs. (Refer
to Selecting audio output on page 30.)
1 Touch NEXT on the DVD setup menu.
2 Touch DIGITAL OUTPUT to select the desired digital output setting.
! STREAM – The Dolby Digital/DTS signal is
output as it is (initial setting)
! Linear PCM – The Dolby Digital/DTS signal
is converted to and output as a linear PCM
signal
Initial Settings
Adjusting initial settings
Using the initial settings, you can customize
various system settings to achieve optimal performance from this unit.
1 Function display
Shows the function names.
1 Touch the source icon and then touch
OFF to turn this unit off.
2 Touch the screen to display the touch
panel keys.
3 Touch A.MENU and then touch
INITIAL MENU to display the function
names.
The function names are displayed and operable ones are highlighted.
# To go to the next group of function names,
touch NEXT.
# To return to the previous group of function
names, touch PREV.
4 Touch ESC to return to the ordinary display.
# To return to the previous display, touch BACK.
Operating this unit
En
41
Page 42

Section
03
Operating this unit
Switching the auxiliary setting
Auxiliary equipments connected to this unit
can be activated individually. Set each AUX
source to ON when using. About connecting
or using auxiliary equipments, refer to Using
the AUX source on page 49.
Switching the auxiliary 1 setting
% Touch AUX1 on the initial menu to select desired setting.
! VIDEO – an iPod with video capabilities
connected with 4-pole mini plug cable (e.g.,
CD-V150M)
! AUDIO – auxiliary equipment connected
with stereo mini plug cable
! OFF – No auxiliary equipment is connected
Switching the auxiliary 2 setting
% Touch AUX2 on the initial menu to turn
auxiliary 2 setting on.
# To turn auxiliary 2 setting off, touch AUX2
again.
Setting the rear output and
subwoofer controller
This unit’s rear output (rear speaker leads output and RCA rear output) can be used for fullrange speaker (FULL) or subwoofer (S.W) connection. If you switch the rear output setting
to S.W, you can connect a rear speaker lead
directly to a subwoofer without using an auxiliary amp.
! When the multi-channel processor (e.g.,
DEQ-P8000) is connected to this unit, you
cannot operate this function.
1 Touch REAR SP on the initial menu.
2 Touch c or d to switch the rear output
setting.
Touch c to select full-range speaker and FULL
appears in the display. Touch d to select subwoofer and S.W appears in the display.
# When no subwoofer is connected to the rear
output, select FULL.
# When a subwoofer is connected to the rear
output, set for subwoofer S.W.
Notes
! Even if you change this setting, there is no
output unless you turn the subwoofer output
on (refer to Using subwoofer output on page
35).
! If you change this setting, subwoofer output
in the audio menu return to the factory settings.
! Both rear speaker leads outputs and RCA rear
output are switched simultaneously in this
setting.
Selecting the OSD color
You can change the OSD color.
% Touch OSD COLOR on the initial menu
to select the desired color.
Each time you touch OSD COLOR it selects
colors in the following order:
BLUE (blue)—RED (red)—AMBER (amber)—
GREEN (green)—VIOLET (violet)
Selecting the illumination color
This unit is equipped with two illumination colors, blue and red. You can select the desired illumination color.
% Touch ILLUMI COLOR on the initial
menu to select the desired color.
42
En
Page 43

Operating this unit
Section
03
Changing languages for CAUTION
Some operations on this unit are prohibited
while driving or needs to be paid a careful attention when operating. In such case, a caution appears on the display. You can change
the language of the cautions at this setting.
% Touch CAUTION LANGUAGE on the initial menu to select your desired language.
Each time you touch CAUTION LANGUAGE it
selects languages for CAUTION in the following order:
ENGLISH—ESPAÑOL—FRANÇAIS
Switching the sound muting/
attenuation
Sound from this system is muted or attenuated automatically when the signal from the
equipment with mute function is received.
! Sound from this system returns to normal
when the muting or attenuation is canceled.
1 Touch NEXT on the initial menu.
2 Touch TEL to select any of the muting,
attenuation or off.
Touch TEL until the desired setting appears in
the display.
! MUTE – Muting
! ATT-20dB – Attenuation (ATT-20dB has a
stronger effect than ATT-10dB)
! ATT-10dB – Attenuation
! OFF – Turn the sound muting/attenuation
off
Notes
! The sound is turned off, MUTE is displayed
and no audio adjustments are possible.
! The sound is attenuated, ATT is displayed and
no audio adjustments, except volume control,
are possible.
! Operation returns to normal when the phone
connection is ended.
Switching the warning tone
If the front panel is not detached from the
head unit within four seconds of turning off
the ignition, a warning tone will sound. You
can turn off the warning tone.
1 Touch NEXT on the initial menu.
2 Touch DT.WARNING to turn warning
tone on.
# To turn warning tone off, touch DT.WARNING
again.
Entering PIN code for Bluetooth
wireless connection
To connect your cellular phone to this unit via
Bluetooth wireless technology, you need to
enter PIN code on your phone to verify the
connection. The default code is 0000, but you
can change this in this function.
! With some Bluetooth audio players, you
may be required to enter to this unit in advance PIN code of your Bluetooth audio
player, in order to set this unit ready for a
connection from your Bluetooth audio
player.
! Only when Bluetooth adapter (e.g. CD-
BTB200) is connected to this unit, you can
operate this function.
1 Touch NEXT on the initial menu.
2 Touch PINCODE INPUT.
PIN code input display appears.
3 Touch 0 to 9 to input the PIN code of
your Bluetooth audio player.
# To cancel the inputted numbers, touch C.
4 After inputting PIN code (up to 16 digits), touch ENTER.
The PIN code you entered is stored in this system.
Operating this unit
En
43
Page 44

1
Section
03
Operating this unit
Correcting distorted sound
You can minimize distortion that may be
caused by the equalizer curve settings.
Setting an equalizer level high can cause distortion. If high sound is crippled or distorted,
try switching to LOW. Normally, leave the setting at HIGH to ensure quality sound.
! Only when the multi-channel processor
(e.g., DEQ-P8000) is connected to this unit,
you can operate this function.
1 Touch NEXT on the initial menu.
2 Touch DIGITAL ATT to switch the digital
attenuator setting.
Touch DIGITAL ATT repeatedly until the desired setting appears in the display.
! HIGH – High quality sound
! LOW – Minimize distortion sound
Resetting the audio functions
You can reset all audio functions except volume.
! Only when the multi-channel processor
(e.g., DEQ-P8000) is connected to this unit,
you can operate this function.
1 Touch NEXT on the initial menu.
2 Touch AUDIO RESET.
3 Touch RESET.
4 Touch RESET again to reset audio functions.
# To cancel resetting the audio functions, touch
CANCEL.
Other Functions
Introduction of system
adjustments
1 System menu display
Shows the system function names.
1 Touch A.MENU and then touch
SYSTEM MENU to display the system function names.
The system function names are displayed and
operable ones are highlighted.
# To go to the next group of function names,
touch NEXT.
# To return to the previous group of function
names, touch PREV.
2 Touch ESC to return to the display of
each source.
# To return to the previous display, touch BACK.
Changing the wide screen mode
You can select a desired mode for enlarging a
4:3 picture to a 16:9 one.
1 Touch WIDE MODE on the system
menu.
44
2 Touch the desired wide mode setting.
3 Touch ESC to hide the touch panel keys.
FULL (full)
A 4:3 picture is enlarged in the horizontal direction only, giving you a 4:3 TV picture (normal picture) without any omissions.
En
Page 45

Operating this unit
Section
03
JUST (just)
The picture is enlarged slightly at the center and
the amount of enlargement increases horizontally
to the ends, enabling you to enjoy a 4:3 picture
without sensing any disparity even on a wide
screen.
CINEMA (cinema)
The picture is enlarged by the same proportion as
FULL or ZOOM in the horizontal direction and by
an intermediate proportion between FULL and
ZOOM in the vertical direction; ideal for a cinema-sized picture (wide screen picture) where captions lie outside.
ZOOM (zoom)
A 4:3 picture is enlarged in the same proportion
both vertically and horizontally; ideal for a cinema-sized picture (wide screen picture).
NORMAL (normal)
A 4:3 picture is displayed as it is, giving you no
sense of disparity since its proportions are the
same as that of the normal picture.
Notes
! Different settings can be memorized for each
video source.
! When video is viewed in a wide screen mode
that does not match its original aspect ratio, it
may appear different.
! Remember that using the wide mode feature
of this system for commercial or public viewing purposes may constitute an infringement
on the author’s rights protected by the Copyright Law.
! Video will appear grainy when viewed in
CINEMA or ZOOM mode.
! The adjustments of BRIGHTNESS and
CONTRAST are stored separately for light
ambient (daytime) and dark ambient (nighttime). A sun
or moon is displayed to
the left of BRIGHTNESS and CONTRAST,
respectively, as the ambient light sensor determines brightness or darkness.
! You cannot adjust COLOR or HUE for the
audio source.
1 Touch PICTURE ADJUSTMENT on the
system menu.
The adjustment function names are displayed.
2 Touch any of the following touch panel
keys to select the function to be adjusted.
! BRIGHTNESS – Adjust the black intensity
! CONTRAST – Adjust the contrast
! COLOR – Adjust the color saturation
! HUE – Adjust the tone of color (red is em-
phasized or green is emphasized)
! DIMMER – Adjust the brightness of display
! REAR VIEW CAMERA/SOURCE – Switch
the picture adjustment modes
# You cannot adjust the picture adjustment for
rear view camera when CAMERA POLARITY is
set to OFF. (Refer to Setting for rear view camera
(back up camera) on page 47.)
# With some rear view cameras, picture adjustment may not be possible.
3 Touch c or d to adjust the selected
item.
Each time you touch c or d it increases or decreases the level of selected item. +24 to –24
is displayed as the level is increased or decreased.
4 Touch ESC to hide the touch panel keys.
Operating this unit
Changing the picture adjustment
You can adjust BRIGHTNESS (brightness),
CONTRAST (contrast), COLOR (color) and
HUE (hue) for each source and rear view cam-
era.
En
45
Page 46

Section
03
Operating this unit
Adjusting the dimmer
The adjustment of DIMMER is stored separately for each ambient light; daytime, evening
and nighttime. The brightness of LCD screen
will be adjusted to optimum level automatically in accordance with the ambient light
based on the setting values.
! The icons indicating the current ambient
brightness used for adjusting BRIGHTNESS
and CONTRAST may differ from DIMMER
slightly.
1 Touch PICTURE ADJUSTMENT on the
system menu.
The adjustment function names are displayed.
2 Touch DIMMER.
The ambient light level used as the standard
for adjusting DIMMER appears above the level
bar.
! Red sun – Adjust the brightness for
bright ambient light (daytime)
! Yellow sun
termediate brightness (evening)
! Yellow moon
dark ambient light (nighttime)
– Adjust the brightness for in-
– Adjust the brightness for
3 Touch c or d to adjust the brightness.
Each time you touch c or d it moves cursor
towards the left or the right.
The level indicates the brightness of the
screen being adjusted. The farther cursor
moves to the right, the brighter the screen.
4 Touch ESC to hide the touch panel keys.
Selecting the background display
You can switch background displays while listening to each source.
! You can enjoy AV (AV input) as the back-
ground video image while you are listening
to audio source such as radio or CD.
% Touch BACKGROUND on the system
menu to select the desired background display.
Audio source
BGP1 (background picture 1)—BGP2 (background picture 2)—BGP3 (background picture
3)—AV (AV input)
Video source
OFF (off)—BGP1 (background picture 1)—
BGP2 (background picture 2)—BGP3 (back-
ground picture 3)—AV (AV input)
# When the AV (AV input) is not set to VIDEO,
AV cannot be selected. (Refer to this page.)
Setting the AV input
You can switch the setting according to the
connected component.
! Select VIDEO to watch video of a con-
nected component as AV source.
! Select S-DVD to watch video of a con-
nected DVD player as S-DVD source.
! Select EXT-VIDEO to watch video of a con-
nected video unit as EXT source.
% Touch AV INPUT on the system menu to
select the AV input setting.
! OFF – No video component connected
! VIDEO – External video component (such
as portable video player)
! S-DVD – DVD player connected with RCA
cable
! EXT-VIDEO – External video unit (such as
Pioneer products available in the future)
# When a DVD player is connected with an AVBUS cable, do not select S-DVD otherwise no picture will be displayed even if you select S-DVD as
a source.
Setting the clock
Use these instructions to set the clock.
1 Touch CLOCK ADJ on the system menu.
46
En
Page 47

Operating this unit
Section
03
2 Touch ON/OFF to turn the clock display
on.
# To turn the clock display off, touch ON/OFF
again.
3 Touch c or d to select the segment of
the clock display you wish to set.
Each time you touch c or d it will select one
segment of the clock display:
Hour—Minute
As you select segments of the clock display
the segment selected will be highlighted.
4 Touch a or b to put a clock right.
Notes
! You can match the clock to a time signal by
touching JUST.
— If the minute is 00 to 29, the minutes are
rounded down. (e.g., 10:18 becomes
10:00.)
— If the minute is 30 to 59, the minutes are
rounded up. (e.g., 10:36 becomes 11:00.)
! Even when the sources are off, the clock dis-
play appears on the display.
Setting for rear view camera
(back up camera)
CAUTION
Pioneer recommends the use of a camera
which outputs mirror reversed images, otherwise screen image may appear reversed.
This unit features a function that automatically
switches to the rear view camera video (REAR
VIEW CAMERA IN jack) when a rear view
camera is installed on your vehicle. When the
gear shift is in REVERSE (R) position, the
video automatically switches to a rear view
camera video. (For more details, consult your
dealer.)
! After you set up the rear view camera set-
ting, move the gear shift in REVERSE (R)
and confirm if a rear view camera video
can be shown on the display.
! If the display should be switched to a rear
view camera video by error while you are
driving forward, change the rear view camera setting.
! To end watching a rear view camera video
and return to the source display, press and
hold DISPLAY.
% Touch CAMERA POLARITY on the system menu to select an appropriate setting.
! BATTERY – When the polarity of the con-
nected lead is positive while the gear shift
is in REVERSE (R) position
! GROUND – When the polarity of the con-
nected lead is negative while the gear shift
is in REVERSE (R) position
! OFF – When a rear view camera is not con-
nected to this unit
Adjusting the LCD panel slide
position
You can adjust the LCD panel slide position so
that the panel is set back or forward.
1 Touch NEXT on the system menu.
2 Touch FLAP SET BACK to turn the set
back on.
The LCD panel slides to the back.
# Touch FLAP SET BACK again to turn the set
back off and the LCD panel slides to the front.
Operating this unit
En
47
Page 48

Section
03
Operating this unit
Setting the automatic open
function
To prevent the display from hitting the shift
lever of an automatic vehicle when it is in P
(park) position, or when you do not wish the
display to open/close automatically, you can
set the automatic open function in the manual
mode.
1 Touch NEXT on the system menu.
2 Touch AUTO FLAP to select the display
to open/close automatically or manually.
Each time you touch AUTO FLAP it switches
between the following settings:
! ON – The LCD panel will be opened or
closed automatically with the turning of the
ignition switch on or off
! OFF – You have to press OPEN/CLOSE to
open/close the LCD panel
Switching the iPod charge setting
You can turn the iPod charge setting on or off
while listening to an iPod.
! Listening AM radio while an iPod is
charged from this unit may generate noise.
In this case, turn the iPod charge setting
off and noise is disappeared.
1 Touch NEXT on the system menu.
2 Touch iPod CHARGE to turn the iPod
charge setting on.
# To turn the iPod charge setting off, touch
iPod CHARGE again.
Adjusting the response
positions of the touch panels
(Touch Panel Calibration)
If you feel that the touch panel keys on the
screen deviate from the actual positions that
respond to your touch, adjust the response positions of the touch panel. There are two adjustment methods: 4-point adjustment, in
which you touch four corners of the screen;
and 16-point adjustment, in which you make
fine-adjustments on the entire screen.
! Make sure to use the supplied pen for ad-
justment, and gently touch the screen. If
you press the touch panel forcefully, the
touch panel may be damaged. Do not use
a sharp pointed tool such as ballpoint pen
or a mechanical pen. Otherwise the screen
is damaged.
! If touch panel adjustment cannot be per-
formed properly, consult your local Pioneer
dealer.
1 Touch the source icon and then touch
OFF to turn this unit off.
# When the source icon is not displayed, you
can display it by touching the screen.
2 Press and hold BAND/ESC.
The 4-point touch panel adjustment screen appears.
3 Touch each of the arrows on the four
corners of the screen with the touch panel
adjustment pen.
# To cancel the adjustment, press and hold
VOLUME/ATT.
Note
To obtain maximum performance, we recommend that you use the latest version of the iPod
software.
48
En
4 Press BAND/ESC to complete the 4point adjustment.
The adjusted position data is saved.
# Do not turn off the engine while saving the adjusted position data.
Page 49

Operating this unit
Section
03
5 Press BAND/ESC to proceed to the 16point adjustment.
The 16-point touch panel adjustment screen
appears.
# To cancel the adjustment, press and hold
VOLUME/ATT.
6 Gently touch the center of the + mark
displayed on the screen with the touch
panel adjustment pen.
After you touch all the marks, the adjusted position data is saved.
# Do not turn off the engine while saving the adjusted position data.
7 Press and hold VOLUME/ATT to complete the adjustment.
Using the AUX source
This unit can control an auxiliary equipment
such as VCR or portable device (sold separately). When connected, auxiliary equipment
is automatically recognized as AUX source
and assigned to AUX.
About AUX connection method
You have two methods to connect auxiliary
equipment to this unit.
verse connection between Red (right side
audio) cable and yellow (video) cable is required. Otherwise, audio and video may not
be correctly reproduced.
% Insert the mini plug into the microphone/auxiliary input jack on this unit.
For more details, refer to the installation manual.
IP-BUS-RCA interconnector (AUX 2)
When connecting auxiliary equipment using an
IP-BUS-RCA Interconnector (sold separately)
% Use an IP-BUS-RCA Interconnector such
as the CD-RB20/CD-RB10 (sold separetely)
to connect this unit to auxiliary equipment
featuring RCA output.
For more details, refer to the IP-BUS-RCA Interconnector owner’s manual.
# You can only make this type of connection if
the auxiliary equipment has RCA outputs.
Selecting AUX as the source
% Touch the source icon and then touch
AUX 1/AUX 2 to select AUX as the source.
# If the auxiliary setting is not turned on, AUX
cannot be selected. For more details, see Switch-
ing the auxiliary setting on page 42.
Operating this unit
Mini pin plug cable (AUX 1)
When connecting auxiliary equipment using a
mini plug cable
iPod and portable audio/video player can be
connected to this unit via mini plug cable.
! If an iPod with video capabilities is con-
nected to this unit via 3.5 mm plug (4 pole)
cable (e.g., CD-V150M), you can enjoy the
video contents of the iPod.
! It is possible to connect a portable audio/
video player by using a 3.5 mm plug (4
pole) to RCA cable, which is sold separately. However, depending on the cable, re-
Setting the AUX title
The title displayed for the AUX source can be
changed.
! Each title can be up to 10 characters long.
1 After you have selected AUX as the
source, touch A.MENU and
FUNCTION MENU and then touch
NAME EDIT.
# When the touch panel keys are not displayed,
you can display them by touching the screen.
En
49
Page 50

Section
03
Operating this unit
2 Touch ABC to select the desired character type.
Touch ABC repeatedly to switch between the
following character types:
Alphabet (upper case)—Alphabet (lower case)
# You can select to input numbers and symbols
by touching 123.
3 Touch a or b to select a letter of the alphabet.
4 Touch d to move the cursor to the next
character position.
5 Touch OK to store the entered title in
memory.
6 Touch ESC to return to the ordinary display.
Using the PGM button
You can operate the preprogrammed functions
for each source by using PGM.
% Press PGM to turn pause on when selecting the following sources:
! DVD – Built-in DVD player
! iPod – iPod
! USB – USB portable audio player/USB
memory
! S-DVD – DVD player/multi-DVD player
! MCD – Multi-CD player
! BT Audio – Bluetooth audio player
# To turn pause off, press PGM again.
% Press PGM and hold to turn BSSM on
when selecting TV as the source.
Press PGM and hold until the BSSM turns on.
# To cancel the storage process, press PGM
again.
% Press PGM to select the desired channel
select setting when selecting XM or SIRIUS
as the source.
Press PGM repeatedly to switch between the
following channel select settings:
CH-NUMBER (channel number select setting)
—CATEGORY (channel category select
setting)
% Press PGM and hold to turn BSM on
when selecting RADIO as the source.
Press PGM and hold until the BSM turns on.
# To cancel the storage process, press PGM
again.
50
En
Page 51

3216475
Available accessories
Section
04
Playing songs on USB portable
audio player/USB memory
Basic Operations
You can use this unit to control a USB adapter
(e.g., CD-UB100), which is sold separately.
For details concerning operation, refer to the
USB adapter’s operation manual. This section
provides information on USB portable audio
player/USB memory operations with this unit
which differs from that described in the USB
adapter’s operation manual.
! Optimum performance of this unit may not
be obtained depending on the connected
USB portable audio player/USB memory.
1 Source icon
2 Media indicator
Shows the type of file currently playing.
3 Folder number indicator
4 Folder name indicator
5 File number indicator
6 Play time indicator
7 Song information
Shows detailed information of currently playing song.
1 Touch the source icon and then touch
USB to select the USB.
# When the source icon is not displayed, you
can display it by touching the screen.
2 Touch a or b to select a folder.
# To return to folder 01 (ROOT), press and hold
BAND/ESC. However, if folder 01 (ROOT) contains
no files, playback commences with folder 02.
# You cannot select a folder that does not have
a compressed audio file recorded in it.
3 To perform fast forward or reverse,
keep touching o or p.
4 To skip back or forward to another
compressed audio file, briefly touch o or
p.
Pausing compressed audio
playback
% Touch de during playback.
# To resume playback at the same point that you
turned pause on, touch de again.
# If you perform track search during pause, text
information such as album title, track title or
folder name appear in blank.
Introduction of advanced
operations
1 Touch A.MENU and then touch
FUNCTION MENU to display the function
names.
The function names are displayed and operable ones are highlighted.
2 Touch ESC to return to the playback display.
# To return to the previous display, touch BACK.
Function and operation
REPEAT, RANDOM and SCAN operations are
basically the same as that of the built-in DVD
player.
Available accessories
En
51
Page 52

2316475
Section
04
Available accessories
Function name Operation
Refer to Repeating play on page 29.
But the repeat play ranges you can
select are different from that of the
built-in DVD player. The repeat play
ranges of the USB portable audio
REPEAT
RANDOM
SCAN
Notes
! If you select another folder during repeat play,
the repeat play range changes to ALL.
! If you perform track search or fast forward/re-
verse during FILE, the repeat play range
changes to FOLDER.
! When FOLDER is selected, it is not possible to
play back a subfolder of that folder.
! After file or folder scanning is finished, nor-
mal playback of the files will begin again.
player/USB memory are as below:
! FILE – Repeat just the current
file
! FOLDER – Repeat the current
folder
! ALL – Repeat all files
Refer to Playing tracks in random
order on page 29.
Refer to Scanning tracks or folders
on page 30.
Displaying text information of
an audio file
The operation is the same as that of the builtin DVD player.
Refer to Text information on page 28.
! If the characters recorded on the audio file
are not compatible with this unit, those
characters will not be displayed.
Selecting files from the file
name list
The operation is the same as that of the builtin DVD player.
Refer to Selecting files from the file name list
on page 28.
XM tuner
Basic Operations
You can use this unit to control an XM satellite
digital tuner (GEX-P920XM), which is sold
separately.
For details concerning operation, refer to the
XM tuner’s operation manuals. This section
provides information on XM operations with
this unit which differs from that described in
the XM tuner’s operation manual.
! This unit does not have the text scroll
function.
! With this unit, you can operate one addi-
tional function: XM channel direct
selection.
1 Source icon
2 XM band indicator
3 XM channel category
4 XM channel select setting indicator
Shows what channel select setting has been
selected.
5 XM preset number indicator
6 XM channel number indicator
7 Detail information
Shows the detail information of the broadcast
channel currently being received.
1 Touch the source icon and then touch
XM to select the XM.
52
En
Page 53

Available accessories
Section
04
2 Touch BAND to select an XM band.
Touch BAND repeatedly until the desired XM
band is displayed, XM1, XM2 or XM3.
# To switch between groups of touch panel keys,
touch NEXT or PREV.
3 Touch c or d to select a desired
channel.
The channels move up or down step by step.
Channels that cannot currently be selected
are skipped, and the next channel is selected.
# If you touch and hold c or d, you can in-
crease or decrease the channel number continuously.
# You can also select a channel by pressing o
or p.
# You can also perform tuning from a desired
channel category. (Refer to Selecting a channel in
the channel category on this page.)
Storing and recalling broadcast
stations
You can easily store up to six broadcast stations for later recall.
! Up to 18 stations, six for each of three XM
bands can be stored in memory.
1 Select the channel that you want to
store in memory.
2 Touch LIST to display the preset list.
3 Touch and hold a preset tuning key
P1 (PRESET1) to P6 (PRESET6) until the beep
sounds.
The selected station has been stored in memory.
The next time you touch the same preset tuning key P1 (PRESET1) to P6 (PRESET6) the station is recalled from memory.
Note
You can also use a and b to recall stations assigned to preset tuning keys P1 (PRESET1) to
P6 (PRESET6) when the CH-NUMBER mode is
selected.
Switching the XM channel
select mode
You have two methods for selecting a channel:
by number and by category. When selecting
by number, channels in any category can be
selected. Select by category to narrow your
search down to only channels in a particular
category.
% Touch MODE to select the desired channel select mode.
Touch MODE repeatedly to switch between
the following channel select modes:
CH-NUMBER (channel number select setting)
—CATEGORY (channel category select
setting)
Selecting a channel in the channel
category
1 Touch MODE to select the channel category select mode.
Touch MODE repeatedly to switch between
the following channel select modes:
CH-NUMBER (channel number select setting)
—CATEGORY (channel category select
setting)
2 Touch a or b to select the desired channel category.
3 Touch c or d to select the desired channel in the selected channel category.
Available accessories
4 Touch ESC to return to the ordinary display.
En
53
Page 54

Section
04
Available accessories
Selecting a channel from the XM
channel list display
The list content can be switched so you can
search for the track you want to listen to not
only by the channel name but also by the artist
name or song title.
! This function is available for GEX-P920XM.
! The channel list shows all the channels
during the CH-NUMBER mode, and the
channels included in the selected category
during the CATEGORY mode. To switch the
channel mode, touch MODE.
1 Touch
.
XM channel list appears in the display.
Each touch of
changes the following set-
tings as follows:
CHANNEL NAME LIST (channel name)—
SONG TITLE LIST (song title)—
ARTIST NAME LIST (artist name)
2 Touch the desired channel that you
want to listen to.
# To switch between the lists of names/titles,
touch
or .
# When the CATEGORY mode is selected,
touch a or b to switch to another category.
Selecting an XM channel directly
You can select an XM channel directly by entering the desired channel number.
1 Touch DIRECT.
# To switch between groups of touch panel keys,
touch NEXT or PREV.
2 Touch 0 to 9 to input the desired channel number.
# To cancel the input numbers, touch C.
3 Touch ENTER.
The XM channel of entered number is
selected.
Using the MyMix function
The MyMix function allows you to make the
MyMix song playlist. When the song in the
MyMix playlist is being broadcast on a station
other than the one you are listening to, you
will be alerted, and you can tune to the station
to listen to that song.
! This function is available for GEX-P920XM.
! A track itself is NOT downloaded BUT only
the song title and the artist name are memorized.
Making the MyMix playlist
You can add a song that is being broadcast to
the MyMix playlist. When it is added, the song
title and its artist name is memorized to this
unit. The MyMix function will start on the song
that matches the song title and its artist name
in the MyMix playlist.
1 When a desired song is broadcast,
touch and hold MEMO.
The song title and artist name of the song you
are listening to are memorized, and a confirmation message appears.
# The song title and artist name of up to 12
tracks can be memorized. Trying to save more
than 12 tracks will overwrite old ones.
# You cannot memorize the song title or the artist name when “––––––––”is displayed on
the title information.
# You cannot memorize the song title or the artist name of the channel 000.
# It is possible that the memorized title is not
displayed correctly.
2 Touch OK to confirm.
! To delete the song from the MyMix playlist,
refer to Deleting the song from the MyMix
playlist on the next page.
54
En
Page 55

Available accessories
Section
04
When the song in the MyMix playlist
is broadcast
As soon as the song in the MyMix playlist
starts broadcast on a different station, a message is displayed. Touch YES to switch to that
station, and you can listen to that song.
! If you would rather not to tune to that sta-
tion, touch CANCEL.
! If an alert for the song in the MyMix playlist
is set up to off, no alert will be provided
even when the song is broadcast. Refer to
Setting up a song alert on page 58.
! If there is slight difference between the
memorized title and the title of the song
being broadcast, no alert will be provided
even though they are the same song.
Setting up a song alert
You can set up an alert on or off by each song
in the MyMix playlist. First, display the MyMix
playlist and then change each alert setting.
Set up an alert to on so you can receive the
alert when the song is broadcast, or set it up
to off to stop the alert for that song.
1 Touch MEMO EDIT.
The MyMix playlist is displayed.
# To switch between groups of touch panel keys,
touch NEXT or PREV.
2 Touch DELETE next to the song title you
want to delete.
That song will be deleted from the MyMix
playlist.
# To delete all the songs in the MyMix playlist,
touch DELETE ALL.
3 A message will appear asking you to
confirm to delete it. Touch YES.
# To cancel the deleting, touch NO.
Displaying the Radio ID
Channel number select setting
If you select CH000, the ID code is displayed.
% Touch c or d to select CH000.
Channel category select setting
RADIO ID is provided as a channel category
for displaying the ID code.
% Touch a or b to select RADIO ID from
channel category.
Display of the ID code repeats displaying
RADIO ID and the ID code one after the other.
# If you select another channel, display of the ID
code is canceled.
Available accessories
2 Touch the song title that you want to
set up the alert to off.
The check mark is removed, and the alert for
that song is off.
Deleting the song from the MyMix
playlist
You can delete each song in the MyMix
playlist.
1 Touch MEMO EDIT.
The MyMix playlist is displayed.
Switching the XM display
! This function is available for GEX-P910XM.
% Touch INFO to switch the XM display.
Channel name—Artist name/feature—Song/
program title—Channel category
En
55
Page 56

2316475
Section
04
Available accessories
SIRIUS Satellite Radio tuner
Basic Operations
You can use this unit to control a SIRIUS Satellite Radio tuner, which is sold separately.
When the SIRIUS tuner is used together with
this unit, some operations differ slightly from
those described in the SIRIUS operation manual. This manual provides information on
these points. For all other information on
using the SIRIUS tuner, please refer to the SIRIUS operation manual.
! This unit does not have the text scroll
function.
! With this unit, you can operate one addi-
tional function: SIRIUS channel direct selection. Refer to Selecting a SIRIUS channel
directly on the next page.
2 Touch BAND to select a band.
Touch BAND repeatedly until the desired SIRIUS band is displayed, SIRIUS1, SIRIUS2 or
SIRIUS3.
# To switch between groups of touch panel keys,
touch NEXT or PREV.
3 Touch c or d to select a desired
channel.
The channels move up or down step by step.
Channels that cannot currently be selected
are skipped, and the next channel is selected.
# If you touch and hold c or d, you can in-
crease or decrease the channel number continuously.
# You can also select a channel by pressing o
or p.
# You can also perform tuning from a desired
channel category. (Refer to Selecting a channel in
the channel category on the next page.)
Note
It may take a few seconds before you can hear
anything while this unit acquires and processes
the satellite signal.
1 Source icon
2 SIRIUS band indicator
3 SIRIUS channel category
4 SIRIUS channel select setting indicator
Shows what channel select setting has been
selected.
5 SIRIUS preset number indicator
6 SIRIUS channel number indicator
7 Detail information
Shows the detail information of the broadcast
channel currently being received.
1 Touch the source icon and then touch
SIRIUS to select SIRIUS.
56
En
Storing and recalling broadcast
stations
You can easily store up to six broadcast stations for later recall.
! Up to 18 stations, six for each of three SIR-
IUS bands can be stored in memory.
! Channels are stored and recalled on a
broadcast station basis. This means that if
the broadcast station you stored has been
assigned to a different channel by SIRIUS,
you can still recall the same broadcast station (though a different channel number
may appear in the display).
1 Select the channel that you want to
store in memory.
Page 57

Available accessories
Section
04
2 Touch LIST to display the preset list.
3 Touch and hold a preset tuning key P1
to P6 until the beep sounds.
The selected station has been stored in memory.
The next time you touch the same preset tuning key P1 to P6 the station is recalled from
memory.
4 Touch ESC to return to the ordinary display.
Note
You can also use a and b to recall stations assigned to preset tuning keys P1 to P6 when the
CH-NUMBER mode is selected.
Selecting the SIRIUS channel
select mode
You have two methods for selecting a channel:
by number and by category. When selecting
by number, channels in any category can be
selected. Select by category to narrow your
search down to only channels in a particular
category.
% Touch MODE to select the desired channel select mode.
Touch MODE repeatedly to switch between
the following channel select modes:
CH-NUMBER (channel number select setting)
—CATEGORY (channel category select
setting)
Selecting a channel in the channel
category
Channels are organized into various program
categories, e.g. Rock, Classic, Jazz. You can
specify channels by selecting the desired
category.
1 Touch MODE to select the channel category select mode.
Touch MODE repeatedly to switch between
the following channel select modes:
CH-NUMBER (channel number select setting)
—CATEGORY (channel category select
setting)
2 Touch a or b to select the desired channel category.
3 Touch c or d to select the desired channel in the selected channel category.
Selecting a SIRIUS channel directly
You can select a SIRIUS channel directly by
entering the desired channel number.
1 Touch DIRECT.
# To switch between groups of touch panel keys,
touch NEXT or PREV.
2 Touch 0 to 9 to input the desired channel number.
# To cancel the input numbers, touch C.
3 Touch ENTER.
The SIRIUS channel of entered number is
selected.
Using the MyMix function
The MyMix function allows you to make the
MyMix song playlist. When the song in the
MyMix playlist is being broadcast on a station
other than the one you are listening to, you
will be alerted, and you can tune to the station
to listen to that song.
! This function is available for SIR-PNR2/SIR-
PNR2C.
! A track itself is NOT downloaded BUT only
the song title and the artist name are memorized.
Available accessories
En
57
Page 58

Section
04
Available accessories
Making the MyMix playlist
You can add a song that is being broadcast to
the MyMix playlist. When it is added, the song
title and its artist name is memorized to this
unit. The MyMix function will start on the song
that matches the song title and its artist name
in the MyMix playlist.
% When a desired song is broadcast,
touch and hold MEMO.
The song title and artist name of the song you
are listening to are memorized, and a confirmation message appears.
# The song title and artist name of up to 10
tracks can be memorized. When you try to save
more than 10 tracks, FULL is displayed and that
song being broadcast cannot be saved.
# You cannot memorize the song title or the artist name of the channel 000.
# It is possible that the memorized title is not
displayed correctly.
When the song in the MyMix playlist
is broadcast
As soon as the memorized song starts broadcast on a different station, a song alert is displayed. Touch JUMP to switch to that station,
and you can listen to that track.
! If you would rather not to tune to that sta-
tion, touch STAY.
! If an alert for the song in the MyMix playlist
is set up to off, no alert will be provided
even when the song is broadcast. Refer to
Setting up a song alert on this page.
! If there is slight difference between the
memorized title and the title of the song
being broadcast, no alert will be provided
even though they are the same song.
Turning the MyMix function on or off
You can turn the MyMix function off and stop
this unit to alert you for all the songs in the
MyMix playlist. To restart, turn this function
on.
! The MyMix function is on at the default
setting.
1 Touch MEMO EDIT.
The display is switched to the memo edit
mode.
# To switch between groups of touch panel keys,
touch NEXT or PREV.
2 Touch ALERT OFF to turn the MyMix
function off.
The MyMix function is now off.
# To turn the MyMix function on, touch
ALERT ON.
Setting up a song alert
You can set up an alert on or off by each song
in the MyMix playlist. First, display the MyMix
playlist and then change each alert setting.
Set up an alert to on so you can receive the
alert when the song is broadcast, or set it up
to off to stop the alert for that song.
1 Touch MEMO EDIT.
The display is switched to the memo edit
mode.
# To switch between groups of touch panel keys,
touch NEXT or PREV.
2 Touch PREV or NEXT to select the song
title that you want to turn the alert off.
3 Touch ON/OFF to turn the alert off.
The alert for the song is turned off.
58
En
Page 59

Available accessories
Section
04
Deleting the song from the MyMix
playlist
You can delete each song in the MyMix
playlist.
1 Touch MEMO EDIT.
The song title in the MyMix playlist is displayed.
# To switch between groups of touch panel keys,
touch NEXT or PREV.
2 Touch PREV or NEXT to select the song
title that you want to delete.
3 Touch DELETE.
4 A message will appear asking you to
confirm to delete it. Touch YES.
The selected song is deleted.
# To cancel the deleting, touch CANCEL.
Using the Game Alert function
This unit can alert you when games involving
your favorite teams are about to start. To use
this function you need in advance to set up a
game alert for the teams.
! This function is available for SIR-PNR2/SIR-
PNR2C.
4 Touch ON/OFF to store the selected
team in memory.
ON is displayed with the selected team, and
the Game Alert function will start on that
team.
# To turn the Game Alert off of the selected
team, touch ON/OFF again.
# When you have already made 12 team selections, FULL is displayed and additional team selection is not possible. In this case, first delete
the team selection and then try again.
5 Repeat these steps for selecting other
teams.
Up to 12 teams can be selected.
Switching the Game Alert on or off
Once you made team selections, you need to
turn the Game Alert function on.
! The Game Alert function is on at the default
setting.
1 Touch TEAM SET.
2 Touch ALERT ON to turn the Game Alert
on.
The Game Alert function is now on.
# To turn the Game Alert function off, touch
ALERT OFF.
Available accessories
Selecting teams for Game Alert
1 Touch TEAM SET.
2 Touch PREV or NEXT next to LEAGUE to
select a desired league.
League names are switched in the display.
3 Touch PREV or NEXT next to TEAM to
select a desired team.
Teams in the selected category are switched in
the display.
When the game of the selected team
starts
When a game of the selected team is about to
start (or is currently playing) on a different station, a game alert is displayed. Touch JUMP to
switch to that station, and you can listen to
that game.
! If you would rather not to tune to that sta-
tion, touch STAY.
En
59
Page 60

Section
04
Available accessories
Displaying game information
If games of your selected teams are currently
playing, you can display information of the
games and tune to the broadcast channel.
1 Touch GAME INFO.
The game information of your selected team is
displayed.
2 Touch PREV or NEXT to select a game.
The game is displayd, followed by more detailed game information.
! Game score will be updated automatically.
3 Touch TuneTO to switch to that station
to listen to the game.
Notes
! If you have not made any team selections,
NOT SET is displayed.
! When games involving your favorite teams are
not currently playing, NO GAME is displayed.
Displaying the Radio ID
If you select CH000, the ID code is displayed.
% Touch c or d to select CH000.
# To select CH000, set the channel select setting
to CH-NUMBER. About the channel select setting, refer to Selecting the SIRIUS channel select
mode on page 57
Switching the SIRIUS display
! This function is available for SIR-PNR1.
% Touch INFO to switch the SIRIUS display.
Channel name—Artist name/feature—Song/
program title—Channel category
Bluetooth Audio
Basic Operations
If you connect Bluetooth adapter (e.g. CDBTB200) to this unit, you can control Bluetooth
audio player via Bluetooth wireless technology.
Important
! Depending on the Bluetooth audio player con-
nected to this unit, the available operations
with this unit are limited to the following two
levels:
— Lower level: Only playing back songs on
your audio player is possible.
— Higher level: Playing back, pausing, select-
ing songs, etc., are possible (all the operations illustrated in this manual).
! Since there are a number of Bluetooth audio
players available on the market, operations
with your Bluetooth audio player using this
unit vary in great range. Please refer to the instruction manual that came with your Bluetooth audio player as well as this manual
while operating your player on this unit.
! Information about songs (e.g. the elapsed
playing time, song title, song index, etc.) cannot be displayed on this unit.
! While you are listening to songs on your Blue-
tooth audio player, please refrain from operating on your cellular phone as much as
possible. If you try operating on your cellular
phone, the signal from your cellular phone
may cause a noise on the song playback.
! When you are talking on the cellular phone
connected to this unit via Bluetooth wireless
technology, the song playback from your Bluetooth audio player connected to this unit is
muted.
! Even if while you are listening to song on your
Bluetooth audio player you switch to another
source, the playback of song continues to
elapse.
60
En
Page 61

123
Available accessories
Section
04
For details concerning operation, refer to the
Bluetooth adapter’s operation manual. This
section provides brief information on Bluetooth audio player operations with this unit
which slightly differes or is cut short from that
described in the Bluetooth adapter’ s operation
manual.
! Even though your audio player does not
contain a Bluetooth module, you can still
control it from this unit via Bluetooth wireless technology. To control your audio
player by using this unit, connect a product
featuring Bluetooth wireless technology
(available on the market) to your audio
player and connect Bluetooth adapter (e.g.
CD-BTB200) to this unit.
1 Source icon
2 Device name
Shows the device name of the connected
Bluetooth audio player (or Bluetooth adapter).
3 Connection indicator
Shows the Bluetooth wireless connection status.
1 Touch the source icon and then touch
BT Audio to select the Bluetooth audio
source.
# For this unit to control your Bluetooth audio
player it needs to establish a Bluetooth wireless
connection. (Refer to Connecting a Bluetooth
audio player on this page.)
3 To skip back or forward to another
track, briefly touch o or p.
4 To perform fast forward or reverse,
keep touching o or p.
5 To stop playback, touch g.
Pausing playback
% Touch e during playback.
# To resume playback at the same point that you
turned pause on, touch d.
Introduction of advanced
operations
1 Touch A.MENU and then touch
FUNCTION MENU to display the function
names.
The function names are displayed and operable ones are highlighted.
2 Touch ESC to return to the ordinary display.
# To return to the previous display, touch BACK.
Connecting a Bluetooth audio
player
% Touch CONNECTION OPEN on the function menu to turn the connection open on.
CONNECTION WAITING is displayed. This
unit is now on standby for connection from
Bluetooth audio player.
If your Bluetooth audio player is set ready for
Bluetooth wireless connection, connection to
this unit will be automatically established.
Available accessories
2 Touch d.
Playback starts.
En
61
Page 62

4
5678a
9
213
Section
04
Available accessories
Note
Before you can use audio players you may need
to enter the PIN code into this unit. If your player
requires a PIN code to establish a connection,
look for the code on the player or in its accompanying documentation. Enter the PIN code referring to Entering PIN code for Bluetooth wireless
connection on page 43.
Disconnecting a Bluetooth
audio player
% Touch DISCONNECT on the function
menu.
After the disconnection is completed,
NO CONNECTION is displayed.
Displaying BD (Bluetooth
Device) address
% Touch DEVICE INFO on the function
menu to display the BD address.
Various information regarding the Bluetooth
wireless technology are displayed.
! DEVICE NAME (device name of this sys-
tem)
! BD ADDRESS (address of Bluetooth device)
! SYSTEM VERSION (system version)
! BT MODULE VERSION (version of Blue-
tooth module)
Bluetooth Telephone
Basic Operations
If you use Bluetooth adapter (e.g. CD-BTB200),
you can connect a cellular phone featuring
Bluetooth wireless technology to this unit for
hands-free, wireless calls, even while driving.
Important
! Since this unit is on standby to connect with
your cellular phones via Bluetooth wireless
technology, using this unit without running
the engine can result in battery drainage.
! Advanced operations that require your atten-
tion such as dialing numbers on the monitor,
using phone book, etc., are prohibited while
you are driving. When you need to use these
advanced operations, stop your vehicle in a
safe place and operate.
For details concerning operation, refer to the
Bluetooth adapter’s operation manual. This
section provides brief information on the
hands-free phoning operations with this unit
which slightly differes or is cut short from that
described in the Bluetooth adapter’ s operation
manual.
! This unit is not compatible with registration
for guest phone.
! This unit does not have the name edit func-
tion of a Phone Book entry.
62
1 Source icon
2 User number indicator
En
Page 63

Available accessories
Section
04
Shows the registration number of the cellular
phone.
3 Device name
Shows the device name of the cellular phone.
4 Phone number
Shows the phone number you selected.
5 Voice recognition indicator
Shows when the voice recognition function is
on (for more details, refer to Voice recognition
on the next page).
6 Incoming call notice indication
Shows when an incoming call has been received and not checked yet.
! Incoming call notice is not displayed for
calls made when your cellular phone is
disconnected from this unit.
7 Automatic answering/Automatic rejecting in-
dicator
Shows when the automatic answering function is on (for more details, refer to Setting the
automatic answering on page 69).
Shows when the automatic rejecting function
is on (for more details, refer to Setting the
automatic rejecting on page 69).
8 Battery strength indicator
Shows the battery strength of cellular phone.
! Battery strength indicator may differ
from the actual battery strength.
! If the battery strength is not available,
nothing is displayed in the battery
strength indicator area.
9 Signal level indicator
Shows the signal strength of cellular phone.
! Signal level indicator may differ from
the actual signal level.
! Depending on the cellular phones fea-
turing Bluetooth wireless technology,
radio field intensity is not available. In
this case, the signal level indicator does
not appear.
! If your cellular phone is out of service,
is displayed.
a Telephone indicator
Shows when a phone connection using Bluetooth wireless technology is established (for
more details, refer to Connecting a cellular
phone on the next page).
! While connecting automatically, tele-
phone indicator is flashing.
Available accessories
% Touch the source icon and then touch
TEL to select the telephone.
Note
Equalizer curve for the phone source is fixed.
When selecting the phone source, you cannot operate the equalizer function. Refer to Recalling
equalizer curves on page 34.
When the multi-channel processor is connected
to this unit, you can operate the equalizer function even when selecting the phone source. Refer
to Recalling equalizer curves on page 84.
Setting up for hands-free phoning
Before you can use the hands-free phoning
function you will need to set up the unit for
use with your cellular phone. This entails establishing a Bluetooth wireless connection between this unit and your phone, registering
your phone with this unit, and adjusting the
volume level.
1 Connection
For detailed instructions on connecting your
phone to this unit via Bluetooth wireless technology, refer to Connecting a cellular phone on
the next page.
# Your phone should now be temporarily connected; however, to make best use of the technology, we recommend you register the phone to
this unit.
2 Registration
To register your temporarily connected phone,
refer to Registering connected cellular phone
on page 65.
En
63
Page 64

Section
04
Available accessories
3 Volume adjustment
Adjust the earpiece volume on your cellular
phone for comfort. When adjusted, the volume
level is memorized in this unit as the default
setting.
# Caller’s voice volume and ring volume may
vary depending on the type of cellular phones.
# If the difference between the ring volume and
caller’s voice volume is big, overall volume level
may become unstable.
# Before disconnecting cellular phone from this
unit, make sure to adjust the volume to proper
level. If the volume has been muted (zero level)
on your cellular phone, the volume level of your
cellular phone remains muted even after the cellular phone is disconnected from this unit.
Making a phone call
Voice recognition
1 Touch VOICE to turn the voice recognition function on.
Voice dial icon appears on the information bar.
Voice recognition function is now ready.
# To cancel the voice recognition function,
touch VOICE again.
2 Pronounce the name of your contact.
Taking a phone call
Answering an incoming call
1 When a call comes in, touch .
# You can also perform this operation by pressing o.
# If the private mode is selected on the cellular
phone, hands-free phoning may not be performed.
Rejecting an incoming call
% When a call comes in, touch .
The call is rejected.
Answering a call waiting
1 Touch to answer a call waiting.
2 Touch
# The caller you have been talking to is now on
hold. To end the call, both you and your caller
need to hang up the phone.
# While your callers hold the line, touching
switches between callers.
to end all calls.
Rejecting a call waiting
% Touch to reject a call waiting.
Introduction of advanced
operations
1 Touch A.MENU and then touch
FUNCTION MENU to display the function
names.
The function names are displayed and operable ones are highlighted.
2 Touch ESC to return to the telephone
standby display.
# To return to the previous display, touch BACK.
Connecting a cellular phone
Searching for available cellular phones
1 Touch PHONE CONNECT on the function
menu.
2 To end the call, touch .
# You can also perform this operation by pressing p.
64
En
Page 65

Available accessories
Section
04
2 Touch SEARCH to search for available
cellular phones.
While searching, SEARCHING flashes. When
available cellular phones featuring Bluetooth
wireless technology are found, device names
or Name Not Found (if names cannot be obtained) are displayed.
# If this unit fails to find any available cellular
phones, NOT FOUND is displayed.
# You can display the BD address by touching
BD ADDR. To return to the device name, touch
PHONE NAME.
3 Touch the device name you want to
connect.
While connecting, CONNECTING flashes. To
complete the connection, please check the device name (Pioneer BT unit2) and enter the
link code on your cellular phone. If the connection is established, CONNECTED is displayed.
# The link code is set to 0000 as default. You
can change this code in the initial setting. Refer
to Entering PIN code for Bluetooth wireless con-
nection on page 43.
Using a cellular phone to initiate a
connection
1 Touch PHONE CONNECT on the function
menu.
2 Touch CONNECTION OPEN.
CONNECTION WAITING flashes and the unit
is now on standby for connection from cellular
phone.
Disconnecting a cellular phone
1 Touch PHONE CONNECT on the function
menu.
2 Touch DISCONNECT to disconnect the
currently connected cellular phone from
this unit.
After the disconnection is completed,
NO CONNECTION is displayed.
Registering connected cellular
phone
1 Touch PHONE REGISTER on the function
menu.
Registration assignments for user phone 1, 2
and 3 appear on the display.
2 Touch and hold one of the registration
assignments to register the currenctly connected phone.
If the registration is succeeded, the device
name of the connected phone is displayed in
the selected assignment.
# If the assignment is empty, the device name is
not displayed. If the assignment is already taken,
the device name appears. To replace an assignment with a new phone, first delete the current
assignment. For more detailed instructions, see
Deleting a registered phone on this page.
# If the registration failed, device name of the
connected phone is not displayed in the selected
assignment. In this case, return to step 1 and try
again.
Available accessories
3 Use cellular phone to connect to this
unit.
# To cancel this function, touch
CONNECTION OPEN again.
# The link code is set to 0000 as default. You
can change this code in the initial setting. Refer
to Entering PIN code for Bluetooth wireless con-
nection on page 43.
Deleting a registered phone
1 Touch PHONE REGISTER on the function
menu.
En
65
Page 66

Section
04
Available accessories
2 Touch DELETE next to the device name
you want to delete.
A confirmation display appears. Touch OK to
delete the phone.
# To cancel deleting a registered phone, touch
CANCEL.
Connecting to a registered
cellular phone
Connecting to a registered phone
manually
1 Touch PHONE CONNECT on the function
menu.
2 Touch DIRECT CONNECT.
3 Touch the device name you want to
connect.
While connecting, CONNECTING is flashing.
If the connection is established, CONNECTED
is displayed.
Connecting to a registered phone
automatically
1 Touch NEXT on the function menu.
2 Touch AUTO CONNECT to turn the
Automatic Connection function on.
If your cellular phone is set ready for Bluetooth
wireless connection, the connection to this
unit will be automatically established.
# To turn automatic connection off, touch
AUTO CONNECT again.
Using the Phone Book
Transferring entries to the Phone Book
The Phone Book can hold a total of 500 entries; 300 from User 1, 150 from User 2, and 50
from User 3.
1 Touch PHONE BOOK TRANSFER on the
function menu.
2 Touch START to turn the Phone Book
Transfer function on.
The Phone Book Transfer is now on standby.
3 Use cellular phone to perform phone
book transfer.
Perform phone book transfer using the cellular phone. For detailed instruction on this,
refer to the instruction manual that came with
your cellular phone.
# The display indicates how many entries have
been transferred and the total number to be
transferred.
# To cancel the transferring process, touch
STOP.
4 When you are done transferring Phone
Book entries, touch ESC.
Note
When the phone book transfer is complete, the
connection to your cellular phone is off. To use
the Phone Book, connect to your cellular phone
once again, referring to Connecting to a registered
cellular phone on this page.
Changing the Phone Book display order
% Touch PHONE BOOK NAME VIEW on
the function menu to change the name
view order.
INVERTED is displayed and the name view
order is changed.
# To change to the other display order, touch
PHONE BOOK NAME VIEW again.
66
En
Page 67

Available accessories
Section
04
Calling a number in the Phone Book
Important
To perform this operation, be sure to park your vehicle and apply the parking brake.
1 Touch PHONE BOOK to display the
Phone Book.
2 Touch a or b to select the first letter of
the name you are looking for.
Touching a or b changes alphabetical letters.
3 Touch ENTER to show entries starting
with the letter you chose.
The display shows the first six Phone Book entries starting with that letter (e.g. “Ben”,
“Brian” and “Burt” when “B” is selected).
# Touch or to display other phone book entries.
# To refine the search with a different letter,
touch CLEAR.
4 Touch a Phone Book entry you want to
call.
The display is switched to the Phone Book detail display.
Editing phone numbers
Important
To perform this operation, be sure to park your vehicle and apply the parking brake.
You can edit the numbers of Phone Book entries. Each phone number can be up to 24 digits long.
1 Touch PHONE BOOK to display the
Phone Book.
2 Select a Phone Book entry you want to
edit.
See step two to four on Calling a number in the
Phone Book on this page for how to do this.
3 Touch EDIT next to the phone number
you want to edit.
The display is changed to the Phone Book dial
edit display.
4 Touch 0 to 9 to input numbers.
# For an international call, touch add “+” to add
+ to the phone number.
# Touch CLEAR to delete the number. Touch and
hold CLEAR to delete all the input numbers.
Available accessories
5 Touch phone number of the Phone
Book entry you want to call.
If several phone numbers are entered to an
entry, touch one you want to call.
The display returns to the normal display and
the Phone Book entry you selected is displayed on the information bar.
6 Touch
# For an international call, touch add “+” to add
+ to the phone number.
to make a call.
7 To end the call, touch .
5 Touch OK to store the new number.
Clearing a Phone Book entry
Important
To perform this operation, be sure to park your vehicle and apply the parking brake.
1 Touch PHONE BOOK to display the
Phone Book.
2 Select a Phone Book entry you want to
delete.
See step two to four on Calling a number in the
Phone Book on this page for how to do this.
En
67
Page 68

Section
04
Available accessories
3 Touch DELETE to delete the Phone Book
entry.
A confirmation display appears. Touch YES to
delete the entry.
# If you do not want to clear a Phone Book entry
that you have selected, touch NO.
Using the Call History
Important
To perform this operation, be sure to park your vehicle and apply the parking brake.
The 6 most recent calls made (dialled), received and missed, are stored in the Call History. You can browse the Call History and call
numbers from it.
1 Touch LOG to display the Call History.
Touching LOG repeatedly switches between
the following call histories:
MISSED CALL LIST (missed call)—
DIALED CALL LIST (dialled call)—
RECEIVED CALL LIST (received call)
# You can switch between phone number and
name (if entered) by touching ABC/123.
# If no phone numbers have been stored in the
selected list, nothing is displayed.
2 Touch a phone number or name (if entered) you want to call.
The display returns to the normal display and
the phone number you selected is displayed
on the information bar.
3 Touch
# For an international call, touch add “+” to add
+ to the phone number.
to make a call.
Using preset numbers
Important
To perform this operation, be sure to park your vehicle and apply the parking brake.
Assigning preset numbers
Numbers that you dial frequently can be assigned to presets for quick recall.
You can assign up to 6 frequently called phone
numbers to number presets.
1 Select a desired phone number from
the Phone Book or the Call History. Or directly enter a desired phone number.
To select a desired phone number from the
Phone Book or the Call History, see the instructions explained in previous pages. To directly enter a desired phone number, see
Making a call by entering phone number on the
next page.
The display should now be the normal display
and the selected phone number is displayed
on the information bar.
2 Touch LIST to display preset assignments.
Preset assignments appear in the display (if
not displayed yet).
3 Keep touching one of preset assignments to store the phone number.
The phone number you selected is stored in
presets.
# No Data is displayed for empty assignment.
Even if the assignment is taken, you can replace
it to the new one by keeping touching the assignment.
4 To end the call, touch .
68
En
Recalling preset numbers
1 Touch LIST to display preset assignments.
Preset assignments appear in the display (if
not displayed yet).
Page 69

Available accessories
Section
04
2 Touch one of preset assignments.
The selected phone number should now be
displayed on the information bar.
3 Touch
4 To end the call, touch
to make a call.
.
Making a call by entering
phone number
Important
To perform this operation, be sure to park your vehicle and apply the parking brake.
1 Touch DIRECT to display the direct dial
display.
2 Touch 0 to 9 to input numbers.
# For an international call, touch add “+” to add
+ to the phone number.
# Touch CLEAR to delete the number. Touch and
hold CLEAR to delete all the input numbers.
# Up to 24 digits can be entered.
# If you want to store the entered phone number
to preset assignment, touch SET here. The display
returns to the normal display and the phone number you entered is selected.
3 When you completed entering the
number, touch
4 To end the call, touch
to make a call.
.
Clearing memory
1 Touch CLEAR MEMORY on the function
menu.
2 Touch CLEAR next to the item you want
to delete from the memory.
Select from the following:
! PHONE BOOK (phone book)
! DIALED CALLS (dialled call history)
! RECEIVED CALLS (received call history)
! MISSED CALLS (missed call history)
! DIAL PRESET (preset phone numbers)
After selecting a desired item, a confirmation
display appears. Touch OK to delete the memory.
# If you do not want to clear memory that you
have selected, touch CANCEL.
# If you want to clear all the Phone Book,
dialled/received/missed call history list and preset phone number, touch CLEAR ALL.
Setting the automatic answering
% Touch AUTO ANSWER on the function
menu to turn the automatic answer on.
# To turn the automatic answer off, touch
AUTO ANSWER again.
Setting the automatic rejecting
1 Touch NEXT on the function menu.
2 Touch REFUSE ALL CALLS to turn the
automatic call rejection on.
# To turn the automatic call rejection off, touch
REFUSE ALL CALLS again.
Switching the ring tone
1 Touch NEXT on the function menu.
2 Touch RING TONE to turn the ring tone
on.
# To turn the ring tone off, touch RING TONE
again.
Echo canceling and noise reduction
1 Touch NEXT on the function menu.
2 Touch ECHO CANCEL to turn Echo Cancel function on.
# To turn echo canceling off, touch
ECHO CANCEL again.
Available accessories
En
69
Page 70

21534
Section
04
Available accessories
Displaying BD (Bluetooth
Device) address
Displaying BD address of this system
1 Touch NEXT on the function menu.
2 Touch DEVICE INFO to display the BD
address.
Various information regarding the Bluetooth
wireless technology are displayed.
! DEVICE NAME (device name of this sys-
tem)
! BD ADDRESS (address of Bluetooth device)
! SYSTEM VERSION (version of this unit’s
microprocessor)
! BT MODULE VERSION (version of Blue-
tooth module)
Displaying BD address of your
cellular phone
1 Touch PHONE CONNECT on the function
menu.
2 Touch BD ADDRESS to display the BD
address.
12-digit hexadecimal string is displayed.
# To return to the device name, touch
PHONE NAME.
Multi-CD Player
Basic Operations
You can use this unit to control a multi-CD
player, which is sold separately.
! This unit does not have ITS playlist, disc title
and track title list functions.
! Only those functions described in this man-
ual are supported by 50-disc multi-CD
players.
! This unit is not designed to operate disc title
list functions with a 50-disc multi-CD player.
1 Source icon
2 Disc number indicator
3 Disc title indicator
Shows the title of the currently playing disc
only when playing CD TEXT discs.
4 Track number indicator
5 Play time indicator
70
1 Touch the source icon and then touch
MCD to select the multi-CD player.
2 Touch a or b to select a disc.
3 To skip back or forward to another
track, briefly touch o or p.
# You can also skip back or forward to another
track by pressing o or p.
4 To perform fast forward or reverse,
keep touching o or p.
# You can also perform fast reverse/fast forward
by pressing and holding o or p.
En
Page 71

Available accessories
Section
04
Notes
! When the multi-CD player performs the pre-
paratory operations, READY is displayed.
! If an error message such as ERROR-02-XX is
displayed, refer to the multi-CD player owner’s
manual.
! If there are no discs in the multi-CD player ma-
gazine, NO DISC is displayed.
Selecting a disc
1 Touch LIST.
2 Touch your favorite disc.
Selectable discs are highlighted.
3 Touch ESC to return to the ordinary display.
Pausing CD playback
% Touch de during playback.
# To resume playback at the same point that you
turned pause on, touch de again.
Introduction of advanced
operations
You can use these functions only with a multiCD player that supports them.
1 Touch A.MENU and then touch
FUNCTION MENU to display the function
names.
The function names are displayed and operable ones are highlighted.
2 Touch ESC to return to the playback display.
# To return to the previous display, touch BACK.
Function and operation
REPEAT, RANDOM, SCAN and
COMPRESSION operations are basically the
same as that of the built-in DVD player.
Function name Operation
Refer to Repeating play on page 29.
But the repeat play ranges you can
select are different from that of the
built-in DVD player. The repeat play
ranges of the multi-CD player are
REPEAT
RANDOM
SCAN
COMPRESSION
Notes
! If you select other discs during repeat play,
the repeat play range changes to MULTI-CD.
! If you perform track search or fast forward/re-
verse during TRACK, the repeat play range
changes to DISC.
! After track or disc scanning is finished, nor-
mal playback of the tracks will begin again.
! If the multi-CD player does not support
COMP/DBE, you cannot operate this function.
as below:
! MULTI-CD – Repeat all discs in
the multi-CD player
! TRACK – Repeat just the cur-
rent track
! DISC – Repeat the current disc
Refer to Playing tracks in random
order on page 29.
Refer to Scanning tracks or folders
on page 30.
Refer to Using compression on
page 30.
Multi-CD player has COMP (compression) and DBE (dynamic bass
emphasis) functions.
The settings can be switched as
below:
OFF—COMP1—COMP2—OFF—
DBE 1—DBE 2
Available accessories
Using CD TEXT functions
You can use these functions only with a CD
TEXT compatible multi-CD player.
En
71
Page 72

42156
3
7
Section
04
Available accessories
The operation is the same as that of the builtin DVD player.
Refer to Text information on page 28.
DVD Player
Basic Operations
You can use this unit to control a DVD player or
multi-DVD player, which is sold separately.
For details concerning operation, refer to the
DVD player’s or multi-DVD player’s operation
manual. This section provides information on
DVD operations with this unit which differs
from that described in the DVD player’sor
multi-DVD player’s operation manual.
! This unit does not have ITS playlist and disc
title functions.
1 Source icon
2 Media indicator
3 Disc number indicator
Shows the disc number currently playing
when using a multi-DVD player.
4 Title/Folder number indicator
5 Chapter/track number indicator
6 Play time indicator
7 Variable message area
Shows the text information of disc currently
playing when playing a compressed audio
disc.
! This unit cannot display the text infor-
mation recorded on a CD TEXT disc
playing on the optional DVD player.
72
1 Touch the source icon and then touch
S-DVD to select the DVD player.
# When the source icon is not displayed, you
can display it by touching the screen.
En
Page 73

Available accessories
Section
04
2 Touch the screen to display the touch
panel keys.
3 To skip back or forward to another
chapter/track, briefly touch o or p.
# You can also skip back or forward to another
chapter/track by pressing o or p.
4 To perform fast forward or reverse,
keep touching o or p.
# You can also perform fast reverse/fast forward
by pressing and holding o or p.
Note
If you do not use the touch panel keys within 30
seconds, they will be hidden automatically when
playing DVD video or Video CD.
Selecting a disc
! You can operate this function only when a
multi-DVD player is connected to this unit.
1 Touch LIST.
2 Touch your favorite disc.
Selectable discs are highlighted.
3 Touch ESC to return to the ordinary display.
Pausing disc playback
% Touch de during playback.
# To resume playback at the same point that you
turned pause on, touch de again.
Introduction of advanced
operations
1 Touch A.MENU and then touch
FUNCTION MENU to display the function
names.
The function names are displayed and operable ones are highlighted.
2 Touch ESC to return to the playback display.
# To return to the previous display, touch BACK.
Function and operation
REPEAT, RANDOM and SCAN operations are
basically the same as that of the built-in DVD
player.
Available accessories
Note
You can also select a disc by keeping touching a
or b.
Selecting a folder
! You can operate this function only when a
DVD player which is corresponding to compressed audio playback is connected to
this unit.
% Touch a or b to select a folder.
En
73
Page 74

Section
04
Available accessories
Function name Operation
Refer to Repeating play on page 29.
But the repeat play range that you
can select is var y depending on
the type of disc or system. The repeat play ranges of the DVD
player/multi-DVD player are as
below:
During PBC playback of Video
CDs, this function cannot be oper-
REPEAT
RANDOM
SCAN
ated.
! DISC – Repeat the current disc
! FOLDER – Repeat the current
folder
! TITLE – Repeat just the current
title
! CHAPTER – Repeat just the
current chapter
! TRACK – Repeat just the cur-
rent track
Refer to Playing tracks in random
order on page 29.
Refer to Scanning tracks or folders
on page 30.
Notes
! If you select other discs during repeat play,
the repeat play range changes to DISC.
! When playing back Video CD or CD, if you per-
form track search or fast forward/reverse during TRACK, the repeat play range changes to
DISC.
! When playing back compressed audio, if you
select another folder during repeat play, the
repeat play range changes to DISC.
! When playing back compressed audio, if you
perform track search or fast forward/reverse
during TRACK, the repeat play range changes
to FOLDER.
! If the characters recorded on the audio file
are not compatible with this unit, those
characters will not be displayed.
Selecting files from the file name list
! You can operate this function only when a
DVD player which is corresponding to compressed audio playback is connected to
this unit.
1 Touch LIST to display the list of folder
and file names.
DISC LIST (disc list)—FOLDER&FILE LIST
(folder and file list)
2 Select the desired file name (or folder
name).
The operation is the same as that of the builtin DVD player.
Refer to Selecting files from the file name list
on page 28.
Displaying text information of an
audio file
The operation is the same as that of the builtin DVD player.
Refer to Text information on page 28.
74
En
Page 75

213
4
Available accessories
Section
04
TV tuner
Basic Operations
You can use this unit to control a TV tuner (e.g.
GEX-P5700TV), which is sold separately.
For details concerning operation, refer to the
TV tuner’s operation manual. This section provides information on TV operations with this
unit which differs from that described in the
TV tuner’s operation manual.
1 Source icon
2 Band indicator
3 Preset number indicator
4 Channel indicator
1 Touch the source icon and then touch
TV to select the TV.
# When the source icon is not displayed, you
can display it by touching the screen.
2 Touch the screen to display the touch
panel keys.
3 Touch BAND to select a band.
Touch BAND repeatedly until the desired band
is displayed, TV1 or TV2.
4 To perform manual tuning, briefly
touch c or d.
# You can also perform manual tuning by pressing o or p.
5 To perform seek tuning, keep touching
c or d for about one second and release.
The tuner will scan the channels until a broadcast strong enough for good reception is
found.
# You can cancel seek tuning by briefly touching
either c or d.
# If you keep touching c or d you can skip
broadcasting channels. Seek tuning starts as
soon as you release the keys.
# You can also perform seek tuning by pressing
and holding o or p.
Note
If you do not use the touch panel keys within 30
seconds, they will be hidden automatically.
Storing and recalling broadcast
stations
If you touch any of the preset tuning keys P01
to P12 you can easily store up to 12 broadcast
stations for later recall with the touch of a key.
! Up to 24 stations, 12 for each of two TV
bands, can be stored in memory.
1 Touch LIST to display the preset list.
# When the touch panel keys are not displayed,
you can display them by touching the screen.
2 When you find a station that you want
to store in memory, keep touching one of
preset tuning keys P01 to P12 until the
beep sounds.
The next time you touch the same preset tuning key the station is recalled from memory.
# To switch between P01 to P06 and P07 to P12,
touch PREV or NEXT.
3 Touch ESC to return to the ordinary display.
Available accessories
En
75
Page 76

1
Section
04
Available accessories
Note
You can also use a and b to recall stations assigned to preset tuning keys P01 to P12.
Storing the strongest broadcast
stations sequentially
1 Touch A.MENU and then touch
FUNCTION MENU to display the function
names.
2 Touch BSSM on the function menu to
turn BSSM on.
BSSM begins to flash. While BSSM is flashing
the 12 strongest broadcast stations will be
stored in order from the lowest channel up.
When finished, BSSM stops flashing.
# To cancel the storage process, touch BSSM
again.
3 Touch ESC to return to the TV picture.
# To return to the previous display, touch BACK.
Note
Storing broadcast stations with BSSM may replace broadcast stations you have saved using
P01 to P12.
Digital Signal Processor
Introduction of DSP adjustments
You can use this unit to control multi-channel
processor (e.g. DEQ-P8000), which is sold separately.
! Some functions may differ depending on the
multi-channel processor connected to this
unit.
Important
When a multi-channel processor and an optional
DVD player are connected to this unit, be sure to
use an optical cable (e.g., CD-AD600).
1 DSP display
Shows the DSP function names.
By carrying out the following settings/adjustments in the order shown, you can create a finely-tuned sound field effortlessly.
1 Setting the speaker setting
2 Using the position selector
3 Auto TA and EQ (auto-time alignment and auto-
equalizing)
4 Adjusting the time alignment
5 Adjusting the speaker output levels using a
test tone
6 Selecting a cross-over frequency
7 Adjusting the speaker output levels
8 Adjusting 3-band parametric equalizer
76
En
Page 77

Available accessories
Section
04
1 Touch A.MENU and then touch
DSP MENU to display the DSP function
names.
The DSP function names are displayed and
operable ones are highlighted.
# To go to the next group of function names,
touch NEXT.
# To return to the previous group of function
names, touch PREV.
# When playing discs recorded with more than
96 kHz sampling frequency, you cannot use audio
functions. Also, equalizer curve setting,
POSITION, AUTO EQ and AUTO TA will be cancelled.
# When playing discs recorded with more than
96 kHz sampling frequency, audio is outputted
from front speakers only.
# When selecting the FM as the source, you
cannot switch to SLA.
# When playing other than the DVD disc, you
cannot switch to DYNAMIC RANGE CONTROL.
# When neither FRONT-L nor FRONT-R is se-
lected in POSITION, you cannot switch to
TIME ALIGNNMENT.
# When both the center speaker and the rear
speaker are set to OFF in the speaker setting, you
cannot switch to DOLBY PRO LOGIC II.
2 Touch ESC to return to the ordinary display.
# To return to the previous display, touch BACK.
verberations. Those factors are programed
into the SFC circuitry to recreate the acoustics of various performance settings.
1 On the normal display, touch EQ and
hold to switch to SFC function.
Touch EQ and hold until SFC appears in the
display.
# To switch to equalizer function, touch SFC and
hold.
2 Touch SFC to select the desired SFC
mode.
Touch SFC repeatedly to switch between the
following modes:
MUSICAL (musical)—DRAMA (drama)—
ACTION (action)—JAZZ (jazz)—HALL (hall)—
CLUB (club)—OFF (off)
Note
If the source is a 2-channel LPCM audio or a 2channel Dolby Digital audio and you select SFC
effects that are most applicable for 5.1-channel
audio (i.e., MUSICAL, DRAMA or ACTION), we
recommend turning Dolby Pro Logic II on. On the
other hand, when selecting SFC effects that are
intended for use with 2-channel audio (i.e., JAZZ,
HALL or CLUB), we recommend turning Dolby
Pro Logic II off.
Available accessories
Using the sound field control
The SFC function creates the sensation of a
live performance.
! The acoustics of different performance en-
vironments are not the same and depend
on the extent and contour of space through
which sound waves move and on how
sounds bounce off the stage, walls, floors
and ceilings. At a live performance you
hear music in three stages: direct sound,
early reflections, and late reflections, or re-
En
77
Page 78

Section
04
Available accessories
Using the position selector
One way to assure a more natural sound is to
accurately position the stereo image, putting
you right in the center of the sound field. The
position selector function lets you automatically adjust the speaker output levels and inserts a delay time to match the number and
position of occupied seats. When used in conjunction with the SFC, the feature will make
the sound image more natural and offer a panoramic sound that envelops you.
1 Touch POSITION on the DSP function
menu.
2 Touch c/d/a/b to select a listening position.
Touch one of these, c/d/a/b, to select a listening position as listed in the table.
Key Display Position
c FRONT-L Front seat left
d FRONT-R Front seat right
a FRONT Front seats
b ALL All seats
# To cancel the selected listening position,
touch the same key again.
Note
When you make adjustments to the listening position, the speaker outputs are automatically set
for appropriate levels. You can tailor the levels
more precisely referring to Adjusting the speaker
output levels using a test tone or Adjusting the
speaker output levels.
Using balance adjustment
You can change the fader/balance setting so
that it can provide you an ideal listening environment in all occupied seats.
1 Touch FADER/BALANCE on the DSP
function menu.
2 Touch a or b to adjust front/rear
speaker balance.
Each time you touch a or b it moves the
front/rear speaker balance towards the front or
the rear.
FRONT:25 to REAR:25 is displayed as the
front/rear speaker balance moves from front to
rear.
# FR: 0 is the proper setting when only two
speakers are used.
3 Touch c or d to adjust left/right speaker balance.
Each time you touch c or d it moves the left/
right speaker balance towards the left or the
right.
LEFT:25 to RIGHT:25 is displayed as the left/
right speaker balance moves from left to right.
Adjusting source levels
SLA (source level adjustment) lets you adjust
the volume level of each source to prevent radical changes in volume when switching between sources.
! Settings are based on the FM volume level,
which remains unchanged.
1 Compare the FM volume level with the
level of the source you wish to adjust.
2 Touch SLA on the DSP function menu.
3 Touch c or d to adjust the source volume.
Each time you touch c or d it increases or decreases the source volume.
+4 to –4 is displayed as the source volume is
increased or decreased.
78
En
Page 79

Available accessories
Section
04
Notes
! The AM volume level can also be adjusted
with source level adjustments.
! Video CD, CD, compressed audio and DivX
are set to the same source level adjustment
volume automatically.
! DVD and the optional DVD player are set to
the same source level adjustment volume
automatically.
! XM tuner and SIRIUS tuner are set to the
same source level adjustment volume automatically.
! External unit 1 and external unit 2 are set to
the same source level adjustment volume
automatically.
! AUX (auxiliary input) and AV (AV input) are set
to the same source level adjustment volume
automatically.
Using the dynamic range control
The dynamic range refers to the difference between the largest and softest sounds. The dynamic range control compresses this
difference so that you can clearly hear sounds
even at low volume levels.
! The dynamic range control is effective only
on Dolby Digital sounds.
! When playing other than the DVD disc, you
cannot switch to
DYNAMIC RANGE CONTROL.
1 Touch DYNAMIC RANGE CONTROL on
the DSP function menu.
2 Touch d to turn the dynamic range control on.
# To turn dynamic range control off, touch c.
1 Touch DOWN MIX on the DSP function
menu.
2 Touch c or d to select the desired level.
! Lo/Ro – Stereo mix the original audio that
do not contain channel modes such as surround components.
! Lt/Rt – Down mix so that the surround
components can be restored (decoded).
Using the direct control
You can override audio settings to check for effectiveness of your audio settings.
! All audio functions are locked out when the
direct control is on except VOLUME/ATT
and DOLBY PRO LOGIC II.
1 Touch DIGITAL DIRECT on the DSP function menu.
2 Touch d to turn the direct control on.
# To turn direct control off, touch c.
Using the Dolby Pro Logic II
Dolby Pro Logic II creates five full-bandwidth
output channels from two-channel sources to
achieve high-purity matrix surround.
! Dolby Pro Logic II supports up to 48kHz
sampling rate stereo source and has no effect on other types of source.
! When both the center speaker and the rear
speaker are set to OFF in the speaker setting, you cannot switch to
DOLBY PRO LOGIC II.
1 Touch NEXT on the DSP function menu.
Available accessories
Using the down-mix function
The down-mix function allows you to play back
multi-channel audio in 2 channels.
2 Touch DOLBY PRO LOGIC II.
En
79
Page 80

Section
04
Available accessories
3 Touch any of the following touch panel
keys to select the desired mode.
! MOVIE – The Movie mode suitable for
movie playback
! MUSIC – The Music mode suitable for
music playback
! MATRIX – The Matrix mode for when FM
radio reception is weak
! OFF – Turn Dolby Pro Logic II off
! MUSIC ADJUST – Adjust the Music mode
# You can operate MUSIC ADJUST only when
MUSIC has been selected.
Adjusting the Music mode
You can adjust the Music mode with the following three controls.
! Panorama (PANORAMA) extends the front
stereo image to include the surround
speakers for an exciting “wraparound” effect.
! Dimension (DIMENSION) allows you to
gradually adjust the sound field either towards the front or the rear.
! Center Width Control (CENTER WIDTH) al-
lows center-channel sounds to be positioned between the center speaker and the
left/right speakers. It improves the left-center-right stage presentation for both the driver and the front passenger.
1 Touch NEXT on the DSP function menu.
2 Touch DOLBY PRO LOGIC II.
3 Touch MUSIC and then touch
MUSIC ADJUST.
# You can operate MUSIC ADJUST only when
MUSIC has been selected.
4 Touch a or b to select PANORAMA (panorama).
Each time you touch a or b selects the item
in the following order:
PANORAMA (panorama)—DIMENSION (dimension)—CENTER WIDTH (center width)
5 Touch d to turn the panorama control
on.
# To turn the panorama control off, touch c.
6 Touch b to select DIMENSION and then
touch c or d to adjust front/surround
speaker balance.
Each time you touch c or d it moves the
sound towards the front or the surrounds.
+3 to –3 is displayed as the front/surround
speaker balance moves from front to surrounds.
7 Touch b to select CENTER WIDTH and
then touch c or d to adjust the center
image.
Each time you touch c or d it gradually
spreads the center channel sound into the
front left and right speakers over a range 0 to
7.
3 is the default and it’s recommended for
most recordings. 0 places all center sound in
the center speaker. 7 places all center sound
equally in the left/right speakers.
Setting the speaker setting
You need to make with/without (or yes/no) and
size (bass reproducing capacity) selection/adjustments depending on the installed speakers. The size needs to be set to LARGE (large)
if the speaker is capable of reproducing
sounds of about 100 Hz or below. Otherwise
select SMALL (small).
! Low frequency range is not output if the
subwoofer is set to OFF and the front and
rear speakers set to SMALL or OFF.
! It is imperative that non-installed speakers
be set to OFF.
80
En
Page 81

Available accessories
Section
04
! Set the front or rear speaker to LARGE if
the speaker is capable of reproducing bass
content, or if no subwoofer is installed.
1 Touch NEXT on the DSP function menu.
2 Touch SPEAKER SETTING.
3 Touch a or b to select the speaker to
be adjusted.
Each time you touch a or b selects the speaker in the following order:
FRONT (front speakers)—CENTER (center
speaker)—REAR (rear speakers)—
SUB WOOFER (subwoofer)—PHASE (subwoofer setting)
# You can switch to PHASE only when the sub-
woofer has been set to ON.
4 Touch c or d to select the correct size
for the selected speaker.
Each time you touch c or d selects the size in
the following order:
OFF (off)—SMALL (small)—LARGE (large)
# You cannot select OFF, when FRONT (front
speakers) have been selected.
# You can select ON or OFF, when
SUB WOOFER (subwoofer) has been selected.
# You can switch REVERSE (reverse phase) or
NORMAL (normal phase), when PHASE (subwoo-
fer setting) has been selected.
3 Touch a or b to select SUB WOOFER
(subwoofer).
Each time you touch a or b selects the speaker in the following order:
FRONT (front speakers)—CENTER (center
speaker)—REAR (rear speakers)—
SUB WOOFER (subwoofer)—PHASE (subwoofer setting)
4 Touch d to turn subwoofer output on.
# To turn subwoofer output off, touch c.
5 Touch b and then touch c or d to select the phase of subwoofer output.
Touch d to select normal phase and
NORMAL appears in the display. Touch c to
select reverse phase and REVERSE appears in
the display.
Note
When playing a 2-channel mono source with Pro
Logic turned on, there may be occasions when
the following will occur:
! No audio is outputted if the center speaker
setting is SMALL or LARGE and no center
speaker is installed.
! Audio is heard only over the center speaker if
installed and the center speaker setting is
SMALL or LARGE.
Available accessories
Correcting the subwoofer’s phase
If trying to boost the bass output of the subwoofer doesn’t do much or rather makes you
feel that the bass gets more murky, this may
indicate that the subwoofer ’s output and bass
content you hear over other speakers cancel
each other out. To remove this problem, try
changing the phase setting for the subwoofer.
1 Touch NEXT on the DSP function menu.
2 Touch SPEAKER SETTING.
Adjusting the speaker output
levels
Speaker level can be adjusted finely by listening to an audio output. First, use test tone to
adjust the approximate speaker level, and then
use this function to adjust finely.
1 Touch NEXT on the DSP function menu.
2 Touch SPEAKER LEVEL.
En
81
Page 82

Section
04
Available accessories
3 Touch a or b to select the speaker to
be adjusted.
Each time you touch a or b selects the speaker in the following order:
FRONT L (front speaker left)—CENTER (center
speaker)—FRONT R (front speaker right)—
REAR R (rear speaker right)—REAR L (rear
speaker left)—SUB WOOFER (subwoofer)
# You cannot select speakers whose size is set
at OFF. (Refer to Setting the speaker setting on
page 80.)
4 Touch c or d to adjust the speaker output level.
Each time you touch c or d increases or decreases the speaker output level. +10 to –10 is
displayed as the level is increased or decreased.
Note
To adjust the speaker output levels in this mode is
the same as making the speaker output levels at
TEST TONE. Both provide the same results.
Selecting a cross-over frequency
You can select a frequency, under which
sounds are reproduced through the subwoofer. If the installed speakers include one whose
size has been set to SMALL, you can select a
frequency, under which sounds are reproduced through a LARGE speaker or subwoofer.
1 Touch NEXT on the DSP function menu.
2 Touch CROSS OVER.
3 Touch a or b to select the speaker to
be adjusted.
Each time you touch a or b selects the speaker in the following order:
FRONT (front speakers)—CENTER (center
speaker)—REAR (rear speakers)—
SUB WOOFER (subwoofer)
4 Touch c or d to select cross-over frequency.
Each time you touch c or d selects cross-over
frequencies in the following order:
63—80—100—125—160—200 (Hz)
Note
Selecting a cross-over frequency is to set a crossover frequency of the subwoofer’s L.P.F. (low-pass
filter) and that of the SMALL speaker H.P.F. (highpass filter). The cross-over frequency setting has
no effect if the subwoofer is set to OFF and other
speakers are set to LARGE or OFF.
Adjusting the speaker output
levels using a test tone
This function allows you to easily get the overall balance right among the speakers.
1 Touch NEXT on the DSP function menu.
2 Touch TEST TONE.
3 Touch START to start the test tone output.
The test tone is outputted. It rotates from
speaker to speaker in the following sequence
at intervals of about two seconds. The current
settings for the speaker over which you hear
the test tone are shown in the display.
FRONT L (front speaker left)—CENTER (center
speaker)—FRONT R (front speaker right)—
REAR R (rear speaker right)—REAR L (rear
speaker left)—SUB WOOFER (subwoofer)
Check each speaker output level. If no adjustments are needed, perform step 5 to stop the
test tone.
82
En
Page 83

Available accessories
Section
04
# The settings do not appear for speakers
whose size is set OFF. (Refer to Setting the speak-
er setting on page 80.)
4 Touch c or d to adjust the speaker output level.
Each time you touch c or d increases or decreases the speaker output level. +10 to –10 is
displayed as the level is increased or decreased.
# The test tone rotates to the next speaker after
about two seconds from the last operation.
5 Touch STOP to stop the test tone output.
Notes
! If needed, select speakers and adjust their ‘ab-
solute’ output levels. (Refer to Adjusting the
speaker output levels on page 81.)
! To adjust the speaker output levels in this
mode is the same as making the speaker output levels at SPEAKER LEVEL. Both provide
the same results.
Using the time alignment
The time alignment lets you adjust the distance between each speaker and the listening
position.
1 Touch NEXT on the DSP function menu.
2 Touch TIME ALIGNNMENT.
3 Touch any of the following touch panel
keys to select the time alignment.
! INITIAL – Initial time alignment (factory set-
ting)
! AUTO TA – Time alignment created by auto
TA and EQ. (Refer to Auto TA and EQ (auto-
time alignment and auto-equalizing) on
page 85.)
! CUSTOM – Adjusted time alignment that
you can create for yourself
! OFF – Turn the time alignment off
! ADJUSTMENT – Adjust the time alignment
as desired
# You cannot select AUTO TA if auto TA and EQ
has not been carried out.
# You cannot select ADJUSTMENT when
neither FRONT-L nor FRONT-R is selected in
POSITION.
Adjusting the time alignment
You can adjust the distance between each
speaker and the selected position.
! An adjusted time alignment is memorized
in CUSTOM.
1 Touch NEXT on the DSP function menu.
2 Touch TIME ALIGNNMENT and then
touch ADJUSTMENT.
# You cannot select ADJUSTMENT when
neither FRONT-L nor FRONT-R is selected in
POSITION.
3 Touch a or b to select the speaker to
be adjusted.
Each time you touch a or b selects the speaker in the following order:
FRONT L (front speaker left)—CENTER (center
speaker)—FRONT R (front speaker right)—
REAR R (rear speaker right)—REAR L (rear
speaker left)—SUB WOOFER (subwoofer)
# You cannot select speakers whose size is set
at OFF. (Refer to Setting the speaker setting on
page 80.)
4 Touch c or d to adjust the distance between the selected speaker and the listening position.
Each time you touch c or d increases or decreases the distance. 0.0inch to 200.0inch is
displayed as the distance is increased or decreased.
Available accessories
En
83
Page 84

Section
04
Available accessories
Using the equalizer
The equalizer lets you adjust the equalization
to match car interior acoustic characteristics
as desired.
Recalling equalizer curves
There are seven stored equalizer curves which
you can easily recall at any time. Here is a list
of the equalizer curves:
Display Equalizer curve
POWERFUL Powerful
NATURAL Natural
VOCAL Vocal
FLAT Flat
CUSTOM1 Custom 1
CUSTOM2 Custom 2
SUPER BASS Super bass
! CUSTOM1 and CUSTOM2 are adjusted
equalizer curves.
! When FLAT is selected no supplement or
correction is made to the sound. This is
useful to check the effect of the equalizer
curves by switching alternatively between
FLAT and a set equalizer curve.
% On the normal display, touch EQ to select the equalizer.
Touch EQ repeatedly to switch between the following equalizers:
POWERFUL—NATURAL—VOCAL—FLAT—
CUSTOM1—CUSTOM2—SUPER BASS
# If SFC instead of EQ appears on the normal
display, touch SFC and hold to switch to equalizer
function. About SFC, refer to Using the sound
field control on page 77.
Adjusting 3-band parametric equalizer
For CUSTOM1 and CUSTOM2 equalizer
curves, you can adjust the front, rear and cen-
ter equalizer curves separately by selecting a
center frequency, an equalizer level and a Q
factor for each band.
! A separate CUSTOM1 curve can be cre-
ated for each source.
! A CUSTOM2 curve can be created com-
mon to all sources.
! The center speaker largely determines the
sound image and getting the balance right
isn’t easy. We recommend reproducing a 2ch. audio (a CD for example) and getting
the balance right among the speakers except for the center, and then reproducing a
5.1-ch. audio (Dolby Digital or DTS) and adjusting the center speaker output to the
balance you have already got among the
other speakers.
1 Touch NEXT twice on the DSP function
menu.
2 Touch PARAMETRIC EQ.
3 Touch a or b to select the desired item.
Each time you touch a or b selects the item
in the following order:
EQ (equalizer)—SP-SELECT (speakers)—
BAND (bands)—FREQUENCY (center fre-
quency)—LEVEL (equalizer level)—
Q. FACTOR (Q factor)
4 Touch d to select the equalizer.
Touch d repeatedly to switch between the following equalizers:
POWERFUL—NATURAL—VOCAL—FLAT—
CUSTOM1—CUSTOM2—SUPER BASS
5 Touch b and then touch c or d to select the speaker to be adjusted.
Touch c or d until the desired speaker appears in the display.
REAR (rear speakers)—CENTER (center speaker)—FRONT (front speakers)
84
En
Page 85

Available accessories
Section
04
# You cannot select speakers whose size is set
at OFF. (Refer to Setting the speaker setting on
page 80.)
6 Touch b and then touch c or d to select the equalizer band to be adjusted.
Each time you touch c or d selects equalizer
bands in the following order:
LOW (low)—MID (mid)—HIGH (high)
7 Touch b and then touch c or d to select the center frequency of selected band.
Touch c or d until the desired frequency appears in the display.
40Hz—50Hz—63Hz—80Hz—100Hz—125Hz
—160Hz—200Hz—250Hz—315Hz—400Hz—
500Hz—630Hz—800Hz—1kHz—1.25kHz—
1.6kHz—2kHz—2.5kHz—3.15kHz—4kHz—
5kHz—6.3kHz—8kHz—10kHz—12.5kHz
8 Touch b and then touch c or d to adjust the equalizer level.
Each time you touch c or d it increases or decreases the equalizer level. +12 to –12 is displayed as the level is increased or decreased.
9 Touch b and then touch c or d to select the desired Q factor.
Each time you touch c or d switches between
the following Q factor:
NARROW (narrow)—WIDE (wide)
# You can adjust parameters for each band of
the other speakers in the same way.
Note
You can select a center frequency for each band.
You can change the center frequency in 1/3-octave steps, but you cannot select frequencies that
have intervals shorter than 1 octave among the
center frequencies of the three bands.
Using the auto-equalizer
The auto-equalizer is the equalizer curve created by auto TA and EQ (refer to Auto TA and
EQ (auto-time alignment and auto-equalizing)
on this page).
You can turn the auto-equalizer on or off.
1 Touch NEXT twice on the DSP function
menu.
2 Touch AUTO EQ.
# You cannot use this function if auto TA and
EQ has not been carried out.
3 Touch d to turn the auto-equalizer on.
# To turn auto-equalizer off, touch c.
Auto TA and EQ (auto-time
alignment and auto-equalizing)
The auto-time alignment is automatically adjusted for the distance between each speaker
and the listening position.
The auto-equalizer automatically measures
the car interior acoustic characteristics, and
then creates the auto-equalizer curve based
on that information.
WARNING
To prevent accidents, never carry out auto TA and
EQ while driving. When this function measures
the car interior acoustic characteristics to create
an auto-equalizer curve, a loud measurement
tone (noise) may be outputted from the speakers.
CAUTION
! Carrying out auto TA and EQ under the follow-
ing conditions may damage the speakers. Be
sure to check the conditions thoroughly before carrying out auto TA and EQ.
Available accessories
En
85
Page 86

Section
04
Available accessories
— When speakers are incorrectly connected.
(e.g., When a rear speaker is connected to
a subwoofer output.)
— When a speaker is connected to a power
amp delivering output higher than the
speaker’s maximum input power capability.
! If the microphone is placed in an unsuitable
position the measurement tone may become
loud and measurement may take a long time,
resulting in a drain on battery power. Be sure
to place the microphone in the specified location.
Before operating the auto TA and EQ
function
! Carry out auto TA and EQ in as quiet a
place as possible, with the car engine and
air conditioning switched off. Also cut
power to car phones or portable telephones
in the car, or remove them from the car before carrying out auto TA and EQ. Sounds
other than the measurement tone (surrounding sounds, engine sound, telephones ringing etc.) may prevent correct
measurement of the car interior acoustic
characteristics.
! Be sure to carry out auto TA and EQ using
the supplied microphone. Using another
microphone may prevent measurement, or
result in incorrect measurement of the car
interior acoustic characteristics.
! When front speaker is not connected, auto
TA and EQ cannot be carried out.
! When this unit is connected to a power
amp with input level control, auto TA and
EQ may not be possible if you lower power
amp input level. Set the power amp’s input
level to the standard position.
! When this unit is connected to a power
amp with an LPF, turn off the LPF on the
power amp before carrying out auto TA and
EQ. In addition, the cut-off frequency for
built-in LPF of an active subwoofer should
be set to the highest frequency.
! The time alignment value calculated by
auto TA and EQ may differ from the actual
distance in the following circumstances.
However, the distance has been calculated
by computer to be the optimum delay to
give accurate results for the circumstances, so please continue to use this
value.
— When the reflected sound within a vehi-
cle is strong and delays occur.
— When delays occur for low sounds due
to the influence of the LPF on active
subwoofers or external amps.
! Auto TA and EQ changes the audio settings
as below:
— The fader/balance settings return to the
center position. (Refer to page 78.)
— The equalizer curve switches to FLAT.
(Refer to page 84.)
— It will be adjusted automatically to high
pass filter setting for front, center and
rear speaker.
! If you carry out auto TA and EQ when a pre-
vious setting of this already exists, the setting will be replaced.
Carrying out auto TA and EQ
1 Stop the car in a place that is as quiet
as possible, close all doors, windows and
the sun roof, and then turn the engine off.
If the engine is left running, engine noise may
prevent correct auto TA and EQ.
2 Fix the supplied microphone in the center of the headrest of the driver’s seat, facing forward, using the belt (sold
separately).
The auto TA and EQ may differ depending on
where you place the microphone. If desired,
place the microphone on the front passenger
seat to carry out auto TA and EQ.
86
En
Page 87

Available accessories
3 Turn the ignition switch to ON or ACC.
If the car’s air conditioner or heater is turned
on, turn it off. Noise from the fan in the air
conditioner or heater may prevent correct auto
TA and EQ.
# Press SOURCE to turn the source on if this
unit is turned off.
4 Select the position for the seat on
which the microphone is placed.
Refer to Using the position selector on page
78.
# If no position is selected before you start auto
TA and EQ, FRONT-L is selected automatically.
5 Press SOURCE and hold until the unit
turns off.
6 Touch the screen to display the touch
panel keys.
7 Touch and hold EQ to enter the auto TA
and EQ measurement mode.
Section
04
8 Plug the microphone into the microphone input jack on the multi-channel processor.
Available accessories
For details concerning operation, refer to the
multi-channel processor’s operation manual.
9 Touch START to start the auto TA and
EQ.
10 Get out of the car and close the door
within 10 seconds when the 10-second
count-down starts.
The measurement tone (noise) is outputted
from the speakers, and auto TA and EQ begins.
# When all speakers are connected, auto TA
and EQ is completed in about nine minutes.
# To stop auto TA and EQ, touch STOP.
# To cancel auto TA and EQ part way through,
touch BACK or ESC.
11 When auto TA and EQ is completed,
Complete is displayed.
When correct measurement of car interior
acoustic characteristics is not possible, an
error message is displayed. (Refer to Under-
standing auto TA and EQ error messages on
page 92.)
12 Touch ESC to cancel the auto TA and EQ
mode.
En
87
Page 88

Section
04
Available accessories
13 Store the microphone carefully in the
glove compartment.
Store the microphone carefully in the glove
compartment or any other safe place. If the
microphone is subjected to direct sunlight for
an extended period, high temperatures may
cause distortion, color change or malfunction.
88
En
Page 89

Additional Information
Troubleshooting
Common
Symptom Cause Action (See)
Power doesn’t turn on.
The unit doesn’t operate.
Operation with the remote control isn’t possible.
The unit does not operate correctly even when the appropriate
remote control buttons are
pressed.
Playback is not possible. The disc is dirty. Clean disc. (Page 94)
No sounds are heard.
The volume level will not rise.
There is no picture. The parking brake cord is not con-
The icon
eration is not possible.
The picture stops (pauses) and
the unit cannot be operated.
There is no sound.
Volume level is low.
There is audio and video skipping.
The picture is stretched, the aspect is incorrect.
is displayed, and op-
Leads and connectors are incorrectly connected.
The fuse is blown. Rectify the reason for the fuse blowing, then
Noise and other factors are causing
the built-in microprocessor to operate incorrectly.
The remote control operation mode
is incorrect.
The remote control code is incorrect.
Battery power is low. Load new battery.
Some operations are prohibited
with certain discs.
The loaded disc is a type this unit
cannot play.
Non compatible video system disc
is loaded.
Cables are not connected correctly. Connect the cables correctly.
The unit is performing still, slow motion or frame-by-frame playback.
nected.
The parking brake is not applied. Connect a parking brake cord, and apply the
The operation is prohibited for the
disc.
The operation is not compatible
with the disc’s organization.
Reading of data has become impossible during playback.
The volume level is low. Adjust the volume level.
The attenuator is on. Turn the attenuator off.
The unit is not firmly secured. Secure the unit firmly.
The aspect setting is incorrect for
the display.
Confirm once more that all connections are
correct.
replace the fuse. Be very sure to install the
correct fuse with the same rating.
Press RESET. (Page 14)
Switch to the correct remote control mode.
Make sure the remote control selection
switch setting and code type setting are the
same.
Check by using another disc.
Check what type the disc is.
Change to a disc compatible to your video
system.
There is no sound during still, slow motion or
frame-by-frame playback.
Connect a parking brake cord, and apply the
parking brake.
parking brake.
This operation is not pos sible.
This operation is not pos sible.
After stopping playback once, start playback
once more.
Select the appropriate setting for your display.
(Page 39)
Appendix
Additional Information
En
89
Page 90

Appendix
Additional Information
Symptom Cause Action (See)
When the ignition switch is
turned ON (or turned to ACC),
the motor sounds.
Nothing is displayed.
The touch panel keys cannot be
used.
Problems during DVD playback
Symptom Cause Action (See)
Playback is not possible. The loaded disc has a different re-
A parental lock message is displayed and playback is not possible.
Parental lock cannot be canceled.
Dialog language (and subtitle
language) cannot be switched.
No subtitles are displayed. The DVD playing does not feature
Playback is not with the audio
language and subtitle language
settings selected in DVD SETUP.
Switching the viewing angle is
not possible.
The picture is extremely unclear/
distorted and dark during playback.
The unit is confirming whether a
disc is loaded or not.
The rear view camera is not connected.
CAMERA POLARITY is at incorrect
setting.
gion number from this unit.
Parental lock is on. Turn parental lock off or change the level.
The code number is incorrect. Input the correct code number. (Page 39)
You have forgotten your code number.
The DVD playing does not feature
multiple language recordings.
You can only switch between items
indicated in the disc menu .
subtitles.
You can only switch between items
indicated in the disc menu .
The DVD playing does not feature
dialog or subtitles in the language
selected in DVD SETUP.
The DVD playing does not feature
scenes shot from multiple angles.
You are trying to switch to multiple
angle viewing of a scene that is not
recorded from multiple angles.
The disc features a signal to prohibit
copying. (Some discs may have
this.)
This is a normal operation.
Connect a rear view camera.
Press and hold DISPLAY to return to the
source display and then select the correct setting for CAMERA POLARITY. (Page 47)
Replace the disc with one featuring the same
region number as this unit. (Page 9, Page
102)
(Page 39)
Touch C 10 times to cancel the code number.
(Page 40)
You cannot switch among multiple languages
if they are not recorded on the disc.
Switch using the disc menu.
Subtitles are not displayed if they are not recorded on the disc.
Switch using the disc menu.
Switching to a selected language is not possible if the language selected in DVD SETUP is
not recorded on the disc.
You cannot switch between multiple angles if
the DVD does not feature scenes recorded
from multiple angles.
Switch between multiple angles when watching scenes recorded from multiple angles.
Since this unit is compatible with the copy
guard analog copy protect system, when playing a disc that has a signal prohibiting copying, the picture may suff er from horizontal
stripes or other imperfections when viewed
on some displays. This does not mean this
unit is malfunctioning.
90
En
Page 91

Additional Information
Problems during Video CD playback
Symptom Cause Action
The PBC (playback control)
menu display cannot be called
up.
Repeat play and track/time
search are not possible.
Problems during iPod playback
Symptom Cause Action
iPod doesn’t operate correctly. Cables are incorrectly connected. Disconnect the cable from iPod. Once iPod
Problems during multi-channel processor connection
Symptom Cause Action (See)
No sounds are heard.
The volume level will not rise.
Even if multi-channel audio is
selected, 2-channel audio is output.
The Video CD playing does not feature PBC.
The Video CD playing features PBC. This operation is not possible with Video CDs
The iPod version is old. Update the iPod version.
Optical cables are not connected
correctly.
Digital output setting is set to Line-
ar PCM.
This operation is not pos sible with Video CDs
not featuring PBC.
featuring PBC.
main menu is displayed, connect the cable
again.
Reset the iPod.
Connect the cables correctly.
Normally, set the digital output setting to
STREAM. (Page 41)
Appendix
Additional Information
Error messages
When you contact your dealer or your nearest Pioneer Service Center, be sure to record the error
message.
Built-in DVD player
Message Cause Action
DIFFERENT REGION DISC (R
ERROR)
ERROR-02-XX Dirty disc Clean disc.
The disc does not have the same region number as this unit
Scratched disc Replace disc.
The disc is loaded upside down Check that the disc is loaded correctly.
Electrical or mechanical Press RESET.
Replace the DVD video with one bearing the
correct region number.
En
91
Page 92

Appendix
Additional Information
Message Cause Action
NON-PLAYABLE DISC (NONPLAY)
PROTECT All the files on the inserted disc are
SKIPPED The inserted disc contains WMA
TEMP The temperature of this unit is out-
iPod
Message Cause Action
ERROR-11 Communication failure Disconnect the cable from iPod. Once iPod
ERROR-21 Old version of iPod Update the iPod version.
ERROR-30 iPod failure Reset the iPod.
No Songs No songs Transfer the songs to iPod.
STOP No songs in the current list Select a list that contains the songs.
This type of disc cannot be played
by this unit
The inserted disc does not contain
any files that can be played back
secured by DRM
files that are protected by DRM
side the normal operating range
iPod is not charged but operates
correctly
Replace the disc with one this unit can play.
Replace disc.
Replace disc.
Replace disc.
Wait until the unit’s temperature returns to
within normal operating limits.
main menu is displayed, connect the cable
again.
Reset the iPod.
Check if the connection cable for iPod
shorted out (e.g., not caught in metal objects). After checking, switch the ignition key
or disconnect the iPod and connect again.
Understanding auto TA and EQ error messages
When correct measurement of car interior acoustic characteristics is not possible using the auto
TA and EQ, an error message may appear on the display. If an error message appears, refer to the
table below to see what the problem is and the suggested method of correcting the problem. After
checking, try again.
Message Cause Action
Error. Please check MIC. Microphone is not connected. Plug the supplied microphone securely into
92
En
the jack.
Page 93

Additional Information
Message Cause Action
Error. Please check front SP.,
Error. Please check FL SP.,
Error. Please check FR SP.,
Error. Please check center SP.,
Error. Please check rear SP.,
Error. Please check RL SP.,
Error. Please check RR SP.,
Error. Please check subwoofer
Error. Please check noise. The surrounding noise level is too
The microphone cannot pick up the
measuring tone of a speaker.
high.
! Confirm that the speakers are connected
correctly.
! Correct the input level setting of the power
amp connected to the speakers.
! Set the microphone correctly.
! Stop your car in a place that is as quiet as
possible, and switch off the engine, air conditioner or heater.
! Set the microphone correctly.
Appendix
Additional Information
En
93
Page 94

Appendix
Additional Information
Handling guideline of discs
and player
! Use only conventional, fully circular discs.
Do not use shaped discs.
! Use 12-cm or 8-cm disc. Do not use an
adapter when playing 8-cm discs.
! Do not insert anything other than a disc
into the disc loading slot. Discs which can
be played back are listed on Playable discs
on page 9.
! Do not use cracked, chipped, warped, or
otherwise damaged discs as they may damage the player.
! Do not touch the recorded surface of the
discs.
! Store discs in their cases when not in use.
! Avoid leaving discs in excessively hot envir-
onments including under direct sunlight.
! Do not attach labels, write on or apply che-
micals to the surface of the discs.
! To clean a disc, wipe the disc with a soft
cloth outward from the center.
! Condensation may temporarily impair the
player’s performance. Leave it to adjust to
the warmer temperature for about one
hour. Also, wipe any dump discs with a soft
cloth.
! Playback of discs may not be possible be-
cause of disc characteristics, disc format,
recorded application, playback environment, storage conditions and so on.
! Road shocks may interrupt disc playback.
! Read the precautions with discs before
using them.
DVD discs
! With some DVD video discs, it may not be
possible to use certain functions.
! It may not be possible to play back some
DVD video discs.
! It is not possible to play back DVD-ROM/
DVD-RAM discs.
DVD-R/DVD-RW discs
! Unfinalized DVD-R/-RW discs which have
been recorded with the Video format (video
mode) cannot be played back.
! DVD-R/-RW discs which have been re-
corded with the Video Recording format
(VR mode) cannot be played back.
! For more information about recording
mode, please contact manufacture of DVD
recorder or application.
AVCHD recorded discs
! This unit is not compatible with discs re-
corded in AVCHD (Advanced Video Codec
High Definition) format. Do not insert
AVCHD discs. If inserted, the disc may not
be ejected.
CD-R/CD-RW discs
! When CD-R/CD-RW discs are used, play-
back is possible only for discs which have
been finalized.
! It may not be possible to play back CD-R/
CD-RW discs recorded on a music CD recorder or a personal computer because of
disc characteristics, scratches or dirt on
the disc, or dirt, condensation, etc., on the
lens of this unit.
94
En
Page 95

Additional Information
Appendix
! Playback of discs recorded on a personal
computer may not be possible, depending
on the application settings and the environment. Please record with the correct format. (For details, contact the manufacturer
of the application.)
! Playback of CD-R/CD-RW discs may be-
come impossible in case of direct exposure
to sunlight, high temperatures, or the storage conditions in the vehicle.
! Titles and other text information recorded
on a CD-R/CD-RW disc may not be displayed by this unit (in the case of audio
data (CD-DA)).
! Read the precautions with CD-R/CD-RW
discs before using them.
Dual Discs
! Dual Discs are two-sided discs that have a
recordable CD for audio on one side and a
recordable DVD for video on the other.
! Playback of the DVD side is possible with
this unit. However, since the CD side of
Dual Discs is not physically compatible
with the general CD standard, it may not be
possible to play the CD side with this unit.
! Frequent loading and ejecting of a Dual
Disc may result in scratches on the disc.
Serious scratches can lead to playback problems on this unit. In some cases, a Dual
Disc may become stuck in the disc loading
slot and will not eject. To prevent this, we
recommend you refrain from using Dual
Disc with this unit.
! Please refer to the information from the
disc manufacturer for more detailed information about Dual Discs.
Compressed audio files on
the disc
! Depending on the version of Windows
Media Player used to encode WMA files,
album names and other text information
may not be correctly displayed.
! There may be a slight delay when starting
playback of audio files encoded with image
data.
! ISO 9660 Level 1 and 2 compliant. Romeo
and Joliet file systems are both compatible
with this player.
! Multi-session playback is possible.
! Compressed audio files are not compatible
with packet write data transfer.
! Only 64 characters from the beginning can
be displayed as a file name (including the
extension such as .wma or .mp3) or a folder
name.
! Folder selection sequence or other opera-
tion may be altered depending on the encoding or writing software.
! Regardless of the length of blank section
between the songs of original recording,
compressed audio discs will play with a
short pause between songs.
! File extensions such as .wma, .mp3 or .m4a
must be used properly.
Additional Information
En
95
Page 96

1
2
5
6
Appendix
Additional Information
Example of a hierarchy
: Folder
: Compressed audio file
3
4
Level 1 Level 2 Level 3 Level 4
! This unit assigns folder numbers. The user
cannot assign folder numbers.
! It is possible to play back up to 255 folders
on one disc.
Compressed audio compatibility
WMA
! Compatible format: WMA encoded by
Windows Media Player Ver. 7, 7.1, 8, 9 or 10
! Bit rate: 5 kbps to 320 kbps (CBR), VBR
! Sampling frequency: 8 kHz to 48 kHz
! Windows Media Audio 9 Professional, Loss-
less, Voice: No
MP3
! Bit rate: 8 kbps to 320 kbps (CBR), VBR
! Sampling frequency: 8 kHz to 48 kHz (em-
phasis: 8 kHz to 48 kHz)
! Compatible ID3 tag version: 1.0, 1.1, 2.2, 2.3
(ID3 tag Version 2.x is given priority than
Version 1.x.)
! M3u playlist: No
! MP3i (MP3 interactive), mp3 PRO: No
AAC
! Compatible format: AAC encoded by
®
iTunes
version 6.0.5 and earlier
! Bit rate: 8 kbps to 320 kbps (CBR)
! VBR: No
! Sampling frequency: 8 kHz to 44.1 kHz
! Apple Lossless: No
DivX video files
! Depending on the file information composi-
tion such as the number of audio stream,
there may be a slight delay in the start of
playback on discs.
! Some special operation may be prohibited
because of the composition of DivX files.
! DivX files downloaded only from DivX part-
ner site are guarantee of proper operation.
Unauthorized DivX file may not operate
properly.
! DRM rental file cannot be operated until
starting playing back.
! This unit corresponds to a DivX file display
up to 1 590 minutes 43 seconds. Also,
search operation beyond this time limit is
prohibited.
! If a file contains more than 4 GB, playback
is stopped on the way.
! DivX VOD file playback requires ID code of
this unit to DivX VOD provider. About ID
code, refer to Displaying your DivX
gistration code on page 41.
! File extensions such as .avi or .divx must be
used properly.
! For more details about DivX, visit the follow-
ing site:
http://www.divx.com/
DivX compatibility
! Compatible format: DivX video format im-
plemented in relation to DivX standards
! DivX Ultra format: No
! DivX files without video data: No
! Compatible audio codec: MP2, MP3, Dolby
Digital
®
VOD re-
96
En
Page 97

Additional Information
Appendix
! LPCM: No
! Bit rate: 8 kbps to 320 kbps (CBR), VBR
! Sampling frequency: 8 kHz to 48 kHz
! Compatible external subtitle file extension:
.srt
About handling the iPod
CAUTION
! Pioneer accepts no responsibility for data lost
on the iPod even if that data is lost while
using this unit.
! Do not leave the iPod in direct sunlight for ex-
tended amounts of time. Extended exposure
to direct sunlight can result in iPod malfunction due to the resulting high temperature.
! Do not leave the iPod in any location with a
high temperature.
! Firmly secure the iPod when driving. Do not
let the iPod fall onto the floor, where it may become jammed under the brake or accelerator
pedal.
For details, refer to the iPod’s manuals.
About iPod settings
! You cannot operate the iPod Equalizer on
the Pioneer products. We recommend that
you set the iPod Equalizer to off, before connecting the iPod to this unit.
! You cannot set Repeat to off on the iPod
when using this unit. Even if you set Repeat
to off on the iPod, Repeat is changed to All
automatically when connecting the iPod to
this unit.
Using the display correctly
CAUTION
! If liquid or foreign matter should get inside
this unit, turn off the power immediately and
consult your dealer or the nearest authorized
PIONEER Service Station. Do not use the unit
in this condition because doing so may result
in a fire, electric shock, or other failure.
! If you notice smoke, a strange noise or smell,
or any other abnormal signs from the display,
turn off the power immediately and consult
your dealer or the nearest authorized
PIONEER Service Station. Using this unit in
this condition may result in permanent damage to the system.
! Do not disassemble or modify this unit, as
there are high-voltage components inside
which may cause an electric shock. Be sure
to consult your dealer or the nearest authorized PIONEER Service Station for internal inspection, adjustments or repairs.
Handling the display
! When the display is subjected to direct sun-
light for a long period of time, it will become very hot resulting in possible
damage to the LCD screen. When not
using this unit, close the display and avoid
exposing it to direct sunlight.
! The display should be used within the tem-
perature ranges shown below.
Storage temperature range: -4 °F to +176 °F
At temperatures higher or lower than the
operating temperature range the display
may not operate normally.
! The LCD screen of this unit is exposed in
order to increase its visibility within the vehicle. Please do not press strongly on it as
this may damage it.
Additional Information
En
97
Page 98

Appendix
Additional Information
! Do not place anything on the display when
it is opened. Also, do not attempt to carry
out angle adjustment, or open/close the
display by hand. Applying strong force to
the display may damage it.
! Do not push the LCD screen with much
force as this may scratch it.
! Be careful not to place anything between
the display and the main body when the
display is opening or closing. If an object
gets between the display and main body,
the display may stop working.
! Be careful of fingers, long hair, and loose
articles of clothing which could possibly
get caught between the display and the
main body and cause serious injury.
Liquid crystal display (LCD) screen
! If the display is near the vent of an air con-
ditioner when it is opened, make sure that
air from the air conditioner is not blowing
on it. Heat from the heater may damage
the LCD screen, and cool air from the cooler may cause moisture to form inside the
display resulting in possible damage. Also,
if the display is cooled down by the cooler,
the screen may become dark, or the life
span of the small fluorescent tube used inside the display may be shortened.
! Small black dots or white dots (bright dots)
may appear on the LCD screen. These are
due to the characteristics of the LCD
screen and do not indicate a problem with
the display.
! At low temperatures, the LCD screen may
be dark for a while after the power is turned
on.
! The LCD screen will be difficult to see if it is
exposed to direct sunlight.
! When using a portable phone, keep the an-
tenna of the portable phone away from the
display to prevent disruption of the video by
the appearance of spots, colored stripes,
etc.
Keeping the display in good
condition
! When removing dust from the screen or
cleaning the display, first turn the system
power off, then wipe with a soft dry cloth.
! When wiping the screen, take care not to
scratch the surface. Do not use harsh or
abrasive chemical cleaners.
Small fluorescent tube
! A small fluorescent tube is used inside the
display to illuminate the LCD screen.
— The fluorescent tube should last for ap-
proximately 10 000 hours, depending on
operating conditions. (Using the display
at low temperatures reduces the service
life of the fluorescent tube.)
— When the fluorescent tube reaches the
end of its useful life, the screen will be
dark and the image will no longer be
projected. If this happens, consult your
dealer or the nearest authorized
PIONEER Service Station.
98
En
Page 99

Additional Information
Language code chart for DVD
Language (code), input code Language (code), input code Language (code), input code
Japanese (ja), 1001 Guarani (gn), 0714 Pashto, Pushto (ps), 1619
English (en), 0514 Gujarati (gu), 0721 Quechua (qu), 1721
French (fr), 0618 Hausa (ha), 0801 Rhaeto-Romance (rm), 1813
Spanish (es), 0519 Hindi (hi), 0809 Kirundi (rn), 1814
German (de), 0405 Croatian (hr), 0818 Romanian (ro), 1815
Italian (it), 0920 Hungarian (hu), 0821 Kinyarwanda (rw), 1823
Chinese (zh), 2608 Armenian (hy), 0825 Sanskrit (sa), 1901
Dutch (nl), 1412 Interlingua (ia), 0901 Sindhi (sd), 1904
Portuguese (pt), 1620 Interlingue (ie), 0905 Sangho (sg), 1907
Swedish (sv), 1922 Inupiak (ik), 0911 Serbo-Croatian (sh), 1908
Russian (ru), 1821 Indonesian (in), 0914 Sinhalese (si), 1909
Korean (ko), 1115 Icelandic (is), 0919 Slovak (sk), 1911
Greek (el), 0512 Hebrew (iw), 0923 Slovenian (sl), 1912
Afar (aa), 0101 Yiddish (ji), 1009 Samoan (sm), 1913
Abkhazian (ab), 0102 Javanese (jw), 1023 Shona (sn), 1914
Afrikaans (af), 0106 Georgian (ka), 1101 Somali (so), 1915
Amharic (am), 0113 Kazakh (kk), 1111 Albanian (sq), 1917
Arabic (ar), 0118 Greenlandic (kl), 1112 Serbian (sr), 1918
Assamese (as), 0119 Cambodian (km), 1113 Siswati (ss), 1919
Aymara (ay), 0125 Kannada (kn), 1114 Sesotho (st), 1920
Azerbaijani (az), 0126 Kashmiri (ks), 1119 Sundanese (su), 1921
Bashkir (ba), 0201 Kurdish (ku), 1121 Swahili (sw), 1923
Byelorussian (be), 0205 Kirghiz (ky), 1125 Tamil (ta), 2001
Bulgarian (bg), 0207 Latin (la), 1201 Telugu (te), 2005
Bihari (bh), 0208 Lingala (ln), 1214 Tajik (tg), 2007
Bislama (bi), 0209 Laothian (lo), 1215 Thai (th), 2008
Bengali (bn), 0214 Lithuanian (lt), 1220 Tigrinya (ti), 2009
Tibetan (bo), 0215 Latvian (lv), 1222 Turkmen (tk), 2011
Breton (br), 0218 Malagasy (mg), 1307 Tagalog (tl), 2012
Catalan (ca), 0301 Maori (mi), 1309 Setswana (tn), 2014
Corsican (co), 0315 Macedonian (mk), 1311 Tonga (to), 2015
Czech (cs), 0319 Malayalam (ml), 1312 Turkish (tr), 2018
Welsh (cy), 0325 Mongolian (mn), 1314 Tsonga (ts), 2019
Danish (da), 0401 Moldavian (mo), 1315 Tatar (tt), 2020
Bhutani (dz), 0426 Marathi (mr), 1318 Twi (tw), 2023
Esperanto (eo), 0515 Malay (ms), 1319 Ukrainian (uk), 2111
Estonian (et), 0520 Maltese (mt), 1320 Urdu (ur), 2118
Basque (eu), 0521 Burmese (my), 1325 Uzbek (uz), 2126
Persian (fa), 0601 Nauru (na), 1401 Vietnamese (vi), 2209
Finnish (fi), 0609 Nepali (ne), 1405 Volapük (vo), 2215
Fiji (fj), 0610 Norwegian (no), 1415 Wolof (wo ), 2315
Faroese (fo), 0615 Occitan (oc), 1503 Xhosa (xh), 2408
Frisian (fy), 0625 Oromo (om), 1513 Yoruba (yo), 2515
Irish (ga), 0701 Oriya (or), 1518 Zulu (zu), 2621
Scots-Gaelic (gd), 0704 Panjabi (pa), 1601
Galician (gl), 0712 Polish (pl), 1612
Appendix
Additional Information
En
99
Page 100

Appendix
Additional Information
Terms
AAC
AAC is short for Advanced Audio Coding and
refers to an audio compression technology
standard used with MPEG 2 and MPEG 4.
Aspect ratio
This is the width-to-height ratio of a TV screen.
A regular display has an aspect ratio of 4:3.
Wide screen displays have an aspect ratio of
16:9, providing a bigger picture for exceptional
presence and atmosphere.
Bit rate
This expresses data volume per second, or bps
(bits per second) units. The higher the rate,
the more information is available to reproduce
the sound. Using the same encoding method
(such as MP3), the higher the rate, the better
the sound.
Chapter
DVD titles are in turn divided into chapters
which are numbered in the same way as the
chapters of a book. With DVD video discs featuring chapters, you can quickly find a desired
scene with chapter search.
DivX
DivX is a popular media technology created by
DivX, Inc. DivX media files contain highly compressed video with high visual quality that
maintains a relatively small file size. DivX files
can also include advanced media features like
menus, subtitles, and alternate audio tracks.
Many DivX media files are available for download online, and you can create your own
using your personal content and easy-to-use
tools from DivX.com.
DivX Certified
DivX Certified products are officially tested by
the creators of DivX and guaranteed to play all
versions of DivX video, including DivX 6.
Dolby Digital
Dolby Digital provides multi-channel audio
from up to 5.1 independent channels. This is
the same as the Dolby Digital surround sound
system used in theaters.
Dolby Pro Logic II
Dolby Pro Logic II can create five full-bandwidth output channels from two-channel
sources. This new technology enables a discrete 5-channel playback with 2 front channels, 1 center channel, and 2 rear channels. A
music mode is also available for 2-channel
sources in addition to the movie mode.
DTS
This stands for Digital Theater Systems. DTS is
a surround system delivering multi-channel
audio from up to 6 independent channels.
Dynamic range control
Dolby Digital has a function for compressing
the difference between the loudest and softest
sounds: Dynamic range control. This control
ensures sounds with an increased dynamic
range are heard clearly even at low volume levels.
ID3 tag
This is a method of embedding track-related
information in an MP3 file. This embedded information can include the track title, the artist’s name, the album title, the music genre,
the year of production, comments and other
data. The contents can be freely edited using
software with ID3 Tag editing functions.
Although the tags are restricted as to the number of characters, the information can be
viewed when the track is played back.
ISO9660 format
This is the international standard for the format logic of CD-ROM folders and files. For the
ISO9660 format, there are regulations for the
following two levels.
100
En
 Loading...