

Page 1
MG3710
MG3711
MG3712
MG3720
MG3721
MG3722
MG3730
MG3731
MG3740
MG3747
MG3748
MG3757
MG3758
Page 2
Page 3
9MM
12MM
16MM
3-7MM
1MM
2MM
3MM
5MM
BODY 3MM
6 7 8
9
17
10 11 12
14
3
2
1
5
4
13
18
15
16
Page 4

empty page before TOC
Page 5

English 6
Dansk 20
Deutsch 34
Español 50
Français 65
Italiano 81
Nederlands 96
Norsk 111
Português 125
Suomi 140
Svenska 154
Türkçe 168
Ελληνικά
182
Page 6

English
6
Introduction
Congratulations on your purchase and welcome to
Philips! To fully benefit from the support that
Philips offers, register your product at
www.philips.com/welcome.
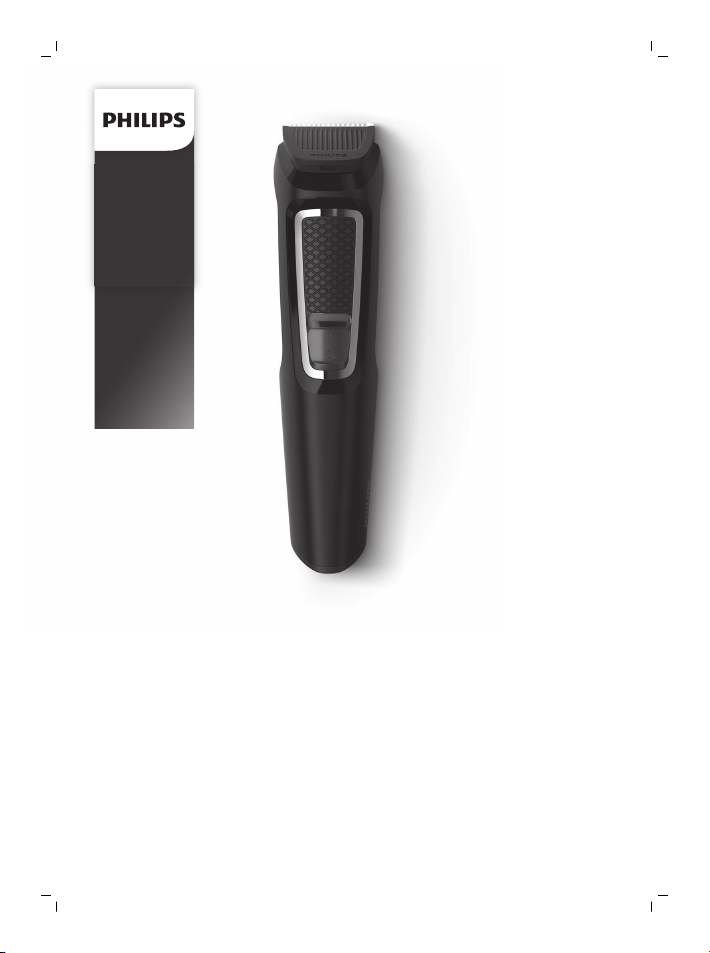
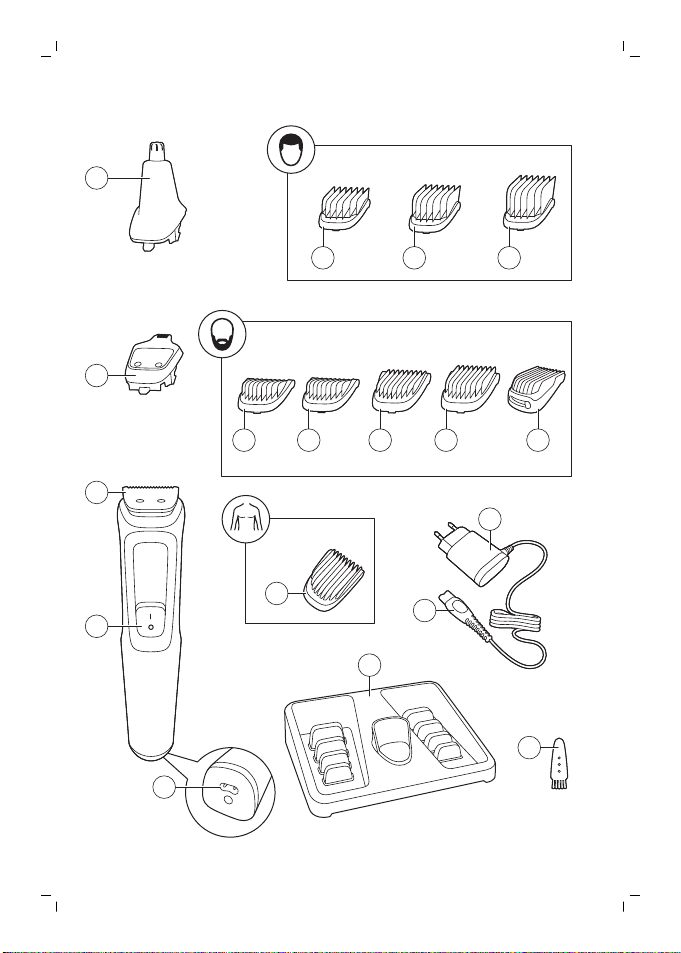
General description (Fig. 1)
1 Nose trimmer (MG3710, MG3711, MG3712,
MG3721, MG3720, MG3730, MG3731, MG3740,
MG3747, MG3748, MG3757 only)
2 Precision trimmer (MG3740, MG3757 only)
3 Full-size hair trimmer
4 On/off slide
5 Socket for small plug
6 Hair comb (9mm) (MG3720, MG3721, MG3730,
MG3731, MG3740, MG3747, MG3748, MG3757
only)
7 Hair comb (12mm) (MG3730, MG3740, MG3747,
MG3757, MG3731, MG3748 only)
8 Hair comb (16mm) (MG3730, MG3740, MG3747,
MG3757, MG3731, MG3748 only)
9 Stubble comb (1mm) (MG3710, MG3711, MG3712,
MG3720, MG3721, MG3730, MG3731, MG3740,
MG3747, MG3748, MG3757 only)
10 Stubble comb (2mm) (MG3710, MG3711,
MG3720, MG3721, MG3730, MG3731, MG3740,
MG3747, MG3748, MG3757 only)
11 Stubble comb 3mm (MG3710, MG3711, MG3712,
MG3720, MG3721 only)
12 Stubble comb 5mm (MG3710, MG3711, MG3712,
MG3720, MG3721 only)
13 Adjustable comb (3-7mm) (MG3730, MG3731,
MG3740, MG3747, MG3748, MG3757 only)
14 Body comb (3mm) (MG3747, MG3748 only)
15 Supply unit
16 Small plug
17 Storage display (MG3711, MG3712, MG3721,
MG3731, MG3748 only)
English
Page 7
English
18 Cleaning brush
The accessories supplied may vary for different
products. The box shows the accessories that have
been supplied with your appliance.
Important safety information
Read this important information carefully before
you use the appliance and its accessories and save
it for future reference. The accessories supplied
may vary for different products.
Danger
- Keep the supply unit dry.
Warning
- To charge the battery, only use the
detachable supply unit (A00390) provided
with the appliance.
- The supply unit contains a transformer. Do
not cut off the supply unit to replace it with
another plug, as this causes a hazardous
situation.
7
Page 8
English
8
- This appliance can be used by children aged
from 8 years and above and persons with
reduced physical, sensory or mental
capabilities or lack of experience and
knowledge if they have been given
supervision or instruction concerning use of
the appliance in a safe way and understand
the hazards involved. Children shall not play
with the appliance. Cleaning and user
maintenance shall not be made by children
without supervision.
- Always check the appliance before you use
it. Do not use the appliance if it is damaged,
as this may cause injury. Always replace a
damaged part with one of the original type.
- Do not open the appliance to replace the
rechargeable battery.
Caution
- This appliance is not washable.Never
immerse the appliance in water and do not
rinse it under the tap.
Page 9

English
- Only use this appliance for its intended
purpose as shown in the user manual.
- For hygienic reasons, the appliance should
only be used by one person.
- Never use compressed air, scouring pads,
abrasive cleaning agents or aggressive
liquids such as petrol or acetone to clean
the appliance.
- Do not use the supply unit in or near wall
sockets that contain an electric air freshener
to prevent irreparable damage to the supply
unit.
Electromagnetic fields (EMF)
This Philips appliance complies with all applicable
standards and regulations regarding exposure to
electromagnetic fields.
General
- The supply unit is suitable for mains voltages
ranging from 100 to 240 volts.
- The supply unit transforms 100-240 volts to a
safe low voltage of less than 24 volts.
9
Charging
When the appliance has charged for 16 hour, it has
a cordless operating time of up to 60 minutes
(MG3710, MG3711, MG3712, MG3720, MG3721,
MG3730, MG3731, MG3740) or 70 minutes (MG3757,
MG3748, MG3747).
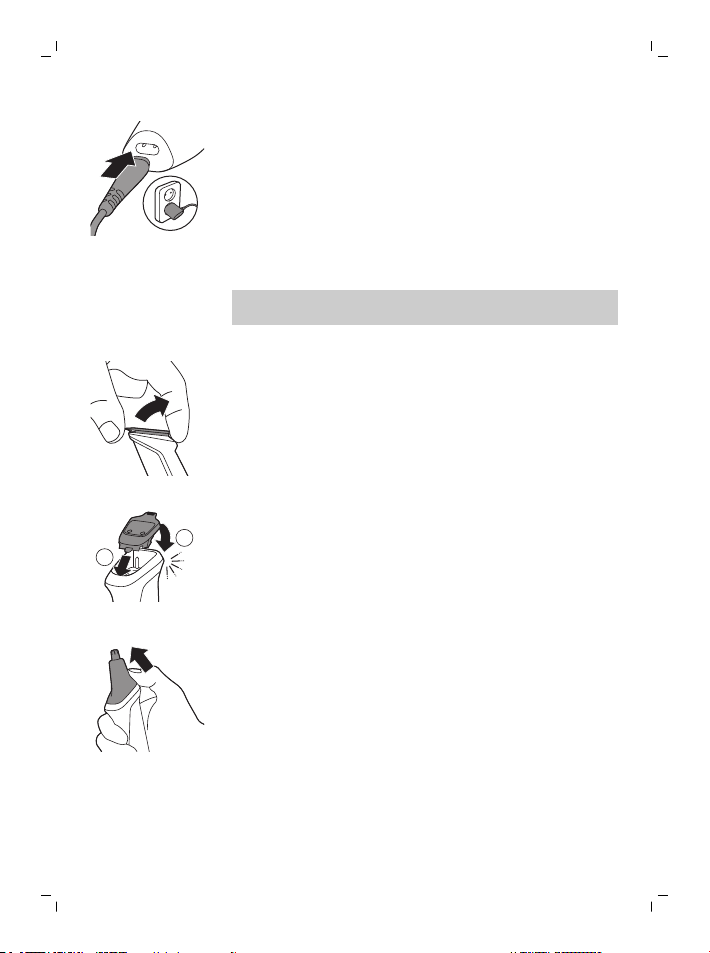
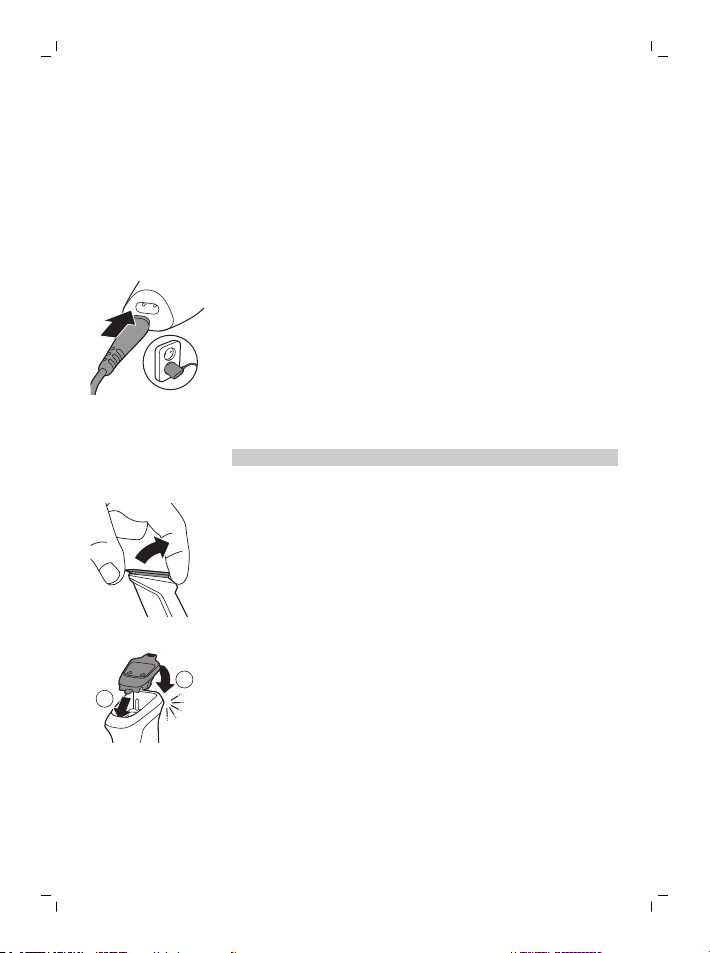
1 Make sure the appliance is switched off.
Page 10
1
2
English
10
2 Insert the small plug into the appliance and put
the supply unit in the wall socket.
3 After charging, remove the supply unit from the
wall outlet and pull the small plug out of the
appliance.
Using the appliance
Note: Switch off and clean the appliance after each
use.
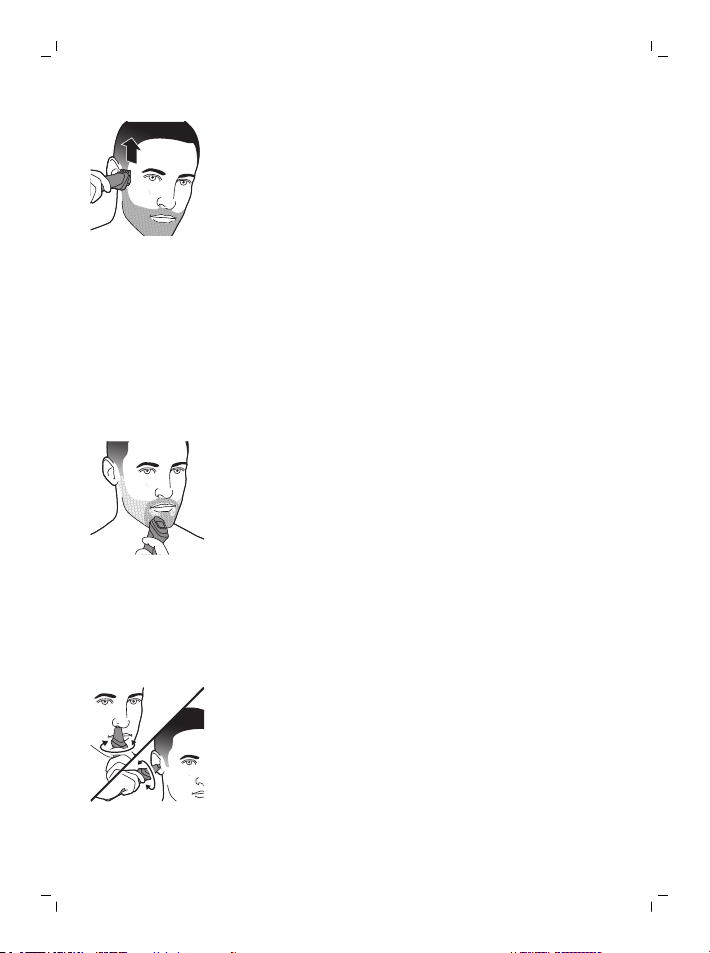
Detaching and attaching cutting elements
1 To detach a cutting element, push upwards
against the teeth of the cutting element and
take it off the handle.
2 To attach a cutting element, insert the lug of the
cutting element into the guiding slot at the front
and push the back of the cutting element onto
the appliance ('click').
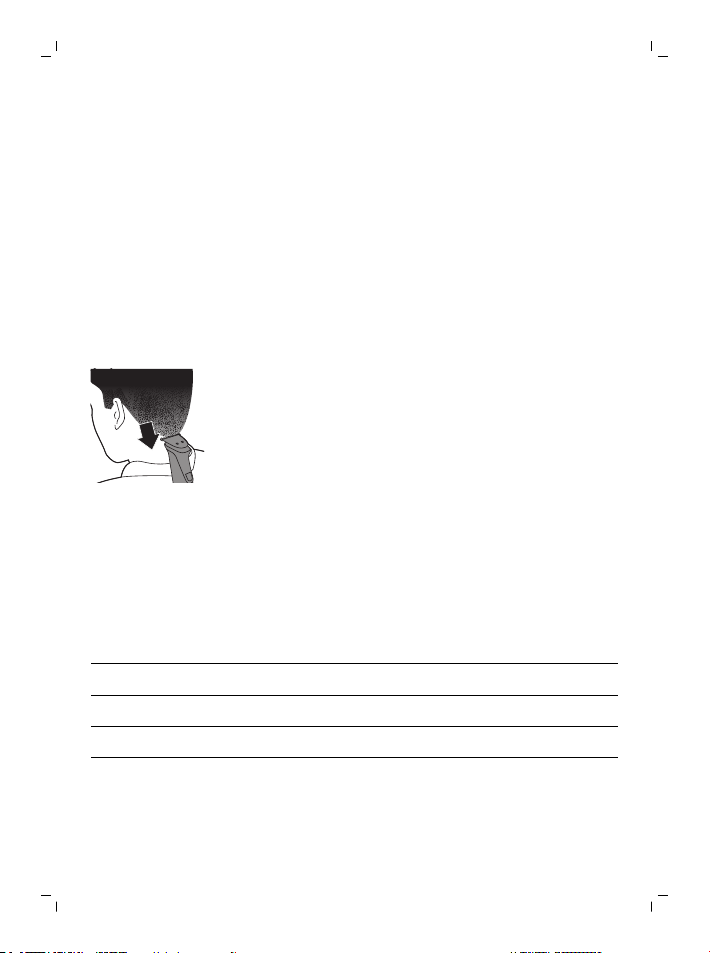
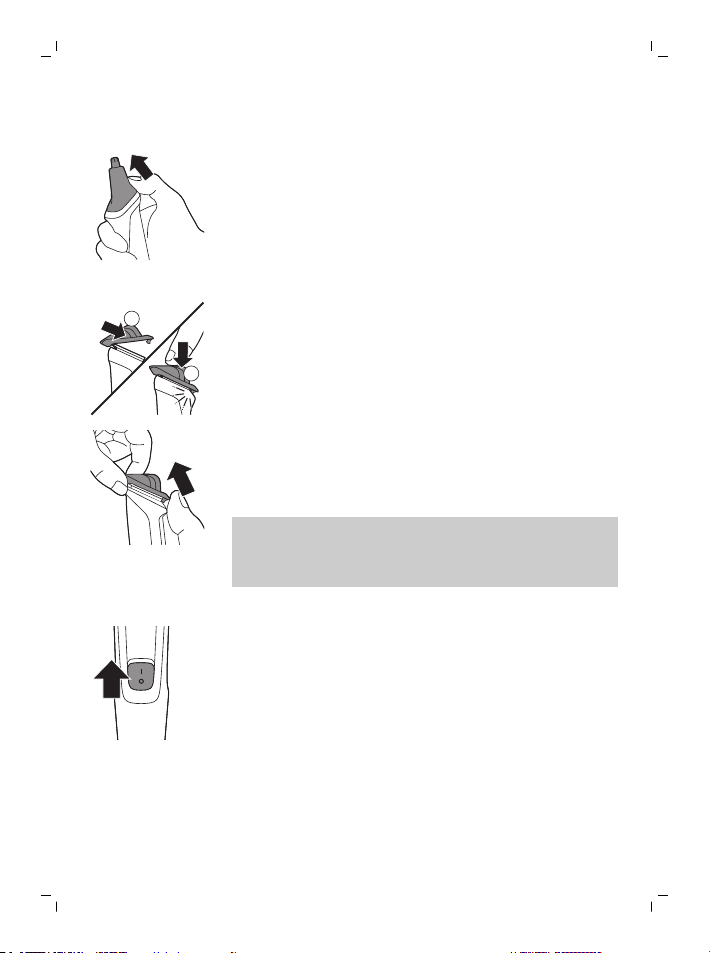
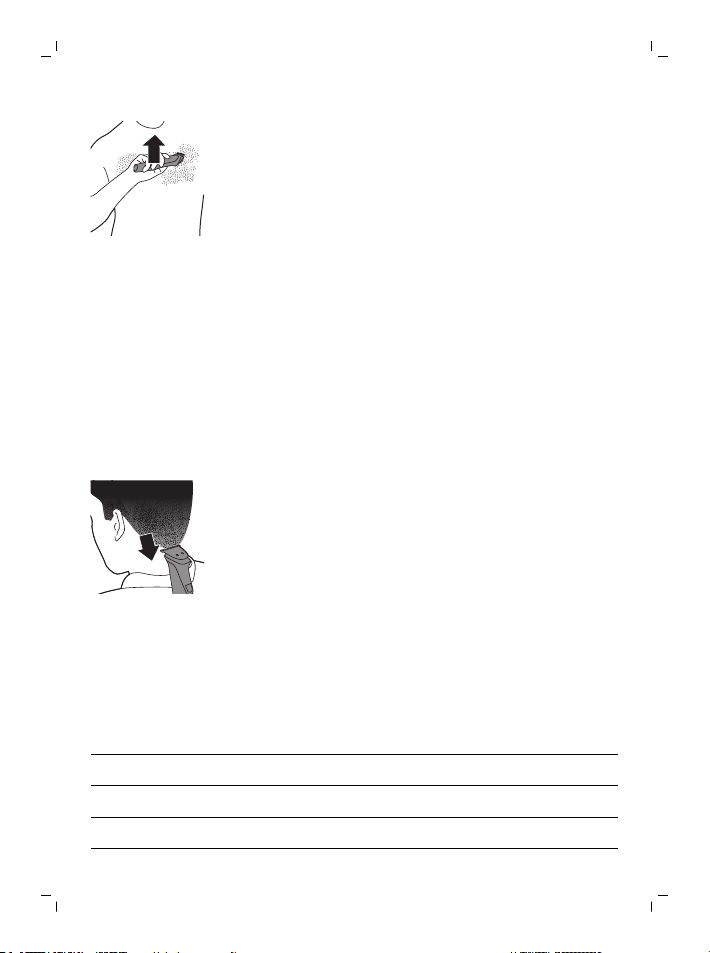
Detaching the nose trimmer
1 Place your finger on the arrow at the back of
the attachment and push it off the handle in the
direction of the arrow.
Page 11
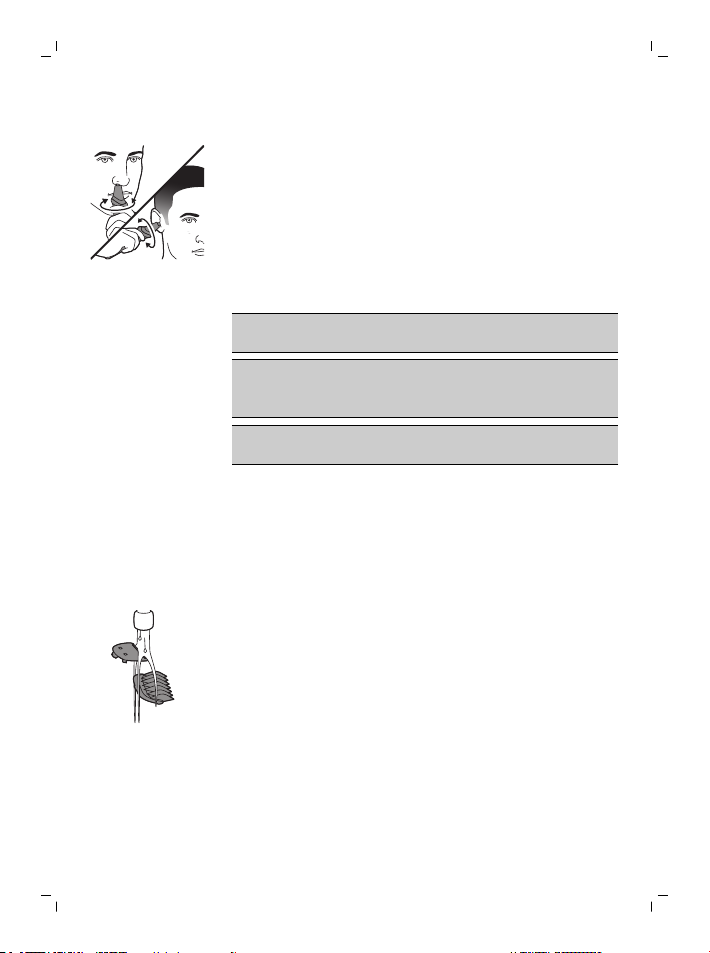
Attaching and detaching combs
1
2
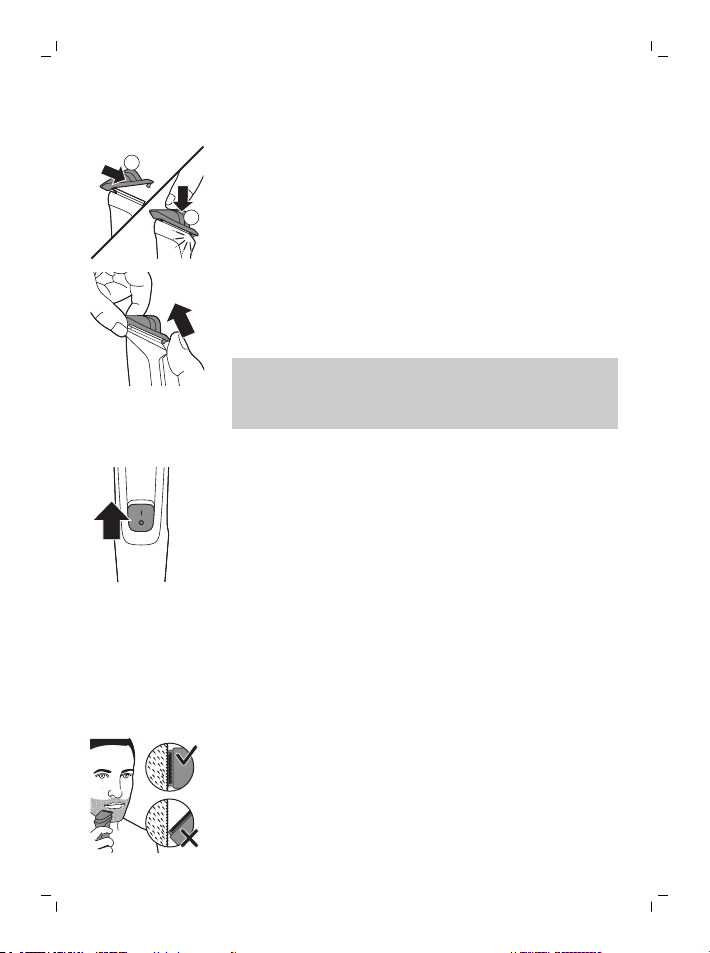
1 To attach any type of guard onto a cutting
element, slide the front part of the guard onto
the teeth of the cutting element. Then push
down the center of the guard with your fingers
or the palm of your hand ('click').
2 To detach any type of comb from the cutting
element, carefully pull its back part off the
appliance and then slide it off the cutting
element.
Note: When trimming for the first time, start by
using the comb with the maximum trimming
length setting to familiarize yourself with the
appliance.
Switching the appliance on and off
To switch on the appliance, slide the on/off button
up.
To switch off the appliance, slide the on/off button
down.
Attachments for use on beard
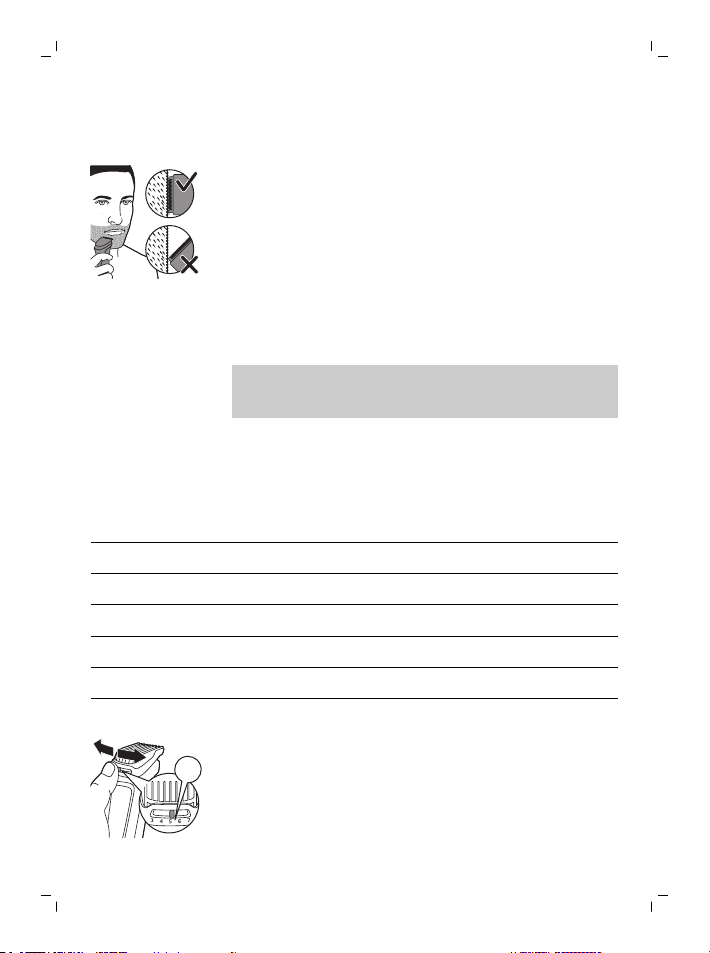
Full-size hair trimmer
Use the full-size hair trimmer without a comb to
trim hair close to the skin (to a length of 1/32in
(0.5mm) or to create clean lines around your
beard, neck and sideburns.
1 To trim hair close to the skin, place the flat side
of the cutting element against your skin and
make strokes against the direction of hair
growth.
English
11
Page 12

= mm
English
12
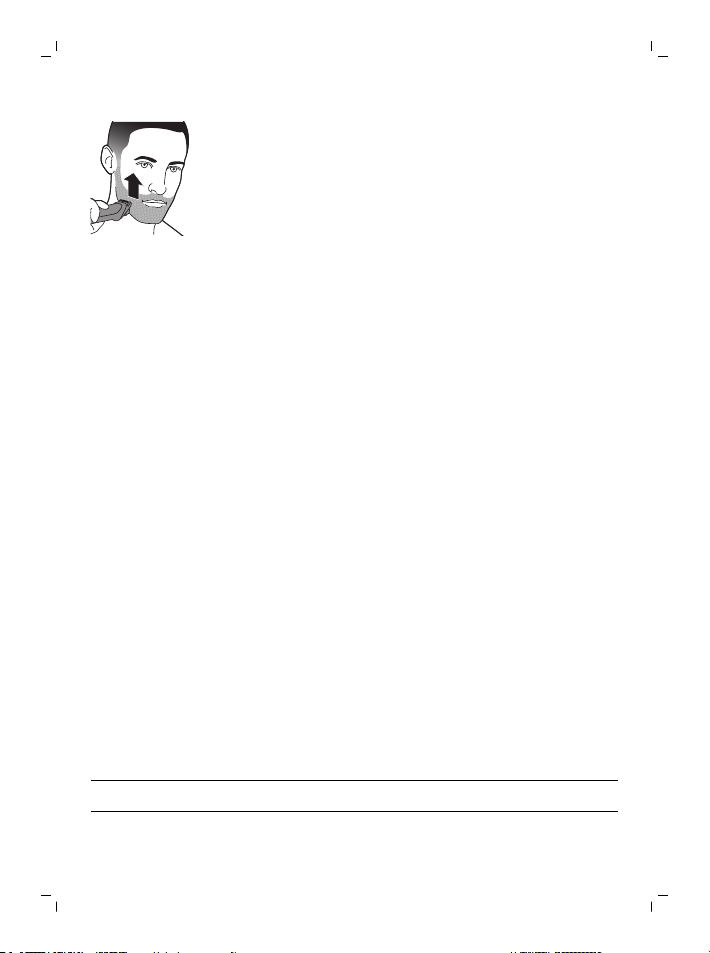
2 For contouring, hold the cutting element
perpendicular to the skin and move it upwards
or downwards with gentle pressure.
Beard combs
Note: The accessories supplied may vary for
different products. The box shows the accessories
that have been supplied with your appliance.
The appliance comes with multiple stubble combs
and an adjustable comb. The hair length settings
are indicated on the combs. The settings
correspond to the remaining hair length after
trimming.
Comb mm
Stubble comb 1mm
Stubble comb 2mm
Stubble comb 3mm
Stubble comb 5mm
Adjustable comb 3-7mm
1 Attach the comb to the full-size hair trimmer.
2 Adjustable comb: Push the length selector to
the left or right to select the desired hair length
setting.
3 To trim the most effective way, move the comb
against the direction of hair growth. Make sure
the surface of the comb always stays in contact
with the skin.
Page 13
Attachments for use on body
- Use the green body guard to trim body hair.
- Make sure hair is clean and dry as wet hair
tends to stick to the body and, when trimming
sensitive areas, always use a body guard.
- Since all hairs do not grow in the same
direction, you may want to try different
trimming positions (i.e. upwards, downwards, or
across). Practice is best for optimum results.
- Always make smooth and gentle movements
and be sure the surface of the guard always
stays in contact with your skin.
- When too many hairs have accumulated on the
product, blow the hairs out before use, for best
trimming results.
Body comb
Attach the body comb to the full-size hair trimmer
to trim hairs below the neckline. The appliance
comes with 1 body comb. The hair length settings
is indicated on the comb. The setting corresponds
to the remaining hair length after trimming.
Comb mm
Body comb (green) 3mm
1 Attach the body comb to the full-size hair
trimmer.
2 To trim in the most effective way, stretch the
skin with your free hand and move the comb
against the direction of hair growth. Make sure
the surface of the comb always stays in contact
with the skin.
English
13
Page 14
English
14
Attachments for use on head
Full-size hair trimmer
Use the full-size hair trimmer without a comb to
clip the hair on your head very close to the skin
(1/32in (0.5mm) or to contour the neckline and
area around the ears.
1 To contour the hairline around the ears, comb
the hair ends over the ears.
2 Tilt the appliance in such a way that only one
edge of the cutter blades touches the hair ends
when you shape the contours around the ears.
3 To contour the nape of the neck or sideburns,
turn the appliance and make downward
strokes.
4 Move the appliance slowly and smoothly
following the natural hairline.
Hair combs
Attach a hair comb to the full-size hair trimmer to
evenly trim the hairs on your head. The appliance
comes with 3 hair combs. The hair length settings
are indicated on the combs. The settings
correspond to the remaining hair length after
trimming.
Comb mm
Hair comb 9mm
Hair comb 12mm
Hair comb 16mm
1 Attach a comb to the full-size hair trimmer.
Page 15

2 Move the trimmer slowly over the crown from
different directions to achieve an even result.
Make sure the surface of the comb always stays
in contact with the skin.
-
Always move the trimmer against the
direction of hair growth. Press lightly.
-
Make overlapping passes over the head to
ensure that all hair that should be cut has
been cut.
Precision attachments for use on face
Precision trimmer
Use the precision trimmer to create fine lines and
contours around your facial style, close to the skin
(to a length of 1/32in./0.5mm).
1 Hold the precision trimming head perpendicular
to the skin and move the trimming head
upwards or downwards with gentle pressure.
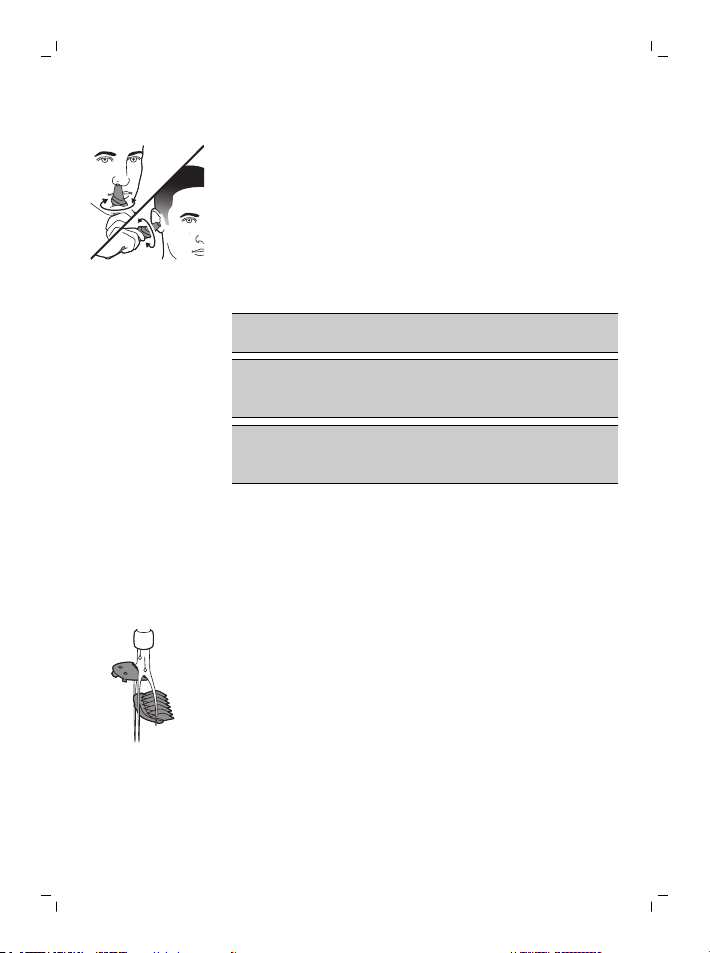
Nose trimmer
Use the nose trimmer to trim your nose hair and
ear hair.
- Make sure nasal passages are clean. Make sure
outer ear channels are clean and free from wax.
- Do not insert the tip more than 5mm.
- Always clean the attachment after each use.
Trimming nose hair
1 Gently move the tip in and out of nose while
turning it around to remove unwanted hairs.
English
15
Page 16
English
16
Trimming ear hair
1 Slowly move the tip round the ear to remove
hairs that stick out beyond the rim of the ear.
2 Gently move the tip in and out of the outer ear
channel to remove unwanted hairs.
Cleaning
Do not rinse the handle under the tap, only the
attachments can be rinsed under the tap.
Never use scouring pads, abrasive cleaning
agents or aggressive liquids such as gasoline or
acetone to clean the product.
Never dry the trimmer teeth with a towel or
tissue, as this may damage the trimmer teeth.
After every use: cleaning under the tap
1 Turn off the appliance and disconnect from the
wall socket.
2 Remove any comb or cutting element from the
appliance.
3 Rinse the hair chamber under a warm tap.
4 Clean the cutting element and comb under a
warm tap.
5 Carefully shake off excess water and let all parts
air dry completely.
Thorough cleaning
1 Turn off the appliance and disconnect from the
2 Wipe the handle of the appliance with a dry
power outlet.
cloth.
Page 17

3 Remove any comb or cutting element from the
appliance.
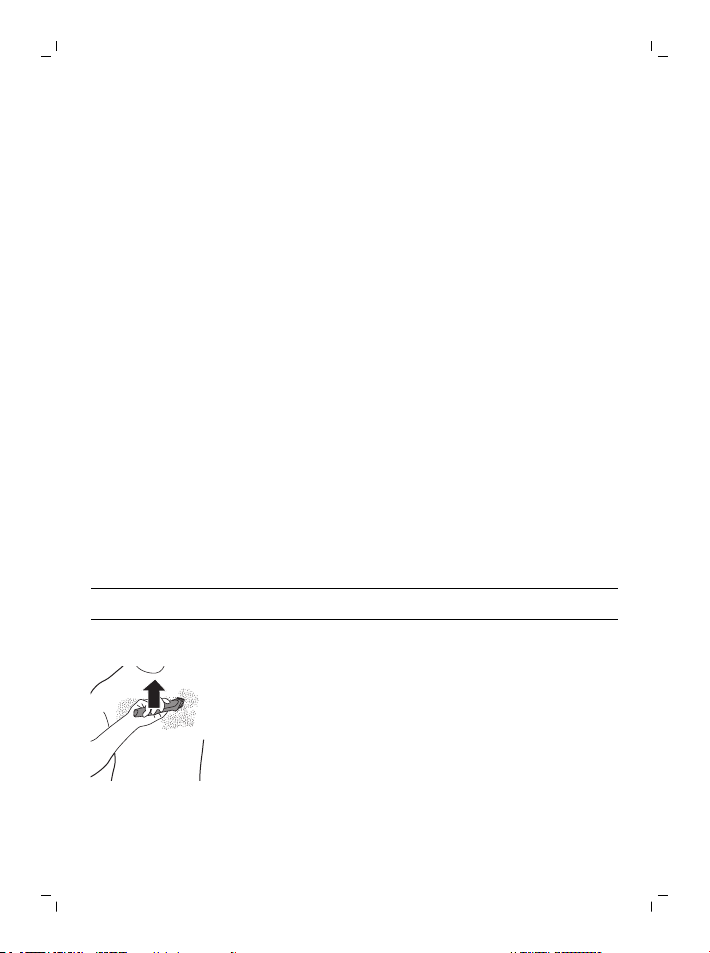
4 Remove any hairs that have accumulated in the
hair chamber with the cleaning brush supplied.
5 Remove any hairs that have accumulated in the
cutting elements and/or combs with the
cleaning brush supplied.
6 Clean the cutting elements under a warm tap.
The handle is not suitable for cleaning under
the tap.
7 Clean the combs under a warm tap.
8 Carefully shake off excess water and let all parts
air dry completely.
Cleaning the nose trimmer
Clean the nose trimmer immediately after use and
when a lot of hair or dirt has accumulated on the
nose trimmer head.
1 Rinse the nose trimmer head with hot water.
2 Turn on the appliance and rinse the nose
trimmer head once more to remove any
remaining hairs. Then turn off the appliance
again.
For a thorough clean, immerse the nose trimmer
head in a bowl with warm water for a few minutes
and then turn on the appliance to remove
stubborn hair/debris.
3 Carefully shake off excess water and let all parts
air dry completely.
English
17
Storage
- Store the appliance in the pouch supplied.
Note: Make sure the appliance is dry before you
store it in the pouch.
Page 18
English
18
Ordering accessories
To buy accessories or spare parts, visit
www.philips.com/parts-and-accessories or go to
your Philips dealer. You can also contact the
Philips Consumer Care Center in your country (see
the international warranty leaflet for contact
details).
Recycling
- This symbol means that this product shall not
be disposed of with normal household waste
(2012/19/EU).
- This symbol means that this product contains a
built-in rechargeable battery which shall not be
disposed of with normal household waste
(2006/66/EC). Please take your product to an
official collection point or a Philips service
center to have a professional remove the
rechargeable battery.
- Follow your country’s rules for the separate
collection of electrical and electronic products
and rechargeable batteries. Correct disposal
helps prevent negative consequences for the
environment and human health.
Removing the rechargeable battery
Only remove the rechargeable battery when
you discard the product. Before you remove
the battery, make sure that the product is
disconnected from the wall socket and that
the battery is completely empty.
Page 19

Take any necessary safety precautions
when you handle tools to open the product
and when you dispose of the rechargeable
battery.
1 Check if there are screws in the back or front of
the appliance. If so, remove them.
2 Remove the back and/or front panel of the
appliance with a screwdriver. If necessary, also
remove additional screws and/or parts until you
see the printed circuit board with the
rechargeable battery.
3 Remove the rechargeable battery.
Warranty and support
If you need information or support, please visit
www.philips.com/support or read the
international warranty leaflet.
Warranty restrictions
Cutting units are not covered by the terms of the
international warranty because they are subject to
wear.
English
19
Page 20

Dansk
20
Introduktion
Tillykke med dit køb, og velkommen til Philips! For
at få fuldt udbytte af den support, Philips tilbyder,
skal du registrere dit produkt på
www.philips.com/welcome.
Generel beskrivelse (fig. 1)
1 Næsehårstrimmer (kun MG3710, MG3711,
MG3712, MG3721, MG3720, MG3730, MG3731,
MG3740, MG3747, MG3748, MG3757)
2 Præcisionstrimmer (kun MG3740, MG3757)
3 Hårtrimmer i fuld størrelse
4 On/off-kontakt
5 Indgang til lille strømstik
6 Hårkam (9 mm) (kun MG3720, MG3721, MG3730,
MG3731, MG3740, MG3747, MG3748, MG3757)
7 Hårkam (12 mm) (kun MG3730, MG3740,
MG3747, MG3757, MG3731, MG3748)
8 Hårkam (16 mm) (kun MG3730, MG3740,
MG3747, MG3757, MG3731, MG3748)
9 Stubbekam (1 mm) (kun MG3710, MG3711,
MG3712, MG3720, MG3721, MG3730, MG3731,
MG3740, MG3747, MG3748, MG3757)
10 Stubbekam (2 mm) (kun MG3710, MG3711,
MG3720, MG3721, MG3730, MG3731, MG3740,
MG3747, MG3748, MG3757)
11 Stubbekam 3 mm (kun MG3710, MG3711,
MG3712, MG3720, MG3721)
12 Stubbekam 5 mm (kun MG3710, MG3711,
MG3712, MG3720, MG3721)
13 Justerbar kam (3-7 mm) (kun MG3730, MG3731,
MG3740, MG3747, MG3748, MG3757)
14 Kropskam (3 mm) (kun MG3747, MG3748)
15 Oplader
16 Lille stik
17 Lagerskærm (kam MG3711, MG3712, MG3721,
MG3731, MG3748)
18 Rensebørste
Dansk
Page 21

Dansk
Det medfølgende tilbehør kan variere for
forskellige produkter. Boksen viser det tilbehør, der
leveres sammen med apparatet.
Vigtige sikkerhedsoplysninger
Læs disse vigtige oplysninger omhyggeligt
igennem, inden apparatet og tilbehøret tages i
brug, og gem dem til eventuel senere brug. Det
medfølgende tilbehør kan variere for forskellige
produkter.
Fare
- Hold forsyningsenheden tør.
Advarsel
- Brug kun den aftagelige forsyningsenhed
(A00390), der fulgte med apparatet, til at
oplade batteriet.
- Strømforsyningsenheden indeholder en
transformator. Klip ikke
strømforsyningsenheden af og udskift den
med et andet stik, da dette vil føre til farlige
situationer.
21
Page 22
Dansk
22
- Dette apparat må bruges af børn fra 8 år og
opefter og personer med reducerede
fysiske, sensoriske eller mentale evner eller
manglende erfaring og viden, hvis de er
blevet instrueret i sikker brug af apparatet
og forstår de medfølgende risici. Lad ikke
børn lege med apparatet. Rengøring og
vedligeholdelse må ikke foretages af børn
uden opsyn.
- Kontroller altid apparatet, indendu
anvender det. Anvend ikke apparatet, hvis
det er beskadiget, da dette kan forårsage
personskade. Udskift altid en beskadiget del
med en tilsvarende original type.
- Apparatet må ikke åbnes i forbindelse med
udskiftning af det genopladelige batteri.
Forsigtig
- Dette apparat er ikke
vaskbart.Apparatet må aldrig
lægges ned i vand eller skylles
under vandhanen.
- Brug kun apparatet til det
tilsigtede formål som vist i
brugervejledningen.
Page 23

- Af hygiejniske grunde bør
apparatet kun anvendes af en
og samme person.
- Brug aldrig trykluft,
skuresvampe eller skrappe
rengøringsmidler, som f.eks.
benzin, acetone eller lignende,
til rengøring af apparatet.
- Brug ikke
strømforsyningsenheden i eller i
nærheden af stikkontakter, som
indeholder en elektrisk
luftfrisker, for at forhindre
uoprettelig beskadigelse af
strømforsyningsenheden.
Elektromagnetiske felter (EMF)
Dette Philips-apparat overholder alle branchens
gældende standarder og regler angående
eksponering for elektromagnetiske felter.
Dansk
23
Generelt
- Forsyningsenheden er egnet til netspændinger
fra 100 til 240 volt.
- Strømforsyningsenheden omformer 100-240
Volt til en lav sikkerhedsspænding under 24
Volt.
Page 24
1
2
Dansk
24
Opladning
Når apparatet har ladet op i 16 tuner, kan det
bruges uden ledning i op til 60 minutter (MG3710,
MG3711, MG3712, MG3720, MG3721, MG3730,
MG3731, MG3740) eller 70 minutter (MG3757,
MG3748, MG3747).
1 Kontroller, at apparatet er slukket.
2 Sæt det lille stik i apparatet, og sæt opladeren i
stikkontakten.
3 Efter opladning skal du tage opladeren ud af
stikkontakten og det lille stik ud af apparatet.
Sådan bruges apparatet
Bemærk: Sluk og rengør apparatet efter hver brug.
Aftagning og påsætning af skæreenheder
1 For at tage en skæreenhed af skal du skubbe
opad mod skæreenhedens tænder og fjerne
den fra grebet.
2 For at sætte en skæreenhed på skal du placere
den lille tap på skærenheden i hullet forrest på
apparatet og trykke bagsiden af skærenheden
fast ("klik").
Page 25
Aftagning af næsehårstrimmer
1
2
1 Placer din finger på pilen bag på tilbehøret, og
skub det af grebet i pilens retning.
Påsætning og aftagning af kamme
1 For at sætte en hvilken som helst beskyttende
enhed på skæreenheden skal du sætte den
forreste del af den beskyttende enhed på
skæreenhedens tænder. Tryk derefter ned midt
på den beskyttende enhed med fingrene eller
håndfladen ("klik").
2 For at tage en hvilken som helst kam af
skæreenheden skal du forsigtigt trække
kammens bagerste del af apparatet og derefter
tage den af skæreenheden.
Bemærk: Hvis det er første gang, du bruger
trimmeren, anbefales det at bruge kammen
med den højeste længdeindstilling, indtil du
vænner dig til at bruge apparatet.
Sådan tændes og slukkes apparatet
Tænd apparatet ved at trykke on/off-knappen
opad.
Sluk apparatet ved at trykke on/off-knappen
nedad.
Dansk
25
Tilbehør til skæg
Hårtrimmer i fuld størrelse
Brug hårtrimmeren i fuld størrelse uden kam, hvis
du vil klippe håret meget kort (0,5 mm) eller rette
Page 26
= mm
Dansk
26
hårgrænsen omkring skægget, i nakken og ved
bakkenbarterne til.
1 Hvis du vil klippe håret meget kort, skal du
placere den flade side af skæreenheden ind
mod huden og bevæge apparatet mod hårenes
retning.
2 Hvis du vil rette håret til, skal du holde
skæreenheden vinkelret på huden og bevæge
den opad eller nedad, mens du anvender et let
tryk.
Skægkamme
Bemærk: Det medfølgende tilbehør kan variere for
forskellige produkter. Boksen viser det tilbehør, der
leveres sammen med apparatet.
Der følger flere stubbekamme og en justerbar kam
med apparatet. Indstillingerne for hårlængde er
angivet på kammene. Indstillingerne svarer til
længden af håret på dit hoved efter trimningen.
Kam mm
Stubbekam 1 mm
Stubbekam 2 mm
Stubbekam 3 mm
Stubbekam 5 mm
Justerbar kam 3-7 mm
1 Sæt kammen på hårtrimmeren i fuld størrelse.
2 Justerbar kam: Skub længdevælgeren til højre
eller venstre for at vælge den ønskede
hårlængdeindstilling.
Page 27
3 Trimningen bliver mest effektiv, når apparatet
bevæges mod hårenes retning. Sørg for, at
kammens overflade forbliver i kontakt med
huden.
Tilbehør til krop
- Brug den grønne kropsbeskyttelse til at trimme
kropshår.
- Sørg for at håret er rent og tørt, da våde hår har
tendens til atklæbe sig til kroppen. Brug altid
kropsbeskytter, når du trimmer følsomme
områder.
- Da ikke alt hår vokser i samme retning, skal du
bevæge apparatet i forskellige retninger (opad,
nedad og tværs over kroppen). Det bedste
resultat opnås med lidt øvelse.
- Brug altid stille og rolige bevægelser, og sørg
for, at beskyttelsens overflade altid bevarer
kontakten med huden.
- Når der har samlet sig for mange hår på
produktet, så pust dem forsigtig væk for at få
det bedste resultat.
Kropskam
Sæt kropskammen på hårtrimmeren i fuld størrelse
for at trimme hår fra halsen og nedefter. Apparatet
leveres med 1 kropskam. Indstillingen for
hårlængde er angivet på kammen. Indstillingen
svarer til længden af håret på dit hoved efter
trimningen.
Kam mm
Kropskam (grøn) 3 mm
1 Sæt kropskammen på hårtrimmeren i fuld
størrelse.
Dansk
27
Page 28
Dansk
28
2 For at få den mest effektive trimning skal du
lade kammen glide hen over huden mod
hårenes retning, mens du strækker huden med
den frie hånd. Sørg for, at kammens overflade
forbliver i kontakt med huden.
Tilbehør til hovedhår
Hårtrimmer i fuld størrelse
Brug hårtrimmeren i fuld størrelse uden kam, hvis
du vil klippe dit hovedhår meget kort (0,5 mm) eller
rette hårgrænsen i nakken og omkring ørerne til.
1 For at rette hårgrænsen omkring ørerne til skal
du rede hårspidserne ned over ørerne.
2 Hold apparatet i en vinkel, så kun kanten af
skæreklingerne berører hårspidserne, når du
retter til omkring ørerne.
3 For at rette nakkehår og bakkenbarter til skal du
vende apparatet om og bevæge det med
nedadgående strøg.
4 Brug kun langsomme og rolige bevægelser, der
følger den naturlige hårgrænse.
Hårkamme
Sæt en hårkam på hårtrimmeren i fuld størrelse for
at trimme dine hovedhår jævnt. Apparatet leveres
med 3 hårkamme. Indstillingerne for hårlængde er
angivet på kammene. Indstillingerne svarer til
længden af håret på dit hoved efter trimningen.
Kam mm
Hårkam 9 mm
Hårkam 12 mm
Hårkam 16 mm
1 Sæt en kam på hårtrimmeren i fuld størrelse.
Page 29
2 Før apparatet langsomt hen over issen fra
forskellige retninger for at opnå et jævnt
resultat. Sørg for, at kammens overflade
forbliver i kontakt med huden.
-
Bevæg altid trimmeren mod hårets retning.
Tryk forsigtigt.
-
Før apparatet hen over hovedet i
overlappende baner, så du sikrer, at alle de
hår, som skal klippes, klippes.
Præcisionstilbehør til ansigt
Præcisionstrimmer
Brug præcisionstrimmeren til at skabe fine linjer og
rette håret omkring dit ansigt til. Håret klippes
meget kort (0,5 mm).
1 Hold præcisionstrimmerhovedet vinkelret på
huden, og bevæg trimmerhovedet opad eller
nedad, mens du anvender et let tryk.
Næsehårstrimmer
Brug næsehårstrimmeren til at trimme næse- og
ørehår.
- Sørg for, at næseborene er rene. Sørg for, at
den ydre øregang er ren og fri for voks.
- Stik aldrig spidsen længere end 5 mm ind.
- Rengør altid tilbehøret efter hver brug.
Trimning af næsehår
1 Bevæg spidsen forsigtigt ud og ind af næsen,
mens du drejer den rundt for at fjerne uønsket
hår.
Dansk
29
Page 30
Dansk
30
Trimning af ørehår
1 Bevæg langsomt spidsen rundt om øret for at
fjerne hår, der stikker ud over ørets kant.
2 Bevæg spidsen forsigtigt ud og ind af
ørekanalen for at fjerne uønsket hår.
Rengøring
Skyl ikke grebet under hanen. Det er kun delene,
der må skylles under hanen.
Brug aldrig skuresvampe eller skrappe
rengøringsmidler eller væsker såsom benzin eller
acetone til rengøring af produktet.
Trimmerens tænder må aldrig tørres med et
håndklæde eller køkkenrulle, da dette kan
beskadige tænderne.
Efter hver brug: rengøring under vandhanen
1 Sluk for apparatet, og tag det ud af
stikkontakten.
2 Fjern eventuelle kamme og/eller skæreenheder
fra apparatet.
3 Skyl hårkammeret under den varme hane.
4 Rengør skæreenheden og kammen under den
varme hane.
5 Ryst forsigtigt overskydende vand af, og lad alle
dele lufttørre, til de er helt tørre.
Grundig rengøring
1 Sluk for apparatet, og tag stikket ud af
2 Tør apparatets greb af med en tør klud.
stikkontakten.
Page 31

3 Fjern eventuelle kamme eller skæreenheder fra
apparatet.
4 Fjern eventuelle hår, der har samlet sig i
hårkammeret, med den medfølgende
rensebørste.
5 Fjern eventuelle hår, der har samlet sig i
skæreenhederne og/eller kammene, med den
medfølgende rensebørste.
6 Rengør skæreenhederne under den varme
hane.
Grebet må ikke rengøres under vandhanen.
7 Rengør kammene under den varme hane.
8 Ryst forsigtigt overskydende vand af, og lad alle
dele lufttørre, til de er helt tørre.
Rengøring af næsehårstrimmer
Rengør næsehårstrimmeren straks efter brug, og
når der har samlet sig meget hår eller snavs i
næsehårstrimmerhovedet.
1 Skyl næsehårstrimmerhovedet med varmt vand.
2 Tænd for apparatet, og skyl
næsehårstrimmerhovedet igen for at fjerne
eventuelle hårrester. Sluk derefter for apparatet
igen.
Rengør næsehårstrimmeren grundigt ved at
komme den i en skål med varmt vand i et par
minutter og derefter tænde for den for at fjerne de
sidste hår og rester.
3 Ryst forsigtigt overskydende vand af, og lad alle
dele lufttørre, til de er helt tørre.
Dansk
31
Opbevaring
- Opbevar apparatet i det medfølgende etui.
Bemærk: Sørg for, at apparatet er tørt, før du
opbevarer det i den medfølgende pose.
Page 32

Dansk
32
Bestilling af tilbehør
Du kan købe tilbehør og reservedele på
www.philips.com/parts-and-accessories eller hos
din Philips-forhandler. Du kan også kontakte det
lokale Philips-kundecenter (du kan finde
kontaktoplysninger i den internationale
garantifolder).
Genanvendelse
- Dette symbol betyder, at dette produkt ikke må
bortskaffes sammen med almindeligt
husholdningsaffald (2012/19/EU).
- Dette symbol betyder, at produktet indeholder
et indbygget genopladeligt batteri, som ikke må
bortskaffes sammen med almindeligt
husholdningsaffald (2006/66/EF). Aflever
produktet på et officielt indsamlingssted eller
hos en Philips-forhandler, hvor du kan få en
fagmand til at tage det genopladelige batteri
ud.
- Følg den nationale lovgivning om særskilt
indsamling af elektriske og elektroniske
produkter og genopladelige batterier. Korrekt
bortskaffelse er med til at forhindre negativ
påvirkning af miljøet og menneskers helbred.
Udtagning af det genopladelige batteri
Det genopladelige batteri må kun tages ud
af apparatet, når produktet skal
bortskaffes. Før du fjerner batteriet, skal du
sørge for, at produktet er taget ud af
stikkontakten, og at batteriet er
fuldstændigt afladet.
Page 33

Overhold de nødvendige
sikkerhedsforanstaltninger, når du anvender
værktøj til at åbne produktet, og når du
bortskaffer det genopladelige batteri.
1 Kontrollér, om der er skruer på for- eller
bagsiden af apparatet. Hvis der er, skal de
fjernes.
2 Fjern bag- og frontpanelet fra apparatet med
en skruetrækker. Hvis det er nødvendigt, skal du
også fjerne yderligere skruer og/eller andre
dele, indtil du kan se printpladen med det
genopladelige batteri.
3 Fjern det genopladelige batteri.
Reklamationsret og support
Hvis du har brug for hjælp eller support, bedes du
besøge www.philips.com/support eller læse i
folderen om international garanti.
Gældende forbehold i reklamationsretten
Skærhoveder er ikke omfattet af den
internationale garanti, da de udsættes for slitage.
Dansk
33
Page 34

Deutsch
34
Einführung
Herzlichen Glückwunsch zu Ihrem Kauf und
willkommen bei Philips! Um die Unterstützung von
Philips optimal nutzen zu können, sollten Sie Ihr
Produkt unter www.philips.com/welcome
registrieren.
Allgemeine Beschreibung (Abb. 1)
1 Nasenhaartrimmer (nur MG3710, MG3711,
MG3712, MG3721, MG3720, MG3730, MG3731,
MG3740, MG3747, MG3748, MG3757)
2 Präzisionstrimmer (nur MG3740, MG3757)
3 Full Size-Haartrimmer
4 Ein-/Ausschalter
5 Buchse für Gerätestecker
6 Haar-Kammaufsatz (9mm) (nur MG3720,
MG3721, MG3730, MG3731, MG3740, MG3747,
MG3748, MG3757)
7 Haar-Kammaufsatz (12 mm) (nur MG3730,
MG3740, MG3747, MG3757, MG3731, MG3748)
8 Haar-Kammaufsatz (16 mm) (nur MG3730,
MG3740, MG3747, MG3757, MG3731, MG3748)
9 Stoppel-Kammaufsatz (1 mm) (nur MG3710,
MG3711, MG3712, MG3720, MG3721, MG3730,
MG3731, MG3740, MG3747, MG3748, MG3757)
10 Stoppel-Kammaufsatz (2 mm) (nur MG3710,
MG3711, MG3720, MG3721, MG3730, MG3731,
MG3740, MG3747, MG3748, MG3757)
11 Stoppel-Kammaufsatz 3 mm (nur MG3710,
MG3711, MG3712, MG3720, MG3721)
12 Stoppel-Kammaufsatz 5 mm (nur MG3710,
MG3711, MG3712, MG3720, MG3721)
13 Verstellbarer Kammaufsatz (3-7mm) (nur
MG3730, MG3731, MG3740, MG3747, MG3748,
MG3757)
14 Körperhaar-Kammaufsatz (3 mm) (nur MG3747,
MG3748)
15 Stromversorgungseinheit
Deutsch
Page 35

Deutsch
16 Gerätestecker
17 Speicheranzeige (nur MG3711, MG3712, MG3721,
MG3731, MG3748)
18 Reinigungsbürste
Das mitgelieferte Zubehör kann für verschiedene
Produkte variieren. Die Verpackung zeigt das
Zubehör, das mit Ihrem Gerät mitgeliefert wurde.
Wichtige Sicherheitsinformationen
Lesen Sie diese wichtigen Informationen vor dem
Gebrauch des Geräts und des Zubehörs
aufmerksam durch, und bewahren Sie sie für eine
spätere Verwendung auf. Das mitgelieferte
Zubehör kann für verschiedene Produkte variieren.
Gefahr
- Halten Sie das Netzteil trocken.
Warnhinweis
- Verwenden Sie nur das im Lieferumfang des
Geräts enthaltene abnehmbare Netzteil
(A00390), um den Akku aufzuladen.
- Das Netzteil enthält einen Transformator.
Schneiden Sie das Netzteil keinesfalls auf,
um einen anderen Stecker anzubringen, weil
dies eine gefährliche Situation verursachen
könnte.
35
Page 36

Deutsch
36
- Dieses Gerät kann von Kindern ab 8Jahren
und Personen mit verringerten physischen,
sensorischen oder psychischen Fähigkeiten
oder Mangel an Erfahrung und Kenntnis
verwendet werden, wenn sie bei der
Verwendung beaufsichtigt werden oder
Anleitung zum sicheren Gebrauch des
Geräts erhalten und die Gefahren
verstanden haben. Kinder dürfen nicht mit
dem Gerät spielen. Die Reinigung und
Pflege des Geräts darf von Kindern nicht
ohne Aufsicht durchgeführt werden.
- Überprüfen Sie das Gerät vor jedem
Gebrauch. Um Verletzungen zu vermeiden,
benutzen Sie das Gerät nicht, wenn es
beschädigt ist. Ersetzen Sie ein
beschädigtes Teil nur durch Originalteile.
- Öffnen Sie das Gerät nicht, um den Akku zu
ersetzen.
Achtung
- Dieses Gerät ist nicht
wasserdicht.Tauchen Sie es
nicht in Wasser, und halten Sie
es nicht unter den Wasserhahn.
Page 37

Deutsch
37
- Verwenden Sie dieses Gerät nur
für den vorgesehenen Zweck
wie in der Bedienungsanleitung
angegeben.
- Aus hygienischen Gründen
sollte das Gerät nur von einer
Person verwendet werden.
- Benutzen Sie zum Reinigen des
Geräts keine Druckluft,
Scheuerschwämme und -mittel
oder aggressive Flüssigkeiten
wie Benzin oder Azeton.
- Verwenden Sie das Netzteil
nicht in oder in der Nähe von
Wandsteckdosen, die einen
elektrischen Lufterfrischer
enthalten, um irreparable
Schäden am Netzteil zu
vermeiden.
Elektromagnetische Felder
Dieses Philips-Gerät erfüllt alle einschlägigen
Normen und Vorschriften zur Exposition
gegenüber elektromagnetischen Feldern.
Allgemeines
- Der Netzteil ist für Netzspannungen von 100 bis
240 Volt geeignet.
Page 38

1
2
Deutsch
38
- Das Netzteil wandelt Netzspannungen von 100
bis 240 Volt in eine sichere Betriebsspannung
von unter 24 Volt um.
Aufladen
Wenn das Gerät 16 Stunden lang geladen hat, hat
es eine Autonomie von 60 Minuten (MG3710,
MG3711, MG3712, MG3720, MG3721, MG3730,
MG3731, MG3740) bzw. von 70 Minuten (MG3757,
MG3748, MG3747).
1 Vergewissern Sie sich, dass das Gerät
ausgeschaltet ist.
2 Schließen Sie den Gerätestecker an das Gerät
an und stecken Sie die
Stromversorgungseinheit in die Steckdose.
3 Ziehen Sie nach dem Ladevorgang die
Stromversorgungseinheit aus der Steckdose
und den Gerätestecker aus dem Gerät.
Das Gerät benutzen
Hinweis: Schalten Sie das Gerät nach jedem
Gebrauch aus, und reinigen Sie es.
Schneideelemente entfernen und anbringen
1 Um ein Schneideelement zu entfernen, drücken
Sie gegen die Zähne des Schneideaufsatzes
nehmen Sie ihn vom Handstück.
2 Um ein Schneideelement anzubringen, stecken
Sie die Nase des Schneideelements in den
Führungsschlitz auf der Vorderseite und
drücken Sie den hinteren Teil des
Schneideelements in das Gerät, bis Sie ein
Einrasten hören ("klick").
Page 39

Den Nasenhaartrimmer entfernen
1
2
1 Platzieren Sie ihren Finger auf den Pfeil auf der
Rückseite des Aufsatzes und drücken Sie ihn
vom Handstück ab, in Richtung des Pfeils.
Kammaufsätze entfernen und anbringen
1 Um einen Aufsatz jedweder Art auf einem
Schneideelement anzubringen, schieben Sie
den vorderen Teil des Aufsatzes auf die Zähne
des Schneidelements. Drücken Sie dann mit
Ihren Fingern oder Ihrem Handteller in die Mitte
des Aufsatzes, bis Sie hören, dass er einrastet
("klick").
2 Um einen Kammaufsatz jedweder Art von
einem Schneideelement zu entfernen, ziehen
Sie den hinteren Teil des Kammaufsatzes
vorsichtig vom Gerät und lassen ihn dann vom
Schneideelement gleiten.
Hinweis: Wenn Sie das erste Mal Ihr Haar
trimmen, verwenden Sie erst den Kammaufsatz
mit der höchsten Trimmlängen-Einstellung, um
sich mit dem Gerät vertraut zu machen.
Das Gerät ein- und ausschalten
Drücken Sie den Ein-/Ausschalter, um das Gerät
einzuschalten.
Drücken Sie den Ein-/Ausschalter, um das Gerät
auszuschalten.
Deutsch
39
Page 40

Deutsch
40
Die Aufsätze für Barthaare
Full Size-Haartrimmer
Verwenden Sie den Full Size-Trimmer ohne
Kammaufsatz, um Körperhaar kurz zu trimmen (auf
eine Länge von 0,5 mm) oder um deutliche
Konturen um Ihren Bart, Nacken und Koteletten zu
trimmen.
1 Um Körperhaar kurz zu trimmen, platzieren Sie
die flache Seite des Schneideelements auf Ihrer
Haut und trimmen Sie gegen die Richtung des
Haarwuchses.
2 Um genaue Konturen zu trimmen, halten Sie
das Schneideelement schräg zur Haut und
bewegen Sie es mit sanftem Druck auf- und
abwärts.
Kammaufsätze für den Bart
Hinweis: Das mitgelieferte Zubehör kann für
verschiedene Produkte variieren. Die Verpackung
zeigt das Zubehör, das mit Ihrem Gerät mitgeliefert
wurde.
Das Gerät wird geliefert mit einer Vielzahl von
Stoppel-Kammaufsätzen und einem verstellbaren
Kammaufsatz. Die Einstellungen für die Haarlänge
werden auf den Kammaufsätzen angezeigt. Die
Einstellung entspricht jeweils der Länge, auf die
das Haar gekürzt wird.
Kammaufsatz mm
Stoppel-Kammaufsatz 1 mm
Stoppel-Kammaufsatz 2mm
Stoppel-Kammaufsatz 3mm
Stoppel-Kammaufsatz 5mm
Page 41

Verstellbarer Kammaufsatz 3-7 mm
= mm
1 Setzen Sie den Kammaufsatz auf den Full Size-
Haartrimmer.
2 Verstellbarer Kammaufsatz: Bewegen Sie den
Längenselektor nach links oder rechts, um die
gewünschte Haarlängeneinstellung
auszuwählen.
3 Sie erzielen die größte Wirkung, wenn Sie den
Kamm gegen die Richtung des Haarwuchses
bewegen. Achten Sie darauf, dass der Kamm
stets in Kontakt mit der Haut bleibt.
Aufsätze für Anwendung am Körper
- Verwenden Sie den grünen Aufsatz, um
Körperhaar zu trimmen.
- Stellen Sie sicher, dass das Haar sauber und
trocken ist, da nasses Wasser tendenziell am
Körper kleben bleibt, und verwenden Sie beim
Trimmen von Körperhaar in sensiblen
Bereichen immer einen Aufsatz.
- Nachdem nicht alle Haare in die gleiche
Richtung wachsen, werden Sie mitunter
verschiedene Schneidepositionen ausprobieren
(d. h. aufwärts, abwärts oder schräg). Mit etwas
Übung werden Sie optimale Ergebnisse
erzielen.
- Machen Sie stets gleichmäßige und sanfte
Bewegungen und stellen Sie sicher, dass die
Oberfläche des Aufsatzes stets in Kontakt mit
Ihrer Haut bleibt.
Deutsch
41
Page 42

Deutsch
42
- Sobald sich zu viele Haare im Produkt
angesammelt haben, pusten Sie diese heraus,
bevor Sie das Gerät weiterverwenden. So
erzielen Sie das beste Ergebnis.
Kammaufsatz für Körperhaar
Setzen Sie den Körperhaar-Kammaufsatz auf den
Full Size-Haartrimmer, um Haar im Nacken
trimmen. Das Gerät wird mit einem Kammaufsatz
für Körperhaar geliefert. Die Einstellungen für die
Haarlänge werden auf dem Kammaufsatz
angezeigt. Die Einstellung entspricht jeweils der
Länge, auf die das Haar gekürzt wird.
Kammaufsatz mm
Kammaufsatz für Körperhaar
(grün)
1 Setzen Sie den Körperhaar-Kammaufsatz auf
den Full Size-Haartrimmer.
2 Sie erzielen die größte Wirkung, wenn Sie die
Haut mit Ihrer freien Haut spannen und den
Kamm gegen die Richtung des Haarwuchses
bewegen. Achten Sie darauf, dass der Kamm
stets in Kontakt mit der Haut bleibt.
3mm
Aufsätze für Kopfhaare
Full Size-Haartrimmer
Verwenden Sie den Full Size-Haartrimmer ohne
Kammaufsatz, um Ihr Kopfhaar sehr kurz zu
trimmen (auf eine Länge von 0,5 mm) oder um
deutliche Konturen im Nacken und im Bereich
rund um die Ohren zu trimmen.
1 Um die Haarlinie rund um die Ohren zu
trimmen, kämmen Sie die Haarenden über Ihre
Ohren.
Page 43

2 Legen Sie das Gerät so schräg an, dass nur die
Kanten der Schneidemesser die Haarenden
berühren, wenn Sie die Konturen rund um die
Ohren trimmen.
3 Um die Konturen im Nacken oder der
Koteletten zu trimmen, drehen Sie das Gerät
und bewegen es von oben nachunten.
4 Bewegen Sie das Gerät langsam und sanft und
folgen Sie dabei dem natürlichen Haaransatz.
Kammaufsätze für Kopfhaar
Setzen Sie den Kopfhaar-Kammaufsatz auf den
Full Size-Haartrimmer, um Ihre Kopfhaar
gleichmäßig zu trimmen. Das Gerät wird mit 3
Kammaufsätzen für Kopfhaar geliefert. Die
Einstellungen für die Haarlänge werden auf den
Kammaufsätzen angezeigt. Die Einstellung
entspricht jeweils der Länge, auf die das Haar
gekürzt wird.
Kammaufsatz mm
Kammaufsatz für Kopfhaar 9mm
Kammaufsatz für Kopfhaar 12mm
Kammaufsatz für Kopfhaar 16mm
1 Setzen Sie einen Kammaufsatz auf den Full
Size-Haartrimmer.
2 Bewegen Sie den Trimmer langsam und aus
verschiedenen Richtungen über den Kopf, um
ein gleichmäßiges Ergebnis zu erzielen. Achten
Sie darauf, dass der Kamm stets in Kontakt mit
der Haut bleibt.
-
Bewegen Sie den Kamm immer gegen die
Richtung des Haarwuchses . Üben Sie
leichten Druck aus.
Deutsch
43
Page 44

Deutsch
44
-
Führen Sie den Kamm mehrmals in
überlappenden Bewegungen über den Kopf
um sicherzustellen, dass sämtliches Haar,
das getrimmt werden soll, auch tatsächlich
getrimmt wurde.
Präzisionsaufsätze für Gesichtshaare
Präzisionstrimmer
Mit dem Präzisions-Trimmer definieren Sie feine
Linien und Konturen um das Gesicht, nahe an der
Haut (Länge 1/32 Zoll/0,5mm).
1 Halten Sie den Schneidekopf senkrecht zur
Haut und bewegen ihn mit leichtem Druck aufoder abwärts.
Nasenhaartrimmer
Verwenden Sie den Nasenhaartrimmer zum
Trimmen von Nasen- und Ohrenhaar.
- Stellen Sie sicher, dass die Nasengänge sauber
sind. Stellen Sie sicher, dass die äußeren
Gehörgänge sauber und frei von Cerumen
(Ohrenschmalz) sind.
- Führen Sie die Spitze nicht weiter als 5 mm ein.
- Reinigen Sie den Aufsatz nach jeder
Verwendung.
Haare in der Nase schneiden
1 Führen Sie die Spitze vorsichtig mit einer
Drehbewegung in und aus der Nase, um
unerwünschte Haare zu entfernen.
Page 45

Haare in den Ohren schneiden
1 Führen Sie die Spitze langsam um das Ohr, um
über den Rand des Ohrs hinausragende Haare
zu entfernen.
2 Führen Sie die Spitze vorsichtig in und aus dem
äußeren Gehörgang, um unerwünschte Haare
zu entfernen.
Reinigung
Spülen Sie das Handstück nicht unter dem
Wasserhahn. Nur die Aufsätze können unter dem
Wasserhahn gespült werden.
Zum Reinigen des Produkts keine
Scheuerschwämme und mittel oder aggressiven
Flüssigkeiten wie Benzin oder Aceton verwenden.
Trocknen Sie die Zähne des Trimmers niemals mit
einem Handtuch oder Tuch ab, da dies die
Schneideelemente beschädigen kann.
Nach jedem Gebrauch: unter fließendem Leitungswasser reinigen
1 Schalten Sie das Gerät aus, und trennen Sie es
von der Steckdose.
2 Nehmen Sie Kammaufsätze oder
Schneideeinheit vom Gerät ab.
3 Spülen Sie die Haarauffangkammer unter
fließendem Warmwasser ab.
4 Reinigen Sie die Schneideeinheit und den
Kammaufsatz unter fließendem Warmwasser.
5 Schütteln Sie überschüssiges Wasser sorgfältig
ab, und lassen Sie alle Teile vollständig an der
Luft trocknen.
Deutsch
45
Page 46

Deutsch
46
Gründliche Reinigung
1 Schalten Sie das Gerät aus und stecken Sie es
aus.
2 Wischen Sie das Handstück des Geräts mit
einem trockenen Tuch ab.
3 Nehmen Sie Kamm- bzw. Schneideaufsätze ab.
4 Entfernen Sie Haare, die sich in der
Haarkammer angesammelt haben, mithilfe der
mitgelieferten Reinigungsbürste.
5 Entfernen Sie Haare, die sich in den
Schneideelementen bzw. Kammaufsätzen
angesammelt haben, mithilfe der mitgelieferten
Reinigungsbürste.
6 Reinigen Sie die Schneideelemente unter
warmen fließenden Wasser.
Das Handstück ist nicht für eine Reinigung
unter dem Wasserhahn geeignet.
7 Reinigen Sie die Kämme unter warmen
fließenden Wasser.
8 Schütteln Sie das verbleibende Wasser
vorsichtig ab und lassen Sie alle Teile gründlich
in der Luft trocknen.
Den Nasenhaartrimmer reinigen
Reinigen Sie den Nasenhaartrimmer sofort nach
dem Gebrauch oder bei Ansammlungen von vielen
Haaren oder Verschmutzung auf dem Kopf des
Nasenhaartrimmers.
1 Spülen Sie den Kopf des Nasenhaartrimmers
mit heißem Wasser.
2 Schalten Sie das Gerät ein, und spülen Sie den
Kopf des Nasenhaartrimmers erneut aus, um
noch verbleibende Haare zu entfernen.
Schalten Sie das Gerät daraufhin wieder aus.
Page 47

Für eine gründliche Reinigung tauchen Sie den
Kopf des Nasenhaartrimmers für ein paar Minuten
in eine Schüssel mit warmem Wasser und schalten
Sie dann das Gerät ein, um hartnäckige
Haare/Rückstände zu entfernen.
3 Schütteln Sie überschüssiges Wasser sorgfältig
ab, und lassen Sie alle Teile vollständig an der
Luft trocknen.
Aufbewahrung
- Bewahren Sie das Gerät in der im Lieferumfang
enthaltenen Tasche auf.
Hinweis: Achten Sie darauf, dass das Gerät
trocken ist, bevor Sie es in der Tasche
aufbewahren.
Bestellen von Zubehör
Um Zubehör oder Ersatzteile zu kaufen, besuchen
Sie www.philips.com/parts-and-accessories, oder
suchen Sie Ihren Philips Händler auf. Sie können
sich auch an das Philips Consumer Care Center in
Ihrem Land wenden. Die Kontaktdaten finden Sie
in der internationalen Garantieschrift.
Recycling
- Dieses Symbol bedeutet, dass das Produkt
nicht mit dem normalen Hausmüll entsorgt
werden kann (2012/19/EU).
Deutsch
47
Page 48

48
Deutsch
- Dieses Symbol bedeutet, dass das Produkt
einen Akku enthält, der nicht mit dem normalen
Hausmüll entsorgt werden darf (2006/66/EG).
Bitte geben Sie das Produkt bei einer offiziellen
Sammelstelle oder einem Philips ServiceCenter ab, um den Akku fachgerecht ausbauen
zu lassen.
1 Altgeräte/Altakkus/Batterien können kostenlos
an geeigneten Rücknahmestellen abgegeben
werden.
2 Diese werden dort fachgerecht gesammelt oder
zur Wiederverwendung vorbereitet.
Altgeräte/Altakkus/Batterien können
Schadstoffe enthalten, die der Umwelt und der
menschlichen Gesundheit schaden können.
Enthaltene Rohstoffe können durch ihre
Wiederverwertung einen Beitrag zum
Umweltschutz leisten.
3 Die Löschung personenbezogener Daten auf
den zu entsorgenden Altgeräten muss vom
Endnutzer eigenverantwortlich vorgenommen
werden.
4 Hinweise für Verbraucher in Deutschland: Die in
Punkt 1 genannte Rückgabe ist gesetzlich
vorgeschrieben. Altgeräte mit Altbatterien
und/oder Altakkus, die nicht vom Altgerät
umschlossen sind, sind vor der Abgabe an einer
Rücknahmestelle von diesen zu trennen. Dies
gilt nicht, falls die Altgeräte für eine
Wiederverwendung noch geeignet (d.h.
funktionstüchtig) sind und von den anderen
Altgeräten getrennt werden. Sammel- und
Rücknahmestellen in DE:
https://www.stiftung-ear.de/; für Batterien
auch Rückgabe im Handel möglich.
Page 49

Den Akku entfernen
Bauen Sie den wiederaufladbaren Akku nur
zur Entsorgung des Produkts aus. Bevor Sie
den Akku entfernen, stellen Sie sicher, dass
das Produkt nicht an einer Steckdose
eingesteckt ist und dass der Akku
vollständig entleert ist.
Treffen Sie angemessene
Sicherheitsvorkehrungen, wenn Sie das
Produkt mithilfe von Werkzeugen öffnen
und den Akku entsorgen.
1 Prüfen Sie, ob an der Vorder- oder Rückseite
des Geräts Schrauben vorhanden sind. Wenn ja,
bauen Sie diese aus.
2 Bauen Sie die hintere und/oder vordere
Geräteabdeckung mithilfe eines
Schraubendrehers aus. Soweit vorhanden,
bauen Sie weitere Schrauben und/oder Teile
aus, bis Sie die Platine mit dem Akku sehen.
3 Entnehmen Sie den Akku.
Garantie und Support
Für Unterstützung und weitere Informationen
besuchen Sie die Philips Website unter
www.philips.com/support, oder lesen Sie die
internationale Garantieschrift.
Garantieeinschränkungen
Schneideeinheiten unterliegen nicht den
Bestimmungen der internationalen Garantie, da sie
einem normalen Verschleiß ausgesetzt sind.
Deutsch
49
Page 50

Español
50
Introducción
Enhorabuena por la adquisición de este producto,
y bienvenido a Philips Para sacar el mayor partido
a la asistencia que Philips le ofrece, registre el
producto en www.philips.com/welcome.
Descripción general (fig. 1)
1 Recortador para nariz (solo MG3710, MG3711,
MG3712, MG3721, MG3720, MG3730, MG3731,
MG3740, MG3747, MG3748, MG3757)
2 Recortador de precisión (solo MG3740,
MG3757)
3 Recortador de pelo grande
4 Botón de encendido/apagado
5 Toma para clavija pequeña
6 Peine para el cabello (9 mm) (solo MG3720,
MG3721, MG3730, MG3731, MG3740, MG3747,
MG3748, MG3757)
7 Peine para el cabello (12 mm) (solo MG3730,
MG3740, MG3747, MG3757, MG3731, MG3748)
8 Peine para el cabello (16 mm) (solo MG3730,
MG3740, MG3747, MG3757, MG3731, MG3748)
9 Peine-guía para barba (1 mm) (solo MG3710,
MG3711, MG3712, MG3720, MG3721, MG3730,
MG3731, MG3740, MG3747, MG3748, MG3757)
10 Peine-guía para barba (2 mm) (solo MG3710,
MG3711, MG3720, MG3721, MG3730, MG3731,
MG3740, MG3747, MG3748, MG3757)
11 Peine-guía para barba de 3 mm (solo MG3710
MG3711, MG3712, MG3720, MG3721)
12 Peine-guía para barba de 5 mm (solo MG3710
MG3711, MG3712, MG3720, MG3721)
13 Peine-guía ajustable (3-7 mm) (solo MG3730,
MG3731, MG3740, MG3747, MG3748, MG3757)
14 Peine-guía para el cuerpo (3 mm) (solo MG3747,
MG3748)
15 Unidad de alimentación
16 Clavija pequeña
Español
Page 51

Español
17 Pantalla de almacenamiento (solo MG3711,
MG3712, MG3721, MG3731, MG3748)
18 Cepillo de limpieza
Los accesorios suministrados pueden variar en
función del producto. La caja muestra los
accesorios suministrados con el aparato.
Información de seguridad importante
Antes de utilizar el aparato y sus accesorios, lea
atentamente esta información importante y
consérvela por si necesitara consultarla en un
futuro. Los accesorios suministrados pueden variar
según los diferentes productos.
Peligro
- Mantenga seca la fuente de
alimentación.
Advertencia
- Para cargar la batería, utilice únicamente la
unidad extraíble (A00390) suministrada con
el aparato.
- La fuente de alimentación contiene un
transformador. No corte la fuente de
alimentación para sustituirla por otra clavija,
ya que podría provocar situaciones de
peligro.
51
Page 52

Español
52
- Este aparato puede ser usado por niños a
partir de ocho años y por personas con su
capacidad física, psíquica o sensorial
reducida y por quienes no tengan los
conocimientos y la experiencia necesarios,
si han sido supervisados o instruidos acerca
del uso del aparato de forma segura y
siempre que sepan los riesgos que conlleva
su uso. No permita que los niños jueguen
con el aparato. Los niños no deben limpiar
el aparato ni realizar tareas de
mantenimiento sin supervisión.
- Compruebe siempre el aparato antes de
utilizarlo. No utilice el aparato si está
dañado, ya que podría ocasionar lesiones.
Sustituya las piezas dañadas por repuestos
originales.
- No abra el aparato para cambiar la batería
recargable.
Precaución
- Este aparato no es lavable.No
lo sumerja nunca en agua ni lo
enjuague bajo el grifo.
Page 53

Español
- Utilice este aparato solo para el
uso al que está destinado
como se indica en el manual de
usuario.
- Por razones de higiene, el
aparato debería ser usado
únicamente por una persona.
- No utilice nunca aire
comprimido, estropajos,
agentes de limpieza abrasivos
ni líquidos agresivos, como
gasolina o acetona, para limpiar
el aparato.
- No utilice la fuente de
alimentación cerca o en tomas
de corriente en las que esté o
haya estado enchufado un
ambientador eléctrico para
evitar daños irreparables.
53
Campos electromagnéticos (CEM)
Este Philips cumple los estándares y las
normativas aplicables sobre exposición a campos
electromagnéticos.
General
- La unidad de alimentación es adecuada para
voltajes de red de 100 a 240voltios.
Page 54

1
2
Español
54
- La fuente de alimentación transforma la
corriente de 100 - 240voltios en un bajo voltaje
de seguridad inferior a 24voltios.
Carga
Cuando se haya cargado durante 16 horas, el
aparato tendrá una autonomía de hasta 60
minutos (MG3710, MG3711, MG3712, MG3720,
MG3721, MG3730, MG3731, MG3740) o 70 minutos
(MG3757, MG3748, MG3747).
1 Asegúrese de que el aparato está apagado.
2 Introduzca la clavija pequeña en el aparato y
enchufe la unidad de alimentación a la toma de
corriente.
3 Después de la carga, desenchufe la unidad de
alimentación de la toma de corriente y
desconecte la clavija pequeña del aparato.
Uso del aparato
Nota: Apague y limpie el aparato después de cada
uso.
Desconexión y conexión de elementos de corte
1 Para desconectar un elemento de corte,
empuje hacia arriba los dientes del elemento
de corte y sáquelo del mango.
2 Para colocar un elemento de corte, inserte el
saliente del elemento de corte en la ranura de
guía de la parte frontal y empuje la parte
posterior del elemento en el aparato ("clic").
Page 55

Desconexión del recortador para nariz
1
2
1 Coloque el dedo en la flecha de la parte
posterior del accesorio y empuje en la dirección
de la flecha para sacarlo del mango.
Conexión y desconexión de los peines-guía
1 Para colocar cualquier tipo de protector en un
elemento de corte, deslice la parte frontal del
protector sobre los dientes del elemento de
corte. A continuación, presione hacia abajo el
centro del protector con los dedos o con la
palma de la mano (oirá un "clic").
2 Para quitar cualquier tipo de peine del
elemento de corte, tire de la parte posterior con
cuidado y deslice el elemento de corte fuera
del aparato.
Nota: Cuando corte por primera vez, empiece
con la posición máxima de longitud de corte
para familiarizarse con el aparato.
Encendido y apagado del aparato
Para encender el aparato, mueva el botón de
encendido/apagado hacia arriba.
Para apagar el aparato, deslice el botón de
encendido/apagado hacia abajo.
Español
55
Accesorios para la barba
Recortador de pelo grande
Utilice el recortador de pelo grande sin peine-guía
para cortar el pelo al ras (a una longitud de 0,5mm
Page 56

= mm
Español
56
(1/32 pulg.) o para crear líneas limpias alrededor de
la barba, el cuello y las patillas.
1 Para cortar el pelo al cero, coloque el lado
plano del elemento de corte sobre la piel y
realice pasadas en dirección contraria a la del
crecimiento del pelo.
2 Para definir el contorno, mantenga el elemento
de corte perpendicular a la piel y muévalo
arriba o abajo presionando con suavidad.
Peines-guía para barba
Nota: Los accesorios suministrados pueden variar
en función del producto. La caja muestra los
accesorios suministrados con el aparato.
El aparato incluye un peine-guía ajustable y varios
peines-guía para barba. Las posiciones de
longitud del pelo se indican en los peines. Las
posiciones se corresponden con la longitud del
pelo que queda después de recortarlo.
Peine mm
Peine-guía para barba 1 mm
Peine-guía para barba 2mm
Peine-guía para barba 3mm
Peine-guía para barba 5mm
Peine-guía ajustable 3-7 mm
1 Coloque el peine-guía en el recortador de pelo
grande.
2 Peine-guía ajustable: Empuje el selector a la
izquierda o a la derecha para seleccionar la
longitud de corte que desee.
Page 57

3 Para cortar de la forma más eficaz, mueva el
peine-guía en dirección contraria a la del
crecimiento del pelo. Asegúrese de que la
superficie del peine esté siempre en contacto
con la piel.
Accesorios para el cuerpo
- Utilice el protector de cuerpo de color verde
para recortar el vello corporal.
- Asegúrese de que el vello esté limpio y seco, ya
que el vello húmedo tiende a pegarse al
cuerpo. En las zonas sensibles, utilice siempre
un protector de cuerpo.
- Puesto que no todo el vello crece en la misma
dirección, puede probar diferentes posiciones
de corte (es decir, hacia arriba, hacia abajo o en
diagonal). Practique para obtener mejores
resultados.
- Realice movimientos suaves y lentos en todo
momento y asegúrese de que el protector esté
siempre en contacto con la piel.
- Cuando se acumule demasiado vello en el
producto, elimínelo antes de seguir para
obtener mejores resultados de corte.
Peine-guía para el cuerpo
Coloque el peine-guía para el cuerpo en el
recortador de pelo grande para recortar el vello
por debajo del cuello. El aparato dispone de 1
peine-guía para el cuerpo. Las posiciones de
longitud del pelo se indican en el peine. Las
posiciones se corresponden con la longitud del
pelo que queda después de recortarlo.
Peine mm
Peine-guía para el cuerpo
(verde)
3mm
Español
57
Page 58

Español
58
1 Coloque el peine-guía para el cuerpo en el
recortador de pelo grande.
2 Para recortar de la forma más eficaz, estire la
piel con la mano libre y mueva el peine-guía en
dirección contraria a la del crecimiento del
vello. Asegúrese de que la superficie del peine
esté siempre en contacto con la piel.
Accesorios para la cabeza
Recortador de pelo grande
Utilice el recortador de pelo grande sin peine para
cortar el pelo muy próximo al cuero cabelludo (0,5
mm) o para perfilar la línea del cuello y la zona de
alrededor de la orejas.
1 Para perfilar la zona de alrededor de las orejas,
peine las puntas del pelo sobre las orejas.
2 Cuando perfile el contorno de la zona de las
orejas, incline el aparato de forma que solo un
extremo de las cuchillas toque las puntas del
pelo.
3 Para perfilar la línea del cuello o las patillas, dé
la vuelta al aparato y haga pasadas hacia abajo.
4 Mueva el aparato de manera lenta y suave
siguiendo la línea natural del pelo.
Peines para el cabello
Coloque un peine para el cabello en el recortador
de pelo grande para cortar el pelo de la cabeza de
manera uniforme. El aparato incluye 3 peines para
el cabello. Las posiciones de longitud del pelo se
indican en los peines. Las posiciones se
corresponden con la longitud del pelo que queda
después de recortarlo.
Peine mm
Page 59

Peine para el cabello 9mm
Peine para el cabello 12 mm
Peine para el cabello 16mm
1 Coloque un peine en el recortador de pelo
grande.
2 Mueva el recortador lentamente por la coronilla
en distintas direcciones para conseguir un
resultado uniforme. Asegúrese de que la
superficie del peine esté siempre en contacto
con la piel.
-
Mueva siempre el recortador en dirección
contraria a la del crecimiento del pelo.
Presione un poco.
-
Haga pasadas que se solapen por toda la
cabeza para asegurarse de cortar todo el
pelo que pretendía.
Accesorios para la cara
Recortador de precisión
Utilice el recortador de precisión para crear líneas
finas y contornos alrededor del óvalo facial a ras
de la piel (longitud de 0,5 mm o 1/32 pulg.).
1 Mantenga el cabezal de corte de precisión
perpendicular a la piel y muévalo hacia arriba o
hacia abajo presionando con suavidad.
Recortador para nariz
Utilice el recortador para cortar el pelo de la nariz y
las orejas.
- Asegúrese de que las fosas nasales estén
limpias. Asegúrese de que los canales auditivos
externos estén limpios y sin cera.
- No introduzca la punta más de 5 mm.
Español
59
Page 60

Español
60
- Limpie siempre el accesorio después de cada
uso.
Recorte del pelo de la nariz
1 Desplace suavemente la punta dentro y fuera
de la nariz mientras gira el recortador alrededor
para eliminar el vello no deseado.
Recorte del pelo de las orejas
1 Mueva lentamente la punta alrededor de la
oreja para eliminar los pelos que sobresalen.
2 Mueva suavemente la punta dentro y fuera del
canal auditivo externo para eliminar el vello no
deseado.
Limpieza
No enjuague el mango bajo el grifo; los accesorios
son los únicos que pueden enjuagarse bajo el
grifo.
No utilice estropajos, agentes abrasivos ni
líquidos agresivos para limpiar el producto, como
alcohol, gasolina o acetona.
Nunca seque los dientes del recortador con una
toalla o servilleta, ya que podría dañar los
dientes.
Después de cada uso: limpieza con agua del grifo
1 Apague el aparato y desconéctelo de la toma
de corriente.
2 Quite cualquier peine o elemento de corte que
haya en el aparato.
3 Enjuague la cámara de recogida del pelo con
agua del grifo tibia.
Page 61

4 Limpie el elemento de corte y el peine-guía con
agua del grifo tibia.
5 Sacuda el exceso de agua con cuidado y deje
que todas las piezas se sequen por completo.
Limpieza a fondo
1 Apague el aparato y desconéctelo de la toma
de corriente.
2 Limpie el mango del aparato con un paño seco.
3 Quite cualquier peine o elemento de corte que
haya en el aparato.
4 Quite los pelos que se hayan acumulado en la
cámara de recogida del pelo con el cepillo de
limpieza suministrado.
5 Quite los pelos que se hayan acumulado en los
elementos de corte o los peines con el cepillo
de limpieza suministrado.
6 Limpie los elementos de corte con agua del
grifo tibia.
El mango no puede limpiarse con agua del
grifo.
7 Limpie los peines-guía con agua del grifo tibia.
8 Sacuda el exceso de agua con cuidado y deje
que todas las piezas se sequen por completo.
Limpieza del recortador para nariz
Limpie el recortador para nariz inmediatamente
después de usarlo o cuando se haya acumulado
mucho pelo o suciedad en el cabezal del
recortador.
Español
61
Page 62

Español
62
1 Enjuague el cabezal del recortador para nariz
con agua caliente.
2 Encienda el aparato y enjuague el cabezal del
recortador para nariz una vez más para eliminar
el pelo restante. A continuación, apague el
aparato otra vez.
Para limpiarlo bien, sumerja el cabezal del
recortador para nariz en un recipiente con agua
tibia durante unos minutos y, a continuación,
encienda el aparato para eliminar el pelo o la
suciedad resistente.
3 Sacuda el exceso de agua con cuidado y deje
que todas las piezas se sequen por completo.
Almacenamiento
- Guarde el aparato en la funda suministrada.
Nota: Asegúrese de que el aparato esté seco
antes de guardarlo en el estuche.
Solicitud de accesorios
Para comprar accesorios o piezas de repuesto,
visite www.philips.com/parts-and-accessories o
acuda a su distribuidor de Philips. También puede
ponerse en contacto con el Servicio de Atención al
Cliente de Philips en su país (consulte los datos de
contacto en el folleto de la garantía internacional).
Reciclaje
- Este símbolo significa que este producto no
debe desecharse con la basura normal del
hogar (2012/19/UE).
Page 63

- Este símbolo significa que este producto
contiene una batería recargable integrada, que
no debe desecharse con los residuos
domésticos normales (2006/66/EC). Lleve el
producto a un punto de recogida oficial o a un
centro de asistencia de Philips para que un
profesional extraiga la batería recargable.
- Siga la normativa de su país para la recogida
selectiva de productos eléctricos y electrónicos
y de baterías recargables. El desechado
correcto ayuda a evitar consecuencias
negativas para el medio ambiente y la salud
humana.
Cómo extraer la batería recargable
No quite la batería recargable hasta que
deseche el producto. Antes de extraer la
batería, asegúrese de que el producto esté
desconectado de la toma de corriente y de
que la batería esté completamente vacía.
Tome las precauciones de seguridad
necesarias cuando maneje herramientas
para abrir el producto y se deshaga de la
batería recargable.
1 Compruebe si hay tornillos en la parte posterior
o frontal del aparato. Si es así, quítelos.
2 Quite el panel trasero o frontal del aparato con
un destornillador. Si es necesario, quite también
otros tornillos o piezas hasta que vea el circuito
impreso con la batería recargable.
3 Extraiga la batería recargable.
Español
63
Page 64

Español
64
Garantía y asistencia
Si necesita asistencia o información, visite
www.philips.com/support o lea el folleto de
garantía internacional.
Restricciones de la garantía
Las unidades de corte no están cubiertas por los
términos de la garantía internacional debido a que
están sujetas a desgaste.
Page 65

Introduction
Félicitations pour votre achat et bienvenue dans
l'univers Philips! Pour profiter pleinement de
l'assistance offerte par Philips, enregistrez votre
produit à l'adresse suivante:
www.philips.com/welcome.
Description générale (fig. 1)
1 Tondeuse nez (MG3710, MG3711, MG3712,
MG3721, MG3720, MG3730, MG3731, MG3740,
MG3747, MG3748, MG3757 uniquement)
2 Tondeuse de précision (MG3740, MG3757
uniquement)
3 Tondeuse large
4 Bouton marche/arrêt
5 Prise pour petite fiche
6 Sabot pour cheveux (9mm) (MG3720, MG3721,
MG3730, MG3731, MG3740, MG3747, MG3748,
MG3757 uniquement)
7 Sabot pour cheveux (12mm) (MG3730, MG3740,
MG3747, MG3757, MG3731, MG3748
uniquement)
8 Sabot pour cheveux (16mm) (MG3730, MG3740,
MG3747, MG3757, MG3731, MG3748
uniquement)
9 Sabot barbe de trois jours (1mm) (MG3710,
MG3711, MG3712, MG3720, MG3721, MG3730,
MG3731, MG3740, MG3747, MG3748, MG3757
uniquement)
10 Sabot barbe de trois jours (2mm) (MG3710,
MG3711, MG3720, MG3721, MG3730, MG3731,
MG3740, MG3747, MG3748, MG3757
uniquement)
11 Sabot barbe 3mm (MG3710, MG3711, MG3712,
MG3720, MG3721 uniquement)
12 Sabot barbe 5mm (MG3710, MG3711, MG3712,
MG3720, MG3721 uniquement)
Français
65
Français
Page 66

Français
66
13 Sabot réglable (3-7mm) (MG3730, MG3731,
MG3740, MG3747, MG3748, MG3757
uniquement)
14 Sabot corps (3mm) (MG3747, MG3748
uniquement)
15 Bloc d’alimentation
16 Petite fiche
17 Affichage de rangement (MG3711 MG3712,
MG3721, MG3731, MG3748 uniquement)
18 Brosse nettoyante
Les accessoires fournis peuvent varier selon les
différents produits. Les accessoires qui ont été
fournis avec votre appareil sont indiqués sur
l’emballage.
Informations de sécurité importantes
Lisez attentivement ces informations importantes
avant d'utiliser l'appareil et ses accessoires et
conservez-les pour un usage ultérieur. Les
accessoires fournis peuvent varier selon les
différents produits.
Danger
- Gardez le bloc d’alimentation
au sec.
Avertissement
- Pour charger la batterie, veuillez
uniquement utiliser le bloc d’alimentation
amovible (A00390) fourni avec l’appareil.
Page 67

Français
67
- Le bloc d’alimentation contient un
transformateur. N’essayez pas de remplacer
le bloc d’alimentation par une autre fiche
afin d’éviter tout accident.
- Cet appareil peut être utilisé par des enfants
âgés de 8ans ou plus, des personnes dont
les capacités physiques, sensorielles ou
intellectuelles sont réduites ou des
personnes manquant d'expérience et de
connaissances, à condition que ces enfants
ou personnes soient sous surveillance ou
qu'ils aient reçu des instructions quant à
l'utilisation sécurisée de l'appareil et qu'ils
aient pris connaissance des dangers
encourus. Les enfants ne doivent pas jouer
avec l'appareil. Le nettoyage et l'entretien
ne doivent pas être effectués par des
enfants sans surveillance.
- Vérifiez toujours l'appareil avant utilisation.
Afin d'éviter tout accident, n'utilisez pas
l'appareil s'il est endommagé. Remplacez
toujours une pièce endommagée par une
pièce du même type.
- N'ouvrez pas l'appareil pour remplacer la
pile rechargeable.
Page 68

Français
68
Attention
- Cet appareil n'est pas lavable à
l'eau.Ne plongez jamais
l'appareil dans l'eau et ne le
rincez pas sous l'eau.
- N'utilisez pas cet appareil à
d'autres fins que celles pour
lesquelles il a été conçu (voir le
mode d'emploi).
- Pour des raisons d'hygiène,
l'appareil doit être utilisé par
une seule personne.
- N'utilisez jamais d'air comprimé,
de tampons à récurer, de
produits abrasifs ou de
détergents agressifs tels que de
l'essence ou de l'acétone pour
nettoyer l'appareil.
Page 69

- N’utilisez pas le bloc
d’alimentation dans ou à
proximité de prises murales qui
contiennent un assainisseur
d’air électrique, afin d’éviter que
le bloc d’alimentation ne
subisse des dommages
irréversibles.
Champs électromagnétiques (CEM)
Cet appareil Philips est conforme à toutes les
normes et à tous les règlements applicables
relatifs à l'exposition aux champs
électromagnétiques.
Informations d'ordre général
- Le bloc d'alimentation est conçu pour une
tension secteur comprise entre 100V et 240V.
- Le bloc d’alimentation transforme la tension de
100-240V en une tension de sécurité de moins
de 24V.
Charge
Lorsque l'appareil a chargé pendant 16heures, il a
une autonomie sans fil de 60minutes (MG3710,
MG3711, MG3712, MG3720, MG3721, MG3730,
MG3731, MG3740) or 70 minutes (MG3757, MG3748,
MG3747).
1 Assurez-vous que l'appareil est éteint.
Français
69
Page 70

1
2
Français
70
2 Insérez la petite fiche dans l'appareil et
branchez le bloc d'alimentation sur la prise
secteur.
3 Une fois la charge terminée, débranchez le bloc
d'alimentation de la prise murale, puis retirez la
petite fiche de l'appareil.
Utilisation de l'appareil
Remarque: Éteignez l'appareil et nettoyez-le
après chaque utilisation.
Fixation et retrait des blocs tondeuses
1 Pour retirer un bloc tondeuse, poussez vers le
haut, sur les dents du bloc tondeuse et retirezle du manche.
2 Pour fixer un bloc tondeuse, insérez la
languette du bloc tondeuse dans la fente
prévue à l'avant et poussez l'arrière du bloc
tondeuse sur l'appareil («clic»).
Retrait de la tondeuse nez
1 Placez votre doigt sur la flèche située à l'arrière
de l'accessoire et poussez sur celui-ci pour le
séparer du manche dans le sens de la flèche.
Page 71

Fixation et retrait des sabots
1
2
1 Pour fixer tout type de grille sur un bloc
tondeuse, faites glisser la partie avant de la
grille sur les dents du bloc tondeuse. Abaissez
ensuite le centre de la grille avec les doigts ou
la paume de la main («clic»).
2 Pour retirer tout type de sabot du bloc
tondeuse, tirez avec précaution sur sa partie
arrière pour le séparer de l'appareil, puis faitesle glisser pour le séparer du bloc tondeuse.
Remarque: Lors de la première utilisation,
commencez par utiliser le sabot avec le réglage
de longueur maximum pour vous familiariser
avec l'appareil.
Mise en marche et arrêt de l’appareil
Pour allumer l'appareil, déplacez le bouton
marche/arrêt vers le haut.
Pour éteindre l'appareil, déplacez le bouton
marche/arrêt vers le bas.
Accessoires pour la barbe
Tondeuse large
Utilisez la tondeuse large en métal sans sabot pour
tondre au plus près de la peau à une longueur de
coupe de 0,5mm (1/32po) ou pour créer des
lignes nettes autour de votre barbe, au niveau du
cou et des favoris.
Français
71
Page 72

= mm
Français
72
1 Pour une tonte confortable au plus près de la
peau, placez la partie plate du bloc tondeuse
contre votre peau et déplacez l'appareil dans le
sens inverse de la pousse.
2 Pour dessiner les contours, maintenez le bloc
tondeuse en position perpendiculaire à la peau
et déplacez-le de haut en bas avec de légères
pressions.
Sabots pour barbe
Remarque: Les accessoires fournis peuvent varier
selon les différents produits. Les accessoires qui
ont été fournis avec votre appareil sont indiqués
sur l’emballage.
L'appareil est livré avec plusieurs sabots pour
barbe et un sabot réglable. Les réglages de la
longueur de coupe sont indiqués sur les sabots.
Les réglages correspondent à la longueur des
cheveux après la tonte.
Sabot mm
Sabot «barbe de 3 jours» 1mm
Sabot «barbe de 3 jours» 2mm
Sabot «barbe de 3 jours» 3mm
Sabot «barbe de 3 jours» 5mm
Sabot réglable 3 à 7mm
1 Fixez le sabot sur la tondeuse large.
2 Sabot réglable: Poussez sur le sélecteur de
hauteur de coupe vers la gauche ou la droite
pour sélectionner le réglage de la longueur de
coupe souhaité.
Page 73

3 Pour obtenir des résultats optimaux, déplacez
le sabot dans le sens inverse de la pousse des
poils. Veillez à ce que le sabot reste toujours en
contact avec la peau.
Accessoires pour le corps
- Utilisez l'élément de protection vert pour tondre
les poils du corps.
- Assurez-vous que les poils sont propres et secs
car les cheveux mouillés ont tendance à
adhérer à la peau. Lorsque vous effectuez la
tonte de zones sensibles, utilisez toujours un
élément de protection pour le corps.
- Étant donné que tous les poils ne poussent pas
dans le même sens, vous pouvez essayer des
positions de tonte différentes (c'est-à-dire vers
le haut, vers le bas, ou en travers). Il est
préférable de s'entraîner pour obtenir les
meilleurs résultats.
- Effectuez toujours des mouvements uniformes
et tout en douceur et veillez à ce que la surface
de l'élément de protection reste toujours en
contact avec votre peau.
- Si trop de poils se sont accumulés sur le
produit, retirez-les en soufflant avant utilisation
pour de meilleurs résultats.
Sabot corps
Fixez le sabot corps sur la tondeuse large pour
tailler les poils situés sous la nuque. L'appareil est
fourni avec 1sabot corps. Le réglage de la longueur
de coupe est indiqué sur les sabots. Le réglage
correspond à la longueur des cheveux après la
tonte.
Sabot mm
Français
73
Page 74

Français
74
Sabot corps (vert) 3mm
1 Fixez le sabot corps sur la tondeuse large.
2 Pour obtenir des résultats optimaux, tendez la
peau avec votre main libre et déplacez le sabot
dans le sens inverse de la pousse des poils.
Veillez à ce que le sabot reste toujours en
contact avec la peau.
Accessoires pour la tête
Tondeuse large
Vous pouvez utiliser la tondeuse large sans sabot
pour couper les cheveux au plus près du cuir
chevelu (1/32po, 0,5mm) ou pour tondre les
contours de la nuque et le tour des oreilles.
1 Pour tondre le contour des oreilles, peignez les
cheveux vers celles-ci.
2 Inclinez l'appareil de manière à ce que seul un
côté des lames de la tondeuse touche les
pointes des cheveux lorsque vous dessinez le
contour des oreilles.
3 Pour tondre la nuque ou les favoris, retournez
l'appareil et déplacez-le vers le bas.
4 Déplacez l'appareil lentement en suivant
l'implantation des cheveux.
Sabots cheveux
Fixez un sabot cheveux sur la tondeuse large pour
couper uniformément les cheveux sur votre tête.
L'appareil est fourni avec 3sabots cheveux. Les
réglages de la longueur de coupe sont indiqués
sur les sabots. Les réglages correspondent à la
longueur des cheveux après la tonte.
Sabot mm
Page 75

Sabot cheveux 9mm
Sabot cheveux 12mm
Sabot cheveux 16mm
1 Fixez un sabot sur la tondeuse large.
2 Pour garantir un résultat uniforme, déplacez la
tondeuse lentement sur le crâne dans
différentes directions. Veillez à ce que le sabot
reste toujours en contact avec la peau.
-
Déplacez toujours la tondeuse dans le sens
inverse de la pousse. Appuyez légèrement.
-
Effectuez plusieurs passages pour vous
assurer que la tondeuse a coupé toutes les
mèches rebelles.
Accessoires de précision pour le visage
Tondeuse de précision
Utilisez la tondeuse de précision pour créer de
fines lignes et dessiner les contours pour parfaire
le style de votre visage, au plus près de la peau
(longueur de coupe de 1/32po/0,5mm).
1 Maintenez la tête de tonte en position
perpendiculaire à la peau et déplacez-la de
haut en bas avec de légères pressions.
Tondeuse nez
Utilisez la tondeuse nez pour tondre les poils de
votre nez et de vos oreilles.
- Veillez à ce que vos voies nasales soient
propres. Assurez-vous que vos oreilles sont
propres.
- N'introduisez pas l'embout à plus de 5mm.
- Nettoyez toujours l'accessoire après chaque
utilisation.
Français
75
Page 76

Français
76
Coupe des poils du nez
1 Effectuez des mouvements lents vers l'intérieur
et l'extérieur du nez en faisant pivoter
l'accessoire pour couper les poils.
Coupe des poils des oreilles
1 Déplacez lentement l'accessoire autour de
l'oreille pour couper les poils superflus autour
du pavillon de l'oreille.
2 Effectuez des mouvements lents vers l'intérieur
et l'extérieur de l'oreille pour couper les poils.
Nettoyage
Ne rincez pas le manche sous l'eau du robinet,
seuls les accessoires peuvent être rincés sous
l'eau du robinet.
N’utilisez jamais d'éponge à récurer, de produits
abrasifs ou de détergents agressifs tels que de
l’essence ou de l’acétone pour nettoyer le
produit.
Ne séchez jamais les dents de la tondeuse à l'aide
d'une serviette ou d'un mouchoir, car vous
risqueriez de les endommager.
Après chaque utilisation: nettoyage sous le robinet
1 Éteignez l'appareil et débranchez-le de la prise
secteur.
2 Retirez le sabot ou bloc tondeuse de l'appareil.
3 Rincez le collecteur de poils à l'eau chaude.
Page 77

4 Nettoyez le bloc tondeuse et le sabot sous le
robinet d'eau chaude.
5 Retirez l'excès d'eau en secouant l'accessoire,
puis laissez sécher toutes les pièces.
Nettoyage en profondeur
1 Éteignez l'appareil et débranchez-le de la prise
secteur.
2 Essuyez le manche de l'appareil à l'aide d'un
chiffon sec.
3 Retirez le sabot ou bloc tondeuse de l'appareil.
4 Retirez les poils qui se sont accumulés dans le
collecteur de poils avec la brosse de nettoyage
fournie.
5 Retirez les poils qui se sont accumulés dans les
blocs tondeuses et/ou les sabots avec la brosse
de nettoyage fournie.
6 Nettoyez les blocs tondeuses sous le robinet
d'eau chaude.
Le manche n'est pas conçu pour être nettoyé
sous le robinet.
7 Nettoyez les sabots sous le robinet d'eau
chaude.
8 Retirez l'excès d'eau en secouant l'accessoire,
puis laissez sécher toutes les pièces.
Nettoyage de la tondeuse nez
Nettoyez la tondeuse nez immédiatement après
utilisation ou lorsqu'une quantité importante de
poils ou de poussière s'est accumulée dans la tête
de l'accessoire.
Français
77
Page 78

Français
78
1 Rincez la tête de la tondeuse nez à l'eau
chaude.
2 Allumez l'appareil et rincez-la à nouveau pour
enlever les poils restants. Éteignez ensuite
l'appareil.
Pour un nettoyage en profondeur, plongez la tête
de la tondeuse nez dans un bol d'eau chaude
pendant quelques minutes, puis allumez l'appareil
pour éliminer les poils/débris accumulés.
3 Retirez l'excès d'eau en secouant l'accessoire,
puis laissez sécher toutes les pièces.
Rangement
- Rangez l'appareil dans la housse fournie.
Remarque: Assurez-vous que l'appareil est sec
avant de le ranger dans l'étui.
Commande d’accessoires
Pour acheter des accessoires ou des pièces de
rechange, consultez le site Web
www.philips.com/parts-and-accessories ou
rendez-vous chez votre revendeur Philips. Vous
pouvez également contacter le Service
Consommateurs Philips de votre pays (consultez le
dépliant de garantie internationale pour obtenir
les coordonnées).
Recyclage
- Ce symbole signifie que ce produit ne doit pas
être jeté avec les déchets ménagers
(2012/19/EU).
Page 79

- Ce symbole signifie que ce produit contient une
batterie rechargeable intégrée, qui ne doit pas
être mise au rebut avec les déchets ménagers
(2006/66/CE). Veuillez déposer votre produit
dans un point de collecte agréé ou un centre de
service après-vente Philips pour faire retirer la
batterie rechargeable par un professionnel.
- Respectez les réglementations de votre pays
concernant la collecte séparée des appareils
électriques et électroniques et des piles
rechargeables. La mise au rebut appropriée des
piles permet de protéger l'environnement et la
santé.
Retrait de la pile rechargeable
Ne retirez la pile rechargeable que lorsque
vous mettez le produit au rebut. Avant
d'enlever la pile, assurez-vous que le
produit est débranché de la prise secteur et
que la pile est complètement vide.
Respectez toutes les mesures de sécurité
nécessaires lorsque vous utilisez des outils
pour ouvrir le produit et lorsque vous jetez
la pile rechargeable.
1 Vérifiez si des vis sont présentes à l'arrière ou à
l'avant de l'appareil. Si c'est le cas, enlevez-les.
2 Retirez le panneau arrière et/ou avant de
l'appareil à l'aide d'un tournevis. Si nécessaire,
retirez également toute vis et/ou pièce
supplémentaire jusqu'à ce que le circuit
imprimé et la pile rechargeable soient visibles.
3 Retirez la pile rechargeable.
Français
79
Page 80

Français
80
Garantie et assistance
Si vous avez besoin d'une assistance ou
d'informations supplémentaires, consultez le site
Web www.philips.com/support ou lisez le dépliant
sur la garantie internationale.
Limites de la garantie
En raison de l'usure normale du bloc tondeuse, ce
dernier n'est pas couvert par la garantie
internationale.
Page 81

Introduzione
Congratulazioni per l'acquisto e benvenuti in
Philips! Per trarre il massimo vantaggio
dall'assistenza fornita da Philips, registrate il vostro
prodotto sul sito www.philips.com/welcome.
Descrizione generale (Fig. 1)
1 Rifinitore per naso (solo MG3710, MG3711,
MG3712, MG3721, MG3720, MG3730, MG3731,
MG3740, MG3747, MG3748, MG3757)
2 Rifinitore di precisione (solo MG3740, MG3757)
3 Rifinitore completo
4 Cursore on/off
5 Presa spinotto
6 Pettine (9 mm) (solo MG3720, MG3721, MG3730,
MG3731, MG3740, MG3747, MG3748, MG3757)
7 Pettine (12 mm) (solo MG3730, MG3740,
MG3747, MG3757, MG3731, MG3748)
8 Pettine (16 mm) (solo MG3730, MG3740,
MG3747, MG3757, MG3731, MG3748)
9 Pettine per peli corti (1 mm) (solo MG3710,
MG3711, MG3712, MG3720, MG3721, MG3730,
MG3731, MG3740, MG3747, MG3748, MG3757)
10 Pettine per peli corti (2 mm) (solo MG3710,
MG3711, MG3720, MG3721, MG3730, MG3731,
MG3740, MG3747, MG3748, MG3757)
11 Pettine per peli corti 3 mm (solo MG3710,
MG3711, MG3712, MG3720, MG3721)
12 Pettine per peli corti 5 mm (solo MG3710,
MG3711, MG3712, MG3720, MG3721)
13 Pettine regolabile (3-7 mm) (solo MG3730,
MG3731, MG3740, MG3747, MG3748, MG3757)
14 Pettine per il corpo (3 mm) (solo MG3747,
MG3748)
15 Unità di alimentazione
16 Spinotto
17 Display (solo MG3711, MG3712, MG3721, MG3731,
MG3748)
Italiano
81
Italiano
Page 82

Italiano
82
18 Spazzolina per la pulizia
Gli accessori forniti potrebbero variare a seconda
del prodotto. La confezione mostra gli accessori
forniti con l'apparecchio.
Informazioni di sicurezza importanti
Prima di utilizzare l'apparecchio e i relativi
accessori, leggete attentamente queste
informazioni importanti e conservatele per
eventuali riferimenti futuri. Gli accessori forniti
potrebbero variare a seconda del prodotto.
Pericolo
- Tenete l'unità di alimentazione
lontano dall'acqua.
Avvertenza
- Per ricaricare la batteria, utilizzate solo
l'unità di alimentazione rimovibile (A00390)
fornita in dotazione con l'apparecchio.
- L'unità di alimentazione contiene un
trasformatore. Non tagliate l'unità di
alimentazione per sostituirla con un'altra
spina onde evitare situazioni pericolose.
Page 83

Italiano
- Questo apparecchio può essere usato da
bambini a partire da 8 anni di età e da
persone con capacità mentali, fisiche o
sensoriali ridotte, prive di esperienza o
conoscenze adatte a condizione che tali
persone abbiano ricevuto assistenza o
formazione per utilizzare l'apparecchio in
maniera sicura e capiscano i potenziali
pericoli associati a tale uso. Evitate che i
bambini giochino con l'apparecchio. La
manutenzione e la pulizia non devono
essere eseguite da bambini se non in
presenza di un adulto.
- Controllate sempre l'apparecchio prima di
utilizzarlo. Per evitare il rischio di lesioni, non
utilizzate l'apparecchio nel caso in cui sia
danneggiato. Sostituite sempre le parti
danneggiate con ricambi originali.
- Non aprite l'apparecchio per sostituire la
batteria ricaricabile.
83
Attenzione
- L'apparecchio non può essere
lavato.Non immergetelo mai in
acqua né sciacquatelo con
acqua corrente.
Page 84

84
Italiano
- Utilizzate questo apparecchio
per lo scopo previsto come
indicato nel manuale
dell'utente.
- Per motivi igienici, l'apparecchio
deve essere usato da una sola
persona.
- Non usate aria compressa,
prodotti o sostanze abrasive o
detergenti aggressivi, come
benzina o acetone, per pulire
l'apparecchio.
- Per evitare danni irreparabili,
non usate l'unità di
alimentazione in o vicino a
prese a muro che contengono o
hanno contenuto un
deodorante elettrico per
ambienti.
Campi elettromagnetici (EMF)
Questo apparecchio Philips è conforme a tutti gli
standard e alle norme relativi all'esposizione ai
campi elettromagnetici.
Indicazioni generali
- L'unità di alimentazione funziona con tensioni
comprese fra 100 e 240 V.
Page 85

- L'unità di alimentazione consente di
1
2
trasformare la tensione a 100-240 volt in una
tensione più bassa e sicura inferiore a 24 volt.
Come ricaricare il dispositivo
Dopo essere rimasto in carica per 16 ore,
l'apparecchio ha un'autonomia difunzionamento
senza filodi circa 60 minuti (MG3710, MG3711,
MG3712, MG3720, MG3721, MG3730, MG3731,
MG3740) o 70 minuti (MG3757, MG3748, MG3747).
1 Controllate che l'apparecchio sia spento.
2 Inserire lo spinotto nell'apparecchio e collegare
l'unità di alimentazione alla presa di corrente.
3 Dopo la ricarica, scollegare l'unità di
alimentazione dalla presa di corrente ed
estrarre lo spinotto dall'apparecchio.
Modalità d'uso dell'apparecchio
Nota: Spegnete l'apparecchio e pulitelo dopo ogni
uso.
Rimozione e inserimento delle testine
1 Per rimuovere una testina, spingere verso l'alto
contro i denti della testina ed estrarla
dall'impugnatura.
Italiano
85
2 Per inserire una testina, introdurre la linguetta
della testina nella fessura guida sulla parte
anteriore e spingere la parte posteriore della
testina sull'apparecchio ("clic").
Page 86

1
2
Italiano
86
Rimozione del rifinitore per naso
1 Posizionare il dito sulla freccia sul retro
dell'accessorio e staccare quest'ultimo
dall'impugnatura premendo nella direzione
della freccia.
Inserimento e rimozione dei pettini
1 Per inserire qualsiasi tipo di dispositivo di
protezione su una testina, fare scorrere la parte
anteriore del dispositivo di protezione sui denti
della testina. Premere quindi il centro del
dispositivo di protezione con le dita o con il
palmo della mano ("clic").
2 Per rimuovere qualsiasi tipo di pettine dalla
testina, staccarne con attenzione la parte
posteriore dall'apparecchio e quindi estrarre il
pettine facendolo scorrere dalla testina.
Nota: al primo utilizzo, impostare il pettine sulla
lunghezza massima di taglio per prendere
confidenza con l'apparecchio.
Accensione e spegnimento dell'apparecchio
Per accendere l'apparecchio, fare scorrere il tasto
on/off verso l'alto.
Per spegnere l'apparecchio, fare scorrere il tasto
on/off verso il basso.
Accessori per l'uso sulla barba
Rifinitore completo
Utilizzare il rifinitore completo senza pettine per
rifinire i peli vicino alla pelle (a una lunghezza di
Page 87

0,5 mm) o per creare linee pulite attorno alla
= mm
barba, al collo e alle basette.
1 Per rifinire i peli vicino alla pelle, posizionare il
lato piatto della testina contro la pelle ed
eseguire movimenti in direzione contraria a
quella della crescita dei peli.
2 Per rifinire i contorni, tenere la testina in
posizione perpendicolare alla pelle ed eseguire
movimenti verso l'alto e verso il basso
esercitando una leggera pressione.
Pettini regolabarba
Nota: Gli accessori forniti potrebbero variare a
seconda del prodotto. La confezione mostra gli
accessori forniti con l'apparecchio.
L'apparecchio viene fornito con più pettini per peli
corti e un pettine regolabile. Le impostazioni di
lunghezza dei peli sono indicate sui pettini. Le
impostazioni corrispondono alla lunghezza dei peli
restante dopo il taglio.
Pettine mm
Pettine per peli corti 1 mm
Pettine per peli corti 2 mm
Pettine per peli corti 3 mm
Pettine per peli corti 5 mm
Pettine regolabile 3-7 mm
1 Inserire il pettine nel rifinitore completo.
2 Pettine regolabile: spostare il selettore della
lunghezza verso sinistra o verso destra per
selezionare l'impostazione di lunghezza
desiderata.
Italiano
87
Page 88

Italiano
88
3 Per ottenere un risultato ottimale, muovere il
pettine in direzione contraria a quella della
crescita dei peli. Assicurarsi che la superficie del
pettine sia sempre a contatto con la pelle.
Accessori per l'uso sul corpo
- Utilizzare il dispositivo di protezione del corpo
verde per rifinire i peli del corpo.
- Verificare che i peli siano puliti e asciutti, poiché
i peli bagnati tendono ad attaccarsi al corpo, e
utilizzare sempre un dispositivo di protezione
del corpo quando si rifiniscono aree sensibili.
- Poiché non tutti i peli crescono nella stessa
direzione, si consiglia di provare diverse
posizioni di rifinitura (ad esempio verso l'alto,
verso il basso o trasversalmente). La pratica è la
cosa migliore per ottenere risultati ottimali.
- Eseguire sempre movimenti uniformi e delicati
e assicurarsi che la superficie del dispositivo di
protezione sia sempre a contatto con la pelle.
- Quando sul prodotto si sono accumulati troppi
peli, soffiare sui peli per rimuoverli, in modo da
ottenere i migliori risultati di rifinitura.
Pettine per il corpo
Inserire il pettine per il corpo nel rifinitore
completo per rifinire i peli al di sotto del collo.
L'apparecchio viene fornito con 1 pettine per il
corpo. L'impostazione di lunghezza dei peli è
indicata sul pettine. L'impostazione corrisponde
alla lunghezza dei peli restante dopo il taglio.
Pettine mm
Pettine per il corpo (verde) 3 mm
Page 89

1 Inserire il pettine per il corpo nel rifinitore
completo.
2 Per ottenere un risultato ottimale, tendere la
pelle con la mano libera e muovere il pettine in
direzione contraria a quella della crescita dei
peli. Assicurarsi che la superficie del pettine sia
sempre a contatto con la pelle.
Accessori per l'uso sulla testa
Rifinitore completo
Usare il rifinitore completo senza pettine per
tagliare i capelli molto corti (0,5 mm) o per rifinire i
contorni del collo e la zona intorno alle orecchie.
1 Per rifinire i contorni intorno alle orecchie,
pettinare le punte dei capelli sulle orecchie.
2 Inclinare l'apparecchio in modo che solo un
margine delle lame sfiori l'estremità dei capelli
quando si procede alla rifinitura della zona
attorno alle orecchie.
3 Per rifinire la nuca o le basette, girare
l'apparecchio ed eseguire movimenti verso il
basso.
4 Eseguire movimenti lenti e uniformi seguendo
la linea naturale dei capelli.
Pettini
Inserire un pettine nel rifinitore completo per
tagliare uniformemente i capelli. L'apparecchio
viene fornito con 3 pettini. Le impostazioni di
lunghezza dei peli sono indicate sui pettini. Le
impostazioni corrispondono alla lunghezza dei peli
restante dopo il taglio.
Pettine mm
Pettine per capelli 9 mm
Italiano
89
Page 90

Italiano
90
Pettine per capelli 12 mm
Pettine per capelli 16 mm
1 Inserire un pettine nel rifinitore completo.
2 Muovere lentamente il rifinitore sulla sommità
della testa da varie direzioni, per ottenere un
risultato uniforme. Assicurarsi che la superficie
del pettine sia sempre a contatto con la pelle.
-
Muovere sempre il rifinitore in direzione
contraria a quella della crescita dei capelli.
Esercitare una leggera pressione.
-
Passare sulla stessa zona più volte in modo
da essere sicuri di tagliare tutti i capelli.
Accessori di precisione per l'uso sul viso
Rifinitore di precisione
Utilizzare il rifinitore di precisione per creare linee
sottili e delineare il viso, vicino alla pelle (a una
lunghezza di 0,5 mm).
1 Tenere la testina di precisione in posizione
perpendicolare alla pelle e passarla verso l'alto
e il basso esercitando una leggera pressione.
Rifinitore per naso
Utilizzare il rifinitore per naso per rifinire i peli del
naso e delle orecchie.
- Assicurarsi che le vie nasali siano pulite.
Accertarsi che le orecchie siano pulite e prive di
cerume.
- Non inserire la punta per più di 5 mm.
- Pulire sempre l'accessorio dopo ogni utilizzo.
Page 91

Come regolare i peli del naso
1 Passare delicatamente la punta dentro e fuori
naso ruotandola per rimuovere i peli superflui.
Come regolare i peli delle orecchie
1 Passate lentamente la punta attorno
all'orecchio per rimuovere i peli che fuoriescono
dal bordo dell'orecchio.
2 Passare delicatamente la punta all'interno e
all'esterno del padiglione auricolare per
rimuovere i peli superflui.
Pulizia
Non risciacquare l'impugnatura sotto l'acqua
corrente, solo gli accessori possono essere
risciacquati sotto l'acqua corrente.
Non usare spugnette abrasive, detergenti abrasivi
o liquidi aggressivi, come benzina o acetone, per
pulire il prodotto.
Non asciugare mai i dentini del rifinitore con un
asciugamano o un fazzolettino di carta, poiché
questo potrebbe danneggiare i dentini del
rifinitore.
Dopo ogni uso: pulire sotto acqua corrente
1 Spegnere l'apparecchio e scollegarlo dalla
presa di corrente a muro.
2 Rimuovere eventuali pettini o la testina
dall'apparecchio.
3 Sciacquare il vano di raccolta peli sotto l'acqua
corrente calda.
Italiano
91
Page 92

Italiano
92
4 Pulire la testina e il pettine sotto l'acqua calda
corrente.
5 Scuotere per eliminare accuratamente l'acqua
in eccesso e lasciare asciugare tutte le parti
all'aria completamente.
Pulizia accurata
1 Spegnere l'apparecchio e scollegarlo
dall'alimentazione principale.
2 Pulire l'impugnatura dell'apparecchio con un
panno asciutto.
3 Rimuovere eventuali pettini o testine
dall'apparecchio.
4 Rimuovere i peli che si sono accumulati nel
vano di raccolta peli con la spazzolina per la
pulizia fornita in dotazione.
5 Rimuovere i peli che si sono accumulati nelle
testine e/o nei pettini con la spazzolina per la
pulizia fornita in dotazione.
6 Pulire le testine sotto l'acqua corrente calda.
L'impugnatura non è adatta per essere pulita
sotto l'acqua corrente.
7 Pulire i pettini sotto l'acqua corrente calda.
8 Scuotere per eliminare accuratamente l'acqua
in eccesso e lasciare asciugare completamente
tutte le parti all'aria.
Pulizia del rifinitore naso
Pulire il rifinitore per il naso subito dopo l'uso e
quando i peli o sporcizia si accumulano sulla
testina di precisione per il naso.
Page 93

1 Sciacquare la testina di precisione per naso con
acqua calda corrente.
2 Accendere l'apparecchio e sciacquare di nuovo
la testina di precisione per il naso per rimuovere
eventuali peli residui. Spegnere nuovamente
l'apparecchio.
Per una pulizia accurata, immergere la testina di
precisione per il naso in una ciotola con acqua
calda per qualche minuto e quindi accendere
l'apparecchio per rimuovere i peli più
resistenti/residui.
3 Scuotere per eliminare accuratamente l'acqua
in eccesso e lasciare asciugare tutte le parti
all'aria completamente.
Conservazione
- riporre l'apparecchio nell'apposita custodia.
Nota: assicuratevi che l'apparecchio sia asciutto
prima di riporlo nella custodia.
Ordinazione degli accessori
Per acquistare accessori o parti di ricambio,
visitate il sito Web www.philips.com/parts-and-
accessories o recatevi presso il vostro rivenditore
Philips. Potete inoltre contattare il Centro
Assistenza Clienti Philips del vostro paese. Per i
dettagli, fate riferimento all'opuscolo della
garanzia internazionale.
Italiano
93
Riciclaggio
- Questo simbolo indica che il prodotto non può
essere smaltito con i normali rifiuti domestici
(2012/19/UE).
Page 94

Italiano
94
- Questo simbolo indica che il prodotto contiene
una batteria ricaricabile incorporata che non
deve essere smaltita con i normali rifiuti
domestici (2006/66/CE). Vi invitiamo a recarvi
presso un punto di smaltimento ufficiale o un
centro di assistenza Philips per far rimuovere la
batteria ricaricabile da un professionista.
- Ci sono due situazioni in cui potete restituire
gratuitamente il prodotto vecchio a un
rivenditore:
1 Quando acquistate un prodotto nuovo, potete
restituire un prodotto simile al rivenditore.
2 Se non acquistate un prodotto nuovo, potete
restituire prodotti con dimensioni inferiori a 25
cm (lunghezza, altezza e larghezza) ai
rivenditori con superficie dedicata alla vendita
di prodotti elettrici ed elettronici superiore ai
400 m2.
- In tutti gli altri casi, attenetevi alle normative di
raccolta differenziata dei prodotti elettrici,
elettronici e delle batterie ricaricabili in vigore
nel vostro paese: un corretto smaltimento
consente di evitare conseguenze negative per
l’ambiente e la salute.
Rimozione della batteria ricaricabile
Rimuovete la batteria ricaricabile solo
prima di smaltire il prodotto. Prima di
rimuovere la batteria, assicuratevi che il
prodotto sia scollegato dalla presa di
corrente e che la batteria sia
completamente scarica.
Adottate tutte le misure di sicurezza
necessarie quando utilizzate utensili per
aprire il prodotto e quando smaltite la
batteria ricaricabile.
Page 95

1 Verificate se sono presenti viti nella parte
posteriore o anteriore dell'apparecchio. In caso
affermativo rimuovetele.
2 Rimuovete il pannello posteriore e/o anteriore
dall'apparecchio con l'ausilio di un cacciavite.
Se necessario, rimuovete anche viti aggiuntive
e/o eventuali parti fino a quando non sarà
visibile la scheda a circuito stampato con la
batteria ricaricabile.
3 Rimuovete la batteria ricaricabile.
Garanzia e assistenza
Per assistenza o informazioni, visitate il sito Web
all'indirizzo www.philips.com/support oppure
leggete l'opuscolo della garanzia internazionale.
Limitazioni della garanzia
I blocchi lame non sono coperti dai termini della
garanzia internazionale perché soggetti a usura.
Italiano
95
Page 96

Nederlands
96
Introductie
Gefeliciteerd met uw aankoop en welkom bij
Philips! Registreer uw product op
www.philips.com/welcome om optimaal gebruik
te kunnen maken van de door Philips geboden
ondersteuning.
Algemene beschrijving (afb. 1)
1 Neustrimmer (alleen MG3710, MG3711, MG3712,
MG3721, MG3720, MG3730, MG3731, MG3740,
MG3747, MG3748, MG3757)
2 Precisietrimmer (alleen MG3740, MG3757)
3 Complete trimmer
4 Aan-uitknop
5 Aansluiting voor kleine stekker
6 Haarkam 9 mm (alleen MG3720, MG3721,
MG3730, MG3731, MG3740, MG3747, MG3748,
MG3757)
7 Haarkam 12 mm) (alleen MG3730, MG3740,
MG3747, MG3757, MG3731, MG3748)
8 Haarkam 16 mm (alleen MG3730, MG3740,
MG3747, MG3757, MG3731, MG3748)
9 Stoppelkam 1 mm (alleen MG3710, MG3711,
MG3712, MG3720, MG3721, MG3730, MG3731,
MG3740, MG3747, MG3748, MG3757)
10 Stoppelkam 2 mm (alleen MG3710, MG3711,
MG3720, MG3721, MG3730, MG3731, MG3740,
MG3747, MG3748, MG3757)
11 Stoppelkam 3 mm (alleen MG3710, MG3711,
MG3712, MG3720, MG3721)
12 Stoppelkam 5 mm (alleen MG3710, MG3711,
MG3712, MG3720, MG3721)
13 Instelbare kam 3-7 mm (alleen MG3730,
MG3731, MG3740, MG3747, MG3748, MG3757)
14 Kam voor lichaamsbeharing 3mm (alleen
MG3747, MG3748)
15 Voedingsunit
16 Kleine stekker
Nederlands
Page 97

Nederlands
17 Opbergetui (alleen MG3711, MG3712, MG3721,
MG3731, MG3748)
18 Schoonmaakborsteltje
De meegeleverde accessoires kunnen per product
verschillen. Op de doos wordt aangegeven welke
accessoires bij het apparaat worden geleverd.
Belangrijke veiligheidsinformatie
Lees deze belangrijke informatie zorgvuldig door
voordat u het apparaat en de accessoires gaat
gebruiken. Bewaar het boekje om het indien nodig
later te kunnen raadplegen. De meegeleverde
accessoires kunnen per product verschillen.
Gevaar
- Houd de voedingsunit droog.
Waarschuwing
- Gebruik alleen de afneembare voedingsunit
(A00390) die met het apparaat is
meegeleverd om de accu op te laden.
- De voedingsunit bevat een transformator.
Knip de voedingsunit niet af om deze te
vervangen door een andere stekker. Dit leidt
tot een gevaarlijke situatie.
97
Page 98

Nederlands
98
- Dit apparaat kan worden gebruikt door
kinderen vanaf 8 jaar en door personen met
verminderde lichamelijke, zintuiglijke of
geestelijke capaciteiten of weinig ervaring
en kennis, mits zij onder toezicht staan of
instructies hebben gekregen voor veilig
gebruik van het apparaat en mits zij
begrijpen welke gevaren het gebruik met
zich mee kan brengen. Kinderen mogen niet
met het apparaat spelen. Kinderen mogen
het apparaat niet reinigen en geen
gebruikersonderhoud uitvoeren zonder
toezicht.
- Controleer het apparaat altijd voordat u het
gebruikt. Gebruik het apparaat niet als het
beschadigd is, aangezien dit verwondingen
kan veroorzaken. Vervang een beschadigd
onderdeel altijd door een onderdeel van het
oorspronkelijke type.
- Probeer het apparaat niet te openen om de
herlaadbare batterij te vervangen.
Page 99

Let op
Nederlands
- Dit apparaat is niet
afwasbaar.Dompel het
apparaat nooit in water en
spoel het niet af onder de
kraan.
- Gebruik dit apparaat alleen
voor het beoogde doeleinde
zoals beschreven in de
gebruiksaanwijzing.
- Om hygiënische redenen dient
het apparaat slechts door één
persoon te worden gebruikt.
- Gebruik nooit perslucht,
schuursponzen, schurende
schoonmaakmiddelen of
agressieve vloeistoffen zoals
benzine of aceton om het
apparaat schoon te maken.
- Gebruik de voedingsunit niet in
of in de buurt van
stopcontacten waar een
elektrische luchtverfrisser in zit.
Dit kan de voedingsunit
onherstelbaar beschadigen.
99
Page 100

Nederlands
100
Elektromagnetische velden (EMV)
Dit Philips-apparaat voldoet aan alle toepasselijke
richtlijnen en voorschriften met betrekking tot
blootstelling aan elektromagnetische velden.
Algemeen
- De voedingsunit is geschikt voor een
netspanning tussen 100 en 240 volt.
- De voedingsunit zet 100-240 volt om in een
veilige laagspanning van minder dan 24 volt.
Opladen
Wanneer het apparaat 16 uur is opgeladen, kunt u
het tot 60 minuten (MG3710, MG3711, MG3712,
MG3720, MG3721, MG3730, MG3731, MG3740) of 70
minuten (MG3757, MG3748, MG3747) snoerloos
gebruiken.
1 Zorg ervoor dat het apparaat is uitgeschakeld.
2 Steek de kleine stekker in het apparaat en steek
de voedingsunit in het stopcontact.
3 Haal de voedingsunit na het opladen uit het
stopcontact en trek de kleine stekker uit het
apparaat.
Het apparaat gebruiken
Opmerking: Schakel het apparaat na gebruik uit en
maak het schoon.
Knipelementen verwijderen en bevestigen
1 Om een knipelement te verwijderen, duwt u
omhoog tegen de tanden van het knipelement
en haalt u het van het handvat af.
 Loading...