

Page 1
Mini Hi-Fi System
Need help? Call us!
Philips representatives are ready to help you with
any questions about your new product. We can guide you
through Connections, First-time Setup, or any of the Features.
We want you to start enjoying your new product right away!
CALL US BEFORE YOU CONSIDER
RETURNING THE PRODUCT!
Visit us on the web at www.philips.com
1-800-531-0039
or
FW-
C579
FW-
C579
T
A
R
N
O
Registration Card
visit our website
P
M
Return
I
your Warranty
within 10 days
S
E
E
W
T
!
E
D
I
S
N
H
I
Y
www.audio.philips.com
to download latest UPDATES of USB PC Link Driver
MusicMatch Jukebox softwares and FAQs.
1
Page 2
Canada
English:
This digital apparatus does not exceed
the Class B limits for radio noise
emissions from digital apparatus as set
out in the Radio Interference
Regulations of the Canadian
Department of Communications.
This warning label is located on the rearside
and inside this laser product.
INVISIBLE
:
CAUTION
LASER RADIATION
WHEN OPEN. DO NOT STARE INTO BEAM.
INVISIBLE LASER RADIATION WHEN OPEN.
:
DANGER
AVOID DIRECT EXPOSURE TO BEAM.
AVATTAESSA JA SUOJALUKITUS OHITETTAESSA OLET
VARO !
ALTTIINANAKYMATTOMAALLE LASERSATEILYLLE. ALA
KATSO SATEESEEN.
OSYNLIG LASERSTRÅLNING NÄR DENNA DEL ÄR ÖPPNAD.
VARNING!
OCH SPARREN AR URKOPPLAD.BETRAKTA EJ STRÅLEN.
or
DANGER - Invisible laser radiation when open.
AVOID DIRECT EXPOSURE TO BEAM.
CAUTION
Use of controls or adjustments or
performance of procedures other
than herein may result in hazardous
radiation exposure or other unsafe
operation.
ATENCIÓN
El uso de mando o ajustes o la
ejecucción de métodos que no sean
los aquí descritos puede ocasionar
peligro de exposición a radiación.
Energy Star
As an ENERGY STAR
Partner, Philips has determined
that this product meets the
ENERGY STARR guidelines for energy efficiency.
R
PHILIPS FWC579
T ested To Comply
With FCC Standards
Philips Consumer Electronics North America
P.O.Box 14810 Knoxville, TN 37914-1810
Phone no.: 1-800-531-0039
2
This system complies with the FCC rules, Part
15 and with 21 CFR 1040.10. Operation is
subject to the following two conditions:
– This device may not cause harmful
interference, and
– This device must accept any interference
received, including interference that may cause
undesired operation.
Page 3
DISC 5
DISC 1
DISC 2
DISC 3
DISC 4
DISC
DISC
DISC
DISC
DISC
CD
CD-R
CD-R
W
OMP
TIBLE
IR
DSC
DBB
TUNER
GAME
UX
USB
PC LINK
MODE
GAMESOUND
MA
X
SOUND
DSC
P1
D
I
SC
1
D
ISC
2
D
I
SC
3
D
ISC
4
D
ISC
D
ISC
D
ISC
D
ISC
D
ISC
C
D
C
D
-R
C
D
-R
W
C
O
M
P
TI
B
L
E
D
IS
C 1
P2
P3
CD TUNER
AUX/GAME
USB PC LINK
CD1 CD2 CD3
CD4 CD5
VOL
TITLE
ALBUM
REPEAT PROGRAM SHUFFLE DISPLAY
DIM SLEEP CLK/TIMER TIMER
DSC MUTEVAC
GAME
GAME
MIX-ITSOUND
ON/OFF
MAX ON/OFF
➠
☞
P4
2
C
D
/
C
D
-
R
/
C
D
-
R
W
C
O
M
P
AT
I
B
L
D
I
S
C
1
D
I
S
C
2
D
I
S
C
3
D
I
S
C
4 D
I
S
C
5
D
I
S
C
1
D
I
S
C
2
D
I
S
C
3
D
D
I
I
S
S
C
C
4
1
1 3
C
D
/C
D
-
R
/C
D
-
R
W
CO
M
P
AT
I
B
L
E
D
I
S
C
1
D
I
S
C
2
D
I
S
C
3
D
I
S
C
4
D
I
S
C
5
1
I
D
C
S
C
2
I
D
S
3
I
C
S
D
4
C
I
D
S
5
C
I
D
S
S
S
T
M
E
Y
I
I
N
M
T
R
O
P
E
M
A
G
R
I
S
E
N
S
O
R
O
E
C
R
E
W
O
P
L
L
E
E
N
N
N
N
A
Y
B
D
N
A
T
S
A
H
H
C
C
T
T
H
N
O
F
G
E
I
L
R
D
D
R
R
R
R
I
I
V
V
E
E
E
E
V
V
O
O
D
S
C
1
D
C
L
A
M
I
T
P
O
Z
Z
A
J
K
C
O
R
P
O
P
M
I
D
S
W
E
N
P
E
E
L
S
2
D
B
L
A
X
I
M
M
F
W
M
E
L
T
I
T
M
A
M
P
C
C
D
3
F
U
H
S
C
G
O
R
P
P
E
R
K
R
T
C
S
I
D
L
L
A
D
4
C
C
.
.
T
T
T
T
R
R
S
I
E
E
R
E
B
Y
C
L
L
A
H
O
O
O
O
U
U
U
U
U
U
S
S
I
I
B
B
B
B
R
R
R
R
T
R
E
C
N
O
C
E
D
A
C
R
A
A
M
E
N
I
C
C
D
5
VAC
D
I
M
K
O
C
L
C
•
T
I
M
R
E
P
O
G
R
U
S
B
E
M
U
L
CD
E
N
T
U
R
L
P
C
K
N
I
E
M
A
G
•
AU
X
O
V
N
R
E
X
E
T
T
•
T
E
P
S
S
R
E
E
A
R
S
P
E
•
M
T
V
E
R
P
P
O
T
D
B
B
D
S
C
VAC
S
P
L
O
A
Y
M
E
•
D
P
•
A
P
U
S
O
E
T
S
M
A
X
S
O
U
N
D
S
G
E
N
A
I
R
N
C
U
T
H
•
O
E
D
I
V
E
M
U
L
M
I
X
I
-
T
O
V
E
M
A
G
L
E
F
O
T
I
D
U
A
G
A
M
E
S
O
U
N
D
R
S
P
E
E
D
I
P
U
N
C
H
B
L
A
S
T
G
H
T
O
I
E
D
O
M
D
U
A
M
A
X
S
O
U
N
D
D
I
G
A
I
L
T
S
O
•
U
N
D
C
O
N
T
R
O
L
V
I
R
T
A
U
L
A
M
B
I
E
N
C
E
C
O
N
T
R
O
L
•
D
Y
N
A
M
I
C
B
A
S
S
B
O
O
S
T
,
E
3
3
Page 4
Return your Warranty Registration card today to
ensure you receive all the benefits you’re entitled to.
• Once your Philips purchase is registered,
you’re eligible to receive all the privileges
of owning a Philips product.
Warranty
Verification
Registering your product
within 10 days confirms
your right to maximum
protection under the
terms and conditions of
your Philips warranty.
Owner
Confirmation
Your completed Warranty
Registration Card serves
as verification of ownership in the event of product theft or loss.
Know these
ssaaffeettyy symbols
CAUTION
RISK OF ELECTRIC SHOCK
DO NOT OPEN
CAUTION: TO REDUCE THE RISK OF ELECTRIC SHOCK, DO NOT
REMOVE COVER (OR BACK). NO USER-SERVICEABLE PARTS
INSIDE. REFER SERVICING TO QUALIFIED SERVICE PERSONNEL.
• So complete and return the Warranty
Registration Card enclosed with your
purchase at once, and take advantage
of these important benefits.
Model
Registration
Returning your Warranty
Registration Card right
away guarantees you’ll
receive all the information
and special offers which
you qualify for as the
owner of your model.
For Customer Use
Enter below the Serial No. which is located on the rear of the cabinet. Retain this
information for future reference.
Model No. _______________________
Serial No. ________________________
This “bolt of lightning” indicates uninsulated material
t
an electrical shock. For the safety of
everyone in your household, please do
not remove product covering.
s
enclosed literature closely to prevent
operating and maintenance problems.
4
within your unit may cause
The “exclamation point” calls
attention to features for
which you should read the
WARNING:
FIRE OR SHOCK HAZARD, DO
NOT EXPOSE THIS EQUIPMENT TO
RAIN OR MOISTURE.
CAUTION:
shock, match wide blade of plug to
wide slot, and fully insert.
TO PREVENT
To prevent electric
MAC5097
Page 5

Visit our World Wide Web Site at http://www.philips.com
I
T
O
A
N
R
T
S
I
G
E
R
S
Y
Hurry!
A
D
0
N
I
T
H
I
1
N
Congratulations on your purchase,
and welcome to the “family!”
Dear Philips product owner:
Thank you for your confidence in Philips.You’ve selected one of the best-built,
best-backed products available today.And we’ll do everything in our power to
keep you happy with your purchase for many years to come.
As a member of the Philips “family,” you’re entitled to protection by one
of the most comprehensive warranties and outstanding service networks
in the industry.
What’s more, your purchase guarantees you’ll receive all the information
and special offers for which you qualify, plus easy access to accessories
from our convenient home shopping network.
E
E
D
E
D
W
And most importantly you can count on our uncompromising commitment
to your total satisfaction.
All of this is our way of saying welcome – and thanks for investing in a
Philips product.
Sincerely,
Lawrence J. Blanford
President and Chief Executive Officer
P.S. Remember, to get the most from your Philips product, you
must return your Warranty Registration Card within 10 days.
So please mail it to us right now!
5
Page 6
IMPORTANT SAFETY INSTRUCTIONS
Class II equipment symbol
This symbol indicates that the unit has
a double insulation system
1.
Read these instructions.
2.
Keep these instructions.
3.
Heed all warnings.
4.
Follow all instructions.
5.
Do not use this apparatus near
water.
6.
Clean only with dry cloth.
7.
Do not block any ventilation
openings. Install in accordance with
the manufacturer´s instructions.
8.
Do not install near any heat sources
such as radiators, heat registers, stoves, or
other apparatus (including amplifiers) that
produce heat.
9.
Do not defeat the
safety purpose of the
polarized or
grounding-type plug.
A polarized plug has two blades with one
wider than the other. A grounding type plug
has two blades and a third grounding prong.
The wide blade or the third prong are
provided for your safety. If the provided plug
does not fit into your outlet, consult an
electrician for replacement of the obsolete
outlet.
10.
Protect the power cord from being
walked on or pinched, particularly at plugs,
convenience receptacles, and the point
where they exit from the apparatus.
11.
Only use attachments/accessories
specified by the manufacturer.
AC Polarized
Plug
12 .
13 .
Unplug this apparatus during lightning
storms or when unused for long periods of
time.
14 .
Refer all servicing to qualified service
personnel. Servicing is required when the
apparatus has been damaged in any way,
such as power-supply cord or plug is
damaged, liquid has been spilled or objects
have fallen into the apparatus, the apparatus
has been exposed to rain or moisture, does
not operate normally, or has been dropped.
15.
Battery usage CAUTION – To
prevent battery leakage which may result in
bodily injury, property damage, or damage
to the unit:
●
Install all batteries correctly, + and - as
marked on the unit.
●
Do not mix batteries (old and new or
carbon and alkaline, etc.).
●
Remove batteries when the unit is not used
for a long time.
To reduce the risk of fire or electric
shock, this apparatus should not be
objects filled with liquids, such as vases,
should not be placed on this apparatus.
Use only with the cart, stand,
tripod, bracket, or table specified
by the manufacturer or sold with
the apparatus. When a car t is
used, use caution when moving
the cart/apparatus combination
to avoid injury from tip-over.
EL 6475-E004: 02/8
WARNING
exposed to rain or moisture, and
6
Page 7
Index
English ------------------------------------------------ 8
Español --------------------------------------------- 32
English
Español
7
Page 8

Contents
English
General Information
Supplied accessories ............................................ 9
Environmental information ................................ 9
Care and safety information .............................. 9
Functional Overview
Main unit and remote control .................. 10–11
Control buttons available on the
remote only ...................................................... 11
Connections
Step 1: Connecting FM/AM antennas ............ 13
Step 2: Connecting the speakers .................... 13
Step 3: Connecting to PC ................................. 13
Step 4: Connecting to game console ............. 13
Step 5: Connecting to game woofer .............. 14
Setting the game woofer ............................... 14
Step 6: Connecting the AC power cord ........ 14
Step 7: Inserting batteries into the remote
control .................................................................. 14
Using the remote control to operate
the system ........................................................ 14
Gameport Operations
About Gameport ............................................... 15
Preparation before use ..................................... 15
Start operating .................................................... 15
USB PC Link
Quick Setup Guide ............................................ 16
PC system requirement ................................. 16
Install MusicMatch software ......................... 16
Enable digital CD audio output ................... 17
Connecting USB PC Link ................................. 17
Disc Operations
Playable discs ....................................................... 20
Loading discs ....................................................... 20
Basic playback controls .............................. 20–21
Repeat and Shuffle .............................................. 21
Repeat play ....................................................... 21
Random play ..................................................... 21
Programming the disc tracks ........................... 21
Checking the program ................................... 22
Playing a disc without clearing the
program ............................................................. 22
Clearing the program ..................................... 22
Tuner Operations
Tuning to radio stations .................................... 23
Presetting radio stations ................................... 23
Using the Plug and Play .................................. 23
Automatic presetting ..................................... 23
Manual presetting ............................................ 23
Selecting a preset radio station ....................... 23
Deleting a preset radio station .................... 23
Timer Operations
Timer setting ....................................................... 24
Activating/Deactivating the timer ............... 24
Sleep timer setting ............................................. 25
Other Connections
Listening to an external device ....................... 25
Recording to an external device ..................... 25
Specifications ........................................... 26
Troubleshooting .................................... 27
Basic Operations
Switching on/off .................................................. 18
Switching to active mode .............................. 18
Switching to Eco Power standby mode ..... 18
Switching to standby mode (view clock) ... 18
Demonstration mode ........................................ 18
Setting the clock ................................................. 18
Dimming system’s display screen .................... 19
Volume control ................................................... 19
Sound control ..................................................... 19
MAX sound ...................................................... 19
Digital Sound Control .................................... 19
Virtual Ambience Control ............................. 19
Dynamic Bass Boost ....................................... 19
8
Limited Warranty ................................ 28
Page 9

General Information
Refer to the type plate on the rear or
bottom of the system for identification
and supply ratings.
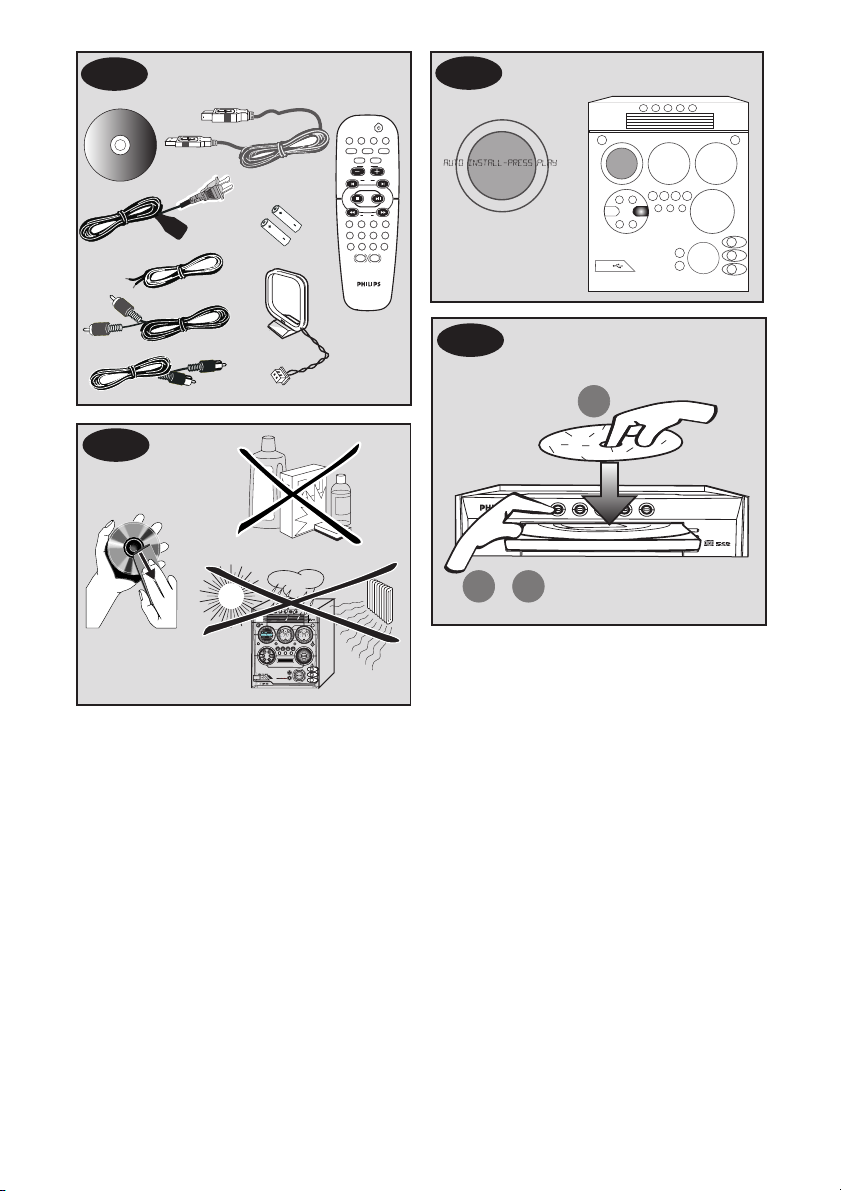
Supplied accessories (page 3 – P1)
– USB PC LINK software installer CD-ROM
– USB cable
– Remote control and two AA batteries.
– AM loop antenna
– FM wire antenna
– Video cinch cable (yellow)
– Game woofer cable (black)
– AC power cord
Environmental information
All unnecessary packaging has been omitted.
We have tried to make the packaging easy to
separate into three materials: cardboard (box),
polystyrene foam (buffer) and polyethylene (bags,
protective foam sheet).
Your system consists of materials which can be
recycled and reused if disassembled by a
specialized company. Please observe the local
regulations regarding the disposal of packaging
materials, exhausted batteries and old
equipment.
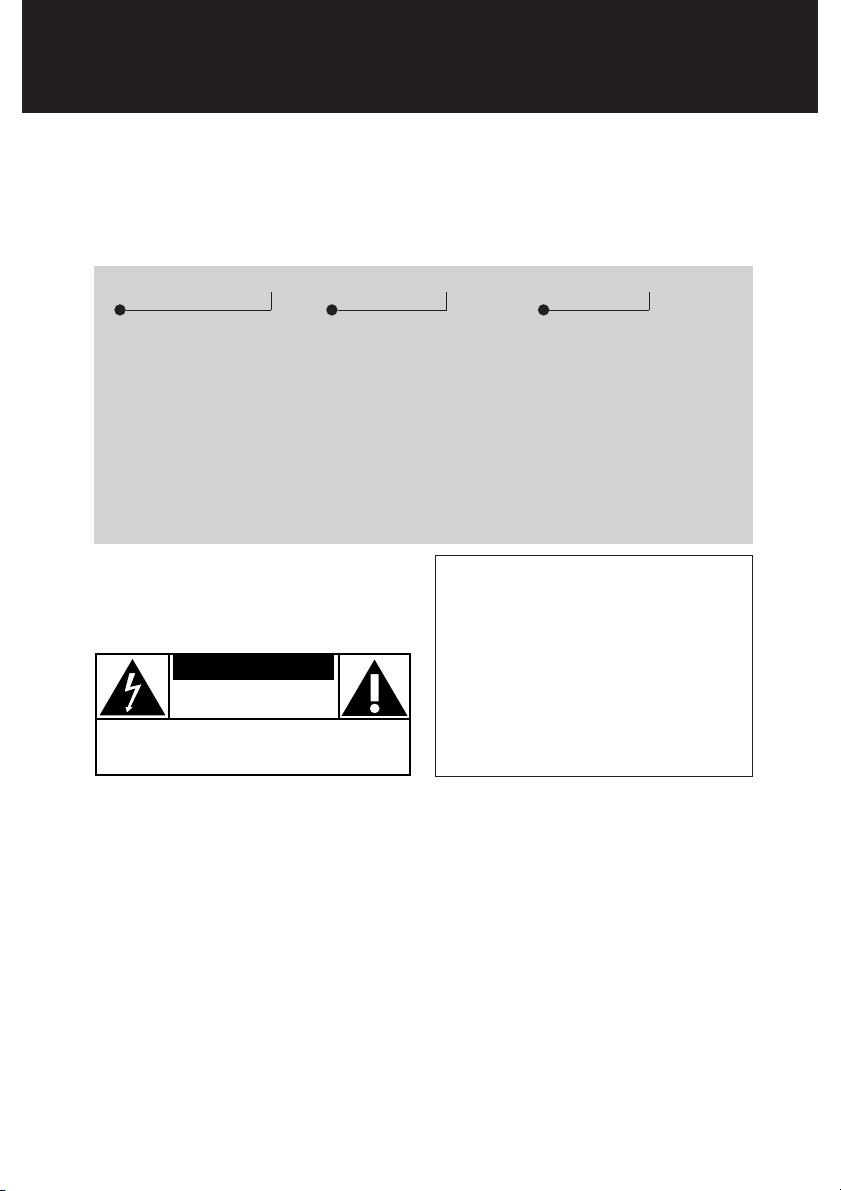
Care and safety information
(page 3 – P2)
Avoid high temperatures, moisture,
water and dust
– Do not expose the system, batteries or discs
to humidity, rain, sand or excessive heat (caused
by heating equipment or direct sunlight). Always
keep the disc tray closed to avoid dust on the
lens.
Avoid condensation problem
– The lens may cloud over when the system is
suddenly moved from cold to warm
surroundings, making it impossible to play a disc.
Leave the system in the warm environment until
the moisture evaporates.
Do not block the vents
– In a cabinet, allows about 10cm (4 inches) of
free space all around the system for adequate
ventilation.
Care of disc
– To clean a CD, wipe it in a straight line from
the center towards the edge using a soft, lint-free
cloth. A cleaning agent may damage the disc!
– Write only on the printed side of a CDR(W)
and only with a soft felt-tipped pen.
– Handle the disc by its edge, do not touch the
surface.
Care of the cabinet
– Use a soft cloth slightly moistened with a mild
detergent solution. Do not use a solution
containing alcohol, spirits, ammonia or abrasives.
Finding a suitable location
– Place the system on a flat, hard, and stable
surface.
Built-in safety circuit
– Under extreme conditions, this system may
switch to standby mode automatically. If this
happens, let the system cool down before
reusing it.
Power saving
– This system is designed to use less than 1W
of electricity when switches to Eco Power
standby. Disconnect the AC power cord from
the power outlet when not in use.
English
9
Page 10

CD
CD-R
CD-RW
COMP
TIBLE
IR
DSC
AC
#
$
∞
Functional Overview
English
D
IS
C
1
D
I
S
C
2
D
IS
C
3
D
IS
C
4
D
I
S
C
5
D
I
S
C
1
D
I
S
C
2
D
I
S
C
3
D
I
S
C
4
D
I
S
C
T
P
L
A
Y
•
P
A
U
S
E
SPE
ND
•
D
IG
AMB
I
E
N
IMER
CD
DB
B
P
UNCH
E
D
I
TAL
SOU
N
D
C
ON
CE C
ON
TROL• D
5
GAMEPORT
L
E
N
N
A
H
C
T
F
E
L
D
R
R
I
E
V
V
E
O
C
T
T
R
E
U
U
U
S
I
B
B
R
R
U
SB
TUNE
R A
P
C
LINK
D
S
C
MAX SOUND
MIX-IT
BL
AS
T
MODE
T
R
OL
Y
N
AMIC
B
AS
S
B
O
O
ST
MINI SYSTEM
O
O
VAC
H
G
I
R
C
R
U
P
R
OG
UX
•GAME
A
M
1
2
3
4
5
6
7
8
9
0
!
STANDBY
D
I
O
M MODE
O
T
S
O
M
E
D
•
P
ECO
POW
E
R
N
DSC
CD1
O
PT
I
M
A
LJAZ
ZROCKP
O
P
DI
M
NE
W
S
S
L
E
E
P
A
L
BMIX
F
MMW
T
I
T
L
E
AM P
M
CD2
CD
3
SHUF
CD4
ROG
R
E
P
TRKP
D
I
SC AL
L
.
.
I
S
CYB
E
R
HA
L
L
CONCERT
A
R
CADE CI
NEM
A
CD5
VAC
C
L
OCK•
N
E
T
X
E
T
S
•
E
P
R
R
P
E
•
V
E
R
P
P
O
T
S
S
E
T
G
S
E
N
I
A
N
R
U
C
T
H
•
@
MAX SO U
V
IRTUAL
Main unit and remote control
1 ECO POWER indicator
– Lights up when the system is in Eco Power
standby mode.
2 STANDBY ON B
– Switches to Eco Power standby mode or turns
on the system.
– *Switches to standby mode.
3 Display screen
4 CLOCK • TIMER (CLK / TIMER)
– *Enters clock or timer setting mode.
5 DIM MODE (DIM)
– Turns on/off the dim mode.
C
C
D
-
R
W
CO
I
R
S
E
N
S
O
R
L
E
N
N
A
H
C
T
D
R
R
I
E
V
V
E
O
T
T
E
O
O
U
U
S
I
B
B
R
R
V
O
R
L
E
U
T
S
M
E
O
E
D
I
V
.
L
O
I
D
U
A
.
R
O
I
D
U
A
≤
D
/C
D
-
R
/
M
P
AT
I
B
L
E
£
6
™
¡
*
CD TUNER
CD1 CD2 CD3
CD4 CD5
7
8
)
9
(
0
§
*
(
5
&
≥
&
#
^
REPEAT PROGRAM SHUFFLE DISPLAY
DIM SLEEP CLK/TIMER TIMER
DSC MUTEVAC
GAME
%
6 CD / TUNER / USB PC LINK /
AUX • GAME
– Selects the relevant active mode.
– CD: toggles between DISC 1~5.
– TUNER: toggles between FM and AM band.
– AUX • GAME: toggles between AUX and
GAMEPORT mode.
7 PREV • PRESET 4 (í) /
NEXT•PRESET3 (ë)
– CD: selects a track.
– TUNER: selects a preset radio station.
– CLOCK: sets the minutes.
– USB PC LINK: selects a track from the playlist.
8 STOP•DEMO STOP Ç
– Exits an operation.
– CD: stops playback or clears a program.
– TUNER: *erases a preset radio station.
– USB PC LINK: stops playback.
(only on the main unit)
– *Turns on/off the demonstration mode.
ALBUM
VOL
TITLE
USB PC LINK
AUX/GAME
¤
⁄
º
ON/OFF
MAX ON/OFF
GAME
MIX-ITSOUND
ª
4
!
•
@
* = Press and hold the button for more than two seconds.
10
Page 11

Functional Overview
9 PLAY•PAUSE ÉÅ
– CD: starts/pauses playback.
– USB PC LINK: starts/pauses playback.
(only on the main unit)
TUNER: *enters Plug & Play mode and/or starts
preset radio station installation.
0 SEARCH•TUNING (à á)
– CD: *searches backward/forward.
– TUNER: tunes the radio frequency up/ down.
– CLOCK: sets the hours.
– USB PC LINK: *searches backward/forward.
! MAX SOUND (MAX ON / OFF)
– Turns on/off the optimal mix of various sound
features.
@ MIX IT (GAME MIX IT)
– Mixes the game sound with your favorite music
from one of these music source (CD, TUNER,
USB PC LINK or AUX).
# MODE (GAME SOUND)
– Selects different type of equalizer setting for
Gameport (SPEED, PUNCH or BLAST).
$ Connect the USB cable between the system and
PC’s USB port.
% GAME VOLUME
– Adjusts the game’s output volume level.
^ VIDEO
– Use a video cable to connect to your game
console’s video output.
AUDIO L. / AUDIO R.
– Use a audio cable to connect to your game
console’s left/ right audio output.
& DBB
– Selects different type of bass boost level settings
(DBB 1, DBB 2, DBB 3 or DBB OFF).
DSC
– Selects different type of preset sound equalizer
settings (OPTIMAL, JAZZ, ROCK or POP).
VAC
– Selects different type of environment ambience-
based equalizer settings (HALL, CINEMA,
CONCERT, CYBER or ARCADE).
* MASTER VOLUME (VOL +-)
– Adjusts the volume level.
( PROG (PROGRAM)
– CD: starts or confirms tracks programming.
– TUNER: starts *automatic/manual preset
programming.
– CLOCK: selects 12- or 24-hour clock display.
) n
– Plug in the headphones jack. The speakers
output will be cancelled.
¡ VU meters
– Indicates signal strength of left/right channel.
™ iR SENSOR
– Point the remote control towards this sensor.
£ Disc trays (1~5)
≤ OPEN•CLOSE 0 (DISC 1~5)
– Opens/closes the individual disc tray.
Control buttons available on the
remote only
∞ CD 1~5
– Selects a disc tray to playback.
§ REPEAT
– Repeats a track / disc / all discs / all programmed
tracks.
≥ SLEEP
– Sets the sleep timer function.
• MUTE
– Mutes or restores the volume.
ª TIMER ON / OFF
– Turns on/off the timer function.
º SHUFFLE
– Turns on/off the random play mode.
⁄ DISPLAY
– Displays disc remaining playback time.
¤ B
– Switches to Eco Power standby mode.
– *Switches to standby mode.
English
* = Press and hold the button for more than two seconds.
11
Page 12

Connections
English
Game Woofer
12
Game console
Page 13

Connections
WARNING!
– Use only the supplied speakers.
The combination of the main unit and
speakers provide the best sound. Using
other speakers can damage the unit and
sound quality will be negatively affected.
– Never make or change connections
with the power switched on.
– Connect the AC power cord to the
power outlet only after you have finished
hooking up everything.
Step 1: Connecting FM/ AM
antennas
– Place the AM loop antenna on a shelf or
attach it to a stand or wall.
– Extend the FM antenna and fix its ends to the
wall.
– Adjust the position of the antennas for
optimal reception.
– Position the antennas as far as possible from a
TV, VCR or other radiation source to prevent
unwanted noise.
– For better FM stereo reception, connect
external FM antenna.
Step 2: Connecting the
speakers
Connect the speaker wires to the SPEAKERS
terminals, right speaker to "R" and left speaker to
"L", colored (marked) wire to "+" and black
(unmarked) wire to "-". Fully insert the
stripped portion of the speaker wire into the
terminal as shown.
Notes:
– Ensure that the speaker cables are correctly
connected. Improper connections may damage the
system due to short-circuit.
– Do not connect more than one speaker to any
one pair of +/- speaker terminals.
Step 3: Connecting to PC
Use the supplied USB cable to connect the
system to your personal computer’s USB port.
After installed the USB PC LINK application
software onto your PC, you are able to playback
your music collection via the system (refer to
“USB PC Link”).
Step 4: Connecting to game
console
IMPORTANT!
Gameport inputs are solely for game
console only.
a. Use the game console’s video cable (not
supplied) to connect its video output to the
GAMEPORT-VIDEO terminal.
b. Use the game console’s audio cables (not
supplied) to connect its audio outputs to the
GAMEPORT-AUDIO L. / AUDIO R.
terminals.
c. Use a video cable (yellow) to connect the
VIDEO OUT terminal to the video input on
the TV for viewing.
Notes:
– On the TV, the Video Input jack is usually yellow
and might be labeled A/V In, CVBS, Composite or
Baseband.
– To avoid magnetic interference, do not position
the front speakers too close to your TV.
Helpful Hint:
For optimal enjoyment of your Gaming
Experience, it is advisable that you avoid
connecting the TV’s AUDIO OUT to the audio
system’s AUX IN (R/ L) terminals.
If you wish to listen to your favorite movies/
TV programmes through the Philips Mini
System, please disconnect the Game Console
connection on the front of the set to avoid
experiencing any unwanted noise.
English
13
Page 14

Connections
English
Step 5: Connecting to game
woofer
Use the supplied game woofer cable to connect
the SUBWOOFER OUT terminal to the
SIGNAL INPUT on the game woofer.
Setting the game woofer
1 After connecting the game woofer’s AC power
cable to the wall socket, press POWER
ON• OFF to activate the game woofer.
2 Adjust the VOLUME CONTROL to increase
or decrease the game woofer volume level.
3 Play sound through the game woofer and adjust
the PHASE SELECT button at the rear of the
game woofer to the position (IN or OUT) at
which the lowest frequency is heard best.
➜ Phase is closely related to the distance from
the listening position to the front speakers and
game woofer.
4 To switch off the game woofer, press POWER
ON•OFF again.
Step 7: Inserting batteries into
the remote control
3
1
2
1 Open the battery compartment cover.
1
2 Insert two batteries type R06 or AA, following
the indications (+-) inside the compartment.
3 Close the cover.
2
Using the remote control to operate
the system
1 Aim the remote control directly at the remote
sensor (iR) on the main unit.
2 Select the source you wish to control by
pressing one of the source select keys on the
remote control (for example CD, TUNER).
3 Then select the desired function (for example
ÉÅ, í, ë).
CAUTION!
– Remove batteries if they are exhausted
or will not be used for a long time.
– Do not use old and new or different
types of batteries in combination.
– Batteries contain chemical substances,
so they should be disposed of properly.
Step 6: Connecting the AC
power cord
"AUTO INSTALL – PRESS PLAY" may appear
on the display panel when the AC power cord is
plugged into the power outlet for the first time.
Press ÉÅ on the main unit to store all available
radio stations (page 3 – P3) or press Ç to exit
(refer to “Tuner Operations”).
14
Page 15

Gameport Operations
MO
DE
G
AM
E
SOUN
D
GAM
E
A
U
X
About Gameport
Gameport allows you to connect your game
console to this mini system which enables you to
enjoy a total game immersion experience by
having powerful sound output.
Preparation before use
rear panel
2
3
1
G
AME
•A
U
5
7
6
X
O
E
D
I
V
E
M
U
L
O
V
E
M
A
.
L
G
O
I
D
U
A
M
IX
-
I
T
GA
ME SOUND
.
R
S
P
E
E
D
P
U
O
N
C
H
B
L
A
ST
I
D
U
M
O
D
E
A
front panel
Game console
1 Connect your game console’s video and audio
output to the GAMEPORT video and audio
inputs respectively (refer to “Connections -
Connecting to game console).
2 Connect your TV’s video input to the VIDEO
OUT (CVBS) on the rear panel.
3 Connect all the AC power cord to the power
outlet.
Start operating
4 Turn on the TV and set to the correct
video-in channel.
The TV’s video input channel may be called
AUX(iliary) IN, AUDIO/VIDEO (A/V) IN, EXT 1,
etc. These channels are often near channel 00
on your TV. Or, your TV remote control may
have a button or switch that chooses different
video modes. See your TV manual for details.
5 Press AUX • GAME until “GAMEPORT” is
displayed.
6 Press MODE (or GAME SOUND on
remote) to select the type of sound setting
that best suit the game : SPEED, PUNCH,
BLAST or OFF.
7 If you like to mix your game sound to your
favorite music, press MIX-IT to select the
desired music source : CD, TUNER,
USB PC LINK, AUX or OFF.
CD ™ “MIX-CD"
TUNER ™ “MIX-TU"
USB PC LINK ™ “MIX-USB"
AUX ™ “MIX-AUX"
OFF ™ “MIX-OFF"
8 If necessary, start playback your chosen mixer
source.
9 Start playing your favorite game.
To adjust the game console’s volume
level
● Adjust GAME VOLUME.
To change the mixer source
● Press MIX-IT.
To control the current active mixer
source
● Press the respective source button (for
example, CD, TUNER) on the remote control,
then select the desired function (for example
í,
ë).
É,
For example, if CD is the mixer source and to
change the disc tray, you have to press CD, then
press CD 1~5 to select the desired disc tray.
Notes:
– You can only activate GAME VOLUME and
MIX-IT while in game source mode.
– If your game console is switched on, the video
image will always appear on the TV even though
you are not in the gameport mode.
English
15
Page 16

USB PC Link
English
Quick Setup Guide
PC system requirement
– Windows 98 (SE)/ ME/2000/XP
– Intel Pentium MMX200 or higher
– CD-ROM drive
– USB port
– Free hard disk space : 15 MB for the
software
Install MusicMatch software
1
P
O
W
E
R
O
N
/
O
F
F
3
1 Use the supplied USB cable to connect the
audio system to your personal computer’s
USB port.
2 Press USB PC LINK.
3 Turn on the PC and insert the USB PC LINK
installer disc (which comes with this product)
onto the PC’s CD-ROM drive.
This application software can also be downloaded
from “http://www.audio.philips.com”.
IMPORTANT!
Please use this customized MusicMatch
software for your USB PC Link
application. Remember to un-install all
other MusicMatch jukebox software first
from your PC system (if available).
4 The installation guide will appear automatically.
If it does not, go to the CD-ROM drive in
Windows Explorer and double click on the
“USBPCLINK.exe”. Then perform the following
steps:
– First, select your desired language from the list.
– Then, select “installer driver” and follow by
“installer MusicMatch jukebox”.
– Select other options (Tutorial, Free goodies,
FAQ).
Note:
– You are advised to read the MusicMatch tutorial
before using it for the first time. Make sure the
mute function on the PC is deactivated in order to
ensure sound output from the Audio System.
For optimum performance, the equalizer function in
MusicMatch should be set to a low level.
2
5
5 Launch the “MUSICMATCH JUKEBOX” and
choose to do one of the followings :
To create a “Playlist”
Select “Open” button on the MusicMatch
Jukebox and simply drag/drop the music tracks
from anywhere on your PC into the “Playlist”
window. Remember to save this “Playlist” for
future use.
To create a music library
A music library of all stored music files available
on your PC can be setup by simply select “add”
function on the MusicMatch Jukebox. Once
created, you may then choose to drag/drop any
music tracks from this library to a “Playlist” for
music playback.
Note:
– It is not possible to create a playlist from the
system’s 5 CD changer. If you encounter problem
using USB PC LINK, please refer to the FAQ
(Frequently Asked Questions) stored in your USB PC
LINK installer disc or visit “www.audio.philips.com”
for latest update on FAQ.
16
Page 17

USB PC Link
REPEAT SHUFFLE
DIM SLEEP CLK/TIMER TIMER
VOL
ALBUM
TITLE
USB PC LINK
ON/OFF
2
3
4
5
1
Enable digital CD audio output
Before playing the CD through your PC’s
CD-ROM drive, it is necessary to configure your
PC’s hardware as follows:
For Windows ME / 2000/ XP
1 Enter the system control panel menu and
select :
“SYSTEM ™ HARDWARE ™
DEVICE MANAGER ™ CD-ROM DRIVES ™
ACTION–PROPERTIES ™ PROPERTIES”.
OR
For Windows 98 (SE)
Enter the system control panel menu and
select “MULTIMEDIA” and “CD 2C”.
2 Check the ‘Enable digital CD audio for this
CD-ROM device’ setting option is selected
(enabled).
Note:
– You may need to refer to your PC’s manual for
correct configuration.
Connecting to USB PC LINK
USB PC LINK allows you to playback your music
collection from the PC via the powerful amplifier
and speakers of this system.
IMPORTANT!
Make sure the MusicMatch software has
been installed. Refer to “Quick Setup
Guide” for USB PC Link.
1 Turn on your computer and launch the
“MUSICMATCH JUKEBOX”.
➜ The volume level of PC should not be put
into mute.
2 Press USB PC LINK.
➜ If the audio streaming is detected,
“CONNECTING” is displayed and the USB
indicator will be flashing.
➜ If “NO CONNECTION” is displayed, check the
connection between your PC and mini system.
3 Press í or ë until the desired track in the
playlist is highlighted.
4 Press ÉÅ to start playback.
➜ The track information will appear on the
display. The display only supports English
characters.
During playback,
– Press SHUFFLE to play all available tracks in
the playlist in random order.
– Press REPEAT to repeat playback of all the
tracks in the playlist.
5 To exit, select another active mode or
press Ç.
English
17
Page 18

Basic Operations
CLK/TIMER
(00:00 î 12:00AM)
(
00
:00 / 12:00AM)
(00:
00
/ 12:00AM)
5
4
3
1 2
,
6
,
2
English
Switching on/ off
Switching to active mode
● Press CD, TUNER, USB PC LINK or
AUX•GAME.
Switching to Eco Power standby mode
● Press B.
➜ ECO POWER button lights up.
➜ The display screen will go blank.
Switching to standby mode
(view clock)
● Press and hold B.
➜ The clock is displayed.
➜ While in standby mode, pressing
CLOCK•TIMER button will switch the system to
Eco Power standby mode.
Note:
– Before switching the system to Eco Power
standby or standby mode, make sure the
demonstration mode has been deactivated.
Demonstration mode
If the demonstration mode is active, whenever
you switch the system to Eco Power standby or
standby mode, it will begin showing the various
features offered by the system.
To activate the demonstration
● In Eco Power standby/standby mode,
press and hold Ç on the main unit until
"DEMO ON" is displayed.
To deactivate the demonstration
● Press and hold Ç on the main unit until
"DEMO OFF" is displayed.
Setting the clock
The clock can be set in either 12-hour or
24-hour mode ("11:59 PM" or "23:59" for
example).
1 Press and hold CLK / TIMER (or
CLOCK•TIMER on main unit) until
"SELECT CLOCK OR TIMER" is displayed.
2 Press ë to change the display to "CLOCK"
and press CLK/TIMER (CLOCK•TIMER)
again to confirm.
3 Press PROGRAM (PROG) repeatedly to
change between 12-hour and 24-hour clock
mode.
4 Press à or á repeatedly to set the hour.
5 Press í or ë repeatedly to set the minute.
6 Press CLK / TIMER (CLOCK • TIMER) to
store the setting.
➜ The clock will start working.
To view the clock time in any active
mode
● Press CLK / TIMER (CLOCK•TIMER)
once.
➜ The clock is displayed for a few seconds.
Notes:
– The clock setting will be erased when the system
is disconnected from the power supply.
– The system will exit clock setting mode if no
button is pressed within 90 seconds.
18
Page 19

Basic Operations
Dimming system’s display screen
You can select the desired brightness for the
display panel.
● In any active mode, press DIM MODE (or
DIM on remote) repeatedly to turn on/off
dim mode.
➜ DIM is shown, except for DIM OFF mode.
Volume control
● Adjust MASTER VOLUME (or press
VOL +/- on remote) to increase or
decrease the sound level.
➜ "VOL MIN" is the minimum volume level and
"VOL MAX" is the maximum volume level.
To switch off the volume temporarily
● Press MUTE on the remote.
➜ Playback will continue without sound and
"MUTE" is displayed.
➜ To restore the volume, press MUTE again or
increase the volume level.
Sound control
MAX sound, DSC and VAC sound features
cannot be activated on the same time.
While in game mode, all the sound control
features are not available for selection, except
DBB and Game Sound control.
MAX sound
MAX sound provides the best mixture of
various sound features (DSC, VAC for example).
● Press MAX SOUND (or MAX ON/OFF
on remote).
➜ If activated, the MAX SOUND button lights
up. All other sound effects (DSC, VAC or DBB)
will be switched off automatically
Digital Sound Control
DSC provides a different type of preset sound
equalizer setting.
● Press DSC repeatedly to select : OPTIMAL,
JAZZ, ROCK or POP.
Virtual Ambience Control
VAC provides a different type of environmentbased equalizer setting.
● Press VAC repeatedly to select : HALL,
CINEMA, CONCERT, CYBER or ARCADE.
English
Dynamic Bass Boost
DBB enhances the bass response.
● Press DBB repeatedly to select : DBB 1,
DBB 2, DBB 3 or DBB OFF.
➜ Some discs might be recorded in high
modulation, which causes a distortion at high
volume. If this occurs, switch off DBB or reduce
the volume.
Automatic DSC-DBB and VAC-DBB
selection
The best DBB setting is generated automatically
for each DSC, VAC or Game Sound selection.
You can manually select the DBB setting that
best suits your listening environment.
19
Page 20

Disc Operations
English
IMPORTANT!
– This system is designed for regular
discs. Therefore, do not use any
accessories such as disc stabilizer rings or
disc treatment sheets, etc., as offered on
the market, because they may jam the
changer mechanism.
– Do not load more than one disc onto
each tray.
Playable discs
This system is able to play :
– All pre-recorded audio CDs
– All finalized audio CDR and audio CDRW
discs
Loading discs (page 3 – P4)
1 Press OPEN • CLOSE 0 DISC 1 button
on top of the main unit to open disc tray 1.
2 Load a disc with the label side facing up.
For double-sided discs, load the side you want
to play facing up.
3 Press OPEN • CLOSE 0 DISC 1 button
again to close the disc tray.
➜ “READING“ is displayed. The selected disc
tray, total number of tracks and the playing time
will appear on the display.
4 Repeat steps 1~3 for loading discs onto the
disc trays 2~5.
Notes:
– To ensure good system performance, wait until
the disc trays completely read the disc(s) before
proceeding.
– Only one tray can be opened at each time.
If you open the second tray before closing the first
tray, the first tray will automatically close before the
second tray opens.
Basic playback controls
Load discs (page 3 – P4)
To play all discs on the disc trays
● Press ÉÅ.
OR
In stop mode, press CD to select a disc tray
to begin, then press ÉÅ.
➜ All the available discs will play once, then stop.
To play the selected disc only
● Press one of the CD 1~5 on remote.
➜ The selected disc will play once, then stop.
To select a desired track
● Press í or ë repeatedly until the desired
track is displayed.
➜ To skip to the beginning of the current track
during playback, press í once.
➜ During random play (shuffle mode),
pressingí will cause the player to skip only to
the beginning of the current track.
To search for a particular passage
during playback
● Press and hold à or á and release it when
the desired passage is located.
➜ During searching, the volume will be reduced.
To replace discs without interrupting
playback
● Press OPEN•CLOSE 0 buttons of the
inactive disc trays (refer to “Loading discs”).
For example, if currently disc tray 1 is playing,
you can replace the discs on disc tray 2~5.
To check the disc remaining playing
time
● Press DISPLAY on the remote.
➜ During random play or program play, the
total remaining time will not be shown.
➜ To restore the display for elapsed playing
time, repeat the above.
20
Page 21

D
I
S
C
1
D
I
SC
1
D
I
S
C
2
D
I
SC
2
D
I
S
C
3
D
I
SC
3
D
I
S
C
4
D
I
SC
4
D
I
S
C
D
ISC
3
D
I
S
C
D
ISC
4
D
I
S
C
D
I
S
C
5
D
I
S
C
D
IS
C
2
D
I
S
C
D
ISC
1
CDC
D
/
C
D
-
R
C
D
-R
/
C
D
-
R
W
C
D
-R
W
C
O
M
P
C
O
M
P
AT
I
B
L
E
TI
B
L
E
D
IS
C
1
DISC
1
3
4
6
7
2 5
,
1
Disc Operations
To interrupt playback
● Press ÉÅ.
➜ To resume normal playback, repeat the
above.
To stop playback
● Press Ç.
➜ If the system remains in stop mode for 30
minutes, it will switch to Eco Power standby
mode.
Repeat and Shuffle
You can select and change the various play
modes before or during playback.
Repeat play
1 Press REPEAT on the remote repeatedly to
select :
D
E
A
B
C
A – to repeat playback of the current track.
B – to repeat playback of the current disc.
C – to repeat playback of all available discs.
D – to repeat playback of the current
programmed track (only if the program
mode is active)
E – to repeat playback of all the programmed
tracks (only if the program mode is active)
2 To resume normal playback, press REPEAT
until "OFF" is displayed.
Random play
● Press SHUFFLE on the remote to turn
on/off the shuffling mode.
➜ If activated, SHUF is shown and the repeat
mode (if any) will be cancelled.
➜ All the available discs or programmed tracks
(if program is active) will be played in random
order.
Note:
– Pressing the OPEN•CLOSE button will cancel all
repeat and shuffling modes.
Programming the disc tracks
Programming tracks is possible when playback is
stopped. Up to 40 tracks can be stored in the
memory in any order.
1 Load the desired discs on the disc trays (refer
to “Loading discs”).
2 Press PROGRAM (PROG) to start
programming.
➜ PROG starts flashing.
3 Press CD or one of the CD 1~5 buttons to
select a disc.
4 Press í or ë repeatedly to select the
desired track.
5 Press PROGRAM (PROG) to store.
● Repeat steps 3–5 to select other discs and
store the tracks.
➜ Skip step 3 if you are selecting tracks from
the same disc.
➜ If you attempt to program more than 40
tracks, "PROGRAM FULL" is displayed.
6 To start program play, press ÉÅ.
7 To stop playback or to end the programming,
press Ç once.
➜ PROG stays and the program mode remains
active.
Notes:
– If the total playing time reached 100 minutes or
if one of the programmed tracks has a number
greater than 30, then "--:--" is displayed instead
of the total playing time.
– The system will exit programming mode if no
button is pressed within 20 seconds.
English
21
Page 22

Disc Operations
English
Checking the program
1 Stop playback and press í or ë repeatedly.
2 Press Ç to exit.
OR
Press ÉÅ to start playback from the current
programmed track
Playing a disc without clearing the
program
● Press one of the CD 1~5 buttons on the
remote to select a disc for playback.
➜ After the selected disc has been played, the
program mode will resume.
Clearing the program
● Stop playback, then press Ç to clear the
program.
OR
Press the OPEN•CLOSE 0 button of the
programmed disc tray.
➜ PROG disappears and "PROGRAM CLEARED"
is displayed.
Note:
– The program will be erased if the system is
disconnected from the power supply.
22
Page 23

Tuner Operations
IMPORTANT!
Make sure the FM and AM antennas are
connected.
Tuning to radio stations
1 Press TUNER to enter tuner mode.
To select another waveband (FM or AM),
press TUNER again.
2 Press and hold à or á until the frequency
indication starts to change, then release.
➜ The system automatically tunes to the next
strong signal radio reception.
➜ lights up for FM stereo reception.
For tuning to a weak signal station,
● Press à or á briefly and repeatedly until an
optimal reception is found.
Presetting radio stations
You can store up to 40 preset radio stations in
the memory, starting from FM and followed by
AM bands.
Notes:
– The system will exit presetting mode if no button
is pressed within 20 seconds.
– If no stereo frequency is detected during Plug
and Play, "CHECK ANTENNA" is displayed.
Automatic presetting
You can start the automatic presetting from a
selected preset number.
1 In tuner mode, press í or ë to select a
preset number.
2 Press and hold PROGRAM (PROG) until
"AUTO" is displayed.
➜ If a radio station has been stored in one of
the presets, it will not be stored again under
another preset number.
➜ If no preset number is selected, automatic
preset will begin from preset (1) and all your
former presets will be overridden.
Manual presetting
You can choose to store only the favorite radio
stations.
1 Tune to your desired radio station (refer to
“Tuning to radio stations”).
2 Press PROGRAM (PROG).
➜ The preset number starts flashing. If you want
to store the radio station in another preset
number, press í or ë.
3 Press PROGRAM (PROG) again to store.
● Repeat steps 1–3 to store other radio
stations.
English
Using the Plug and Play (page 3 - P3)
Plug and Play allows you to store all available
radio stations automatically.
1 Connect the system to the power supply,
"AUTO INSTALL - PRESS PLAY" is
displayed.
OR
In Eco Power standby/standby mode,
press and hold ÉÅ on the main unit until
"AUTO INSTALL - PRESS PLAY" is
displayed.
2 Press ÉÅ on the main unit to start
installation.
➜ "INSTALL TUNER" is displayed.
➜ All previously stored radio stations will be
replaced.
➜ Once completed, the last tuned radio station
will be played.
Selecting a preset radio station
● In tuner mode, press í or ë.
➜ The preset number, radio frequency, and
waveband are displayed.
Deleting a preset radio station
● Press and hold Ç until “PRESET DELETED”
is displayed.
➜ The current preset radio station will be
deleted.
➜ All other preset radio stations with higher
numbers are decreased by one.
23
Page 24

Timer Operations
English
Timer setting
The system can switch on to CD, TUNER or
USB PC LINK mode automatically at a preset
time, serving as an alarm to wake you up.
IMPORTANT!
– Before setting the timer, ensure that
the clock is set correctly.
– The volume of the timer will increase
gradually to minimum level 10 or last
tuned volume level.
3
(CD / TUNER / USB PC LINK)
4
(00:
00 / 12:00AM)
4
(00:00 / 12:00AM)
CLK/TIMER TIMER ON/OFF
2
1 2
,
5
,
1 Press and hold CLK / TIMER (or
CLOCK•TIMER on main unit) until
"SELECT CLOCK OR TIMER" is displayed.
2 Press ë to change the display to "TIMER"
and press CLK/ TIMER again to confirm.
3 Press CD or TUNER or USB PC LINK to
select the wake-up source.
➜ The selected source will be lighted while
other available sources are flashing.
4 Press à or á (for hours) and í or ë
(for minutes) repeatedly to set the wake up
time.
5 Press CLK / TIMER to store the setting.
➜ The timer will always be switched on after it
has been set.
➜ icon remains on the display. It indicates the
timer is activated.
● At the preset time, the selected sound
source will be played for 30 minutes
before it switches to Eco Power standby
mode (if no button is being pressed within the
time frame).
➜ CD – playing the first track of the last
selected disc or programmed track (if program
mode is active). If the last selected disc tray is
empty, it will switch to the next available disc.
If all the disc trays are not available, it will switch
to Tuner mode.
➜ TUNER – playing the last tuned radio station.
➜ USB PC LINK – playing the last selected
playlist. If the connection fails, it will switch to
Tuner mode. Refer to “USB PC Link” for proper
connection and setup before use.
Activating/Deactivating the timer
● Press TIMER ON /OFF on the remote to
turn off the timer or turn on to the last
setting again.
➜ If activated, the timer information will display
for a few seconds, then the system resumes to
the last active source or stays in standby mode.
➜ If deactivated, “OFF” is displayed.
Note:
– The system will exit timer setting mode if no
button is pressed within 90 seconds.
24
Page 25

Timer Operations Other Connections
Sleep timer setting
The sleep timer enables the system to switch to
Eco Power standby mode automatically at a
preset time.
1 Press SLEEP repeatedly until it reaches the
desired preset turn-off time.
➜ The selections are as follows (time in
minutes):
15 ™ 30 ™ 45 ™ 60 ™ 90 ™ 120 ™
OFF ™ 15 …
➜ SLEEP is shown, except for "OFF" mode.
➜ To view or change the setting, repeat the
above.
2 Before the system switches to Eco Power
standby mode, a countdown of 10 seconds is
displayed.
"SLEEP 10" ™ "SLEEP 9".... ™ "SLEEP 1"
™ "SLEEP"
To cancel the sleep timer function
● Press SLEEP repeatedly until "OFF" is
displayed, or press the STANDBY ON B
button.
Listening to an external device
You can listen to the sound of the connected
external device through your system’s speakers.
AUDIO OUT
L
R
LR
AUX
IN
LINE
OUT
AUX
IN
1 Use the red / white audio cables to connect
the system’s AUX IN (R / L) terminals to the
AUDIO OUT terminals on the other
audio/visual device (such as a TV, VCR, Laser
Disc player, DVD player or CD recorder).
2 Press AUX • GAME until “AUX” is displayed.
3 Press PLAY on the connected device to start
playback.
Recording to an external device
English
AUDIO I N
L
R
LR
LINE
OUT
LINE
OUT
AUX
IN
● Use the red / white audio cables to connect the
system’s LINE OUT (R/ L) terminals to the
AUDIO IN terminals on a recording device
(such as CD/Tape recorder).
Notes:
– All the sound control features (DSC, VAC for
example) are available for selection.
– Always refer to the owner’s manual of the other
equipment for complete connection and use details.
25
Page 26

Specifications
English
☞
AMPLIFIER
Output power 400 W total power
Signal-to-noise ratio ≥ 75 dBA (IEC)
Frequency response 50 – 18000 Hz, –3 dB
Input sensitivity
AUX In 640 m V
Gameport 310 mV
Output
Speakers ≥ 6 Ω
Headphones 32 Ω – 1000 Ω
Subwoofer Out 830 mV
Line Out 500 mV
(1) (6 Ω, 60 Hz – 12.5 kHz, 10% THD)
DISC PLAYER
Programmable tracks 40
Frequency response 20 – 20000 Hz, –3 dB
Signal-to-noise ratio ≥ 76 dBA
Channel separation ≥ 60 dB (1 kHz)
USB
Frequency response 20 – 20000 Hz, –3 dB
Signal-to-noise ratio ≥ 75 dBA
Channel separation ≥ 40 dB (1 kHz)
Total harmonic distortion < 0.3% (1 kHz)
TUNER
FM wave range 87.5 – 108 MHz
AM wave range 530 – 1700 kHz
Number of presets 40
Antenna
FM 300 Ω dipole wire
AM Loop antenna
2 x 140 W RMS
2 x 110 W FTC
(1)
(1)
SPEAKERS
System 3 way, Bass reflex
Impedance 6 Ω
Woofer 1 x 6.5"
Tweeter 1 x 2" Ferrofluid cooled
Dimensions (w x h x d) 348 x 322 x 245 (mm)
13.7” x 12.68” x 9.65”
Weight 4.35 kg each/
9.57 pounds each
GAME WOOFER
System 6.5”
Output power 120 W (4 Ω, DIN)
THD 10% at 55 Hz
Reproduction frequency
response 20 Hz – 120 Hz
Input sensitivity 830 mV
AC power 120 V / 60 Hz
Power Consumption 120 W
(at 1/8 Rated Power)
Dimensions (w x h x d) 200 x 310 x 370 (mm)
7.87” x 12.2” x 14.57”
Weight 8.3 kg / 18.26 pounds
GENERAL
Material/finish Polystyrene/Metal
AC Power 120 V / 60 Hz
Power Consumption
Active 175 W
Standby < 25 W
Eco Power Standby < 1 W
Dimensions (w x h x d) 265 x 322 x 390 (mm)
10.43” x 12.68” x 15.35”
Weight (without speakers) 8.6 kg / 18.92 pounds
26
Specifications and external appearance are subject
to change without notice.
Page 27

Troubleshooting
WARNING
Under no circumstances should you try to repair the system yourself, as this will invalidate the
warranty. Do not open the system as there is a risk of electric shock.
If a fault occurs, first check the points listed below before taking the system for repair. If you
are unable to remedy a problem by following these hints, please call 1-800-531-0039 for help.
English
Problem
When in USB PC LINK mode, “NO
CONNECTION” is displayed.
Radio reception is poor.
“NO DISC” is displayed or the disc cannot
be played.
“DISC NOT FINALIZED” is displayed.
The system does not react when buttons are
pressed.
Sound cannot be heard or is of poor quality.
The remote control does not function
properly.
Solution
✔ Check the connection between your PC and the
system and the inital setup required, see “Connections”
and “USB PC Link”.
✔ Make sure the connected PC is turned on.
✔ If the signal is too weak, adjust the antenna or connect
an external antenna for better reception.
✔ Increase the distance between the system and your TV
or VCR.
✔ Insert a disc.
✔ Load in the disc with label facing right.
✔ Replace or clean the disc, see “Care and safety
information”.
✔ Use a finalized CD-R(W) or a correct format disc.
✔ Remove and reconnect the AC power cord and switch
on the system again.
✔ Adjust the volume.
✔ Disconnect the headphones.
✔ Check that the speakers are connected correctly.
✔ Check that the AC power cord is connected properly.
✔ When in USB PC LINK mode, check that the PC’s
volume is not put into mute.
✔ When playing CD from PC’s CD drive, refer to “USB
PC Link - Enable digital CD audio output“.
✔ Select the source (CD or TUNER, for example) before
pressing the function button (ÉÅ, S ,
✔ Reduce the distance between the remote control and
the system.
✔ Replace the battery.
✔ Point the remote control directly toward the IR sensor.
T).
The timer is not working.
The system displays features automatically and
buttons start flashing.
Refer to the FAQ (Frequently Asked Questions) on the supplied CD-ROM or visit our website
“www.audio.philips.com” for latest update on FAQ.
✔ Set the clock correctly.
✔ Press TIMER ON/OFF to switch on the timer.
✔ Press and hold DEMO STOP on the main unit to switch
off the demonstration mode.
27
Page 28

LIMITED WARRANTY
AUDIO SYSTEM
One Year Free Labor
One Year Free Service on Parts
This product must be carried in for repair.
WHO IS COVERED?
You must have proof of purchase to receive warranty service. A sales receipt or other document showing that you
purchased the product is considered proof of purchase.
WHAT IS COVERED?
Warranty coverage begins the day you buy your product.
For one year thereafter, all parts will be repaired or
replaced, and labor is free. After one year from the day of
purchase, you pay for the replacement or repair of all
parts, and for all labor charges.
All parts, including repaired and replaced parts, are covered
only for the original warranty period.When the warranty
on the product expires, the warranty on all replaced and
repaired parts also expires.
WHAT IS EXCLUDED?
Your warranty does not cover:
• labor charges for installation or setup of the product,
adjustment of customer controls on the product, and
installation or repair of antenna systems outside of the
product.
• product repair and/or part replacement because of misuse,
accident, unauthorized repair or other cause not within the
control of Philips.
• reception problems caused by signal conditions or cable
or antenna systems outside the unit.
• a product that requires modification or adaptation to
enable it to operate in any country other than the country for which it was designed, manufactured, approved
and/or authorized, or repair of products damaged by
these modifications.
• incidental or consequential damages resulting from the
product. (Some states do not allow the exclusion of incidental or consequential damages, so the above exclusion
may not apply to you.This includes, but is not limited to,
prerecorded material, whether copyrighted or not copyrighted.)
• a product that is used for commercial or institutional
purposes.
WHERE IS SERVICE AVAILABLE?
Warranty service is available in all countries where the
product is officially distributed by Philips. In countries
where Philips does not distribute the product, the local
Philips service organization will attempt to provide service
(although there may be a delay if the appropriate spare
parts and technical manual(s) are not readily available).
MAKE SURE YOU KEEP...
Please keep your sales receipt or other document showing
proof of purchase.Attach it to this owner’s manual and
keep both nearby.Also keep the original box and packing
material in case you need to return your product.
BEFORE REQUESTING SERVICE...
Please check your owner's manual for assistance. If you
have additional questions, call us at 1-800-531-0039.
TO GET WARRANTY SERVICE IN U.S.A.,
PUERTO RICO, OR U.S. VIRGIN ISLANDS...
Take the product to a Philips factory service center (see
enclosed list) or authorized service center for repair.When
the product has been repaired, you must pick up the unit at
the center. Centers may keep defective parts.
(In U.S.A., Puerto Rico, and U.S.Virgin Islands, all implied
warranties, including implied warranties of merchantability
and fitness for a particular purpose, are limited in duration
to the duration of this express warranty. But, because some
states do not allow limitations on how long an implied
warranty may last, this limitation may not apply to you.)
TO GET WARRANTY SERVICE IN CANADA...
Please contact Philips at:
1-800-661-6162 (French Speaking)
1-800-531-0039 (English or Spanish Speaking)
(In Canada, this warranty is given in lieu of all other warranties. No other warranties are expressed or implied,
including any implied warranties of merchantability or fitness for a particular purpose. Philips is not liable under any
circumstances for any direct, indirect, special, incidental or
consequential damages, howsoever incurred, even if notified
of the possibility of such damages.)
REMEMBER...
Please record below the model and serial numbers found
on the product.Also, please fill out and mail your warranty
registration card promptly. It will be easier for us to notify
you if necessary.
MODEL # __________________________________
SERIAL # __________________________________
This warranty gives you specific legal rights.You may have other rights which vary from state/province to state/province.
Philips, P.O. Box 520890, Miami,FL 33152, USA, (402) 536-4171
EL4965E007 / 8-02
28
 Loading...