

Page 1

:
PFAFF
ii
Instruction
manua
PFAFF
4
—
expresS0fl2
r
-t
expreSS0fl
quilt
—
V
1
2044
w
I
I
Page 2

Page 3

—
IMPORTANT
When
Read
using
instructions
all
an
electrical
appliance,
before
SAFETY
safety
basic
household
this
using
INSTRUCTIONS
followed,
be
always
precautions
sewing
should
machine.
including
the
following:
F
F
F
F
F
F
F
plugged
type
cord
machine
blocked.
loose
and
required
is
cause
can
needle
the
adjustment
foot,
outlet
used
then
plug,
shock:
in.
rated
fire,
when
this
in
plug,
or
to
cloth.
around
the
etc.
when
manual.
or
remove
the
not
Always
max
electric
sewing
this
manual.
it
if
nearest
the
ventilation
Keep
needle
causing
the
in
removing
where
plug
cord.
Watt.
5
not
is
the
to
it
needle
oxygen
from
unplug
shock,
machine
Use
working
authorized
sewing
break.
break.
to
area,
covers,
is
outlet.
sewing
this
is
attachments
only
properly,
openings
machine
such
lubricating,
being
machine
injury
or
or
by
used
has
it
if
service
or
dealer
sewing
the
of
needle.
threading
as
when
or
administered.
the
from
person:
to
children.
near
recommended
dropped
been
center
machine
needle,
making
for
and
any
reduce
machine
immediately
before
to
this
or
repair,
the
free
away
the
bent
or
push
sewing
needle,
servicing
or
outdoors.
—To
should
used
be
machine
sewing
dropped
sewing
from
from
proper
needles.
fabric
machine
threading
sewing
the
insert
where
turn
pulling
by
the
never
after
relamping.
—To
as
only
contained
as
into
electrical
machine
the
all
needle
while
adjustments
object
any
aerosol
controls
all
on
general
DANGER
sewing
A
•
electric
Always
•
outlet
unplug
WARNING
allow
not
Do
•
sewing
this
Use
•
•
•
•
•
•
•
•
I
‘
•
I
•
I
a
•
•
•
a
•
•
Please
manufacturer
the
by
operate
Never
damaged,
or
examination,
operate
Never
controller
foot
fingers
Keep
not
not
Always
other
Never
Do
not
not
Do
disconnect,
To
not
Do
also
use
use
pull
the
unplug
user
drop
use
operate
unplug
observe
Always
Do
Do
Switch
changing
the
left
be
using
Replace
reduce
Close
toy.
a
its
for
in
machine
water.
mechanical
or
accumulation
plate.
stitching.
(0”)
off
bobbin,
into
(spray)
to
cord.
safety
parts.
mentioned
the
To
moving
machine
unattended
and
the
attention
intended
manual.
this
has
it
if
Return
any
with
The
when
changing
or
from
any
products
off
unplug,
notes
before
with
bulb
risk
use
damaged
a
the
adjustment.
air
lint,
of
Special
wrong
may
It
making
electrical
the
in
opening.
position,
(“0”)
grasp
on
page
when
cleaning.
same
of
necessary
is
as
sewing
openings
dust,
care
plate
deflect
any
presser
instruction
the
being
are
the
2.
burns,
described
electric
of
risk
THESE
and
USA
machine
in
fit
to
qualified
a
Canada
has
polarized
a
electrician
polarized
a
outlet
to
F
F
j
—
I
SAVE
the
For
sewing
This
.
..
intended
contact
iL
—I
INSTRUCTIONS
the
than
wider
blade
(one
only
install
plug
one
the
way.
proper
the
If
outlet.
plug
Do
does
not
not
modify
other).
fully
fit
the
To
in
plug
reduce
the
in
outlet,
any
the
reverse
way.
risk
of
electric
plug.
the
shock,
it
If
still
this
does
plug
not
is
fit,
Page 4

Notes
on
safety
for
domestic
sewing
machines
in
accordance
exercise
must
user
The
1.
2.
3.
4.
5.
10.
11.
12.
13.
When
6.
7.
8.
9.
observe
disconnect
maximum
The
tension
The
machine
The
not
Do
not
Do
there
•
function
its
•
is
it
•
not
Do
liability
No
intended
is
it
avoid
To
repair.
Only
The
According
caused,
the
leaving
place
use
visible
is
e.g.
wet,
pull
the
This
original
machine
should
sewing
the
machine
the
permissable
the
of
is
any
the
is
with
the
will
be
or
risk
solely
is
PFAFF
is
the
to
area
machine,
drive
put
be
to
objects
sewing
damage
disturbed
condensation
mains
accepted
is
it
if
electric
of
the
parts
designed
laws
mains
the
with
adequate
while
during
the
from
wattage
may
belt
operation
into
openings
in
machine
out
plug
for
operated
shock,
responsibility
may
a
for
concerning
power
EN
caution
working.
maintenance
by
mains
the
for
only
be
according
on
if:
that
may
socket
the
of
damage
any
incorrectly.
not
do
of
used.
be
supply
mains
electromagnetic
line
be
60335-2-28
to
with
pulling
sewing
adjusted
machine.
the
caused
be
by
caused
open
qualified
our
with
changed
regard
work
its
the
the
when
or
mains
the
out
lampis5
PFAFF
by
a
the
indications
to
introducing
by
cord.
machine
this
if
machine.
service
rated
mains
a
compatibility,
should
or
and
up
changing
plug.
watts.
mechanic.
There
staff.
voltage
no
changes
and/or
movement
down
mechanical
the
on
cold
a
is
used
no
are
of
liability
made
be
specification
machine
purpose
any
for
inside
parts
and
10%
+1-
accepted
be
can
it.
to
IEC
the
of
partsoraccessories,
plate.
into
a
the
rated
a
335-2-28
and
needle
room.
warm
than
other
machine
frequency
any
for
which
mains
constantly
always
for
that
the
of
+1-
interruptions
which
user
4%.
can
Environment
recommended
The
Ambient
Air
Storage
The
operated
itisa
dampness,
The
Treatment
Always
Cleaning
Housing
moistened
Please
Do
temperature
humidity
temperature
machine
in
machine
machine
protect
and
note!
not
use
20%
is
the
direct
is
display:
with
any
environment
10C
80%.
to
-
suppressed
vicinity
direct
for
supervised
sunlight,
used
to
be
machine
the
To
plastic
insecticides
(50°F)
25C
static
on
clean
cleanser
is:
(-13°F)
insensitive
and
electronic
of
use
electricity,
firm
a
against
the
with
chemical
or
40°C
to
+
to
the
in
and
damage
housing
maximum
(104°F)
(+140°F)
60°C
interference
to
devices.
should
It
home,
heat-producing
surface
even
which
a
use
38°’
products
This
dry,
such
sewing
which
could
clean,
alcohol.
as
according
be
operated
objects,
is
caused
be
soft.
petrol
machine
corrosive
for
open
by
lint-free
liquid
or
international
to
is
a
such
in
ventilation
being
it
cloth.
chemicals
conventions;
high-quality
that
way
a
chemicals
purposes.
dropped.
or
hit
remove
To
to
however,
electronic-mechanical
subjected
not
is
it
liquids.
or
stubborn
any
housing.
the
clean
dirt,
it
to:
shoLild
appliance;
dust,
a
use
not
severe
soft
be
cloth
Page 5
Modern,
uncomplicated
—
Sewing
push-button
by
control
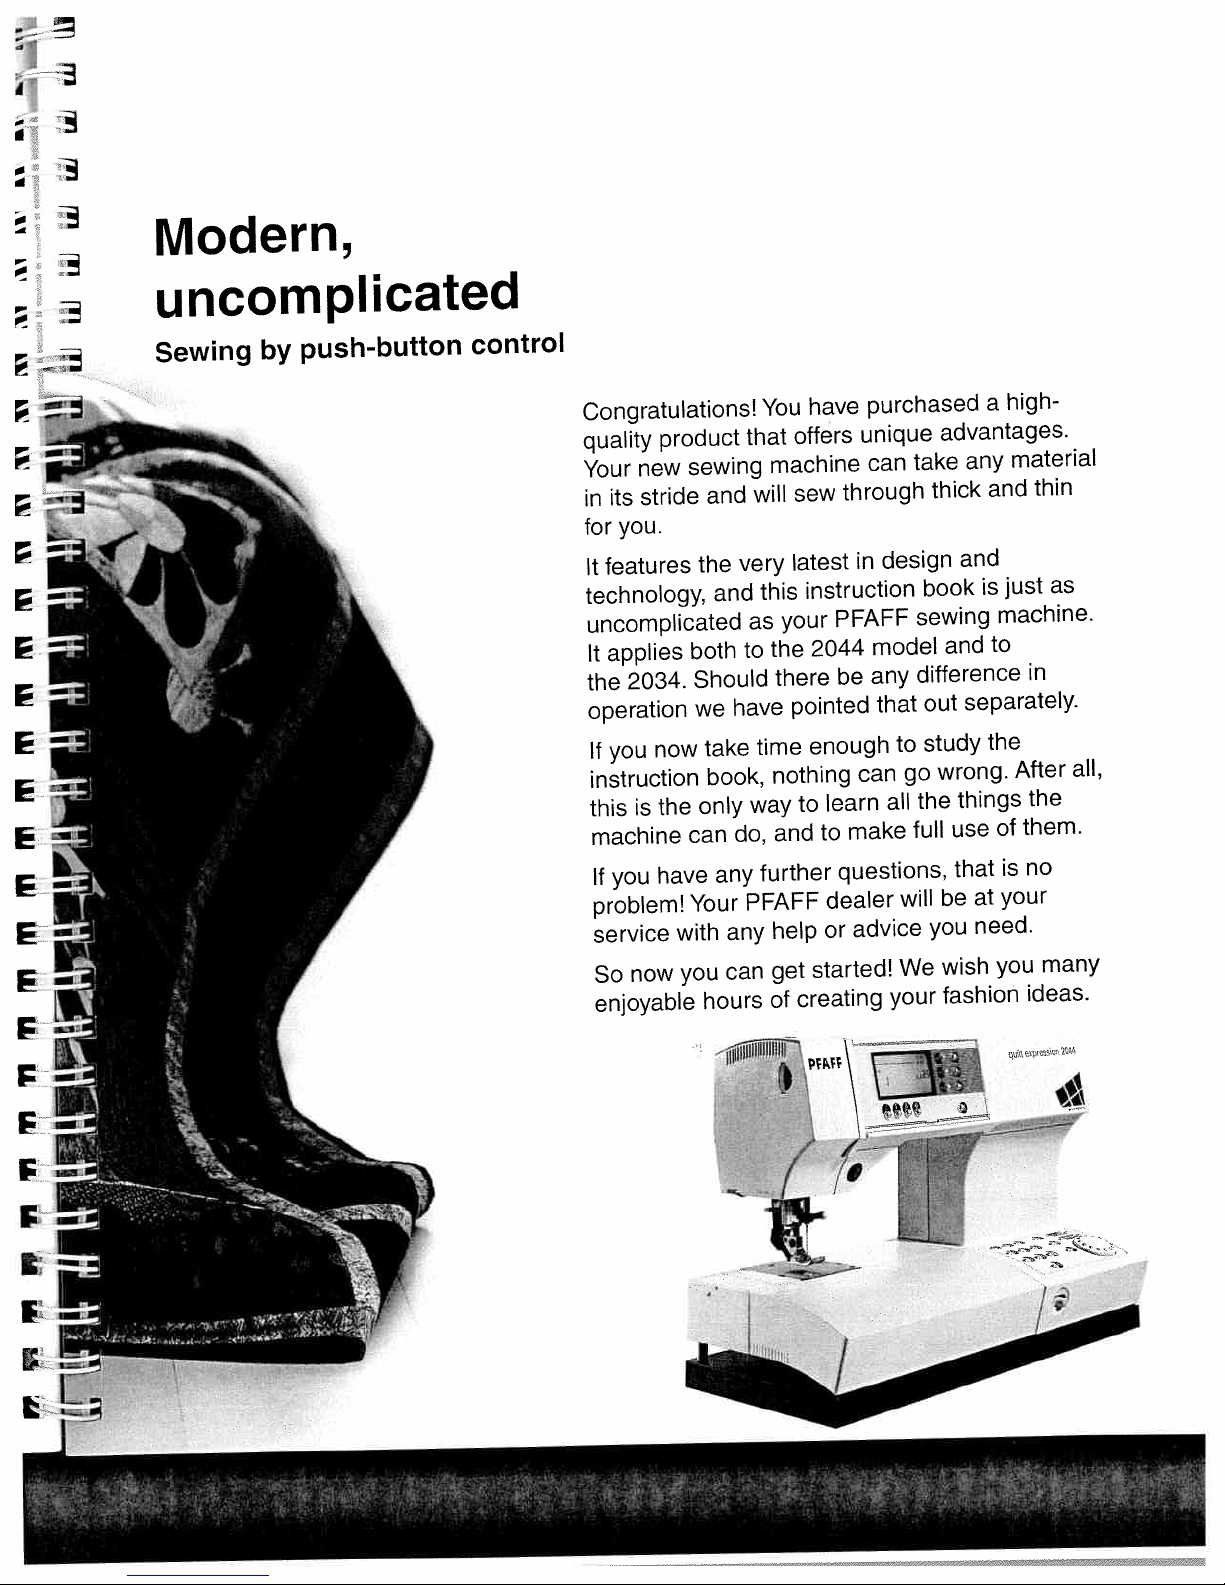
Congratulations!
quality
Your
in
for
It
technology,
uncomplicated
It
the
operation
If
instruction
this
machine
If
problem!
service
So
enjoyable
product
new
stride
its
you.
features
applies
2034.
now
you
is
the
have
you
now
sewing
and
the
and
both
Should
we
take
book,
only
can
any
Your
with
you
hours
can
You
that
will
very
this
as
to
have
time
way
do,
further
PFAFF
any
have
offers
machine
sew
latest
instruction
your
2044
the
there
pointed
enough
nothing
learn
to
to
and
dealer
or
help
started!
get
creating
of
purchased
unique
can
through
design
in
PFAFF
model
any
be
that
to
go
can
all
make
questions,
will
advice
We
your
a
advantages.
any
take
and
thick
and
is
book
sewing
and
difference
separately.
out
wrong.
things
use
that
be
you
wish
fashion
the
at
need.
study
the
full
high-
material
thin
as
just
machine.
to
in
After
the
them.
of
no
is
your
many
you
ideas.
all,
2M
o
Page 6
Jntroaucuori
Index
A
Accessories
Applique
Applique
Automatic
B
Balance
Basting
binder
Bias
hem
Blind
Bobbin
Bobbin
Bobbin
Bobbin
Bobbin
Bobbin
Braiding
Bridging
Buttonhole,
Buttonholes
Buttonholes
case
thread
thread
thread,
winding
winding
Buttonhole
Buttonholes,
Buttons,
headings
of
foot
designs
tapering
monitor
tension
drawing
through
foot
fully-automatic
with
tips
types
sewing
gimp
on
(model
up
the
thread
2044)
needle
20,
101,
78-79
1
102
24,
21-23
70-76
82
03
40
55
87
56
25
37
25
28
30
89
65
72
75
76
71
61
Decorative
Decorative
Decorative
E
Elastic
Electrical
Eyelet
Eyelets
utility
embroidery
F
dog,
Feed
Felling
Foot
Free
Free
Fringe
Gathering
foot
control,
motion
motion
foot
H
Hemming,
Hemstitching
(Integrated
IDT
menu
Info
Invisible
sewing,
stitches,
stitches,
stitches
connection
lowering
connecting
embroidery
quilting
rolled
Dual
blind
hems,
general
Expression
Quilt
Expression
foot
Feed)
stitch
notes
2034
2044
56-60,
64,
32,
96
10
11
65
19
109
61
34
82
19
99
87
91
84
66
110
33
41
56
Carrying
Changing
stitch
the
Circular
Cleaning
Combined
Combined
Cording
hem
Cross
Cross-stitch
D
Darning,
Darning,
4
case
pattern
a
sequence
embroidery
oiling
and
borders
borders
foot
stitch
automatic
sewing
with
on
within
guide
twin
darning
patches
needle
(model
2044)
59,
18
52
90
112
97
97
84
65
108
62
62-63
K
edge
Knit
L
stitch
with
Lid
bulb,
Light
“Lock”
button
M
M-memories,
Master
Monograms,
switch
foot
chart
changing
deleting
Free
all
motion
85
18
113
43
52
19
98
Page 7
II
ILl
l.JUUL.11U
N
foot
Narrow
Needle
Needle
Needle
Needle,
Needle,
Needle/bobbin
Non-elastic/elastic
Non-stick
edge
plate,
table
threader,
changing
threading
fancy
changing
0
Overlock
stitches
P
sewing
the
of
Parts
sewing
the
of
Parts
Patchwork
“Pattern
“Pattern
Pattern
changing
Pattern
Pattern
Pattern
Pattern
Pattern
Patterns,
Pintuck
Pintuck
Presser
Presser
Presser
Presser
and
start”
within
start”
length/pattern
decorative
for
length/stitch
mirroring
settings,
altering
sizes,
width/stitch
storing
foot
with
foot
(special
feet
(standard
feet
lifter
foot
changing
foot,
Integrated
thread
stitches
stitch
machine
machine
quilting
altering
guide
tension
foot
for
sequence
stitch
width,
stitches
density
length,
altering
accessories)
accessories)
leather
(2044)
(2034)
112
92,
26-27
24-26
54-58
14-15
16-17
104-107
37-40
38,
49,
80-81
78,
91
93
27
31
88
49
52
96
39
42
37
39
50
83
88
79
28
29
S
Sewing
Sewing
Sewing
edging
Shell
Shirring
patterns,
Stitch
sequence
Stitch
sequence,
Stitch
sequence,
Stitch
sequence,
Stitch
sequences,
Stitch
width/needle
Stitch
T
Tapering
Technical
Thread
Thread
Threading
Tie-off
for
Tips
feed
Top
needle
Twin
needle,
Twin
U
stitches,
Utility
stitches,
Utility
V
Voltage
w
Window,
function
problems
programs,
foot
satin-stitch
with
data
cutter
tension,
perfect
a
(integrated
threading
switch
adjusting
buttons
and
their
selecting
formation
buttons
deleting
deleting
inserting
general
position,
general
buttonhole
dual
Expression
Quilt
Expression
the contrast
solutions
from
into
notes
zigzag
notes
feed)
2034
altering
2044
114,
100-1
26,
32,
42
115
36
67
84
45
49
51
50
51
48
38
01
116
28
24
27
42
76
33
44
31
6,
8,
7
9
19
36
R
Removable
Repairing
Reverse
hemming
Roll
Ruffler
accessory
tears
sewing
tray
21
59
41
66
85
z
Zippers,
inch
1/4
hole
7/9
sewing
quilt
foot
in
and
patchwork
foot
54
86
89
5
Page 8
Introduction
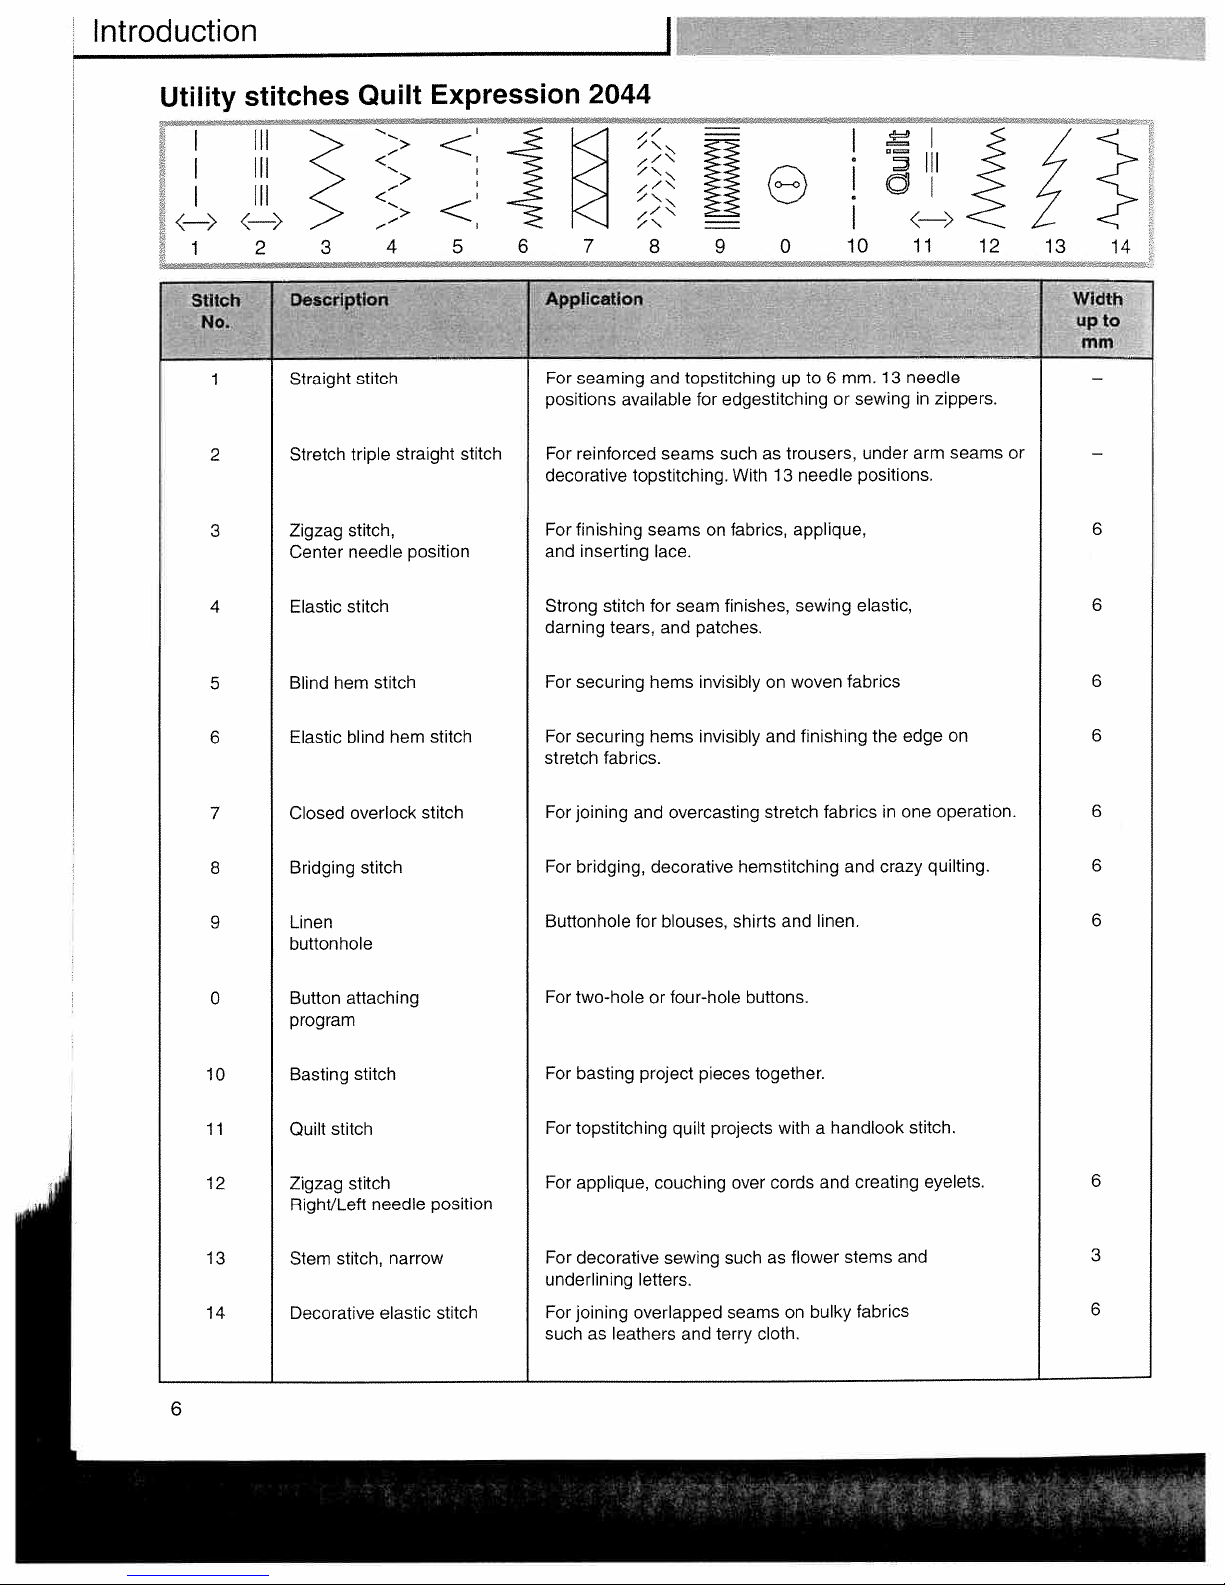
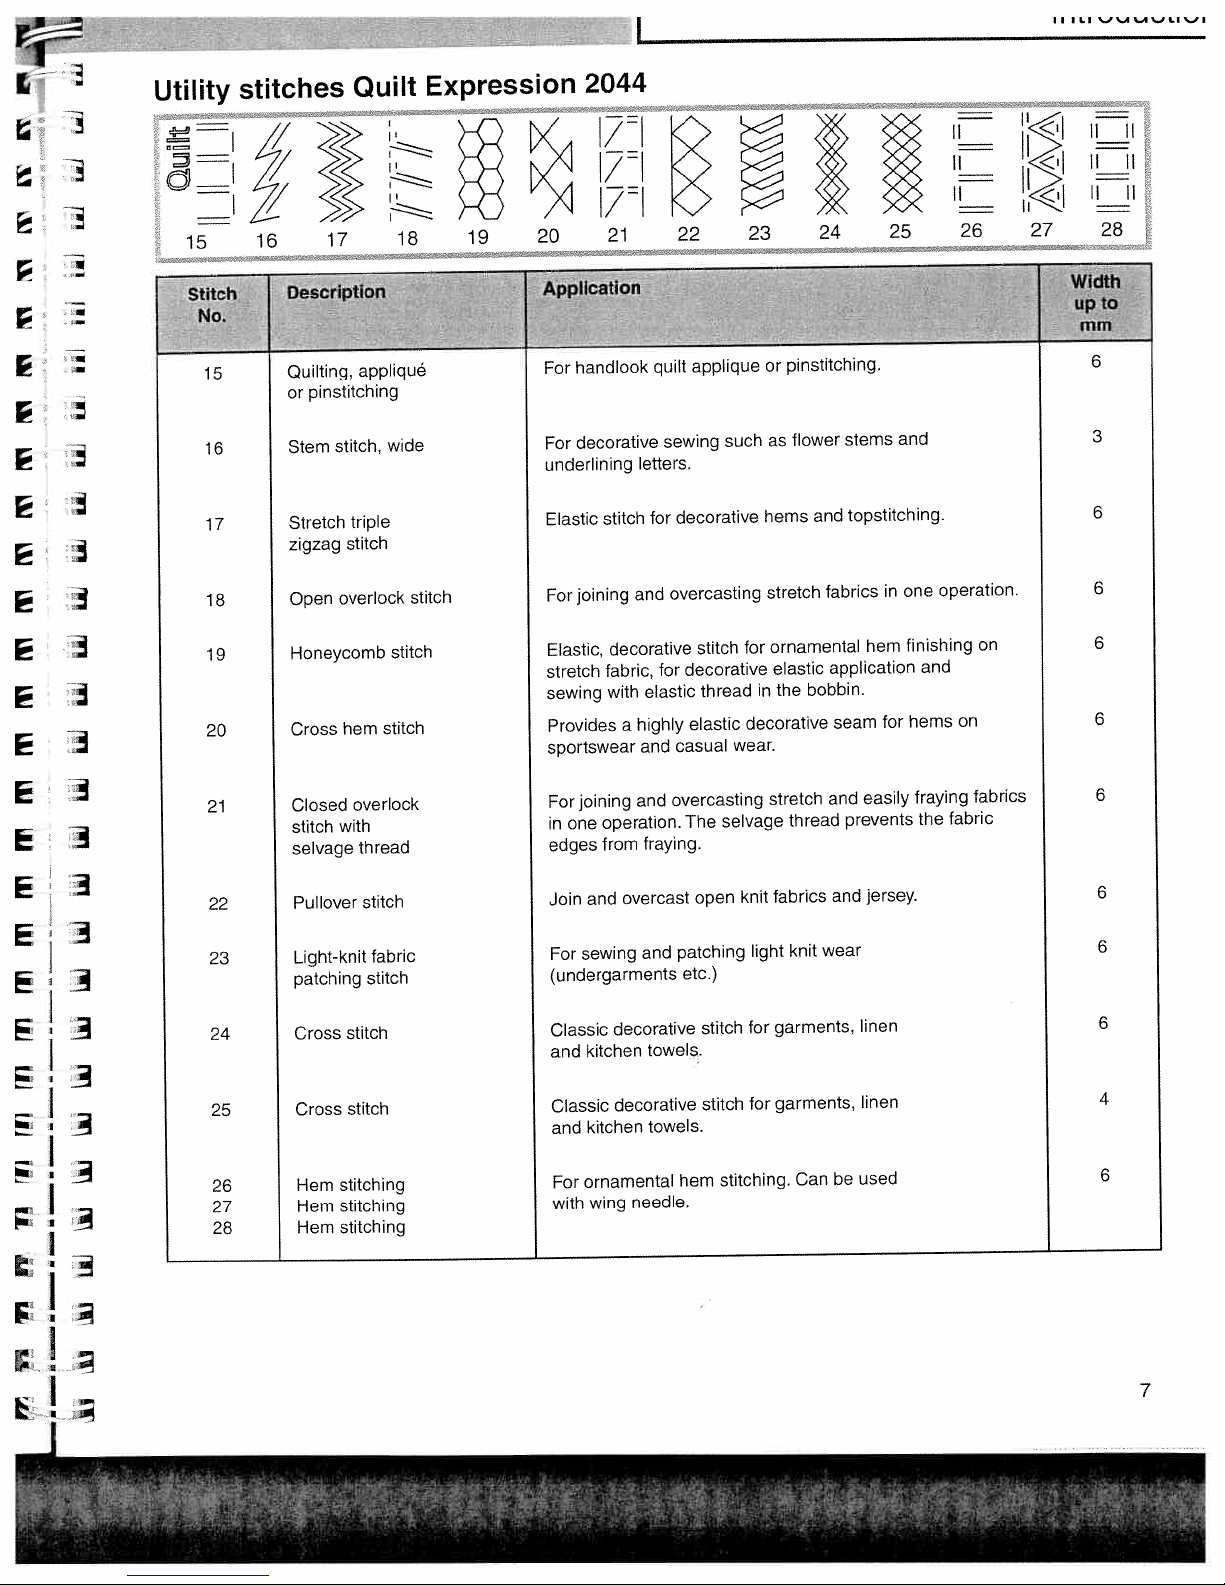
Utility
I
I
I
<—>
1
Stitch
No.
2
3
4
stitches
III
III
III
<—>
2
Description.
.
Straight
Stretch
Zigzag
Center
Elastic stitch
Quilt
3
. .
stitch
triple
stitch,
needle
-.,-.
<>
<
;>
-...
>
4
straight
position
Expression
<i
<
5
stitch
I
6
2044
7
pplication
For
seaming
positions
For
reinforced
decorative
finishing
For
inserting
and
Strong
stitch
darning
//
/\\
//\
/\\
/\
8 9
and
available
topstitching.
seams
lace.
for
tears,
and
=
H
=
topstitching
for
seams
on
seam
patches.
8
0
up
edgestitching
such
finishes,
trousers,
as
With13needle
fabrics,
applique,
sewing
I
I
lol
I
10
.
to6mm.
sewinginzippers.
or
under
positions.
elastic,
13
I
WI
11
needle
arm
seams
12
Width
upto
mm
or
6
6
10
11
12
13
14
woven
finishing
fabricsinone
and
linen.
and
stems
flower
bulky
fabrics
the
crazy
creating
fabrics
edge
stitch.
and
on
operation.
quilting.
eyelets.
For
5
6
7
8
9
0
Blind
Elastic
Closed
Bridging
Linen
buttonhole
Button
program
Basting
Quilt
Zigzag
Right/Left
Stem
Decorative
stitch
hem
blind
hem
overlock stitch
stitch
attaching
stitch
stitch
stitch
needle
narrow
stitch,
elastic
stitch
position
stitch
securing hems
securing hems
For
fabrics.
stretch
For
joining
For
bridging,
Buttonhole
For
two-hole
For
basting
topstitching
For
For
applique,
For
decorative
underlining
For
joining
as
leathers
such
and overcasting
for
letters.
overlapped
decorative
blouses,
or
four-hole
project
quilt
couching
sewing such
and
invisibly
invisibly
hemstitching
shirts
buttons.
pieces
projects
over
seams
terry
on
and
stretch
and
together.
withahandlook
cords
as
on
cloth.
6
6
6
6
6
6
3
6
6
Page 9
II
11.1
%..A.A1l.i%_I
Utility
o=
1z7
15
Stitch
No
15
16
17
18
19
20
stitches
16
Description
Quilting,
or
Stem
Stretch
zigzag
Open
Honeycomb
Cross
Quilt
17
.
appliqué
pinstitching
stitch,
triple
stitch
overlock
hem
Expression
18
wide
stitch
stitch
stitch
19
2044
20
Application
handlook
For
decorative
For
underlining
stitch
Elastic
joining
For
Elastic,
fabric,
stretch
sewing
Provides
sportswear
21
quilt
sewing
letters.
for
and
decorative
for
elastic
with
highly
a
and
22
applique
such
decorative
overcasting
stitch
decorative
thread
elastic
wear.
casual
23
pinstitching.
or
flower
as
hems
stretch
for
ornamental
elastic
the
in
decorative
24
stems
topstitching.
and
fabrics
application
bobbin.
seam
hem
25
and
one
in
finishing
hems
for
26
operation.
and
on
on
27
28
Width
dpto
nlm
6
3
6
6
6
6
21
22
23
24
25
26
27
28
Closed
with
stitch
selvage
Pullover
Light-knit
patching
Cross
Cross
Hem
stitching
stitching
Hem
stitching
Hem
overlock
thread
stitch
fabric
stitch
stitch
stitch
and
joining
For
operation.
one
in
fraying.
from
edges
Join
For
(undergarments
Classic
and
Classic
and
For
with
overcast
and
sewing
and
decorative
kitchen
decorative
kitchen
ornamental
needle.
wing
overcasting
The
patching
etc.)
towels.
towels.
hem
open
stitch
stitch
stitching.
selvage
knit
light
for
for
stretch
thread
fabrics
knit
garments,
garments,
Can
and
prevents
and
wear
be
easily
jersey.
linen
linen
used
fraying
fabric
the
fabrics
6
6
6
6
4
6
7
Page 10
Utility
<_>
Sfltch
No.
1
stitches
Expression
<1
2
3
Description.
Straight
stitch
<
<
2034
—,
—
‘---‘
<
,
i
I
5
-
App’ication
For
positions
-
>
4
C
6
iz:1
i2t
I..-{
l
_—4
-.
-
seaming
I
7
and
available
\\
/“
/N
,/\
/\\
fle
/\
topstitching
8
for
edgestitching
=
9
up
II
III
!0i
0
10
11
Width
upto
.
mm
to
6
mm.
13
needle
sewing
or
in
zippers.
2
3
4
5
6
7
8
9
0
Stretch
Zigzag
Center
Elastic
Blind
hem
Elastic
Closed
Bridging
Linen
buttonhole
Button
attaching
program
triple
stitch,
needle
stitch
stitch
blind
hem
overlock
stitch
straight
position
stitch
stitch
stitch
For
reinforced
decorative
For
finishing
and
inserting
Strong
darning
For
securing
For
securing
stretch
fabrics.
For
joining
For
bridging,
Buttonhole
For
two-hole
topstitching.
stitch
tears,
and
for
or
seams
seams
lace.
for
seam
and
patches.
hems
invisibly
hems
invisibly
overcasting
decorative
blouses,
four-hole
such
With
on
fabrics,
finishes,
and
stretch
hemstitching
shirts and
buttons.
as
13
on
trousers,
needle
applique,
sewing
woven
finishing
fabrics
linen.
under
positions.
elastic.
fabrics
the
and
in
crazy
arm
edge
one
seams
on
operation.
quilting.
or
6
6
6
6
6
6
6
10
11
12
13
8
Basting
Quilt
stitch
Zigzag
Right/Left
Stem
stitch,
stitch
stitch
needle
narrow
position
For
basting
For
topstitching
For
applique,
For
decorative
underlining
project
couching
sewing
letters.
quilt
pieces
projects
over
such
together.
with
cords
as
flower
a
handlook
and
stems
creating
and
stitch.
eyelets.
6
3
Page 11
-]
L
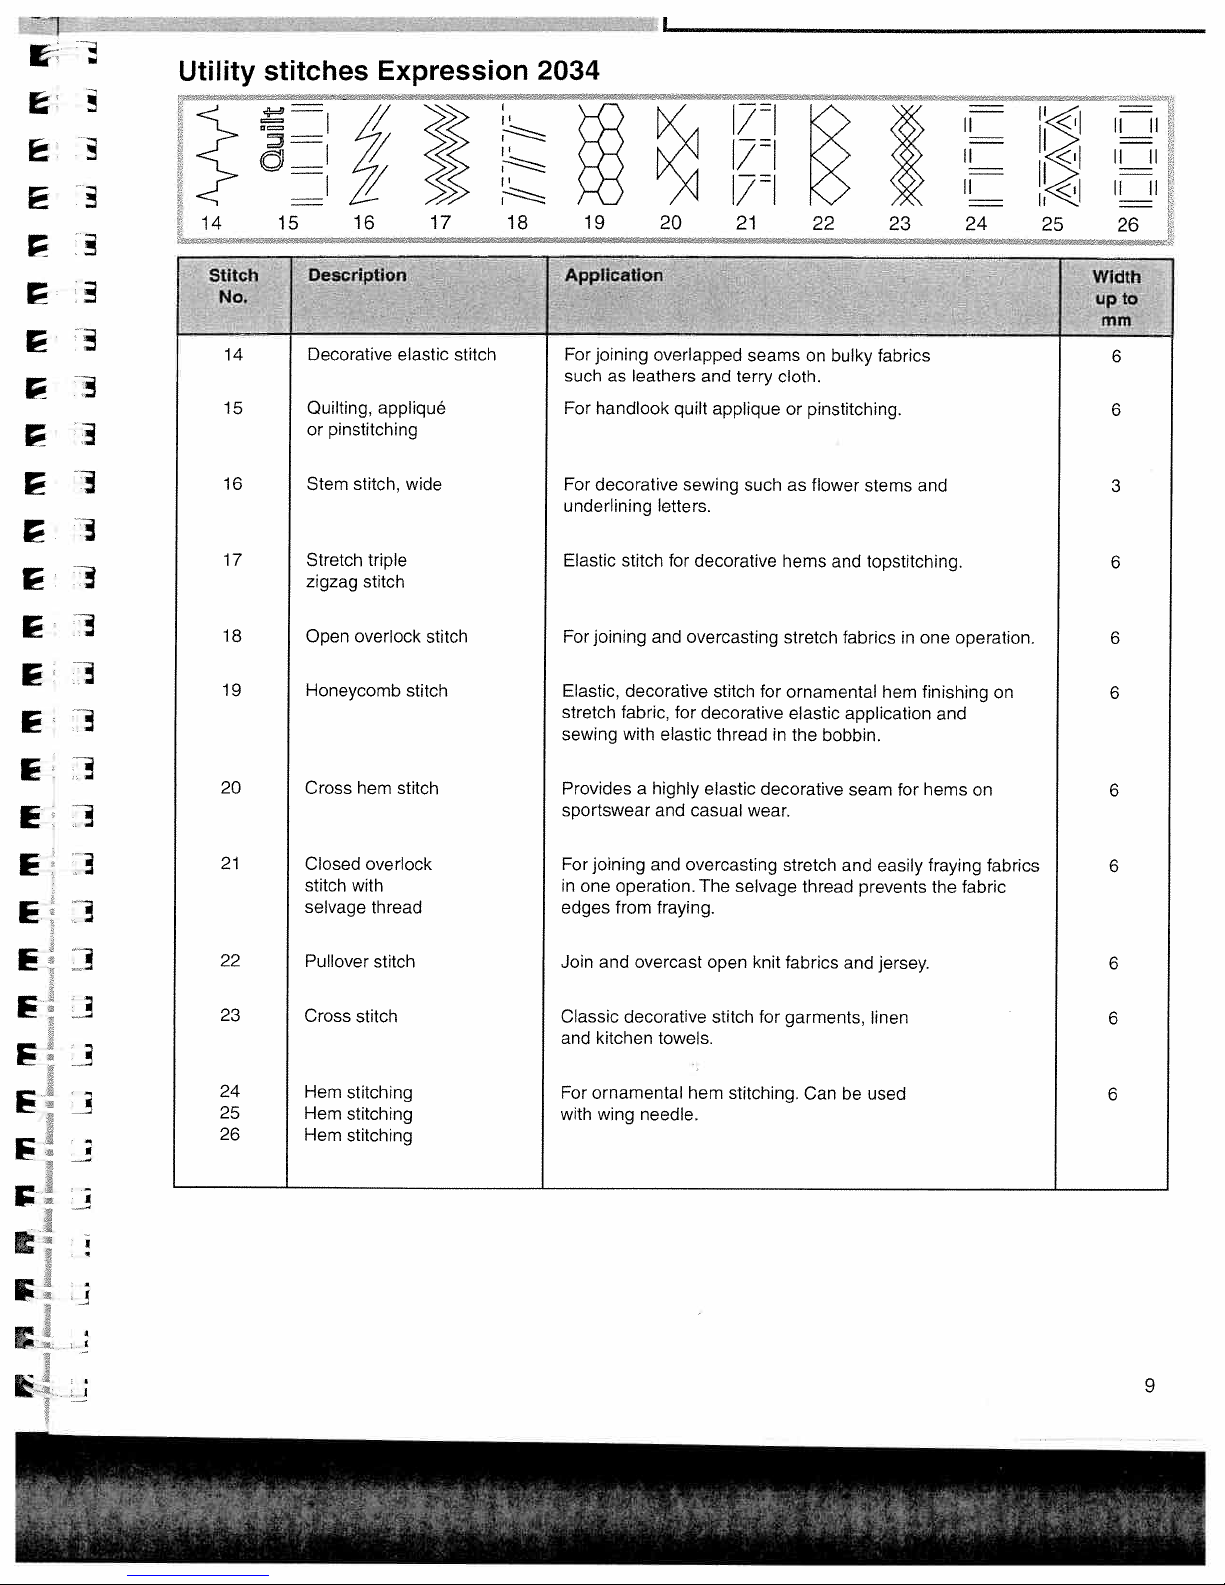
Utility
stitches
Expression
2034
14
Stitch
I’4o
14
15
16
17
18
19
15
Description
Decorative
Quilting,
or
pinstitching
Stem
Stretch
zigzag
Open
Honeycomb
16
elastic
appliqué
stitch,
triple
stitch
overlock
wide
stitch
stitch
17
stitch
18
19
Application
For
joining
such
For
For
underlining
Elastic
For
Elastic,
stretch
sewing
leathers
as
handlook
decorative
stitch
joining
decorative
fabric,
with
20
overlapped
and
quilt
sewing
letters.
for
decorative
and
overcasting
for
decorative
elastic
7=1
21
seams
terry
applique
such
stitch
thread
cloth.
or
as
hems
stretch
for
ornamental
elastic
in
the
22
bulky
stems
and
fabrics
application
bobbin.
fabrics
topstitching.
on
pinstitching.
flower
23
hem
and
in
one
finishing
II
24
operation.
and
on
25
II II
II
26
Width
tipto
mm
6
6
3
6
6
6
F
E
F
F
Fl
F
F
20
21
22
23
24
25
26
Cross
Closed
stitch
selvage
Pullover
Cross
Hem
stitching
Hem
stitching
Hem
stitching
hem
overlock
with
thread
stitch
stitch
stitch
Provides
sportswear
For
joining
in
one
operation.
edges
from
Join
and
Classic
and
kitchen
For
ornamental
with
wing
highly
a
and
and
fraying.
overcast
decorative
towels.
needle.
elastic
casual
wear.
overcasting
The
selvage
open
knit
stitch
hem
stitching.
decorative
stretch
thread
fabrics
for
garments,
Can
seam
and
prevents
and
used
be
easily
jersey.
linen
for
hems
fraying
the
on
fabrics
fabric
6
6
6
6
6
9
Page 12
_______
_______
__________________________
___
______________________________
0
C
—
CD
(I)
C,
CD
Cl)
x
.
m
CD
C,’
Cl)
o.
0
E2
4PI”
C.)
C.’)
C,)
0)
-J
CO
01
C)
C.)
01
ç
iiiIIIIIIIII
iIHIIjjjIIlIIIIII
III
iii
—.J
01
11111
11111
11111
01
‘
C)
ii
‘‘IiiiiI
Ii
I
0•1
m
Co
CD
‘<
(1)
C
C)
-c-cb-
I
lib
“1111111
liii!
ilIIIIIIjliIIIIIIII
2
iI’’I’’’’’’1l
0)
I’ll’
iIliIIIIlIIIIIIIIIIl
C’)
,I’h’’’h’’’
C)
lIjili
1111111
iijii
IlIli
01
C)
II1
,ii,
II
1
iii
I’ii
.iii,
hI’’uhII’hII
C)
C)
-
-
C.)
riiiii
1111111
i
CD
EEE
4u
‘I’
—.
0
w
o
—
.
o
Cl)
I
01
o
0)
V
—
Page 13

i
L
1
i
íieJ
_______________________
________
______
La]
ai
iu
ía]
i
,al
‘i’
iAi
..J
r”
Lili
1
T1
I
jj
—
KD-KD-
°)
1IIlI
‘‘‘‘‘‘‘i’iBIBBB
4.
IlIIIIIIIIII
u
ru
mm
ni
ru
i
a’
‘
‘•
*aJ
J
.aJ
J
La]
ía]
La]
Li
LJ
J
9
UIIl
11111
t
1111!
IIIIII,IIIIIIlIIIlIIIIII
tIIIIIIIIIiIIIllhIIIIl
‘ii
.IIIIIiII.IIIIIIIIr
HIIF1IIII1—
•
LJ
i)
LL
Page 14
Page 15
Technical
section
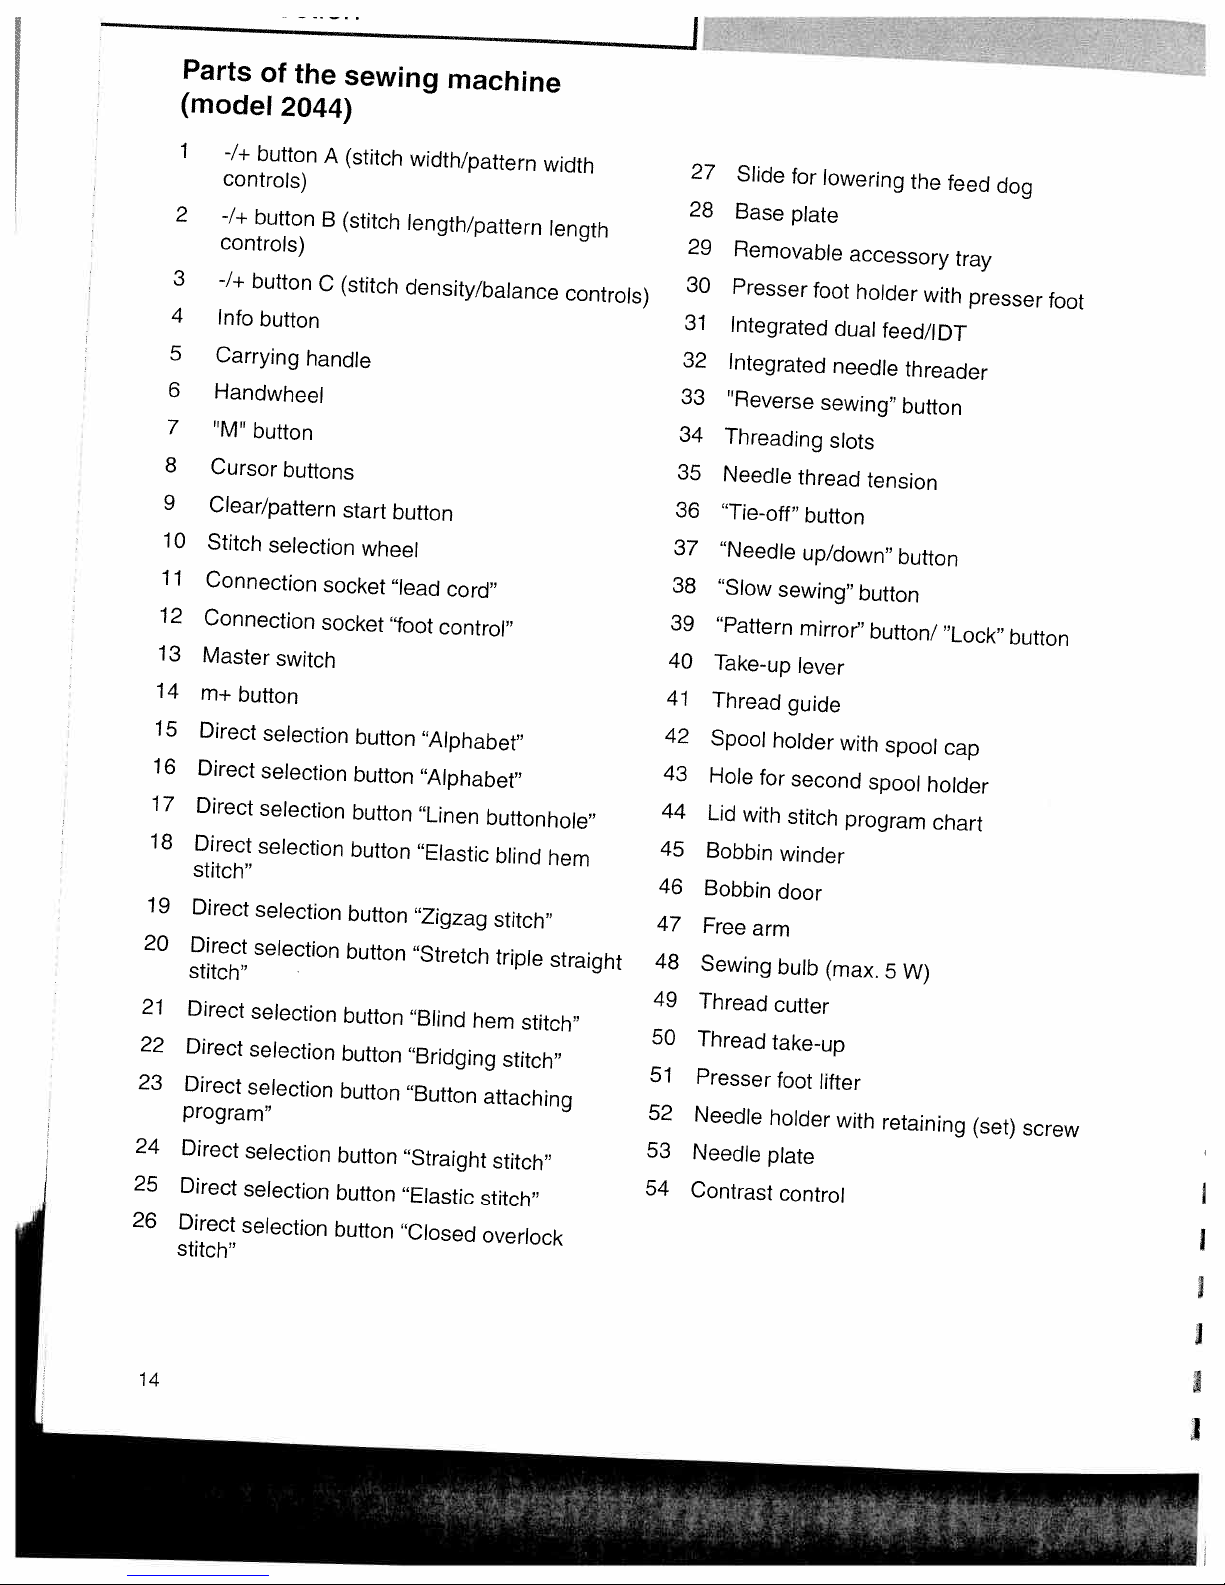
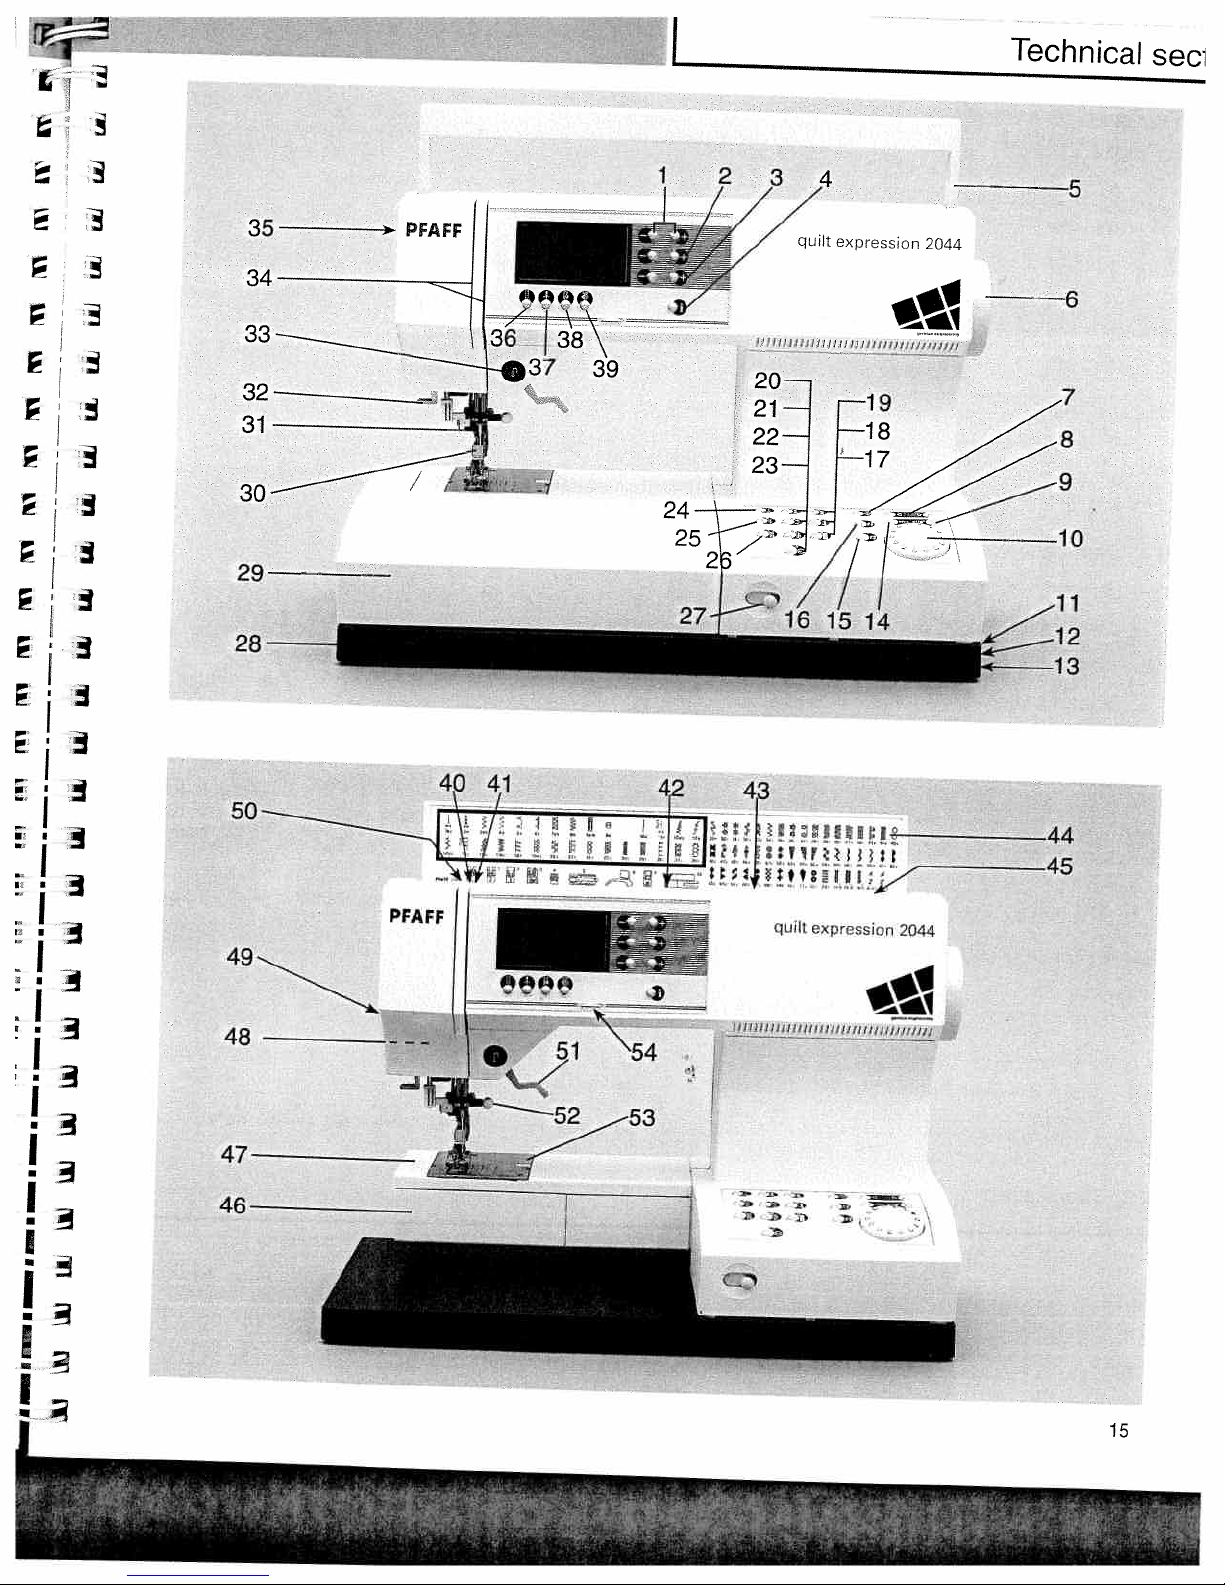
Parts
Parts
Carrying
Lid
I
Electrical
Voltage
Accessories
Removable
Bobbin
Bobbin
Needle/bobbin
Threading
Integrated
Drawing
Presser
Thread
Changing
Winding
the
Changing
Threading
Integrated
Lowering
with
needle
of
the
of
the
case
stitch
connection
switch
winding
case
the
needle
up
the
foot
lifter
cutter
the
a
bobbin
needles
twin
Dual
feed
sewing
sewing
chart
accessory
thread
needle
threader
bobbin
presser
through
needle
Feed/IDT
dog
machine
machine
tray
tension
thread
thread
feet
(2044)
(2034)
14-15
16-17
21
21-23
24-25
24-25
26
27
28
28
28
29
30
31
18
18
1
19
20
9
Page 16
18
19
20
21
22
23
24
25
26
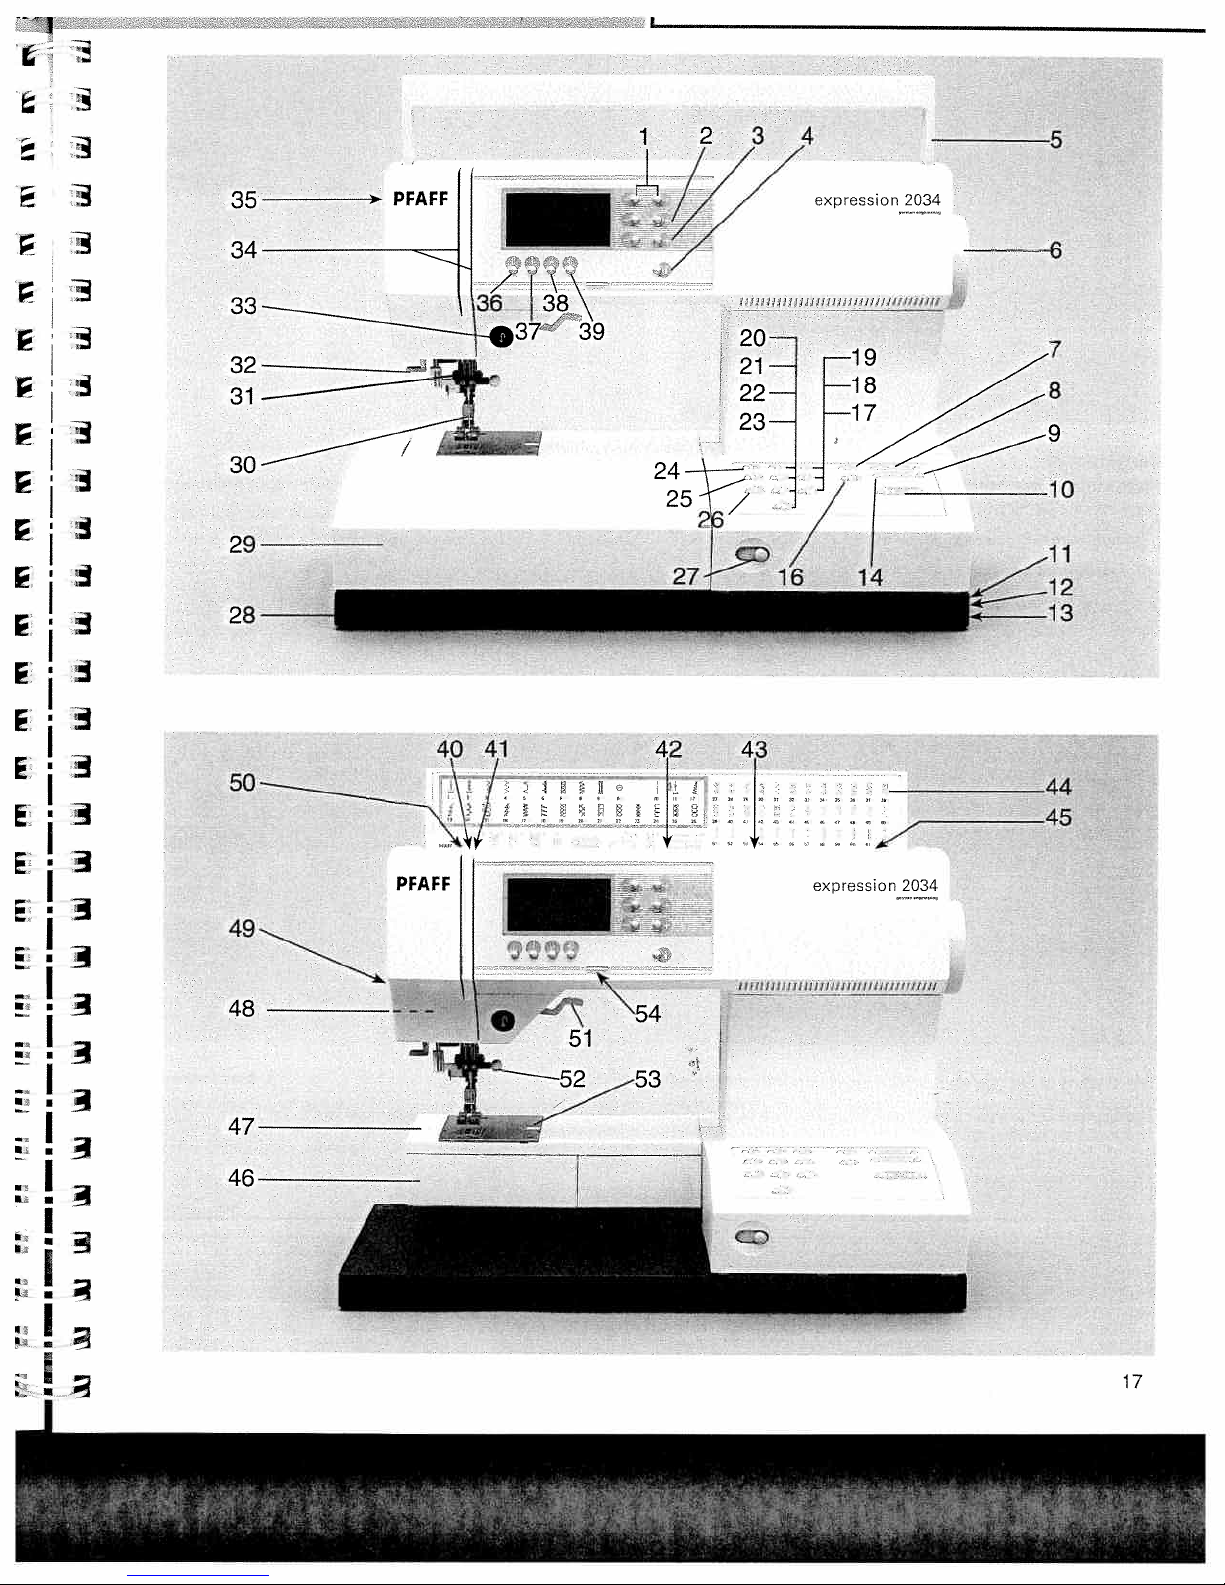
Parts
(mod&
1
2
3
4
5
6
7
8
9
10
11
12
13
14
15
16
17
stitch”
Direct
Direct
stitch”
Direct
Direct
Direct
program”
Direct
Direct
Direct
stitch”
of
-1+
button
controls)
-7+
button
controls)
-7+
button
Info
button
Carrying
Handwheel
M
button
Cursor
Clear/pattern
Stitch
Connection
Connection
Master
m÷button
Direct
Direct
Direct
Direct
selection
switch
selection
selection
selection
selection
selection
selection
selection
selection
selection
selection
selection
selection
the
2044)
A
B
C
handle
buttons
socket
socket
sewing
(stitch
(stitch
(stitch
start
wheel
“foot
button
button
button
button
button
button
button
button
button
button
button
button
machine
width/pattern
length/pattern
density/balance
button
“lead
cord”
control”
“Alphabet”
“Alphabet”
“Linen
“Elastic
“Zigzag
“Stretch
“Blind
“Bridging
“Button
“Straight
“Elastic
“Closed
buttonhole”
blind
stitch”
triple
hem
attaching
stitch”
stitch”
overlock
width
stitch”
stitch”
length
controls)
hem
straight
48
49
50
51
52
53
54
32
33
34
35
36
37
38
39
40
41
42
43
44
45
46
47
27
Slide
28
Base
29
Removable
30
Presser
31
Integrated
Integrated
Reverse
Threading
Needle
“Tie-off”
“Needle
“Slow
“Pattern
Take-up
Thread
Spool
Hole
Lid
Bobbin
Bobbin
Free
Sewing
Thread
Thread
Presser
Needle
Needle
Contrast
for
with
arm
for
plate
foot
thread
button
up/down”
sewing”
mirror”
lever
guide
holder
second
stitch
winder
door
bulb
cutter
take-up
foot
holder
plate
control
lowering
accessory
holder
dual
needle
sewing”
slots
tension
button
button/
with
spool
program
(max.
lifter
with
the
with
feed/IDT
threader
button
button
“Lock”
spool
5
retaining
cap
holder
chart
W)
feed
tray
presser
(set)
dog
foot
button
screw
I
14
1
Page 17
0)
0)
C)
(3C)
F’)
-3
CD
Cfl
3
0)
0)
H
1
0
01
C
flU)
)j..t4*.3
.0
*.*na
E.
—
e
W)):tV
(1D
X
U)
o
0
N.)
0
C
44
a,
3
%j
4
0)
c-fl
Page 18

Parts
(model
1
2
3
4
5
6
7
8
9
10
11
12
13
14
16
17
18
19
20
21
22
23
24
25
26
of
2034)
-1+
button
controls)
-1+
button
controls)
-/+
button
Info
button
Carrying
Handwheel
‘M
button
Cursor
Clear/pattern
Stitch
Connection
Connection
Master
m+button
Direct
Direct
Direct
stitch”
Direct
Direct
stitch”
Direct
Direct
Direct
program”
Direct
Direct
Direct
stitch”
selection
selection
selection
selection
selection
selection
selection
selection
selection
selection
selection
selection
the
A
B
C
handle
buttons
switch
sewing
(stitch
(stitch
(stitch
start
button
socket
socket
button
button
button
button
button
button
button
button
button
button
button
machine
width/pattern
length/pattern
density/balance
button
“lead
cord”
“foot
control”
“Alphabet”
“Linen
“Elastic
“Zigzag
“Stretch
“Blindhem
“Bridging
“Button
“Straight
“Elastic
“Closed
buttonhole”
attaching
stitch”
overlock
width
length
blind
stitch”
triple
stitch”
stitch”
stitch”
controls)
hem
straight
39
40
41
42
43
44
45
46
47
48
49
50
51
52
53
54
27
28
29
30
31
32
33
34
35
36
37
38
Contrast
Slide
Base
Removable
Presser
Integrated
Integrated
Reverse
Threading
Needle
“Tie-off”
“Needle
“Slow
“Pattern
Take-up
Thread
Spool
Hole
for
Lid
with
Bobbin
Bobbin
Free
arm
Sewing
Thread
Thread
Presser
Needle
Needle
for
lowering
plate
foot
dual
needle
sewing”
slots
thread
button
up/down”
sewing”
mirror”
lever
guide
holder
second
stitch
winder
door
bulb
cutter
take-up
foot
lifter
holder
plate
control
accessory
holder
feed/IDT
tension
button
button/
with
spool
spool
program
(max.
with
the
feed
tray
with
threader
button
button
“Lock”
cap
holder
chart
W)
5
retaining
dog
presser
(set)
foot
button
screw
16
Page 19
it
ii
Co
0
x
C,,
0
C,,
CA)
CA)
Co
-
CA)
jr’J
I
ci
ic
rt
m
mm
Fr
rn
ri
Iii
II
CA)[0-C
[0
[0
Co
01
C
C)
CA)
L
-
-
—.jcyco
Co
x
cf
o
C,,
r.
.*
.
,.i
,.
.
—.
.
OD
/
L
Page 20
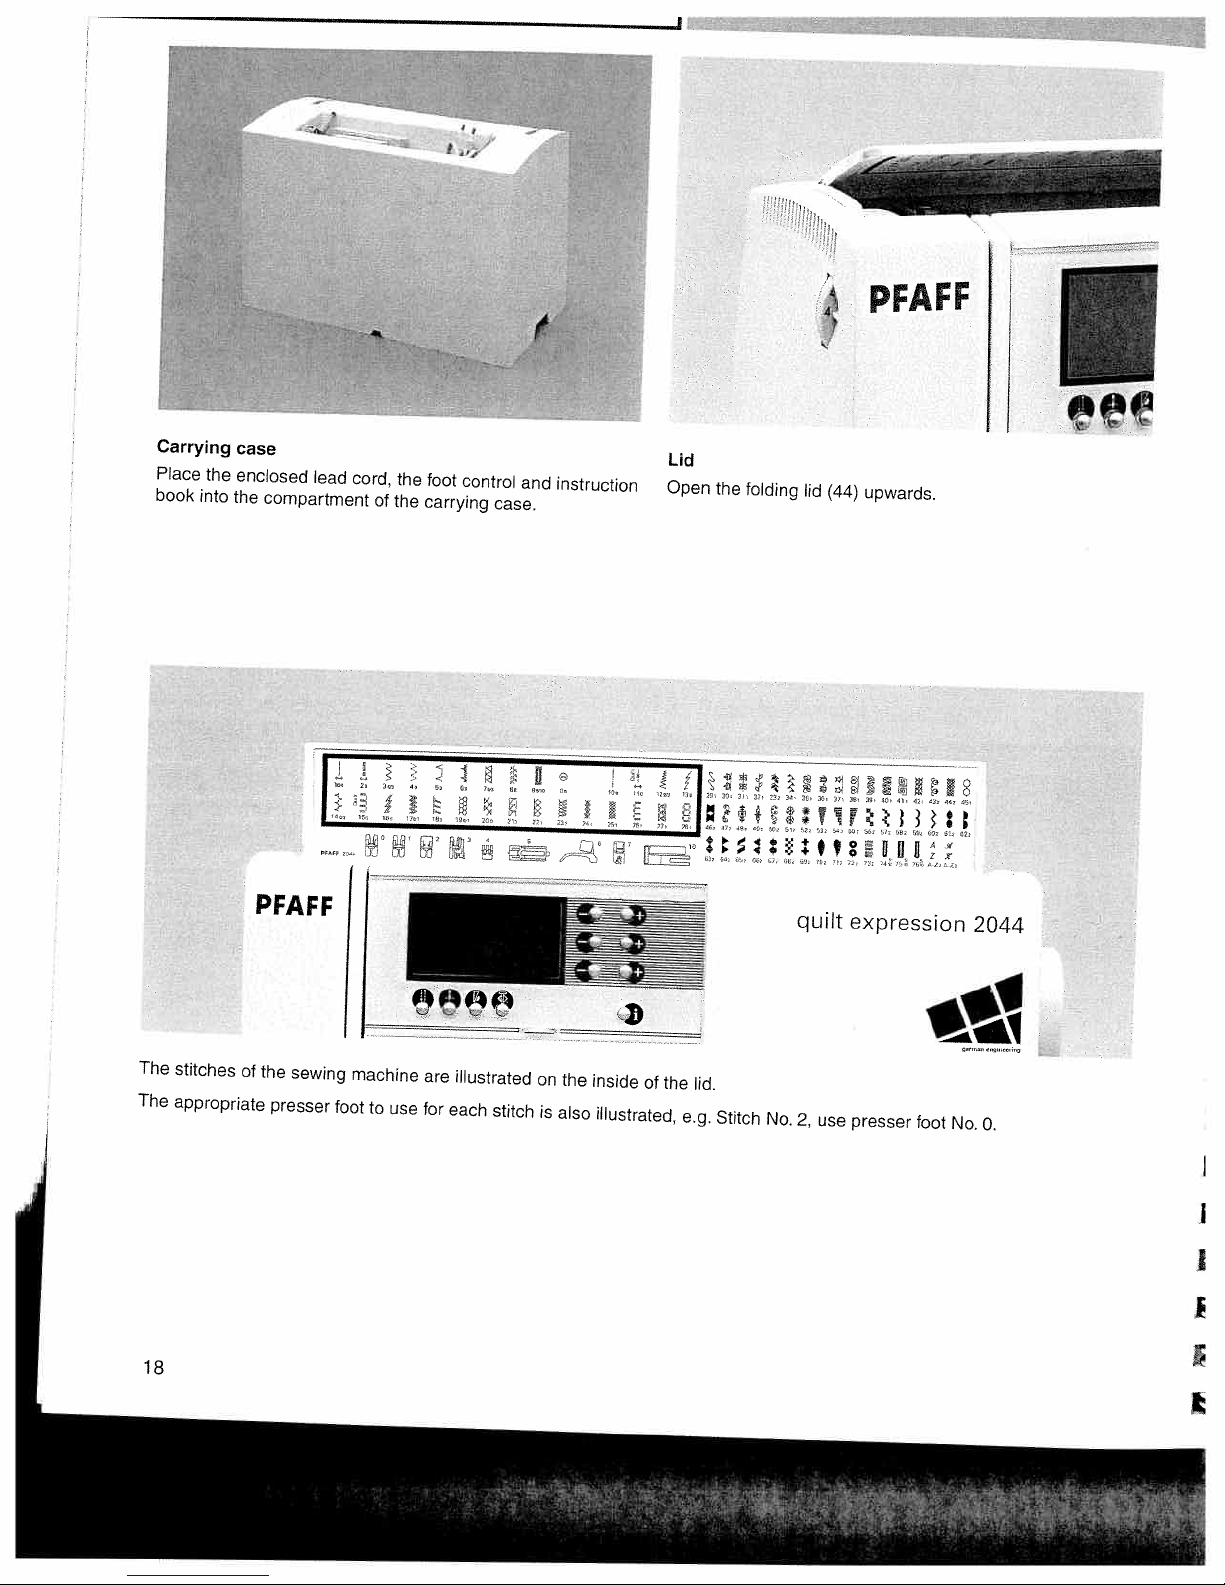
PFAFF
Carrying
Place
the
book
into
case
enclosed
the
compartment
PFAFF
lead
cord,
I
the
foot
control
and
of
the
carrying
case.
instruction
Lid
Open
the
folding
lid
(44)
upwards.
fl
RH
.
r::
quilt
expression
2044
The
stitches
The
appropriate
18
of
the
presser
sewing
machine
foot
to
use
are
for
illustrated
each
stitch
on
is
the
also
inside
of
illustrated,
the
lid.
e.g.
Stitch
No.
2,
use
presser
foot
No.
0.
I
Page 21
I
-
Technical
sectio
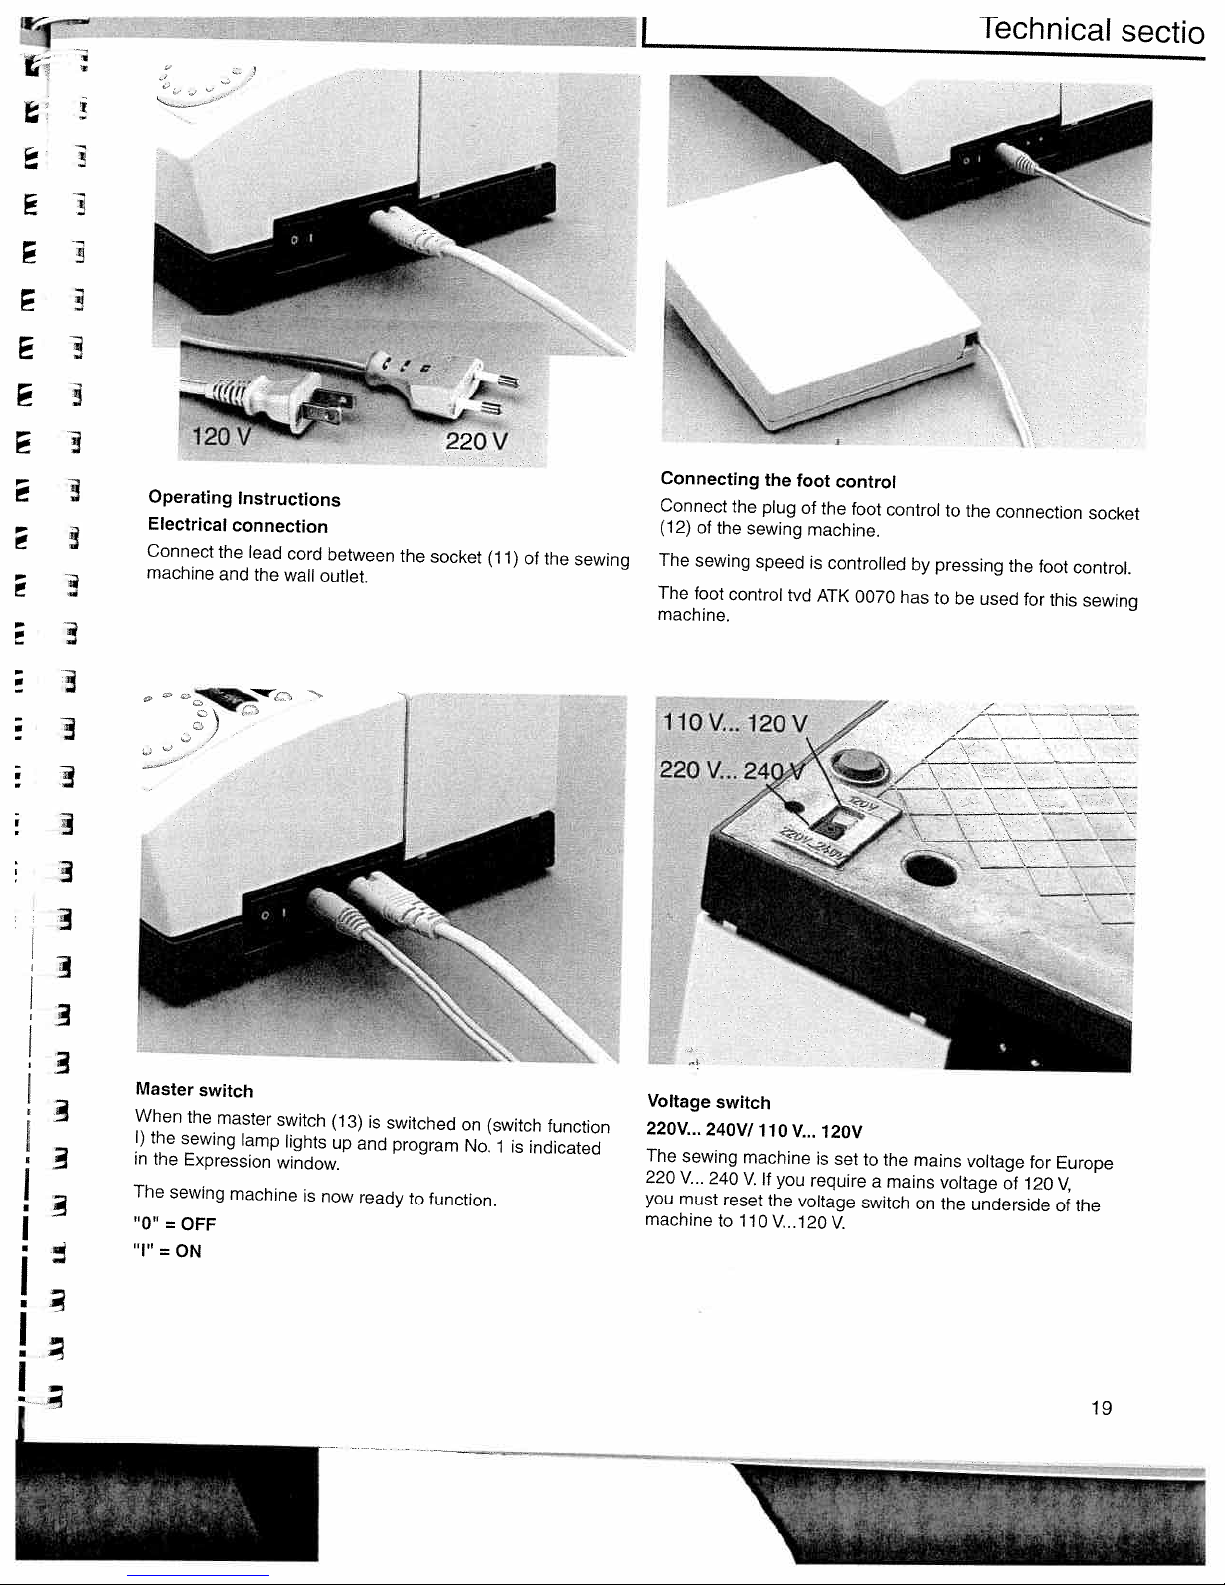
Operating
Electrical
Connect
machine
.
Instructions
connection
the
lead
and
the
cord
wall
between
outlet.
the
socket
(11)
of
the
sewing
Connecting
Connect
(12)
of
The
sewing
The
foot
machine.
11OV..
;
220
the
‘L.
the
plug
sewing
speed
control
120V
the
foot
of
machine.
is
tvd
ATK
control
the
foot
controlled
0070
control
by
has
to
the
pressing
to
be
connection
the
used
for
foot
this
socket
control.
sewing
zzz:z
Master
When
I)
in
The
“0”
“I”
the
the
=
=
sewing
ON
switch
the
master
sewing
OFF
lamp
Expression
machine
switch
lights
window.
is
now
(13)
up
is
and
ready
switched
program
to
on
No.
function.
(switch
is
1
function
indicated
Voltage
22OV..24OV/11OV...
The
220
you
machinetolloV..120V.
sewing
V...
240
must
switch
machine
V.
reset
If
you
the
120V
is
require
voltage
set
to
the
mains
a
switch
mains
voltage
on
the
voltage
of
underside
for
120
Europe
‘1,
of
the
19
Page 22
iecnnicai
section
4!—
1
w
L
Accessory
Open
the
the
ridged
and
towards
tray
accessory
area
on
you.
traybyplacing
the
left
of
the
lid
your
and
left
open
index
the
finger
lid
on
upwards
Arranging
The
standard
Arrange
accessory
the
the
tray.
accessories
accessories
parts
in
ft
the
are
marked
respective
with
numbers.
compartments
of
the
Accessories
(see
also
20
pages
2034/2044
78-79)
Page 23

I
Technical
sectic
/6
-
-.
.
.
-,
F.
r
Removing
In
order
to
the
the
tray,
machine.
left
to
sew
and
make
the
accessory
using
it
lift
upwards
sure
it
the
is
free
flush
tray
out
arm,
with
(free
of
the
swing
the
arm)
hole.
free
the
When
arm
accessory
replacing
of
the
tray
sewing
I
I
Preparing
i•g
I
7O
73
71
U
74,
75,W
Place
winder
an
snaps
the
empty
machine
bobbin
into
the
slot
so
for
that
of
bobbin
the
the
bobbin.
winding
black
pin
of
the
bobbin
I
j
68
69
7Q
72
73
]
NI
Push
Note:
the
the
The
right.
bobbin
bobbin
to
can
the
right.
only
be
wound
if
is
it
moved
fully
to
21
Page 24
Technical
section
1.
I.
if
4.,.
,.
i
.
,
.
.
!.
.
!LJ
I
-
,
C
lit
*.,
i,
2øat
;
b
2.n
ia
15
t044
n
*,
ii
2
1
b3
B
J
4
‘-
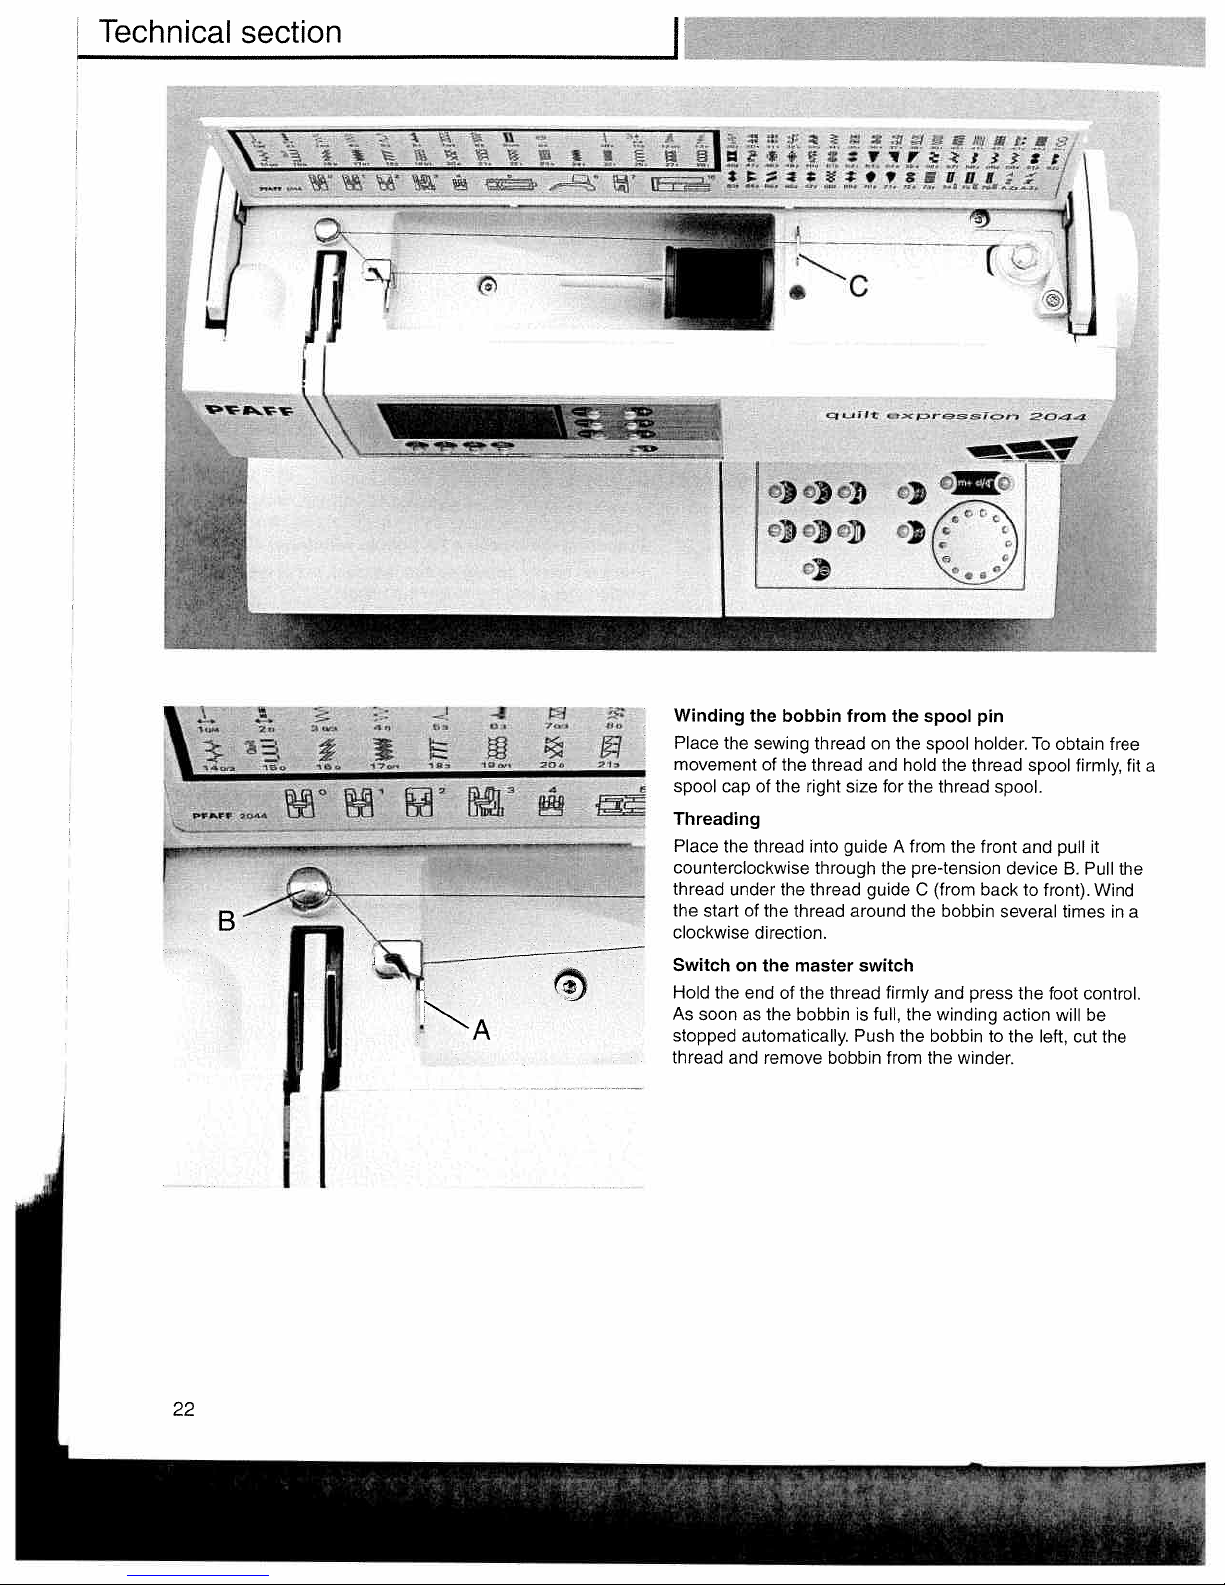
Winding
Place
movement
spool
Threading
Place
counterclockwise
thread
the
clockwise
Switch
Hold
As
stopped
thread
the
capofthe
the
under
start
on
the
soon
as
automatically.
and
the
sewing
of
thread
the
of
the
direction.
the
end
of
the
remove
bobbin
the
from
thread
thread
right
size
guideAfrom
into
through
thread
thread
around
master
thread
the
bobbinisfull,
Push
bobbin
on
and
for
the
guide
switch
firmly
from
spool
the
the
spool
hold
the
pre-tension
(from
C
the
and
the
the
bobbin
the
pin
holder.
thread
the
thread
front
the
backtofront).
bobbin
press
winding
winder.
To
obtain
spool
spool.
pull
and
deviceB.Pull
several
to
the
action
the
times
foot
will
left,
firmly,
it
Wind
control.
be
cut
the
free
the
in
fit
a
a
22
Page 25
_____
-
—
h
II
\
—
——
—
i--—
Technical
s
1.;
E’
9
‘\
V
.
i
Kr
,—
:
t.
jr,
r
secti
o)o)o)
cj
c)
(
I
j
j
I
j
-4
P’R#F
B
?
1
jO
o44
tXI
DtJ
2
DC
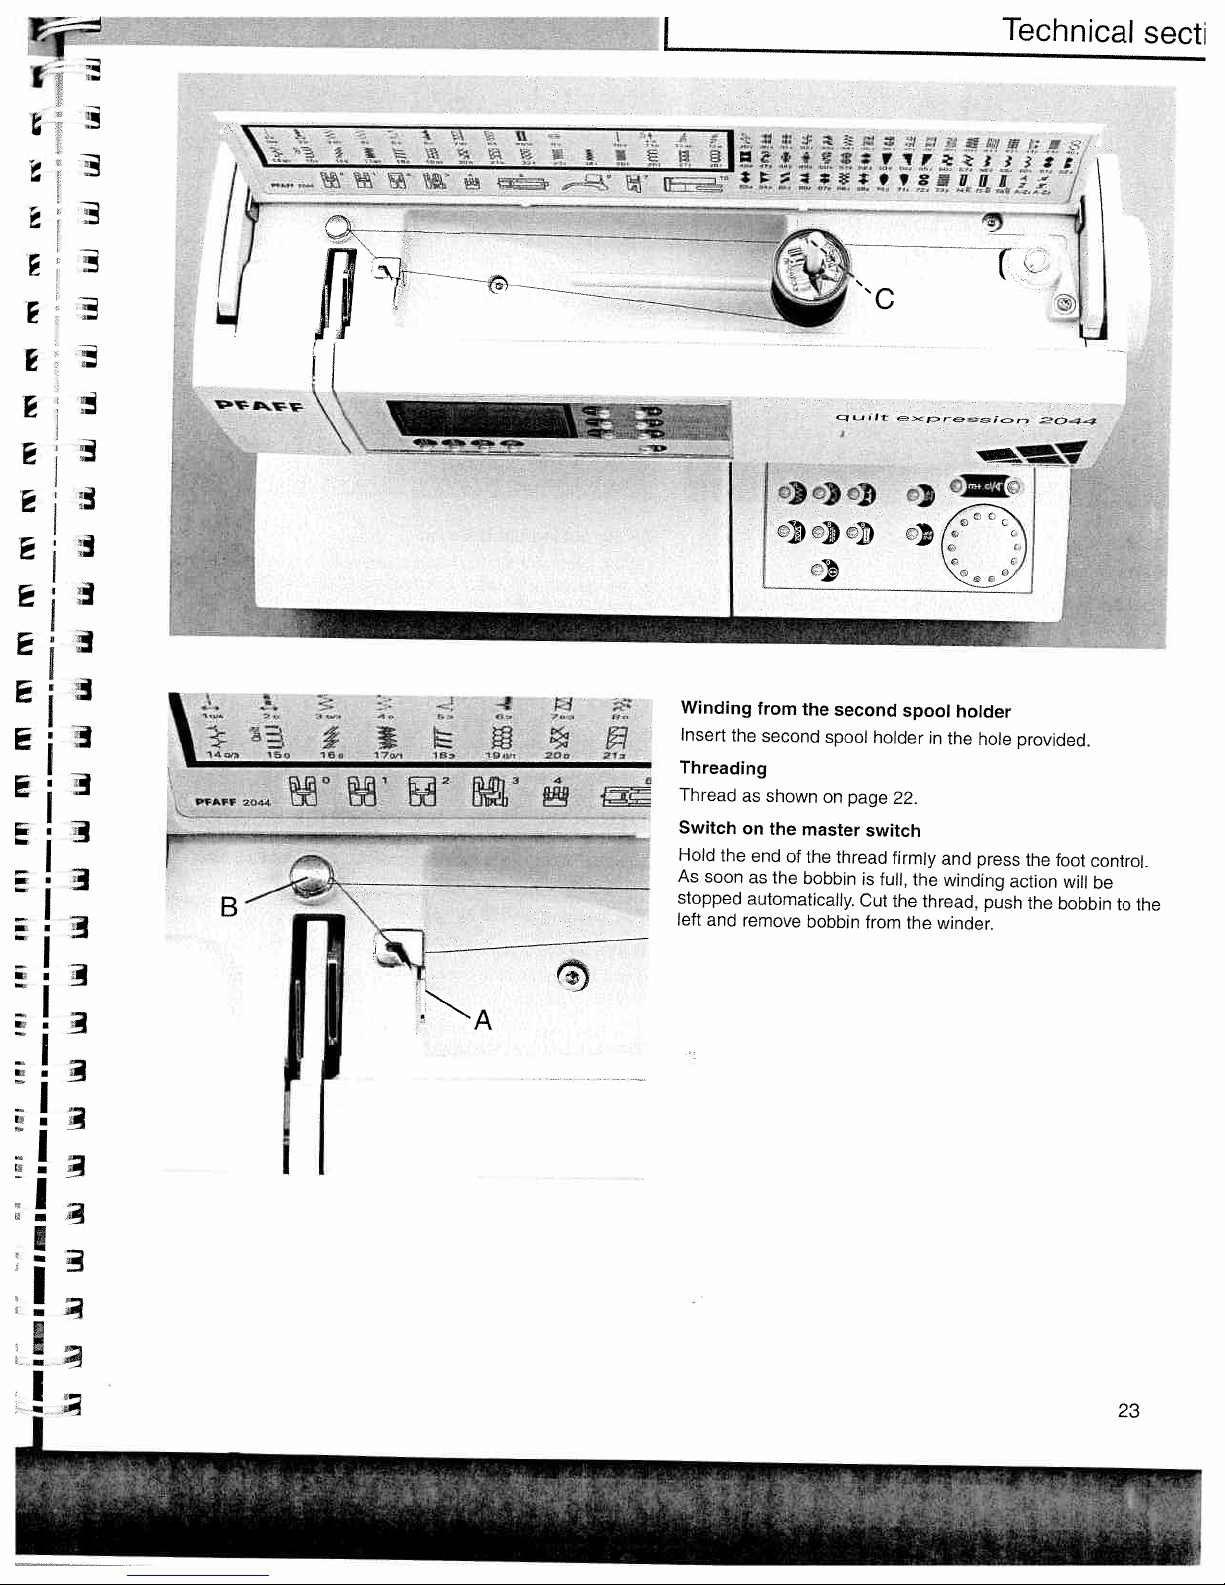
Winding
Insert
the
Threading
Thread
Switch
Hold
the
As
soon
stopped
left
and
from
the
second
as
on
end
as
automatically.
remove
shown
the
of
the
spool
on
master
the
bobbin
bobbin
second
page
switch
thread
is
Cut
from
spool
holder
22.
firmly
full,
the
the
thread,
the
holder
in
the
and
winding
winder.
hole
press
push
provided.
the
action
the
foot
will
bobbin
control.
be
to
the
3
3
I
3
I
3
I
I
I
23
Page 26
1
r
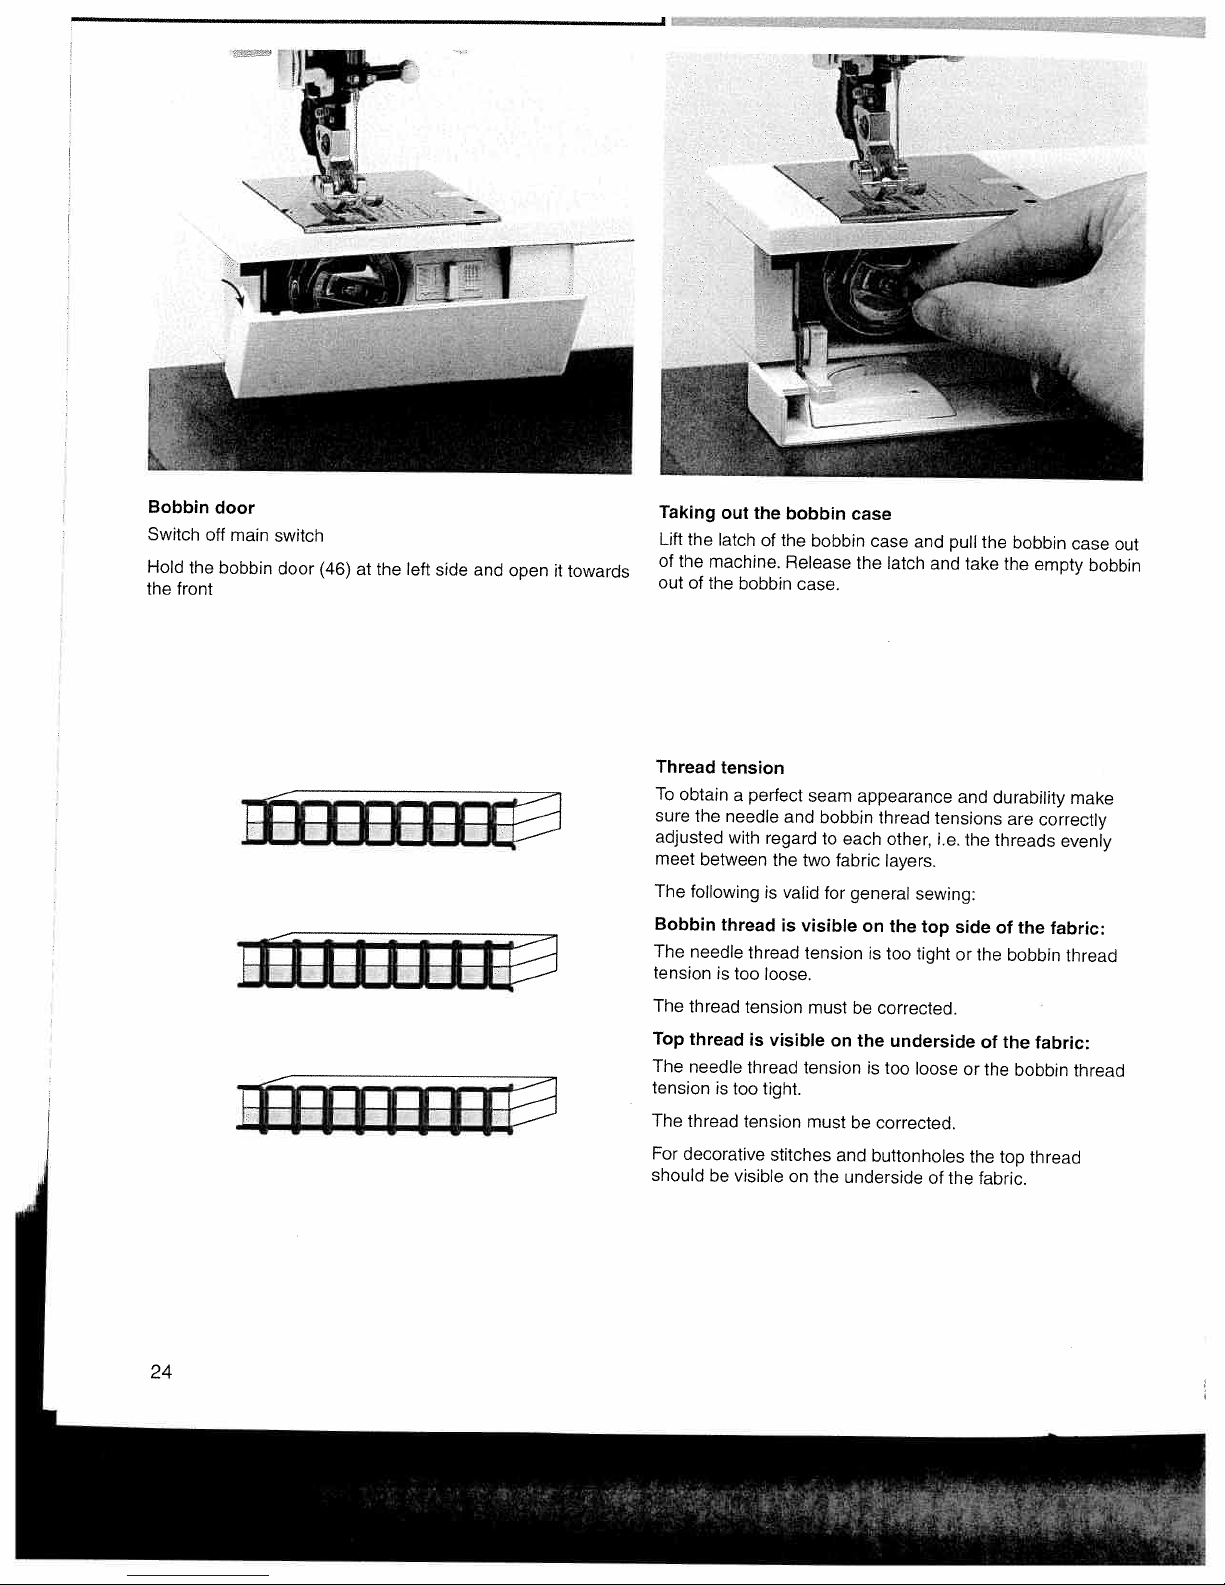
Bobbin
Switch
Hold
the
front
door
off
main
switch
the
bobbin
door
tiIIiiiI
rrrnTnI
(46)
Taking
Lift
at
left
the
side
and
open
towards
it
of
outofthe
Thread
To
sure
adjusted
meet
The
Bobbin
The
tension
The
Top
The
tension
The
For
should
out
the
latch
machine.
the
tension
obtain
a
the
needle
with
between
following
thread
needle
is
thread
thread
needle
is
too
thread
decorative
be
the
of
bobbin
perfect
regard
is
thread
too
loose.
tension
is
thread
tight.
tension
visible
bobbin
the
Release
case.
and
the
two
valid
visible
is
tension
visible
tension
stitches
on
bobbin
seam
bobbin
to
fabric
for
must
on
must
the
case
case
the
appearance
thread
each
general
on
is
corrected.
be
the
is
be
corrected.
and
buttonholes
underside
and
latch
and
other,
layers.
sewing:
the
top
tight
too
underside
too
loose
of
pull
take
and
tensions
i.e.
the
side
or
the
or
the
the
fabric.
the
bobbin
the
durability
are
threads
of
the
bobbin
of
the
the
bobbin
top
empty
correctly
evenly
fabric:
thread
fabric:
thread
case
bobbin
make
thread
out
24
Page 27

Inserting
TI
Insert
pull
spring
Check:
When
the
the
thread
B
you
the
full
until
pull
bobbin
bobbin
sideways
it
rests
the
thread,
in
in
the
through
the
the
bobbin
opening
bobbin
slot
case.
(see
A,
must
When
then
arrow).
turn
doing
under
clockwise.
so,
tension
t
Checking
Hold
sharply
little
the
with
the
bobbin
upwards.
each
bobbin
case
The
hand
thread
by
the
bobbin
movement
tension:
thread
case
and
must
move
downwards
slip
your
hand
a
Correcting
Turn
adjusting
bobbin
to
Inserting
Lift
the
upwards.
E
Check:
Pull
out
the
latch
sewing
the
of
the
thread
right
bobbin
the
and
F
hook.
the
increase
to
bobbin
hook.
tension:
screw
tension.
push
Opening
thread
just
C
Turn
the
case
the
sharply.
a
the
bobbin
bobbin
of
E
little
adjusting
case
the
The
to
the
thread
fully
bobbin
bobbin
lefttodecrease
screw
tension.
onto
case
case
C
pin
must
must
just
D
a
of
face
not
the
little
fall
25
Page 28
Technical
section
14
PFAFF
B
4—>
10/4
III
I
<-->
3
!012
4L
1/
/
16o
0/3
20
C
15o
0/3
2044
40
>
>>>
170/1
>
53
r
183
i9
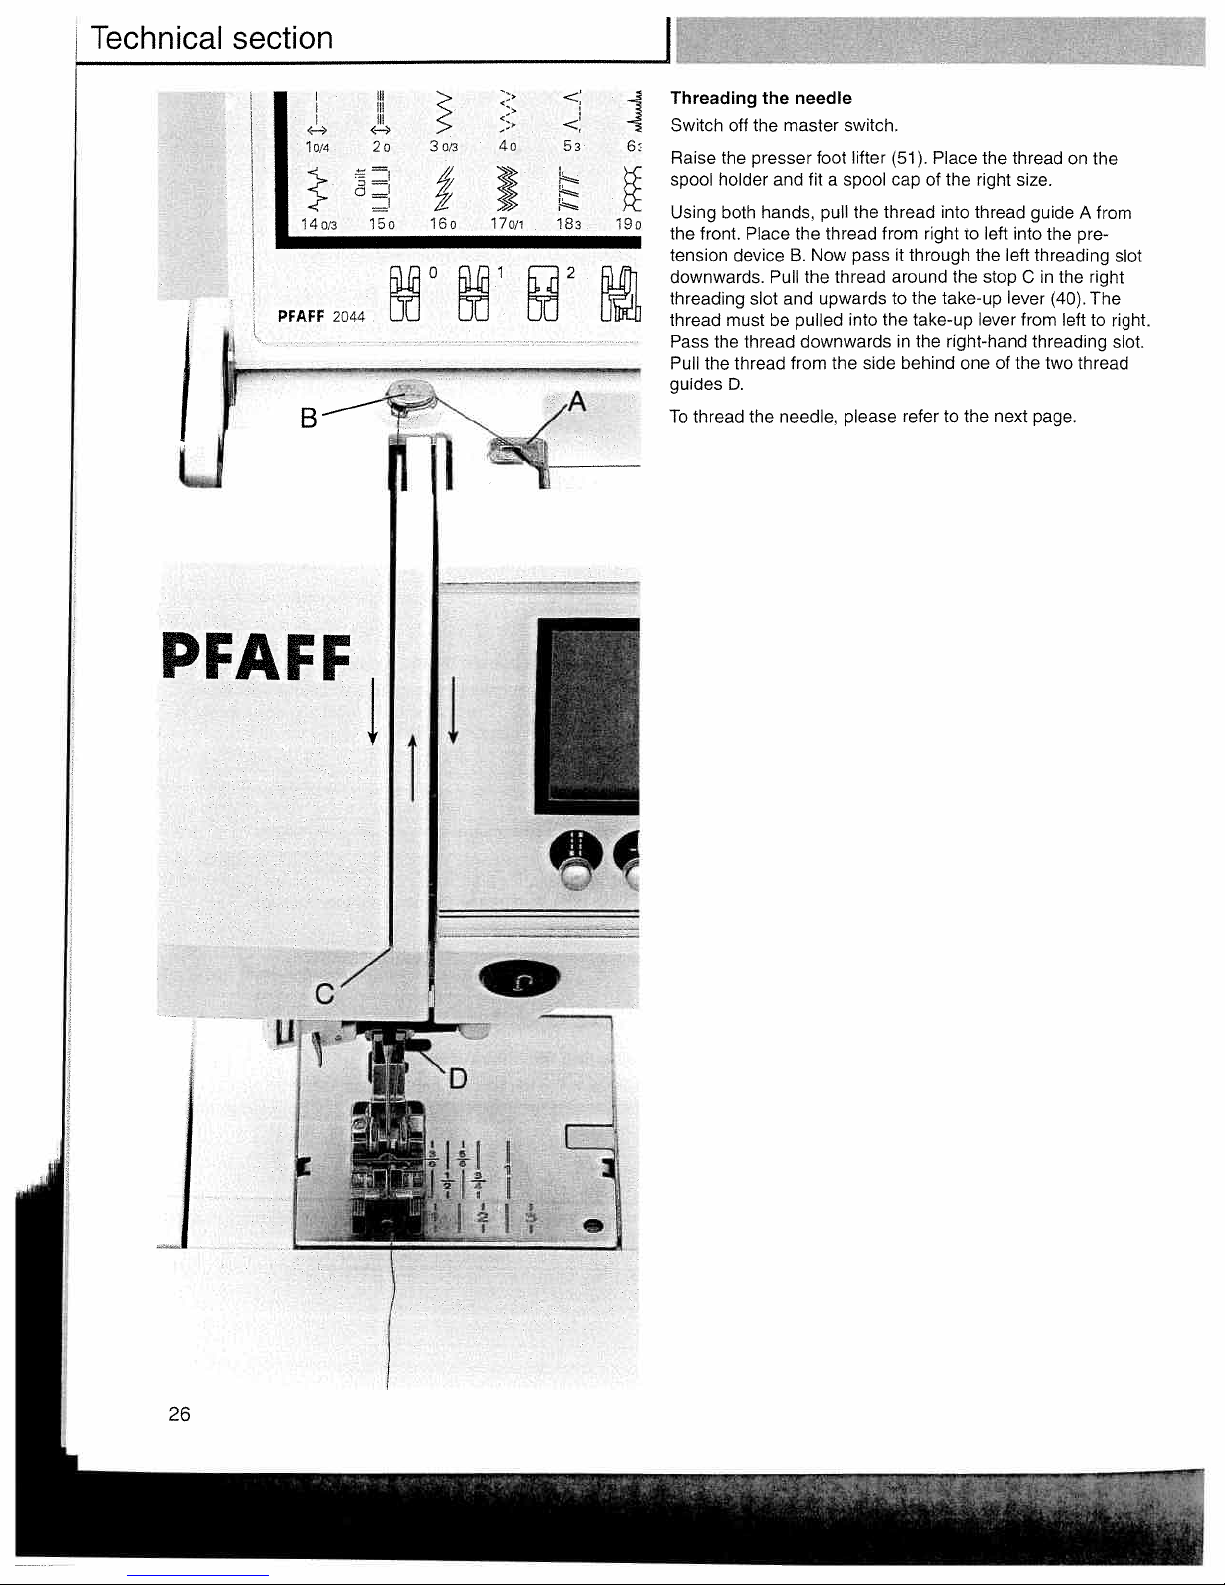
Threading
Switch
off
the
Raise
spool holder
both
Using
the
front.
tension
downwards.
threading
thread
Pass
Pull
guides
To
the
the
thread
device
must
thread
D.
the
the
presser
hands,
Place
Pull
slot
be
thread
the
needle
master
and
fit
the
B.
Now
the
and
pulled
downwards
from
needle,
switch.
lifter
foot
spooi
a
pull
the
thread
pass
thread
upwards
into
the
please
side
(51).
cap
thread
from
it
through
around
to
the
in
behind
refer
Place
of
the
into
rightioleft
the
take-up
the
take-up
the
right-hand
oneofthe
the
to
the
right
thread
the
stop
lever
next
thread
size.
guide
into
left
Cinthe
lever
from
threading
on
A
the
pre
threading
(40).
lefttoright.
two
thread
page.
the
from
slot
right
The
slot.
PFAFF
C
j
1
‘0
Is
3
le
I.-
I
26
Page 29
iei,i
IJL.,ctJ
ii
,eutji
El
El
El
L1
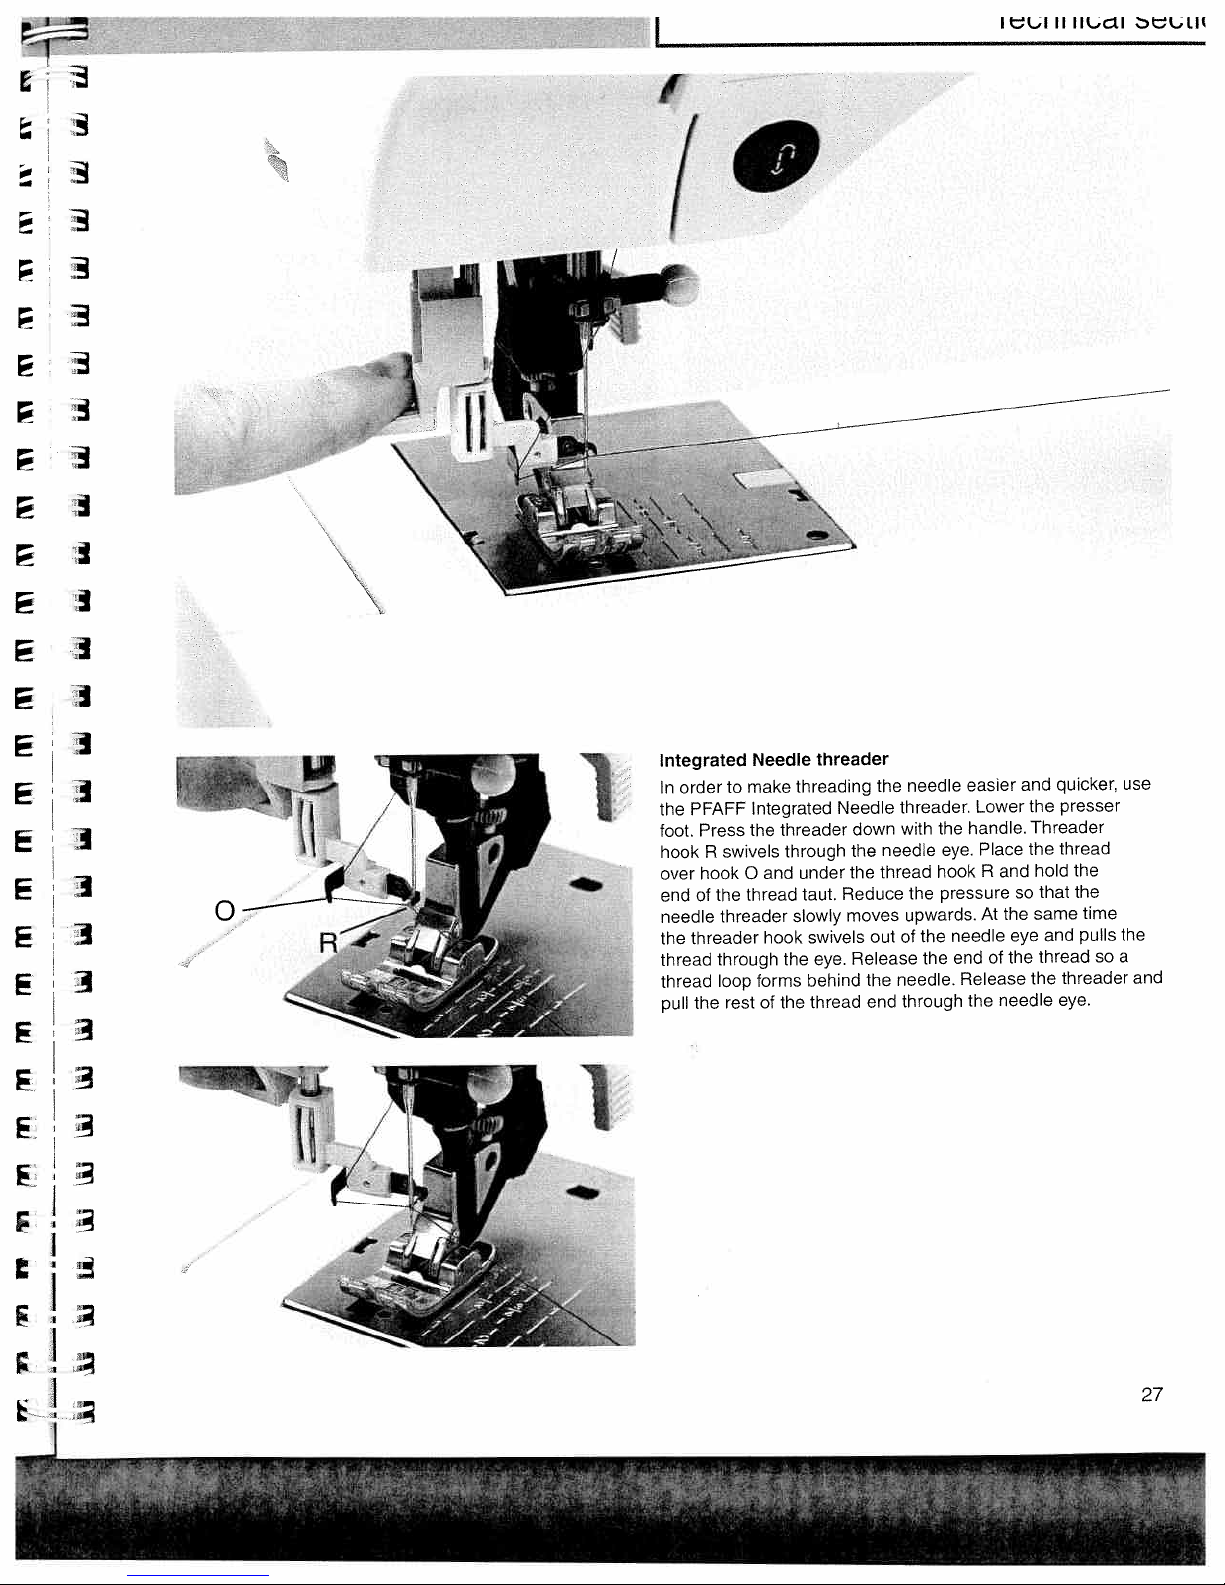
Integrated
order
In
PFAFF
the
Press
foot.
R
hook
hook
over
of
0
]
end
needle
the
thread
thread
pull
threader
the
#\
Needle
make
to
Integrated
the
swivels
and
0
thread
the
threader
hook
through
loop
forms
restofthe
L
threading
threader
through
under
taut.
slowly
swivels
the
behind
threader
Needle
eye.
thread
the
down
the
thread
the
Reduce
moves
out
Release
the
end
needle
threader.
with
needle
the
upwards.
of
needle.
through
the
eye.
hook
pressure
the
the
easier
Lower
handle.
Place
R
At
needle
end
Release
the
and
the
the
of
needle
and
the
Threader
the
hold
that
so
same
eye
thread
the
quicker,
presser
thread
the
the
and
threader
eye.
time
pulls
so
use
the
a
and
3
3
27
Page 30

I
tftE
IF
IJUdI
SULlUI
I
)
Presser
presser
The
lifter
(51).
foot
lifter
foot
is
raised
lowered
or
with
the
/
presser
foot
Drawing-up
Raise
the
Pull
press
the
thread,
up.
I
t
the
presser
the
needle
bobbin
foot.
foot
thread
thread
While
control
to
holding
the
so
draw
needle
up
the
the
end
bobbin
I,
of
moves
the
down
thread.
needle
and
Bobbin
Close
presser
28
the
foot
thread
bobbin
(46)
and
door
to
the
left
pull
the
thread
under
the
Thread
Pull
the
cutter
cutter
thread
(49).
from
the
back
front
over
the
to
the
thread
Page 31

I
I
I
j
j
j
I
j
Removing
Switch
Press
the
same
time
the
presser
off
the
the
front
the
foot
presser
master
switch
part
of
rear
part downwards
holder
the
(30).
foot
presser
foot
upwards
untilitdisengages
andatthe
from
Attaching
Place
the
that
when
the
foot
the
presser
the
engage
presser
foot
presser
in
the
foot
under
foot
lifter
presser
the
(51)
foot
presser
is
holder.
foot
lowered,
holder
the
(30),
pins
so
of
I
I
:1
I
I
A
1
pFAFF
R
Check:
Please
raising
check
the
that
presser
the
foot
presser
lifter.
I
foot
properly
is
attached
by
Setting
the required
Set
using
The
normal
darning
the needle
the
markings
setting
and
thread tension
amount
on
for
buttonhole
of
the
tension
sewing
sewing
the
needle thread
is
4-5.
3.
dial.
For
tension
decorative
(35)
sewing,
29
Page 32

_
I
1
PVAcF
0
2044
2
Winding
It
is
possible
fully
threaded.
position.
and
upward
a
Pull
\-
bobbin
to
wind
Raise
the
through
‘-
through
bobbins
needle
the
the
presser
thread
right-hand
the
even
-
needle
when
foot
lifter
underneath
threader
the
(51)
machine
to
the
presser
slot
-
the
(34).
is
top
foot
Place
the
(40).
Important:
thread
The
[
from
take-up
left
lever
l-t
to
right
must
—--C
,
r425icr,
through
be
at
the
its
take-up
highest
lever
position.
Guide
the
thread
to
the
right
clockwise
direction.
Push
the
under
bobbin
30
thread
to
the
guide
right.
C.
Hold
Wind
the
the
end
beginning
of
the
of
thread
the
thread
firmly
rC))
and
several
press
times
the
foot
around
control.
the
bobbin
in
a
Page 33

Changing
Switch
To
highest
needle
1
To
needle
Lower
the
as
and
firmly.
off
remove:
out
insert:
must
the
needle,
it
will
tighten
the
the
Lower
position.
downwards.
The
flat
face
presser
pushing
go.
Hold
the
needle
master
the
Loosen
side
to
foot
the
needle
switch
presser
the
A
of
the
rear.
and
it
upasfar
needle
screw
needle
the
insert
(52)
foot
and
screw
set
the
(52)
needle
and
!A
pull
to
its
the
E
¶1
VP
Threading
Replace
the
spool
—
and
together.
stitches
Note:
right
It
the
holders.
sides
Pull
with
is
not
the
sewing
the
the
possible
twin
of
tension
threads
twin
needle:
needle
During
needle”
to
with
threading
disk
B.
right
and
p.
use
the
a
twin
in
Continue
left
97).
integrated
needle.
the
into
Insert
left
threading
threading
the
thread
needle
the
slot
in
the
guide
threader
second
(34),
usual
and
with
spool
make
manner,
thread
twin
a
holder
sure
making
the
needle.
and
that
needles
you
sure
place
pass
(for
one
one
the
threads
additional
spool
thread
of
thread
each
do
not
details,
on
to
the
become
see
‘Decorative
each
left
of
twisted
31
Page 34

,,
I
The
IDT
For
sewing
solution:
industrial
top
and
precisely.
feed
prevents
action
striped
aligned
(Integrated
any
the
machines,
bottom
On
also
ensures
fabrics.
to
prevent
Integrated
light
puckering
fabric
at
the
fabrics
The
stretching
Dual
precisely
the
same
perfect
IDT
Dual
IDT
such
of
keeps
Feed)
PFAFF
Feed,
feeds
time.
as
the
seam.
matching
all
of
the
IDT
the
The
silk
layers
top
provides
system.
fabric
material
or
rayon
The
of
checked
of
layers.
even
quilt
from
is
the
feeding
projects
As
the
fed
and
ideal
on
the
dual
32
Page 35

Technical
V
I
sec
f:
Engaging
Important:
feet
with
Raise
the
engages.
the
For
the
presser
lOT
all
center
work
back
foot.
with
cut-out.
Press
the
the
Dual
IDT
Feed
(31)
IDT.
down
use
until
presser
it
Disengaging
Hold
the
Press
the
release
Stripes
the
and
material
Dual
the
IDT
IDT
plaids
to
the
Feed
(31)
slowly
be
IDT
with
down,
match
sewn.
two
then
upward.
perfectly
fingers
pull
due
it
at
the
away
to
the
ribbed
from
even
you
ankle.
and
feed
of
33
Page 36

I
LI
H
IR;ëtI
euuon
PFAFF
/
pa
L
—‘
__7/
fe
A
-.
Lowering
For
certain
darning
dog
has
Raise
slide
A
To
engage
Raise
the
the
and
to
to
the
sewing
when
be
presser
the
left.
the
presser
pAcF
-1
feed
dog
work
the
lowered.
foot
feed
dog
foot
-.
It
10
t
such
machine
before
move
before
as
free-motion
must
lowering
the
slide
engaging
11
,,hW/4t’*”.
I’
be
the
to
the
quilting
cleaned,
feed
the
right.
feed
dog.
dog.
the
or
feed
Push
You
can
also
lower
the
feed
dog
and
move
Raise
dog.
moving
the
the
slide
slide
presser
B
to
the
to
the
left.
foot
before
right.
by
To
lowering
34
opening
engage
or
the
the
raising
bobbin
feed
the
door
dog
feed
Page 37

Seithig
functions
Adjusting
in
the
Stitch
Bobbin
Altering
Altering
width/needle
‘1ng
ii
the
Expression
selection
thread
pattern
the
the
mg
the
*Th
‘reverse
contrast
monitor
sizes
stitch
position
pattern
length
pattern
density
ion
window
sewing
buttons
(model
button
2044)
38,
36
36
37
37
38
39
39
40
41
42
43
44
:
I
j
z
45
A
—
Page 38

‘Jc;vvii
ILII
Ij
I.jLIJI
wwww
Stitch
selectiononmodel 2044
oo
Adjusting
The
different
This
(54).
Stitch
c
There
1.
Clockwise=in
Counterclockwise=in
Model
>
in
<in
If
you
of
model
stitch
2.
With
of
the
QO
3.
With
number:Toselect
then
the
the
contrast
lighting
setting
canbereadjusted
selection
are three
With
the
selection
2034):
for
stitches.
2034:
ascending
descending
areinthe
2034)
No.
0.
the
direct
the
most commonly
selectionofthe
the
direct
press
window.
contrast
settinginthe
situations.
waysofselecting
scrolling
ascending
order
order
last
and continuetoscroll
button3.The
wheel
backward
descending
stitch,
selection
alphabets.
selection
program
on
the
window
(selection
order
No.
buttons
used stitches
buttonstochoose
stitch
Expression
may
with
the
your
and
order
76,
(No.61in
for
No.
23,
number
be
contrast
desired
buttons,
forward
will
you
instant
(0-9)
press
window
changed
stitch:
in
the
return
selection
and
the
button
appears
for
control
model
the
case
to
for
stitch
2
in
Stitch
selection
36
on
model
2034
oEp
Page 39

H
PFAFF
I
I
Instruction
manual
PFAFF
pFAFF
B
quilt
exPreSSOfl
expression
2044
2034
—
t
—
j
H
Page 40

.jcvvii
1LAI
IL,LJLII
I
Bobbin
If
(3
symbol
The
you
Altering
Adjust
position
buttons
in
thread
the
bobbin
m)].orthereisno
appearsinthe
symbol
start
disappears
to
sew
stitches
the
length,
of
stitchesbytouching
to
the
the
window.
monitor
is
nearing
again.
width,
rightofthe
(model
its
thread
window.
afterafull
balance,
window.
2044)
end
[2¾yd(2m)-3
on
the
bobbin,
bobbin
densityorneedle
the
Each
the
is
appropriate
change
¾
yd
bobbin
inserted
-1+
is
and
visible
<
<III>
To
change:
Stitch
Pattern
Needle
Stitch
Pattern
Stitch
Pattern
Balance
width
width
position
length
length
density
density
for
straight
stitches
Use
A
B
C
-1+
buttons
37
Page 41

Altering
selected
The
zigzag
the
stitch
stitch
stitch
No.
3.
width
can
be
sewn
in
various
widths,
e.g.
Altering
Straight
sewn
be
button
Altering
Stitch
For
decorative
shown
standard
in
a
A.
A
63
in
the
stitch
any
in
to
the
(Stitch
the
needle
No.
move
pattern
stitches,
window.
width
of
1,
13
the
56
position
stitch
different
needle
width,
on
the
When
can
and
No. 2
model
overall
and
needle
to
left
e.g.
2034)
entered,
altered
be
stitch
positions.
right
or
width
stitch
using
of
No.
of
the
63
11
Press
center.
pattern
comes
button
-1+
can
1+
is
up
38
Page 42

4f
Fj
Altering
The
stitch
button
B.
the
length
stitch
of
length
a
stitch
can
be
altered
using
+1-
Altering
The
using
change.
p
Altering
The
stitches,
remain
densely
density,
the
pattern
pattern
stitch
lengthofdecorative
button
-1+
the
stitch
densityofvarious
etc.)
can
constant,
or
less
when
B.
The
density
be
but
densely.
available.
length
density
changed.
the
pattern
Use
stitches
of
stitches
The
will
button
-1+
the
stitch
(buttonholes,
pattern
sewn
be
C
can
to
be
will
length
more
adjust
altered
not
satin
will
the
39
Page 43

“4”
Balance
fl
Decorative
heavy
fabric
adjusts
best
After
symbol
of
balance
way
having
the
Expression
the
witha“0
for
can
stitches
fed
is
reverse
different
selected
altered
be
can
vary
differently
feed
fabrics.
a
stitch,
after
it
window.
on
of
in
the
the
This
this
on
than
stitch
you
bottom
symbol
stitch.
different
fine
so
will
fabric
silk.
The
it
is
sewn
see
the
right-hand
indicates
types
balance
in
balance
corner
that
—
the
the
“4”
The
standard
With
I÷
machine
In
the
thus
the
In
the
stretched
button
from
minus
overall
plus
range
out.
balance
C
-9
range
length
to
the
you
can
(+)9.
the
stitches
setting
change
stitches
will
be
is
“0”.
are
sewn
are
the
sewn
shorter.
sewn
reverse
shorter,
longer
feed
or
and
of
the
40
I
Page 44

Sewing
Info
button
Touch
the
info
button
to
selected
Info
The
needle
tension
the
I
I
menu
info
feed
stitch.
menu
size/type
setting.
dogs,
gives
to
page
receive
you
recommendation,
engage
number
the
or
information
following
needle
disengage
of
the
info
information:
the
menu.
about
thread
lDT
functioi
the
lower
I
Reverse
Ii
!I
‘5
‘1
I
This
•
•
•
•
•
sewing
button
has
when
pressed,
manual
programming
determines
2044)
engages
finish
(see
automatic
the
the
page
following
will
of
buttonhole
a
the
buttonhole
length
62)
reverse
of
tapering
functions:
sew
(see
the
darning
(see
page
page
72)
program
101-102)
(model
‘3
‘3
A
3
3
41
Page 45

DtWlEJ
IULIULIUFIS
I
“99
Sewing
There
are
the
beginning
Tie-off
button
When
you
symbol
The
symbol
will
disappear.
“Needle
Use
the
stop
sewing. The
the
needle
needle
from
from
the
“Sew
slow”
When
you
disappears
“Pattern
This
symbol
a
point
will
function
four
sewing
and/or
(36)
press
disappears
appearsinthe
up/down”
“up/down’
is
lowered
the
window.
button
press
when
mirror”
will
appear
buttons
function
the
this button
the
from
button
button
symbol
into
press
fabric,
(38)
the
“sew
the
buttonispressed
button
appear
in
below
buttons
endofa
to
appears
the
slow”
(39)
the
stitch,
before
startingtosew,
window.
window.
(37)-a-
determine whether
the “needle
the
symbol
above
fabric.
button
4g
window
Press
The
The
indicating
below
the
Expression
“needle
set
the
pattern
the
button
needle
up/down”
the
speedofthe machine
again.
for
any
up/down”,
the
button
will
thenbecompleted
the
needle
in
will
remain
button.
stitch
that
the
pattern
window.
‘sew
symbol
appearsinthe
while
sewingsoyou
should
the
window
in
the
The
needle
is
canbemirrored.
will
be mirrored.
With
these
slow”
be
in
when
fabric
reducedbyhalf.
“pattern
and
window.
can
and
tied
its
highest
the
buttonispressed.
each
time
lifts
outofthe
When
buttons
tie
off
at
The
off.
positionorin
you
fabric,
The symbol
“pattern
the
you
mirror”.
Once the
the
end
machine
stop
sewing.
and
mirror”
can
choose
machine
ofaseamorpattern.
will
the
Press
the
appearsinthe
stop
fabric
the
To
symbol
button
between
has
and the
when
foot
remove
disappears
has
tied
off,
you
control
the
window
been
“tie-off”
the
symbol
and
pressed,
I
at
and
42
Page 46

can
the
Press
window.
in
the
released.
is
as
locked.
now
unintentional
any
another
memory
clear
button
“lock”
already
sequence.
any
time.
at
selected.
pattern
and
You
Note:
button
button
mirror”
safeguard
pattern
the
pattern
/
been
The
“Lock”
“Pattern
You
unintentional
another
Switching
well
The
the
selection
on
button
The
rr
The
button
pattern
is
selected,
You
The
stitch
density!
can
(39).
button:
your
sequence
“lock”
the
symbol
The
direct
button
machine
selection
sequence.
start
switched
scroll
can
sewing
mirror
still
of
until
selection
(7)
m+
button
it
length
balance
(39)
sewing
another
by
means
button:
locking
the
disappears
the
and
now
is
of
(14),
and
on
still
is
within
function
width,
/
pattern
a
machine
sewing
buttons
selection
safeguarded
another
cursor
the
remain
(9)
pattern
a
possible
the
buttons
pattern
can
be
if
the
of
symbol
when
sewing
pattern
altered.
you
against
program
“lock”
appears
the
(15
to
dial
button
active,
sequence
alter
to
sequence
still
can
length
quickly
the
or
button.
button
as
26),
are
against
program
(8)
and
If
the
this
be
width
I
tap
or
has
the
I
(39)
function
after
button:
until
the
the
now
is
button
unlocking
switched
released.
is
symbol
off.
This
Switching
the
Press
appears.
symbol
off
the
button
The
locking
disappears
“lock”
j
I
•
‘I
43
Page 47

Twin
needle
Depending
a
stitch.
window.
cannot
be
set
width.
the
This
on
twin
used
the
needle
symbol
to
needle
indicates
sew
position
warning
the
stitch
that
will
at
or
a
the
the
appear
twin
currently
width
needle
of
in
the
Reduce
disappears.
needle
of
the
2.0
pattern
The
mm
stitch
or
width
may
less.
until
now
the
be
warning
sewn
symbol
with
a
twin
44
Page 48

Formation
stitch
The
patterns
Some
right
side
adjusted.
,..
,*.7i)
retained.
patterns
The
always
any
of
Note:
formed
are
Do
not
window
changes
Do
I
formation
of
The
retain
not
use
lights
the
of
the
left-hand
that
the
use
from
twin
a
up
stitches
varies.
are
formed
stitch
are
right
width.
in
a
twin
one side!
needle
(see
changes
side
formed
side
needle
if
page
from
of
from
of
this
44).
the
when
the
the
to
symbol
left,
stitch
the
stitch,
sew
so
the
width
is
right
regardless
patterns
in
only
always
will
the
the
is
that
I
.s
Patterns
change
width
is
are
that
equally
adjusted.
formed
from
the
from
right
the
and
center
the
left
will
when
the
3
3
45
Page 49

Page 50

Stitch
p
Sequenc
49,
48
49
50
50
51
51
52
52
52
Stitch
Buttons
Storing
Deleting
Inserting
Deleting
Deleting
Changing
“Pattern
r.
sequences
the
for
Stitches
from
the
into
a
stitch
all
M-memories
a
stitch
start”
stitch
the
stitch
stitch
sequence
within
function
sequence
sequence
sequence
sequence
a
exprsson
uth
T-A
‘
;
I’
,
I
if
11
Page 51

outuii
squeii
*4
LULL4
—
Stitch
sequences
Your
Expression
sequences
The
Quilt
be
storedineach
Expression
—
offers
remaininthe
2044
memory.
the
you
possibilityofstoring
memory
until
has6m-memories,
you
overwrite
the
stitch
and
or
delete
Expression
:
—
word
sequencesinthe
it.
2034
has3m-memories.
memories
Upto20
c*
of
the
machine.
patternsorletters
The
*
stitch
can
48
Page 52

011LLr1
sequtriu
E
Buttons
The
wheel
I
)
()
“M”
m+:
cl/pattern
stitches
activated,
beginning.
Cursor
scrolling
A-Z
direct
Opening
Press
All
Select
button
following
(selection
button:
storing
for
in
buttons:
buttons
selection
the
rn-memories
the
an
(8).
for
the
r
start
the
the
through
(2
an
rn-memory
“M”
empty
stitch
buttons
pattern
button
can
button
opening
for
selected
button:
rn-memory.
start
for
rn-memories
the
on
the
x
of
the
fonts
m
appear
rn-memory
sequence
found
be
the
on
or
stitches
use
the
When
restarts
selecting
2044,
in
by
next
model
2034)
closing
in
the
button
cI
rn-memory
an
the
an rn-memory!
which
1
on
the
x
Expression
the
scrolling
to
the
selection
an
rn-memory
rn-memory
for
deleting
stitch
from
are
activated.
2034):
window.
using
the
is
for
not
the
the
cursor
•
I,
•
II
3
Open
again.
a
I
rn-memorybypressing
a
free
“M”
button
m)
(7)
49
Page 53

iitcri
sequences
The
symbol
Select
(1
5-26),
selection
button
the
stitch
scrolltothe
or
wheel.
(14).
rr
appears
using
Store
in
the
desired
the
the
window.
direct
stitches
selection
stitch
by
buttons
or
letter
pressing
with
the
the
m÷
Once
start
can
been
machine’s
the
machine.
Tip:
In
tie-off
The
machine
Deleting
If
you
scroll
the
stitch
stitch
After
deleting
to
the
you
to
sewn
order
embroidery
a
wish
using
sequence.
which
cursor
have
entered
sew
automatically
are
memory
to
button
stops
pattern
to
delete
cursor
the
is
to
the
position.
the
immediately.
even
sewastitch
(36)
when
is
tied-off
automatically
within
one
stitch
buttons
The
cursor
deleted.
be
stitch,
the
stitch
All
stored
after
sequence
you
stitch
the
in
to
Press
rest
sequence,
stitches
and
you
have
on
completion
the
the
....
must
the
of
the
that
remain
switch
once,
started
sequence
stitch
desired
be
clear
memory
you
have
in
oft
the
press
sew.
to
and
sequence,
position
below
button
moves
the
the
in
the
(9).
up
50
Page 54

Stitch
sequenc
Inserting
If
you
using
sequence.
where
of
the
the
m÷
cursor
Inserting
sequence
If
you
wish
sequence,
Once
the
sequence,
appears
store
it
inserted
a
wish
the
cursor
The
the
stitch
cursor).
button
moves
a
to
scroll
cursor
the
using
at
the
stitch
insert
to
cursor
Select
(14).
to
pattern
insert
is
symbol
in
the
the
beginning
into
a
buttons
is
to
be
the
After
the
position
at
stitch
a
to
the
positioned
for
window.
m+
button
the
stitch
to
..
inserted
the
left
the
of
stitch
into
the
desired
must
new
stitch
having
of
beginning
the
at
using
at
beginning
Select
(14).
the
sequence.
sequence
a
sequence,
be
in
(the
and
inserted
the
inserted
beginning
the
cursor
the
beginning
the
The
new
position
front
position
store
of
the
of
new
of
the
button.
the
stitch
stitch
scroll
in
the
of
it
using
stitch,
stitch.
stitch
of
a
of
sequence
and
will
the
pattern
the
the
the
be
tip
““p
“‘9
Deleting
You
can
button
(9)
the
delete
until
sitch
the
the
sequence
stitch
memory
sequence
completely
is
by
pressing
empty.
the
clear
51
Page 55

tIrcn
sequeriutts
9
Deleting
can
You
clear
the
Changing
change
To
sequence,
changed.
M-memories
all
delete
button
pattern
a
the
position
Now
M-memories
all
while
(9)
within
length
the
stitch
the
or
cursor
turning
width
can
the
of
below
be
at
once
on
stitch
a
altered.
the
stitch
the
holding
by
machine.
sequence
within
stitch
to
down
the
be
90
*0
“Pattern
you
If
to
like
as
appears
button
have
start
far
(9).
start”
interrupted
the
the
to
the
in
function
stitch
as
left
window.
sewing
the
sequence
possible,
Then
again,
press
operation
the
until
the
position
symbol
cl/pattern
and
the
would
cursor
start
52
Page 56

Utility
stitches
I
I
I
I
I
:3
:3
:3
:3
:3
Non-elastic/elastic
Zippers
Overlock
Sewing
Darning/inserting
Gathering
Bridging
Cross
Hemming
Shell
stitches
on
stitches
hem
edging
buttons
stitches
stitches
patches
59,
54-58
54
62,
60
61
63
64
65
65
66
67
j
j
i
N
ii
Page 57

%.LJJILJ
S.1LI%tI
I%.’
—
basic
the
length
position
along
“needle
1
straight
can
be
the
of
edge
the
positions
up/down”
in
stitch
center
increasedupto
straight
that
stitch
collar.
of
a
be
adjusted
can
button
The
to
6
sew
to
easily
needle
mm.
2044
position.
Change
zipper
in
a
and 2034
with
the
pivot
at
-1+
collar
is
1
stitch
needle
topstitch
13
“A”.
Use
stitch
needle
the
Straight
Stitch
The
the
or
have
button
•,
•
-•
Tip:
points.
54
Sewing
are
There
directions
For
all
of
teeth
presser
insert
will
enters
it
the
13
of
attached
right,
the
be
only
in
types
the
foot
close
needle
on
If
moved
zippers
different
included
zippers
of
zipper.
ankle
zipper.
your
to
the
foot
the
to
—
1
ways
with
The
the
on
Then
edge
the
positions
side,
right
is
attached
left.
the
to
your
it
is
zipper
left
of
available.
the
in
sew
pattern
important
foot
right,
or
set
the
zipper
the
needle
on
the
zippers.
for
to
be
can
depending
needle
the
If
must
left,
best
sew
snapped
teeth
presser
the
Follow
results.
close
position
by
only
be
needle
the
to
on
so
using
foot
the
the
to
how
that
one
is
moved
must
you
to
Page 58

•IhIJ
%JLII.’..,II
I
Basting
With
stitch
When
you
stitch
at
•
Lower
•
Place
•
Sew
to
the
•
Continue
basting.
Tip:
Light
stitches
lowered.
be
Topstitching
The
straight
positions
presser
of
You
of
edge,
edge
The
set
foot
topstitching
can
also
the
presser
by
guide.
edge
screw
stitch
10
press
time.
a
the
the
fabric
one
stitch,
rear.
to
fabrics
(6
stitch
allowing
for
space
using
The
guide
F
—
10
you
can
the
Press
feed
dog
then
sew
are
mm).
Use
can
youtoguide
stitching.
top
can
be
your
foot.
Begin
guide
the
guide
inserted
is
baste
foot
control,
foot
the
and
under
the
move
one
stitch
easier
In
this
stitch
sewn
be
determined
rows
topstitching
marks
marks
a
garment
the
control
disengage
presser
the
atatime
to
baste
case
1,
stitch
in13different
the
The
distance
topstitching
of
on
are
given
into
hole
fabric
the
fabric
by
the
C
before
machine
again
the
foot.
the
until
with
bottom
length
the
needle
further
needle
in
and
for
IDT.
required
you
long
feed
6
mm.
edge
between
by
from
and
cm
is
secured
trying
will
sew
each
finish
straight
need
needle
along
positions.
the
the
plate,
inches.
it
stitch.
amount
the
the
width
fabric
or
with
on.
one
not
rows
the
Feed
To
ensure
place
under
aid
a
the
for
precise
piece
presser
thick
of
seams
feeding
fabric
foot
of
to
at
the
the
same
support
beginning
thickness
it.
of
thick
a
seam,
the
as
seam
55
Page 59

hem
Blind
blind
The
trousers
skirts,
Finish
•
Fold
•
Fold
•
approximately
the
of
beyond
side
now
Place
•
runs
When
•
a
small
the
screw
hem
the
and
the
finished
of
be
the
along
the
right
A.
stitch
stitch
edge
press
hem
the
your
facing
fabric
edge
needle
amount
side,
—
and
back
1/4
edge
fold.
project
up.
adjust
5
is
home
of
the
The
under
guide
of
used
the
hem
on
inch
extends
wrong
should
swings
fabric.
edge
make
to
decorating.
hem.
allowance
itself
so
mm)
(6
presser
the
B.
the
into
the
If
guide
invisible
inwards.
foot
fold
stitches
by
B
so
should
it
are
turning
hems
that
visible
on
fold
the
catch
on
adjusting
Elastic
elastic
The
fabrics.
There
Create
is
the
blind
The
no
hem
blind
hem
need
blind
stitch
hem
is
to
hem
stitch
finished
finish
as
6
—
especially
is
and
raw
the
described
sewn
edge
at
above.
suitable
the
first.
same
for
time.
stretchy
56
Page 60

Zigzag
Raw
sure
needle
swing
stitch
edges
the
and
of
can
needle
overcasts
needle.
the
—
3
be
pierces
finished
the
the
easily
fabric
edge
the
3.
of
right
Make
the
stitch
zigzag
with
swing
left
the
on
on
fabric
the
of
—
stitch
the
and
tension
17
produces
can
denim.
on
width.
right
sew.
be
for
a
for
used
or
side,
decorative
highly
T-shirt
thread
elastic
hems
the
threads.
and
top
Stretch
t
-±
t
t
The
decorative
and
•
,
‘.
•
Tip
triple
stretch
decorative
with
up
Fold
Topstitch
decorative
with
Lower
triple
seam.
hem
a
the
needle
zigzag
This
threads
the
hem
thread
thread
stitch
correct
from
stitch
zigzag
57
Page 61

•!•
Stretch
This
needed,
the
fabric,
stitch
triple
is
such
the
straight
used
as
longer
stitch
for
sewing
underarm
the
and
stitch
—
2
seams
crotch
length
where
seams.
required.
strength
The
is
heavier
Elastic
Use
stitch
•
To
create
garment.
•
Cut
elastic
•
Sew
•
Divide
•
Stretch
Honeycomb
The
honeycomb
which
is
very
stitch
4
the
the
the
—
to
add
waistband,
a
to
ends
garment
elastic
stitch
stitch
suitable
4
elastic
comfortably
of
the
elastic
edge
fit
to
—
19
is
an
for
children
to
pajamas.
finish
fit
and
the
elastic
the
around
together.
elastic
fabric.
and
clothes
s
skirts
top
edge
waist.
into
Sew
decorative
and
quarters.
elastic.
on
and
sportswear.
of
the
hem,
lingerie.
58
Page 62

Darning
Use
the
areas.
•
If
several
•
For
of
the
over
fabric
repair.
with
elastic
area
the
tears,
fabric,
same
the
closetothe
the
elastic
stitch
is
only
rows
stitching
of
frayed
slightly
color,onthe
damaged
stitch
to
repair
holes,
slightly
damaged,
until
edgesorsmall
than
larger
the
wrong
area,
then
stitching
on
—
4
tears
sew
it
is
well
holes,
damaged
sideofthe
away
cut
back
the
and
damaged
over
covered.
place
area
fabric.
the
excess
side
of
it
a
with
piece
and
Stitch
your
of
Sewing-on
The
damaged
•
Cut
best
a
patches
way
area
piece
to
repair
with
of
—4
a
fabric
larger
pieceoffabric.
new
slightly
holesisto
larger
than
patch
the
the
damaged
areaorhole.
•
Stitch
•
Cut
closetothe
over
back
the
the
damaged
seam.
fabric
edges
fabric
with
on
the
the
elastic
reverse
stitch.
side
4
Repairing
On
pieceofmaterial
a
The
perfect
•
•
•
a
tears
frayed
edgesorsmall
tears,
under
underlayed
fabric
repair.
Layapieceoffabric
must
Now
Cut
the
be
sew
a
little
over
under
larger
the
layed
the
reinforces
underneath
than
damaged
piece
holes
reverse
the
damaged
the
area.
of
material
usefultolay
it
is
sideofthe
workpiece
damaged
the
back
area.
to
fabric.
and
fabric.
the
ensures
It
seam.
59
Page 63

utiiiiy
iiu.ile
Overlock
elastic,
For
of
Use
seam
the
needle
fabric
blind
layers
stitches.
Tip:
knits
and
stitch
at
clears
stitches
stretch
and
overcast
foot
stitch
wider
raw
the
No.
fabrics,
them
3
widths.
edge
when
of
the 2034
in
one
sewing
Adjust
the
operation.
the
fabric
and
2044
overlock
stitch
and
the
These
seams.
width
pin
provide
stitches
and
of
the
a
This
guide
presser
selection
have
guides
of
foot.
of
built-in
the
the
foot
overlock
stretch
fabric
to
stitches.
and
more
ensure
are
precisely
that the
These
more
and
right-hand
stitches
durable
prevents
join
than
swing
multiple
standard
tunneling
of
the
of
Closed
This
serging
good
Closed
If
you
With
edge
overlock
stitch,
fabrics
stitch
overlock
wish
this
against
in
single operation,
a
that
for
attaching
to
sewafabric
stitch
an
further
stitch
—
fray
easily.
knit
stitch
with
additional
fraying.
7
that
The
cuffs
selvage
frays
edge
is
suitable
closed
and
for
overlock
collarstogarments.
thread
easily.
select
thread
protects
sewing
—21
stitch
the
is
and
also
21.
fabric
a
overlock
Open
The
open
finishing
Pullover
together
Used
this
stitch
Garments
Tip:
To
overcast
overlock
fabrics
stitch
can
can be
prevent
stitch—18
stitch
that
—
22
with
the
be
used
joined
the
seam
woolen
a
works
not
do
knit-edge
for
effortlessly
thread
well
fray
excessively.
open-knit
from
stretching
or
foot
twill
when
(special
and
with
tape
joining
heavy
this
while
in
or
edge-
accessories),
knit
fabrics.
stitch.
sewing,
the
seam.
60
Page 64

LJLIIIL
LILLiI
IC
Sewing
With
four-hole
and
•
Remove
sure
•
Mark
on
•
Turn
so
•
Lower
place
make
button.
•
Continue
complete
Sewing
•
Attach
•
Leave
the
on
Button
the
the
the
the
the
on
holes
buttons
sewing
buttons.
the
IDT
button
marked
handwheel
needle
presser
the
the
by
the
sure
sewing
the
buttons
presser
the
feed
the
of
—0
program0you
presser
disengaged.)
is
position
fabric.
enters
foot
shank
of
needle
on
program
with
foot.
dogs
button
the
and
foot
on
towards
left
the
lifter.
the
also
button.
the
for
shanks
lowered.
and
lower
your
you
holeinthe
The
Turn
foot.
enters
you.
Place
sew
can
The
—
it
easily
the
fabric.
and
button
the
the
machine
0
a
on
sew
feed
Place
position
button.
willbeheld
handwheel
holeofthe
right
toothpick
described
as
dog.
the
the
will
two
on
(Make
button
button
to
between
above.
in
14
JI3
4
•
Remove
apart.
•
Wrap
Eyelets
stitch
To
the
the
—72
eyelets
toothpick
stem
(Model
on
sewing
with
2044)
beltorlinen
a
and
pull
thread
the
items,
button
and
select
knot
and
fabric
it.
stitch
72.
61
Page 65

uuiiiy
suicnes
j
Automatic
(Model 2044)
Stitch73is
repairing
•
Stitch
•
Press
the
The
needed.
Dependingonthe
may
pattern
‘Balance”,
If
the
in
the
darning
for
tears.
over
the
darning
saved
darning
shift
slightly
using
page
pattern
plus-section.
strengthening
the
reverse
the
shifts
—73
damaged
program
length
type
of
out
balance
40>.
this
button;
and
can
of
fabric,
square.
adjustment
way
damaged
area
at
the
the
machine
the
darning
nowberepeated
the
darning pattern
You
can
capability
havetocorrect the
you
areas
of
fabric
required
lengthissaved.
straighten
finishes
length.
sewing
as
the
(see
often
and
as
chapter
balance
62
If
the
pattern
in
the minus-section.
shifts
this
way
havetocorrect
you
the
balance
Page 66

Darning
Attach
until
and
the
of
place
arm
Tighten
•
Darning
push
In
Lower
•
•
Draw
you
with
darning
the
index
pinofthe
presser
the
itself
must
it
to
position
this
the
up
start
the
needle
finger
around
behind
be
set
the
position:
the
feed
bobbin
the
sewing.
straight
foot
set
is
press
darning
foot
screw.
Lower
until
rear
the
dog.
No.
at
the
foot
holder.
presser
the
the
thread
thread
stitch
Turn
6.
its
darning
as
The
needle
the
engages
it
tension
—
1
the
highest
far
as
“C-shaped”
bar.
clamp/needle
presser
hold
and
__..._J
handwheel
position.
together.
foot
go
will
it
long,
The
lifter
bar
darning
the
in
is
engaged
threads
the
With
into
guide
plastic
slowly
toward
thumb
Insert
the
should
set
screw.
position.
darning.
for
when
you
hole
and
.4
-
4+
ArtH
the
of
damaged
the
produce
dogs
even,
An
you
Sewing
the
on
fabric
seam
the
area
lowered.
sew
to
reverse
area,
again.
a
a
too
guiding
of
the
and
over
speed
of
knots
by
The
hole.
the
width
stitch
a
the
with
by
will
straight
to
of
tear
you.
allow
stitch.
appear
length
the
over
will
feed
and
the
by
covered
degrees
90
directions
when
is
sewing
length
work
area/hole
backwards.
size
sewing
determined
small
damaged
the
Repair
•
forwards
evenly
determined
is
•
Tip:
When
turn
Darning
stronger
Remember
the
you
the
stitch
have
fabric
both
in
repair.
length
medium-to-fast
consistent
more
cause
may
slowly
of
your
1
-:-‘-
-
—
-J
side
I
63
Page 67

LJUIIL
LIL’...iI
I’’j
1
—
be
neat
gathering
of
length
line.
beginning
rows
guide.
a
by
fullness.
gathers
the
use
to
breakage
stitch
used
and
to
line
Leave
of
pulling
evenly
gathering.
a
gather
to
even
stitches.
mm.
6.0
on
about
and
stitching,
the
and
strong
when
gathers
Lower
the
4-5
end
bobbin
knot
thread
pulling
sleeves,
needle
side
right
inches
the
of
using
(bottom)
the
when
you
seam.
the
thread
on
cuffs,
should
thread
the
of
(10-13
edge
threads
gathering
gathering
the
skirts
fabric.
cm)
of
ends
sew
the
Gathering
straight
A
valances.
or
three
or
two
Set
•
tension
Mark
•
Sew
thread
of
Sew
•
presser
Gather
•
the
to
Distribute
•
together
It
Tip:
to
with
stitch
your
to
the
along
or
1
the
desired
important
is
avoid
To
rows
stitch
3.
first
at
2
foot
the
to
thread
straight
can
obtain
gathering
this
the
more
as
fabric
secure
threads.
Gathering
Gathering
visible,
seams
waist
Mark
•
stitches
foot.
needle
and
needle.
Lower
•
secure
elastic
elastic
When
•
on
gathering
of
elastic
Tip:
Use
the
with
elastic
the
Turn
place
the
you
the
the
elastic
with
elastic
gathering
or
first
until
the
in
is
the
presser
elastic
the
threads
thread
are
ends
thread.
cording
elastic
thread
necklines.
gathering
needle
the
hand-wheel
lowest
the
elastic
foot
thread
fabric.
to
the
in
finished
elastic
the
of
determined
is
Secure
foot
thread.
threads
is
seams
row
in
is
towards
position.
thread
and
to
Make
stitching.
attaching
threads
thread
all
(special
19
—
particularly
such
as
fabric.
the
on
middle
the
yourself
Raise
around
few
a
sew
fabric.
the
sure
the
to
amount
by
the
ends.
accessory)
blouse
the
the
more
Continue
you
elastic
gather.
suitable
sleeves,
Sew
the
of
until
presser
back
stitches
not
do
thread,
The
you
to
for
few
a
presser
the
the
of
attaching
catch
amount
pull
help
foot
to
the
pull
on
guide
the
64
Page 68

Bridging
bridging
The
for
used
•
Finish
the
to
Place
•
approximately
•
Stitch
the
To
Tip:
guide
mm
is
plate.
Cross
highly
This
•
Fold
•
Stitch
excess
stitches
stitch
connecting
fabric
the
wrong
fabric
the
from
needle
guiding
make
(special
widths.
inserted
stitch
hem
elastic
hem
the
hem
the
hem
—8
creates
side.
1/8
right
the
catches
The
the
in
—20
stitch
allowance
from
fabric
or
14
a
finished
two
and
edges
under
the
inch
(3
side
the
fabric
fabric
the
accessory).
post
small
small
is
very
the
to
up
hemstitching
fabric
press
presser
apart.
mm)
fabric,
the
of
on
the
easier
available
is
It
the
on
the
at
hole
suitable
reverse
the
to
side
right
stitching.
the
edges.
the
foot
right
use
bottom
front
for
the
of
effect.Itis
allowance
seam
with
the
making
and
bridging
the
in
of
of
the
decorative
side.
fabric.
3
edges
sure
left
mm
the
needle
Trim
often
that
sides.
and
guide
hems.
any
5
Ei
h4
—
Light-knit
(Model
light-knit
The
very
It
is
stretch
•
Finish
Now
•
right
the
mending
2044)
mending
suitable
materials,
sportswear
the
seam
the
of
side
seams
for
especially
allowance
the
falt.
stitch
overstitching
garment.
23
stitchisa
for
directed
as
can
This
stretchy
and
cuff
sportswear.
in
the
overstitched
be
add
will
covering
collar
pattern.
strength
stitch.
seams
from
and
in
the
keep
65
I
Page 69

Rolled
Use
scarves,orruffles
beforehand.
producesaneat
•
•
•
•
hem
the
rolled
Double-fold
fold).
Place
the
a
few
stitches
Turn
the
lowest
point.
into
the
scrollofthe
Lower
the
evenly
edge
sure
the
of
the hemmer
underneath
with
hemmertofinish
Hemming
folded
handwheel
presser
raw
hemmer
without
and
the
to
Raise
into
edge
the
prevents
durable
fabric
edge
fabric
secure.
towards
the
hemmer.
foot
hemmer. When
the
of
the
opening.
sideofthe
right
No.
7—
1
the
edgesofblouses,
havingtoiron
the
edges
finish.
edge
(about
edge
under
until
you
presser
and
while
fabric
Ensure
foot
sewing, guide
butts
the
presser
the
edges
from
fraying
1/8
inch
/2mm
the
hemmer
the
needle
and
slide
roll-hemming,
against
fabric
the
does
foot.
and
the
the
left
not run
and
per
sew
is
at
fabric
fabric
make
edge
its
66
Stitch
A
narrow
lighter
3
zigzag
stretch
stitch
fabrics.
also
makesanice
rolled
hem
on
Page 70

5
is
silk
and
lingerie.
blind
button
the
tuck.
the
left.
sewing,
foot
over
colored
a
sew
you
strengthens
—
a
stitch
needle
raw
very
rayon
.
edge
make
half
at
the
the
effective
fabrics.
No.
thread
of
folded
pearl
shell
the
5
and
sure
the
cotton
hem.
and
press
edge.
tuck.
finish
is
It
mirror
tension
the
foot
thread
This
for
frequently
it
to
seam
the
fabric
width,
creates
thin,
with
create
runs
and
on
soft
used
the
a
allowance
under
the
folded
the
pretty
a
fabrics
a
as
“Pattern
deeper
the
hem
blind
edge
contrast
hem
to
edging
Shell
edging
Shell
as
such
finish
on
Select
•
mirror”
Tighten
•
shell
Finish
•
the
While
•
presser
swings
Add
Tip:
as
and
I
I
•1
.1
67
Page 71

Page 72

BUttonHoles
Geflerai
insertflQ
sertiflg
TVpeS0tt00
Fully
SemiaUt0matc
manual
Manual
8uttOfl0
Tips
notes
the
the
autOmat
inSh
buttOnh0
peeCt
tor
a
buttOnh0
on
b
ttOflh0
buttonh000t
butt0nh0
bUttOflI0
with
gimP
buttOnh0
guide
thread
70
70
70
71
72
72-73
74
75
76
I
Page 73

uuonnoies
4
Buttonholes
Your
Expression
and
garment.
jackets,
different
garments
The
10
accurately.
most
and
Your
buttonhole:
•
•
pants
buttonholes
the
Expression
and
sensors
difficult
heavy
Expression
fully
automatically
semiautomatically
manual
Whether
(trousers),
professional
uses
to
Perfect
of
fabrics
knits.
offers
has
the
you
(3
on
sensormatic
ensure
buttonholes
such
you
perfect
wish
blouses
the
touch.
that
as
three
buttonhole
to
sew
or
model
buttonhole
every
can
be
velvet,
ways
for
buttonholes
stretch
fabrics.
2034)
give
buttonhole
sewn
plush,
of
sewing
every
guide
is
on
even
knitted
fabric
on
4
your
No.
sized
the
fabrics
a
7.
Inserting
Push
the
(between
The
white
Press
spring
guide
and
Attaching
Use
buttonhole
Before
the
front
presser
the
metal
the
part
the
guide
back
the
buttonhole
starting
to
the
foot”
sensormatic
part
two
arrows)
extends
towards
slightly
back
foot
to
sew,
second
page
29).
buttonhole
the
buttonhole
of
on
the
back
over
the
needle
the
front
that
so
there
is
of
the
machine.
foot
No.
5:
No.
to
sew
5
pull
red
Snaponbuttonhole
the
mark
buttonholes.
runner
(also
guide:
guide
into
the
slot
of
the
needle
plate.
plate.
as
far
as
will
it
go.
It
must
a
small
gap
of
see
the
between
foot
toward
“Changing
foot
No.
the
the
5.
70
Page 74

I_,_II,’,I
II
Choose
Linen
1)
blouses,
for
Stretch
2)
(No
60
stretch
for
from
buttonhole
shirts,
buttonhole
the
on
fabrics
the
model
following
No.
dresses,
No.
2034)
buttonholes:
9
etc.
75
Ej
4
74
74
74
3)
(No
for
4)
(only
for
Keyhole
on
61
jackets.
Round
on
ladies’
buttonhole
model
the
coats
buttonhole
model
garments,
outer
and
2044)
No.
2034)
pants
No.
76
(trousers)
74
especially
blouses
and
dresses
71
Page 75

Buttonholes
I
4
automatic
Fully
the
adjust
buttonhole
buttonholes
to
can
also
“reverse
the
allow
will
you
desired
buttonhole
sew
want
Select
sizeofthe
can also
and the
many
continue
adjustments.
Semi-automatic
You
the
stitched
This
where
the
the
finish
sewing”
bartack
first
you
it.
buttonhole
buttonhole
by
buttonhole
density
as
you
same
buttonhole
buttonhole
a
button
of
place
to
using
(-1+
wish.
size
(33)
the
the
No.
(e.g.
the
-1+
width
(-1÷
button
Expression
Your
buttonhole
manually
one
time
buttonhole.
or
last
9).
button
button
C).
back
Adjust
B.
Sew
until
pressing
by
after
bartack
You
A)
as
will
you
you
the
make
have
72
word
The
have
you
buttonhole
the
of
buttonhole
side
left
the buttonhole
of
side
once
(33)
“man”
touched
ends,
the
of
again.
appears
reverse.
is
desired.
the
machine
buttonhole
press
in
This
is
the
Expression
indicates
Before
will
the
the
the
slow
same
“reverse
a
left
down.
length
sewing”
window,
manual
of
side
When
the
as
after
finish
the
the
right
button
Page 76

second
The
buttonhole.
I
bartack
The
word
be
“auto”
appears
the
in
complete
and
sewn
will
the
window.
I-i-—
“,,
automatically.
sewn
be
now
or
stitch
the
new
a
will
of
density
programming
length
a
value
programmed
cancelled.
is
new
a
or
density
remaining
All
length
the
If
Note:
buttonhole
Reprogramming
required.
is
is
buttonholes
changed,
with
•1
s4
.
1;
I
U
DUD
.4
1,-i
73
Page 77

Manual
You
sewing.
sewing”
The
Once
“reverse
now
—
buttonhole.
Before
machine
a
once
and
in
repeated
Note:
when
You
the
sewing”
bartack.
indicates
Before
will
same
“reverse
The
buttonhole.
can
buttonhole
you
sew
the
second
again.
complete
the
window.
The
another
can
also
buttonhole
button
The
the
slow
down.
length
sewing”
second
buttonhole
also
set
the
Select
the
button.
The
length,
have
reached
sewing”
the
will
left
first
side
slow
button
bartack
down.
bartack,
The
machine
the
buttonhole.
All
remaining
fully
automatically.
programming
program
place
has
one
word
“man”
manual
a
left
side
When
as
the
button
bartack
The
word
length
desired
word
of
the
press
the
been
time
finish
of
the
the
right
will
“auto”
last
of
the
buttonhole.
“man”
set
previously,
the
desired
once
again.
and
the
buttonhole
To
complete
the
“reverse
will
sew
The
buttonholes
of
the
buttonhole
is
selected.
bartack
programmed.
after
you
appears
of
the
buttonhole
buttonhole
left
side
side
of
the
(33)
once
be
sewn
appears
buttonhole
appears
length.
The
left
is
the
sewing”
the
word
manually,
have
in
the
ends,
of
the
buttonhole
again.
and
complete
in
Press
in
the
disappears.
press
machine
side
of
completed,
buttonhole
second
“auto”
can
now
is
deleted
even
Press
the
stitched
window.
is
desired.
the
buttonhole
the
window.
while
the
“reverse
window.
the
button
bartack
appears
be
‘reverse
the
This
machine
press
the
the
will
the
with
after
first
is
the
the
74
Keyhole
Keyhole
sewn
Warning:
the
project.
the
measuring
the
edge.
“I
Choose
appear
stitch
Tip:
buttonhole
buttonholes,
with
the
The
rounded
Howe
bartack
from
buttonhole
The
keyhole
stitch
the
in
density
Cut
open
the
curve
punch
or
buttonhole
keyhole
end
towards
ver
the
end.
It
is
important
the
starting
from
the
buttonhole
76.Astandard
window
indications.
buttonholes
all
of
keyhole
the
awl.
—76
up
toalength
foot.
buttonhole
the
buttonhole
point
inside
along
with
These
buttonhole
must
edge
will
to
first
inwards.
to
the
sewn
is
keyhole
the
settings
with
the
of
40
be
of
your
begin
mark
outside
fully
buttonhole
width,
can
seam
with
mm
can
be
sewn
with
garment!
sewing
Always
the
from
length,
sew
towards
automatically
will
length
and
altered,
be
Open
ripper
belt
a
the
Page 78

PFAFF
Instruction
I
4
I
£
I
I
I
manual
0
6
expression
quilt
expression
—
20
2044
0__
I
J
L
Page 79

Buttonhole
Buttonholes
thread
buttonhole
up
the
bartack.
bartack.
and
to
over
into
presser
completing
until
durable
gimp
thread
thread
the
pull
of
After
thread
with
that
not
will
approximately
over.
stitch
metal
the
foot.
right
the
foot.
loop
the
the
off
Cut
gimp
sewn
are
stretch.
Place
bar
Pass
and
Buttonhole
buttonhole,
the
of
gimp
thread
with
the
the
extending
the
left
thread
threads
gimp
Use
same
center
thread
guides
No.
is
threads
pearl
from
ends
on
can
9
pull
hidden
just
cotton
color
of
a
the
the
below
behind
as
length
the
under
clamp
now
ends
are
more
or
a
the
of
center,
the
be
sewn.
the
of
the
final
the
regular
sewing
gimp
back
foot
front
at
the
gimp
buttonhole
of
and
thread
gimp
of
from
ends
the
on
thread
the
presser
a
the
seam
first
from
with
length
center,
under
clamp
along
few
the
foot
of
the
at
the
the
of
stitches
clamp
must
thread
gimp
of
front
and
foot
the
back
foot
buttonhole.
of
with
be
not
the
at
the
a
of
the
raised
over
buttonhole
up
pull
presser
the
side.
After
curved
straight
from
the
into
the
end
pin.
metal
foot.
the
pull
the
right
foot,
the
fabric
Keyhole
Place
bar
I
Pass
and
Guide
Sew
machine
gimp
Warning:
buttonhole
center
the
extending
thread
the
guides
left
gimp
the
right-hand
the
sews
thread
The
down
surface.
the
until
rear
Pull
loop
After
taut
gimp
the
just
is
sewing
and
thread.
gimp
finish
in
thread
front
the
sewing
of
curve,
on
the
the
left
the
needle.
the
hold
buttonhole.
towards
Carefully
thread
gimp
Cut
the
sew
off
a
the
the
little
curve.
more
excess
75
Page 80

bUuOflnoies
Buttonhole
less
wider,
A
•
•
•
•
•
•
fabrics.
heavy
presser
Use
very
sewn
Materials
water-soluble,
with
stabilizer.
Keyhole
gimp
a
if
buttonhole
buttonholes
Linen
use
you
Buttonholes
diameter.
button
buttonhole
that
buttonholes
thread
buttonhole
dense
foot
close
with
are
on
tips:
No.
to
shift
is
gimp
normally
It
the
buttonhole
for
1
reinforced
a
stretch
or
tissue
are
inserted
thread).
particularly
are
twist
important
is
fabric/stabilizer
same
is
recommended
buttonholes
edge.
easily
or
paper
particularly
sewing
while
thread.
selected
to
should
other
stable
dense
little
a
always
are
that
be
lightweight
and
(see
and
larger
sew
your
as
on
to
be
reinforced
durable
“Keyhole
attractive
than
test
a
project
if
the
76
Page 81

I
Accessories
and
needles
I
j
r
I
I
-
I
I
j
—
I
4.
Presser
(standard
Special
Felling
Pintuck
Cording
edge
Knit
inch
1/4
motion
Free
binder
bias
Pintuck
Non-stick
Hole
7/9
Circular
Fringe
Needle
feet
accessories)
accessory
foot/appliqué
foot
foot/shirring
foot/ruffler
and
quilt
quilting
with
foot
fancy
foot/braiding
embroidery
foot/narrow
chart
stitch
table
foot
foot
patchwork
foot!
guide
foot
foot
guide
edge
for
foot
foot
leather
78-79
80-8
82
83
84
92,
1
85
86
87
88
88
89
90
91
93
Ij
ii
Page 82

Mccessorie
ëIEIU
I
Presser
Standard
No.0
No.:
Order
Fancy
dual
Order
98-694
816-00/000
stitch
feed)
No.:
98-694
feet
presser
foot
1
No.
814-00/000
(normal
foot
(for
accessories)
Zipper
presser
No.:
Order
98-694
Buttonhole
No.:
Order
93-036
Darning
Order
93-035
edge
and
No.
foot
884-00/000
foot
990-91/000
No.
foot
No.:
960-91/000
4
No.
5
6
Fancy
dual
for
Order
98-694
Blind
overlock
Order
98-694
78
foot
stitch
feed)
No.:
897-00/000
and
stitch
foot
No.:
890-00/000
No.
No.
(not
2
3
hemmer
Roll
No.:
J...—
4
2
Order
98-694
No.7
818-00/000
Page 83

Edge
Order
Bulb
Order
8
No.
guide
98-802
No.:
remover/Needle
93-038
No.:
422-00/000
plate
920-91/000
changer
-
Sensormatic
No.:
Order
Second
ripper
Seam
Brush
Oil
-.
93-037
spool
buttonhole
595-91/000
holder
e
guide
Order
Order
Order
Order
No.
No.:
No.:
No.:
No.:
.
10
93-033
99-053
93-847
93-035
063-44/000
6-91/000
01
979-91/000
0-91/000
91
1171
i4
II
/
SCHMETZ
IJNIVEF9SAL
130705H
90
80
00
921214
1
100
1611
Spool
5.
6.
pad
Order
Order
Order
box
No.:
No.:
No.:
48-020
93-033
93-040
cap
No.:
No.:
No.:
93-035
93-036
93-036
804-32/000
064-05/000
970-45/000
050-44/000
048-44/000
049-44/000
Needle
1
—
/
2
Order
Felt
Order
70
Bobbins
2
.
3
Order
4-6
4.
7.
Page 84

Accessories
Special
and
neeaies
accessories/preSser
feet
I
(available
from
your
dealer):
egnat1oi
Appliqué
Open toe
binder
Bias
Pintuck
needles
Pintuck
needles
Pintuck
Fringe
foot
Straight
Needle
Felling
foot
Felling
foot
Shirring
Shirring
Ruffler
Cording
Eyelet
plate
Eyelet
plate
Roll
hemmer2mm
Hemmer
Hemmer
Knit-edge
Non-stick
Non-stick
Non-stick
Circular
foot
appliqué
foot
with
foot
with
blade
stitch
plate
4.5
6.5
foot/Gathering
foot/Gathering
foot(3groove)
4
mm
mm
3
foot
foot
foot
fancy
embroidery
foot
grooves
5
needle
7
grooves
needle spacing1.6-2.0)
(2)
foot
with
mm
mm
dia.4mm
dia.
(for
(without
spacing
with
round
mm
6
(without
(for
dual
(without
dual
stitch
guide
(size
(size80twin
round hole
hole
foot
foot
feed)
dual
feed)
dual
foot
twin
80
2.0-2.5)
(metal)
dual
feed)
feed)
feed)
OrdetNo
93-042
941-91/000
93-036
931-91/000
98-053
484-91/000
93-042
950-91/000
93-042
953-91/000
93-035
93-042-943-91/000
98-694
98-694
93-042
93-042
93-036
93-036
98-999
93-036
93-036
93-036
98-694
98-694
98-694
93-042
93-036917-91/000
93-036
93-036
93-036
952-45/000
821
-00/000
822-00/000
946-91/000
948-91/000
998-91
967-91/000
650-00/000
915-91/000
976-45/000
947-45/000
873-00/000
823-00/000
818-00/000
957-91/000
922-91/000
962-91/000
953-91/000
/000
Sewing
For
Allows
For
For
lighttomedium weight
For
lightweight
Enhances
For
Warning!
in
For
very
Warning!
in
For flat-felled
lighttomedium
For
For
weight
For
pleatsatregular
Warning!
in
For
For
For
For
For
For
For
For
For
For
Circular
work
appliqué
binding
creating
creating
creating
center
top-stitching
light
center
gatheringonvery
gatheringonlight
placing
center needle
cording
eyelet
eyelet
hemming
hemming
hemming
sewing
sewing
embroidering
embroidering
work
view
full
edges
pintucks
pintucks
fabrics
the
effectofan
fringe/loop
Only
needle
and
soft
Only
needle
seams
fabrics
dense
Only
embroidery
embroidery
edges
edges
edges
knitted
leather
embroidery
of
use
use
weight
use
work
with
position.
seams,
materials
straight
position.
or
intervals.
straight
position.
fabrics
and
leather
leather
surface
bias
on
fabrics
on
embroidery
straight
on
fabrics
light
to
loose
synthetics
tape
uncorded
stitch
quilting
(silk,
stitch
weight
medium
stitch
and
jersey
fabrics
pintuck
effects
sewing
etc.)
80
Page 85

Designation
Order
No.
Sewing
Accessories
work
and
needk
Bridging
1/4
(without
1/4
(for
Pintuck
Braiding
7/9
Narrow-edge
Stitch-in-the-ditch
Free
I
Quilt
Quilt
The
guide
Quilting
dual
Quilting
dual feed)
foot
foot
foot
hole
motion
work
guide
following
and
feed)
and
with
(for
(for
foot!
quilt
finger
pages
patchwork
patchwork
guide
6
dual
feed)
dual
feed)
foot
foot
guard
contain
foot
foot
mm
application
examples
93-036
93-036
93-036
93-036
93-036
93-036
93-036
93-036
93-036
93-036
of
some
952-46/000
925-91/000
927-91/000
942-91/000
936-91/000
946-91/000
939-91/000
963-91/000
910-91/000
909-91/000
special
accessory
For
sewing
with
For
quilting
For
quilting
For
embroidering
For
oversewing
For
oversewing
For
topstitching
laceorsecond
fabric
For
quilt
For
all
For
quilt
feet.
together
hemstitch
a
and
stitch-in-the-ditch
and
sewing
work
seam
and
patchwork
and
patchwork
areas
cords
decorative
narrow
fabric
embroidery
work
two
edge
edges
effect
jobs
jobs
between
threads
edges,
to
work
of
pintucks
sewing
main
quilting
fabrics
14
I
i
I
‘I
I
81
Page 86

Accessories
and
needles
Felling
Flat
felled
known
children’s
technique.
this
decorative
felling
The
•
Attach
•
Place
•
Overlap
5/8(1
•
Place
foot.
foot.
Sew
•
Separate
felling
overstitched
taut
Stitch:
Stitch
Tension:
foot
seams
as
jeans
wear,
the
the
this
The
along
foot.
during
1
length:
4-5
seams.
blouses
You
using
by
foot
is
felling
fabrics
the
raw
-1.5cm).
overlapping
fabric
the
the
fabric
The
along
sewing.
3
ih’
are
particularly
can
make
sewing
a
available
foot
wrong
edge
must
folded
and
hem
the
Seams
and
in
to
the
sides
of
the
edge
be
placed
edge
feed/the
is
turned
edge.
on
shirts
these
thread
two
presser
lower
over
with
Pull
strong
sportswear
are
more
seams
of
a
different
together.
ply
the
fully
under
straight
a
protruding
over
by
the
and
are
durable
particularly
contrasting
widths.
foot
holder.
by
about
tongue
the
stitch.
the
foot
two
fabric
commonly
and
3/8
of
the
presser
hem
into
and
layers
with
color.
“to
felling
is
the
Appliqué
Appliqués
effect.
create
densely
special
•
Attach
•
Transfer
fusible,
a
letters
•
Iron
out
appliqué.
Position
base
Place
•
Stitch
Make
that
Stitch:
Stitch
Stitch
Tension:
foot
are
By
using
countless
stitched
cutout
the
or
the
fusible
your
fabric.
stabilizer
a
over
sure
no
fraying
3
length:
width:
2
-
easily
different
new
seam
its
on
sole
appliqué
your
drafted
paper-backed
numbers
webbing
motif
and
and
press
under
all
contours
that
the
occurs
0.35
L5-4.O
3
sewn
materials
designs.
with
for
foot.
pattern
have
peel
your
needle
later.
and
always
You
the
appliqué
the
webbing.
to
be
onto
the
paper
appliqué
your
with
a
sews
and
can
satin
the
to
drawn
the
work
narrow
over
produce
patterns
make
foot,
stitch
seam.
paper
Remember
mirror
as
appliqué
from
the
pieces
in
area.
satin
the
f
a
you
a
perfect
which
side
material.
back
place
stitch
outer
beautiful
can
has
of
that
any
images.
of
the
on
zigzag.
edge
a
Cut
your
so
82
Page 87

Pintuck
classic
This
duplicated
Undergarments
linens.
nostalgic
Attach
•
Insert
•
H-ZWI;
•
Thread
Using
•
your
Increase
•
adjusting
(see
form
•
Sew
pintuck,
in
the
Stitch:
Stitch
Tension:
foot
heirloom
many
on
by
touch
pintuck
the
twin
a
or
1.6
two
the
water-soluble
a
pintuck.
first
the
screw
chapter
well-defined
first
your
allow
This
foot.
1
length:
2.5
5
sewing
types
pintucking.
foot.
needle
mm
2.0
needles
bobbin
the
of
“Bobbin
on
pintucks.
pintuck.
first
the
will
of
children’s
and
your
on
needle
(see
marker,
thread
bobbin
When
pintuck
produce
technique
such
fabric
machine
spacing:
page
draw
tension
case
thread
you
to
evenly
can
as
clothes
(e.g.
size
31).
placement
a
turning
by
slightly
tension”).
on
start
parallel
run
spaced
be
light
easily
cotton
given
are
130/705
80).
the
to
This
second
the
in
pintucks.
the
will
a
and
a
for
line
right
help
groove
If
Tip:
can
shapes
thin
For
small
with
foot
Inserting
making
cording
A
your
in
•
Remove
Thread
•
the
Replace
•
plate
gimp
the
during
Gently
•
would
you
attach
of
edge
front
the
better-defined
use
fabrics
5
a
the
blade,
grooves
gimp
pintuck
pintuck
tongue
pintucks.
the
gimp
the
front
center
the
the
and
thread
support
work
sewing.
the
pull
like
pintuck
a
the
fabric
and
thread
is
needle
needle
sewing
while
fabric
emphasise
to
needle
prior
pintuck.
pintuck
the
heavier
for
the
creates
appear
used
not
plate.
thread
the
of
plate.
sewing.
that
so
blade
plate.
sewing
to
foot
large
even
when
from
needle
The
machine
Feed
does
it
while
taut
‘_)
the
(special
The
and
with
materials
pintuck
similar
a
more
inserting
below
plate.
notch
provides
the
not
sewing
I I
ç
pintuck
accessory)
pintuck
produces
grooves
7
use
blade.
optical
raised.
through
between
space
gimp
become
the
c
effect,
blade
the
effect
gimp
a
the
thread
pintucks.
i
i
on
a
and
pintuck
thread
hole
the
for
under
knotted
i i
i..,
you
the
pre
the
by
at
needle
the
‘...
L,
I
83
Page 88

Cording
Cording
is
overstitched
obtain
made
•
Attach
•
Place
of
foot
•
Overstitch
produces
Tip:
You
a
Stitch
Stitch
Stitch
Tension:
foot
is
an
effect
more
the
the
the
grooves
at
the
can
medium
12
length:
width:
3
a
technique
to
effective
cording
pearl
back.
the
what
also
pearl
0.4
1.5
produce
similar
thread
at
pearl
is
obtain
-
0.6
-2
in
to
with
foot.
the
front
thread
known
a
thread
which
pearl
purl
a
braiding.
this
seam.
in
the
foot
and
with
the
as
remarkable
with
a
thread
seam.
Appliqués
soitleads
lies
under
narrow
a
purl
thread
With
seam.
effect
of
or
a
fine
this
you
can
also
through
the
presser
satin
stitch.
by
overstitching
different
a
cord
can
be
one
This
color.
Shirring
Beautiful
easily
wear
•
Attach
foot
upwards
•
Place
presser
the
•
Hold
you
•
Be
•
Disengage
front
presser
Tip:
Tighter
needle
Stitch:
Stitch
Tension:
foot/Gathering
gathering
with
the
or
home
the
into
the
until
the
foot,
through
top
the
top
pull,
the
sure
to
and
remove
foot
gathers
thread
1
length:
3-5
effects
shirring
decorating
shirring
rear
it
snaps
fabric
to
and
the
fabric
greater
guide
the
shirring
holder
tension
3
foot,
foot
groove
be
the
foot
slightly
the
the
fabric
it
in
at
can
foot
can
e.g.
projects.
by
hooking
of
into
gathered,
fabric
cutout.
taut
gathering
foot
the
direction
the
back.
be
achieved
and
be
on
the
the
to
edges
by
the
achieved
lightweight
the
foot
holder.
front
bar.
face
remain
while
effect
evenly
pushing
of
by
stitch
quickly
children’s
rear
bar
Push
up,
under
flat,
face
sewing.
you
through
it
down
the
groove
increasing
length.
and
of
the
the
the
down,
The
harder
achieve.
the
at
the
of
the
foot
on
foot.
the
84
Page 89

I’t,,ul
ItS
dl
ILl
I
IUI
S
Ruffler
the
With
pleats
ruffles,
The
ruffler
1.
Folding
Folding
2.
one
in
Folding
3.
another
When
operating
Stitch
Stitch
Tension:
ruffler
you
automatically
home
frills,
can
be
securing
and
pleats
operation.
pleats
one
in
fabric
the
buy
you
instructions
1
length:
3
3-5
can
textiles,
used
fabric
in
fabric,
in
ruffler
make
sewing.
while
etc.
three
in
pleats
and
attaching
operation.
from
are
included.
closely
This
different
fabric.
in
securing
PFAFF
your
or
is
to
lace
widely
spaced
very useful
ways:
second
a
securing
and
dealer,
for
fabric
to
lull
fabrics
foot.
(e.g.
additional
foot
or
In
shoulder
pulled
imitation
order
seams),
slightly
strength
to
furs
obtain
we
taut
and
can
be
a
perfect
recommend
into
the
keep
it
sewn
seam.
from
edge/piping/beading
Knit
knitted
in
seams
Thick
knit
fabrics
wool
a
the
of
3.0
6.0
edge
thread,
seam
shape.
the
with
easily
knit
on
seam
over
sewing
This
stretching
I
I
Stitch:
Stitch
Stitch
Tension:
will
length:
width:
give
out
18
3-5
I
85
Page 90

1/4
inch
quilt
consists
A
sandwiched
joined
together
layer
top
polyester
The
1/4
for
joining
needle
and
and
between
(3.15
mm).
Attach
Engage
•
Sew
seam
edge
fabric
Stitch:
Stitch
1
length:
Tension:
Quilt
between.
of
the
cotton
or
inch
quilt
your
the
the
the
the
together
allowance
of
the
along
3
-
5
and
patchwork
of
two
in
continually
quilt.
batting
and
pieces
outer
needle
1/4
inch quilt
dual
your
foot.
the inner
2.5
layers
Many
This
is
patchwork
of
fabric.
edge
and
feed
(IDT).
pieces
of
1
/4
For
a
edge
of
geometric
changing
tacked
and
of
the
the
and
of
guide
seam
foot
fabric
to
backing
a
foot
The
clearance
foot
inner
patchwork
fabric
your
allowance
of
the
with
a
pieces
patterns
a
middle
layer.
is
particularly
is1/4
edge
using
fabric
of
foot.
layer
(6.3
of
foot.
stitch
along
of
fabric
of
to
layer
between
mm)
the
1/8
guide
batting
form
of
suitable
foot
1.
For
the
are
the
the
1/8
a
outer
your
Quilting
In
with
accomplished faster
(stitch
•
•
•
Stitch:
Stitch
Tension:
of
traditional
small
11).
Use
invisible
a contrast
in
the
bobbin.
the,needle
Set
thread
to
allow
the
top
to
purchase
PFAFF
threads.
When
you
quilt.
you
bobbin
produces
thus
needle
the
desired
11
length:
9
the
quilting
hand
or
tension
the
side
dealer)
sew
should
thread.
and
fabric
stitches.
needle
of
a
bobbin
effect
3-4
layers
the
three
This
easier
and
(monofilament)
complementary
thread
tension
approximately
thread
your
work.
second
The
a
bobbin
for
working
the
stitch
only
see
intermediate
hand-stitched
thread
on
layers
of
hand-stitched
with
the
thread
polyester
to 7-9.
1/4
turn
to
pull
the
You
may
find
case
with
specialty
the
three
the
triple
stitch
appearance.
tensions
are
fabric
sewing
in
the
Loosen
counterclockwise
bobbin
(available
layers
stitch
disappears
needed
as
look
machine
needle.
or
cotton
thread
beneficial
it
techniques
of
of
your
Adjust
joined
can
the
from
thread
bobbin
your
to
produce
be
Use
to
your
and
and
your
86
Page 91

—I
I
:i
S
S
S
5
S
5
5
S
Free-motion
free-motion
The
well
is
stitch
quilt
of
your
faster
The
stitches
piece.
straight
needle
the
•
•
•
•
Tip:
Stitch:
Stitch
Tension:
will
Free-motion
lines.
position),
four
red
Loosen
Press
thumb
Guide
the
presser
of
the
needle
Tighten
Bring
(see
page
Free-motion
the free-motion
1
length:
quilt
quilt
suited
are
guided
sew,
you
become.
free-motion,
For
with
markings
the
screw
free-motion
the
and
index
the
pinofthe
foot
free-motion
clamp.
the
screw.
the
free
motion
63)
embroidery
25
3-5
foot
foot
free-motion
for
the
Try
quilting
a
on
on
finger.
holder
quilt
and
lower
quilt
combination
in
manually
consistent
more
technique
this
possible
is
straight-line
spacing
corners
the
back
the
foot
quilt
free-motion
farasit
as
must be
foot
quilt
foot
the feed
can
foot.
quilting.
during
1/4 inch
of
of
gently
quilt
into
also
with
free-motion
and
out
in
both
of
the
presser
the
foot
will
go.
positioned
the
dog
be
the
three
The
uniform
firstona
curved
quilting
(6.35
footasa
together
into
the
The
long
darning
page
(see
completed
straight
quilting.
test
(center
mm),
guide.
foot
with
hole
behind
position
34).
layers
your
and
use
holder.
of
fork
the
using
binder
Bias
Binding
edges
unfolded
•
Remove the
binder.
•
Cut
•
Feed
to
•
Adjust
needle
mm)
•
Stitch
•
Insert
bias
will
Tip:
You
a
Stitch:
Tension:
with
bias
smooth and
a
bias
beginning
the
the
tape
the
back.
the
pierces
from
about1’(2.5
the
tape
enclose
can
zigzag
optional
3-5
tape
presser
binder
the
edge
edges
the
obtain
or
fancy
tapeisa
neat
about1’(24
foot
the
of
the
into
and/or
the
fabric
edge
folded
cm)
fabrictobe
of
the
the
into
raw
edge
additional
an
stitch.
very
easy
appearance.
mm)
holder. Attach
and
bias
tapeata
scrollofthe
needle
the
approximately
of
the
the bias
along
slotofthe
automatically
decorative
methodofgiving
For
this
you
wide.
the bias
diagonal.
binder
and
pull
positionsothat the
1/16
(1-1.5
bias
tape.
tape.
bound
between
binder.
The
during
effect
fabric
need
out
the
bias
tape
sewing.
using
by
I6
Li
I
87
Page 92

1”
/
Pintuck
With
this
spacing
precisely
between
•
Attach
attached
•
Insert
needles).
•
Thread
thread
page
•
Place
guide.
automatically
sewn
•
Sew
•
Replace
•
Set
•
Place
•
Place
center
in
this
Stitch:
Stitch
Tension:
foot
foot
of
space
the
the
a
tension
83)
the
Sew
in
all
the
stabilizer
two
of
space.
1
length:
3-5
with
you
5or1 1
decorative
pintucks.
pintuck
with
the
twin
needle
the
two
or
with
first
pintuck
a
second
be
the
area
remaining
the
twin
needle
pintucks
the
foot.
25
guide
can
mm.
foot
guide
needles
tight
without
spaced
between
pintucks.
needles
thread
under
Stitch
accurately
The
same
stitches
with
pointing
(2.0
or
(see
(4
-
5)
gimp
under
pintuck.
to
pintucks.
with
tension
work
in
the
guides
your
guide.
2.5
and
the
allow
area.
desired
sew
foot
up
to
mm
page
sew
thread.
groove
The
a
normal
to
3.
on
pintucks
allows
to
6
The
foot
the
space
31).
one
second
decorative
a
either
decorative
you
mm
left
or
between
Set
pintuck
in
the
pintuck
sewing
side
with
to
wide
can
the
the
extended
stitch
of
a
be
right.
needle
(see
will
needle.
the
stitches
to
also
be
Non-stick
The
synthetic
particularly
of
up
to
6
mm
vinyl.
It
may
woven
or
knit
it
is
important
embroidering.
is
recommended
embroidery
•
Attach
•
Embroider
Remove
WARNING!
tight
stitch
and
vinyls
that
needle
Stitch:
optional
fancy
coating
suitable
wide
helpful
be
interfacing.
to
A
needle
needle
non-stick
leather
stabilizer.
Very
density,
perforate
to
piercing
stitch
foot
(for
on
the
underside
for
sewing
on
leather,
to
back
Due
useastabilizer
with
a
for
thicker
leather.
works
well.
fancy
stitch
as
desired.
closely
may
points
cause
and
set
stitch,
tear.
will
leather)
decorative
synthetic
these
to
the
stretch
under
longer
On
foot.
i.e.
leathers,
It
is
important
remain
of
foot
this
utility
and
leather
and
fabrics
with
a
of
these
the
fabric
when
eye
(system
softer
leathers
short
stitch
length!
synthetic
visibleinleather.
leathers
to
remember
makes
stitches
fusible
fabrics,
130
it
N)
an
88
Page 93

0
—,
—.
—
-
IC
H
1
H
1
special
(e.g.
Thread
the
at
in
the
the
to
Attach
Select
stitch
optional
foot
foot
loosely
your
front
center
back.
the
stitch
a
over
3
best
is
twisted
cord
of
the
of
the
braiding
and
cord
the
suited
wool)
ribbon
or
Feed
foot.
foot
foot
decorative
ribbon.
or
and
to
the
overstitching
for
narrower
or
a
through
down
it
guide
machine.
thread
the
through
under
of
heavy/bulky
tape/ribbon.
loop/guide
wire
the
the
foot
your
hole
choice
and
and
hole
7/9
Beautiful
presser
decorative
•
Cut
through
Lead
Leave
inches
•
Attach
•
Sew
choice.
Tip:
Pearl
Tie
slipping
Stitch:
Tension:
foot
decorative
foot.
Up
stitches
cords
your
the
cords
the
the
(4-5
the
over
the
thread
cord
the
out
optional
3
to
holes
thread
cm)
7/9
threads
of
effects
cords
9
and
the
to
in
under
tails
the
at
hole
foot
embroidery
or
together
tails
foot.
the
can
may
variety
a
desired
foot
the
the
extending
back.
with
easily
be
of
length.
from
presser
stitch
a
twist
prevent
to
achieved
be
the
foot
about
and
is
over
Thread
top
and
1
thread
well
the
stitched
embroidery
threads.
the
to
the
out
inches
1/2
suited.
cords
with
using
bottom.
the
of
cords
back.
your
from
this
to
Braiding
This
cords
2
•
Stitch:
Tension:
I
I
I
89
Page 94

Circular
The
embroidery
circular
embroidered
fabric
Your
embellish
guide
The
a
Mark
•
•
Insert
at
hole
the
of
the
in
the
twice
guide
guide
The
•
holder.
Stabilize
•
Place
•
below
Select
•
Change
•
screw
the
another
Stitch:
optional
embroidery
circles.
is
automatically
clothing
your
is
marked
center
the
circular
back
the
is
circle
holder.
distance
point.
is
your
center
the
the
rubber
desired
the
radius
the
and
mark
guide
The
in
point
embroidery
the
of
determined
full
The
between
secured
fabric.
marked
point
decorative
with
sliding
the
on
guide
creative
and
1
cm
with
presser
width
with
of
the
guide
allows
possibilities
in
fed
a
household
increments.
fabric
a
guide
the
by
of
the
the
screw
the
of
point
embroidery
the
stitch
new
every
circular
arm.
you
circle,
items.
marker
from
holder.
foot
placement
circle
needle
on
your
and
circle
embroidery
create
to
are
allowing
on
your
the
The
be
will
the
and
the
presser
fabric
guide.
begin
loosening
by
perfect
endless!
you
fabric.
left
into
radius
of
the
equal
rubber
directly
sewing.
guide
to
the
guide
to
foot
to
90
Page 95

E
separate
edge.
the
perfect
the
Move
topstitch.
your
lace
center
and
3
foot
topstitching
fabric
The
metal
fabrics
two
and
neat
quilting.
fabric
edge
the
The
fabrictothe
lace
should
will
guide
for
more
sew
width
the
easier.
pieces,
guide
separated.
easy.
against
needle
center
left
the
to
placed
be
keep
precise
catching
and
The
into
guide
of
right
the
length
i.e.
in
It
the
is
foot/Stitch-in-the-ditch
Fringe
this
With
fantastic
terry
on
Mark
•
Place
•
Attach
•
Set
•
Embroider
•
work
•
When
longer
When
•
machine
you
•
Knot
Stitch:
Stitch
Stitch
Tension:
foot
special
effects
cloth.
your
a
the
upper
the
from
using
stitch
you
will
the
3
length:
width:
2
foot
in
desired
of
piece
fringe
thread
the
the
heavier
length.
have
holding
by
the
pull
beginning
0.5
1.5
-
3
for
time.
no
pattern
stabilizer
foot.
motif
outside
finished,
end
-
1
-
2.5
fringe
This
with
under
tensionto2
by
row
inwards.
threads,
Always
pull
last
the
flat/tight.
loops
end
and
embroidery
is
particularly
foot
fabric
a
the
3.
For
row.
should
you
test
sew
a
work
the
If
loops.
threads
you
marking
fabric.
circles
seam
carefully
you
on
the
can
you
select
pull
produce
effective
pen.
must
a
first.
from
too
reverse
slightly
the
quickly,
side.
Narrow
This
excellently
attaching
the
The
metal
Topstitching
For
the
the
allows
Stitch:
Stitch
Tension:
Sewingonlace
Place
center
of
under
the
stitching.
edge
of
Stitch:
I
Stitch
Stitch
Tension:
edge
presser
foot
suited
lace
centerofthe
center
guide
guide
follows
narrow-edge
guide
center
for
left
perfect
desired
1
length:
3-5
folded/pressed
the
guide
center
the
foot
the
fabrics
properly
Choose
the
fabric
of
zigzagasdesired.
your
3
length:
width:
3-5
makes
to
a
to
foot
also
with
topstitching
of
hand
topstitch
2.5
the
and
guide.
right
-
1
1.5
narrow-edge
edge-joining
finished
acts
makes
seam
the
a
narrow
presser
the
position
finished
Both
side
up.
separated
zigzag
the
and
3.0
-
3.5
fabric
keep
to
quilting
for
edge
place
and
spacing.
edge
edgeofyour
fabric
The
allowing
No.
stitch
lace.
foot.
of
and
Adjust
—
I
91
Page 96

Accessories
and
needles
Needle
the
Using
Needle
ye4No
130/705
Size:
130/705
Size:
1301705
Size:
table
correct
points
H
60-130
H-SUK
70-100
H-PS
75-100
needle
Fabric
needle
607075
weight
light
guarantees
size
yoffle
:::.Ez:::
—
—-----
better
stitching
,iitandeye
Light
Medium
point
ball
Medium
point
ball
of
ball
the
Fabric
needle
point
fabric.
weight
medium
8090
size
SiitabIej
Universal
batiste,
fancy
Coarse
fabrics,
Stretch-fabric
especially
for
needle
organdy,
seams
knitted
Quiana
delicate
and
for
stretch
for
woolens,
embroidery
fabrics.
and
needle
Pfaff.
Fabric
heavy
needle
100110120
synthetics,
velvet.
Latex,
Simplex.
developed
Particularly
knitted
and
weight
size
chiffon,
work.
double-knit
suitable
fabrics.
130/705
90-110
Size:
130/705
90-110
Size:
130/705
Size:
130/705
Size:
130
H-N
Size:
130/705
Size:
1301705
Size:
130)705
Size:
130/705
Size:
H-SKF
H-J
H-LR
80-100
H-PCL
80-110
70-110
H-WING
100/1
H-M
60-80
H-Q
80/90
H-E
75-90
20
Simplex
heavy
calf
plastic
cloth
fabrics
and
with
thread,
glass
for
Lycra,
linen,
goatskin
materials,
buttonhole
metallic
heavily
on
cambric
quilting
blue
jeans
leathers
plastic
silk
thread
dressed
,._—
Heavy
point
ball
Acute
point
ball
(cuts
with
groove
ball
eye
round
ball
Light
Medium
point
ball
twist
twist
point,
point
point
Narrow
point
Narrow
point
twist
Light
long
Hemstitching
point
Acute
right)
left
Wide-meshed
Latex
and
work
Twill,
light
and
Leather,
Imitation
sheeting
Topstitched
No.
or
30/3
Effective
materials,
Micro-fiber
Topstitched
Embroidery
corsetry.
wear,
canvas.
suede,
leathers,
and
oil
seams
synthetic
hemstitching
organdy.
woven
seams
work
92
Page 97

4*
i
.
Needle
q
patterns
Fancy
sewing
Before
way,
this
q
chart
Classification
130/705
Size:
80
130/705
80
Size:
90
Size:
100
Size:
with
the
breakage
needle
nintat
130/705
80
Size:
Size:
Size:
H-ZWI
H-ZWI
twin
desired
H-ZWI
80
80
needles
decorative
avoided
is
sJtch
pngz
Stitch
length
2.5mm
2.5
2.5
2.5
3.0
stitches,
much
as
0.5-1.5
0.5-1.5
0.5-1.5
mm
mm
mm
mm
check
possible.
as
mm
mm
mm
Stitch
whether
width
—
—
—
—
—
the
wide
narrow
narrow
needles
-.
can
Needle
spacing
1.6mm
mm
2.0
mm
2.5
mm
3.0
mm
4.0
penetrate
-
.-
1.6
2.0
2.5
mm
mm
mm
Suitable
-
normal
normal
wide
extra
topstitch
turning
by
freely
-
decorative
decorative
decorative
for
pintucks
pintucks
pintucks
pintucks
wide
hem
handwheel.
the
knits
for
.-
stitching
stitching
stitching
In
H
1
I.
ri
needile
I
t1emstitlVpcia1
J.L
needle
sewing
needle
130/705
H-ZWI-HO
80
Size:
100
Size:
desired
the
breakage
130/705
Size:
80
Size:
80
H
I
II
I
R
Triple
Before
this
way,
twin
.
decorative
avoided
is
2.3-3.0
2.0-3.0
stitches.
much
as
0.5-1.5
0.5-1.5
mm
mm
check
possible.
as
mm
mm
whether
very
very
very
very
narrow
narrow
the
needles
narrow
narrow
can
—
penetrate
mm
2.5
mm
3.0
freely
-
by
turning
Decorative
Well
effect.
fabric
woven
are
batiste
suitable.
the
decorative
decorative
hemstitch
finished
fine
and
particularly
handwheel.
stitching
stitching
In
93
Page 98

Page 99

Decorative
sewing!
Specialty
techniques
General
Altering
combined
Combined
Combined
Free-motion
Free-motion
Tapering
Automatic
Appliqué
Patchwork/Quilting
Cross-stitch
notes
pattern
on
borders
borders
borders
monograms
embroidery
satin-stitch
with
tapering
decorative
width/length
using
twin
zigzag
sewing
for
needle
96
96
97
97
98
99
100-101
-1
101
02
103
104-107
108
Eyelet
Hemstitching
embroidery
109
110
Page 100

JUIdLlV
evvii
u-’’
i
General
enhance
To
Expression
stitches.
combining
decorative
Always
stitches.
distortion
following
The
sewing:
stitch
The
the
Lower
needed
project.
tension
Presser
are
feed)
presser
on
notes
your
offers
Create
different
threads
stabilizers
use
Properly
your
of
recommendations
length
upper
bobbin
so
embroidery
Your
is
properly
No.
foot
suitable
most
No.
foot.
decorative
home
own
you
greater
a
patterns,
enhance
to
stabilizing
decorative
width
and
thread
thread
adjusted.
1
(for
for
2
sewing
textilesorgarments
wide
varietyoffancy
a
variety
colors
the
fabric
under
your
stitches.
apply
be
can
does
results
feed)
decorative
fabrics.
to
not
will
tension
dual
for
heavier
of
embellishments
sizes.
and
lovely
stitching.
sewing
when
fabric
will
all
to
as
altered
between
the
to
pull
much
be
No.
work.
2
and
your
decorative
and
Use
decorative
eliminate
help
decorative
desired.
Adjust
2-3.
side
top
prettier
(without
recommend
We
by
specialty
as
your
of
your
if
dual
Changing
pattern
The
can
width
the
also
pattern
width
be
L
width
be
can
adjusted
altered
while
using
sewing.
button
ki
pair
)
can
be
length
altered
be
adjusted
using
while
button
sewing.
pair
B
(2).
pattern
pattern
length
the
length
can
also
Changing
The
A
(1).
The
The
96
 Loading...