

Page 1
£1
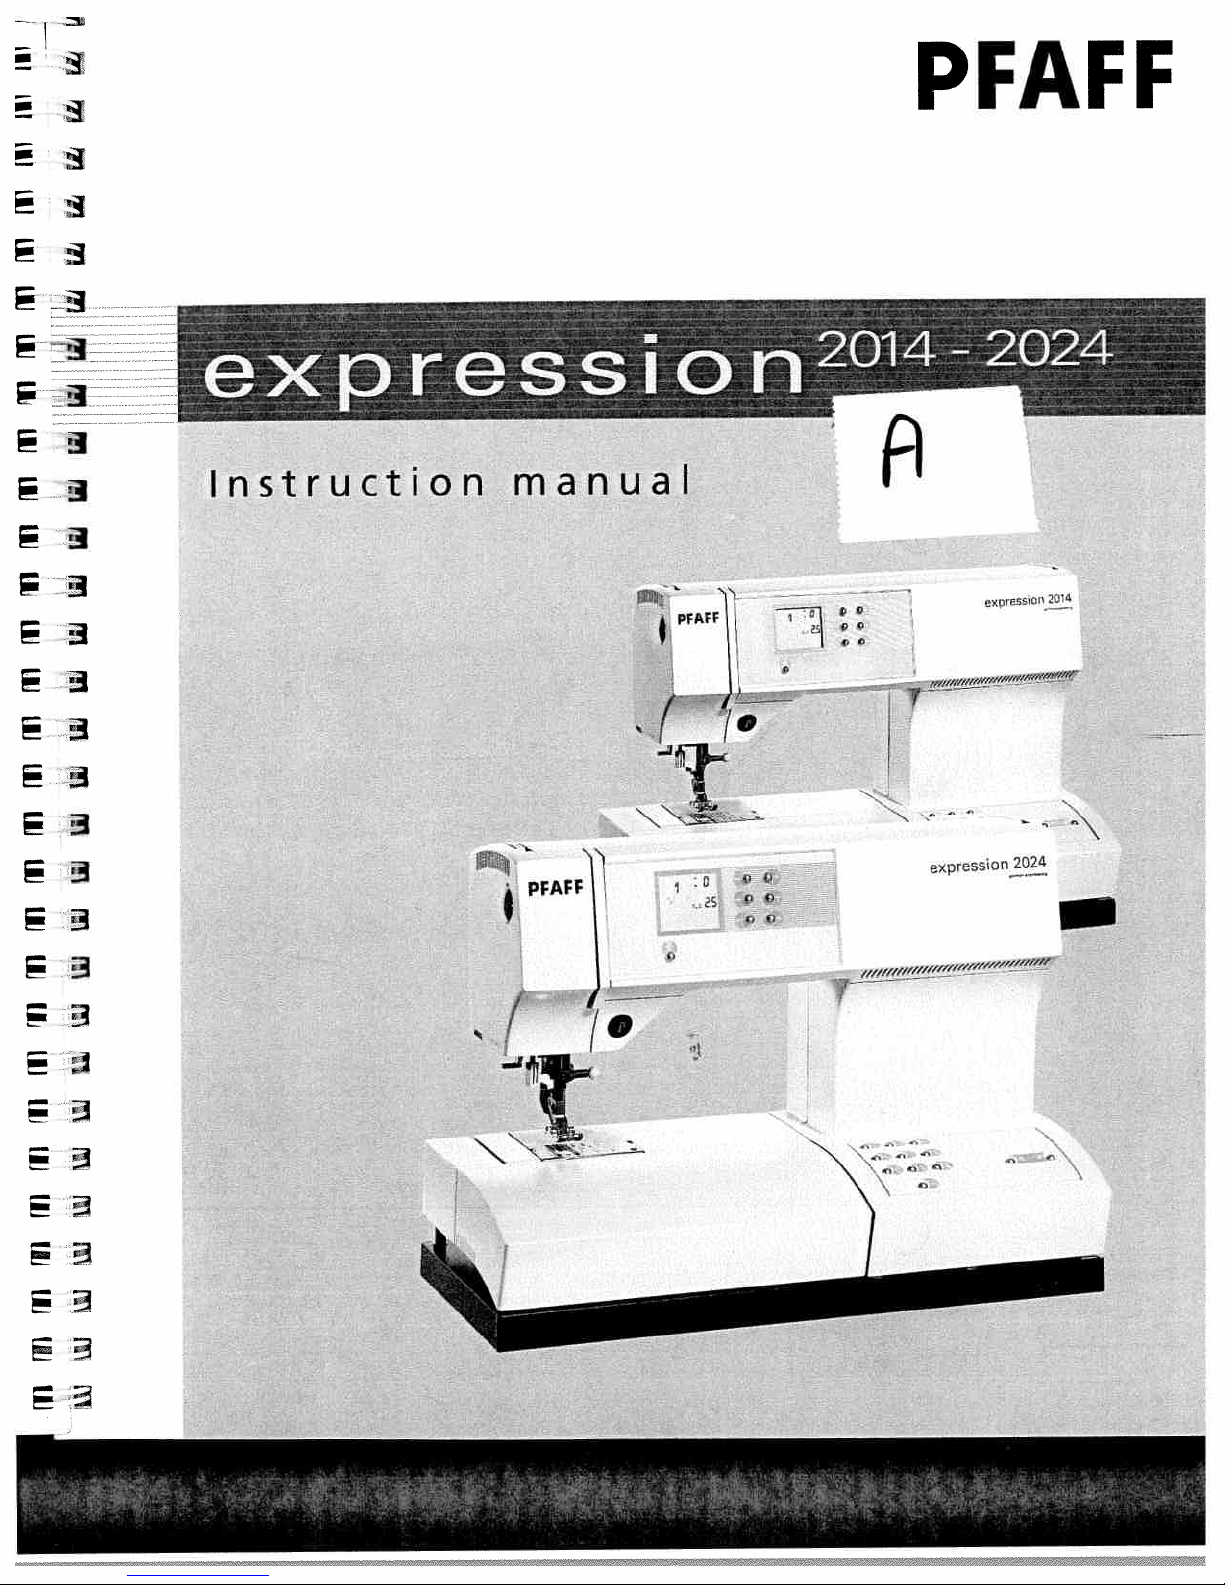
PFAFF
expresscn2
J’
-1
0
r3
NN
f/f/7W/6
expression
2024
PFAFF
V
-
111117
/fff/ffffff//ff/1?fFf//
Page 2
Notes
on
accordance
must exercise
The
user
1
2
3.
4
5
6
7
8.
9.
10.
11,
t2
13
Environment
The
Ambent
Air
Storage
The
operated
it
is
dawpmte
The
Treatment
Always
Cieanmg
Nousesg
moIstened
Ptease
Do
observe
When
disconnect
maximum
The
tension
The
machineisto
The
not
Do
not
Do
•
there
function
ite
•
•itis
wef,
not
Do
liability
No
intended
it
is
avoid
To
repair
original
Only
machine
The
According
caused
-ecommended
temperature
humidity
temperature
machine
ar
amne
machine
protect
and
with
note!
not
mse
the
sewing
leaving
the
of
any
place
the
use
visible
is
is
e.g.
the
pull
will
or
risk
the
is
solely
This
PFAFF
is
the laws
to
should
20%to80%
suppressed
a
direct
the
for
supervised
direct
sunlight
is
to
be
the
machine
display;
plantic
insecticides
any
safety
with
adequate
urea
whi e
the
machine
trom
machine
permissuble
belt may
the
drive
into
be
put
in
obfects
machine
sewing
damage
disturbed
condensation
with
mains
plug
out
be
accepted
if
isoprated
it
of
electric
the
responstbility
parts
may
for
designed
concernirg
mains
power
the
environment
40
Fl
to
(50
j
13F’to
25
C
and
vicinityofelectronic
useinthe home
fic
at
usedonfirm
against
To
clean
the
cleanser
with
chem’cxi
or
woking
dr
ng
the
mains
wattage
onlybeadjusted
Oneration
openings
it
that
of
the
for
arty
incorrectly
hock
be used
mans
a
linebechanged
is
C 1104
insensitive
fricity,
ele
and
damage
ftung
maximum
domestic
for
60335-2-28
EN
caution
with
maintenance
pulling
by
for
the
sewing
according
the
on
maybe
by
socket
caused
damage
open
do
not
of
our
qualitied
upply
electromagnetic
Fj
60C-140
to
interference
devices
tf
should
heat-producing
surface
even
which
dry,
a
use
38
products
regardtothe
work
out
tamp
by
to
machine.
caused
its
cord
the
machtfle
wifh
mains
cowpatibfhty
or
Fj
This
sewing
be
which
could
clean,
alcohol
such
as
up
or
when
mains
the
is
man.
PFAFF
a
the
indications
introducing
by
it
tht
machine
The
servtce
rated
should
chanses
according
macfin
opem
ed
ot9ects,
pen
caused
be
tnt-ire
soft
petrolor‘q,rid
sewing
and
changing
plug.
watts.
5
mechanic,
i
are
staff
voltage
lability
no
international
to
in
osive
cor
ventilation
for
it
by
and/or
down
mechanical
on
the
cold
a
us
d
no
of
be
made
high
i
a
uha
chemicals
being
cloth,
chemicals
movement
specification
machine
for
arty
parts
inside
*1-
tO%
be
can
to
conventions,
quality
way
that
purposes.
hit
dropped,
or
remove
To
to
machines
IEC
needle
of
the
parts
or
accessories,
plate
info
warm
a
other
purpos
machine
the
rated
and
a
accepted
for
it
however,
electronic
it
is
not
ubf
or
liquids
an
ubbom
clean
the
hous
335-2-28
constantly
und
room.
than that
which
the
ncy
of
freq,i
arty
mains
should
it
mecfranicat
clef
to:
dust,
Ce
iff,
ng
in
always
for
which
user
*1-4%
inter’uptiono
not
appliance;
severe
cloth
soft
a
can
be
Page 3

Modern,
uncomplicated
push-button
Sewing
by
control
Congratulations!
product
quality
Your
in
for
It
technology,
uncomplicated
It
the
operation
If
instruction
this
machine
If
problem!
service
So
enjoyable
new
stride
its
you.
features
applies
2014.
you
is
you
now
now
the
have
with
sewing
and
the
both
Should
we
take
book,
only
can
any
Your
you
hours
and
do,
any
can
PFAF
I
that
will
very
this
as
to
have
time
way
further
PFAFF
have
You
offers
machine
sew
latest
instruction
your
2024
the
there
pointed
enough
nothing
to
and
help
started!
get
of
creating
unique
can
through
in
PFAFF
be
can
learn
make
to
questions,
dealer
or
advice
purchased
take
thick
design
book
sewing
model
difference
any
that
out
study
to
wrong.
go
all
the
full
will
be
you
wish
We
fashion
your
high
a
advantages.
material
any
and
and
just
is
machine.
and
to
separately.
the
After
things
them.
use
of
is
no
that
your
at
need.
you
ideas.
thin
as
in
all,
the
many
Page 4
Introduction
Index
A
Accessories
Applique
Applique
B
Balance
Basting
binder
Bias
Blind
Bobbin
Bobbin
Bobbin
Bobbin
Bobbin
Braiding
Bridging
Buttonhole,
Buttonholes
Buttonholes
Buttonhole
Buttons,
C
Carrying
Circular
Cleaning
Combined
Combined
Cording
Cross
Cross-stitch
of
designs
toot
hem
case
thread
thread,
winding
winding
foot
sewing
case
embroidery
toot
hem
headings
tension
drawing
through
fully-automatic
gimp
with
tips
on
and
oiling
borders
borders
stitch
guide
with
up
the
thread
twin
needle
needle
45-49,
10
10
53
17
95
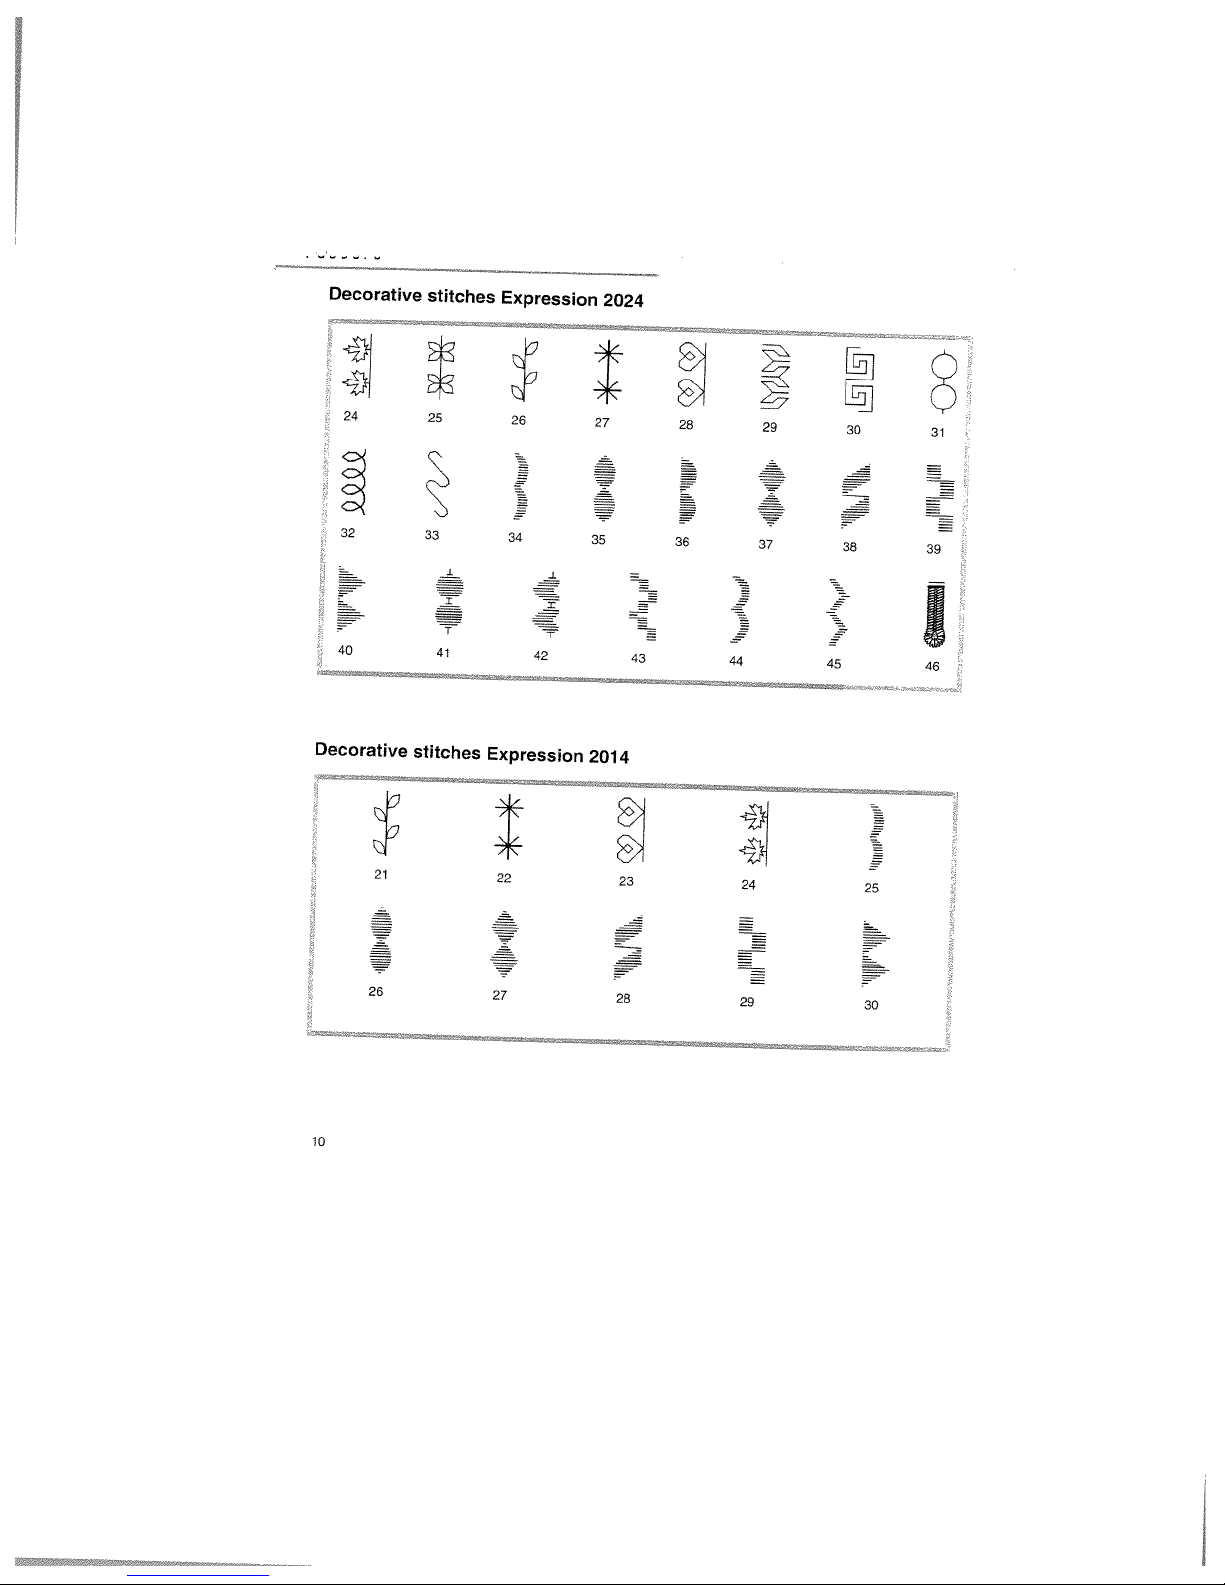
Espression
Decorative
Decorative
66-67
18,
E
Elastic
70
Electrical
Eyelet
stitches,
stitches,
stitches
utility
connection
embroidery
Espression
2024
2014
F
32
70
17
87
75
79
72
52.
54
96
31
30.
45
73
16
99
38
22
19-21
58-64
23
23
26
28
53
59
62
63
50
16
78
98
85
85
72
53
g
Feed
dog,
foot
Felling
control,
Foot
motion
Free
Free
motion
foot
Fringe
G
Gathering
H
Hemming,
Hemstitching
I
IDT
(Integrated
Invisible
K
edge
Knit
L
stitch
with
Lid
bulb,
Light
button
‘Lock
lowering
rolled
hems,
toot
changing
connecting
embroidery
quilting
Dual
blind
program
toot
Feed(
stitch
(2024(
chart
0
sewingonpatches
Darning,
Decorative
sewing,
4
general
notes
47,48,51
M
switch
Master
Monograms. Free
motion
17
86
Page 5
Introduction
N
edge
Narrow
plate,
Needw
table
Neede
tnreader,
Needle
changing
Needle,
threading
Needle,
Needle’bobbin
Non-elasticelastic
fancy
Non-stick
0
St
Overlock
tches
p
ntuck
sewing
sewing
of
the
and
lengthpattern
for
length/stitch
settings,
sizes
width
foot
foot
teat (special
teat
foot
foot,
decorative
with
(standard
lifter
Partsofthe
Parts
Patchwork
Pattern
cr’anging
Pattern
Patternmrroring
Pattern
Pattern
Pattern
Pintuck
P
Presser
Presser
Presser
Presser
foot
changing
Integrated
thread
stitch
quilting
altering
altering
stitch
guide
changing
tensior
stitches
toot
machine
machine
width,
stitches
density
length.
accessories)
accessories)
for
altering
esther
(2024)
(2014)
S
their
and
selecting
on
lion,
pos
buttotthole
dual
on
patchwork
solutions
altering
zigzag
notes
feed) (2024)
2024
2014
toot
problems
Sewing
79
ng
programs,
Sew
98
Shell
81
80,
25
29
24
23.
24
22,
43-49
76
49
12,
13
14, 15
92-93
84
36
38
34-37
34
35.
36
71
76
68.
69
66,
67
26
27
edging
toot
Shirring
patterns,
Stitch
Stitch
width/needle
T
witri
Tapering
Technical
Thread cutter
tension, general
Thread
Threading
Tips
for
a
(integrated
teed
Top
Twin
needle
needle,
Twin
U
stitches,
Utility
Utility
stitches,
V
Voltage
switch
z
sewing
Zippers,
4
inch
qu
1
hole
toot
7/9
data
perfect
t
format
satin-stitch
threading
Express
Expression
in
and
100-101
24,
30.
34
55
72
40
35
88
102
26
22
25
63
31
39
29
6, 7
89
17
43
74
77
R
Removable
Repairing
Reverse
Roll
hemming
Rufter
accessory
tears
sewing
tray
19
48
37
54
73
5
Page 6
Introduction
Utility
1
Stitch
No.
2
3
4
5
6
7
8
stitches
‘
2
Description
Straight
Stretch
Zigzag
Center
Elastic
Blind
Elastic
Closvd
Bridging
Expression
>
3
stitch
straight
triple
stitch,
needle
position
stitch
hem
stitch
hem stitch
blind
ovvrlock
stitch
_>
-->
stitch
2024
0
zippers.
seams
on
quilting.
I
I
I
11
10
Width
upto
mm
—
or
6
6
6
6
6
6
<
e
<
-1
5
4
7
6
Application
and
available
topstitching.
stitch
tears,
fabrics.
seams
seams
for
and
hems
hems
and
decorative
topstitching
for
edgestitching
such
on
seam
patches.
invisibly
Invisibly
overcasting
With
fabrics,
finishes,
hemstitching
stitch
seaming
For
positions
reinforced
For
decorative
finishing
For
inserting lace.
and
Strong
darning
For
securing
securing
For
stretch
For joining
bridging,
For
8
as
13
on
and
stretch
to6mm.
up
trousers,
needle
applique,
sewing
woven
finishing
II
or
fabrics
and
9
sewing
under
positions.
elastic.
fabrics
the
crazy
13
needle
in
arm
edge
one operation.
in
blouses,
or
four-hole
pieces
quilt
shirts and
protects
buttons.
together.
with
handlook
a
stitch.
for
Linen
9
buttonhole
Button
program
Basting
Quilt
attaching
stitch
stitch
0
10
11
Buttonhole
For
two-hole
For
basting
topstitching
For
project
linen.
6
6
Page 7
!ntroductjor
Utility
stitches
Expression
2024
-
E
E
Stitch
No.
12
13
14
15
16
17
16
Description
Zigzag
Right/Left
Stem
Stitch,
Decorat
Ope’r
overlock
Honeycomb
Stretch
zigzag
Cross
hem
stitch
triple
stitch
Application
For
applique
couching
over
cords
creafing
cloth.
for
in
hems
decorat
fiower
as
on
bulky
stretch
ornamental
elastic
the
bobbin.
and
ye
and
fabrics
application
nean’i
need
e position
narrow
elastic
stitch
ye
stitch
stitch
stitch
For
decorafive
undert
For
Joining
such
For
joini’g
Elastic.
strefcti
sewing
Elastic
Provides
sportswear
ng
n
as
leathers
oecotative
fabric,
with
stitch
a
sewing
letters.
overlapped
overcastng
and
for
elastic
for
decoratlee
highly
casna
and
such
and
terry
stitch
decorative
thread
elastic
wear.
seams
stems
and
fabrics
in
one
hem
finishing
topstrc-fvng.
for
hems
eyelets.
and
operaton
on
on
Width
uplo
mm
6
6
6
6
3
6
19
Quilting.
apphque
or
p
nstitching
20
Cross
stitch
21
Closed
overlock
stitch
with
selvage
thread
22
Hem
Hem
stitching
stitching
23
For
Classic
and
For
n
edges
For
with
handook
kitchen
smog
one
operation
from
ornamental
wing
decorative
towe
and
fraying.
needle.
quilt
overcasting
The
bern
aopliqueorpinstitching.
stitch
for
garments.
n.
stretch
thread
Can
and
be
selvage
tching.
at
linen
easilti
prevents
used
fraying
the
fabric
6
6
fabrics
6
7
Page 8
III
r,,Js_4I.AI_,LIIJI
LI
Utility
I
>
Stitch
No.
I
2
3
4
5
6
7
8
stitches
II
4>
Description
Straight
Stretch
Zigzag
Center
Elastic
Blind
hem
Elastic
Closed
Bridging
Expression
stitch
triple
straight
stitch,
needle
position
sfitch
stitch
blind
hem
overlook
stitch
stitch
stitch
atitch
>
2014
Application
For
positions
For
decorative
For
and
Strong
darning
For
For
stretch
For
For
<;
<
seaming
reinforced
finishing
inserting
stitch
tears,
securing
securing
fabrics
joining
bridging,
and
available
seams
topstitching,
seams
lace.
for
and
hems
hems
and
overcasting
decorative
4
topstitching
for
sacs
on
seam
patches.
invisibly
invisibly
up
edgeatitching
as
trousers,
With
13
fabrics,
finishes,
on
and
stretch
hemslitchirrg
toG
needle
applique.
sewing
woven
finishing
fabrics
mm.
or
fabrics
and
sewing
elastic,
13
under
positions.
the
in
one
crazy
needle
edge
in
zippers.
arm
operation.
quilting.
seams
on
8
Width
upto
mm
—
or
—
6
B
6
6
6
6
B
Linen
buttonhole
0
Button
attaching
program
S
Buttonhole
For
twohole
for
blouses.
or
four-hole
shirts
buttons.
and
linen.
6
Page 9
Utility
11
Stitch
No.
10
11
12
13
14
15
16
stitches
Description
Basting
Qilt
Zigzag
Right/Left
Stem
Decorative
Open
Honeycomb
Expression
stitch
sttch
stitch
needle
stitch,
narrow
elastic
overlock
stitch
stitch
positron
stitch
2014
Application
For
For
For
For
underlining
For
such
For
Elastic,
stretch
sewing
basting
topstitching
applique
decorative
joining
leathers
as
joining
decorative
fabric
with
project
quilt
couching
sewing
letters
overlapped
and
and
overcasting
for
decorative
elastic
stitch
thread
pieces
projects
such
seams
terry
over
cloth.
stretch
for
In
together.
with
cords
as
f
ower
on
bulky
ornamental
elastic
the
bobbin.
handlook
a
and
creating
stems
fabrics
fabrics
hem
application
in
IS
stitch.
eyelets
and
one
ooeration.
finishing
and
iniroauciioi
Width
upto
mm
6
3
6
6
on
6
17
Stretch
triple
zigzag
stitch
18
Hem
stitch
ng
19
Qulting,
app
plnntifching
tch
sf
que
or
20
Cross
Elastic
For
with
For
Classic
and
stitch
ornamental
wing
handlook
decorative
kitchen
needle.
towels.
for
quilt
decorative
hem
stitching
applique
stitch
hems
Can
orpnstitching.
for
garments
and
be
topstitching.
used
linen
6
6
6
S
9
Page 10
CD
L
-‘
o
CD
C)
Cfl
ni
-I
CD
0
t.3
0
C..)
)(
______
______
‘
IjIflhI
1
Q_QQQ.
U
Hijj(i
)IlI
I
iII
‘I
hHh
ih
s4,
r
in’’h
Ii’
‘h
—•
Ill
Q9
Q9
‘lUlll’
lW’
‘Ill
C.)
1
I)
jIj.
jI
“hiiil’l’’i”
-
(>Q
(.)
lilA
flfl{I
C.)
El
c)
CD
o
°
<
CD
o
CD
m
-‘
CD
U,
(0
C...)
0
‘U,
cx
0
)f(
-L
r
)f(
-‘
ArIIII
uBllt
‘I
h
I’’IJIH
‘‘1111’
jill!
‘lilPIl
‘‘lIil1l
0
Page 11
E
Technical
section
Parts
of
Parts
of
Carrying
Lid
with
Electrical
Voltage
Accessories
Removable
Bobbin
winding
Bobbin
case
Needle/bobbin
Threading
Integrated
Drawing
Presser
foot
Thread
cutter
Changing
Winding
the
Changing
Threading
Integrated
Lowering
a
needle
the
sewing
the
sewing
case
stitch
connection
switch
accessory
the
needle
up
the
lifter
the
presser
bobbin
needles
twin
Dual
feed
dog
chart
thread
needle
threader
bobbin
through
needle
Feed/IDT
machine
machine
tray
tension
thread
thread
feet
(2024)
(2024)
(2014)
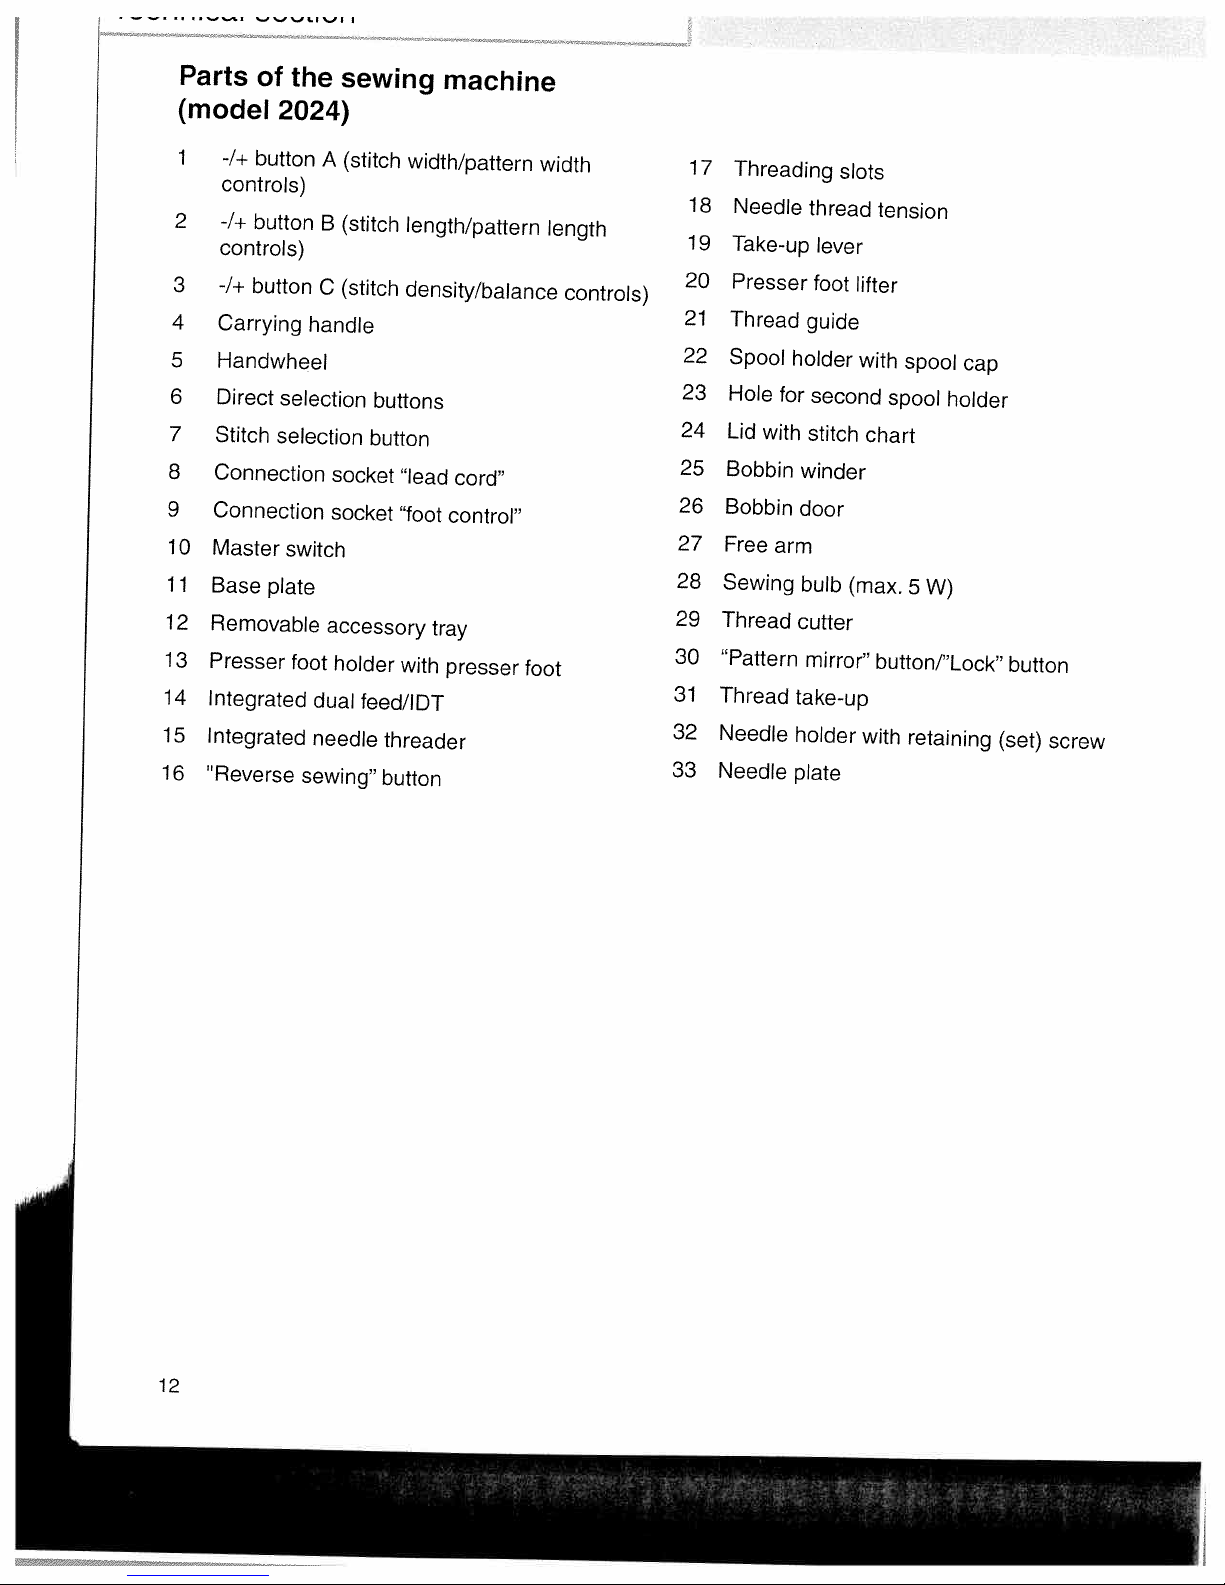
12-13
14-15
16
16
17
17
18
19
19-21
22-23
22-24
24
25
26
26
26
27
28
29
29
30-31
32
j
Page 12
—
—.
—
‘—..
%_,
‘_
%J
%J
SI
I
I
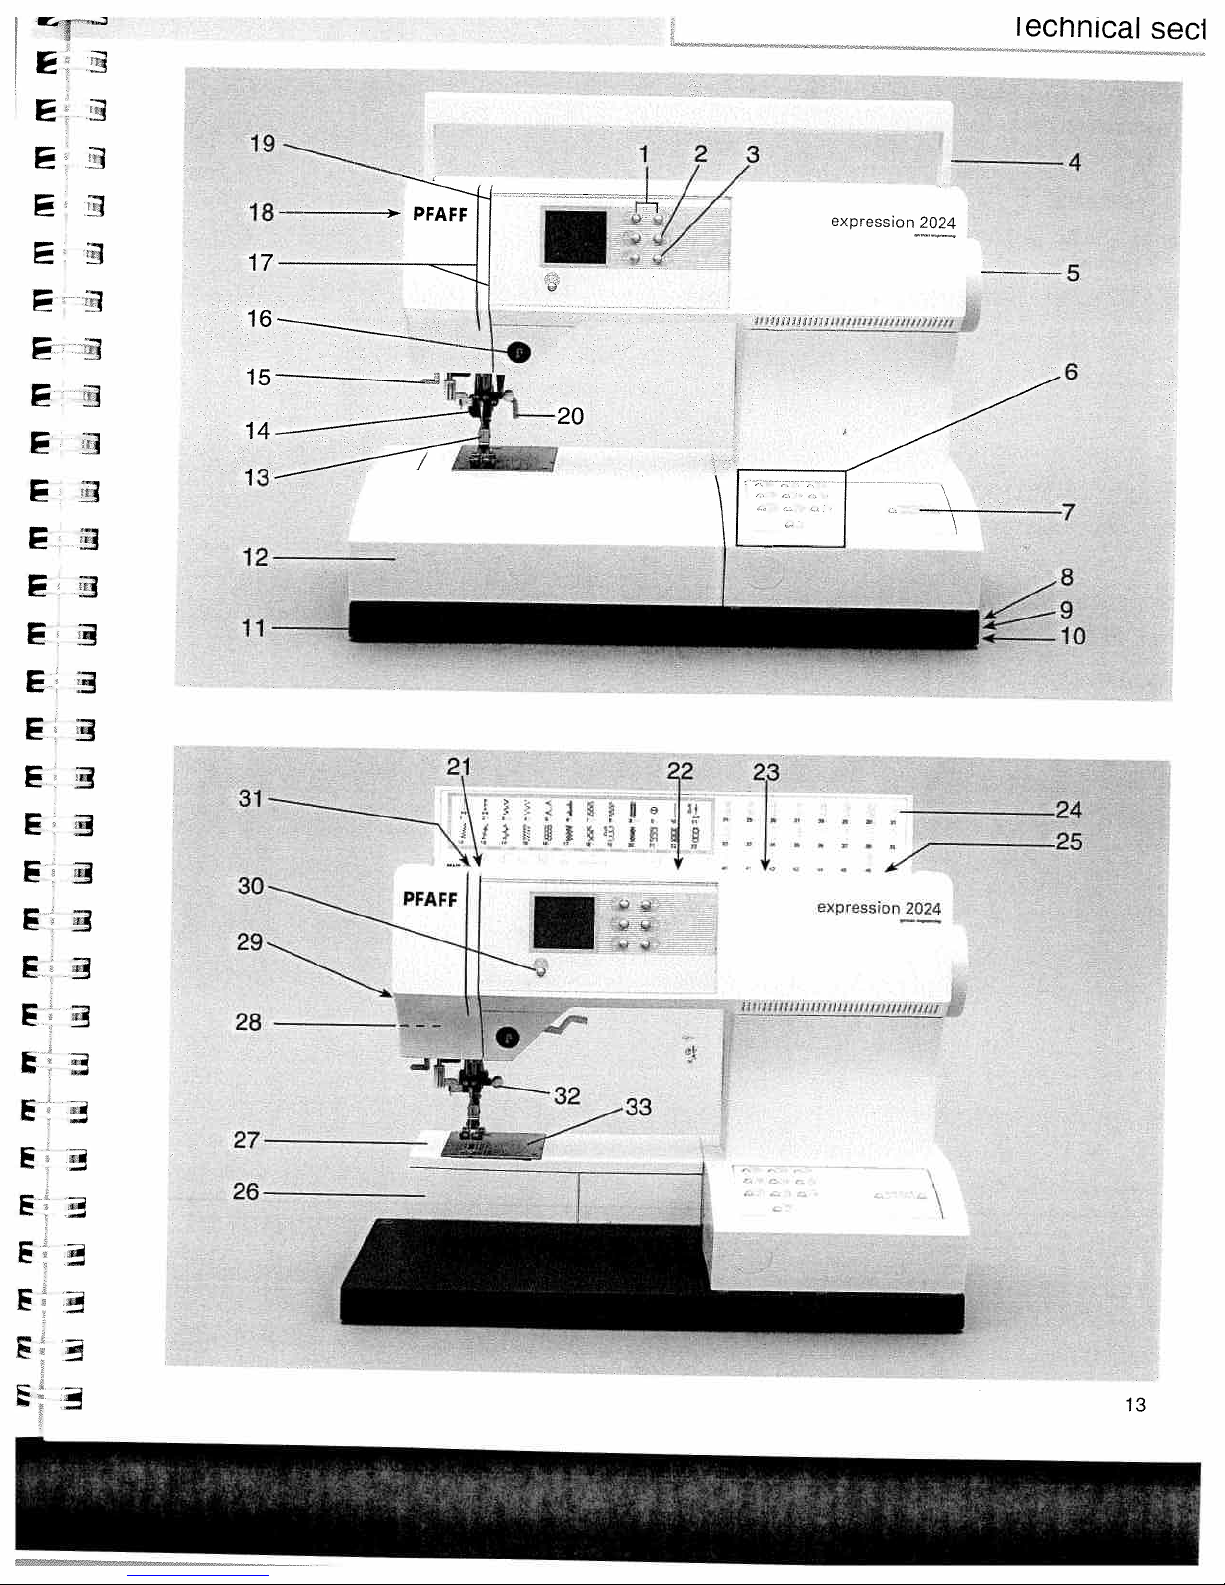
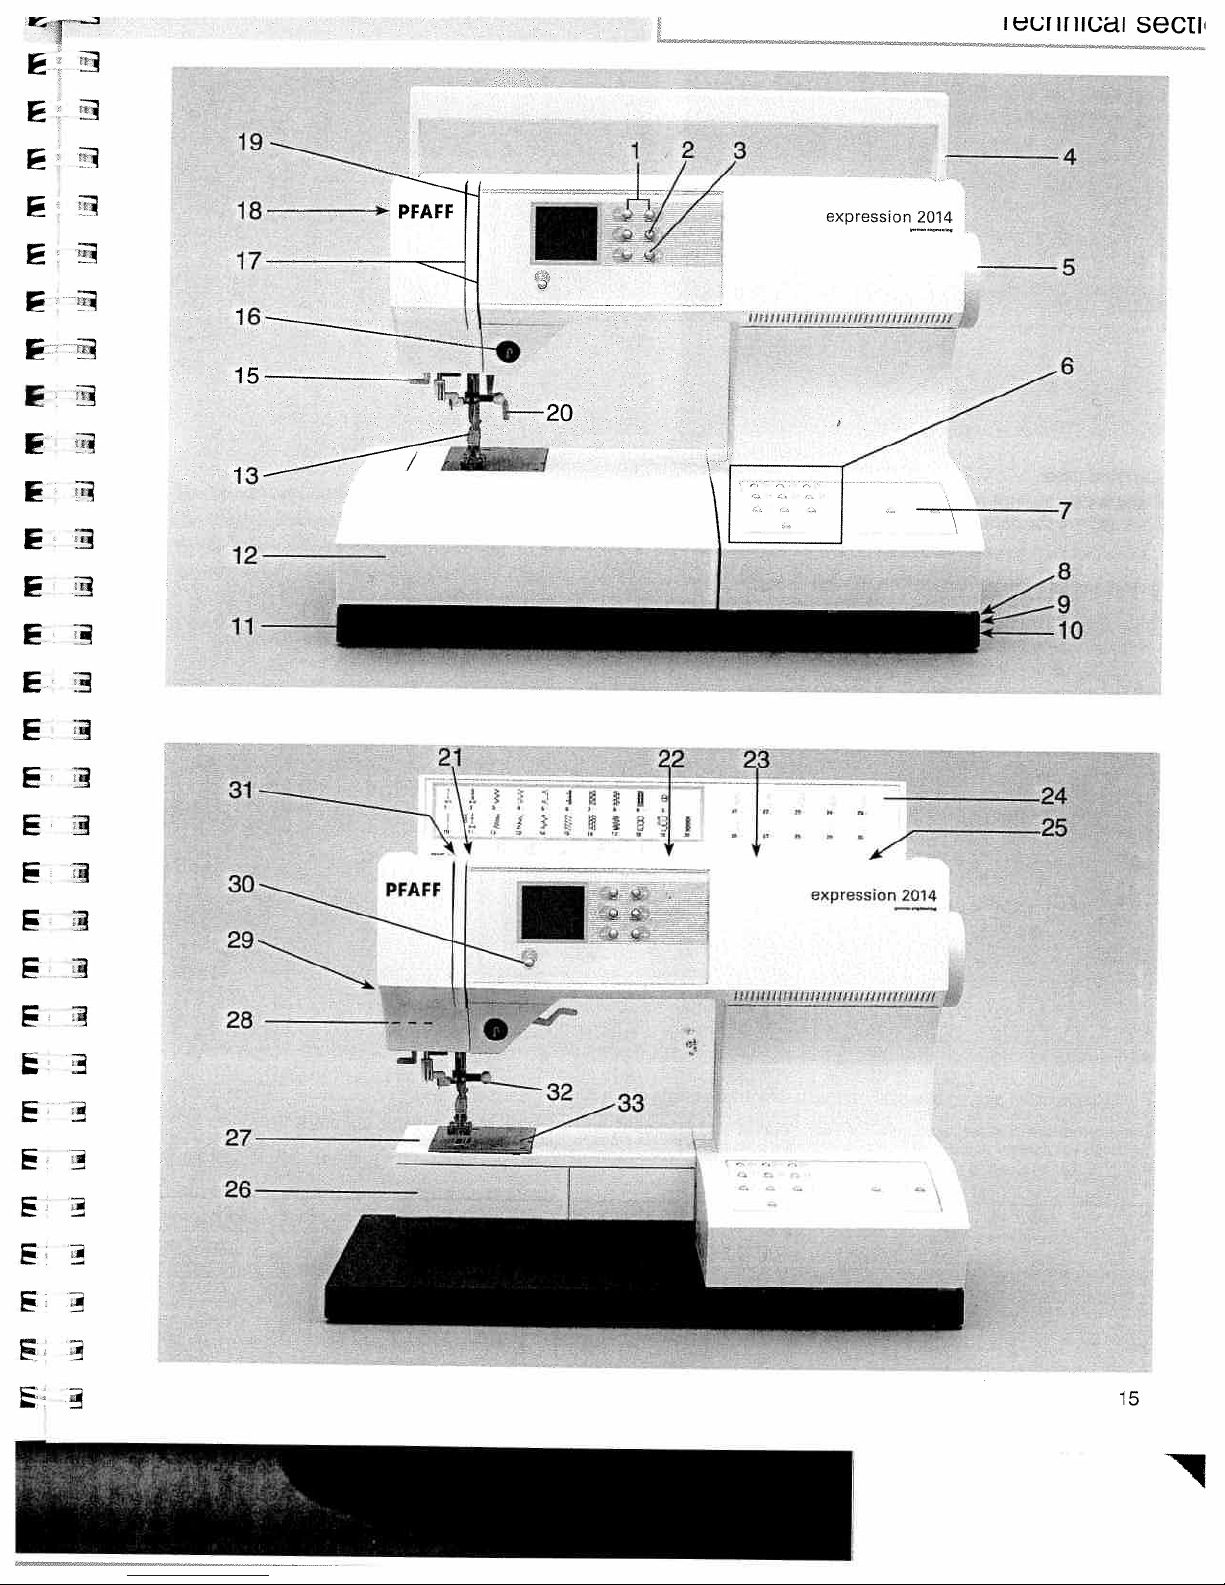
Parts
(model
1
2
3
4
5
6
7
8
9
10
11
12
13
14
15
16
of
2024)
-1+
button
controls)
-1+
button
controls)
-1+
button
Carrying
Handwheel
Direct
Stitch
Connection
Connection
Master
Base
Removable
Presser
Integrated
Integrated
Reverse
selection
selection
switch
plate
the
A
B
C
handle
socket
socket
accessory
foot
holder
dual
needle
sewing”
sewing
(stitch
(stitch
(stitch
buttons
button
“lead
“foot
with
feed/IDT
threader
button
machine
width/pattern
length/pattern
density/balance
cord”
control”
tray
presser
foot
width
length
controls)
27
28
29
30
31
32
33
17
18
19
20
21
22
23
24
25
26
Threading
Needle
Take-up
Presser
Thread
Spool
Hole
Lid
with
Bobbin
Bobbin
Free
arm
Sewing
Thread
“Pattern
Thread
Needle
Needle
thread
foot
guide
holder
for
second
stitch
winder
door
bulb
cutter
mirror”
take-up
holder
plate
slots
lever
tension
lifter
with
spool
spool
chart
(max.
5
W)
buttonl’Lock”
with
retaining
cap
holder
button
(set)
screw
12
Page 13
(0
-
0)
..L
-4
.k
0)
C)
x
CD
CCC
0
-U
01
•
•
()
o
C)
r’.z
co
01
4
0)
cx
-
C
1)
1’.)
C)
IL
CD
x
CD
CCC
C
-o
L
F’.)
cx
-
r\)
0)
(D
Page 14

i
ii
ii_,ci.i
oL..Li’.Ji
I
Parts
(model
1
-1+
controls)
2
-1+
controls)
3
-1+
4
Carrying
5
Handwheel
Direct
6
7
Stitch
Connection
8
9
Connection
10
Master
11
Base
12
Removable
13
Presser
15
Integrated
16
‘Reverse
of
the
2014)
button
button
button
selection
selection
switch
plate
A
B
C
handle
socket
socket
accessory
foot
holder
needle
sewing”
sewing
(stitch
(stitch
(stitch
buttons
button
“lead
“foot
with
threader
button
machine
width/pattern
length/pattern
density/balance
cord”
control”
tray
presser
width
length
foot
controls)
20
21
22
23
24
25
26
27
28
29
30
31
32
33
18
19
Needle
Take-up
Presser
Thread
Spool
Hole
Lid
with
Bobbin
Bobbin
Free
arm
Sewing
Thread
“Pattern
Thread
Needle
Needle
thread
guide
holder
for
second
stitch
winder
door
bulb
cutter
mirror”
take-up
holder
plate
lever
foot
tension
lifter
with
spool
spool
program
(max.
with
W)
5
button/”Lock”
retaining
cap
holder
chart
button
(set)
screw
17
Threading
slots
14
Page 15
Ct
-
(0
-
C’)
CD
C-)
I
IC
A.
0)
-
01
CA)
P0
f)
-L
0)
W
-ACC
CC
CLCU
I
P3
0)
•(
CD
x
C
CD
(13
CC
C
i4
01
L(Ø
0
C
P0P’)
(,1
0)
P0
r’)
1’)
J\)
C)
CD
0:’
—.1
C)
x
CD
CC
CD
CC
1,
0)
0)
I,
(31
44
Page 16
3CD
-TI
T1
C)
CD
-
CD
00
“Yvvv
-
ci
CD
-rj
8’
-
—
Ci
-o
CD
x
-
CD
C’)
C/)
1D
D
HH
CD
CD
—
a)
0
D
C)
(Q
:5
o
o
CD
CD
CD
—
0
-‘
CD
ci
g
S2.
0.
H
E
CD
0
0
(j)
0
0
CD
CD
(I)
(I,
CD
—
-D
o
p
Page 17

technical
..
sec
120
Operating
Electrical
Connect
machine
I
Instructions
connection
the
lead
and
the
cord
wall
between
outlet.
the
220
socket
V
(8)
Connecting
Connect
(9)
of
the
of
the
sewing
The
sewing
The
foot
machine.
the
sewing
speed
control
the
plug
foot
of
the
machine.
is
tvd
ATK
control
foot
controlled
0070
control
by
has
to
the
pressing
to
be
connection
the
used
for
foot
this
socket
control.
sewing
110V.120V
220
\4
Master
When
I)
in
The
“0
“I”
the
the
=
=
sewing
ON
switch
the
master
sewing
OFF
lamp
Expression
machine
switch
lights
window.
is
now
(10)
up
is
and
ready
switched
program
to
function.
on
No.
(switch
us
function
indicated
Voltage
220V..240V/110V...
The
220
you
machinetoll0V...
sewing
V..
240
must
switch
machine
V.
reset
If
you
the
120V
is
set
require
voltage
120V.
to
the
a
mains
switch
mains
voltage
on
the
voltage
of
underside
for
120
Europe
V,
of
the
17
Page 18
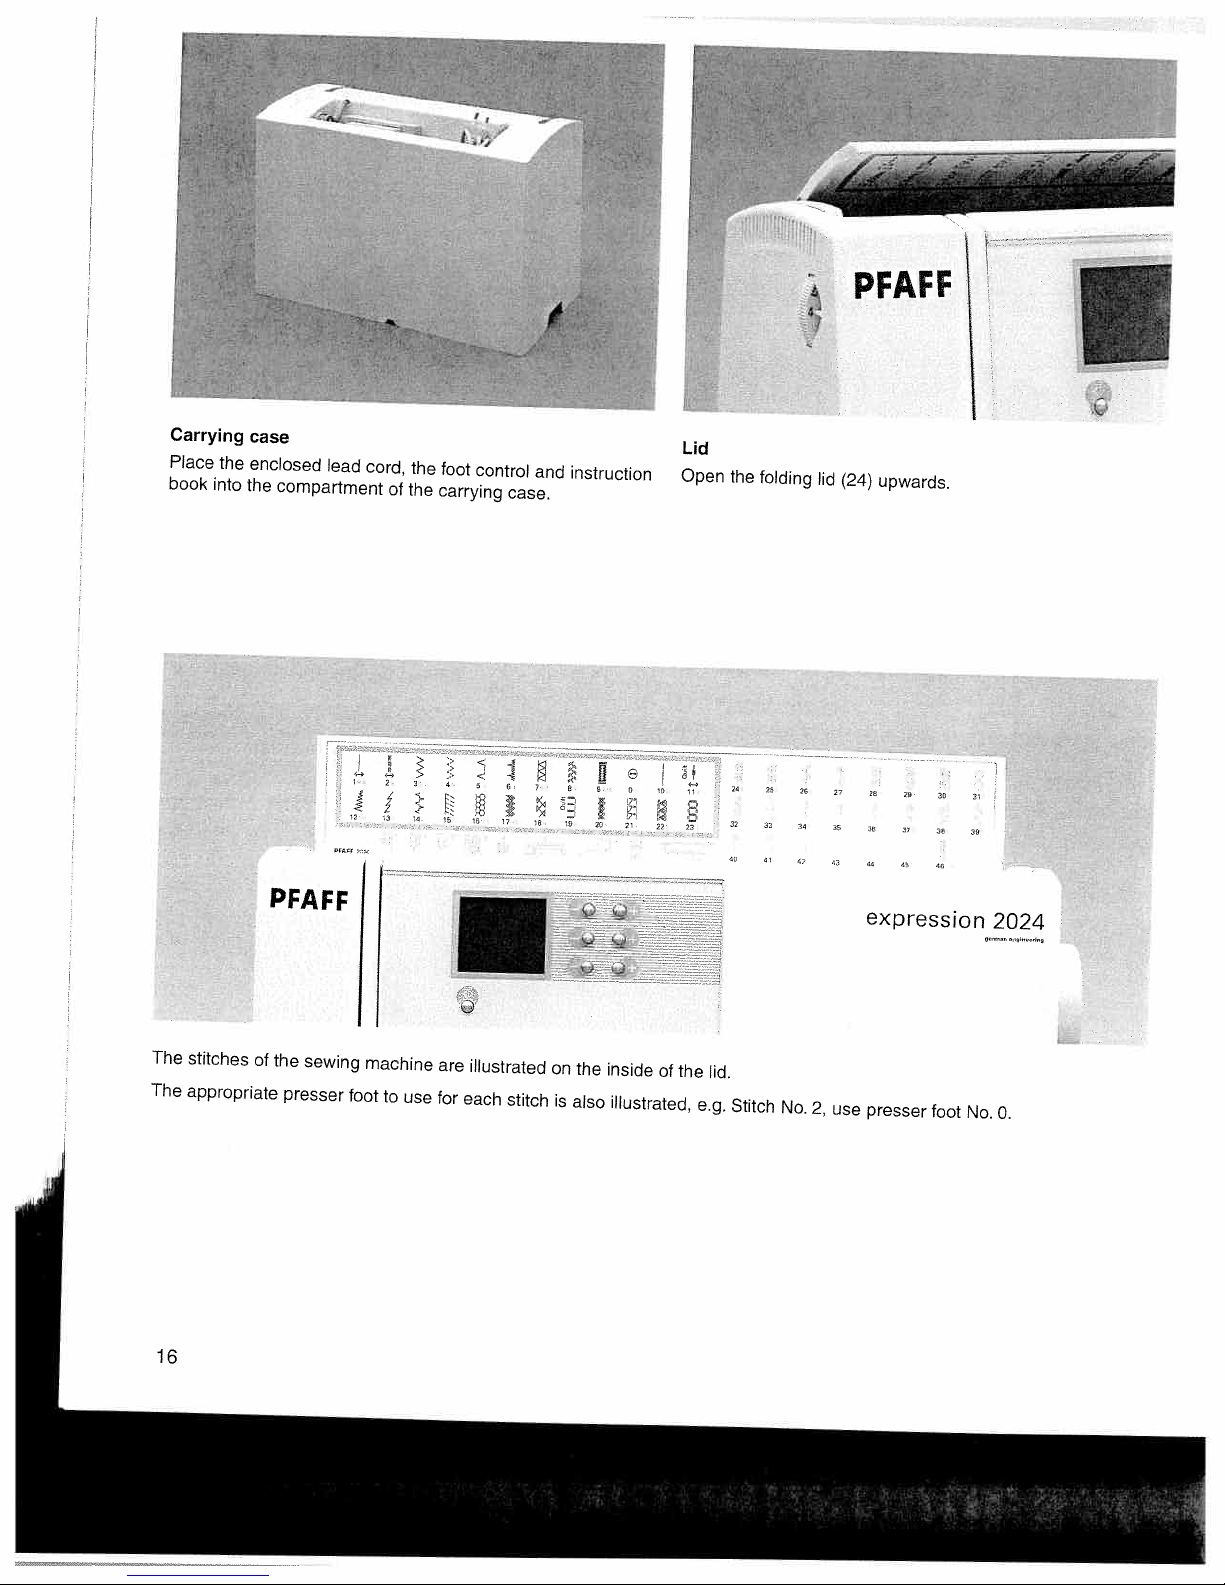
k,1_
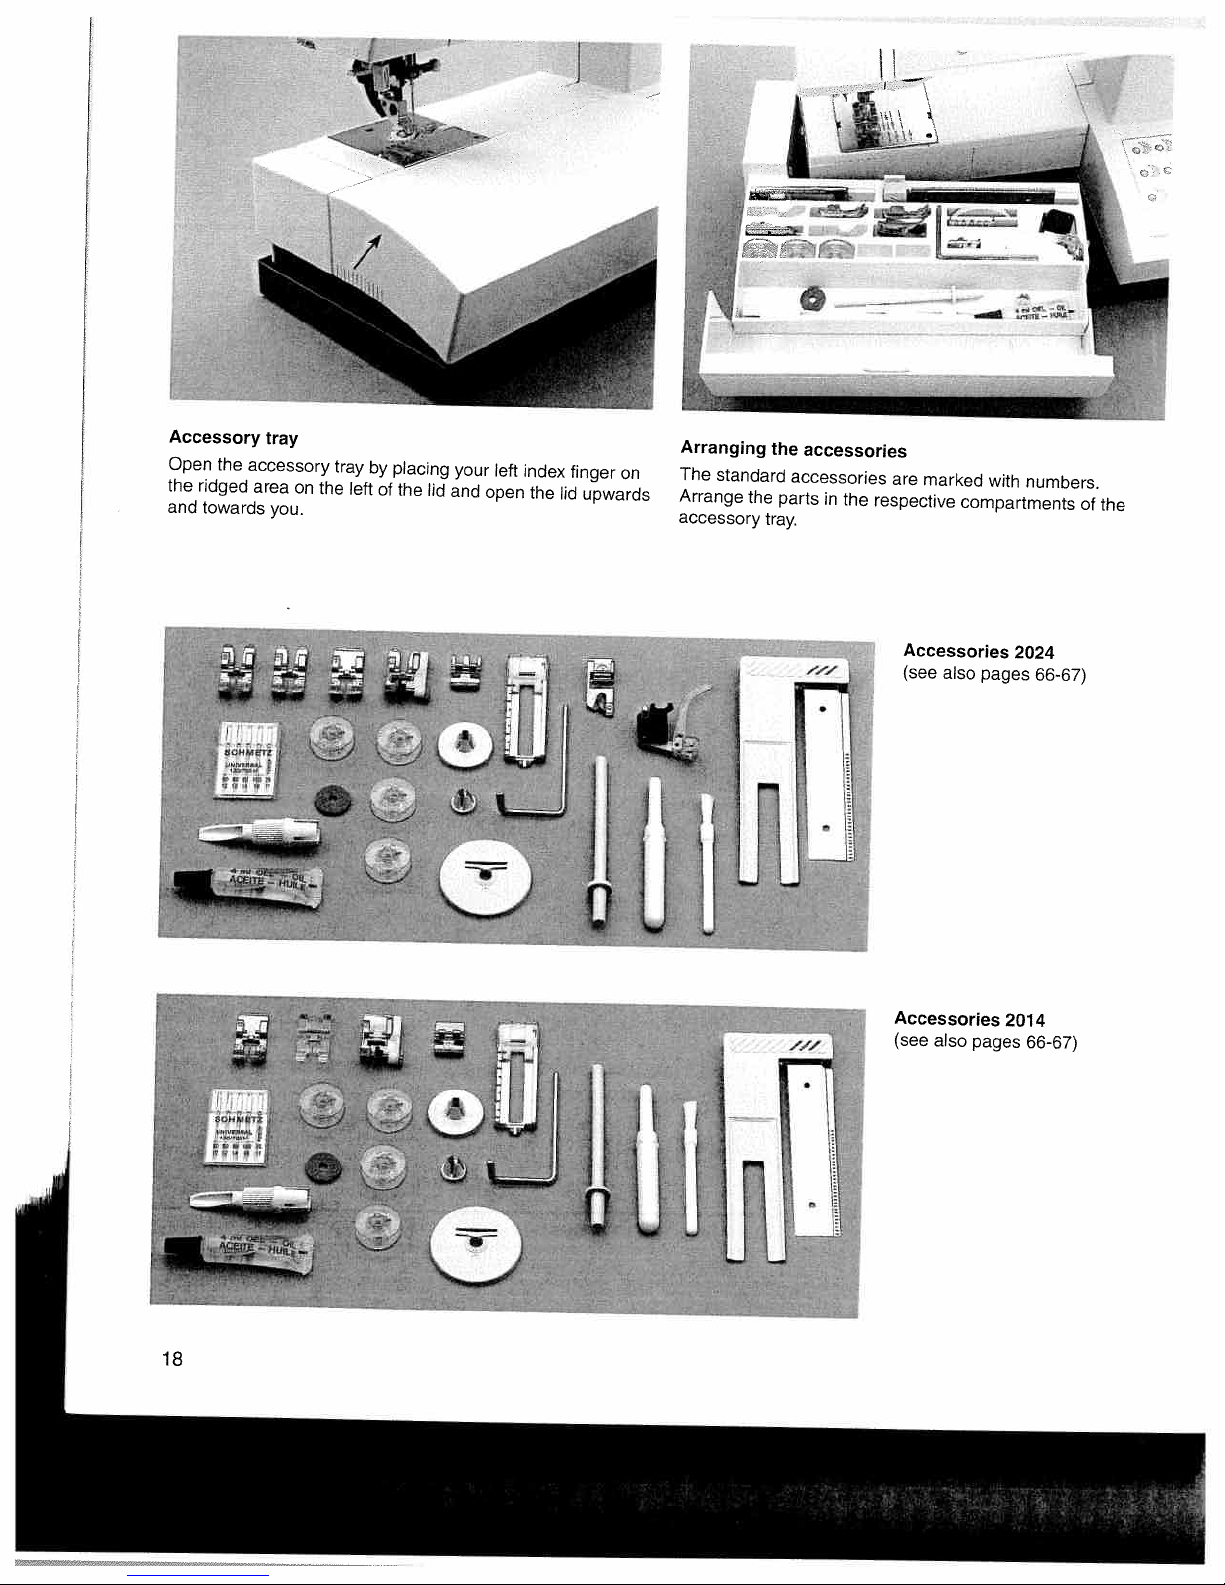
Accessory
Open
the
the
ridged
and
towards
tray
accessory
area
on
you.
the
tray
left
by
of
placing
the
lid
your
and
left
open
index
the
finger
lid
on
upwards
Arranging
The
standard
Arrange
accessory
the
tray.
the
accessories
accessories
parts
in
the
are
marked
respective
Accessories
(see
with
compartments
also
pages
numbers.
2024
66-67)
of
the
18
t1
Accessories
(see
also
pages
2014
66-67)
Page 19
Fl
1’
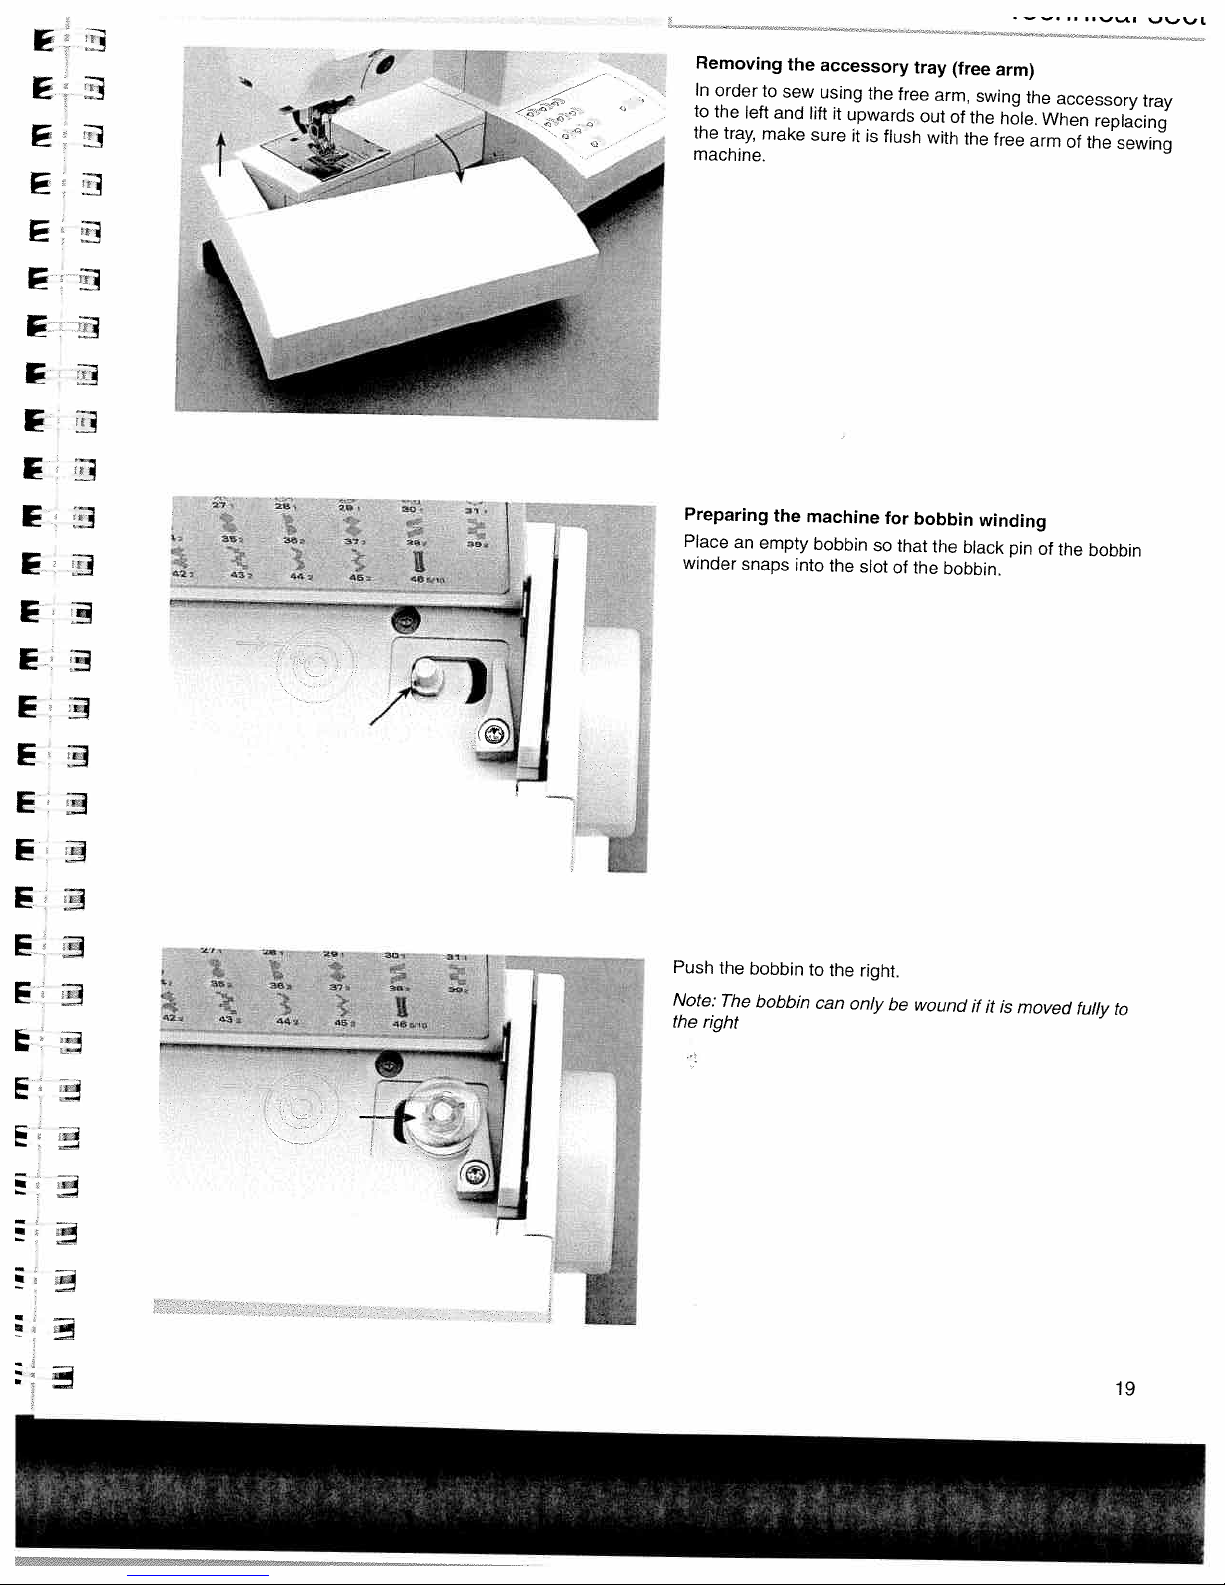
Removing
In
order
to
the
left
the
tray,
machine.
to
sew
and
make
the
accessory
using
lift
it
upwards
sure
it
the
is
free
flush
tray
out
arm,
with
(free
of
the
swing
the
arm)
hole.
free
-
the
When
arm
accessory
replacing
of
the
s—%i
%_J
tray
sewing
‘..,
%.,
L
7
)
4
422
‘2
3S
22
291
•
332
43,
364
432
442
29j
171
33
442
I
3•73
452
301
4
372
48,
11
344
4644
3,
382
392
46,2
391
Preparing
Place
winder
Push
Note:
the
right
the
The
an
snaps
bobbin
the
empty
bobbin
machine
bobbin
into
the
to
the
can
slot
right.
only
so
for
be
that
of
bobbin
the
the
bobbin.
wound
winding
black
if
it
pin
is
of
moved
the
bobbin
fully
to
I..
-1
19
Page 20
/
.
=
B
I
I
I
!
:
O
e)cprsssic,r)
2O2i
.
1
o.
A
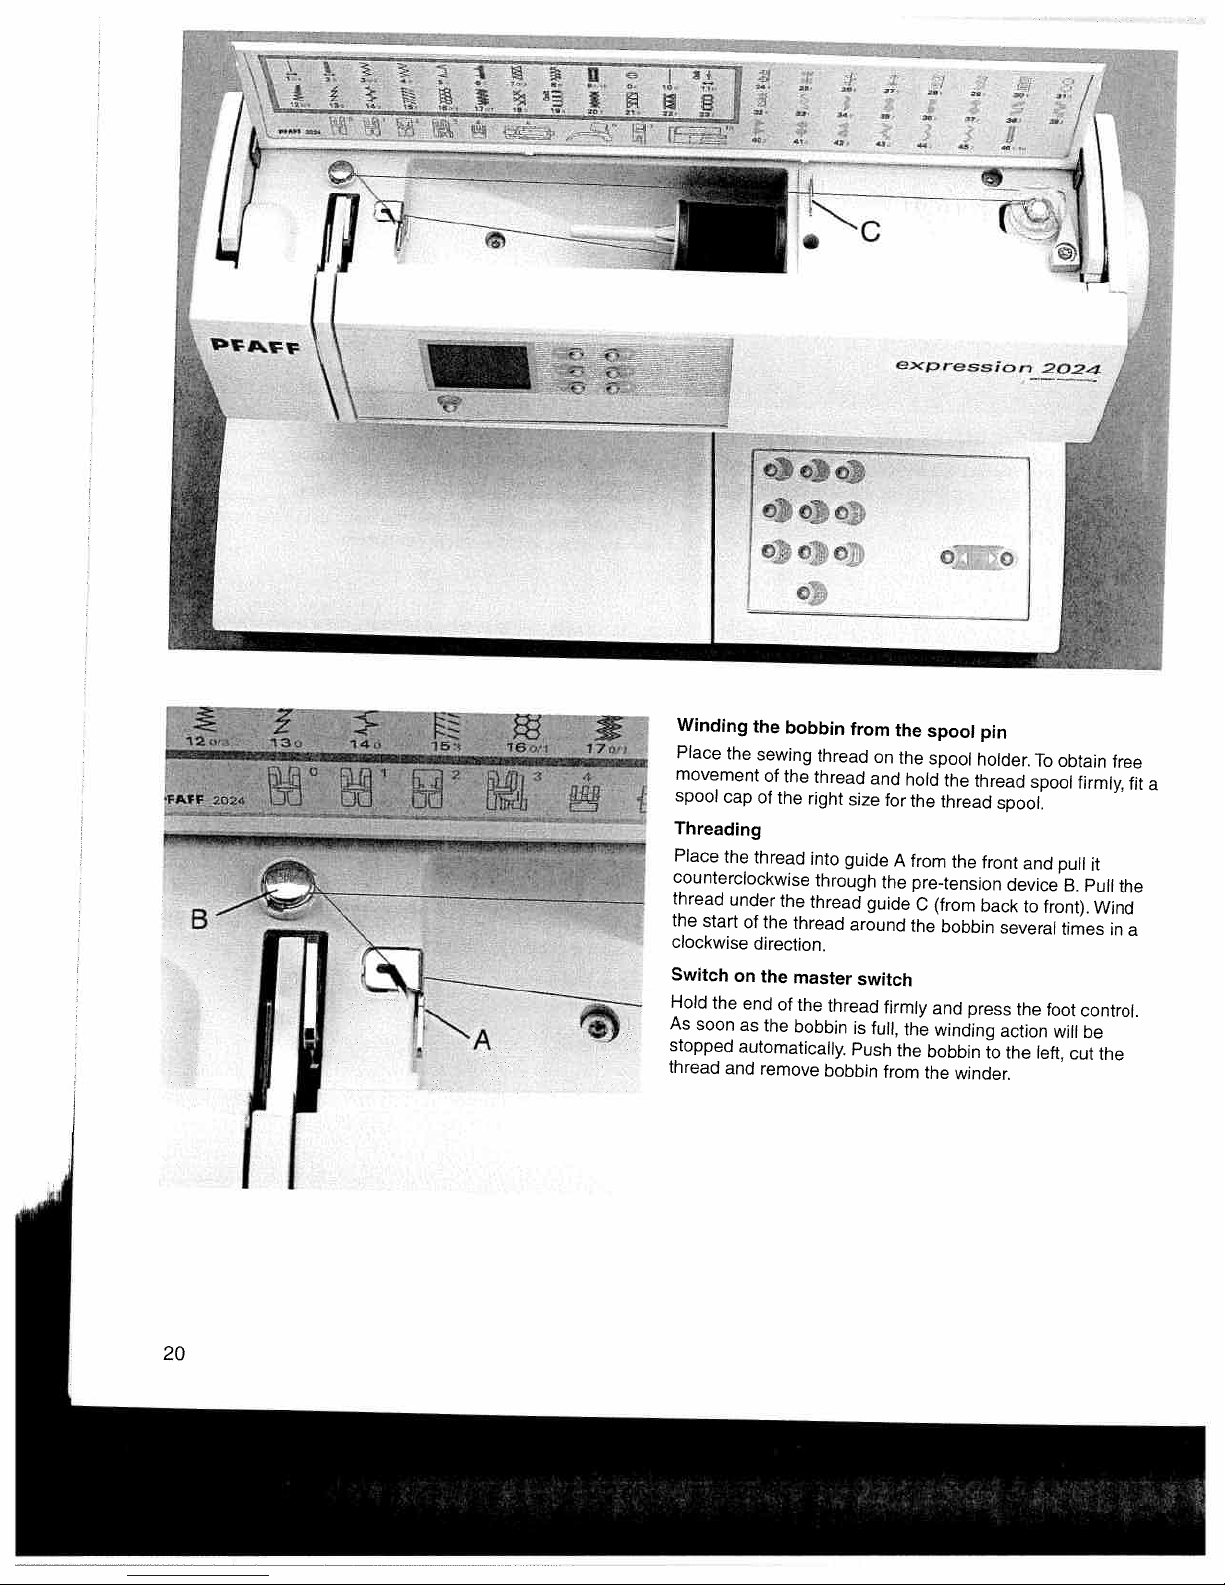
Winding
Place
movement
spool
Threading
Place
counterclockwise
thread
the
clockwise
Switch
Hold
As
stopped
thread
the
cap
the
under
start
on
the
soon
as
automatically.
and
the
bobbin
sewing
of
the
of
the
thread
the
of
the
direction.
the
end
of
the
remove
thread
thread
right
into
through
thread
thread
master
the
bobbin
bobbin
from
size
guide
around
thread
is
Push
on
and
for
the
guide
switch
firmly
full,
from
the
spool
the
spool
hold
the
thread
A
from
pre-tension
C
(from
the
bobbin
and
the
winding
the
bobbin
the
the
the
press
winder.
pin
holder.
thread
spool.
front
back
several
action
to
the
To
spool
and
device
to
the
left,
obtain
pull
B.
front).
times
foot
will
cut
free
firmly.
it
Pull
Wind
in
control.
be
the
the
fit
a
a
20
Page 21
Technical
sec
•
PcRcc
r
j
T’
T
TThflT1
L
=
—
T
—
--
IJL!J
I-
‘°
j••,
Z:
4
tj
ecp
-—
.;
occ
C
resjc),,
C
202.4
C
B
Winding
Insert
Threading
Thread
Switch
Hold
the
As
soon
stopped
left
and
from
the
the
second
as
shown
on
the
master
end
of
as
the
bobbin
automatically.
remove
bobbin
the
second
spool
on
thread
page
switch
is
Cut
from
spool
holder
20.
firmly
full,
the
the
in
the
thread,
winder.
holder
the
hole
and
press
winding
push
provided.
the
action
the
foot
will
bobbin
control.
be
to
the
21
Page 22

Bobbin
Switch
Hold
the
front
the
door
oft
bobbin
main
switch
door
(26)
Taking
Lift
at
the
left
side
and
open
it
towards
of
out
the
the
of
out
the
latch
machine.
the
bobbin
of
bobbin
the
bobbin
Release
case.
case
the
case
latch
and
and
pull
take
the
bobbin
the
empty
case
bobbin
out
DDDDDD
±u±LLa
EWELLLU
Thread
To
obtain
sure
adjusted
meet
The
Bobbin
The
tension
The
thread
Top
thread
The
needle
tension
The
thread
For
decorative
should
tension
a
the
needle
with
between
following
thread
needle
is
too
tension
is
too
tension
be
visible
perfect
regard
the
is
thread
loose.
is
visible
thread
tight.
stitches
and
two
valid
is
visible
tension
on
seam
bobbin
to
fabric
for
tension
must
on
must
and
the
appearance
thread
each
other,
layers.
general
on
the
is
too
be
corrected.
the
underside
is
too
be
corrected.
buttonholes
underside
tensions
i.e.
sewing:
top
side
tight
or
loose
the
of
and
the
the
or
the
fabric.
durability
are
threads
of
the
bobbin
of
the
the
bobbin
top
make
correctly
evenly
fabric:
thread
fabric:
thread
thread
22
Page 23
A
t
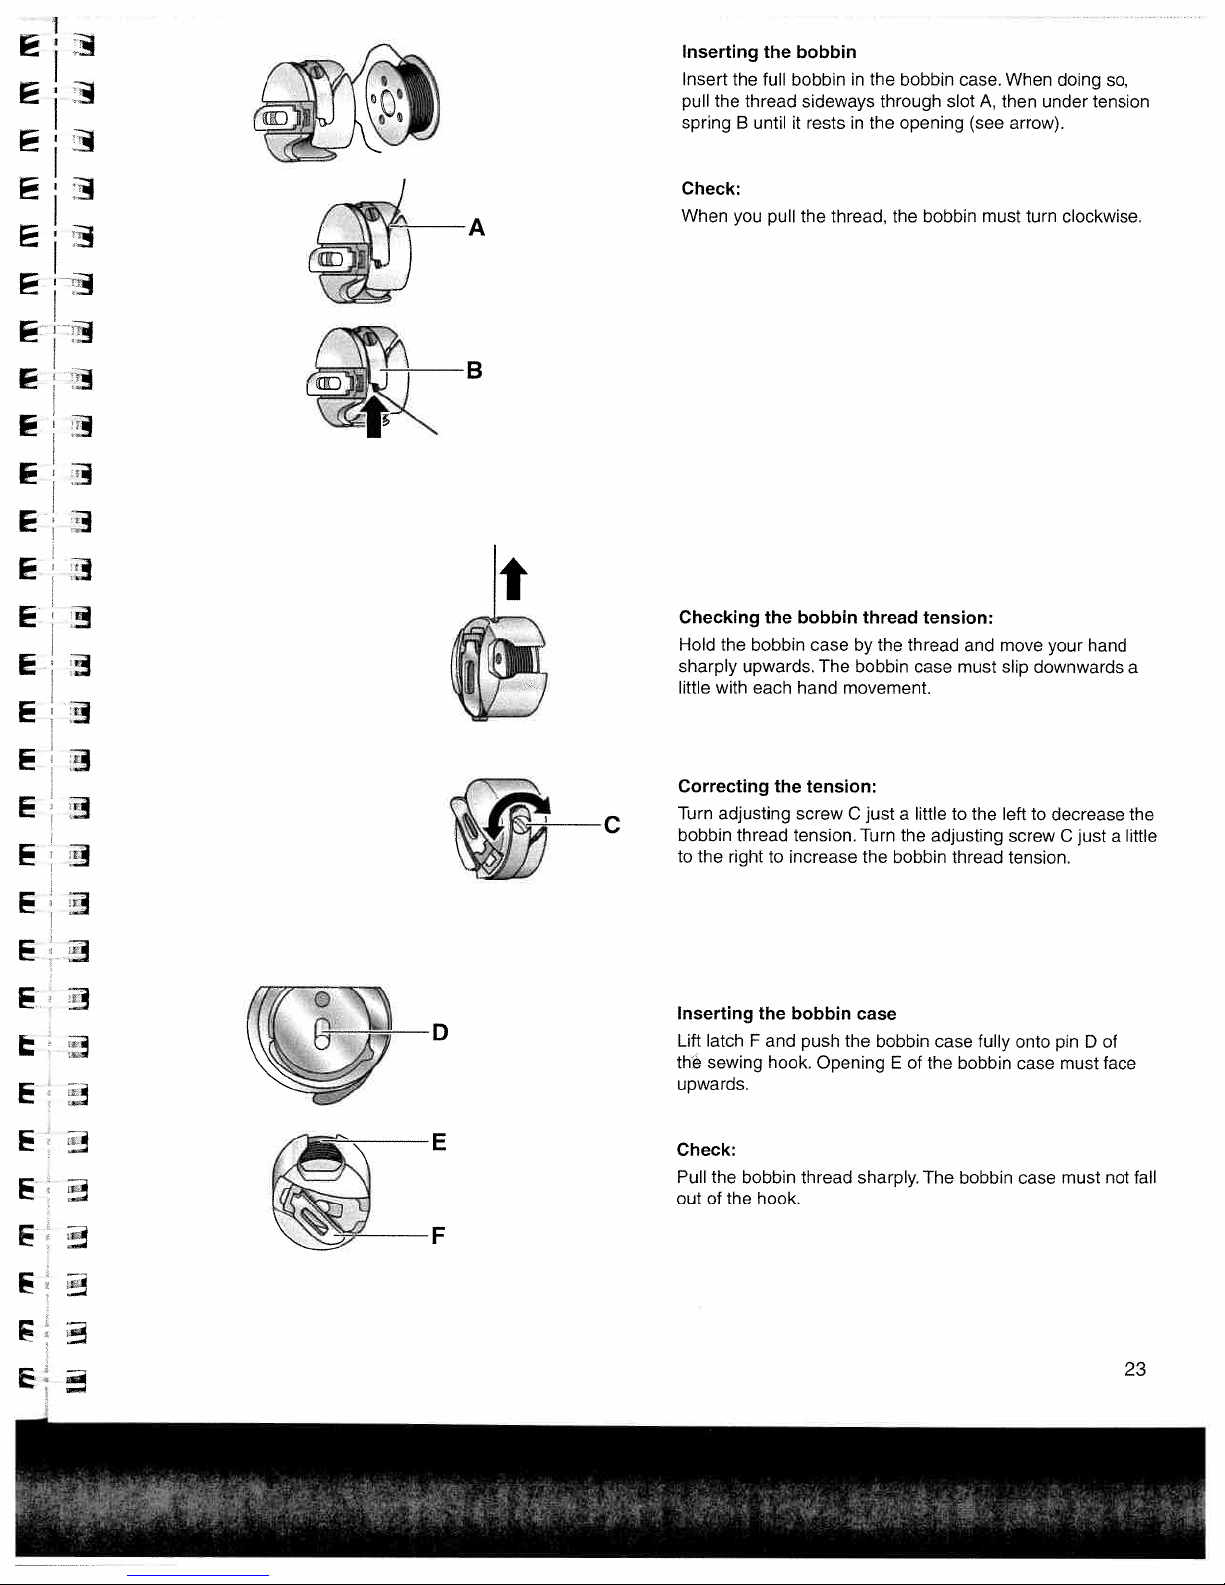
Inserting
Insert
pull
the
spring
Check:
When
Checking
Hold
the
sharply
little
with
the
the
full
thread
until
B
pull
you
the
bobbin
upwards.
each
bobbin
bobbininthe
sideways
the
in
it
rests
thread,
the
case
The
movement.
thread
by
bobbin
bobbin
hand
bobbin
through
opening
the
the
thread
case
case.
slot
bobbin
tension:
and
must
A,
(see
must
When
then
arrow).
turn
move
slip
downwards
doing
under
clockwise.
your
so,
tension
hand
a
Ei
to
the
F
and
hook.
hook.
the
screw
tension.
increase
bobbin
push
thread
tension:
the
Opening
just
C
Turn
the
case
bobbin
sharply.
a
littletothe
the
bobbin
of
the
E
The
adjusting
thread
fully
case
bobbin
bobbin
to
left
screw
tension.
onto
case
case
decrease
just
C
pin
D
must
must
a
of
face
not
the
little
fall
Correcting
Turn
C
E
adjusting
bobbin
the
to
Inserting
latch
Lift
sewing
the
upwards.
Check:
Pull
the
of
out
thread
right
bobbin
the
F
23
Page 24
4o116i
L
fl
1o
12
PFAFF
<-,
I
2024
Ill
Ill
Ill
4-
13o
Threading
tr’-
0
—-—
r
Switch
Raise
spool
Using
the
front.
tension
downwards.
threading
thread
Pass
Pull
the
guides
To
thread
off
the
holder
both
device
must
the
thread
D.
the
the
presser
hands,
Place
Pull
slot
be
thread
the
needle
master
foot
and
fit
the
8.
Now
the
and
upwards
pulled
downwards
from
needle,
switch
a
spool
pull
thread
thread
the
please
lifter
the
pass
into
side
(20).
cap
thread
from
it
around
to
the
in
behind
refer
Place
of
the
into
right
through
the
take-up
take-up
the
right-hand
to
the
to
one
the
the
right
thread
left
the
stop
lever
of
next
thread
size.
guide
into
left
threading
C
lever
from
threading
the
page.
in
two
the
the
(19).
left
on
A
pre
right
The
to
thread
the
from
slot
right.
slot.
PEAFF
4,
.
r
II
24
Page 25
I
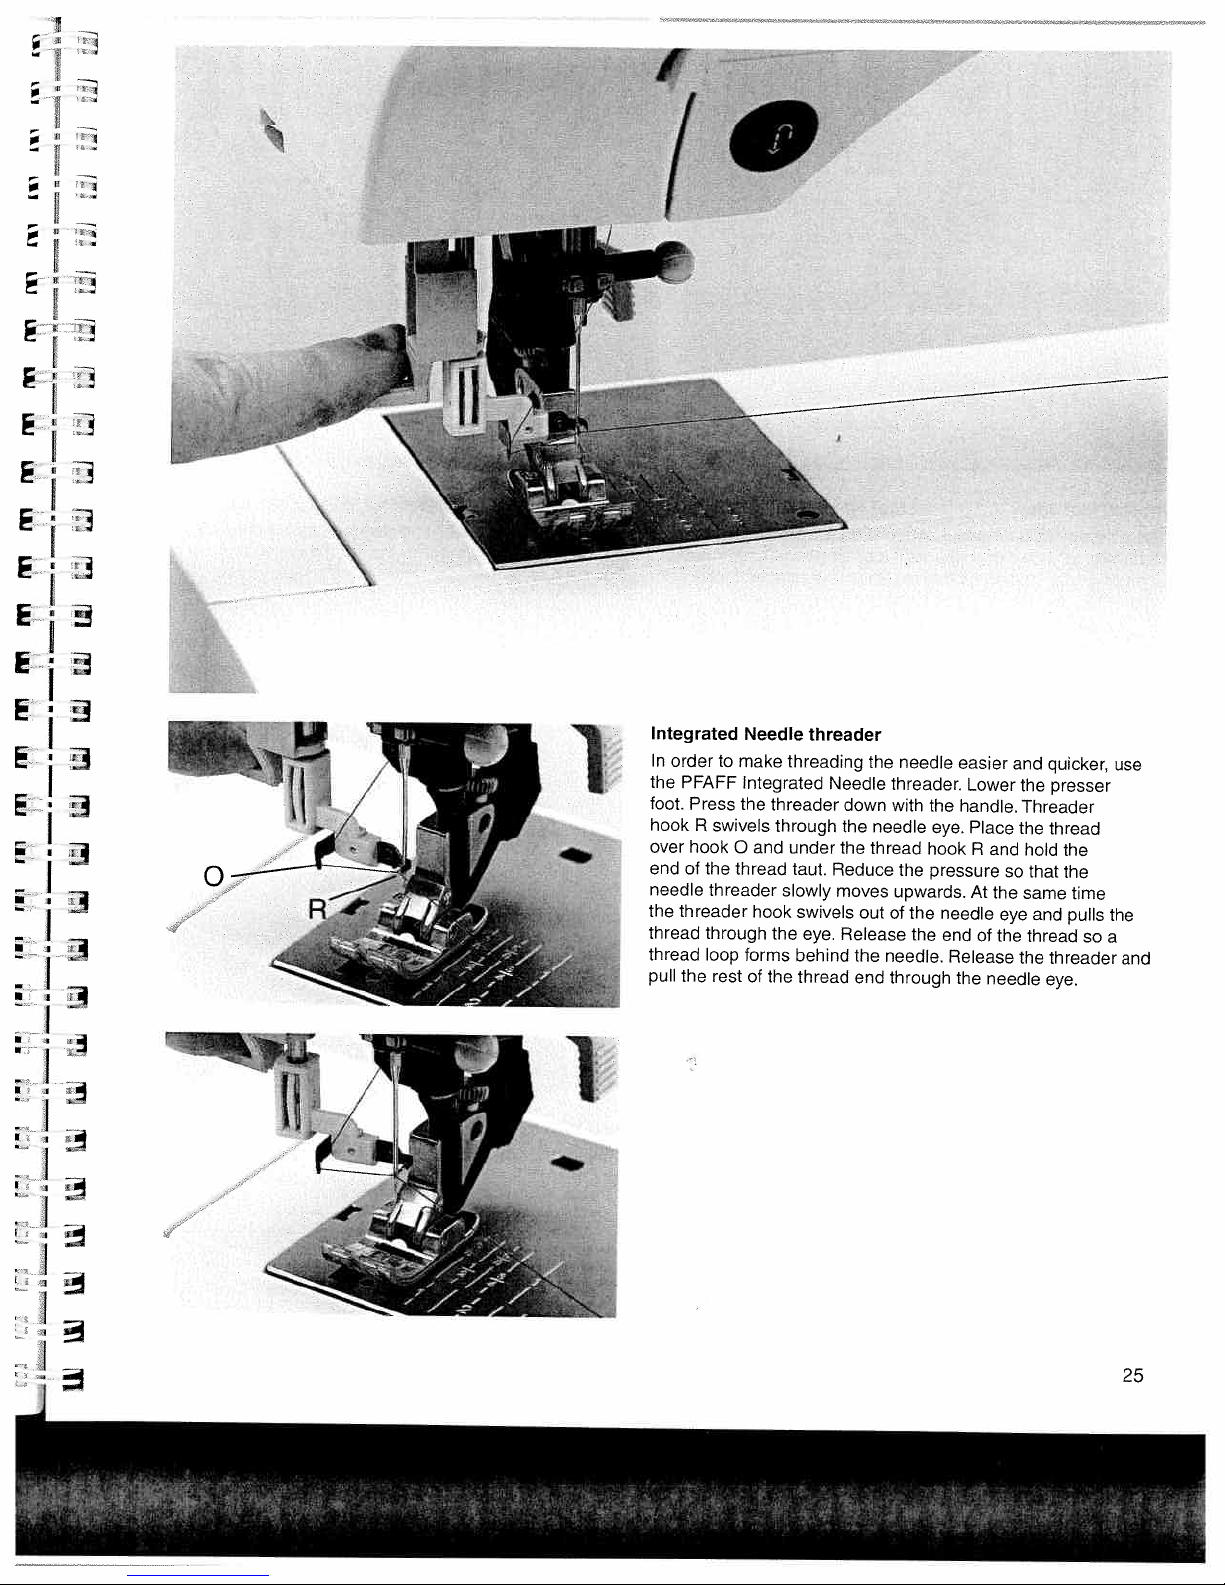
Integrated
In
order
PFAFF
the
foot.
Press
hook
R
over
hook
endofthe
needle
threader
the
thread
through
thread
loop
pull
the
Needle
make
to
Integrated
the
swivels
and
0
thread
threader
hook
forms
restofthe
threader
threading
threader
through
under
taut.
slowly
swivels
eye.
the
behind
thread
Needle
down
the
the
Reduce
moves
out
Release
the
end
the
threader.
with
needle
thread
upwards.
of
needle.
through
needle
the
hook
the
pressure
the
the
eye.
needle
end
Release
easier
Lower
handle.
Place
R
At
of
the
needle
and
so
the
eye
the
and
quicker,
the
presser
Threader
the
thread
hold
that
same
and
thread
threader
the
eye.
the
the
time
pulls
so
use
the
a
and
25
Page 26
)
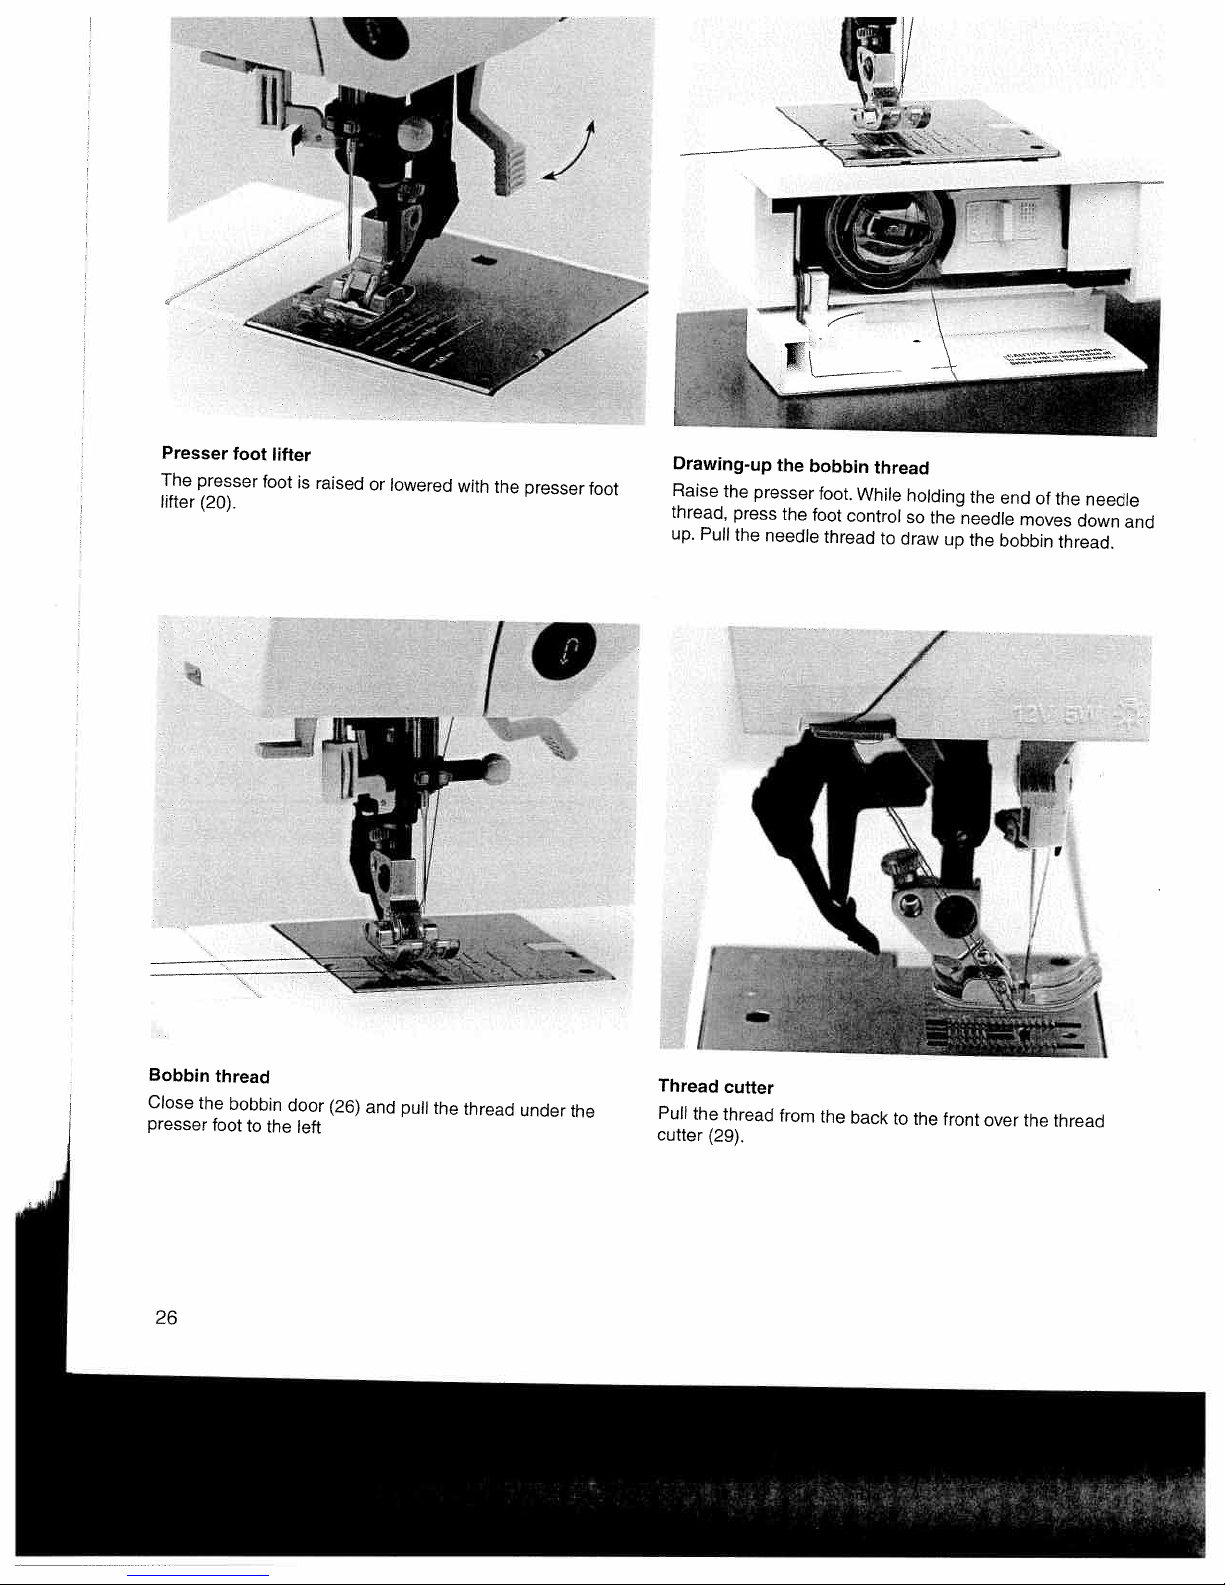
Presser
The
presser
lifter
(20).
foot
lifter
foot
is
raised
or
lowered
with
the
presser
foot
Drawing-up
Raise
the
thread,
up.
Pull
press
the
the
presser
the
needle
bobbin
foot.
foot
thread
thread
While
control
to
holding
so
the
draw
up
the
needle
the
end
moves
bobbin
of
the
needle
down
thread.
and
Bobbin
Close
presser
26
the
foot
thread
bobbin
door
(26)
and
to
the
left
pull
the
thread
under
the
Thread
Pull
cutter
the
cutter
thread
(29).
from
the
back
to
the
front
over
the
thread
Page 27
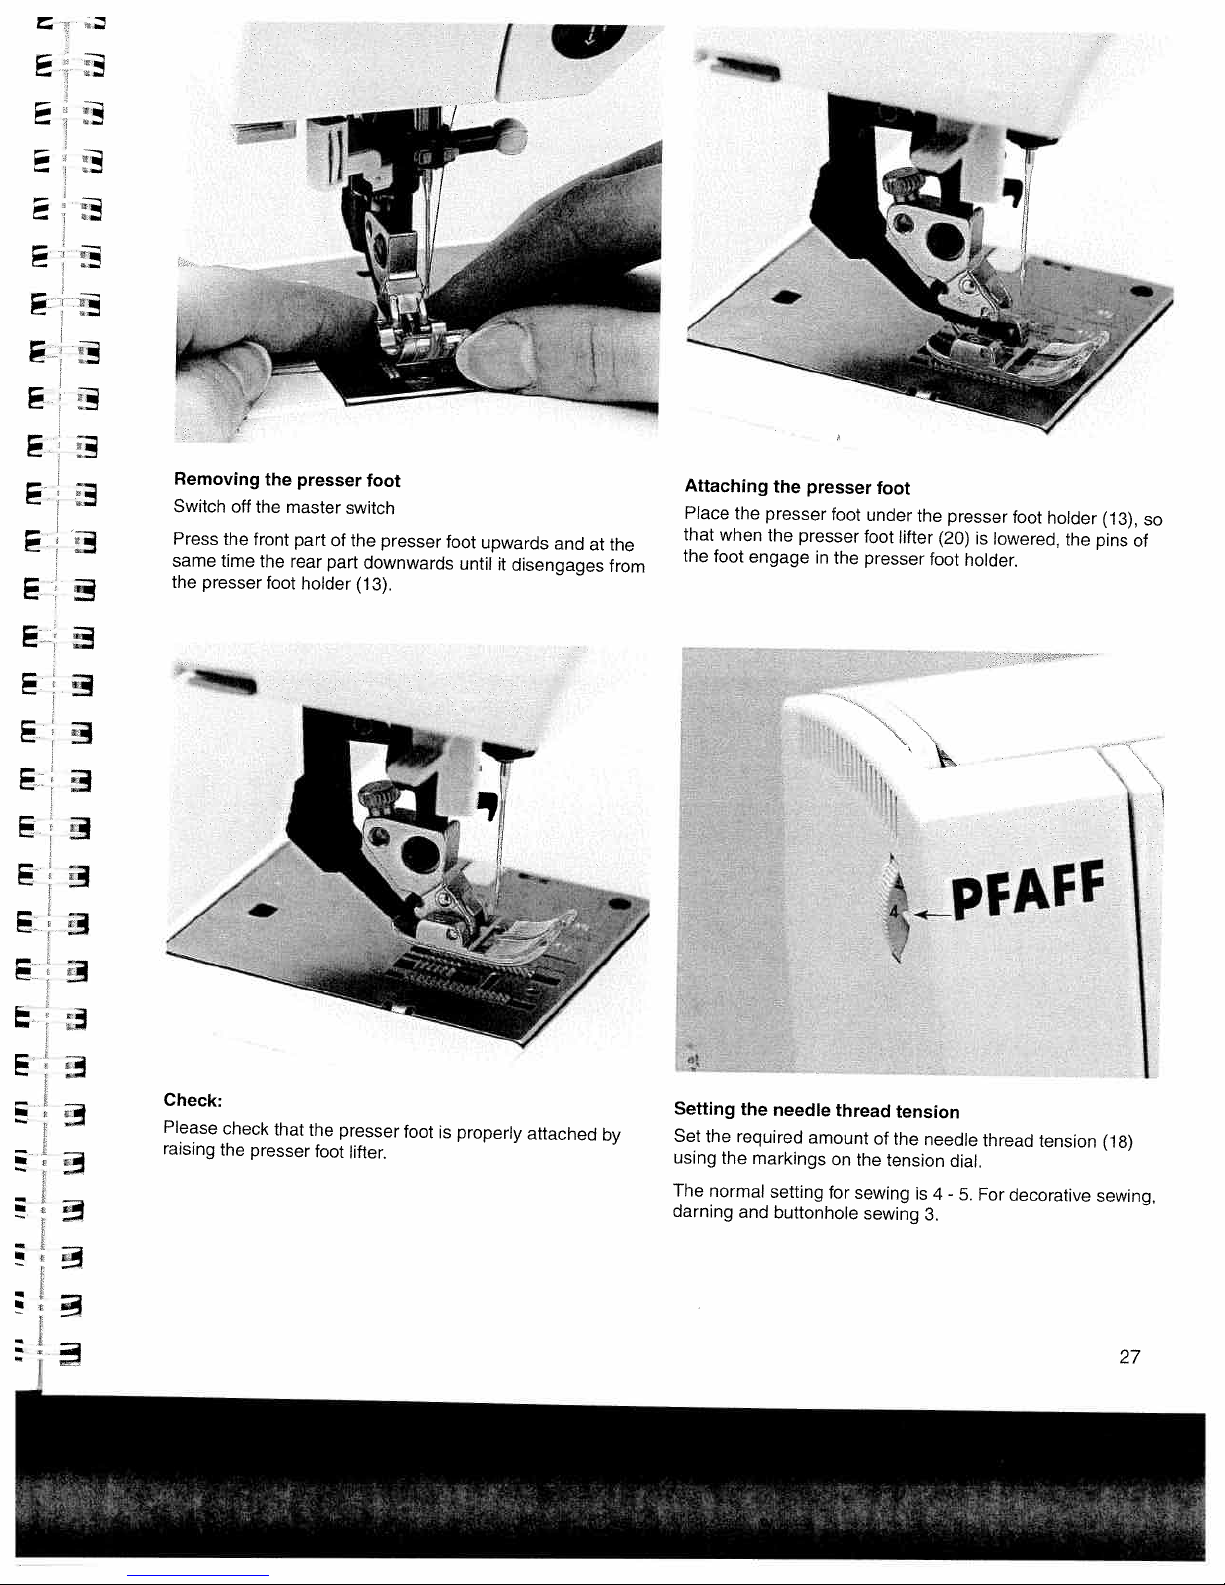
A
Removing
Switch
Press
the
same
time
presser
the
oft
the
the
front
the
foot
presser
master
part
rear
holder
I
of
part
switch
the
(13).
foot
presser
downwards
toot
upwards
until
it
disengages
and
at
the
from
Attaching
Place
the
that
when
the
foot
the
presser
the
engage
presser
foot
presser
in
the
foot
under
the
presser
foot
lifter
(20)
is
presser
foot
7
pFAFF
lowered,
holder.
foot
holder
the
(13),
pins
so
of
Check:
Please
check
that
the
raising
the
presser
presser
foot
foot
lifter.
is
properly
attached
by
Setting
Set
the
using
The
normal
darning
the
required
the
and
needle
markings
setting
buttonhole
thread
amount
on
for
of
the
tension
sewing
sewing
tension
the
needle
is
3.
thread
tension
dial.
4
-
5.
decorative
For
(18)
sewing,
27
Page 28
lechnical
section
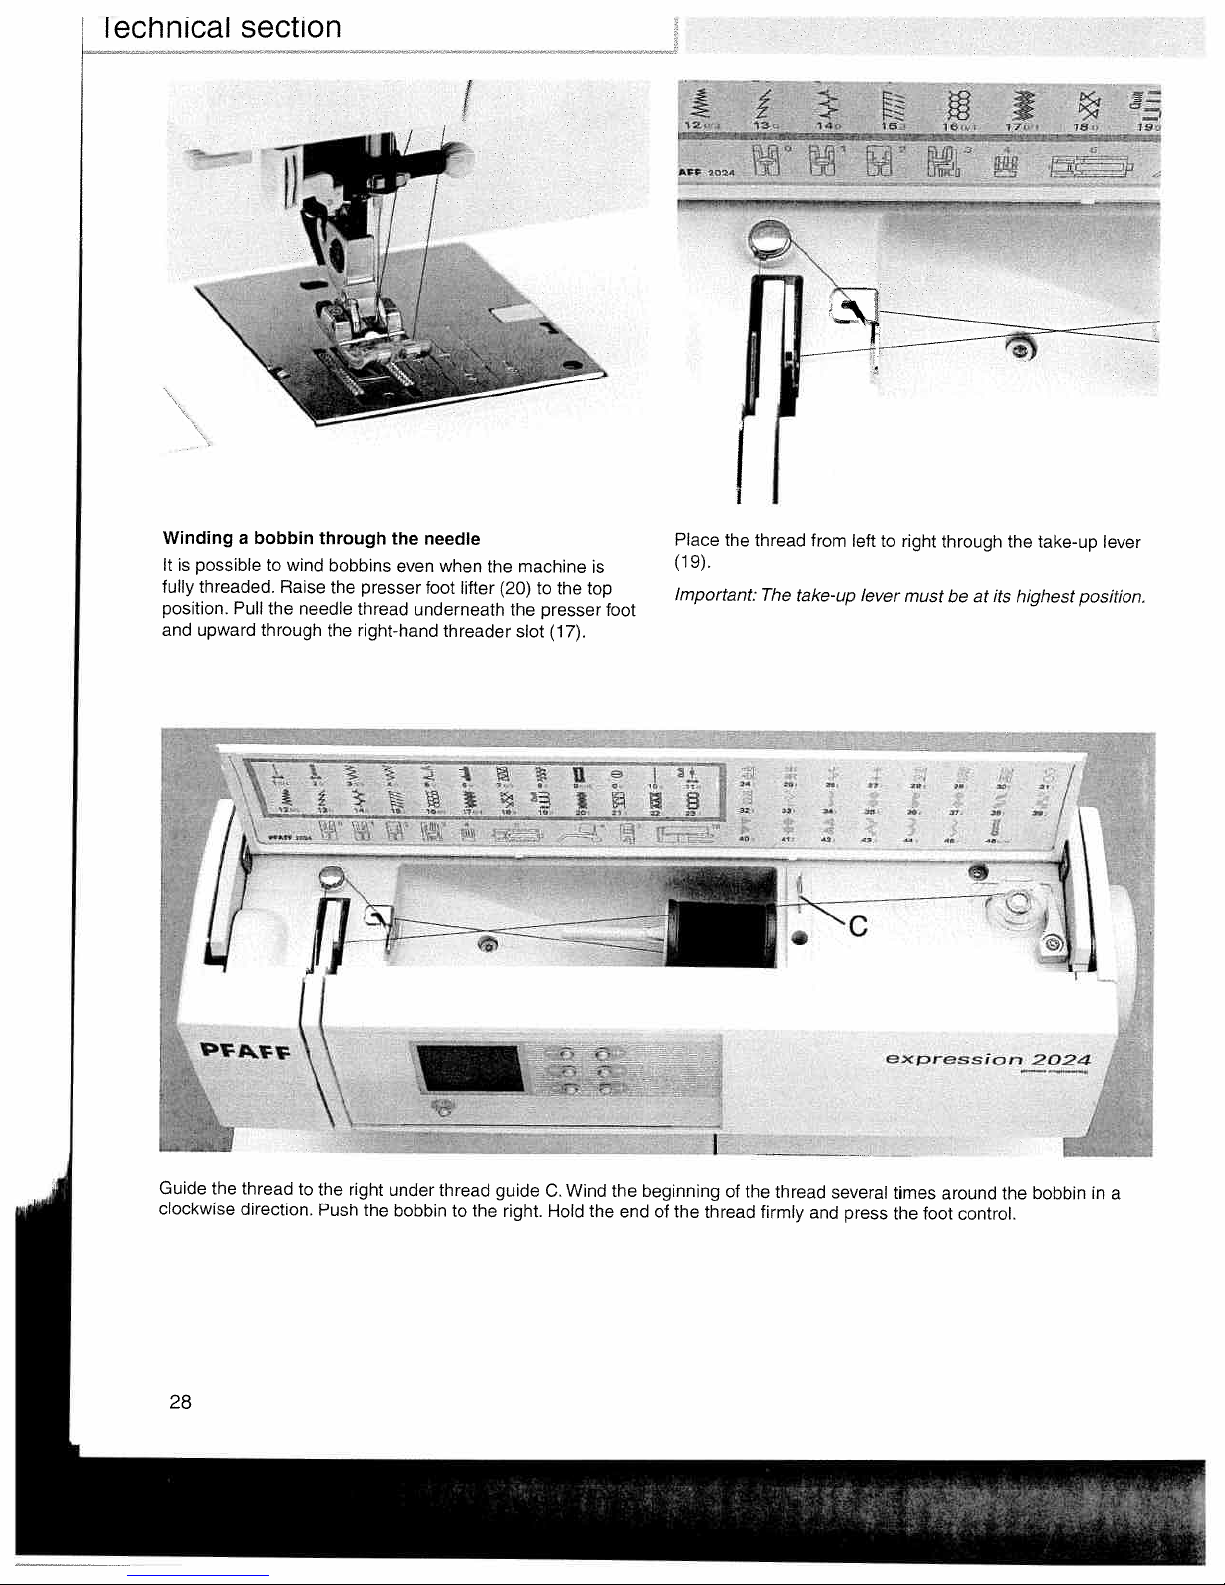
Winding
It
is
possibletowind
threaded.
fully
position.
and
Pull
upward
a
bobbin
Raise
the
needle
through
through
bobbins
the
thread
the
right-hand
the
presser
needle
even
when
foot
underneath
threader
I
lifter
the
(20)
machine
to
the
presser
slot
the top
(17).
is
foot
12o
AFF
2024
Place
the
(19).
Important:
13
r’
)L
bu
thread
The
o
“
ULd
t
take-up
14o
from
I
I
i
left
right
must
through
at
be
the
its
take-up
highest
lever
position.
to
lever
Guide
the
clockwise
‘
thread
direction.
)iJ
32
33
3432333,3939
H
“
e)(pressiG,,
7
/
2024
I
to
the
right
under
thread
Push
the
bobbin
guide
the
right.
to
C.
Hold
Wind
the end
the
beginning
the
of
of
thread
the
thread
firmly
and
several
press
times
the
foot
around
control.
the
bobbin
in
a
28
Page 29
ir
Technical
sec
3
j
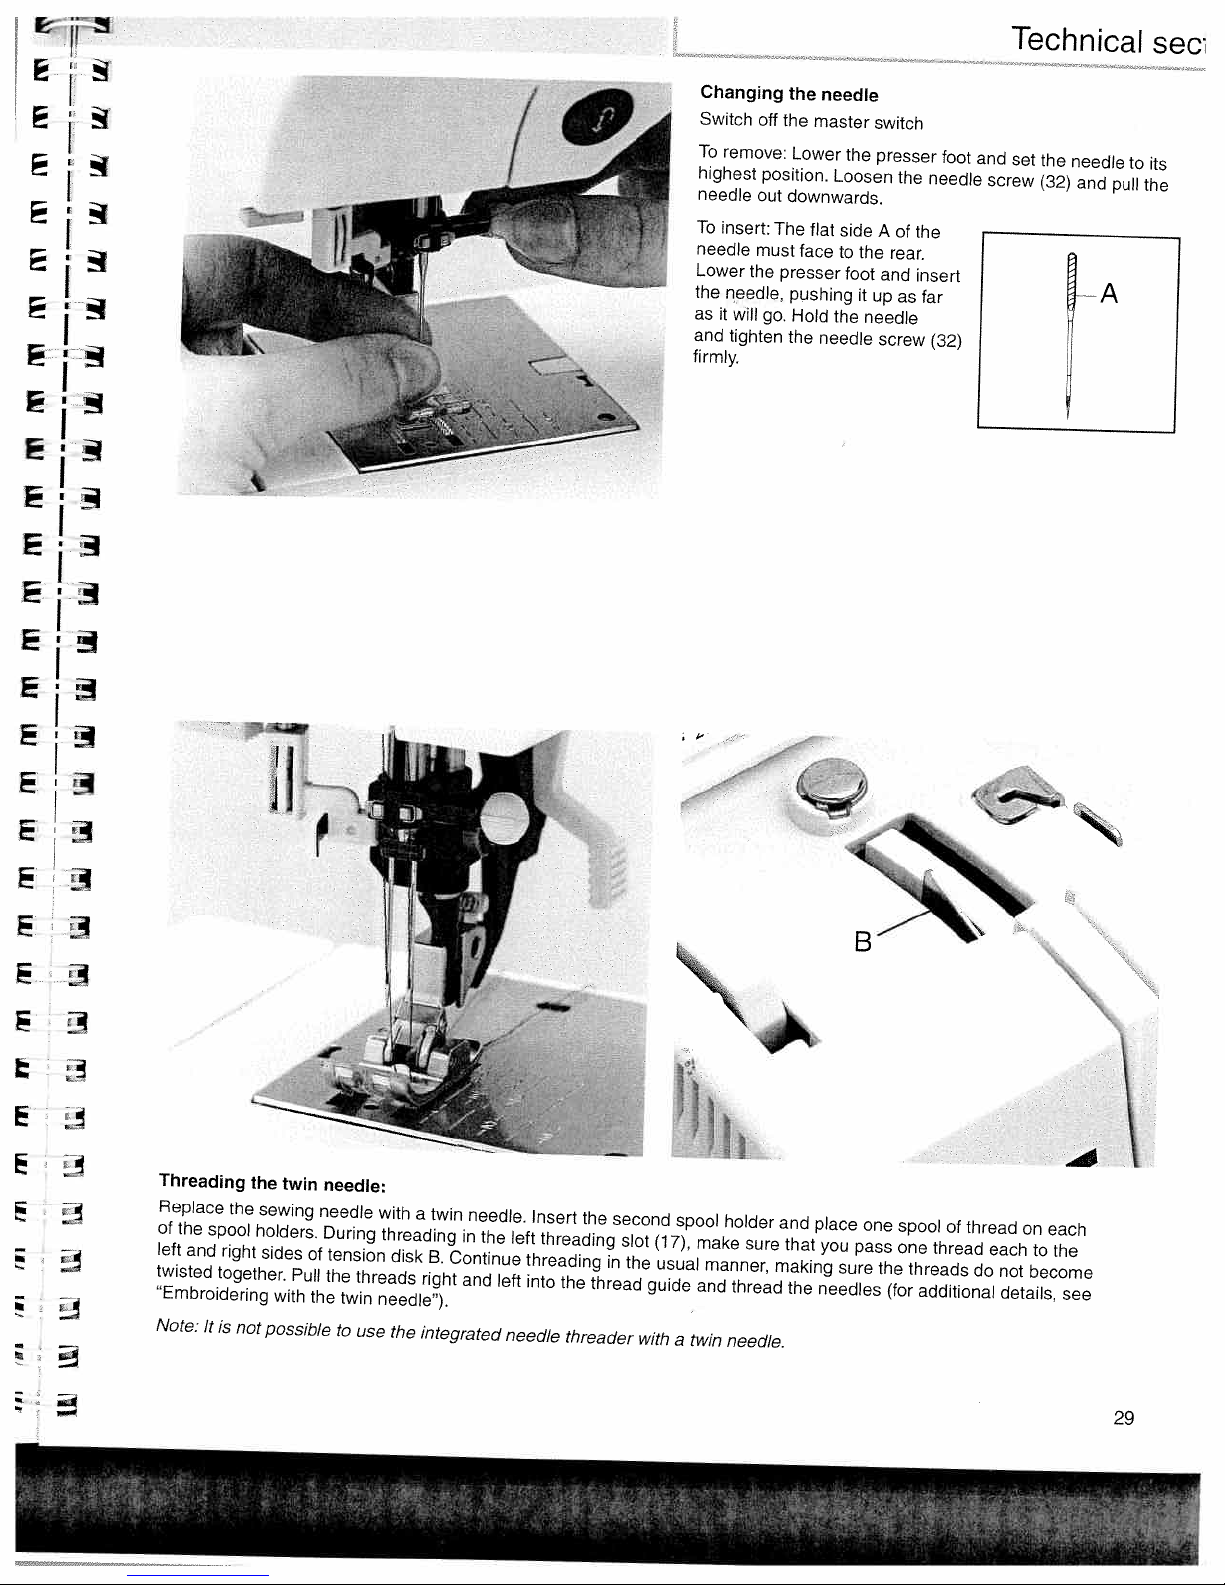
Changing
Switch
To
remove:
highest
needle
To
insert:
needle
Lower
the
needle,
as
it
and
firmly.
off
position.
out
must
the
will
go.
tighten
the
needle
the
master
Lower
downwards.
The
flat
face
presser
pushing
Hold
the
needle
the
Loosen
side
to
the
foot
it
the
needle
switch
presser
the
A
of
rear.
and
up
as
screw
needle
the
insert
far
(32)
foot
and
screw
set
the
(32)
needle
and
[A
pull
to
its
the
r
Threading
Replace
of
left
twisted
“Embroidering
Note:
the
and
It
the
spool
right
together.
is
not
Ii
the
twin
sewing
holders.
sides
with
possible
Pull
needle:
needle
During
of
tension
the
the
threads
twin
to
with
threading
needle”).
use
a
disk
the
twin
needle.
in
B.
Continue
right
and
integrated
the
left
left
needle
Insert
threading
threading
into
the
threader
the
thread
second
slot
in
the
(17).
guide
with
spool
usual
a
make
manner,
and
twin
holder
sure
thread
needle.
and
that
making
the
place
you
sure
needles
B
one
pass
the
(for
spool
one
thread
threads
additional
of
thread
each
do
on
not
become
details,
to
each
the
see
29
Page 30
iecnnicai
secuon
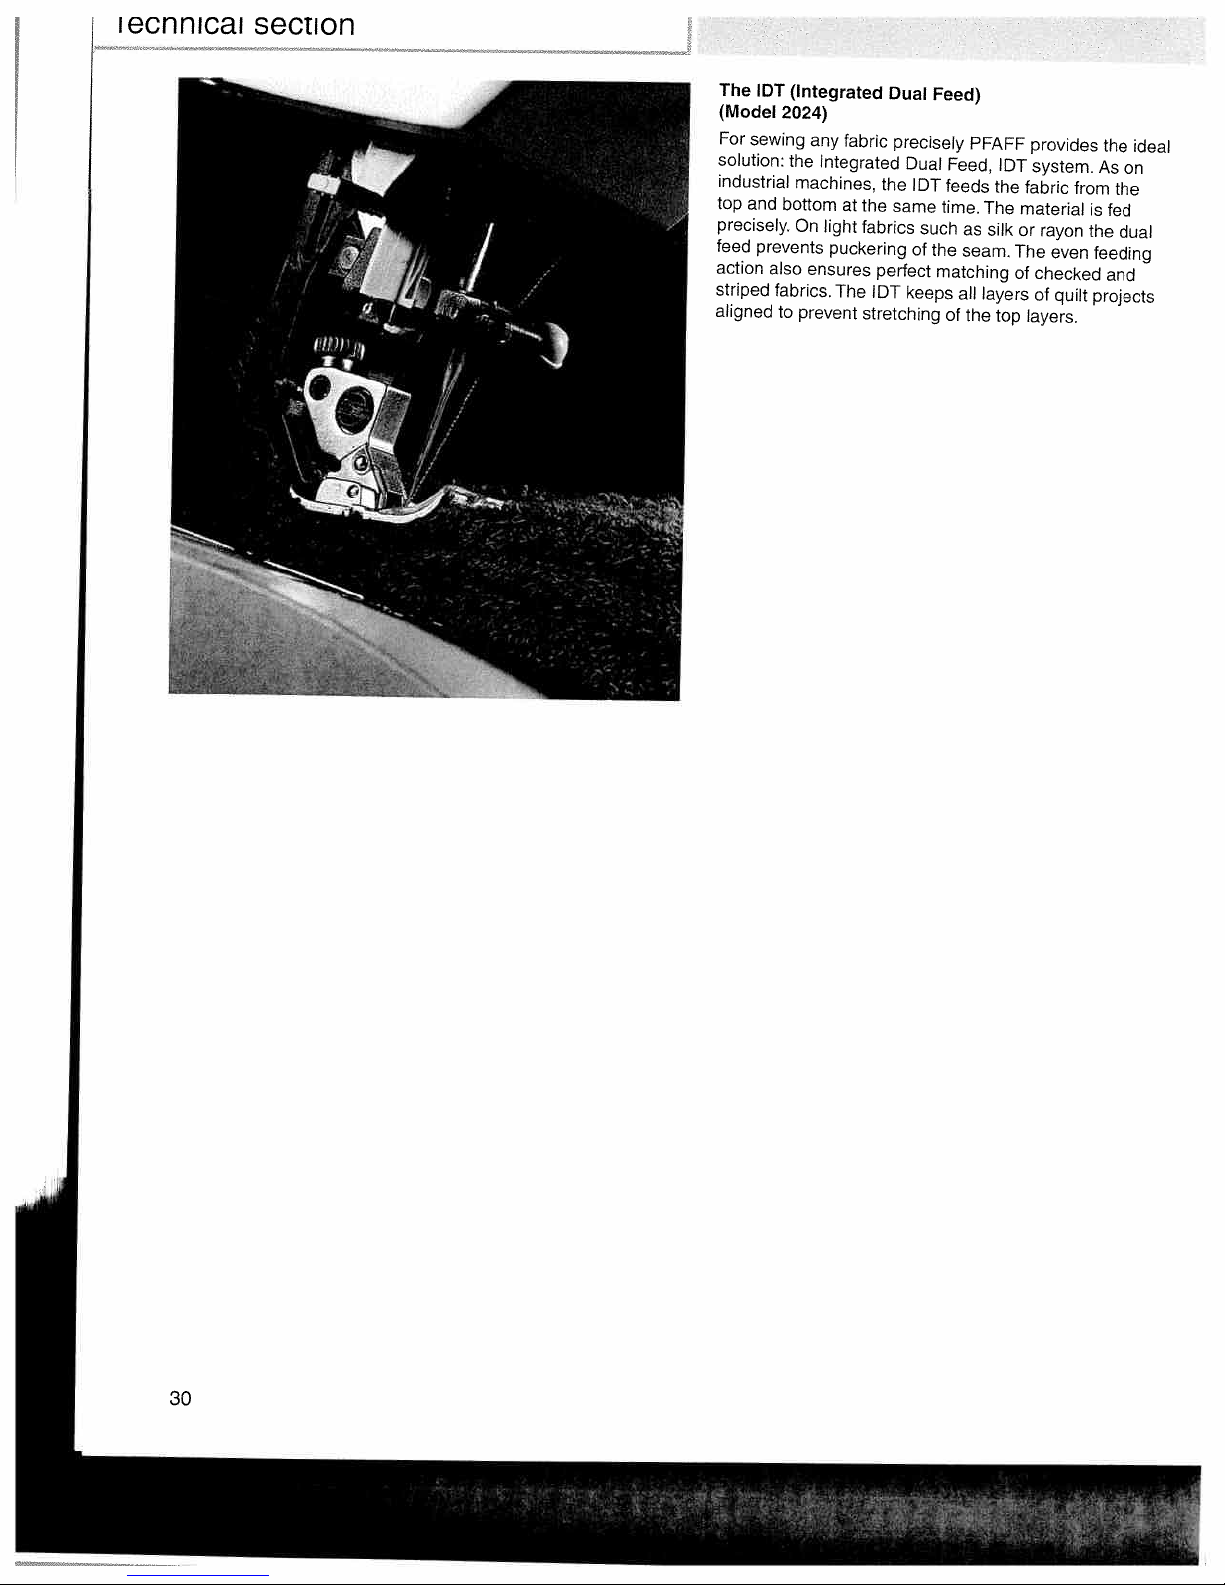
The
IDT
(Model
For
sewing
solution:
industrial
top
and
precisely.
feed
prevents
action
striped
aligned
(Integrated
2024)
any
the
machines,
bottom
On
also
ensures
fabrics.
to
prevent
fabric
Integrated
at
the
light
fabrics
puckering
perfect
The
IDT
stretching
Dual
precisely
Dual
the
IDT
same
such
of
keeps
Feed)
PFAFF
Feed,
feeds
time.
as
the
seam.
matching
all
of
the
IDT
the
The
silk
layers
top
provides
system.
fabric
material
or
rayon
The
even
of
checked
of
layers.
from
quilt
the
As
the
is
fed
the
dual
feeding
and
projects
ideal
on
30
Page 31

1’
Technical
sec
E
Engaging
Important:
feet
with
Raise
the
engages.
the
For
the
presser
IDT
all
center
(model
work
back
foot.
with
cut-out.
Press
2024)
the
the
Dual
IDT
Feed
(14)
IDT,
down
use
until
presser
it
Disengaging
Hold
the
Press
the
release
Stripes
the
the
and
material
Dual
IDT
plaids
IDT
to
the
Feed
(14)
slowly
be
lOT
with
down,
match
sewn.
(model
two
then
upward.
perfectly
2024)
fingers
pull
it
due
at
away
to
the
ribbed
from
the
even
you
ankle.
and
feed
of
—
31
Page 32

Lowering
For
certain
darning
dog
has
(26)
and
lowered.
Raise
dog.
the
the
and
to
press
To
presser
feed
sewing
when
be
lowered.
switch
slide
work
the
on
foot
dog
machine
To
B
fully
the
before
such
do
feed
as
this,
to
the
dog
lowering
free-motion
must
be
open
right.
press
or
cleaned,
the
Now
slide
raising
quilting
bobbin
the
feed
B
to
the
the
door
the
feed
or
feed
dog
is
left.
32
Page 33

Sewi1Ig
functions
A
II
•‘
4
Stitch
Altering
Altering
width/needle
Altering
width/stitch
Altering
selection
pattern
the
the
the
Lngth/stitch
rse
sewing
‘mirror
stitch
position
pattern
length
pattern
density
‘the
sizes
button
button
stitches
35,
34
34
35
36
36
37
37
38
38
39
40
(7
A
I
Page 34

C
C
Stitch
There
1.
With
forward
>
<in
If
2014),
No.
2.
With
of
3.
With
number.
then
Expression
selection
are
three
the
in
ascending
descending
you
are
and
0.
the
the
most
the
press
selection
in
the
in
the
continue
direct
commonly
direct
To
select
button
window.
ways
stitches.
order
order
last
selection
selection
of
selecting
button:
stitch,
scroll
to
used
program
3.
The
for
No.
you
buttons
stitches
buttons
No.
stitch
your
scrolling
46
(No.
will
for
to
choose
23,
press
number
desired
backward
30
return
instant
(0
-
appears
stitch:
model
to
selection
9).
the
button
and
stitch
stitch
2
in
the
4k
<
<III>
To
change:
Stitch
Pattern
Needle
Stitch
Pattern
Stitch
Pattern
Balance
width
width
position
length
length
density
density
for
straight
stitches
Altering
Adjust
position
buttons
in
the
stitches
the
length.
of
stitches
to
the
window.
right
A
B
C
width,
by
of
Use
balance,
touching
the
window.
I+
buttons:
density
the
appropriate
Each
or
change
needle
-1+
is
visible
34
Page 35

Sewing
functia
b
<?E
1
.S.
Altering
The
zigzag
Altering
,.
—‘
Straight
be
button
selected
sewn
stitch
A
the
the
stitch
in
any
move
to
stitch
stitch
No.
needle
No.
of
3.
1,
13
the
width
can
be
position
stitch
different
needle
sewn
No.
2
needle
to
left
in
and
various
stitch
positions.
or
right
widths,
No.
center.
of
1
1
Press
e.g.
can
1÷
jwI—
*
,.
—
Altering
e.g.
Stitch
For
decorative
shown
in
standard
a
A.
the
pattern
25
in
the
window.
width
stitches,
and
width
the
When
can
overall
entered,
be
altered
width
stitch
of
using
the
25
pattern
comes
4+
is
up
button
35
Page 36

Altering
The
stitch
button
B.
the
length
stitch
of
length
a
stitch
can
be
altered
using
+/-
Altering
The
using
change.
Altering
The
stitch
stitches,
remain
more
the
density,
pattern
-1+
the
density
etc.)
constant
densely
the
length
button
stitch
can
or
when
pattern
B.
of
be
but
less
available.
length
of
decorative
The
density
various
changed.
the
pattern
densely.
density
stitches
of
The
will
Use
stitches
the
stitch
(buttonholes,
pattern
be
embroidered
-1+
button
can
will
length
C
be
to
altered
not
satin
will
adjust
36
Page 37

PFAFF
Instruction
manual
PFAFF
V
1°
NN’
PFAFF
N
-
-—
-
--
—
exps’tOfl
2O24
N
N
Page 38

Balance
2fl
Decorative
heavy
adjusts
best
way
After
having
symbol
window.
of
the
can
be
The
standard
With
-1+
machine
In
the
minus
thus
the
In
plus
the
stretched
fabric
the
for
with
altered
button
from
overall
range
out.
stitches
is
fed
reverse
different
selected
a0after
This
on
this
balance
C
you
-9to(÷)9.
range
length
the
can
vary
differently
feed
of
fabrics.
stitch,
a
it
in
symbol
stitch.
setting
can
change
stitches
the
will
be
stitches
on
different
than
the
stitch
you
the
bottom
indicates
is
0.
are
sewn
sewn
are
fine
so
will
that
the
sewn
shorter.
fabric
silk.
The
it
is
sewn
see
the
right-hand
the
reverse
shorter,
longer
types
balance
in
balance
corner
balance
feed
and
or
—
the
of
the
Ei’3
11
.-
Reverse
This
button
•
when
•
manual
•
programming
sewing
has
pressed.
finish
the
will
of
the
following
reverse
buttonhole
a
buttonhole
functions:
sew
(see
page
59-61)
37
Page 39

OtVVIl
I,LILJI
ILII
ly
10
I
1,
8’Q
“Pattern
This
that
has
indicating
“Lock”
“Pattern
You
unintentional
another
Switching
Press
in
is
selection
pattern
be
Note:
symbol
can
been
button
can
pattern
the
window.
the
released.
length
altered.
You
button
mirror”
be
pressed,apoint
the
mirror”
safeguard
dial
can
(30).
will
appearinthe
mirrored.
pattern
selection
sequence
on
the
button
The
direct
The
are
width
/
still
button
button:
your
“lock”
until
symbol
now
mirror
(30)
When
be
will
(30)
sewing
another
of
by
button:
the
selection
locked.
pattern
and
a
$,
window
the
“pattern
will
appear
mirrored.
machine
sewing
means
locking
disappears
buttons
The
density
pattern
of
symbol
stitch
you
if
any
for
mirror”
below
against
program
the
when
(6)
length
I
quickly
stitch
button
the
“lock”
appears
the
and
/
balance
symbol
the
or
button.
button
the
width,
can
the
tap
38
Switching
the
Press
appears.
symbol
the
off
button
locking
The
disappears
“lock”
(30)
function
after
button:
until
the
the
is
button
unlocking
switched
now
released.
is
symbol
off.
This
Page 40

i—I
*
Twin
needle
Depending
stitch,
a
window.
cannot
be
width.
set
on
the
twin
the
This
symbol
usedtosew
needle
needle
position
warning
indicates
the
stitch
oevviiy
or
the
will
appear
that
twin
a
at
the
IUIltIC
width
in
needle
currently
of
the
EH
E
Reduce
disappears.
needle
of
the
2.0
pattern
The
mm
stitch
or
width
may
less.
until
now
the
be
warning
sewn
symbol
with
a
twin
E
39
Page 41

zw
‘
skJ
Formation
The
Some
right
adjusted.
retained.
The
always
of
any
Note:
are
formed
Do
not
window
stitch
patterns
side
patterns
retain
changes
Do
not
use
lights
of
the
formation
of
the
The
left-hand
that
the
in
use
from
one
a
twin
up
(see
stitches
are
stitch
are
right
width.
twin
a
needle
varies.
formed
changes
side
formed
side
needle
side!
if
page
of
this
39).
from
of
from
the
symbol
when
the
to
the
stitch
the
stitch,
sew
left,
so
the
is
right
regardless
patterns
in
the
only
width
always
will
the
is
that
40
,s
Patterns
change
width
that
equally
is
adjusted.
are
formed
from
the
from
right
the
and
center
the
left
will
when
the
Page 42

Utility
stitches
Sewing
Zippers
Non-elastic/elastic
Overlock
Sewing
Darning/inserting
Gathering
Bridging
Hemming
Shell
recommendations
stitches
on
buttons
stitches
edging
stitches
patches
table
43-49
47-48,
42
43
49
50
51
52
53
54
55
b
.
Page 43

Explanation
following
In
the
recommend
tables
These
selected
the
Integrated
tension
thread
for
stitches
Dual
of
the
table
different
give
Feed
setting
you
sewing
you
—
recommendations
will
find
the
purposes.
sewing
further
information
whether
(IDT)
and
you
engagedordisengaged,
recommended
settings
should
we
required
sew
presser
table
with
for
the
foot,.
sewing
needle
2024
Stitch
-%
_
2
•‘‘
‘,
*‘
1F3J
2024
2014
Stitch
Expression 2024
Expression 2014
Stitch
number
Stitch
widthinmm
Stitch length
Top
feed switched
in
switched
Needle
Number
Special
thread tension
of
presser
accessories
mm
foot
on•
off
0
42
Page 44
I
2024/
/
72014
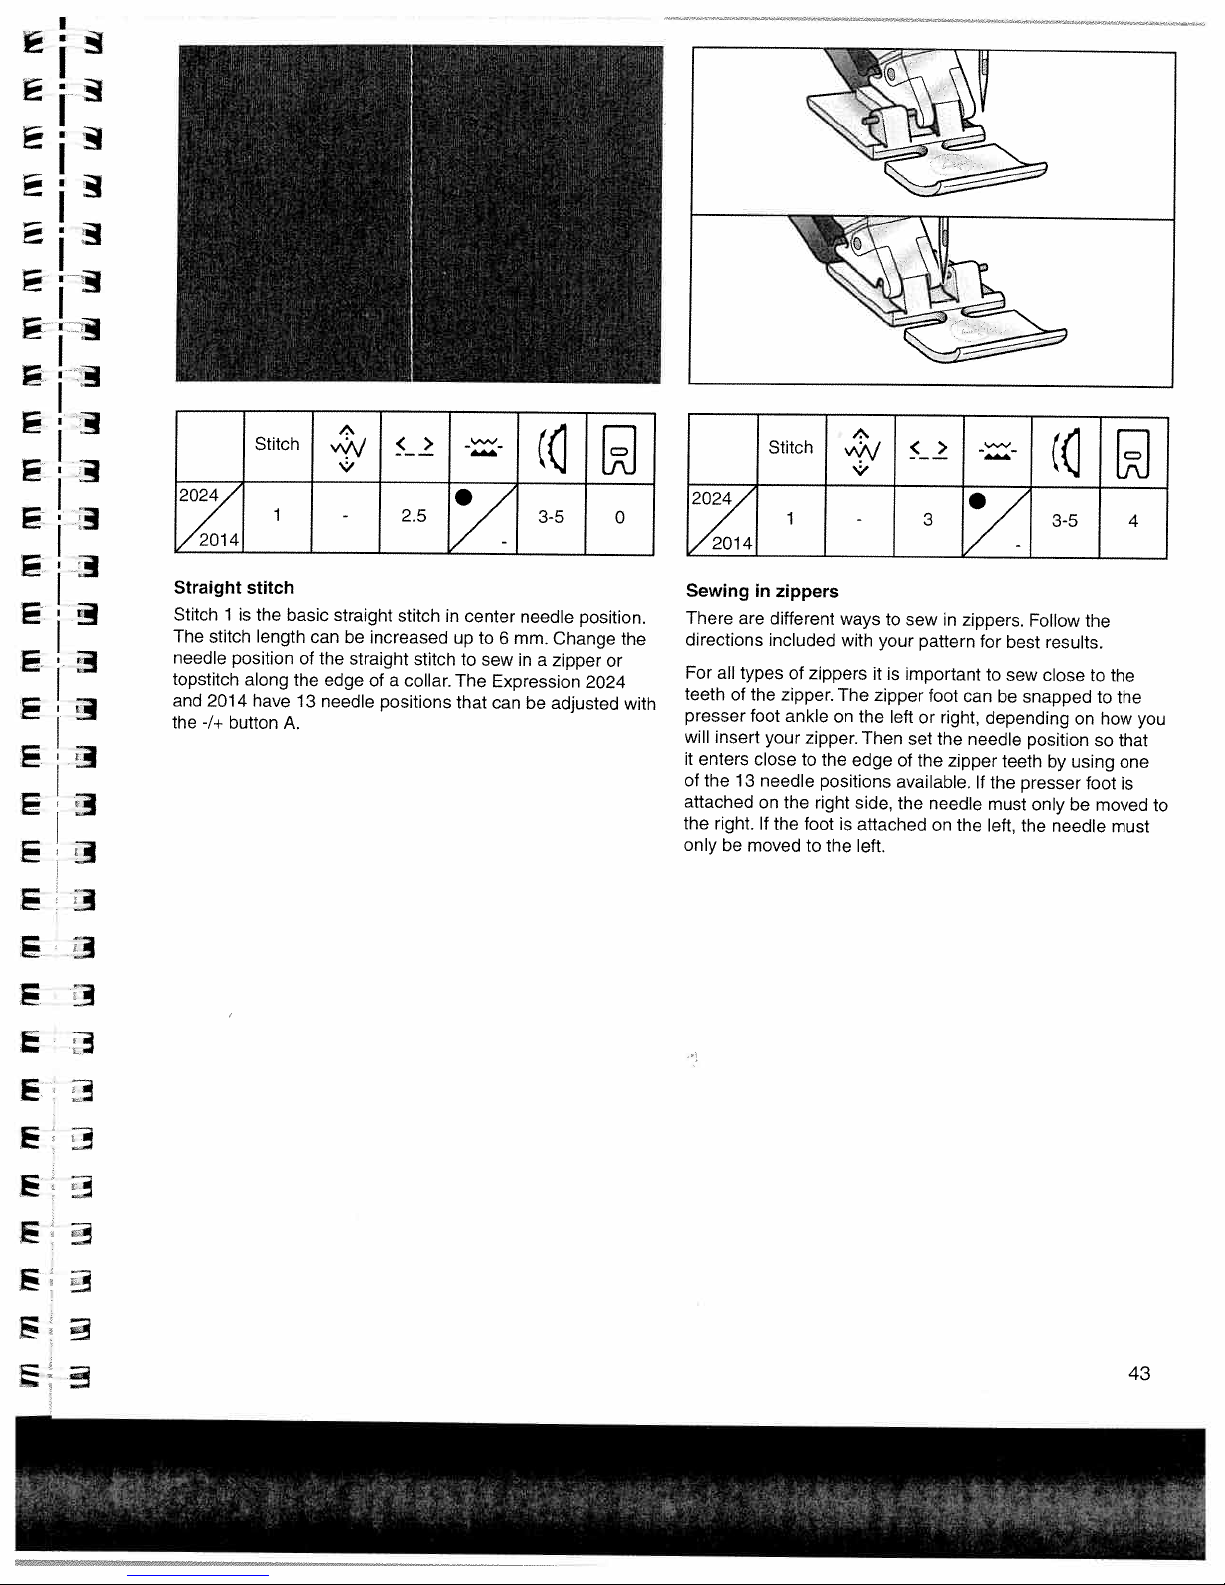
Straight
Stitch
The
stitch
needle
topstitch
and
2014
the
-1+
Stitch
stitch
1
the
is
length
position
along
have
button
-,%
,
1
-
basic
straight
canbeincreased
of
straight
the
the
edge
13
needle
A.
—
<
2.5
stitch
of
a
collar.
positions
—
>
stitch
in
up
The
that
center
to
needle
mm.
to
6
sew
in
Expression
can
be
3-5
Change
zipper
a
adjusted
0
position.
the
or
2024
with
2024
Sewing
There
directions
For
all
of
teeth
presser
insert
will
it
enters
of
the
attached
right.
the
only
be
in
are
types
the
foot
close
13
on
If
moved
Stitch
1
zippers
different
included
of
zipper.
ankle
your
to
needle
the
the
zippers
The
on
zipper.
the
positions
right
foot
to
the
-
ways
with
the
Then
edge
side,
is
attached
left.
to
your
it
is
important
zipper
left
of
available,
the
3
sew
pattern
foot
or
set
the
needle
2
in
right,
the
on
.
/-
zippers.
can
needle
zipper
If
the
--
/
Follow
for
best
to
sew
be
snapped
depending
position
teeth
the
presser
must
onlybemoved
left,
the
3-5
results.
close
on
using
by
needle
the
to
so
foot
the
to
how
4
the
you
that
one
is
to
must
43
Page 45
uiiiiy
suicries
2024/
/
/2014
Basting
With
When
stitch
•
Lower
•
Place
•
Sew
to
•
Continue
basting.
Tip:
stitch
stitch
you
at
a
one
the
Light
stitches
lowered.
be
Stitch
10
10
press
time.
the
the
stitch,
rear.
to
fabrics
you
Press
feed
fabric
sew
mm).
(6
the
can
dog
are
Use
-
foot
the
under
then
one
easier
In
stitch
baste
control,
foot
and
move
stitch
this
<_2
6.0
garment
a
control
disengage
presser
the
the
at
baste
to
case
1,
stitch
the
fabric
a
time
the
--
-
before
machine
again
the
foot.
the
until
with
bottom
length
for
IDT.
required
you
long
feed
6.0
3
trying
will
sew
each
finish
straight
need
mm.
0
it
on.
one
stitch.
amount
not
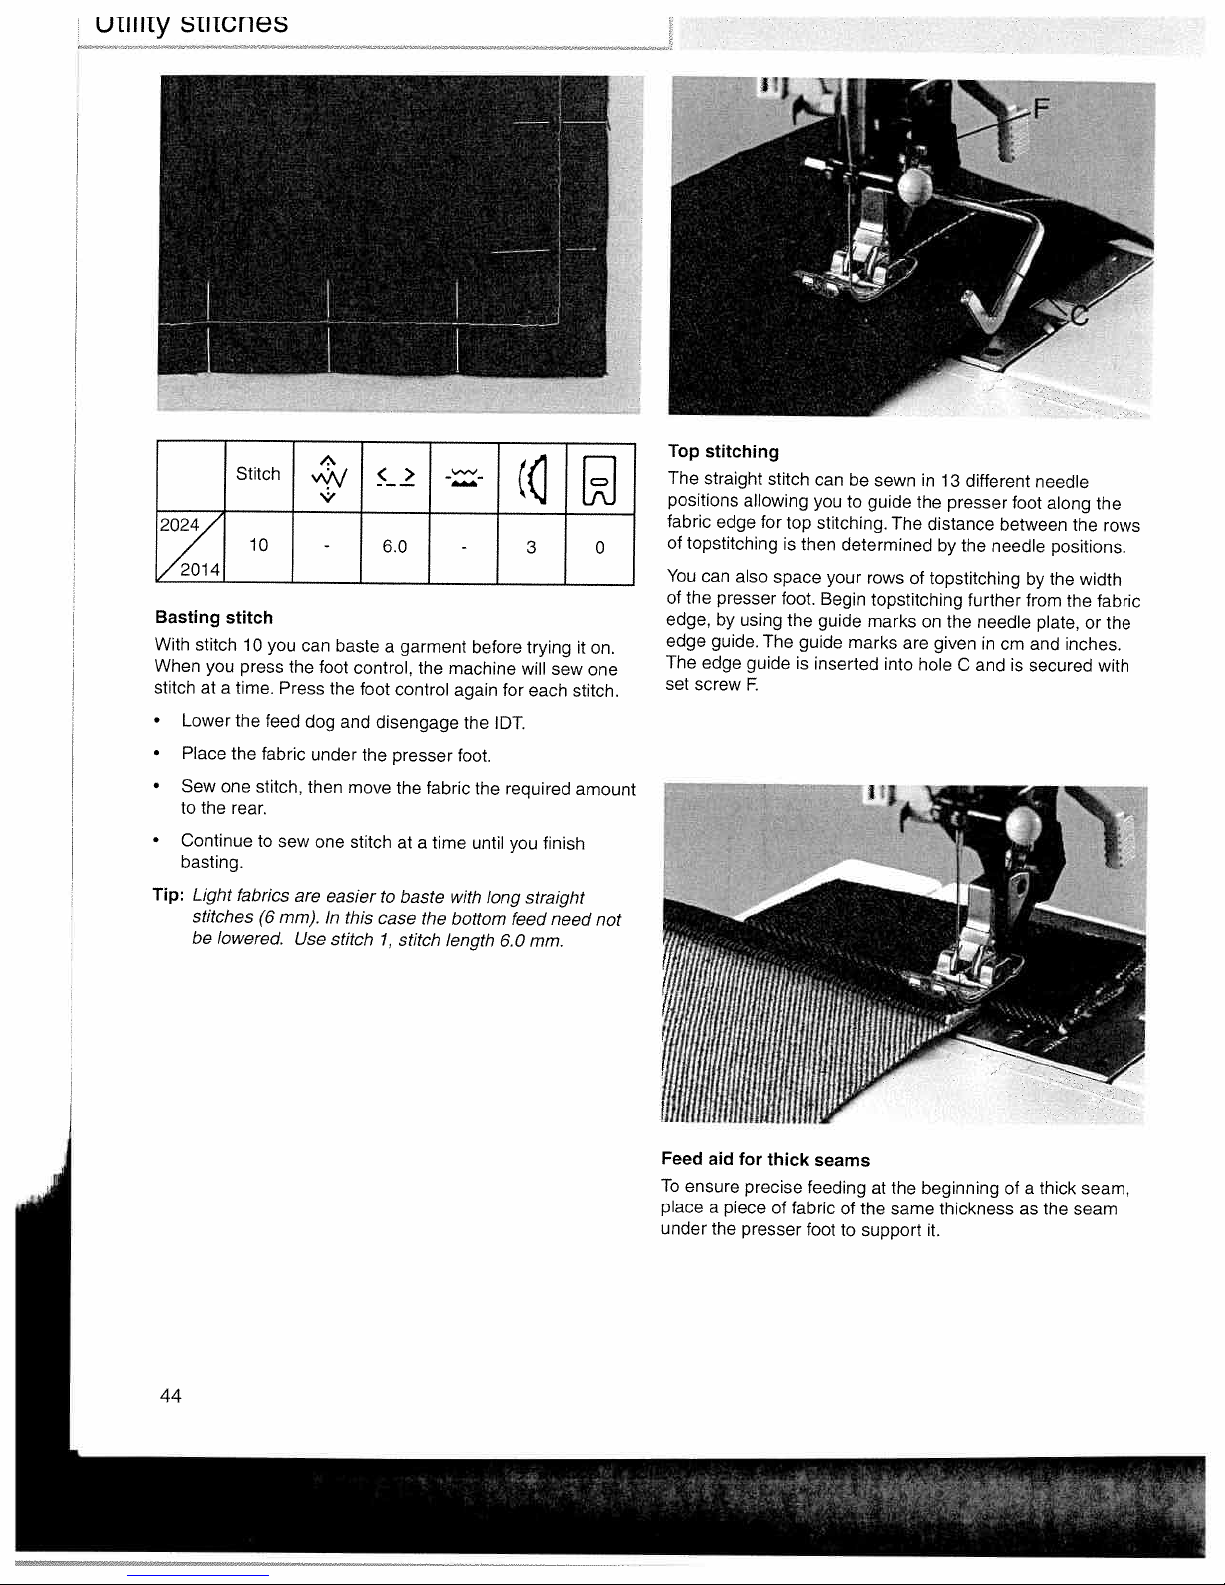
Top
stitching
The
straight
positions
fabric
of
topstitching
You
can
of
the
edge,
edge
guide.
The
edge
set
screw
allowing
edge
also
presser
using
by
guide
F.
stitch
for
space
The
top
is
foot.
the
is
can
you
stitching.
then
your
Begin
guide
guide
inserted
be
sewn
to
guide
The
determined
rows
topstitching
marks
marks
are
into
in13different
presser
the
distance
by
the
topstitching
of
further
on
needle
the
given
in
hole
and
C
foot
between
needle
by
from
cm
is
needle
along
positions.
the
the
plate,
inches.
and
secured
the
width
or
the
rows
fabric
the
with
44
Feed
To
place
under
aid
ensure
a
the
for
precise
piece
presser
thick
of
seams
feeding
fabric
foot
of
to
the
at
the
same
support
beginning
thickness
it.
thick
of
as
seam,
a
seam
the
Page 46

Utility
stitch
2024
,/‘
/2014
Blind
The
blind
skirts,
•
Finish
•
Fold
•
Fold
approximately
of
the
beyond
side
now
•
Place
runs
•
When
a
small
the
screw
Stitch
/
hem
stitch
hem
trousers
the
and
the
finished
the
of
your
be
facing
the
along
the
amount
right
side,
A.
5
stitch
edge
press
hem
fold.
fabric
edge
needle
and
the
back
1/4
edge
The
project
up.
under
of
adjust
—f’.
‘.V
‘7
4.5
is
used
home
of
the
hem
on
inch
should
guide
swings
fabric,
2.5
to
decorating.
hem.
allowance
itself
(6
mm)
extends
wrong
the
presser
B.
into
If
edge
guide
the
make
so
the
--
invisible
inwards.
foot
fold
stitches
B
by
-
so
it
should
are
turning
,i1
3-5
hems
that
visible
on
j
the
fold
catch
on
adjusting
Stitch
3
2024/
/
/2014
Elastic
The
fabrics.
There
Create
blind
elastic
The
is
the
no
blind
hem
need
blind
6
hem
hem
is
to
hem
AJ
V
4.5
stitch
stitch
finished
finish
as
<>
1.5
is
especially
and
the
raw
described
sewn
edge
under
suitable
at
the
first.
-
same
“Blind
c&j
3-5
for
hem
E.1
3
stretchy
time.
stitch”.
E
:
;
L
_,
L
—
&
45
Page 47

2024
,/
/2014
Stitch
/
v
3
3.0
<_2
.,‘,
2.0
i1
3J
3-5
-
0
Zigzag
Raw
sure
needle
swing
stitch
edges
the
and
of
can
needle
overcasts
the
be
pierces
needle.
finished
the
the
easily
fabric
edge
Stretch
zigzag
with
on
the
of
the
fabric
left
stitch
swing
on
the
3.
of
right
Make
the
The
decorative
and
•
•
Tip:
2024
/2014
Stretch
This
needed,
the
triple
stretch
with
decorative
Fold
up
Topstitch
with
decorative
Lower
Stitch
I
/
triple
stitch
such
fabric,
triple
seam.
a
needle
2
is
used
the
zigzag
hem
the
straight
as
underarm
longer
zigzag
This
threads
the
hem
thread
thread
.‘%
vV
‘;,
for
stitch
stitch
correct
from
-
stitch
sewing
the
stitch
the
and
tension
and
stitch
can
on
width.
_
3.0
seams
produces
be
used
denim.
right
side,
sew.
for
--
where
crotch
length
highly
a
for
or
decorative
.___
-
strength
seams.
required.
T-shirt
thread
cj
3-5
The
elastic
hems
the
threads.
E1
is
heavier
and
top
0
46
Page 48

2024/
/
2014
Stitch
4
AJ
6.0
,%
%‘-
_2
1.0
-
i/i
ç
3-5
-
EJ
0/1
‘WAAA\/W\AW
Elastic
Use
•
•
•
•
•
2024.’
stitch
stitch
createawaistband,
To
garment.
Cut
elastic
the
Sew
Divide
Stretch the
Stitch
,/
/2014
4 to
add
to
endsofthe
garment
the
elastictofit
4
elastictopajamas,
finish
comfortably
‘
,
6.0
fit
elastic together.
edge
and
the
<>
0.2-1
the
around
elastic
fabric.
-‘-
top
skirts
Sew
edge
waist.
into
on
-
and
sportswear.
of
the
quarters.
elastic.
f/I
j
3-5
[]
0
Darning
Use the
areas.
•Ifthe
several
•
tears,
For
fabric, slightly
same
damaged area,
the
to
the
with
the
elastic
elastic
stitchtorepair holes,
is
only
area
of
frayed
stitching
larger
rows
color,onthe
stitchingonthe
stitch
slightly
edges
damaged,
untilitis
or
small
than
the
wrong
sideofthe
then
cut
back sideofyour
holes,
damaged
away
tears
well
the
sew
covered.
fabric.
excess
and
damaged
overitwith
placeapiece
area
andofthe
Stitch
fabric
repair.
of
over
close
47
Page 49

:
;*;
i
I
2024
/
Sewing-on
The
best
area
with
•
Cut
area
•
Stitch
•
Cut
to
the
way
a
piece
or
back
seam.
-
Stitch
new
a
hole.
over
4
patches
to
repair
piece
of
the
the
damaged
6.0
fabric
fabric
larger
of
fabric.
slightly
edges
<_2
0.2-1
holes
fabric
larger
with
on
.
/
is
the
the
--
to
than
patch
the
elastic
reverse
3-5
the
damaged
damaged
stitch.
side
close
1-
1
1
111
1
Stitch
-,
‘
.
1
<.2
2024/
0
4
6.0
0.2-1
,/14
Repairing
On
tears,
piece
a
The
perfect
•
Lay
must
•
Now
•
Cut
tears
frayed
of
material
underlayed
repair.
a
piece
be
a
sew
the
under
little
over
edges
fabric
of
fabric
the
layed
under
larger
damaged
or
small
the
reinforces
underneath
than
piece
of
reverse
the
I•
-
.
,,,/
holes
the
workpiece
the
damaged
area.
material
1
--
side
t
4
,
it
I
..
(
/
-
3-5
is
useful
of
the
damaged
area.
back
to
to
fabric.
and
fabric.
the
I
E:1
0
lay
ensures
It
seam.
48
2024/
/
/2014
Honeycomb
The
honeycomb
which
is
very
Stitch
16
stitch
suitable
stitch
—%
vJ
%-
6.0
for
is
an
children’s
<
2.0
elastic
w.
--
and
decorative
clothes
i/i
3-5
-
and
0/1
hem,
lingerie.
Page 50

OLIL’.jI
l
Overlock
For
elastic,
of
Use
seam
the
needle
fabric
blind
layers
stitches.
Tip:
knits
and
stitch
at
clears
stitches
stretch
and
overcast
foot
wider
stitch
raw
the
fabrics,
them
when
No.
3
widths.
edgeofthe
in
your
one
sewing
Adjust
fabric
Expression
operation.
overlock
the
stitch
and
These
the
provides
stitches
seams.
width
pin
of
and
the
selection
a
This
guide
presser
have
guides
of
of
built-in
the
the
foot.
overlock
stretch
fabric
foot
to
stitches.
and
more
ensure
These
are
more
precisely
that
the
stitches
durable
and
prevents
right-hand
join
than
tunneling
swing
multiple
standard
of
the
of
2024
/
2014
Closed
This
serging
good
/
overlock
stitch,
fabrics
stitch
Stitch
7
in
for
stitch
single
a
that
attaching
/%
J
‘;,
6.0
operation,
fray
_2
easily.
knit
3.0
The
cuffs
is
suitable
closed
and
—-
-
overlock
collars
cj
3-5
for
to
sewing
is
garments.
E1
0/3
and
also
a
2024/
,/
/2014
Open
overlock
The
open
finishing
J
27ly%//f/oy
Closed
If
With
edge
you
overlock
wish
this
against
sew
stitch
that
stitch
a
—%
v.,V
%,
6.0
stitch
do
fabric
fraying.
not
with
Stitch
15
overlock
fabrics
Stitch
to
stitchanadditional
further
_2
3.0
works
fray
that
edge
--
well
when
excessively.
selvage
easily,
frays
thread
-
thread
protects
‘ii
3-5
joining
(
J
(2024)
select
or
edge-
J
stitch
the
0/3
J
21.
fabric
49
Page 51

2024/
/
2014
Prog.
0
vf
-
4.0
,
__
‘w
>
-
(f11
0
-
/
2-3
-/0
Sewing
•
•
Attach
Leave
the
the
on
holes
left.
buttons
the
the
presser
feed
of
the
with
dogs
button
shanks
foot.
lowered.
and
sew
Place
it
on
a
toothpick
described
as
between
on
Sewing
With
and
•
•
•
Turn
so
•
Lower
place
make
button.
•
Continue
complete
on
Button
four-hole
Remove
Mark
on
the
the
the
buttons
sewing
the
the
button
marked
handwheel
needle
the
presser
by
the
sure
sewing
the
buttons.
presser
fabric.
enters
shank
the
needle
program
program
foot
position
towards
the
foot
of
the
on
the
lifter.
also
button.
for
0
and
on
left
foot.
you.
you
lower
your
you
hole
The
Turn
enters
can
fabric.
and
button
The
easily
the
in
the
the
the
machine
sew
feed
Place
position
button.
will
be
handwheel
right
hole
dog.
the
the
will
on
held
of
two
button
button
in
to
the
•
•
Remove
apart.
Wrap
the
the
stem
toothpick
with
and
sewing
pull
thread
the
button
and
knot
and
fabric
it.
50
Page 52

s..#LIIILy
.)LIL.,I
I
2024/
/
2014
Darning
•
Attach
Turn
its
the
foot
holder.
the
needle
•
Darning
push
In
Lowerthe
•
•
Draw
you
Stitch
with
darning
the
highest
darning
far
as
The
presser
clamp/needle
it
to
this
position
up
start
1
the
straight
handwheel
position.
foot
will
as
it
C-shaped”
bar.
position:
the
rear
the
feed
dog.
the
bobbin
sewing.
-4.
“—?v’
‘7
0
foot
No.
toward
With
together.
go
The
long,
Lower
until
thread
thread
into
set
it
<_2
-
stitch
(special
6
you
thumb
Insert
the
guide
plastic
screw.
the
presser
engages
tension
and
-
until
and
the
hole
should
arm
Tighten
hold
d
-
accessory
the
index
pin
of
of
the
place
must
the
bar
lifter
in
the
darning
is
engaged
the
threads
c4jc;
2-3
for
needle
finger
the
darning
presser
itself
be
set
slowly
for
6
/
2014).
is
set
press
foot
around
behind
screw.
position.
darning.
when
at
the
and
I
I
I
—
I
I
I
I
L-’_.r’
...—
L
4
-i.
-,
,--
—-,-
•
Repair
evenly
is
determined
•
When
turn
Darning
stronger
Tip:
Remember,
the
medium-to-fast
more
slowly
side
the
forwards
you
the
fabric
in
stitch
consistent
may
of
your
damaged
have
both
repair.
length
and
by
covered
90
directions
when
cause
work
area/hole
backwards.
the
size
degrees
sewing
is
determined
sewing
length
small
of
the
and
over
with
speed
of
straight
knots
the
width
by
The
hole.
stitch
a
tear
the
by
will
to
guiding
length
of
the
over
will
feed
you.
allow
stitch.
appear
the
fabric
of
the
damaged
area
the
produce
lowered,
dogs
An
even,
youtosew
Sewing
on
the
seam
area,
again.
a
a
too
reverse
51
Page 53

sJLIL..I
I’.._)
2024/
/
2014
Gathering
A
straight
or
valances.
two
or
•
Set
tension
•
Mark
Sew
of
•
Sew
presser
•
Gather
to
•
Distribute
together
Tip:
It
to
threads.
three
your
the
along
thread
1
the
desired
is
important
avoid
Stitch
1
with
stitch
To
rows
stitch
to
first
at
or
2
foot
the
to
thread
obtain
3.
this
the
more
as
fabric
the
secure
%
“N
.,‘-
-
straight
can
be
of
gathering
length
gathering
line.
beginning
rows
a
guide.
by
fullness.
gathers
the
to
use
breakage
stitch
used
neat
to
Leave
of
pulling
evenly
gathering.
a
_2
6
to
gather
and
even
stitches.
6.0
mm.
line
on
about
and
stitching,
the
and
strong
when
--
gathers
Lower
the
4-
end
bobbin
knot
thread
pulling
-
sleeves,
right
inches
5
of
the
using
(bottom)
the
when
cij
2-3
you
needle
side
seam.
the
thread
on
the
cuffs,
skirts
should
thread
of
the
(10-13
edge
of
threads
ends
gathering
gathering
[]
0
sew
fabric.
cm)
the
Gathering
Gathering
visible,
waist
•
Mark
stitches
foot.
needle
and
needle.
•
Lower
to
attaching
not
•
When
pull
amount
pull
Tip:
Use
guide
elastic
seams
the
Turn
place
secure
catch
on
on
the
with
with
until
is
the
you
the
of
the
the
elastic
elastic
gathering
or
necklines.
first
gathering
the
the
hand-wheel
in
the
the
elastic
presser
the
elastic
elastic
the
elastic
are
finished
ends
gathering
elastic
cording
elastic
thread
needle
lowest
foot
threads
of
the
thread.
foot
thread.
threads
seams
row
is
towards
position.
thread
and
thread
to
thread
attaching
elastic
is
determined
Secure
(special
is
particularly
such
on
the
in
the
Raise
around
sew
a
to
the
fabric.
in
the
threads
accessory)
as
blouse
fabric.
middle
yourself
the
few
fabric.
Make
stitching.
the
elastic
to
the
by
all
thread
suitable
of
the
back
more
Continue
sure
gather.
amount
to
sleeves,
Sew
the
presser
until
presser
of
stitches
you
thread,
ends.
help
a
the
the
The
for
few
foot
do
you
52
Page 54

uiiiity
stitcfl
E
p.13
‘3
3
3
2024/
/
/2014
Bridging
The
bridging
for
used
•
Finish
the
to
•
Place
approximately
•
Stitch
needle
the
Tip:
To
guide
mm
is
inserted
plate.
Stitch
8
stitch
stitch
connecting
the
fabric
wrong
fabric
the
the
from
catches
make
guiding
(special
widths.
creates
side.
1/8
right
accessory.
The
in
the
h.
Q..J
“,
6.0
two
edges
under
inch
the
the
small
small
<>
a
finished
and
the
(3
side
fabric
fabric
post
hole
-.-
/•//
2.0
hemstitching
fabric
press
the
presser
mm)
apart.
of
fabric,
the
on
the
easier
It
is
available
on
the
at
the
-
edges.
seam
foot
making
right
use
bottom
front
/1
3-5
effect.
with
and
the
in
of
It
is
allowance
the
edges
sure
left
bridging
mm
3
of
the
the
needle
0
often
that
sides.
and
guide
1
202
0i4
vYYYZ
Cross
This
highly
•
Fold
•
Stitch
excess
5
J
hem
the
_1j
Stitch
18/
elastic
the
hem
:
stitch
hem
hem
cn..
AV
(2024)
stitch
allowance
from
fabric
‘r
up
is
the
to
Ii
_2
very
to
right
the
.:Tr
J—
suitable
the
reverse
side
stitching.
,±
of
ir-
.
*
for
decorative
side.
fabric.
the
T
T
.,
j
c
hems.
Trim
any
53
Page 55

LI
I
L,J
LII
L’jI
I%
2024/
/
2014
Rolled
Use
scarves,
beforehand.
produces
•
•
•
•
hem
the
Double-fold
fold).
Place
few
a
Turn
lowest
into
the
Lower
edge
sure
of
the
underneath
Stitch
1
with
rolled
ruffles
or
Hemming
neat
a
the
stitches
the
handwheel
point.
scroll
the
evenly
raw
the
hemmer
hemmer
and
the
folded
Raise
of
presser
into
edge
the
A
%,
0
hemmer
without
prevents
durable
fabric
fabric
to
secure.
the
the
foot
the
of
opening.
right
3
No.
7
to
finish
the
havingtoiron
edge
edge
(about
edge
towards
presser
hemmer.
and
while
hemmer.
the
fabric
Ensure
side
of
the
y
(2014
the
finish.
under
you
foot
When
butts
presser
Wd
--
-
special
edges
the
edges
1/8
the
until
the
and
sewing.
roll-hemming,
against
the
fabric
ç,j
3-5
of
blouses,
edges
from
inch
/
hemmer
needle
slide
guide
does
foot.
E1
accessory)
fraying
2
mm
per
and
is
the
fabric
the
fabric
make
the
left
not
run
SZ
and
sew
at
edge
its
54
2024
/
2014
Rolled
A
narrow
lighter
Stitch
/
hem
zigzag
stretch
3
with
fabrics.
AJ
Stitch
stitch
A
‘,
1-3
_2
1-3
3
makesanice
also
Wd
--
‘i1
35
-
rolled
-
hem
Sz
on
Page 56

I
I
Utility
stitci
2024/
/2014
Shell
Shell
such
finish
•
•
•
•
/
edging
edging
as
on
Select
mirror”
Tighten
shell
Finish
the
left.
While
presser
swings
Stitch
5
silk
and
lingerie.
blind
button
the
tuck.
the
sewing,
foot
over
is
needle
raw
at
the
a
very
rayon
stitch
edge
make
half
,,%
s:,
4.5
effective
No.
thread
of
folded
fabrics.
5
and
and
sure
the
edge.
1.5
tension
press
the
foot
finish
It
is
mirror
fabric
width,
the
_..,
--
-
for
thin,
frequently
with
it
to
create
seam
runs
and
c.j
4-5
soft
fabrics
used
the
“Pattern
a
deeper
allowance
under
the
the
blind
as
hem
i1
0
a
hem
to
Tip:
Add
as
and
you
colored
a
sew
strengthens
the
pearl
shell
the
cotton
tuck.
hem.
thread
This
on
creates
the
folded
a
pretty
edge
contrast
55
Page 57

Page 58

Buttonholes
buttonhole
the
buttonhole
the
with
on
buttonholes
buttonhole
buttonhole!
gimp
buttonhole
guide
foot
thread
58
58
58
59
59-60
61
62
63
General
Inserting
Inserting
Fully
Semi-automatic
manual
Manual
Buttonholes
Tips
a
notes
automatic
finish
buttonhole
foraperfect
Page 59

Buttonholes
Your
Expression
and
garment.
jackets,
different
pants
buttonholes
professional
Insert
the
buttonhole
fabric.
Place
guide.
This
fabric
itself,
can
thus
be
velvet,
knitwear
The
buttonhole
be
sewn
on
plush,
knitted
Your
Expression
buttonhole:
•
fully
automatically
•
semi-automatically
•
manual
has
Whether
(trousers),
touch.
the
fabric
ensures
that
guaranteeing
sewn
even
or
thick
guide
even
the
fabrics
offers
the
perfect
you
(1
for
guide
between
the
in
woollens,
ensures
most
and
you
wish
blouses
2014)
to
guide
an
even
difficult
difficult
heavy
three
buttonhole
to
sew
or
give
support
the
moves,
feed
materials,
that
perfect
of
knits.
ways
buttonholes
stretch
your
garments
the
feed
buttonhole
rather
motion.
buttonholes
fabrics
of
sewing
for
every
fabrics,
motion
foot
than
Buttonholes
such
such
a
as
as
fabric
on
2
the
and
the
plush
velvet,
of
the
can
the
Inserting
Push
the
(between
The
white
Press
spring
guide
and
Attaching
Use
buttonhole
Before
the
front
presser
the
metal
the
part
the
guide
back
the
buttonhole
starting
to
the
foot”
sensormatic
part
arrows)
two
extends
towards
slightly
back
foot
to
sew,
second
page
27).
of
so
of
No.
the
over
the
that
the
foot
5
pull
red
Snap
buttonhole
buttonhole
on
the
the
front
there
machine.
No.
to
sew
the
runner
mark
on
guide
backofthe
plate.
needle
as
far
as
isasmall
5:
buttonholes.
of
the
(also
see
buttonhole
guide
into
needle
it
will
gap
foot
“Changing
foot
the
slot
plate.
go.
It
between
toward
No.
5.
must
the
the
58
Page 60

I
o
COO
o
—-“-‘-I’ll’
Fully
automatic
Fully
automatic
pressing
0
0
using
width
button
Expression
until
(-1+
you
the
C).
button
-1+
button
make
button
Sew
will
adjustments.
buttonhole
buttonholes
9.
Adjust
B.
You
A)
and
as
many
continue
are
accomplished
the
size
can
also
the
buttonhole
buttonholes
to
sew
the
of
the
adjust
as
same
buttonhole
the
density
you
wish.
size
by
by
buttonhole
(-1+
Your
buttonhole
Semi-automatic
You
can
the
“reverse
started
sewing
This
will
allow
where
you
The
word
“man”
you
have
touched
of
the
buttonhole
buttonhole
left
side
of
once
of
the
again.
side
(16)
also
finish
sewing”
the
you
want
appears
is
ends,
the
the
buttonhole
buttonhole
buttonhole
a
buttonhole
button
buttonhole.
to
place
it.
reverse.
desired.
machine
press
in
This
is
(16)
the
the
Expression
indicates
Before
will
the
same
the
manually
one
last
or
the
slow
“reverse
time
back
a
left
down.
length
sewing”
by
pressing
after
you
bartack
window,
manual
side
of
When
as
the
have
after
finish
the
the
right
button
59
Page 61

H
r!
The
‘V
V.
second
buttonhole,
All
remaining
Note:
If
the
length
buttonhole
Reprogramming
is
required.
is
bartack
The
word
buttonholes
or
stitch
changed,
with
will
“auto”
a
new
the
be
sewn
and
appears
will
now
be
density
programming
length
of
value
complete
in
the
window.
sewn
automatically.
a
programmed
is
cancelled.
or
a
new
the
density
U
IUU
I
60
Page 62

DULLUI
lUIt
II
Manual
You
sewing.
sewing”
The
Once
“reverse
now
buttonhole
can
also
Select
button.
buttonhole
you
sewing”
sew
the
buttonhole.
Before
the
will
slow
down.
bartack,
The
the
The
All
press
machine
buttonhole.
word
remaining
automatically.
Note:
The
when
another
You
can
also
buttonhole
the
sewing”
bartack.
indicates
Before
will
same
“reverse
The
the
slow
length
second
button
The
a
down.
sewing”
buttonhole.
remaining
All
pressing
by
the
side
left
set
the
the
desired
The
length,
have
reached
button
first
bartack
left
side
of
complete
To
“reverse
the
will
sew
“auto”
appears
buttonholes
programming
stitch
is
place
the
has
been
one
time
word
“man”
manual
left
side
finish
of
When
the
right
as
button
bartack
The
will
word
buttonholes
the
“reverse
of
the
buttonhole.
length
word
“man”
set
the
once
and
the
buttonhole
the
second
in
can
of
selected.
last
programmed.
after
appears
of
the
buttonhole
the
left
side
(16)
be
“auto”
can
sewing”
of
the
buttonhole
buttonhole.
appears
previously,
desired
again.
the
length,
The
second
ends,
the
buttonhole
sewing”
button
bartack
the
window.
nowberepeated
buttonhole
the
bartack
the
you
have
in
buttonhole
manually,
the
ends.
side
of
the
of
the
buttonhole
once
again.
sewn
and
appears
in
nowbefinished
button
while
Press
the
in
the
window.
disappears.
press
machine
side
of
machine
the
with
a
once
again.
and
complete
fully
deleted
is
even
Press
stitched
window.
the
desired.
is
the
“reverse
the
This
machine
buttonholeisthe
press
complete
the
the
window.
manually,
(16)
the
at
“reverse
the
will
the
second
after
first
the
of
end
Keyhole
Keyhole
sewn
Warning:
the
I
I
project.
the
measuring
the
edge.
Choose
appear
stitch
Tip:
buttonhole
buttonholes,
with
the
The
rounded
Howe
bartack
from
buttonhole
The
keyhole
stitch
in
the
density
Cut
open
the
curve
punch
buttonhole
keyhole
end
towards
ver
the
end.
Itisimportant
the
from
46.
A
window
indications.
all
buttonholes
of
the
or
awl.
—46
uptoa
toot.
buttonhole
the
buttonhole
starting
the
inside
buttonhole
standard
along
These
keyhole
(model
length
edge
to
point
to
is
keyhole
with
with
buttonhole
2024)
of40mm
must
of
begin
will
first
inwards.
outside
the
sewn
width,
the
settings
the
be
sewn
your
garment/
sewing
mark
the
Always
towards
automatically
fully
buttonhole
length
can
be
seam
ripper.
with
a
can
belt
be
with
from
length,
sew
the
will
and
altered,
Open
61
Page 63

*_‘..A’.i.I
ii
iJIcO
Buttonhole
Buttonholes
durable
gimp
thread
thread
thread
the
buttonhole
pull
up
of
the
presser
After
completing
thread
until
bartack.
bartack.
and
will
approximately
to
stitch
over
the
into
the
the
Cut
off
with
that
foot.
foot.
loop
are
not
over.
metal
right
the
the
gimp
gimp
thread
sewn
with
stretch.
Place
the
bar
extending
Pass
the
and
left
Buttonhole
buttonhole,
of
thread
threads
Use
the
thread
guides
is
gimp
pearl
same
center
No.
pull
hidden
just
9
from
ends
on
can
the
threads
cotton
color
of
a
the
now
ends
below
behind
as
length
the
under
clamp
the
are
or
a
the
of
center,
the
be
sewn.
of
the
the
final
more
regular
sewing
gimp
back
foot
and
at
the
front
gimp
buttonhole
of
Keyhole
Place
bar
extending
Pass
and
left
Guide
Sew
the
machine
gimp
Warning:
surface.
Pull
the
loop
is
After
sewing
taut
and
gimp
thread.
the
the
guides
the
right-hand
sews
thread
The
gimp
just
finish
buttonhole
center
from
thread
ends
on
gimp
thread
the
down
presser
thread
in
front
the
curve,
sewing
of
from
of
a
the
the
seam
first
on
with
length
center,
under
clamp
along
few
the
foot
the
the
hold
the
gimp
of
gimp
front
the
at
the
the
of
the
buttonhole.
stitches
clamp
must
not
left
towards
needle.
the
gimp
buttonhole.
thread
thread
of
the
foot
and
back
foot
at
of
the
with
a
be
raised
Carefully
thread
Cut
over
buttonhole
pull
of
the
the
After
curved
straight
the
rear
sew
off
up
side.
from
little
a
the
the
into
presser
the
end
pin.
until
the
excess
metal
foot.
the
pull
the
the
curve.
more
right
foot.
the
fabric
62
Page 64

bUttOflflO
Buttonhole
•
wider,
A
heavy
•
Use
sewn
•
Materials
with
stabilizer.
•
Keyhole
if
gimp
a
buttonhole
•
Linen
you
use
•
Buttonholes
button
buttonhole
tips:
less
dense
fabrics.
presser
watersoluble.
foot
very
close
that
shiftorstretch
buttonholes
thread
with
buttonholes
buttonhole
are
diameter.
on
the
buttonhole
No.1for
reinforced
to
a
tissue
are
is
inserted
gimp
thread).
are
twist
normally
important
It
is
same
is
buttonholes
edge.
easily
paper
or
particularly
while
particularly
thread.
selected
to
fabric/stabilizer
recommended
that
are
should
be
other
lightweight
stable
and
sewing
(see
dense
and
little
larger
a
always
sew
your
as
on
to
be
reinforced
durable
Keyhole
attractive
than
test
a
project
if
the
I
63
Page 65

-ri
-Il
D
C
0
D
—
3
C
0)
0
0
0
/
I
1I
i
J
ti!
/
7/
Page 66

Page 67

Presser
Accessories
—
R
—
and
4,
F
needles
feet
(standard
accessory
Felling
Pintuck
Cording
Knit
1/4
Free
bias
Pintuck
Special
Non-stick
7/9
Circular
Fringe
Needle
foot/appliqué
foot
foot/shirring
edge
inch
quilt
motion
binder
foot
Hole
foot/braiding
embroidery
foot/narrow
chart
accessories)
foot/ruffler
and
quilting
with
guide
fancy
stitch
table
foot
foot
patchwork
foot!
foot
foot
guide
edge
foot
for
foot
leather
66-67
68-69
80,
70
71
72
73
74
75
76
76
77
78
79
81
Page 68

-
-
-
-
‘—.
,-.
,
,
‘-
,..,
...4
I
%..,
Presser
Standard
No.
Order
98-694
(model
98-694
(model
Fancy
(for
Order
98-694
(model
Fancy
for
dual
Order
98-694
(model
0
No.:
816-00/000
2024)
847-00/000
2014)
stitch
dual
feed)
No.:
814-00/000
2024)
stitch
feed)
No.:
897-00/000
2014)
feet
presser
foot
No.
foot
No.
foot
1
(not
2
(normal
accessories)
Zipper
and
V
r
presser
Order
98-694
(model
Order
/t
:
-.
98-694
,
(model
Buttonhole
Order
93-036
(model
Darning
Order
No.:
93-035
(model
For
model
special
edge
foot
No.:
884-00/000
2024)
No.:
843-00/000
2014)
foot
No.:
990-91/000
2024
and
foot
No.
960-91/000
2024)
2014
accessory
No.
4
No.
2014)
6
5
Clear
(Fancy
for
dual
Order
96-694
(model
Blind
overlock
Order
98-694
(model
Order
98-694
(model
66
view
foot
stitch
feed)
No.:
864-01/000
2014)
stitch
and
foot
No.:
890-00/000
2024)
No.:
845-00/000
2014)
foot
No.
No.
3
not
1
Roll
Order
98-694
(model
For
special
hemmer
No.:
model
No.
818-00/000
2024)
2014
accessory
7
Page 69

7.
7
Accessories
and
nee
Edge
Order
(model
Bulb
remover/Needle
Order
No.:
(model
guide
No.:
2024
2024
/1
No
98-802
and
93-038
and
7
8
422-00/000
2014)
plate
920-91/000
2014)
changer
77
Buttonhole
Order
(model
Second
Seam
Brush
Oil
7
No.:
2024
spool
ripper
guide
93-037
and
holder
No.
10
595-91/000
2014)
Order
Order
Order
Order
.<
No.:
No.:
No.:
No.:
93-033
99-053
93-847
93-035
.
063-44/000
016-91/000
979-91/000
910-91/000
[1
1
SCHMETZ
LN1VEI8SAL
130/7058
00
80
00
12
121415
4
ml
100
75
11
—
HUia.
Z4
4’%
5,
A
1
2
3
Order
46
4.
5.
6.
Needle
Order
Felt
pad
Order
Bobbins
Spool
Order
Order
Order
No.:
No.:
No.:
No.:
box
cap
No.:
No.:
48-020
93-033
93-040
93-035
93-036
93-036
804-32/000
064-05/000
970-45/000
050-44/000
048-44/000
049-44/000
67
Page 70

Special
accessories/presser
feet
(available
from
your
dealer):
Designation
Appliqué
Open
Bias
Pintuck
needles
Pintuck
needles
Pintuck
Fringe
Straight
Needle
Felling
Felling
Shirring
Shirring
Ruffler
Cording
Eyelet
Eyelet
Roll
hemmer
Hemmer
Hemmer
Knit-edge
Non-stick
Non-stick
Non-stick
Circular
foot
toe
appliqué
binder
foot
5
with
foot
7
with
needle
blade
foot
stitch
plate
with
foot
4.5
foot
6.5
foot/Gathering
foot/Gathering
foot
(3
plate
dia.
plate
dia.
2
mm
4
mm
(for
3
mm
(without
foot
toot
(for
foot
(without
fancy
stitch
embroidery
grooves
needle
grooves
(2)
foot
with
round
mm
mm
groove)
4
mm
6
mm
(without
dual
dual
guide
foot
spacing
spacing
feed)
dual
feed)
dual
toot
(size
(size
round
hole
foot
foot
(metal)
dual
feed)
feed)
80
80
2.0
1.6
hole
feed)
twin
-
twin
-
2.5)
2.0)
Order
No.
93-042
93-036
98-053
93-042
93-042
93-035
93-042-943-91/000
98-694
98-694
93-042
93-042
93-036
93-036
98-999
93-036
93-036
93-036
98-694
98-694
98-694
93-042
93-036
93-036
93-036
93-036
941-91/000
931-91/000
484-91/000
950-91/000
953-91/000
952-45/000
821-00/000
822-00/000
946-91/000
948-91/000
998-91
967-91/000
650-00/000
91
5-91/000
976-45/000
947-45/000
873-00/000
823-00/000
81
8-00/000
957-91/000
917-91/000
922-91/000
962-91/000
953-91/000
/000
Sewing
For
Allows
For
For
light
For
lightweight
Enhances
For
Warning!
in
center
For
very
Warning!
in
center
For
flat-felled
light
For
gathering
For
gathering
weight
For
placing
pleats
Warning!
in
center
For
cording
For
eyelet
For
eyelet
For
hemming
For
hemming
For
hemming
For
sewing
For
sewing
For
embroidering
For
embroidering
Circular
work
appliqué
full
view
binding
creating
creating
creating
top-stitching
light
to
at
embroidery
to
medium
the
Only
needle
and
Only
needle
medium
fabrics
dense
regular
Only
needle
embroidery
embroidery
knitted
leather
edges
pintucks
fabrics
fringe/loop
seams
on
on
edges
edges
edges
work
of
pintucks
weight
effect
use
position.
seams,
soft
materials
use
straight
position.
weight
very
light
or
intervals.
use
straight
position.
fabrics
and
leather
leather
work
surface
with
bias
on
fabrics
on
of
an
embroidery
straight
quilting
on
fabrics
light
to
medium
loose
synthetics
tape
uncorded
stitch
(silk,
stitch
weight
stitch
and
jersey
fabrics
pintuck
effects
sewing
etc.)
68
Page 71

.3
Designation
Bridging
1/4
(without
1/4
(for
Pintuck
Braiding
7/9
3
Narrow-edge
Stitch-in-the-ditch
Free
Quilt
Quilt
The
following
Quilting
Quilting
dual
hole
motion
work
guide
dual
feed)
foot
foot
foot
guide
and
with
(for
quilt
finger
pages
and
feed)
(for
foot/
foot
guard
patchwork
patchwork
guide
6
dual
feed)
dual
feed)
foot
contain
foot
foot
mm
application
examples
Order
93-036
93-036
93-036
93-036
93-036
93-036
93-036
93-036
93-036
93-036
of
some
No.
952-46/000
925-91/000
927-91/000
942-91/000
936-91/000
946-91/000
939-91/000
963-91/000
910-91/000
909-91/000
special
accessory
Sewing
For
with
For
For
For
For
For
For
lace
fabric
For
For
For
feet.
all
quilt
oversewing
oversewing
topstitching
quilt
work
sewing
quilting
quilting
embroidering
or
together
a
hemstitch
and
and
second
and
stitch-in-the-ditch
and
embroidery
sewing
work
work
two
seam
patchwork
patchwork
areas
cords
decorative
narrow
fabric
edge
edges
effect
jobs
jobs
between
threads
edges,
to
quilting
work
of
sewing
main
fabrics
pintucks
69
Page 72

Felling
Flat
felled
known
children’s
this
technique.
decorative
The
felling
•
Attach
•
Place
•
Overlap
5/8(1
•
Place
foot.
foot.
Sew
•
Separate
felling
overstitched
taut
Stitch:
Stitch
Tension:
foot
jeans
as
wear,
the
the
-1.5
this
The
along
foot.
during
1
length:
4-5
seams
seams.
blouses
You
by
using
foot
is
felling
fabrics
the
raw
cm).
overlapping
fabric
the
the
fabric
The
along
sewing.
3
are
particularly
can
make
a
sewing
available
foot
wrong
edge
must
folded
and
hem
the
Seams
and
in
to
of
edge
be
placed
edge
feed/the
is
turned
edge.
shirts
these
thread
two
the
presserfoot
sides
the
over
with
strong
on
sportswear
are
seams
different
together.
lower
the
fully
a
protruding
over
Pull
the
and
are
morexdurable
particularly
of
contrasting
a
widths.
holder.
ply
about
by
tongue
under
straight
by
the
two
stitch.
foot
fabric
commonly
and
of
the
presser
hem
and
with
color.
3/8
the
into
is
layers
to
felling
the
Appliqué
Appliqués
effect.
create
densely
special
•
Attach
•
Transfer
a
letters
•
Iron
out
appliqué.
•
Position
base
•
Place
•
Stitch
Make
that
Stitch:
Stitch
Stitch
Tension:
foot
are
By
using
countlessrnew
stitched
cutout
the
appliqué
your
fusible,
or
the
your
paper-backed
numbers
fusible
motif
and
fabric.
a
stabilizer
over
all
sure
that
fraying
no
3
length:
width:
0.35
1.5-2
2-3
easily
different
seam
on
its
drafted
and
press
contours
the
occurs
sewn
designs.
with
sole
foot.
have
webbing
peel
your
under
needle
and
materials
You
the
for
the
pattern
webbing.
to
be
onto
the
paper
appliqué
your
with
a
sews
later.
always
and
can
appliqué
satin
to
the
Remember
drawn
the
appliqué
from
pieces
work
narrow
over
produce
patterns
make
foot,
stitch
paper
as
area.
satin
the
seam.
mirror
the
in
outer
beautiful
a
you
a
perfect
which
side
of
that
images.
material.
back
place
stitch
edge
can
has
any
Cut
of
the
on
your
zigzag.
a
so
70
Page 73

eul
,
ts
aria
neec
Pintuck
This
duplicated
linens.
nostalgic
•
Attach
•
Insert
H-ZWI;
•
Thread
•
Using
your
•
Increase
adjusting
(see
form
•
Sew
pintuck,
in
Stitch:
Stitch
Tension:
foot
classic
the
heirloom
on
many
Undergarments
touch
the
pintuck
a
twin
1.6
or
the
two
water-soluble
a
first
pintuck.
the
screw
chapter
well-defined
your
first
allow
foot.
This
1
length:
2.5
5
types
pintucking.
by
needle
2.0
mm
needles
bobbin
of
the
on
“Bobbin
pintucks.
pintuck.
the
first
will
sewing
of
and
foot
on
your
needle
marker,
thread
bobbin
When
pintuck
produce
technique
fabric
children’s
machine
spacing;
(see
page
draw
tension
case
thread
you
to
evenly
can
such
as
clothes
(e.g.
29).
a
placement
by
turning
slightly
tension”).
start
on
run
parallel
spaced
be
light
size
This
the
easily
cotton
are
given
130/705
80).
the
to
the
will
second
in
a
groove
pintucks.
line
right
help
and
a
for
Tip:
For
the
small
foot
Inserting
making
A
cording
in
your
•
Remove
•
Thread
the
•
Replace
plate
gimp
the
during
•
Gently
If
you
would
can
attach
front
edge
shapes
better-defined
thin
materials
pintuck
with
grooves
5
a
gimp
the
pintuck
tongue
pintucks.
the
the
center
the
and
the
thread
work
support
sewing.
pull
like
to
a
pin
tuck
of
the
the
fabric
pintuck.
use
the
blade,
and
thread
appear
is
not
needle
gimp
thread
front
of
the
needle
sewingmachine
while
sewing.
so
the
fabric
emphasise
blade
needle
prior
pintuck
for
heavier
the
large
creates
even
used
plate.
from
needle
plate.
that
it
taut
while
plate.
to
when
The
Feed
does
(special
sewing
foot
pintuck
a
similar
more
inserting
below
plate.
notch
provides
the
not
sewing
the
pintuck
accessory)
The
pintuck
and
with
materials
blade.
optical
raised.
through
between
space
gimp
become
the
effect,
blade
produces
7
grooves
use
effect
gimp
a
the
the
for
thread
knotted
pintucks.
the
hole
you
on
pre
a
and
pintuck
by
thread
needle
the
under
the
at
71
Page 74

—
Cording
Cording
is
overstitched
obtain
made
Attach
Place
of
foot
•
Overstitch
produces
Tip:
You
a
Stitch:
Stitch
Stitch
Tension:
foot
is
an
effect
more
the
the
the
grooves
at
the
can
medium
12
‘ength:
width:
3
a
technique
to
effective
cording
pearl
back.
the
what
also
pearl
0.4
1.5
produce
similar
thread
at
the
pearl
is
known
obtain
thread
-
0.6
-
2
in
to
with
foot
front
thread
a
which
pearl
a
purl
seam.
braiding.
this
seam.
in
the
foot
and
with
as
the
remarkable
with
a
thread
With
Appliqués
so
it
lies
under
narrow
a
purl
seam.
effect
thread
leads
of
this
the
satin
by
a
or
a
fine
you
can
also
through
presser
stitch.
overstitching
different
cord
can
color
be
one
This
Shirring
Beautiful
easily
wear
•
Attach
foot
upwards
•
Place
presser
the
Hold
you
•
Be
•
Disengage
front
presser
Tip:
Tighter
needle
Stitch:
Stitch
Tension:
footfGathering
gathering
with
the
or
home
the
into
the
the
foot,
top
through
the
top
pull
the
sure
to
and
remove
foot
gathers
thread
1
length:
3-5
shirring
decorating
shirring
rear
until
it
fabric
and
fabric
greater
guide
the
shirring
holder
tension
3
effects
groove
snaps
to
the
the
the
it
can
foot
foot,
projects.
foot
into
be
gathered,
fabric
foot
slightly
the
gathering
fabric
foot
in
the
at
the
be
and
can
be
e.g.
on
by
hooking
of
the
the
to
cut
out.
taut
edges
by
direction
back.
achieved
the
achieved
lightweight
the
foot
holder.
front
bar.
face
remain
while
effect
evenly
pushing
of
by
stitch
quickly
rear
Push
up,
under
flat,
face
sewing.
you
through
it
down
the
groove
increasing
length.
and
children’s
bar
of
the
the
the
down,
The
harder
achieve.
the
at
the
of
the
the
foot
on
foot.
72
Page 75

i}
F]
F]
Knit
edge/piping/beading
Thick
seams
easily
with
seam
on
will
length:
width:
knit
over
give
15
3-5
sewing
This
stretching
Stitch:
Stitch
Stitch
Tension:
the
out
in
knit
fabrics
wool
a
the
of
3.0
6.0
knitted
edge
thread,
seam
shape.
fabrics
foot.
(e.g.
additional
foot
or
In
shoulder
pulled
imitation
order
seams),
slightly
strength
to
furs
obtain
we
taut
and
can
be
a
perfect
recommend
into
the
keep
it
sewn
seam.
from
Ruttier
With
pleats
ruffles,
The
ruffler
1.
Folding
2.
Folding
in
one
3.
Folding
another
When
operating
Stitch:
Stitch
Tension:
the
ruffler
automatically
frills,
home
can
and
pleats
operation.
pleats
fabric
in
you
buy
the
instructions
1
length:
3
3-5
you
can
while
textiles,
be
used
securing
in
fabric
in
fabric,
one
ruffler
Accessories
make
closely
sewing.
etc.
in
three
pleats
in
and
securing
attaching
operation.
from
your
are
included.
or
This
different
fabric.
lace
PFAFF
widely
is
ways:
to
and
very
a
second
dealer,
and
spaced
useful
securing
full
neec
for
fabric
to
.
J
73
Page 76

LAUI
1/4
A
quilt
sandwiched
joined
top
polyester
The
for
needle
and
(3.15
•
•
Stitch:
Stitch
Tension:
inch
consists
together
layer
1/4
joining
and
between
mm).
Attach
Sew
seam
edge
fabric
1
length:
i
Quilt
between.
of
the
cotton
or
inch
quilt
your
the
the
the
together
allowance
of
the
along
3
-
5
cii
and
of
two
in
continually
quilt.
and
pieces
outer
needle
1/4
inch
your
foot.
the
2.5
I
ItLJl
iU
patchwork
layers
Many
This
is
batting
patchwork
of
fabric.
edge
and
quilt
pieces
of
1
/4’
For
a
inner
edge
foot
of
fabric
geometric-pieces
changing
tacked
to
andabacking
foot
The
clearance
of
the
foot
the
inner
and
patchwork
of
fabric
guide
your
seam
allowance
of
the
with
a
patterns
middle
a
layer.
is
particularly
is
1
/4
edge
using
fabric
of
foot.
layer
of
foot.
stitch
of
fabric
to
layer
between
(6.3
the
along
1/8
of
batting
form
of
suitable
mm)
foot
1.
For
the
guide
are
the
the
118
a
outer
your
Quilting
In
traditional
with
small
accomplished
(stitch
11).
•
•
Use
contrast
a
the
in
Set
invisible
the,needle
thread
to
allow
top
the
purchase
to
PFAFF
threads.
•
When
quilt,
you
bobbin
thus
produces
needle
the
desired
Stitch:
Stitch
11
length:
Tension:
of
the
quilting
hand
bobbin.
tension
the
side
dealer)
you
should
thread.
and
9
or
sew
fabric
layers
the
stitches.
faster
and
(monofilament)
complementary
thread
approximately
needle
thread
of
your
work.
a
second
for
working
the
stitch
only
The
intermediate
hand-stitched
a
bobbin
thread
effect.
3
-
4
three
This
easier
tension
bobbin
on
see
You
the
tensions
layers
of
fabric
hand-stitched
with
the
thread
in
polyester
to
7-9.
1/4
turn
to
pull
the
may
find
case
(available
with
specialty
the
three
triple
stitch
stitch
appearance.
as
are
joined
look
can
be
sewing
Loosen
the
or
machine
needle.
cotton
the
Use
thread
bobbin
counterclockwise
bobbin
thread
it
beneficial
from
your
techniques
layers
of
your
of
your
disappears
and
Adjust
needed
to
produce
to
and
your
74
Page 77

1’
Free-motion
The
free-motion
stitch
is
your
of
The
stitches
piece.
straight
needle
the
•
•
•
•
Tip:
Stitch:
Stitch
Tension:
quilt
faster
Free-motion
position),
four
Loosen
Press
thumb
Guide
the
presser
of
the
needle
Tighten
Bring
(see
Free-motion
the
1
length:
quilt
well
suited
are
guided
you
sew,
become.
will
lines.
For
markings
red
the
screw
free
the
and
index
the
pin
foot
free-motion
clamp.
the
screw.
the
free-motion
page
51)
free-motion
15
3-5
foot
quilt
foot
free-motion
for
manually
more
the
Try
this
quilting
free-motion,
with
spacing
a
on
the
on
the
motion
quilt
finger.
of
the
free-motion
holder
quilt
quilt
and
lower
embroidery
quilt
foot.
combination
in
consistent
technique
possible
is
straight-line
of
corners
back
foot
as
far
asitwill
foot
must
foot
feed
the
can
quilting.
during
1/4
of
of
the
gently
quilt
be
into
dog
also
with
The
free-motion
and
uniform
out
first
in
both
curved
quilting
inch
(635
the
foot
presser
together
foot
into
The
go.
positioned
the
darning
(see
completed
be
straight
the
three
onatest
(center
mm),
asaguide.
foot
with
the
hole
long
behind
position
page
32).
layers
quilting.
your
and
use
holder.
of
fork
the
using
Bias
Binding
edges
unfolded
•
Remove
binder.
•
Cut
•
Feed
to
•
Adjust
needle
mm)
•
Stitch
•
Insert
bias
will
Tip:
You
a
Stitch:
Tension:
binder
with
smooth
a
the
the
the
from
tape
enclose
can
zigzag
optional
bias
bias
tape
the
beginning
tape
back.
binder
the
pierces
the
about
the
edge
edges
obtain
or
3-5
tape
and
presser
into
the
folded
1
(2.5
the
fancy
neat
about
of
and/or
of
the
into
raw
an
very
is
a
appearance.
1(24
foot
the
bias
scroll
the
the
fabric
edge
along
cm)
fabric
the
slot
edge
additional
stitch.
easy
method
For
mm)
wide.
holder.
and
tape
atadiagonal.
the
of
binder
needle
approximately
of
tobebound
automatically
the
bias
the
bias
of
the
decorative
position
binder.
this
Attach
1/16
tape.
tape.
between
during
effect
of
and
The
giving
you
the
pull
that
so
(1
bias
sewing.
by
need
bias
-
1.5
the
fabric
out
the
tape
using
75
Page 78

I
Pintuck
With
this
spacing
precisely
between
•
Attach
attached
•
Insert
needles).
•
Thread
thread
page
•
Place
guide.
automatically
sewn
Sew
Replace
Set
Place
•
Place
center
stitches
Stitch:
Stitch
Tension:
foot
foot
of
space
the
the
a
tension
71)
the
Sew
in
all
the
stabilizer
two
of
1
length:
3-5
with
you
5
or
11
decorative
pintucks.
pintuck
with
the
twin
needle
the
two
with
or
first
pintuck
a
second
be
area
the
remaining
the
twin
needle
pintucks
foot.
the
in
this
2.5
guide
can
accurately
mm.
foot
guide
needles
tight
without
spaced
between
pintucks.
needles
thread
under
in
Embroider
space.
The
stitches
with
(2.0
(4-
under
pintuck.
tension
work
the
same
guide.
pointing
or
2.5
(see
page
and
5)
gimp
the
The
to
allow
pintucks.
with
area.
guides
your
sew
foot
up
to
mm
sew
thread.
groove
a
normal
a
to
3.
on
desired
pintucks
allows
to
6
mm
foot
The
left
the
space
29).
Set
one
pintuck
in
second
decorative
sewing
either
with
a
you
to
wide
can
be
right.
or
the
between
the,
needle
(see
the
extended
pintuck
stitch
needle.
side
the
of
decorative
will
to
also
be
Non-stick
The
synthetic
particularly
of
up
to
6
vinyl.
It
may
woven
or
knit
is
it
important
embroidering.
is
recommended
embroidery
Attach
Embroider
Remove
WARNING!
tight
stitch
and
vinyls
that
needle
Stitch:
optional
fancy
coating
suitable
mm
wide
be
helpful
interfacing.
to
A
needle
non-stick
leather
stabilizer.
Very
density,
to
perforate
piercing
stitch
for
on
use
needle
for
thicker
works
fancy
closely
may
points
foot
on
the
sewing
leather,
to
stabilizer
a
with
as
desired.
set
cause
and
back
Due
a
leather.
well.
stitch
stitch,
tear.
will
(for
leather)
underside
decorative
synthetic
these
to
longer
foot.
leathers,
It
remain
of
leather
fabrics
the
stretch
the
under
eye
(system
On
softer
i.e.
short
synthetic
is
importanttoremember
visible
this
and
with
of
fabric
stitch
foot
utility
and
a
these
when
leathers
leathers
in
leather.
makes
stitches
fusible
fabrics,
130
length!
it
N)
an
76
Page 79

‘..J’J’JI
7/9
hole
foot
Beautiful
presser
decorative
—
•
1
—
Tip:
—
—
Stitch:
Tension:
Cut
your
through
Lead
Leave
inches
Attach
Stitch
choice.
Pearl
optional
decorative
foot.
Up
stitches
cords
the
cords
the
the
thread
(4
-
the
7/9
over
the
thread
3
holes
5
to
cm)
or
effects
cords
9
and
a
to
the
in
the
under
tails
at
the
hole
foot
threads
embroidery
can
may
variety
desired
foot
the
presser
extending
back,
with
a
easily
be
stitched
embroidery
of
length.
from
about
stitch
twist
be
the
foot
and
is
achieved
over
Thread
top
and
1
thread
well
threads.
the
to
the
out
1/2
inches
suited.
with
using
bottom.
the
of
this
cords
back.
to
your
Braiding
This
cords
•
2
•
•
Stitch:
Tension:
special
(e.g.
Thread
at
the
in
the
to
the
Attach
Select
stitch
optional
foot
loosely
your
front
center
back
the
stitch
a
over
3
foot
cord
of
of
braiding
the
is
best
twisted
the
the
and
cord
suited
wool)
or
ribbon
foot.
Feed
foot
and
foot
to
decorative
or
ribbon.
for
overstitching
or
through
it
down
guide
the
machine.
thread
narrower
a
the
through
under
I
wire
of
your
Cu
heavy/bulky
tape/ribbon.
loop/guide
the
the
foot
choice
i
hole
and
and
I
IUI
77
Page 80

ctliu
iieeuIes
Circular
The
circular
embroidered
Your
embellish
The
guide
•
Mark
•
Insert
hole
of
in
twice
guide
•
The
holder.
•
Stabilize
•
Place
below
•
Select
•
Change
the
another
Stitch:
embroidery
fabric
your
a
the
at
the
the
circle
the
holder.
the
point.
guide
the
the
the
the
screw
mark
optional
embroidery
circles.
is
automatically
clothing
is
marked
center
point
circular
back
is
determined
The
distance
is
secured
your
fabric.
center
rubber
desired
radius
and
sliding
on
guide
guide
The
and
in
1
with
embroidery
of
the
full
width
between
with
marked
point
of
embroidery
with
the
the
guide
creative
fed
household
cm
increments.
a
fabric
presser
by
of
the
point
the
every
circular
arm.
allows
you
possibilities
in
a
circle,
marker
guide
foot
the
placement
the
circle
the
needle
screw
of
your
embroidery
pattern
new
circle
embroidery
to
allowing
items.
from
holder.
will
and
on
the
fabric
and
by
create
are
on
your
the
The
of
be
the
presser
directly
guide.
begin
loosening
guide
perfect
endless!
you
fabric.
left
into
radius
the
equal
rubber
sewing.
to
the
guide
to
foot
to
78
Page 81
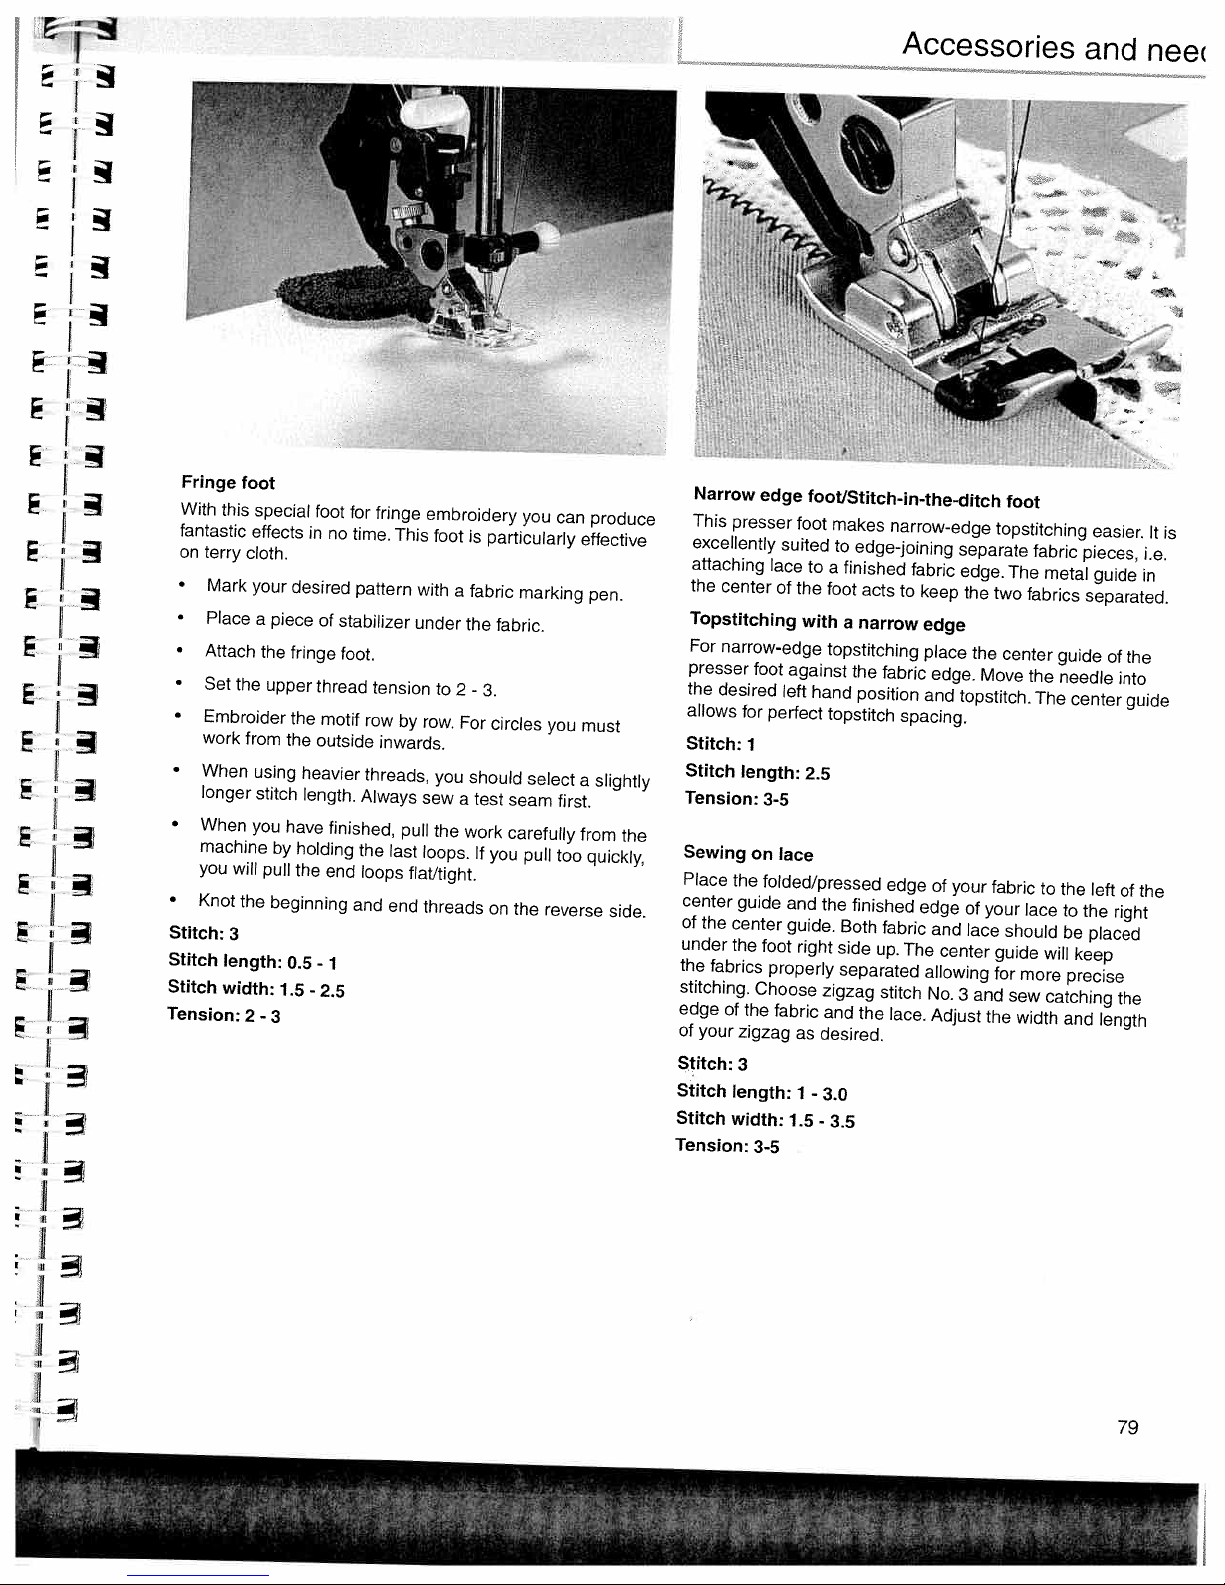
Accessories
and
nee
Fringe
With
fantastic
on
terry
Mark
Place
•
Attach
•
Set
Embroider
work
•
When
longer
•
When
machine
you
•
Knot
Stitch:
Stitch
Stitch
Tension:
foot
this
special
effects
cloth.
your
the
from
using
you
will
the
3
length:
width:
2
desired
a
piece
the
fringe
upper
the
the
stitch
have
by
holding
pull
the
beginning
0.5
1.5
-
3
foot
in
no
of
stabilizer
thread
motif
outside
heavier
length.
finished,
end
-
1
-
2.5
for
time.
pattern
foot.
the
and
fringe
This
tension
row
by
inwards.
threads,
Always
last
loops
end
embroidery
foot
with
under
to
row.
you
sew
pull
the
loops.
flat/tight.
threads
is
particularly
fabric
a
the
2
-
3.
For
should
a
test
work
If
you
on
you
marking
fabric.
circles
seam
carefully
pull
the
you
select
reverse
can
effective
must
a
first.
from
too
produce
pen.
slightly
the
quickly,
side.
Narrow
This
presser
excellently
attaching
the
center
Topstitching
For
narrow-edge
presser
the
desired
allows
Stitch:
Stitch
Tension:
Sewing
Place
the
center
guide
of
the
center
under
the
the
fabrics
stitching.
edge
of
of
your
zigzag
Stitch:
Stitch
Stitch
3
length:
width:
Tension:
edge
foot/Stitch-in-the-ditch
foot
suited
lace
to
of
the
with
foot
against
left
for
perfect
1
length:
25
3-5
on
lace
folded/pressed
and
guide.
foot
right
properly
Choose
the
fabric
as
1
1.5
3-5
.
makes
to
edge-joining
a
finished
foot
acts
a
narrow
topstitching
the
hand
position
topstitch
the
finished
Both
side
separated
zigzag
and
the
desired.
-
3.0
-
3.5
narrow-edge
fabric
to
keep
edge
place
fabric
edge.
and
spacing.
edge
of
edge
fabric
and
up.
The
allowing
stitch
No.
lace.
Adjust
separate
edge.
the
topstitch.
your
of
lace
center
3
TI
.-
foot
topstitching
The
two
the
center
Move
fabric
your
should
guide
for
and
sew
the
width
fabric
metal
fabrics
the
The
to
lace
will
more
catching
pieces,
separated.
guide
needle
center
the
to
the
be
keep
precise
and
/
easier.
guide
of
into
left
right
placed
the
length
the
guide
of
i.e.
in
the
It
is
79
Page 82

iitssurles
aria
neeaies
Needle
Using
the
Needle
System
130/705
Size:
130/705
Size:
70-100
130/705
Size:
75-100
130/705
Size:
90-110
130/705
Size:
90-110
130/705
Size:
80-100
130/705
Size:
80-110
130
N
Size:
70-110
130/705
Size:
100/1
130/705
Size:
60-80
130/705
Size:
80/90
table
correct
points
&
H
60-1
30
H-SUK
H-PS
H-SKF
H-J
H-LR
H-PCL
H-WING
20
H-M
H-Q
No.
needle
Fabric
needle
607075
weight
light
guarantees
size
Profile
-Z.-j
—.--
,..__—
-ZZZ
._—-
better
stitching
Point
and
Light
ball
Medium
ball
point
Medium
ball
point
Heavy
ball
point
Acute
ball
point
Narrow
point
Narrow
point
twist
Light
long
Hemstitching
point
Acute
round
Light
twist
(cuts
twist
with
groove
ball
eye
point
ball
point
of
the
point
right)
left
point,
fabric.
Fabric
medium
needle
8090
eye
weight
size
Suitable
Universal
batiste,
fancy
seams
Coarse
fabrics,
Stretch-fabric
especially
for
delicate
Wide-meshed
and
Latex
Twill,
work
and
light
Leather,
Imitation
sheeting
Topstitched
or
No.
30/3
Effective
materials,
Micro-fiber
Topstitched
for
needle
organdy,
knitted
Quiana
canvas.
suede,
leathers,
and
hemstitching
organdy,
woven
and
fabrics.
and
needle
for
Pfaff.
stretch
corsetry.
wear,
calf
oil
cloth.
seams
synthetic
seams
woolens,
heavy
plastic
fabrics
for
Fabric
needle
100110120
for
synthetics,
embroidery
Latex,
Simplex.
developed
Particularly
and
knitted
Lycra,
linen,
and
goatskin
materials,
with
buttonhole
thread,
on
heavily
glass
cambric
quilting
weight
heavy
chiffon,
velvet,
work.
double-knit
suitable
fabrics.
Simplex
blue
metallic
dressed
size
jeans
leathers
plastic
silk
thread
130/705
Size:
80
H-E
75-90
Medium
ball
point
Embroidery
work
Page 83

Accessories
and
needli
Needle
[
I
{
Fancy
patterns
Before
sewing
this
way,
[
chart
Classification
130/705
Size:
130,705
Size:
Size:
Size:
the
needle
Ornamental
130/705
Size:
Size:
Size:
H-ZWI
80
H-ZWI
80
90
100
with
twin
desired
breakage
H-ZWI
80
80
80
needles
embroidery
is
avoided
stitch
patterns/zigzag
Stitch
length
2.5
mm
2.5
mm
2.5
mm
2.5
mm
3.0
mm
stitches,
much
as
0.5-1
0.5-1.5mm
0.5-1
.5
.5
check
possible.
as
patterns
mm
mm
—
—
whether
wide
narrow
narrow
Stitch
width
—
—
—
the
needles
can
Needle
spacing
1.6
mm
2.0
mm
2.5
mm
3.0
mm
4.0
mm
penetrate
1
.6
mm
2.0mm
2.5
mm
freely.
Suitable
normal
normal
wide
extra
pintucks
turning
by
decorative
decorative
decorative
for
pintucks
pintucks
pintucks
wide
the
handwheel.
stitching
stitching
stitching
In
V
Triple
Before
by
turning
Hemstitch/special
130/705
H-ZWI-HO
Size:
Size:
needle
sewing
the
handwheel.
130/705
Size:
Size:
the
80
100
desired
80
80
H
twin
decorative
In
this
way,
needle
2.3-3.0
2.0-3.0
stitches,
needle
0.5-1.5
0.5-1.5
mm
mm
check
breakage
mm
mm
whether
is
avoided
very
very
very
very
the
narrow
narrow
needles
as
narrow
narrow
much
can
as
—
penetrate
possible.
2.5
mm
3.0
mm
freely,
Decorative
effect.
Well
woven
batiste
suitable.
decorative
decorative
hemstitch
finished
fabric
are
particularly
stitching
stitching
and
fine
81
Page 84

4?
Page 85

Decorative
sewing!
I
i
I
Specialty
I
techniques
General
Altering
combined
Combined
Combined
Free-motion
Free-motion
Tapering
Appliqué
Patchwork/Quilting
Cross-stitch
Eyelet
Hemstitching
notes
pattern
borders
borders
borders
monograms
embroidery
with
satin-stitch
embroidery
on
decorative
width/length
using
sewing
for
twin
zigzag
needle
84
84
85
85
86
87
88-90
91
92-93
94
95
96
Page 86

1
General
To
enhance
Expression
stitches.
combining
decorative
Always
stitches.
distortion
The
following
sewing:
The
stitch
Lower
needed
project.
tension
Presser
feed)
are
presser
notes
Create
use
Properly
the
so
Your
is
properly
foot
most
foot.
your
offers
different
threads
stabilizers
of
your
length
upper
bobbin
embroidery
No.
No.
on
decorative
own
home
you
wide
a
a
greater
variety
patterns,
to
enhance
under
stabilizing
decorative
recommendations
and
width
can
thread
tension
thread
does
results
adjusted.
1
(for
dual
suitable
for
2
for
decorative
heavier
feed)
sewing
textiles
variety
of
colors
the
fabric
your
fabric
stitches.
apply
be
to
not
will
and
fabrics.
or
garments
of
fancy
embellishments
and
sizes.
lovely
stitching.
when
sewing
will
help
to
all
decorative
altered
between
pull
be
to
much
No.
work.
as
2-3.
the
2
(without
We
your
and
decorative
Use
specialty
decorative
eliminate
desired.
Adjust
top
side
prettier
dual
recommend
by
if
of
your
as
your
Changing
The
width
pattern
can
the
also
pattern
width
be
width
can
be
adjusted
altered
while
using
sewing.
84
-1+
button
Changing
A
(1).
The
The
length
pattern
can
the
length
also
pattern
can
be
adjusted
length
be
altered
while
using
sewing.
-1+
button
B
(2).
The
Page 87

V
J’.vV
II
%_JjJc:;*..IIctILy
‘‘::J
LiI
II
IIL4U
4••*4i44
Combined
Create
decorative
smooth
weights.
The
following
you
can
available
Place
stabilizer
Mark
the
pencil.
press
the
even
with
row
of
stitching
Sew
stitch
each
side
should
borders
stitching
as
on
center
Sew
‘Pattern
the
3;
of
now
Borders
of
stitches.
example
easily
the
2014.
under
of
stitch
top
directly
stitch
your
have
any
Rayon
results
create
your
43;
mirror
of
the
density
center
six
rows
width
embroidery
and
uses
beautiful
fabric.
fabric
stitch
width
button”
first
across
0.2
embroidery.
of
by
combining
come
stitches
borders
with
a
6
(30).
row
of
stitching.
from
mm
and
decorative
in
many
from
fabric
mm
Position
the
Your
different
threads
colors
the
with
marking
along
Sew
first.
stitch
completed
stitching.
give
2024,
the
your
your
45
and
stitches
line.
fabric
the
along
shiny,
but
pen!
Next
second
border
Twin
needle
Additional
needle.
‘WVMAMWvv’VWAfVW\J
created
Note:
.
,M
j
I
The
with
DO
appears
decorative
illustration
just
NOT
use
in
the
little
a
a
window
effects
can
shows
imagination!
twin
needle
(see
what
page
achieved
be
beautiful
when
39).
the
using
borders
warning
twin
a
can
symbol
85
be
Page 88

Free
motion
Use
stitch
monogram
Transfer
embroidered.
Attach
the
into
the
Lower
the
Place
a
a
piece
of
fabric.
Place
zigzag
stitch,
Do
not
forget
Knot
the
the
stabilizers.
dissolve
TIP:
Sewing
move
of
your
will
your
comfortable
monograms
3
(stitch
initials
the
initials
darning
darning
feed
dog.
tear-away
water-soluble
the
in
varying
to
use
threads
The
in
water.
at
a
the
fabric
free-motion
also
give
stitches.
width
of
your
with
foot
position
stabilizer
fabric
the
on
the
remaining
medium
more
you
Practice
with
the
3-6
own
a
fabric
(special
(see
stabilizer
in
an
widths,
darning
back
to
slowly
monogram.
more
consistency
on
free-motion
mm)
to
create
design.
marker
accessory
page
51).
under
your
on
the
embroidery
to
follow
position.
of
your
project
water-soluble
fast
speed
and
A
scrap
fabric
technique.
to
fabric.
right
hoop
your
will
give
slightly
in
until
wonderful
the
area
2014)
Then
side
and
traced
and
remove
stabilizer
allow
you
more
faster
the
density
you
and
use
you
to
place
of
lines.
will
speed
are
be
bring
the
the
to
control
of
it
Block
along
stitch
Apply
on
the
Mark
Sew
capitals
the
density
stabilizer
top
the
along
are
marked
0.2
under
of
the
fabric.
monogram
the
marked
a
lines
-
0.3
little
the
on
with
mm.
the
lines
easier
stitch
fabric
fabric.
with
to
embroider.
3,
stitch
and
water-soluble
the
zigzag
Simply
width
stitch.
3-6
mm
stabilizer
stitch
and
86
Page 89

41
41
41
41
41
‘‘
s_,
a
ii
—
I—
•
ii
4
41
4
41
4
‘
4
14
41
Free
These
Set
your
Draw
Follow
motion
striking
Expression
the
outline
the
embroidery
embroidery
of
instructions
as
for
the
embroideries
and
designs
free
motion
tips
br
can
monograms.
on
free
motion
easily
fabric
be
sewn
where
you
monograms
with
your
want
to
Expression.
to
stitch
stitch
them.
your
embroideries.
-
.
-:
87
Page 90

.1
Tapering
With
your
increments.
This
technique
the
size
with
Expression
of
a
wide
the
satin-stitch
of
adjusting
zigzag
you
also
the
stitch.
zigzag
have
width
the
of
option
zigzag
a
of
increasing
seam
is
or
called
decreasing
TAPERING.
the
You
width
can
of
the
achieve
zigzag
great
stitch
effects
in
by
0.5
mm
adjusting
88
Page 91

—
I
—
Manual
—
—
I’
•
•
7
Note:
the
Place
needle
Set
needle
button”
to
left
when
stitch
Set
With
reduce
If
you
stitch
change/
stabilizer
position
needle
(A)
a
center
length
button
-1+
it
again
have
width
thread
(16)
selected
only
Regular
under
tension
(stitch
will
change
position
(B)
needle
to
0.2-0.3
increase
A
0mm.
to
changes
pattern
fabric.
12).
stitch.
position
the
in
to
3.
Select
Pressing
the
stitch
mm.
the
width
right
one
Zigzag
motif
Begin
left
or
direction.
the
the
from
from
needle
-
zigzag
“Pattern
right
a
stitch
is
desired.
sewing.
to
0
——
stitch
mirror
(C)
is
3
used
mm
6
position,
and
A
—
—
(2
I..
B
C
Manual
•
•
rç
•
•
Note:
the
Try
These
projects
change/Irregular
stabilizer
Place
needle
Set
motifs
with
for
motifs
stitch
Set
Using
-1+
sewing.
If
you
stitch
width
creating
larger
like
under
thread
rightorleft
a
with
a
center
length
to
button
A
have
selected
only
changes
flowers
placemats,
and
embroideries
fabric.
tension
needle
0.2
-
increase
the
leaves
are
cushions
pattern
to
needle
mm.
0.3
and
right
in
with
perfect
Select
3.
position.
one
and
position
reduce
or
left
direction.
technique.
this
for
valances.
zigzag
or
the
needle
home
stitch
zigzag
width
position,
decorating
12
stitch
while
for
3
A
B
C
89
Page 92

Satin
Mitered
altering
Select
•
•
Set
Set
•
•
Satin
•
To
the
the
Reduce
•
Continue
•
Turn
pierces
fabric
Increase
•
•
Increase
Continue
Continue
•
width.
If
the
the
left-hand
button
stitch
corners
the
stitch
the
miter
right
-1+
the
corner
(30)).
mitered
width
zigzag
width
needle
stitch
a
the
corner,
side
button
the
width
until
handwheel
the
fabric
90°
and
the
the
until
embroidering
to run
is
needle
(with
of
stitch
to
thread
single
of
A
the
sew
width
width
the
corners
an
the
satin
12
mm,
6
straight
lower
stitch,
the
by
(1)
again
stitch
towards
in
the
one
by
by
starting
in
the
position
angle
stitch
(right
stitch
tension
the
reduce
0.5
mm.
by
width
right-hand
stitch.
0.5
mm
mm
0.5
width
a
straight
opposite
(stitch
of
45°)
needle
to
line.
needle
Sew one
0.5
mm
is
yourself
to
again
can
zigzag
position).
length
3.
the
and
reduced
position.
1
mm.
and
reached.
is
line
direction,
12
and
be
while
to
into
stitch
sew
until
Sew
the
at
‘Pattern
achieved
0.2-0.3
the
width
stitch.
one
to
0.5
the
Turn
one
sew
6.0
work
sewing.
mm.
fabric
using
stitch.
mm.
needle
the
stitch.
one
stitch.
mm
with
mirror
by
on
90
Decorative
This
buttonhole
buttonhole.
Since
you
can
be
up
Set
•
•
•
•
•
stitch
needle
Set
Sew
buttonhole.
Select
triangle.
a
Using
from
The
tip
two
seams.
buttonhole
determine
to
12mm
No.
two
seams
stitch
-1+
button
mm
0
of
the
is
an
3,
thread
No.
to
3
triangle
attractive
the
wide.
stitch
tension
1
mm
12
and
(1).
A
mm
seam
width
apart
and
should
stitch
alter
back
variation
width
mm,
3
3.
at
the
over
the
to
meet
yourself
length
stitch
mm
0
in
of
stitch
the
width
the
the
the
length
desired
of
two
during
middle
classic
buttonhole
0.2
ends
with
gradually
sewing.
of
linen
mm.
the
Page 93
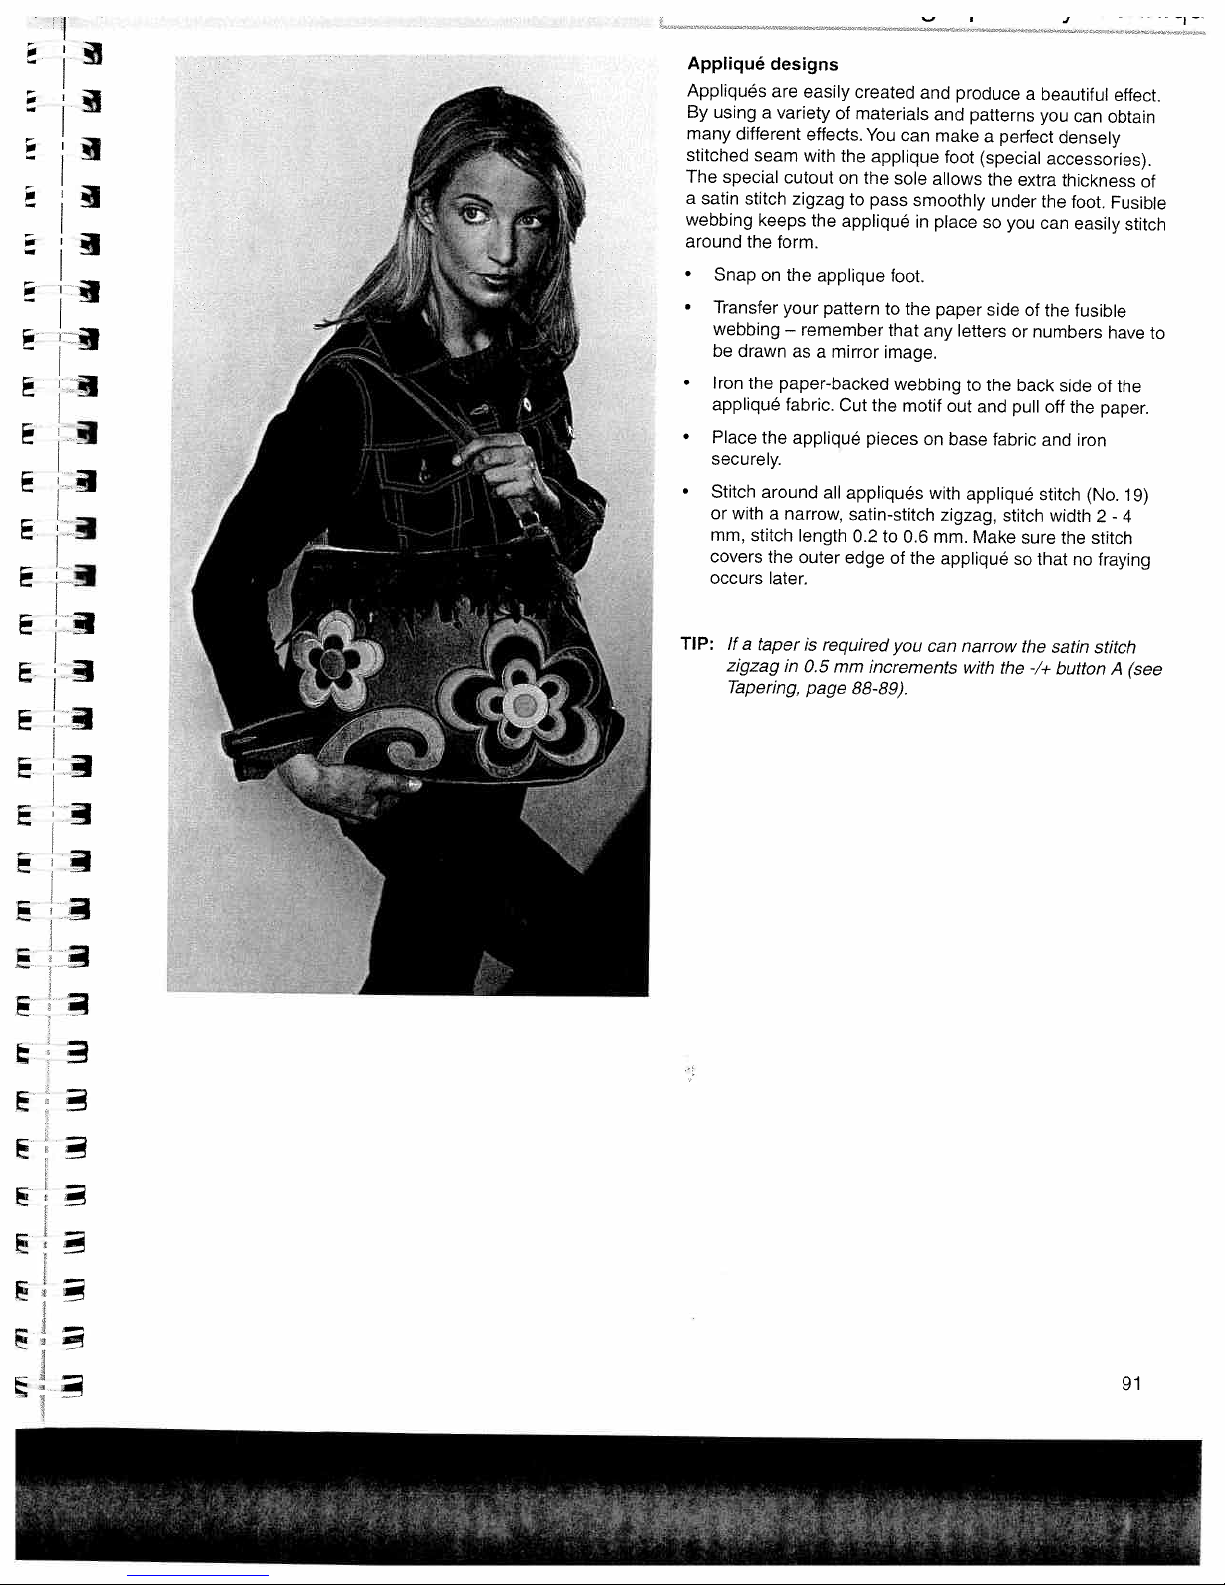
J
I
I
3
I
I
3
I
I
4
3
Appliqué
Appliqués
By
using
many
different
stitched
The
special
satin
a
webbing
around
Snap
•
Transfer
webbing
drawn
be
•
Iron
appliqué
Place
securely.
Stitch
or
withanarrow,
mm,
covers
occurs
designs
are
variety
a
seam
cutout
stitch
zigzag
keeps
the
form.
on
the
your
—
asamirror
the
paper-backed
fabric.
the
appliqué
around
stitch
the
later.
easily
of
effects.
with
the
on
to
the
appliqué
applique
pattern
remember
Cut
all
appliqués
satin-stitch
length
outer
edge
created
materials and
0.2
You
applique
the
sole
pass
foot.
to
that
image.
webbing
the
pieces
to
of
and
can
make
allows
smoothly
in
place
the
paper
any
motif
on
with
zigzag,
0.6
mm.
appliqué
the
produce
patterns
foot
letters
to
out
and
base
appliqué
Make
perfect
a
(special
the
extra
under
so
you
side
or
the
back
pull
fabric
stitch
sure
so
beautiful
a
you
can
densely
accessories).
thickness
the
foot.
can
easily
of
the
fusible
numbers
side
off
the
iron
and
stitch
width
the
that
no
obtain
Fusible
have
of
paper.
(No.
2
stitch
fraying
effect.
-
I
of
stitch
to
the
19)
4
E
TIP;
If
taper
a
zigzag
Tapering.
in
is
required
0.5
page
mm
88-89).
can
you
increments
narrow
with
the
the
-/+
satin
button
stitch
A
(see
91
Page 94

uecorauve
sewingipeciaity
iecnniques
Patchwork
Patchwork
techniques
American
over
fabric.
creative
a
A
patchwork
two
fabric,
sandwiched
joined
together
of
the
quilt.
polyester
quilt
The
particularly
is
quilting.
of
edge
mm)
(3
In
traditional
together
beautiful
makes
accomplishing
and
faster!
quilt
stitch
and
easily
invisible
the
needle
cotton
thread
of
your
quilt
be
set
quite
thread
to
only
see
pioneer
hobby.
layers
or
and
The
the
to
the
with
family
The
No.
achieve
sewing
thread
pull
the
quilt
and
quilting
which
Over
quilt
between.
in
This
is
cotton
patchwork
helpful
distance
foot
is
inner
quilting
small
heirlooms.
Expression
11,
thread
to
contrast
top.
The
tight
the
triple
the
of
and
(7),
bobbin
stitch
are
traditional
were
originally
womentomake
years
it
has
consists
patterns
tacked
1/4
which
a
of
fabric
with
Many
to
to
batting
and
foot
for
sewing
of
the
inch
(6
edge).
the
three
hand
stitches
The
this
technique
2024
enables
hand-quilted
(nylon
wind
or
blend
needle
and
the
thread
of
the
three
pieces
form
a
middle
(special
needle
mm)
layers
sewing
monofilament)
the
thread
bobbin
bobbin
used
use
developed
layers
layer
a
of
the
backing
a
accessory)
patchwork
to
and
are
to
create
much
and
2014
to
you
look!
bobbin
with
tension
thread
to
the
top
thread.
handicraft
by
North
of
left
into
of
of
batting
fabric
are
top
layer
layer
of
layer.
and
the
outer
1/8
inch
joined
machine
easier
have
quickly
Use
as
with
the
colors
must
tension
of
your
quilt.
The
intermediate
quite
loose
When
(approximately
you
sew
the
stitch
disappears
stitch
1/4
on
turn
counterclockwise)
the
three
and
thus
layers
appears
of
to
fabric
be
to
allow
the
of
the
quilt
hand-quilted.
needle
you
92
Quilt
stitch—li
Quilt
stitch
hand-quilted
Stitch
11
overcoats.
stitches
can
11
and
look.
works
equally
Combining
create
and
19
unique
19
enable
well
the
for
quilt
new
you
to
achieve
topstitching
stitch
patterns.
with
on
other
wonderful
a
jackets
decorative
and
Page 95

euorative
this
Cut
the
include
to
Sew
the
chosen.
will
form
Baste
the
bottom
Use
your
from
long
seams.
Pfaff
quilting.
is
the
the
dealer,
And
•
—
•
1
I
•
Experiment
your
on
sewingipecaaiiy
how
it’s
done:
pieces
necessary
seam
top
quilt
other
allowance
together
squares
of
layer.
the
of
library,
quilt.
the
top
of
to
quilt
stitches
or
will
sew
bookstore
a
pieces
These
the
finished
Expression
center
with
for
as
the
out.
on
your
1/4
of
required
then
be
quilt
all
layers
Use
scrap
a
quilt
onto
for
top,
inch
by
sewn
the
together.
a
straight
of
more
making
(6
mm).
the
block
together
batting
fabric.
information
tecnniqu
sure
and
and
Work
stitch
for
Contact
4%.
LJ
93
Page 96

•0
J
Cross-stitch
Cross-stitch
What
used
ease
and
With
cross-stitch
and
give
Tips
for
cross-stitching:
•
Sew
slowly.
•
Use
foot
•
Place
•
You
can
Expression
•
Use
decorative
embroidery
tobestitched
speed.
No.
special
a
No.
2.
stabilizer
embroider
can
20.
touch
under
on
be
altered
threads
has
by
design
table
to
the
Aida
to
always
hand
with
your
linen,
fabric.
cloth
depending
make
been
a
own
towels
as
your
wonderful
a
great
deal
cross-stitch
or
used
for
on
the
cross-stitch
traditional,
of
effort
combinations.
garments.
hand
cross-stitching.
count/size
look
can
of
more
the
embroidery
now
be
sewn
These
The
Aida
cloth
professional.
technique.
patterns
length
squares.
with
the
and
Expression
look
as
width
if
they
of
the
with
astonishing
were
hand-embroidered
cross-stitches
of
your
94
Page 97

H
1
H
1
H
1
H
1
I4
E3
Eyelet
Eyelet
an
eyelet
decorative
And
•
Lower
•
Place
that
cutout
front.
•
Tightly
•
With
two
center
and
•
Remove
•
Place
the
•
Pull
stitches.
•
Stitch
doing
The
•
Secure
embroidery
embroidery
plate
stitches
this
is
the
the
the
pin
of
hoop
small
of
the
of
push
the
darning
up
the
around
so,
stitches
with
how
feed
eyelet
the
scissors
fabric
the
the
the
presser
position.
bobbin
turn
a
enhances
(special
beautiful
it’s
dog.
(A)
at
needle
your
threads
marked
fabric
presser
the
the
should
few
accessory)
done:
plate
the
plate.
marked
cut
over
foot
foot
thread
cut
with
hoop
be
straight
II
onto
back
one
eyelet
the
lifter
with
very
IJI
at
and
zigzag
JJc..,IaILy
your
linens
and
embroidery
the
needle
of
the
plate
Push
the
embroidery
or
the
area
pin
in
hold
pattern
the
fabric
close
to
stitches.
various
plate
—
A
-
for
it
each
and
can
plate
fits
fabric.
the
No.
slowly
blouses.
utility
be
produced.
making
into
down
first
3.
and
other.
LL.J
the
at
few
While
evenly.
II
Using
and
sure
middle
the
IILfI
95
Page 98

Decorative
sewing/Specialty
techniques
Hemstitching
This
is
technique
a
previously
you
Special
for
stitch
Use
only
is
most
single
thread,
hemstitches
applied.
can
2014,
length
a
used
wing
threads
only
produce
hemstitches
are
for
successful
particularly
embroidered
hemstitching
built
and
width
needle
very
can
on
your
everyone
No.22and
your
into
you
hemstitching.
for
fabrics—size
light
woven
on
easily
be
cotton,
Expression,
recognizes
hand!
by
much
machine.
can
achieve
natural
pulled.
are
very
quicker
23
for
By
(A
80.)
fabrics
Embroidery
suitable.
various
—
but
With
your
and
2024,
and
changing
different
normal
Hemstitching
from
With
techniques
was
Expression
easier.
No.
18
the
effects.
needle
is
which
and darning
the
can
be
Traditional
•
Use
stitches
2014,
•
Sew the
For
pulled
•
Count
sewn
piercing
not
of
the
remove
•
Pull
1
of
the pattern.
•
Overstitch
program.
both
sides
hemstitching
No.
create
to
appropriate
thread
the
threads
the
threads
3
the
The
Adjust
a
threads
needle
close
pattern.
threads
-
22
and23for
lovely
hemstitched
program
hemstitching:
of
the
the
thread
tobepulled,
your
fabric.
of
within
outofthe
remaining
must
the
edges.
to
fabric
pattern
This
the
material
threads
enter
2024,
on
a
within
width
will
pattern
with
the
and
holes.
piece
the
so
fallingtothe
but
allow
area.
to
the
the
pulled
No.18for
fabric.
of
test
areaofthe
the
needle
you
to
right
and
selected
threads
is
side
easily
left
on
96
Page 99
:
CD
1
CD
CD
9
CD
CD
o:
i
Iii1k
4’t
/
CD
s:u
--
CD
o)oQ.o
CDca
CQ
-‘t
CD
_.
5CQ
Cl)
.
a
C
OD
(0(0(0
(0
Page 100

iviaintenance
[1
I
Changing
Switch
Removal
•
Replacing
•
Place
out
in
plate
Tip:
off
Raise
the
(lamp
changer)
the
up
on
removed.
the
then
place.
is
Lower
easier.
the
the
press
Before
lying
the
needle
main
presser
right,
needle
flat.
feed
plate
switch.
foot.
Position
as
shown,
then
on
the
plate
against
downatthe
you
start
dog
to
make
and
left.
front
sewing,
removing
the
press
It
the
until
needle
can
rear
check
the
now
you
needle
edge
hear
that
the
plate
be
easily
of
the
needle
changer
plate
the
it
snap
needle
cut
plate
Cleaning
•
Switch
•
Remove
the
feed
•
Apply
above.
and
•
Clean
operation.
of
Cleaning
Wipe
the
aggressive
and
off
only
The
must
and
the
display
oiling
the
the
needle
dog
and
one
machine
not
be
oil
the
display
with
cleansers
main
drop
switch.
plate
hook
of
otherwise
oiled
sewing
a
soft,
or
solvents!
and
area
oiltothe
at
any
machine
lint-free
lower
with
other
the
the brush.
area
requires
points.
every
dry cloth.
feed
in
the
no
10
dog.
Clean
hook
shown
maintenance
-
15
hours
NOT
DO
use
98
 Loading...