

Page 1
w
0
0
‘0
•ri
In
Page 2

Contents
Foreword
Essential
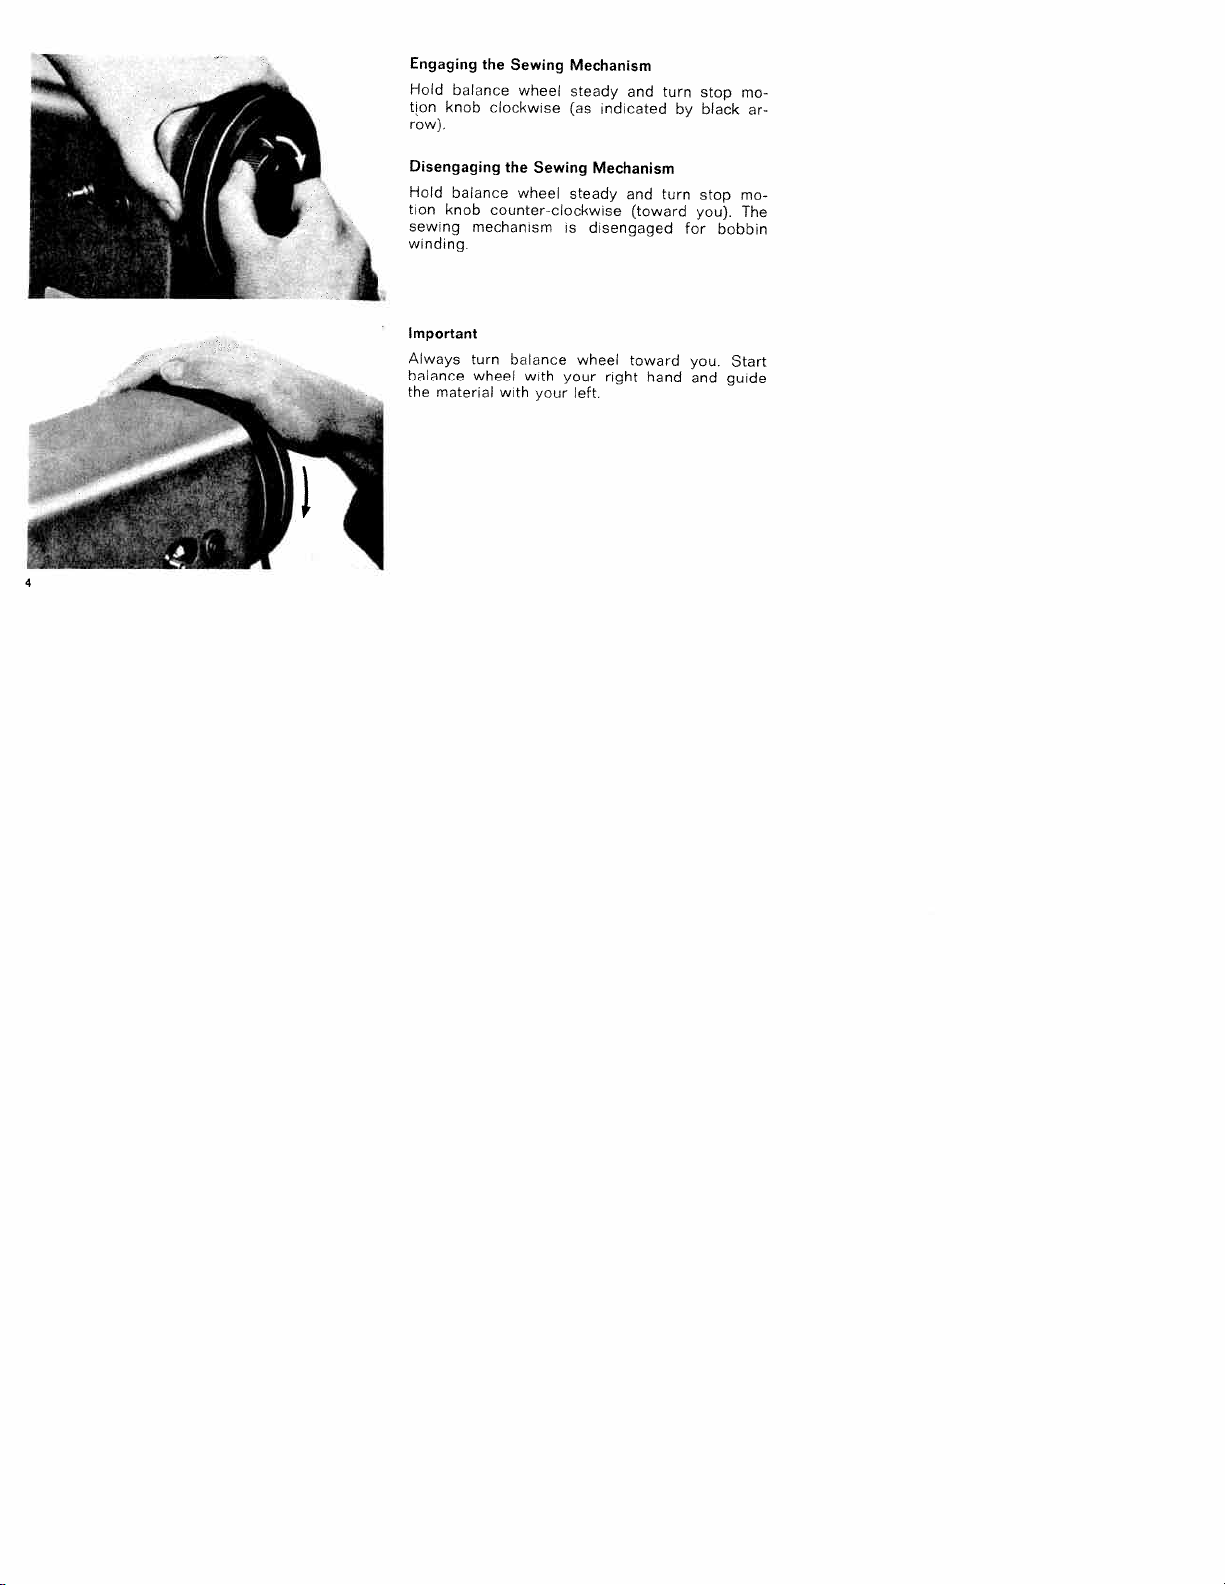
Engaging
Sewing
the
Electrical
Straight
Zigzag
Elastic
Removing
Winding
Inserting
Inserting
Changing
Needle
Threading
Upper
Drawing
Correct
Regulating
Length
Stitch
Reverse
Parts
Disengaging
and
Mechanism
Information
Stitching
the
Bobbin
the
Bobbin
the
Bobbin
the
the
Thread
and
the
Up
Tension
the
Regulation
Sewing
Seam
Bobbin
Needle
Bobbin
Regulation
Tensions
•
Case
Case
Chart
.
•
•
Thread
19
•
19
•
20
•
21
22
•
22
•
23
24
•
25
•
26
•
28
•
29
•
30
32
•
33
•
35
•
36
37
•
Machine
Oiling
Face
Light
Feed
Foot
Cover
Bulb
Foot
Operation
•
Machine
Dropping
1
Darning
2
All-Purpose
.
•
4
5
6
6
7
8
9
11
12
13
14
15
16
17
18
18
Fundamentals
Zipper
Quilting
Hemming
Edge
Inserting
Sewing
Button
Darning
Cording
Stitching
Cleaning
Removing
Changing
Trouble
the
and
Insertion
Finishing
Patches
Buttonholes
Sewing
Synthetics
and
the
tho
Shootin
9
Embroidery
Sewing
of
Page 3

Foreword
Your
proud
which
sewing,
come
This
machine
the
important
of
reference
gotten
Follow
your
If
you
your
tact
at
you
dream
ownerofa
enable
will
embroidering
in
a
up
instruction
book
some
these
will
Pfaff
have
Pfaff
time.
any
has
Pfaff
you
home.
book
familiarize
and
sewing
in
details.
simple
become
sewing
any
dealer.
PFAFF-Haushaltmaschinen
the
9,
master
to
darning
and
will
help
you
Keep
jobs.
case
instructions
Karisruhe-Durlach
you
a
lasting
problems,
He
should
will
You
true.
come
are
sewing
all
jobs
understand
you
with
handy
it
sewing
and
pleasure.
please
gladtohelp
be
now
machine
ordinary
that
number
a
have
GmbH
may
as
for
with
con
the
a
Page 4

Essential
Face
I
Take-up
2
Thread
3
4
Spool
Stitch
5
Needle
6
Bobbin
7
Balance
8
Stop
9
Bobbin
10
Reverse
11
Stitch
12
Bed
13
Pfaff
14
Feed
15
Needle
16
Sewing
17
Light
18
Needle
19
Presser
20
Needle
21
Sewing
22
Parts
cover
lever
retainer
pins
lever
width
position
winder
wheel
motion
knob
winder
control
feed
control
length
slide
rotary sewing
dog
plate
thumb
foot
switch
thread
lifter
bar
set
screw
foot
(A)
ever
thread
tension
(B)
retainer
hook
screw
Page 5

hese
parts
iachine:
come
with
your
sewing
bobbins
can
.leedles,Systeml3OR,
)arning
JI-purpose
io.
93-1
lastic
bag
struction
gzag
)fl
machine)
1070
774
93-009
No.
No.
91-129449-91,full
No.
sewing
accessories
for
book
foot
93-102
(not
foot
00 179-00
sewing
033-21
No.93-847
826-91
foot
ill.)
93-838954-00
No.
(not
990-00
ill,)
Zigzag
sewing
Bobbin
foot
All-purpose
Darning
sewing
Needles
foot
foot
Page 6

the
following
Felling
Hemmer
(see
p.
Buttonhole
(see
p.
Zipper
(see
p.
Button
(see
p.
Edge
guide
Cording
(see
p.
“Arrow”
(see
p.
Soft
brush
(not
ill.)
Tape
meosure
No.
93-847
No.
93-847
“Greist”
No.
91
-053
Orders
number
foot
foot
23)
26)
foot
22)
sewing
28)
kt
30)
seam
27)
No.
200-60
204-60
bios
484-91
should
No.
No.
foot
No.
No.
binder
specify
parts
93-847
93-847
93-847
No.
93-847
foot
No.
91-053
ripper
93-847
(centimeters)
(inches)
(not
ore
561-06
551
600-00
93-84’
076-25
No.
979-91
ill.)
the
available
-00
616-00
608-00
99-053
ten-digit
on
special
(4
mm
5/32”)
request
and
at
extra
cost:
I
01
Hemmer
6-91
port
Zipper
foot
foot
Felling
foot
Edge
Button
Buttonhole
“Arrow”
guide,
w/
sewing
seam
screw
foot
foot
ripper
Page 7

following
the
foot
Felling
Hemmer
23)
(see
p.
Buttonhole
26)
(see
p.
Zipper
(see
p.
sewing
Button
(see
p.
guide
Edge
Cording
(see
p.
‘Arrow”
(see
p.
brush
Soft
ill.)
(not
measure
Tape
93-847
No.
93-847
No.
“Greist”
91
No.
Orders
number
foot
foot
22)
28)
kit
30)
seam
27)
-053
should
No.
No.93-847
foot
No.
No.
No.
200-60
204-60
bias
484-91
parts
93-847
No.
93-847
foot
91-053
ripper
93-847
(cenirneters)
(inches)
binder
(not
specify
are
561-06
93-847
600-00
No.
076-23
No.
979-91
available
-00
551
616-00
93-847
99-053
HI.)
ten-digit
the
mm
(4
608-00
016-91
on
part
=
special
5/32”)
request
Hemmer
and
foot
Zipper
at
Felling
foot
extra
cost:
foot
Edge
Button
Buttonhole
“Arrow”
guide,
sewing
seam
w/
foot
foot
ripper
screw
Page 8

parts
hese
iachine:
bobbins
No.
)il
can
eedles,
)arning
Jl-purpose
93-100
o.
‘lastic
bag
nstruction
sewing
igzag
on
machine)
1070
O774
come
No.
91-129
System
foot
No.
sewing
179-00
for
book
with
033-21
93-009
449-91,
No.93-847
130
R,
93-1
02
foot
accessories
(not
ill.)
No.93-838954-00
foot
your
full
826-91
(not
sewing
990-00
ill.)
Zigzag
sewing
Bobbin
Oil
foot
con
All-purpose
sewing
Darning
Needles
foot
foot
Page 9

SL
14
6
LL—
CL
E
Page 10
PI0H
uoi
6ui5fiu
3
qou
aq
eoueeq
6U1M9S
eaqM
esoop
s)
Apeeis
wsJueqap%J
pue
un
popu
/q
dos
-ow
-
PIOH
110fl
qou
6uMos
bu!puM
weiodwj
sAMjV
eoujq
6ui6eBuasia
aq
ocuooq
wsutpaw
ujni
atM
qvm
tflM
eei
5uMaS
s
jno,c
Apoajs
9SMjoo3-Jeuno3
eem
inoA
Ul
q6ii
wsiuepa
pue
p966uesip
UJfl
pJlMo4)
peto
pue
-ow
dos
ej
‘(noA
io;
ulqqoq
Js
noc
pu
pnb
Page 11
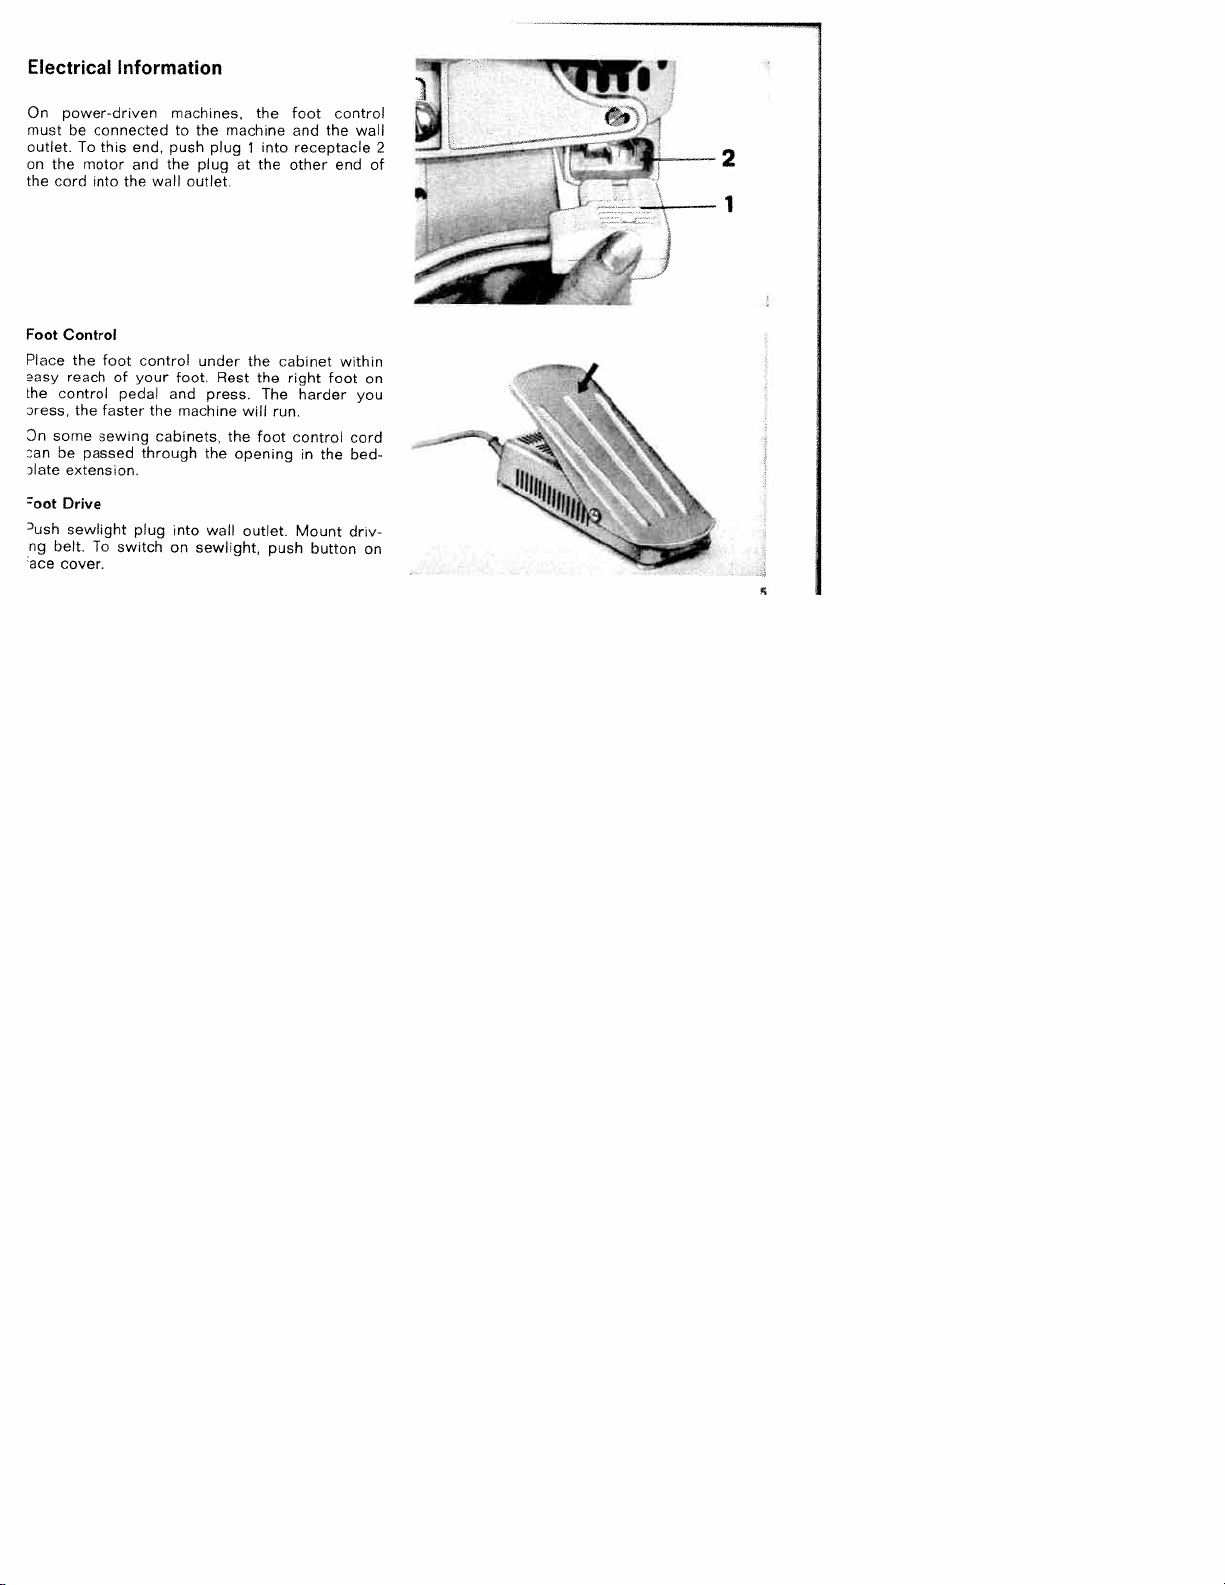
Electrical
Information
power-driven
On
mustbeconnected
outlet.Tothis
on
the
the cord
Foot
Control
Place
the
sasy
reach
Ihe
control
Dress,
Dn
some
Dan
be
late
extension,
root
Drive
ush
sewlight
ng
belt.Toswitch
ace
cover.
motor
the
passed
into
toot
of
pedal and
faster
sewing
end,
and
the
your
plug
push
the
wail
control
the
cabinets,
through
on
machines,
to
the
plug
plug
outlet.
under
foot.
Rest
press.
machine
the
into
wall
sewlight,
foot
the
machine and
into
receptacle
at
the
other
the
cabinet
the
right
The
harder
will
run.
the foot
opening
outlet.
push button
control
Mount
control
wall
the
2
end
of
within
foot
on
you
cord
in
the
bed
driv
on
2
Page 12

Straight
straight-stitch
For
Lever
Lever
On
pp.
this:
like
0,8
A
Zigzag
If
you
zigzag
width
Lever
center
straight
in
starting
stitching.
center
Stitching
0
A
B
22—32,
Sewing
want
stitching
(indicated
is
B
to
point
Lever
right.
or
Center
the
switch
to
used
right
the
stitching.
of
sewing
i
machine
flick
numbers
by
to
the
B
from
move
or
This
can
set:
lever
left
needle
be
setting
straight
A
I
the
of
applies
vibration
flicked
to
to
needle
the
is
(A
desired
4).
needle
likewise
to
indicated
0)
to
stitch
from
to
zigzag
in
the
to
the
hole
the
left.
Page 13

Removing
the
Bobbin
Case
Raise
end
hand
When
and
you
7
Lift
the
slide
of
bed
and
pull.
front
Lift
point.
highest
its
to
needle
pull
release
out
bobbin
the
latch,
case
the
with
bobbin
bobbin.
drops
out.
left
your
of
thumb
the
with
k
latch
Page 14
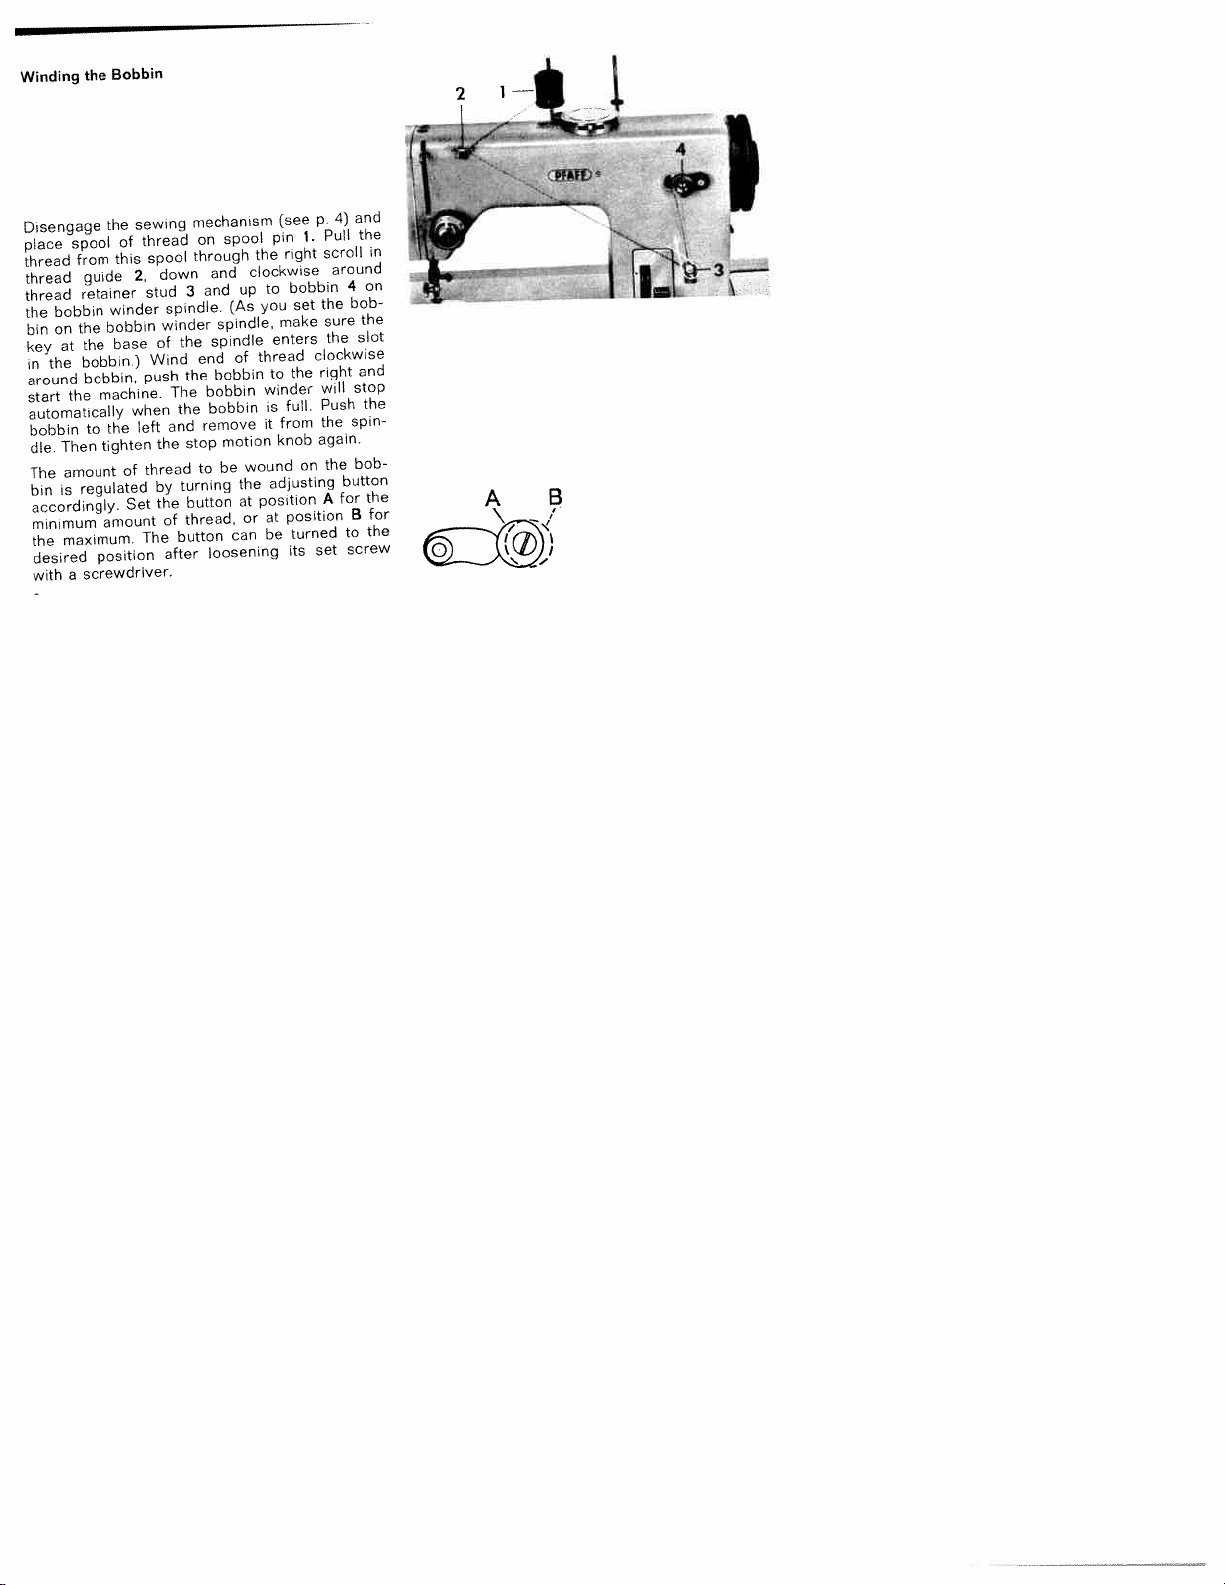
Winding
Disengage
place
thread
the
spool
from
guide
thread
retainer
thread
bobbin
the
the
on
bin
the
at
key
bobbin
the
in
bobbin,
around
the
start
automatically
bobbin
Then
dle.
amount
The
regulated
is
bin
accordingly.
minimum
maximum.
the
desired
screwdriver,
a
with
Bobbin
the
winder
bobbin
base
machine.
the
to
tighten
amount
position
of
this
of
Set
sewing
thread
spool
2,
stud
of
Wind
)
push
when
left
thread
by
The
down
spindle.
winder
the
The
the
and
the
turning
the
of
button
after
mechanism
spool
on
through
and
and
3
(As
spindle,
spindle
end
bobbin
the
bobbin
bobbin
remove
motion
stop
be
to
button
thread,
can
loosening
the
clockwise
to
up
you
thread
of
winder
is
it
wound
the
position
at
at
or
be
(see
1.
pin
right
bobbin
set
make
enters
the
to
Full.
From
knob
on
adjusting
position
turned
its
and
4)
p
the
Pull
scroll
around
4
bob
the
the
sure
slot
the
clockwise
and
right
stop
will
Push
spin
the
again.
bob
the
button
for
A
B
to
screw
set
on
the
the
the
in
for
1
2
I—
A
B
Page 15

Inserting
Hold
top
the
bobbin
Hold
the
pull
a
bobbin
down
case.
the
thread
Full
so
toward
bobbin
Bobbin
that
steady
into
the
the
you
case
thrad
and
in
the
insert
slot.
ind
bobbin
fdll
bobbin
case
from
into
and
Page 16

Pull
emerges
about
case.
Hold
bin
the
3
the
cannot
thread
from
of
case
fall
under
the
thread
by
out.
the
opening
hanging
open
its
tension
at
latch
from
its
so
spring
end.
the
that
until
Leave
bobbin
the
it
bob
Page 17

nserting
Raise
latch
hand.
arrow).
hook.
replacing
In
the
jammed
the
you
serted
needle
with
Turn
loose
latch
hear
the
the
Place
end
between
and
it
bobbin
Bobbin
to
thumb
bobbin
bobbin
the
press
snap
case
its
bobbin
of
bobbin
Case
highest
and
case
thread
into
will
forefinger
until
case
case,
case
against
place.
cause
point
points
slot
center
on
is
it
it
that
so
and
bobbin
An
hook.
improperly
needle
of
best
will
your
up
stud
to
not
Release
case
breakage.
right
(see
S
hold
until
of
get
in
Ii
the
lift
and
Page 18

Needle
The
Pfaff
Genuine
able
should
Chart
Changing
Bring
sewing
turn
Push
sure
back
dle
9
from
on
needle
and
new
that
and
set
machines
Pfaff
every
chosen
be
page
the
foot.
pull
needle
flat
long
screw
needles
Pfaff
13.
Needle
bar
Loosen
old
side
groove
a.
use
from
to
needle
up
of
System
of
dealer.
its
needle
as
toward
this
the
highest
out
far
shank
system
The
Needle
set
of
as
faces
you.
130
point
it
needles
and
screw
needle
will
Tighten
R
are
and
go.
toward
needles.
avail
size
Thread
lower
half
a
clamp.
Make
a
the
nee
Page 19

Size
Needle
or
70
60
80
90
100
Deterimo
0
S
ed
00
Mercerized
Chart
Thread
and
Needle
Silk
Cotton
Fabrics
of
Types
to
0
80
Fabrics
Fine
000
twist
to
100
silk.
chiffon,
lawn,
georgette,
voile,
as
batiste.
such
B
&
twist
A
to
80
70
cot-
shirt-
and
silks
woolens,
Fabrics
dress
sheer
as
Lightweight
such
tons,
draperies.
ing,
C
&
B
50
wool-
lightweight
Fabrics
as
such
Medium
twist
to
70
bro-
rayon.
silks,
muslin,
heavy
madras,
cades,
ens,
Fabrics
gabardine.
Heavy
and
D
&
C
to
40
fab-
denim,
slipcover
coating,
as
corduroy,
such
twist
50
light-
tickings,
bed
rics,
canvas.
weight
by
fabric
ned
of
Determ,
weight
Acetate
orion,
Rayon.
nylon,
inciudi.ng
Synthetics,
etc
piast,cs,
decrcr,,
Page 20

Threading
Upper
Rasethe
Place
a
the
end
drawing
(see
the
Pull
3
discs
to
over
and
slot
this,
do
ing
between
Pass
the
from
lever
into
it
pull
needle
inches
spool
(see
the
press
from
of
take-up
of
thread
right
under
thread
slot
thread
of
the
below
drawing
the
spool
right
front
thread
thread
between
so
the
through
to
from
5
through
lever
left).
that
thread
thread
and
left,
to
on
below
tension.
the
back
to
spool
through
any
right)
slips
it
check
against
hole
then
right.
and
the
its
properly
4
lead
needle
highest
pin1and
the
two
and
spring.
the
in
it
Now
pull
eye
left
of
jerk
arm
the
down
thread
about
point.
lead
scroll
tension
it
into
As
cast
take-up
three
far
the
you
and
the
4
2
‘5
Page 21

Drawing
Hold
Turn
moves
thread
needle
sewing
Up
needle
balance
down
to
hole.
foot.
the
draw
Bobbin
thread
wheel
and
Place
toward
up
bobbin
both
Thread
lightly
again.
thread
threads
n
you
Lightly
your
until
up
back
left
the
pull
through
under
hand.
needle
needle
the
the
15
Page 22

__________________________________________
interlock
to
Regulation
are
properly
in
the
sheer
prevent
center
fabrics,
puckering.
balanced
of
set
both
the
if
both
material.
tensions
Correct
The
Tension
tensions
threads
stitching
When
iittle
a
lighter
too
too
too
too
tight
loose
loose
tight
balanced
lower
or
lower
or
Both
tensions
-
Upper
properly
tension
tenson
tension
Upper
tension
Page 23

Regulating
tension
Turn
heavier
lighter
upper
The
tension,
of
one
with
numbers
degrees
specific
a
threads
hardly
need
upper
the
upper
Your
two-needle
Regulating
lower
The
special
for
turn
ed,
with
case
Turn
a
for
the
materials,
fabrics.
tension
complete
on
of
are
tension
the
the
right
it
looser
Upper
knob
from
the
tension
degree
the
be
tension
work.
the
tension
sewing
small
tip
for
tension.
right
or
is
loose
turn
tension
same
adjusted.
should
Lower
rarely
of
a
Tension
left,
designed
so
to
of
and
tension.
of
size,
has
Tension
jobs.
knurled
your
tighter
inr.rease
to
to
tight,
the
dial
are
For
set
be
third
a
needs
adjustment
If
screw
thumb
tension,
ease
can
tension
indicate
helpful
the
ordinary
on
tension
adjusting,
as
tension
tension
all
that
be
in
Provided
thread
about
the
on
follows:
or
grades
covered
The
dial.
different
restoring
both
tension
sewing,
5.
disc
except
requir
is
bobbin
it
turn
on
on
for
left
Page 24

Stitch
stitch
Ihe
,,titch
numbers
The
length
stitch).
machine
to
6
is
length,
opposite
s
row)
Length
length
(the
When
ceases
the
turn
Regulation
length
and
on
higher
inch
the
the
control
to
the
the
feeding;
(4
control
dot
limit
control
the
control
mm).
on
serves
it
in
number,
is
maximum
To
the
until
left
the
to
sewing
indicate
set
regulate
desired
of
regulate
backwards.
the
on
stitch
the
the
longer
“0”,
the
slot
the
stitch
the
the
length
stitch
number
(see
h
Reverse
sew
To
control
machine
Sewing
in
down.
resumes
reverse,
When
simply
the
forward
press
control
sewing.
the
released,
is
finger-tip
the
Page 25

Dropping
Remove
down
ever
indicated
(as
retained
be
feeding.
cease
machine
The
embroidery
raise
To
let
and
the
the
the
it
Machine
bed
slantwise,
in
and
machine
return
by
feed
cover
a
this
button
to
white
position
dropped
is
feed,
original
its
Feed
and
then
sewing.
press
to
arrow).
and
press
position.
the
for
the
rear
The
the
darning,
lever
the
drop
lever
fabric
and
feed
up
will
will
hoop
down
Darning
Remove
93-102
No.
c
clip
tighten
and
and
so
Embroidery
sewing
the
826-91
that
screw
Foot
set
foot
spring
screw,
19
foot.
the
from
the
behind
is
it
rear.
needle
Hold
darning
Attach
b.
Page 26

All
i1li
All
ticlied
Pie
the
Special
on
9n
Purpose
rjr
purpose
transparency
iperations
rig
neede
pp.
Sewing
V
instructed
as
penetrate
upplication
22—32
ew
sewing
Shoe)
of
where
Foot
foot
on
its
the
possibilities
No
page
shoe
it
fabric
93-100
is
21
facilitates
importont
are
179-00
to
discussed
all
is
sew-
watch
at
Page 27

Fundamentals
run
Never
•
•
•
•
fabric
have
Place
before
foot
Always
position
completed
machine
The
sewing
guide
is
by
ing
both
bring
before
foot
pushing
of
threaded
a
under
threads
you
the
seam.
a
will
automatically
work.
the
Machine
sewing
the
back
fabric
put
take-up
begin
you
feed
Never
pulling
or
machine
lever
and
the
try
the
Operation
unless
foot.
the
under
the
into
to
after
material
you
All
hasten
to
fabric.
sewing
machine
highest
its
you
under
have
you
have
to
feed
the
do
sewing
The
loosening
tighten
this
feet
the
thumb
can
thumb
screw
be
screw.
easily
securely
exchanged
Make
again.
sure
after
you
Page 28

Insertion
Zipper
zipper
Setting:
or
baste
Position
want the
zipper.
seam close
end
foot
from
Turn
andupthe
with
obtained
be
Machine
Pin
fabric.
you
not
the
straight
across
tinuous operation,
guide.
22
No.
your
A
closed
zipper
of
edgeofthe
fabric
Use
to
93-847
Pfaff
B
0,
zipper
depends
left
other
right
dealer).
to
edge
600-00
•
on
fabric
right
of
side
edge
wrong
on
side.
zipper,
in
of
(which
side
whether
overlap
to
one
foot
Run
stitch
con
as
can
of
or
a
a
Quilting
zipper
with
your
Machine
Zipper
quilting
at
any
Pfaff
dealer).
Setting:
foot
gauge
distance
faceofthe
along
tea
the
cosies,
ger
ive
canbequilted.
foot
No.
sews
fabric.
preceding
slippers,
No.
A
93-847
and
93-847
0,
parallel
angle
Always
B
-
600-00
guide
row
seat
600-00
rows
over
of
pads
(available
used
the
the
stitches.
of
entire
gauge
and
with
stitching
sur
Attract
covers
at
the
fin
Page 29

Hemming
hemmer
with
tained
Machine
You
can
stitches,
over
Fold
under
in
the
and
close
far
as
but
do
fabric
threads
both
edge
hem
hemmer
Avoid
this,
do
shortly
ill,
(see
edges,
into
cut
excess
ond
edge.
away
strated
from
Setting:
make
depending
edge
hemmer
material
the
as
not
into
scroll
ugly
press
before
at
hem
hem,
material
about
sketch
in
foot
your
neat
of
foot
about
the
to
rear
the
trim
the
scroll
backwards.
in
is
(top
ends
the
you
center).
first
turn
Before
/4”
No.
Pfaff
A
fabric
folded
fabric
line
by
fabric
edge
(see
of
3.
93-84]
dealer).
0
hems
the
on
so
/2”
threads
of
with
ill.).
slowing
come
If
you
end
sketch
you
the
2to3,
or
with
material.
about
that
short
edge.
edge.
(sketch
the
Feed
the
against
to
want
within
to
outwards
hem
hem
551-00
straight
i/a”,
the
of
Sew
Remove
hemmer
fabric
left
down
the
the
2).
the
sewn
(can
B
place
needle
its
1).
edge
needle
end
hem
to
1/2”
and
Then
last
first,
be
•
zigzag
or
fabric
stitches
edge
rear
backwards
work,
the
Draw
pulling
by
that
so
of
feeding.
the
of
several
corner,
of
cut
hem
edge,
as
ob
the
the
the
To
plate
hem
away
sec
cut
illu
23
Page 30

Overcasting
Machine
Overcasting
zigzag
wide
one
taking
over
24
edge
its
Edges
Setting:
prevents
stitch
stitch
A
(normal
and
into
to
2
frayed
sew
the
tension
4,
edge
fabric
B
edges.
with
setting).
..
and
Use
the
the
long,
a
needle
other
Page 31

Inserting
Machine
Large
method
ng
fabrics.
making
rhe
fabric.
holes
Cut
sure
Patches
Setting:
can
may
patch
that
A
be
be
its
4,
patched
used
slightly
grain
B
•
quickly
particularly
larger
matches
than
The
the
for
the
follow
jersey
hole
rest
of
4:1.1
Sew
of
over
close
elastic
down
medium
corners
to
joining
the
length
seams.
patch
twice.
seam.
The
For
Turn
with
added
zigzag
wide
a
fabric
strength,
over
stitches
zigzag
and
make
stitch
stitch
trim
an
I
Ic
Page 32

Sewing
Machine
Attach
21.
p
obtain
To
cotton
clear-view
and
rial
Buttonholes
Setting:
all-purpose
more
thread
filler
shoe.
regulate
A
Stitch
No.
Use
sewing
prominent
in
on
Sew
stitch
the
(first
1.5
length
50
foot
buttonholes,
the
piece
a
length
notch),
almost
embroidery
instructed
as
groove
left
of
correctly.
scrac
B
thread.
place
of
mate
*0*
the
•
on
a
buttonhole
A
tained
from
your
foot
(see
Pfaff
ill,
dealer.
may
right)
at
ob
be
Page 33

Instructions
first
1
Sew
fabric
in
foot,
Lift
2
needle
the
to
rallel
Flick
3
make
Flick
4
cord
and
first
as
left,
to
lever
4
lever
at
stop
seam.
to
Buttonholing
for
over
side
right
on
fabric
turn
pivot.
a
pull
completed
A
to
bartacking
6
A
back
of
end
about
side
filler
first
4
filler
a
of
around
Lower
line
second
first
to
seam.
to
its
cord
of
stitches,
stitches
6
cord.
throw.
clockwise,
take
foot,
taut
stitching,
notch
notch
Sew
Leave
and
(at
and
second
from
one
lay
“3”)
trim
needle
using
stitch
it
and
filler
seam
end
‘
I
to
6
sew
to
3
threads.
ripper,
your
4
4
tying
Open
but
be
Phft
27
and
notch
second
A
lever
not
ripper
to
stitches.
A
the
sewing
injure
to
may
to
with
“0”
be
and
and
your
the
bartacks.
obtained
make
filler
seam
from
lever
Flick
5
bartacking
Move
6
pa
stitches.
both
Trim
7
the
buttonhole
careful
seam
A
of
dealer.
Page 34

Button
Machine
28
Sewing
Setting:
A
Stitch
O,B
length
•
0
all-pur
under
button
Place
lever
its
sewing
foot
the
pair
hole.
1
A,
throw
zigzag
button
to
2
above
feed.
foot
or
usually
3
and
holes.
of
and
Let
tying
2
centered
is
stitches
securely.
tying
four-hole
on
reposition
process,
align
needle
stitches.
“3”,
to
as
stitches.
so
stitch
until
over
you
Move
buttons
the
stitching
that
through
Raise
needle
left
deem
lever
button,
needle
needle.
hole.
necessary
A
raise
then
through
will
hole
the
on
Sew
“0’
to
the
re
the
Drop
pose
enter
and
Move
left
as
to
and
When
sewing
peat
second
machine
sewing
right
make
of
many
fasten
make
Page 35

F-
Darning
Machine
Drop
93-102826-91.
No.
Clamp
worn
obtained
he
out
Cut
the
ing
across
high
and
with
area
torn
Triangular
best
foot
the
the
Setting:
machine
fabric
area
small
fabric
the
speed.
sew
short
darned
No
machine
work
in
is
from
hole
Then
back
stitches
around
tears,
93-838
spot.
feed
into
the
and
grain.
with
feed
A
your
with
and
the
954-00,
B
0,
and
darning
middle.
Pfaff
medium-sized
First
the
the
turn
forth
anchors
This
hole.
rips
small
of
aid
the
using
sew
and
attach
hoops
(Darning
dealer.)
stitch
machine
fabric
over
and
the
back
darninq
so
hoops
holes,
back
running
right
at
preceding
threads
thin
ordinary
hoops.
no
and
that
and
spots
forth
foot
the
may
follow
forth
angles
work
in
sewinq
Raise
at
Un-
are
over
29
Page 36

Cording
Machine
Setting:
A
Stitch
B
0,
length
a
and
may
(/32’),
cording
wide
cording
mm
cording
wide
distance
needle
foot
be
each)
wide
obtained
3.0
foot
foot
each;
foot
each)
of
2.0
distances
and
No.
and
No.
No.
and
or
cording
a
use
Pfaff,
your
on
cord
To
needle.
=
medium
)
a
twin
Twin
1.2,
of
4.0
Pin
93-847
1.2-mm
a
For
93-847
see
Wider
93-847
twin
a
2.5
Twin
From
needles
mm
tucks
narrow
ill.)
mm.
your
1.6
(/32”).
680-00
twin
675-00
and
cording
671-00
needle
needles
(/io’),
are
a
Pfaff
and
made
grooves,
(7
needle.
cording,
(5
1.6-mm
is
grooves,
(3
with
are
dealer.
cordrng
1.8,
grooves.
twin
made
needle
a
available
2.0,
with
use
feet
2.5
mm
1
1.5
needle.
with
mm
2
for
ordinary
needle
sewing
and
point
needle
securely.
b
and
(see
foot.
loosen
out
12).
p.
Attach
of
Needle
set
clamp
screw
foot
screw
and
and
Twin
lever
and
b
to
a.
insert
tighten
highest
Pull
twin
remove
screw
Changing
take-up
Bring
1
_g
—
f
30
.
—
needle
needle
Loosen
cording
Page 37

Jpper
?ach
?nds
see
3nd
oth
Fhen
fhread
iiaterial
:ension.
If
you
nent,
and
of
needle
end
you
cord
Threading:
the
of
through
14).
p.
through
threads
thread
Tension:
being
want
insert
pass
filler
of
replace
not
is
two
the
separately
the
down
each
sewn
to
filler
a
filler
the
hole
thread
the
pinched.
spool
hole
needle
Adjust
render
f
bed
Place
eyelets
and
and
cord.
cord
from
back
slide,
a
pins.
through
take-up
in
pull
from
upper
slightly
your
Remove
through
below
under
spool
Pass
of
front
cording
make
thread
thread
them
tension
(see
cording
thread
of
both
retainer
lever
into
back.
to
increase
more
the
hole
p.
sure
thread
tension
4.
slot
to
promi
bed
in
g
30).
foot.
the
on
2
3
Lead
5.
suit
lower
slide
front
Lay
As
filler
Spacing
spacing
ceding
and
between
Use
narrow
ing.
use
No.
between
between
seam
it
tucks,
50
cording,
Tucks:
parallel
one
into
guide.
a
as
the
use
embroidery
and
of
the
cording
thread
sewing
To
tucks,
For
ensure
place
grooves
larger
a
gauge.
for
for
silk
pin
of
tucks
wider
uniform
the
the
spacing
cord
pre
foot
and
31
Page 38

Stitching
u
r
C
Machine
t
a
Synthetic
n
s
Setting:
Materiais
A
terial;
about
fabrics.
be
synthetic
and
adhered
the
curtain
lower
thread
to
thread.
tensions
order
in
and
the
edge
ease
hints
laundry.
use
of
a
the
should
of
matching
upper
both
To
such
ma
depending
3,
to
1
B
2
Stitch
•:
on
length
If
somewhat.
necessary,
Both
avoid
to
Fabric
as
these
in
Diolen,
shrinking
the
the
finish
synthetic
I
P
a
s
Machine
32
t
i
c
Setting:
thread
after
sticking
an
and
or
plastic
the
oily
used
synthetic
sheets
its
in
under
removed
sole
sticky
from
with
Plastic
t
e
h
s
e
S
A
length
0
2;
to
medium.
B
Stitch
,;
bathrooms,
cotton
a
Place
sheets
sewing.
the
to
cloth.
curtains,
and
piece
which
To
sewing
are
fine
a
of
prevent
can
sewn
tissue
foot,
as
needle.
be
plastic
with
paper
easily
wipe
are
kitchens
Page 39

Dleaning
and
Oiling
Regular
the
incorporation
have
Put
ing
ing
All
maintenance-free
cleaning
service
oil
to
drop
one
hook
machine
the
is
each
other
and
your
of
life
self-lubricating
of
sewing
the
oil
of
day
oil
only.
bearings
into
you
proper
machine
hook.
the
sew
raceway
of
oiling
(see
your
will
Ihanke
bearings
ill)
machine
ire
em
r
the
to
ll
ymu
ew
the
of
oew
Use
are
Page 40

From
end
bar
vicinity
do
To
the
bobbin.
On
bottom
back
time
and
of
this,
needle
portable
of
cautiously.
time,
to
in
the
remove
plate
machines,
the
the
sewing
and
machine
clean
machine
hook
the
the
base
the
arm
with
needle,
bobbin
loosen
parts
and
a
the
as
the
at
soft
tilt
the
well
sewing
case
screw
the
needle-
as
brush.
with
machine
on
in
the
foot,
the
the
Page 41

I
Removing
change
To
needle
it
ling
the
the
end,
bar
upwards.
Face
light
remove
Cover
bulb
or
the
oil
face
the
parts
cover
Cover
Face
tip
it
d
snaps
the
into
into
slot
e
place.
and
push
face
cover
up
35
Rep’acing
the
at
by
pul
Slip
until
Page 42

hangng
the
Light
Bulb
The
area
change
To
push
When
voltage
pins
riaht.
built-in
stitching
of
the
bulb
the
inserting
agrees
socket
into
Reolace face
15-watt
perfectly.
light
into
with
a
bulb,
its
new
slots,
cover.
sewing
socket,
light
the
light
remove
line
press
turn
bulb,
voltage
bulb
illuminates
face
the
left,
make
Slide
in,
and
sure
and
the
cover.
pull
its
bulb
turn
Page 43

rrouble
Machine
Dause
incorrectly
\Jeedle
needle.
rong
Needle
Machine
Needle
Needle
2.
Cause;
above-mentioned
The
age
Thread
or
Poor
raceway
Hook
oiling.
Shooting
Skips
bent.
threaded
fine
too
Thread
tension
knotty
Stitches
inserted.
improperly.
too
or
Breaks
tight.
too
thread
jammed
is
thick
may
used.
for
cause
with
the
thread.
thread
thread
or
break-
needs
Remedy;
Push
the
sure
System
Use
Insert
Check
14.
p.
Use
13).
p.
Remedy:
See
Adlust
Use
Clean
needle
long
new
and
correct
remedies
tensions
good
and
up
groove
130
needle.
correct
needle
quality
oil
as
R
listed
as
hook
as
far
faces
needles
threading
and
under
instructed.
threads
raceway.
will
it
toward
only.
thread
above.
1.
only.
as
and
go
you.
instructed
(see
chart
make
on
on
Page 44

No.
20758
engl.
CPFAFFD
Germany
n
1070
R
Prrnted
 Loading...