

Page 1
®
CM6700 Matrix
Switcher/Controller
Installation/
Operation Manual
C523M-H (6/05)
Pelco • 3500 Pelco Way • Clovis, CA 93612-5699 USA • www.pelco.com
In North America and Canada: Tel (800) 289-9100 • FAX (800) 289-9150
International Customers: Tel +1(559) 292-1981 • FAX +1(559) 348-1120
Page 2

CONTENTS
Section Page
IMPORTANT SAFEGUARDS AND WARNINGS ................................................................ 3
MODELS ............................................................................................................................4
ASSOCIATED EQUIPMENT ......................................................................................4
DESCRIPTION ................................................................................................................... 5
INSTALLATION ..................................................................................................................8
SET OPTIONS ........................................................................................................... 8
MOUNT UNIT ............................................................................................................. 9
CONNECT VIDEO SOURCES ................................................................................. 10
CONNECT CONTROL LINES ................................................................................... 11
CONNECT MONITORS ............................................................................................13
CONNECT ALARMS .................................................................................................14
CONNECT AUXILIARIES .........................................................................................15
CONNECT COM 2 PORT .........................................................................................17
CONNECT KEYBOARDS ......................................................................................... 18
PROGRAMMING .............................................................................................................. 20
OPERATION ..................................................................................................................... 36
ASCII OPERATING COMMANDS ............................................................................ 36
TROUBLESHOOTING ...................................................................................................... 39
GAINING INITIAL CONTROL ...................................................................................39
USING A PC TO SEND ASCII COMMANDS VIA COM 2 ......................................... 39
PERFORMING A SOFTWARE RESET.....................................................................39
SPECIFICATIONS............................................................................................................. 41
INDEX ............................................................................................................................... 43
REGULATORY NOTICES ......................................................................................... 44
WARRANTY AND RETURN INFORMATION.................................................................... 44
LIST OF ILLUSTRATIONS
Figure Page
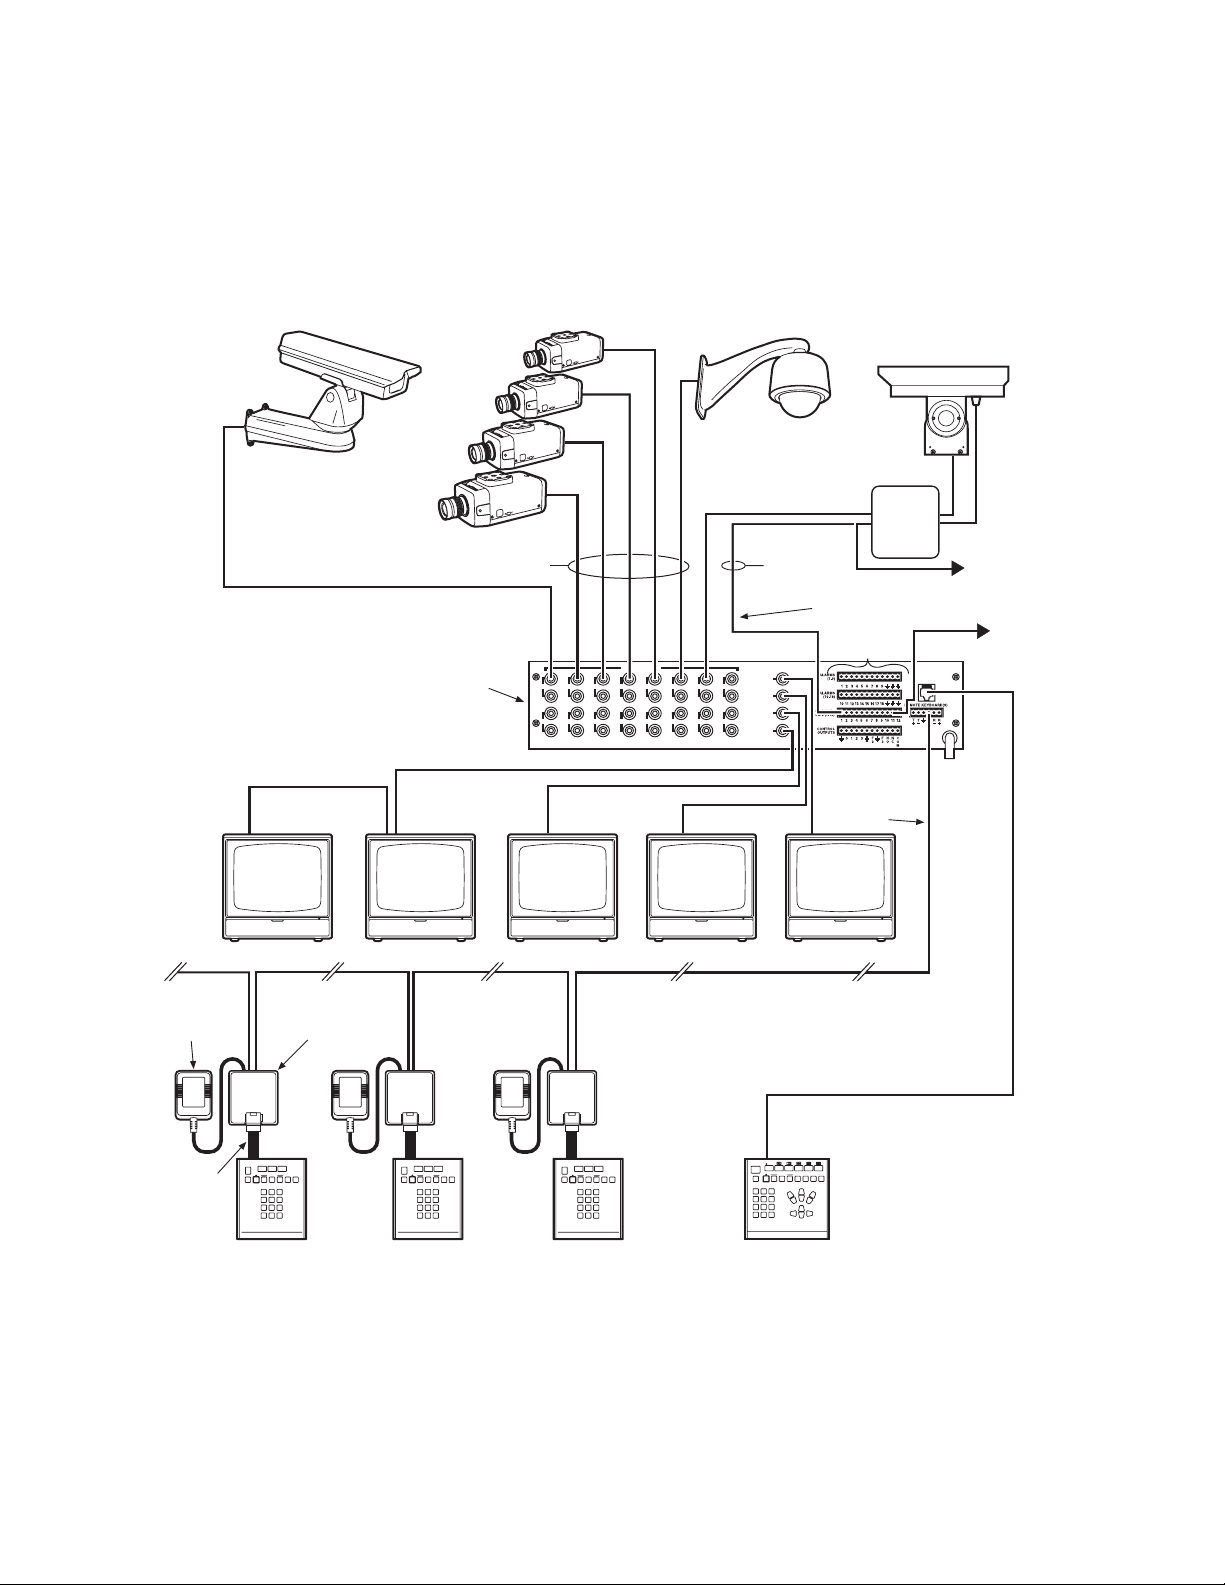
1 CM6700 Applications .........................................................................................6
2 Application with a Multiplexer ............................................................................. 7
3 Applications with Remote Keyboards (ASCII, KBD200A Only) .......................... 7
4 Cover Removal .................................................................................................. 8
5Video Termination Jumpers ................................................................................8
6 DIP Switch Locations ......................................................................................... 9
7 Installing Mounting Ears ..................................................................................... 9
8 Mounting the Matrix Switcher ............................................................................ 10
9 Connecting Video Sources................................................................................10
11 Daisy-Chaining Receivers ................................................................................. 11
10 COM 1 Connections on the SCU ...................................................................... 11
12 Making Receiver Connections at a Distribution Block (CM9760-CDU-T) ......... 12
13 Monitor Connections ......................................................................................... 13
14 Connecting Alarms ............................................................................................ 14
15 Wiring the AUX 1 (Relay) Output ...................................................................... 15
16 Wiring the AUX 2 and AUX 3 (TTL) Outputs ..................................................... 16
17 Connecting an RS-232 Interface ....................................................................... 17
18 Connecting an RS-422/485 Interface ................................................................ 17
19 Installing Local and Remote Keyboards ........................................................... 18
20 Quick Reference Chart ..................................................................................... 21
21 Software Reset Button Location ....................................................................... 39
LIST OF TABLES
Table Page
A Keyboard Addresses .........................................................................................19
B Programming the CM6700 Switching Control Unit ........................................... 20
C Examples of ASCII Commands ......................................................................... 36
D ASCII Commands ............................................................................................. 37
E Solutions To Common Problems .......................................................................40
F Switcher/Controller and Keyboard RJ-45 Pin Functions ...................................40
2 Pelco Manual C523M-H (6/05)
Page 3

IMPORTANT SAFEGUARDS AND WARNINGS
Prior to installation and use of this product, the following WARNINGS should be observed.
1. Installation and servicing should be done only by qualified service personnel and
conform to all local codes.
2. This unit is designed for indoor use only and must not be installed where exposed to
rain and moisture.
3. The installation method and materials should be capable of supporting four times the
weight of the unit and equipment.
4. After replacement/repair of this unit’s electrical components, conduct a resistance
measurement between line and exposed parts to verify the exposed parts have not
been connected to line circuitry.
The product and/or manual may bear the following marks:
This symbol indicates that dangerous voltage constituting a risk of electric shock is
present within this unit.
This symbol indicates that there are important operating and maintenance instructions
in the literature accompanying this unit.
Please thoroughly familiarize yourself with the information in this manual prior to installation
and operation.
CAUTION:
RISK OF ELECTRIC SHOCK.
DO NOT OPEN.
REGULATORY NOTICES
This equipment has been tested and found to comply with the limits of a Class A digital
device, pursuant to part 15 of the FCC rules. These limits are designed to provide reasonable protection against harmful interference when the equipment is operated in a commercial environment. This equipment generates, uses, and can radiate radio frequency energy
and, if not installed and used in accordance with the instruction manual, may cause harmful
interference to radio communications. Operation of this equipment in a residential area is
likely to cause harmful interference in which case the user will be required to correct the
interference at his own expense.
Pelco Manual C523M-H (6/05) 3
Page 4

MODELS
CM6700-MXB2 Matrix switcher/controller with 16 video inputs and 2 monitor outputs,
CM6700-MXB2-X Same as CM6700-MXB2, PAL-configured for 230 VAC and 50 Hz
CM6700-MXB4 Same as CM6700-MXB2 with two-monitor expansion card
CM6700-MXB4-X Same as CM6700-MXB4, PAL-configured for 230 VAC and 50 Hz
120 VAC, 50/60 Hz
operation
(CM6700VMC2) pre-installed
operation
ASSOCIATED EQUIPMENT
KBD100 Desktop keyboard with full switching and programming capabilities
KBD200A Desktop keyboard with full switching and programming capabilities,
KBD300A Desktop keyboard with full switching and programming capabilities,
CM6700-VMC2 Expansion card with two monitor outputs
CM6700-VMC2-X Expansion card with two monitor outputs, PAL-configured
KBDKIT Wiring kit for connecting KBD100, KBD200A, and KBD300A keyboards
plus push-button control of PTZ functions
plus joystick control of PTZ functions
to remote keyboard port; includes two RJ-45 wall blocks and a transformer to convert 120 VAC to 12 VAC for keyboard power
KBDKIT-X Wiring kit for connecting KBD100, KBD200A, and KBD300A keyboards
CM9760-CDU-T This is a 16-channel RS-422 transmit-only (two-wire and ground) dis-
to remote keyboard port; includes two RJ-45 wall blocks and a transformer to convert 230 VAC to 12 VAC for keyboard power
tributor that is used primarily to install pan and tilt and dome receivers
in a star configuration.
4 Pelco Manual C523M-H (6/05)
Page 5

DESCRIPTION
Pelco’s CM6700 is a keyboard-controlled cross-point video matrix switcher/control unit
(SCU) that allows you to route up to sixteen video images to as many as four monitors
while controlling camera positions.
Applications
The CM6700 SCU can be controlled from a local or remote keyboard (refer to Figure 1),
used with a multiplexer to display multiple camera views on a monitor (refer to Figure 2),
and interfaced to a distant keyboard via dial-up telephone circuits through appropriate interface equipment (refer to Figure 3). The CM6700 features menu-driven, password-protected
programming. The CM6700 can also be controlled from a personal computer using ASCII
commands.
Keyboards
Camera positioning options can be programmed and controlled from a keyboard. Up to
eight keyboards can be connected to the CM6700 SCU, allowing monitoring stations that
share a common monitor to each have a keyboard. Four different keyboards are available
to use with the CM6700 SCU, each with varying features and different costs. (Keyboard
types can be mixed in a system – See
Sequences, Presets, and Patterns
Special programmed operations include sequences, presets and patterns.
A sequence allows you to see a routine of 16 camera views on your monitor over and
over again. The sequence can be operated automatically or manually. The order in which
the views appear and the time each view remains can be programmed.
A preset allows you to direct a pan/tilt/zoom (camera positioning system) to move to a
certain position on command or as a result of an alarm. In addition to moving the
camera, a descriptive title can appear on the screen. (Presets are not available with the
KBD100 keyboard.)
Associated Equipment
.)
With a pattern you can program a camera positioning system to move around its
viewing area in a repeating pattern. The number and time length of patterns varies with
different positioning systems. (Patterns are not available with the KBD100 keyboard.)
Alarm Inputs
Eighteen alarm inputs are provided. These can be programmed to cause the display to
switch automatically to the camera with the alarm and/or to operate one of three auxiliary
outputs. Sixteen of the inputs are associated with individual cameras. Two of the inputs
activate group camera sequences.
Auxiliary Outputs
Three auxiliary outputs are provided. One output is a relay and two are open collector (TTL)
outputs. Auxiliary outputs are activated at the keyboard (except KBD100).
Protocols
The CM6700 works with Pelco’s Coaxitron®‚ D, and P protocol receivers.
Power, Mounting Methods
The CM6700 SCU operates on 120 VAC or 230 VAC, depending on the model. The
compact case mounts in 3-1/2 inches of vertical space in a 19-inch equipment bay or to a
wall or table top.
Pelco Manual C523M-H (6/05) 5
Page 6
12 VAC
TRANSFORMER
COAXITRON
WALL BLOCK
COAXITRON
CM6700 SCU
VIDEO INPUTS
1 3 5 7 9 1 13 15
2 4 6 8 10 12 14 16
SHIELDED
TWISTED
PAI R
VIDEO OUTPUTS
1
2
3
4
RCVR
RS-422 (P OR D)
TO ALARM
CONTACTS
LOCAL
KEYBOARD
RS-485
DAISY-CHAIN TO
OTHER
RECEIVERS
RS-232 TO PC OR
CARD ACCESS
COMPUTER
DATA
CABLE
KBD100/200A/300A
REMOTE KEYBOARDS
LOCAL KEYBOARD
00044
Figure 1. CM6700 Applications
6 Pelco Manual C523M-H (6/05)
Page 7
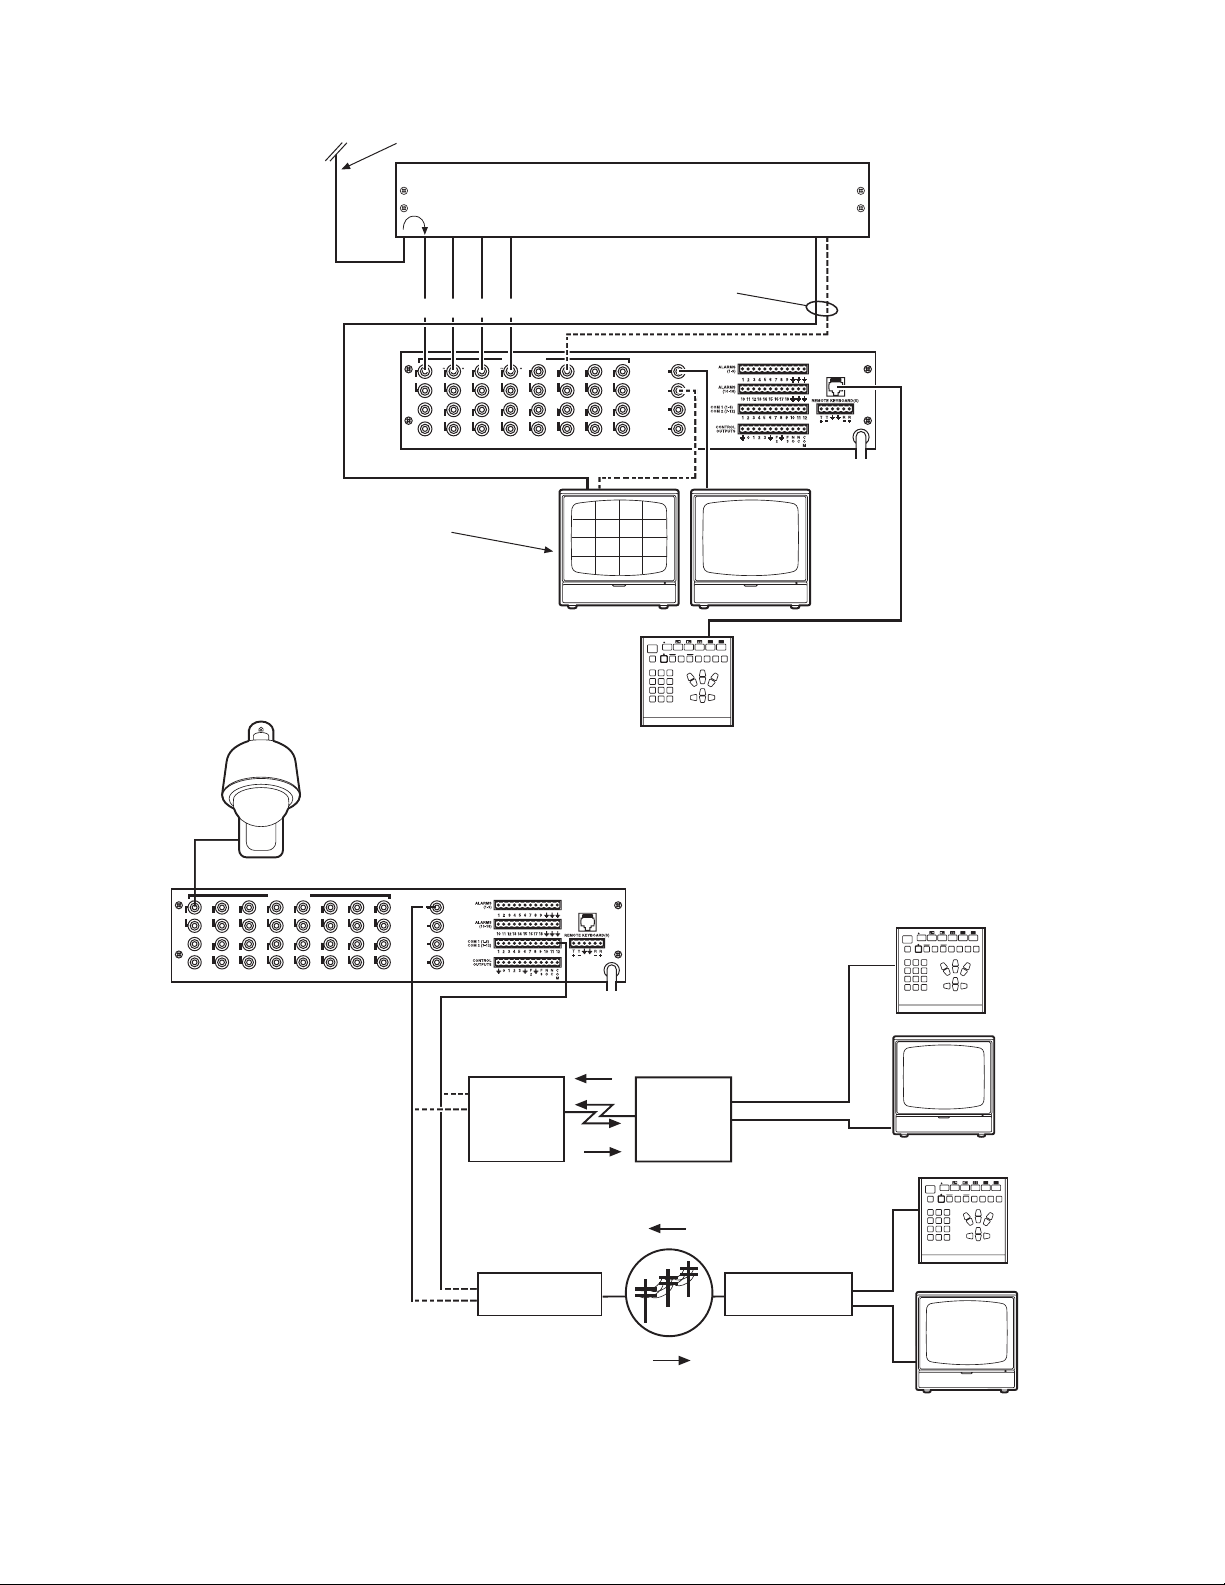
CAMERA VIDEO
LOOPED VIDEO INPUTS
MULTIPLEXER
MULTIPLEXED
VIDEO
MULTIPLEXER
*
VIDEO INPUTS
1 3 5 7 9 1 13 15
2 4 6 8 10 12 14 16
VIDEO INPUTS
1 3 5 7 9 11 13 15
2 4 6 8 10 12 14 16
CM6700 SCU
ALTERNATE MULTIPLEXED
VIDEO ROUTING THROUGH
A CAMERA INPUT.
KBD200A/300A
Figure 2. Application with a Multiplexer
VIDEO OUTPUTS
1
2
3
4
*
VIDEO OUTPUTS
1
2
3
4
LOCAL
KEYBOARD
*
00045
LOCAL
KEYBOARD
NOTE: ASCII DOES
RS-422 FACILITY (FIBER OPTIC TERMINAL,
ETC.) TO REMOTE KEYBOARD (ASCII)
CONTROL
KBD200A
NOT SUPPORT
PROGRAMMING
FOT = FIBER OPTIC TERMINAL
FOT
(VIDEO+)
VIDEO
FOT
(VIDEO+)
MONITOR
RS-232 FACILITY (PELCOVISION, ETC.)
TO REMOTE KEYBOARD (ASCII)
CONTROL
KBD200A
TRANSMITTER RECEIVER
PSTN
VIDEO
00046
MONITOR
Figure 3. Applications with Remote Keyboards (ASCII, KBD200A Only)
Pelco Manual C523M-H (6/05) 7
Page 8
INSTALLATION
1 SET OPTIONS
1. Refer to Figure 4. Remove the cover.
A
2. Refer to Figure 5. Set jumpers according to your system requirements. JP1-JP16 are
used to terminate the video input with a 75-ohm resistor or to unterminate the video
(looping). The factory default has the jumper installed in the terminating position. If you
are connecting only a camera to an input, leave the jumper in the terminating position.
If you are looping the video to another device, move the jumper to the looped position,
and terminate at the equipment connected to the looping output.
REMOVE 6
SCREWS
75-OHM TERMINATION
JUMPER
LIFT COVER
C
OFF
Figure 4. Cover Removal
B
REMOVE 6
SCREWS
00055
KEY
TERMINATED LOOPED
75-OHM TERMINATION
JUMPERS (ONE PER INPUT)
JP16
NOTE: JUMPER JP1 CORRESPONDS TO VIDEO INPUT 1,
Figure 5. Video Termination Jumpers
ON
1234
JP2 TO VIDEO INPUT 2, ETC.
ON
1234
BACK OF SCU
ON
ON
1234
JP1
1234
8 Pelco Manual C523M-H (6/05)
Page 9
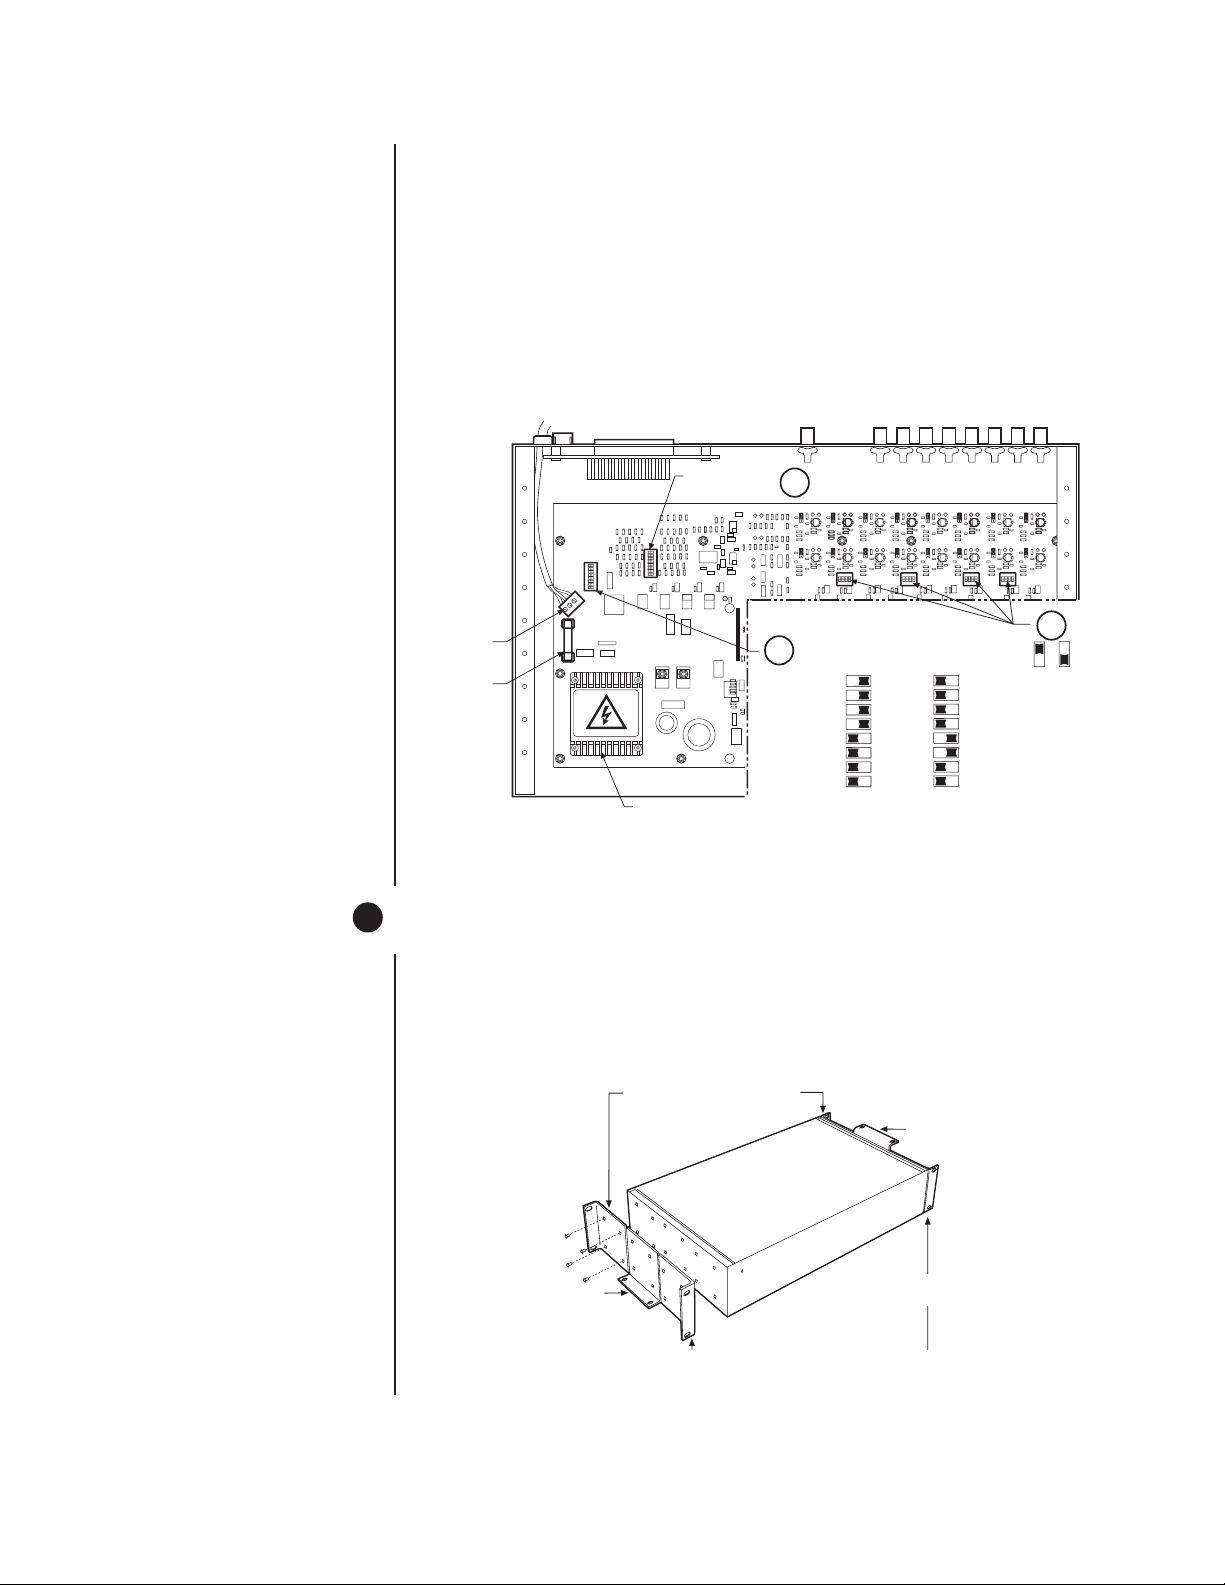
3. Refer to Figure 6. Set DIP switches.
a. Communication port 2 is available for a PC or remote keyboard operating in ASCII
mode. (Refer to
ASCII Operating Commands
.) Most PC applications require
RS-232. A remote keyboard can require either RS-232 or RS-422, depending on
the communications facility. To find out the required interface, check your PC
serial port information or refer to your keyboard manual. Set DIP switch SW5
(COM 2) for RS-232 or RS-422, according to your system requirements. The
SCU is configured at the factory for RS-422.
b. DIP switches SW1, SW2, SW3 and SW4 are to remain in the factory default posi-
tion (OFF).
c. DIP switch SW6 (COM1) is to remain in factory default position (RS-422).
POWER
TERMINAL
BLOCK
FUSE
4. Replace cover.
2 MOUNT UNIT
1. Select a suitable location for the SCU. It must be within 6 feet (1.8 m) of a suitable
electrical outlet. Do not connect the power yet.
2. Refer to Figure 7. Position mounting ears on the sides of the SCU for the appropriate
mounting. If the ears are not required, leave them off.
SW6 DEFAULTS
TO RS-422
ON
12345678
ON
12345678
3a
HIGH VOLTAGE
TRANSFORMER
Figure 6. DIP Switch Locations
3c
ON
1234
SW5 & 6 DIP SWITCH SETTINGS
RS-422/485 RS-232
12345678
ON
ON
1234
12345678
ON
ON
ON
1234
1234
3b
KEY
OFF
ON
00054
POSITION BRACKETS FOR
RACK MOUNTING (REAR)
POSITION BRACKETS FOR
UNDER-TABLE MOUNTING
POSITION BRACKETS FOR
FLUSH MOUNTING
(WALL OR TABLE TOP)
NOTE: EACH SCU COMES WITH
2 MOUNTING BRACKETS
Figure 7. Installing Mounting Ears
Pelco Manual C523M-H (6/05) 9
Page 10
3. Refer to Figure 8. Use suitable hardware to mount the SCU an in equipment bay or
against a flat surface, according to your installation requirements.
MOUNT TO RACK OR SURFACE
WITH 4 SCREWS
Figure 8. Mounting the Matrix Switcher
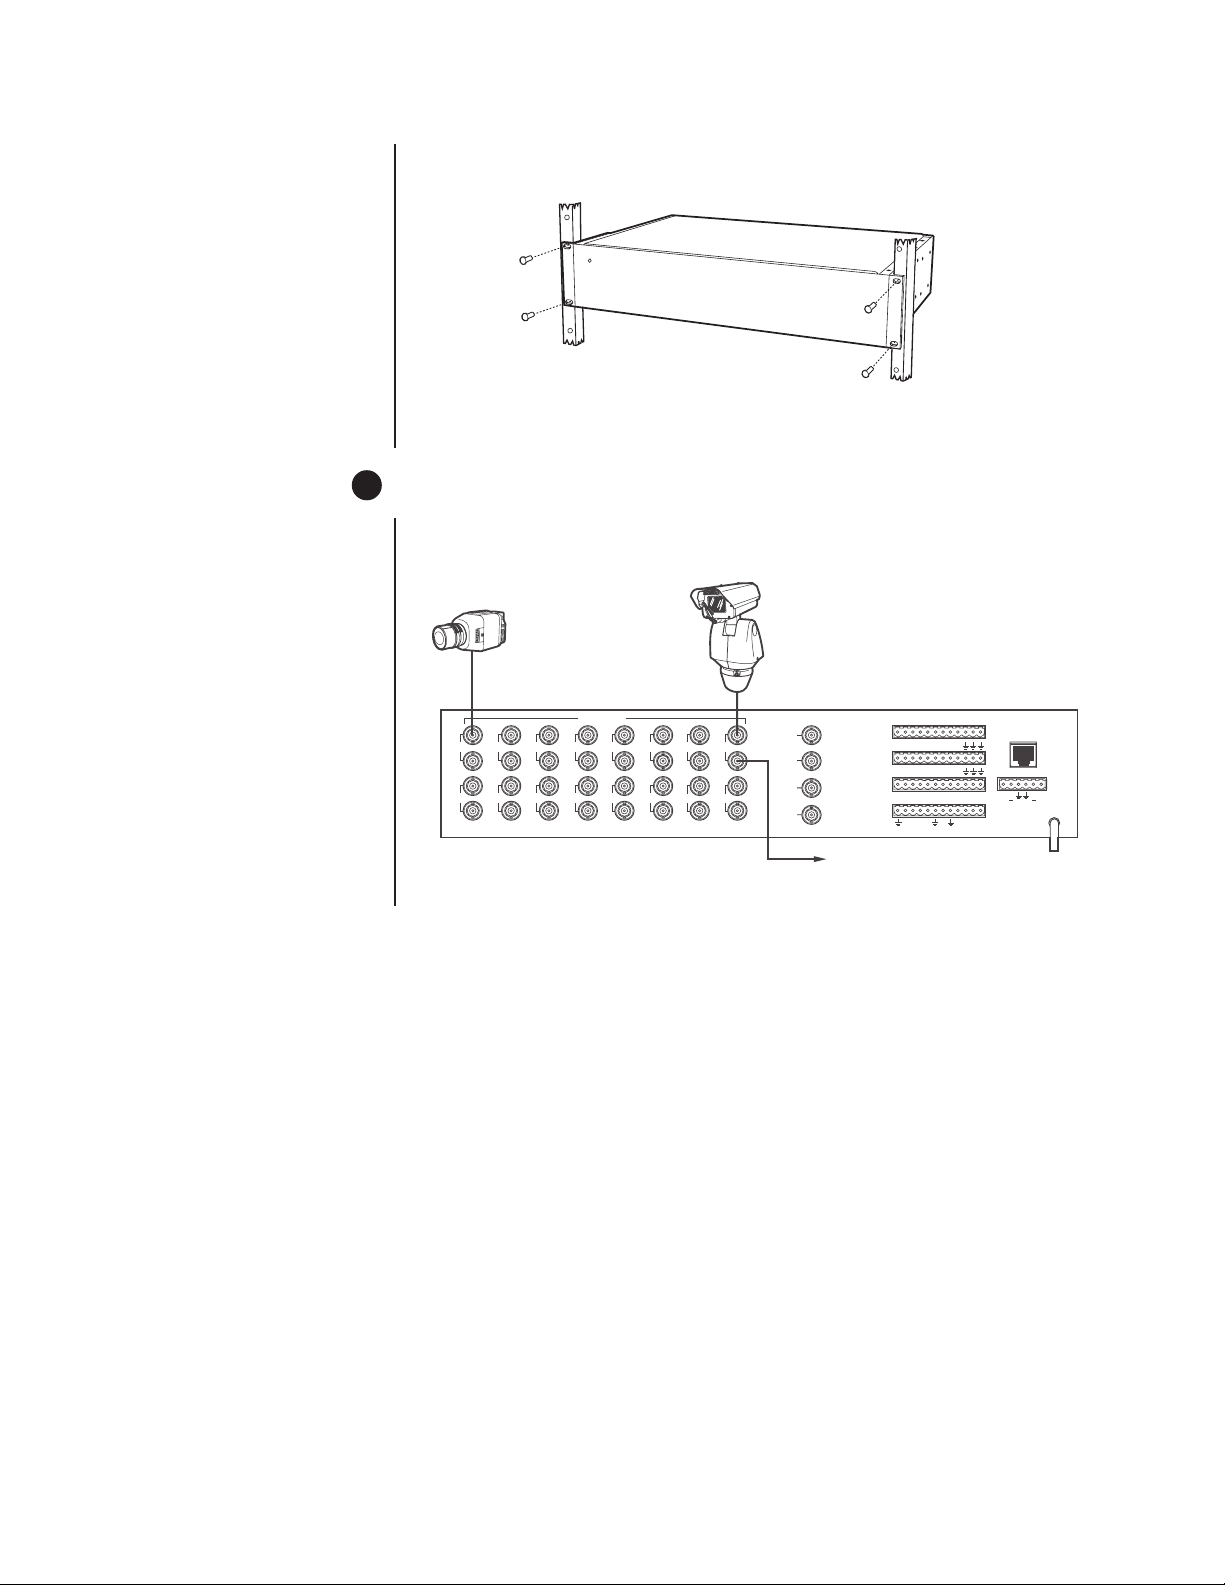
3 CONNECT VIDEO SOURCES
Refer to Figure 9. Connect video cables at the appropriate BNC receptacles on the back of
the SCU.
CAMERA 1
CAMERA 15
VIDEO INPUTS
13 579
246810
Figure 9. Connecting Video Sources
11
12 14
13 15
VIDEO OUTPUTS
1
2
16
3
4
ALARMS
ALARMS
COM 1 (1-6)
COM 2 ( 7-12)
CONTROL
OUTPUTS
(1-9)
(10-18)
10
12 3456789
11
12 13 14 15 16 17 18
1 2345 6789
F
0123
2
F
3NONCCO
10
11
12
M
LOCAL
KEYBOARD
REMOTE KEYBOARD(S)
TT RR
+ +
LOOPING OUT
CM6700 SCU
10 Pelco Manual C523M-H (6/05)
Page 11
4 CONNECT CONTROL LINES
Y
NOTE:
If D or P protocol
receivers are used, they must
all be the same protocol. D
and P protocol receivers
cannot be mixed on the
SCU’s communication port.
Coaxitron control may be
used for some of your
sources when either D or P
protocol receivers are used.
NOTE:
Unless you have
receivers that are equipped
for bi-directional control, you
will only need to run two
wires (TX+ and TX-) to each
receiver.
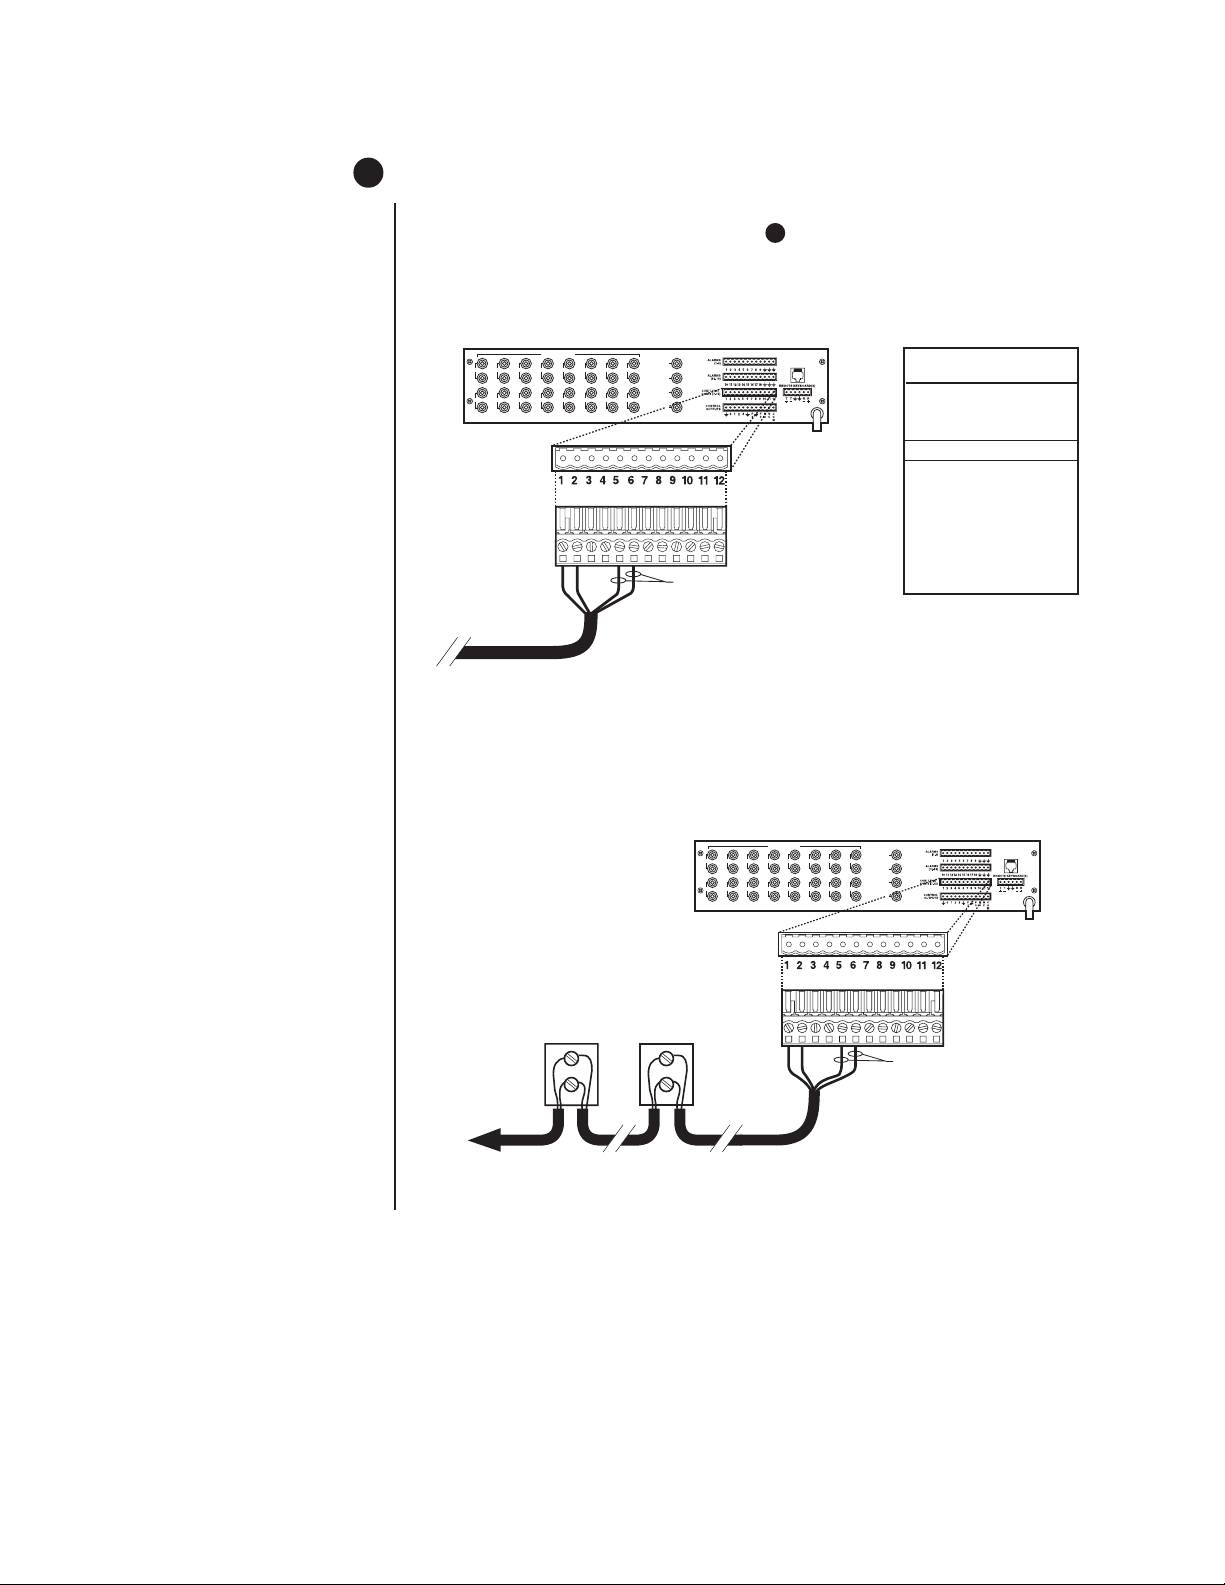
1. Connect camera control lines to receivers. If your video sources are all controlled by
Coaxitron, skip this section and go to step 5 . If any of your video sources are using D
or P protocol via RS-422 communications circuits, they will connect at COM 1 on the
back of the SCU, as outlined below.
2. Refer to Figure 10. Connect control lines to COM 1 at the connector on the back of the
SCU.
1 3 5 7 9 1 13 15
2 4 6 8 10 12 14 16
VIDEO INPUTS
COM 1 (1-6)
COM 2 (7-12)
12-PIN PLUG-IN
CONNECTOR
TO RECEIVERS
VIDEO OUTPUTS
1
2
3
4
CONNECT PINS 5 & 6 ONLY IF
USING BI-DIRECTIONAL CONTROL
LOCAL
KEYBOARD
NOTE: TO PROPERLY
SHIELD DATA CABLE
CONNECT GROUND
ON ONE END ONLY
COM 1 (1-6)
RS-422
PIN ASSIGNMENTS
PIN FUNCTION
1T+
2T–
3 (OPTIONAL) GND
4 NC
5R–
6R+
00052
Figure 10. COM 1 Connections on the SCU
3. Connect wiring to all receivers.
a. Daisy-chaining (going from one receiver to another) is recommended (refer to
Figure 11) but not always possible.
1 3 5 7 9 1 13 15
VIDEO INPUTS
2 4 6 8 10 12 14 16
VIDEO OUTPUTS
1
2
3
4
KEYBOARD
LOCAL
COM 1 (1-6)
COM 2 (7-12)
12-PIN PLUG-IN
CONNECTOR
NOTE: TO PROPERL
SHIELD DATA CABLE
CONNECT GROUND
ON ONE END ONLY
RECEIVER 2 RECEIVER 1
DAISY-CHAINING
RX+ RX+
RX- RX-
CONNECT PINS 5 & 6 ONLY
FOR BI-DIRECTIONAL CONTROL
TO SCU
TO ADDITIONAL
RECEIVERS
00050
Figure 11. Daisy-Chaining Receivers
Pelco Manual C523M-H (6/05) 11
Page 12
b. A star configuration (going to each receiver from a central connecting point) is
sometimes more practical. Your installation will be easier to maintain and troubleshoot if you make all connections at a distribution block made of barrier terminals
or at a Pelco CM9760-CDU-T distribution panel (refer to Figure 12). The total
length of all control lines combined should not exceed 4,000 feet (1,219 m).
VIDEOINPUTS
13579
246810
RECEIVER 2
RECEIVER 1
Tx+
Tx+
Tx+
TxGnd
1234567 891011121 13 14 15 16
Tx+
Tx-
Tx-
Tx-
Gnd
Gnd
Gnd
11
12 14
Tx+
TxGnd
13 15
VIDEOOUTPUTS
ALARMS
1
(1-9)
1 23456789
ALARMS
2
(10-18)
10
11
121314 15 1617 18
COM1 (1-6)
COM2 (7-12)
3
16
4
Tx+
Tx+
Tx-
Tx-
Gnd
Gnd
1 23456789
CONTROL
OUTPUTS
F
0123
2
NOTE: USE
CM9760-CDU-T
ONLY WITH
2-WIRE
CONTROL.
Tx+
Tx+
Tx-
Tx-
Gnd
Gnd
11
12
10
F
3NONCCO
M
Tx+
TxGnd
LOCAL
KEYBOARD
REMOTEKEYBOARD(S)
TT R R
+ +
Tx+
TxGnd
ALARMS
ALARMS
(10-18)
COM 1 (1-6)
COM 2 (7-12)
CONTROL
OUTPUTS
Tx+
TxGnd
(1-9)
1 23456789
11
1213 14 15 1617 18
10
12345678910
0123
Tx+
Tx+
Tx+
Tx-
Tx-
Tx-
Gnd
Gnd
Gnd
F
F
2
3NONCCO
Tx+
OUT IN
TxGnd
LOCAL
KEYBOARD
NOTE: TO PROPERLY
SHIELD DATA CABLE
REMOTE KEYBOARD(S)
CONNECT GROUND
ON ONE END ONLY.
TT RR
11
12
+ +
M
TO SCU
100-240V
10-24 AC/DC
Figure 12. Making Receiver Connections at a Distribution Block (CM9760-CDU-T)
12 Pelco Manual C523M-H (6/05)
Page 13
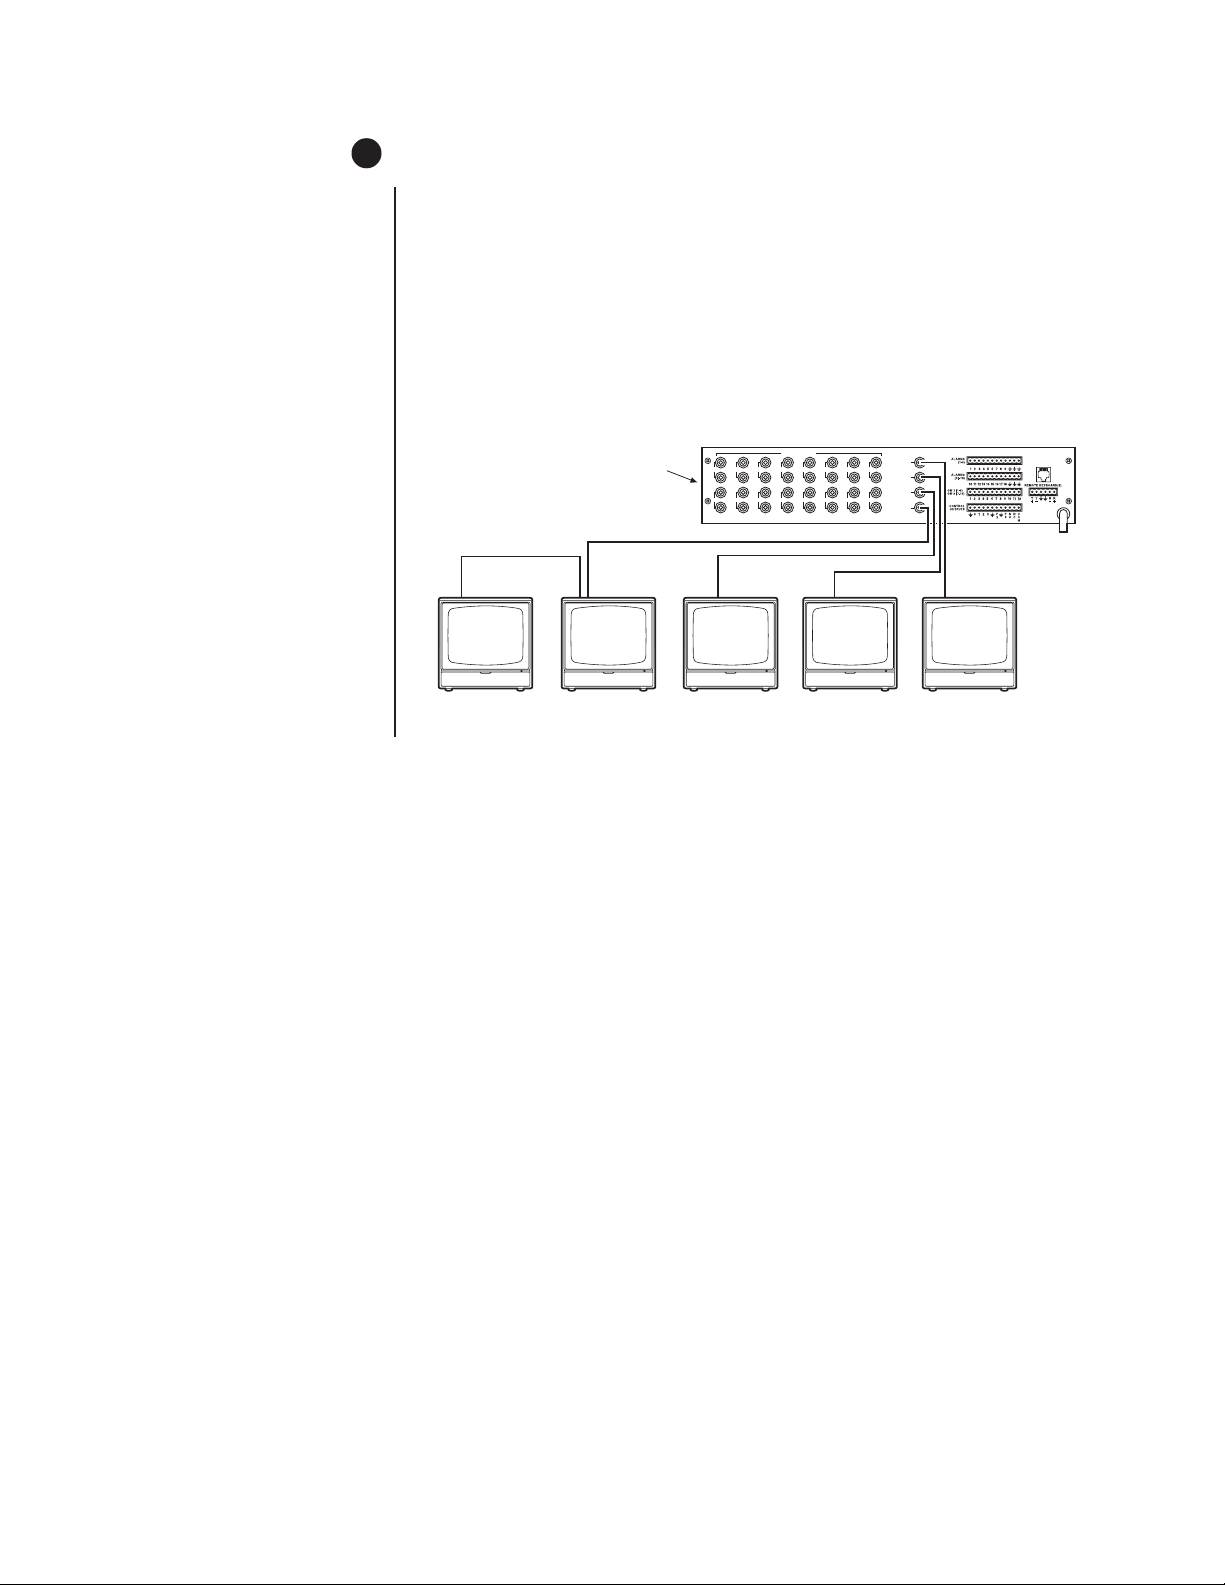
5 CONNECT MONITORS
1. Your SCU will support either two or four monitors. Models CM6700-MXB4 and
CM6700-MXB4-X support four monitors (Monitors 1-4). Models CM6700-MXB2 and
CM6700-MXB2-X support two monitors (Monitor 1 and 2). A CM6700-VMC2 expansion card can be added to the CM6700-MXB2 or a CM6700-VMC2-X to the
CM6700-MXB2-X to increase the support to four monitors.
2. Install monitors according to the instructions provided with them.
3. Refer to Figure 13. Connect the monitor cables at the appropriate BNC receptacle on
the back of the SCU.
4. Be sure to terminate cables properly at the monitors.
75
Ω
MONITOR
4b
CM6700 SCU
LOOPING
MONITOR
4a
1 3 5 7 9 1 13 15
2 4 6 8 10 12 14 16
75
Ω
MONITOR
3
Figure 13. Monitor Connections
VIDEO INPUTS
75
Ω
MONITOR
2
VIDEO OUTPUTS
1
2
3
4
75
Ω
MONITOR
1
KEYBOARD
LOCAL
00049
Pelco Manual C523M-H (6/05) 13
Page 14

6 CONNECT ALARMS
1. Refer to Figure 14. Alarm inputs 1-16 correspond to video inputs 1-16. If an open door
sensor is connected to alarm input 1, when the sensor is activated the video image
from camera 1 will be displayed on one of the four monitors and the camera will move
to a preset (determined by programming). Alarm sensors can be either N.O. or N.C.
contacts. Connect wires from the sensors to the respective alarm input points on the
connectors at the back of the SCU. Each sensor requires one wire to the alarm input
terminal and a return wire to one of the ground terminals on the connector.
2. Alarm inputs 17 and 18 correspond to group sequences 1 and 2. During a group
sequence four video inputs are sequentially shown on a monitor. Each of the four
monitors can be programmed to show the images from four different video sources.
An alarm sensed at input 17 or 18 causes the respective group sequence to operate.
Connect sensors for these two alarm inputs as described in step 1 above.
CAMERA 1
VIDEO INPUT CORRESPONDS
TO ALARM INPUT
1 3 5 7 9 1 13 15
2 4 6 8 10 12 14 16
VIDEO INPUTS
VIDEO OUTPUTS
1
2
3
4
KEYBOARD
LOCAL
ALARMS
(1-9)
12-PIN PLUG-IN
CONNECTOR
TO ALARM SOURCE
12-PIN TERMINAL STRIP
ON REAR OF SCU
ALARMS
(10-18)
Figure 14. Connecting Alarms
(10)
(11)
(12)
(13)
(14)
(15)
(16)
(17)
(18)
00047
14 Pelco Manual C523M-H (6/05)
Page 15

7 CONNECT AUXILIARIES
The SCU provides three auxiliary (AUX) outputs for controlling VCRs and other devices.
These outputs can be activated directly from a keyboard by using the F1, F2, and F3 function keys, or they can be activated by an alarm (determined by programming). Both relay
contacts and TTL outputs are used.
a. AUX 1 is a dry contact relay output. Refer to Figure 15 for wiring details. Terminal
connections are provided for both normally open (N.O.) and normally closed (N.C.)
contacts. Do not exceed the voltage and current ratings for the relay contacts. You will
need to provide an external power source to operate your device. In most cases you
will also need an external current limiting resistor. The formula for calculating the resistor value is given in Figure 15.
b. AUX 2 and 3 are TTL open collector outputs. These outputs provide a path to ground
to control the low voltage trigger inputs on many devices. They can control higher voltage control inputs via isolation relays. Refer to Figure 16 for wiring details. Do not exceed the voltage and current ratings for the TTL outputs. An external pull-up resistor is
usually necessary. The formula for calculating the resistor value is given in Figure 16.
CONTROL
12-PIN PLUG-IN
CONNECTOR
PIN 1
NOTE: Io MUST NOT EXCEED
FI CURRENT RATING. +VPS
MUST NOT EXCEED FI VOLTAGE
RATING FOR THE ASSOCIATED
FI CURRENT. VPS CAN BE AC OR DC.
FORMULAS FOR R VALUES
R (OHMS) = VPS - Vo
P (WATTS) = (I
*WIRING FOR NORMALLY OPEN TYPE CONTACTS SHOWN. FOR
NORMALLY CLOSED TYPE CONTACT, MOVE WIRE FROM
THE NO TERMINAL TO THE NC TERMINAL.
VIDEO INPUTS
1 3 5 7 9 1 13 15
2 4 6 8 10 12 14 16
12-PIN TERMINAL STRIP
ON REAR OF SCU
OUTPUTS
NOT USED
Io = OPERATING CURRENT OF THE EXTERNAL DEVICE.
Vo = RATED OPERATING VOLTAGE OF THE EXTERNAL DEVICE.
R = CURRENT LIMITING RESISTOR.
+VPS = VOLTAGE OF THE EXTERNAL POWER SOURCE.
-VPS = NEGATIVE, COMMON OR GROUND TERMINAL OF EXTERNAL
POWER SOURCE.
I
o
2
o)
X R
VIDEO OUTPUTS
1
2
3
4
CONTACT RATINGS
CURRENT VOLTAGE
1 A 30 VDC
0.3 A 11 VDC
0.5 A 125 VAC
I
o
R
LOCAL
KEYBOARD
F1 RELAY
EXTERNAL
DEVICE
V
o
+VPS -VPS
00048
Figure 15. Wiring the AUX 1 (Relay) Output
Pelco Manual C523M-H (6/05) 15
Page 16

1 3 5 7 9 1 13 15
2 4 6 8 10 12 14 16
CONTROL
OUTPUTS
12-PIN PLUG-IN
CONNECTOR
VIDEO INPUTS
12-PIN TERMINAL STRIP
ON REAR OF SCU
NOT USED
VIDEO OUTPUTS
1
2
3
4
+VDC
LOCAL
KEYBOARD
R = +VDC
R
25 mA
DEVICE, EX. VIDEO PRINTER
INPUT
FROM VIDEO OUTPUT
LOOPED TO MONITOR
+VDC = VOLTAGE OF THE EXTERNAL POWER SOURCE
NOTE: +VDC SHOULD BE 5 V OR GREATER,
BUT NOT EXCEED 32 V OR THE MAXIMUM
RATED OUTPUT VOLTAGE FOR THE DEVICE
INPUT. +VDC CAN ONLY BE DC.
Figure 16. Wiring the AUX 2 and AUX 3 (TTL) Outputs
16 Pelco Manual C523M-H (6/05)
Page 17

8 CONNECT COM 2 PORT
NOTE:
If you are using a
PC at COM 2, refer to the
Troubleshooting
section.
You will need to use the COM 2 port if your system includes an ASCII control device, such
as a personal computer or a keyboard that is connected via dial-up lines or fiber optic network. The port interface at COM 2 can be either RS-232 or RS-422/485. The DIP switches
should have been set (refer to Figure 6).
a. If you require an RS-232 port interface, connect wires from the RS-232 device to the
COM 2 terminals at the back of the SCU. Refer to Figure 17.
b. If you require an RS-422/485 port interface, connect wires from the RS-422 device to
the COM 2 terminals at the back of the SCU. Refer to Figure 18.
VIDEO INPUTS
1 3 5 7 9 1 13 15
2 4 6 8 10 12 14 16
VIDEO OUTPUTS
1
2
3
4
LOCAL
KEYBOARD
12-PIN TERMINAL STRIP
ON REAR OF SCU
COM 1 (1-6)
COM 2 (7-12)
COM 2 (7-12)
RS-232
PIN ASSIGNMENTS
PIN FUNCTION
7T+
12-PIN PLUG-IN
CONNECTOR
TX+ GND RX+
8SPARE
9 GND
10 SPARE
11 SPARE
TO EXTERNAL DEVICE
12 R+
10
VIDEO INPUTS
1 3 5 7 9 1 13 15
2 4 6 8 10 12 14 16
COM 1 (1-6)
COM 2 (7-12)
12-PIN PLUG-IN
CONNECTOR
TO EXTERNAL DEVICE
Figure 18. Connecting an RS-422/485 Interface
Figure 17. Connecting an RS-232 Interface
VIDEO OUTPUTS
1
2
3
4
12-PIN TERMINAL STRIP
ON REAR OF SCU
TX-
TX+
GND
RX-
RX+
10
LOCAL
KEYBOARD
COM 2 (7-12)
RS-422/485
PIN ASSIGNMENTS
PIN FUNCTION
7T+
8T-
9 GND
10 SPARE
11 R-
12 R+
Pelco Manual C523M-H (6/05) 17
Page 18

9 CONNECT KEYBOARDS
Pelco offers three keyboard models for use with the CM6700 matrix switcher. Complete installation instructions are provided with each keyboard. The most common connections are
for local and remote keyboards. The procedures for installing local and remote keyboards
are repeated here. Refer to the keyboard manual for the less common ASCII connection
(KBD200A only).
Do the following to install. Refer to Figure 19.
1. Local keyboard. Using the data cable that is supplied with the keyboard, plug one end
into the RJ-45 connector on the rear of the keyboard and plug the other end into the
LOCAL KEYBOARD port on the SCU. Set the keyboard DIP switch for the desired
address for the local keyboard (refer to Table A).
NOTE:
A KBDKIT or
KBDKIT-X is required to
connect remote keyboards.
The KBDKIT consists of two
RJ-45 wall blocks and one
120 VAC to 12 VAC transformer. The KBDKIT-X is for
230 VAC. Use one wall block
for each keyboard.
CM6700 SCU
LOCAL
KEYBOARD
REMOTE KEYBOARD(S)
If you are not installing any other keyboards, go to the
Programming
section. To install
remote keyboards, complete steps 2-10.
2. Select a suitable location for each keyboard and wall block. Wall blocks must be within
6 feet (1.8 m) of a suitable electrical outlet. Do not mount the wall block yet.
3. Run wall block interconnect cable (user-supplied) from the SCU to the closest keyboard location, and then to the next nearest location, and the next, etc.
Communication to the keyboards is RS-485. Maximum total cable distance for RS-485
communication over 24-gauge wire is 4,000 feet (1,219 m). Pelco recommends using
shielded twisted pairs cable that meets or exceeds the basic requirements for EIA
RS-485 applications.
4. Remove the wall block cover and make cable connections at each wall block.
5. At each wall block, wire the transformer to pins 3 and 4. Polarity is unimportant.
6. Replace the cover on the wall block. Secure the wall block to a suitable surface.
A double-sided sticky pad is provided to mount the wall block.
7. Set the address switches for each keyboard according to Table A.
KBD
LOCAL
KEYBOARD
25-FOOT KEYBOARD DATA
GND
TX-
TO ADDITIONAL
TX+
KEYBOARDS
USER-SUPPLIED CABLE
TO REMOTE KEYBOARDS
WALL BLOCK TERMINALS WALL BLOCK TERMINALS
4
5
3
6
2
7
18
REMOTE KEYBOARD
12 VAC 12 VAC
25-FOOT KEYBOARD
DATA CABLE
4
3
2
18
5
6
7
REMOTE KEYBOARD
25-FOOT KEYBOARD
DATA CABLE
RX+
RX-
Figure 19. Installing Local and Remote Keyboards
18 Pelco Manual C523M-H (6/05)
Page 19

8. Plug in all keyboard data cables.
9. Plug the KBDKIT or KBDKIT-X transformers into a suitable outlet and apply power to
the SCU.
NOTE:
You must re-initialize
whenever power is cycled.
NOTE:
Switch positions 5
through 8 appear on the
KBD200A and KBD300A.
Set 5, 7, and 8 OFF. Switch
6 enables (ON) or disables
(OFF) turbo pan.
NOTE:
You can also use
older KBD200 and KBD300
models with the CM6700.
10. To initialize a keyboard, wait five seconds after power-up, enter the number for the
monitor you are viewing (1-4) and press MON.
Table A. Keyboard Addresses
Keyboard Address Switch Settings
1234
10OFF OFF OFF OFF
21ONOFF OFF OFF
32OFF ON OFF OFF
43ONON OFF OFF
54OFF OFF ON OFF
65ONOFF ON OFF
76OFF ON ON OFF
87ONON ON OFF
98OFF OFF OFF ON
10 9 ON OFF OFF ON
11 10 OFF ON OFF ON
12 11 ON ON OFF ON
13 12 OFF OFF ON ON
14 13 ON OFF ON ON
15 14 OFF ON ON ON
16 15 ON ON ON ON
Pelco Manual C523M-H (6/05) 19
Page 20

PROGRAMMING
Programming allows you to assign titles for cameras, establish monitor group sequences, enable/disable alarms, establish access
restrictions, set alarm options, set time and date, change password, and set auxiliary options.
Refer to Figure 20. You program the CM6700 with the keyboard and a monitor. During programming, a menu appears on the monitor
screen. Use the sequence and macro keys (KBD100), pan/tilt positioning keys (KBD200A), or the joystick (KBD300A) on your keyboard to navigate the menu. The F1 and F2 keys select (toggle) options and scroll through lists. Use the numerical keypad to enter
numerical values.
Programming the CM6700 SCU is described in Table B. Table B is arranged in the general order in which you should program your
SCU, but also allows you to go into the programming mode at any time to change a particular item. If you do not wish to perform a
step (for example, change password), just go to the next step.
If you are familiar with programming the SCU, you can use Figure 20 by itself to quickly locate any program item. Permission is
granted to copy Figure 20 if you wish to post it in a convenient location for quick reference.
Table B. Programming the CM6700 Switching Control Unit
Step 1
Function Action Result
Enter Main Menu a. Press the PGM key.
The Password
screen appears.
ENTER
YOUR
PASSWORD
(Default is 2899100)
LANGUAGE: ENGLISH
b. Make sure the language selection is English.
c. Use the number keypad to enter the password –
default is 2899100 (Pelco’s toll-free phone number).
d. Press ACK.
e. Go to another step or press 9 to exit.
Select English.
Asterisks (*) appear on screen for each number
you type.
The Main Menu appears.
MAIN MENU
1. CAMERAS
2. MONITORS
3. TIME/DATE
4. ALARMS
5. PORTS
6. AUXILIARIES
7. PASSWORD
8. ACCESS
9. EXIT
(Continued on page 22)
20 Pelco Manual C523M-H (6/05)
Page 21

PGM
PG
ACK
ACK
PRESS
Enter Camera #.
Enter Camera Title
(1-20 characters).
Select Receiver Type
(Std. Coaxitron, Ext.
Coaxitron, 422D, or
422P).
Keypad
F1/F2
F1/F2 or
Pan L/R
Keypad
Keypad
F1/F2
F1/F2 or
Pan L/R
Pan right
Enter Monitor # (1-4).
Select Alarm Type
(Off, Auto, Manual).
Set Alarm Dwell
(0-99 sec).
Turn display On/Off.
Keypad
F1/F2
Keypad
F1/F2
Enter Monitor #.
Set Dwell time (1-99 sec)
and Preset number
for each camera
in the 16-step sequence.
Enter Monitor #.
Turn each alarm on/off
(*/--).
Move text around on the
screen to place it in the
desired location.
Press ACK when done.
Keypad
Keypad
Keypad
F1/F2
Pan/Tilt
Enter Date (Note Style).
Enter Time (Note Type).
Select Style
(MMM-DD-YY,
DD-MM-YY, MM-DD-YY,
DD-MMM-YY).
Select Type
(12 hour, 24 hour).
Select Set Clock to
accept changes.
Press PGM to
cancel changes.
PROCEDURE METHOD
PROCEDURE METHOD
PROCEDURE METHOD
PROCEDURE METHOD
PROCEDURE METHOD
PROCEDURE METHOD
PROCEDURE METHOD
PROCEDURE METHOD
PROCEDURE METHOD
PROCEDURE METHOD
PROCEDURE METHOD
PROCEDURE METHOD
PROCEDURE METHOD
PROCEDURE METHOD
PROCEDURE METHOD
For each F# select
auxiliary activation
Source
(Alarms defined for Monitor 1 or Keyboard).
Select auxiliary
output Mode
(Off, Momentary,
Latching, or Keyed).
F1/F2
F1/F2
Enter Old Password.
Enter New Password.
Enter New Password
again.
Keypad
Keypad
Keypad
Turn Alarm on/off
Select alarm source Type
(NO, NC).
Enter Preset to go to
when alarm occurs.
(*/--).
F1/F2
F1/F2
Keypad
F1/F2
F1/F2
Keypad
MON CAM1 CAM2 CAM3 CAM4
Turn alarm on/off
(*/--).
Select alarm source Type
(NO, NC).
Assign 4 inputs for each
monitor to sequence.
Assign Preset for
each input in sequence.
Keypad
Select Protocol
(422D, 422P).
Select Baud
(1200, 2400, 4800,
9600).
Select Baud
(1200, 2400, 4800,
9600).
Set Parity (None,
Even, Odd).
Set Stop Bits (1, 2).
F1/F2
Pan L/R
F1/F2
Pan L/R
F1/F2
Pan L/R
F1/F2
Pan L/R
F1/F2
Pan L/R
Enable/disable each
keyboard's ability to
control the monitors
(Y/N).
Enable/disable each
keyboard's ability to
program a preset
(Y/N).
Enable/disable each
monitor's ability to display
the image from each camera
(Y/N).
F1/F2
F1/F2
ALM SET ALM SET ALM SET
F1/F2
NOTES:
1. Use your keyboard to perform all programming functions.
2. Flashing character shows your position in a field.
3. On the KBD100 and KBD200A use the keys to move around the screen.
PAN/TILT
LEFT RIGHT UP DOWN
PREV NEXT MACRO HOLD
KBD100
KBD200A
KBD300A
4. To move right on this chart, move to the menu item and pan right
or press the key for the number of the item.
5. To move left on this chart, move to RETURN and pan right.
CM6700 PROGRAMMING
PRESS
RETURN
TO
NORMAL
DISPLAY
F1/F2
Select 17 or 18.
Select 1-8 or 9-16.
F1/F2
On the KBD300A use the joystick.
6. To return to camera view from the Main Menu, press PGM.
To return to camera view from any other screen press PGM twice.
“QUICK REFERENCE” CHART
MAIN MENU
1. CAMERAS
2. MONITORS
5. PORTS
6. AUXILIARIES
START
ENTER
YOUR
PASSWORD
(Default is 2899100)
LANGUAGE: ENGLISH
9. EXIT
ACCESS
1. KEYBOARD TO MONITOR
2. MON TO CAMERA 1-10
3. MON TO CAMERA 11-16
RETURN
8. ACCESS
7. PASSWORD
4. ALARMS
3. TIME/DATE
RETURN
SET PASSWORD
OLD PASSWORD *******
NEW PASSWORD *******
VERIFICATION *******
SET AUXILIARY MENU
AUX SOURCE MODE
F1 ALM KEY
F2 KBD -F3 KBD LAT
RETURN
PORTS
1. COM PORT 1
2. COM PORT 2
RETURN
SET ALARM INPUT
1. INPUT 1-16
2. INPUT 17 AND 18
RETURN
DATE: 03-01-00
TIME: 11:27:00 PM
STYLE: DD-MM-YY
TYPE: 12 HOUR
SET TIME/DATE
SET CLOCK
RETURN
ALARM DWELL: 05
DISPLAY: *
1. CAMERA SEQUENCE
2. ALARM ENABLE
3. POSITION DISPLAY
CAMERA XX
CAMERA TITLE
CAM O1
RETURN
RX TYPE: 422P
MONITOR XX
ALARM TYPE: AUTO
RETURN
MONITOR XX ALARM ENABLE
1 -- NO 00
2 --
3 --
4 --
5 --
6 --
7 --
8 --
NO 00
NO 00
NO 00
NO 00
NO 00
NO 00
NO 00
ALM ENABLE TYPE PRESET
RETURN
ALARM INPUT XX
MACRO X
ENABLE: -- TYPE: NO
MACRO PRESET MENU
RETURN
COM 1
SET PORT
PROTOCOL 422D
BAUD RATE 2400
RETURN
COM 2
SET PORT
RETURN
BAUD RATE 9600
PARITY Even
STOP BITS 2
KBD TO MONITOR ACCESS
KBD MONITOR PRESET
RETURN
MON TO CAMERA ACCESS
RETURN
MON CAMERA
12 3 4 5 6 7 8 9 10
1 Y Y Y Y Y Y Y Y Y Y
2 Y Y Y Y Y Y Y Y Y Y
3 Y Y Y Y Y Y Y Y Y Y
4 Y Y Y Y Y Y Y Y Y Y
ENTRY 1-8 ENTRY 9-16
01 02 00
02 02 00
03 02 00
04 02 00
05 02 00
06 02 00
07 02 00
08 02 00
09 02 00
10 02 00
11 02 00
12 02 00
13 02 00
14 02 00
15 02 00
16 02 00
CAM DWL PRE CAM DWL PRE
1 -- 7 -- 13 -2 -- 8 -- 14 -3 -- 9 -- 15 -4 -- 10 -- 16 -5 -- 11 -- 17 -6 -- 12 -- 18 --
DISPLAY
SHOWING
POSITION
OF TEXT
SET ALARM INPUT XX
1 01 02 03 04
2 05 06 07 08
3 09 10 11 12
4 13 14 15 16
MACRO X
PRESETS
MON CAM1 CAM2 CAM3 CAM4
PRE PRE PRE PRE
1 00 00 00 00
23 00 00 00 00
00 00 00 00
00 00 00 00
RETURN
1 2 3 4 ENABLE
1 Y Y Y Y Y
2 Y Y Y Y Y
3
4
5
6
7
8
Y Y Y Y Y
Y Y Y Y Y
Y Y Y Y Y
Y Y Y Y Y
Y Y Y Y Y
Y Y Y Y Y
DISPLAY AS:
Select English.
MONITOR XX SEQUENCE MENU
Pelco Manual C523M-H (6/05) 21
Figure 21. Quick Reference Chart
Page 22

PROCEDURE METHOD
Enter Old Password.
Enter New Password.
Enter New Password
again.
Keypad
Keypad
Keypad
RETURN
SET PASSWORD
OLD PASSWORD *******
NEW PASSWORD *******
VERIFICATION *******
Table B. Programming the CM6700 Switching Control Unit (Continued)
Step 2
Function Action Result
Change a. Enter the Main Menu.
Password
NOTE:
If you
b. Press 7.
change the
password and then
forget the new one,
c. Type the existing password and press ACK.
you will have to
reset the system to
the factory defaults.
All system
d. Type the new password and press ACK.
programming will
be lost.
See the
shooting
the system reset
procedure.
Trouble-
section for
e. Type the new password again and press ACK.
f. Go to another step or press 9 to exit.
The Main Menu appears.
The Set Password screen appears. The first
asterisk (*) in the OLD PASSWORD field flashes.
The first asterisk (*) in the NEW PASSWORD field
flashes. If you make a mistake, you are prompted to
try again.
The first asterisk (*) in the VERIFICATION field
flashes.
The screen says “NEW PASSWORD ACCEPTED.”
If you make a mistake, you will be notified that the
new password does not match the verification
password.
After the new password is accepted, the Main Menu
appears.
22 Pelco Manual C523M-H (6/05)
Page 23

Table B. Programming the CM6700 Switching Control Unit (Continued)
Step 3
Function Action Result
Program
a. Enter the Main Menu.
The Main Menu appears.
Cameras
Assign Camera
b. Press 1.
The Camera NN screen appears. NN is the camera
number. The camera number flashes.
Titles: Up to 20
alpha or numeric
characters can be
c. Enter the desired camera number (01-16) or pan
left/right to show the desired camera number.
The selected number appears on screen.
assigned to help
identify on-screen
video. This will
d. Move down to highlight the CAMERA TITLE (CAM NN)
field (the line below CAMERA TITLE).
The first position in the CAMERA TITLE field flashes.
appear with camera
number, time and
date on the monitor.
e. Use the F1 and F2 keys to scroll through the
available characters. There are 26 upper case
The first position shows the character you are on.
letters, 26 lower case letters and the numbers 0-9.
Select Receiver
Protocol: Type of
receiver communi-
f. When you find the character you want for the first
position, pan right to the next position.
The second position in the CAMERA TITLE field
flashes.
cation you will use to
control a camera’s
g. Use F1 and F2 to find the second character.
The second position shows the character.
pan and tilt and lens
(if applicable).
Choose from
h. Pan right.
The third position in the CAMERA TITLE field
flashes.
Standard Coaxitron,
Extended Coaxitron,
Pelco D protocol or
i. Continue selecting characters until the title field is
completed (up to 20 characters).
The CAMERA TITLE field shows the entire title.
Pelco P protocol.
NOTE:
P and D
j. To change any position’s entry, pan left until the
character flashes and use F1 and F2 to change it.
The new character flashes.
protocols cannot be
mixed in the same
system.
k. When finished, move down to the RX TYPE field.
The current protocol setting for the selected camera
flashes.
l. Use F1 and F2 to find the desired protocol.
m. To program another camera, go to step n. When you
have finished programming cameras, go to step o.
n. Move up to the CAMERA NN field and go back to
step c to program another camera. When you have
finished programming cameras, go to step o.
o. Move down to RETURN and pan right to go back to
the Main Menu.
p. Go to another step or press 9 to exit.
The selected protocol appears.
The Main Menu appears.
CAMERA XX
CAMERA TITLE
CAM O1
RX TYPE: 422P
RETURN
PROCEDURE METHOD
Enter Camera #.
Enter Camera Title
(1-20 characters).
Select Receiver Type
(Std. Coaxitron, Ext.
Coaxitron, 422D, or
422P).
Keypad
F1/F2
F1/F2 or
Pan L/R
Pelco Manual C523M-H (6/05) 23
Page 24

Table B. Programming the CM6700 Switching Control Unit (Continued)
Step 4
Function Action Result
Program
Monitors
Alarm Type:
Manual – must
press ACK to reset.
Auto – alarm resets
10 seconds after
alarm normalizes.
Off – no alarms
shown.
Alarm Dwell:
1 to 99 seconds –
time between
display of multiple
alarm screens.
Character Display:
On or off.
Program Camera
Sequences:
Each monitor can
have one 16-step
sequence. Set dwell
time and preset
number for each
camera.
a. Enter the Main Menu.
b. Press 2.
c. Enter the desired monitor number (01-04) or pan left/
right to show the desired monitor number.
d. Move down to highlight the ALARM TYPE: field.
e. Use the F1 and F2 keys to find the desired alarm
type.
f. Move down to highlight the ALARM DWELL field.
g. Use the keypad to enter the desired dwell time
(1 to 99 seconds).
h. Move down to highlight the DISPLAY field.
i. Use F1 and F2 to toggle the character display on or
off.
j. Move down to the 1. CAMERA SEQUENCE field.
k. Pan right.
l. Use the position keys or joystick to move around the
menu. Set Camera Number (1-16), Dwell Time (1-99
sec.) and Preset number for each camera in the
sequence. Enter zeroes to skip a camera.
The Main Menu appears.
The Monitor NN screen appears. NN is the monitor
number. The monitor number flashes.
The selected number appears on screen.
The current alarm type for the selected monitor
appears on screen.
The selected alarm type appears.
The current alarm dwell for the selected monitor
appears on screen.
The entered dwell time appears.
The current status of character display appears.
Asterisk (*) = on, dashes (--) = off.
The 1. In the 1. CAMERA SEQUENCE field flashes.
The Monitor NN Sequence Menu appears.
The entered values appear.
m. Move down to RETURN.
n. Pan right.
(Continued on next page)
MONITOR XX
ALARM TYPE: AUTO
ALARM DWELL: 05
DISPLAY: *
1. CAMERA SEQUENCE
2. ALARM ENABLE
3. POSITION DISPLAY
RETURN
PROCEDURE METHOD
Enter Monitor # (1-4).
Select Alarm Type
(Off, Auto, Manual).
Set Alarm Dwell
(0-99 sec).
Turn display On/Off.
Keypad
F1/F2
Keypad
F1/F2
The R in RETURN flashes.
The Monitor NN screen appears.
MONITOR XX SEQUENCE MENU
ENTRY 1-8 ENTRY 9-16
CAM DWL PRE CAM DWL PRE
01 02 00
02 02 00
03 02 00
04 02 00
05 02 00
06 02 00
07 02 00
08 02 00
MONITOR XX ALARM ENABLE
ALM SET ALM SET ALM SET
1 -- 7 -- 13 -2 -- 8 -- 14 -3 -- 9 -- 15 -4 -- 10 -- 16 -5 -- 11 -- 17 -6 -- 12 -- 18 --
09 02 00
10 02 00
11 02 00
12 02 00
13 02 00
14 02 00
15 02 00
16 02 00
RETURN
DISPLAY
SHOWING
POSITION
OF TEXT
PROCEDURE METHOD
Enter Monitor #.
Set Dwell time (1-99 sec)
and Preset number
for each camera
in the 16-step sequence.
PROCEDURE METHOD
Enter Monitor #.
Turn each alarm on/off
(*/--).
PROCEDURE METHOD
Move text around on the
screen to place it in the
desired location.
Press ACK when done.
Keypad
Keypad
Keypad
F1/F2
Pan/Tilt
ACK
24 Pelco Manual C523M-H (6/05)
Page 25

Table B. Programming the CM6700 Switching Control Unit (Continued)
Step 4 (Continued
Function Action Result
)
o. Move down to the 2. ALARM ENABLE field.
p. Pan right.
q. Turn each alarm on or off.
r. Move down to RETURN.
s. Pan right.
t. Move down to the 3. POSITION DISPLAY field.
u. Pan right.
v. Use the position keys or joystick to move the text to
the desired position on the screen.
w. Press the ACK button.
x. To program another monitor, go to step c. When you
have finished programming monitors, go to step y.
y. Move down to RETURN and pan right to go back to
the Main Menu.
z. Go to another step or press 9 to exit.
The 2. in the 2. ALARM ENABLE field flashes.
The Monitor NN Alarm Enable screen appears.
Asterisk (*) = on, dashes (--) = off.
The R in RETURN flashes.
The Monitor NN screen appears.
The 3. in the 3. POSITION DISPLAY field flashes.
The real-time camera display appears with
superimposed text.
The text moves one line or character position at a
time.
The Monitor NN screen appears.
The Main Menu appears.
Pelco Manual C523M-H (6/05) 25
Page 26

Table B. Programming the CM6700 Switching Control Unit (Continued)
Step 5
Function Action Result
Program
a. Enter the Main Menu.
The Main Menu appears.
Time and Date
Time and date is
kept current in
battery-backed
RAM. Corrections
can be made when
necessary. The time
b. Press 3.
Take note of the contents of the STYLE and TYPE
fields for the following procedure. The Style must be
MMM-DD-YY and the Type must be 12 hour. If they
are not, move down to the field and use the F1 and
F2 keys to change them, then move back up to the
first field.
The Set Time/Date screen appears. The MONTH
field flashes.
and date displayed
is the time in
c. Use F1 and F2 to find the desired month.
The selected month appears.
memory when the
TIME/DATE field is
d. Pan right.
The DAY field flashes.
selected. The new
time will be set
e. Use the keypad to select the desired day.
The selected day appears.
when you select the
SET CLOCK field
f. Pan right.
The YEAR field flashes.
and pan right.
NOTE:
To abort
time and date programming without
changing the set-
g. Use the keypad to select the desired year.
h. To change any position’s entry, pan left until the
character flashes and use the keypad or F1 and F2
to change it.
The selected year appears.
tings already in
memory, press
i. Pan right and move down to TIME field.
The HOUR field flashes.
PGM.
j. Use the keypad to select the desired hour.
The selected hour appears.
k. Pan right.
l. Use the keypad to select the desired minute.
m. Pan right.
n. Use the keypad to select the desired second.
o. Pan right.
p. Use F1 and F2 to select the correct designator.
q. Move down to the STYLE field.
(Continued on next page)
The MINUTE field flashes.
The selected minute appears.
The SECOND field flashes.
The selected second appears.
The AM/PM designator field flashes.
The selected designator flashes.
The STYLE field flashes.
PROCEDURE METHOD
Enter Date (Note Style).
SET TIME/DATE
DATE: 03-01-00
TIME: 11:27:00 PM
DISPLAY AS:
STYLE: DD-MM-YY
TYPE: 12 HOUR
SET CLOCK
Enter Time (Note Type).
Select Style
(MMM-DD-YY,
DD-MM-YY, MM-DD-YY,
DD-MMM-YY).
Select Type
(12 hour, 24 hour).
Press PGM to
cancel changes.
Select Set Clock to
accept changes.
Keypad
Keypad
F1/F2
F1/F2 or
Pan L/R
PG
Pan right
26 Pelco Manual C523M-H (6/05)
Page 27

Table B. Programming the CM6700 Switching Control Unit (Continued)
Step 5 (Continued)
Function Action Result
Use F1 and F2 to select the desired style (DD-MM-YY,
r.
MM-DD-YY, DD-MMM-YY and MMM-DD-YY).
The selected style flashes.
s. Move down to the TYPE field.
t. Use F1 and F2 to select the desired type (12 HOUR
or 24 HOUR).
u. Move down to the SET CLOCK field.
v. Check all your entries. If any fields are incorrect,
to them, enter the corrections, and move
move
back to the SET CLOCK field.
w. When you are ready to set the time, mark time and
pan right when the new time in the TIME field arrives.
x. Go to another step or press 9 to exit.
The TYPE field flashes.
The selected type flashes.
The SET CLOCK field flashes.
The SET CLOCK field flashes.
The clock begins running from the new time.
The Main Menu appears.
Pelco Manual C523M-H (6/05) 27
Page 28

Table B. Programming the CM6700 Switching Control Unit (Continued)
Step 6
Function Action Result
Program a. Enter the Main Menu.
Alarms 1-16
b. Press 4.
The Main Menu appears.
The Set Alarm Input screen appears. Alarms are
programmed in two groups. The Group 1 (INPUT
1-16) number flashes.
c. Pan right.
d. Move down to the ALM ENABLE 1 field.
e. Use the F1 and F2 keys to toggle the Alarm Enable
field (* = ON, -- = OFF). If you selected OFF go to
step k; otherwise, go to the next step.
f. Pan right.
g. Use the F1 and F2 keys to toggle the Alarm TYPE
field (NO = normally open contacts, NC = normally
closed contacts).
h. Pan right.
i. Use the keypad to select the desired preset (that the
camera will assume when an alarm occurs) for this
alarm number.
j. Pan right.
k. To program another alarm, go to step l. When you
have finished programming the alarms in this group,
go to step m.
l. Move down to the next ALM ENABLE field. Repeat
steps e through k for the next alarm.
The Set Alarm Input 1-8 screen appears. 1-8
flashes.
The entry in the ENABLE field flashes.
The selected value flashes.
The entry in the TYPE field flashes.
The selected value flashes.
The entry in the PRESET field flashes.
The selected value flashes.
The Alarm 1 ENABLE field flashes.
The entry in the ENABLE field flashes.
m. To program group 2 (INPUT 9-16), go to step n.
When you have finished programming the alarms in
group 2, go to step r.
n. Move up to the Set Alarm Input 1-8 screen.
The Set Alarm Input 1-8 screen appears. 1-8
flashes.
(Continued on next page)
SET ALARM INPUT
1. INPUT 1-16
2. INPUT 17 AND 18
RETURN
SET ALARM INPUT XX
ALM ENABLE TYPE PRESET
1 -- NO 00
2 --
NO 00
3 --
NO 00
4 --
NO 00
5 --
NO 00
6 --
NO 00
7 --
NO 00
8 --
NO 00
RETURN
PROCEDURE METHOD
Select 1-8 or 9-16.
Turn Alarm on/off
(*/--).
Select alarm source Type
(NO, NC).
Enter Preset to go to
when alarm occurs.
F1/F2
F1/F2
F1/F2
Keypad
28 Pelco Manual C523M-H (6/05)
Page 29

Table B. Programming the CM6700 Switching Control Unit (Continued)
Step 6 (Continued)
Function Action Result
o. Pan right.
The Set Alarm Input 9-16 screen appears. 9-16
flashes. The screen changes to show alarms 9-16.
p. Move down to the ALM ENABLE 9 field.
q. Repeat steps e through l for alarms 9 through 16.
Then go to step r.
r. Move down to RETURN.
s. Pan right.
t. To program the macros (inputs 17 and 18), go to
step 7c.
u. Move down to RETURN and pan right to go back to
the Main Menu.
v. Go to another step or press 9 to exit.
The entry in the ENABLE field flashes.
The R in RETURN flashes.
The Set Alarm Input screen appears.
The Main Menu appears.
Pelco Manual C523M-H (6/05) 29
Page 30

Table B. Programming the CM6700 Switching Control Unit (Continued)
Step 7
Function Action Result
Program a. Enter the Main Menu.
Alarms 17 & 18
b. Press 4.
The Main Menu appears.
The Set Alarm Input screen appears. Alarms are
programmed in two groups. The Group 1 (INPUT 1-
16) number flashes.
c. Press 2.
d. Move down to the ENABLE field.
e. Use the F1 and F2 keys to toggle the Alarm Enable
field (* = ON, -- = OFF). If you selected OFF go to
step q. Otherwise go to the next step.
f. Pan right.
g. Use the F1 and F2 keys to toggle the Alarm TYPE
field (NO = normally open contacts, NC = normally
closed contacts).
h. Move down to the MON1/CAM1 field in the Macro
matrix.
i. The entry indicates which camera will be displayed
first on monitor number 1 when the Macro alarm is
activated. Use the keypad to enter the desired
camera number.
j. Use the pan and tilt to move through the matrix and
assign the cameras to the sequence for each monitor.
If a monitor is not to be included in the sequence,
enter all zeros.
k. When you have completed all entries, move down to
MACRO PRESET MENU.
The Set Alarm Input 17 screen appears. The number
17 flashes.
The entry in the ENABLE field flashes.
The selected value flashes.
The entry in the TYPE field flashes.
The selected value flashes.
The entry in the MON1/CAM1 field flashes.
The entered value flashes.
The selected value flashes.
Each selected value flashes.
The M in MACRO PRESET MENU flashes.
l. Pan right.
The Macro 1 (or 2) Presets screen appears.
The entry in the MON1/CAM1 field flashes.
m. The entry indicates which preset will be assumed by
The entered value flashes.
the MON1/CAM1 camera when the Macro alarm is
activated. Use the keypad to enter the desired preset
number.
(Continued on next page)
PROCEDURE METHOD
Select 17 or 18.
Turn alarm on/off
(*/--).
Select alarm source Type
(NO, NC).
Assign 4 inputs for each
monitor to sequence.
F1/F2
F1/F2
F1/F2
Keypad
MACRO X
PRESETS
MON CAM1 CAM2 CAM3 CAM4
PRE PRE PRE PRE
1 00 00 00 00
23 00 00 00 00
00 00 00 00
00 00 00 00
RETURN
PROCEDURE METHOD
Assign Preset
for each input
in sequence.
Keypad
SET ALARM INPUT
1. INPUT 1-16
2. INPUT 17 AND 18
RETURN
ALARM INPUT XX
MACRO X
ENABLE: -- TYPE: NO
MON CAM1 CAM2 CAM3 CAM4
1 01 02 03 04
2 05 06 07 08
3 09 10 11 12
4 13 14 15 16
MACRO PRESET MENU
RETURN
30 Pelco Manual C523M-H (6/05)
Page 31

Table B. Programming the CM6700 Switching Control Unit (Continued)
Step 7 (Continued)
Function Action Result
n. Use the sequence and macro keys (KBD100) or pan
and tilt to move through the matrix and use the
keypad to assign the presets for each MON/CAM
entry.
Each entered value flashes.
o. When you have completed all entries, move down to
RETURN.
p. Pan right.
q. To program Alarm Input 18, Macro 2, go to step r.
To exit go to step t.
r. Pan right.
s. Repeat steps d through q for Alarm Input 18, Macro 2.
t. Move down to the RETURN field at the bottom of the
screen.
u. Pan right.
v. Move down to the RETURN field at the bottom of the
screen.
w. Pan right.
x. Go to another step or press 9 to exit.
The R in RETURN flashes.
The Alarm Input 17 (or 18) Macro 1 (or 2) screen
appears. The number 17 (or 18) flashes.
The Alarm Input 18 Macro 2 screen appears. The
number 18 flashes.
The R in RETURN flashes.
The Set Alarm Input screen appears.
The R in RETURN flashes.
The Main Menu appears.
Pelco Manual C523M-H (6/05) 31
Page 32

Table B. Programming the CM6700 Switching Control Unit (Continued)
Step 8
Function Action Result
Program a. Enter the Main Menu.
Com Ports
b. Press 5.
c. To configure port 1, go to step d.
To skip port 1 and configure port 2, go to step j.
The Main Menu appears.
The Ports screen appears. Port number 1 flashes.
d. Pan right.
e. Use the F1 and F2 keys to toggle the protocol field.
f. Move down to the BAUD RATE field.
g. Use F1 and F2 to select the desired baud rate.
h. Move down to the RETURN field.
i. Pan right.
j. Move down to the COM 2 PORT field.
k. Pan right.
l. Use F1 and F2 to toggle baud rate field.
m. Move down to the PARITY field.
n. Use F1 and F2 to select the parity.
o. Move down to the STOP BITS field.
p. Use F1 and F2 to select the stop bits.
q. Move down to the RETURN field.
The COM 1 Set Port screen appears. The entry in
the PROTOCOL field flashes.
The selected value flashes.
The entry in the BAUD RATE field flashes.
The selected value flashes.
The R in RETURN flashes.
The Ports screen appears.
Port number 2 flashes.
The COM 2 Set Port screen appears. The entry in
the BAUD RATE field flashes.
The selected value flashes.
The entry in the PARITY field flashes.
The selected value flashes.
The entry in the STOP BITS field flashes.
The selected value flashes.
The R in RETURN flashes.
r. Pan right.
s. Move down to the RETURN field.
t. Pan right.
The Ports screen appears.
The R in RETURN flashes.
The Main Menu appears.
u. Go to another step or press 9 to exit.
PROCEDURE METHOD
Select Protocol
(422D, 422P).
Select Baud
(1200, 2400, 4800,
9600).
PROCEDURE METHOD
Select Baud
(1200, 2400, 4800,
9600).
Set Parity (None,
Even, Odd).
Set Stop Bits (1, 2).
F1/F2
Pan L/R
F1/F2
Pan L/R
F1/F2
Pan L/R
F1/F2
Pan L/R
F1/F2
Pan L/R
PORTS
1. COM PORT 1
2. COM PORT 2
RETURN
COM 1
SET PORT
PROTOCOL 422D
BAUD RATE 2400
RETURN
COM 2
SET PORT
BAUD RATE 9600
PARITY Even
STOP BITS 2
RETURN
32 Pelco Manual C523M-H (6/05)
Page 33

Table B. Programming the CM6700 Switching Control Unit (Continued)
Step 9
Function Action Result
Program
Auxiliary Outputs
AUX F1, F2, and F3
can be operated by
an alarm* (ALM) or
from the keyboard
(KBD).
a. Enter the Main Menu.
b. Press 6.
c. Use the F1 and F2 keys to select the source.
d. Pan right.
The Main Menu appears.
The Set Auxiliary Menu screen appears.
The entry in the AUX F1 SOURCE field flashes.
The selected value flashes.
The entry in the MODE field flashes.
Mode can be off (--),
on or off latching
(LAT), momentary
for 300 microseconds (MOM), or momentary for the time
the key is held down
(KEY).
*Alarms as defined
for Monitor 1.
e. Use F1 and F2 to select the mode.
f. Pan left and move down to the AUX F2 SOURCE field.
g. Use F1 and F2 to select the source.
h. Pan right.
i. Use F1 and F2 to select the mode.
j. Pan left and move down to the AUX F3 SOURCE field.
k. Use F1 and F2 to select the source.
l. Pan right.
m. Use F1 and F2 to select the mode.
n. Move down to the RETURN field.
o. Pan right.
p. Go to another step or press 9 to exit.
The selected value flashes.
The entry in the AUX F2 SOURCE field flashes.
The selected value flashes.
The entry in the MODE field flashes.
The selected value flashes.
The entry in the AUX F3 SOURCE field flashes.
The selected value flashes.
The entry in the MODE field flashes.
The selected value flashes.
The R in the RETURN field flashes.
The Main Menu appears.
PROCEDURE METHOD
For each F# select
SET AUXILIARY MENU
AUX SOURCE MODE
F1 ALM KEY
F2 KBD -F3 KBD LAT
RETURN
auxiliary activation
Source
(Alarm or Keyboard).
Select auxiliary
output Mode
(Off, Momentary,
Latching, or Keyed).
F1/F2
F1/F2
Pelco Manual C523M-H (6/05) 33
Page 34

Table B. Programming the CM6700 Switching Control Unit (Continued)
Step 10
Function Action Result
Program
Keyboard Access
Access determines
which keyboards
have access to
which monitors and
if presets can be
programmed.
a. Enter the Main Menu.
b. Press 8.
c. Pan right.
d. Use the F1 and F2 keys to toggle the keyboard 1/
monitor 1 access entry.
The Main Menu appears.
The Access screen appears. Access is programmed in three groups. The group 1 (Keyboard
to Monitor) number flashes.
The Keyboard to Monitor Access matrix screen
appears. The entry for KBD 1/MONITOR 1 flashes.
The selected value flashes.
e. Use the sequence and macro keys (KBD100) or pan
and tilt to move through the matrix. Use F1 and F2
to assign the desired value for each keyboard/
monitor combination and preset enable.
f. When you have completed all entries, move down to
RETURN.
g. Pan right.
h. To continue with Access programming, go to step c.
Otherwise continue with the next step.
i. Move down to the RETURN field.
j. Pan right.
k. Go to another step or press 9 to exit.
ACCESS
1. KEYBOARD TO MONITOR
2. MON TO CAMERA 1-10
3. MON TO CAMERA 11-16
RETURN
The selected values flash.
The R in the RETURN field flashes.
The Access screen appears.
The R in RETURN flashes.
The Main Menu appears.
PROCEDURE METHOD
KBD TO MONITOR ACCESS
KBD MONITOR PRESET
1 2 3 4 ENABLE
1 Y Y Y Y Y
2 Y Y Y Y Y
Y Y Y Y Y
3
Y Y Y Y Y
4
Y Y Y Y Y
5
Y Y Y Y Y
6
Y Y Y Y Y
7
Y Y Y Y Y
8
RETURN
Enable/disable each
keyboard's ability to
control the monitors
(Y/N).
Enable/disable each
keyboard's ability to
program a preset
(Y/N).
F1/F2
F1/F2
34 Pelco Manual C523M-H (6/05)
Page 35

Table B. Programming the CM6700 Switching Control Unit (Continued)
Step 11
Function Action Result
Program a. Enter the Main Menu.
Camera Access
b. Press 8.
Access determines
which camera
images are shown
on which monitors. c. Move down to the group 2 (MON TO CAMERA 1-10)
field.
The Main Menu appears.
The Access screen appears. Access is programmed in three groups. The group 1 (Keyboard
to Monitor) number flashes.
The group 2 number flashes.
d. Pan right.
e. Use the F1 and F2 keys to toggle the monitor 1/
camera 1 access entry.
f. Use the sequence and macro keys (KBD100) or pan
and tilt to move through the matrix. Use F1 and F2
to assign the desired value for each keyboard/
monitor combination.
g. When you have completed all entries, move down to
RETURN.
h. Pan right.
i. To program group 3 go to step j. Otherwise go to step l.
j. Move down to the group 3 (MON TO CAMERA 11-
16) field.
k. Repeat steps d through i for group 3.
l. Move down to the RETURN field.
m. Pan right.
n. Go to another step or press 9 to exit.
The Monitor to Camera Access matrix screen
appears. The entry for MON 1/CAMERA 1 flashes.
The selected value flashes.
The selected values flash.
The R in the RETURN field flashes.
The Access screen appears. The group 1
(Keyboard to Monitor) number flashes.
The group 3 number flashes.
The R in RETURN flashes.
The Main Menu appears.
ACCESS
1. KEYBOARD TO MONITOR
2. MON TO CAMERA 1-10
3. MON TO CAMERA 11-16
RETURN
MON TO CAMERA ACCESS
MON CAMERA
12 3 4 5 6 7 8 9 10
1 Y Y Y Y Y Y Y Y Y Y
2 Y Y Y Y Y Y Y Y Y Y
3 Y Y Y Y Y Y Y Y Y Y
4 Y Y Y Y Y Y Y Y Y Y
RETURN
PROCEDURE METHOD
Enable/disable each
monitor's ability to display
the image from each camera
(Y/N).
F1/F2
Step 12
Function Action Result
Program Refer to your keyboard manual.
Presets,
Patterns, and
Zones
Programming is completed.
Pelco Manual C523M-H (6/05) 35
Page 36

OPERATION
ASCII OPERATING COMMANDS
The CM6700 can be operated with a KBD100, KBD200A, or KBD300A keyboard. It can
also be operated from a PC with ASCII operating commands. Refer to your keyboard
manual for keyboard operating instructions.
NOTE:
If you are using a
PC to send ASCII commands
via COM 2, refer to the
Troubleshooting
section.
ASCII protocol uses the ASCII character set to transmit and receive commands between a
personal computer (PC) and the CM6700. The commands are readable but are not English.
They control the pan and tilt mechanisms (fixed and variable speed), camera functions, auxiliary relays, and alarms.
The ASCII protocol communicates in a standard asynchronous, byte-oriented protocol that
includes: 1 start bit, 8 data bits, 1 parity bit (odd parity), and 1 stop bit. The communication
rate is 9600 baud.
A lowercase “a” ends each command. The ASCII translator acknowledges accepted commands with “AKa” and rejected commands with “NA”, the command that was rejected, and
a lowercase “a”. If it does not recognize the command, it sends “NAa”. If the command
requires a numeric value, enter the number first. Table C gives examples of ASCII commands. Table D lists all of the commands.
Table C. Examples of ASCII Commands
Functional Procedure Commands Result
Select a pan and tilt device labeled 3Ma Switch camera # 16 to currently selected monitor 3.
“CAMERA # 16” and switch it to 16#a
monitor # 3.
Manipulate the pan and tilt device. 1Ma3#a Switch camera 3 to monitor 1.
5Ma2#a3\a Go to camera 2, preset 3, on monitor 5.
47Ra33Da Pan right at speed 47, tilt down at speed 33.
sa Stop tilt down only.
Switch a camera. 1Ma3#a Switch camera 3 to monitor 1.
Call a preset. 5Ma2#a3\a Go to camera 2, preset 3, on monitor 5.
Pan and tilt. 47Ra33Da Pan right at speed 47, tilt down at speed 33.
36 Pelco Manual C523M-H (6/05)
Page 37

Table D. ASCII Commands
Number ranges are enclosed in brackets–do not enter the brackets. When you control a fixed speed pan and tilt, omit the speed
information.
Desired Action Command Result
Select monitor [1-9999]Ma Calls a monitor to use for camera operation.
Select camera [1-9999]#a
Next camera +a
Previous camera –a
Start a sequence [1-99]qa
forward
Start a sequence [1-99]ba
backward
Hold a sequence ea
Pan left [1-64]La
Pan right [1-64]Ra
Stop pan left sa or ~La
Stop pan right sa or ~Ra
Tilt up [1-63]Ua
Tilt down [1-63]Da
Stop tilt up sa or ~Ua
Stop tilt down sa or ~Da
Zoom telephoto Ta
Zoom wide Wa
Stop zoom telephoto sa or ~Ta
Stop zoom wide sa or ~Wa
Focus near Na
Focus far Fa
Stop focus near sa or ~Na
Stop focus far sa or ~Fa
Iris open Oa
Iris close Ca
Stop iris open sa or ~Oa
Stop iris close sa or ~Ca
Stop all PTZ motion sa
Record pattern [1-99]/a
Execute pattern [1-99]pa
End pattern [1-99]na
Go to preset position [1-99]\a
Set preset with a label la[string]!a
[1-9999]^a
Selects a camera to display on the current operating monitor. The NEXT
key (+) and PREV key (-) commands switch to the next numbered
camera in the system.
Starts the selected sequence going forward (incrementing camera
numbers) by pressing and holding the NEXT key for two seconds.
Starts the selected sequence going backward (decrementing camera
numbers) by pressing and holding the PREV key for two seconds.
Places the running sequence on hold, freezing the currently selected
camera on the monitor. It lets you control the camera or switch. The
sequence is still “armed” on the monitor, but inactive.
Moves the currently selected pan and tilt device left or right at the speed
indicated. If you omit the speed, some devices move at their default
speed and others move at their slowest possible speed. Speed
information has no effect on fixed speed devices.
Moves the currently selected pan and tilt device up or down at the speed
indicated. If you omit the speed, some devices move at their default
speed and others move at their slowest possible speed. Speed
information has no effect on fixed speed devices.
Makes the currently selected camera zoom in (close up view) or zoom
out (wide view).
Changes the good focus range nearer or farther on the currently
selected camera.
Opens (brighter image) or closes (darker image) the iris on the currently
selected camera.
Stops all image motion (stops pan, tilt, zoom, focus, and iris). Does not
stop a pattern.
On receivers that do patterns, these commands let you record your
motions and operations (for a limited time) and then have the system
repeat them.
Recalls a stored preset position.
Sets a preset location with an embedded label, where the ASCII string
must be UPPERCASE characters.
The [string] is an alphanumeric label up to 20 ASCII characters long
and [1-9999] is the associated preset number.
NOTE:
Auxiliary on [1-9999]Aa
Auxiliary off [1-9999]Ba
All transmitted characters
Auxiliaries are relay outputs that can be controlled through the protocol.
1-8 operate auxiliaries at the camera (receiver) and 9-11 operate F1-F3
auxiliaries at the CM6700.
must be ASCII
(Continued on next page)
.
Pelco Manual C523M-H (6/05) 37
Page 38

Table D. ASCII Commands (Continued)
Desired Action Command Result
Start macro [1-99]Sa
Acknowledge alarm [1-9999]Ia
Send camera titles Ya[string1/…/string16]!a
Send one camera title [camera number (1-16)]
Ya[camera title]!a
Version va
Set date and time ZaMM/DD/YY/HH:MM:SSa
Starts the pre-programmed system group camera sequence (the
CM6700 supports only two macros–1 and 2).
Acknowledges an existing alarm.
Sends a series of camera titles (up to 16) to a matrix switching system.
The first string always corresponds to camera #1, then each
subsequent string (separated by a slash) corresponds to the next
higher camera number (ending with camera #16). You can choose to
send fewer than 16 camera titles; be sure to end with ]!a. Valid
characters in the string are A-Z, a-z, space, and 0-9 in ASCII represen-
tation. Strings are limited to 20 characters.
Sends one camera title to the matrix switching system. Valid characters
in the string are A-Z, a-z, space, and 0-9 in ASCII representation.
Strings are limited to 20 characters.
Returns the device’s version number.
This mode of operation command sets the date and time. Since the
date and time string might be confused with other commands, Za
comes first. This puts the receiving device into a mode that can accept
the specialized string.
NOTE:
All transmitted characters
must be ASCII
.
38 Pelco Manual C523M-H (6/05)
Page 39

TROUBLESHOOTING
GAINING INITIAL CONTROL
If you are having problems gaining control of your system for the first time:
1. Confirm that everything is plugged in and has power.
2. Confirm that multiple keyboards have different DIP switch addresses. See the
Settings
section.
3. Confirm that keyboard interconnect cable is wired correctly. See installation step 9 –
Connect Keyboards
.
4. Be sure data cables have not been mixed up. See Figure 19.
5. Cycle (unplug and then plug in again) the data cable to the keyboard.
6. WAIT AT LEAST FIVE SECONDS.
7. Select a monitor.
If you still cannot gain control of the system:
1. Confirm the wiring is correct and the user-supplied cable between wall jacks is appropriate for the application.
2. Confirm that when the keyboard data cable is cycled, the keyboard LED flashes
momentarily (indicating power).
If you still cannot gain control of the system, call Pelco’s 24-hour technical support at
1-800-289-9100 or 1-559-292-1981.
USING A PC TO SEND ASCII COMMANDS VIA COM 2
The CM6700 will ignore ASCII commands issued to the COM 2 port from an external
device (such as a PC) if (1) the commands are issued manually from a PC, AND (2) a system keyboard is connected to the local keyboard port. The CM6700 will respond with the
acknowledgement string (AK or NA), but it will not execute the commands. Under these
conditions the CM6700 will execute the ASCII commands if they are issued as strings from
a text file or programmed function key. The problem exists only if keying the characters in
manually.
Switch
Solution:
Disconnect any system keyboard from the CM6700 if you are manually keying in ASCII
commands from a PC, or 2) do not key ASCII characters in manually. Write command
strings to text files and send the file. If using Terminal in Windows 3.1, program the function
keys with complete command strings.
PERFORMING A SOFTWARE RESET
CAUTION:
Resetting the
software restores
the system to default
settings.
All program-
ming is lost.
Pelco Manual C523M-H (6/05) 39
Press the Software Reset button on the front panel (refer to Figure 21). The button is
recessed to prevent accidental operation. Use a small screwdriver, pencil tip, or similar
probe to operate the switch. Hold the switch in for about five seconds, and then release.
The switcher will go through a software clear cycle and reset back to defaults. Re-initialize
keyboards by entering the monitor number and then pressing the MON key.
RESET BUTTON ACCESS HOLE
CM6700-MXB
CM 6700
Matrix Switcher/Controller
Made in USA
Figure 21. Software Reset Button Location
Page 40

Table E. Solutions To Common Problems
Problem Remedy
CM6700 does not have power. Make sure the power cord is plugged in.
Check the fuse. Refer to Figure 6 for the fuse location.
You can see some cameras and not others Confirm that the camera is properly connected and has power.
from your location.
The CM6700 does not respond to key- Confirm that the monitor the keyboard is addressing is the same as the monitor in
board commands. front of you.
Pressing the PGM key displays a P on the Confirm that the keyboard transformer is plugged in and all electrical connections
keyboard LED but the Password menu are in order.
does not appear on the menu.
Upon initial system startup, the alpha- Jumper JP17 on the motherboard is in the wrong position. Remove the cover and
numeric monitor display is in the middle change JP17 to the opposite position. Instructions for switching video termination
of the screen or is not seen. jumpers in the
Keyboards do not function after installation
and initial power-up.
Previous system control has been lost. First, try initializing the keyboard by entering the monitor number followed by
The keyboard and monitor may have been denied access to the cameras.
Confirm that the monitor the keyboard is addressing is the same as the monitor in
front of you.
Set Options
Confirm that all wiring is correct and that keyboards have power and are connected.
Confirm that all keyboards are addressed differently.
pressing the MON key. If this does not restore control…
Second, try unplugging the data cable from the rear of the keyboard and then
plugging it back in. Then re-initialize the keyboard. If this does not restore control…
section are a similar process.
Third, power down the CM6700, power back up, and then re-initialize keyboards.
If this does not restore control…
Fourth, perform a software reset (refer to
section). If this does not restore control, call Pelco at 1-800-289-9100.
Cannot gain keyboard and ASCII port PTZ You must wait at least five seconds after a separate user has stopped before you
control after another user has stopped can gain control.
controlling.
The unit malfunctions and you cannot Perform a software reset (refer to
restore it to satisfactory operation. section).
The keyboard transformer must be If a 12 VAC transformer is unavailable, you can use a 12 VDC transformer.
replaced. Polarity is unimportant when wiring the transformer to the wall jack.
Performing a Software Reset
Performing a Software Reset
in this
in this
Table F. Switcher/Controller and Keyboard RJ-45 Pin Functions
Switcher/Controller Keyboards
Pin Function Pin Function
1 RX+ 1 TX+
2 RX- 2 TX-
3 12 VAC 3 12 VAC/DC
4 12 VAC 4 NON-POLAR
5 Ground 5 Ground
6NC 6NC
7 TX- 7 RX-
8 TX+ 8 RX+
NC = No connection
40 Pelco Manual C523M-H (6/05)
Page 41

SPECIFICATIONS
SWITCHING
Programmable Switching
Duration: User-defined between 1 and 99 seconds
Programmable
Number of Steps
per Sequence: 16
Maximum Number
of Sequences: 4
VIDEO INPUTS
Number of inputs: 16
Type: 75-ohm, unbalanced, terminating or looping; jumper-selectable
Level: 1 Vp-p
Connector Type: Panel-mount BNC
VIDEO OUTPUTS
Number: 4 (maximum)
Type: 75-ohm, unbalanced
Level: 1 Vp-p
Video Fail Detection
Type: Vertical sync detector
Action: Switch to back-up sync generator
Connector Type: Panel-mount BNC
VIDEO SPECIFICATIONS
Bandwidth: 17 MHz
Frequency Response: Flat to 8 MHz, ±1.0 dB to 15 MHz
Gain: Unity (±1 dB)
Differential Gain: 2% typical
Differential Phase: 0.2° typical
Tilt: 0.5% typical
Signal-to-Noise: -55 dB (peak-to-peak vs. RMS noise)
DC Output: Zero volts
Cross Talk: -50 dB typical at 3.58 MHz
CHARACTER GENERATOR
Display: White with black border
Program Menus: Raster background with white characters
KEYBOARD INTERFACE
Protocol: Keyboard
Number of Ports: 1
Number of Independent
Keyboards: 8
Data Rate: 9600 baud
Connector Type: RJ-45, 8-pin modular (female)
Cable Type (supplied): 6 feet (1.8 m), flat, unshielded (may be shielded)
ALARM INTERFACE INPUTS
Number of Inputs: 18
Connector Type: 12-pin screw terminal
Sensing: Programmable, N.O./N.C.
Pelco Manual C523M-H (6/05) 41
Page 42

AUXILIARY OUTPUTS
Number of Outputs: 3
Connector Type: 12-pin screw terminal
Contact Configuration
F1: Form C, 0.5 A at 125 VAC maximum
F2 and F3: Open collector, 32 VDC at 25 mA maximum
POWER SUPPLY
Input Voltage: 120 VAC, 50/60 Hz or 230 VAC, 50 Hz
Power Consumption: 10 watts
Ambient Operating
Temperature: 20° to 120°F (-7° to 49°C)
Humidity: 10–90% noncondensing
PHYSICAL SPECIFICATIONS
Dimensions: 17.0 (W) x 10.5 (D) x 3.5 (H) inches
Weight
CM6700-MXB2: 9.39 lb (4.26 kg)
CM6700-MXB2-X: 9.47 lb (4.30 kg)
CM6700-MXB4: 10.15 lb (4.61 kg)
CM6700-MXB4-X: 10.06 lb (4.56 kg)
Rating: Meets NEMA Type 1 standard
(43.18 x 26.67 x 8.89 cm)
(Design and product specifications subject to change without notice.)
42 Pelco Manual C523M-H (6/05)
Page 43

INDEX
A
Alarm dwell 24
Alarm enable 28
Alarm inputs 5, 14
Alarm type 24
ASCII 5, 9, 17, 36
ASCII operating commands 36
Assign camera titles 23
AUX F1 15, 33
AUX F2 15, 33
AUX F3 15, 33
Auxiliary outputs 5, 15, 33
B
Baud rate 32
C
Character display 24
CM6700 installation 8
CM6700-MXB2 4, 13
CM6700-MXB2-X 4, 13
CM6700-MXB4 4, 13
CM6700-MXB4-X 4, 13
CM6700-VMC2 4, 13
CM6700-VMC2-X 4, 13
CM9760-RDU 4, 12
Coaxitron 5, 11
COM 2 17, 32
COM 2 port 17, 32
Connect alarms 14
Connect auxiliaries 15
Connect COM 2 port 17
Connect control lines 11
Connect keyboards 18
Connect monitors 13
Connect video sources 10
D
D or P protocol 5, 11
Daisy-chaining 11
Description 5
DIP switches 9, 18
G
Group sequences 5
J
Jumpers 8
K
KBD100 4
KBD200A 4
KBD300A 4
KBDKIT 4, 18
KBDKIT-X 4, 18
Keyboard addresses 19
Keyboards 5
L
Local keyboard 18
Looping terminations 8
M
Macro preset 30
Main menu 20
Mount unit 9
Multiplexer 5
O
Open collector 5, 15
Operation 36
P
P protocol 5, 11
Password – default 20
Patterns 5
Personal computer 5, 17, 36
Presets 5
Program alarms 28, 30
Program auxiliary outputs 33
Program camera access 35
Program camera sequences 24
Program cameras 23
Program communication ports 32
Program keyboard access 34
Program monitors 24
Program time and date 26
Programming 20
Programming presets, patterns, and zones
35
Q
Quick reference chart 21
R
Regulatory notices 3
Relay 5
Relay output 15
Remote keyboards 18
Returns 44
RS-232 9, 17
RS-422 9, 11, 17
RS-422/485 17
RS-485 cable distance 18
S
Safeguards 3
Select receiver protocol 23
Sequences 5
Set options 8
Set time 26
Specifications 41
Star configuration 12
T
Troubleshooting 39
TTL 5, 15
W
Wall block 18
Warnings 3
Warranty 44
Pelco Manual C523M-H (6/05) 43
Page 44

PRODUCT WARRANTY AND RETURN INFORMATION
WARRANTY
Pelco will repair or replace, without charge, any merchandise proved defective in material or
workmanship for a period of one year after the date of shipment.
Exceptions to this warranty are as noted below:
• Five years on FT/FR8000 Series fiber optic products.
®
• Three years on Genex
• Three years on Camclosure® and fixed camera models, except the CC3701H-2,
CC3701H-2X, CC3751H-2, CC3651H-2X, MC3651H-2, and MC3651H-2X camera models,
which have a five-year warranty.
•Two years on standard motorized or fixed focal length lenses.
•Two years on Legacy
fixed dome products.
•Two years on Spectra
continuous motion applications.
•Two years on Esprit
• Eighteen months on DX Series digital video recorders, NVR300 Series network video
recorders, and Endura
• One year (except video heads) on video cassette recorders (VCRs). Video heads will be
covered for a period of six months.
• Six months on all pan and tilts, scanners or preset lenses used in continuous motion
applications (that is, preset scan, tour and auto scan modes).
Pelco will warrant all replacement parts and repairs for 90 days from the date of Pelco
shipment. All goods requiring warranty repair shall be sent freight prepaid to Pelco, Clovis,
California. Repairs made necessary by reason of misuse, alteration, normal wear, or accident
are not covered under this warranty.
Pelco assumes no risk and shall be subject to no liability for damages or loss resulting from
the specific use or application made of the Products. Pelco’s liability for any claim, whether
based on breach of contract, negligence, infringement of any rights of any party or product
liability, relating to the Products shall not exceed the price paid by the Dealer to Pelco for
such Products. In no event will Pelco be liable for any special, incidental or consequential
damages (including loss of use, loss of profit and claims of third parties) however caused,
whether by the negligence of Pelco or otherwise.
The above warranty provides the Dealer with specific legal rights. The Dealer may also have
additional rights, which are subject to variation from state to state.
Series products (multiplexers, server, and keyboard).
®
, CM6700/CM6800/CM9700 Series matrix, and DF5/DF8 Series
®
, Esprit®, ExSite™, and PS20 scanners, including when used in
®
and WW5700 Series window wiper (excluding wiper blades).
™
Series distributed network-based video products.
If a warranty repair is required, the Dealer must contact Pelco at (800) 289-9100 or
(559) 292-1981 to obtain a Repair Authorization number (RA), and provide the following
information:
1. Model and serial number
2. Date of shipment, P.O. number, Sales Order number, or Pelco invoice number
3. Details of the defect or problem
If there is a dispute regarding the warranty of a product which does not fall under the
warranty conditions stated above, please include a written explanation with the product
when returned.
Method of return shipment shall be the same or equal to the method by which the item was
received by Pelco.
RETURNS
In order to expedite parts returned to the factory for repair or credit, please call the factory at
(800) 289-9100 or (559) 292-1981 to obtain an authorization number (CA number if returned
for credit, and RA number if returned for repair).
All merchandise returned for credit may be subject to a 20% restocking and refurbishing
charge.
Goods returned for repair or credit should be clearly identified with the assigned CA or RA
number and freight should be prepaid. Ship to the appropriate address below.
If you are located within the continental U.S., Alaska, Hawaii or Puerto Rico, send goods to:
Service Department
Pelco
3500 Pelco Way
Clovis, CA 93612-5699
If you are located outside the continental U.S., Alaska, Hawaii or Puerto Rico and are
instructed to return goods to the USA, you may do one of the following:
If the goods are to be sent by a COURIER SERVICE, send the goods to:
Pelco
3500 Pelco Way
Clovis, CA 93612-5699 USA
If the goods are to be sent by a FREIGHT FORWARDER, send the goods to:
Pelco c/o Expeditors
473 Eccles Avenue
South San Francisco, CA 94080 USA
Phone: 650-737-1700
Fax: 650-737-0933
This equipment contains electrical or electronic components that must be recycled properly to comply with Directive 2002/96/EC of the European Union
regarding the disposal of waste electrical and electronic equipment (WEEE). Contact your local dealer for procedures for recycling this equipment.
REVISION HISTORY
Manual # Date Comments
C523M 6/97 Original version.
C523M-A 10/97 Revised to add KBD300 keyboard information, update drawings, and expand troubleshooting section.
C523M-B 4/98 Revised keyboard installation instructions as a result of hardware changes to rear panel. Changed manual pagination.
C523M-C 9/98 Revised Section 4.2.5.
C523M-D 3/99 Corrected an error in Figure 6. Revised programming menus. Documented an option for programming patterns for
C523M-E 6/99 Revised and reformatted entire manual. Added ASCII command information and some keyboard material.
9/99 Added a Spanish menus option to the Password screen. Revised the Set Alarm Input and Set Time/Date programming
C523M-F 10/00 Revised and reformatted entire manual.
C523M-G 11/01 Revised Table D to add additional ASCII stop commands for pan, tilt, zoom, focus, and iris functions. These additional
C523M-H 4/03 Removed KBD300V installation material. Added ASCII command to send one camera title. Added information in the
8/04 Removed agency logos and certifications; updated Warranty and Return information.
6/05 Corrected Figure 9, Connecting Video Sources.
Pelco, the Pelco Logo, Camclosure, Esprit, Genex, Legacy, and Spectra are registered trademarks of Pelco. © Copyright 2005, Pelco. All rights reserved.
Endura and ExSite are trademarks of Pelco.
®
Spectra
. Added Section 5.8, Programming Zones, and renumbered subsequent sections. Revised Figures 31 and 32.
menus and the procedures for setting alarm inputs and the time and date.
commands, which begin with a tilde (~), also work with the CM9760.
Troubleshooting section that there is a five-second wait required when trying to gain ASCII PTZ port control after
another user gives up control.
 Loading...