

Parkside PTSS 1200 C1 Instruction Manual
PLUNGE SAW PTSS 1200 C1
PLUNGE SAW
Translation of the original instructions
IAN 310942
TAUCHSÄGE
Originalbetriebsanleitung

Before reading, unfold the page containing the illustrations and familiarise yourself with all functions of
the device.
Klappen Sie vor dem Lesen die Seite mit den Abbildungen aus und machen Sie sich anschließend mit allen
Funktionen des Gerätes vertraut.
GB / IE / NI Translation of t he original instructions Page 1
DE / AT / CH Originalbetriebsanleitung Seite 13
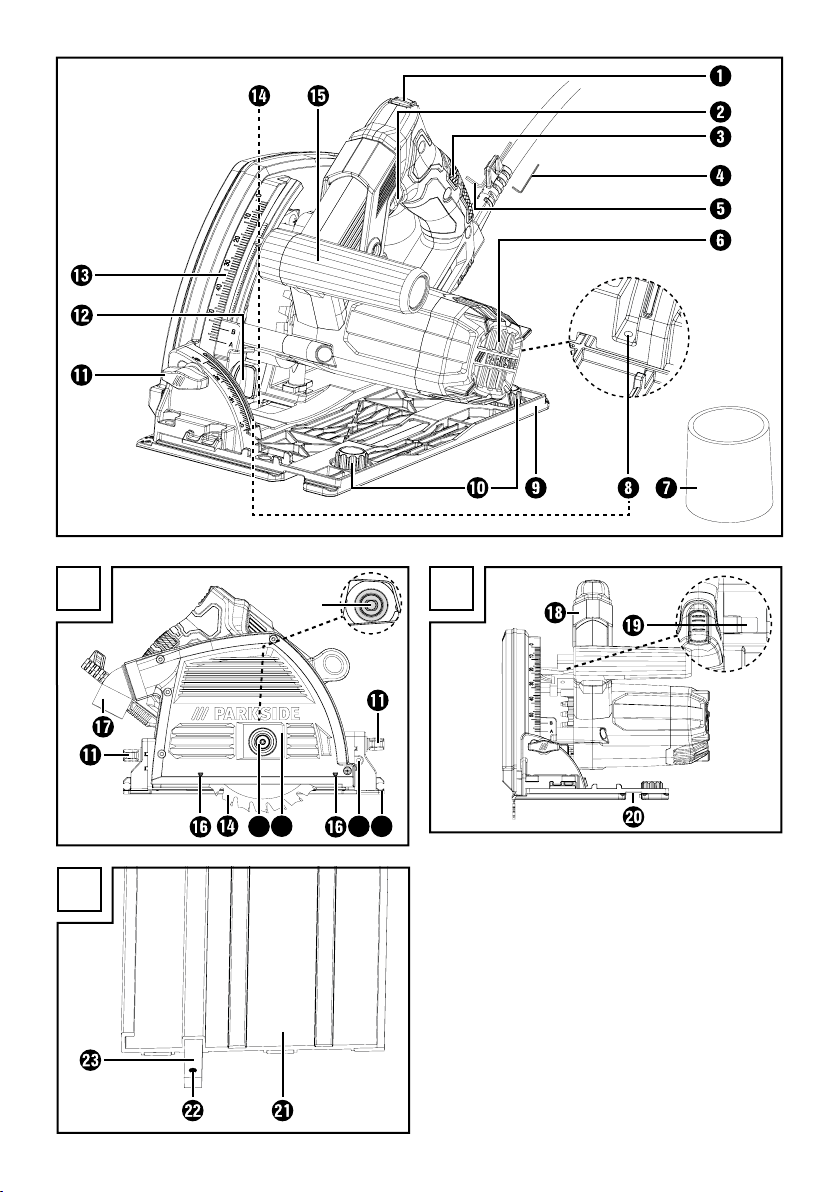
A B
8a
14a
14b
X
9a
C

Contents
Introduction ......................................................2
Intended use ................................................................ 2
Features ................................................................... 2
Package contents ............................................................ 2
Technical data .............................................................. 2
General power tool safety warnings .................................3
1. Work area safety .......................................................... 3
2. Electrical safety ........................................................... 3
3. Personal safety ............................................................ 4
4. Power tool use and care .................................................... 4
5. Service .................................................................. 5
Appliance-specific safety instructions for circular saws ..................5
Safety information for circular saw blades ......................................... 7
Original accessories/auxiliary equipment ......................................... 7
Operation .......................................................7
Fitting/changing the saw blade ................................................. 7
Connecting the sawdust extraction device ......................................... 7
Check that the blade guard is functioning ......................................... 7
Operation .......................................................8
Switching on and off .........................................................8
Setting the cutting depth (dive depth) ............................................. 8
Setting the cutting angle (mitre angle) ............................................ 8
Note the cut line ............................................................. 8
Connecting the guide rails ..................................................... 8
Eccentric screws ............................................................. 9
Sawing (without guide rail) .................................................... 9
Sawing (with guide rail) ....................................................... 9
Plunge cutting with guide rail ..................................................10
Cleaning and maintenance ........................................10
Disposal ........................................................10
Kompernass Handels GmbH warranty ..............................11
Service .........................................................12
Importer .......................................................12
Translation of the original Conformity Declaration .....................12
PTSS 1200 C1
GB│IE│NI
│
1 ■
PLUNGE SAW PTSS 1200 C1
8a
9a
14a
14b
165mm
max. 65 mm
Introduction
Congratulations on the purchase of your new appliance. You have selected a highquality product. The
operating instructions are part of this product. They
contain important information on safety, usage and
disposal. Before using the product, familiarise yourself with all operating and safety instructions. Use
the product only as described and for the specified
areas of application. Please also pass on these
operating instructions to any future owner.
Panel cut out
Additional handle
Cutting width marking
Chip ejector (rotatable)
Clamping lever for changing saw blades
Spindle lock
Groove for guide rails
Guide rail
Grub screws
Connector
X flange (factory-fitted)
Intended use
This circular saw (hereinafter “appliance” or “machine”) is designed for longitudinal, cross and
plunge cuts in firmly supported solid wood, chip
board, plastics and lightweight construction materials. Working with metals is not permitted. This appliance can be used with the provided guide rails
– exclusively for the cutting techniques described.
Any other uses of or modification to the appliance
is deemed to be improper and carries the risk of
serious personal injury. Not for commercial use.
Features
Safety lock-out
ON/OFF switch
Handle
Hex key (small)
Hex key (large)
Motor unit
Chip ejector adapter
Fine adjustment screws for 0° cutting angle
Fine adjustment screw for 45° cutting angle
Baseplate
Markings for cutting line
Eccentric screw (2 x)
Adjustment wheel for cutting
angle adjustment (2 x)
Cutting depth adjustment
Cutting depth scale
Saw blade
Clamping screw/plain washer
Package contents
1 circular saw
1 saw blade 165mm / 24 teeth (pre-fitted)
2 guide rails
1 connector
1 chip ejector adapter
2 Hex keys
1 set of operating instructions
Technical data
Rated voltage: 230 V~ 50 Hz
(Alternating current)
Nominal power input: 1200 W
Idle speed: n0 5200 min
Sawblade mount: ø 20 mm
Saw blade:
165mm
Ø 165 mm
Main blade width: 1.5 mm
Tooth thickness: 2.6 mm
Max. cutting depth: 56 mm at a 90°
mitre angle
42 mm at a 45°
mitre angle
5 mm less with guide rails
Protection class: II / (Double insulation)
Accessories: Guide rails 2 x
700mm x 180 mm
-1
■ 2 │ GB
│IE│
NI
PTSS 1200 C1
Noise emission value:
Noise measurement value determined in accordance with EN 62841. The A-rated noise level of
the power tool is typically as follows:
Sound pressure level: LPA = 89 dB (A)
Uncertainty: K = 3 dB (A)
Sound power level: LWA = 100 dB (A)
Uncertainty: K = 3 dB (A)
Wear hearing protection!
Vibration values:
Vibration values (vector total of three directions)
determined in accordance with EN 62841:
Cutting chipboard: a
h,W
Uncertainty K = 1.5 m/s
= 1.3 m/s
2
2
NOTE
► The vibration emission value and noise
emission levels specified in these instructions
have been measured in accordance with the
standardised testing procedure specified and
can be used to make equipment comparisons. The specified vibration emission value
and the noise emission values can also be
used to make an initial load estimate.
WARNING!
► Depending on the manner in which the pow-
er tool is being used, and in particular the
kind of workpiece that is being worked, the
vibration and noise emission values can deviate and may, in many cases, be higher than
the values given in these instructions. Regular
use of the power tool in this way may cause
the user to underestimate the vibration. Try to
keep the vibration loads as low as possible.
Measures to reduce the vibration load are,
e.g. wearing gloves and limiting the working
time. Wherein all states of operation must be
included (e.g. times when the power tool is
switched off and times where the power tool
is switched on but running without load).
General power tool
safety warnings
WARNING!
► Read all safety warnings, instructions, illust-
rations and specifications provided with this
power tool. Failure to follow all instructions
listed below may result in electric shock, fire
and/or serious injury.
Save all warnings and instructions for future
reference.
The term „power tool“ in the warnings refers to
your mains-operated (corded) power tool or battery-operated (cordless) power tool.
1. Work area safety
a) Keep work area clean and well lit. Cluttered
or dark areas invite accidents.
b) Do not operate power tools in explosive
atmospheres, such as in the presence of
flammable liquids, gases or dust. Power tools
create sparks which may ignite the dust or
fumes.
c) Keep children and bystanders away while
operating a power tool. Distractions can cause
you to lose control.
2. Electrical safety
a) Power tool plugs must match the outlet. Never
modify the plug in any way. Do not use any
adapter plugs with earthed (grounded)
power tools. Unmodified plugs and matching
outlets will reduce risk of electric shock.
b) Avoid body contact with earthed or ground-
ed surfaces, such as pipes, radiators, ranges
and refrigerators. There is an increased risk of
electric shock if your body is earthed or grounded.
c) Do not expose power tools to rain or wet
conditions. Water entering a power tool will
increase the risk of electric shock.
PTSS 1200 C1
GB│IE│NI
│
3 ■

d) Do not abuse the cord. Never use the cord
for carrying, pulling or unplugging the power
tool. Keep cord away from heat, oil, sharp
edges or moving parts. Damaged or entangled
cords increase the risk of electric shock.
e) When operating a power tool outdoors, use
an extension cord suitable for outdoor use.
Use of a cord suitable for outdoor use reduces
the risk of electric shock.
f) If operating a power tool in a damp location
is unavoidable, use a residual current device
(RCD) protected supply. Use of an RCD reduc-
es the risk of electric shock.
3. Personal safety
a) Stay alert, watch what you are doing and
use common sense when operating a power
tool. Do not use a power tool while you are
tired or under the influence of drugs, alcohol
or medication. A moment of inattention while
operating power tools may result in serious
personal injury.
b) Use personal protective equipment. Always
wear eye protection.
as a dust mask, non-skid safety shoes, hard hat or
hearing protection used for appropriate conditions
will reduce personal injuries.
c) Prevent unintentional starting. Ensure the
switch is in the off-position before connecting
to power source and/or battery pack, picking
up or carrying the tool. Carrying power tools
with your finger on the switch or energising
power tools that have the switch on invites
accidents.
d) Remove any adjusting key or wrench before
turning the power tool on. A wrench or a key
left attached to a rotating part of the power tool
may result in personal injury.
e) Do not overreach. Keep proper footing and
balance at all times. This enables better control
of the power tool in unexpected situations.
f) Dress properly. Do not wear loose clothing or
jewellery. Keep your hair and clothing away
from moving parts. Loose clothes, jewellery or
long hair can be caught in moving parts.
Protective equipment such
g) If devices are provided for the connection of
dust extraction and collection facilities, ensure
these are connected and properly used.
Use of dust collection can reduce dust-related
hazards.
h) Do not let familiarity gained from frequent
use of tools allow you to become complacent
and ignore tool safety principles. A careless
action can cause severe injury within a fraction
of a second.
4. Power tool use and care
a) Do not force the power tool. Use the correct
power tool for your application. The correct
power tool will do the job better and safer at
the rate for which it was designed.
b) Do not use the power tool if the switch does
not turn it on and off. Any power tool that cannot be controlled with the switch is dangerous
and must be repaired.
c) Disconnect the plug from the power source
and/or remove the battery pack, if detachable, from the power tool before making any
adjustments, changing accessories, or storing
power tools. Such preventive safety measures
reduce the risk of starting the power tool accidentally.
d) Store idle power tools out of the reach of
children and do not allow persons unfamiliar
with the power tool or these instructions to
operate the power tool. Power tools are
dangerous in the hands of untrained users.
e) Maintain power tools and accessories. Check
for misalignment or binding of moving parts,
breakage of parts and any other condition
that may affect the power tool’s operation. If
damaged, have the power tool repaired before use. Many accidents are caused by poorly
maintained power tools.
f) Keep cutting tools sharp and clean. Properly
maintained cutting tools with sharp cutting
edges are less likely to bind and are easier to
control.
■ 4 │ GB
│IE│
NI
PTSS 1200 C1

g) Use the power tool, accessories and tool bits
etc. in accordance with these instructions, taking into account the working conditions and
the work to be performed. Use of the power
tool for operations different from those intended
could result in a hazardous situation.
h) Keep handles and grasping surfaces dry,
clean and free from oil and grease. Slippery
handles and grasping surfaces do not allow
for safe handling and control of the tool in unexpected situations.
5. Service
a) Have your power tool serviced by a qualified
repair person using only identical replacement parts. This will ensure that the safety of
the power tool is maintained.
b) Never service damaged battery packs. Service
of battery packs should only be performed by
the manufacturer or authorized service providers.
Appliance-specific safety instructions
for circular saws
Safety instructions for all saws
Sawing method
a) DANGER! Keep your hands clear of
the sawing area and the saw blade.
When both hands are being used to
hold the saw, neither can be injured by the saw
blade.
b) Do not reach underneath the workpiece. The
blade guard cannot protect you from the saw
blade underneath the workpiece.
c) Set the cutting depth to match the thickness
of the workpiece. The blade should not extend
more than one full tooth depth under the workpiece.
d) Never hold the workpiece to be sawn in your
hand or over your leg. Fasten the workpiece
onto a stable working surface. It is important
to fasten the workpiece securely to minimise the
danger of bodily contact, jamming of the saw
blade or loss of control.
e) Hold the power tool only by the insulated
handles when you are carrying out work
in which the accessory tool may come into
contact with concealed power cables. Contact
with a live wire will also make exposed metal
parts of the power tool live and could give the
operator an electric shock.
f) When making longitudinal cuts, always use
a rip fence or a straight edge guide. This will
improve the accuracy of your cut and reduce
the likelihood of the saw blade jamming.
g) Always use saw blades of the correct size
and with an appropriate central fixing bore
(e.g. diamond-shaped or circular). Blades that
do not match the mounting hardware of the saw
will run eccentrically, causing loss of control.
h) Never use damaged or incorrect blade
washers or bolts. The saw blade washers and
screws have been specially designed to provide
optimum performance and operational safety
for your saw.
Further safety instructions for all saws
Kickback – causes and corresponding safety
instructions
▯ A kickback is a sudden reaction caused as a
result of the saw blade catching, jamming or
being falsely aligned, causing the saw to jump
up uncontrollably and out of the workpiece in
the direction of the operator;
▯ if the saw blade catches or jams in a narrowing
saw cut, the blade can no longer rotate and the
power of the motor throws the appliance back
in the direction of the operator;
▯ if the saw blade twists in the saw cut or be-
comes misaligned, the teeth at the rear edge of
the saw blade can become caught in the wood
surface, causing the saw blade to jump out of
the cut and the saw to jump backwards in the
direction of the operator.
Kickback is a result of saw misuse and/or incorrect
operating procedures or conditions. This can be
avoided by taking proper precautions as given
below.
PTSS 1200 C1
GB│IE│NI
│
5 ■

a) Hold the saw firmly and position your arms
so that they can absorb the force of a kickback. Always stand to the side of the saw
blade and never in line with it. If a kickback
occurs, the circular saw may jump backwards.
However, by taking appropriate precautions the
operator can control the kickback forces.
b) If the saw blade jams or you stop working,
switch the saw off and hold it steadily in the
workpiece until the saw blade has completely
stopped turning. Never attempt to remove
the saw from the workpiece or pull it backwards while the saw blade is still moving as
this could lead to a kickback. Investigate and
take corrective actions to eliminate the cause of
blade binding.
c) If you want to restart a saw that is still in the
workpiece, centre the saw blade in the cut
and check to ensure that the teeth are not
caught anywhere in the workpiece. If the saw
blade catches it can jump out of the workpiece
or cause a kickback when the saw is restarted.
d) Support large panels to minimise the risk of
blade pinching and kickback. Large panels
tend to bend under their own weight. Panels/
boards must be supported on both sides: i.e.
both in the vicinity of the saw cut and also at
the edge.
e) Do not use blunt or damaged saw blades.
Saw blades with blunt or misaligned teeth may
cause excessive friction as the saw cut is too
narrow, and this can cause a saw blade jam
and kickback.
f) Before sawing, ensure that the fastenings for
the cut depth and cut angle settings are tightened. If the settings change while sawing, the
saw blade might jam and cause a kickback.
g) Be particularly careful when sawing in exist-
ing walls or other obscured areas. The inserted
saw blade could get caught on hidden objects
and cause a kickback.
Function of the lower blade guard
a) Check whether the lower blade guard closes
properly before each use. Do not operate
the saw if lower blade guard does not move
freely and close instantly. Never clamp or tie
the lower blade guard into the open position.
If the saw is accidentally dropped, lower blade
guard may be bent. Raise the blade guard with
the release lever and make sure it moves freely
and does not touch the blade or any other part
at all angles and cut depths.
b) Check the operation of the lower blade
guard spring. Have the saw serviced before
using it if the lower blade guard and spring
are not working properly. Damaged parts,
sticky deposits or accumulations of chippings
can cause the lower blade guard to operate
slowly.
c) Lower guard may be retracted manually
only for special cuts such as “plunge cuts”
and “compound cuts”. Raise the lower blade
guard with the release lever and release it
as soon as blade enters the material. During
all other types of sawing work, the lower blade
guard should function automatically.
d) Always ensure that the lower blade guard is
covering the blade before placing the saw
down on the workbench or floor. An unpro-
tected, coasting saw blade will move the saw
in the opposite direction to the cutting direction
and saw anything in its path. Always take into
account that the saw blade takes some time to
stop spinning.
Supplementary notes:
■ Do not use any grinding discs.
■ Use only saw blades with diameters corre-
sponding to the label on the saw.
■ Always use the right saw blade for the material
being worked.
■ Use only saw blades with a speed marking
that corresponds to or is higher than the speed
specified for the power tool.
■ Saw blades that are intended for use on wood
or similar materials must comply with EN 847-1.
■ 6 │ GB
│IE│
NI
PTSS 1200 C1
 Loading...