

Page 1
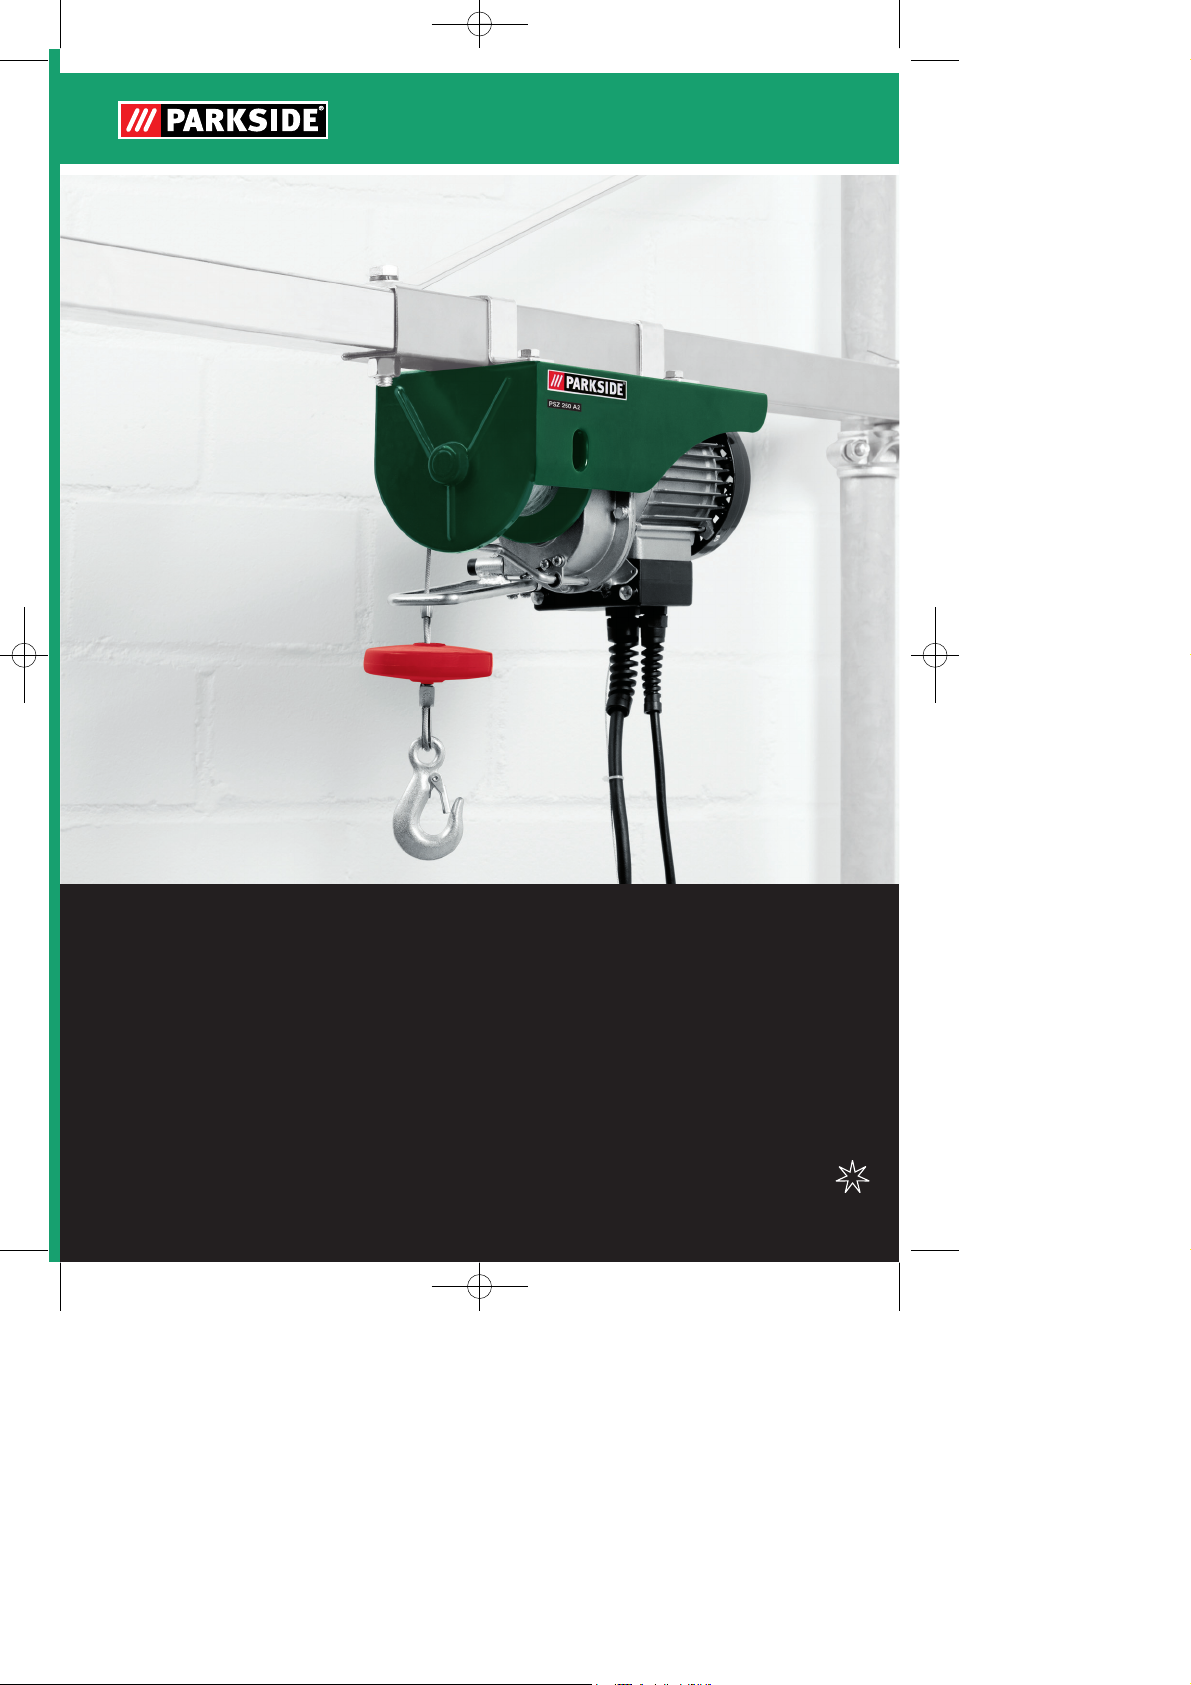
PSZ 250 A2
5
POLIPASTO DE CABLE
Instrucciones de utilización y de seguridad
Manual de instrucciones original
PARANCO SOLLEVATORE
Indicazioni per l’uso e per la sicurezza
Istruzioni per l’uso originali
SEILHEBEZUG
Bedienungs- und Sicherheitshinweise
Originalbetriebsanleitung
CABLE HOIST
Operation and Safety Notes
Original operating instructions
Anleitung_LB5_2255123:_ 31.05.2011 10:13 Uhr Seite 1
Page 2

2
Antes de empezar a leer abra la página que contiene las imágenes y, en seguida, familiarícese con
todas las funciones del dispositivo.
Prima di leggere aprire la pagina con le immagini e prendere confidenza con le diverse funzioni
dell’apparecchio.
Before reading, unfold the page containing the illustrations and familiarise yourself with all functions of
the device.
Klappen Sie vor dem Lesen die Seite mit den Abbildungen aus und machen Sie sich anschließend mit
allen Funktionen des Gerätes vertraut.
ES Instrucciones de utilización y de seguridad Página 6
IT/MT Indicazioni per l’uso e per la sicurezza Pagina 14
GB/MT Operation and Safety Notes Page 22
DE/AT/CH Bedienungs- und Sicherheitshinweise Seite 30
Anleitung_LB5_2255123:_ 31.05.2011 10:13 Uhr Seite 2
Page 3
3
1
2
1
1
13
14
9
10
11
12
3
4
5
6
7
8
3
15
16
2
Anleitung_LB5_2255123:_ 31.05.2011 10:13 Uhr Seite 3
Page 4
4
4 5
6 7
8 9
15
6
16
1
1
6
6
15
16
16
16
15
4
15
5
7
2
8
Anleitung_LB5_2255123:_ 31.05.2011 10:13 Uhr Seite 4
Page 5
5
10
9
10
11
Anleitung_LB5_2255123:_ 31.05.2011 10:13 Uhr Seite 5
Page 6

6
ES
Índice de contenidos: Página
1. Introducción..................................................................................7
2. Instrucciones de seguridad ..........................................................7
3. Descripción del aparato y volumen de entrega ............................7-8
4. Uso adecuado .............................................................................8
5. Características técnicas ..............................................................8
6. Antes de la puesta en marcha......................................................8-9
7. Manejo..........................................................................................9-10
8. Mantenimiento, limpieza y pedido de piezas de repuesto.............10-11
9. Eliminación y reciclaje ..................................................................11
10. Declaración de conformidad.........................................................12
11. Certificado de garantía ................................................................13
La reimpresión o cualquier otra reproducción
de documentos e información adjunta a
productos, incluida cualquier copia, sólo se
permite con la autorización expresa de ISC
GmbH.
Salvo modificaciones técnicas
Anleitung_LB5_2255123:_ 31.05.2011 10:13 Uhr Seite 6
Page 7

ES
7
1. Introducción
¡Atención!
Al usar aparatos es preciso tener en cuenta
una serie de medidas de seguridad para evitar
lesiones o daños. Por este motivo, es preciso
leer atentamente estas instrucciones de uso.
Guardar esta información cuidadosamente
para poder consultarla en cualquier momento.
En caso de entregar el aparato a terceras
personas, será preciso entregarles, asimismo,
el manual de instrucciones.
No nos hacemos responsables de accidentes
o daños provocados por no tener en cuenta
este manual y las instrucciones de seguridad.
2. Instrucciones de seguridad
¡AVISO!
Lea todas las instrucciones de seguridad e
indicaciones.
El incumplimiento de dichas instrucciones e
indicaciones puede provocar descargas,
incendios y/o daños graves.
Guarde todas las instrucciones de
seguridad e indicaciones para posibles
consultas posteriores.
Controlar en todo momento que la tensión
de red coincida con la tensión indicada en
la placa de identificación. Si la tensión de
red no es la indicada, la máquina podrá
trabajar de forma anormal y podría
ocasionar daños personales.
La alimentación de corriente debe estar
puesta a tierra y estar dotada de una
protección diferencial.
Está prohibido elevar cargas superiores a
la carga nominal.
Utilizar el aparato exclusivamente para su
fin previsto. No elevar nunca a personas
con el torno de cable.
No tirar del cable para desenchufar el
aparato. Mantener el cable alejado de
fuentes de calor, de aceites o bordes
afilados.
No intentar nunca elevar cargas fijas o
bloqueadas.
Desenchufar el torno de cable cuando no
se utilice.
Mantener alejados de la máquina tanto a
los niños como a otras personas no
autorizadas.
Está prohibido elevar cargas lateralmente o
desde un lateral. Evitar que la carga se
balancee.
Asegurarse de que el gancho se mueva en
la misma dirección que la indicada en el
pulsador.
Controlar regularmente que el torno de
cable no presente daños. El interruptor de
control debe estar en buen estado.
Las reparaciones y los trabajos de
mantenimiento solo serán llevados a cabo
por electricistas profesionales y en talleres
especializados. Sólo un electricista
especializado puede llevar a cabo las
reparaciones, ya que de otro modo el
operario podría sufrir algún accidente.
Evitar conectar y desconectar rápidamente
(servicio discontinuo).
Prestar atención en todo momento en que
se esté operando el torno de cable.
No detenerse o trabajar bajo la carga en
suspensión.
No está admitido, elevar cargas fijas o
encajadas.
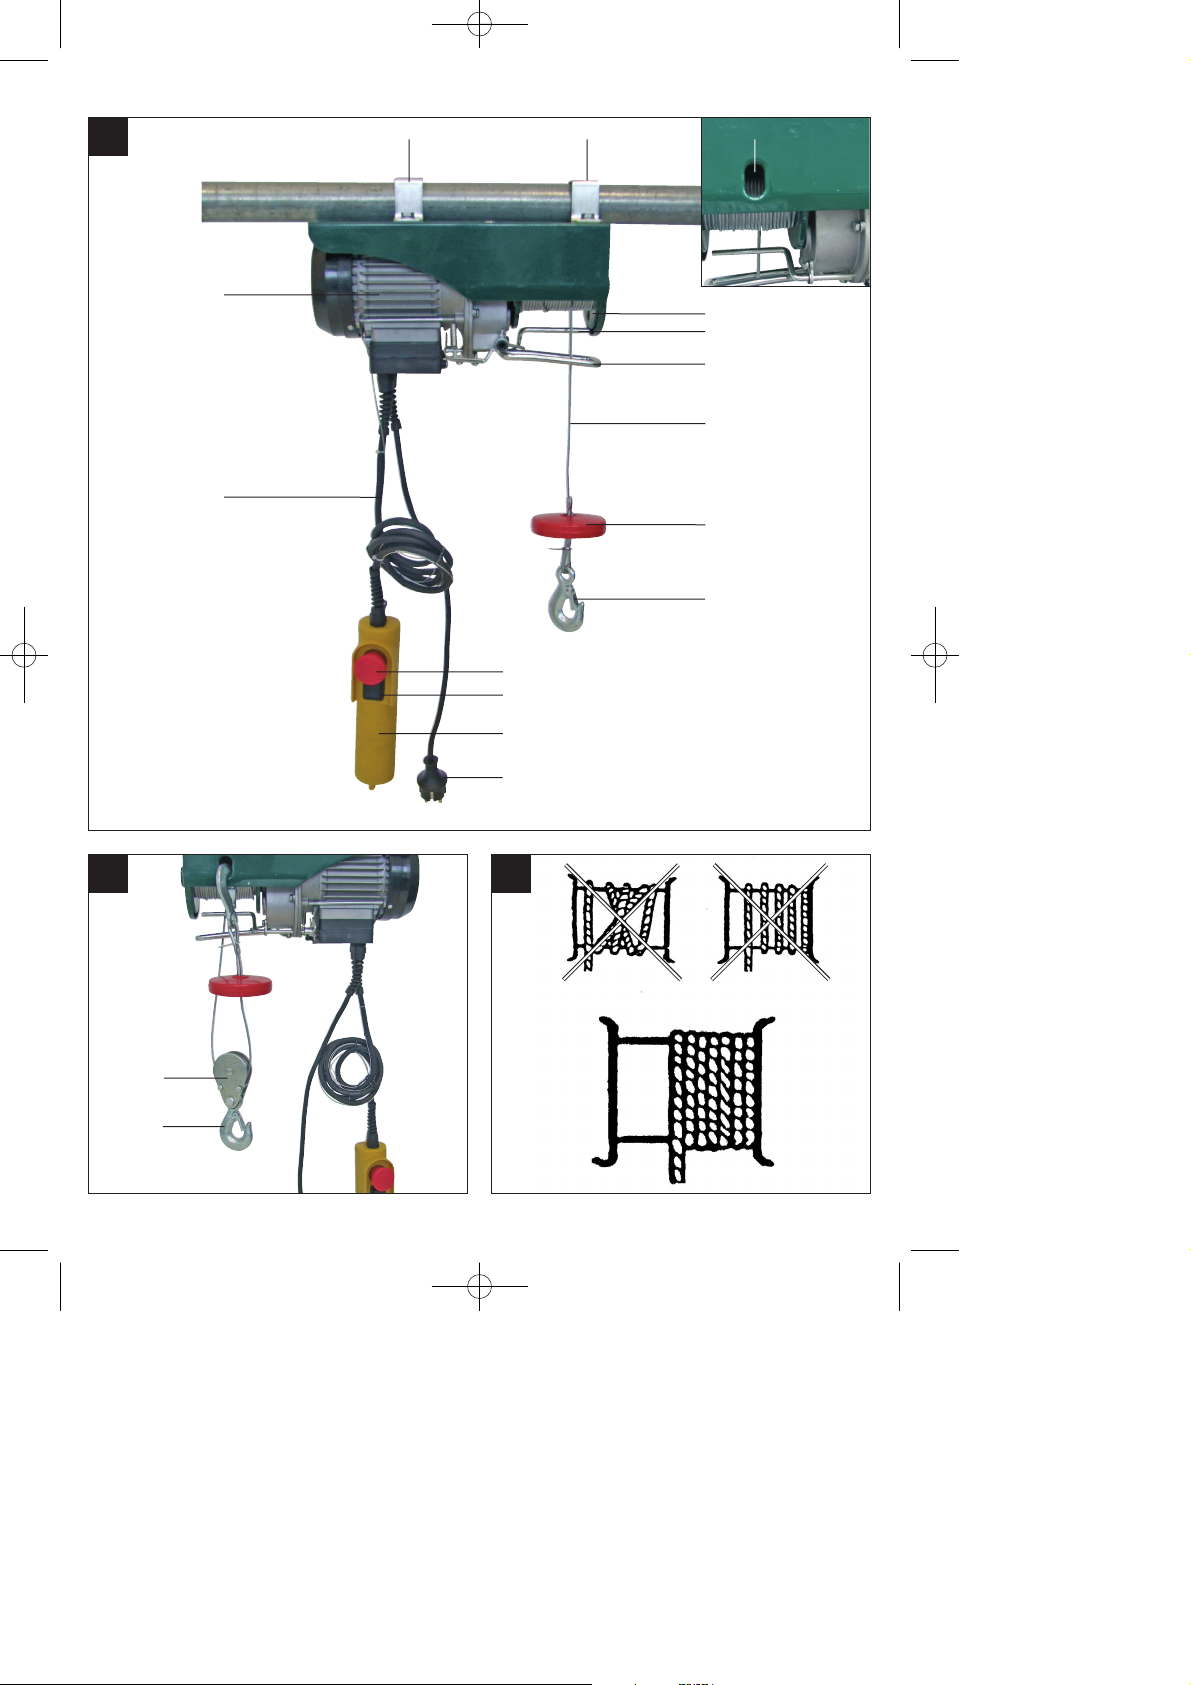
3. Descripción del aparato y
volumen de entrega (fig. 1-2)
1. Estribo de fijación
2. Orificio de fijación para gancho
3. Tambor
4. Palanca para longitud de cable máxima
5. Palanca para mecanismo de parada
automática
6. Cable de acero
7. Peso de desconexión
8. Gancho
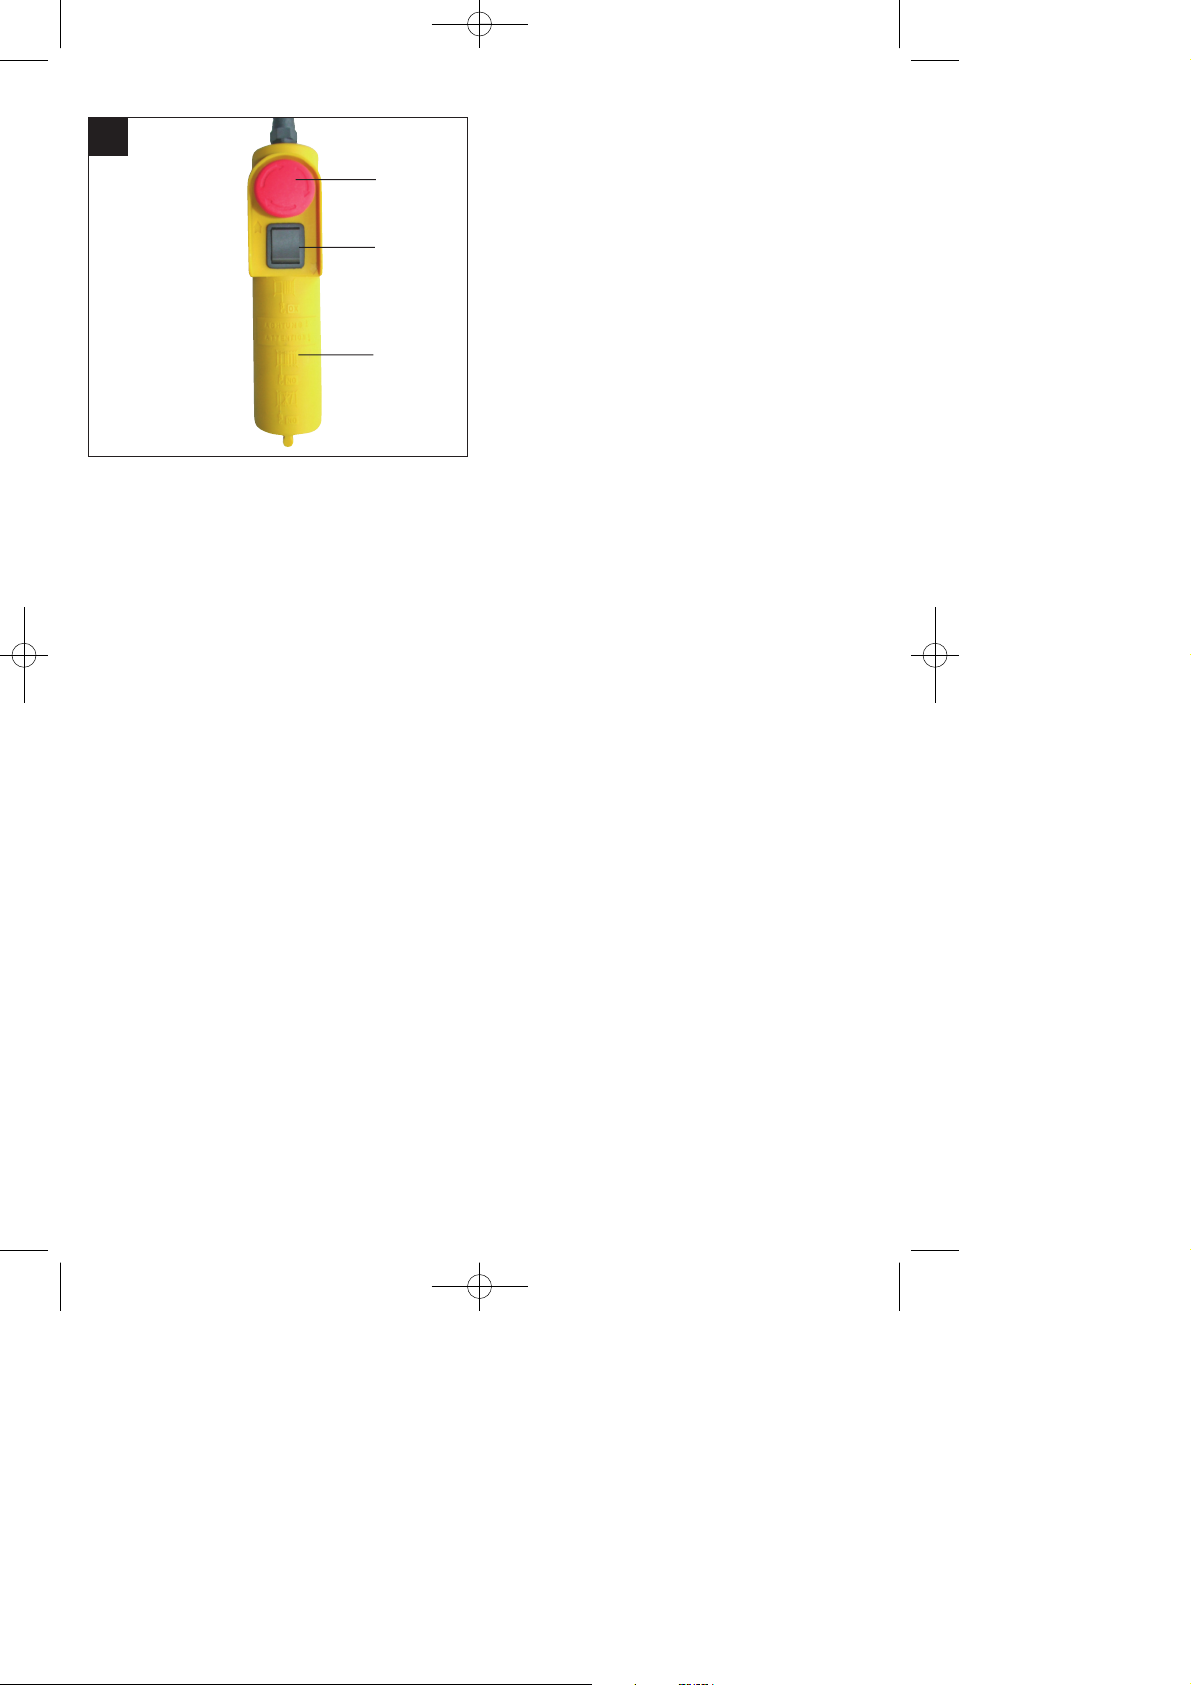
9. Interruptor de paro de emergencia
10. Pulsador
11. Mando a distancia
12. Cable de conexión a la red
13. Cable de control
Anleitung_LB5_2255123:_ 31.05.2011 10:13 Uhr Seite 7
Page 8

ES
8
14. Motor
15. Polea de inversión
16. Gancho adicional
4. Uso adecuado
El torno de cable sirve para elevar y bajar
cargas adecuadas para la potencia del aparato
en salas cerradas.
Utilizar la máquina sólo en los casos que se
indican explícitamente como de uso adecuado.
Cualquier otro uso no será adecuado. En caso
de uso inadecuado, el fabricante no se hace
responsable de daños o lesiones de cualquier
tipo; el responsable es el usuario u operario de
la máquina.
Tener en consideración que nuestro aparato
no está indicado para un uso comercial,
industrial o en taller. No asumiremos ningún
tipo de garantía cuando se utilice el aparato en
zonas industriales, comerciales o talleres, así
como actividades similares.
5. Características técnicas
Tensión (V) 230 V ~ 50 Hz
Corriente nominal (A) 2,2
Consumo (W) 500
Modo operativo S3 20%:10 min
Carga nominal (kg) 125 / 250
Altura de elevación (m) 11,5 / 5,7
Velocidad nominal (m/min) 8 / 4
Diámetro del cable de acero (mm) 3,0
Resistencia a la tracción del cable de
acero (N/mm2) 1870
Clase de aislamiento B
Clase de protección IP24
Categoría de mecanismo de propulsión M1
Peso neto (kg) 10,5
Modo operativo S3 - 20% - 10 min: S3 =
Régimen de funcionamiento discontinuo
independientemente del proceso de arranque.
Es decir, durante un periodo de 10 min. el
tiempo de funcionamiento máx. es del 20% (2
min).
6. Antes de la puesta en marcha
Antes de conectar la máquina, asegurarse
de que los datos de la placa de
identificación coincidan con los datos de la
red eléctrica.
Desenchufar el aparato antes de realizar
ajustes.
El torno de cable no ha sido concebido para
transportar masas calientes y/o fundidas, ni
para utilizarlo a bajas temperaturas ni en un
ambiente particularmente expuesto a los
agentes atmosféricos.
El grupo mecánico es M1.
La duración de uso del torno de cable es
de unos 8000 ciclos (excl. piezas de
desgaste). Cuando el torno ha realizado los
8000 ciclos, es preciso controlar y revisar
todas las piezas mecánicas.
Antes de utilizar el torno de cable es
preciso haber leído y comprendido el
manual de instrucciones.
Asegurarse de que el operario sabe cómo
funciona la máquina y cómo se opera.
El operario debe actuar siempre de acuerdo
con el manual de instrucciones.
El torno no ha sido previsto para un uso
ininterrumpido. El modo operativo es:
régimen de funcionamiento discontinuo
independientemente del proceso de
arranque.
La potencia nominal de la máquina no
varía con la posición de la carga.
6.1 Desembalar
Tras abrir el embalaje , comprobar que el
aparato, el cable de acero, los ganchos, la
palanca para la longitud de cable máxima y la
palanca para el mecanismo de parada
automática no hayan sufrido daños durante el
transporte.
Anleitung_LB5_2255123:_ 31.05.2011 10:13 Uhr Seite 8
Page 9

ES
9
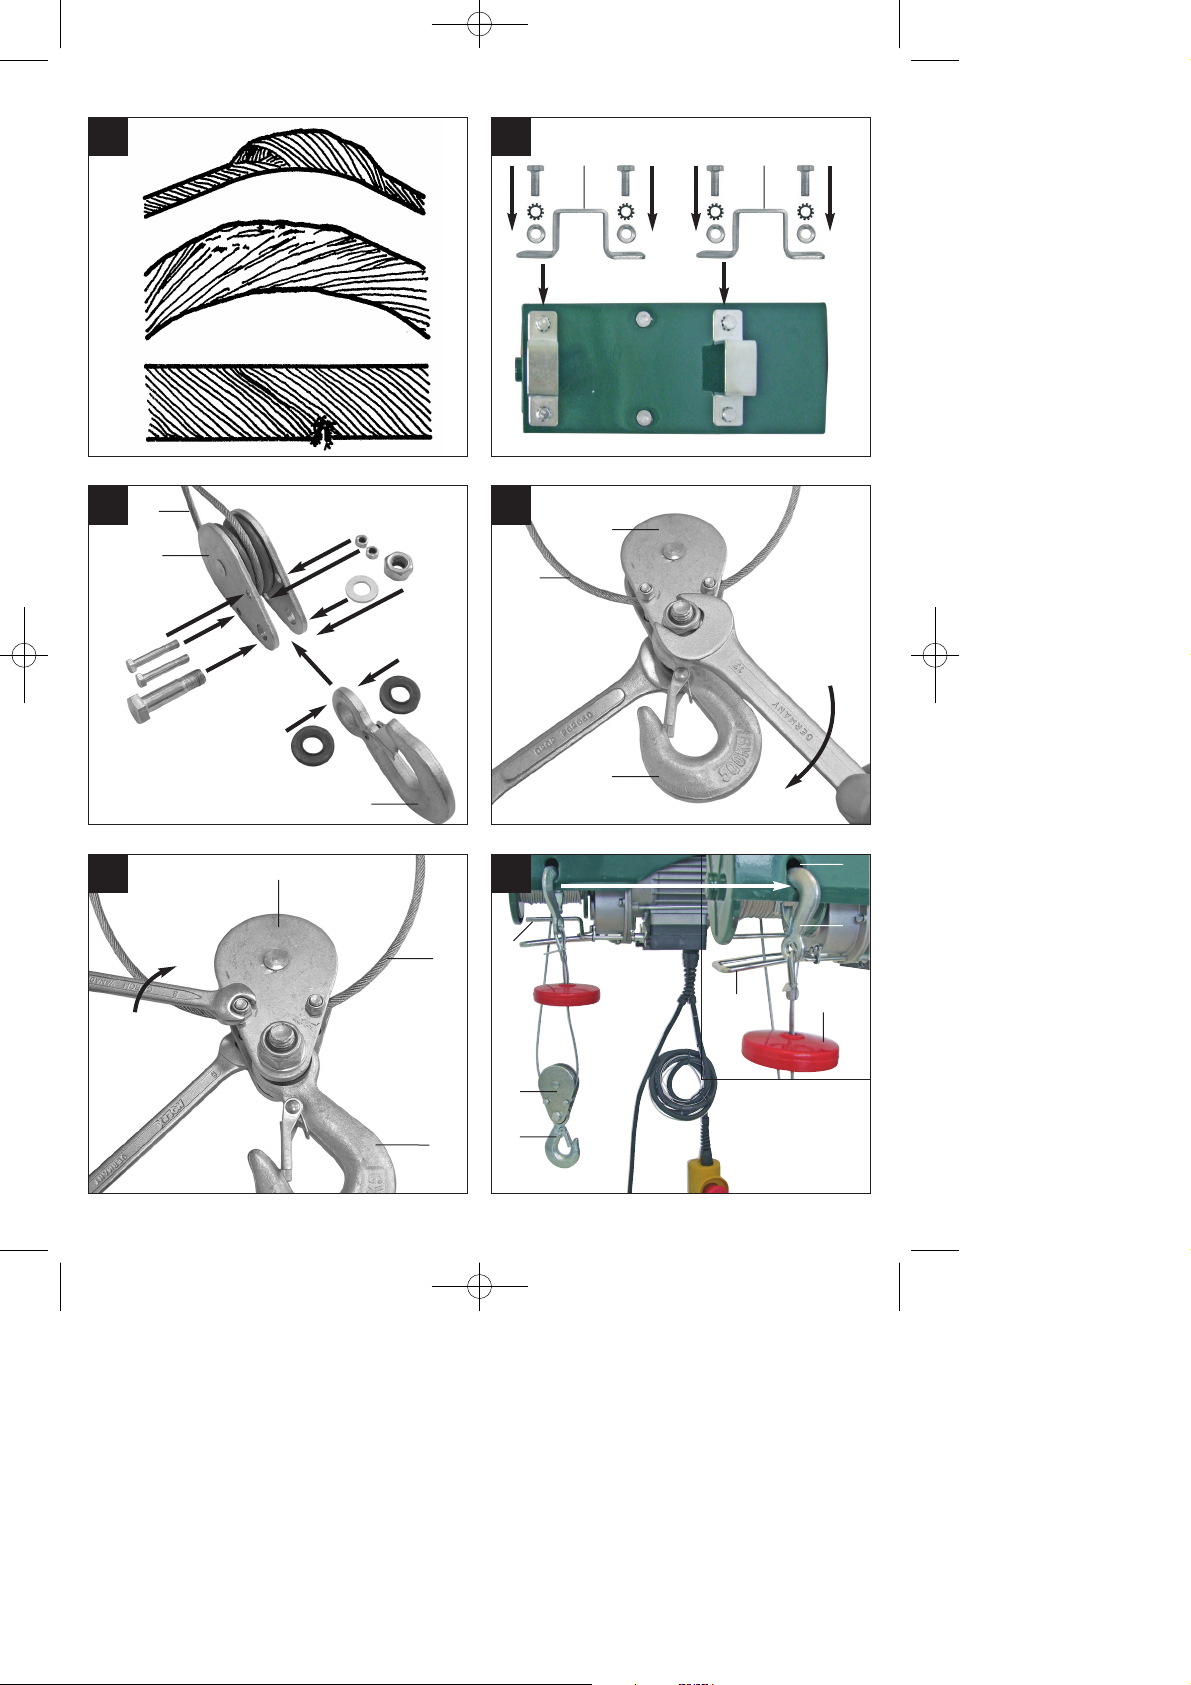
6.2 Montaje (fig. 5)
El torno de cable está dotado de 2 estribos de
fijación (1) con los que se debe sujetar a un
tubo cuadrado / brazo oscilante. Las
dimensiones del tubo cuadrado / brazo
oscilante deben coincidir con el tamaño de los
estribos de fijación (1) y el tubo / brazo debe
poder soportar el doble de la carga nominal.
Recomendamos ponerse en contacto con un
técnico cualificado. Es preciso apretar todos
los tornillos. Antes de la puesta en marcha un
técnico cualificado deberá comprobar el
anclaje del tubo cuadrado / brazo oscilante.
6.3 Función de polipasto (fig. 6 – 9)
El torno de cable está dotado de una polea de
inversión (15) y un gancho adicional (16). Si se
utiliza correctamente, el torno de cable puede
elevar el doble de carga.
Montar la polea de inversión (15) y el gancho
adicional (16) según se muestra en las fig. 6-8.
El gancho fijo (8) debe colgar del orificio de
fijación (2) (fig. 9).
La carga se eleva con ayuda de dos cables de
acero, de forma que el torno de cable se
puede elevar con el doble de carga.
7. Manejo
7.1 Puesta en marcha
Antes del primer uso quitar la cinta
adhesiva del tambor (3).
El valor de la emisión de ruido clasificado
como A en la posición del usuario es
inferior a los 70 dB.
Tensión de alimentación: 230V ± 10%,
50Hz ± 1%.
Operar el torno de cable a temperaturas
ambiente que oscilen entre los 0°C y los
40°C y a una humedad relativa inferior al
85%. Altura sobre el nivel del mar: máx.
1000 m.
La temperatura de transporte y
almacenamiento puede ser entre -25 °C y
55 °C. La temperatura máxima admisible
no puede superar los 70°C.
El usuario debe elevar la carga del suelo a
la velocidad mínima posible. La cadena
debe estar tensada al elevar la carga.
El motor (14) del torno de cable está
dotado de un interruptor de termostato.
Durante el funcionamiento del torno de
cable es posible que el motor (14) se pare,
pero volverá a ponerse en marcha de
forma automática una vez se haya
enfriado.
El torno de cable eléctrico no está dotado
de un limitador de potencia nominal. Por
este motivo, no seguir elevando la carga
cuando la protección contra
sobrecalentamiento suspenda el
funcionamiento. En este caso la carga
supera la potencia nominal del torno de
cable.
No desatender ninguna carga en
suspensión sin haber tomado previamente
las medidas de seguridad necesarias.
Asegurar el aparato con un fusible de 10 A
o con una protección diferencial de 10 A
para proteger el circuito eléctrico.
No utilizar la palanca (4/5) como dispositivo
de parada rutinario, puesto que solo sirve
como dispositivo de parada en caso de
emergencia.
Antes de empezar asegurarse de que el
cable de acero (6) esté bien enrollado
alrededor del tambor (3) y que la distancia
entre las vueltas sea inferior al diámetro
cable de acero (fig. 3).
Asegurar que la carga esté correctamente
asegurada en el gancho (8) o, en el modo
de polipasto, los ganchos adicionales (16)
y que mantienen en todo momento
distancia con respecto de la carga y el
cable de acero (6).
7.2 Funcionamiento (fig. 9-10)
Comprobar si el interruptor de paro de
emergencia (9) está pulsado. Girar el
interruptor de paro de emergencia hacia la
derecha para desbloquearlo.
Presionar el pulsador ▲ (10) para elevar la
carga.
Presionar el pulsador ▼ (10) para bajar la
carga.
Palanca para mecanismo de parada
automática (5): Una vez alcanzada la altura
Anleitung_LB5_2255123:_ 31.05.2011 10:13 Uhr Seite 9
Page 10

máxima de elevación, el peso de
desconexión (7) presiona la palanca (5)
hacia arriba. Así se activa un interruptor de
fin de carrera y la carga no se puede
elevar.
Palanca para longitud de cable máxima (4):
una vez la carga ha alcanzado la posición
más baja posible, se activa un interruptor de
fin de carreta que no permite seguir bajando
la carga. Este interruptor de fin de carrera
evita asimismo que el torno de cable
funcione en la dirección incorrecta (el
gancho se mueve en dirección contraria a la
indicada en el pulsador).
Cuando se activa el interruptor de fin de
carrera (9) el torno de cable se para.
En caso de emergencia, activar de
inmediato el interruptor de paro de
emergencia (9) para parar el torno de
cable. Si el interruptor de paro de
emergencia está activado no es posible
operar el torno de cable.
8. Mantenimiento, limpieza y
pedido de piezas de repuesto
Desenchufar siempre antes de realizar
algún trabajo de limpieza.
8.1 Limpieza
Reducir al máximo posible la suciedad y el
polvo en los dispositivos de seguridad, las
rendijas de ventilación y la carcasa del
motor. Frotar el aparato con un paño limpio
o soplarlo con aire comprimido
manteniendo la presión baja.
Limpiar el aparato inmediatamente después
de cada uso.
Limpiar el aparato con regularidad con un
paño húmedo y un poco de jabón blando.
No utilizar productos de limpieza o
disolventes ya que se podrían deteriorar
las piezas de plástico del aparato. Es
preciso tener en cuenta que no entre agua
en el interior del aparato.
8.2 Mantenimiento
¡Atención! Asegurar que la máquina esté
desenchufada de la red eléctrica siempre
que se someta a trabajos de
mantenimiento.
A continuación: Un ciclo corresponde a un
movimiento hacia arriba y hacia abajo de
una carga. La comprobación periódica
corresponde a una comprobación tras 100
ciclos.
Comprobar de forma periódica que el
interruptor de fin de carrera del torno de
cable funcione correctamente. (comprobar
sin carga) La comprobación tiene lugar de
la siguiente manera: Cuando el cable ha
alcanzado la altura de elevación máxima,
la palanca activa el mecanismo de parada
automático (5). El motor (14) se debe
parar.
Si el cable de acero (6) está desenrollado
al máximo posible, se activa la palanca
para la longitud máxima del cable (4). El
motor (14) se debe parar.
Comprobar periódicamente el cable de red
(12) y el cable de control (13).
Cada 200 ciclos es preciso lubricar el cable
de acero (6) y la polea de inversión (15).
Cada 30 ciclos es preciso comprobar,
según se muestra en la fig. 4, que todo el
cable de acero (6) esté en buen estado. En
caso de estar dañado, cambiarlo por uno
nuevo que coincida con las características
técnicas.
Comprobar cada 1000 ciclos que todos los
tornillos del estribo de fijación (1) y de la
polea de inversión (15) estén bien
apretados.
Comprobar cada 1000 ciclos que los
ganchos (8/16) y la polea de inversión (15)
estén en buen estado.
Antes de cada uso del torno de cable es
preciso comprobar que el interruptor de
paro de emergencia (9) y el pulsador (10)
se encuentren en perfecto estado de
funcionamiento.
Comprobar cada 1000 ciclos el sistema de
frenado. Cuando el motor (14) emita ruidos
inusuales o no pueda elevar la carga
nominal, es posible que se deba revisar el
ES
10
Anleitung_LB5_2255123:_ 31.05.2011 10:13 Uhr Seite 10
Page 11
sistema de frenado.
- Cambiar las piezas dañadas o
desgastadas y guardar bien la
documentación de mantenimiento
correspondiente.
- Para trabajos de cuidado no previstos
ponerse en contacto con un centro de
servicio autorizado.
8.3 Pedido de piezas de recambio:
Al solicitar recambios se indicarán los datos
siguientes:
Tipo de aparato
No. de artículo del aparato
No. de identidad del aparato
Encontrará los precios y la información actual
en www.isc-gmbh.info
9. Eliminación y reciclaje
El aparato está protegido por un embalaje para
evitar daños producidos por el transporte. Este
embalaje es materia prima y, por eso, se
puede volver a utilizar o llevar a un punto de
reciclaje.
El aparato y sus accesorios están compuestos
de diversos materiales, como, p. ej., metal y
plástico. Depositar las piezas defectuosas en
un contenedor destinado a residuos
industriales. Informarse en el organismo
responsable al respecto en su municipio o en
establecimientos especializados.
Sólo para países miembros de la
UE
No tirar herramientas eléctricas en
la basura casera.
Según la directiva europea 2002/96/CE sobre
aparatos usados electrónicos y eléctricos y su
aplicación en el derecho nacional, dichos
aparatos deberán recojerse por separado y
eliminarse de modo ecológico para facilitar su
posterior reciclaje.
Alternativa de reciclaje en caso de devolución:
El propietario del aparato eléctrico, en caso de
no optar por su devolución, está obligado a
reciclar adecuadamente dicho aparato
eléctrico. Para ello, también se puede entregar
el aparato usado a un centro de reciclaje que
trate la eliminación de residuos respetando la
legislación nacional sobre residuos y su
reciclaje. Esto no afecta a los medios auxiliares
ni a los accesorios sin componentes eléctricos
que acompañan a los aparatos usados.
ES
11
Anleitung_LB5_2255123:_ 31.05.2011 10:13 Uhr Seite 11
Page 12

ES
12
10. Declaración de conformidad
k erklärt folgende Konformität gemäß EU-Richtlinie und
Normen für Artikel
t explains the following conformity according to EU
directives and norms for the following product
p déclare la conformité suivante selon la directive CE et les
normes concernant l’article
C dichiara la seguente conformità secondo la direttiva UE e
le norme per l’articolo
N verklaart de volgende overeenstemming conform EU
richtlijn en normen voor het product
m declara la siguiente conformidad a tenor de la directiva y
normas de la UE para el artículo
O declara a seguinte conformidade, de acordo com a
directiva CE e normas para o artigo
l attesterer følgende overensstemmelse i medfør af
EU-direktiv samt standarder for artikel
U förklarar följande överensstämmelse enl. EU-direktiv och
standarder för artikeln
q vakuuttaa, että tuote täyttää EU-direktiivin ja standardien
vaatimukset
. tõendab toote vastavust EL direktiivile ja standarditele
j vydává následující prohlášení o shodě podle směrnice
EU a norem pro výrobek
X potrjuje sledečo skladnost s smernico EU in standardi za
izdelek
W vydáva nasledujúce prehlásenie o zhode podľa smernice
EÚ a noriem pre výrobok
A a cikkekhez az EU-irányvonal és Normák szerint a
következő konformitást jelenti ki
P deklaruje zgodność wymienionego poniżej artykułu z
następującymi normami na podstawie dyrektywy WE.
e декларира съответното съответствие съгласно
Директива на ЕС и норми за артикул
H paskaidro šādu atbilstību ES direktīvai un standartiem
G apibūdina šį atitikimą EU reikalavimams ir prekės
normoms
Q declară următoarea conformitate conform directivei UE
şi normelor pentru articolul
z δηλώνει την ακόλουθη συμμόρφωση σύμφωνα με την
Οδηγία ΕΚ και τα πρότυπα για το προϊόν
B potvrđuje sljedeću usklađenost prema smjernicama EU
i normama za artikl
f potvrđuje sljedeću usklađenost prema smjernicama EU
i normama za artikl
4 potvrđuje sledeću usklađenost prema smernicama EZ i
normama za artikal
T следующим удостоверяется, что следующие
продукты соответствуют директивам и нормам ЕС
1 проголошує про зазначену нижче відповідність
виробу директивам та стандартам ЄС на виріб
5 ја изјавува следната сообрзност согласно
ЕУ-директивата и нормите за артикли
Z Ürünü ile ilgili AB direktifleri ve normları gereğince
aşağıda açıklanan uygunluğu belirtir
L erklærer følgende samsvar i henhold til EU-direktivet
og standarder for artikkel
E Lýsir uppfyllingu EU-reglna og annarra staðla vöru
Konformitätserklärung
Einhell Germany AG · Wiesenweg 22 · D-94405 Landau/Isar
Seilhebezug PSZ 250 A2 (Parkside)
Standard references: EN 14492-2; EN 60204-32;
EN 55014-1; EN 55014-2; EN 61000-3-2; EN 61000-3-3
Landau/Isar, den 18.04.2011
First CE: 09 Archive-File/Record: NAPR003513
Art.-No.: 22.551.23 I.-No.: 11031 Documents registrar: Robert Mayn
Subject to change without notice Wiesenweg 22, D-94405 Landau/Isar
Weichselgartner/General-Manager Wentao/Product-Management
x
87/404/EC_2009/105/EC
2005/32/EC_2009/125/EC
2006/95/EC
2006/28/EC
2004/108/EC
2004/22/EC
1999/5/EC
97/23/EC
90/396/EC_2009/142/EC
89/686/EC_96/58/EC
x
2006/42/EC
2004/26/EC
Emission No.:
2000/14/EC_2005/88/EC
Annex IV
Notified Body:
Notified Body No.:
Reg. No.:
Annex V
Annex VI
Noise: measured LWA= dB (A); guaranteed LWA= dB (A)
P = KW; L/Ø = cm
Notified Body:
Anleitung_LB5_2255123:_ 31.05.2011 10:14 Uhr Seite 12
Page 13

ES
13
11. CERTIFICADO DE GARANTÍA
Estimado cliente:
Nuestros productos están sometidos a un estricto control de calidad. No obstante, lamentaríamos que este
aparato dejara de funcionar correctamente, en tal caso, le rogamos que se dirija a nuestro servicio de atención
al cliente en la dirección indicada en la parte inferior de la presente tarjeta de garantía. Con mucho gusto le
atenderemos también telefónicamente en el número de servicio indicado a continuación. Para hacer válido el
derecho de garantía, proceda de la siguiente forma:
1. Estas condiciones de garantía regulan prestaciones de la garantía adicionales. Sus derechos legales a
prestación de garantía no se ven afectados por la presente garantía. Nuestra prestación de garantía es
gratuita para usted.
2. La prestación de garantía se extiende exclusivamente a defectos ocasionados por fallos de material o de
producción y está limitada a la reparación de los mismos o al cambio del aparato. Tenga en consideración
que nuestro aparato no está indicado para un uso comercial, en taller o industrial. Por lo tanto, no
procederá un contrato de garantía cuando se utilice el aparato en zonas industriales, comerciales o talleres,
así como actividades similares. De nuestra garantía se excluye cualquier otro tipo de prestación adicional
por daños ocasionados por el transporte, daños ocasionados por la no observancia de las instrucciones de
montaje o por una instalación no profesional, no observancia de las instrucciones de uso (como, p. ej.,
conexión a una tensión de red o corriente no indicada), aplicaciones impropias o indebidas (como, p. ej.,
sobrecarga del aparato o uso de herramientas o accesorios no homologados), no observancia de las
disposiciones de mantenimiento y seguridad, introducción de cuerpos extraños en el aparato (como, p. ej.,
arena, piedras o polvo), uso violento o influencias externa (como, p. ej., daños por caídas), así como por el
desgaste habitual por el uso. Esto se aplica especialmente en aquellas baterías para las que ofrecemos un
plazo de garantía de 12 meses.
El derecho a garantía pierde su validez cuando ya se hayan realizado intervenciones en el aparato.
3. El periodo de garantía es de 3 años y comienza en la fecha de la compra del aparato. El derecho de
garantía debe hacerse válido, antes de finalizado el plazo de garantía, dentro de un periodo de dos
semanas una vez detectado el defecto. El derecho de garantía vence una vez transcurrido el plazo de
garantía. La reparación o cambio del aparato no conllevará ni una prolongación del plazo de garantía ni un
nuevo plazo de garantía ni para el aparato ni para las piezas de repuesto montadas. Esto también se aplica
en el caso de un servicio
in situ
.
4. Para hacer efectivo su derecho a garantía, envíe gratuitamente el aparato defectuoso a la dirección
indicada a continuación. Adjunte el original del ticket de compra u otro tipo de comprobante de compra con
fecha. ¡A tal efecto, guarde en lugar seguro el ticket de compra como comprobante! Describa con la mayor
precisión posible el motivo de la reclamación. Si nuestra prestación de garantía incluye el defecto
aparecido en el aparato, recibirá de inmediato un aparato reparado o nuevo de vuelta.
Naturalmente, también solucionaremos los defectos del aparato que no se encuentren comprendidos o ya no
se encuentren comprendidos en la garantía, en este caso contra reembolso de los costes. Para ello, envíe el
aparato a nuestra dirección de servicio técnico.
Comercial Einhell, S.A.
Travesia Villa Ester, 9 B
Poligono Industrial El Nogal
E-28119 Algete-Madrid
Tel. 0034 91 729 48 88
Anleitung_LB5_2255123:_ 31.05.2011 10:14 Uhr Seite 13
Page 14

IT/
MT
14
Indice Pagina
1. Introduzione..................................................................................15
2. Avvertenze di sicurezza................................................................15
3. Descrizione dellʼapparecchio ed elementi forniti .........................15-16
4. Utilizzo proprio..............................................................................16
5. Caratteristiche tecniche................................................................16
6. Prima della messa in esercizio.....................................................16-17
7. Uso ...............................................................................................17-18
8. Pulizia, manutenzione e ordinazione dei pezzi di ricambio ...........18-19
9. Smaltimento e riciclaggio..............................................................19
10. Dichiarazione di conformità ..........................................................20
11. Certificato di garanzia ..................................................................21
La ristampa o lʼulteriore riproduzione, anche
parziale, della documentazione o dei
documenti dʼaccompagnamento dei prodotti è
consentita solo con lʼesplicita autorizzazione
da parte della ISC GmbH.
Con riserva di apportare modifiche tecniche
Anleitung_LB5_2255123:_ 31.05.2011 10:14 Uhr Seite 14
Page 15

IT/
MT
15
1. Introduzione
Attenzione!
Nellʼusare gli apparecchi si devono rispettare
diverse avvertenze di sicurezza per evitare
lesioni e danni. Quindi leggete attentamente
queste istruzioni per lʼuso. Conservatele bene
per avere a disposizione le informazioni in
qualsiasi momento. Se date lʼapparecchio ad
altre persone consegnate loro queste istruzioni
per lʼuso insieme allʼapparecchio!
Non ci assumiamo alcuna responsabilità per
incidenti o danni causati dal mancato rispetto
di queste istruzioni e delle avvertenze di
sicurezza.
2. Avvertenze sulla sicurezza
AVVERTIMENTO!
Leggete tutte le avvertenze di sicurezza e le
istruzioni.
Dimenticanze nel rispetto delle avvertenze di
sicurezza e delle istruzioni possono causare
scosse elettriche, incendi e/o gravi lesioni.
Conservate tutte le avvertenze e le
istruzioni per eventuali necessità future.
Controllate sempre che la tensione di rete
corrisponda a quella indicata sulla
targhetta. Una tensione di rete non adatta
può causare un funzionamento anomalo
della macchina o danni alle persone.
Lʼalimentazione di corrente deve essere
dotata di messa a terra e deve essere
protetta con un interruttore di sicurezza per
correnti di guasto.
È vietato sollevare carichi superiori al
relativo valore nominale.
Utilizzate lʼapparecchio esclusivamente per
lo scopo previsto. Il paranco elettrico non
deve mai essere usato per sollevare
persone.
Non tirate mai il cavo per staccare la spina
dalla presa di corrente. Tenete lontano il
cavo dal calore, dallʼolio e dagli spigoli.
Non tentate mai di sollevare carichi che
siano fissi o bloccati.
Togliete la spina dalla presa di corrente
quando il paranco elettrico non è in
funzione.
Tenete lontano dallʼapparecchio i bambini e
le persone non autorizzate.
È vietato sollevare carichi lateralmente o da
un lato. Evitate oscillazioni del carico.
Assicuratevi che il gancio si muova nella
direzione indicata sul pulsante.
Verificate regolarmente che il paranco
elettrico non presenti danni. Il pulsante deve
essere in perfette condizioni.
Fate eseguire le riparazioni e i lavori di
manutenzione esclusivamente da un
elettricista specializzato in officine
autorizzate. Le riparazioni devono essere
eseguite solo da un elettricista
specializzato, altrimenti ne possono
derivare infortuni per lʼutilizzatore.
Evitate di inserire e disinserire
continuamente lʼapparecchio (utilizzo a
intermittenza).
Durante lʼutilizzo del paranco elettrico
prestate sempre molta attenzione.
Non sostate o lavorate sotto al carico
sospeso.
Non è consentito sollevare carichi bloccati o
incastrati.
3. Descrizione dell’apparecchio
ed elementi forniti (Fig. 1-2)
1. Staffa di fissaggio
2. Foro di fissaggio per gancio
3. Tamburo
4. Leva per lunghezza massima cavi
5. Leva per meccanismo di arresto
automatico
6. Cavo dʼacciaio
7. Peso di disinserimento
8. Gancio
9. Interruttore di arresto di emergenza
10. Pulsante
11. Telecomando
12. Cavo di alimentazione
13. Cavo di comando
14. Motore
15. Carrucola di rinvio
Anleitung_LB5_2255123:_ 31.05.2011 10:14 Uhr Seite 15
Page 16

16. Gancio aggiuntivo
4. Utilizzo proprio
Il paranco elettrico serve per il sollevamento e
lʼabbassamento di carichi in ambienti chiusi in
modo conforme alle prestazioni
dellʼapparecchio.
Lʼapparecchio deve venire usato solamente
per lo scopo a cui è destinato. Ogni altro tipo di
uso che esuli da quello previsto non è un uso
conforme. Lʼutilizzatore/lʼoperatore, e non il
costruttore, è responsabile dei danni e delle
lesioni di ogni tipo che ne risultino.
Tenete presente che i nostri apparecchi non
sono stati costruiti per lʼimpiego professionale,
artigianale o industriale. Non ci assumiamo
alcuna garanzia quando lʼapparecchio viene
usato in imprese commerciali, artigianali o
industriali, o in attività equivalenti.
5. Caratteristiche tecniche
Tensione (V) 230 V ~ 50 Hz
Corrente nominale (A) 2,2
Potenza assorbita (W) 500
Modalità operativa S3 20%:10 min
Carico nominale (kg) 125 / 250
Altezza di sollevamento (m) 11,5 / 5,7
Velocità nominale (m/min) 8 / 4
Diametro del cavo dʼacciaio (mm) 3,0
Resistenza del cavo alla trazione
(N/mm2) 1870
Classe di isolamento B
Grado di protezione IP24
Classe del motore M1
Peso netto (kg) 10,5
Modalità operativa S3 - 20% - 10min S3 =
esercizio intermittente senza influsso sul
processo di avvio. Ciò significa che in un lasso
di tempo di 10 min il tempo di utilizzo max. è il
20% (2 min).
6. Prima della messa in esercizio
Prima di inserire la spina nella presa di
corrente assicuratevi che i dati sulla
targhetta di identificazione corrispondano a
quelli di rete.
Staccate sempre la spina di alimentazione
prima di ogni impostazione allʼapparecchio.
Il paranco elettrico non è adatto per il
trasporto di masse calde e/o fuse, inoltre
non è adatto per l’impiego in caso di basse
temperature e in ambienti particolarmente
esposti agli agenti atmosferici.
Il gruppo meccanico è M1.
La durata utile del paranco elettrico è di
circa 8000 cicli (escl. le parti soggette ad
usura). Quando il cavo ha superato gli
8000 cicli tutte le parti meccaniche devono
essere controllate e revisionate.
Le istruzioni per lʼuso devono essere lette e
comprese prima di utilizzare il paranco
elettrico.
Assicuratevi che lʼutilizzatore conosca il
funzionamento e il modo di utilizzo della
macchina.
L’utilizzatore deve sempre operare in
conformità con le istruzioni per l’uso.
Il paranco non è adatto allʼuso continuo. La
modalità operativa è: esercizio intermittente
senza influsso del processo di avvio.
La potenza nominale dellʼapparecchio non
varia a seconda della posizione del carico.
6.1 Togliere dall’imballo
Dopo aver tolto l’imballaggio controllate che
l’apparecchio, il cavo in acciaio, i ganci, la leva
per la lunghezza massima del cavo e la leva del
meccanismo di arresto automatico non
presentino danni dovuti al trasporto.
6.2 Montaggio (Fig. 5)
Il paranco elettrico è dotato di 2 appoggi di
fissaggio (1) con i quali può essere fissato ad
un tubo quadro / braccio orientabile. Le
dimensioni del tubo quadro / braccio orientabile
IT/
MT
16
Anleitung_LB5_2255123:_ 31.05.2011 10:14 Uhr Seite 16
Page 17

IT/
MT
17
devono corrispondere alle dimensioni degli
appoggi di fissaggio (1) e il tubo quadro /
braccio orientabile deve poter sostenere il
doppio del carico nominale. Vi consigliamo di
contattare un tecnico qualificato. Tutte le viti
devono essere ben avvitate. Prima della messa
in esercizio un tecnico qualificato dovrebbe
controllare l’ancoraggio del tubo quadro /
braccio orientabile.
6.3 Funzione con bozzello (Fig 6-9)
Il paranco elettrico è dotato di una carrucola di
rinvio (15) e di un gancio aggiuntivo (16). Se
utilizzato in modo corretto il paranco elettrico
può sollevare un carico doppio.
Montate la carrucola di rinvio (15) e il gancio
aggiuntivo (16) come indicato nelle Fig. 6-8. Il
gancio (8) deve essere montato saldamente e
appeso al foro di fissaggio (2) (Fig. 9).
Ora il carico viene sollevato con lʼaiuto di due
cavi in acciaio e in questo modo è possibile
sollevare il doppio del carico.
7. Uso
7.1 Messa in funzione
Prima di utilizzare lʼapparecchio per la
prima volta togliete il nastro adesivo dal
tamburo (3).
Il valore delle emissioni sonore (A) nella
posizione dellʼoperatore è inferiore a 70dB.
Tensione di alimentazione: 230V ± 10%,
50Hz ± 1%.
Il paranco elettrico deve essere utilizzato
ad una temperatura ambiente compresa tra
0 °C e 40 °C e con unʼumidità relativa
inferiore allʼ85%. Altezza sul livello del
mare: max. 1.000 m
Per il trasporto e la conservazione la
temperatura deve essere compresa tra i
-25 °C e i 55 °C . La massima temperatura
consentita non deve superare i 70 °C.
Lʼutilizzatore deve sollevare il carico dal
terreno alla minima velocità possibile.
Quando il carico viene sollevato il cavo
deve essere teso.
Il motore (14) del paranco elettrico è dotato
di interruttore a termostato. Durante
lʼesercizio del paranco elettrico ci può
essere un arresto del motore (14), che si
riavvia automaticamente una volta
raffreddato.
Il paranco elettrico non è fornito di
limitatore di corrente nominale. Si prega
quindi di non riprovare a sollevare il carico
se la protezione dal surriscaldamento ha
interrotto lʼesercizio. In questo caso il carico
supera la potenza nominale del paranco
elettrico.
Non lasciate incustodito alcun carico
sospeso senza aver prima preso tutte le
misure di sicurezza relative.
Assicurate lʼapparecchio con una
protezione di 10 A o con un interruttore di
sicurezza per correnti di guasto 10 A per
proteggere il ciclo di corrente.
Non utilizzate la leva (4/5) come abituale
dispositivo di arresto. Serve solo come
dispositivo di arresto in caso di emergenza.
Prima di cominciare assicuratevi che il cavo
di acciaio (6) sia avvolto correttamente al
tamburo (3) e che la distanza tra gli
avvolgimenti sia inferiore al cavo dʼacciaio
(Fig.3).
Accertatevi che il carico sia assicurato
correttamente al gancio (8) ovvero al
gancio aggiuntivo (16) durante la funzione
con bozzello e tenetevi sempre a distanza
dal carico e dal cavo dʼacciaio (6).
7.2 Esercizio (Fig. 9-10)
Controllate se l’interruttore di arresto di
emergenza (9) è premuto. Ruotate
l’interruttore di arresto d’emergenza in
senso orario per sbloccarlo.
Premete il pulsante ▲ (10) per sollevare il
carico.
Premete il pulsante ▼ (10) per abbassare il
carico.
Leva per meccanismo di arresto
automatico (5): quando viene raggiunta la
massima altezza di sollevamento il peso di
disinserimento (7) spinge la leva (5) verso
lʼalto. In questo modo si aziona un
interruttore di fine corsa e il carico non può
essere sollevato ulteriormente.
Anleitung_LB5_2255123:_ 31.05.2011 10:14 Uhr Seite 17
Page 18

Leva per lunghezza massima del cavo (4):
quando il carico ha raggiunto la posizione
più bassa possibile viene azionato un
interruttore di fine corsa che impedisce di
abbassare il carico ulteriormente. Tale
interruttore di fine corsa impedisce anche
l’esercizio del paranco elettrico in direzione
errata (il gancio si muove in direzione
opposta a quella indicata sul pulsante).
Quando viene azionato lʼinterruttore di
arresto di emergenza (9) il paranco elettrico
si ferma.
In caso di emergenza azionare
immediatamente lʼinterruttore di arresto di
emergenza (9) per fermare il paranco
elettrico. Lʼutilizzo del paranco elettrico non
è possibile se è stato azionato lʼinterruttore
di arresto di emergenza.
8. Pulizia, manutenzione e
ordinazione dei pezzi di
ricambio
Prima di qualsiasi lavoro di pulizia staccate
la spina dalla presa di corrente.
8.1 Pulizia
Tenete il più possibile i dispositivi di
protezione, le fessure di aerazione e la
carcassa del motore liberi da polvere e
sporco. Strofinate lʼapparecchio con un
panno pulito o soffiatelo con lʼaria
compressa a pressione bassa.
Pulite l’apparecchio subito dopo l’uso.
Pulite lʼapparecchio regolarmente con un
panno asciutto ed un poʼ di sapone. Non
usate detergenti o solventi perché questi
ultimi potrebbero danneggiare le parti in
plastica dellʼapparecchio. Fate attenzione
che non possa penetrare dellʼacqua
nellʼinterno dellʼapparecchio.
8.2 Manutenzione
Attenzione! Assicuratevi che lʼapparecchio
non sia collegato alla rete elettrica durante i
lavori di manutenzione.
Seguente: un ciclo corrisponde ad un
movimento di sollevamento ed
abbassamento di un carico. Un controllo
periodico è un controllo effettuato ogni 100
cicli.
Controllate periodicamente che gli
interruttori di fine corsa del paranco
elettrico funzionino in modo regolare.
(controllare senza carico) Il controllo va
eseguito nel modo seguente: quando il
cavo raggiunge la massima altezza di
sollevamento si aziona la leva per il
meccanismo di arresto automatico (5). Il
motore (14) si deve fermare.
Quando il cavo di acciaio (6) è svolto il più
possibile viene azionata la leva per la
lunghezza massima cavi (4). Il motore (14)
si deve fermare.
Controllate periodicamente il cavo di
alimentazione (12) e il cavo di comando
(13).
Ogni 200 cicli il cavo dʼacciaio (6) e la
carrucola di rinvio (15) devono essere
lubrificati.
Ogni 30 cicli si deve controllare come
mostrato in Fig. 4 che lʼintero cavo di
acciaio (6) sia in buone condizioni. Nel
caso sia danneggiato deve essere
sostituito con un cavo dʼacciaio
corrispondente ai dati tecnici.
Controllare ogni 1000 cicli che le viti della
staffa di fissaggio (1) e la carrucola di rinvio
(15) siano ben serrate.
Controllare ogni 1000 cicli che i ganci
(8/16) e la carrucola di rinvio (15) siano in
buone condizioni.
Controllate prima di ogni utilizzo del
paranco elettrico che lʼinterruttore di arresto
di emergenza (9) e il pulsante (10) siano in
perfette condizioni.
Ogni 1000 cicli controllate il sistema
frenante. Se il motore (14) produce rumori
insoliti o non riesce a sollevare il carico
nominale è possibile che il sistema frenante
debba essere revisionato:
IT/
MT
18
Anleitung_LB5_2255123:_ 31.05.2011 10:14 Uhr Seite 18
Page 19

IT/
MT
19
- sostituite le parti danneggiate o
consumate e conservate i relativi
documenti di manutenzione
- per operazioni di riparazione non
programmate rivolgetevi ad un centro di
assistenza autorizzato.
8.3 Ordinazione di pezzi di ricambio:
Volendo commissionare dei pezzi di ricambio,
si dovrebbe dichiarare quanto segue:
modello dellʼapparecchio
numero dellʼarticolo dellʼapparecchio
numero dʼident. dellʼapparecchio
Per i prezzi e le informazioni attuali si veda
www.isc-gmbh.info
9. Smaltimento e riciclaggio
Lʼapparecchio si trova in una confezione per
evitare i danni dovuti al trasporto. Questo
imballaggio rappresenta una materia prima e
può perciò essere utilizzato di nuovo o
riciclato.
Lʼapparecchio e i suoi accessori sono fatti di
materiali diversi, per es. metallo e plastica.
Consegnate i pezzi difettosi allo smaltimento di
rifiuti speciali. Per informazioni rivolgetevi ad
un negozio specializzato o allʼamministrazione
comunale!
Solo per paesi membri dell’UE
Non smaltite gli elettroutensili nei
rifiuti domestici!
Secondo la direttiva europea 2002/96/CE sui
rifiuti di apparecchiature elettriche ed
elettroniche e il suo recepimento nelle
normative nazionali, gli elettroutensili usati
devono venire raccolti separatamente e venire
smaltiti in modo ecocompatibile.
Alternativa di riciclaggio alla richiesta di
restituzione:
il proprietario dell’apparecchio elettrico è tenuto
in alternativa, invece della restituzione, a
collaborare in modo che lo smaltimento venga
eseguito correttamente in caso ceda
l’apparecchio. L’apparecchio vecchio può
anche venire consegnato ad un centro di
raccolta che provvede poi allo smaltimento
secondo le norme nazionali sul riciclaggio e sui
rifiuti. Non ne sono interessati gli accessori e i
mezzi ausiliari senza elementi elettrici forniti
insieme ai vecchi apparecchi.
Anleitung_LB5_2255123:_ 31.05.2011 10:14 Uhr Seite 19
Page 20

IT/
MT
20
10. Dichiarazione di conformità
k erklärt folgende Konformität gemäß EU-Richtlinie und
Normen für Artikel
t explains the following conformity according to EU
directives and norms for the following product
p déclare la conformité suivante selon la directive CE et les
normes concernant l’article
C dichiara la seguente conformità secondo la direttiva UE e
le norme per l’articolo
N verklaart de volgende overeenstemming conform EU
richtlijn en normen voor het product
m declara la siguiente conformidad a tenor de la directiva y
normas de la UE para el artículo
O declara a seguinte conformidade, de acordo com a
directiva CE e normas para o artigo
l attesterer følgende overensstemmelse i medfør af
EU-direktiv samt standarder for artikel
U förklarar följande överensstämmelse enl. EU-direktiv och
standarder för artikeln
q vakuuttaa, että tuote täyttää EU-direktiivin ja standardien
vaatimukset
. tõendab toote vastavust EL direktiivile ja standarditele
j vydává následující prohlášení o shodě podle směrnice
EU a norem pro výrobek
X potrjuje sledečo skladnost s smernico EU in standardi za
izdelek
W vydáva nasledujúce prehlásenie o zhode podľa smernice
EÚ a noriem pre výrobok
A a cikkekhez az EU-irányvonal és Normák szerint a
következő konformitást jelenti ki
P deklaruje zgodność wymienionego poniżej artykułu z
następującymi normami na podstawie dyrektywy WE.
e декларира съответното съответствие съгласно
Директива на ЕС и норми за артикул
H paskaidro šādu atbilstību ES direktīvai un standartiem
G apibūdina šį atitikimą EU reikalavimams ir prekės
normoms
Q declară următoarea conformitate conform directivei UE
şi normelor pentru articolul
z δηλώνει την ακόλουθη συμμόρφωση σύμφωνα με την
Οδηγία ΕΚ και τα πρότυπα για το προϊόν
B potvrđuje sljedeću usklađenost prema smjernicama EU
i normama za artikl
f potvrđuje sljedeću usklađenost prema smjernicama EU
i normama za artikl
4 potvrđuje sledeću usklađenost prema smernicama EZ i
normama za artikal
T следующим удостоверяется, что следующие
продукты соответствуют директивам и нормам ЕС
1 проголошує про зазначену нижче відповідність
виробу директивам та стандартам ЄС на виріб
5 ја изјавува следната сообрзност согласно
ЕУ-директивата и нормите за артикли
Z Ürünü ile ilgili AB direktifleri ve normları gereğince
aşağıda açıklanan uygunluğu belirtir
L erklærer følgende samsvar i henhold til EU-direktivet
og standarder for artikkel
E Lýsir uppfyllingu EU-reglna og annarra staðla vöru
Konformitätserklärung
Einhell Germany AG · Wiesenweg 22 · D-94405 Landau/Isar
Seilhebezug PSZ 250 A2 (Parkside)
Standard references: EN 14492-2; EN 60204-32;
EN 55014-1; EN 55014-2; EN 61000-3-2; EN 61000-3-3
Landau/Isar, den 18.04.2011
First CE: 09 Archive-File/Record: NAPR003513
Art.-No.: 22.551.23 I.-No.: 11031 Documents registrar: Robert Mayn
Subject to change without notice Wiesenweg 22, D-94405 Landau/Isar
Weichselgartner/General-Manager Wentao/Product-Management
x
87/404/EC_2009/105/EC
2005/32/EC_2009/125/EC
2006/95/EC
2006/28/EC
2004/108/EC
2004/22/EC
1999/5/EC
97/23/EC
90/396/EC_2009/142/EC
89/686/EC_96/58/EC
x
2006/42/EC
2004/26/EC
Emission No.:
2000/14/EC_2005/88/EC
Annex IV
Notified Body:
Notified Body No.:
Reg. No.:
Annex V
Annex VI
Noise: measured LWA= dB (A); guaranteed LWA= dB (A)
P = KW; L/Ø = cm
Notified Body:
Anleitung_LB5_2255123:_ 31.05.2011 10:14 Uhr Seite 20
Page 21

IT/
MT
21
11. CERTIFICATO DI GARANZIA
Gentili clienti,
i nostri prodotti sono soggetti ad un rigido controllo di qualità. Se l’apparecchio non dovesse tuttavia funzionare
correttamente, ci scusiamo e vi preghiamo di rivolgervi al nostro servizio di assistenza clienti all’indirizzo
indicato in questa scheda di garanzia. Siamo a vostra disposizione anche telefonicamente al numero del
servizio assistenza sotto indicato. Per la rivendicazione dei diritti di garanzia vale quanto segue:
1. Queste condizioni di garanzia regolano ulteriori prestazioni di garanzia. La presente garanzia non tocca i
vostri diritti al ricorso di garanzia previsti dalla legge. Le nostre prestazioni di garanzia sono per voi gratuite.
2. La prestazione di garanzia riguarda esclusivamente le anomalie riconducibili a difetti del materiale o di
produzione ed è limitata all’eliminazione di queste anomalie o alla sostituzione dell’apparecchio. Tenete
presente che i nostri apparecchi non sono stati costruiti per l’impiego professionale, artigianale o
industriale. Un contratto di garanzia non viene concluso quando l’apparecchio viene usato in imprese
commerciali, artigianali o industriali, o con attività equivalenti. Dalla nostra garanzia sono escluse inoltre le
prestazioni di risarcimento per danni dovuti al trasporto o danni causati dalla mancata osservanza delle
istruzioni per il montaggio o per installazione non corretta, dalla mancata osservanza delle istruzioni per
l’uso (come per es. collegamento a tensione di rete o tipo di corrente non corretto), dall’uso improprio o
illecito (come per es. sovraccarico dell’apparecchio o utilizzo di utensili o accessori non consentiti), dalla
mancata osservanza delle norme di sicurezza e di manutenzione, dalla penetrazione di corpi estranei
nell’apparecchio (come per es. sabbia, pietre o polvere), dall’impiego della forza o dall’influsso esterno
(come per es. danni dovuti a caduta) e dall’usura normale e dovuta all’impiego. Ciò vale particolarmente per
batterie, per esse concediamo tuttavia 12 mesi di garanzia
Il diritti di garanzia decadono quando sono già effettuati interventi sull’apparecchio.
3. Il periodo di garanzia è 3 anni e inizia alla data d’acquisto dell’apparecchio. I diritti di garanzia devono
essere fatti valere prima della scadenza del periodo di garanzia, entro due settimane dopo avere accertato
il difetto. È esclusa la rivendicazione di diritti di garanzia dopo la scadenza del relativo periodo. La
riparazione o la sostituzione dell’apparecchio non comporta una proroga del periodo di garanzia e con
questa prestazione per l’apparecchio o per pezzi di ricambio eventualmente installati non inizia un nuovo
periodo di garanzia. Questo vale anche nel caso si ricorra ad un servizio sul posto.
4. Per la rivendicazione dei vostri diritti di garanzia inviate l’apparecchio difettoso franco di porto all’indirizzo
sotto indicato. Allegate lo scontrino di cassa in originale o un’altra prova d’acquisto che riporti la data.
Conservate bene perciò lo scontrino di cassa come prova! Indicate il motivo di reclamo nel modo più
dettagliato possibile. Se il difetto dell’apparecchio rientra nella nostra prestazione di garanzia, ricevete
l’apparecchio riparato o un apparecchio nuovo a stretto giro di posta.
Naturalmente effettuiamo a pagamento anche riparazioni sull’apparecchio che non rientrano o non rientrano più
nella garanzia. A tale scopo inviate l’apparecchio all’indirizzo del servizio assistenza.
Einhell Italia s.r.l.
Via Marconi, 16
I-22070 Beregazzo (Co)
Tel. 031 992080 · Fax 031 992084
Anleitung_LB5_2255123:_ 31.05.2011 10:14 Uhr Seite 21
Page 22

GB/
MT
22
Table of contents: Page
1. Introduction .............................................................................23
2. Safety information...................................................................23
3. Layout and items supplied .....................................................23
4. Proper use ..............................................................................24
5. Technical data ........................................................................24
6. Before starting the equipment.................................................24-25
7. Operation ...............................................................................25-26
8. Cleaning, maintenance and ordering of spare parts...............26
9. Disposal and recycling............................................................26-27
10. Declaration of conformity ........................................................28
11. Guarantee Certificate .............................................................29
The reprinting or reproduction by any other
means, in whole or in part, of documentation
and papers accompanying products is
permitted only with the express consent of ISC
GmbH.
Technical changes subject to change
Anleitung_LB5_2255123:_ 31.05.2011 10:14 Uhr Seite 22
Page 23

GB/
MT
23
1. Introduction
Important!
When using equipment, a few safety
precautions must be observed to avoid injuries
and damage. Please read the complete
operating manual with due care. Keep this
manual in a safe place, so that the information
is available at all times. If you give the
equipment to any other person, give them
these operating instructions as well.
We accept no liability for damage or accidents
which arise due to non-observance of these
instructions and the safety information.
2. Safety information
CAUTION!
Read all safety regulations and
instructions.
Any errors made in following the safety
regulations and instructions may result in an
electric shock, fire and/or serious injury.
Keep all safety regulations and instructions
in a safe place for future use.
Always check that the mains voltage is
identical to the voltage quoted on the rating
plate. In the event that the mains voltage is
not suitable, it may cause the machine to
work abnormally and thus result in personal
injury.
The power supply must be earthed and be
secured by a residual current operated
circuit breaker (RCCB).
Do not attempt to lift loads that exceed the
rated load.
Use the machine only for the purpose for
which it is designed. Never lift personnel
using the cable hoist.
Do not pull the power cable in order to pull
out the plug. Protect the power cable from
heat, oil and sharp edges.
Never attempt to raise fixed or jammed
loads.
Pull out the plug when the cable hoist is not
in use.
Keep children and other unauthorized
persons away from the machine.
Do not pull loads sideways or from one
side. Do not allow the load to swing.
Ensure that the hook moves in the same
direction as shown on the pushbutton.
Check the cable hoist at regular intervals for
signs of damage. The pushbutton must be
in good condition.
Have repair and servicing work carried out
only by authorized workshops by a trained
electrician. Repair work must only be
carried out by a trained electrician,
otherwise the machine may cause
accidents.
Do not switch the machine on and off
quickly (inching mode).
Always concentrate fully when operating
the cable hoist.
Do not stand or work under the raised load.
It is not permitted to lift fixed or jammed
loads.
3. Layout and items supplied
(Fig. 1-2)
1. Fastening bar
2. Fastening hole for hook
3. Drum
4. Lever for maximum cable length
5. Automatic stop mechanism lever
6. Steel cable
7. Cut-out weight
8. Hook
9. Emergency Stop switch
10. Pushbutton
11. Remote control
12. Power cable
13. Control cable
14. Motor
15. Return roller
16. Additional hook
Anleitung_LB5_2255123:_ 31.05.2011 10:14 Uhr Seite 23
Page 24

4. Proper use
The cable hoist is designed for lifting and
lowering loads in enclosed areas
commensurate with the machineʼs capacity.
The equipment is to be used only for its
prescribed purpose. Any other use is deemed
to be a case of misuse. The user / operator
and not the manufacturer will be liable for any
damage or injuries of any kind caused as a
result of this.
Please note that our equipment has not been
designed for use in commercial, trade or
industrial applications. Our warranty will be
voided if the machine is used in commercial,
trade or industrial businesses or for equivalent
purposes.
5. Technical data
Voltage (V) 230 V ~ 50 Hz
Rated current (A) 2.2
Power consumption (W) 500
Operating mode S3 20%:10 min
Rated load (kg) 125 / 250
Lifting height (m) 11.5 / 5.7
Rated speed (m/min) 8 / 4
Diameter of steel cable (mm) 3.0
Tensile strength of the steel cable
(N/mm²) 1870
Insulation class B
Protection class IP24
Drive unit class M1
Net weight (kg) 10.5
Operating mode S3 – 20% - 10 minutes: S3 =
Intermittent mode without influencing the
starting process. This means that the
maximum operating period over a time of 10
minutes is 20% (2 minutes).
6. Before starting the equipment
Before you connect the equipment to the
mains supply make sure that the data on
the rating plate are identical to the mains
data.
Always pull out the power plug before
making adjustments to the equipment.
The cable hoist is not suitable for
transporting hot and/or molten materials nor
is it suitable for use at low temperatures or
in environments subject to intensive
weathering.
It is in mechanical group M1.
The service life of the cable hoist is
approximately 8000 cycles (excluding
wearing parts). When the hoist has
completed 8000 cycles, all its mechanical
parts must be checked and overhauled.
Read and absorb the operating instructions
before you use the cable hoist.
Ensure that the operator knows how the
machine works and how it should be
operated.
The user must always operate the
equipment as set out in the operating
instructions.
The cable hoist is not designed for
continuous operation. Its mode of operation
is: Intermittent mode without influencing the
starting process.
The rated capacity of the machine does not
vary due to the position of the load.
6.1 Unpacking
After opening the packaging, inspect the
equipment, the steel cable, the hook, the lever
for maximum cable length and the automatic
stop mechanism lever for signs of possible
transit damage.
6.2 Assembly (Fig. 5)
The cable hoist is fitted with two fastening bars
(1) with which it has to be fastened to a
rectangular tube / swing arm. The dimensions
of the rectangular tube / swing arm must
conform with the size of the fastening bars (1)
and must be capable of supporting twice the
rated load. We recommend that you seek
GB/
MT
24
Anleitung_LB5_2255123:_ 31.05.2011 10:14 Uhr Seite 24
Page 25

GB/
MT
25
advice from a qualified technician. All screws
must be tightened correctly. A qualified
technician should check the anchoring of the
rectangular tube / swing arm before the
machine is started.
6.3 Block and tackle function (Fig. 6 – 9)
The cable hoist is fitted with a return roller (15)
and an additional hook (16). If these parts are
used correctly, the cable hoist can lift twice its
rated load.
Fit the return roller (15) and additional hook
(16) as shown in Figure 6 – 8. The permanent
hook (8) must be attached to the fastening hole
(2) (Fig. 9).
The load is now raised by two steel cables,
which means that the cable hoist can lift twice
its rated load.
7. Operation
7.1 Starting up
Remove the adhesive tape from the drum
(3) before using the hoist for the first time.
The value of the A-rated noise emissions at
the operatorʼs position is less than 70 dB.
Supply voltage: 230 V ± 10%, 50 Hz ± 1%.
The cable hoist must be operated in
ambient temperatures of between 0°C and
40°C with a relative humidity of less than
85%. Height above sea level: max. 1,000
m.
The temperature for transport and storage
may be between -25°C and 55°C. The
maximum temperature must not exceed
70°C.
The user should lift the load off the ground
at the slowest possible speed. The cable
should be taut when the load is raised.
The motor (14) for the cable hoist is fitted
with a thermostat switch. Whilst the cable
hoist is operating, the motor (14) may
therefore stop. It will restart automatically
when it has cooled down.
The electric cable hoist is not fitted with a
rated power limiter. You should therefore
not repeat attempts to lift a load if the
overload trip is limiting the hoistʼs
operation. In this case the load exceeds the
rated capacity of the cable hoist.
Do not leave any suspended loads
unsupervised without first taking the
appropriate safety precautions.
Fit the machine with a 10 A fuse or a 10 A
residual current operated circuit breaker
(RCCB) to protect the circuit
Do not use the lever (4/5) as a routine
stopping device. It should only be used to
stop the machine in an emergency.
Before you start, ensure that the steel cable
(6) is correctly wound around the drum (3)
and that the spacing between the windings
is smaller than the steel cable (Fig. 3)
Ensure that the load is correctly secured to
the hook (8) or, if you are using the block
and tackle, the additional hook (16) and
always maintain a safe distance from the
load and the steel cable (6).
7.2 Operation (Fig. 9-10)
Check whether the Emergency Stop switch
(9) is pressed. Turn the Emergency Stop
switch clockwise to release it.
Press the pushbutton ▲ (10) to raise the
load.
Press the pushbutton ▼ (10) to lower the
load.
Automatic stop mechanism lever (5): When
the maximum lifting height has been
reached, the cut-out weight (7) presses the
lever (5) upwards. This trips a limit switch
after which the load cannot be raised any
further.
Lever for maximum cable length (4): When
the load has reached its lowest possible
position, a limit switch is tripped which
makes it impossible to lower the load any
further. This limit switch also prevents the
cable hoist operating in the wrong direction
(hook moving in the opposite direction to
the arrow shown on the pushbutton).
The cable hoist will stop if the Emergency
Stop switch (9) is pressed.
In an emergency, immediately press the
Emergency Stop switch (9) to stop the
cable hoist. The cable hoist cannot be
operated if the Emergency Stop switch has
Anleitung_LB5_2255123:_ 31.05.2011 10:14 Uhr Seite 25
Page 26

been pressed.
8. Cleaning, maintenance and
ordering of spare parts
Always pull out the mains power plug
before starting any cleaning work.
8.1 Cleaning
Keep all safety devices, air vents and the
motor housing free of dirt and dust as far as
possible. Wipe the equipment with a clean
cloth or blow it with compressed air at low
pressure.
Clean the equipment immediately after you
use it.
Clean the equipment regularly with a moist
cloth and some soft soap. Do not use
cleaning agents or solvents; these could
attack the plastic parts of the equipment.
Ensure that no water can seep
into the device.
8.2 Servicing
Important. Always ensure that the machine
is not connected to the mains supply before
you start any servicing work.
In the following: One cycle means one
raising and lowering movement of a load.
Periodic inspection means an inspection
after 100 cycles.
Test periodically that the limit switches on
the cable hoist are in correct working order.
(Test without a load) Conduct this test as
follows: When the cable has reached the
maximum height, the lever on the
automatic stopping mechanism (5) will be
actuated. The motor (14) must then stop.
When the steel cable (6) has been
unwound as far as possible, the lever for
the maximum cable length (4) will be
actuated. The motor (14) must then stop.
Inspect the mains cable (12) and the
control cable (13) periodically.
The steel cable (6) and return roller (15)
must be greased every 200 cycles.
A check must be made every 30 cycles, as
shown in Fig. 4, to find whether the entire
steel cable (6) is in good condition. If it is
damaged, it must be replaced by a steel
cable of the type specified in the technical
data.
Check every 1000 cycles whether the
screws for the fastening bars (1) and return
roller (15) are properly tightened.
Check every 1000 cycles whether the
hooks (8/16) and return roller (15) are in
good condition.
Check before using the cable hoist whether
the Emergency Stop switch (9) and
pushbuttons (10) are in perfect working
order.
Check the braking system every 1000
cycles. If the motor (14) makes any unusual
noises or cannot raise the rated load, it is
possible that the braking system requires
an overhaul:
- Replace damaged or worn parts and keep
the service documentation relating to this in
a safe place.
- Please contact an authorized service
center for any unscheduled maintenance
work.
8.3 Ordering replacement parts:
Please quote the following data when ordering
replacement parts:
Type of machine
Article number of the machine
Identification number of the machine
For our latest prices and information please go
to www.isc-gmbh.info
9. Disposal and recycling
The unit is supplied in packaging to prevent its
being damaged in transit. This packaging is
raw material and can therefore be reused or
can be returned to the raw material system.
The unit and its accessories are made of
various types of material, such as metal and
plastic. Defective components must be
disposed of as special waste. Ask your dealer
or your local council.
GB/
MT
26
Anleitung_LB5_2255123:_ 31.05.2011 10:14 Uhr Seite 26
Page 27

For EU countries only
Never place any electric tools in
your household refuse.
To comply with European Directive 2002/96/EC
concerning old electric and electronic
equipment and its implementation in national
laws, old electric tools have to be separated
from other waste and be disposed of in an
environment-friendly fashion, e.g. by taking to a
recycling depot.
Recycling alternative to returning the electrical
equipment:
The owner of the electrical equipment is
obligated to arrange for its proper disposal if he
no longer wants to keep the equipment in his
possession and does not want to return it. In
this case the old equipment can be taken to a
recycling depot where it is disposed of in
accordance with national recycling and waste
disposal laws. This does not apply to accessory
parts and aids which supplement the old
equipment and contain no electrical parts
GB/
MT
27
Anleitung_LB5_2255123:_ 31.05.2011 10:14 Uhr Seite 27
Page 28

GB/
MT
28
10. Declaration of conformity
k erklärt folgende Konformität gemäß EU-Richtlinie und
Normen für Artikel
t explains the following conformity according to EU
directives and norms for the following product
p déclare la conformité suivante selon la directive CE et les
normes concernant l’article
C dichiara la seguente conformità secondo la direttiva UE e
le norme per l’articolo
N verklaart de volgende overeenstemming conform EU
richtlijn en normen voor het product
m declara la siguiente conformidad a tenor de la directiva y
normas de la UE para el artículo
O declara a seguinte conformidade, de acordo com a
directiva CE e normas para o artigo
l attesterer følgende overensstemmelse i medfør af
EU-direktiv samt standarder for artikel
U förklarar följande överensstämmelse enl. EU-direktiv och
standarder för artikeln
q vakuuttaa, että tuote täyttää EU-direktiivin ja standardien
vaatimukset
. tõendab toote vastavust EL direktiivile ja standarditele
j vydává následující prohlášení o shodě podle směrnice
EU a norem pro výrobek
X potrjuje sledečo skladnost s smernico EU in standardi za
izdelek
W vydáva nasledujúce prehlásenie o zhode podľa smernice
EÚ a noriem pre výrobok
A a cikkekhez az EU-irányvonal és Normák szerint a
következő konformitást jelenti ki
P deklaruje zgodność wymienionego poniżej artykułu z
następującymi normami na podstawie dyrektywy WE.
e декларира съответното съответствие съгласно
Директива на ЕС и норми за артикул
H paskaidro šādu atbilstību ES direktīvai un standartiem
G apibūdina šį atitikimą EU reikalavimams ir prekės
normoms
Q declară următoarea conformitate conform directivei UE
şi normelor pentru articolul
z δηλώνει την ακόλουθη συμμόρφωση σύμφωνα με την
Οδηγία ΕΚ και τα πρότυπα για το προϊόν
B potvrđuje sljedeću usklađenost prema smjernicama EU
i normama za artikl
f potvrđuje sljedeću usklađenost prema smjernicama EU
i normama za artikl
4 potvrđuje sledeću usklađenost prema smernicama EZ i
normama za artikal
T следующим удостоверяется, что следующие
продукты соответствуют директивам и нормам ЕС
1 проголошує про зазначену нижче відповідність
виробу директивам та стандартам ЄС на виріб
5 ја изјавува следната сообрзност согласно
ЕУ-директивата и нормите за артикли
Z Ürünü ile ilgili AB direktifleri ve normları gereğince
aşağıda açıklanan uygunluğu belirtir
L erklærer følgende samsvar i henhold til EU-direktivet
og standarder for artikkel
E Lýsir uppfyllingu EU-reglna og annarra staðla vöru
Konformitätserklärung
Einhell Germany AG · Wiesenweg 22 · D-94405 Landau/Isar
Seilhebezug PSZ 250 A2 (Parkside)
Standard references: EN 14492-2; EN 60204-32;
EN 55014-1; EN 55014-2; EN 61000-3-2; EN 61000-3-3
Landau/Isar, den 18.04.2011
First CE: 09 Archive-File/Record: NAPR003513
Art.-No.: 22.551.23 I.-No.: 11031 Documents registrar: Robert Mayn
Subject to change without notice Wiesenweg 22, D-94405 Landau/Isar
Weichselgartner/General-Manager Wentao/Product-Management
x
87/404/EC_2009/105/EC
2005/32/EC_2009/125/EC
2006/95/EC
2006/28/EC
2004/108/EC
2004/22/EC
1999/5/EC
97/23/EC
90/396/EC_2009/142/EC
89/686/EC_96/58/EC
x
2006/42/EC
2004/26/EC
Emission No.:
2000/14/EC_2005/88/EC
Annex IV
Notified Body:
Notified Body No.:
Reg. No.:
Annex V
Annex VI
Noise: measured LWA= dB (A); guaranteed LWA= dB (A)
P = KW; L/Ø = cm
Notified Body:
Anleitung_LB5_2255123:_ 31.05.2011 10:14 Uhr Seite 28
Page 29

29
GB/
MT
11. GUARANTEE CERTIFICATE
Dear Customer,
All of our products undergo strict quality checks to ensure that they reach you in perfect condition. In the unlikely
event that your device develops a fault, please contact our service department at the address shown on this
guarantee card. Of course, if you would prefer to call us then we are also happy to offer our assistance under
the service number printed below. Please note the following terms under which guarantee claims can be made:
1. These guarantee terms cover additional guarantee rights and do not affect your statutory warranty rights.
We do not charge you for this guarantee.
2. Our guarantee only covers problems caused by material or manufacturing defects, and it is restricted to the
rectification of these defects or replacement of the device. Please note that our devices have not been
designed for use in commercial, trade or industrial applications. Consequently, the guarantee is invalidated
if the equipment is used in commercial, trade or industrial applications or for other equivalent activities. The
following are also excluded from our guarantee: compensation for transport damage, damage caused by
failure to comply with the installation/assembly instructions or damage caused by unprofessional
installation, failure to comply with the operating instructions (e.g. connection to the wrong mains voltage or
current type), misuse or inappropriate use (such as overloading of the device or use of non-approved tools
or accessories), failure to comply with the maintenance and safety regulations, ingress of foreign bodies
into the device (e.g. sand, stones or dust), effects of force or external influences (e.g. damage caused by
the device being dropped) and normal wear resulting from proper operation of the device.
This applies in
particular to rechargeable batteries for which we nevertheless issue a guarantee period of 12 months.
The guarantee is rendered null and void if any attempt is made to tamper with the device.
3. The guarantee is valid for a period of 3 years starting from the purchase date of the device. Guarantee
claims should be submitted before the end of the guarantee period within two weeks of the defect being
noticed. No guarantee claims will be accepted after the end of the guarantee period. The original guarantee
period remains applicable to the device even if repairs are carried out or parts are replaced. In such cases,
the work performed or parts fitted will not result in an extension of the guarantee period, and no new
guarantee will become active for the work performed or parts fitted. This also applies when an on-site
service is used.
4. In order to assert your guarantee claim, please send your defective device postage-free to the address
shown below. Please enclose either the original or a copy of your sales receipt or another dated proof of
purchase. Please keep your sales receipt in a safe place, as it is your proof of purchase. It would help us if
you could describe the nature of the problem in as much detail as possible. If the defect is covered by our
guarantee then your device will either be repaired immediately and returned to you, or we will send you a
new device.
Of course, we are also happy offer a chargeable repair service for any defects which are not covered by the
scope of this guarantee or for units which are no longer covered. To take advantage of this service, please send
the device to our service address.
Einhell Italia s.r.l.
Via Marconi, 16
I-22070 Beregazzo (Co)
Tel. 031 992080 · Fax 031 992084
Anleitung_LB5_2255123:_ 31.05.2011 10:14 Uhr Seite 29
Page 30

DE/AT/
CH
30
Inhaltsverzeichnis Seite
1. Einleitung ................................................................................31
2. Sicherheitshinweise ................................................................31
3. Gerätebeschreibung und Lieferumfang ..................................31-32
4. Bestimmungsgemäße Verwendung........................................32
5. Technische Daten...................................................................32
6. Vor Inbetriebnahme ................................................................32-33
7. Bedienung...............................................................................33-34
8. Reinigung, Wartung und Ersatzteilbestellung.........................34-35
9. Entsorgung und Wiederverwertung .......................................35
10. Konformitätserklärung.............................................................36
11. Garantieurkunde .....................................................................37
Der Nachdruck oder sonstige Vervielfältigung
von Dokumentation und Begleitpapieren der
Produkte, auch auszugsweise ist nur mit ausdrücklicher Zustimmung der ISC GmbH
zulässig.
Technische Änderungen vorbehalten
Anleitung_LB5_2255123:_ 31.05.2011 10:14 Uhr Seite 30
Page 31

1. Einleitung
Achtung!
Beim Benutzen von Geräten müssen einige
Sicherheitsvorkehrungen eingehalten werden,
um Verletzungen und Schäden zu verhindern.
Lesen Sie diese Bedienungsanleitung deshalb
sorgfältig durch. Bewahren Sie diese gut auf,
damit Ihnen die Informationen jederzeit zur
Verfügung stehen. Falls Sie das Gerät an
andere Personen übergeben sollten, händigen
Sie diese Bedienungsanleitung bitte mit aus.
Wir übernehmen keine Haftung für Unfälle
oder Schäden, die durch Nichtbeachten dieser
Anleitung und den Sicherheitshinweisen
entstehen.
2. Sicherheitshinweise
WARNUNG
Lesen Sie alle Sicherheitshinweise und
Anweisungen. Versäumnisse bei der
Einhaltung der Sicherheitshinweise und
Anweisungen können elektrischen Schlag,
Brand und/oder schwere Verletzungen zur
Folge haben.
Bewahren Sie alle Sicherheitshinweise und
Anweisungen für die Zukunft auf.
Kontrollieren Sie stets ob die
Netzspannung der Spannung auf dem
Typenschild entspricht. Für den Fall, dass
die Netzspannung nicht geeignet ist, kann
dies zu abnormalem Arbeiten der Maschine
und zu Personenschäden führen.
Die Stromversorgung muss eine Erdung
besitzen und mit einem FehlerstromSchutzschalter abgesichert sein.
Es ist verboten, Lasten die die Nennlast
überschreiten, anzuheben.
Verwenden Sie das Gerät nur für den
vorgesehenen Zweck. Nie Personen mit
dem Seilhebezug anheben.
Ziehen Sie nicht am Kabel, um den Stecker
zu ziehen. Halten Sie das Kabel von Hitze,
Öl und scharfen Kanten fern.
Versuchen Sie nie, feste oder blockierte
Lasten anzuheben.
Ziehen Sie den Netzstecker, wenn der
Seilhebezug nicht in Gebrauch ist.
Halten Sie Kinder und andere nicht
autorisierte Personen von der Maschine
fern.
Es ist verboten Lasten seitwärts oder von
einer Seite zu ziehen. Vermeiden Sie ein
Schwingen der Last.
Stellen Sie sicher dass sich der Haken in
die selbe Richtung wie auf dem Drucktaster
angezeigt bewegt.
Kontrollieren Sie den Seilhebezug
regelmäßig auf Beschädigungen. Der
Drucktaster muss in gutem Zustand sein.
Lassen Sie Reparaturen und
Wartungsarbeiten nur in autorisierten
Fachwerkstätten durch einen
Elektrofachmann durchführen. Reparaturen
dürfen nur von einer Elektrofachkraft
ausgeführt werden, andernfalls können
Unfälle für den Betreiber entstehen.
Vermeiden Sie schnelles An- und
Abschalten (Tippbetrieb).
Seien Sie bei der Bedienung des
Seilhebezuges stets aufmerksam.
Stehen oder arbeiten Sie nicht unter der
gehobenen Last.
Es ist unzulässig, festsitzende oder
verklemmte Lasten anzuheben.
3. Gerätebeschreibung und
Lieferumfang (Bild 1-2)
1. Befestigungsbügel
2. Befestigungsloch für Haken
3. Trommel
4. Hebel für maximale Seillänge
5. Hebel des automatischen
Stoppmechanismus
6. Stahlseil
7. Abschaltgewicht
8. Haken
9. Not-Aus-Schalter
10. Drucktaster
11. Fernbedienung
12. Netzkabel
13. Steuerleitung
14. Motor
DE/AT/
CH
31
Anleitung_LB5_2255123:_ 31.05.2011 10:14 Uhr Seite 31
Page 32

15. Umlenkrolle
16. Zusatzhaken
4. Bestimmungsgemäße
Verwendung
Der Seilhebezug dient zum Heben und
Absenken von Lasten in geschlossenen
Räumen entsprechend der Geräteleistung.
Die Maschine darf nur nach ihrer Bestimmung
verwendet werden. Jede weitere darüber
hinausgehende Verwendung ist nicht
bestimmungsgemäß. Für daraus
hervorgerufene Schäden oder Verletzungen
aller Art haftet der Benutzer/Bediener und nicht
der Hersteller.
Bitte beachten Sie, dass unsere Geräte
bestimmungsgemäß nicht für den
gewerblichen, handwerklichen oder
industriellen Einsatz konstruiert wurden. Wir
übernehmen keine Gewährleistung, wenn das
Gerät in Gewerbe-, Handwerks- oder
Industriebetrieben sowie bei
gleichzusetzenden Tätigkeiten eingesetzt wird.
5. Technische Daten
Spannung (V) 230 V ~ 50 Hz
Nennstrom (A) 2,2
Leistungsaufnahme (W) 500
Betriebsart S3 20% 10 min
Nennlast (kg) 125 / 250
Hebehöhe (m) 11,5 / 5,7
Nenngeschwindigkeit (m/min) 8 / 4
Durchmesser des Stahlseiles (mm) 3,0
Zugfestigkeit des Stahlseils (N/mm2) 1870
Isolationsklasse B
Schutzklasse IP24
Triebwerksklasse M1
Nettogewicht (kg) 10,5
Betriebsart S3 - 20% - 10min: S3 =
Aussetzbetrieb ohne Einfluss des
Anlaufvorganges. Dies bedeutet, dass
während eines Zeitraums von 10 min die max.
Betriebszeit 20% (2 Min) beträgt.
6. Vor Inbetriebnahme
Überzeugen Sie sich vor dem Anschließen,
dass die Daten auf dem Typenschild mit
den Netzdaten übereinstimmen.
Ziehen Sie immer den Netzstecker, bevor
Sie Einstellungen am Gerät vornehmen.
Der Seilhebezug ist nicht für den Transport
von heißen und/oder geschmolzenen
Massen geeignet, des Weiteren ist der
Seilhebezug nicht für den Einsatz bei
niedrigen Temperaturen und in
witterungsintensiver Umgebung geeignet.
Mechanische Gruppe ist M1.
Die Nutzungsdauer des Seilhebezuges ist
ca. 8000 Zyklen (exkl. Verschleißteile).
Wenn der Zug 8000 Zyklen durchlaufen
hat, müssen alle mechanischen Teile
kontrolliert und überholt werden.
Lesen und verstehen Sie die Bedienungs-
anleitung, bevor Sie den Seilhebezug
benutzen.
Stellen Sie sicher, dass die Bedienperson
weiß, wie die Maschine funktioniert, und
wie sie betrieben werden sollte.
Der Nutzer muss immer in
Übereinstimmung mit der
Bedienungsanleitung operieren.
Der Hebezug ist nicht für den Dauereinsatz
vorgesehen. Die Betriebsart ist:
Aussetzbetrieb ohne Einfluss des
Anlaufvorganges.
Die Nennleistung der Maschine variiert
nicht mit der Position der Belastung.
6.1 Auspacken
Nach dem Öffnen der Verpackung inspizieren
Sie bitte das Gerät, das Stahlseil, die Haken,
den Hebel für die maximale Seillänge und den
Hebel des automatischen Stoppmechanismus
auf mögliche Transportschäden.
DE/AT/
CH
32
Anleitung_LB5_2255123:_ 31.05.2011 10:14 Uhr Seite 32
Page 33

6.2 Montage (Bild 5)
Der Seilhebezug ist mit 2 Befestigungsbügeln
(1) ausgestattet, mit denen er an einem
Vierkantrohr / Schwenkarm befestigt werden
muss. Die Abmessungen des Vierkantrohrs /
Schwenkarms müssen in Übereinstimmung mit
der Größe der Befestigungsbügel (1) sein und
er muss die zweifache Nennlast tragen
können. Wir empfehlen Ihnen, Kontakt mit
einem qualifizierten Techniker aufzunehmen.
Alle Schrauben müssen richtig angezogen
werden. Vor der Inbetriebnahme sollte ein
qualifizierter Techniker die Verankerung des
Vierkantrohrs / Schwenkarms überprüfen.
6.3 Flaschenzugfunktion (Bild 6-9)
Der Seilhebezug ist mit einer Umlenkrolle (15)
und einem Zusatzhaken (16) ausgestattet. Bei
richtiger Verwendung kann der Seilhebezug
die doppelte Last heben.
Montieren Sie Umlenkrolle (15) und
Zusatzhaken (16) wie in Bild 6-8 dargestellt.
Der fest montierte Haken (8) muss am
Befestigungsloch (2) eingehängt werden (Bild
9).
Die Last wird nun mit Hilfe von zwei
Stahlseilen angehoben, der Seilhebezug kann
somit die doppelte Last anheben.
7. Bedienung
7.1 Inbetriebnahme
Entfernen Sie vor der ersten Benutzung
das Klebeband von der Trommel (3).
Der Wert der A-bewerteten Lärmemission
an der Betreiberposition ist niedriger als
70dB.
Versorgungsspannung: 230V ± 10%, 50Hz
± 1%.
Der Seilhebezug ist bei
Umgebungstemperaturen zwischen 0 °C
und 40 °C relative Luftfeuchtigkeit unter
85% zu betreiben. Höhe über dem
Meeresspiegel: max. 1000 m.
Für Transport und Lagerung darf die
Temperatur zwischen -25 °C und 55 °C
betragen. Die höchste zulässige
Temperatur darf nicht über
70 °C betragen.
Der Nutzer muss die Last vom Boden mit
der geringsten möglichen Geschwindigkeit
anheben. Das Seil muss gestrafft sein,
wenn die Last angehoben wird.
Der Motor (14) des Seilhebezuges ist mit
einem Thermostatschalter ausgestattet.
Während des Betriebes des Seilhebezuges
kann es daher zum Stoppen des Motors
(14) kommen, dieser läuft automatisch
wieder an wenn er abgekühlt ist.
Der elektrische Seilhebezug ist nicht mit
einem Nennleistungsbegrenzer
ausgestattet. Deshalb, nicht weiter
Versuchen die Last anzuheben, wenn der
Überhitzungsschutz den Betrieb begrenzt.
Die Last überschreitet in diesem Fall die
Nennleistung des Seilhebezuges.
Lassen Sie keine hängenden Lasten
unbeaufsichtigt ohne entsprechende
Sicherheitsvorkehrungen getroffen zu
haben.
Sichern Sie das Gerät mit einer 10 A
Sicherung oder einem 10 A FehlerstromSchutzschalter ab um den Stromkreis zu
schützen.
Verwenden Sie die Hebel (4/5) nicht als
Routine Stoppvorrichtung. Diese dienen
nur als Stoppvorrichtung für den Notfall.
Bevor Sie beginnen, stellen Sie sicher,
dass das Stahlseil (6) korrekt um die
Trommel (3) gewickelt ist und der Abstand
zwischen den Windungen kleiner als das
Stahlseil ist (Bild. 3)
Stellen Sie sicher, dass die Ladung
ordnungsgemäß am Haken (8)
beziehungsweise bei Flaschenzugbetrieb
dem Zusatzhaken (16) gesichert ist und
halten Sie stets Abstand zur Last und dem
Stahlseil (6).
7.2 Betrieb (Bild 9-10)
Überprüfen Sie, ob der Not-Aus-Schalter
(9) gedrückt ist. Drehen Sie den Not-AusSchalter im Uhrzeigersinn um ihn zu
entriegeln.
Drücken Sie den Drucktaster ▲ (10) zum
Anheben der Last.
Drücken Sie den Drucktaster ▼ (10) zum
DE/AT/
CH
33
Anleitung_LB5_2255123:_ 31.05.2011 10:14 Uhr Seite 33
Page 34

Senken der Last.
Hebel des automatischen
Stoppmechanismus (5): Wenn die
maximale Hebehöhe erreicht ist, drückt das
Abschaltgewicht (7) den Hebel (5) nach
oben. Dadurch wird ein Endschalter
betätigt und die Last kann nicht weiter
angehoben werden.
Hebel für maximale Seillänge (4): Wenn die
Last die niedrigste mögliche Position
erreicht hat, wird ein Endschalter betätigt,
der ein weiteres Absenken der Last nicht
ermöglicht. Dieser Endschalter würde auch
einen Betrieb des Seilhebezuges in
falscher Richtung (Haken bewegt sich
entgegengesetzt zur am Drucktaster
angezeigten Richtung) verhindern.
Wenn der Not-Aus-Schalter (9) betätigt
wird, hält der Seilhebezug an.
Im Falle eines Notfalls, sofort Not-Aus-
Schalter (9) betätigen um den Seilhebezug
anzuhalten. Die Bedienung des
Seilhebezuges ist nicht möglich, wenn der
Not-Aus-Schalter betätigt wurde.
8. Reinigung, Wartung und
Ersatzteilbestellung
Ziehen Sie vor allen Reinigungsarbeiten
den Netzstecker.
8.1 Reinigung
Halten Sie Schutzvorrichtungen,
Luftschlitze und Motorengehäuse so staubund schmutzfrei wie möglich. Reiben Sie
das Gerät mit einem sauberen Tuch ab
oder blasen Sie es mit Druckluft bei
niedrigem Druck aus.
Das Gerät direkt nach jeder Benutzung
reinigen.
Reinigen Sie das Gerät regelmäßig mit
einem feuchten Tuch und etwas
Schmierseife. Verwenden Sie keine
Reinigungs- oder Lösungsmittel; diese
könnten die Kunststoffteile des Gerätes
angreifen. Achten Sie darauf, dass kein
Wasser in das Geräteinnere gelangen
kann.
8.2 Wartung
Achtung! Stellen Sie stets sicher, dass die
Maschine nicht mit dem Stromnetz
verbunden ist, wenn Sie die Maschine
pflegen.
Nachstehend: Ein Zyklus entspricht einer
Auf- und Abwärtsbewegung einer Last.
Periodische Prüfung entspricht einer
Prüfung nach 100 Zyklen.
Überprüfen Sie periodisch, dass die
Endschalter des Seilhebezugs
ordnungsgemäß funktionieren. (ohne Last
prüfen) Die Prüfung erfolgt
folgendermaßen: Wenn das Seil die
maximale Hebehöhe erreicht, wird der
Hebel des automatischen
Stoppmechanismus (5) betätigt. Der Motor
(14) muss nun stoppen. Wenn das Stahlseil
(6) so weit wie möglich abgewickelt ist, wird
der Hebel für maximale Seillänge (4)
betätigt. Der Motor (14) muss nun stoppen.
Prüfen Sie periodisch das Netzkabel (12)
und die Steuerleitung (13).
Alle 200 Zyklen müssen Stahlseil (6) und
Umlenkrolle (15) geschmiert werden.
Alle 30 Zyklen muss entsprechend Bild 4
kontrolliert werden, ob das gesamte
Stahlseil (6) in gutem Zustand ist. Falls es
beschädigt ist, muss es durch ein den
technischen Daten entsprechendes
Stahlseil ersetzt werden.
Alle 1000 Zyklen prüfen, ob die Schrauben
der Befestigungsbügel (1) und Umlenkrolle
(15) gut angezogen sind.
Alle 1000 Zyklen prüfen, ob die Haken
(8/16) und die Umlenkrolle (15) in gutem
Zustand sind.
Kontrollieren Sie vor jeder Benutzung des
Seilhebezuges, ob Not-Aus-Schalter (9)
und Drucktaster (10) in einwandfreiem
Betriebszustand sind.
Alle 1000 Zyklen das Bremssystem
überprüfen. Wenn der Motor (14)
ungewöhnliche Geräusche macht oder die
Nennlast nicht anheben kann, ist es
möglich, dass das Bremssystem überholt
werden muss:
- Ersetzen Sie beschädigte oder
abgenutzte Teile, und bewahren Sie die
DE/AT/
CH
34
Anleitung_LB5_2255123:_ 31.05.2011 10:14 Uhr Seite 34
Page 35

dazugehörige Wartungsdokumentation auf.
- Für außerplanmäßige
Instandhaltungsarbeiten wenden Sie sich
bitte an ein autorisiertes Servicecenter.
8.3 Ersatzteilbestellung:
Bei der Ersatzteilbestellung sollten folgende
Angaben gemacht werden:
Typ des Gerätes
Artikelnummer des Gerätes
Ident-Nummer des Gerätes
Aktuelle Preise und Infos finden Sie unter
www.isc-gmbh.info
9. Entsorgung und
Wiederverwertung
Das Gerät befindet sich in einer Verpackung
um Transportschäden zu verhindern. Diese
Verpackung ist Rohstoff und ist somit wieder
verwendbar oder kann dem Rohstoffkreislauf
zurückgeführt werden. Das Gerät und dessen
Zubehör bestehen aus verschiedenen
Materialien, wie z.B. Metall und Kunststoffe.
Führen Sie defekte Bauteile der
Sondermüllentsorgung zu. Fragen Sie im
Fachgeschäft oder in der Gemeindeverwaltung
nach!
Nur für EU-Länder
Werfen Sie Elektrowerkzeuge nicht
in den Hausmüll!
Gemäß europäischer Richtlinie 2002/96/EG
über Elektro- und Elektronik-Altgeräte und
Umsetzung in nationales Recht müssen
verbrauchte Elektrowerkzeuge getrennt
gesammelt werden und einer umweltgerechten
Wiederverwertung zugeführt werden.
Recycling-Alternative zur Rücksendeaufforderung:
Der Eigentümer des Elektrogerätes ist alternativ anstelle Rücksendung zur Mitwirkung bei
der sachgerechten Verwertung im Falle der
Eigentumsaufgabe verpflichtet. Das Altgerät
kann hierfür auch einer Rücknahmestelle
überlassen werden, die eine Beseitigung im
Sinne der nationalen Kreislaufwirtschaftsund Abfallgesetze durchführt. Nicht betroffen
sind den Altgeräten beigefügte Zubehörteile
und Hilfsmittel ohne Elektrobestandteile.
DE/AT/
CH
35
Anleitung_LB5_2255123:_ 31.05.2011 10:14 Uhr Seite 35
Page 36

DE/AT/
CH
36
10. Konformitätserklärung
k erklärt folgende Konformität gemäß EU-Richtlinie und
Normen für Artikel
t explains the following conformity according to EU
directives and norms for the following product
p déclare la conformité suivante selon la directive CE et les
normes concernant l’article
C dichiara la seguente conformità secondo la direttiva UE e
le norme per l’articolo
N verklaart de volgende overeenstemming conform EU
richtlijn en normen voor het product
m declara la siguiente conformidad a tenor de la directiva y
normas de la UE para el artículo
O declara a seguinte conformidade, de acordo com a
directiva CE e normas para o artigo
l attesterer følgende overensstemmelse i medfør af
EU-direktiv samt standarder for artikel
U förklarar följande överensstämmelse enl. EU-direktiv och
standarder för artikeln
q vakuuttaa, että tuote täyttää EU-direktiivin ja standardien
vaatimukset
. tõendab toote vastavust EL direktiivile ja standarditele
j vydává následující prohlášení o shodě podle směrnice
EU a norem pro výrobek
X potrjuje sledečo skladnost s smernico EU in standardi za
izdelek
W vydáva nasledujúce prehlásenie o zhode podľa smernice
EÚ a noriem pre výrobok
A a cikkekhez az EU-irányvonal és Normák szerint a
következő konformitást jelenti ki
P deklaruje zgodność wymienionego poniżej artykułu z
następującymi normami na podstawie dyrektywy WE.
e декларира съответното съответствие съгласно
Директива на ЕС и норми за артикул
H paskaidro šādu atbilstību ES direktīvai un standartiem
G apibūdina šį atitikimą EU reikalavimams ir prekės
normoms
Q declară următoarea conformitate conform directivei UE
şi normelor pentru articolul
z δηλώνει την ακόλουθη συμμόρφωση σύμφωνα με την
Οδηγία ΕΚ και τα πρότυπα για το προϊόν
B potvrđuje sljedeću usklađenost prema smjernicama EU
i normama za artikl
f potvrđuje sljedeću usklađenost prema smjernicama EU
i normama za artikl
4 potvrđuje sledeću usklađenost prema smernicama EZ i
normama za artikal
T следующим удостоверяется, что следующие
продукты соответствуют директивам и нормам ЕС
1 проголошує про зазначену нижче відповідність
виробу директивам та стандартам ЄС на виріб
5 ја изјавува следната сообрзност согласно
ЕУ-директивата и нормите за артикли
Z Ürünü ile ilgili AB direktifleri ve normları gereğince
aşağıda açıklanan uygunluğu belirtir
L erklærer følgende samsvar i henhold til EU-direktivet
og standarder for artikkel
E Lýsir uppfyllingu EU-reglna og annarra staðla vöru
Konformitätserklärung
Einhell Germany AG · Wiesenweg 22 · D-94405 Landau/Isar
Seilhebezug PSZ 250 A2 (Parkside)
Standard references: EN 14492-2; EN 60204-32;
EN 55014-1; EN 55014-2; EN 61000-3-2; EN 61000-3-3
Landau/Isar, den 18.04.2011
First CE: 09 Archive-File/Record: NAPR003513
Art.-No.: 22.551.23 I.-No.: 11031 Documents registrar: Robert Mayn
Subject to change without notice Wiesenweg 22, D-94405 Landau/Isar
Weichselgartner/General-Manager Wentao/Product-Management
x
87/404/EC_2009/105/EC
2005/32/EC_2009/125/EC
2006/95/EC
2006/28/EC
2004/108/EC
2004/22/EC
1999/5/EC
97/23/EC
90/396/EC_2009/142/EC
89/686/EC_96/58/EC
x
2006/42/EC
2004/26/EC
Emission No.:
2000/14/EC_2005/88/EC
Annex IV
Notified Body:
Notified Body No.:
Reg. No.:
Annex V
Annex VI
Noise: measured LWA= dB (A); guaranteed LWA= dB (A)
P = KW; L/Ø = cm
Notified Body:
Anleitung_LB5_2255123:_ 31.05.2011 10:14 Uhr Seite 36
Page 37

DE/AT/
CH
37
11. GARANTIEURKUNDE
Sehr geehrte Kundin, sehr geehrter Kunde,
unsere Produkte unterliegen einer strengen Qualitätskontrolle. Sollte dieses Gerät dennoch einmal nicht einwandfrei funktionieren, bedauern wir dies sehr und bitten Sie, sich an unseren Servicedienst unter der auf dieser Garantiekarte angegebenen Adresse zu wenden. Gern stehen wir Ihnen auch telefonisch über die unten
angegebene Servicerufnummer zur Verfügung. Für die Geltendmachung von Garantieansprüchen gilt Folgendes:
1. Diese Garantiebedingungen regeln zusätzliche Garantieleistungen. Ihre gesetzlichen Gewährleistungsansprüche werden von dieser Garantie nicht berührt. Unsere Garantieleistung ist für Sie kostenlos.
2. Die Garantieleistung erstreckt sich ausschließlich auf Mängel, die auf Material- oder Herstellungsfehler zurückzuführen sind und ist auf die Behebung dieser Mängel bzw. den Austausch des Gerätes beschränkt.
Bitte beachten Sie, dass unsere Geräte bestimmungsgemäß nicht für den gewerblichen, handwerklichen
oder industriellen Einsatz konstruiert wurden. Ein Garantievertrag kommt daher nicht zustande, wenn das
Gerät in Gewerbe-, Handwerks- oder Industriebetrieben sowie bei gleichzusetzenden Tätigkeiten eingesetzt wird.
Von unserer Garantie sind ferner Ersatzleistungen für Transportschäden, Schäden durch Nichtbeachtung
der Montageanleitung oder aufgrund nicht fachgerechter Installation, Nichtbeachtung der Gebrauchsanleitung (wie durch z.B. Anschluss an eine falsche Netzspannung oder Stromart), missbräuchliche oder unsachgemäße Anwendungen (wie z.B. Überlastung des Gerätes oder Verwendung von nicht zugelassenen
Einsatzwerkzeugen oder Zubehör), Nichtbeachtung der Wartungs- und Sicherheitsbestimmungen, Eindringen von Fremdkörpern in das Gerät (wie z.B. Sand, Steine oder Staub), Gewaltanwendung oder
Fremdeinwirkungen (wie z. B. Schäden durch Herunterfallen) sowie durch verwendungsgemäßen, üblichen
Verschleiß ausgeschlossen. Dies gilt insbesondere für Akkus, auf die wir dennoch eine Garantiezeit von
12 Monaten gewähren
Der Garantieanspruch erlischt, wenn an dem Gerät bereits Eingriffe vorgenommen wurden.
3. Die Garantiezeit beträgt 3 Jahre und beginnt mit dem Kaufdatum des Gerätes. Garantieansprüche sind vor
Ablauf der Garantiezeit innerhalb von zwei Wochen, nachdem Sie den Defekt erkannt haben, geltend zu
machen. Die Geltendmachung von Garantieansprüchen nach Ablauf der Garantiezeit ist ausgeschlossen.
Die Reparatur oder der Austausch des Gerätes führt weder zu einer Verlängerung der Garantiezeit noch
wird eine neue Garantiezeit durch diese Leistung für das Gerät oder für etwaige eingebaute Ersatzteile in
Gang gesetzt. Dies gilt auch bei Einsatz eines Vor-Ort-Services.
4. Für die Geltendmachung Ihres Garantieanspruches übersenden Sie bitte das defekte Gerät portofrei an die
unten angegebene Adresse. Fügen Sie den Verkaufsbeleg im Original oder einen sonstigen datierten Kaufnachweis bei. Bitte bewahren Sie deshalb den Kassenbon als Nachweis gut auf! Beschreiben Sie uns bitte
den Reklamationsgrund möglichst genau. Ist der Defekt des Gerätes von unserer Garantieleistung erfasst,
erhalten Sie umgehend ein repariertes oder neues Gerät zurück.
Selbstverständlich beheben wir gegen Erstattung der Kosten auch gerne Defekte am Gerät, die vom Garantieumfang nicht oder nicht mehr erfasst sind. Dazu senden Sie das Gerät bitte an unsere Serviceadresse.
Einhell Italia s.r.l.
Via Marconi, 16
I-22070 Beregazzo (Co)
Tel. 031 992080 · Fax 031 992084
Anleitung_LB5_2255123:_ 31.05.2011 10:14 Uhr Seite 37
Page 38

38
Anleitung_LB5_2255123:_ 31.05.2011 10:14 Uhr Seite 38
Page 39

39
Anleitung_LB5_2255123:_ 31.05.2011 10:14 Uhr Seite 39
Page 40

IAN: 66764 PSZ 250 A2
Einhell Germany AG
Wiesenweg 22
D-94405 Landau/Isar
Estado de las informaciones · Versione delle informazioni
Last Information Update · Stand der Informationen:
05/2011 Ident.-No.: 22.551.23 052011 - 5
5
POLIPASTO DE CABLE PARANCO SOLLEVATORE
Anleitung_LB5_2255123:_ 31.05.2011 10:14 Uhr Seite 40
 Loading...