

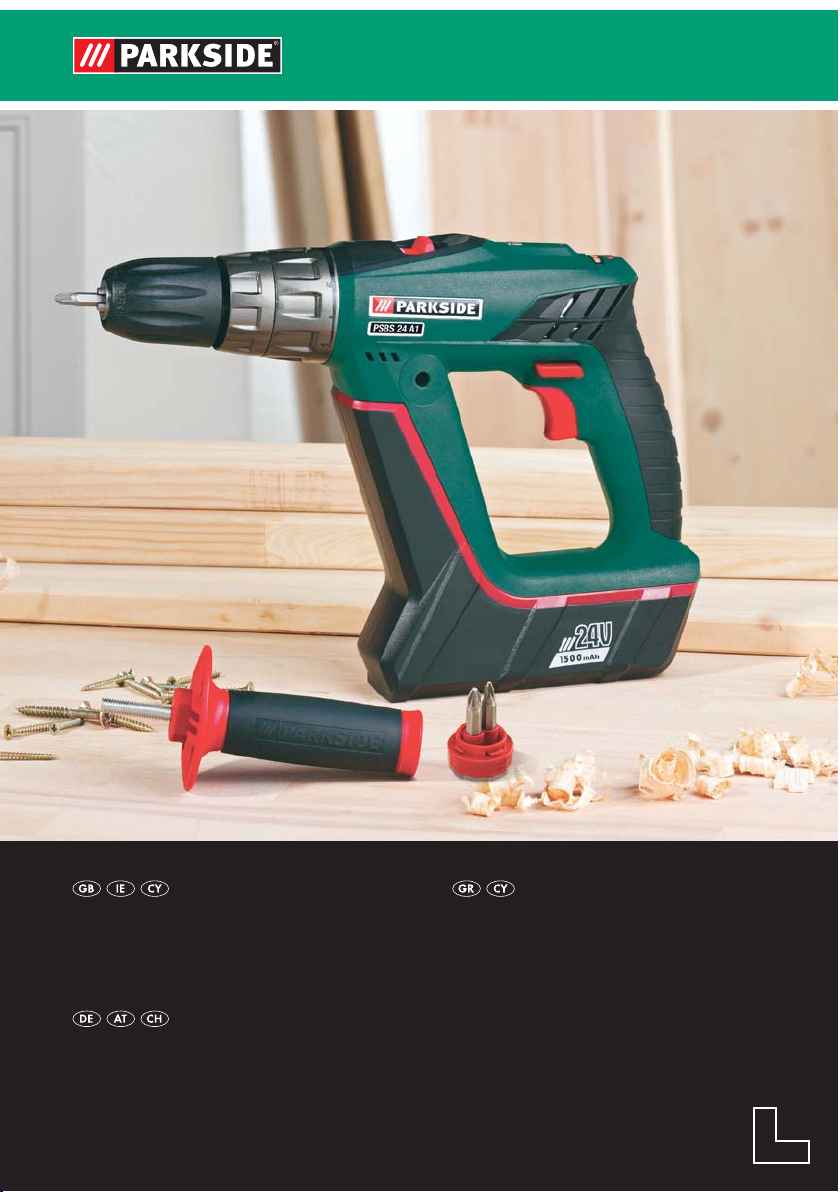
PSBS 24 A1
CORDLESS HAMMER DRILL
Operation and Safety Notes
Translation of original operation manual
AKKU-SCHLAGBOHRSCHRAUBER
Bedienungs- und Sicherheitshinweise
Originalbetriebsanleitung
ΚΡΟΥΣΤΙΚΟ ΚΑΤΣΑΒΙΔΙ
ΜΠΑΤΑΡΙΑΣ
Υποδείξεις χειρισμού και ασφαλείας
Μετάφραση των αυθεντικών οδηγιών λειτουργίας
3

Before reading, unfold the page containing the illustrations and familiarise yourself with all functions of the
device.
Πριν ξεκινήσετε την ανάγνωση, ανοίξτε τη σελίδα με τις εικόνες και εξοικειωθείτε με όλες τις λειτουργίες της
συσκευής.
Klappen Sie vor dem Lesen die Seite mit den Abbildungen aus und machen Sie sich anschließend mit allen
Funktionen des Gerätes vertraut.
GB / IE / CY Operation and Safety Notes Page 5
GR / CY Υποδείξεις χειρισμού και ασφαλείας Σελίδα 15
DE / AT / CH Bedienungs- und Sicherheitshinweise Seite 27
11 12 13
1
A
4
10
9
2
3
5
6
87
B
15
9
14
16
C D

Table of contents
Introduction
Proper use ......................................................................................................................Page 6
Features and equipment ...............................................................................................Page 6
Included items ...............................................................................................................Page 7
Technical information ....................................................................................................Page 7
General safety advice for electrical power tools
1. Workplace safety .....................................................................................................Page 8
2.
Electrical safety .........................................................................................................Page 8
3. Personal safety ..........................................................................................................Page 8
4.
Careful handling and use of electrical power tools ...............................................Page 9
5. Use and handling of the cordless electrical power tool ........................................Page 9
Safety advice relating specifically to cordless impact drill / drivers ...........................Page 10
Original accessories / attachments ..............................................................................Page 10
Caution utility services! .................................................................................................Page 10
Preparing for use
Attaching the auxiliary handle .....................................................................................Page 10
Charging the battery pack ...........................................................................................Page 10
Inserting / removing the battery pack into / out of the device ....................................Page 11
Checking the battery charge state ...............................................................................Page 11
2-speed gear operation ................................................................................................Page 11
Torque preselection.......................................................................................................Page 11
Drilling / screwing / impact drilling ............................................................................... Page 11
Changing inserted tools ................................................................................................Page 11
Switching On / Off ........................................................................................................Page 12
Setting the speed ...........................................................................................................Page 12
Reversing the direction of rotation ...............................................................................Page 12
Tips and tricks ................................................................................................................Page 12
Maintenance and cleaning .........................................................................Page 12
Service .........................................................................................................................Page 12
Warranty ...................................................................................................................Page 12
Disposal ......................................................................................................................Page 13
Declaration of Conformity / Manufacturer....................................Page 14
5 GB/IE/CY
Introduction
The following pictograms are used in these operating instructions / on the device:
Read instruction manual!
Observe caution and safety notes! DC (current and voltage type)
Caution – electric shock!
Danger to life!
n
0
V
Design no-load speed Safety class II
Volt (AC) Drill setting (torque preselect)
~
Wear hearing protection, dust
protection mask, protective glasses
and protective gloves.
Wear appropriate footwear.
For indoor use only!
Spindle lock
Drill chuck, Made In Germany
Cordless hammer drill
PSBS 24 A1
For drilling and screwing into wood,
plastic and metal
Introduction
Please make sure you familiarise yourself
fully with the way the device works before
you use it for the first time and that you
understand how to handle electrical power tools
correctly. Further details can be found in the operating instructions. Keep these instructions in a safe
place. If you pass the device on to anyone else,
ensure that you also pass on all the documentation.
Proper use
This device is intended for drilling and screwing into
wood, plastic and metal as well as for impact drilling
into stone, brick and concrete. When drilling into
6 GB/IE/CY
please
W
Nm
Ah
granite, we recommend the use of a drill hammer.
Use the device only as described and for the indicated purposes. Any other use or modification to
the device shall be considered as improper use and
could give rise to considerable risk of accident. The
manufacturer will not accept liability for loss or
damage arising from improper use. Not suitable
for commercial use.
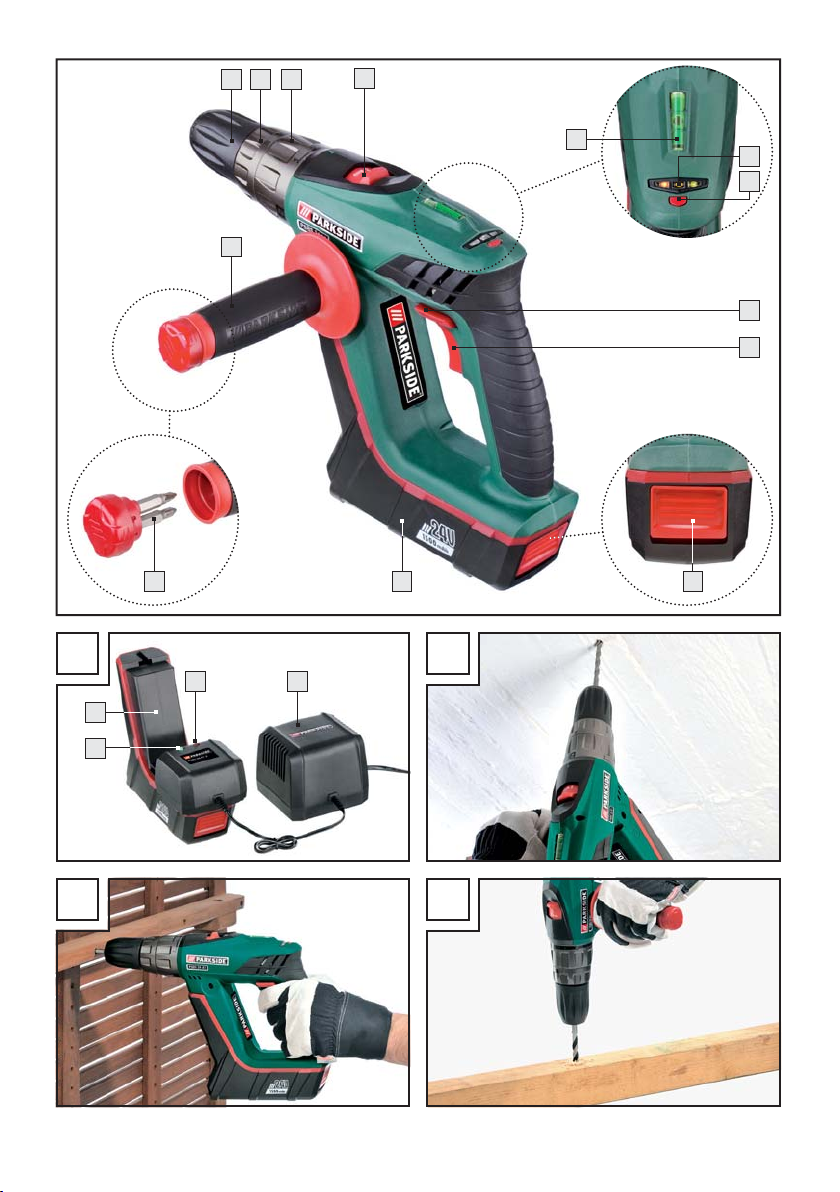
Features and equipment
1
2
3
4
5
6
7
8
9
10
11
Watts (Effective power)
Newton metre (torque)
Drill setting (impact drilling)
Amp (Battery capacity)
Risk of loss of life by electric shock from
damaged mains lead or mains plug!
Keep children away from electrical
power tools!
Dispose packaging and appliance in
an environmentally-friendly way!
Gear selector switch
LED display / battery charge state
Battery charge state test button
Spirit level
Direction of rotation switch / lock
ON / OFF switch / Speed regulator
Bit
Battery unlocking button
Battery pack
Auxiliary handle
Quick-release chuck
Introduction
12
Drill / hammer drill setting ring
13
Torque preselection ring
14
Fast battery charger
15
Red charge indicator LED
16
Green charge indicator LED
Included items
1 Carrying case
1 Rechargeable impact drill / driver with
rechargeable battery pack
1 Auxiliary handle
2 Bits
1 Charger
1 Operating instructions
Technical information
Cordless hammer drill PSBS 24 A1:
Rated voltage: 24 V
No-load speed: 1st gear: n0 0 - 500 min
-1
No-load speed: 2nd gear: n0 0 - 1800 min
Chuck capacity: 1.0 - 13 mm
Max. drill diameter: Metal: 13 mm
Wood: 30 mm
Masonry (concrete): 15 mm
Max. torque: 35 Nm
Dimensions: 338 x 69x 237 mm
Ni-Cd rechargeable battery pack
PSBS 24 A1-1:
Rated voltage: 24 V
Capacity: 1.5 (Ah)
Capacity: 36 Wh
Fast battery charger PSBS 24 A1-2:
Rated voltage: 230 V ~ 50 Hz, 105 W
Charging current: 3000 mA
Charging duration: 90 min
Protection class: II /
Noise and vibration data:
Measured values for noise are determined in accordance with EN 60745. The A-weighted noise level
of the electrical power tool are typically:
Sound pressure level: 76 dB(A)
Sound power level: 87 dB(A)
Sound pressure level
(Impact drilling in concrete): 87 dB(A)
Sound power level
(Impact drilling in concrete): 98 dB(A)
Uncertainty K: 3 dB
).
Wear ear protection!
Total vibration (vector sum of three directions) is
calculated in accordance with EN 60745:
Drilling in metal: Vibration emission value
a
= 1.682 m / s2,
h, D
Uncertainty K = 1.5 m / s
Screwing: Vibration emission value
a
= 1.109 m / s2,
h
Uncertainty K = 1.5 m / s
Impact drilling
in concrete: Vibration emission value
-1
a
= 11.25 m / s2,
h, ID
Uncertainty K = 1.5 m / s
WARNING!
The vibration level given in these
instructions has been measured in accordance with
a standardised measurement procedure specified
in EN 60745 and can be used to compare devices.
Different uses of the device give rise to different
vibration levels and in many cases they may exceed
the values given in these instructions. It is easy to
underestimate the vibration load if the electrical power
tool is used regularly in particular circumstances.
Note: If you wish to make an accurate assessment
of the vibration loads experienced during a particular
period of working, you should also take into account
the intervening periods of time when the device is
switched off or is running but is not actually in use.
This can result in a much lower vibration load over
the whole of the period of working.
2
,
2
,
2
.
7 GB/IE/CY
General safety advice for electrical power tools
General safety advice for
electrical power tools
WARNING!
and instructions! Failure to observe the safety
advice and instructions may result in electric shock,
fire and / or serious injury.
Keep all the safety advice and instructions
in a safe place for future reference!
The term “electrical tool” used in the safety advice
refers to electrical tools powered by mains electricity
(by means of a mains lead) and electrical tools
powered by rechargeable batteries (without a
mains lead).
Read all the safety advice
1. Workplace safety
a) Keep your working area clean and
well lit. Untidy or poorly lit working areas
can lead to accidents.
b)
inflammable liquids, gases or dusts.
c)
Distractions can cause you to lose control of
Do not work with the device
in potentially explosive environments in which there are
Electrical power tools create sparks, which can
ignite dusts or fumes.
Keep children and other
people away while you are
operating the electrical tool.
the device.
2. Electrical safety
a)
The mains plug on the device must match
the mains socket. The plug must not be
modified in any way. Do not use an
adapter plug with devices fitted with
a protective earth. Unmodified plugs and
matching sockets reduce the risk of electric shock.
b) Avoid touching earthed surfaces such
as pipes, radiators, ovens and refrigerators with any part of your body.
8 GB/IE/CY
There is an increased risk of electric shock if
your body is earthed
c) Keep the device away from rain or
moisture. Water entering an electrical device
increases the risk of electric shock.
d)
device, to hang up the device or to pull
e) When working outdoors with an
f) Use a residual current device (RCD)
Do not use the mains lead for
any purpose for which it was
not intended, e.g. to carry the
the mains plug out of the mains socket.
Keep the mains lead away from heat,
oil, sharp edges or moving parts of the
device. Damaged or tangled mains leads
increase the risk of electric shock.
electrical power tool always use extension cables that are also approved
for use outdoors. The use of an extension
cable suitable for outdoor use reduces the risk
of electric shock.
for protection if operating the electrical power tool in a moist environment
is unavoidable. The use of an RCD reduces
the risk of electric shock.
.
3. Personal safety
a) Remain alert at all times, watch what
you are doing and always proceed
with caution. Do not use the device if
you are tired or under the influence of
drugs, alcohol or medication. One mo
of carelessness when using the device can lead
to serious injury.
b)
The wearing of personal protective equipment
such as dust masks, non-slip safety shoes, safety helmets or ear protectors, appropriate to
the type of electrical power tool used and
work undertaken, reduces the risk of injury.
c) Avoid unintentional operation of the
device. Check that the electrical power
tool is switched off before you connect
it to the mains, pick it up or carry it.
Wear personal protective
equipment and always
wear safety glasses.
ment

General safety advice for electrical power tools
Accidents can happen if you carry the device
with your finger on the ON / OFF switch or with
the device switched on.
d) Remove any setting tools or spanners
before you switch the device on. A tool
or spanner left attached to a rotating part of a
device can lead to injury.
e) Avoid placing your body in an unnat-
ural position. Keep proper footing and
balance at all times. By doing this you will
be in a better position to control the device in
unforeseen circumstances.
f) Wear suitable clothing. Do not wear
loose clothing or jewellery. Keep your
hair, clothing and gloves clear of moving parts. Loose clothing, jewellery or long
hair can become trapped in moving parts.
g) If vacuum dust extraction and collection
devices are fitted do not forget to
that they are properly connected and
correctly used. The use of these devices
reduces the hazard presented by dust.
check
4. Careful handling and use
of electrical power tools
a) Do not overload the device. Always
use an electrical power tool that is
intended for the task you are undertaking. By using the right electrical power
tool for the job you will work more safely and
achieve a better result.
b) Do not use an electrical power tool if
its switch is defective. An electrical power
tool that can no longer be switched on and off
is dangerous and must be repaired.
c) Pull the mains plug from the socket
before you make any adjustments to
the device, change accessories or when
the device is put away. This precaution is
intended to prevent you from unintentionally
starting the device.
d) When not in use always ensure that
electrical power tools are kept out of
reach of children. Do not let anyone use
the device if he or she is not familiar
with it or has not read the instructions
and advice. Electrical power tools are danger-
ous when they are used by inexperienced people.
e) Look after the device carefully. Check
that moving parts are working properly and move freely. Check for any
parts that are broken or damaged
enough to detrimentally affect the
functioning of the device. Have damaged parts repaired before you use
the device. Many accidents have their origins
in poorly maintained electrical power tools.
f) Keep cutting tools clean and sharp.
Carefully maintained cutting tools with sharp
cutting edges are less likely to jam and are
easier to control.
g) Use the electrical power tool, accesso-
ries, inserted tools etc. in accordance
with these instructions and advice, and
the stipulations drawn up for this particular type of device. In doing this, take
into account the working conditions
and the task in hand. The use of electrical
power tools for purposes other than those intended can lead to dangerous situations.
5. Use and handling of the cordless electrical power tool
a) Charge a rechargeable battery unit
using only the charger recommended
by the manufacturer. Chargers are often
designed for a particular type of rechargeable
battery unit. There is the danger of fire if other
types of rechargeable battery units are used.
b) Only the rechargeable battery units
supplied are to be used with an electrical power tool. The use of other recharge-
able battery units may lead to the danger of
injury or fire.
c) When they are not being used, store
rechargeable battery units away from
paperclips, coins, keys. nails, screws
or other small metal objects that could
cause the contacts to be bridged. Short-
circuiting the contacts of a rechargeable battery
unit may result in heat damage or fire.
9 GB/IE/CY
General safety advice for electrical power tools / Preparing for use
d) Fluids may leak out of rechargeable
battery units if they are misused. If
this happens, avoid contact with the
fluid. If contact occurs, flush the affected area with water. Seek additional
medical help if any of the fluid gets
into your eyes. Escaping battery fluid may
cause skin irritation or burns.
Safety advice relating
specifically to cordless
impact drill / drivers
Wear ear protection when
percussion drilling. Exposure
to noise can cause hearing loss.
Use the additional handle
with the appliance. Losing control of the
machine can lead to injuries.
Hold the appliance by the insulated
handling surfaces when you are carrying out work during which the insertion
tool might hit on hidden power supply
lines or the appliance’s own power
cable. Contact with a live electrical wire can
also make metal parts of the electrical tool live
and can lead to electric shock.
Before cleaning or maintaining the
charger or battery pack always pull
the plug out of the mains socket. This
precaution is intended to prevent you from unintentionally starting the device.
Never charge the battery pack if the
ambient temperature is below 10 °C
or above 40 °C. In this way you will ensure
your battery has long working life.
The ventilation openings on the charg-
er must always be kept free. Otherwise
there is the danger of overheating.
Before you carry out any tasks on the
device, transport or store it, make sure
that the direction of rotation switch
is in the middle position (lock) to pre
the device from starting up unintentionally.
10 GB/IE/CY
10
that came
vent
Original accessories /
attachments
Use only the accessories detailed in
the operating instructions. The use of
inserted tools or accessories other than those
recommended in the operating instructions
could lead to you suffering an injury.
Caution utility services!
WARNING!
electrical cables, gas or water pipes when you
are working with an electrical power tool.
Check a wall using a suitable detector before
you drill or cut slots.
Preparing for use
Attaching the auxiliary handle
Screw the additional handle 10 onto the left-
hand or the right-hand side of your appliance
depending on the way you work.
Charging the battery pack
Note: A battery pack that has been unused for a
while or never been charged must be charged
before reuse or first use. The battery pack requires
about 3 - 5 cycles before it can reach its full charge.
Charging takes about 90 minutes.
WARNING!
the mains socket before removing the battery pack
from the charger or inserting it into the charger. This
precaution is intended to prevent you from unintentionally starting the device.
Push the coupler (see Fig. A) onto the recharge-
5
able battery pack
into the socket.
The red charge indicator LED
the charging process has started. The red light
goes out as soon as the battery pack
charged.
Ensure that you do not strike
Always pull the mains plug from
9
. Insert the mains plug
15
indicates that
9
is fully
Preparing for use
The green charge indicator LED 16 shows that
the charging process is complete and the
battery pack
9
is ready for use.
Do not use the quick-charge process to charge
a battery pack
9
for a second time in close
succession. Otherwise there is the danger that
the battery pack
9
will become overcharged
and its useful life and that of the charger reduced.
Switch the charger
14
off for at least 15 minutes between successive charging processes.
To do this pull the mains plug out of the socket.
Inserting / removing t he battery
pack into / out of the device
Removing the rechargeable battery pack:
In order to remove the rechargeable battery,
turn the appliance 180°.
Press the unlocking button
chargeable battery pack
8
and push the re-
9
out of the appliance.
Inserting the rechargeable battery pack:
Push the rechargeable battery pack
9
onto
the appliance.
Checking the battery
charge state
Press the battery charge state test button 3.
The remaining charge capacity is shown on the
LED display
2-speed gear operation
In first gear (gear selector switch 1 in
position: 1)
the device achieves a speed of approx. 500 min
and a high torque. For example, for screwing work
with small screw diameters.
In second gear (gear selector switch
position: 2)
the device achieves a speed of approx. 1800 min
and a lower torque. For example, for rapid drill
progress in masonry or large drill or screw diameters.
2
.
-1
1
in
Torque preselection
Use the torque preselection ring 13 to set the torque.
When this set torque is reached the clutch decouples
the drive. This allows you to screw in screws to a
predetermined depth, which is ideal e.g. for screwing in a series of screws.
Select a lower setting for small screws or soft
materials.
Select a high setting for large screws, hard ma-
terials, or when screwing out screws.
For drilling tasks select drilling setting by placing
the torque preselection ring in the
Drilling / screwing /
impact drilling
Drilling / screwing:
Turn the setting ring
Impact drilling:
Turn the setting ring
Changing inserted tools
Your cordless hammer drill has a fully automatic spindl
lock
and is fitted with a single-sleeve drill chuck
with radial lock “Made in Germany” by
Once the motor has come to a halt, the drive shaft
is automatically locked so that the quick-action drill
11
chuck
can be opened simply by turning it in the
direction of the arrow (see labelling at the front of
the drill chuck “
After you have inserted the tool you wish to have, turn
the drill chuck in the direction of the arrow until you
cannot hear any click any more (see the labelling on
the front of the drill chuck “
drill chuck will then lock automatically. The spindle
lock releases itself automatically when the motor is
started (by operation of ON / OFF switch
-1
12
to the symbol .
12
to the symbol .
AUF / OPEN”).
ZU / CLOSE”). The
position.
6
).
e
.
11 GB/IE/CY
Preparing for use / Maintenance and cleaning / Service / Warranty
Switching On / Off
To start the device, press the ON / OFF switch 6
and keep it pressed.
To switch off the device, release the ON / OFF
6
switch
Setting the speed
The ON / OFF switch 6 has a variable speed
regulator.
Increasing the speed:
Increase the pressure on the ON / OFF
switch
Reducing the speed:
Reduce the pressure on the ON / OFF switch
The integral motor brake quickly brings the
device to a standstill – which is ideal e.g. for
screwing in a series of screws.
Reversing the direction
.
6
.
6
of rotation
Maintenance and cleaning
The cordless impact drill / driver is maintenance-free.
Clean the device frequently. This should be done
immediately after you have finished using it.
Use a dry cloth to clean the outside of the
device - never use petrol, solvents or cleaners.
WARNING!
Always have any repairs carried out or replace-
ment parts fitted at the service centre or by an
electrical equipment repair specialist.
Service
WARNING!
at the service centre or by qualified
specialist personnel using original
manufacturer parts only. This will ensure
.
that your device remains safe to use.
WARNING!
to be replaced, always have the
replacement carried out by the manufacturer or its service centre. This will
ensure that your device remains safe to use.
Never open up the device.
Have your device repaired
If the plug or lead needs
Push the direction of rotation switch 5 fully
through to the right or left to reverse the direction of rotation.
Tips and tricks
Drilling in metal: Use a metal drill bit (HSS).
For the best results, you should cool the bit with oil.
Metal drill bits can also be used to drill into plastic.
Drilling in stone: Use a hardened-metal-tipped
masonry drill bit.
Drilling in wood: Use a wood drill bit with a
centring point. For deep holes, use an auger type
bit. For large diameter holes, use a forstner bit. You
can screw small screws into soft wood without the
need for pre-drilling.
12 GB/IE/CY
Warranty
The warranty for this appliance is for 3
years from the date of purchase. The appliance has been manufactured with care
and meticulously examined before delivery. Please retain your receipt as proof
of purchase. In the event of a warranty
claim, please make contact by telephone
with our Service Department. Only in this
way can a post-free despatch for your
goods be assured.
The warranty covers only claims for material and
maufacturing defects, but not for transport damage,
for wearing parts or for damage to fragile components, e.g. buttons or batteries. This product is for
private use only and is not intended for commercial
use.

Warranty / Disposal
The warranty is void in the case of abusive and improper handling, use of force and internal tampering
not carried out by our authorized service branch. Your
statutory rights are not restricted in any way by this
warranty.
The warranty period will not be extended by repairs
made unter warranty. This applies also to replaced
and repaired parts. Any damage and defects extant
on purchase must be reported immediately after
unpacking the appliance, at the latest, two days after
the purchase date. Repairs made after the expiration
of the warranty period are subject to payment.
GB
DES UK LTD
Tel.: 0871 5000 700 (£ 0.10 / minute)
e-mail: support.uk@kompernass.com
IE
Kompernass Service Ireland
Tel: 1850 930 412 (0,082 EUR/Min.)
Standard call rates apply.
Mobile operators may vary.
e-mail: support.ie@kompernass.com
CY
Kompernass Service Cyprus
Tel.: 800 94401
e-mail: support.cy@kompernass.com
Do not dispose of rechargeable
batteries with your household
refuse!
Defective or exhausted rechargeable batteries must
be recycled in accordance with Directive
2006 / 66 / EC. Please refer to the special safety
advice in relation to the charger and battery pack.
Return the rechargeable battery and / or the equipment to the appropriate collection facilities.
Contact your local refuse disposal authority for more
details of how to dispose of your worn out electrical devices.
Disposal
The packaging is wholly composed of
environmentally-friendly materials that can
be disposed of at a local recycling centre.
Do not dispose of electrical
appliances in household waste.
In accordance with European Directive 2002 / 96 / EC
(covering waste electrical and electronic equipment)
and its transposition into national legislation, worn
out electrical power tools must be collected separately
and taken for environmentally compatible recycling.
13 GB/IE/CY

Declaration of Conformity / Manufacturer
Declaration of Conformity /
Manufacturer
We, Kompernaß GmbH, the person responsible for
documents: Mr Felix Becker, Burgstr. 21, D-44867
Bochum, Germany, hereby declare that this product
complies with the following standards, normative
documents and EU directives:
Machinery Directive
(2006 / 42 / EC)
EC Low-Voltage Directive
(2006 / 95 / EC)
Electromagnetic Compatibility
(2004 / 108 / EC)
Applicable harmonized standards
EN 60335-1: 2002+A1+A11+A12+A2+A13
EN 60335-2-29: 2004
EN 62233:2008
EN 60745-1: 2009
EN 60745-2-1: 2003+A11+A1+A12
EN 60745-2-2: 2003+A11+A1+A12
ZEK 01.2-08 / 12.08
2006 / 42 / EC – Annex I / 05.06
Product designation:
Cordless hammer drill PSBS 24 A1
Date of manufacture (DOM): 05 - 2010
Serial number: IAN 49384
Bochum, 31.05.2010
Hans Kompernaß
- Managing Director -
We reserve the right to make technical modifications in the course of product development.
14 GB/IE/CY

Πίνακας περιεχομένων
Eισαγωγή
Χρήση σύμφωνα με τους κανονισμούς .......................................................................Σελίδα 16
Εξοπλισμός ...................................................................................................................Σελίδα 17
Περιεχόμενα παράδοσης .............................................................................................Σελίδα 17
Τεχνικά δεδομένα ..........................................................................................................Σελίδα 17
Γενικές υποδείξεις ασφάλειας για ηλεκτρικά εργαλεία
1. Θέση εργασίας-ασφάλεια ........................................................................................Σελίδα 18
2.
Ηλεκτρική ασφάλεια .................................................................................................Σελίδα 18
3. Ασφάλεια ατόμων .....................................................................................................Σελίδα 19
4.
Ασφαλής λειτουργία και χρήση ηλεκτρονικών συσκευών ......................................Σελίδα 19
5. Χρήση και χειρισμός εργαλείου με συσσωρευτή ....................................................Σελίδα 20
Ειδικές υποδείξεις ασφάλειας για κρουστικά τρυπανοκατσάβιδα μπαταρίας ........Σελίδα 20
Αυθεντικά εξαρτήματα / πρόσθετες συσκευές ............................................................ Σελίδα 21
Προσοχή αγωγοί! .........................................................................................................Σελίδα 21
Θέση σε λειτουργία
Συναρμολόγηση πρόσθετης χειρολαβής ...................................................................Σελίδα 21
Φόρτιση συσκευασίας μπαταρίας...............................................................................Σελίδα 21
Τοποθέτηση / αφαίρεση συσκευασίας μπαταρίας στη συσκευή ...............................Σελίδα 21
Ελεγχος κατάστασης μπαταρίας .................................................................................Σελίδα 22
Σασμάν 2 ταχυτήτων .....................................................................................................Σελίδα 22
Προεπιλογή ροπής στρέψης .......................................................................................Σελίδα 22
Διατρήσεις / Βιδώματα / Κρουστικές διατρήσεις ........................................................ Σελίδα 22
Αντικατάσταση εργαλείων .............................................................................................Σελίδα 22
Ενεργοποίηση / Απενεργοποίηση .............................................................................. Σελίδα 22
Ρύθμιση αριθμού στροφών ..........................................................................................Σελίδα 23
Αλλαγή φοράς περιστροφής .......................................................................................Σελίδα 23
Συμβουλές και τρικ .......................................................................................................Σελίδα 23
Συντήρηση και καθαρισμός ......................................................................Σελίδα 23
Σέρβις ...........................................................................................................................Σελίδα 23
Εγγύηση .....................................................................................................................Σελίδα 23
Απόσυρση ................................................................................................................Σελίδα 24
Δήλωση συμμόρφωσης / κατασκευαστής ......................................Σελίδα 25
15 GR/CY

Eισαγωγή
Σε αυτές τις οδηγίες χρήσης / συσκευής μπορούν να χρησιμοποιηθούν τα
παρακάτω εικονογράμματα:
Διαβάστε την οδηγία χρήσεως!
Προσέχετε τις προειδοποιητικές υποδείξεις και τις υποδείξεις ασφαλείας!
Προσοχή για ηλεκτροπληξία!
Κίνδυνος ζωής!
n
0
V
Μέτρηση αριθμών στροφών ρελαντί Κατηγορία προστασίας II
Volt (Εναλλασσόμενη τάση)
~
Φοράτε προστατευτικά γυαλιά,
ωτοασπίδες, μάσκα στόματος που
προστατεύει από τη σκόνη και
προστατευτικά γάντια.
Φοράτε κατάλληλα υποδήματα.
Κατάλληλο μόνο για χρήση σε
εσωτερικούς χώρους!
Ασφάλιση ατράκτου
Σφιγκτήρας τρυπανιού,
Made in Germany
Κρουστικό κατσαβίδι μπαταρίας
PSBS 24 A1
Διατρήσεις και βιδώματα σε ξύλο,
πλαστικό και μέταλλο
Eισαγωγή
Εξοικειωθείτε οπωσδήποτε πριν από την
πρώτη θέση σε λειτουργία με τις λειτουρ-
γίες της συσκευής και ενημερωθείτε σχετικά με το σωστό χειρισμό ηλεκτρικών συσκευών.
Για το σκοπό αυτό διαβάστε τις παρακάτω οδηγίες
λειτουργίας. Παραδώστε όλα τα έγγραφα κατά την
ενδεχόμενη μεταβίβαση της συσκευής σε τρίτο.
W
Nm
Ah
Χρήση σύμφωνα με
Watt (Αποτελεσματική ισχύς)
Συνεχές ρεύμα
(είδος ρεύματος και τάσης)
Μέτρο Newton (ροπή στρέψης)
Βαθμίδα διάτρησης
(προεπιλογή ροπής στρέψης)
Βαθμίδα διάτρησης
(κρουστική διάτρηση)
Aμπέρ (Χωρητικότητα συσσωρευτή)
Κίνδυνος θάνατος από ηλεκτροπληξία
όταν είναι ελαττωματικό το καλώδιο ή
το βύσμα δικτύου!
Κρατήστε τα παιδιά μακριά από
ηλεκτρικά εργαλεία!
Απομακρύνετε τη συσκευασία και τη
συσκευή φιλικά προς το περιβάλλον!
τους κανονισμούς
Αυτή η συσκευή έχει σχεδιαστεί για διατρήσεις και
βιδώματα σε ξύλο, πλαστικό και μέταλλο καθώς και
για κρουστικές διατρήσεις σε τούβλα, μπετόν και
πετρώματα. Για διατρήσεις σε γρανίτη προτείνουμε
ένα σφυροτρύπανο. Χρησιμοποιήστε τη συσκευή
μόνο με τον τρόπο που περιγράφεται εδώ και για
τον τομέα εφαρμογής που αναφέρεται. Οποιαδήποτε άλλη χρήση ή τροποποίηση της συσκευής
θεωρείται ως αντικανονική και εγκυμονεί σοβαρούς
κινδύνους ατυχημάτων. Ο κατασκευαστής δεν αναλαμβάνει καμία ευθύνη για φθορές που οφείλονται
σε μη ορθή χρήση. Δεν προβλέπεται για επαγγελματική χρήση.
16 GR/CY

Eισαγωγή
Εξοπλισμός
1
Διακόπτης επιλογής ταχύτητας
2
Οπτική ένδειξη LED / Κατάσταση μπαταρίας
3
Πλήκτρο για τον έλεγχο κατάστασης μπαταρίας
4
Αλφάδι
5
Διακόπτης φοράς περιστροφής / Ασφάλεια
6
Διακόπτης ΕΝΤΟΣ / ΕΚΤΟΣ / Ρύθμιση
αριθμού στροφών
7
Bit
8
Πλήκτρο για απομανδάλωση μπαταρίας
9
Συσκευασία μπαταρίας
10
Πρόσθετη χειρολαβή
11
Σφιγκτήρας ταχείας σύσφιξης
12
Ρυθμιστικός δακτύλιος διάτρησης / Κρουστική
διάτρηση
13
Προεπιλογή ροπής στρέψης
14
Ταχυφορτιστής μπαταρίας
15
Κόκκινη φωτοδίοδος LED ελέγχου φόρτισης
16
Πράσινη φωτοδίοδος LED ελέγχου φόρτισης
Περιεχόμενα παράδοσης
1 Βαλίτσα μεταφοράς
1 Κρουστικό τρυπανοκατσάβιδο μπαταρίας
με συσκευασία μπαταρίας
1 Πρόσθετη χειρολαβή
2 Bit
1 Φορτιστής
1 Οδηγίες χειρισμού
Μέγ. διάμετρος διάτρησης: Μέταλλο: 13 mm
Ξύλο: 30 mm
Τοίχος (μπετόν): 15 mm
Μέγ. ροπή στρέψης: 35 Nm
Μέγεθος: 338 x 69 x 237 mm
Συσκευασία μπαταρίας Ni-CD
PSBS 24 A1-1:
Ονομαστική τάση: 24 V
Χωρητικότητα: 1,5 (Ah)
Ενέργεια: 36 Wh
Ταχυφορτιστής μπαταρίας PSBS 24 A1-2:
Ονομαστική τάση: 230 V ~ 50 Hz, 105 W
Ρεύμα φόρτισης: 3000 mA
Διάρκεια φόρτισης: 90 λεπ.
Κλάση προστασίας: II /
Πληροφορίες θορύβου και δονήσεων:
Υπολογισμένη τιμή για θόρυβο εξακριβώνεται σύμφωνα με ΕΝ 60745. Η στάθμη ηχητικής πίεσης που έχει
αξιολογηθεί με A ηλεκτρικής συσκευής ανέρχεται σε:
Στάθμη ηχητικής πίεσης: 76 dB(A)
Στάθμη ηχητικής ισχύος: 87 dB(A)
Στάθμη ηχητικής πίεσης
(Κρουστική διάτρηση σε μπετόν): 87 dB(A)
Στάθμη ηχητικής ισχύος
(Κρουστική διάτρηση σε μπετόν): 98 dB(A)
Ανασφάλεια K: 3 dB
Φοράτε προστασία ακοής!
Τεχνικά δεδομένα
Κρουστικό κατσαβίδι μπαταρίας
PSBS 24 A1:
Ονομαστική τάση: 24 V
Ονομαστικός αριθμός
στροφών ρελαντί: 1. Ταχύτητα:
n
0 - 500 σ.α.λ.
0
Ονομαστικός αριθμός
στροφών ρελαντί: 2. Ταχύτητα:
n
0 - 1800 σ.α.λ.
0
Εύρος σφιγκτήρα: 1,0 - 13 mm
Συνολικές τιμές δονήσεων (άθροισμα διανυσμάτων
τριών κατευθύνσεων) καθορισμένο σύμφωνα με
πρότυπο EN 60745:
Διάτρηση σε μέταλλο: Τιμή εκπομπής δονήσεων
a
= 1,682 m / s2,
h, D
Αστάθεια K = 1,5 m / s
2
,
Βίδωμα: Τιμή εκπομπής δονήσεων
a
= 1,109 m / s2,
h
Αστάθεια K = 1,5 m / s
2
,
Κρουστική διάτρηση
σε μπετόν: Τιμή εκπομπής δονήσεων
a
= 11,25 m / s2,
h, ID
Αστάθεια K = 1,5 m / s
2
.
17 GR/CY

Eισαγωγή /
Γενικές υποδείξεις ασφάλειας για ηλεκτρικά εργαλεία
ΠΡΟΕΙΔΟΠΟΙΗΣΗ!
παρούσες οδηγίες στάθμη δονήσεων μετρήθηκε με
τυποποιημένη μέθοδο μέτρησης σύμφωνα με το
πρότυπο EN 60745 και μπορεί να χρησιμοποιηθεί
για τη σύγκριση της συσκευής. Η στάθμη δονήσεων
μεταβάλλεται ανάλογα με τη χρήση του ηλεκτρικού
εργαλείου και μερικές φορές ενδέχεται να υπερβαίνει
τις τιμές που αναφέρονται στις παρούσες οδηγίες.
Το φορτίο δονήσεων ενδέχεται να υποτιμηθεί, σε
περίπτωση που το ηλεκτρικό εργαλείο χρησιμοποιείται τακτικά κατά τέτοιο τρόπο.
Υπόδειξη: Για τον ακριβή υπολογισμό της επιβάρυνσης κραδασμών κατά τη διάρκεια ενός ορισμένου χρονικού διαστήματος εργασίας θα πρέπει να
ληφθούν υπόψη και οι χρόνοι κατά τους οποίους
η συσκευή είναι απενεργοποιημένη ή λειτουργεί
χωρίς όμως να παράγει πραγματικά έργο. Αυτό
μπορεί να μειώσει σημαντικά την επιβάρυνση κραδασμών για το συνολικό χρονικό διάστημα εργασίας.
Η αναφερόμενη στις
Γενικές υποδείξεις
ασφάλειας για
ηλεκτρικά εργαλεία
ΠΡΟΕΙΔΟΠΟΙΗΣΗ!
υποδείξεις ασφάλειας και οδηγίες! Οι
παραβιάσεις κατά την τήρηση των υποδείξεων
ασφάλειας και των οδηγιών ενδέχεται να προκαλέσουν
ηλεκτροπληξία, πυρκαγιά ή / και σοβαρούς
τραυματισμούς.
Διαφυλαξτε ολες τις υποδειξεις ασφαλειας
και τις οδηγιες για μελλοντικη χρηση!
Ο ορος που χρησιμοποιειται στις υποδειξεις
ασφαλειας „ηλεκτρονικο εργαλειο“ αναφερεται σε
ηλεκτρικα εργαλεια που λειτουργουν με το δικτυο
(με καλωδιο δικτυου) και σε αυτa που λειτουργουν
με μπαταρια (χωρις καλωδιο δικτυου).
Διαβάστε όλες τις
1. Θέση εργασίας-ασφάλεια
α) Διατηρείτε το χώρο εργασίας σας
καθαρό και καλά φωτισμένο.
18 GR/CY
Η ακαταστασία καθώς και ο ελλιπής φωτισμός
του χώρου εργασίας μπορεί να οδηγήσει σε
ατυχήματα.
β)
οποίο υπάρχουν εύφλεκτα υγρά,
γ)
χρήσης του. Σε περίπτωση μη τήρησης ίσως
Μην εργάζεστε με τη συσκευή
σε περιβάλλον όπου υφίσταται κίνδυνος έκρηξης, στο
αέρια ή σκόνη. Τα ηλεκτρονικά εργαλεία
παράγουν σπίθες, οι οποίες μπορεί να
αναφλέξουν τη σκόνη ή τους ατμούς.
Κρατήστε τα παιδιά και άλλα
άτομα μακριά από το ηλεκτρονικό εργαλείο κατά τη διάρκεια
χάσετε τον έλεγχο της συσκευής.
2. Ηλεκτρική ασφάλεια
α) Το βύσμα σύνδεσης συσκευής θα
πρέπει να ταιριάζει στην πρίζα.
Απαγορεύεται η τροποποίηση με
οποιοδήποτε τρόπο του βύσματος.
Απαγορεύεται η χρήση βύσματος
προσαρμογέα μαζί με συσκευές με
προστατευτική γείωση. Το ανέπαφο
βύσμα και η κατάλληλη πρίζα μειώνουν τον
κίνδυνο πρόκλησης ηλεκτροπληξίας.
β) Αποφύγετε τη σωματική επαφή με
γειωμένες επιφάνειες, όπως σωλήνες,
θερμαντικά σώματα, εστίες και ψυγεία.
Υφίσταται υψηλός κίνδυνος ηλεκτροπληξίας
όταν το σώμα σας γειωθεί.
γ) Κρατήστε τη συσκευή μακριά από τη
βροχή και την υγρασία. Η εισχώρηση
νερού μέσα σε μία ηλεκτρονική συσκευή
αυξάνει τον κίνδυνο ηλεκτροπληξίας.
δ)
αναρτήσετε ή για να τραβήξετε το βύσμα
ε) Για χρήση ηλεκτρονικής συσκευής σε
Μην χρησιμοποιείτε το καλώδιο
για άλλο λόγο, για να μεταφέρετε τη συσκευή, για να την
από την πρίζα. Κρατήστε το καλώδιο
μακριά από θερμότητα, λάδι, αιχμηρές
ακμές ή κινούμενα εξαρτήματα συσκ
Κατεστραμμένο ή τυλιγμένο καλώδιο αυξάνει τον
κίνδυνο πρόκλησης ηλεκτροπληξίας.
εξωτερικούς χώρους, χρησιμοποιήστε
ευής.

Γενικές υποδείξεις ασφάλειας για ηλεκτρικά εργαλεία
μόνο καλώδιο επέκτασης που είναι
κατάλληλο για εξωτερική χρήση.
Η χρήση ενός καλωδίου κατάλληλο για εξωτερική
χρήση μειώνει τον κίνδυνο ηλεκτροπληξίας.
ζ) Σε περίπτωση που είναι αναπόφευκτη
η λειτουργία του ηλεκτρικού εργαλείου
σε υγρό περιβάλλον, χρησιμοποιείτε
προστατευτικό διακόπτη συνολικού
ρεύματος προς το σφάλμα. Η χρήση
προστατευτικού διακόπτη συνολικού ρεύματος
προς το σφάλμα μειώνει τον κίνδυνο
ηλεκτροπληξίας.
3. Ασφάλεια ατόμων
α) Επιδείξτε μεγάλη προσοχή, έχετε
πάντοτε επίγνωση των πράξεών σας
και δείξτε ιδιαίτερη συναίνεση στην
εργασία που πραγματοποιείτε με
το ηλεκτρονικό εργαλείο. Μην
χρησιμοποιείτε τη συσκευή όταν δεν
είσαστε συγκεντρωμένοι ή όταν
νοιώθετε κούραση ή ενώ βρίσκεστε υπό
την επήρεια ναρκωτικών, αλκοόλ ή
φαρμάκων. Ακόμα και μόλις μία στιγμή
αφηρημάδας κατά τη χρήση της συσκευής μπορεί
να οδηγήσει σε σοβαρούς τραυματισμούς.
β)
γυαλιά. Ο προσωπικός προστατευτικός
εξοπλισμός όπως είναι αναπνευστική μάσκα,
προστατευτικά παπούτσια που δεν γλιστράνε,
προστατευτικό κράνος ή ωτοασπίδες, ανάλογα
με το είδος και την εφαρμογή του μειώνουν τον
κίνδυνο πρόκλησης τραυματισμών.
γ) Αποφεύγετε την αθέλητη θέση σε
λειτουργία. Βεβαιωθείτε ότι το ηλεκτρικό εργαλείο είναι απενεργοποιημένο
προτού το συνδέσετε στην ηλεκτρική
τροφοδοσία ή το πάρετε και το μεταφέρετε. Εάν κατά τη μεταφορά της συσκευής
έχετε το δάκτυλό σας στο διακόπτη ΕΝΤΟΣ /
ΕΚΤΟΣ ή η συσκευή είναι ενεργοπ οιημένη,
ενδέχεται να προκληθούν ατυχήματα.
δ) Απομακρύνετε τα εργαλεία ρύθμισης ή
τα κλειδιά προτού ενεργοποιήσετε τη
Φοράτε προσωπικό
προστατευτικό εξοπλισμό
και πάντα προστατευτικά
συσκευή. Ενα εργαλείο ή ένα κλειδί που
βρίσκεται πάνω σε ένα περιστρεφόμενο
εξάρτημα συσκευής μπορεί να προκαλέσει
τραυματισμούς.
ε) Αποφεύγετε αντικανονική στάση του
σώματός σας. Φροντίζετε ώστε να
υπάρχει πάντα σταθερή θέση και
διατηρείτε ανά πάση στιγμή την
ισορροπία σας. Ετσι μπορείτε να ελέγχετε
καλύτερα τη συσκευή και ιδιαίτερα σε
απρόσμενες καταστάσεις.
ζ) Φοράτε κατάλληλο ρουχισμό. Μην
φοράτε φαρδιά ρούχα και κοσμήματα.
Κρατήστε τα μαλλιά, το ρουχισμό και
τα γάντια μακριά από τα κινούμενα
εξαρτήματα. Ο φαρδύς ρουχισμός που δεν
έχει στενή εφαρμογή, τα κοσμήματα ή τα μαλλιά
μπορεί να πιαστούν από τα κινούμενα εξαρτήματα.
η) Κατά τη συναρμολόγηση διατάξεων
αναρρόφησης και συλλογής, φροντί
στε ώστε αυτές να έχουν συνδεθεί και
να χρησιμοποιούνται σωστά. Η χρήση
τέτοιου είδους διατάξεων μειώνει τον κίνδυνο
από τη σκόνη.
4. Ασφαλής λειτουργία και χρήση
ηλεκτρονικών συσκευών
α) Μην υπερφορτώνετε τη συσκευή.
Χρησιμοποιήστε το ηλεκτρονικό
εργαλείο που είναι κατάλληλο για την
εργασία σας. Με το κατάλληλο ηλεκτρονικό
εργαλείο μπορείτε να εργαστείτε καλύτερα και με
μεγαλύτερη ασφάλεια εντός του καθορισμένου
τομέα απόδοσης.
β) Μην χρησιμοποιείτε ηλεκτρονικό
εργαλείο, του οποίου ο διακόπτης
είναι ελαττωματικός. Ενα ηλεκτρονικό
εργαλείο που δεν μπορεί να ενεργοποιηθεί ή να
απενεργοποιηθεί είναι επικίνδυνο και θα πρέπει
να επιδιορθωθεί.
γ)
Πριν προβείτε σε ρυθμίσεις της μηχανής
σε αντικατάσταση εξαρτημάτων ή σε
απόθεση της μηχανής, αποσυνδέετε το
βύσμα από την ηλεκτρική πρίζα. Αυτά
τα προστατευτικά μέτρα μειώνουν τον κίνδυνο
αθέμιτης εκκίνησης της συσκευής.
,
19 GR/CY

Γενικές υποδείξεις ασφάλειας για ηλεκτρικά εργαλεία
δ) Φυλάξτε τα ηλεκτρονικά εργαλεία που
δεν χρησιμοποιείτε μακριά από
παιδιά. Μην επιτρέπετε τη χρήση της
συσκευής σε άτομα, τα οποία δεν
είναι έμπιστα ή τα οποία δεν έχουν
διαβάσει τις οδηγίες. Τα ηλεκτρονικά
εργαλεία είναι επικίνδυνα όταν χρησιμοποιούνται
από άπειρα άτομα.
Φροντίστε τη συσκευή με προσοχή.
ε)
Ελέγχετε αν τα κινούμενα εξαρτήματα
λειτουργούν άψογα και δεν μπλοκάρουν, αν υπάρχουν σπασμένα ή
κατεστραμμένα εξαρτήματα έτσι ώστε
να επηρεάζεται αρνητικά η λειτουργία
της συσκευής. Αναθέστε την επιδιό ρθωση
των ελαττωματικών εξαρτη μάτων πριν
από τη χρήση στης συσ κευής. Πολλά
ατυχήματα οφείλονται σε ηλεκτρονικές συσκευές
που δεν έχουν συντηρηθεί σωστά.
ζ) Διατηρήστε τα εργαλεία κοπής αιχμηρά
και καθαρά. Τα προσεγμένα εργαλεία κοπής
μπλοκάρουν λιγότερο και κόβουν πιο εύκολα.
η) Χρησιμοποιήστε το ηλεκτρονικό εργα-
λείο, το εξάρτημα, τα εργαλεία εφαρμογής κ.τ.λ. σύμφωνα με τις οδηγίες τους
και με τον τρόπο που περιγράφεται για
αυτό τον ειδικό τύπο συσκευής. Λάβετε
υπόψη σας τις συνθήκες εργασίας και
τις δραστηριότητες που πρέπει να
πραγματοποιηθούν. Η χρήση ηλεκτρονικών
εργαλείων για εφαρμογή άλλη από αυτή που
προδιαγράφεται μπορεί να οδηγήσει σε επικίνδυνες καταστάσεις.
5. Χρήση και χειρισμός
εργαλείου με συσσωρευτή
α) Φορτίστε τις μπαταρίες μόνο μέσα σε
συσκευές φόρτισης, τις οποίες προτείνει ο κατασκευαστής. Σε ό,τι αφορά σε
μία συσκευή φόρτισης, η οποία είναι κατάλληλη
για ειδικού τύπου μπαταρίες, υφίσταται κίνδυνος
πρόκλησης πυρκαγιάς, σε περίπτωση που χρησιμοποιηθεί με άλλου είδους μπαταρίες.
β) Χρησιμοποιήστε μόνο τις προβλεπόμε-
νες μπαταρίες για τα ηλεκτρικά εργα
Η χρήση άλλων μπαταριών μπορεί να οδηγήσει
20 GR/CY
λεία.
σε τραυματισμούς και κίνδυνο πρόκλησης πυρκαγιάς.
γ) Κρατήστε τη μπαταρία που δεν χρησι-
μοποιείτε μακριά από συνδετήρες,
κέρματα, βελόνες, βίδες ή άλλα μικρά
μεταλλικά αντικείμενα, τα οποία ίσως
να προκαλέσουν γεφύρωση των συνδέσεων. Το βραχυκύκλωμα ανάμεσα στις επα-
φές μπαταρίας μπορεί να έχει ως αποτέλεσμα
την πρόκληση εγκαυμάτων ή πυρκαγιάς.
δ) Σε περίπτωση λάθος εφαρμογής ίσως
εξέλθει υγρό από τη μπαταρία. Αποφύγετε την επαφή με αυτό. Σε περίπτωση αθέμιτης επαφής πλύνετε με νερό.
Αν το υγρό έρθει σε επαφή με μάτια,
καλέστε και ιατρική βοήθεια. Το υγρό
μπαταρίας που εξέρχεται μπορεί να προκαλέσει
ερεθισμό του δέρματος ή εγκαύματα.
Ειδικές υποδείξεις ασφάλει-
ας για κρουστικά τρυπανοκατσάβιδα μπαταρίας
Φοράτε ωτοασπίδες κατά την
πραγματοποίηση κρουστικού
τρυπήματος. Η επίδραση θορύβου
μπορεί να έχει ως συνέπεια τις βλάβες στην ακοή.
Χρησιμοποιήστε την πρόσθετη χειρολα-
βή
που επισυνάπτεται στη συσκευή.
10
Η απώλεια ελέγχου του μηχανήματος μπορεί
να προκαλέσει τραυματισμούς.
Κρατάτε τη συσκευή μόνο από τις μο-
νωμένες επιφάνειες λαβής κατά την
εκτέλεση εργασιών, κατά τις οποίες το
εργαλείο μπορεί να συναντήσει κρυφούς αγωγούς ρεύματος ή το ίδιο του
το καλώδιο δικτύου. Η επαφή με έναν
αγωγό που φέρει τάση μπορεί να θέσει υπό
τάση τα μεταλλικά εξαρτήματα της συσκευής
και να οδηγήσει σε ηλεκτροπληξία.
Αποσυνδέετε πάντα το βύσμα δικτύου
πριν από τον καθαρισμό ή τη συντήρηση της συσκευής φόρτισης ή της
συσκευασίας μπαταρίας. Αυτό τα προ-
στατευτικό μέτρο μειώνει τον κίνδυνο αθέλητης
εκκίνησης της συσκευής.

Γενικές υποδείξεις ασφάλειας για ηλεκτρικά εργαλεία
/ Θέση σε λειτουργία
Μην φορτίζετε ποτέ τη συσκευασία
μπαταρίας όταν η θερμοκρασία περιβάλλοντος είναι κάτω από 10°C ή
πάνω από 40°C. Ετσι επιτυγχάνετε μεγάλη
διάρκεια ζωής της μπαταρίας.
Οι οπές αερισμού της συσκευής φόρτι-
σης θα πρέπει να μένουν πάντα ελεύθερες. Διαφορετικά υφίσταται κίνδυνος από
υπερθέρμανση.
Κατά τις εργασίες στη συσκευή όπως και
κατά τη μεταφορά ή τη φύλαξη ρυθμίστε το διακόπτη φοράς περιστροφής
στην κεντρική θέση (ασφάλεια), προς
αποφυγή αθέλητης εκκίνησης.
Αυθεντικά εξαρτήματα /
5
πρόσθετες συσκευές
Χρησιμοποιήστε τα εξαρτήματα που
αναφέρονται στις οδηγίες χρήσης. Η
χρήση άλλων εργαλείων ή εξαρτημάτων από
αυτά που προτείνονται μέσα στις οδηγίες χρήσης μπορεί να προκαλέσει κίνδυνο τραυματι
Προσοχή αγωγοί!
ΠΡΟΕΙΔΟΠΟΙΗΣΗ!
χτυπάτε πάνω σε ηλεκτρικούς αγωγούς, αγω-
γούς αερίου ή αγωγούς νερού κατά την εργασία
με ένα ηλεκτρικό εργαλείο. Ελέγχετε ενδεχομένως
με μία συσκευή ανίχνευσης αγωγών προτού
τρυπήσετε ή κόψετε έναν τοίχο.
Θέση σε λειτουργία
Συναρμολόγηση πρόσθετης
Βεβαιωθείτε ότι δεν
σμού.
χειρολαβής
Φόρτιση συσκευασίας
μπαταρίας
Υπόδειξη: Μία νέα συσκευασία μπαταρίας ή μία
τέτοια που δεν έχει χρησιμοποιηθεί για πολύ καιρό
πρέπει να φορτιστεί πριν από την πρώτη / εκ νέου
χρήση της. Η συσκευασία μπαταρίας φτάνει στην
πλήρη χωρητικότητά της μετά από περ. 3 - 5 κύκλους
φόρτισης. Μία διαδικασία φόρτισης διαρκεί περ.
90 λεπτά.
ΠΡΟΕΙΔΟΠΟΙΗΣΗ!
το βύσμα δικτύου προτού αφαιρέσετε τη συ-
σκευασία μπαταρίας από τη συσκευή φόρτισης
ή την τοποθετήσετε στη συσκευή φόρτισης.
Αυτό τα προστατευτικό μέτρο μειώνει τον κίνδυνο
αθέλητης εκκίνησης της συσκευής.
Ωθήστε τη σύζευξη (βλέπε Εικ. A) πάνω στη
συσκευασία συσσωρευτή
βύσμα δικτύου μέσα στην πρίζα.
Η κόκκινη φωτοδίοδος LED ελέγχου φόρτισης
15
υποδεικνύει την έναρξη της διαδικασίας
φόρτισης. Σβήνει μόλις φορτιστεί η συσκευασία
μπαταρίας
Η πράσινη φωτοδίοδος LED ελέγχου φόρτισης
16
σηματοδοτεί το πέρας της διαδικασίας
φόρτισης και την ετοιμότητα λειτουργίας της
συσκευασίας μπαταρίας
Μην φορτίζετε ποτέ για δεύτερη φορά μία συ-
σκευασία μπαταρίας
διαδικασία φόρτισης. Υφίσταται κίνδυνος διότι
η συσκευασία μπαταρίας
φορτιστεί και με τον τρόπο αυτό μειώνεται η
διάρκεια ζωής της μπαταρίας και της συσκευής
φόρτισης.
Απενεργοποιήστε τη συσκευή φόρτισης στο
χρονικό διάστημα ανάμεσα σε δύο διαδικασίες
φόρτισης
σκοπό αυτό αποσυνδέστε το βύσμα δικτύου.
9
.
14
για τουλάχιστον 15 λεπτά. Για το
Αποσυνδέετε πάντα
. Τοποθετήστε το
9
9
.
9
αμέσως μετά την ταχεία
9
μπορεί να υπερ-
Βιδώστε την πρόσθετη χειρολαβή 10 ανάλογα
από τον τρόπο εργασίας, είτε δεξιά ή αριστερά
στη συσκευή.
Τοποθέτηση / αφαίρεση
συσκευασίας μπαταρίας
στη συσκευή
Αφαίρεση συσκευασίας συσσωρευτή:
Στρέψτε την αφαίρεση συσσωρευτή της συσκευής
κατά 180°.
21 GR/CY

Θέση σε λειτουργία
Πιέστε το πλήκτρο για απασφάλιση 8 και
βγάλτε τη συσκευασία συσσωρευτή
από τη
9
συσκευή.
Τοποθέτηση συσκευασίας συσσωρευτή:
Ωθήστε τη συσκευασία συσσωρευτή
9
πάνω
στη συσκευή.
Ελεγχος κατάστασης μπαταρίας
Πιέστε το πλήκτρο κατάστασης μπαταρίας 3.
Το υπόλοιπο της ισχύος εμφανίζεται στην οπτική
ένδειξη LED
Σασμάν 2 ταχυτήτων
2
.
Στην πρώτη ταχύτητα (διακόπτης επιλογής
1
σε θέση: 1)
επιτυγχάνετε αριθμό στροφών περ. 500 σ.α.λ. και
υψηλή ροπή στρέψης. Για παράδειγμα εργασίας
βιδώματος με εξαιρετικά μικρές διαμέτρους βιδών.
Στη δεύτερη ταχύτητα (διακόπτης επιλογής
1
σε θέση: 2)
επιτυγχάνετε αριθμό στροφών περ. 1800 σ.α.λ. και
χαμηλότερη ροπή στρέψης. Για παράδειγμα για
γρήγορη διάτρηση σε τοιχοποιία ή μεγάλη διάμετρο
τρυπήματος / βιδώματος.
Προεπιλογή ροπής στρέψης
Μπορείτε να ρυθμίσετε μέσω της προεπιλογής ροπής στρέψης
13
τη δύναμη περιστροφής.
Οταν επιτευχθεί η ρυθμισμένη δύναμη περιστροφής,
ο συμπλέκτης αποσυνδέει τη μετάδοση κίνησης.
Με τον τρόπο αυτό μπορείτε να βιδώνετε βίδες σε
προκαθορισμένο βάθος, ιδανική περίπτωση για
τυποποιημένα βιδώματα.
Επιλέξτε μικρότερη βαθμίδα για μικρές βίδες,
απαλά υλικά.
Επιλέξτε μεγαλύτερη βαθμίδα για μεγάλες βίδες,
σκληρά υλικά ή για ξεβίδωμα βιδών.
Για εργασίες διάτρησης επιλέξτε τη βαθμίδα
διάτρησης ρυθμίζοντας την προεπιλογή ροπής
στρέψης στη θέση
22 GR/CY
.
Διατρήσεις / Βιδώματα /
Κρουστικές διατρήσεις
Διατρήσεις / Βιδώματα:
Περιστρέψτε το ρυθμιστικό δακτύλιο
σύμβολο
.
Κρουστικές διατρήσεις:
Περιστρέψτε το ρυθμιστικό δακτύλιο
σύμβολο
Αντικατάσταση εργαλείων
.
Το τρυπάνι με συσσωρευτή διαθέτει υπεραυτόματη
μανδάλωση ατράκτου
και έχει εξοπλιστεί με
σφιγκτήρα τρυπανιού ενός άξονα με ακτινική
ασφάλιση „Made in Germany“ της
Κατά την ακινητοποίηση του μοτέρ, το σύστημα
μετάδοσης κίνησης μανδαλώνεται, έτσι ώστε ο σφιγκτήρας τρυπανιού άμεσης τάνυσης
να ανοίξει στρέφοντας προς τη φορά του βέλους
(βλέπε επιγραφή μπροστά σε σφιγκτήρα τρυπανιού
„
ΑΝΟΙΧΤΟ / OPEN“).
Εφόσον έχετε εφαρμόσει το επιθυμητό εργαλείο,
στρέψτε το σφιγκτήρα τρυπανιού προς τη φορά
του βέλους έως ότου σταματήσουν να ακούγονται
ήχοι ασφάλισης (Κλικ!) (βλέπε επιγραφή μπροστά
σε σφιγκτήρα τρυπανιού „
ΚΛΕΙΣΤΟ / CLOSE“).
Ο σφιγκτήρας τρυπανιού μανδαλώνει αυτόματα με
τον τρόπο αυτό. Η μανδάλωση ατράκτου απελευθερώνεται κατά την έναρξη του μοτέρ (ενεργοποίηση
πλήκτρου ΕΝΤΟΣ / ΕΚΤΟΣ
Ενεργοποίηση / Απενεργοποίηση
).
6
Πατήστε το διακόπτη ΕΝΤΟΣ / ΕΚΤΟΣ 6 για
τη θέση σε λειτουργία της συσκευής και κρατήστε
τον πατημένο.
Αφήστε ελεύθερο το διακόπτη ΕΝΤΟΣ / ΕΚΤΟΣ
6
για την απενεργοποίηση της συσκευής.
12
12
να μπορεί
11
στο
στο
.

Θέση σε λειτουργία / Συντήρηση και καθαρισμός / Σέρβις / Εγγύηση
Ρύθμιση αριθμού στροφών
Ο διακόπτης ΕΝΤΟΣ / ΕΚΤΟΣ 6 διαθέτει μεταβλητή
ρύθμιση ταχύτητας.
Αύξηση αριθμού περιστροφών:
Αυξήστε την πίεση στο διακόπτη ΕΝΤΟΣ /
ΕΚΤΟΣ
6
.
Για το καθάρισμα του πλαισίου χρησιμοποιείτε
ένα στεγνό πανί και σε καμία περίπτωση βενζίνη, διαλύτες ή απορρυπαντικά.
ΠΡΟΕΙΔΟΠΟΙΗΣΗ!
Μην ανοίγετε ποτέ
τις συσκευές. Αναθέστε τις εργασίες επιδιόρ-
θωσης ή αντικατάστασης μόνο σε ειδική υπηρεσία σέρβις ή σε έναν ειδικό ηλεκτροτεχνικό.
Μείωση αριθμού περιστροφών:
Μειώστε την πίεση στο διακόπτη ΕΝΤΟΣ /
ΕΚΤΟΣ
6
. Το ενσωματωμένο φρένο κινητήρα
φροντίζει για ταχεία ακινητοποίηση – ιδανική
περίπτωση για τυποποιημένα βιδώματα.
Αλλαγή φοράς περιστροφής
Αλλάξτε τη φορά περιστροφής πιέζοντας το
διακόπτη φοράς περιστροφής
5
προς τα
δεξιά ή προς τα αριστερά.
Συμβουλές και τρικ
Διάτρηση σε μέταλλο: Χρησιμοποιείτε μεταλλικό
τρυπάνι (HSS). Για καλύτερα αποτελέσματα θα
πρέπει να ψύχετε το τρυπάνι με έλαιο. Μεταλλικά
τρυπάνια μπορείτε να χρησιμοποιείτε επίσης για
διατρήσεις σε πλαστικά.
Διάτρηση σε πέτρωμα: Χρησιμοποιείτε ειδικό
τρυπάνι σκληρού μετάλλου για πετρώματα.
Διάτρηση σε ξύλο: Χρησιμοποιείτε τρυπάνι για
διατρήσεις σε ξύλο με ακίδα κεντραρίσματος, για
βαθιές διατρήσεις χρησιμοποιείτε „τρυπάνι μεγάλης
ελίκωσης”, για διατρήσεις μεγάλης διαμέτρου τρυπάνι Forstner. Μικρές βίδες σε μαλακό ξύλο μπορούν να βιδώνονται αμέσως χωρίς προδιάτρηση.
Σέρβις
ΠΡΟΕΙΔΟΠΟΙΗΣΗ!
Αναθέστε την
επιδιόρθωση της συσκευής σας σε
υπηρεσία εξυπηρέτησης πελατών ή σε
εξειδικευμένο ηλεκτρολόγο και χρησιμοποιήστε μόνο αυθεντικά ανταλλακτικά. Με τον τρόπο αυτό μπορεί να διασφα-
λιστεί το γεγονός ότι διατηρείται το επίπεδο
ασφάλειας της συσκευής.
ΠΡΟΕΙΔΟΠΟΙΗΣΗ!
Αναθέστε την
αντικατάσταση του βύσματος και του
συνδετικού αγωγού πάντα στον κατασκευαστή της συ σκευής ή στην υπηρεσία εξυπηρέτησης πελατών. Με τον τρόπο
αυτό μπορεί να διασφαλιστεί το γεγονός ότι διατηρείται το επίπεδο ασφάλειας της συσκευής.
Εγγύηση
Έχετε για αυτή τη συσκευή 3 χρόνια εγγύηση από την ημερομηνία αγοράς. Η συσκευή κατασκευάστηκε και ελέγχθηκε
προσεκτικά πριν από την αποστολή. Παρακαλούμε φυλάξτε την απόδειξη ταμείου
ως απόδειξη για την αγορά. Παρακαλούμε
επικοινωνήστε τηλεφωνικά με την υπηρεσία
σέρβις σε περίπτωση εγγύησης. Μόνο έτσι
μπορεί να εξασφαλιστεί μια δωρεάν αποστολή του εμπορεύματός σας.
Συντήρηση και καθαρισμός
Το κρουστικό τρυπανοκατσάβιδο μπαταρίας δεν
χρειάζεται συντήρηση.
Καθαρίζετε τακτικά τη συσκευή, αμέσως μετά
το πέρας της εργασίας.
Η απόδοση εγγύησης ισχύει μόνο για σφάλματα
υλικού ή κατασκευής, όχι όμως για ζημιές από τη
μεταφορά, για εξαρτήματα φθοράς ή για βλάβες
σε εύθραυστα εξαρτήματα, π.χ. διακόπτες ή συσσωρευτές. Το προϊόν προορίζεται μόνο για την
ιδιωτική και όχι για την επαγγελματική χρήση.
23 GR/CY

Εγγύηση / Απόσυρση
Σε περίπτωση κακής μεταχείρισης και ακατάλληλης
χρήσης, σε χρήση βίας και σε παρεμβάσεις οι
οποίες δεν διεξήχθησαν από το εξουσιοδοτημένο
μας τμήμα σέρβις, η εγγύηση παύει να ισχύει. Τα
νομικά σας δικαιώματα δεν περιορίζονται μέσω αυτής της εγγύησης.
Ο χρόνος εγγύησης δεν επεκτείνεται μέσω της απόδοσης εγγύησης. Αυτό ισχύει και για εξαρτήματα
τα οποία έχουν αντικατασταθεί ή επισκευαστεί.
Ενδεχόμενες ήδη υπάρχουσες κατά την αγορά,
ζημιές και ελλείψεις πρέπει να αναφέρονται αμέσως
μετά την αποσυσκευασία, το αργότερο όμως δύο
ημέρες μετά την ημερομηνία αγοράς. Επισκευές που
εμφανίζονται μετά τη λήξη του χρόνου εγγύησης
χρεώνονται.
GR
Kompernass Service Greece
Tel.: 801 200 10 18 (local charge
0,031EUR/minute (including
VAT 19 %))
e-mail: support.gr@kompernass.com
CY
Kompernass Service Cyprus
Tel.: 800 94401
e-mail: support.cy@kompernass.com
Μην απορρίπτετε τους συσσωρευτές
μέσα στα οικιακά απορρίμματα!
Ελαττωματικές ή μεταχειρισμένες μπαταρίες πρέπει
να ανακυκλώνονται σύμφωνα με την Οδηγία
2006 / 66 / EC. Προς το σκοπό αυτό διαβάστε τις
ειδικές υποδείξεις ασφάλειας για συσκευή φόρτισης και συσκευασία μπαταρίας. Επιστρέφετε τις
μπαταρίες ή / και τη συσκευή στις προσφερόμενες
υπηρεσίες συλλογής απορριμμάτων.
Δυνατότητες απόσυρσης των χρησιμοποιημένων
συσκευών θα πληροφορηθείτε από τη διαχείριση
κοινότητας ή πόλης σας.
Απόσυρση
Η συσκευασία αποτελείται αποκλειστικά
από υλικά που σέβονται το περιβάλλον.
Αποσύρετέ τη με τη βοήθεια των κατά
τόπους υπηρεσιών ανακύκλωσης.
Μην πετάτε ποτέ ηλεκτρικές συ-
σκευές στα οικιακά απορρίμματα!
Σύμφωνα με την Ευρωπαϊκή Οδηγία 2002 / 96 / EC
σχετικά με παλιές ηλεκτρονικές και ηλεκτρικές συσκευές και εφαρμογή σε εθνικό δίκαιο θα πρέπει οι
μεταχειρισμένες ηλεκτρικές συσκευές να συλλέγονται σε ξεχωριστό χώρο και να ανακυκλώνονται
οικολογικά.
24 GR/CY

Δήλωση συμμόρφωσης /
κατασκευαστής
Εμείς, η εταιρία Kompernaß GmbH, υπεύθυνος
εγγράφων: Κύριος Felix Becker, Burgstr. 21,
D-44867 Bochum, Γερμανία, δηλώνουμε με το παρόν ότι το προϊόν αυτό συμφωνεί με τα ακόλουθα
πρότυπα, κανονιστικά έγγραφα και οδηγίες ΕΚ.
Οδηγία μηχανημάτων
(2006 / 42 / EC)
Οδηγία περί χαμηλών συχνοτήτων Ε.Κ.
(2006/ 95 / EC)
Ηλεκτρομαγνητική συμβατότητα
(2004 / 108 / EC)
Εφαρμοσθέντα εναρμονισμένα πρότυπα
EN 60335-1: 2002+A1+A11+A12+A2+A13
EN 60335-2-29: 2004
EN 62233:2008
EN 60745-1: 2009
EN 60745-2-1: 2003+A11+A1+A12
EN 60745-2-2: 2003+A11+A1+A12
ZEK 01.2-08 / 12.08
2006 / 42 / EC – Annex I / 05.06
Δήλωση συμμόρφωσης / Κατασκευαστής
Ονομασία προϊόντος:
Κρουστικό κατσαβίδι μπαταρίας PSBS 24 A1
Date of manufacture (DOM): 05 - 2010
Αριθμός σειράς: IAN 49384
Bochum, 31.05.2010
Hans Kompernaß
- Διευθυντής -
Με επιφύλαξη τεχνικών τροποποιήσεων κατά την
έννοια της περαιτέρω βελτίωσης.
25 GR/CY

26

Inhaltsverzeichnis
Einleitung
Bestimmungsgemäßer Gebrauch .................................................................................Seite 28
Ausstattung ....................................................................................................................Seite 28
Lieferumfang ..................................................................................................................Seite 29
Technische Daten ..........................................................................................................Seite 29
Allgemeine Sicherheitshinweise für Elektrowerkzeuge
1. Arbeitsplatz-Sicherheit ..............................................................................................Seite 30
2. Elektrische Sicherheit ................................................................................................Seite 30
3. Sicherheit von Personen ...........................................................................................Seite 30
4. Verwendung und Behandlung des Elektrowerkzeugs ............................................Seite 31
5. Verwendung und Behandlung des Akkuwerkzeuges .............................................Seite 32
Gerätespezifische Sicherheitshinweise für Akku-Schlag-Bohrschrauber ....................Seite 32
Originalzubehör / -zusatzgeräte ..................................................................................Seite 32
Achtung Leitungen! .......................................................................................................Seite 32
Inbetriebnahme
Zusatzhandgriff montieren ............................................................................................Seite 32
Akku-Pack laden ............................................................................................................Seite 33
Akku-Pack ins Gerät einsetzen / entnehmen ................................................................Seite 33
Akkuzustand prüfen ......................................................................................................Seite 33
2-Gang Getriebe ..........................................................................................................Seite 33
Drehmomentvorwahl .....................................................................................................Seite 33
Bohren / Schrauben / Schlagbohren ............................................................................ Seite 33
Werkzeuge wechseln ...................................................................................................Seite 33
Ein- / ausschalten ...........................................................................................................Seite 34
Drehzahl einstellen ........................................................................................................Seite 34
Drehrichtung umschalten ..............................................................................................Seite 34
Tipps und Tricks .............................................................................................................Seite 34
Wartung und Reinigung ...............................................................................Seite 34
Service .........................................................................................................................Seite 34
Garantie .....................................................................................................................Seite 35
Entsorgung ...............................................................................................................Seite 35
Konformitätserklärung / Hersteller ....................................................Seite 36
27 DE/AT/CH

Einleitung
In dieser Bedienungsanleitung / am Gerät werden folgende Piktogramme verwendet:
Bedienungsanleitung lesen!
Warn- und Sicherheitshinweise
beachten!
Vorsicht vor elektrischem Schlag!
Lebensgefahr!
n
0
V
Bemessungs-Leerlaufdrehzahl Schutzklasse II
Volt (Wechselspannung) Bohrstufe (Drehmomentvorwahl)
~
Tragen Sie einen Gehörschutz, eine
Atem- / Staubschutzmaske, Schutzhandschuhe und eine Schutzbrille.
Tragen Sie geeignetes Schuhwerk.
Nur zur Verwendung in Innenräumen!
Spindelarretierung
Bohrfutter, Made in Germany
Akku-Schlagbohrschrauber
PSBS 24 A1
Bohren und Schrauben in Holz,
Kunststoff und Metall
Einleitung
W
Nm
Ah
Sie das Gerät nur wie beschrieben und für die angegebenen Einsatzbereiche. Jede andere Verwendung
oder Veränderung des Gerätes gilt als nicht bestimmungsgemäß und birgt erhebliche Unfallgefahren.
Für aus bestimmungswidriger Verwendung entstan
Schäden übernimmt der Hersteller keine Haftung.
Nicht für den gewerblichen Einsatz bestimmt.
Watt (Wirkleistung)
Gleichstrom (Strom- und Spannungsart)
Newtonmeter (Drehmoment)
Bohrstufe (Schlagbohren)
Ampere-Stunde (Akku-Kapazität)
Lebensgefahr durch elektrischen
Schlag bei beschädigtem Netzkabel
oder -stecker!
Kinder vom Elektrowerkzeug
fernhalten!
Entsorgen Sie Verpackung und Gerät
umweltgerecht!
dene
Machen Sie sich vor der ersten Inbetrieb-
nahme mit den Funktionen des Gerätes
vertraut und informieren Sie sich über den
richtigen Umgang mit Elektrowerkzeugen. Lesen Sie
hierzu die nachfolgende Bedienungsanleitung. Bewahren Sie diese Anleitung auf. Händigen Sie alle
Unterlagen bei Weitergabe des Gerätes an Dritte aus.
Bestimmungsgemäßer Gebrauch
Dieses Gerät ist zum Bohren und Schrauben in Holz,
Kunststoff und Metall, sowie zum Schlagbohren in
Gestein, Ziegel und Beton bestimmt. Für Bohrungen
in Granit empfehlen wir einen Bohrhammer. Benutzen
28 DE/AT/CH
Ausstattung
1
Gangwahlschalter
2
LED-Display / Akkuzustand
3
Taste zur Prüfung des Akkuzustands
4
Wasserwaage
5
Drehrichtungsumschalter / Sperre
6
EIN- / AUS-Schalter / Drehzahlregulierung
7
Bit
8
Taste zur Entriegelung des Akkus
9
Akku-Pack
10
Zusatzhandgriff
11
Schnellspannfutter
12
Einstellring Bohren / Schlagbohren

Einleitung
13
Drehmomentvorwahl
14
Akku-Schnell-Ladegerät
15
rote Ladekontroll-LED
16
grüne Ladekontroll-LED
Lieferumfang
1 Tragekoffer
1 Akku-Schlagbohrschrauber mit Akku-Pack
1 Zusatzhandgriff
2 Bits
1 Ladegerät
1 Bedienungsanleitung
Technische Daten
Akku-Schlagbohrschrauber PSBS 24 A1:
Nennspannung: 24 V
Nennleerlaufdrehzahl: 1. Gang: n0 0 - 500 min
Nennleerlaufdrehzahl: 2. Gang: n0 0 - 1800 min
Spannfutterweite: 1,0 - 13 mm
Max. Bohrdurchmesser: Metall: 13 mm
Holz: 30 mm
Mauerwerk
(Beton): 15 mm
Max. Drehmoment: 35 Nm
Größe: 338 x 69 x 237 mm
Ni-CD Akku-Pack PSBS 24 A1-1:
Nennspannung: 24 V
Kapazität: 1,5 (Ah)
Energiegehalt: 36 Wh
Akku-Schnell-Ladegerät PSBS 24 A1-2:
Nennspannung: 230 V
50 Hz, 105 W
~
Ladestrom: 3000 mA
Ladedauer: 90 min
Schutzklasse: II /
Geräusch und Vibrationsinformationen:
Messwert für Geräusch ermittelt entsprechend
EN 60745. Der A-bewertete Geräuschpegel des
Elektrowerkzeugs beträgt typischerweise:
Schalldruckpegel: 76 dB(A)
Schallleistungspegel: 87 dB(A)
Schalldruckpegel
(Schlagbohren in Beton): 87 dB(A)
Schallleistungspegel
(Schlagbohren in Beton): 98 dB(A)
Unsicherheit K: 3 dB
Gehörschutz tragen!
Schwingungsgesamtwerte (Vektorsumme dreier
Richtungen) ermittelt entsprechend EN 60745:
Bohren in Metall: Schwingungsemissionswert
a
= 1,682 m / s2,
h, D
Unsicherheit K = 1,5 m / s2,
Schrauben: Schwingungsemissionswert
a
= 1,109 m / s2,
h
Unsicherheit K = 1,5 m / s
Schlagbohren
in Beton: Schwingungsemissionswert
-1
-1
WARNUNG!
a
= 11,25 m / s2,
h, ID
Unsicherheit K = 1,5 m / s2.
Der in diesen Anweisungen
angegebene Schwingungspegel ist entsprechend
einem in EN 60745 genormten Messverfahren
gemessen worden und kann für den Gerätevergleich verwendet werden.
Der Schwingungspegel wird sich entsprechend
dem Einsatz des Elektrowerkzeugs verändern und
kann in manchen Fällen über dem in diesen Anweisungen angegebenen Wert liegen. Die Schwingungsbelastung könnte unterschätzt werden, wenn das
Elektrowerkzeug regelmäßig in solcher Weise
verwendet wird.
Hinweis: Für eine genaue Abschätzung der
Schwingungsbelastung während eines bestimmten
Arbeitszeitraumes sollten auch die Zeiten berücksichtigt werden, in denen das Gerät abgeschaltet
ist oder zwar läuft, aber nicht tatsächlich im Einsatz
ist. Dies kann die Schwingungsbelastung über den
gesamten Arbeitszeitraum deutlich reduzieren.
2
,
29 DE/AT/CH

Allgemeine Sicherheitshinweise für Elektrowerkzeuge
Allgemeine
Sicherheitshinweise
für Elektrowerkzeuge
WARNUNG!
hinweise und Anweisungen. Versäumnisse
bei der Einhaltung der Sicherheitshinweise und
Anweisungen können elektrischen Schlag, Brand
und / oder schwere Verletzungen verursachen.
Bewahren Sie alle Sicherheitshinweise
und Anweisungen für die Zukunft auf.
Der in den Sicherheitshinweisen verwendete Begriff
„Elektrowerkzeug“ bezieht sich auf netzbetriebene
Elektrowerk
triebene Elektrowerkzeuge (ohne Netzkabel).
Lesen Sie alle Sicherheits-
zeuge (mit Netzkabel) und auf akkube-
1. Arbeitsplatz-Sicherheit
a) Halten Sie Ihren Arbeitsbereich sauber
und gut beleuchtet. Unordnung und unbeleuch-
tete Arbeitsbereiche können zu Unfällen führen.
b)
der sich brennbare Flüssigkeiten, Gase
c)
fern. Bei Ablenkung können Sie die Kontrolle
Arbeiten Sie mit dem Elektro-
werkzeug nicht in explosionsgefährdeter Umgebung, in
oder Stäube befinden. Elektrowerkzeuge
erzeugen Funken, die den Staub oder die
Dämpfe entzünden können.
Halten Sie Kinder und andere
Personen während der Benutzung des Elektrowerkzeugs
über das Gerät verlieren.
2. Elektrische Sicherheit
a) Der Anschlussstecker des Elektrowerk-
zeuges muss in die Steckdose passen.
Der Stecker darf in keiner Weise verändert werden. Verwenden Sie keine
Adapterstecker gemeinsam mit
schutzgeerdeten Elektrowerkzeugen.
Unveränderte Stecker und passende Steckdosen
verringern das Risiko eines elektrischen Schlages.
30 DE/AT/CH
b) Vermeiden Sie Körperkontakt mit ge-
erdeten Oberflächen, wie von Rohren,
Heizungen, Herden und Kühlschränken.
Es besteht ein erhöhtes Risiko durch elektrischen
Schlag, wenn Ihr Körper geerdet ist.
c) Halten Sie Elektrowerkzeuge von Re-
gen oder Nässe fern. Das Eindringen von
Wasser in ein Elektrogerät erhöht das Risiko
eines elektrischen Schlages.
d)
hängen oder um den Stecker aus der
e) Wenn Sie mit einem Elektrowerkzeug
f) Wenn der Betrieb des Elektrowerk-
Zweckentfremden Sie das
Kabel nicht, um das Elektrowerkzeug zu tragen, aufzu-
Steckdose zu ziehen. Halten Sie das
Kabel fern von Hitze, Öl, scharfen
Kanten oder sich bewegenden Geräteteilen. Beschädigte oder verwickelte Kabel
erhöhen das Risiko eines elektrischen Schlages.
im Freien arbeiten, verwenden Sie nur
Verlängerungskabel, die auch für den
Außenbereich zugelassen sind. Die
Anwendung eines für den Außenbereich
geeigneten Verlängerungskabels verringert
das Risiko eines elektrischen Schlages.
zeuges in feuchter Umgebung nicht
vermeidbar ist, verwenden Sie einen
Fehlerstromschutzschalter. Der Einsatz
eines Fehlerstromschutzschalters vermindert
das Risiko eines elektrischen Schlages.
3. Sicherheit von Personen
a)
Seien Sie stets aufmerksam, achten Sie
darauf, was Sie tun und gehen Sie mit
Vernunft an die Arbeit mit einem Elektrowerkzeug. Benutzen Sie kein Elektrowerkzeug, wenn Sie müde sind oder
unter dem Einfluss von Drogen, Alkohol oder Medikamenten stehen. Ein
Moment der Unachtsamkeit beim Gebrauch
des Elektrowerkzeuges kann zu ernsthaften
Verletzungen führen.
b)
Tragen Sie persönliche
Schutzausrüstung und
immer eine Schutzbrille.

Allgemeine Sicherheitshinweise für Elektrowerkzeuge
Das Tragen persönlicher Schutzausrüstung
wie Staubmaske, rutschfeste Sicherheitsschuhe,
Schutzhelm oder Gehörschutz, je nach Art und
Einsatz des Elektrowerkzeuges, verringert das
Risiko von Verletzungen.
c) Vermeiden Sie eine unbeabsichtigte
Inbetriebnahme. Vergewissern Sie sich,
dass das Elektrowerkzeug ausgeschaltet ist, bevor Sie es an die Stromversorgung anschließen, es aufnehmen
oder tragen. Wenn Sie beim Tragen des
Elektrowerkzeuges den Finger am Schalter ha
oder das Gerät bereits eingeschaltet an die
Stromversorgung anschließen, kann dies zu
Unfällen führen.
d) Entfernen Sie Einstellwerkzeuge oder
Schraubenschlüssel, bevor Sie das
Elektrowerkzeug einschalten. Ein Werk-
zeug oder Schlüssel, der sich in einem drehenden
Geräteteil befindet, kann zu Verletzungen führen.
e) Vermeiden Sie eine abnormale Körper-
haltung. Sorgen Sie für einen sicheren
Stand und halten Sie jederzeit das
Gleichgewicht. Dadurch können Sie das
Elektrowerkzeug in unerwarteten Situationen
besser kontrollieren.
f) Tragen Sie geeignete Kleidung. Tragen
Sie keine weite Kleidung oder Schmuck.
Halten Sie Haare, Kleidung und Handschuhe fern von sich bewegenden
Teilen. Lockere Kleidung, Schmuck oder lange
Haare können von sich bewegenden Teilen
erfasst werden.
g) Wenn Staubabsaug- und -auffangein-
richtungen montiert werden können,
vergewissern Sie sich, dass diese
angeschlossen sind und richtig verwendet werden. Die Verwendung einer
Staubabsaugung kann Gefährdungen durch
Staub verringern.
ben
4. Verwendung und Behandlung
des Elektrowerkzeugs
bestimmte Elektrowerkzeug. Mit dem
passenden Elektrowerkzeug arbeiten Sie besser
und sicherer im angegebenen Leistungsbereich.
b) Benutzen Sie kein Elektrowerkzeug,
dessen Schalter defekt ist. Ein Elektrowerk-
zeug, das sich nicht mehr ein- oder ausschalten
lässt, ist gefährlich und muss repariert werden.
c) Ziehen Sie den Stecker aus der Steck-
dose und / oder entfernen Sie den
Akku, bevor Sie Geräteeinstellungen
vornehmen, Zubehörteile wechseln
oder das Gerät weglegen. Diese
Vorsichtsmaßnahme verhindert den unbeabsichtigten Start des Elektrowerkzeuges.
d) Bewahren Sie unbenutzte Elektrowerk-
zeuge außerhalb der Reichweite von
Kindern auf. Lassen Sie Personen das
Gerät nicht benutzen, die mit diesem
nicht vertraut sind oder diese Anweisungen nicht gelesen haben. Elektrowerk-
zeuge sind gefährlich, wenn sie von unerfahrenen
Personen benutzt werden.
e) Pflegen Sie Elektrowerkzeuge mit
Sorgfalt. Kontrollieren Sie, ob bewegliche Teile einwandfrei funktionieren
und nicht klemmen, ob Teile gebrochen
oder so beschädigt sind, dass die Funktion des Elektrowerkzeuges beeinträchtigt ist. Lassen Sie beschädigte Teile vor
dem Einsatz des Gerätes reparieren.
Viele Unfälle haben ihre Ursache in schlecht
gewarteten Elektrowerkzeugen.
f) Halten Sie Schneidwerkzeuge scharf
und sauber. Sorgfältig gepflegte Schneid-
werkzeuge mit scharfen Schneidkanten verklemmen sich weniger und sind leichter zu führen.
g) Verwenden Sie Elektrowerkzeug,
Zubehör, Einsatzwerkzeuge usw.
entsprechend diesen Anweisungen.
Berücksichtigen Sie dabei die Arbeitsbedingungen und die auszuführende
Tätigkeit. Der Gebrauch von Elektrowerk-zeu-
gen für andere als die vorgesehenen Anwendungen kann zu gefährlichen Situationen führen.
a) Überlasten Sie das Gerät nicht. Ver-
wenden Sie für Ihre Arbeit das dafür
31 DE/AT/CH

Allgemeine Sicherheitshinweise für Elektrowerkzeuge / Inbetriebnahme
5. Verwendung und Behandlung
des Akkuwerkzeuges
a) Laden Sie die Akkus nur in Ladegeräten
auf, die vom Hersteller empfohlen werden. Für ein Ladegerät, das für eine bestimmte
Art von Akkus geeignet ist, besteht Brandgefahr,
wenn es mit anderen Akkus verwendet wird.
b) Verwenden Sie nur die dafür vorgese-
henen Akkus in den Elektrowerkzeugen.
Der Gebrauch von anderen Akkus kann zu
Verletzungen und Brandgefahr führen.
c) Halten Sie den nicht benutzten Akku
fern von Büroklammern, Münzen,
Schlüsseln, Nägeln, Schrauben oder
anderen kleinen Metallgegenständen,
die eine Überbrückung der Kontakte
verursachen könnten. Ein Kurzschluss zwi-
schen den Akkukontakten kann Verbrennungen
oder Feuer zur Folge haben.
d) Bei falscher Anwendung kann Flüssig-
keit aus dem Akku austreten. Vermei
Sie den Kontakt damit. Bei zufälligem
Kontakt mit Wasser abspülen. Wenn
die Flüssigkeit in die Augen kommt,
nehmen Sie zusätzlich ärztliche Hilfe
in Anspruch. Austretende Akkuflüssigkeit kann
zu Hautreizungen oder Verbrennungen führen.
den
k
ann auch metallene Geräteteile unter Spannu
setzen und zu einem elektrischen Schlag führen.
Ziehen Sie vor Reinigung oder War-
tung von Ladegerät oder Akku-Pack
immer den Netzstecker. Dies verhindert
den unbeabsichtigten Start des Gerätes.
Laden Sie nie den Akku-Pack, wenn
die Umgebungstemperatur unterhalb
10 °C oder oberhalb 40 °C liegt. Dadurch
erreichen Sie eine hohe Lebensdauer des Akkus.
Die Lüftungsöffnungen des Ladegeräts
müssen immer frei sein. Andernfalls droht
Gefahr durch Überhitzung.
Bei Arbeiten am Gerät, sowie Trans-
port, bzw. Aufbewahrung bringen Sie
den Drehrichtungsumschalter
die Mittelposition (Sperre), um unbeabsichtigtes Anlaufen zu verhindern.
Originalzubehör / -zusatzgeräte
Benutzen Sie nur Zubehör und Zusatz-
geräte, die in der Gebrauchsanweisung
angegeben sind. Der Gebrauch anderer als
in der Bedienungsanleitung empfohlener Einsatzwerkzeuge oder anderen Zubehörs kann
eine Verletzungsgefahr für Sie bedeuten.
ng
5
in
Gerätespezifische Sicher-
heitshinweise für AkkuSchlag-Bohrschrauber
Tragen Sie Gehörschutz beim
Schlagbohren. Die Einwirkung von
Lärm kann Gehörverlust bewirken.
Benutzen Sie den mit dem Gerät gelie-
ferten Zusatzhandgriff
Kontrolle über die Maschine kann zu Verlet
führen.
Halten Sie das Gerät an den isolierten
Griffflächen, wenn Sie Arbeiten ausführen, bei denen das Einsatzwerkzeug
verborgene Stromleitungen oder das
eigene Netzkabel treffen kann. Der
Kontakt mit einer spannungsführenden Leitung
32 DE/AT/CH
10
. Der Verlust der
zungen
Achtung Leitungen!
WARNUNG!
nicht auf Strom-, Gas- oder Wasserleitungen
stoßen, wenn Sie mit einem Elektrowerkzeug
arbeiten. Prüfen Sie ggf. mit einem Leitungssucher,
bevor Sie in eine Wand bohren bzw. aufschlitzen.
Inbetriebnahme
Zusatzhandgriff montieren
Schrauben Sie den Zusatzhandgriff 10 abhän-
gig von Ihrer Arbeitsweise rechts oder links am
Gerät ein.
Vergewissern Sie sich, dass Sie

Inbetriebnahme
Akku-Pack laden
HINWEIS: Ein neuer oder lange Zeit nicht ge-
nutzter Akku-Pack muss vor der ersten / erneuten
Benutzung aufgeladen werden. Seine volle Kapazität erreicht der Akku-Pack nach ca. 3 - 5 Ladezyklen.
Ein Ladevorgang dauert ca. 90 Minuten.
WARNUNG!
Ziehen Sie vor Entnahme des
Akku-Packs aus dem Gerät bzw. vor Einsetzen in
das Gerät immer den Netzstecker. Dies verhindert
den unbeabsichtigten Start des Gerätes.
Schieben Sie die Kupplung (siehe Abb. A) auf
den Akku-Pack
9
. Stecken Sie den Netzstecker
in die Steckdose.
Die rote Ladekontroll-LED
15
zeigt den Beginn
des Ladevorgangs an. Sie erlischt, sobald der
Akku-Pack
Die grüne Ladekontroll-LED
9
geladen ist.
16
signalisiert Ihnen,
dass der Ladevorgang abgeschlossen und der
Akku-Pack
Laden Sie einen Akku-Pack
9
einsatzbereit ist.
9
niemals
unmittelbar nach dem Schnell-Ladevorgang ein
zweites Mal auf. Es besteht die Gefahr, dass der
Akku-Pack
9
überladen und dadurch die Lebens-
dauer von Akku und Ladegerät verringert wird.
Schalten Sie das Ladegerät
14
zwischen aufeinanderfolgenden Ladevorgängen für mindestens
15 Minuten ab. Ziehen Sie dazu den Netzstecker.
Akku-Pack ins Gerät einsetzen /
entnehmen
Akku-Pack entnehmen:
Drehen Sie zur Akkuentnahme das Gerät um
180°.
Drücken Sie die Taste zur Entriegelung
schieben Sie den Akku-Pack
9
Akku-Pack einsetzen:
Schieben Sie den Akku-Pack
9
8
und
aus dem Gerät.
auf das Gerät.
2-Gang Getriebe
Im ersten Gang (Gangwahlschalter 1 in
Position: 1)
erreichen Sie eine Drehzahl von ca. 500 min
-1
und
ein hohes Drehmoment. Beispielsweise für Schraubarbeiten mit geringen Schraubendurchmessern.
Im zweiten Gang (Gangwahlschalter
Position: 2)
erreichen Sie eine Drehzahl von ca. 1800 min
1
-1
und
in
ein geringeres Drehmoment. Beispielsweise für
schnellen Bohrfortschritt in Mauerwerk oder große
Bohr- / Schraubdurchmesser.
Drehmomentvorwahl
Sie können über die Drehmomentvorwahl 13 die
Drehkraft einstellen. Ist die eingestellte Drehkraft
erreicht, trennt die Kupplung den Antrieb. Dadurch
können Sie Schrauben in eine vorbestimmte Tiefe
einschrauben, ideal z.B. für Serienverschraubungen.
Wählen Sie eine niedrige Stufe für kleine
Schrauben, weiche Werkstoffe.
Wählen Sie eine hohe Stufe für große Schrauben,
harte Werkstoffe, bzw. beim Herausdrehen von
Schrauben.
Wählen Sie für Bohrarbeiten die Bohrstufe, indem
Sie die Drehmomentvorwahl in die
Position
einstellen.
Bohren / Schrauben /
Schlagbohren
Bohren / Schrauben:
Drehen Sie den Einstellring
Schlagbohren:
Drehen Sie den Einstellring
12
auf das Symbol .
12
auf das Symbol .
Akkuzustand prüfen
Drücken Sie die Taste Akkuzustand 3. Die
Restleistung wird am LED-Display
2
angezeigt.
Werkzeuge wechseln
Ihr Akku-Schlag-Bohrschrauber hat eine vollautomatische Spindelarretierung
und ist mit einem
33 DE/AT/CH

Inbetriebnahme / Wartung und Reinigung / Service
einhülsigen Bohrfutter mit Radialverriegelung
„Made in Germany“ von
ausgestattet.
Beim Stillstand des Motors wird der Antriebsstrang
verriegelt, so dass Sie das Schnellspannbohrfutter
11
durch Drehen in Pfeilrichtung öffnen können (sehen
Sie Beschriftung vorne am Bohrfutter „
AUF /
OPEN“).
Nachdem Sie das gewünschte Werkzeug eingesetzt
haben, drehen Sie das Bohrfutter in Pfeilrichtung bis
kein Überrasten (Click!) mehr zu hören ist (sehen Sie
Beschriftung vorne am Bohrfutter „
ZU / CLOSE“).
Das Bohrfutter verriegelt dadurch automatisch. Die
Spindelarretierung löst sich mit Starten des Motors
(Betätigung des EIN- / AUS-Schalters
Ein- / ausschalten
6
).
Drücken Sie zur Inbetriebnahme des Gerätes
den EIN- / AUS-Schalter
6
und halten Sie ihn
gedrückt.
Lassen Sie zum Ausschalten des Gerätes den
EIN- / AUS-Schalter
Drehzahl einstellen
6
los.
Tipps und Tricks
Bohren in Metall: Verwenden Sie Metallbohrer
(HSS). Für beste Ergebnisse sollten Sie den Bohrer
mit Öl kühlen. Metallbohrer können Sie auch zum
Bohren in Kunststoff verwenden.
Bohren in Gestein: Verwenden Sie einen Hartmetallbestückten Steinbohrer.
Bohren in Holz: Verwenden Sie einen Holzbohrer
mit Zentrierspitze, für tiefe Bohrungen verwenden Sie
einen „Schlangenbohrer”, für großen Bohr-Durchmesser
einen Forstner-Bohrer. Kleine Schrauben in weichem
Holz können Sie auch ohne Vorbohren direkt eindrehen.
Wartung und Reinigung
Der Akku-Schlag-Bohrschrauber ist wartungsfrei.
Reinigen Sie das Gerät regelmäßig, direkt
nach Abschluss der Arbeit.
Verwenden Sie zur Reinigung des Gehäuses
ein trockenes Tuch und keinesfalls Benzin,
Lösungsmittel oder Reiniger.
WARNUNG!
Öffnen Sie niemals die Geräte.
Lassen Sie Reparatur- oder Austauscharbeiten
nur von der Servicestelle oder einer Elektrofachkraft durchführen.
Der EIN- / AUS-Schalter 6 verfügt über eine variable Drehzahlregelung.
Drehzahl erhöhen:
Erhöhen Sie den Druck auf den EIN- / AUS-
Schalter
6
.
Drehzahl verringern:
Verringern Sie den Druck auf den
EIN- / AUSSchalter 6.
Die integrierte Motorbremse sorgt für schnellen
Stillstand – ideal z.B. für Serienverschraubungen.
Drehrichtung umschalten
Wechseln Sie die Drehrichtung, indem Sie den
Drehrichtungsumschalter
5
nach rechts, bzw.
links durchdrücken.
34 DE/AT/CH
Service
WARNUNG!
Lassen Sie Ihre Geräte
nur von qualifiziertem Fachpersonal
und nur mit Original-Ersatzteilen reparieren. Damit wird sichergestellt, dass die
Sicherheit des Gerätes erhalten bleibt.
WARNUNG!
Lassen Sie den Austausch
des Steckers oder der Netzleitung im-
mer
vom Hersteller des Gerätes oder
seinem Kundendienst ausführen.
Damit wird sichergestellt, dass die Sicherheit
des Gerätes erhalten bleibt.

Garantie
Sie erhalten auf dieses Gerät 3 Jahre Garantie ab Kaufdatum. Das Gerät wurde
sorgfältig produziert und vor Anlieferung
gewissenhaft geprüft. Bitte bewahren Sie
den Kassenbon als Nachweis für den Kauf
auf. Bitte setzen Sie sich im Garantiefall mit
Ihrer Servicestelle telefonisch in Verbin
dung.
Nur so kann eine kostenlose Einsendung
Ihrer Ware gewährleistet werden.
Die Garantieleistung gilt nur für Material- oder Fabrikationsfehler, nicht aber für Transportschäden,
Verschleißteile oder für Beschädigungen an zerbrechlichen Teilen, z. B. Schalter oder Akkus.
Das Produkt ist lediglich für den privaten und nicht
für den gewerblichen Gebrauch bestimmt.
Bei missbräuchlicher und unsachgemäßer Behandlung, Gewaltanwendung und bei Eingriffen, die nicht
von unserer autorisierten Service-Niederlassung
vorgenommen wurden, erlischt die Garantie. Ihre
gesetzlichen Rechte werden durch diese Garantie
nicht eingeschränkt.
Garantie / Entsorgung
CH
Kompernaß Service Switzerland
Tel.: 0848 000 525
(max. 0,0807 CHF/Min.)
e-mail: support.ch@kompernass.com
Entsorgung
Die Verpackung besteht aus umwelt-
freundlichen Materialien, die Sie über
die örtlichen Recyclingstellen entsorgen
können.
Werfen Sie Elektrowerkzeuge
nicht in den Hausmüll!
Gemäß Europäischer Richtlinie 2002 / 96 / EC
über Elektro- und Elektronik-Altgeräte und Umsetzung
in nationales Recht müssen verbrauchte Elektro werkzeuge getrennt gesammelt und einer umweltgerechten Wiederverwertung zugeführt werden.
Werfen Sie Akkus nicht in
den Hausmüll!
Die Garantiezeit wird durch die Gewährleistung nicht
verlängert. Dies gilt auch für ersetzte und reparierte
Teile. Eventuell schon beim Kauf vorhandene Schäden
und Mängel müssen sofort nach dem Auspacken
gemeldet werden, spätestens aber zwei Tage nach
Kaufdatum. Nach Ablauf der Garantiezeit anfallende
Reparaturen sind kostenpflichtig.
DE
Schraven
Service- und Dienstleistungs GmbH
Tel.: + 49 (0) 180 5 008107
(0,14 € / Min. aus dem dt. Festnetz,
Mobilfunk max. 0,42 € / Min.)
Fax: +49 (0) 2832 3532
e-mail: support.de@kompernass.com
AT
Kompernaß Service Österreich
Tel.: 0820 899 913 (0,20 EUR/Min.)
e-mail: support.at@kompernass.com
Defekte oder verbrauchte Akkus müssen gemäß
Richtlinie 2006 / 66 / EC recycelt werden. Lesen
Sie hierzu auch die speziellen Sicherheitshinweise
für Ladegerät und Akku-Pack.
Geben Sie Akku und / oder Gerät über die angebotenen Sammeleinrichtungen zurück.
Möglichkeiten zur Entsorgung des ausgedienten
Gerätes erfahren Sie bei Ihrer Gemeinde- oder
Stadtverwaltung.
35 DE/AT/CH

Konformitätserklärung / Hersteller
Konformitätserklärung /
Hersteller
Wir, Kompernaß GmbH, Dokumentenverantwortlicher:
Herr Felix Becker, Burgstr. 21, D-44867 Bochum,
Deutschland, erklären hiermit dass dieses Produkt
mit den folgenden Normen, normativen Dokumenten
und EG-Richtlinien übereinstimmt:
Maschinenrichtlinie
(2006 / 42 / EC)
EG-Niederspannungsrichtlinie
(2006 / 95 / EC)
Elektromagnetische Verträglichkeit
(2004 / 108 / EC)
angewandte harmonisierte Normen
EN 60335-1: 2002+A1+A11+A12+A2+A13
EN 60335-2-29: 2004
EN 62233:2008
EN 60745-1: 2009
EN 60745-2-1: 2003+A11+A1+A12
EN 60745-2-2: 2003+A11+A1+A12
ZEK 01.2-08 / 12.08
2006 / 42 / EC – Annex I / 05.06
Typ / Gerätebezeichnung:
Akku-Schlagbohrschrauber PSBS 24 A1
Herstellungsjahr: 05 - 2010
Seriennummer: IAN 49384
Bochum, 31.05.2010
Hans Kompernaß
- Geschäftsführer -
Technische Änderungen im Sinne der Weiterentwicklung sind vorbehalten.
36 DE/AT/CH

IAN 49384
KOMPERNASS GMBH
Burgstraße 21
D-44867 Bochum
© by ORFGEN Marketing
Last Information Update · Έκδοση των πληροφοριών · Stand der
Informationen: 05 / 2010 · Ident.-No.: PSBS 24 A1052010-3
3
 Loading...