

Page 1
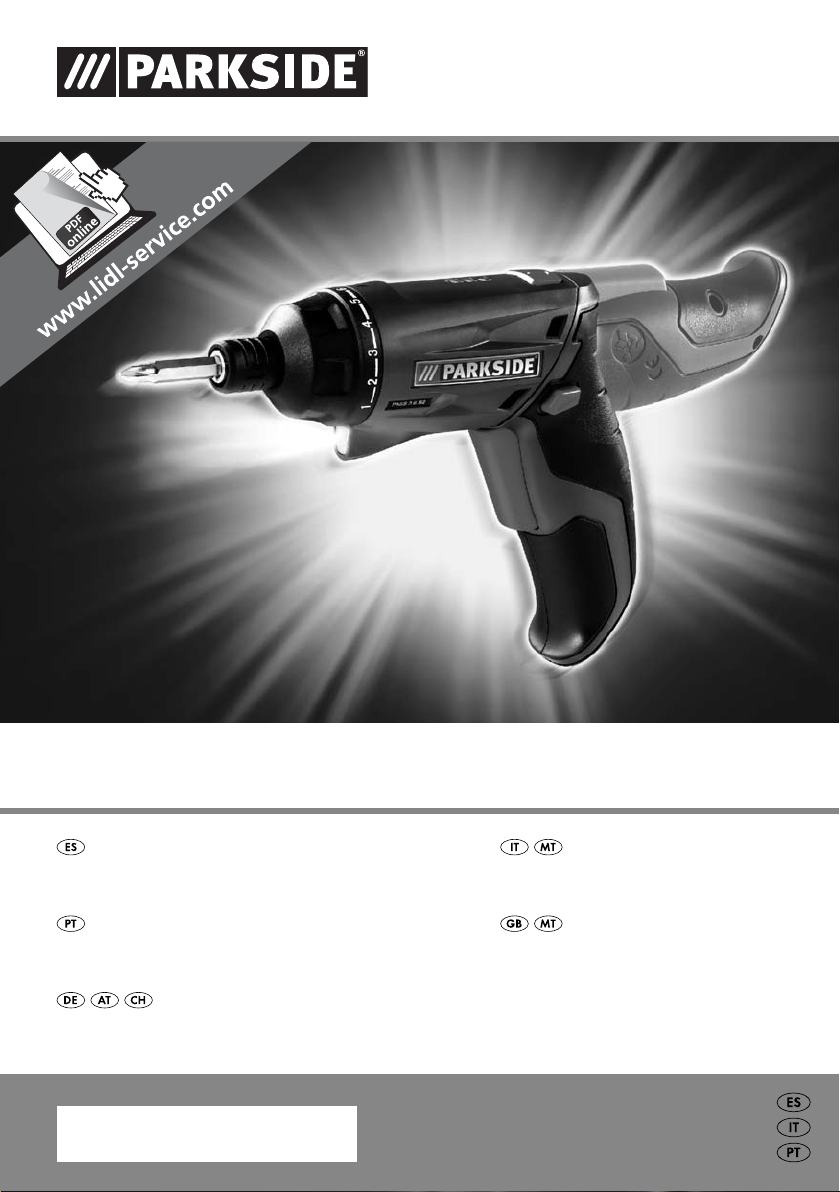
ATORNILLADOR RECARGABLE /
AVVITATORE RICARICABILE PASS 3.6 B2
ATORNILLADOR RECARGABLE
Traducción del manual de instrucciones original
APARAFUSADORA COM ACUMULADOR
Tradução do manual de instruções original
AKKU-STABSCHRAUBER
Originalbetriebsanleitung
AVVITATORE RICARICABILE
Traduzione delle istruzioni d’uso originali
CORDLESS SCREWDRIVER
Translation of original operation manual
IAN 96266
Page 2
Antes de empezar a leer abra la página que contiene las imágenes y, en seguida, familiarícese con todas
las funciones del dispositivo.
Prima di leggere aprire la pagina con le immagini e prendere confi denza con le diverse funzioni
dell'apparecchio.
Antes de começar a ler abra na página com as imagens e, de seguida, familiarize-se com todas as
funções do aparelho.
Before reading, unfold the page containing the illustrations and familiarise yourself with all functions of
the device.
Klappen Sie vor dem Lesen die Seite mit den Abbildungen aus und machen Sie sich anschließend mit allen
Funktionen des Gerätes vertraut.
ES Traducción del manual de instrucciones original Página 1
IT / MT Traduzione delle istruzioni d’uso originali Pagina 9
PT Tradução do manual de instruções original Página 17
GB / MT Translation of original operation manual Page 25
DE / AT / CH Originalbetriebsanleitung Seite 33
Page 3
A B
Page 4

Índice
Introducción . . . . . . . . . . . . . . . . . . . . . . . . . . . . . . . . . . . . . . . . . . . . . . . . . . . . . 2
Uso previsto . . . . . . . . . . . . . . . . . . . . . . . . . . . . . . . . . . . . . . . . . . . . . . . . . . . . . . . . . . . . . . . . 2
Equipamiento . . . . . . . . . . . . . . . . . . . . . . . . . . . . . . . . . . . . . . . . . . . . . . . . . . . . . . . . . . . . . . . 2
Volumen de suministro . . . . . . . . . . . . . . . . . . . . . . . . . . . . . . . . . . . . . . . . . . . . . . . . . . . . . . . . 2
Características técnicas . . . . . . . . . . . . . . . . . . . . . . . . . . . . . . . . . . . . . . . . . . . . . . . . . . . . . . . 2
Indicaciones generales de seguridad para las herramientas eléctricas . . . . . 3
1. Seguridad en el lugar de trabajo . . . . . . . . . . . . . . . . . . . . . . . . . . . . . . . . . . . . . . . . . . . . . 3
2. Seguridad eléctrica . . . . . . . . . . . . . . . . . . . . . . . . . . . . . . . . . . . . . . . . . . . . . . . . . . . . . . . . 3
3. Seguridad personal . . . . . . . . . . . . . . . . . . . . . . . . . . . . . . . . . . . . . . . . . . . . . . . . . . . . . . . . 4
4. Uso y manejo de la herramienta eléctrica . . . . . . . . . . . . . . . . . . . . . . . . . . . . . . . . . . . . . . . 4
5. Uso y manejo de la herramienta inalámbrica . . . . . . . . . . . . . . . . . . . . . . . . . . . . . . . . . . . . 5
6. Asistencia técnica . . . . . . . . . . . . . . . . . . . . . . . . . . . . . . . . . . . . . . . . . . . . . . . . . . . . . . . . . . 5
Indicaciones de seguridad específi cas para los atornilladores inalámbricos . . . . . . . . . . . . . . 5
Accesorios/equipos adicionales originales . . . . . . . . . . . . . . . . . . . . . . . . . . . . . . . . . . . . . . . . 5
Puesta en funcionamiento . . . . . . . . . . . . . . . . . . . . . . . . . . . . . . . . . . . . . . . . . . 6
Carga de la batería . . . . . . . . . . . . . . . . . . . . . . . . . . . . . . . . . . . . . . . . . . . . . . . . . . . . . . . . . . 6
Cambio de las brocas/puntas para atornilladores . . . . . . . . . . . . . . . . . . . . . . . . . . . . . . . . . . 6
Manejo . . . . . . . . . . . . . . . . . . . . . . . . . . . . . . . . . . . . . . . . . . . . . . . . . . . . . . . . . 6
Encendido/apagado del atornillador inalámbrico . . . . . . . . . . . . . . . . . . . . . . . . . . . . . . . . . . 6
Cambio de la dirección de giro . . . . . . . . . . . . . . . . . . . . . . . . . . . . . . . . . . . . . . . . . . . . . . . . . 6
Encendido/apagado de la luz LED
Ajuste de prensión . . . . . . . . . . . . . . . . . . . . . . . . . . . . . . . . . . . . . . . . . . . . . . . . . . . . . . . . . . . 6
Ajuste de par de giro . . . . . . . . . . . . . . . . . . . . . . . . . . . . . . . . . . . . . . . . . . . . . . . . . . . . . . . . . 7
Indicador de capacidad de la batería . . . . . . . . . . . . . . . . . . . . . . . . . . . . . . . . . . . . . . . . . . . 7
Consejos y trucos . . . . . . . . . . . . . . . . . . . . . . . . . . . . . . . . . . . . . . . . . . . . . . . . . . . . . . . . . . . . 7
. . . . . . . . . . . . . . . . . . . . . . . . . . . . . . . . . . . . . . . . . . . . . . 6
ES
Mantenimiento y limpieza . . . . . . . . . . . . . . . . . . . . . . . . . . . . . . . . . . . . . . . . . . 7
Garantía y asistencia técnica . . . . . . . . . . . . . . . . . . . . . . . . . . . . . . . . . . . . . . . . 7
Importador . . . . . . . . . . . . . . . . . . . . . . . . . . . . . . . . . . . . . . . . . . . . . . . . . . . . . . 8
Desecho . . . . . . . . . . . . . . . . . . . . . . . . . . . . . . . . . . . . . . . . . . . . . . . . . . . . . . . . . 8
Declaración de conformidad/fabricante
. . . . . . . . . . . . . . . . . . . . . . . . . . . . . . 8
PASS 3.6 B2
1
Page 5
ATORNILLADOR RECARGABLE
ES
PASS 3.6 B2
Introducción
Felicidades por la compra de su aparato
nuevo. Ha adquirido un producto de alta
calidad. Las instrucciones de uso forman
parte del producto y contienen indicaciones importantes acerca de la seguridad, el uso y el desecho
de este aparato. Antes de usar el producto, familiarícese con todas las indicaciones de manejo y de
seguridad. Utilice el producto únicamente como se
describe y para los ámbitos de aplicación indicados.
Entregue todos los documentos cuando transfi era
el producto a terceros.
Uso previsto
Este aparato está indicado para atornillar en madera,
plástico y metal. Utilice el aparato únicamente como
se describe a continuación y para los campos de
aplicación indicados. La utilización de la máquina
para otros fi nes o su transformación se considerará
contraria al uso previsto y elevará considerablemente el riesgo de accidentes. Esta herramienta no
es apta para el uso industrial.
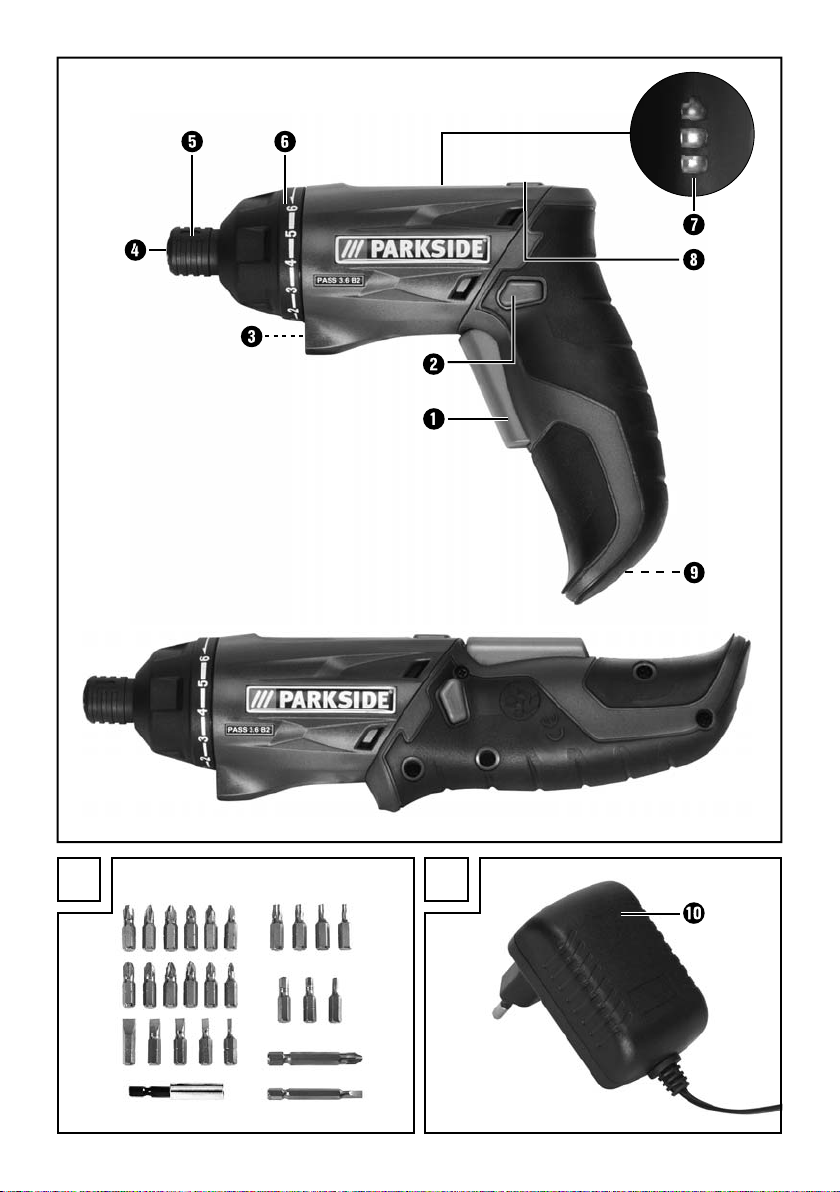
Equipamiento
Interruptor de ENCENDIDO/APAGADO
Interruptor de dirección de giro/
bloqueo de encendido
Luz LED
Portaherramientas
Casquillo de bloqueo
Ajuste del par de giro
Indicador de capacidad de la batería
Tecla de bloqueo
Clavija de carga del aparato
Cargador
Volumen de suministro
1 atornillador recargable PASS 3.6 B2
1 cargador PASS 3.6 B2-1
1 maleta de transporte
24 brocas x 25 mm
2 brocas x 50 mm
1 alargador de broca
1 instrucciones de uso
Características técnicas
Atornillador inalámbrico: PASS 3.6 B2
Tensión nominal: 3,6 V
Batería (integrada): Ion-litio
Capacidad de la
batería: 1500 mAh
Velocidad nominal en
marcha en vacío: n
Par de giro: máx. 4,0 Nm
Portaherramientas: 6,35 mm (¼")
Cargador: PASS 3.6 B2-1
ENTRADA/Input:
Tensión nominal: 230 - 240 V∼ 50/60 Hz
Corriente nominal: 200 mA
SALIDA/Output:
Tensión nominal: 5,5 V
Corriente nominal: 600 mA
Duración de carga: aprox. 3 horas
Clase de protección: II /
Información sobre ruidos y vibraciones:
Medición de ruidos según la norma EN 60745.
Valores típicos del nivel sonoro con ponderación A
de la herramienta eléctrica:
Nivel de presión sonora: 57 dB(A)
Nivel de potencia sonora: 68 dB(A)
Incertidumbre K: 3 dB
Valores de vibraciones (suma vectorial de tres líneas)
transmitidos de conformidad con EN 60745:
Tornillos: Valores de emisión de vibraciones
ah = 0,393 m/s
Incertidumbre K = 1,5 m/s
2
200 min
0
-1
2
2
PASS 3.6 B2
Page 6
El nivel de vibraciones especifi cado en estas instrucciones de uso se ha calculado según un proceso de
medición estandarizado en la norma EN 60745 y
puede utilizarse para la comparación de aparatos.
El valor de emisión de vibraciones especifi cado también puede utilizarse para realizar una valoración
preliminar de la exposición. El nivel de vibraciones
se modifi ca en función del uso de la herramienta
eléctrica y, en algunos casos, puede superar los
valores especifi cados en estas instrucciones.
Por este motivo, la carga de las vibraciones puede
estar infravalorada si se utiliza la herramienta eléctrica
regularmente de esta manera.
Intente que la carga de las vibraciones sea lo más
baja posible. Ejemplos de medidas para reducir la
carga de las vibraciones son el uso de guantes al
manejar la herramienta y la limitación del tiempo
de trabajo. Para ello, deben tenerse en cuenta
todas las partes del ciclo de funcionamiento (por
ejemplo, los momentos en los que la herramienta
eléctrica está desconectada y los momentos en
los que está conectada pero funciona sin carga).
Indicaciones generales
de seguridad para las
herramientas eléctricas
¡ADVERTENCIA!
► Lea detenidamente todas las indicaciones
de seguridad y las instrucciones. El incumplimiento de las indicaciones de seguridad
y de las instrucciones especifi cadas puede
provocar una descarga eléctrica, un incendio
y/o lesiones graves.
Conserve todas las indicaciones de seguridad
y las instrucciones para el futuro.
El término "herramienta eléctrica" utilizado en las
indicaciones de seguridad se refi ere a las herramientas eléctricas de accionamiento eléctrico (con
cable de red) y a las de accionamiento por batería
(sin cable de red).
1. Seguridad en el lugar de trabajo
a) Mantenga limpia y bien iluminada la zona
de trabajo. El desorden y la falta de ilumina-
ción en el lugar de trabajo pueden provocar
accidentes.
b) No trabaje con la herramienta eléctrica en
un entorno potencialmente explosivo en el
que haya líquidos, gases o polvos infl amables.
Las herramientas eléctricas generan chispas
que pueden incendiar el polvo o los vapores.
c) Mantenga a los niños y otras personas aleja-
dos durante el manejo de herramientas eléctricas. En caso de desvíos podría perder el
control sobre el aparato.
2. Seguridad eléctrica
a) La clavija de conexión de la herramienta
eléctrica (o fuente de alimentación) debe
encajar en la base de enchufe. No debe
modifi carse la clavija de ninguna forma.
No utilice adaptadores con las herramientas
eléctricas con toma de tierra. El uso de
clavijas sin manipular conectadas a una base
de enchufe correcta reduce el riesgo de
descarga eléctrica.
b) Evite el contacto físico con cualquier superfi cie
que esté conectada a tierra, como tubos,
sistemas de calefacción, cocinas y neveras.
Si su cuerpo hace contacto con la toma a tierra, existe mayor riesgo de descarga eléctrica.
c) Mantenga el aparato alejado de la lluvia
o humedades. La penetración de agua en un
aparato eléctrico aumenta el riesgo de descarga
eléctrica.
d) No utilice el cable para otros usos, p. ej.,
para transportar y colgar la herramienta
eléctrica o para tirar de la clavija de red y
extraerla de la base del enchufe. Mantenga
el cable apartado del calor, del aceite, de
los bordes cortantes o de las piezas móviles
del aparato. Un cable dañado o enredado
aumenta el riesgo de descarga eléctrica.
ES
PASS 3.6 B2
3
Page 7

e) Si desea utilizar la herramienta eléctrica al aire
ES
libre, utilice exclusivamente los alargadores
de cable homologados para su uso en exte-
riores. Su uso reduce el riesgo de descarga
eléctrica.
f) Si no puede evitarse el uso de la herramienta
eléctrica en un entorno húmedo, utilice un
interruptor diferencial residual. Su uso reduce
el riesgo de descarga eléctrica.
3. Seguridad personal
a) Esté siempre atento, preste atención a lo que
hace y proceda con sensatez a la hora de
trabajar con una herramienta eléctrica. No
utilice ninguna herramienta eléctrica si se siente
cansado o se encuentra bajo la infl uencia
de drogas, alcohol o medicamentos. Un solo
momento de distracción mientras utiliza la herra-
mienta eléctrica puede causar lesiones graves.
b) Utilice siempre equipo de protección personal
y gafas de protección. El uso de equipo de
protección personal, como, por ejemplo, masca-
rilla antipolvo, botas de seguridad antideslizan-
tes, casco o protecciones auditivas según el tipo
de herramienta eléctrica en cuestión reduce el
riesgo de lesiones.
c) Evite que el aparato pueda ponerse en marcha
accidentalmente. Asegúrese de que la herra-
mienta eléctrica esté apagada antes de
conectarla a la red eléctrica o a la batería,
asirla o transportarla. Si transporta la herra-
mienta eléctrica con los dedos en el interruptor
o conecta el aparato ya encendido a la red
eléctrica, puede provocar accidentes.
d) Antes de encender la herramienta eléctrica,
retire las herramientas de ajuste o las llaves.
Las herramientas o llaves que se encuentren
dentro del alcance de la pieza giratoria del
aparato pueden producir lesiones.
e) Evite mantener una postura corporal forzada.
Colóquese sobre una base fi rme y mantenga
el equilibrio en todo momento. Así podrá
controlar mejor la herramienta eléctrica, espe-
cialmente en situaciones inesperadas.
f) Utilice ropa adecuada. No lleve ropa ancha
ni joyas. Mantenga el pelo, la ropa y los
guantes lejos de las piezas móviles. La ropa
holgada, las joyas o el pelo suelto pueden
quedar atrapados en las piezas móviles.
g) Si se admite el montaje de dispositivos de
aspiración y de acumulación de polvo, asegúrese de que estén conectados y cerciórese
de que se utilicen correctamente. El uso de
un dispositivo de aspiración de polvo puede
reducir los riesgos causados por el polvo.
4. Uso y manejo de la herramienta
eléctrica
a) No sobrecargue el aparato. Utilice la herra-
mienta eléctrica adecuada para el trabajo en
cuestión. De esta manera, trabajará mejor y de
forma más segura dentro del rango de trabajo
indicado.
b) No utilice ninguna herramienta eléctrica con
el interruptor averiado. Una herramienta que
no pueda encenderse o apagarse es peligrosa
y debe repararse.
c) Extraiga la clavija de la base de enchufe y/o
retire la batería antes de realizar cualquier
ajuste en el aparato, cambiar los accesorios
o abandonar el aparato. Estas medidas de
seguridad evitan que la herramienta eléctrica
se encienda de forma accidental.
d) Guarde las herramientas eléctricas que no
vaya a utilizar fuera del alcance de los niños.
No deje que utilicen el aparato personas que
no estén familiarizadas con su manejo o que
no hayan leído estas indicaciones. Las herra-
mientas eléctricas son peligrosas cuando están
en manos de personas inexpertas.
e) Mantenga las herramientas eléctricas en
perfecto estado. Compruebe que las piezas
móviles funcionen correctamente y no se
atasquen y asegúrese de que ninguna pieza
se haya roto ni esté dañada de forma que
el funcionamiento del aparato pueda verse
afectado. Encargue la reparación de las
piezas dañadas antes de utilizar el aparato.
Muchos accidentes se deben al mal estado de
las herramientas.
4
PASS 3.6 B2
Page 8

f) Mantenga las herramientas de corte limpias
y afi ladas, ya que así se atascan menos y son
más fáciles de guiar.
g) Utilice la herramienta eléctrica, los acceso-
rios, las herramientas de ajuste, etc. según
lo dispuesto en estas indicaciones. Tenga
en cuenta las condiciones de trabajo y los
procedimientos que deban seguirse. El uso
de las herramientas eléctricas en aplicaciones
distintas a las previstas puede causar situaciones peligrosas.
5. Uso y manejo de la herramienta
inalámbrica
a) Cargue las baterías solo en cargadores reco-
mendados por el fabricante. Utilizar un car-
gador con una batería que no le corresponde
entraña peligro de incendios.
b) Utilice en las herramientas eléctricas tan solo
las baterías indicadas. El uso de otras baterías
puede provocar lesiones y peligro de incendios.
c) Mantenga la batería que no utilice alejada
de grapas, monedas, llaves, clavos, tornillos u
otros pequeños objetos de metal que puedan
provocar un puenteado de los contactos.
Un cortocircuito entre los contactos de la batería puede provocar quemaduras o fuego.
d) En caso de uso incorrecto, puede derramarse
líquido de la batería. Evite el contacto con
dicho líquido. En caso de contacto involuntario, lavar con agua. Si el líquido entra en
contacto con los ojos, contacte a un médico
como medida adicional. El líquido derramado
de la batería puede causar irritación cutánea o
quemaduras.
¡CUIDADO! ¡RIESGO DE EXPLOSIÓN!
No recargue nunca las baterías no
recargables.
6. Asistencia técnica
a) Encargue exclusivamente la reparación de su
herramienta eléctrica al profesional cualifi cado especializado y solo con recambios
originales. De esta forma, garantizará que la
seguridad del aparato no se vea afectada.
Indicaciones de seguridad específi cas
para los atornilladores inalámbricos
■ Fije la pieza de trabajo. Una pieza de trabajo
sujeta con dispositivos de tensado o tornillos de
banco estará mejor fi jada que si la sujeta con
la mano.
■ Sujete la herramienta eléctrica. Al apretar
o afl ojar tornillos, pueden producirse pares de
reacción altos de poca duración.
■ Apague la herramienta eléctrica al momento
si la herramienta de trabajo está bloqueada.
Esté preparado para pares de reacción altos
que provocan un retroceso.
■ Sujete el aparato por los mangos aislados
si pretende utilizarlo para trabajos en los
que el tornillo pueda entrar en contacto
con conexiones eléctricas ocultas. El contacto
del tornillo con cables conductores de electricidad también puede someter las piezas metálicas
del aparato a tensión eléctrica y provocar una
descarga eléctrica.
■ Al trabajar en el aparato, así como en el
transporte o almacenamiento, ponga el
interruptor de dirección de giro en la posición del medio (bloqueado). Esto le permi-
tirá evitar un accionamiento accidental de la
herramienta eléctrica.
■ No permita utilizar el aparato a personas
(incluidos los niños) con facultades físicas, sensoriales o mentales limitadas o que carezcan
de experiencia y/o conocimientos a menos que
les vigile una persona responsable de su seguridad o hayan sido instruidas por esta en el uso
del aparato. Vigile a los niños para asegurarse
de que no jueguen con el aparato.
Accesorios/equipos adicionales
originales
■ Utilice únicamente los accesorios y equipos
adicionales que estén indicados en las
instrucciones de uso. El uso de herramientas
complementarias u otros accesorios diferentes
a los recomendados en las instrucciones de
uso, puede suponer un riesgo de lesiones para
usted.
ES
PASS 3.6 B2
5
Page 9
Puesta en funcionamiento
ES
Carga de la batería
¡Solo para uso interior!
INDICACIÓN
La batería se entrega parcialmente cargada.
►
Antes de la primera puesta en marcha,
cargue la batería un mínimo de 3 horas.
Puede cargar la batería de ion-litio en todo
momento sin reducir su vida útil. La batería
no se daña aunque se interrumpa el proceso
de carga.
Manejo
Encendido/apagado del atornillador
inalámbrico
Encendido:
♦ Pulse el interruptor de encendido/apagado
y manténgalo pulsado.
Apagado:
♦ Suelte el interruptor de encendido/apagado .
Cambio de la dirección de giro
Inicio del proceso de carga:
♦ Conecte el cargador a una fuente de corriente
de 230 V∼ 50 Hz.
♦ Conecte el cargador a la clavija de carga
del aparato.
La batería está cargada cuando el indicador de
capacidad de la batería
Fin del proceso de carga:
♦ Retire el cargador de la alimentación eléctrica.
♦ Retire el cargador de la clavija de carga
del aparato.
pasa de rojo a verde.
Cambio de las brocas/puntas para
atornilladores
Colocación:
♦ Retire y sujete el casquillo de bloqueo .
♦ Coloque la broca en el portaherramientas ,
suelte el casquillo de bloqueo
Extracción:
♦ Retire y sujete el casquillo de bloqueo .
♦ Retire la broca y suelte el casquillo de bloqueo .
.
Giro a la derecha:
♦ Deslice el interruptor de dirección de giro
a la izquierda.
♦ Pulse el interruptor de encendido/apagado .
Ahora puede enroscar los tornillos.
Giro a la izquierda:
♦ Deslice el interruptor de dirección de giro
a la derecha.
♦ Pulse el interruptor de encendido/apagado .
Ahora puede afl ojar los tornillos.
Bloqueo de encendido:
♦ Deslice el interruptor de dirección de giro
a la posición del medio. El interruptor de encendido/apagado está bloqueado.
Encendido/apagado de la luz LED
Encendido:
♦ Pulse el interruptor de encendido/apagado
y manténgalo pulsado.
Apagado:
♦ Suelte el interruptor de encendido/apagado .
Ajuste de prensión
El atornillador puede detenerse en dos posiciones
de prensión diferentes. Para ello, hay que pulsar la
tecla de bloqueo
posición deseada. A continuación, vuelva a soltar
la tecla de bloqueo .
y girar el atornillador en la
6
PASS 3.6 B2
Page 10
Ajuste de par de giro
El par de giro para un tamaño de tornillo determinado se confi gura en el ajuste del par de giro .
El par de giro necesario depende de varios factores:
- del tipo y dureza del material en que se va a
trabajar.
- del tipo y longitud de los tornillos utilizados.
- de los requisitos que debe cumplir la atornilladura.
El par de giro se alcanza cuando se activa el
acoplamiento.
Indicador de capacidad de la batería
El indicador de capacidad de la batería le
señala el estado de carga de la batería mediante
3 LED de colores.
Todos los LED están encendidos:
La batería está totalmente cargada.
El LED rojo y el amarillo están encendidos:
La batería dispone de sufi ciente carga residual.
LED rojo:
La batería está vacía y debe cargarla.
Consejos y trucos
Las brocas para tornillos están identifi cadas con
sus medidas y forma. Si no está seguro, pruebe
siempre primero si la broca encaja sin holgura en
el cabezal del tornillo.
Garantía y asistencia técnica
Este aparato tiene 3 años de garantía desde
la fecha de compra. El aparato ha sido fabricado cuidadosamente y examinado en profundidad antes de su entrega. Guarde el comprobante de caja como justifi cante de compra.
Si necesitara hacer uso de la garantía, póngase en contacto por teléfono con su punto
de servicio habitual. Este es el único modo
de garantizar un envío gratuito.
La garantía cubre los defectos de fabricación o del
material, pero no los daños de transporte, las piezas
sujetas a desgaste ni los daños sufridos por las
piezas frágiles (p. ej., interruptores o pilas). Este
producto ha sido diseñado exclusivamente para
el uso particular y no para el uso industrial.
En caso de manipulación indebida e incorrecta, uso
de la fuerza y apertura del aparato por personas
ajenas a nuestros centros de asistencia técnica
autorizados, la garantía pierde su validez. Sus
derechos legales no se ven limitados por esta
garantía.
La duración de la garantía no se prolonga por hacer
uso de ella. Este principio rige también para las
piezas sustituidas y reparadas. Si después de la
compra del aparato, se detecta la existencia de
daños o de defectos al desembalarlo, deben notifi carse de inmediato o, como muy tarde, dos días
después de la fecha de compra. Cualquier reparación que se realice una vez fi nalizado el plazo de
garantía está sujeta a costes.
ES
Mantenimiento y limpieza
¡PELIGRO DE DESCARGA ELÉCTRICA!
Antes de efectuar la limpieza, extraiga el
cargador
El atornillador inalámbrico no necesita mantenimiento.
■ El aparato debe estar siempre limpio, seco y
sin restos de aceite ni grasas lubricantes.
■ Evite que pueda penetrar cualquier líquido en
el interior de los aparatos.
■ Limpie la carcasa con un paño. No utilice nunca
gasolina, disolventes o productos de limpieza
que puedan atacar el plástico.
PASS 3.6 B2
de la base de enchufe.
Servicio España
Tel.: 902 59 99 22
(0,08 EUR/Min. + 0,11 EUR/llamada
(tarifa normal))
(0,05 EUR/Min. + 0,11 EUR/llamada
(tarifa reducida))
E-Mail: kompernass@lidl.es
IAN 96266
Disponibilidad de la línea de atención al cliente:
de lunes a viernes de 8.00 a 20.00 h (CET)
7
Page 11
Importador
ES
KOMPERNASS HANDELS GMBH
BURGSTRASSE 21
44867 BOCHUM
GERMANY
www.kompernass.com
Desecho
El embalaje consta de materiales
ecológicos que pueden desecharse a
través de los centros de reciclaje locales.
¡No deseche las herramientas
eléctricas con la basura doméstica!
Según la Directiva europea 2012/19/EU, las
herramientas eléctricas usadas deben recogerse por
separado para someterse a un reciclaje ecológico.
¡No deseche las baterías con la
basura doméstica!
Las baterías defectuosas o agotadas deben reciclarse
según la directiva 2006/66/EC. Deseche la
batería y/o el aparato a través de los puntos de
recogida disponibles.
En su ayuntamiento y administración local puede
informarse acerca de las posibilidades de eliminación de herramientas eléctricas y baterías usadas.
Directiva relativa a las máquinas
(2006/42/EC)
Directiva de baja tensión CE
(2006/95/EC)
Compatibilidad electromagnética
(2004/108/EC)
Directiva sobre las restricciones a la utilización de determinadas sustancias peligrosas
en aparatos eléctricos y electrónicos
(2011/65/EU)
Normas armonizadas aplicadas:
EN 60745-1 / A11: 2010
EN 60745-2-2: 2010
EN 55014-1 / A2: 2011
EN 55014-2 / A2: 2008
EN 60335-1: 2012
EN 60335-2-29: 2004 + A2
EN 62233: 2008
EN 61000-3-3: 2008
EN 61000-3-2: 2006 + A1 + A2
Tipo/denominación del aparato:
Atornillador recargable PASS 3.6 B2
Año de fabricación: 10 - 2013
Número de serie: IAN 96266
Bochum, 27.09.2013
Declaración de conformidad/
fabricante
En virtud del presente documento, nosotros,
KOMPERNASS HANDELS GMBH, responsables de
los documentos: Señor Semi Uguzlu, BURGSTR. 21,
44867 BOCHUM, ALEMANIA, declaramos que
este producto cumple con lo dispuesto por las
siguientes normas, documentos normativos y
Directivas CE:
8
Semi Uguzlu
- Responsable de calidad -
Reservado el derecho de realizar modifi caciones
técnicas en relación con el desarrollo tecnológico.
PASS 3.6 B2
Page 12

Indice
Introduzione . . . . . . . . . . . . . . . . . . . . . . . . . . . . . . . . . . . . . . . . . . . . . . . . . . . . 10
Uso conforme . . . . . . . . . . . . . . . . . . . . . . . . . . . . . . . . . . . . . . . . . . . . . . . . . . . . . . . . . . . . . . 10
Dotazione . . . . . . . . . . . . . . . . . . . . . . . . . . . . . . . . . . . . . . . . . . . . . . . . . . . . . . . . . . . . . . . . . 10
Volume della fornitura . . . . . . . . . . . . . . . . . . . . . . . . . . . . . . . . . . . . . . . . . . . . . . . . . . . . . . . 10
Dati tecnici . . . . . . . . . . . . . . . . . . . . . . . . . . . . . . . . . . . . . . . . . . . . . . . . . . . . . . . . . . . . . . . . 10
Indicazioni generali di sicurezza per elettroutensili . . . . . . . . . . . . . . . . . . . . 11
1. Sicurezza del luogo di lavoro . . . . . . . . . . . . . . . . . . . . . . . . . . . . . . . . . . . . . . . . . . . . . . . 11
2. Sicurezza elettrica . . . . . . . . . . . . . . . . . . . . . . . . . . . . . . . . . . . . . . . . . . . . . . . . . . . . . . . . 11
3. Sicurezza delle persone . . . . . . . . . . . . . . . . . . . . . . . . . . . . . . . . . . . . . . . . . . . . . . . . . . . . 11
4. Uso e trattamento dell'elettroutensile . . . . . . . . . . . . . . . . . . . . . . . . . . . . . . . . . . . . . . . . . . 12
5. Uso e trattamento dell'utensile ricaricabile. . . . . . . . . . . . . . . . . . . . . . . . . . . . . . . . . . . . . . 12
6. Assistenza . . . . . . . . . . . . . . . . . . . . . . . . . . . . . . . . . . . . . . . . . . . . . . . . . . . . . . . . . . . . . . 13
Indicazioni di sicurezza specifi che per avvitatori ricaricabili . . . . . . . . . . . . . . . . . . . . . . . . . . 13
Accessori originali / apparecchi addizionali . . . . . . . . . . . . . . . . . . . . . . . . . . . . . . . . . . . . . . 13
Messa in funzione . . . . . . . . . . . . . . . . . . . . . . . . . . . . . . . . . . . . . . . . . . . . . . . . 13
Caricamento della batteria dell'apparecchio . . . . . . . . . . . . . . . . . . . . . . . . . . . . . . . . . . . . . . 13
Sostituzione delle punte per viti / bit . . . . . . . . . . . . . . . . . . . . . . . . . . . . . . . . . . . . . . . . . . . . 14
Funzionamento . . . . . . . . . . . . . . . . . . . . . . . . . . . . . . . . . . . . . . . . . . . . . . . . . . 14
Accensione/spegnimento dell'avvitatore ricaricabile . . . . . . . . . . . . . . . . . . . . . . . . . . . . . . . . 14
Commutazione della direzione di rotazione . . . . . . . . . . . . . . . . . . . . . . . . . . . . . . . . . . . . . . 14
Accensione/spegnimento della spia LED . . . . . . . . . . . . . . . . . . . . . . . . . . . . . . . . . . . . . . . . . 14
Impostazione della posizione di presa. . . . . . . . . . . . . . . . . . . . . . . . . . . . . . . . . . . . . . . . . . . 14
Impostazione della forza di serraggio . . . . . . . . . . . . . . . . . . . . . . . . . . . . . . . . . . . . . . . . . . . 14
Indicatore del livello di carica della batteria . . . . . . . . . . . . . . . . . . . . . . . . . . . . . . . . . . . . . . 15
Consigli e suggerimenti . . . . . . . . . . . . . . . . . . . . . . . . . . . . . . . . . . . . . . . . . . . . . . . . . . . . . . 15
IT
MT
Manutenzione e pulizia . . . . . . . . . . . . . . . . . . . . . . . . . . . . . . . . . . . . . . . . . . . 15
Garanzia e assistenza . . . . . . . . . . . . . . . . . . . . . . . . . . . . . . . . . . . . . . . . . . . . 15
Importatore. . . . . . . . . . . . . . . . . . . . . . . . . . . . . . . . . . . . . . . . . . . . . . . . . . . . . 15
Smaltimento . . . . . . . . . . . . . . . . . . . . . . . . . . . . . . . . . . . . . . . . . . . . . . . . . . . . 16
Dichiarazione di conformità / produttore . . . . . . . . . . . . . . . . . . . . . . . . . . . . . 16
PASS 3.6 B2
9
Page 13

AVVITATORE RICARICABILE
PASS 3.6 B2
Introduzione
IT
Congratulazioni per l'acquisto del nuovo
MT
istruzioni è parte integrante del presente prodotto.
Esso contiene importanti indicazioni per la sicurezza,
l'uso e lo smaltimento. Prima di utilizzare il prodotto,
familiarizzarsi con tutte le indicazioni relative ai
comandi e alla sicurezza. Utilizzare l'apparecchio
solo come descritto e per i campi d'impiego indicati.
In caso di cessione del prodotto a terzi, consegnare
anche tutta la documentazione relativa.
Uso conforme
Questo apparecchio è destinato all'avvitamento nel
legno, plastica e metallo. Utilizzare l'apparecchio
solo nei modi prescritti e per i campi di utilizzo
indicati. Qualunque altro impiego o modifi ca della
macchina è da considerarsi non conforme alla
destinazione e comporta gravi rischi di infortunio.
Non adatta all'uso commerciale.
Dotazione
Volume della fornitura
1 Avvitatore ricaricabile PASS 3.6 B2
1 Caricabatterie PASS 3.6 B2-1
1 Valigetta
24 punte x 25 mm
2 punte x 50 mm
apparecchio. È stato acquistato un
pro dotto di alta qualità. Il manuale di
Interruttore ON/OFF
Commutatore della direzione di rotazione /
Blocco di accensione
Spia LED
Portapunte
Bussola di bloccaggio
Impostazione della forza di serraggio
Indicatore del livello di carica della batteria
Tasto di bloccaggio
Presa di carica apparecchio
Caricabatterie
1 Prolungamento della punta
1 Manuale di istruzioni per l'uso
Dati tecnici
Avvitatore ricaricabile: PASS 3.6 B2
Tensione nominale: 3,6 V
Batteria (integrata): agli ioni di LITIO
Capacità della batteria: 1500 mAh
Numero di giri minimo
nominale: n
Forza di serraggio: max. 4,0 Nm
Portapunte: 6,35 mm (¼")
Caricabatterie: PASS 3.6 B2-1
INGRESSO / Input:
Tensione nominale: 230 - 240 V∼ 50/60 Hz
Corrente nominale: 200 mA
USCITA / Output:
Tensione nominale: 5,5 V
Corrente nominale: 600 mA
Tempo di carica: ca. 3 ore
Classe di protezione: II /
Informazioni sul rumore e sulle vibrazioni:
Valore misurato per i rumori determinato secondo
EN 60745. Il livello di rumore classifi cato con A
dell'elettroutensile è tipicamente:
Livello di pressione sonora: 57 dB(A)
Livello di potenza sonora: 68 dB(A)
Fattore di convergenza K: 3 dB
Valori di vibrazione (somma dei vettori di tre dire-
zioni) rilevati ai sensi della norma EN 60745:
Viti: coeffi ciente di emissione delle vibrazioni
ah = 0,393 m/s
Fattore di convergenza K = 1,5 m/s
Il livello di vibrazioni indicato nelle presenti istru-
zioni è stato misurato secondo un procedimento
di misurazione conforme alla norma EN 60745 e
può essere usato per il confronto dell'apparecchio.
Il coeffi ciente di emissione delle vibrazioni può
anche essere usato per una stima introduttiva
dell'esposizione.
2
200 min
0
-1
2
10
PASS 3.6 B2
Page 14
Il livello di vibrazioni cambia in base all'uso dell'elettroutensile e in alcuni casi può essere superiore al
valore indicato nelle presenti istruzioni. La sollecitazione da vibrazioni potrebbe essere sottostimato se
l'elettroutensile viene utilizzato regolarmente in tal
modo.
Cercare di ridurre il più possibile la sollecitazione
da vibrazioni. Provvedimenti adeguati per la riduzione della sollecitazione da vibrazioni sono l'uso di
guanti nell'utilizzo dell'elettroutensile e la limitazione
della durata d'impiego. Occorre tenere in considerazione tutte le componenti del ciclo di esercizio
(per esempio i tempi nei quali l'elettroutensile è
spento e i tempi in cui è acceso ma funziona senza
subire carichi).
Indicazioni generali
di sicurezza per
elettroutensili
AVVERTENZA!
► Leggere tutte le indicazioni di sicurezza e le
istruzioni. L'errata applicazione delle indicazioni di sicurezza può dare luogo a scosse
elettriche, incendi e / o gravi lesioni.
Conservare le indicazioni di sicurezza e le
istruzioni per il futuro.
Il termine "elettroutensile" utilizzato nelle indicazioni
di sicurezza si riferisce a elettroutensili collegabili
alla rete elettrica (con cavo di rete) e a elettroutensili a batteria (senza cavo di rete).
1. Sicurezza del luogo di lavoro
a) Mantenere l'area di lavoro pulita e ben illumi-
nata. Il disordine e la scarsa illuminazione dell'a-
rea di lavoro possono dare luogo a infortuni.
b) Non lavorare con elettroutensili in ambienti
a rischio di esplosione, in cui siano presenti
liquidi, gas o polveri infi ammabili. Gli elet-
troutensili generano scintille che possono dare
fuoco alla polvere o ai vapori.
c) Tenere lontani i bambini e altre persone
durante l'uso dell'elettroutensile. In caso di
distrazione, si potrebbe perdere il controllo
dell'apparecchio.
2. Sicurezza elettrica
a) La spina dell'elettroutensile (ossia dell'alimen-
tatore) deve essere idonea all'inserimento nella
presa. La spina non deve venire assolutamente
modifi cata. Non utilizzare adattatori insieme
a elettroutensili con messa a terra. Le spine
non modifi cate e le prese idonee riducono il
rischio di scosse elettriche.
b) Evitare il contatto corporeo con superfi ci
conduttive, come tubi, termosifoni, stufe e
frigoriferi. Quando il corpo è a diretto contatto
con la terra sussiste un maggiore pericolo di
scosse elettriche.
c) Tenere gli elettroutensili lontano dalla pioggia
o dall'umidità. La penetrazione di acqua in
un apparecchio elettrico aumenta il rischio di
scosse elettriche.
d) Non utilizzare il cavo elettrico a fi ni non con-
formi, come ad es. per trasportare l'elettroutensile, per appenderlo o per scollegare la
spina dalla presa. Tenere il cavo lontano dal
calore, dall'olio, da angoli acuminati o da
parti dell'apparecchio in movimento. I cavi o
le spine danneggiati o ingarbugliati aumentano
il rischio di scosse elettriche.
e) Se si lavora all'aperto con un elettroutensile,
utilizzare solo una prolunga adatta anche per
esterni. L'utilizzo di una prolunga idonea all'uso
esterno riduce il rischio di scosse elettriche.
f) Se è inevitabile l'uso dell'elettroutensile in
un ambiente umido, utilizzare un salvavita.
L'uso di un salvavita evita il rischio di scosse
elettriche.
3. Sicurezza delle persone
a) Prestare sempre attenzione controllando le
operazioni in corso e procedere con cura
quando si lavora con un elettroutensile. Non
utilizzare l'elettroutensile se non si è concentrati o riposati a suffi cienza, o se si è sotto
l'infl usso di droghe, alcol o farmaci. Un solo
momento di disattenzione nell'uso dell'elettroutensile può dare luogo a gravi lesioni.
IT
MT
PASS 3.6 B2
11
Page 15

b) Indossare un'attrezzatura personale di
protezione e sempre occhiali di protezione.
L'uso di dispositivi personali di protezione come
mascherina antipolvere, scarpe antiscivolo, casco
IT
MT
protettivo o protezione per l'udito, a seconda del-
l'uso e dell'impiego dell'elettroutensile, riduce il
rischio di lesioni.
c) Evitare l'accensione involontaria. Accertarsi
che l'elettroutensile sia spento prima di col-
legarlo all'alimentazione e/o alla batteria,
sollevarlo o movimentarlo. Se si tiene il dito
sull'interruttore On/Off mentre si sposta l'elettro-
utensile o si collega l'apparecchio alla rete
elettrica con l'interruttore su on, si possono
verifi care infortuni.
d) Rimuovere gli utensili di regolazione o le chiavi
per dadi prima di accendere l'elettroutensile.
Un utensile o una chiave lasciati in una parte
dell'apparecchio in movimento possono provo-
care lesioni.
e) Evitare posizioni innaturali. Provvedere a
una posizione sicura e mantenere sempre
l'equilibrio. In tal modo si può controllare
meglio l'elettroutensile, soprattutto in situazioni
impreviste.
f) Indossare un abbigliamento idoneo. Non
indossare abiti ampi od ornamenti. Tenere
lontani i capelli, gli abiti e i guanti dalle parti
in movimento. Gli abiti ampi e pendenti, gli
ornamenti o i capelli lunghi possono impigliarsi
nelle parti mobili.
g) Se è possibile montare aspiratori per polvere
e trucioli, accertarsi che siano collegati e
vengano utilizzati correttamente. L'uso di un
aspiratore per polvere può ridurre i pericoli
associati alla polvere.
4. Uso e trattamento dell'elettroutensile
a) Non sovraccaricare l'apparecchio. Utilizzare
l'elettroutensile idoneo al proprio lavoro. Con
l'elettroutensile adatto si lavora meglio e con
maggiore sicurezza nell'intervallo di potenza
indicato.
b) Non utilizzare elettroutensili con interruttore
difettoso. Un elettroutensile che non si riesce
più a spegnere o ad accendere è pericoloso
e dev'essere riparato.
c) Staccare la spina dalla presa di corrente
e/o rimuovere la batteria prima di eseguire
impostazioni dell'apparecchio, sostituire gli
accessori o riporre l'apparecchio. Questa
misura precauzionale impedisce l'avvio involontario dell'elettroutensile.
d) Conservare gli elettroutensili non utilizzati
fuori della portata dei bambini. Non consentire l'uso dell'apparecchio a persone
inesperte o che non hanno letto le presenti
istruzioni. Gli elettroutensili sono pericolosi se
utilizzati da persone inesperte.
e) Trattare gli elettroutensili con cura. Control-
lare che le parti mobili dell'apparecchio
funzionino perfettamente e non si inceppino,
che non vi siano elementi rotti o danneggiati
al punto da compromettere la funzione dell'elettroutensile. Fare riparare le parti danneggiate prima di utilizzare l'apparecchio. Molti
infortuni derivano da una cattiva manutenzione
degli elettroutensili.
f) Mantenere gli utensili di taglio ben affi lati e
puliti. Gli utensili di taglio trattati con cura e
con angoli di taglio affi lati si inceppano meno
spesso e sono più facili da controllare.
g) Utilizzare elettroutensili, accessori, utensili, ecc.
conformi a queste istruzioni. Tenere conto
delle condizioni di lavoro e dell'attività da
eseguire. L'uso di elettroutensili per applicazioni
diverse da quelle previste può dare luogo a
situazioni di pericolo.
5. Uso e trattamento dell'utensile
ricaricabile
a) Caricare le batterie solo in caricabatterie che
vengono consigliati dal costruttore. Se un
caricabatterie adatto a un determinato tipo di
batteria viene utilizzato con batterie diverse,
vi è pericolo di incendio.
12
PASS 3.6 B2
Page 16

b) Utilizzare solo le batterie appositamente
previsti per gli elettroutensili. L'uso di altre
batterie può dare luogo a lesioni e al rischio
di incendio.
c) Tenere la batteria non utilizzata lontano da
graff ette, monete, chiavi, chiodi, viti o altra
minuteria in metallo, poiché tali oggetti
potrebbero provocare un cortocircuito fra
i contatti. Un cortocircuito fra i contatti della
batteria può dare luogo a ustioni o incendio.
d) In caso di utilizzo scorretto, potrebbe fuoriu-
scire del liquido dalla batteria. Evitare il contatto con questo liquido. In caso di contatto
accidentale, sciacquare con acqua. Se il liquido giunge negli occhi, consultare un medico.
Il liquido che fuoriesce dalla batteria potrebbe
comportare irritazioni della pelle o ustioni.
ATTENZIONE! PERICOLO DI
ESPLOSIONE! Non caricare
mai batterie non ricaricabili.
6. Assistenza
a) Fare riparare l'elettroutensile solo da per-
sonale qualifi cato specializzato e solo con
ricambi originali. In tal modo si garantisce la
sicurezza dell'elettroutensile.
Indicazioni di sicurezza specifi che
per avvitatori ricaricabili
■ Fissare il pezzo da lavorare. Un utensile tenuto
fermo con dispositivi di bloccaggio o con una
morsa è più stabile che se viene tenuto in mano.
■ Tenere l'elettroutensile ben fermo. Nel ser-
rare o nello svitare viti potrebbero presentarsi
per breve tempo elevati momenti di reazione.
■ Spegnere immediatamente l'elettroutensile
se la punta si blocca. Tenersi preparati ad
elevati momenti di reazione che potrebbero
causare un contraccolpo.
■ Aff errare sempre l'apparecchio dai manici
isolati quando si eseguono lavori nei quali
la vite potrebbe colpire cavi elettrici nascosti. Il contatto della vite con una linea che
conduce tensione può mettere sotto tensione
anche le parti dell'apparecchio di metallo e
causare così una scossa elettrica.
■ In caso di lavori all'apparecchio, trasporto
o conservazione, portare il commutatore
della direzione di rotazione in posizione
centrale (blocco). In tal modo si impedisce
l'avvio indesiderato dell'elettroutensile.
■ Questo apparecchio non è indicato per l'uso da
parte di persone (inclusi bambini) con limitate
capacità fi siche, sensoriali o mentali o prive
dell'esperienza e/o della conoscenza necessaria, a meno che tali persone non vengano
sorvegliate da un responsabile per la sicurezza
o abbiano ricevuto indicazioni sull'impiego
dell'apparecchio. Sorvegliare i bambini per
assicurarsi che non giochino con l'apparecchio.
Accessori originali / apparecchi
addizionali
■ Utilizzare solo accessori e apparecchi ad-
dizionali indicati nel manuale di istruzioni.
L'uso di apparecchi diversi da quelli consigliati
o da altri accessori indicati nel manuale di istruzioni può comportare il pericolo di lesioni.
Messa in funzione
Caricamento della batteria dell'apparecchio
Solo per l'utilizzo in ambienti interni!
AVVERTENZA
Alla consegna la batteria è parzialmente
►
caricata. Prima della messa in esercizio
caricare la batteria per almeno 3 ore. Si può
caricare la batteria agli ioni di litio in ogni
momento senza che ciò ne riduca la durata
utile. Un'interruzione del processo di carica
non provoca danni alla batteria.
Avviare il processo di carica:
♦ Collegare il caricabatterie a una sorgente
di corrente elettrica da 230 V∼ 50 Hz.
♦ Collegare il caricabatterie con la presa
di carica
La batteria è carica quando l'indicatore del livello
di carica della batteria
dell'apparecchio.
passa da rosso a verde.
IT
MT
PASS 3.6 B2
13
Page 17

Concludere il processo di carica:
♦ staccare il caricabatterie dalla sorgente di
corrente elettrica.
♦ staccare il caricabatterie dalla presa di
IT
MT
carica dell'apparecchio.
Sostituzione delle punte per viti / bit
Inserimento:
♦ tirare indietro la bussola di bloccaggio e
tenerla ferma.
♦ infi lare la punta nel portapunte, lasciar
andare la bussola di bloccaggio .
Rimozione:
♦ tirare indietro la bussola di bloccaggio e
tenerla ferma.
♦ prelevare la punta e lasciar andare la bussola
di bloccaggio .
Rotazione verso sinistra:
♦ spostare il commutatore della direzione di
rotazione verso destra.
♦ premere l'interruttore On/Off . Ora si possono
svitare ed estrarre le viti.
Blocco di accensione:
♦ portare il commutatore della direzione di rota-
zione nella posizione centrale. L'interruttore
On/Off
è bloccato.
Accensione/spegnimento della
spia LED
Accensione:
♦ premere e tenere premuto l'interruttore On /
Off .
Spegnimento:
♦ rilasciare l'interruttore On/Off .
Funzionamento
Accensione/spegnimento dell'avvitatore ricaricabile
Accensione:
♦ premere e tenere premuto l'interruttore On/
Off .
Spegnimento:
♦ rilasciare l'interruttore On/Off .
Commutazione della direzione di
rotazione
Rotazione verso destra:
♦ spostare il commutatore della direzione di
rotazione verso sinistra.
♦ premere l'interruttore On/Off . Ora si possono
inserire e avvitare le viti.
Impostazione della posizione di
presa
L'avvitatore può venire bloccato in due diverse posizioni di presa. A tale scopo occorre premere il
tasto di bloccaggio e portare l'avvitatore nella
posizione desiderata. Dopo di ciò rilasciare il tasto
di bloccaggio .
Impostazione della forza di serraggio
La forza di serraggio per una determinata dimensione delle viti viene regolata tramite l'impostazione
della forza di serraggio
necessaria dipende da diversi fattori:
- dal tipo e dalla durezza del materiale da
lavorare.
- dal tipo e dalla lunghezza delle viti utilizzate.
- dai requisiti che il raccordo a vite deve soddisfare.
Il raggiungimento della forza di serraggio viene
segnalato dallo sgancio dell'accoppiamento.
. La forza di serraggio
14
PASS 3.6 B2
Page 18

Indicatore del livello di carica della
batteria
L'indicatore del livello di carica della batteria
segnala lo stato di carica della batteria servendosi
di 3 LED colorati.
Tutti i LED sono accesi:
la batteria è completamente carica.
I LED giallo e rosso sono accesi:
la batteria dispone di una suffi ciente carica residua.
LED rosso:
la batteria è scarica, occorre ricaricarla.
Consigli e suggerimenti
Le punte sono contrassegnate con dimensioni e
forma. In caso di dubbio, controllare prima che
la punta entri nella testa della vite senza gioco.
La prestazione della garanzia vale solo per difetti
del materiale o di fabbricazione, ma non per i
danni da trasporto, danni alle parti soggette a
usura o alle parti fragili, come ad es. interruttori o
accumulatori. Il prodotto è destinato esclusivamente
all'uso domestico e non a quello commerciale.
La garanzia decade in caso di impiego improprio
o manomissione, uso della forza e interventi non
eseguiti dalla nostra fi liale di assistenza autorizzata.
Questa garanzia non costituisce alcun limite ai
diritti legali del consumatore.
Il periodo di garanzia non viene prolungato da
interventi in garanzia. Ciò vale anche per le parti
sostituite e riparate. I danni e difetti eventualmente
presenti già all'atto dell'acquisto devono venire
comunicati immediatamente dopo il disimballaggio,
e comunque entro e non oltre due giorni dalla data
di acquisto. Le riparazioni eseguite dopo la scadenza
del periodo di garanzia sono a pagamento.
IT
MT
Manutenzione e pulizia
PERICOLO DI SCOSSA ELETTRICA!
Prima dei lavori di pulizia, staccare il
caricabatterie dalla presa di corrente.
L'avvitatore ricaricabile non necessita di manutenzione.
■ L'apparecchio dev'essere sempre pulito, asciutto
ed esente da olio o grassi lubrifi canti.
■ Impedire la penetrazione di liquidi all'interno
degli apparecchi.
■ Per la pulizia dell'alloggiamento utilizzare un
panno. Non utilizzare mai benzina, solventi o
detergenti in grado di attaccare la plastica.
Garanzia e assistenza
Questo apparecchio è garantito per tre anni
a partire dalla data di acquisto. L'apparecchio
è stato prodotto con cura e debitamente collaudato prima della consegna. Conservare
lo scontrino come prova d'acquisto. Nei casi
contemplati dalla garanzia, mettersi in comunicazione telefonicamente con il centro di
assistenza più vicino. Solo in tal modo è
possibile garantire una spedizione gratuita
della merce.
Assistenza Italia
Tel.: 02 36003201
E-Mail: kompernass@lidl.it
IAN 96266
Assistenza Malta
Tel.: 80062230
E-Mail: kompernass@lidl.com.mt
IAN 96266
Raggiungibilità della hotline:
dal lunedì al venerdì, dalle 8.00 alle 20.00 (CET)
Importatore
KOMPERNASS HANDELS GMBH
BURGSTRASSE 21
44867 BOCHUM
GERMANY
www.kompernass.com
PASS 3.6 B2
15
Page 19

Smaltimento
L'imballaggio è costituito da materiali
ecocompatibili che possono venire smaltiti
IT
tramite gli appositi centri di raccolta e
riciclaggio.
MT
Non smaltire gli elettroutensili
insieme ai normali rifi uti domestici!
In base alla direttiva europea 2012/19/EU, gli
apparecchi elettrici usati devono essere raccolti
separatamente e inviati a un centro per il riciclaggio ecologico.
Non smaltire le batterie assieme
ai normali rifi uti domestici!
Le batterie difettose o esauste devono essere
riciclate in base alla direttiva 2006/66/EC.
Riconsegnare la batteria e/o l'apparecchio
presso gli appositi centri di raccolta.
Per le possibilità di smaltimento relative agli elettroutensili/batterie usati, informarsi presso il municipio
o l'amministrazione comunale di residenza.
Dichiarazione di conformità /
produttore
La KOMPERNASS HANDELS GMBH, responsabile
della documentazione: Sig. Semi Uguzlu,
BURGSTR. 21, 44867 BOCHUM, GERMANY,
dichiara con la presente che questo prodotto è
conforme alle seguenti norme, ai documenti
normativi e alle direttive CE:
Norme armonizzate utilizzate:
EN 60745-1 / A11: 2010
EN 60745-2-2: 2010
EN 55014-1 / A2: 2011
EN 55014-2 / A2: 2008
EN 60335-1: 2012
EN 60335-2-29: 2004 + A2
EN 62233: 2008
EN 61000-3-3: 2008
EN 61000-3-2: 2006 + A1 + A2
Tipo / contrassegno apparecchio:
Avvitatore ricaricabile PASS 3.6 B2
Anno di produzione: 10 - 2013
Numero di serie: IAN 96266
Bochum, 27/09/2013
Semi Uguzlu
- Direttore qualità -
Con riserva di modifi che tecniche volte al miglioramento del prodotto.
Direttiva macchine
(2006/42/EC)
Direttiva UE bassa tensione
(2006/95/EC)
Compatibilità elettromagnetica
(2004/108/EC)
Direttiva RoHS
(2011/65/EU)
16
PASS 3.6 B2
Page 20

Índice
Introdução . . . . . . . . . . . . . . . . . . . . . . . . . . . . . . . . . . . . . . . . . . . . . . . . . . . . . . 18
Utilização correta . . . . . . . . . . . . . . . . . . . . . . . . . . . . . . . . . . . . . . . . . . . . . . . . . . . . . . . . . . . 18
Equipamento . . . . . . . . . . . . . . . . . . . . . . . . . . . . . . . . . . . . . . . . . . . . . . . . . . . . . . . . . . . . . . 18
Conteúdo da embalagem . . . . . . . . . . . . . . . . . . . . . . . . . . . . . . . . . . . . . . . . . . . . . . . . . . . . 18
Dados técnicos . . . . . . . . . . . . . . . . . . . . . . . . . . . . . . . . . . . . . . . . . . . . . . . . . . . . . . . . . . . . . 18
Indicações gerais de segurança para ferramentas elétricas . . . . . . . . . . . . .19
1. Segurança no local de trabalho . . . . . . . . . . . . . . . . . . . . . . . . . . . . . . . . . . . . . . . . . . . . . 19
2. Segurança elétrica . . . . . . . . . . . . . . . . . . . . . . . . . . . . . . . . . . . . . . . . . . . . . . . . . . . . . . . . 19
3. Segurança de pessoas . . . . . . . . . . . . . . . . . . . . . . . . . . . . . . . . . . . . . . . . . . . . . . . . . . . . . 20
4. Utilização e conservação da ferramenta elétrica . . . . . . . . . . . . . . . . . . . . . . . . . . . . . . . . 20
5. Utilização e conservação da ferramenta com acumulador . . . . . . . . . . . . . . . . . . . . . . . . . 21
6. Assistência técnica . . . . . . . . . . . . . . . . . . . . . . . . . . . . . . . . . . . . . . . . . . . . . . . . . . . . . . . . 21
Indicações de segurança específi cas do aparelho para aparafusadoras com acumulador . . 21
Acessórios/aparelhos adicionais originais . . . . . . . . . . . . . . . . . . . . . . . . . . . . . . . . . . . . . . . 21
Colocação em funcionamento . . . . . . . . . . . . . . . . . . . . . . . . . . . . . . . . . . . . . . 22
Carregar o acumulador do aparelho. . . . . . . . . . . . . . . . . . . . . . . . . . . . . . . . . . . . . . . . . . . . 22
Substituir pontas / pontas de chave de parafusos adaptáveis à aparafusadora . . . . . . . . . . . 22
Operação . . . . . . . . . . . . . . . . . . . . . . . . . . . . . . . . . . . . . . . . . . . . . . . . . . . . . . 22
Ligar / desligar a aparafusadora com acumulador . . . . . . . . . . . . . . . . . . . . . . . . . . . . . . . . . 22
Mudar de direção de rotação . . . . . . . . . . . . . . . . . . . . . . . . . . . . . . . . . . . . . . . . . . . . . . . . . 22
Ligar/desligar a lâmpada LED . . . . . . . . . . . . . . . . . . . . . . . . . . . . . . . . . . . . . . . . . . . . . . . . . 22
Ajuste do punho . . . . . . . . . . . . . . . . . . . . . . . . . . . . . . . . . . . . . . . . . . . . . . . . . . . . . . . . . . . . 22
Ajuste do binário . . . . . . . . . . . . . . . . . . . . . . . . . . . . . . . . . . . . . . . . . . . . . . . . . . . . . . . . . . . 23
Indicador da capacidade do acumulador . . . . . . . . . . . . . . . . . . . . . . . . . . . . . . . . . . . . . . . . 23
Dicas e truques . . . . . . . . . . . . . . . . . . . . . . . . . . . . . . . . . . . . . . . . . . . . . . . . . . . . . . . . . . . . . 23
PT
Manutenção e limpeza . . . . . . . . . . . . . . . . . . . . . . . . . . . . . . . . . . . . . . . . . . . . 23
Garantia e assistência técnica . . . . . . . . . . . . . . . . . . . . . . . . . . . . . . . . . . . . . . 23
Importador . . . . . . . . . . . . . . . . . . . . . . . . . . . . . . . . . . . . . . . . . . . . . . . . . . . . . 24
Eliminação . . . . . . . . . . . . . . . . . . . . . . . . . . . . . . . . . . . . . . . . . . . . . . . . . . . . . . 24
Declaração de conformidade / fabricante . . . . . . . . . . . . . . . . . . . . . . . . . . . .24
PASS 3.6 B2
17
Page 21

APARAFUSADORA COM
ACUMULADOR PASS 3.6 B2
Introdução
Parabéns pela compra do seu novo apare-
lho. Optou por um produto de elevada
qualidade. O manual de instruções faz
parte deste produto. Este contém indicações
PT
importantes para a segurança, utilização e eliminação. Antes de utilizar o produto, familiarize-se com
todas as indicações de operação e segurança.
Utilize o produto apenas como descrito e nas áreas
de aplicação indicadas. Ao transferir o produto
para terceiros, entregue todos os respetivos
documentos.
Utilização correta
Este aparelho é concebido para aparafusar em
madeira, material sintético e metal. Utilize o aparelho apenas como descrito e nas áreas de aplicação indicadas. Qualquer outra utilização ou alteração desta máquina é considerada não adequada
e acarreta consigo perigos de acidente graves.
Não é adequado para uso comercial.
Equipamento
Interruptor LIGAR/DESLIGAR
Conversor da direção rotativa / bloqueio de
ativação
Lâmpada LED
Encabadouro da ferramenta
Bucha de bloqueio
Ajuste do binário
Indicador da capacidade do acumulador
Tecla de bloqueio
Tomada de carregamento aparelho
Carregador
Conteúdo da embalagem
1 Aparafusadora com acumulador PASS 3.6 B2
1 Carregador PASS 3.6 B2-1
1 Mala
24 Pontas x 25 mm
2 Pontas x 50 mm
1 Prolongamento para pontas
1 Manual de instruções
Dados técnicos
Aparafusadora com
acumulador: PASS 3.6 B2
Tensão nominal: 3,6 V
Acumulador (integrado): Iões de LÍTIO
Capacidade do acumulador: 1500 mAh
Velocidade nominal em vazio: n
Binário: máx. 4,0 Nm
Encabadouro da ferramenta: 6,35 mm (¼")
Carregador: PASS 3.6 B2-1
ENTRADA / Input:
Tensão nominal: 230 - 240 V∼
Corrente nominal: 200 mA
SAÍDA / Output:
Tensão nominal: 5,5 V
Corrente nominal: 600 mA
Duração do carregamento: aprox. 3 horas
Classe de proteção: II /
Informações sobre ruído e vibração:
Valor de medição para ruído, determinado de
acordo com a Norma EN 60745. Por norma, o
nível de ruído, avaliado com A, da ferramenta
elétrica é:
Nível de pressão sonora: 57 dB(A)
Nível de potência sonora: 68 dB(A)
Incerteza K: 3 dB
Valores de oscilação (soma vetorial de três direções)
determinados de acordo com a Norma EN 60745:
Parafusos: Valor de emissão de oscilação
ah = 0,393 m/s
Incerteza K = 1,5 m/s
O nível de vibração indicado nestas instruções foi
medido de acordo com um processo de medição
normalizado pela norma EN 60745 e pode ser
utilizado para a comparação de aparelhos.
2
2
200 min
0
50/60 Hz
-1
18
PASS 3.6 B2
Page 22

O valor da emissão de vibração indicado também
pode ser utilizado para uma avaliação preliminar
do período de suspensão. O nível de vibração
altera-se de acordo com a utilização da ferramenta elétrica e pode, em alguns casos, exceder
o valor indicado nestas instruções. A pressão de
vibração pode ser subestimada, caso a ferramenta
seja utilizada frequentemente desta forma.
Tente manter a pressão exercida por vibrações tão
baixa quanto possível. Podem ser tomadas medidas
para reduzir a pressão exercida pela vibração,
como por exemplo, o uso de luvas ao utilizar a
ferramenta e a limitação do tempo de trabalho. Ao
mesmo tempo todas as partes do ciclo de serviço
têm de ser tidas em conta (por exemplo, os períodos, nos quais a ferramenta elétrica está desligada
e aqueles, nos quais está ligada, mas funciona
sem pressão).
Indicações gerais de
segurança para ferramentas elétricas
AVISO!
► Leia todas as indicações de segurança e ins-
truções. A inobservância das indicações de
segurança e instruções pode causar choque
elétrico, incêndio e/ou ferimentos graves.
Guarde todas as indicações de segurança e
instruções para futuras consultas.
O conceito “ferramenta elétrica”, utilizado nas
indicações de segurança, refere-se a ferramentas
elétricas operadas com corrente elétrica (com
cabo de alimentação elétrica) e a ferramentas
elétricas operadas com acumulador (sem cabo
de alimentação elétrica).
1. Segurança no local de trabalho
a) Mantenha o seu local de trabalho limpo e
bem iluminado. Desarrumação e áreas de
trabalho pouco iluminadas podem causar
acidentes.
b) Não trabalhe com a ferramenta elétrica em
ambientes potencialmente explosivos, onde
se encontram líquidos, gases ou poeiras infl amáveis. Ferramentas elétricas originam faíscas
que podem infl amar poeiras e vapores.
c) Durante a utilização da ferramenta elétrica,
mantenha crianças e outras pessoas afastadas.
Em caso de distração pode perder o controlo
do aparelho.
2. Segurança elétrica
a) A fi cha de ligação da ferramenta elétrica
(e a fonte de ligação) tem de ser adequada à
tomada. A fi cha não pode, de forma alguma,
ser alterada. Não utilize quaisquer fi chas de
adaptadores juntamente com ferramentas
elétricas com proteção de ligação à terra.
Fichas inalteradas e tomadas adequadas
reduzem o risco de choque elétrico.
b) Evite o contacto físico com superfícies ligadas
à terra, como tubos, aquecimentos, fogões e
frigorífi cos. Existe um risco maior de choque
elétrico se o seu corpo estiver ligado à terra.
c) Mantenha as ferramentas elétricas afastadas
de chuva ou humidade. A infi ltração de água
num aparelho elétrico aumenta o risco de
choque elétrico.
d) Não utilize o cabo para um fi m diferente do
previsto, p. ex. para transportar a ferramenta
elétrica ou para puxar a fi cha da tomada.
Mantenha o cabo afastado de calor, óleo,
arestas afi adas ou partes do aparelho móveis.
Cabos danifi cados ou enrolados aumentam o
risco de choque elétrico.
e) Se trabalhar com uma ferramenta elétrica ao
ar livre, utilize apenas extensões que também
sejam adequadas para áreas exteriores.
A utilização de uma extensão adequada para
o exterior diminui o risco de choque elétrico.
f) Se não for possível evitar a utilização da
ferramenta elétrica num ambiente húmido,
utilize um disjuntor diferencial residual.
A utilização de um disjuntor diferencial residual
reduz o risco de choque elétrico.
PT
PASS 3.6 B2
19
Page 23

3. Segurança de pessoas
a) Esteja sempre atento, preste atenção ao que
está a fazer e utilize a ferramenta elétrica
de forma sensata. Não utilize o aparelho se
estiver desconcentrado, com sono ou sob infl uência de drogas, álcool ou medicamentos.
Um momento de distração durante a utilização
PT
da ferramenta elétrica pode causar ferimentos
graves.
b) Use o equipamento de proteção pessoal e
sempre óculos de proteção. O uso do equipamento de proteção pessoal, como máscaras
de proteção contra pó, calçado de segurança
antiderrapante, capacete de proteção ou proteção auditiva, de acordo com o tipo de aplicação da ferramenta elétrica, reduz o risco de
ferimentos.
c) Evite uma colocação em funcionamento in-
voluntária. Certifi que-se de que a ferramenta
elétrica se encontra desligada antes de a
ligar à fonte de alimentação e/ou ao acumulador, elevar ou transportar. Se, durante o
transporte da ferramenta elétrica, tiver o dedo
no interruptor ou ligar o aparelho a uma fonte
de alimentação quando este já se encontra
ligado, poderão ocorrer acidentes.
d) Retire as ferramentas de ajuste ou a chave de
parafusos antes de ligar a ferramenta elétrica.
Uma ferramenta ou uma chave numa parte
rotativa do aparelho pode causar ferimentos.
e) Evite uma postura corporal incorreta. Assegure
uma posição estável e mantenha sempre o
equilíbrio. Desta forma, consegue controlar
melhor a ferramenta elétrica em situações
inesperadas.
f) Use vestuário adequado. Não use roupas lar-
gas ou jóias. Mantenha o cabelo, vestuário
e luvas afastados das peças móveis. Vestuário
solto, jóias ou cabelos compridos podem ser
recolhidos pelas peças móveis.
g) Se existir a possibilidade de montar dispo-
sitivos de aspiração ou recolha de poeiras,
certifi que-se de que são ligados e utilizados
corretamente. A utilização de um dispositivo
de aspiração pode reduzir eventuais perigos
devido a poeiras.
4. Utilização e conservação da
ferramenta elétrica
a) Não sobrecarregue o aparelho. Utilize a
ferramenta elétrica apropriada para o seu
trabalho. Com a ferramenta elétrica adequada,
trabalhará melhor e de forma mais segura na
respetiva área de trabalho.
b) Não utilize qualquer ferramenta elétrica, cujo
interruptor esteja avariado. Uma ferramenta
elétrica que não se consegue ligar nem desligar
constitui perigo e tem de ser reparada.
c) Retire a fi cha da tomada e / ou retire o acu-
mulador antes de realizar ajustes no aparelho, substituir acessórios ou se não estiver a
utilizar o aparelho. Esta medida de segurança
impede o arranque involuntário do aparelho.
d) Guarde as ferramentas elétricas que não estão
a ser utilizadas fora do alcance das crianças.
Não autorize a utilização do aparelho por
pessoas que não estejam familiarizadas com
o mesmo ou que não tenham lido estas instruções. As ferramentas elétricas são perigosas,
caso sejam utilizadas por pessoas inexperientes.
e) Faça um tratamento cuidadoso das ferramen-
tas elétricas. Verifi que se as peças móveis
funcionam corretamente e não se encontram
encravadas, se estão partidas ou danifi cadas
a ponto de interferir no bom funcionamento
da ferramenta elétrica. Antes de utilizar o
aparelho, as peças danifi cadas devem ser
reparadas. Muitos acidentes ocorrem devido à
má manutenção das ferramentas elétricas.
f) Mantenha as ferramentas de corte afi adas e
limpas. Ferramentas de corte bem conservadas
e afi adas encravam muito menos e são mais
fáceis de conduzir.
g) Utilize a ferramenta elétrica, os acessórios,
ferramentas de aplicação, etc., de acordo
com estas instruções. Tenha em consideração
as condições de trabalho e a atividade a
exercer. A utilização de ferramentas elétricas
para outras utilizações diferentes das previstas
pode levar a situações perigosas.
20
PASS 3.6 B2
Page 24

5. Utilização e conservação da
ferramenta com acumulador
a) Carregue os acumuladores apenas em carre-
gadores, que sejam aconselhados pelo fabricante. Se um carregador adequado a um tipo
específi co de acumuladores for utilizado com
outros acumuladores, há perigo de incêndio.
b) Utilize, nas ferramentas elétricas, apenas
os acumuladores previstos para as mesmas.
A utilização de outros acumuladores pode
causar ferimentos e perigo de incêndio.
c) Mantenha o acumulador não utilizado afas-
tado de clips, moedas, chaves, pregos, parafusos ou de outros pequenos objetos de
metal, que possam causar uma conexão dos
contactos. Um curto-circuito entre os contactos
do acumulador pode ter como consequência
queimaduras ou fogo.
d) Se o acumulador for utilizado de forma incor-
reta, é possível que saia líquido do mesmo.
Evite o contacto com este. Se houver eventual
contacto, lave com água. Se o líquido entrar
em contacto com a vista, contacte além disso
um médico. O líquido do acumulador vertido
pode provocar irritações ou queimaduras na
pele.
CUIDADO! PERIGO DE EXPLOSÃO!
Nunca carregue baterias que não
sejam recarregáveis.
6. Assistência técnica
a) A sua ferramenta elétrica só pode ser reparada
por técnicos especializados e com peças sobressalentes de origem. Desta forma, é garantida a
segurança da sua ferramenta elétrica.
Indicações de segurança específi cas
do aparelho para aparafusadoras
com acumulador
■ Fixe a peça a ser trabalhada. Uma peça a
trabalhar presa com dispositivos de fi xação ou
um torno de bancada está mais segura do que
com a sua mão.
■ Segure a ferramenta elétrica de forma
segura. Ao apertar e desapertar parafusos
podem surgir repentinamente momentos de
reação elevados.
■ Desligue imediatamente a ferramenta elé-
trica, se a ferramenta utilizada bloquear.
Prepare-se para momentos de reação elevados,
que causam um contragolpe.
■ Segure no aparelho apenas pelas super-
fícies isoladas do punho quando realizar
trabalhos em que o parafuso possa atingir
cabos elétricos escondidos. O contacto do
parafuso com um cabo condutor de tensão
também pode colocar peças metálicas do aparelho sob tensão, causando assim um choque
elétrico.
■ Em caso de trabalhos no aparelho, bem
como transporte ou armazenamento, coloque o conversor da direção rotativa na
posição média (bloqueio). Assim evitará um
arranque involuntário da ferramenta elétrica.
■ Este aparelho não se destina a ser utilizado por
pessoas (incluindo crianças) com capacidades
físicas, sensoriais ou mentais limitadas ou com
falta de experiência e/ou de conhecimento, a
não ser que estas sejam supervisionadas por
uma pessoa responsável pela sua segurança
ou que desta tenham recebido instruções acerca do funcionamento do aparelho. As crianças
devem ser vigiadas, para garantir que não
brincam com o aparelho.
Acessórios/aparelhos adicionais
originais
■ Utilize apenas acessórios e aparelhos adi-
cionais que estejam indicados no manual
de instruções. A utilização de ferramentas
elétricas ou acessórios diferentes dos recomendados no manual de instruções pode signifi car
perigo de ferimentos para si.
PT
PASS 3.6 B2
21
Page 25

Colocação em funcionamento
Operação
Carregar o acumulador do aparelho
Deve ser apenas utilizado em espaços interiores!
NOTA
O acumulador é fornecido carregado parcial-
►
mente. Carregue o acumulador antes da
PT
primeira utilização, no mínimo, 3 horas.
Poderá carregar o acumulador de iões de
lítio em qualquer altura sem reduzir a
durabilidade. Uma interrupção do processo
de carregamento não danifi ca o acumulador.
Iniciar o processo de carregamento:
♦ Ligue o carregador a uma fonte de corrente
com 230 V∼ 50 Hz.
♦ Ligue o carregador à tomada de carrega-
mento do aparelho.
O acumulador está carregado, quando o indicador de capacidade do acumulador
vermelho para verde.
Terminar processo de carregamento:
♦ Separe o carregador da fonte de corrente.
♦ Separe o carregador da tomada de carre-
gamento do aparelho.
Substituir pontas / pontas de chave
de parafusos adaptáveis à aparafusadora
Colocação:
♦ Puxe para trás a bucha de bloqueio e
retenha-a.
♦ Coloque a ponta no encabadouro da ferra-
menta , solte a bucha de bloqueio .
Retirar:
♦ Puxe para trás a bucha de bloqueio e
retenha-a.
♦ Retire a ponta e solte a bucha de bloqueio .
mudar de
Ligar / desligar a aparafusadora
com acumulador
Ligar:
♦ Prima o interruptor LIGAR/DESLIGAR e
mantenha-o premido.
Desligar:
♦ Solte o interruptor LIGAR/DESLIGAR .
Mudar de direção de rotação
Rotação à direita:
♦ Empurre o conversor da direção rotativa
para a esquerda.
♦ Prima o interruptor LIGAR/DESLIGAR .
Pode agora atarraxar os parafusos.
Rotação à esquerda:
♦ Empurre o conversor da direção rotativa
para a direita.
♦ Prima o interruptor LIGAR/DESLIGAR .
Pode agora desatarraxar os parafusos.
Bloqueio de ativação:
♦ Empurre o conversor da direção rotativa
para a posição média. O interruptor LIGAR/
DESLIGAR está bloqueado.
Ligar/desligar a lâmpada LED
Ligar:
♦ Prima o interruptor LIGAR/DESLIGAR e
mantenha-o premido.
Desligar:
♦ Solte o interruptor LIGAR/DESLIGAR .
Ajuste do punho
A aparafusadora pode ser encaixada em 2 posições de punho diferentes. Para este fi m, a tecla de
bloqueio
ra rodada para a posição desejada. Em seguida
solte novamente a tecla de bloqueio
tem de ser premida e a aparafusado-
.
22
PASS 3.6 B2
Page 26

Ajuste do binário
O binário para um tamanho de parafuso específi co
é ajustado no ajuste do binário . O binário
necessário está dependente de vários fatores:
- do tipo e da dureza do material a trabalhar.
- do tipo e comprimento dos parafusos utilizados.
- das exigências, colocadas às uniões roscadas.
O alcance do binário é sinalizado através da
ativação do acoplamento.
Indicador da capacidade do acumulador
O indicador da capacidade do acumulador
sinaliza-lhe o estado de carregamento do acumulador por meio de 3 LED‘s de várias cores.
Todos os LED‘s estão iluminados:
O acumulador está totalmente carregado.
O LED amarelo e o vermelho estão iluminados:
O acumulador possui um resto de carga sufi ciente.
LED vermelho:
O acumulador está vazio, carregue novamente
o acumulador.
Dicas e truques
As pontas de aparafusar estão identifi cadas com
as suas medidas e a forma. Se não tiver a certeza,
experimente sempre primeiro se a ponta assenta
sem folga na cabeça do parafuso.
Manutenção e limpeza
■ Utilize para a limpeza do exterior um pano.
Nunca utilize benzina, solventes ou detergentes
agressivos para o plástico.
Garantia e assistência técnica
Este aparelho tem uma garantia de 3 anos
a contar da data de compra. Este aparelho
foi fabricado com o maior cuidado e testado
escrupulosamente antes da sua distribuição.
Guarde o talão de compra como comprovativo da compra. Caso deseje acionar a garantia, telefone para o seu serviço de Assistência
Técnica. Apenas deste modo pode ser garantido um envio gratuito do seu produto.
A garantia abrange apenas defeitos de material ou
de fabrico e não inclui danos durante o transporte,
peças de desgaste ou danos em peças frágeis, p.
ex. interruptores ou acumuladores. O produto foi
concebido apenas para uso privado e não para
uso comercial.
A garantia extingue-se em caso de utilização incorreta, uso de força e intervenções que não tenham
sido efetuadas pela nossa fi lial de assistência
técnica autorizada. Os seus direitos legais não
são limitados por esta garantia.
O período de garantia não é prolongado pelo
acionamento da mesma. Isto também se aplica a
peças substituídas e reparadas. Danos e defeitos
que possam eventualmente existir no momento da
compra devem ser imediatamente comunicados,
após retirar o aparelho da embalagem, o mais
tardar dois dias após a data de compra. Expirado
o período da garantia, quaisquer reparações
necessárias estão sujeitas a pagamento.
PT
PERIGO DE CHOQUE ELÉTRICO!
Retire o carregador da tomada de
corrente antes de realizar trabalhos de
limpeza.
A aparafusadora com acumulador não possui
manutenção.
■ O aparelho deve estar sempre limpo, seco e
livre de óleos ou lubrifi cantes.
■ Não podem entrar quaisquer líquidos para o
interior dos aparelhos.
PASS 3.6 B2
Assistência Portugal
Tel.: 70778 0005 (0,12 EUR/Min.)
E-Mail: kompernass@lidl.pt
IAN 96266
Horário de atendimento da linha de apoio:
Segunda a sexta das 8:00 horas – 20:00 horas (HEC)
23
Page 27

Importador
KOMPERNASS HANDELS GMBH
BURGSTRASSE 21
44867 BOCHUM
GERMANY
www.kompernass.com
Diretiva Máquinas
(2006 / 42 / EC)
Diretiva Baixa Tensão da CE
(2006 / 95 / EC)
Compatibilidade Eletromagnética
(2004 / 108 / EC)
PT
Eliminação
A embalagem é composta por materiais
recicláveis que pode depositar nos
ecopontos locais.
Não deite fora ferramentas elétricas
no lixo doméstico!
Em conformidade com a Diretiva Europeia
2012/19/EU, as ferramentas elétricas usadas têm
de ser recolhidas separadamente e submetidas a
reciclagem adequada.
Não deite fora acumuladores no
lixo doméstico!
Acumuladores avariados ou usados têm de ser
reciclados em conformidade com a diretiva
2006/66/EC. Devolva o conjunto de acumuladores e /ou o aparelho nos pontos de recolha
disponibilizados.
Relativamente a possibilidades de eliminação para
ferramentas elétricas/conjunto de acumuladores,
informe-se junto da sua administração municipal
ou local.
Diretiva RSP
(Restrição de Substâncias Perigosas)
(2011 / 65 / EU)
Normas harmonizadas aplicadas:
EN 60745-1 / A11: 2010
EN 60745-2-2: 2010
EN 55014-1 / A2: 2011
EN 55014-2 / A2: 2008
EN 60335-1: 2012
EN 60335-2-29: 2004 + A2
EN 62233: 2008
EN 61000-3-3: 2008
EN 61000-3-2: 2006 + A1 + A2
Tipo / designação do aparelho:
Aparafusadora com acumulador PASS 3.6 B2
Ano de fabrico: 10 - 2013
Número de série: IAN 96266
Bochum, 27.09.2013
Declaração de conformidade /
fabricante
Nós, a KOMPERNASS HANDELS GMBH,
responsável pela documentação: Sr. Semi Uguzlu,
BURGSTR. 21, 44867 BOCHUM, ALEMANHA,
declaramos que este produto cumpre os documentos normativos, normas e diretivas comunitárias:
24
Semi Uguzlu
- Gestor de qualidade -
Reservado o direito a alterações técnicas no
âmbito da evolução técnica.
PASS 3.6 B2
Page 28

Contents
Introduction . . . . . . . . . . . . . . . . . . . . . . . . . . . . . . . . . . . . . . . . . . . . . . . . . . . . . 26
Proper use . . . . . . . . . . . . . . . . . . . . . . . . . . . . . . . . . . . . . . . . . . . . . . . . . . . . . . . . . . . . . . . . 26
Features . . . . . . . . . . . . . . . . . . . . . . . . . . . . . . . . . . . . . . . . . . . . . . . . . . . . . . . . . . . . . . . . . . 26
Package contents . . . . . . . . . . . . . . . . . . . . . . . . . . . . . . . . . . . . . . . . . . . . . . . . . . . . . . . . . . . 26
Technical details . . . . . . . . . . . . . . . . . . . . . . . . . . . . . . . . . . . . . . . . . . . . . . . . . . . . . . . . . . . . 26
General Power Tool Safety Warnings . . . . . . . . . . . . . . . . . . . . . . . . . . . . . . . 27
1. Work area safety . . . . . . . . . . . . . . . . . . . . . . . . . . . . . . . . . . . . . . . . . . . . . . . . . . . . . . . . . 27
2. Electrical safety . . . . . . . . . . . . . . . . . . . . . . . . . . . . . . . . . . . . . . . . . . . . . . . . . . . . . . . . . . 27
3. Personal safety . . . . . . . . . . . . . . . . . . . . . . . . . . . . . . . . . . . . . . . . . . . . . . . . . . . . . . . . . . . 27
4. Power tool use and care . . . . . . . . . . . . . . . . . . . . . . . . . . . . . . . . . . . . . . . . . . . . . . . . . . . 28
5. Use and handling of the cordless electrical power tool . . . . . . . . . . . . . . . . . . . . . . . . . . . . 28
6. Service . . . . . . . . . . . . . . . . . . . . . . . . . . . . . . . . . . . . . . . . . . . . . . . . . . . . . . . . . . . . . . . . . 28
Safety instructions specifi cally for cordless screwdrivers . . . . . . . . . . . . . . . . . . . . . . . . . . . . . 28
Original accessories/additional equipment . . . . . . . . . . . . . . . . . . . . . . . . . . . . . . . . . . . . . . . 29
Initial operation . . . . . . . . . . . . . . . . . . . . . . . . . . . . . . . . . . . . . . . . . . . . . . . . . 29
Charging the appliance . . . . . . . . . . . . . . . . . . . . . . . . . . . . . . . . . . . . . . . . . . . . . . . . . . . . . . 29
Changing bits / screwdriver bits . . . . . . . . . . . . . . . . . . . . . . . . . . . . . . . . . . . . . . . . . . . . . . . . 29
Operation . . . . . . . . . . . . . . . . . . . . . . . . . . . . . . . . . . . . . . . . . . . . . . . . . . . . . . 29
Switching the cordless screwdriver on / off . . . . . . . . . . . . . . . . . . . . . . . . . . . . . . . . . . . . . . . . 29
Changing the direction of rotation . . . . . . . . . . . . . . . . . . . . . . . . . . . . . . . . . . . . . . . . . . . . . . 29
Switch LED on / off . . . . . . . . . . . . . . . . . . . . . . . . . . . . . . . . . . . . . . . . . . . . . . . . . . . . . . . . . . 30
Adjusting the handle . . . . . . . . . . . . . . . . . . . . . . . . . . . . . . . . . . . . . . . . . . . . . . . . . . . . . . . . . 30
Torque setting . . . . . . . . . . . . . . . . . . . . . . . . . . . . . . . . . . . . . . . . . . . . . . . . . . . . . . . . . . . . . . 30
Battery level display . . . . . . . . . . . . . . . . . . . . . . . . . . . . . . . . . . . . . . . . . . . . . . . . . . . . . . . . 30
Tips and tricks . . . . . . . . . . . . . . . . . . . . . . . . . . . . . . . . . . . . . . . . . . . . . . . . . . . . . . . . . . . . . . 30
GB
MT
Maintenance and cleaning . . . . . . . . . . . . . . . . . . . . . . . . . . . . . . . . . . . . . . . . . 30
Warranty and service . . . . . . . . . . . . . . . . . . . . . . . . . . . . . . . . . . . . . . . . . . . . 31
Importer . . . . . . . . . . . . . . . . . . . . . . . . . . . . . . . . . . . . . . . . . . . . . . . . . . . . . . . 31
Disposal . . . . . . . . . . . . . . . . . . . . . . . . . . . . . . . . . . . . . . . . . . . . . . . . . . . . . . . . 31
Declaration of conformity / Manufacturer
. . . . . . . . . . . . . . . . . . . . . . . . . . . . 32
PASS 3.6 B2
25
Page 29

CORDLESS SCREWDRIVER
PASS 3.6 B2
Introduction
Congratulations on the purchase of your
new appliance. You have selected a high-
quality product. The operating instructions
are part of this product. They contain important
information on safety, use and disposal. Before
using the product, familiarise yourself with all
operating and safety instructions. Use this product
GB
only as described and only for the specifi ed areas
MT
of application. Please also pass these operating
instructions on to any future owner(s).
Proper use
This appliance is designed for screwing into wood,
plastic and metal. Use the appliance only as described
and only for the areas of application specifi ed.
Any other uses or modifi cations to the appliance
are deemed to be improper usage and may result
in serious physical injury. Not for commercial use.
Features
ON/OFF switch
Rotation direction switch/safety lock-out
LED
Tool holder
Locking collar
Torque setting
Battery level display
Locking button
Charging socket (appliance)
Charger
Package contents
1 cordless screwdriver PASS 3.6 B2
1 charger PASS 3.6 B2-1
1 carrying case
24 bits x 25 mm
2 bits x 50 mm
1 bit extension
1 operating instructions
Technical details
Cordless screwdriver: PASS 3.6 B2
Rated voltage: 3.6 V
Battery (integrated): LITHIUM-ion
Battery capacity: 1500 mAh
Nominal idle speed: n
Torque: max. 4.0 Nm
Tool holder: 6.35 mm (¼")
Charger: PASS 3.6 B2-1
INPUT:
Rated voltage: 230 - 240 V∼ 50/60 Hz
Rated current: 200 mA
OUTPUT:
Rated voltage: 5.5 V
Rated current: 600 mA
Charging time: approx. 3 hours
Protection class: II /
Noise and vibration data:
Noise measurement determined in accordance
with EN 60745 The A-rated noise level of the
power tool is typically:
Sound pressure level: 57 dB(A)
Sound power level: 68 dB(A)
Uncertainty K: 3 dB
Vibration values (vector total of three directions)
determined in accordance with EN 60745
Screws: Vibration emission value ah = 0.393 m/s
Uncertainty K = 1.5 m/s
The vibration level specifi ed in these instructions has
been measured in accordance with the standardised
measuring procedure specifi ed in EN 60745 and
can be used to make equipment comparisons.
The specifi ed vibration emission value can also
be used to make an initial exposure estimate. The
vibration level varies in accordance with the use of
the power tool and may be higher than the value
specifi ed in these instructions in some cases. It is
easy to underestimate the vibration load if the
electrical power tool is used regularly in a certain
manner.
= 200 min
0
2
-1
2
26
PASS 3.6 B2
Page 30

Try to keep the vibration loads as low as possible.
Measures to reduce the vibration load are, e.g.
wearing gloves and limiting the working time.
Wherein all states of operation must be included
(e.g. times when the power tool is switched off
and times where the power tool is switched on
but running without load).
General Power Tool
Safety Warnings
WARNING!
► Read all safety warnings and all instructions.
Failure to follow the warnings and instructions
may result in electric shock, fi re and/or serious
injury.
c) Do not expose power tools to rain or wet
conditions. Water entering a power tool will
increase the risk of electric shock.
d) Do not abuse the cord. Never use the cord for
carrying, pulling or unplugging the power tool.
Keep cord away from heat, oil, sharp edges
or moving parts. Damaged or entangled cords
increase the risk of electric shock.
e) When operating a power tool outdoors, use
an extension cord suitable for outdoor use.
Use of a cord suitable for outdoor use reduces
the risk of electric shock.
f) If operating a power tool in a damp location
is unavoidable, use a residual current device
(RCD) protected supply. Use of an RCD
reduces the risk of electric shock.
GB
MT
Save all warnings and instructions for future
reference.
The term “power tool” in the warnings refers to your
mains-operated (corded) power tool or batteryoperated (cordless) power tool.
1. Work area safety
a) Keep work area clean and well lit. Cluttered
or dark areas invite accidents.
b) Do not operate power tools in explosive
atmospheres, such as in the presence of fl ammable liquids, gases or dust. Power tools create
sparks which may ignite the dust or fumes.
c) Keep children and bystanders away while
operating a power tool. Distractions can cause
you to lose control.
2. Electrical safety
a) Power tool plugs must match the outlet. Never
modify the plug in any way. Do not use any
adapter plugs with earthed (grounded)
power tools. Unmodifi ed plugs and matching
outlets will reduce risk of electric shock.
b) Avoid body contact with earthed or ground-
ed surfaces, such as pipes, radiators, ranges
and refrigerators. There is an increased risk
of electric shock if your body is earthed or
grounded.
3. Personal safety
a) Stay alert, watch what you are doing and
use common sense when operating a power
tool. Do not use a power tool while you are
tired or under the infl uence of drugs, alcohol
or medication. A moment of inattention while
operating power tools may result in serious
personal injury.
b) Use personal protective equipment. Always
wear eye protection. Protective equipment
such as dust mask, non-skid safety shoes, hard
hat, or hearing protection used for appropriate
conditions will reduce personal injuries.
c) Prevent unintentional starting. Ensure the
switch is in the off -position before connecting
to power source and/or battery pack, picking
up or carrying the tool. Carrying power tools
with your fi nger on the switch or energising
power tools that have the switch on invites
accidents.
d) Remove any adjusting key or wrench before
turning the power tool on. A wrench or a key
left attached to a rotating part of the power tool
may result in personal injury.
e) Do not overreach. Keep proper footing and
balance at all times. This enables better control
of the power tool in unexpected situations.
PASS 3.6 B2
27
Page 31

f) Dress properly. Do not wear loose clothing or
jewellery. Keep your hair, clothing and gloves
away from moving parts. Loose clothes, jewel-
lery or long hair can be caught in moving parts.
g) If devices are provided for the connection of
dust extraction and collection facilities, ensure
these are connected and properly used.
Use of dust collection can reduce dust-related
hazards.
4. Power tool use and care
GB
a) Do not force the power tool. Use the correct
MT
power tool for your application. The correct
power tool will do the job better and safer at the
rate for which it was designed.
b) Do not use the power tool if the switch does
not turn it on and off . Any power tool that cannot be controlled with the switch is dangerous
and must be repaired.
c) Disconnect the plug from the power source
and/or the battery pack from the power tool
before making any adjustments, changing
accessories, or storing power tools. Such
preventive safety measures reduce the risk of
starting the power tool accidentally.
d) Store idle power tools out of the reach of
children and do not allow persons unfamiliar
with the power tool or these instructions to
operate the power tool. Power tools are
dangerous in the hands of untrained users.
e) Maintain power tools. Check for misalignment
or binding of moving parts, breakage of parts
and any other condition that may aff ect the
power tool’s operation. If damaged, have the
power tool repaired before use. Many
accidents are caused by poorly maintained
power tools.
f) Keep cutting tools sharp and clean. Properly
maintained cutting tools with sharp cutting edges
are less likely to bind and are easier to control.
g) Use the power tool, accessories and tool bits
etc. in accordance with these instructions, taking into account the working conditions and
the work to be performed. Use of the power
tool for operations diff erent from those intended
could result in a hazardous situation.
5. Use and handling of the cordless
electrical power tool
a) Charge a rechargeable battery unit using only
the charger recommended by the manufacturer.
Chargers are often designed for a particular
type of rechargeable battery unit. There is the
danger of fi re if other types of rechargeable
battery units are used.
b) Only the rechargeable battery units supplied
are to be used with an electrical power tool.
The use of other rechargeable battery units may
lead to the danger of injury or fi re.
c) When they are not being used, store recharge-
able battery units away from paperclips,
coins, keys. nails, screws or other small metal
objects that could cause the contacts to be
bridged. Short-circuiting the contacts of a
rechargeable battery unit may result in heat
damage or fi re.
d) Fluids may leak out of rechargeable battery
units if they are misused. If this happens,
avoid contact with the fl uid. If contact occurs,
fl ush the aff ected area with water. Seek additional medical help if any of the fl uid gets into
your eyes. Escaping battery fl uid may cause
skin irritation or burns.
CAUTION! RISK OF EXPLOSION!
Never charge non-rechargeable
batteries!
6. Service
a) Have your power tool serviced by a qualifi ed
repair person using only identical replacement parts. This will ensure that the safety of
the power tool is maintained.
Safety instructions specifi cally for
cordless screwdrivers
■ Immobilise the workpiece securely. A
workpiece that is held in place with a clamp/
vice can be worked much more safely than a
workpiece held with the hand.
■ Hold the power tool fi rmly. When tightening or
loosening screws, a high reaction moment can
quickly occur.
28
PASS 3.6 B2
Page 32

■ Switch off the power tool immediately if the
tool being used gets blocked. Be prepared
for high reaction moments as these can cause
kick-back.
■ Hold power tool by insulated gripping surfaces,
when performing an operation where the
fastener may contact hidden wiring or its
own cord. Fasteners contacting a “live” wire may
make exposed metal parts of the power tool
“live” and could give the operator an electric
shock.
■ When working on the appliance, as well as
during transport and storage, always place
the rotation direction switch in the middle
position (locked). This will prevent unintentional
activation of the device.
■ This appliance is not intended for use by people
(including children) with reduced physical,
sensory or mental abilities or for those without
experience and/or knowledge, unless they are
supervised by a person responsible for their
safety or they have been instructed in its use.
Children should be supervised to ensure that
they do not play with the appliance.
Original accessories/additional
equipment
■ Use only the additional equipment and acces-
sories detailed in the operating instructions.
The use of tools and accessories other than
those recommended in the operating instructions could lead to an increased risk of personal
injury for you.
Initial operation
Start charging:
♦ Connect the charger to a 230 V ~ 50 Hz
power source.
♦ Connect the charger to the charging socket
on the appliance.
The battery is fully charged when the battery level
display
Stop charging:
changes from red to green.
♦ Disconnect the charger from the mains
power supply.
♦ Disconnect the charger from the charging
socket on the appliance.
Changing bits / screwdriver bits
Inserting:
♦ Pull back the locking collar and hold it fi rmly.
♦ Insert the bit into the tool holder and let go
of the locking collar .
Removing:
♦ Pull back the locking collar and hold it fi rmly.
♦ Remove bit and let go of the locking collar .
Operation
Switching the cordless screwdriver
on / off
Switching on:
♦ Press the ON/OFF switch and keep it
pressed in.
GB
MT
Charging the appliance
Only for interior use!
NOTE
The battery is supplied partially charged.
►
Before fi rst use, charge the battery for at least
3 hours. Li-ion batteries can be charged at
any time without adversely aff ecting their
service life. Interruption of the charging
process will not damage the battery.
PASS 3.6 B2
Switching off :
♦ Release the ON/OFF switch .
Changing the direction of rotation
Clockwise:
♦ Push the rotation direction switch to the left.
♦ Press the ON/OFF switch . You can now
screw in the screws.
29
Page 33

Anti-clockwise:
♦ Push the rotation direction switch to the right.
♦ Press the ON/OFF switch . You can now
unscrew the screws.
Safety lock-out:
♦ Push the rotation direction switch into the
middle position. The ON/OFF switch is
blocked.
Switch LED on / off
GB
MT
Switching on:
♦ Press the ON/OFF switch and keep it
pressed in.
Switching off :
♦ Release the ON/OFF switch .
Battery level display
The battery level display indicates the charge
level using 3 coloured LEDs.
All LEDs are lit up:
The battery is fully charged.
Red and yellow LEDs lit:
The battery has a suffi cient remaining charge.
Red LED:
The battery is fl at. Recharge it.
Tips and tricks
Screw bits are labelled according to their dimensions and their shape. If you are unsure, always try
the particular screw bit out to see whether it sits in
the screw head without any free play.
Adjusting the handle
The screwdriver can be locked into two diff erent
handle settings To do this, press the locking button
and set the screwdriver into the desired position.
Afterwards, release the locking button .
Torque setting
The torque for a specifi c screw size can be set using
the torque setting . The required torque is dependent on an number of factors:
- the type and hardness of the material being
worked.
- the type and length of the screws being used.
- the demands being put on the screw joint.
When the set torque is reached, this is indicated
by the actuation of the clutch.
Maintenance and cleaning
RISK OF ELECTRIC SHOCK! Before
cleaning, disconnect the charger from
the mains socket.
The cordless screwdriver is maintenance-free.
■ The appliance must always be kept clean, dry
and free from oil or grease.
■ Never allow fl uids to get into the appliance.
■ Use a soft cloth to clean the appliance housing.
Never use benzine, solvents or cleansers which
can damage plastic.
30
PASS 3.6 B2
Page 34

Warranty and service
The warranty provided for this appliance
is 3 years from the date of purchase. This
appliance has been manufactured with care
and inspected meticulously prior to delivery. Please retain your receipt as proof of
purchase. In the event of a warranty claim,
please contact your Customer Service by
telephone. This is the only way to guarantee
free return of your goods.
The warranty covers only claims for material and
manufacturing defects, not for transport damage,
wearing parts or for damage to fragile components, e.g. switches or batteries. This appliance is
intended solely for private use and not for commercial purposes.
The warranty is deemed void if this product has been
subjected to improper or inappropriate handling,
abuse or modifi cations which were not carried
out by one of our authorised service centres. Your
statutory rights are not restricted in any way by this
warranty.
The warranty period is not prolonged by repairs
made under the warranty. This also applies to
replaced and repaired parts. Damage and defects
present at the time of purchase must be reported
immediately after unpacking, or no later than two
days after the date of purchase. Repairs made
after expiry of the warranty period are chargeable.
Service Great Britain
Tel.: 0871 5000 720 (£ 0.10/Min.)
E-Mail: kompernass@lidl.co.uk
IAN 96266
Service Malta
Tel.: 80062230
E-Mail: kompernass@lidl.com.mt
IAN 96266
Hotline availability:
Monday to Friday 08:00 - 20:00 (CET)
Importer
KOMPERNASS HANDELS GMBH
BURGSTRASSE 21
44867 BOCHUM
GERMANY
www.kompernass.com
Disposal
The packaging is made from environmen-
tally friendly material and can be disposed
of at your local recycling plant.
Do not dispose of power tools in
your normal domestic waste!
European Directive 2012/19/EU requires that
worn-out power tools are collected separately and
fed into an environmentally compatible recycling
process.
Do not dispose of batteries in your
normal domestic waste!
Defective or worn-out rechargeable batteries must
be recycled according to Directive 2006/66/EC.
Take the battery pack and/or appliance to the
existing collection facilities.
Please consult your local authorities regarding suitable
disposal of worn-out power tools/battery packs.
GB
MT
PASS 3.6 B2
31
Page 35

Declaration of conformity /
Manufacturer
We, KOMPERNASS HANDELS GMBH, documents
offi cer: Mr. Semi Uguzlu, BURGSTR. 21, 44867
BOCHUM, GERMANY, hereby declare that this
product complies with the following standards,
normative documents and the EC directives:
Machinery Directive
(2006 / 42 / EC)
GB
EU Low Voltage Regulations
(2006 / 95 / EC)
MT
EMC (Electromagnetic Compatibility)
(2004 / 108 / EC)
Type / appliance designation:
Cordless screwdriver PASS 3.6 B2
Year of manufacture: 10 - 2013
Serial number: IAN 96266
Bochum, 27/09/2013
Semi Uguzlu
- Quality Manager -
RoHS Directive
(2011 / 65 / EU)
Applied harmonised standards:
EN 60745-1 / A11: 2010
EN 60745-2-2: 2010
EN 55014-1 / A2: 2011
EN 55014-2 / A2: 2008
EN 60335-1: 2012
EN 60335-2-29: 2004 + A2
EN 62233: 2008
EN 61000-3-3: 2008
EN 61000-3-2: 2006 + A1 + A2
Subject to technical changes in the course of
further developments.
32
PASS 3.6 B2
Page 36

Inhaltsverzeichnis
Einleitung . . . . . . . . . . . . . . . . . . . . . . . . . . . . . . . . . . . . . . . . . . . . . . . . . . . . . . . 34
Bestimmungsgemäßer Gebrauch . . . . . . . . . . . . . . . . . . . . . . . . . . . . . . . . . . . . . . . . . . . . . . . 34
Ausstattung . . . . . . . . . . . . . . . . . . . . . . . . . . . . . . . . . . . . . . . . . . . . . . . . . . . . . . . . . . . . . . . . 34
Lieferumfang . . . . . . . . . . . . . . . . . . . . . . . . . . . . . . . . . . . . . . . . . . . . . . . . . . . . . . . . . . . . . . . 34
Technische Daten . . . . . . . . . . . . . . . . . . . . . . . . . . . . . . . . . . . . . . . . . . . . . . . . . . . . . . . . . . . 34
Allgemeine Sicherheitshinweise für Elektrowerkzeuge . . . . . . . . . . . . . . . . . . 35
1. Arbeitsplatz-Sicherheit . . . . . . . . . . . . . . . . . . . . . . . . . . . . . . . . . . . . . . . . . . . . . . . . . . . . . 35
2. Elektrische Sicherheit . . . . . . . . . . . . . . . . . . . . . . . . . . . . . . . . . . . . . . . . . . . . . . . . . . . . . . 35
3. Sicherheit von Personen . . . . . . . . . . . . . . . . . . . . . . . . . . . . . . . . . . . . . . . . . . . . . . . . . . . . 35
4. Verwendung und Behandlung des Elektrowerkzeugs . . . . . . . . . . . . . . . . . . . . . . . . . . . . . 36
5. Verwendung und Behandlung des Akkuwerkzeugs . . . . . . . . . . . . . . . . . . . . . . . . . . . . . . . 36
6. Service . . . . . . . . . . . . . . . . . . . . . . . . . . . . . . . . . . . . . . . . . . . . . . . . . . . . . . . . . . . . . . . . . 37
Gerätespezifi sche Sicherheitshinweise für Akkuschrauber . . . . . . . . . . . . . . . . . . . . . . . . . . . . . 37
Originalzubehör / -zusatzgeräte . . . . . . . . . . . . . . . . . . . . . . . . . . . . . . . . . . . . . . . . . . . . . . . 37
Inbetriebnahme . . . . . . . . . . . . . . . . . . . . . . . . . . . . . . . . . . . . . . . . . . . . . . . . .37
Geräte-Akku laden . . . . . . . . . . . . . . . . . . . . . . . . . . . . . . . . . . . . . . . . . . . . . . . . . . . . . . . . . . 37
Bits / Schraubendrehereinsätze auswechseln . . . . . . . . . . . . . . . . . . . . . . . . . . . . . . . . . . . . . . 38
Bedienung . . . . . . . . . . . . . . . . . . . . . . . . . . . . . . . . . . . . . . . . . . . . . . . . . . . . . .38
Akkuschrauber ein- / ausschalten . . . . . . . . . . . . . . . . . . . . . . . . . . . . . . . . . . . . . . . . . . . . . . . 38
Drehrichtung umschalten . . . . . . . . . . . . . . . . . . . . . . . . . . . . . . . . . . . . . . . . . . . . . . . . . . . . . 38
LED-Lampe ein- / ausschalten . . . . . . . . . . . . . . . . . . . . . . . . . . . . . . . . . . . . . . . . . . . . . . . . . . 38
Griff einstellung . . . . . . . . . . . . . . . . . . . . . . . . . . . . . . . . . . . . . . . . . . . . . . . . . . . . . . . . . . . . . 38
Drehmoment-Einstellung . . . . . . . . . . . . . . . . . . . . . . . . . . . . . . . . . . . . . . . . . . . . . . . . . . . . . . 38
Akku-Kapazitätsanzeige . . . . . . . . . . . . . . . . . . . . . . . . . . . . . . . . . . . . . . . . . . . . . . . . . . . . . 39
Tipps und Tricks . . . . . . . . . . . . . . . . . . . . . . . . . . . . . . . . . . . . . . . . . . . . . . . . . . . . . . . . . . . . 39
DE
AT
CH
Wartung und Reinigung . . . . . . . . . . . . . . . . . . . . . . . . . . . . . . . . . . . . . . . . . . . 39
Garantie und Service . . . . . . . . . . . . . . . . . . . . . . . . . . . . . . . . . . . . . . . . . . . . . 39
Importeur . . . . . . . . . . . . . . . . . . . . . . . . . . . . . . . . . . . . . . . . . . . . . . . . . . . . . . 39
Entsorgung . . . . . . . . . . . . . . . . . . . . . . . . . . . . . . . . . . . . . . . . . . . . . . . . . . . . . 40
Konformitätserklärung / Hersteller . . . . . . . . . . . . . . . . . . . . . . . . . . . . . . . . . . 40
PASS 3.6 B2
33
Page 37

AKKU-STABSCHRAUBER
PASS 3.6 B2
Einleitung
Wir beglückwünschen Sie zum Kauf Ihres
neuen Gerätes. Sie haben sich damit für
ein hochwertiges Produkt entschieden. Die
Bedienungsanleitung ist Teil dieses Produkts. Sie
enthält wichtige Hinweise für Sicherheit, Gebrauch
und Entsorgung. Machen Sie sich vor der Benutzung
des Produkts mit allen Bedien- und Sicherheitshinweisen vertraut. Benutzen Sie das Produkt nur wie
beschrieben und für die angegebenen Einsatzbereiche. Händigen Sie alle Unterlagen bei Weitergabe
DE
des Produkts an Dritte mit aus.
AT
CH
Bestimmungsgemäßer Gebrauch
Dieses Gerät ist zum Schrauben in Holz, Kunststoff
und Metall bestimmt. Benutzen Sie das Gerät
nur wie beschrieben und für die angegebenen
Einsatzbereiche. Jede andere Verwendung oder
Veränderung der Maschine gilt als nicht bestimmungsgemäß und birgt erhebliche Unfallgefahren.
Nicht zum gewerblichen Gebrauch.
Ausstattung
EIN-/AUS-Schalter
Drehrichtungsumschalter / Einschaltsperre
LED-Lampe
Werkzeugaufnahme
Verriegelungshülse
Drehmomenteinstellung
Akku-Kapazitätsanzeige
Verriegelungstaste
Ladebuchse Gerät
Ladegerät
Lieferumfang
1 Akku-Stabschrauber PASS 3.6 B2
1 Ladegerät PASS 3.6 B2-1
1 Tragekoff er
24 Bits x 25 mm
2 Bits x 50 mm
1 Bitverlängerung
1 Bedienungsanleitung
Technische Daten
Akku-Stabschrauber: PASS 3.6 B2
Nennspannung: 3,6 V
Akku (integriert): LITHIUM-Ionen
Akku-Kapazität: 1500 mAh
Nennleerlaufdrehzahl: n
Drehmoment: max. 4,0 Nm
Werkzeug-Aufnahme: 6,35 mm (¼“)
Ladegerät: PASS 3.6 B2-1
EINGANG / Input:
Nennspannung: 230 - 240 V∼ 50/60 Hz
Nennstrom: 200 mA
AUSGANG / Output:
Nennspannung: 5,5 V
Nennstrom: 600 mA
Ladedauer: ca. 3 Std.
Schutzklasse: II /
Geräusch- und Vibrationsinformationen:
Messwert für Geräusch ermittelt entsprechend
EN 60745. Der A-bewertete Geräuschpegel des
Elektrowerkzeugs beträgt typischerweise:
Schalldruckpegel: 57 dB(A)
Schallleistungspegel: 68 dB(A)
Unsicherheit K: 3 dB
Schwingungswerte (Vektorsumme dreier Richtungen)
ermittelt entsprechend EN 60745:
Schrauben: Schwingungsemissionswert
ah = 0,393 m/s
Unsicherheit K = 1,5 m/s
Der in diesen Anweisungen angegebene Schwin-
gungspegel ist entsprechend einem in EN 60745
genormten Messverfahren gemessen worden und
kann für den Gerätevergleich verwendet werden.
Der angegebene Schwingungsemissionswert kann
auch zu einer einleitenden Einschätzung der Aussetzung verwendet werden. Der Schwingungspegel
wird sich entsprechend dem Einsatz des Elektro-
2
200 min
0
2
-1
34
PASS 3.6 B2
Page 38

werkzeugs verändern und kann in manchen Fällen
über dem in diesen Anweisungen angegebenen
Wert liegen. Die Schwingungsbelastung könnte
unterschätzt werden, wenn das Elektrowerkzeug
regelmäßig in solcher Weise verwendet wird.
Versuchen Sie, die Belastung durch Vibrationen so
gering wie möglich zu halten. Beispielhafte Maßnahmen zur Verringerung der Vibrationsbelastung
sind das Tragen von Handschuhen beim Gebrauch
des Werkzeugs und die Begrenzung der Arbeitszeit. Dabei sind alle Anteile des Betriebszyklus zu
berücksichtigen (beispielweise Zeiten, in denen
das Elektrowerkzeug abgeschaltet ist, und solche,
in denen es zwar eingeschaltet ist, aber ohne
Belastung läuft).
Allgemeine
Sicherheitshinweise
für Elektrowerkzeuge
WARNUNG!
► Lesen Sie alle Sicherheitshinweise und Anwei-
sungen. Versäumnisse bei der Einhaltung der
Sicherheitshinweise und Anweisungen können
elektrischen Schlag, Brand und/oder schwere
Verletzungen verursachen.
Bewahren Sie alle Sicherheitshinweise und
Anweisungen für die Zukunft auf.
Der in den Sicherheitshinweisen verwendete Begriff
„Elektrowerkzeug“ bezieht sich auf netzbetriebene
Elektrowerkzeuge (mit Netzkabel) und auf akkubetriebene Elektrowerkzeuge (ohne Netzkabel).
1. Arbeitsplatz-Sicherheit
a) Halten Sie Ihren Arbeitsbereich sauber und
gut beleuchtet. Unordnung und unbeleuchtete
Arbeitsbereiche können zu Unfällen führen.
b) Arbeiten Sie mit dem Elektrowerkzeug nicht in
explosionsgefährdeter Umgebung, in der sich
brennbare Flüssigkeiten, Gase oder Stäube
befi nden. Elektrowerkzeuge erzeugen Funken, die
den Staub oder die Dämpfe entzünden können.
c) Halten Sie Kinder und andere Personen wäh-
rend der Benutzung des Elektrowerkzeugs fern.
Bei Ablenkung können Sie die Kontrolle über
das Gerät verlieren.
2. Elektrische Sicherheit
a) Der Anschlussstecker des Elektrowerkzeuges
(bzw. Netzteils) muss in die Steckdose passen.
Der Stecker darf in keiner Weise verändert
werden. Verwenden Sie keine Adapterstecker
gemeinsam mit schutzgeerdeten Elektrowerkzeugen. Unveränderte Stecker und passende
Steckdosen verringern das Risiko eines elektrischen Schlages.
b) Vermeiden Sie Körperkontakt mit geerdeten
Oberfl ächen, wie von Rohren, Heizungen,
Herden und Kühlschränken. Es besteht ein
erhöhtes Risiko durch elektrischen Schlag, wenn
Ihr Körper geerdet ist.
c) Halten Sie Elektrowerkzeuge von Regen oder
Nässe fern. Das Eindringen von Wasser in ein
Elektrogerät erhöht das Risiko eines elektrischen
Schlages.
d) Zweckentfremden Sie das Kabel nicht, um das
Elektrowerkzeug zu tragen, aufzuhängen oder
um den Stecker aus der Steckdose zu ziehen.
Halten Sie das Kabel fern von Hitze, Öl, scharfen Kanten oder sich bewegenden Geräteteilen.
Beschädigte oder verwickelte Kabel erhöhen das
Risiko eines elektrischen Schlages.
e) Wenn Sie mit einem Elektrowerkzeug im
Freien arbeiten, verwenden Sie nur Verlängerungskabel, die auch für den Außenbereich
zugelassen sind. Die Anwendung eines für den
Außenbereich geeigneten Verlängerungskabels
verringert das Risiko eines elektrischen Schlages.
f) Wenn der Betrieb des Elektrowerkzeuges in
feuchter Umgebung nicht vermeidbar ist, verwenden Sie einen Fehlerstromschutzschalter.
Der Einsatz eines Fehlerstromschutzschalters vermindert das Risiko eines elektrischen Schlages.
3. Sicherheit von Personen
a) Seien Sie stets aufmerksam, achten Sie darauf,
was Sie tun und gehen Sie mit Vernunft an die
Arbeit mit einem Elektrowerkzeug. Benutzen
Sie kein Elektrowerkzeug, wenn Sie müde sind
oder unter dem Einfl uss von Drogen, Alkohol
oder Medikamenten stehen. Ein Moment der
DE
AT
CH
PASS 3.6 B2
35
Page 39

Unachtsamkeit beim Gebrauch des Elektrowerkzeuges kann zu ernsthaften Verletzungen führen.
b) Tragen Sie persönliche Schutzausrüstung und
immer eine Schutzbrille. Das Tragen persönlicher
Schutzausrüstung wie Staubmaske, rutschfeste
Sicherheitsschuhe, Schutzhelm oder Gehörschutz,
je nach Art und Einsatz des Elektrowerkzeuges,
verringert das Risiko von Verletzungen.
c) Vermeiden Sie eine unbeabsichtigte Inbetrieb-
nahme. Vergewissern Sie sich, dass das Elektrowerkzeug ausgeschaltet ist, bevor Sie es
an die Stromversorgung und / oder den Akku
anschließen, es aufnehmen oder tragen.
DE
AT
CH
Wenn Sie beim Tragen des Elektrowerkzeuges
den Finger am Schalter haben oder das Gerät
bereits eingeschaltet an die Stromversorgung
anschließen, kann dies zu Unfällen führen.
d) Entfernen Sie Einstellwerkzeuge oder Schrau-
benschlüssel, bevor Sie das Elektrowerkzeug
einschalten. Ein Werkzeug oder Schlüssel, der
sich in einem drehenden Geräteteil befi ndet,
kann zu Verletzungen führen.
e) Vermeiden Sie eine abnormale Körperhaltung.
Sorgen Sie für einen sicheren Stand und halten
Sie jederzeit das Gleichgewicht. Dadurch kön-
nen Sie das Elektrowerkzeug in unerwarteten
Situationen besser kontrollieren.
f) Tragen Sie geeignete Kleidung. Tragen Sie
keine weite Kleidung oder Schmuck. Halten
Sie Haare, Kleidung und Handschuhe fern
von sich bewegenden Teilen. Lockere Kleidung,
Schmuck oder lange Haare können von sich
bewegenden Teilen erfasst werden.
g) Wenn Staubabsaug- und -auff angeinrichtun-
gen montiert werden können, vergewissern
Sie sich, dass diese angeschlossen sind und
richtig verwendet werden. Die Verwendung
einer Staubabsaugung kann Gefährdungen
durch Staub verringern.
4. Verwendung und Behandlung des
Elektrowerkzeugs
a) Überlasten Sie das Gerät nicht. Verwenden
Sie für Ihre Arbeit das dafür bestimmte
Elektrowerkzeug. Mit dem passenden Elektro-
werkzeug arbeiten Sie besser und sicherer im
angegebenen Leistungsbereich.
b) Benutzen Sie kein Elektrowerkzeug, dessen
Schalter defekt ist. Ein Elektrowerkzeug, das
sich nicht mehr ein- oder ausschalten lässt, ist
gefährlich und muss repariert werden.
c) Ziehen Sie den Stecker aus der Steckdose
und / oder entfernen Sie den Akku, bevor Sie
Geräteeinstellungen vornehmen, Zubehörteile
wechseln oder das Gerät weglegen. Diese
Vorsichtsmaßnahme verhindert den unbeabsichtigten Start des Elektrowerkzeuges.
d) Bewahren Sie unbenutzte Elektrowerkzeuge
außerhalb der Reichweite von Kindern auf.
Lassen Sie Personen das Gerät nicht benutzen,
die mit diesem nicht vertraut sind oder diese
Anweisungen nicht gelesen haben. Elektro-
werkzeuge sind gefährlich, wenn sie von
unerfahrenen Personen benutzt werden.
e) Pfl egen Sie Elektrowerkzeuge mit Sorgfalt.
Kontrollieren Sie, ob bewegliche Teile einwandfrei funktionieren und nicht klemmen, ob Teile
gebrochen oder so beschädigt sind, dass die
Funktion des Elektrowerkzeuges beeinträchtigt ist. Lassen Sie beschädigte Teile vor dem
Einsatz des Gerätes reparieren. Viele Unfälle
haben ihre Ursache in schlecht gewarteten
Elektrowerkzeugen.
f) Halten Sie Schneidwerkzeuge scharf und
sauber. Sorgfältig gepfl egte Schneidwerkzeuge
mit scharfen Schneidkanten verklemmen sich
weniger und sind leichter zu führen.
g) Verwenden Sie Elektrowerkzeug, Zubehör,
Einsatzwerkzeuge usw. entsprechend diesen
Anweisungen. Berücksichtigen Sie dabei die
Arbeitsbedingungen und die auszuführende
Tätigkeit. Der Gebrauch von Elektrowerkzeugen
für andere als die vorgesehenen Anwendungen
kann zu gefährlichen Situationen führen.
5. Verwendung und Behandlung des
Akkuwerkzeugs
a) Laden Sie die Akkus nur in Ladegeräten auf,
die vom Hersteller empfohlen werden. Für
ein Ladegerät, das für eine bestimmte Art von
Akkus geeignet ist, besteht Brandgefahr, wenn
es mit anderen Akkus verwendet wird.
36
PASS 3.6 B2
Page 40

b) Verwenden Sie nur die dafür vorgesehenen
Akkus in den Elektrowerkzeugen. Der Gebrauch
von anderen Akkus kann zu Verletzungen und
Brandgefahr führen.
c) Halten Sie den nicht benutzten Akku fern von
Büroklammern, Münzen, Schlüsseln, Nägeln,
Schrauben oder anderen kleinen Metallgegenständen, die eine Überbrückung der Kontakte
verursachen könnten. Ein Kurzschluss zwischen
den Akkukontakten kann Verbrennungen oder
Feuer zur Folge haben.
d) Bei falscher Anwendung kann Flüssigkeit aus
dem Akku austreten. Vermeiden Sie den Kontakt damit. Bei zufälligem Kontakt mit Wasser
abspülen. Wenn die Flüssigkeit in die Augen
kommt, nehmen Sie zusätzlich ärztliche Hilfe
in Anspruch. Austretende Akkufl üssigkeit kann
zu Hautreizungen oder Verbrennungen führen.
kann auch metallene Geräteteile unter Spannung
setzen und zu einem elektrischen Schlag führen.
■ Bei Arbeiten am Gerät, sowie Transport
bzw. Aufbewahrung bringen Sie den Drehrichtungsumschalter in die Mittelposition
(Sperre). So verhindern Sie unbeabsichtigtes
Anlaufen des Elektrowerkzeuges.
■ Dieses Gerät ist nicht dafür bestimmt, durch
Personen (einschließlich Kinder) mit eingeschränkten physischen, sensorischen oder
geistigen Fähigkeiten oder mangels Erfahrung
und / oder mangels Wissen benutzt zu werden,
es sei denn, sie werden durch eine für ihre
Sicherheit zuständige Person beaufsichtigt oder
erhielten von ihr Anweisungen, wie das Gerät
zu benutzen ist. Kinder sollten beaufsichtigt
werden, um sicherzustellen, dass sie nicht mit
dem Gerät spielen.
DE
AT
CH
VORSICHT! EXPLOSIONSGEFAHR!
Laden Sie nichtaufladbare Batterien
niemals auf.
6. Service
a) Lassen Sie Ihr Elektrowerkzeug nur von quali-
fi ziertem Fachpersonal und nur mit OriginalErsatzteilen reparieren. Damit wird sicherge-
stellt, dass die Sicherheit des Elektrowerkzeugs
erhalten bleibt.
Gerätespezifi sche Sicherheitshinweise
für Akkuschrauber
■ Sichern Sie das Werkstück. Ein mit Spann-
vorrichtungen oder Schraubstock festgehaltenes
Werkstück ist sicherer gehalten als mit Ihrer Hand.
■ Halten Sie das Elektrowerkzeug fest. Beim
Festziehen und Lösen von Schrauben können
kurzfristig hohe Reaktionsmomente auftreten.
■ Schalten Sie das Elektrowerkzeug sofort
aus, wenn das Einsatzwerkzeug blockiert.
Seien Sie auf hohe Reaktionsmomente gefasst,
die einen Rückschlag verursachen.
■ Halten Sie das Gerät an den isolierten
Griff fl ächen, wenn Sie Arbeiten ausführen, bei denen die Schraube verborgene
Stromleitungen treff en kann. Der Kontakt der
Schraube mit einer spannungsführenden Leitung
Originalzubehör / -zusatzgeräte
■ Benutzen Sie nur Zubehör und Zusatzgeräte,
die in der Gebrauchsanweisung angegeben
sind. Der Gebrauch anderer als in der Bedie-
nungsanleitung empfohlener Einsatzwerkzeuge
oder anderen Zubehörs kann eine Verletzungsgefahr für Sie bedeuten.
Inbetriebnahme
Geräte-Akku laden
Nur zur Verwendung in Innenräumen!
HINWEIS
Der Akku wird teilgeladen ausgeliefert. Laden
►
Sie den Akku vor der ersten Inbetriebnahme
mindestens 3 Stunden. Sie können den Li-IonenAkku jederzeit aufl aden, ohne die Lebensdauer
zu verkürzen. Eine Unterbrechung des Ladevorgangs schädigt den Akku nicht.
Ladevorgang starten:
♦ Schließen Sie das Ladegerät an eine Strom-
quelle mit 230 V∼ 50 Hz an.
♦ Verbinden Sie das Ladegerät mit der Lade-
buchse des Gerätes.
Der Akku ist geladen, wenn die Akku-Kapazitätsan-
von rot auf grün wechselt.
zeige
PASS 3.6 B2
37
Page 41

Ladevorgang beenden:
♦ Trennen Sie das Ladegerät von der Strom-
quelle.
♦ Trennen Sie das Ladegerät von der Lade-
buchse des Gerätes.
Bits / Schraubendrehereinsätze
auswechseln
Einsetzen:
♦ Verriegelungshülse zurückziehen und
festhalten.
♦ Bit in die Werkzeugaufnahme stecken,
DE
Verriegelungshülse loslassen.
AT
Entnehmen:
CH
♦ Die Verriegelungshülse zurückziehen und
festhalten.
♦ Bit entnehmen und Verriegelungshülse
loslassen.
Bedienung
Akkuschrauber ein- / ausschalten
Einschalten:
♦ Drücken Sie den EIN-/AUS-Schalter und
halten Sie ihn gedrückt.
Ausschalten:
♦ Lassen Sie den EIN-/AUS-Schalter los.
Drehrichtung umschalten
Rechtslauf:
♦ Schieben Sie den Drehrichtungsumschalter
nach links.
♦ Drücken Sie den EIN-/AUS-Schalter . Sie
können jetzt die Schrauben eindrehen.
Einschaltsperre:
♦ Schieben Sie den Drehrichtungsumschalter
in die Mittelposition. Der EIN-/AUS-Schalter
ist blockiert.
LED-Lampe ein- / ausschalten
Einschalten:
♦ Drücken Sie den EIN-/ AUS-Schalter und
halten ihn gedrückt.
Ausschalten:
♦ Lassen Sie den EIN-/AUS-Schalter los.
Griff einstellung
Der Schrauber kann in 2 verschiedenen Griff einstellungen arretiert werden. Hierzu muss die Verriegelungstaste gedrückt und der Schrauber in die
gewünschte Stellung gedreht werden. Danach die
Verriegelungstaste wieder loslassen.
Drehmoment-Einstellung
Das Drehmoment für eine bestimmte Schraubengröße wird an der Drehmomenteinstellung
eingestellt. Das erforderliche Drehmoment ist von
mehreren Faktoren abhängig:
- von der Art und Härte des zu bearbeitenden
Materials.
- von der Art und der Länge der verwendeten
Schrauben.
- von den Anforderungen, die an die Schraubverbindung gestellt werden.
Das Erreichen des Drehmoments wird durch Auslösen der Kupplung signalisiert.
Linkslauf:
♦ Schieben Sie den Drehrichtungsumschalter
nach rechts.
♦ Drücken Sie den EIN-/AUS-Schalter . Sie
können jetzt Schrauben herausdrehen.
38
PASS 3.6 B2
Page 42

Akku-Kapazitätsanzeige
Die Akku-Kapazitätsanzeige signalisiert Ihnen
den Ladezustand des Akkus anhand von 3 farbigen LED‘s.
Alle LED‘s leuchten:
Der Akku ist voll aufgeladen.
Gelbe und rote LED leuchten:
Der Akku verfügt über ausreichende Restladung.
Rote LED:
Der Akku ist leer, laden Sie den Akku auf.
Tipps und Tricks
Schraub-Bits sind mit ihren Maßen und der Form
gekennzeichnet. Falls Sie sich unsicher sind, probieren Sie immer zuerst aus, ob das Bit ohne Spiel im
Schraubkopf sitzt.
Die Garantieleistung gilt nur für Material- oder
Fabrikationsfehler, nicht aber für Transportschäden,
Verschleißteile oder für Beschädigungen an zerbrechlichen Teilen, z. B. Schalter oder Akkus. Das
Produkt ist lediglich für den privaten und nicht für
den gewerblichen Gebrauch bestimmt.
Bei missbräuchlicher und unsachgemäßer Behandlung, Gewaltanwendung und bei Eingriff en, die
nicht von unserer autorisierten Service-Niederlassung vorgenommen wurden, erlischt die Garantie.
Ihre gesetzlichen Rechte werden durch diese
Garantie nicht eingeschränkt.
Die Garantiezeit wird durch die Gewährleistung nicht
verlängert. Dies gilt auch für ersetzte und reparierte
Teile. Eventuell schon beim Kauf vorhandene
Schäden und Mängel müssen sofort nach dem
Auspacken gemeldet werden, spätestens aber zwei
Tage nach Kaufdatum. Nach Ablauf der Garantiezeit anfallende Reparaturen sind kostenpfl ichtig.
DE
AT
CH
Wartung und Reinigung
STROMSCHLAGGEFAHR! Ziehen Sie
vor Reinigungsarbeiten das Ladegerät
aus der Steckdose.
Der Akkuschrauber ist wartungsfrei.
■ Das Gerät muss stets sauber, trocken und frei
von Öl oder Schmierfetten sein.
■ Es dürfen keine Flüssigkeiten in das Innere der
Geräte gelangen.
■ Verwenden Sie zum Reinigen des Gehäuses ein
Tuch. Verwenden Sie niemals Benzin, Lösungsmittel oder Reiniger, die Kunststoff angreifen.
Garantie und Service
Sie erhalten auf dieses Gerät 3 Jahre Garantie
ab Kaufdatum. Das Gerät wurde sorgfältig
produziert und vor Anlieferung gewissenhaft
geprüft. Bitte bewahren Sie den Kassenbon
als Nachweis für den Kauf auf. Bitte setzen
Sie sich im Garantiefall mit Ihrer Servicestelle
telefonisch in Verbindung. Nur so kann eine
kostenlose Einsendung Ihrer Ware gewährleistet werden.
Service Deutschland
Tel.: 0800 5435 111
E-Mail: kompernass@lidl.de
IAN 96266
Service Österreich
Tel.: 0820 201 222 (0,15 EUR/Min.)
E-Mail: kompernass@lidl.at
IAN 96266
Service Schweiz
Tel.: 0842 665566 (0,08 CHF/Min.,
Mobilfunk max. 0,40 CHF/Min.)
E-Mail: kompernass@lidl.ch
IAN 96266
Erreichbarkeit Hotline: Montag bis Freitag von
8:00 Uhr – 20:00 Uhr (MEZ)
Importeur
KOMPERNASS HANDELS GMBH
BURGSTRASSE 21
44867 BOCHUM
GERMANY
www.kompernass.com
PASS 3.6 B2
39
Page 43

Entsorgung
Die Verpackung besteht aus umweltfreund-
lichen Materialien, die Sie über die örtlichen
Recyclingstellen entsorgen können.
Werfen Sie Elektrowerkzeuge nicht
in den Hausmüll!
Gemäß Europäischer Richtlinie 2012/19/EU
müssen verbrauchte Elektrowerkzeuge getrennt
gesammelt und einer umweltgerechten Wiederverwertung zugeführt werden.
DE
AT
Werfen Sie Akkus nicht in den
CH
Hausmüll!
Angewandte harmonisierte Normen:
EN 60745-1 / A11: 2010
EN 60745-2-2: 2010
EN 55014-1 / A2: 2011
EN 55014-2 / A2: 2008
EN 60335-1: 2012
EN 60335-2-29: 2004 + A2
EN 62233: 2008
EN 61000-3-3: 2008
EN 61000-3-2: 2006 + A1 + A2
Typ / Gerätebezeichnung:
Akku-Stabschrauber PASS 3.6 B2
Herstellungsjahr: 10 - 2013
Defekte oder verbrauchte Akkus müssen gemäß
Richtlinie 2006/66/EC recycelt werden. Geben
Sie Akku-Pack und / oder das Gerät über die angebotenen Sammeleinrichtungen zurück.
Über Entsorgungsmöglichkeiten für ausgediente
Elektrowerkzeuge / Akku-Pack informieren Sie sich
bitte bei Ihrer Gemeinde- oder Stadtverwaltung.
Konformitätserklärung /
Hersteller
Wir, KOMPERNASS HANDELS GMBH, Dokumentenverantwortlicher: Herr Semi Uguzlu, BURGSTR. 21,
44867 BOCHUM, DEUTSCHLAND, erklären hiermit,
dass dieses Produkt mit den folgenden Normen,
normativen Dokumenten und EG-Richtlinien
übereinstimmt:
Maschinenrichtlinie
(2006 / 42 / EC)
EG-Niederspannungsrichtlinie
(2006 / 95 / EC)
Elektromagnetische Verträglichkeit
(2004 / 108 / EC)
RoHS Richtlinie
(2011 / 65 / EU)
Seriennummer: IAN 96266
Bochum, 27.09.2013
Semi Uguzlu
- Qualitätsmanager -
Technische Änderungen im Sinne der Weiterentwicklung sind vorbehalten.
40
PASS 3.6 B2
Page 44

KOMPERNASS HANDELS GMBH
BURGSTRASSE 21
44867 BOCHUM
DEUTSCHLAND / GERMANY
www.kompernass.com
Estado de las informaciones · Versione delle informazioni · Estado
das informações · Last Information Update · Stand der Informationen:
12 / 2013 · Ident.-No.: PASS3.6B2-092013-3
IAN 96266
5
 Loading...