

Page 1
VISSEUSE SANS FIL PASS 3.6 B2
VISSEUSE SANS FIL
Traduction du mode d'emploi d'origine
CORDLESS SCREWDRIVER
Translation of original operation manual
IAN 96266
AKKU-STABSCHRAUBER
Originalbetriebsanleitung
Page 2

Avant de lire le mode d'emploi, ouvrez la page contenant les illustrations et familiarisez-vous ensuite avec
toutes les fonctions de l'appareil.
Klappen Sie vor dem Lesen die Seite mit den Abbildungen aus und machen Sie sich anschließend mit allen
Funktionen des Gerätes vertraut.
Before reading, unfold the page containing the illustrations and familiarise yourself with all functions of
the device.
FR / BE Traduction du mode d'emploi d'origine Page 1
DE / AT / CH Originalbetriebsanleitung Seite 9
GB Translation of original operation manual Page 17
Page 3
A B
Page 4

Table des matières
Introduction . . . . . . . . . . . . . . . . . . . . . . . . . . . . . . . . . . . . . . . . . . . . . . . . . . . . . . 2
Usage conforme . . . . . . . . . . . . . . . . . . . . . . . . . . . . . . . . . . . . . . . . . . . . . . . . . . . . . . . . . . . . . 2
Équipement . . . . . . . . . . . . . . . . . . . . . . . . . . . . . . . . . . . . . . . . . . . . . . . . . . . . . . . . . . . . . . . . . 2
Matériel livré . . . . . . . . . . . . . . . . . . . . . . . . . . . . . . . . . . . . . . . . . . . . . . . . . . . . . . . . . . . . . . . 2
Caractéristiques techniques . . . . . . . . . . . . . . . . . . . . . . . . . . . . . . . . . . . . . . . . . . . . . . . . . . . . 2
Avertissements de sécurité généraux pour l'outil . . . . . . . . . . . . . . . . . . . . . . . . 3
1. Sécurité de la zone de travail . . . . . . . . . . . . . . . . . . . . . . . . . . . . . . . . . . . . . . . . . . . . . . . . 3
2. Sécurité électrique . . . . . . . . . . . . . . . . . . . . . . . . . . . . . . . . . . . . . . . . . . . . . . . . . . . . . . . . . 3
3. Sécurité des personnes . . . . . . . . . . . . . . . . . . . . . . . . . . . . . . . . . . . . . . . . . . . . . . . . . . . . . 4
4. Utilisation et entretien de l'outil . . . . . . . . . . . . . . . . . . . . . . . . . . . . . . . . . . . . . . . . . . . . . . . 4
5. Utilisation et manipulation d'un outil à accu. . . . . . . . . . . . . . . . . . . . . . . . . . . . . . . . . . . . . . 5
6. Maintenance et entretien . . . . . . . . . . . . . . . . . . . . . . . . . . . . . . . . . . . . . . . . . . . . . . . . . . . . 5
Consignes de sécurité spécifi ques aux visseuses sans fi l . . . . . . . . . . . . . . . . . . . . . . . . . . . . . . 5
Accessoires / équipements supplémentaires d'origine . . . . . . . . . . . . . . . . . . . . . . . . . . . . . . . . 5
Mise en service . . . . . . . . . . . . . . . . . . . . . . . . . . . . . . . . . . . . . . . . . . . . . . . . . . . 6
Charger l'accu de l'appareil . . . . . . . . . . . . . . . . . . . . . . . . . . . . . . . . . . . . . . . . . . . . . . . . . . . . 6
Remplacer les mèches / embouts de visseuse . . . . . . . . . . . . . . . . . . . . . . . . . . . . . . . . . . . . . . . 6
Opération . . . . . . . . . . . . . . . . . . . . . . . . . . . . . . . . . . . . . . . . . . . . . . . . . . . . . . . 6
Allumer / éteindre la visseuse sans fi l . . . . . . . . . . . . . . . . . . . . . . . . . . . . . . . . . . . . . . . . . . . . . 6
Changer le sens de marche . . . . . . . . . . . . . . . . . . . . . . . . . . . . . . . . . . . . . . . . . . . . . . . . . . . . 6
Mise en marche / arrêt de la lampe LED
Réglage de la préhension . . . . . . . . . . . . . . . . . . . . . . . . . . . . . . . . . . . . . . . . . . . . . . . . . . . . . 6
Réglage du couple de serrage . . . . . . . . . . . . . . . . . . . . . . . . . . . . . . . . . . . . . . . . . . . . . . . . . . 7
Affi chage de capacité de l'accu . . . . . . . . . . . . . . . . . . . . . . . . . . . . . . . . . . . . . . . . . . . . . . . . . 7
Conseils et astuces . . . . . . . . . . . . . . . . . . . . . . . . . . . . . . . . . . . . . . . . . . . . . . . . . . . . . . . . . . . 7
. . . . . . . . . . . . . . . . . . . . . . . . . . . . . . . . . . . . . . . . . . 6
FR
BE
Maintenance et nettoyage . . . . . . . . . . . . . . . . . . . . . . . . . . . . . . . . . . . . . . . . . . 7
Garantie et service . . . . . . . . . . . . . . . . . . . . . . . . . . . . . . . . . . . . . . . . . . . . . . . . 7
Importateur . . . . . . . . . . . . . . . . . . . . . . . . . . . . . . . . . . . . . . . . . . . . . . . . . . . . . . 8
Mise au rebut . . . . . . . . . . . . . . . . . . . . . . . . . . . . . . . . . . . . . . . . . . . . . . . . . . . . 8
Déclaration de conformité / fabricant . . . . . . . . . . . . . . . . . . . . . . . . . . . . . . . . . 8
PASS 3.6 B2
1
Page 5

VISSEUSE SANS FIL
FR
PASS 3.6 B2
BE
Introduction
Toutes nos félicitations pour l'achat de
votre nouvel appareil. Ainsi, vous venez
d'opter pour un produit de grande qualité.
Le mode d'emploi fait partie de ce produit. Il contient
des remarques importantes concernant la sécurité,
l'usage et la mise au rebut. Avant l'usage du produit,
veuillez vous familiariser avec toutes les consignes
d'utilisation et de sécurité. N'utilisez le produit que
conformément aux consignes et pour les domaines
d'utilisation prévus. Si vous cédez le produit à un
tiers, remettez-lui également tous les documents.
2 mèches x 50 mm
1 rallonge pour mèche
1 mode d'emploi
Caractéristiques techniques
Visseuse sans fi l : PASS 3.6 B2
Tension nominale : 3,6 V
Accu (intégré) : Ions LITHIUM
Capacité de l'accu : 1500 mAh
Vitesse à vide
nominale : n
Couple de serrage : max. 4,0 Nm
Porte-outil : 6,35 mm (¼")
200 min
0
-1
Usage conforme
Cet appareil est conçu pour visser dans le bois, les
matières plastiques et le métal. N'utilisez l'appareil
que conformément aux consignes et pour les
domaines d'utilisation prévus. Toute autre utilisation
ou modifi cation de la machine est considérée comme
non conforme et présente des risques d'accidents
non négligeables. Ne convient pas pour un usage
commercial.
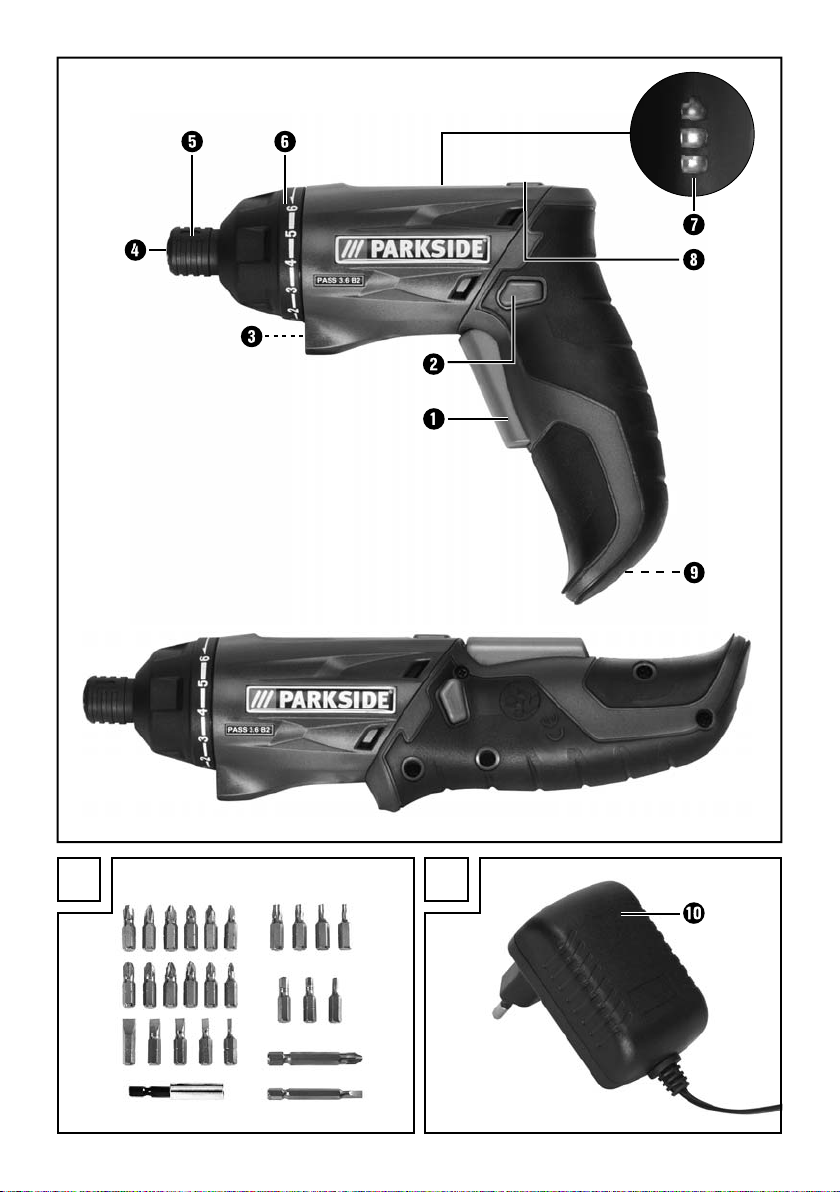
Équipement
Interrupteur MARCHE/ARRÊT
Commutateur de sens de marche / verrouillage
de sécurité
Lampe LED
Porte-outil
Manchon de verrouillage
Réglage du couple
Affi chage de capacité de l'accu
Touche de verrouillage
Prise chargeur de l'appareil
Chargeur
Matériel livré
1 visseuse sans fi l PASS 3.6 B2
1 chargeur PASS 3.6 B2-1
1 mallette de transport
24 mèches x 25mm
Chargeur : PASS 3.6 B2-1
ENTREE / Input :
Tension nominale : 230 - 240 V∼ 50/60 Hz
Courant nominal : 200 mA
SORTIE / Output :
Tension nominale : 5,5 V
Courant nominal : 600 mA
Durée de charge : env. 3 heures
Classe de protection : II /
Informations relatives aux bruits et aux
vibrations:
Valeur de mesure du bruit déterminée conf. à la
norme EN 60745. Le niveau sonore A pondéré
typique de l'outil électrique est typiquement de:
Niveau de pression
acoustique: 57 dB(A)
Niveau de puissance
acoustique: 68 dB(A)
Incertitude K: 3 dB
Valeurs des vibrations (somme vectorielle triaxiale)
déterminées selon la norme EN 60745:
Vis : Valeur d'émission des vibrations
ah = 0,393 m/s
Incertitude K = 1,5 m/s
2
2
2
PASS 3.6 B2
Page 6
Le niveau de vibrations indiqué dans ces instructions a été mesuré conformément aux méthodes
de mesure décrites dans la norme EN 60745 et
peut être utilisé pour la comparaison d'appareils.
La valeur d'émission des vibrations mentionnée
peut être également utilisée pour une évaluation
préliminaire de l'arrêt. Le niveau de vibrations varie
en fonction de l'usage de l'outil électrique et peut,
dans certains cas, excéder la valeur indiquée dans
ces instructions. L'exposition due aux vibrations
pourrait être sous-estimée si l'outil électrique est
utilisé régulièrement de cette manière.
Essayez de garder la sollicitation par vibrations
aussi faible que possible. Des mesures d'exemple
de réduction de la sollicitation des vibrations sont
le port de gants lors de l'utilisation de l'outil et la
limitation du temps de travail. Pour cela, toutes
les parts du cycle de travail doivent être prises en
compte (par exemple les durées pendant lesquelles
l'outil électrique est éteint et celles pendant lesquels
il est allumé mais fonctionne sans charge).
Avertissements de sécurité
généraux pour l'outil
AVERTISSEMENT !
► Lire tous les avertissements de sécurité et
toutes les instructions. Ne pas suivre les
avertissements et instructions peut donner lieu
à un choc électrique, un incendie et/ou une
blessure sérieuse.
Conserver tous les avertissements et toutes
les instructions pour pouvoir s'y reporter
ultérieurement.
Le terme "outil" dans les avertissements fait référence
votre outil électrique alimenté par le secteur (avec
cordon d'alimentation) ou votre outil fonctionnant
sur batterie (sans cordon d'alimentation).
1. Sécurité de la zone de travail
a) Conserver la zone de travail propre et bien
éclairée. Les zones en désordre ou sombres
sont propices aux accidents.
b) Ne pas faire fonctionner les outils électriques
en atmosphère explosive, par exemple en
présence de liquides infl ammables, de gaz ou
de poussières. Les outils électriques produisent
des étincelles qui peuvent enfl ammer les poussières ou les fumées.
c) Maintenir les enfants et les personnes pré-
sentes à l'écart pendant l'utilisation de l'outil.
Les distractions peuvent vous faire perdre le
contrôle de l'outil.
2. Sécurité électrique
a) Il faut que les fi ches de l'outil électrique soient
adaptées au socle. Ne jamais modifi er la fi che
de quelque façon que ce soit. Ne pas utiliser
d'adaptateur avec des outils à branchement de
terre. Des fi ches non modifi ées et des socles
adaptés réduiront le risque de choc électrique.
b) Éviter tout contact du corps avec des surfaces
reliées à la terre, telles que les tuyaux, les
radiateurs, les cuisinières et les réfrigérateurs.
Il existe un risque accru de choc électrique si
votre corps est relié à la terre.
c) Ne pas exposer les outils électriques à la pluie
ou à des conditions humides. La pénétration
d'eau à l'intérieur d'un outil augmentera le
risque de choc électrique.
d) Ne pas maltraiter le cordon. Ne jamais utiliser
le cordon pour porter, tirer ou débrancher
l'outil. Maintenir le cordon à l'écart de la
chaleur, du lubrifi ant, des arêtes ou des parties
en mouvement. Des cordons endommagés ou
emmêlés augmentent le risque de choc électrique.
e) Lorsqu'on utilise un outil à l'extérieur, utiliser un
prolongateur adapté à l'utilisation extérieure.
L'utilisation d'un cordon adapté à l'utilisation
extérieure réduit le risque de choc électrique.
f) Si l'usage d'un outil dans un emplacement
humide est inévitable, utiliser une alimentation protégée par un dispositif à courant diff érentiel résiduel (RCD). L'usage d'un RCD
réduit le risque de choc électrique.
FR
BE
PASS 3.6 B2
3
Page 7

3. Sécurité des personnes
FR
a) Rester vigilant, regarder ce que vous êtes en
BE
train de faire et faire preuve de bon sens dans
votre utilisation de l'outil. Ne pas utiliser un
outil lorsque vous êtes fatigué ou sous l'em-
prise de drogues, d'alcool ou de médicaments.
Un moment d'inattention en cours d'utilisation
d'un outil peut entraîner des blessures graves des
personnes.
b) Utiliser un équipement de sécurité. Toujours
porter une protection pour les yeux. Les équipe-
ments de sécurité tels que les masques contre les
poussières, les chaussures de sécurité antidéra-
pantes, les casques ou les protections acous-
tiques utilisés pour les conditions appropriées
réduiront les blessures de personnes.
c) Éviter tout démarrage intempestif. S'assurer
que l'interrupteur est en position arrêt avant
de brancher l'outil au secteur et/ou au bloc
de batteries, de le ramasser ou de le porter.
Porter les outils en ayant le doigt sur l'interrupteur
ou brancher des outils dont l'interrupteur est en
position marche est source d'accidents.
d) Retirer toute clé de réglage avant de mettre
l'outil en marche. Une clé laissée fi xée sur une
partie tournante de l'outil peut donner lieu à
des blessures de personnes.
e) Ne pas se précipiter. Garder une position
et un équilibre adaptés à tout moment. Cela
permet un meilleur contrôle de l'outil dans des
situations inattendues.
f) S'habiller de manière adaptée. Ne pas porter
de vêtements amples ou de bijoux. Garder
les cheveux, les vêtements et les gants à
distance des parties en mouvement. Des
vêtements amples, des bijoux ou les cheveux
longs peuvent être pris dans des parties en
mouvement.
g) Si des dispositifs sont fournis pour le raccor-
dement d'équipements pour l'extraction et la
récupération des poussières, s'assurer qu'ils
sont connectés et correctement utilisés. Utiliser
des collecteurs de poussière peut réduire les
risques dus aux poussières.
4. Utilisation et entretien de l'outil
a) Ne pas forcer l'outil. Utiliser l'outil adapté
à votre application. L'outil adapté réalisera
mieux le travail et de manière plus sûre au
régime pour lequel il a été construit.
b) Ne pas utiliser l'outil si l'interrupteur ne permet
pas de passer de l'état de marche à arrêt et
vice versa. Tout outil qui ne peut pas être com-
mandé par l'interrupteur est dangereux et il faut
le réparer.
c) Débrancher la fi che de la source d'alimen-
tation en courant et/ou le bloc de batteries
de l'outil avant tout réglage, changement
d'accessoires ou avant de ranger l'outil. De
telles mesures de sécurité préventives réduisent
le risque de démarrage accidentel de l'outil.
d) Conserver les outils à l'arrêt hors de la portée
des enfants et ne pas permettre à des personnes ne connaissant pas l'outil ou les présentes
instructions de le faire fonctionner. Les outils
sont dangereux entre les mains d'utilisateurs
novices.
e) Observer la maintenance de l'outil. Vérifi er
qu'il n'y a pas de mauvais alignement ou de
blocage des parties mobiles, des pièces cassées ou toute autre condition pouvant aff ecter
le fonctionnement de l'outil. En cas de dommages, faire réparer l'outil avant de l'utiliser.
De nombreux accidents sont dus à des outils
mal entretenus.
f) Garder aff ûtés et propres les outils permet-
tant de couper. Des outils destinés à couper
correctement entretenus avec des pièces
coupantes tranchantes sont moins susceptibles
de bloquer et sont plus faciles à contrôler.
g) Utiliser l'outil, les accessoires et les lames
etc., conformément à ces instructions, en
tenant compte des conditions de travail et du
travail à réaliser. L'utilisation de l'outil pour des
opérations diff érentes de celles prévues pourrait
donner lieu à des situations dangereuses.
4
PASS 3.6 B2
Page 8

5. Utilisation et manipulation d'un
outil à accu
a) Uniquement recharger les accus dans les
chargeurs recommandés par le fabricant.
Un chargeur compatible pour certains types
d'accus, peut provoquer un incendie s'il est
utilisé avec d'autres accus.
b) N'utiliser les outils qu'avec des blocs de bat-
teries spécifi quement désignés. L'utilisation de
tout autre bloc de batteries peut créer un risque
de blessure et de feu.
c) Tenir les accus inutilisés à l'abri des agrafes,
pièces de monnaie, clés, clous, vis et autres
objets en métal susceptibles de court-circuiter
les contacts. Un court-circuit entre les contacts
des accus peut provoquer des brûlures ou un
incendie.
d) L'accu peut couler en cas d'usage incorrect.
Évitez tout contact avec ce liquide. Laver à
l'eau en cas de contact involontaire. En cas
de contact du liquide avec les yeux, il faut
en plus consulter un médecin. Le liquide qui
s'écoule des accus peut causer des irritations
de la peau ou des brûlures.
PRUDENCE ! RISQUE D'EXPLOSION !
Ne rechargez jamais les batteries
non rechargeables.
6. Maintenance et entretien
a) Faire entretenir l'outil par un réparateur
qualifi é utilisant uniquement des pièces de
rechange identiques. Cela assurera que la
sécurité de l'outil est maintenue.
Consignes de sécurité spécifi ques
aux visseuses sans fi l
■ Sécuriser la pièce à usiner. Toute pièce à
usiner maintenue par des dispositifs de serrage
ou un étau est mieux sécurisée qu'avec votre
seule main.
■ Maintenir l'outil électrique. Le fait de serrer ou
de desserrer des vis peut à court terme provoquer des couples de réaction élevés.
■ Éteignez immédiatement l'outil électrique si
l'outil d'usinage est bloqué. Attendez-vous à
des couples de réaction élevés qui provoquent
un recul.
■ Tenir l’outil par les surfaces de préhension
isolées, lors de la réalisation d’une opération
au cours de laquelle le dispositif de serrage
peut entrer en contact avec un câblage non
apparent ou son propre cordon d’alimentation.
Le contact avec une fi l « sous tension » peut
également mettre « sous tension » les parties
métalliques exposées de l’outil électrique et
provoquer un choc électrique sur l’opérateur.
■ Pendant tout travail sur l'appareil, ainsi que
pendant le transport ou l'entreposage, amenez le commutateur de sens de marche en
position centrale (blocage). Vous évitez ainsi
toute remise en marche involontaire de l'outil
électrique.
■ Cet appareil ne doit pas être utilisé par des per-
sonnes (enfants compris) ayant des capacités
physiques, mentales et sensorielles réduites ou
qui n'ont pas l'expérience et les connaissances
nécessaires, à moins qu'elles ne soient sous
la surveillance d'une personne responsable
de leur sécurité ou qu'elles aient reçu de cette
personne des directives concernant l'utilisation
de l'appareil. Il faut surveiller les enfants, pour
être sûr qu'ils ne jouent pas avec l'appareil.
Accessoires / équipements supplémentaires d'origine
■ Utilisez uniquement les accessoires et les
équipements supplémentaires indiqués dans
le mode d'emploi. L'utilisation d'outils d'usi-
nage diff érents de ceux recommandés dans
ces instructions d'utilisation, ou bien d'autres
accessoires, peut vous faire courir un risque de
blessures.
FR
BE
PASS 3.6 B2
5
Page 9
Mise en service
FR
BE
Charger l'accu de l'appareil
Exclusivement pour l'usage à l'intérieur !
REMARQUE
L'accu est livré partiellement chargé. Avant la
►
première mise en service, veuillez faire charger
l'accu pendant au moins 3 heures. Vous
pouvez recharger l'accu en ions lithium à tous
moments, sans raccourcir la durée de vie.
L'interruption du processus de chargement ne
porte pas préjudice à l'accu.
Démarrer le processus de chargement :
♦ Raccordez le chargeur à une source d'élec-
tricité de 230 V∼ 50 Hz.
♦ Raccordez le chargeur à la prise chargeur
de l'appareil.
L'accu est chargé lorsque l'indicateur de capacité
de l'accu
Terminer le processus de chargement :
♦ Coupez le chargeur de l'alimentation secteur.
♦ Coupez le chargeur de la prise chargeur
de l'appareil.
passe du rouge au vert.
Remplacer les mèches / embouts de
visseuse
Opération
Allumer / éteindre la visseuse sans fi l
Mise en marche:
♦ Appuyer sur l'interrupteur MARCHE / ARRÊT
et le maintenir enfoncé.
Éteindre :
♦ Relâcher l'interrupteur MARCHE / ARRÊT .
Changer le sens de marche
Marche à droite :
♦ Faire glisser le commutateur de sens de
marche vers la gauche.
♦ Actionner l'interrupteur MARCHE / ARRÊT .
Vous pouvez à présent insérer les vis.
Marche à gauche :
♦ Faire glisser le commutateur de sens de
marche vers la droite.
♦ Actionner l'interrupteur MARCHE / ARRÊT .
Vous pouvez à présent dévisser les vis.
Verrouillage de sécurité
♦ Faire glisser le commutateur de sens de
marche en position intermédiaire.
L'interrupteur MARCHE / ARRÊT est bloqué.
Mise en place :
♦ Replier le manchon de verrouillage et le
maintenir.
♦ Insérer la mèche dans le porte-outil relâcher
le manchon de verrouillage
Prélèvement :
♦ Replier le manchon de verrouillage et le
maintenir.
♦ Prélever la mèche et relâcher le manchon de
verrouillage .
.
6
Mise en marche / arrêt de la lampe
LED
Mise en marche:
♦ Appuyer sur l'interrupteur MARCHE / ARRÊT
et le maintenir enfoncé.
Éteindre :
♦ Relâcher l'interrupteur MARCHE / ARRÊT .
Réglage de la préhension
La visseuse peut être bloquée en deux positions de
préhension diff érentes. La touche de verrouillage
doit être maintenue enfoncée et tournée dans la
position souhaitée. Relâcher à nouveau la touche
de verrouillage .
PASS 3.6 B2
Page 10

Réglage du couple de serrage
Le couple de serrage pour une certaine taille de
vis est réglé au niveau du réglage du couple de
serrage . Le couple nécessaire dépend de
plusieurs facteurs :
- du type et de la dureté du matériau à transformer.
- du type et de la longueur des vis utilisées.
- des exigences face à la connexion par vis.
Le couple sera atteint au déclenchement de
l'accouplement.
Affi chage de capacité de l'accu
L'affi chage de capacité de l'accu vous signale
l'état de chargement de l'accu à l'aide de 3 LED
de couleur.
Tous les LED sont allumés :
L'accu est entièrement chargé.
Les LED jaune et rouge s'allument :
L'accu dispose d'une charge résiduelle suffi sante.
LED rouge :
L'accu est vide, rechargez l'accu.
Conseils et astuces
Les mèches de vissage sont identifi ées par leurs
dimensions et leur forme. Si vous n'êtes pas sûr,
essayez toujours au préalable de voir si la mèche
est bien fi xée dans la tête fi letée, sans jeu.
Maintenance et nettoyage
RISQUE D'ELECTROCUTION !
Avant tous travaux de nettoyage, retirez
le chargeur de la prise.
La visseuse sans fi l est sans entretien.
■ L'appareil doit toujours être propre, sec et
exempt d'huile ou de graisse.
■ Il faut absolument éviter que des liquides
pénètrent à l'intérieur des appareils.
■ Utilisez un chiff on pour nettoyer le boîtier.
N'utilisez jamais d'essence, de solvants ou de
produits nettoyants susceptibles d'attaquer la
matière plastique.
Garantie et service
Cet appareil bénéfi cie d'une garantie de 3 ans
à compter de la date d'achat. L'appareil a été
fabriqué avec soin et consciencieusement
contrôlé avant sa livraison. Veuillez conserver le ticket de caisse en guise de preuve
d'achat. Dans le cas où la garantie s'applique,
veuillez appeler le service après-vente compétent. Cette condition doit être respectée
pour assurer l'expédition gratuite de votre
marchandise.
La prestation de garantie s'applique uniquement
aux vices de matériau ou de fabrication, et non
aux dégâts de transport, aux pièces d'usure ou aux
dégâts subis par des pièces fragiles telles que les
commutateurs ou les accus. Le produit est destiné
uniquement à un usage privé et ne répond pas à
un usage professionnel.
La garantie est annulée en cas de manipulation
incorrecte et inappropriée, d'usage de la force et
en cas d'intervention non réalisée par notre centre
de service après-vente agréé. Vos droits légaux ne
sont pas restreints par la présente garantie.
L'exercice de la garantie ne prolonge pas la
période de garantie. Cette disposition s'applique
également aux pièces remplacées ou réparées.
Signalez sans attendre toute anomalie éventuelle
sur le matériel au moment de l'achat, au plus tard
deux jours après la date d'achat. Toute réparation
fera l'objet d'une facturation après expiration de la
période de garantie.
Indépendamment de la garantie commerciale
souscrite, le vendeur reste tenu des défauts de
conformité du bien et des vices rédhibitoires dans les
conditions prévues aux articles L211-4 et suivants
du Code de la consommation et aux articles 1641
et suivants du Code Civil.
Service France
Tel.: 0800 919270
E-Mail: kompernass@lidl.fr
IAN 96266
FR
BE
PASS 3.6 B2
7
Page 11

FR
BE
Service Belgique
Tel.: 070 270 171 (0,15 EUR/Min.)
E-Mail: kompernass@lidl.be
IAN 96266
Heures de service de notre hotline : du lundi au
vendredi de 8 h à 20 h (HEC)
Importateur
KOMPERNASS HANDELS GMBH
BURGSTRASSE 21
44867 BOCHUM
GERMANY
www.kompernass.com
Mise au rebut
L'emballage est réalisé à l'aide de
matériaux écologiques qu'il est possible
de confi eraux centres de recyclage
proches de chez vous.
Ne pas jeter les appareils électriques
dans les ordures ménagères!
Conformément à la directive européenne
2012/19/EU, les outils électriques usagés
doivent faire l'objet d'un tri et d'un recyclage
respectueux de l'environnement.
Déclaration de conformité /
fabricant
Nous soussignés, KOMPERNASS HANDELS GMBH,
responsable du document: M. Semi Uguzlu,
BURGSTR. 21, 44867 BOCHUM, GERMANY,
déclarons par la présente que ce produit est en
conformité avec les normes, documents normatifs
et directives CE suivants:
Directive Machines
(2006 / 42 / EC)
Directive européenne sur les basses tensions
(2006 / 95 / EC)
Compatibilité électromagnétique
(2004 / 108 / EC)
Directive RoHS
(2011 / 65 / EU)
Normes harmonisées appliquées:
EN 60745-1 / A11: 2010
EN 60745-2-2: 2010
EN 55014-1 / A2: 2011
EN 55014-2 / A2: 2008
EN 60335-1: 2012
EN 60335-2-29: 2004 + A2
EN 62233: 2008
EN 61000-3-3: 2008
EN 61000-3-2: 2006 + A1 + A2
Type / désignation de l'appareil :
Visseuse sans fi l PASS 3.6 B2
Ne pas jeter les accus dans les
ordures ménagères!
Des accus défectueux ou usagés doivent être
recyclés selon la directive 2006/66/EC. Confi ez
le pack d'accus et / ou l'appareil à l'un des points
de collecte proposés.
Vous trouverez des informations sur les possibilités
de mise au rebut des appareils électroniques /
packs d'accus usagés auprès de votre administration communale ou municipale.
8
Année de fabrication : 10 - 2013
Numéro de série : IAN 96266
Bochum, 27/09/2013
Semi Uguzlu
- Responsable qualité Sous réserve de modifi cations techniques à des fi ns
d'amélioration.
PASS 3.6 B2
Page 12

Inhaltsverzeichnis
Einleitung . . . . . . . . . . . . . . . . . . . . . . . . . . . . . . . . . . . . . . . . . . . . . . . . . . . . . . . 10
Bestimmungsgemäßer Gebrauch . . . . . . . . . . . . . . . . . . . . . . . . . . . . . . . . . . . . . . . . . . . . . . . 10
Ausstattung . . . . . . . . . . . . . . . . . . . . . . . . . . . . . . . . . . . . . . . . . . . . . . . . . . . . . . . . . . . . . . . . 10
Lieferumfang . . . . . . . . . . . . . . . . . . . . . . . . . . . . . . . . . . . . . . . . . . . . . . . . . . . . . . . . . . . . . . . 10
Technische Daten . . . . . . . . . . . . . . . . . . . . . . . . . . . . . . . . . . . . . . . . . . . . . . . . . . . . . . . . . . . 10
Allgemeine Sicherheitshinweise für Elektrowerkzeuge . . . . . . . . . . . . . . . . . . 11
1. Arbeitsplatz-Sicherheit . . . . . . . . . . . . . . . . . . . . . . . . . . . . . . . . . . . . . . . . . . . . . . . . . . . . . 11
2. Elektrische Sicherheit . . . . . . . . . . . . . . . . . . . . . . . . . . . . . . . . . . . . . . . . . . . . . . . . . . . . . . 11
3. Sicherheit von Personen . . . . . . . . . . . . . . . . . . . . . . . . . . . . . . . . . . . . . . . . . . . . . . . . . . . . 11
4. Verwendung und Behandlung des Elektrowerkzeugs . . . . . . . . . . . . . . . . . . . . . . . . . . . . . 12
5. Verwendung und Behandlung des Akkuwerkzeugs . . . . . . . . . . . . . . . . . . . . . . . . . . . . . . . 12
6. Service . . . . . . . . . . . . . . . . . . . . . . . . . . . . . . . . . . . . . . . . . . . . . . . . . . . . . . . . . . . . . . . . . 13
Gerätespezifi sche Sicherheitshinweise für Akkuschrauber . . . . . . . . . . . . . . . . . . . . . . . . . . . . . 13
Originalzubehör / -zusatzgeräte . . . . . . . . . . . . . . . . . . . . . . . . . . . . . . . . . . . . . . . . . . . . . . . 13
Inbetriebnahme . . . . . . . . . . . . . . . . . . . . . . . . . . . . . . . . . . . . . . . . . . . . . . . . .13
Geräte-Akku laden . . . . . . . . . . . . . . . . . . . . . . . . . . . . . . . . . . . . . . . . . . . . . . . . . . . . . . . . . . 13
Bits / Schraubendrehereinsätze
auswechseln . . . . . . . . . . . . . . . . . . . . . . . . . . . . . . . . . . . . . . . . . . . . . . . . . . . . . . . . . . . . . . . 14
Bedienung . . . . . . . . . . . . . . . . . . . . . . . . . . . . . . . . . . . . . . . . . . . . . . . . . . . . . .14
Akkuschrauber ein- / ausschalten . . . . . . . . . . . . . . . . . . . . . . . . . . . . . . . . . . . . . . . . . . . . . . . 14
Drehrichtung umschalten . . . . . . . . . . . . . . . . . . . . . . . . . . . . . . . . . . . . . . . . . . . . . . . . . . . . . 14
LED-Lampe ein- / ausschalten . . . . . . . . . . . . . . . . . . . . . . . . . . . . . . . . . . . . . . . . . . . . . . . . . . 14
Griff einstellung . . . . . . . . . . . . . . . . . . . . . . . . . . . . . . . . . . . . . . . . . . . . . . . . . . . . . . . . . . . . . 14
Drehmoment-Einstellung . . . . . . . . . . . . . . . . . . . . . . . . . . . . . . . . . . . . . . . . . . . . . . . . . . . . . . 14
Akku-Kapazitätsanzeige . . . . . . . . . . . . . . . . . . . . . . . . . . . . . . . . . . . . . . . . . . . . . . . . . . . . . 15
Tipps und Tricks . . . . . . . . . . . . . . . . . . . . . . . . . . . . . . . . . . . . . . . . . . . . . . . . . . . . . . . . . . . . 15
DE
AT
CH
Wartung und Reinigung . . . . . . . . . . . . . . . . . . . . . . . . . . . . . . . . . . . . . . . . . . . 15
Garantie und Service . . . . . . . . . . . . . . . . . . . . . . . . . . . . . . . . . . . . . . . . . . . . . 15
Importeur . . . . . . . . . . . . . . . . . . . . . . . . . . . . . . . . . . . . . . . . . . . . . . . . . . . . . . 15
Entsorgung . . . . . . . . . . . . . . . . . . . . . . . . . . . . . . . . . . . . . . . . . . . . . . . . . . . . . 16
Konformitätserklärung / Hersteller . . . . . . . . . . . . . . . . . . . . . . . . . . . . . . . . . . 16
PASS 3.6 B2
9
Page 13

AKKU-STABSCHRAUBER
PASS 3.6 B2
Einleitung
DE
Wir beglückwünschen Sie zum Kauf Ihres
AT
CH
Bedienungsanleitung ist Teil dieses Produkts. Sie
enthält wichtige Hinweise für Sicherheit, Gebrauch
und Entsorgung. Machen Sie sich vor der Benutzung
des Produkts mit allen Bedien- und Sicherheitshinweisen vertraut. Benutzen Sie das Produkt nur wie
beschrieben und für die angegebenen Einsatzbereiche. Händigen Sie alle Unterlagen bei Weitergabe
des Produkts an Dritte mit aus.
Bestimmungsgemäßer Gebrauch
Dieses Gerät ist zum Schrauben in Holz, Kunststoff
und Metall bestimmt. Benutzen Sie das Gerät
nur wie beschrieben und für die angegebenen
Einsatzbereiche. Jede andere Verwendung oder
Veränderung der Maschine gilt als nicht bestimmungsgemäß und birgt erhebliche Unfallgefahren.
Nicht zum gewerblichen Gebrauch.
Ausstattung
Lieferumfang
1 Akku-Stabschrauber PASS 3.6 B2
1 Ladegerät PASS 3.6 B2-1
1 Tragekoff er
24 Bits x 25 mm
2 Bits x 50 mm
neuen Gerätes. Sie haben sich damit für
ein hochwertiges Produkt entschieden. Die
EIN-/AUS-Schalter
Drehrichtungsumschalter / Einschaltsperre
LED-Lampe
Werkzeugaufnahme
Verriegelungshülse
Drehmomenteinstellung
Akku-Kapazitätsanzeige
Verriegelungstaste
Ladebuchse Gerät
Ladegerät
1 Bitverlängerung
1 Bedienungsanleitung
Technische Daten
Akku-Stabschrauber: PASS 3.6 B2
Nennspannung: 3,6 V
Akku (integriert): LITHIUM-Ionen
Akku-Kapazität: 1500 mAh
Nennleerlaufdrehzahl: n
Drehmoment: max. 4,0 Nm
Werkzeug-Aufnahme: 6,35 mm (¼“)
Ladegerät: PASS 3.6 B2-1
EINGANG / Input:
Nennspannung: 230 - 240 V∼ 50/60 Hz
Nennstrom: 200 mA
AUSGANG / Output:
Nennspannung: 5,5 V
Nennstrom: 600 mA
Ladedauer: ca. 3 Std.
Schutzklasse: II /
Geräusch- und Vibrationsinformationen:
Messwert für Geräusch ermittelt entsprechend
EN 60745. Der A-bewertete Geräuschpegel des
Elektrowerkzeugs beträgt typischerweise:
Schalldruckpegel: 57 dB(A)
Schallleistungspegel: 68 dB(A)
Unsicherheit K: 3 dB
Schwingungswerte (Vektorsumme dreier Richtungen)
ermittelt entsprechend EN 60745:
Schrauben: Schwingungsemissionswert
ah = 0,393 m/s
Unsicherheit K = 1,5 m/s
Der in diesen Anweisungen angegebene Schwin-
gungspegel ist entsprechend einem in EN 60745
genormten Messverfahren gemessen worden und
kann für den Gerätevergleich verwendet werden.
Der angegebene Schwingungsemissionswert kann
auch zu einer einleitenden Einschätzung der Aussetzung verwendet werden. Der Schwingungspegel
wird sich entsprechend dem Einsatz des Elektro-
2
200 min
0
2
-1
10
PASS 3.6 B2
Page 14

werkzeugs verändern und kann in manchen Fällen
über dem in diesen Anweisungen angegebenen
Wert liegen. Die Schwingungsbelastung könnte
unterschätzt werden, wenn das Elektrowerkzeug
regelmäßig in solcher Weise verwendet wird.
Versuchen Sie, die Belastung durch Vibrationen so
gering wie möglich zu halten. Beispielhafte Maßnahmen zur Verringerung der Vibrationsbelastung
sind das Tragen von Handschuhen beim Gebrauch
des Werkzeugs und die Begrenzung der Arbeitszeit. Dabei sind alle Anteile des Betriebszyklus zu
berücksichtigen (beispielweise Zeiten, in denen
das Elektrowerkzeug abgeschaltet ist, und solche,
in denen es zwar eingeschaltet ist, aber ohne
Belastung läuft).
Allgemeine
Sicherheitshinweise
für Elektrowerkzeuge
WARNUNG!
► Lesen Sie alle Sicherheitshinweise und Anwei-
sungen. Versäumnisse bei der Einhaltung der
Sicherheitshinweise und Anweisungen können
elektrischen Schlag, Brand und/oder schwere
Verletzungen verursachen.
Bewahren Sie alle Sicherheitshinweise und
Anweisungen für die Zukunft auf.
Der in den Sicherheitshinweisen verwendete Begriff
„Elektrowerkzeug“ bezieht sich auf netzbetriebene
Elektrowerkzeuge (mit Netzkabel) und auf akkubetriebene Elektrowerkzeuge (ohne Netzkabel).
1. Arbeitsplatz-Sicherheit
a) Halten Sie Ihren Arbeitsbereich sauber und
gut beleuchtet. Unordnung und unbeleuchtete
Arbeitsbereiche können zu Unfällen führen.
b) Arbeiten Sie mit dem Elektrowerkzeug nicht in
explosionsgefährdeter Umgebung, in der sich
brennbare Flüssigkeiten, Gase oder Stäube
befi nden. Elektrowerkzeuge erzeugen Funken, die
den Staub oder die Dämpfe entzünden können.
c) Halten Sie Kinder und andere Personen wäh-
rend der Benutzung des Elektrowerkzeugs fern.
Bei Ablenkung können Sie die Kontrolle über
das Gerät verlieren.
2. Elektrische Sicherheit
a) Der Anschlussstecker des Elektrowerkzeuges
(bzw. Netzteils) muss in die Steckdose passen.
Der Stecker darf in keiner Weise verändert
werden. Verwenden Sie keine Adapterstecker
gemeinsam mit schutzgeerdeten Elektrowerkzeugen. Unveränderte Stecker und passende
Steckdosen verringern das Risiko eines elektrischen Schlages.
b) Vermeiden Sie Körperkontakt mit geerdeten
Oberfl ächen, wie von Rohren, Heizungen,
Herden und Kühlschränken. Es besteht ein
erhöhtes Risiko durch elektrischen Schlag, wenn
Ihr Körper geerdet ist.
c) Halten Sie Elektrowerkzeuge von Regen oder
Nässe fern. Das Eindringen von Wasser in ein
Elektrogerät erhöht das Risiko eines elektrischen
Schlages.
d) Zweckentfremden Sie das Kabel nicht, um das
Elektrowerkzeug zu tragen, aufzuhängen oder
um den Stecker aus der Steckdose zu ziehen.
Halten Sie das Kabel fern von Hitze, Öl, scharfen Kanten oder sich bewegenden Geräteteilen.
Beschädigte oder verwickelte Kabel erhöhen das
Risiko eines elektrischen Schlages.
e) Wenn Sie mit einem Elektrowerkzeug im
Freien arbeiten, verwenden Sie nur Verlängerungskabel, die auch für den Außenbereich
zugelassen sind. Die Anwendung eines für den
Außenbereich geeigneten Verlängerungskabels
verringert das Risiko eines elektrischen Schlages.
f) Wenn der Betrieb des Elektrowerkzeuges in
feuchter Umgebung nicht vermeidbar ist, verwenden Sie einen Fehlerstromschutzschalter.
Der Einsatz eines Fehlerstromschutzschalters vermindert das Risiko eines elektrischen Schlages.
3. Sicherheit von Personen
a) Seien Sie stets aufmerksam, achten Sie darauf,
was Sie tun und gehen Sie mit Vernunft an die
Arbeit mit einem Elektrowerkzeug. Benutzen
Sie kein Elektrowerkzeug, wenn Sie müde sind
oder unter dem Einfl uss von Drogen, Alkohol
oder Medikamenten stehen. Ein Moment der
DE
AT
CH
PASS 3.6 B2
11
Page 15

Unachtsamkeit beim Gebrauch des Elektrowerkzeuges kann zu ernsthaften Verletzungen führen.
b) Tragen Sie persönliche Schutzausrüstung und
DE
AT
CH
immer eine Schutzbrille. Das Tragen persönlicher
Schutzausrüstung wie Staubmaske, rutschfeste
Sicherheitsschuhe, Schutzhelm oder Gehörschutz,
je nach Art und Einsatz des Elektrowerkzeuges,
verringert das Risiko von Verletzungen.
c) Vermeiden Sie eine unbeabsichtigte Inbetrieb-
nahme. Vergewissern Sie sich, dass das Elektrowerkzeug ausgeschaltet ist, bevor Sie es
an die Stromversorgung und / oder den Akku
anschließen, es aufnehmen oder tragen.
Wenn Sie beim Tragen des Elektrowerkzeuges
den Finger am Schalter haben oder das Gerät
bereits eingeschaltet an die Stromversorgung
anschließen, kann dies zu Unfällen führen.
d) Entfernen Sie Einstellwerkzeuge oder Schrau-
benschlüssel, bevor Sie das Elektrowerkzeug
einschalten. Ein Werkzeug oder Schlüssel, der
sich in einem drehenden Geräteteil befi ndet,
kann zu Verletzungen führen.
e) Vermeiden Sie eine abnormale Körperhaltung.
Sorgen Sie für einen sicheren Stand und halten
Sie jederzeit das Gleichgewicht. Dadurch kön-
nen Sie das Elektrowerkzeug in unerwarteten
Situationen besser kontrollieren.
f) Tragen Sie geeignete Kleidung. Tragen Sie
keine weite Kleidung oder Schmuck. Halten
Sie Haare, Kleidung und Handschuhe fern
von sich bewegenden Teilen. Lockere Kleidung,
Schmuck oder lange Haare können von sich
bewegenden Teilen erfasst werden.
g) Wenn Staubabsaug- und -auff angeinrichtun-
gen montiert werden können, vergewissern
Sie sich, dass diese angeschlossen sind und
richtig verwendet werden. Die Verwendung
einer Staubabsaugung kann Gefährdungen
durch Staub verringern.
4. Verwendung und Behandlung des
Elektrowerkzeugs
a) Überlasten Sie das Gerät nicht. Verwenden
Sie für Ihre Arbeit das dafür bestimmte
Elektrowerkzeug. Mit dem passenden Elektro-
werkzeug arbeiten Sie besser und sicherer im
angegebenen Leistungsbereich.
b) Benutzen Sie kein Elektrowerkzeug, dessen
Schalter defekt ist. Ein Elektrowerkzeug, das
sich nicht mehr ein- oder ausschalten lässt, ist
gefährlich und muss repariert werden.
c) Ziehen Sie den Stecker aus der Steckdose
und / oder entfernen Sie den Akku, bevor Sie
Geräteeinstellungen vornehmen, Zubehörteile
wechseln oder das Gerät weglegen. Diese
Vorsichtsmaßnahme verhindert den unbeabsichtigten Start des Elektrowerkzeuges.
d) Bewahren Sie unbenutzte Elektrowerkzeuge
außerhalb der Reichweite von Kindern auf.
Lassen Sie Personen das Gerät nicht benutzen,
die mit diesem nicht vertraut sind oder diese
Anweisungen nicht gelesen haben. Elektro-
werkzeuge sind gefährlich, wenn sie von
unerfahrenen Personen benutzt werden.
e) Pfl egen Sie Elektrowerkzeuge mit Sorgfalt.
Kontrollieren Sie, ob bewegliche Teile einwandfrei funktionieren und nicht klemmen, ob Teile
gebrochen oder so beschädigt sind, dass die
Funktion des Elektrowerkzeuges beeinträchtigt ist. Lassen Sie beschädigte Teile vor dem
Einsatz des Gerätes reparieren. Viele Unfälle
haben ihre Ursache in schlecht gewarteten
Elektrowerkzeugen.
f) Halten Sie Schneidwerkzeuge scharf und
sauber. Sorgfältig gepfl egte Schneidwerkzeuge
mit scharfen Schneidkanten verklemmen sich
weniger und sind leichter zu führen.
g) Verwenden Sie Elektrowerkzeug, Zubehör,
Einsatzwerkzeuge usw. entsprechend diesen
Anweisungen. Berücksichtigen Sie dabei die
Arbeitsbedingungen und die auszuführende
Tätigkeit. Der Gebrauch von Elektrowerkzeugen
für andere als die vorgesehenen Anwendungen
kann zu gefährlichen Situationen führen.
5. Verwendung und Behandlung des
Akkuwerkzeugs
a) Laden Sie die Akkus nur in Ladegeräten auf,
die vom Hersteller empfohlen werden. Für
ein Ladegerät, das für eine bestimmte Art von
Akkus geeignet ist, besteht Brandgefahr, wenn
es mit anderen Akkus verwendet wird.
12
PASS 3.6 B2
Page 16

b) Verwenden Sie nur die dafür vorgesehenen
Akkus in den Elektrowerkzeugen. Der Gebrauch
von anderen Akkus kann zu Verletzungen und
Brandgefahr führen.
c) Halten Sie den nicht benutzten Akku fern von
Büroklammern, Münzen, Schlüsseln, Nägeln,
Schrauben oder anderen kleinen Metallgegenständen, die eine Überbrückung der Kontakte
verursachen könnten. Ein Kurzschluss zwischen
den Akkukontakten kann Verbrennungen oder
Feuer zur Folge haben.
d) Bei falscher Anwendung kann Flüssigkeit aus
dem Akku austreten. Vermeiden Sie den Kontakt damit. Bei zufälligem Kontakt mit Wasser
abspülen. Wenn die Flüssigkeit in die Augen
kommt, nehmen Sie zusätzlich ärztliche Hilfe
in Anspruch. Austretende Akkufl üssigkeit kann
zu Hautreizungen oder Verbrennungen führen.
kann auch metallene Geräteteile unter Spannung
setzen und zu einem elektrischen Schlag führen.
■ Bei Arbeiten am Gerät, sowie Transport
bzw. Aufbewahrung bringen Sie den Drehrichtungsumschalter in die Mittelposition
(Sperre). So verhindern Sie unbeabsichtigtes
Anlaufen des Elektrowerkzeuges.
■ Dieses Gerät ist nicht dafür bestimmt, durch
Personen (einschließlich Kinder) mit eingeschränkten physischen, sensorischen oder
geistigen Fähigkeiten oder mangels Erfahrung
und / oder mangels Wissen benutzt zu werden,
es sei denn, sie werden durch eine für ihre
Sicherheit zuständige Person beaufsichtigt oder
erhielten von ihr Anweisungen, wie das Gerät
zu benutzen ist. Kinder sollten beaufsichtigt
werden, um sicherzustellen, dass sie nicht mit
dem Gerät spielen.
DE
AT
CH
VORSICHT! EXPLOSIONSGEFAHR!
Laden Sie nichtaufladbare Batterien
niemals auf.
6. Service
a) Lassen Sie Ihr Elektrowerkzeug nur von quali-
fi ziertem Fachpersonal und nur mit OriginalErsatzteilen reparieren. Damit wird sicherge-
stellt, dass die Sicherheit des Elektrowerkzeugs
erhalten bleibt.
Gerätespezifi sche Sicherheitshinweise
für Akkuschrauber
■ Sichern Sie das Werkstück. Ein mit Spann-
vorrichtungen oder Schraubstock festgehaltenes
Werkstück ist sicherer gehalten als mit Ihrer Hand.
■ Halten Sie das Elektrowerkzeug fest. Beim
Festziehen und Lösen von Schrauben können
kurzfristig hohe Reaktionsmomente auftreten.
■ Schalten Sie das Elektrowerkzeug sofort
aus, wenn das Einsatzwerkzeug blockiert.
Seien Sie auf hohe Reaktionsmomente gefasst,
die einen Rückschlag verursachen.
■ Halten Sie das Gerät an den isolierten
Griff fl ächen, wenn Sie Arbeiten ausführen, bei denen die Schraube verborgene
Stromleitungen treff en kann. Der Kontakt der
Schraube mit einer spannungsführenden Leitung
Originalzubehör / -zusatzgeräte
■ Benutzen Sie nur Zubehör und Zusatzgeräte,
die in der Gebrauchsanweisung angegeben
sind. Der Gebrauch anderer als in der Bedie-
nungsanleitung empfohlener Einsatzwerkzeuge
oder anderen Zubehörs kann eine Verletzungsgefahr für Sie bedeuten.
Inbetriebnahme
Geräte-Akku laden
Nur zur Verwendung in Innenräumen!
HINWEIS
Der Akku wird teilgeladen ausgeliefert. Laden
►
Sie den Akku vor der ersten Inbetriebnahme
mindestens 3 Stunden. Sie können den Li-IonenAkku jederzeit aufl aden, ohne die Lebensdauer
zu verkürzen. Eine Unterbrechung des Ladevorgangs schädigt den Akku nicht.
Ladevorgang starten:
♦ Schließen Sie das Ladegerät an eine Strom-
quelle mit 230 V∼ 50 Hz an.
♦ Verbinden Sie das Ladegerät mit der Lade-
buchse des Gerätes.
Der Akku ist geladen, wenn die Akku-Kapazitätsan-
von rot auf grün wechselt.
zeige
PASS 3.6 B2
13
Page 17

Ladevorgang beenden:
♦ Trennen Sie das Ladegerät von der Strom-
quelle.
DE
♦ Trennen Sie das Ladegerät von der Lade-
AT
CH
buchse des Gerätes.
Bits / Schraubendrehereinsätze
auswechseln
Einsetzen:
♦ Verriegelungshülse zurückziehen und
festhalten.
♦ Bit in die Werkzeugaufnahme stecken,
Verriegelungshülse loslassen.
Entnehmen:
♦ Die Verriegelungshülse zurückziehen und
festhalten.
♦ Bit entnehmen und Verriegelungshülse
loslassen.
Bedienung
Akkuschrauber ein- / ausschalten
Einschalten:
♦ Drücken Sie den EIN-/AUS-Schalter und
halten Sie ihn gedrückt.
Ausschalten:
♦ Lassen Sie den EIN-/AUS-Schalter los.
Drehrichtung umschalten
Rechtslauf:
♦ Schieben Sie den Drehrichtungsumschalter
nach links.
♦ Drücken Sie den EIN-/AUS-Schalter . Sie
können jetzt die Schrauben eindrehen.
Einschaltsperre:
♦ Schieben Sie den Drehrichtungsumschalter
in die Mittelposition. Der EIN-/AUS-Schalter
ist blockiert.
LED-Lampe ein- / ausschalten
Einschalten:
♦ Drücken Sie den EIN-/ AUS-Schalter und
halten ihn gedrückt.
Ausschalten:
♦ Lassen Sie den EIN-/AUS-Schalter los.
Griff einstellung
Der Schrauber kann in 2 verschiedenen Griff einstellungen arretiert werden. Hierzu muss die Verriegelungstaste gedrückt und der Schrauber in die
gewünschte Stellung gedreht werden. Danach die
Verriegelungstaste wieder loslassen.
Drehmoment-Einstellung
Das Drehmoment für eine bestimmte Schraubengröße wird an der Drehmomenteinstellung
eingestellt. Das erforderliche Drehmoment ist von
mehreren Faktoren abhängig:
- von der Art und Härte des zu bearbeitenden
Materials.
- von der Art und der Länge der verwendeten
Schrauben.
- von den Anforderungen, die an die Schraubverbindung gestellt werden.
Das Erreichen des Drehmoments wird durch Auslösen der Kupplung signalisiert.
Linkslauf:
♦ Schieben Sie den Drehrichtungsumschalter
nach rechts.
♦ Drücken Sie den EIN-/AUS-Schalter . Sie
können jetzt Schrauben herausdrehen.
14
PASS 3.6 B2
Page 18

Akku-Kapazitätsanzeige
Die Akku-Kapazitätsanzeige signalisiert Ihnen
den Ladezustand des Akkus anhand von 3 farbigen LED‘s.
Alle LED‘s leuchten:
Der Akku ist voll aufgeladen.
Gelbe und rote LED leuchten:
Der Akku verfügt über ausreichende Restladung.
Rote LED:
Der Akku ist leer, laden Sie den Akku auf.
Tipps und Tricks
Schraub-Bits sind mit ihren Maßen und der Form
gekennzeichnet. Falls Sie sich unsicher sind, probieren Sie immer zuerst aus, ob das Bit ohne Spiel im
Schraubkopf sitzt.
Die Garantieleistung gilt nur für Material- oder
Fabrikationsfehler, nicht aber für Transportschäden,
Verschleißteile oder für Beschädigungen an zerbrechlichen Teilen, z. B. Schalter oder Akkus. Das
Produkt ist lediglich für den privaten und nicht für
den gewerblichen Gebrauch bestimmt.
Bei missbräuchlicher und unsachgemäßer Behandlung, Gewaltanwendung und bei Eingriff en, die
nicht von unserer autorisierten Service-Niederlassung vorgenommen wurden, erlischt die Garantie.
Ihre gesetzlichen Rechte werden durch diese
Garantie nicht eingeschränkt.
Die Garantiezeit wird durch die Gewährleistung nicht
verlängert. Dies gilt auch für ersetzte und reparierte
Teile. Eventuell schon beim Kauf vorhandene
Schäden und Mängel müssen sofort nach dem
Auspacken gemeldet werden, spätestens aber zwei
Tage nach Kaufdatum. Nach Ablauf der Garantiezeit anfallende Reparaturen sind kostenpfl ichtig.
DE
AT
CH
Wartung und Reinigung
STROMSCHLAGGEFAHR! Ziehen Sie
vor Reinigungsarbeiten das Ladegerät
aus der Steckdose.
Der Akkuschrauber ist wartungsfrei.
■ Das Gerät muss stets sauber, trocken und frei
von Öl oder Schmierfetten sein.
■ Es dürfen keine Flüssigkeiten in das Innere der
Geräte gelangen.
■ Verwenden Sie zum Reinigen des Gehäuses ein
Tuch. Verwenden Sie niemals Benzin, Lösungsmittel oder Reiniger, die Kunststoff angreifen.
Garantie und Service
Sie erhalten auf dieses Gerät 3 Jahre Garantie
ab Kaufdatum. Das Gerät wurde sorgfältig
produziert und vor Anlieferung gewissenhaft
geprüft. Bitte bewahren Sie den Kassenbon
als Nachweis für den Kauf auf. Bitte setzen
Sie sich im Garantiefall mit Ihrer Servicestelle
telefonisch in Verbindung. Nur so kann eine
kostenlose Einsendung Ihrer Ware gewährleistet werden.
Service Deutschland
Tel.: 0800 5435 111
E-Mail: kompernass@lidl.de
IAN 96266
Service Österreich
Tel.: 0820 201 222 (0,15 EUR/Min.)
E-Mail: kompernass@lidl.at
IAN 96266
Service Schweiz
Tel.: 0842 665566 (0,08 CHF/Min.,
Mobilfunk max. 0,40 CHF/Min.)
E-Mail: kompernass@lidl.ch
IAN 96266
Erreichbarkeit Hotline: Montag bis Freitag von
8:00 Uhr – 20:00 Uhr (MEZ)
Importeur
KOMPERNASS HANDELS GMBH
BURGSTRASSE 21
44867 BOCHUM
GERMANY
www.kompernass.com
PASS 3.6 B2
15
Page 19

Entsorgung
Die Verpackung besteht aus umweltfreund-
lichen Materialien, die Sie über die örtlichen
DE
AT
CH
Werfen Sie Elektrowerkzeuge nicht
Gemäß Europäischer Richtlinie 2012/19/EU
müssen verbrauchte Elektrowerkzeuge getrennt
gesammelt und einer umweltgerechten Wiederverwertung zugeführt werden.
Werfen Sie Akkus nicht in den
Recyclingstellen entsorgen können.
in den Hausmüll!
Hausmüll!
Angewandte harmonisierte Normen:
EN 60745-1 / A11: 2010
EN 60745-2-2: 2010
EN 55014-1 / A2: 2011
EN 55014-2 / A2: 2008
EN 60335-1: 2012
EN 60335-2-29: 2004 + A2
EN 62233: 2008
EN 61000-3-3: 2008
EN 61000-3-2: 2006 + A1 + A2
Typ / Gerätebezeichnung:
Akku-Stabschrauber PASS 3.6 B2
Herstellungsjahr: 10 - 2013
Defekte oder verbrauchte Akkus müssen gemäß
Richtlinie 2006/66/EC recycelt werden. Geben
Sie Akku-Pack und / oder das Gerät über die angebotenen Sammeleinrichtungen zurück.
Über Entsorgungsmöglichkeiten für ausgediente
Elektrowerkzeuge / Akku-Pack informieren Sie sich
bitte bei Ihrer Gemeinde- oder Stadtverwaltung.
Konformitätserklärung /
Hersteller
Wir, KOMPERNASS HANDELS GMBH, Dokumentenverantwortlicher: Herr Semi Uguzlu, BURGSTR. 21,
44867 BOCHUM, DEUTSCHLAND, erklären hiermit,
dass dieses Produkt mit den folgenden Normen,
normativen Dokumenten und EG-Richtlinien
übereinstimmt:
Maschinenrichtlinie
(2006 / 42 / EC)
EG-Niederspannungsrichtlinie
(2006 / 95 / EC)
Elektromagnetische Verträglichkeit
(2004 / 108 / EC)
RoHS Richtlinie
(2011 / 65 / EU)
Seriennummer: IAN 96266
Bochum, 27.09.2013
Semi Uguzlu
- Qualitätsmanager -
Technische Änderungen im Sinne der Weiterentwicklung sind vorbehalten.
16
PASS 3.6 B2
Page 20

Contents
Introduction . . . . . . . . . . . . . . . . . . . . . . . . . . . . . . . . . . . . . . . . . . . . . . . . . . . . . 18
Proper use . . . . . . . . . . . . . . . . . . . . . . . . . . . . . . . . . . . . . . . . . . . . . . . . . . . . . . . . . . . . . . . . 18
Features . . . . . . . . . . . . . . . . . . . . . . . . . . . . . . . . . . . . . . . . . . . . . . . . . . . . . . . . . . . . . . . . . . 18
Package contents . . . . . . . . . . . . . . . . . . . . . . . . . . . . . . . . . . . . . . . . . . . . . . . . . . . . . . . . . . . 18
Technical details . . . . . . . . . . . . . . . . . . . . . . . . . . . . . . . . . . . . . . . . . . . . . . . . . . . . . . . . . . . . 18
General Power Tool Safety Warnings . . . . . . . . . . . . . . . . . . . . . . . . . . . . . . . 19
1. Work area safety . . . . . . . . . . . . . . . . . . . . . . . . . . . . . . . . . . . . . . . . . . . . . . . . . . . . . . . . . 19
2. Electrical safety . . . . . . . . . . . . . . . . . . . . . . . . . . . . . . . . . . . . . . . . . . . . . . . . . . . . . . . . . . 19
3. Personal safety . . . . . . . . . . . . . . . . . . . . . . . . . . . . . . . . . . . . . . . . . . . . . . . . . . . . . . . . . . . 19
4. Power tool use and care . . . . . . . . . . . . . . . . . . . . . . . . . . . . . . . . . . . . . . . . . . . . . . . . . . . 20
5. Use and handling of the cordless electrical power tool . . . . . . . . . . . . . . . . . . . . . . . . . . . . 20
6. Service . . . . . . . . . . . . . . . . . . . . . . . . . . . . . . . . . . . . . . . . . . . . . . . . . . . . . . . . . . . . . . . . . 20
Safety instructions specifi cally for cordless screwdrivers . . . . . . . . . . . . . . . . . . . . . . . . . . . . . 20
Original accessories/additional equipment . . . . . . . . . . . . . . . . . . . . . . . . . . . . . . . . . . . . . . . 21
Initial operation . . . . . . . . . . . . . . . . . . . . . . . . . . . . . . . . . . . . . . . . . . . . . . . . . 21
Charging the appliance . . . . . . . . . . . . . . . . . . . . . . . . . . . . . . . . . . . . . . . . . . . . . . . . . . . . . . 21
Changing bits / screwdriver bits . . . . . . . . . . . . . . . . . . . . . . . . . . . . . . . . . . . . . . . . . . . . . . . . 21
Operation . . . . . . . . . . . . . . . . . . . . . . . . . . . . . . . . . . . . . . . . . . . . . . . . . . . . . . 21
Switching the cordless screwdriver on / off . . . . . . . . . . . . . . . . . . . . . . . . . . . . . . . . . . . . . . . . 21
Changing the direction of rotation . . . . . . . . . . . . . . . . . . . . . . . . . . . . . . . . . . . . . . . . . . . . . . 21
Switch LED on / off . . . . . . . . . . . . . . . . . . . . . . . . . . . . . . . . . . . . . . . . . . . . . . . . . . . . . . . . . . 22
Adjusting the handle . . . . . . . . . . . . . . . . . . . . . . . . . . . . . . . . . . . . . . . . . . . . . . . . . . . . . . . . . 22
Torque setting . . . . . . . . . . . . . . . . . . . . . . . . . . . . . . . . . . . . . . . . . . . . . . . . . . . . . . . . . . . . . . 22
Battery level display . . . . . . . . . . . . . . . . . . . . . . . . . . . . . . . . . . . . . . . . . . . . . . . . . . . . . . . . 22
Tips and tricks . . . . . . . . . . . . . . . . . . . . . . . . . . . . . . . . . . . . . . . . . . . . . . . . . . . . . . . . . . . . . . 22
GB
Maintenance and cleaning . . . . . . . . . . . . . . . . . . . . . . . . . . . . . . . . . . . . . . . . . 22
Warranty and service . . . . . . . . . . . . . . . . . . . . . . . . . . . . . . . . . . . . . . . . . . . . 23
Importer . . . . . . . . . . . . . . . . . . . . . . . . . . . . . . . . . . . . . . . . . . . . . . . . . . . . . . . 23
Disposal . . . . . . . . . . . . . . . . . . . . . . . . . . . . . . . . . . . . . . . . . . . . . . . . . . . . . . . . 23
Declaration of conformity / Manufacturer
. . . . . . . . . . . . . . . . . . . . . . . . . . . . 24
PASS 3.6 B2
17
Page 21

CORDLESS SCREWDRIVER
PASS 3.6 B2
Introduction
Congratulations on the purchase of your
new appliance. You have selected a highquality product. The operating instructions
are part of this product. They contain important
GB
information on safety, use and disposal. Before
using the product, familiarise yourself with all
operating and safety instructions. Use this product
only as described and only for the specifi ed areas
of application. Please also pass these operating
instructions on to any future owner(s).
Proper use
This appliance is designed for screwing into wood,
plastic and metal. Use the appliance only as described
and only for the areas of application specifi ed.
Any other uses or modifi cations to the appliance
are deemed to be improper usage and may result
in serious physical injury. Not for commercial use.
Features
ON/OFF switch
Rotation direction switch/safety lock-out
LED
Tool holder
Locking collar
Torque setting
Battery level display
Locking button
Charging socket (appliance)
Charger
Package contents
1 cordless screwdriver PASS 3.6 B2
1 charger PASS 3.6 B2-1
1 carrying case
24 bits x 25 mm
2 bits x 50 mm
1 bit extension
1 operating instructions
Technical details
Cordless screwdriver: PASS 3.6 B2
Rated voltage: 3.6 V
Battery (integrated): LITHIUM-ion
Battery capacity: 1500 mAh
Nominal idle speed: n
Torque: max. 4.0 Nm
Tool holder: 6.35 mm (¼”)
Charger: PASS 3.6 B2-1
INPUT:
Rated voltage: 230 - 240 V∼ 50/60 Hz
Rated current: 200 mA
OUTPUT:
Rated voltage: 5.5 V
Rated current: 600 mA
Charging time: approx. 3 hours
Protection class: II /
Noise and vibration data:
Noise measurement determined in accordance
with EN 60745 The A-rated noise level of the
power tool is typically:
Sound pressure level: 57 dB(A)
Sound power level: 68 dB(A)
Uncertainty K: 3 dB
Vibration values (vector total of three directions)
determined in accordance with EN 60745
Screws: Vibration emission value ah = 0.393 m/s
Uncertainty K = 1.5 m/s
The vibration level specifi ed in these instructions has
been measured in accordance with the standardised
measuring procedure specifi ed in EN 60745 and
can be used to make equipment comparisons.
The specifi ed vibration emission value can also
be used to make an initial exposure estimate. The
vibration level varies in accordance with the use of
the power tool and may be higher than the value
specifi ed in these instructions in some cases. It is
easy to underestimate the vibration load if the
electrical power tool is used regularly in a certain
manner.
= 200 min
0
2
-1
2
18
PASS 3.6 B2
Page 22

Try to keep the vibration loads as low as possible.
Measures to reduce the vibration load are, e.g.
wearing gloves and limiting the working time.
Wherein all states of operation must be included
(e.g. times when the power tool is switched off
and times where the power tool is switched on
but running without load).
General Power Tool
Safety Warnings
WARNING!
► Read all safety warnings and all instructions.
Failure to follow the warnings and instructions
may result in electric shock, fi re and/or serious
injury.
c) Do not expose power tools to rain or wet
conditions. Water entering a power tool will
increase the risk of electric shock.
d) Do not abuse the cord. Never use the cord for
carrying, pulling or unplugging the power tool.
Keep cord away from heat, oil, sharp edges
or moving parts. Damaged or entangled cords
increase the risk of electric shock.
e) When operating a power tool outdoors, use
an extension cord suitable for outdoor use.
Use of a cord suitable for outdoor use reduces
the risk of electric shock.
f) If operating a power tool in a damp location
is unavoidable, use a residual current device
(RCD) protected supply. Use of an RCD
reduces the risk of electric shock.
GB
Save all warnings and instructions for future
reference.
The term “power tool” in the warnings refers to your
mains-operated (corded) power tool or batteryoperated (cordless) power tool.
1. Work area safety
a) Keep work area clean and well lit. Cluttered
or dark areas invite accidents.
b) Do not operate power tools in explosive
atmospheres, such as in the presence of fl ammable liquids, gases or dust. Power tools create
sparks which may ignite the dust or fumes.
c) Keep children and bystanders away while
operating a power tool. Distractions can cause
you to lose control.
2. Electrical safety
a) Power tool plugs must match the outlet. Never
modify the plug in any way. Do not use any
adapter plugs with earthed (grounded)
power tools. Unmodifi ed plugs and matching
outlets will reduce risk of electric shock.
b) Avoid body contact with earthed or ground-
ed surfaces, such as pipes, radiators, ranges
and refrigerators. There is an increased risk
of electric shock if your body is earthed or
grounded.
3. Personal safety
a) Stay alert, watch what you are doing and
use common sense when operating a power
tool. Do not use a power tool while you are
tired or under the infl uence of drugs, alcohol
or medication. A moment of inattention while
operating power tools may result in serious
personal injury.
b) Use personal protective equipment. Always
wear eye protection. Protective equipment
such as dust mask, non-skid safety shoes, hard
hat, or hearing protection used for appropriate
conditions will reduce personal injuries.
c) Prevent unintentional starting. Ensure the
switch is in the off -position before connecting
to power source and/or battery pack, picking
up or carrying the tool. Carrying power tools
with your fi nger on the switch or energising
power tools that have the switch on invites
accidents.
d) Remove any adjusting key or wrench before
turning the power tool on. A wrench or a key
left attached to a rotating part of the power tool
may result in personal injury.
e) Do not overreach. Keep proper footing and
balance at all times. This enables better control
of the power tool in unexpected situations.
PASS 3.6 B2
19
Page 23

f) Dress properly. Do not wear loose clothing or
jewellery. Keep your hair, clothing and gloves
away from moving parts. Loose clothes, jewel-
lery or long hair can be caught in moving parts.
g) If devices are provided for the connection of
dust extraction and collection facilities, ensure
these are connected and properly used.
Use of dust collection can reduce dust-related
GB
hazards.
4. Power tool use and care
a) Do not force the power tool. Use the correct
power tool for your application. The correct
power tool will do the job better and safer at the
rate for which it was designed.
b) Do not use the power tool if the switch does
not turn it on and off . Any power tool that cannot be controlled with the switch is dangerous
and must be repaired.
c) Disconnect the plug from the power source
and/or the battery pack from the power tool
before making any adjustments, changing
accessories, or storing power tools. Such
preventive safety measures reduce the risk of
starting the power tool accidentally.
d) Store idle power tools out of the reach of
children and do not allow persons unfamiliar
with the power tool or these instructions to
operate the power tool. Power tools are
dangerous in the hands of untrained users.
e) Maintain power tools. Check for misalignment
or binding of moving parts, breakage of parts
and any other condition that may aff ect the
power tool’s operation. If damaged, have the
power tool repaired before use. Many
accidents are caused by poorly maintained
power tools.
f) Keep cutting tools sharp and clean. Properly
maintained cutting tools with sharp cutting edges
are less likely to bind and are easier to control.
g) Use the power tool, accessories and tool bits
etc. in accordance with these instructions, taking into account the working conditions and
the work to be performed. Use of the power
tool for operations diff erent from those intended
could result in a hazardous situation.
5. Use and handling of the cordless
electrical power tool
a) Charge a rechargeable battery unit using only
the charger recommended by the manufacturer.
Chargers are often designed for a particular
type of rechargeable battery unit. There is the
danger of fi re if other types of rechargeable
battery units are used.
b) Only the rechargeable battery units supplied
are to be used with an electrical power tool.
The use of other rechargeable battery units may
lead to the danger of injury or fi re.
c) When they are not being used, store recharge-
able battery units away from paperclips,
coins, keys. nails, screws or other small metal
objects that could cause the contacts to be
bridged. Short-circuiting the contacts of a
rechargeable battery unit may result in heat
damage or fi re.
d) Fluids may leak out of rechargeable battery
units if they are misused. If this happens,
avoid contact with the fl uid. If contact occurs,
fl ush the aff ected area with water. Seek additional medical help if any of the fl uid gets into
your eyes. Escaping battery fl uid may cause
skin irritation or burns.
CAUTION! RISK OF EXPLOSION!
Never charge non-rechargeable
batteries!
6. Service
a) Have your power tool serviced by a qualifi ed
repair person using only identical replacement parts. This will ensure that the safety of
the power tool is maintained.
Safety instructions specifi cally for
cordless screwdrivers
■ Immobilise the workpiece securely. A
workpiece that is held in place with a clamp/
vice can be worked much more safely than a
workpiece held with the hand.
■ Hold the power tool fi rmly. When tightening or
loosening screws, a high reaction moment can
quickly occur.
20
PASS 3.6 B2
Page 24

■ Switch off the power tool immediately if the
tool being used gets blocked. Be prepared
for high reaction moments as these can cause
kick-back.
■ Hold power tool by insulated gripping surfaces,
when performing an operation where the
fastener may contact hidden wiring or its
own cord. Fasteners contacting a “live” wire may
make exposed metal parts of the power tool
“live” and could give the operator an electric
shock.
■ When working on the appliance, as well as
during transport and storage, always place
the rotation direction switch in the middle
position (locked). This will prevent unintentional
activation of the device.
■ This appliance is not intended for use by people
(including children) with reduced physical,
sensory or mental abilities or for those without
experience and/or knowledge, unless they are
supervised by a person responsible for their
safety or they have been instructed in its use.
Children should be supervised to ensure that
they do not play with the appliance.
Original accessories/additional
equipment
■ Use only the additional equipment and acces-
sories detailed in the operating instructions.
The use of tools and accessories other than
those recommended in the operating instructions could lead to an increased risk of personal
injury for you.
Initial operation
Start charging:
♦ Connect the charger to a 230 V ~ 50 Hz
power source.
♦ Connect the charger to the charging socket
on the appliance.
The battery is fully charged when the battery level
display
Stop charging:
changes from red to green.
♦ Disconnect the charger from the mains
power supply.
♦ Disconnect the charger from the charging
socket on the appliance.
Changing bits / screwdriver bits
Inserting:
♦ Pull back the locking collar and hold it fi rmly.
♦ Insert the bit into the tool holder and let go
of the locking collar .
Removing:
♦ Pull back the locking collar and hold it fi rmly.
♦ Remove bit and let go of the locking collar .
Operation
Switching the cordless screwdriver
on / off
Switching on:
♦ Press the ON/OFF switch and keep it
pressed in.
GB
Charging the appliance
Only for interior use!
NOTE
The battery is supplied partially charged.
►
Before fi rst use, charge the battery for at least
3 hours. Li-ion batteries can be charged at
any time without adversely aff ecting their
service life. Interruption of the charging
process will not damage the battery.
PASS 3.6 B2
Switching off :
♦ Release the ON/OFF switch .
Changing the direction of rotation
Clockwise:
♦ Push the rotation direction switch to the left.
♦ Press the ON/OFF switch . You can now
screw in the screws.
21
Page 25

Anti-clockwise:
♦ Push the rotation direction switch to the right.
♦ Press the ON/OFF switch . You can now
unscrew the screws.
Safety lock-out:
♦ Push the rotation direction switch into the
GB
middle position. The ON/OFF switch is
blocked.
Switch LED on / off
Switching on:
♦ Press the ON/OFF switch and keep it
pressed in.
Switching off :
♦ Release the ON/OFF switch .
Battery level display
The battery level display indicates the charge
level using 3 coloured LEDs.
All LEDs are lit up:
The battery is fully charged.
Red and yellow LEDs lit:
The battery has a suffi cient remaining charge.
Red LED:
The battery is fl at. Recharge it.
Tips and tricks
Screw bits are labelled according to their dimensions and their shape. If you are unsure, always try
the particular screw bit out to see whether it sits in
the screw head without any free play.
Adjusting the handle
The screwdriver can be locked into two diff erent
handle settings To do this, press the locking button
and set the screwdriver into the desired position.
Afterwards, release the locking button .
Torque setting
The torque for a specifi c screw size can be set using
the torque setting . The required torque is dependent on an number of factors:
- the type and hardness of the material being
worked.
- the type and length of the screws being used.
- the demands being put on the screw joint.
When the set torque is reached, this is indicated
by the actuation of the clutch.
Maintenance and cleaning
RISK OF ELECTRIC SHOCK! Before
cleaning, disconnect the charger from
the mains socket.
The cordless screwdriver is maintenance-free.
■ The appliance must always be kept clean, dry
and free from oil or grease.
■ Never allow fl uids to get into the appliance.
■ Use a soft cloth to clean the appliance housing.
Never use benzine, solvents or cleansers which
can damage plastic.
22
PASS 3.6 B2
Page 26

Warranty and service
The warranty provided for this appliance
is 3 years from the date of purchase. This
appliance has been manufactured with care
and inspected meticulously prior to delivery. Please retain your receipt as proof of
purchase. In the event of a warranty claim,
please contact your Customer Service by
telephone. This is the only way to guarantee
free return of your goods.
The warranty covers only claims for material and
manufacturing defects, not for transport damage,
wearing parts or for damage to fragile components, e.g. switches or batteries. This appliance is
intended solely for private use and not for commercial purposes.
The warranty is deemed void if this product has been
subjected to improper or inappropriate handling,
abuse or modifi cations which were not carried
out by one of our authorised service centres. Your
statutory rights are not restricted in any way by this
warranty.
The warranty period is not prolonged by repairs
made under the warranty. This also applies to
replaced and repaired parts. Damage and defects
present at the time of purchase must be reported
immediately after unpacking, or no later than two
days after the date of purchase. Repairs made
after expiry of the warranty period are chargeable.
Disposal
The packaging is made from environmen-
tally friendly material and can be disposed
of at your local recycling plant.
Do not dispose of power tools in
your normal domestic waste!
GB
European Directive 2012/19/EU requires that
worn-out power tools are collected separately and
fed into an environmentally compatible recycling
process.
Do not dispose of batteries in your
normal domestic waste!
Defective or worn-out rechargeable batteries must
be recycled according to Directive 2006/66/EC.
Take the battery pack and/or appliance to the
existing collection facilities.
Please consult your local authorities regarding suitable
disposal of worn-out power tools/battery packs.
Service Great Britain
Tel.: 0871 5000 720 (£ 0.10/Min.)
E-Mail: kompernass@lidl.co.uk
IAN 96266
Hotline availability:
Monday to Friday 08:00 - 20:00 (CET)
Importer
KOMPERNASS HANDELS GMBH
BURGSTRASSE 21
44867 BOCHUM
GERMANY
www.kompernass.com
PASS 3.6 B2
23
Page 27

Declaration of conformity /
Manufacturer
We, KOMPERNASS HANDELS GMBH, documents
offi cer: Mr. Semi Uguzlu, BURGSTR. 21, 44867
BOCHUM, GERMANY, hereby declare that this
product complies with the following standards,
normative documents and the EC directives:
GB
Machinery Directive
(2006 / 42 / EC)
EU Low Voltage Regulations
(2006 / 95 / EC)
EMC (Electromagnetic Compatibility)
(2004 / 108 / EC)
Type / appliance designation:
Cordless screwdriver PASS 3.6 B2
Year of manufacture: 10 - 2013
Serial number: IAN 96266
Bochum, 27/09/2013
Semi Uguzlu
- Quality Manager -
RoHS Directive
(2011 / 65 / EU)
Applied harmonised standards:
EN 60745-1 / A11: 2010
EN 60745-2-2: 2010
EN 55014-1 / A2: 2011
EN 55014-2 / A2: 2008
EN 60335-1: 2012
EN 60335-2-29: 2004 + A2
EN 62233: 2008
EN 61000-3-3: 2008
EN 61000-3-2: 2006 + A1 + A2
Subject to technical changes in the course of
further developments.
24
PASS 3.6 B2
Page 28

KOMPERNASS HANDELS GMBH
BURGSTRASSE 21
44867 BOCHUM
DEUTSCHLAND / GERMANY
www.kompernass.com
Version des informations · Stand der Informationen
Last Information Update: 12 / 2013
Ident.-No.: PASS3.6B2-092013-3
IAN 96266
2
 Loading...