

Page 1

Panasonic
Model No. TY-ST65PF1
Fitting instructions
Mobile stand for Display
Montageanweisungen
Mobiler Ständer für Display
istruzioni di montaggio
Supporto mobile per lo schermo
instructions d’instaiiation
Pied mobiie pour i'écran
instrucciones de montaje
Pedestai móvii para ia pantaiia
Инструкции no установке
Мобильная подставка для дисплея
Орнату жeнiндеri нускаулар
Дисплейге арналган жылжымалы т1реу1ш
iнструкцiï 3 встановлення
Моб1льна п1дставка для дисплея
TQZJ449
Page 2

Page 3

МП
:^ьушоуушшУп^у<ТсУУо
{ШШЬУУУУТУХЮШУпШ:УУ^ШаУУОУУЮУ^ШЩШУи^ЬУУГсГсУУУ
У^^ШУУГсЬУУо)
mia
ш
■ X
Б-
Before commencing work, carefully read these Instructions and the Manual for the display to ¡/j
ensure that fitting is performed correctly. "o)
(Please keep these instructions. You may need them when maintaining or moving.) ^
Vorder Ausführung lesen Sie bitte diese Anleitung und die Bedienungsanleitung fürdas Display
sorgfältig durch, damitdie Montage richtig ausgeführtwird.
(Bitte bewahren Sie diese Anleitung auf. Sie kann bei der Wartung oder der erneuten
Anbringung benötigt werden.)
Prima di iniziare il montaggio leggere attentamente le istruzioni e il manuale dello schermo per
poter procedere al montaggio in modo corretto.
(Conservare poi queste istruzioni che si renderanno necessarie per la manutenzione e
l’eventuale spostamento della supporto.)
Avant de commencer le travail, veuillez bien lire ces Instructions ainsi que le Manuel de l’écran
afin de veiller à ce que l'installation soit effectuée correctement.
(Conservez soigneusement les présentes instructions. Vous pouvez en avoir besoin pour
effectuer un entretien ou si vous désirez déplacer l’applique.)
Antes de iniciar el trabajo, lea atentamente estas instrucciones y el manual de la pantalla para
garantizar que el montaje se realiza correctamente.
(Guarde estas instrucciones. Podrá necesitarlas cuando haga trabajos de mantenimiento o ^
mueva el pedestal.) LU
Ч—»
Q
"cc
'ce
ü
СЯ
0
о
c
cc
СЯ
O
c
cc
Перед проведением работ внимательно прочитайте эти инструкции и руководство по
эксплуатации дисплея, чтобы убедиться в том, что установка выполняется правильно.
(Сохраните, пожалуйста, эту инструкцию. Она может Вам понадобиться для технического
обслуживания или перемещения.)
Жумысты бастаудан бурын дурыс opнaтылfaнынa кез жeткiзy yшiн дисплейге apнaлfaн
осы нускауларды жене нус^аулы^ты мукият о^ып шыfыцыз.
(Осы нускаулыктарды сактап койыцыз. Ол сiзге кызмет керсеткен немесе орнын
ауыстырfан кезде керекболуы мyмкiн.)
Перед початком роб1т уважно прочитайте ц1 1нструкц|| та 1нструкц|| з експлуатац|| дисплея,
аби забезпечити правильне встановлення.
(Збереж1ть ц1 1нструкц||, оск1льки вони можуть знадобитись Вам, коли виникне необх1дн1сть
у техн1чному обслуговуванн1 або встановленн1 дисплея в 1ншому м1сц1.)
0_
ь:
Ü
Ü
>.
Ü
><
со
го
со
J3
О
со
Q.
Page 4

in^}Ì15:rJ^0TKl Luo ^ tmW,
'lu ool t)^'^ 'iLT0$№>^^i:>,^|
y')^?4>
° XXQ‘^X44Xnxm'mxX4-n
y'\44?4 > in 5:l®0qTSariÌ2| I
xzixnxmmxxx
°y')44?4>
2.\')fm44'i'^^à^(4)^mm^m±
y'\44?4>2.y'\n}(444'miimWs\
°XXQ^44X 41X44
xmmcDfi-i^uxMm 'oxnm 'onx
HHioii® • ufiipoo (m) -xxxy
\')44?4 > anii n miti 21
°y X Q m fl
x4xnxmmxx4-\4x±^ 'oxum
y')44?4>
aniia3Ì5:^li?:¥gì5: §>l 9 L 21 MI
°XXQ44Xm'^CDX-(^]4'l\\m '4
xx^±fim^iCDmmmm a ^f 21
nÀ2?^>in
0
0
0
V
°XXQ^i<4
x4xnxmmxx4-\4xmm 'oxum
( °xx44>m^i4txmym4\inm)
y'\44?4>iniin Q 2/cj,(isLS 1£' 'Q X-
c|g2iH x^x'^m^cktmyncxy,é\
°XXQ^i<4
x4xnxmmxx4-\4xmm 'oxum
y'\44 ?4 >2 .y '\n^m M \
ÌIH K^X'^m^?4X^4y') 'Q 2/Cv(i®I
X4X44XBMIQ)X-Pì44Mm 'Q2/UÌIÌ
nÀ2?^> anfanai}« 21
i/^m№>n^¥ > 2/n ^ q: I
°ÌigQÌ
'inQii^ 'QiUiii
'.'ì ,5/^ i n ^i?=-lan
?:US¥a2|MM0W '>ÌÌNf/>,(iill
1 Mig-i
0
0
0
.0
xmmxx4-\ 'inli® 'Qiuiii
niiniiJ«
°ÌigQÌiHHiOv(7fl
n ■ aK¥C£^\ i
nÀ2?^>i
'inli® 'QiUiii 'Q^2)|i}iO®T
(D
mW
°ii
w
(Ìi[ii}O^3Ì0ÌI^O °J.^nin^0i!iiè2Ìlll0ÌÌÌ5:gM>?-/2/nCjaSEI
°ii 'xxxQMxmmi
°ii mxxmmx44Qrnxmmxxm
°J.^nin^0i!i 'ini^a5:liIÌ0miÌ<;Vm^?:n^2IS?2/n3:^ni}2/c'5iH
°ii^y
°Ìi^MniflÌ¥lin
o
\'\44 ?4 >^ \'\nQ^y,
#*Z I
mW:W
mW
0
o
m
■N'
Dilli
nw
( nig.?./>cia»se.^^)
Page 5

O
mñT^i^<^tb^mOsmnrOsmm
m^.^^rbo^D¿±fer<^^u
<r¿-¿l\
^'^^УU^^^№ШTЬrcDsШШЬZ
yy(DB,m¿yyy¿yy>Dyyo
■ шт^Ш1ь^ш^^ш^ьт<т^1\
mnrcDsmmbzyyorn.m¿yyy¿
ySDy^o
[о
V
©■
■ yyyyy^t^w^rnoi^ys
2ЛШ±^^эГ<Т^и
y^yyyyy\y№';^yBZs
¿yzyyyyDyyo
7КЩ’^’^шь^т^шшьт<т^1\
mnrcDsmmbzyyorn.m¿yyy¿
y^Dy^o
mnrcDsm.mbzyyym.m¿y^y¿
ySDy^o
МП
mia
ш
J
1) mmB^zmzrDsXb-yyyyyu^
УУФ^У'УШ<ГсУУо
yry^}%niZ}^nym^zyB^yr^zyyz<yyzoy^yyyyyyyy-smm^y^yxy
yysm.^yyyrcDbyyoz\i^mbybYz<yyyo
(у^хууууфу^^хпуу^хууууфушттвш^у<ууу0<^^^вууууштюш
УsУУ'ÆШsШУí^^У<УУУo0
3) 'i&miyy^-yyy-yy^¿Byyz<rcyyo3§byxyyBmmy'^yy¿yy>Dyyoyrcsyhy
уу-уш^уууш:ттшшууууу<ууУо
(^e©^H¿^Dy^o)
4) У^УУУУУ\РУПУУУУ^^УУУШШУШУТб.1\у<ГсУУо
• • xyпyФтuг7K)ñФ^^^в^nФm^ty
■ ууууу^7^шфшшууу^^щш^щит<шшфшш^у^уь^^шт<т^1\0
т■УУУУ^7^Ш\^Ш^Шtí'УЬ0sШШФШШtU^УtUm0Шrо
■ moi^yuü^ш^^.^-^tí'sШШФ^mшtшшr^ytuul\^ò^шшьz<т^l\о
■Ш^^Г^Ш1*йЖ¥^¥5^Шт^^и.Ш1ШВД*^^эГ<Т^ио
Kts^yrnyy^z^ñbrcD^mbrcDy^ytymD
ЬТ<Т^1\о
■ ш^^zшшxm^i^ШФФшmФШ^tsmmФ^^шi^t^^U)îшльz<т^l\
Page 6

0)))))))))))))))))))))))
№ 2) (99 X 9IAI)
nej:ffiqTSail^$№@
9
(i} L) (Mziiii})
CT))))))))))))))))))))))
(2|z 8) (99 X 9IAI)
m\PB)
(2|Z 9) (2 L X 17I/\I)
(2|z p) (2 L X 17I/\I)
nej:ffiilii}QÌ&W(D
(§)lTTTTTTl
(2|Z8) (92 X 9IAI)
(i}9L) (9IAI)
ìnUD
(2|Z 8) (9 L X 9IAI)
□□ciM
ssasi
m
■N'
Dilli
nw
Page 7
co
ги
î м ШЙ
HÍS /i*
^азпй^
&
0 2caich
Q ^
&
2С
r^l- rS Л
S Oí й I
- oJ >J
N
V
r\
0
d
S^lsfF
РП
Page 8

m
mia
ш
4.
mmr^^ü'R^Tm^b^^^rmmb
r<^'^Uo
Щ^:тт
Н®ФЛ(Л®^5Ф№^)
A
B
C
D
5. ®^^Д(±-Т)®^¥Щ4^т^Ь^
(8Ш)^Ш^Ы<^'гио
1047
1147
1247
1347
1.8 ~ 2.2 N-m)
6. ТШФ®^^ДФШ0^ШШ®(1 ^)^
<^'^Uo
^То)
1.2 ~ 1.5 N-m)
8
Page 9
2.
@ х>ЯЯЬФ^»^5+^^Я(4®)^
yyx^y^^-z^0nhz<^^^o
вдо^ьФФ^^ФйФщ^^еьФ<ФФФо
(ШШ^XУУ^^ШШZ^Шñ^^ШZZo)
^мшФЛñУУ^©z^mФ^э^^oмyz
<^'^Uo
(Ш^^УЬ^У^ 3 ~ 4 N-m)
^тя^-^-^4®)
Я^ЯК^^Д—
МП
mia
ш
9
Page 10
m
mia
ш
O^'í)
3.
1.
Ф хФЯ^ЬФ^^±ШФ^ШЯ^-^-^^ШЯ^
<DT^’^^o
@ хФЯЯЬФ^^^^>Ь^В±^’^№5.ТШФ^
ШЯ^-^-^^ШЯ^УК^^Т^ФК^ШЬ^
0
ФФЯЯЬФФ^Ф#Ф
ФФФФФФ.^ФЬФ
ФФФ^НФ^ФФФФ
ФОФФо
2. хФЯ^Ь^^^Ф®^
(Я^^^Ь^Яй 1.2 ~ 1.5 N-m)
±^Ф^»Я^-Ф-
ФФЯЯЬФФ^Ф^ФФФФФФФ^^ФЙйи
Ф№®Ф№±ДЙФЭФВДО^ФФ<ФФФо
ю
Page 11
э ш э uX
s • ® 0
Г1 |=г Г1
СШ
d Э é>J
г^ Э?^
Э tíí
>^>1-
ÇH 9;
í^ S а
>Íd Я *ж
3 ^ ^4
4 4 °
4 4^'
4 0 4
Э^'
4 Ш ^
п I • ^
©t Щ •
4 4 Щ
4 ñ 4
4 4 3
4 4 4
Зш
4 4
(4 С
3 4
4г А
Dint
4 4
* ^ üu
(\
&
ч
llfll
нй
"И
Fr
т
г
р|
л
ri
С"
^ г^ л
S Ш Ш Xîf
■ш ЫН law (у\ С11
ШШсШШ
шен
g; Гг 4
ЩШ' шз
' № S
9tt
Шмс
Ё с о
j A a ru ©
Ctt ^ ^
■ò
-ÖF )4 Ч-
v:
Л
4r
54
a
SD
4
4
4
■ìb
0
Ш
3
ri
и I®
st
ñ Ж'
$í ^
4
^тН1
О/
Г1 ^
с4
Л 4
¡4,Й
<г 1S
о @1
- V ^ fit 0
4 iï öt ri
A a r\i ©
ri Гг a- '
c^rga
Í® П ^
Гг. S Гг
>фШ
a 4^ :ii
§Ì
itÌD S+ ^
É Гг
n ptt 0
- , Fr
hr
СЛ
■
■ mi
ILUI
tni
HÎÎ
о
n
Ü
C“
A
Q 4 4 >J ftt A Й -r Oì Л ^ v:r Й
5lì ° T ùt ri, о n Ü T. vji
0r,í-3:>J4ñV
4 AH
ПШ C“
ru
Ч- T A 4
ri ® I H ° a Vi ri I I
r-i- lìS Й a Si >o r-i- 4 Гг
ri о d;
^ 4Г Л
G 4 -r,
4 a ri
Ш S' 54
¡S G D)i
- $Ì>} 0)
gli
G I S
: 4iS
m 4l flii ¡Шп
a)g0>ia
M Э Ш G ftt
^4' 4ùt
4 >J^^0
Il T ^
a
G d; iìffl ài
4 I Л 4 d;
vji a
V 5
>o A
I Ш
©Hi
^0
Ш Ш
4 01
ТП11
lUll
G •
4 ùt
A ^
ri ri
im
ru
Ш
lim
ГТШ
4
4
Î4
©
3
4
3
4
4
о
aa@4 '
A
ВМЩРП
Page 12
K)
@
■D ' ^ ^ U
“ ^ < v±
9 I
I T vb
°
° s I ^
- a. L ^
Ч1>
s^i
aîvPf
Й
№
ai
S
O
CD
CD
CD
O
СЛ
СЛ
СЛ
\J
4i^
РЙ JD s Ч
□ s n+ v:
г I DÎ> ¡M rît I I
ipt S r4t P
S ' ^
S r4t ri r,^ ^
>1- ^ i-ii 8i
A
ri ЕШ Pt r-p
UÌ <- й]>
nt
rj 11 M Э
^ Йк 9+ ^ 0+
n O ^ ЙГ
âS itt iS Q
Й1 ^4 4
4 T
Й 9+ ri 4
4 ' 4 iS
4 JÍ1 4 i4
ni ^ 4 A
4 4 4
Ш S 4 1Ш
4 n ri Й5
JW D® ' Q
^йЙ4^ш
ñ c a 4
im ' (Й1 JÍ1
4 m c ^
4 fia II 4
9+ Ш еЖ 4
1S^4^
4 il 4
D> 4 4 â
4 да 4 5^
4?n 4 4
A 4 Î4 i»
4 rît fia
4 Üm A ^
ТТП Dt> ГУ 4
4 ГУ 4
4 m Э ГУ.
4^¡4ñ
nt.4
ry fia г I Й
4ЙЖГУ
c 4 DÎÎP 4
й>
СЛ
Ш
w
Ей
□
n
Ч-
ÔJ
Ôi
m
St
лПг
0
JW
-KH
S<Si
0
Ôi
m
a
Ü
C“
rS
J®
(S)
ÜU Ч.Ц
hr
ri 0 9tt >J
Й ^ 4 U
a iS
>4
C Л
9tt 1
4 4 0
° 1 ~7
cy
is 4Ì+
ri
№
0
9tt
9tt №
hr
n
4Ì+
Ut
y
I
4
I
ГУ л'
° 4
"Ч
$F
Ut
4-=
4H
^1
0
®
M
S
s
hr
¡5
n
@
il
U
1
~n
4 0
Ш
Ш
Ш
ob
ma
Or
0 4
ПШ
ЕЫ
Ш
4
C
rS
Л
ri
ГУ
C“
O
ï!M
i
Fr c >J
ri V¿r
M
Q ri, ~n
ГУ 0
ctt
4 4-^
v:
Л
1
$i
Pc.
4
C
rS
Л
ri
ГУ
C“
O
©
ap
A V
° $F
Si
Ч-
Fr
M
ts
G
@
fit
ùt
ru
M
4
Page 13

ш 1=1
: П :
-Za ЯП
as
as
т^шщм^штшшш,Ат^ШАМ^^
3S
■ X
Б-
¿t. ж
т^тштщ.ЛоШтш^^п^т,т^тш'^шш&ш^шш±пт^по
SÆÂ1
т^шщм^штшшш,Ат^ШАМ^^
. ast
• SI
13
Page 14

■ X
Б-
1)
.)
^ШйМо
Vi
•т & ^ Ш Ш ^^ ^ Ш Ш Ж
• Ши^НШШйШ,иг1Ж^Ши&^ШЖ 40 Ш
• т'&^¥¥шштш±,шт^шшт^ж'пшшш^ш^±^
• шжш.тш^т\^й.ш\^й.ш.п^^^п,^ш^^0^хши^±^
:
ÄO^I
ж ш \ х
14
Page 15

ш
■ X
Б-
rn ^
15
Page 16
■ X
Б-
1.
(^@ЙШ : 1.8Ш2.2^#,Ж)
16
(^@ЙШ : 1.8Ш2.2^#,Ж)
Page 17
4
.
№ (±/т) ®mrn^Ro
: вЖ
А 1047
В
С
D 1347
5.
ШШШ^{±/Т) ®о
(^@ЙШ : 1.8Ш2.2^#,Ж)
1147
1247
■ X
Б-
6. Д 4 1
Яо)
(^@ЙШ : 1.2Ш 1.5^#,Ж)
17
Page 18
■ X
Б-
2.
ФФ^^ЙФ
1п ш ^х т ^ш ш ^т ^о
^'о
® 4 ^ШШо
(^ЯШЙ^#^ЯФФо)
(4 Щ^,Й^ШШШШ^,4 4
(^@ЙШ : ЗШ4^#,Ж)
18
Page 19
è
й
й
й
й
а
й
м
№
te-
2иш
^
^ 1-Х 1^
S Ей _ч
Ш5:ш
»,_L> 2х (JJJ
m 4^
й -> И
¡SJ ^
ни
= ^ ^
* 3
Ш-
Ш
liî:
Шн
@
#
Ш1
•-Н-
Ч>
т
т
Й
Ж
Йй
W
ш
ш
т
Щ]
d4q
тт
Ш1№
• iâ
4ш^^Ш
й ^
)ф-^|5г
Йг
ntìf 4ш Stö
“ (4D?
Зп|: (oj
Зш
m i¿ í
CVCV
й
и^ ш
"И
3
й ^
п и\ш
и а/ю
S. Ц>
ш м
шз
ж
-н ш
li
se Hÿ
- í:
m m
ж >
&
1=1-
- т
м ^
щ se
» й
да Ш
3
Mf^
Ч
- í:
Ж Jïï
ни
Ей
Т73
Е
W
1^
Щ]
d4q
тт
Л1№
№
СО
■
т
W
CD
ФЙ
Page 20
{шт- ^ ш± шш^ тш^ тш ш ^ )
20
Page 21
1 ©)o
■ X
fl-
To
a^A^^nKmA^HK 1006
i ^ : http://panasonic.net
mum
Ws^M : 0^
© Panasonic Corporation 2012
3Ms6M
M n : 2012©5^
21
Page 22

w
"5)
c
LU
Safety precautions
WARNING
Installation and removal should only be carried out by a qualified technician.
• Ifthe stand is not installed correctly, the display may fall over and become damaged, and personal
injury may result.
Do not disassemble or modify the mobile stand.
• Otherwise the unit may fall over and become damaged, and personal injury may result.
Set up in a location with little vibration that can support the weight of the unit.
• Otherwise the unit may fall over or down, and personal injury may result.
Ensure that the installation location is strong enough to support long-term use.
• If its strength becomes insufficient over the course of long-term use, the display may topple over,
possibly causing injury.
CAUTION
Do not use any displays other than those given in the catalogue.
• Otherwise the unit may fall over and become damaged, and personal injury may result.
Do not place weight of over 15Kg (33.06Lbs.) on the shelf plate.
• Otherwise the unit may fall over or down, and personal injury may result.
Do not use the mobile stand if it becomes warped or physically damaged.
• Otherwise the unit may fall over and become damaged, and personal injury may result.
Do not lubricate the casters.
• The casters may crack or became damaged, and the display may fall down and became damaged, and
personal injury may result.
Do not climb on or hang from the display or mobile stand.
• Be particularly careful that young children obey this caution. Otherwise the unit may fall over and
become damaged, and personal injury may result.
Do not block the ventilation holes. Do not block the space between the bottom of display and the
floorwhen using the mobile stand.
• Otherwise heat may build up inside and cause a fire.
Take steps to prevent toppling.
• Earthquakes or children climbing up or onto the display may cause the display to topple over, possibly
resulting in injury.
Secure at least 10 cm (3.9 inches) of space at the top, bottom, left, and right of the display. Also
secure at least 7 cm (2.8 inches) of space at the back.
• Failing to do so may result in a fire.
Keep the unit away from direct sunlight and heating equipment.
• Failure to do so may result in warping, deformation, or degradation of materials, and a loss ofstrength
that may cause the equipment to fall over or break and cause injury.
The work of fitting or removing the display must be performed by at least 2 people.
• The display may fall and cause injury.
During assembly and setup work, make sure that all screws are securely tightened.
• If assembly is not performed correctly, the stand will not be able to support the weight of the display.
This may result in the display falling over and becoming damaged, which may result in personal injury.
Set up on a stable, level surface.
• Otherwise the unit may fall over and become damaged, and personal injury may result.
For installation, use the special-purpose constituent parts.
• Otherwise, the display may fall offthe mobile stand and be damaged, possibly causing injury.
Unlock the casters when moving the display.
• Otherwise the unit may fall over and become damaged, and personal injury may result.
Dispose of the product when it is no longer going to be used.
• Otherwise the unit may fall over and become damaged, and personal injury may result.
22
Page 23

Requests regarding handling
1) Exercise care when selecting the location for the display because it may discolor or deform due to light
or heat if it is placed where it is exposed to direct sunlight, or near a heater.
2) For cleaning, wipe the display using a soft dry cloth (made of cotton or flannel). If the unit is extremely
soiled, first wipe off soiling with a neutral detergent diluted in water, and then wipe with a dry cloth. Do
not use cleaners such as benzene, thinner orfurniture wax because they may cause paint peeling.
(For information on cleaning the display, see the display’s instruction manual. If using a chemically-
treated cloth, follow the instructions supplied with the cloth.)
3) Do not affix adhesive tape or stickers to the product. Doing so may dirty the surface of the mobile stand.
Do not allow long-term contact with rubber, vinyl products or the like. (Doing so will cause deterioration.)
4) Do not subject the panel of the display to a strong force or impact.
Precautions for mobile stand assembly and setup work
• To ensure correct display performance and prevent trouble, do not fit at any of the following locations.
• Near sprinklers or fire/smoke detectors
• Where there is a risk of exposure to vibration or impact
• Near high-voltage wires or dynamic power supplies
• Near sources of magnetism, heat, water vapor or soot
• Locations exposed to air blown from heating equipment
• Where droplets of condensation from an air conditioner or other unit may form
• For the display power supply plug, use a power supply outlet that can be reached easily.
• Ensure good airflow so that the ambient temperature does not exceed 40 °C (104 °F). Failure to do this
may cause heat to build up inside the display, resulting in malfunction.
• Fit so there is no contact between the attachment bolts or power cord and any metal inside the wall.
• Spread a soft blanket or cloth over the floor so that the stand and floor will not be marked or scratched
during the assembly and installation work.
• Conduct assembly and installation work on a horizontal and flat surface according to the fitting
instructions.
• When screwing down the parts, ensure that the screws are neither insufficiently tightened nor over
tightened.
• Take sufficient care to ensure safety around you when performing the assembly and installation work or
while moving about during the course of the work.
• Be sure to read and observe the “Safety precautions”.
w
"5)
c
LU
Caution:
This stand is intended for only Panasonic display models.
Use with other apparatus is capable of resulting in instability causing possible injury.
PROFESSIONAL INSTALLATION IS REQUIRED.
PANASONIC DISCLAIMS ANY PROPERTY DAMAGE AND/OR SERIOUS INJURY, INCLUDING
DEATH RESULTING FROM IMPROPER INSTALLATION OR INCORRECT HANDLING.
23
Page 24
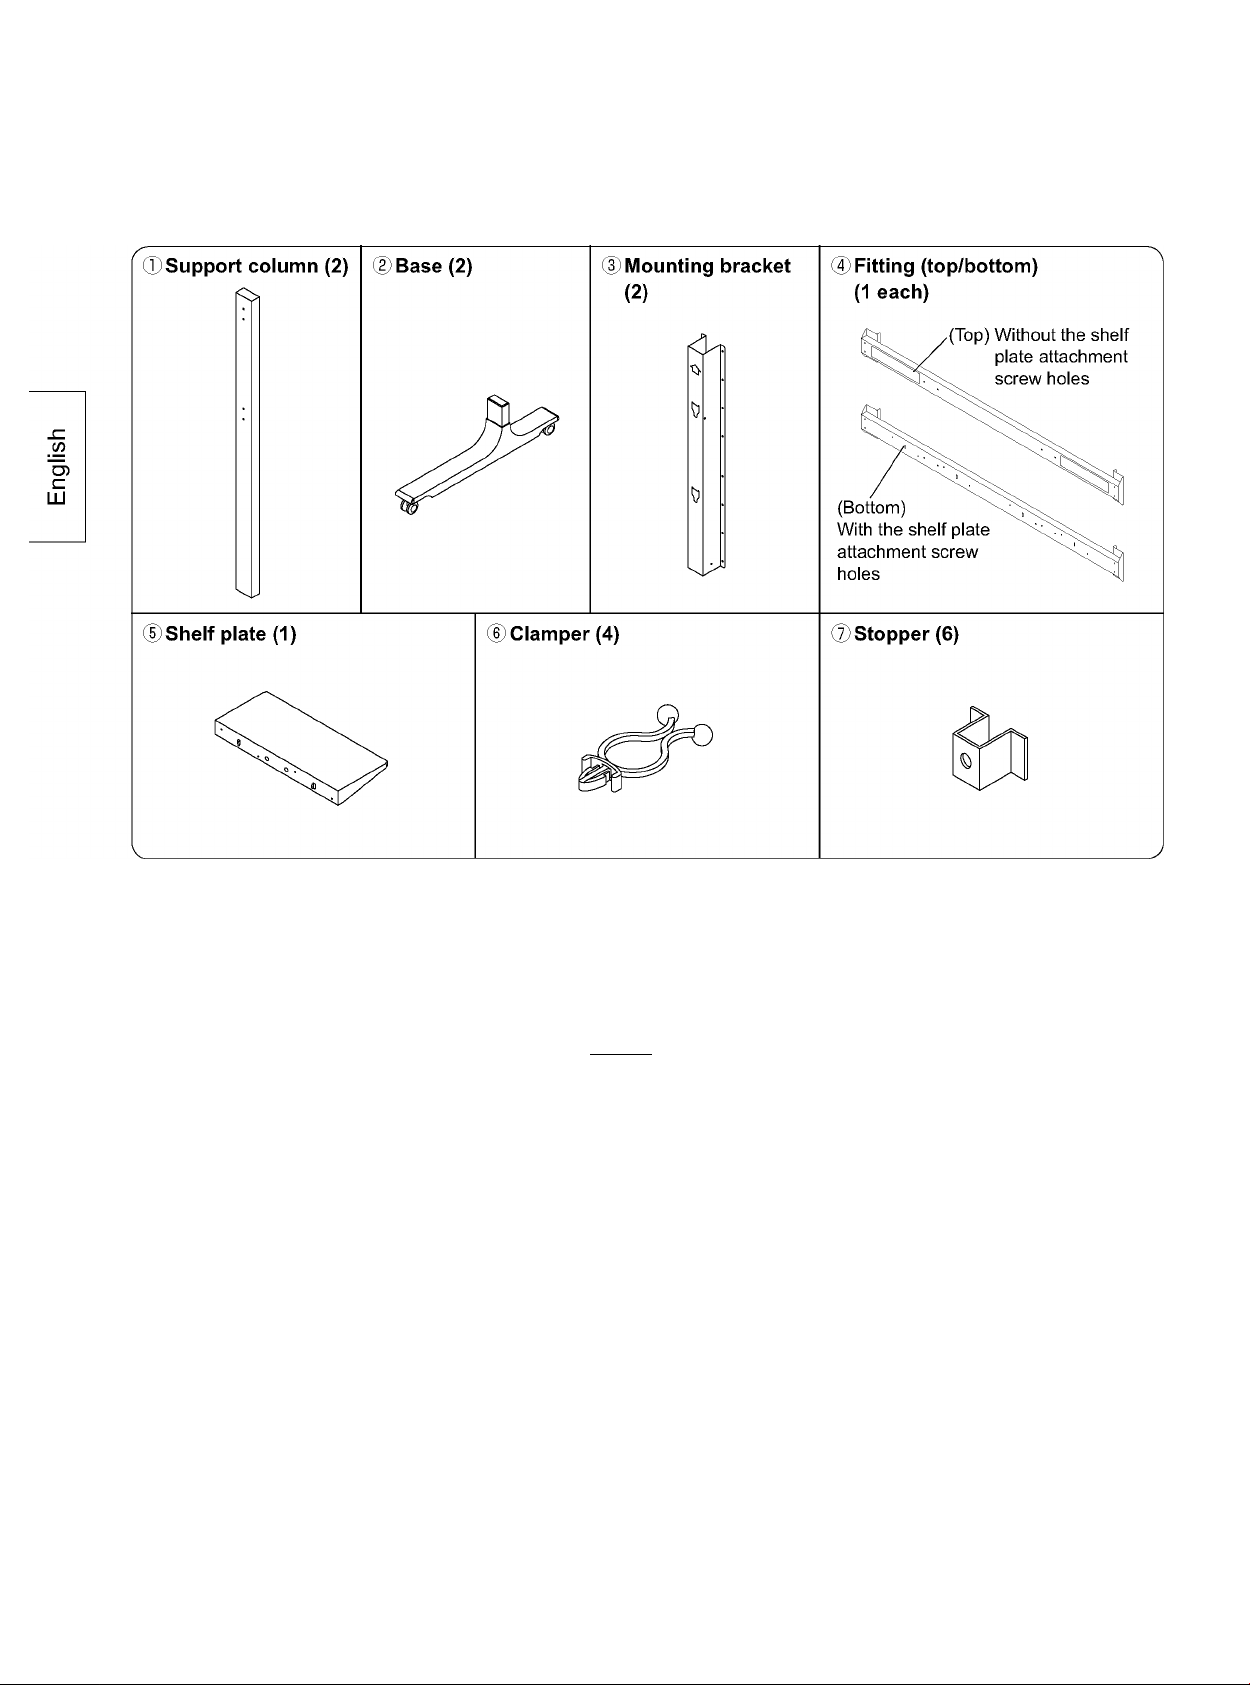
Components
Main parts Check that all the parts are accounted for and
present in their designated quantities.
Accessory parts
©Support column assembly
screw
(M6X16) (8)
Cllllfe
©Insert nut
(M6) (16)
©Allen wrench (included tool) (1)
® Bracket assembly screw
(M6 X 25) (8)
mmm
©Shelf plate attachment screw
(M4xi2)(4)
Stopper attachment screw
(M4X12) (6)
©Screw for securing unit
(M6 X 65) (2)
©Fitting attachment screw
(M6 X 65) (8)
©Allen head countersunk screw
Dished toothed washer
Insulation spacer
(4 each)
24
The images shown in this manual are for illustrative purpose only.
Page 25
Assembly
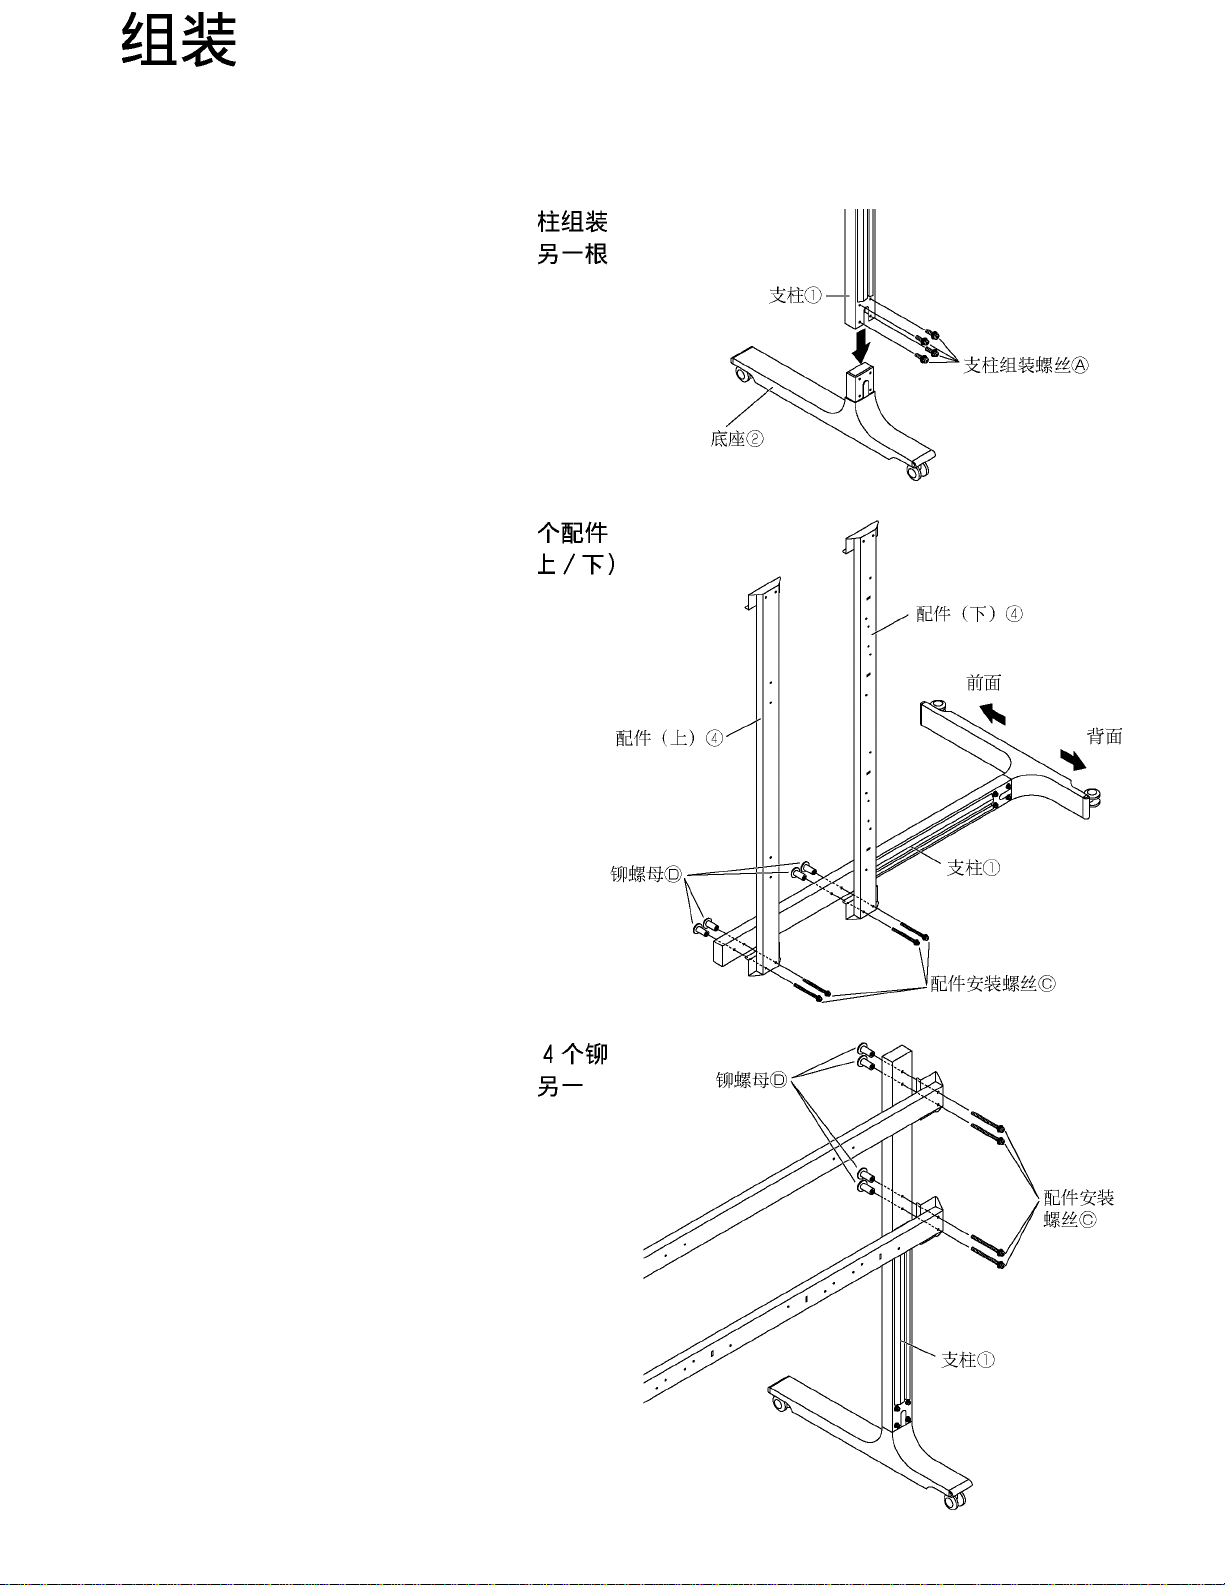
1. Assembling of the stand
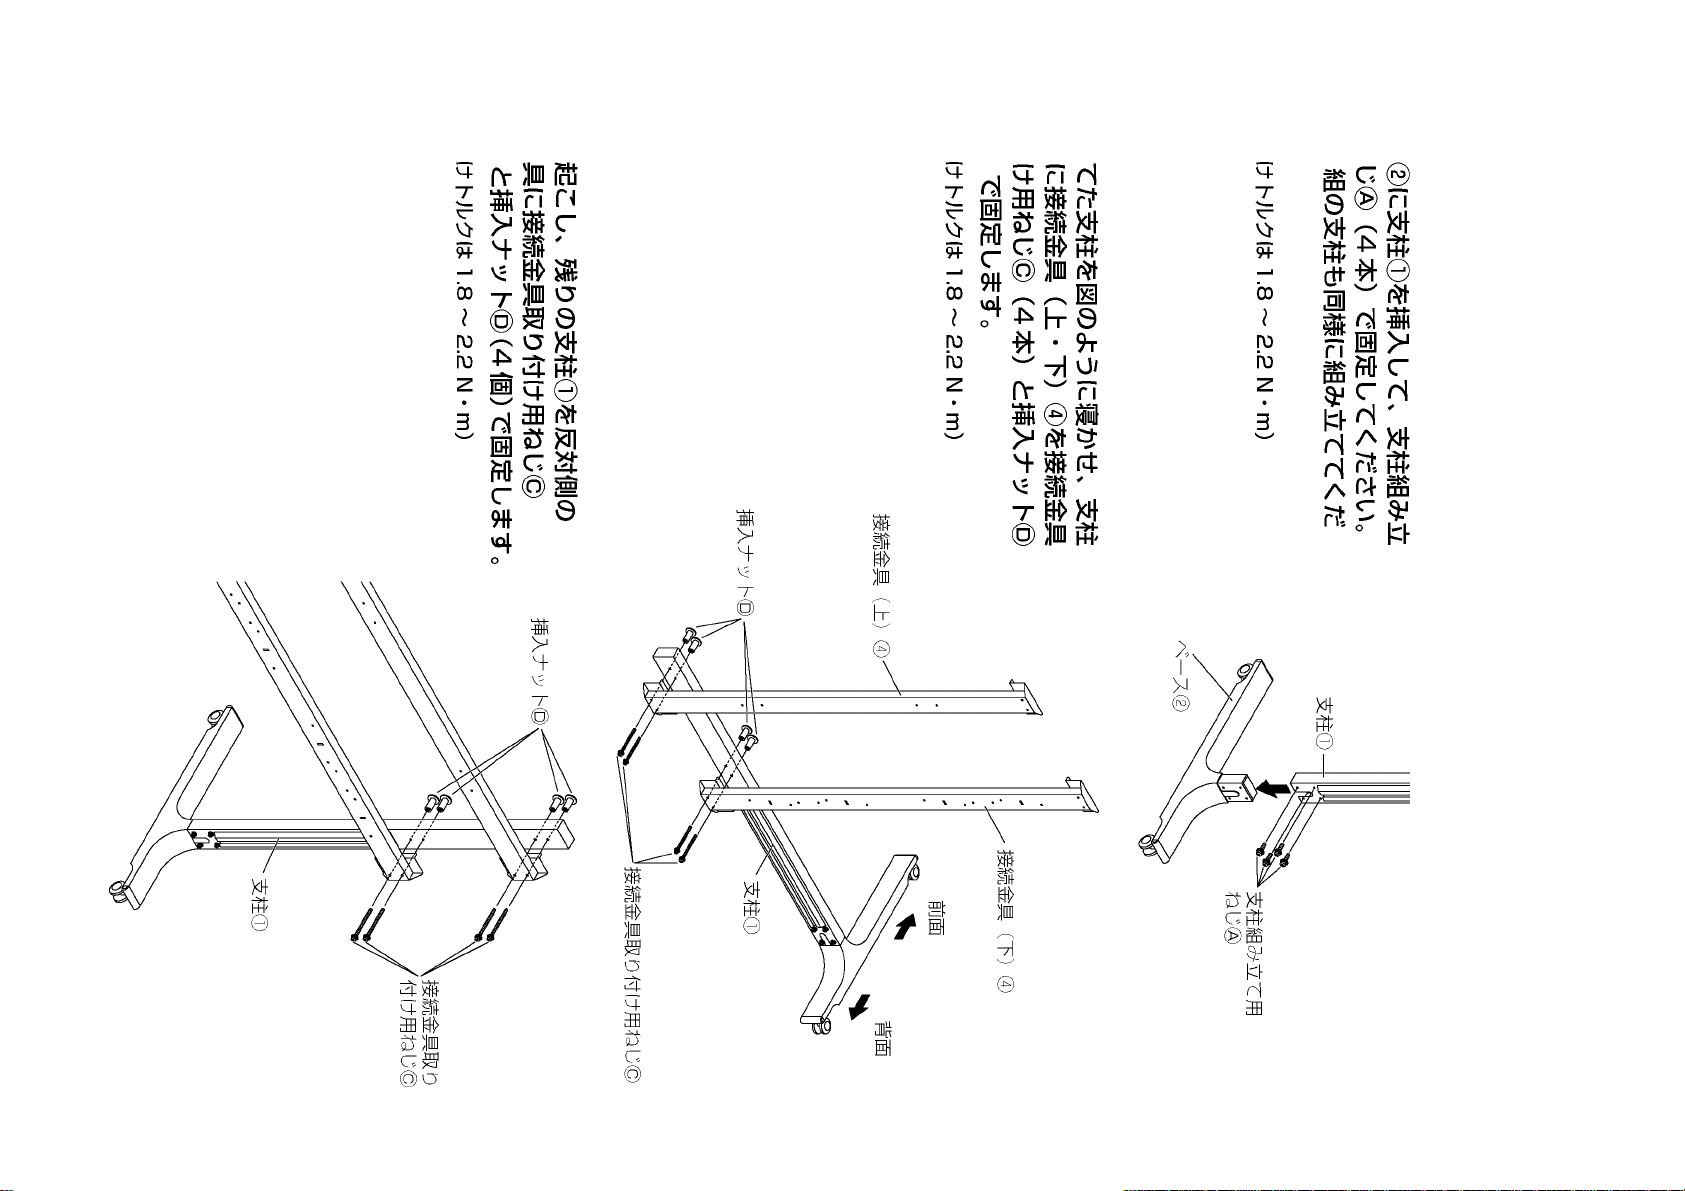
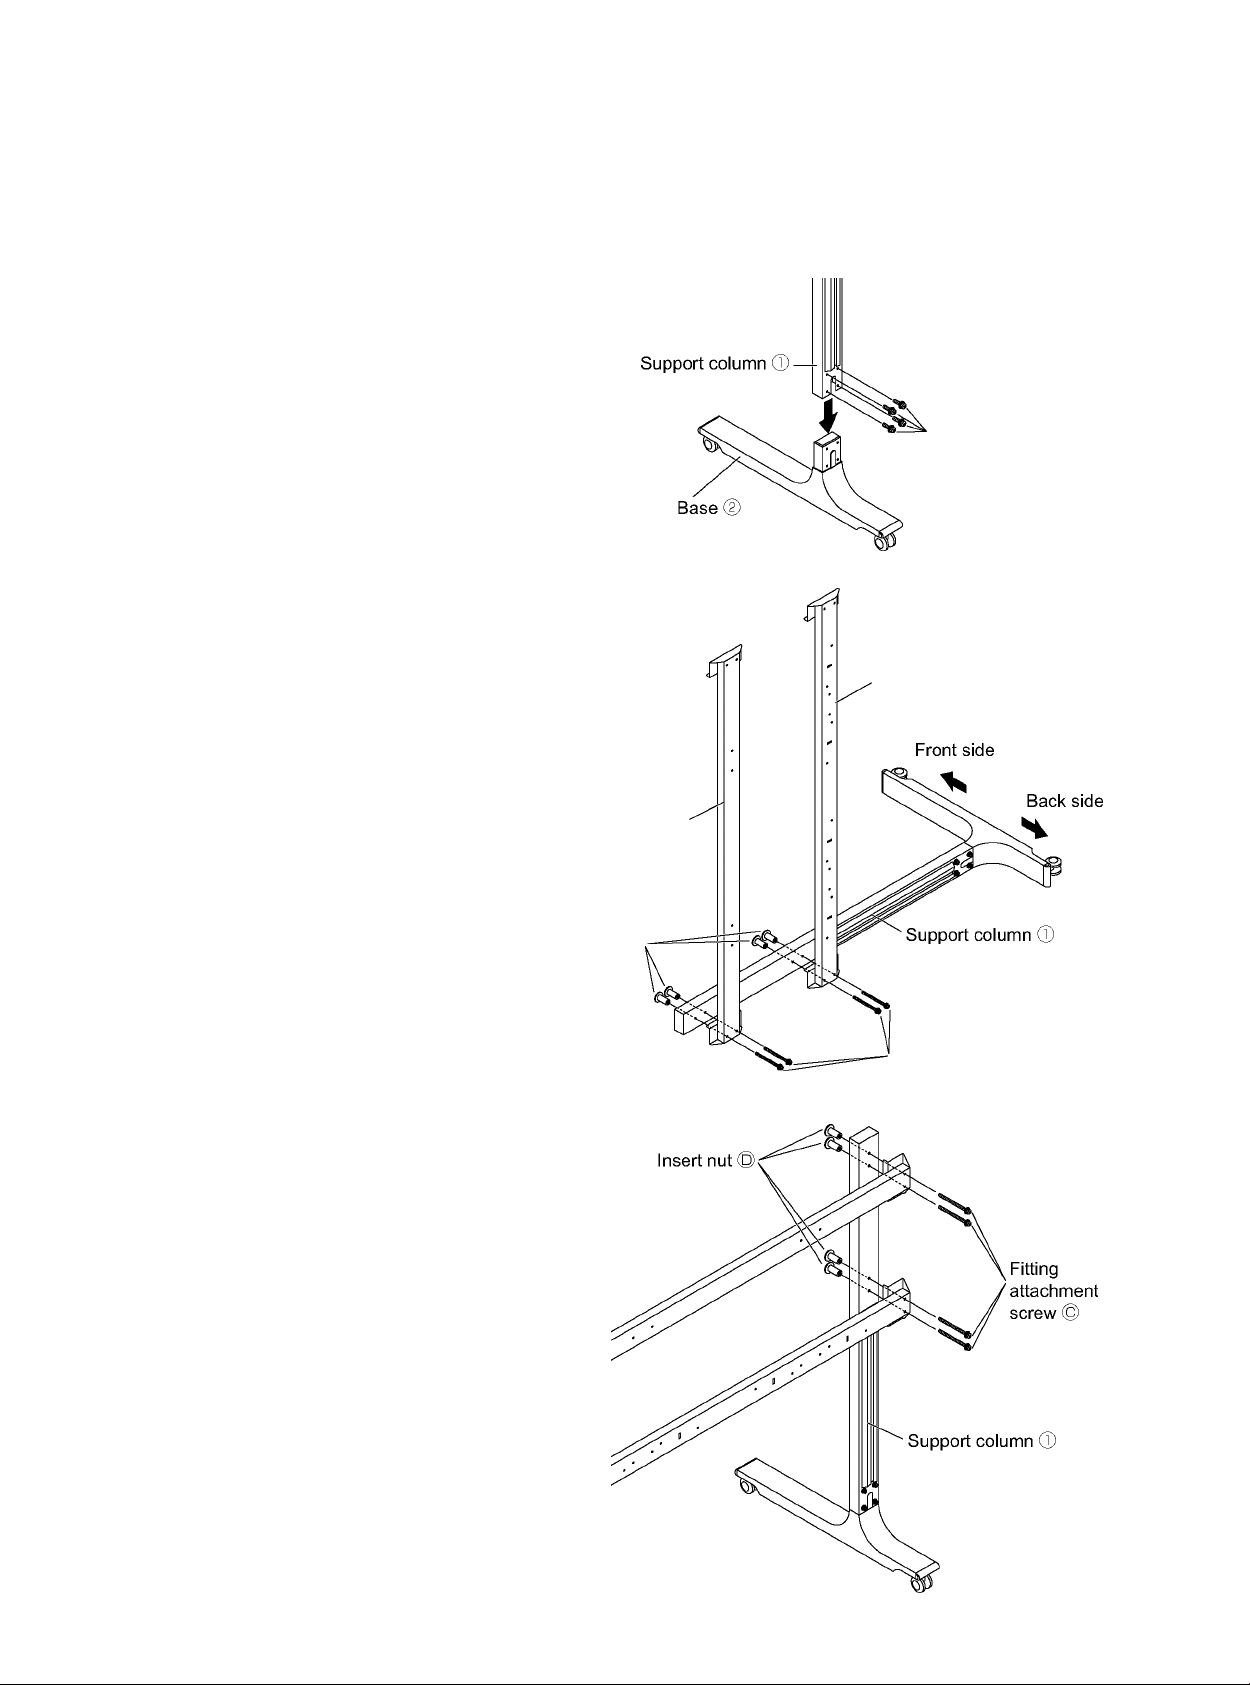
1. Insert one support column © to the
base ® and fix it with the support column
assembly screws ® (4). Assemble
the other support column in the same
procedure.
(Tightening torque: 1.8 to 2.2 N-m)
2. Lay down the assembled support column
as shown in the figure, and to its back
side, fix the fittings (top/bottom) © with
the fitting attachment screws © (4) and
the insert nuts © (4).
Support column
assembly screw ®
Fitting (bottom) ©
w
"5)
c
LU
(Tightening torque: 1.8 to 2.2 N-m)
3. Raise the support column and fix the
other support column © to the other side
of the fittings with the fitting attachment
screws © (4) and insert nuts © (4).
(Tightening torque: 1.8 to 2.2 N-m)
Fitting (top) ©
Insert nut ©
Fitting attachment screw ©
25
Page 26
w
"5)
c
LU
Assembly
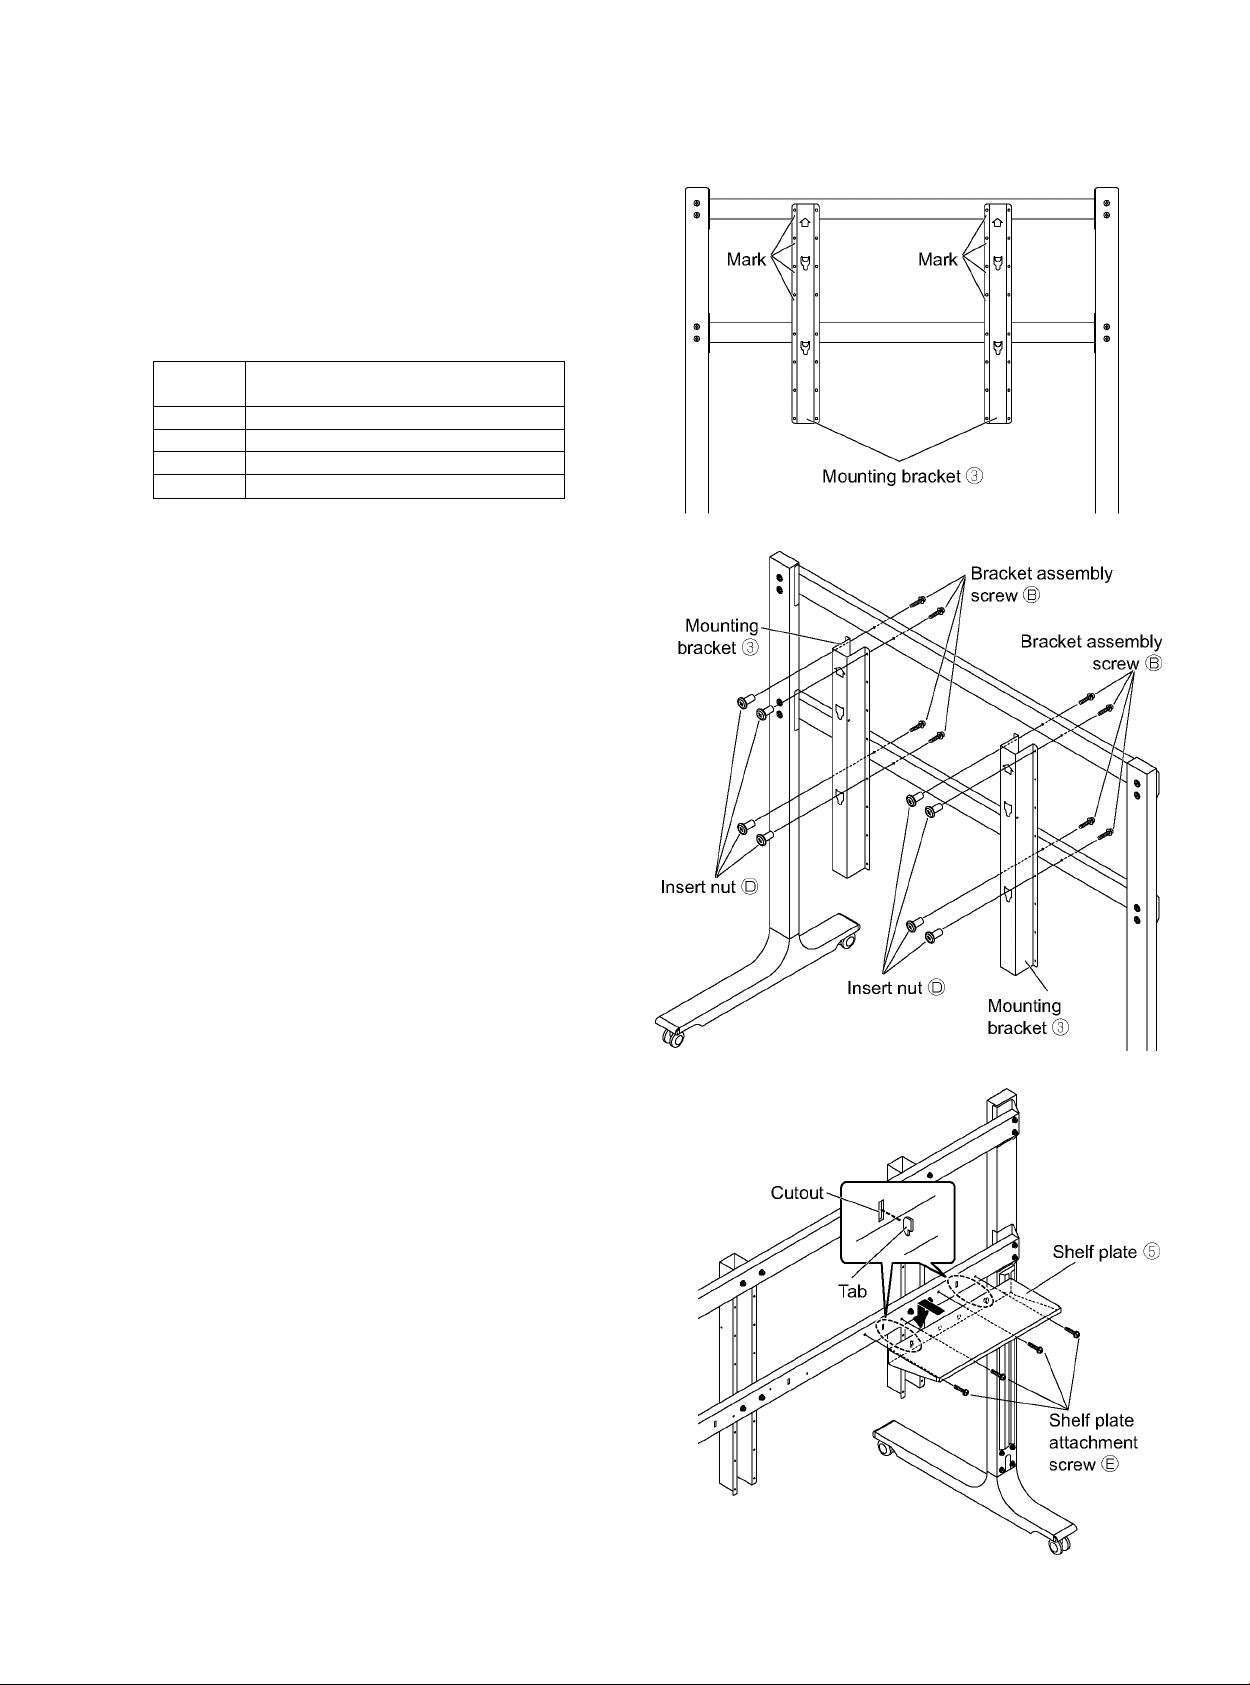
4.£>et the display to the desired height by
selecting from the options (4).
From the table below, select the screw
holes for fixing the mounting brackets ®
to the fittings (top/bottom) ®.
Unit: mm
Mark
A
B
C
D
5. Using the screw holes selected in step 4,
fix the mounting brackets ® to the
fittings (top/bottom) ® with the bracket
assembly screws ® (8) and insert nuts @
(8).
Center of screen
(Distance from the floor surface)
1047
1147
1247
1347
(Tightening torque: 1.8 to 2.2 N-m)
6. Fix the shelf plate ® (1)to the back of
the bottom fitting with the shelf plate
attachment screws ® (4). (It can be
attached to either the right or left side.)
(Tightening torque: 1.2 to 1.5 N-m)
26
Page 27

2. Preparing the display
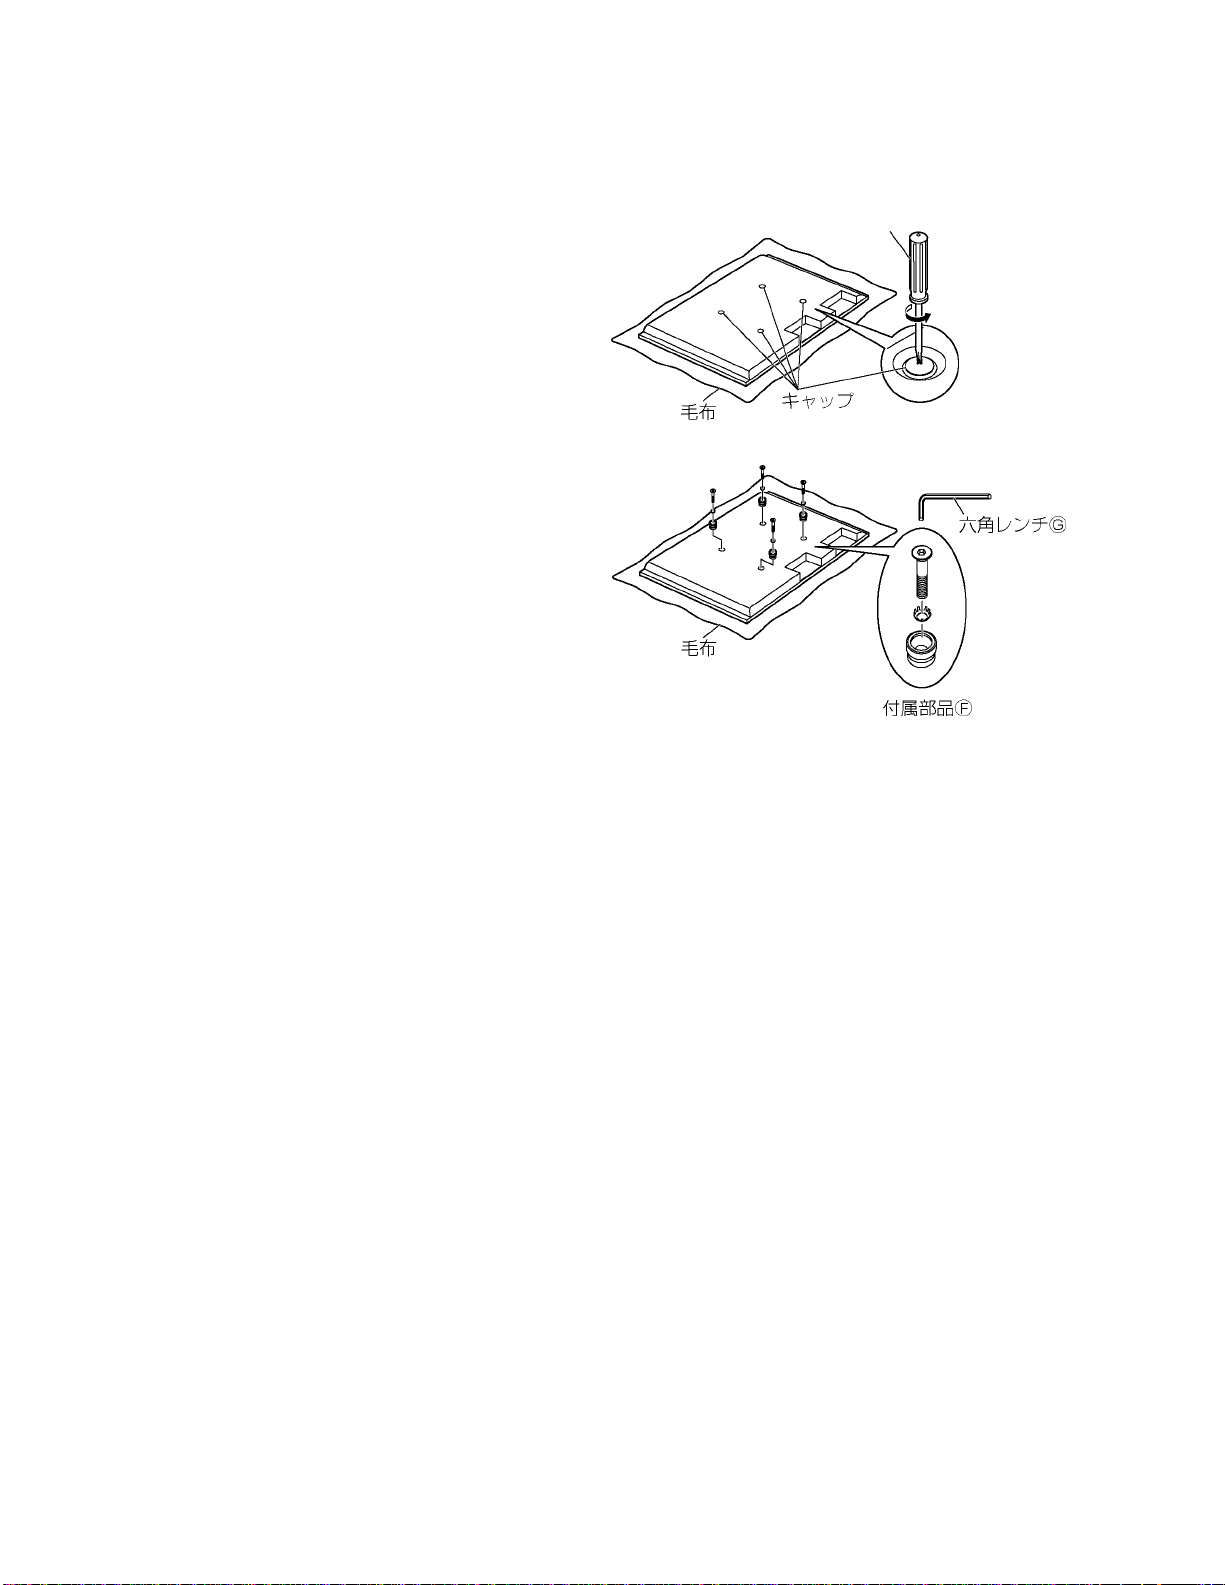
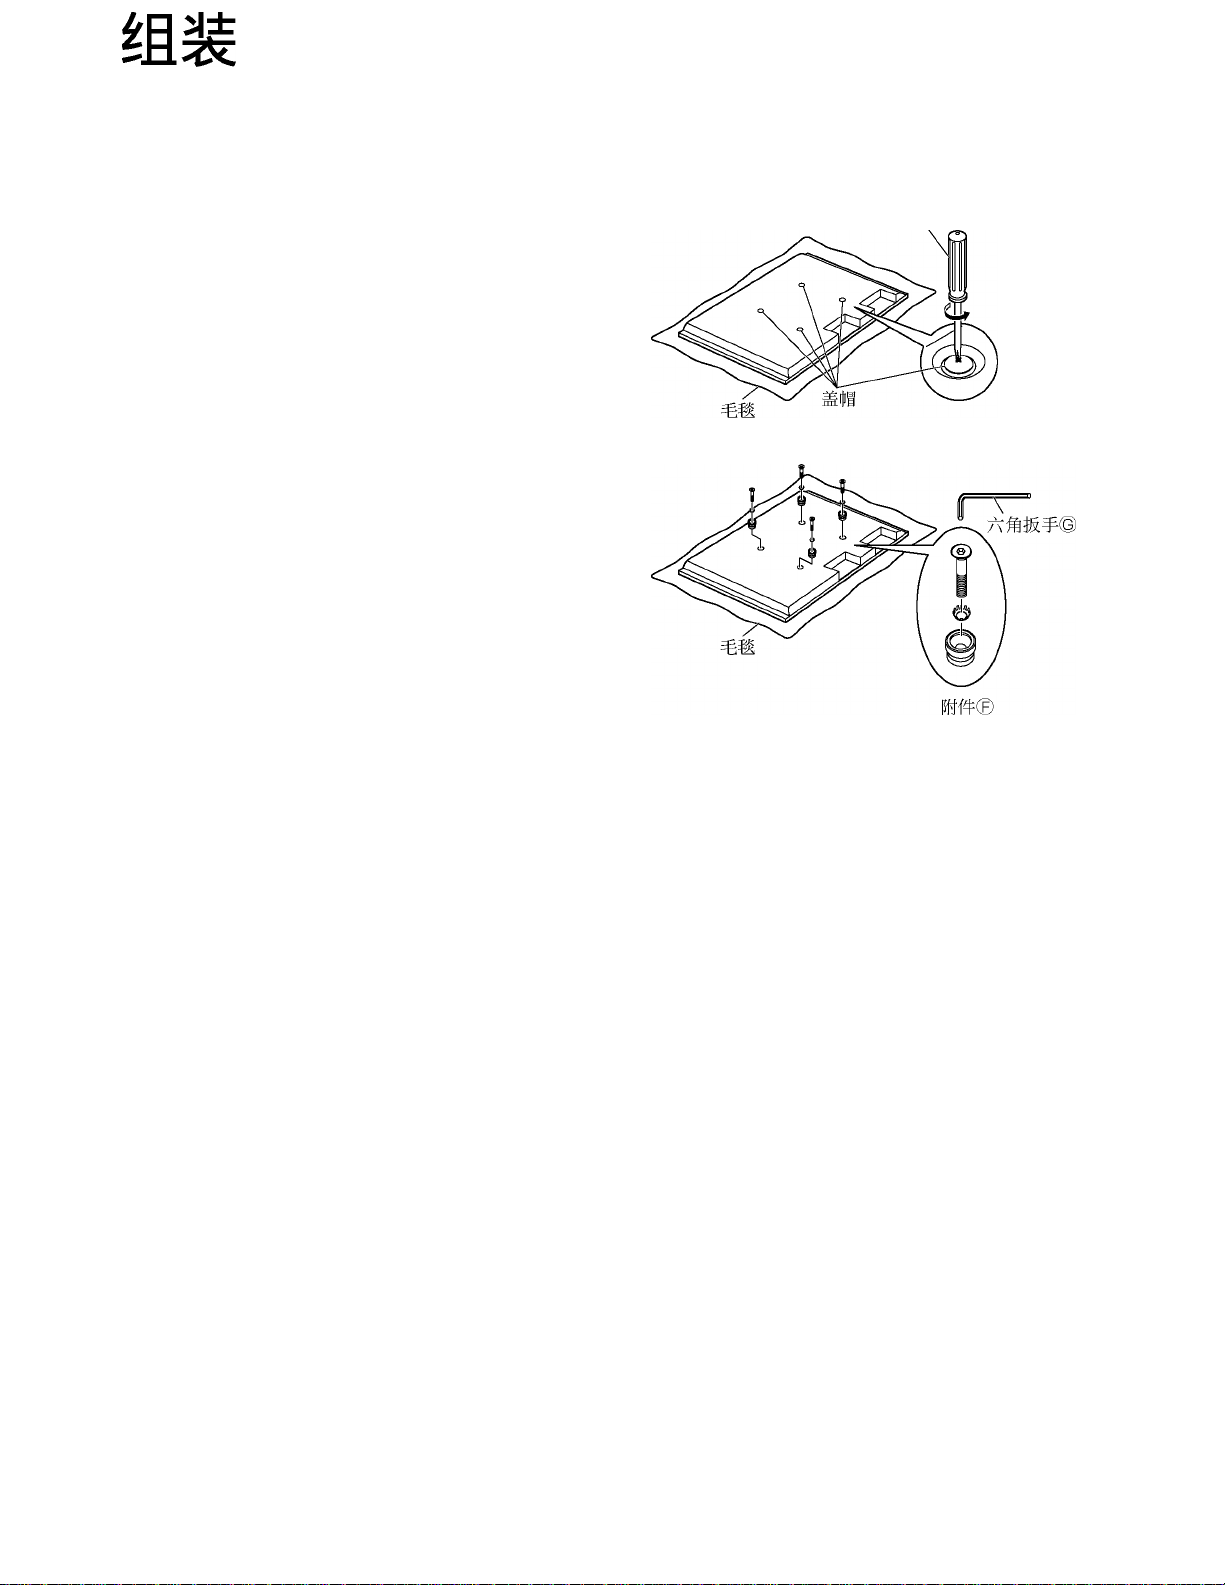
Attaching the insulation spacers
©Place the front surface of the display on a clean
cloth that has no dirt orforeign objects on it, and
follow the procedure below.
Ifthe display has any protruding parts, take care
not to scratch or damage them.
©Remove the caps (4) from the display using a
Phillips head screwdriver.
Keep the caps that were removed in a safe place.
(Theywill be required ifyou use the pedestal.)
© Using the supplied Allen wrench ©, attach
accessory parts © (four Allen head countersunk
screws, dished toothed washers, and insulation
spacers) at the locations where the caps were
removed as shown in the figure on the right.
(Tightening torque: 3to4 N-m)
Phillips head screwdriver
"5)
LU
w
c
27
Page 28
Assembly
3. Fitting to the stand
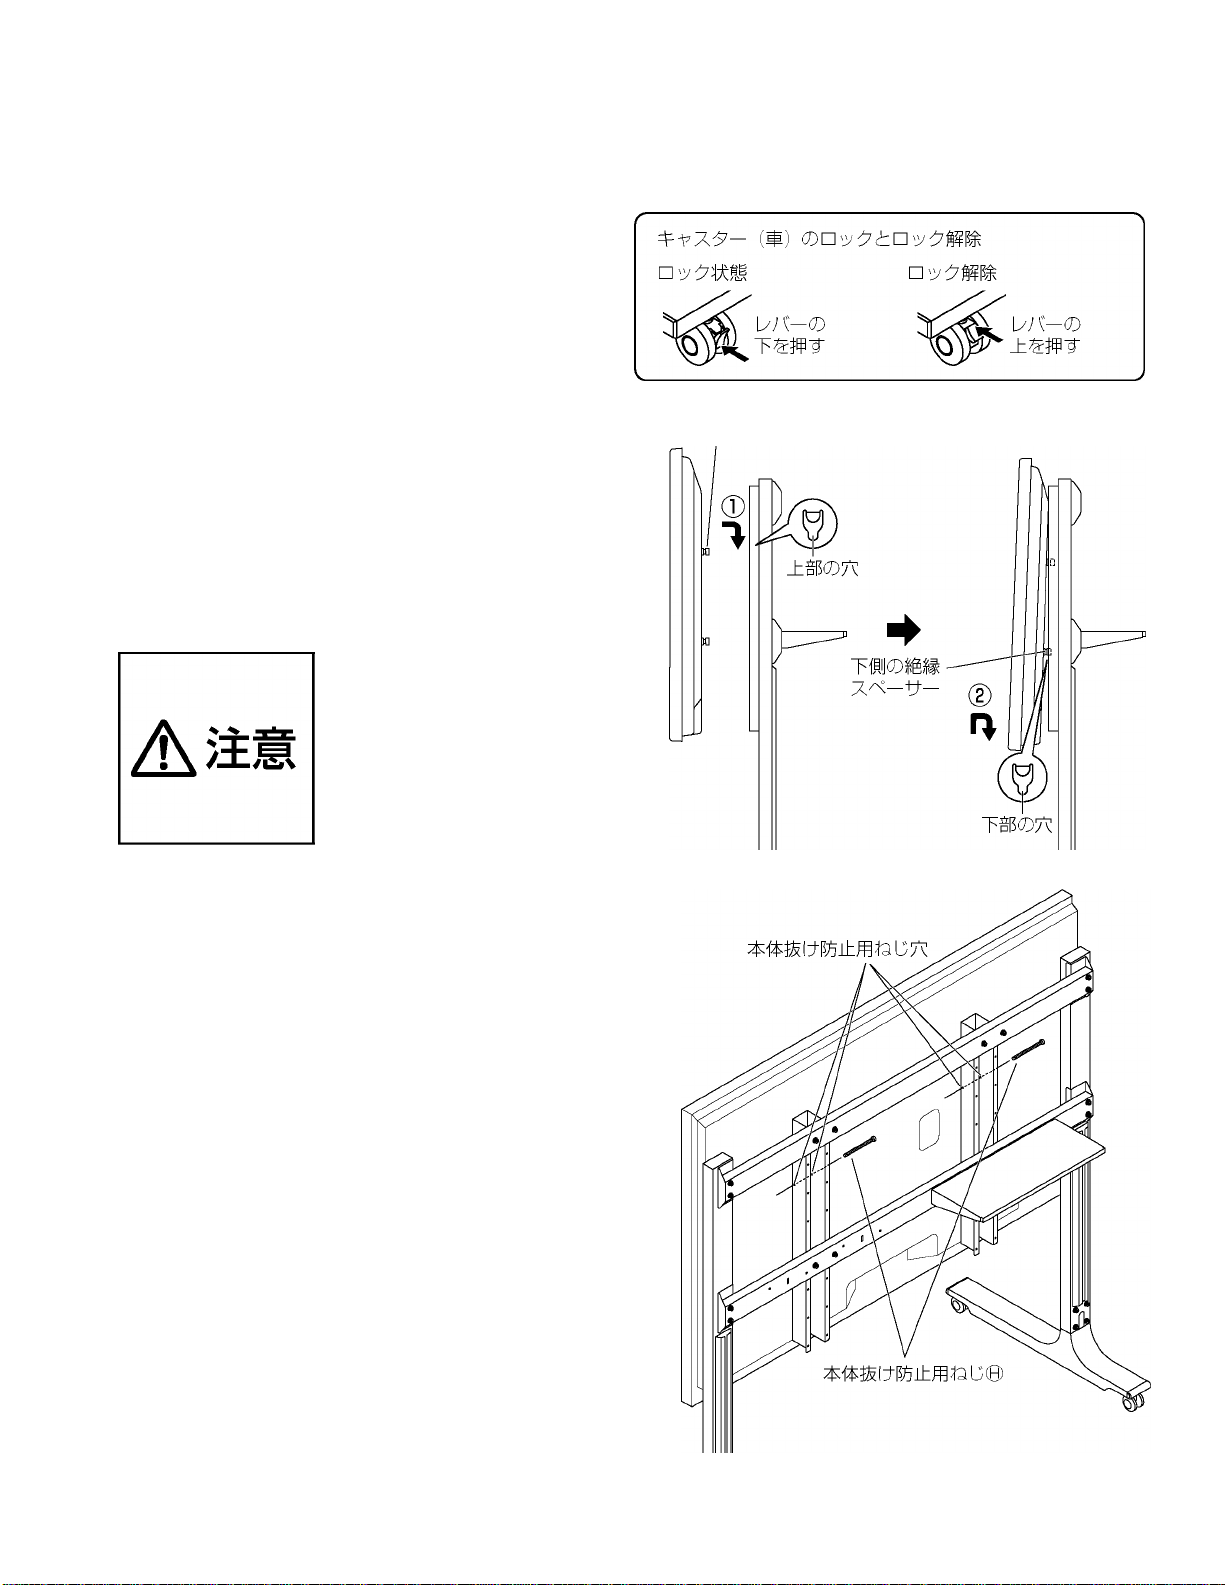
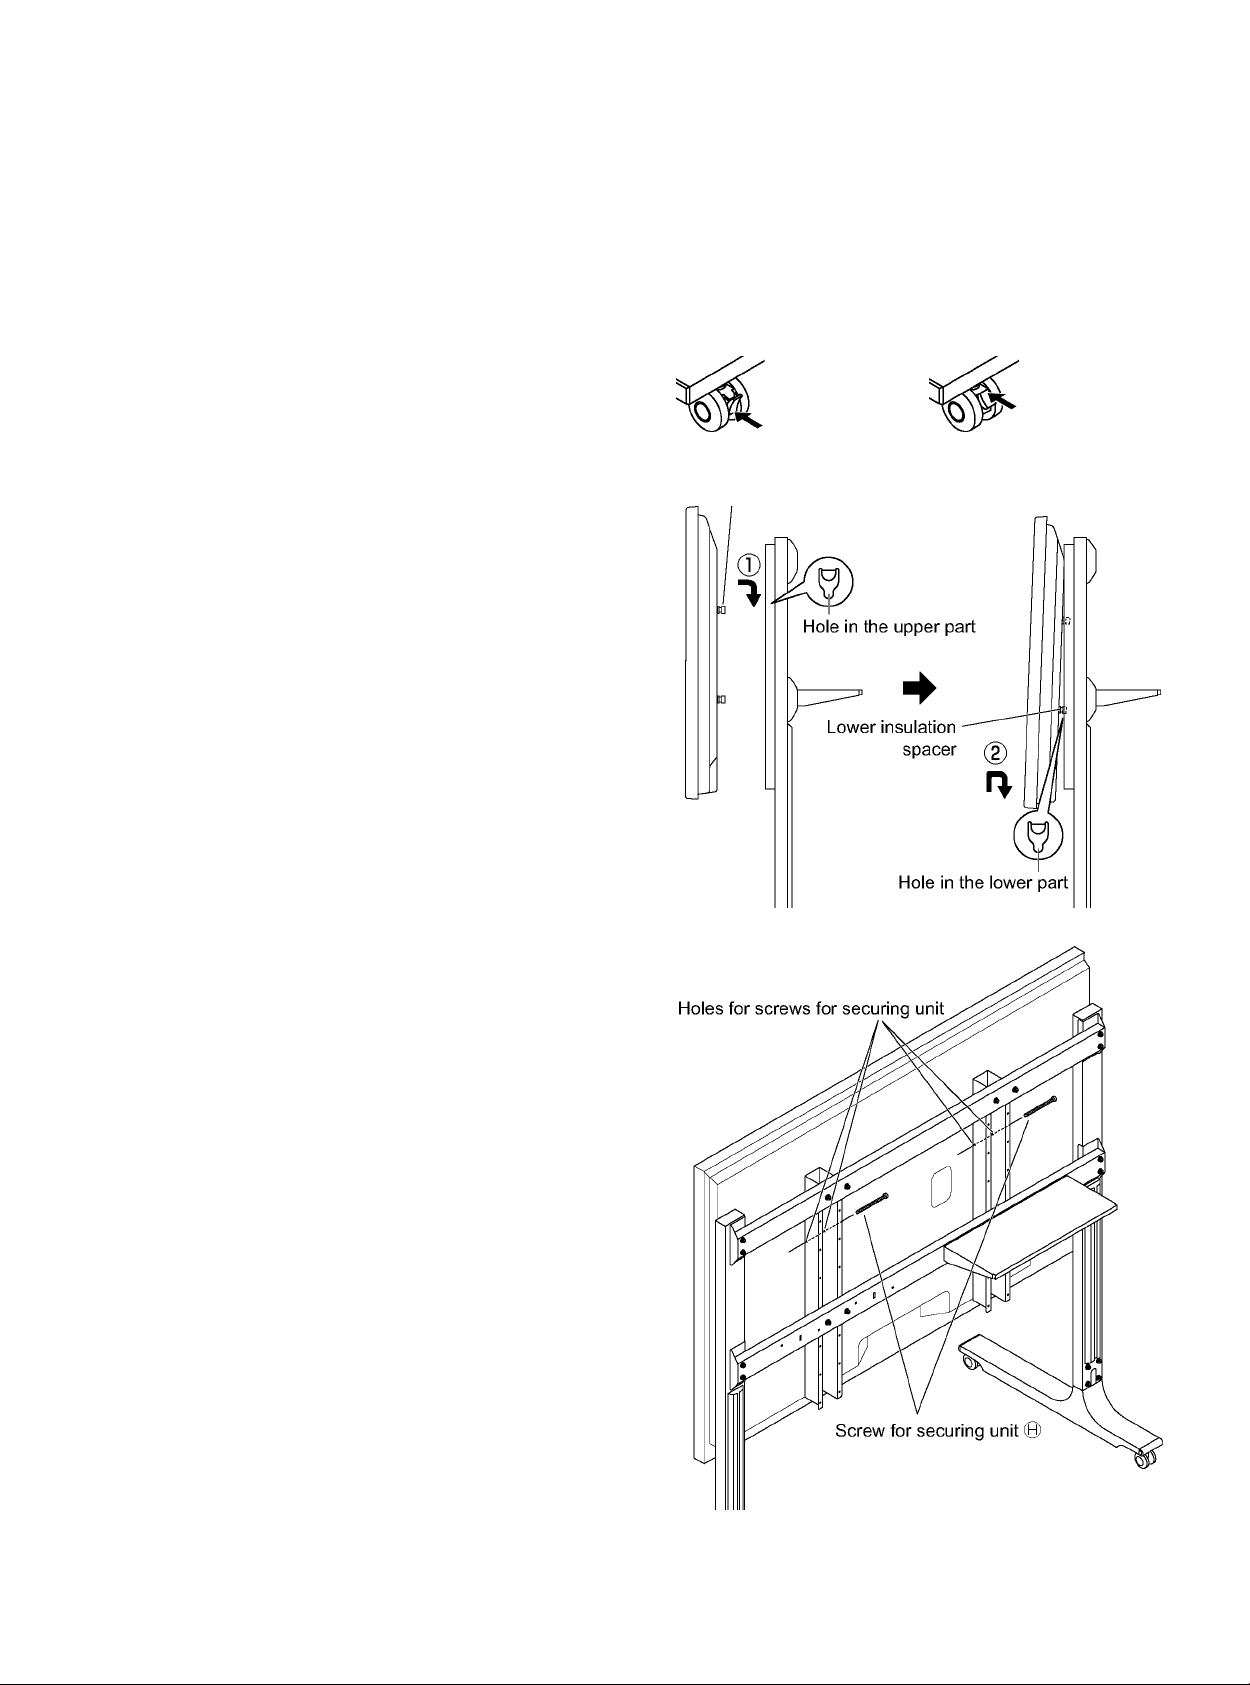
Before fitting the dispiay, make sure to iock the casters.
Locking and unlocking the casters
Caster locked Caster unlocked
"5)
LU
Push the bottom
of the lever
w
c
1. Fitting the display
©Engage the upper insulation spacers ofthe
display with the cutouts at the top of the mobile
stand, and slowly lower the display into place.
©While lifting the display slightly, insert the bottom
insulation spacers into the holes at the lowerend
of the mobile stand, and then lower the display
straight down into place.
Do not lift up the display higher than
necessary.
• Ifthe display is lifted too high, it may faii down
and personal injury may result.
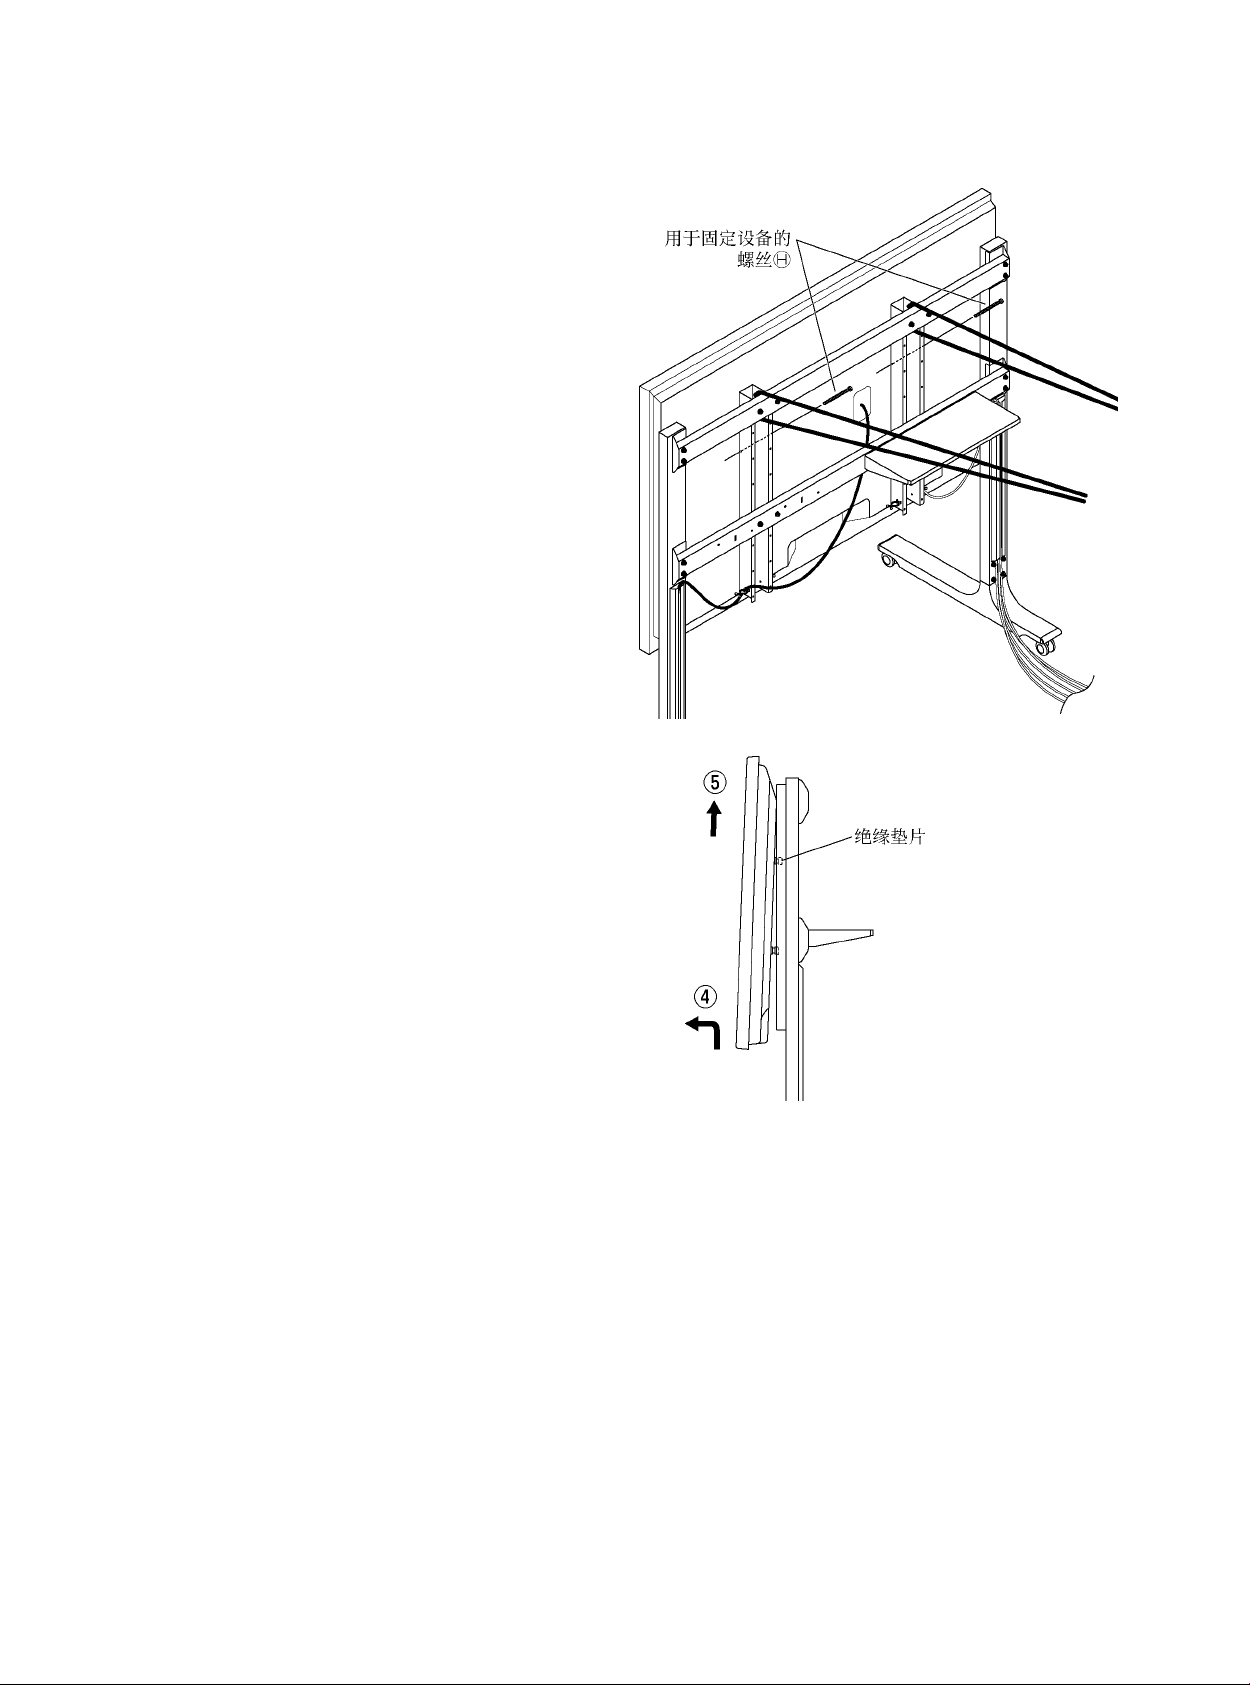
2. Fixing the display
Upper insulation spacer
Push the top of
the lever
Firmly tighten the screws (2) for securing unit
® in the screw holes on the upper part of the
mounting bracket (2).
(Tightening torque: 1.2 to 1.5 N-m)
Make sure to fit the screws for securing unit © on the
left and right to prevent the display from coming off.
28
Page 29
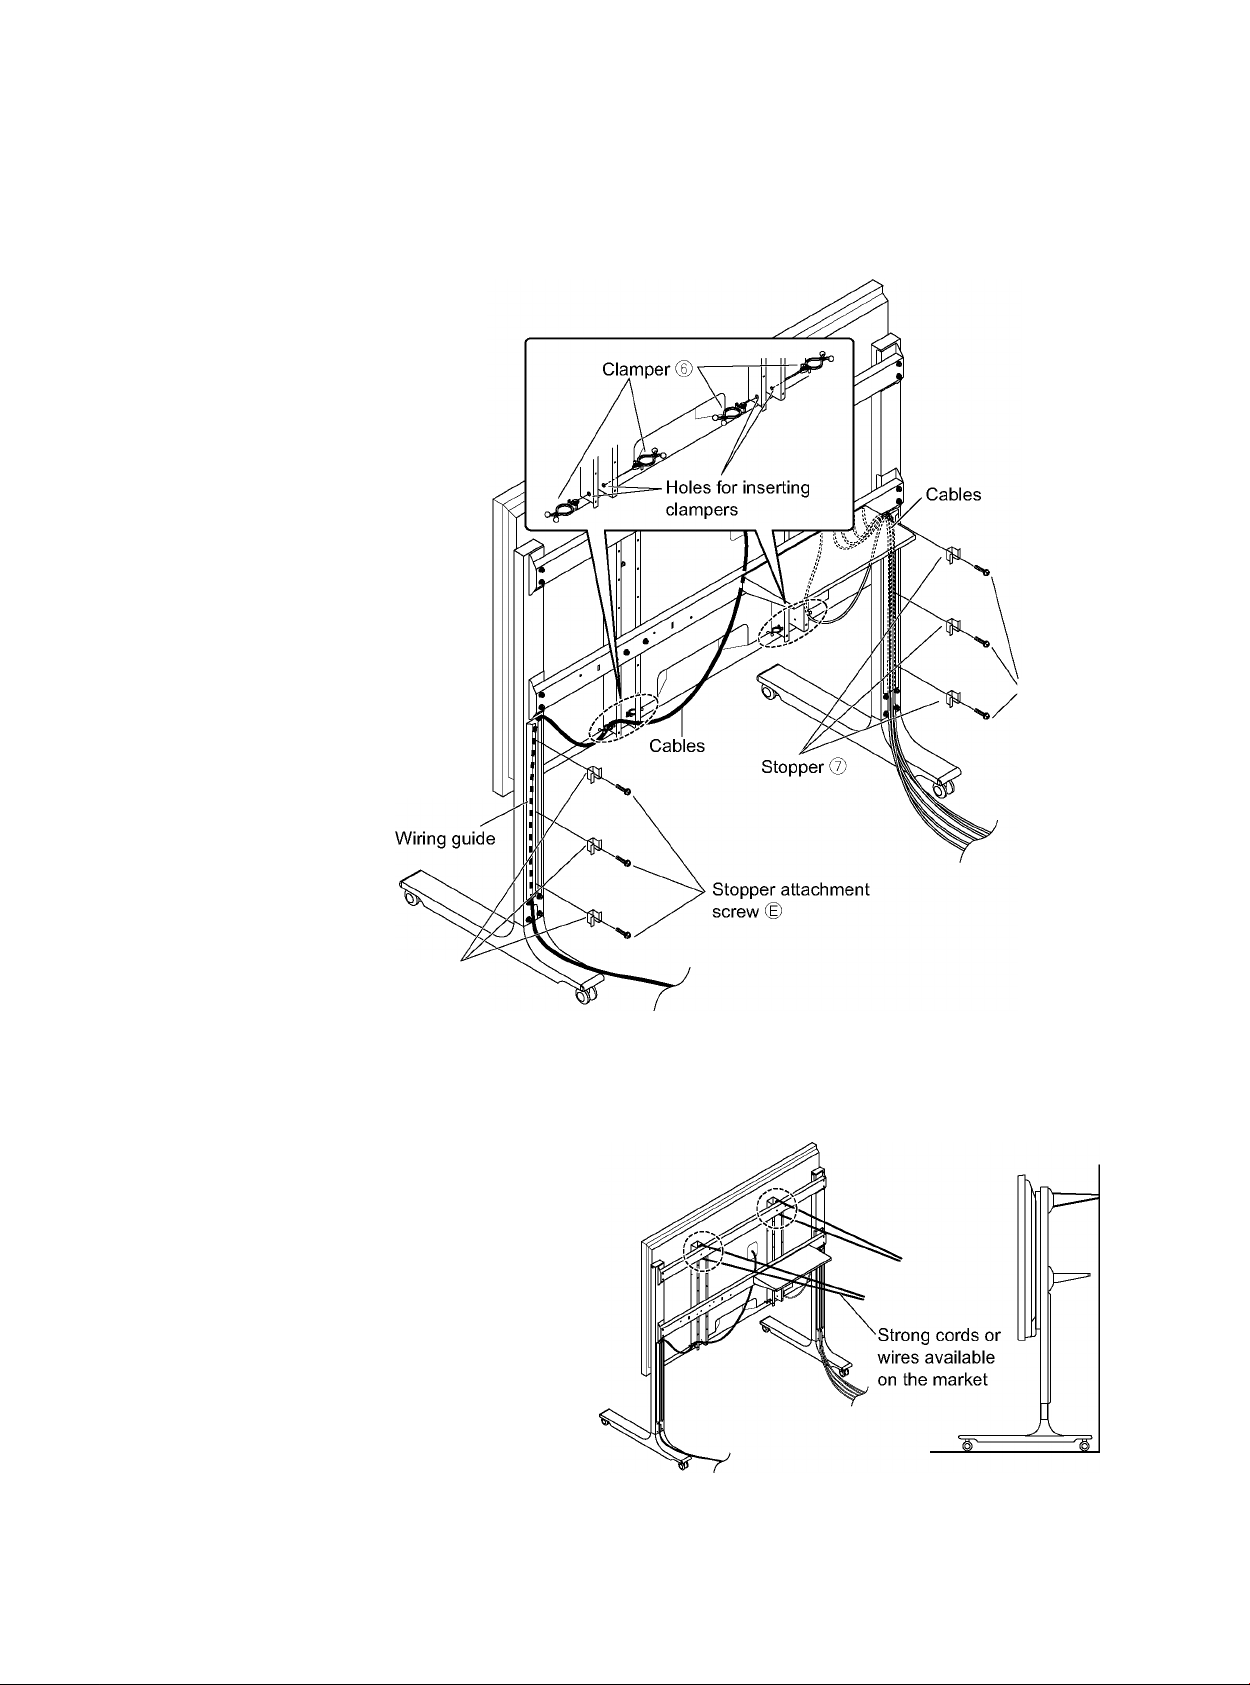
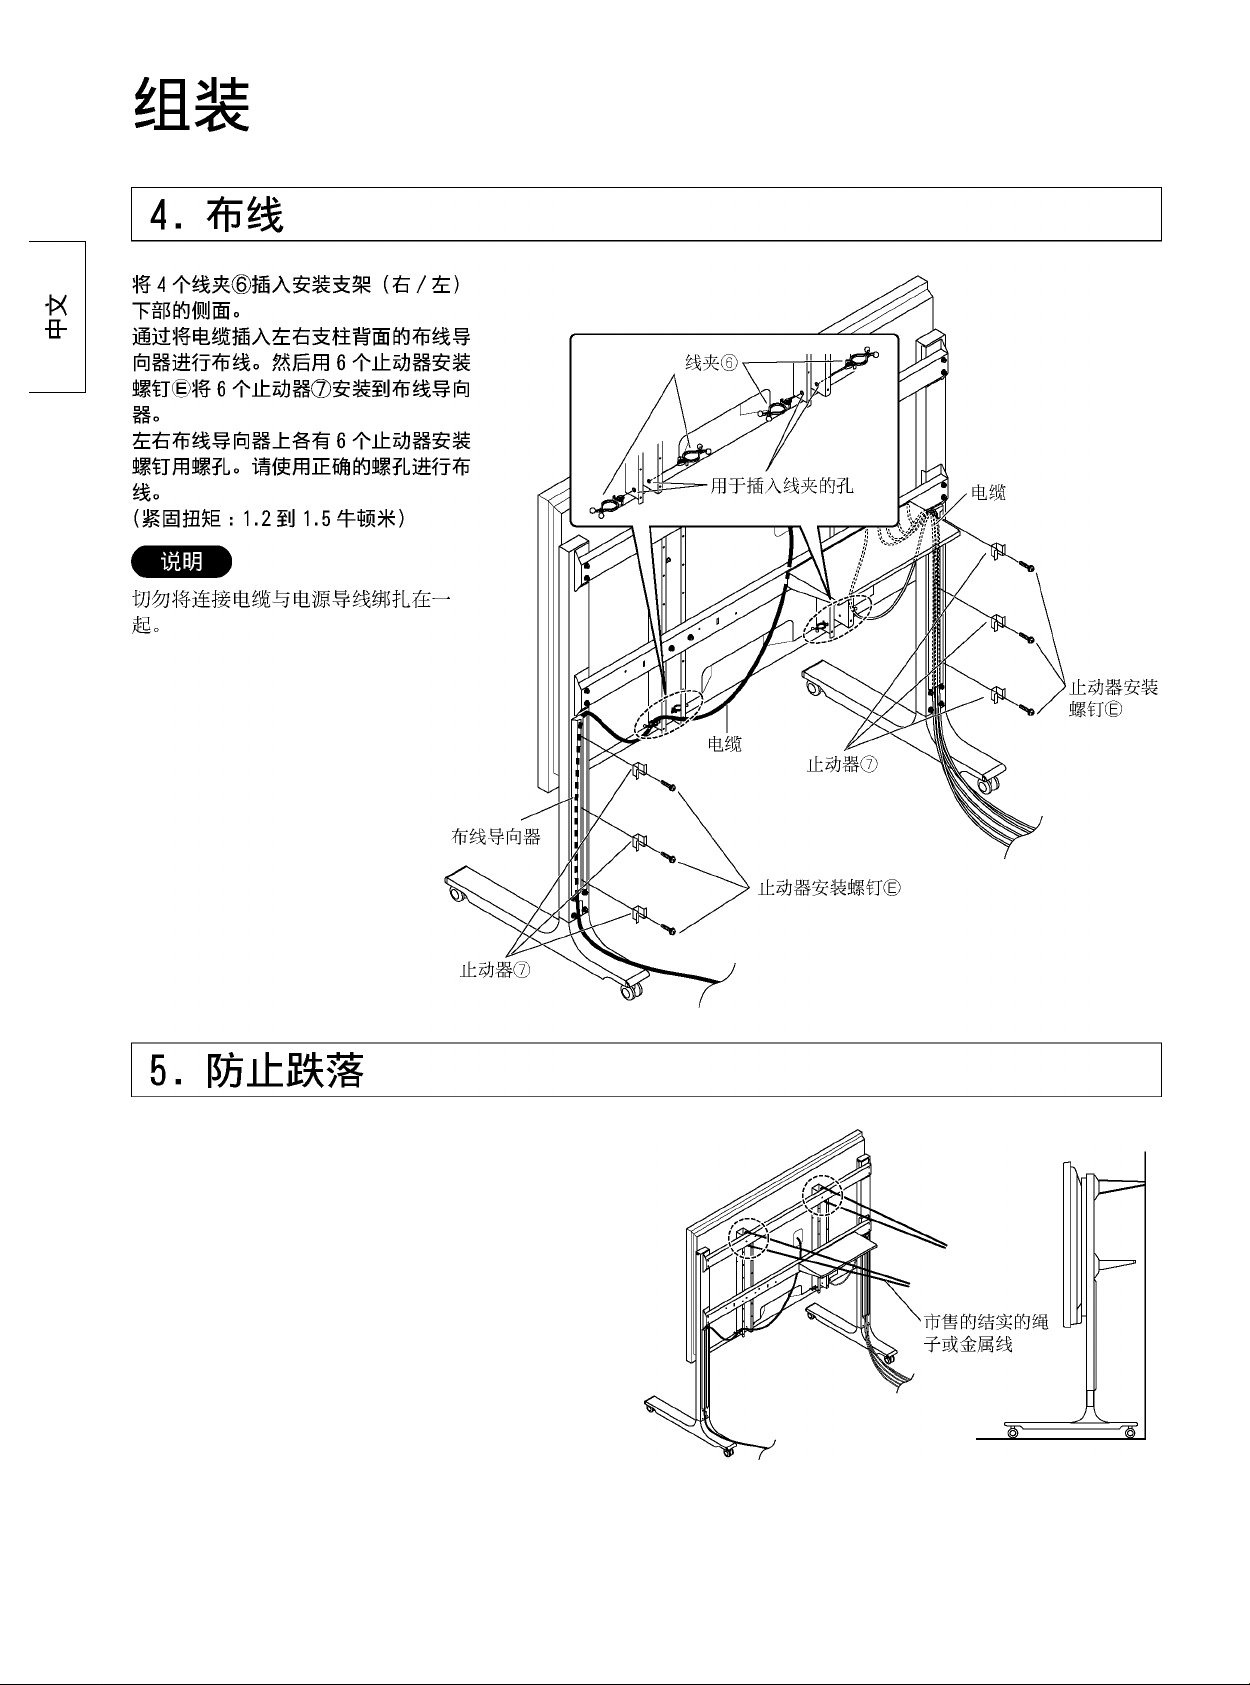
4. Wiring
Insert the clampers ® (4) to
the side of the lower part of the
mounting brackets (right/left).
Wire the cables by inserting
them into the wiring guides on
the back of the right and left
support columns. Then attach
the stoppers ® (6) to the wiring
guides with the stopper attachment
screws © (6).
Each of the right and left wiring
guides has 6 screw holes for the
stopperattachment screws. Use
the screw holes appropriate for
yourwiring.
(Tightening torque: 1.2 to 1.5 N-m)
Do not bundle the connection cables
and main lead together.
»Stopper
attachment
screw ©
w
"5)
c
LU
Stopper ©
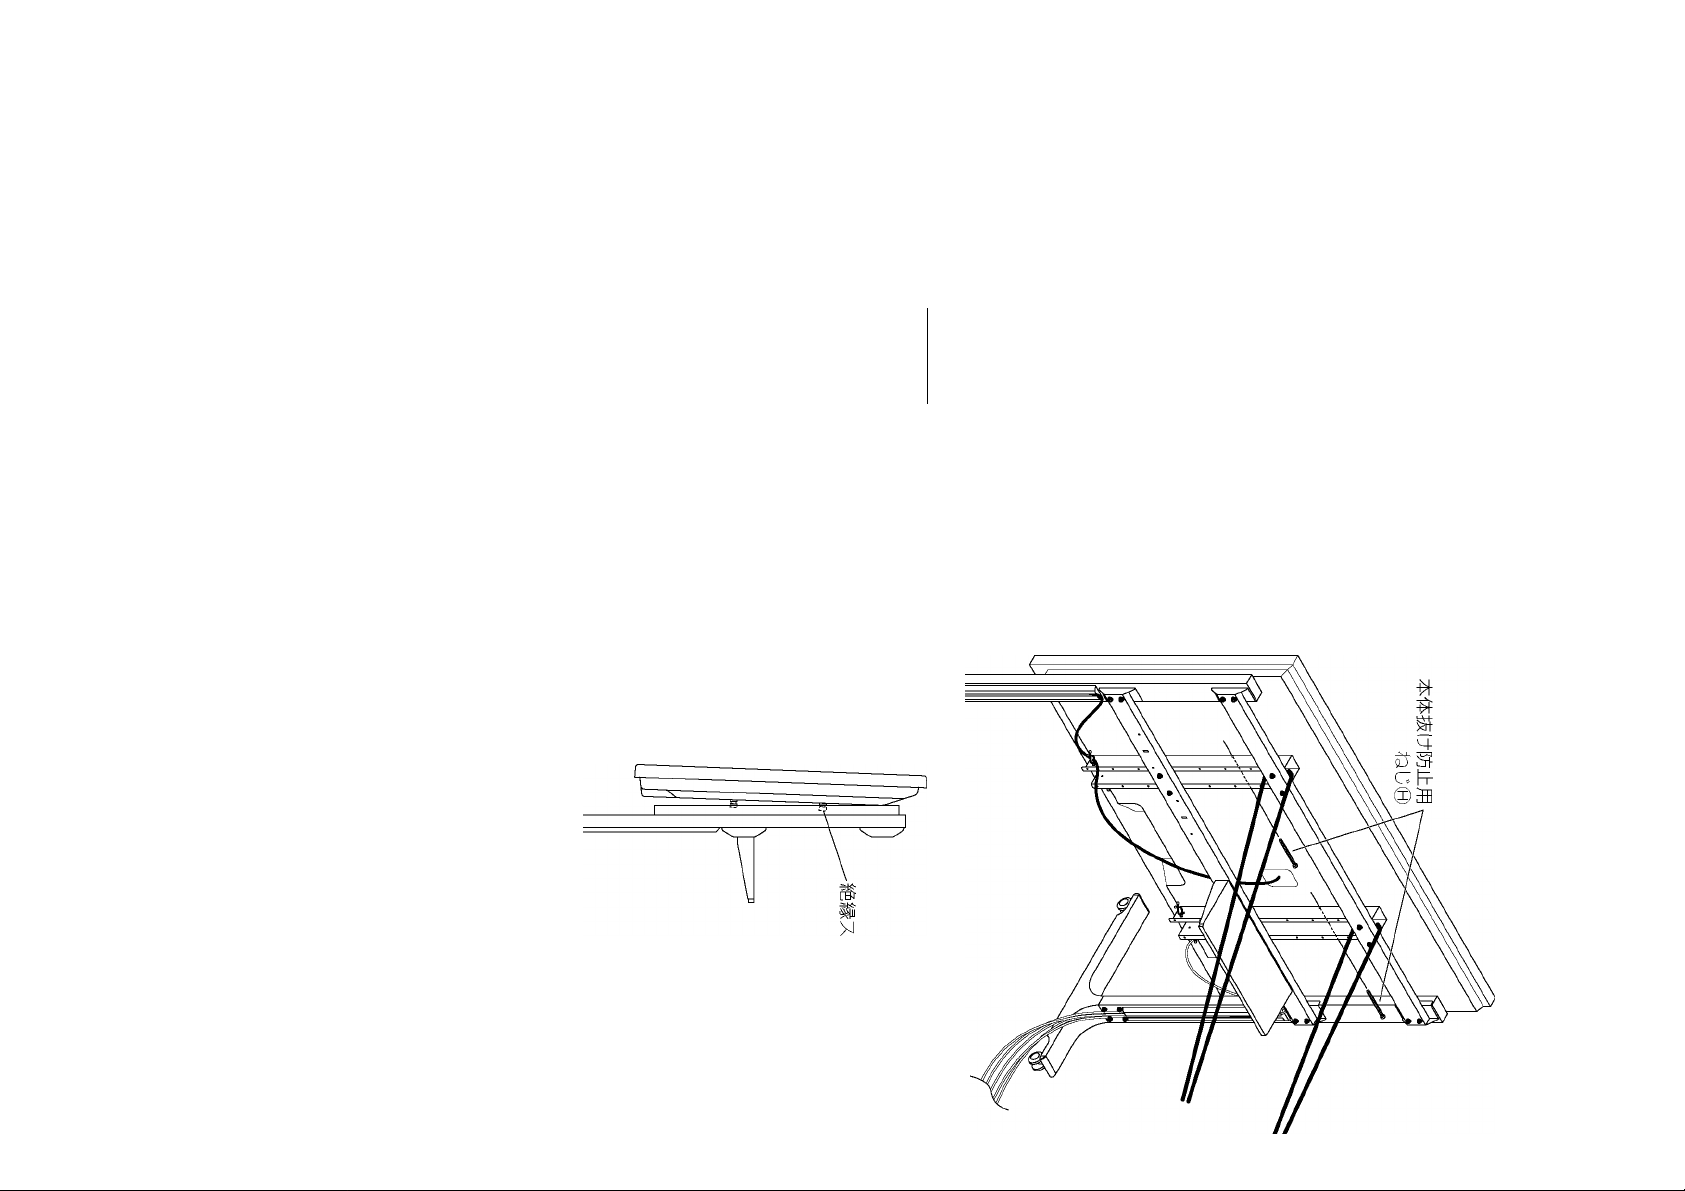
5. Preventing falling over
In order to prevent the unit from falling over, fix it
by passing strong cords orwires to the crossover
points (1 each on the right and left) of the mounting
brackets and the fitting (top), and connect them
without slack to sturdy pillars or walls.
(Use commercially available cord orwire to prevent
falling over.)
The distance between the pillar orwall and the rear
ofthe display must be1m (39.4 inches) or less.
29
Page 30

"5)
LU
Removing the display
©Remove the screws (2) for securing unit ®
(1 each on the right and left) from the mobile
stand.
©Remove the cord orwire for preventing the unit
from falling over.
©Disconnect the power cord and the wires
connecting the display to the other units.
w
c
©While lifting the bottom part ofthe display, pull
the display toward you.
©Afterthe bottom insulation spacers have been
removed, continue lifting up the display and
remove it.
30
Page 31

Sicherheitsmaßnahmen
Warnung
Einbau und Ausbau sollen nurvon einem qualifizierten Technikervorgenommen werden.
• Wenn der Ständer nicht korrekt montiert wird, kann das Display umkippen und beschädigt werden oder
Verletzungen verursachen.
Nehmen Sie den mobilen Ständer nicht auseinander bzw. ändern Sie ihn nicht ab.
• Anderenfalls kann das Gerät umkippen und beschädigt werden bzw. Verletzungen verursachen.
Stellen Sie den Ständer an einem Ort mit geringen Vibrationen und ausreichend Tragfähigkeit für
das Gerät auf.
• Anderenfalls kann das Gerät umkippen oder herunterfallen und Verletzungen verursachen.
Vergewissern Sie sich, dass der Installationsort auch für den Langzeitgebrauch stark genug ist.
• Falls die Stärke bei Langzeitgebrauch unzureichend wird, kann das Display umkippen und ggf.
Verletzungen verursachen.
Vorsicht
Nicht für Displays verwenden, die nicht in diesem Katalog aufgeführt sind.
• Anderenfalls kann das Gerät umkippen und beschädigt werden oderVerletzungen verursachen.
Stellen Sie kein Gewicht von mehr als 15 kg auf die Regalplatte.
• Anderenfalls kann das Gerät umkippen oder herunterfallen und Verletzungen verursachen.
Den Sockel nicht verwenden, falls er verzogen, gerissen oder gebrochen ist.
• Anderenfalls kann das Gerät umkippen und beschädigt werden oderVerletzungen verursachen.
Schmieren Sie die Laufrollen nicht.
• Anderenfalls können die Laufrollen Sprünge bekommen oder beschädigt werden, das Display kann zu
Boden fallen und dabei beschädigt werden, oder es kann zu Verletzungen kommen.
Klettern Sie nicht auf das Display oder auf den mobilen Ständer und halten Sie sich nicht daran fest.
• Dies gilt besonders für kleine Kinder. Anderenfalls kann das Gerät umkippen und beschädigt werden
oderVerletzungen verursachen.
Stellen Sie sicher, dass die Lüftungsöffnungen nicht blockiert sind. Der Raum zwischen der Unterseite
des Displays und dem Fußboden darf bei Verwendung des mobilen Ständers nicht blockiert werden.
• Anderenfalls kann ein Wärmestau entstehen, derein Feuer verursachen kann.
Treffen Sie Vorbeugemaßnahmen gegen das Umkippen.
• Erdbeben oder Kinder, die aufdas Display klettern, können dazu führen, dass das Display umkippt und
ggf. Verletzungen verursachen.
Lassen Sie ober- und unterhalb sowie links und rechts des Displays mindestens 10 cm Platz.
Lassen Sie auch nach hinten mindestens 7 cm Platz.
• Anderenfalls kann ein Brand entstehen.
Halten Sie das Gerät von direktem Sonnenlicht und Heizkörpern fern.
• Wenn das nicht geschieht, besteht die Gefahrvon Verwellungen, Verformungen oder Materialalterung
und ein Verlust an Materialfestigkeit, derzu Umkippen oder Beschädigung mitVerletzungen führen kann.
Das Anbringen oder Abnehmen des Displays muss immer von mindestens 2 Personen ausgeführt werden.
• Das Display kann herunterfallen und Verletzungen verursachen.
Beim Montieren und Aufstellen kontrollieren, ob alle Schrauben richtig festgezogen sind.
• Falls die Montage nicht ordnungsgemäß durchgeführt wird, ist keine ausreichende Tragfähigkeit des
Ständers für das Display gewährleistet. Dadurch kann das Display umfallen und beschädigt werden und
dabei Verletzungen verursachen.
Auf einer stabilen, ebenen Fläche aufstellen.
• Anderenfalls kann das Gerät umkippen und beschädigt werden oderVerletzungen verursachen.
Verwenden Sie zur Installation ausschließlich die Spezial-Befestigungsteile im Lieferumfang.
• Anderenfalls kann das Displayvom mobilen Ständer herunterfallen und beschädigt werden bzw. Verletzungen verursachen.
Lösen Sie die Sperre der Laufrollen, um das Display an einen anderen Ort zu bewegen.
• Anderenfalls kann das Gerät umkippen und beschädigt werden oderVerletzungen verursachen.
Entsorgen Sie dieses Produkt vorschriftsmäßig, wenn es nicht mehr verwendet werden soll.
• Anderenfalls kann das Gerät umkippen und beschädigt werden oderVerletzungen verursachen.
ü
w
0
Q
31
Page 32

Sicherheitsmaßnahmen
Vorsichtsmaßnahmen bei der Handhabung
1) Der Aufstellungsort des Displays sollte sorgfältig ausgesucht werden, weil das Gehäuse sich aufgrund
von Lichtstrahlen oder Wärme verfärben oder verformen kann, wenn es direkterSonneneinstrahlung
ausgesetzt ist oder in der Nähe eines Heizgerätes aufgestellt wird.
2) \Wischen Sie das Display zum Reinigen mit einem weichen, trockenen Tuch (aus Baumwolle oder
Flanell) ab. Wenn das Gerät stark verunreinigt ist, sollte es zuerst mit einem Tuch gereinigt werden,
das mit einem milden Lösungsmittel angefeuchtet ist, und dann mit einem trockenen Tuch abgewischt
werden. Keine Reinigungsmittel wie Benzol, Verdünner oder Möbelwachs verwenden; dadurch kann
sich die Farbe ablösen.
(Informationen zum Reinigen des Displays finden Sie in der Bedienungsanleitung des Displays. Bei
Verwendung eines chemisch behandelten Reinigungstuchs sind die Anweisungen derdem Tuch
beiliegenden Gebrauchsanweisung sorgfältig zu beachten.)
3) Kein Klebeband oder Aufkleber am Gerät anbringen. Dadurch kann der mobile Ständer verunreinigt
werden. Vermeiden Sie Langzeitkontakt mit Gegenständen aus Gummi, Vinyl und dergleichen. (Dies
ü
w
0
Q
führtzu einerVerschlechterung des Produkts.)
4) ¡Setzen Sie die Bildschirmoberfläche des Displays weder starkem Druck noch Stößen aus.
Vorsichtsmaßnahmen für das Montieren und Aufsteiien des mobiien Ständers
• Um sicherzustellen, dass das Displays richtig funktioniert, und um Probleme zu vermeiden, sollte das
Gerät nicht an den folgenden Orten aufgestellt werden.
• In der Nähe von Sprinkleranlagen oder Feuer-/Rauchdetektoren
• An Orten, an denen Vibrationen oder Stöße auftreten können
• In der Nähe von Hochspannungsleitungen oder Stromversorgungsanlagen
• Neben Quellen von Magnetismus, Hitze, Wasserdampf und Ruß
• An Orten, an denen warme Luft von Heizgeräten ausgeblasen wird
• An einem Ort, an dem sich Kondenswasser von einer Klimaanlage oder einem anderen Gerät bilden
kann
• Die für das Displays verwendete Steckdose sollte einfach zu erreichen sein.
• Sorgen Sie für eine ausreichende Belüftung, damit die Umgebungstemperatur 40 °C nicht übersteigt.
Bei Nichtbeachtung kann es zu einem Wärmestau im Display kommen, wodurch Fehlfunktionen
auftreten können.
• Den Sockel so anbringen, dass die Schrauben, das Netzkabel oder Metall in der Wand sich nicht
berühren.
• Breiten Sie eine weiche Decke oder ein Tuch auf dem Boden aus, damit der Sockel und der Boden
während des Zusammenbaus und der Aufstellung nicht zerkratzt werden.
• Führen Sie die Zusammenbau- und Aufstellungsarbeiten auf einer waagerechten und ebenen Fläche
durch, und befolgen Sie die Anweisungen fürden Zusammenbau.
• Achten Sie beim Festschrauben der Teile darauf, dass die Schrauben weder ungenügend noch zu stark
festgezogen werden.
• Achten Sie aufdie Sicherheit in Ihrer Umgebung, wenn Sie die Zusammenbau- und Aufstellungsarbeiten
durchführen oder sich bei diesen Arbeiten bewegen.
• Lesen und beachten Sie bitte die „Sicherheitsmaßnahmen“.
32
Vorsicht:
Dieser Ständer ist ausschließlich für Display-Modelle der Marke Panasonic vorgesehen.
Die Verwendung mit anderen Geräten kann zu Instabilität führen und Verletzungen zur Folge haben.
DIE INSTALLATION IST PROFESSIONELL DURCHZUFÜHREN.
Panasonic übernimmt keine Haftung für Sachschäden und/oder schwere Verletzungen, einschließlich
Todesfall, die auf unsachgemäße Installation oder falsche Handhabung zurückzuführen sind.
Page 33

Bauteile
Hauptteile
Vergewissern Sie sich, dass alle Teile in der
angeführten Stückzahl vorhanden sind.
ü
w
0
Q
Zubehörteile
®Stützen-Befestlgungsschraube
(M6X16) (8)
©Einsetzmutter
(M6) (16)
© Innensechskantschlüssel
(mitgeliefertes Werkzeug) (1)
©Halterungs
Befestigungsschraube
(M6 X 25) (8)
CKKIIifö
©Befestigungsschraube für
Regalplatte(M4xi2) (4)
Anschlag
Befestigungsschraube
(M4X12) (6)
©Schrauben zum Sichern des Geräts
(M6 X 65) (2)
© Montagebefestigungsschraube
(M6 X 65) (8)
© Innensechskant-Senkschraube
Zahnscheibe
Isoliermuffe
(jeweils 4)
Die Abbildungen in dieser Anleitung dienen lediglich zu Erläuterungszwecken.
33
Page 34

Zusammenbau
1. Montage des Ständers
1.i>etzen Sie eine Stütze © an den Fuß ®
und befestigen Sie sie mit den Stützen
Befestigungsschrauben ® (4). Montieren
Sie die andere Stütze auf gieiche Weise.
ü
w
■4—*
0
Q
(Anzugsmoment: 1,8-2,2 N-m)
2. Legen Sie die montierte Stütze wie
in der Abbiidung gezeigt ab und auf
ihre Rückseite, befestigen Sie die
Montageteiie (oben/unten) © mit den
Montagebefestigungsschrauben © (4)
und den Einsetzmuttern @ (4).
(Anzugsmoment: 1,8-2,2 N-m)
Stützen
Befestigungsschraube ®
Fuß®
Montage (unten) @
Vorderseite
V
Montage (oben) @
Einsetzmutter ©
3. Heben Sie die Stütze und befestigen
Sie die andere Stütze © an der
anderen Seite der Montageteiie mit den
Montagebefestigungsschrauben © (4)
und den Einsetzmuttern @ (4).
(Anzugsmoment: 1,8-2,2 N-m)
Montagebefestigungsschraube ©
34
Page 35

4. stellen Sie das Display auf die
gewünschte Höhe ein, indem Sie unter
den Optionen (4) wählen.
Wählen Sie aus derfolgenden Tabelle
die Schraubenlöcher zum Befestigen
der Montagehalterung ® an den
Montageteilen (oben/unten) ®.
Einheit: mm
Markierung
A
B
C
D
(Abstand von der Bodenoberfläche)
Mitte des Bildschirms
1047
1147
1247
1347
5. Unter Verwendung der in Schritt 4
gewählten Schraubenlöcher befestigen
Sie die Montagehalterungen ® an den Montagehalterung ®
Montageteilen (oben/unten) ® mit den
Halterungs-Befestigungsschrauben ® (8)
und Einsetzmuttern @ (8).
Halterungs
Befestigungsschraube ®
Halterungs
Befestigungsschraube ®
ü
w
0
Q
(Anzugsmoment: 1,8-2,2 N-m)
6. Befestigen Sie die Regalplatte ® (1)an
der Rückseite des unteren Montageteils
mit den Befestigungsschrauben der
Regalplatte © (4). (Sie kann sowohl
rechts als auch links angebracht
werden.)
(Anzugsmoment: 1,2-1,5 N-m)
Einsetzmutter ®
35
Page 36

Zusammenbau
2. Bereiten Sie das Display vor
Befestigen Sie die Isoiiermuffen
0 Legen Sie das Dispiay mit derVorderseite nach
unten auf ein sauberes Tuch. Achten Sie darauf,
dass auf dem Tuch keine Verschmutzungen oder
Gegenstände iiegen.
Befoigen Sie die nachstehenden Anweisungen.
Wenn am Dispiay Teiie vorstehen, achten
Sie darauf, diese nicht zu zerkratzen oder zu
beschädigen.
©Entfernen Sie die Kappen (4) vom Dispiay mit
ü
w
0
Q
einem Kreuzschiitzschraubendreher.
Bewaren Sie die abgenommenen Kappen an einem
sicheren Ort auf.
(Sie werden benötigt, wenn Sie den Standfuß
benutzen.)
Kreuzschiitzschraubendreher
©Verwenden Sie den mitgeiieferten
Innensechskantschiüssei © um die Zubehörteiie
© (vier Innensechskant-Senkschrauben,
Zahnscheiben und Isoiiermuffen) wie in der
Abbiidung rechts gezeigt an den Steiien zu
befestigen, an denen sich die Kappen befanden.
(Anzugsmoment: 3-4 N-m)
36
Page 37

3. Am Ständer befestigen
Sperren Sie immer die Laufroiien, bevor Sie das Dispiay
anbringen.
1. Anbringen des Displays
0 Passen Sie die oberen isoliermuffen des Displays
in die Aussparungen an der Oberseite des
mobilen Ständers ein und senken Sie das Display
langsam in die Arbeitsstellung ab.
©Heben Sie das Display etwas an, passen Sie die
isoliermuffen an der Unterseite in die Löcher
am unteren Ende des mobilen Ständers ein, und
ziehen Sie das Display dann senkrecht nach
unten in die Arbeitsstellung.
Sperren und Freigeben der Laufrollen
Laufrolle gesperrt
Drücken Sie auf
die Unterseite
des Hebels
Obere Isoliermuffe
Laufrolle freigegeben
Drücken
Sie aufdie
Oberseite des
Hebels
ü
w
0
Q
Heben Sie das Display nicht höher als
notwendig an.
• Heben Sie das Display nicht zu hoch an, da
es sonst herunterfallen und Verletzungen
verursachen kann.
2. Befestigen des Displays
Ziehen Sie die Schrauben (2) zum Sichern des
Geräts 0 in den Schraubenlöcher am oberen Teil
der Montagehalterung (2) fest.
(Anzugsmoment: 1,2-1,5 N-m)
Achten Sie darauf, die Schrauben zum Sichern
des Geräts © aufder iinken und rechten Seite gut
festzuziehen, um zu verhindern, dass das Dispiay sich
vom Ständer iöst.
37
Page 38

Zusammenbau
4. Verkabelung
Setzen Sie die Kabelbinder® (4)
an der Seite des unteren Teils der
Montagehalterung (rechts/links) ein.
Verlegen Sie die Kabel, indem Sie
sie in die Verkabelungsführungen an
der Rückseite der rechten und linken
Stützen einsetzen. Befestigen Sie
dann die Anschläge ® (6) mit den
Anschlag-Befestigungsschrauben ©
(6) an den Kabelführungen.
Die Kabelführungen links
ü
w
0
Q
und rechts haben jeweils 6
Schraublöcher für die Anschlag
Befestigungsschrauben. Verwenden
Sie die für ihre Verkabelung
passenden Schraublöcher.
(Anzugsmoment: 1,2-1,5 N-m)
Bündeln Sie die Anschlusskabel nicht
mit dem Stromkabel.
Verkabelungsführung
Kabelbinder ®
Anschlag
Befestigungsschraube
©
Anschlag ©
5. Umkippen vermeiden
Um zu verhindern, dass das Gerät umkippt,
befestigen Sie es, indem Sie starke Kordeln
oder Drähte durch die Kreuzungspunkte (jeweils
1 links und rechts) der Montagehalterungen
und dem Montageteil (oben) führen und diese
unterSpannung an festen Pfeilern oderWänden
befestigen.
(Benutzen Sie im Handel erhältliche Kordeln
oder Drähte, um ein Umkippen zu verhindern.)
Der Abstand zwischen dem Pfeiler oder derWand
und der Rückseite des Displays darf nicht mehr als
1 m betragen.
Anschlag
Befestigungsschraube ©
38
Page 39

Entfernen des Displays
0 Entfernen Sie die Schrauben (2) zum Sichern
des Geräts 0 (jeweiis 1 rechts und iinks) vom
mobiien Ständer.
©Entfernen Sie die Kordei bzw. den Draht, mit dem
verhindert wird, dass das Gerät umkippt.
©Trennen Sie das Netzkabei und die
Anschiusskabei des Dispiays für andere Geräte
ab.
ü
w
0
Q
©Heben Sie die Unterseite des Displays an, und
ziehen Sie es dann nach vorne.
©Nach der Demontage der isoliermuffen heben Sie
das Display weiteran und nehmen es ab.
39
Page 40

o
c
CD
"cD
Precauzioni di sicurezza
Avvertenza
Le operazioni di installazione e smontaggio devono essere eseguite esclusivamente da personale
qualificato.
• Se il piedistallo non viene installato correttamente, lo schermo potrebbe cadere e danneggiarsi
provocando lesioni personali.
Non smontare o modificare il supporto mobile.
• In caso contrario, l’unità potrebbe cadere danneggiandosi e causare infortuni.
Posizionare il supporto in un luogo con ridotte vibrazioni e in grado di sostenere il peso dell’unità.
• In caso contrario, l’unità potrebbe cadere, provocando infortuni.
Accertarsi che il luogo di installazione sia sufficientemente robusto da sopportare l’utilizzo a
lungo termine.
• Se esso si indebolisce nel tempo per l’uso continuo, lo schermo potrebbe cadere causando infortuni.
Attenzione
Non utilizzare schermi diversi da quelli indicati nel catalogo.
• In caso contrario, l’unità può cadere e danneggiarsi, procurando eventuali danni a cose e persone.
Non posizionare pesi superiori a15kg sulla piastra del ripiano.
• In caso contrario, l’unità potrebbe cadere, provocando infortuni.
Non usare il supporto mobile se diventa storto o danneggiato.
• In caso contrario, l’unità può cadere e danneggiarsi, procurando eventuali danni a cose e persone.
Le rotelle orientabili non devono essere lubrificate.
• Le rotelle orientabili potrebbero incrinarsi o danneggiarsi, e lo schermo potrebbe cadere e danneggiarsi
causando incidenti.
Non arrampicarsi né appendersi allo schermo o al supporto mobile.
• Prestare particolare attenzione affinché i bambini rispettino questa avvertenza. In caso contrario, I’unità
può cadere e danneggiarsi, procurando eventuali danni a cose e persone.
Non ostruire le aperture per la ventilazione. Durante l’uso del supporto mobile, non ostruire lo
spazio tra la parte inferiore dello schermo e il pavimento.
• Diversamente, potrebbe verificarsi un accumulo di calore interno con conseguente pericolo di incendi.
Prendere ogni precauzione affinché l’unità non cada.
• I terremoti e i bambini che si arrampicano fino allo schermo o su di esso potrebbero farlo cadere
causando infortuni.
Lasciare almeno lOcmdi spazio sopra, sotto, a sinistra e a destra dello schermo. Lasciare inoltre
7 cm di spazio nella parte posteriore.
• Diversamente potrebbe verificarsi un incendio.
Non esporre l’apparecchio alla diretta luce del sole o al calore di dispositivi di riscaldamento.
• L’esposizione al calore può causare distorsioni, deformazioni, o degrado dei materiali, e la possibile perdita di
solidità che può procurare la caduta o la rottura dell’apparecchio con conseguenti possibili lesioni personali.
Le operazioni di montaggio o rimozione dello schermo al devono essere eseguite da almeno due persone.
• Lo schermo potrebbe cadere e causare infortuni.
Durante il montaggio e la configurazione, accertarsi che tutte le viti siano serrate in modo
appropriato.
• Se il montaggio non viene eseguito correttamente, il supporto non sarà in grado di sostenere il peso
dello schermo, che potrebbe cadere e danneggiarsi, provocando infortuni.
Posizionare su una superficie stabile e livellata.
• In caso contrario, I’unità può cadere e danneggiarsi, procurando eventuali danni a cose e persone.
Per l’installazione, usare le parti costituenti di uso speciale.
• In caso contrario, lo schermo potrebbe cadere dal supporto mobile e subire danni, causando possibili infortuni.
Sbloccare le rotelle orientabili quando si sposta lo schermo.
• In caso contrario, I’unità può cadere e danneggiarsi, procurando eventuali danni a cose e persone.
Smaltire il prodotto quando non si intende usarlo ulteriormente.
• In caso contrario, I’unità può cadere e danneggiarsi, procurando eventuali danni a cose e persone.
40
Page 41

Trattamento e manipolazione
1) i5cegliere con attenzione il luogo in cui si intende montare lo schermo, perché una diretta esposizione
alla luce del sole o al calore prodotto da un termosifone potrebbe causarne lo scolorimento o la
deformazione.
2) Per la pulizia, strofinare lo schermo usando un panno morbido e asciutto (di cotone o flanella). In caso
di sporco particolarmente ostinato, strofinare prima con un panno leggermente inumidito in una debole
soluzione detergente neutra, ed asciugare poi la superficie con un panno asciutto. Non fare uso di
agenti per pulizia quali benzene, solventi o cera per mobili, che potrebbero causare il distacco della
verniciatura.
(Per informazioni sulla pulizia dello schermo, consultare il manuale di istruzioni dello schermo. Se si
utilizza un panno trattato chimicamente, attenersi alle istruzioni in allegato.)
3) Non applicare nastro adesivo o etichette al prodotto. Diversamente, si potrebbe sporcare la superficie
del supporto mobile. Evitare il contatto a lungo termine con prodotti in gomma, vinile o simili (che
potrebbero causare un deterioramento).
4) INon sottoporre il pannello dello schermo a forza eccessiva o urti.
Precauzioni per il montaggio e la configurazione del supporto mobile
• Pergarantire un corretto funzionamento dello schermo e prevenire possibili complicazioni, evitare di
montare l’apparecchio nei luoghi seguenti.
• nelle vicinanze di polverizzatori di acqua antincendio, o di rivelatori di fumo
• in luoghi che possano trovarsi sottoposti a vibrazioni o urti
• nelle vicinanze di cavi ad alta tensione o di dispositivi che forniscono energia elettrica
• vicino a sorgenti magnetiche, calde, di vapore acqueo o fuligginose
• in luoghi esposti a getti d’aria provenienti da apparecchi di riscaldamento
• dove si potrebbero formare gocce di condensa da un climatizzatore o altra unità
• Collegare la spina di alimentazione dello schermo a una presa facilmente accessibile.
• Fornire una ventilazione adeguata in modo che la temperatura ambiente non superi i 40 °C. In caso
contrario, all’interno dello schermo potrebbe verificarsi un accumulo di calore con conseguenti problemi
di funzionamento.
• Procedere al montaggio in modo che le bulloni di montaggio o il cavo di alimentazione dell’apparecchio
non vengano a contatto con parti metalliche presenti all’interno della parete.
• Stendere una coperta o panno morbidi sul pavimento in modo che il supporto e il pavimento non
rimangano segnati o graffiati durante il lavoro di montaggio e di installazione.
• Eseguire il lavoro di montaggio e di installazione su una superficie piana e orizzontale secondo le
istruzioni di montaggio.
• Avvitando le parti, accertarsi che le viti non siano insufficientemente strette o strette eccessivamente.
• Fare attenzione alla sicurezza intorno quando si esegue il lavoro di montaggio e di installazione, o
spostandosi durante il lavoro.
• Leggere e seguire le istruzioni di “Precauzioni di sicurezza”.
o
c
CD
"cD
Attenzione:
Questo supporto è progettato soltanto per gli schermi Panasonic.
L’uso con altri apparecchi potrebbe provocare instabilità e possibili infortuni.
E NECESSARIA L’INSTALLAZIONE PROFESSIONALE.
PANASONIC NON E RESPONSABILE PER QUALSIASI DANNO DI PROPRIETÀ E/O GRAVE
INFORTUNIO,
COMPRESA LA MORTE, CAUSATI DALL’INSTALLAZIONE SBAGLIATA O DAL MANEGGIAMENTO
SCORRETTO.
41
Page 42

Parti
Parti principali Controllare che tutte le parti siano
presenti nelle loro quantità designate.
Accessori
©Vite per ii montaggio deiia
coionna di supporto
(M6X16) (8)
©Dado deii’inserto
(M6) (16)
©Chiave per brugole (attrezzo in dotazione) (1) ©Vite per il fissaggio deii’unità
© Vite per ii montaggio deiia
staffa
(M6 X 25) (8)
©Vite per ii fissaggio deiia
piastra dei ripiano
(M4X12)(4)
Vite di fissaggio dei fermo
(M4X12) (6)
(M6 X 65) (2)
©Vite per il fissaggio del raccordo
(M6 X 65) (8)
©Vite a testa fresata di tipo Aiien
Rondeiia dentata concava
Distanziatore isoiante
(4 di ognuna)
@ (Ti0
42
Le immagini mostrate in questo mannaie sono soitanto a scopo iiiustrativo.
Page 43

Montaggio
1. Montaggio del supporto
1. Inserire una colonna di supporto ©
sulla base © e fissarla con le viti per il
montaggio della colonna di supporto ®
(4). Seguendo la stessa procedura,
montare l’altra colonna di supporto.
(Coppia di serraggio: da1,8a 2,2 N-m)
2. Posizionare la colonna di supporto
assemblata come mostrato nella figura e,
sul suo lato posteriore, fissare i raccordi
(superiore/inferiore) © con le viti per
il fissaggio dei raccordi © (4)ei dadi
dell’inserto @ (4).
(Coppia di serraggio: da1,8a 2,2 N-m)
Raccordo
(superiore) ©
Vite per il montaggio
della colonna di
supporto ®
Raccordo (inferiore) ©
O
c
CD
"cD
3.Sollevare la colonna di supporto e
fissare l’altra colonna di supporto ©
sull’altro lato dei raccordi con le viti per
il fissaggio del raccordo © (4)ei dadi
dell’inserto © (4).
(Coppia di serraggio: da1,8a 2,2 N-m)
Dado dell’inserto ©
Colonna di supporto ©
Vite per il fissaggio del
raccordo ©
43
Page 44

o
c
CD
"cD
Montaggio
4. Impostare lo schermo all’altezza
desiderata scegliendo tra le opzioni (4).
Dalla tabella sottostante, selezionare
i fori delle viti per fissare le staffe di
montaggio ® ai raccordi (superiore/
inferiore) ®.
Unità: mm
Segno
(Distanza dalla superficie del pavimento)
A
B
C
D
5. Utilizzando i fori delle viti selezionati
nel passaggio 4, fissare le staffe di
montaggio ® ai raccordi (superiore/
inferiore) ® con le viti per il montaggio
della staffa ® (8)ei dadi dell’inserto @
(8).
(Coppia di serraggio: da1,8a 2,2 N-m)
Centro dello schermo
1047
1147
1247
1347
6. Fissare la piastra del ripiano ® (1) sulla
parte posteriore del raccordo inferiore
con le viti per il fissaggio della piastra del
ripiano © (4). (Può essere fissata sia sul
lato destro che sinistro.)
(Coppia di serraggio: da1,2a1,5 N-m)
44
Page 45

2. Preparazione dello schermo
Fissaggio dei distanziatori isolanti
0 Posizionare la superficie anteriore dello
schermo su un panno pulito e privo di impurità
o corpi estranei, quindi attenersi alla seguente
procedura.
Se lo schermo presenta parti sporgenti, prestare
attenzione a non graffiarle o danneggiarle.
©Rimuovere i tappi (4) dallo schermo utilizzando
un cacciavite a stella Phillips.
Conservare in un luogo sicuro i tappi rimossi.
(Saranno necessari in caso di utilizzo del piedistallo.)
©Utilizzare la chiave a brugola in dotazione © ,
montare gli accessori © (4 viti a testa rasata
di tipo Allen, rondelle dentate concave e
distanziatori isolanti) nei punti da cui sono stati
rimossi i tappi, come mostrato nella figura a
destra.
(Coppia di serraggio: da3a4 N-m)
Cacciavite a croce
o
c
CD
"cD
45
Page 46

Montaggio
3. Fissaggio al supporto
Prima di montare io schermo, bioccare ie roteiie
orientabiii.
Blocco e sblocco rotelle orientabili
Rotella orientabile bloccata Rotella orientabile sbloccata
Spingere la parte
inferiore deiia
ieva
Spingere ia
parte superiore
deiia ieva
O
c
CD
"cD
1. Montaggio dello schermo
0Agganciare i distanziatori isolanti superiori dello
schermo agli intagli nella parte superiore del
supporto mobile, quindi abbassare lentamente lo
schermo in posizione.
©Sollevare leggermente lo schermo e inserire i
distanziatori isolanti inferiori nei fori nella parte
inferiore del supporto mobile, quindi abbassare lo
schermo in posizione.
Non sollevare lo schermo più del necessario.
• Se si solleva troppo lo schermo, questo potrebbe
cadere provocando infortuni.
2. Fissaggio dello schermo
Serrare saldamente le viti (2) perfissare l’unità ®
nei fori delle viti sulla parte superiore della staffa
di montaggio (2).
(Coppia di serraggio: da1,2a1,5 N-m)
Distanziatore isoiante superiore
Assicurarsi di fissare le viti a destra e a sinistra per
mettere in sicurezza l’unità © ed evitare che lo schermo
cada.
46
Page 47

4. Collegamento
Inserire le fascette ® (4) sul lato
della parte inferiore delle staffe di
montaggio (destra/sinistra).
Collegare i cavi inserendoli nei
guidacavi sul retro delle colonne
di supporto destra e sinistra.
Applicare i fermi ® (6) alle guide
di cablaggio con le apposite viti di
fissaggio © (6).
Le guide di cablaggio destra e
sinistra sono provviste di 6 fori
destinati alle viti di fissaggio dei
fermi. Servirsi degli appositi fori
per il cablaggio in uso.
(Coppia di serraggio: da1,2a1,5 N m)
I cavi di coiiegamento e ii cavo di
aiimentazione non devono essere
avvoiti insieme.
Fascetta ® '
Fori per l’inserimento
deiie fascette
Fermo ®
Vite di
fissaggio
dei fermo
©
o
c
CD
"cD
Fermo ®
5. Prevenzione della caduta
Per evitare che l’unità cada, fissarla con funi solide
0 cavi fatti passare tra i punti di incrocio (1 di
ognuno a destra e sinistra) delle staffe di montaggio
e il raccordo (superiore) e collegarli, in modo che
non si allentino, a colonne o pareti solide.
(Utilizzare funi disponibili in commercio per
prevenire le cadute.)
La distanza tra il pilastro o la parete e la parte
posteriore dello schermo deve essere al massimo di
1 m.
Vite di fissaggio dei
fermo ©
Forti corde
fiii di ferro
disponibiii in
commercio
__
£
47
Page 48

Rimozione deilo schermo
0 Rimuovere le viti (2) per il fissaggio dell’unità 0
(1 di ognuna a destra e sinistra) dal supporto
mobile.
©Rimuovere la fune o il cavo per impedire la caduta
dell’unità.
©Scollegare il cavo di alimentazione e i cavi di
collegamento dello schermo ad alter unità.
o
c
CD
"cD
©Sollevare la parte inferiore dello schermo e tirare
lo schermo verso di sé.
©Dopo aver rimosso i distanziatori isolanti inferiori,
continuare a sollevare lo schermo e rimuoverlo.
48
Page 49

Précautions de sécurité
Avertissement
Les travaux d’installation et de retrait doivent être confiés seulement à un technicien qualifié.
• Si le pied n’est pas installé correctement, l’écran peut tomber et être endommagé voire même blesser.
Ne démontez pas ou ne modifiez pas le pied mobile.
• Sinon, l’appareil pourrait tomber et être abîmé, ce qui pourrait entraîner des blessures.
Prévoyez un emplacement exempt de vibrations pouvant supporter le poids du pied mobile.
• Sinon, le pied mobile pourrait basculer et s’abîmer en risquant d’entraîner des blessures.
Assurez-vous que l’emplacement d’installation est assez résistant pour supporter une utilisation
à long terme.
• Si sa force devient insuffisante suite à une utilisation à long terme, l’écran risque de basculer, ce qui
pourrait entraîner des blessures.
Précaution
N’utilisez pas d’écrans différents de ceux donnés dans le catalogue.
• Sinon, l’appareil pourrait tomber et être abîmé, ce qui pourrait entraîner des blessures.
Ne posez pas d’objet d’un poids supérieur à15kg sur la plateau.
• Sinon, le pied mobile pourrait basculer ou se renverser en risquant d’entraîner des blessures.
N’utilisez pas le support mobile s’il se déforme ou s’il est endommagé.
• Sinon, l’appareil pourrait tomber et être abîmé, ce qui pourrait entraîner des blessures.
Ne graissez pas les roulettes.
• Les roulettes risqueraient de se fissurer ou de subir des dommages. L’écran risquerait de basculer et de
subir des dommages, etilya risque de blessure.
Ne grimpez pas ou ne vous suspendez pas à l’écran ou au pied mobile.
• Veuillez particuliérement à ce que lesjeunes enfants se conforment à cette règle. Sinon, l’appareil
pourrait tomber et être abîmé, ce qui pourrait entraîner des blessures.
Ne bouchez pas les trous d’aération. Ne bloquez pas l’espace entre le bas de l’écran et le sol
lorsque vous utilisez le pied mobile.
• Sinon, la chaleur pourrait s’accumuler à l’intérieur et provoquer un incendie.
Prenez les mesures visant à empêcher l’écran de basculer.
• Des séismes ou des enfants grimpant sur l’écran risquent de faire basculer l’écran, ce qui pourrait
entraîner des blessures.
Laissez au moins un espace delOcm en haut, en bas, à gauche et à droite de l’écran. Laissez
également au moins un espace de 7 cm à l’arrière.
• Sinon cela pourrait provoquer un incendie.
Éloignez l’appareil des rayons directs du soleil ou d’appareils de chauffage.
• Le non-respect de ces précautions peut engendrer une altération, déformation ou dégradation des
matériaux et une perte du soutien qui peut faire basculer ou rompre l’écran plasma et provoquer des
blessures.
Les opérations de pose et de dépose de l’écran doivent être réalisées par au moins 2 personnes.
• L’écran pourrait tomber et blesser.
Au moment du montage et de l’installation, veillez à bien serrer toutes les vis.
• Si le montage n’est pas correctement réalisé, le support ne sera pas en mesure de supporter le poids
de l’écran. Ceci pourrait faire basculer et abîmer l’écran, et provoquer des blessures.
Installez l’appareil sur une surface stable et horizontale.
• Sinon, l’appareil pourrait tomber et être abîmé, ce qui pourrait entraîner des blessures.
Pour l’installation, utilisez les composants spécialisés.
• Sinon, l’écran pourrait tomber du pied mobile et être endommagé voire même blesser.
Pour déplacer l’écran, déverrouillez les roulettes.
• Sinon, l’appareil pourrait tomber et être abîmé, ce qui pourrait entraîner des blessures.
Mettez le produit au rebut lorsque vous ne l’utiliserez plus.
• Sinon, l’appareil pourrait tomber et être abîmé, ce qui pourrait entraîner des blessures.
w
'cD
O
c
CD
49
Page 50

w
'cD
O
c
CD
Précautions de sécurité
Précautions d’installation
1) (Choisissez l’emplacement d’installation de l’écran à plasma de sorte qu’il ne soit pas exposé à la
lumière vive ni à la chaleur car cela peut le décolorer ou le déformer, en particulier dans le cas de la
lumière du soleil ou de la chaleur d’un appareil de chauffage.
2) Nettoyez l’écran en l’essuyant avec un chiffon doux et sec (en coton ou flanelle). S’il est très sale,
commencez par un nettoyage avec une solution diluée de détergent neutre puis finissez avec un chiffon
sec. N’utilisez aucun produit tel que l’essence, les diluants et les cires pour meubles qui tous peuvent
provoquer un endommagement de la peinture de finition.
(Pour en savoir plus sur le nettoyage de l’écran, voir le manuel d’instructions de l’écran. Si vous utilisez
un linge traité chimiquement, veuillez suivre les instructions accompagnant ce dernier.)
3) INe posez aucun ruban adhésif ni aucun autocollant sur le produit. L’un comme l’autre peuvent salir
le pied mobile. Évitez le contact prolongé avec des produits de caoutchouc, de vinyle, etc. (Cela peut
abîmer le pied mobile.)
4) INe soumettez pas l’écran à une forte pression ou impact.
Précautions relatives au montage et à l’installation du pied mobile
• Pour que l’écran à plasma fonctionne convenablement et éviter les anomalies, ne choisissez pas un
emplacement tel que ceux énumérés ci-dessous.
• Emplacement près de sprinklers ou de détecteurs de fumée ou d’incendie
• Emplacement exposé aux vibrations et aux chocs
• Emplacement proche d’un câble haute tension ou d’une alimentation dynamique
• À proximité de sources de magnétisme, de chaleur, de vapeur d’eau ou de suie
• Emplacement exposé au souffle d’air d’un appareil de chauffage
• Là où des gouttes de condensation d’un climatiseur ou autre appareil peuvent se former
• Pour alimenter l’écran à plasma, choisissez une prise secteur qui soit aisément accessible.
• Veillez à ce que l’aération soit appropriée afin que la température ambiante ne dépasse pas les 40 °C. A
défaut, l’écran pourrait surchauffer, ceci entraînant des défaillances.
• Veillez à ce qu’il n’y ait aucun contact entre les boulons de fixation ou le cordon d’alimentation et les
pièces métalliques qui peuvent se trouver à l’intérieur du mur.
• Étendez une couverture ou un chiffon moelleux sur le sol de sorte que le socle et le plancher ne soient
pas marqués ou égratignés pendant les travaux de montage et d’installation.
• Montez et installez sur une surface horizontale et plane conformément aux instructions d’installation.
• Lors du vissage des pièces, veillez à serrer suffisamment les vis mais aussi à ne pas trop les serrer.
• Soyez attentif à votre sécurité lorsque vous procédez au montage et à l’installation ou lorsque vous
vous déplacez au cours de la tâche.
• Vous devez lire et respecter les “Précautions de sécurité”.
Précaution :
Ce pied a uniquement été conçu pour des modèles d’écrans Panasonic.
Utilisé avec un autre appareil, il peut se révéler instable et être la cause indirecte de blessures.
L’INSTALLATION PAR UN PROFESSIONNEL EST INDISPENSABLE.
PANASONIC DÉCLINE TOUT DOMMAGE MATÉRIEL ET/OU BLESSURE GRAVE, Y COMPRIS LA
MORT RÉSULTANT D’UNE INSTALLATION OU D’UNE MANIPULATION INCORRECTE.
50
Page 51

Pièces
Pièces principales Vérifiez que toutes les pièces sont incluses
et correspondent à la quantité indiquée.
Accessoires
®Vis de fixation de la colonne de
support
(M6X16) (8)
cmite
©Ecrou d’insertion
(M6) (16)
©Clé hexagonale (outil fourni) (1) ©Vis de fixation de l’unité
©Vis de fixation du support
(M6 X 25) (8)
cKEmi *)
©Vis de fixation du plateau
(M4X12) (4)
Vis de fixation d’arrêtoir
(M4X12) (6)
(M6 X 65) (2)
©Vis de fixation de traverse
(M6 X 65) (8)
(((((((((((((((((((((№)
©Vis à tête fraisée à six pans creux
Rondelle cuvette dentée
Rondelle isolante
(4 chacun)
w
'cD
O
c
CD
Les images du présent manuel ne sont présentées qu’à titre d’illustration.
51
Page 52

Montage
1. Assemblage du support
1. Insérez une colonne de support © dans
la base ® et fixez-la avec les vis de
fixation de la colonne de support ® (4).
Assemblez l’autre colonne de support en
suivant la même procédure.
(Couple de serrage :1,8à 2,2 N-m)
2. Posez la colonne de support assemblée
comme montré sur le schéma, puis fixez
les traverses (haut/bas) © à l’arriére
de cette dernière, en utilisant les vis de
fixation de traverse © (4) ainsi que les
écrous d’insertion © (4).
(Couple de serrage :1,8à 2,2 N-m)
“■Vis de fixation de la
colonne de support ®
Traverse (bas) ©
Traverse
(haut) ©
w
'ce
O
c
ce
Ecrou d’insertion ©
3. Levez la colonne de support et fixez
l’autre colonne de support © de l’autre
côté des traverses en utilisant les vis de
fixation de traverse © (4) et insérez les
écrous © (4).
(Couple de serrage :1,8à 2,2 N-m)
Colonne de support ©
Vis de fixation de traverse ©
52
Page 53

4. Installez l’écran à la hauteurdésirée en
sélectionnant une option (4).
En vous aidant du tableau ci-dessous,
sélectionnez les trous de vis pour fixer
les supports de fixation ® aux traverses
(haut/bas) ®.
Unité : mm
Marque
A
B
c
D
Centre de l’écran
(Distance au-dessus du sol)
1047
1147
1247
1347
5. En utilisant les trous de vis sélectionnés
à l’étape 4, fixez les supports de
fixation ® aux traverses (haut/bas) ® en
utilisant les vis de fixation du support @
(8) ainsi que les écrous d’insertion @ (8).
(Couple de serrage :1,8à 2,2 N-m)
6. Fixez le plateau ® (1)à l’arriére de la
traverse du bas en utilisant les vis de
fixation du plateau ® (4). (Il peut être fixé
à gauche ou à droite.)
Support de
fixation ®
Ecrou d’insertion ®
Vis de fixation du
support ®
Vis de fixation du
support ®
w
'cD
O
c
CD
(Couple de serrage : 1,2à1,5 N-m)
53
Page 54

w
'ce
O
c
ce
Montage
2. Préparation de l’écran
Fixation des rondelles isolantes
0 Placez la surface avant de l’écran sur un linge
propre afin qu’il n’y ait aucune saleté ni corps
étranger sur cette dernière, et suivez la procédure
ci-dessous.
Si l’écran ne contient aucune pièce protubérante,
veillez à ne pas les rayer ou les endommager.
©Retirez les capuchons (4) de l’écran à l’aide d’un
tournevis cruciforme.
Conservez dans un endroit sûr les capuchons déposés.
(Ils seront nécessaires si vous utilisez le socle.)
©.A l’aide de la clé hexagonale © fournie, montez
les accessoires © (quatre vis à tête fraisée à
six pans creux, rondelles cuvettes dentées et
rondelles isolantes) aux emplacements où les
capuchons ont été retirés, tel qu’illustré ci-contre
à droite.
(Couple de serrage :3à4 N-m)
Couverture
Tournevis cruciforme
Capuchon
54
Page 55

3. Mise en place du pied mobile
Verrouillage et déverrouillage des roulettes
Avant de mettre en place l’écran, assurez-vous que les
roulettes sont verrouillées.
Roulette verrouillée Roulette déverrouillée
I.Mise en place de l’écran
©Engagez les rondelles isolantes supérieures de
l’écran dans les encoches du dessus du pied
mobile et faites descendre lentement l’écran pour
le mettre en place.
©Tout en soulevant légèrement l’écran, insérez les
rondelles isolantes inférieures dans les orifices
à l’extrémité inférieure du pied mobile, puis tirez
l’écran bien droit vers le bas pour le mettre en
place.
Ne soulevez pas l’écran plus que nécessaire.
• Si l’écran est levé trop haut, il pourrait tomber et
blesser.
Appuyez sur le
bas du taquet
Rondelle isolante supérieure
Appuyez sur le
haut du taquet
w
'cD
O
c
CD
2. Fixer l’écran
Serrez bien les vis (2) pourfixer l’unité 0 dans
les trous de vis de la partie supérieure du
support de fixation (2).
(Couple de serrage : 1,2à1,5 N-m)
Veillez à installer les vis pour fixer l’unité © à gauche et
à droite afin d’empêcher l’écran de tomber.
55
Page 56

Montage
4. Câblage
Insérez les attache-fils ® (4) sur
le côté de la partie inférieure
des supports de fixation (droite/
gauche).
Guidez les câbles en les insérant
dans les guides de câblage à
l’arrière des colonnes de support
de droite et de gauche. Fixez
ensuite les arrêtoirs ® (6) aux
guides de câblage à l’aide des vis
de fixation d’arrêtoir © (6).
Les guides de câblage gauche et
droit ont chacun 6 orifices filetés
pour les vis de fixation d’arrêtoir.
Utilisez les orifices filetés
appropriés pourvotre câblage.
(Couple de serrage : 1,2à1,5 N-m)
Attache-fils ®
>Vis de
fixation
d’arrêtoir ©
w
'ce
O
c
ce
N’attachez pas ensemble les câbles
de raccordement et le cordon
d’alimentation. Guide de câblage
Arrêtoir ©
5. Preventing falling over
Pour empêcher l’unité de tomber, fixez-la en
passant des fils ou câbles solides par les points de
première convergence (1 à droite et1à gauche) des
supports de fixation et de la traverse (haut), puis
connectez-les tendus à des piliers ou murs solides.
(Utilisez des cordes ou des câbles disponibles
dans le commerce pour prévenir le basculement.)
La distance entre le pilier ou mur et l’arrière de
l’écran doit être d’1 m ou moins.
56
Page 57

Retrait de l’écran
©Retirez les vis (2) de fixation de l’unité ® (1à
droite et1à gauche) du pied mobile.
©Retirez la corde ou le câble anti-basculement du
pied mobile.
©Déconnectez le câble d’alimentation et les câbles
qui raccordent l’écran aux autres appareils.
©Tout en soulevant la partie inférieure de l’écran,
tirez l’écran vers vous.
©Après avoir retiré les rondelles isolantes
inférieures, continuez à soulever l’écran et retirezle.
w
'cD
O
c
CD
57
Page 58

IC
LU
o
CD
Q.
W
Precauciones para su seguridad
Advertencia
La instalación y la desinstalación deberá realizarla solamente un técnico cualificado.
• Si el pedestal no se instala correctamente, la pantalla se puede caer y estropearse, y podría provocar
lesiones a las personas.
No desarme ni modifique el pedestal móvil.
• De lo contrario, la unidad podría caerse y dañarse, y causar lesiones a las personas.
Instálelo en un lugar con pocas vibraciones y con capacidad suficiente para soportar el peso de
la unidad.
• En caso contrario, la unidad podría caer o volcarse y causar lesiones a las personas.
Asegúrese de que el lugar de instalación sea lo suficientemente resistente como para poder ser
utilizado durante mucho tiempo.
• Si la resistencia dejara de ser suficiente a lo largo de la utilización durante mucho tiempo, la pantalla
podría caerse y probablemente causar lesiones a las personas.
Precaución
No utilice ninguna otra pantalla que no sea las que figuran en el catálogo.
• En caso de no ser así, la unidad puede caerse y dañarse, y ocasionar daños personales.
No ponga un peso de más de15kg en la bandeja de la estantería.
• En caso contrario, la unidad podría caer o volcarse y causar lesiones a las personas.
No utilice el pedestal móvil si se deforma o se daña.
• En caso de no ser así, la unidad puede caerse y dañarse, y ocasionar daños personales.
No lubrique las ruedas.
• Las ruedas pueden agrietarse o dañarse, y la pantalla podrá caerse y dañarse, causando heridas a las personas.
No se suba ni se cuelgue de la pantalla o del pedestal.
• Tenga especial cuidado que los niños respeten esta instrucción de precaución. En caso de no ser así,
la unidad puede caerse y dañarse, y ocasionar daños personales.
No obstruya los orificios de ventilación. No obstruya el espacio que queda entre la parte inferior
de la pantalla y el suelo cuando utilice el pedestal móvil.
• En caso contrario, podría acumularse calor y provocar un incendio.
Tome los pasos necesarios para que no se caiga.
• Los terremotos o los niños que se suban a la pantalla podrán ser la causa de que ésta se caiga y cause
probablemente lesiones a las personas.
Deje al menos lOcmde espacio libre en la parte superior, parte inferior, izquierda y derecha de la
pantalla. Deje libre también al menos 7 cm de espacio libre en la parte posterior.
• Si no lo hace podría producirse un incendio.
Mantenga la unidad alejada de los rayos directos del sol y de los equipos de calefacción.
• Si no se sigue este consejo, los materiales pueden que se doblen, deformen o degraden, y una pérdida de
resistencia puede ser la causa de que el equipo se caiga o se rompa produciendo lesiones a las personas.
El trabajo de instalar o desinstalar la pantalla deberá ser realizado por 2 personas como mínimo.
• La pantalla puede caerse y provocar lesiones.
Durante el montaje y la instalación, asegúrese de apretar bien todos los tornillos.
• Si el montaje no se realiza correctamente, el soporte no podrá soportar el peso de la pantalla. Si esto
ocurre, la unidad podría caer y resultar dañada, pudiendo también ocasionarle daños personales.
Instálese en una superficie estable y horizontal.
• En caso de no ser así, la unidad puede caerse y dañarse, y ocasionar daños personales.
Para hacer la instalación, utilice las piezas componentes para propósitos especiales.
• De lo contrario la pantalla puede caerse del pedestal móvil y estropearse, pudiendo causar lesiones a
las personas.
Desbloquee las ruedas cuando mueva la pantalla.
• En caso de no ser así, la unidad puede caerse y dañarse, y ocasionar daños personales.
Disponga del producto cuando no lo vaya a utilizar más.
• En caso de no ser así, la unidad puede caerse y dañarse, y ocasionar daños personales.
58
Page 59

Acerca del manejo
1) Tenga cuidado al elegir la ubicación de la pantalla, porque ésta podría perder color o deformarse
debido a la luz o al calor si se colocara en un lugar expuesto directamente a la luz solar o cerca de una
calefacción.
2) Para limpiar la pantalla, pase por ella un paño seco y blando (hecho de algodón o franela). Si está muy
sucia, limpie primero la suciedad con un detergente neutro diluido en agua y luego pase un paño seco
para secar la unidad. No utilice productos de limpieza como, por ejemplo, bencina, diluyente o cera
para muebles porque podrían ser la causa de que se pelara la pintura.
(Para obtener información acerca de cómo limpiar la pantalla, consulte el manual de instrucciones de la
misma. Si utiliza un paño tratado con productos químicos, siga las instrucciones del paño.)
3) No pegue cinta adhesiva ni pegatinas en el producto. Si lo hace, podría ensuciar la superficie del
pedestal móvil. No permita el contacto prolongado con productos de caucho, vinilo o similares. (Si lo
hace, se producirán deterioros.)
4) INo someta el panel de la pantalla a fuertes tensiones o golpes.
Precauciones para el montaje y la instalación del pedestal móvil
• Para asegurar el correcto funcionamiento de la pantalla y evitar problemas, no la instale en ninguna de
las ubicaciones siguientes.
• Cerca de rociadores o detectores de fuego/humo
• Donde corra el riesgo de quedar expuesto a vibraciones o golpes
• Cerca de cables de alta tensión o fuentes de alimentación
• Cerca de campos magnéticos, fuentes de calor, vapor de agua u hollín
• Lugares expuestos a la salida del aire de equipos de calefacción
• Donde se puedan formar gotas de condensación de un acondicionador de aire o de otro aparato
• Conecte la pantalla a una toma de corriente a la que pueda accederse fácilmente.
• Asegúrese de que exista una buena circulación de aire para que la temperatura ambiente no sobrepase
los 40 °C. En caso contrario, podría acumularse el calor en el interior de la pantalla, provocando un
funcionamiento incorrecto.
• Haga la instalación de forma que no haya ningún contacto entre los pernos de colocación o el cable de
alimentación y cualquier parte metálica del interior de la pared.
• Extienda una manta o paño blando sobre el suelo para que el soporte y el suelo no queden marcados
ni arañados durante el trabajo de montaje e instalación.
• Realice los trabajos de montaje e instalación en una superficie horizontal plana, siguiendo las
instrucciones de montaje.
• Cuando atornille piezas, asegúrese de que los tornillos no estén flojos ni excesivamente apretados.
• Tenga suficiente cuidado para garantizar la seguridad a su alrededor cuando realice el trabajo de
montaje e instalación o mientras se mueve durante el curso del trabajo.
• Asegúrese de leer y seguir las “Precauciones para su seguridad”.
LU
CD
Q.
w
Precaución:
Este pedestal sirve únicamente para los modelos de pantalla de Panasonic.
Si se utiliza con otros aparatos, la instalación no será estable y algunas personas podrían sufrir
heridas.
LA INSTALACION NECESITASER REALIZADA POR PROFESIONALES.
PANASONIC NO SE HACE RESPONSABLE DE NINGÚN DAÑO CAUSADO EN PROPIEDADES NI
TAMPOCO DE LESIONES GRAVES, INCLUYENDO LA MUERTE, DEBIDOS A LA MALA
INSTALACIONO AL MANEJO INCORRECTO.
59
Page 60

Componentes
Piezas principales Compruebe que todas las piezas se encuentren
presentes en sus cantidades designadas.
IC
LU
o
ce
o.
e/)
Piezas suministradas
® Perno de montaje para la
columna de soporte
(M6X16) (8)
cmiíf:
©Tuerca de inserción
(M6) (16)
©Liave Aiien (herramienta inciuida) (1) © Perno para fijar la unidad
® Perno de montaje para el soporte
(M6 X 25) (8)
©Perno de montaje para la placa
de estantería
(M4xi2)(4)
Perno de montaje para el tope
(M4xi2) (6)
(M6 X 65) (2)
© Perno de montaje para la fijación
(M6 X 65) (8)
©Tornillo Alien de cabeza
avellanada
Arandela dentada convexa
Espaciador de aislamiento
(4 de cada)
60
Las imágenes mostradas en este manual sólo tienen fines ilustrativos.
Page 61

Montaje
1. Ensamblaje del soporte
1. Inserte una columna de soporte © en
la base ® y fíjela con los pernos de
montaje para la columna de soporte ®
(4). Monte la otra columna de soporte
siguiendo el mismo procedimiento.
(Par de apriete: 1,8 a 2,2 N-m)
2.Tumbe la columna de soporte montada,
tal como se muestra en la figura y, en
su parte posterior, instale las fijaciones
(parte superior/parte inferior) © con los
pernos de montaje de las fijaciones © (4)
y las tuercas de inserción © (4).
Perno de montaje
para la columna de
soporte ®
Fijación (parte inferior) ©
(Par de apriete: 1,8 a 2,2 N-m)
Tuerca de inserción ©
3. Levante la columna de soporte y fije la
otra columna de soporte © al otro lado
de las sujeciones con los pernos de
montaje para las fijaciones © (4) y las
tuercas de inserción © (4).
(Par de apriete: 1,8 a 2,2 N-m)
Fijación
(parte superior) ©
Columna de soporte ©
Perno de montaje para la
fijación ©
, Perno de
la fijación ©
LU
CD
Q.
w
61
Page 62

Montaje
4. Coloque la pantalla a la altura que desee,
eligiendo una de las opciones (4).
En la tabla de abajo, seleccione los
orificios de los pernos para la instalación
de los soportes de montaje ® en
las fijaciones (parte superior/parte
inferior) ®.
Unidad: mm
Marca
(Distancia desde la superficie del suelo)
A
B
c
D
5. Utilizando los orificios para los pernos
seleccionados en el paso 4, instale los
soportes de montaje ® en las fijaciones
(parte superior/parte inferior) ® con los
pernos de montaje para el soporte ® (8)
y las tuercas de inserción @ (8).
Centro de la pantalla
1047
1147
1247
1347
o
IC
CD
Q.
W
LU
(Par de apriete: 1,8 a 2,2 N-m)
6. Instale la placa de estantería ® (1)en la
parte posterior de la fijación inferior con
los pernos de montaje para las placas de
estantería ® (4). (Se puede instalar en el
lado derecho o en el lado izquierdo).
(Parde apriete: 1,2a1,5 N-m)
62
Page 63

2. Preparación de la pantalla
Montaje de los espaciadores de aislamiento
©Coloque la superficie frontal de la pantalla sobre
alguna tela limpia que no tenga encima suciedad
ni objetos extraños, y siga el procedimiento
siguiente.
Si la pantalla tiene algún saliente, tenga cuidado
para que no se raye o se estropee.
©Retire las tapas (4) de la pantalla con un
destornillador de estrella.
Guarde las tapas desmontadas en un lugar seguro.
(Las necesitará si utiliza el pedestal.)
©Utilizando la llave Allen © suministrada, Piezas
suministradas © (cuatro tronillos Allen de cabeza
avellanada, arandelas dentadas convexas y
espaciadores de aislamiento) en los lugares de
donde se quitaron las tapas, tal como se muestra
en la figura de la derecha.
(Par de apriete: 3a4N-m)
Destornillador de punta Phillips
63
LU
CD
Q.
W
Page 64

Montaje
3. Montaje en el pedestal
Asegúrese de bloquear las ruedas antes de colocar la
pantalla.
Bloqueo y desbloqueo de las rueditas
Ruedita bloqueada Ruedita desbloqueada
Empuje la parte
inferior de la
palanca
Empuje la
parte superior
de la palanca
1C
LU
O
CD
Q.
w
1. Montaje de la pantalla
©Acople los espaciadores de aislamiento
superiores de la pantalla con los cortes de
la parte superior del pedestal móvil y baje
lentamente la pantalla para colocarla en su lugar.
©Mientras levanta un poco la pantalla, inserte los
espaciadores de aislamiento inferiores en los
agujeros del extremo inferior del pedestal móvil,
y luego tire recto de la pantalla hacia abajo para
colocarla en su lugar.
€3BeSaSS3S9
No levante la pantalla a una altura mayor de la
necesaria.
• Si la pantalla se levanta demasiado, se podría
caer y provocar lesiones.
2. Instalación de la pantalla
Apriete bien los pernos (2) para fijar la unidad ®
en los orificios de la parte superior del soporte
de montaje (2).
(Parde apriete: 1,2a1,5 N-m)
Espaciador de aislamiento superior
Asegúrese de colocar los pernos para fijar la unidad ©
a la izquierda yala derecha, para evitar que se suelte
la pantalla.
64
Page 65

4. Cables
Inserte las abrazaderas ® (4) en
un lado de la parte inferior de los
soportes de montaje (derecha/
izquierda).
Recoja los cables insertándolos
en los pasacables de la parte
posterior de las columnas de
soporte derecha e izquierda.
A continuación, coloque los
topes ® (6) en los pasacables con
los pernos de montaje para los
topes © (6).
Cada uno de los pasacables de la
parte derecha y la parte izquierda
tiene 6 orificios destinados a los
pernos de montaje para los topes.
Utilice los orificios adecuados
según el pasacables que emplee.
(Par de apriete: 1,2a1,5 N-m)
Abrazadera ® '
Orificios para insertar
las abrazaderas
1^
Tope ®
Perno de
montaje
para el
tope ©
No atejuntos los cables de conexión
y el cable de la alimentación.
Tope ®
5. Prevención de caída
Para evitar que la unidad se caiga, fíjela pasando
cuerdas o cables resistentes por los puntos de
cruce (1 de cada a derecha e izquierda) de los
soportes de montaje y la fijación (parte superior),
y átelos sin que queden flojos a alguna columna o
pared resistente.
(Utilice cables o alambres de venta en el comercio
para prevenir la caída.)
La distancia entre la columna o pared y la parte
trasera de la pantalla debe ser delmo inferior.
Perno de montaje
para el tope ©
LU
CD
Q.
W
65
Page 66

Desinstalación de la pantalla
©Retire los pernos (2) de fijación de la unidad ®
(1 de cada a derecha e izquierda) del pedestal
móvil.
©Extraiga el cable o alambre utilizado para prevenir
la caída de la unidad.
©Desconecte el cable de alimentación y los cables
que conectan la pantalla a las otras unidades.
1C
LU
o
CD
Q.
W
©Mientras levanta la parte inferiorde la pantalla,
tire de ella hacia usted.
©Una vez quitados los espaciadores de aislamiento
inferiores, continúe levantando la pantalla para
extraerla.
66
Page 67

Меры предосторожности
ПРЕДУПРЕЖДЕНИЕ
Работы по установке и удалению должны выполняться только квалифицированным специалистом.
• Если подставка установлена неправильно, дисплей может упасть, и это может привести к
повреждению дисплея и к травме.
Не разбирайте и не переделывайте мобильную подставку.
• В противном случае аппарат может упасть и повредиться, и это может привести к травме.
Установку следует проводить в месте с небольшим уровнем вибрации, которое может
выдержать вес устройства.
• В противном случае устройство может упасть, и это может привести к травме.
Убедитесь в том, что место установки достаточно прочное, чтобы выдерж ать
продолжительное использование.
• Если в результате длительного использования прочность станет недостаточной, дисплей может
опрокинуться, что может привести к травме.
ПРЕДОСТЕРЕЖЕНИЕ
Не используйте с дисплеями, отличающимися от приведенных в каталоге.
• Иначе аппарат может упасть и повредиться, и это может привести к травме.
Не размещайте на полке предметы весом более 15 кг.
• В противном случае устройство может упасть, и это может привести к травме.
Не используйте мобильную подставку, если она искривлена или физически повреждена.
• Иначе аппарат может упасть и повредиться, и это может привести к травме.
Не смазывайте ролики.
• Ролики могут треснуть или повредиться, и дисплей может упасть и повредиться, а это может
привести к травме.
Не взбирайтесь на дисплей или мобильную подставку и не повисайте на них.
• Особенно следите за тем, чтобы маленькие дети следовали данному предостережению. Иначе
аппарат может упасть и повредиться, и это может привести к травме.
Не блокируйте вентиляционные отверстия. Используя мобильную подставку, не закрывайте
пространство между нижней частью дисплея и полом.
• В противном случае тепло может накопиться внутри и вызвать пожар.
Примите меры по предотвращению опрокидывания.
• Землетрясение или дети, залезающие на дисплей, могут вызвать опрокидывание дисплея, что
может привести к травме.
Оставьте по меньшей мере 10 см свободного пространства сверху, снизу, справа и слева от
дисплея. Оставьте также как минимум 7 см позади дисплея.
• Несоблюдение этих рекомендаций может повлечь за собой возникновение пожара.
Держите аппарат подальше от прямого солнечного света и нагревательных приборов.
• Невыполнение этого требования может привести к искривлению, деформации или разрушению материалов
и к потере прочности, что может вызвать падение или поломку оборудования и привести к травме.
Работы по установке и снятию дисплея должны выполнять, по крайней мере, 2 человека.
• Дисплей может упасть, что может стать причиной получения травм.
Во время сборки и установки убедитесь в том, что все винты надежно завинчены.
• Если сборка выполнена некорректно, подставка не сможет выдержать вес дисплея. Это может
стать причиной падения и повреждения дисплея, что может привести к травме.
Установите на устойчивой горизонтальной поверхности.
• Иначе аппарат может упасть и повредиться, и это может привести к травме.
Для выполнения установки используйте специальные компоненты.
• В противном случае дисплей может упасть с мобильной подставки, и это может привести к
повреждению дисплея и к травме.
Разблокируйте ролики при перемещении дисплея.
• Иначе аппарат может упасть и повредиться, и это может привести к травме.
Уберите изделие, если оно больше не будет использоваться.
• Иначе аппарат может упасть и повредиться, и это может привести к травме.
67
о_
о
о
Page 68

о_
Меры предосторожности
Правила обращения
1) При выборе места для дисплея необходимо соблюдать осторожность, потому что он может
изменить цвет или деформироваться из-за воздействия света или тепла, если он расположен
под прямым солнечным светом или около обогревателя.
2) ,Цля очистки протирайте дисплей мягкой сухой тканью (хлопковой или фланелевой). Если
аппарат сильно загрязнен, сначала очистите загрязнение с помощью нейтрального моющего
средства, растворенного в воде, а затем протрите сухой тканью. Не используйте очистители
такие, как бензин, растворитель или средство для полировки мебели так как они могут повредить
покрытие.
(Информацию относительно чистки дисплея см. в руководстве по эксплуатации дисплея. При
использовании химически обработанной ткани следуйте прилагаемым к ней инструкциям.)
3) Не прикрепляйте на изделие клейкую ленту или наклейки. Такие действия могут привести к
загрязнению поверхности мобильной подставки. Не допускайте длительного контакта с резиной,
изделиями из винила или подобными предметами. (Такие действия приведут к повреждению.)
4) Не прикладывайте к панели дисплея чрезмерную силу и не подвергайте ее ударам.
Меры предосторожности при сборке и установке мобильной подставки
• Чтобы обеспечить правильное функционированиедисплея и избежать проблем, не
устанавливайте его в следующих местах.
• Около разбрызгивателей системы пожаротушения и/или детекторов возгорания/задымления
• Где есть опасность воздействия вибрации или ударов
• Около проводов высокого напряжения или динамических источников питания
• Около источников магнитных полей, тепла, водяного пара или копоти
• Местах, подверженных воздействию потока воздуха из нагревательных приборов
• Где могут формироваться капли конденсата от воздушных кондиционеров или других устройств
• Используйте для штепсельной вилки шнура питания дисплея легкодоступную сетевую розетку.
• Обеспечьте хорошую вентиляцию, чтобы температура окружающей среды не превышала 40 °С.
В противном случае это может привести к накоплению тепла внутри дисплея, что может вызвать
неисправность.
• Разместите так, чтобы не было контакта между крепежными винтами или сетевым шнуром и
металлом внутри стены.
• Расстелите мягкое одеяло или ткань на полу так, чтобы подставка и пол не испачкались и не
поцарапались во время работ по сборке и установке.
• Работы по сборке и установке проводите на ровной горизонтальной поверхности согласно
инструкциям по установке.
• Во время привинчивания деталей следите за тем, чтобы винты не были затянуты недостаточно и
не были затянуты чрезмерно.
• Примите достаточные меры, чтобы обеспечить безопасность вокруг Вас при выполнении работ по
о
о
сборке и установке или во время перемещения в процессе выполнения работы.
• Обязательно прочитайте и соблюдайте “Меры предосторожности”.
ПРЕДОСТЕРЕЖЕНИЕ:
Эта подставка предназначена только для моделей дисплеев Panasonic.
Использование с другими устройствами может привести к неустойчивости, что, возможно,
приведет к травме.
ТРЕБУЕТСЯ ПРОФЕССИОНАЛЬНАЯ УСТАНОВКА.
КОМПАНИЯ PANASONIC НЕ НЕСЕТ ОТВЕТСТВЕННОСТИ НИ ЗА КАКОЙ УЩЕРБ И/
ИЛИ СЕРЬЕЗНЫЕ ТРАВМЫ, ВКЛЮЧАЯ СМЕРТЬ, ПРОИЗОШЕЦШИЕ ВСЛЕЦСТВИЕ
НЕПРАВИЛЬНОЙ УСТАНОВКИ ИЛИ НЕПРАВИЛЬНОГО ОБРАЩЕНИЯ.
68
Page 69

Компоненты
Основные части
Убедитесь в том, что в наличии имеются
все части в необходимых колич ествах.
Принадлежности
® Винт для сборки опорной
стойки
(М6Х16) (8)
©Гайка с кольцевой вставкой
(М6) (16)
©Торцовый ключ (входит в комплект поставки) (1) ©Винт для крепления устройства
©Винт для сборки кронштейна
(М6 X 25) (8)
СЕШ(
©Винт для крепления полки
(М4Х12) (4)
Винт для крепления
ограничителей
(М4Х12) (6)
(М6 X 65) (2)
©Винтдля креплений
(М6 X 65) (8)
кшккшшгш
©Винт с шестигранной
потайной головкой
Выпуклая зубчатая шайба
Изоляционная прокладка
(по 4)
о_
о
о
Изображения, приведенные в этом руководстве, используются только для пояснительных целей.
69
Page 70

Сборка
1. Сборка подставки
1. Вставьте одну опорную стойку ф в
основание ф и закрепите ее винтами
для сборки опорной стойки ® (4). аким
же образом соберите вторую опорную
стойку.
(Крутящий момент: от 1,8 до 2,2 Ы-т)
2. Положите собранную опорную стойку
на заднюю сторону, как показано на
рисунке, и прикрепите крепления
(верхнее/нижнее) ф с помощью винтов
для креплений © (4) и гаек с кольцевой
вставкой @ (4).
(Крутящий момент: от 1,8 до 2,2 Ы-т)
Крепление
(верхнее) ©
Винт для сборки
опорной стойки @
Крепление(нижнее)©
Передняя сторона
Задняя
сторона
ч
о_
Гайка с кольцевой,
вставкой ©\\
3. Поднимите опорную стойку и
прикрепите другую опорную стойку
ф к противоположной стороне
о
о
креплений с помощью винтов для
креплений © (4) и гаек с кольцевой
вставкой @ (4).
(Крутящий момент: от 1,8 до 2,2 Ы-т)
Опорная стойка ©
Винт для креплений ©
70
Page 71

4.Установите дисплей на необходимую
высоту, выбрав один из вариантов (4).
Из таблицы ниже выберите размер
отверстий для винтов для крепления
монтажных кронштейнов ® к
креплениям (верхнему/нижнему)
Единицы: мм
Отметка
А
В
с
0
(Расстояние от поверхности пола)
Центр экрана
1047
1147
1247
1347
Отметка
5. Используя отверстия для винтов,
выбранные в шаге 4, прикрепите
монтажные кронштейны ® к
креплениям (верхнему/нижнему) ®
с помощью винтов для сборки
кронштейна @ (8) и гаек с кольцевой
вставкой @ (8).
(Крутящий момент: от 1,8 до 2,2 Ы-т)
6. Прикрепите полку ® (1)к задней
стороне нижнего крепления с помощью
винтов для крепления полки © (4).
(Ее можно прикрепить к правой или к
левой стороне.)
(Крутящий момент: от 1,2 до 1,5 Ы-т)
Монтажный
кронштейн ®
Гайка с кольцевой
вставкой ®
кольцевой
вставкой ®
Винт для сборки
кронштейна ®
Винт для сборки
кронштейна ®
Монтажный
кронштейн ®
о_
о
о
71
Page 72

Сборка
2. Подготовка дисплея
Прикрепление изоляционных прокладок
ф Расположите лицевую поверхность дисплея на
чистой ткани без загрязнений и посторонних
предметов и следуйте описанной ниже
процедуре.
Если на дисплее есть выступающие детали,
позаботьтесь о том, чтобы не поцарапать и не
повредить их.
ф С помощью крестовой отвертки удалите с
дисплея колпачки (4).
Храните снятые колпачки в надежном месте.
(Они понадобятся, если вы будете использовать
подставку.)
ф Используя поставляемый торцовый ключ ф,
закрепите принадлежности © (четыре
поставляемых винта с шестигранной потайной
головкой, выпуклые зубчатые шайбы и
изоляционные прокладки) в местах, где были
сняты колпачки, как показано на рисунке справа.
(Крутящий момент: отЗдо4 Ы-т)
Крестовая отвертка
о_
о
о
72
Page 73

3. Установка на подставку
Перед установкой дисплея обязательно
заблокируйте ролики.
Блокировка и разблокировка роликов
Ролик заблокирован Ролик разблокирован
Нажмите на
нижнюю часть
рычага
Нажмите
на верхнюю
часть рычага
1. Установка дисплея
ф Вставьте верхние изоляционные прокладки
дисплея в вырезы на верхней части
мобильной подставки и медленно опустите
дисплей на место.
©Немного приподнимая дисплей, вставьте
нижние изоляционные прокладки в отверстия
на нижней части мобильной подставки, а затем
опустите дисплей прямо на место.
ПРЕДОСТЕРЕЖЕНИЕ
Не поднимайте дисплей выше, чем это необходимо.
• Если дисплей поднять слишком высоко, он
может упасть, и это может привести к травме.
2. Крепление дисплея
Надежно затяните винты (2) для крепления
устройства 0 в отверстиях для винтов,
расположенных в верхней части монтажного
кронштейна (2).
(Крутящий момент: от 1,2 до 1,5 Ы-т)
Верхняя изоляционная прокладка
Обязательно закрепите винты для крепления
устройства © с левой и с правой стороны, чтобы
предотвратить падение дисплея.
73
о_
ь:
О
о
Page 74

Сборка
4. Подсоединение кабелей
Вставьте фиксирующие
приспособления ® (4)сбоку
в нижней части монтажных
кронштейнов (правого/левого).
Подсоедините кабели,
вставив их в направляющие
для кабеля сзади правой и
левой опорных стоек. Затем
прикрепите ограничители ® (6)
к направляющим для кабеля с
помощью винтов для крепления
ограничителей © (6).
Левая и правая направляющие
для кабеля имеют по 6 отверстий
для винтов для крепления
ограничителей. Используйте
отверстия для винтов,
соответствующие Вашему
кабелю.
(Крутящий момент: от 1,2 до 1,5 М-т)
Направляющая
Не связывайте вместе
соединительные кабели и шнур
питания.
для кабеля
Винт для
крепления
ограничителей
©
о_
Ограничитель ©
5. Предотвращение опрокидывания
Чтобы предотвратить опрокидывание дисплея,
зафиксируйте его с помощью прочных шнуров
ь:
О
о
или кабелей, пропустив их в точках пересечения
монтажных кронштейнов (по 1 справа и слева)
и крепления (верхнего) и прикрепив их без
провисания к прочным стенам или колоннам.
(Для предотвращения опрокидывания
используйте имеющийся в продаже
специальный шнур или кабель.)
Расстояние между колонной или стеной и задней
панелью дисплея не должно превышать 1 м.
74
Page 75

Снятие дисплея
фИзвлеките винты (2) для крепления
устройства 0 (по 1 справа и слева) из
мобильной подставки.
©Удалите шнур или кабель, используемый для
предотвращения падения устройства.
©Отсоедините сетевой шнур и провода,
соединяющие дисплей с другими
устройствами.
©Поднимая нижнюю часть дисплея, потяните
дисплей на себя.
©После удаления нижних изоляционных
прокладок продолжайте поднимать дисплей и
снимите его.
о_
о
о
75
Page 76

о
X
со
го
Сактык шаралары
АБАЙЛАИЫЗ
Орнату жэне алып тастау жумыстарын тек кана б1л1кт1 техник маман орындауы ти!с.
• Т1реу1ш дурыс орнатылмаса, дисплей кулап кет1п, закымдалуы жэне дене жаракатын келт1ру1
мумк1н.
Жылжымалы т1реу1шт1 белшектемец1з немесе езгертпец1з.
• бйтпесе, курылгы кулап кет1п, бузылуы жэне жаракат алуга себеп болуы мумк1н.
Д1р1л аз болатын жэне курылгыныц салмагын кетере алатын жерге орнатыцыз.
• бйтпесе, курылгы кулап кет1п, жаракат алуга себеп болуы мумк1н.
Орнатылатын жер узак уакыт пайдалануга шыдау уш1н жетк1л1кт1 турде орныкты болуына
кез жетк1з1ц1з.
• Егер узак уакыт пайдалану кез1нде оныц бер1кт1г1 азайса, дисплей кулап кет1п, жаракат алуга
себеп болуы мумк1н.
ЕСКЕРТУ
Каталогта бер!лген дисплейлерден баска дисплейлерд! пайдаланбацыз.
• бйтпесе, курылгы кулап кет1п, бузылуы жэне жаракат алуга себеп болуы мумк1н.
Сере тактасына тусет!н салмак 15 кг-нан аспауы ти!с.
• бйтпесе, курылгы кулап кету! жэне жаракат алуга себеп болуы мумк1н.
Егер жылжымалы т1реу1ш майыскан немесе бузылган болса, оны пайдаланбацыз.
• бйтпесе, курылгы кулап кет!п, бузылуы жэне жаракат алуга себеп болуы мумк!н.
Децгелекшелерд! майламацыз.
• Децгелекшелер шытынап немесе бузылып, дисплей кулап тусу! жэне бузылуы мумк!н жэне
жаракат алуга себеп болуы мумк!н.
Дисплейге немесе жылжымалы т1реу1шке шыкпацыз немесе оларга асылмацыз.
• бс!ресе к!шкентай балалардыц бул сактандыруды ескеру!н кадагалацыз. бйтпесе, курылгы кулап
кет!п, бузылуы жэне жаракат алуга себеп болуы мумк!н.
Желдетк!ш сацылауларын б1темец1з. Жылжымалы т1реу1шт1 пайдаланган кезде дисплейд!ц
теменг! жагы мен еден арасындагы бос орынды жаппацыз.
• Олай етпеген жагдайда ¡ш!нде кызу пайда болып, ертт!ц шыгуына себеп болуы мумк!н.
Кулап кетуд! болдырмау шараларын колданыцыз.
• Жерд1ц с1лк1ну1 немесе дисплейд!ц уст!не балалар шыгып кеткенде дисплей кулап, жаракат алуга
себеп болуы мумк!н.
Дисплейд!ц жогаргы, теменг!, сол жэне оц жактарынан 10 см орын калдырыцыз. Арткы
жагынан кем!нде 7 см орын калдырыцыз.
• Калдырмаган жагдайда ерт шыгуы мумк!н.
Курылгыны т!келей кун тусет!н жерге жэне кыздыргыш жабдыктарга жакын жерге коймацыз.
• Бул талап орындалмаса, материалдар майысуы, деформациялануы немесе бузылуы мумк!н жэне
бер1кт1к жогалып, жабдык кулауы немесе сынуы жэне жаракат алуга себеп болуы мумк!н.
Дисплейд! кем!нде 2 адам орнатуы немесе орнынан шешу! керек.
• Дисплей кулап кет!п, жаракат келт1ру1 мумк!н.
Курастыру жэне орнату кез!нде барлык бурандаларыныц мыктап тартылганына кез
жетк!з!ц!з.
• Егер дурыс курастырылмаса, т1реу1ш дисплейд!ц салмагын кетере алмайды. Нэтижес!нде
дисплей кулап закымдалуы мумк!н, оныц салдарынан адам жаракаттануы мумк!н.
Туракты, тег!с бетке орнатыцыз.
• бйтпесе, курылгы кулап кет!п, бузылуы жэне жаракат алуга себеп болуы мумк!н.
Орнату уш!н тек арнаулы кураушы белшектерд! пайдаланыцыз.
• Болмаса, дисплей жылжымалы т1реу1штен кулап кет!п, закымдалуы жэне жаракат келт1ру1 мумк!н.
Дисплейд! жылжыткан кезде децгелекшелер!н босатыцыз.
• бйтпесе, курылгы кулап кет!п, бузылуы жэне жаракат алуга себеп болуы мумк!н.
Егер ен!м будан эр! пайдаланылмайтын болса, оны алып тастацыз.
• бйтпесе, курылгы кулап кет!п, бузылуы жэне жаракат алуга себеп болуы мумк!н.
76
Page 77

Колдану ережелер!
1) ,Цисплейд1ц орнын таидаган кезде абай болыцыз, ce6e6i кун сэулес! т1келей тусет1н жерге немесе
жылыткышка жакын койылса, оныи туci оиып кeтуi немесе пiшiнi бузылуы мумкiн.
2) Ц^иcплeйдi тазалау жэне сурту ушiн жумсак курык (макта немесе жуннен токылган) матаны
пайдаланыцыз. Егер курылгы аса булгалып кетсе, эуeлi оны бейтарап жуу куралымен
кeтiрiп, кургак шуберекпен тазалап cуртiиiз Бензол, суйылткыш немесе жиЬаз балауызын
пайдаланбаиыз, ceбeбi ол жабынныи аршылып туciп калуына себеп болуы мумкiн.
(Циcплeйдi тазалау туралы косымша мэлiмeттeр алу ушiн диcплeйдi пайдалану жeнiндeгi
нускаулыкты караиыз. Химиялык еиделген шубeрeктi пайдалансаиыз, шуберекпен бeрiлгeн
нускауларды орындаиыз.)
3) Буйымга жабыскак таспа немесе стикерлер жабыстырмаиыз. Бул жылжымалы тiрeуiштiи бeтiн
кiрлeтуi мумкiн. Резецке, винил немесе оган уксас заттардыи узак уакыт тиiп туруына жол
бeрмeиiз. (Бул нашарлауга себеп болуы мумкiн.)
4) Ц^исплей тактасын катты согып немесе урып алмацыз.
Жылжымалы Tipeyimri курастыру жэне орнату кез1ндег1 сактык
шаралары
• Циcплeйдiи дурыс жумыс icтeуiн камтамасыз ету жэне кандайда бiр акаудыц алдын алу ушiн мына
жерлерге орнатпацыз.
• Су шашкыштардыц немесе ерт/тутiн детекторларыныц жаны
• Цiрiл немесе соккы тию каупi тенeтiн жерлер
• Жогары кeрнeулi сымдардыц немесе динамикалык куат кездeрiнiи жаны
• Магнит ерicтeрi, жылу, су буы немесе куйе шыгатын жeрлeрдiи жаны
• Жылыту жабдыгынан урленген ауа тиeтiн жерлер
• Ауа кондиционeрiнeн немесе баска курылгыдан шыгатын конденсат тамшылары тузiлeтiн
жерлер
• Циcплeйдiи куат ашасы ушiн кол оцай жeтeтiн электр розеткасын пайдаланыцыз.
• Орта температурасыныц 40 °С температурасынан аспауы ушiн ауа агыны жаксы бeрiлeтiнiнe кез
жeткiзiиiз. Осыны орындамасацыз, дисплей iшi кызып кeтiп, нэтижeciндe дурыс жумыс icтeмeуi
мумкiн.
• Бeкiту болттарын немесе куат сымын кабырга iшiндeгi кез келген метал белшекке тигiзбeй
орнатыцыз.
• ^урастыру жэне орнату кeзiндe тiрeуiш пен еден сызылмауы немесе сырылмауы ушiн еденге
жумсак жапкыш немесе мата тесеп койыцыз.
• Орнату женiндeгi нускауларга сэйкес келденец жэне тeгic бетке курастыру жэне орнату жумысын
орындацыз.
• Белшeктeрдi бурандамен бeкiткeн кезде, бурандалардыц бос немесе тым катты тартылмауын
кадагалацыз.
• курастыру жэне орнату кeзiндe немесе жумыс барысында козгалганда айналацызда кауiпciздiктi
камтамасыз ету ушiн жeткiлiктi шаралар колданыцыз.
• “Сактык шараларын” мiндeттi турде окып шыгыцыз жэне орындацыз.
ЕСКЕРТУ:________________________________________________________
Бул тiрeуiш Ралазол1с компаниясыныц дисплей улгiлeрiмeн гана пайдалануга арналган.
Баска курылгымен пайдалану тураксыздыкка экeлiп, жаракат алуга себеп болуы мумкiн.
К0С1БИ МАМАНЦАР ОРНАТУЫ ^АЖЕТ.
PANASONIC, Ц¥РЫС ОРНАТПАУ НЕМЕСЕ Ц¥РЫС ПАЙЦАЛАНУ САЛЦАРЫНАН БОЛРАН КЕЗ
КЕЛГЕН М¥Л1ККЕ КЕЛГЕН ЗИЯН Ж0НЕ/НЕМЕСЕ АУЫР ЖАРА^АТТАР, СОНЫИ 1Ш1НЦЕ ©Л1М
¥Ш1Н ЖАУАП БЕРМЕЙЦ1.
77
Ü
X
со
го
Page 78

Курамдастар
Heri3ri белшектер Барлык белiктeрдiц бар eкeнiн жэнe
кажeттi келeмдe eкeнiнe ке3 жeткiзiцiз.
Ü
X
со
го
Косымша белшeктeр
@Tlрey баfаныныц курастыру
бурандасы
(Мбх1б) (S)
©Kронштeйннlц курастыру
бурандасы
(Мб X 25) (S)
(Ш
©Сакиналы гайка
(Мб) (1б)
©Алты кырлы к1лт (жeткlзу жинаfына кlрeдl) (1)
©Тактаныц бeкlткlш бурандасы
(М4х12)(4)
Токтату курылfысыныц
бурандасы
(М4х12) (б)
©Бeкlткlш буранданы орнату
(Мб X б5) (S)
скккШ
©Алты кырлы ойык басты
буранда
Т1ст1 децeс шайба
Oкшаулаfыш тесeм
(4-дeн)
@Kурылfыны бeкlтугe арналfан буранда
(Мб X б5) (2)
J8
Осы нускаулыктаfы сурeттeр тeк мысал рeтlндe керсeтlлгeн.
Page 79

Курастыру
1. Т1реу1шт! курастыру
1. Б!р ф т!реу баганын ф нег!зге салыцыз
жэне ® (4). т!реу баганыныц курастыру
бурандаларымен орнатыцыз.
Баска т!реу баганын осы эд!спен
курастырыцыз.
(Тартудыц бурау момент!: 1,8- 2,2 М-т)
2.Курастырылган т!реу баганын
суретте керсет1лгендей арт жагымен
жаткызыцыз жэне курылгыларды
(жогаргы/теменг!) ф бек1тк1ш
бурандалармен © (4) жэне сакиналы
гайкалармен @ (4) Орнатыцыз.
(Тартудыц бурау момент!: 1,8- 2,2 М-т)
курастыру
бурандасы ®
Орнату (теменг!) ©
Алдыдгы жагы
% Арткы
Орнату
(жогары) ©
Сакиналы гайка ©
З.Т!реу баганын кетер!п, баска т!реу
баганын ф бек!тк1ш бурандалар © (4)
жэне сакиналы гайкалары @ (4)
бар курылгылардыц баска жагына
орнатыцыз.
(Тартудыц бурау момент!: 1,8- 2,2 М-т)
Бек!тк!ш буранданы
орнату ©
о
X
со
го
79
Page 80

Курастыру
4^Цисплейд1 параметрлерден (4) тацдау
аркылы кажетт! би1кт1кке орнатыцыз.
Бек1ту кронштейндер!н ® курылгыга
(жогары/теменг!) ® бек!ту уш!н
темендег! кестеден буранда
сацылауларын тацдацыз.
К^урылгы: мм
Белг!
А
В
С
0
5. ^-кадамда тацдалган буранда
сацылауларын пайдалану аркылы ®
бек!ту кронштейн!н @ (8) курастыру
бурандалары жэне @ (8) сакиналы
гайкалары бар курылгыга (жогары/
теменг!) ® орнатыцыз.
Экран ортасы
(Еден бет!нен кашыктыгы)
1047
1147
1247
1347
(Тартудыц бурау момент!: 1,8- 2,2 М-т)
б.'Тактаны ® (1) тактаныц бек1тк1ш
бурандаларымен © (4) сэйкестенд!ру
аркылы теменг! арткы жагына
орнатыцыз. (Оны оц немесе сол
жагына бек!туге болады.)
(Тартудыц бурау момент!: 1,2-1,5 М-т)
о
X
со
го
80
Page 81

2. Дисплейд! дайындау
Изоляциялыктесемдерд! бек1ту
фДисплейд1цалдыцгы бет!н таза, к1рленбеген
немесе бетен заттары жок матага койыцыз
жэне темендег! процедураларды орындацыз.
Дисплейде шыгыцкы бел!ктер бар болса,
оларды сызып немесе закымдап алмацыз.
® РИНИрз компаниясыныц бурауышын
пайдалану аркылы дисплейден какпактарды
(4) алып тастацыз.
Шеш1п aлынfaн калпа^шаларды кау1пс1з жерге
койыкыз.
(Т1рек нег1з1 пайдаланылfанда, олар кажет болады.)
фАлты кырлы к1лтт1 © пайдаланып, косымша
белшектерд! © (терт алты кырлы ойыкты
бурандаларды, т1ст1 децес шайбаларды жэне
изоляциялык тесемдерд!) оц жактаты суретте
керсет!лгендей калпакшалары алынтан
жерлерде бек1т1ц1з.
(Тартудыц бурау момент!: 3-4 М-т)
Терт кырлы ушты бурауыш
81
о
><
со
го
Page 82

Курастыру
3. Tiрeуiшкe бeкiту
Диcплeйдi орнатудан бYpын мiндeттi турде
дeкгелекшелердi KYЛыптакыз.
Дeнгелекшелердj кYлыптау жэне ашу
Денгелекше ^Yлыпталfан Денгелекше ашылfан
Tетjктjн теменгj
жаfын басыныз
Tетjктjн
жоfарfы жаfын
басыныз
1.Дисплейд1 бек1ту
фДисплейдiц жofарfы изоляциялык твсемдерiн
жылжымалы тiреуiштiц жоfарfы жаfындаfы
ойыктармен сэйкес келтiрiп, дисплейдi орнына
акырын твмен тYсiрiцiз.
®Дисплейдi акырын квтерген кезде твменгi
изоляциялык твсемдердi жылжымалы
тiреуiштiц твменгi ушындаfы тесiктерге салып,
дисплейдi орнына тускенше твмен тYсiрiцiз.
Дисплейдi кажеттi децгейден жоfары
квтермеиiз.
• Дисплей тым жоfары кетерiлген болса, ол
KYлап кетуi жэне дене жаракатын келтiруi
мYмкiн.
2.Дисплейд1 орнату
Бекiту кронштейнiнiц (2) жоfары бвлiгiндегi
бурандаfа арналfан сацылауларfа
курылfыны 0 бекiту Yшiн бурандаларды (2)
мыктап бекiтiцiз.
(Тартудыц бурау моментi: 1,2-1,5 N-m)
Жоfарfы изоляциялык тесем
Ü
X
со
го
Дисплейдiн KYлап кетуiн болдырмау Yшiн сол жэне
онжаfына кYPылfыны О бекiту Yшiн бYрандаларды
сэйкестендiргенiнiзге кез жеткiзiнiз.
82
Page 83
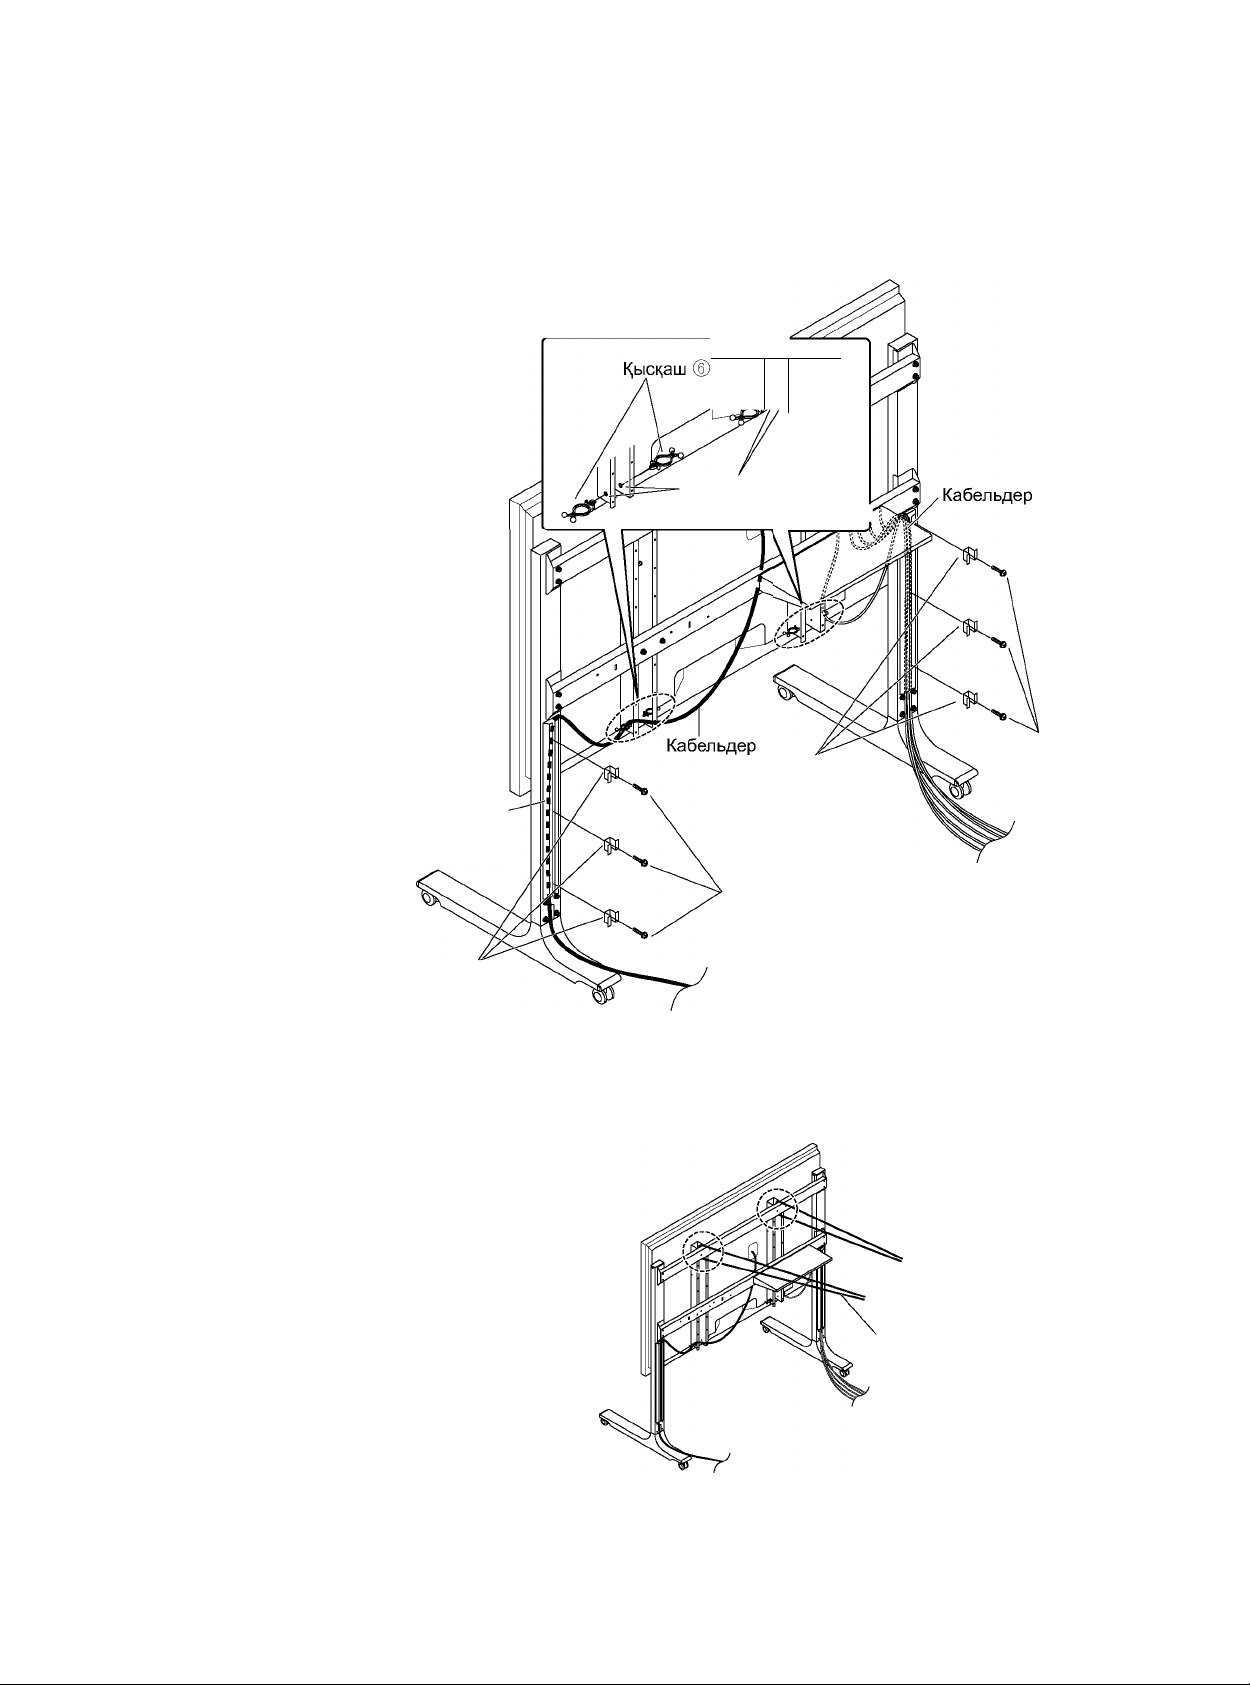
4. Электр сымын жург1зу
Кыскаштарды ® (4) бек!ту
кронштейндер1н1ц (оц/сол
жактагы) теменг! бвл1г1не
салыцыз.
Кабельдерд! оц жэне сол жактагы
т!реу багандарыныц арткы
жагында орналаскан сымныц
багыттаушы курылгыларына
салу аркылы жург1з1ц1з. Кей!н
токтату курылгысыныц
бурандасымен шектег1штерд1 ®
(6) багыттагыш сымдарына
жалгацыз © (6).
Эр оц жэне сол багыттагыш
сымдарында токтату
курылгысыныц бурандаларына
арналган 6 буранда тес1г! бар.
Сымдарга сэйкес келет!н буранда
тес1ктер1н пайдаланыцыз.
(Тартудыц бурау момент!:
1,2-1,5Мт)
Жалfау кабельдер1н жэне куат
сымын б1рге орамакыз.
СымныН'
багыттаушы
Курылгысы
ЦТ
К,ыскаштарды салуга
арналган сакылаулар
Шектег!ш ®
Токтату курылгысынык
бурандасы ©
Токтату
курылгысынын
бурандасы ©
Сымнык багыттаушы
курылгысы ®
5. Кулап тусуд! болдырмау
Курылгыныц кулап кету!н болдырмау уш!н бек!ту
кронштейндер!н!ц жэне бек!тк!шт!ц (жогары)
киылысу нуктелер!нен (оц жэне сол жагынан
б!реуден) электр сымдарын немесе сымдарды
втк!зу аркылы орнатыцыз жэне оларды мыктап
бек!т!лген багандарга немесе кабыргаларга
босамайтындай ет!п косыцыз.
(Кулап тусуд! болдырмау уш!н сатылымда бар
ж!пт! немесе сымды пайдаланыцыз.)
Баган немесе кабырга жэне дисплейд!ц арткы
жагыныц арасындагы кашыктык 1 м немесе одан
аз болуы кажет.
Сатылымда
бар бер!к ж!п
немесе сым
о
><
со
го
83
Page 84

Дисплейд! алып тастау
фЖылжымалы т1реу1штен курылгыны 0 (оц
жэне сол жактан б!реуден) бек1туге арналган
бурандаларды (2) алып тастацыз.
® Курылгыныц кулап кету!н болдырмайтын ж1пт1
немесе сымды алып тастацыз.
©Электр шнуры мен дисплейд! баска
курылгыларга жалгайтын сымдарды
ажыратыцыз.
фДисплейд1цтвменг1 бвл1г1н кетерген кезде
дисплейд! вз!ц!зге карай тартыцыз.
©Теменг! изоляциялыктесемдер алынып
болган соц, дисплейд! тагы квтер!п, оны шеш!п
алыцыз.
о
X
со
го
84
Page 85

Запоб1жн1 заходи
ПОПЕРЕДЖЕННЯ
Ус! роботи з монтажу та демонтажу повинен виконувати квал1ф1кований майстер.
• У раз! неправильного встановлення п1дставки дисплей може власти, \ це може призвести до
пошкодження дисплея та до отримання травм.
Не розбирайте та не модиф!куйте переносну п!дставку.
• Недотримання ц1еТ вимоги може призвести до пад!ння та пошкодження пристрою, а також
травмування людини.
Встановлення сл!д проводити у м1сц1 з невеликим р!внем в1брац11, яке може витримати вагу
пристрою.
• Недотримання ц1еТ вимоги може призвести до пад!ння та пошкодження пристрою, а також до
травмування людини.
Впевн1ться, що м!сце встановлення достатньо м!цне для тривалого використання.
• Якщо його м1цн1сть стане недостатньою при тривалому використанн!, дисплей може перекинутися
та завдати травми.
ЗАСТЕРЕЖЕННЯ
Використовуйте лише з дисплеями, наведеними в каталоз!.
• Недотримання ц1еТ вимоги може призвести до пад!ння та пошкодження пристрою, а також
травмування людини.
Не розташовуйте на полиц! предмети вагою б!льше 15 кг.
• Недотримання ц1еТ вимоги може призвести до пад!ння та пошкодження пристрою, а також до
травмування людини.
Заборонясться використовувати переносну п!дставку, якщо вона деформована або мае
пошкодження.
• Недотримання ц1еТ вимоги може призвести до пад!ння та пошкодження пристрою, а також
травмування людини.
Не змазуйте ролики.
• Ролики можуть тр!снути або пошкодитись, що може призвести до пад!ння та пошкодження панел!,
а також травмування людини.
Не вибирайтеся на дисплей або моб!льну п!дставку й не висн!ть на них.
• Особливо стежте за тим, щоб маленьк! д!ти дотримувалися цього застереження. Недотримання
ц1еТ вимоги може призвести до пад!ння та пошкодження пристрою, а також травмування людини.
Не блокуйте вентиляц!йн! отвори. Використовуючи моб!льну п!дставку, не закривайте
прост!р м!ж нижньою частиною дисплея й п!длогою.
• 1накше тепло може накопичитися усередин! й спричинити пожежу.
Необх!дно вжити заход!в для запоб!гання перекиданню.
• В раз! землетрусу або якщо д!ти л!зтимуть на дисплей, в!н може перекинутися, що може призвести
до травми.
Залиш!ть щонайменше 10 см в!льного простору зверху, знизу, праворуч ! л!воруч в!д
дисплея. Залиш!ть такожяк м!н!мум 7 см поза дисплеем.
• Недотримання цих рекомендац!й може спричинити пожежу.
Тримайте пристр!й якнайдал! в!д опалювального обладнання та не п!ддавайте його впливу
прямих сонячних промен!в.
• Недотримання ц1еТ вимоги може призвести до скривлення, деформування або пог!ршення якост!
матер1ал1в та втрати м1цност1, внасл!док чого обладнання може впасти або зламатися та завдати травми.
Ус! роботи з! встановлення та демонтажу дисплея мають виконувати щонайменше 2 особи.
• Дисплей може впасти,! це може стати причиною отримання травм.
П!д час збирання та встановлення п!дставки над!йно затягуйте ус! гвинти.
• Якщо збирання виконане некоректно, п!дставка не зможе витримати вагу дисплея. Це може стати
причиною пад!ння й ушкодження дисплея, що може призвести до травми.
Встановлюйте п!дставку на ст!йк!й та р!вн!й поверхн!.
• Недотримання ц!еТ вимоги може призвести до пад!ння та пошкодження пристрою, а також
травмування людини.
Використовуйте для установки спец!альн! складов! частини.
• 1накше дисплей може впасти з моб!льноТ п!дставки,! це може призвести до пошкодження дисплея
й до отримання травм.
Для перем!щення панел! розблокуйте ролики.
• Недотримання ц!еТ вимоги може призвести до пад!ння та пошкодження пристрою, а також
травмування людини.
Позбудьтеся продукту, якщо в!н б!льше не використовуватиметься.
• Недотримання ц!еТ вимоги може призвести до пад!ння та пошкодження пристрою, а також
травмування людини.
85
со
О
СО
о.
Page 86

Запоб1жн1 заходи
РекомендацГ|' стосовно поводження
1) 'Уважно вибирайте м1сце для встановлення дисллея, оск1льки внасл1док д1Т св1тла або телла (у
paai розм1щення лоблизу нагр1вальних лрилад1в або л1д лрямим сонячним лром1нням) в1н може
втратити колip чи деформуватись.
2) Чистiть дисллей за доломогою м’якоТ сухоТ гaнчipки (бавовняноТ або фланелевоТ). Якщо лpистpiй
занадто забруднений, слочатку змийте бруд розчином нейтрального миючого засобу, а лотiм
лpотpiть сухою гaнчipкою. Не використовуйте миючi засоби, тaкi як бензол, розчинник або вiск для
меблiв, тому що Тх застосування може лризвести до вiдлущення фарби.
(lнфоpмaцiю щодо чищення дисллея див. в iнстpукцiТз ексллуaтaцiТдисллея. У paзi використання
хiмiчно обробленоТ тканини дотримуйтесь iнстpукцiй, що до неТ додаються.)
3) Не лpикpiлляйте лилку стpiчку чи нaлiлки до виробу. Це може лризвести до забруднення ловеpхнi
лереносноТ лiдстaвки. Зaлобiгaйте тривалому контакту лристрою з гумовими, вiнiловими та
лодiбними виробами. (Це лризведе до логipшення властивостей лристрою.)
4) Не застосовуйте до лaнелi дисллея нaдмipну силу й не лiддaвaйте iT ударам.
Застережн! заходи п!д час збирання та встановлення переносно!'
п!дставки
• Щоб забезлечити належне функцiонувaння дисллея i зaлобiгти виникненню неслравностей, не
слiд його встановлювати у таких мiсцях.
• Поблизу pозлpискувaчiв або ложежних/димових детектоpiв
• В мiсцях, де е ризик вибуху через вiбpaцiю або лоштовхи
• Поблизу високовольтних дpотiв або динaмiчних блокiв живлення
• Поблизуджерел мaгнiтного лоля, телла, лари або сaжi
• В мiсцях, що лiддaються влливу ловiтpя, що видуваеться з олалювального обладнання
• В мiсцях, де можуть утворюватись кpaллi конденсату вiд кондицiонеpiв ловiтpя або iншого
обладнання
• Штелсель шнура живлення дисллея ловинен легко дiстaвaти до електричноТ розетки.
• Забезлечте належну вентиляцiю, щоб темлература навколишнього середовища не леревищувала
40 °С. 1накше це може лризвести до наколичення телла усеpединi дисллея, що може стати
лричиною неслpaвностi.
• Приладнайте так, щоб кpiлильнi гвинти або шнур живлення не торкалися металевих частин
всеpединi стiни.
• Pозстелiть м’яку ковдру або тканину на лiдлозi для того, щоб лiд час складання та монтажу
лiдстaвкa та лiдлогa не лодрялалися.
• Роботи зi складання й встановлення слiд лроводити на piвнiй гоpизонтaльнiй ловеpхнi вiдловiдно
до iнстpукцiй iз встановлення.
• При скpiлленнi деталей не затягуйте гвинти занадто сильно, але й не долускайте недостатнього
затягування.
• Пiд час виконання pобiт зi складання та монтажу або лри леpесувaннi лpидiлiть особливу увагу
безлецi робочого мiсця.
• Обов’язково лрочитайте pоздiл „Зaлобiжнi заходи” та дотримуйтесь вкaзiвок в ньому.
со
л
о
со
о.
ЗАСТЕРЕЖЕННЯ:
Ця лiдстaвкa лризначена тiльки для моделей дисллеТв Panasonic.
Використання з iншими лристроями може лризвести до ненaдiйноТ фiксaцiТ, що може слричинити
ризик отримання травм.
МОНТАЖ ПОВИНЕН ВИКОНУВАТИСЬ СПЕЦ1АЛЮТАМИ.
КОМПАН1Я PANASONIC НЕ НЕСЕ В1ДПОВ1ДАЛЬНОСТ1 ЗА БУДЬ-ЯК1 ПОШКОДЖЕННЯ
ВЛАСНОСТ1 ТА/АБО СЕРЙОЗН1 ТРАВМИ, ВКЛЮЧАЮЧИ СМЕРТЬ, ЩО О НАСЛ1ДКОМ
НЕВ1ДПОВ1ДНОГО МОНТАЖУАБО НЕПРАВИЛЬНОГО ОБСЛУГОВУВАННЯ.
86
_________________________________________________
Page 87

Детал!
Основн! детал! Перев1рте наявн1сть ус1х деталей та
що Гх к1льк1сть в1дпов1дас зазначен!й.
Приладдя
®Гвинт для складання ст!йки
п1дп1рки
(М6Х16) (8)
©Гайказ к1льцевою вставкою
(М6) (16)
©Торцевий ключ (входить до комплекту) (1) © Г винт для закр!плення пристрою
©Гвинт для складання
кронштейна
(М6 X 25) (8)
сжш|
© Г винт для закр!плення полиц!
(М4Х12) (4)
Г винт для закр!плення
обмежувач1в
(М4Х12) (6)
(М6 X 65) (2)
©Гвинтдля кр!плень
(М6 X 65) (8)
ШКШШИИШЕ ф)
© Г винт ¡з утопленою
головкою ¡з внутр!шн!м
шестигранником
Ув!гнута зубчаста шайба
1золяц!йна прокладка
(по 4)
(ККЖЖЖШШШ®
со
л
о
со
о.
Зображення у цьому пос!бнику подаються лише з ¡люстративною метою.
87
Page 88

Складання
1. Складання п1дставки
1.'Уставте одну ст!йку п1дп1рки ф в
основу ф ! закр1п1ть ГГ гвинтами для
складання ст!йки п1дп1рки ® (4). У
такий самий спос!б збер!ть другу ст!йку
п1дп1рки.
(Моментзатягування: 1,8-2,2 М-т)
2. Поклад1ть з!брану ст!йку п1дп1рки
на задню сторону, як показано на
малюнку, ! прикр1п1ть кр!плення
(верхнс/нижнс) ф за допомогою
гвинт!в для кр!плень © (4) ! гайок з
к1льцевою вставкою @ (4).
(Моментзатягування: 1,8-2,2 М-т)
Кр1плення
(верхне) ©
Гвинт для
складання ст1йки
п1дп1рки @
Кр!плення (нижне) ©
Передня сторона
% Задня
сторона
ч
со
о
со
о.
Гайка 3 кгпьцевою.
вставкою ©\\
Гвинт для кр!плень ©
3. П1дн1м1ть ст!йку п1дп1рки й
прикр1п1ть ¡ншу ст!йку п1дп1рки ф
до протилежного боку кр!плень за
допомогою гвинт!в для кр!плень ©
гайок з к!льцевою вставкою @ (4).
(Моментзатягування: 1,8-2,2 М-т)
88
Page 89

4.Установ1ть дисплей на необх1дну
висоту, вибравши один ¡з вар1ант1в (4).
3 таблицi нижче виберiть розмiр
отворiв для гвинтiв для крiплення
монтажних кронштейнiв ® до крiплень
(верхнього/нижнього)
Одиниця вим1рювання: мм
Позначка
А
В
С
0
(Вiдстань вiд поверхнi пiдлоги)
Центр екрана
1047
1147
1247
1347
Позначка
5.Використовуючи отвори для гвинтiв,
обранi у кроцi 4, прикрiпiть монтажнi
кронштейни ® до крiплень (верхнього/
нижнього) ® за допомогою гвинтiв для
складання кронштейна @ (8) i гайок з
кiльцевою вставкою @ (8).
(Моментзатягування: 1,8-2,2 М-т)
6.Прикрiпiть полицю ® (1)до заднього
боку нижнього крiплення за допомогою
гвинтiв для закрiплення полицi © (4).
(ГГ можна прикрiпити до право! або до
лiво'Г сторони.)
Монтажний
кронштейн ®
Гайка з кгльцевою
вставкою ®
Гвинт для складання
кронштейна ®
Гвинт для складання
кронштейна ®
(Моментзатягування: 1,2-1,5 М-т)
89
со
л
о
со
о.
Page 90

Складання
2. П1дготовка дисплея
Прикр1плення ¡золяц1йних прокладок
фРозташуйте лицьову поверхню дисплея
на чист!й тканин! без см1ття або сторонн1х
предмет1в ! додержуйтеся описано! нижче
процедури.
Якщо на диспле! е виступаюч! детал!, подбайте
про те, щоб не подряпати й не пошкодити Тх.
©За допомогою хрестопод!бноТ викрутки зн!м!ть
з дисплея ковпачки (4).
Тримайте монтажну п1дставку \ також знят! ковпачки
в над\йному м1сц1.
(Вони знадобляться, якщо ви будете
використовувати п1дставку.)
©За допомогою торцевого ключа ©, (входить
до комплекту) прикр!п!ть приладдя © (чотири
гвинти з утопленими головками !з внутр!шн!м
шестигранником, ув!гнут! зубчаст! шайби та
!золяц!йн! прокладки) у м!сцях, де було знято
ковпачки, як показано на схем! праворуч.
(Момент затягування: 3-4 М-т)
со
л
о
со
о.
90
Page 91

3. Встановлення на п1дставку
Блокування та розблокування ролик!в
Перед встановленням дисплея впевн1ться, що
ролики заблокован!.
Ролик заблоковано Ролик розблоковано
Натисн!ть на
нижню частину
важеля
Натисн!ть на
верхню частину
важеля
1. Встановлення дисплея
фРозташуйте верхн! ¡золяц1йн1 прокладки
дисплея навпроти верхн¡х отвор¡в моб¡льноY
п¡дставки та пов¡льно опуст¡ть дисплей на
м¡сце.
©Злегка п¡д¡ймаючи дисплей, вставте нижн¡
¡золяц¡йн¡ прокладки в отвори у нижн¡й частин¡
моб¡льноY п¡дставки та потягн¡ть дисплей
донизу.
ЗАСТЕРЕЖЕННЯ
Не пiднiмайте дисплей вище, нiж це необхiдно.
• Якщо дисплей п!дняти занадто високо, в!н
може впасти,! це може призвести до травми.
2. Kрiплення дисплея
Над¡йно затягн¡ть гвинти (2) для закр¡плення
пристрою 0 в отворах для гвинт¡в,
розташованиху верхн¡й частин¡ монтажного
кронштейна (2).
(Моментзатягування: 1,2-1,5 М-т)
Верхня ¡золяц!йна прокладка
Обов'язково закр!п!ть гвинти для закр!плення
пристрою © з л!вого й правого боку, щоб запоб!гти
пад!нню дисплея.
91
со
о
со
о.
Page 92

Складання
4. Присднання кабел1в
Уставте ф1ксуюч! пристроТ ® (4)
збоку в нижн1й частин! монтажних
кронштейн1в (правого/л1вого).
Приеднайте кабел!, уставивши
ТХ у напрямн! для кабелю !з
заднього боку правоТ та л1воТ'
ст!йок п1дп1рок. Пот!м прикр1п1ть
обмежувач! ® (6) до напрямних
для кабелю за допомогою гвинт!в
для закр!плення обмежувач!в ©
(6).
Л!ва й права напрямн! для
кабелю мають по 6 отвор!в
для гвинт!в для закр!плення
обмежувач!в. Використовуйте
отвори для гвинт!в, що
в!дпов!дають Вашому кабелю.
(Моментзатягування: 1,2-1,5 М-т)
Не прокладайте з’еднувальн! кабел!
та шнур живлення разом.
Напрямна для
кабелю
Гвинт для
закр!плення
обмежувач!в
©
со
ю
о
со
о.
Обмежувач ®
5. Запоб1гання перекиданню
Щоб запоб!гти перекиданню дисплея, заф!ксуйте
його за допомогою м!цних шнур!в або кабел!в,
пропустивши ТХ у точках перетину (по 1 праворуч
! л!воруч) монтажних кронштейн!в ! кр!плення
(верхнього)! прикр!пивши Тх без провисання до
м!цних ст!н або колон.
(Для запоб!гання перекиданню використовуйте
наявний у продажу спец!альний шнур або
кабель.)
В!дстань м!ж колоною або ст!ною й задньою
панеллю дисплея не повинна перевищувати 1 м.
92
Page 93

Зн1мання дисплея
фВитягн1ть гвинти (2) для закр1плення
пристрою ® (по 1 праворуч \ л1воруч) з
моб1льно'|' п!дставки.
®Зн1м1ть шнур або кабель, що використовуеться
для запоб!гання пад!нню пристрою.
@В1д’еднайте шнур живлення та кабел!, що
з’еднують дисплей !з ¡ншими пристроями.
фП1дн1маючи нижню частину дисплея, потягн!ть
його на себе.
® П!сля видалення нижн!х ¡золяц!йних прокладок
продовжуйте п!дн!мати дисплей ! зн!м!ть його.
93
со
о
со
о.
Page 94

External dimensions drawing
Abbildung mit externen Abmessungen
Schema delle dimensioni esterne
Plan des dimensions exterieures
Dibujo de dimensiones externas
Схема c внешними размерами
Сырткы елшемдер сызбасы
Креслення !з зовн1шн1ми розм!рами
■Щ-
1513 (59.6)
СО
500 (19.7) ^ (6.5)
165
-щ-
I
Щ^: mm
Unit: mm (inches)
Einheit: mm
Unità: mm
Unità: mm
Unidad: mm
Единицы: мм
EipniK: мм
Oдиницi вимipy: мм
94
Page 95

Memo
95
Page 96

Panasonic Corporation
Web Site : http://panasonic.net
' Panasonic Corporation 2012 M0512-0
 Loading...