

Page 1
Region number
1 ALL
2
4
1
As an ENERGY STAR Partner,
Panasonic has determined that
this product meets the ENERGY STAR
guidelines for energy efficiency.
®
®
Dynamic sound with
big diameter speaker
6
iPod connectivity
Enjoy iPod music through the
speakers, view iPod photos or
videos on the TV.
28
Sound enhancement
options
Surround Enhancer, Dolby Pro
Logic
II
and more.
26
The player plays DVD-Video marked with labels containing the region
number “1” or “ALL”.
Example:
Operating Instructions
DVD Home Theater Sound System
Model No. SC-PT665
[_P_] pr
Panasonic Consumer Electronics Company,
Division of Panasonic Corporation of North America
One Panasonic Way, Secaucus, New Jersey 07094
http://www.panasonic.com
C Panasonic Corporation 2009
Printed in Malaysia
Before connecting, operating or adjusting this product, please read
the instructions completely.
Please keep this manual for future reference.
If you have any questions contact
1-800-211-PANA (7262)
RQTX0275-1P
F0309ZA1049
Page 2
Dear customer
The lightning flash with arrowhead symbol, within
an equilateral triangle, is intended to alert the user
to the presence of uninsulated “dangerous voltage”
within the product’s enclosure that may be of
sufficient magnitude to constitute a risk of electric
shock to persons.
CAUTION
CAUTION: TO REDUCE THE RISK OF ELECTRIC
SHOCK, DO NOT REMOVE SCREWS .
NO USER-SERVICEABLE PARTS INSIDE.
REFER SERVICING T O QU ALIFIED
SERVICE PERSONNEL.
The exclamation point within an equilateral triangle
is intended to alert the user to the presence of
important operating and maintenance (servicing)
instructions in the literature accompanying the
appliance.
RISK OF ELECTRIC SHOCK
DO NOT OPEN
(Inside of product)
Thank you for purchasing this product. For optimum performance and
safety, please read these instructions carefully.
Operations in these instructions are described mainly with the
remote control, but you can perform the operations on the main
unit if the controls are the same.
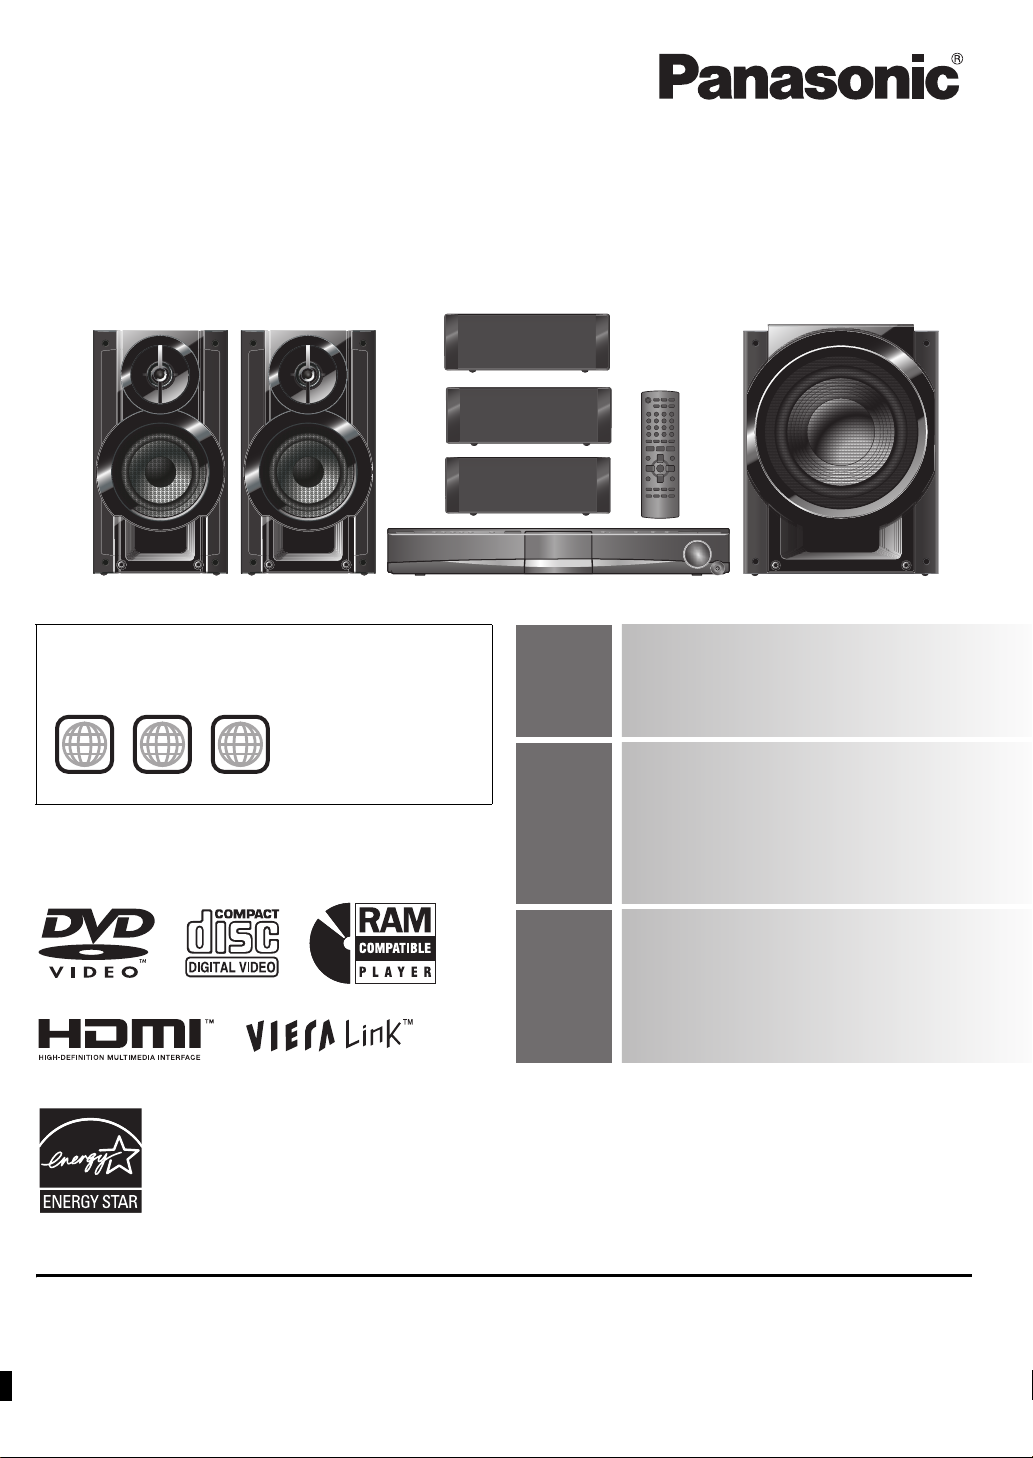
System
Main unit
Front speakers
Center speaker
Surround speakers
Subwoofer
SC-PT665
SA-PT665
SB-HF665
SB-PC880
SB-HS665
SB-WVK870
CAUTION!
THIS PRODUCT UTILIZES A LASER.
USE OF CONTROLS OR ADJUSTMENTS OR PERFORMANCE OF
PROCEDURES OTHER THAN THOSE SPECIFIED HEREIN MAY
RESULT IN HAZARDOUS RADIATION EXPOSURE.
DO NOT OPEN COVERS AND DO NOT REPAIR YOURSELF.
REFER SERVICING TO QUALIFIED PERSONNEL.
WARNING:
TO REDUCE THE R ISK O F FIRE, ELEC TRIC SH OC K
OR PRODUCT DAMAGE,
≥
DO NOT EXPOSE THIS APPARATUS TO RAIN,
MOISTURE, DRIPPING OR SPLASHING AND THAT
NO OBJECTS FILLED WITH LIQUIDS, SUCH AS
V ASES, SHALL BE PLACED ON THE APPARATUS.
≥
USE ONLY THE RECOMMENDED ACCESSORIES.
≥
DO NOT REMOVE THE COVER (OR BACK); THERE
ARE NO USER SERVICEABLE PARTS INSIDE. REFER
SERVICING T O Q UALIFIED SERVICE PERSONNEL.
FCC Note:
This equipment has been tested and found to comply with the limits
for a Class B digital device, pursuant to Part 15 of the FCC Rules.
These limits are designed to provide reasonable prot ection against
harmful interference in a residential installation. This equipment
generates, uses and can radiate radio frequency energy and, if not
installed and used in accordance with the instructions, may cause
harmful interference to radio communications. However, there is no
guarantee that interference will not occur in a particular installation. If
this equipment does cause harmful interference to radio or television
reception, which can be determined by turning the equipment off and
on, the user is encouraged to try to correct the interference by one or
more of the following measures:
≥ Reorient or relocate the receiving antenna.
≥ Increase the separation between the equipment and receiver.
≥ Connect the equipment into an outlet on a circuit different from that
to which the receiver is connected.
≥ Consult the dealer or an experienced radio/TV technician for help.
Any unauthorized changes or modifications to this equipment would
void the user’s authority to operate this device.
This device complies with Part 15 of the FCC Rules.
Operation is subject to the following two conditions:
(1) This device may not cause harmful interf erence, and
(2) this device must accept any interference received, including
interference that may cause undesired operation.
Responsible Party:
Panasonic Corporation of North America
One Panasonic Way
Secaucus, NJ 07094
Support Contact:
Panasonic Consumer Electronics Company
Telephone No.: 1-800-211-PANA (7262)
CAUTION!
DO NOT INSTALL OR PLACE THIS UNIT IN A BOOKCASE, BUILTIN CABINET OR IN ANOTHER CONFINED SPACE. ENSURE THE
UNIT IS WELL VENTILATED. TO PREVENT RISK OF ELECTRIC
SHOCK OR FIRE HAZARD DUE TO OVERHEATING, ENSURE
THAT CURTAINS AND ANY OTHER MATERIALS DO NOT
OBSTRUCT THE VENTILATION VENTS.
The socket outlet shall be installed near the equipment and easily
accessible. The mains plug of the power suppl y cord shall remain
readily operable.
To completely disconnect this apparatus from the AC Mains,
disconnect the power supply cord plug from AC receptacle.
RQTX0275
2
Page 3
RQTX0275
TABLE OF CONTENTS
Getting
Started
Playing
Discs
Other
Operations
IMPORTANT SAFETY INSTRUCTIONS . . . . . . 4
Accessories . . . . . . . . . . . . . . . . . . . . . . . . . . . . 4
Glossary . . . . . . . . . . . . . . . . . . . . . . . . . . . . . . . 5
Product Service . . . . . . . . . . . . . . . . . . . . . . . . . 5
Simple Setup
step 1 Positioning. . . . . . . . . . . . . . . . . . . . . . 6
step 2 Cable connections. . . . . . . . . . . . . . . . 7
Audio and video connections. . . . . . . . . . . . 7
Speaker connections . . . . . . . . . . . . . . . . . . 8
Radio antenna connections. . . . . . . . . . . . . 8
Basic play. . . . . . . . . . . . . . . . . . . . . . . . . . . . . 14
Using the main unit. . . . . . . . . . . . . . . . . . . . . . . . . . 14
Using the remote control . . . . . . . . . . . . . . . . . . . . . 15
Other playback functions . . . . . . . . . . . . . . . . 16
Playing CDs sequentially (CD Mode). . . . . . . . . . . . 16
Repeat play . . . . . . . . . . . . . . . . . . . . . . . . . . . . . . . 16
Program and Random play. . . . . . . . . . . . . . . . . . . . 16
Using the VIERA LinkTM “HDAVI ControlTM”. . . 24
One touch play . . . . . . . . . . . . . . . . . . . . . . . . . . . . . 24
Auto input switching . . . . . . . . . . . . . . . . . . . . . . . . . 24
Power off link . . . . . . . . . . . . . . . . . . . . . . . . . . . . . . 24
Speaker control . . . . . . . . . . . . . . . . . . . . . . . . . . . . 25
VIERA Link Control only with TV’s remote control
[for “HDAVI Control 2 (or later)”] . . . . . . . . . . . . . . 25
step 3 AC cord connection . . . . . . . . . . . . . . 9
step 4 Preparing the remote control . . . . . . . 9
step 5 Performing QUICK SETUP . . . . . . . . 10
step 6 Presetting the radio stations . . . . . . 11
Presetting stations automatically. . . . . . . . .11
Confirming the preset channels. . . . . . . . . .11
Control reference guide . . . . . . . . . . . . . . . . . 12
Utilizing the START menu. . . . . . . . . . . . . . . . 13
Using navigation menus. . . . . . . . . . . . . . . . . 17
Playing data discs . . . . . . . . . . . . . . . . . . . . . . . . . . 17
Playing RAM and DVD-R/-RW (DVD-VR) discs . . . 17
Using on-screen menus . . . . . . . . . . . . . . . . . 18
Changing the player settings . . . . . . . . . . . . . 20
Selecting the delay time of the speakers. . . . . . . . . 23
Using sound effects . . . . . . . . . . . . . . . . . . . . 26
Setting the sound effects . . . . . . . . . . . . . . . . . . . . . 26
Using Dolby Pro Logic II . . . . . . . . . . . . . . . . . . . . . 26
Using Whisper-mode Surround . . . . . . . . . . . . . . . . 26
Adjusting the subwoofer level . . . . . . . . . . . . . . . . . 27
Using Subwoofer Boost . . . . . . . . . . . . . . . . . . . . . . 27
Adjusting the speaker level . . . . . . . . . . . . . . . . . . . 27
Enjoying the FM/AM radio . . . . . . . . . . . . . . . 27
Manual tuning . . . . . . . . . . . . . . . . . . . . . . . . . . . . . 27
Operating other equipment . . . . . . . . . . . . . . 28
Enjoying TV audio . . . . . . . . . . . . . . . . . . . . . . . . . . 28
Enjoying digital audio. . . . . . . . . . . . . . . . . . . . . . . . 28
Using the iPod . . . . . . . . . . . . . . . . . . . . . . . . . . . . . 28
Speaker installation options. . . . . . . . . . . . . . 29
Reference
Surround
Sound
26
Discs that can be played. . . . . . . . . . . . . . . . . 30
Maintenance. . . . . . . . . . . . . . . . . . . . . . . . . . . 31
Troubleshooting guide . . . . . . . . . . . . . . . . . . 32
TV Audio
28
Specifications . . . . . . . . . . . . . . . . . . . . . . . . . 35
Limited Warranty . . . . . . . . . . . . . . . . . . . . . . . 36
3
Page 4
IMPORTANT SAFETY INSTRUCTIONS
Read these operating instructions carefully before using the unit. Follow the safet y inst ructions on the unit and the applicable safety instructions listed
below. Keep these operating instructions handy for future reference.
1) Read these instructions.
2) Keep these instructions.
3) Heed all warnings.
4) Follow all instructions.
5) Do not use this apparatus near water.
6) Clean only with dry cloth.
7) Do not block any ventilation openings. Install in accordance with the
manufacturer’s instructions.
8) Do not install near any heat sources such as radiators, heat registers,
stoves, or other apparatus (including amplifiers) that produce heat.
9) Do not defeat the safety purpose of the polarized or grounding-type
plug. A polarized plug has two blades with one wider than the other.
A grounding-type plug has two blades and a third grounding prong.
The wide blade or the third prong are provided for your safety. If the
provided plug does not fit into your outlet, consult an electrician for
replacement of the obsolete outlet.
10) Protect the power cord from being walked on or pinched particularly
at plugs, convenience re ceptacles, an d the point where the y e xit from
the apparatus.
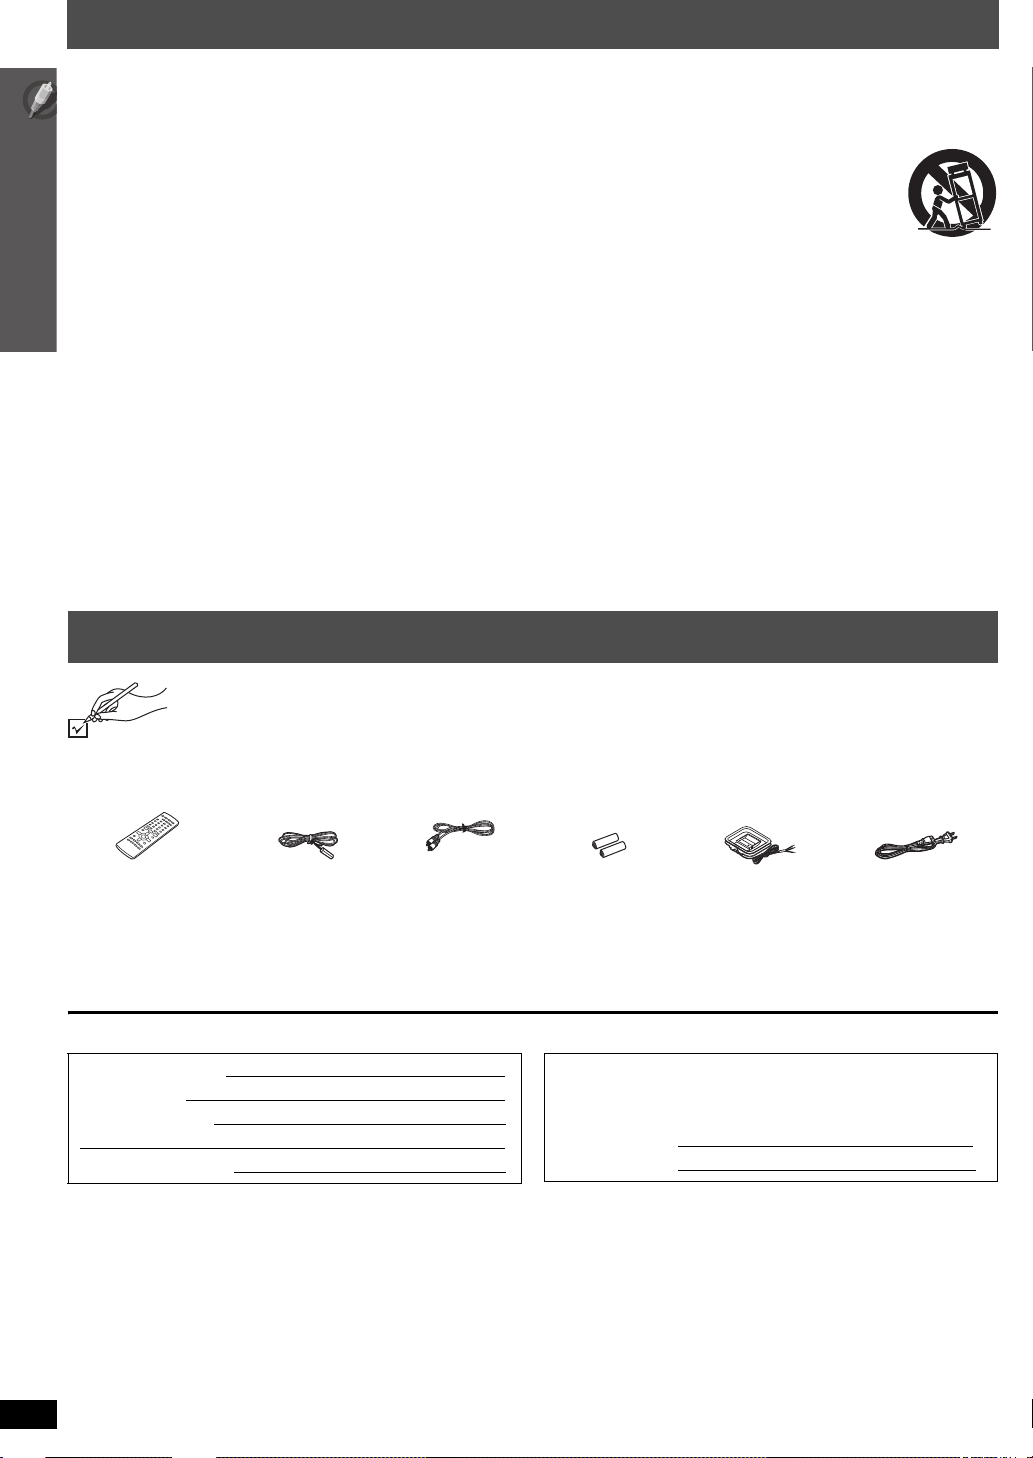
Accessories
Please check and identify the supplied accessories. Use numbers indicated in parentheses when asking for replacement parts.
(Product numbers correct as of March 2009. These may be subject to change.)
To order accessories, refer to “Accessory Purchases (United States and Puerto Rico)” on page 36.
11) Only use attachments/accessories specified by the manufacturer.
12) Use only with the cart, stand, tripod, bracket, or table
specified by the manufacturer, or sold with the
apparatus. When a cart is used, use caution when
moving the cart/apparatus combination to avoid injury
from tip-over.
13) Unplug this apparatus during lightning storms or when unused for
long periods of time.
14) Refer all servicing to qualified service personnel. Servicing is
required when the apparatus has been damaged in an y w a y, such as
power-supply cord or plug is damaged, liquid has been spilled or
objects have fallen into the apparatus, the apparatus has been
exposed to rain or moisture, does not operate normally, or has been
dropped.
∏ 1 Remote co nt rol
(N2QAYB000421)
IMPORTANT SAFETY INSTRUCTIONS / Accessories
User memo:
DATE OF PURCHASE
DEALER NAME
DEALER ADDRESS
TELEPHONE NUMBER
∏ 1 FM indoor
antenna
(RSAX0002)
∏ 1 Video cable
(K2KA2BA00001)
∏ 2Remote
control
batteries
The model number and serial number of this product can be found
on either the back or the bottom of the unit.
Please note them in the space provided below and keep for future
reference.
MODEL NUMBER SC-PT665
SERIAL NUMBER
∏ 1 AM loop
antenna
(N1DAAAA00002)
∏ 1 AC power supply
cord
(K2CB2CB00021)
RQTX0275
4
Page 5

Glossary
Decoder
A decoder restores the coded audio signals on DVDs to normal. This is
called decoding.
Dolby Digital
This is a method of coding digital signals developed by Dolby
Laboratories. Apart from stereo (2-channel) audio, t hese sign als can also
be 5.1-channel sound.
DTS (Digital Theater Systems)
This surround system is used in many movie theaters around the world.
There is good separation between the channels , so realist ic sound effects
are possible.
Dynamic range
Dynamic range is the difference between the lowest level of sound that
can be heard above the noise of the equipment and the highest level of
sound before distortion occurs.
Frame still and field still
Frames are the still pictures that go together to make a moving picture.
There are about 30 frames shown each second.
One frame is made up of two fields. A regular TV shows these fields one
after the other to create frames.
A still is shown when you pause a moving picture. A frame still is made up
of two alternating fields, so the picture may appear blurred, but overall
quality is high.
A field still is not blurred, but it has only half the inf ormation of a frame still
so picture quality is lower.
HDMI (High-Definition Multimedia Interface)
HDMI is a next-generation digital interface for consumer electronic
products. Unlike conventional connections, it transmits uncompressed
digital video and audio signals on a single cable. This unit supports highdefinition video output (720p, 1080i, 1080p) from the HDMI AV OUT
terminal. To enjoy high-definition video, a high-definition compatible TV is
required.
I/P/B
MPEG 2, the video compression standard adopted for use with
DVD-Video, codes frames using these 3 picture types.
I: Intra coded picture
This picture has the best quality and is the best to use when adjusting
the picture.
P: Predictive coded picture
This picture is calculated based on past I- or P-pictures.
B: Bidirectionally-predictive coded picture
This picture is calculated by comparing past and future I- and
P-pictures so it has the lowest volume of information.
JPEG (Joint Photographic Experts Group)
This is a system used for compressing/decoding color still pictures. The
benefit of JPEG is less deterioration in picture quality considering the
degree of compression.
Linear PCM (pulse code modulation)
These are uncompressed digital signals, similar to those found on CDs.
MP3 (MPEG Audio Layer 3)
An audio compression method that compresses audio to approximately
one tenth of its size without any considerable loss of audio quality.
Playback control (PBC)
If a Video CD has playback control, you can select scenes and
information with menus.
Progressive/Interlaced
NTSC, the video signal standard, has 480 interlaced (i) scan lines,
whereas progressive scanning uses twice the number of scan lines. This
is called 480p.
Using progressive output, you can enjoy the high-resolution video
recorded on media such as DVD-Video.
Your television must be compatible to enjoy progressive video.
Sampling frequency
Sampling is the process of converting the heights of sound wave (analog
signal) samples taken at set periods into digits (digital encoding).
Sampling frequency is the number of samples taken p er second, so larger
numbers mean more faithful reproduction of the original sound.
Glossary / Product Service
Product Service
1. Damage requiring service—The unit should be serviced by qualified
service personnel if:
(a)The AC power supply cord or AC adaptor has been damaged; or
(b)Objects or liquids have gotten into the unit; or
(c) The unit has been exposed to rain; or
(d)The unit does not operate normally or exhibits a mark ed ch ange in
performance; or
(e)The unit has been dropped or the cabinet damaged.
2. Servicing—Do not attempt to service the unit beyond that described
in these operating instructions. Refer all other servicing to authorized
servicing personnel.
3. Replacement parts—When parts need replacing ensure the servicer
uses parts specified by the manufacturer or parts that have the same
characteristics as the original parts. Unauthorized substitutes may
result in fire, electric shock, or other hazards.
4. Safety check—After repairs or service, ask the servicer to perform
safety checks to confirm that the unit is in proper working condition.
The servicer will require all components to service your system.
Therefore, should service ever be necessary, be sure to bring the entire
system.
WMA
WMA is a compression format developed by Microsoft Corporation. It
achieves the same sound quality as MP3 with a file size that is smaller
than that of MP3.
Product information
For product information or assistance with product operation:
Refer to “Customer Services Directory (United States and Puerto Rico)”
on page 36.
-If you see this symbolInformation on Disposal in other Countries outside the
European Union
This symbol is only valid in the European Union.
If you wish to discard this product, please
contact your local authorities or dealer and ask
for the correct method of disposal.
RQTX0275
5
5
Page 6
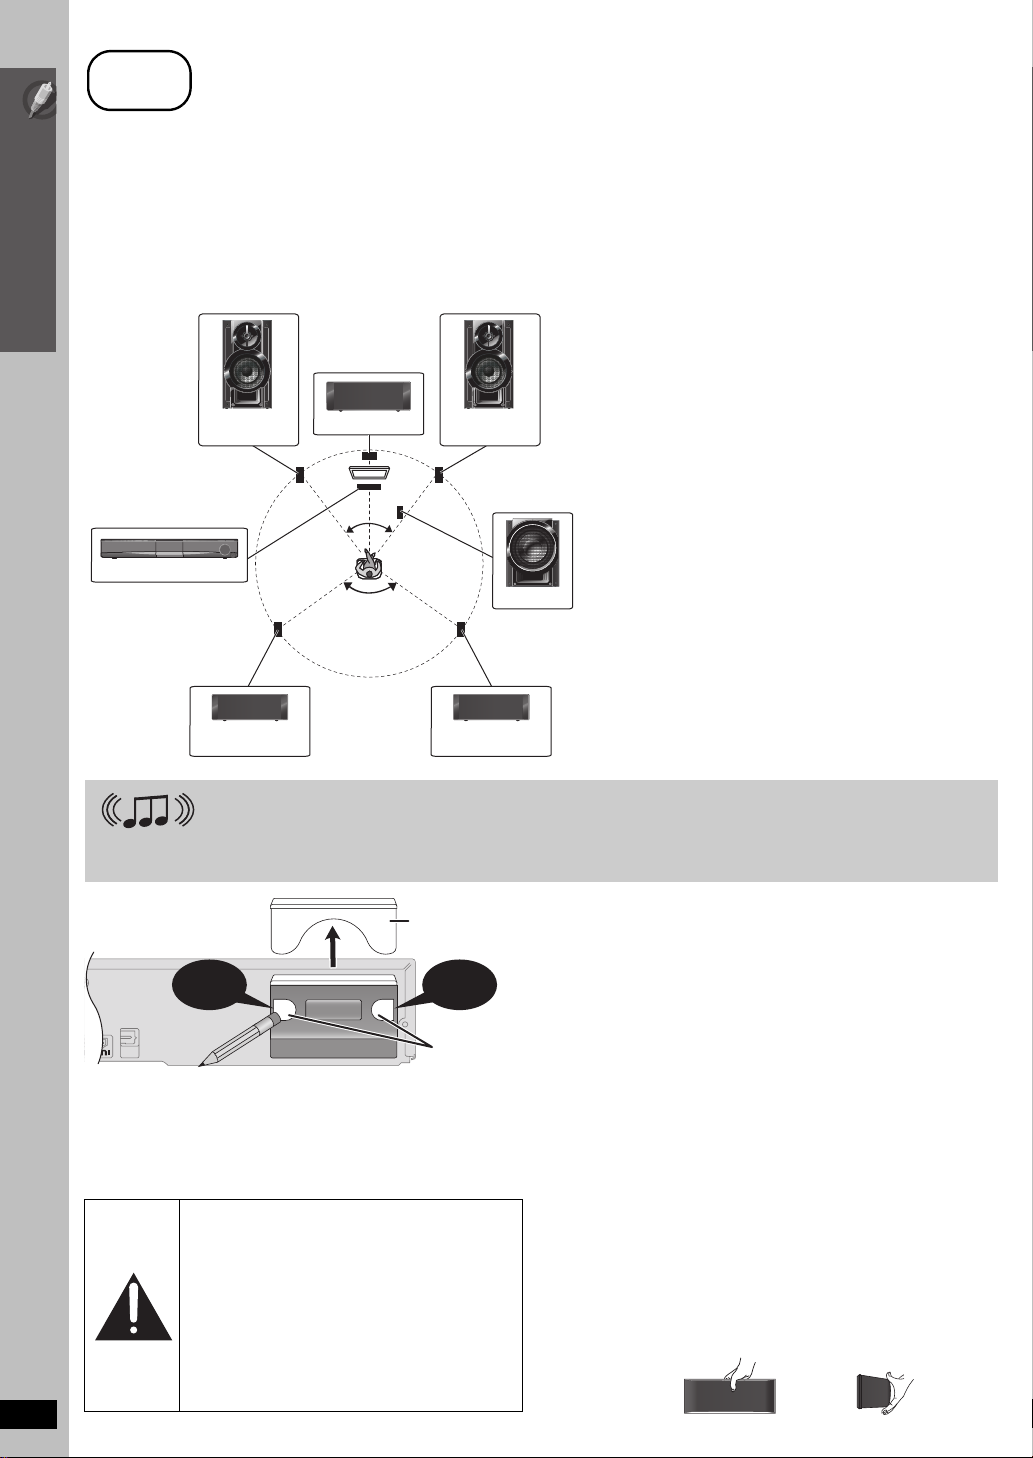
Simple Setup
How you set up your speakers can affect the bass and the sound field.
step
1
Positioning
120°
30° 30°
Front speaker
(left)
Front speaker
(right)
Center speaker
Main unit
Subwoofer
(right)
Surround speaker
(left)
Surround speaker
Center speaker
Put on a rack or shelf. Vibration caused by the speaker can
disrupt the picture if it is placed directly on the TV.
Main unit
To allow for proper ventilation and to maintain good airflow
around the main unit, position it with at least 5 cm (2z) of
space on all sides.
Subwoofer
Place to the right or left of the TV, on the floor or a sturdy
shelf so that it will not cause vibration. Leav e about 30 cm
(11
13
/16z) from the TV.
OPTICAL
IN
TRANSMITTER
DIGITAL
PUSHPUSH
PUSHPUSH
Back of the main unit
Digital transmitter cover
Push! Push!
≥ Remove the digital transmitter cover before installing any
optional Panasonic wireless accessory.
≥ Replace the cover when the digital transmitter is not in
use.
You can use the blunt end of a writing instrument to push
here until the cover pops out.
DO
DO
NOT
Note the following points:
≥ Place speakers on flat secure bases.
≥ Placing speakers too close to floors, walls, and corners can result in excessive bass. Cover walls and windows with thick curtains.
≥ For optional wall mount, refer to page 29.
[Note]
Keep your speakers at least 10 mm (
Setup example
Place the front, center, an d sur round speakers at approximately the same distance from the seating position. The angles in the diagram are
approximate.
13
/32z) away from the system for proper ventilation.
Positioning
You can enjoy surround speaker sound wirelessly when you use the optional Panasonic wireless accessory (example: SH-FX70).
For details, please refer to the operating instructions for the optional Panasonic wireless accessory.
If irregular coloring occurs on your TV
The center and front speaker are designed to be used cl ose t o a TV, but
the picture may be affected with some TVs and setup combinations.
If this occurs, turn the TV off for about 30 minutes.
The demagnetizing function of the TV should correct the problem. If it
persists, move the speakers further away from the TV.
RQTX0275
6
Set your surround sound free!
Optional Panasonic wireless accessory (example: SH-FX70)
Notes on speaker use
Caution
≥
The main unit and supplied speaker s are to be
used only as indicated in this setup. Failure to
do so may lead to damage to the amplifier and/or
the speakers, and may result in the risk of fire.
Consult a qualified servic e person i f damage has
occurred or if you experience a sudden chang e
in performance.
≥
Do not attempt to attach these speakers to walls
using methods other than those described in this
manual.
≥Use only supplied speakers
Using other speakers can damage the unit, and sound quality will be
negatively affected.
≥ You can damage your speakers and shorten their useful life if you play
sound at high levels over extended periods.
≥ Reduce the volume in the following cases to avoid damage:
– When playing distorted sound.
– When the speakers are reverberating due to a record player, noise
from FM broadcasts, or continuous signals from an oscillator, test
disc, or electronic instrument.
– When adjusting the sound quality.
– When turning the unit on or off.
Caution
Do not touch the front netted area of the speakers. Hold by the sides.
e.g. Center speaker
Page 7
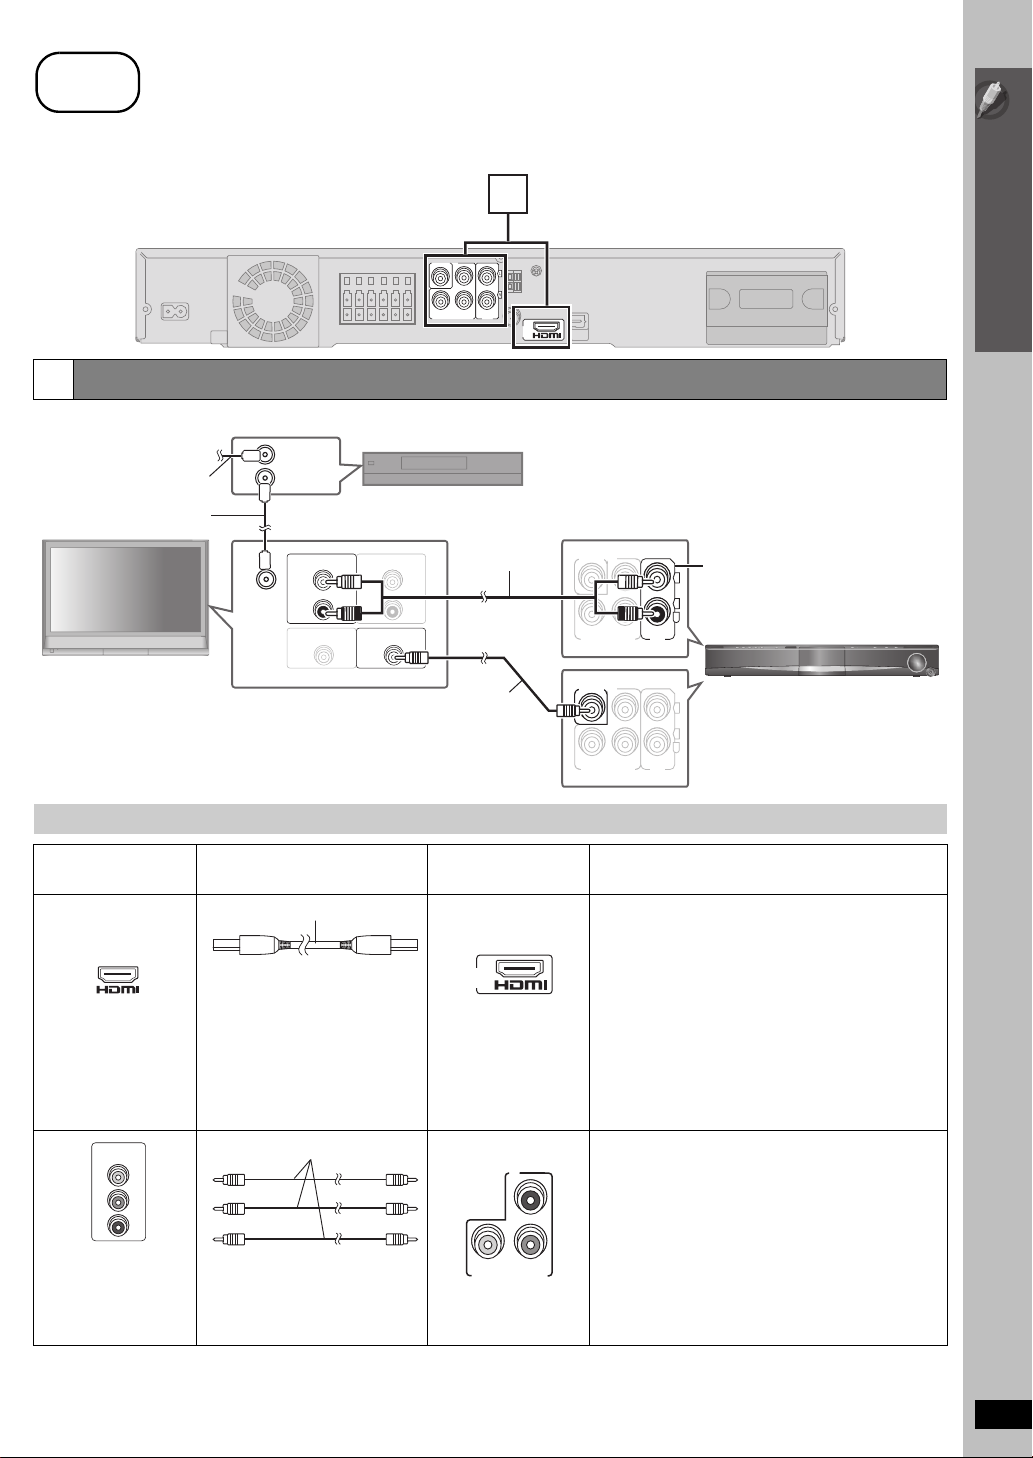
Simple Setup
Turn off all equipment before connection and read the appropriate operating instructions.
step
2
Cable connections
Main unit
AUDIO OUT
L
R
AUDIO IN
L
R
RF IN
VIDEO INVIDEO OUT
RF OUT
RF IN
COMPONENT VIDEO OUT
R
P
P
B
Y
L
R
AUX
VIDEO OUT
COMPONENT VIDEO OUT
R
P
P
B
Y
L
R
AUX
VIDEO OUT
Cable TV box or video cassette recorder
(not included)
Main unit
Audio cable
(not included)
You can enjoy audio from your TV,
video cassette recorder or cable TV
programs through this home theater
system by connecting to the AUX
terminals. Select “AUX” as the
source (➜ 28).
TV (not included)
To your cable TV
service or TV antenna
RF cable (not included)
Video cable
(included)
AV IN
HDMI cable
Video cables
Do not connect the AC power supply cord until all other connections are complete.
1
VIDEO OUT
P
R
PBY
COMPONENT VIDEO OUT
AUX
AV
OUT
Audio and video connections
1
Basic setup example
Cable connections
Other video connections for improved picture quality
TV terminal
[Note]
≥ Do not make the video connections through the video cassette recorder.
≥ Only one video connection is required. Choose one of the video connections above depending on your TV.
COMPONENT
VIDEO IN
Y
PB
PR
All Panasonic televisions
that have 480p input
connectors are
compatible. Consult the
manufacturer if you have
another brand of TV.
Due to copy guard protection, the picture may not be displayed properly.
Cable required
(not included)
[Note]
≥ Non-HDMI-compliant cables
cannot be utilized.
≥ It is recommended that you use
Panasonic’s HDMI cable.
Recommended part number:
RP-CDHG15 (1.5 m/4.9 ft),
RP-CDHG30 (3.0 m/9.8 ft),
RP-CDHG50 (5.0 m/16.4 ft), etc.
Main unit terminal Features
[\\\\\\\\\\\HDMI\\\\\\\\\\\]
AV
OUT
This connection provides the best picture quality.
≥ Set “VIDEO PRIORITY” to “ON” (➜ 22, “HDMI”
menu).
≥ Set “VIDEO FORMAT” in Menu 4 (HDMI) (➜ 19).
VIERA Link “HDAVI Control”
If your Panasonic TV is an HDMI control compatible,
you can operate your TV synchronizing with home
theater operations or vice versa (➜ 24, Using the
VIERA Link
≥ Make the audio connection (➜ above) when you use
[COMPONENT\VIDEO]
Y
COMPONENT VIDEO OUT
≥ Connect to terminals
of the same color.
P
R
P
B
VIERA Link “HDAVI Control” function.
This connection provides a much purer pict ure tha n the
VIDEO OUT terminal.
≥ After making this connection, select “DARK ER” from
the “BLACK LEVEL” in the “VIDEO” menu (➜ 21).
To enjoy progressive video
≥ Connect to a progressive output compatible TV.
– Set “VIDEO OUT (I/P)” in “VIDEO” menu to
“PROGRESSIVE” and then foll ow the instructions
on the menu screen (➜ 21, “VIDEO” menu).
TM
“HDAVI ControlTM”).
(Continued on next page)
RQTX0275
7
Page 8
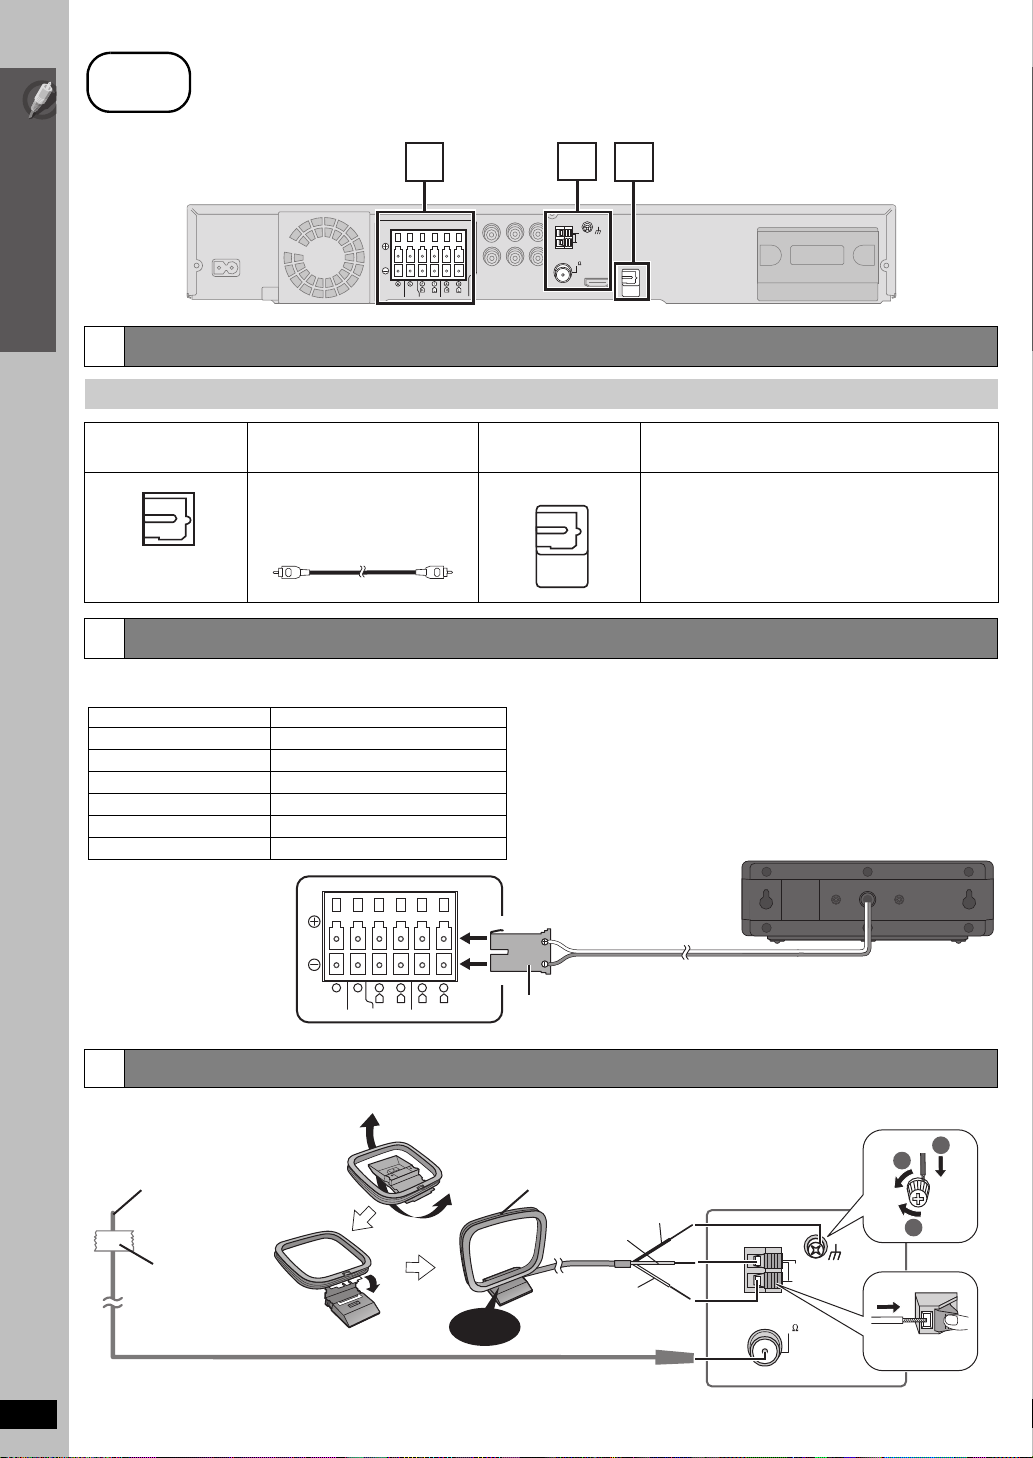
Simple Setup
step
2
Cable connections
OPTICAL
IN
AM ANT
EXT
LOOP
FM ANT
(75 )
CENTERSUBWOOFER FRONT SURROUND
LOOP ANT GND
2
3
1
Main unit
Audio and video connections (Continued)
OPTICAL OUT
Optical digital audio cable
≥ Do not bend sharply when
connecting.
OPTICAL
IN
Connecting the speakers to the main unit:
Connect to terminals of the same color.
Speaker Terminal/connector color
1
FRONT (L) White
2
FRONT (R) Red
3
SURROUND (L) Blue
4
SURROUND (R) Gray
5
CENTER Green
6
SUBWOOFER Purple
e.g. Surround speaker
Main unit
Insert fully.
FM ANT
(75 )
AM ANT
EXT
LOOP
LOOP ANT GND
1
3
2
Adhesive
tape
Click!
Black
Red
White
Main unit
Push!
[AM\loop\antenna]
(included)
Stand the antenna up on its base.
Place the antenna where reception is best.
[FM\indoor\antenna]
(included)
Affix this end of the antenna where
reception is best.
1
Other audio connection
TV terminal
Cable connections
Speaker connections
2
Cable required
(not included)
6 5 2 1 4 3
CENTERSUBWOOFER FRONT
LRL
R
SURROUND
Main unit terminal Features
[\\\\\\OPTICAL\IN\\\\\\]
This unit can decode the surround signals received
through cable TV box, digital broadcasting or satellite
broadcasts. Refer to your equipment’s operating
instructions for details. Only Dolb y Digita l and PCM can
be played with this connection.
≥ After making this connection, make settings to suit the
type of audio from your digital equipment (➜ 28).
Radio antenna connections
3
≥ Keep loose antenna cables away from other wires and cables.
8
RQTX0275
Page 9
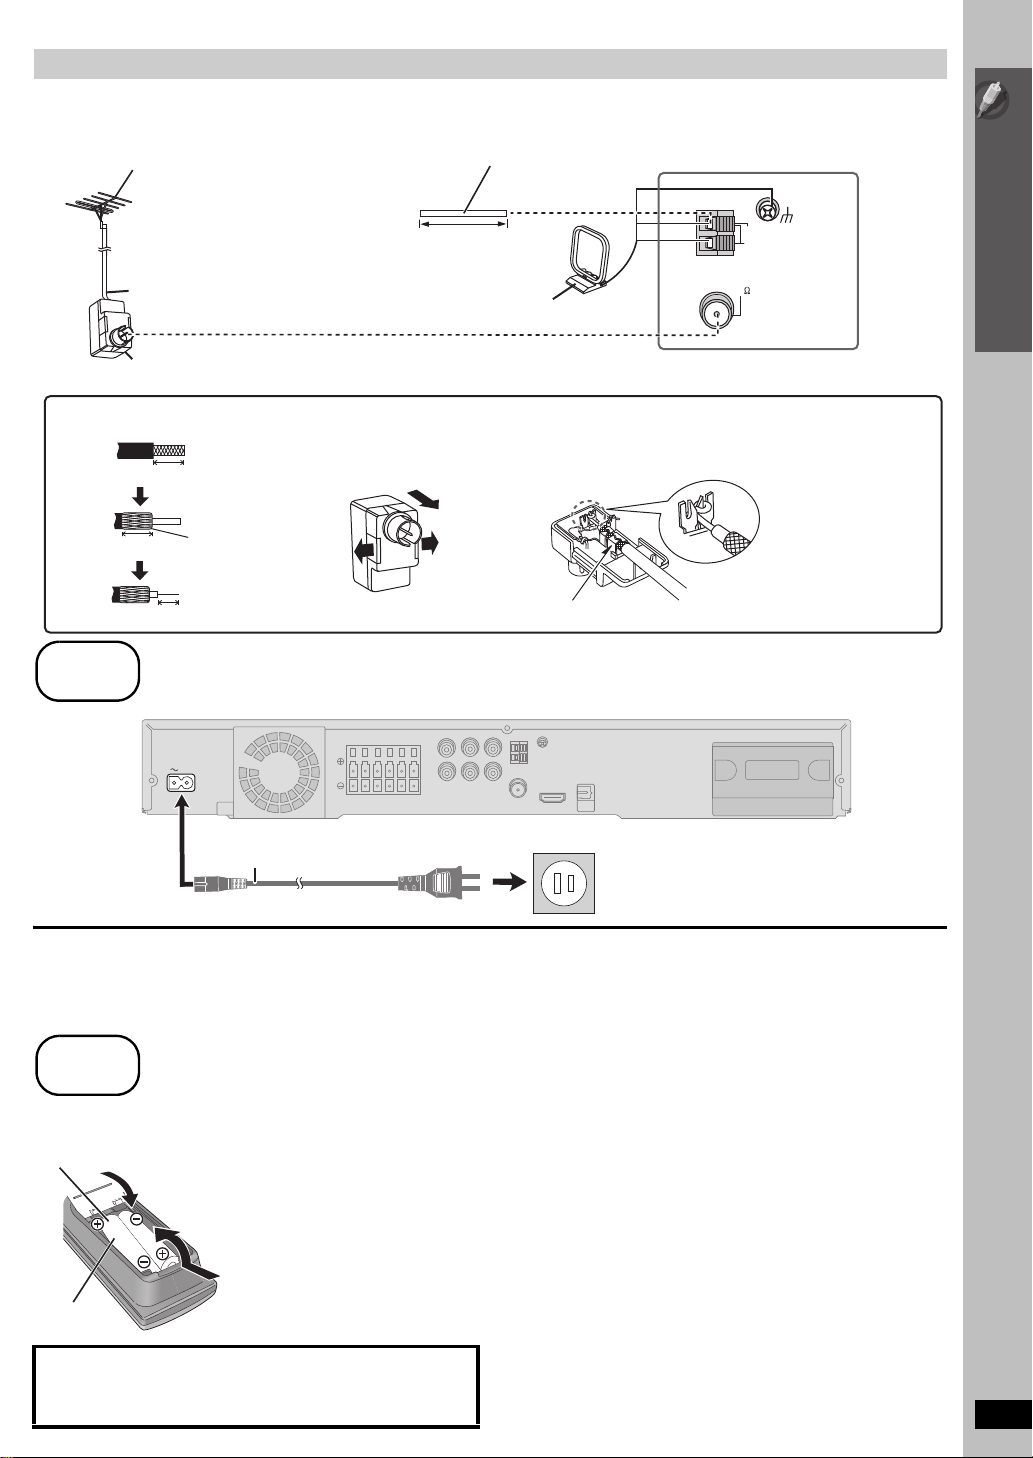
Simple Setup
Using an FM/AM outdoor antenna (optional)
FM ANT
(75 )
AM ANT
EXT
LOOP
LOOP ANT GND
Main unit
Leave the AM loop
antenna connected.
AM outdoor antenna
[Using a vinyl wire (not included)]
Run a piece of vinyl wire horizontally across a
window or other convenient location.
5.0 m to 12 m
(16 ft to 39 ft)
FM outdoor antenna
[Using a TV antenna (not included)]
≥ The antenna should be installed by a
competent technician.
75 ≠ coaxial cable
§
(not included)
Antenna plug (not included)
Use outdoor antenna if FM/AM radio reception is poor.
≥ Disconnect the antenna when the unit is not in use.
≥ Do not use the outdoor antenna during an electrical storm.
1 Remove a piece of the outer
vinyl insulator.
2 Carefully pull the tabs apart
to remove the cover.
3 Inst all the coaxial cable.
Clamp the cable conductor, and
wind it on so that it does not
contact anything else.
7 mm (
9
/32z)
Peel back
4 Attach the cover.
Clamp with pliers
10 mm (
13
/32z)
§
Rework your outdoor antenna’s 75 ≠ coaxial cable as follows.
10 mm (
13
/32z)
step
3
AC cord connection
AC IN
AC power supply cord
(included)
Main unit
To household AC outlet
(120 V, 60 Hz)
step
4
Preparing the remote control
R6/LR6, AA
Insert so the poles (i and j) match those in the remote control.
Conserving power
The main unit consumes a small amount of power when it is turned off
(approx. 0.3 W). To save powe r when it is not to be used for a long time,
unplug it from the household AC outlet.
You will need to reset some memory items after plugging in the main
unit.
∫ Batteries
CAUTION
Danger of explosion if battery is incorrectly replaced. Replace only with
the same or equivalent type recommended by the manufacturer.
Dispose of used batteries according to the manufacturer’s instructions.
[Note]
The included AC power supply cord is for use with the main unit only.
Do not use it with other equipment. Also, do not use cords for other
equipment with the main unit.
≥ Do not heat or expose to flame.
≥ Do not leave the battery(ies) in an automobile exposed to direct
sunlight for a long period of time with doors and windows closed.
Do not:
≥ mix old and new batteries.
≥ use different types at the same time.
≥ take apart or short circuit.
≥ attempt to recharge alkaline or manganese batteries.
≥ use batteries if the covering has been peeled off.
Mishandling of batteries can cause electrolyte leakage which can
severely damage the remote control.
Remove the batteries if the remote control is not going to be used for a
long period of time. Store in a cool, dark place.
∫ Use
Aim at the remote control signal sensor (➜ 13), avoiding obstacles ,
at a maximum range of 7 m (23 ft) directly in front of the unit.
Cable connections / AC cord connection / Prep aring the remote control
RQTX0275
9
Page 10
Simple Setup
The QUICK SETUP screen assists you to make necessary settings.
step
5
Performing QUICK SETUP
DVD
—
SLEEP
—
REPEAT
-
FL DISPLAY
-
PLAY MODE
VOL
OK
MUTE
SUBWOOFER
—
CH SELECT
FUNCTIONS
CANCEL SOUND
LEVEL
TOP MENU
MENU
DIRECT
NAVIGATOR
START
PLAY
LIST
-
RETURN
—
SETUP
SLOW/SEARCH
PLAYPAUSESTOP
SKIP
-
CD
MODE
12
3
4
5 6
7
8 9
0
10
ONE TOUCH PLAY
RADIO/
EXT-IN
INPUT
VOL
iPod
TV
DVD
—
W.SRD
PL
DISC
-
RETURN/
—
SETUP
OK
-
RETURN
—
SETUP
(press and hold)
SET
MAIN
DISC
VIDEO
AUDIO
DISPLAY
HDMI
OTHERS
EXIT : SETUP
RETURN
OK
OK
OK
OK
OK
OK
-
RETURN
—
SETUP
(press and hold)
Preparation
Turn on your TV and select the appropriate
video input mode (e.g. VIDEO 1, AV 1, HDMI,
etc.).
≥To change your TV’s video input mode, refer
to its operating instructions.
≥This remote control can perform some basic
TV operations (➜ 12).
1
2
3
DVD
Turn on the unit.
Select “DVD/CD”.
Show the setup menu.
Performing QUICK SETUP
RQTX0275
10
∫ Details of settings
MENU LANGUAGE
≥ ENGLISH ≥ FRANÇAIS ≥ESPAÑOL
Choose the language for the
on-screen messages.
TV TYPE
Select to suit the type of TV.
TV ASPECT
Choose the setting to suit your TV
and preference.
≥ Underlined items are the factory settings in the above table.
≥ STANDARD
≥ PROJECTION ≥ PLASMA
≥ 4:3PAN&SCAN
≥ 16:9NORMAL ≥ 16:9SHRINK ≥16:9ZOOM
4
5
6
7
8
Select “OTHERS”.
Select “QUICK SETUP”.
Select “SET”.
Select “YES”.
OTHER S −QUICK SETUP
SELECT THE MENU LANGUAGE.
SET
RETURN
Follow the messages and
make the settings.
≥MENU LANGUAGE
≥TV TYPE
≥TV ASPECT
To return to the previous screen, press
[-RETURN].
9
10
≥ CRT ≥ LCD
≥ 4:3LETTERBOX ≥ 4:3ZOOM
Finish QUICK SETUP.
Exit.
ENGLISH
FRANÇAIS
ES PAÑOL
Page 11
Simple Setup
step
6
Presetting the radio stations
-
SLEEP
-
REPEAT
-
FL DISPLAY
-
PLAY MODE
VOL
MUTE
SUBWOOFER
—
CH SELECT
FUNCTIONS
CANCEL SOUND
LEVEL
TOP MENU
MENU
DIRECT
NAVIGATOR
START
PLAY
LIST
-
RETURN
—
SETUP
SLOW/SEARCH
PLAYPAUSESTOP
SKIP
-
CD
MODE
12
3
4
5 6
7
8 9
0
10
ONE TOUCH PLAY
RADIO/
EXT-IN
INPUT
VOL
iPod
TV
DVD
—
W.SRD
PL
DISC
,
RADIO/EXT-IN
OK
OK
FUNCTIONS
-
PLAY MODE
Numbered
buttons
SELECTOR
TUNE
MEMORY
-TUNE MODE/—FM MODE
RADIO/
EXT-IN
OK
(press and hold)
W
P
Confirming the preset channels
ST
MONO
1
RADIO/
EXT-IN
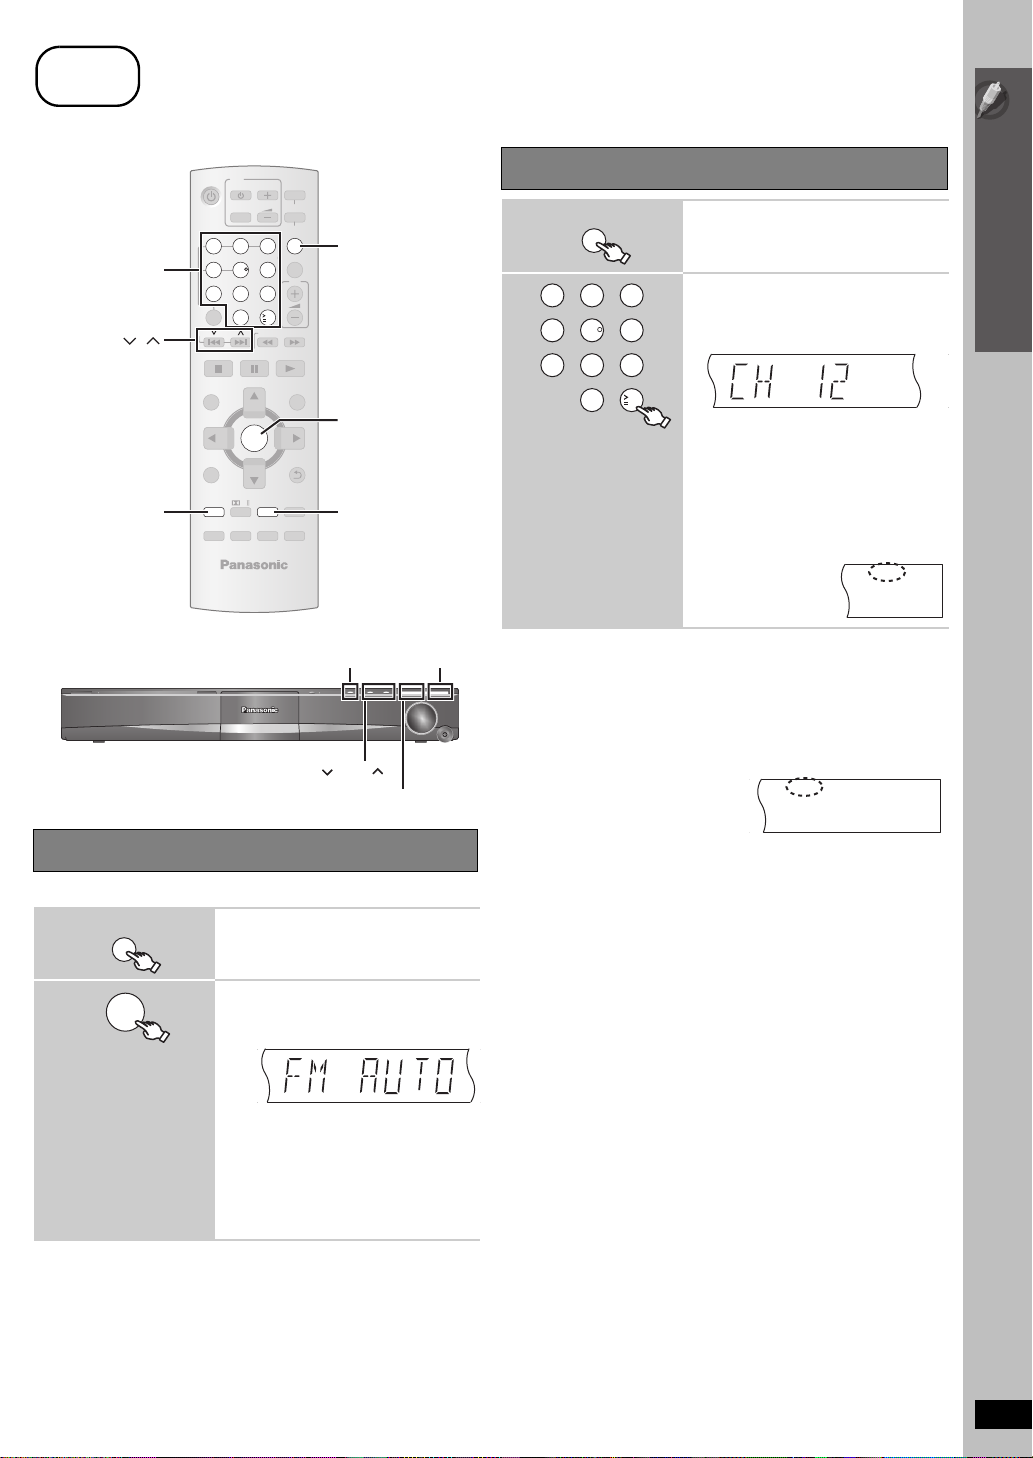
Select “FM” or “AM”.
≥ Main unit:
Press [SELECTOR].
2
12
5
4
8 9
7
0
Select the channel.
3
≥ To select a 2-digit number
6
e.g. 12: [S10] ➜ [1] ➜ [2]
10
Alternatively, press [X, W].
≥ Main unit:
Press [-TUNE MODE] to select
“PRESET” on the display, and then
press [X TUNE W] to select the channel.
When a stereo FM broadcast is being
received, “ST” lights in the display.
≥ The FM/AM setting is also shown on the TV display.
∫ If noise is excessive
When “FM” is selected
Press and hold [-PLAY MODE] (main unit: [—FM MODE]) to
display “MONO”.
Presetting the radio stations
Presetting stations automatically
Up to 30 stations can be set in each band, FM and AM.
1
2
≥ “SET OK” is displayed when the stations are set, and the radio tunes
to the last preset station.
≥ “ERROR” is displayed when automatic presetting is unsuccessf ul.
Preset the channels manually (➜ 27).
Select “FM” or “AM”.
≥ Main unit:
Press [SELECTOR].
Release the button when
“FM AUTO” or “AM AUTO” is displayed.
e.g.
≥ Main unit:
Press and hold [MEMORY].
The tuner tunes to the lowest frequency
and starts to preset all the stations it can
receive into the channels in ascending
order.
Press and hold the button again to cancel the mode.
≥ The mode is also canceled when you change the frequency.
When “AM” is selected
Press [FUNCTIONS]
on the remote control.
Each time you press the button: BP 2()BP 1
RQTX0275
11
Page 12
Control reference guide
TV
1
2
3
4
12
4
7
-
CD
DISC
MODE
SKIP
INPUT
5 6
8 9
0
DVD
VOL
iPod
RADIO/
EXT-IN
3
ONE TOUCH PLAY
VOL
10
SLOW/SEARCH
PLAYPAUSESTOP
5
TOP MENU
6
DIRECT
NAVIGATOR
7
MENU
8
PLAY
LIST
Control reference guide
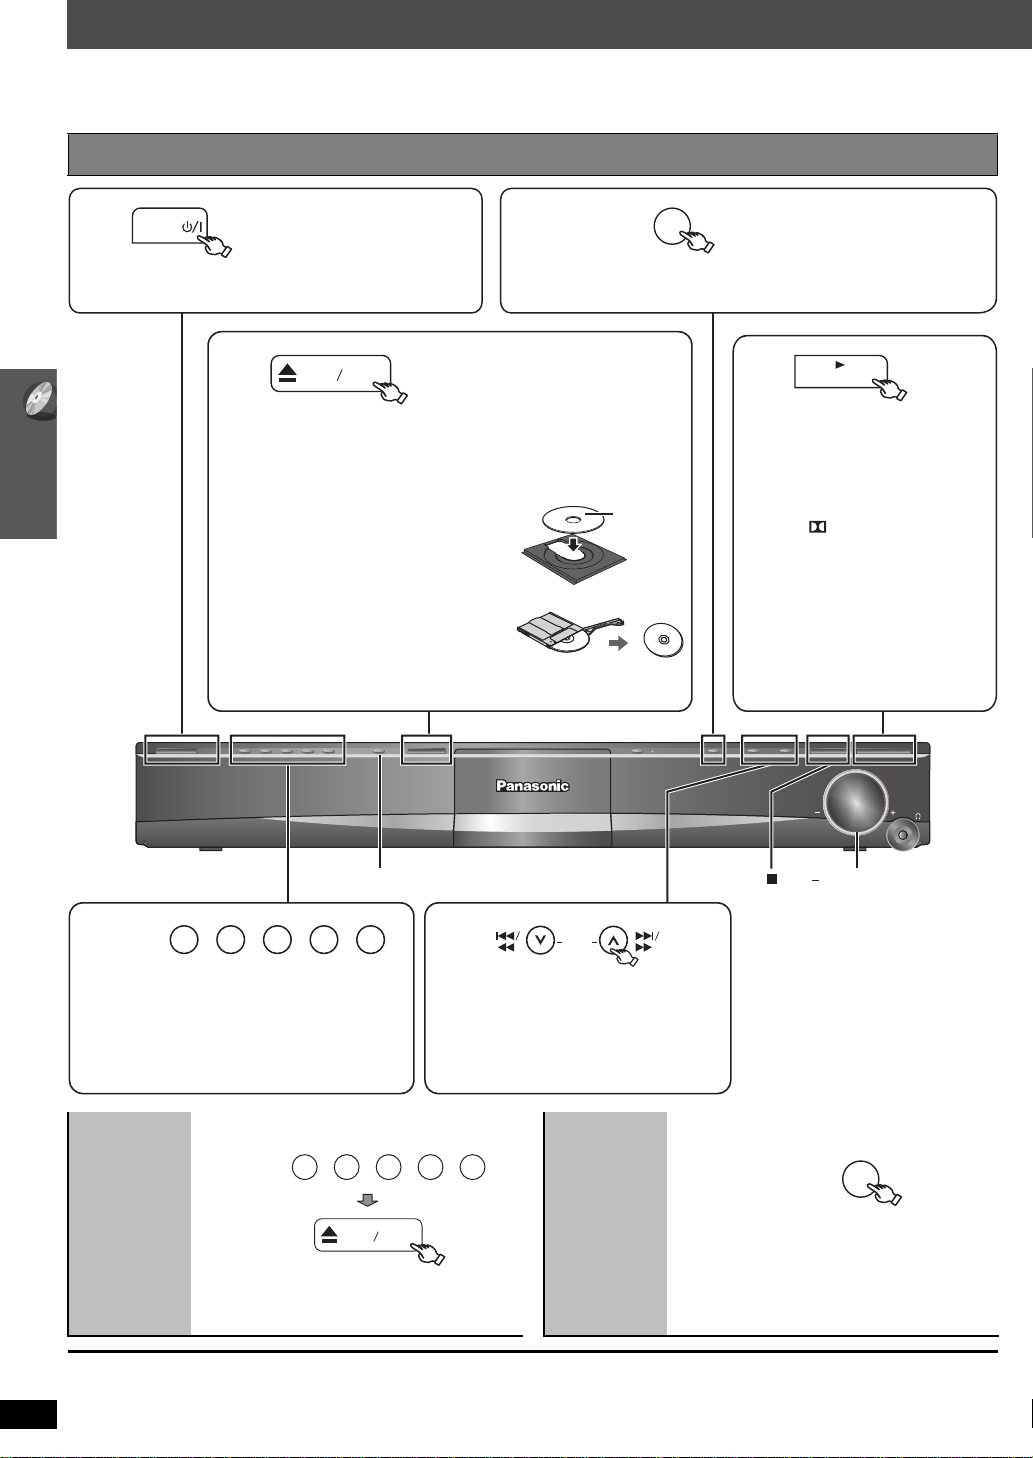
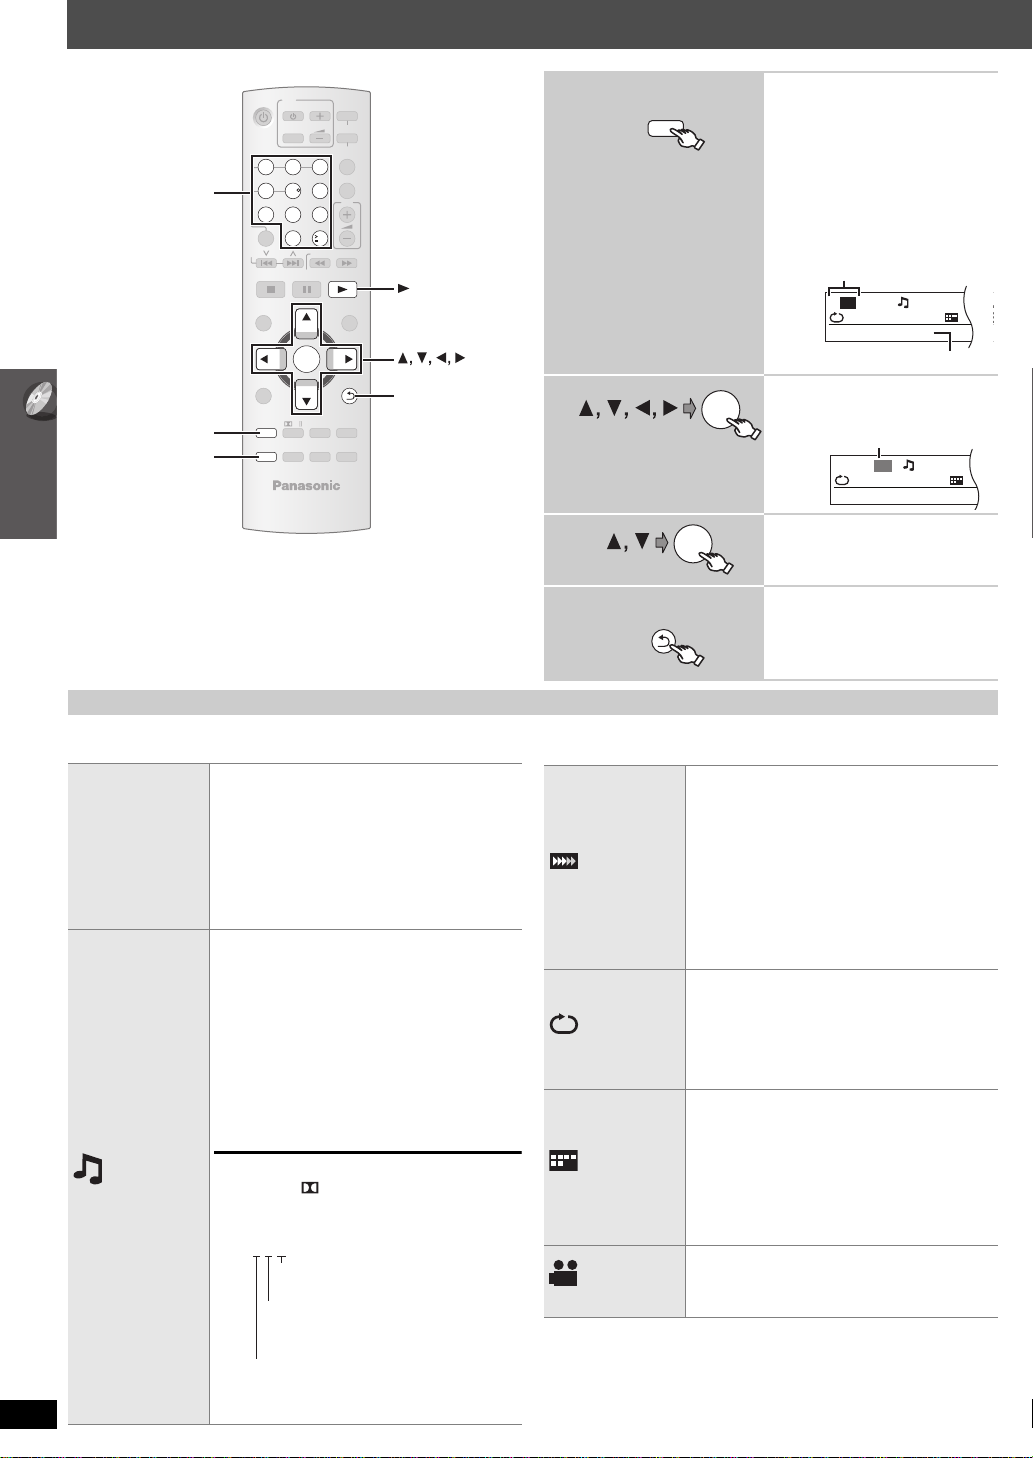
FUNCTIONS
9
10
11
12
1 Turn the main unit on/off (➜ 10)
2 Select channels and title numbers etc. / Enter numbers
(➜ 11, 15)
3 Select a disc / Play all loaded CDs sequentially (➜ 15, 16)
4 Select preset radio stations (➜ 27)
5 Basic operations for play (➜ 14, 15)
PL
CANCEL SOUND
—
W.SRD
OK
-
PLAY MODE
—
REPEAT
SUBWOOFER
LEVEL
—
CH SELECT
START
-
RETURN
—
SETUP
-
FL DISPLAY
—
SLEEP
MUTE
13
14
15
16
17
18
19
20
21
22
24
23
25
6 Show a disc top menu or program list (➜ 15, 17)
7 Select or confirm menu items / Frame-by-frame (➜ 15)
8 Show a disc menu or play list (➜ 15, 17)
9 Show on-screen menu (➜ 18)
: Turn Dolby Pro Logic II on/off (➜ 26)
; Cancel (➜ 16)
< Select sound mode / Turn Whisper Surround on/off (➜ 26)
= TV operations
Aim the remote control at the Panasonic TV and press th e button.
[Í TV]: Turn the TV on/off
[INPUT]:Change the TV’s video input mode
[r, s]: Adjust the TV volume
This may not work properly with some models.
> Select disc as the source (➜ 10)
? Select iPod as the source (➜ 28)
@ Select FM/AM tuner or external audio as the source (➜ 27,
28)
FM#AM#AUX#D-IN
^-------------------------------}
A Start up and play a disc automatically (➜ 15, 24)
B Adjust the volume of the main unit
C Select radio stations manually (➜ 27)
D Show START menu (➜ 13)
E Return to previous screen / Show setup menu (➜ 15, 10)
F Switch information on the main unit’s display (➜ 15)
or
Set the Sleep timer
Press and hold [—SLEEP].
While the time is shown on the main unit’s display, press the
[—SLEEP] repeatedly.
SLEEP 30#SLEEP 60#SLEEP 90#SLEEP120
^---------------------- OFF (Cancel) (---------------}
≥ To confirm the remaining time, press and hold the button again.
G Select the play mode / Set the repeat mode (➜ 16)
H Mute the sound
≥ “MUTE” flashes on the main unit’s display while the function is on.
≥ To cancel, press the button again or adjust the volume.
≥ Muting is canceled when you switch the unit to standby
I Adjust the subwoofer level or select speaker channel
(➜ 27)
Avoiding interference with other Panasonic equipment
Other Panasonic audio/video equipment may start functioning when you
operate the unit using the supplied remote control.
You can operate this unit in another mode by setting the remote control
operating mode to “REMOTE 2”.
RQTX0275
12
The main unit and remote control must be set to the same mode.
1 Press and hold [9/5] on the main unit and [2] on the remote
control until the main unit’s disp lay shows “REMOTE 2”.
2 Press and hold [OK] and [2] on the remote control for at least 2
seconds.
To change the mode back to “REMOTE 1”, repeat both steps above by
replacing [2] with [1].
Page 13
VOLUME
POWER
SELECTOR TUNE
MEMORY
TUNE MODE FM MODE
SW
BOOST
OPEN CLOSE
5 DISC
SELECTOR
EXCHANGE
123 45
13 14
1 43 6 8 9
11 12
SW
BOOST
OPEN CLOSE
5 72
10
1 Standby/on switch (POWER Í/I)
START
DVD/CD Home theater
OK
RETURN
Input select
OK
DVD/CD Home theater
OK
RETURN
Input select
Playback Disc
TOP MENU (DVD)
MENU (DVD)
Playback/menu
access
Press to switch the unit from on to standby mode or vice
versa. In standby mode, the unit is still consuming a small
amount of power. (➜ 14)
2 5 DISC SELECTOR
Select a disc directly (➜ 14)
3 Disc exchange
Open the disc tray to exchange the disc. (➜ 14)
4 Open/Close the disc tray (➜ 14)
5 Turn Subwoofer Boost on/off (➜ 27)
6 Select the source
DVD/CD#FM#AM#AUX#D-IN#IPOD
^---------------------------------------------------------------}
7 Skip or slow-search play / Select the radio stations
(➜ 11, 14)
Utilizing the START menu
8 Stop playing / Select the tuning mode / Adjust the FM
reception condition (➜ 11, 14)
9 Play discs / Memorize the receiving radio stations
(➜ 14, 27)
: Connect iPod (➜ 28)
; Remote control signal sensor
< Display
= Adjust the volume of the main unit
> Connect headphones (not included)
Headphone plug type: ‰3.5 mm (1/8q) stereo mini plug
≥ Reduce the volume before connecting.
≥ Audio is automatically switched to 2-channel stereo.
≥ To prevent hearing damage, avoid listening for prolonged periods
of time.
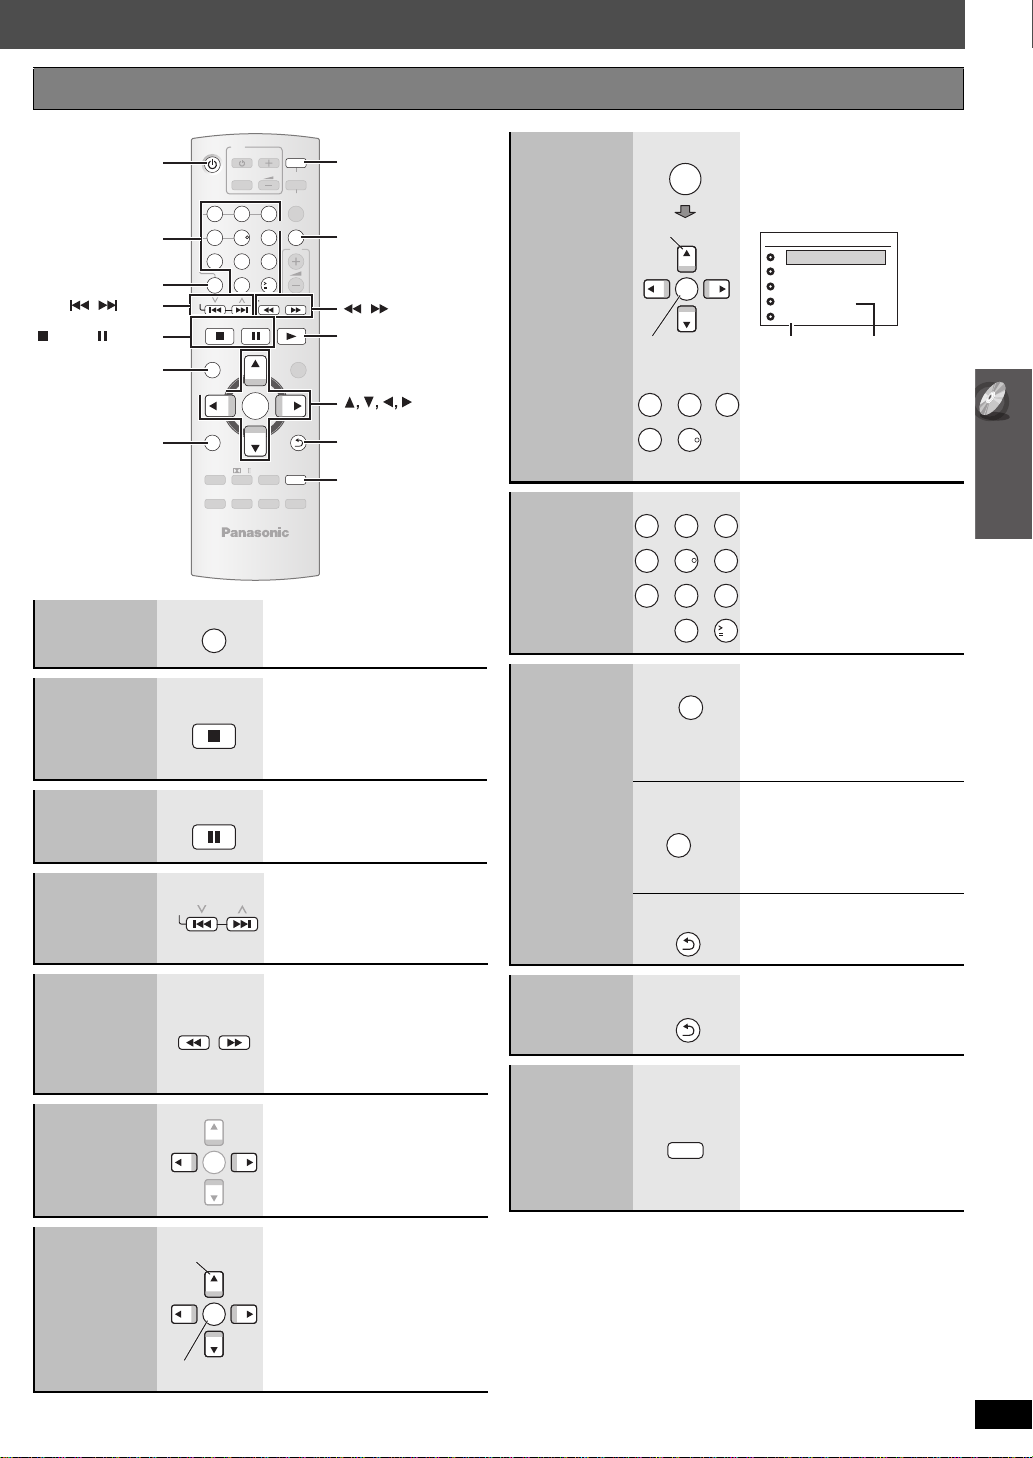
Control reference guide / Utilizing the ST ART menu
You can select desired source or access playback/menus by using the
START menu.
1
Show the START menu.
When a disc is loaded, you can also access playback or menus from the
START menu.
e.g. [DVD-V]
e.g.
When the on-screen control panel appears
e.g. [DVD-V] (when “Playback Disc” is selected from the START menu)
2
When “Input select” is selected
You can select a desired source from the menu.
≥ DVD/CD (➜ 10), FM (➜ 11), AM (➜ 11), AUX
DIGITAL IN
§
“(TV)” will appear beside “AUX” or “DIGITAL IN”, indicating the TV audio
§
(➜ 28), iPod (➜ 28)
Select an item.
≥ To exit press [START].
§
(➜ 28),
SEARCH
PLAY
PAUSE
STOP
You can operate the playback with the indicated controls.
setting for VIERA Link “HDAVI Control” (➜ 24).
Press [3, 4], then press [OK] to make the settings.
SEARCH
RETURN
RQTX0275
13
13
Page 14
Basic play
VOLUME
OPEN CLOSE
SELECTOR
12
3
4
MEMORY
5
, + VOLUMEEXCHANGE
5 DISC
SELECTOR
123 45
TUNE
POWER
Start play.
≥ Turn [`, i VOLUME] to
adjust the volume.
≥ You can enjoy surround
sound when you press
[PLII] on the remote
control to turn on Dolby Pro
Logic II (➜ 26).
(Stop)
Select “DVD/CD”.Turn on the unit.
Press to skip.
Press and hold to
– search during play
– start slow-motion play during pause
≥ Press [1] (Play) to start normal play.
Open all the disc trays.
≥ To select a desired tray (➜ below, Selecting the desired tray).
≥ Press [<OPEN/CLOSE] again to close all the disc trays.
Load the disc.
≥ Load double-sided discs so the
label for the side you w ant to play is
facing up.
≥ Press [EXCHANGE] to load discs
one by one.
≥ For DVD-RAM, remove the disc
from its cartridge before use.
≥ Do not:
– Load more than one disc per tray.
– Push or pull out the tray by hand.
Press to select a disc directly.
≥ You can also select the disc using the remote
control (➜ 15, Selecting a disc).
Label
facing up
Preparation
To display the picture, turn on your TV and change its video input mode (e.g. VIDEO 1, AV 1, HDMI, etc.) to suit the
connections to this unit.
Using the main unit
Basic play
5 DISC
SELECTOR
123 45
Selecting
the desired
tray
[Note]
≥ DISC CONTINUES TO ROTATE WHILE MENUS ARE DISPLAYED.
RQTX0275
To preserve the unit’s motor and your TV screen, press [∫] (Stop) when you are finished with the menus.
14
≥ Total title number may not be displayed properly on iR/iRW.
Press [<OPEN/CLOSE] again to close the tray.
OPEN CLOSE
Change
discs
without
interrupting
playback
During play,
≥ All trays are opened (exce pt the t r ay that the disc
is playing).
≥ Press [EXCHANGE] to close the top tray.
Press again until all the trays are closed.
≥ Press [<OPEN/CLOSE]
EXCHANGE
to close all the open trays.
Page 15
Using the remote control
—
SLEEP
—
REPEAT
-
FL DISPLAY
-
PLAY MODE
VOL
OK
MUTE
SUBWOOFER
—
CH SELECT
FUNCTIONS
CANCEL SOUND
LEVEL
TOP MENU
MENU
DIRECT
NAVIGATOR
START
PLAY
LIST
-
RETURN
—
SETUP
SLOW/SEARCH
PLAYPAUSESTOP
SKIP
-
CD
MODE
12
3
4
5 6
7
8 9
0
10
ONE TOUCH PLAY
RADIO/
EXT-IN
INPUT
VOL
iPod
TV
DVD
—
W.SRD
PL
1
SLOW/SEARCH
,
,
SKIP
STOP, PAUSE
TOP MENU,
DIRECT NAVIGATOR
OK
-
FL DISPLAY
-
RETURN
MENU, PLAY LIST
DISC
DISC
2
ONE TOUCH PLAY
5
Numbered
buttons
ONE TOUCH PLAY
PAUSE
SKIP
—
SLOW/SEARCH
OK
Select
Confirm
OK
—
Select
Confirm
or
DISC CHANGE
CD
DATA-DISC
UNCHECKED
NO DISC
DVD-VIDEO1
2
3
4
5
Not yet readEmpty tray
TOP MENU
DIRECT
NAVIGATOR
MENU
PLAY
LIST
-
RETURN
—
SETUP
—
—
SLEEP
-
FL DISPLAY
If you are experiencing problems, refer to troubleshooting (➜ 32 to 34).
Disc information screen is
-
CD
MODE
DISC
displayed.
≥ To exit the screen, press [DISC].
e.g. [DVD-V]
One touch
play
Stop
Pause
Skip
STOP
The main unit automatically turns
on and starts playing the disc in
the tray.
The position is memorized while
“RESUME STOP” is on the screen.
≥ Press [1 PLAY] to resume.
≥ Press [∫ STOP] again to clear
the position.
≥ Press [1 PLAY] to restart play.
Selecting a
disc
Enter
number
Disc menu
OK
12
5
4
12
5
4
8 9
7
0
3
[DVD-VR] [DVD-V] [VCD] [CD]
e.g. To select 12:
3
[S10] ➜ [1] ➜ [2]
6
[VCD] with playback control
Press [∫ STOP] to cancel the PBC
function, and then press the
numbered buttons.
10
[DVD-V]
Shows a disc top menu.
[DVD-VR]
Press the button to show the
programs (➜ 17).
[DVD-V]
Shows a disc menu.
[DVD-VR]
Press the button to show a pla y list
(➜ 17).
[VCD] with playback control
Shows a disc menu.
Basic play
Search
(during play)
Slow-motion
(during pause)
Frame-byframe
(during pause)
On-screen
item select
≥ Up to 5 steps.
≥ Press [1 PLAY] to start normal
play.
≥ [VCD] Slow-motion: Forward
direction only.
[DVD-VR] [DVD-V] [VCD]
≥ [DVD-VR] [VCD] Forward direction
only.
Return to
previous
screen
Main unit
display
-
RETURN
—
SETUP
[DVD-VR] [DVD-V] [WMA] [MP3]
Time display
,-. Information display
(e.g. [DVD-VR] Program
number)
[JPEG]
,-.Contents number
SLIDE
RQTX0275
15
Page 16
Other playback functions
—
SLEEP
—
REPEAT
-
FL DISPLAY
-
PLAY MODE
VOL
OK
MUTE
SUBWOOFER
—
CH SELECT
FUNCTIONS
CANCEL SOUND
LEVEL
TOP MENU
MENU
DIRECT
NAVIGATOR
START
PLAY
LIST
SLOW/SEARCH
PLAYPAUSESTOP
SKIP
-
CD
MODE
4
5 6
7
8 9
0
10
—
W.SRD
PLAY
OK
CANCEL
STOP
DISC
−CD MODE
-
RETURN
—
SETUP
-
RETURN
-
PLAY MODE
—
REPEAT
PL
-
CD
MODE
DISC
PLAY
(press and hold)
W1 W2
CD
P.MODE
—
REPEAT
-
PLAY MODE
(press and hold)
—
REPEAT
-
PLAY MODE
—
REPEAT
-
PLAY MODE
OK
DVD-V PROGRAM
SELECT TITLE
TITLE CHAP.
TITLE 1
TITLE 2
TITLE 3
TITLE 4
1
2
3
4
5
6
7
8
9
10
START:PLAY
CLEAR ALL
OK
ALL DISC RANDOM
PRESS PLAY TO START
Playing CDs sequentially (CD Mode)
[VCD] [CD] [WMA] [MP3]
This feature allows you to play all loaded CDs sequentially. Select an
applicable disc before playing (➜ 15, Selecting a disc).
While stopped
≥ If all loaded discs are DVDs, CD Mode does not work.
≥ Video CD playback control is disabled.
≥ You cannot turn CD Mode on or off during program or random mode.
≥ If you want to play a DVD, press and hold [–CD MODE] again while
stopped to cancel CD Mode. (CD Mode is also canceled when you
switch the unit to standb y, select another source, or when the disc tr ay i s
opened.)
Other playback functions
Repeat play
This works only when the elapsed play time can be displayed. It also
works with all JPEG content.
During play
1
While the repeat
2
mode is displayed
Items shown differ depending on the type of di sc and playback mode.
Show the repeat mode.
Select an item to be repeated.
e.g. [DVD-V]
`TITLE ---. `CHAP. ---. `OFF
^-------------------------------------------------}
≥ To cancel, select “OFF”.
Program play (up to 30 items)
∫ 1-Disc program
[DVD-V] [VCD] [CD] [WMA] [MP3] [JPEG] You can program all the items on a
disc in the selected tray.
1
Select an item.
e.g. [DVD-V]
≥ Repeat this step to program other items.
≥ To return to the previous menu, press
[-RETURN].
2
PLAY
Start play.
∫ All-Disc program (when CD Mode is on)
[VCD] [CD] You can program all the items on all the discs.
1 Press [3, 4], and then press [OK] to select the disc.
2 Press [3, 4], and then press [OK] to select the track.
3 Re peat step 1 and 2 to program other items.
≥To return to the previous menu, press [-RETURN].
4 Press [1 PLAY].
To select all the items
Press [3, 4] to select “ALL” and press [OK].
To clear the selected program
1 Press [1] and then press [3, 4] to select the program.
2 Press [CANCEL].
To clear the whole program
Press [1] several times to select “CLE AR ALL”, and then press [OK].
The whole program is also cleared when the disc tray is opene d, the unit
is turned off or another source is selected.
Random play
∫ 1-Disc random
[VCD] [CD] You can playback all the items o n a di sc in t he selected tr ay in
random order.
[DVD-V] [WMA] [MP3] [JPEG] Y ou can pla yback selected item(s) on a disc in
the selected tray in random order.
1
(Only when the disc has groups or multiple titles.)
Select a group or title.
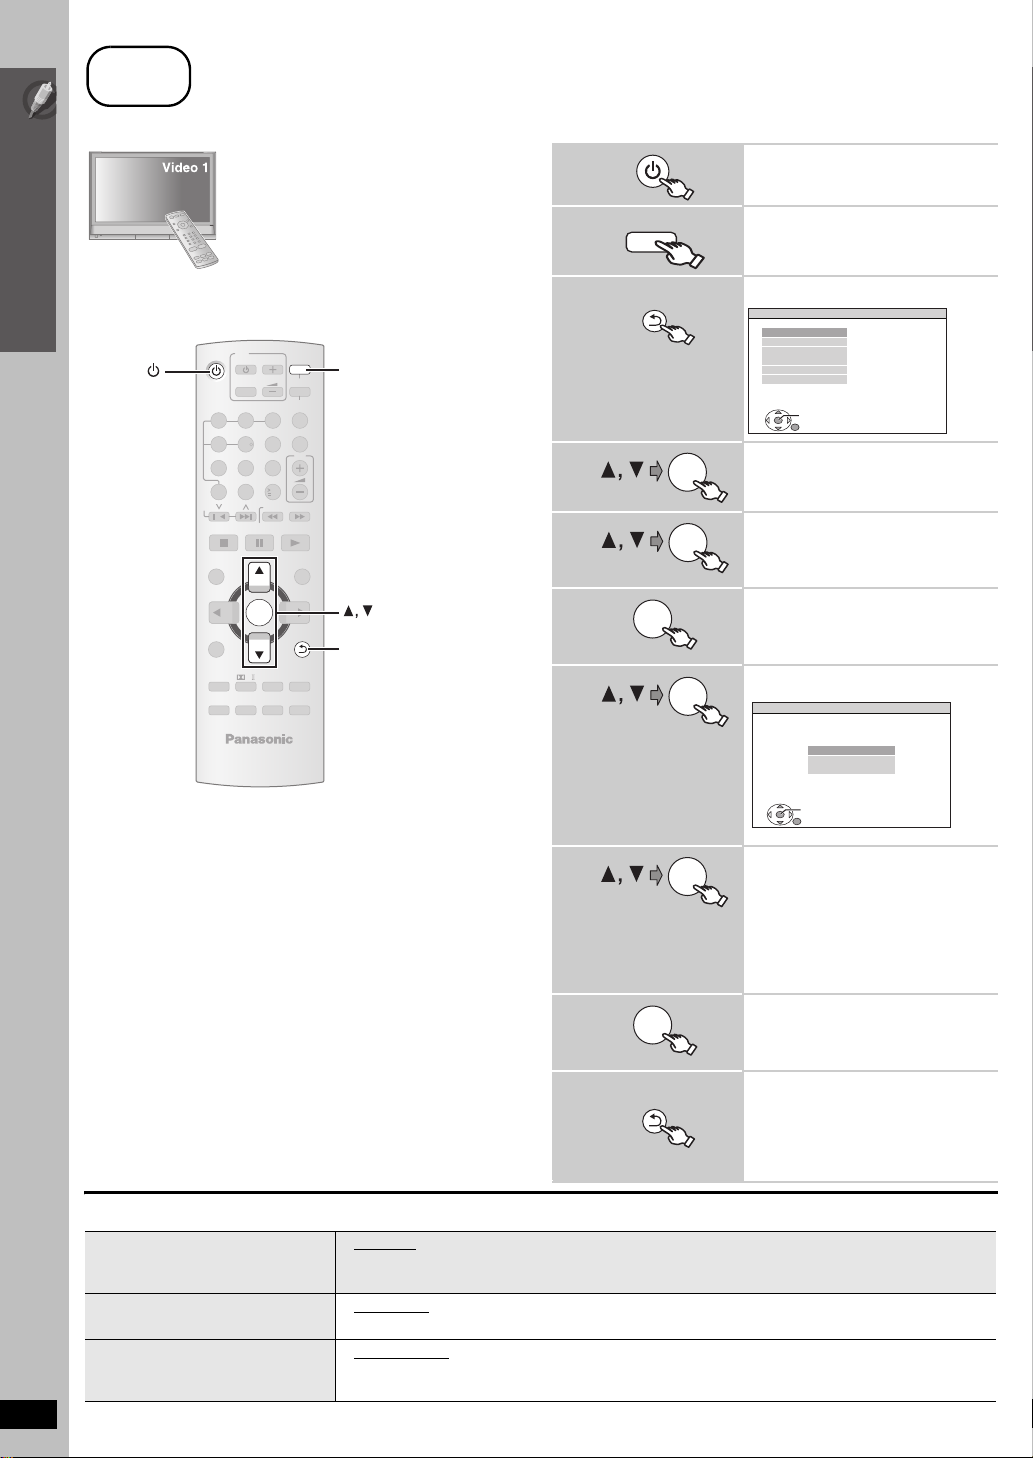
e.g. [DVD-V]
DVD-V RANDOM
SELECT TITLE
TITLE 1
TITLE 2
TITLE 3
To enjoy program or random play with:
≥ [DVD-VR] Select “DATA” in “DVD-VR/DATA” (➜ 22, “OTHERS” menu) to
play WMA, MP3 or JPEG contents.
RQTX0275
≥ [DVD-V] Some items cannot be played ev en if you have programmed
them.
16
Program and Random play
[DVD-V] [VCD] [CD] [WMA] [MP3] [JPEG]
– 1 disc : ensure CD Mode (➜ above) is off
– all discs: ensure CD Mode is on
While stopped
Select the play mode.
Program and random playback screens
appear sequentially.
Program ------------------------------------------) Random
^--- Exit program and random screens (}
PRESS PLAY TO START
≥ “¢” represents selected. To deselect, press
[OK] again.
2
PLAY
Start play.
∫ All-Disc random (when CD Mode is on)
[VCD] [CD] You can playback all the items on all the discs in random order.
Press [1 PLAY].
e.g. [CD]
Page 17
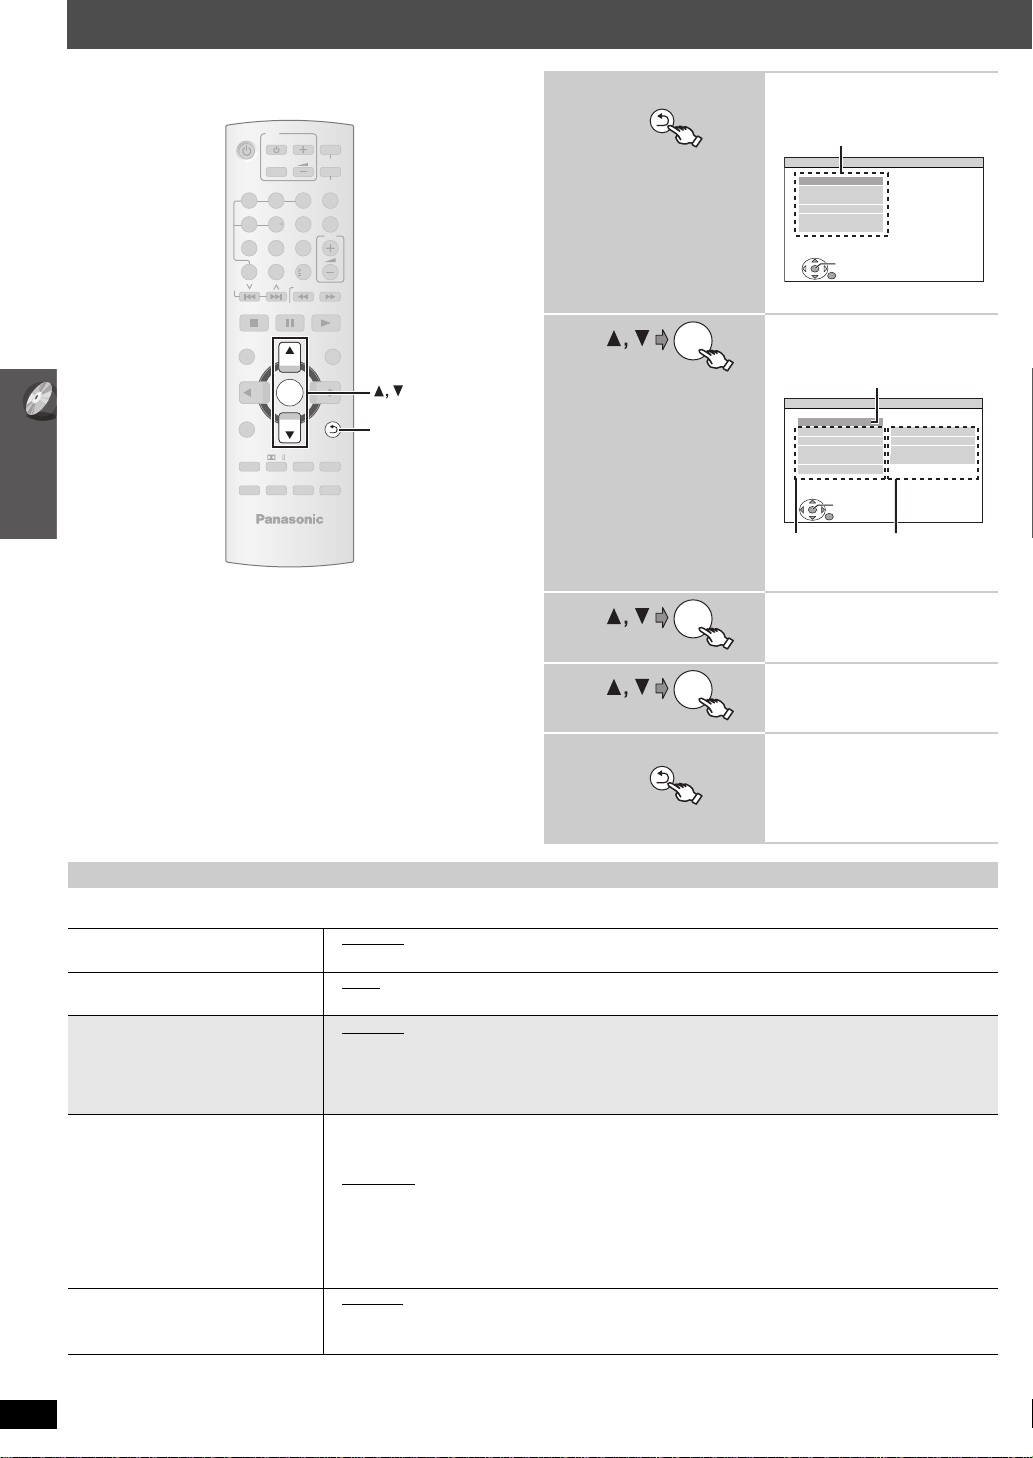
Using navigation menus
Group (Folder):
Content (File):
: WMA/MP3
: JPEG
TOP MENU
DIRECT
NAVIGATOR
Group name
Group and content
number
OK
TOP MENU
DIRECT
NAVIGATOR
PG
DATE
LENGTH
TITLE
1
0:16:02
10/11
LIVE CONCERT
02:15
2
0:38:25
12/05
AUTO ACTION
3
1: 16:05
04/03
CINEMA
02:10
01:3 0
OK
RETURN
e.g.
OK
MENU
PLAY
LIST
PL
DATE
LENGTH
TITLE
1
0:00:10
11/11
CITY PENGUIN
00:01
2
0: 01:20
12/01
FOOTBALL
3
1: 10:04
01/02
SPECIAL
01:10
01:20
OK
RETURN
e.g.
OK
TV
DVD
VOL
INPUT
iPod
RADIO/
EXT-IN
3
,
SKIP
STOP
TOP MENU,
DIRECT NAVIGATOR
MENU,
PLAY LIST
12
4
7
-
CD
DISC
MODE
SKIP
TOP MENU
DIRECT
NAVIGATOR
MENU
FUNCTIONS
CANCEL SOUND
PLAY
LIST
5 6
8 9
0
PL
—
W.SRD
10
SLOW/SEARCH
OK
-
PLAY MODE
—
REPEAT
SUBWOOFER
LEVEL
—
CH SELECT
ONE TOUCH PLAY
VOL
PLAYPAUSESTOP
START
-
RETURN
—
SETUP
-
FL DISPLAY
—
SLEEP
MUTE
OK
-
RETURN
Playing data discs
[WMA] [MP3] [JPEG]
[DVD-VR] Select “DATA” in “DVD-VR/DATA” (➜ 22, “OTHERS” menu) to
play WMA, MP3 or JPEG contents.
Playing from the selected item
You can select to play from your desired item while the “DATA-DISC”
screen is displayed.
e.g.
DATA-DISC
ROOT
Perfume
My favorite1
My favorite2
My favorite3
Underwater
Fantasy planet
City of cascade
Infinite unit
Lady Starfish
Metal Glue
Life on Jupiter
Starpersons1
Starpersons2
OK
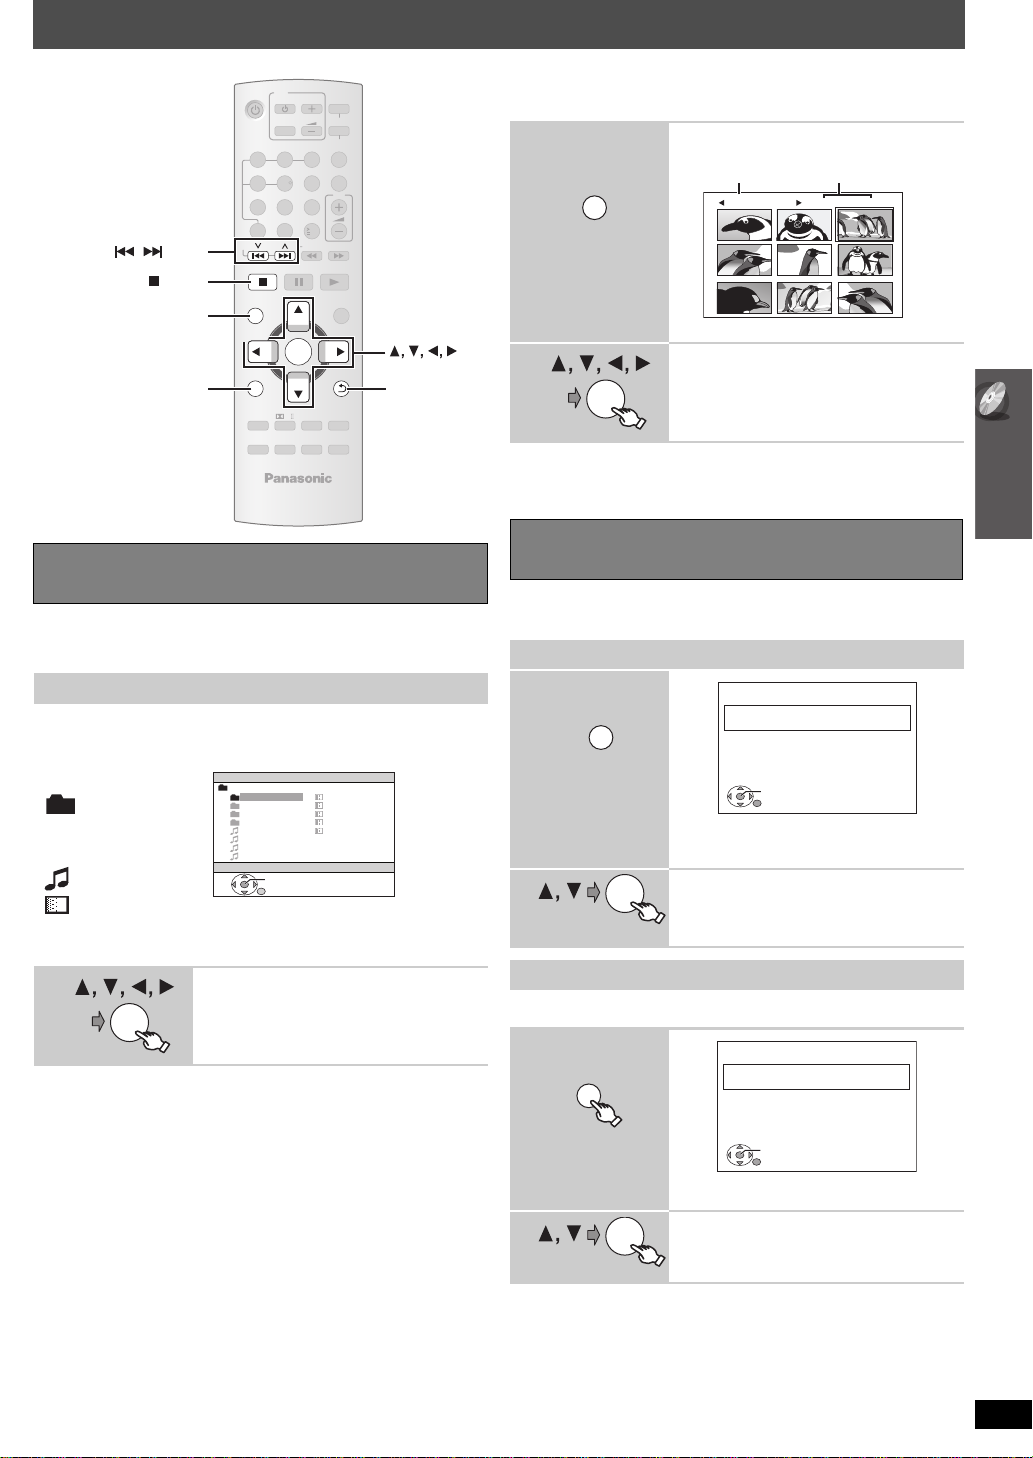
∫ Selecting the picture in Thumbnail menu
[JPEG]
While picture is
1
displayed
2
To go to other group
1 Press [3] to select the group name.
2 Press [2, 1] to select the group and press [OK].
Playing RAM and DVD-R/-RW (DVD-VR) discs
[DVD-VR]
≥ Titles appear only if the titles are recorded on the disc.
≥ You cannot edit programs, play lists and disc titles.
Playing the programs
While stopped
1
2
e.g.
JPEG image s G 1/ 1:C 3/ 9
Select a picture.
≥ Press [:, 9 SKIP] to skip page by
page.
≥ To exit the screen, press [DIRECT
NAVIGATOR].
Select the program.
≥ Press [2, 1] to skip page by page.
Using navigation menus
≥ To display/exit the screen, press [MENU].
Select an item.
≥ Press [2, 1] to skip page by page.
OK
Play starts from the selected content.
≥ To return to the previous screen, press
[-RETURN].
≥ Maximum: 12 characters for file/folder name.
Playing a play li st
This works only when the disc contains a play list.
While stopped
1
≥ To exit the screen, press
2
Select the play list.
≥ Press [2, 1] to skip page by page.
[PLAYLIST].
RQTX0275
17
Page 18
Using on-screen menus
—
SLEEP
—
REPEAT
-
FL DISPLAY
-
PLAY MODE
VOL
OK
MUTE
SUBWOOFER
—
CH SELECT
FUNCTIONS
CANCEL SOUND
LEVEL
TOP MENU
MENU
DIRECT
NAVIGATOR
START
PLAY
LIST
SLOW/SEARCH
PLAYPAUSESTOP
SKIP
-
CD
MODE
12
3
4
5 6
7
8 9
0
10
RADIO/
EXT-IN
INPUT
VOL
iPod
TV
DVD
—
W.SRD
DISC
OK
PLAY
FUNCTIONS
CANCEL
ONE TOUCH PLAY
-
RETURN
—
SETUP
-
RETURN
PL
Numbered
buttons
FUNCTIONS
T
1
C1
1:ENG
3/2.
1 :E
OFF
TITLE SEARCH
Current item
Item name
T
1
C 1
1:ENG
3/
1
OFF
CHAPTER SEARCH
Current setting
OK
-
RETURN
—
SETUP
.0: No surround
.1: Mono surround
.2: Stereo surround (left/right)
.1: Low frequency effect
(not displayed if there is no signal)
.1: Center
.2: Front leftiFront right
.3: Front leftiFront rightiCenter
e.g.
1
Show the on-screen
menu.
Each time you press the button:
Menu 1 (Disc/Play)
Menu 2 (Video)
Menu 3 (Audio)
Menu 4 (HDMI)
Exit
e.g. Menu 1 (Disc/Play) [DVD-V]
2
3
4
Select the item.
OK
e.g. Menu 1 (Disc/Play) [DVD-V]
Make the settings.
Exit.
Items shown differ depending on the type of disc.
∫ Menu 1 (Disc/Play)
Using on-screen menus
TRACK SEARCH
TITLE SEARCH
CONTENT SEARCH
CHAPTER SEARCH
PG SEARCH
(Program Search)
PL SEARCH
(Playlist Search)
AUDIO
RQTX0275
18
To start from a specific item
≥ [VCD] This does not work when using playback
control.
e.g. [DVD-V] : T2 C5
To select numbers for data disc
e.g. 123: [S10] ➜ [1] ➜ [2] ➜ [3] ➜ [OK]
[DVD-V] (with multiple soundtracks)
To select audio soundtrack
[DVD-VR] [VCD]
To select “L”, “R”, “L+R” or “L R”
[DVD-V] (Karaoke disc)
To select “ON” or “OFF” for vocals
To select “OFF”, “V1”, “V2” or “V1+V2” for
vocal selections
Actual operations depend on the disc. Read the
disc’s instructions for details.
Signal type/data
LPCM/PPCM/ D/DTS/MP3/MPEG: Signal type
kHz (Sampling frequency)/bit/ch (Number of
channels)
3/2 .1ch
PLAY SPEED
REPEAT MODE
SUBTITLE
ANGLE
[DVD-VR] [DVD-V]
To change play speed
– from “k0.6” to “k1.4” (in 0.1-unit steps)
≥ Press [1 PLAY] to return to normal play.
≥ After you change the speed
– Dolby Pro Logic II has no effect.
– Audio output switches to 2-channel stereo.
– Sampling frequency of 96 kHz is converted to
48 kHz.
≥ This function may not work depending on the
disc’s recording.
(➜ 16, Repeat play)
A-B Repeat
(To repeat a specified section)
Except [JPEG] [DVD-VR] (Still picture part)
[VCD] (SVCD)
Press [OK] at the starting and ending points.
≥ Select “OFF” to cancel.
[DVD-V] (with multiple subtitles)
[VCD] (SVCD only)
To select subtitle language
≥ On iR/iRW, a subtitle n umber may be shown
for subtitles that are not displayed.
[DVD-VR] (with subtitle on/off information)
To select “ON” or “OFF”
≥ This may not work depending on the disc.
[DVD-V] (with multiple angles)
To select a video angle
Page 19
[JPEG] To select “ON” or “OFF” for picture’s
JPG
DATE
PLII
HDMI --- IN F OR M ATION
CONNECTED STATE
AUDIO STREAM
MAX CHANNEL
VIDEO FORMAT
COLOR SPACE
CONNECTED
PCM
2ch
720p
YCbCr 4:4:4
1
2
3
4
5
e.g.
date display
DATE DISPLAY
To rotate a picture (during pause)
[JPEG] : 0,------. 90,------.180,------.270
ROTATION
∫ Menu 2 (Video)
NORMAL
CINEMA1: Mellows images and enhances
CINEMA2: Sharpens images and enhances
PICTURE MODE
ZOOM
TRANSFER
MODE
DYNAMIC: Enhances the contrast for powerful
ANIMATION
To select zoom sizes
NORMAL, AUTO (
≥ [JPEG]: during pause
If you have chosen “480p”/“720p”/“1080p”
(progressive), “1080i” (interlaced)
[“VIDEO FORMAT” in Menu 4 (HDMI)] or
“PROGRESSIVE” under “VIDEO OUT (I/P)”
(➜ 21, “VIDEO” menu), select the method of
conversion for progressive output to suit the type
of material.
≥ The setting will return to “AUTO1” when the disc
tray is opened, the unit is turned off or another
source is selected.
AUTO1: Automatically detects the film and video
AUTO2: In addition to “AUTO1”, automatically
VIDEO: Select when using “AUT O1” or “A UT O2”,
∫ Menu 3 (Audio)
To make the dialogue in movies easier to hear
[DVD-V] (Dolby Digital, DTS, 3-channel or higher,
DIALOGUE
ENHANCER
Dolby PLII
with the dialogue recorded in the center channel)
OFF, ON
OFF, MOVIE, MUSIC
(➜ 26, Using Dolby Pro Logic II)
^--------------------------------------------J
detail in dark scenes.
detail in dark scenes.
images.
: Suitable for animation.
[DVD-VR] [DVD-V] [VCD]
content, and appropriately converts it.
detects film contents with different fr ame
rates and appropriately converts it.
and the content is distorted.
), k2, k4
∫ Menu 4 (HDMI)
HDMI
HDMI STATUS
HD ENHANCER
VIDEO FORMAT
COLOR SPACE
Confirming HDMI information
To show HDMI information.
(➜ below
,
Confirming HDMI information)
This works when the HDMI connection is being
used with “VIDEO PRIORITY” (➜ 22, “HDMI”
menu) is set to “ON”.
To sharpen the “720p”, “1080i” and “1080p”
picture quality
OFF , 1 (weakest) to 3 (strongest)
This works when the HDMI connection is being
used with “VIDEO PRIORITY” (➜ 22, “HDMI”
menu) is set to “ON”.
To select suitable picture quality with your TV
(Video recordings will be converted to , and outp ut
as, high-definition video.)
§
480p/720p/1080p (progressive)
§
480i/1080i (interlaced)
≥ If the picture is distorted, press and hold
[CANCEL] until the picture is displayed
correctly. (The output will return to “480p”.)
§
The numbers displayed depend on the disc
being played. One of the above numbers is
displayed.
This works when the HDMI connection is being
used with “VIDEO PRIORITY” (➜ 22, “HDMI”
menu) is set to “ON”.
To select suitable picture color with your TV
bCr (4:2:2)
YC
– Luminance and color details is sent
separately. Most of the picture details are in
luminance. The color rate is much higher than
composite video. Compatible with all TV
models.
YCbCr (4:4:4)
– All color details is sent. Luminance and color
details are in the same signal.
RGB
– Component video type of signal.
≥ If the setting above is not compatible with your
TV, it will not be displayed.
§
Terms are descriptions of the sample formats
used in digital video. YC
luminance (Y), blue (C
§
§
Using on-screen menus
bCr is a video signal for
b) and red (Cr) details.
1 Connection status
2 Shows the output signal type.
3 Shows the number of audio channels.
4 (➜ above, VIDEO FORMAT)
5 (➜ above, COLOR SPACE)
[Note]
When “OFF” is selected in “AUDIO OUT” (➜ 22, “HDMI” menu),
“– – –” will be displayed in “AUDIO STREAM”.
RQTX0275
19
Page 20
Changing the player settings
-
RETURN
—
SETUP
(press and hold)
SET
MAIN
DISC
VIDEO
AUDIO
DISPLAY
HDMI
OTHERS
EXIT : SETUP
RETURN
Menu
OK
SET
RETURN
DISC
EXIT : SETUP
SETTING STATE
AUDIO
SUBTITLE
MENUS
RATINGS
PASSWORD
ENGLISH
AUTO
ENGLISH
8 NO LIMIT
Display the current
setting of the items below
Item Setting
OK
OK
-
RETURN
—
SETUP
(press and hold)
12
4
7
-
CD
DISC
MODE
SKIP
TOP MENU
DIRECT
NAVIGATOR
MENU
FUNCTIONS
CANCEL SOUND
PLAY
LIST
TV
INPUT
5 6
8 9
0
—
W.SRD
OK
PL
-
—
SUBWOOFER
—
VOL
RADIO/
EXT-IN
3
ONE TOUCH PLAY
10
SLOW/SEARCH
PLAYPAUSESTOP
-
RETURN
—
-
FL DISPLAY
PLAY MODE
—
REPEAT
LEVEL
CH SELECT
DVD
iPod
VOL
START
OK
SETUP
-
RETURN/—SETUP
SLEEP
MUTE
1
Show the setup
menu.
2
3
Select the menu.
≥ To return to the previous screen,
press [-RETURN].
Select the item.
Changing the player settings
≥ The settings remain intact even if you switch the unit to standby.
≥ Underlined items are the factory settings in the following table .
QUICK SETUP enables successive settings of the items in the shaded area.
∫ “DISC ” menu
AUDIO
Choose the audio language.
SUBTITLE
Choose the subtitle language.
MENUS
Choose the language for disc menus.
Changing the menu language in
QUICK SETUP also changes this
setting.
RATINGS
Set a rating level to limit DVD-Video
play.
PASSWORD
Change the password for “RATINGS”.
§1
The original language designated on the disc is selected.
§2
Input the appropriate code from the language code list (➜ 23).
RQTX0275
§3
20
If the language selected for “AUDIO” is not available, subtitles ap pear in that language (if available on the disc).
4
5
≥ ENGLISH
§3
≥ AUTO
≥ ENGLISH ≥ FRENCH ≥SPANISH ≥OTHER – – – –
≥ FRENCH ≥ SPANISH ≥ORIGINAL§1≥ OTHER – – – –
≥ ENGLISH ≥ FRENCH ≥SPANISH ≥OTHER – – – –
Make the settings.
Exit.
§2
§2
§2
Setting ratings (When level 8 is selected)
≥ 0 LOCK ALL: To prevent play of discs without rating levels.
≥ 1 to 7
≥ 8 NO LIMIT
When you select your ratings level, a password screen is shown.
Follow the on-screen instructions.
Do not forget your password.
A message screen will be shown if a DVD-Video disc exceeding the rating level is inserted in the unit.
Follow the on-screen instructions.
≥ SETTING
To change ratings (When level 0 to 7 is selected)
≥ CHANGE: Follow the on-screen instructions.
Page 21
QUICK SETUP enables successive settings of the items in the shaded area.
∫ “VIDEO ” menu
TV ASPECT
Choose the setting to suit your TV and
preference.
TV TYPE
Select to suit the type of TV.
TIME DELAY
When connected with a Plasma
display, adjust if you notice the audio is
out of sync with the video.
STILL MODE
Specify the type of picture shown
when paused.
BLACK LEVEL
Change the black level of the picture.
VIDEO OUT (I/P)
Select “PROGRESSIVE” only if
connecting to a progressive output
compatible TV.
≥ 4:3PAN&SCAN: Regular aspect TV (4:3)
The sides of the widescreen picture are cut off so it fills the screen (unless
prohibited by the disc).
≥ 4:3LETTERBOX: Regular aspect TV (4:3)
Widescreen picture is shown in the letterbox style.
≥ 4:3ZOOM: Regular aspect TV (4:3)
The picture zooms in and out.
≥ 16:9NORMAL: Widescreen TV (16:9)
Laterally stretches image.
≥ 16:9SHRINK: Widescreen TV (16:9)
Images appear at the center of the screen.
≥ 16:9ZOOM: Widescreen TV (16:9)
Expands to 4:3 aspect ratio.
≥ STANDARD ≥CRT ≥LCD
≥ PROJECTION ≥PLASMA
≥ 0 ms/AUTO
When using VIERA Link “HDAVI Control” with “HDAVIControl 3” compatible TV (➜ 24), select “0 ms/
AUTO”. Audio and video will automatically be set in sync.
≥ AUTO
≥ FIELD§4: The picture is not blurred, but picture quality is lower.
≥ FRAME
≥ LIGHTER
≥ DARKER
≥ INTERLACE
≥ PROGRESSIVE: A message screen will appear. Follow the on-screen instructions.
≥ 20 ms ≥ 40 ms ≥60 ms ≥ 80 ms ≥100 ms
§4
: Overall quality is high, but the picture may appear blurred.
∫ “AUDIO” menu
§
DOLBY DIGITAL
§
5
DTS
5
DYNAMIC RANGE
SPEAKER SETTINGS
Make settings for your speakers.
§4
Refer to “Frame still and field still” (➜ 5, Glossary).
§5
When audio is output from HDMI AV OUT terminal, and the connected equipment does not support the item selected, the actual output will depend
on the performance of this connected equipment.
≥ BITSTREAM
≥ PCM
≥ BITSTREAM
≥ PCM
≥ ON: Adjusts for clarity even when the volume is low. Convenient for late night viewing. (Only works with
Dolby Digital)
≥ OFF
≥ SETTINGS:
≥ C DELAY: 0ms
Select the delay time for your center speaker (➜ 23, Selecting the delay time of the speakers).
≥ SL/SR DELAY: 0ms
Select the delay time for your surround speakers (➜ 23, Selecting the delay time of the speakers).
≥TEST TONE: SETTING
Use the test tone for speaker level adjustments (➜ 27, Adjusting the speaker level).
≥CENTER, SURROUND RIGHT, SURROUND LEFT: `6dB to i6 dB (Factory preset: 0 dB
Select to suit the type of equipment you connected to the HDMI AV OUT
terminal.
Select “BITSTREAM” when the equipment can decode the bitstream (digital
form of 5.1 channel data). Otherwise, select “PCM”.
(If the bitstream is output to the equipment without a decoder, high levels of
noise can be output and may damage your speakers and hearing.)
, 1ms, 2ms, 3ms, 4ms, 5ms
, 5ms, 10ms, 15ms
)
(Continued on next page)
Changing the player settings
RQTX0275
21
Page 22
Changing the player settings
QUICK SETUP enables successive settings of the items in the shaded area.
∫ “DISPLAY ” menu
LANGUAGE
Choose the language for the
on-screen messages.
∫ “HDMI ” menu
VIDEO PRIORITY
AUDIO OUT
RGB RANGE
This works only when “COLOR
SPACE” in Menu 4 (HDMI) is set to
RGB (➜ 19).
VIERA Link
∫ “OTHERS ” menu
JPEG TIME
Set the speed of the slideshow.
Factory preset: 3 SEC
FL DIMMER
Change the brightness of the unit’s
display.
QUICK SETUP
DVD-VR/DATA
Select to play only DVD-VR or DATA
Changing the player settings
format.
DEFAULTS
This returns all values in the MAIN
menu to the default settings.
≥ ENGLISH ≥ FRANÇAIS ≥ESPAÑOL
≥ ON: When using the HDMI A V OUT terminal f or video output. The resolu tion of the video output from t he
HDMI AV OUT terminal is optimized according t o the capability of the connected equipment
(e.g. TV).
≥ OFF:When not using the HDMI AV OUT terminal for video output. Video output will not depend on the
connected equipment, but on this unit.
≥ ON: When audio output is from the HDMI AV OUT terminal. (Depending on the capabilities of the
connected equipment, audio output may differ from the audio settings of the main unit.)
≥ OFF
:When audio output is not from the HDMI A V O UT terminal. (The audio is output usi ng the sett ings of
the main unit.)
≥ STANDARD
≥ ENHANCED: When the black and white images are not distinct.
≥ ON: The
≥ OFF
≥ 1 SEC to 15 SEC (in 1-unit steps)
≥ 15 SEC to 60 SEC (in 5-unit steps)
≥ 60 SEC to 180 SEC (in 30-unit steps)
≥ BRIGHT
≥ AUTO: The display is dimmed, but brightens when you perform some operations.
≥ SET
≥ DVD-VR
≥ DATA: To play the data files on DVD-RAM or DVD-R/-RW.
≥ RESET
VIERA Link “
Follow the on-screen instructions.
: To play the video programs on DVD-RAM or DVD-R/-RW.
The password screen is shown if “RATINGS” (➜ 20) is set. Please enter the same password, then t urn
the unit off and on again.
HDAVI Control” function is available (➜ 24).
≥ DIM
22
RQTX0275
Page 23

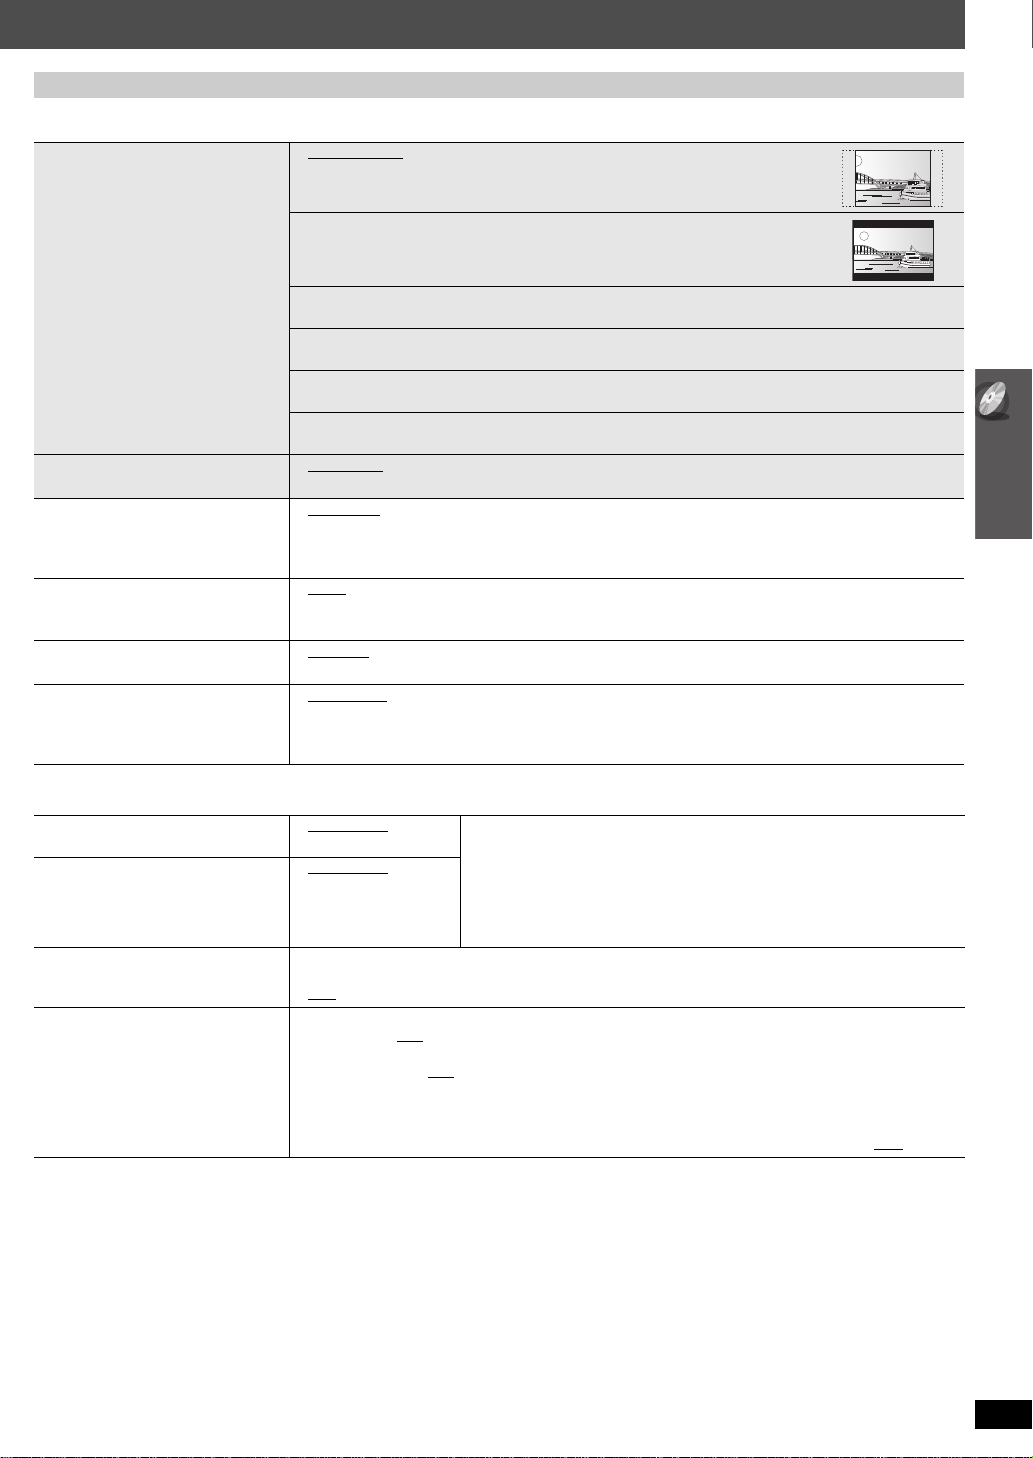
Selecting the delay time of the speakers
L
LS
R
SW
C
RS
C
RS
LS
b ca
a
b
c
Approximate room dimensions
Circle of constant primary listening distance
: Actual speaker position
: Ideal speaker position
: Primary listening distance
Abkhazian: 6566
Afar: 6565
Afrikaans: 6570
Albanian: 8381
Ameharic: 6577
Arabic: 6582
Armenian: 7289
Assamese: 6583
Aymara: 6589
Azerbaijani: 6590
Bashkir: 6665
Basque: 6985
Bengali, Bangla: 6678
Bhutani: 6890
Bihari: 6672
Breton: 6682
Bulgarian: 6671
Burmese: 7789
Byelorussian: 6669
Cambodian: 7577
Catalan: 6765
Chinese: 9072
Corsican: 6779
Croatian: 7282
Czech: 6783
Danish: 6865
Dutch: 7876
English: 6978
Esperanto: 6979
Estonian: 6984
Faroese: 7079
Fiji: 7074
Finnish: 7073
French: 7082
Frisian: 7089
Galician: 7176
Georgian: 7565
German: 6869
Greek: 6976
Greenlandic: 7576
Guarani: 7178
Gujarati: 7185
Hausa: 7265
Hebrew: 7387
Hindi: 7273
Hungarian: 7285
Icelandic: 7383
Indonesian: 7378
Interlingua: 7365
Irish: 7165
Italian: 7384
Japanese: 7465
Javanese: 7487
Kannada: 7578
Kashmiri: 7583
Kazakh: 7575
Kirghiz: 7589
Korean: 7579
Kurdish: 7585
Laotian: 7679
Latin: 7665
Latvian, Lettish: 7686
Lingala: 7678
Lithuanian: 7684
Macedonian: 7775
Malagasy: 7771
Malay: 7783
Malayalam: 7776
Maltese: 7784
Maori: 7773
Marathi: 7782
Moldavian: 7779
Mongolian: 7778
Nauru: 7865
Nepali: 7869
Norwegian: 7879
Oriya: 7982
Pashto, Pushto: 8083
Persian: 7065
Polish: 8076
Portuguese: 8084
Punjabi: 8065
Quechua: 8185
Rhaeto-Romance:
8277
Romanian: 8279
Russian: 8285
Samoan: 8377
Sanskrit: 8365
Scots Gaelic: 7168
Serbian: 8382
Serbo-Croatian: 8372
Shona: 8378
Sindhi: 8368
Singhalese: 8373
Slovak: 8375
Slovenian: 8376
Somali: 8379
Spanish: 6983
Sundanese: 8385
Swahili: 8387
Swedish: 8386
Tagalog: 8476
Tajik: 8471
Tamil: 8465
Tatar: 8484
Telugu: 8469
Thai: 8472
Tibetan: 6679
Tigrinya: 8473
Tonga: 8479
Turkish: 8482
Turkmen: 8475
Twi: 8487
Ukrainian: 8575
Urdu: 8582
Uzbek: 8590
Vietnamese: 8673
Volapük: 8679
Welsh: 6789
Wolof: 8779
Xhosa: 8872
Yiddish: 7473
Yoruba: 8979
Zulu: 9085
(Effective when playing 5.1-channel sound)
(Center and surround speakers only)
For optimum listening with 5.1-channel sound, a ll the speak ers , e xcept f or
the subwoofer, should be the same distance from the seating position.
If you have to place the center or surround speakers closer to the seating
position, adjust the delay time to make up for the difference.
If either distance a or b is less than c, find the diff erence in the table
and change to the recommended setting.
Language code list
a Center speaker b Surround speaker
Difference (Approx.) Setting Difference (Approx.) Setting
30 cm (1 foot) 1ms 150 cm (5 feet) 5ms
60 cm (2 feet) 2ms 300 cm (10 feet) 10ms
90 cm (3 feet) 3ms 450 cm (15 feet) 15ms
120 cm (4 feet) 4ms
150 cm (5 feet) 5ms
To make the delay time settings
Select “C DELAY” (Center Delay) or “SL/SR DELAY” (Surround Left/
Surround Right Delay) from “SPEAKER SETTINGS” in “A UDIO” menu
(➜ 21).
Changing the player settings
RQTX0275
23
Page 24

Using the VIERA Link
—
SLEEP
—
REPEAT
-
FL DISPLAY
-
PLAY MODE
VOL
OK
MUTE
SUBWOOFER
—
CH SELECT
FUNCTIONS
CANCEL SOUND
LEVEL
TOP MENU
MENU
DIRECT
NAVIGATOR
START
PLAY
LIST
-
RETURN
—
SETUP
SLOW/SEARCH
PLAYPAUSESTOP
SKIP
-
CD
MODE
12
3
4
5 6
7
8 9
0
10
ONE TOUCH PLAY
RADIO/
EXT-IN
INPUT
VOL
iPod
TV
DVD
—
W.SRD
PL
DISC
—
SETUP
SKIP
RADIO/EXT-IN
ONE TOUCH PLAY
SLOW/SEARCH
PLAY
”
TM
TM
“HDAVI Control
TM
VIERA Link “HDA VI Control”
VIERA Link
VIERA Link “HDAVI Control” is a convenient function that offers linked
operations of this unit, and a Panasonic TV (VIERA) under “HDAVI
Using the VIERA Link
Control”. You can use this function by connecting the equipment with the
HDMI cable. See the operating instructions for connected equipment for
operational details.
≥ VIERA Link “HDA VI Control”, based on the contro l functions pro vided by
HDMI which is an industry standard known as HDMI CEC (Consumer
Electronics Control), is a unique function that we have developed and
added. As such, its operation with other manufacturers’ equipment that
supports HDMI CEC cannot be guaranteed.
≥ This unit supports “HDAVIControl 3” function.
“HDAVI Control 3” is the newest standard (current as of December,
2007) for Panasonic’s HDAVI Control compatible equipment. This
standard is compatible with Panasonic’s conventional HDAVI
equipment.
≥ Please refer to individual manuals for other manufacturers’ equipment
TM
is a new name for EZ SyncTM.
supporting VIERA Link function.
The TV with “HDAVI Control 2 (or later)” function enables the following
operation: VIERA Link Control only with TV’s remote control [for
“HDAVI Control 2 (or later)”] (➜ 25)
Preparation
≥ Confirm that the HDMI connection has been made (➜ 7).
≥ Set “VIERA Link” to “ON” (➜ 22, “HDMI” menu).
≥ To complete and activate the connection correctly, turn on all VIERA
Link “HDAVI Control” compatible equipment and set the TV to the
corresponding HDMI input mode for this unit.
Setting the TV audio for VIERA Link “HDAVI Control”
Select between “
Confirm the audio connection to the
OPTICAL IN terminal (for “D-IN”) (➜ 8).
1 Press [RADIO/EXT-IN] to select
2 Press and hold [—SETUP] to select “TV AUDIO”, then press [3, 4]
to switch “
Whenever the connection or settings are changed, reconfirm the points
above.
§
“
AUX
” or “D-IN” (“DIGITAL IN”) works depending on the “TV AUDIO”
setting (➜ above, Setting the TV audio for VIERA Link “HDAVI
Control”).
RQTX0275
AUX
” and “D-IN” to work with the linked operations.
AUX
” or “D-IN”.
AUX
terminal (for “
“AUX”
or “D-IN”.
AUX
24
“HDAVI ControlTM”
∫ Auto setup
”) (➜ 7) or
The settings for “TV ASPECT”§1 (➜ 21, “VIDEO” menu) and
“LANGUAGE”
the settings of the TV.
(This may not work if the corresponding setting you have made for
your TV is not availabl e on this unit.)
§1
When using VIERA Link “HDAVI Control” with “HDAVI Control 3”
compatible TV
§2
When using VIERA Link “HDAVI Control” with “HDAVI Control 2
(or later)” compatible TV
∫ Auto lip sync
(Availab le when using VIERA Link “HDAVI Control” with
“HDAVI Control 3” compatible TV)
This function automatically provides synchronised audio and video
output. (This works only when the source is “DVD/CD”, “
“D-IN”.)
≥ When using “DVD/CD” as the source, set “TIME DELAY” in
“VIDEO” menu to “0 ms/AUTO” (➜ 21).
One touch play
You can turn on this unit and the TV, and start playing the disc with a
single press of a button.
This function also works if you press [1 PLAY] on this unit’s remote
control when this unit is in standby mode.
[Note]
Playback may not be immediately displayed on the TV . If you miss the
beginning portion of playback, press [:] or [6] to go back to where
playback started.
Auto input switching
≥ When you switch the TV input to TV tuner mode, this unit will
automatically switch to
unit is in “IPOD” mode.)
≥ When you start disc play , th e TV will automatically switch its input mode
for this unit.
Power off link
When the TV is turned off, this unit goes into standby mode automatically.
≥ This function works only when “DVD/CD”,
as the source on this unit.
[Note]
When you press [Í], only this unit turns off. Other connected equipment
compatible with VIERA Link “HDAVI Control” stays on.
ONE TOUCH PLAY
§2
(➜ 22, “DISPLAY” menu) will automatically f ollow to
AUX
” or
To start disc playback.
≥ This unit’s speakers will be automatically
activated (➜ 25).
“AUX”§ or “D-IN”§. (This does not work when this
“AUX”§ or “D-IN”§ is selected
Page 25

Speaker control VIERA Link Control only with TV’s remote
DVD/CD Home theater
OK
RETURN
Input select
Playback Disc
TOP MENU (DVD)
MENU (DVD)
Playback/menu
access
You can select whether audio is output from this unit’s speakers or the TV
speakers by using the TV menu settings . F or details , ref er to th e operatin g
instructions of your TV.
Home theater
This unit’s speakers are active.
≥ When this unit is in standby mode, changing the TV speakers to this
unit’s speakers in the TV menu will automatically turn this unit on and
“AUX”§ or “D-IN”§ as the source.
select
≥ The TV speakers are automatically muted.
≥ You can control the volume setting using the volume or mute button on
the TV’s remote control. (The volume level is displayed on the main
unit’s FL display.)
≥ To cancel muting, you can also use this unit’s remote control (➜ 12).
≥ If you turn off this unit, TV speakers will be automatically activated.
TV
TV speakers are active.
≥ The volume of this unit is set to “0”.
– This function works only when “DVD/CD”, “AUX”
§
or “D-IN”§ is
selected as the source on this unit.
≥ Audio output is 2-channel audio.
When switching between this unit speakers and TV speakers, the TV
screen may be blank for several seconds.
control [for “HDAVI Control 2 (or later)”]
You can control the playback menus of this unit with the TV’s remote
control. When operating the TV’ s remote control, refer to the below
illustration for operat i on buttons.
1 Select this unit’s operation menu by using the TV menu settings.
(For details, refer to the operating instructions of your TV.)
The START menu will be shown.
e.g. [DVD-V]
≥The START menu can also be shown by using a button on the TV’s
remote control (e.g. [SUB MENU]).
“DVD/CD”
– When
stop mode.
– This does not work while iPod music playback screen is displayed
on the TV.
2 Select the desired item on the START menu (➜ 13).
is selected as the source, this works only during
”
TM
“HDAVI Control
TM
When the on-screen control panel appears
e.g. [DVD-V] (when “Playback Disc” is selected from the START menu.)
PAUSE
SEARCH
PLAY
STOP
SEARCH
RETURN
You can operate the playback with the indicated controls.
≥ The on-screen control panel can also be shown by using a b utton on t he
TV’s remote control (e.g. [SUB MENU]).
– This works only during
“DVD/CD”
playback and resume modes or,
while iPod music playback screen is displayed on the TV.
[Note]
≥ Depending on the menu, some button operations cannot be performed
from the TV’s remote control.
≥ You cannot input numbers with the numbered buttons on the TV’ s
remote control ([0] to [9]). Use this unit’s remote control to select the
play list etc.
Using the VIERA Link
RQTX0275
25
Page 26

Using sound effects
—
SLEEP
—
REPEAT
-
FL DISPLAY
-
PLAY MODE
VOL
OK
MUTE
SUBWOOFER
—
CH SELECT
FUNCTIONS
CANCEL SOUND
TOP MENU
MENU
DIRECT
NAVIGATOR
START
PLAY
LIST
-
RETURN
—
SETUP
SLOW/SEARCH
PLAYPAUSESTOP
SKIP
-
CD
MODE
12
3
4
5 6
7
8 9
0
10
ONE TOUCH PLAY
RADIO/
EXT-IN
INPUT
VOL
iPod
TV
DVD
—
W.SRD
PL
DISC
OK
SOUND,
—
W.SRD
SUBWOOFER LEVEL
—
CH SELECT
PLII
LEVEL
—
SETUP
+, VOL
SOUND
—
W.SRD
PL
PL
—
SW BOOST
Using sound effects
[Note]
≥ The following sound effects may not be available or have no effect with
some sources, or when headphones are used (➜ 13).
≥ You may experience a reduction in sound quality when these sound
effects are used with some sources. If this occurs , turn the sound effe cts
off.
Preparation
To display the picture, turn on the TV and select the appropriate video
input mode.
Setting the sound effects
∫ Real Center Focus
(Effective when playing audio containing center channel sound
or when Dolby Pro Logic II is on.)
You can make the sound of the center speak er seem lik e it is coming
from within the TV.
R.C.FCS ON,------.R.C.FCS OFF
∫ Surround Enhancer
Automatically adjusts each speaker to enhance the surround sound
effect of 5.1-channel audio. When playing two-channel audio, the
audio of the L/R front speakers is also output through th e rest o f the
speakers creating a surround sound effect.
SRD ENH ON,------.SRD ENH OFF
∫ Surround Music
The sound fills the room, and comes from all directions with equal
intensity.
S.MUSIC ON,------.S.MUSIC OFF
Using Dolby Pro Logic II
Dolby Pro Logic II is an advanced decoder that derives 5-channel
surround from stereo sound sources, whether or not it has be en
specifically Dolby Surround encoded.
Each time you press the button:
MOVIE: Movie software
MUSIC: Stereo sources
OFF: Cancel
≥ “PLII” lights when there is effect.
≥ This does not work when audio is output from HDMI AV OUT terminal.
≥ You can adjust the volume of the surround speakers to get the best
surround effect (➜ 27, Adjusting the speaker level).
Using Whisper-mode Surround
You can enhance the surround effect for low volume 5.1-channel sound.
(Convenient for late night viewing.)
26
1
While the selected
2
mode is displayed
∫ Equalizer
You can select sound quality settings.
Each time you press [3, 4]:
HEAVY: Adds punch to rock.
CLEAR: Clarifies higher sounds.
SOFT: For background music.
FLAT: Cancel (no effect is added).
RQTX0275
Select a sound mode.
Each time you press the button:
EQ: Equalizer
R.C. FCS: Real Center Focus
SRD ENH:Surround Enhancer
S.MUSIC: Surround Music
Make settings.
Refer to the followings for setting details of
each sound effect.
SOUND
W.SRD
(press and hold)
≥ “(( ))” lights when there is
effect.
Each time you press the button:
WHISPER-MODE SRD ON
↕
WHISPER-MODE SRD OFF
Page 27

Adjusting the subwoofer level
SW
BOOST
SW BOOST indicator
OK
e.g.
OK
VOL
TOP MENU
MENU
DIRECT
NAVIGATOR
START
PLAY
LIST
-
RETURN
—
SETUP
SLOW/SEARCH
PLAYPAUSESTOP
SKIP
-
CD
MODE
12
3
4
5 6
7
8 9
0
10
ONE TOUCH PLAY
RADIO/
EXT-IN
INPUT
iPod
DISC
,
RADIO/EXT-IN
OK
OK
,
Numbered
buttons
SELECTOR
TUNE
MEMORY
-TUNE MODE
You can adjust the amount of bass. The unit automatically selects the
most suitable setting according to the type of playback source.
Enjoying the FM/AM radio
SUBWOOFER
LEVEL
-
CH SELECT
≥ To c heck the current setting, press [SUBWOOFER LEVEL].
≥ The setting you make is retained, and recalled every time you play the
SUB W 1#SUB W 2#SUB W 3
^-------------------------------------------}
same type of source.
Using Subwoofer Boost
Main unit only
You can enhance the subwoofer effect with strong bass.
BST ON,------.BST OFF
The SW BOOST indicator lights when
Subwoofer Boost is turned on.
Adjusting the speaker level
You can adjust the surround sound levels.
Preparation
≥ Press [i, ` VOL] to adjust the volume to normal listening level.
≥ Select “TEST TONE” from “SPEAKER SETTINGS” in “AUDIO” menu
(➜ 21).
1
Enter test tone mode.
AUDIO - SPEAKER SETTINGS - TEST TONE
SPEAKER
LEFT
CENTER
RIGHT
SURROUND RIGHT
SURROUND LEFT
SET
RETURN
TRIM LEVEL
− −
0dB
− −
0dB
0dB
EXIT : SETUP
Test tone will be output to each channel in the
following order.
LEFT, CENTER, RIGHT,
SURROUND RIGHT, SURROUND LEFT
2
Adjust the speaker level for each
speaker. (CENTER, SURROUND
RIGHT, SURROUND LEFT)
`
6dB to i6dB
≥ To exit the screen, press and hold
[—SETUP].
∫ To adjust speaker level during play
(Effective when playing 5.1-channel sound or when Dolby Pro
Logic II is on.)
1 Press and hold [—CH SELECT] to select the speaker.
While the speaker channel is displayed, press [—CH SELECT].
L #C #R #RS #LS #SW
^---------------------------------------------}
≥ You can adjust SW (Subwoofer) only if the disc includes a
2 Press [3] (increase) or [4] (decrease) to adjust the speaker
level for each speaker.
C, RS, LS, SW: `6dB to i6dB
(L, R: Only the balance is adjustable.)
To adjust the balance of the front speakers, while “L” or “R” is selected,
press [2, 1].
subwoofer channel and “ PLII” is not lit.
Manual tuning
1
RADIO/
EXT-IN
2
Select “FM” or “AM”.
≥ Main unit:
Press [SELECTOR].
Select the frequency.
≥ Main unit:
Press [-TUNE MODE] to select
“MANUAL” on the display, and then press
[X TUNE W] to select the frequency.
≥ To start automatic tuning, press and hold
[6, 5] (main unit: [X TUNE W]) until
the frequency starts scrolling. Tuning
stops when a station is found.
∫ Presetting stations manually
Up to 30 stations can be set in each band, FM and AM.
1 While listening to the radio broadcast
Press [OK].
2 While the frequency is flashing on the display
Press the numbered buttons to select a channel.
≥ To select a 2-digit number
e.g. 12: [S10] ➜ [1] ➜ [2]
Alternatively, press [X, W],
and then press [OK].
Main unit:
1 While listening to the radio broadcast
Press [MEMORY] twice.
2 While a channel no. is flashing on the display
Press [X TUNE W], and then press [MEMORY].
A station previously stored is overwritten when another station is
stored in the same channel preset.
FM frequency step
Main unit only
The step is factory-set to 0.2-MHz, but you can change it to receive
broadcasts allocated in 0.1-MHz steps.
1 Press [SELECTOR] to select “FM”.
2 Press and hold [SELECTOR].
After a few seconds the display changes to show the current minimum
frequency. Continue to hold the button down. The minimum frequency
changes and the step is changed.
To return to the original step, repeat steps 1 and 2.
[Note]
After changing the setting, previously preset frequencies will be cleared.
Preset them again.
Using sound effects / Enjoying the FM/AM radio
RQTX0275
27
Page 28

Operating other equipment
,
—
SLEEP
—
REPEAT
-
FL DISPLAY
-
PLAY MODE
VOL
OK
MUTE
SUBWOOFER
—
CH SELECT
FUNCTIONS
CANCEL SOUND
LEVEL
TOP MENU
MENU
DIRECT
NAVIGATOR
START
PLAY
LIST
SLOW/SEARCH
PLAYPAUSESTOP
SKIP
-
CD
MODE
12
3
4
5 6
7
8 9
0
10
ONE TOUCH PLAY
RADIO/
EXT-IN
INPUT
VOL
iPod
TV
DVD
—
W.SRD
PL
DISC
-
RETURN/—SETUP
RADIO/EXT-IN
PLAY
STOP, PAUSE
PLII
iPod
OK
FUNCTIONS
-
PLAY MODE
—
REPEAT
-
RETURN
—
SETUP
RADIO/
EXT-IN
RADIO/
EXT-IN
Main unit
iPod
Dock for iPod
e.g.
Dock adapter
(not included)
iPod
iPod Home theater
OK
Playlist
Artist s
Albums
Songs
Podca s ts
Genres
Composers
Audio Books
RETURN
iPod Home theater
Good morning
Ronaldo
Happy days
3 of 20
2:43 -1:15
e.g.
Song
Artist
Album
Playback condition
Shuffle mode
§1
Repeat mode
§2
Current position
: Song shuffle
: Album shuffle
Off: Cancel
: Repeat 1 song
: Repeat all
Off: Cancel
You can play an external source through your home theater system.
Using the iPod
Preparation
≥ To view photos/videos from the iPod
– Ensure the video connection to the VIDEO OUT terminal on this unit
(
➜ 7).
– Operate the iPod menu to make the appropriate photo/video output
settings for your TV. (Refer to operating instructions of your iPod.)
≥ To display the picture, turn on the TV and select the appropriate video
input mode.
≥ Before connecting/disconnecting the iPod, turn the main unit off or
reduce the volume of the main unit to its minimum.
Connect the iPod (not included) firmly.
Recharging starts when the iPod is inserted.
Enjoying TV audio
Preparation
Operating other equipment
Confirm the audio connection to the AUX terminal on the main unit (➜ 7).
≥ Reduce the volume on the TV to its minimum, and then adjust the
volume of the main unit.
≥ You can enjoy surround sound effect when you press [ PLII] to turn
on Dolby Pro Logic II (➜ 26).
Enjoying digital audio
Preparation
Confirm the audio connection to the OPTICAL IN terminal on the main
unit (➜ 8).
Making settings for digital audio input
Select to suit the type of audio from the OPTICAL IN terminal on the main unit.
1 While in “D-IN” mode
Press and hold [—SETUP] to select “MAIN/SAP”, “DRC” or
“PCM FIX”.
2 While the selected mode is displayed
Press [3, 4] to make the setting.
MAIN/SAP mode
MAIN, SAP
§
“SAP” = Secondary Audio Program
Dynamic Range Compression
DRC ON:
DRC OFF
PCM FIX mode
PCM ON: Select when receiving only PCM signals.
PCM OFF: Select when receiving Dolby Digital and PCM signals.
28
[Note]
RQTX0275
Audio that is input through the OPTICAL IN terminal cannot be output
through the HDMI terminal.
§
, MAIN+SAP§ (stereo audio)
Adjust for clarity even when the volume is low by compressing the
range of the lowest sound level and the highest sound level.
Convenient for late night viewing. (Only works with Dolby Digital)
Select “AUX”.
Select “D-IN” (Digital In).
(Only works with Dolby Dual Mono)
≥ Hold the dock when connecting/disconnecting the iPod.
≥ Attach the dock adapter which should be supplied with your iPod to the
dock for the stable use of the iPod.
If you need an adapter, consult your iPod dealer.
Select “IPOD”.
The iPod automatically switches to this
unit’s display mode.
Music menu appears on the TV.
e.g.
To operate through display of iPod, press [FUNCTIONS].
Enjoying music
OK
Play starts from the selected song.
§1
To select shuffle modes
Press [-PLAY MODE].
Each time you press the button:
§2
To select repeat modes
Press and hold [—REPEAT] and then press the button repeatedly within 3
seconds.
Each time you press the button:
Select an item.
≥ Press [2, 1] to skip page by page.
≥ To ret urn to the previous screen, press
[-RETURN].
Page 29

Speaker installation options
FUNCTIONS
‰7.0 mm to 9.4 mm
(
9
/32z to 11/32z)
4.0 mm to 6.0 mm
(
5
/32z to 1/4z)
Wall or pillar
‰4.0 mm (
5
/32z)
At least 30 mm (1
3
/16z)
Center and surround speaker
190 mm
(7
15
/32z)
Enjoying photos/videos
1
Play a slideshow or video on your iPod.
2
The picture will be displayed on your TV.
You can also use the remote control to operate iPod menu.
[3, 4]: To navigate menu items
[OK]: To go to the next menu
[-RETURN]: To return to the previous menu
The remote control operation may vary between iPod models.
Basic controls (For music and videos only)
Button Function
[1 PLAY] Play
[∫ STOP], [; PAUSE] Pause
[:, 9] Skip
(press and hold)
[:, 9]
≥ You can enjoy surround sound effect when you press [ PLII] to tur n
on Dolby Pro Logic II (➜ 26).
When using the START menu in “IPOD” mode
Select “Music” or “Photos/Videos”.
Music: Shows the music menu.
Photos/Videos: Switches to display of iPod.
About recharging the battery
≥ iPod will start recharging regardless of whether this unit is on or off.
≥ “IPOD ¢” will be shown on the main unit’s display during iPod charging
in main unit standby mode.
≥ Check iPod to see if the battery is fully recharged.
≥ If you are not using iPod for an extended period of time after recharging
has completed, disconnect it from main unit, as the battery will be
depleted naturally. (Once fully recharged, additional recharging will not
occur.)
Switch the iPod to its own display
mode.
Proceed with operations through display of
iPod.
Search
∫ Attaching to a wall
Center and surround speakers only
The wall or pillar on which the speakers are to be attached should be
capable of supporting 10 kg (22 lbs) per screw. Consult a qualified
building contractor when attaching the speakers to a wall. Improper
attachment may result in damage to the wall and speakers.
1 Drive a screw (not included) into the wall.
2 Fit the speaker securely onto the screw(s) with the hole(s).
Operating other equipment / Speaker installation options
Compatible iPod
≥ iPod touch 2nd generation (8GB, 16GB, 32GB)
≥ iPod nano 4th generation (video) (8GB, 16GB)
≥ iPod classic (120GB)
≥ iPod touch 1st generation (8GB, 16GB, 32GB)
≥ iPod nano 3rd generation (video) (4GB, 8GB)
≥ iPod classic (80GB, 160GB)
≥ iPod nano 2nd generation (aluminum) (2GB, 4GB, 8GB)
≥ iPod 5th generation (video) (60GB, 80GB)
≥ iPod 5th generation (video) (30GB)
≥ iPod nano 1st generation (1GB, 2GB, 4GB)
≥ iPod 4th generation (color display) (40GB, 60GB)
≥ iPod 4th generation (color display) (20GB, 30GB)
≥ iPod 4th generation (40GB)
≥ iPod 4th generation (20GB)
≥ iPod mini (4GB, 6GB)
Compatibility depends on the software version of your iPod.
To use the iPod touch features
1 Press the Home button on the iPod touch.
2 Select the iPod touch features on the touch screen to operate.
RQTX0275
29
Page 30

Discs that can be played
Commercial discs
Disc Logo
Indicated in these
instructions by
Remarks
DVD-Video
Video CD
CD
Recorded discs (±: Playable,
Disc Logo
DVD-RAM
DVD-R/RW
DVD-R DL
—: Not playable)
[DVD-VR]§2[DVD-V]
[DVD-V]
[VCD]
[CD]
Recorded on a
DVD video
recorder, etc.
§4
High quality movie and music discs
Music discs with video
Including SVCD (Conforming to IEC62107)
Music discs
Recorded on a personal
computer, etc.
[WMA] [MP3] [JPEG]
± ——±±
±±— ±±
§3
±
± ———
Finalizing
Not necessary
Necessary
Necessary
§6
iR/iRW
iR
DL
CD-R/RW
≥ It may not be possible to play all the above-mentioned discs in some cases due to the type of disc, the condition of the recording, the recording
method, or how the files were created (➜ 31, Tips for making data discs).
§1
This unit can play CD-R/RW recorded with CD-DA or Video CD format.
§2
Discs recorded on DVD re corders or DVD video cameras, etc. using Version 1.1 of the Video Recording Format (a unified video recording standard).
§3
Discs recorded on DVD recorders or DVD video cameras using Version 1.2 of the Video Reco rding Format (a unified video recording standard).
§4
Discs recorded on DVD recorders or DVD video cameras using DVD-Video Format.
§5
Recorded using a format different from DVD-Video Format, therefore some functions cannot be used.
§6
Discs that can be played
A process that allows play on compatible equipment. To play a disc that is indicated as “Necessary”, the disc must first be finalized on the d evice it
was recorded on.
§7
Closing the session will also work.
§1
——(±)
——(±)
———±±±
Note about using a DualDisc
The digital audio content side of a DualDisc does not meet the technical
specifications of the Compact Disc Digital Audio (CD-DA) format so
playback ma y not be possible.
∫ Discs that cannot be played
Blu-ray, HD DVD, AVCHD discs, DVD-RW version 1.0, DVD-Audio,
DVD-ROM, CD-R OM, CDV, CD-G, SACD, DivX Video Discs and
Photo CD, DVD-RAM that cannot be removed from their cartridge,
2.6 GB and 5.2 GB DVD- RAM, and “Chaoji VCD” available on the
market including CVD, DVCD and SVCD that do not conform to
IEC62107.
§5
———
§5
———
∫ Disc handling precautions
≥ Do not attach labels or stickers to discs. This may cause disc
warping, rendering it unusable.
≥ Do not write on the label side with a ball-point pen or other writing
instrument.
≥ Do not use record cleaning sprays, benzine, thinner, liquids which
prevent static electricity, or any other solvent.
≥ Do not use scratch-proof protectors or covers.
≥ Do not use the following discs:
– Discs with exposed adhesive from removed stickers or labels
(rented discs, etc.).
– Discs that are badly warped or cracked.
– Irregularly shaped discs, such as heart shapes.
Necessary
Necessary
Necessary
§7
30
RQTX0275
Page 31

∫ Tips for making data discs
DO
DO NOT
EST. 1924
Selecting fine audio equipment such as the unit
you’ve just purchased is only the start of your
musical enjoyment. Now it’s time to consider
how you can maximize the fun and excitement
your equipment offers. This manufacturer and
the Electronic Industries Association’s
Consumer Electronics Group want you to get
the most out of your equipment by pla ying it at a
safe level. One that lets the sound come
through loud and clear without annoying blaring
or distortion—and, most importantly, without
affecting your sensitive hearing.
We recommend that you avoid prolonged
exposure to excessive noise.
Sound can be deceiving. Over time your
hearing “comfort level” adapts to higher
volumes of sound. So what sounds “nor mal”
can actually be loud and harmful to your
hearing.
Guard against this by setting your equ ipment at
a safe level BEFORE your hearing adapts.
To establish a safe level:
≥ Start your volume control at a low setting.
≥ Slowly increase the sound until you can hear
it comfortably and clearly, and without
distortion.
Once you have established a comfortable
sound level:
≥ Set the dial and leave it there.
Taking a minute to do this now will help to
prevent hearing damage or loss in the future.
After all, we want you listening for a lifetime.
Format Disc Extension Reference
[WMA] CD-R/RW “.WMA”
[MP3] DVD-RAM
[JPEG] DVD-RAM
≥ There may be differences in the display order on the menu scre en and computer screen.
≥ This unit cannot play files recorded using packet write.
DVD-RAM
≥ Discs must conform to UDF 2.0.
DVD-R/RW
≥ Discs must conform to UDF bridge (UDF 1.02/ISO9660).
≥ This unit does not support multi-session. Only the default session is play ed.
CD-R/RW
≥ Discs must conform to ISO9660 level 1 or 2 (e xcept for extended formats).
≥ This unit supports multi-session but if there are many sessio ns it takes more time f or play to start. Keep the number of sessions to a minimum to avo id
this.
DVD-R/RW
CD-R/RW
DVD-R/RW
CD-R/RW
“.wma”
“.MP3”
“.mp3”
“.JPG”
“.jpg”
“.JPEG”
“.jpeg”
≥ Compatible compression rate: between 48 kbps and 320 kbps
≥ You cannot play WMA files that are copy-protected.
≥ This unit does not support Multiple Bit Rate (MBR: an encoding process for audio content that
produces an audio file encoded at several different bit rates).
≥ This unit does not support ID3 tags.
≥ Sampling frequency and compression rate:
– DVD-RAM, DVD-R/RW: 11.02, 12, 22.05, 24 kHz (8 to 160 kbps), 44.1 and 48 kHz (32 to 320 kbps)
– CD-R/RW: 8, 11 .02, 12, 16, 22.05, 24 kHz (8
≥ JPEG files taken on a digital camera that conform to DCF Standard (Design rule for Camera File
system) Version1.0 are displayed.
– Files that have been altered, edited or saved with computer picture editing software may not be
displayed.
≥ This unit cannot display moving pictures, MO TIO N JPEG and other such formats, still pictures other
than JPEG (e.g. TIFF), or play pictures with atta ched audio.
to 160
kbps), 32, 44.1 and 48 kHz (32
to 320
kbps)
Maintenance
∫ To clean discs
Wipe with a damp cloth and then wipe dry.
∫ Clean this unit with a soft, dry cloth.
≥ Never use alcohol, paint thinner or benzine to clean this unit.
≥ Before using chemically treated cloth, carefully read the instructions that
came with the cloth.
Do not use commercially available lens cleaners as they may cause
malfunction. Cleaning of the lens is generally not necessary although
this depends on the operating environment.
Before moving the unit, ensure the disc tray s are empty . F ailure to
do so will risk severely damaging the discs and the unit.
Listening caution
Discs that can be played / Maintenance
RQTX0275
31
Page 32

Troubleshooting guide
Before requesting service, make the following checks. If you are in doubt about some of the check points, or if the solutions indicated in the following
guide do not solve the problem, refer to “Customer Services Directory (United States and Puerto Rico)” on page 36.
Power
No power. ≥ Insert the AC power supply cord securely. 9
The unit is automatically switched
to standby mode.
Unit displays
The display is dark. ≥ Select “BRIGHT” in “FL DIMMER” in the “OTHERS” menu. 22
“NOPLAY” ≥ You inserted a disc the unit cannot play; insert one it can.
“NODISC” ≥ You have not inserted a disc; insert one.
“F61” ≥ Check and correct the speaker cable connections .
“F76” ≥ There is a power supply problem. Consult the dealer. —
“DVD U11” ≥ Disc may be dirty. Wipe it clean. 31
“ERROR” ≥ Incorrect operation performed. Read the instructions and try again. —
“DVD H∑∑”
“DVD F∑∑∑”
∑ stands for a number.
“ [W1] ” is flashing. ≥ [W1] is the wireless link indicators for the optional wireless accessories: SH-FX70. The flashing
“U70∑”
∑ stands for a number.
The actual number following “U70”
will depend on the state of the main
unit.
“REMOTE 1” or “REMOTE 2” ≥ Match the modes on the main unit and remote control. Depending on the number being
“LOADING” ≥ The iPod is not ready. Wait f or this display to disappear.
≥ The Sleep timer was working and had reached the set time limit. 12
≥ You inserted a blank disc.
≥ You inserted a disc that has not been finalized.
≥ You have not inserted the disc correctly; insert it correctly.
If this does not fix the problem, consult the dealer.
≥ Tr ouble may have occurred. The numbers following “H” and “F” depe nd on the status of the unit.
Turn the unit off and then back on. Alternatively, turn the unit off, disconnect the AC supply cord,
and then reconnect it.
≥ If the service numbers fail to clear, note the service number and contact a qualified service
person.
will stop after a while.
≥ The HDMI connection acts unusually.
– The connected equipment is not HDMI-compatible.
– Please use HDMI cables that have the HDMI logo (as shown on the cover).
– The HDMI cable is too long.
– The HDMI cable is damaged.
displayed (“1” or “2”), pr ess and hold [ OK] and the correspo nding n umbered button ([1] or [2]) for
at least 2 seconds.
≥ Disconnect the iPod, and then reconnect it firmly.
30
—
—
—
14
8
—
—
—
—
—
—
—
12
—
28
General operation
No response when any buttons
are pressed.
Troubleshooting guide
No response when remote control
buttons are pressed.
Other products respond to the
remote control.
Cannot play DVDs. ≥ CD Mode is on. Press and hold [–CD MODE] to turn CD Mode off. 16
No picture or sound. ≥ Check the video or speaker connection.
You have forgotten your ratings
password.
Reset all the settings to Factory
Preset.
The VIERA Link “HDAVI Control”
function does not respond.
The setting you made in “TV
ASPECT” (➜ 21, “VIDEO” menu)
or “LANGUAGE” (➜ 22,
“DISPLAY” menu) does not work.
RQTX0275
≥ This unit cannot play discs other than the ones listed in these operating instructions.
≥ The unit may not be operating properly due to lightning, static electricity or some other external
factor. Turn the unit off and then back on. Alte rnatively, turn the unit off, disconnect the AC supply
cord, and then reconnect it.
≥ Condensation has formed. Wait 1 to 2hours for it to evaporate.
≥ Check that the batteries are installed correctly.
≥ The batteries are depleted. Replace them with new ones.
≥ Aim the remote control at the remote control signal sensor and operate.
≥ Change the remote control operating mode. 12
≥ Check the power or input setting of the connected equipment and the main unit.
≥ Check that the disc has something recorded on it.
≥ While stopped and “DVD/CD” is the source, press and hold [∫](Stop) on the main unit and [S10]
on the remote control until “INITIALIZED” disappears from the TV. Turn the unit off and on again.
All settings will return to the default values.
(This does not work during program and random modes, or when setup menu or START menu is
displayed.)
≥ Depending on the condition of this unit or the connected equipment, it may be necessary to
repeat the same operation so that the function can w ork correctly.
≥ T
he settings for
the TV. Select using TV settings.
§1
When using VIERA Link “HDAVI Control” with “HDAVI Control 3” compatible TV
§2
When using VIERA Link “HDAVI Control” with “HDAVIControl 2 (or later)” compatible TV
“TV ASPECT”§1 and “LANGUAGE”§2 will automatically follow to the settings of
32
30
—
—
9
9
13
7, 8
—
—
—
24
—
Page 33

Disc trays
Disc tray(s) cannot open.
“CHGR ERR” is displayed.
≥ Press [Í] to release the jammed tray(s) as the unit will switch off. Switch it on again and the
tray(s) will initialize to the previous tray(s) condition. If this still does not fix the problem, please
consult the dealer.
—
Disc operation
It takes time before play starts.
[MP3]
A menu screen appears during
skip or search. [VCD]
Playback control menu does not
appear. [VCD]
Program and Random play do not
work. [DVD-V]
No subtitles. ≥ Display the subtitles. (“SUBTITLE” in Menu 1) 18
Point B is automatically set. ≥ The end of an item becomes point B when it is reached. —
The Setup menu cannot be
accessed.
with playback control
≥ Play may take time to begin when an MP3 t r ack has still picture data. Even after the track starts,
the correct play time will not be displayed. This is normal.
≥ This is normal for Video CDs. —
≥ Press [∫ STOP] twice and then press [1 PLAY]. —
≥ These functions do not work with some DVD-Videos. —
≥ Select “DVD/CD” as the source.
≥ Cancel Program and Random play.
—
—
16
Sound
Sound is distorted. ≥ Noise may occur when playing WMA.
Effects do not work. ≥ Some audio effects do not work or have less ef fect with some discs. —
Humming is heard during play. ≥ An AC supply cord or fluorescent light is near the main unit. Keep other appliances and cables
No sound. ≥ There may be a slight pause in sound when you change the play speed.
No sound from the TV. ≥ Confirm the audio connection. Press [RADIO/EXT-IN] to select the corresponding source. 7, 8, 28
No surround sound.
≥ When using the HDMI output, audio may not be output from other terminals.
away from the main unit.
≥ Audio may not be heard when more tha n 4 devices ar e connected with HDMI cables . Reduce the
number of connected devices.
≥ When using the HDMI connection, ensure that “AUDIO OUT” in the “HDMI” menu is set to “ON”.
≥ If the input source is bitstream, set the sound setting to PCM on the ex ternal equipment.
≥ Press [ PLII] to turn on Dolby Pro Logic II or turn on Surround Enhancer.
—
—
—
—
—
22
—
26
Picture
The picture on the TV is not
displayed correctly or disappears.
Picture size does not fit the
screen.
Menu is not displayed correctly. ≥ Restore the zoom ratio to “NORMAL”. (“ZOOM” in Menu 2) 19
Auto zoom function does not work
well.
≥ Ensure that the unit is connected directly to the TV, and is not connected through a video
cassette recorder.
≥ Mobile telephone chargers can cause some disturbance.
≥ If you are using an indoor TV antenna, change to an outdoor antenna.
≥ The TV antenna wire is too close to the unit. Move it away from the unit.
≥ Picture may not be seen when more than 4 devices are connected with HDMI cables. Reduce
the number of connected devices.
≥ When using the COMPONENT VIDEO OUT terminal, ensure that progressive output is not
selected when the connected TV is not progressive compatible. Press and hold [CANCEL] until
“PRG” disappears from the main unit display and the picture is displayed correctly.
≥ When using the HDMI AV OUT terminal, ensure that video output unacceptable with the
connected TV is not selected. Press and hold [CANCEL] until the picture is displayed correctly.
(The output will return to “480p”.)
≥ Video images converted to 1920k1080 resolution ma y look dif ferent from the true, native 1080p
full-HD sources. This is not malfunction of the main unit.
≥ Change “TV ASPECT” in the “VIDEO” menu.
≥ Use the TV to change the aspect.
≥ Change the zoom setting. (“ZOOM” in Menu 2)
≥ Turn off TV’s zoom function.
≥ Zoom function may not work well, especially in da rk scenes and may not work depending on the
type of disc.
21
19
21
19
(Continued on next page)
7
—
—
—
—
Troubleshooting guide
—
—
—
—
RQTX0275
33
Page 34

Troubleshooting guide
iPod operation
Cannot charge or operate. ≥ Check that the iPod is connected firmly.
Cannot display iPod photos/
videos on the TV.
HDMI or progressive video
There is ghosting when HDMI or
progressive output is on.
Pictures not in progressive
output.
Closed captions not displayed. ≥When HDMI or progressive output is on, closed captions will not be displayed. —
Radio
Distorted sound or noise is heard.
“ST” flickers or does not light.
A beat sound is heard. ≥ Turn the TV off or move it away from the unit. —
A low hum is heard during AM
broadcasts.
≥ The battery of the iPod is depleted. Charge the iPod, and then operate again.
≥ Ensure the video connection to the VIDEO OUT terminal on this unit.
≥ Operate the iPod menu to mak e the appropriate phot o/video output settings f or y our TV. (Refer to
operating instructions for your iPod.)
≥ This problem is caused by the editing method or material used on DVD-Video, but should be
corrected if you use interlaced output. When using the HDMI AV OUT terminal, set “VIDEO
FORMAT” in Menu 4 to “480i”. Or, disable the HDMI AV OUT connection and use other video
connections.
≥ When using the COMPONENT VIDEO OUT terminal, set “VIDEO OUT (I/P)” in “VIDEO” menu
to “INTERLACE”. (Alternatively, press and hold [CANCEL] until “PRG” disappears from the main
unit display.)
≥ Select “PROGRESSIVE” in “VIDEO OUT (I/P)” in “VIDEO” menu.
≥ The unit’s VIDEO OUT terminal outputs the interlaced signal even if “PRG” is displayed.
≥ Adjust the position of the FM or AM antenna.
≥ Use an outdoor antenna.
≥ Separate the antenna from other cables. —
28
—
7
—
19
21
21
—
—
9
TV displays
“/” ≥ The operation is prohibited by the unit or disc. —
“THIS DISC MAY NOT BE PLAYED
IN YOUR REGION.”
U.S. Patent Nos. 6,836,549; 6,381,747; 7,050,698; 6,516,132; and
5,583,936.
This product incorporates copyright protection technology that is
protected by U.S. patents and other intellectual property rights. Use of
this copyright protection technology must be authorized by Macrovision,
and is intended for home and other limited viewing uses only unless
otherwise authorized by Macrovision. Reverse engineering or
disassembly is prohibited.
Troubleshooting guide
Windows Media and the Windows logo are trademarks or registered
trademarks of Microsoft Corporation in the United States and/or other
countries.
This product is protected by certain intellectual property rights of
Microsoft Corporation and third parties. Use or distribution of such
technology outside of this product is prohibit ed without a license from
Microsoft or an authorized Microsoft subsidiary and third parties.
≥ Only DVD-Video discs that include or ha ve the same region number as the one on the rear panel
of this unit can be played.
Manufactured under license from Dolby Laboratories.
Dolby, Pro Logic, and the double-D symbol are trademarks of Dolby
Laboratories.
Manufactured under license under U.S. Patent #’s: 5,451,942;
5,956,674; 5,974,380; 5,978,762; 6,487,53 5 & other U.S. and
worldwide patents issued & pending. DTS and DTS Digital Surround
are registered trademarks and the DTS logos and Symbol are
trademarks of DTS, Inc. c 1996-2008 DTS, Inc. All Rights Reserved.
HDMI, the HDMI logo and High-Definition Multimedia Interface ar e
trademarks or registered trademarks of HDMI Licensing LLC.
HDAVI Control
VIERA Link
EZ Sync
iPod is a trademark of Apple Inc., registered in the U.S. and other
countries.
TM
is a trademark of Panasonic Corporation.
TM
is a trademark of Panasonic Corporation.
TM
is a trademark of Panasonic Corporation.
Cover
page
34
RQTX0275
Page 35

Specifications
AMPLIFIER SECTION
RMS Output Power: Dolby Digital Mode
Front Ch 125W per channel (3 ≠), 1 kHz, 10 % THD
Surround Ch 125 W per channel (3 ≠), 1 kHz, 10 % THD
Center Ch 250 W per channel (6 ≠), 1 kHz, 10% THD
Subwoofer Ch 250 W per channel (6 ≠), 100 Hz, 10 % THD
Total RMS Dolby Digital mode power 1000 W
FTC Output Power: Dolby Digital Mode
Front Ch 63 W per channel (3 ≠), 120 Hz to 20 kHz, 1 % THD
Surround Ch 34 W per channel (3 ≠), 120 Hz to 20 kHz, 1 % THD
Center Ch 113 W per channel (6 ≠), 120 Hz to 20 kHz, 1 % THD
Subwoofer Ch 121 W per channel (6 ≠), 45 Hz to 120Hz, 1 % THD
Total FTC Dolby Digital mode power 428 W
FM/AM TUNER, TERMINALS SECTION
Preset Memory FM 30 stations
Frequency Modulation (FM)
Frequency range 87.9 MHz to 107.9 MHz (200-kHz step)
87.5 MHz to 108.0 MHz (100-kHz step)
Antenna terminals 75 ≠ (unbalanced)
Amplitude Modulation (AM)
Frequency range 520 kHz to 1710 kHz (10-kHz step)
Digital audio input
Optical digital input Optical terminal
Sampling frequency 32 kHz, 44.1 kHz, 48 kHz
Phone jack
Terminal Stereo, 3.5 mm (
AM 30 stations
1
/8z
) jack
DISC SECTION
Discs played [8 cm (3
(1) D VD (DVD-Video)
(2) DVD-RAM (DVD-VR, MP3
(3) DVD-R (DVD-Video, DVD-VR, MP3
(4) DVD-R DL (DVD-Video, DVD-VR)
(5) DVD-RW (DVD-Video, DVD-VR, MP3
(6) iR/iRW (Video)
(7) iR DL (Video)
(8) CD, CD-R/RW (CD-DA, Video CD, SVCD
§4, 5
JPEG
§1
Conforming to IEC62107
§2
MPEG-1 Layer 3, MPEG-2 Layer 3
§3
Windows Media Audio Ver.9.0 L3
Not compatible with Multiple Bit Rate (MBR)
§4
Exif Ver 2.1 JPEG Baseline files
Picture resolution: between 160k120 and 6144k4096 pixels (Sub
sampling is 4:0:0, 4:2:0, 4:2:2 or 4:4:4). Extremely long and narrow
pictures may not be displayed.
§5
The total combined maximum number of recognizable audio and
picture contents and groups: 4000 audio and picture contents and
400 groups.
Pick up
Wavelength (DVD/CD) 655/785 nm
Laser power (DVD/CD) CLASS II/CLASS I
Audio output (Disc)
Number of channels 5.1 ch (FL, FR, C, SL, SR, SW)
)
z
) or 12 cm (5z)]
§2, 5
, JPEG
§4, 5
§2, 5
)
, JPEG
§2, 5
, JPEG
§1
§4, 5
, MP3
§4, 5
)
§2, 5
)
, WMA
§3, 5
,
VIDEO SECTION
Video system NTSC
Composite video output
Output level 1 Vp-p (75 ≠)
Terminal Pin jack (1 system)
Component video output
Y output level 1 Vp-p (75 ≠)
B output level 0.7 Vp-p (75 ≠)
P
R output level 0.7 Vp-p (75≠)
P
Terminal Pin jack (Y: green, P
HDMI AV output
Terminal 19-pin type A connector
HDAVI Control This unit supports “HDAVI Control 3” function.
B: blue, PR: red) (1 system)
SPEAKER SECTION
[Front\speakers\SB-HF665]
Type 2 way, 2 speaker system (Bass reflex)
Speaker unit(s) Impedance 3 ≠
Tweeter 6 cm (2
Woofer 16 cm (6
3
/8z) Cone type
1
/2z) Cone type
Input power (IEC) 130W (Max)
Output sound pressure 83 dB/W (1.0 m)
Frequency range 49 Hz to 28 kHz (j16 dB)
52 Hz to 26 kHz (j10 dB)
Dimensions (WtHtD) 221 mmk401 mmk244 mm
11
/16zk1525/32zk919/32z)
(8
Mass [Weight] 3.5 kg (7.7 lbs)
[Surround\speakers\SB-HS665]
Type 1 way, 1 speaker system (Bass reflex)
Speaker unit(s) Impedance 3 ≠
Full range 6.5 cm (2
Input power (IEC) 125 W
1
/2z) Cone type
§6
(Max)
Output sound pressure 80 dB/W (1.0 m)
Frequency range 95 Hz to 25 kHz (j16dB)
110 Hz to 2 2 kHz (j10dB)
Dimensions (WtHtD) 270 mmk94 mmk95 mm
5
(10
/8zk311/16zk33/4z)
Mass [Weight] 0.9 kg (1.98 lbs)
[Center\speaker\SB-PC880]
Type 1 way, 2 speaker system (Bass reflex)
Speaker unit(s) Impedance 6 ≠
1. Full range 6.5 cm (2
2. Full range 6.5 cm (2
Input power (IEC) 250 W
1
/2z) Cone type
1
/2z) Cone type
§6
(Max)
Output sound pressure 82 dB/W (1.0 m)
Frequency range 80 Hz to 25 kHz (j16 dB)
96 Hz to 22 kHz (j10 dB)
Dimensions (WtHtD) 270 mmk94 mmk95 mm
5
/8zk311/16zk33/4z)
(10
Mass [Weight] 1.3 kg (2.9 lbs)
[Subwoofer\SB-WVK870]
Type 1 way, 1 speaker system (Bass reflex)
Speaker unit(s) Impedance 6 ≠
Woofer 25 cm (10z) Cone type
Input power (IEC) 250W (Max)
Output sound pressure 82 dB/W (1.0 m)
Frequency range 48 Hz t o 250 Hz (j16 dB)
50 Hz t o 200 Hz (j10 dB)
Dimensions (WtHtD) 320 mmk411 mmk330 mm
19
(12
/32zk163/16zk13z)
Mass [Weight] 7.2 kg (15.9 lbs)
GENERAL
Power supply AC 120 V, 60 Hz
Power consumption Main unit 135 W
Dimensions (WtHtD) 430 mmk63 mmk327 mm
Mass [Weight] Main unit 3.7 kg (8.2 Ibs)
Operating temperature range 0 oC to r40 oC (r32 oF to r104 oF)
Operating humidity range 35 % to 80 % RH (no condensation)
Power consumption in standby mode approx. 0.3 W
§6
Rating with Low-cut filter equipped Amplifier
[Note]
1. Specifications are subject to change without notice.
Mass and dimensions are approximate.
2. Total harmonic distortion is measured by a digital spectrum analyzer.
(1
615/16zk
215/32zk
127/8z
Specifications
)
RQTX0275
35
Page 36

Limited Warranty
Panasonic Consumer Electronics C o mpany,
Division of Panasonic Corporation of North America
One Panasonic Way, Secaucus, New Jersey 07094
Panasonic Audio Products Limited Warranty
Limited Warranty Coverage (For USA and Puerto Rico Only)
f your product does not work properly because of a defect in materials or
workmanship, Panasonic Consumer Electronics Company (referred to as “the
warrantor”) will, for the length of the period indicated on the chart below, which starts
with the date of original purc hase (“w arra nty period”), a t its op tion either (a) re pair y our
product with new or refurbished parts, or (b) replace it with a new or a refurbished
product. The decision to repair or replace will be made by the warrantor.
Product or Part Name Parts Labor
Audio Products (except items listed below) One (1) year One (1) year
USB Reader-Writer, Personal Computer
Card Adapters
(in exchange for defective item)
Accessories: Headphones, Cartridges,
Microphones, Adapters
Rechargeable Batteries, DVD-R/-RAM Discs
(in exchange for defective item)
SD Memory Cards, Rechargeable Battery
Packs (in exchange for defective item)
During the “Labor” warranty period there will be no charge for labor. During the “Parts”
warranty period, there will be no charge for parts. You must carry-in or mail-in your
product during the warranty period. If non-rechargeable batteries are included, they
are not warranted. This warranty only applies to products purchased and serviced in
the United States or Puerto Rico. This warranty is extended only to the original
purchaser of a new product which was not sold “as is”. A purchase receipt or other
proof of the original purchase date is required for warranty service.
One (1) year
Ninety (90)
days
Ten (10)
days
Ninety (90)
days
Not
Applicable
Ninety (90)
days
Not
Applicable
Not
Applicable
Carry-In or Mail-In Service
For Carry-In or Mail-In Service in the United States and Puerto Rico call 1-800-211-PANA
(7262) or visit Panasonic web site: http://www.panasonic.com
Limited Warranty Limits And Exclusions
This warranty ONLY COVERS failures due to defects in materials or workmanship,
and DOES NOT COVER normal wear and tear or cosmetic damage. The warranty
ALSO DOES NOT COVER damages which occurred in shipment, or failures which
are caused by products not supplied by the warrantor, or failures which result from
accidents, misuse, abuse, neglect, mishandling, misapplication, alteration, faulty
installation, set-up adjustments, misadjustment of consumer controls, improper
maintenance, power line surge, lightning damage, modification, or commercial use
(such as in a hotel, office, restaurant, or other business), rental use of the product,
service by anyone other than a Factory Service Center or other Authorized Servicer,
or damage that is attributable to acts of God.
THERE ARE NO EXPRESS WARRANTIES EXCEPT AS LISTED UNDER “LIMITED
WARRANTY COVERAGE”. THE WARRANTOR IS NOT LIABLE FOR INCIDENTAL
OR CONSEQUENTIAL DAMAGES RESULTING FROM THE USE OF THIS
PRODUCT, OR ARISING OUT OF ANY BREACH OF THIS WARRANTY. (As
examples, this excludes damages for lost time, travel to and from the servicer, loss of
media or images, data or other memory content. The items listed are not exclusive,
but are for illustration only.)
ALL EXPRESS AND IMPLIED WARRANTIES, INCLUDING THE WARRANTY OF
MERCHANTABILITY, ARE LIMITED TO THE PERIOD OF THE LIMITED
WARRANTY.
Some states do not allow the exclusion or limitation of incidental or consequential
damages, or limitations on how long an implied warranty lasts, so the exclusions may
not apply to you.
This warranty gives y ou specifi c lega l rights and y ou may also have other rights which
vary from state to state. If a problem with this product develops during or after the
warranty period, you may contact your dealer or Service Center. If the problem is not
handled to your satisfaction, then write to the warrantor’s Consumer Affairs
Department at the addresses listed for the warrantor.
PARTS AND SERVICE WHICH ARE NOT COVERED BY THIS LIMITED
WARRANTY ARE YOUR RESPONSIBILITY.
Customer Services Directory (United States and Puerto Rico)
Obtain Product Information and Operating Assistance; locate your nearest Dealer or Servicenter; purchase Parts and
Accessories; or make Customer Service and Literature requests by visiting our Web Site at:
http://www.panasonic.com/help
or, contact us via the web at:
http://www.panasonic.com/contactinfo
You may also contact us directly at:
1-800-211-PANA (7262),
Limited Warranty
Monday-Friday 9 am-9 pm; Saturday-Sunday 10 am-7 pm, EST.
For hearing or speech impaired TTY users, TTY : 1-877-833-8855
Accessory Purchases (United States and Puerto Rico)
Purchase Parts, Accessories and Instruction Books online for all Panasonic Products by visiting our Web Site at:
http://www.pstc.panasonic.com
or, send your request by E-mail to:
npcparts@us.panasonic.com
You may also contact us directly at:
1-800-332-5368 (Phone) 1-800-237-9080 (Fax Only) (Monday – Friday 9 am to 9 pm, EST.)
Panasonic Service and Technology Company
20421 84th Avenue South, Kent, WA 98032
(We Accept Visa, MasterCard, Discover Card, American Express, and Personal Checks)
For hearing or speech impaired TTY users, TTY : 1-866-605-1277
RQTX0275
36
As of October 2008
Page 37

Número de región
1 ALL
2
4
1
Sonido dinámico con
altavoz de diámetro
grande
6
Conectividad iPod
Disfrute de la música de su iPod a
través de los altavoces, vea las
fotos de su iPod o sus vídeos en
la televisión.
28
Opciones para
mejorar el sonido
Potenciador de sonido envolvente,
Dolby Pro Logic II y más.
26
El reproductor reproduce DVD-Vídeo etiquetado con el número de
región “1” o “ALL”.
Ejemplo:
Instrucciones de funcionamiento
Sistema DVD de cine en casa
Modelo SC-PT665
Como socio de ENERGY STAR
Panasonic ha determinado que
este producto satisface las directrices
de ENERGY STAR
energético.
®
sobre el rendimiento
®
,
[_P_] rp
Panasonic Consumer Electronics Company,
Division of Panasonic Corporation of North America
One Panasonic Way, Secaucus, New Jersey 07094
http://www.panasonic.com
C Panasonic Corporation 2009
Impreso en Malaisia
Antes de conectar, utilizar o ajustar este producto, lea
completamente estas instrucciones.
Guarde este manual para consultarlo en el futuro.
Si tiene alguna pregunta contacte con
1-800-211-PANA (7262)
RQTX0275-1P
F0309ZA1049
Page 38

Estimado cliente
(Parte interior del aparato)
Le agradecemos haber adquirido este producto. Lea cuidadosamente
estas instrucciones para obtener un rendimiento y una seguridad óptimos.
Las operaciones descritas en estas instrucciones se realizan
principalmente con el mando a distancia, pero también puede
realizarlas en el aparato principal si los controles son los mismos.
Sistema
Aparato principal SA-PT665
Altavoces delanteros SB-HF665
Altavoz central SB-PC880
Altavoces para sonido envolvente SB-HS665
Subwoofer SB-WVK870
SC-PT665
¡ADVERTENCIA!
ESTE APARATO UTILIZA UN LÁSER.
EL USAR LOS CONTROLES, HACER LOS AJUSTES O LOS
PASOS REQUERIDOS EN FORMA DIVERSA DE LA AQUÍ
EXPUESTA PUEDE REDUNDAR EN EXPOSICIÓN PELIGROSA A
LA RADIACIÓN.
NO ABRA LAS TAPAS NI HAGA REPARACIONES USTED
MISMO. EN CASO DE PRODUCIRSE ANOMALÍAS SOLICITE
AYUDA DE PERSONAL CALIFICADO.
ADVERTENCIA:
PARA REDUCIR EL RIESGO DE INCENDIOS,
DESCARGAS ELÉCTRICAS O DAÑOS EN EL
PRODUCTO ,
≥NO EXPONGA ESTE APARATO A LA LLUVIA,
HUMEDAD, GOTEO O SALPICADURAS, Y NO
COLOQUE ENCIMA DEL MISMO OBJETOS CON
LÍQUIDOS COMO, POR EJEMPLO, FLOREROS
≥UTILICE SOLAMENTE LOS ACCESORIOS
RECOMENDADOS
.
≥NO QUITE LA CUBIERTA (O EL PANEL
TRASERO); EN EL INTERIOR NO HAY PIEZAS
QUE PUEDA REPARAR EL USUARIO. SOLICITE
LAS REPARACIONES AL PERSONAL DE
SERVICIO CALIFICADO.
.
Nota FCC:
Este equipo ha sido probado y se ha comprobado que satisface los
límites de los dispositivos digitales de Clase B, de acuerdo con la
Parte 15 de las Reglas FCC.
Estos límites han sido diseñados para proporcionar una protección
razonable contra las interferencias dañinas en una instalación
residencial. Este equipo genera, utiliza y puede irradiar energía
radioeléctrica y, si no se instala y se utiliza de conformidad con las
instrucciones, podría causar interferencias dañinas en las
comunicaciones radio. Sin embargo, no se garantiza la no aparición
de interferencias en una instalación particular. Si este equipo causas
interferencias dañinas en la recepción radio o televisiva, que se
puede determinar apagando y encendiendo el equipo, animamos al
usuario a intentar corregir la interferencia adoptando una o más de
las siguientes medidas:
≥ Volver a orientar o a colocar la antena receptora.
≥ Aumentar la separación entre el equipo y el receptor.
≥ Conectar el equipo a una toma en un circuito distinto del circuito al
que está conectado el receptor.
≥ Consultar al distribuidor o a un técnico experto de radio/TV para
conseguir ayuda.
Cualquier cambio no autorizado o modificación en este equipo
invalidará la autoridad del usuario de utilizar este dispositivo.
Este dispositivo satisface la Parte 15 de las Reglas FCC.
El funcionamiento está sujeto a las siguientes dos condiciones:
(1) Este dispositivo no debe causar interferencias dañinas,
(2) este dispositivo debe aceptar cualquier interferencias recibida,
incluidas las interferencias que podrían causar un funcionamiento no
deseado.
Parte responsable:
Panasonic Corporation of North America
One Panasonic Way
Secaucus, NJ 07094
Contacto servic i o de asistencia:
Panasonic Consumer Electronics Company
Nº de Teléfono: 1-800-211-PANA (7262)
¡ADVERTENCIA!
PARA MANTENER BIEN VENTILADA ESTA UNIDAD, NO LA
INSTALE NI PONGA EN UN ESTANTE DE LIBROS, MUEBLE
EMPOTRADO U OTRO ESPACIO DE DIME NSIONES REDUCIDAS.
ASEGÚRESE QUE CORTINAS Y OTROS MATERIALES NO
OBSTRUYAN LAS CONDICIONES DE VENTILACIÓN PARA
PREVENIR EL RIESGO DE SACUDIDAS ELÉCTRICAS O
INCENDIOS DEBIDOS AL RECALENTAMIENTO.
La toma de corriente deberá estar instalada cerca del equipo y
donde se pueda acceder a ella fácilmente. El enchufe del cable
de la alimentación deberá estar siempre listo para ser utilizado.
Para desconectar completament e este aparato de la red de CA,
desconecte el enchufe del cable de alimentación del receptáculo
de CA.
RQTX0275
2
Page 39

RQTX0275
ÍNDICE DEL CONTENIDO
Cómo
empezar
Reproducción
de discos
INSTRUCCIONES IMPORTANTES DE
SEGURIDAD . . . . . . . . . . . . . . . . . . . . . . . . . . . 4
Accesorios . . . . . . . . . . . . . . . . . . . . . . . . . . . . . 4
Glosario . . . . . . . . . . . . . . . . . . . . . . . . . . . . . . . 5
Mantenimiento del producto . . . . . . . . . . . . . . 5
Instalación Sencilla
paso 1 Posicionamiento . . . . . . . . . . . . . . . . . 6
paso 2 Conexiones de los cables. . . . . . . . . . 7
Conexiones de audio y vídeo. . . . . . . . . . . . 7
Conexiones de los altavoces. . . . . . . . . . . . 8
Conexiones de la antena de radio. . . . . . . . 8
Reproducción básica . . . . . . . . . . . . . . . . . . . 14
Uso del aparato principal . . . . . . . . . . . . . . . . . . . . . 14
Uso del mando a distancia. . . . . . . . . . . . . . . . . . . . 15
Otras funciones de reproducción . . . . . . . . . 16
Reproducir los CDs de manera secuencial
(Modo CD). . . . . . . . . . . . . . . . . . . . . . . . . . . . . . . 16
Reproducción repetida . . . . . . . . . . . . . . . . . . . . . . . 16
Reproducción programada y aleatoria. . . . . . . . . . . 16
paso 3 Conexiones del cable de CA . . . . . . . 9
paso 4
paso 5 Ejecución de CONFIG. RÁPIDA . . . . 10
paso 6
Guía de referencia de controles. . . . . . . . . . . 12
Uso del menú START . . . . . . . . . . . . . . . . . . . 13
Uso de los menús de navegación . . . . . . . . . 17
Utilización de los menús en pantalla. . . . . . . 18
Cambio de los ajustes del reproductor . . . . . 20
Preparación del mando a distancia
Preajuste de las emisoras de radio
Presintonización automática
de emisoras . . . . . . . . . . . . . . . . . . . . . . 11
Confirmación de los canales
presintonizados . . . . . . . . . . . . . . . . . . . 11
Reproducción de discos de datos . . . . . . . . . . . . . . 17
Reproducción de discos RAM y
DVD-R/-RW (DVD-VR) . . . . . . . . . . . . . . . . . . . . 17
Selección del tiempo de retra s o de los altavoces
. . . . 9
. . . . 11
. . . . 23
Otras
operaciones
Referencias
Uso de VIERA LinkTM “HDAVI ControlTM”. . . . . 24
Reproducción con un solo botón . . . . . . . . . . . . . . . 24
Cambio automático de entrada . . . . . . . . . . . . . . . . 24
Apagado vinculado. . . . . . . . . . . . . . . . . . . . . . . . . . 24
Control de los altavoces . . . . . . . . . . . . . . . . . . . . . . 25
VIERA Link Control sólo con el mando a
distancia del televisor [para “HDAVI Control 2
(o posterior)”] . . . . . . . . . . . . . . . . . . . . . . . . . . . . . 25
Discos que pueden reproducirse. . . . . . . . . . 30
Mantenimiento . . . . . . . . . . . . . . . . . . . . . . . . . 31
Guía para solucionar problemas . . . . . . . . . . 32
Garantía limitada: Remítase a la página 36 de la sección en inglés.
Uso de efectos de sonido. . . . . . . . . . . . . . . . 26
Ajuste de los efectos de sonido. . . . . . . . . . . . . . . . 26
Uso de Dolby Pro Logic II . . . . . . . . . . . . . . . . . . . . 26
Uso de modo Whisper Surround . . . . . . . . . . . . . . . 26
Ajuste del nivel de subwoofer . . . . . . . . . . . . . . . . . 27
Uso de Subwoofer Boost. . . . . . . . . . . . . . . . . . . . . 27
Ajuste del nivel de los altavoces . . . . . . . . . . . . . . . 27
Gozar de la radio FM/AM. . . . . . . . . . . . . . . . . 27
Sintonización manual. . . . . . . . . . . . . . . . . . . . . . . . 27
Control de otro equipo . . . . . . . . . . . . . . . . . . 28
Reproducción del audio del televisor . . . . . . . . . . . . 28
Uso del audio digital. . . . . . . . . . . . . . . . . . . . . . . . . 28
Uso del iPod. . . . . . . . . . . . . . . . . . . . . . . . . . . . . . . 28
Opciones de instalación de los altavoces
Especificaciones . . . . . . . . . . . . . . . . . . . . . . . 35
. . . . 29
Sonido
envolvente
26
Audio del
televisor
28
3
Page 40

I
NSTRUCCIONES IMPORTANTES DE SEGURIDAD
Lea las siguientes instrucciones de operación cuidadosamente antes de usar el aparato. Siga las instrucciones de seguridad de el aparato y aplique las
instrucciones de seguridad listadas abajo. Mantenga a la mano este instructivo para futuras referencias.
1) Lea estas instrucciones.
2) Guarde estas instrucciones.
3) Atienda todas las advertencias.
4) Siga todas las instrucciones.
5) No use esta unidad cerca del agua.
6) Limpie la unidad sólo con una tela seca.
7) No obstruya ninguna ranura de ventilación. Instálela como se indica
en estas instrucciones.
8) No la instale cerca de fuentes de calor como radiadores, estufas u
otros aparatos (incluyendo amplificadores) que produzcan calor.
9) Respete el propósito de seguridad del cordón polarizado o
aterrizado. El cordón polarizado tiene dos cuchillas, una más ancha
que la otra. El cordón aterrizado tiene la s dos cuchillas y u na ter cer a
punta aterrizada. La cuchilla ancha y la tercer punta fueron provistas
para su seguridad. Si la clavija del cordón de alimentación no se
ajusta a su tomacorriente, consulte a un electricista para reemplazar
el tomacorriente obsoleto.
Accesorios
Compruebe e identifique los accesorios suministrados. Utilice los números indicado s entre paré ntesis cuan do v a y a a solicita r piezas
de repuesto.
(Números de producto correctos a partir de Marzo de 2009. Podrían estar sujetos a cambios.)
Para pedir los accesorios, remítase a “Access ory Purchases (United S t ate s and Puerto Rico)” en la página 36 de la sección
en inglés.
10) Cuide que el cordón de alimentación no se pise o pellizque,
particularmente la clavija, el tomacorriente y los puntos donde está la
salida de los aparatos.
11) Sólo use los accesorios especificados en estas instrucciones.
12) Use sólo la base, tripié, soporte o mesa especificada
o aquellas vendidas con el aparato. Cuando necesite
moverlo, tenga cuidado de no provocar lesiones.
13) Desconecte esta unidad durante tormentas eléctricas
y durante largos periodos sin uso.
14) Todo servicio debe realizarlo un centro de servicio autorizado. El
servicio es requerido cuando el aparato o el cordón de alimentación
o la clavija han sido dañados, se le derramó liquido, se ha caído un
objeto dentro de la unidad, si el aparato fue expuesto a la lluvia o
humedad, no opera normalmente o se cayó.
∏ 1 Mando a
distancia
(N2QAYB000421)
∏ 1 Antena interior
INSTRUCCIONES IMPORTANTES DE SEGURIDAD / Accesorios
Recordatorio para el usuario:
FECHA DE COMPRA
NOMBRE DEL DISTRIBUIDOR
DIRECCIÓN DEL DISTRIBUIDOR
NÚMERO DE TELÉFONO
de FM
(RSAX0002)
∏ 1 Cable de señal
de vídeo
(K2KA2BA00001)
∏ 2 Pilas del
mando a
distancia
El número de modelo y el número de serie de este producto se hallan en su parte trasera o inferior.
Tome nota de ellos en el espacio aquí abajo y guárdelos para con-
sultarlos en el futuro.
NÚMERO DE MODELO SC-PT665
NÚMERO DE SERIE
∏ 1 Antena de
cuadro AM
(N1DAAAA00002)
∏ 1
Cables de
alimentación de CA
(K2CB2CB00021)
RQTX0275
4
Page 41

Glosario
Decodificador
Un descodificador restablece las señales de audio codificadas en DVD y
las convierte en señales normales. A esto se le llama decodificación.
Dolby Digital
Es un método de codificación de señales digitales desarrollado por Dolby
Laboratories. Además del audio estéreo (2 canales), estas señales
también pueden ser sonido de 5.1 canales.
DTS (Digital Theater Systems)
Este sistema de sonido envolvent e se utiliza en muchos cines de todo el
mundo. La separación entre los canales es muy buena, por lo que es
posible obtener efectos de sonido muy reales.
Gama dinámica
La gama dinámica representa la diferencia entre el nivel más bajo de
sonido que se puede oír por encima del ruido producido por el aparato y
el nivel de sonido más alto antes que se produzca distorsión.
Cuadro fijo y campo fijo
Los cuadros son imágenes fijas que van juntas para formar una imagen
en movimiento. Cada segundo se muestran aproximadamente
30 cuadros.
Un cuadro se forma con dos campos. Un televisor convencional muestra
estos campos uno tras otro para crear cuadros.
Al poner en pausa una imagen en movimiento, se muestra una imagen
fija. Un cuadro fijo está formado por dos campos alternativos, por lo que
la imagen puede aparecer borrosa, pero la calidad general es buena.
Un campo fijo no aparece borroso, pero sólo tiene la mitad de información
de un cuadro fijo, por lo que la calidad de la imagen resulta inferior.
HDMI (High-Definition Multimedia Interface)
HDMI es una interfaz digital de última generación para productos
electrónicos de consumo. A dif erencia de las cone xione s con v encionales ,
transmite señales de vídeo y audio sin comprimir en un solo cable. Este
aparato es compatible con la salida de vídeo de alta definición (720p,
1080i, 1080p) del terminal HDMI AV OUT. Para disfrutar de vídeo de alta
definición, se requiere un televisor compatible con la alta definición.
I/P/B
MPEG 2, el estándar de compresión de vídeo para DVD-Vídeo, codifica
los cuadros usando estos tres tipos de imágenes.
I: Imagen intracodificada
Esta imagen ofrece la mejor calidad y es la mejor para cuando se
ajusta la imagen.
P: Imagen codificada predictiva
Esta imagen se calcula tomando como base imágenes-I o
imágenes-P pasadas.
B: Imagen codificada predictiva bidireccional
Esta imagen se calcula comparando las imágenes-I y P pasadas y
futuras, así que es la que tiene el menor volumen de información.
JPEG (Joint Photographic Experts Group)
Éste es un sistema utilizado para comprimir/decodificar imágenes fijas en
color. La ventaja de JPEG es la menor deterioración de la calidad de la
imagen teniendo en cuenta el grado de compresión.
PCM lineal (modulación por codificación de pulsos)
Son señales digitales sin comprimir similares a las de los CD .
MP3 (MPEG Audio Layer 3)
Un método de compresión de audio que comprime audio a
aproximadamente una décima parte de su tamaño sin que se produzca
ninguna pérdida considerable de calidad de audio.
Control de reproducción (PBC)
Si un Vídeo CD tiene control de reproducción, usted podrá seleccionar
escenas e información con los menús.
Progresivo/entrelazado
NTSC, el estándar de la señal de vídeo, tiene 480 líneas de exploración
entrelazadas (i), mientras la exploración progresiva utiliza dos veces el
número de líneas de exploración. Ella se llama 480p.
Con la salida progresiva podrá disfrutar de vídeo de alta resolución
grabado en soportes como DVD-Vídeo.
El televisor debe ser compatible con la reproducción de vídeo progresivo.
Frecuencia de muestreo
El muestreo es el proceso de convertir los picos de las muestras de
ondas de sonido (señal analógica) tomadas durante periodos
establecidos en dígitos (codificación digital). La frecuencia de muestreo
es el número de muestras tomadas por segundo, así que cuanto más alto
sea el número, más fiel será la reproducción del sonido original.
Glosario / Mantenimiento del producto
Mantenimiento del producto
1. Daños que necesitan reparación—La unidad tiene que ser
reparada por personal calificado si:
(a)El cable de alimentación de CA o el adaptador de CA están
dañados; o
(b)Encima de la unidad se han caído objetos o líquidos; o
(c) La unidad ha sido expuesta a la lluvia; o
(d)La unidad no funciona normalmente o muestra un marcado
cambio en su rendimiento; o
(e)La unidad se ha caído o la caja está dañada.
2. Mantenimiento—N o i n t e n t e r e p a ra r l a unidad más allá de lo
descrito en estas instrucciones de funcionamiento. P ara el
mantenimiento, remítase a personal autorizado.
3. Sustitución de las piezas—Si necesita sustituir alguna pieza,
asegúrese de que el técnico utilice las piezas especificadas por el
fabricante o unas piezas con las mismas características que las
piezas originales. Una sustitución no autorizada podría causar
incendios, descargas eléctricas u otros peligros.
4. Control de seguridad—Después de la reparación o del
mantenimiento, pida al técnico que lleva a cabo los controles de
seguridad para confirmar que la unidad funcione correctamente.
El técnico necesitará todos los componentes para llevar a cabo el
mantenimiento de su sistema.
Por lo tanto, en caso de que sea necesario el mantenimiento, asegúrese
de traer todo el sistema.
WMA
WMA es un formato de compresión desarrollado por Microsoft
Corporation. Éste obtiene la misma calidad de sonido que MP3 con
archivos de menor tamaño que los de MP3.
Información sobre el producto
Para obtener información sobre el producto o asistencia sobre el
funcionamiento del producto:
Remítase a la “Customer Services Directory (United States and Puerto
Rico)” en la página 36 de la sección en inglés.
-Si ve este símboloInformación sobre la eliminación en otros países no
pertenecientes a la Unión Europea
Este símbolo sólo es válido en la Unión
Europea.
Si desea desechar este producto, póngase en
contacto con las autoridades locales o con su
distribuidor para que le informen sobre el
método correcto de eliminación.
RQTX0275
5
5
Page 42

Instalación Sencilla
El modo en que instale los altavoces puede afectar a los graves y al campo acústico. Tenga en cuenta los puntos siguientes:
paso
1
Posicionamiento
120°
30° 30°
Altavoces delanteros
(izquierdo)
Altavoces delanteros
(derecho)
Altavoz central
Aparato principal
Subwoofer
(derecho)
Altavoces de sonido envolvente
Altavoces de sonido envolvente
(izquierdo)
Altavoz central
Colocar el altavoz sobre un estante o anaquel. La vibración
causada por el altavoz puede distorsiona r la imagen si éste
se coloca directamente sobre el televisor.
Aparato principal
Para permitir una ventil ación adecuada y mantener una
buena circulación del aire alrededor del aparato principal,
colóquelo de forma que quede un espacio de al menos 5cm
(2z) en todos los lados.
Subwoofer
Póngalos a la derecha o a la izquierda del televisor, en el
suelo o en un estante fuerte para que no produzcan
vibraciones. Deje unos 30 cm (11
13
/16z) de espacio con
respecto al televisor.
OPTICAL
IN
TRANSMITTER
DIGITAL
PUSHPUSH
PUSHPUSH
Parte posterior de la
unidad principal
Tapa del transmisor
digital
¡Empuje!
≥ Quite la tapa del transmisor digital antes de instalar
cualquier accesorio inalámbrico opcional de Panasonic.
≥ Vuelva a colocar la tapa cuando no utilice el transmisor
digital.
Puede utilizar el extremo no afilado de un instrumento de
escritura para presionar aquí hasta que la tapa salte hacia fuera.
¡Empuje!
CORRECTOINCORRECTO
≥ Coloque los altavoces en bases firmes y planas.
≥ Colocar los altavoces muy próximos al suelo, paredes y esquinas puede producir un sonido grave excesivo. Tape las paredes y las ventanas con
cortinas gruesas.
≥ Para el montaje opcional en pared, consulte la página 29.
[Nota]
Mantenga los altavoces a unos 10 mm (
Ejemplo de instalación
Coloque los altavoces delant eros, cent ral y de sonido en v olv e nte apro ximadamente a la misma distancia de la posición de escucha. Los ángulos del
diagrama son aproximados.
13
/32q) como mínimo del sistema para que la ventilación sea apropiada.
Posicionamiento
Puede disfrutar del sonido de los altavoces envolventes inalámbricos cuando utilice el accesorio inalámbrico opcional de Panasonic
(ejemplo: SH-FX70).
Para obtener más información, consulte las instrucciones de funcionamiento del accesorio inalámbrico opcional de Panasonic.
Si el televisor muestra unos colores irregulares
Los altavoces frontales y central se pueden poner cerca del televisor,
pero la imagen puede verse afectada co n algunos televisores y
combinaciones de instalación.
En tal caso, apague el televisor durante unos 30 minutos.
La función de desmagnetización del televisor debería corregir el
problema. Si el problema persiste, separe más los altavoc es del televisor.
RQTX0275
6
¡Una experiencia envolvente sin ataduras!
Accesorios inalámbricos opcionales de Panasonic (ejemplo: SH-FX70)
Notas acerca de la utilización de los altavoces
≥Utilice solamente los altavoces suministrados
Precaución
≥El aparato principal y los altavoces
suministrados sólo deberán utilizarse como se
indica en estas instrucciones de instalación. De
lo contrario, el amplificador y/o los altavoces
podrían dañarse, y se podría correr el riesgo de
que se produjera un incendio. Consulte a un
profesional especializado en reparaciones si se
producen daños o si nota algún cambio súbito
en el rendimiento.
≥ No intente colgar estos altavoces en la pared
utilizando otros métodos diferentes de los
descritos en este manual.
La utilización de otros altavoces puede da ñar el aparato y la calidad
del sonido se verá afectada negativamente.
≥ Si reproduce el sonido con niveles altos durante largos periodos de
tiempo, pueden dañarse los altavoces y reducirse su vida útil.
≥ Para evitar daños, reduzca el volumen en los casos siguientes:
– Cuando reproduzca sonido distorsionado.
– Cuando los altavoces retumben debido a un reproductor de discos,
ruido de emisiones de FM o señales continuas de un oscilador , disco
de prueba o instrumento electrónico.
– Cuando ajuste la calidad del sonido.
– Cuando encienda o apague el aparato.
Advertencia
No toque el área de red que hay en la parte frontal de los altavoces.
Sujételos por los lados
Ej.: Altavoz central
Page 43

Instalación Sencilla
Apague todos los equipos antes de la conexión y lea las instrucciones de funcionamiento adecuadas.
paso
2
Conexiones de los cables
Aparato principal
AUDIO OUT
L
R
AUDIO IN
L
R
RF IN
VIDEO INVIDEO OUT
RF OUT
RF IN
COMPONENT VIDEO OUT
R
P
P
B
Y
L
R
AUX
VIDEO OUT
COMPONENT VIDEO OUT
R
P
P
B
Y
L
R
AUX
VIDEO OUT
Caja del televisor de cable o videograbadora
(no incluido)
Aparato principal
Cable de audio
(no incluido)
Conectando a los terminales AUX,
puede gozar del audio desde su
televisor, videograbadora o
programas televisivos de cable
mediante este sistema de cine de
casa. Seleccione “AUX” como fuente
(➜ 28).
Televisor (no incluido)
Al servicio de
televisión por cable o
a la antena del televisor
Cable RF (no incluido)
Cable de señal
de vídeo (incluido)
AV IN
Cable HDMI
Cables de señal de vídeo
No conecte la alimentación de CA ni el cable hasta que estén completadas todas las demás conexiones.
1
VIDEO OUT
P
R
PBY
COMPONENT VIDEO OUT
AUX
AV
OUT
Conexiones de audio y vídeo
1
Ejemplo de instalación básica
Conexiones de los cables
Otras conexiones de vídeo para una calidad de imagen mejor
Terminales del
televisor
[Nota]
≥ No realice las conexiones de vídeo mediante una grabadora de cintas de vídeo.
≥ Sólo se requiere una conexión de vídeo. Elija una de las conexiones de vídeo anteriores en función de su televisor.
COMPONENT
VIDEO IN
Y
PB
PR
Todos los televisores
Panasonic que poseen
conectores de entrada
480p son compatibles.
Si tiene un televisor de
otra marca, consulte al
fabricante del mismo.
Debido a la protección contra el copiado, la imagen puede que no se vi sualice correctamente.
Cable necesario
(no incluido)
[Nota]
≥ No se pueden utilizar cables que
no sean compatibles con HDMI.
≥ Se recomienda utilizar el cable
HDMI de Panasonic.
Número de pieza recomendado:
RP-CDHG15 (1,5 m/4,9 ft),
RP-CDHG30 (3,0 m/9,8 ft),
RP-CDHG50 (5,0 m/16,4 ft), etc.
Terminal del
aparato principal
[\\\\\\\\\\\HDMI\\\\\\\\\\\]
AV
OUT
[COMPONENT\VIDEO]
≥ Haga la conexión a
P
R
P
B
Y
COMPONENT VIDEO OUT
los terminales del
mismo color.
Esta conexión ofrece la mejor calidad de imagen.
Ajuste “PRIORIDAD VÍDEO” a “ENCEN.” (➜ 22, Menú
≥
“HDMI”).
≥
Ajuste “FORMATO VÍDEO” en Menú 4 (HDMI) (➜ 19).
VIERA Link “HDAVI Control”
Si su televisor Panasonic es un televisor compatible con
VIERA Link, podrá utilizar el televisor sincronizándolo
con operaciones de cine en casa o viceversa
de VIERA Link
≥ Realice la conexión de audio (➜ arriba) cuando
utilice la función VIERA Link “HDAVI Control”.
Esta conexión ofrece una imagen más pura que el
terminal VIDEO OUT.
≥ Después de haber realizado la conexión, seleccione
“MÁS OSCURO” del “NIVEL DEL NEGRO” en el
Menú “VÍDEO” (➜ 21).
Para disfrutar del vídeo progresivo
≥ Realice la conexión a un televisor compatible con
salida de señal progresiva.
– Ajuste “SAL. VÍD (I/P)” en el Menú “VÍDE O” a
“PROGRESIVO” y luego siga las instrucciones en
la pantalla del menú (➜ 21, Menú “VÍDEO”).
TM
Características
(➜ 24, Uso
“HDAVI ControlTM”).
(Continúa en la página siguiente)
RQTX0275
7
Page 44

Instalación Sencilla
paso
2
Conexiones de los cables
OPTICAL
IN
AM ANT
EXT
LOOP
FM ANT
(75 )
CENTERSUBWOOFER FRONT SURROUND
LOOP ANT GND
2
3
1
Aparato principal
Conexiones de audio y vídeo (continúa)
OPTICAL OUT
Cable óptico de audio digital
≥ Evite que se doble demasiado al
conectarlo.
OPTICAL
IN
CENTERSUBWOOFER FRONT
6 5 2 1 4 3
LRL
R
SURROUND
Conexión de los altavoces al dispositivo principal:
Haga la conexión a los terminales del mismo color.
Speaker Terminal/connector color
1
FRONT (L) Blanco
2
FRONT (R) Rojo
3
SURROUND (L) Azul
4
SURROUND (R) Gris
5
CENTER Verde
6
SUBWOOFER Morado
Ej.: Altavoces de sonido env o lvente
Aparato principal
Insértelo por comp l e to.
FM ANT
(75 )
AM ANT
EXT
LOOP
LOOP ANT GND
1
3
2
Cinta
adhesive
Clic!
Negro
Rojo
Blanco
Aparato principal
¡ Empuje !
[Antena\de\cuadro\AM]
(incluido)
Coloque la antena de pie en su base.
Sitúe la antena donde se consiga la mejor recepción.
[Antena\interior\de\FM]
(incluido)
Fije este extremo de la antena donde
la recepción sea mejor.
1
Otras conexiones de audio
Conexiones de los cables
Terminales del
Cable necesario
televisor
Conexiones de los altavoces
2
(no incluido)
Terminal del
aparato principal
[\\\\\\OPTICAL\IN\\\\\\]
Características
Esta unidad puede decodificar las señales env olventes
recibidas a través de la caja TV de cable, de la emisión
digital o de las emisiones de satélite. Consulte las
instrucciones de funcionamiento del equipo para
conocer los detalles. Sólo se puede reproducir Dolby
Digital y PCM con esta conexión.
≥ Una vez realizada esta conexión, realice los ajustes
necesarios sobre el tipo de audio de su equipo digital
(➜ 28).
Conexiones de la antena de radio
3
≥ Mantenga los cables de antena sueltos alejados de los otros cables.
RQTX0275
8
Page 45

Instalación Sencilla
Uso de una antena exterior de FM/AM (opcional)
FM ANT
(75 )
AM ANT
EXT
LOOP
LOOP ANT GND
Aparato principal
Deje conectada la
antena de cuadro AM.
Antena externa AM
[Usando un cable de vinilo (no incluido)]
Haga correr horizontalmente un pedazo
de cable de vinilo a través de una
ventana u otra ubicación
conveniente.
5,0 m a 12 m
(16 ft a 39 ft)
Antena exterior de FM
[Uso de una antena de televisión
(no incluido)]
≥ La antena deberá ser instalada por
un técnico competente.
Cable coaxial de 75 ≠
§
(no incluido)
Antena tapón (no incluido)
Utilice la antena exterior si la recepción de la radio FM/AM es mala.
≥ Desconecte la antena cuando no utilice el aparato.
≥ No utilice la antena exterior durante una tormenta eléctrica.
1 Quite un trozo del aislador
vinílico exterior
2 Separe las lengüetas con
cuidado para quitar la tapa.
3 Instale el cable coaxial.
Sujete el conductor del cable y
enróllelo de manera que no toque
nada.
7 mm (9/32z)
Despéguelo
4 Vuelva a colocar
la tapa.
Sujete con los alicates
10 mm (
13
/32z)
§
Revise el cable coaxial de 75 ≠ de su antena exterior como descrito a continuación.
10 mm (
13
/32z)
paso
3
Conexiones del cable de CA
AC IN
Cable de alimentación de CA
(incluido)
Aparato principal
A la toma doméstica de CA
(CA 120 V, 60 Hz)
paso
4
Preparación del mando a distancia
R6/LR6, AA
Introdúzcalas de forma que los polos (i y j) concuerden con los
del mando a distancia.
Ahorro de energía
El aparato principal consume una pequeña cantidad de corriente
aunque esté en modo de espera (0,3 W aproximadamente). Para
ahorrar energía cuando el aparato no se utilice durante mucho tiempo,
desenchúfelo de la toma de CA.
Después de enchufar el aparato principal, tendrá que restablecer
algunos elementos de la memoria.
∫ Pilas
PRECAUCIÓN
Existe riesgo de explosión si las pilas se colocan de forma incorrecta.
Sustitúyalas sólo con el mismo tipo o un tipo equivalente
recomendado por el fabricante.
Elimine las pilas usadas según las instrucciones del fabricante.
[Nota]
El cable de alimentación de CA suministr ado es par a ser utilizado con el
aparato principal solamente. No lo utilice con ningún otro equipo. No
utilice tampoco otros cables de otros equipos con el aparato principal.
≥ No las caliente ni exponga a las llamas.
≥
No deje la(s) pila(s) en un vehículo expuesto a la luz solar directa durante
largos periodos de tiempo con la puerta y las ventanas cerradas.
No:
≥ mezcle pilas viejas y nuevas.
≥ utilice tipos diferentes al mismo tiempo.
≥ las desarme ni provoque cortocircuitos.
≥ intente cargar pilas alcalinas o de manganeso.
≥ utilice pilas que tengan la cubierta pelada.
Una manipulación incorrecta de las pilas puede causar fugas de
electrolito, que pueden dañar gravemente el mando a distancia.
Retire las pilas si el mando a distancia no va a ser utilizado durante
mucho tiempo. Guárdelas en un lugar fresco y oscuro.
∫ Utilización
Apunte al sensor de señal del mando a distancia (➜ 13), evitando
los obstáculos, a una distancia máxima de 7m (23 ft) directamente
enfrente del aparato.
Conexiones de los cables / Conexiones del cable de CA / Preparación del mando a distancia
RQTX0275
9
Page 46

Instalación Sencilla
La pantalla QUICK SETUP le ayudará a realizar los ajustes necesarios.
paso
5
Ejecución de CONFIG. RÁPIDA
DVD
—
SLEEP
—
REPEAT
-
FL DISPLAY
-
PLAY MODE
VOL
OK
MUTE
SUBWOOFER
—
CH SELECT
FUNCTIONS
CANCEL SOUND
LEVEL
TOP MENU
MENU
DIRECT
NAVIGATOR
START
PLAY
LIST
-
RETURN
—
SETUP
SLOW/SEARCH
PLAYPAUSESTOP
SKIP
-
CD
MODE
12
3
4
5 6
7
8 9
0
10
ONE TOUCH PLAY
RADIO/
EXT-IN
INPUT
VOL
iPod
TV
DVD
—
W.SRD
PL
DISC
-
RETURN/
—
SETUP
OK
-
RETURN
—
SETUP
(mantenga pulsado
el botón)
OK
OK
OK
OK
OK
OK
-
RETURN
—
SETUP
(mantenga pulsado
el botón)
Preparación
Encienda el televisor y seleccione el modo de
entrada de vídeo adecuado (Ej.: VIDEO 1,
AV 1, HDMI, etc.).
≥Para cambiar el modo de entrada de vídeo del
televisor, consulte las instrucciones de
funcionamiento correspondientes.
≥Este mando a distancia permite realizar
algunas operaciones básicas en el televisor
(➜ 12).
1
2
3
4
DVD
Encienda el aparato.
Seleccione “DVD/CD”.
Acceda al menú setup.
MAIN
DISC
VIDEO
AUDIO
DISPLAY
HDMI
OTHERS
SET
RETURN
EXIT : SETUP
Seleccione “OTHERS”.
Ejecución de CONFIG. RÁPIDA
∫ Detalles de los ajustes
RQTX0275
10
≥ Los elementos subrayados en la tabla anterior son los ajustes de fábrica.
≥ ENGLISH ≥ FRANÇAIS ≥ESPAÑOL
≥ ESTÁNDAR
≥ PROYECCIÓN ≥ PLASMA
≥ 4:3PAN&SCAN
≥ 16:9NORMAL ≥ 16:9SHRINK ≥16:9ZOOM
IDIOMA DEL MENÚ
Seleccione el idioma de los mensajes
en pantalla.
TIPO DE TV.
Haga la selección adecuada al tipo de
su televisor.
ASPECTO TV
Elija el ajuste adecuado a su tele vi sor
y a sus preferencias.
5
Seleccione “QUICK
SETUP”.
S
6
7
8
eleccione
S
eleccione
OTHERS−QUICK SETUP
SELECT THE MENU LANGUAGE.
SET
RETURN
Siga los mensajes y haga
los ajustes.
≥IDIOMA DEL MENÚ
≥TIPO DE TV.
≥ASPECTO TV
Para volv er a la pantalla ante rior , pulse
[-RETURN].
9
10
≥ CRT ≥ LCD
≥ 4:3LETTERBOX ≥ 4:3ZOOM
Finalice QUICK SETUP.
Pulse para salir.
“SET”.
“YES”.
ENGLISH
FRANÇAIS
ES PAÑOL
Page 47

Instalación Sencilla
paso
6
Preajuste de las emisoras de radio
-
SLEEP
-
REPEAT
-
FL DISPLAY
-
PLAY MODE
VOL
MUTE
SUBWOOFER
—
CH SELECT
FUNCTIONS
CANCEL SOUND
LEVEL
TOP MENU
MENU
DIRECT
NAVIGATOR
START
PLAY
LIST
-
RETURN
—
SETUP
SLOW/SEARCH
PLAYPAUSESTOP
SKIP
-
CD
MODE
12
3
4
5 6
7
8 9
0
10
ONE TOUCH PLAY
RADIO/
EXT-IN
INPUT
VOL
iPod
TV
DVD
—
W.SRD
PL
DISC
,
RADIO/EXT-IN
OK
OK
FUNCTIONS
-
PLAY MODE
Botones
numerados
SELECTOR
TUNE
MEMORY
-TUNE MODE/—FM MODE
RADIO/
EXT-IN
(mantenga pulsado
el botón)
W
P
Confirmación de los canales
ST
MONO
presintonizados
1
RADIO/
EXT-IN
Seleccione “FM” o “AM”.
≥ Aparato principal:
Pulse [SELECTOR].
2
12
5
4
8 9
7
0
Seleccione el canal.
3
≥ Para seleccionar un número de 2 dígitos
6
Ej.: 12: [S10] ➜ [1] ➜ [2]
10
También puede pulsar [X, W].
≥ Aparato principal:
Pulse [-TUNE MODE] para seleccionar
“PRESET” en la pantalla, y pulse
[X TUNE W] para seleccionar el canal.
Cuando está recibiéndose una emisión FM
estéreo, se enciende “ST” en el display.
≥ El ajuste de FM/AM también aparece en la pantalla del televiso r.
∫ Si el ruido es excesivo
Cuando selecciona “FM”
Mantenga pulsado [-PLAY MODE] (aparato principal:
[—FM MODE]) para visualizar “MONO”.
Preajuste de las emisoras de radio
Presintonización automática de emisoras
Es posible sintonizar hasta 30estaciones en cada banda, FM y AM.
1
2
≥ “SET OK” aparece cuando se han sintonizado las emisoras y la radio
se sintoniza con la última emisora presintonizada.
≥ “ERROR” aparece cuando la presintonización automática no se
realiza correctamente. Presintonice las emisoras manualmente
(➜ 27).
OK
Seleccione “FM” o “AM”.
≥ Aparato principal:
Pulse [SELECTOR].
Suelte el botón cuando aparezca
“FM AUTO” o “AM AUTO”.
Ej.:
≥ Aparato principal:
Mantenga pulsado [MEMORY].
El sintonizador sintoniza la frecuencia
más baja y empieza a presintonizar todas
las emisoras que puede recibir en los
canales en orden ascendente.
Mantenga pulsado de nuevo el botón para cancelar el modo.
≥El modo también se cancela al cambiar la frecuencia.
Cuando selecciona “AM”
Pulse [FUNCTIONS]
en el mando a distancia.
Cada vez que pulsa el botón: BP 2()BP 1
RQTX0275
11
Page 48

Guía de referencia de controles
TV
1
2
3
4
12
4
7
-
CD
DISC
MODE
SKIP
INPUT
5 6
8 9
0
DVD
VOL
iPod
RADIO/
EXT-IN
3
ONE TOUCH PLAY
VOL
10
SLOW/SEARCH
PLAYPAUSESTOP
5
TOP MENU
6
DIRECT
NAVIGATOR
7
MENU
8
9
10
Guía de referencia de controles
11
12
1 Encendido/apagado del aparato principal (➜ 10)
2 Selección de los canales y los números de título /
introducción de números (➜ 11, 15)
3 Selección del disco / Reproducción de todos los CDs
cargados en secuencia (➜ 15, 16)
4 Selección de emisoras de radio presintonizadas (➜ 27)
5 Operaciones básicas de reproducción (➜ 14, 15)
6 Visualización del menú inicial del disco o de la lista de
programas (➜ 15, 17)
7 Selección o confirmación de opciones de menú / Cuadro a
cuadro (➜ 15)
PLAY
LIST
FUNCTIONS
CANCEL SOUND
—
W.SRD
PL
OK
-
PLAY MODE
—
REPEAT
SUBWOOFER
LEVEL
—
CH SELECT
START
-
RETURN
—
SETUP
-
FL DISPLAY
—
SLEEP
MUTE
13
14
15
16
17
18
19
20
21
22
24
23
25
8 Visualización del menú inicial o de la lista de reproducción
(➜ 15, 17)
9 Visualización del menú en pantalla (➜ 18)
: Activación/desactivación de Dolby Pro Logic II (➜ 26)
; Cancelación (➜ 16)
< Selección del modo de sonido / Activación/desactivación del
Whisper Surround (➜ 26)
= Operaciones de TV
Apunte el mando a distancia al televisor Panasonic y pulse el botón.
[Í TV]: Encendido/ap agado del televisor
[INPUT]: Cambio del modo de entrada de vídeo del televisor
[r, s]: Ajuste del volumen del televisor
Puede que no funcione correctamente con algunos modelos.
> Selección del disco como fuente (➜ 10)
? Selección de iPod como fuente (➜ 28)
@ Selección de sintonizador de FM/AM tuner o audio externo
como fuente (➜ 27, 28)
FM#AM#AUX#D-IN
^-------------------------------}
A Inicio y reproducción automáticos de un disco (➜ 15, 24)
B Ajuste del volumen del aparato principal
C Selección manual de emisoras de radio (➜ 27)
D Visualización del menú START (➜ 13)
E Regreso a la pantalla anterior / Visualización del menú
Setup (➜ 15, 10)
F Cambio de información en el display del aparato principal
(➜ 15)
o
Ajuste del temporizador de suspensión
Mantenga pulsado [—SLEEP].
Mientras se muestre el tiempo en el display del aparato principal,
pulse [—SLEEP] varias veces.
SLEEP 30#SLEEP 60#SLEEP 90#SLEEP120
^------------OFF (Cancelación)(-------------}
≥ Para confirmar el tiempo restante, mantenga pulsado el botón de
nuevo.
G Selección del modo de reproducción / Ajuste del modo de
repetición (➜ 16)
H Desactivación del sonido
≥ “MUTE” parpadea en el display del aparato principal mientras la
función está activada.
≥ Para cancelarla, pulse de nuevo el botón o ajuste el volumen.
≥ La desactivación del sonido se cancela al poner el aparato en el
modo de espera.
I Ajuste del nivel de subwoofer o selección del canal del
altavoz (➜ 27)
Cómo evitar interferencias con otros equipos Panasonic
Otros equipos de audio/vídeo Panasonic pueden ponerse en marcha al
manejar la unidad con el mando a distancia suministrado.
El aparato se puede manejar en otro modo ajustando el modo de
funcionamiento del mando a distancia a “REMOTE2”.
RQTX0275
12
El aparato principal y el mando a distancia deben ajustarse al mismo
modo.
1 Mantenga pulsado [9/5] en el aparato principal y [2] en el
mando a distancia hasta que en el display del aparato principal
aparezca “REMOTE 2”.
2 Mantenga pulsado [OK] y [2] en el mando a distancia durante al
menos 2 segundos.
Para volver a cambiar el modo a “REMOTE 1”, repita los dos pasos
anteriores reemplazando [2] por [1].
Page 49

VOLUME
POWER
SELECTOR TUNE
MEMORY
TUNE MODE FM MODE
SW
BOOST
OPEN CLOSE
5 DISC
SELECTOR
EXCHANGE
123 45
13 14
1 43 6 8 9
11 12
SW
BOOST
OPEN CLOSE
5 72
10
1 Interruptor de alimentación en espera/conectada
START
DVD/CD Cine para casa
OK
VOLVER
Seleccionar entrada
OK
DVD/CD Cine para cas a
OK
VOLVER
Seleccionar entrada
Reproducir disco
TOP MENU (DVD)
MENU (DVD)
Reproducción/acceso a
los menús
(POWER Í/I)
Pulse este interruptor para cambiar del modo de
alimentación conectada al modo de alimentación en espera
o viceversa. En el modo de alimentación en espera, el
aparato consume una pequeña cantidad de corriente.
(➜ 14)
2 5 DISC SELECTOR
Seleccione directamente un disco (➜ 14)
3 Cambio del disco
Abra la bandeja del disco para cambiarlo. (➜ 14)
4 Apertura/Cierre de la bandeja del disco (➜ 14)
5 Activación/desactivación de Subwoofer Boost (➜ 27)
6 Selección de la fuente
DVD/CD#FM#AM#AUX#D-IN#IPOD
^---------------------------------------------------------------}
7 Salto o reproducción lenta / Selección de emisoras de radio
(➜ 11, 14)
Uso del menú START
8 Parada de la reproducción / Selección del modo de
sintonización / Ajuste del estado de recepción de FM (➜ 11,
14)
9 Reproducción de discos / Memorización de las emisoras de
radio receptoras (➜ 14, 27)
: Conecte el iPod (➜ 28)
; Sensor de señal del mando a distancia
< Pantalla
= Ajuste del volumen del aparato principal
> Conexión de auriculares (no incluido)
Tipo de clavija de auriculares: Miniclavija estéreo de ‰3,5mm (1/8q)
≥ Baje el volumen antes de conectarlos.
≥ El audio cambia automáticamente a estéreo de 2 canales.
≥ Para no dañarse los oídos, evite escuchar durante mucho tiempo.
Guía de referencia de controles / Uso del menú START
Puede seleccionar la fuente deseada o acceder a reproducción/menús
usando el menú START.
1
Acceda al menú START.
Si ha puesto un disco, también puede iniciar la reproducción o acceder a
los menús desde el menú START.
Ej.: [DVD-V]
Ej.:
2
Seleccione una opción.
≥ Para salir pulse [START].
Si se selecciona “Seleccionar entrada”
Se puede seleccionar una fuente del menú.
≥ DVD/CD (➜ 10), FM (➜ 11), AM (➜ 11), AUX
DIGITAL IN
§
“(TV)” aparecerá junto a “AUX” o “DIGITAL IN”, indicando la
configuración de audio del televisor para VIERA Link “HDAVI Control”
(➜ 24).
Pulse [3, 4], y luego [OK] para realizar los ajustes.
§
(➜ 28), iPod (➜ 28)
§
(➜ 28),
Si se muestra el panel de control en pantalla
Ej.: [DVD-V] (si “Reproducir disco” está seleccionado desde el menú
START)
PAUSA
BUSCAR
REPROD.
PARADA
Puede controlar la reproducción con los controles indicados.
BUSCAR
VOLVER
RQTX0275
13
13
Page 50

Reproducción básica
VOLUME
OPEN CLOSE
SELECTOR
12
3
4
MEMORY
5
, + VOLUMEEXCHANGE
5 DISC
SELECTOR
123 45
TUNE
POWER
Inicie la
reproducción.
≥ Gire [`, i VOLUME] para
ajustar el volumen.
≥ Para disfrutar del sonido
envolvent e, pulse [ PLII]
en el mando a distancia y se
activará Dolby Pro Logic II
(➜ 26).
(Parada)
Seleccione “DVD/CD”.Encienda el aparato.
Pulse para saltar a otra posición.
Mantenga pulsado para
– realizar una búsqueda durante la reproducción
– iniciar la reproducción a cámara lenta durante la pausa
≥ Pulse [1] (Reproducción) para iniciar la reproducción normal.
Abra todas las bandejas del disco.
≥ Para seleccionar una bandeja deseada (➜ abajo, Seleccionar la
bandeja deseada).
≥ Pulse de nuevo [<OPEN/CLOSE] para cerrar la bandeja.
Cargue el disco.
≥ Cargue los discos de dos caras de
forma que la etiqueta de la cara que
quiera reproducir quede hacia arriba.
≥ Pulse [EXCHANGE] para cargar los
discos uno a la vez.
≥ En el caso de DVD-RAM, retire el
disco de su cartucho antes de su uso.
≥ No:
– Cargue más de un disco por bandeja.
– Empuje ni tire fuera la bandeja con la mano.
Pulse para seleccionar un disco
directamente.
≥ Puede seleccionar el disco usando también el
mando a distancia (➜ 15, Seleccionar un disco).
Etiqueta
mirando
hacia
arriba
5 DISC
SELECTOR
123 45
OPEN CLOSE
EXCHANGE
Preparación
Para ver la imagen, encienda el televisor y cambie el modo de entrada de vídeo (p.ej. VIDEO 1, AV 1, HDMI, etc.) para que se
ajuste a las conexiones a esta unidad.
Uso del aparato principal
Reproducción básica
Durante la reproducción,
Cambiar los
Seleccionar la
bandeja
deseada
Pulse de nuevo [<OPEN/CLOSE] para cerrar
[Nota]
≥ EL DISCO CONTINÚA GIRANDO MIENTRAS SE VISUALIZA EL MENÚ.
RQTX0275
Para preservar el motor del aparato y la pantalla del televisor, pulse [∫] (Parada) cuando ya no tenga que hacer más operaciones con menús.
≥ El número total de títulos puede no mostrarse correctamente en iR/iRW .
14
la bandeja.
discos sin
interrumpir
la
reproducción
≥ Todas las bandejas están abiertas (salvo la
que está reproduciendo el disco).
≥ Pulse [EXCHANGE] para cerrar la bandeja
superior. Vuelva a pulsar hasta que estén
cerradas todas las bandejas.
≥ Pulse [<OPEN/CLOSE] para cerrar todas
las bandejas abiertas.
Page 51

Si tiene problemas, consulte la guía para la solución de problemas (➜ 32 a 34).
—
SLEEP
—
REPEAT
-
FL DISPLAY
-
PLAY MODE
VOL
OK
MUTE
SUBWOOFER
—
CH SELECT
FUNCTIONS
CANCEL SOUND
LEVEL
TOP MENU
MENU
DIRECT
NAVIGATOR
START
PLAY
LIST
-
RETURN
—
SETUP
SLOW/SEARCH
PLAYPAUSESTOP
SKIP
-
CD
MODE
12
3
4
5 6
7
8 9
0
10
ONE TOUCH PLAY
RADIO/
EXT-IN
INPUT
VOL
iPod
TV
DVD
—
W.SRD
PL
1
SLOW/SEARCH
,
,
SKIP
STOP, PAUSE
TOP MENU,
DIRECT NAVIGATOR
OK
-
FL DISPLAY
-
RETURN
MENU, PLAY LIST
DISC
DISC
2
ONE TOUCH PLAY
5
Botones
numerados
STOP
SKIP
—
SLOW/SEARCH
Seleccionar
Confirmar
—
Seleccionar
Confirmar
o
Todavía sin leer Bandeja vacía
MENU
PLAY
LIST
-
RETURN
—
SETUP
—
—
SLEEP
-
FL DISPLAY
Uso del mando a distancia
Seleccionar
un disco
-
CD
MODE
DISC
OK
Se visualiza la pantalla de
información del disco.
≥ Para salir de la pantalla, pulse
[DISC].
Ej.: [DVD-V]
Cambio de disco
DVD-VIDEO1
2
CD
3
DISCO DE DATOS
4
no comprobado
5
NO HAY CD
R
eproducción
con un solo
botón
Parada
Pausa
Salto
Búsqueda
(durante la
reproducción)
Cámara
lenta
(durante la
pausa)
Cuadro a
cuadro
(durante la
pausa)
Selección de
elementos
en la
pantalla
ONE TOUCH PLAY
PAUSE
OK
OK
El aparato principal se enciende
automáticamente y se empieza a
reproducir el disco de la bandeja.
La posición se memoriza mientras
aparece “REAN. PARADA” en la
pantalla.
≥ Pulse [1 PLAY] para reanudar.
≥ Pulse [∫ STOP] de nuevo para
cancelar la posición.
≥ Pulse [1 PLAY] para rean udar la
reproducción.
≥ Hasta 5 pasos.
≥ Pulse [1 PLAY] para iniciar la
reproducción normal.
≥ [VCD] Cámara lenta: Dirección de
avance solamente.
[DVD-VR] [DVD-V] [VCD]
≥ [DVD-VR] [VCD] Cámara lenta: No
funciona.
Introducción
del número
Menú del
disco
Vuelta a la
pantalla
anterior
Display de la
unidad
principal
12
5
4
12
5
4
8 9
7
0
TOP MENU
DIRECT
NAVIGATOR
-
RETURN
—
SETUP
3
[DVD-VR] [DVD-V] [VCD] [CD]
Ej.: Para seleccionar el 12:
3
[S10] ➜ [1] ➜ [2]
[VCD] on control de reproducción
6
Pulse [∫ STOP] para cancelar la
función PBC y pulse los botones
numerados.
10
[DVD-V]
Muestra el menú inicial de un
disco.
[DVD-VR]
Pulse el botón para ver los
programas (➜ 17).
[DVD-V]
Muestra el menú del disco.
[DVD-VR]
Pulse el botón para ver una list a de
reproducción (➜ 17).
[VCD] con control de reproducción
Muestra el menú del disco.
[DVD-VR] [DVD-V] [WMA] [MP3]
Indicación del tiempo
,-. Indicación de información
(Ej.: [DVD-VR] Número de
programa)
[JPEG]
,-.Número de contenido
SLIDE
Reproducción básica
RQTX0275
15
Page 52

Otras funciones de reproducción
—
SLEEP
—
REPEAT
-
FL DISPLAY
-
PLAY MODE
VOL
OK
MUTE
SUBWOOFER
—
CH SELECT
FUNCTIONS
CANCEL SOUND
LEVEL
TOP MENU
MENU
DIRECT
NAVIGATOR
START
PLAY
LIST
SLOW/SEARCH
PLAYPAUSESTOP
SKIP
-
CD
MODE
7
8 9
0
10
—
W.SRD
PLAY
OK
CANCEL
STOP
DISC
−CD MODE
-
RETURN
—
SETUP
-
RETURN
-
PLAY MODE
—
REPEAT
PL
-
CD
MODE
DISC
PLAY
(mantenga
pulsado el botón)
W1 W2
CD
P.MODE
—
REPEAT
-
PLAY MODE
(mantenga
pulsado el botón)
—
REPEAT
-
PLAY MODE
—
REPEAT
-
PLAY MODE
OK
PROGRAMA DVD-V
SELEC. TÍTULO
TtLO. CAP.
TtLO. 1
TtLO. 2
TtLO. 3
TtLO. 4
1
2
3
4
5
6
7
8
9
10
EMPEZAR:PLAY
BORRAR TODO
PLAY
OK
Ej.: [DVD-V]
TODOS EN ALEATORIO
PULSE PLAY PARA EMP
Ej.: [CD]
Reproducir los CDs de manera secuencial
(Modo CD)
[VCD] [CD] [WMA] [MP3]
Esta característica le permite reproducir todos los CDs cargados en
secuencia. Seleccione un disco aplicable antes de reproducir (➜ 15,
Seleccionar un disco).
≥ Si todos los discos cargados son DVDs, el modo CD no funciona.
≥ El control de reproducción del CD de vídeo se desactiva.
No puede encender ni apagar el modo CD durante el modo programado
≥
o aleatorio.
≥ Si quiere reproducir un DVD, pulse de nuevo y mantenga pulsado
[–CD MODE] mientras está parado para cancelar el modo CD (el modo
CD se cancela también cuando pone el aparato en espera, seleccione
otra fuente o cuando está abierta la bandeja del disco).
Reproducción repetida
Sólo funciona cuando puede visualizarse el tiempo de reproducción
transcurrido. También funciona con todo el contenido JPEG.
Otras funciones de reproducción
1
2
Los elementos mostrados cambian según el tipo de disco y el modo de
reproducción.
Reproducción programada y aleatoria
[DVD-V] [VCD] [CD] [WMA] [MP3] [JPEG]
Para gozar de la reproducción programada o aleatoria con:
≥ [DVD-VR] Seleccione “DATOS” en “DVD-VR/DATOS” (➜ 22, Menú
RQTX0275
“OTROS”) para reproducir contenidos WMA, MP3 o JPEG.
≥ [DVD-V] Algunos elementos no pueden reproducirse aunque se hayan
16
programado.
Durante la parada
Durante la
Otras funciones de reproducción
.
reproducción
Mientras se
muestra el modo
de repetición
Seleccione la opción que desee repetir.
Ej.: [DVD-V]
`TtLO. ---. `CAP. ---. `APAGADO
^------------------------------------------------------b
≥ Para cancelar, seleccione “APAGADO”.
– 1 disco : asegúrese de que el modo CD (➜ arriba) esté apagado
– odos los discos: asegúrese de que el modo CD esté encendido
Durante la parada
Seleccione el modo de reproducción.
Las pantallas de reproducción programada y
aleatoria aparecen secuencialmente.
Programada -----------------) Aleatoria
^--- Salir de reproducción (--}
programada y aleatoria
Reproducción programada (hasta 30 elementos)
∫ Programa de 1 disco
[DVD-V] [VCD] [CD] [WMA] [MP3] [JPEG] Puede programar todos los
detalles de un disco en la bandeja seleccionada.
1
Seleccione una opción.
Ej.: [DVD-V]
≥ Repita este paso para programar otros
elementos.
≥ Para volver al menú anterior, pulse
[-RETURN].
2
Inicie la reproducción.
∫ Programada de todos los discos (cuando está
encendido el modo CD)
[VCD] [CD] Puede programar todos los detalles en todos los discos.
1 Pulse [3, 4], luego pulse[OK] para seleccionar el disco.
2 Pulse [3, 4], luego pulse [OK] para seleccionar la pista.
3 Repita el paso 1 y 2 para programar otros detalles.
≥Para volver al menú anterior, pulse [-RETURN].
4 Pulse [1 PLAY].
Para seleccionar todos los elementos
Pulse [3, 4] para seleccionar “TODO” y pulse [OK].
Para cancelar el programa seleccionado
1 Pulse [1] y luego pulse [3, 4] para seleccionar el programa.
2 Pulse [CANCEL].
Para cancelar todo el programa
Pulse [1] varias veces para seleccionar “BORRAR TODO” , y pulse [OK].
El programa completo también se cancela cuando se a bre la bandeja del
disco, se apaga el aparato o se selecciona otra fuente.
Reproducción aleatoria
∫ Aleatoria de 1 disco
[VCD] [CD] Puede reproducir todos los detall es de un disco en la bandeja
seccionada en orden aleatorio.
[DVD-V] [WMA] [MP3] [JPEG]
de un disco en la bandeja seccionada en orden aleatorio.
1
Puede reproducir el/los deta lle/s sel eccionad o/s
(Sólo cuando el disco contiene grupos o v arios
títulos.)
Select a group or title.
≥ “¢” representa la
opción
seleccionada.
Para
deseleccionarla,
vuelva a pulsar
[OK].
2
PLAY
Inicie la reproducción.
DVD-V ALEATORIO
SELEC. TÍTULO
TtLO. 1
TtLO. 2
TtLO. 3
PULS E PLAY PARA EMP
∫ Aleatoria de todos los discos (cuando está
encendido el modo CD)
[VCD] [CD] Puede reproducir todos los
detalles en todos los discos en orden
aleatorio.
Pulse [1 PLAY].
Page 53

Uso de los menús de navegación
Grupo (Carpeta):
Contenido (Archivo):
: WMA/MP3
: JPEG
Nombre del grupo
Número de grupo y
contenido
OK
TOP MENU
DIRECT
NAVIGATOR
PG
FECHA
LONGITUD
TÍTULO
1
0:16:02
10/11
LIVE CONCERT
02:15
2
0:38:25
12/05
AUTO ACTION
3
1: 16:05
04/03
CINEMA
02:10
01:3 0
OK
VOLVER
Ej.:
OK
MENU
PLAY
LIST
LR
FECHA
LONGITUD
TÍTULO
1
0:00:10
11/11
CITY PENGUIN
00:01
2
0: 01:20
12/01
FOOTBALL
3
1: 10:04
01/02
SPECIAL
01:10
01:20
OK
VOLVER
Ej.:
OK
∫
Selección de la imagen en el menú
Thumbnail
Mientras se
1
muestra una
imagen
2
Para ir al otro grupo
1 Pulse [3] para seleccionar el nombre del grupo.
2 Pulse [2, 1] para seleccionar el grupo y pulse [OK].
,
SKIP
STOP
TOP MENU,
DIRECT NAVIGATOR
MENU,
PLAY LIST
12
4
7
-
CD
DISC
MODE
SKIP
TOP MENU
DIRECT
NAVIGATOR
MENU
FUNCTIONS
CANCEL SOUND
PLAY
LIST
TV
INPUT
5 6
8 9
0
PL
—
W.SRD
VOL
3
10
SLOW/SEARCH
OK
-
PLAY MODE
—
REPEAT
SUBWOOFER
LEVEL
—
CH SELECT
DVD
iPod
RADIO/
EXT-IN
ONE TOUCH PLAY
VOL
PLAYPAUSESTOP
START
-
RETURN
—
SETUP
-
FL DISPLAY
—
SLEEP
MUTE
OK
-
RETURN
[JPEG]
TOP MENU
DIRECT
NAVIGATOR
Ej.:
ORIGEN G 1/ 1:C 3/ 9
Para seleccionar una imagen.
≥ Pulse [:, 9 SKIP] para saltar página
por página.
Reproducción de discos de datos
[WMA] [MP3] [JPEG]
[DVD-VR] Seleccione “DATOS” en “DVD-VR/DATOS” (➜ 22, Menú
“OTROS”) para reproducir contenidos WMA, MP3 o JPEG.
Reproducción desde el elemento seleccionado
Cuando se muestra la pantalla “DISCO DE D ATOS”, puede seleccionar la
reproducción del elemento que desee.
Ej.:
DISCO DE DATOS
ORIGEN
Perfume
My favorite1
My favorite2
My favorite3
Underwater
Fantasy planet
City of cascade
Infinite unit
≥ Para mostrar la pantalla o salir, pulse [MENU].
Seleccione una opción.
≥ Pulse [2, 1] para saltar página por página.
OK
La reproducción empieza desde el contenido seleccionado.
≥ Para volver a la pantalla anterior, pulse
[-RETURN].
≥ Máximo: 12 caracteres por nombre de
archivo/carpeta.
Lady Starfish
Metal Glue
Life on Jupiter
Starpersons1
Starpersons2
OK
Reproducción de discos RAM y DVD-R/-RW
(DVD-VR)
[DVD-VR]
≥ Los títulos aparecen sólo si están grabados en el disco.
≥
No se pueden editar programas, listas de reproducción ni títulos de disco.
Reproducción de programas
Durante la parada
1
≥ Para salir de la pantalla, pulse [DIRECT
NAVIGATOR].
2
Reproducción de una lista de reproducción
Sólo funciona cuando el disco contiene una lista de reproducción.
Durante la parada
1
Para seleccionar el programa.
≥ Pulse [2, 1] para saltar página por página.
Uso de los menús de navegación
≥ Para salir de la pantalla, pulse
2
Para seleccionar la lista de
reproducción.
[PLAYLIST].
≥ Pulse [2, 1] para saltar página por página.
RQTX0275
17
Page 54

Utilización de los menús en pantalla
—
SLEEP
—
REPEAT
-
FL DISPLAY
-
PLAY MODE
VOL
OK
MUTE
SUBWOOFER
—
CH SELECT
FUNCTIONS
CANCEL SOUND
LEVEL
TOP MENU
MENU
DIRECT
NAVIGATOR
START
PLAY
LIST
SLOW/SEARCH
PLAYPAUSESTOP
SKIP
-
CD
MODE
12
3
4
5 6
7
8 9
0
10
RADIO/
EXT-IN
INPUT
VOL
iPod
TV
DVD
—
W.SRD
DISC
OK
PLAY
FUNCTIONS
CANCEL
ONE TOUCH PLAY
-
RETURN
—
SETUP
-
RETURN
PL
Botones
numerados
FUNCTIONS
T
1
C1
1:ENG
3/2.
1 :E
APAGADO
BÚSQUEDA TÍTULO
Elemento actual
Nombre del elemento
T
1
C 1
1:ENG
3/
1
APAGADO
BÚSQUEDA CAPÍTULO
Ajuste actual
OK
-
RETURN
—
SETUP
3/2 .1ch
0: No hay sonido envolvente
1: Sonido envolvente mono
2: Sonido envolvente estéreo
(izquierda/derecha)
.1: Efecto de baja frecuencia
(no se visualiza si no hay señal
)
.1: Central
.2:
Delantero izquierdoiDelantero derecho
.3:
Delantero izquierdoiDelantero
derecho
i
Central
Ej.:
1
Se muestra el menú en
pantalla.
Cada vez que se pulsa el botón:
Menú 1 (Disco/Reproducción)
Menú 2 (Vídeo)
Menú 3 (Audi o)
Menú 4 (HDMI)
Salir
Ej.: Menú 1 (Disco/Reproducción)
[DVD-V]
2
3
4
Seleccione el elemento.
Ej.: Menú 1 (Disco/Reproducción)
OK
[DVD-V]
Haga los ajustes.
Pulse para salir.
Los elementos mostrados difieren según el tipo de disco.
∫ Menú 1 (Disco/Reproducción)
BÚSQUEDA PI STA
BÚSQUEDA TÍTULO
BÚSQUE.
CONTENIDO
BÚSQUEDA
CAPÍTULO
BÚSQUEDA PG
Utilización de los menús en pantalla
(
Búsqueda
Programada
BÚSQUEDA LR
Búsqueda
(
Lista de
Reproducción
AUDIO
RQTX0275
18
)
Para empezar desde un elemento específico
≥ [VCD] No funciona si se utiliza el control de
reproducción.
Ej.: [DVD-V] : T2 C5
Seleccionar números para discos de datos
Ej.: 123: [S10] ➜ [1] ➜ [2] ➜ [3] ➜ [OK]
)
[DVD-V] (con varias pistas de sonido)
Para seleccionar la pista de audio
[DVD-VR] [VCD]
Para seleccionar “IZDA”, “DCHA”, “I+D” o “I D”
[DVD-V] (Disco de Karaoke)
Para seleccionar “ENCEN.” o “APAGADO” para la voz
Para seleccionar “APAGADO”, “V1”, “V2” o
“V1+V2” para la selección de voces
Las operaciones reales dependen del disco. Lea
las instrucciones del disco para detalles.
Tipo de señal/datos
LPCM/PPCM/ D/DTS/MP3/MPEG: Tipo de
señal kHz (Frecuencia de muestreo)/bit/ch
(Número de canales)
VELOCIDAD
REPROD.
MODO
REPETICIÓN
SUBTÍTULO
ÁNGULO
[DVD-VR] [DVD-V]
Para cambiar la velocidad de reproducción
– de “k0.6” a “k1.4” (en unidades de 0,1)
≥ Pulse [1 PLAY] para volver a la reproducción
normal.
≥ Después de cambiar la velocidad
– No se activa Dolby Pro Logic II.
–
La salida de audio cambia al canal estéreo 2
– La frecuencia de muestreo de 96 kHz se
convierte en 48 kHz.
≥ Esta función puede no funcionar dependiendo
de la grabación del disco.
(➜ 16, Reproducción repetida)
A-B Repetir (Para repetir una sección
especificada
Excepto [JPEG] [DVD-VR] (La parte de la imagen
fija)
[VCD] (SVCD)
Pulse [OK] en los puntos de inicio y fin.
≥ Seleccione “APAGADO” para cancelar.
[DVD-V] (con múltiples subtítulos)
[VCD] (SVCD solamente)
)
Para seleccionar el idioma de los subtítulos
≥ En iR/iRW, puede verse un número de
subtítulo para los subtítulos que no se
muestran.
[DVD-VR] (con información de activación/
desactivación de subtítulos)
Para seleccionar “ENCEN.” o “APAGADO”
≥ Esto puede no funcionar dependiendo del disco .
[DVD-V] (con varios ángulos)
Para seleccionar el ángulo de un vídeo
.
Page 55

[JPEG] Para seleccionar “ENCEN.” o
JPG
DATE
PLII
HDMI --- INFORMACIÓN
ESTADO CONECTADO
CORRIENTE AUDIO
CANAL MÁXIMO
FORMA T O VÍDEO
ESPACIO COLOR
CONECTAR
PCM
2ch
720p
YCbCr 4:4:4
1
2
3
4
5
Ej.:
“APAGADO”
VISUALIZ.
en la visualización de la fecha de la imagen
FECHA
Para girar una imagen (durante la pausa)
[JPEG] : 0,------. 90,------.180,------.270
ROTA CIÓN
∫ Menú 2 (Vídeo)
NORMAL
CINE1:
CINE2:
MODO DE
IMAGEN
ZOOM
DINÁMICO:
ANIMACIÓN
Para seleccionar el tamaño del zoom
NORMAL, AUT OMATICO (
k
2, k4
≥ [JPEG]: durante la pausa
Si ha elegido “480p”/“720p”/“1080p” (progresiva)
o “1080i” (entrelazada)
[“FORMATO VÍDEO” en Menú 4 (HDMI)] o
“PROGRESIVO” en “SAL. VÍD (I/P)”
(➜ 21, Menú “VÍDEO”), seleccione el método de
conversión para la salida prog r esiva que sea
apropiado para el tipo de material.
≥ El ajuste vuelve a “AUTOMATICO1” cuando se
abre la bandeja del disco, se apaga el aparato o
se selecciona otra fuente.
AUTOMATICO1: Detecta automáticamente el
MODO
TRANSFER.
AUTOMATICO2: Además de la función
VÍDEO: Seleccione la opción si usa
∫ Menú 3 (Audio)
Para escuchar más fácilmente el diálogo de
las películas
[DVD-V] (Dolby Digital, DTS, 3 canales o superior,
POTEN. DIALOGO
Dolby PLII
con el diálogo grabado en el canal centra l)
APAGADO, ENCEN.
APAGADO, PELÍCULA, MÚSICA
(➜ 26, Uso de Dolby Pro Logic II)
^--------------------------------------------J
Suaviza las imágenes y realza los
detalles de las escenas oscuras.
Hace que las imágenes sean m ás
nítidas y realza los detalles de las
escenas oscuras.
Refuerza el contraste para conseguir
imágenes con más impacto
: Adecuado para animación.
[DVD-VR] [DVD-V] [VCD]
contenido de película y vídeo, y
lo convierte adecuadamente.
“AUTOMATICO1”, detecta
automáticamente el contenido
de película con distintas
velocidades de cuadro y lo
convierte adecuadamente.
“AUTOMATICO1” y
“AUTOMATICO2”, y el
contenido se ve distorsionado.
∫ Menú 4 (HDMI)
HDMI
ESTADO HDMI
POTENCIADOR
HD
.
FORMATO VÍDEO
),
ESPACIO COLOR
Confirmación de la información HDMI
Para mostrar información de HDMI.
(➜ abajo
,
Confirmación de la información HDMI)
Esto funciona cuando la conexión HDMI se está
utilizando con la opción “PRIORIDAD VÍDEO”
(➜ 22, Menú “HDMI”) ajust a da en “E N C EN.”.
Para ofrecer una calidad de imagen “720p”,
“1080i” y “1080p” más nítida
APAGADO, 1 (menos nítida) a 3 (más nítida)
Esto funciona cuando la conexión HDMI se está
utilizando con la opción “PRIORIDAD VÍDEO”
(➜ 22, Menú “HDMI”) ajust a da en “E N C EN.”.
Para seleccionar una calidad de imagen
adecuada al televisor
(Las grabaciones de vídeo se convierten a vídeo
de alta definición y se emiten así.)
§
480p/720p/1080p (progresiva)
§
480i/1080i (entrelazada)
≥ Si la imagen se ve distorsionada, mantenga
pulsado [CANCEL] hasta que se vea
correctamente. (La salida volv erá a “480p”).
§
Los números que aparecen dependen del disco
que se está reproduciendo. Se muestra uno de
los números anteriores.
Esto funciona cuando la conexión HDMI se está
utilizando con la opción “PRIORIDAD VÍDEO”
(➜ 22, Menú “HDMI”) ajust a da en “E N C EN.”.
Para seleccionar un color de imagen
adecuado al TV
bCr (4:2:2)
YC
– Los detalles de luminancia y color se envían
por separado. La mayoría de los detalles de
imagen están en luminancia. La intensidad del
color es mucho más alta que el vídeo
compuesto. Compatible para todos los
modelos de televisor.
YC
bCr (4:4:4)
– Se envían todos los detalles de color. Los
detalles de luminancia y color se hallan en la
misma señal.
RGB
– Tipo de vídeo componente de la señal.
≥ Si el antedicho ajuste no es compatible con su
televisor, él no se visualizará..
§
Los términos son las descripciones de los
formatos de muestra usados en el vídeo digital.
YC
de luminancia (Y), azul (C
§
§
bCr es una señal de vídeo para los detalles
b) y rojo (Cr).
Utilización de los menús en pantalla
1 Estado de conexión
2 Indica el tipo de señal de salida.
3 Indica el número de canales de audio.
4 (➜ arriba, FORMATO VÍDEO)
5 (➜ arriba, ESPACIO COLOR )
[Nota]
Si se selecciona “APAGADO” en “SALIDA AUDIO” (➜ 22, Menú “HDMI”),
“– – –” aparecerá en “CORRIENTE AUDIO”.
RQTX0275
19
Page 56

Cambio de los ajustes del reproductor
-
RETURN
—
SETUP
(mantenga
pulsado el botón)
AJUSTAR
PRINCIPAL
DISCO
VÍDEO
AUDIO
VISUALIZACIÓN
HDMI
OTROS
SALIR : SETUP
VOLVER
Menú
OK
AJUSTAR
VOLVER
DISCO
SALIR : SETUP
ES TADO AJUSTE
AUDIO
SUBTÍTULOS
MENÚS
ACCESO
CONTRASEÑA
INGLÉS
AUTOMATICO
INGLÉS
8 SIN LÍMITE
Muestra el ajuste actual de los
elementos siguientes
Elemento Ajuste
OK
OK
-
RETURN
—
SETUP
(mantenga
pulsado el botón)
12
4
7
-
CD
DISC
MODE
SKIP
TOP MENU
DIRECT
NAVIGATOR
MENU
FUNCTIONS
CANCEL SOUND
PLAY
LIST
TV
INPUT
5 6
8 9
0
—
W.SRD
OK
PL
-
—
SUBWOOFER
—
VOL
RADIO/
EXT-IN
3
ONE TOUCH PLAY
10
SLOW/SEARCH
PLAYPAUSESTOP
-
RETURN
—
-
FL DISPLAY
PLAY MODE
—
REPEAT
LEVEL
CH SELECT
DVD
iPod
VOL
START
OK
SETUP
-
RETURN/—SETUP
SLEEP
MUTE
1
Acceda al menú
Ajustes.
2
3
Seleccione el menú.
≥ Para volver a la panta lla ant erior,
pulse [-RETURN].
Seleccione el
elemento.
4
Haga los ajustes.
≥ Los ajustes permanecen intactos aunque se ponga la unidad en el
modo de espera.
≥ Los elementos subrayados en la tabla siguiente son los ajustes de
fábrica.
CONFIG. RÁPIDA permite hacer ajustes sucesivos de los elementos del área sombreada.
Cambio de los ajustes del reproductor
∫ Menú “DISCO ”
AUDIO
Elija el idioma de audio
SUBTÍTULOS
Elija el idioma de los subtítulos.
MENÚS
Elija el idioma para los menús del
disco.
Al cambiar el idioma del menú en
CONFIG. RÁPIDA también cambia
este ajuste.
ACCESO
Ajuste un nivel de calificación para
limitar la reproducción de
DVD-Vídeo.
CONTRASEÑA
Cambie la contraseña de “ACCESO”.
§1
Se selecciona el idioma original designado en el disco.
§2
Especifique el código correspondiente de la lista de códigos de idioma (➜ 23).
RQTX0275
§3
Si el idioma seleccionado para “AUDIO” no está disponible, aparecen subtítulos en ese idioma (si están disponibles en el disco).
20
5
≥ INGLÉS
≥ AUTOMATICO
≥ INGLÉS ≥ FRANCÉS ≥ ESPAÑOL ≥OTROS – – – –
≥ FRANCÉS ≥ ESPAÑOL ≥ ORIGINAL§1≥ OTROS – – – –
§3
≥ INGLÉS ≥ FRANCÉS ≥ ESPAÑOL ≥OTROS – – – –
Pulse para salir.
§2
§2
§2
Ajuste de calificaciones (Cuando se seleccione el nivel 8)
≥ 0 BLOQ. TODOS: Para impedir la reproducción de discos sin niveles de calificación.
≥ 1 a 7
≥ 8 SIN LÍMITE
Al ajustar el nivel de calificaciones, se muestra una pantalla de contraseña.
Siga las instrucciones de la pantalla.
No olvide su contraseña.
Aparecerá una pantalla con mensaje si se introduce en el aparato un disco DVD-Vídeo que sobrepase el
nivel de calificación.
Siga las instrucciones de la pantalla.
≥ AJUSTE
Modificar las calificaciones (Cuando se seleccione el nivel 0 a 7)
≥ CAMBIO: Siga las instrucciones de la pantalla.
Page 57

CONFIG. RÁPIDA permite hacer ajustes sucesivos de los elementos del área sombreada.
∫ Menú “VÍDEO ”
PANTALLA TV
Elija el ajuste adecuado a su televisor
y a sus preferencias.
TIPO TELEVISOR
Haga la sección adecuada al tipo de
su televisor.
RETRASO
Si conecta el aparato a una pantalla
de plasma, ajuste esta opción si nota
que el audio no está sincronizado con
el vídeo.
MODO IM. FIJA
Especifique el tipo de imagen que se
va a mostrar cuando se haga una
pausa.
NIVEL DEL NEGRO
Cambia el nivel de negro de la
imagen.
SAL. VÍD (I/P)
Seleccione “PROGRESIVO” sólo si el
aparato está conectado a un televisor
compatible con la salida progresiva.
≥ 4:3PAN&SCAN: TV de aspecto normal (4:3)
Los lados de la imagen de pantalla panorámica se cortan para poder caber en la
pantalla (a menos que lo prohíba el disco).
≥ 4:3LETTERBOX: TV de aspecto normal (4:3)
La imagen de la pantalla panorámica se muestra en el estilo de buzón.
≥ 4:3ZOOM: TV de aspecto normal (4:3)
La imagen se acerca y se aleja.
≥ 16:9NORMAL: Widescreen TV (16:9)
Alarga lateralmente las imágenes.
≥ 16:9SHRINK: Widescreen TV (16:9)
Las imágenes aparecen en el centro de la pantalla.
≥ 16:9ZOOM: Widescreen TV (16:9)
Expande la relación de aspecto a 4:3.
≥ ESTÁNDAR ≥CRT ≥LCD
≥ PROYECCIÓN ≥PLASMA
AUTOMATICO ≥20 ms ≥ 40 ms ≥60 ms ≥ 80 ms ≥ 100 ms
≥ 0 ms/
Si se utiliza VIERA Link “HDAVI Control” con un televisor compatible con “HDAVI Control 3” (➜ 24),
seleccione “0 ms/AUTOMATICO”. El audio y el vídeo se sincronizarán automáticamente.
≥ AUTOMATICO
≥ CAMPO§4: La imagen no está borrosa, pero la calidad de la misma es inferior.
≥ CUADRO
≥ MÁS CLARO
≥ MÁS OSCURO
≥ ENTRELAZADO
≥ PROGRESIVO: Aparecerá una pantalla con mensajes. Siga las instrucciones de la pantalla.
§4
:
La calidad general es alta, pero la imagen puede aparecer borrosa.
∫ Menú “AUDIO”
§
DOLBY DIGITAL
§
5
DTS
5
GAMA DINÁMICA
AJUSTES ALTAVOZ
Configure los ajustes de los altavoces.
§4
Consulte “Cuadro fijo y campo fijo” (➜ 5, Glosario).
§5
Cuando se emite audio por el terminal HDMI AV OUT y el equipo conectado no es compatible con el elemento seleccionado, el audio emitido
realmente dependerá del rendimiento del equipo conectado.
≥ BITSTREAM
≥ PCM
≥ BITSTREAM
≥ PCM
≥ ENCEN.:
≥ APAG.
≥ CONFIGURACIÓN:
Aumenta la claridad incluso a un volumen bajo. Útil para ver la televisión a altas horas de la noche.
(Solamente funciona con Dolby Digital)
≥ RETRASO C: 0ms
Seleccione el tiempo de retraso del altavoz central (➜ 23, Selección del tiempo de retraso de los
altavoces).
≥ RET ARDO SL/SR: 0ms
Seleccione el tiempo de retraso de los altav oces d e sonido en volv ente ( ➜ 23, Selección del tiemp o de
retraso de los altavoces).
≥SEÑAL DE PRUEBA: AJUSTE
Utilice el tono de prueba para realizar los ajustes de nivel de los altavoces (➜ 27, Ajuste del nivel de
los altavoces).
≥CENTRAL, SURROUND DRCH., SURROUND IZQ.: `6dB a i6 dB (Ajuste de fábrica: 0 dB
Seleccione la opción que se adecue al tipo de equipo que haya conectado al
terminal HDMI AV OUT.
Seleccione “BITSTREAM” si el equipo puede descodificar el flujo de bits (f orma
digital de los datos de 5.1 canales). En caso contrario, seleccione “PCM”.
(Si el flujo de bits se emite al equipo sin decodificar , pue den pr oducirse n iveles
altos de ruido que pueden dañar los altavoces y el oído.)
, 1ms, 2ms, 3ms, 4ms, 5ms
, 5ms, 10ms, 15ms
(Continúa en la página siguiente)
Cambio de los ajustes del reproductor
)
RQTX0275
21
Page 58

Cambio de los ajustes del reproductor
CONFIG. RÁPIDA permite hacer ajustes sucesivos de los elementos del área sombreada.
∫ Menú “VISUALIZACIÓN ”
IDIOMA
Seleccione el idioma de los mensajes
en pantalla.
∫ Menú “HDMI ”
PRIORIDAD VÍDEO
SALIDA AUDIO
GAMA RGB
Esto sólo funciona cuando “ESPACIO
COLOR” del Menú 4 (HDMI) se ajusta
a RGB (➜ 19).
VIERA Link
∫ Menú “OTROS ”
TIEMPO JPEG
Ajuste la velocidad de la presentación
de imágenes.
Ajuste de fábrica: 3 SEG
REGUL. FLUOR.
Cambia el brillo del display del aparato .
CONFIG. RÁPIDA
DVD-VR/DATOS
Seleccione estas opciones para
reproducir sólo archivos de formato
DVD-VR o DATOS.
faltar
Devuelve todos los valores del menú
PRINCIPAL a los ajustes
predeterminados.
Cambio de los ajustes del reproductor
≥ ENGLISH ≥ FRANÇAIS ≥ ESPAÑOL
≥ ENCEN.:Si utiliza el terminal HDMI AV OUT para la salida de vídeo. La resolución de la salida de vídeo
≥ AP AG.: Si no utiliza el terminal HDMI AV OUT para la salida de vídeo. La salida de vídeo no depende
≥ ENCEN.:Si el audio se emite mediante el terminal HDMI AV OUT. (En función de las capacidades del
≥ APAG.
≥ NORMAL
≥ AUMENTAR: Cuando las imágenes en blanco y negro no se diferencian bien.
≥ ENCEN.: La función
≥ APAG.
≥ De 1 SEG a 15 SEG (en unidades de 1)
≥ De 15 SEG a 60 SEG (en unidades de 5)
≥ De 60 SEG a 180 SEG (en unidades de 30)
≥ BRILLANTE ≥TENUE
≥ AUTOMATICO: El display pierde intensidad, pero la recupera cuando usted hace algunas operaciones.
≥ AJUSTAR
≥ DVD-VR
≥ DATOS: Para reproducir los archivos de datos en DVD-RAM o DVD-R/-RW.
≥ REINICIAR
del terminal HDMI AV OUT se optimiza según la capacidad del equipo conectado (Ej.: TV).
del equipo conectado, sino de esta unidad.
equipo conectado, la salida de audio puede diferir de los ajustes de audio del aparato principal.)
: Si el audio no se emite mediante el terminal HDMI AV OUT. (El audio se emite según los ajustes
del aparato principal.)
VIERA Link “HDAVI ControlTM”
Siga las instrucciones de la pantalla.
: Para reproducir los programas de vídeo en DVD-RAM o DVD-R/-RW.
Se muestra la pantalla de contraseña si se ajusta “ACCESO” (➜ 20). Introduzca la misma contraseña,
apague el aparato y vuelva a encenderlo.
está disponible (➜ 24).
22
RQTX0275
Page 59

Selección del tiempo de retraso de los altavoces
L
LS
R
SW
C
RS
C
RS
LS
b ca
a
b
c
Dimensiones aproximadas de la habitación
Círculo de distancia de escucha primaria constante
: Posición real de los altavoces
: Posición ideal de los altavoces
: Distancia de escucha primaria
Abkhazio: 6566
Afar: 6565
Afrikaans: 6570
Aimara: 6589
Albanés: 8381
Alemán: 6869
Amharico: 6577
Árabe: 6582
Armenio: 7289
Asamés: 6583
Azerbaiyano: 6590
Bashkirio: 6665
Bengalí: 6678
Bielorruso: 6669
Bihari: 6672
Birmano: 7789
Bretón: 6682
Búlgaro: 6671
Butanés: 6890
Cachemiro: 7583
Camboyano: 7577
Catalán: 6765
Checo: 6783
Chino: 9072
Coreano: 7579
Corso: 6779
Croata: 7282
Danés: 6865
Eslovaco: 8375
Esloveno: 8376
Español: 6983
Esperanto: 6979
Estonio: 6984
Faroés: 7079
Finés: 7073
Fiyano: 7074
Francés: 7082
Frisón: 7089
Gaélico: 7168
Galés: 6789
Gallego: 7176
Georgiano: 7565
Griego: 6976
Groenlandés: 7576
Guaraní: 7178
Gujarati: 7185
Hausa: 7265
Hebreo: 7387
Hindi: 7273
Holandés: 7876
Húngaro: 7285
Indonesio: 7378
Inglés: 6978
Interlingua: 7365
Irlandés: 7165
Islandés: 7383
Italiano: 7384
Japonés: 7465
Javanés: 7487
Kannada: 7578
Kazajstano: 7575
Kirguiz: 7589
Kurdo: 7585
Laosiano: 7679
Latín: 7665
Letón: 7686
Lingala: 7678
Lituano: 7684
Macedonio: 7775
Malagasio: 7771
Malayalam: 7776
Malayo: 7783
Maltés: 7784
Maorí: 7773
Marathí: 7782
Moldavo: 7779
Mongol: 7778
Naurano: 7865
Nepalí: 7869
Noruego: 7879
Oriya: 7982
Pashto: 8083
Persa: 7065
Polaco: 8076
Portugués: 8084
Punjabi: 8065
Quechua: 8185
Romance: 8277
Rumano: 8279
Ruso: 8285
Samoano: 8377
Sánscrito: 8365
Serbio: 8382
Serbocroata: 8372
Shona: 8378
Sindhi: 8368
Singalés: 8373
Somalí: 8379
Suajili: 8387
Sudanés: 8385
Sueco: 8386
Tagalo: 8476
Tailandés: 8472
Tamil: 8465
Tártaro: 8484
Tayiko: 8471
Telugu: 8469
Tibetano: 6679
Tigrinia: 8473
Tonga: 8479
Turcomano: 8482
T
urkmenio: 8475
Twi: 8487
Ucraniano: 8575
Urdu: 8582
Uzbeko: 8590
Vasco: 6985
Vietnamita: 8673
Volapük: 8679
Wolof: 8779
Xhosa: 8872
Yídish: 7473
Yoruba: 8979
Zulú: 9085
(Efectivo al reproducir sonido de 5.1 canales)
(Altavoces central y de sonido envolvente)
Para escuchar de forma óptima el sonido de 5.1 canales, todos los
altavoces, a e xcepción del subwoofer, deberán estar a la misma distancia
de la posición de escucha.
Si tiene que colocar el altavoz central o los altavoces de sonido
envolvente más cerca de la posición de escucha, ajust e el tiempo de
retraso para compensar la diferencia.
Si la distancia a o b es inferior a c, busque la diferencia en la tabla y
realice el ajuste recomendado.
Lista de códigos de idiomas
a Altavoz central b Altavoces de sonido
envolvente
Diferencia (Aprox.) Ajuste Diferencia (Aprox.) Ajuste
30 cm (1 pie) 1ms 150 cm (5 pies) 5ms
60 cm (2 pies) 2ms 300 cm (10 pies) 10ms
90 cm (3 pies) 3ms 450 cm (15 pies) 15ms
120 cm (4 pies) 4ms
150 cm (5 pies) 5ms
Para realizar el ajuste del tiempo de retraso
Seleccione “RETRASO C” (Retraso del altavoz central) or “RETARDO
SL/SR” (Retraso del altavoz envolvente izquierdo/altavoz envolvente
derecho) en “AJUSTES ALTAVOZ” el Menú “AUDIO”
(➜ 21).
Cambio de los ajustes del reproductor
RQTX0275
23
Page 60

Uso de VIERA LinkTM “HDAVI ControlTM”
—
SLEEP
—
REPEAT
-
FL DISPLAY
-
PLAY MODE
VOL
OK
MUTE
SUBWOOFER
—
CH SELECT
FUNCTIONS
CANCEL SOUND
LEVEL
TOP MENU
MENU
DIRECT
NAVIGATOR
START
PLAY
LIST
-
RETURN
—
SETUP
SLOW/SEARCH
PLAYPAUSESTOP
SKIP
-
CD
MODE
12
3
4
5 6
7
8 9
0
10
ONE TOUCH PLAY
RADIO/
EXT-IN
INPUT
VOL
iPod
TV
DVD
—
W.SRD
PL
DISC
—
SETUP
SKIP
RADIO/EXT-IN
ONE TOUCH PLAY
SLOW/SEARCH
PLAY
∫ Configuración automática
∫ Sincronía labial automática
”
TM
Los ajustes “PANTALLA TV”§1 (➜ 21, Menú “VÍDEO”) y “IDIOMA”§2
(➜ 22, Menú “VISUALIZACIÓN”) siguen automáticamente a los
ajustes del televisor.
(Esto puede no funcionar si el ajuste correspondiente seleccionado
para el televisor no está disponible en este aparato.)
§1
Si se utiliza VIERA Link “HDAVI Control” con un televisor
compatible con “HDAVI Control 3”
§2
Si se utiliza VIERA Link “HDAVI Control” con un televisor
compatible con “HDAVIControl 2 (o posterior)”
(Disponible al utilizar “HDAVI Control” de VIERA Link con un
televisor compatible con “HDAVI Control 3”)
Esta función ofrece automáticamente una salida de vídeo y audio
sincronizados. (Esto funciona sólo cuando la fuente es “DVD/CD”,
AUX
” o “D-IN”.)
“
≥Si utiliza “DVD/CD” como fuente, ajuste “RETRASO” en el Menú
“VÍDEO” a “0 ms/AUTOMATICO” (➜ 21).
“HDAVI Control
TM
VIERA Link “HDA VI Control”
VIERA Link
VIERA Link “HDAVI Control” es una práctica función que ofrece
operaciones vinculadas de este aparato y un tele visor Panasonic (VI ERA)
Uso de VIERA Link
en “HDAVI Control”. Puede utilizar esta función conectando el equi po co n
el cable HDMI. Consulte las instrucciones de funcionamiento del equipo
conectado para obtener más información sobre el funcionamiento.
≥ VIERA Link “HDAVI Control”, basada en las funciones de control
provistas por HDMI, una norma industrial conocida como HDMI CEC
(control electrónico de consumidores), es una función única que
nosotros hemos desarrollado y agregado. Como tal, su funcionamiento
con equipos de otros fabricantes que soportan HDMI CEC no puede ser
garantizado.
≥ Este aparato es compatible con la función “HDAVI Control3”.
“HDAVI Control 3” es la norma más reciente (en diciembre de 2007)
para el equipo compatible con HDAVI Control de Panasonic. Esta
norma es compatible con el equipo HDAVI convencional de Panasonic.
≥ Consulte los manuales individuales para los equipos de otros
TM
est a novus nomen pro EZ SyncTM.
fabricantes que sean compatibles con la función VIERA Link.
El televisor con función “HDAVI Control 2 (o posterior)” permite el
siguiente funcionamiento: VIERA Link Control sólo con el mando a
distancia del televisor [para “ HDAVI Control2 (o posterior)”] (➜ 25).
Preparación
≥ Confirme que se haya realizado la conexión HDMI (➜ 7).
Ajuste
“VIERA Link” a “ENCEN.” (➜ 22, Menú “HDMI”).
≥
≥ Para completar y activar cor rectament e la conexión, encienda todos los
equipos compatibles con VIERA Link “HDAVI Control” y ponga el
televisor en el modo de entrada HDMI correspondiente para este
equipo.
Ajuste del audio de TV para VIERA Link “HDAVI Control”
Seleccione “AUX” o “D-IN” para utilizar las operaciones vinculadas.
Confirme la conexión de audio al terminal AUX (para “AUX”) (➜ 7) o al
terminal OPTICAL IN (para “D-IN”) (➜ 8).
1 Pulse [RADIO/EXT-IN] para seleccionar “
2 Mantenga pulsado el botón [—SETUP] para seleccionar “TV AUDIO”,
después pulse [3, 4] para cambiar a “
Siempre que se modifiquen las conexiones o los ajustes, vuelva a
confirmar los puntos an t eriores.
§
“AUX” y “D-IN” (“DIGITAL IN”) funcionan dependiendo del ajuste de
“TV AUDIO” (➜ arriba, Ajuste del audio de TV para VIERA Link
“HDAVI Control”).
RQTX0275
AUX
AUX
” o “D-IN”.
” o “D-IN”.
24
Reproducción con un solo botón
Se puede encender el aparato y el televisor, y empezar a reproducir un
disco con sólo pulsar un botón.
ONE TOUCH PLAY
Esta función también se activa al pulsar [1 PLAY] en el mando a
distancia del aparato cuando se encuentra en modo de espera.
[Nota]
Puede que la reproducción no se muestre inmediatamente en el tele visor .
Si no llega a ver la parte inicial de la reproducción, pulse [:] o [6]
Para iniciar la reproducción del disco.
≥ Los altavoces de la unidad se activarán
automáticamente (➜ 25).
para volver al punto en el que empiece la reproducción.
Cambio automático de entrada
≥ Si cambia la entrada del televisor al modo de sintonizador del televisor,
este aparato cambiará automáticamente a
funciona cuando el aparato se encuentra en el modo “IPOD”.)
≥ Cuando inicie la reproducción del disco, el televisor cambiará
automáticamente su modo de entrada para este aparato.
“AUX”§ o “D-IN”§. (Esto no
Apagado vinculado
Al iniciarse la reproducción del disco, el televisor cambiará
automáticamente el modo de entrada en el aparato.
≥ Esta función sólo funciona cuando se selecciona “DVD/CD”,
§
“D-IN”
como fuente en este aparato.
[Nota]
Cuando se pulsa [Í], sólo se apaga este aparato. Los demás equipos
compatibles con VIERA Link “HDAVI Control” que estén conectados se
quedan encendidos.
“AUX”§ o
Page 61

Control de los altavoces VIERA Link Control sólo con el mando a
DVD/CD Cine para cas a
OK
VOLVER
Seleccionar entrada
Reproducir disco
TOP MENU (DVD)
MENU (DVD)
Reproducción/
acceso a los
menús
BUSCAR
VOLVER
BUSCAR
REPROD.
PAUSA
PARADA
Es posible seleccionar si el audio se emite por los altavoces de este
aparato o por los del televisor utilizando los ajustes del menú del
televisor. Para obtener más información, consulte las instrucciones de
funcionamiento del televisor.
Teatro en casa
Los altavoces del aparato están activos.
≥ Si el aparato está en modo de espera, al cambiar de los altavoces del
televisor a los del aparato en el menú del televisor, se enciende
automáticamente y se selecciona “AUX”
≥ El sonido de los altavoces del televisor se desactiva automáticamente.
≥ El ajuste del volumen se puede controlar utilizando el botón de vol umen
o de desactivación del sonido en el mando a distancia del televisor. (El
nivel de volumen se muestra en el display FL del aparato principal.)
≥ Para cancelar la desactivación del sonido, también puede utilizar el
mando a distancia del aparato (➜ 12).
≥ Si apaga este aparato, se activarán automáticamente los altavoces del
televisor.
§
o “D-IN”§ como fuente.
TV
Los altavoces del televisor están activos.
≥ El volumen del aparato se ajusta a “0”.
– Esta función sólo funciona cuando se selecciona “DVD/CD”, “AUX”
§
como fuente en este aparato.
o “D-IN”
≥ El audio se emite por dos canales.
Al cambiar de los altavoces del apara to a los del televisor, puede que la
pantalla del televisor se quede en blanco unos segundos.
distancia del televisor [para
“HDAVI Control 2 (o post er i or) ”]
Se pueden controlar los menús de reproducción del aparato con el
mando a distancia del televisor. Si utiliza el mando a distancia del
televisor, consulte la ilustración de abajo para saber qué botones debe
utilizar.
1 Seleccione el menú de manejo del aparato mediante los ajustes del
menú del televisor.
(Para obtener más inf ormación, consulte las instrucciones de
funcionamiento del televisor.)
Aparecerá el menú START.
Ej.: [DVD-V]
§
≥El menú START también se puede mostrar pulsando un botón del
mando a distancia del televisor (Ej.: [SUB MENU]).
– Cuando “
– Esto no funciona cuando la pantalla de visualización de música
2 Seleccione el elemento que desee en el menú START (➜ 13).
Si se muestra el panel de control en pantalla
Ej.: [DVD-V] (si “Reproducir disco” está seleccionado desde el menú
START.)
DVD/CD
” estén seleccionada como fuente, esto sólo
funciona durante el modo de parada.
del iPod se muestre en el televisor.
”
TM
“HDAVI Control
TM
Uso de VIERA Link
Puede controlar la reproducción con los controles indicados.
≥ El panel de control también se puede mostrar en pantalla pulsando un
botón del mando a distancia del televisor (Ej.: [SUB MENU]).
– Esto sólo funciona durante los modos de reproducción de “
de reanudación o cuando la pantalla de reproducción de música del
iPod se muestre en el televisor.
DVD/CD
[Nota]
≥ Dependiendo del menú, algunas operaciones con botones no se
pueden realizar desde el mando a distancia del televisor.
≥ No se pueden introducir números con los botones numerados del
mando a distancia (de [0] a [9]). Utilice el mando a distancia del apar ato
para seleccionar la lista de reproducción, etc.
” y
RQTX0275
25
Page 62

Uso de efectos de sonido
—
SLEEP
—
REPEAT
-
FL DISPLAY
-
PLAY MODE
VOL
OK
MUTE
SUBWOOFER
—
CH SELECT
FUNCTIONS
CANCEL SOUND
TOP MENU
MENU
DIRECT
NAVIGATOR
START
PLAY
LIST
-
RETURN
—
SETUP
SLOW/SEARCH
PLAYPAUSESTOP
SKIP
-
CD
MODE
12
3
4
5 6
7
8 9
0
10
ONE TOUCH PLAY
RADIO/
EXT-IN
INPUT
VOL
iPod
TV
DVD
—
W.SRD
PL
DISC
OK
SOUND,
—
W.SRD
SUBWOOFER LEVEL
—
CH SELECT
PLII
LEVEL
—
SETUP
+, VOL
SOUND
—
W.SRD
PL
PL
—
Uso de efectos de sonido
[Nota]
≥ Puede que los siguientes efectos de sonido no estén disponibles o no
se activen con algunas fuentes o cuando se utilicen auriculares (➜ 13).
≥ Cuando estos efectos de sonido se utili za n con algunas f uen tes, puede
que experimente una reducción en la calidad del sonido. Si pasa esto,
desactive los efectos de sonido.
Preparación
Para ver la imagen, encie nda el tele visor y seleccione el modo de entr ada
de vídeo adecuado.
Ajuste de los efectos de sonido
1
Mientras se
2
26
muestra el modo
seleccionado
∫ Ecualizador
RQTX0275
Se pueden seleccionar los ajustes de la calidad del sonido.
Cada vez que se pulsa [3, 4]:
FUERTE: Añade fuerza a la música rock.
CLARO: Aclara los sonidos más altos.
SUAVE: Para música de fondo.
PLANO: Cancelación (no se añade efecto).
SW BOOST
Seleccione un modo de sonido.
Cada vez que se pulsa el botón:
EQ: Ecualizador
R.C. FCS: Enfoque central real
SRD ENH:Potenciador de sonido envolvente
S.MUSIC: Sonido Envolvente
Realice los ajustes.
Consulte los apartados siguientes para
obtener más información de cada efecto de
sonido.
∫ Enfoque central real
(Efectivo cuando se reproduce audio que contiene sonido del
canal central o cuando está activado Dolby Pro Logic II).
Con este ajuste, parece que el sonido del altavoz central sale del
interior del televisor.
R.C.FCS ON,------.R.C.FCS OFF
∫ Potenciador de sonido envolvente
Ajusta de forma automática cada altavoz par a potenciar el ef ecto de
sonido envolvente del audio de 5.1 canales. Al reproducir audio de
dos canales, el audio de los altav oces delanteros izquierdo y
derecho también se emite por el resto de los altavoces para crear
un efecto de sonido envolvente.
SRD ENH ON,------.SRD ENH OFF
∫ Sonido envolvente
El sonido procediendo de todas las direcciones llena la habitación
con igual intensidad.
S.MUSIC ON,------.S.MUSIC OFF
Uso de Dolby Pro Logic II
Dolby Pro Logic II es un decodificador av a nzado que extrae 5 canales de
sonido envolvente de fuentes de sonido estéreo, tanto si se han
codificado con Dolby Surround como si no.
Cada vez que se pulsa el botón:
PELÍCULA:Fuentes de vídeo
MÚSICA: Fuentes de
APAGADO:Cancelación
≥ “PLII” se enciende cuando se aplica el efecto.
≥ No funciona cuando el audio se emite desde un terminal HDMI A V OUT.
≥ Puede ajustar el volumen de los altavoces de sonido envolvente para
obtener el mejor efecto ambiental (➜ 27, Ajuste del nivel de los
altavoces).
Uso de modo Whisper Surround
Se puede potenciar el efecto de sonido envolvente para el sonido de 5.1
canales de bajo volumen.
(Útil para ver la televisión a altas horas de la noche.)
SOUND
W.SRD
(mantenga
pulsado el botón)
≥ “(( ))” se enciende cuando
se aplica el efecto.
Cada vez que se mantiene pulsado el botón:
WHISPER-MODE SRD ON
WHISPER-MODE SRD OFF
sonido estéreo
↕
Page 63

Ajuste del nivel de subwoofer
OK
Ej.:
AJUSTAR
VOLVER
AUDIO - AJUSTES ALTAVOZ - SEÑAL DE PRUEBA
ALTAVO Z
IZQUIERDO
CENTRAL
DERECHO
SURROUND DRCH.
SURROUND IZQ.
NIVEL AJUS.
− −
0dB
− −
0dB
0dB
SALIR : SETUP
OK
VOL
TOP MENU
MENU
DIRECT
NAVIGATOR
START
PLAY
LIST
-
RETURN
—
SETUP
SLOW/SEARCH
PLAYPAUSESTOP
SKIP
-
CD
MODE
12
3
4
5 6
7
8 9
0
10
ONE TOUCH PLAY
RADIO/
EXT-IN
INPUT
iPod
DISC
,
RADIO/EXT-IN
OK
OK
,
Botones
numerados
SELECTOR
TUNE
MEMORY
-TUNE MODE
Se puede ajustar la cantidad de graves. Este aparato selecciona
automáticamente el ajuste más adecuado en función del tipo de fuente
que se reproduzca.
SUBWOOFER
LEVEL
-
CH SELECT
SUB W 1#SUB W 2#SUB W 3
^-------------------------------------------}
≥ Para comprobar el ajuste actual, pulse [SUBWOOFER LEVEL].
≥ El ajuste configurado se conserva y se utiliza cada vez que se
reproduce el mismo tipo de fuente.
Uso de Subwoofer Boost
Sólo el aparato princip a l
Se puede potenciar el efecto de subwoofer reforzando los graves.
SW BOOST
SW
BOOST
BST ON,------.BST OFF
indicador
El indicador SW BOOST se enciende cuando
Subwoofer Boost está activado.
Gozar de la radio FM/AM
Sintonización manual
Ajuste del nivel de los altavoces
Se pueden ajustar los niveles de sonido envolvente.
Preparación
≥ Pulse [i, ` VOL] para ajustar el volumen al nivel de audición normal.
≥ Seleccione “SEÑAL DE PRUEBA” en “AJUSTES ALTAVOZ” e n el Menú
“AUDIO” (➜ 21).
1
2
Acceda al modo de tono de prueba.
El tono de prueba se emitirá por cada uno de
los canales en el orden siguiente.
IZQUIERDO, CENTRAL, DERECHO,
SURROUND DRCH., SURROUND IZQ.
Ajuste el nivel de cada uno de los
altavoces. (CENTRAL, SURROUND
DRCH., SURROUND IZQ.)
`
6dB a i6dB
≥ Para salir de la pantalla, mantenga pulsado
el botón [—SETUP].
∫ Para ajustar el nivel de los altavoces
durante la reproducción
(Efectivo cuando se reprodu ce sonido de 5.1 canales o cuand o está
activado Dolby Pro Logic II.)
1 Mantenga pulsado [—CH SELECT] para seleccionar el
altavoz.
Mientras se muestra el canal del altavoz, pulse [—CH SELECT].
L #C #R #RS #LS #SW
^---------------------------------------------}
≥Sólo se puede ajustar el SW (Subwoofer) si el disco incluy e u n
2 Puls e [3] (aumento) o [4] (disminución) para ajustar el
nivel de cada altavoz.
C, RS, LS, SW: `6dB a i6dB
(L, R: Sólo se puede ajustar el balance.)
Para ajustar el balance de los altavoces delanteros, con “L” o “R”
seleccionado, pulse [2,1].
canal de subwoofer y “ PLII” no se enciende .
1
RADIO/
EXT-IN
2
Seleccione “FM” o “AM”.
≥ Aparato principal:
Pulse [SELECTOR].
Seleccione la frecuencia.
≥ Aparato principal:
Pulse primero [-TUNE MODE]
seleccionar
luego pulse
la frecuencia.
≥ Para iniciar la sintonización automática,
mantenga pulsado [6, 5] (aparato
principal: [X TUNE W]) hasta que
empiece a desplazarse la frecuencia. La
sintonización se detiene cuando se
encuentra una emisora.
“MANUAL” en la pantalla,
[X TUNE W]
para
para seleccionar
y
∫ Presintonización manual de emisoras
Es posible sintonizar hasta 30 estaciones en cada banda, FM y AM.
1 Mientras se escucha la emisión de radio
Pulse [OK].
2 Mientras la frecuencia parpadea en el display
Pulse los botones numerados para seleccionar un canal.
≥ Para seleccionar un
número de 2 dígitos
Ej.: 12: [S10] ➜ [1] ➜ [2]
También puede pulsar [X, W], y luego [OK].
Aparato principal:
1 Mientras se escucha la emisión de radio
Pulse [MEMORY] dos veces.
2 Mientras la frecuencia parpadea en el display
Pulse [X TUNE W], y luego pulse [MEMORY].
Una emisora que se haya guardado con anterioridad se
sobrescribirá si en la misma presintonización de canal se guarda
otra emisora.
Intervalo de frecuencia FM
Sólo aparato principa l
El intervalo fue ajustado en fábrica a 0,2-MHz, pero puede cambiarlo
para recibir emisiones asignada en intervalos de 0,1-MHz.
1 Pulse [SELECTOR] para seleccionar “FM”.
2 Mantenga pulsado [SELECTOR].
Después de algunos segundos la visualización cambia para mostrar la
frecuencia mínima actual. Siga manteniendo pulsado el botón. Va a
cambiar la frecuencia mínima junto con el intervalo.
Para volver al intervalo original, repita los pasos 1 y 2.
[Nota]
Luego de cambiar los ajustes, las frecuencias ajustadas anteriormente se
anularán. Preajústelas de nuevo.
Uso de efectos de sonido / Gozar de la radio FM/AM
RQTX0275
27
Page 64
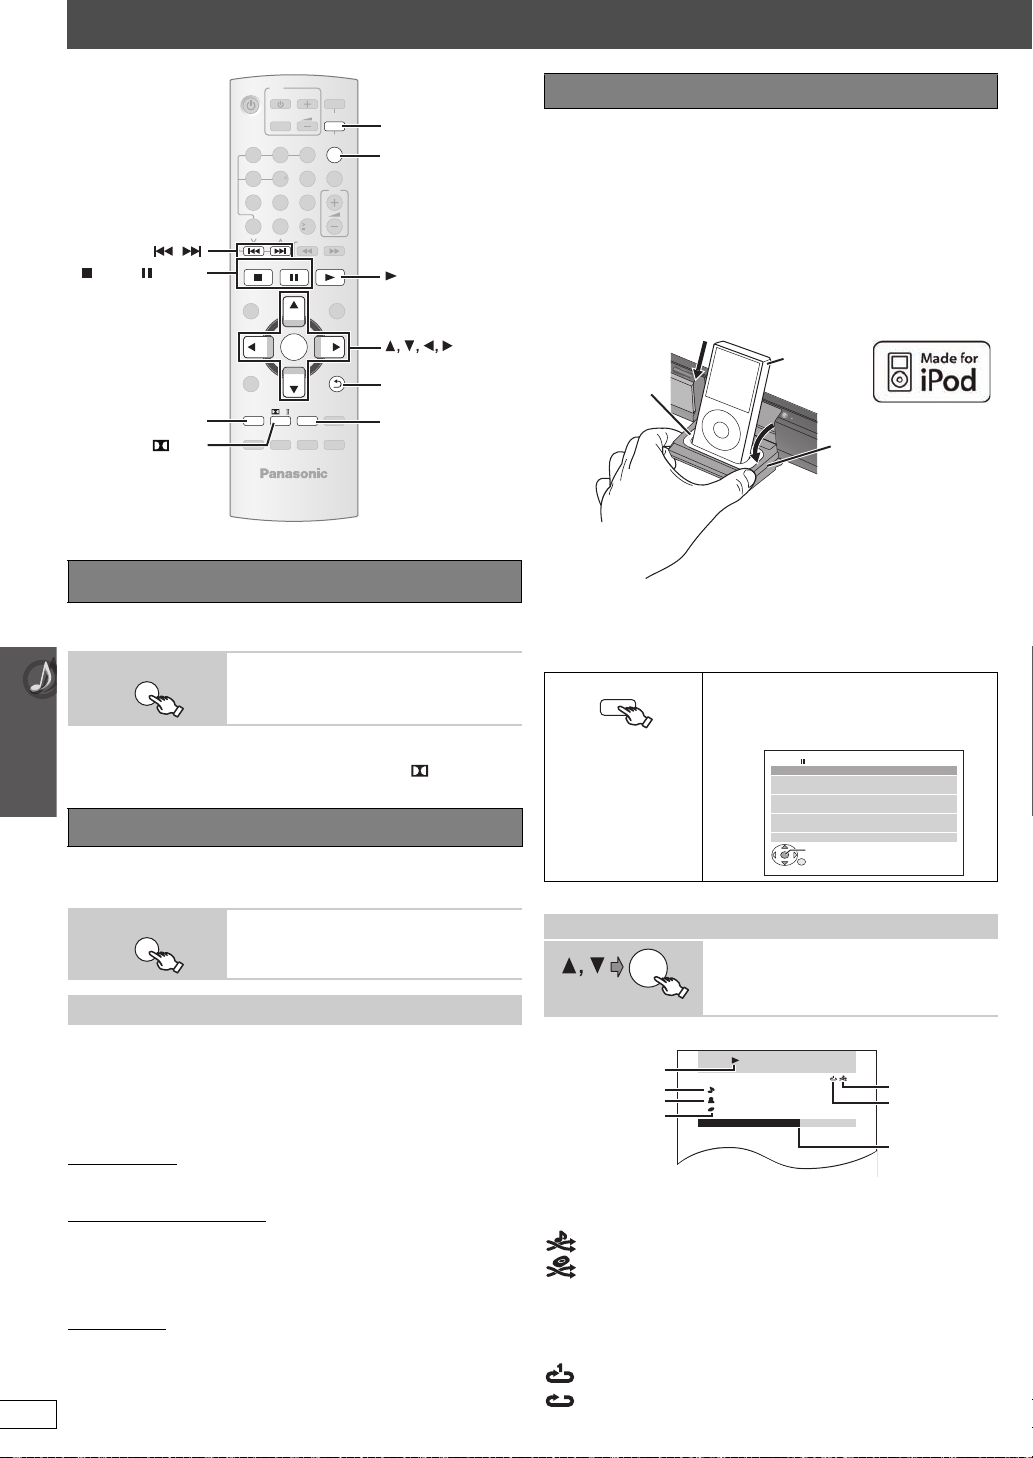
Control de otro equipo
,
—
SLEEP
—
REPEAT
-
FL DISPLAY
-
PLAY MODE
VOL
OK
MUTE
SUBWOOFER
—
CH SELECT
FUNCTIONS
CANCEL SOUND
LEVEL
TOP MENU
MENU
DIRECT
NAVIGATOR
START
PLAY
LIST
SLOW/SEARCH
PLAYPAUSESTOP
SKIP
-
CD
MODE
12
3
4
5 6
7
8 9
0
10
ONE TOUCH PLAY
RADIO/
EXT-IN
INPUT
VOL
iPod
TV
DVD
—
W.SRD
PL
DISC
-
RETURN/—SETUP
RADIO/EXT-IN
PLAY
STOP, PAUSE
PLII
iPod
OK
FUNCTIONS
-
PLAY MODE
—
REPEAT
-
RETURN
—
SETUP
RADIO/
EXT-IN
RADIO/
EXT-IN
Aparato principal
iPod
Base de iPod
Ej.:
Adaptadores
de puerto
(no incluido)
iPod
RETURN
iPod Cine para casa
Good morning
Ronaldo
Happy days
3 de 20
2:43 -1:15
Ej.:
Modo aleatorio
§1
Modo de
repetición
§2
Posición actual
Canción
Intérprete
Álbum
Estado de
reproducción
: Reproducción aleatoria de canciones
: Reproducción aleatoria de álbumes
Apagar: Cancelación
: Repetición de una canción
: Repetición de todas las pistas
Apagar: Cancelación
Es posible reproducir una fuente externa mediante el sistema de cine en ca sa.
Uso del iPod
Preparación
≥ Para ver fotografías o vídeos desde un iPod.
– Compruebe que se haya realizado la conexión de terminal VIDEO
OUT en este aparato
– Utilíce el menú iPod para hacer los ajustes de salida de foto/vídeo
apropiados para su televisor. (Consulte las instrucciones de
funcionamiento del iPod.)
≥ Para ver la imagen, encienda el televisor y seleccione el modo de
entrada de vídeo adecuado.
≥ Antes de conectar/desconectar el iPod, apague el aparato o reducir el
volumen al mínimo.
Conecte el iPod (no incluido) firmemente.
La recarga se inicia cuando se inserta el iPod.
(
➜ 7).
Reproducción del audio del televisor
Preparación
Control de otro equipo
Confirme la conexión de audio al terminal AUX del aparato principal (➜ 7).
≥ Baje el volumen del televisor al mínimo y ajuste el volumen del aparato
principal.
≥ Para disfrutar del efecto de so nido envolvente, pulse [ PLII] para
activar el Dolby Pro Logic II (➜ 26).
Uso del audio digital
Preparación
Confirme la conexión de audio al terminal OPTICAL IN del aparato
principal (➜ 8).
Ajustes de entrada del audio digital
Seleccione la opción que se adecue al tipo de audio del terminal
OPTICAL IN en el aparato principal.
1 En modo “D-IN”
Mantenga pulsado [—SETUP] para seleccionar “MAIN/SAP”, “DRC” o
“PCM FIX”.
2 Mientras se muestra el modo seleccionado
Pulse [3, 4] para realizar el ajuste.
MAIN/SAP mode
MAIN, SAP
§
“SAP” = Secondary Audio Program (Segundo Programa de Audio)
Dynamic Range Compression
DRC ON: Permite una mayor claridad incluso cuando el volumen esté
DRC OFF
PCM FIX mode
PCM ON: Seleccione la opción si sólo recibe señales PCM.
PCM OFF: Seleccione la opción si recibe señales Dolby Digital y PCM.
[Nota]
RQTX0275
El audio que entra por el terminal OPTICAL IN no se puede emitir por el
terminal HDMI.
28
(Sólo funciona con Dolby Dual Mono)
§
, MAIN+SAP§ (audio estéreo)
bajo comprimiendo la gama entre el nivel de sonido más bajo y
el nivel de sonido más alto. Úti l para ver la televisión a altas
horas de la noche. (Solamente funciona con Dolby Digital)
Seleccione “AUX”.
Seleccione “D-IN” (Digital In).
≥ Sujete la base cuando conecte/desconecte el iPod.
≥ Conecte el adaptador de base suministrado junto con su iPod a la base
para hacer un uso estable del iPod.
Si necesita un adaptador, póngase en contacto con el distribuidor de su
iPod.
Seleccione “IPOD”.
El iPod cambia automáticamente al modo
de visualización propio de esta unidad.
El menú Music aparece en el televisor.
Ej.:
iPod Cine para casa
Listas repr.
Artistas
Álbumes
Canciones
Podcasts
Géneros
Autores
Audiolibros
OK
Para trabajar con la pantalla del iPod, pulse [FUNCTIONS].
Reproducción de música
OK
La reproducción empieza desde la canción seleccionada.
§1
Para seleccionar los modos aleatorios
Pulse [-PLAY MODE].
Cada vez que se pulsa el botón:
§2
Para seleccionar los modos de repetición
Mantenga pulsado [—REPEAT] y luego pulse el botón varias veces
durante 3 segundos.
Cada vez que se pulsa el botón:
Seleccione una opción.
≥ Pulse [2, 1] para saltar página por página.
≥ Para volver a la pantalla anterior, pulse
[-RETURN].
Page 65
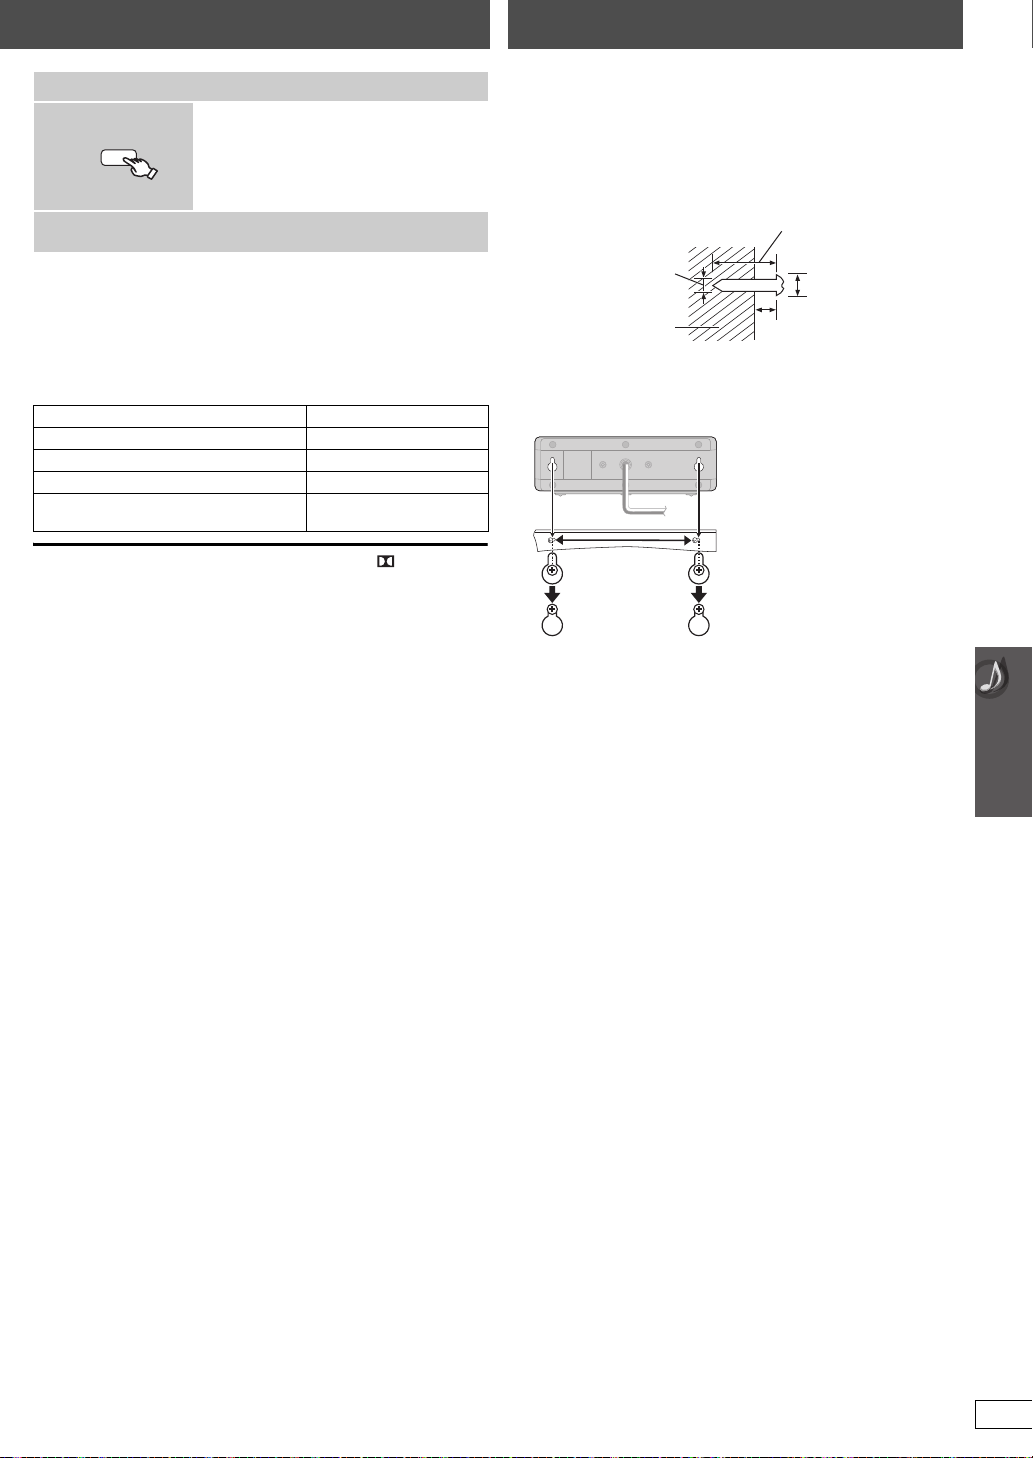
Opciones de instalación de los altav oces
FUNCTIONS
‰7,0 mm a 9,4 mm
(
9
/32z a 11/32z)
4,0 mm a 6,0 mm
(
5
/32z a 1/4z)
Pared o columna
‰4,0 mm (
5
/32z)
Al menos 30 mm (1
3
/16z)
Central y altavoces de sonido envolvente
190 mm
(7
15
/32z)
Activación de fotos/vídeos
1
Reproduzca una fotografía o vídeo en el iPod.
2
La imagen aparecerá en su televisor.
También puede controlar el menú iPod mediante el mando a distancia.
[3, 4]: Para desplazarse por las opciones de menú
[OK]: Para ir al siguiente menú
[-RETURN]: Para volver al menú anterior
El funcionamiento del mando a distancia puede ser diferente en según
qué modelo de iPod.
Cambie el iPod al modo de
visualización propia.
Siga trabajando con la pantalla del iPod.
∫ Colocación en una pared
Controles básicos (Sólo para música y vídeos)
Botón Función
[1 PLAY] Reproducción
[∫ STOP], [; PAUSE] Pausa
[:, 9]Salto
(mantenga pulsado el botón)
[:, 9]
≥ Para disfrutar del efecto de sonido envolvente, pulse [ PLII] para
activar el Dolby Pro Logic II (➜ 26).
Si utiliza el menú START en modo “IPOD”
Seleccione “Música” o “Fotos/Vídeo”.
Música: Muestra el menú de música.
Fotos/Vídeo: Pasa a la pantalla del iPod.
Sobre la recarga de la batería
≥ La batería del iPod comenzará a recargarse tanto si el aparato está
encendido como si no lo está.
≥ “IPOD ¢” aparecerá en la pantalla del aparato principal durante la
carga del iPod en el modo de espera del aparato principal.
≥ Compruebe el iPod para ver si la batería se ha recargado por completo.
≥ Si no utilice el iPod durante un periodo prolongado de tiempo una vez
completada la recarga, desconéctelo de la unidad principal, ya que la
batería se descargará de forma natural. (Una vez recargado por
completo, no seguirá recargándose.)
Búsqueda
Central y altavoces de sonido envolvente solamente
La pared o columna en la que vaya a colgar los altavoces deberá ser
capaz de aguantar un peso de 10 kg (22lbs) por tornillo. Antes de
colgar los altavoces en una pared, consulte a un especialista. Si se
colocan mal, se pueden dañar la pared y los altavoces.
1 Coloque un tornillo en la pared (no incluido).
2 Coloque firmemente el altavoz en los tornillos por los
agujeros.
Control de otro equipo / Opcion es de in st alación de los altavoces
iPod compatibles
≥ iPod touch 2ª generación (8GB, 16GB, 32GB)
≥ iPod nano 4ª generación (vídeo) (8GB, 16GB)
≥ iPod classic (120GB)
≥ iPod touch 1ª generación (8GB, 16GB, 32GB)
≥ iPod nano 3ª generación (vídeo) (4GB, 8GB)
≥ iPod classic (80GB, 160GB)
≥ iPod nano 2ª generación (aluminio) (2GB, 4GB, 8GB)
≥ iPod 5ª generación (vídeo) (60GB, 80GB)
≥ iPod 5ª generación (vídeo) (30GB)
≥ iPod nano 1ª generación (1GB, 2GB, 4GB)
≥ iPod 4ª generación (pantalla en color) (40GB, 60GB)
≥ iPod 4ª generación (pantalla en color) (20GB, 30GB)
≥ iPod 4ª generación (40GB)
≥ iPod 4ª generación (20GB)
≥ iPod mini (4GB, 6GB)
La compatibilidad depende de la versión de software del iPod.
Para utilizar las características del iPod touch
1 Pulse el botón Home del iPod touch.
2 Seleccione las características del iPod touch en la pantalla táctil para
proceder.
RQTX0275
29
Page 66

Discos que pueden reproducirse
Discos de venta en comercios
Disco Logotipo
Indicado en estas
instrucciones mediante
Observaciones
DVD-Vídeo
Vídeo CD
CD
Discos grabados (±: Reproducible,
Disco Logotipo
DVD-RAM
DVD-R/RW
DVD-R DL
—: No reproducible)
Grabado en una
grabadora de
DVD-Vídeo, etc.
[DVD-VR]§2[DVD-V]
± ——±±
±±— ±±
§3
±
[DVD-V]
[VCD]
[CD]
Discos de películas y música de alta calidad
Discos de música con vídeo
Incluido SVCD (Conforme a la norma IEC62107)
Discos de música
Grabado en un ordenador
personal, etc.
§4
[WMA] [MP3] [JPEG]
± ———
Finalización
No necesario
Necesario
Necesario
§6
iR/iRW
iR
DL
CD-R/RW
≥ Puede que no sea posible reproducir todos los discos mencionados arriba en algunos casos debido al tipo de disco, a las condiciones de la
grabación, al método de grabación y al sistema utilizado para crear los archivos (➜ 31, Consejos para crear discos de datos).
§1
Este aparato también puede reproducir discos CD-R/RW grabados con formato CD-DA o Vídeo-CD.
§2
Discos grabados e n g rabadoras de DVD o vídeocámaras de D VD, etc., que usan la versión 1.1 de Video Recording Fo rmat (una norma unificada de
grabación de vídeo).
§3
Discos grabados en grabadoras de DVD o vídeocámaras de DVD que usan la versión 1.2 de Video Recording Format (una norma unificada de
grabación de vídeo).
§4
Discos grabados en grabadoras de DVD o vídeocámaras de DVD que usan el formato DVD-Vídeo.
Discos que pueden reproducirse
§5
Discos grabados con un formato distinto de DVD-Vídeo, por lo que no se pueden utilizar algunas funciones.
§6
Un proceso que permite la reproducción en un equipo compati ble. Para reproducir un disco indicado con “Necesario”, es necesario finalizar primero
el disco en el aparato en el que se h a grabado.
§7
También funciona cerrar la sesión.
§1
——(±)
——(±)
———±±±
Nota acerca de la utilización de un DualDisc
La cara con el contenido de audio digital de un DualDisc no cumple con
las especificaciones técnicas del formato de audio digital de disco
compacto (CD-DA), por lo que la reproducción podría resultar
imposible.
∫ Discos que no se pueden reproducir
Blu-ray, HD DVD, discos AVCHD, versión 1.0 de DVD-RW,
DVD- A udio, DVD-ROM, CD-ROM, CDV, CD-G, SA CD, Discos Vídeo
DivX y Photo CD, DVD-RAM que no pueden sacarse de sus
cartuchos, DVD-RAM de 2,6 GB y 5,2 GB, y “Ch aoji VCD”
disponibles en el mercado, incluyendo CVD, DVCD y SVCD que no
cumplan con la norma IEC62107.
§5
———
§5
———
∫ Precauciones para manejar los discos
≥ No adhiera etiquetas o pegatinas en los discos. Puede
deformarse el disco y luego no podría utilizarse.
≥ No escriba en la cara de la etiqueta con un bolígrafo u otro
instrumento de escritura.
≥ No utilice aerosoles de limpieza de discos analógicos, bencina,
diluyente, líquidos para la prevención de la electricidad estática ni
ningún otro disolvente.
≥ No utilice protect o re s ni cu biertas a prueba de arañazos.
≥ No utilice los discos siguientes:
– Discos con adhesivo expuesto que ha quedado al quitar
pegatinas o etiquetas (discos de alquiler, etc.).
– Discos muy deformados o agrietados.
– Discos de forma irregular como, por ejemplo, en forma de
corazón.
Necesario
Necesario
Necesario
§7
30
RQTX0275
Page 67

∫ Consejos para crear discos de datos
CORRECTO
INCORRECTO
EST. 1924
Si elige un buen equipo de sonido como la
unidad que acaba de comprar es solo el
principio de su disfrute musical. Ahora es el
momento de ver de qué manera puede
maximizar la diversión y la emoción que le
ofrece su equipo. Este fabricante y el
Consumer Electronics Group de la Electronic
Industries Association quiere que pueda sacar
todo lo mejor de su equipo utilizándolo a un
nivel seguro. Un equipo que emita un sonido
fuerte y claro sin que la música sea retumbante
o distorsionada—y, sobre todo, que no afecte a
su oído sensible.
Recomendamos no exponerse durante
demasiado tiempo a ruido excesivo.
El sonido puede engañar. Con el pasar del
tiempo su oído adapta su “nivel de confort” a
volúmenes de sonido elevados. Así lo que
parece “normal” en realidad puede ser fuerte y
perjudicial para su oído.
Protéjase de esto regulando su equipo a un
nivel seguro ANTES de que su oído se adapte.
Para establecer un nivel seguro:
≥ Ponga el mando del volumen a un nivel bajo.
≥ Suba lentamente el volumen hasta que pueda
oír el sonido de manera cómoda y clara, y sin
distorsión.
Una vez haya establecido un nivel de sonido
cómodo:
≥ Ajuste el selector y déjelo como está.
Si se toma un minuto para hacerlo ahora,
evitará daños en el oído o su pérdida en el
futuro. Después de todo, queremos que pueda
escuchar mientras viva.
Formato Disco Extensión Referencia
[WMA] CD-R/RW “.WMA”
[MP3] DVD-RAM
[JPEG] DVD-RAM
≥ Pueden existir diferencias en el orden de visualización en la pantalla del menú y en la pantalla del ordenador.
≥ Este aparato no puede reproducir archivos grabados mediante escritura por paquetes.
DVD-RAM
≥ Los discos deben cumplir con UDF 2.0.
DVD-R/RW
≥ Los discos deben cumplir con UDF bridge (UDF 1.02/ISO9660).
≥ Este aparato no es compatible con múltiples sesiones. Sólo se reproduce la sesión predeterminada.
CD-R/RW
≥ Los discos deben cumplir con el nivel 1ó 2 de ISO9660 (excepto para los formatos extendidos).
≥ Este aparato admite múltiples sesiones, pero si hay muchas, la reproducción tardará más en empezar. Mantenga el número de sesiones al mínimo
para evitar esto.
DVD-R/RW
CD-R/RW
DVD-R/RW
CD-R/RW
“.wma”
“.MP3”
“.mp3”
“.JPG”
“.jpg”
“.JPEG”
“.jpeg”
≥ Relación de compresión compatible: entre 48 kbps y 320 kbps
≥ No puede reproducir archivos WMA que están protegidos contra el copiado.
≥ Este aparato no es compatible con Multiple Bit Rate (MBR: un proceso de codificación para
contenido de audio que produce un archivo de audio codificad o con varias velocidades de
transferencia de bits diferentes).
≥ Este aparato no es compatible con identificadores ID3.
≥ Frecuencia de muestreo y relación de compresión:
– DVD-RAM, DVD-R/RW: 11,02, 12, 22,05, 24 kHz (8 a 160 kbps), 44,1 y 48 kHz (32 a 320 kbps)
– CD-R/RW: 8, 11,02, 12, 16, 22,05, 24 kHz (8 a 160 kbps), 32, 44,1 y 48 kHz (32 a 320 kbps)
≥ Se muestran los archivos JPEG tomados en una cámara digital que cumplan con la norma DCF
(Design rule for Camera File system), versión 1.0.
– Los archivos que han sido modificados, editados o guardados con un software informático de
edición de imágenes pueden no mostrarse.
≥ Este aparato no puede mostrar imágenes en movimiento, MOTION JPEG y otros formatos
similares, imágenes fijas que no son JPEG (ej.: TIFF), ni reproducir imágenes con audio asociado.
Mantenimiento
∫ Para limpiar discos
Límpielos pasando un paño húmedo y luego séquelos pasando un
paño seco.
Advertencia de escucha
∫ Limpie el aparato con un paño suave y
seco.
≥ No utilice nunca alcohol, diluyente de pintura o bencina para limpiar
este aparato.
≥ Antes de utilizar un paño tratado químicamente, lea atentamente las
instrucciones que acompañan al paño.
No use limpiadores de lentes disponibles en el mercado, ya que
pueden causar un mal funcionamiento de la misma. En general no es
necesario limpiar la lente, aunque esto depende del entorno de
funcionamiento.
Antes de trasladar el aparato, asegúrese de que la bandeja del
disco esté vacía. Si no lo hace correrá el riesgo de dañar
gravemente el disco y el aparato.
Discos que pueden reproducirse / Mantenimiento
RQTX0275
31
Page 68

Guía para solucionar problemas
Antes de solicitar el servicio de reparaciones, haga las comprobaciones indicadas en la tabla de abajo. Si tiene alguna duda acerca de algunos de los
puntos de comprobación o si las soluciones indicadas en la tabla no resuelven el problema, remítase a la “Customer Services Directory (United States
and Puerto Rico)” en la página36 de la sección en inglés.
Alimentación
No hay alimentación. ≥ Inserte firmemente el cable de alimentación de CA. 9
El aparato se pone
automáticamente en modo de
espera.
Indicaciones del aparato
El display está oscuro. ≥ Seleccione “BRILLANTE” en “REGUL. FLUOR.” en el Menú “OTROS”. 22
“NOPLAY” ≥ Ha introducido un disco que el aparato no puede reproducir; introduzca uno que sí pueda
“NODISC” ≥ No ha introducido ningún disco; introdúzcalo.
“F61” ≥ Verifique y corrija las conexiones de los cables de los altavoces.
“F76” ≥ Hay un problema de suministro de alimentación. Consulte a su distribuidor. —
“DVD U11” ≥ El disco puede estar sucio. Límpielo. 31
“ERROR” ≥ Se ha realizado una operación incorrecta. Lea las instrucciones e inténtelo de nuevo. —
“DVD H∑∑”
“DVD F∑∑∑”
∑ significa un número.
“ [W1] ” está destellando. ≥[W1] es el enlace inalámbrico opcional para los indicadores de accesorios inalámbricos: SH-
“U70∑”
∑ significa un número.
El número real posterior a “U70”
dependerá del estado del aparato
principal.
“REMOTE 1” o “REMOTE 2” ≥ Los modos del aparato principal y del mando a distancia deben ser los mismos. Dependiendo
“LOADING” ≥ El iPod no está listo. Espere a que desaparezca esta pantalla.
≥ El temporizador de suspensión estaba activado y ha alcanzado el límite de tiempo ajustado. 12
reproducir.
≥ Ha introducido un disco en blanco.
≥ Ha introducido un disco que no ha sido finalizado.
≥ No ha introducido el disco correctamente; introdúzcalo correctamente.
Si esto no soluciona el problema, consulte a su distribuidor.
≥ Puede haberse producido un problema. Los números posteriores a la “H” y la “F” dependen del
estado del aparato. Apague el aparato y luego vuelva a encenderlo. O apague el aparato,
desconecte el cable de alimentación de CA y vuelva a conectarlo.
≥ Si los números de servicio no desaparecen, anótelos y póngase en contacto con el personal de
servicio cualificado.
FX70. El parpadeo se detiene después de un tiempo.
≥ La conexión HDMI funciona de forma inusual.
– El equipo conectado no es compatible con HDMI.
– Utilice cable
–El cable HDMI es demasiado largo.
–El cable HDMI está dañado.
del número que se muestre (“1” o “2”), mantenga pulsado [OK] y el botón numerado
correspondiente ([1] o [2]) durante al menos 2 segundos.
≥ Desconecte el iPod y, a continuación, vuelva a conectarlo firmemente.
s HDMI que tengan el logotipo HDMI (como se muestra en la cubierta).
30
—
—
—
14
8
—
—
—
—
—
—
—
12
—
28
Funcionamiento general
No hay respuesta cuando se
pulsan los botones.
Guía para solucionar problemas
No hay respuesta cuando se
pulsan los botones del mando a
distancia.
Otros productos responden al
mando a distancia.
No se pueden reproducir los
DVDs.
No hay imagen ni sonido. ≥ Compruebe las conexiones del vídeo o de los altavoces.
Ha olvidado su contraseña de
calificaciones.
Restablezca todos los ajustes a los
preajustados de fábrica.
La función VIERA Link “HDAVI
Control” no responde.
El ajuste seleccionado en
“P ANTALLA TV” (
RQTX0275
VÍDEO”) o “IDIOMA” (➜ 22, Menú
“
“
32
VISUALIZACIÓN”)
➜
21, Menú
no funciona.
≥ Este aparato no puede reproducir discos que no sean los indicados en estas instrucciones de
funcionamiento.
≥ El aparato puede no funcionar correctamente debido a una tormenta eléctrica, electricidad
estática o algún otro factor externo . Apague el aparato y luego vuelv a a encenderlo . O apa gue el
aparato, desconecte el cable de alimentación de CA y vuelva a conectarlo.
≥ Se ha formado condensación. Espere de 1 a 2 horas hasta que ésta se evapore.
≥ Compruebe que las pilas estén correctamente instaladas.
≥ Las pilas están agotadas: reemplácelas por otras nuevas.
≥ Apunte el mando a distancia al sensor de señal del mando a distancia y utilícelo.
≥ Cambie el modo de funcionamiento del mando a distancia. 12
≥ Está encendido el modo CD. Pulse y mantenga pulsado [–CD MODE] para apagar el modo CD. 16
≥ Compruebe el ajuste de la alimentación o la entrada del equipo conectado y del aparato
principal.
≥ Compruebe que el disco tenga algo grabado.
≥ Durante la parada, y siendo la fuente “DVD/CD” mantenga pulsado [∫] (Parada) en el aparato
principal y [S10] en el mando a distancia hasta que “INITIALIZED” desaparezca del televisor.
Apague y encienda de nuevo el aparato.
Todos los ajustes volverán a los valores predeterminados.
(Esto no funciona durante los modos de reproducción programa y aleatoria o cuando se
muestran el menú Setup o el menú START.)
≥ Según el estado del aparato o del equipo conectado, pued e que sea necesario repetir l a misma
operación para que la función pueda funcionar correctamente.
§1
≥ Los ajustes “PANTALLA TV”
Haga la selección utilizando los ajustes del televisor.
§1
Si se utiliza VIERA Link “HDAVI Control” con un televisor compatible con “HDAVI Control 3”
§2
Si se utiliza VIERA Link “HDAVI Control” con un televisor compatible con “HDAVI Control 2
(o posterior)”
y “IDIOMA”§2 siguen automáticamente a los ajustes del televisor.
30
—
—
9
9
13
7, 8
—
—
—
24
—
Page 69

Bandejas de disco
La/s bandeja/s del disco no puede
abrirse. Está visualizado
“CHGR ERR”.
≥ Pulse [Í] para soltar la/s bandeja/s trabada/s mientras se apaga el aparato. Enciéndalo de
nuevo y la/s bandeja/s inicializará/n a la condición anterior. Si esto no soluciona todavía el
problema, llame a su concesionario.
Funcionamiento de un disco
La reproducción tarda en
empezar.
[MP3]
Durante el salto o la búsqueda
aparece una pantalla de menú.
[VCD]
No aparece el menú de control de
reproducción. [VCD] con control de
reproducción
La reproducción programada y la
aleatoria no funcionan. [DVD-V]
No hay subtítulos. ≥ Visualice los subtítulos. (“SUBTÍTULO” en el Menú 1) 18
El punto B se establece
automáticamente.
No se puede acceder al menú
Setup.
≥ La reproducción puede tardar algo en empezar cuando una pista MP3 tiene datos de imagen
fija. No se mostrará el tiempo de reproducción correcto incluso después de empezar la pista.
Esto es normal.
≥ Esto es normal para los Vídeo CD. —
≥ Pulse [∫ STOP] dos veces y pulse [1 PLAY]. —
≥ Estas funciones no son válidas con algunos discos DVD-Vídeo. —
≥ El final de un elemento se convierte en el puntoB al llegar a él. —
≥ Seleccione “DVD/CD” como fuente.
≥ Cancele la reproducción de todos los grupos, la programada y la aleatoria.
16
Sonido
El sonido está distorsionado. ≥ Puede producirse ruido cuando se reproduce WMA.
Los efectos no funcionan. ≥ Algunos efectos de audio no funcionan o tienen menos efecto con algunos discos. —
Se oye ruido de zumbido durante
la reproducción.
No hay sonido. ≥ Puede haber una ligera pausa en el sonido cuando cambia la velocidad de reproducción.
No hay sonido del televisor. ≥ Confirme la conexión de audio. Pulse [RADIO/EXT-IN] para seleccionar la fuente
No hay sonido envolvente.
≥ Si se utiliza la salida HDMI, puede que no se emita audio de otros terminales.
≥ Hay un cable de alimentación de CA o una luz fluorescente cerca del aparato principal.
Mantenga otros aparatos y cables alejados del aparato principal.
≥ Puede que no se oiga el audio si hay más de 4 dispositivos conectados con cables HDMI.
Reduzca el número de dispositivos conectados.
≥ Si utiliza la conexión HDMI, asegúrese de ajustar a “ENCEN.” la opción “SALIDA AUDIO” del
Menú “HDMI”.
≥ Si la fuente de entrada es en el formato de flujo de datos, ajuste la configuración del sonido del
equipo externo en PCM.
correspondiente.
≥ Pulse [ PLII] para activar Dolby Pro Logic II o active el potenciador de sonido envolvente.
22
7, 8, 28
26
—
—
—
—
—
—
—
—
—
Imagen
La imagen del televisor no se
muestra correctamente o
desaparece.
El tamaño de la imagen no cabe
en la pantalla.
El menú no se visualiza
correctamente.
La función de zoom automático
no funciona bien.
≥ Asegúrese de que el aparato esté conectado directamente al televisor y no a través de una
grabadora de vídeo.
≥ Los cargadores de los teléfonos móviles pueden causar algunas interferencias.
≥ Si está utilizando una antena interior de televisión, cámbiela por una antena exterior.
≥ El cable de la antena de televisión está demasiado cerca del aparato. Aléjelo del aparato.
≥ Puede que no se vea la imagen si hay más de 4 dispositivos conectados con cables HDMI.
Reduzca el número de dispositivos conectados.
≥ Cuando utiliza el terminal COMPONENT VIDEO OUT, asegúrese de que no esté seleccionada
la salida progresiva si el televisor conectado no es progresivo compatible. Pulse y mantenga
pulsado [CANCEL] hasta que desaparezca “PRG” de la pantalla del aparato principal y se
visualice correctamente la imagen.
≥ Si utiliza el terminal HDMI AV OUT, asegúrese de que no se haya seleccionado una salida de
vídeo incompatible con el televisor conectado. Mantenga pulsado [CANCEL] hasta que la
imagen se muestre correctamente. (La salida volverá a “480p”.)
≥ Las imágenes de vídeo convertidas a una resolución de 1920 x 1080 pueden lucir distintas a la
realidad, debido a fuentes 1080p full-HD nativas. Esto no significa que el aparato principal esté
funcionando mal.
≥ Cambie “PANTALLA TV” en el Menú “VÍDEO”.
≥ Utilice el televisor para cambiar el aspecto.
≥ Cambie el ajuste del zoom. (“ZOOM” en el Menú 2)
≥ Restablezca la relación del zoom a “NORMAL”. (“ZOOM” en el Menú 2) 19
≥ Desactive la función de zoom del televisor.
≥ La función del zoom puede no funcionar bien, especialment e con las escenas o scur as, y tal vez
no funcione en absoluto dependiendo del tipo del disco utilizado.
21
19
21
19
(Continúa en la página siguiente)
7
—
—
—
—
—
—
—
—
Guía para solucionar problemas
RQTX0275
33
Page 70

Guía para solucionar problemas
Funcionamiento del iPod
No se puede cargar o hacer
funcionar.
No se pueden mostrar fotos/
vídeos del iPod en el televisor.
Vídeo HDMI o progresivo
Se produce un efecto fantasma
cuando está activada la salida
HDMI o progresiva.
Las imágenes no son de salida
progresiva.
Encabezados cerrados no
visualizados.
Radio
Se oye sonido distorsionado o
ruido.
“ST” parpadea o no se enciende.
Se oye un sonido de golpe
rítmico.
Se oye un bajo zumbido durante
las emisiones AM.
≥ Asegúrese de que el iPod esté bien conectado.
≥ La batería del iPod está agotada. Cargue el iPod y vuelva a hacerlo funcionar.
≥ Compruebe que se haya realizado la conexión de terminal VIDEO OUT en este aparato.
≥ Utilíce el menú iPod para hacer los ajustes de salida de foto/vídeo apropiados para su televisor.
(Consulte las instrucciones de funcionamiento del iPod.)
≥ Este problema se debe al método de edición o al material utilizado en DVD-Vídeo, pero debería
corregirse si se utiliza la salida entrelazada. Si utiliza el terminal HDMI AV OUT, ajuste
“FORMATO VÍDEO” en el Menú 4 a “480i”. O bien inhabilite la conexión HDMI AV OUT y utilice
otras conexiones de vídeo.
≥ Cuando use el terminal COMPONENT VIDEO OUT, ajuste “SAL. VÍD (I/P)” al Menú “VÍDEO” a
“ENTRELAZADO”. (También puede mantener pulsado [CANCEL] hasta que “PRG”
desaparezca de la pantalla del aparato principal.)
≥ Seleccione “PROGRESIVO” en “SAL. VÍD (I/P)” en el Menú “VÍDEO”.
≥ El terminal VIDEO OUT del aparato emite una señal entrelazada aunque aparezca “PRG”.
≥ Cuando está encendido el HDMI o la salida progresiva, no se visualizarán los encabezados
cerrados.
≥ Ajuste la posición de la antena de FM o AM.
≥ Utilice una antena exterior.
≥ Apague el televisor o aléjelo del aparato. —
≥ Separe la antena de los demás cables. —
28
—
7
—
19
21
21
—
—
—
9
Indicaciones del televisor
“/” ≥ La operación está prohibida por el aparato o el disco. —
“ESTE CD NO PUEDE SER
REPRODUCIDO EN SU REGIÓN.”
Fabricado bajo licencia de Dolby Laboratories.
Dolby, Pro Logic y el símbolo de la doble D son marcas comerciales
de Dolby Laboratories.
Fabricado bajo licencia según las Patentes de los Estados Unidos #:
5,451,942; 5,956,674; 5,974,380; 5,978,762; 6,487,535 y otras
patentes de los Estados Unidos e internacionales emitidas y
Guía para solucionar problemas
pendientes. DTS y DTS Digital Sound son marcas co merciales
registradas y los logotipos de DTS y Símbolo son marcas comerciales
registradas de DTS, Inc. c 1996-2008 DTS, Inc. Todos los derechos
reservados.
Patentes de los EE.UU. 6,836,549; 6,381,747; 7,050,698; 6,516,132;
y 5,583,936.
Este producto contiene tecnología de protección de cop yright sujeta a
las leyes de patentes de los EE.UU. y a otras leyes de la propiedad
intelectual. Dicha tecnología de protección de copyright debe
utilizarse con la pertinente autorización de Macrovision y, si
Macrovision no autoriza expresamente lo contrario, está destinada
exclusivamente al uso doméstico y limitada a otra s aplicaciones . Está
prohibido desmontar e intentar reproducir la unidad.
≥ Sólo se pueden reproducir los discos DVD-Vídeo que incluy en o tienen el mismo número de
región que el que aparece en el panel posterior de este aparato.
Windows Media y el logotipo de Windows son marcas comerciales o
marcas registradas de Microsoft Corporation en los Estados Unidos
y/o en otros países.
Este producto está protegido por ciertos derechos de propiedad
intelectual pertenecientes a Microsoft Corporation y a terceros. El uso
o la distribución de tal tecnología fuera de est e pr oducto están
prohibidos si no se cuenta con una licencia de Microsoft o de una
subsidiaria de Microsoft y terceros.
HDMI, el logotipo HDMI y High-Definition Multimedia Interface son
marcas de fábrica o marcas registradas de HDMI Licensing LLC.
HDAVI Control
VIERA Link
EZ Sync
iPod es una marca de Apple Inc., registrada en EUA y otros países.
TM
es una marca de fábrica de Panasonic Corporation.
TM
es una marca de fábrica de Panasonic Corporation.
TM
es una marca de fábrica de Panasonic Corporation.
Cubierta
34
RQTX0275
Page 71

Especificaciones
SECCIÓN DEL AMPLIFICADOR
Potencia de salida RMS: Modo Dolby Digital
Canal delantero
125 W por canal (3 ≠), 1kHz, distorsión armónica total del 10 %
Canal de sonido envolvente
125 W por canal (3 ≠), 1kHz, distorsión armónica total del 10 %
Canal central
250 W por canal (6 ≠), 1 kHz, distorsión armónica total del 10 %
Canal subwoofer
250 W por canal (6 ≠), 100 Hz,distorsión armónica total del 10 %
Potencia total RMS en el modo Dolby Digital 1000 W
Potencia de salida FTC: Modo Dolby Digital
Canal delantero 63 W por canal (3 ≠), 120Hz a 20 kHz, distorsión
Canal de sonido envolvente
Canal central
Canal subwoofer
W por canal (3 ≠),
34
113 W por canal (6 ≠),
121 W por canal (6 ≠),
Potencia total FTC del modo Dolby Digital 428 W
armónica total del 1 %
120 Hz a 20 kHz, distorsión
armónica total del 1 %
120 Hz a 20 kHz, distorsión
armónica total del 1 %
45 Hz a 120 Hz, distorsión
armónica total del 1 %
SECCIÓN DE SINTONIZADOR DE FM/AM,
TERMINALES
Memoria de presintonías 30emisoras de FM
Modulación de frecuencia (FM)
Gama de frecuencias 87,9 MHz a 107,9 MHz (paso de 200-kHz)
Terminales de antena 75 ≠ (Sin equilibrio)
Modulación de amplitud (AM)
Gama de frecuencias 520 kHz a 1710 kHz (paso de 10-kHz)
Entrada de audio digital
Entrada digital óptica Terminal óptico
Frecuencia de muestreo 32 kHz, 44,1 kHz, 48 kHz
87,5 MHz a 108,0 MHz (paso de 100-kHz)
Toma de auriculares
Terminal Estéreo, toma de 3,5 mm (
30 emisoras de AM
1
SECCIÓN DE DISCOS
Discos reproducidos [8 cm (3
(1) D VD (DVD-Vídeo)
(2) DVD-RAM (DVD-VR, MP3
(3) DVD-R (DVD-Vídeo, DVD-VR, MP3
(4) D VD-R DL (DVD-Vídeo, DVD-VR)
(5) D VD-RW (DVD-Vídeo, DVD-VR, MP3
(6) iR/iRW (Vídeo)
(7) iR DL (Vídeo)
(8) CD, CD-R/RW (CD-DA, Vídeo CD, SVCD
§4, 5
JPEG
§1
§2
§3
§4
§5
Lector
Longitud de onda (DVD/CD) 655/785 nm
Potencia del láser (DVD/CD) CLASS II/CLASS I
Salida de la señal de audio (Disco)
)
Conforme a la directiva IEC62107
MPEG-1 Layer 3, MPEG-2 Layer 3
Windows Media Audio Ver.9.0 L3
No es compatible con Multiple Bit Rate (MBR)
Archivos Exif, versión 2.1, JPEG Baseline
Resolución de imagen: entre 160k120 y 6144k4096 píxeles (el
muestreo secundario es 4:0:0, 4:2:0, 4:2:2 ó 4:4:4). Puede que no
se muestren las imágenes extremadamente largas y estrechas.
El número total máximo combinado de grupos y contenidos de
audio e imágenes que pueden reconocerse: 4000 contenidos de
audio e imágenes y 400 grupos.
Número de canales 5.1 canales (FL, FR, C, SL, SR, SW)
z
) o 12 cm (5z)]
§2, 5
, JPEG
§2, 5
§4, 5
, JPEG
§2, 5
)
, JPEG
§1
, MP3
§4, 5
§4, 5
)
§2, 5
)
, WMA
§3, 5
,
SECCIÓN DE VÍDEO
Sistema de vídeo NTSC
Señal de salida de vídeo compuesta
Nivel de salida 1 Vp-p (75 ≠)
Term i na l Toma de cont actos (1 sistema)
Señal de salida de vídeo componente
Nivel de salida Y 1 Vp-p (75 ≠)
Nivel de salida P
Nivel de salida P
Terminal Toma de contactos (Y: verde, P
Salida HDMI AV
Terminal Conector de tipo A (19 contactos)
HDAVI Control Este aparato es compatible con la función
B 0,7 Vp-p (75 ≠)
R 0,7 Vp-p (75 ≠)
B: azul, PR: rojo) (1 sistema)
“HDAVI Control 3”.
SECCIÓN DE ALTAVOCES
[Altavoces\delanteros\SB-HF665]
Tipo Sistema de 2 altavoces de 2 vías (Reflejo de graves)
Unidad(es) de altavoz(altavoces) Impedancia 3 ≠
Altavoz de frecuencias altas Tipo cónico de 6 cm (2
Altavoz de graves Tipo cónico de 16 cm (6
Potencia de entrada (IEC) 130 W (Máxima)
Presión acústica de salida 83 dB/W (1,0 m)
Gama de frecuencias 49 Hz a 28 kHz (j16 dB)
52 Hz a 26 kHz (j10 dB)
Dimensiones (AntAltProf) 221 mmk401 mmk244 mm
11
/16zk1525/32zk919/32z)
(8
Peso 3,5 kg (7,7 lbs)
[Altavoces\de\sonido\envolvente\SB-HS665]
Tipo Sist e m a de 1 altavoz de 1 vía (Reflejo de graves)
Unidad(es) de altavoz(altavoces) Impedancia 3 ≠
Gama completa Tipo cónico de 6,5 cm (2
Potencia de entrada (IEC) 125 W
Presión acústica de salida 80 dB/W (1,0 m)
Gama de frecuencias 95 Hz
Dimensiones (AntAltProf) 270 mmk94 mmk95 mm
110 Hz
a
25 kHz (j16dB)
a
22 kHz (j10dB)
5
/8zk311/16zk33/4z)
(10
Peso 0,9 kg (1,98 lbs)
[Altavoz\central\\SB-PC880]
Tipo Sistema de 1 altavoz de 2 vías (Reflejo de graves)
Unidad(es) de altavoz(altavoces) Impedancia 6 ≠
1. Gama completa Tipo cónico de 6,5 cm (2
2. Gama completa Tipo cónico de 6,5 cm (2
Potencia de entrada (IEC) 250 W
Presión acústica de salida 82 dB/W (1,0 m)
Gama de frecuencias 80 Hz a 25 kHz (j16 dB)
96 Hz a 22 kHz (j10 dB)
Dimensiones (AntAltProf) 270 mmk94 mmk95 mm
/8z
)
5
(10
/8zk311/16zk33/4z)
Peso 1,3 kg (2,9 lbs)
[Subwoofer\SB-WVK870]
Tipo Sistema de 1 altavoz de 1 vías (Reflejo de graves)
Unidad(es) de altavoz(altavoces) Impedancia 6 ≠
Altavoz de graves T i p o cóni co de 25 cm (10z)
Potencia de entrada (IEC) 250 W (Máxima)
Presión acústica de salida 82 dB/W (1,0 m)
Gama de frecuencias 48 Hz a 250 Hz (j16 dB)
50 Hz a 200 Hz (j10 dB)
Dimensiones (AntAltProf) 320 mmk411 mmk330 mm
19
(12
/32zk163/16zk13z)
Peso 7,2 kg (15,9 lbs)
GENERALIDADES
Alimentación CA 120 V, 60 Hz
Consumo de energía Aparato principal 135 W
Dimensiones (AntAltProf) 430 mmk63 mmk327 mm
Peso Aparato principal 3,7 kg (8,2 Ibs)
Gama de temperaturas de funcionamiento 0 oC a r40 oC
Gama de humedades de funcionamiento 35 % a 80 % RH
Consumo de energía en modo de espera aprox. 0,3 W
§6
Valores nominales del amplificador equip ado con filtro de co rte de baja
frecuencia
[Nota]
1. Las especificaciones están sujetas a cambios sin previo aviso.
El peso y las dimensiones son aproximados.
2. La distorsión armónica total se mide mediante un analizador de
espectro digital.
(1
615/16zk
(r32 oF a r104 oF)
(sin condensación)
§6
(Máxima)
§6
(Máxima)
215/32zk
3
1
1
1
1
127/8z
/8z)
/2z)
/2z)
/2z)
/2z)
Especificaciones
)
RQTX0275
35
Page 72

36
RQTX0275
 Loading...