

Page 1
EC
Operating Instructions
Instrukcja obsługi
Návod k obsluze
Instrucciones de funcionamiento
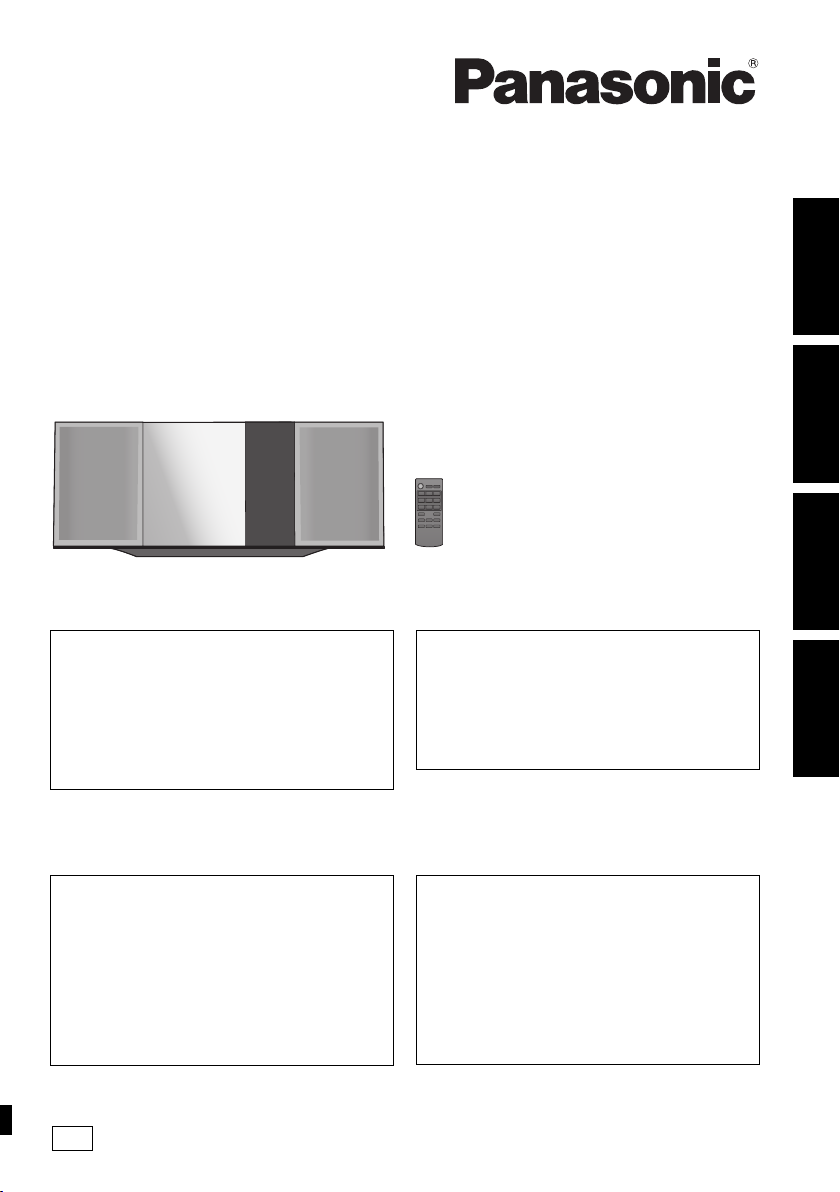
Compact Stereo System
Kompaktowy zestaw stereo
Kompaktní stereo systém
Sistema estéreo compacto
Thank you for purchasing this product.
Please read these instructions carefully before using
this product, and save this manual for future use.
Included Installation Instructions
(l 2 and 16, 17)
The installation work should be done by a
qualified installation specialist.
Before commencing work, carefully read these
installation instructions and the operating instructions
to ensure that installation is performed correctly.
(Please keep these instructions. You may need them
when maintaining or moving this unit.)
Dziękujemy za zakupienie tego produktu.
Przed przystąpieniem do eksploatacji opisywanego
produktu należy dokładnie przeczytać niniejsze
zalecenia i zachować instrukcję obsługi do wglądu.
Załączone instrukcje instalacji
(l 20 i 34, 35)
Instalację powinien przeprowadzić wyłącznie
wykwalifikowany specjalista.
Przed rozpoczęciem pracy należy się dokładnie
zapoznać z instrukcją instalacji oraz z instrukcją
obsługi, aby się upewnić, że instalacja została
przeprowadzona prawidłowo.
(Proszę zachować niniejszą instrukcję. Będzie ona
potrzebna podczas serwisowania lub przenoszenia
urządzenia.)
Model No. SC-HC39
Děkujeme, že jste si zakoupil tento výrobek.
Před použitím tohoto produktu si pečlivě přečtěte tyto
pokyny a celý návod si uložte pro pozdější použití.
Přiložené pokyny k instalaci (l 38 a 52, 53)
Instalační práce musí být provedeny
kvalifikovaným instalatérským odborníkem.
Před zahájením instalace si pečlivě pročtěte tyto
pokyny k instalaci a návod k obsluze, abyste instalaci
provedli opravdu správně.
(Tyto pokyny si uschovejte. Můžete je potřebovat při
údržbě nebo přesouvání tohoto zařízení.)
Muchísimas gracias por haber adquirido este aparato.
Lea cuidadosamente estas instrucciones antes de usar
este producto, y guarde este manual para usarlo en el
futuro.
Se incluyen instrucciones de instalación
(l 56 y 70, 71)
La instalación debe ser realizada por un
especialista calificado.
Antes de comenzar la instalación, lea
cuidadosamente estas instrucciones de instalación y
el manual de instrucciones para asegurarse de que la
instalación se realice correctamente.
(Conserve estas instrucciones. Puede necesitarlas al
momento de realizar mantenimiento o trasladar esta
unidad)
POLSKI ENGLISHČESKYESPAÑOL
RQT9944-R
Page 2

Safety precautions
WARNING
Unit
≥ To reduce the risk of fire, electric shock or product damage,
– Do not expose this unit to rain, moisture, dripping or
splashing.
– Do not place objects filled with liquids, such as vases, on
this unit.
– Use only the recommended accessories.
– Do not remove covers.
– Do not repair this unit by yourself. Refer servicing to
qualified service personnel.
– Do not let metal objects fall inside this unit.
– Do not place heavy items on this unit.
AC mains lead
≥ To reduce the risk of fire, electric shock or product damage,
– Ensure that the power supply voltage corresponds to the
voltage printed on this unit.
– Insert the mains plug fully into the socket outlet.
– Do not pull, bend, or place heavy items on the lead.
– Do not handle the plug with wet hands.
– Hold onto the mains plug body when disconnecting the
plug.
– Do not use a damaged mains plug or socket outlet.
≥ The mains plug is the disconnecting device.
Install this unit so that the mains plug can be unplugged from
the socket outlet immediately.
CAUTION
Unit
≥ This unit utilizes a laser. Use of controls or adjustments or
performance of procedures other than those specified herein
may result in hazardous radiation exposure.
≥ Do not place sources of naked flames, such as lighted
candles, on this unit.
≥ This unit may receive radio interference caused by mobile
telephones during use. If such interference occurs, please
increase separation between this unit and the mobile
telephone.
≥ This unit is intended for use in moderate climates.
Placement
≥ Place this unit on an even surface.
≥ To reduce the risk of fire, electric shock or product damage,
– Do not install or place this unit in a bookcase, built-in
cabinet or in another confined space. Ensure this unit is
well ventilated.
– Do not obstruct this unit’s ventilation openings with
newspapers, tablecloths, curtains, and similar items.
– Do not expose this unit to direct sunlight, high
temperatures, high humidity, and excessive vibration.
Battery
≥ Danger of explosion if battery is incorrectly replaced.
Replace only with the type recommended by the
manufacturer.
≥ Mishandling of batteries can cause electrolyte leakage and
may cause a fire.
– Remove the battery if you do not intend to use the remote
control for a long period of time. Store in a cool, dark
place.
– Do not heat or expose to flame.
– Do not leave the battery(ies) in a car exposed to direct
sunlight for a long period of time with doors and windows
closed.
– Do not take apart or short circuit.
– Do not recharge alkaline or manganese batteries.
– Do not use batteries if the covering has been peeled off.
≥ When disposing of the batteries, please contact your local
authorities or dealer and ask for the correct method of
disposal.
NORSK
ADVARSEL
Produkt
≥ For å redusere faren for brann, elektrisk støt eller skade på
apparatet:
– Utsett ikke produktet for regn, fukt, drypping eller sprut.
– Ikke plasser objekter som er fylt med væske, som vaser,
på apparatet.
– Bruk kun anbefalt tilbehør.
– Fjern ikke deksler.
– Reparer ikke denne enheten selv, overlat service til
kvalifisert servicepersonell.
Vekselstrømnett
≥ Nettstøpselet er trukket ut fra denne enheten.
Installer denne enheten slik at nettstøpselet umiddelbart kan
trekkes fra stikkontakten.
FORSIKTIG
Produkt
≥ Dette produktet anvender en laser. Betjening av kontroller
eller justering eller andre inngrep enn de beskrevet i denne
bruksanvisning kan føre til farlig bestråling.
≥ Plasser ikke åpen ild, slik som levende lys, oppå apparatet.
≥ Dette apparatet er beregnet for bruk under moderate
klimaforhold.
Plassering
≥ For å redusere faren for brann, elektrisk støt eller skade på
apparatet:
– Ikke plasser apparatet i en bokhylle, et innebygget
kabinett eller et annet lukket sted. Pass på at produktet er
godt ventilert.
– Apparatets ventilasjonsåpninger må ikke dekkes til med
aviser, duker, gardiner eller lignende.
2
RQT9944
Product Identification Marking is located on the bottom of the
unit.
Page 3

Table of contents
Safety precautions............................................ 2
Accessories....................................................... 3
Control reference guide ................................... 4
Connections ...................................................... 5
Inserting media ................................................. 6
Bluetooth
Media playback controls .................................. 9
Listening to the radio ..................................... 10
®
operations ...................................... 7
Accessories
Check the supplied accessories before using this unit.
∏ 1 Remote control
∏ 1 Battery for remote control
∏ 1 AC mains lead
∏ 1 FM indoor antenna
Sound adjustment .......................................... 11
Clock and Timer.............................................. 11
Others .............................................................. 12
Troubleshooting.............................................. 13
Unit and media care........................................ 14
About Bluetooth
®
............................................ 15
Playable media................................................ 15
Licenses .......................................................... 15
Wall mounting accessories
∏ 1 Safety holder
∏ 1 Screw
Attaching the unit to a wall (optional)........... 16
Specifications.................................................. 18
About descriptions in these operating
instructions
≥ Pages to be referred to are indicated as “l ±±”.
≥ Unless otherwise indicated, operations are described using
the remote control.
Disposal of Old Equipment and Batteries
Only for European Union and countries with recycling systems
These symbols on the products, packaging, and/or accompanying documents mean that used
electrical and electronic products and batteries must not be mixed with general household
waste.
For proper treatment, recovery and recycling of old products and used batteries, please take
them to applicable collection points in accordance with your national legislation.
By disposing of them correctly, you will help to save valuable resources and prevent any
potential negative effects on human health and the environment.
For more information about collection and recycling, please contact your local municipality.
Penalties may be applicable for incorrect disposal of this waste, in accordance with national
legislation.
Note for the battery symbol (bottom symbol):
This symbol might be used in combination with a chemical symbol. In this case it complies with
the requirement set by the Directive for the chemical involved.
≥ Do not use AC mains lead with other equipment.
≥ Product numbers provided in these operating instructions are
correct as of January 2014. These may be subject to change.
(N2QAYB000944)
∏ 2 Wall mount
brackets
ENGLISH
3
RQT9944
Page 4
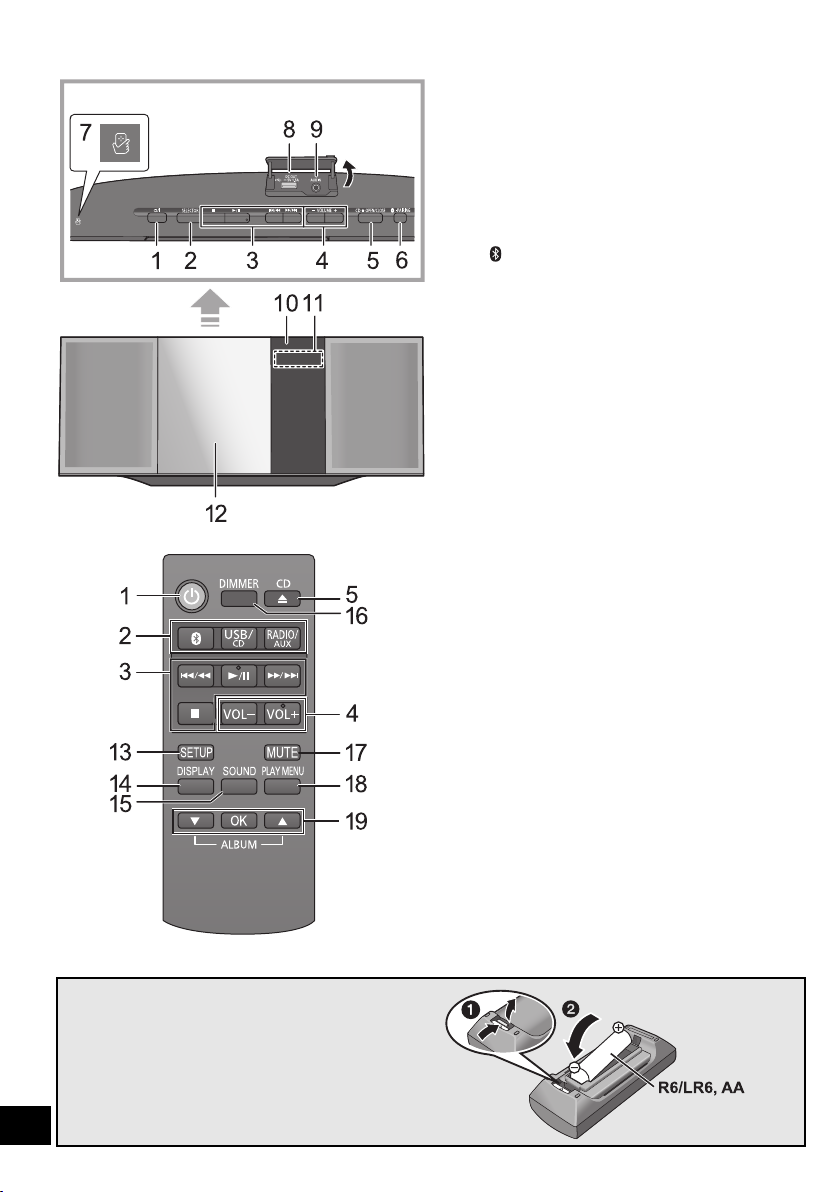
Control reference guide
Top view
(Alkaline or manganese
battery)
1 Standby/on switch (Í/I) (Í)
Press to switch the unit from on to standby mode or vice
versa.
In standby mode, the unit is still consuming a small
amount of power.
2 Select the audio source
On this unit:
“CD” """"-. “BLUETOOTH” """"-. “USB”
^"""--" “AUX” (""-"" “FM” ("-""-}
On the remote control:
[ ]: “BLUETOOTH”
[USB/CD]: “CD” ,. “USB”
[RADIO/AUX]: “FM”,. “AUX”
3 Basic playback control buttons
4 Adjust the volume (0 (min) to 50 (max))
5 Open or close the sliding door
6 Bluetooth
≥ Press to select “BLUETOOTH” as the audio source.
≥ Press and hold to enter pairing mode (l 7) or
®
-pairing button
disconnect a Bluetooth
®
device (l 8).
7 NFC touch area (l 7)
8 Port for USB devices / DC OUT terminal (l 6)
9 AUX IN jack (l 5)
10 Remote control signal sensor
Distance: Within approx. 7 m directly in front
Angle: Approx. 30o left and right
11 Display
12 Sliding door
13 Enter setup menu
14 Change the displayed information
15 Enter sound menu
16 Dim the display panel
Press again to cancel.
17 Mute the sound
Press again to cancel. “MUTE” is also cancelled when the
volume is adjusted or the unit is turned off.
18 Enter playback menu
19 Selection/OK
∫ Using the remote control
Insert the battery so the terminals (i and j) match those
in the remote control.
Point it at the remote control signal sensor on this unit.
≥ To avoid interference, please do not put any objects in front of
signal sensor.
4
RQT9944
Page 5
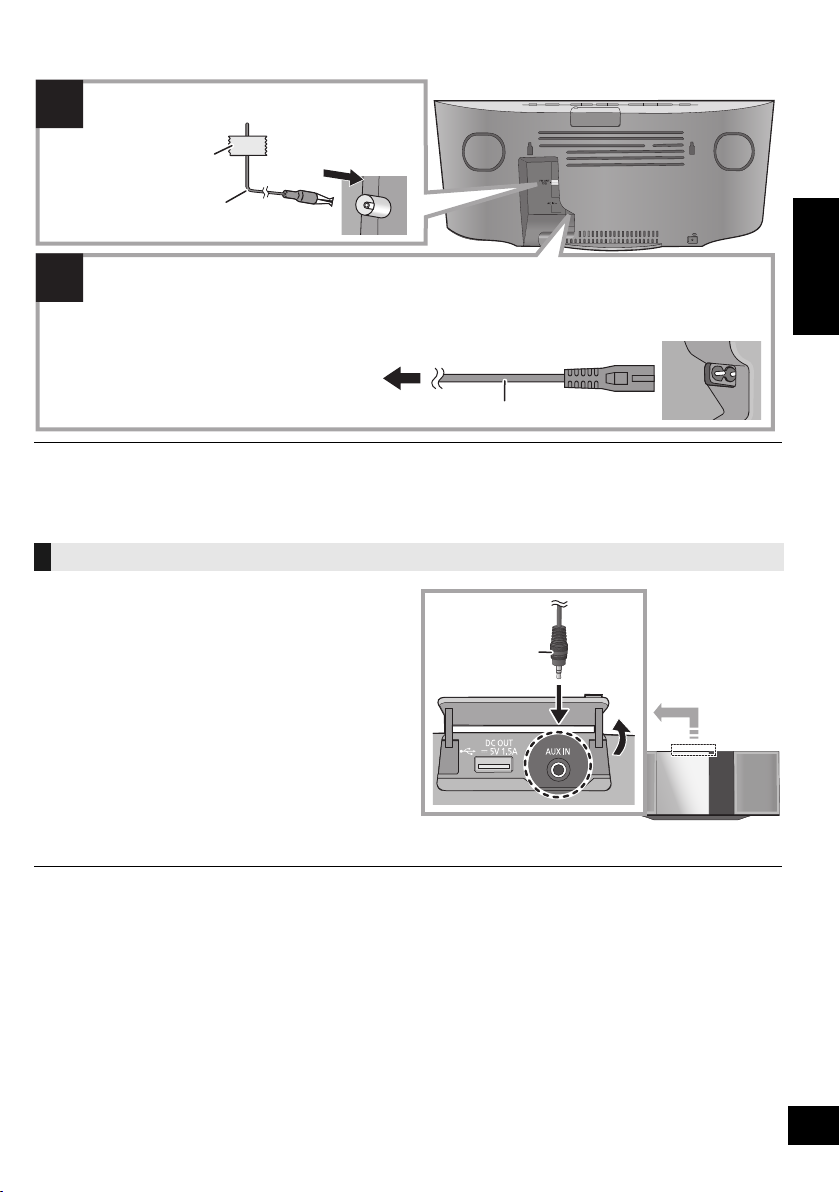
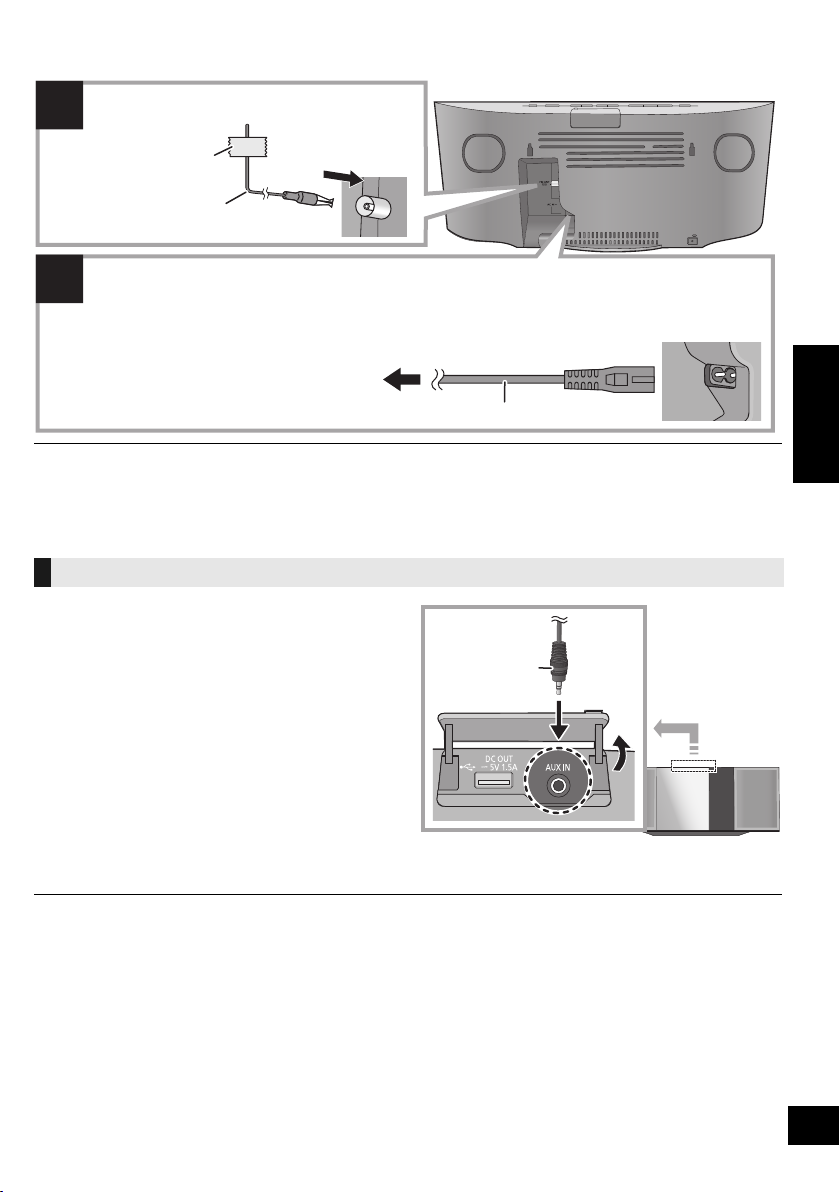
Connections
2
1
Connect the AC mains lead after all other connections are completed.
This unit consumes a small amount of AC power (l 18) even when turned off.
≥ In the interest of energy conservation, if you will not be using this unit for an extended period of time,
unplug it from the mains socket.
Adhesive tape
(not supplied)
FM indoor antenna
(supplied)
To a mains socket
AC mains lead (supplied)
Connect the antenna.
Audio cable
(not supplied)
≥ These speakers do not have magnetic shielding. Do not place them near a TV, personal computer or other magnetic devices.
≥ Tape the antenna to a wall or column in a position with the least amount of interference.
≥ If radio reception is poor, use a FM outdoor antenna with a right angle type connector (not supplied).
Connect an external music device
1 Connect an external music device using an audio
cable (not supplied).
≥ Plug type: ‰3.5 mm stereo
2 Press [RADIO/AUX] to select “AUX” and start
playback on the connected device.
ENGLISH
∫ To select the sound input level of the
external device
1 While in AUX mode, press [SOUND] repeatedly to
select “INPUT LEVEL”.
2 Press [3, 4] to select “NORMAL” or “HIGH” and
then press [OK].
≥ The factory default is “NORMAL”.
≥ To improve sound distortion when “HIGH” is selected, select “NORMAL”.
≥ Switch the equalizer off or turn the volume of the external device down to reduce the input signal. High level of input signal will
≥ For details, refer to the operating instructions of the device.
distort the sound.
5
RQT9944
Page 6
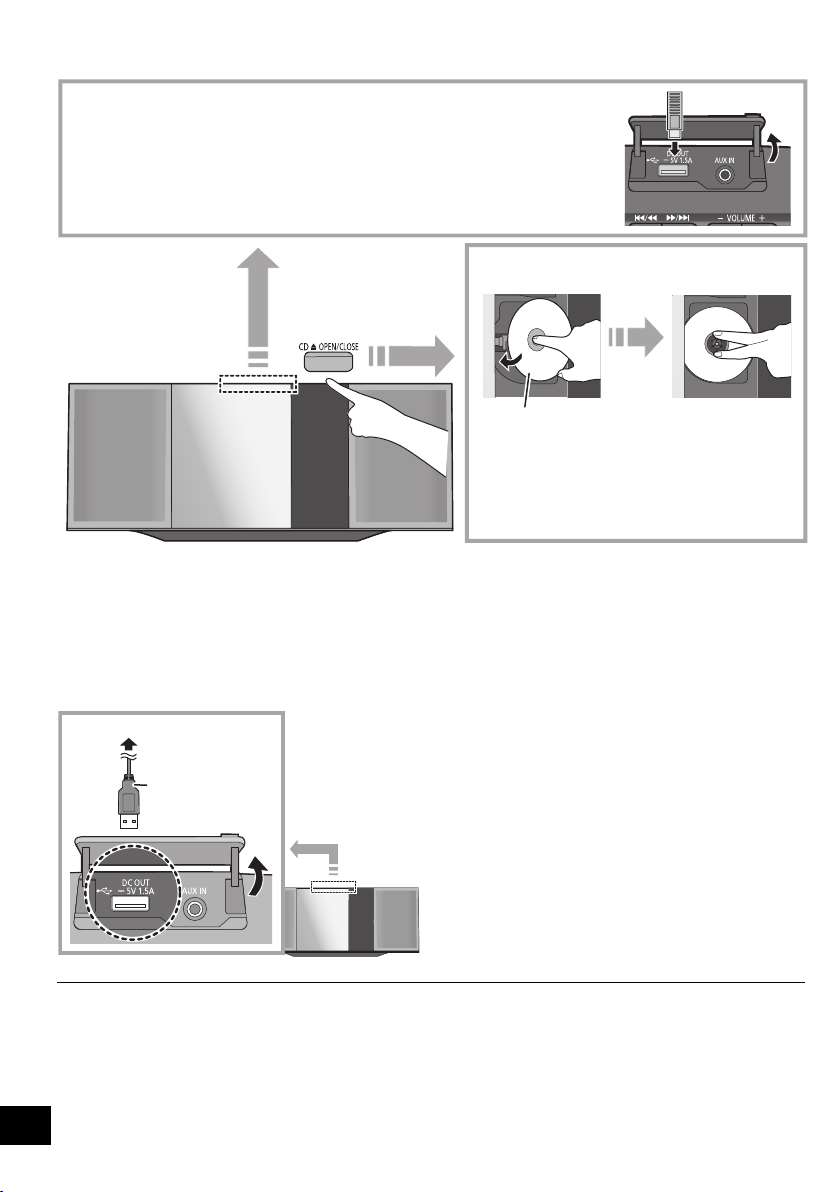
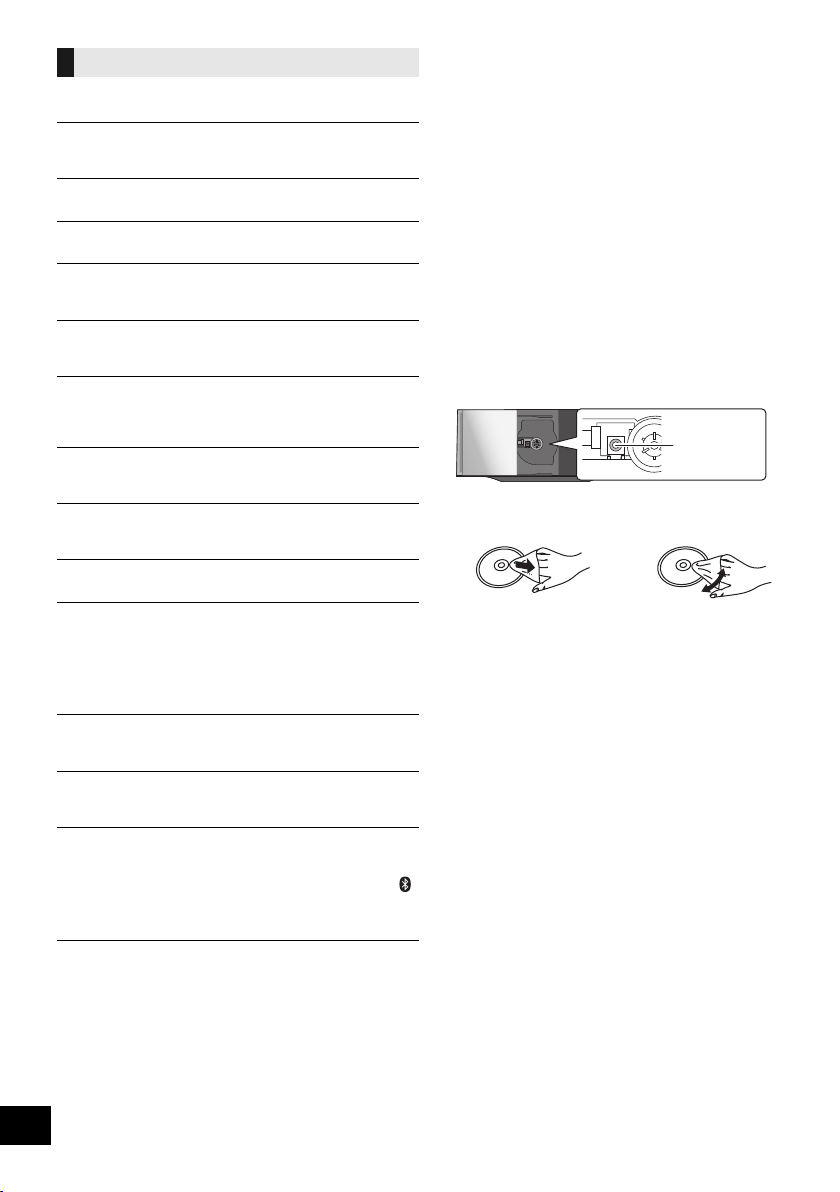
Inserting media
≥ Make sure to tilt the disc so as not to touch the sliding
door.
≥ Do not open the sliding door manually.
The label side
∫ Connecting a USB device
≥ Insert the USB device directly. Do not use any USB extension cable.
≥ Please disconnect the USB device if you finish using.
≥ Before removing the USB device, select a source other than “USB”.
∫ Inserting a CD
USB cable
(not supplied)
To the compatible device
∫ Charging a device
Charging starts when a device (rated value: 5 V/1.5 A) is connected to the DC OUT terminal of this unit.
1 Turn the unit on.
2 Connect a device.
{. Confirm from the screen of the connected device, etc. to
make sure charging has started.
≥ Make sure that the unit does not fall when inserting or removing media.
≥ When moving this unit, be sure to remove all media and turn this unit to standby mode.
≥ A cable compatible with your device is required. Use the
cable that comes with your device.
≥ Even if you connect a cable compatible with the DC OUT
terminal of this unit, your device may not be charged. In that
case, use the charger that comes with the device.
≥ Depending on your device, using other chargers may not
work. Check the operating instructions of your device before
use.
≥ Do not connect a device with a rated value higher than 5 V/
1.5 A to this unit.
≥ To check if charging is complete, look at the screen of the
connected device, etc.
≥ Once fully charged, remove the USB cable from the DC OUT
terminal.
≥ To continue charging during standby mode, make sure the
device has started charging before turning the unit to standby
mode.
– When charging a depleted device, do not turn the unit to
6
RQT9944
standby mode until the device becomes operational.
Page 7
Bluetooth® operations
You can listen to the sound from the Bluetooth® audio device from this unit wirelessly.
≥ Refer to the operating instructions of the Bluetooth® device for details.
≥ If you intend to use an NFC (Near Field Communication)-compatible Bluetooth® device, proceed to “One-Touch
Connection (Connecting by NFC)”.
Connecting via Bluetooth® menu
Preparation
≥ Turn on the Bluetooth® feature of the device and
place the device near this unit.
∫ Pairing with Bluetooth® devices
1 Press [ ] to select “BLUETOOTH”.
{. If “PAIRING” is indicated on the display, go to step 4.
To enter pairing mode*
2 Press [PLAY MENU] to select “PAIRING”.
3 Press [3, 4] to select “OK? YES” and then press
[OK].
To pair with a device
®
device.
®
device’s
4 Select “SC-HC39” from the Bluetooth
Bluetooth® menu.
{. The name of the connected device is indicated on the
display for a few seconds.
5 Start playback on the Bluetooth
* You can also enter pairing mode by pressing and holding
[ -PAIRING] on the unit.
∫ Connecting a paired Bluetooth® device
1 Press [ ] to select “BLUETOOTH”.
{. “READY” is indicated on the display.
2 Select “SC-HC39” from the Bluetooth
®
Bluetooth
{. The name of the connected device is indicated on the
menu.
display for a few seconds.
3 Start playback on the Bluetooth
≥ If prompted for the passkey, input “0000”.
≥ You can register up to 8 devices with this unit. If a 9th device
is paired, the device that has not been used the longest will
be replaced.
≥ This unit can only be connected to one device at a time.
≥ When “BLUETOOTH” is selected as the source, this unit will
automatically try and connect to the last connected
®
Bluetooth
device.
®
device.
®
device’s
One-Touch Connection
(Connecting by NFC)
For NFC-compatible AndroidTM devices only
Simply by touching an NFC (Near Field
Communication)-compatible Bluetooth® device on the
unit, you can complete all preparations, from
registering a Bluetooth® device to establishing a
connection.
≥ Android device version lower than 4.1 requires the
installation of the app “Panasonic Music Streaming”
(Free of charge). Download the app to your
Bluetooth® device.
– Enter “Panasonic Music Streaming” in the search box of
Google Play
Music Streaming”.
Preparation
≥ Turn on the NFC feature of the device.
TM
to search, and then select “Panasonic
1 Press [ ] to select “BLUETOOTH”.
2 Touch and hold your device on the NFC touch area
of this unit [ ]. (l 4)
{. Once the registration and connection of the Bluetooth®
device is complete, the name of the connected device is
indicated on the display for a few seconds. Move the
device away from the unit.
≥ When the connection is not established even if your
device has touched the NFC touch area, move the
device so it can be detected.
3 Start playback on the Bluetooth
≥ If you touch another device to this unit, you can update the
≥ If the image and sound are out of sync during playback,
≥ When the connection is established, the playback may start
≥ The One-Touch Connection may not work properly
®
Bluetooth
be disconnected automatically.
restart the playback app you are using. If the problem
persists, connect the Bluetooth
audio cable (not supplied).
automatically depending on the type of device being used.
depending on the type of device being used.
connection. The previously connected device will
®
device.
®
device and this unit with an
ENGLISH
7
RQT9944
Page 8
Bluetooth® transmission mode
You can change the transmission mode to prioritise
transmission quality or sound quality.
Preparation
≥ Press [ ] to select “BLUETOOTH”.
≥ If a Bluetooth® device is already connected,
disconnect it.
Disconnecting a Bluetooth® device
1 While a Bluetooth
Press [PLAY MENU] repeatedly to select
“DISCONNECT?”.
®
device is connected:
2 Press [3, 4] to select “OK? YES” and then press
[OK].
1 Press [PLAY MENU] repeatedly to select
“LINK MODE”.
2 Press [3, 4] to select the mode and then press
[OK].
MODE 1: Emphasis on connectivity
MODE 2: Emphasis on sound quality
≥ Select “MODE 1” if the sound is interrupted.
≥ The factory default is “MODE 2”.
Bluetooth® input level
If the sound input level from the Bluetooth® device is
too low, change the input level setting.
Preparation
≥ Connect a Bluetooth® device.
1 Press [PLAY MENU] repeatedly to select “INPUT
LEVEL”.
2 Press [3, 4] to select the level and then press
[OK].
“LEVEL 0” ,. “LEVEL i1” ,. “LEVEL i2”
^---------------------------------------------------------J
≥ Select “LEVEL 0” if the sound is distorted.
≥ The factory default is “LEVEL 0”.
≥ You can also disconnect the Bluetooth® device by pressing
and holding [ -PAIRING] on the unit.
≥ The Bluetooth
audio source (e.g., “CD”) is selected.
®
device will be disconnected if a different
8
RQT9944
Page 9
Media playback controls
The following marks indicate the availability of the
feature.
[CD]: CD audio in CD-DA format and a CD that
[USB]: USB devices containing MP3 files (l 15)
[Bluetooth]: Connected Bluetooth® device
Preparation
≥ Turn the unit on.
≥ Insert the media or connect the Bluetooth® device.
≥ Press [USB/CD] or [ ] to select the audio source.
Play Press [1/;].
Stop Press [∫].
Pause Press [1/;].
Skip Press [:/6] or [5/9] to skip
Search During play or pause, press and hold
∫ To display information
Press [DISPLAY] repeatedly.
≥ To use this unit’s remote control with a Bluetooth® device, the
Bluetooth
Remote Control Profile).
Depending on the status of the device, some controls may
not work.
≥ Maximum number of displayable characters: approx. 30
≥ This unit supports ver. 1.0, 1.1 and 2.3 ID3 tags. Text data
that is not supported will not be displayed or will be shown
differently.
≥ Album and track indication for MP3 files.
contains MP3 files (l 15)
Basic controls
([CD], [USB], [Bluetooth])
≥ [USB]: The position is memorised and
“RESUME” is displayed.
Press again to restart play.
track.
[CD], [USB] Press [3] or [4] to skip
the MP3 album.
[:/6] or [5/9].
®
device must support AVRCP (Audio Video
Playback modes ([CD], [USB])
Select the playback mode.
1 Press [PLAY MENU] to select “PLAYMODE” or
“REPEAT”.
2 Press [3, 4] to select the setting and then press
[OK].
PLAYMODE
OFF
PLAYMODE
1-TRACK Only plays the selected track.
1-ALBUM Only plays the selected MP3 album.
RANDOM Plays the contents randomly.
1-ALBUM
RANDOM
REPEAT
ON REPEAT Turns on repeat mode.
OFF
REPEAT
≥ During random play, you cannot skip to the previous track.
≥ The mode is cancelled when you open the sliding door.
Cancels the play mode setting.
≥ “1”, “ ” is displayed.
(Skip to the desired track.)
≥ “1”, “ ” is displayed.
≥ “RND” is displayed.
Plays the tracks in the selected
MP3 album randomly.
≥ Press [3] or [4] to select the MP3
album.
≥ “1”, “ ”, “RND” is displayed.
≥ “`” is displayed.
Turns off repeat mode.
ENGLISH
“A _ _ _”: MP3 album number.
“T _ _ _”: MP3 track number.
≥ “ _ ” stands for the album or track number.
“”:
“”:
This indication is also used to refer to an album.
This indication is also used to refer to a track.
9
RQT9944
Page 10

Listening to the radio
You can preset up to 30 channels.
Preparation
≥ Make sure that the antenna is connected. (l 5)
≥ Turn the unit on.
≥ Press [RADIO/AUX] to select “FM”.
≥ A station previously stored is overwritten when another
station is stored in the same channel preset.
Presetting stations automatically
1 Press [PLAY MENU] to select “A.PRESET”.
2 Press [3, 4] to select “LOWEST” or “CURRENT”
and then press [OK].
LOWEST:
To begin auto preset with the lowest frequency
(FM 87.50).
CURRENT:
To begin auto preset with the current frequency.*
{. The tuner starts to preset all the stations it can receive
into the channels in ascending order.
* To change the frequency, refer to “Manual tuning and
presetting”.
Listening to a preset channel
1 Press [PLAY MENU] repeatedly to select
“TUNEMODE”.
2 Press [3, 4] to select “PRESET” and then press
[OK].
3 Press [:/6] or [5/9] to select the
channel.
∫ Manual tuning and presetting
Select a radio broadcast.
1 Press [PLAY MENU] repeatedly to select
“TUNEMODE”.
2 Press [3, 4] to select “MANUAL” and then press
[OK].
3 Press [:/6] or [5/9] to tune to the
required station.
≥ To start automatic tuning, press and hold [:/6] or
[5/9] until the frequency starts scrolling. Tuning
stops when a station is found.
To preset the channel
4 While listening to the radio broadcast, press [OK].
5 Press [3, 4] to select the channel and then press
[OK].
∫ To improve FM sound quality
1 While receiving FM broadcasts, press
[PLAY MENU] repeatedly to select “FM MODE”.
2 Press [3, 4] to select “MONO” and then press
[OK].
≥ This setting can be preset and memorised. To do so,
continue to step 4 of “Manual tuning and presetting”.
≥ Select “STEREO” in step 2 to return to stereo broadcasts.
≥ “MONO” is cancelled if the frequency is changed.
∫ To display the current FM signal status
While receiving FM signal, press [PLAY MENU]
repeatedly to display “FM STATUS” and then press
[OK].
“FM ST”: The FM signal is tuned and in stereo.
“FM”: There is no tuned signal or the FM signal
“FM MONO”: “MONO” is selected in step 2 of “To
∫ To display RDS text data
Press [DISPLAY] to display the text data.
≥ Each time you press the button:
“PS”: Programme service
“PTY”: Programme type
“FREQ”: Frequency display
is in monaural.
improve FM sound quality” (l above).
10
RQT9944
≥ “STEREO” is displayed when this unit tunes to a stereo
broadcast.
≥ The unit can display the text data transmitted by the radio
data system (RDS) available in some areas. (RDS displays
may not be available if reception is poor.)
Page 11
Sound adjustment
The following sound effects can be added to the audio
output.
1 Press [SOUND] repeatedly to select the effect.
2 Press [3, 4] to select the setting and then press
[OK].
“PRESET EQ”
(Preset Equalizer)
“BASS” (Bass) or
“TREBLE” (Treble)
“D.BASS”
(Dynamic Bass)
“SURROUND”
(Surround)
≥ You may experience a reduction in sound quality when these
effects are used with some sources. If this occurs, turn the
sound effects off.
≥ When “AUX” is selected as the source, you can select
“INPUT LEVEL” to adjust the sound input level of the
external device. (l 5)
“HEAVY” (heavy), “SOFT” (soft),
“CLEAR” (clear), “VOCAL”
(vocal) or “FLAT” (flat/off).
≥ The factory default is “HEAVY”.
Adjust the level (j4 to i4).
“ON D.BASS” or “OFF D.BASS”.
≥ The factory default is
“ON D.BASS”.
“ON SURROUND” or
“OFF SURROUND”.
≥ The factory default is
“OFF SURROUND”.
Clock and Timer
Setting the clock
This is a 24-hour clock.
1 Press [SETUP] repeatedly to select “CLOCK”.
2 Press [3, 4] to set the time and then press [OK].
≥ To display the clock, press [SETUP] repeatedly to select
“CLOCK” and then press [OK] once. The time is displayed for
10 seconds.
(During standby, press [DISPLAY] once.)
≥ The clock is reset when there is a power failure or when the
AC mains lead is removed.
≥ Reset the clock regularly to maintain accuracy.
Play timer
You can set the timer so this unit turns on at a certain
time every day.
Preparation
Set the clock.
∫ Setting the timer
1 Press [SETUP] repeatedly to select “TIMER ADJ”.
2 Press [3, 4] to set the starting time (“ON TIME”)
and then press [OK].
3 Press [3, 4] to set the finishing time
(“OFF TIME”) and then press [OK].
4 Press [3, 4] to select the music source*
press [OK].
and then
∫ Turning the timer on
1 Prepare the selected music source and set the
desired volume.
2 Press [SETUP] repeatedly to select “TIMER SET”.
3 Press [3, 4] to select “SET” and then press [OK].
≥ “F” is displayed.
≥ To turn the timer off, select “OFF”.
4 Press [Í] to turn the unit to standby mode.
≥ To display the timer settings, press [SETUP] repeatedly to
select “TIMER ADJ” and then press [OK] once.
The music source and volume will also be displayed if the
timer is turned on.
≥ During standby, if the timer is turned on, press [DISPLAY]
twice to display the settings.
≥ This unit can be used as normal after the timer is set,
however:
– Turn the unit to standby mode before the timer start time.
– Even if the audio source or the volume is changed, the
timer will still use the audio source and volume that was
set when the timer was turned on.
* “CD”, “USB”, “FM” and “AUX” can be set as the music
source.
Sleep timer
The sleep timer can turn the unit off after a set time.
1 Press [SETUP] to select “SLEEP”.
2 Press [3, 4] to set the time (in minutes) and then
press [OK].
“SLEEP 30” ,. “SLEEP 60” ,. “SLEEP 90” ,. “SLEEP 120”
^------------------. “OFF” (Cancel) (------------------J
ENGLISH
≥ The remaining time is indicated on the unit’s display except
when other operations are performed.
≥ The play timer and sleep timer can be used together. The
sleep timer is always the main timer on the unit.
11
RQT9944
Page 12
Others
Auto off function
As a factory default, this unit will turn to standby mode
automatically if there is no sound and it is not being
used for approximately 20 minutes.
To cancel this function
1 Press [SETUP] repeatedly to select “AUTO OFF”.
2 Press [3, 4] to select “OFF” and then press [OK].
≥ To turn the function on, select “ON” in step 2.
≥ This setting cannot be selected when “FM” is the source.
≥ When connected to a Bluetooth
not work.
Bluetooth® standby
When “SC-HC39” is selected from a paired Bluetooth®
device’s Bluetooth® menu, this unit will turn on
automatically from standby mode and establish a
Bluetooth® connection.
®
device, the function does
1 Press [SETUP] repeatedly to select “BLUETOOTH
STANDBY”.
2 Press [3, 4] to select “ON” and then press [OK].
≥ To turn the function off, select “OFF” in step 2.
Changing the unit and remote
control code
When other Panasonic equipment responds to the
supplied remote control, change the remote control
code.
1 Press [USB/CD] to select “CD”.
2 While pressing and holding [SELECTOR] on the
unit, press and hold [USB/CD] on the remote
control until the unit’s display shows “REMOTE 2”.
3 Press and hold [OK] and [USB/CD] on the remote
control for at least 4 seconds.
≥ To change the mode back to “REMOTE 1”, press [USB/CD]
to select “CD” and then repeat the step 2 and 3 but replace
[USB/CD] with [ ].
Software update
Occasionally, Panasonic may release updated
software for this unit that may add or improve the way
a feature operates. These updates are available free of
charge.
For more details, refer to the following website.
http://panasonic.jp/support/global/cs/
(This site is in English only.)
∫ Checking the software version
The version of the installed software is displayed.
Press [SETUP] repeatedly to select “SW VER.” and
then press [OK].
≥ Press [OK] to exit.
12
RQT9944
Page 13
Troubleshooting
Before requesting service, make the following checks.
If you are uncertain about some of the check points, or
if the solutions indicated in the following guide does not
resolve the issue, then consult your dealer for
instructions.
To return all settings to the factory defaults
When the following situations occur, reset the
memory:
≥ There is no response when buttons are pressed.
≥ You want to clear and reset the memory contents.
1 Disconnect the AC mains lead. (Wait for at least
3 minutes before proceeding to step 2.)
2 While pressing and holding down [Í/I] on the
unit, reconnect the AC mains lead.
≥ Keep holding down [Í/I] until “---------” appears on the
display.
3 Release [Í/I].
≥ All the settings are returned to the factory defaults. You will
need to reset the memory items.
General
Humming heard during playback.
≥ If an AC mains lead or fluorescent lights are near the cords, then
keep other appliances and cords away from the cables.
MP3 cannot be read.
≥ You may not be able to play MP3 if you have copied a
multi-session disc that has no data between sessions.
≥ When creating a multi-session disc, it is necessary to close the
session.
≥ The amount of data on the disc is too small. Set the amount of
data to above 5 MB.
Charging does not start during standby mode.
≥ Turn the unit on. Check the charging has started, and then turn
the unit to standby mode. (l 6)
Noise is heard.
≥ When a device is connected to both the AUX IN jack and the DC
OUT terminal, noise may be generated depending on the device.
In this case, remove the USB cable from the DC OUT terminal.
Remote control
The remote control does not work properly.
≥ The battery is depleted or inserted incorrectly. (l 4)
Disc
Incorrect display or play does not start.
≥ Make sure that the disc is compatible with this unit. (l 15)
≥ There is moisture on the lens. Wait for about an hour and then try
again.
USB
No response when [1/;] is pressed.
≥ Disconnect the USB device and then reconnect it. Alternatively,
turn the unit off and on again.
The USB drive or its contents cannot be read.
≥ The USB drive format or its contents is/are not compatible with the
unit (l 15).
≥ The USB host function of this product may not work with some
USB devices.
Slow operation of the USB flash drive.
≥ Large file size or high memory USB flash drive takes longer time
to read.
The elapsed time displayed is different from the
actual play time.
≥ Copy the data to another USB device or backup the data and
reformat the USB device.
Radio
Static or noisy reception is heard while listening to
a radio broadcast.
≥ Confirm the antenna is properly connected. (l 5)
≥ Adjust the position of the antenna.
≥ Try to keep a certain amount of distance between the antenna and
AC mains lead.
≥ Try using an outdoor antenna if there are buildings or mountains
nearby. (l 5)
≥ Turn the TV or other audio players off or separate it from this unit.
≥ Keep this unit away from mobile phones if there is interference.
Bluetooth
Pairing cannot be completed.
≥ Check the Bluetooth® device condition.
The device cannot be connected.
≥ The pairing of the device was unsuccessful or the registration has
been replaced. Try re-pairing the device. (l 7)
≥ This unit might be connected to a different device. Disconnect the
other device and try re-pairing the device. (l 7)
The device is connected, but audio cannot be
heard through this unit.
≥ For some built-in Bluetooth® devices, you have to set the audio
output to “SC-HC39” manually. Read the operating instructions for
the device for details.
The sound is interrupted.
≥ The device is out of the 10 m communication range. Place the
Bluetooth® device closer to this unit.
≥ Remove any interference between this unit and the device.
≥ Other devices that use the 2.4 GHz frequency band, such as
wireless routers, microwaves, cordless phones, etc. are
interfering. Place the Bluetooth
distance it from the other devices.
≥ Select “MODE 1” for stable communication. (l 8)
The One-Touch Connection (NFC feature) is not
working.
≥ Make sure the unit and the NFC feature of the device are turned
on. (l 7)
®
®
device closer to this unit and
ENGLISH
13
RQT9944
Page 14
Messages
Lens
The following messages or service numbers may
appear on the unit’s display.
“--:--”
≥ You plugged the AC mains lead in for the first time or there was a
power failure recently. Set the time (l 11 ).
“ADJUST CLOCK”
≥ Clock is not set. Adjust the clock accordingly.
“ADJUST TIMER”
≥ Play timer is not set. Adjust the play timer accordingly.
“AUTO OFF”
≥ The unit has been left unused for about 20 minutes and will shut
down within a minute. Press any button to cancel it.
“ERROR”
≥ Incorrect operation is performed. Read the instructions and try
again.
“F” (“ ” stands for a number.)
≥ There is a problem with this unit.
Write down the displayed number, disconnect the AC mains lead
and consult your dealer.
“ILLEGAL OPEN”
≥ Sliding door is in the wrong position. Turn the unit off and on
again. If this display appears again, consult the dealer.
“NODEVICE”
≥ The USB device is not inserted correctly. Read the instructions
and try again (l 6).
“NO DISC”
≥ Insert the disc to be played (l 6).
“NO PLAY”
≥ A CD that is not in CD-DA or MP3 format is inserted. It cannot be
played.
≥ Examine the content. You can only play supported format. (l 15)
≥ The files in the USB device can be corrupted. Format the USB
device and try again.
≥ The unit may have a problem. Turn the unit off and then on again.
“PLAYERROR”
≥ You played an unsupported MP3 file. The system will skip that
track and play the next one.
“READING”
≥ The unit is checking the CD/USB information. After this display
has disappeared, start operating.
“REMOTE ” (“ ” stands for a number.)
≥ The remote control and this unit are using different codes. Change
the code on the remote control.
– When “REMOTE 1” is displayed, press and hold [OK] and [ ]
for at least 4 seconds.
– When “REMOTE 2” is displayed, press and hold [OK] and
[USB/CD] for at least 4 seconds.
“USB OVER CURRENT ERROR”
≥ The USB device is drawing too much power. Select a source other
than “USB”, remove the USB and turn the unit off.
Unit and media care
Pull out the AC mains lead from the outlet before
maintenance.
∫ Clean this unit with a soft, dry cloth
≥ When dirt is heavy, wring a wet cloth tightly to wipe the dirt,
and then wipe it with a dry cloth.
≥ When cleaning the speaker covers, use a fine cloth.
Do not use tissues or other materials that can fall apart.
Small pieces may get stuck inside the speaker cover.
≥ Never use alcohol, paint thinner or benzine to clean this unit.
≥ Before using chemically treated cloth, carefully read the
cloth’s instructions.
∫ Maintenance of the lens
≥ Clean the lens regularly to prevent malfunctions. Use a dust
blower to remove dust and a cotton swab if it is extremely
dirty.
≥ You cannot use a CD type lens cleaner.
≥ Do not leave the sliding door open for prolonged periods of
time. This will cause the lens to get dirty.
≥ Be careful not to touch the lens with your fingers.
∫ Clean discs
DO DO NOT
Wipe with a damp cloth and then wipe dry.
∫ Disc handling precautions
≥ Handle discs by the edges to avoid inadvertent scratches or
fingerprints on the disc.
≥ Do not attach labels or stickers to discs.
≥ Do not use record cleaning sprays, benzine, thinner, static
electricity prevention liquids or any other solvent.
≥ Do not use the following discs:
– Discs with exposed adhesive from removed stickers or
labels (rented discs etc.).
– Discs that are badly warped or cracked.
– Irregularly shaped discs, such as heart shapes.
∫ To dispose or transfer this unit
The unit may keep the user settings information in the
unit. If you discard this unit either by disposal or
transfer, then follow the procedure to return all the
settings to the factory defaults to delete the user
settings.
(l 13, “To return all settings to the factory defaults”)
≥ The operation history may be recorded in the
memory of this unit.
14
RQT9944
Page 15
About Bluetooth
®
Panasonic bears no responsibility for data and/or
information that is compromised during a
wireless transmission.
∫ Frequency band used
≥ This system uses the 2.4 GHz frequency band.
∫ Certification of this device
≥ This system conforms to frequency restrictions and
has received certification based on frequency laws.
Thus, a wireless permit is not necessary.
≥ The actions below are punishable by law in some
countries:
– Taking apart or modifying the system.
– Removing specification indications.
∫ Restrictions of use
≥ Wireless transmission and/or usage with all
Bluetooth® equipped devices is not guaranteed.
≥ All devices must conform to standards set by
Bluetooth SIG, Inc.
≥ Depending on the specifications and settings of a
device, it can fail to connect or some operations can
be different.
≥ This system supports Bluetooth® security features.
But depending on the operating environment and/or
settings, this security is possibly not sufficient.
Transmit data wirelessly to this system with caution.
≥ This system cannot transmit data to a Bluetooth®
device.
∫ Range of use
≥ Use this device at a maximum range of 10 m. The
range can decrease depending on the environment,
obstacles or interference.
∫ Interference from other devices
≥ This system may not function properly and troubles
such as noise and sound jumps may arise due to
radio wave interference if this system is located too
close to other Bluetooth
®
devices or the devices that
use the 2.4 GHz band.
≥ This system may not function properly if radio waves
from a nearby broadcasting station, etc. is too
strong.
∫ Intended usage
≥ This system is for normal, general use only.
≥ Do not use this system near an equipment or in an
environment that is sensitive to radio frequency
interference (example: airports, hospitals,
laboratories, etc).
Playable media
Compatible CD
≥ A disc with the CD Logo.
≥ This unit can play back discs that conform to the CD-DA
format.
≥ The unit may not be able to play some discs due to the
condition of the recording.
Compatible USB devices
≥ This unit does not guarantee connection with all USB
devices.
≥ FAT12, FAT16 and FAT32 file systems are supported.
≥ This unit supports USB 2.0 full speed.
≥ This unit can support USB devices of up to 32 GB.
Compatible MP3 files
≥ Supported format: Files with the extension “.mp3” or “.MP3”.
≥ Compatible compression rate: Between 16 kbps and
320 kbps (stereo).
≥ Depending on how you create the MP3 files, they may not
play in the order you numbered them or may not play at all.
CD-R/RW
≥ Maximum number of tracks and albums: 999 tracks and 254
albums (Excluding Root folder).
≥ Disc formats: ISO9660 level 1 and level 2 (except for
extended formats).
≥ If the disc includes both MP3 and normal audio data
(CD-DA), the unit plays the type recorded in the inner part of
the disc.
≥ This unit cannot play files recorded using packet write.
USB device
≥ Maximum number of tracks and albums: 8000 tracks and 799
albums (Excluding Root folder).
≥ Only one memory card will be selected when connecting a
multiport USB card reader, typically the first memory card
inserted.
Licenses
The Bluetooth® word mark and logos are owned by the
Bluetooth SIG, Inc. and any use of such marks by Panasonic
Corporation is under license.
Other trademarks and trade names are those of their respective
owners.
Google Play and Android are trademarks of Google Inc.
MPEG Layer-3 audio coding technology licensed from
Fraunhofer IIS and Thomson.
ENGLISH
15
RQT9944
Page 16
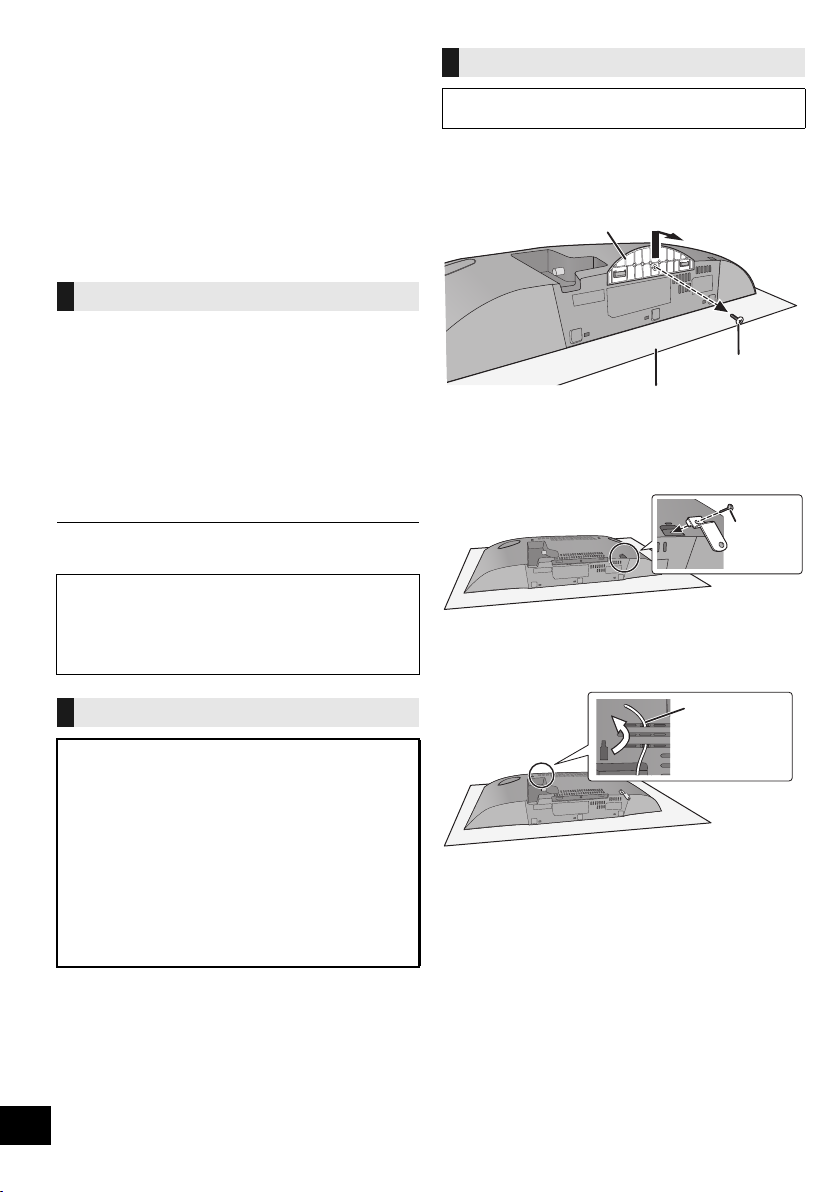
Attaching the unit to a wall
Stan d
Fixing screw
Soft blanket or cloth
Screw
(supplied)
Cord
(not supplied)
(optional)
This unit can be wall mounted using the supplied wall
mount brackets, etc. Make sure that the wall and the
screws used for securing to the wall are capable of
supporting at least 33 kg. The screws and other items
are not supplied as the type and size will vary with
each installation.
≥ Refer to step 5 of “Wall mount instructions” for details
about the required screws.
≥ As an additional protective measure, attach the unit
to the wall with the fall prevention cord.
Installation accessories
∫ Supplied accessories
≥ 1 Safety holder
≥ 1 Screw
≥ 2 Wall mount brackets
∫ Additionally required accessories
(commercially available)
≥ 4 Wall mount bracket fixing screws
≥ 1 Safety holder fixing screw
≥ 1 Fall prevention cord*
≥ 1 Screw eye
* Use a cord that is capable of supporting over 33 kg
(with a diameter of about 1.5 mm).
≥ Keep the safety holder out of reach of children to
prevent swallowing.
≥ Keep the screws out of reach of children to prevent
swallowing.
≥ Keep the wall mount brackets out of reach of children
to prevent swallowing.
Wall mount instructions
Before installation, turn the unit off and disconnect the
AC mains lead from the mains socket.
1 Detach the stand from the unit.
≥ Unscrew the fixing screw at the bottom of the unit.
≥ Gently pull the stand off the unit as illustrated.
≥ Keep the removed screw and the stand in a safe place.
2 Fix the safety holder onto the unit with the screw
(supplied).
≥ Screw tightening torque: 50 N0cm to 70 N0cm.
3 Attach the fall prevention cord (not supplied) to this
unit.
Safety precautions
Professional installation is required.
The installation should never be done by any
other than a qualified installation specialist.
PANASONIC DISCLAIMS ANY PROPERTY
DAMAGE AND/OR SERIOUS INJURY,
INCLUDING DEATH RESULTING FROM
IMPROPER INSTALLATION OR INCORRECT
HANDLING.
WARNING:
To prevent injury, this apparatus must be securely
attached to the wall in accordance with the
installation instructions.
16
RQT9944
Page 17
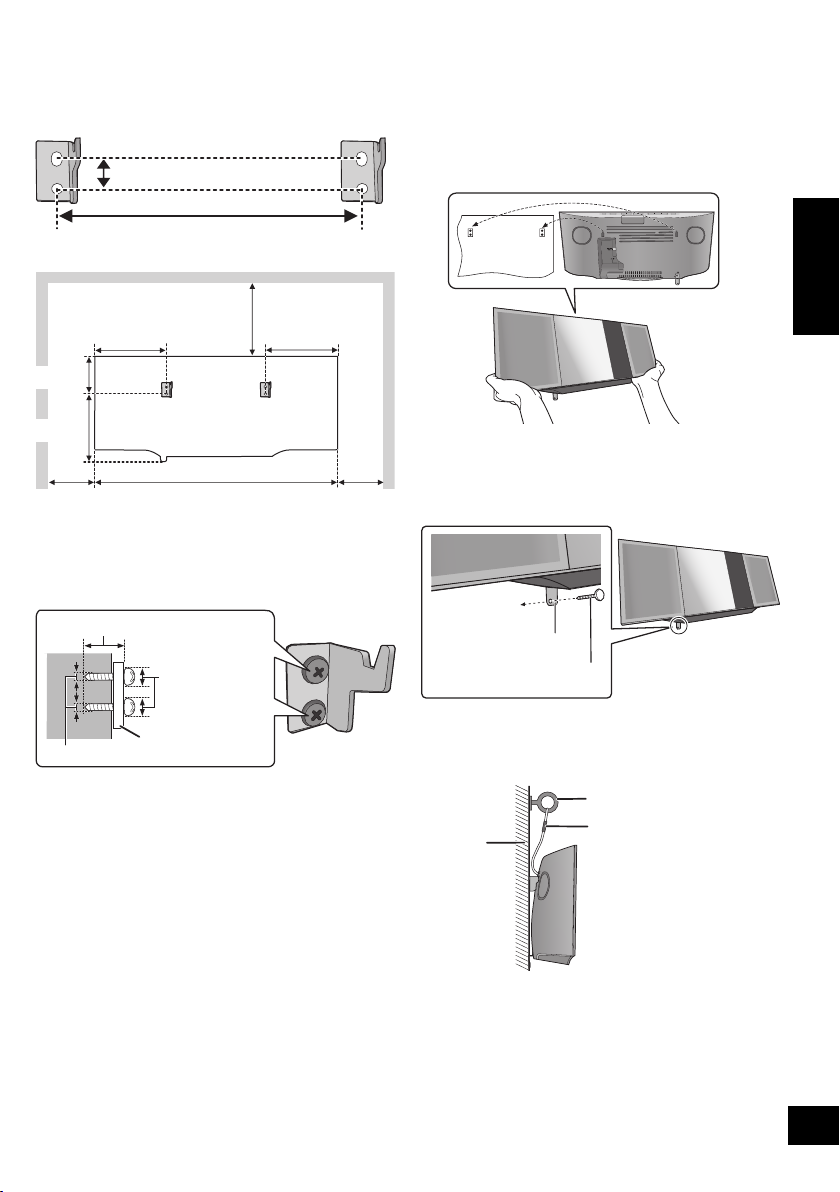
4 Measure and mark the position of both sides of the
204 mm
13 mm
500 mm
75 mm
142 mm
154 mm
100 mm
142
mm
300 mm
100 mm
At least 30 mm
‰7.5 mm to
‰9.4 mm
‰4 mm
Wall mount bracket
Wall
Safety holder fixing screw
(not supplied)
Safety holder
Fix to the wall
Cord (not supplied)
Screw eye (not supplied)
Wall
wall mount brackets.
≥ Use figures below to identify the screwing positions.
The position to attach the wall mount brackets
Space required
5 Attach the wall mount bracket to both sides of the
wall with two screws (not supplied).
≥ Use a level to ensure both wall mount brackets are
level.
6 Hook the unit securely onto the wall mount
brackets with both hands.
≥ Connect the antenna and the AC mains lead to the unit
before hanging the unit onto the wall. (l 5)
≥ After hanging the unit, release your hands carefully to
confirm the unit sits securely on the wall mount
brackets.
7 Drive the safety holder fixing screw (not supplied)
to secure the safety holder onto the wall.
≥ Refer to step 5 for requirements before screwing.
ENGLISH
8 Attach the fall prevention cord (not supplied) to the
wall.
≥ Make sure that the slack of the cord is minimal.
17
RQT9944
Page 18

Specifications
∫ GENERAL
Power consumption 26 W
Power consumption in standby mode*
(When “BLUETOOTH STANDBY” is “ON”)*
Power supply
AC 220 V to 240 V, 50 Hz
Dimensions (WkHkD)
500 mmk205 mmk92 mm
Mass Approx. 2.5 kg
Operating temperature range
Operating humidity range
35 % to 80 % RH (no condensation)
∫ AMPLIFIER SECTION
Output power
RMS Output Power Stereo mode
Front Ch (both ch driven)
20 W per channel (8 ≠), 1 kHz, 10 % THD
Total RMS Stereo mode power
∫ TUNER SECTION
Preset Memory FM 30 stations
Frequency Modulation (FM)
Frequency range
87.50 MHz to 108.00 MHz (50 kHz step)
Antenna terminals
∫ DISC SECTION
Disc played (8 cm or 12 cm)
CD, CD-R/RW (CD-DA, MP3*3)
Pick up
Wavelength 790 nm (CD)
[NORSK]
Bølgelengde 790 nm (CD)
Laserstyrke Ingen farlig stråling sendes ut
(med sikkerhets-beskyttelse)
1, 2
Approx. 0.2 W
2
Approx. 0.3 W
0 oC to r40 oC
40 W
75 ≠ (unbalanced)
∫ SPEAKER SYSTEM SECTION
Speaker unit(s)
Full range
Passive Radiator
Impedance 8 ≠
6.5 cm Cone typek1 per channel
8cmk2 per channel
∫ TERMINAL SECTION
USB Port
USB Standard
Media file format support
USB device file system
AUX IN
DC OUT 5V 1.5A
USB 2.0 full speed
MP3 (¢.mp3)
FAT12, FAT16, FAT32
Stereo, 3.5 mm jack
∫ BLUETOOTH SECTION
Versi on Bluetooth® Ver.2.1+EDR
Class Class 2
Supported Profiles
Operating Frequency
Operation Distance
A2DP, AVRCP
2.4 GHz band FH-SS
10 m Line of sight
≥ Specifications are subject to change without notice.
≥ Mass and dimensions are approximate.
≥ Total harmonic distortion is measured by a digital spectrum
analyzer.
*1: “BLUETOOTH STANDBY” is “OFF”.
*2: No device is connected to the USB port before turning to
standby mode.
*3: MPEG-1 Layer 3, MPEG-2 Layer 3
18
RQT9944
Page 19
ENGLISH
19
RQT9944
Page 20
Zasady bezpieczeństwa
OSTRZEËENIE
Urządzenie
≥ Aby ograniczyć niebezpieczeństwo pożaru, porażenia
prądem lub uszkodzenia urządzenia,
– Nie należy wystawiać urządzenia na działanie deszczu,
wilgoci, kapanie lub zachlapanie.
– Na urządzeniu nie należy ustawiać żadnych naczyń
zawierających płyny, takich jak wazony.
–Należy korzystać wyłącznie z zalecanych akcesoriów.
– Nie należy demontować obudowy urządzenia.
– Nie należy podejmować prób samodzielnej naprawy.
Naprawę urządzenia należy zlecić wykwalifikowanym
pracownikom serwisu.
–Należy uważać, aby do wnętrza urządzenia nie dostały
się metalowe przedmioty.
– Na urządzeniu nie wolno umieszczać żadnych ciężkich
przedmiotów.
Przewód zasilania
≥ Aby ograniczyć niebezpieczeństwo pożaru, porażenia
prądem lub uszkodzenia urządzenia,
–Należy się upewnić, że napięcie źródła zasilania
odpowiada napięciu podanemu na urządzeniu.
–Dokładnie podłączyć wtyczkę przewodu zasilającego do
gniazda ściennego.
– Nie wolno ciągnąć za przewód, zginać go ani kłaść na nim
ciężkich przedmiotów.
– Nie wolno dotykać wtyczki mokrymi rękami.
– Przy odłączaniu przewodu należy chwycić za wtyczkę.
– Nie wolno podłączać urządzenia do uszkodzonego
gniazda ściennego oraz gdy wtyczka przewodu
zasilającego jest uszkodzona.
≥ Wtyczka zasilania umożliwia odłączenie urządzenia.
Zainstaluj to urządzenie w taki sposób, aby mo
natychmiastowe odłączenie wtyczki zasilania od gniazda
zasilania.
UWAGA
Urządzenie
≥ W tym urządzeniu znajduje się laser. Wykonywanie regulacji
innych niż opisane lub postępowanie w sposób
nieprzewidziany w instrukcji obsługi grozi niebezpiecznym
naświetleniem promieniami lasera.
≥ Nie należy umieszczać na urządzeniu źródeł otwartego
ognia, takich jak zapalone świece.
≥ To ur z ądzenie może odbierać zakłócenia wywołane użyciem
telefonu komórkowego. Jeżeli takie zakłócenia wystąpią,
wskazane jest zwiększenie odległości pomiędzy
urządzeniem a telefonem komórkowym.
≥ Urządzenie jest przeznaczone do używania w klimacie
umiarkowanym.
Wybór miejsca
≥ Urządzenie należy ustawić na równej powierzchni.
≥ Aby ograniczyć niebezpieczeństwo pożaru, porażenia
prądem lub uszkodzenia urządzenia,
– Niniejszego urządzenia nie należy instalować lub
umieszczać w szafce na książki, zabudowanej szafce lub
innej ograniczonej przestrzeni, w celu zapewnienia dobrej
wentylacji.
– Nie należy zasłaniać otworów wentylacyjnych urządzenia
gazetami, obrusami, zasłonami i podobnymi
przedmiotami.
–Urządzenie należy chronić przed bezpośrednim
działaniem promieni słonecznych, wysoką temperaturą,
wysoką wilgotnością oraz nadmiernymi drganiami.
żliwe było
Bateria
≥ Istnieje niebezpieczeństwo wybuchu w przypadku, gdy
baterie zostaną nieprawidłowo włożone. Baterie należy
wymieniać wyłącznie na baterie typu zalecanego przez
producenta.
≥ Nieprawidłowe obchodzenie się z bateriami może prowadzić
do wycieku elektrolitu i może być także przyczyną pożaru.
– Baterię należy wyjąć, jeżeli pilot nie będzie używany przez
dłuższy czas. Należy ją przechowywać w chłodnym,
ciemnym miejscu.
– Nie ogrzewaj i nie wrzucaj do ognia.
– Nie należy pozostawiać baterii przez dłuższy czas w
samochodzie z zamkniętymi drzwiami i oknami
wystawionym na bezpośrednie działanie promieni
słonecznych.
– Nie demontuj i nie powoduj zwarcia.
– Baterii alkalicznych lub manganowych nie należy ładować
ponownie.
– Nie używaj baterii, z których usuni
≥ W przypadku utylizacji baterii, należy się skontaktować z
lokalnymi władzami lub ze sprzedawcą celem uzyskania
informacji o prawidłowym sposobie postępowania.
Oznaczenia identyfikacyjne produktu znajdują się na
spodzie urządzenia.
Deklaracja zgodności
Niniejszym “Panasonic Corporation” deklaruje, że ten
produkt jest zgodny z istotnymi wymaganiami i innymi
odnośnymi postanowieniami dyrektywy 1999/5/WE.
Klienci mogą pobrać oryginalną deklarację zgodności
naszych produktów z serwera deklaracji zgodności:
http://www.doc.panasonic.de
Kontakt się z autoryzowanym przedstawicielem: Panasonic
Marketing Europe GmbH,
Panasonic Testing Centre, Winsbergring 15, 22525
Hamburg, Niemcy
Ten produkt jest przeznaczony dla użytkownika ogólnego.
(Kategoria 3)
ęta została osłona.
20
RQT9944
Page 21
Spis treści
Zasady bezpieczeństwa ................................. 20
Akcesoria......................................................... 21
Instrukcja sterowania ..................................... 22
Podłączenia ..................................................... 23
Wsadzanie nośników...................................... 24
Operacje Bluetooth
Przyciski odtwarzania z nośników ................ 27
Słuchanie radia ............................................... 28
Regulacja dźwięku.......................................... 29
Zegar i timer .................................................... 29
Inne .................................................................. 30
Usuwanie usterek ........................................... 31
Konserwacja urządzenia i nośników ............ 32
Informacje o Bluetooth
Nośniki, które mogą być odtwarzane ........... 33
Licencje ........................................................... 33
Mocowanie urządzenia do ściany
(opcjonalne) .................................................... 34
Dane techniczne ............................................. 36
Informacje dotyczące opisów w niniejszej
instrukcji obsługi
≥ Odniesienia do stron są oznaczone jako “l ±±”.
≥ Jeżeli brak innych instrukcji, wykonywanie operacji
opisano z użyciem zdalnego sterowania.
®
....................................... 25
®
................................. 33
Akcesoria
Sprawdź dostarczone akcesoria przed rozpoczęciem
użytkowania urządzenia.
∏ 1 Pilot zdalnego sterowania
(N2QAYB000944)
∏ 1 Bateria do pilota zdalnego sterowania
∏ 1 Kabel zasilania prądem przemiennym
∏ 1 Antena
wewnętrzna FM
Akcesoria do montażu ściennego
∏ 1 Uchwyt
bezpieczeństwa
∏ 1 Śruba
≥ Nie używaj kabla zasilającego do zasilania innych
produktów.
≥ Numery produktów podane w niniejszej instrukcji obsługi
według stanu na styczeń 2014. Mogą ulec zmianie.
∏ 2 Wsporniki
ścienne
POLSKI
Pozbywanie się zużytych urządzeń elektrycznych i elektronicznych oraz baterii.
Dotyczy wyłącznie obszaru Unii Europejskiej oraz krajów posiadających systemy zbiórki i recyklingu.
Niniejsze symbole umieszczane na produktach, opakowaniach i/lub w dokumentacji
towarzyszącej oznaczają, że nie wolno mieszać zużytych urządzeń elektrycznych i
elektronicznych oraz baterii z innymi odpadami domowymi/komunalnymi.
W celu zapewnienia właściwego przetwarzania, utylizacji oraz recyklingu zużytych urządzeń
elektrycznych i elektronicznych oraz zużytych baterii, należy oddawać je do wyznaczonych
punktów gromadzenia odpadów zgodnie z przepisami prawa krajowego.
Poprzez prawidłowe pozbywanie się zużytych urządzeń elektrycznych i elektronicznych oraz
zużytych baterii pomagasz oszczędzać cenne zasoby naturalne oraz zapobiegać
potencjalnemu negatywnemu wpływowi na zdrowie człowieka oraz na stan środowiska
naturalnego.
W celu uzyskania informacji o zbiórce oraz recyklingu zużytych urządzeń elektrycznych i
elektronicznych oraz baterii prosimy o kontakt z władzami lokalnymi.
Za niewłaściwe pozbywanie się tych odpadów mogą grozić kary przewidziane przepisami prawa
krajowego.
Dotyczy symbolu baterii (symbol poniżej):
Ten symbol może występować wraz z symbolem pierwiastka chemicznego. W takim przypadku
wymagania Dyrektywy w sprawie określonego środka chemicznego są spełnione.
21
RQT9944
Page 22

Instrukcja sterowania
Widok z góry
(Bateria alkaliczna lub
manganowa)
1 Przełącznik trybu gotowości/włączania (Í/I)
(Í)
Naciśnij, aby przełączyć urządzenie z trybu włączenia na
tryb gotowości lub odwrotnie.
W trybie gotowości urządzenie wciąż zużywa niewielką
ilość energii.
2 Wybór źródła dźwięku
Na urządzeniu:
“CD” """"-. “BLUETOOTH” """"-. “USB”
^"""--" “AUX” (""-"" “FM” ("-""-}
Na pilocie:
[ ]: “BLUETOOTH”
[USB/CD]: “CD” ,. “USB”
[RADIO/AUX]: “FM”,. “AUX”
3 Podstawowe przyciski sterowania odtwarzaniem
4 Regulacja poziomu głośności (0 (min.) do 50
(maks.))
5 Otwórz lub zasuń odsuwaną pokrywę
6 Bluetooth
≥ Naciśnij, aby wybrać “BLUETOOTH” jako źródło
≥ Naciśnij i przytrzymaj, aby wejść do trybu parowania
®
-przycisk parowania
dźwięku.
(l 25) lub rozłączyć urządzenie Bluetooth
®
(l 26).
7 Obszar kontaktu NFC (l 25)
8 Port urządzeń USB / Złącze DC OUT (l 24)
9 AUX IN wtyk (l 23)
10 Czujnik sygnału zdalnego sterowania
Odległość: Do około 7 m bezpośrednio na wprost
Kąt około 30o w lewo i prawo
11 Wyświetlacz
12 Odsuwana pokrywa
13 Wyświetlanie menu ustawień
14 Zmiana wyświetlanych informacji
15 Wyświetlanie menu dźwięku
16 Przyciemnianie panelu wyświetlacza
Naciśnij ponownie, aby anulować.
17 Wyciszanie dźwięku
Naciśnij ponownie, aby anulować. “MUTE” jest także
anulowana podczas regulacji głośności i po wyłączeniu
urządzenia.
18 Wyświetlanie menu odtwarzania
19 Wybór/OK
∫ Korzystanie z pilota
Włóż baterię tak, aby bieguny (i oraz j) odpowiadały
biegunom w pilocie.
Skieruj na czujnik odbioru sygnału pilota w urządzeniu.
≥ Aby uniknąć zakłóceń, nie umieszczaj żadnych przedmiotów
przed czujnikiem sygnału.
22
RQT9944
Page 23
Podłączenia
2
1
Podłącza kabel zasilacza sieciowego dopiero po ustanowieniu wszystkich
innych połączeń.
Urządzenie pobiera niewielką ilość energii elektrycznej (l 36) nawet po wyłączeniu.
≥ W celu oszczędzania energii elektrycznej
odłącz urządzenie od gniazdka, gdy nie będzie używane przez dłuższy czas.
Ta śma klejąca
(brak w zestawie)
Antena wewnętrzna FM
(w zestawie)
Do gniazdka elektrycznego
Kabel zasilania prądem przemiennym
(w zestawie)
Podłącz antenę.
Kabel audio
(brak w zestawie)
≥ Głośniki nie są ekranowane magnetycznie. Nie umieszczaj ich w pobliżu telewizora, komputera osobistego ani innych urządzeń
emitujących pole magnetyczne.
≥ Przymocuj taśmą antenę do ściany lub do kolumny w pozycji zapewniającej najmniejsze zakłócenia.
≥ Jeżeli odbiór sygnałów radiowych jest słaby, użyj zewnętrznej anteny FM z kątowym złączem antenowym (brak w zestawie).
Podłącz zewnętrzne źródło muzyki
1 Podłącz zewnętrzne urządzenie muzyczne za
pomocą kabla audio (brak w zestawie).
≥ Typ wtyczki: ‰3,5 mm stereo
2 Naciśnij [RADIO/AUX], aby wybrać “AUX”, i włącz
odtwarzanie na podłączonym urządzeniu.
POLSKI
∫ Wybieranie poziomu dźwięku
wejściowego urządzenia zewnętrznego
1 Gdy urządzenie znajduje się w trybie “AUX”,
naciśnij kilkakrotnie [SOUND], aby wybrać “INPUT
LEVEL”.
2 Naciśnij [3, 4], aby wybrać “NORMAL” lub
“HIGH”, a następnie naciśnij [OK].
≥ Ustawienie fabryczne to “NORMAL”.
≥ Aby zmniejszyć zniekształcenia dźwięku po ustawieniu opcji “HIGH”, wybierz “NORMAL”.
≥ Wyłącz korektor lub zmniejsz głośność urządzenia zewnętrznego w celu zmniejszenia poziomu sygnału wejściowego. Wysoki
poziom sygnału wejściowego spowoduje przesterowanie dźwięku.
≥ Więcej informacji znajduje się w instrukcji obsługi urządzenia.
23
RQT9944
Page 24

Wsadzanie nośników
≥ Przechyl płytę, aby nie dotykała odsuwanej pokrywy.
≥ Nie otwierać ręcznie przesuwanej pokrywy.
Strona z etykietą
∫ Podłączanie urządzenia USB
≥ Włóż urządzenie USB bezpośrednio do gniazda USB. Nie używaj kabla przedłużającego
USB.
≥ Po zakończeniu używania urządzenia USB należy je odłączyć.
≥ Przed wyjęciem urządzenia USB wybierz źródło inne niż “USB”.
∫ Wkładanie płyty CD
Kabel USB
(brak w zestawie)
Do urządzenia kompatybilnego
∫ Ładowanie urządzenia
Ładowanie zostanie rozpoczęte po podłączeniu urządzenia (o parametrach: 5 V/1,5 A) do gniazda DC OUT
urządzenia.
1 Włącz urządzenie.
2 Podłącz urządzenie.
{. Sprawdź na ekranie urządzenia, czy ładowanie się
rozpoczęło.
≥ Wkładając lub wyjmując nośnik, upewnij się, że urządzenie nie spadnie.
≥ Przed przeniesieniem urządzenia wyjmij wszystkie nośniki i przełącz urządzenie w tryb gotowości.
≥ Wymagany jest kabel kompatybilny z danym urządzeniem.
Należy używać kabla dołączonego do urządzenia.
≥ Nawet po podłączeniu kabla kompatybilnego z gniazdem
wyjściowym DC OUT urządzenia głównego, podłączone
urządzenie może nie być ładowane. W takiej sytuacji należy
używać ładowarki dołączonej do urządzenia.
≥ W zależności od urządzenia, użycie innej ładowarki może nie
być możliwe. Przed użyciem należy to sprawdzić w instrukcji
obsługi danego urządzenia.
≥ Do urządzenia głównego nie wolno podłącza
wartości znamionowej wyższej niż 5 V/1,5 A.
≥ Aby sprawdzić, czy ładowanie zostało ukończone, należy
sprawdzić informację na ekranie ładowanego urządzenia.
≥ Po ukończeniu ładowania, odłącz kabel USB od gniazda DC
OUT
≥ Aby kontynuować ładowanie w trybie gotowości, upewnij się,
że ładowanie zostało rozpoczęte przed przełączeniem
urządzenia w tryb gotowości.
– Podczas ładowania urządzenia o całkowicie
rozładowanym akumulatorze, nie należy przełączać
urządzenia głównego w tryb gotowości zanim podłączone
urządzenie naładuje się wystarczają
funkcjonalności.
24
RQT9944
ć urządzeń o
co do odzyskania
Page 25

Operacje Bluetooth
®
Istnieje możliwość słuchania muzyki z urządzenia Bluetooth® poprzez połączenie bezprzewodowe z urządzeniem
głównym.
≥ Więcej informacji znajduje się w instrukcji obsługi urządzenia Bluetooth®.
≥ Jeżeli chcesz użyć urządzenia kompatybilnego z NFC (Near Field Communication) Bluetooth®, przejdź do
“Połączenie One-Touch (Połączenie za pomocą NFC)”.
Połączenie poprzez menu
Bluetooth
Przygotowanie
≥ Włącz funkcję Bluetooth® w urządzeniu i umieść
urządzenie w pobliżu tego zestawu.
®
∫ Parowanie z urządzeniami Bluetooth®
1 Naciśnij [ ], aby wybrać “BLUETOOTH”.
{. Jeżeli na wyświetlaczy wyświetlone jest “PAIRING”,
przejdź do kroku 4.
Aby wejść w tryb parowania*
2 Naciśnij [PLAY MENU], aby wybrać “PAIRING”.
3 Naciśnij [3, 4], aby wybrać “OK? YES”, a
następnie naciśnij [OK].
Aby sparować z innym urządzeniem
4 Wybierz “SC-HC39” w menu Bluetooth
®
w
urządzeniu Bluetooth®.
{. Nazwa połączonego urządzenia wyświetlana jest na
ekranie przez kilka sekund.
5 Rozpocznij odtwarzanie na urządzeniu Bluetooth
* Do trybu parowania można wejść również naciskając i
przytrzymując przycisk [ -PAIRING] na urządzeniu.
∫ Podłączanie sparowane urządzenie
Bluetooth
®
1 Naciśnij [ ], aby wybrać “BLUETOOTH”.
{. “READY” jest wyświetlone na wyświetlaczu.
2 Wybierz “SC-HC39” w menu Bluetooth
urządzeniu Bluetooth®.
{. Nazwa połączonego urządzenia wyświetlana jest na
ekranie przez kilka sekund.
®
w
3 Rozpocznij odtwarzanie na urządzeniu Bluetooth
≥ Jeżeli wyświetli się komunikat proszący o klucz, wprowadź
“0000”.
≥ Można zarejestrować maksymalnie 8 urządzeń w tym
zestawie. W przypadku sparowania dziewiątego urządzenia,
urządzenie, które było najdłużej nieużywane, zostanie
zastąpione.
≥ Do zestawu można podłączać tylko jedno urządzenie
jednocześnie.
≥ Kiedy “BLUETOOTH” wybrane jest jako źródło, niniejsze
urządzenie automatycznie spróbuje połączyć się z ostatnio
podłączonym urządzeniem Bluetooth
®
.
Połączenie One-Touch (Połączenie
za pomocą NFC)
Tylko dla kompatybilnych z NFC urządzeń
TM
Android
Poprzez samo przyłożenie zgodnego z NFC (Near
Field Communication) urządzenia Bluetooth® do
urządzenia głównego można przeprowadzić wszystkie
czynności przygotowawcze, od rejestracji urządzenia
Bluetooth® aż po ustanowienie połączenia.
≥ Wersja systemu Android na urządzeniu niższa niż
4.1 wymaga instalacji “Panasonic Music Streaming”
(aplikacja jest darmowa). Pobierz aplikację na swoje
urządzenie Bluetooth®.
– W celu wyszukania wprowadź “Panasonic Music
Streaming” w oknie wyszukiwania Google Play
następnie wybierz “Panasonic Music Streaming”.
Przygotowanie
≥ Włącz funkcję NFC w urządzeniu głównym.
1 Naciśnij [ ], aby wybrać “BLUETOOTH”.
2 Przyłóż i przytrzymaj urządzenie przy obszarze
®
kontaktu NFC urządzenie głównego [ ]. (l 22)
{. Po ukończeniu rejestracji i podłączeniu urządzenia
.
≥ Jeżeli połączenie nie zostało nawiązane pomimo tego,
®
Bluetooth
, nazwa urządzenia zostanie wyświetlona na
wyświetlaczu przez kilka sekund. Oddal urządzenie od
urządzenia głównego.
że urządzenie zostało przyłożone do obszaru NFC,
przesuń urządzenie tak, aby zostało wykryte.
3 Rozpocznij odtwarzanie na urządzeniu Bluetooth
≥ Jeżeli przyłożysz inne urządzenie do urządzenia głównego,
połączenie Bluetooth
nawiązane połączenie zostanie automatycznie zerwane.
≥ Jeżeli podczas odtwarzania obraz i dźwięk nie są ze sobą
zsynchronizowane, należy ponownie uruchomić aplikację
używaną do odtwarzania. Jeżeli problem nie ustąpi, należy
połączyć urządzenie Bluetooth
®
.
pomocą kabla audio. (brak w zestawie).
≥ Kiedy połączenie zostanie nawiązane, odtwarzanie może
rozpocząć się automatycznie, w zależności od używanego
sprzętu.
≥ Połączenie One-Touch może nie działać prawidłowo, w
zależności od używanego sprzętu.
®
zostanie zaktualizowane. Poprzednio
®
z urządzeniem głównym za
TM
, a
®
POLSKI
.
25
RQT9944
Page 26

Tryb transmisji Bluetooth
Możesz zmienić tryb transmisji, aby ustawić priorytet
jakości transmisji lub jakości dźwięku.
Przygotowanie
≥ Naciśnij [ ], aby wybrać “BLUETOOTH”.
≥ Jeżeli urządzenie Bluetooth® jest już podłączone,
rozłącz je.
®
Odłączanie urządzenia Bluetooth
1 Kiedy urządzenie Bluetooth
Naciśnij kilkakrotnie [PLAY MENU], aby wybrać
“DISCONNECT?”.
®
jest podłączone:
2 Naciśnij [3, 4], aby wybrać “OK? YES”, a
następnie naciśnij [OK].
®
1 Naciśnij kilkakrotnie [PLAY MENU], aby wybrać
“LINK MODE”.
2 Naciśnij [3, 4], aby wybrać tryb, a następnie
naciśnij [OK].
MODE 1: Nacisk na jakość połączenia
MODE 2: Nacisk na jakość dźwięku
≥ Wybierz “MODE 1”, jeżeli dźwięk jest przerywany.
≥ Ustawienie fabryczne to “MODE 2”.
Poziom sygnału wejściowego
Bluetooth
Jeżeli poziom sygnału wyjściowego transmisji z
urządzenia Bluetooth® jest zbyt niski, zmień ustawienie
poziomu sygnału wejściowego.
Przygotowanie
≥ Podłącz urządzenie Bluetooth
®
®
1 Naciśnij kilkakrotnie [PLAY MENU], aby wybrać
“INPUT LEVEL”.
2 Naciśnij [3, 4], aby wybrać poziom, a następnie
naciśnij [OK].
“LEVEL 0” ,. “LEVEL i1” ,. “LEVEL i2”
^---------------------------------------------------------J
≥ Wybierz “LEVEL 0”, jeżeli dźwięk jest zniekształcony.
≥ Ustawienie fabryczne to “LEVEL 0”.
≥ Można również odłączyć urządzenie Bluetooth® naciskając i
przytrzymując przycisk [ -PAIRING] na urządzeniu
głównym.
≥ Urządzenie Bluetooth
zostanie inne źródło audio (n.p., “CD”).
®
zostanie rozłączone, jeżeli wybrane
26
RQT9944
Page 27

Przyciski odtwarzania z
nośników
Poniższe oznaczenia wskazują dostępność funkcji.
[CD]:Płyty CD Audio w formacie CD-DA oraz
[USB]:Urządzenia USB zawierające pliki MP3
[Bluetooth]:Podłącz urządzenie Bluetooth
Przygotowanie
≥ Włącz urządzenie.
≥ Wsadź nośnik lub podłącz urządzenie Bluetooth®
urządzenie.
≥ Naciśnij [USB/CD] lub [ ], aby wybrać źródło
dźwięku.
Odtwarzanie Naciśnij [1/;].
Stop Naciśnij [∫].
Pauza Naciśnij [1/;].
Pomijanie Naciśnij [:/6] lub [5/9],
Szukanie Podczas odtwarzania lub po
∫ Aby wyświetlić informacje
Naciśnij kilkakrotnie [DISPLAY].
płyty CD zawierające pliki MP3 (l 33)
(l 33)
Podstawowe przyciski
[CD], [USB], [Bluetooth])
(
≥ [USB]: położenie jest zapamiętywane i
wyświetlane jest “RESUME”.
Naciśnij ponownie, aby powrócić do
odtwarzania.
aby pominąć utwór.
[CD], [USB] Naciśnij [3] lub [4], aby
pominąć album MP3.
naciśnięciu pauzy,
naciśnij i przytrzymaj
[:/6] lub [5/9].
®
Tryby odtwarzania ([CD], [USB])
Wybierz tryb odtwarzania.
1 Naciśnij [PLAY MENU], aby wybrać “PLAYMODE”
lub “REPEAT”.
2 Naciśnij [3, 4], aby wybrać ustawienie, a
następnie naciśnij [OK].
PLAYMODE
OFF
PLAYMODE
1-TRACK Odtwarzanie tylko wybranej ścieżki.
1-ALBUM Odtwarzanie tylko wybranego
RANDOM Losowe odtwarzanie zawartości.
1-ALBUM
RANDOM
REPEAT
ON REPEAT Włączanie trybu powtarzania.
OFF
REPEAT
≥ Nie ma możliwości przejścia do poprzedniego utworu w
trybie odtwarzania losowego.
≥ Po otwarciu odsuwanej pokrywy tryb odtwarzania jest
anulowany.
Anulowanie ustawienia trybu
odtwarzania.
≥ Wyświetli się “1”, “ ”.
(Przechodzenie do żądanej
ścieżki.)
albumu MP3.
≥ Wyświetli się “1”, “ ”.
≥ Wyświetli się “RND”.
Losowe odtwarzanie ścieżek z
wybranego albumu MP3.
≥ Naciśnij [3] lub [4], aby wybrać
album MP3.
≥ Wyświetli się “1”, “ ”, “RND”.
≥ Wyświetli się “`”.
Wyłączanie trybu powtarzania.
POLSKI
≥ Aby skorzystać z funkcji zdalnej kontroli urządzenia
≥ Maksymalna liczba wyświetlanych znaków: około30
≥ Niniejsze urządzenie obsługuje wersje 1.0, 1.1 i 2.3
≥ Oznaczenie albumu i ścieżki dla plików MP3.
®
Bluetooth
(Audio Video Remote Control Profile – Profil zdalnego
sterowania Audio Video).
W zależności od stanu urządzenia, obsługa niektórych
przycisków może nie być możliwa.
znaczników ID3. Dane tekstowe nieobsługiwane przez
urządzenie nie mogą być wyświetlane lub mogą zostać
wyświetlane nieprawidłowo.
“A _ _ _”: Numer albumu MP3.
“T _ _ _”: Numer ścieżki MP3.
≥ “ _ ” oznacza numer albumu lub ścieżki.
“”:
“”:
, urządzenie Bluetooth® musi obsługiwać AVRCP
To oznaczenie odnosi się również do albumu.
To oznaczenie odnosi się również do ścieżki.
27
RQT9944
Page 28

Słuchanie radia
Można zaprogramować maksymalnie 30 stacji.
Przygotowanie
≥ Upewnij się, że antena jest podłączona. (l 23)
≥ Włącz urządzenie.
≥ Naciśnij [RADIO/AUX], aby wybrać “FM”.
≥ Jeśli pod tą samą zaprogramowaną pozycją zapiszesz inną
stację, stara stacja ulegnie nadpisaniu.
Automatyczne programowanie stacji
1 Naciśnij [PLAY MENU], aby wybrać “A.PRESET”.
2 Naciśnij [3, 4], aby wybrać “LOWEST” lub
“CURRENT”, a następnie naciśnij [OK].
LOWEST:
Rozpoczęcie automatycznego programowania od
najniższej częstotliwości (FM 87.50).
CURRENT:
Rozpoczęcie automatycznego programowania od
bieżącej częstotliwości.*
{. Tuner zaczyna programowanie wszystkich stacji, które
może odbierać, w kolejności rosnącej.
* Aby zmienić częstotliwość, przeczytaj rozdział “Ręczne
strojenie i programowanie”.
Słuchanie zaprogramowanej stacji
1 Naciśnij kilkakrotnie [PLAY MENU], aby wybrać
“TUNEMODE”.
2 Naciśnij [3, 4], aby wybrać “PRESET”, a
następnie naciśnij [OK].
3 Naciśnij [:/6] lub [5/9], aby wybrać
kanał.
∫ Ręczne strojenie i programowanie
Wybierz stację radiową.
1 Naciśnij kilkakrotnie [PLAY MENU], aby wybrać
“TUNEMODE”.
2 Naciśnij [3, 4], aby wybrać “MANUAL”, a
następnie naciśnij [OK].
3 Naciśnij [:/6] lub [5/9] w celu
dostrojenia do żądanej stacji.
≥ Aby rozpocząć automatyczne strojenie, naciśnij i
przytrzymaj [:/6] lub [5/9], dopóki
częstotliwość nie zacznie się przewijać. Po znalezieniu
stacji strojenie się zatrzymuje.
Aby zaprogramować stację
4 Podczas słuchania stacji radiowej, naciśnij [OK].
5 Naciśnij [3, 4], aby wybrać stację, a następnie
naciśnij [OK].
∫ Poprawa jakości odbioru w paśmie FM
1 Podczas słuchania stacji radiowej w paśmie FM
naciśnij kilkakrotnie [PLAY MENU], aby wybrać
“FM MODE”.
2 Naciśnij [3, 4], aby wybrać “MONO”, a następnie
naciśnij [OK].
≥ To ustawienie można zaprogramować i zapamiętać.
W tym celu wykonaj krok 4 z rozdziału “Ręczne
strojenie i programowanie”.
≥ Wybierz “STEREO” w kroku 2, aby powrócić do odbioru
stereo.
≥ Tryb “MONO” jest anulowany po zmianie częstotliwości.
∫ Wyświetlanie aktualnego stanu
sygnału FM
Jeżeli dostępny jest sygnał FM, naciśnij kilkakrotnie
[PLAY MENU], aby wyświetlić “FM STATUS”, a
następnie naciśnij [OK].
“FM ST”: Sygnał FM jest dostrojony i
“FM”: Brak dostrojonego sygnału lub
“FM MONO”: “MONO” zostało wybrane w kroku 2
∫ Wyświetlanie danych tekstowych RDS
Naciśnij [DISPLAY], aby wyświetlić dane tekstowe.
≥ Każde naciśnięcie przycisku:
“PS”: Nazwa stacji
“PTY”: Charakter programu
“FREQ”: Częstotliwość
stereofoniczny.
monofoniczny sygnał FM.
części “Poprawa jakości odbioru w
paśmie FM” (l powyżej).
28
RQT9944
≥ “STEREO” pojawia się po nastrojeniu na stację stereo.
≥ Urządzenie może wyświetlać dane tekstowe transmitowane
przez system RDS (RDS) dostępny w niektórych rejonach.
(wyświetlanie informacji RDS może nie być możliwe w
przypadku słabego odbioru.)
Page 29

Regulacja dźwięku
Odtwarzanie dźwięku można wzbogacić o poniższe
efekty dźwiękowe.
1 Naciśnij kilkakrotnie [SOUND], aby wybrać efekt.
2 Naciśnij [3, 4], aby wybrać ustawienie, a
następnie naciśnij [OK].
“PRESET EQ”
(Programowanie
korektora dźwięku)
“BASS” (Tony
niskie) lub
“TREBLE”
(wysokie)
“D.BASS”
(Dynamic Bass)
“SURROUND”
(Dźwięk
przestrzenny)
≥ W przypadku niektórych źródeł może dać się zauważyć
pogorszenie jakości dźwięku podczas stosowania tych
efektów dźwiękowych. Wówczas należy wyłączyć efekty
dźwiękowe.
≥ Jeżeli jako źródło wybrano “AUX”, możesz wybrać opcję
“INPUT LEVEL”, aby ustawić poziom sygnału wejściowego z
urządzenia zewnętrznego. (l 23)
“HEAVY” (ciężki), “SOFT”
(łagodny), “CLEAR” (wyraźny),
“VOCAL” (wokal) lub “FLAT”
(bezbarwny/wył).
≥ Ustawienie fabryczne to “HEAVY”.
Ustaw poziom (j4 na i4).
“ON D.BASS” lub
“OFF D.BASS”.
≥ Ustawienie fabryczne to
“ON D.BASS”.
“ON SURROUND” lub
“OFF SURROUND”.
≥ Ustawienie fabryczne to
“OFF SURROUND”.
Zegar i timer
Ustawienia zegara
Jest to zegar 24-godzinny.
1 Naciśnij kilkakrotnie [SETUP], aby wybrać
“CLOCK”.
2 Naciśnij [3, 4], aby ustawić czas, a następnie
naciśnij [OK].
≥ Aby wyświetlić zegar, naciśnij kilkakrotnie [SETUP], aby
wybrać “CLOCK”, a następnie naciśnij jednokrotnie [OK].
Czas jest wyświetlany przez 10 sekund
(w trybie gotowości, naciśnij jednokrotnie [DISPLAY]).
≥ Zegar zostaje wyzerowany w przypadku awarii zasilania oraz
po odłączeniu przewodu zasilania.
≥ W celu zapewnienia dokładności wskazań zegara należy go
regularnie ustawiać.
Timer odtwarzania
Można ustawić timer w celu włączania urządzenia
codziennie o określonej godzinie.
Przygotowanie
Ustaw zegar.
∫ Ustawianie timera
1
Naciśnij kilkakrotnie [SETUP], aby wybrać “TIMER ADJ”.
2 Naciśnij [3, 4], aby ustawić czas rozpoczęcia
(“ON TIME”), a następnie naciśnij [OK].
3 Naciśnij [3, 4], aby ustawić czas zakończenia
(“OFF TIME”), a następnie naciśnij [OK].
4 Naciśnij [3, 4], aby wybrać źródło dźwięku*, a
następnie naciśnij [OK].
∫ Włączanie timera
1 Przygotuj wybrane źródło dźwięku i ustaw żądaną
głośność.
2
Naciśnij kilkakrotnie [SETUP], aby wybrać “TIMER SET”.
3 Naciśnij [3, 4], aby wybrać “SET”, a następnie
naciśnij [OK].
≥ Wyświetli się “F”.
≥ Aby wyłączyć timer, wybierz “OFF”.
4 Naciśnij [Í], aby przełączyć urządzenie do trybu
gotowości.
≥
Aby wyświetlić ustawienia timera, naciśnij kilkakrotnie [SETUP]
i wybierz “TIMER ADJ”, a następnie naciśnij jednokrotnie [OK].
Po włączeniu timera wyświetlone zostanie również źródło
dźwięku i głośność.
≥
W trybie oczekiwania, jeśli timer jest włączony, naciśnij
[DISPLAY] dwukrotnie, aby wyświetlić ustawienia.
≥ Urządzenie może być używane normalnie po ustawieniu
timera, jednak:
– Przed czasem rozpoczęcia timera przełącz urządzenie w
tryb gotowości.
– Nawet w przypadku zmiany źródła dźwięku lub głośności,
zastosowane zostaną źródło dźwięku i głośność
ustawione dla timera.
* “CD”, “USB”, “FM” i “AUX” można wybrać jako źródło
dźwięku.
Timer wyłączający
Timer wyłączający może wyłączyć urządzenie po
określonym czasie.
1 Naciśnij [SETUP], aby wybrać “SLEEP”.
2 Naciśnij [3, 4], aby ustawić czas (w minutach), a
następnie naciśnij [OK].
“SLEEP 30” ,. “SLEEP 60” ,. “SLEEP 90” ,. “SLEEP 120”
^------------------. “OFF” (Anuluj) (------------------J
≥ Pozostały czas jest pokazywany na wyświetlaczu
urządzenia, chyba że wykonywane są inne operacje.
≥ Możliwe jest jednoczesne użycie timera odtwarzania i
wyłączającego. Timer wyłączający jest głównym timerem
urządzenia.
POLSKI
29
RQT9944
Page 30

Inne
Funkcja automatycznego wyłączania
Zgodnie z ustawieniami fabrycznymi, urządzenie
przełącza się do trybu gotowości automatycznie, jeżeli
nie jest odtwarzany dźwięk i urządzenie nie jest
używane przez około 20 minut.
Aby anulować tę funkcję
1 Naciśnij kilkakrotnie [SETUP], aby wybrać
“AUTO OFF”.
2 Naciśnij [3, 4], aby wybrać “OFF”, a następnie
naciśnij [OK].
≥ Aby włączyć funkcję, wybierz “ON” w kroku 2.
≥ Nie można wybrać tego ustawienia, gdy źródłem jest “FM”.
≥ Po podłączeniu do urządzenia Bluetooth
będzie działać.
Bluetooth® gotowość
Jeżeli wybrano “SC-HC39” z menu Bluetooth®
sparowanego urządzenia Bluetooth®, urządzenie
główne automatycznie włączy się z trybu gotowości i
nawiąże połączenie Bluetooth®.
®
, funkcja ta nie
1 Naciśnij kilkakrotnie [SETUP], aby wybrać
“BLUETOOTH STANDBY”.
2 Naciśnij [3, 4], aby wybrać “ON”, a następnie
naciśnij [OK].
≥ Aby wyłączyć funkcję, wybierz “OFF” w kroku 2.
Zmiana kodu urządzenia i pilota
Gdy inne urządzenie firmy Panasonic reaguje na
polecenia dołączonego pilota, zmień kod pilota.
1 Naciśnij [USB/CD], aby wybrać “CD”.
2 Kiedy naciśniesz i przytrzymasz [SELECTOR] na
urządzeniu, naciśnij i przytrzymaj jednocześnie
[USB/CD] na pilocie, aż na ekranie wyświetli się
“REMOTE 2”.
3 Naciśnij i przytrzymaj [OK] i [USB/CD] na pilocie
przez co najmniej 4 sekundy.
≥ Aby zmienić tryb ponownie na “REMOTE 1”, naciśnij [USB/
CD], aby wybrać “CD” a następnie powtórz krok 2 oraz 3, ale
zamiast [USB/CD] wybierz [ ].
Aktualizacja oprogramowania
Co jakiś czas firma Panasonic może udostępnić
zaktualizowane oprogramowanie dla tego urządzenia,
które może ulepszyć istniejące funkcje lub dodać nowe
funkcje. Aktualizacje te są darmowe.
Szczegółowe informacje można znaleźć na poniższej
stronie internetowej
http://panasonic.jp/support/global/cs/
(Strona w języku angielskim.)
∫ Sprawdzanie wersji oprogramowania
Wyświetlona zostanie wersja zainstalowanego
oprogramowania.
Naciśnij kilkakrotnie [SETUP], aby wybrać “SW VER.”,
a następnie naciśnij [OK].
≥ Naciśnij [OK], aby wyjść.
30
RQT9944
Page 31

Usuwanie usterek
Przed oddaniem urządzenia do naprawy należy
sprawdzić następujące pozycje. Jeżeli masz
wątpliwości co do niektórych punktów lub jeśli podane
w poniższym przewodniku środki nie rozwiązują
problemu, skonsultuj się ze swoim sprzedawcą.
Aby przywrócić wszystkie ustawienia do
wartości fabrycznych
Pamięć należy wyzerować w następujących
sytuacjach:
≥ Urządzenie nie reaguje po naciśnięciu przycisków.
≥ Chcesz wyczyścić i wyzerować ustawienia pamięci.
1 Odłącz wszystkie kable zasilające. (Zaczekaj co
najmniej 3 minuty przed przejściem do kroku 2.)
2 Kiedy wciśniesz i przytrzymasz przycisk [Í/I] na
urządzeniu, podłącz jednocześnie przewód
zasilający.
≥ Przytrzymaj [Í/I], aż na wyświetlaczu pojawi się
“---------”.
3 Zwolnij [Í/I].
≥ Zostaną przywrócone wszystkie ustawienia fabryczne.
Należy ponownie wprowadzić pozycje pamięci.
Ogólne
Podczas odtwarzania słychać przydźwięk.
≥ Oddalić przewody oraz inne urządzenia od przewodów
zasilających lub lamp świetlówkowych.
Urządzenie nie odczytuje plików MP3.
≥ Odtwarzanie plików MP3 może być niemożliwe, jeśli skopiowano
płytę wielosesyjną, która nie zawiera danych między sesjami.
≥ Podczas nagrywania dysku wielosesyjnego należy zamknąć
sesję.
≥ Ilość danych na płycie jest zbyt mała. Ustaw pojemność danych
na powyżej 5 MB.
Ładowanie nie rozpoczyna się w trybie gotowości.
≥ Włącz urządzenie i upewnij się, że ładowanie zostało rozpoczęte,
a następnie przełącz urządzenie w tryb gotowości. (l 24)
Słychać szum.
≥ Kiedy urządzenie jest podłączone jednocześnie do gniazda AUX
IN i wyjścia DC OUT, w niektórych urządzeniach może
powstawać szum. W takim przypadku należy wyjąć kabel USB z
wyjścia DC OUT.
Pilot zdalnego sterowania
Pilot nie działa prawidłowo.
≥ Bateria jest rozładowana lub nieprawidłowo włożona. (l 22)
Płyta
Wyświetlanie jest niepoprawne lub odtwarzanie nie
rozpoczyna się.
≥ Upewnij się, że płyta może być odtwarzana w tym urządzeniu.
(l 33)
≥ Soczewka jest zawilgocona. Odczekaj około godziny, a następnie
spróbuj ponownie.
USB
Brak odpowiedzi po wciśnięciu [1/;].
≥ Odłącz urządzenie USB i podłącz je ponownie. Ewentualnie
wyłącz i ponownie włącz urządzenie.
Napęd USB lub zapisane dane nie mogą zostać
odczytane.
≥ Format napędu USB lub jego treść nie są kompatybilne z
urządzeniem (l 33).
≥ Funkcja hosta USB tego produktu może nie działać z niektórymi
urządzeniami USB.
Powolne działanie napędu flash USB.
≥ Pliki o dużych rozmiarach lub napęd Flash USB o dużej
pojemności wymagają dłuższego czasu wczytywania.
Czas odtwarzania, który rzeczywiście upłynął, i
czas wyświetlany różnią się od siebie.
≥ Skopiuj dane na inne urządzenie USB lub wykonaj kopię
zapasową danych i sformatuj urządzenie USB.
Radio
Podczas słuchania radia słychać szum lub
zakłócenia.
≥ Upewnij się, że antena jest prawidłowo podłączona. (l 23)
≥ Wyreguluj pozycję anteny.
≥ Zachowaj odpowiednią odległość pomiędzy anteną a przewodem
zasilania.
≥ Jeśli w pobliżu są budynki lub góry, użyj anteny zewnętrznej.
(l 23)
≥ Wyłącz odbiornik TV lub inne odtwarzacze albo oddal je od
urządzenia.
≥ Nie zbliżaj do urządzenia telefonów komórkowych jeśli powoduje
to zakłócenia.
Bluetooth
Nie można ukończyć parowania.
≥ Sprawdź stan urządzenia Bluetooth®.
Nie można podłączyć urządzenia.
≥ Parowanie urządzenia nie powiodło się lub rejestracja została
zastąpiona nową. Spróbuj sparować urządzenie ponownie.
(l 25)
≥ Urządzenie główne może być podłączone do innego urządzenia.
Odłącz inne urządzenie i spróbuj sparować urządzenie ponownie.
(l 25)
Urządzenie jest podłączone, ale dźwięk nie jest
odtwarzany z głośników tego urządzenia.
≥ W przypadku niektórych wbudowanych urządzeń Bluetooth®,
konieczne jest ręczne ustawienie odtwarzania dźwięku na
“SC-HC39”. Szczegółowe informacje znajdują się w instrukcji
obsługi danego urządzenia.
Dźwięk jest przerywany.
≥ Urządzenie znajduje się poza zasięgiem komunikacji 10 m.
Umieść urządzenie Bluetooth® bliżej urządzenia głównego.
≥ Usuń wszelkie przeszkody występujące pomiędzy urządzeniami.
≥ Inne urządzenia korzystające z zakresu częstotliwości 2,4 GHz,
takie jak router sieci bezprzewodowej, kuchenki mikrofalowe,
telefony bezprzewodowe itp. mogą powodować zakłócenia. Zbliż
urządzenie Bluetooth® do urządzenia głównego i ustaw je dalej od
innych urządzeń.
≥ Wybierz “MODE 1” w celu zapewnienia stabilnej komunikacji.
(l 26)
Połączenie One-Touch (funkcja NFC) nie działa.
≥ Upewnij się, że urządzenie i funkcja NFC (Near Field
Communication - Komunikacja bliskiego zasięgu) urządzenia są
włączone. (l 25)
®
RQT9944
POLSKI
31
Page 32

Komunikaty
Soczewka
Na wyświetlaczu urządzenia mogą się pojawić
następujące komunikaty lub numery serwisowe.
“--:--”
≥ Po raz pierwszy podłączono kabel zasilania lub ostatnio wystąpiła
awaria zasilania. Ustaw godzinę (l 29).
“ADJUST CLOCK”
≥ Zegar nie jest ustawiony. Ustaw prawidłowo zegar.
“ADJUST TIMER”
≥ Timer odtwarzania nie jest ustawiony. Ustaw odpowiednio timer.
“AUTO OFF”
≥ Urządzenie nie było używane przez około 20 minut i za minutę
zostanie wyłączone. Naciśnij dowolny przycisk, aby anulować.
“ERROR”
≥ Wykonano nieprawidłową operację. Przeczytaj instrukcję i spróbuj
ponownie.
“F” (“” oznacza numer.)
≥ Wystąpił problem z urządzeniem.
Zapisz wyświetlony numer, odłącz przewód zasilania i skontaktuj
się ze swoim sprzedawcą.
“ILLEGAL OPEN”
≥ Odsuwana pokrywa nie znajduje się w prawidłowym położeniu.
Wyłącz urządzenie i włącz je ponownie. Jeśli ten komunikat
wyświetli się ponownie, skontaktuj się ze sprzedawcą urządzenia.
“NODEVICE”
≥ Urządzenie USB nie jest włożone prawidłowo. Zapoznaj się z
instrukcją i spróbuj ponownie (l 24).
“NO DISC”
≥ Włóż płytę do odtworzenia (l 24).
“NO PLAY”
≥ Włożono płytę CD w formacie innym niż CD-DA lub MP3. Nie
można jej odtworzyć.
≥ Sprawdź nośnik i znajdujące się na nim dane. Można odtwarzać
wyłącznie obsługiwane formaty. (l 33)
≥ Pliki w urządzeniu USB mogą być uszkodzone. Sformatuj
urządzenie USB i spróbuj ponownie.
≥ Możliwe, że wystąpił problem z urządzeniem. Wyłącz je i włącz
ponownie.
“PLAYERROR”
≥ Został włączony nieobsługiwany plik MP3. System pominie tę
ścieżkę i przejdzie do kolejnej.
“READING”
≥ Urządzenie sprawdza informacje na płycie CD/USB. Gdy zniknie
to wskazanie, rozpocznij obsługę.
“REMOTE ” (“ ” oznacza numer.)
≥ Pilot i urządzenie używają różnych kodów. Zmień kod na pilocie.
–Gdy wyświetlane jest wskazanie “REMOTE 1”, naciśnij i
przytrzymaj [OK] i [ ] przez co najmniej 4 sekundy.
–Gdy wyświetlane jest wskazanie “REMOTE 2”, naciśnij i
przytrzymaj [OK] i [USB/CD] przez co najmniej 4 sekundy.
“USB OVER CURRENT ERROR”
≥ Urządzenie USB pobiera za dużo energii. Wybierz źródło inne niż
“USB”, wyjmij kabel USB i wyłącz urządzenie główne.
32
RQT9944
Konserwacja urządzenia i
nośników
Przed wykonywaniem prac konserwacyjnych wyjmij
kabel zasilający z gniazda.
∫ Urządzenie należy czyścić miękką i
suchą szmatką
≥ Gdy urządzenie jest bardzo zabrudzone, należy przetrzeć je
zwilżoną, mocno wyciśniętą szmatką, a następnie wytrzeć do
sucha.
≥
Do czyszczenia obudowy głośników używaj delikatnej ściereczki.
Nie stosuj chusteczek ani innych materiałów, które łatwo się
rozdzierają. Drobne strzępki papieru mogą się dostać do
obudowy głośnika.
≥ Do czyszczenia urządzenia nie wolno używać alkoholu,
rozcieńczalnika do farb ani benzyny ekstrakcyjnej.
≥
Zanim użyjesz ściereczki nasączonej środkami chemicznymi,
uważnie przeczytaj dołączone do niej informacje.
∫ Konserwacja soczewki
≥
Soczewkę należy czyścić regularnie, aby zapobiec
nieprawidłowemu działaniu. Jeżeli jest ona bardzo
zanieczyszczona, przedmuchać pył za pomocą sprężonego
powietrza w sprayu lub użyć patyczka z bawełnianym wacikiem.
≥ Nie wolno stosować środka do czyszczenia soczewek CD.
≥ Nie zostawiaj odsuwanej pokrywy otwartej przez dłuższy
czas. Spowoduje to zanieczyszczenie soczewki.
≥ Należy uważać, aby nie dotknąć soczewki palcami.
∫ Czyszczenie płyt
Prawidłowo Nieprawidłowo
Przetrzyj wilgotną szmatką, a następnie wytrzyj do sucha.
∫ Środki ostrożności podczas
przenoszenia płyt
≥
Płyty należy chwytać za krawędzie, aby unikać nieusuwalnych
zarysowań lub pozostawiania odcisków palców na płycie.
≥ Nie umieszczaj etykiet ani naklejek na płycie.
≥ Nie stosuj środków w sprayu do czyszczenia płyt,
rozcieńczalników, płynów zapobiegających przed
elektrycznością statyczną ani innych rozpuszczalników.
≥ Nie stosuj następujących płyt:
–Płyt z pozostałością kleju po odklejonych naklejkach lub
etykietach (wypożyczane płyty itp.).
–Płyt pozaginanych albo popękanych.
–Płyt o nieregularnych kształtach, np. w kształcie serca.
∫
Pozbywanie się lub oddawanie urządzenia
W urządzeniu mogą być zachowane ustawienia
użytkownika. W przypadku pozbywania się urządzenia
należy wykonać procedurę przywracania ustawień
fabrycznych dla wszystkich funkcji, aby skasować
ustawienia użytkownika.
(l 31, “Aby przywrócić wszystkie ustawienia do
wartości fabrycznych”)
≥ W pamięci urządzenia może być zachowana historia
operacji.
Page 33

Informacje o Bluetooth
®
Firma Panasonic nie ponosi odpowiedzialności
za narażenie danych na zagrożenia podczas
transmisji bezprzewodowej.
∫ Stosowane pasmo częstotliwości
≥ System wykorzystuje pasmo częstotliwości 2,4 GHz.
∫ Certyfikacja tego urządzenia
≥ Zestaw podlega ograniczeniom dotyczącym
częstotliwości i ma odpowiedni certyfikat wydany na
podstawie odpowiednich przepisów. Nie ma więc
konieczności uzyskiwania pozwolenia na transmisję
bezprzewodową.
≥ Poniższe działania są ścigane przez prawo w
niektórych krajach:
–Rozkładanie na części lub modyfikacja systemu.
– Usuwanie informacji dotyczących specyfikacji.
∫ Ograniczenia użytkowania
≥ Nie gwarantuje się możliwości transmisji
bezprzewodowej i/lub stosowania ze wszystkimi
urządzeniami z technologią Bluetooth®.
≥ Wszystkie urządzenia muszą być zgodne z normami
określonymi przez Bluetooth SIG, Inc.
≥ W zależności od specyfikacji i ustawień urządzenia,
podłączenie może nie być możliwe lub niektóre
operacje mogą się różnić.
≥ Zestaw obsługuje technologię bezpieczeństwa
Bluetooth®. Jednak w zależności od środowiska, w
którym działa, oraz/lub ustawień, bezpieczeństwo to
może nie być wystarczające. Podczas
bezprzewodowej transmisji danych do zestawu
należy zachować ostrożność.
≥ Zestaw nie może przesyłać danych do urządzenia
Bluetooth®.
∫ Zasięg stosowania
≥ Używaj urządzenia w odległości maksymalnie 10 m.
Zasięg może się zmniejszyć w zależności od
otoczenia, przeszkód lub zakłóceń.
∫ Zakłócenia powodowane przez inne
urządzenia
≥ W wyniku zakłóceń powodowanych przez inne
Bluetooth
korzystają z pasma częstotliwości 2,4 GHz,
znajdujące się w pobliżu systemu, system może nie
działać prawidłowo i mogą wystąpić problemy takie
jak hałas oraz przeskakiwanie dźwięku.
≥ System może nie działać prawidłowo, jeżeli fale
radiowe emitowane przez pobliską stację nadawczą
itp. są zbyt silne.
®
urządzenie lub urządzenia, które
∫ Przeznaczenie
≥ System przeznaczony jest do użytku ogólnego.
≥ Nie należy używać tego zestawu w pobliżu urządzeń
lub w środowisku wrażliwym na zakłócenia radiowe
(np. lotniska, szpitale, laboratoria itp.).
Nośniki, które mogą być
odtwarzane
Obsługiwane płyty CD
≥ Płyty z logo CD.
≥ Urządzenie odtwarza płyty zgodne z formatem CD-DA.
≥ Urządzenie może nie odtwarzać niektórych płyt ze względu
na ich stan.
Obsługiwane urządzenia USB
≥ To urządzenie nie gwarantuje połączenia ze wszystkimi
urządzeniami USB.
≥ Obsługiwane systemy plików to FAT12, FAT16 i FAT32.
≥ Niniejsze urządzenie obsługuje specyfikację USB 2.0 Full
Speed.
≥ To urządzenie obsługuje urządzenia USB o pojemności do
32 GB.
Obsługiwane pliki MP3
≥ Obsługiwane formaty: pliki z rozszerzeniem “.mp3” lub
“.MP3”.
≥ Obsługiwany stopień kompresji: Pomiędzy 16 kbps i
320 kbps (stereo).
≥ W zależności od tego, w jaki sposób zostały stworzone pliki
MP3, mogą one nie być odtwarzane w kolejności, w jakiej
zostały ponumerowane, lub mogą wogóle nie być
odtwarzane.
CD-R/RW
≥ Maksymalna liczba ścieżek i albumów: 999 ścieżek i 254
albumów (z wyłączeniem katalogu głównego).
≥ Formaty płyt: ISO9660 poziom 1 i poziom 2 (z wyjątkiem
formatów rozszerzonych).
≥ Jeżli na płycie zamieszczono materiały zarówno w formacie
MP3, jak i w normalnym formacie audio (CD-DA), urządzenie
odtwarza materiał nagrany na wewnętrznej części płyty.
≥ Niniejsze urządzenie nie odtwarza plików nagranych w trybie
zapisu pakietowego.
Urządzenie USB
≥ Maksymalna liczba ścieżek i albumów: 8000 ścieżek i 799
albumy (z wyłączeniem katalogu głównego).
≥ W przypadku połączenia z czytnikiem wielu kart USB
wybrana zostanie pierwsza włożona karta pamięci.
Licencje
Nazwa marki Bluetooth® i logotypy są własnością firmy
Bluetooth SIG, Inc. I wszelkie ich użycie przez firmę Panasonic
Corporation jest objęte licencją.
Pozostałe znaki towarowe i nazwy handlowe są własnością ich
posiadaczy.
Google Play i Android są znakami handlowymi firmy Google Inc.
Technologia kodowania dźwięku MPEG Layer-3 na licencji firmy
Fraunhofer IIS i Thomson.
RQT9944
POLSKI
33
Page 34

Mocowanie urządzenia do
Stojak
Śruba mocująca
Miękki koc lub tkanina
Śruba
(w zestawie)
Sznurek (brak w
zestawie)
ściany (opcjonalne)
Urządzenie można zamontować na ścianie za pomocą
dostarczonych uchwytów ściennych itp. Upewnij się,
że używana śruba oraz ściana są w stanie wytrzymać
obciążenie co najmniej 33 kg. Śruby i inne elementy
nie są załączone do zestawu, gdyż ich rodzaj i rozmiar
są różne dla poszczególnych instalacji.
≥ Aby dowiedzieć się więcej o wymaganych rodzajach
śrub, przeczytaj instrukcje w kroku 5 w części
“Instrukcja montowania do ściany”.
≥ Jako dodatkowe zabezpieczenie, przymocuj
urządzenie do ściany za pomocą linki
zabezpieczającej.
Akcesoria do instalacji
∫ Dostarczone akcesoria
≥ 1 Uchwyt bezpieczeństwa
≥ 1 Śruba
≥ 2 Wsporniki ścienne
∫ Dodatkowo wymagane akcesoria
(dostępne w sprzedaży)
≥ 4 Śruby mocujące wspornika ściennego
≥ 1 Śruba mocująca uchwytu bezpieczeństwa
≥ 1 Sznurek zabezpieczający przed upadkiem*
≥ 1 Wkręt z oczkiem
*Użyj sznurka mogącego utrzymać masę ponad 33 kg
(o średnicy około 1,5 mm).
≥ Przechowuj uchwyt bezpieczeństwa poza zasięgiem
dzieci.
≥ Przechowuj śruby poza zasięgiem dzieci.
≥ Przechowuj wsporniki do montażu ściennego poza
zasięgiem dzieci.
Instrukcja montowania do ściany
Przed zainstalowaniem, wyłączyć urządzenie i odłączyć
przewód zasilania od gniazda zasilania.
1 Odłącz stojak od urządzenia.
≥ Odkręć śrubę mocującą u dołu urządzenia.
≥ Delikatnie pociągnij stojak, aby wysunąć go z
urządzenia w sposób pokazany na rysunku.
≥ Odkręconą śrubę i stojak odłóż w bezpieczne miejsce.
2 Przymocuj uchwyt bezpieczeństwa do urządzenia
za pomocą śruby (w zestawie).
≥ Moment dokręcania śruby: od 50 N0cm do 70 N0cm.
3 Przymocuj sznurek zabezpieczający przed
upadkiem (brak w zestawie) do urządzenia.
Środki bezpieczeństwa
Wymagana jest profesjonalna instalacja.
Instalację należy powierzać wyłącznie
wykwalifikowanemu instalatorowi.
PANASONIC ZRZEKA SIĘ
ODPOWIEDZIALNOŚCI ZA JAKIEKOLWIEK
SZKODY MATERIALNE ORAZ/LUB POWAŻNE
OBRAŻENIA CIAŁA, W TYM ŚMIERĆ, NA
SKUTEK NIEPRAWIDŁOWEJ INSTALACJI LUB
NIEWŁAŚCIWEGO OBCHODZENIA SIĘ.
OSTRZEËENIE:
Aby zapobiec obrażeniom, urządzenie należy
dobrze przymocować do ściany, zgodnie z
instrukcjami montażu.
34
RQT9944
Page 35

4 Zmierz i zaznacz pozycję wsporników do montażu
204 mm
13 mm
500 mm
75 mm
142 mm
154 mm
100 mm
142
mm
300 mm
100 mm
Co najmniej 30 mm
‰7,5 mm do
‰9,4 mm
‰4 mm
Wsporniki ścienne
Ściana
Śruba mocująca uchwytu bezpieczeństwa
(brak w zestawie)
Uchwyt bezpieczeństwa
Mocowanie
do ściany
Sznurek
(brak w zestawie)
Wkręt z oczkiem
(brak w zestawie)
Ściana
ściennego (z obu stron).
≥ Skorzystaj z poniższych rysunków w celu określenia
położenia śrub.
Położenie mocowania wsporników do montażu
ściennego
Wymagana przestrzeń
5 Przymocuj wsporniki do montażu ściennego do
ściany za pomocą 2 śrub (brak w zestawie).
≥ Za pomocą poziomicy sprawdź, czy oba wsporniki do
montażu ściennego są umieszczone w poziomie.
6 Zaczep urządzenie bezpiecznie na wspornikach
do montażu naściennego, trzymając je dwiema
rękami.
≥ Podłącz antenę i przewód zasilania do urządzenia
przed jego zawieszeniem na ścianie. (l 23)
≥ Po zawieszeniu urządzenia ostrożnie odsuń rękę,
upewniając się, czy urządzenie wisi bezpiecznie na
uchwytach ściennych.
7 Wkręć śrubę mocującą uchwytu bezpieczeństwa
(brak w zestawie) w celu przymocowania uchwytu
bezpieczeństwa do ściany.
≥ Informacje na temat warunków, które trzeba spełnić
przed przykręceniem, znajdują się w kroku 5.
POLSKI
8 Przymocuj sznurek zabezpieczający przed
upadkiem (brak w zestawie) do ściany.
≥ Upewnij się, że luz sznurka jest minimalny.
35
RQT9944
Page 36

Dane techniczne
∫ INFORMACJE OGÓLNE
Pobór mocy 26 W
Pobór mocy w trybie gotowości*
(Gdy “BLUETOOTH STANDBY” jest w stanie
2
“ON”)*
Zasilanie
220 V do 240 V pr. przem., 50 Hz
Wymiary (SzkWkG)
Waga Około 2,5 kg
Zakres temperatur pracy
Zakres wilgotności roboczej
35 % do 80 % RH (bez kondensacji)
∫ SEKCJA WZMACNIACZA
Moc wyjściowa
Moc wyjściowa RMS w trybie stereo
K. przednie (oba wysterowane)
Całkowita moc RMS w trybie stereo
20 W na kanał (8 ≠), 1 kHz, 10 % THD
∫ SEKCJA TUNERA
Programowanie stacji 30 stacji FM
Modulacja częstotliwości (FM)
Zakres częstotliwości
Zaciski anteny
87,50 MHz do 108,00 MHz (50 kHz krok)
∫ SEKCJA PŁYT
Obsługiwane płyty (8 cm lub 12 cm)
Odbiór
Długość fali 790 nm (CD)
CD, CD-R/RW (CD-DA, MP3*3)
1, 2
Około0,2W
Około0,3W
500 mmk205 mmk92 mm
0 oC do r40 oC
40 W
75 ≠ (niesymetryczne)
∫ SEKCJA SYSTEMU GŁOŚNIKÓW
Głośnik(i)
Pełen zakres
Pasywny radiator
Impedancja 8 ≠
6,5 cm Stożkowyk1 na kanał
8cmk2 na kanał
∫ SEKCJA ZACISKÓW
Port USB
Standard USB
Obsługiwany format plików multimedialnych
System plików urządzenia USB
AUX IN
DCOUT 5V1,5A
USB 2.0 Full Speed
MP3 (¢.mp3)
FAT12, FAT16, FAT32
Stereo, wtyk 3,5 mm
∫ SEKCJA BLUETOOTH
Wersja Bluetooth® Wersja2.1+EDR
Klasa Klasa 2
Obsługiwane profile
Częstotliwość pracy
Zakres działania
A2DP, AVRCP
2,4 GHz FH-SS
10 m w linii widzenia
≥ Producent zastrzega sobie prawo zmiany danych
technicznych bez uprzedniego powiadomienia.
≥ Masy i wymiary są podane w przybliżeniu.
≥ Całkowite zniekształcenia harmoniczne zmierzono cyfrowym
analizatorem widma.
*1: “BLUETOOTH STANDBY” znajduje się w stanie “OFF”.
*2: Przed przełączeniem do trybu gotowości do portu USB nie
jest podłączone żadne urządzenie.
*3: MPEG-1 warstwa 3, MPEG-2 warstwa 3
36
RQT9944
Page 37

POLSKI
37
RQT9944
Page 38

Bezpečnostní opatření
VAROVÁNÍ UPOZORNĚNÍ
Zařízení
≥ Za účelem snížení rizika požáru, zásahu elektrickým
proudem nebo poškození výrobku,
–Chraňte zařízení před deštěm, vlhkostí, kapající a
stříkající vodou.
– Nepokládejte na zařízení předměty naplněné tekutinou,
např. vázy.
– Používejte pouze doporučené příslušenství.
– Nesundávejte kryty.
– Neopravujte sami zařízení – opravy přenechejte
kvalifikovaným pracovníkům servisu.
– Dejte pozor, aby se do zařízení nedostaly kovové
předměty.
– Nepokládejte na zařízení těžké předměty.
Síťová šňůra
≥ Za účelem snížení rizika požáru, zásahu elektrickým
proudem nebo poškození výrobku,
– Ujistěte se, že napájecí napětí odpovídá napětí
uvedenému na zařízení.
–Dobře zasuňte zástrčku do zásuvky.
– Neohýbejte kabel, netahejte za něj a nepokládejte na něj
těžké předměty.
– Nesahejte na zástrčku mokrýma rukama.
–Při vypojování zástrčky ji držte za plastové tělo.
– Nepoužívejte poškozenou zástrčku či zásuvku.
≥ Rozpojovacím zařízením je síťová zásuvka.
Nainstalujte toto zařízení tak, aby bylo možno síťovou
zásuvku okamžitě odpojit ze sítě.
Zařízení
≥ Toto zařízení používá laser. Ovládání, nastavení nebo
provádění úkonů jiných, než jsou popsány v této příručce,
může vést ke vzniku nebezpečného záření.
≥ Nepokládejte na zařízení zdroje otevřeného ohně, jako
zapálené svíčky apod.
≥ Zařízení může být rušeno rádiovými vlnami např. z mobilního
telefonu. V případě takových interferencí lépe oddělte
zařízení od mobilního telefonu.
≥ Zařízení je zkonstruováno pro použití v mírném podnebí.
Umístění přístroje
≥ Umístěte zařízení na rovný povrch.
≥ Za účelem snížení rizika požáru, zásahu elektrickým
proudem nebo poškození výrobku,
– Neinstalujte ani nepokládejte zařízení do knihovny,
vestavěné skříně nebo do jiných stísněných prostor.
Zajistěte pro zařízení dostatečné větrání.
– Nezakrývejte ventilační otvory zařízení novinami, ubrusy,
záclonami a podobnými předměty.
– Nevystavujte zařízení přímému slunci, vysokým teplotám,
vysoké vlhkosti ani nadměrným vibracím.
Baterie
≥ V případě nesprávné výměny baterie hrozí nebezpečí
výbuchu. K výměně používejte pouze typ baterií doporučený
výrobcem.
≥ Nesprávným zacházením s bateriemi může dojít k vytečení
elektrolytu a k požáru.
– Když nebudete dálkové ovládání delší dobu používat,
vyjměte z něj baterii. Uskladněte ji na chladném tmavém
místě.
– Baterie nevystavujte horku ani ohni.
– Nenechávejte baterii (baterie) dlouhou dobu v automobilu
vystaveném přímému slunci se zavřenými dveřmi a okny.
– Baterie nerozebírejte a nezkratujte je.
– Alkalické a manganové baterie znovu nenabíjejte.
– Nepoužívejte baterie s odloupnutým obalem.
≥ Při likvidaci baterií se obraťte na místní úřady nebo prodejce
a zeptejte se na správný způsob likvidace.
38
RQT9944
Identifikační značení výrobku je umístěno na dolní straně
jednotky.
Prohlášení o shodě
Společnost “Panasonic Corporation” tímto prohlašuje, že
tento výrobek je ve shodě se základními požadavky a
dalšími příslušnými ustanoveními směrnice 1999/5/EC.
Zákazníci si mohou stáhnout kopii originálu prohlášení o
shodě pro naše produkty R&TTE z našeho serveru:
http://www.doc.panasonic.de
Oprávněný zástupce: Panasonic Marketing Europe GmbH,
Panasonic Testing Centre, Winsbergring 15, 22525
Hamburg, Německo
Tento produkt je určen pro běžného zákazníka.
(Kategorie 3)
Page 39

Obsah
Bezpečnostní opatření ................................... 38
Příslušenství ................................................... 39
Ovládací prvky ................................................ 40
Zapojení ........................................................... 41
Vkládání médií................................................. 42
Operace Bluetooth
Ovládání přehrávání médií............................. 45
Poslech rádia .................................................. 46
®
........................................ 43
Příslušenství
Před zahájením používání zařízení zkontrolujte
dodané příslušenství.
∏ 1 Dálkové ovládání
(N2QAYB000944)
∏ 1 Baterie dálkového ovládání
∏ 1 Síťový kabel
∏ 1 Vnitřní anténa FM
Nastavení zvuku.............................................. 47
Hodiny a časovač ........................................... 47
Další ................................................................. 48
Návod k odstraňování problémů................... 49
Péče o jednotku a o média............................. 50
O zařízení Bluetooth
®
..................................... 51
Příslušenství pro montáž na zeď
∏ 1 Bezpečnostní
∏ 2 Konzoly na zeď
držák
Přehrávatelná média....................................... 51
Licence ............................................................ 51
Připevnění zařízení na zeď (volitelné)........... 52
∏ 1 Šroub
Technické údaje.............................................. 54
Informace o popisech v tomto návodu k
obsluze
≥ Stránky, na které je odkazováno, jsou označovány
následujícím způsobem: “l ±±”.
≥ Není-li uvedeno jinak, jsou funkce popsány pomocí
dálkového ovladače.
Likvidace použitých zařízení a baterií
Jen pro státy Evropské unie a země s fungujícím systémem recyklace a zpracování odpadu.
Tyto symboly na výrobcích, jejich obalech a v doprovodné dokumentaci upozorňují na to, že se
použitá elektrická a elektronická zařízení, včetně baterií, nesmějí likvidovat jako běžný
komunální odpad.
Aby byla zajištěna správná likvidace a recyklace použitých výrobků a baterií, odevzdávejte je v
souladu s národní legislativou na příslušných sběrných místech.
Správnou likvidací přispějete k úspoře cenných přírodních zdrojů a předejdete možným
negativním dopadům na lidské zdraví a životní prostředí.
O další podrobnosti o sběru a recyklaci odpadu požádejte místní úřady.
Při nesprávné likvidaci tohoto druhu odpadu se vystavujete postihu podle národní legislativy.
Poznámka k symbolu baterie (značka pod symbolem):
Tento symbol může být použitý v kombinaci s chemickou značkou. Takový případ je souladu s
požadavky směrnice pro chemické látky.
≥ Nepoužívejte napájecí kabel s jinými zařízeními.
≥ Čísla výrobku uvedená v tomto návodu představují správná
čísla výrobku z lednu 2014. Mohou být předmětem změny.
ČESKY
39
RQT9944
Page 40

Ovládací prvky
Pohled shora
(Alkalická nebo
manganová baterie)
1 Přepínač pohotovostního režimu/zapnutí (Í/I)
(Í)
Stisknutím se přístroj přepne mezi provozním a
pohotovostním režimem.
V pohotovostním režimu přístroj stále
množství energie.
spotřebovává malé
2 Volba zdroje zvuku
Na tomto zařízení:
“CD” """"-. “BLUETOOTH” """"-. “USB”
^"""--" “AUX” (""-"" “FM” ("-""-}
Na dálkovém ovládání:
[ ]: “BLUETOOTH”
[USB/CD]: “CD” ,. “USB”
[RADIO/AUX]: “FM”,. “AUX”
3 Tlačítka pro základní ovládání přehrávání
4 Nastavení hlasitosti (0 (min.) až 50 (max.))
5 Otevření a zavření posuvných dvířek
6 Bluetooth
≥ Stisknutím vyberte “BLUETOOTH” jako zdroj zvuku.
≥ Stisknutím a podržením vyberete režim párování (l 43)
®
párovací tlačítko
nebo odpojte zařízení Bluetooth
®
(l 44).
7 Dotyková oblast NFC (l 43)
8 Port pro zařízení USB / DC OUT zásuvka (l 42)
9 AUX IN konektor (l 41)
10 Čidlo signálu dálkového ovladače
Vzdálenost: Do cca 7 m přímo před zařízením
Úhel: přibl. 30o doleva a doprava
11 Displej
12 Posuvný kryt
13 Vstup do menu nastavení
14 Změna zobrazovaných informací
15 Vstup do menu zvuk
16 Ztmavnutí panelu displeje
Opětovným stisknutím funkci zrušíte.
17 Vypnutí zvuku
Opětovným stisknutím funkci zrušíte. Funkci “MUTE”
rovněž zrušíte stisknutím tlačítka pro nastavení hlasitosti
nebo vypnutím zařízení.
18 Vstup do menu přehrávání
19 Volba/OK
∫ Použití dálkového ovládání
Vložte baterii tak, aby póly (i a j) odpovídaly indikaci na
dálkovém ovládání.
Nasměrujte jej na snímač signálu dálkového ovládání na
tomto zařízení.
≥ Abyste zabránili interferencím, nepokládejte před čidlo signálu
žádné předměty.
40
RQT9944
Page 41

Zapojení
2
1
Přívodní kabel připojte až po dokončení všech ostatních zapojení.
Toto zařízení spotřebovává malé množství energie (l 54) i v případě, že je vypnuté.
≥ Pokud nebudete toto zařízení delší dobu používat, odpojte je v zájmu úspory elektrické energie ze zásuvky.
Lepicí páska
(nedodává se)
Vnitřní anténa FM
(dodává se)
Do síťové zásuvky
Síťový kabel (dodává se)
Připojte anténu.
Audio kabel
(nedodává se)
≥ Tyto reproduktory nemají magnetické stínění. Neumisťujte je blízko televizorů, osobních počítačů nebo jiných zařízení snadno
ovlivnitelných magnetickým polem.
≥ Přilepte anténu lepicí páskou na zeď nebo na sloupek v takové poloze, která zajistí příjem signálu s nejmenším rušením.
≥ Pokud je signál rádia slabý, použijte venkovní FM anténu se správným zahnutým konektorem (nedodává se).
Připojení externího hudebního zařízení
1 Připojte externí hudební zařízení pomocí audio
kabelu (nedodává se).
≥ Typ konektoru: ‰3,5 mm stereo
2 Stisknutím tlačítka [RADIO/AUX] vyberte možnost
“AUX” a spusťte přehrávání na připojeném
zařízení.
∫ Výběr hlasitosti vstupu z externího
zařízení
1 V režimu AUX stiskněte opakovaně tlačítko
[SOUND] pro výběr možnosti “INPUT LEVEL”.
2 Stisknutím tlačítka [3, 4] vyberte “NORMAL”
nebo “HIGH” a poté stiskněte [OK].
≥ Výchozí tovární nastavení je “NORMAL”.
≥ Aby bylo zkreslení zvuku v režimu “HIGH” nižší, vyberte možnost “NORMAL”.
≥ Vypnutím ekvalizéru nebo snížením hlasitosti na externím zařízení můžete snížit hlasitost vstupního signálu. Při vysoké hlasitosti
≥ Podrobnější informace naleznete v návodu k obsluze zařízení.
vstupního signálu dochází ke zkreslení zvuku.
ČESKY
41
RQT9944
Page 42

Vkládání médií
≥ Vyklopte disk tak, aby se nedotýkal posuvného krytu.
≥ Neotevírejte posuvná dvířka manuálně.
Strana se štítkem
∫ Připojení zařízení USB
≥ Zasuňte USB zařízení přímo. Nepoužívejte žádný USB prodlužovací kabel.
≥ Pokud zařízení USB nepoužíváte, odpojte jej.
≥ Před odpojením USB zařízení zvolte jiný zdroj než “USB”.
∫ Vložení disku CD
Kabel USB
(nedodává se)
Do kompatibilního zařízení
∫ Nabíjení zařízení
Nabíjení začne po připojení zařízení (jmenovitá hodnota: 5 V/1,5 A) ke konektoru DC OUT tohoto zařízení.
1 Zapnutí přístroje.
2 Připojte zařízení.
{. Potvrzení proveďte na obrazovce připojeného zařízení
apod. a ověřte, že nabíjení začalo.
≥ Zajistěte, aby zařízení při vkládání a vyjímání médií nespadlo.
≥ Při přemisťování tohoto zařízení nezapomeňte vyjmout veškerá média a přepnout toto zařízení do pohotovostního režimu.
≥ Je vyžadován kabel kompatibilní s vaším zařízením. Použijte
kabel dodaný s vaším zařízením.
≥ Zařízení se nemusí nabíjet, ani když je k portu DC OUT
tohoto zařízení připojen kompatibilní kabel. V takovém
případě použijte nabíječku dodanou se zařízením.
≥ V závislosti na daném zařízení nemusí být podporováno
nabíjení jinou nabíječkou. Před použitím konzultujte návod k
obsluze k zařízení.
≥ Nepřipojujte k tomuto zařízení jiná zařízení jejichž parametry
přesahují jmenovité hodnoty 5 V/1,5 A.
≥ Chcete-li zkontrolovat, zda je nabíjení dokončeno, najdete
příslušnou informaci na displeji připojeného zařízení.
≥ Po úplném nabití odpojte kabel USB od konektoru DC OUT.
≥ Chcete-li pokračovat v nabíjení i v pohotovostním režimu,
musí se zařízení začít nabíjet před přepnutím tohoto zařízení
do pohotovostního režimu.
–Při nabíjení vybitého zařízení nepřepínejte toto zařízení do
pohotovostního režimu, dokud nebude schopné provozu.
42
RQT9944
Page 43

Operace Bluetooth
®
Toto zařízení umožňuje bezdrátový poslech zvuku ze zvukového zařízení Bluetooth®.
≥ Podrobnosti o zařízení Bluetooth® naleznete v návodu k obsluze.
≥ Pokud chcete používat zařízení Bluetooth® kompatibilní s technologií NFC (Near Field Communication),
přejděte k části věnované “Připojení jedním dotykem (připojení pomocí technologie NFC)”.
Připojení pomocí nabídky
Bluetooth
Příprava
≥ Na zařízení zapněte funkci Bluetooth
zařízení do blízkosti tohoto zařízení.
∫ Párování se zařízením Bluetooth
®
®
a umístěte
®
1 Stisknutím [ ] vyberte “BLUETOOTH”.
{. Pokud je zařízení “PAIRING” uvedeno na displeji,
přejděte ke kroku 4.
Přechod do režimu párování*
2 Stisknutím [PLAY MENU] vyberte “PAIRING”.
3 Stisknutím [3, 4] zvolte “OK? YES” a poté
stiskněte [OK].
Párování se zařízením
4 Zvolte “SC-HC39” z menu Bluetooth
®
zařízení
Bluetooth®.
{. Název připojeného zařízení je na několik sekund
zobrazen na displeji.
5 Spusťte přehrávání na zařízení Bluetooth
* Do režimu párování lze přejít rovněž stisknutím a
podržením tlačítka [ -PAIRING] na tomto zařízení.
∫ Připojování spárovaného zařízení
Bluetooth
®
®
.
1 Stisknutím [ ] vyberte “BLUETOOTH”.
{. Na displeji se objeví nápis “READY”.
2 Zvolte “SC-HC39” z menu Bluetooth
Bluetooth®.
{. Název připojeného zařízení je na několik sekund
zobrazen na displeji.
3 Spusťte přehrávání na zařízení Bluetooth
≥ Pokud budete vyzváni k zadání hesla, zadejte hodnotu
“0000”.
≥ S tímto zařízením můžete registrovat až 8 zařízení. Pokud je
spárováno 9. zařízení, bude nahrazeno zařízení, které se
nepoužívalo po nejdelší dobu.
≥ To to z a řízení lze najednou připojit pouze k jednomu zařízení.
≥ Pokud jako zdroj vyberete funkci “BLUETOOTH”, pokusí se
tato jednotka automaticky připojit k poslednímu připojenému
zařízení Bluetooth
®
.
®
zařízení
®
.
Připojení jedním dotykem (připojení
pomocí technologie NFC)
Platí pouze pro zařízení AndroidTM podporující
technologii NFC
Pouhým dotykem zařízení Bluetooth® s technologií
NFC (Near Field Communication) s tímto zařízením
můžete dokončit všechny přípravy od registrace
zařízení Bluetooth® po navázání spojení.
≥ Zařízení Android verze nižší než 4.1 vyžaduje
instalaci aplikace “Panasonic Music Streaming”
(zdarma). Stáhněte si aplikaci do vašeho zařízení
Bluetooth®.
– Do pole pro vyhledávání služby Google PlayTM zadejte
hodnotu “Panasonic Music Streaming” a vyberte možnost
“Panasonic Music Streaming”.
Příprava
≥ Zapněte funkci NFC na zařízení.
1 Stisknutím [ ] vyberte “BLUETOOTH”.
2 Přiložte zařízení k dotykové oblasti NFC na tomto
zařízení [ ]. (l 40)
{. Po dokončení registrace a připojení zařízení Bluetooth®
je na několik sekund zobrazen název připojeného
zařízení zobrazen na displeji. Přemístěte zařízení dále
od tohoto zařízení.
≥ Pokud k navázání připojení nedojde ani po kontaktu
zařízení s oblastí technologie NFC, přemístěte zařízení
tak, aby jej bylo možné rozpoznat.
3 Spusťte přehrávání na zařízení Bluetooth
≥ Pokud k tomuto zařízení přiložíte jiné zařízení, lze
aktualizovat připojení Bluetooth
bude automaticky odpojeno.
≥ Pokud během přehrávání není zvuk synchronizován s
obrazem, restartujte aplikaci používanou pro přehrávání.
Pokud problém přetrvává, propojte zařízení Bluetooth
zařízení pomocí audio kabelu. (nedodává se).
≥ Po navázání spojení, v závislosti na použitém zařízení, může
začít automaticky přehrávání.
≥ U některých zařízení nemusí funkce připojení jedním
dotykem pracovat správně.
®
. Dříve připojené zařízení
®
.
®
a toto
ČESKY
43
RQT9944
Page 44

Režim vysílání Bluetooth
Režim přenosu lze změnit pro zajištění vyšší kvality
přenosu nebo vyšší kvality zvuku.
Příprava
≥ Stisknutím [ ] vyberte “BLUETOOTH”.
≥ Pokud je již zařízení Bluetooth® připojeno, odpojte
ho.
®
Odpojení zařízení Bluetooth
1 Po připojení zařízení Bluetooth
Opakovaným stisknutím tlačítka [PLAY MENU]
vyberte možnost “DISCONNECT?”.
®
®
:
2 Stisknutím [3, 4] zvolte “OK? YES” a poté
stiskněte [OK].
1 Opakovaným stisknutím tlačítka [PLAY MENU]
vyberte možnost “LINK MODE”.
2 Pro volbu režimu stiskněte možnost [3, 4] a pak
stiskněte tlačítko [OK].
MODE 1: Důraz na konektivitu
MODE 2: Důraz na kvalitu zvuku
≥ Pokud dojde k přerušení přehrávání zvuku, vyberte možnost
“MODE 1”.
≥ Výchozí tovární nastavení je “MODE 2”.
Úroveň vstupu Bluetooth
Pokud je vstupní úroveň zvuku ze zařízení Bluetooth®
příliš nízká, změňte nastavení vstupní úrovně.
Příprava
≥ Připojte zařízení Bluetooth®.
®
1 Opakovaným stisknutím tlačítka [PLAY MENU]
vyberte možnost “INPUT LEVEL”.
2 Pro volbu úrovně stiskněte možnost [3, 4] a pak
stiskněte tlačítko [OK].
“LEVEL 0” ,. “LEVEL i1” ,. “LEVEL i2”
^---------------------------------------------------------J
≥ Je-li zvuk zkreslený, zvolte “LEVEL 0”.
≥ Výchozí tovární nastavení je “LEVEL 0”.
≥ Zařízení Bluetooth® můžete rovněž odpojit stisknutím a
podržením tlačítka [ -PAIRING] na tomto zařízení.
≥ Zařízení Bluetooth
zdroj zvuku (např., “CD”).
®
bude odpojeno, pokud vyberete odlišný
44
RQT9944
Page 45

Ovládání přehrávání médií
Následující značky označují dostupnost funkce.
[CD]: Audio CD ve formátu CD-DA a CD
[USB]:USB zařízení obsahující soubory MP3
[Bluetooth]:Připojené zařízení Bluetooth
Příprava
≥ Zapnutí přístroje.
≥ Vložte médium nebo připojte zařízení Bluetooth®.
≥ Stisknutím [USB/CD] nebo [ ] zvolte zdroj zvuku.
Přehrávání Stiskněte [1/;].
Zastavení Stiskněte [∫].
Pauza při
přehrávání
Přeskočení Stisknutím [:/6] nebo
Vyhledávání Během přehrávání nebo pozastavení,
∫ Zobrazení informací
Opakovaně stiskněte [DISPLAY].
≥ Chcete-li použít dálkové ovládání tohoto zařízení se
zařízením Bluetooth
funkci AVRCP (Audio Video Remote Control Profile – profil
dálkového ovládání zvuku a videa).
V závislosti na stavu zařízení nemusí některé ovládací prvky
fungovat.
≥ Maximální počet zobrazitelných znaků: přibližně 30
≥ To to z a řízení podporuje tagy ID3 verze 1.0, 1.1 a 2.3.
Nepodporovaná textová data se nezobrazí nebo se zobrazí
odlišně.
≥ Označení alba a stopy u souborů MP3.
obsahující soubory MP3 (l 51)
(l 51)
Základní ovládání
([CD], [USB], [Bluetooth])
≥ [USB]: Pokud je zobrazeno “RESUME”, je
pozice uložena do paměti.
Stiskněte [1/;].
Přehrávání zahájíte opětovným
stisknutím.
[5/9] můžete přeskočit skladbu.
[CD], [USB] Stiskněte [3] nebo [4] pro
přeskočení alba MP3.
stiskněte a podržte tlačítko [:/6]
nebo [5/9].
®
, musí zařízení Bluetooth® podporovat
®
Režimy přehrávání ([CD], [USB])
Zvolte režim přehrávání.
1 Stisknutím [PLAY MENU] zvolte “PLAYMODE”,
nebo “REPEAT”.
2 Pro volbu nastavení stiskněte [3, 4] a poté
stiskněte [OK].
PLAYMODE
OFF
PLAYMODE
1-TRACK Přehraje pouze zvolenou stopu.
1-ALBUM Přehraje pouze zvolené album
RANDOM Náhodně přehraje obsah.
1-ALBUM
RANDOM
REPEAT
ON REPEAT Zapne režim opakování.
OFF
REPEAT
≥ Během přehrávání v režimu náhodného přehrávání se nelze
vrátit na předchozí skladbu.
≥ Při otevření posuvných dvířek dojde ke zrušení režimu.
Zruší nastavení režimu přehrávání.
≥ “1”, “ ” je zobrazeno.
(Slouží k přeskočení požadované
skladby.)
MP3.
≥ “1”, “ ” je zobrazeno.
≥ Bude zobrazeno hlášení “RND”.
Náhodně přehraje stopy ve
zvoleném albu MP3.
≥ Pro volbu alba MP3 stiskněte [3] nebo
[4].
≥ “1”, “ ”, “RND” je zobrazeno.
≥ Bude zobrazeno hlášení “`”.
Vypne režim opakování.
ČESKY
“A _ _ _”: Číslo alba MP3.
“T _ _ _”: Číslo stopy MP3.
≥ “ _ ” označuje číslo alba či stopy.
“”:
“”:
Pro označení alba je použito i toto označení.
Pro označení stopy je použito i toto označení.
45
RQT9944
Page 46

Poslech rádia
Můžete předvolit až 30 kanálů.
Příprava
≥ Ujistěte se, že je anténa připojena. (l 41)
≥ Zapnutí přístroje.
≥ Stisknutím [RADIO/AUX] vyberte “FM”.
≥ Dříve uložená stanice bude přepsána, pokud jinou stanici
uložíte pod stejnou předvolbu kanálu.
Automatické přednastavení stanic
1 Stisknutím [PLAY MENU] vyberte “A.PRESET”.
2 Stisknutím tlačítka [3, 4] vyberte “LOWEST”
nebo “CURRENT” a poté stiskněte [OK].
LOWEST:
Pro zahájení automatického nastavení od nejnižší
frekvence (FM 87.50).
CURRENT:
Pro zahájení automatického nastavení od stávající
frekvence.*
{. Tuner zahájí nastavování všech stanic, které lze
přijmout, do kanálů ve vzestupném pořadí.
* Ohledně změny frekvence si přečtěte část “Ruční ladění a
ukládání předvoleb”.
Poslech předvoleného kanálu
1 Opakovaným stisknutím tlačítka [PLAY MENU]
vyberte možnost “TUNEMODE”.
2 Stisknutím [3, 4] zvolte “PRESET” a poté
stiskněte [OK].
3 Stisknutím [:/6] nebo [5/9] vyberte
kanál.
∫ Ruční ladění a ukládání předvoleb
Zvolte rozhlasové vysílání.
1 Opakovaným stisknutím tlačítka [PLAY MENU]
vyberte možnost “TUNEMODE”.
2 Stisknutím [3, 4] zvolte “MANUAL” a poté
stiskněte [OK].
3 Pro naladění požadované stanice stiskněte
[:/6] nebo [5/9].
≥ Chcete-li zahájit automatické ladění, stiskněte a podržte
tlačítko [:/6] nebo [5/9], dokud se frekvence
nezačne rychle měnit. Ladění se zastaví po nalezení
stanice.
Předvolení kanálu
4 Při poslouchání rádia, stiskněte [OK].
5 Zvolte kanál stisknutím [3, 4] a poté stiskněte
[OK].
∫ Pro lepší kvalitu zvuku vysílání FM
1 Při příjmu FM vysílání opakovaně stiskněte
tlačítko [PLAY MENU] a zvolte režim “FM MODE”.
2 Stisknutím [3, 4] zvolte “MONO” a poté stiskněte
[OK].
≥ Toto nastavení lze uložit do paměti jako předvolbu.
Abyste tak učinili, pokračujte ke kroku 4 “Ruční
ladění a ukládání předvoleb”.
≥ Vybráním možnosti “STEREO” v kroku 2 se vrátíte do stereo
vysílání.
≥ Dojde-li ke změně frekvence, režim “MONO” bude zrušen.
∫ Zobrazení aktuálního stavu signálu FM
Při příjmu signálu FM opakovaně tiskněte tlačítko
[PLAY MENU], aby se zobrazil údaj “FM STATUS”, a
stiskněte tlačítko [OK].
“FM ST”: Signál FM je naladěn a stereo.
“FM”: Není naladěn žádný signál nebo je
“FM MONO”: Hodnota “MONO” je vybrána v kroku 2
∫ Zobrazení textových údaj RDS
Stisknutím [DISPLAY] zobrazte textová data.
≥ Každým stiskem tlačítka:
“PS”: Programový servis
“PTY”: Typ programu
“FREQ”: Zobrazení frekvence
signál FM mono.
části “Pro lepší kvalitu zvuku vysílání
FM” (l viz výše).
46
RQT9944
≥ “STEREO” se zobrazí, když zařízení naladí stereo vysílání.
≥ Zařízení může zobrazit textová data vysílaná rádiovým
datovým systémem (RDS), který je v některých oblastech k
dispozici. (Je-li špatný příjem, zobrazení RDS nemusí být k
dispozici.)
Page 47

Nastavení zvuku
Audio výstup lze rozšířit o dále uvedené zvukové
efekty.
1 Opakovaným stisknutím tlačítka [SOUND] vyberte
efekt.
2 Pro volbu nastavení stiskněte [3, 4] a poté
stiskněte [OK].
“PRESET EQ”
(Přednastavení
ekvalizéru)
“BASS” (Basy)
nebo “TREBLE”
(výšky)
“D.BASS”
(Dynamické basy)
“SURROUND”
(Prostorový zvuk)
≥ Jsou-li tyto efekty používány s některými zdroji, může dojít ke
zhoršení kvality zvuku. Pokud k tomu dojde, zvukové efekty
vypněte.
≥ Pokud je jako zdroj vybrána možnost “AUX”, můžete vybrat
možnost “INPUT LEVEL” a upravit hlasitost vstupu z
externího zařízení. (l 41)
“HEAVY” (těžký), “SOFT”
(lehký), “CLEAR” (čistý),
“VOCAL” (vokální) nebo “FLAT”
(nevýrazný/vypnutý).
≥ Výchozí tovární nastavení je
“HEAVY”.
Nastavte úroveň (j4 až i4).
“ON D.BASS” nebo
“OFF D.BASS”.
≥ Výchozí tovární nastavení je
“ON D.BASS”.
Hodnota “ON SURROUND”
nebo “OFF SURROUND”.
≥ Výchozí tovární nastavení je
“OFF SURROUND”.
Hodiny a časovač
Nastavení hodin
Hodiny fungují v režimu zobrazení 24 hodin.
1 Opakovaným stisknutím tlačítka [SETUP] vyberte
možnost “CLOCK”.
2 Pro nastavení času stiskněte tlačítko [3, 4] a
poté stiskněte [OK].
≥ Opakovaným stisknutím tlačítka [SETUP] vyberte možnost
“CLOCK” a jednou stiskněte tlačítko [OK], tak zobrazíte
hodiny. Čas je zobrazen 10 sekund.
(V pohotovostním režimu jednou stiskněte [DISPLAY].)
≥ Při výpadku elektrického proudu nebo při vytažení
napájecího kabelu dojde k resetování hodin.
≥ Pro větší přesnost hodiny pravidelně seřizujte.
Časovač přehrávání
Časovač můžete nastavit tak, aby se zařízení každý
den zapnulo v určitý čas.
Příprava
Nastavte hodiny.
∫ Nastavení časovače
1 Opakovaným stisknutím tlačítka [SETUP] vyberte
možnost “TIMER ADJ”.
2 Stiskem tlačítka [3, 4] nastavte čas spuštění
(“ON TIME”) a poté stiskněte [OK].
3 Stiskem tlačítka [3, 4] nastavte čas vypnutí
(“OFF TIME”) a poté stiskněte [OK].
4 Pomocí tlačítek [3, 4] vyberte zdroj hudby*
poté stiskněte tlačítko [OK].
a
∫ Zapnutí časovače
1
Vyberte zdroj hudby a nastavte požadovanou hlasitost.
2 Opakovaným stisknutím tlačítka [SETUP] vyberte
možnost “TIMER SET”.
3
Stisknutím [3,4] zvolte “SET” a poté stiskněte [OK].
≥ Bude zobrazeno hlášení “F”.
≥ Pro vypnutí časovače zvolte “OFF”.
4 Tlačítkem [Í] přepněte zařízení do
pohotovostního režimu.
≥
Pro zobrazení nastavení časovače opakovaně stiskněte tlačítko
[SETUP], zvolte “TIMER ADJ” a poté jednou stiskněte [OK].
Při zapnutí časovače bude rovněž zobrazen zdroj zvuku a
hlasitost.
≥ Když je v pohotovostním režimu časovač zapnutý, zobrazte
nastavení tak, že dvakrát stisknete [DISPLAY].
≥ Po nastavení časovače lze zařízení opět používat běžným
způsobem, nicméně:
–Před časem spuštění časovače přepněte zařízení do
pohotovostního režimu.
– I když dojde ke změně zdroje zvuku a hlasitosti, časovač
použije zdroj zvuku a hlasitost, které byly nastaveny při
zapnutí časovače.
* Hodnota jako zdroj zvuku lze nastavit “CD”, “USB”, “FM” a
“AUX”.
Časovač spánku
Časovač spánku zařízení po uplynutí nastavené doby
vypne.
1
Stisknutím tlačítka [SETUP] vyberte možnost “SLEEP”.
2 Stiskem tlačítka [3, 4] nastavte čas (v minutách)
a pak stiskněte [OK].
“SLEEP 30” ,. “SLEEP 60” ,. “SLEEP 90” ,. “SLEEP 120”
^------------------. “OFF” (Zrušit) (------------------J
≥ Pokud neprobíhají jiné operace, na displeji tohoto zařízení je
zobrazen zbývající čas.
≥ Časovač přehrávání a časovač automatického vypnutí lze
použít současně. Hlavním časovačem tohoto zařízení je
vždy časovač automatického vypnutí.
RQT9944
ČESKY
47
Page 48

Další
Funkce automatického vypnutí
Dle výchozího továrního nastavení přejde toto zařízení
automaticky do pohotovostního režimu, pokud není slyšet
žádný zvuk a není používáno po dobu přibližně 20 minut.
Pro zrušení této funkce
1 Opakovaným stisknutím tlačítka [SETUP] vyberte
možnost “AUTO OFF”.
2
Stisknutím [3,4] zvolte “OFF” a poté stiskněte [OK].
≥ Tuto funkci zapnete výběrem hodnoty “ON” v kroku 2.
≥ Toto nastavení nelze použít, pokud je zdrojem zvuku “FM”.
≥ Pokud je navázáno připojení k zařízení Bluetooth
funkce nefunguje.
Bluetooth® pohotovostní režim
Pokud je v menu Bluetooth® spárovaného zařízení
Bluetooth® vybrána hodnota “SC-HC39”, toto zařízení
se z pohotovostního režimu automaticky zapne a
naváže spojení Bluetooth®.
®
, tato
1 Opakovaným stisknutím tlačítka [SETUP] vyberte
možnost “BLUETOOTH STANDBY”.
2 Stisknutím tlačítka [3, 4] vyberte “ON” a pak
stiskněte [OK].
≥ Tuto funkci vypnete výběrem hodnoty “OFF” v kroku 2.
Změna kódu zařízení a dálkového
ovládání
Pokud na pokyny dodaného dálkového ovládání
reaguje jiné zařízení Panasonic, změňte kód
dálkového ovládání.
1 Stisknutím [USB/CD] vyberte “CD”.
2 Stiskněte a podržte tlačítko [SELECTOR] na tomto
zařízení a stiskněte a podržte tlačítko [USB/CD] na
dálkové ovládání, dokud nebude na displeji
zařízení zobrazen text “REMOTE 2”.
3 Stiskněte a podržte tlačítko [OK] a [USB/CD] na
dálkovém ovladači alespoň na 4 sekundy.
≥ Chcete-li režim vrátit zpět na hodnotu “REMOTE 1”,
stiskněte tlačítko [USB/CD] a vyberte hodnotu “CD” a poté
zopakujte krok 2 a 3, ale namísto hodnoty [USB/CD]
nastavte hodnotu [ ].
Aktualizace softwaru
Občas může Panasonic vydat aktualizovaný software
pro toto zařízení, který může zařízení přidat funkce či
zlepšit fungování stávajících funkcí. Tyto aktualizace
jsou k dispozici bezplatně.
Další podrobnosti naleznete na následující webové
stránce.
http://panasonic.jp/support/global/cs/
(Tato stránka je pouze v angličtině.)
∫ Kontrola verze softwaru
Zobrazí se verze instalovaného softwaru.
Opakovaným stisknutím tlačítka [SETUP] vyberte
položku “SW VER.” a pak stiskněte tlačítko [OK].
≥ Ukončete stisknutím tlačítka [OK].
48
RQT9944
Page 49

Návod k odstraňování
problémů
Než se obrátíte na servisní službu, proveďte
následující kontroly. Pokud si nejste jistí s některými
kontrolními body nebo když navržené řešení
neodstraní problém, obraťte se na vašeho prodejce s
žádostí o pokyny.
Obnovení všech nastavení na výchozí tovární
Pokud nastane některá z následujících situací,
vynulujte paměť:
≥ Zařízení nereaguje na ovládání pomocí tlačítek.
≥ Chcete vymazat a vynulovat obsah paměti.
1 Odpojte přívodní kabel. (Počkejte alespoň
3 minuty, než budete pokračovat krokem 2.)
2 Stiskněte a podržte tlačítko [Í/I] na hlavním
zařízení a znovu zapojte přívodní kabel.
≥ Ponechte stisknuté [Í/I] dokud se na displeji
nezobrazí “---------”.
3 Uvolněte tlačítko [Í/I].
≥ Všechna nastavení budou obnovena do původního stavu z
výroby. Bude nutné znovu nastavit položky uložené v
paměti.
Obecné
Během přehrávání je slyšet bzučení.
≥ Pokud je blízko kabelů přívodní kabel nebo zářivka, nesmí být v
jejich blízkosti jiné spotřebiče ani kabely.
Nelze načíst soubory MP3.
≥ Soubory MP3 nelze přehrávat, pokud zkopírujete disk s více
relacemi (multisession), mezi jehož relacemi nejsou žádná data.
≥ Při vytváření disků s více relacemi je nutno relace uzavřít.
≥ Na disku je uloženo příliš málo dat. Objem dat musí být větší než
5MB.
V pohotovostním režimu se nabíjení nezahájí.
≥ Zapněte zařízení. Ověřte, že započalo nabíjení, a přepněte
zařízení do pohotovostního režimu. (l 42)
Je slyšet šum.
≥ Pokud je zařízení připojeno ke konektoru AUX IN a vývodu DC
OUT, v závislosti na zařízení může vznikat šum. V takovém
případě odpojte USB kabel od vývodu DC OUT.
Dálkový ovladač
Dálkové ovládání nepracuje správným způsobem.
≥ Baterie je vybitá nebo není správně vložená. (l 40)
Disk
Nesprávné zobrazení nebo nepřehrává.
≥ Ujistěte se, že disk je kompatibilní s tímto zařízením. (l 51)
≥ Snímací čočka je vlhká. Počkejte asi hodinu a zkuste to znovu.
USB
Zařízení nereaguje na stisk tlačítka [1/;].
≥ Odpojte USB zařízení a znovu je připojte. Případně vypněte
zařízení a znovu je zapněte.
Nelze číst USB jednotku nebo její obsah.
≥ Formát USB zařízení nebo jeho obsah nejsou kompatibilní s tímto
zařízením. (l 51)
≥ Funkce USB tohoto výrobku nemusí být kompatibilní s některými
USB zařízeními.
Pomalá činnost USB flash disku.
≥ Velké soubory nebo USB flash disky s velkou kapacitou se mohou
načítat delší dobu.
Zobrazený uplynulý čas se liší od skutečné doby
přehrávání.
≥ Kopírujte data na jiné USB zařízení nebo data zálohujte a USB
zařízení přeformátujte.
Rádio
Při poslechu rádiového vysílání je slyšet rušivé
zvuky nebo šum.
≥ Potvrďte, že je anténa správně připojena. (l 41)
≥ Nastavte pozici antény.
≥ Snažte se zachovat mezi anténou a napájecím kabelem určitou
vzdálenost.
≥ Pokud se v blízkém okolí nacházejí budovy či hory, zkuste použít
venkovní anténu. (l 41)
≥ Vypněte televizi nebo jiný audio přehrávač nebo je oddělte od
tohoto zařízení.
≥ V případě rušení nenechávejte v blízkosti zařízení mobilní
telefony.
Bluetooth
Párování nelze dokončit.
≥ Zkontrolujte stav zařízení Bluetooth®.
Nelze se spojit se zařízením.
≥ Párování zařízení neproběhlo úspěšně nebo došlo ke změně
registrace. Zkuste provést opětovné párování zařízení. (l 43)
≥ Důvodem by mohlo být připojení tohoto zařízení k jinému
zařízení. Odpojte jiné zařízení a zkuste provést spárování
zařízení znovu. (l 43)
Zařízení je připojeno, ale prostřednictvím tohoto
zařízení není slyšet zvuk.
≥ U některých zabudovaných Bluetooth® zařízení musíte výstup
zvuku “SC-HC39” nastavit ručně. Pro podrobné informace si
přečtěte návod k použití daného zařízení.
Zvuk je přerušovaný.
≥ Zařízení se nachází mimo komunikační dosah 10 m. Přemístěte
zařízení Bluetooth® blíže k tomuto zařízení.
≥ Odstraňte všechny překážky mezi tímto zařízením a druhým
zařízením.
≥ Další zařízení, která používají frekvenční pásmo 2,4 GHz, např.
bezdrátové směrovače, mikrovlnné trouby, bezdrátové telefony
apod., způsobují rušení. Přemístěte zařízení Bluetooth® blíže k
tomuto zařízení a dále od ostatních zařízení.
≥ Pro stabilní komunikaci zvolte “MODE 1”. (l 44)
Funkce připojení jedním dotykem (funkce NFC)
nefunguje.
≥ Zkontrolujte, že jsou zařízení a funkce NFC zapnuté. (l 43)
®
ČESKY
49
RQT9944
Page 50

Zprávy
Čočka
Na displeji zařízení se mohou objevovat následující
zprávy nebo čísla služeb.
“--:--”
≥ Poprvé jste zapojili přívod elektrického proudu nebo nedávno
došlo k výpadku elektrického proudu. Nastavte čas (l 47).
“ADJUST CLOCK”
≥ Není nastaven čas. Nastavte správný čas.
“ADJUST TIMER”
≥ Časovač přehrávání není nastaven. Nastavte časovač
přehrávání.
“AUTO OFF”
≥ Zařízení nebylo po dobu cca 20 minut použito a za minutu se
proto vypne. Stisknutím libovolného tlačítka tuto akci zastavíte.
“ERROR”
≥ Provedli jste nesprávnou operaci. Přečtěte si instrukce a
zopakujte postup.
“F” (“ ” označuje nějaké číslo.)
≥ Došlo k problému se zařízením.
Poznamenejte si zobrazené číslo, odpojte přívodní kabel a
poraďte se s prodejcem.
“ILLEGAL OPEN”
≥ Posuvný kryt není ve správné pozici. Vypněte zařízení a znovu jej
zapněte. Při opětovném zobrazení tohoto upozornění se obraťte
na prodejce.
“NODEVICE”
≥ Zařízení USB není správně vloženo. Přečtěte si pokyny a zkuste
to znovu (l 42).
“NO DISC”
≥ Vložte disk určený k přehrávání (l 42).
“NO PLAY”
≥ Vložili jste CD disk, na kterém nejsou uloženy soubory ve formátu
CD-DA nebo MP3. Takový disk nelze přehrávat.
≥ Zkontrolujte obsah. Můžete přehrávat pouze podporovaný formát.
(l 51)
≥ Soubory na zařízení USB mohou být poškozeny. Naformátujte
zařízení USB a zkuste znovu.
≥ Zařízení může mít potíže. Vypněte a znovu zapněte zařízení.
“PLAYERROR”
≥ Přehráváte nepodporovaný soubor formátu MP3. Systém
přeskočí tuto stopu a bude přehrávat další stopu.
“READING”
≥ Zařízení kontroluje informace z CD/USB. Po zmizení této zprávy
zařízení zahájí činnost.
“REMOTE ” (“” označuje nějaké číslo.)
≥ Dálkové ovládání a zařízení používají rozdílné kódy. Změňte kód
dálkového ovládání.
– Když se zobrazí údaj “REMOTE 1”, stiskněte a podržte tlačítko
[OK] a [ ] na déle než 4 sekundy.
– Když se zobrazí údaj “REMOTE 2”, stiskněte a podržte tlačítko
[OK] a [USB/CD] na déle než 4 sekundy.
“USB OVER CURRENT ERROR”
≥ Zařízení USB odebírá příliš mnoho energie. Změňte zdroj na jiný
než “USB”, odpojte zařízení USB a vypněte toto zařízení.
50
RQT9944
Péče o jednotku a o média
Před zahájením údržby vytáhněte síťový kabel ze
zásuvky.
∫ Očistěte zařízení měkkou, suchou
látkou
≥ V případě velkého znečištění vyždímejte vlhký hadřík a
utřete nečistoty a poté přejeďte otřená místa suchým
hadříkem.
≥ Při čištění krytů reproduktorů používejte jemný hadřík.
Nepoužívejte kapesníky nebo jiné materiály, které se mohou
rozpadat. Malé částice mohou uvíznout uvnitř krytů
reproduktorů.
≥ K čištění zařízení nikdy nepoužívejte alkohol, ředidlo nebo
benzín.
≥ Před použitím vlhčených ubrousků si pečlivě prostudujte
pokyny k tomuto čisticímu prostředku.
∫ Péče o snímací čočku
≥ Pravidelně čočku čistěte, abyste zabránili poruchám. Pro
odstranění prachu použijte ofukování, v případě většího
znečištění pak vatový tampon.
≥ K čištění čočky nepoužívejte čisticí CD disky.
≥ Nenechávejte posuvný kryt dlouho otevřený. Mohlo by dojít k
znečištění čočky.
≥ Nedotýkejte se prsty čočky.
∫ Čištění disků
SPRÁVNĚ NESPRÁVNĚ
Otřete disk vlhkým hadříkem a poté jej otřete do sucha.
∫ Manipulace s diskem
≥ Disk uchopte za okraje, aby nedošlo k jeho poškrábání nebo
znečištění otisky prstů.
≥ Nenalepujte na disky nálepky nebo štítky.
≥ Nepoužívejte spreje na čištění desek, benzín, ředidla,
kapaliny bránící vzniku statické elektřiny ani žádná další
rozpouštědla.
≥ Nepoužívejte následující disky:
– Disky, na jejichž povrchu je lepidlo z odstraněných nálepek
nebo štítků (disky z půjčoven atd.).
– Pokroucené nebo popraskané disky.
– Disky s nepravidelným tvarem, například disky ve tvaru
srdce.
∫ Likvidace zařízení nebo jeho
postoupení jinému majiteli
V zařízení mohou být uchovány informace
uživatelského nastavení. Při vyřazení, likvidaci nebo
postoupení zařízení jinému majiteli proveďte postup
pro nastavení přednastavených hodnot z výrobního
závodu za účelem vymazání uživatelských nastavení.
(l 49, “Obnovení všech nastavení na výchozí
tovární”)
≥ V paměti tohoto zařízení může být zaznamenán
přehled o jeho činnosti.
Page 51

O zařízení Bluetooth
®
Společnost Panasonic nenese žádnou
odpovědnost za data a/nebo informace
prozrazené během bezdrátového přenosu.
∫ Používané kmitočtové pásmo
≥ Tento systém využívá frekvenční pásmo 2,4 GHz.
∫ Certifikace zařízení
≥ Tento systém vyhovuje kmitočtovým omezením a je
certifikován na základě telekomunikačních zákonů,
takže povolení k bezdrátovému provozu není nutné.
≥ Níže uvedené činnosti jsou v některých zemích
podle zákona trestné:
– Rozebírání nebo pozměňování systému.
– Odstranění označení uvádějících technické
specifikace.
∫ Omezení použití
≥ Bezdrátový přenos a používání všech zařízení
vybavených technologií Bluetooth® nejsou zaručeny.
≥ Všechna zařízení musí být v souladu se standardy
Bluetooth SIG, Inc.
≥ V závislosti na specifikacích a nastavení zařízení
může dojít k selhání spojení či odlišnému provedení
operací.
≥ Tento systém podporuje funkce zabezpečení
Bluetooth®. V závislosti na prostředí provozu a/nebo
nastavení však toto zabezpečení nemusí
dostačovat. Data bezdrátově přenášená do tohoto
systému přenášejte s opatrností.
≥ Tento systém neumožňuje přenos dat do zařízení
Bluetooth®.
∫ Dosah použití
≥ Tot o zařízení používejte v maximálním dosahu 10 m.
Rozsah se může snížit vlivem okolního prostředí,
překážek nebo rušení.
∫ Rušení způsobené jinými zařízeními
≥ Tento systém nemusí fungovat správně a může
docházet k problémům jako šum a přeskakování
zvuku z důvodu rušení radiovými vlnami, pokud se
systém nachází příliš blízko dalším zařízením
Bluetooth
®
nebo zařízením, která využívají pásmo
2,4 GHz.
≥ Systém nemusí správně fungovat, pokud jsou
radiové vlny z blízké vysílací stanice apod. příliš
silné.
∫ Určené použití
≥ Systém je určeno pro normální obecné používání.
≥ Nepoužívejte tento systém poblíž citlivých zařízení či
v prostředí citlivém na rušení rádiové frekvence
(např.: letiště, nemocnice, laboratoře atd.).
Přehrávatelná média
Kompatibilní CD
≥ Disk s logem CD.
≥ V tomto zařízení lze přehrávat disky, které odpovídají
formátu CD-DA.
≥ V závislosti na stavu záznamu nemusí být zařízení schopno
některé disky přehrát.
Kompatibilní USB zařízení
≥ Toto zařízení nezaručuje spojení se všemi USB zařízeními.
≥ Je podporován systém souborů FAT12, FAT16 a FAT32.
≥ Toto zařízení podporuje rozhraní USB 2.0 Full Speed.
≥ Toto zařízení podporuje USB zařízení s kapacitou až 32 GB.
Kompatibilní soubory MP3
≥ Podporovaný formát: Soubory s příponou “.mp3” nebo
“.MP3”
≥ Kompatibilní rozsah komprimace: mezi 16 kbps a 320 kbps
(stereo).
≥ V závislosti na způsobu vytvoření MP3 souborů se může
stát, že zařízení nebude tyto soubory přehrávat ve vámi
očíslovaném pořadí, případně je nemusí být schopno
přehrávat vůbec.
CD-R/RW
≥ Maximální počet skladeb a alb: 999 skladeb a 254 alb
(kromě kořenové složky).
≥ Formát CD disků: ISO9660 úroveň 1 a úroveň 2 (kromě
rozšířených formátů).
≥ Jsou-li na disku uloženy soubory ve formátu MP3 společně s
běžnými audio skladbami (CD-DA), bude zařízení přehrávat
ten typ záznamu, který se nachází blíže středu disku.
≥ Zařízení není schopno přehrávat soubory zaznamenané
pomocí technologie “packet write”.
USB zařízení
≥ Maximální počet skladeb a alb: 8000 skladeb a 799 alb
(kromě kořenové složky).
≥ Pokud připojíte čtečku karet s rozhraním USB a podporou
více karet, zařízení bude pracovat jen s jednou kartou;
většinou se bude jednat o první vloženou paměťovou kartu.
Licence
Slovní označení a loga Bluetooth® jsou majetkem společnosti
Bluetooth SIG, Inc. a veškeré jejich používání společností
Panasonic Corporation se řídí licenčními podmínkami.
Ostatní obchodní značky a názvy jsou majetkem příslušných
majitelů.
Google Play a Android jsou ochranné známky společnosti
Google Inc.
Technologie kódování zvuku MPEG Layer-3 licencovaná
společnostmi Fraunhofer IIS a Thomson.
ČESKY
51
RQT9944
Page 52

Připevnění zařízení na zeď
Stojánek
Spojovací šroub
Měkká přikrývka nebo látka
Šroub
(dodává se)
Lanko
(nedodává se)
(volitelné)
Toto zařízení může být připevněno na stěnu pomocí
dodaných konzol pro montáž na stěnu a podobně.
Ověřte, že stěna a šrouby udrží váhu alespoň 33 kg.
Součástí dodávky nejsou šrouby a jiný materiál pro
upevnění, protože typ a rozměr se může v každé
instalaci lišit.
≥ Podrobné informace o požadovaných šroubech jsou
popsány v kroku 5 v části “Pokyny pro montáž na
zeď”.
≥ Jako přídavné ochranné opatření připevněte toto
zařízení ke stěně pomocí šňůry pro zabránění pádu.
Příslušenství pro montáž
∫ Dodávané příslušenství
≥ 1 Bezpečnostní držák
≥ 1 Šroub
≥ 2 Konzoly na zeď
∫ Další vyžadované příslušenství
(prodává se samostatně)
≥ 4 Šrouby pro konzolu na zeď
≥ 1 Šroub pro bezpečnostní držák
≥ 1 Šňůra pro zabránění pádu*
≥ 1 Závěsný šroub
* Použijte šňůru, která je schopna udržet více než 33 kg
(s průměrem kolem 1,5 mm).
≥ Bezpečnostní držák uložte mimo dosah dětí, hrozí
nebezpečí spolknutí.
≥ Šrouby uložte mimo dosah dětí, hrozí nebezpečí
spolknutí.
≥ Konzoly na stěnu uložte mimo dosah dětí, hrozí
nebezpečí spolknutí.
Pokyny pro montáž na zeď
Před montáží zařízení vypněte a odpojte síťový kabel.
1 Odmontujte stojánek od zařízení.
≥ Uvolněte spojovací šroub ve spodní části zařízení.
≥ Opatrně vysuňte stojánek ze zařízení, jak je
znázorněno na obrázku.
≥ Demontovaný stojánek a šrouby uchovávejte na
bezpečném místě.
2 Za pomoci šroubu k zařízení připevněte
bezpečnostní držák (dodává se).
≥ Utahovací moment šroubu: 50 N0cm až 70 N0cm.
3 Připojte k zařízení šňůru pro zamezení pádu
(nedodává se).
Bezpečnostní upozornění
Vyžaduje se profesionální instalace.
Instalaci může provádět pouze kvalifikovaný
odborník na instalaci.
PANASONIC SE VZDÁVÁ ODPOVĚDNOSTI ZA
ŠKODY NA MAJETKU A/NEBO ZA VÁŽNÉ
UBLÍŽENÍ NA ZDRAVÍ ZPŮSOBENÉ
NEVHODNOU INSTALACÍ NEBO Z
NESPRÁVNOU MANIPULACÍ.
VAROVÁNÍ:
Aby nedošlo ke zranění osob, musí být toto
zařízení pevně namontováno na zeď v souladu s
pokyny pro montáž.
52
RQT9944
Page 53

4 Změřte a označte si polohu konzol na zdi na obou
204 mm
13 mm
500 mm
75 mm
142 mm
154 mm
100 mm
142
mm
300 mm
100 mm
Minimálně 30 mm
‰7,5 mm až
‰9,4 mm
‰4 mm
Konzoly na zeď
Montáž na
stěnu
Šroub pro bezpečnostní držák
(nedodává se)
Bezpečnostní držák
Připevnění ke
zdi
Lanko (nedodává se)
Závěsný šroub
(nedodává se)
Montáž
na stěnu
stranách.
≥ Pomocí následujících obrázků vyhledejte místa
přišroubování.
Místo pro připevnění konzol na zeď
Vyžadovaný prostor
5 Připevněte konzole na obou stranách na zeď
pomocí dvou šroubů (nedodává se).
≥ Pomocí vodováhy zkontrolujte, jestli jsou obě konzoly
ve stejné výšce.
6 Oběma rukama zařízení opatrně zavěste na
konzoly pro montáž na zeď.
≥ Před zavěšením zařízení na zeď připojte anténu a
přívodní kabel. (l 41)
≥ Po zavěšení toto zařízení opatrně pusťte a ujistěte se,
že je dostatečně pevně připevněno ke konzolám na zdi.
7 Pomocí šroubu pro bezpečnostní držák
(nedodává se) připevněte bezpečnostní držák ke
zdi.
≥ Ohledně požadavků před zašroubováním si přečtěte
krok 5.
ČESKY
8 Připevněte ke zdi šňůru pro zamezení pádu
(nedodává se).
≥ Ujistěte se, že je vůle šňůrky minimální.
53
RQT9944
Page 54

Technické údaje
∫ OBECNÉ ÚDAJE
Spotřeba energie 26 W
Spotřeba energie v pohotovostním režimu*
(Když je “BLUETOOTH STANDBY” “ON”)*
Zdroj napájení
AC 220 V až 240 V, 50 Hz
Rozměry (škvkh)
500 mmk205 mmk92 mm
Hmotnost Přibližně 2,5 kg
Rozsah provozních teplot
Provozní vlhkost
35 % až 80 % r.v. (bez kondenzace)
∫ ZESILOVAČ
Výstupní výkon
Výstupní výkon RMS v režimu stereo
Přední kanál (při fungování obou kanálů)
20 W na kanál (8 ≠), 1 kHz, 10 % THD
Celkový výkon RMS v režimu stereo
∫ TUNER
Kapacita paměti 30 stanic FM
Frekvenční modulace (FM)
Frekvenční rozsah
87,50 MHz až 108,00 MHz (krok 50 kHz)
Anténní konektory
75 ≠ (nevyvážený)
∫ CD DISKY
Přehrávané disky (8 cm nebo 12 cm)
CD, CD-R/RW (CD-DA, MP3*3)
Čtení
Vlnová délka 790 nm (CD)
1, 2
Přibližně 0,2 W
2
Přibližně 0,3 W
0 oC až r40 oC
40 W
∫ ČÁST TÝKAJÍCÍ SE REPROSOUSTAVY
Reproduktory
Úplný rozsah
Passive Radiator
Impedance 8 ≠
6,5 cm kónickýk1 na kanál
8cmk2 na kanál
∫ KONEKTORY
USB Port
USB standard
Podpora formátu souboru média
Systém souboru zařízení USB
AUX IN
DC OUT 5 V 1,5 A
Formát USB 2.0 Full Speed
MP3 (¢.mp3)
FAT12, FAT16, FAT32
Stereo, 3,5 mm jack
∫ ČÁST VĚNOVANÁ BLUETOOTH
Verze Bluetooth® Ver.2.1+EDR
Třída Třída 2
Podporované profily
Provozní frekvence
FH-SS v pásmu 2,4 GHz
Provozní vzdálenost
A2DP, AVRCP
10 m přímá viditelnost
≥ Technické údaje mohou být změněny bez předchozího
upozornění.
≥ Hmotnost a rozměry jsou pouze přibližné.
≥ Celkové harmonické zkreslení se měří pomocí digitálního
spektrálního analyzátoru.
*1: Hodnota “BLUETOOTH STANDBY” je “OFF”.
*2: Před přepnutím do pohotovostního režimu není ke
konektoru USB připojeno žádné zařízení.
*3: MPEG-1 Layer 3, MPEG-2 Layer 3
54
RQT9944
Page 55

55
RQT9944
ČESKY
Page 56

Precauciones de seguridad
AVISO
Unidad
≥ Para reducir el riesgo de incendio, descarga eléctrica o daño
del producto,
– No exponga esta unidad a la lluvia, humedad, goteo ni
salpicaduras.
– No coloque objetos llenos con líquidos, como floreros,
sobre esta unidad.
– Use solamente los accesorios recomendados.
– No saque las cubiertas.
– No repare esta unidad usted mismo. Consulte al personal
de servicio calificado para la reparación.
– No permita que objetos de metal caigan dentro de esta
unidad.
– No ponga objetos pesados en esta unidad.
Cable de alimentación de CA
≥ Para reducir el riesgo de incendio, descarga eléctrica o daño
del producto,
– Asegúrese de que el voltaje de alimentación corresponda
al voltaje impreso en esta unidad.
– Inserte por completo el enchufe del cable de alimentación
en la toma de CA.
– No tire, doble o coloque elementos pesados sobre el
cable de alimentación.
– No manipule el enchufe con las manos mojadas.
– Agarre el cuerpo del enchufe del cable de alimentación al
desconectar el enchufe.
– No use un enchufe del cable de alimentación o toma de
CA dañado.
≥ El enchufe de conexión a la red eléctrica es el dispositivo de
desconexión.
Instale esta unidad de forma que el enchufe de conexión a la
red eléctrica pueda desenchufarse de la toma de forma
inmediata.
ADVERTENCIA
Unidad
≥ Esta unidad utiliza un láser. El usar los controles, hacer los
reglajes o los pasos requeridos en forma diversa de la aquí
expuesta puede redundar en exposición peligrosa a la
radiación.
≥ No coloque objetos con llama descubierta, una vela por
ejemplo, encima de la unidad.
≥ Esta unidad puede tener interferencias de radio causadas
por teléfonos móviles durante su utilización. Si tales
interferencias resultan evidentes, aumente la separación
entre la unidad y el teléfono móvil.
≥ Esta unidad ha sido diseñada para ser utilizada en climas
moderados.
Ubicación
≥ Coloque esta unidad sobre una superficie pareja.
≥ Para reducir el riesgo de incendio, descarga eléctrica o daño
del producto,
– Para mantener bien ventilada esta unidad, no la instale ni
ponga en un estante de libros, mueble empotrado u otro
espacio de dimensiones reducidas.
– No obstruya las aberturas de ventilación de la unidad con
periódicos, manteles, cortinas u objetos similares.
– No exponga esta unidad a la luz solar directa, altas
temperaturas, mucha humedad y vibración excesiva.
Pila
≥ Existe un daño de explosión si la batería no se reemplaza
correctamente. Reemplace sólo con el tipo recomendado por
el fabricante.
≥ La mala manipulación de las baterías puede causar una
pérdida de electrolito y puede causar un incendio.
– Retire la batería si piensa no usar el mando a distancia
durante un período largo de tiempo. Almacene en lugares
oscuros y frescos.
– No caliente ni exponga las pilas a las llamas.
– No deje la(s) batería(s) en un automóvil expuesto a la luz
solar directa por un período prolongado de tiempo con las
puertas y ventanas cerradas.
– No las desarme ni coloque en cortocircuito.
– No intente recargar baterías alcalinas o de manganeso.
– No utilice baterías si se ha pelado la cubierta.
≥ Al desechar las baterías, comuníquese con sus autoridades
locales o distribuidores y pregunte por el método de
eliminación correcto.
La marca de identificación de producto está situada en la
parte inferior de la unidad.
Declaración de conformidad (DoC, por sus siglas en
inglés)
Por la presente, “Panasonic Corporation” declara que este
producto se encuentra en conformidad con los
requerimientos esenciales y otras disposiciones relevantes
de la Directiva 1999/5/EC.
Los clientes pueden descargar una copia de la DoC
original hacia nuestros productos R&TTE desde nuestro
servidor DoC:
http://www.doc.panasonic.de
Contacto con un representante autorizado: Panasonic
Marketing Europe GmbH,
Panasonic Testing Centre, Winsbergring 15, 22525
Hamburg, Alemania
Este producto se encuentra diseñado para el consumidor
general. (Categoría 3)
56
RQT9944
Page 57

Contenidos
Precauciones de seguridad ........................... 56
Accesorios ...................................................... 57
Guía de referencia del control remoto.......... 58
Conexiones ..................................................... 59
Colocación de los medios ............................. 60
Operaciones Bluetooth
Controles de reproducción de medios .........63
Escuchar la radio............................................ 64
Ajuste del sonido............................................ 65
Reloj y temporizador ...................................... 65
Otros ................................................................ 66
Solución de problemas .................................. 67
Cuidado de la unidad y los medios............... 68
Acerca de Bluetooth
Medios reproducibles..................................... 69
Licencias ......................................................... 69
Montaje de la unidad a la pared
(opcional)......................................................... 70
Especificaciones............................................. 72
Acerca de las descripciones en este manual de
instrucciones
≥ Las páginas de consulta se indican del siguiente modo
“l ±±”.
≥ A menos que se indique lo contrario, las operaciones se
describen usando el control remoto.
®
................................. 61
®
..................................... 69
Accesorios
Compruebe los accesorios antes de utilizar esta
unidad.
∏ 1 Mando a distancia
(N2QAYB000944)
∏ 1 Pila del mando a distancia
∏ 1 Cable de suministro de energía CA
∏ 1 Antena interior
para FM
Accesorios de montaje en la pared
∏ 1 Soporte de
seguridad
∏ 1 Tornillo
≥ No utilice el cable de suministro de energía CA con otros
equipos.
≥ Números de productos correctos proporcionados en estas
instrucciones de funcionamiento a partir de Enero de 2014.
Pueden estar sujetos a cambios.
∏ 2 Soportes de
montaje en la
pared
Eliminación de Aparatos Viejos y de Pilas y Baterías
Solamente para la Unión Europea y países con sistemas de reciclado.
Estos símbolos en los productos, su embalaje o en los documentos que los acompañen
significan que los productos eléctricos y electrónicos y pilas y baterías usadas no deben
mezclarse con los residuos domésticos.
Para el adecuado tratamiento, recuperación y reciclaje de los productos viejos y pilas y baterías
usadas llévelos a los puntos de recogida de acuerdo con su legislación nacional.
Si los elimina correctamente ayudará a preservar valuosos recursos y evitará potenciales
efectos negativos sobre la salud de las personas y sobre el medio ambiente.
Para más información sobre la recogida u reciclaje, por favor contacte con su ayuntamiento.
Puede haber sanciones por una incorrecta eliminación de este residuo, de acuerdo con la
legislación nacional.
Nota para el símbolo de pilas y baterías (símbolo debajo):
Este símbolo puede usarse en combinación con el símbolo químico. En este caso, cumple con
los requisitos de la Directiva del producto químico indicado.
ESPAÑOL
57
RQT9944
Page 58

Guía de referencia del control remoto
Vista superior
(Pila alcalina o de
manganeso)
1 Interruptor de espera/encendido (Í/I) (Í)
2 Seleccione la fuente de audio
3 Botones de control de reproducción básica
4 Ajuste el volumen (de 0 (min) a 50 (máx))
5 Abra o cierre la tapa deslizante
6 Botón de sincronización Bluetooth
7 Zona táctil NFC (l 61)
8 Puerto para dispositivos USB / Terminal DC OUT
9 Clavija AUX IN (l 59)
10 Sensor de señales del mando a distancia
11 Pantalla
12 Puerta deslizante
13 Ingrese el menú de configuración
14 Cambie la información que aparece en pantalla
15 Ingrese el menú del audio
16 Atenuar la pantalla
17 Silencie el sonido
18 Ingrese el menú de reproducción
19 Selección/OK
Presione para cambiar la unidad del modo encendido al
modo de espera y viceversa.
En el modo de espera, la unidad sigue consumiendo una
pequeña cantidad de energía.
En este aparato:
“CD” """"-. “BLUETOOTH” """"-. “USB”
^"""--" “AUX” (""-"" “FM” ("-""-}
En el control remoto:
[ ]: “BLUETOOTH”
[USB/CD]: “CD” ,. “USB”
[RADIO/AUX]: “FM”,. “AUX”
®
≥ Pulse para seleccionar “BLUETOOTH” como fuente de
sonido.
≥ Mantenga pulsado para entrar en el modo de
sincronización (l 61) o desconecte un dispositivo
®
Bluetooth
(l 62).
(l 60)
Distancia: dentro de 7 m aproximadamente directamente
enfrente de la unidad
Ángulo: Aproximado 30o izquierda y derecha
Presione nuevamente para cancelar.
Presione nuevamente para cancelar. “MUTE” también se
cancela cuando el volumen se ajusta o la unidad se
apaga.
∫ Uso del control remoto
Introduzca la pila de modo que los polos (i y j)
coincidan con los del mando a distancia.
Dirija hacia el sensor del control remoto de esta unidad.
≥ Para evitar interferencia, no coloque objetos en frente del
sensor de señal.
58
RQT9944
Page 59

Conexiones
2
1
Conecte el cable de alimentación de CA luego de haber completado todas las
otras conexiones.
Esta unidad consume poca corriente CA (l 72) incluso cuando se encuentra apagada.
≥ Para ahorrar energía, si no va a usar este dispositivo durante un período prolongado de tiempo,
desenchufarlo de la toma de corriente.
Cinta adhesiva
(no suministrado)
Antena interior para FM
(suministrado)
A una toma de corriente
Cable de suministro de energía CA (suministrado)
Conecte la antena.
Cable de audio
(no suministrado)
≥ Estos altavoces no disponen de protección magnética. No los coloque cerca de una televisión, un ordenador y otros dispositivos
magnéticos.
≥ Pegue con cinta adhesiva la antena a una pared o columna en la posición que presente menor interferencia.
≥ Si la recepción de radio es mala, utilice una antena exterior de FM con un conector del tipo ángulo recto (no suministrado).
Conecte un dispositivo externo de música
1 Conecte un dispositivo de música externa con un
cable de audio (no suministrado).
≥ Tipo de enchufe: ‰3,5 mm estéreo
2 Presione [RADIO/AUX] para seleccionar “AUX” y
comenzar a reproducir en el dispositivo
conectado.
∫ Para seleccionar el nivel de entrada de
sonido del dispositivo externo
1 Mientras está en modalidad AUX, pulse [SOUND]
repetidamente para seleccionar “INPUT LEVEL”.
2 Presione [3, 4] para seleccionar “NORMAL” o
“HIGH” y luego presione [OK].
≥ El ajuste de fábrica es “NORMAL”.
≥ Para mejorar la distorsión del sonido cuando se selecciona “HIGH”, seleccione “NORMAL”.
≥ Desconecte el ecualizador o baje el volumen de sonido del dispositivo externo para reducir la señal de entrada. Un nivel alto de
la señal de entrada distorsionará el sonido.
≥ Para obtener más información, consulte las instrucciones de funcionamiento del dispositivo.
ESPAÑOL
59
RQT9944
Page 60

Colocación de los medios
≥ Asegúrese de inclinar el disco para no tocar la puerta
deslizante.
≥ No abra la puerta deslizante manualmente.
El lado de la etiqueta
∫ Conexión de un dispositivo USB
≥ Inserte el dispositivo USB directamente. No use un cable de extensión USB.
≥ Desconecte el dispositivo USB si ha terminado de utilizarlo.
≥ Antes de retirar el dispositivo USB, seleccione una fuente que no sea “USB”.
∫ Insertar un CD
Cable USB
(no suministrado)
En el dispositivo compatible
∫ Cargar un dispositivo
La carga comienza cuando un dispositivo (valor nominal: 5 V/1,5 A) se conecta al terminal DC OUT de este
dispositivo.
1 Encienda la unidad.
2 Conecte un dispositivo.
{. Confirmar en la pantalla del dispositivo conectado, etc.
para comprobar que ha comenzado la carga.
≥ Tenga cuidado de que el aparato no se caiga cuando se inserten o saquen medios.
≥ Al mover este aparato, asegúrese de retirar todos los medios y ponerla en modo de espera.
≥ Se requiere cable compatible con su dispositivo. Utilice el
cable que viene con el dispositivo.
≥ Incluso si conecta un cable compatible con el terminal DC
OUT de este aparato, es posible que su dispositivo no se
cargue. En ese caso, utilice el cargador que viene con el
dispositivo.
≥ Según el dispositivo, es posible que otros cargadores no
funcionen. Compruebe las instrucciones de funcionamiento
del aparato antes de usar.
≥ No conecte un dispositivo con un valor nominal superior a
5 V/1,5 A a este aparato.
≥ Para verificar si la carga está completa, mire la pantalla del
dispositivo conectado, etc.
≥ Una vez se ha completado la carga, retire el cable USB del
terminal DC OUT.
≥ Para continuar con la carga durante el modo de espera,
compruebe que el dispositivo ha comenzado a cargar antes
de cambiar el aparato al modo en espera.
– Cuando se carga un dispositivo agotado, no cambie el
dispositivo al modo en espera hasta que el aparato sea
operativo.
60
RQT9944
Page 61

Operaciones Bluetooth
®
Se puede escuchar música del dispositivo de audio Bluetooth® de forma inalámbrica.
≥ Consulte las instrucciones de funcionamiento del dispositivo Bluetooth® para obtener más detalles.
≥ Si desea utilizar un dispositivo Bluetooth® compatible con NFC (Near Field Communication), proceda a
“Conexión de un solo toque (conexión vía NFC)”.
Conexión vía menú de Bluetooth
®
Preparación
≥ Encienda la función Bluetooth® del dispositivo y
coloque el dispositivo cerca de este aparato.
∫ Sincronización con dispositivos
Bluetooth
®
1 Pulse [ ] para seleccionar “BLUETOOTH”.
{. Si se indica “PAIRING” en la pantalla, vaya al paso 4.
Para entrar en el modo de sincronización*
2 Pulse [PLAY MENU] para seleccionar “PAIRING”.
3 Presione [3, 4] para seleccionar “OK? YES” y
luego presione [OK].
Para sincronizar con un dispositivo
4 Seleccione “SC-HC39” desde el menú Bluetooth
del dispositivo Bluetooth®.
{. El nombre del dispositivo conectado aparece en la
pantalla durante algunos segundos.
5 Inicie la reproducción en el dispositivo Bluetooth
* Se puede entrar en el modo de sincronización al pulsar y
mantener pulsado [ -PAIRING] en el dispositivo.
∫ Conexión de un dispositivo Bluetooth®
sincronizado
1 Pulse [ ] para seleccionar “BLUETOOTH”.
{. “READY” se indica en la pantalla.
2 Seleccione “SC-HC39” desde el menú Bluetooth
del dispositivo Bluetooth®.
{. El nombre del dispositivo conectado aparece en la
pantalla durante algunos segundos.
3 Inicie la reproducción en el dispositivo Bluetooth
≥ Si se le solicita la contraseña, ingrese “0000”.
≥ Puede registrar hasta 8 dispositivos con este aparato. Si se
sincroniza un noveno dispositivo, se reemplazará el
dispositivo que menos se ha utilizado.
≥ Esta unidad se puede conectar solamente a un dispositivo
por vez.
≥ Cuando se selecciona “BLUETOOTH” como fuente, este
aparato intentará conectarse automáticamente con el último
dispositivo conectado Bluetooth
®
.
Conexión de un solo toque
(conexión vía NFC)
Para dispositivos AndroidTM compatibles con NFC
únicamente
Con tan solo tocar un dispositivo NFC (Near Field
Communication) compatible con Bluetooth® en el
aparato, se pueden completar todos los preparativos,
desde registrar un dispositivo Bluetooth® hasta
establecer una conexión.
≥ En un dispositivo Android con una versión inferior a
4.1 es necesario instalar la aplicación “Panasonic
Music Streaming” (Gratuita). Descargue la aplicación
del dispositivo Bluetooth®.
– Introduzca “Panasonic Music Streaming” en el cuadro de
búsqueda de Google Play
seleccione “Panasonic Music Streaming”.
TM
para buscar, y a continuación
Preparación
≥ Encienda la función NFC del dispositivo.
®
1 Pulse [ ] para seleccionar “BLUETOOTH”.
2 Mantenga pulsada su unidad en el área de toque
®
de NFC de este aparato [ ]. (l 58)
.
{. Una vez se ha completado el registro y la conexión del
dispositivo Bluetooth
dispositivo conectado en la pantalla durante algunos
segundos. Aleje el dispositivo del aparato.
≥ Cuando no se establece la conexión incluso si el
dispositivo ha tocado la zona táctil NFC, mueva el
dispositivo para que pueda ser detectado.
®
, aparece el nombre del
3 Inicie la reproducción en el dispositivo Bluetooth
≥ Si pulsa otro dispositivo en este aparato, puede actualizar la
®
conexión Bluetooth
desconectará automáticamente.
≥ Si la imagen y el sonido no están sincronizados durante la
reproducción, reinicie la aplicación de reproducción que está
utilizando. Si el problema persiste, conecte el dispositivo
®
.
Bluetooth
suministrado).
≥ Cuando se establece la conexión, la reproducción puede
comenzar automáticamente en función del tipo de dispositivo
que se utilice.
≥ Es posible que la conexión de un solo toque no funcione
correctamente dependiendo del tipo de dispositivo utilizado.
®
. El dispositivo que se conectó antes se
®
y este aparato con un cable de audio (no
®
.
ESPAÑOL
61
RQT9944
Page 62

Bluetooth® modo de transmisión
Puede cambiar el modo de transmisión para priorizar
la calidad de la transmisión o la calidad de sonido.
Preparación
≥ Pulse [ ] para seleccionar “BLUETOOTH”.
≥ Si un dispositivo Bluetooth® ya está conectado,
desconéctelo.
1 Presione [PLAY MENU] repetidamente para
seleccionar “LINK MODE”.
2 Pulse [3, 4] para seleccionar el modo y luego
pulse [OK].
MODE 1: Énfasis en la conectividad
MODE 2: Énfasis en la calidad de sonido
≥ Seleccione “MODE 1” si se interrumpe el sonido.
≥ El ajuste de fábrica es “MODE 2”.
Bluetooth® nivel de entrada
Si el nivel de entrada de sonido del dispositivo
Bluetooth® es demasiado bajo, cambie la
configuración del nivel de entrada.
Preparación
≥ Conecte un dispositivo Bluetooth®.
1 Presione [PLAY MENU] repetidamente para
seleccionar “INPUT LEVEL”.
2 Pulse [3, 4] para seleccionar el nivel y luego
pulse [OK].
“LEVEL 0” ,. “LEVEL i1” ,. “LEVEL i2”
^---------------------------------------------------------J
Desconexión del dispositivo
Bluetooth
1 Mientras se conecta un dispositivo Bluetooth
Presione [PLAY MENU] repetidamente para
seleccionar “DISCONNECT?”.
®
®
:
2 Presione [3, 4] para seleccionar “OK? YES” y
luego presione [OK].
≥ Se puede desconectar el dispositivo Bluetooth® al mantener
pulsado [ -PAIRING] en el aparato.
≥ El dispositivo Bluetooth
una fuente de audio diferente (por ej. “CD”).
®
se desconectará si se selecciona
≥ Seleccione “LEVEL 0” si el sonido resultara distorsionado.
≥ El ajuste de fábrica es “LEVEL 0”.
62
RQT9944
Page 63

Controles de reproducción
de medios
Las siguientes marcas indican la disponibilidad de la
función.
[CD]: Audio de CD en formato CD-DA y un CD
[USB]: Dispositivos USB que contengan archivos
[Bluetooth]: Dispositivo Bluetooth® conectado
Preparación
≥ Encienda la unidad.
≥
Inserte los medios o conecte el Bluetooth® dispositivo.
≥ Pulsa [USB/CD] o [ ] para seleccionar la fuente de
audio.
Reproducción Pulse [1/;].
Parada Pulse [∫].
Pausa Pulse [1/;].
Avance Presione [:/6] o [5/9] para
Búsqueda Durante la reproducción o pausa,
que contiene archivos MP3 (l 69)
MP3 (l 69)
Controles básicos
([CD], [USB], [Bluetooth])
≥ [USB]: La posición se memoriza mientras
se visualiza “RESUME”.
Presione de nuevo para reiniciar la
reproducción.
avanzar una pista.
[CD], [USB] Pulse [3] o [4] para
avanzar el álbum MP3.
mantenga pulsado [:/6] o
[5/9].
Modos de reproducción ([CD], [USB])
Seleccione el modo de grabación.
1 Presione [PLAY MENU] para seleccionar
“PLAYMODE” o “REPEAT”.
2 Pulse [3, 4] para seleccionar el ajuste y luego
pulse [OK].
PLAYMODE
OFF
PLAYMODE
1-TRACK Solamente se reproduce la pista
1-ALBUM Solamente se reproduce el álbum
RANDOM Selecciona los contenidos de
1-ALBUM
RANDOM
REPEAT
ON REPEAT Encienda el modo de repetición.
OFF
REPEAT
Cancelar la configuración del modo
de reproducción.
seleccionada.
≥ “1”, “ ” se visualizará.
(Saltar a la pista deseada.)
MP3 seleccionado.
≥ “1”, “ ” se visualizará.
manera aleatoria.
≥ “RND” se visualizará.
Reproduce de manera aleatoria las
pistas del álbum MP3 seleccionado.
≥ Presione [3] o [4] seleccione el
álbum MP3.
≥ “1”, “ ”, “RND” se visualizará.
≥ “`” se visualizará.
Apague el modo de repetición.
∫ Para visualizar la información
Presione [DISPLAY] repetidamente.
≥ Para usar el control remoto de este aparato con un
dispositivo Bluetooth
AVRCP (Audio Video Remote Control Profile – Perfil de
control remoto de audio y video).
Según el estado del dispositivo, es posible que algunos
controles no funcionen.
≥ El número máximo de caracteres que se pueden visualizar
es de aproximadamente 30
≥ Esta unidad admite etiquetas ID3 ver. 1.0, 1.1 y 2.3. Los
datos de texto que no son compatibles no se podrán ver o
aparecerán de forma diferente.
≥ Indicación de álbum y pistas para archivos MP3.
“A _ _ _”: Número de álbum MP3.
“T _ _ _”: Número de pista MP3.
≥ “ _ ” significa número de álbum o pista.
“”:
“”:
®
, el dispositivo Bluetooth® debe admitir
Esta indicación también se utiliza para referirse a
un álbum.
Esta indicación también se utiliza para referirse a
una pista.
≥ Durante la reproducción aleatoria no se puede omitir la pista
anterior.
≥ El modo se cancela cuando abre la tapa deslizante.
RQT9944
ESPAÑOL
63
Page 64

Escuchar la radio
Puede predeterminar hasta 30 canales.
Preparación
≥ Asegúrese de que la antena esté conectada. (l 59)
≥ Encienda la unidad.
≥ Pulse [RADIO/AUX] para seleccionar “FM”.
≥ Una estación almacenada previamente se sobrescribe
cuando otra estación se almacena en la misma
presintonización del canal.
Presintonización automática de
emisoras
1 Pulse [PLAY MENU] para seleccionar
“A.PRESET”.
2 Presione [3, 4] para seleccionar “LOWEST” o
“CURRENT” y luego presione [OK].
LOWEST:
Para iniciar la auto-presintonización con la
frecuencia más baja (FM 87.50).
CURRENT:
Para iniciar la auto-presintonización con la
frecuencia actual.*
{. El sintonizador comienza a predeterminar de manera
ascendente todas las estaciones que pueda recibir en
los canales.
* Para cambiar la frecuencia, consulte “Presintonización y
sintonización manual”.
Escuchar un canal predeterminado
1 Presione [PLAY MENU] repetidamente para
seleccionar “TUNEMODE”.
2 Presione [3, 4] para seleccionar “PRESET” y
luego presione [OK].
3 Presione [:/6] o [5/9] para seleccionar
el canal.
∫
Presintonización y sintonización manual
Seleccione una emisión de radio.
1 Presione [PLAY MENU] repetidamente para
seleccionar “TUNEMODE”.
2 Presione [3, 4] para seleccionar “MANUAL” y
luego presione [OK].
3 Presione [:/6] o [5/9] para sintonizar
la estación deseada.
≥ Para comenzar la sintonización automática, mantenga
presionado [:/6] o [5/9] hasta que la
frecuencia comience a desplazarse. La sintonización se
detiene cuando se encuentra una emisora.
Para presintonizar el canal
4
Mientras se escucha la emisión de la radio, pulse [OK].
5 Pulse [3, 4] para seleccionar el canal y luego
pulse [OK].
∫ Mejora de la calidad de sonido FM
1 Al recibir emisiones de FM, pulse [PLAY MENU]
repetidamente para seleccionar “FM MODE”.
2 Presione [3, 4] para seleccionar “MONO” y
luego presione [OK].
≥ Este ajuste se puede predeterminar y memorizar.
Para hacerlo, continúe con el paso 4 del
“Presintonización y sintonización manual”.
≥ Seleccione “STEREO” en el paso 2 para regresar a las
emisiones estéreo.
≥ “MONO” se cancelará si se cambia la frecuencia.
∫
Para ver el estado de la señal de FM actual
Al recibir la señal de FM, pulse [PLAY MENU]
repetidamente que aparezca “FM STATUS” y luego
pulse [OK].
“FM ST”: La señal de FM está sintonizada y en
“FM”: No se ha sintonizado ninguna señal o la
“FM MONO”: “MONO” se selecciona en el paso 2 de
∫
Para visualizar los datos de texto de RDS
Pulse [DISPLAY] para visualizar los datos de texto.
≥ Cada vez que presiona el botón:
“PS”: Servicio del programa
“PTY”: Tipo de programa
“FREQ”: Visualización de frecuencia
estéreo.
señal de FM es monoaural.
“Mejora de la calidad de sonido FM”
(l arriba).
64
RQT9944
≥ “STEREO” se visualiza cuando esta unidad está sintonizada
a una emisión estéreo.
≥ La unidad puede mostrar los datos de texto transmitidos por
el sistema de datos de radio (RDS) disponible en algunas
áreas. (RDS es posible que las visualizaciones no estén
disponibles si la recepción es mala.)
Page 65

Ajuste del sonido
Los siguientes efectos de sonido se pueden añadir a la
salida de audio.
1 Pulse repetidamente [SOUND] para seleccionar el
efecto.
2 Pulse [3, 4] para seleccionar el ajuste y luego
pulse [OK].
“PRESET EQ”
(Pre establecer el
ecualizador)
“BASS” (Bajos) o
“TREBLE” (Agudos)
“D.BASS”
(Graves Dinámicos)
“SURROUND”
(Envolvente)
≥ Es posible que experimente una reducción en la calidad de
sonido cuando estos efectos se utilizan con algunas fuentes.
Si esto ocurre, apague los efectos de sonido.
≥ Cuando se selecciona “AUX” como la fuente, se puede
seleccionar “INPUT LEVEL” para ajustar el nivel de la
entrada de sonido del dispositivo externo. (l 59)
“HEAVY” (fuerte), “SOFT” (suave),
“CLEAR” (claro), “VOCAL” (vocal)
o “FLAT” (plano/apagado).
≥ El ajuste de fábrica es “HEAVY”.
Ajuste el nivel (j4 a i4).
“ON D.BASS” o “OFF D.BASS”.
≥
El ajuste de fábrica es “ON D.BASS”.
“ON SURROUND” o
“OFF SURROUND”.
≥ El ajuste de fábrica es
“OFF SURROUND”.
Reloj y temporizador
Configuración del reloj
Este es un reloj de 24 horas.
1 Pulse [SETUP] repetidamente para seleccionar
“CLOCK”.
2 Presione [3, 4] para seleccionar la hora y luego
presione [OK].
≥ Para ver el reloj, pulse [SETUP] repetidamente para
seleccionar “CLOCK” y a continuación pulse una vez [OK].
Aparecerá la hora durante 10 segundos.
(Durante el modo de espera, pulse [DISPLAY] una vez.)
≥ El reloj se reinicia cuando hay una falla de energía o cuando
se desconecta el cable de alimentación CA.
≥ Reinicie el reloj con regularidad para mantener la precisión.
Temporizador de reproducción
Puede fijar el temporizador para que esta unidad se
encienda a una determinada hora cada día.
Preparación
Ajuste el reloj.
∫ Ajuste del temporizador
1 Presione [SETUP] repetidamente para seleccionar
“TIMER ADJ”.
2 Pulse [3, 4] para establecer la hora de inicio
(“ON TIME”) y luego pulse [OK].
3 Presione [3, 4] para seleccionar la hora de
finalización (“OFF TIME”) y luego presione [OK].
4 Pulse [3, 4] para seleccionar la fuente de música*
y a continuación pulse [OK].
∫ Encienda el temporizador
1 Prepare la fuente de música seleccionada y ajuste el
volumen deseado.
2 Presione [SETUP] repetidamente para seleccionar
“TIMER SET”.
3 Presione [3, 4] para seleccionar “SET” y luego
presione [OK].
≥ “F” se visualizará.
≥ Para apagar el temporizador, seleccione “OFF”.
4 Pulse [Í] para cambiar el dispositivo a modo en
espera.
≥ Para visualizar los ajustes del temporizador, pulse [SETUP]
reiteradas veces para seleccionar “TIMER ADJ” y luego
presione [OK] una vez.
La fuente de música y el volumen también se visualizarán si el
temporizador está encendido.
≥
Durante el modo en espera, si el temporizador está encendido,
pulse [DISPLAY] dos veces para ver los ajustes.
≥ Esta unidad se puede usar como normal luego de fijar el
temporizador, sin embargo:
– Ponga la unidad en modo de espera antes de que el
temporizador inicie la hora.
– Incluso cuando se cambie la fuente de audio o el volumen, el
temporizador aún utilizará la fuente de audio y volumen que se
predeterminó cuando el temporizador estaba encendido.
* “CD”, “USB”, “FM” y “AUX” se pueden fijar como fuente de
música.
Apagado automático
El apagado automático puede apagar la unidad luego de
un tiempo predeterminado.
1 Pulse [SETUP] para seleccionar “SLEEP”.
2 Pulse [3, 4] para seleccionar la hora (en minutos) y
a continuación pulse [OK].
“SLEEP 30” ,. “SLEEP 60” ,. “SLEEP 90” ,. “SLEEP 120”
^------------------. “OFF” (Cancelar) (------------------J
ESPAÑOL
≥ El tiempo restante se indica en la pantalla de la unidad, salvo
cuando se realicen otras operaciones.
≥
El temporizador de reproducción y el temporizador de apagado
automático se pueden usar juntos. El temporizador de apagado
automático es siempre el temporizador principal del dispositivo.
65
RQT9944
Page 66

Otros
Función de apagado automático
Como configuración de fábrica, este dispositivo se
cambiará a modo en espera automáticamente si no hay
sonido y no se utiliza durante 20 minutos
aproximadamente.
Para cancelar esta función
1 Presione [SETUP] repetidamente para seleccionar
“AUTO OFF”.
2 Presione [3, 4] para seleccionar “OFF” y luego
presione [OK].
≥
Para encender el temporizador, seleccione “ON” en el paso 2.
≥ Este ajuste no se puede realizar cuando “FM” es la fuente.
≥ Cuando se conecta a un dispositivo Bluetooth
funciona.
Bluetooth® en espera
Cuando se selecciona “SC-HC39” desde un menú
®
Bluetooth
aparato se encenderá automáticamente desde el modo
en espera y se establecerá una conexión Bluetooth
de dispositivo Bluetooth® sincronizado, este
®
, la función no
®
.
1 Pulse [SETUP] repetidamente para seleccionar
“BLUETOOTH STANDBY”.
2 Pulse [3, 4] para seleccionar “ON” y a continuación
pulse [OK].
≥ Para apagar la función, seleccione “OFF” en el paso 2.
Cambio de la unidad y del código de
mando a distancia
Cuando otro equipo Panasonic responda a mando a
distancia provisto, cambie el código de mando a
distancia.
1 Pulse [USB/CD] para seleccionar “CD”.
2 Mientras mantiene pulsado [SELECTOR] en el
aparato, mantenga pulsado [USB/CD] en el
control remoto hasta que aparezca “REMOTE 2”
en la pantalla del aparato.
3 Mantenga pulsado [OK] y [USB/CD] en el control
remoto durante al menos 4 segundos.
≥ Para cambiar el modo otra vez a “REMOTE 1”, pulse [USB/
CD] para seleccionar “CD” y a continuación repita el paso 2 y
3 pero sustituya [USB/CD] con [ ].
Actualización de software
En ocasiones, Panasonic puede lanzar
actualizaciones del software para esta unidad que
pueden optimizar el desempeño de ciertas funciones.
Estas actualizaciones se encuentran disponibles en
forma gratuita.
Para obtener más detalles, consulte el siguiente sitio
web.
http://panasonic.jp/support/global/cs/
(Este sitio está en inglés solamente.)
∫ Verificación de la versión de software
Se visualizará la versión del software instalado.
Presione [SETUP] reiteradas veces para seleccionar
“SW VER.” y luego presione [OK].
≥ Pulse [OK] para salir.
66
RQT9944
Page 67

Solución de problemas
Haga las comprobaciones siguientes antes de solicitar
el servicio de reparaciones. Si tiene alguna duda
acerca de los puntos de comprobación, o si las
soluciones indicadas en la siguiente guía no
solucionan el problema, consulte a su concesionario
para recibir instrucciones.
Para volver a la configuración de fábrica
Cuando ocurran las siguientes situaciones, reinicie la
memoria:
≥ No hay respuesta al presionar los botones.
≥ Desea limpiar y reiniciar los contenidos de la memoria.
1 Desconecte el cable de alimentación de CA.
(Espere al menos 3 minutos antes de proceder
con el paso 2.)
2 Mientras mantiene pulsado [Í/I] en el aparato,
vuelva a conectar el cable de alimentación de
CA.
≥ Mantenga pulsado [Í/I] hasta que “---------” aparezca
en la pantalla.
3 Libere [Í/I].
≥ Todos los ajustes vuelven a la configuración de fábrica. Es
necesario restablecer los elementos de la memoria.
General
Se escucha zumbido durante la reproducción.
≥ Si un cable de alimentación de CA o luz fluorescente se
encuentra cerca de los cables, entonces mantenga otros aparatos
y cables alejados de los cables.
No se lee el formato MP3
≥ No es posible reproducir MP3 si ha copiado un disco de sesión
múltiple que no tiene datos entre las sesiones.
≥ Al crear un disco de sesión múltiple, es necesario cerrar la sesión.
≥ La cantidad de datos en el disco es demasiado pequeña.
Configure una cantidad de datos superior a 5 MB.
La carga no comienza durante el modo en espera.
≥ Encienda el aparato. Compruebe que ha comenzado la carga, y a
continuación cambie el dispositivo al modo en espera. (l 60)
Se escucha un ruido.
≥ Cuando se conecta un dispositivo a la clavija AUX IN y al terminal
DC OUT, se puede generar ruido en función del dispositivo. En
este caso, retire el cable USB del terminal DC OUT.
Mando a distancia
El mando a distancia no funciona correctamente.
≥ La pila está gastada o se ha insertado incorrectamente. (l 58)
Disco
La pantalla no es correcta o no comienza la
reproducción.
≥ Asegúrese de que el disco sea compatible con esta unidad.
(l 69)
≥ Hay humedad en la lente. Aguarde por aproximadamente una
hora y vuelva a intentarlo.
USB
No hay respuesta cuando se presiona [1/;].
≥ Desconecte el dispositivo USB y vuelva a conectarlo.
Alternativamente, apague la unidad y vuelva a encenderla.
La unidad USB o sus contenidos no se pueden
leer.
≥ El formato de la unidad USB o sus contenidos no son compatibles
con la unidad. (l 69)
≥ Es posible que la función del host USB de este producto no
funcione con algunos dispositivos USB.
Operación lenta de la memoria USB.
≥ La lectura de las unidades grandes de memoria USB insume
mucho tiempo.
El tiempo transcurrido visualizado es diferente al
tiempo de reproducción real.
≥ Copie los datos a otro dispositivo USB o realice una copia de
seguridad de los datos y vuelva a formatear el dispositivo USB.
Radio
Se oye la recepción estática o ruido mientras se
escucha una emisión de radio.
≥ Confirme que la antena esté conectada correctamente. (l 59)
≥ Ajuste la posición de la antena.
≥ Intente de mantener cierta distancia entre la antena y el cable de
alimentación CA.
≥ Intente utilizar una antena para exteriores si hay edificios o
montañas cerca. (l 59)
≥ Apague la televisión u otro reproductor de audio o sepárelo de
este aparato.
≥ Mantenga este aparato alejado de teléfonos móviles si hay
alguna interferencia.
Bluetooth
No se puede completar la sincronización.
≥ Verifique la condición del dispositivo Bluetooth®.
El dispositivo no se puede conectar.
≥ La sincronización del dispositivo no tuvo éxito o se ha sustituido el
registro. Intente sincronizar de nuevo el dispositivo. (l 61)
≥ Este aparato puede estar conectado a un dispositivo diferente.
Desconecte el otro dispositivo e intente sincronizarlo de nuevo.
(l 61)
El dispositivo está conectado pero el audio no se
puede escuchar en este aparato.
≥ Para algunos dispositivos Bluetooth® incorporados, tiene que fijar
manualmente la salida de audio a “SC-HC39”. Lea las
instrucciones de funcionamiento del dispositivo para obtener más
detalles.
Se interrumpe el sonido.
≥ El dispositivo está fuera del rango de comunicación de 10 m.
Sitúe el dispositivo Bluetooth
≥ Retire los obstáculos entre este aparato y el dispositivo.
≥ Otros dispositivos que usan la banda de frecuencia de 2,4 GHz,
tales como (router inalámbrico, microondas, teléfonos
inalámbricos, etc.) están interfiriendo. Coloque el dispositivo
Bluetooth® más cerca de este aparato y lejos de otros
dispositivos.
≥ Seleccione “MODE 1” para la comunicación estable. (l 62)
La conexión de un solo toque (función NFC) no
funciona.
≥ Compruebe que el aparato y la función NFC del dispositivo están
encendidos. (l 61)
®
®
más cerca de este aparato.
ESPAÑOL
67
RQT9944
Page 68

Mensajes
Lente
Los siguientes mensajes o números de servicio
pueden aparecer en la pantalla de la unidad.
“--:--”
≥ Ha conectado por primera vez el cable de suministro de energía
CA o ha habido una falla de energía reciente. Configure la hora
(l 65).
“ADJUST CLOCK”
≥ El reloj no se encuentra configurado. Ajuste el reloj como
corresponda.
“ADJUST TIMER”
≥ El temporizador de reproducción no se encuentra configurado.
Ajuste el temporizador de reproducción como corresponda.
“AUTO OFF”
≥ La unidad no ha sido utilizada por aproximadamente 20 minutos y
se apagará en un minuto. Presione cualquier botón para cancelar.
“ERROR”
≥ Se realiza una operación incorrecta. Lea las instrucciones e
inténtelo nuevamente.
“F” (“ ” significa un número.)
≥ Hay un problema con este aparato.
Anote el número que aparece, desenchufe el cable de
alimentación de CA y consulte a su distribuidor.
“ILLEGAL OPEN”
≥ La tapa deslizante no se encuentra en la posición correcta.
Apague la unidad y enciéndala nuevamente. Si esta pantalla
aparece de nuevo, consulte al distribuidor.
“NODEVICE”
≥ El dispositivo USB no se ha insertado correctamente. Lea las
instrucciones e inténtelo de nuevo (l 60).
“NO DISC”
≥ Inserte el disco que quiere reproducir (l 60).
“NO PLAY”
≥ Se ha insertado un disco CD que no se encuentra en formato
CD-DA o MP3. No se puede reproducir.
≥ Examine el contenido. Sólo se pueden reproducir formatos
compatibles. (l 69)
≥ Los archivos en el dispositivo USB pueden estar dañados.
Formatee el dispositivo USB y vuelva a intentarlo.
≥ Es posible que el aparato tenga algún tipo de problema. Apague
el aparato y a continuación vuelva a encenderlo.
“PLAYERROR”
≥ Se ha reproducido un archivo MP3 no compatible. El sistema se
saltará esa canción y reproducirá la siguiente.
“READING”
≥ La unidad está verificando la información del CD/USB. Una vez
que esta visualización haya desaparecido, inicie la operación.
“REMOTE ” (“ ” significa un número.)
≥ El mando a distancia y esta unidad están usando diferentes
códigos. Cambie el código en el mando a distancia.
– Cuando aparece “REMOTE 1”, mantenga pulsado [OK] y [ ]
durante más de 4 segundos.
– Cuando aparece “REMOTE 2”, mantenga pulsado [OK] y
[USB/CD] durante más de 4 segundos.
“USB OVER CURRENT ERROR”
≥ El dispositivo USB está consumiendo demasiada energía.
Seleccione otra fuente distinta a “USB”, extraiga el USB y apague
el aparato.
68
RQT9944
Cuidado de la unidad y los
medios
Desconecte el cable de energía CA antes de realizar el
mantenimiento.
∫ Limpie esta unidad con un paño suave
y seco
≥ Cuando esté muy sucio, humedezca un paño en agua para
limpiar el aparato; a continuación limpie otra vez con un paño
seco.
≥ Use un paño fino para limpiar los altavoces.
No use pañuelos de papel u otros materiales que se puedan
deshacer. Las pequeñas partículas pueden quedar
atrapadas dentro de la cubierta del altavoz.
≥ No utilice alcohol, diluyente de pintura o bencina para limpiar
esta unidad.
≥ Antes de utilizar un paño tratado químicamente, lea
cuidadosamente las instrucciones que lo acompañan.
∫ Mantenimiento de la lente
≥ Limpie el objetivo de forma regular para un correcto
funcionamiento. Utilice un ventilador para eliminar el polvo y
un bastoncillo de algodón si está muy sucio.
≥ No utilice un limpiador de lentes de CD.
≥ No deje la tapa deslizante abierta por períodos de tiempo
prolongados. Esto hará que la lente se ensucie.
≥ Tenga cuidado de no tocar la lente con sus dedos.
∫ Discos limpios
SÍ NO
Limpie con un paño húmedo y luego con un paño seco.
∫ Precauciones al manipular el disco
≥ Tome los discos por los bordes para evitar rayones o marcas
de huellas digitales en los mismos.
≥ No pegue etiquetas o autoadhesivos en los discos.
≥ No utilice rociadores para la limpieza de discos, bencina,
diluyente, líquidos para prevenir la electricidad estática o
cualquier otro solvente.
≥ No utilice los siguientes discos:
– Discos que presenten adhesivos expuestos provenientes
de autoadhesivos o etiquetas que hayan sido removidos
(discos rentados, etc.).
– Discos que se encuentren mal empaquetados o rotos.
– Discos que presenten formas irregulares, tales como
discos con forma de corazón.
∫ Para tirar o transferir esta unidad
Este aparato puede guardar información de la
configuración del usuario. Si decide deshacerse de
esta unidad ya sea eliminándola o transfiriéndola, siga
los procedimientos para restablecer todos los ajustes
de fábrica para así borrar la configuración del usuario.
(l 67, “Para volver a la configuración de fábrica”)
≥ Se puede grabar el historial de funcionamiento en la
memoria de esta unidad.
Page 69

Acerca de Bluetooth
®
Panasonic no se hace responsable de los daños
y/o información que se pueda poner en peligro
durante una transmisión inalámbrica.
∫ Banda de frecuencia utilizada
≥ Este sistema usa la banda de frecuencia 2,4 GHz.
∫ Certificación de este dispositivo
≥ Este sistema se adecua a las restricciones de
frecuencia y ha sido certificado en base a las leyes
de frecuencia de modo que no es necesario contar
con una licencia para productos inalámbricos.
≥ Las siguientes acciones son castigables legalmente
en algunos países:
– Desarmar o modificar el sistema.
– Retirar las indicaciones de las especificaciones.
∫ Restricciones de uso
≥ La transmisión inalámbrica y/o uso de los
dispositivos equipados con Bluetooth® no se
encuentra garantizada.
≥ Todos los dispositivos deben cumplir con las normas
establecidas por Bluetooth SIG, Inc.
≥ De acuerdo con las especificaciones o
configuraciones de un dispositivo, es posible que la
conexión no se establezca o que varíen algunas
operaciones.
≥ Este sistema admite las funciones de seguridad
Bluetooth®. Pero según el ambiente de
funcionamiento o los ajustes, esta seguridad
posiblemente no sea suficiente. Transmita los datos
de forma inalámbrica a este sistema y con cuidado.
≥ Este sistema no puede transmitir datos hacia un
dispositivo Bluetooth®.
∫ Rango de uso
≥ Use el dispositivo a un rango máximo de 10 m. El
rango puede disminuir según el ambiente, los
obstáculos o la interferencia.
∫ Interferencia desde otros dispositivos
≥ Este sistema puede no funcionar adecuadamente y
pueden surgir problemas como ruidos o elevaciones
del sonido debido a la interferencia de ondas
radiales si el sistema está ubicado demasiado cerca
de otros dispositivos Bluetooth® o los dispositivos
que usan la banda de 2,4 GHz.
≥ Este sistema no funcionará adecuadamente si las
ondas radiales de estaciones de emisión, etc.,
cercanas son demasiado intensas.
∫ Uso específico
≥ Este sistema es para uso normal y general
únicamente.
≥ No use este sistema cerca de un equipo ni en un
entorno que sea sensible a la interferencia de
frecuencia de radio (por ejemplo: aeropuertos,
hospitales, laboratorios, etc.)
Medios reproducibles
CD compatible
≥ Un disco con el logo CD.
≥ Esta unidad puede reproducir discos que cumplen con el
formato CD-DA.
≥ Es posible que esta unidad no reproduzca algunos discos
debido a la condición de grabado.
Compatible con dispositivos USB
≥ Esta unidad no garantiza la conexión con todos los
dispositivos USB.
≥ Se soportan los sistemas de archivo FAT12, FAT16 y FAT32.
≥ Esta unidad es compatible con dispositivos USB 2.0 de
velocidad total.
≥ Esta unidad admite dispositivos USB de hasta 32 GB.
Compatible con archivos MP3
≥ Formato admitido: archivos con extensión “.mp3” o “.MP3”.
≥ Tasa de compresión compatible: entre 16 kbps y 320 kbps
(estéreo).
≥ De acuerdo con el modo en el que se encuentran creados
los archivos MP3, es posible que no se reproduzcan en el
orden en que los haya numerado o que no se reproduzcan
en lo absoluto.
CD-R/RW
≥ Cantidad máxima de pistas y álbumes: 999 pistas y
254 álbumes (Excluyendo la carpeta raíz).
≥ Formatos de disco: ISO9660 nivel 1 y nivel 2 (a excepción de
los formatos extendidos).
≥ Si el disco incluye MP3 y datos de audio normales (CD-DA),
la unidad reproducirá el tipo de audio grabado en la parte
interna del disco.
≥ Esta unidad no puede reproducir archivos grabados por
medio de escritura por paquetes.
Dispositivo USB
≥ Cantidad máxima de pistas y álbumes: 8000 pistas y 799
álbumes (Excluyendo la carpeta raíz).
≥ Sólo una tarjeta de memoria será seleccionada al conectar
un lector de tarjeta de puerto USB múltiple, por lo general la
primera tarjeta de memoria que haya sido insertada.
Licencias
La marca Bluetooth® y sus logos son propiedad de Bluetooth
SIG, Inc. y cualquier uso de dichas marcas por parte de
Panasonic Corporation se realiza bajo licencia.
Otros nombres de marcas y marcas comerciales son propiedad
de sus respectivos propietarios.
Google Play y Android son marcas comerciales de Google Inc.
La tecnología de decodificación de audio MPEG Layer-3
autorizada por Fraunhofer IIS y Thomson.
ESPAÑOL
69
RQT9944
Page 70

Montaje de la unidad a la
Soporte
Tornillo de sujeción
Paño o tela suave
To rn i ll o
(suministrado)
Cable
(no suministrado)
pared (opcional)
Este aparato se puede instalar en la pared con los
soportes para el montaje que se suministran, etc.
Asegúrese de que la pared y los tornillos que se
utilizan para instalar en la pared pueden soportar al
menos 33 kg. Los tornillos y otros elementos no se
suministran ya que el tipo y el tamaño varían con cada
instalación.
≥ Consulte el paso 5 de “Instrucciones de montaje a la
pared” para obtener información sobre los tornillos
necesarios.
≥ Como una medida de protección adicional, conecte
el aparato a la pared con un cable de prevención de
caídas.
Accesorios de instalación
∫ Accesorios suministrados
≥ 1 Soporte de seguridad
≥ 1 Tornillo
≥ 2 Soportes de montaje en la pared
∫ Accesorios requeridos adicionalmente
(disponible en comercios)
≥ 4 Tornillos de sujeción a la pared
≥ 1 Tornillo de soporte de seguridad
≥ 1 Cable de prevención contra las caídas*
≥ 1 Armella roscada
* Use un cable que sea capaz de soportar más de 33 kg (con
un diámetro de aproximadamente 1,5 mm).
Instrucciones de montaje a la pared
Antes de realizar la instalación, apague la unidad y
desconecte el cable de alimentación de CA de la toma de
CA.
1 Separe el soporte de la unidad.
≥ Retire los tornillos en la parte inferior de la unidad.
≥ Tire el soporte suavemente hacia afuera de la unidad
como se ilustra.
≥ Mantenga los tornillos que retira y el soporte en un lugar
seguro.
2 Fije el soporte de seguridad a la unidad con el
tornillo (suministrado).
≥ Ajuste el tornillo a un par de apriete: 50 N0cm a
70 N0cm.
≥ Mantenga el soporte de seguridad lejos del alcance de
los niños para evitar que sea tragado.
≥ Mantenga los tornillos lejos del alcance de los niños
para evitar que sean tragados.
≥ Mantenga los soportes de montaje en la pared fuera
del alcance de los niños para evitar que sean tragados.
Medidas de seguridad
Es imprescindible un montaje profesional.
El montaje nunca debe ser realizado por una
persona quien no sea especialista cualificado
para la instalación.
PANASONIC RECHAZA TODO DAÑO A LA
PROPIEDAD Y/O SERIAS LESIONES
INCLUYENDO LA MUERTE DEBIDOS A UN
MONTAJE ERRÓNEO O UN MANEJO
INCORRECTO.
AVI SO:
Para evitar lesiones, la unidad debe sujetarse con
firmeza siguiendo las instrucciones de instalación.
70
RQT9944
3 Monte el cable de prevención de caídas
(no suministrado) a esta unidad.
Page 71

4 Mida y marque la posición de los soportes de
204 mm
13 mm
500 mm
75 mm
142 mm
154 mm
100 mm
142
mm
300 mm
100 mm
Al menos 30 mm
‰7,5 mm a
‰9,4 mm
‰4 mm
Soporte de montaje
en la pared
Pared
Tornillo de soporte de seguridad
(no suministrado)
Soporte de seguridad
Asegurar a la
pared
Cable (no suministrado)
Armella roscada
(no suministrado)
Pared
montaje en la pared en ambos lados.
≥ Utilice las cifras a continuación para identificar las
posiciones de atornillamiento.
La posición para montar los soportes a la pared
Espacio requerido
5 Instale los soportes en la pared a ambos lados de
la pared con 2 tornillos (no suministrados).
≥ Utilice un nivel de burbuja de aire para asegurar que
ambos soportes se encuentren nivelados.
6 Asegure con las manos la unidad dentro de los
soportes de montaje de la pared.
≥ Conecte la antena y el cable de alimentación de CA a la
unidad antes de colgarla a la pared. (l 59)
≥ Después de colgar el aparato, retire sus manos
cuidadosamente para verificar que el aparato se
encuentra correctamente asegurado a los soportes de
la pared.
7 Utilice el tornillo de soporte (no suministrado) para
asegurar el soporte a la pared.
≥ Consulte el paso 5 para conocer los requerimientos
antes de atornillar.
8 Monte el cable de prevención de caídas
(no suministrado) a la pared.
≥ Asegúrese de que el huelgo de la cuerda sea mínimo.
ESPAÑOL
71
RQT9944
Page 72

Especificaciones
∫ GENERAL
Consumo de energía 26 W
Consumo de energía en modo de espera*
(Cuando “BLUETOOTH STANDBY” se encuentra
en “ON”)*
Suministro de energía
Dimensiones (AnkAlkProf)
Masa Aprox. 2,5 kg
Rango de temperatura de operación
Rango de humedad de operación
2
CA 220 V a 240 V, 50 Hz
500 mmk205 mmk92 mm
35 % a 80 % RH (sin condensación)
∫ SECCIÓN DEL AMPLIFICADOR
Potencia de salida
Modo estéreo de la salida de energía RMS
Canal frontal (se accionan ambos canales)
Modo estéreo de energía RMS total
20 W por canal (8 ≠), 1 kHz, 10 % THD
∫ SECCIÓN DEL SINTONIZADOR
Reinicio de la memoria 30 estaciones FM
Frecuencia Modulada (FM)
Rango de frecuencia
Terminales de la antena
87,50 MHz a 108,00 MHz (50 kHz paso)
∫ SECCIÓN DE DISCO
Discos reproducidos (8 cm o 12 cm)
Detector
Longitud de onda 790 nm (CD)
CD, CD-R/RW (CD-DA, MP3*3)
1, 2
Aprox. 0,2 W
Aprox. 0,3 W
0 oC a r40 oC
40 W
75 ≠ (sin balance)
∫ SECCIÓN DEL SISTEMA DEL ALTAVOZ
Unidad(es) de altavoz
Rango completo
Radiador pasivo
Impedancia 8 ≠
6,5cmConotipok1 por canal
8cmk2 por canal
∫ SECCIÓN TERMINAL
Puerto USB
Estándar USB
USB para USB 2.0 de velocidad total
Soporte de formato de archivo multimedia
Sistema de archivo del dispositivo USB
AUX IN
SALIDA DE CC 5 V 1,5 A
MP3 (¢.mp3)
FAT12, FAT16, FAT32
Estéreo, clavija 3,5 mm
∫ SECCIÓN DE BLUETOOTH
Versi ón Bluetooth® Ver.2.1+EDR
Clase Clase 2
Perfiles admitidos
Frecuencia de funcionamiento
Distancia de funcionamiento
A2DP, AVRCP
2,4 GHz banda FH-SS
10 m Línea de visión
≥ Las especificaciones se encuentran sujetas a cambio sin
previo aviso.
≥ La masa y las dirmensiones son aproximadas.
≥ La distorsión armónica total se mide por medio de un
analizador digital del espectro.
*1: “BLUETOOTH STANDBY” es “OFF”.
*2: No hay ningún dispositivo conectado al puerto USB antes
de cambiar al modo en espera.
*3: MPEG-1 Capa 3, MPEG-2 Capa 3
72
RQT9944
Page 73

73
RQT9944
ESPAÑOL
Page 74

English
Declaration of Conformity (DoC)
Hereby, “Panasonic Corporation” declares that this product is in
compliance with the essential requirements and other relevant
provisions of Directive 1999/5/EC.
Customers can download a copy of the original DoC to our R&TTE
products from our DoC server:
http://www.doc.panasonic.de
Contact to Authorised Representative: Panasonic Marketing Europe
GmbH,
Panasonic Testing Centre, Winsbergring 15, 22525 Hamburg,
Germany
This product is intended for general consumer. (Category 3)
Ελληνικά
Δήλωση συμμόρφωσης (DoC)
Με την παρούσα, η “Panasonic Corpor ation” δηλώνει ότι το προϊόν
αυτό είναι σύμφωνο με τις βασικές απαιτήσεις και άλλες σχετικές
διατάξεις της οδηγίας 1999/5/ΕC.
Οι πελάτες μπορούν να κατεβάσουν ένα αντίγραφο του πρωτοτύπου
DoC για τα R&TTE προϊόντα μας από τον DoC server μας:
http://www.doc.panasonic.de
Στοιχεία επικοινωνίας Eξουσιοδοτημένου Aντιπροσώπου: Panasonic
Marketing Europe GmbH,
Panasonic Testing Centre, Winsbergring 15, 22525 Hamburg,
Γερμανία
Αυτό το προϊόν προορίζεται για καταναλωτές. (Κατηγορία 3)
Português
Declaração de Conformidade (DoC)
Com o presente documento, a “Panasonic Corporation” declara que
este produto é conforme os requisitos específicos e demais
especificações referentes à Directriz 1999/5/EC.
Os clientes podem baixar uma cópia da declaração de conformidade
(DoC) para nossos produtos R&TTE do Server DoC:
http://www.doc.panasonic.de
Contacte o representante autorizado: Panasonic Marketing Europe
GmbH,
Panasonic Testing Centre, Winsbergring 15, 22525 Hamburg,
Alemanha
Este produto destina-se ao consumador geral. (Categoria 3)
Lietuviškai
Atitikties deklaracija (AD)
Bendrovė “Panasonic Corporation” patvirtina, kad šis gaminys
tenkina direktyvos 1999/5/EB esminius reikalavimus ir kitas
taikytinas nuostatas.
Mūsų R&TTE gaminių originalios atitikties deklaracijos kopiją klientai
gali atsisiųsti iš mūsų AD serverio:
http://www.doc.panasonic.de
Įgaliotojo atstovo adresas: “Panasonic Marketing Europe GmbH”,
Panasonic Testing Centre, Winsbergring 15, 22525 Hamburg,
Vok ieti ja.
Šis gaminys skirtas bendrajam vartojimui. (3 kategorija.)
Slovensko
Izjava o skladnosti (DoC)
S pričujočo izjavo podjetje “Panasonic Corporation” izjavlja, da so
svoji izdelki skladni s poglavitnimi zahtevami in drugimi
odgovarjajočimi predpisi direktive 1999/5/ES.
Stranka lahko naloži izvod izvirnega DoC o naših izdelkih R&TTE s
strežnika DoC:
http://www.doc.panasonic.de
Pooblaščeni zastopnik: Panasonic Marketing Europe GmbH,
Panasonic Testing Centre, Winsbergring 15, 22525 Hamburg,
Nemčija
Izdelek je namenjen splošni uporabi. (Razred 3)
Slovensky
Vyhlásenie o zhode (DoC)
“Panasonic Corporation” týmto prehlasuje, že tento výrobok je v
zhode so základnými požiadavkami a ďalšími príslušnými
ustanoveniami smernice 1999/5/ES.
Zákazníci si môžu stiahnuť kópiu pôvodného DoC na naše R&TTE
výrobky z nášho servera DoC:
http://www.doc.panasonic.de
Kontakt na splnomocneného zástupcu: Panasonic Marketing Europe
GmbH,
Panasonic Testing Centre, Winsbergring 15, 22525 Hamburg,
Nemecko
Tento produkt je určený pre všeobecného spotrebiteľa. (Kategória 3)
Norsk
Samsvarserklæring (DoC)
“Panasonic Corporation” erklærer at utstyret er i samsvar med de
grunnleggende krav og øvrige relevante krav i direktiv 1999/5/EF.
Kundene kan laste ned en kopi av den originale
samsvarserklæringen (DoC) for vårt R&TTE utstyr fra vår DoC
server:
http://www.doc.panasonic.de
Kontakt vår autoriserte representant: Panasonic Marketing Europe
GmbH,
Panasonic Testing Centre, Winsbergring 15, 22525 Hamburg,
Tyskland
Utstyret er beregnet på den vanlige forbruker (klasse 3).
Eesti keel
Vastavusdeklaratsioon (DoC)
“Panasonic Corporation” kinnitab käesolevaga, et see toode on
vastavuses põhiliste nõuete ja muude direktiivi 1999/5/EÜ
asjakohaste sätetega.
Kliendid saavad koopia meie R&TTE toodetele kehtiva
originaalvastavusdeklaratsiooni koopia alla laadida meie
DoC-serverist:
http://www.doc.panasonic.de
Võtke ühendust volitatud esindajaga: Panasonic Marketing
Europe GmbH,
Panasonic Testing Centre, Winsbergring 15, 22525 Hamburg,
Germany
See toode on mõeldud tavakasutajale. (III kategooria)
74
RQT9944
Page 75

Български
Latviski
Atbilstības deklarācija (DoC)
Kompānija “Panasonic Corporation” ar šo paziņo, ka šis
izstrādājums atbilst būtiskām prasībām un citām saistošām
Direktīvas 1999/5/EK prasībām.
Pircēji var lejupielādēt oriģinālo DoC kopiju mūsu R&TTE
izstrādājumos no mūsu DoC servera:
http://www.doc.panasonic.de
Lūdzam sazināties ar pilnvaroto parstāvi Panasonic
Marketing Europe GmbH,
Panasonic Testing Centre, Winsbergring 15, 22525
Hamburg, Germany
Šis izstrādājums ir paredzēts parastam patērētājam. (3. kategorija)
Декларация за съответствие (DoC)
“Panasonic Corporation” декларира, че този продукт съответства
на съществените изисквания и другите приложими разпоредби
на Директива 1999/5/EC.
Потребителите могат да свалят копие от оригиналните DoC към
нашите продуктите от типа R&TTE от сървъра, на който се
съхраняват DoC:
http://www.doc.panasonic.de
За контакт с оторизиран представител: Panasonic Marketing
Europe GmbH,
Panasonic Testing Centre, Winsbergring 15, 22525 Hamburg,
Германия
Тоз и продукт е предназначен за обща употреба. (Категория 3)
Român
Declaraţie de Conformitate (DoC)
Prin prezenta, societatea “Panasonic Corporation” declară că
produsul este conform cu cerinţele esenţiale şi cu alte norme
corespunzătoare Directivei 1999/5/EC.
Clienţii pot descărca o copie a DoC-ului original al produselor
noastre R&TTE de la adressa noastră DoC din Internet:
http://www.doc.panasonic.de
Contact la Reprezentanţa autorizată: Panasonic Marketing Europe
GmbH,
Panasonic Testing Centre, Winsbergring 15, 22525 Hamburg,
Germania
Acest produs a fost proiectat pentru clientela generală. (Categoria 3)
Magyar
Megfelelőségi Nyilatkozat (DoC)
Ezennel a , “Panasonic Corporation” kijelenti, hogy a jelen termék
kielégíti az 1999/5/EK Irányelv létfontosságú követelményeit és más
vonatkozó rendelkezéseit.
A vásárlók letölthetik az R&TTE termékek eredeti DoC másolatát a
DoC szerverünkről:
http://www.doc.panasonic.de
Forduljon a hivatalos márkaképviselethez: Panasonic Marketing
Europe GmbH,
Panasonic Testing Centre, Winsbergring 15, 22525 Hamburg,
Németország
A terméket általános fogyasztóknak szánták. (3-as kategória)
Hrvatski
Deklaracija o podobnosti (DoC)
Ovime, “Panasonic Corporation” izjavljuje da je ovaj proizvod
udovoljava osnovnim zahtjevima i ostalim relevantnim uvjetima
Smjernice 1999/5/EC.
Kupci mogu preuzeti kopiju originalne DoC za naše R&TTE
proizvode s našeg DoC poslužitelja:
http://www.doc.panasonic.de
Kontakti u Europskoj uniji: Panasonic Marketing Europe GmbH,
Panasonic Testing Centre, Winsbergring 15, 22525 Hamburg,
Njemačka
Ovaj proizvod je namijenjen za opću potrošnju. (kategorija 3)
75
RQT9944
Page 76

Manufactured by:
EU
Importer for Europe:
Panasonic Corporation
Kadoma, Osaka, Japan
Panasonic Marketing Europe GmbH
Panasonic Testing Centre
Winsbergring 15, 22525 Hamburg, Germany
Panasonic Corporation
Web Site: http://panasonic.net
C Panasonic Corporation 2014
p{zr
RQT9944-R
F0114SR0
 Loading...