

Page 1
Operating Instructions
Käyttöohjeet
Instrucciones de funcionamiento
Thank you for purchasing this product.
For optimum performance and safety, please read these instructions carefully.
Please keep this manual for future reference.
Kiitos, että hankit tämän tuotteen.
Lue nämä ohjeet huolellisesti parhaan suorituskyvyn ja turvallisuuden takaamiseksi.
Säilytä ohje tulevaa tarvetta varten.
Muchísimas gracias por haber adquirido este aparato.
Lea con atención estas instrucciones para obtener las máximas prestaciones y
seguridad.
Guarde este manual para su consulta en el futuro.
感谢您购买本产品。
为确保最佳性能和安全,请仔细阅读本说明书。
请保管本说明书以备今后参考。
EU
Pursuant to at the directive 2004/108/EC, article 9(2)
Panasonic Testing Centre
Panasonic Marketing Europe GmbH
Winsbergring 15, 22525 Hamburg, Germany
Panasonic Corporation
Web Site: http://panasonic.net
使⽤说明书
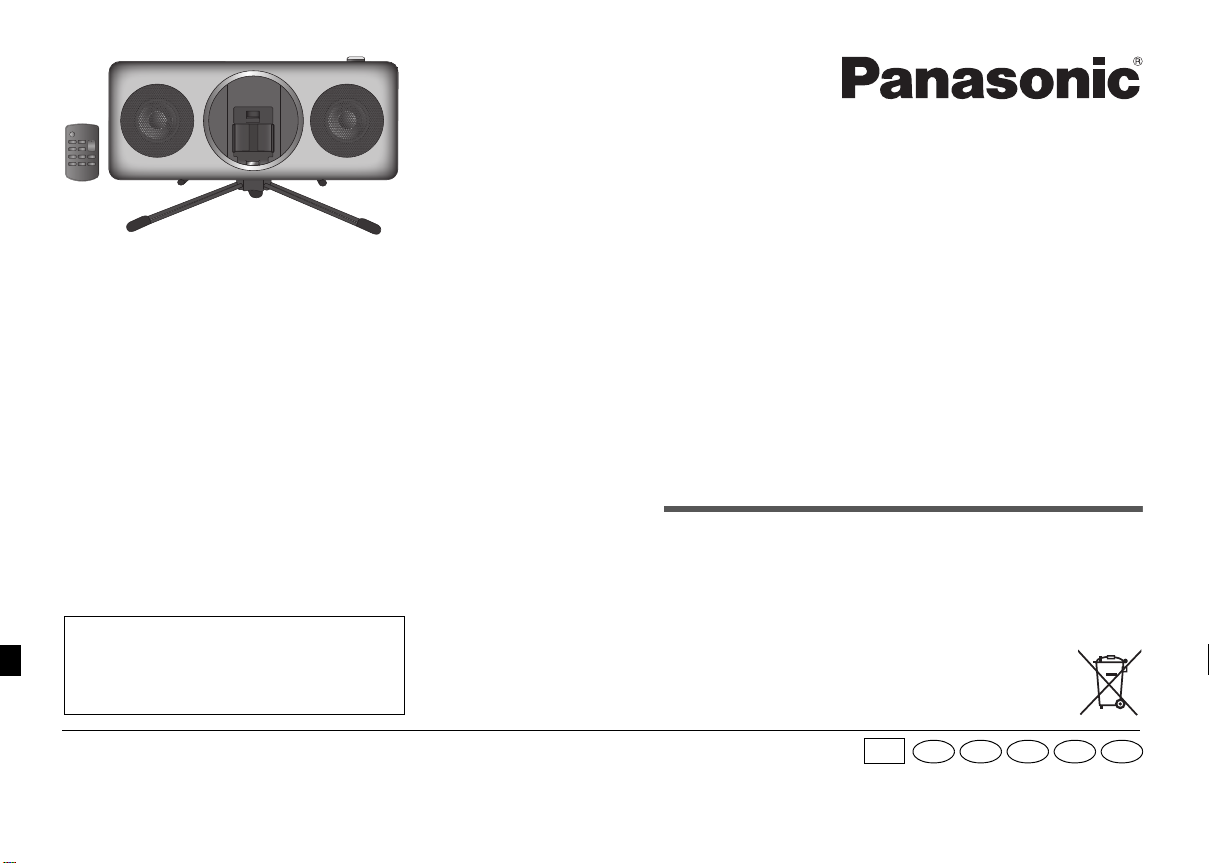
Compact Stereo System
Kompakti stereojärjestelmä
Sistema estéreo compacto
⼩型⽴体声系统
Model No. SC-GT07
EU
En Fi Sp Cn Ar
E
RQT9648-1G
L0212CH1042
Page 2

Safety precautions
WARNING!
Unit
• To reduce the risk of fire, electric shock or product
damage,
– Do not expose this unit to rain, moisture, dripping or
splashing.
– Do not place objects filled with liquids, such as
vases, on this unit.
– Use only the recommended accessories.
– Do not remove covers.
– Do not repair this unit by yourself. Refer servicing to
qualified service personnel.
Button-type battery (Lithium battery)
• Risk of fire, explosion and burns. Do not recharge,
disassemble, heat above 60°C or incinerate.
• Keep the button-type battery out of the reach of
children. Never put button-type battery in mouth. If
swallowed call your doctor.
CAUTION!
Unit
• To reduce the risk of fire, electric shock or product
damage,
– Do not install or place this unit in a bookcase, built-in
cabinet or in another confined space. Ensure this
unit is well ventilated.
– Do not obstruct this unit’s ventilation openings with
newspapers, tablecloths, curtains, and similar items.
– Do not place sources of naked flames, such as
lighted candles, on this unit.
• Install this unit so that the AC mains lead can be
unplugged from the socket outlet immediately if any
problem occurs.
• This unit may receive radio interference caused by
mobile telephones during use. If such interference
occurs, please increase separation between this unit
and the mobile telephone.
For the United Kingdom and Continental Europe
•
This unit is intended for use in moderate climates.
For others
RQT9648
This unit is intended for use in tropical climates.
2
2
Button-type battery (Lithium battery)
• Danger of explosion if battery is incorrectly replaced.
Replace only with the type recommended by the
manufacturer.
• When disposing the batteries, please contact your
local authorities or dealer and ask for the correct
method of disposal.
• Do not heat or expose to flame.
• Do not leave the battery(ies) in a car exposed to direct
sunlight for a long period of time with doors and
windows closed.
Product identification marking is located on the
bottom of the unit.
NORSK
ADVARSEL!
Produkt
• Følg nedenstående instrukser for å redusere risikoen
for brann, elektrisk støt og skade på produktet:
– Dette apparatet må ikke utsettes for regn, fuktighet,
drypp eller sprut.
– Ikke plasser objekter som er fylt med væske, som vaser,
på apparatet.
– Bruk kun anbefalt tilbehør.
– Fjern ikke deksler.
– Reparer ikke denne enheten selv, overlat service til
kvalifisert servicepersonell.
FORSIKTIG!
Produkt
• Følg nedenstående instrukser for å redusere risikoen
for brann, elektrisk støt og skade på produktet:
– Apparatet må ikke plasseres i en bokhylle, et
innebygget kabinett eller et annet lukket sted hvor
ventilasjonsforholdene er utilstrekkelige.
– Apparatets ventilasjonsåpninger må ikke dekkes til med
aviser, bordduker, gardiner og lignende.
– Plasser ikke åpen ild, slik som levende lys, oppå
apparatet.
• Dette apparatet er beregnet til bruk under moderate
klimaforhold.
• Strømuttaket må befinne seg i nærheten slik at den lett
kan kobles fra uttaket umiddelbart om det oppstår
problemer.
Table of contents
Safety precautions . . . . . . . . . . . . . . . . . . . . . 2
Supplied accessories. . . . . . . . . . . . . . . . . . . 3
Caution for AC Mains Lead . . . . . . . . . . . . . . 3
Getting started . . . . . . . . . . . . . . . . . . . . . . . . 4
Overview of controls . . . . . . . . . . . . . . . . . . . 5
Using an iPod/iPhone. . . . . . . . . . . . . . . . . . . 6
Using the auxiliary input . . . . . . . . . . . . . . . . 7
Auto off function. . . . . . . . . . . . . . . . . . . . . . . 8
Maintenance . . . . . . . . . . . . . . . . . . . . . . . . . . 8
Troubleshooting . . . . . . . . . . . . . . . . . . . . . . . 8
Specifications . . . . . . . . . . . . . . . . . . . . . . . . . 8
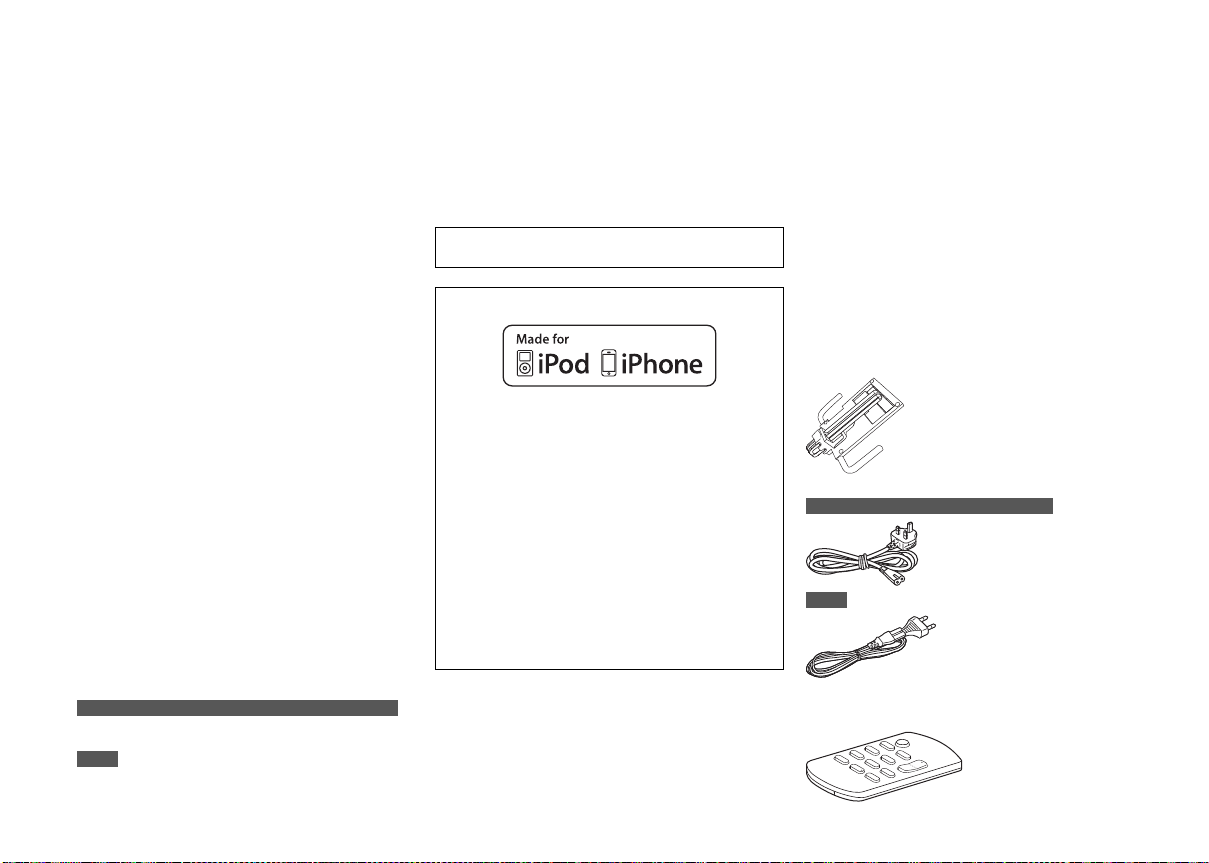
“Made for iPod” and “Made for iPhone” mean that an
electronic accessory has been designed to connect
specifically to iPod, or iPhone, respectively, and has
been certified by the developer to meet Apple
performance standards.
Apple is not responsible for the operation of this
device or its compliance with safety and regulatory
standards.
Please note that the use of this accessory with iPod,
or iPhone may affect wireless performance.
iPhone, iPod, iPod classic, iPod nano, and iPod touch
are trademarks of Apple Inc., registered in the U.S.
and other countries.
Page 3
Supplied accessories
Fuse cover
Fuse (5 ampere)
Fuse (5 ampere)
Check and identify the supplied accessories.
Use numbers indicated in parentheses when asking for
replacement parts. (Product numbers correct as of
March 2012. These may be subject to change.)
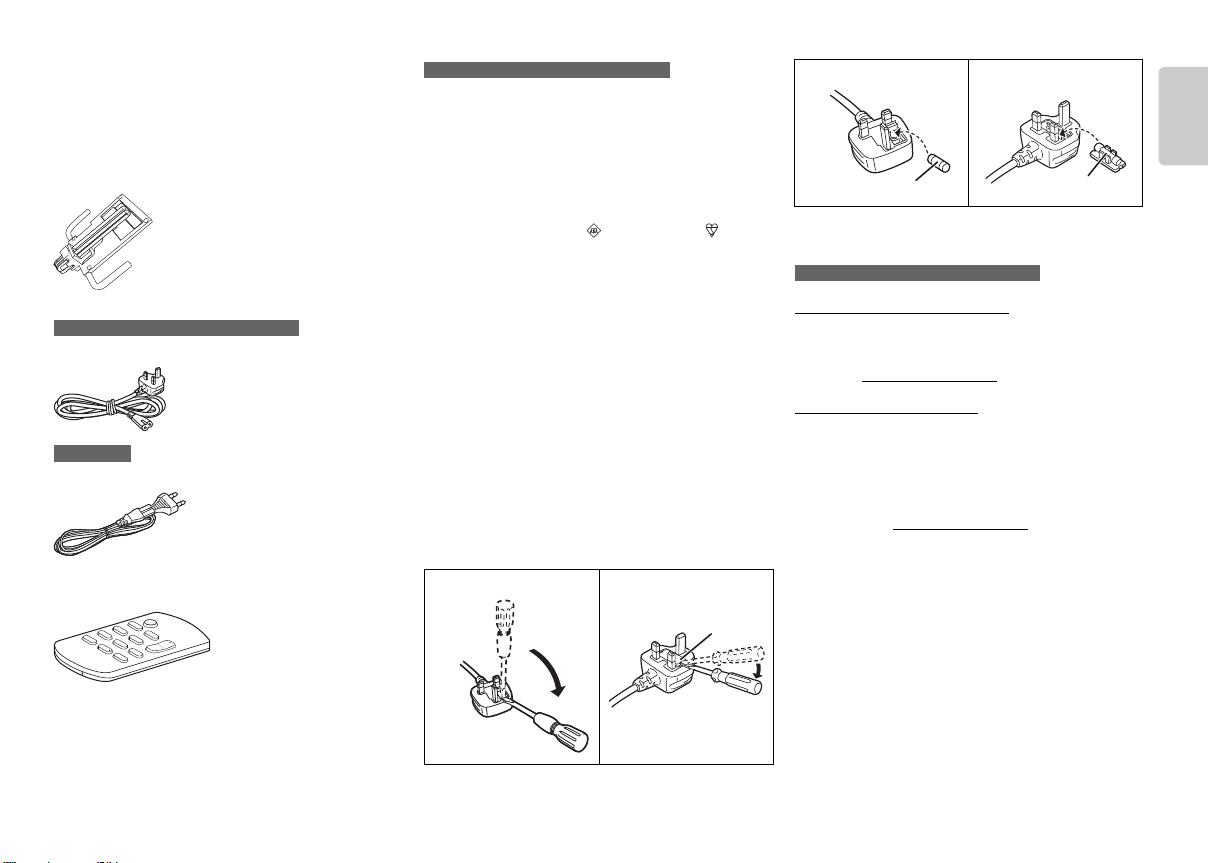
1 x Setting stand
(RFE0239)
2 x AC mains lead
For the United Kingdom and Kuwait
(K2CZ3YY00005)
For others
(K2CQ2CA00007)
1 x Remote control (with a battery)
(RFE0238)
Caution for AC Mains Lead
For the United Kingdom and Kuwait
For your safety, please read the following text carefully.
This appliance is supplied with a moulded three pin
mains plug for your safety and convenience.
A 5-ampere fuse is fitted in this plug.
Should the fuse need to be replaced please ensure that
the replacement fuse has a rating of 5-ampere and that it
is approved by ASTA or BSI to BS1362.
Check for the ASTA mark or the BSI mark on the
body of the fuse.
If the plug contains a removable fuse cover you must
ensure that it is refitted when the fuse is replaced.
If you lose the fuse cover the plug must not be used until
a replacement cover is obtained.
A replacement fuse cover can be purchased from your
local dealer.
Before use
Remove the connector cover.
How to replace the fuse
The location of the fuse differ according to the type of
AC mains plug (figures A and B). Confirm the AC mains
plug fitted and follow the instructions below.
Illustrations may differ from actual AC mains plug.
1) Open the fuse cover with a screwdriver.
Figure A Figure B
2) Replace the fuse and close or attach the fuse cover.
Figure A Figure B
Sales and Support Information
For the United Kingdom and Ireland
Customer Communications Centre
• For customers within the UK: 0844 844 3899
• For customers within Ireland: 01 289 8333
• For further support on your product, please visit our
website: www.panasonic.co.uk
Direct Sales at Panasonic UK
• Order accessory and consumable items for your
product with ease and confidence by phoning our
Customer Communications Centre
Monday-Thursday 9:00 a.m.-5:30 p.m.,
Friday 9:30 a.m.-5:30 p.m. (Excluding public holidays)
• Or go on line through our Internet Accessory ordering
application at www.pas-europe.com
• Most major credit and debit cards accepted.
• All enquiries transactions and distribution facilities are
provided directly by Panasonic UK.
• It couldn’t be simpler!
• Also available through our Internet is direct shopping
for a wide range of finished products. Take a browse
on our website for further details.
.
ENGLISH
RQT9648
3
3
Page 4
Getting started
To household
mains socket
CR2025
Making the connections
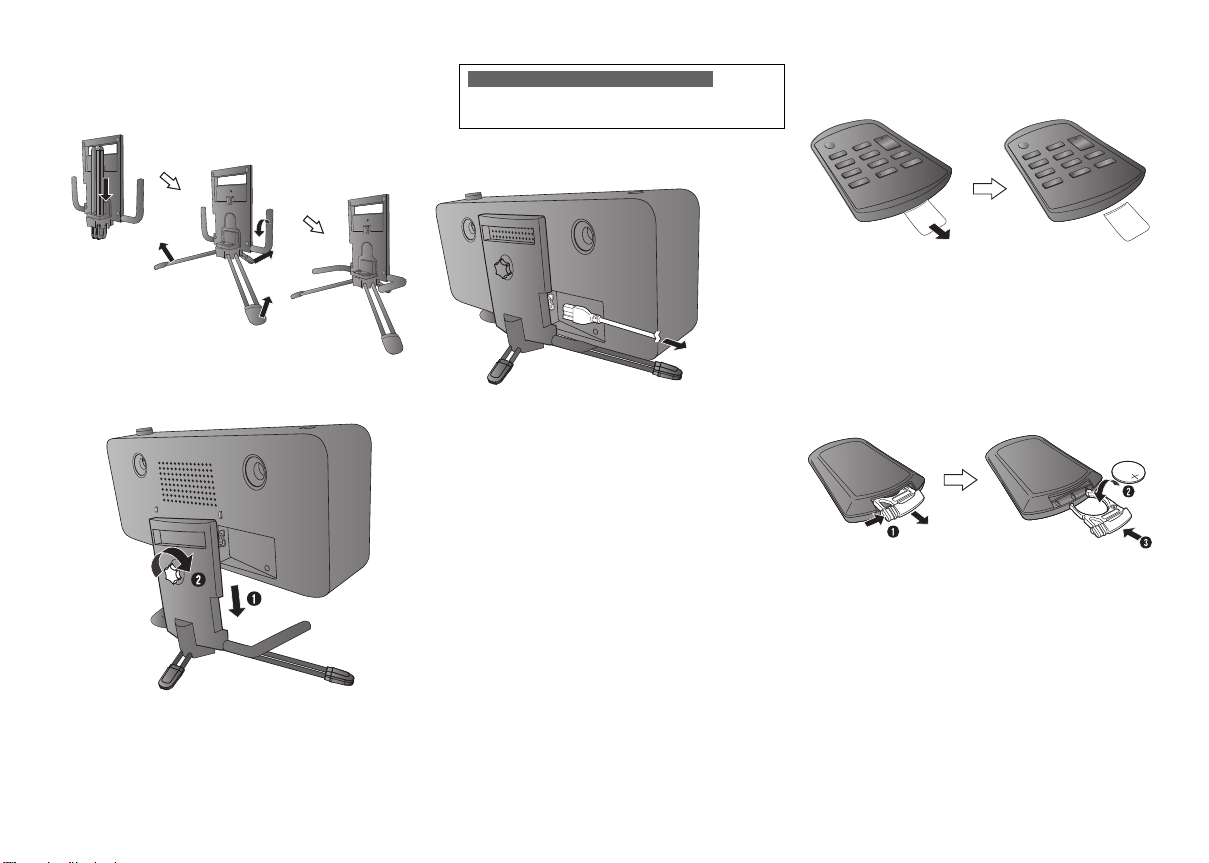
1 Prepare the setting stand.
2 Install the unit on the setting stand.
Align and put the unit on the setting stand, turn the
screw clockwise to secure the unit.
3 Connect the AC mains lead.
For the United Kingdom and Kuwait
READ THE CAUTION FOR AC MAINS LEAD
ON PAGE 3 BEFORE CONNECTION.
The system consumes approximately 0.2 W when it
is in standby mode.
Do not use an AC mains lead from other equipment.
Note:
• Do not sit on top of the unit.
• Some settings return to default when you disconnect
the system.
• These speakers do not have magnetic shielding. Do
not put them near TVs, PCs or other equipment easily
influenced by magnetism.
• Do not remove the speaker nets.
• Hold the unit firmly when moving it. Do not hold the
setting stand.
Preparing the remote control
Before using
Remove the insulation sheet.
Replacing the battery
Replace with a new battery (CR2025 lithium battery).
1 While pressing the stopper, pull out the
battery holder.
2 Insert a new battery with the (+) side facing
up.
3 Push the battery holder back fully.
RQT9648
4
4
Page 5
Overview of controls
J
AA
B
C
D
AML
G
K
N
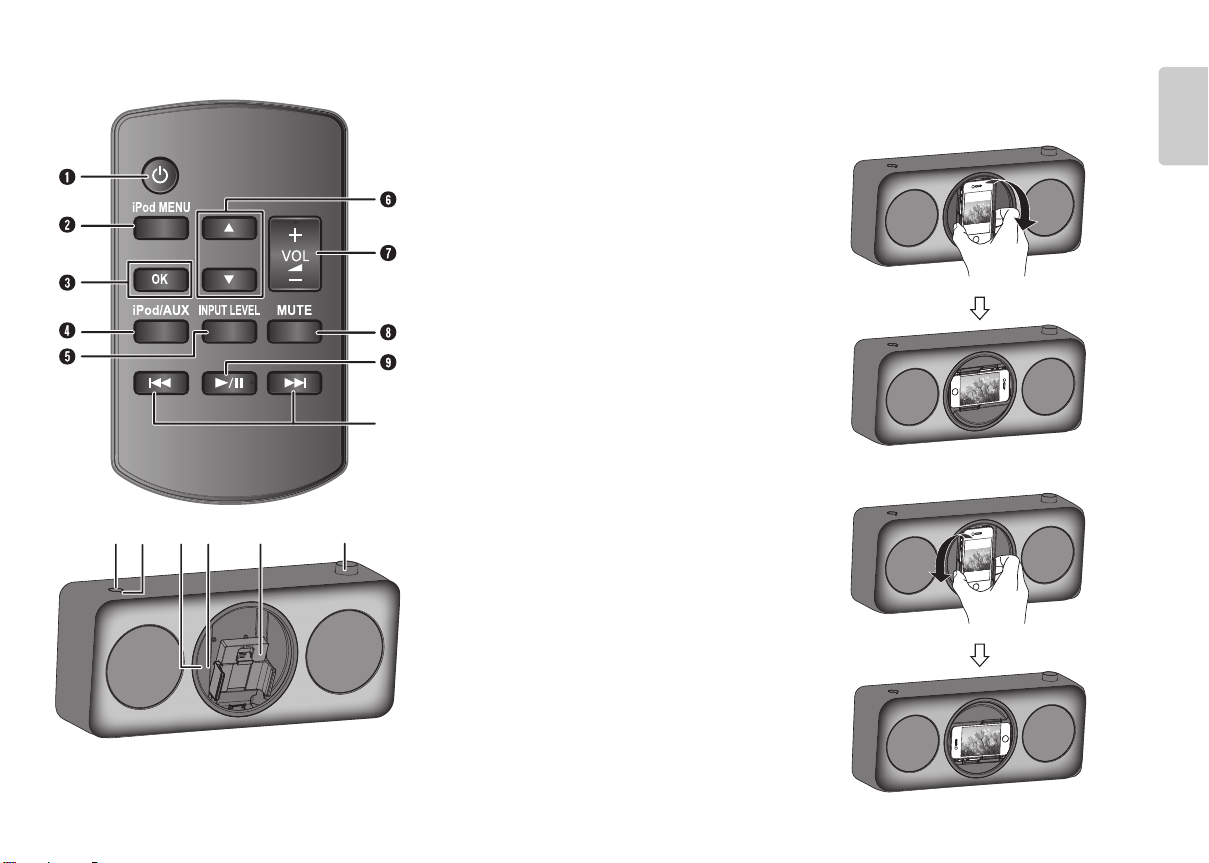
A Standby/on switch [`], [1]
Press to switch the unit from on to standby mode or
vice versa. In standby mode, the unit is still
consuming a small amount of power.
B View the iPod menu
C Confirm a selection
Set or cancel the auto off function
D Select iPod or AUX mode
E Adjust the audio input level in AUX mode
F Select an item
G Adjust the volume of the system
H Mute the sound of the system
In iPod mode: The amber and green status
In AUX mode: The amber status indicator blinks
Press the button again to cancel.
Mute is also cancelled when you adjust the volume
or when you switch off the system.
indicators blink alternately.
continuously.
I Start or pause playback
J Skip or search track
K Power indicator
On: The system is on
Off: The system is in standby mode
N Dock for iPod/iPhone
You can turn the dock clockwise or anticlockwise to
the horizontal position to view the iPod/iPhone in
widescreen mode.
Hold the side holder and turn clockwise.
Hold the side holder and turn anticlockwise.
ENGLISH
L Status indicator
Green: iPod mode
Amber: Set or cancel the auto off function
Mute function is on
Off: AUX mode
The green status indicator blinks each time you
perform an operation.
M Remote control sensor
Maximum range: 7 m directly in front
RQT9648
5
5
Page 6

Using an iPod/iPhone
A
B
C
D
Inserting an iPod/iPhone
1 Prepare the dock.
Gently pull out the dock towards you.
Pull out the support
for iPod/iPhone.
A: iPod classic
B: iPhone
C: iPod touch
D: iPod nano
(except 6th
generation)
2 Insert the iPod/iPhone.
Make sure to remove the iPod/iPhone from its case.
Make sure to align your iPod/iPhone with the
connector when inserting.
3 Push the side holder inwards to hold the
iPod/iPhone and gently push the dock back
inside.
Removing an iPod/iPhone
1 Hold the side holder and gently pull out the
dock.
2 Push the side holder outwards and carefully
remove the iPod/iPhone.
CAUTION!
To prevent damage to the iPod/iPhone
Make sure to pull out the dock before inserting or
removing the iPod/iPhone.
Hold the side holder to pull out the dock when
removing the iPod/iPhone.
Do not pull out the dock with the iPod/iPhone.
Do not remove the iPod/iPhone when it is in
horizontal position.
RQT9648
6
6
Page 7
Basic playback
Portable audio equipment
(not supplied)
Audio cable
(not supplied)
1 Press [`] to turn on the system.
2 Insert the iPod/iPhone.
Status indicator: Green
3 Press [4/9] to start playback.
Pause
playback
Skip track Press [2] or [6].
Search track Press and hold [2] or [6].
View iPod
menu
Select an item Press [R, T] and then press [OK].
Note:
• After you insert the iPod/iPhone, the system will check
the connection and the green status indicator blinks.
• Depending on the model, it may be necessary to
remove the iPod/iPhone and select the album, artist,
etc. on the iPod/iPhone.
• The system automatically switches on when you
connect an iPod/iPhone that is in playback mode
(except for some models).
• Operation results may vary depending on the iPod/
iPhone models.
• Read the User Guide of the iPod/iPhone for the
operating instructions.
Press [4/9].
Press again to continue playback.
Press [iPod MENU].
Compatible iPod/iPhone (as of February 2012)
Update your iPod/iPhone with the latest software before
using this system.
iPod touch
1st, 2nd, 3rd and 4th generation
iPod nano
2nd, 3rd, 4th, 5th and 6th generation
iPod classic
iPhone 4S / iPhone 4 / iPhone 3GS / iPhone 3G /
iPhone
For up to date compatibility information, refer to
http://panasonic.jp/support/global/cs/
Charging an iPod/iPhone
An iPod/iPhone is charged automatically when
connected to the system (even when the system is in
standby mode).
• See the iPod/iPhone display for its battery charging
status.
• Disconnect the iPod/iPhone if it is not used for an
extended period of time after charging is complete.
• Charging stops when the battery is fully charged. The
battery will deplete naturally.
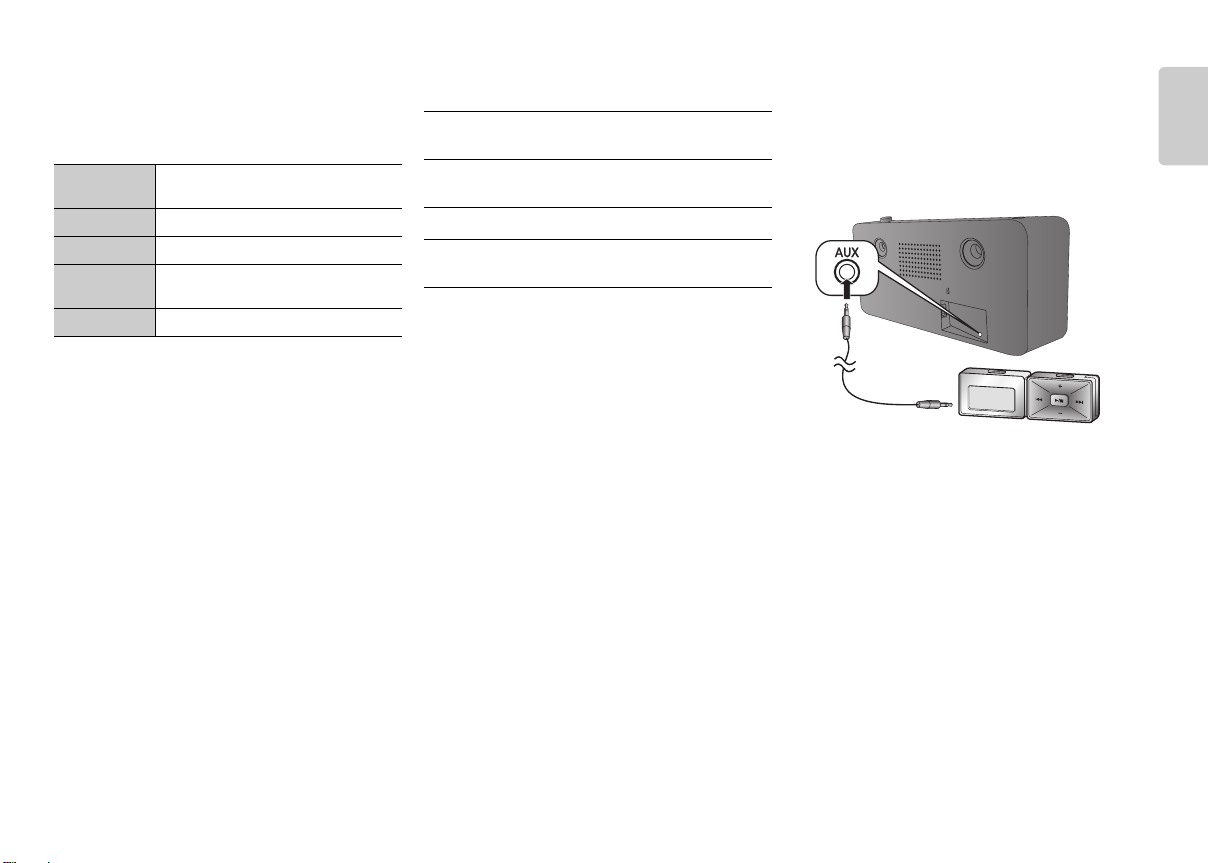
Using the auxiliary input
You can connect a portable audio equipment and listen
to the audio through this system.
Preparation
Switch off the equalizer (if any) of the portable audio
equipment to prevent sound distortion.
Decrease the volume of the system and the portable
audio equipment before you connect or disconnect the
portable audio equipment.
1 Connect the portable audio equipment.
Plug type: Ø 3.5 mm stereo
2 Press [iPod/AUX] to select AUX mode.
Status indicator: Off
3 Play the portable audio equipment.
Note:
• Read the operating instructions of the portable audio
equipment for details.
• Components and cables are sold separately.
To adjust the audio input level
Press [INPUT LEVEL].
Normal (default) ↔ High
Note:
• Select “High” if the output level is too low even when
you have increased the volume.
• Select “Normal” if there are abnormalities or the sound
is distorted during “High” input level.
RQT9648
7
7
ENGLISH
Page 8

Auto off function
The system automatically switches off if there is no
audio input and when you do not use it for approximately
30 minutes.
1 Press [iPod/AUX] to select AUX mode.
Status indicator: Off
2 Press and hold [OK].
On (default) ↔ Off
On: The green status indicator blinks 1 time,
followed by the amber status indicator blinking
2 times.
Off: The green status indicator blinks 1 time,
followed by the amber status indicator blinking
1 time.
Note:
1 minute before the system switches off, the power
indicator blinks.
Maintenance
To clean this system, wipe with a soft, dry cloth
• Never use alcohol, paint thinner or benzine to clean
this system.
• Before using chemically treated cloth, read the
instructions that came with the cloth carefully.
RQT9648
8
8
Troubleshooting
Before requesting service, make the following checks. If
you are in doubt about some of the check points, or if the
solutions indicated do not solve the problem, consult
your dealer for instructions.
No power
• Ensure the AC mains lead is connected properly.
No sound
• Increase the volume of the system.
• Examine the volume of the iPod/iPhone or portable
audio equipment.
• Make sure that the iPod/iPhone or portable audio
equipment is actually playing something.
Sound is distorted
• Lower the volume of the system.
• Make sure that the equalizer function of the iPod/
iPhone or portable audio equipment is switched off.
No operations can be done with the remote control
• Remove the insulation sheet before you use the
remote control for the first time.
• Examine that the battery is installed correctly.
• The battery is weak. Replace it with a new one.
Green status indicator blinks
• The system is checking the connected iPod/iPhone. If
the battery of iPod/iPhone is depleted, the system will
charge the iPod/iPhone before it can connect to the
iPod/iPhone.
• Switch off the system and then switch it on again.
iPod/iPhone does not switch on
• Examine the battery of iPod/iPhone to make sure it is
not depleted. Charge the iPod/iPhone.
• Switch off the system and then switch it on again.
iPod/iPhone does not respond
• Make sure that the system is in iPod mode.
• The iPod/iPhone is not connected correctly. Remove
the iPod/iPhone and connect it again.
iPod/iPhone does not charge
• Examine the connection.
Specifications
Amplifier section
RMS output power stereo mode
Front Ch (both ch driven)
Total RMS stereo mode power 40 W
Terminal section
AUX (rear)
Terminal Stereo, 3.5 mm jack
Speaker section
Type 1 way, 1 speaker system
Speaker unit(s)
Full range 6.5 cm cone type
Impedance 6 Ω
General
Power supply AC 110 to 240 V, 50/60 Hz
Power consumption 17 W
Dimensions (W x H x D)
Main set (without stand) 400 mm x 175 mm x 91 mm
Mass 2.7 kg
Operating temperature range 0°C to +40°C
Operating humidity range 20% to 80% RH
Power consumption in standby mode
Note:
• Specifications are subject to change without notice.
Mass and dimensions are approximate.
• Total harmonic distortion is measured by the digital
spectrum analyzer.
20 W per channel (6 Ω), 1 kHz, 10% THD
(bass reflex)
(no condensation)
0.2 W (approximate)
Page 9
WEEE
Information for Users on Collection and Disposal of
Old Equipment and used Batteries
These symbols on the products, packaging,
and/or accompanying documents mean
that used electrical and electronic products
and batteries should not be mixed with
general household waste.
For proper treatment, recovery and
recycling of old products and used
batteries, please take them to applicable
collection points, in accordance with your
national legislation and the Directives
2002/96/EC and 2006/66/EC.
By disposing of these products and
batteries correctly, you will help to save
valuable resources and prevent any
potential negative effects on human health
and the environment which could otherwise
arise from inappropriate waste handling.
For more information about collection and
recycling of old products and batteries,
please contact your local municipality, your
waste disposal service or the point of sale
where you purchased the items.
Penalties may be applicable for incorrect
disposal of this waste, in accordance with
national legislation.
For business users in the European
Union
If you wish to discard electrical and
electronic equipment, please contact your
dealer or supplier for further information.
[Information on Disposal in other
Countries outside the European Union]
These symbols are only valid in the
European Union. If you wish to discard
these items, please contact your local
authorities or dealer and ask for the correct
method of disposal.
Note for the battery symbol (bottom two
symbol examples):
This symbol might be used in combination
with a chemical symbol. In this case it
complies with the requirement set by the
Directive for the chemical involved.
RQT9648
9
9
ENGLISH
Page 10
Turvallisuusohjeet
VAROITUS!
Laite
• Vähennä tulipalon, sähköiskun tai laitteiston
vahingoittumisen vaaraa:
– Tätä laitetta ei saa altistaa sateelle, kosteudelle,
roiskeille tai tippuville nesteille.
– Älä aseta laitteen päälle nestettä sisältäviä esineitä,
kuten maljakoita.
– Käytä vain suositeltuja lisävarusteita.
– Älä avaa laitteen koteloa.
– Älä korjaa laitetta itse. Anna huolto pätevän
huoltohenkilön tehtäväksi.
Nappiparisto (litiumparisto)
• Tulipalo-, räjähdys- ja palovammavaara. Älä lataa
uudelleen, pura, altista yli 60 °C lämmölle tai polta.
• Säilytä nappiparistot lasten ulottumattomissa. Älä
koskaan pane nappiparistoa suuhun. Jos nielet
pariston, ota yhteys lääkäriin.
Nappiparisto (litiumparisto)
• Pariston virheellinen vaihto saattaa aiheuttaa
räjähdysvaaran. Korvaa se vain valmistajan
suosittelemilla paristotyypeillä.
• Kun hävität paristoja, ota yhteys paikallisiin
viranomaisiin tai jälleenmyyjään ja kysy heiltä oikea
hävitystapa.
• Älä kuumenna tai altista avotulelle.
• Älä jätä paristoja suorassa auringonpaisteessa
olevaan autoon, jonka ovet ja ikkunat ovat pitkään
suljettuina.
Tuotteen tunnistemerkinnät sijaitsevat laitteen
pohjassa.
license_iPod
Sisältö
Turvallisuusohjeet . . . . . . . . . . . . . . . . . . . . . .2
Toimitetut lisävarusteet. . . . . . . . . . . . . . . . . .2
Käytön aloitus . . . . . . . . . . . . . . . . . . . . . . . . .3
Yleiskatsaus ohjaimiin. . . . . . . . . . . . . . . . . . .4
iPodin/iPhonen käyttö . . . . . . . . . . . . . . . . . . .5
Lisälaiteliitännän käyttö . . . . . . . . . . . . . . . . .6
Automaattisammutustoiminto . . . . . . . . . . . .6
Ylläpito . . . . . . . . . . . . . . . . . . . . . . . . . . . . . . .6
Vianmääritys. . . . . . . . . . . . . . . . . . . . . . . . . . .7
Tekniset tiedot . . . . . . . . . . . . . . . . . . . . . . . . .7
Toimitetut lisävarusteet
Tarkista toimitetut lisävarusteet.
1 x jalusta
HUOMIO!
Laite
• Vähennä tulipalon, sähköiskun tai laitteiston
vahingoittumisen vaaraa:
– Älä asenna tai laita tätä laitetta kabinettityyppiseen
kirjakaappiin tai muuhun suljettuun tilaan, jotta
tuuletus onnistuisi.
– Älä peitä laitteen tuuletusaukkoja sanomalehdellä,
pöytäliinalla, verholla tai muulla vastaavalla
esineellä.
– Älä aseta palavaa kynttilää tai muuta avotulen
lähdettä laitteen päälle.
• Asenna laite siten, että vaihtovirtajohto voidaan
irrottaa pistorasiasta välittömästi ongelmien ilmetessä.
• Tämä laite saattaa olla altis matkapuhelinten käytön
aikana aiheuttamille radiohäiriöille. Jos häiriöitä
esiintyy, siirrä laite kauemmas matkapuhelimesta.
Yhdistynyt kuningaskunta ja Manner-Eurooppa
•
Tämä laite on tarkoitettu käytettäväksi leudossa
ilmastossa.
Muut
RQT9648
Tämä laite on tarkoitettu käytettäväksi trooppisessa
ilmastossa.
2
10
”Made for iPod”- ja ”Made for iPhone” -merkinnät
tarkoittavat, että kyseinen elektroninen laite on
suunniteltu nimenomaan liitettäväksi iPodiin tai
iPhoneen, ja sen kehittäjä on sertifioinut sen Applen
suorituskykystandardien mukaiseksi.
Apple ei ole vastuussa laitteen toiminnasta tai siitä,
että se noudattaa turvallisuusstandardeja tai lain
asettamia vaatimuksia.
Huomaa, että tämän lisävarusteen käyttö iPodin tai
iPhonen kanssa saattaa vaikuttaa langattomaan
yhteyteen.
iPhone, iPod, iPod classic, iPod nano ja iPod touch
ovat Apple Inc.:in tavaramerkkejä, jotka on rekisteröity
Yhdysvalloissa ja muissa maissa.
2 x Vaihtovirtajohto
Yhdistynyt kuningaskunta ja Kuwait
Muut
1 x Kaukosäädin (sisältää pariston)
(RFE0238)
Page 11

Käytön aloitus
Verkkovirtapistorasiaan
CR2025
Liitäntöjen tekeminen
1
Valmistele jalusta.
3
Liitä vaihtovirtajohto.
Järjestelmä kuluttaa noin 0,2 W valmiustilassa.
Kaukosäätimen valmistelu
Ennen käyttöä
Poista eristysliuska.
2
Asenna laite jalustaan.
Kohdista ja aseta laite jalustaan ja kiinnitä se
kiertämällä ruuvia myötäpäivään.
Älä käytä muille laitteille tarkoitettuja
vaihtovirtajohtoja.
Huomautus:
• Älä istu laitteen päälle.
• Osa asetuksista palautuu oletusasetuksiin, kun irrotat
järjestelmän verkkovirrasta.
• Näissä kaiuttimissa ei ole magneettisuojausta. Älä
sijoita niitä televisioiden, tietokoneiden tai muiden
sellaisten laitteiden läheisyyteen, joihin
magneettikenttä vaikuttaa helposti.
• Älä irrota kaiutinten verkkoja.
• Pidä laitteesta tukevasti kiinni, kun siirrät sitä. Älä
nosta laitetta jalustasta kiinni pitäen.
Pariston vaihtaminen
Vaihda paristo uuteen (CR2025-litiumparisto).
1
Pidä lukitussalpaa painettuna ja vedä
pariston pidike ulos.
2
Aseta uusi paristo (+)-puoli ylöspäin.
3
Paina pariston pidike kokonaan sisään.
SUOMI
RQT9648
3
11
Page 12

Yleiskatsaus ohjaimiin
J
AA
B
C
D
AML
G
K
N
RQT9648
4
12
A Valmiustila-/virtakytkin [`], [1]
Painamalla kytkintä voit siirtää laitteen valmiustilaan
tai palauttaa sen valmiustilasta. Valmiustilassa laite
kuluttaa edelleen pienen määrän virtaa.
B Näytä iPod-valikko
C Vahvistaa valinnan
Asettaa tai peruuttaa automaattisammutustoiminnon
D Valitsee iPod- tai AUX-tilan
E Säätää äänen tulotasoa AUX-tilassa
F Valitse kohde
G Säätää järjestelmän äänenvoimakkuutta
H Vaimentaa järjestelmän äänen
iPod-tilassa: Keltainen ja vihreä tilan merkkivalo
AUX-tilassa: Keltainen tilan merkkivalo vilkkuu
Peruuta painamalla painiketta uudelleen.
”MUTE” peruuntuu myös, kun äänenvoimakkuutta
säädetään tai laite sammutetaan.
vilkkuvat vuorotellen.
jatkuvasti.
I Aloittaa tai keskeyttää toiston
J Ohittaa raidan tai selaa raitaa
K Virran merkkivalo
Päällä: Järjestelmä on käynnissä
pois päältä: Järjestelmä on valmiustilassa
L Tilan merkkivalo:
Vihreä: iPod-tilassa
Keltainen: Asettaa tai peruuttaa
Pois päältä: AUX-tila
Vihreä tilan merkkivalo vilkkuu aina, kun suoritat
toiminnon.
M Kaukosäätimen tunnistin
Enimmäisetäisyys: 7 m suoraan edestä
automaattisammutustoiminnon
Vaimennustoiminto on käytössä
N iPod/iPhone-telakka
Voit kääntää telakan vaaka-asentoon joko
myötäpäivään tai vastapäivään katsellaksesi iPodia/
iPhonea laajakuvatilassa.
Ota kiinni sivupidikkeestä ja kierrä myötäpäivään.
Ota kiinni sivupidikkeestä ja kierrä vastapäivään.
Page 13

iPodin/iPhonen käyttö
A
B
C
D
iPodin/iPhonen asettaminen telakkaan
1
Valmistele telakka.
Vedä telakkaa varovasti itseäsi kohti.
Vedä iPodin/iPhonen tuki
ulos.
A: iPod classic
B: iPhone
C: iPod touch
D: iPod nano
(paitsi 6. sukupolven
laitteet)
2
Aseta iPod/iPhone telakkaan.
Poista iPod/iPhone kotelostaan.
Varmista, että kohdistat iPodin/iPhonen liittimeen,
kun asetat sitä paikalleen.
3
Paina sivupidike kiinni iPodin/iPhonen
ympärille ja työnnä telakka takaisin sisään.
iPodin/iPhonen poistaminen telakasta
1
Ota kiinni sivupidikkeistä ja vedä telakka
varovasti ulos.
2
Avaa sivupidike työntämällä sen reunoja
ulospäin ja irrota iPod/iPhone varovasti.
HUOMIO!
iPodin/iPhonen vahingoittumisen välttämiseksi
Varmista, että vedät telakan ulos ennen kuin asetat
iPodin/iPhonen laitteeseen tai poistat sen.
Pidä kiinni sivupidikkeestä, kun vedät telakan ulos
poistaessasi iPodia/iPhonea.
Älä vedä telakkaa ulos iPodista/iPhonesta kiinni
pitäen.
Älä irrota iPodia/iPhonea, kun se on vaakaasennossa.
SUOMI
RQT9648
5
13
Page 14

Perustoisto
Äänikaapeli
(ei toimiteta)
Kannettava audiolaite
(ei toimiteta)
1
Käynnistä järjestelmä painamalla [`]-painiketta.
2
Aseta iPod/iPhone telakkaan.
Tilan merkkivalo: Vihreä
3
Aloita toisto painamalla [4/9].
Keskeytä toisto Paina [4/9].
Ohita raita Paina [2] tai [6].
Selaa raitaa Pidä [2] tai [6] painiketta
Näytä iPodvalikko
Valitse kohde Paina [R, T] ja sitten [OK].
Huomautus:
• Kun olet asettanut iPodin/iPhonen telakkaan,
järjestelmä tarkistaa yhteyden ja vihreä merkkivalo
vilkkuu.
• Mallista riippuen saattaa olla tarpeen irrottaa iPod/
iPhone telakasta ja valita albumi, artisti jne. iPodissa/
iPhonessa.
• Järjestelmä käynnistyy automaattisesti, kun liität
siihen iPodin/iPhonen, joka on toistotilassa (joitakin
malleja lukuun ottamatta).
• Toiminnon tulokset saattavat vaihdella iPod/iPhonemallin mukaan.
• Lue käyttöohjeet iPodin/iPhonen käyttöoppaasta.
Yhteensopiva iPod/iPhone
(helmikuussa 2012)
Päivitä iPodiin/iPhoneen uusin ohjelmisto ennen tämän
järjestelmän käyttöä.
iPod touch
1., 2., 3. ja 4. sukupolvi
iPod nano
2., 3., 4., 5. ja 6. sukupolvi
iPod classic
iPhone 4S / iPhone 4 / iPhone 3GS / iPhone 3G /
iPhone
RQT9648
Päivitettyjen yhteensopivuustietojen saamiseksi katso
6
http://panasonic.jp/support/global/cs/
14
Paina uudelleen toiston jatkamiseksi.
painettuna.
Paina [iPod MENU].
iPodin/iPhonen lataus
iPod/iPhone latautuu automaattisesti, kun se kytketään
järjestelmään (silloinkin, kun järjestelmä on
valmiustilassa).
• Näet iPodin/iPhonen akun latauksen tilan sen
näytöstä.
• Irrota iPod/iPhone, jos sitä ei käytetä pitkään aikaan
latauksen päättymisen jälkeen.
• Lataus päättyy, kun akku on täysin ladattu. Akku
tyhjenee itsestään.
Lisälaiteliitännän käyttö
Voit liittää kannettavia audiolaitteita ja kuunnella niiden
ääntä tämän järjestelmän kautta.
Valmistelu
Kytke taajuuskorjain pois käytöstä (jos se on käytössä)
kannettavassa audiolaitteessa äänen vääristymisen
estämiseksi.
Alenna järjestelmän ja kannettavan audiolaitteen
äänenvoimakkuutta ennen kuin liität tai irrotat
kannettavan audiolaitteen.
1
Liitä kannettava audiolaite.
Pistoketyyppi: Ø 3,5 mm:n stereo
2
Valitse AUX-tila painamalla [iPod/AUX].
Tilan merkkivalo: pois päältä
3
Toista musiikkia kannettavalla audiolaitteella.
Huomautus:
• Katso tarkemmat tiedot kannettavan audiolaitteen
käyttöohjeista.
• Osat ja johdot myydään erikseen.
Audiotulon äänenvoimakkuuden tason
säätäminen
Paina [INPUT LEVEL].
Normaali (oletus) ↔ Korkea
Huomautus:
• Valitse ”Korkea”, jos lähtötaso on liian alhainen, vaikka
olet lisännyt äänenvoimakkuutta.
• Valitse ”Normaali”, jos käytössä esiintyy häiriöitä tai
jos ääni kuulostaa vääristyneeltä tason ollessa
”Korkea”.
Automaattisammutustoiminto
Tämä järjestelmä sammuu automaattisesti, jos äänen
tuloliitännästä ei tule signaalia etkä käytä laitetta n.
30 minuuttiin.
1
Valitse AUX-tila painamalla [iPod/AUX].
Tilan merkkivalo: pois päältä
2
Pidä [OK] painettuna.
Päällä (oletus) ↔ pois päältä
Päällä: Vihreä tilan merkkivalo vilkahtaa 1 kerran,
minkä jälkeen keltainen tilan merkkivalo
vilkkuu 2 kertaa.
pois päältä: Vihreä tilan merkkivalo vilkahtaa
Huomautus:
Yksi minuutti ennen laitteen sammumista virran
merkkivalo vilkkuu.
1 kerran, minkä jälkeen keltainen tilan
merkkivalo vilkkuu 1 kerran.
Ylläpito
Voit puhdistaa järjestelmän pyyhkimällä sen
pehmeällä, kuivalla liinalla.
• Älä koskaan käytä alkoholia, tinneriä tai bensiiniä
järjestelmän puhdistukseen.
• Ennen kemiallisesti käsiteltyjen liinojen käyttöä lue
huolellisesti liinan mukana tulevat ohjeet.
Page 15

Vianmääritys
Tee seuraavat tarkistukset ennen kuin pyydät huoltoa.
Jos et ole varma joistakin tarkistettavista kohdista, tai jos
annetut ratkaisut eivät ratkaise ongelmaa, pyydä
jälleenmyyjältä ohjeita.
Ei virtaa
• Varmista, että vaihtovirtajohto on liitetty tukevasti.
Ei ääntä
• Lisää järjestelmän äänenvoimakkuutta.
• Tarkista iPodin/iPhonen tai kannettavan audiolaitteen
äänenvoimakkuus.
• Tarkista, että iPod/iPhone tai kannettava audiolaite
toistaa parhaillaan jotain.
Ääni on vääristynyt
• Alenna järjestelmän äänenvoimakkuutta.
• Varmista, että iPodin/iPhonen tai kannettavan
audiolaitteen taajuuskorjaintoiminto on kytketty pois
käytöstä.
Mitään toimintoja ei voi suorittaa kaukosäätimellä
• Poista eristysliuska ennen kuin käytät kaukosäädintä
ensimmäisen kerran.
• Tarkista, että paristo on asetettu oikein.
• Pariston virta on vähissä. Vaihda se uuteen.
Vihreä tilan merkkivalo vilkkuu
• Järjestelmä tarkistaa liitettyä iPodia/iPhonea. Jos
iPodin/iPhonen akku on lopussa, järjestelmän on
ladattava iPod/iPhone ennen kuin se voi muodostaa
yhteyden iPodiin/iPhoneen.
• Sammuta järjestelmä ja käynnistä se uudelleen.
iPod/iPhone ei käynnisty
• Tarkista, ettei iPodin/iPhonen akku ole lopussa. Lataa
iPod/iPhone.
• Sammuta järjestelmä ja käynnistä se uudelleen.
iPod/iPhone ei vastaa
• Varmista, että järjestelmä on iPod-tilassa.
• iPodia/iPhonea ei ole liitetty oikein. Irrota iPod/iPhone
ja liitä se uudelleen.
iPod/iPhone ei lataudu
• Tarkista liitäntä.
Tekniset tiedot
Vahv istinosa
RMS-lähtöteho stereotilassa
Etukanava (molempia kanavia vahvistetaan)
RMS-kokonaisteho stereotilassa 40 W
Liitäntäosa
AUX (takana)
Liitäntä Stereo, 3,5 mm:n liitin
Kaiutinosa
Tyyppi Yhden kaiuttimen
Kaiutinyksiköt
Täysi ääniala 6,5 cm kartiotyyppinen
Impedanssi 6 Ω
Yleistä
Virtalähde 110 – 240 V AC, 50/60 Hz
Virrankulutus 17 W
Mitat (L x K x S)
Pääyksikkö
(ilman jalustaa)
Massa 2,7 kg
Käyttöympäristön lämpötila-alue 0 °C – +40 °C
Käyttöympäristön kosteusalue
Virrankulutus valmiustilassa
Huomautus:
• Tekniset tiedot voivat muuttua ilman eri ilmoitusta.
Massa ja mitat ovat likimääräisiä arvoja.
• Harmoninen kokonaissärö on mitattu digitaalisella
spektrianalysaattorilla.
20 W / kanava (6 Ω), 1 kHz, 10 %:n THD
1-tiejärjestelmä (bassorefleksi)
400 mm x 175 mm x 91 mm
20% – 80 % suht. kosteus (ei tiivistyvä)
0,2 W (noin)
Tietoja vanhojen laitteiden ja käytettyjen paristojen
keräyksestä ja hävittämisestä
Nämä merkinnät tuotteissa, pakkauksissa ja/
tai niihin liitetyissä dokumenteissa
tarkoittavat, että käytettyjä sähkö- ja
elektroniikkalaitteita sekä paristoja ei tule
sekoittaa tavalliseen kotitalousjätteeseen.
Vanhojen tuotteiden ja käytettyjen paristojen
asianmukainen käsittely, talteen ottaminen ja
kierrätys edellyttävät niiden viemistä tarjolla
oleviin keräyspisteisiin kansallisten
määräysten sekä direktiivien 2002/96/EC ja
2006/66/EC mukaisesti.
Kun hävität tuotteet ja paristot
asianmukaisesti, autat säilyttämään
arvokkaita luonnonvaroja sekä ehkäisemään
ihmisen terveydelle ja ympäristölle haitallisia
vaikutuksia, joita vääränlainen
jätteenkäsittely voi aiheuttaa.
Ota yhteys asuinkuntasi viranomaisiin,
jätteenkäsittelystä vastaavaan tahoon tai
tuotteiden ostopaikkaan saadaksesi
lisätietoja vanhojen tuotteiden ja paristojen
keräyksestä ja kierrätyksestä.
Tuotteiden epäasianmukaisesta
hävittämisestä saattaa seurata kansallisessa
lainsäädännössä määrätty rangaistus.
Yrityksille Euroopan unionissa
Lisätietoja sähkö- ja elektroniikkalaitteiden
hävittämisestä saat jälleenmyyjältä tai
tavarantoimittajalta.
[Tietoja hävittämisestä Euroopan unionin
ulkopuolella]
Nämä merkinnät ovat voimassa ainoastaan
Euroopan unionin alueella. Ota yhteys
paikallisiin viranomaisiin tai jälleenmyyjään
saadaksesi tietoja oikeasta
jätteenkäsittelymenetelmästä.
Paristomerkintää koskeva huomautus
(alla kaksi esimerkkiä merkinnöistä):
Tämä merkki voi olla käytössä yhdessä
kemiallisen merkinnän kanssa. Siinä
tapauksessa merkki noudattaa kyseistä
kemikaaliakoskevan direktiivin vaatimuksia.
SUOMI
RQT9648
7
15
Page 16

Precauciones de seguridad
¡ADVERTENCIA!
Unidad
• Para reducir el riesgo de incendios, descargas
eléctricas o daños en el producto,
– No exponga este aparato a la lluvia, humedad,
goteo o salpicaduras.
– No coloque encima del mismo objetos con líquidos
como, por ejemplo, floreros.
– Utilice solamente los accesorios recomendados.
– No quite las tapas.
– No reparar esta unidad usted mismo. Solicite las
reparaciones al personal de servicio cualificado.
Pila tipo botón (pila de litio)
• Riesgo de incendio, explosión o quemaduras. No
cargue, desarme, caliente a más de 60°C ni la
incinere.
• Mantenga la pila tipo botón fuera del alcance de los
niños. No la ponga nunca en la boca. Si alguien se la
traga, llame a un médico.
¡CUIDADO!
Unidad
• Para reducir el riesgo de incendios, descargas
eléctricas o daños en el producto,
– Para mantener bien ventilada esta unidad, no la
instale ni la ponga en un estante de libros, mueble
empotrado u otro espacio de dimensiones
reducidas.
– No obstruya las aberturas de ventilación de la
unidad con periódicos, manteles, cortinas u objetos
similares.
– No coloque objetos con llama descubierta, una vela
por ejemplo, encima de la unidad.
• Instale esta unidad de forma que el cable de
alimentación de CA se pueda desconectar de la toma
de corriente inmediatamente si ocurre algún
problema.
• Esta unidad puede tener interferencias causadas por
teléfonos móviles durante su utilización. Si tales
interferencias resultan evidentes, aumente la
separación entre la unidad y el teléfono móvil.
RQT9648
2
16
Para el Reino Unido y Europa Continental
•
Esta unidad ha sido diseñada para ser utilizada en
climas moderados.
Para otros
Esta unidad ha sido diseñada para ser utilizada en
climas tropicales.
Pila tipo botón (pila de litio)
• Hay peligro de explosión si se sustituye
incorrectamente la pila. Solo sustituir con el mismo
tipo recomendado por el fabricante.
• Al desechar las baterías, por favor contacte con sus
autoridades locales o distribuidor y consulte el método
correcto de eliminación.
• No caliente o exponga a las llamas.
• No deje la(s) pila(s) en un automóvil expuesto a luz
solar directa durante un largo período de tiempo con
las puertas y ventanas cerradas.
La marca de identificación del producto se encuentra
en la parte inferior de la unidad.
“Made for iPod” y “Made for iPhone” significa que un
accesorio electrónico ha sido diseñado para
conectarse específicamente a iPod, o iPhone,
respectivamente, y su fabricante ha certificado que
cumple con los estándares de rendimiento de Apple.
Apple no se responsabiliza del funcionamiento de este
dispositivo o su cumplimiento de las normas de
regulación y seguridad.
Tenga en cuenta que el uso de este accesorio con
iPod, o iPhone pueda afectar el rendimiento
inalámbrico.
iPhone, iPod, iPod classic, iPod nano, e iPod touch
son marcas comerciales de Apple Inc., registradas en
EUA y otros países.
Contenido
Precauciones de seguridad . . . . . . . . . . . . . .2
Accesorios suministrados . . . . . . . . . . . . . . .2
Primeros pasos . . . . . . . . . . . . . . . . . . . . . . . .3
Controles . . . . . . . . . . . . . . . . . . . . . . . . . . . . .4
Utilización un iPod/iPhone . . . . . . . . . . . . . . .5
Utilización de la entrada auxiliar . . . . . . . . . .6
Función de apagado automático . . . . . . . . . .6
Mantenimiento . . . . . . . . . . . . . . . . . . . . . . . . . 6
Solución de problemas . . . . . . . . . . . . . . . . . .7
Especificaciones . . . . . . . . . . . . . . . . . . . . . . .7
Accesorios suministrados
Por favor, compruebe e identifique los accesorios
suministrados.
1 x Soporte de ajuste
2 x Cable de alimentación de CA
Para el Reino Unido y Kuwait
Para otros
1 x Mando a distancia (con una pila)
(RFE0238)
Page 17

Primeros pasos
A la toma
de CA
CR2025
Conexiones
1
Prepare el soporte de ajuste.
2
Instale la unidad en el soporte de ajuste.
Alinee y coloque la unidad en el soporte de ajuste,
gire el tornillo en el sentido de las agujas del reloj
para asegurar la unidad.
3
Conecte el cable de alimentación de CA.
El sistema consume aproximadamente 0,2 W
cuando está en modo en espera.
No utilice el cable de alimentación CA de otro
equipo.
Nota:
• No sentarse encima de la unidad.
• Alguna configuración vuelve por defecto después de
desconectar el sistema.
• Estos altavoces no disponen de blindaje magnético.
No lo ponga cerca de la TV, el PC u otros equipos
afectados fácilmente por el magnetismo.
• No quite las redes del altavoz.
• Sujete la unidad firmemente al moverla. No sujete el
soporte de ajuste.
Preparación del mando a distancia
Antes de la utilización
Retire la lámina aislante.
Sustituir la pila
Sustituya la pila con una nueva (CR2025 pila de litio).
1
Mientras aprieta el tapón, saque el soporte de
la pila.
2
Coloque una pila nueva con el lado (+) hacia
arriba.
3
Empuje de vuelta a su sitio el soporte de la
pila.
ESPAÑOL
RQT9648
3
17
Page 18

Controles
J
AA
B
C
D
AML
G
K
N
RQT9648
4
18
A
Botón de alimentación en espera/conectada [`
Pulse este botón para cambiar del modo de
alimentación conectada al modo de alimentación en
espera o viceversa. En el modo de alimentación en
espera, el aparato consume una pequeña cantidad
de corriente.
B Ver el menú del iPod
C Confirmar una selección
Ponga o cancele la función de apagado automático
], [1]
N Base de conexión para iPod/iPhone
Puede girar la base de conexión en dirección de las
agujas del reloj o en contra de las agujas del reloj a
la posición horizontal para ver el iPod/iPhone en
modo pantalla ancha.
Sujete el soporte lateral y gírelo en la dirección de
las agujas del reloj.
D Seleccione iPod o modo AUX
E Ajustar el nivel de entrada de audio en el modo AUX
F Seleccionar un elemento
G Ajustar el volumen del sistema
H Silenciar el sonido del sistema
En modo iPod: Los indicadores de estado ámbar y
En modo AUX: El indicador de estado ámbar
Vuelva a pulsar el botón para cancelar.
La función silenciar también se cancela cuando se
ajusta el volumen o se apaga el aparato.
I Iniciar o pausar reproducción
verde parpadean alternativamente.
parpadea continuamente.
Sujete el soporte lateral y gírelo en la dirección
contraria a las agujas del reloj.
J Saltar o buscar la pista
K Indicador de energía
Encendido: El sistema está encendido
Apagado: El sistema está en modo en espera
L Indicador de estado
Verde: modo iPod
Ámbar: Ponga o cancele la función de apagado
automático
La función silenciar está activada
Apagado: modo AUX
El indicador de estado verde parpadea cada vez que
realiza una operación.
M Sensor de mando a distancia
Distancia máxima: 7 m directamente delante de la
unidad
Page 19

Utilización un iPod/iPhone
A
B
C
D
Introducir un iPod/iPhone
1
Prepare la base de conexión.
Desconecte suavemente la base de conexión hacia
usted.
Desconecte el soporte
para iPod/iPhone.
A: iPod classic
B: iPhone
C: iPod touch
D: iPod nano
(excepto la 6ª
generación)
3
Presione el soporte lateral hacia dentro para
sujetar el iPod/iPhone y pulse suavemente la
base de conexión de nuevo dentro.
Retirar un iPod/iPhone
1
Sujete el soporte lateral y saque suavemente
la base de conexión.
¡CUIDADO!
Para evitar dañar el iPod/iPhone
Asegúrese de desconectar la base antes de insertar
o retirar el iPod/iPhone.
Sujete el soporte lateral para sacar la base al retirar
el iPod/iPhone.
No saque la base con el iPod/iPhone.
ESPAÑOL
2
Introduzca un iPod/iPhone
Asegúrese de quitar el iPod/iPhone de su caja.
Asegúrese de alinear su iPod/iPhone con el
conector al insertarlo.
2
Presione el soporte lateral hacia fuera y retire
con cuidado el iPod/iPhone.
No retire el iPod/iPhone esté en posición horizontal.
RQT9648
5
19
Page 20

Reproducción básica
Cable de audio
(no suministrado)
Equipo portátil de audio
(no suministrado)
1
Pulse [`] para encender la unidad.
2
Introduzca un iPod/iPhone
Indicador de estado: Verde
3
Pulse [4/9] para iniciar la reproducción.
Pausar la
reproducción
Saltar pista Pulse [2] o [6].
Buscar pista Mantenga pulsado [2] o [6].
Ver el menú del
iPod
Seleccionar un
elemento
Nota:
• Después de insertar el iPod/iPhone, el sistema
comprobará la conexión y el indicador verde
parpadea.
• Dependiendo del modelo, puede ser necesario quitar
el iPod/iPhone y seleccionar el álbum, artista, etc en el
iPod/iPhone.
• El sistema cambia automáticamente cuando conecta
el iPod/iPhone que está en modo reproducción
(excepto para algunos modelos)
• Los resultados de la operación pueden variar
dependiendo en modelos de iPod/iPhone.
• Lea la Guía del usuario del iPod/iPhone para las
instrucciones de funcionamiento.
Pulse [4/9].
Vuelva a pulsar para continuar la
reproducción.
Pulse [iPod MENU].
Pulse [R, T] y después pulse [OK].
iPod/iPhone compatibles (a febrero de 2012)
Actualice su iPod/iPhone con el software más reciente
antes de utilizar este sistema.
iPod touch
1a, 2a, 3a y 4a generación
iPod nano
2a, 3a, 4a, 5a y 6a generación
iPod classic
iPhone 4S / iPhone 4 / iPhone 3GS / iPhone 3G /
iPhone
RQT9648
Para obtener información actualizada sobre compatibilidad,
6
20
consulte http://panasonic.jp/support/global/cs/
Cargar un iPod/iPhone
Un iPod/iPhone se carga automáticamente cuando se
conecta al sistema (incluso cuando el sistema está en
modo en espera).
• Observe la pantalla del iPod/iPhone para verificar el
estado de carga de la pila.
• Desconecte el iPod/iPhone si no se usa durante un
periodo de tiempo largo después de que la carga se
haya completado.
• La carga se para cuando la pila está totalmente
cargada. La pila se agotará con naturalidad.
Utilización de la entrada
auxiliar
Puede conectar un equipo portátil de audio y escuchar
el audio a través de este sistema.
Preparación
Apague el ecualizador (si hay alguno) del equipo portátil
de audio para evitar la distorsión del sonido.
Reduzca el volumen del sistema y el equipo de audio
portátil antes de conectar o desconectar el equipo
portátil de audio.
1
Conecte el equipo portátil de audio.
Tipo de clavija: estéreo de Ø 3,5 mm
2
Pulse [iPod/AUX] para seleccionar modo AUX.
Indicador de estado: Apagado
3
Reproduzca el equipo portátil de audio.
Nota:
• Lea las instrucciones de funcionamiento del equipo
portátil de audio para más detalles.
• Los componentes y los cables se venden por
separado.
Para ajustar el nivel de entrada de
audio
Pulse [INPUT LEVEL].
Normal (predeterminado) ↔ Alto
Nota:
• Seleccione “Alto” si el nivel de salida es demasiado
bajo incluso cuando haya subido el volumen.
• Seleccione “Normal” si hay anormalidades o si se
distorsiona el sonido durante el nivel de entrada “Alto”.
Función de apagado
automático
El sistema se apaga automáticamente si no hay ninguna
entrada de audio y no lo utiliza durante aprox. 30
minutos.
1
Pulse [iPod/AUX] para seleccionar modo AUX.
Indicador de estado: Apagado
2
Mantenga pulsado [OK].
Encendido (predeterminado) ↔ Apagado
Encendido: El indicador de estado verde parpadea 1
Apagado: El indicador de estado verde parpadea 1
Nota:
1 minuto antes de que el sistema se apague, el
indicador de batería parpadea.
vez, seguida de un indicador de estado
ámbar que parpadea 2 veces.
vez, seguida de un indicador de estado
ámbar que parpadea 1 vez.
Mantenimiento
Utilice un paño suave y seco para limpiar este
sistema.
• No utilice nunca alcohol, diluyente de pintura o
gasolina para limpiar este sistema.
• Antes de utilizar un paño impregnado químicamente,
lea con atención, las instrucciones del mismo.
Page 21

Solución de problemas
Antes de solicitar el servicio de reparaciones haga las
comprobaciones indicadas abajo. Si tiene alguna duda
acerca de algunos de los puntos de comprobación o si
las soluciones indicadas no resuelven el problema,
consulte a su distribuidor para obtener instrucciones.
Sin alimentación
• Asegúrese de que el cable de alimentación de CA se
encuentre conectado correctamente.
Sin sonido
• Aumente el volumen del sistema.
• Compruebe el volumen del iPod/iPhone o su equipo
portátil de audio.
• Asegúrese de que el iPod/iPhone o equipo portátil de
audio está realmente reproduciendo algo.
El sonido está distorsionado
• Disminuya el volumen del sistema.
• Asegúrese de que la función ecualizador del iPod/
iPhone o equipo portátil de audio está apagada.
No se puede realizar ninguna operación con el
mando a distancia
• Retire la lámina aislante antes de utilizar el mando a
distancia por primera vez.
• Compruebe que la pila está correctamente instalada.
• La pila está débil. Sustitúyala por una nueva.
El indicador de estado verde parpadea
• El sistema comprueba el iPod/iPhone conectado. Si la
batería del iPod/iPhone está agotada, el sistema
cargará el iPod/iPhone antes de que se pueda
conectar al iPod/iPhone.
• Apague el sistema y después vuélvalo a encender.
El iPod/iPhone no se enciende
• Examine la batería del iPod/iPhone para asegurarse
de que no está agotada. Cargue el iPod/iPhone.
• Apague el sistema y después vuélvalo a encender.
El iPod/iPhone no responde
• Asegúrese de que el sistema está en modo iPod.
• El iPod/iPhone no está conectado correctamente.
Retire el iPod/iPhone y conéctelo de nuevo.
El iPod/iPhone no se carga
• Compruebe la conexión.
Especificaciones
Sección del amplificador
Modo estéreo de potencia de salida RMS
Canal frontal (ambos canales accionados)
Potencia total del modo estéreo RMS 40 W
Sección de terminal
AUX (trasero)
Terminal Estéreo, entrada de 3,5 mm
Sección de altavoz
Tipo Sistema de 1 altavoz de 1 vía
Altavoz(ces)
Gama completa Tipo cónico de 6,5 cm
Impedancia 6 Ω
Generalidades
Alimentación 110 a 240 V CA, 50/60 Hz
Consumo energético 17 W
Dimensiones (An x Al x Prf)
Conjunto principal
(sin soporte)
Peso 2,7 kg
Gama de temperaturas de funcionamiento
Gama de humedades de funcionamiento
Consumo en el modo de espera
Nota:
• Las especificaciones están sujetas a cambios sin
previo aviso.
El peso y las dimensiones son aproximados.
• La distorsión armónica total se mide con el analizador
de espectro digital.
20 W por canal (6 Ω), 1 kHz,
distorsión armónica total del 10%
(reflector de bajos)
400 mm x 175 mm x 91 mm
0°C a +40°C
20% a 80% humedad relativa
(sin condensación)
0,2 W (aproximados)
Información para Usuarios sobre la Recolección y
Eliminación de aparatos viejos y baterías usadas
Estos símbolos en los productos, embalajes
y/o documentos adjuntos, significan que los
aparatos eléctricos y electrónicos y las
baterías no deberían ser mezclados con los
desechos domésticos.
Para el tratamiento apropiado, la recuperación
y el reciclado de aparatos viejos y baterías
usadas, observe las normas de recolección
aplicables, de acuerdo a su legislación
nacional y a las Directivas 2002/96/CE y
2006/66/CE.
Al desechar estos aparatos y baterías
correctamente, estará ayudando a preservar
recursos valiosos y a prevenir cualquier
potencial efecto negativo sobre la salud de la
humanidad y el medio ambiente que, de lo
contrario, podría surgir de un manejo
inapropiado de los residuos.
Para mayor información sobre la recolección
y el reciclado de aparatos y baterías viejos,
por favor, contacte con su comunidad local,
su servicio de eliminación de residuos o con
el comercio donde adquirió estos aparatos.
Podrán aplicarse penas por la eliminación
incorrecta de estos residuos, de acuerdo a la
legislación nacional.
Para usuarios empresariales en la Unión
Europea
Si usted desea descartar aparatos eléctricos
y electrónicos, por favor contacte a su
distribuidor o proveedor a fin de obtener
mayor información.
[Informacion sobre la Eliminación en
otros Países fuera de la Unión Europea]
Estos símbolos solo son válidos dentro de la
Unión Europea. Si desea desechar estos
objetos, por favor contacte con sus
autoridades locales o distribuidor y consulte
el método correcto de eliminación.
Nota sobre el símbolo de la bateria (abajo,
dos ejemplos de símbolos):
Este símbolo puede ser usado en
combinación con un símbolo químico. En
este caso, el mismo cumple con los
requerimientos establecidos por la Directiva
para los químicos involucrados.
7
21
ESPAÑOL
RQT9648
Page 22

安全注意事项
警告 !
主机
• 为减低火灾、触电或产品损坏的危险,
– 不要将此设备暴露在雨水、潮湿、滴水或溅水
下。
– 不要将盛满液体的物体,例如花瓶等放置在此
设备上。
– 只使用被推荐的附件。
– 勿拆开机壳。
– 切勿自行修理本机。 任何有关维修的问题请只
咨询合格人员。
钮扣型电池 ( 锂电池 )
• 火灾、爆炸和烧伤风险。 切勿重新充电、拆卸、
加热超过
• 将钮扣型电池置于儿童无法触及之处。 切勿将
钮扣型电池放入口中。 若误吞,立刻联络您的
医生。
60°C 或焚烧。
• 用于英国和欧洲大陆
本机供在温和气候地区使用。
用于其它
本机供在热带气候地区使用。
钮扣型电池 ( 锂电池 )
• 如果电池放置错误,有发生爆炸的危险。 更换
电池时,只使用制造商建议的类型的电池。
• 当处理废旧电池时,请联络当地政府单位或经
销商以洽询正确的弃置方法。
• 切勿让电池遇热或触火。
• 切勿将电池长时间留在车门和车窗被关紧同时
被阳光直接照射的车子内。
产品识别标志在本机的底部。
license_iPod
⽬录
安全注意事项 . . . . . . . . . . . . . . . . . . . . . . . . . .2
提供附件 . . . . . . . . . . . . . . . . . . . . . . . . . . . . . .2
准备使用 . . . . . . . . . . . . . . . . . . . . . . . . . . . . . .3
控制概要 . . . . . . . . . . . . . . . . . . . . . . . . . . . . . .4
使用 iPod/iPhone . . . . . . . . . . . . . . . . . . . . . . .5
使用 AUX 输入 . . . . . . . . . . . . . . . . . . . . . . . . .6
自动关闭功能 . . . . . . . . . . . . . . . . . . . . . . . . . .6
保养 . . . . . . . . . . . . . . . . . . . . . . . . . . . . . . . . . .6
故障排除指南 . . . . . . . . . . . . . . . . . . . . . . . . . .7
技术规格 . . . . . . . . . . . . . . . . . . . . . . . . . . . . . .7
提供附件
请检查并确认所提供的附件。
1 x 设置支架
注意!
主机
• 为减低火灾、触电或产品损坏的危险,
– 为了确保良好的通风条件,请勿将本机安装或
置于书柜、内藏式机柜或其它密闭的空间里。
– 切勿让报纸、桌布、窗帘等物品堵塞住本机的
通风孔。
– 切勿将诸如点燃的蜡烛等明火火源置于本机
上。
• 将本机安装在电源插头容易接近之处以便在发
生问题时能立即把电源插头断开。
• 本机在使用过程中,可能会受到行动电话的无
线电波干扰。 如果干扰出现,请增加本机和行
动电话之间的距离。
RQT9648
2
22
“Made for iPod” 和 “Made for iPhone” 表示电子配
件专为连接
员认证符合
Apple 公司不对这种装置的使用负责,也不对它
iPod 或 iPhone 所设计,且经开发人
Apple 效能标准。
们的安全和管理标准负责。
请注意,此配件与
iPod 或 iPhone 的使用可能影
响其无线功能。
iPhone, iPod, iPod classic, iPod nano 和 iPod
touch 是 Apple Inc. 的商标,已在美国及其他国
家 / 地区注册。
2 x 交流电源线
用于英国和科威特
用于其它
1 x 遥控器 ( 附电池 )
(RFE0238)
Page 23

准备使用
至家用交流
电源插座
CR2025
连接
1
准备设置支架。
2
将本机安装于设置支架上。
调准并放置本机于设置支架上,以顺时针方向
转动螺丝锁紧本机。
3
连接交流电源线。
本系统在待机模式的耗电量约为 0.2 W。
不要使用其他设备的交流电源线。
备注 :
• 请勿坐在本机上。
• 当您断开此系统后,一些设定将会返回到出厂
设定。
• 这些扬声器无磁屏蔽功能,因此切勿将其放置
在电视机、电脑或其他易受磁性影响的装置附
近。
• 请勿拆卸扬声器网。
• 移动本机时,紧握本机。 不要握住设置支架。
准备遥控器
使用之前
拆除绝缘片。
更换电池
使用新电池更换 (CR2025 锂电池)。
1
按着制动器的同时,拉出电池匣。
2
以 (+) 面朝上插入新的电池。
3
将电池匣完全推入。
中文
RQT9648
3
23
Page 24

控制概要
J
A
B
C
D
RQT9648
4
24
K
AML G
N
A
A 待机 / 开机开关 [`], [1]
按此开关可将本机从开机切换到待机状态或相
反。 在待机状态下,本机仍将消耗少量电力。
iPod 选单
B 查看
C 确认选择
设定或取消自动关闭功能
iPod 或 AUX 模式
D 选择
AUX 模式中调节音频输入水平
E 在
F 选择项⽬
G 调整系统音量
H 静音系统
iPod 模式中 : 琥珀色和绿色状态指示灯交
在
替闪烁。
AUX 模式中 : 琥珀色状态指示灯持续闪
在
烁。
再按一次按钮以取消。
当调节音量或关闭本系统时,消音功能将取
消。
I 开始或暂停播放
J 跳越或搜寻曲⽬
K 电源指示灯
开: 系统开启
关 : 系统处于待机模式
L 状态指示灯
iPod 模式
绿色 :
琥珀色 : 设定或取消自动关闭功能
消音功能开启
AUX 模式
关:
绿色状态指示灯在您每次进行操作时闪烁。
M 遥控感应器
最远: 正对着
7 m
N iPod/iPhone 的底座
您可以顺时针或逆时针方向转动底座至水平位
置以宽屏模式观看
iPod/iPhone。
握住侧面固定器然后以顺时针方向转动。
握住侧面固定器然后以逆时针方向转动。
Page 25

使用 iPod/iPhone
A
B
C
D
插入 iPod/iPhone
1
准备底座。
轻轻地将底座向您拉出。
将 iPod/iPhone 的
支撑拉出。
A: iPod classic
B: iPhone
C: iPod touch
D: iPod nano
(第六代除外)
2
插入 iPod/iPhone。
确保 iPod/iPhone 已从护套中取出。
插入时,务必将您的
iPod/iPhone
对准连接器。
3
将侧面固定器向内推以握住 iPod/iPhone,
然后轻轻地将底座向内推入。
取出 iPod/iPhone
1
握住侧面固定器然后轻轻地拉出底座。
2
将侧面固定器向外推,然后小心地取出
iPod/iPhone。
注意!
要避免损坏
务必在插入或取出
取出
底座。
不要用
不要在
iPhone。
iPod/iPhone
iPod/iPhone 之前拉出底座。
iPod/iPhone 时,握住侧面固定器以拉出
iPod/iPhone 来拉出底座。
iPod/iPhone 处于水平位置时取出 iPod/
中文
RQT9648
5
25
Page 26

基本播放
音频电线
(非附件)
便携式音频设备
( 非附件 )
1
按 [`] 开启系统。
2
插入 iPod/iPhone。
状态指示灯 : 绿色
3
按 [4/9] 以开始播放。
暂停播放 按 [4/9]。
再次按此按钮可恢复播放。
跳越曲⽬ 按 [2] 或 [6]。
搜寻曲⽬ 按住 [2] 或 [6]。
查看 iPod 选单 按 [iPod MENU]。
选择项⽬ 按 [R, T] 然后按 [OK]。
备注 :
• 在您插入 iPod/iPhone 之后,系统将检查连接,
然后绿色指示灯闪烁。
• 根据型号,您可能需要将 iPod/iPhone 断开,并
iPod/iPhone 来选择唱片集、歌手等。
使用
• 当您连接处于播放模式的 iPod/iPhone 时,本系
统自动开启 (除了一些机型 )。
• 操作结果视 iPod/iPhone 的机型而不同。
• 请参阅 iPod/iPhone 的使用说明。
与 iPod 或 iPhone 兼容
(截至 2012 年 2 月)
使用本系统前请更新您的
件。
iPod touch
第一、第二、第三和四代
iPod nano
第二、第三、第四、第五和第六代
iPod classic
iPhone 4S / iPhone 4 / iPhone 3GS / iPhone 3G /
iPhone
RQT9648
最新的兼容信息,请参
6
http://panasonic.jp/support/global/cs/
26
iPod/iPhone 至最新的软
为 iPod/iPhone 充电
当连接至本系统时, iPod/iPhone 将自动充电
(甚至当系统处于待机模式)。
• 参看 iPod/iPhone 的显示幕以检查其充电状态。
• 如果您打算在充满电池后很长一段时间内不使
用
iPod/iPhone,请将其与本系统断开连接。
• 一旦电池已完全充满,将不会另行充电。 电池
的电力将自然耗尽。
使用 AUX 输入
您可以连接至便携式音频设备,并通过本系统享
受音乐。
准备
关闭便携式设备的音频平衡器功能 ( 若有 ) 以防
止声音失真。
连接或断开便携式设备前先降低本系统和便携式
设备的音量。
1
连接便携式音频设备。
插头类型 : Ø 3.5 mm 立体声
2
按 [iPod/AUX] 以选择 AUX 模式。
状态指示灯 : 关
3
启动便携式音频设备。
备注 :
• 请参阅有关便携式音频设备的使用说明书。
• 不包括电线与设备。
调节输入音量
按 [INPUT LEVEL]。
正常 (预设) ↔ 高
备注 :
• 如果当你提高音量后,输出水平仍太低, 选择
“高”。
• 如果在“ 高”输入水平时出现反常或声音失真,
选择“正常”。
自动关闭功能
如果没有音频输入,而且您在大约 30 分钟内没有
使用,本系统会自动关闭。
1
按 [iPod/AUX] 以选择 AUX 模式。
状态指示灯 : 关
2
按住 [OK]。
开 ( 预设 ) ↔ 关
开 : 绿色状态指示灯闪烁
指示灯闪烁
关 : 绿色状态指示灯闪烁
指示灯闪烁
备注 :
系统关闭前的
2 次。
1 分钟,电源指示灯闪烁。
1 次。
1 次后,琥珀色状态
1 次后,琥珀色状态
保养
清洗本系统时,请使用柔软的干布。
• 切勿使用酒精、涂料稀释剂或挥发剂等清洗本
系统。
• 使用经化学浸处理的布之前,请仔细阅读该布
附带的说明。
Page 27

故障排除指南
要求维修之前,首先确认下列各项。 如果不能按
照下述方式修理好本系统或出现某些此处未列出
的问题时,请向经销处查询。
沒有電源
• 確定交流電源線正確連接。
无声
• 增大音量。
• 检查 iPod/iPhone 或便携式音频设备的音量。
• 确保 iPod/iPhone 或便携式音频设备确实正在播
放。
声音扭曲
• 调低系统的音量。
• 确保 iPod/iPhone 或便携式音频设备的均衡器功
能已被关闭。
遥控器无法操作
• 首次使用遥控器前,请拆除绝缘片。
• 检查电池是否正确装入。
• 电池微弱。 使用新电池更换。
绿色状态指示灯闪烁
• 系统正在检查连接的 iPod/iPhone。 如 果 iPod/
iPhone 的电池耗尽,系统在连接 iPod/iPhone 之
iPod/iPhone 充电。
前将替
• 关闭系统,然后再次开启。
iPod/iPhone 没有启动。
• 检查 iPod/iPhone 的电池以确保电池没有耗尽。
iPod/iPhone 充电。
为
• 关闭系统,然后再次开启。
iPod/iPhone 没有反应。
• 确保系统处于 iPod 模式。
• iPod/iPhone 连接不当。 拔下 iPod/iPhone,然后
再次连接。
iPod/iPhone 无法充电
• 检查连接。
技术规格
扩音器部份
RMS 输出功率立体声
前置声道 ( 双声道驱动 )
每声道
20 W (6 Ω), 1 kHz, 10% 全谐波失真
RMS 立体模总式功率
端子部份
AUX ( 后 )
端子 立体声,
扬声器部份
类型 单声道,单扬声器系统
扬声器
全音程
阻抗
一般规格
电源 交流 110 ~ 240 V, 50/60 Hz
耗电量
尺寸 ( 宽 x 高 x 深)
主机
400 mm x 175 mm x 91 mm
(不包括支架)
重量 2.7 kg
操作温度范围
操作湿度范围 20% ~ 80% 相对湿度
( 无形成水珠 )
待机状态下的耗电量
0.2 W (大约)
备注 :
• 规格若有变更,恕不另行通知。
重量和尺寸为近似值。
• 全谐波失真由数位波谐分析器测量。
40 W
3.5 mm 插孔
( 低音反射 )
6.5 cm 锥型
6 Ω
17 W
0°C ~ +40°C
- 如果看到此符号的话 -
在欧盟以外其它国家的废物处置信息
此符号仅在欧盟有效。
如果要废弃此产品,请与当地机构或
经销商联系,获取正确的废弃方法。
中文
RQT9648
7
27
Page 28

ﺓﺮﻛﺬﻣ
RQT9648
9
28
Page 29

ﻲﺑﺮﻋ
ﺕﺎﻔﺻﺍﻮﻤﻟﺍ
ﺕﻮﺼﻟﺍ ﻢﺨﻀﻣ ﻢﺴﻗ
RMS ﻭﺩﺭﻳﺗﺳﻟﺍ ﻊﺿﻭ ﺝﺭﺧ ﺔﻗﺎﻁ ﻊﺿﻭ
(ﻦﻴﺗﺎﻨﻘﻟﺍ ﻼﻛ ﻞﻴﻐﺸﺗ) ﺔﻴﻣﺎﻣﻻﺍ ﺓﺎﻨﻘﻟﺍ
،(ﻡﻭﺃ 6) ﺓﺎﻧﻗ ﻝﻛﻟ ﻁﺍﻭ 20
10% ﻲﻠﻛ ﻲﻘﻓﺍﻭﺗ ﺵﻳﻭﺷﺗ ،ﺯﺗﺭﻫ ﻭﻠﻳﻛ 1
ﻁﺍﻭ 40 ﺔﻴﻠﻜﻟﺍ RMS ﻮﻳﺮﻴﺘﺴﻟﺍ ﻊﺿﻭ ﺔﻗﺎﻃ
ﻒﻟﺍﻮﻣ ﻢﺴﻗ
(ﺔﻴﻔﻠﺨﻟﺍ) AUX
ﻮﻳﺮﻴﺘﺳﺍ ،ﻢﻣ 3.5 ﺲﺒﻘﻣ ﻑﺮﻄﻟﺍ
ﺕﺎﻋﺎﻤﺴﻟﺍ ﻢﺴﻗ
(ﺱﻛﻌﻧﻣ ﺹﺎﺑ) ﻩﺎﺟﺗﺍ 1 ،ﺔﻋﺎﻣﺳ 1 ﻡﺎﻅﻧ ﻉﻮﻨﻟﺍ
( ﺕﺎﻋﺎﻤﺴﻟﺍ) ﺔﻋﺎﻤﺴﻟﺍ ﺓﺪﺣﻭ
ﻲﻁﻭﺭﺧﻣ ﻉﻭﻧ ﻡﺳ 6.5 ﻞﻣﺎﻜﻟﺍ ﻯﺪﻤﻟﺍ
ﻡﻭﺃ 6 ﺔﻣﻭﺎﻘﻤﻟﺍ
ﺔﻣﺎﻋ ﺕﺎﻔﺻﺍﻮﻣ
،ﺖﻟﻮﻓ 240ﻰﻟﺍ 110 ﺩﺩﺮﺘﻣ ﺭﺎﻴﺗ ﺔﻴﺋﺎﺑﺮﻬﻜﻟﺍ ﺔﻗﺎﻄﻟﺍ ﺪﻳﻭﺰﺗ
ﺰﺗﺮﻫ 50/60
ﻁﺍﻭ
17 ﺔﻴﺋﺎﺑﺮﻬﻜﻟﺍ ﺔﻗﺎﻄﻟﺍ ﻙﻼﻬﺘﺳﺍ
(ﻖﻤﻌﻟﺍ x ﻉﺎﻔﺗﺭﻻﺍ x ﺽﺮﻌﻟﺍ) ﺩﺎﻌﺑﻷﺍ
91 x ﻢﻣ 175 x ﻢﻣ 400 ( ﻞﻣﺎﺤﻟﺍ ﻥﻭﺪﺑ) ﻲﺴﻴﺋﺮﻟﺍ ﺯﺎﻬﺠﻟﺍ
ﻢﻣ
ﻢﺠﻛ
2.7 ﺔﻠﺘﻜﻟﺍ
ﺔﻳﻮﺌﻣ ﺔﺟﺭﺩ
(ﺔﺑﻮﻃﺭ ﻒﺜﻜﺗ ﻥﻭﺪﺑ)
+40 ﻰﻟﺍ ﺔﻳﻮﺌﻣ ﺔﺟﺭﺩ 0 ﻞﻴﻐﺸﺘﻟﺍ ﺓﺭﺍﺮﺣ ﺔﺟﺭﺩ ﻯﺪﻣ
RH 80% ﻰﻟﺍ 20% ﻞﻴﻐﺸﺘﻟﺍ ﺔﺑﻮﻃﺭ ﻯﺪﻣ
ﻞﻴﻐﺸﺘﻠﻟ ﺩﺍﺪﻌﺘﺳﻻﺍ ﻊﺿﻭ ﻲﻓ ﺔﻴﺋﺎﺑﺮﻬﻜﻟﺍ ﺔﻗﺎﻄﻟﺍ ﻙﻼﻬﺘﺳﺍ
ﹰ
(
) ﻁﺍﻭ 0.2
ﺎﺒﻳﺮﻘﺗ
.ﺔﻴﺒﻳﺮﻘﺗ ﻲﻫ ﺩﺎﻌﺑﻷﺍﻭ ﺔﻠﺘﻜﻟﺍ
:ﺔﻈﺣﻼﻣ
•.ﻖﺒﺴﻣ ﺭﺎﻌﺷﺇ ﻥﻭﺩ ﺮﻴﻴﻐﺘﻠﻟ ﺔﺿﺮﻋ ﺕﺎﻔﺻﺍﻮﻤﻟﺍ
•.ﻲﻤﻗﺭ ﻲﻔﻴﻃ ﻞﻠﺤﻣ ﻡﺍﺪﺨﺘﺳﺎﺑ ﻲﻠﻜﻟﺍ ﻲﻘﻓﺍﻮﺘﻟﺍ ﺶﻳﻮﺸﺘﻟﺍ ﺱﺎﻴﻗ ﻢﺗ
ﺡﻼﺻﻹﺍﻭ ﻝﺎﻄﻋﻷﺍ ﻦﻋ ﺚﺤﺒﻟﺍ ﻞﻴﻟﺩ
ﻝﻮﺣ ﻚﺷ ﻙﺪﻨﻋ ﻥﺎﻛ ﺍﺫﺇ .ﺔﻴﻟﺎﺘﻟﺍ ﺕﺎﺻﻮﺤﻔﻟﺍ ﻞﻤﻋﺍ ،ﺔﻧﺎﻴﺼﻟﺍ ﺐﻠﻃ ﻞﺒﻗ
ﻞﺤﺗ ﻻ ﺎﻨﻫ ﺔﻨﻴﺒﻤﻟﺍ ﻝﻮﻠﺤﻟﺍ ﺖﻧﺎﻛ ﺍﺫﺇ ﻭﺃ ،ﺔﻴﻟﺎﺘﻟﺍ ﺺﺤﻔﻟﺍ ﻁﺎﻘﻧ ﺾﻌﺑ
ﺪﻌﺑ ﻦﻋ ﻢﻜﺤﺘﻟﺍ ﺓﺪﺣﻭ ﺔﻄﺳﺍﻮﺑ ﺕﻼﻴﻐﺸﺗ ﺔﻳﺃ ﺀﺍﺮﺟﺇ ﻦﻜﻤﻳ ﻻ
ﺯﺎﻬﺟ ﺔﻳﺭﺎﻄﺑ ﻡﺎﻈﻨﻟﺍ ﻦﺤﺸﻳ ﻑﻮﺳ ،ﺔﻜﻠﻬﺘﺴﻣ iPod/iPhone
.iPod/iPhone ﺯﺎﻬﺟ ﻊﻣ ﻡﺎﻈﻨﻟﺍ ﻞﻴﺻﻮﺗ ﻞﺒﻗ iPod/iPhone
.ﺕﺍﺩﺎﺷﺭﻹﺍ ﻞﺟﺍ ﻦﻣ ﻚﻠﻴﻤﻋ ﺮﺸﺘﺳﺍ ،ﺔﻠﻜﺸﻤﻟﺍ
ﺔﻴﺋﺎﺑﺮﻬﻛ ﺔﻗﺎﻃ ﺪﺟﻮﻳ ﻻ
.ﺔﺤﻴﺤﺻ
ﺕﻮﺻ ﺪﺟﻮﻳ ﻻ
.ﻞﻘﻨﺘﻤﻟﺍ
.ﺎﻴﻟﺎﺣ
ﻩﻮﺸﻣ ﺕﻮﺼﻟﺍ
.ﻞﻘﻨﺘﻤﻟﺍ ﺕﻮﺼﻟﺍ ﺯﺎﻬﺟ
.ﻰﻟﻭﻷﺍ
ﺮﻀﺧﻷﺍ ﺔﻟﺎﺤﻟﺍ ﺮﺷﺆﻣ ﺾﻣﻮﻳ
.ﺔﻴﻧﺎﺛ ﺓﺮﻣ ﻪﻠﻴﻐﺸﺗ ﺪﻋﺍﻭ ﻡﺎﻈﻨﻟﺍ ﻞﻴﻐﺸﺗ ﻒﻗﻭﺃ
iPod/iPhone ﺯﺎﻬﺟ ﻞﻐﺘﺸﻳ ﻻ
.ﺔﻳﺭﺎﻄﺒﻟﺍ ﻙﻼﻬﺘﺳﺍ
iPod/iPhone ﺯﺎﻬﺟ ﺐﻴﺠﺘﺴﻳ ﻻ
.ﺔﻴﻧﺎﺛ ﺓﺮﻣ ﺔﻠﻴﺻﻮﺗ ﺪﻋﺍﻭ iPod/iPhone
iPod/iPhone
ﺯﺎﻬﺟ ﻦﺠﺷ ﻢﺘﻳ ﻻ
• ﺓﺭﻮﺼﺑ ﻻﻮﺻﻮﻣ AC ﻲﺴﻴﺋﺮﻟﺍ ﺩﺩﺮﺘﳌﺍ ﺭﺎﻴﺘﻟﺍ ﻚﻠﺳ ﻥﺍ ﻦﻣ ﺄﻛﺪﺗ
•.ﺕﻮﺼﻟﺍ ﻯﻮﺘﺴﻣ ﻊﻓﺭﺍ
• ﺕﻮﺼﻟﺍ ﺯﺎﻬﺟ ﻭﺃ iPod/iPhone ﺯﺎﻬﺟ ﺕﻮﺻ ﻯﻮﺘﺴﻣ ﺺﺤﻓﺍ
ﻪﻠﻤﻌﺘﺴﺗ ﻻﻭ ﺕﻮﺻ ﻝﻮﺧﺩ ﻡﺪﻋ ﺔﻟﺎﺣ ﻲﻓ ﺎﻴﻜﻴﺗﺎﻣﻮﺗﻭﺃ ﻡﺎﻈﻨﻟﺍ ﻒﻗﻮﺘﻳ
• ﻞﻐﺘﺸﺗ ﻞﻘﻨﺘﻤﻟﺍ ﺕﻮﺼﻟﺍ ﺯﺎﻬﺟ ﻭﺃ iPod/iPhone ﺯﺎﻬﺟ ﻥﺇ ﻦﻣ ﺪﻛﺄﺗ
.AUX ﻊﺿﻭ ﺭﺎﻴﺘﺧﻻ [iPod/AUX] ﺭﺰﻟﺍ ﻂﻐﺿﺍ
•.ﻡﺎﻈﻨﻟﺍ ﺕﻮﺻ ﻯﻮﺘﺴﻣ ﺾﻔﺧﺍ
• ﻭﺃ iPod/iPhone ﺯﺎﻬﺠﻟ ﻥﺯﺍﻮﻤﻟﺍ ﺔﻔﻴﻇﻭ ﻞﻴﻐﺸﺗ ﻑﺎﻘﻳﺇ ﻦﻣ ﺪﻛﺄﺗ
ﺮﺷﺆﻣ ﺾﻣﻮﺑ ﺎﻋﻮﺒﺘﻣ ﺓﺮﻣ 1 ﺮﻀﺧﻷﺍ ﺔﻟﺎﺤﻟﺍ ﺮﺷﺆﻣ ﺾﻣﻮﻳ :ﻞﻴﻐﺸﺗ
ﺮﺷﺆﻣ ﺾﻣﻮﺑ ﺎﻋﻮﺒﺘﻣ ﺓﺮﻣ 1 ﺮﻀﺧﻷﺍ ﺔﻟﺎﺤﻟﺍ ﺮﺷﺆﻣ ﺾﻣﻮﻳ :ﻑﺎﻘﻳﺇ
• ﺓﺮﻤﻠﻟ ﺪﻌﺑ ﻦﻋ ﻢﻜﺤﺘﻟﺍ ﺓﺪﺣﻭ ﻝﺎﻤﻌﺘﺳﺍ ﻞﺒﻗ ﻝﺰﻌﻟﺍ ﺔﺤﻴﻔﺻ ﻉﺰﻧﺍ
•.ﺕﺎﻳﺭﺎﻄﺒﻟﺍ ﻝﺎﺧﺩﺇ ﺔﺤﺻ ﻦﻣ ﺪﻛﺄﺗ
•.ﺓﺪﻳﺪﺟ ﺔﻳﺭﺎﻄﺒﺑ ﺔﻳﺭﺎﻄﺒﻟﺍ ﻝﺪﺒﺘﺳﺍ .ﺔﻔﻴﻌﺿ ﺔﻳﺭﺎﻄﺒﻟﺍ
• ﺯﺎﻬﺟ ﺔﻳﺭﺎﻄﺑ ﺖﻧﺎﻛ ﺍﺫﺇ .iPod/iPhone ﺯﺎﻬﺟ ﻞﻴﺻﻮﺗ ﻡﺎﻈﻨﻟﺍ ﺺﺤﻔﻳ
•
• ﺪﻤﻋ ﻦﻣ ﺪﻛﺄﺘﻟﺍ ﻞﺟﺍ ﻦﻣ iPod/iPhone ﺯﺎﻬﺟ ﺔﻳﺭﺎﻄﺑ ﺺﺤﻓﺍ
•.ﺔﻴﻧﺎﺛ ﺓﺮﻣ ﻪﻠﻴﻐﺸﺗ ﺪﻋﺍﻭ ﻡﺎﻈﻨﻟﺍ ﻞﻴﻐﺸﺗ ﻒﻗﻭﺃ
•.iPod ﻊﺿﻭ ﻲﻓ ﻡﺎﻈﻨﻟﺍ ﻥﺃ ﻦﻣ ﺪﻛﺄﺗ
• ﺯﺎﻬﺟ ﺝﺮﺧﺍ .ﺢﻴﺤﺻ ﻞﻜﺸﺑ ﻝﻮﺻﻮﻣ ﺮﻴﻏ iPod/iPhone ﺯﺎﻬﺟ
•.ﺕﻼﻴﺻﻮﺘﻟﺍ ﺺﺤﻓﺍ
ﺔﻗﺎﻄﻟﺍ ﺮﺷﺆﻣ ﺾﻣﻮﻳ ،ﺔﻘﻴﻗﺩ
.ﺔﻔﻴﻈﻧﻭ ﺔﻤﻋﺎﻧ ﺵﺎﻤﻗ ﺔﻌﻄﻘﺑ ﺢﺴﻣﺍ ،ﺯﺎﻬﺠﻟﺍ ﺍﺬﻫ ﻒﻴﻈﻨﺘﻟ
ﺕﻮﺼﻟﺍ ﻞﺧﺩ ﻯﻮﺘﺴﻣ ﻂﺒﻀﻟ
.[INPUT LEVEL] ﺭﺰﻟﺍ ﻂﻐﺿﺍ
ﻲﻟﺎﻋ ↔ (ﻲﻠﺻﻷﺍ) ﻱﺩﺎﻋ
:ﺔﻈﺣﻼﻣ
.ﺕﻮﺼﻟﺍ ﺓﻮﻗ ﻯﻮﺘﺴﻣ
.“ﻲﻟﺎﻋ”ﻞﺧﺪﻟﺍ ﻯﻮﺘﺴﻣ
ﻲﺋﺎﻘﻠﺘﻟﺍ - ﻑﺎﻘﻳﻹﺍ ﺔﻔﻴﻇﻭ
.ﺎﺒﻳﺮﻘﺗ ﺔﻘﻴﻗﺩ 30 ﺓﺪﻤﻟ
1
ﻑﺎﻘﻳﺇ :ﺔﻟﺎﺤﻟﺍ ﺮﺷﺆﻣ
.[OK] ﺭﺰﻟﺍ ﻂﻐﺿ ﻊﺑﺎﺗﻭ ﻂﻐﺿﺍ
ﻑﺎﻘﻳﺇ ↔ (ﻲﻠﺻﻷﺍ) ﻞﻴﻐﺸﺗ
.ﺓﺮﻣ 2 ﻲﻧﺎﻣﺮﻬﻜﻟﺍ ﻰﻟﺎﺤﻟﺍ
.ﺓﺮﻣ 1 ﻲﻧﺎﻣﺮﻬﻜﻟﺍ ﻰﻟﺎﺤﻟﺍ
1 ـﺑ ﺯﺎﻬﺠﻟﺍ ﻞﻴﻐﺸﺗ ﻑﺎﻘﻳﺇ ﻞﺒﻗ
2
:ﺔﻈﺣﻼﻣ
.ﺔﻴﺋﺎﺑﺮﻬﻜﻟﺍ
ﺔﻧﺎﻴﺼﻟﺍ
.ﺯﺎﻬﺠﻟﺍ
.ﺔﻳﺎﻨﻌﺑ ﺵﺎﻤﻘﻟﺍ ﺔﻌﻄﻗ ﻊﻣ ﺔﻘﻓﺮﻤﻟﺍ
• ﺪﻳﺰﺗ ﺎﻣﺪﻨﻋ ﻰﺘﺣﻭ ﺍﺪﺟ ﺾﻔﺨﻨﻣ ﺝﺮﺨﻟﺍ ﻯﻮﺘﺴﻣ ﻥﺎﻛ ﺍﺫﺇ “ﻲﻟﺎﻋ” ﺮﺘﺧﺍ
• ﺀﺎﻨﺛﺃ ﺎﻫﻮﺸﻣ ﺕﻮﺼﻟﺍ ﺍﺫﺇ ﻭﺃ ﺔﻳﺩﺎﻋ ﺮﻴﻏ ﺀﺎﻴﺷﺃ ﻙﺎﻨﻫ ﻥﺎﻛ ﺍﺫﺇ “ﻱﺩﺎﻋ”ﺮﺘﺧﺍ
• ﺍﺬﻫ ﻒﻴﻈﻨﺘﻟ ﻦﻳﺰﻨﺒﻟﺍ ﻭﺃ ﻥﺎﻫﺪﻟﺍ ﺮﻨﻴﺛ ،ﻝﻮﺤﻜﻟﺍ ﺎﻘﻠﻄﻣ ﻡﺪﺨﺘﺴﺗ ﻻ
• ﺕﺎﻤﻴﻠﻌﺘﻟﺍ ﺃﺮﻗﺍ ،ﺎﻳﻭﺎﻤﻴﻛ ﺔﺠﻟﺎﻌﻣ ﺵﺎﻤﻗ ﺔﻌﻄﻗ ﻝﺎﻤﻌﺘﺳﺍ ﻞﺒﻗ
RQT9648
8
29
ﻲﺑﺮﻋ
Page 30

ﻲﻓﺎﺿﻹﺍ ﺯﺎﻬﺠﻟﺍ ﻞﺧﺩ ﻝﺎﻤﻌﺘﺳﺍ
ﺍﺬﻫ ﻝﻼﺧ ﻦﻣ ﺕﻮﺼﻠﻟ ﻉﺎﻤﺘﺳﻻﺍﻭ ﻝﺎﻘﻨﻟﺍ ﺕﻮﺼﻟﺍ ﺯﺎﻬﺟ ﻞﻴﺻﻮﺗ ﻚﻨﻜﻤﻳ
ﻊﻨﻤﻟ ﻝﺎﻘﻨﻟﺍ ﺕﻮﺼﻟﺍ ﺯﺎﻬﺠﻟ (ﺩﻮﺟﻮﻣ ﻥﺎﻛ ﺍﺫﺇ) ﻝﺩﺎﻌﻤﻟﺍ ﻞﻴﻐﺸﺗ ﻒﻗﻭﺃ
ﻭﺃ ﻞﺻﻮﺗ ﻞﺒﻗ ﻝﺎﻘﻨﻟﺍ ﺕﻮﺼﻟﺍ ﺯﺎﻬﺟ ﺕﻮﺻﻭ ﺯﺎﻬﺠﻟﺍ ﺕﻮﺻ ﻯﻮﺘﺴﻣ ﺾﻔﺧﺍ
ﺕﻮﺼﻟﺍ ﻞﺒﻛ
(ﻖﻓﺮﻣ ﺮﻴﻏ)
.ﻝﺎﻘﻨﻟﺍ ﺕﻮﺼﻟﺍ ﺯﺎﻬﺟ ﻞﺼﻓ
ﻝﺎﻘﻨﻟﺍ ﺕﻮﺼﻟﺍ ﺯﺎﻬﺟ
.ﻝﺎﻘﻨﻟﺍ ﺕﻮﺼﻟﺍ ﺯﺎﻬﺟ ﻞﺻﻭﺃ
ﻮﻳﺮﻴﺘﺳ ﻢﻣ 3.5 Ø :ﺲﺑﺎﻘﻟﺍ ﻉﻮﻧ
.AUX ﻊﺿﻭ ﺭﺎﻴﺘﺧﻻ [iPod/AUX] ﺭﺰﻟﺍ ﻂﻐﺿﺍ
ﻑﺎﻘﻳﺇ :ﺔﻟﺎﺤﻟﺍ ﺮﺷﺆﻣ
.ﻝﺎﻘﻨﻟﺍ ﺕﻮﺼﻟﺍ ﺯﺎﻬﺟ ﻞﹼﻐﺷ
.ﺯﺎﻬﺠﻟﺍ
ﺮﻴﻀﺤﺘﻟﺍ
.ﺕﻮﺼﻟﺍ ﻩﻮﺸﺗ
(ﻖﻓﺮﻣ ﺮﻴﻏ)
1
2
3
:ﺔﻈﺣﻼﻣ
(2012 ﺮﻳﺍﺮﺒﻓ ﻲﻓ ﺎﻤﻛ)
..ﺯﺎﻬﺠﻟﺍ ﻡﺍﺪﺨﺘﺳﺍ ﻞﺒﻗ ﺞﻣﺍﺮﺒﻟﺍ ﺙﺪﺣﺄﺑ iPod/iPhone ﺯﺎﻬﺟ ﺙﹼﺪﺣ
iPhone 3G / iPhone 3GS / iPhone 4 / iPhone 4S
ﻊﻣ ﻪﻠﻴﺻﻮﺗ ﻢﺘﻳ ﺎﻣﺪﻨﻋ ﺎﻴﻜﻴﺗﺎﻣﻮﺗﻭﺃ iPod/iPhone ﺯﺎﻬﺟ ﻦﺤﺷ ﻢﺘﻳ
.(ﻞﻴﻐﺸﺘﻠﻟ ﺩﺍﺪﻌﺘﺳﻻﺍ ﻊﺿﻭ ﻲﻓ ﺯﺎﻬﺠﻟﺍ ﻥﻮﻜﻳ ﺎﻣﺪﻨﻋ ﻰﺘﺣ) ﺯﺎﻬﺠﻟﺍ
•.ﻞﻴﺻﺎﻔﺘﻟﺍ ﻞﺟﺍ ﻦﻣ ﻝﺎﻘﻨﻟﺍ ﺕﻮﺼﻟﺍ ﺯﺎﻬﺟ ﻞﻴﻐﺸﺗ ﺕﺎﻤﻴﻠﻌﺗ ﺃﺮﻗﺍ
•.ﻞﺼﻔﻨﻣ ﻞﻜﺸﺑ ﻉﺎﺒﺗ ﻙﻼﺳﻷﺍﻭ ﺖﻧﺎﻧﻮﺒﻤﻜﻟﺍ ﺓﺰﻬﺟﺃ
iPod/iPhone ﺯﺎﻬﺟ ﻖﻓﺍﻮﺗ
ﻊﻗﻮﳌﺍ ﻰﻟﺍ ﻊﺟﺭﺍ ،ﺔﻴﻘﻓﺍﻮﺘﻟﺍ ﺕﺎﻣﻮﻠﻌﻣ ﺙﺪﺣﺍ ﺔﻓﺮﻌﳌ
http://panasonic.jp/support/global/cs
iPod/iPhone
.ﻦﺤﺸﻟﺍ ﺀﺎﻬﺘﻧﺍ ﺪﻌﺑ
.ﺔﻴﻌﻴﺒﻃ ﺓﺭﻮﺼﺑ ﺔﻳﺭﺎﻄﺒﻟﺍ
iPod touch
4 ﻭ 3 ،2 ،1 ﻞﻴﺟ
iPod nano
6 ﻭ 5 ،4، 3، 2 ﻞﻴﺟ
iPod classic
iPhone /
ﺯﺎﻬﺟ ﻦﺤﺷ
ﻲﺳﺎﺳﻷﺍ ﻞﻴﻐﺸﺘﻟﺍ
.ﺯﺎﻬﺠﻟﺍ ﻞﻴﻐﺸﺘﻟ [`] ﺭﺰﻟﺍ ﻂﻐﺿﺍ
.iPod/iPhone ﺯﺎﻬﺟ ﻞﺧﺩﺍ
ﺮﻀﺧﺍ :ﺔﻟﺎﺤﻟﺍ ﺮﺷﺆﻣ
.ﻞﻴﻐﺸﺘﻟﺍ ﺀﺪﺒﻟ [4/9] ﺭﺰﻟﺍ ﻂﻐﺿﺍ
.ﻞﻴﻐﺸﺘﻟﺍ ﺔﻌﺑﺎﺘﻤﻟ ﺔﻴﻧﺎﺛ ﺓﺮﻣ ﻂﻐﺿﺍ
[6] ﻭﺃ [2] ﺭﺰﻟﺍ ﻂﻐﺿ ﻊﺑﺎﺗﻭ ﻂﻐﺿﺍ ﺭﺎﺴﻤﻟﺍ ﻝﻼﺧ ﺚﺤﺒﻠﻟ
.
[OK] ﺭﺰﻟﺍ ﻚﻟﺫ ﺪﻌﺑﻭ [
.
•.ﺔﻳﺭﺎﻄﺒﻟﺍ ﻦﺤﺷ ﺔﻟﺎﺣ ﻞﺟﺍ ﻦﻣ iPod/iPhone ﺯﺎﻬﺟ ﺔﺷﺎﺷ ﺮﻈﻧﺍ
• ﺔﻠﻳﻮﻃ ﺓﺪﻤﻟ ﻡﺍﺪﺨﺘﺳﻻﺍ ﻡﺪﻋ ﺔﻟﺎﺣ ﻲﻓ iPod/iPhone ﺯﺎﻬﺟ ﻞﺼﻓﺍ
• ﺬﻔﻨﺘﺴﺗ ﻑﻮﺳ .ﻞﻣﺎﻜﻟﺎﺑ ﺔﻳﺭﺎﻄﺒﻟﺍ ﻦﺤﺷ ﻢﺘﻳ ﺎﻣﺪﻨﻋ ﻦﺤﺸﻟﺍ ﻒﻗﻮﺘﻳ
iPhone ﻭﺃ iPod ﺯﺎﻬﺟ ﻞﻴﺻﻮﺗ ﺪﻨﻋ ﺎﻴﻜﻴﺗﺎﻣﻮﺗﻭﺃ ﺯﺎﻬﺠﻟﺍ ﻞﻐﺘﺸﻳ
.(ﺕﻼﻳﺩﻮﻤﻟﺍ ﺾﻌﺒﻟ ﺀﺎﻨﺜﺘﺳﺎﺑ) ﻞﻴﻐﺸﺘﻟﺍ ﻊﺿﻭ ﻲﻓ ﻥﻮﻜﻳ ﻱﺬﻟﺍ
ﺕﺎﻤﻴﻠﻌﺗ ﻞﺟﺍ ﻦﻣ iPod/iPhone ﺯﺎﻬﺠﻟ ﻡﺪﺨﺘﺴﻤﻟﺍ ﻞﻴﻟﺩ ﺃﺮﻗﺍ
.[9/4] ﺭﺰﻟﺍ ﻂﻐﺿﺍ
[6] ﻭﺃ [2] ﺭﺰﻟﺍ ﻂﻐﺿﺍ ﺭﺎﺴﻤﻟﺍ ﻲﻄﺨﺘﻟ
.
[iPod MENU] ﺭﺰﻟﺍ ﻂﻐﺿﺍ iPod ﺔﻤﺋﺎﻗ ﺓﺪﻫﺎﺸﻤﻟ
.
،
ﺭﺰﻟﺍ ﻂﻐﺿﺍ ﺪﻨﺒﻟﺍ ﺭﺎﻴﺘﺧﻻ
]
R
T
.ﺮﻀﺧﻷﺍ ﺮﺷﺆﻣ ﺾﻣﻮﻳ ﻑﻮﺳﻭ
ﺯﺎﻬﺟ ﻰﻠﻋ ،ﺦﻟﺍ ،ﻥﺎﻨﻔﻟﺍ ،ﻡﻮﺒﻟﻷﺍ ﺭﺎﻴﺘﺧﺍﻭ iPod/iPhone
1
2
3
ﺖﻗﺆﻤﻟﺍ ﻑﺎﻘﻳﻺﻟ
ﻞﻴﻐﺸﺘﻠﻟ
:ﺔﻈﺣﻼﻣ
• ﻞﻴﺻﻮﺘﻟﺍ ﺯﺎﻬﺠﻟﺍ ﺺﺤﻔﻳ ﻑﻮﺳ ،iPod/iPhone ﺯﺎﻬﺟ ﻝﺎﺧﺩﺇ ﺪﻌﺑ
• ﺯﺎﻬﺟ ﻉﺰﻧ ﻱﺭﻭﺮﻀﻟﺍ ﻦﻣ ﻥﻮﻜﻳ ﻥﺃ ﻦﻜﻤﻳ ﻪﻧﺎﻓ ،ﻞﻳﺩﻮﻤﻟﺍ ﻰﻠﻋ ﺍﺩﺎﻤﺘﻋﺍ
.iPod/iPhone
•
•ﺯﺎﻬﺟ ﺕﻼﻳﺩﻮﻣ ﻰﻠﻋ ﺍﺩﺎﻤﺘﻋﺍ ﻞﻴﻐﺸﺘﻟﺍ ﺞﺋﺎﺘﻧ ﻒﻠﺘﺨﺗ ﻥﺃ ﻦﻜﻣ
.iPod/iPhone
•
.ﻞﻴﻐﺸﺘﻟﺍ
RQT9648
7
30
Page 31

ﻲﺑﺮﻋ
A
B
C
D
!ﻪﻴﺒﻨﺗ
iPhone/iPod
ﺯﺎﻬﺟ ﺝﺍﺮﺧﺇ ﻭﺃ ﻝﺎﺧﺩﺇ ﻞﺒﻗ ﺝﺭﺎﺨﻠﻟ ﻰﺳﺮﻤﻟﺍ ﺐﺤﺳ ﻦﻣ ﺪﻛﺄﺗ
ﺯﺎﻬﺟ ﻉﺰﻧ ﺪﻨﻋ ﺝﺭﺎﺨﻠﻟ ﻰﺳﺮﻤﻟﺍ ﺐﺤﺴﻟ ﻲﺒﻧﺎﺠﻟﺍ ﻞﻣﺎﺤﻟﺍ ﻚﺴﻣﺍ
.iPhone/iPod ﺯﺎﻬﺟ ﻊﻣ ﺝﺭﺎﺨﻠﻟ ﻰﺳﺮﻤﻟﺍ ﺐﺤﺴﺗ ﻻ
ﺯﺎﻬﺟ ﺭﺮﺿ ﻊﻨﻤﻟ
.iPhone/iPod
.iPhone/iPod
ﺯﺎﻬﺟ ﻞﻤﺤﻟ ﻞﺧﺍﺪﻟﺍ ﻰﻟﺇ ﻲﺒﻧﺎﺠﻟﺍ ﻞﻣﺎﺤﻟﺍ ﻊﻓﺩﺍ
.ﻞﺧﺍﺪﻠﻟ ﻰﺳﺮﻤﻟﺍ ﻊﻓﺩﺍ ﻒﻄﻠﺑﻭ
iPod/iPhone
iPod/iPhone ﻉﺰﻧ
ﻰﺳﺮﻤﻟﺍ ﺐﺤﺳﺍ ﻒﻄﻠﺑﻭ ﻲﺒﻧﺎﺠﻟﺍ ﻞﻣﺎﺤﻟﺍ ﻚﺴﻣﺍ
.ﺝﺭﺎﺨﻠﻟ
3
1
iPod/iPhone ﺯﺎﻬﺟ ﻝﺎﻤﻌﺘﺳﺍ
iPod/iPhone ﺯﺎﻬﺟ ﻝﺎﺧﺩﺇ
.ﻚﻫﺎﺠﺗﺎﺑ ﺝﺭﺎﺨﻠﻟ ﻰﺳﺮﻤﻟﺍ ﺐﺤﺳﺍ ﻒﻄﻠﺑ
.ﻰﺳﺮﻤﻟﺍ ﺮﹼﻀﺣ
ﺯﺎﻬﺟ ﻢﻋﺍﺩ ﺝﺭﺎﺨﻠﻟ ﺐﺤﺳﺍ
iPod/iPhone
iPod classic :A
iPhone :B
iPod touch :C
iPod nano :D
ﻞﻴﺠﻟﺍ ﺀﺎﻨﺜﺘﺳﺎﺑ)
(6
1
ﻲﺑﺮﻋ
.ﻲﻘﻓﺃ ﻊﺿﻭ ﻲﻓ ﺯﺎﻬﺠﻟﺍ ﻥﻮﻜﻳ ﺎﻣﺪﻨﻋ iPhone/iPod ﺯﺎﻬﺟ ﻉﺰﻨﺗ ﻻ
ﺯﺎﻬﺟ ﻉﺰﻧﺍ ﻩﺎﺒﺘﻧﺎﺑﻭ ﺝﺭﺎﺨﻠﻟ ﻲﺒﻧﺎﺠﻟﺍ ﻞﻣﺎﺤﻟﺍ ﻊﻓﺩﺍ
2
.ﻝﺎﺧﺩﻹﺍ ﺪﻨﻋ ﻞ
ﻑﻼﻐﻟﺍ ﻦﻣ iPod/iPhone ﺯﺎﻬﺟ ﻉﺰﻧ ﻦﻣ ﺪﻛﺄﺗ
.iPod/iPhone ﺯﺎﻬﺟ ﻞﺧﺩﺍ
iPod/iPhone ﺯﺎﻬﺟ ﺓﺍﺫﺎﺤﻣ ﻦﻣ ﺪ
ﺻﻮﻤﻟﺍ ﻊﻣ
ﹼ
.ﻖﻓﺍﻮﺘﻣ ﻰﺳﺮﻣ ﺊﻳﺎﻬﻣ ﻡﺪﺨﺘﺳﺍ
2
ﻛﺄﺗ
ﹼ
RQT9648
6
31
Page 32

- ﺲﻜﻋ ﻩﺎﺠﺗﺎﺑ ﻭﺃ ﺔﻋﺎﺴﻟﺍ ﺏﺭﺎﻘﻋ ﻩﺎﺠﺗﺎﺑ ﻰﺳﺮﻤﻟﺍ ﺮﻳﻭﺪﺗ ﻚﻨﻜﻤﻳ
A
B
C
D
iPod/iPhone ﺓﺪﻫﺎﺸﻤﻟ ﻲﻘﻓﺃ ﻊﺿﻭ ﻰﻠﻋ ﺔﻋﺎﺴﻟﺍ ﺏﺭﺎﻘﻋ ﻩﺎﺠﺗﺍ
.ﺔﻀﻳﺮﻋ ﺔﺷﺎﺷ ﻊﺿﻮﺑ
.ﺔﻋﺎﺴﻟﺍ ﺏﺭﺎﻘﻋ ﻩﺎﺠﺗﺎﺑ ﺭﹼﻭﺩﻭ ﻲﻠﺧﺍﺪﻟﺍ ﻞﻣﺎﺤﻟﺍ ﻚﺴﻣﺍ
.ﺔﻋﺎﺴﻟﺍ ﺏﺭﺎﻘﻋ - ﺲﻜﻋ ﻩﺎﺠﺗﺎﺑ ﺭ
RQT9648
ﻭﺩﻭ ﻲﻠﺧﺍﺪﻟﺍ ﻞﻣﺎﺤﻟﺍ ﻚﺴﻣﺍ
ﹼ
5
32
NiPod/iPhone ﺯﺎﻬﺠﻟ ﻰﺳﺮﻣ
ﻊﺿﻭ ﻰﻟﺇ ﻞﻴﻐﺸﺘﻟﺍ ﻊﺿﻭ ﻦﻣ ﺯﺎﻬﺠﻟﺍ ﻞﻳﻮﺤﺘﻟ ﺡﺎﺘﻔﻤﻟﺍ ﻂﻐﺿﺍ
A[1] ،[`] ﻞﻴﻐﺸﺘﻟﺍ/ﻞﻴﻐﺸﺘﻠﻟ ﺩﺍﺪﻌﺘﺳﻻﺍ ﺡﺎﺘﻔﻣ
ﻢﻜﺤﺘﻟﺍ ﺭﺍﺭﺯﺃ ﺀﺎﻤﺳﺃ
ﺩﺍﺪﻌﺘﺳﻻﺍ ﻊﺿﻭ ﻲﻓ .ﺲﻜﻌﻟﺎﺑ ﺲﻜﻌﻟﺍ ﻭﺃ ﻞﻴﻐﺸﺘﻠﻟ ﺩﺍﺪﻌﺘﺳﻻﺍ
ﺔﻗﺎﻄﻟﺍ ﻦﻣ ﺓﺮﻴﻐﺻ ﺔﻴﻤﻛ ﻚﻠﻬﺘﺴﻳ ﺯﺎﻬﺠﻟﺍ ﻰﻘﺒﻳ ،ﻞﻴﻐﺸﺘﻠﻟ
.ﺔﻴﺋﺎﺑﺮﻬﻜﻟﺍ
BiPod ﺯﺎﻬﺟ ﺔﻤﺋﺎﻗ ﺓﺪﻫﺎﺸﻤﻟ
Cﺭﺎﻴﺘﺧﻻﺍ ﺪﻴﻛﺄﺘﻟ
ﻲﺋﺎﻘﻠﺘﻟﺍ ﻑﺎﻘﻳﻹﺍ ﺔﻔﻴﻇﻭ ﺀﺎﻐﻟﺇ ﻭﺃ ﻂﺒﻀﻟ
DAUX ﻭﺃ iPod ﻊﺿﻭ ﺭﺎﻴﺘﺧﻻ
EAUX ﻊﺿﻭ ﻲﻓ ﺕﻮﺼﻟﺍ ﻞﺧﺩ ﻯﻮﺘﺴﻣ ﻂﺒﻀﻟ
Fﺪﻨﺒﻟﺍ ﺭﺎﻴﺘﺧﻻ
Gﺯﺎﻬﺠﻟﺍ ﺕﻮﺻ ﻯﻮﺘﺴﻣ ﻞﻳﺪﻌﺘﻟ
Hﺯﺎﻬﺠﻟﺍ ﺕﻮﺻ ﻢﺘﻜﻟ
ﻲﻧﺎﻣﺮﻬﻜﻟﺍ ﺔﻟﺎﺤﻟﺍ ﺕﺍﺮﺷﺆﻣ ﺾﻣﻮﺗ : iPod ﺯﺎﻬﺟ ﻊﺿﻭ ﻲﻓ
.ﺏﻭﺎﻨﺘﻟﺎﺑ ﺢﺗﺎﻔﻟﺍ ﺮﻀﺧﻷﺍﻭ
.ﺭﺍﺮﻤﺘﺳﺎﺑ ﻲﻧﺎﻣﺮﻬﻜﻟﺍ ﺔﻟﺎﺤﻟﺍ ﺮﺷﺆﻣ ﺾﻣﻮﻳ : AUX ﻊﺿﻭ ﻲﻓ
.ﺀﺎﻐﻟﻺﻟ ﺔﻴﻧﺎﺛ ﺓﺮﻣ ﺭﺰﻟﺍ ﻂﻐﺿﺍ
J
ﻭﺃ ﺕﻮﺼﻟﺍ ﻯﻮﺘﺴﻣ ﻝﹼﺪﻌﺗ ﺎﻣﺪﻨﻋ ﺕﻮﺼﻟﺍ ﻢﺘﻛ ﺀﺎﻐﻟﺇ ﺎﻀﻳﺃ ﻢﺘﻳ
.ﺯﺎﻬﺠﻟﺍ ﻞﻴﻐﺸﺗ ﻒﻗﻮﺗ ﺎﻣﺪﻨﻋ
Iﺖﻗﺆﻣ ﻞﻜﺸﺑ ﻞﻴﻐﺸﺘﻟﺍ ﻑﺎﻘﻳﺇ ﻭﺃ ﺀﺪﺒﻟ
Jﺭﺎﺴﻤﻟﺍ ﺚﺤﺑ ﻭﺃ ﻲﻄﺨﺘﻠﻟ
K
Kﺔﻴﺋﺎﺑﺮﻬﻜﻟﺍ ﺔﻗﺎﻄﻟﺍ ﺮﺷﺆﻣ
AML
N
G
ﻞﻴﻐﺸﺗ ﺔﻟﺎﺣ ﻲﻓ ﺯﺎﻬﺠﻟﺍ ﻥﻮﻜﻳ :ﻞﻴﻐﺸﺗ
ﻞﻴﻐﺸﺘﻠﻟ ﺩﺍﺪﻌﺘﺳﻻﺍ ﺔﻟﺎﺣ ﻲﻓ ﺯﺎﻬﺠﻟﺍ ﻥﻮﻜﻳ :ﻑﺎﻘﻳﺇ
ﻲﺋﺎﻘﻠﺘﻟﺍ ﻑﺎﻘﻳﻹﺍ ﺔﻔﻴﻇﻭ ﺀﺎﻐﻟﺇ ﻭﺃ ﻂﺒﻀﻟ :ﻲﻧﺎﻣﺮﻬﻛ
iPod ﻊﺿﻭ :ﺮﻀﺧﺍ
.ﻞﻴﻐﺸﺗ ﺔﻟﺎﺣ ﻲﻓ ﺕﻮﺼﻟﺍ ﻢﺘﻛ
AUX ﻊﺿﻭ :ﻑﺎﻘﻳﺇ
Lﺔﻟﺎﺤﻟﺍ ﺮﺷﺆﻣ
A
.ﺔﻴﻠﻤﻋ ﻱﺮﺠﺗ ﺓﺮﻣ ﻞﻛ ﻲﻓ ﺮﻀﺧﻷﺍ ﺔﻟﺎﺤﻟﺍ ﺮﺷﺆﻣ ﺾﻣﻮﻳ
ﺔﻴﺴﻴﺋﺮﻟﺍ ﺓﺪﺣﻮﻟﺍ ﻡﺎﻣﺃ ﻦﻣ ﺓﺮﺷﺎﺒﻣ ﺭﺎﺘﻣﺃ 7 :ﻰﺼﻗﻷﺍ ﻯﺪﻤﻟﺍ
Mﺪﻌﺑ ﻦﻋ ﻢﻜﺤﺘﻟﺍ ﺓﺪﺣﻭ ﺓﺭﺎﺷﺇ ﺲﺴﺤﺘﻣ
Page 33

ﻲﺑﺮﻋ
ﺪﻌﺑ ﻦﻋ ﻢﻜﺤﺘﻟﺍ ﺓﺪﺣﻭ ﺮﻴﻀﺤﺗ
ﻡﺍﺪﺨﺘﺳﻻﺍ ﻞﺒﻗ
.ﻝﺰﻌﻟﺍ ﺔﺤﻴﻔﺻ ﻉﺰﻧﺍ
ﺔﻳﺭﺎﻄﺒﻟﺍ ﻞﻳﺪﺒﺗ
.(ﻡﻮﻴﺜﻴﻟ ﺔﻳﺭﺎﻄﺑ CR2025) ﺓﺪﻳﺪﺟ ﺔﻳﺭﺎﻄﺒﺑ ﺔﻳﺭﺎﻄﺒﻟﺍ ﻝﹼﺪﺑ
.ﺔﻳﺭﺎﻄﺒﻟﺍ ﻞﻣﺎﺣ ﺐﺤﺳﺍ ،ﺓﺩﺍﺪﺴﻟﺍ ﻰﻠﻋ ﻂﻐﻀﻟﺍ ﺀﺎﻨﺛﺃ
(+) ﺐﺟﻮﻤﻟﺍ ﺐﻧﺎﺠﻟﺍ ﻥﻮﻜﻳ ﺚﻴﺤﺑ ﺓﺪﻳﺪﺟ ﺔﻳﺭﺎﻄﺑ ﻞﺧﺩﺍ
.ﻰﻠﻋﻸﻟ ﺎﻬﺠﺘﻣ
.ﺔﻠﻣﺎﻛ ﺓﺭﻮﺼﺑ ﻞﺧﺍﺪﻠﻟ ﺔﻳﺭﺎﻄﺒﻟﺍ ﻞﻣﺎﺣ ﻊﻓﺩﺍ
CR2025
ﻊﺿﻭ ﻲﻓ ﻁﺍﻭ 0.2 ﺎﺒﻳﺮﻘﺗ ﺔﻴﺋﺎﺑﺮﻬﻛ ﺔﻗﺎﻃ ﺔﻴﻤﻛ ﺯﺎﻬﺠﻟﺍ ﻚﻠﻬﺘﺴﻳ
.ﻯﺮﺧﻷﺍ ﺓﺰﻬﺟﻷﺍ ﻦﻣ ﺲﻴﺋﺭ AC ﺔﻴﺋﺎﺑﺮﻬﻛ ﺔﻗﺎﻃ ﻚﻠﺳ ﻞﻤﻌﺘﺴﺗ ﻻ
1
2
3
ﻭﺃ ﻲﺼﺨﺸﻟﺍ ﺮﺗﻮﻴﺒﻤﻜﻟﺍ ﺓﺰﻬﺟﺃ ﻭﺃ ،ﺕﺎﻧﻮﻳﺰﻔﻠﺘﻟﺍ ﺏﺮﻘﺑ ﺕﺎﻋﺎﻤﺴﻟﺍ
.ﺔﻴﺴﻴﻄﻨﻐﻤﻟﺍ ﺔﻄﺳﺍﻮﺑ ﺔﻟﻮﻬﺴﺑ ﺮﺛﺄﺘﺗ ﻲﺘﻟﺍ ﻯﺮﺧﻷﺍ ﺓﺰﻬﺟﻷﺍ
.ﺲﻴﺋﺮﻟﺍ AC ﺔﻴﺋﺎﺑﺮﻬﻜﻟﺍ ﺔﻗﺎﻄﻟﺍ ﻚﻠﺳ ﻞﺻﻭﺃ
.ﻞﻴﻐﺸﺘﻠﻟ ﺩﺍﺪﻌﺘﺳﻻﺍ
ﺔﻗﺎﻄﻟﺍ ﺲﺒﻘﻣ ﻰﻟﺇ
ﺲﻴﺋﺮﻟﺍ ﺔﻴﺋﺎﺑﺮﻬﻜﻟﺍ
ﻲﻟﺰﻨﻤﻟﺍ
:ﺔﻈﺣﻼﻣ
.ﺔﻴﺋﺎﺑﺮﻬﻜﻟﺍ ﺔﻗﺎﻄﻟﺍ ﺲﺒﻘﻣ
.ﺯﺎﻬﺠﻟﺍ
3
•.ﺓﺪﺣﻮﻟﺍ ﺔﻤﻗ ﻰﻠﻋ ﺲﻠﺠﺗ ﻻ
• ﻦﻣ ﺯﺎﻬﺠﻟﺍ ﻞﺼﻓ ﺪﻌﺑ ﻲﻠﺻﻷﺍ ﻂﺒﻀﻟﺍ ﻰﻟﺇ ﺕﺎﻃﻮﺒﻀﻟﺍ ﺾﻌﺑ ﻊﺟﺮﺗ
• ﻊﻀﺗ ﻻ .ﻲﺴﻴﻄﻨﻐﻣ ﺐﺠﺣ ﻰﻠﻋ ﺕﺎﻋﺎﻤﺴﻟﺍ ﻩﺬﻫ ﻱﻮﺘﺤﺗ ﻻ
•.ﺕﺎﻋﺎﻤﺴﻟﺍ ﺕﺎﻜﺒﺷ ﻉﺰﻨﺗ ﻻ
• ﺐﺼﻧ ﻞﻣﺎﺣ ﻚﺴﻤﺗ ﻻ .ﺎﻬﻠﻘﻧ ﺪﻨﻋ ﺔﺘﺑﺎﺛ ﺓﺭﻮﺼﺑ ﺓﺪﺣﻮﻟﺍ ﻚﺴﻣﺍ
ﺯﺎﻬﺠﻟﺍ ﺐﻴﻛﺮﺗ ﺀﺪﺑ
ﺕﻼﻴﺻﻮﺘﻟﺍ ﻞﻤﻋ
.ﺯﺎﻬﺠﻟﺍ ﺐﺼﻧ ﻞﻣﺎﺣ ﺮﹼﻀﺣ
.ﺯﺎﻬﺠﻟﺍ ﺐﺼﻧ ﻞﻣﺎﺣ ﻰﻠﻋ ﺓﺪﺣﻮﻟﺍ ﺐﻛﺭ
ﻩﺎﺠﺗﺎﺑ ﻲﻏﺮﺒﻟﺍ ﺭﹼﻭﺩ ﻭ ،ﺯﺎﻬﺠﻟﺍ ﺐﺼﻧ ﻞﻣﺎﺣ ﻰﻠﻋ ﺓﺪﺣﻮﻟﺍ ﻊﺿﻭ ﻥﺯﺍﻭ
.ﺓﺪﺣﻮﻟﺍ ﺖﻴﺒﺜﺘﻟ ﺔﻋﺎﺴﻟﺍ ﺏﺭﺎﻘﻋ
1
2
ﻲﺑﺮﻋ
RQT9648
4
33
Page 34

– ﺰﻣﺮﻟﺍ ﺍﺬﻫ ﺖﻳﺃﺭ ﺍﺫﺇ –
ﺝﺭﺎﺧ ﻯﺮﺧﻷﺍ ﻝﻭﺪﻟﺍ ﻲﻓ ﺕﺎﻔﻠﺨﻤﻟﺍ ﻦﻣ ﺺﻠﺨﺘﻟﺍ ﻝﻮﺣ ﺕﺎﻣﻮﻠﻌﻣ
.ﻂﻘﻓ ﻲﺑﻭﺭﻭﻷﺍ ﺩﺎﺤﺗﻻﺍ ﻲﻓ ﻝﻮﻌﻔﻤﻟﺍ ﻱﺭﺎﺳ ﺰﻣﺮﻟﺍ ﺍﺬﻫ
ﻳ ،ﺞﹶﺘﹸﻨﻤﻟﺍ ﺍﺬﻫ ﻦﻣ ﺺﻠﺨﺘﻟﺍ ﻲﻓ ﺖﺒﻏﺭ ﺍﺫﺇ
ﻰﺟﺮ
ﹸ
ﻚﻳﺪﻟ ﻉﺯﻮﻤﻟﺍ ﻭﺃ ﺔﻴﻠﺤﻤﻟﺍ ﺕﺎﻄﻠﺴﻟﺎﺑ ﻝﺎﺼﺗﻻﺍ
.ﻪﻨﻣ ﺺﻠﺨﺘﻠﻟ ﺔﺤﻴﺤﺼﻟﺍ ﺔﻘﻳﺮﻄﻟﺍ ﻦﻋ ﻝﺍﺆﺴﻟﺍﻭ
ﻲﺑﻭﺭﻭﻷﺍ ﺩﺎﺤﺗﻻﺍ ﻕﺎﻄﻧ
ﺔﻴﺋﺎﺑﺮﻬﻜﻟﺍ ﺔﻗﺎﻄﻟﺍ ﻚﻠﺳ ﻝﻮﺣ ﺔﻈﺣﻼﻣ
ﺲﻴﺋﺮﻟﺍ
.ﻞﹼﺻﻮﻤﻟﺍ ﺀﺎﻄﻏ ﻉﺰﻧﺍ
AC ﺔﻴﺋﺎﺑﺮﻬﻜﻟﺍ ﺔﻗﺎﻄﻟﺍ ﺲﺑﺎﻗ ﻉﻮﻨﻟ ﺎﻘﺒﻃ ﺮﻬﺼﻤﻟﺍ ﻥﺎﻜﻣ ﻒﻠﺘﺨﻳ
AC ﺔﻴﺋﺎﺑﺮﻬﻜﻟﺍ ﺔﻗﺎﻄﻟﺍ ﺲﺑﺎﻗ ﻥﺃ ﻦﻣ ﺪﻛﺄﺗ .(B ﻭ A ﻝﺎﻜﺷﻷﺍ) ﺲﻴﺋﺮﻟﺍ
ﺕﺎﻣﻮﺳﺮﻟﺍ ﻒﻠﺘﺨﺗ ﻥﺃ ﻦﻜﻤﻳ .ﻞﻔﺳﻷﺍ ﻲﻓ ﺕﺎﻤﻴﻠﻌﺘﻟﺍ ﻊﺒﺗﺍﻭ ﻢﺋﻼﻣ ﺲﻴﺋﺮﻟﺍ
.ﻲﻠﻌﻔﻟﺍ ﺲﻴﺋﺮﻟﺍ AC ﺔﻴﺋﺎﺑﺮﻬﻜﻟﺍ ﺔﻗﺎﻄﻟﺍ ﺲﺑﺎﻗ ﻦﻋ ﺔﻴﺤﻴﺿﻮﺘﻟﺍ
.ﻲﻋﺍﺮﺑ ﻚﻔﻣ ﺔﻄﺳﺍﻮﺑ ﺮﻬﺼﻤﻟﺍ ﺀﺎﻄﻏ ﺢﺘﻓﺍ .1
B ﻞﻜﺷ
ﺮﻬﺼﻤﻟﺍ ﺀﺎﻄﻏ
ﺮﻬﺼﻤﻟﺍ ﻝﺍﺪﺒﺘﺳﺍ ﺔﻴﻔﻴﻛ
AC
ﻂﻘﻓ ﺖﻳﻮﻜﻠﻟ
ﻝﺎﻤﻌﺘﺳﻷﺍ ﻞﺒﻗ
A ﻞﻜﺷ
ﺔﻘﻓﺮﻤﻟﺍ ﺕﺎﻘﺤﻠﻤﻟﺍ
.ﺔﻘﻓﺮﻤﻟﺍ ﺕﺎﻘﺤﻠﻤﻟﺍ ﺰﻴﻴﻤﺗﻭ ﺺﺤﻓ ﻰﺟﺮﻳ
ﺯﺎﻬﺠﻟﺍ ﺐﺼﻧ ﻞﻣﺎﺣ
ﺲﻴﺋﺮﻟﺍ AC ﺔﻴﺋﺎﺑﺮﻬﻜﻟﺍ ﺔﻗﺎﻄﻟﺍ ﻚﻠﺳ x 2
ﺖﻳﻮﻜﻟﺍﻭ ﺓﺪﺤﺘﻤﻟﺍ ﺔﻜﻠﻤﻤﻠﻟ
x 1
ﻯﺮﺧﻻﺍ ﺭﺎﻄﻗﻸﻟ
RQT9648
3
34
.ﺮﻬﺼﻤﻟﺍ ﺀﺎﻄﻏ ﻂﺑﺭﺍ ﻭﺃ ﻖﻠﻏﺃﻭ ﺮﻬﺼﻤﻟﺍ ﻝﺪﺒﺘﺳﺍ .2
B ﻞﻜﺷ
(ﺮﻴﺒﻣﺃ 5) ﺮﻬﺼﻤﻟﺍ
(ﺮﻴﺒﻣﺃ 5) ﺮﻬﺼﻤﻟﺍ
(ﺔﻳﺭﺎﻄﺒﻟﺍ ﻊﻣ) ﺪﻌﺑ ﻦﻋ ﻢﻜﺤﺗ ﺓﺪﺣﻭ x 1
(RFE0238)
A ﻞﻜﺷ
Page 35

ﻲﺑﺮﻋ
ﺕﺎﻳﻮﺘﺤﻤﻟﺍ ﻝﻭﺪﺟ
2 ................................................. ﺔﻣﻼﺴﻟﺍ ﺕﺎﻃﺎﻴﺘﺣﺇ
3 ................................................. ﺔﻘﻓﺮﻤﻟﺍ ﺕﺎﻘﺤﻠﻤﻟﺍ
ﺔﻴﺋﺎﺑﺮﻬﻜﻟﺍ ﺔﻗﺎﻄﻟﺍ ﻚﻠﺳ ﻝﻮﺣ ﺔﻈﺣﻼﻣ
3 ..........................................................ﺲﻴﺋﺮﻟﺍ AC
4 ...................................................ﺯﺎﻬﺠﻟﺍ ﺐﻴﻛﺮﺗ ﺀﺪﺑ
5 ................................................ ﻢﻜﺤﺘﻟﺍ ﺭﺍﺭﺯﺃ ﺀﺎﻤﺳﺃ
6 ................................iPod/iPhone ﺯﺎﻬﺟ ﻝﺎﻤﻌﺘﺳﺍ
7 .............................. ﻲﻓﺎﺿﻹﺍ ﺯﺎﻬﺠﻟﺍ ﻞﺧﺩ ﻝﺎﻤﻌﺘﺳﺍ
8 ........................................ﻲﺋﺎﻘﻠﺘﻟﺍ - ﻑﺎﻘﻳﻹﺍ ﺔﻔﻴﻇﻭ
8 .................................................................. ﺔﻧﺎﻴﺼﻟﺍ
8 .......................... ﺡﻼﺻﻹﺍﻭ ﻝﺎﻄﻋﻷﺍ ﻦﻋ ﺚﺤﺒﻟﺍ ﻞﻴﻟﺩ
8 ............................................................. ﺕﺎﻔﺻﺍﻮﻤﻟﺍ
(ﻡﻮﻴﺜﻴﻟ ﺔﻳﺭﺎﻄﺑ) ﺭﺯ ﻉﻮﻧ ﺔﻳﺭﺎﻄﺑ
ﻭﺃ ﻉﻮﻨﻟﺍ ﺲﻔﻧ ﻦﻣ ﺓﺪﻳﺪﺟ ﺔﻳﺭﺎﻄﺒﺑ ﻂﻘﻓ ﺔﻳﺭﺎﻄﺒﻟﺍ ﻝﺪﺒﺘﺳﺍ .ﺢﻴﺤﺻ
.ﻪﻨﻣ ﺺﻠﺨﺘﻠﻟ ﺔﺤﻴﺤﺼﻟﺍ ﺔﻘﻳﺮﻄﻟﺍ ﻦﻋ ﻝﺍﺆﺴﻟﺍﻭ ﻚﻳﺪﻟ ﻉﺯﻮﻤﻟﺍ
ﻥﺃ “Made for iPhone” ﻭ “Made for iPod” ﺓﺭﺎﺒﻋ ﻲﻨﻌﺗ
ﻊﻣ ﺔﺻﺎﺧ ﺓﺭﻮﺼﺑ ﻞﻴﺻﻮﺘﻠﻟ ﺎﻬﻤﻴﻤﺼﺗ ﻢﺗ ﺔﻴﻧﻭﺮﺘﻜﻟﻻﺍ ﺔﻘﺤﻠﻤﻟﺍ
ﺮﻴﻳﺎﻌﻣ ﻪﺟﺍﻮﺘﻟ ﺭﹼﻮﻄﻤﻟﺍ ﻞﺒﻗ ﻦﻣ ﺎﻬﺗﺯﺎﺠﻳﺍ ﻢﺗﻭ iPhone ﻭﺃ iPod
ﻊﻣ ﻪﻘﻓﺍﻮﺗ ﻭﺃ ﺯﺎﻬﺠﻟﺍ ﺍﺬﻫ ﻞﻴﻐﺸﺗ ﻦﻋ ﺔﻟﻮﺌﺴﻣ ﺮﻴﻏ Apple ﺔﻛﺮﺷ
ﻭﺃ iPod ﺯﺎﻬﺟ ﻊﻣ ﺔﻘﺤﻠﻤﻟﺍ ﻩﺬﻫ ﻝﺎﻤﻌﺘﺳﺍ ﻥﺃ ﺔﻈﺣﻼﻣ ﻰﺟﺮﻳ
iPod touch ﻭ ،iPod nano ،iPod classic ،iPod ،iPhone
ﺕﺎﻳﻻﻮﻟﺍ ﻲﻓ ﺔﻠﺠﺴﻣ ،Apple Inc. ﺔﻛﺮﺸﻟ ﺔﻳﺭﺎﺠﺗ ﺕﺎﻣﻼﻋ ﻲﻫ
.ﻊﻧﺎﺼﻟﺍ ﻦﻣ ﺎﻬﺑ ﻰﺻﻮﻳﻭ ﻪﺑﺎﺸﻣ ﻉﻮﻧ ﻦﻣ
ﻳ ،ﺕﺎﻳﺭﺎﻄﺒﻟﺍ ﻦﻣ ﺺﻠﺨﺘﻟﺍ ﺪﻨﻋ
ﹸ
ﺮﻌﺗ ﻻﻭ ﺔﻳﺭﺎﻄﺒﻟﺍ ﻦﹼﺨﺴﺗ ﻻ
ﹼ
.ﺔﻠﻳﻮﻃ ﺓﺪﻤﻟ ﺬﻓﺍﻮﻨﻟﺍﻭ ﺏﺍﻮﺑﻷﺍ ﺔﻘﻠﻐﻤﻟﺍﻭ ﺓﺮﺷﺎﺒﻤﻟﺍ
.ﺓﺪﺣﻮﻟﺍ ﻞﻔﺳﺃ ﻲﻓ ﺓﺩﻮﺟﻮﻣ ﺞﺘﻨﻤﻟﺍ ﻒﻳﺮﻌﺗ ﺔﻣﻼﻋ
.Apple ﺔﻛﺮﺷ ﺔﻳﺩﺄﺗ
.ﻂﺒﻀﻟﺍ ﺮﻴﻳﺎﻌﻣ ﻭ ﻥﺎﻣﻵﺍ
.ﺔﻴﻜﻠﺳﻼﻟﺍ ﺔﻳﺩﺄﺘﻟﺍ ﻰﻠﻋ ﺮﺛﺆﻳ ﻥﺃ ﻦﻜﻤﻳ iPhone
.ﻯﺮﺧﻷﺍ ﻝﻭﺪﻟﺍﻭ ﺓﺪﺤﺘﻤﻟﺍ
• ﺮﻴﻏ ﻞﻜﺸﺑ ﺔﻳﺭﺎﻄﺒﻟﺍ ﻝﺍﺪﺒﺘﺳﺍ ﺔﻟﺎﺣ ﻲﻓ ﺭﺎﺠﻔﻧﺍ ﺙﻭﺪﺣ ﺓﺭﻮﻄﺧ ﻚﻟﺎﻨﻫ
• ﻭﺃ ﺔﻴﻠﺤﻤﻟﺍ ﺕﺎﻄﻠﺴﻟﺎﺑ ﻝﺎﺼﺗﻻﺍ ﻰﺟﺮ
•.ﺐﻬﻠﻟ ﺎﻬﺿ
• ﺲﻤﺸﻟﺍ ﺔﻌﺷﻷ ﺔﺿﺮﻌﻤﻟﺍ ﺓﺭﺎﻴﺴﻟﺍ ﻲﻓ (ﺕﺎﻳﺭﺎﻄﺒﻟﺍ) ﺔﻳﺭﺎﻄﺒﻟﺍ ﻙﺮﺘﺗ ﻻ
.ﺢﻴﻠﺼﺘﻟﺍﻭ
ﺔﻣﻼﺴﻟﺍ ﺕﺎﻃﺎﻴﺘﺣﺇ
ﺔﻧﺎﻴﺼﻟﺍ ﻞﺟﺍ ﻦﻣ ﻦﻴﻠﻫﺆﻤﻟﺍ ﺢﻴﻠﺼﺘﻟﺍﻭ
(ﻡﻮﻴﺜﻴﻟ ﺔﻳﺭﺎﻄﺑ) ﺭﺯ ﻉﻮﻧ ﺔﻳﺭﺎﻄﺑ
ﺨﺴﺗ ﻭﺃ ،ﻚﻜﻔﺗ ﻭﺃ ،ﻦﺤﺸﺗ ﻻ .ﻕﻭﺮﺤﻟﺍﻭ ﺭﺎﺠﻔﻧﻻﺍﻭ ،ﻖﻳﺮﺤﻟﺍ ﺮﻄﺧ
ﹼ
ﺭﺰﻟﺍ-ﻉﻮﻧ ﺔﻳﺭﺎﻄﺒﻟﺍ ﻊﻀﺗ ﻻ .ﻝﺎﻔﻃﻷﺍ ﻝﻭﺎﻨﺘﻣ ﻦﻋ ﺭﺰﻟﺍ-ﻉﻮﻧ ﺔﻳﺭﺎﻄﺒﻟﺍ ﺪﻌﺑﺍ
.ﺍﺭﻮﻓ ﺐﻴﺒﻄﻟﺎﺑ ﻞﺼﺗﺍ ﺔﻳﺭﺎﻄﺒﻟﺍ ﻊﻠﺑ ﻢﺗ ﺍﺫﺍ .ﺎﻘﻠﻄﻣ ﻚﻤﻓ ﻲﻓ
ﻦﻣ ﺪﻛﺄﺗ .ﻚﻟﺬﻟ ﺔﻬﺑﺎﺸﻤﻟﺍ ﺭﻮﺼﺤﻤﻟﺍ ﻍﺍﺮﻔﻟﺍ ﻲﻓ ﻭﺃ ﺔﻴﻠﺧﺍﺪﻟﺍ
.ﺔﻠﻜﺸﻣ ﺖﻠﺼﺣ ﺍﺫﺇ ﺩﺩﺮﺘﻤﻟﺍ ﺭﺎﻴﺘﻟﺍ ﺬﺧﺄﻣ ﺔﺤﺘﻓ ﻦﻣ ﺔﻋﺮﺴﺑ AC
ﻒﺗﺍﻮﻬﻟﺍ ﺐﺒﺴﺑ ﻮﻳﺩﺍﺮﻟﺍ ﻦﻣ ﻼﺧﺍﺪﺗ ﺓﺪﺣﻮﻟﺍ ﻩﺬﻫ ﻞﺒﻘﺘﺴﺗ ﻥﺃ ﻦﻜﻤﻳ
ﺓﺩﺎﻳﺯ ﻰﺟﺮﻳ ،ﺎﺤﺿﺍﻭ ﻞﺧﺍﺪﺘﻟﺍ ﺍﺬﻫ ﻥﺎﻛ ﺍﺫﺇ .ﻡﺍﺪﺨﺘﺳﻻﺍ ﺀﺎﻨﺛﺃ ﺔﻠﻘﻨﺘﻤﻟﺍ
ﻝﺪﺘﻌﻤﻟﺍ ﺥﺎﻨﻤﻟﺍ ﻲﻓ ﻝﺎﻤﻌﺘﺳﻼﻟ ﺔﺼﺼﺨﻣ ﺓﺪﺣﻮﻟﺍ ﻩﺬﻫ
ﺥﺎﻨﻤﻟﺍ ﺕﺍﺫ ﻖﻃﺎﻨﻤﻟﺍ ﻲﻓ ﻡﺍﺪﺨﺘﺳﻻﺍ ﻞﺟﺃ ﻦﻣ ﺓﺪﻌﻣ ﺓﺪﺣﻮﻟﺍ ﻩﺬﻫ
.ﺔﻳﺭﺎﻄﺒﻟﺍ ﻕﺮﺤﺗ ﻭﺃ ﺔﻳﻮﺌﻣ ﺔﺟﺭﺩ 60
.ﺓﺪﻴﺟ ﺓﺭﻮﺼﺑ ﺓﺪﺣﻮﻟﺍ ﺔﻳﻮﻬﺗ
.ﻚﻟﺬﻟ ﺔﻬﺑﺎﺸﻤﻟﺍ ﺩﺍﻮﻤﻟﺍﻭ ،ﺮﺋﺎﺘﺴﻟﺍﻭ
.ﻞﻘﻨﺘﻤﻟﺍ ﻒﺗﺎﻬﻟﺍﻭ ﺓﺪﺣﻮﻟﺍ ﻦﻴﺑ ﺔﻓﺎﺴﻤﻟﺍ
!ﺮﻳﺬﺤﺗ
ﺓﺪﺣﻮﻟﺍ
!ﻪﻴﺒﻨﺗ
ﺓﺪﺣﻮﻟﺍ
.ﺓﺪﺣﻮﻟﺍ
ﻯﺮﺧﻻﺍ ﺭﺎﻄﻗﻸﻟ
.ﻱﺭﺍﺪﻤﻟﺍ
ﻲﺑﺮﻋ
•،ﺞﺘﻨﻤﻟﺍ ﻒﻠﺗ ﻭﺃ ﺔﻴﺋﺎﺑﺮﻬﻜﻟﺍ ﺔﻣﺪﺼﻟﺍ ،ﻖﻳﺮﺤﻟﺍ ﺮﻄﺧ ﻞﻴﻠﻘﺘﻟ
– .ﺀﺎﻤﻟﺍ ﻪﺷﺮﺷﺭ ﻭﺃ ﺮﻴﻄﻘﺗ ،ﺔﺑﻮﻃﺮﻟﺍ ،ﺮﻄﻤﻠﻟ ﺓﺪﺣﻮﻟﺍ ﻩﺬﻫ ﺽﺮﻌﺗ ﻻ
– .ﺓﺪﺣﻮﻟﺍ ﻰﻠﻋ ،ﺕﺎﻳﺮﻫﺰﻤﻟﺍ ﻞﺜﻣ ،ﻞﺋﺍﻮﺴﻟﺎﺑ ﺓﺀﻮﻠﻤﻣ ﺀﺎﻴﺷﺃ ﻊﻀﺗ ﻻ
– .ﺎﻬﺑ ﻰﺻﻮﻤﻟﺍ ﺕﺎﻘﺤﻠﻤﻟﺍ ﻂﻘﻓ ﻡﺪﺨﺘﺳﺍ
– .ﺀﺎﻄﻐﻟﺍ ﻉﺰﻨﺗ ﻻ
– ﺔﻧﺎﻴﺼﻟﺍ ﻲﻔﻇﻮﻣ ﻰﻟﺇ ﻊﺟﺭﺍ .ﻚﺴﻔﻨﺑ ﺓﺪﺣﻮﻟﺍ ﺡﻼﺻﺇ ﻝﻭﺎﺤﺗ ﻻ
• ﻕﻮﻓ ﻦ
•
•،ﺞﺘﻨﻤﻟﺍ ﻒﻠﺗ ﻭﺃ ﺔﻴﺋﺎﺑﺮﻬﻜﻟﺍ ﺔﻣﺪﺼﻟﺍ ،ﻖﻳﺮﺤﻟﺍ ﺮﻄﺧ ﻞﻴﻠﻘﺘﻟ
– ﻦﺋﺍﺰﺨﻟﺍ ﻭﺃ ﺐﺘﻜﻟﺍ ﺕﺎﻧﺍﺰﺧ ﻲﻓ ﺓﺪﺣﻮﻟﺍ ﻩﺬﻫ ﻊﻀﺗ ﻻ ﻭ ﺐﹼﻛﺮﺗ ﻻ
– ،ﺓﺪﺋﺎﻤﻟﺍ ﺔﻴﻄﻏﺃﻭ ،ﻒﺤﺼﻟﺎﺑ ﺓﺪﺣﻮﻟﺍ ﺔﻳﻮﻬﺗ ﺕﺎﺤﺘﻓ ﻖﻠﻐﺗ ﻻ
– ﻰﻠﻋ ،ﺓﺀﺎﻀﻤﻟﺍ ﻉﻮﻤﺸﻟﺎﻛ ،ﻑﻮﺸﻜﻤﻟﺍ ﺐﻬﻠﻟﺍ ﺭﺩﺎﺼﻣ ﻊﻀﺗ ﻻ
• ﺲﻴﺋﺮﻟﺍ ﺔﻴﺋﺎﺑﺮﻬﻜﻟﺍ ﺔﻗﺎﻄﻟﺍ ﻚﻠﺳ ﻉﺰﻧ ﻦﻜﻤﻳ ﺚﻴﺤﺑ ﺓﺪﺣﻮﻟﺍ ﻩﺬﻫ ﺐﻛﺭ
•
•ﺎﺑﺭﻭﺃ ﺓﺭﺎﻗﻭ ﺓﺪﺤﺘﻤﻟﺍ ﺔﻜﻠﻤﻤﻠﻟ
RQT9648
2
35
Page 36

ﻞﻴﻐﺸﺘﻟﺍ ﺕﺍﺩﺎﺷﺭﺇ
ﺞﻣﺪﻣ ﻮﻳﺮﻴﺘﺳ ﺯﺎﻬﺟ
SC-GT07 ﻞﻳﺩﻮﻤﻟﺍ ﻢﻗﺭ
Panasonic Corporation
Web Site: http://panasonic.net
.ﺞﺘﻨﻤﻟﺍ ﺍﺬﻫ ﻚﺋﺍﺮﺸﻟ ﺍﺮﻜﺷ
.ﺍﺪﻴﺟ ﺕﺍﺩﺎﺷﺭﻹﺍ ﻊﻴﻤﺟ ﺓﺀﺍﺮﻗ ﻰﺟﺮﻳ ،ﻥﺎﻣﺃﻭ ﺀﺍﺩﺃ ﻞﻀﻓﺃ ﻰﻠﻋ ﻝﻮﺼﺤﻠﻟ
.ﺔﺟﺎﺤﻟﺍ ﺖﻗﻭ ﺎﻌﺟﺮﻣ ﻚﻟ ﻥﻮﻜﻴﻟ ﺐﻴﺘﻜﻟﺍ ﺍﺬﻬﺑ ﻅﺎﻔﺘﺣﻻﺍ ﻰﺟﺮﻳ
CnFiEn ArSp
RQT9648-1G
L0212CH1042
E
 Loading...