

Page 1

As an ENERGY STAR® Partner,
3
WARNING!
Unit
• To reduce the risk of fire, electric shock or product
damage,
– Do not expose this unit to rain, moisture, dripping or
splashing.
– Do not place objects filled with liquids, such as vases,
on this unit.
– Use only the recommended accessories.
– Do not remove covers.
– Do not repair this unit by yourself. Refer servicing to
qualified service personnel.
Button-type battery (Lithium battery)
• Risk of fire, explosion and burns. Do not disassemble,
heat above 60°C (140°F) or incinerate.
CAUTION!
Unit
• To reduce the risk of fire, electric shock or product
damage,
– Do not install or place this unit in a bookcase, built-in
cabinet or in another confined space. Ensure this unit
is well ventilated.
– Do not obstruct this unit’s ventilation openings with
newspapers, tablecloths, curtains, and similar items.
– Do not place sources of naked flames, such as lighted
candles, on this unit.
• Install this unit so that the power cord can be unplugged
from the socket outlet immediately if any problem occurs.
Button-type battery (Lithium battery)
• Insert with poles aligned.
• Do not touch the terminals (+ and –) with metal objects.
• Do not recharge, disassemble, remodel, heat or throw
into fire.
• Keep out of reach of children.
• If any electrolyte should come into contact with your
hands or clothes, wash it off thoroughly with water.
• If any electrolyte should come into contact with your
eyes, never rub the eyes. Rinse eyes thoroughly with
water, and then consult a doctor.
• Danger of explosion if battery is incorrectly replaced.
Replace only with the type recommended by the
manufacturer.
• When disposing the batteries, please contact your local
authorities or dealer and ask for the correct method of
disposal.
• Do not heat or expose to flame.
• Do not leave the battery(ies) in a car exposed to direct
sunlight for a long period of time with doors and windows
closed.
< For USA-California only >
This product contains a CR Coin Cell Lithium Battery
which contains Perchlorate Material - special handling
may apply.
See www.dtsc.ca.gov/hazardouswaste/perchlorate
.
Product identification marking is located on the bottom
of the unit.
FCC Note:
This equipment has been tested and found to comply
with the limits for a Class B digital device, pursuant to
Part 15 of the FCC Rules.
These limits are designed to provide reasonable
protection against harmful interference in a residential
installation. This equipment generates, uses and can
radiate radio frequency energy and, if not installed and
used in accordance with the instructions, may cause
harmful interference to radio communications. However,
there is no guarantee that interference will not occur in a
particular installation. If this equipment does cause
harmful interference to radio or television reception,
which can be determined by turning the equipment off
and on, the user is encouraged to try to correct the
interference by one or more of the following measures:
• Reorient or relocate the receiving antenna.
• Increase the separation between the equipment and
receiver.
• Connect the equipment into an outlet on a circuit
different from that to which the receiver is connected.
• Consult the dealer or an experienced radio/TV
technician for help.
Any unauthorized changes or modifications to this
equipment would void the user’s authority to operate this
device.
This device complies with Part 15 of the FCC Rules.
Operation is subject to the following two conditions:
(1) This device may not cause harmful interference, and
(2) this device must accept any interference received,
including interference that may cause undesired
operation.
Responsible Party:
Panasonic Corporation of North America
One Panasonic Way, Secaucus, NJ 07094
Support Contact:
Panasonic Consumer Marketing Company of North
America
Telephone No.: 1-800-211-PANA (7262)
4
Supplied accessories
Check and identify the supplied accessories.
Use numbers indicated in parentheses when asking for
replacement parts. (Product numbers correct as of
February 2012. This may be subject to change.)
To order accessories, refer to “Accessory Purchases
(United States and Puerto Rico)”.
1 x Setting stand
(RFE0239)
1 x AC power supply cord
(K2CB2CB00021)
1 x Remote control (with a battery)
(RFE0238)
- If you see this symbol -
Information on Disposal in other Countries outside
the European Union
This symbol is only valid in the European
Union.
If you wish to discard this product, please
contact your local authorities or dealer and
ask for the correct method of disposal.
“Made for iPod” and “Made for iPhone” mean that an
electronic accessory has been designed to connect
specifically to iPod, or iPhone, respectively, and has
been certified by the developer to meet Apple
performance standards.
Apple is not responsible for the operation of this device
or its compliance with safety and regulatory standards.
Please note that the use of this accessory with iPod, or
iPhone may affect wireless performance.
iPhone
®
, iPod®, iPod classic®, iPod nano®, and iPod
touch
®
are trademarks of Apple Inc., registered in the
U.S. and other countries.
Panasonic has determined that this
product meets the ENERGY STAR
guidelines for energy efficiency.
Thank you for purchasing this product.
For optimum performance and safety, please read these instructions carefully.
Please keep this manual for future reference.
If you have any questions, contact:
®
1-800-211-PANA (7262)
La guía rápida en español se encuentra en la contraportada.
Panasonic Consumer Marketing Company of North America,
Division of Panasonic Corporation of North America
One Panasonic Way, Secaucus,
New Jersey 07094
http://www.panasonic.com
© Panasonic Corporation 2012
Printed in China
Owner’s Manual
Compact Stereo System
Model No. SC-GT07
En Sp
P
RQT9645-2P
L0212CH2042
Panasonic Consumer Marketing Company of North America,
Division of Panasonic Corporation of North America
One Panasonic Way, Secaucus, New Jersey 07094
Panasonic Home Audio Products
Limited Warranty Coverage
(For USA and Puerto Rico Only)
If your product does not work properly because of a defect in
materials or workmanship, Panasonic Consumer Marketing
Company of North America (referr ed to as “the warrantor”) will, for the
length of the period indicated on the chart below, which starts with the
date of original purchase (“warranty period”), at its option either (a)
repair your product with new or refurbished parts, (b) replace it with a
new or a refurbished equivalent value product, or (c) refund your
purchase price. The decision to repair, replace or refund will b e made
by the warrantor.
Product or Part Name Parts Labor
Audio Products (except items below) 1 year 1 year
DVD Home Theater System 1 year 1 year
Home Theater Audio System 1 year 1 year
SD Memory Cards, Rechargeable
Battery Packs (defective exchange)
During the “Labor” warranty period there will be no charge for labor.
During the “Parts” warranty period, there will be no charge for parts.
This Limited Warranty excludes both parts and labor for nonrechargeable batteries, antennas, and cosmetic parts (cabinet). This
warranty only applies to products purchased and serviced in the
United States or Puerto Rico. This warranty is extended only to the
original purchaser of a new product which was not sold “as is”.
Carry-In or Mail-In Service
To find a service center please visit http://www.panasonic.com/help
or call 1-800-211-PANA (7262).
When shipping the unit, carefully pack, include all supplied
accessories listed in the Owner's Manual, and send it prepaid,
adequately insured and packed well in a carton box. When shipping
Lithium Ion batteries please visit our Web Site at
www.panasonic.com/BatteryHandling
providing the most up to date information. Include a letter detailing the
complaint, a return address and provide a daytime phone number
where you can be reached. A valid registered receipt is required
under the Limited Warranty.
90 days Not
as Panasonic is committed to
Applicable
Limited Warranty
IF REPAIR IS NEEDED DURING THE WARRANTY PERIOD, THE
PURCHASER WILL BE REQUIRED TO FURNISH A SALES
RECEIPT/PROOF OF PURCHASE INDICATING DATE OF
PURCHASE, AMOUNT PAID AND PLACE OF PURCHASE.
CUSTOMER WILL BE CHARGED FOR THE REPAIR OF ANY UNIT
RECEIVED WITHOUT SUCH PROOF OF PURCHASE.
Limited Warranty Limits And Exclusions
This warranty ONLY COVERS failures due to defects in materials or
workmanship, and DOES NOT COVER normal wear and tear or
cosmetic damage. The warranty ALSO DOES NOT COVER
damages which occurred in shipment, or failures which are caused by
products not supplied by the warrantor, or failures which result from
accidents, misuse, abuse, neglect, mishandling, misapplication,
alteration, faulty installation, set-up adjustments, misadjustment of
consumer controls, improper maintenance, power line surge,
lightning damage, modification, introduction of sand, humidity or
liquids, commercial use such as hotel, office, restaurant, or other
business or rental use of the product, or service by anyone other than
a Factory Service Center or other Authorized Servicer, or damage
that is attributable to acts of God.
THERE ARE NO EXPRESS WARRANTIES EXCEPT AS LISTED
UNDER “LIMITED WARRANTY COVERAGE”.
THE WARRANTOR IS NOT LIABLE FOR INCIDENTAL OR
CONSEQUENTIAL DAMAGES RESULTING FROM THE USE OF
THIS PRODUCT, OR ARISING OUT OF ANY BREACH OF THIS
WARRANTY. (As examples, this excludes damages for lost time,
travel to and from the servic er, loss of or damage to media or images,
data or other memory or recorded content. The items listed are not
exclusive, but for illustration only.)
ALL EXPRESS AND IMPLIED WARRANTIES, INCLUDING THE
WARRANTY OF MERCHANTABILITY, ARE LIMITED TO THE
PERIOD OF THE LIMITED WARRANTY.
Some states do not allow the exclusion or limitation of incidental or
consequential damages, or limitations on how long an implied
warranty lasts, so the exclusions may not apply to you.
This warranty gives you specific legal rights and you may also have
other rights which vary from state to state. If a problem with this
product develops during or after the warranty period, you may contact
your dealer or Service Center. If the problem is not handled to your
satisfaction, then write to the warrantor’s Consumer Affairs
Department at the addresses listed for the warrantor.
PARTS AND SERVICE, WHICH ARE NOT COVERED BY THIS
LIMITED WARRANTY, ARE YOUR RESPONSIBILITY.
Customer Services Directory (United States and Puerto Rico)
Obtain Product Information and Operating Assistance; locate
your nearest Dealer or Service Center; purchase Parts and
Accessories; or make Customer Service and Literature requests
by visiting our Web Site at:
http://www.panasonic.com/help
or, contact us via the web at:
http://www.panasonic.com/contactinfo
You may also contact us directly at:
1-800-211-PANA (7262)
Monday-Friday 9am-9pm, Saturday-Sunday 10am-7pm EST
For hearing or speech impaired TTY users, TTY: 1-877-833-8855
Accessory Purchases (United States and Puerto Rico)
Purchase Parts, Accessories and Instruction Books online for all
Panasonic Products by visiting our Web Site at:
http://www.pstc.panasonic.com
or, send your request by E-mail to:
npcparts@us.panasonic.com
You may also contact us directly at:
1-800-332-5368 (Phone) 1-800-237-9080 (Fax Only)
(Monday-Friday 9am-9pm EST)
Panasonic National Parts Center
20421 84th Ave. S., Kent, WA 98032
(We accept Visa, MasterCard, Discover Card, American Express)
For hearing or speech impaired TTY users, TTY: 1-866-605-1277
As of January 2012
The model number and serial number of this product
can be found on either the back or the bottom of the
unit. Please note them in the space provided below
and keep for future reference.
MODEL NUMBER
SERIAL NUMBER
User memo:
DATE OF PURCHASE _________________________
DEALER NAME ______________________________
DEALER ADDRESS _________________________
___________________________________________
TELEPHONE NUMBER ________________________
CAUTION: TO REDUCE THE RISK OF ELECTRIC
SHOCK, DO NOT REMOVE SCREWS.
NO USER-SERVICEABLE PARTS
INSIDE.
REFER SERVICING TO QUALIFIED
SERVICE PERSONNEL.
The lightning flash with arrowhead
symbol, within an equilateral triangle, is
intended to alert the user to the presence
of uninsulated “dangerous voltage” within
the product’s enclosure that may be of
sufficient magnitude to constitute a risk of
electric shock to persons.
The exclamation point within an
equilateral triangle is intended to alert the
user to the presence of important
operating and maintenance (servicing)
instructions in the literature
accompanying the appliance.
SC-GT07
IMPORTANT SAFETY
INSTRUCTIONS
Read these operating instructions carefully before using the unit. Follow the safety instructions on the unit and the
applicable safety instructions listed below. Keep these operating instructions handy for future reference.
1) Read these instructions.
2) Keep these instructions.
3) Heed all warnings.
4) Follow all instructions.
5) Do not use this apparatus near water.
6) Clean only with dry cloth.
7) Do not block any ventilation openings. Install in
accordance with the manufacturer’s instructions.
8) Do not install near any heat sources such as radiators,
heat registers, stoves, or other apparatus (including
amplifiers) that produce heat.
9) Do not defeat the safety purpose of the polarized or
grounding-type plug. A polarized plug has two blades
with one wider than the other. A grounding-type plug
has two blades and a third grounding prong. The wide
blade or the third prong are provided for your safety. If
the provided plug does not fit into your outlet, consult
an electrician for replacement of the obsolete outlet.
10) Protect the power cord from being walked on or
pinched particularly at plugs, convenience receptacles,
and the point where they exit from the apparatus.
11) Only use attachments/accessories specified by the
manufacturer.
12) Use only with the cart, stand, tripod,
bracket, or table specified by the
manufacturer, or sold with the
apparatus. When a cart is used, use
caution when moving the cart/
apparatus combination to avoid injury
from tip-over.
13) Unplug this apparatus during lightning storms or when
unused for long periods of time.
14) Refer all servicing to qualified service personnel.
Servicing is required when the apparatus has been
damaged in any way, such as power-supply cord or
plug is damaged, liquid has been spilled or objects
have fallen into the apparatus, the apparatus has been
exposed to rain or moisture, does not operate normally,
or has been dropped.
Maintenance
To clean this system, wipe with a soft, dry cloth
• Never use alcohol, paint thinner or benzine to clean this
system.
• Before using chemically treated cloth, read the
instructions that came with the cloth carefully.
Troubleshooting
Before requesting service, make the following checks. If
you are in doubt about some of the check points, or if the
solutions indicated do not solve the problem, refer to
“Customer Services Directory (United States and Puerto
Rico)”.
No power
• Ensure the AC power supply cord is connected properly.
No sound
• Increase the volume of the system.
• Examine the volume of the iPod/iPhone or portable audio
equipment.
• Make sure that the iPod/iPhone or portable audio
equipment is actually playing something.
Sound is distorted
• Lower the volume of the system.
• Make sure that the equalizer function of the iPod/iPhone
or portable audio equipment is switched off.
No operations can be done with the remote control
• Remove the insulation sheet before you use the remote
control for the first time.
• Examine that the battery is installed correctly.
• The battery is weak. Replace it with a new one.
Green status indicator blinks
• The system is checking the connected iPod/iPhone. If
the battery of iPod/iPhone is depleted, the system will
charge the iPod/iPhone before it can connect to the iPod/
iPhone.
• Switch off the system and then switch it on again.
2
iPod/iPhone does not switch on
• Examine the battery of iPod/iPhone to make sure it is not
depleted. Charge the iPod/iPhone.
• Switch off the system and then switch it on again.
iPod/iPhone does not respond
• Make sure that the system is in iPod mode.
• The iPod/iPhone is not connected correctly. Remove the
iPod/iPhone and connect it again.
iPod/iPhone does not charge
• Examine the connection.
Specifications
Amplifier section
RMS output power stereo mode
Front Ch (both ch driven)
Total RMS stereo mode power 40 W
FTC output power stereo mode
Front Ch (both ch driven)
Total FTC stereo mode power 30 W
Terminal section
AUX (rear)
Terminal Stereo, 3.5 mm (ǩƎ) jack
Speaker section
Type 1 way, 1 speaker system
Speaker unit(s)
Full range 6.5 cm (2½Ǝ) cone type
Impedance
General
Power supply AC 120 V, 60 Hz
Power consumption 17 W
Dimensions (W x H x D)
main set (without stand) 400 mm x 175 mm x 91 mm
Mass (Weight) 2.7 kg (6 lbs)
Operating temperature range 0°C to +40°C
Operating humidity range 20% to 80% RH
Power consumption in standby mode
Note:
• Specifications are subject to change without notice.
Mass (weight) and dimensions are approximate.
• Total harmonic distortion is measured by the digital
spectrum analyzer.
20 W per channel (6 ȍ), 1 kHz, 10% THD
15 W per channel (6 ȍ), 20 Hz to 20 kHz, 1% THD
(bass reflex)
6 ȍ
(15¾Ǝ x 6ǬƎ x 3½Ǝ)
(+32°F to +104°F)
(no condensation)
0.1 W (approximate)
9
Page 2
Getting started
To household
AC outlet
A
B
C
D
8
Basic playback
1
Press [`] to turn on the system.
2
Insert the iPod/iPhone.
Status indicator: Green
3
Press [4/9] to start playback.
Note:
• After you insert the iPod/iPhone, the system will check
the connection and the green indicator blinks.
• Depending on the model, it may be necessary to remove
the iPod/iPhone and select the album, artist, etc. on the
iPod/iPhone.
• The system automatically switches on when you connect
an iPod/iPhone that is in playback mode
(except for some
models)
.
• Operation results may vary depending on the iPod/
iPhone models.
• Read the User Guide of the iPod/iPhone for the
operating instructions.
Compatible iPod/iPhone (as of February 2012)
Update your iPod/iPhone with the latest software before
using this system.
For up to date compatibility information, refer to
http://panasonic.jp/support/global/cs/
Charging an iPod/iPhone
An iPod/iPhone is charged automatically when connected
to the system (even when the system is in standby mode).
• See the iPod/iPhone display for its battery charging
status.
• Disconnect the iPod/iPhone if it is not used for an
extended period of time after charging is complete.
• Charging stops when the battery is fully charged. The
battery will deplete naturally.
Auto off function
The system automatically switches off if there is no audio
input and when you do not use it for approximately 30
minutes.
1
Press [iPod/AUX] to select AUX mode.
Status indicator: Off
2
Press and hold [OK].
On (default) ļ Off
On: The green status indicator blinks 1 time, followed
by the amber status indicator blinking 2 times.
Off: The green status indicator blinks 1 time, followed
by the amber status indicator blinking 1 time.
Note:
1 minute before the system switches off, the power
indicator blinks.
Using the auxiliary input
You can connect portable audio equipment and listen to
the audio through this system.
Preparation
Switch off the equalizer (if any) of the portable audio
equipment to prevent sound distortion.
Decrease the volume of the system and the portable audio
equipment before you connect or disconnect the portable
audio equipment.
1
Connect the portable audio equipment.
Plug type: Ø 3.5 mm (ǩƎ) stereo
2
Press [iPod/AUX] to select AUX mode.
Status indicator: Off
3
Play the portable audio equipment.
Note:
• Read the operating instructions of the portable audio
equipment for details.
• Components and cables are sold separately.
To adjust the audio input level
Press [INPUT LEVEL].
Normal (default) ļ High
Note:
• Select “High” if the output level is too low even when you
have increased the volume.
• Select “Normal” if there are abnormalities or the sound is
distorted during “High” input level.
Pause
playback
Press [4/9].
Press again to continue playback.
Skip track Press [2] or [6].
Search track Press and hold [2] or [6].
View iPod
menu
Press [iPod MENU].
Select an item Press [R, T] and then press [OK].
iPod touch
1st, 2nd, 3rd and 4th generation
iPod nano
2nd, 3rd, 4th, 5th and 6th generation
iPod classic
iPhone 4S / iPhone 4 / iPhone 3GS / iPhone 3G /
iPhone
Audio cable
(not supplied)
Portable audio
equipment (not supplied)
6
Overview of controls
A Standby/on switch [`], [1]
Press to switch the unit from on to standby mode or
vice versa. In standby mode, the unit is still consuming
a small amount of power.
B View the iPod menu
C Confirm a selection
Set or cancel the auto off function
D Select iPod or AUX mode
E Adjust the audio input level in AUX mode
F Select an item
G Adjust the volume of the system
H Mute the sound of the system
In iPod mode: The amber and green status indicators
blink alternately.
In AUX mode: The amber status indicator blinks
continuously.
Press the button again to cancel.
Mute is also canceled when you adjust the volume or
when you switch off the system.
I Start or pause playback
J Skip or search track
K Power indicator
On: The system is on
Off: The system is in standby mode
L Status indicator
Green: iPod mode
Amber: Set or cancel the auto off function
Mute function is on
Off: AUX mode
The green status indicator blinks each time you
perform an operation.
M Remote control sensor
Maximum range: 7 m (23 ft) directly in front
N Dock for iPod/iPhone
You can turn the dock clockwise or counter-clockwise
to the horizontal position to view the iPod/iPhone in
widescreen mode.
Hold the side holder and turn clockwise.
Hold the side holder and turn counter-clockwise.
J
AA
B
C
D
AML
G
K
N
Al enchufe de
conexión a la
red de CA
CR2025
A
B
C
D
Making the connections
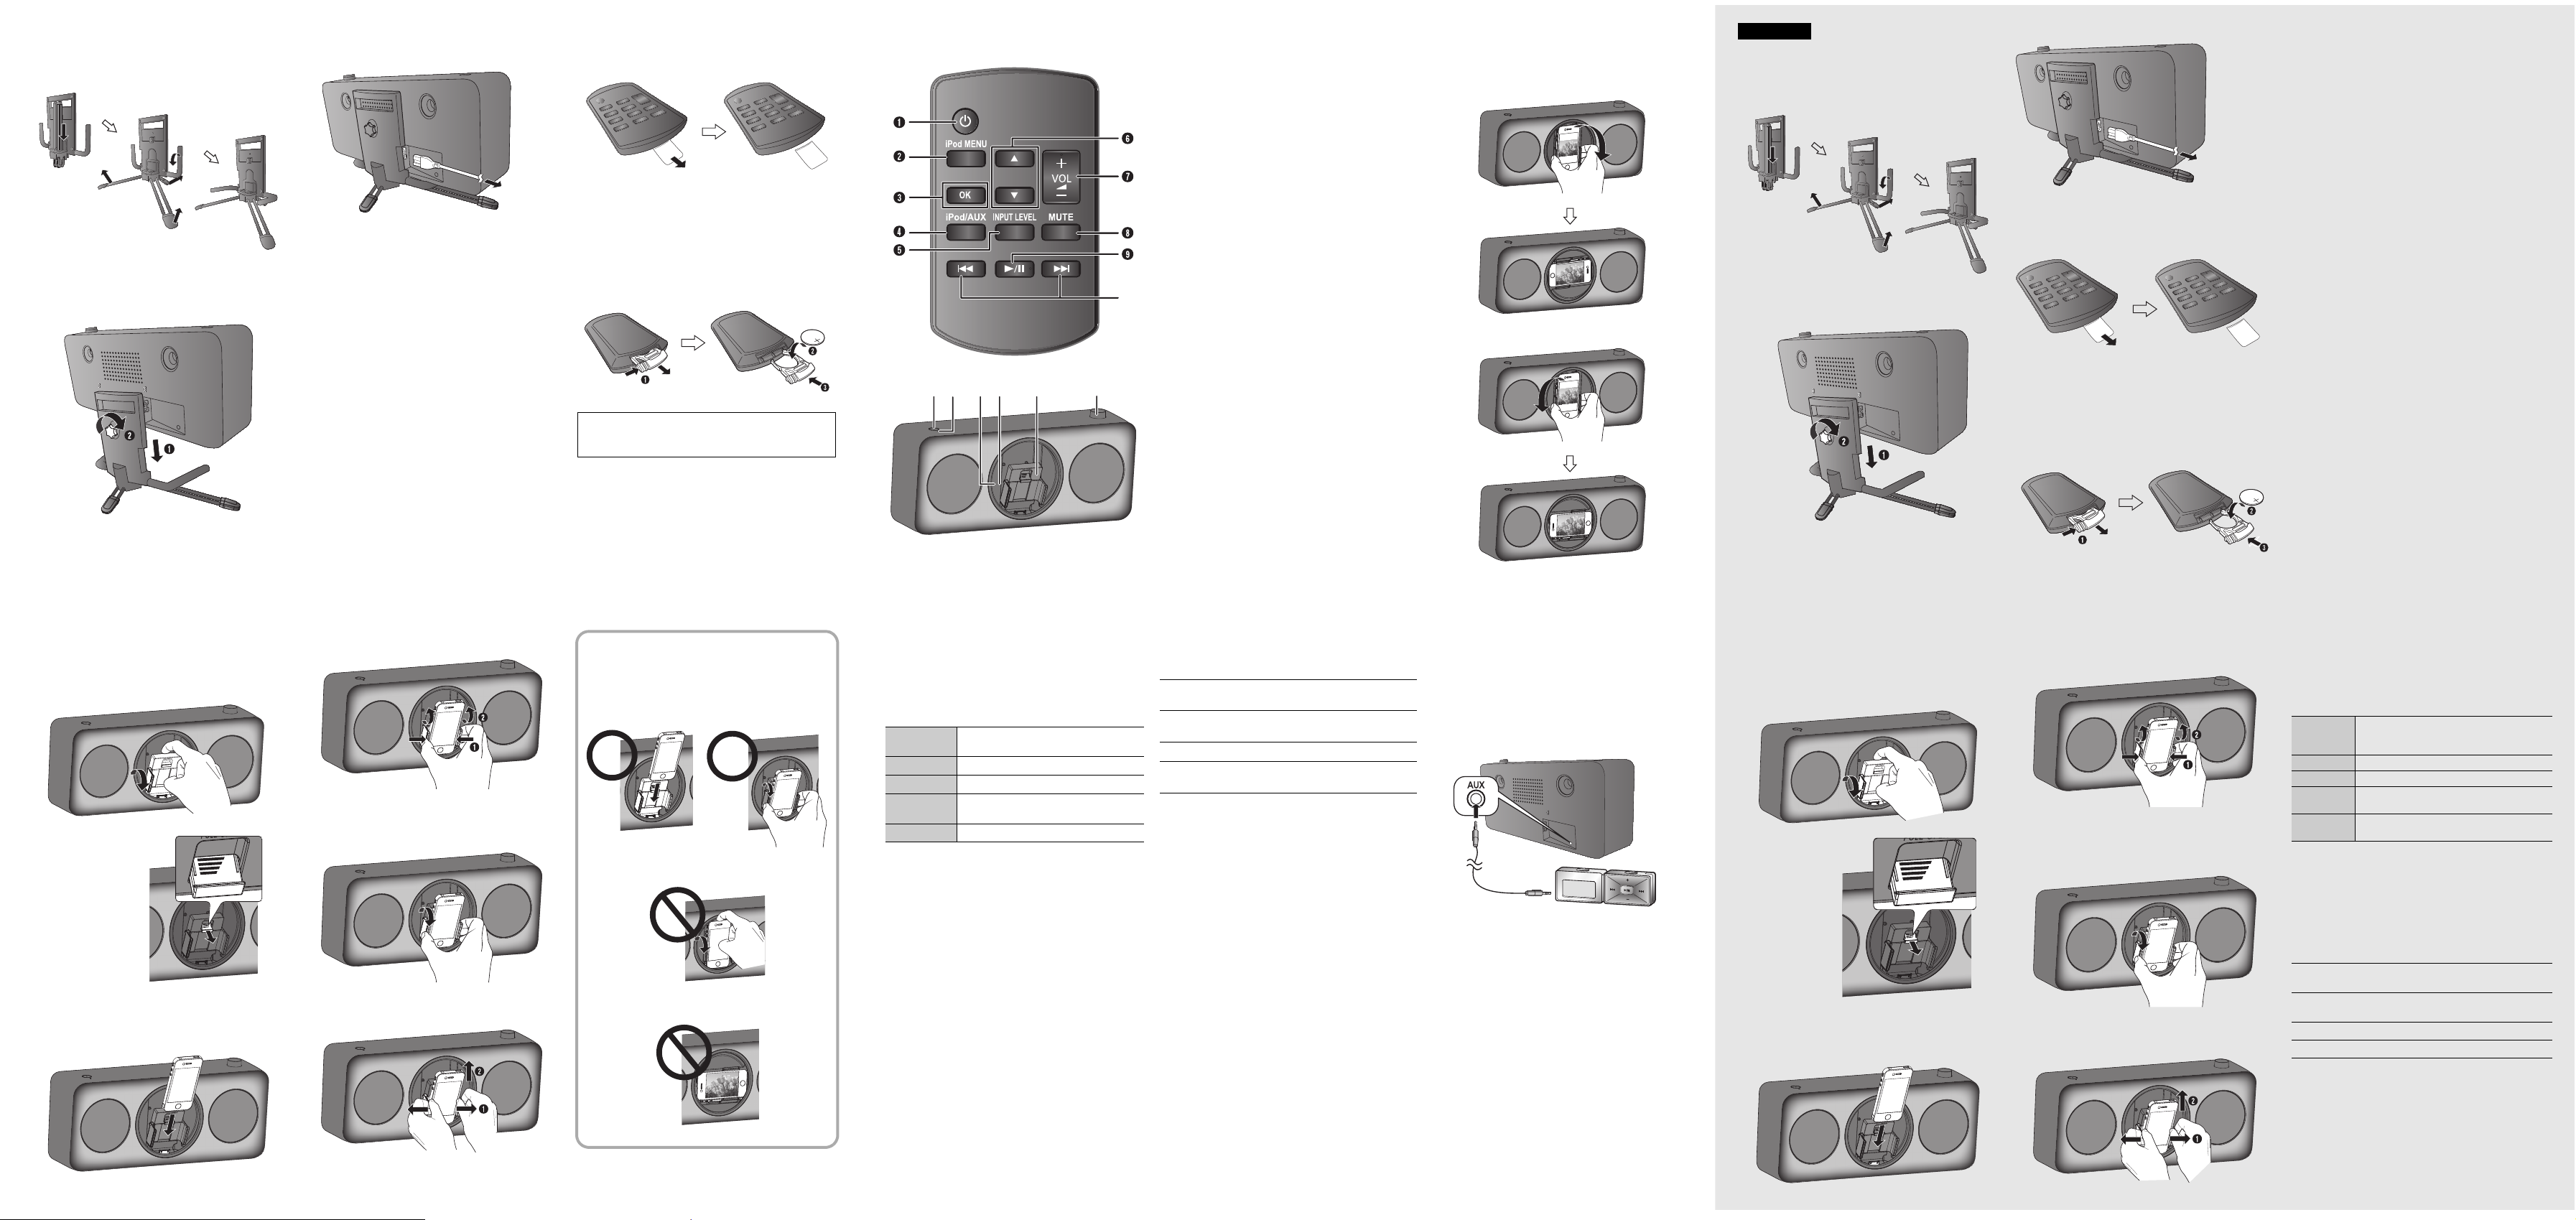
1
Prepare the setting stand.
2
Install the unit on the setting stand.
Align and put the unit on the setting stand, turn the
screw clockwise to secure the unit.
3
Connect the AC power supply cord.
The system consumes approximately 0.1 W when it is
in standby mode.
Do not use an AC power supply cord from other
equipment.
Note:
• Do not sit on top of the unit.
• Some settings return to default when you disconnect the
system.
• These speakers do not have magnetic shielding. Do not
put them near TVs, PCs or other equipment easily
influenced by magnetism.
• Do not remove the speaker nets.
• Hold the unit firmly when moving it. Do not hold the
setting stand.
Preparing the remote control
Before using
Remove the insulation sheet.
Replacing the battery
Replace with a new battery (CR2025 lithium battery).
1
While pressing the stopper, pull out the battery
holder.
2
Insert a new battery with the (+) side facing up.
3
Push the battery holder back fully.
CR2025
Warni ng!
Keep the button-type battery out of reach of children to
prevent swallowing.
ESPAĕOL
Guía introductoria
Cómo realizar las conexiones
1
Prepare la base de colocación.
2
Instale la unidad en la base de colocación.
Alinee y ponga la unidad en la base de colocación, gire el
tornillo hacia la derecha para asegurar la unidad.
3
Conecte el cable de alimentación de CA.
Cómo preparar el control remoto
Antes de usar
Retire la hoja de aislamiento.
Cómo reemplazar la pila
Reemplace por pila nueva (CR2025 pila de litio).
1
Mientras apriete el tapón, saque el soporte de
la pila.
2
Inserte una pila nueva con el signo (+) hacia
arriba.
3
Empuje de vuelta a su sitio el soporte de la pila.
Visión general de los controles
Consulte “Overview of controls” para las
ilustraciones.
A
Interruptor de alimentación en espera/conectada [`
Pulse este interruptor para cambiar del modo de
alimentación conectada al modo de alimentación en espera
o viceversa. En el modo de alimentación en espera, la
unidad consume una pequeña cantidad de corriente.
B
Ver el menú del iPod
C
Confirmar selección
Configure o cancele la función de apagado automático
D
Seleccione el modo iPod o AUX
E
Ajuste el nivel de entrada de audio en el modo AUX
F
Seleccione un elemento
G
Ajuste el volumen del sistema
H
Desactive el sonido del sistema
En modo iPod: Los indicadores de estado ámbar y verde
En modo AUX: El indicador de estado ámbar parpadea
Pulse el botón nuevamente para cancelar.
El silenciado del sonido también se cancela cuando usted
ajusta el volumen o cuando apaga el sistema.
I
Inicie o pause la reproducción
J
Saltar o buscar pista
K
Indicador de encendido
Encendido: El sistema está encendido
Apagado: El sistema está en modo de espera
L
Indicador de estado
Verde: El modo iPod
Ámbar: Configure o cancele la función de apagado
Apagado: El modo AUX
El indicador de estado verde parpadea cada vez que
realiza una operación.
M
Sensor del control remoto
Máximo de rango: 7 m (23 pies) directamente al frente de
la unidad principal
N
Base de acoplamiento par iPod/iPhone
Puede girar la base de acoplamiento hacia la derecha o
hacia la izquierda para colocarla en posición horizontal
para ver el iPod/iPhone en el modo de pantalla ancha.
parpadean alternativamente.
continuamente.
automático
La función de silencio está activada
], [1]
Using an iPod/iPhone
Inserting an iPod/iPhone
1
Prepare the dock.
Gently pull out the dock towards you.
Pull out the support
for iPod/iPhone.
A: iPod classic
B: iPhone
C: iPod touch
D: iPod nano
2
Insert the iPod/iPhone.
Make sure to remove the iPod/iPhone from its case.
Make sure to align your iPod/iPhone with the connector
when inserting.
(except 6th
generation)
3
Push the side holder inwards to hold the iPod/
iPhone and gently push the dock back inside.
Removing an iPod/iPhone
1
Hold the side holder and gently pull out the
dock.
2
Push the side holder outwards and carefully
remove the iPod/iPhone.
CAUTION!
To prevent damage to the iPod/iPhone
Make sure to pull out the dock before inserting or
removing the iPod/iPhone.
Hold the side holder to pull out the dock when removing
the iPod/iPhone.
Do not pull out the dock with the iPod/iPhone.
Do not remove the iPod/iPhone when it is in horizontal
position.
5
3
Cómo usar un iPod/iPhone
Cómo insertar un iPod/iPhone
1
Prepare la base de acoplamiento.
Tire suavemente la base de acoplamiento hacia usted.
Saque el soporte para
el iPod/iPhone.
A: iPod classic
B: iPhone
C: iPod touch
D: iPod nano
(excepto para la 6ª
generación)
2
Inserte el iPod/iPhone.
Asegúrese de sacar el iPod/iPhone de su estuche.
Asegúrese de alinear su iPod/iPhone con el conector
cuando realice la inserción.
Empuje el soporte lateral hacia adentro para
sostener el iPod/iPhone y presione suavemente la
base de acoplamiento hacia adentro.
Cómo retirar un iPod/iPhone
1
Sostenga el soporte lateral y saque
suavemente la base de acoplamiento.
2
Empuje el soporte lateral hacia afuera y retire
cuidadosamente el iPod/iPhone.
Reproducción básica
1
Pulse [`] para encender la unidad.
2
Inserte el iPod/iPhone.
Indicador de estado: Verde
3
Pulse [4/9] para iniciar la reproducción.
Pausar la
reproducción
Saltar pista
Buscar pista
Ver el menú
del iPod
Seleccione
un elemento
Nota:
• Luego de insertar el iPod/iPhone, el sistema revisará la
conexión y el indicador verde parpadea.
• Dependiendo del modelo, podría requerirse quitar el iPod/
iPhone y elegir el álbum, artista, etc. en el iPod/iPhone.
Pulse [4/9].
Pulse nuevamente para continuar la
reproducción.
Pulse [2] o [6].
Pulse y mantenga pulsado [2] o [6].
Pulse [iPod MENU].
Pulse [R, T] y después pulse [OK].
Compatible con el iPod/iPhone
(a partir de febrero de 2012)
Actualice su iPod/iPhone con el software más reciente
antes de usar este sistema.
iPod touch
1ª, 2ª, 3ª y 4ª generación
iPod nano
2ª, 3ª, 4ª, 5ª y 6ª generación
iPod classic
iPhone 4S / iPhone 4 / iPhone 3GS / iPhone 3G / iPhone
10
Cómo cargar un iPod/iPhone
El iPod/iPhone se carga automáticamente cuando está
conectado al sistema (incluso cuando el sistema está en
modo de alimentación en espera).
• Consulte la pantalla del iPod/iPhone para verificar el estado
de carga de su batería.
• Desconecte el iPod/iPhone si no se utiliza durante un periodo
de tiempo largo después que se hubiera completado la carga.
• La carga se detiene cuando la batería está completamente
cargada. La batería se agotará de forma natural.
7
11
 Loading...