

Page 1

Voice Processing System
Subscriber’s Guide
VOICE PROCESSING SYSTEM
POWER
<KX-TVS75>
Model No.
KX-TVS75
KX-TVS100 / KX-TVS200
Thank you for purchasing a Panasonic Voice Processing System, Model KX-TVS75/100/200.
Please read this manual before installing, customizing, or operating the Voice Processing System.
Page 2

2
Page 3

Introduction
The Panasonic Voice Processing System (VPS) is a powerful tool used to manage your voice
communications and increase your productivity through the use of your voice mailbox. As a
subscriber (the owner of a VPS mailbox), you can:
• Send a message to one or more people inside or outside of your office.
• Transfer messages (with your annotation) to other VPS subscribers.
• Receive messages from any touch-tone telephone.
• Be called at an outside telephone or be notified through your beeper, when there are
messages stored in your mailbox.
• Be notified by the message-waiting lamp on your extension that there are messages
stored in your mailbox.
• Screen your calls.
• Automate the handling of callers.
• And more...
This guide is your refe re nce to making the best use of you r mai lb ox a nd t he Voic e Pr oce ssi ng
System.
How to Use This Manual
This Subscriber's Guide explains how to use the Voice Processing System (VPS) with any
touch-tone telephone. Diagrams and notes accompany step-by-step descriptions of each VPS
operation. Additionally, you are guided through each procedure by the voice prompts played
as each step is performed.
Description
Describes the step-by-step actions that you must perform for each procedure.
This symbol identifies important notes about the operation being described.
Introduction
3
Page 4
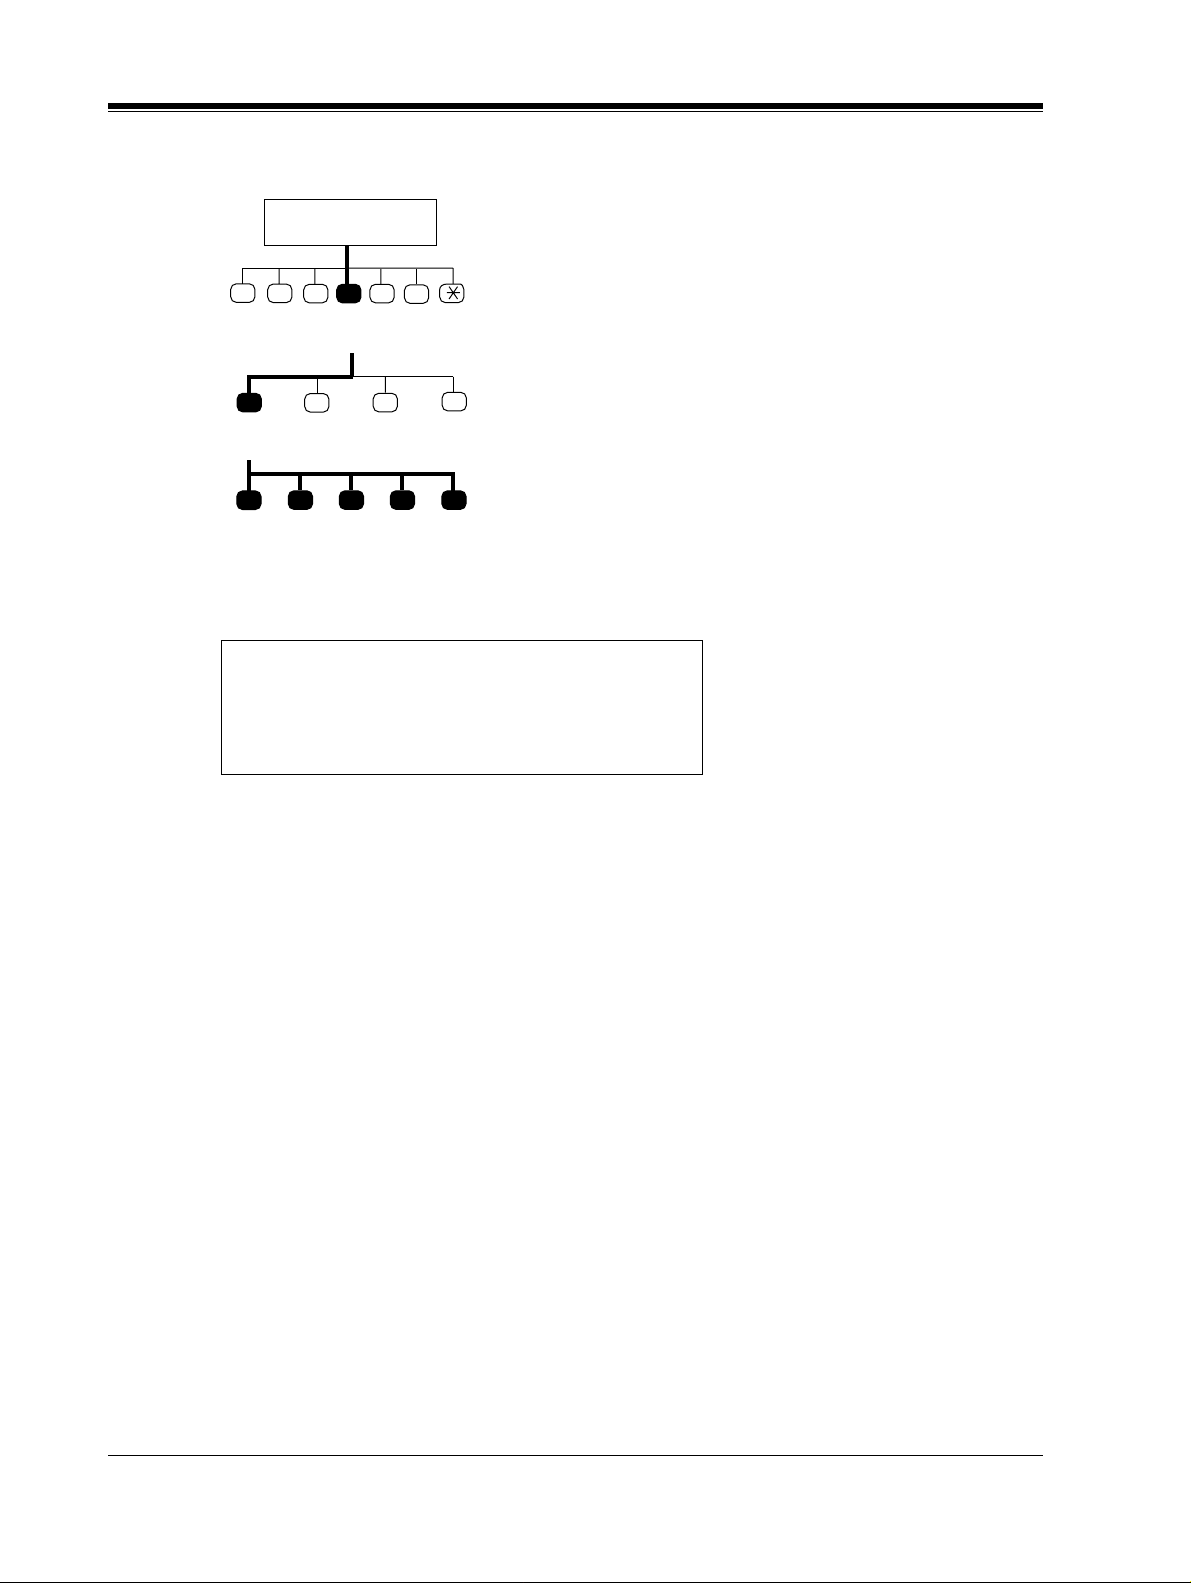
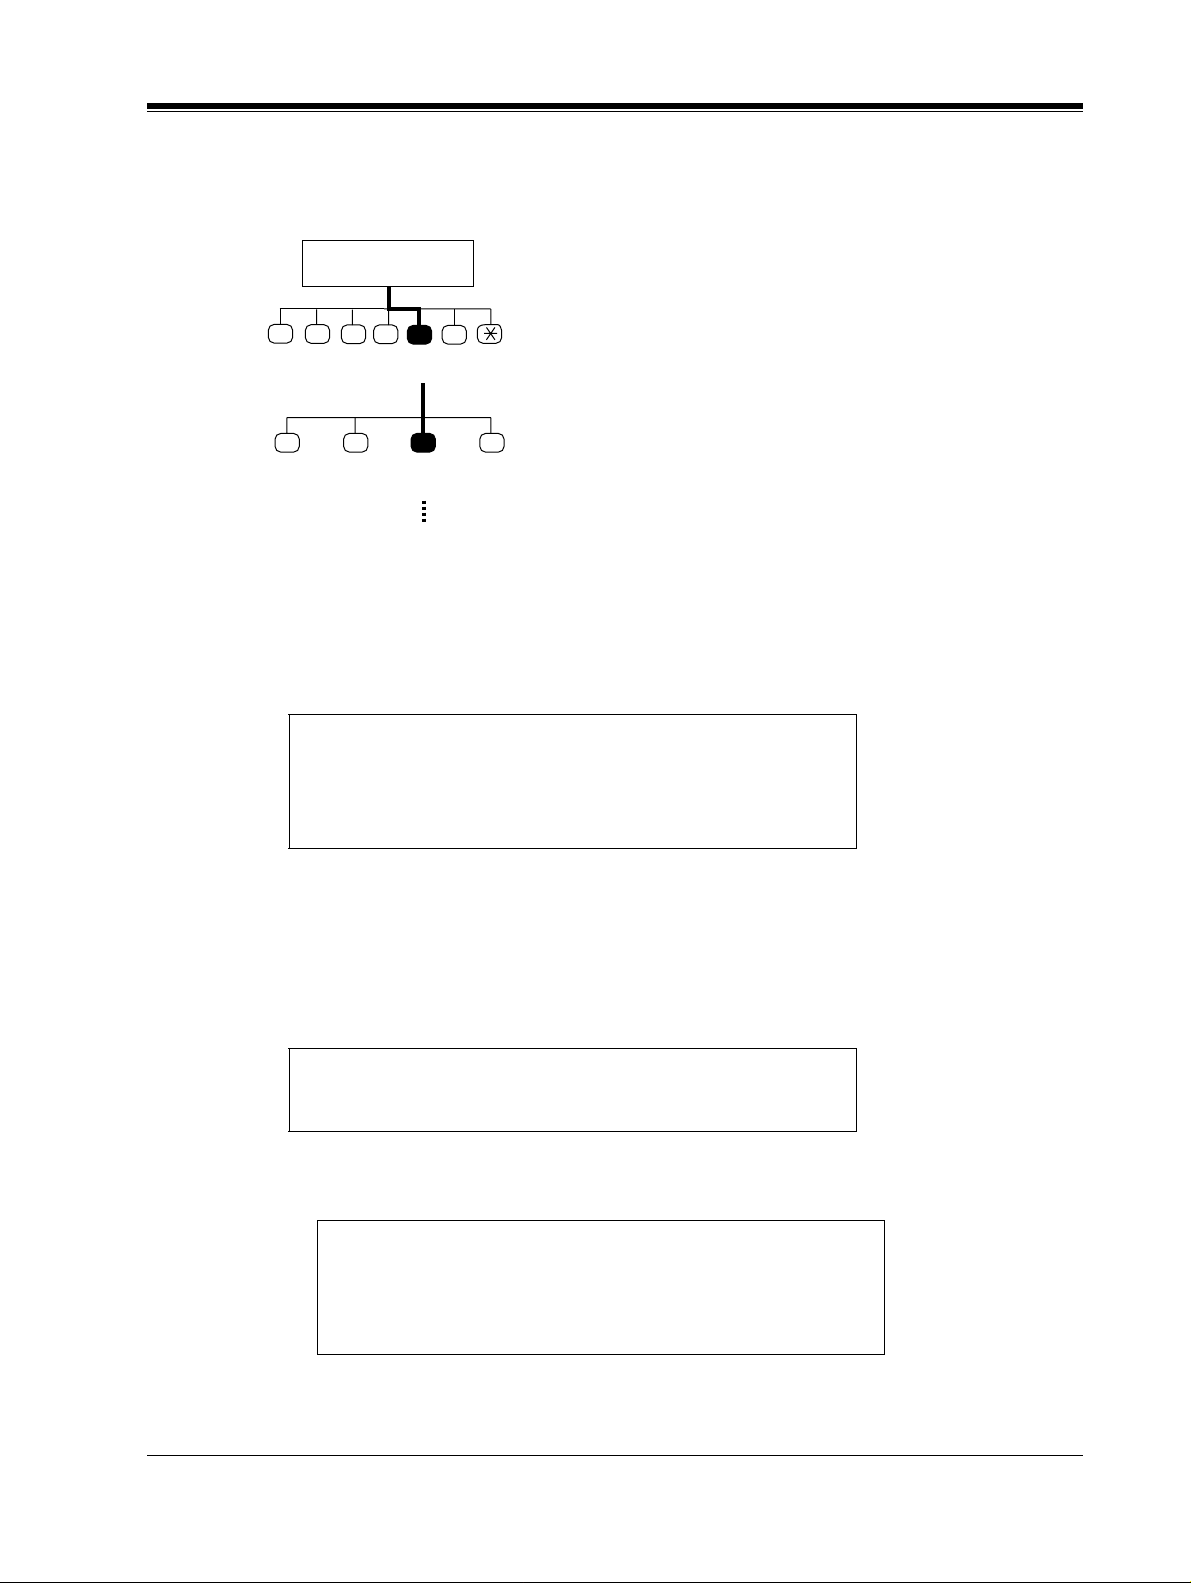
Menu Diagram
Subscriber's
Main Command Menu
12
1
Call
Transfer
Status
1
Call
Blocking
3
2
Covering
Extension
Setting
4
Automated
Attendant
Status
Message
Reception
5
3
Mode
2 3 4 5
Intercom
Call
Screening
Paging
Calling
a Beeper
6
Incomplete
Handling
Status
Disable
All Transfer
Services
4
Voice Prompts
To set Call Transfer Status, Press [1]
To set up Covering Extension, Press [2]
To set Message reception Mode, Press [3]
To set Incomplete Handling Status, Press [4]
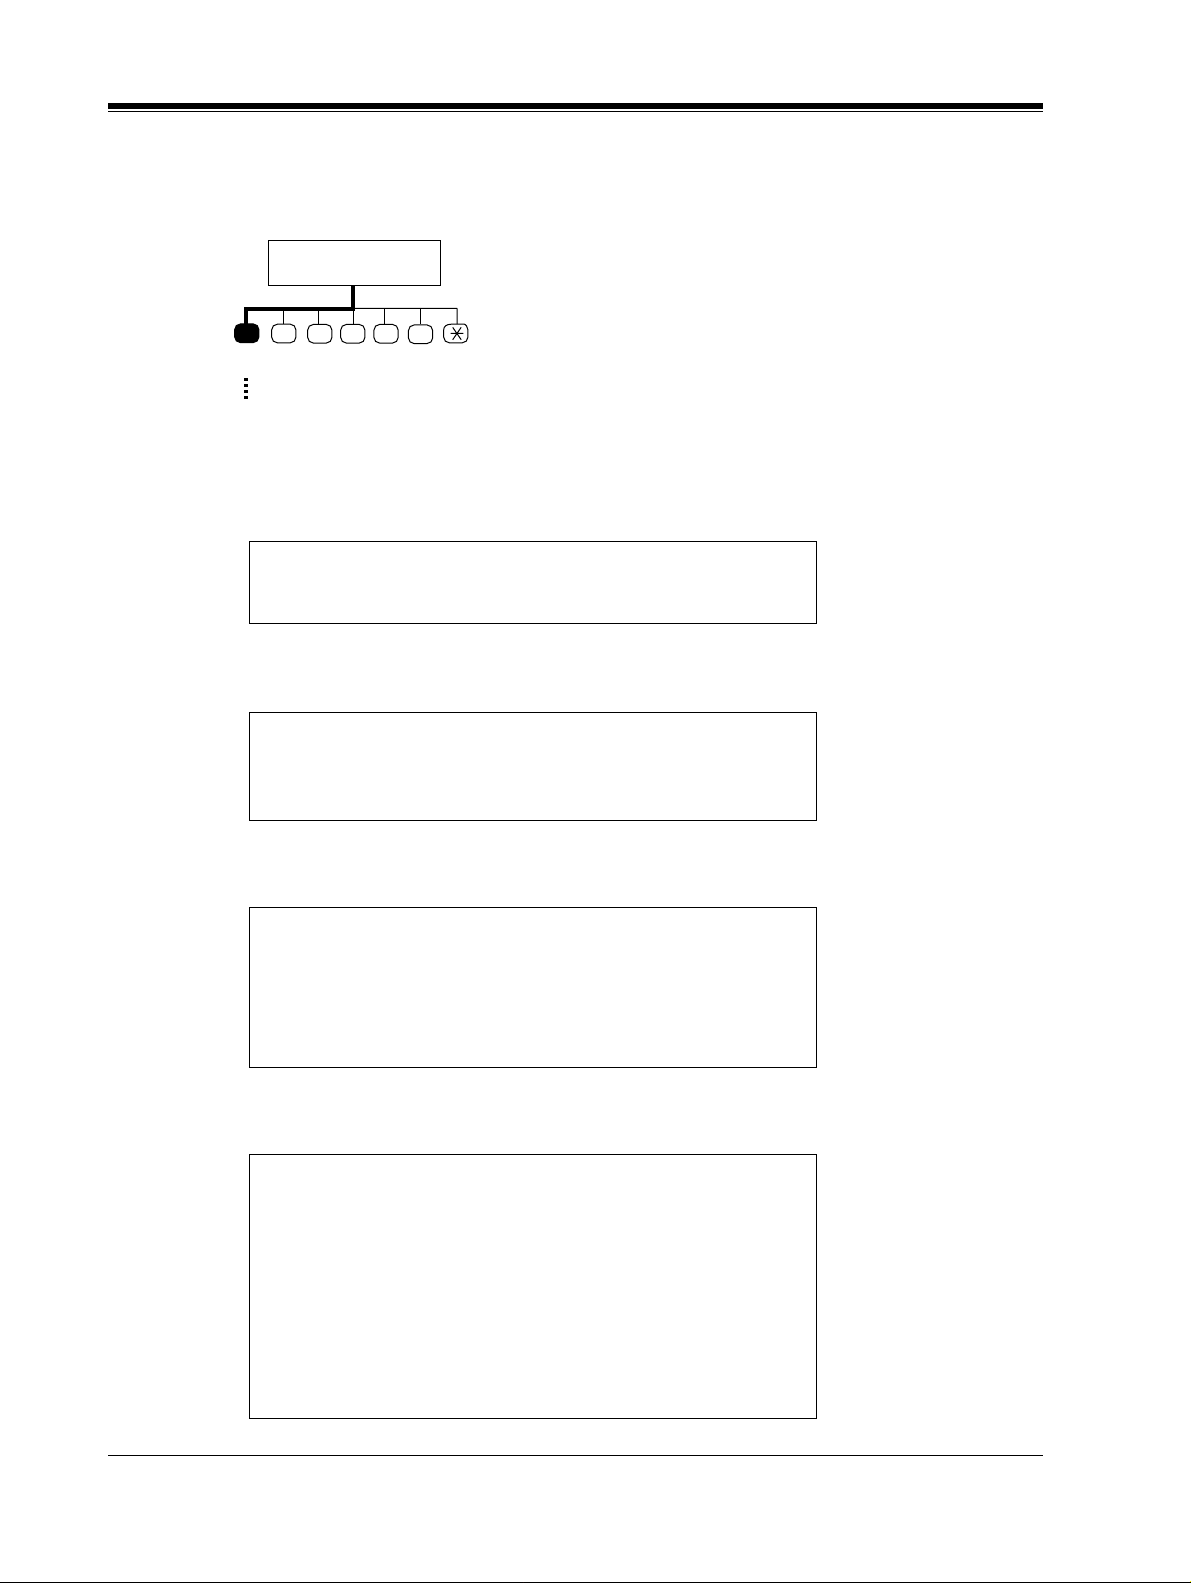
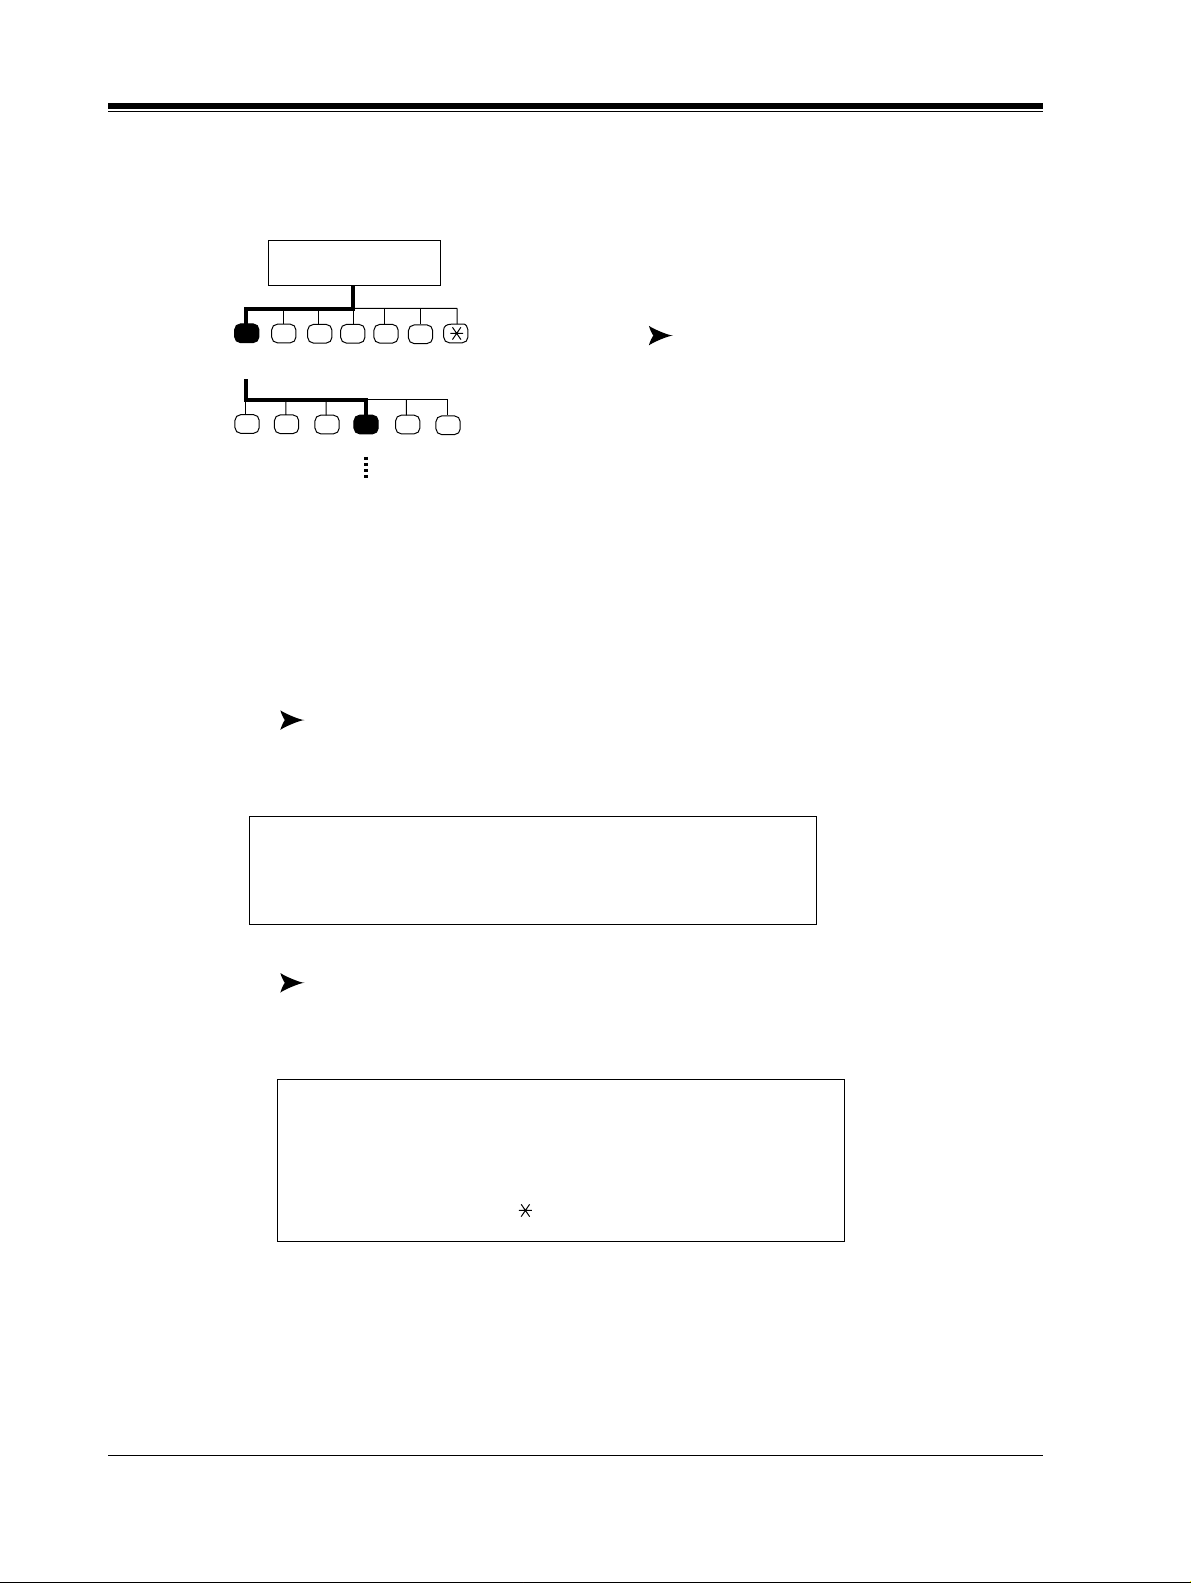
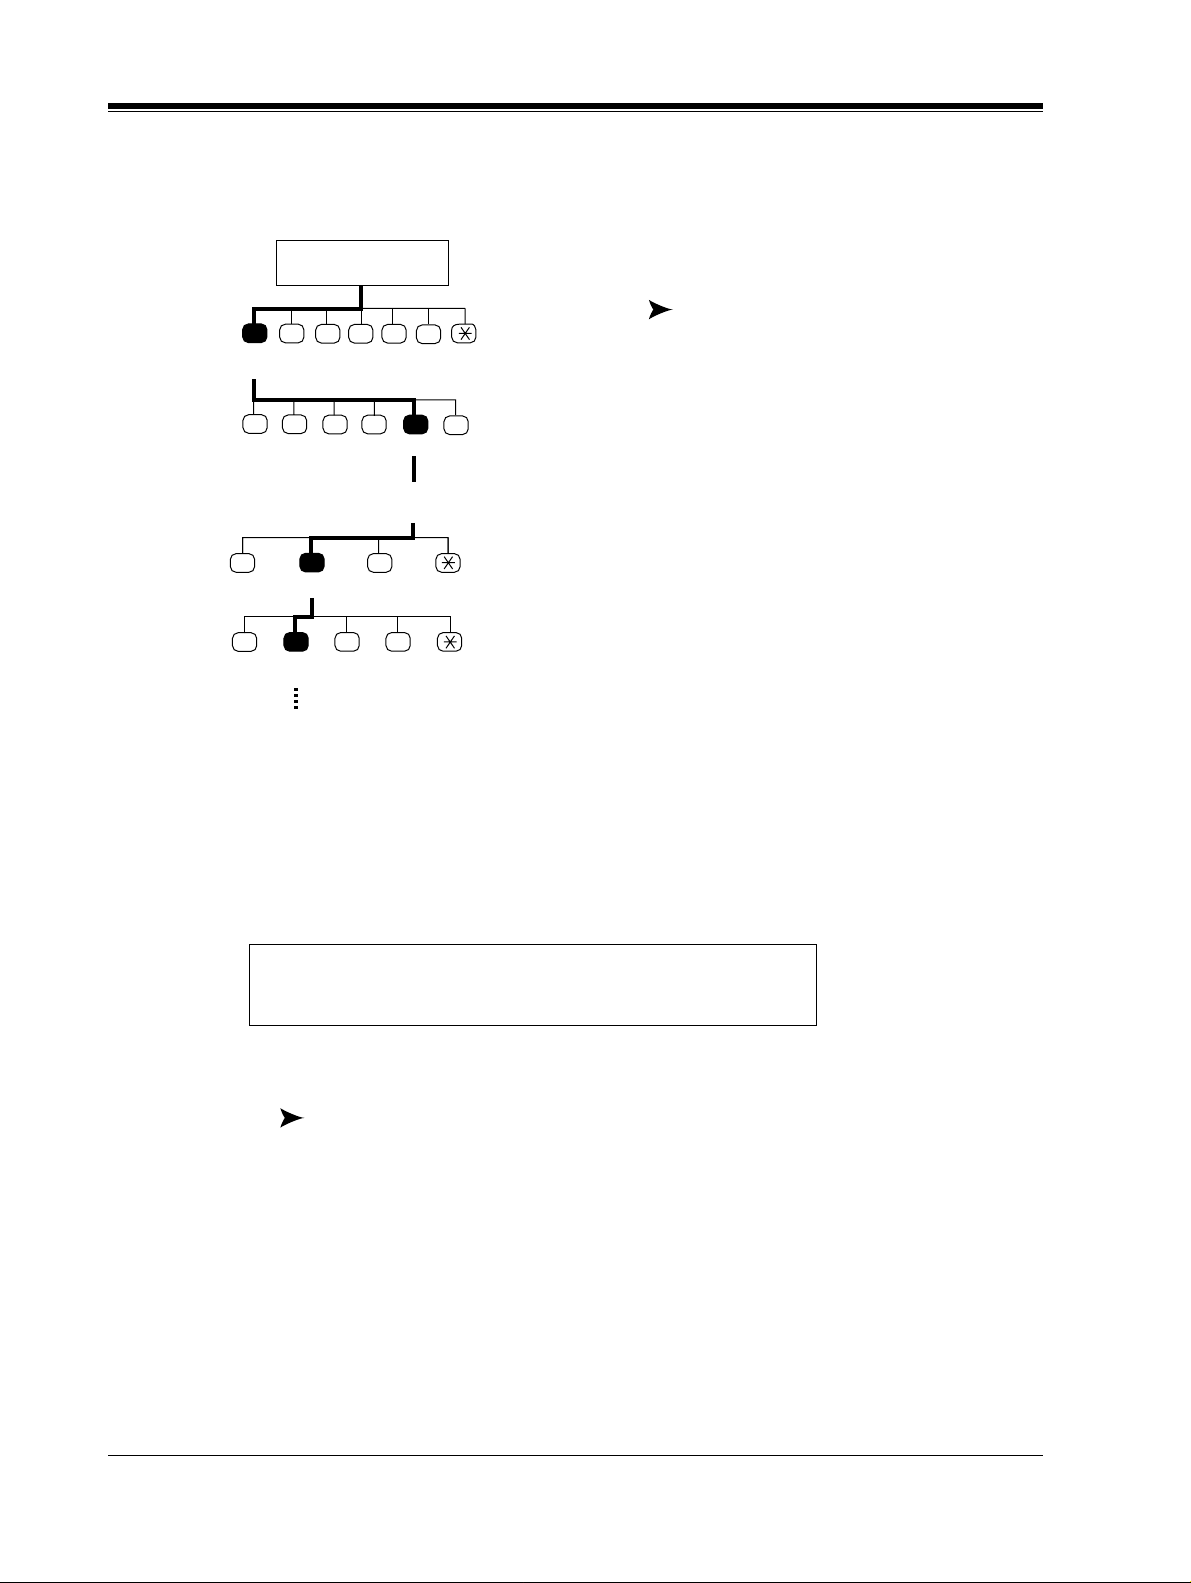
You will find a diagram in the left-hand
corner of the first page of each procedure.
The diagrams illustrate the menu path for
each procedure. The bold lines and black
keys indicate the path that you should take
and the steps that must be performed.
The voice prom pts for each st ep are shown in Italicized text.
Quick Reference
At the end of this guide is a flow-chart showing all VPS operations. The Quick Reference has
been designed to serve as an at-a-glance guide to basic VPS operations.
Terms to Know
Subscriber
The owner of a VPS mailbox.
System Manage r
The person who manages and maintains the Voice Processing System. The System Manager
creates mailboxes and authorizes the use of some VPS features.
Getting Started
Numbers to Know
You must have the following information before you begin:
• The extension number(s) of the VPS.
• Your mailbox and extension number.
• The System Manager's phone number.
4
Introduction
Page 5

Basic Steps
When using your mailbox for the first time, you must read "Chapter 1: Mailbox Setup" and
perform the key s et up procedures desc ribed. You must customize your mailbox befor e sending
or receiving messa ges .
Identify yourself as the owner of your mailbox by setting the following:
• Recording Personal Greetings
• Recording Your Name
• Setting Your Password
You may further customize your mailbox by setting any of the additional features:
• Call T ran sf er Status
• Covering Extension
• Incomplete Call Handling Status
• Message Reception Mode
• Notification by C alling
Introduction
5
Page 6

Table of Contents
1 Mailbox Setup
1.1 Logging into Your Mailbox........................................................................................... 8
1.2 Recording Personal Greetings.................................................................................... 10
1.3 Setting, Changing and Clearing Your Password ...................................................... 13
1.4 Recording Your Name................................................................................................. 15
1.5 Service Access Commands............................... ........................................................... 17
2 Receiving Messages
2.1 Receiving Messages...................................................................................................... 20
2.2 Replying to Messages .................................................................................................. 22
2.3 Message Transfer......................................................................................................... 24
2.4 Erasing Messages......................................................................................................... 27
2.5 Accessing Your Mailbox from an Outside Telephone............................................... 28
3 Sending Messages
3.1 Delivering Messages to Other Subscribers................................................................ 30
3.2 Checking Mailbox Distribution.................................................................................. 34
3.3 Setting up an External Message Delivery List.......................................................... 36
3.4 Sending External Delivery Messages......................................................................... 39
3.5 Checking and Setting External Message Delivery Status........................................ 44
4 Special Features
4.1 Call Transfer Status..................................................................................................... 48
4.2 Covering Extension...................................................................................................... 50
4.3 I ncomplete Call Handling Status ............................................................................... 52
4.4 Message Reception Mode............................................................................................ 53
4.5 Personal Group Distribution Lists............................................................................. 54
4.6 Deleting Group Distribution Members...................................................................... 57
4.7 Deleting Group Distribution Lists.............................................................................. 59
4.8 Message Waiting Notification..................................................................................... 61
4.9 I nterview Mailbox........................................................................................................ 65
4.10 Live Call Screening.................................................................................................... 68
4.11 Recording a Two-Way Conversation........................................................................ 69
Appendix A Quick Reference
A1 Subscriber..................................................................................................................... 72
A2 Message Manager........................................................................................................ 73
A3 System Manager .......................................................................................................... 74
Glossary
............................................................................................................................. 75
6
Table of Contents
Page 7

Section 1
Mailbox Setup
This chapter describes the procedures for customizing
your mailbox.
Mailbox Setup
7
Page 8

1.1 Logging into Your Mailbox
1.1 Logging into Your Mailbox
Before you can access Subscriber Services, you must first open your mail box.
Press the Intercom Button on the telephone keypad.
1.
Dial the extension number connected to the Voice Mail Service.
2.
The extension number is______.
If you do not know the VPS extension number, ask the System Manager.
To access your mailbox from your extension when the Direct Mailbox Access is enabled
3.
(the extension assigned to your mailbox), go to Step 4.
To access your mailbox from another extension, go to Step 5.
Y o u will hear the follo wing if you ha ve set your pa ssword. (See 1.3 Setting, Changing and
4.
Clearing Your Password.)
Enter your password followed by the pound sign.
Enter your password and Press
a)
Command Menu.
You have _________new messages.
To Receive a Message, Press [1].
To Deliver a Message, Press [2].
To Check the Mailbox Distribution, Press [3].
For Automated Attendant Status, Press [4].
Fo r Mailbox Management, Press [5].
For Other Features, Press [6].
To End this Ca ll, Press []
Make your selection.
b)
Ignore the greeting and Press
5.
Please enter your party's mailbox number.
Press
a)
the following.
______(your mailbox number). If you have set your password, you will hear
[]
[#]
.
[#] [6]
(if needed.) You will then hear the following Main
.
Enter your password followed by the pound sign.
8
Mailbox Setup
Page 9

1.1 Logging into Your Mailbox
Enter your password and Press
b)
(if needed.) You will then hear the following Main
[#]
Command Menu.
You have _________new messages.
To Receive a Message, Press [1].
To Deliver a Message, Press [2].
To Check the Mailbox Distribution, Press [3].
For Automated Attendant Status, Press [4].
For Mailbox Management, Press [5].
For Other Features, Press [6].
To End this Call, Press []
Make your selection.
c)
.
Mailbox Setup
9
Page 10
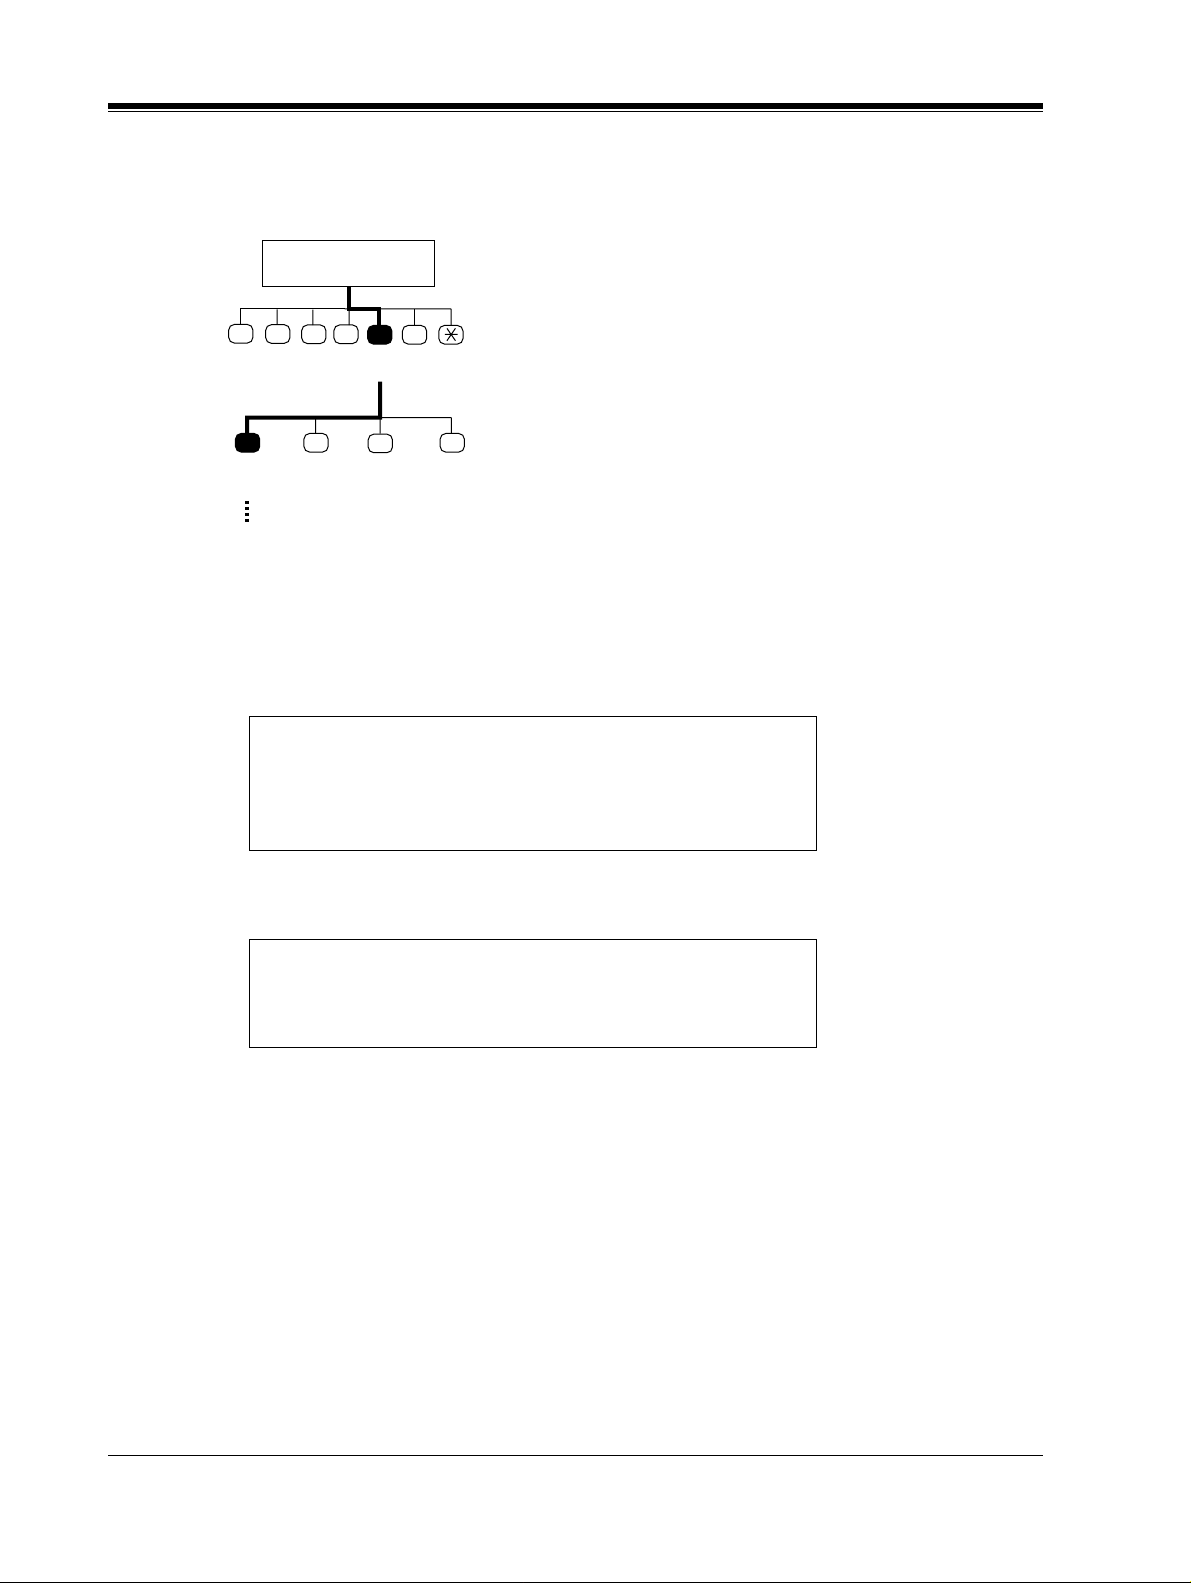
1.2 Recording Personal Greetings
1.2 Recording Personal Greetings
Subscriber's
Main Command Menu
After reaching your mailbox, caller will hear
your personal greet ing mess age(s ). You can
record 3 kinds of personal greetings: No
12
354
Mailbox
Management
6
Answer Greeting, Busy Greeti ng, and After
Hours Greeting.
The VPS plays the appropriate mess age for
each call.
1 2
Change
Personal
Greeting
Go to
Step 4
Change
Password
3
Change
Owner's
Name
4
Group
Distribution
List
Setting
Personal greeting messages are always
followed by a tone and a chance to leave a
message. Your personal greeting sh ould t ell
callers to "please leave a message at the
tone"— otherwise your callers will be
confused.
Log in to your mailbox to access the Main Command Menu.
1.
2.
Press
for Mailbox Management.
[5]
To change the personal greeting, Press [1].
To change the password, Press [2].
To change the owner's name, Press [3].
To set the Group Distribution List, Press [4].
10
3.
Press
to record a pe rsonal greeting.
[1]
To change the No Answer Greeting, Press [1].
To change the Busy Signal Greeting, Press [2].
To change the After Hours Greeting, Press [3].
To record a greeting for the first time, go to Step 5.
4.
To change or erase a greeting, go to Step 6.
To erase a greeting, go to Step 7.
To record a greeting for the first time:
5.
a)
Press
[1], [2]
, or
[3]
.
Mailbox Setup
Page 11

(No Answer) (Busy) or (After Hours) Greeting is not
recorded.
Record greeting at the tone.
To end recording, Press [1].
To pause and start recording, Press [2].
1.2 Recording Personal Greetings
Record the greeting at the tone and Press
b)
To review, Press [1].
To accept, Press [2].
To erase and try again, Press [3].
To add, Press [4].
To erase and exit, Press [ ]
Press
c)
Recording accepted.
To change the No Answer Greeting, Press [1].
To change the Busy Signal Greeting, Press [2].
To change the After Hours Greeting, Press [3].
To change a greeting:
6.
Press
a)
to accept the message recorded.
[2]
When
[1], [2]
is selected, the VPS will not play the accepted message.
[2]
, or
from the previous menu.
[3]
.
[1]
.
Mailbox Setup
(No Answer) (Busy) or (After Hours) Greeting is:
__________(message played).
To change, Press [1].
To accept, Press [2].
To erase, Press [3].
Press
b)
Record greeting at the tone.
To end recording, Press [1].
To pause and start recording, Press [2].
to change the greeting.
[1]
11
Page 12
1.2 Recording Personal Greetings
Repeat Steps 5b and 5c.
c)
When
To erase a greeting:
7.
Press
a)
[1], [2]
is selected, the VPS will not play the accepted message.
[2]
, or
from the previous menu.
[3]
(No Answer) (Busy) or (After Hours) Greeting is:
__________(message played).
To change, Press [1].
To accept, Press [2].
To erase, Press [3].
b)
Press
to erase the greeting without re-recording.
[3]
Greeting erased.
Be sure to exit from th e menu
AFTER
the greeting is acc epted. Other wise the g reeting will
not be stored.
By system default, the maximum length of a personal gree ting is 16 s. If you need more time,
ask your System Administrator or System Manager to increase the upper bound.
If you change the greeting, follow the steps in "TO RECORD FOR THE FIRST TIME" to
re-record.
It is recommended that you mention your name in each personal greeting, because the
regular announcement of name (1.4 Recording Your Name) will be suppressed.
12
Mailbox Setup
Page 13
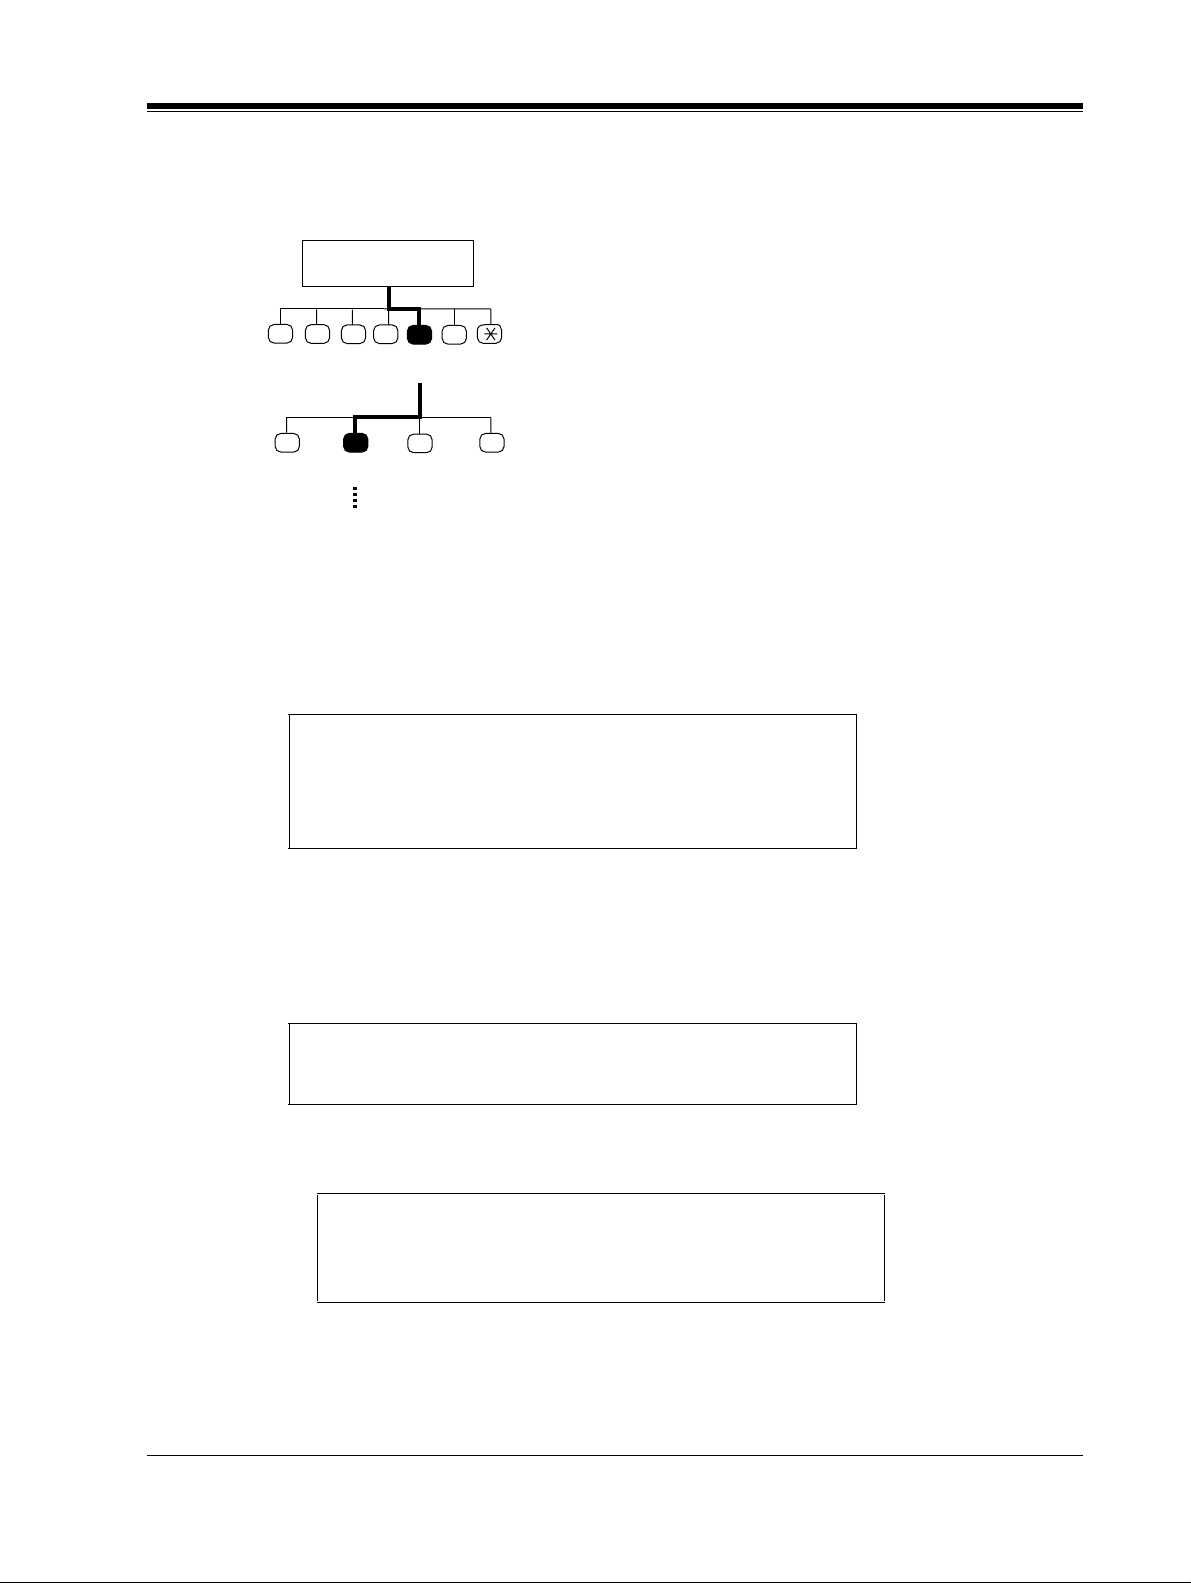
1.3 Setting, Changing and Clearing Your Password
1.3 Setting, Changing and Clearing Your Password
Subscriber's
Main Command Menu
The VPS provides t he o pti on of assigning a
password to your mailbox to protect the
messages stored there from unauthorized
12
354
Mailbox
Management
6
access. A password should be no lon ger than
8 digits (using the k eys 0-9). You can change
your password at any time. When setting
your password, av oid using obvious numbe r
1 2
Change
Personal
Greeting
1.
2.
Change
Password
Go to
Step 3
Log in to your mailbox to access the Main Command Menu.
Press
[5]
3
Change
Owner's
Name
for Mailbox Management.
4
Group
Distribution
List
Setting
combinations. If you forget your password,
have your System Administrator or System
Manager clear it. You may then set a new
one.
To change the Personal Greeting, Press [1].
To change the Password, Press [2].
To change the Owner's Name, Press [3].
To set the Group Distribution List, Press [4].
Mailbox Setup
To set a password for the first time, go to Step 4.
3.
To change an existing password, go to Step 5.
To clear a password, go to Step 6.
4.
Press
to enter the password for the first time.
[2]
Password not assigned.
Enter your password followed by the pound sign [#].
Enter the password and Press
a)
[#]
.
Password is (password stated).
To change, Press [1].
To accept, Press [2].
5.
Press
b)
Press
to accept the password.
[2]
at the Mailbox Management Menu, to change an existing password.
[2]
13
Page 14

1.3 Setting, Changing and Cle ari ng Your Password
Password is (password stated).
To change, Press [1].
To accept, Press [2].
Press
a)
Enter your password followed by the pound sign [#].
To skip setting the password, Press the pound sign [#].
Enter the new password and Press
b)
Password is (password stated).
To change, Press [1].
To accept, Press [2].
Press
c)
Press
6.
Password is (password stated).
To change, Press [1].
To accept, Press [2].
to change the password.
[1]
to accept th e new password ente red.
[2]
to clear an existing password (no password assigned).
[2]
[#]
.
14
Press
a)
Enter your password followed by the pound sign [#].
To skip setting the password, Press [#].
Press
b)
Password not assigned.
To change, Press [1].
To accept, Press [2].
Press
c)
to change the password.
[1]
to clear the password.
[#]
to accept the password as not assigned.
[2]
Mailbox Setup
Page 15
1.4 Recording Your Name
1.4 Recording Your Name
Subscriber's
Main Command Menu
This recording informs ca llers that they ha ve
reached the correct mailbox (for example,
when transferring a message to a s ubscriber ,
12
354
Mailbox
Management
6
they will hear the subscriber's name). In
addition, if a caller does not know the
mailbox number and specifies the mailbox
by entering t he first 3 or 4 letters of the
1
Change
Personal
Greeting
1.
2.
Change
Password
Log in to your mailbox to access the Main Command Menu.
Press
[5]
32
Change
Owner's
Name
Go to
Step 3
for Mailbox Management.
4
Group
Distribution
List
Setting
owner's name, the VPS will announce a
series of recorded name s which the caller
may select.
To change the Personal Greeting, Press [1]
To change the Password, Press [2].
To change the Owner's Name, Press [3].
To set the Group Distribution List, Press [4].
Mailbox Setup
To record the owner's name for the first time, go to Step 4.
3.
To change an existing owner's name, go to Step 5.
To erase an existing owner's name, go to Step 6.
4.
Press
to record the owner's name for the first time.
[3]
Owner's name is not recorded.
Record owner's name at the tone.
State your name at the tone.
a)
Owner's name is (name stated).
To change, Press [1].
To accept, Press [2].
To erase, Press [3].
15
Page 16

1.4 Recording Your Name
Press
b)
Press
5.
Owner's name is (name stated).
To change, Press [1].
To accept, Press [2].
To erase, Press [3].
Press
a)
Record owner's name at the tone.
Clearly st ate the name at the tone.
b)
Owner's name is (name stated).
To change, Press [1].
To accept, Press [2].
To erase, Press [3].
to accept the name.
[2]
to change an existing owner's name.
[3]
to change the name.
[1]
Press
c)
Press
6.
Owner's name is (name stated).
To change, Press [1].
To accept, Press [2].
To erase, Press [3].
Press
a)
Owner's name erased.
to accept the new name.
[2]
to erase an existing owner's name.
[3]
to erase the owner's name.
[3]
16
Mailbox Setup
Page 17

1.5 Service Access Commands
Before routinely using the VPS, you should familiarize yourself with the Service Access
Commands shown in Appendix A.
The most important ones are the following:
#6 -Pressing this during system prompts activates Voice Mail Service. It prompts you for a
mailbox number and then you ca n recor d a messa ge. You can also press and then your
own mailbox number. In this case, you can log into your mailbox.
#8 -Pressing this during s ystem pr ompts act i vates Automated Attendant Ser vice. I t prompts
you for an extension number and then attempts to call your party. If he cannot take the
call, the VPS will take some suitable action.
If you call the extension directly, the VPS cannot help you.
Note:
-Pressing this dur ing system pr ompts tak es you to th e pre vious VPS menu. If you seem t o
be stuck in "an infinite loop", use this command to get you out.
1.5 Service Access Commands
Mailbox Setup
17
Page 18

1.5 Service Access Commands
18
Mailbox Setup
Page 19

Section 2
Receiving Messages
This chapter explains how to access and manage
received messages.
Receiving Messages
19
Page 20
2.1 Receiving Messages
2.1 Receiving Messages
Subscriber's
Main Command Menu
1 2
Receive
Message
Go to
Step 3
Log in the Main Command Menu.
1.
3
5
4
6
You have _____new messages.
(Main Command Menu played)
2.
Press
to access the Receive Message Menu.
[1]
You have _____message(s).
New/Old Message (1st message played).
Message recorded on (date started) at (time stated).
The VPS plays both the new and saved
messages that are in your mailbox along
with the date, time, and sender information
pertaining to each message.
An abbreviated menu is played first:
To repeat this message, Press [1].
To play the next message, Press [2].
To erase this message, Press [3].
To transfer this message, Press [7].
For Help, Press [0].
Press
or wait and allow the full menu to be played.
[0]
To repeat this message, Press [1].
To replay the previous message, Press [1] twice.
To play the next message, Press [2].
To erase this message, Press [3].
To reply to this message, Press [4].
To rewind, Press [5].
To fast forward, Press [6].
To transfer this message, Press [7].
To message scan, Press [8].
20
Receiving Messages
Page 21

Select the appropriate message option.
3.
2.1 Receiving Messages
Repeat Messages
- Press
Replaying the Previous Message
- Press
Playing the Next Message
- Press
Erase
- Press
Reply
- Press
Rewind
- Press
Fast Forward
- Press
Transfer
- Press
to listen to the current message again.
[1]
twice while receiving a message to listen to the previous mess age.
[1]
while receiving a message to listen to the next message.
[2]
after receiving a message to erase it. (See Erasing Messages)
[3]
after receiving a message to send a reply. (See Replying to Messages)
[4]
after receiving a message to listen to it again.
[5]
while receiving a message to fast forward to the end.
[6]
after receiving a message to transfer it to another subscriber.
[7]
(See Messag e Transfer)
Scan
- Press
to listen to the first 4 s of each message. While scanning, you have these
[8]
options:
These are the brief segments of your messages.
To replay the previous message, Press [1].
To play the next message, Press [2].
To play the entire message, Press [3].
Option 3 - "To play the entire message," is only available once. Selecting this option a
second time will erase the message.
Receiving Messages
21
Page 22
2.2 Replying to Messages
2.2 Replying to Messages
Subscriber's
Main Command Menu
This feature al lows you to reply to messages
that have been sent by other subscribers
through their mailboxes.
1 2
Receive
Message
3
5
4
6
You can reply only to messages that
were transferred to you, or origi na ted as
"Delivering Messages to Other
12
Repeat
Same as Receiving Messages.
1.
Same as Receiving Messages (to access the Receive Message Menu).
2.
Press
3.
3
Erase Reply Transfer Help
Next
to reply to the message.
[4]
4
Go to
Step 4
7
0
Subscribers."
When a message cannot be replied to you will hear this prompt:
"Sorry, you cannot reply. The message sender is unknown."
4.
Press
to record a message.
[2]
Please leave a message at the tone.
To end recording, Press [1].
To pause and restart recording, Press [2].
If paused, the recording must be restarted within 20 s or the
VPS will stop re cording automatically.
Record the message and Press
a)
[1]
.
To review, Press [1].
To accept, Press [2].
To erase and try again, Press [3].
To add, Press [4].
To erase and exit, Press [ ]
b)
Press
to accept the message.
[2]
.
22
Receiving Messages
Page 23

Recording accepted.
To set deliver time or make this message private, Press [1].
To accept, Press [2].
2.2 Replying to M ess a ges
Press
5.
To set delivery time, Press [1].
For immediate delivery, Press [2].
a)
b)
c)
to set delivery time.
[1]
Press
Enter the time followed by the pound sign.
For Hellp, Press [0].
Enter the time and Press
Enter [1] for AM or [2] for PM.
Press
to set delivery time (if desired).
[1]
For example: 5:00 is entered as [5] and [#]. 5:15 is entered as [515] [#].
for AM or
[1]
[2]
.
[#]
for PM.
6.
7.
Receiving Messages
Enter day of the month followed by the pound sign.
Enter the day of the month and Press
This message will be delivered on (date stated) at (time
stated).
To change, Press [1].
To accept, Press [2].
Press
a)
To make this message private, Press [1].
Otherwise, Press [2].
Press
to accept the message.
[2]
to make the message private or
[1]
.
[#]
to return to the main menu.
[2]
23
Page 24
2.3 Message Transfer
2.3 Me ssage Transfer
Subscriber's
Main Command Menu
1 2
Receive
Message
12
Repeat
1
Change
1
Transfer
Same as Receiving Messages.
1.
3
3
Erase Replay Transfer Help
Next
2
Accept
2 3 4
Transfer
W. Comment
Go to
Step 6
Add
M.B.
5
4
4
Mailbox No.
3
Repeat
M.B. Info.
Review
Mailing
XXXX
List
7
6
Cancel
Transfer
Tansfer
This function allows you to transfer
messages to other mailboxes.
If the message has been assigned
as private, it cannot be transferred
to other mailboxes.
0
Cancel
Same as Receiving Messages (to access the Receive Message Menu).
2.
3.
Press
to transfer the message.
[7]
Enter the destination mailbox number.
To enter by name, Press [#] and [1].
Enter the mailbox of the intended recipient.
4.
You can also specify a Personal or a System Group Distribution List instead of an
individual mailbox by entering the number of the list. If you use a Personal Group
Distribution List, pr ess [#] after the lis t number. Personal Group Distributi on Lists must
be created before the y can be used. (See 4.5 Personal Group Distrib ution Lists.) T o use
a System Group Distrib ution Li st, check with the Sys tem Admini strator to ensure that a
list exists within the VPS.
Option 1:
Enter the mailbox number on the telephone keypad.
a)
24
Receiving Messages
Page 25

Mailbox (mailbox number stated).
(Owner stated)
To change, Press [1].
To accept, Press [2].
To repeat, Press [3].
2.3 Message Transfer
Press
b)
To transfer, Press [1].
To transfer with comment, Press [2].
To add a new mailbox number, Press [3].
To review the mailing list, Press [4].
Option 2:
Press
a)
Enter the first three or four letters of the person's last name.
For Q, Press [7].
For Z, Press [9].
Enter the first 3 or 4 letters of the person's last name.
b)
Mailbox (mailbox number stated).
(Owner stated)
To accept, Press [1].
For the next name, Press [2].
To repeat this name, Press [3].
To enter a new name or mailbox, Press [ ]
to accept the mailbox number entered.
[2]
[#]
and
to access the mailbox by name.
[1]
.
5.
Receiving Messages
Press
c)
To transfer, Press [1].
To transfer with comment, Press [2].
To add a new mailbox number, Press [3].
To review the mailing list, Press [4].
Press
to accept the mailbox stated.
[1]
to transfer with comment.
[2]
25
Page 26

2.3 Message Transfer
6.
State your comment at the tone.
To end recording, Press [1].
To pause and restart recording, Press [2].
When paused, the recording must be restated within 20 s
or the VPS will stop recording automatically.
Record a comment and Press
[1]
.
To review, Press [1].
To accept, Press [2].
To erase and try again, Press [3].
To add, Press [4].
To erase and exit, Press [ ]
.
7.
Press
to accept the message and terminate the activity or make another selection from
[2]
the Receive Message Menu.
No acknowledgment will be given that the message has been transferred.
26
Receiving Messages
Page 27

2.4 Erasing Messages
2.4 Erasing Messages
Subscriber's
Main Command Menu
You can erase messages during playback.
Erased messages cannot be recovered.
The VPS will automatically erase
1
2
Receive
Message
3
5
4
6
messages after a specified number of
days.
Your System Manager controls
12
Same as Receiving Messages.
1.
Same as Receiving Messages.
2.
Press
3.
3
Erase Reply Transfer HelpRepeat Next
to erase messages.
[3]
7
4
0
the number of days that messages
will be maintained.
Messages are erased one at a time.
After a message is erased, you will hear the following prompt:
The message erased.
To play the next message, press 2.
If all messages have been erased, you will hear:
All messages erased.
Receiving Messages
27
Page 28

2.5 Accessing Your Mailbox from an Outside Telephone
2.5 Accessing Your Mailbox from an Outside
Telephone
This procedure is use d when checki ng your mess ages remote ly or wh en replying t o a message
waiting notification call (by beeper or telephone).
Call the Voice Processing System from an outside telephone.
1.
Press
2.
Please enter your party's mailbox number.
Press
3.
Enter your password followed by the pound sign.
Enter your password and Press
4.
You have _________new messages.
To Receive the Message, Press [1].
To Deliver a Message, Press [2].
To Check the Mailbox Distribution, Press [3].
For Automated Attendant Status, Press [4].
Fo r Mailbox Management, Press [5].
For Other Features, Press [6].
To End this Call, Press [ ].
(Important - Press Keys Slowly).
[#] [6]
and enter your mailbox number.
[]
[#]
.
28
Press
5.
Review your message s.
6.
to receive your messages.
[1]
Press
[#] [8]
Press
[0]
Press
[#] [9]
to access/call another extension.
to reach the operator.
to exit the VPS.
Receiving Messages
Page 29

Section 3
Sending Messages
This chapter te lls you how to se nd messag es, inclu ding
recording and delivery.
Sending Messages
29
Page 30

3.1 Delivering Messages to Other Subscribers
3.1 Delivering Messages to Other Subscribers
Subscriber's
Main Command Menu
1 2
Mailbox No.
1.
2.
Deliver
Message
XXXX
3
5
4
Go to
Step 4
6
Log in to your mailbox to access the Main Command Menu.
Press
for Message Delivery.
[2]
This feature is used when sending the same
message to several subscribers.
Enter your party's mailbox number.
To enter by name, Press [#] and [1].
Enter the mailbox of the intended recipient.
3.
You can also specify a Personal or a System Group Distribution List instead of an
individual mailbox by entering the number of the list. If you use a Personal Group
Distribution List, pr ess [#] after the lis t number. Personal Group Distributi on Lists must
be created before the y can be used. (See 4.5 Personal Group Distrib ution Lists.) T o use
a System Group Distrib ution Li st, check with the Sys tem Admini strator to ensure that a
list exists within the VPS.
30
Option 1:
Enter the mailbox number on the telephone keypad.
a)
Mailbox (mailbox number stated).
To change, Press [1].
To accept, Press [2].
To repeat, Press [3].
b)
Press
to accept the mailbox number entered.
[2]
To record a message, Press [1].
To add a new mailbox number, Press [2].
To review the mailing list, Press [3].
Sending Messages
Page 31

Option 2:
3.1 Delivering Messages to Other Subscribers
To enter the mailbox by name, Press
a)
Enter the first three or four letters of the person's last name.
For Q, Press [7].
For Z, Press [9].
Enter the first 3 or 4 letters of the person's last name.
b)
Mailbox (mailbox number stated).
To accept, Press [1].
For the next name, Press [2].
To repeat this name, Press [3].
To enter a new name or mailbox, Press [ ]
Press
c)
To record a message, Press [1].
To add a new mailbox number, Press [2].
To review the mailing list, Press [3].
to accept the mailbox stated.
[1]
[#]
and
[1]
.
.
To record a message, go to Step 5.
4.
To add a new mailbox number, go to Step 6.
To review the mailing list, go to Step 7.
Press
5.
Please leave a message at the tone.
To end recording, Press [1].
To pause and restart recording, Press [2].
a)
to record a message.
[1]
If paused, the recording must be restated within 20 s or
the VPS will stop recording automatically.
Record the message and Press
[1]
.
Sending Messages
31
Page 32

3.1 Delivering Messages to Other Subscribers
To review, Press [1].
To accept, Press [2].
To erase and try again, Press [3].
To add, Press [4].
To erase and exit, Press [ ]
.
Press
b)
Recording accepted.
T o set de livery time and / or mak e this message priv ate, Pr ess
[1].
To accept, Press [2].
Press
c)
To set delivery time, Press [1].
For immediate delivery, Press [2].
Press
d)
Enter the ti me followed by [#].
For Help, Press [0]
to accept the message.
[2]
You can deliver your message immediately after recording by pressing
to set delivery time.
[1]
to set delivery time.
[1]
[2].
32
For example: 5:00 is entered as [5] and [#]. 5:15 is entered as [515] [#].
Enter the time an d Press
e)
Enter [1] for AM or [2] for PM.
Press
f)
Enter day of the month followed by the pound sign.
Enter the day of the month and Press
g)
for AM or
[1]
[2]
[#].
for PM.
[#].
Sending Messages
Page 33

3.1 Delivering Messages to Other Subscribers
This message will be delivered on (date stated) at (time
stated).
To change, Press [1].
To accept, Press [2].
h)
Press
to accept the message.
[2]
To make this message private, Press [1].
Otherwise, Press [2].
6.
Press
i)
Press
to make the message private, or
[1]
to add a new mailbox number, and repeat Step 3.
[2]
You can specify a maximum of 20 mailboxes as destinations.
7.
Press
to review the mailing list.
[3]
Mailbox (mailbox number stated).
To record a message, Press [1].
To add a new mailbox number, Press [2].
To review the mailing list, Press [3].
to return to the main menu.
[2]
Sending Messages
33
Page 34

3.2 Chec king Mailbox Distribution
3.2 Checking Mailbox Distribution
Subscriber's
Main Command Menu
This function allows you to check the st atus
of messages, which you have recorded in
your mailbox, for delivery to other
1
2
3
Check
M.B.
Distribution
Go to
Step 3
Log in to your mailbox to access the Main Command Menu.
1.
Press
2.
[3]
5
4
6
to check distribution status.
mailboxes.
You can check the delivery status of
up to 84 message transmissions.
(Number of messages stated) to verify.
Message received on (date stated).
At (time stated) for (mailbox number stated).
(Status of message - whether or not received, is stated).
To play this message, Press [1].
To check the previous message, Press [1] twice.
To check the next message, Press [2].
To cancel this message or verification, Press [3].
34
3.
Press
to cancel the message or delete verification.
[3]
To delete distribution verification of this message, Press [1].
To cancel message delivery, Press [2].
4.
Press
to delete distribution verification of the first message stated.
[1]
Verification deleted.
(Distribution status menu repeated).
5.
Press
to cancel message delivery.
[2]
Sending Messages
Page 35

Message delivery canceled.
(Distribution status menu repeated).
3.2 Checking Mailbox Distribution
Sending Messages
35
Page 36

3.3 Setting up an External Message Delivery List
3.3 Setting up an External Message Delivery List
Subscriber's
Main Command Menu
Setting up an External Message Delivery
List lets you send the same message to
several people outside of the system with a
1
3
2
5
4
6
Other
Features
single operation. Up to 2 lists can be
maintained at the same time, and each list
can contain up to 8 members.
The System Administrator or the
1
Interview
M.B.
Management
1
Record
Message
Log in to your mailbox to access the Main Command Menu.
1.
Press
2.
2
Message
Waiting
Notification
Setting
2
Check
Delivery
Status
for other features.
[6]
3
External
Message
Delivery
3
Mailing
List
Setting
Go to
Step 5
System Manager must authorize
this feature before it can be used.
For Interview Mailbox Management, Press [1].
To set up Message Waiting Notification, Press [2].
For External Message Delivery, Press [3].
3.
Press
for External Message Delivery.
[3]
To record a message for external delivery, Press [1].
To check external delivery message status, Press [2].
To set up the mailing list, Press [3].
4.
Press
to set up the mailing list.
[3]
Enter delivery list number one or two.
5.
Press
[1]
or
to choose the delivery list.
[2]
Up to two delivery lists can be established.
36
Sending Messages
Page 37

3.3 Setting up an External Message Delivery List
Delivery list number is (number selected is stated).
This group has no members (if members not entered).
To add a new member, Press [1].
Press
6.
You can add up to (number of entries remaining) more
members.
Any digit on the telephone keypad can be used.
Enter the telephone number and wait.
To insert a pause or special command, enter the partial
number and wait for the options menu.
Enter the telephone number at the completion of the previous message. Press
7.
if needed
Telephone number is (telephone number stated).
To change, Press [1].
To accept, Press [2].
To review, Press [3].
To add more digits, Press [4].
To insert a pause, Press [5].
To set dial mode, Press [6].
To insert a wait for dial tone, Press [7].
to add members to the list.
[1]
Up to 8 members can be entered on each list.
] [telephone number]
.
[area code
–
Sending Messages
Press
8.
Record the recipient's name at the tone.
Record the recipient's name and wait.
9.
Telephone number is (telephone number stated).
(Recipient's name stated)
To change, Press [1].
To add, Press [2].
Press
10.
to accept the telephone number entered.
[2]
to add more members or to end.
[2]
37
Page 38

3.3 Setting up an External Message Delivery List
To add more members, Press [1].
To end, Press [2].
Press
11.
repeat the procedure.
To delete members from the list, repeat Steps 1 through 5.
12.
a)
b)
c)
and hang-up to end this procedure. Press
[2]
Press
To delete all group members, Press [1].
Otherwise, Press [2].
Press
This group has no members.
Press
Telephone number is (telephone number stated).
(Recipient's name stated ).
To delete, Press 1.
To play next, Press 2.
to delete mem bers from the list.
[2]
to delete all group members.
[1]
to delete individual group members.
[2]
to continue adding members, and
[1]
38
Press
d)
Group member deleted.
to delete.
[1]
Sending Messages
Page 39

3.4 Sending External Delivery Messages
3.4 Sending External Delivery Messages
Subscriber's
Main Command Menu
This feature is used to record and send
external delivery messages.
The System Administrator or the
1
Interview
Management
Record
Message
Step 5
1.
2.
1
M.B.
1
Go to
3
2
4
2
Message
Waiting
Notification
Setting
2
Check
Delivery
Status
5
6
Other
Features
External
Message
Delivery
Mailing
Setting
System Mana ger must authorize
this feature before it can be used.
3
3
List
Log in to your mailbox to access the Main Command Menu.
Press
for other features.
[6]
For Interview Mailbox Management, Press [1].
To set up Message Waiting Notifica tion, Press [2].
For External Message Delivery, Press [3].
Sending Messages
3.
Press
for External Message Delivery.
[3]
To record a message for external delivery, Press [1].
To check external delivery message status, Press [2].
To set up the mailing list, Press [3].
4.
Press
to record a message for external message delivery.
[1]
To send to one recipient, Press [1].
To send by mailing list, Press [2].
5.
Press
to send to 1 recipient.
[1]
39
Page 40

3.4 Sending External Delivery Messages
Any digit on the telephone keypad can be used.
Enter the telephone number and wait.
To insert a pause or special command, enter the partial
number and wait.
Enter the telephone number at the comple tion of the previous message. Press
a)
– if needed
Telephone number is (telephone number stated).
To change, Press [1].
To accept, Press [2].
To review, Press [3].
Press
b)
Enter the four digit password.
To skip setting the password, Press the pound sign.
Enter a 4 digit password or P ress
c)
Record recipients name at the tone.
Record the recipient's name at the tone.
d)
] [telephone number]
to accept the number.
[2]
.
[#]
.
[area code
40
Enter the time followed by the pound sign.
To deliver now, press only the pound sign.
For help, Press [0].
Enter the time an d Press
e)
Enter [1] for AM or [2] for PM.
Press
f)
Enter the day of the month followed by the pound sign.
Enter the day of the month and Press
g)
for AM or
[1]
[2]
.
[#]
for PM.
[#]
.
Sending Messages
Page 41

3.4 Sending External Delivery Messages
Telephone number is (number stated).
Password is (password stated).
External delivery message scheduled for (recipient stated).
On (date) at (time state d).
To change the setting, Press [1].
To accept, Press [2].
To review, Press [3].
Press
h)
Please leave a message at the tone.
To end recording, Press [1].
To pause and start recording, Press [2].
Record the message and Press
i)
To review, Press [1].
To accept, Press [2].
To erase and try again, Press [3].
To add, Press [4].
To erase and exit Press [ ]
Press
j)
Recording accepted.
to accept.
[2]
to accept the message.
[2]
.
[1]
.
Sending Messages
Press
6.
Enter delivery list number one or two.
a)
b)
to send by external message delivery list.
[2]
Press
Delivery list number is (list number stated).
Enter the four digit password.
To skip setting the password, Press the pound sign.
Enter the 4 digit password.
[1]
or
for desired list.
[2]
41
Page 42

3.4 Sending External Delivery Messages
Enter the time followed by the pound sign.
Enter the time an d Press
c)
Enter [1] for AM or [2] for PM.
Press
d)
Enter the day of the month followed by the pound sign.
Enter the day of the month and Press
e)
Password is (password stated).
External delivery messa ge scheduled on (date st ated) at (time
stated).
To change the setting, Press [1].
To accept, Press [2].
To review, Press [3].
Press
f)
for AM or
[1]
to accept.
[2]
[2]
.
[#]
for PM.
[#]
.
Please leave a message at the tone.
To end recording, Press [1].
To pause and start recording, Press [2].
Record the message and Press
g)
To review, Press [1].
To accept, Press [2].
To erase and try again, Press [3].
To add, Press [4].
To erase and exit, Press [ ]
Press
h)
Recording accepted.
to accept the message
[2]
.
[1]
.
42
Sending Messages
Page 43

3.4 Sending External Delivery Messages
Receiving External Delivery Messages
Pick up a call from the VPS.
1.
Press
2.
Enter the password that the sender assigned, if needed, and press
3.
Receiving the message will be disabled after an incorrect password is entered 3 times.
Press
4.
to receive the message.
[1]
to end the call.
[]
[#]
.
Replying to External Delivery Messages
Same as Receiving External Delivery Messages.
1.
Same as Receiving External Delivery Messages.
2.
Same as Receiving External Delivery Messages.
3.
Press
4.
Record the message and press
5.
Press
6.
Press
7.
Otherwise, press
to reply to the message.
[2]
[1]
to accept.
[2]
to make the message private.
[1]
.
[2]
to end recording.
Sending Messages
43
Page 44

3.5 Checking and Setting External Message Delivery Status
3.5 Checking and Setting External Message Delivery
Status
Subscriber's
Main Command Menu
After recording e xte rnal d elivery messages ,
you can check the delivery schedule or
revie w the specified rec ipients. Y ou can only
1
3
2
5
4
6
Other
Features
listen to this report only if th e messages have
not yet been delivered. After listening, you
have the option of deleting messages or
changing schedules.
1
Interview
M.B.
Management
1
Record
Message
Log in to your mailbox to access the Main Command Menu.
1.
Press
2.
2
Message
Waiting
Notification
Setting
Check
Delivery
Status
Go to
Step 5
for other features.
[6]
3
External
Message
Delivery
32
Mailing
List
Setting
The System Administrator or the
System Manager must authorize
this feature before it can be used.
For Interview Mailbox Management, Press [1].
To set up Message Waiting Notification, Press [2].
For External Message Delivery, Press [3].
3.
Press
for External Message Delivery.
[3]
To record a message for external delivery, Press [1].
To check external delivery message status, Press [2].
To set up the mailing list, Press [3].
4.
Press
to check External Message Delivery status.
[2]
External delivery messa ge schedul ed for (r ecipient stated) on
(date stated) at (time stated).
The message is (message stated).
44
Sending Messages
Page 45

To reschedule, Press [1].
To play the next schedule, Press [2].
To repeat this schedule, Press [3].
To play the previous schedule, Press [4].
3.5 Checking and Setting External Message Deliv e ry St atus
5.
6.
Press
Press
to change the schedule or delete the messages.
[1]
to cancel external message delivery or Press
[1]
to change the time and date.
[2]
Sending Messages
45
Page 46

3.5 Checking and Setting External Message Delivery Status
46
Sending Messages
Page 47

Section 4
Special Features
This chapter describes how to set up the special
features for your mailbox.
Special Features
47
Page 48

4.1 Call Transfer Status
4.1 Call Transfer Status
Subscriber's
Main Command Menu
This feature is used to specify how the VPS
should handle a call when a caller reaches
your extension. The following options are
12
3
4
Automated
Attendant
Status
5
6
available: Call Blocking, Call Screening,
Intercom Paging, Calling a Beeper, or
Disable All Transfer Services.
The Intercom Paging feature is
1
Call
Transfer
Status
2
Covering
Extension
Setting
3
Message
Reception
Mode
4
Incomplete
Handling
Status
available
only if your company is using a
Panasonic KX-TD series telephone
system.
2 3 4 5
1
Call
Blocking
Log in to your mailbox to access the Main Command Menu.
1.
Press
2.
Intercom
Call
Paging
Screening
[4]
a Beeper
for Automated Attendant Status.
Calling
Disable
All Transfer
Services
To set Call Transfer Status, Press [1].
To set up Covering Extension, Press [2].
To set Message Reception Mode, Press [3].
To set Incomplete Handling Status, Press [4].
48
3.
Press
to set the Call Transfer Status.
[1]
The Current Call Transfer Status is (current status is stated).
To enable Call Blocking, Press [1].
To enable Call Screening, Press [2].
To enable Intercom Paging, Press [3].
To enable Beeper Access, Press [4].
To disable All Transfer Services, Press [5].
Choose the option desired. Only one Call Transfer Status can be selected. A confirming
4.
message will be played after the selection has been made.
Call Blocking
- Blocks all incoming calls to your extension.
Call Screening
- Allows you to hear the caller's name before answering the call.
Special Features
Page 49

4.1 Call Transfer Status
Intercom Pagi ng
- Pages you over the Intercom Paging System when the voice mail is holding
or transferring a call for you.
Beeper Access
- VPS will call you on your beeper when you have a message.
The beeper displays the caller's callback number on the LCD.
Disable All Transfer Services
- Disables any transfer services previously selected.
Special Features
49
Page 50

4.2 Cover in g Extension
4.2 Covering Extension
Subscriber's
Main Command Menu
12
1
Call
Transfer
Status
3
Automated
Attendant
2
Covering
Extension
Setting
4
Status
5
3
Message
Reception
Mode
6
Incomplete
Handling
Status
The caller goes to the covering extensi on in
2 ways. One way is via the Automated
Attendant Service when the Incomplete Call
Handling Status has enabled Covering
Extension Transfer Status (see
4.3 Incomplete Call Handling Status). The
second way is during a Personal Greeting
4
announcement — if the caller pressed [0]
while a Personal Greeting is played, he is
sent to the covering extension, or an
operator (if the covering extension is not
specified).
The caller will no t know to press [0]
for transfer to your covering extension.
Therefore, the caller must be instructed.
For example, y ou might recor d the Bus y
greeting in this way: "Hi, this is Cindy.
Sorry, but I am busy with another call
right now . If you pre ss zero now , you will
be transferred to my secretary.
Otherwise, please leave a message after
you hear the tone."
Log in to your mailbox to access the Main Command Menu.
1.
2.
Press
for Automated Attendant Status.
[4]
To set Call Transfer Status, Press [1].
To set up Covering Extension, Press [2].
To set Message Reception Mode, Press [3].
To set Incomplete Handling Status, Press [4].
To set up a covering extension, go to Step 4.
3.
To change a previously assigned covering extension, go to Step 5.
4.
Press
to set up a covering extension when one has not been previously assigned.
[2]
Covering extension not assigned,
Enter extension number.
Enter the extension number.
a)
50
Special Features
Page 51

Covering extension is (assigned extension stated).
To change, Press [1].
To accept, Press [2].
To delete, Press [3].
4.2 Covering Extension
Press
b)
Press
5.
Covering extension is (assigned extension stated).
To change, Press [1].
To accept, Press [2].
To delete, Press [3].
Press
a)
Enter extension number.
Enter the new extension number.
b)
Covering extension is (covering extension stated).
To change, Press [1].
To accept, Press [2].
To delete, Press [3].
to accept the covering extension entered.
[2]
to change a previously assigned covering extension.
[1]
to change the extension number.
[1]
Special Features
c)
Press
to accept the new covering extension number.
[2]
51
Page 52

4.3 Incomplete C all Handling Status
4.3 Incomplete Call Handling Status
Subscriber's
Main Command Menu
Calls are co nsidered incomplete if there is
no answer or if the line is busy. The
Incomplete Call Handling Status has 6
12
3
4
Automated
Attendant
Status
5
6
options: (1) record a message from the
caller; (2) transfer the caller to a covering
extension; (3) page the mailbox owner by
intercom (Intercom Paging); (4) notify the
1
Call
Transfer
Status
2
Covering
Extension
Setting
3
Message
Reception
Mode
4
Incomplete
Handling
Status
mailbox owne r via a bee per; (5) transfer t he
caller to the operator; or (6) let the caller try
another extension.
The Intercom Paging feature is available
12
Leave
Message
Log in to your mailbox to access the Main Command Menu.
1.
Press
2.
3
Covering
Ext.
Transfer
[4]
4
Intercom
Beeper Operator
Paging
for Automated Attendant Status.
5
Transfer
6
Return to
A.A. Service
Top Menu
only if your company is using a Panasonic
KX-TD series telephone system.
To set Call Transfer Status, Press [1].
To set up Covering Extension, Press [2].
To set Message Reception Mode, Press [3].
To set Incomplete Handling Status, Press [4].
52
3.
Press
to set the Incomplete Handling Status.
[4]
To set Leaving a Message Status, Press [1].
To set Covering Extension Transfer Status, Press [2].
To set Intercom Paging Status, Press [3].
To set Beeper Access Status, Press [4].
To set Operator Transfer Status, Press [5].
To set Returning to Top Menu Automated Attendant Service
Status, Press [6].
4.
Press
to change or
[1]
to accept
[2]
after
selecting any of the above options.
Special Features
Page 53

4.4 Message Reception Mode
4.4 Message Reception Mode
Subscriber's
Main Command Menu
This feature is used to direct callers to either
your regular or interview mailbox. This
mode is effective only for Incomplete Call
12
3
4
Automated
Attendant
Status
5
6
Handling Service (when the subscriber's
line is busy, or he cannot take the call, or
when he has enabled Call Blocking).
Not all subscribers have an interview
1
Covering
Call
Transfer
1.
2.
Extension
Status
Setting
Log in to your mailbox to access the Main Command Menu.
Press
[4]
32
Message
Reception
Mode
Go to
Step 4
for Automated Attendant Status.
4
Incomplete
Handling
Status
mailbox.
The System Administrator or the Sy stem
Manager must assign an interview
mailbox.
To set Call Transfer Status, Press [1].
To set up Covering Extension, Press [2].
To set Message Reception Mode, Press [3].
To set Incomplete Handling Status, Press [4].
Special Features
3.
Press
to set the Message Reception Mode.
[3]
Message Reception Mode is Message Recording Mode
To change, Press [1].
To accept, Press [2].
4.
Press
to change the current setting.
[1]
(Interview Mode or Message Recording Mode)
53
Page 54

4.5 Personal Group Distribution Lists
4.5 Personal Group Distribution Lists
Subscriber's
Main Command Menu
A Personal Group Distribution List is used
to send the same message to several
mailboxes in a singl e operation. Up to 4 lists
12
12
Change
Personal
Greeting
12
Change
Group
Name
1.
2.
354
Change
Password
Add
Members
Management
Mailbox
3
Change
Owner's
Name
3
Delete
Members
6
4
Group
Distribution
List
Setting
Group No.
4
Review
List
Log in to your mailbox to access the Main Command Menu.
Press
for Mailbox Management.
[5]
can be maintained with each list cont aining
up to 20 mailbox members.
To change the personal greeting, Press [1].
To change the password, Press [2].
To change the owner's name, Press [3].
To set the Group Distribution List, Press [4].
3.
Press
to set the Group Distribution List.
[4]
Enter a group number (1 through 4).
Enter a group number
4.
[1-4]
.
Group number (group number stated).
Group name not recorded.
This group has no members.
To change the group name, Press [1].
To add group members, Press [2].
5.
Press
to record a group name.
[1]
54
Special Features
Page 55

Group name not recorded.
Record the group name at the tone.
Clearly state the group name at the tone.
a)
(The group name is stated)
To change, Press [1].
To accept, Press [2].
To erase, Press [3].
4.5 Personal Group Distribution Lists
Press
b)
To change the group name, Press [1].
To add group members, Press [2].
Press
6.
You can add up to ____ more members.
Enter the mailbox number.
Enter the mailbox number of the first member.
a)
(The mailbox number and name are stated)
To change, Press [1].
To add, Press [2].
Press
b)
to accept the name entered.
[2]
to add group members.
[2]
to add the member to the list.
[2]
Special Features
To add more members, Press [1].
To end, Press [2].
Press
c)
You can add up to _____ more members.
Enter the mailbox number.
Enter the mailbox number of the next member.
d)
to add more members.
[1]
55
Page 56

4.5 Personal Group Distribution Lists
(The mailbox number and name are stated)
To change, Press [1].
To add, Press [2].
e)
Press
to add the mailbox entered to the list, or to end.
[2]
To add more numbers, Press [1].
To end, Press [2].
Continue adding more members by Pressing
f)
, or end the procedure by Pressing
[1]
[2]
.
56
Special Features
Page 57

4.6 Deleting Group Distribution Members
4.6 Deleting Group Distribution Members
Subscriber's
Main Command Menu
This feature is used to de lete group members
from a Group Distribution List. Members
can be deleted in dividually or they can all be
12
12
Change
Personal
Greeting
12
Change
Group
Name
1.
2.
354
Change
Password
Add
Members
Management
Mailbox
3
Change
Owner's
Name
3
Delete
Members
Go to
Step 6
6
4
Group
Distribution
List
Setting
Group No.
Review
List
4
Log in to your mailbox to access the Main Command Menu.
Press
for Mailbox Management.
[5]
deleted at the same time.
3.
Press
to set the Group Distribution List.
[4]
Enter a group distribution number 1 through 4.
Enter the group number
4.
[1-4]
.
Group number (number stated) (group name stated).
Mailbox (1st mailbox number stated) (mailbox owner name
stated).
Mailbox (2nd mailbox number state d) (mail box owner name
stated).
(Remaining mailbox numbers and names stated until number
list is complete).
Special Features
57
Page 58

4.6 Deleting Group Distribution Members
To change the group name, Press [1].
To add group member, Press [2].
To delete group member, Press [3].
To review this group, Press [4].
Press
5.
To delete all group members, Press [1].
Otherwise Press [2].
Press
6.
This group has no members.
To change the group name, Press [1].
To add group members, Press [2].
Press
7.
Mailbox (1st mailbox number stated) (group name stated).
To delete, Press [1].
To play the next, Press [2].
(Message and menu choices repeated for each mailbox.)
to delete group member.
[3]
to delete all group members.
[1]
to delete individual mailboxes from the distribution list.
[2]
58
Press
a)
Group member deleted.
Repeat this procedure until all desired members have been deleted.
b)
to delete the s tated mailbox.
[1]
Special Features
Page 59

4.7 Deleting Group Distribution Lists
4.7 Deleting Group Distribution Lists
Subscriber's
Main Command Menu
This feature is used to de lete a group
distribution list.
To delete a group distribution list,
12
354
Mailbox
Management
6
first delete all group members.
(See 4.6 Deleting Group Distribution
Members.)
12
Change
Personal
Greeting
Change
Group
Name
Step 6
1.
Change
Password
1 2
Go to
Add
Members
Log in to your mailbox to access the Main Command Menu.
3
Change
Owner's
Name
3
Delete
Members
4
Group
Distribution
List
Setting
Group No.
4
Review
List
2.
3.
Press
Press
for Mailbox Management.
[5]
to set the Group Distribution List.
[4]
Enter a group distribution number 1 through 4.
Enter a group number
4.
[1-4]
.
This group has no members.
To change the group name, Press [1].
To add group members, Press [2].
To delete group members, Press [3].
To review this group, Press [4].
5.
Press
[1]
.
Special Features
59
Page 60

4.7 Deleting Group Distribution Lists
(Group name stated).
To change, Press [1].
To accept, Press [2].
To erase, Press [3].
6.
Press
to erase the group name.
[3]
Group name erased.
60
Special Features
Page 61

4.8 Message Waiting Notification
4.8 Message Waiting Notification
Subscriber's
Main Command Menu
The VPS is able to notify you when a new
message has been recorde d in your mailbox.
You can be notified (1) by message waiting
1
3
2
5
4
6
Other
Features
lamp on your telephone, or (2) by a call to
another telephone (e.g. , your mobile phone),
or (3) by your beeper. You can assign time
frames to each of these devices.
1
Interview
M.B.
Management
2
Message
Waiting
Notification
Setting
3
External
Message
Delivery
The VPS is also able to notify your beeper
with the callback number of the party who
left the message. The telephone nu mber
stored on the VPS for your beeper must
include the beeper display command.
1
Message
Waiting
Lamp
Status
Change
Device
Status
32
Assign
Tel. No.
Three features can be set for message
waiting notif ic ati on: Message Waiting
Lamp Status, Change Device Status, and
Assign Telephone Number. These features
can be set by the Syst em Administrator or at
a subscriber's telephone . Each device has its
own phone number that must be entered.
Message Waiting Lamp Notificati on Setting
- The VPS illuminates the message waiting lamp of your extension
when a new message is recorded in your mailbox.
Setting Device Status
- For each device, the notification can be enabled, disabled,
or enabled to a preset schedule. Setting notification to a preset schedule can only be
established by the System Administrator.
Notification Number Assignment
- You can set up to 3 telephone or
beeper numbers to ring when you wish to receive notification calls.
Log in to your mailbox to access the Main Command Menu.
1.
2.
Press
for Other Features.
[6]
For Interview Mailbox Management, Press [1].
To set up Message Waiting Notifica tion, Press [2].
For External Message Delivery, Press [3].
3.
Press
to set Message Waiting Notification.
[2]
Special Features
61
Page 62

4.8 Message Waiting Notification
To change the Message Waiting Lamp Status, Press [1]
To change the Device Status, Press [2].
To Assign a Telephone or Beeper Numbers, Press [3].
To change the Message Waiting Lamp Status, go to Step 5.
4.
To change the Device Status, go to Step 6.
To assign Te lephone or Beeper Numbers, go to Step 8.
Press
5.
Message Waiting Lamp Notification (status stated - enabled
or disabled).
To change, Press [1].
To accept, Press [2].
a)
b)
Press
6.
to change Message Waiting Lamp Status.
[1]
Caution:
when message received) will disable (turn off) the message waiting light.
Press
[1]
Message Waiting Lamp Notification (status stated - enabled
or disabled).
To change, Press [1].
To accept, Press [2].
Press
[2]
to set the device status.
[2]
Changing an enabled status (message waiting light will illuminate
to change from enabled to disabled or from disabled to enabled.
to accept the change.
62
Enter device number one through three.
Enter the device number.
a)
Device number is (device number stated).
(Device status stated).
To use for sched uling, Press [1].
To use continuously, Press [2].
To use not at all, Press [3].
Select the status.
b)
Special Features
Page 63

(The status selected is repeated)
To assign telephone or beeper numbers, go to Step 8.
7.
To delete an existing telephone number, go to Step 9.
To change an existing telephone number, go to Step 10.
4.8 Message Waiting Notification
Press
8.
To change the first telephone number, Press [1].
To change the second telephone number, Press [2].
To change the third telephone number, Press [3].
a)
b)
to assign telephone or beeper numbers.
[3]
Press
[1], [2]
(1st, 2nd, etc.) telephone number is not assigned.
Any digit on the telephone keypad can be used. Enter the
telephone number and wait. To insert a pause or special
command, enter the partial number and wait for the options
menu.
Enter the telephon e number at the completion of the pre vious message. Press
access code
- if needed]
where the pause must be placed and wait.
The options menu will played - Press
The options menu will be played again.
Press
, or
(contact your System Manager if you do not know your code)
[7 - digit telephone number]
Enter a pause by entering the telephone number up to the point
to add more digits then complete entry of the telephone number.
[4]
to enter a telephone number for the first time.
[3]
.
to enter a pa use.
[5]
or a
[9]
[area code
line
Special Features
c)
Press
Telephone number is (number entered is stated).
To change, Press [1].
To accept, Press [2].
To review, Press [3].
To add more digits, Press [4].
To insert a pause, Press [5].
To set dial mode, Press [6].
To insert a wait for dial tone, Press [7].
To insert a beeper display command, Press [8].
to accept the number entered.
[2]
63
Page 64

4.8 Message Waiting Notification
For notification by telephone, Press [1].
For notification by beeper, Press [2].
Press
d)
I'll notify by (beeper or telephone).
Press
9.
(1st, 2nd, etc.) telephone number is (number stated).
To change, Press [1].
To accept, Press [2].
To delete, Press [3].
Press
a)
Telephone number deleted.
Press
10.
(1st, 2nd, etc.) telephone number is (number stated).
To change, Press [1].
To accept, Press [2].
To delete, Press [3].
or
[1]
[1], [2]
[3]
[1], [2]
for telephone or beeper notification.
[2]
, or
to delete the n umber selected.
to delete an existing telephone number.
[3]
, or
to change an existing telephone number.
[3]
64
Press
a)
Repeat Step 8 to enter the new number(s).
b)
to change the number selected.
[1]
Special Features
Page 65

4.9 Interview Mailbox
4.9 Interview Mailbox
Subscriber's
Main Command Menu
An Interview Mailbox plays prerecorded
questions to callers and records their
answers. You can record up to 10 questions
1
3
2
5
4
6
Other
Features
and set the answer lengths from 4 to 32 s.
The answers are recorded and stored, in
order, in your mailbox. The answer length
must be set and questions mu st b e recorded.
1
Interview
M.B.
Management
1
Record
Question
Log in to your mailbox to access the Main Command Menu.
1.
Press
2.
2
Message
Waiting
Notification
Setting
Answer
Length
for Other Features.
[6]
3
External
Message
Delivery
32
Erase
Question
To activate this feature your System
Manager or System Administrator must
assign an Interview Mailbox to your
mailbox.
For Interview Mailbox Management, Press [1].
To set up Message Waiting Notifica tion, Press [2].
For External Message Delivery, Press [3].
Special Features
3.
Press
for Interview Mailbox Management.
[1]
To record the question, Press [1].
To set the answer length, Press [2].
To erase the question, Press [3].
To record questions, go to Step 5.
4.
To set answer length, go to Step 6.
To erase a question, go to Step 7.
5.
Press
to record interview questions.
[1]
65
Page 66

4.9 Interview Mailbox
(No question recorded) or Question # (first question stated).
To change this question, Press [1].
To go to the next question, Press [2].
To skip to the previous question, Press [3].
To go directly to a question, Press [4].
Press
a)
Record the questio n at the tone.
To end recording, Press [1].
To pause and restart recording, Press [2].
Record the question and Press
b)
To review, Press [1].
To accept, Press [2].
To erase and try again, Press [3].
To add, Press [4].
To erase and exit, Press [ ]
Repeat Steps 5a to 5b until all questions have been recorded.
c)
Press
6.
(No question recorded) or Question # (first question stated).
Answer length is (answer length stated).
To change the answer length, Press [1].
To skip to the next question, Press [2].
To go back to the previous question, Press [3].
To go directly to a question, Press [4].
to record the first question.
[1]
to set answer length.
[2]
to end recording.
[1]
.
66
Press
a)
For 4 s, Press [1].
For 8 s, Press [2].
For 16 s, Press [3]
For 32 s, Press [4].
Select the answer length desired.
b)
to change the answer length.
[1]
Special Features
Page 67

Answer length is (answer length stated).
To change the answer length, Press [1].
To skip to the next question, Press [2].
To skip to the previous question, Press [3].
To go directly to a question, Press [4].
Repeat the process for each question.
c)
4.9 Interview Mailbox
7.
Press
to erase questions.
[3]
(No question recorded) or Question # (first question stated).
To erase this question, Press [1].
To skip to the next question, Press [2].
To skip to the previous question, Press [3].
To go directly to a question, Press [4].
a)
Press
to erase t he question.
[1]
Question erased.
The VPS plays the next question.
Repeat this step for all questions to be erased.
b)
Special Features
67
Page 68

4.10 Live Call Screening
4.10 Live Call Screening
By assigning one of your telephone keys to this feature, you can monitor incoming calls that
have been forwarded to the Voice Mail Service.
When in the Hands-Free Mode, you can monitor the incoming call through the telephone's
built-in speaker. You can speak with the caller by picking up the handset.
When in the Private Mode, you can monitor the incoming call through the handset after you
hear the notifi cation t one. You can speak with the caller by pressing the feat ure ke y or you ca n
stop listening to the message by replacing the handset.
This feature is available only if your company is using a Panasonic KX-TD series
telephone system and if the System Administrator has provided your extension
with this feature.
For detailed information concerning this feature, please refer to the Installation Manual
for the Panasonic KX-TD series telephone system.
68
Special Features
Page 69

4.11 Reco rding a Two-Way Conversation
4.11 Recording a Two-Way Conversation
By assigning one of the function keys on your telephone to this feature, you can record the
conversation that you are having.
You must always notify the other party before you begin recording.
This feature is a vailable to you only if your compan y is using a Panasoni c KX-TD series
telephone system and if the System Administrator has provided your extension
with this feature.
Special Features
69
Page 70

4.11 Recording a Two-Way Con v ersation
70
Special Features
Page 71

Appendix A
Quick Reference
Quick Reference
71
Page 72

A1 Subscriber
A1 Subscriber
3
DEF
#3(#D)
Department
2
ABC
1
#1
Service Access Commands
Dial the following commands
any time during system prompts
to get a different mailbox,
extension, or menu.
1 Call Blocking
2 Call Screening
3 Intercom Paging
4 Beeper Access
Set Call Transfer Status:
5 All Disable
Incomplete Handling Status
Dial by
1 Leaving a Message
2 Covering Extension
3 Intercom Paging
4 Beeper Access
1
Dial
Name
5 Operator
6
MNO
#6(#M)
Voice Mail
5
JKL
4
GHI
6 Return to AA Service
Top Menu
1 No Answer
2 Busy
3 After Hours
Record Personal Greeting
4
1
9
WXY
TUV
PRS
Interview Mailbox
Management
Exit
#9(#X)
8
#8(#T)
an Extn.
Transfer to
7
#7(#R)
Restart
(Main Menu)
1 Record Question
2 Set Answer Length
3 Erase Question
Message Notification
1
#
0
0
OPER
1 Message Waiting Lamp
2 Device Status
2
Help
Menu
Previous
Return to
Assign Telephone Numbers
1 Record message
2 Check Delivery Status
3
3 Set a Mailing List
External Message Delivery
3
1 Repeat Message
1.1Previous Message
2 Next Message
3 Erase Message
4 Send Reply
5 Rewind
6 Fast Forward
7 Transfer Message
Receive Message:
8 Scan Messages
1
Location, Dial:
From a Remote
#6 +extn. number
KX-TVS75, KX-TVS100, KX-TVS200
To Enter a Mailbox
Enter Mailbox Number
0 Help
1 Record Message
2 Add Another Mailbox
Deliver Message:
2
Password#
3 Review Mailing List
Check Mailbox Distribution
3
messages.
You have new
Main Command:
72
1 Set Call Transfer Status
2 Set Covering Extensions
1 Play Message
1.1Play Previous Message
2 Play Next Message
3 Cancel
3 Set Message Reception Mode
Set AA Status:
4
3 Check Mailbox
1 Receive message.
2 Deliver message.
1 Record Personal Greetings
2 Set Password
3 Enter Owner's Name
4 Set Group Distribution List
1 Set Interview Mailbox
2 Set Message Waiting
4 Set Incomplete Call Handling
Set Up Mailbox Management:
5
Distribution.
4 Set Automated
Attendant (AA)
Status.
5 Set Up Mailbox
Management.
Notification
Set Other Features:
6
Hang up.
Set Other Features.
6
3 Set External Delivery
Message
Quick Reference
Page 73

A2 Message Manager
A2 Message Manager
3
DEF
#3(#D)
Department
2
ABC
1
#1
Service Access Commands
Dial the following commands
any time during system prompts
to get a different mailbox,
extension, or menu.
Dial by
Dial
Name
MNO
JKL
GHI
6
5
4
#6(#M)
Voice Mail
WXY
TUV
PRS
9
8
7
Exit
#9(#X)
#8(#T)
an Extn.
Transfer to
#7(#R)
Restart
(Main Menu)
#
0
OPER
0
Help
Return to
Menu
Previous
1 Repeat Message
1.1Previous Message
2 Next Message
3 Erase Message
4 Send Reply
5 Rewind
6 Fast Forward
7 Transfer Message
8 Scan Messages
1
dial
#6 998
KX-TVS75, KX-TVS100, KX-TVS200
Dial in to the VPS.
To Enter a Mailbox:
1 Change Message Waiting Lamp.
2 Change Device Status.
3 Assign Telephone or Beeper.
Set Password
2
Password #
3
Main Command:
You have new messages.
Set Day Operator
Set Night Operator
Set Time
Set Date
4
1 Transfer General Delivery
1 Record Company Greeting
2 Record Company Name
3 Record Department Dialing Menu
4 Record Custom Service Menu
5 Record Voice Label
6 Modify User Prompt
#1-your voice-English
5
3 Customize Mailbox.
4 Set Clock.
Messages.
2 Set up Message Waiting
Notification.
5 Modify Message.
#2-your voice-second language
7 Record Selection Menu
Hang up.
Quick Reference
73
Page 74

A3 System Manager
A3 System Manager
3
DEF
#3(#D)
Department
2
ABC
1
#1
Service Access Commands
Dial the following commands
any time during system prompts
to get a different mailbox,
extension, or menu.
Dial by
Dial
Name
MNO
JKL
GHI
6
5
4
#6(#M)
Voice Mail
WXY
TUV
PRS
9
8
7
Exit
#9(#X)
#8(#T)
an Extn.
Transfer to
#7(#R)
Restart
(Main Menu)
#
0
OPER
0
Help
Menu
Previous
Return to
1 Assign or edit the mailbox
2 Delete a mailbox
3 Reset a mailbox password
1
1 Repeat Message
1.1Previous Message
2 Next Message
3 Erase Message
4 Send Reply
5 Rewind
6 Fast Forward
7 Transfer Message
8 Scan Messages
1 Broadcast Message
1
dial
#6 999
KX-TVS75, KX-TVS100, KX-TVS200
Dial in to the VPS.
To Enter a Mailbox:
2
Set Password4Verify Outgoing Message
2 Delivery Single Message
3
Main Command:
Password #
You have new messages.
1 System Service Report
2 Disk Usage
3 Port Usage
4 Mailbox Usage
5 Mailbox Parameters
6 Generate Call Accounting
7 Class of Service
8 Fax Call Report
5
3 Customize the mailbox.
4 Check mailbox
1 Receive messages
2 Deliver messages
distribution
1 Set Up Mailbox
2 Class of Service
3 Clock
6
5 System report
Hang up.
6 Other features
74
Quick Reference
Page 75

Glossary
Alternate Extension Group
If you have extensions (for example, modems) that require a special transfer sequence
(Alternate Extension Transfer Sequence) put the m i nt o thi s gr oup and then set the transfer
sequence.
Auto Configuration
(Available with DP T Inte grat ion only.) The VPS can automatically draw infor mation fr om
the KX-TD816, the KX-TD1232, the KX- TD500 or the KX-TD308 . This sa v es time i n the
initial setup.
Auto Forwarding
Allows unretrieved messages to be copied or forwarded to another mailbox.
Automated Attendant
An electronic operator capable of transferring a caller to an extension.
Call Blocking
Connects the caller to the Incomplete Call Handling Service without ringing the
subscriber's extension.
Call Duration
The maximum time allowed for an external message that is to be delivered by the VPS,
specified by the subscriber.
Call Screening
Allows subscribers to screen calls; the caller hears the message: "Please state your name."
The VPS records the caller's name, then puts the caller on hold to play the name for the
subscriber who decides whether or not to take the call.
Call Transfer
Transfers a call to the requested destination or to an alternative extension.
Called Party ID
(Sometim es referred to as Follow-On ID) Allows the VPS to dial extra digits to bri ng the
caller directly to a specified mailbox, rather than to the General Delivery Mailbox.
Glossary
75
Page 76

Circular Hunting
A search of all e xtensio ns in a hunt gro up to f ind an open lin e. For exampl e, if a hunt group
includes 241, 242, 243, an d 244, if 243 i s b usy, the system goes to 244, 241, then 242, unti l
it finds a free extension.
Covering Extension
This can be a destination f or Incomplete Ca ll Handling Serv ice. Also, it can be accessed by
pressing zero during the playing of a Personal Greeting.
Company Greeting
A short greeting tha t is played pri or to the Custom S ervice Greeting: " Thank you for cal ling
(Your Company Name)."
Company Greeting Mode
Determines which greeting is played (day, night, or holiday).
Custom Service Setting
Allows one-touch access to extensions, other custom service menus, System Group
Distribution Li sts, mail box es, etc. A greeti ng can be recorded f or each of the 100 menus to
give verbal directions to the non-subscriber.
Default Setting
A parameter which was defined for the system at the factory and can be changed through
system programming; i.e. the System Administrator or the System Manager.
Delayed Ringing
There are 2 kinds of delayed ringing applications:
(1) The VPS is used as the no- ans wer de st ination for the Intercept Routi ng f eat ur e of your
PBX.
(2) DIL 1:N (CO line to several extensions) terminates on telephones and
VPS ports. To give the telephone users a chance to answer calls, the
VPS lines should be programmed for delayed ringing. Otherwise, the
VPS will answer the calls immediately.
Delivery Time
The time specified by the subscriber for the VPS to deliver a prerecorded message.
Department Dialling
A number (1-9) assigned to transfer an outside caller to a specific extension.
76
Glossary
Page 77

Direct Mailbox Access
(A va ilable with DPT Inte gration only.) A subscriber can enter his mailbox directly when he
calls the VPS from his extension. He does not have to enter any special codes. But his
password, if established, must be entered.
DPT Integration
Digital integration between the KX-TD816, the KX-TD1232, the KX-TD500 or the KXTD308 and the VPS.
Requires upgraded software in the telephone switch.
DTMF
(Dual Tone Multi Frequency) Commonly referred to as touch tone.
External Call Forwarding
(Available on the KX-TA624, the KX-TD816, the KX-TD1232, the KX-TD500 and the
KX-TD308) Forw ards ca lls to a n e xt ensio n that has ca ll fo rwar ding a ctivated to an out side
phone.
External Delivery Message
A message intended for auto matic delivery to a party o utside of the company.
External Message Delivery List
Allows the subscriber to create 2 lists to deliver messages to outside parties. Each list can
have 8 destinations.
External Message Delivery Redial
Allows the subscriber, when making an external delivery, to instruct the VPS to make a
maximum of 9 retries when the line is busy or when there is no answer.
Fast Forward
Puts the user 4 s ahead in the current message.
Floating Extn. Number
See Logical Extension.
Follow-On ID
See Called Party ID.
Glossary
77
Page 78

General Delivery Mailbox
When the caller does not dia l anything (either because he do es no t want to or he is using a
rotary telephone), he can be sent to the General Delivery Mailbox.
Periodically (daily is best), the Message Manager should transfer the contents of the
General Delivery Mailbox to the appropriate destinations.
HELP
One of the utility commands. It lists all utility commands with a brief description of each.
Immediate Reply
Allows the message recei ver t o reply to a message without specif ying the ex tension number
of the sender.
Inband Signaling
The Follow-On ID (or Caller ID) that integrates t he VPS and the telephone switch. Uses
intercom paths to light message wait light. Does not give "high end" features such as:
Intercom Paging, Two-Way Recording, Live Call Screening, etc.
Incomplete Call Handling Service
Calls are considered incomplete when there is no answer or if the line is busy.
The Incomplete Call Handling Service can be set for 6 options:
(1) to record a message from the caller,
(2) transfer the caller to a covering extension,
(3) page the mailbox owner via the PBX,
(4) notify the mailbox owner via beeper,
(5) transfer the caller to the operator, or
(6) let the caller try another extension.
78
Integration
Required between the VPS and the telephone switch. See Inband signaling and DPT
Integration.
Intercept Routing No Answer
When a call is not answered, it can be transferred to another extension, or to the VPS.
(This is a PBX feature.)
Intercom Paging
(Available wit h DPT Int egration only.) Allows up t o 8 different paging groups. An outside
party can reach a subscriber who is away from his/her telephone using either internal or
external page groups.
Glossary
Page 79

Interview Service
A special type of subscriber mailbox enabling the subscriber to record up to 10 questions.
After the answers are recorded the Message Waiting Lamp is turned on at the subscriber
telephone. (Good for claims departments, order desks, job applications, etc.)
Keypad
All touch-tone keys on the telephone.
LCD
Liquid crystal display.
Live Call Screening
(Available wit h DPT In tegration only.) The proprietary telephone wo rks l ik e an answering
machine.
The subscriber can hear the caller through the speaker phone while the message is being
recorded.
LOAD
One of the utility commands. It is used to loa d new or sav ed data to the VPS from a personal
computer .
Logical Extension
(Sometimes referred to as Floating Extension Number or Virtual Extension) Doesn't go to
an actual telephone extension; used for paging devices, mailboxes without telephones,
amplifiers connected to paging ports, etc.
Mailbox Capacity (messages)
The number of messages that can be recorded in a subscriber's mailbox; should be set
between 5 and 100 messages by the System Administrator or the System Manager.
Mailbox Capacity (recording time)
The total amount of time for messages in a subscriber's mailbox; should be set between 5
and 100 min. by the System Administrator or the System Manager.
Mailbox Extension
Normally the same number as the telephone extension number.
Mailbox Management
Allows a subscriber to alter the setting for personal mailboxes.
Glossary
79
Page 80

Menu
A list of choices from which the user can select by using the telephone keypad or the keys
from a personal computer.
Message Manager
(Mailbox 998) The person who takes care of the General Delivery Mailbox, records
company greetings, custom service greetings and changes the original voice prompts.
Limited system programming capabilities.
Message Retention Time
The amount of time the system will store a message before deleting the message.
Message Retrieval Order
The order in which the subscriber retrieves massages: Last In First Out (LIFO) or First In
First Out (FIFO).
Message Transfer
Allows a subscriber to reroute a message to another mailbox unless the message was
marked "private." Additional comments can be added to this message.
Message Waiting Lamp
Light on proprietary telephones that is lit when there are messages in the mailbox.
Message Waiting Notification
The VPS can notify subscribers and the Message Manager when they have received
messages (if authorized by the System Administrator or the System Manager). Notification
methods are: (1) by Message Waiting Lamp, or (2) by external telephone, or (3) by beeper.
Multilingual Selection Menu
This menu is recorded by the Message Manager and al l ows callers to choose the langua ge
they want (System, User 1 or User 2 prompts) when they call the VPS.
Non-Subscriber
A caller to the VPS who does not own a mailbox.
Notification Method
(See Message Waiting Notification.)
Operator
Up to 3 destinations can be assigned as operators. This is the extension that receives calls
when the calling party is on a rotary phone or dials [0].
80
Glossary
Page 81

Owner's Name
After a subscriber records his name, his name will be annou nced during t ransfers, Int ercom
Paging, and confirmation of Dialing by Name.
Independent of this recordi ng is regi stration of name by Sys tem Administrator. This allows
callers to dial parties by name (Dialing by Name) rather than by number. For example, a
caller can dial "S-M-I-T" (Smith) rather than Smith's mailbox number, which can be hard
to remember.
Password
A number chosen by a subscriber or a manager to protect access to the mailbox.
Personal Greetings
A subscriber can personalize his mailbox to greet callers. There are 3 kinds of Personal
Greetings:
(1) No Answer Greeting
(2) Busy Signal Greeting
(3) After Hours Greeting
Personal Group Distribution List
Each subscriber can ha ve 4 distrib ution lists containing up to 20 mailboxes in each list . Used
to send the same message to a variety of people.
Port
The point of connection between the telephone switch and the VPS.
Pound Sign
The [#] key on the telephone keypad.
Private Message
A message which is delivered to a specific mailbox, that cannot be forwarded.
Prompt
A prerecorded list o f options or a gui dance messa ge played to th e user. The English system
prompts are prerecord ed a t the f actor y and c an be c hanged. Up to 2 other langu ages c an be
recorded as user prompts.
Review
Plays back a message.
Rewind
Replays the last 4 s of a message.
Glossary
81
Page 82

Rotary Telephone
A telephone capable of pulse dial only. Callers using a rotary telephone will be
automatically forwarded to the operator or the general delivery mailbox.
SAVE
One of the utility commands. It is used to save VPS data to a personal computer.
Scanning Messages
Allows the subscriber to listen to only the first 4 s of each message. Another method is to
use the digit [2] while listening to a message; this advises th e VPS to skip to the next
message.
Station Programming
Programming via the proprietary telephone.
Subscriber
A person who has an assigned mailbox.
System Administration
System programming from a personal computer.
System Administrator
Unlike the Message Manager and the System Manager, the System Administrator has full
system programming capabi lit y. He uses a computer connected to the RS-232C port of the
VPS.
System Group Distribution List
The system can maintain an internal list of twenty mailbox groups. Each group can hold
twenty mailboxes . Each group is r eferenced by Syst em Group Distrib ution List n umber and
is assigned via system administration. A recording into System Group Distribution List
number will go into the mailboxes of all members of that group.
System Manager
(Mailbox 999) The person who can perform very basic and limited system programming
using a telephone. He can create/delete mailboxes; clear subscriber passwords when they
are forgotten; set Class of Service parameters; set the system clock; and generate System
Reports.
System Report
Eight System Reports can b e acquired by the system administrato r or system manager upon
request.
82
Glossary
Page 83

TIME
One of the utility commands. It is used to confirm or set the time and date of the VPS.
Two-way Recording (TWR)
(A vail able with DPT Integr ation only .) Allo ws a subscriber t o record a con versation into his/
her mailbox.
Two-Way Transfer (TWT)
(Available with DPT Integration only.) Allows a subscriber to record a conversation into
another person's mailbox.
Virtual Extension
See Logical Extension.
Voice Mail
A general term used for messages recorded over the phone from one person to another.
Voice Mail Button
(Available with DPT Integration only.) Allows one touch access to the voice mail box.
Subscribers can use a function or a CO key.
Voice Prompt
Recorded VPS instructions to callers. These are either system prompts or user prompts.
VPS
Voice Processing System (e.g., Panasonic KX-TVS75, KX-TVS100 and KX-TVS200).
Glossary
83
Page 84

84
Glossary
Page 85

Panasonic Consumer Electronics
Company, Division of Matsushita
Electric Corporation of America
One Panasonic Way, Secaucus,
New Jersey 07094
Panasoni c Sales Compan y (“PSC”)
Division of Matsushita Electric of
Puerto Rico, Inc.
Ave. 65 de Infantería, Km. 9.5,
San Gabriel Industrial Park, Carolina,
Puerto Rico 00985
C
OPYRIGHT
THIS MANUAL IS COPYRIGHTED BY KYUSHU MATSUSHITA ELECTRIC CO., LTD. (KME). UNDER THE APPLICABLE COPYRIGHT LAWS,
THIS MANUAL MAY NOT BE REPRODUCED IN ANY FORM, IN WHOLE OR PART, WITHOUT THE PRIOR WRITTEN CONSENT OF
KME AND ITS LICENSEE.
1999 K
RINTED IN JAPAN
P
:
YUSHU MATSUSHITA ELECTRIC CO
., LTD. ALL R
IGHTS RESERVED
PSQX1738XA
.
KK0399CM2030
 Loading...