


ORDER NO. KM40108849C3
Telephone Equipment
KX-T2375MXW
Integrated Telephone System
White Version
(for Asia, Middle Near East and other areas)
© 2001 Kyushu Matsushita Electric Co., Ltd. All rights reserved. Unauthorized copying and distribution is a violation of law.
Downloaded from www.Manualslib.com manuals search engine

KX-T2375MXW
CONTENTS
|
Page |
|
|
Page |
|
1 |
LOCATION OF CONTROLS |
3 |
|
11.1. Communication ICs |
20 |
2 |
DISPLAY |
4 |
12 |
MODULE BLOCK DIAGRAM |
21 |
3 |
CONNECTION |
5 |
|
12.1. MODULE BLOCK DIAGRAM |
21 |
|
3.1. Connecting the Handset/Telephone Line Cord |
5 |
|
12.2. CONNECTOR PIN ASSIGNMENT |
21 |
|
3.2. Connecting a Communication Device |
5 |
13 |
CIRCUIT OPERATION |
22 |
4 |
SETTINGS |
6 |
|
13.1. Bell Detector Circuit |
22 |
|
4.1. Selecting the Dialing Mode |
6 |
|
13.2. Line Interface |
22 |
|
4.2. Time Adjustment |
7 |
|
13.3. Speakerphone Circuit |
23 |
|
4.3. Setting the LCD Contrast |
8 |
|
13.4. Telephone Line Interface |
24 |
|
4.4. Selecting the Ringer Volume |
8 |
|
13.5. Tone Detect |
25 |
5 |
SPECIAL FEATURES |
9 |
|
13.6. Inializing Circuit |
26 |
|
5.1. FLASH Button |
9 |
14 |
TROUBLE SHOOTING GUIDE |
27 |
|
5.2. Selecting the Flash Time |
9 |
|
14.1. Service Hints |
27 |
|
5.3. Setting the Pin Code |
10 |
|
14.2. Pulse Dialing Problems |
27 |
|
5.4. Dial Lock |
11 |
|
14.3. Tone Dialing Problems (Hnadset) |
28 |
|
5.5. Call Restriction |
12 |
|
14.4. No Ringing Sound When Ring Signal is Input. |
28 |
|
5.6. How to Release the Establishment of Dial Lock |
13 |
15 |
CABINET AND ELECTRICAL PARTS LOCATION |
29 |
6 |
DISASSEMBLY INSTRUCTIONS |
14 |
16 |
ACCESSORY AND PACKING MATERIALS |
30 |
7 |
HOW TO REPLACE FLAT PACKAGE IC |
15 |
17 |
REPLACEMENT PARTS LIST |
31 |
|
7.1. Preparation |
15 |
|
17.1. Base Unit |
31 |
|
7.2. Procedure |
15 |
|
17.2. ACCESSORIES AND PACKING MATERIALS |
33 |
|
7.3. Modification Procedure of Bridge |
15 |
18 |
FOR SCHEMATIC DIAGRAM (SCHEMATIC DIAGRAM) |
34 |
8 |
CPU DATA |
16 |
|
18.1. MEMO |
35 |
|
8.1. IC801 |
16 |
19 |
SCHEMATIC DIAGRAM |
36 |
|
8.2. Speakerphone IC Data |
17 |
20 |
CIRCUIT BOARD AND WIRING CONNECTION DIAGRAM |
39 |
9 |
TERMINAL GUIDE OF IC S TRANSISTORS AND DIODES |
18 |
|
20.1. Component Vie |
39 |
10 |
BLOCK DIAGRAM |
19 |
|
20.2. Flow Solder Side View |
40 |
11 |
BLOCK DIAGRAM (IC 1) |
20 |
|
|
|
2
Downloaded from www.Manualslib.com manuals search engine

KX-T2375MXW
1 LOCATION OF CONTROLS
3
Downloaded from www.Manualslib.com manuals search engine

KX-T2375MXW
2 DISPLAY
4
Downloaded from www.Manualslib.com manuals search engine

KX-T2375MXW
3 CONNECTION
3.1.Connecting the Handset/Telephone Line Cord
After connection, lift the handset to check for a dial tone.
· Use only a Panasonic Handset for the KX-T2375MXW.
3.2.Connecting a Communication Device
If you connect a communication device (computer, modem, fax, answering machine, etc.) to the telephone line, you can connect it through this unit using the DATA jack.
After connecting the handset and telephone line cord, connect the communication device telephone line cord to the DATA jack.
·Make sure the communication device is not in use before using this unit (making calls, storing phone numbers in memory etc.) or the communication device may not operate properly.
5
Downloaded from www.Manualslib.com manuals search engine

KX-T2375MXW
4 SETTINGS
4.1.Selecting the Dialing Mode
You can select the dialing mode by programming. If you have touch tone service, set to "Tone". If rotary or pulse service is used, set to "Pulse". Your phone comes from the factory set to "Tone".
Make sure that a call is not put on hold.
6
Downloaded from www.Manualslib.com manuals search engine
KX-T2375MXW
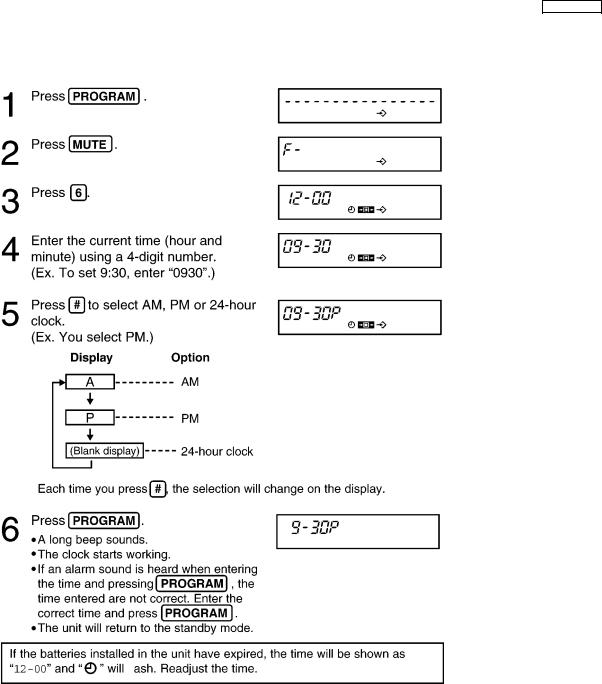
4.2.Time Adjustment
You can select AM/PM or 24-hour clock by programming.
Make sure that a call is not put on hold.
7
Downloaded from www.Manualslib.com manuals search engine

KX-T2375MXW
4.3.Setting the LCD Contrast
You can select the LCD contrast level from 1 to 4 by programming. Your phone comes from the factory set to 3.
Make sure that a call is not put on hold.
4.4.Selecting the Ringer Volume
You can select the ringer volume to HIGH, LOW or OFF. Your phone comes from the factory set to HIGH.
8
Downloaded from www.Manualslib.com manuals search engine

KX-T2375MXW
5 SPECIAL FEATURES
5.1.FLASH Button
Pressing  allows you to use special features of your host PBX such as transferring an extension call or accessing special telephone services (optional) such as call waiting.
5.2.Selecting the Flash Time
The flash time depends on your telephone exchange or host PBX. You can select the following flash times: "80, 90, 100, 110, 200, 250, 300, 400, 600, 700 ms (milliseconds)". Your phone comes from the factory set to "600 ms".
Make sure that a call is not put on hold.
·If you are connected via a PBX, a longer flash time may be necessary to use PBX functions (transferring a call, etc.). Consult your PBX installer for the correct setting.
9
Downloaded from www.Manualslib.com manuals search engine
KX-T2375MXW
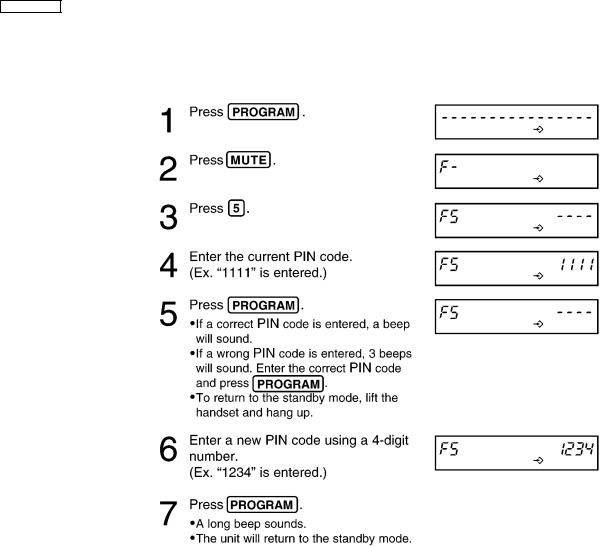
5.3.Setting the Pin Code
A 4-digit Pin Code (Personal Identification Number) prevents unauthorized persons from using your unit. The Pin Code is required for the dial lock and call restriction to be set or canceled. The factory preset Pin code is "1111".
Make sure that a call is not put on hold.
10
Downloaded from www.Manualslib.com manuals search engine
KX-T2375MXW
5.4.Dial Lock
You can prevent others from making a call to any number except the one pre-programmed in the memory of the EMERGENCY button. Once you locked the dialing buttons, even emergency numbers cannot be dialed. Only incoming calls are accepted until the dial lock is canceled.
Before using this feature, we recommend storing an emergency number in the memory of the EMERGENCY button. Even if the dialing buttons are locked, the number stored in the button can be dialed.
·If you choose not to program emergency numbers, but plan to use the dial lock, any number programmed into the EMERGENCY button can be accessed.
5.4.1.To Set the Dial Lock
You can use the following features while the dialing buttons are locked.
·Dialing a number you programmed into the memory of the EMERGENCY button.
·Adjusting the handset and speakerphone volumes.
·Muting the conversation.
·Answering the second call by pressing  .
.
5.4.2.To Cancel the Dial Lock
Follow steps 1 through 3 above again.
· “  “ will disappear, and the unit will return to the standby mode.
11
Downloaded from www.Manualslib.com manuals search engine

KX-T2375MXW
5.5.Call Restriction
You can prevent the unit from dialing phone numbers beginning with specified digit(s) (1 digit or 2 digits). Phone numbers with the restricted leading digits cannot be dialed out.
5.5.1.To Set the Call Restriction
Make sure that a call is not put on hold.
·If your unit is connected to a PBX, this function may not operate. Contact your PBX supplier for more information.
When dialing a phone number with the restricted leading digit(s), the dialed number will flash on the display, but not dialed out.
12
Downloaded from www.Manualslib.com manuals search engine
 Loading...