

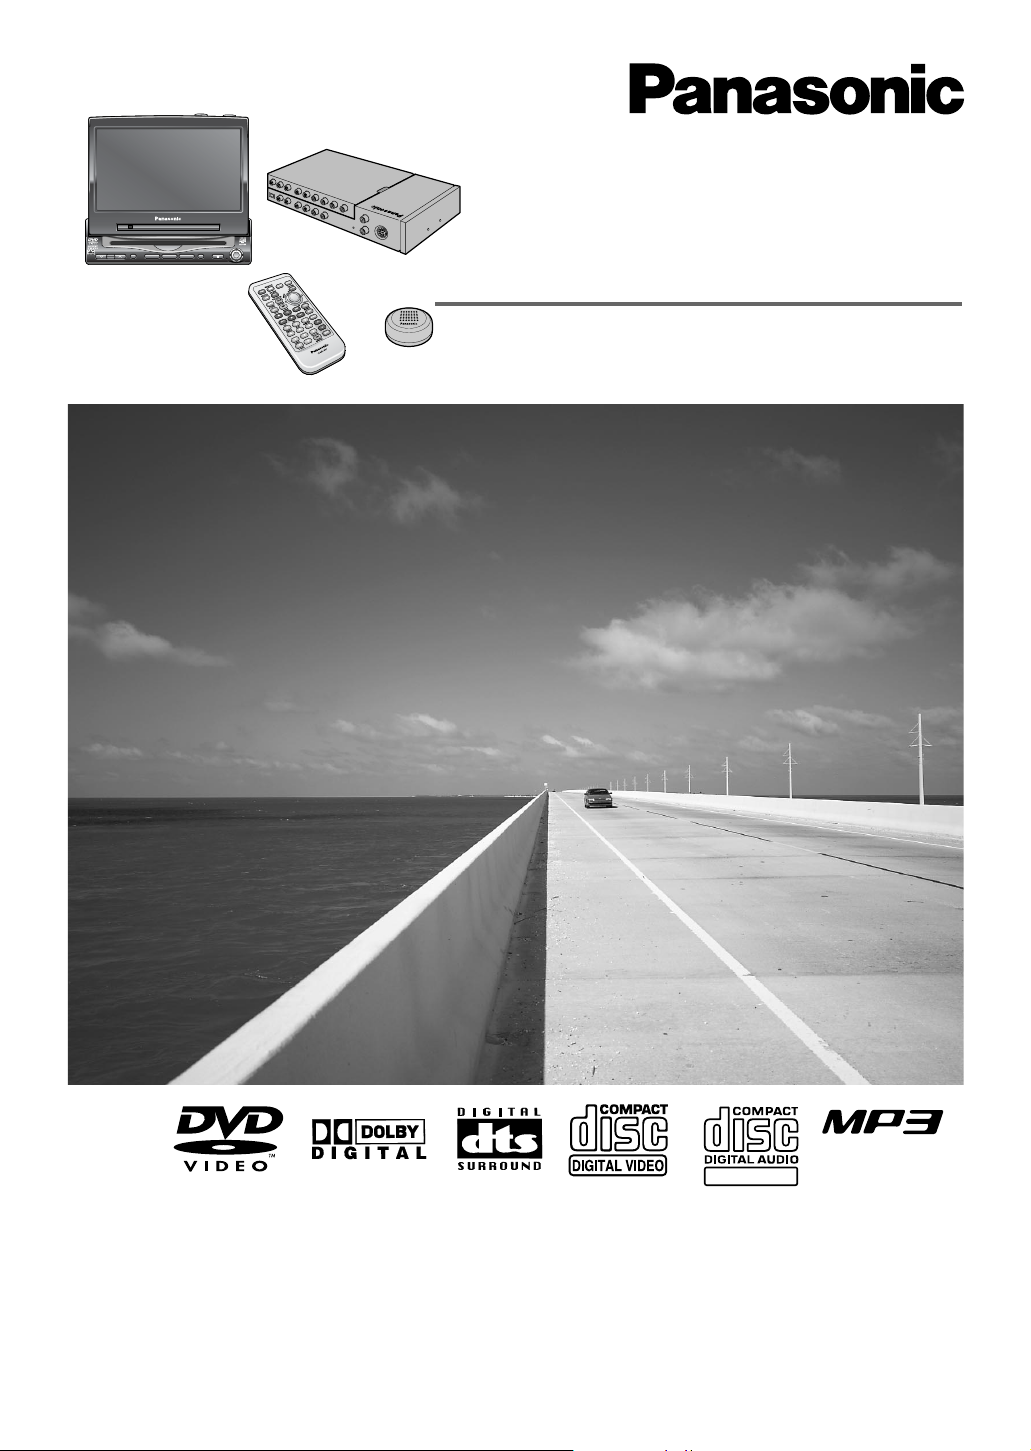
Panasonic CQ-VAD9200U User Manual
®
Multi Channel In-Dash 7 Inch Wide Color LCD TV /
DVD-Video / Receiver
Télé couleur de tableau de bord à ÉCL de 7 po /
lecteur DVD-Vidéo, CD
Reproductor de DVD-Video / CD con TV y LCD de 7"
de Anhco a Color para el Tablero del Auto
CQ-VAD9200U
¡Please read these instructions carefully before using this product and save this manual for future use.
¡Prière de lire ces instructions attentivement avant d’utiliser le produit et garder ce manuel pour l’utilisation ultérieure.
¡Lea con atención estas instrucciones antes de utilizar el producto y guarde este manual para poderlo consultar en el futuro.
Operating Instructions
Manuel d’instructions
Manual de Instrucciones
VOLUME
MENUMUTE MODE NAVI
NAVIGATION ASPECT
P·MODE
POWER
ASP
ENTER
CQ-VAD9200U
IN-DASH 7 INCH WIDE COLOR LCD TV / DVD - VIDEO / RECEIVER
DISC
TRACK/
CHANNEL
TEXT
2
CQ-VAD9200U
Safety Information
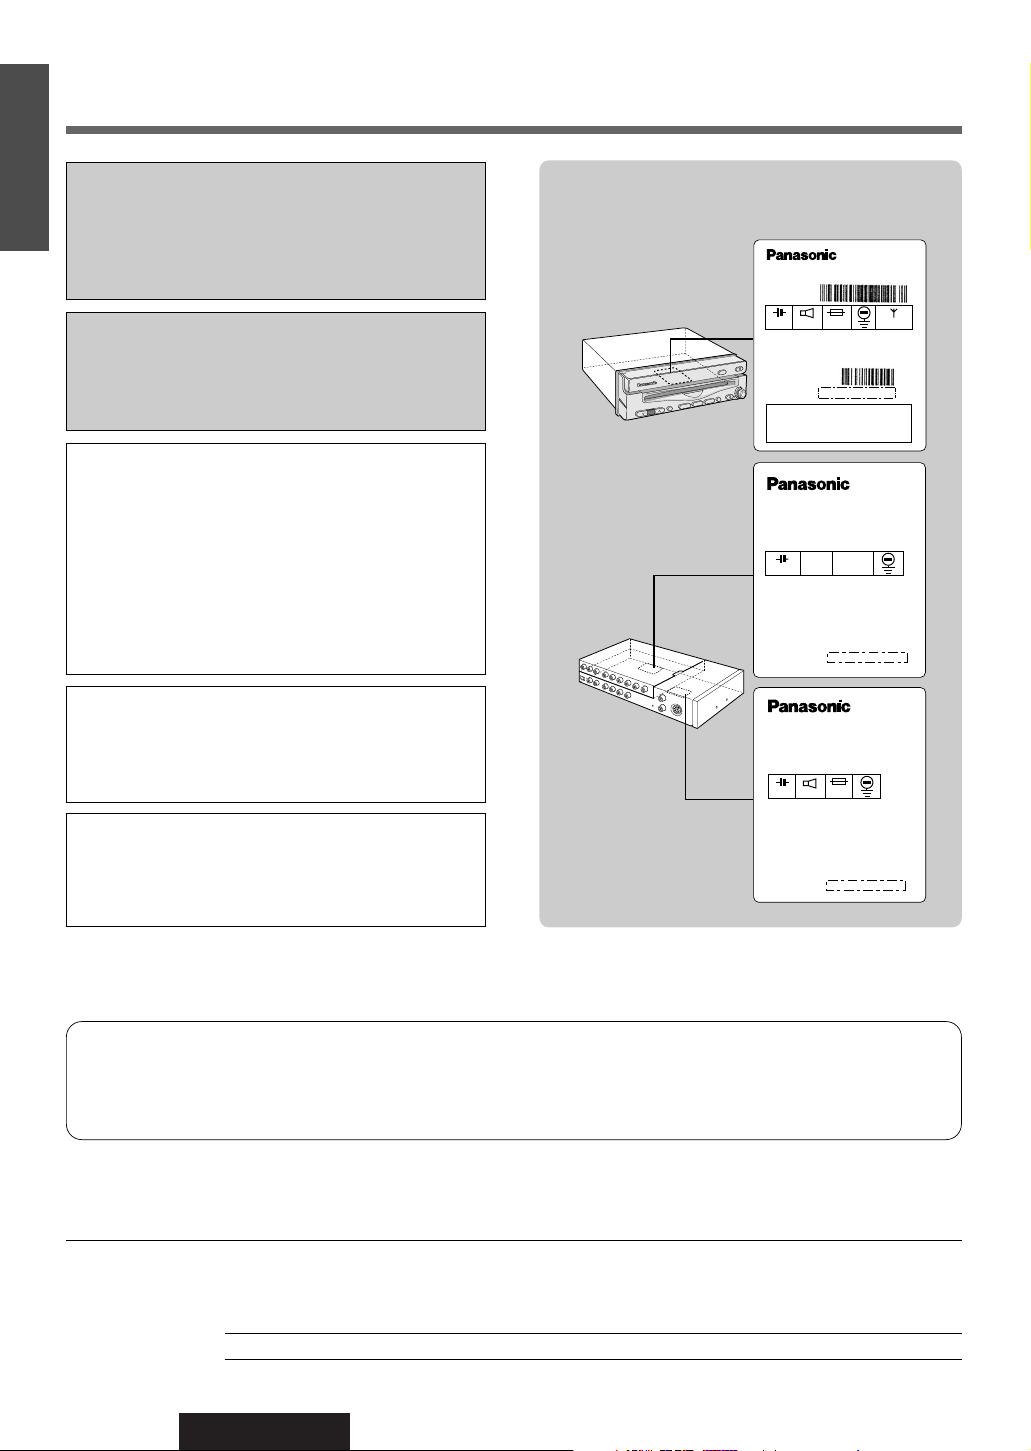
Label Indication and Location
Display Unit
Hide-away Unit
Find the model number and serial number on either the back or bottom of the unit. Please record them in the space
below and retain this booklet as a permanent record of your purchase to help with identification in case of theft.
MODEL NUMBER CQ-VAD9200U SERIAL NUMBER
DATE PURCHASED FROM
CAUTION!
THIS PRODUCT UTILIZES A LASER.
USE OF CONTROLS OR ADJUSTMENTS OR PERFORMANCE OF PROCEDURES OTHER THAN THOSE
SPECIFIED HEREIN MAY RESULT IN HAZARDOUS
RADIATION EXPOSURE.
DO NOT OPEN COVERS AND DO NOT REPAIR
YOURSELF. REFER SERVICING TO QUALIFIED
PERSONNEL.
WARNING:
TO REDUCE THE RISK OF FIRE OR ELECTRIC
SHOCK OR PRODUCT DAMAGE, DO NOT EXPOSE
THIS APPLIANCE TO RAIN, SPLASHING, DRIPPING
OR MOISTURE.
CAUTION:
PLEASE FOLLOW THE LAWS AND REGULATIONS
OF YOUR STATE, PROVINCE OR COUNTRY FOR
INSTALLATION OF THE UNIT.
Laser products:
Wave length: 780 nm
Laser power: No hazardous radiation is emitted with
safety protection.
E
N
G
L
I
S
H
WARNING:
NOT FOR USE WHERE VIDEO MONITOR IS VISIBLE
TO DRIVER TO AVOID RISK OF SERIOUS INJURY
OR POSSIBLE VIOLATION OF STATE LAWS.
THE FOLLOWING APPLIES ONLY IN THE U.S.A.
Part 15 of the FCC Rules
FCC Warning:
Any unauthorized changes or modifications to this equipment would void the user's authority to operate this device.
Model No.
N° De Modèle
Manufactured by Matsushita Communication
Industrial Co., Ltd.
Yokohama Japan Made in Japan
Serial No.
N° De Série
Model No.
N° De Modèle
Manufactured by Matsushita Communication
Industrial Co., Ltd.
Yokohama Japan Made in Japan
CQ-VAD9200U
8 Ω
1 2 V 5 A
This device complies with Part 15 of the
FCC Rules. Operation is subject to the
condition that this device does not cause
harmful interference.
1 2 V
F M 7 5 Ω
YEPOFX4854
(CQ-VAD7200U)
(CQ-VAD9200U)
Model No.
N° De Modèle
Manufactured by Matsushita Communication
Industrial Co., Ltd.
Yokohama Japan Made in Japan
YEPOFX4852
(CQ-VAD9200U)
1 2 V 1 5 A
4 Ω

CQ-VAD9200U
3
Il est recommandé de noter, dans l’espace prévu cidessous, les numéros de modèle et de série inscrits
soit à l’arrière soit sous le fond de l’appareil, et de
conserver ce manuel comme mémorandum de
l’achat afin de permettre l’identification de l’appareil
en cas de vol.
NUMÉRO DE MODÈLE CQ-VAD9200U
NUMÉRO DE SÉRIE
DATE DE L’ACHAT
VENDEUR
Busque el número del modelo y el número de serie
ya sea en la parte trasera o en el fondo de la unidad.
Sírvase anotar dichos números en el espacio siguiente, y mantenga este librete como una anotación
permanente de su compra para ayudar en la identificación en el caso de robo.
NÚMERO DEL MODELO CQ-VAD9200U
NÚMERO DE SERIE
FECHA DE COMPRA
NOMBRE DE LA TIENDA
ATTENTION!
CET APPAREIL EST DOTÉ D’UN LECTEUR AU
LASER. L’UTILISATION DE COMMANDES OU LE
RECOURS À DES RÉGLAGES AUTRES QUE CEUX
INDIQUÉS DANS CE MANUEL PEUVENT PRÉSENTER
DES RISQUES D’EXPOSITION À DES RADIATIONS.
NE PAS OUVRIR LE BOÎTIER. TOUTE RÉPARATION
DOIT ÊTRE FAITE PAR UN PERSONNEL QUALIFIÉ ET
NON PAR L’USAGER.
Produits laser:
Longueur d’onde: 780 nm
Puissance du laser: Aucune radiation dangereuse
n’est émise avec la protection de
sécurité.
ATTENTION:
OBSERVEZ LES LOIS ET RÉGLEMENTS DE VOTRE
DÉPARTEMENT, PROVINCE OU PAYS POUR
L’INSTALLATION DE L’APPAREIL.
PRECAUCIÓN:
RESPETE LAS LEYES Y REGULACIONES DE SU
ESTADO, PROVINCIA O PAÍS PARA LA INSTALACIÓN DEL APARATO.
Productos láser:
Longitud de onda: 780 nm
Potencia láser: Con protección de seguridad no se
emite radiación peligrosa.
Consignes de sécurité
Información para su seguridad
F
R
A
N
Ç
A
I
S
E
S
P
A
Ñ
O
L
AVERTISSEMENT:
POUR RÉDUIRE LES RISQUES D’INCENDIE OU
D’ÉLECTROCUTION, N’EXPOSEZ PAS CET
APPAREIL À LA PLUIE OU À L’HUMIDITÉ.
ADVERTENCIA:
ESTE APARATO NO DEBE UTILIZARSE DONDE EL
CONDUCTOR PUEDA VER EL MONITOR DE VÍDEO,
PARA EVITAR ACCIDENTES GRAVES O POSIBLES
VIOLACIONES DE LAS LEYES ESTATALES.
AVERTISSEMENT:
AFIN DE LIMITER LES RISQUES D’INCENDIE OU
D’ÉLECTROCUTION OU ENCORE D’ENDOMMAGEMENT DE L’APPAREIL, N’EXPOSEZ PAS CET
APPAREIL À LA PLUIE, AUX ÉCLABOUSSURES
D’EAU OU À L’HUMIDITÉ.
ADVERTENCIA:
PARA REDUCIR EL PELIGRO DE INCENDIOS Y DE
DESCARGAS ELÉCTRICAS ASÍ COMO DE DAÑOS
DEL PRODUCTO, NO LO EXPONGA A LA LLUVIA, A
SALPICADURAS, CONDENSACIÓN DE AGUA NI
HUMEDAD.
¡PRECAUCIÓN!
ESTE APARATO UTILIZA RAYOS LÁSER.
LA UTILIZACIÓN DE CONTROLES Y LOS PROCEDIMIENTOS QUE NO ESTÉN ESPECIFICADOS EN
ESTE MANUAL, PUEDEN OCASIONAR UNA EXPOSICIÓN PELIGROSA A LA RADIACIÓN.
NO ABRA LAS CUBIERTAS Y NO EFECTÚE NINGUNA REPARACIÓN USTED MISMO. SOLICITE EL
SERVICIO A PERSONAL CUALIFICADO.

4
CQ-VAD9200U
E
N
G
L
I
S
H
Panasonic welcomes you to our ever growing family of electronic product owners. We know that this product
will bring you many hours of enjoyment. Our reputation is built on precise electronic and mechanical engineering, manufactured with carefully selected components and assembled by people who take pride in their work.
Once you discover the quality, reliability, and value we have built into this product, you too will be proud to be
a member of our family.
❏ Features
■ Integration of the monitor, TV tuner, FM/AM radio, DVD/Video CD player, and
CD/MP3 player
¡A CD-R and a CD-RW that hold CD-DA data can be reproduced.
¡A CD-ROM, a CD-R and a CD-RW that hold MP3 data can be reproduced.
¡MP3 ID3Tag is supported.
■ Built-in Dolby Digital decoder / DTS decoder, Dolby Pro Logic decoder
Optical digital input connector (Optical fiber cable is supplied)
You can enjoy a powerful 5.1 channel surround system by connecting optional center speaker, power
amplifier and sub-woofer.
■ Built-in DSP
8 sound field (space) and 7 band graphic equalizer.
■ 7-inch wide LCD (Liquid Crystal Display) display
Delivers images of high quality and superb color reproduction.
■ Fully powered display positioning mechanism (except for lateral angle)
Positioning of the display unit is fully power driven. This includes extending the unit, raising it to upright
position, adjusting its vertical (tilt) angle and moving it to the front and rear.
The lateral angle to the right and left can be adjusted manually.
■ GUI (Graphic User Interface)
GUI displays various indications with colorful symbols to enhance visibility, enjoyment, and operability.
■ Image capture function
Images can be imported from TV, VTR, DVD or Video CD for a wall paper.
■ Built-in automatic dimmer
The brightness of the screen is automatically adjusted in response to surrounding brightness.
■ ID code
4-digit ID code for increased security.
■ External extension terminal
¡Two video input (on the hide-away unit side)
You can connect a car navigation system, VCR, camcorder and rear view camera with this unit if they
have video output type terminal.
¡One video output (on the hide-away unit side)
You can connect optional monitor for passengers in the rear seat. For example, you can enjoy a map of
the car navigation on the front monitor, and passengers in the rear seat can enjoy DVD movie on the
rear monitor at the same time. Moreover, different sounds can be played in the front seat and rear seat
in the private mode.
■ CD changer control function
An optional CD changer can be connected.
Note: This book explains how to connect to Panasonic Car Navigation System that will be in the market.
Descriptions regarding the car navigation system are boxed with dotted line.

5
CQ-VAD9200U
E
N
G
L
I
S
H
Contents
¢ Safety Information.............................. 2
¢ Features ................................................ 4
¢ Use This Product Safely ...................... 10
¢ Components / Remote Control Unit
Preparation ........................................... 12
Components, battery installation and battery notes
¢ Name of Controls and Functions........ 13
Name of buttons and its functions
¢ Indications on the Screen.................... 16
The state of the current output appears, OSD (On
Screen Display) on / off
¢ Discs that can be Played Back............ 17
¢
System Upgrade
................................... 18
¢ General.................................................. 20
Power, mode change, volume, mute, display
open/close and monitor position adjustment
¢ TV Tuner................................................ 22
TV mode, channel setting, direct channel selection,
preset channels
¢ VTR ........................................................ 24
VTR1/VTR2 mode, connectable external devices
¢ DVD / Video CD Player......................... 26
Disc insert/eject, basic operation, chapter title
selection, useful function
¢ CD / MP3 Player.................................... 30
Disc insert/eject, track/file selection, folder selection (MP3), fast forward / fast reverse (CD),
sequential transition from one file to the next
(MP3), title scroll, direct folder selection (MP3),
repeat, random, points to remember when recording an MP3 disc
¢ Radio ..................................................... 34
Radio mode, band, tuning, preset station
¢ CD Changer Control............................. 36
CD changer mode, disc selection, track selection,
fast forward / fast reverse, random, scan, repeat
¢ SET-UP : User Settings........................ 38
Monitor position, navigation set up, rear view camera set up, ID code setting, button operation
sound, video control setting, memory clearance
¢ SET-UP : Display (Screen) Settings.... 44
Dimmer, display adjustment
¢ SET-UP : DVD Settings ........................ 46
Language setting, display aspect and DVD software
mode
¢ SET-UP : Clock / Date Settings ........... 48
Clock and date setting, calendar display
¢ SET-UP : Capture Function ................. 50
Image capture
¢ SET-UP : Sound Settings..................... 52
Setting the VTR (VTR1/VTR2) input level, digital
input setting, setting the absence/presence and
size of each speaker, adjusting the output balance
of each speaker, adjusting the timing with which
the audio from each speaker reaches the listener's
position, maintaining the ambience even while listening at a low volume level, adjusting the level for
each of the frequency bands, audio channel setting,
dynamic range compression, sound field setting
(space)
¢ SET-UP : Other Settings ...................... 64
Display change, aspect ratio, rear monitor set up,
private mode
¢ Installation Guide ................................. 68
Step-by-step procedures
¢ Electrical Connections......................... 78
Cautions and cable wiring diagram
¢ Troubleshooting................................... 86
Where to get service help, troubleshooting tips,
error display messages and reset switch
¢ Maintenance.......................................... 94
Care of the unit, notes on Discs, Notes on
CD-Rs/CD-RWs
¢ Definition of Terms............................... 96
¢ Language Code List............................. 97
¢ Specifications....................................... 98

10
CQ-VAD9200U
1
E
N
G
L
I
S
H
When Car Washing
Do not expose the product, including the speakers and discs, to water or excessive moisture. This could cause electrical
shorts, fire, or other damage.
When Parked
Parking in direct sunlight can produce very high temperatures inside your car. Give the interior a chance to cool down
before switching the unit on.
Use the Proper Power Supply
This product is designed to operate with a 12 V DC, negative ground battery system (the normal system in a North
American car.)
Disc Mechanism
Do not insert coins or any small objects. Keep screwdrivers and other metallic objects away from the disc mechanism and
disc.
Protect the DVD Software
When you leave the car, be sure to eject the disc from this unit and bring it out.
Use Authorized Servicenters
Do not attempt to disassemble or adjust this precision product. Please refer to the Servicenter list included with this product
for service assistance.
For Installation
The product should be installed in a horizontal position with the front end up at a convenient angle, but not more than 30˚.
The user should bear in mind that in some areas there may be restrictions on how and where this unit must be installed.
Consult your dealer for further details.
Use This Product Safely
NOTICE: Language for Manuals of Products Using LCD
This product has a fluorescent lamp that contains a small amount of mercury. It also contains lead in some components.
Disposal of these materials may be regulated in your community due to environmental considerations. For disposal or
recycling information please contact your local authorities, or the Electronics Industries Alliance: <http://www.eiae.org.>
WARNING:
TO AVOID RISK OF SERIOUS INJURY OR POSSIBLE VIOLATION OF LAWS, NOT FOR USE WHERE
VISIBLE TO DRIVER FOR ANY PURPOSE OTHER THAN NAVIGATION OR USE WITH REAR VIEW
CAMERA.
When Driving
¡The driver must not operate the color LCD
(liquid crystal display) monitor. Operating the color LCD monitor may
lead to carelessness and cause an accident. Stop your car in a safe location when operating the unit.
¡The driver must not watch videos while driving. It may lead to carelessness and cause an accident.
¡Keep the unit at an appropriate sound level. Driving with the sound at a level that prevents you from hearing sounds
outside and around the car may cause an accident.
11
CQ-VAD9200U
2
E
N
G
L
I
S
H
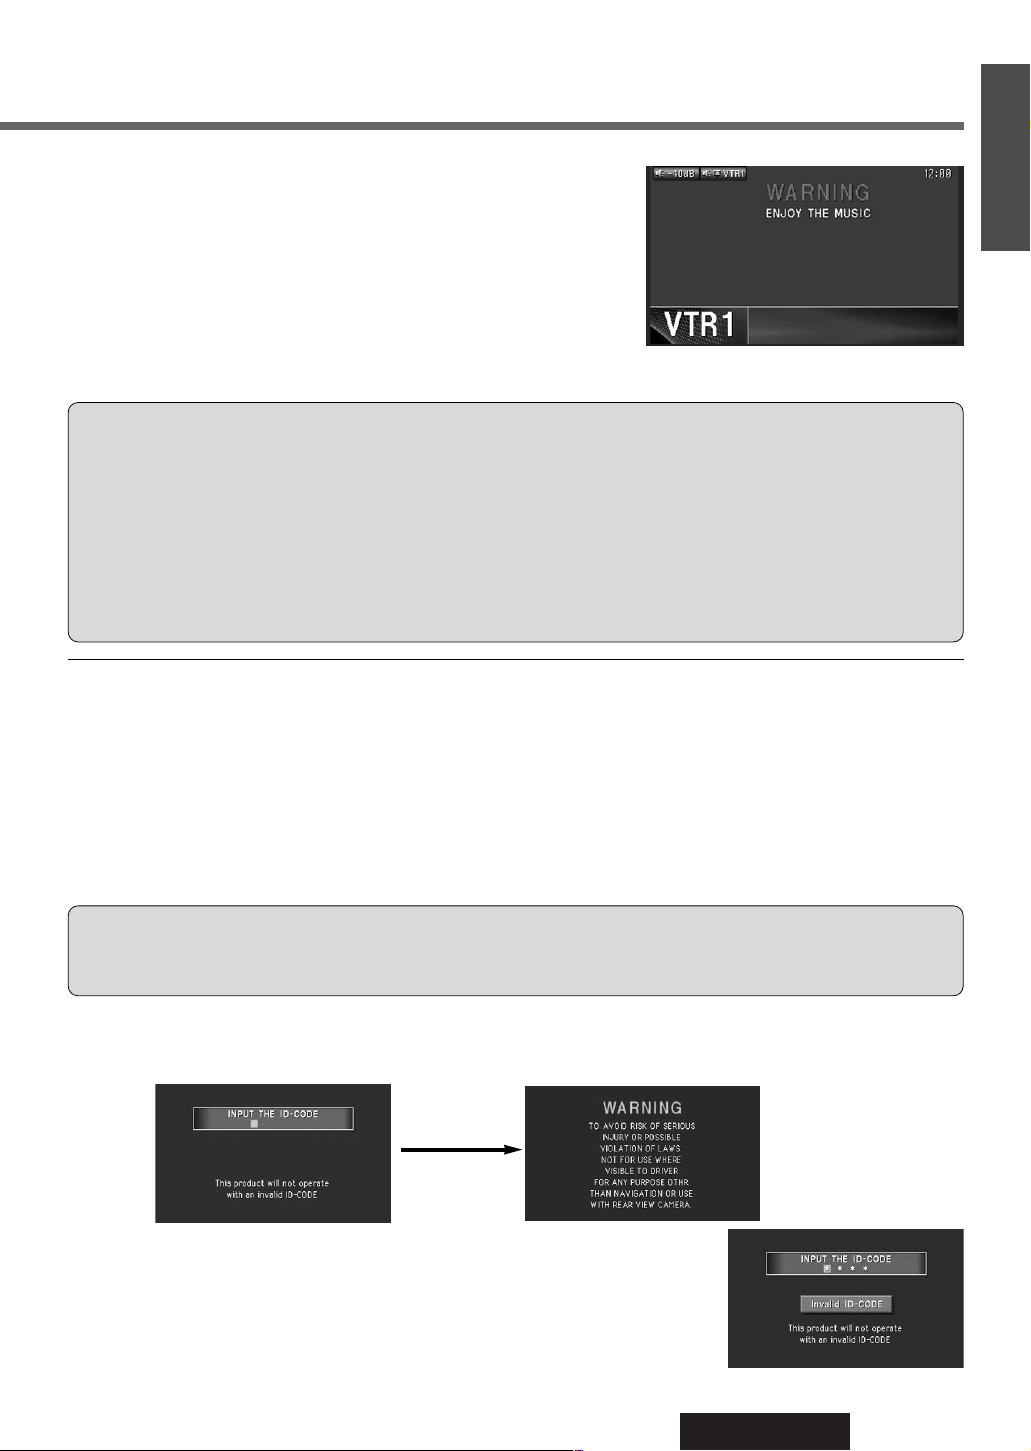
ID Code
Prior to operating this unit, it is a advisable to assign your 4-digit ID code for security. (Make sure to use four digits for ID
code.)
Once the ID code has been set, the unit cannot be operated if the main power supply is disconnected then re-connected. It
is electronically locked so that a thief could not use the stolen unit unless that person knows the code you have set.
The ID code operation must be performed only by the person to whom the unit belongs.
Generally, it is not necessary to enter the ID code each time when using the unit if it has never been disconnected from the
main power supply (car battery). For the ID code setting procedures, see pages 40 to 41.
ID Code Input
Enter the ID code after turning on the power and activating the display.
Note: When you fail in entering the ID code, a screen on the right is displayed and
the unit beeps three times. Enter a correct ID code.
If you fail to enter the correct ID code three times consecutively, the power is turned
off. Turn on the power again and enter a correct ID code in this case.
This system is designed so that you cannot see
the moving picture while you are driving.
¡
Park your car in a safe place with pulling the side brake (parking
brake) lever before watching the monitor.
¡
A rear monitor (option) displays moving picture while driving.
11
Note:
Be sure to connect the side brake (parking brake) connection lead. (apage 82)
Success
Caution: Record your registered ID code and keep it in a secure location. If you forget it, you will be unable
to use the unit. If you cannot operate the unit because you forget the ID code, please consult your nearest Panasonic
Servicenter.
Cautions:
¡Picture might not be displayed, or it might take more time than usual to display picture in low temperature.
Also, movement of picture might become labored, or picture quality might deteriorate in low temperature.
[practicable temperature: 32 °F to 104 °F (0 °C to 40 °C)]
¡Do not touch the LCD (liquid crystal display).
If you touch the LCD, your fingerprints are conspicuous because the surface of the LCD was specially
processed.
¡
In some cases, noise is generated. It depends on the position or direction of a mobile phone and a CB transiever,
etc. Change the position or direction of the mobile phone and a CB transiever, etc. or keep them away from the unit.
12
CQ-VAD9200U
3
E
N
G
L
I
S
H
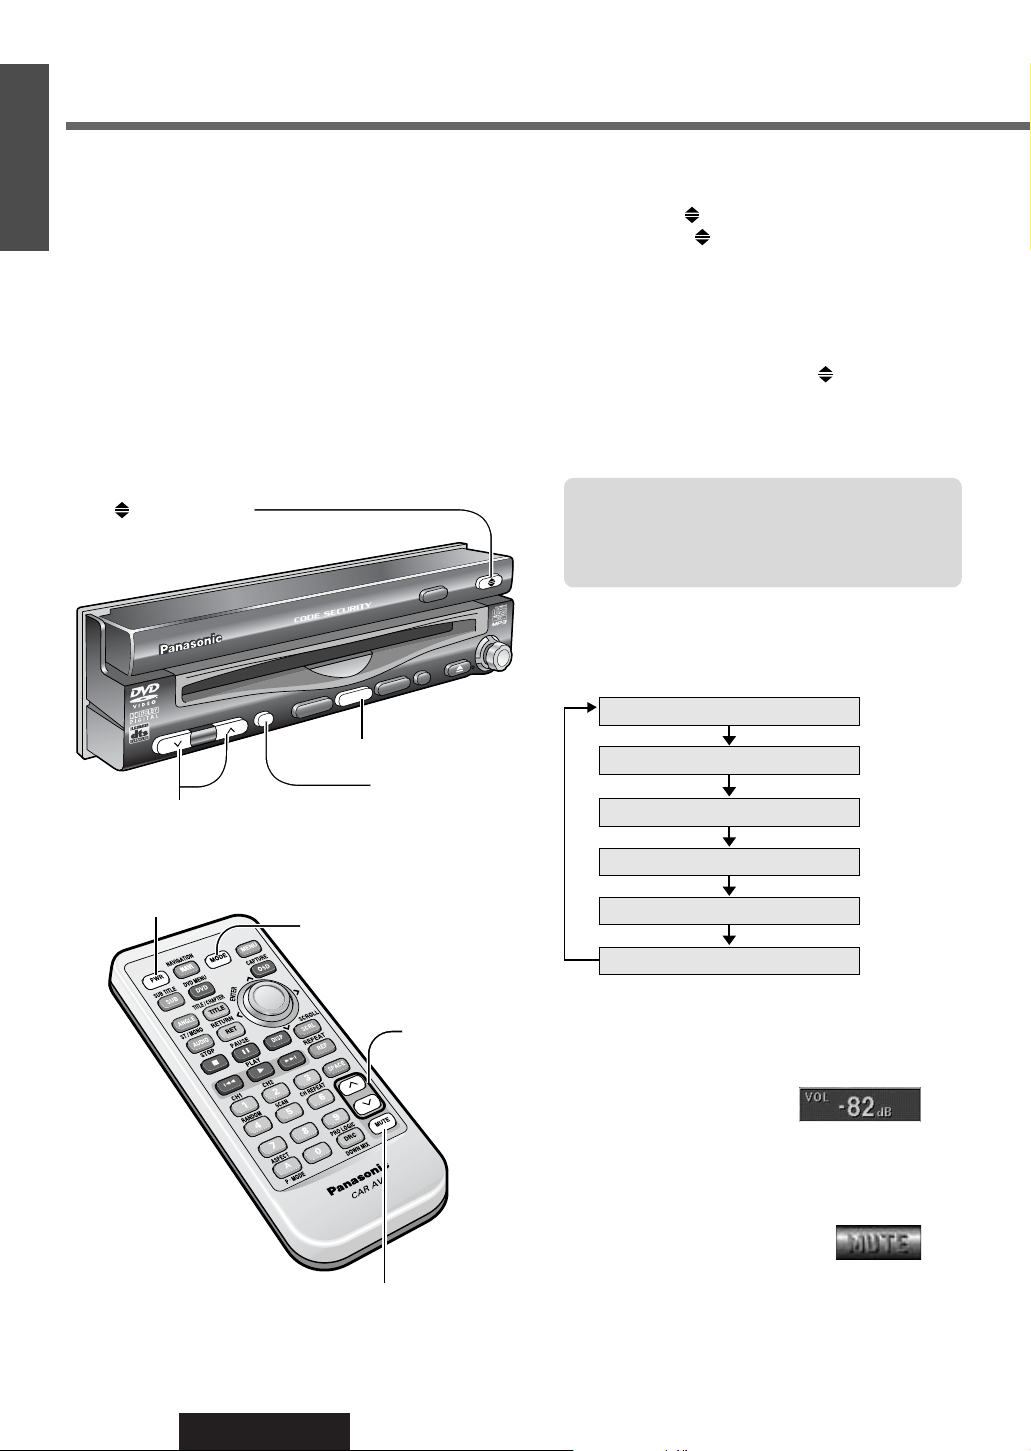
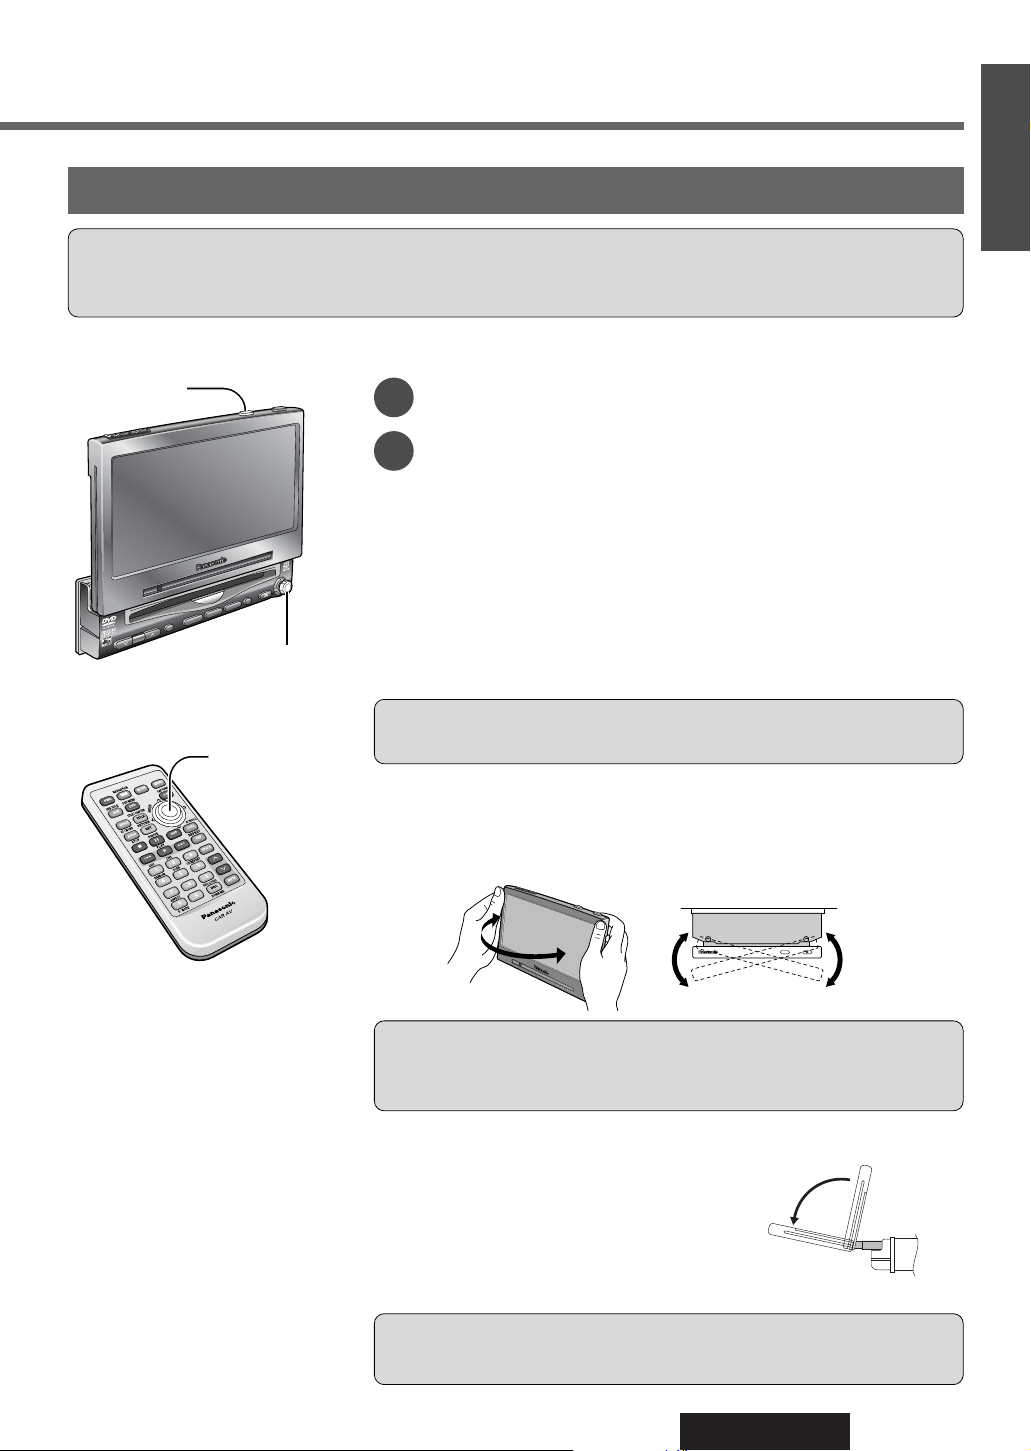
Remote Control Unit Preparation
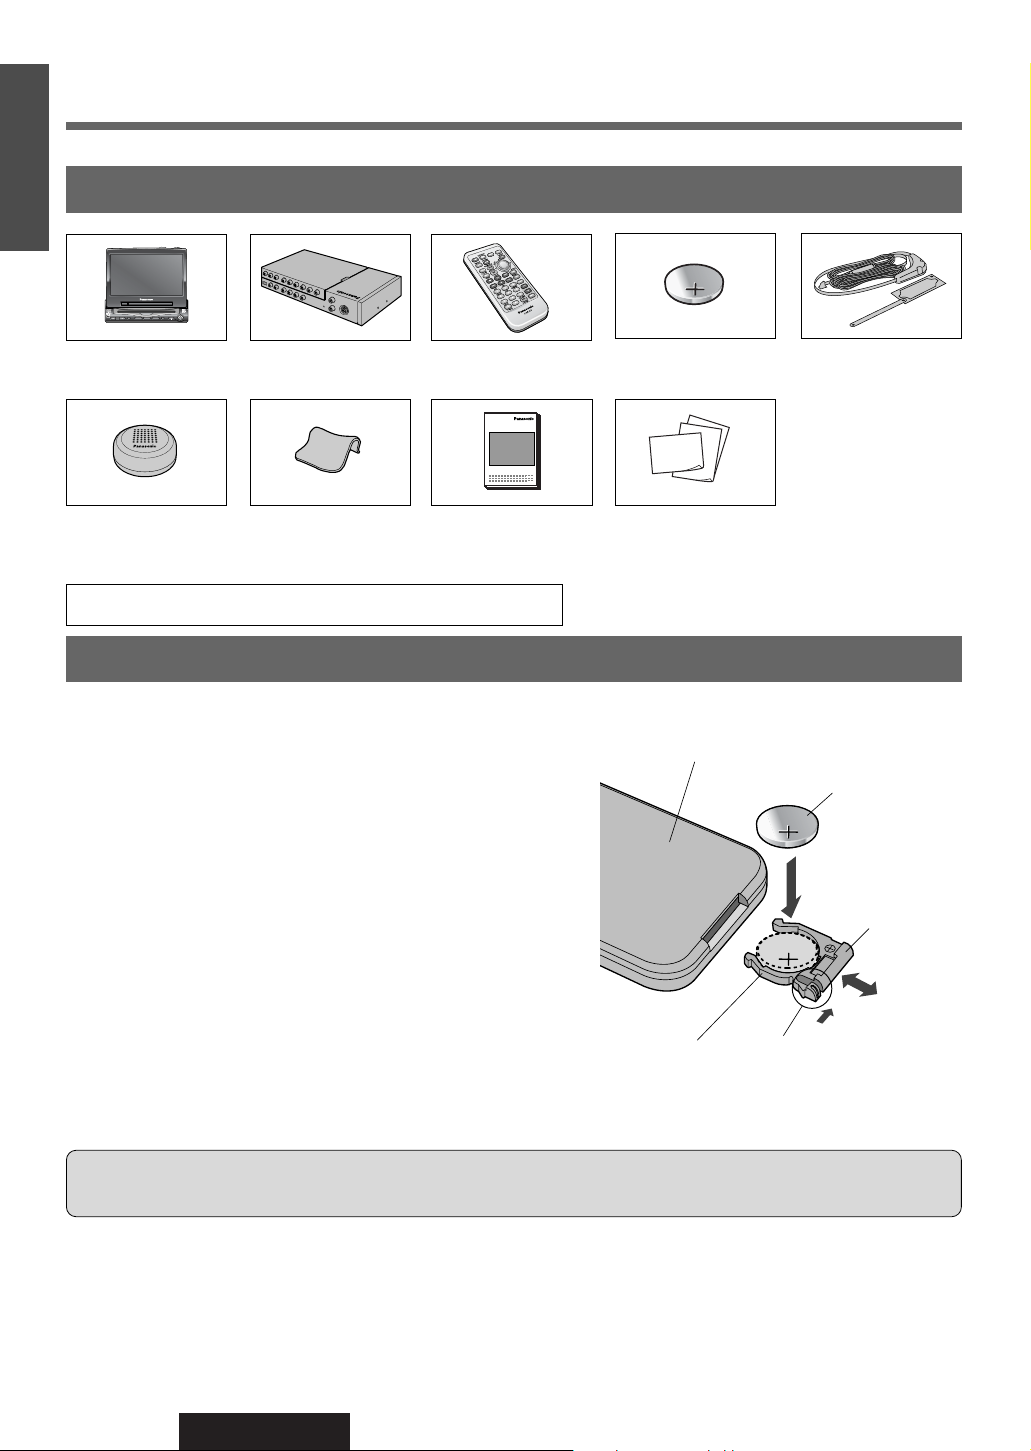
1. Display Unit
1
2. Hide-away Unit
1
3. Remote Control
Unit
1
4. Lithium Battery
(CR2025)
1
10. Installation Hardware (screws, cords, etc.) (a page 68)
7. Wiping Cloth
1
8. Operating
Instructions
1
9. Warranty Card, etc.
5. TV Antenna
Components / Remote Control Unit Preparation
Components
Battery Installation (Inserting / Replacing the Battery)
q Remove the battery holder.
Pull the holder by the position B while pushing position A
in the direction indicated by the arrow.
w Install the battery on the battery holder.
Set a new battery properly with its (+) side facing up as shown in
the figure.
e Insert the battery holder.
Push the battery holder back into its original position.
Back side
Lithium battery
(supplied)
Position B
Position A
¡Do not disassemble or short the battery. Do not throw a battery into a fire.
¡Keep batteries away from children to avoid the risk of accidents.
¡Be careful to observe proper local disposal rules when you dispose of batteries.
Battery Notes
Remove and dispose of the old battery immediately.
Battery Information:
¡Battery Type: Panasonic lithium battery (CR2025) (supplied)
¡Battery Life: Approximately 6 months with normal use (at room temperature)
Caution: Improper use of batteries may cause overheating, an explosion or ignition, resulting in injury or a fire. Battery
leakage may damage the unit.
6. Speaker*
*Do not use it for a
center speaker.
1
2
Battery holder
CQ-VAD9200U
IN-DASH 7 INCH WIDE COLOR LCD TV / DVD - VIDEO / RECEIVER
MENUMUTE MODE NAVI
DISC
NAVIGATION ASPECT
TRACK/
ENTER
CHANNEL
ASP
P·MODE
POWER
OO-OOOOO
XXXXXXXXXXXXXXX
XXXXXXXXXXXXXXXXX
XXXXXXXXXXXXXX
XXXXXXXXXXXXXXXX
VOLUME
13
CQ-VAD9200U
4
E
N
G
L
I
S
H
Display Unit
VOLUME
MENUMUTE MODE NAVI
NAVIGATION ASPECT
P·MODE
POWER
ASP
ENTER
CQ-VAD9200U
IN-DASH 7 INCH WIDE COLOR LCD TV / DVD - VIDEO / RECEIVER
DISC
TRACK/
CHANNEL
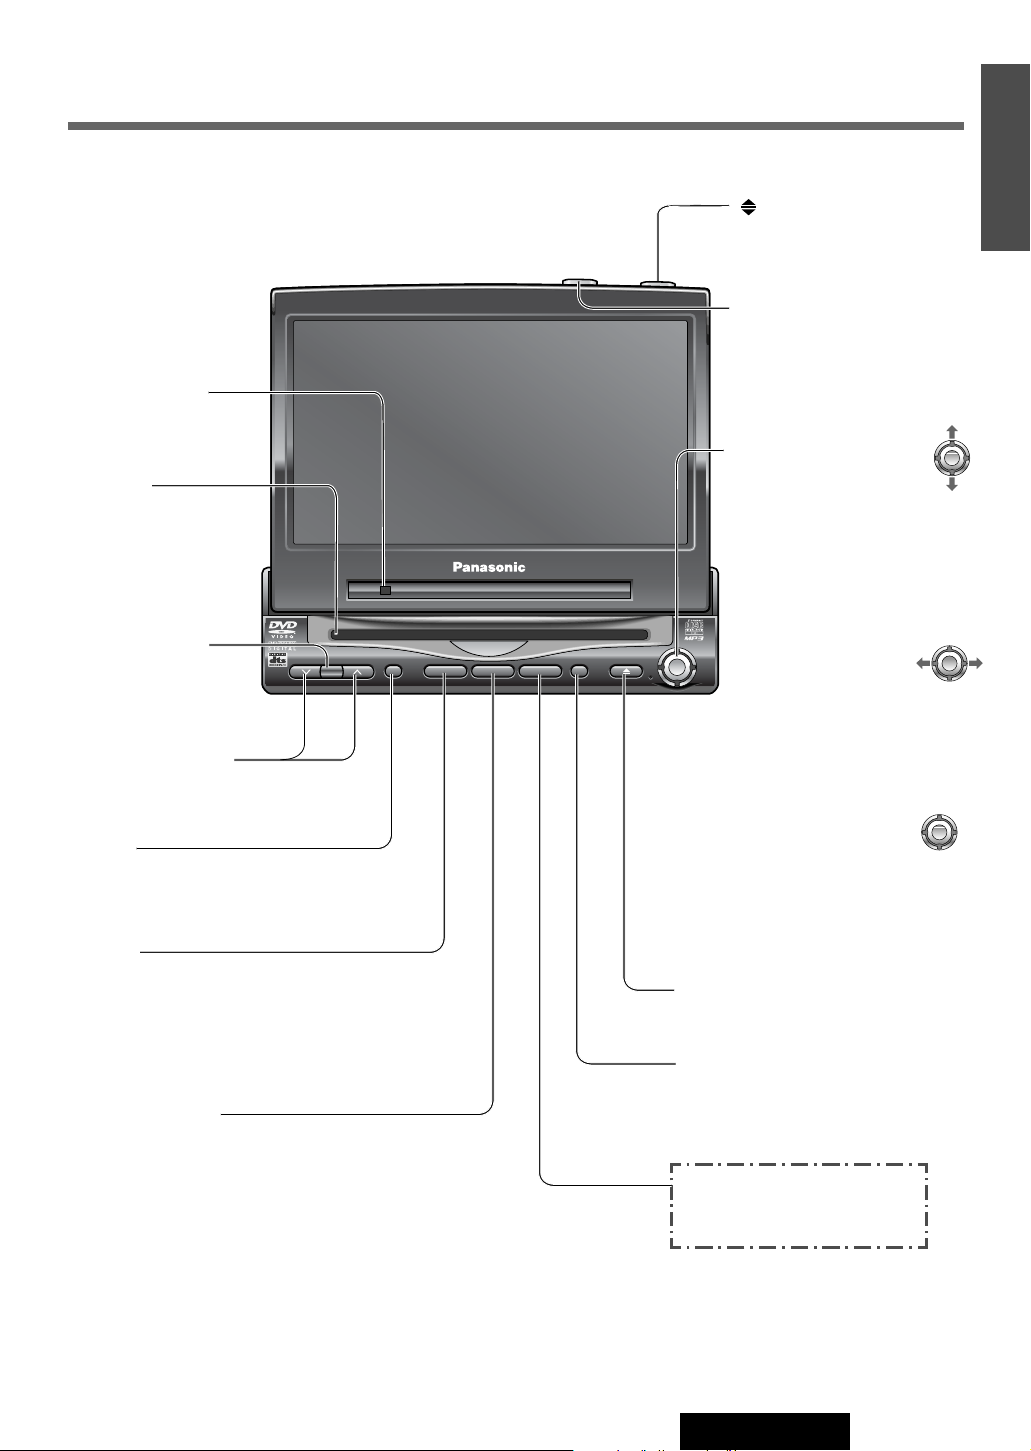
Dimmer sensor
(a page 44)
Remote control
sensor
[MENU]
¡Shows the menu screen.
(a page 38)
¡Shows the rear monitor
setting menu. (a page 66)
[}] [{] (VOLUME)
¡Adjusts the sound volume.
(a page 20)
[MUTE]
¡Mutes the sound temporarily.
(a page 20)
[TILT]
¡Shows the monitor position
setting menu. (a page 21)
¡Tilts the monitor forward
temporarily. (a page 21)
[ASP] (ASPECT) (P • MODE)
¡Selects the aspect ratio. (a page 65)
¡Activates/inactivates the private mode.
(a page 67)
[]
(OPEN/CLOSE)
¡Opens/closes the monitor.
(a page 20)
[NAVI] (NAVIGATION)
¡Activates/inactivates the car
navigation. (a page 25, 38)
[MODE] (POWER)
¡Switches on/off the power. (a page 20)
¡Changes the modes such as sound and
picture. (a page 20)
[u]
¡Ejects/reloads a disc. (a page 26, 30)
Disc slot
[}] [{] (DISC)
¡Searches for TV stations
and memorizes them
automatically. (a page 23)
¡Selects a folder or a disc.
(a page 30, 36)
¡Selects (vertically) or
adjusts an operation or
item.
[]] [[] (TRACK/CHANNEL)
¡Selects or searches
a channel, track, file
or frequency.
(a page 22, 30, 34, 36)
¡Sequential transition from one
file to the next. (a page 30)
¡Selects (horizontally) or
adjusts an operation or item.
[ENTER]
¡Selects a band.
(a page 34)
¡Searches for broadcast sta-
tions and memorizes them
automatically. (a page 35)
¡Determines an operation or
item.
ENTER
ENTER
ENTER
Name of Controls and Functions
Note: Refer to “Electrical Connections” for names on the rear of the hide-away unit. (a page 81)
14
CQ-VAD9200U
5
E
N
G
L
I
S
H
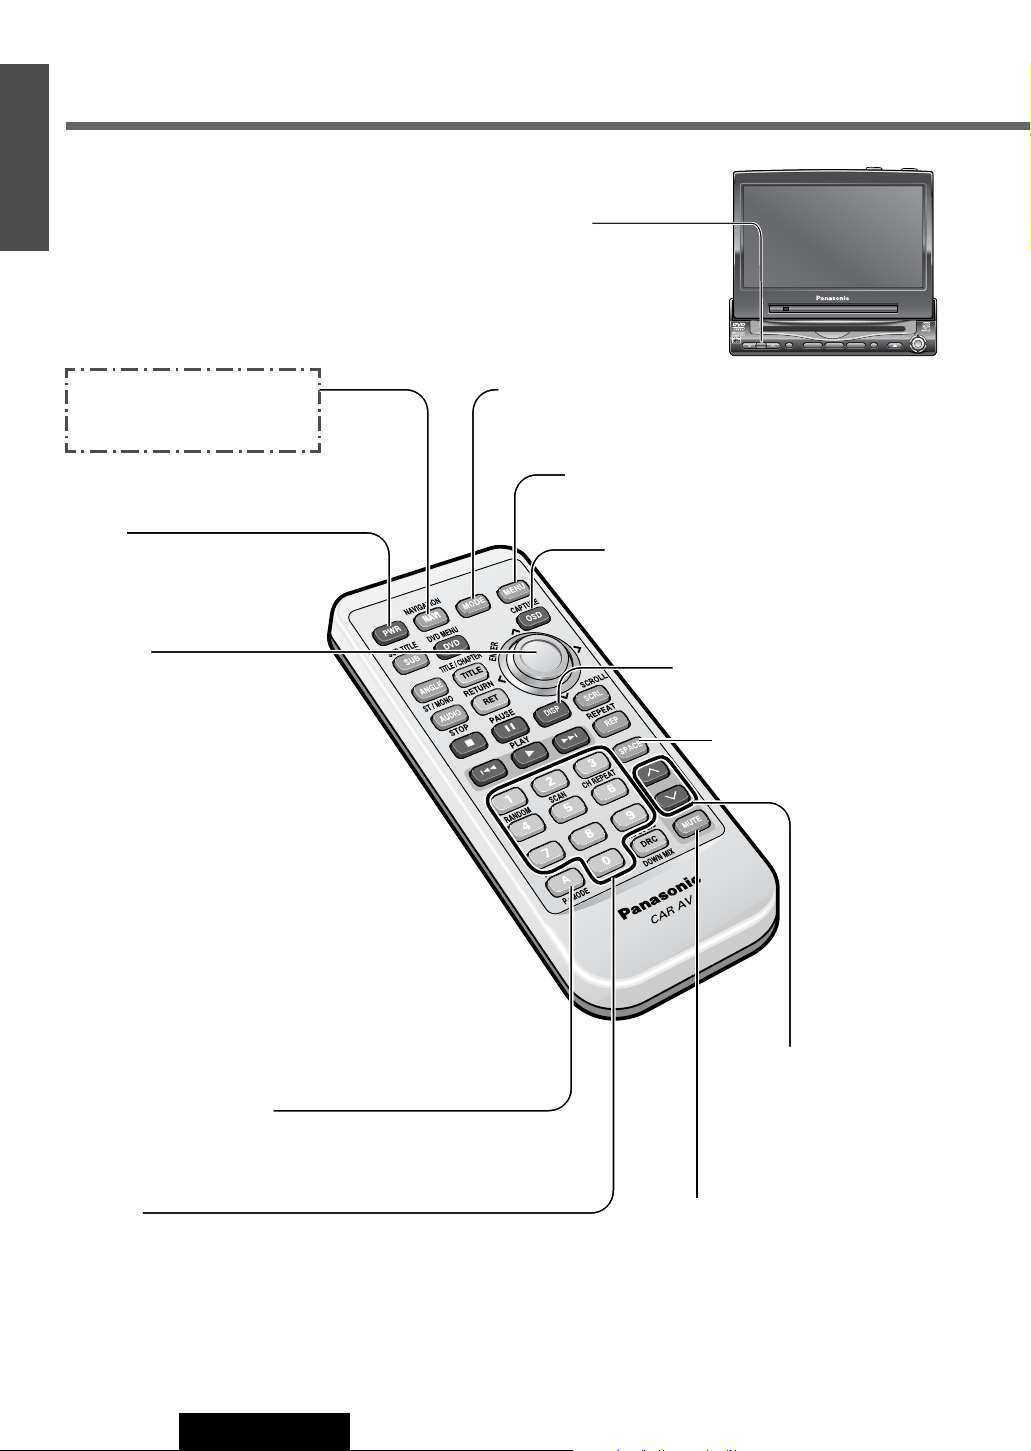
Name of Controls and Functions (continued)
Aim the remote control at the remote control sensor of the
display unit and operate it.
Remote Control
[PWR]
¡Switches on/off the power.
(a page 20)
VOLUME
MENUMUTE MODE NAVI
NAVIGATION ASPECT
P·MODE
POWER
ASP
ENTER
CQ-VAD9200U
IN-DASH 7 INCH WIDE COLOR LCD TV / DVD - VIDEO / RECEIVER
DISC
TRACK/
CHANNEL
[NAVI] (NAVIGATION)
¡Activates/inactivates the car
navigation. (a page 25, 38)
[A] (ASPECT) (P • MODE)
¡Selects the aspect ratio. (a page 65)
¡Activates/inactivates the private mode.
(a page 67)
[0] to [9]
¡Selects a TV channel directly. (a page 22)
¡Memorizes and recalls broadcast stations. (a page 35)
¡Random [4], scan [5], repeat [6] for the CD changer mode.
(a page 37)
¡Sets the ID code. (a page 40)
[MENU]
¡Shows the menu screen. (a page 38)
¡Shows the rear monitor setting menu. (a page 66)
[}] [{] (VOLUME)
¡Adjusts the sound volume.
(a page 20)
[MUTE]
¡Mutes the sound temporarily.
(a page 20)
[MODE]
¡Switches on/off the power. (a page 20)
¡Changes the modes such as sound and picture. (a page 20)
[SPACE]
¡Setting the sound field.
(a page 63)
[DISP]
¡Changes the display. (a page 64)
[OSD] (CAPTURE)
¡Displays information about each source on
the screen. (a page 16)
¡Saves your favorite part of playing picture as
a freeze-frame picture. (a page 51)
[}] [{]
¡Searches for TV stations and
memorizes them automatically.
(a page 23)
¡Selects a disc. (a page 36)
¡Selects (vertically) or adjusts an
operation or item.
[]] [[]
¡Selects or searches a channel,
frequency or track.
(a page 22, 34, 36)
¡Selects (horizontally) or adjusts an
operation or item.
[ENTER]
¡Selects a band. (a page 34)
¡Searches for broadcast stations and
memorizes them automatically.
(a page 35)
¡Determines an operation or item.
15
CQ-VAD9200U
6
E
N
G
L
I
S
H
Meaning of symbols
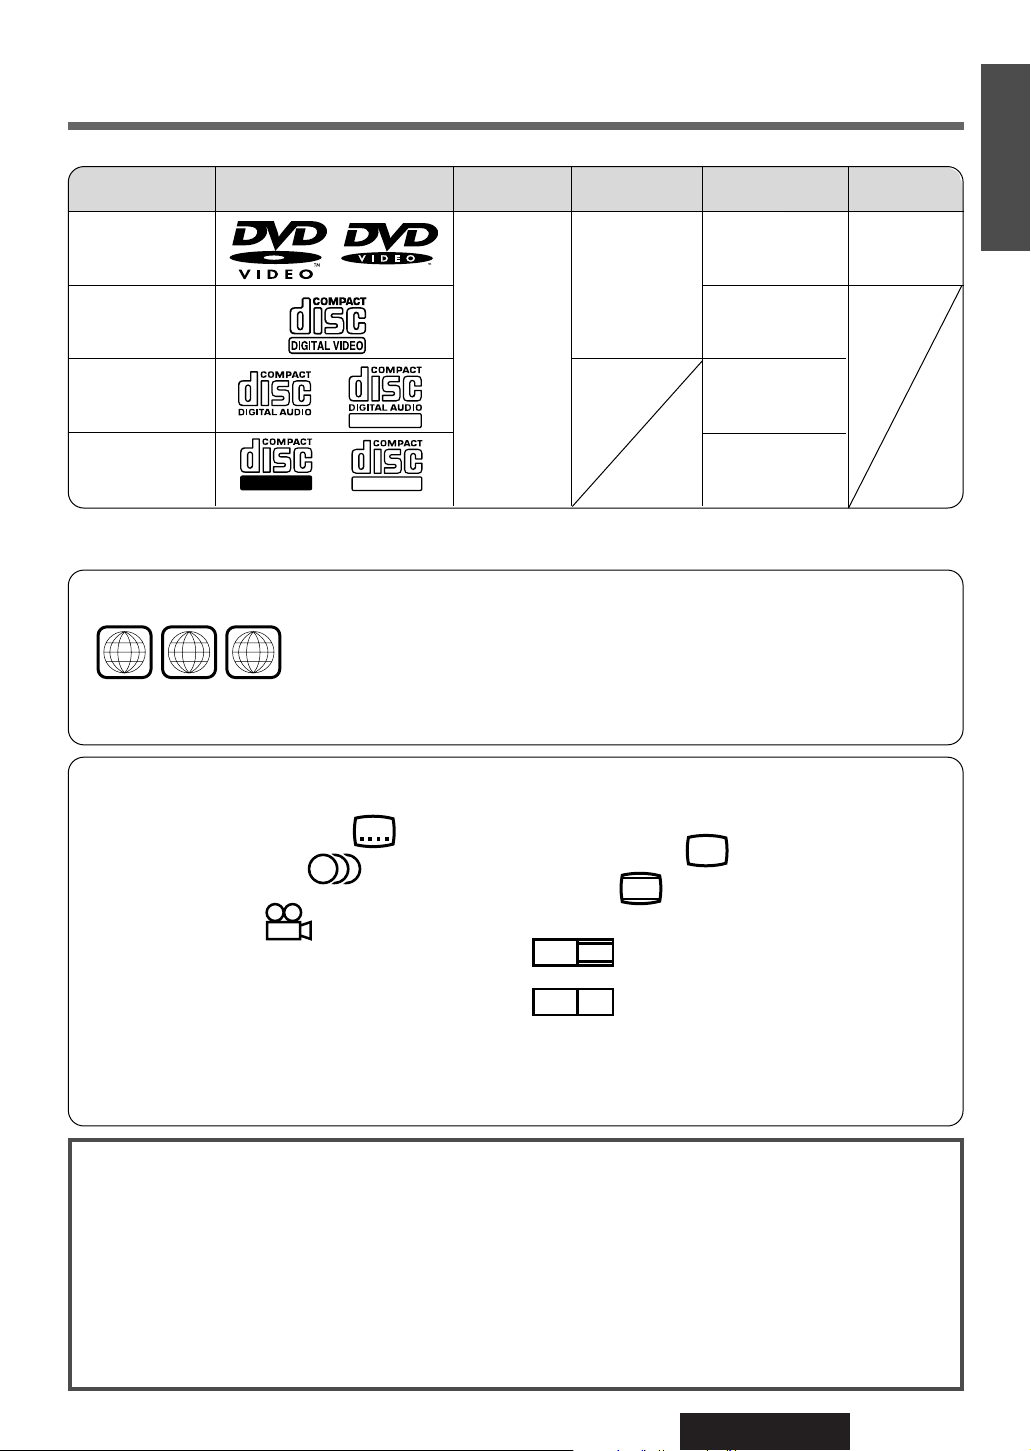
Indicates the compatible types of disc.
DVD
VIDEO
VIDEO
CD
DVD
VIDEO
VIDEO
CD
DVD
VIDEO
VIDEO
CD
CD
DVD
VIDEO
VIDEO
CD
DVD
VIDEO
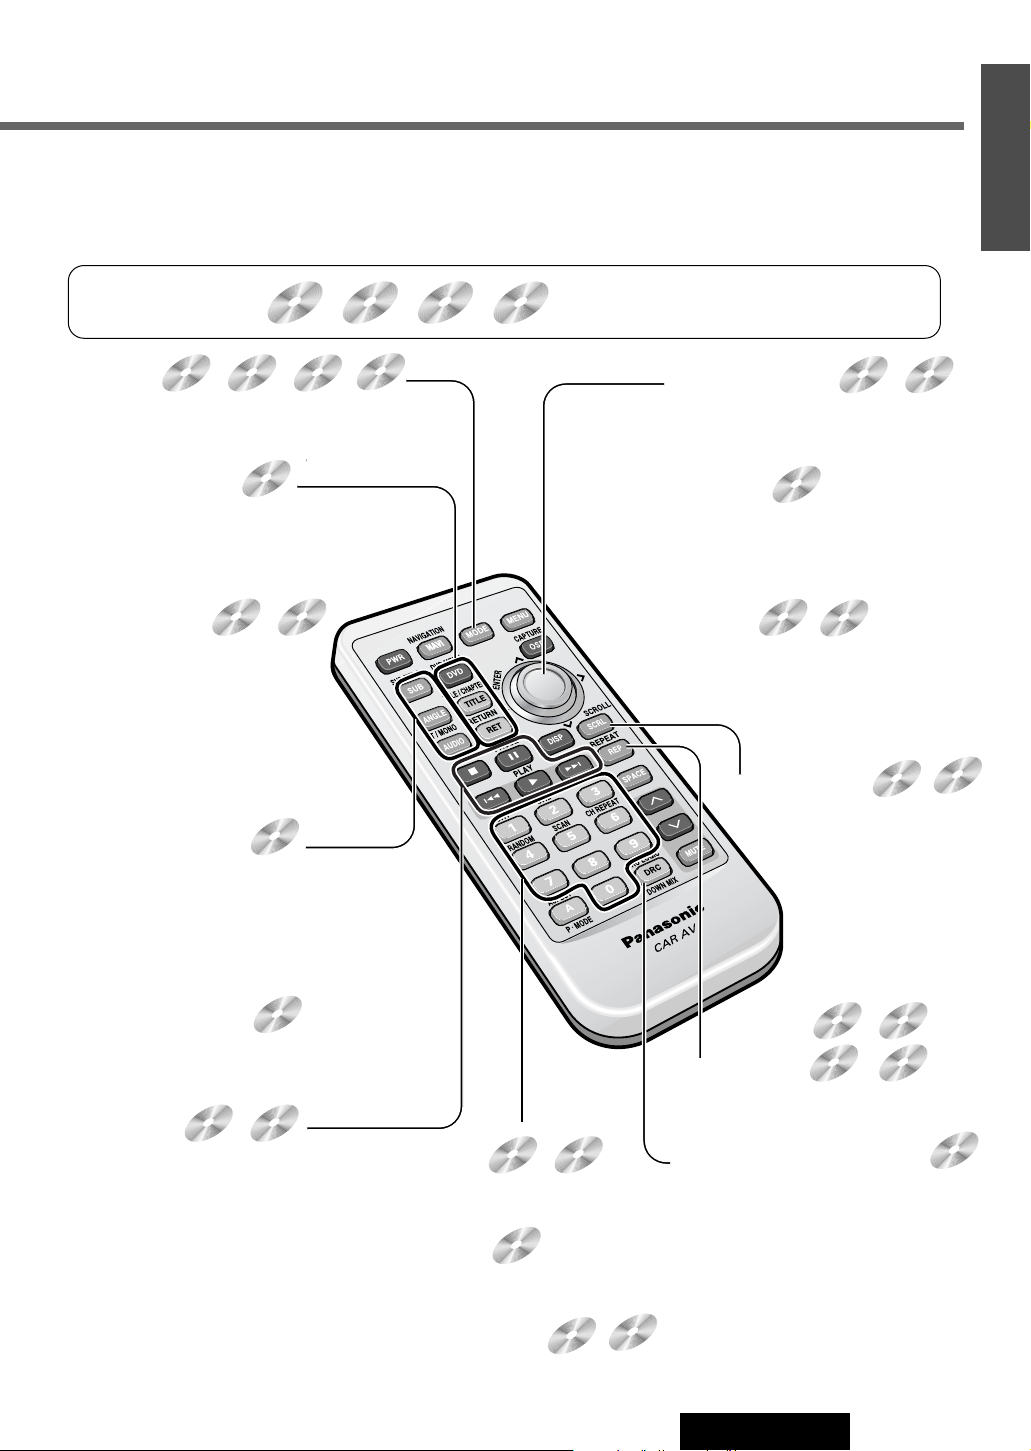
Remote Control Unit of the DVD/Video CD/CD/MP3 Playback
(Operation only for the remote control)
[MODE]
¡Changes the modes such as sound
and picture. (a page 20)
[RET] (RETURN)
¡Returns to the previous display.
(a page 28)
¡Inputs the number again.
(a page 28)
¡Displays the video CD's menu.
(a page 28)
[DRC] (PRO LOGIC) (DOWN MIX)
¡Selecting the audio channel.
(a page 62)
¡Compresses the range of the play-
back level. (a page 63)
[REP] (REPEAT)
¡Repeats a playback. (a page 27, 31)
[■] (STOP)
¡Stop playback. (a page 27)
[❚❚] (PAUSE)
¡Pause. (a page 27)
[B] (PLAY)
¡Playback. (a page 27)
[s] [d]
¡Go to beginning. (a page 27)
¡Fast forward / fast reverse.
(a page 27)
¡Slow playback [d].(a page 27)
DVD
VIDEO
VIDEO
CD
CD
MP3
CD
MP3
MP3
DVD
VIDEO
[SUB] (SUB TITLE)
¡Switching the subtitle language. (a page 29)
[ANGLE]
¡Switching the angle. (a page 29)
[AUDIO]
¡Switching the audio language. (a page 29)
DVD
VIDEO
V
[DVD] (DVD MENU)
¡Displays the DVD menu. (Operations vary
according to the disc.) (a page 28)
[TITLE] (TITLE/CHAPTER)
¡Selects the title/chapter. (a page 28)
[SCRL] (SCROLL)
¡Title scroll. (a page 30)
DVD
VIDEO
VIDEO
CD
DVD
VIDEO
[0] to [9]
¡Selects an item on the menu.
(a page 28)
[0] to [9]
¡Selects a title or chapter.
(a page 28)
DVD
VIDEO
VIDEO
CD
CD
[]] [[]
¡Selects a track or file. (a page 30)
¡Fast forward / fast reverse (a page 30)
¡Sequential transition from one file to
the next. (a page 30)
[ENTER]
¡Changes to the Direct Folder Selection
mode. (a page 31)
[}] [{]
¡Selects a folder. (a page 30)
[}] [{] []] [[]
¡Selects an operation or item.
[ENTER]
¡Determines an operation or item.
MP3
CD
MP3
[4] (RANDOM)
¡Random play. (a page 31)
CD
MP3
MP3
[AUDIO] (ST/MONO)
¡Switches between stereo or monaural sound.
(a page 29)
VIDEO
CD
16
CQ-VAD9200U
7
E
N
G
L
I
S
H
Prohibition
Input is not possible
because a soundtrack, subtitle language or angle number which was not
recorded on the disc
has been selected or
because the user has
attempted to perform
an operation which is
not supported by the
unit.
Additional
Information
Channel,
source type,
various settings, etc.
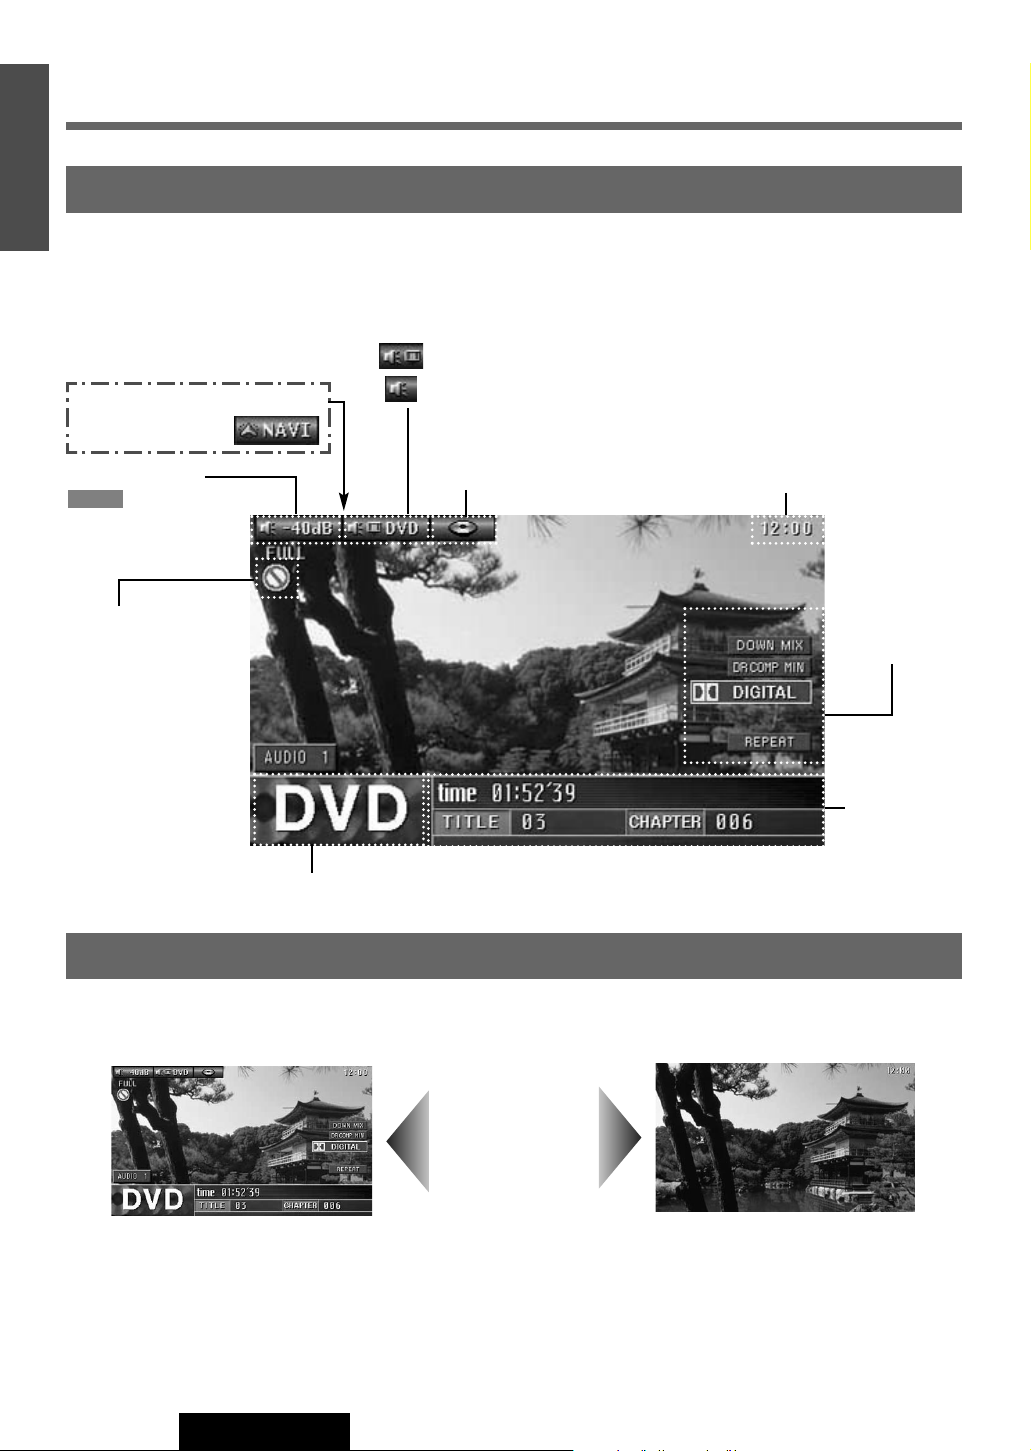
Indications on the Screen
Note: Displaying contents and their positions partly vary with each mode. Refer to the description of each mode for details.
You can switch between OSD-ON and OSD-OFF regarding the mode information when watching a picture.
Mode Display
Clock Time
Default: off
(a page 48)
Example:
DVD Mode
(OSD on a see below)
Image•Sound/Mode Display
The current mode appears.
: Image and sound (TV / VTR1•2 / DVD / Video CD (VCD))
: Sound (Radio (AM/FM) / CD / MP3 / Changer (CH-C))
Volume Display
blinks when
the MUTE function is
set to ON.
MUTE
(During playback)
Press [OSD] on
the Remote
Control.
Information of
Each Mode
Playing
elapsed time,
title, preset
list, etc.
Notes:
¡On-Screen Display also appears when operation is made (for 4 seconds).
¡On-Screen Display cannot be cleared in the following modes where only audio is available: CD, MP3, radio (AM/FM) and
CD changer (CH-C) modes.
The state of the current output appears
OSD (On-Screen Display) on / off
OSD on
OSD off
When the car navigation
mode is set to ON.
Disc Indicator
LPCM, MPEG1,
MPEG2, dts,
Dolby Digital
LPCM, MPEG1
LPCM (CD-DA),
dts
LPCM (CD-DA),
MP3
17
CQ-VAD9200U
8
E
N
G
L
I
S
H
Discs that can be Played Back
❒ Region Management Information
This product is designed and manufactured to respond to the Region Management
Information that is recorded on a DVD disc. If the Region number described on the
DVD disc does not correspond to the Region number of this product, this product
cannot play the disc.
The Region number for this product is “1” and “ALL”.
❒ The following discs cannot be played back on this product.
¡DVD-Audio
¡DVD-ROM ¡DVD-R ¡DVD-RAM ¡DVD+RW ¡DVD-RW ¡SVCD
¡VSD ¡CVD ¡CD-G ¡CD-ROM (except MP3)
¡CD-RW (except MP3 and CD-DA) ¡CD-R (except MP3 and CD-DA) ¡SACD ¡photo CD
¡CDV ¡Divx Video Discs ¡CD-EXTRA (audio-only playback possible)
¡Discs recorded in PAL format, others
¡DVDs with a region number other than “1” or “ALL”
¡Playing back a photo CD disc with this unit could damage the data that is recorded on the disc.
Disc
DVD video
Video CD
CD
5" (12 cm)
1
ALL
Mark (logo) Disc size
Video format Region No.
4:3
1
ALL
12
46
❒ Symbols used on jackets (Examples of such symbols include)
¡Number of subtitle languages
¡Number of audio tracks
¡Number of angles
Screen size (H:V aspect ratio)
The numbers indicate the number of languages, tracks, angles, etc., recorded on the
disc.
¡4:3 standard size
¡Letterbox
¡16:9 wide size
: Play back in letterbox format on a
standard screen (4:3).
: Play back in “Pan & Scan” (
a page
96) format on a standard screen (4:3).
Note: The size of the image that is displayed on the screen
depends on the screen mode (“Aspect Ratio” ➡ page 65),
and on the screen size for the content on the disc.
2
3
(➡ page 96)
Example:
CD-R/RW
TEXT
Audio format
NTSC
LB
LB16:9
PS16:9
Recordable
ReWritable
2
Note: About CD-Rs and CD-RWs, refer to “Notes on CD-Rs/RWs”. (a page 95)
18
CQ-VAD9200U
9
E
N
G
L
I
S
H
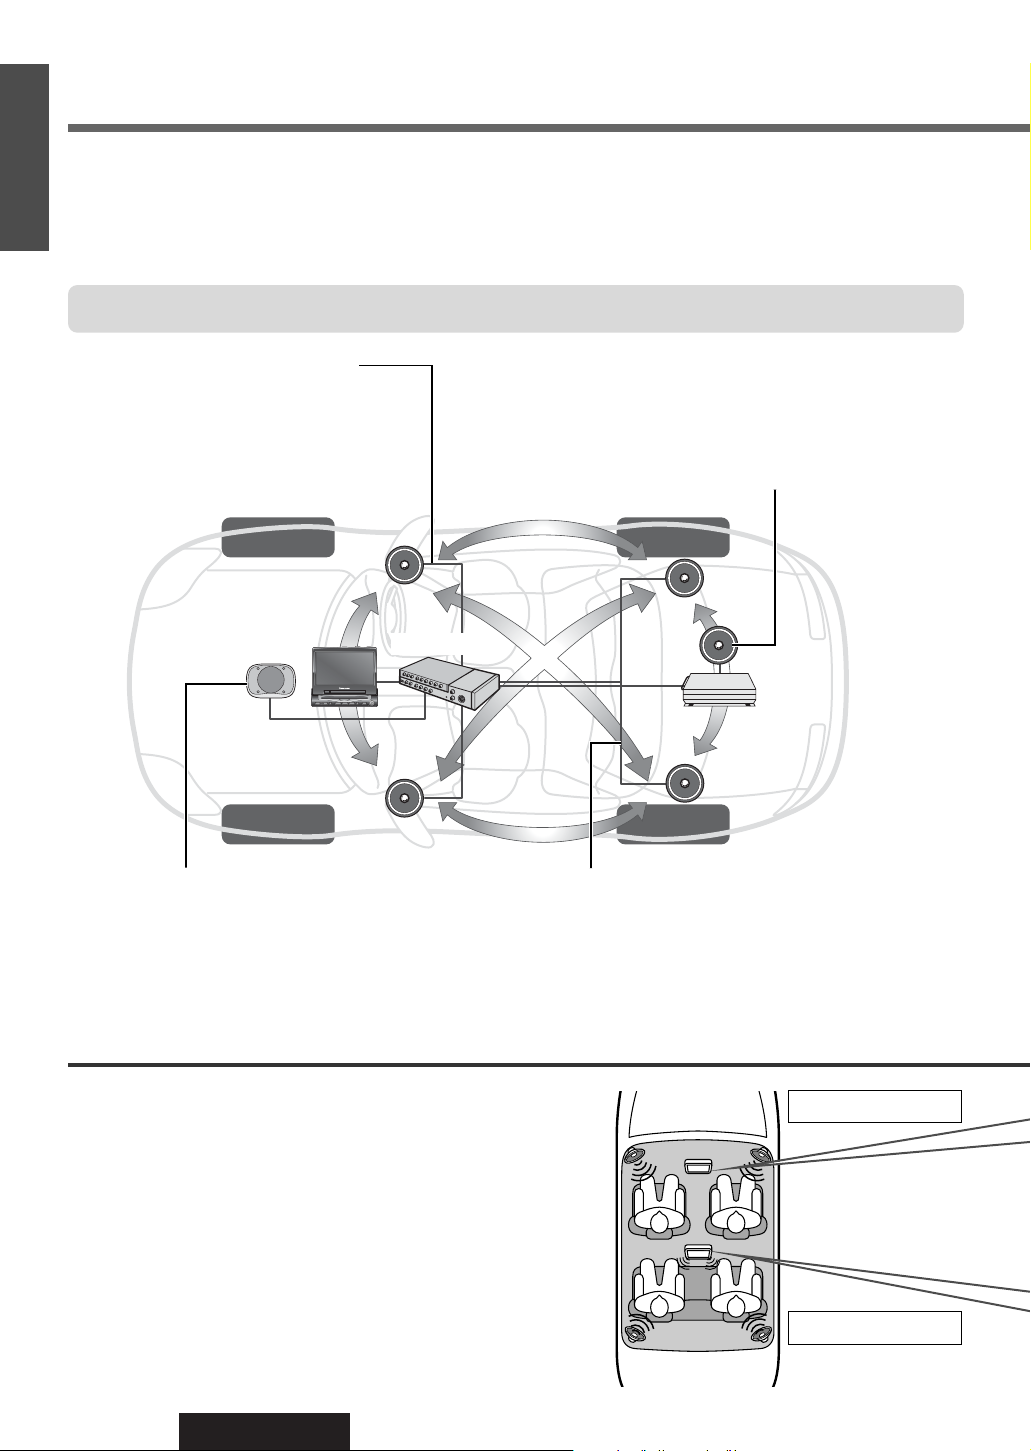
System Upgrade
Be sure to connect the display unit and hide-away unit with optical fiber cable.
Panasonic
CQ-VAD9200U
Power amplifier
Recommended system: 5.1-channel Surround System
This unit has a built-in 5-channel amplifier. The procedure for setting up a 5.1-channel surround
system in order to play DVD software in a way that creates a “you are there” feel in a car is
described below.
Front Speakers: CJ-DVD177
Use the left and right front speakers (such as
speakers that are built into the front door).
Center Speaker: EAB-CF2
Install in the middle of the dashboard, near the
monitor.
¡The supplied speaker cannot be used as the
center speaker.
Surround Speakers: CJ-SS162
Use the left and right rear speakers (such as speakers
that are built into the rear door or the rear deck)
Subwoofer: CJ-HD302
Because the audio imaging is not nearly as dependent
on the position where the subwoofer is installed as it
is with the other speakers, the subwoofer can be
installed anywhere that is convenient. (A separate
power amplifier for the subwoofer is needed.)
¡Details on wiring:
a page 80-81
¡Speaker settings:
a page 54-59
About Rear Monitor (a page 66)
You can have different picture and sound at the front
monitor and rear monitor at the same time.
¡You can mute the sounds from the rear speakers if necessary.
(Private Mode a page 67)
Note: Even if you are using this unit without installing a center speaker, surround speakers, or a subwoofer, it is still nec-
essary to make the speaker settings in order to adjust the sound balance.
Rear Monitor
Main Unit Monitor
19
CQ-VAD9200U
10
E
N
G
L
I
S
H
CQ-VAD9200U
¡Details on wiring:
a page 83-85
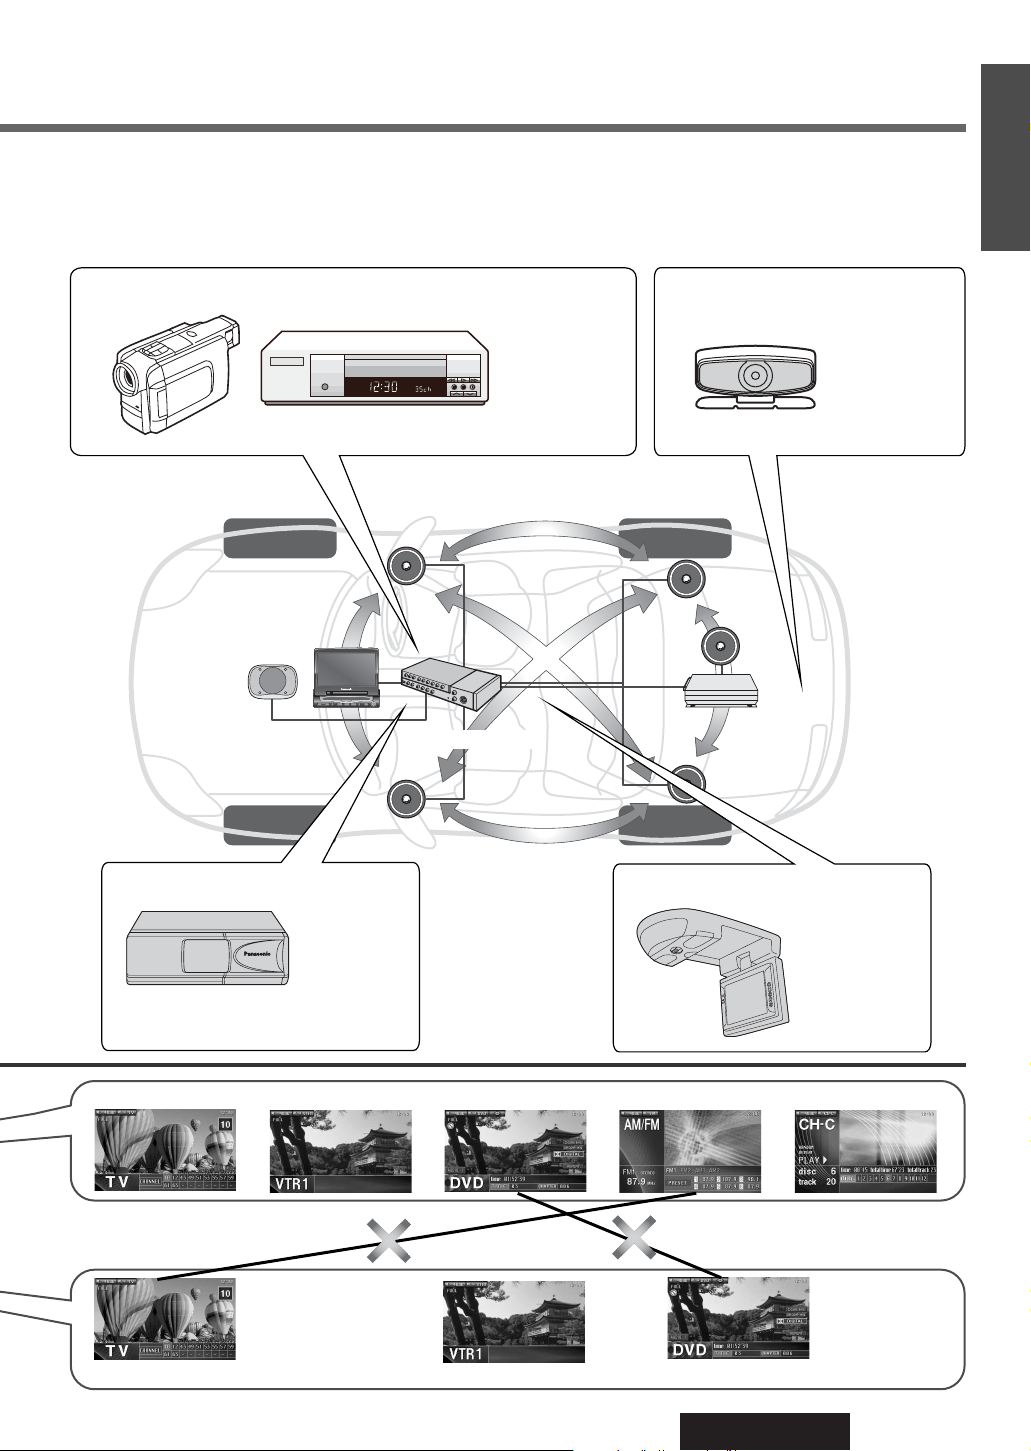
Advanced system
Connecting devices shown below allows you to enjoy a wonderful world consisting of wide
variety of pictures and sounds.
Comecorder
Rear Monitor: CY-VMX6800U
CD Changer: CX-DP88U
Rear View
Camera
( )
TV VTR1 / VTR2 Radio CD Changer
DVD (VCD, CD, MP3)
TV VTR1 / VTR2
DVD (VCD, CD, MP3)
Different types of discs cannot
be played back at the same time.
VCR
Refer to “VTR”
(a page 24).
Refer to “CD
Changer
Control”
(a page 36).
Refer to “Rear
Monitor Set Up”
(a page 66)
Refer to “VTR”
(a page 24)
For a CD and
MP3, the screen
becomes blue.
The rear monitor does
not display television
picture when the main
unit is in the radio mode.
POWER
BS G-CODE
Panasonic
INTELLIGENT SYSTEM
s
o
a
n
n
i
c
a
P
20
CQ-VAD9200U
11
E
N
G
L
I
S
H
Display Open / Close
OPEN
: Press
[]
(OPEN/CLOSE).
CLOSE
: Press
[]
(OPEN/CLOSE) again.
(After returning the lateral angle to the
neutral position.)
Notes:
¡When the display unit is opened or closed, a loud
beep sounds three times.
¡
If the unit stops halfway, press
[]
(OPEN/CLOSE)
again and draw it all the way in.
¡Opening/closing the display can be done when the
power is off.
POW
ER
P·MODE
TRACK/
CHANNEL
VOLUME
MENU
MUTE
MODE
NAVI
NAVIGATION
ASPECT
OPEN/CLOSE
ASP
ENTER
TILT
IN-DASH 7 INCH WIDE COLOR LCD TV / DVD - VIDEO / RECEIVER
CQ-VAD9200U
DISC
Power
Turn your car's ignition key to ACC or ON position.
ON : Press [MODE] (POWER) on the display unit.
Press [PWR] or [MODE] on the remote control.
OFF : Press [MODE] (POWER) again for more than
2 seconds on the display unit.
Press [PWR] again or [MODE] again for more
than 2 seconds on the remote control.
Mode
Press [MODE] to change the mode.
Volume
[}] (VOLUME) : Up
[{] (VOLUME) : Down
Setting Range : -82 dB to 0 dB
Note: The sound level for each source is
stored in memory.
Mute
MUTE ON : Press [MUTE].
MUTE OFF : Press [MUTE] again.
Warning:
Do not touch the unit while the display
is moving. Inserting hands, fingers or foreign
objects into the unit can cause injuries and
damage to the unit.
(a page 22)
(a page 24)
(a page 24)
General
(a page 26, 30)
(a page 34)
(a page 36)
TV
VTR1
DVD / VCD (Video CD) / CD / MP3
AM / FM (Radio)
CH-C (CD Changer Control)*
VTR2
* Selectable only when a CD changer
is connected.
[}] [{] (VOLUME)
[MUTE]
[]
(OPEN/CLOSE)
[MODE] (POWER)
[}] [{]
(VOLUME)
[PWR]
(POWER)
[MUTE]
[MODE]
21
CQ-VAD9200U
12
E
N
G
L
I
S
H
Cautions:
¡For smooth adjustment, make sure to first return the lateral angle to the neutral position and then adjust the tilt angle.
¡Avoid physical shock on the monitor.
Caution: Do not interfere with the movement of the monitor. Do not change
the position of the unit forcibly.
Caution: There is the danger of your fingers being pinched if you hold the
unit by the lower part. Hold the unit by the upper half, and move it carefully
without applying undue force.
Caution: Do not place any object on the display unit, or subject it to undue
force.
Monitor Position Adjustment
Tilt Angle / Front-Rear Position
POWER
VOLUME
MENU
MUTE
MODE
NAVI
N
A
V
IG
A
T
IO
N
EN
T
E
R
T
IL
T
P
.
MODE
ASP
ASPECT
C
Q
-V
A
D
9
2
0
0
U
IN-DASH 7 INCH WIDE COLOR LCD TV / DVD - VIDEO / RECEIVER
DISC
Press and hold [TILT] on the display unit for more than 1 second.
Press [}], [{], []] or [[] to adjust.
The setup is the same way as the one from MENU. Refer to
“SET-UP : User Setting” for details. (a page 38)
Display Unit Lateral Angle Adjustment
Folding Down the Display Temporarily
Hold the display unit by the non-slip part in the upper half of it, and adjust its
lateral angle.
Fold Down : Press [TILT] on the display unit.
Raise : Press [TILT] again on the display unit.
Note: Even when the unit is power off, you can fold down the display temporarily.
2
TILT
[TILT]
Notes:
¡Vertical angle (TILT) and front-rear position data are saved in the memory, so
when the display unit is drawn out next, it is automatically set at the angle and
in the position adjusted before.
¡After adjusting its angle, also adjust the brightness to make it easy for you to
watch. (a page 44)
¡The car model and installation condition may impose some restrictions on the
adjustment of the monitor's angle and position.
1
[}] [{]
[]] [[] (Adjust)
[}] [{]
[]] [[] (Adjust)
View from above
22
CQ-VAD9200U
13
E
N
G
L
I
S
H
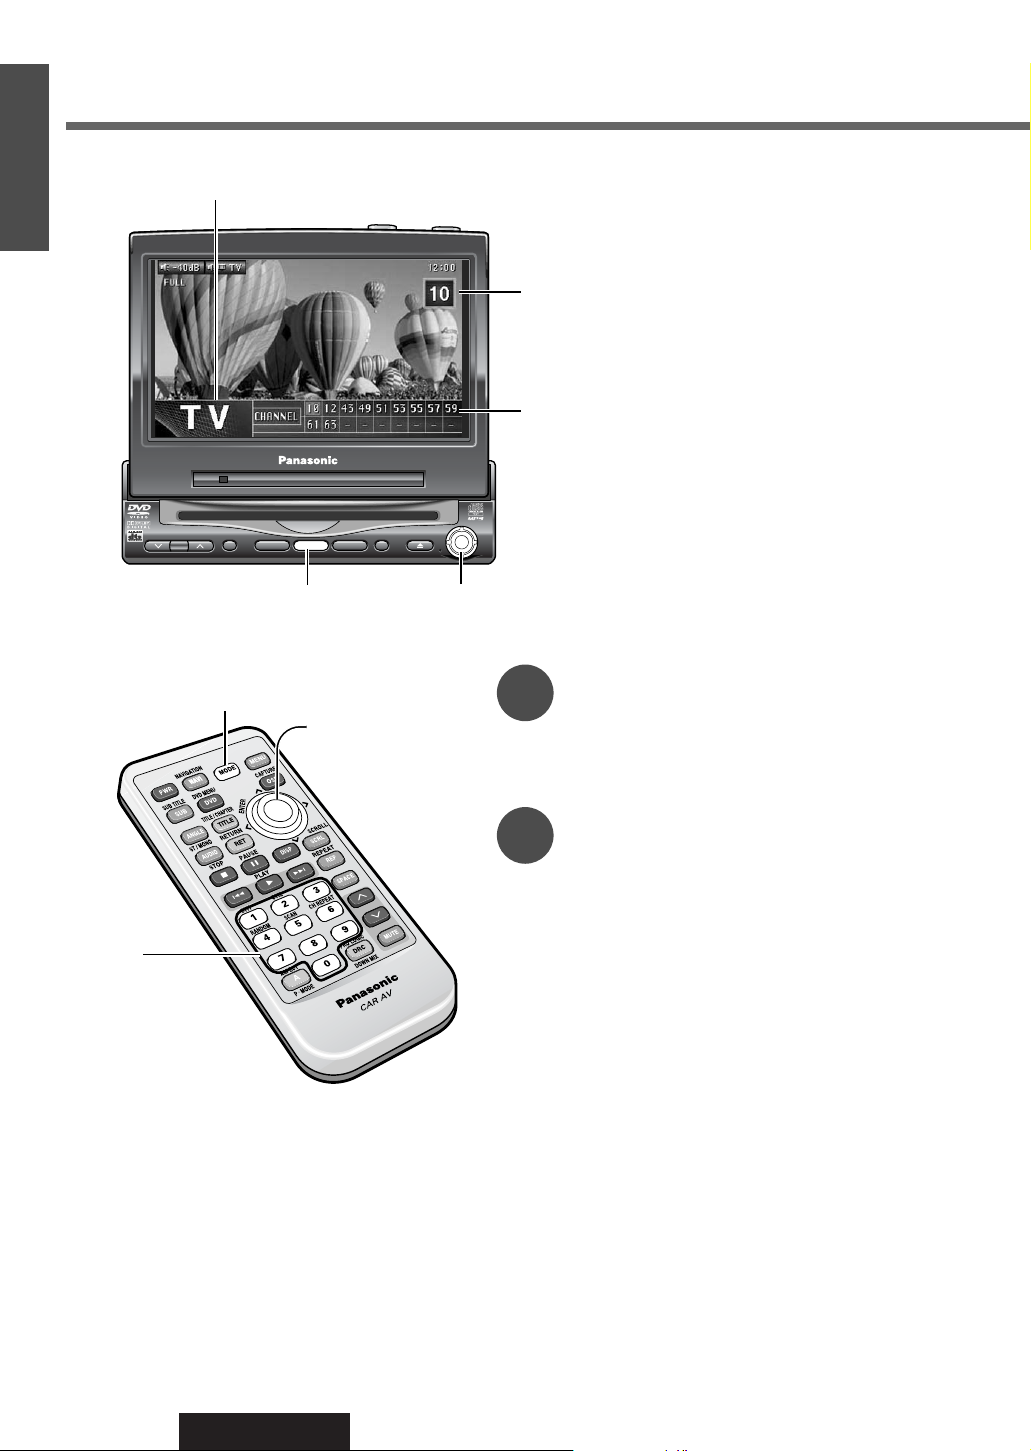
TV Tuner
VOLUME
MENUMUTE MODE NAVI
NAVIGATION ASPECT
P·MODE
POWER
ASP
ENTER
CQ-VAD9200U
IN-DASH 7 INCH WIDE COLOR LCD TV / DVD - VIDEO / RECEIVER
DISC
TRACK/
CHANNEL
MODE
ENTER
TV Mode
Press [MODE] to change to TV mode.
Channel Setting
[[] (CHANNEL) : Up
[]] (CHANNEL) : Down
Press and hold [[] (CHANNEL) or
[]] (CHANNEL) for more than 0.5 seconds.
Seeking will start.
Direct Channel Selection
(Only for remote control)
Enter a channel number by pressing [0] to [9].
Example : Channel Number 17
Press [1] and [7].
1
2
It is required to install the supplied antenna to
receive TV broadcasts. Refer to the description of
mounting the TV antenna. (a page 76)
[MODE]
[]] [[] (CHANNEL)
[}] [{] (Preset memory)
[0] to [9]
(Direct Channel
Selection)
[]] [[] (Channel)
[}] [{] (Preset memory)
[MODE]
Mode Display
Channel Number
Preset Channels
23
CQ-VAD9200U
14
E
N
G
L
I
S
H
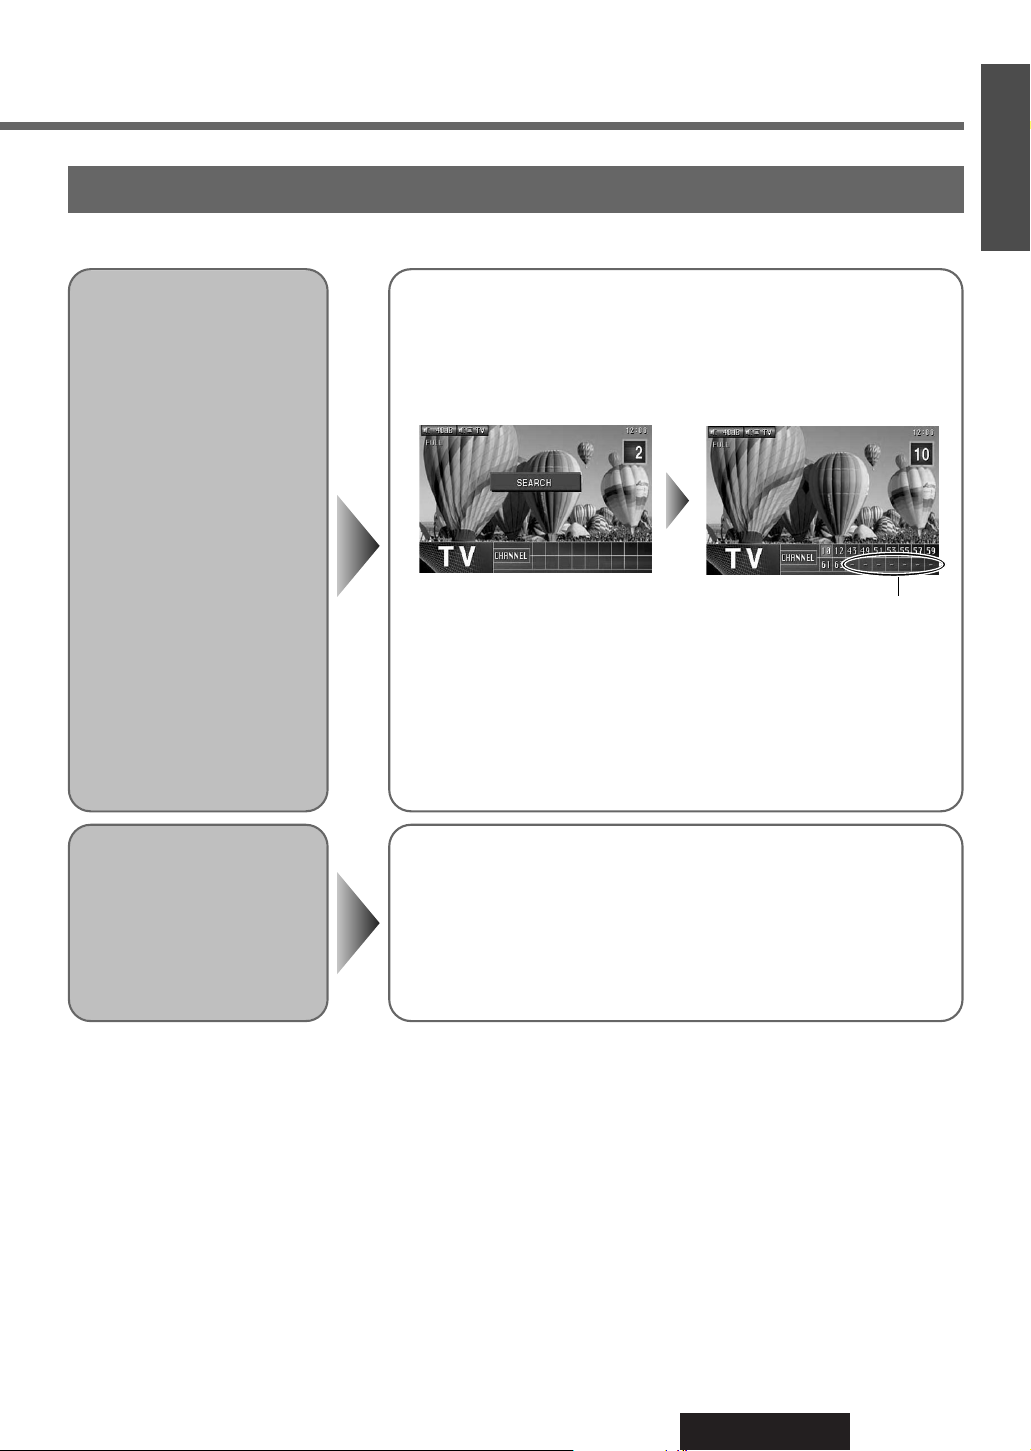
Preset Channels
Auto Preset
Memory
Press and hold [}] or [{] for more than 2 seconds.
[}] : The search starts from ch. 2 successively.
[{] : The search starts from ch. 69 in reverse successively.
¡A stored channel can be renewed every time you store another channel.
¡The unit may receive a channel that has poor-quality images depending
on broadcasting conditions.
¡The search returns to the start position if there is no receivable chan-
nel.
* “–” appears if the number of receivable channels is less than 18.
Preset Channel
Calling
Press [}] or [{] to select the channel.
This function can search for channels automatically. Up to 18 channels can be stored.
* See below
24
CQ-VAD9200U
15
E
N
G
L
I
S
H
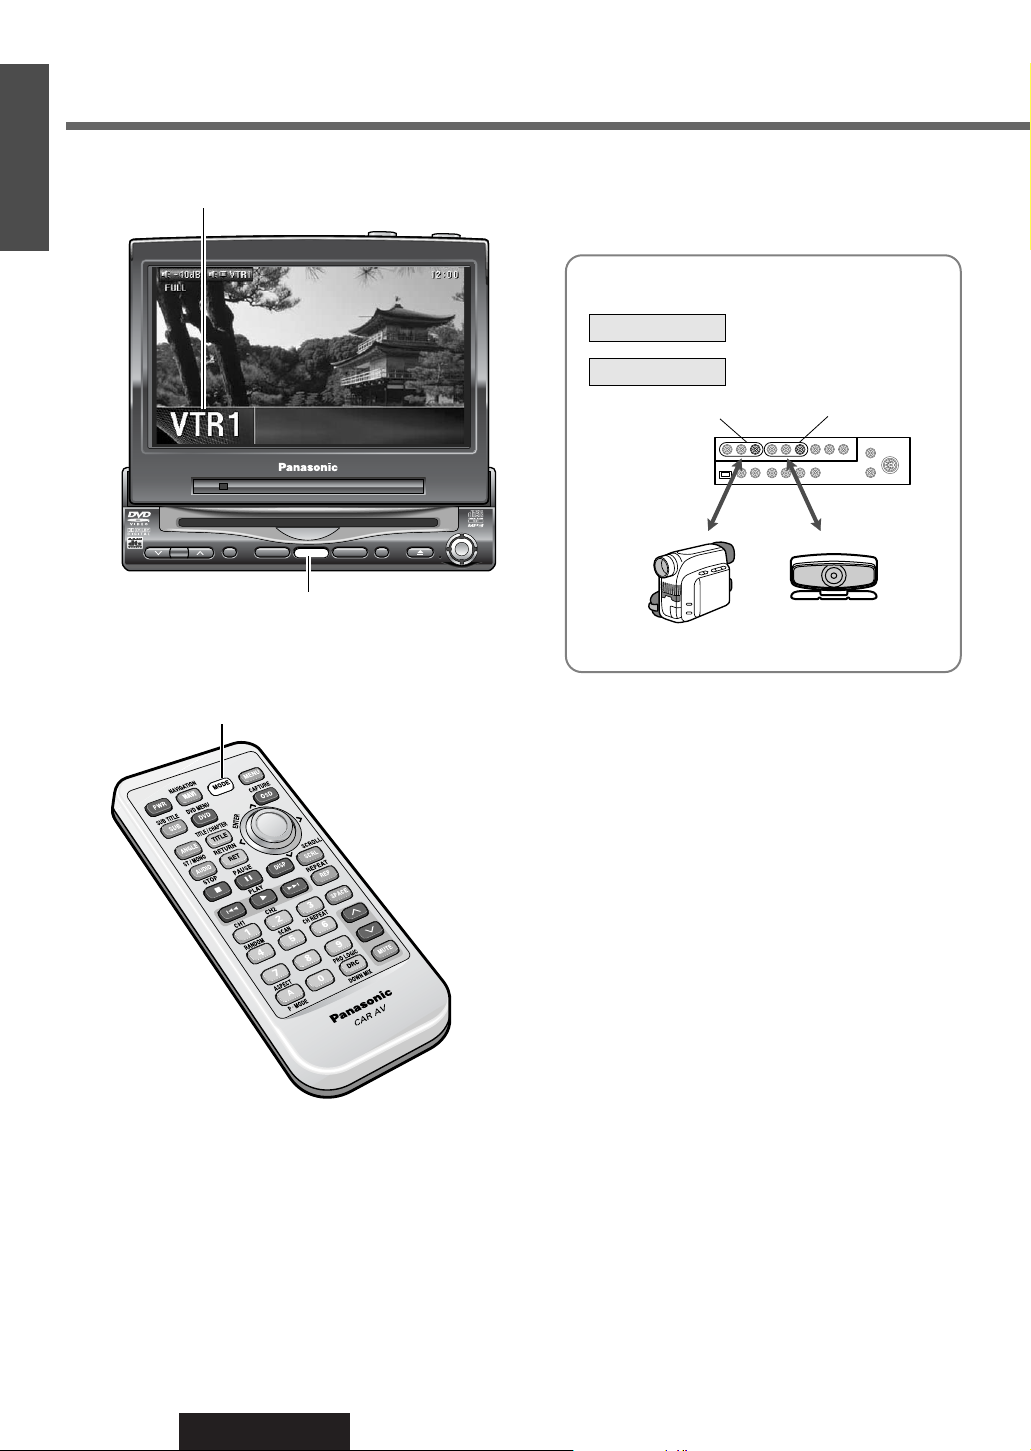
VTR
VOLUME
MENUMUTE MODE NAVI
NAVIGATION ASPECT
P·MODE
POWER
ASP
ENTER
CQ-VAD9200U
IN-DASH 7 INCH WIDE COLOR LCD TV / DVD - VIDEO / RECEIVER
DISC
TRACK/
CHANNEL
MODE
VTR1 / VTR2 Mode
Press [MODE] to change to VTR1 or VTR2 mode.
[MODE]
You can view the images and listen to the sounds
from the connected external devices in the VTR1
mode and VTR2 mode respectively.
Example :
: Camcorder
: Rear View Camera
VTR1
VTR2
VTR1-IN
VTR2-IN
CQ-VAD9200U
Hide-away Unit
Camcorder
Rear View Camera
[MODE]
Mode Display
25
CQ-VAD9200U
16
E
N
G
L
I
S
H
External Devices Connectable to VTR1 / VTR2
Select the same mode (VTR1 or VTR2) as the terminal that is connected
to a VCR or Camcorder (VTR1-IN or VTR2-IN).
Note: Adjust the VTR input level if sound do not comes out normally with
“OVER” displayed. (a page 52)
Refer to “Electrical Connections” for each external device connection. (a page 84-85)
VCR / Camcorder
Select the same mode (VTR1 or VTR2) as the terminal that is connected
to a rear view camera (VTR1-IN or VTR2-IN).
Note: It can also be set to switch to an image through the rear view camera automatically if the shift lever is put into the reverse position.
(a page 40)
Rear View
Camera
Select the same mode (VTR1 or VTR2) as the terminal that is connected
to a car navigation system (VTR1-IN or VTR2-IN).
Note: It can also be set to switch to an image and sound through the car
navigation system only by pressing [NAVI] (NAVIGATION). (a page 38)
Car Navigation
Note: VTR1 and VTR2 terminals are not used for the Panasonic car navigation system (available in future). Refer to
“Electrical Connections” for connection (a page 78-81) and “Navigation Set Up” for setting. (a page 38)
26
CQ-VAD9200U
1
E
N
G
L
I
S
H
CQ-VAD9200U
17
E
N
G
L
I
S
H
DVD / Video CD Player
POWER
VO
LU
M
E
M
ENU
MUTE
MO
D
E
NAVI
NAVIGATION
ENTER
TILT
ASPECT
C
Q
-V
A
D
9
2
0
0
U
IN-DASH 7 INCH WIDE COLOR LCD TV / DVD - VIDEO / RECEIVER
DISC
P
.
MODE
A
SP
Disc Insert
¡The mode that supports the disc is selected, and
playback starts.
¡The audio format is automatically identified.
(➡ page 96)
¡When the menu screen appears, see “DVD Menu /
Video CD Menu” on page 28.
Disc Eject
Press [u] to stop playback and eject the disc.
(Press [u] again to reload the disc.)
When DVD or Video CD is in the player, press
[MODE] to change to DVD or Video CD player
mode and playback starts.
[3] (STOP)
[y] (PAUSE)
[5] (PLAY)
[s][d]
(➡ page 27)
[REP] (REPEAT)
[MODE]
Notes:
¡Due to limitations of certain discs, some DVD video
and Video CD discs may not operate as described in
these Operating Instructions. Refer to the disc jacket for further details.
¡This unit does not support DVD and Video CD
karaoke functions.
[MODE]
Label side
[u] (Eject)
(Lights when
a disc is in
the deck)
Cautions:
¡Do not use irregularly shaped discs.
¡Do not insert foreign matter into the disc slot.
Video CD mode display
Play Setting
Sound Setting (Stereo/monaural)
Playing Time
Mode Display
DVD mode display
Play Setting
Audio Format
(➡ page 96)
Playing Time
Title Number
Chapter Number
Mode Display Disc Indicator
Subtitle Language / Audio Language / Angle
Disc Indicator
Notes:
¡
Do not insert a disc when disc indicator or eject
button lights because a disc is already loaded.
¡The power will be turned on automatically when a
disc is loaded.
¡You can play a disc even if the monitor is closed.
¡The sound may be interrupted for a few moments
while the audio format is being identified.
Note: If you leave a disc in the slot for more than 30
seconds after its ejection, the disc will be automatically
reloaded after loud beep is energized three times.
[]] [[]
(➡ page 27)
27
CQ-VAD9200U
1
E
N
G
L
I
S
H
18
E
N
G
L
I
S
H
Indicates the compatible types of disc.
DVD
VIDEO
VIDEO
CD
Note: It is possible to press []] [[] on the display unit instead of [s] [d] on the remote control
. (
[[]
on the display
unit cannot be used in place of
[d]
that is used for slow playback.)
Basic Operation
Go to Beginning
Fast Forward /
Fast Reverse
[d]: Next track (chapter)
[s]: Beginning of the current track (chapter)
Previous track (chapter) (Press twice.)
Note: When playing a DVD video, there are cases where it is not possible to return to the start of a chapter that spans 2 titles. (➡ page 96)
Press and hold
[d]: Fast forward
[s]: Fast reverse
Release to resume playback.
The speed changes if the button is held down as follows.
Regular speed / 1.5 times /10 times / 20 times
Stop
Press [3] (STOP).
Press [5] (PLAY) again, and play will resume from the point where [3]
(STOP) is pressed. (Continued playback function)
To cancel continued playback, press [3] (STOP) again in the stop
mode.
Pause
Press [y] (PAUSE).
To resume playback, [5] (PLAY) or [y] (PAUSE) again.
Slow Playback
Press and hold [d] in the pause mode.
Playback is at about 1/3 normal speed.
To resume normal playback, press [5] (PLAY).
To pause, press [y] (PAUSE) again.
Note: Reverse slow playback is not possible.
Repeat
Press [REP] (REPEAT).
Press [REP] (REPEAT) again to cancel.
Perform these operations (page 27-29) with the remote control.
Operations vary according to the disc. For details, refer to the guide provided with the disc.
DVD
VIDEO
VIDEO
CD
DVD
VIDEO
VIDEO
CD
DVD
VIDEO
VIDEO
CD
DVD
VIDEO
VIDEO
CD
DVD
VIDEO
VIDEO
CD
DVD
VIDEO
VIDEO
CD
28
CQ-VAD9200U
1
E
N
G
L
I
S
H
CQ-VAD9200U
19
E
N
G
L
I
S
H
DVD / Video CD Player (continued)
[]] [[]
[}] [{] (Select)
[ENTER]
[0] to [9]
(Title/Chapter Number)
[DVD]
(DVD MENU)
[RET] (RETURN)
[TITLE]
(TITLE/CHAPTER)
If no operation is performed, the display
returns to the regular mode.
To return the previous display, press [RET] (RETURN).
Starting Playback
from a Specific
Title / Chapter
Title Menu
If the DVD has multiple titles
recorded on it, it is possible
to select the preferred title
from the title menu to start
playback.
DVD
VIDEO
DVD
VIDEO
DVD Menu /
Video CD Menu
Use this menu during
playback to select content,
audio, subtitle, etc., from a
menu (the DVD / Video CD
menu) that is unique to each
disc.
DVD
VIDEO
VIDEO
CD
DVD MENU
1. SUBTITLE
2. AUDIO
3. ANGLE
Select your favorite music.
1. Love Supremes
2. Impressions
3. In a Sentimental Mood
Number :
TITLE MENU
Rivers
Lovers
Castles
Woods
Regular Mode
Title Number Input Mode
"5" lights on pink.
Chapter Number Input Mode
Chapter / Title Selection
q Press [DVD] (DVD MENU) during DVD
playback.
(For the Video CD menu, press [RET]
(RETURN) during playback.)
w Press []], [[], [}] or [{] to select the
preferred menu.
For the DVD / Video CD with playback
control (➡ page 96), press [0] to [9] on the
remote control.
e Press [ENTER].
To return the previous display, press [RET] (RETURN).
q Press [TITLE] (TITLE/CHAPTER)
to select the input mode.
w Press [0] to [9] to input preferred
title/chapter number.
To input the number again, press
[RET] (RETURN).
e Press [TITLE] (TITLE/CHAPTER).
Playback will start automatically.
q Press and hold [DVD] (DVD MENU) for
more than 2 seconds during playback.
w Press []], [[], [}] or [{] to
select the preferred title.
For the DVD with playback control
(➡ page 96), press [0] to [9] on the
remote control.
e Press [ENTER].
Example:
Example:
29
CQ-VAD9200U
1
E
N
G
L
I
S
H
20
E
N
G
L
I
S
H
Indicates the compatible types of disc.
DVD
VIDEO
VIDEO
CD
Switching the
Subtitle
Language
Switching the
Audio
Language
Switching the
Angle
Switching between
Stereo and
Monaural
VIDEO
CD
Press [SUB] (SUB TITLE) during playback.
It is possible to change the subtitle language during play if the multiple
languages are recorded on the disc.
Note: There may be a brief delay before the subtitles appear.
Press [AUDIO] during playback.
It is possible to change the audio language during play if multiple audio
languages are recorded on the disc.
Press [ANGLE] during playback.
For DVDs which contain scenes which have been shot simultaneously
from a number of different angles the same scene can be viewed from
each of these different angles during play.
Press [AUDIO] (ST/MONO).
It is possible to switch the audio between stereo sound and monaural
sound (L or R).
Notes:
¡If no operation is performed for 5 seconds, the display returns to the regular mode.
¡It may not be possible to switch the language unless the unit is at the DVD menu (➡ page 28) or is at the DVD settings
(➡ page 46).
¡The language on the DVD settings has a priority over when the power is turned on or the disc is loaded. (➡ page 46)
¡The number of languages depends on the disc. Some discs have only one language or have no language.
: The left channel audio is output on both the left and
right speakers.
: The right channel audio is output on both the left
and right speakers.
: Stereo sound
[ANGLE]
[AUDIO]
(ST/MONO)
[SUB]
(SUB TITLE)
DVD
VIDEO
DVD
VIDEO
DVD
VIDEO
STEREO
MONO Rch
MONO Lch
Useful Function
30
CQ-VAD9200U
1
E
N
G
L
I
S
H
CQ-VAD9200U
21
E
N
G
L
I
S
H
Disc Insert
The mode that supports the disc is selected, and playback starts.
When a disc is in the player, press [MODE] to change
to CD or MP3 player mode and playback starts.
Notes:
¡
Do not insert a disc when disc indicator or
eject button lights because a disc is already
loaded.
¡The power will be turned on automatically when a
disc is loaded.
¡You can play a disc even if the monitor is closed.
Track / File Selection
[[] : Next track / file
[]] : Beginning of the current track / file
Previous track / file (Press twice.)
Folder Selection
[}] : Next folder
[
{] : Previous folder
Fast Forward / Fast Reverse
Press and hold.
[[] : Fast forward
[]] : Fast reverse
Release to resume playback.
Sequential transition from
one file to the next
Press and hold.
[[] : Forward
[]] : Backward
Title Scroll
(Only for remote control)
Press [SCRL] (SCROLL).
Disc Eject
Press [u] to stop playback and eject the disc.
(Press [u] again to reload the disc.)
CD / MP3 Player
POWER
V
OLUM
E
M
ENU
M
UTE
M
ODE
NAVI
NAVIG
ATION
ENTER
TILT
ASPECT
C
Q
-V
A
D
9
2
0
0
U
IN-DASH 7 INCH WIDE COLOR LCD TV / DVD - VIDEO / RECEIVER
DISC
P
.
MODE
ASP
[MODE]
[]] [[]
(Track/File)
[}] [{]
(Folder)
[ENTER]
[u] (Eject)
(Lights when
a disc is in
the deck)
[]] [[]
(Track/File)
[}] [{] (Folder)
[ENTER]
[4] (RANDOM)
[SCRL] (SCROLL)
[REP] (REPEAT)
[MODE]
Label side
Cautions:
¡Do not use irregularly shaped discs.
¡Do not insert foreign matter into the disc slots.
Track NumberPlay Setting Play Time
Mode Display Disc Indicator
CD / MP3 mode display
CD
MP3
CD
MP3
MP3CDMP3
Disc Title
Track Title
Total Track
Note: If you leave a disc in the slot for more than 30
seconds after its ejection, the disc will be automatically
reloaded after loud beep is energized three times.

31
CQ-VAD9200U
1
E
N
G
L
I
S
H
22
E
N
G
L
I
S
H
Various Way of Listening
Perform these operations with the remote control.
Indicates the compatible types of disc.
CD
MP3
MP3
MP3
Repeat
Play
Press [REP] (REPEAT).
Press [REP] (REPEAT) again to cancel.
Press [REP] (REPEAT).
Press [REP] (REPEAT) again to cancel.
Current
File
Press and hold [REP] (REPEAT) for more than 2 seconds.
Press and hold [REP] (REPEAT) again to cancel.
Current
Folder
CD
MP3
Random
Play
Press [4] (RANDOM).
Press [4] (RANDOM) again to cancel.
Press [4] (RANDOM).
Press [4] (RANDOM) again to cancel.
All
Files
Press and hold [4] (RANDOM) for more than 2 seconds.
Press and hold [4] (RANDOM) again to cancel.
All Files in the
Current Folder
CD
MP3
Root Folder
(Root Directory)
Folder Selection
File Selection
Tree 1 Root Tree 2 Tree 3
2
1
3
4
5
q
w
e
r
6
16
~
In the order
In the order
q
r
~
Direct Folder Selection
q Press [ENTER] during playback.
w Press []], [[], [}] or [{] to select a folder.
[]][[] : Movement among different levels of trees
[}][{]: Movement in the same tree
e Press [ENTER].
Folder selection order / MP3 file playback order (Example)
Note: It is not possible to display the whole trees
and a file list in a folder.
Notes:
¡This unit counts the number of folders irrespective of the
presence or absence of MP3 file.
¡If the selected folder does not contain any MP3 files, the
nearest MP3 files in the order of playback will be played.
¡Playback order may be different from other MP3 players
even if the same disc is used.
¡“ROOT” appears when displaying the root folder’s folder
name.
Root Folder
Current Folder
Tree 1 Root Tree 2
13
2
4
5
Movement among different
levels of trees
Movement in the
same tree
Folder in the next
lower level tree
: MP3 fils are included
: No MP3 files

32
CQ-VAD9200U
1
E
N
G
L
I
S
H
CQ-VAD9200U
23
E
N
G
L
I
S
H
CD / MP3 Player (continued)
This player allows you to play MP3 files recorded on CD-ROMs, CD-Rs
(Recordable) and CD-RWs (Rewritable).
¡It is recommended that you set the bit rate to “128 kbps or more” and “Fixed”.
¡Bit rate 8 kbps of MPEG-2 and sampling frequency 16 kHz of MPEG-2 can not be reproduced.
¡VBR (Variable Bit Rate) is not supported.
¡The playback sound quality differs depending on the encoding software and the bit rate. For details refer to the user
manual of your encoding software.
■ Converting (encoding) audio data to an MP3 file
¡Do not record files other than MP3s or unnecessary folders on a disc. If many folders or files other than MP3s
are recorded on a disc, it may take some time before playback starts.
¡Use ISO 9660 file system (Extension of the ISO 9660 file systems are included.) (a page 33). APPLE HFS file
system is not supported. If they do not conform to ISO 9660 file system, the file may not play normally, or the file
or folder names may not be displayed correctly.
¡Make sure to add the “.mp3” extension to each MP3 file name. A file with a different file name extension or none
at all will not play.
¡Although Multi session recording is supported, the use of Disc-at-Once is recommended. Make sure to close the
session when you finished recording on a disc.
¡A disc recorded by the packet writing software are not supported.
¡A playlist function is not supported. Record files and folders in the order in which you want them to be played.
Some writing software lets you specify the recording order by adding a prefix in the range of “01” - “99”, etc. to the
file name. For details refer to the user manual of your writing software.
Notes:
¡You may encounter trouble in playing MP3s or displaying the information of MP3 files recorded with certain writing
softwares or CD recorders (CD-R/RW drives).
¡If a disc contains both MP3 and CD-DA, only CD-DA data is reproduced properly. (MP3 files are played but no
sound is output).
■ Recording MP3 files on a CD-R/RW
What is MP3
MP3, short for MPEG-1 Audio Layer 3, MPEG-2 Audio Layer 3 LSF (Low Sampling Frequency), is a standard for compressing digital video data adopted for video CDs and similar media. It is one of the audio compression systems covered by
MPEG's (Motion Picture Experts Group) digital audio compression standards. What it does is reduce the number of bytes
in a song without detracting from the sound quality by eliminating big sound waves within the sound range that is imperceptible to the human ear. This compression allows you to reduce the contents of a conventional music CD by a factor of
around 10. This means that you can record the contents of 10 music CDs on a single CD-R or CD-RW. (The figures refer
to data recorded on a 650 MB CD-R or CD-RW at a fixed bit rate of 128 kbps and a sampling frequency of 44.1 kHz.)
Points to remember when recording an MP3 disc
Warning: Never assign the “.mp3” file name extension to a file that is not in the MP3 format. This may produce
noise from the speakers and cause speaker damage and can damage your hearing.
33
CQ-VAD9200U
1
E
N
G
L
I
S
H
24
E
N
G
L
I
S
H
Glossary
ISO 9660
The most common international standard for the logical
format for files and directories.
APPLE HFS
The file system used by the Macintosh operating system
to organize data. (Not supported)
Multi-session
A method of adding data incrementally to a CD-R or
CD-RW in more than one recording session.
Disc-at-Once
A method of writing data in a media by just one
operation.
ID3Tag
A function that allows character information (title, artist,
album title, date, etc.) to be written onto the disc.
Packet writing
A method of writing data on a CD media in small
increments. (Not supported)
ASCII character set
ASCII character set consisting of A to Z, a to z, digits 0
to 9, and the following symbols: (space) ! ” # $ % & ’ (
) * + , - . / : ; < = > ? @ [ \ ] ˆ _ ` { | }
~
Supported file systems and file names
Maximum number of files / folders
¡Maximum number of trees: 8
¡Maximum number of folders: 254 (Root folder is not included.)
¡Maximum number of files: 512
Note: If the number of files and folders exceeds the number mentioned above, successful playback may not be
performed.
Copyright
It is prohibited by copyright laws to copy, distribute and deliver copyrighted materials such as music without the approval
of copyright holder except for personal use.
ISO 9660 Level 1
ISO 9660 Level 2
Joliet*
Romeo
Apple Extension to ISO 9660
Supported file system
Displayable folder names and file names
Name files and folders in accordance with the standard of each file system.
Refer to the instructions of writing software for details.
¡This player can display file names of up to 31 ASCII character set in
scroll mode.
* Up to 15 letters can be displayed when scrolling in the Joliet system.
According to the standard, “á”, “ç”, etc. can be used. However, this
unit can not display those letters.
¡The unit recognizes only ASCII character set (see the glossary below).
Chinese characters, accented French characters and accented Spanish
characters will be converted into an asterisk (C).
Note: MP3 encode software and writing software are not supplied to this model.
 Loading...